Embed Size (px)
Citation preview
InTempConnect User Guide®
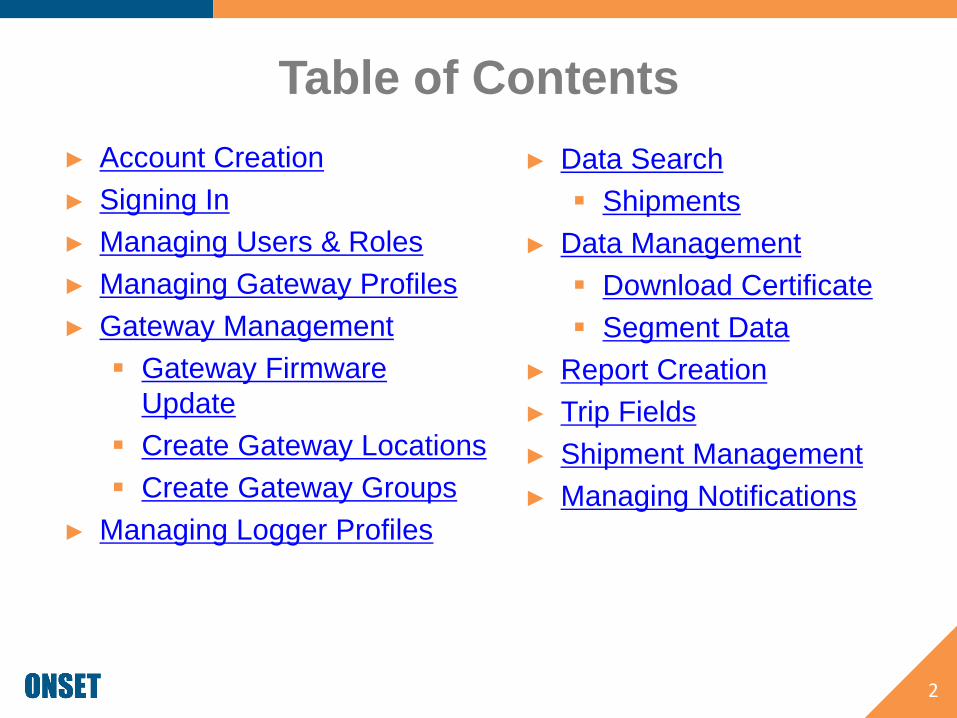
Table of Contents
► Account Creation
► Signing In
► Managing Users & Roles
► Managing Gateway Profiles
► Gateway Management
▪ Gateway Firmware
Update
▪ Create Gateway Locations
▪ Create Gateway Groups
► Managing Logger Profiles
► Data Search
▪ Shipments
► Data Management
▪ Download Certificate
▪ Segment Data
► Report Creation
► Trip Fields
► Shipment Management
► Managing Notifications
2
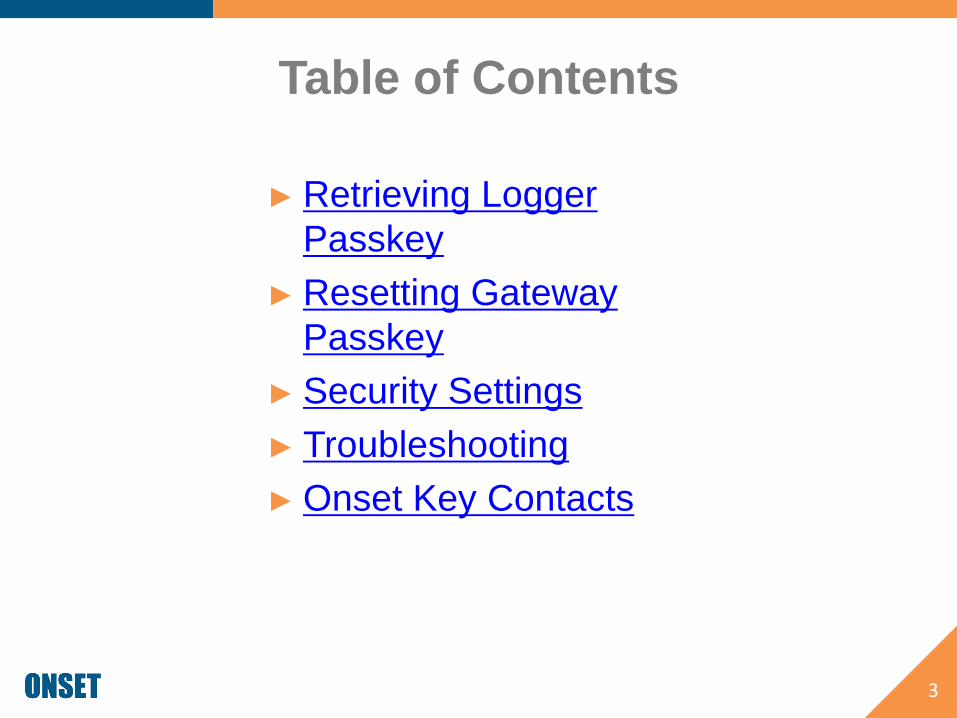
Table of Contents
► Retrieving Logger
Passkey
► Resetting Gateway
Passkey
► Security Settings
► Troubleshooting
► Onset Key Contacts
3

Account Creation
4

Create a New ITC Account
1. Go to
www.intempconnect.com
2. Click “Create Account”
3. Fill out all fields
5
1
2
3

Create a New ITC Account
4. Check “I agree” to
agree to the terms of
service
5. Click “Create Account”
6. Complete the process
by clicking on the
“Account Activation”
link sent to your email
address
6
45
7
Back to Top
Signing In

Signing In
1. Go to
www.intempconnect.com
2. Enter your username (email
address) and password
- If you forgot your
password, click on the
“Forgot password?” link
- Do not create a new
account if one already
exists. Doing so will create
a database separate from
your existing data
1
2
Signing In
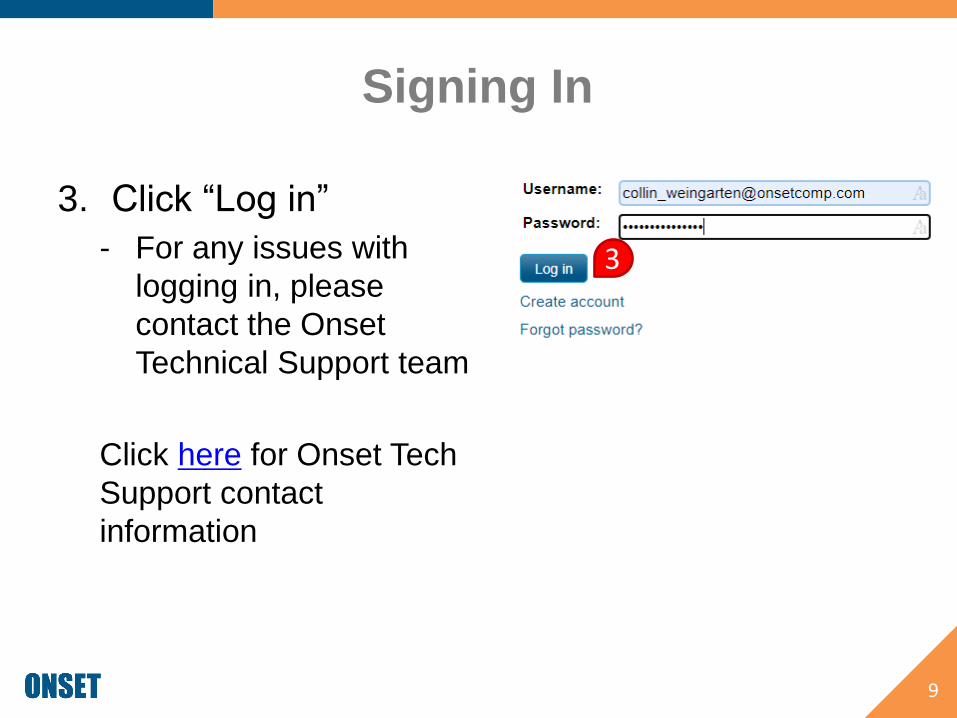
3. Click “Log in”
- For any issues with
logging in, please
contact the Onset
Technical Support team
Click here for Onset Tech
Support contact
information
9
3
Signing In
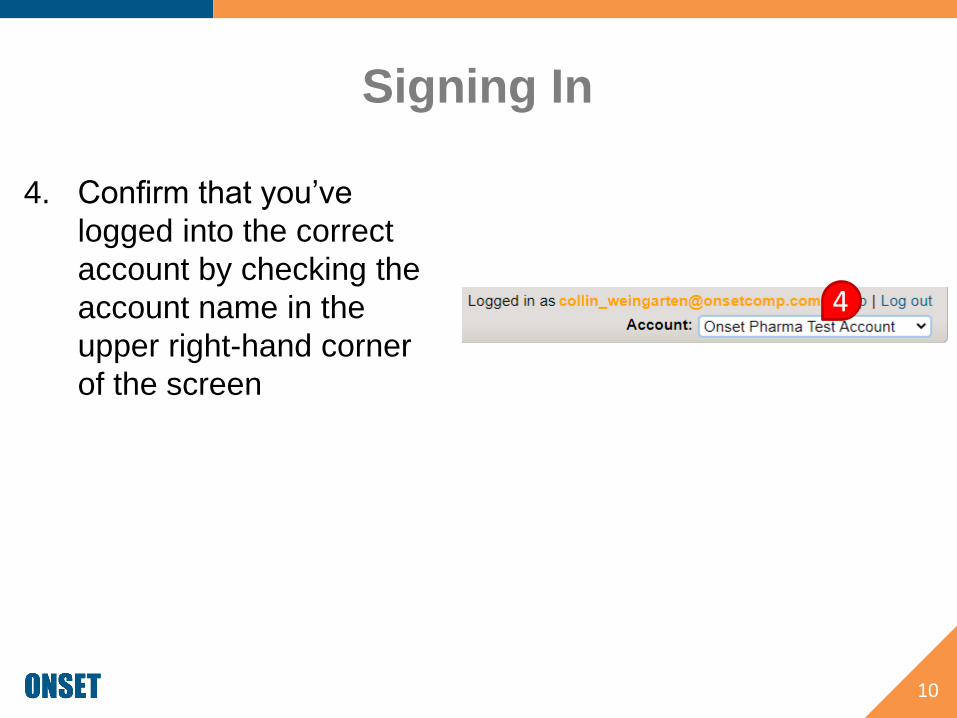
4. Confirm that you’ve
logged into the correct
account by checking the
account name in the
upper right-hand corner
of the screen
10
4
Managing Users
& Roles
11
Back to Top
Managing Users & Roles
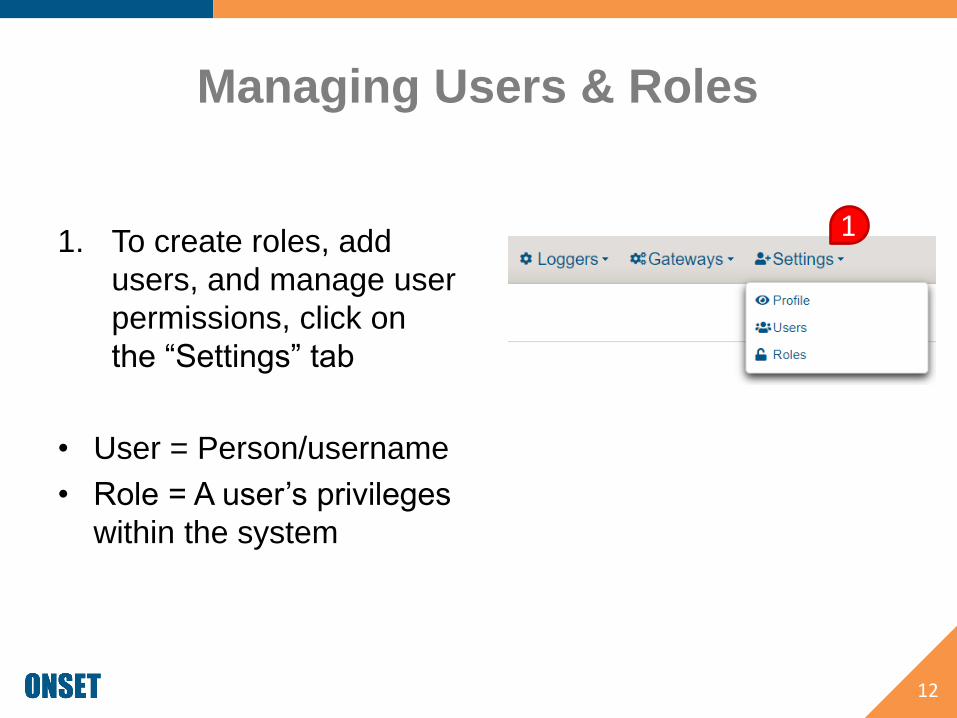
1. To create roles, add
users, and manage user
permissions, click on
the “Settings” tab
• User = Person/username
• Role = A user’s privileges
within the system
12
1

Create a New Role
1. To add a new role,
click “Roles” under
the “Settings” tab
2. Click “Add Role”
13
1
2
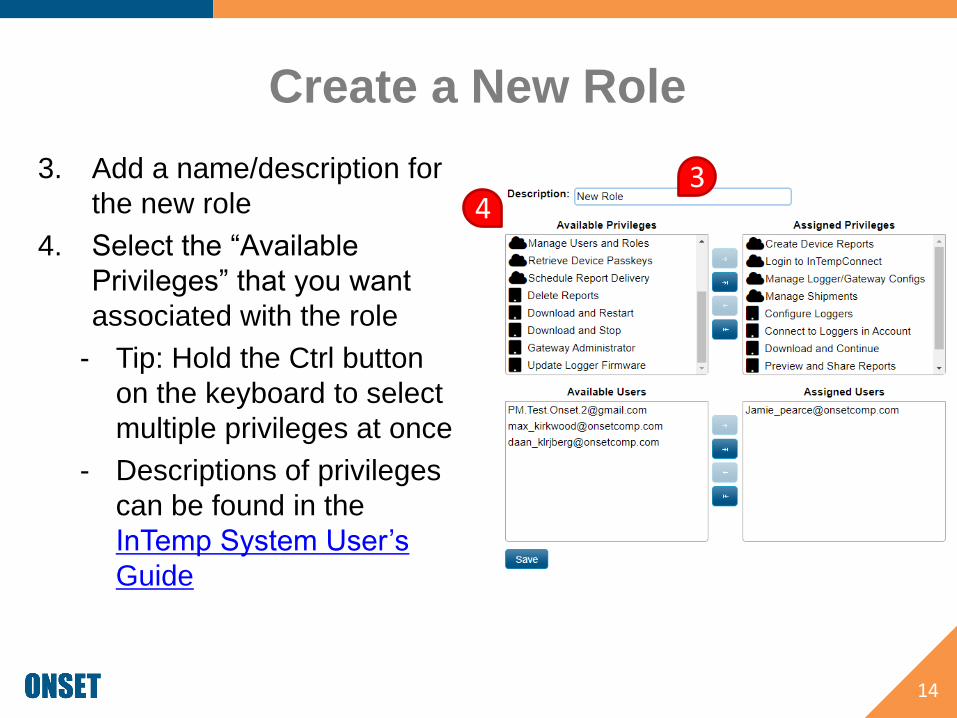
3. Add a name/description for
the new role
4. Select the “Available
Privileges” that you want
associated with the role
- Tip: Hold the Ctrl button
on the keyboard to select
multiple privileges at once
- Descriptions of privileges
can be found in the
InTemp System User’s
Guide
14
Create a New Role
34

Create a New Role
5. Click the button to
add the privileges to the
role
6. If available, select any
users you want assigned
to the new role
7. Click the button to
add users to the role
8. Click “Save”
15
5
67
8
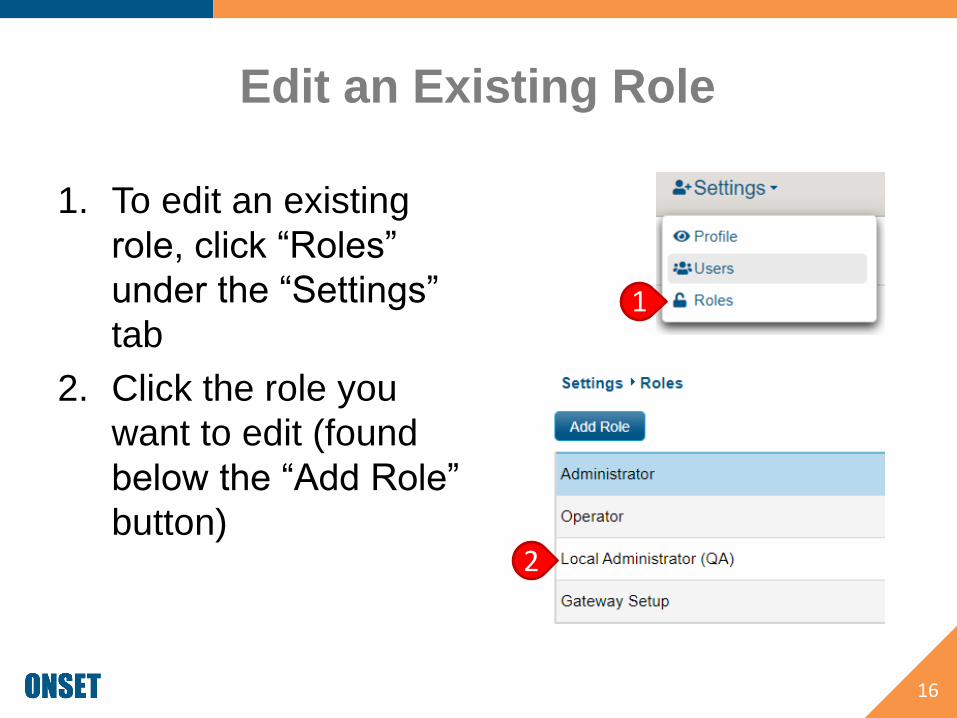
Edit an Existing Role
1. To edit an existing
role, click “Roles”
under the “Settings”
tab
2. Click the role you
want to edit (found
below the “Add Role”
button)
16
2
1
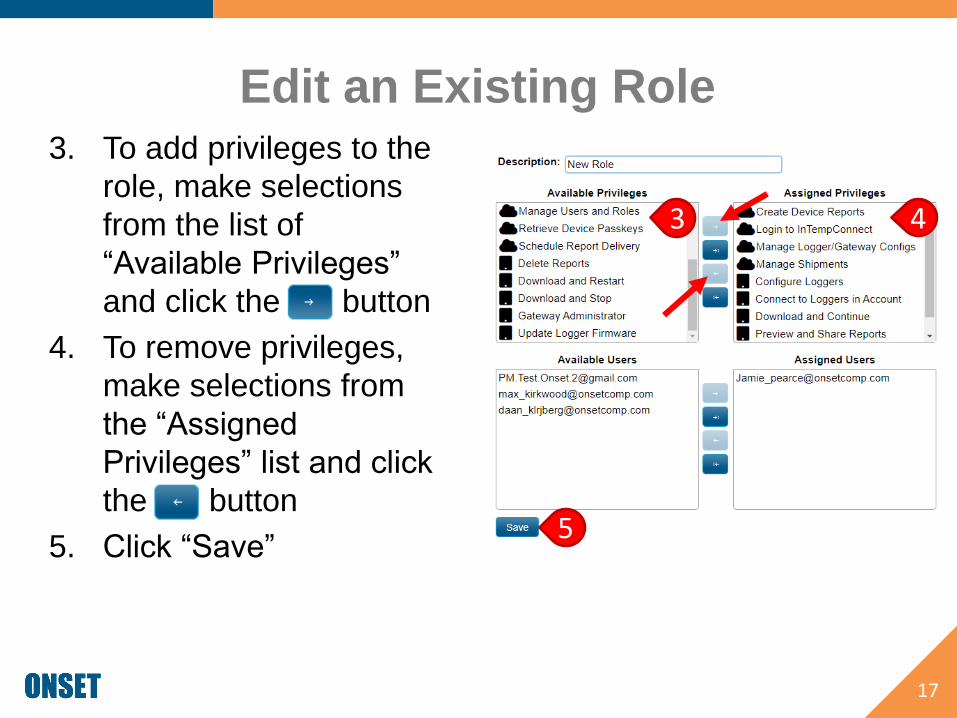
3. To add privileges to the
role, make selections
from the list of
“Available Privileges”
and click the button
4. To remove privileges,
make selections from
the “Assigned
Privileges” list and click
the button
5. Click “Save”
Edit an Existing Role
17
3 4
5

Creating New Users
1. To add or manage
users, click “Users”
under the “Settings”
tab
2. You can either add a
new user manually or
you can import users
via a Microsoft Excel
file
18
1
2 2
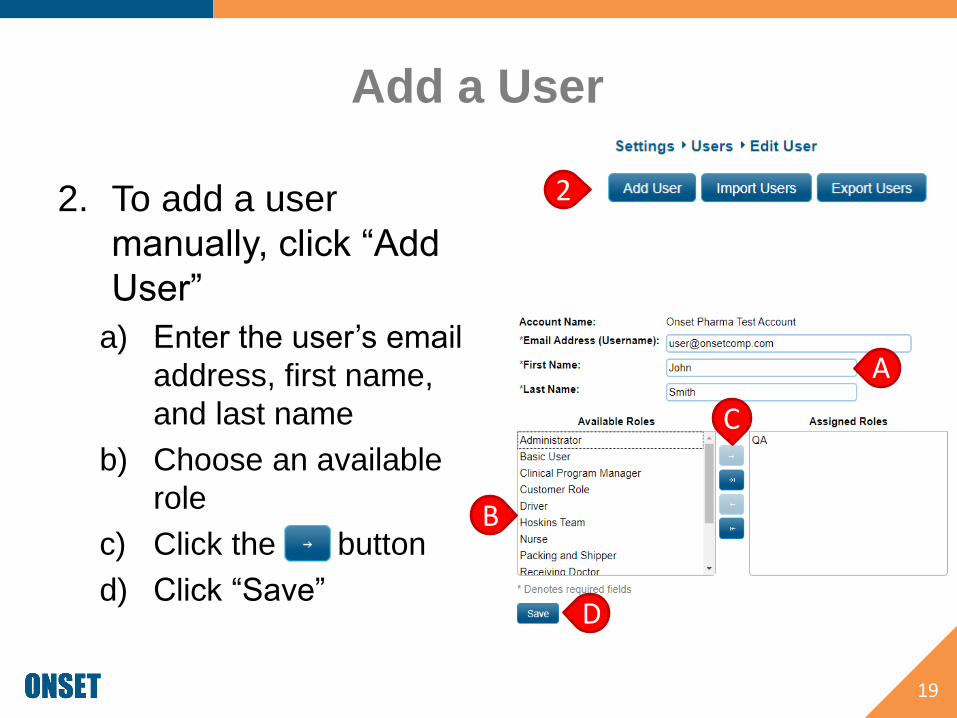
Add a User
2. To add a user
manually, click “Add
User”
a) Enter the user’s email
address, first name,
and last name
b) Choose an available
role
c) Click the button
d) Click “Save”
19
2
B
D
C
A
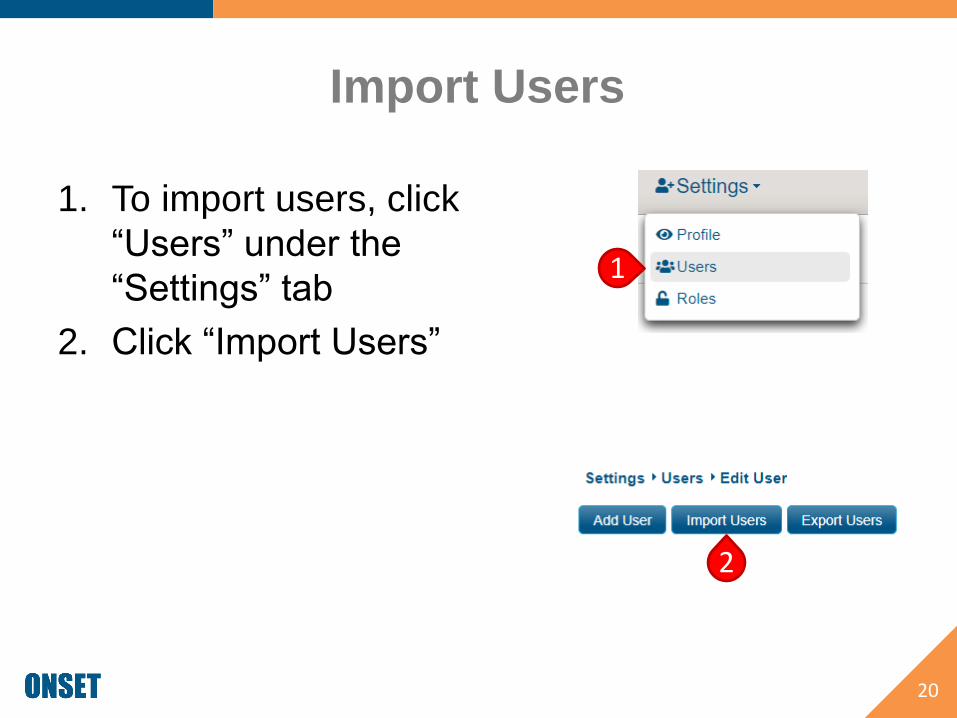
Import Users
1. To import users, click
“Users” under the
“Settings” tab
2. Click “Import Users”
20
1
2

Import Users3. Click on to download
the Excel template
4. Create an Excel file by
adding as many users as
needed to the template
a) Include email, first
name, and last name
(required)
b) Designate roles (role
names must match
exactly)
5. Save the Excel file
21
3
4A 4B
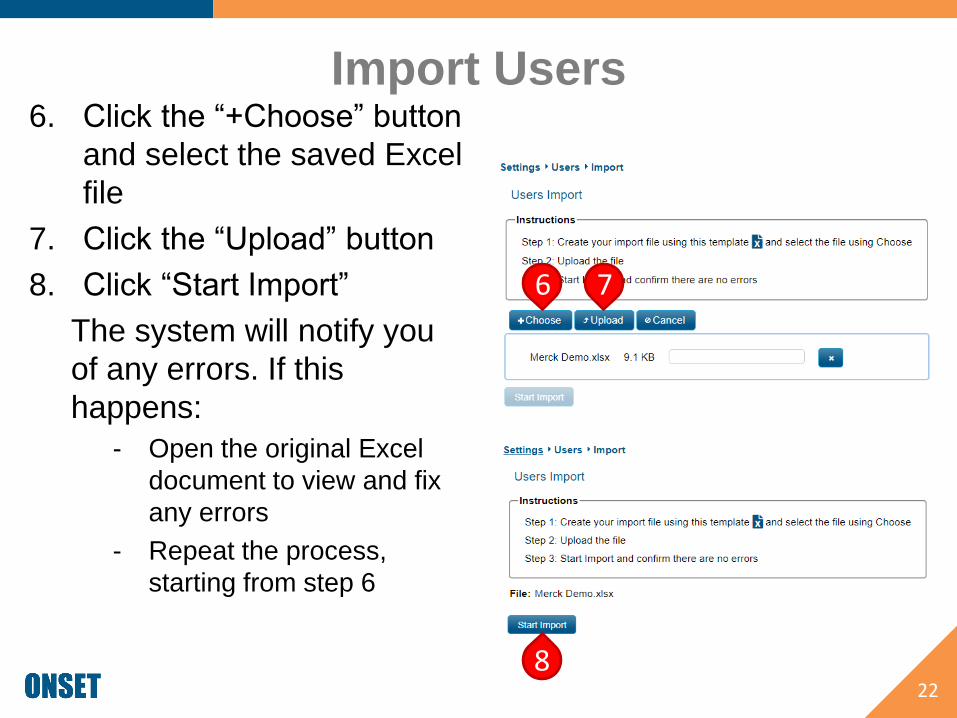
Import Users6. Click the “+Choose” button
and select the saved Excel
file
7. Click the “Upload” button
8. Click “Start Import”
The system will notify you
of any errors. If this
happens:
- Open the original Excel
document to view and fix
any errors
- Repeat the process,
starting from step 6
22
76
8
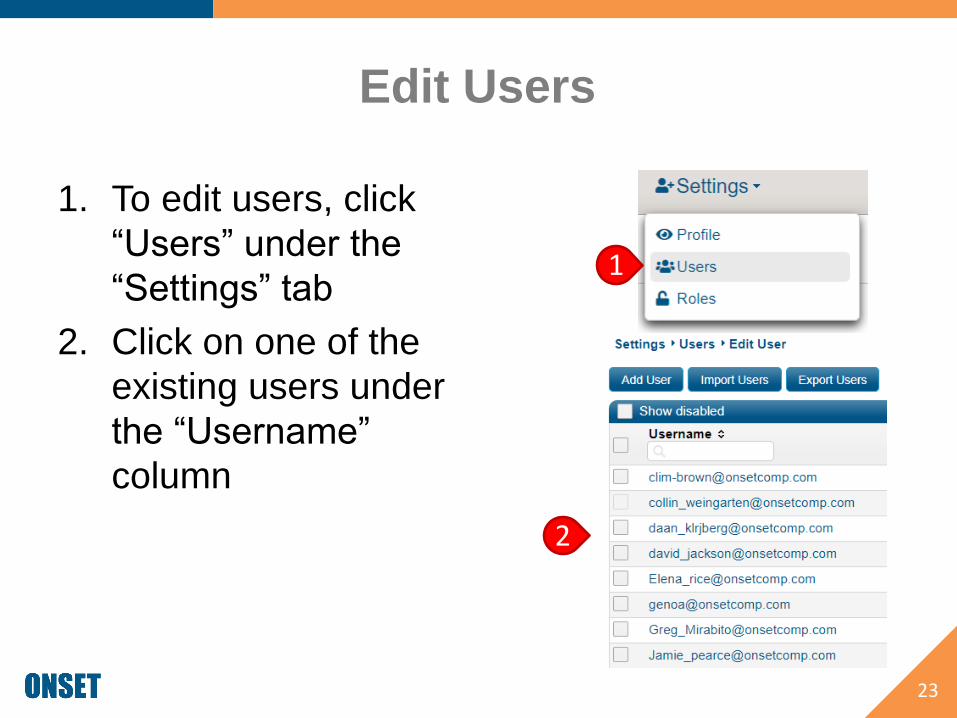
Edit Users
1. To edit users, click
“Users” under the
“Settings” tab
2. Click on one of the
existing users under
the “Username”
column
23
1
2
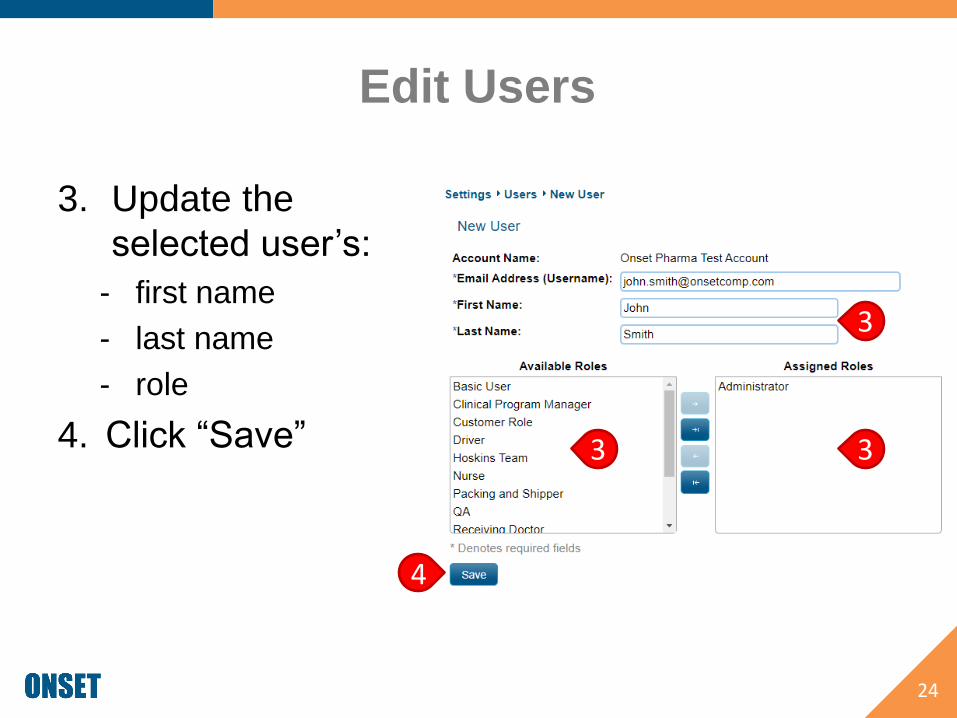
Edit Users
3. Update the
selected user’s:
- first name
- last name
- role
4. Click “Save”
24
4
3
33
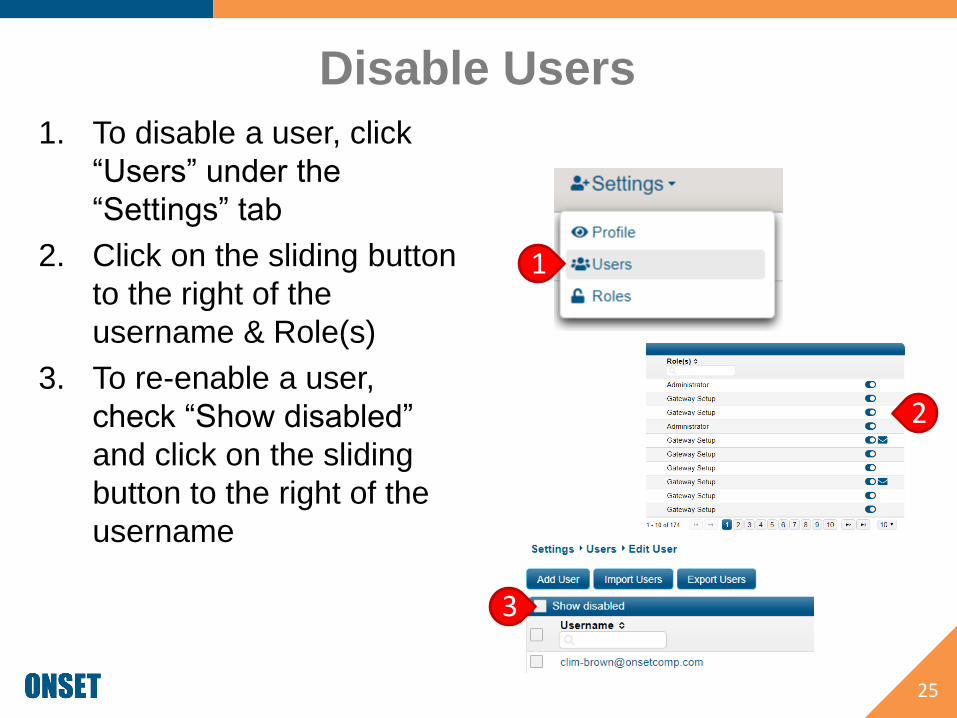
Disable Users
1. To disable a user, click
“Users” under the
“Settings” tab
2. Click on the sliding button
to the right of the
username & Role(s)
3. To re-enable a user,
check “Show disabled”
and click on the sliding
button to the right of the
username
25
1
3
2

Managing Gateway
Profiles
26
Back to Top
Gateway Profiles
• Gateway Profiles define the behavior of your
Gateway – how, when, and how often it downloads
loggers.
• You must create a Gateway Profile prior to
activating the Gateway.
• You can create multiple profiles with different
settings so you can select the appropriate one
when activating the Gateway (e.g., a Gateway
monitoring storage loggers may be configured
differently from a Gateway downloading
transportation loggers).
27
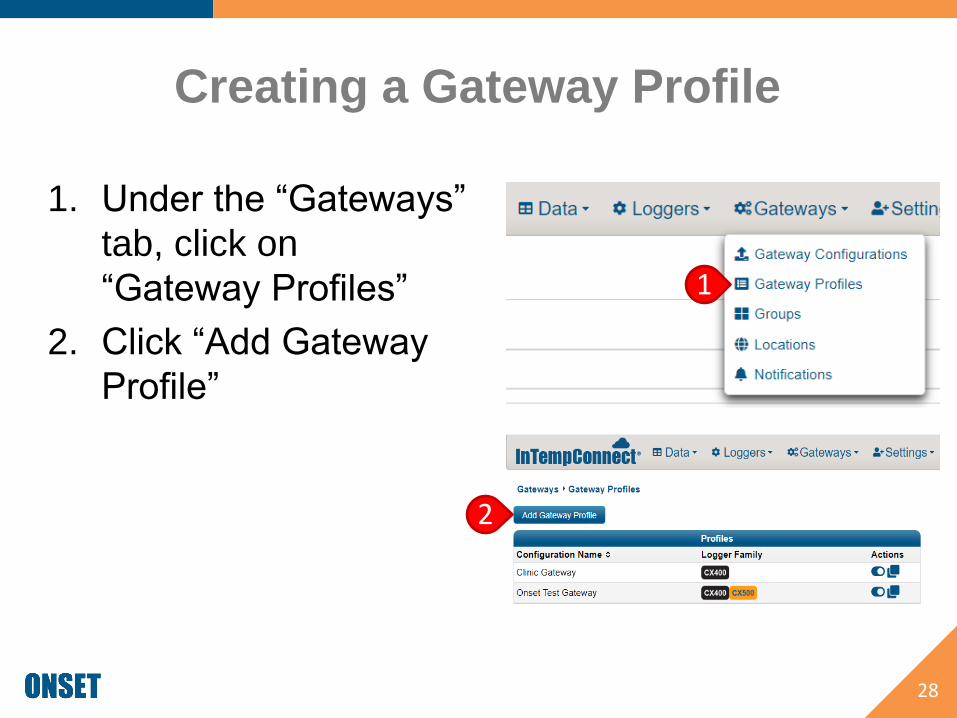
Creating a Gateway Profile
1. Under the “Gateways”
tab, click on
“Gateway Profiles”
2. Click “Add Gateway
Profile”
28
1
2
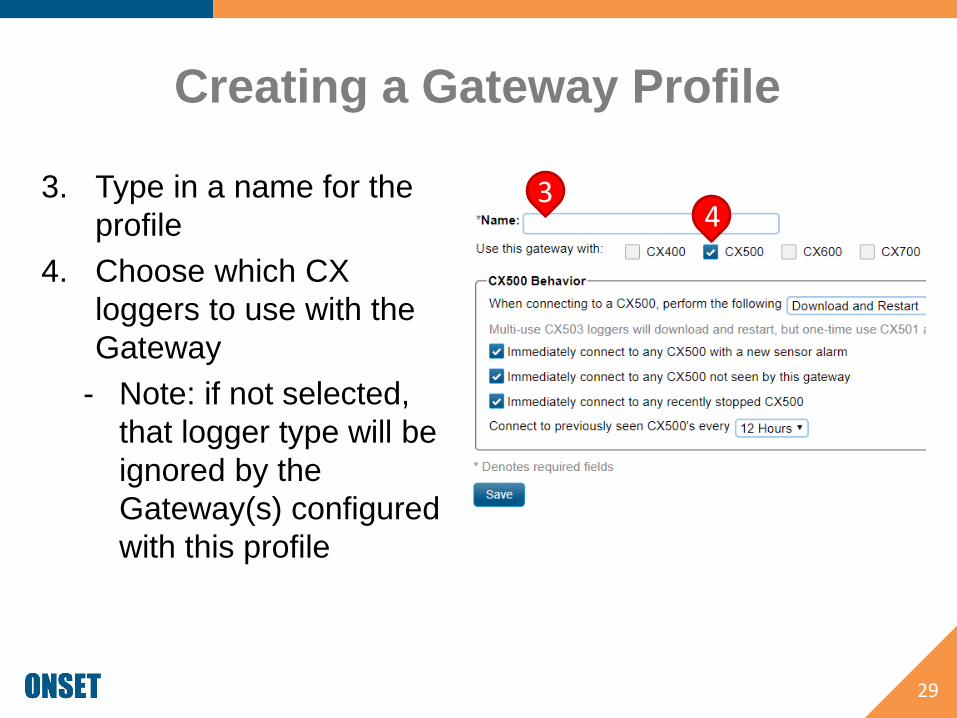
Creating a Gateway Profile
3. Type in a name for the
profile
4. Choose which CX
loggers to use with the
Gateway
- Note: if not selected,
that logger type will be
ignored by the
Gateway(s) configured
with this profile
29
34
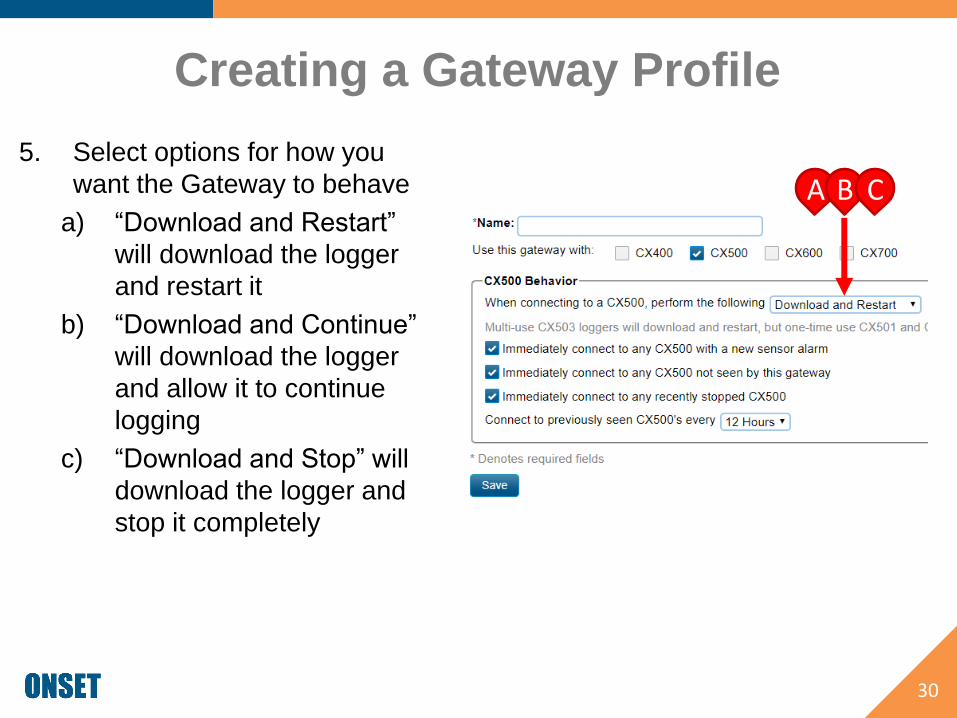
Creating a Gateway Profile
5. Select options for how you
want the Gateway to behave
a) “Download and Restart”
will download the logger
and restart it
b) “Download and Continue”
will download the logger
and allow it to continue
logging
c) “Download and Stop” will
download the logger and
stop it completely
30
A B C
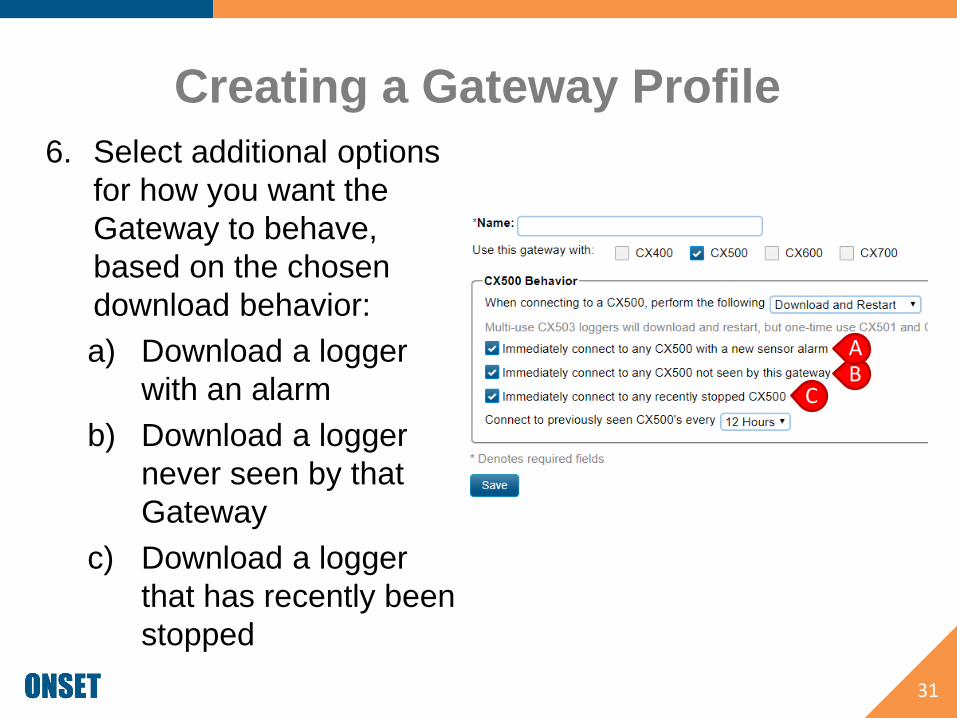
Creating a Gateway Profile
6. Select additional options
for how you want the
Gateway to behave,
based on the chosen
download behavior:
a) Download a logger
with an alarm
b) Download a logger
never seen by that
Gateway
c) Download a logger
that has recently been
stopped
31
BC
A

Creating a Gateway Profile
4. Choose how often you
want a Gateway to connect
to and download previously-
seen loggers. This will
automate regularly-
scheduled downloads
- Note: This is primarily for
product storage monitoring.
For transportation, it is
recommended to choose
the greatest amount of time
5. Click “Save”
32
5
4

Disabling a Gateway Profile
1. Under the “Gateways”
tab, click on
“Gateway Profiles”
2. Click the slider button
to disable
- Note: This is simply to
hide the option when
configuring a Gateway.
You can always re-
enable the profile, if
necessary
33
1
2

Gateway
Management
34
Back to Top
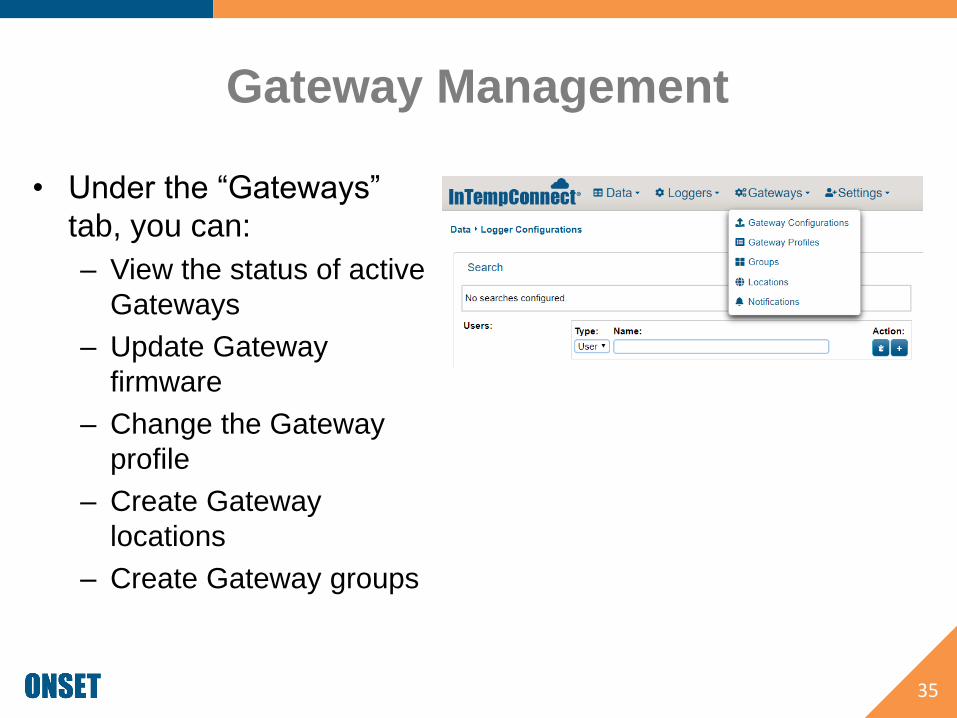
Gateway Management
• Under the “Gateways”
tab, you can:
– View the status of active
Gateways
– Update Gateway
firmware
– Change the Gateway
profile
– Create Gateway
locations
– Create Gateway groups
35

View Gateway Status
1. Under the “Gateways”
tab, click “Gateway
Configurations”
2. From this screen, you
can view the status of
your Gateways
36
1
2

Gateway Firmware Update
1. To update Gateway firmware,
click on the box under the
“Update Firmware” Column
2. Click “Schedule Firmware
Updates”
3. Confirm the Gateway was
updated using the “Firmware
Update Status” column
- If the Gateway does not
update after an hour, contact
Onset Tech Support
37
1
2
3
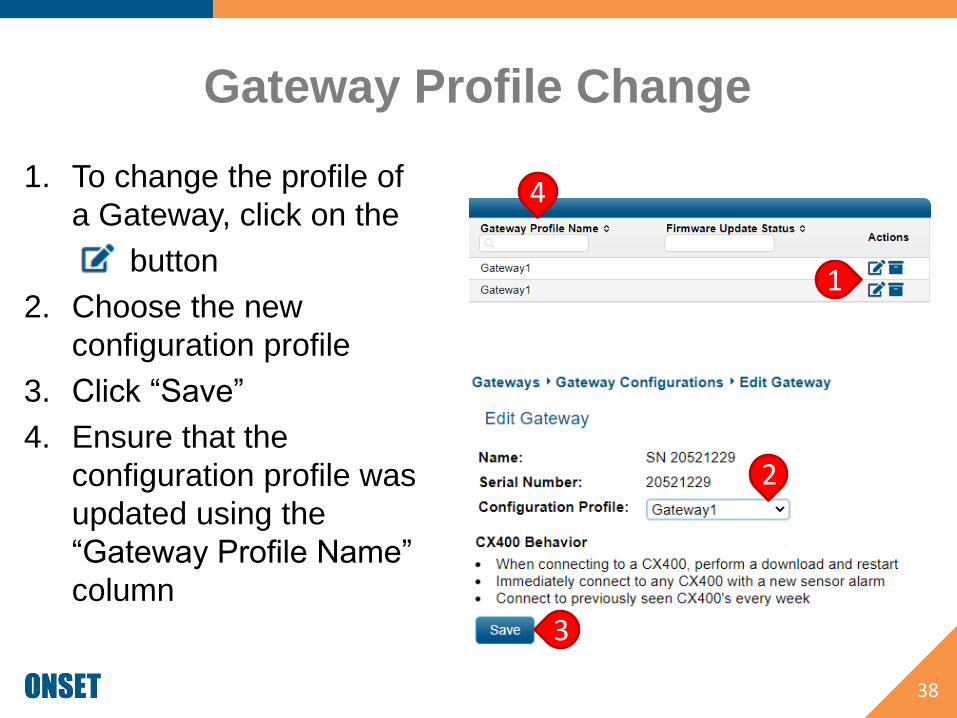
Gateway Profile Change
1. To change the profile of
a Gateway, click on the
button
2. Choose the new
configuration profile
3. Click “Save”
4. Ensure that the
configuration profile was
updated using the
“Gateway Profile Name”
column
38
4
1
2
3
Create Gateway Locations
• Locations can be assigned to Gateways to
create additional automation within the system in
conjunction with the “Shipment” feature.
• If a logger reaches its destination Gateway, the
Gateway will automatically download and stop
the logger.
• All other Gateways will simply download and
continue the logger operations.
39
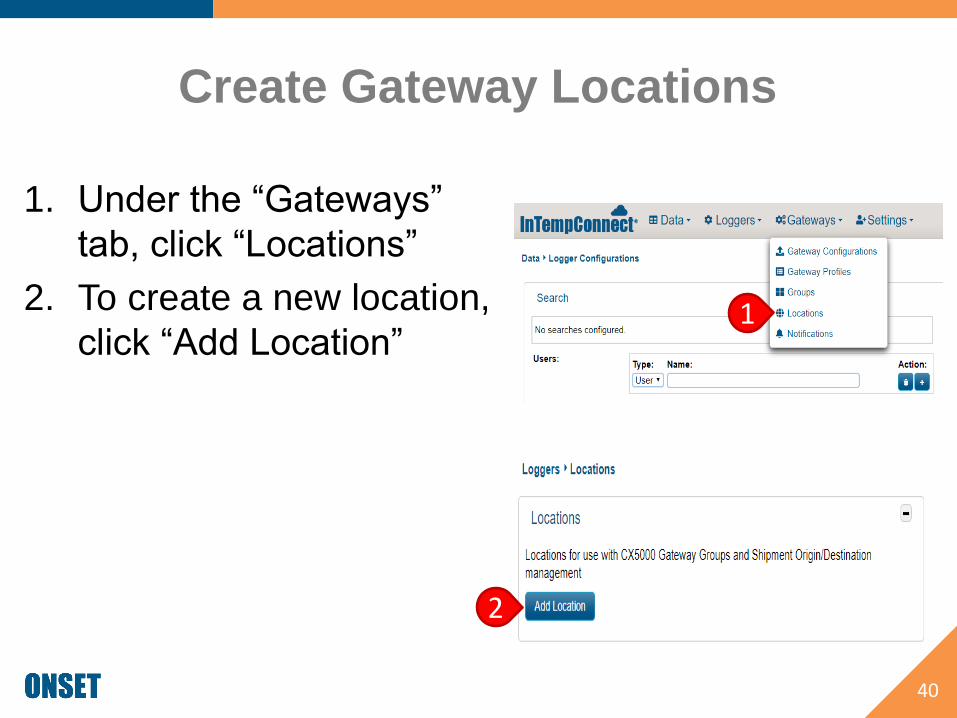
Create Gateway Locations
1. Under the “Gateways”
tab, click “Locations”
2. To create a new location,
click “Add Location”
40
1
2

Create Gateway Locations
3. Enter the shipping or
receiving address in the
location line
- A location can be used for the
origin or destination. There is
no need to enter the location
twice
- This is powered by Google
maps, so site names can be
used
4. Optional: enter Area/Room
(e.g., Receiving)
5. Click “Save”
41
3
4
5

Create Gateway Groups
Gateway Groups can be used for:
1. Multiple Gateways in the same proximity
– If multiple Gateways are within proximity of each other,
place them all into the same group. This will allow them to
work together so that duplicate reports are not created
2. Gateway Groups for shipments
– If a Gateway Group is being used for a shipment, add only
one Gateway per group/location. The location will enable
the Gateway to automatically download and stop loggers
that have been programmed with that end location. All
other Gateways will only download and continue the logger
42
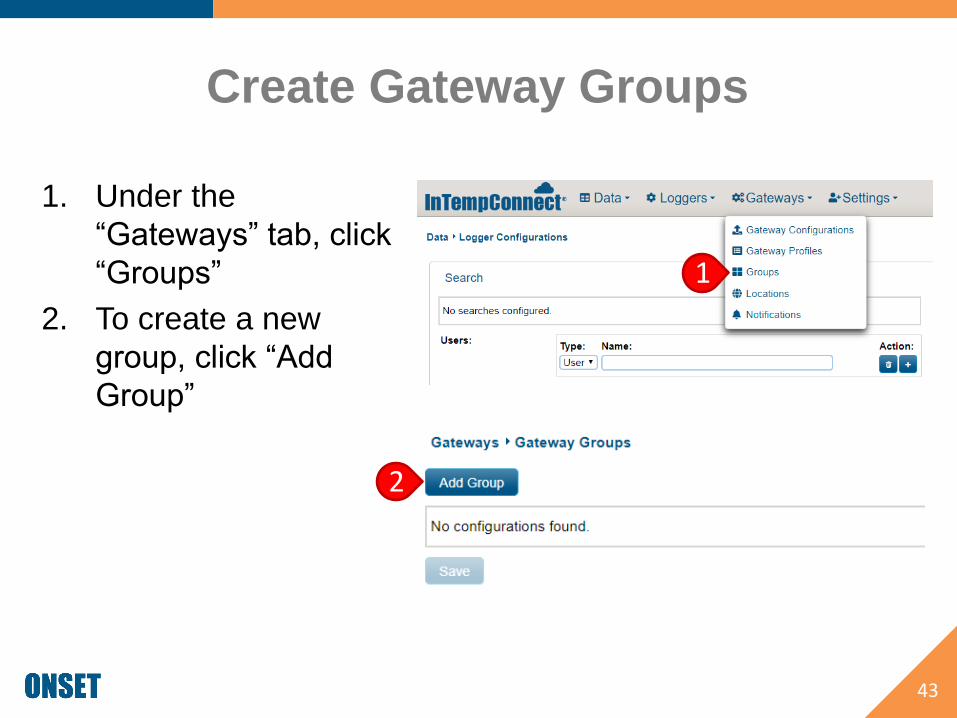
Create Gateway Groups
1. Under the
“Gateways” tab, click
“Groups”
2. To create a new
group, click “Add
Group”
43
2
1
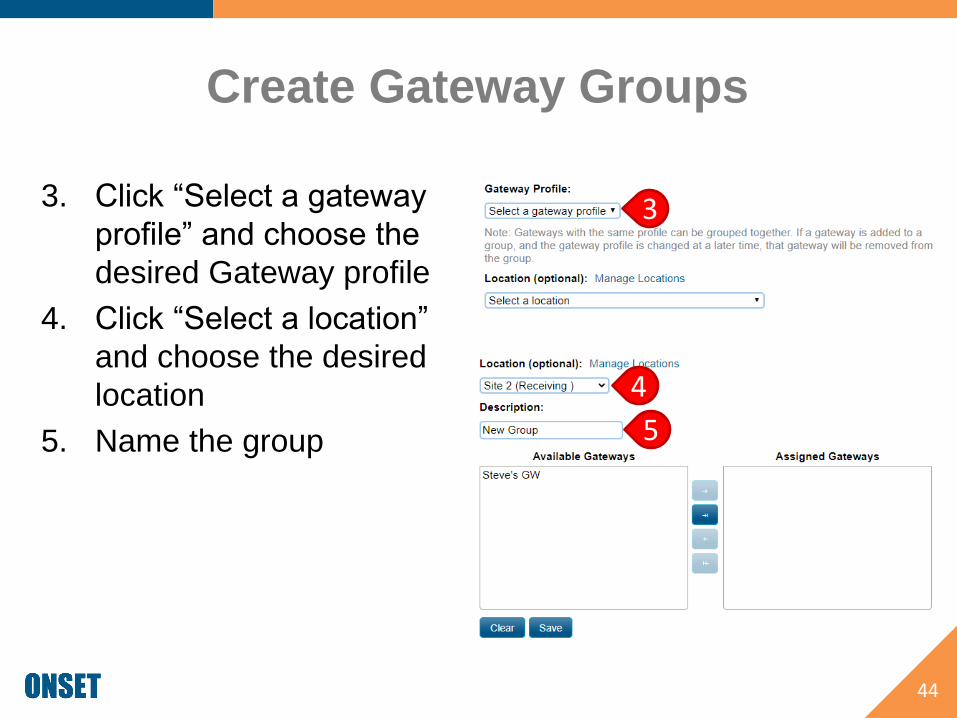
Create Gateway Groups
3. Click “Select a gateway
profile” and choose the
desired Gateway profile
4. Click “Select a location”
and choose the desired
location
5. Name the group
44
3
4
5

Create Gateway Groups
6. Click on the desired
Gateway under
“Available Gateways”
7. Click the button
8. Click “Save”
45
67
8
Managing
Logger Profiles
46
Back to Top
Logger Profiles
• Logger Profiles define the behavior of your
loggers (e.g., recording interval, alarm setting,
start and stop behavior, etc.)
• Multiple Logger Profiles can be created so you
can select the appropriate one when configuring
and starting the logger (e.g., one logger profile
may be created for refrigerated storage, another
for ambient storage, and another for
transportation with 5-minute recording intervals
vs transportation with 1-minute intervals, etc.)
47
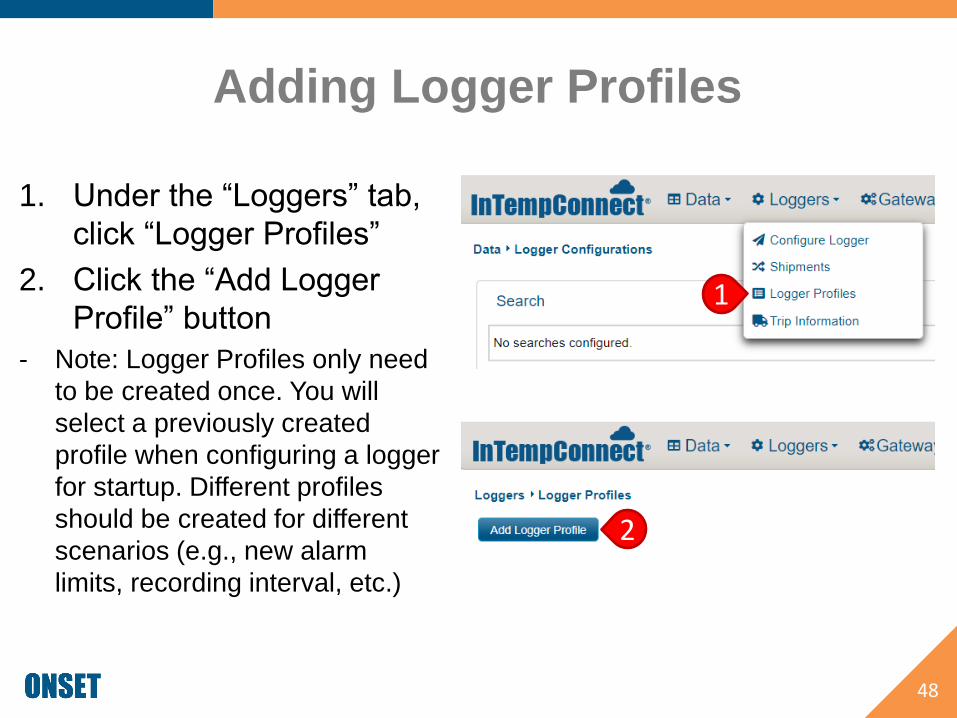
Adding Logger Profiles
1. Under the “Loggers” tab,
click “Logger Profiles”
2. Click the “Add Logger
Profile” button
- Note: Logger Profiles only need
to be created once. You will
select a previously created
profile when configuring a logger
for startup. Different profiles
should be created for different
scenarios (e.g., new alarm
limits, recording interval, etc.)
48
2
1
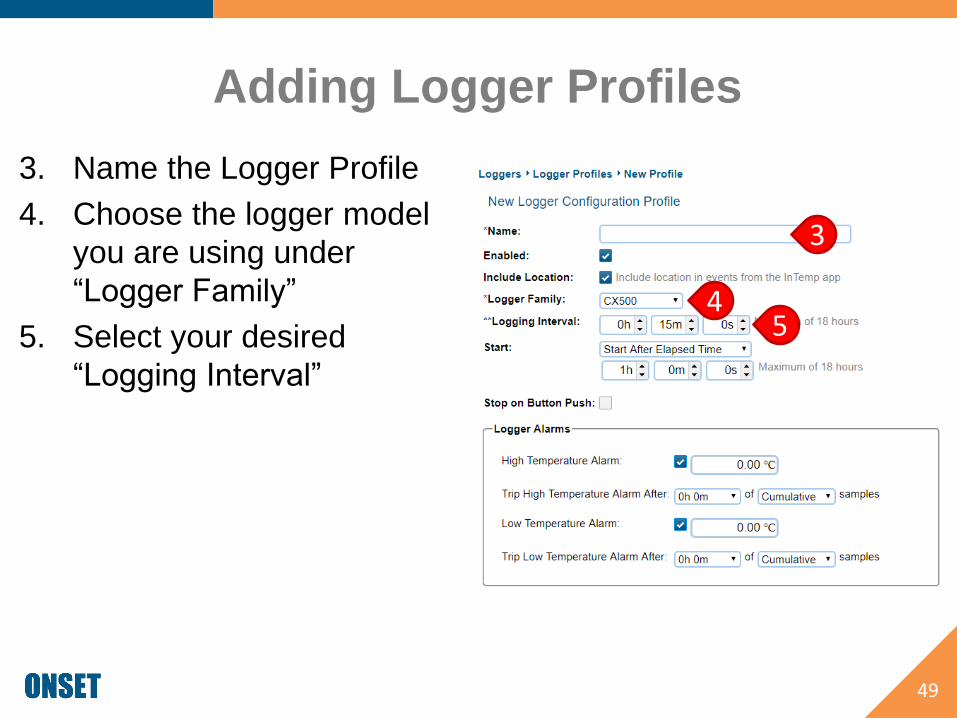
Adding Logger Profiles
3. Name the Logger Profile
4. Choose the logger model
you are using under
“Logger Family”
5. Select your desired
“Logging Interval”
49
3
45

Adding Logger Profiles
6. Choose a logger “Start”
option
- “Start Now” starts the logger
immediately upon configuration
- “Start on Interval” starts the logger
on a pre-defined logging interval
- “Start on Button Push” starts the
logger when you press and hold the
button on the logger
- “Start After Elapsed Time” starts the
logger after a pre-defined amount
of time
- “Start on Date/Time” starts the
logger on a defined date and time
50
6
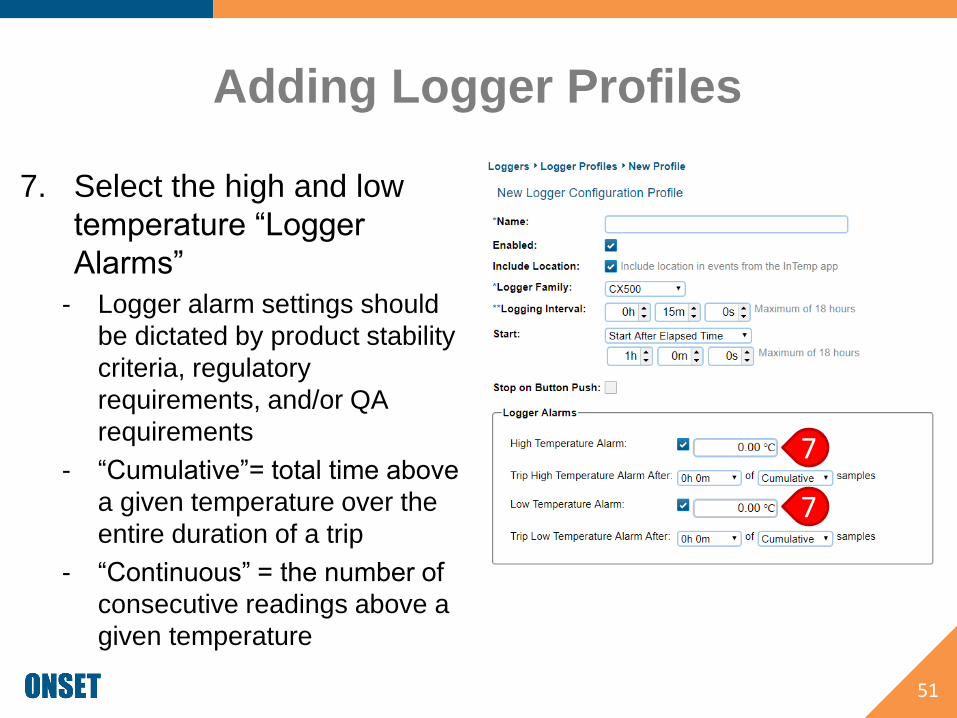
Adding Logger Profiles
7. Select the high and low
temperature “Logger
Alarms”
- Logger alarm settings should
be dictated by product stability
criteria, regulatory
requirements, and/or QA
requirements
- “Cumulative”= total time above
a given temperature over the
entire duration of a trip
- “Continuous” = the number of
consecutive readings above a
given temperature
51
7
7
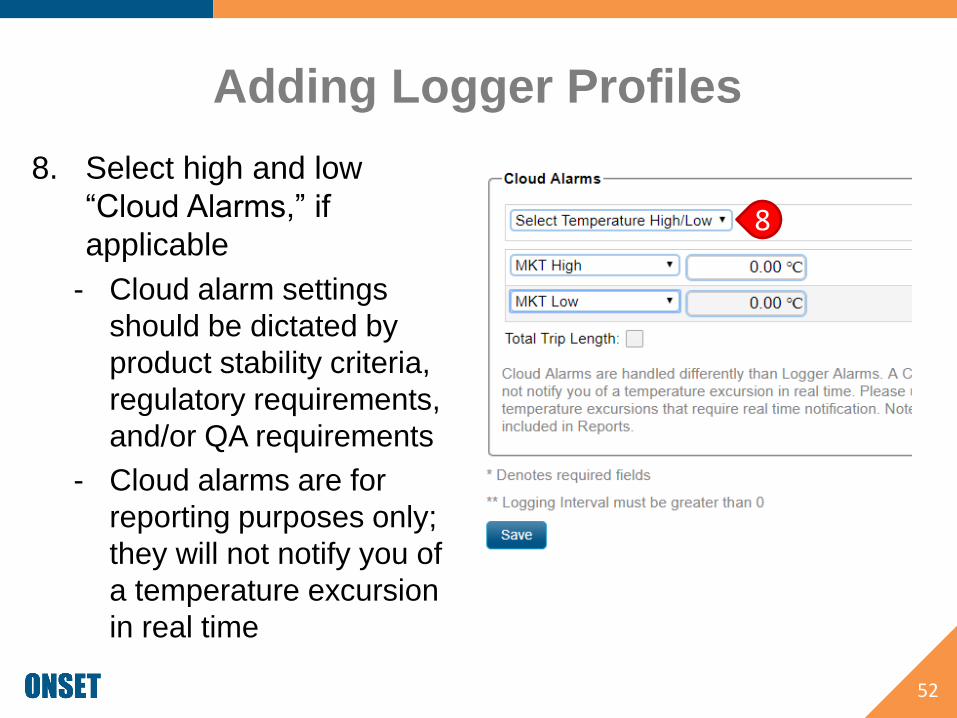
Adding Logger Profiles
8. Select high and low
“Cloud Alarms,” if
applicable
- Cloud alarm settings
should be dictated by
product stability criteria,
regulatory requirements,
and/or QA requirements
- Cloud alarms are for
reporting purposes only;
they will not notify you of
a temperature excursion
in real time
52
8

Adding Logger Profiles
9. Select Mean Kinetic
Temperature (MKT) high
and low alarms
- MKT alarm settings should be
dictated by product stability
criteria, regulatory
requirements, and/or QA
requirements
- MKT is usually used for loggers
in transport. It is not typically
used for storage monitoring, but
can be if regulations/product
stability requires it
10. Click “Save”
53
9
9
10
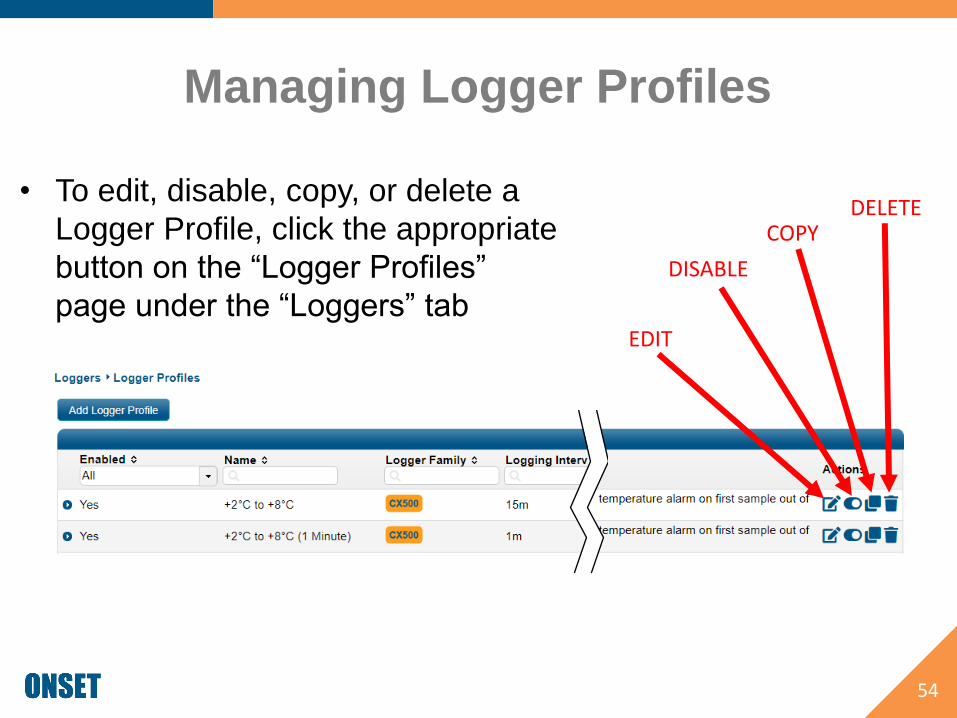
Managing Logger Profiles
• To edit, disable, copy, or delete a
Logger Profile, click the appropriate
button on the “Logger Profiles”
page under the “Loggers” tab
54
EDIT
DISABLE
COPYDELETE
Data Search
55
Back to Top

Data Search – Logger
Configurations
• Upon signing into ITC,
you will be
automatically directed
to the “Logger
Configurations” page
under the “Data” tab
56

Data Search – Logger
Configurations• Use the search fields to
narrow down the downloads
and or logger configurations
you want to see
– Note: The results show
configurations with
downloads and
configurations without
downloads, to keep track
of all active loggers in
the field
57
REMOVE A SEARCH FIELD
ADD AN ADDITIONAL SEARCH FIELD OF THE SAME TYPE
SAVE SEARCH CRITERIA FOR FUTURE USE & REPORT BUILDER
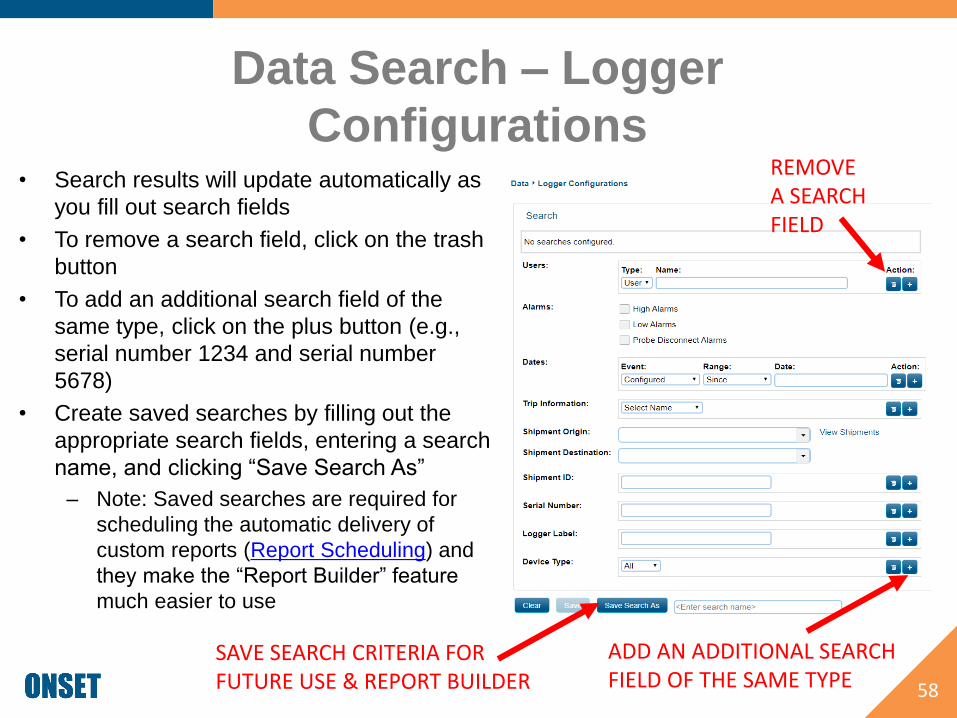
• Search results will update automatically as
you fill out search fields
• To remove a search field, click on the trash
button
• To add an additional search field of the
same type, click on the plus button (e.g.,
serial number 1234 and serial number
5678)
• Create saved searches by filling out the
appropriate search fields, entering a search
name, and clicking “Save Search As”
– Note: Saved searches are required for
scheduling the automatic delivery of
custom reports (Report Scheduling) and
they make the “Report Builder” feature
much easier to use
58
REMOVE A SEARCH FIELD
ADD AN ADDITIONAL SEARCH FIELD OF THE SAME TYPE
SAVE SEARCH CRITERIA FOR FUTURE USE & REPORT BUILDER
Data Search – Logger
Configurations
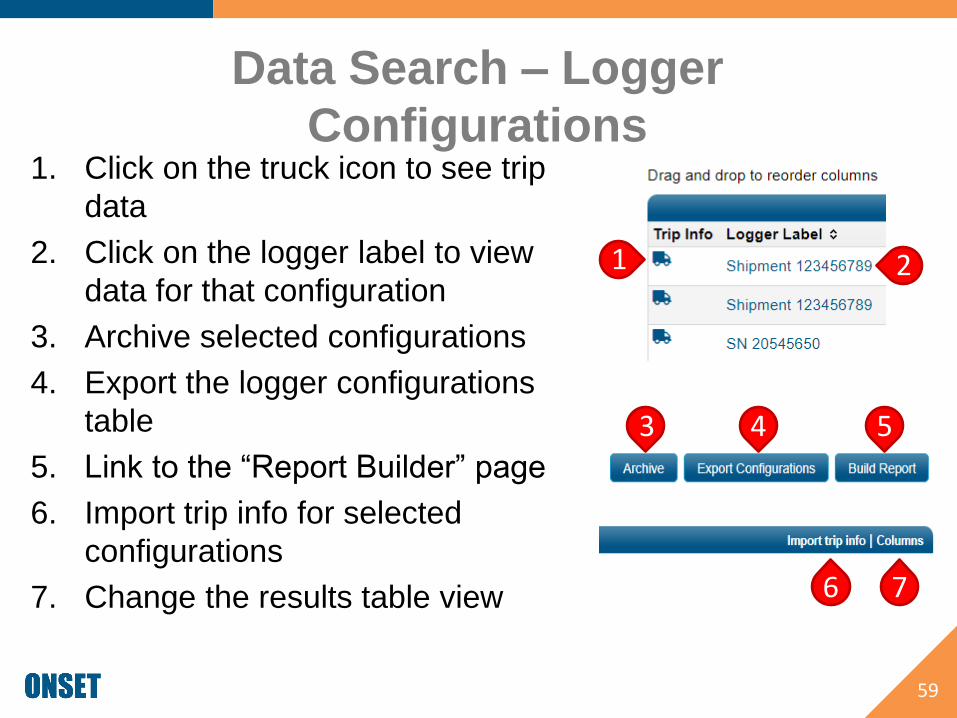
1. Click on the truck icon to see trip
data
2. Click on the logger label to view
data for that configuration
3. Archive selected configurations
4. Export the logger configurations
table
5. Link to the “Report Builder” page
6. Import trip info for selected
configurations
7. Change the results table view
59
Data Search – Logger
Configurations
1 2
3 4 5
6 7
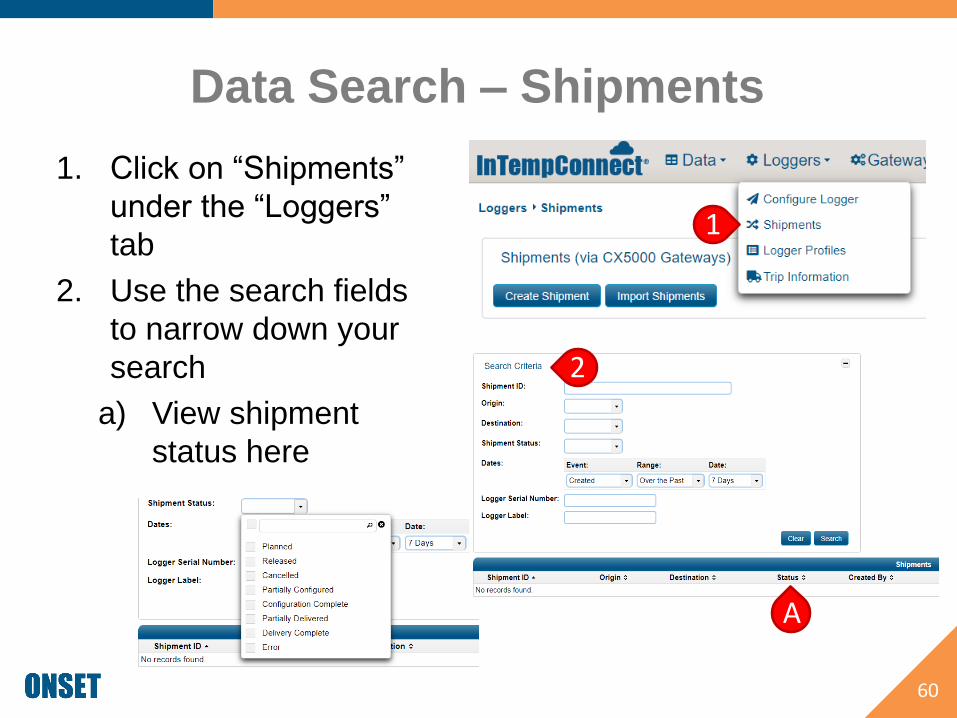
Data Search – Shipments
1. Click on “Shipments”
under the “Loggers”
tab
2. Use the search fields
to narrow down your
search
a) View shipment
status here
60
2
1
A
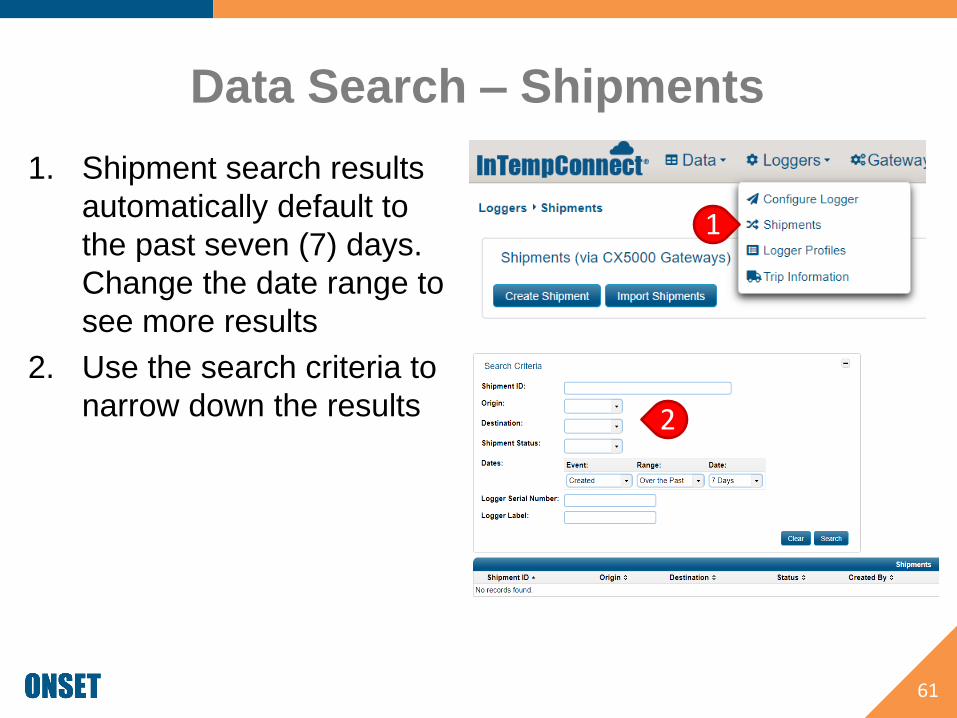
Data Search – Shipments
1. Shipment search results
automatically default to
the past seven (7) days.
Change the date range to
see more results
2. Use the search criteria to
narrow down the results
61
1
2
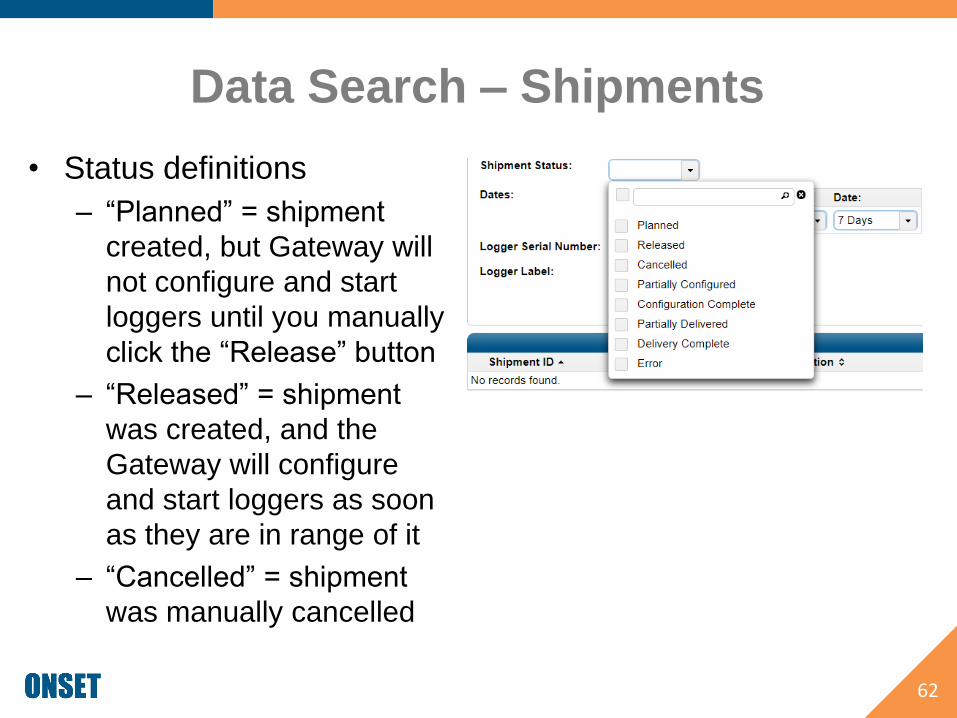
Data Search – Shipments
• Status definitions
– “Planned” = shipment
created, but Gateway will
not configure and start
loggers until you manually
click the “Release” button
– “Released” = shipment
was created, and the
Gateway will configure
and start loggers as soon
as they are in range of it
– “Cancelled” = shipment
was manually cancelled
62
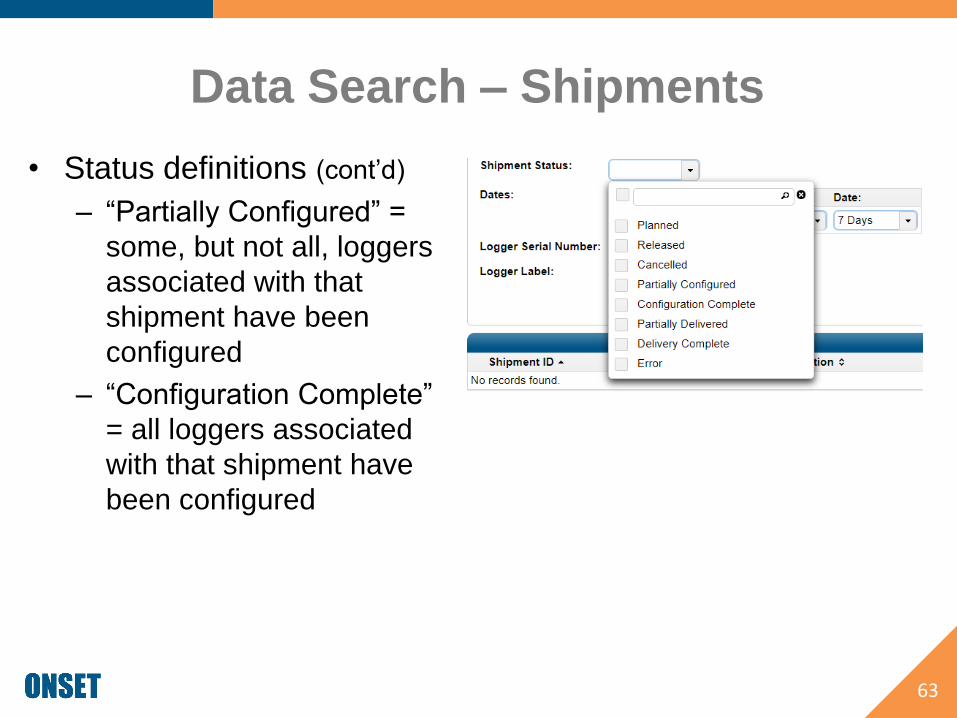
Data Search – Shipments
• Status definitions (cont’d)
– “Partially Configured” =
some, but not all, loggers
associated with that
shipment have been
configured
– “Configuration Complete”
= all loggers associated
with that shipment have
been configured
63

Data Search – Shipments
• Status definitions (cont’d)
– “Partially Delivered” =
some, but not all, loggers
associated with that
shipment have been
download by the
destination Gateway
– “Delivery Complete” = all
loggers associated with
that shipment have been
downloaded by the
destination Gateway
64
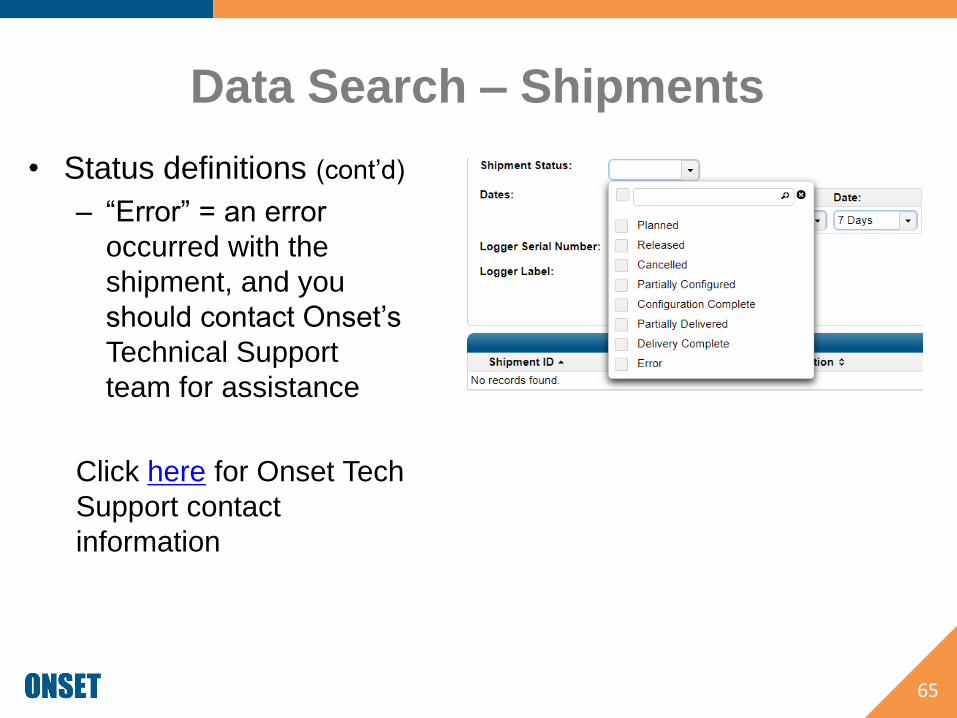
Data Search – Shipments
• Status definitions (cont’d)
– “Error” = an error
occurred with the
shipment, and you
should contact Onset’s
Technical Support
team for assistance
Click here for Onset Tech
Support contact
information
65

Managing Trip
Fields
66
Back to Top

Trip Fields
• Trip Fields are an industry-standard term for Data Tags.
Data Tags allow you to attach additional information to
your temperature data, so you can sort, organize, and
analyze your data by that tag.
• A Trip Field (Data Tag) can be anything you want (e.g.,
courier, fridge type, package type, truck number,
warehouse name, etc.)
• When configuring a logger to start, you can add as many
Trip Fields as you like. The logger is then tagged with the
values you assigned to it.
67
Trip Fields
• Trip Fields are a very powerful tool that can help you
reduce costs and increase efficiency within your storage
areas and supply chain. With these tags, you can assess
courier or package performance, easily identify what
refrigeration unit a data logger belongs to, identify and
monitor multiple sites within a larger network, and more.
• Trip Fields also allow you to more easily organize and
group your data for efficient analysis.
68
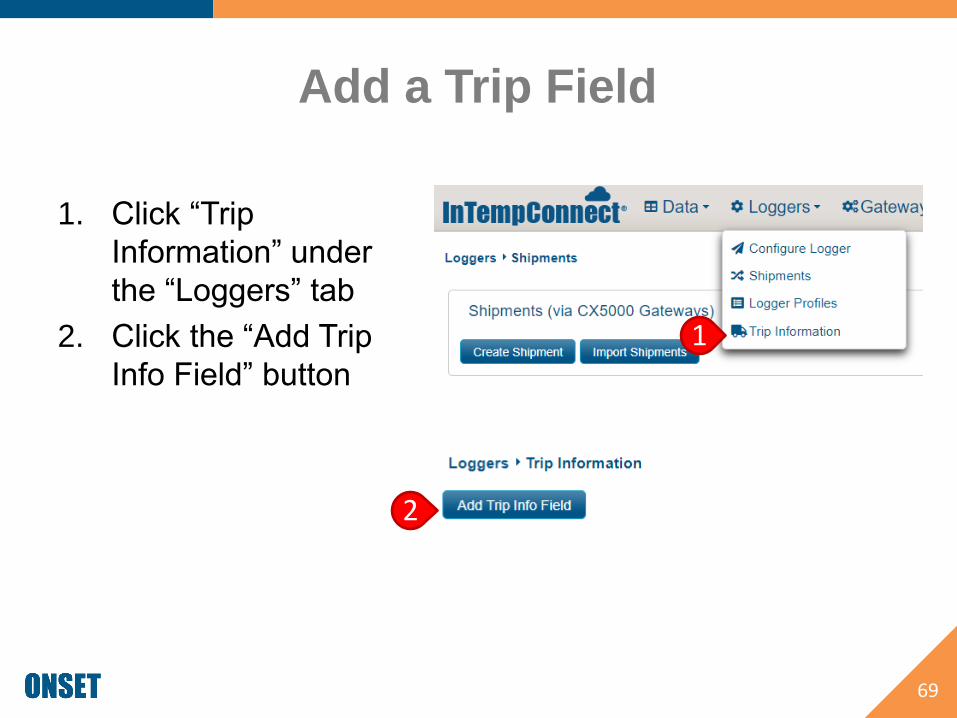
Add a Trip Field
1. Click “Trip
Information” under
the “Loggers” tab
2. Click the “Add Trip
Info Field” button
69
1
2
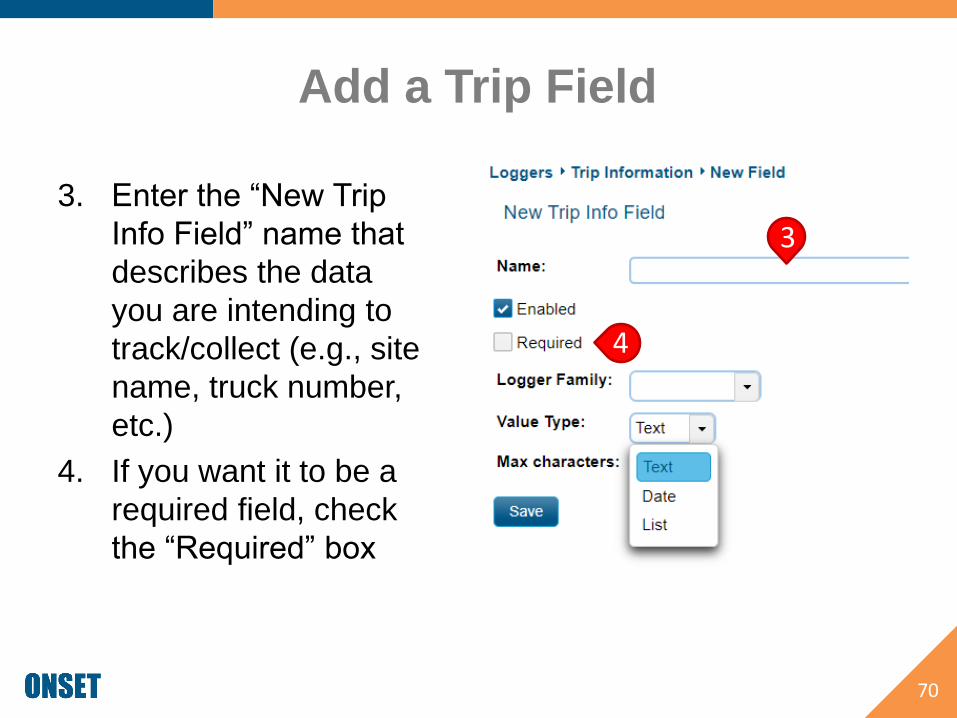
Add a Trip Field
3. Enter the “New Trip
Info Field” name that
describes the data
you are intending to
track/collect (e.g., site
name, truck number,
etc.)
4. If you want it to be a
required field, check
the “Required” box
70
4
3

Add a Trip Field
5. Choose the logger type
from the “Logger Family”
drop-down list (e.g.,
CX500)
6. Choose the value type
- “Text” forces the user to
type in the entry
- “Date” lets the user select
a date
- “List” lets you create
multiple entries for the
user to select from a
drop-down list
71
5
6
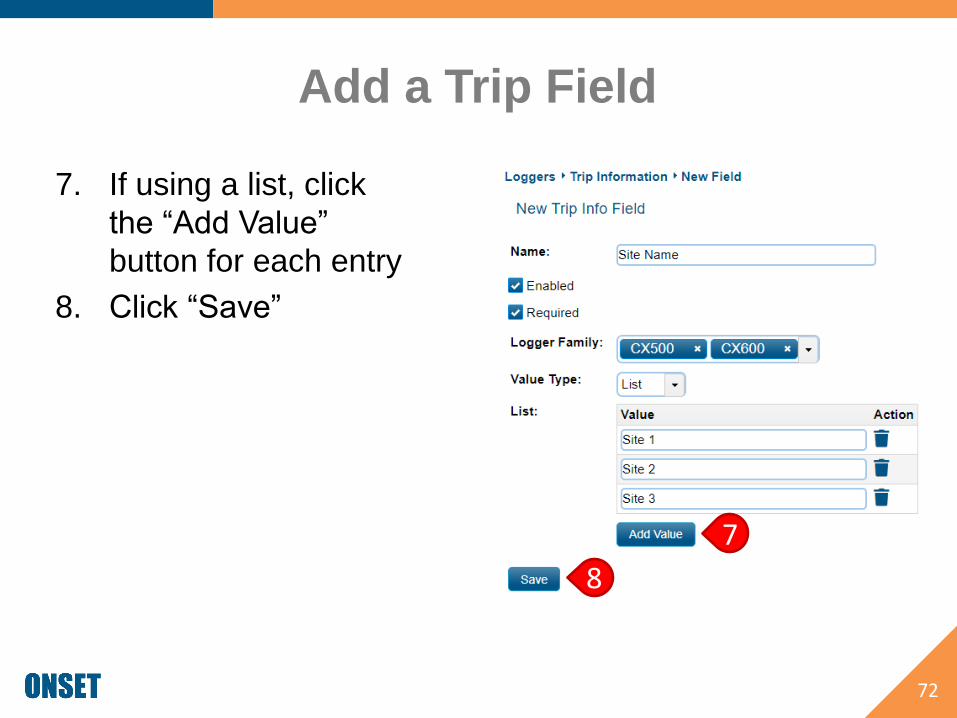
Add a Trip Field
7. If using a list, click
the “Add Value”
button for each entry
8. Click “Save”
72
7
8

Manage Trip Fields
1. Click the edit button to edit an existing trip field
2. Click the slider button to disable a trip field (note: this
button will not appear for user who is programming a
logger)
3. Click the copy button to copy a trip field
73
312
Data Management
74
Back to Top
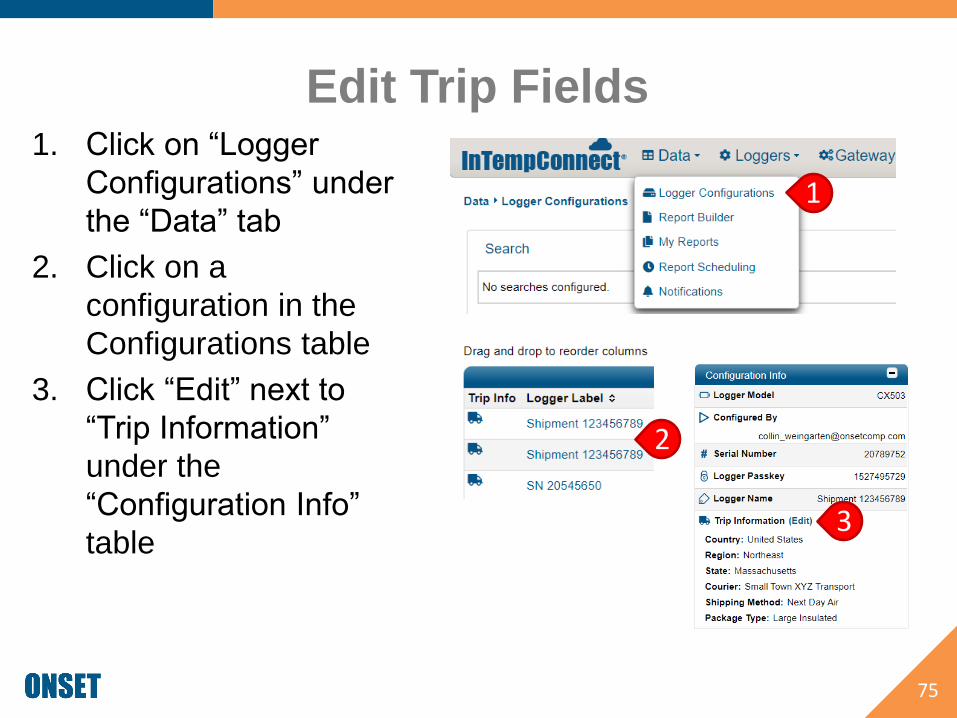
Edit Trip Fields1. Click on “Logger
Configurations” under
the “Data” tab
2. Click on a
configuration in the
Configurations table
3. Click “Edit” next to
“Trip Information”
under the
“Configuration Info”
table
75
1
2
3
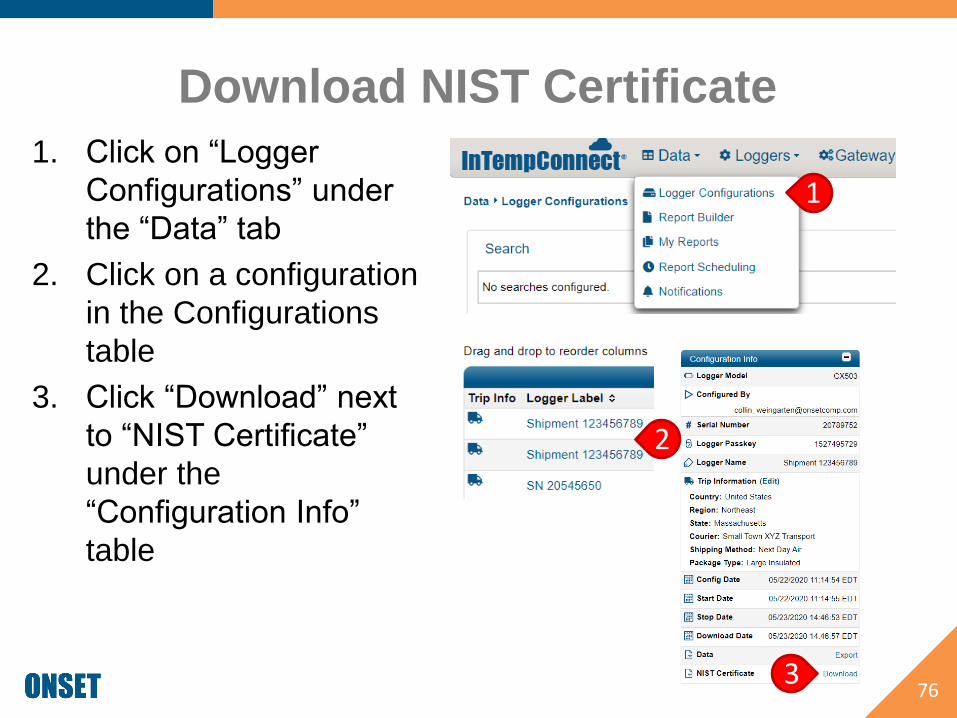
Download NIST Certificate
1. Click on “Logger
Configurations” under
the “Data” tab
2. Click on a configuration
in the Configurations
table
3. Click “Download” next
to “NIST Certificate”
under the
“Configuration Info”
table
763
2
1
Segment Data
77
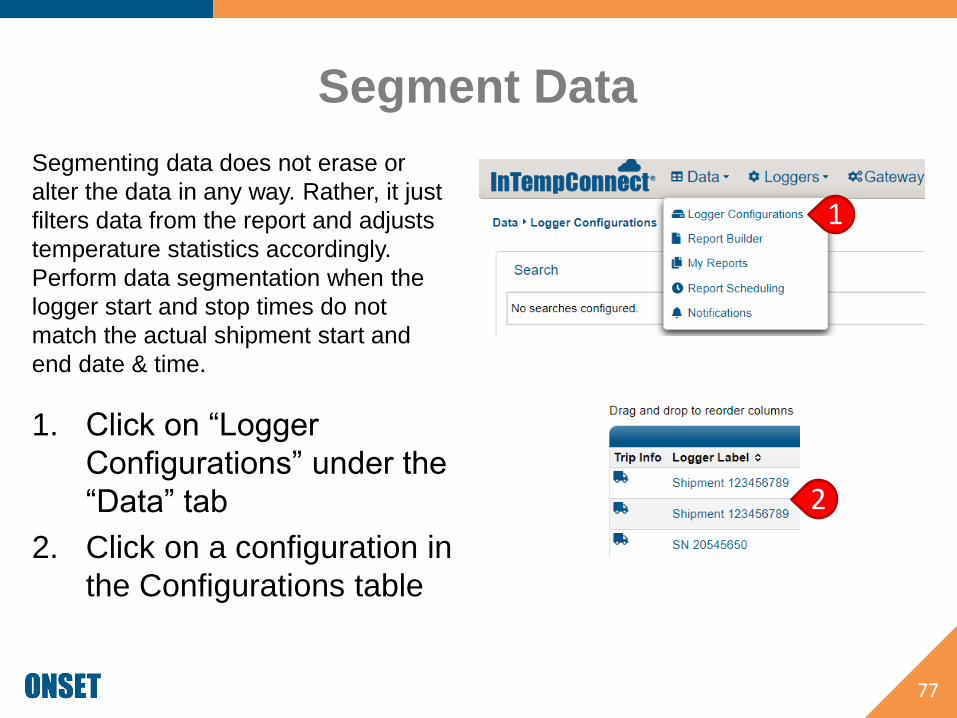
Segmenting data does not erase or
alter the data in any way. Rather, it just
filters data from the report and adjusts
temperature statistics accordingly.
Perform data segmentation when the
logger start and stop times do not
match the actual shipment start and
end date & time.
1. Click on “Logger
Configurations” under the
“Data” tab
2. Click on a configuration in
the Configurations table
1
2
Segment Data
78
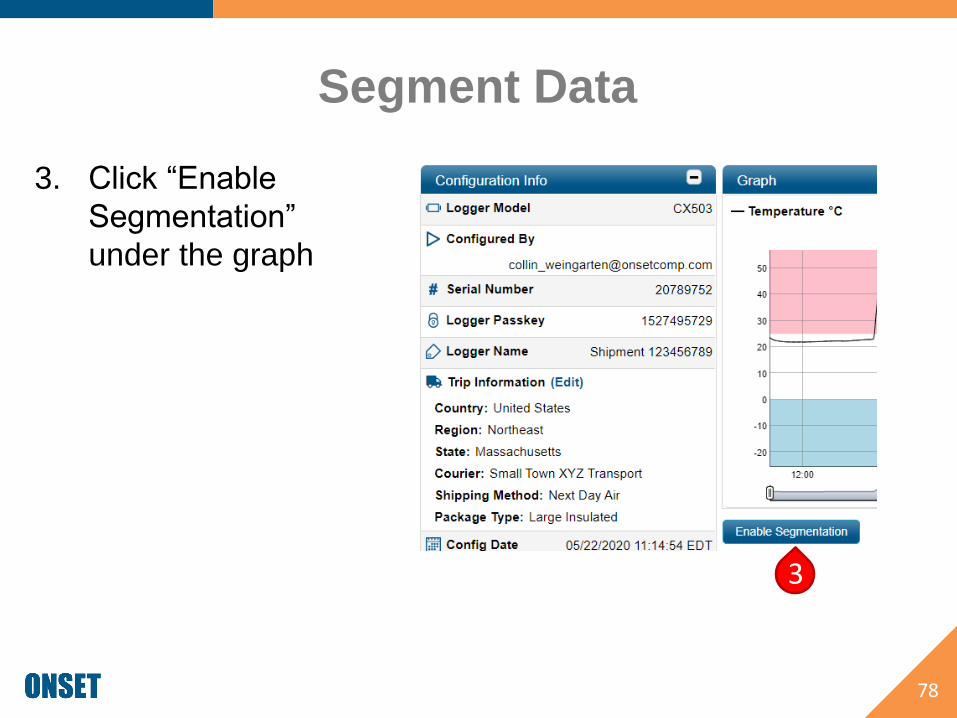
3. Click “Enable
Segmentation”
under the graph
3

Segment Data
79
4. Enter a date and
time next to both the
“Start Point” and
“Stop Point” buttons
5. Enter a note for both
points
5
5
4
4

Segment Data
80
6. If you want to add an
annotation, enter a date
and time next to the
“Annotation” button
7. Add a note for the annotation
- An annotation can be anything –
e.g., it can explain an excursion,
corrective action, critical event,
shipping event, etc.
8. Click “Save”
768

Report Creation
81
Back to Top

Create a Saved Search
1. Navigate to the “Logger
Configurations” page
2. Fill out the relevant
search criteria
3. Enter a search name
4. Click “Save Search As”
82
1
2
34
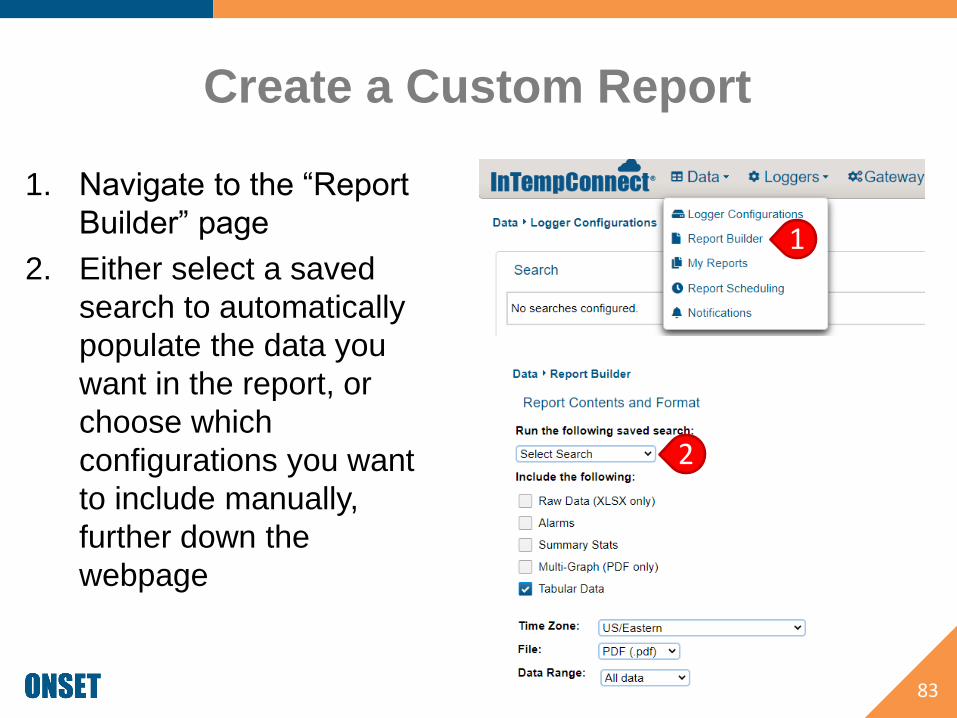
Create a Custom Report
1. Navigate to the “Report
Builder” page
2. Either select a saved
search to automatically
populate the data you
want in the report, or
choose which
configurations you want
to include manually,
further down the
webpage
83
1
2
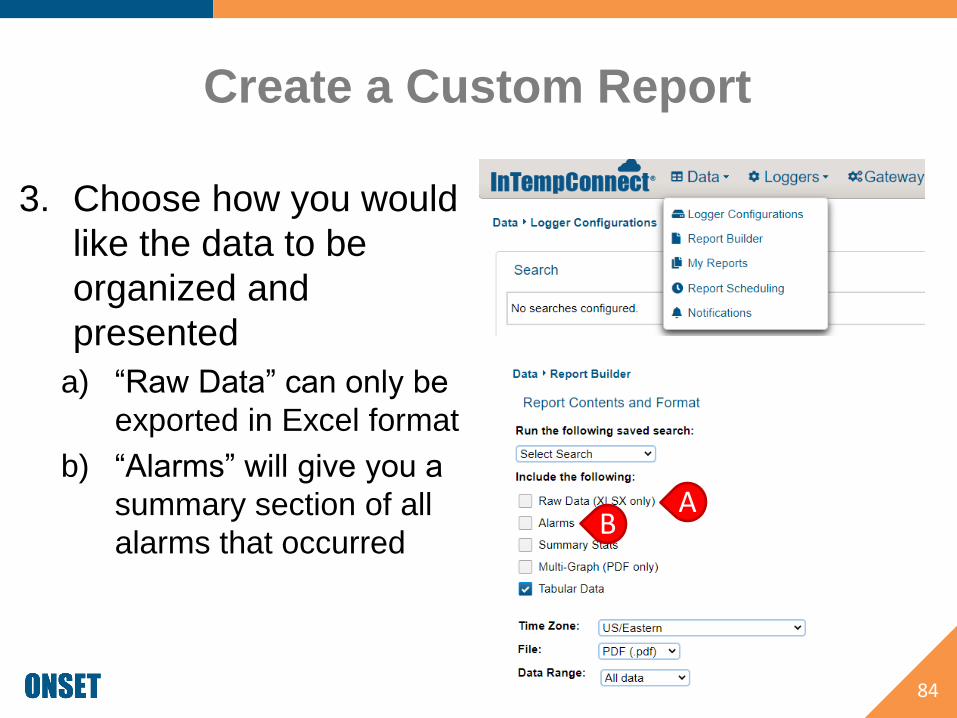
Create a Custom Report
3. Choose how you would
like the data to be
organized and
presented
a) “Raw Data” can only be
exported in Excel format
b) “Alarms” will give you a
summary section of all
alarms that occurred
84
AB
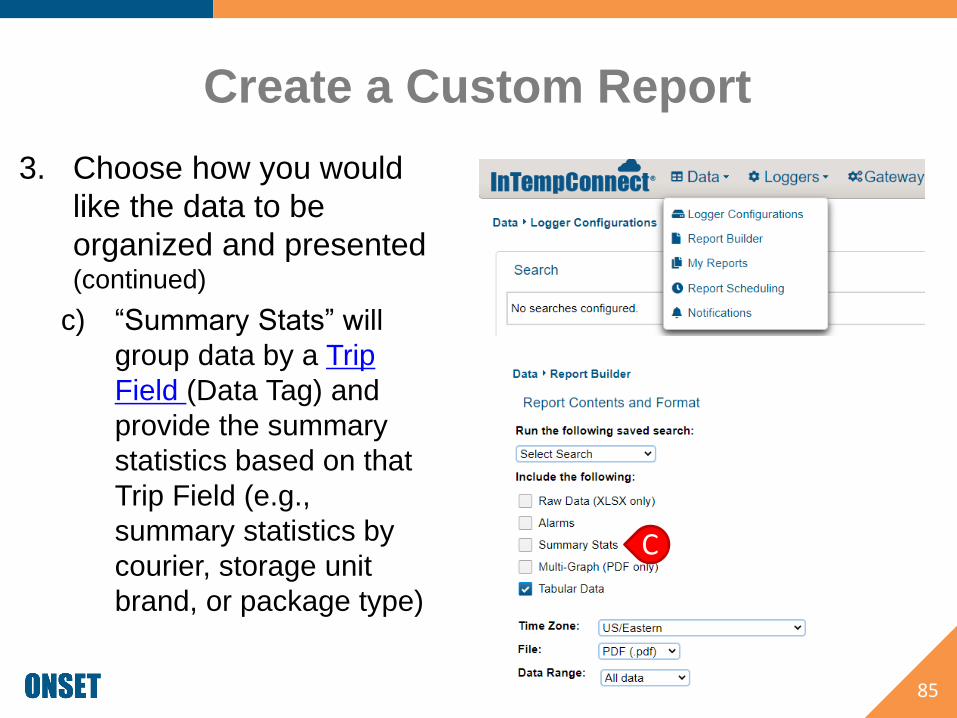
Create a Custom Report
3. Choose how you would
like the data to be
organized and presented (continued)
c) “Summary Stats” will
group data by a Trip
Field (Data Tag) and
provide the summary
statistics based on that
Trip Field (e.g.,
summary statistics by
courier, storage unit
brand, or package type)
85
C
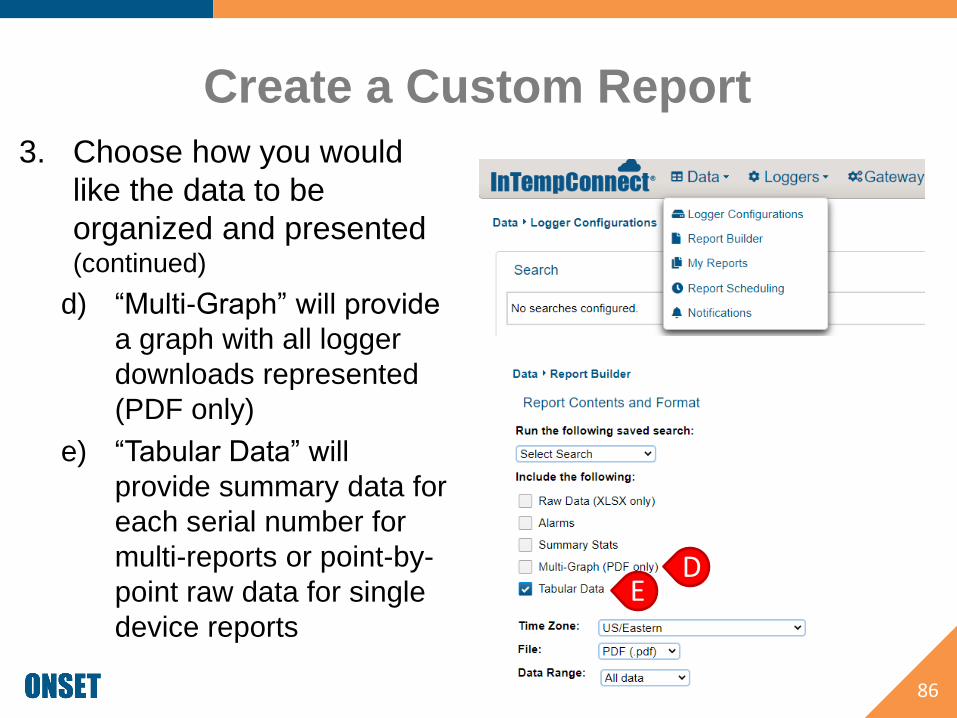
Create a Custom Report
3. Choose how you would
like the data to be
organized and presented (continued)
d) “Multi-Graph” will provide
a graph with all logger
downloads represented
(PDF only)
e) “Tabular Data” will
provide summary data for
each serial number for
multi-reports or point-by-
point raw data for single
device reports
86
DE

Create a Custom Report
4. Choose the time zone
5. Choose the file type
– Note: “Raw Data” can
only be in Excel format
and “Multi-Graph” can
only be in PDF format
6. Choose the data range
7. Check the box if you want
the report emailed to you
8. Click “Submit Report”
87
45
67
8
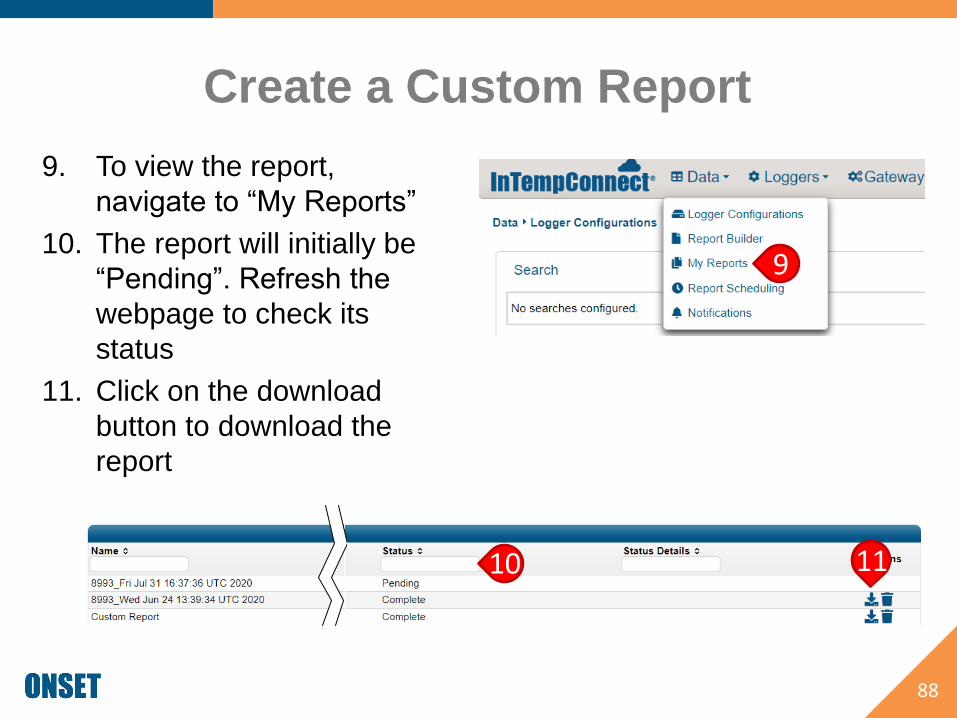
Create a Custom Report
9. To view the report,
navigate to “My Reports”
10. The report will initially be
“Pending”. Refresh the
webpage to check its
status
11. Click on the download
button to download the
report
88
9
10 11
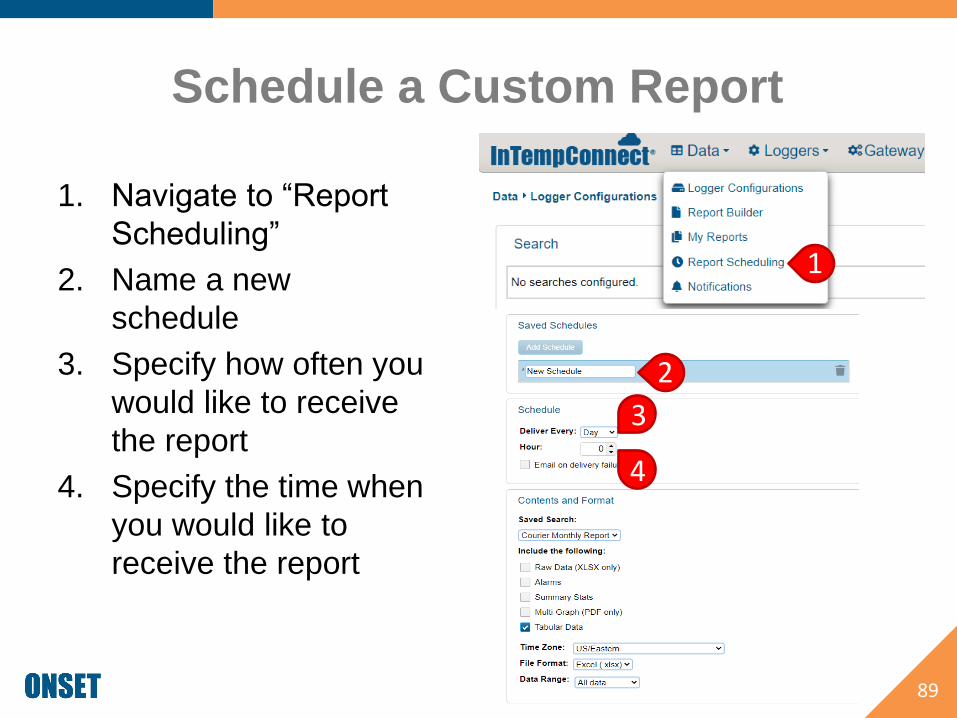
Schedule a Custom Report
1. Navigate to “Report
Scheduling”
2. Name a new
schedule
3. Specify how often you
would like to receive
the report
4. Specify the time when
you would like to
receive the report
89
1
2
3
4
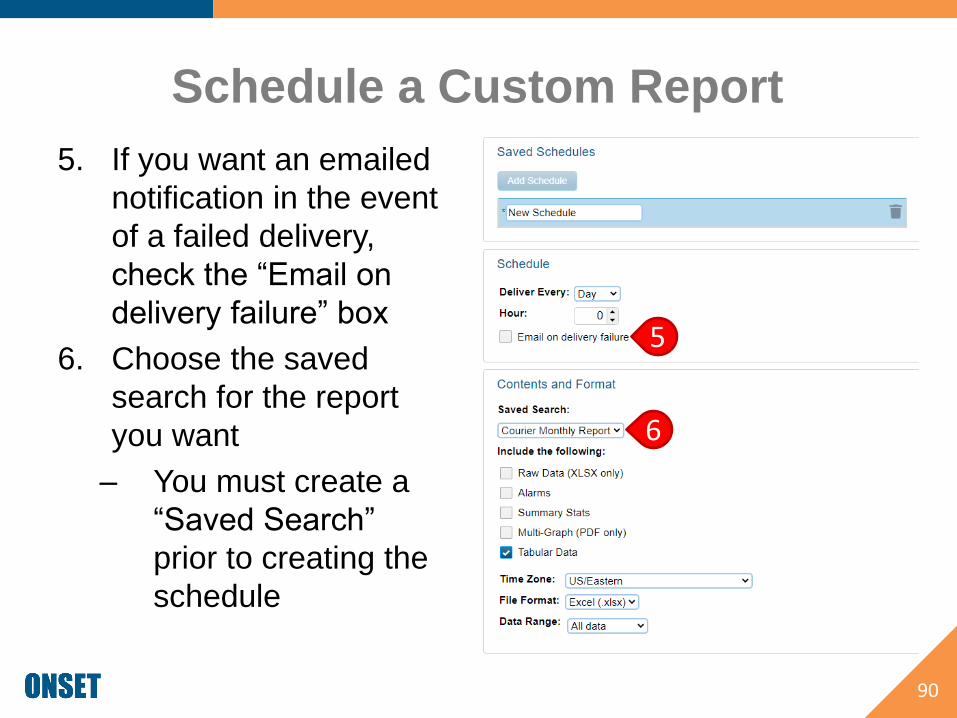
Schedule a Custom Report
5. If you want an emailed
notification in the event
of a failed delivery,
check the “Email on
delivery failure” box
6. Choose the saved
search for the report
you want
– You must create a
“Saved Search”
prior to creating the
schedule
90
5
6

Schedule a Custom Report
7. Select how you would
like the data presented
See Custom Reports
8. Choose the time zone
9. Choose the file format
10. Choose the data
range
91
7
8
10
9

Schedule a Custom Report
11. Enter the email
address to receive the
report
12. Click “Compress email
attachments” if file
size is a concern
13. Click “Save”
92
1112
13
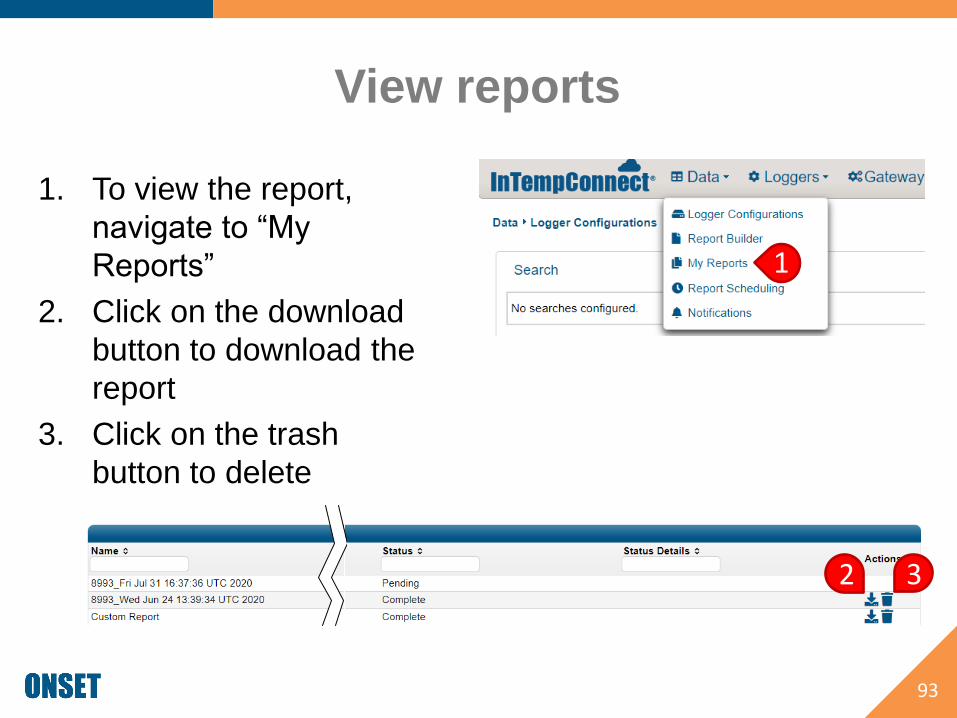
View reports
1. To view the report,
navigate to “My
Reports”
2. Click on the download
button to download the
report
3. Click on the trash
button to delete
93
1
32
Shipment
Management
94
Back to Top

Shipments
• Shipments can be created to automate your supply
chain processes.
• The Gateway at the shipment origin will automatically
configure and start your loggers and the Gateway at the
shipment destination will automatically download and
stop your loggers.
• All other Gateways will only download and continue the
logger to act as waypoints along the shipping route.
• You can group loggers under one shipment and add
essential shipment information using Trip Fields.
95
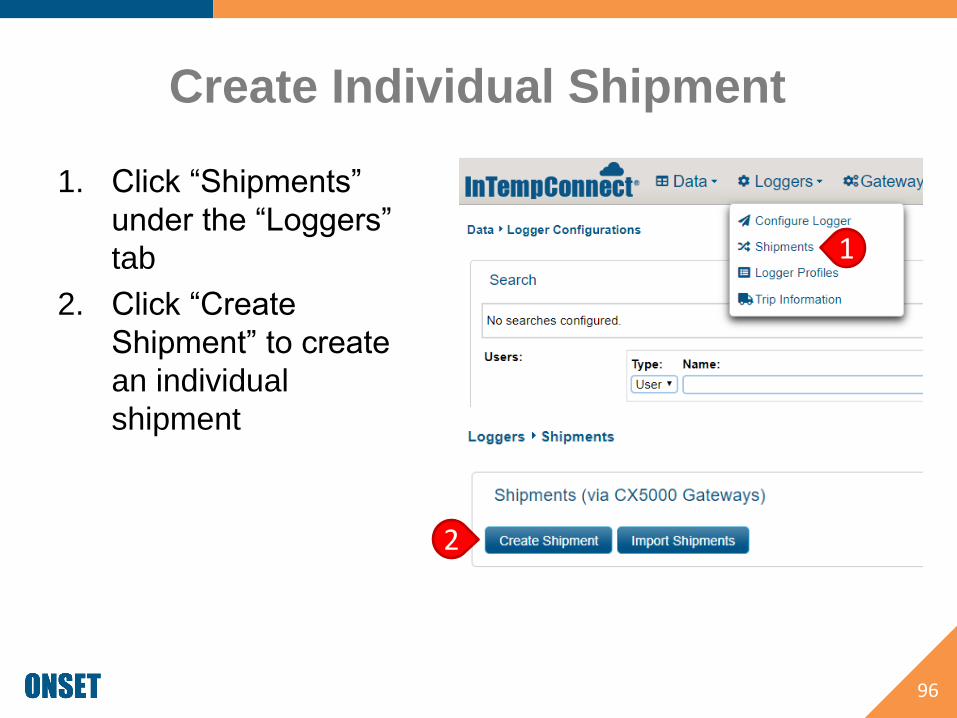
Create Individual Shipment
1. Click “Shipments”
under the “Loggers”
tab
2. Click “Create
Shipment” to create
an individual
shipment
96
1
2
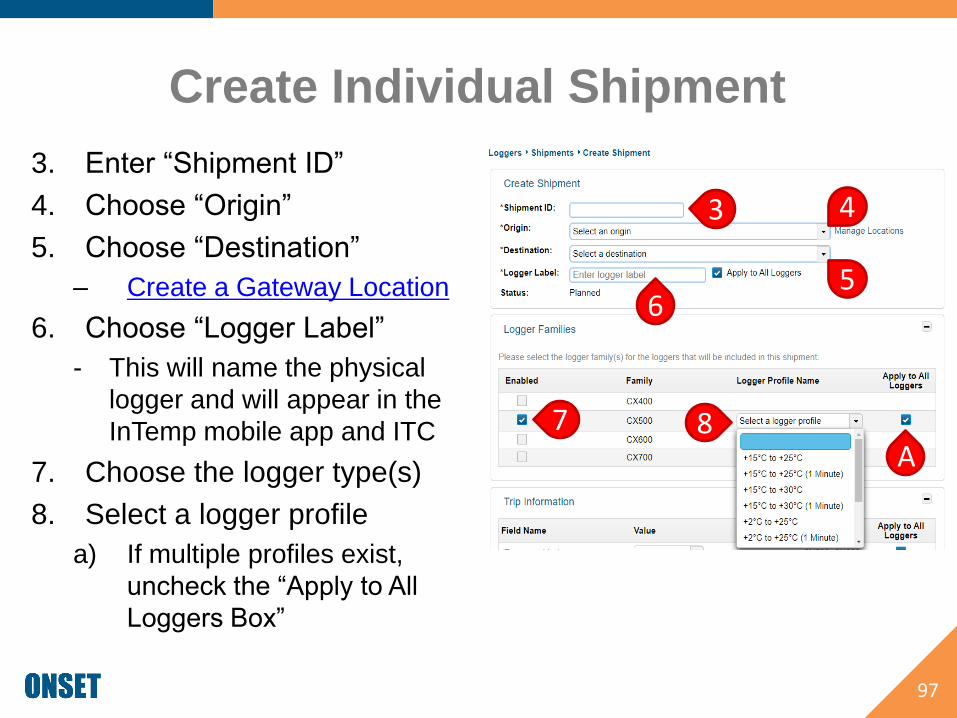
Create Individual Shipment
3. Enter “Shipment ID”
4. Choose “Origin”
5. Choose “Destination”
– Create a Gateway Location
6. Choose “Logger Label”
- This will name the physical
logger and will appear in the
InTemp mobile app and ITC
7. Choose the logger type(s)
8. Select a logger profile
a) If multiple profiles exist,
uncheck the “Apply to All
Loggers Box”
97
3 4
56
7 8A

Create Individual Shipment
9. Enter all required “Trip
Information”
a) If different loggers
have different trip
information, uncheck
the “Apply to All
Loggers” box next to
the corresponding trip
fields
98
9 A

Create Individual Shipment
10. Click “Add Logger” for each logger that will be added to the
shipment
a) If different loggers have different profiles, choose the correct
profile for that logger
b) If different loggers have different trip info, choose the correct
trip info for that logger
99
B
10
A

Create Individual Shipment11. Click “Save” or “Save and Release”
- Clicking “Save” will save the shipment and place it into “Planned” status. This
means a Gateway will not program the loggers once it sees them and you will
have to manually change the status to “Released” once you are ready. Use
this option if you want to have the opportunity to make corrections to the
shipment before the Gateway programs loggers
- Clicking “Save and Release” will place it into “Released” status. The Gateway
will automatically program and start all loggers in this status once they come
into range of it. Once a logger is started, it cannot be changed unless it is a
multi-use logger
100
11 11
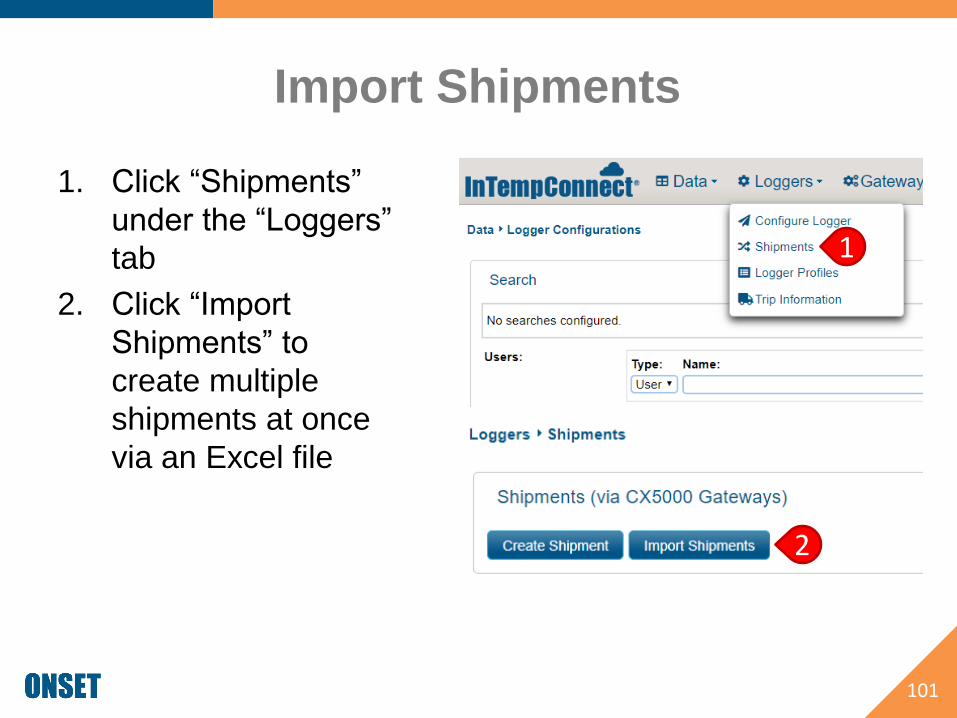
Import Shipments
1. Click “Shipments”
under the “Loggers”
tab
2. Click “Import
Shipments” to
create multiple
shipments at once
via an Excel file
101
1
2
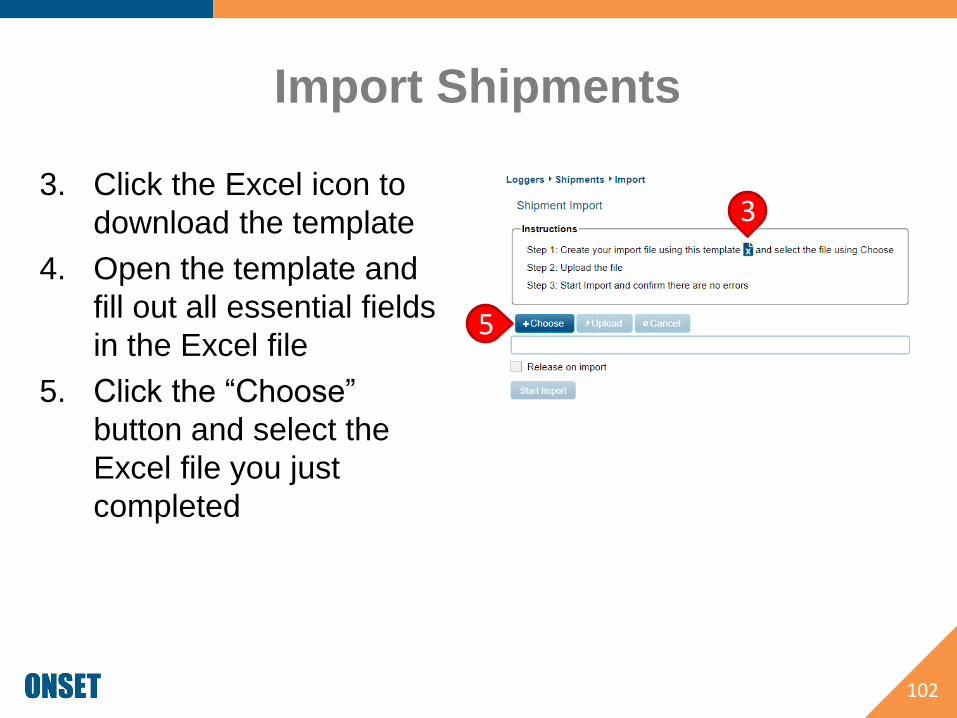
Import Shipments
3. Click the Excel icon to
download the template
4. Open the template and
fill out all essential fields
in the Excel file
5. Click the “Choose”
button and select the
Excel file you just
completed
102
3
5
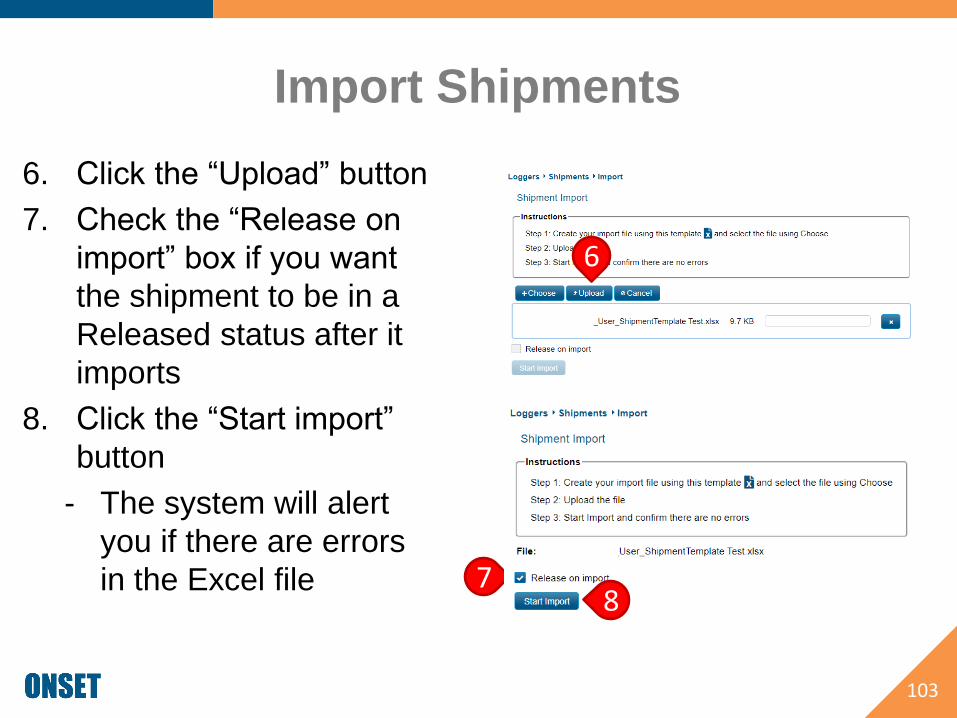
Import Shipments
6. Click the “Upload” button
7. Check the “Release on
import” box if you want
the shipment to be in a
Released status after it
imports
8. Click the “Start import”
button
- The system will alert
you if there are errors
in the Excel file
103
7
6
8
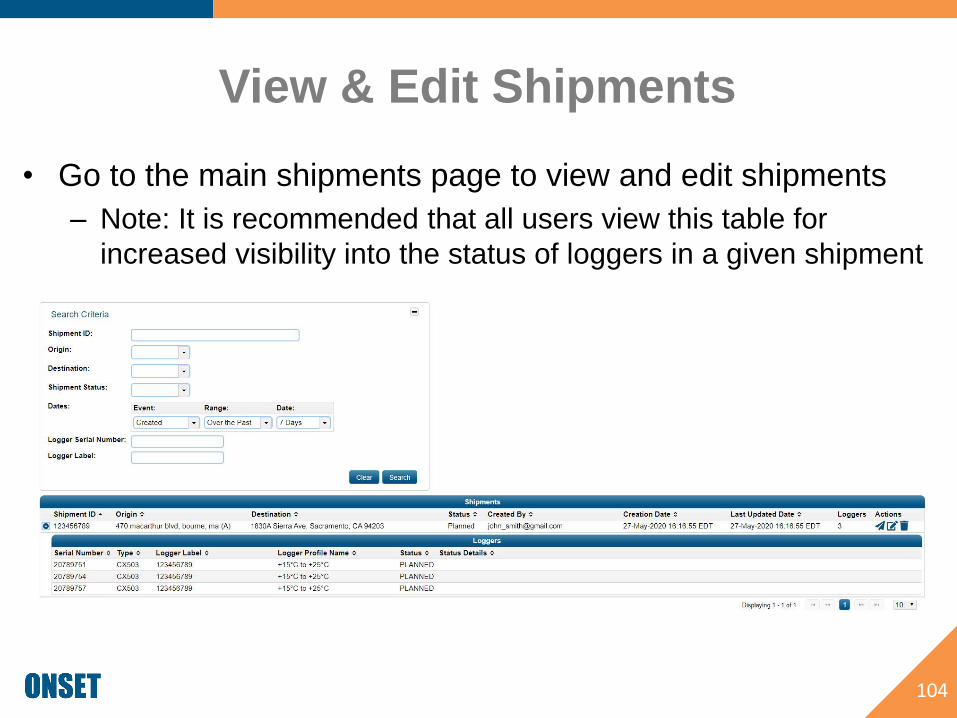
View & Edit Shipments
• Go to the main shipments page to view and edit shipments
– Note: It is recommended that all users view this table for
increased visibility into the status of loggers in a given shipment
104
Lou: Please photoshop new address
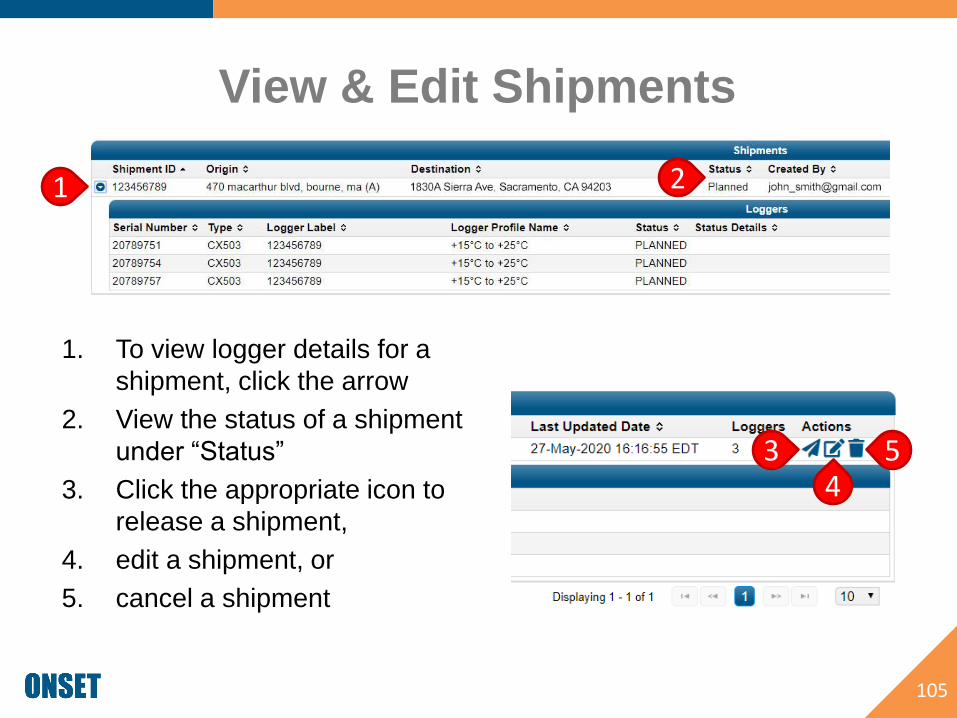
View & Edit Shipments
1. To view logger details for a
shipment, click the arrow
2. View the status of a shipment
under “Status”
3. Click the appropriate icon to
release a shipment,
4. edit a shipment, or
5. cancel a shipment
105
1 2
34
5
Managing
Notifications
106
Back to Top
Notifications
• You can create notifications to alert you to any logger
alarms, missing Gateways, or Gateway downloads.
• The notification can be sent via email or text.
• A Gateway is required for all notifications, and loggers
must be in range (30m/100ft) of the Gateway for a
notification to be sent.
• This feature gives you visibility of your loggers while you
are not on site and it automates your reporting.
107
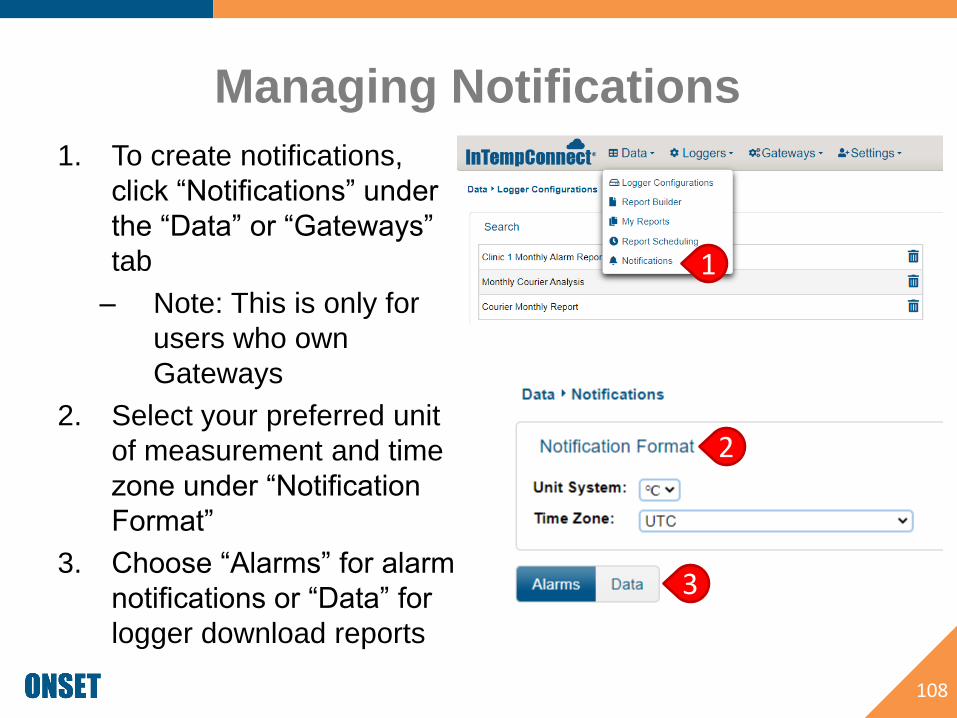
Managing Notifications
1. To create notifications,
click “Notifications” under
the “Data” or “Gateways”
tab
– Note: This is only for
users who own
Gateways
2. Select your preferred unit
of measurement and time
zone under “Notification
Format”
3. Choose “Alarms” for alarm
notifications or “Data” for
logger download reports
108
2
3
1
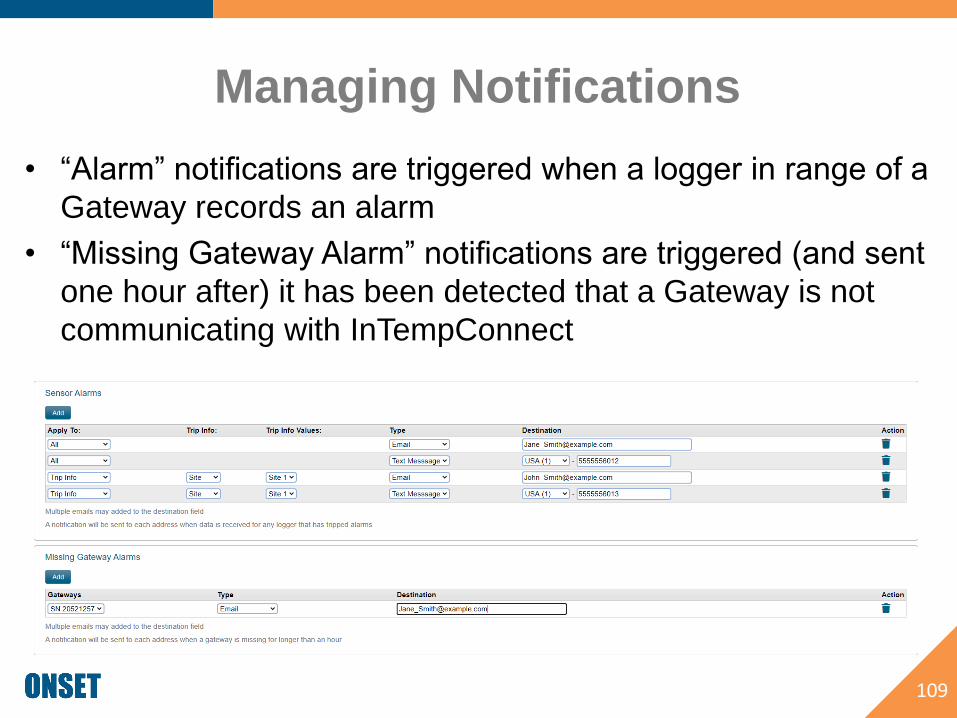
Managing Notifications
• “Alarm” notifications are triggered when a logger in range of a
Gateway records an alarm
• “Missing Gateway Alarm” notifications are triggered (and sent
one hour after) it has been detected that a Gateway is not
communicating with InTempConnect
109
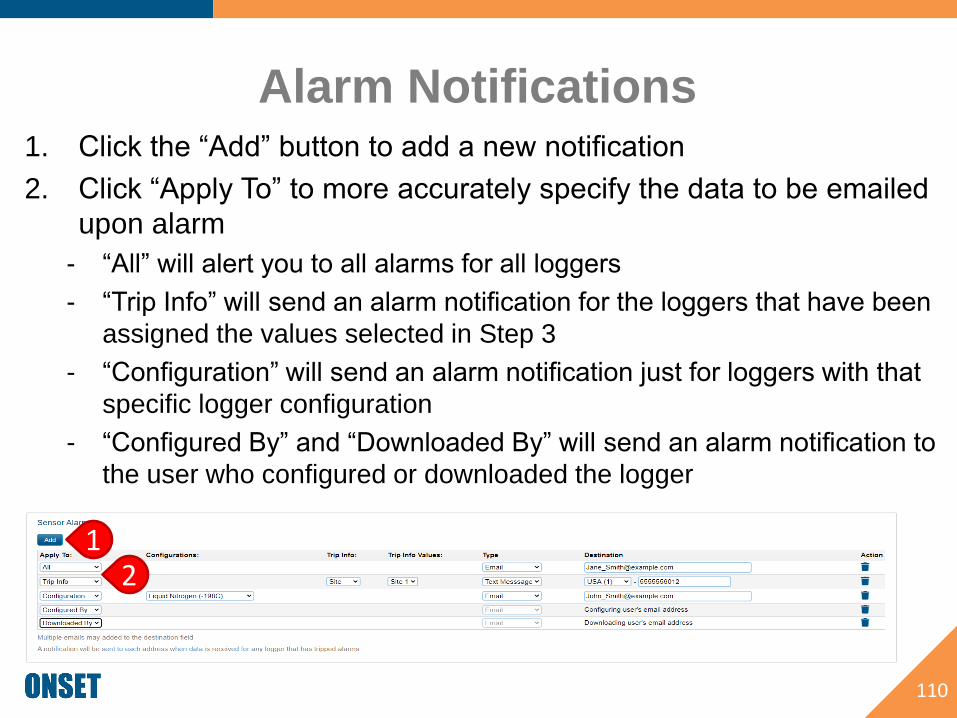
Alarm Notifications1. Click the “Add” button to add a new notification
2. Click “Apply To” to more accurately specify the data to be emailed
upon alarm
- “All” will alert you to all alarms for all loggers
- “Trip Info” will send an alarm notification for the loggers that have been
assigned the values selected in Step 3
- “Configuration” will send an alarm notification just for loggers with that
specific logger configuration
- “Configured By” and “Downloaded By” will send an alarm notification to
the user who configured or downloaded the logger
110
12
Alarm Notifications
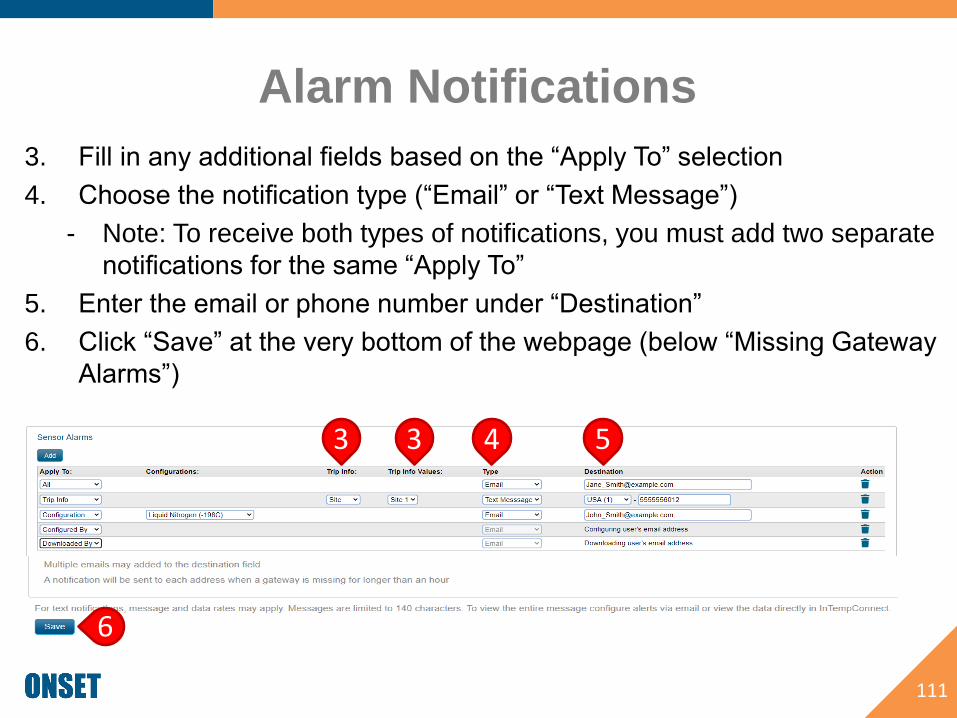
3. Fill in any additional fields based on the “Apply To” selection
4. Choose the notification type (“Email” or “Text Message”)
- Note: To receive both types of notifications, you must add two separate
notifications for the same “Apply To”
5. Enter the email or phone number under “Destination”
6. Click “Save” at the very bottom of the webpage (below “Missing Gateway
Alarms”)
111
5433
6
Missing Gateway Notifications
112
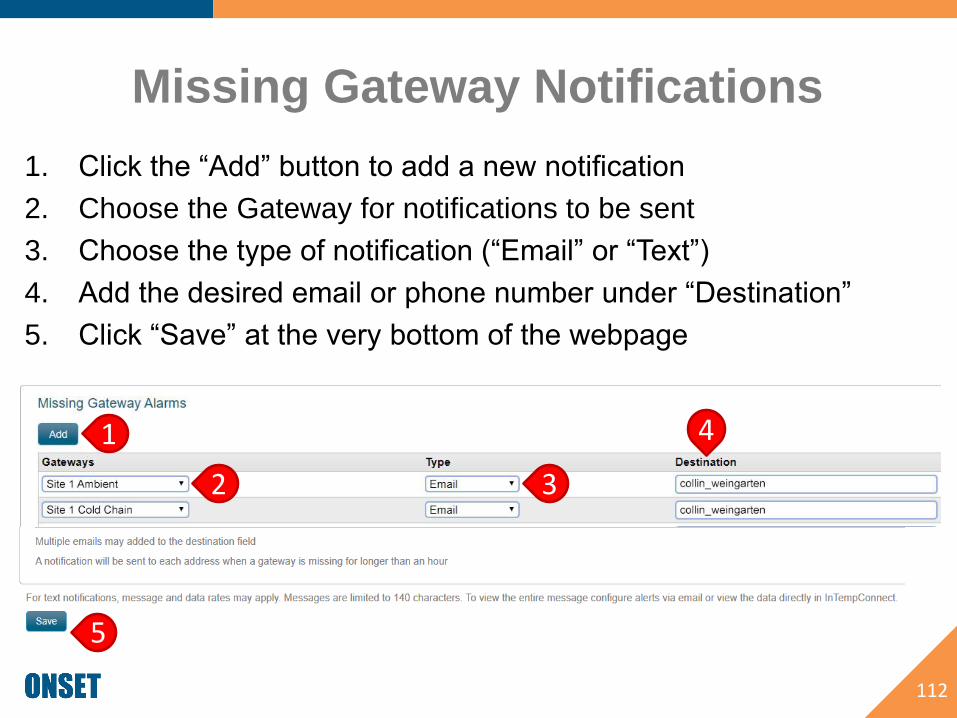
1. Click the “Add” button to add a new notification
2. Choose the Gateway for notifications to be sent
3. Choose the type of notification (“Email” or “Text”)
4. Add the desired email or phone number under “Destination”
5. Click “Save” at the very bottom of the webpage
1
2 3
4
5

Data Notifications
“Data Notifications” are for
sending data reports
whenever a download is
completed by a Gateway
1. Click on the “Data” tab
2. Click “Add”
113
1
2
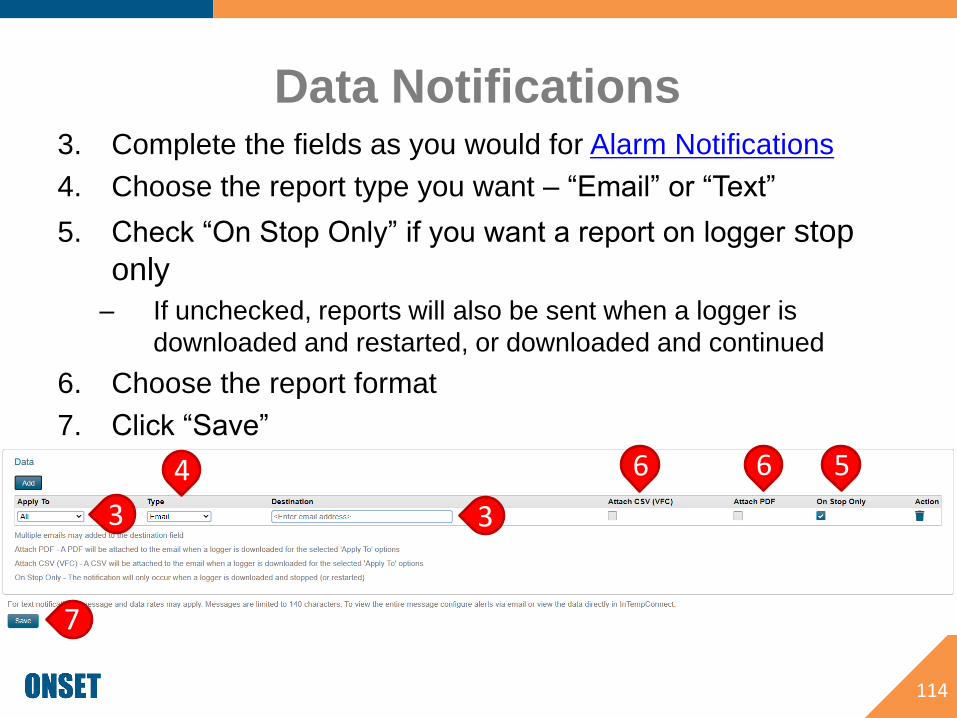
Data Notifications3. Complete the fields as you would for Alarm Notifications
4. Choose the report type you want – “Email” or “Text”
5. Check “On Stop Only” if you want a report on logger stop
only
– If unchecked, reports will also be sent when a logger is
downloaded and restarted, or downloaded and continued
6. Choose the report format
7. Click “Save”
114
3
64
7
56
3
Retrieving
Logger Passkey
115
Back to Top
Logger Passkey Explanation
• When you configure a logger for the first time, the
logger is automatically assigned a passkey that’s
associated with the specific account.
• Only users who are part of that account can access
those loggers.
• If an unauthorized user (outside of the account) tries to
access the logger, a message will pop up requesting the
passkey. This is done for security reasons.
116
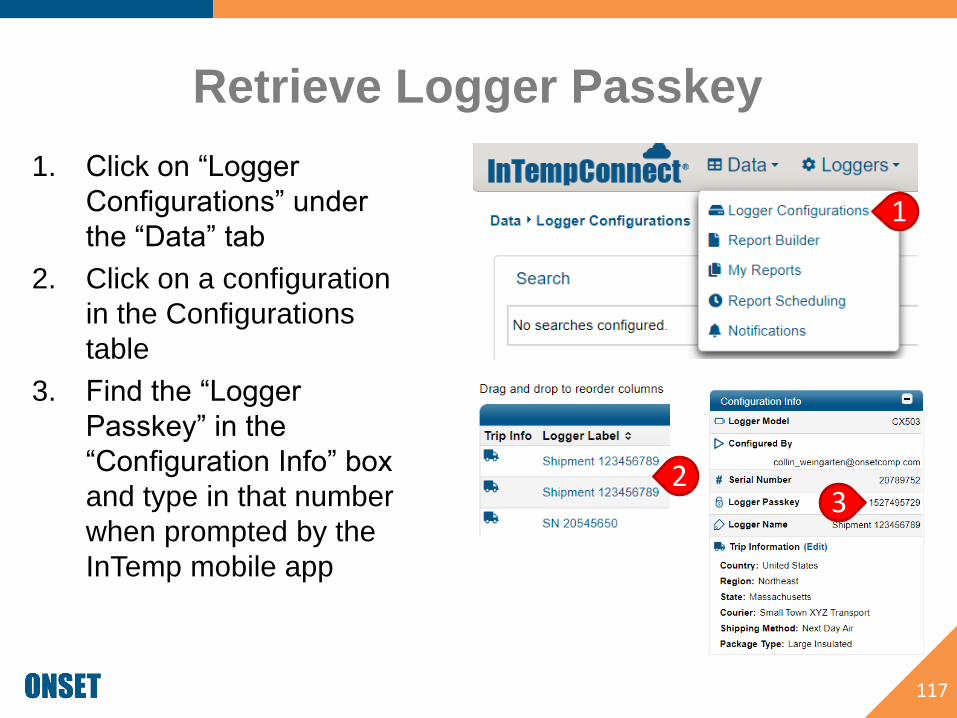
Retrieve Logger Passkey
1. Click on “Logger
Configurations” under
the “Data” tab
2. Click on a configuration
in the Configurations
table
3. Find the “Logger
Passkey” in the
“Configuration Info” box
and type in that number
when prompted by the
InTemp mobile app
117
1
23
Resetting Gateway
Passkey
118
Back to Top
Reset a Gateway Passkey
• When you configure a Gateway for the first time, the Gateway
is automatically assigned a passkey that’s associated with the
specific account.
• Only users who are part of that account can access the
Gateway.
• If an unauthorized user (outside of the account) tries to
access the Gateway, a message will pop up requesting the
passkey. This is done for security reasons.
• To reset a Gateway Passkey, simply hold down the large blue
button on the Gateway for 10 seconds.
119

Security Settings
120
Back to Top
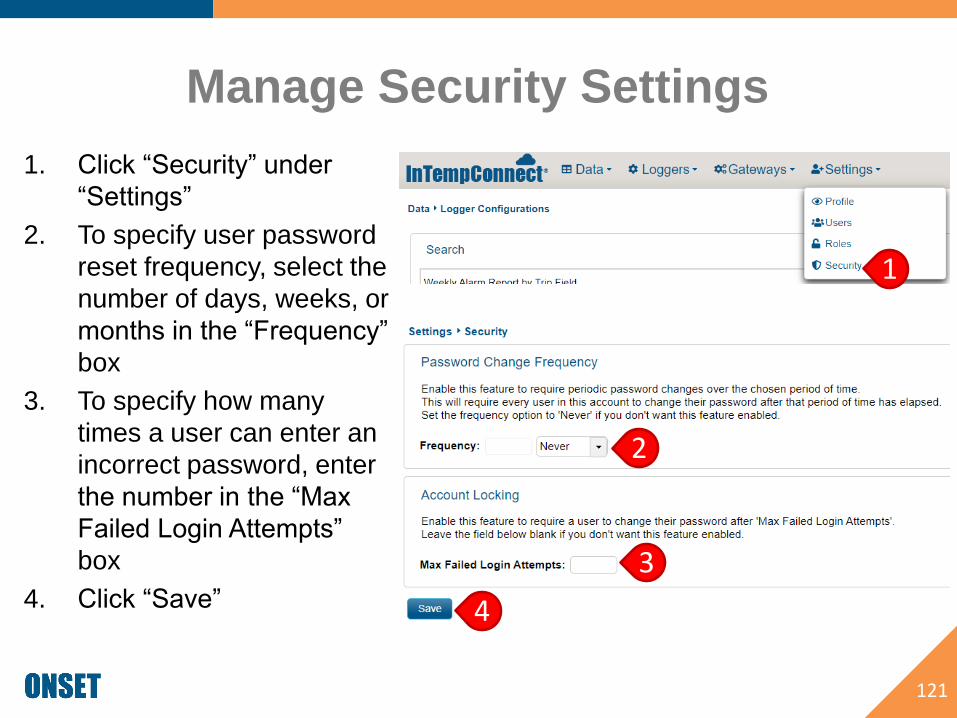
Manage Security Settings
1. Click “Security” under
“Settings”
2. To specify user password
reset frequency, select the
number of days, weeks, or
months in the “Frequency”
box
3. To specify how many
times a user can enter an
incorrect password, enter
the number in the “Max
Failed Login Attempts”
box
4. Click “Save”
121
1
2
4
3

Troubleshooting
122
Back to Top
Common Questions & Issues
• My Gateway does not seem to be connecting to
InTempConnect
– Check your power and internet connectivity
– Ensure that ports 123 and 443 are open
– Protocol for port 123 = 0.us.pool.ntp.org:123, 1.us.pool.ntp.org:123, 2.us.pool.ntp.org:123, 3.us.pool.ntp.org:123
• Do not use your own time protocol!
– Ensure that the Gateway is whitelisted for any relevant
firewalls
– Check with your IT group to see if any network updates
caused ports 123 or 443 to close or caused any other
issues affecting connection
– Ensure a steady green light is showing on the Gateway
after everything above has been assessed123

Common Questions & Issues
• My Gateway does not seem to be connecting to the
loggers
– Ensure that the loggers are in range of the Gateway (30
meters/100 feet)
– Press and hold the button on the loggers for a few
seconds to ensure that they are actively advertising
• The LED indicator lights will flash when you press and hold
the button
– Check the battery level with the InTemp mobile app to
make sure the batteries are not dead
124
Common Questions & Issues
• My loggers unexpectedly stopped recording
– For CX400 loggers, ensure that the batteries are not dead
– For all loggers, check to see if a download was performed by
the Gateway by viewing the Logger Configurations in
InTempConnect
• If a download was performed, view the report and check to see if
the logger ran out of memory
• Logger memory specs can be viewed on the Onset website
– View the logger Configuration Profile to see if “Stop on Button
Push” was selected for that logger. The button may have been
accidentally pushed while in transit
– View the Gateway Configuration Profile to ensure that it’s
programmed with the appropriate settings
125
Common Questions & Issues
• My loggers unexpectedly stopped recording
– The logger may have lost connection with the Gateway while
being configured
• This mostly occurs when the logger is slightly out of range of the
Gateway
• The logger status will change to “Stopped”
• The Gateway status will change to “Logger error, Relaunch
logger(s) with InTemp app
• As indicated by the Gateway status message “Relaunch the
logger(s) using the InTemp app
126

Onset Key Contacts
127Back to Top
►Onset Technical Support(for InTempConnect, logger, Gateway, and InTemp app help)
▪ Website (best method of contact)https://www.onsetcomp.com/intemp/contact/support
▪ Phone: 1-877-564-4377
▪ Email: [email protected]
128
►Onset Sales
▪ Websitehttps://www.onsetcomp.com/intemp/contact/sales
▪ Phone: 1-866-240-8309
Onset Key Contacts

129
►Onset Customer Service
(for order-related questions only)
▪ Email: [email protected]
▪ Phone: 1-800-564-4377
Onset Key Contacts


![User Guide...User. {{]}]} {}]}](https://img.pdfslide.net/doc/110x75/60918ca14327954d24291644/-user-guide-user-.jpg)