Embed Size (px)
Citation preview

Interactive Intelligent PanelSoftware Guide
IFPxx02-V7
www.v7world.com
NOTE: ALL THE PICTURES IN THIS MANUAL ARE FOR REFERENCE ONLY, YOUR PRODUCT MAY LOOK SLIGHTLY DIFFERENT

TABLE OF CONTENTS
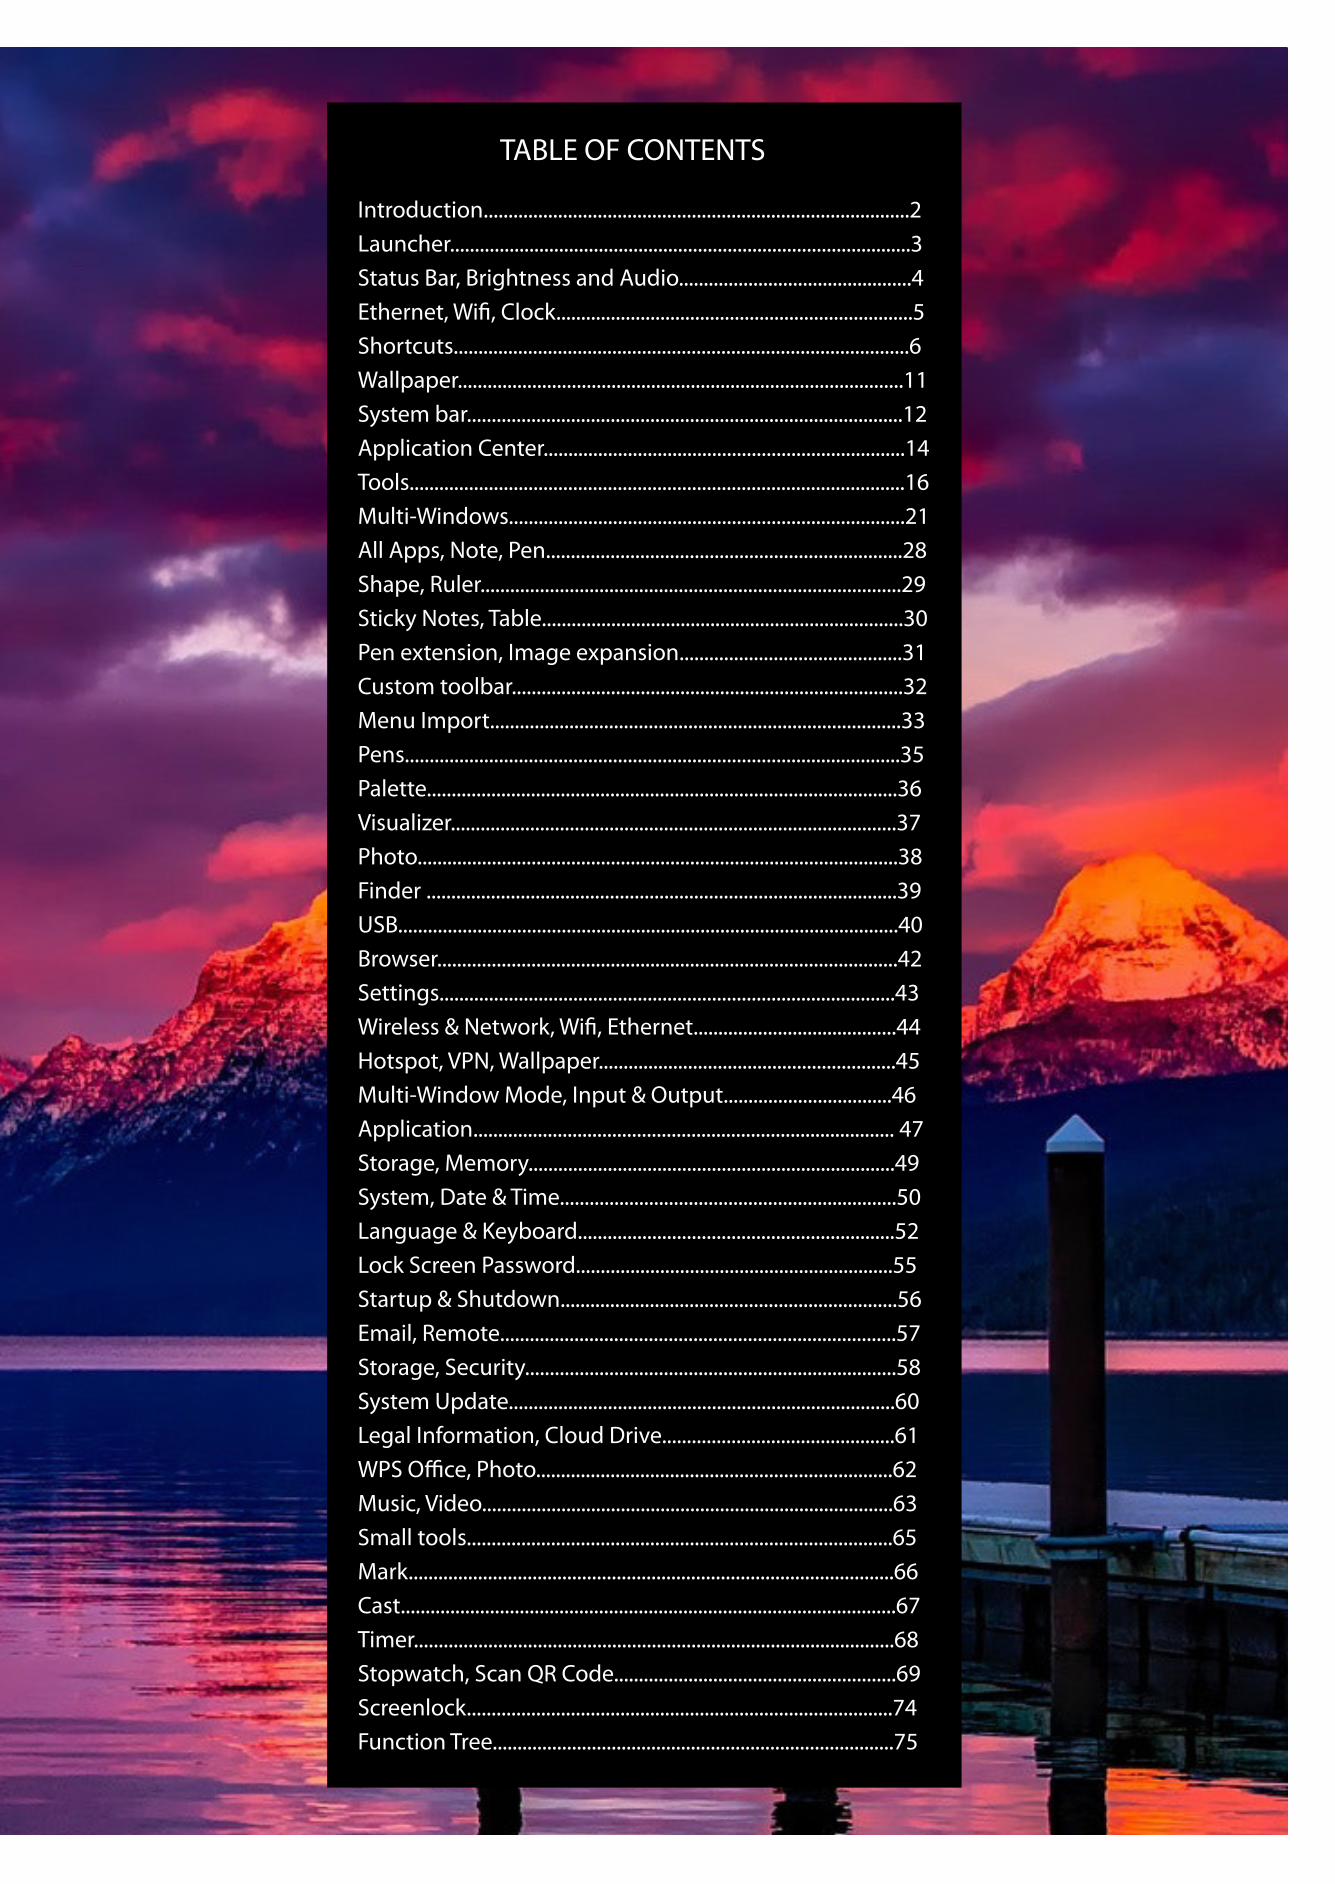
TABLE OF CONTENTSTABLE OF CONTENTS
Introduction......................................................................................2Launcher.............................................................................................3Status Bar, Brightness and Audio...............................................4Ethernet, Wifi, Clock........................................................................5Shortcuts............................................................................................6Wallpaper..........................................................................................11System bar........................................................................................12Application Center.........................................................................14Tools....................................................................................................16 Multi-Windows................................................................................21All Apps, Note, Pen........................................................................28Shape, Ruler.....................................................................................29Sticky Notes, Table.........................................................................30Pen extension, Image expansion.............................................31 Custom toolbar...............................................................................32Menu Import...................................................................................33Pens....................................................................................................35Palette...............................................................................................36Visualizer..........................................................................................37Photo.................................................................................................38Finder ...............................................................................................39USB.....................................................................................................40 Browser.............................................................................................42 Settings............................................................................................43Wireless & Network, Wifi, Ethernet.........................................44 Hotspot, VPN, Wallpaper............................................................45Multi-Window Mode, Input & Output..................................46 Application..................................................................................... 47Storage, Memory..........................................................................49 System, Date & Time....................................................................50Language & Keyboard................................................................52 Lock Screen Password................................................................55 Startup & Shutdown....................................................................56Email, Remote................................................................................57 Storage, Security...........................................................................58 System Update..............................................................................60 Legal Information, Cloud Drive...............................................61WPS Office, Photo........................................................................62 Music, Video...................................................................................63 Small tools......................................................................................65Mark..................................................................................................66Cast....................................................................................................67Timer.................................................................................................68Stopwatch, Scan QR Code.........................................................69 Screenlock......................................................................................74 Function Tree.................................................................................75

Introduction
The software for the V7 IFP is based onAndroid version 9, so it is very intuitive much like a large tablet. It has very robust features
for leading classrooms or meeting roomsinteractively. Because there are sometimes
software updates, your screens and features may differ from what is shown in this
software guide.
2

Launcher
The launcher is the main interface of the IFP and allows you to easily and efficientlystart applications, files and web pages. To customize it, you can can drag/sendfrequently used applications, folders/files, and web pages to the main Launcher screen. When you power on the IFP, the Launcher is displayed by default in Android:
You can create and manage shortcuts for apps, files, and websites:
You can create and manage shortcuts for apps, files, and websites:
3

Status bar:The upper right area is the top status bar, which is a touch screen menu and includes
Display Source Menu: Switch the input sources from Android, to one of the display input
ports such as HDMI, USB-C, or VGA.
Brightness and Audio: Adjust the brightness or Volume of the screen at the bottom.
4

Ethernet Open the “Settings > Ethernet” for wired network settings.
Wi-Fi: After installing the Wi-Fi module in the IFP, will appear which opens the “Settings > Wi-Fi” for wireless network settings.
Clock: Opens the “Settings > Date & Time” to adjust the clock.
5

Shortcuts:The home screen shortcut storage area is where you can place commonly used shortcuts such as:Application shortcuts: Drag the icon from All apps to the shortcut storage area of the Launcher.
Step 1: Drag the app icons from All apps.
Step 2: Drag to the Home screen area where you want to place it.
The application can be quickly launched by touching the shortcut icon on the home screen.
6
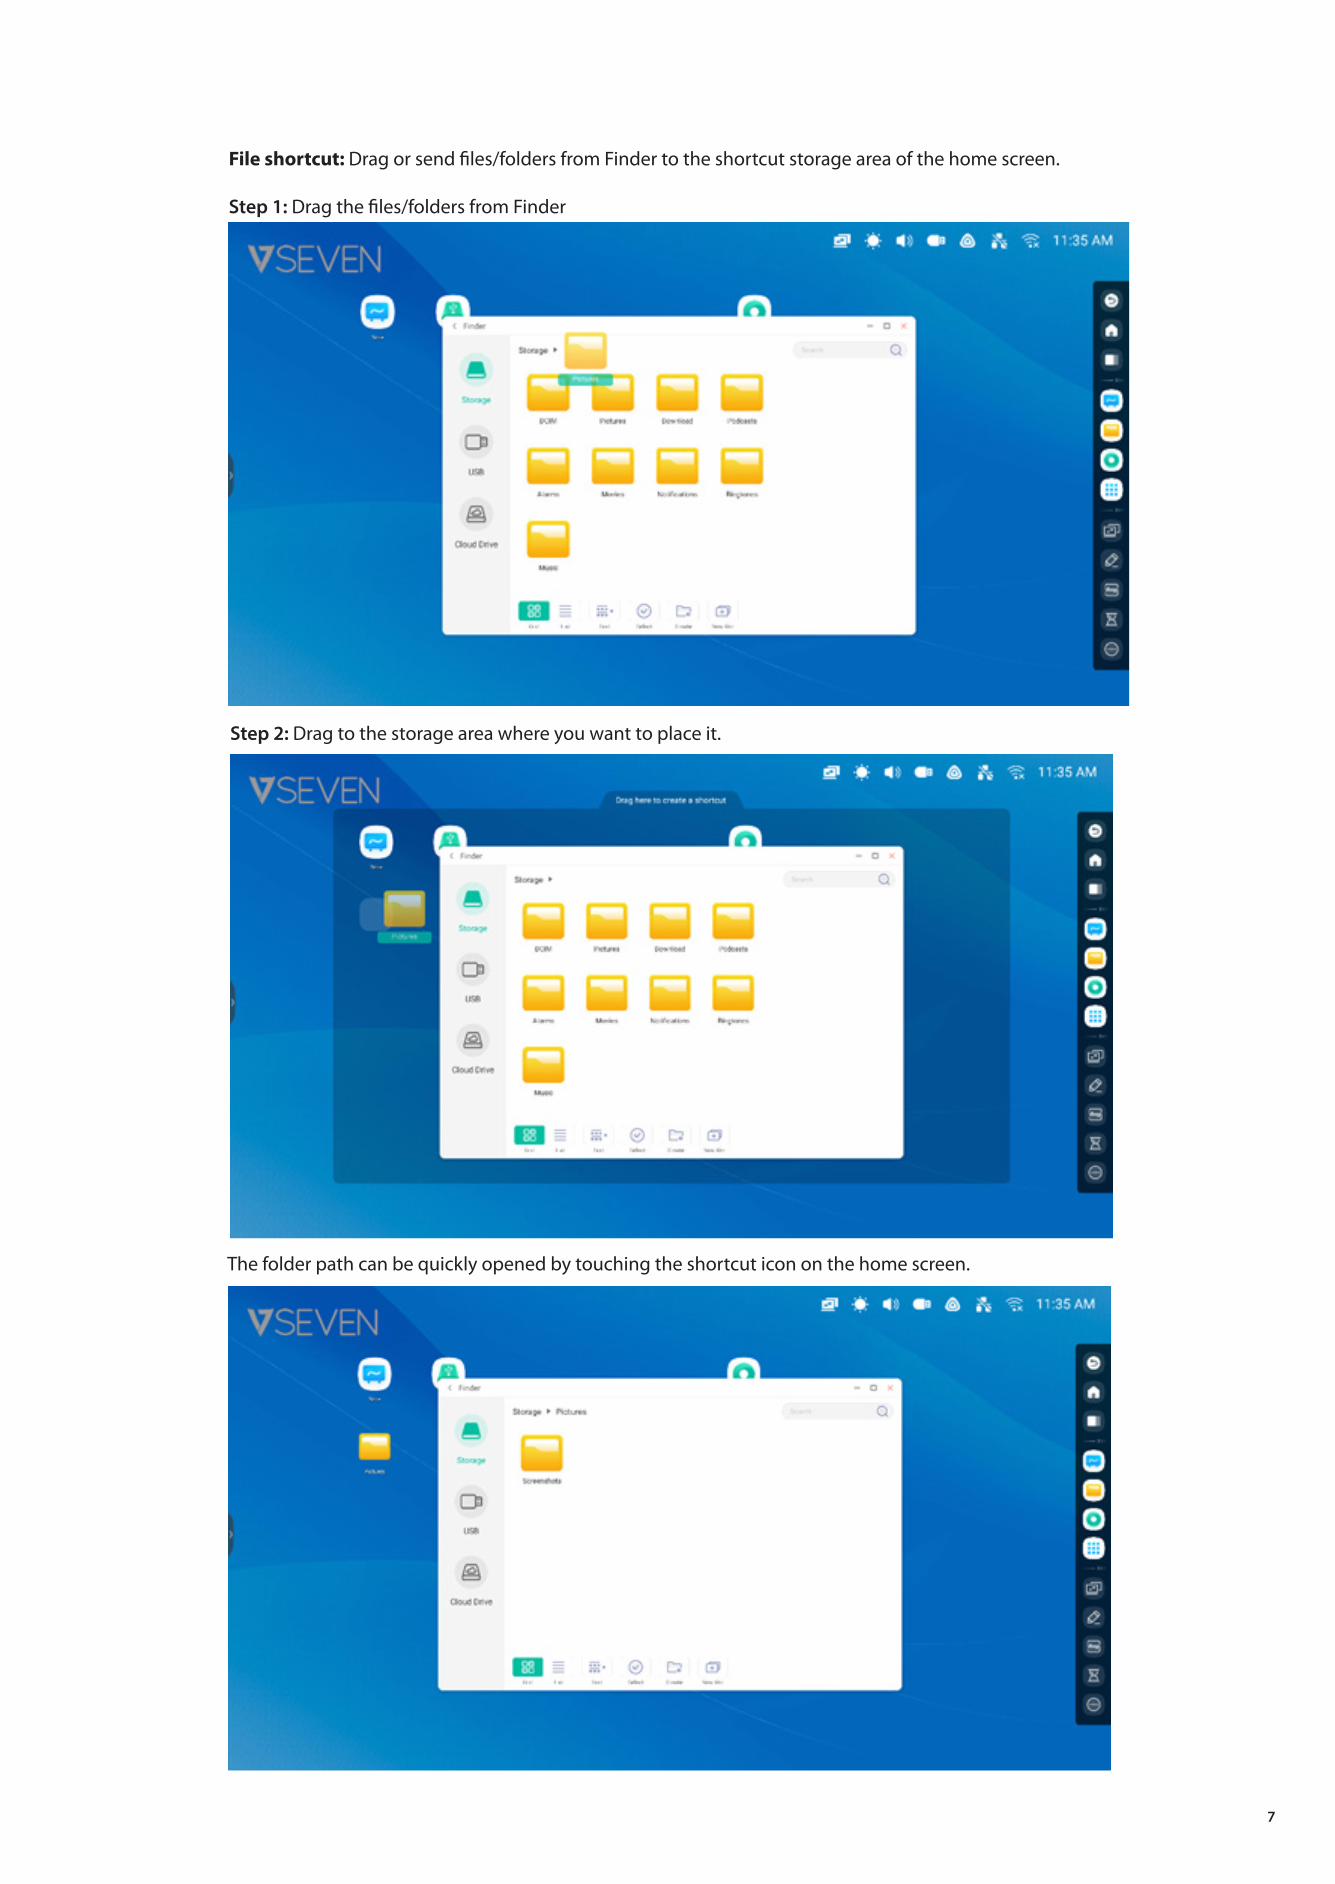
File shortcut: Drag or send files/folders from Finder to the shortcut storage area of the home screen.
Step 1: Drag the files/folders from Finder
Step 2: Drag to the storage area where you want to place it.
The folder path can be quickly opened by touching the shortcut icon on the home screen.
7

Shortcut Tip 1: Another way to create a Home screen shortcut from the Finder:
Select the file > on the bottom ‘Send’ > select ‘shortcut’ to create.
The file can be quickly opened by clicking the Home screen shortcut icon.
Shortcut Tip 2: Long press the icon to quickly find the source file path.
8

Website shortcut
Step 1: From the web browser, open the website you want, touch the three vertical dots menu on the right side of the browser, and select ‘Send the quick-link to Desktop’ .
Step 2: Name the new website shortcut so you can easily find it on your home screen.
The website can be easily opened from the new shortcut.
9

USB shortcut: When you insert a USB disk drive into the USB connector of the IFP, there will be a shortcut entry placedautomatically on the home screen of the Launcher to make it easy to find and open your USB disk drive in the Finder
Shortcut management: Long press or drag shortcuts to manage
Remove: Long press the icon and it will show a menu, select ‘remove’ to remove the shortcut fromthe home screen of the Launcher.
10

Move shortcut: Long press and drag to move the shortcut to where you want on the Launcher.
Wallpaper: Launcher allows you to customize the background wallpaper:
Custom wallpaper: Open “ Settings > Personal > Wallpaper >” page to choose a new background wallpaper for your home screen.
11
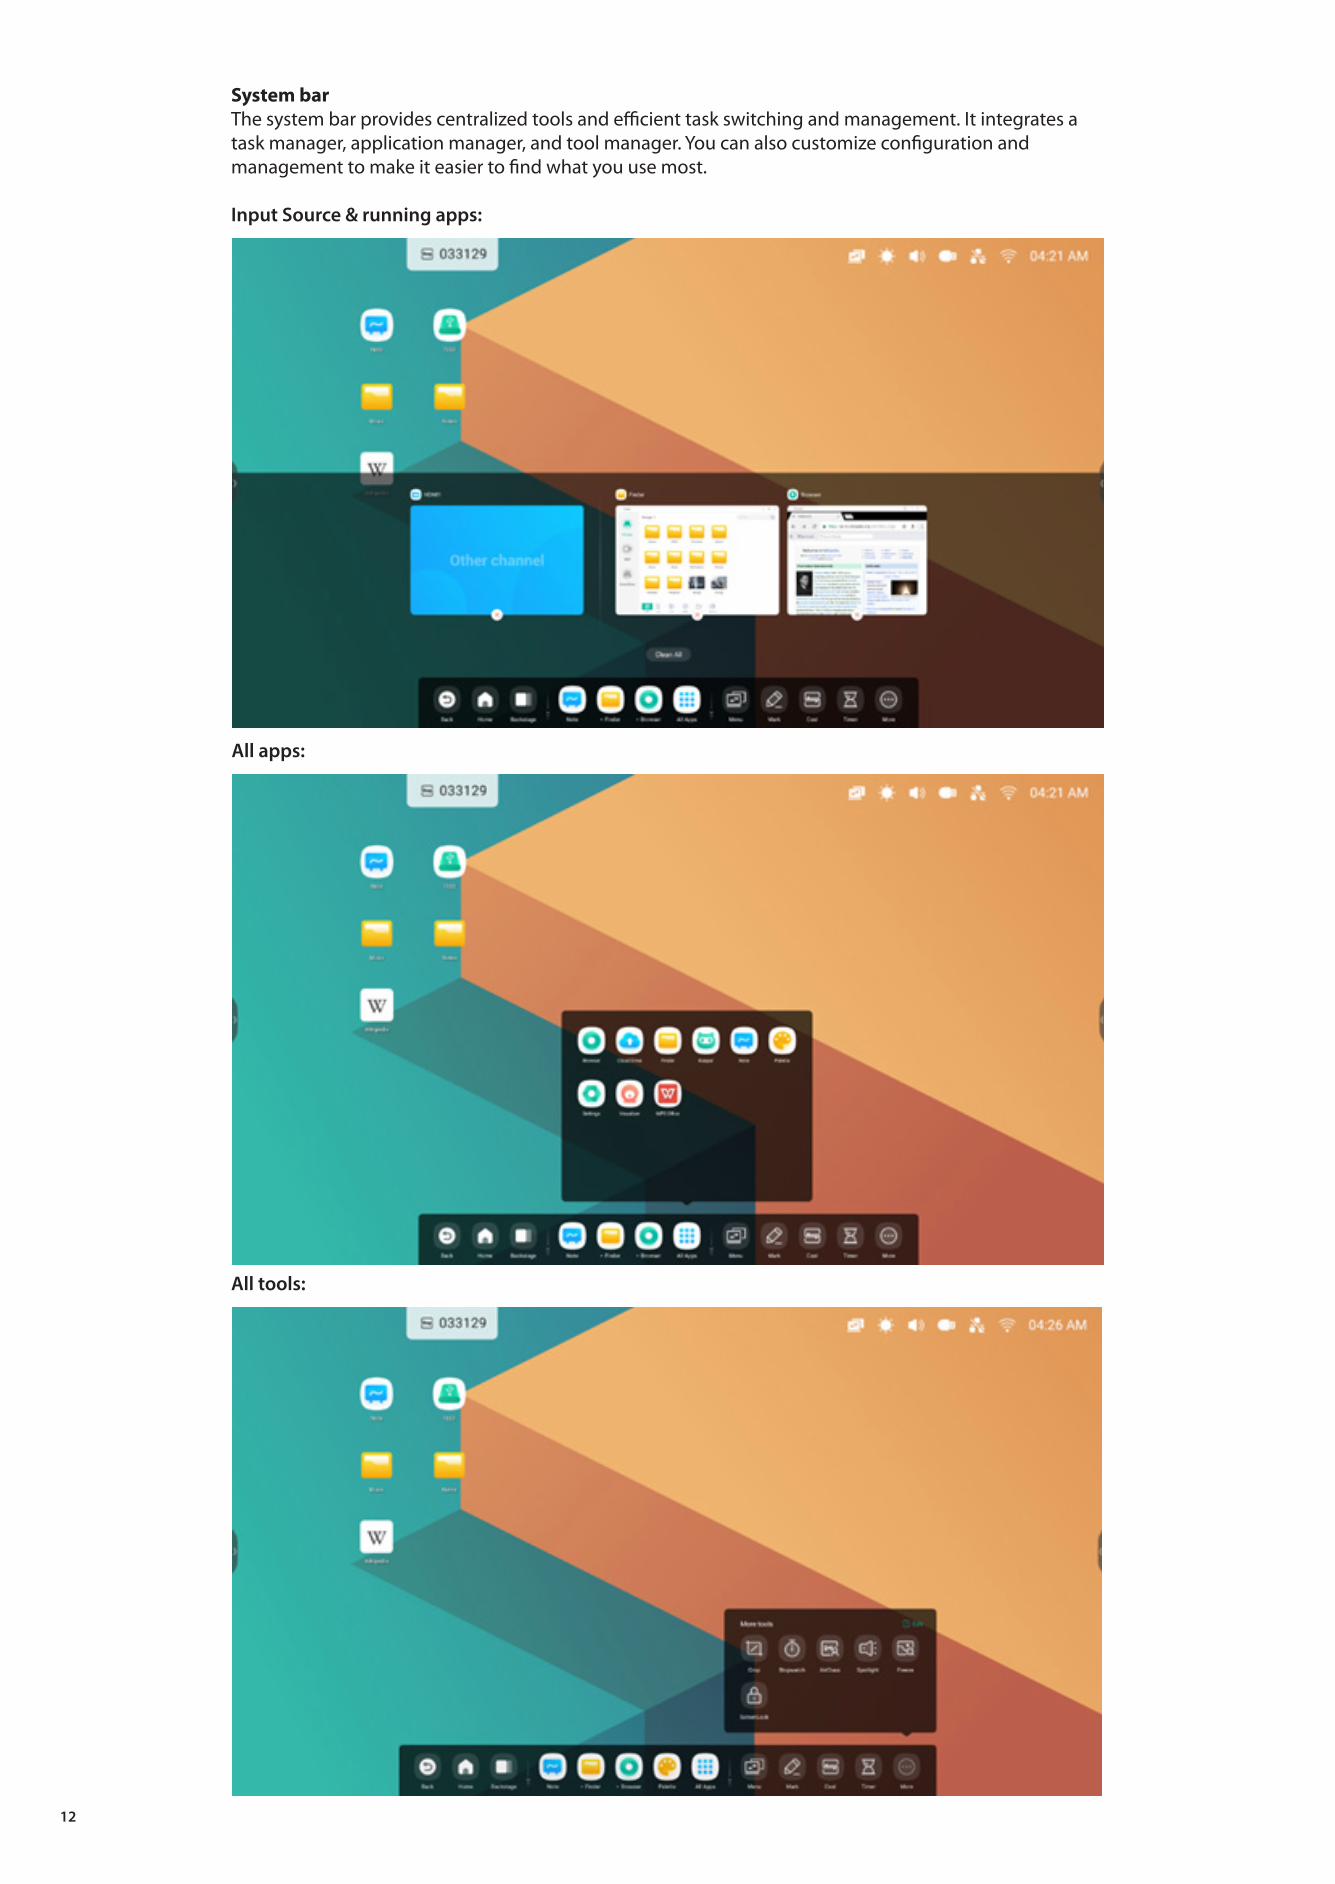
System barThe system bar provides centralized tools and efficient task switching and management. It integrates atask manager, application manager, and tool manager. You can also customize configuration andmanagement to make it easier to find what you use most.
Input Source & running apps:
All apps:
All tools:
12

Customize System bar:
Customize which apps or tools you want on the system bar:
Customize position of system bar on the screen:
13

System Bar Navigation Back: Return to the last operating interface Home: Minimize everything and go to the Home screen of the Launcher Backstage: Display and manage the recent apps and input sources
Backstage: Select a running process to open it, or drag it out to close that process. Or you can close all the running processes on yoursystem by selecting ‘Clean all’
Application CenterStart and manage System bar apps:
Default shortcuts
The default apps are displayed in System bar: Note, Finder, Browser. Select one to start an app.
All apps
to view all apps.
The apps installed by default include: Browser, Cloud Drive, Finder, Keeper, Note, Palette, Settings, Visualizer, WPS Office
Running apps Select a running app to move it to the front of your launcher
14

Default shortcutPlace up to 5 commonly used app shortcuts in the System bar. You can drag and drop app shortcuts to and from All Apps to replaceone that is already there.
Step 1: ‘All Apps’ and find the app you want.
Step 2: Long press and drag it.
15

Step 3: Move to the System bar to create in default shortcut area.
Tools
Function Description
Menu
• Show all input sources including Android, USB-C, HDMI, and VGA.• Show more advanced settings, including Audio, Screen, Display, Adjust of the input source.
16

Mark
Cast
Timer
Crop
Stopwatch
1. Draw on top of the screen. 2. Take notes on top of any onscreen content.3. Share the contents via QR code and saving to cloud disk.
For seamless wireless presentation and collaboration during lectures.
Counts down from a specified time interval.
1. Capture screen shots of anything on the screen, including content from apps, websites, and videos.2. Select Freedom, Full or Window mode.3. Support to insert whiteboard for editing.
Counts upwards from zero for measuring elapsed time.
17

Airclass
Spotlight
Freeze
ScreenLock
1. Presenter can invite audience to join interactive activities through a website with a QR code.
2. Includes voter, responder, selector, message and other activities.
Focus on specific areas of the screen.
Freeze and zoom the current content on the screen.
Lock the screen with the ScreenLock, and unlock it by entering the password, which is configured in Settings.
18

2.3.2 Customize Tools:Create 4 commonly used tools in the System bar. Add other tools from ‘More’ to replace.
Step 1: ‘Edit’ or long press the tools icon into editing state.
Step 2: ‘-’ to remove the display in System bar.
19

‘+’ to add the display in System bar.
2.4 System bar Settings:By default, the system bar is accessible from the arrows on the sides:
20

You can also configure hide / display in settings according to preference:
3. Multi-Windows
Multi-windows provides robust multitasking capabilities on the IFP allowing use of multiple applications on the screen at the same time. Easily drag the display size and position of each application window to preference. For example, a presentation or lesson, along with notes and a web browser. In addition, users can also drag and drop content across applications to exchange information between the differentapplications conveniently and efficiently
21

1. Enlarge applications to make them easier to read:
Example 1: Finder for Windows mode
Example 2: Settings for Windows mode:
22

2. Easily control the Windows display size and position:
Example 1: Drag the edge to change the size of the window:
Example 2: Drag the top bar of the Windows to the edge of the screen to quickly enter 1/4 size:
23

3. Show more apps and tools on the screen:
Example 1: Efficiently display content while recording on Note:
Example 2: Three apps displayed on the screen at the same time:
24
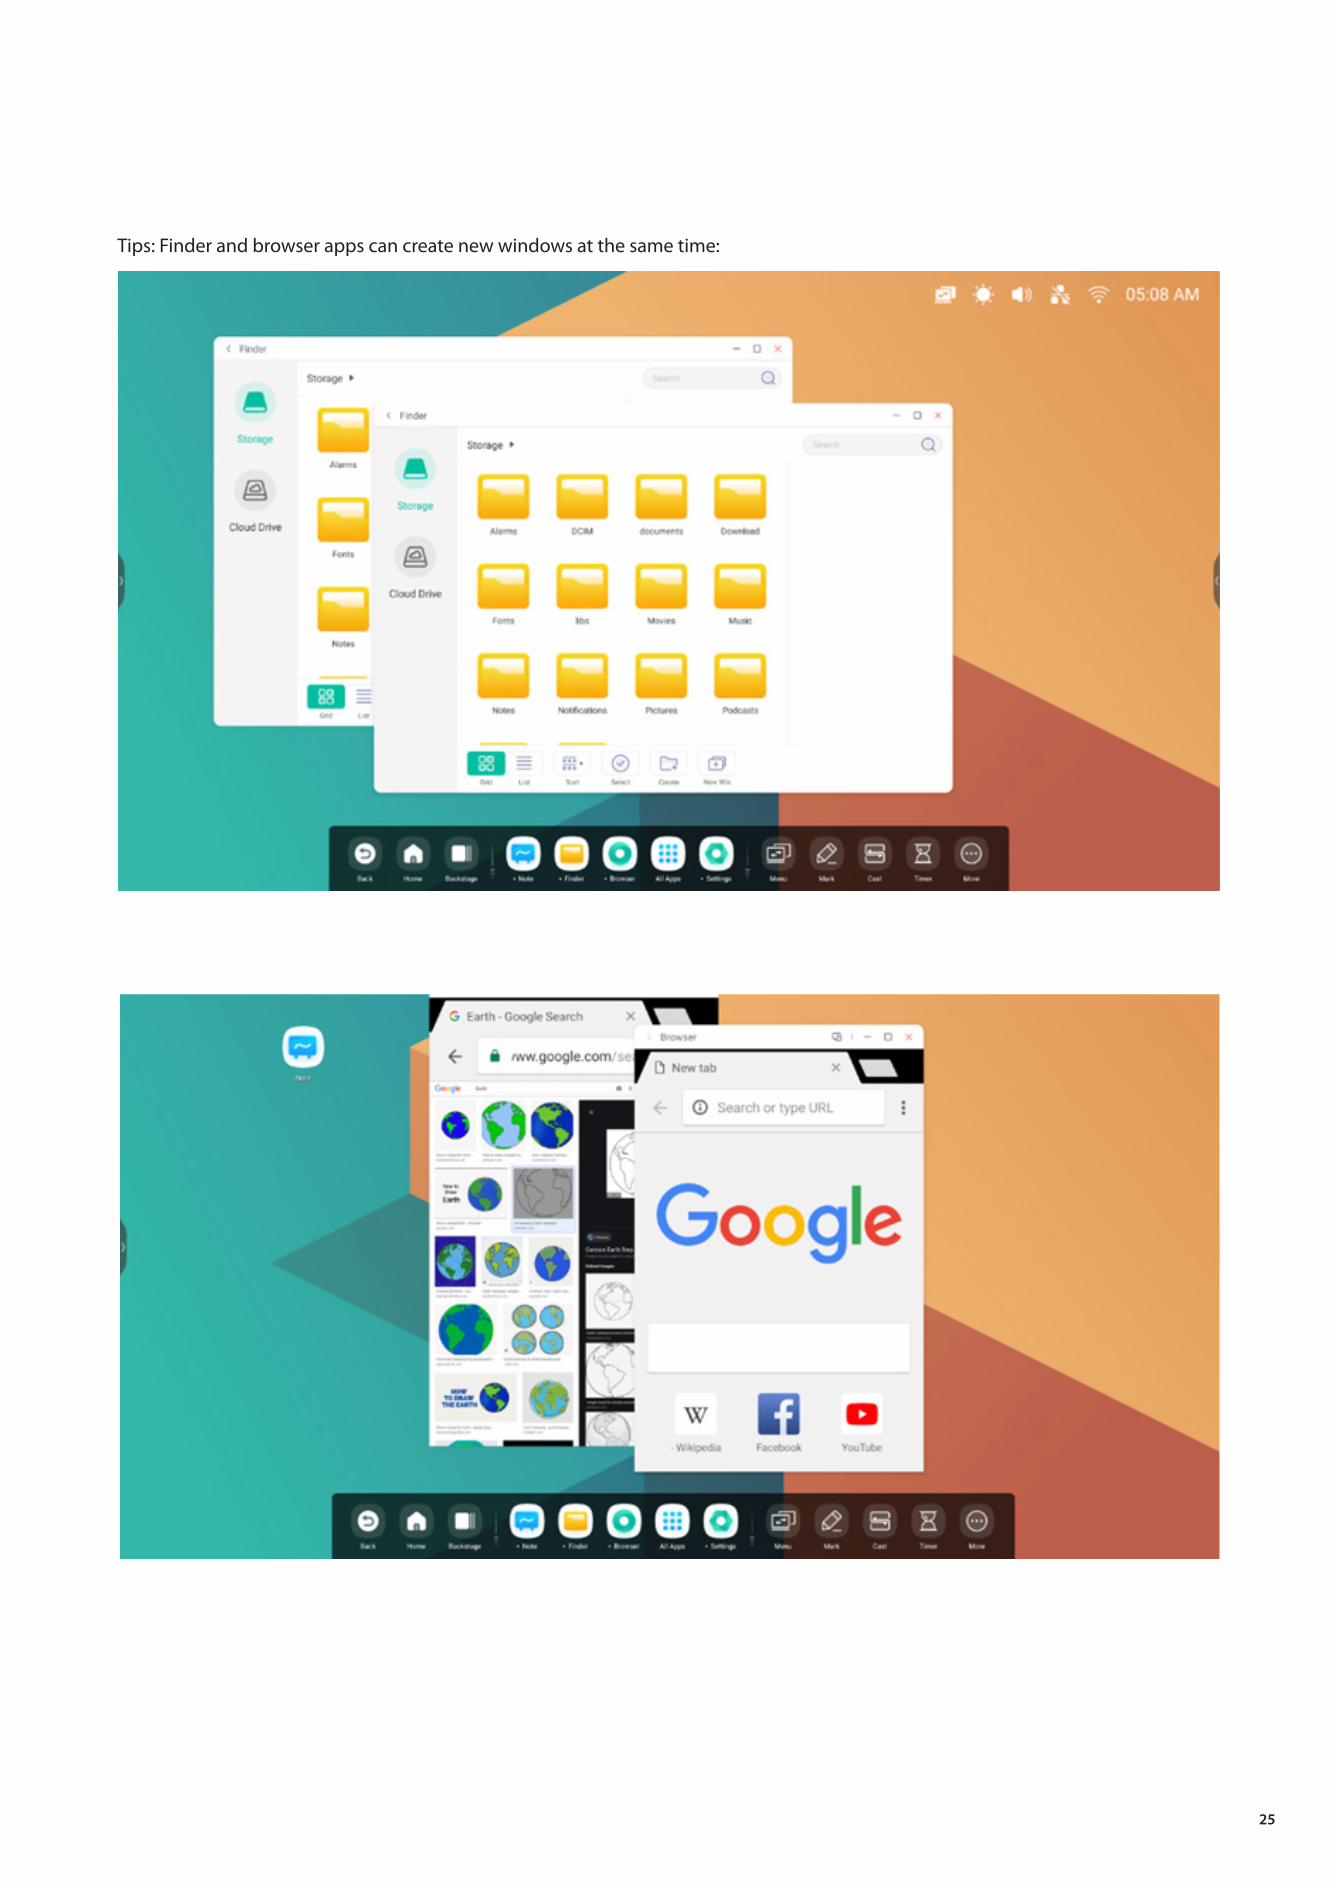
Tips: Finder and browser apps can create new windows at the same time:
25

4. Drag content across apps:Step 1: Long press the image in the browser to pop up and wait to download:
Step 2: Drag it to the Note application:
Tips: Support Image drag and drop to Note, Finder, Photos:
26

Tips: Drag and drop text to Note, Finder:
5. Multi-Window mode:
27

4. All Apps
The IFP has customized applications for leading classroom or presentation discussion including: Note, Palette, Visualizer, Finder, Browser,Settings, Cloud Drive, WPS Office, Photo, Music, Video, Keeper by default.
4.1 Note
4.1.1 Pen:Note supports dual pen writing and a variety of colors and pen styles, allowing users to write with different colors or pen styles at the same time
28

4.1.2 Shape: Note has a wealth of built-in shapes, including two-dimensional plane shapes and three-dimensional geometric shapes.
4.1.3 Ruler:Note's ruler tool eliminates the need for physical ruler tools, and can also assist in teaching in Note.
29

4.1.4 Sticky notes:The sticky notes tool in Note allows you to pin important information to the canvas for users to view, and can also be used as abrainstorming tool.
4.1.5 Table: Note supports creating multiple tables and display them simultaneously.
30

4.1.6 Pen extension: after selecting handwriting, the handwriting can be intelligently recognized as a font, and the handwriting can be searched andmirrored.
4.1.7 Image expansion:after selecting an image, it can be transformed into a vector image, and mirrored.
31

4.1.8 Custom toolbar:When Note is in full screen mode, you can choose which tools appear in the toolbar and which to hide inthe submenu “MORE”.
4.1.9 Import and Export files in multiple formats:
4.1.10 Multiple ways to save files:In addition to saving files to the local system and USB disk, Note also supports scanning files with mobile phones for saving or sending files through email.
32

4.2 Palette
4.2.1 Menu
4.2.1.1 Menu-Save
select the path you want to save to and customize the file name:
‘OK’ to save your pallet into local memory.
33

4.2.1.2 Menu-Import
on the menu window to select a picture import into the Pallet App. This picture will be used as abackground for the current page:
4.2.1.3 Menu-Share
on the menu window to generate a QR Code, which allows you to easily share your pallet to others.
4.2.1.4 Menu-Exit
will exit the Palette App. Be careful, current works will lose if you did not save.
4.2.2 Clear
clear all content on current page.
4.2.3 Undo
back to last action.
4.2.4 Redo recover the last action.
34

4.2.5 Pens
4.2.6 Pen Stroke Slider
35

Step 1: Select a color on the Color Box.
Step 2: Drag the roller on the pallete clockwise
Repeat steps 1 and step 2 to get your desired color
4.2.8 Color Picker
4.2.9 Hide or show Toolbox
36
4.2.7 Palette
You can use palette to customize a color which is not in the Color Box.
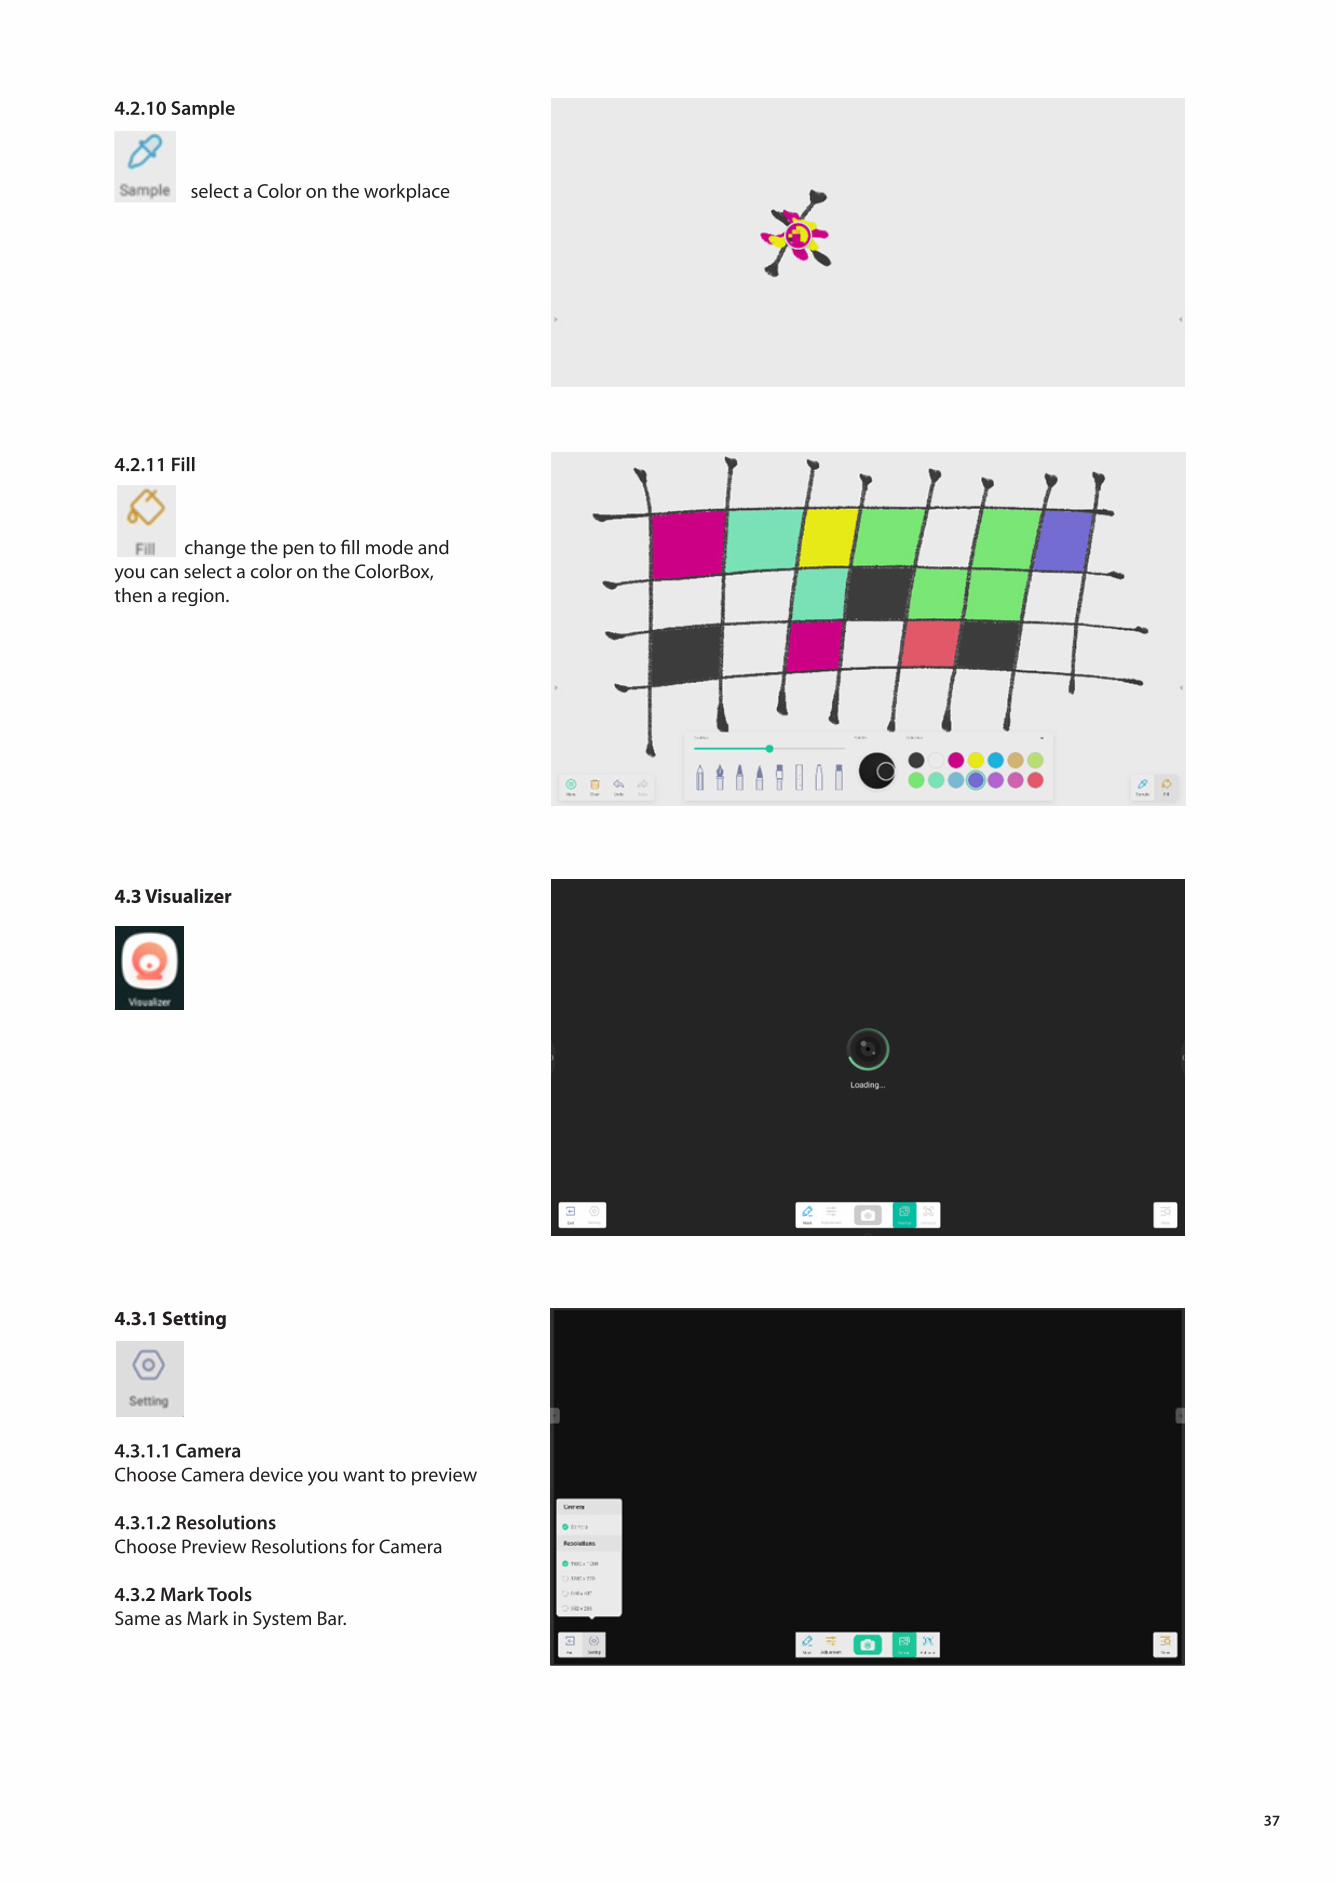
4.2.10 Sample
select a Color on the workplace
4.2.11 Fill
change the pen to fill mode and you can select a color on the ColorBox,then a region.
4.3 Visualizer
4.3.1 Setting
4.3.1.1 CameraChoose Camera device you want to preview
4.3.1.2 ResolutionsChoose Preview Resolutions for Camera
4.3.2 Mark ToolsSame as Mark in System Bar.
37

4.3.3 Photo
to take a picture, then auto switch to Replay mode. now becomes back state in Replay mode, then turn to camera preview state.
4.3.4 Preview Mode
4.3.4.1 Picture mode'Normal' to switch to Picture Mode for default preview default without any effects.
4.3.4.2 Text mode'Enhance' to switch to Picture Mode. It's normal preview mode by default without any effect.
4.3.5 Exhibition Setting
4.3.5.1 SizeFull to preview at full screen.Auto to preview screen with fixed Aspect ratio.
4.3.5.2 Scaling+ button: zoom in the preview screen.- button: zoom out the preview screen.
4.3.5.3 RotationRotate the preview screen 90 degrees clockwise.Rotate the preview screen 90 degrees counterclockwise.
4.3.5.4 Typetype N: Normal type.type T: Text type, reduce color usage and improve text display quality.type P: Picture type, reduce contrast and increase saturation to improve picture display quality.
4.3.5.5 Advanced OptionsDynamically adjust brightness, contrast, saturation, sharpness.
4.3.6 View
button, switch to Preview mode.
38

4.3.6.1 Multi Pics
to switch to two window mode.
to switch to four window mode.
to select preview file.
to exit out.
4.3.7 Exit
to exit the Visualizer
4.4 Finder
to open the Finder.
4.4.1 Storage
Users can browse resources storedin the local storage according tocategory, including document, whiteboard (pages saved by the whiteboard and quick screenshot), video, picture, and audio.
4.4.1.1 Back
button to return to the previous page.
4.4.1.2 Search
Search: In the input box on the right upper corner of the interface, enter the resource name you want to search. For example, byentering “word”, you can find resources named “word”.
39

4.4.2 USB
Users can browse resources stored in the USB storage according to category, including document, whiteboardwriting (pages saved by the whiteboard and quick screenshot ), video, picture, and audio.
4.4.3 Grid Display
to display the resources in the form of icon. The resources aredisplayed in the form of icon bydefault.
4.4.4 List Display
to switch to display the resources in the form of detailed information.
40

4.4.5 Sort
ordering button to pop out the menu as shown in picture. You canorder the resources, including ordering according to the name, type, o size, and time. Resources are ordered according to name by default.
4.4.6 Select
button to switch to , and a selecting box pops out on theleft upper corner of the resources. Then you can select resources asrequired.
4.4.6.1 Select All
Selecting all. By clicking the button, you can select all resourcesunder the current directory.
Cancelling selecting. to cancel all resources that have been selected currently.
41

4.4.6.2 Copying
Copying. When the resource is selected, the copy button will appear. to copy the currently selected resource.
4.4.6.3 Pasting
Pasting. When there is any resource being copied or cut currently, the button is available. Users can paste the copied/cut resource to the specified location as required. You can execute the pasting operation only when thedefault folder is displaying “all” resource locations.
4.4.6.4 Cutting
Cutting. When the resource is selected, the cutting button will appear. to cut the currently selected resource.
4.4.6.5 Deleting
Deleting. to delete the selected resource.
4.4.6.6 Renaming
Renaming. to rename the selected resource.
4.4.6.7 More
More. to pop out the “send to” button. You can send the selected file to the target folder.
4.4.7 New Folder
New Folder. “New Folder” to create new folders under the current directory.
4.5 Browser
to open the Browser.
42

Long press image or text then drag to Note
in browser more settings to add quick-link to Desktop
4.6 Settings
to open the Settings.
43

4.6.1 Wireless & Network
4.6.1.1 Wi-FiIf you plug in a Wi-Fi module, you can on the Wi-Fi menuto enter the Wi-Fi interface, manage and view your Wi-Fi connection.
If you can't find your Wi-Fi, you can manually configure
to add Wi-Fi by clicking on
In addition, you can on to see your Wi-Fi address and install certificates.
4.6.1.2 EthernetWired network Settings allow you to view and control the state of your network, or you can manually set your static IP configuration and proxy configuration.
44

4.6.1.3 HotspotIf you plug in a hotspot module, hotspot Settings allow you to view and control your hotspots, or manually set your hotspot name, password, and frequency
4.6.1.4 VPNYou can add your VPN connection to the VPN setup, where you can manage all of the VPN configuration and status.
4.6.2 Personal
4.6.2.1 WallpaperWallpaper Settings support both static and dynamic wallpapers. You can choose which wallpaper you like to set to your desktop.
45

4.6.2.2 Swipe up options at the bottomYou can use this configuration item to set whether swipe up at the bottom evokes anOSD window or a toolbar.
4.6.2.3 Multi-Window ModeMulti-Window Mode allows you to switch the system's window mode to full-screen mode or multi-window mode, depending on yourpreferences.
4.6.3 Input & Output
4.6.3.1 Touch SoundYou can use this configuration to set whetheror not to enable touch sounds on your device.
46

4.6.3.2 Input Naming SettingsThis setting allows you to enable channel aliases, you can customize your channel name and apply it to the OSD menu and channel display.
4.6.3.3 External Source Display SettingsExternal source Settings allow you to set theHDMI OUT resolution and type-C format.
4.6.4 ApplicationHere you can view and manage all the applications installed on your device. By default, third-party apps and desktop apps are displayed. You cancontrol whether the rest of the system is displayed or not. In addition, you can restore the defaultpreferences of all applications here.
47
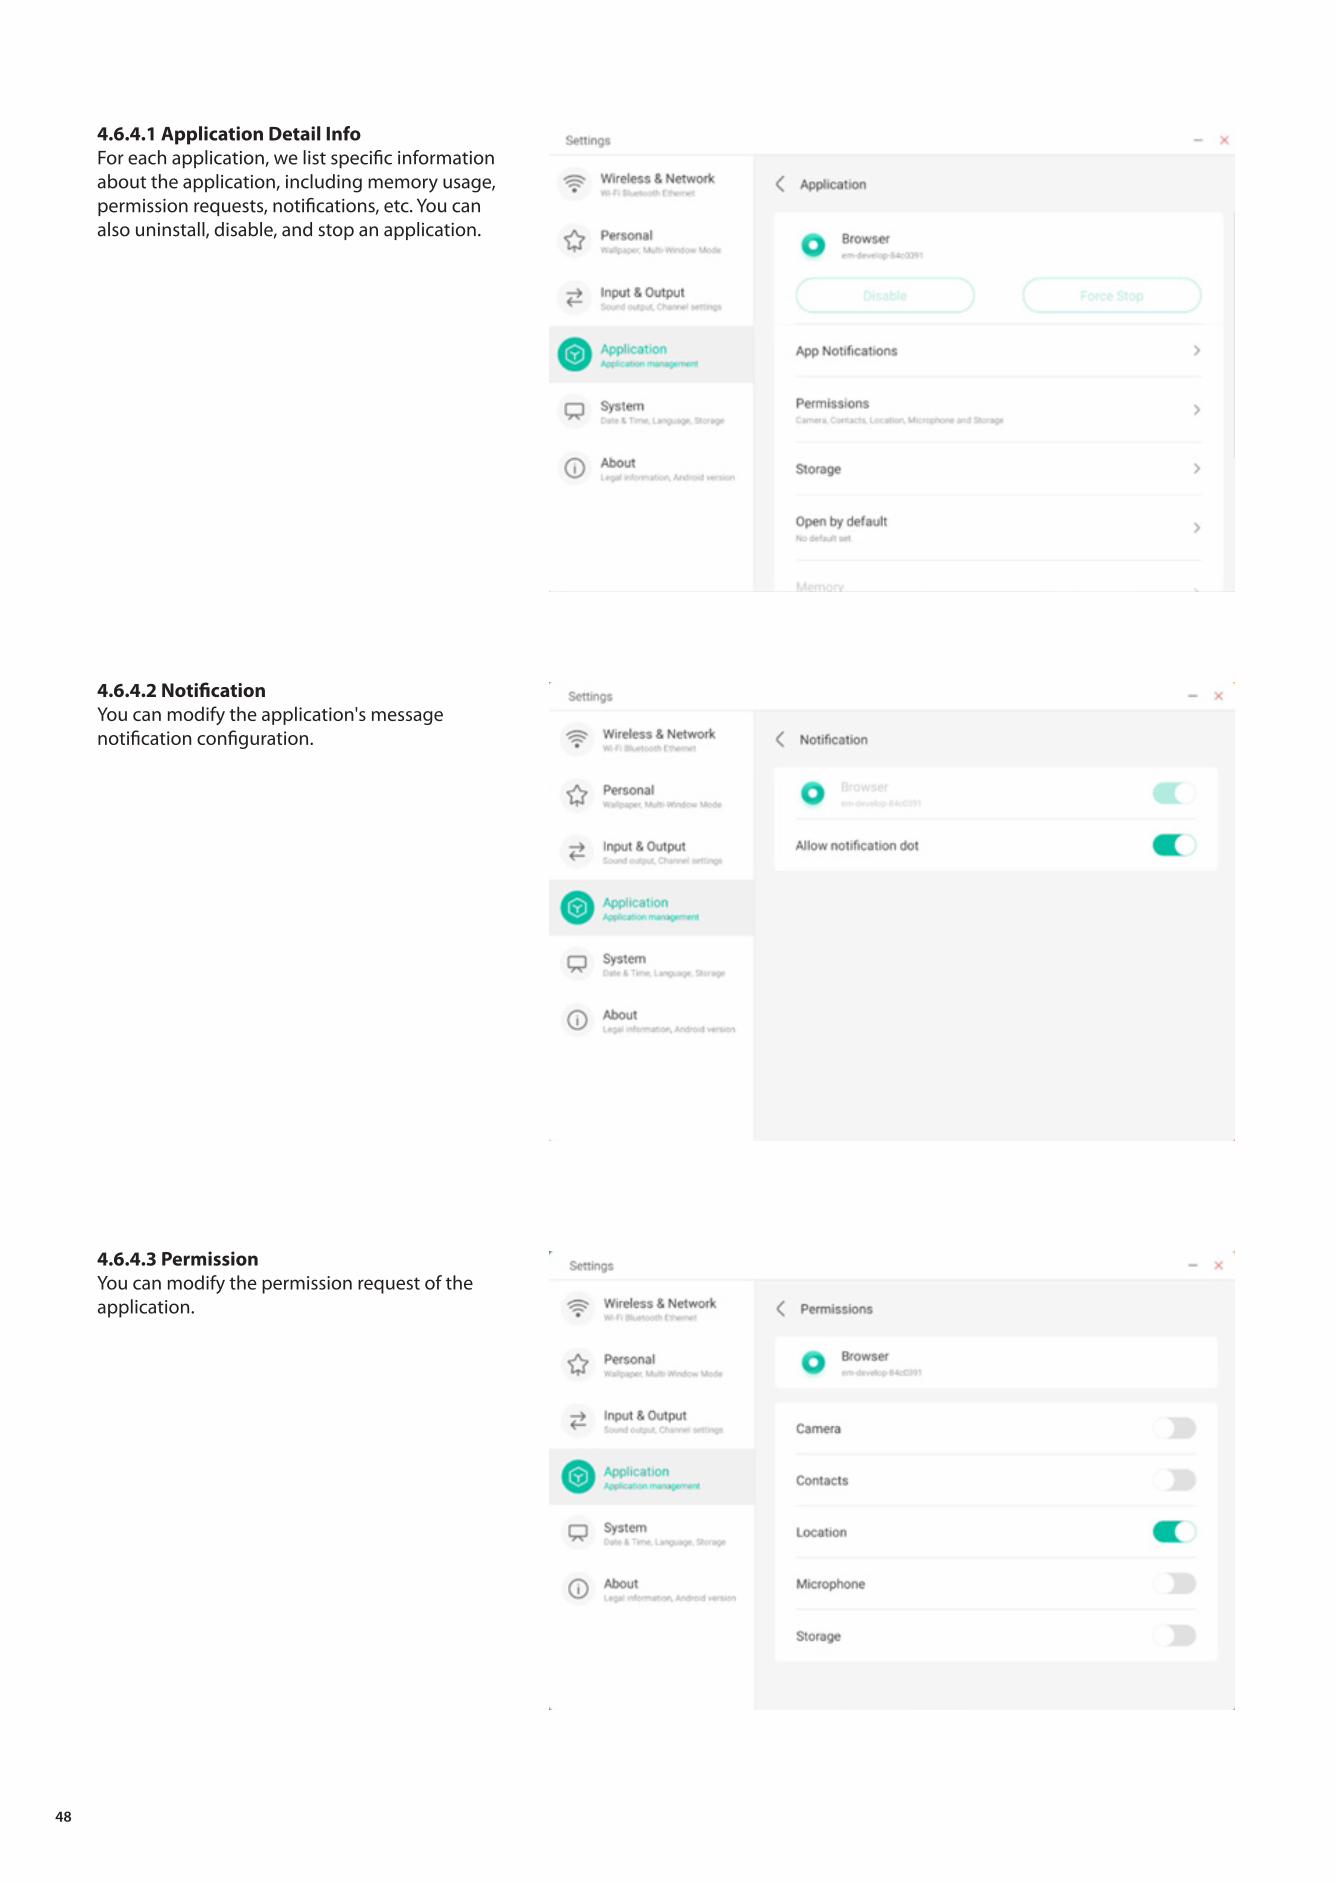
4.6.4.1 Application Detail InfoFor each application, we list specific information about the application, including memory usage, permission requests, notifications, etc. You canalso uninstall, disable, and stop an application.
4.6.4.2 NotificationYou can modify the application's messagenotification configuration.
4.6.4.3 PermissionYou can modify the permission request of theapplication.
48

4.6.4.4 StorageYou can see how the application's storage controls are being used, including user data, caching, and application package size. You can also clear the application's user usage data and the application cache.
4.6.4.5 Open by defaultYou can set the app's open prompt or clear the app's default Settings.
4.6.4.6 MemoryYou can look at your application's memory usage, including average memory usage, frequency of us-age, and maximum usage.
49

4.6.5 SystemIn the system module, you can set andview the system information of the whole machine, set the screen lock password, login to the mailbox, connect to the remoteand update the system.
4.6.5.1 Date & TimeYou can set whether the system uses 24-hour format and whether to automatically obtain network time.When the use of network time is turned off, the date, time, time formatand time zone can be set.When the use ofnetwork time is turned on, you can only set the date and time format.
50

You can set the year, month and day of the system by setting the date
You can set the hour, minute, morningand afternoon of the system by time
51

You can set three date formats, such as month/day/year, day/month/year, year/month/day
You can set the time zone, and the system has built-in time zones around the world.
4.6.5.2 Language & Keyboard
You can set the language in the language and keyboard modules. After setting the language successfully, the language of the whole system will be changed, because it needs to be adapted to the RTL language, setting the RTL language may result in changing the layout of some applications.
52

In the virtual keyboard module, you can view the inputmethods currently supported by the whole machine.Support Android native input method and Google Pinyininput method. The switch button on the right can be usedto control the closing and opening of the input method.
Android native input method can configure the language of the input method, appearance, layout and some advancedsettings.
Android native input method uses the switch on the rightto select the system language and deselect the systemlanguage. After deselecting the system language, you can configure the input method language through the input method language list below.
53

In the appearance and layout, you canconfigure whether to use a separatekeyboard
In the advanced settings of the Androidnative keyboard, you can configure the key sound, keyboard pop-up delay and keyboard long-press delay
Google Pinyin keyboard has very fewconfigurable things. Google Pinyinkeyboard can be configured with key sound and association input
54

4.6.5.3 Lock Screen PasswordIn the screen lock module, you can set the screen lock password, modify the screen lock passwordand clear the screen lock password. When the screen lock password is not set, only the operation ofsetting the screen lock password can be performed.
The screen lock password is 4 digits, you need to enter the password and confirm the password to set the screen lock password
When the screen lock password is set, you can clear the screen lock password and change the screen lock password.To change the screen lock password, you need to enter the original screen lock password first, and you can reset the screen lock password after verification. To clear the screen lock password, you only need to enter the original screen lock password to clear it.
55

4.6.5.4 Startup & Shutdown
In the startup and shutdown module, there are the settings of the startup channel and the startup plan.You can set the channel that you enter when you turn on the computer, such as the channel that was turned off last time, the Android channel, HDMI1, HDMI2, HDMI3, and VGA channels supported by the wholemachine. You can also set whether to enter standby (turn off the backlight) after booting.
In the startup plan, you can configure whether to pop up a shutdown reminder for shutdown, which is used to pop up a reminder after the scheduled shutdown reaches the time and perform a countdown. Users can add scheduled startup tasks and scheduled shutdown tasks for the whole machine. For the startup task and shutdown task, the user can also configure whether this task takes effect.
56

For the added startup tasks and shutdown tasks, the user can also modify these tasks or delete tasks.
4.6.5.5 EmailIn the mailbox module, users can log in to their own mailbox account, which supports SMTP protocol.
4.6.5.6 RemoteIn the Remote module, users can connect to theRemote Web system. The whole device can beoperated in batches through the Remote Websystem.
57

4.6.5.7 StorageThe memory module lists the memory areas thatexist on the whole machine, including internal storage space and portable storage devices. Of course, the prerequisite for the display of a portable storage device is that the device must be inserted (such as a U disk). The user can eject the portable storage device through the icon
The internal storage space lists the memoryusage of the whole machine, including the memory usage of System, Apps, Photos, Files, Videos, Audio and Others.
4.6.5.8 SecurityYou can view all trusted system and usercertificates, and you can control the enablingstatus of these certificates and see the details of each certificate.
58

Here are the certificates installed by the users themselves. You can also manage to removethese certificates.
The following operation path is to install the certificate and clear all certificates of the device. You can add or remove the certificate at theseentrances as needed.
59

4.6.5.9 System Update
In the system update module, users can view the current system version information and system update status. If a new system is released, the Check Update button can be used to detect the update and download the new system for update operation.
4.6.6 AboutYou can view the version informationof the device.
60

4.6.6.1 Legal InfomationYou can check the legal information.
4.7 Cloud Drive
to open the Cloud Drive.
4.7.1 Add Account
Click to add account, then
you can choose the Drive Type
61
4.7.2 Use the Default Account
Select “Use the default account” to set the default account.
4.7.3 Use The Default File Name When Save
Selcet 'Use the default file name when save'.
Default name like year-month-day-hour-minute-second.
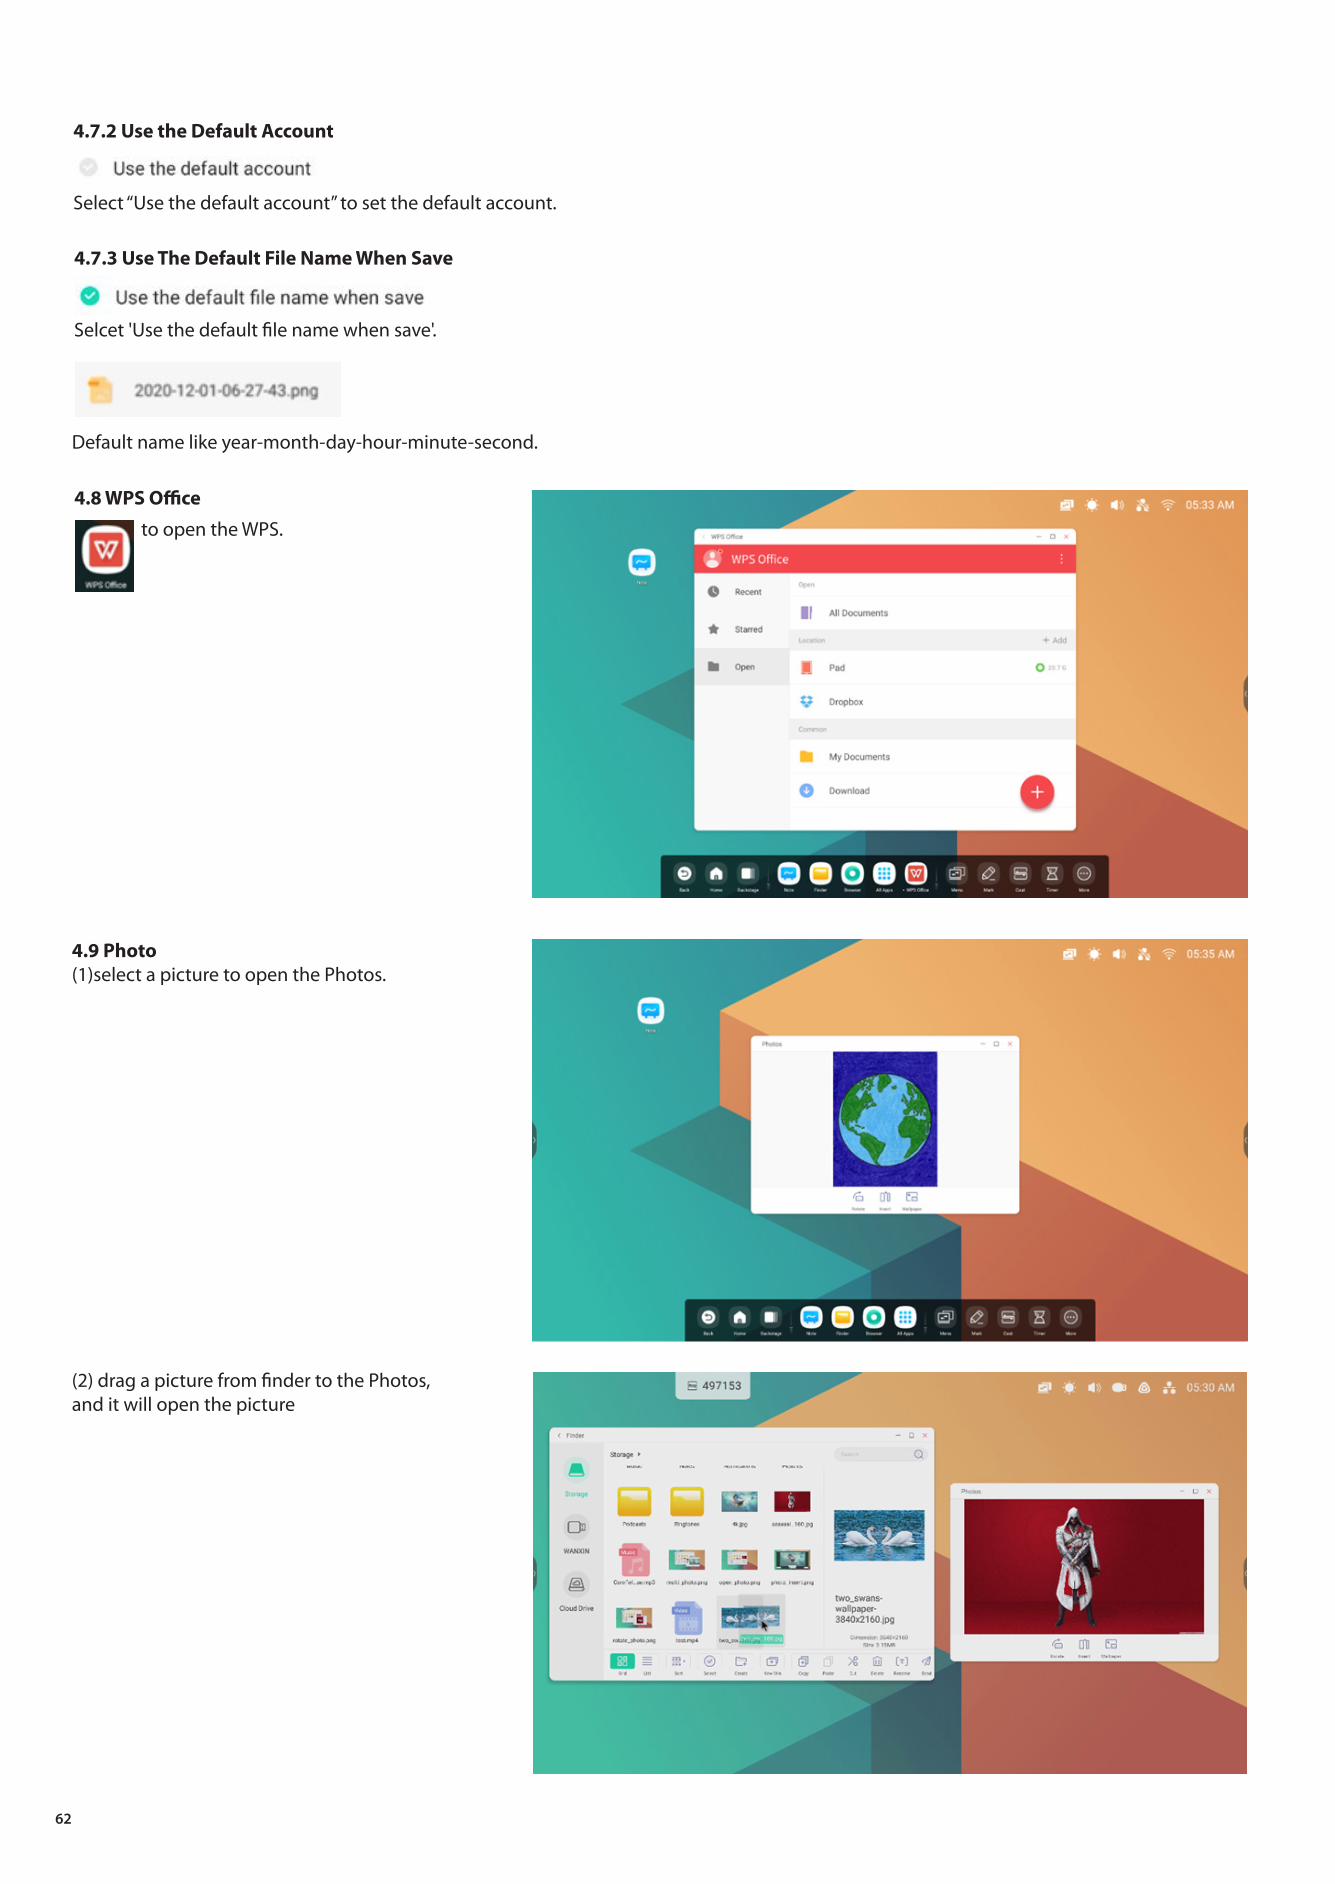
4.8 WPS Office
to open the WPS.
4.9 Photo(1)select a picture to open the Photos.
(2) drag a picture from finder to the Photos,and it will open the picture
62

the button, the current picture will be rotated by 90 degree.
the button, it will insert the current picture into the Note app.
the button, it will set the current picture as wallpaper.
4.10 Musicmusic file to open the Music.
4.11 Videovideo file to open the Video.
4.12 Keeper
to pop out the Keeper interface as shownbelow. You can perform memory optimization, garbage clean and system detection on the intelligent tablet computer.
63
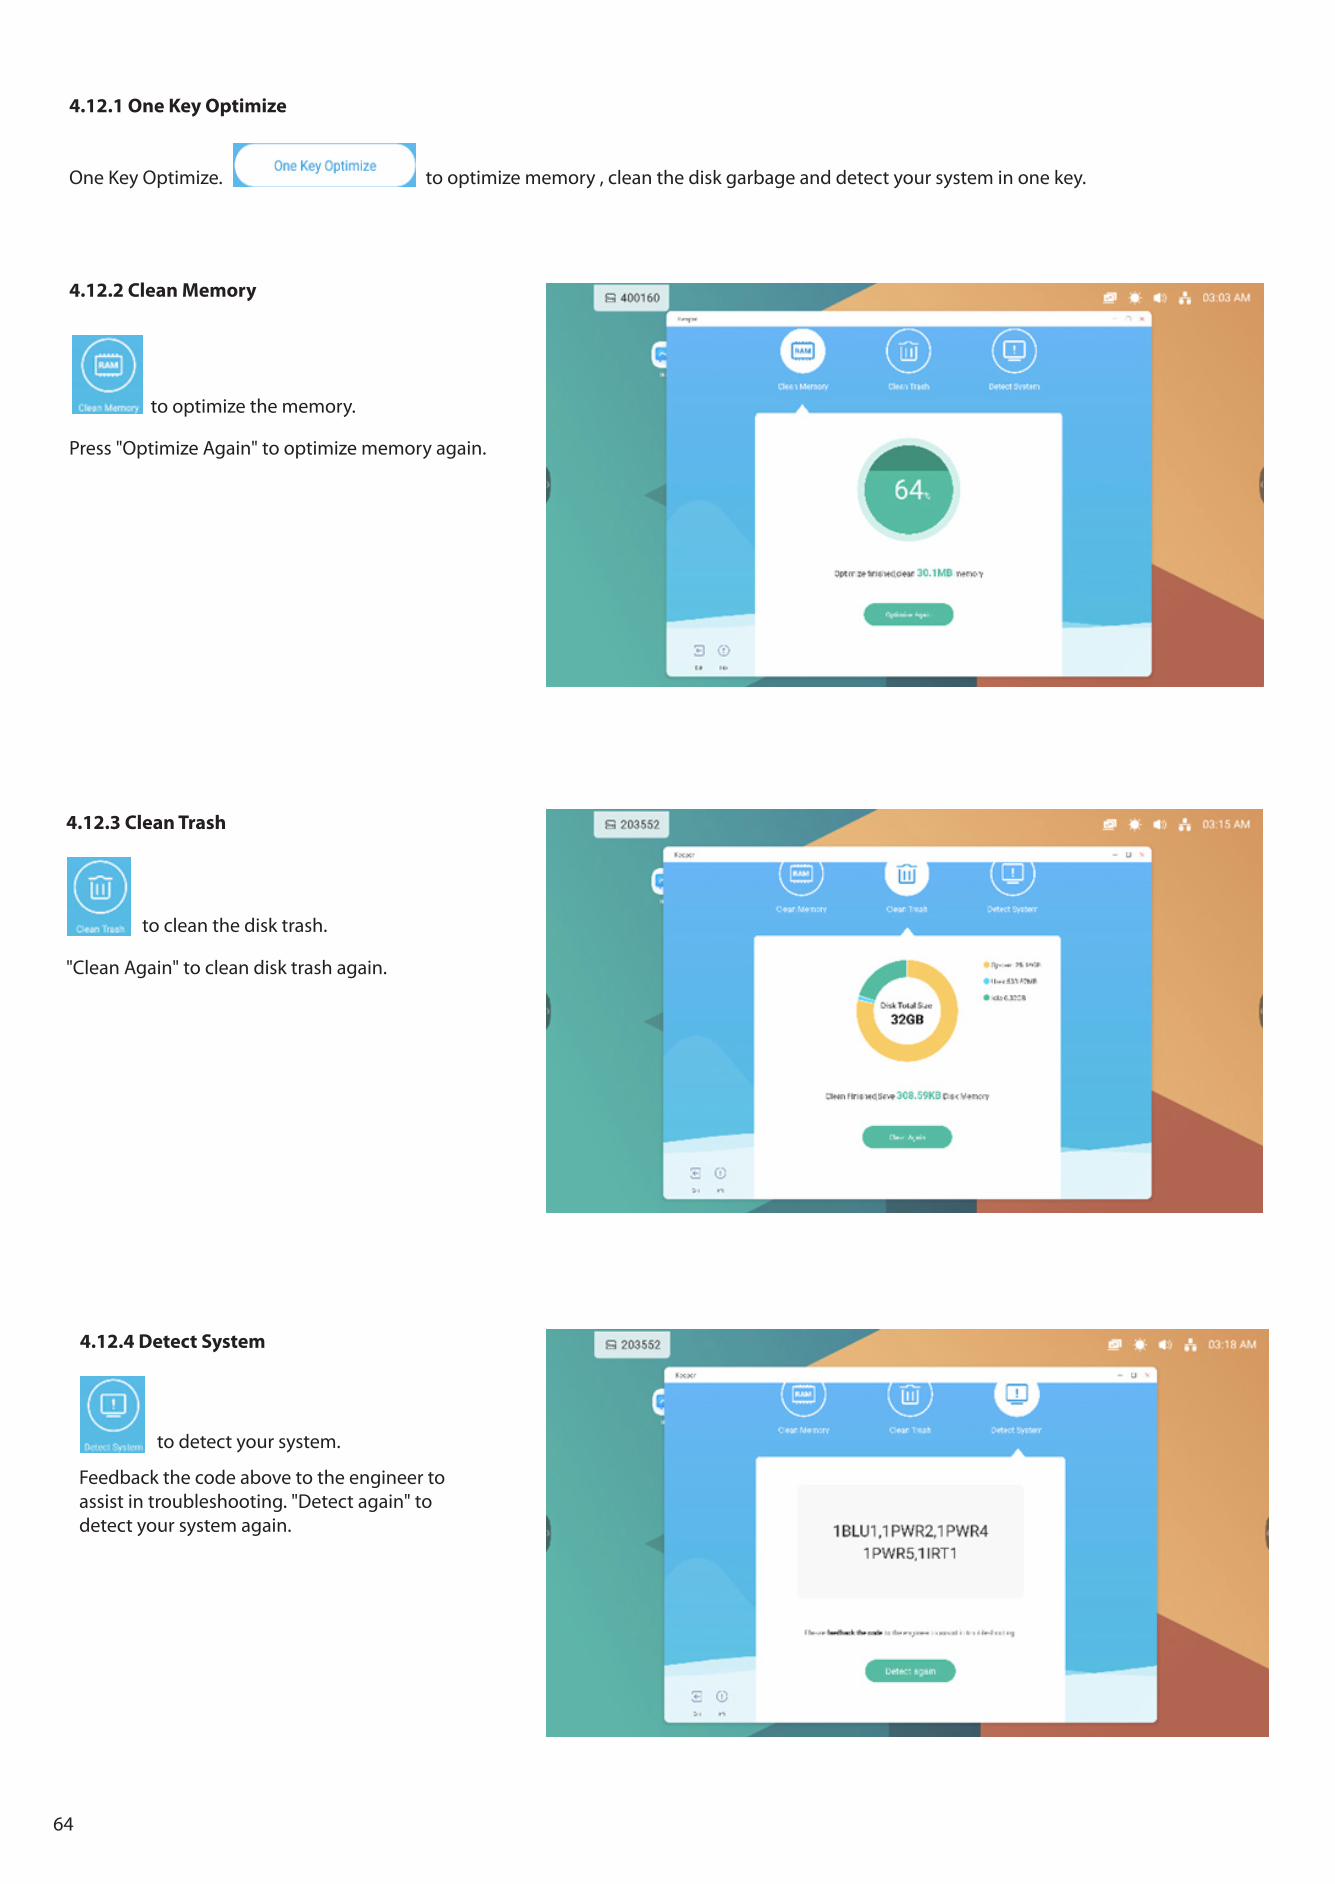
4.12.1 One Key Optimize
One Key Optimize. to optimize memory , clean the disk garbage and detect your system in one key.
4.12.2 Clean Memory
to optimize the memory.
Press "Optimize Again" to optimize memory again.
4.12.3 Clean Trash
to clean the disk trash.
"Clean Again" to clean disk trash again.
4.12.4 Detect System
to detect your system.
Feedback the code above to the engineer toassist in troubleshooting. "Detect again" todetect your system again.
64

4.12.5 Version Information
to view the system information, including system version, MCU version and touch panel version.
again to close the information window.
4.12.6 Exit
to exit the Keeper.
5. Small toolsWith the tools, teacher can enhanced interactive learning with students for a smooth and fun learning experience. Menu, Mark, Cast, Timer, Crop, Stopwatch, Airclass, Spotlight, Freeze, ScreenLock are provided by default in IFP OS.
5.1 Menu5.1.1Common Settings: Show all input sources, include PC, Android, HDMI, VGA.
5.1.2 Advanced Settings:Show more settings, include Audio, Screen,Display, Adjust.
65

5.2 Mark
Content Description
5.2.1 Pen
switch to pen mode and click more times to change the color to red , black ,
blue or green .
5.2.2 Brush
5.2.3 Clean
switch to Brush mode and click more times will change the color to yellow ,
orange , blue or green
Clean the annotations in the screen.
5.2.4 Save
Save current annotations and screen content to picture in the storage. it will show a dialog when save successfully, click close button to dismiss the dialog, and open button to jump to the Finder which locate in the save picture,
5.2.5 Share display on the device through QR code.
5.2.6 Cloud Support saving to cloud disk.
5.2.7 Close Exit the Tools, and the annotations will be ignore.
66

Content Description
5.3.1 Mirroring
5.3.3 Remote
5.3.5 Miracast
5.3.2 Desktop Sync
5.3.4 Airplay/Chromecast
5.3.6 Document sending
5.3 Cast
The tool designed for seamless wireless presentation and collaboration during lecture.
Click start on your phone or click start mirroring on your PC
to mirror your device’s screen on IFP
Click Desktop Sync on your phone or on your PC
to mirror IFP screen on your device and you can control on your device.
Click remote on your phone to remote control IFP on your phone.
Open this switch in settings, you can use any device support airplay or chromecast to find ScreenShare pro and mirror your screen to IFP without install software.
Open this switch in settings, you can use any device support miracast to find ScreenShare pro and mirror your screen to IFP without install software.
Click document sending in device management to send document to the device you selected.
67

5.4 TimerA tool which counts down from a specified time interval.
Content
Content
Description
Description
‘Start’
5.5.3 Window
5.5.1 Freedom
5.5.2 Full
‘Ring’
‘Pause’‘Reset’
Mini size
Click to close the tool.
The default is a custom screenshot, with a default initial size.
Check the 'Ring when time is up', it will reminder user by using ring tone.
Click to switch to full screen size.
Click to start count down.
Click to focus and switch to the uppermost window size.
Click to pause count down time. Click to reset count down time.
Click to view full the screen or restore original size.
Outside of Timer will be minimized, Click again to restore.
5.5 Crop
5.5.4 Save5.5.5 Insert5.5.6 Close
Save the picture in the storage. Click to insert the screenshot directly into Note.Click to exit screenshot mode.
68

Content Description
‘Start’
‘Pause’
‘Lap’
Mini size
5.7 AirClass
Click to close the tool.
Tap the stopwatch to start timing.
Outside of Stopwatch will be Shrinked, User can select Mini size to restore the original size.
5.6 StopwatchA tool which counts upwards from zero for measuring elapsed time.
Click to pause timing.
Click to record multiple time periods anddisplay them in a list.
5.7.1 Scan QR code
Students can just scan the QR code to join the class with their phone. Besides, they can type the URL in their browser to join the class as well.
69

5.7.3 Vote
Click on the button panel to start the voter part. the toolbar of voter will show as above.
5.7.3.1 Single Choice
As default, “Single choice” button will be checked. In single choice mode, students can only submit a single answer for the question.
5.7.3.2 Multiple Choice
When “Multiple choice” button checked, students can submit more then a single answer for the question.
5.7.3.3 Start voting
Click begin to start answering question. After students answer the question, their names turn blue. Clicking a name item, name of it will be shown in a pop up window. Until “FINISH” button is selected, students can submit their answer again and again. But when the question finished, only the finalsubmission would be accepted.
5.7.3.4 Finish
Click Finish to finish answering questions, then you can access the answers statistics page with full screen.
5.7.2 Enter the class
After most of students joined the class, you can select “ENTER THE CLASS” button to enter the class. Then button panel as below will show.
70

5.7.3.5 Choose Right Answer(s)
Choose the right answer(s) and calculate the accuracy. And the bar of wrong answer(s) will be marked red. Clicking the bar of any answers, the names of whom voted for the answer will be shown in a pop up window.
5.7.3.6 Exit
to exit the voter
5.7.4 Responder
button on the button panel to access the responder part.
5.7.4.1 Start
Click “START” button to start responder. Students can responder by pressing the [OK] button with their phone.
71

5.7.5 Selector button on the button panel to access the selector part. You can select one or some students to answer your question randomly. Only if at least 1 student in your class, you can start the selector.
5.7.5.1 Start
“+” button or “-” button to set number of person(s) whom will be selected. Click “START” to start selecting or click to quit.
5.7.5.2 Reset
Click “Reset” to restart the selector.
5.7.6 Message Switch
Click “Message” button to switch enable for message part. The icon of the button will show when message
enable, and show when it disable. After enabling the message, students can publish the message
comments on the mobile phone. The message comments are updated on the IFP in real time.
5.7.7 Manager Button on the button panel to pop up the QR code, for ease of students in the class to join in the class.
72

5.7.7.1 Scan QR code
Scan the QR code or to join the class with their phone or other devce. Or just type the URL in the browser to join the class as well.
5.7.8 Exit Button on thin button panel to exit from the APP. A dialog will show. “CANCEL” to dismiss the dialog and click “EXIT” to confirm exiting.
5.8 Spotlight
Use this function to focus on specific areas of the screen.
5.9 Freeze
Freeze and zoom the current content on the screen.
73

5.10 Screen Lock
Lock the screen with the ScreenLock, and unlock it by entering the password, which is set in Settings
If you have set the password, then the screen will be locked. You need to enter the password to unlock.
74
Content Description
to zoom out the current screen.
to return to original screen size
5.9.1 Zoom in
5.9.2 Zoom out
5.9.3 Default
5.9.4 Close
to zoom in the current screen.
button to exit the screen freezing.
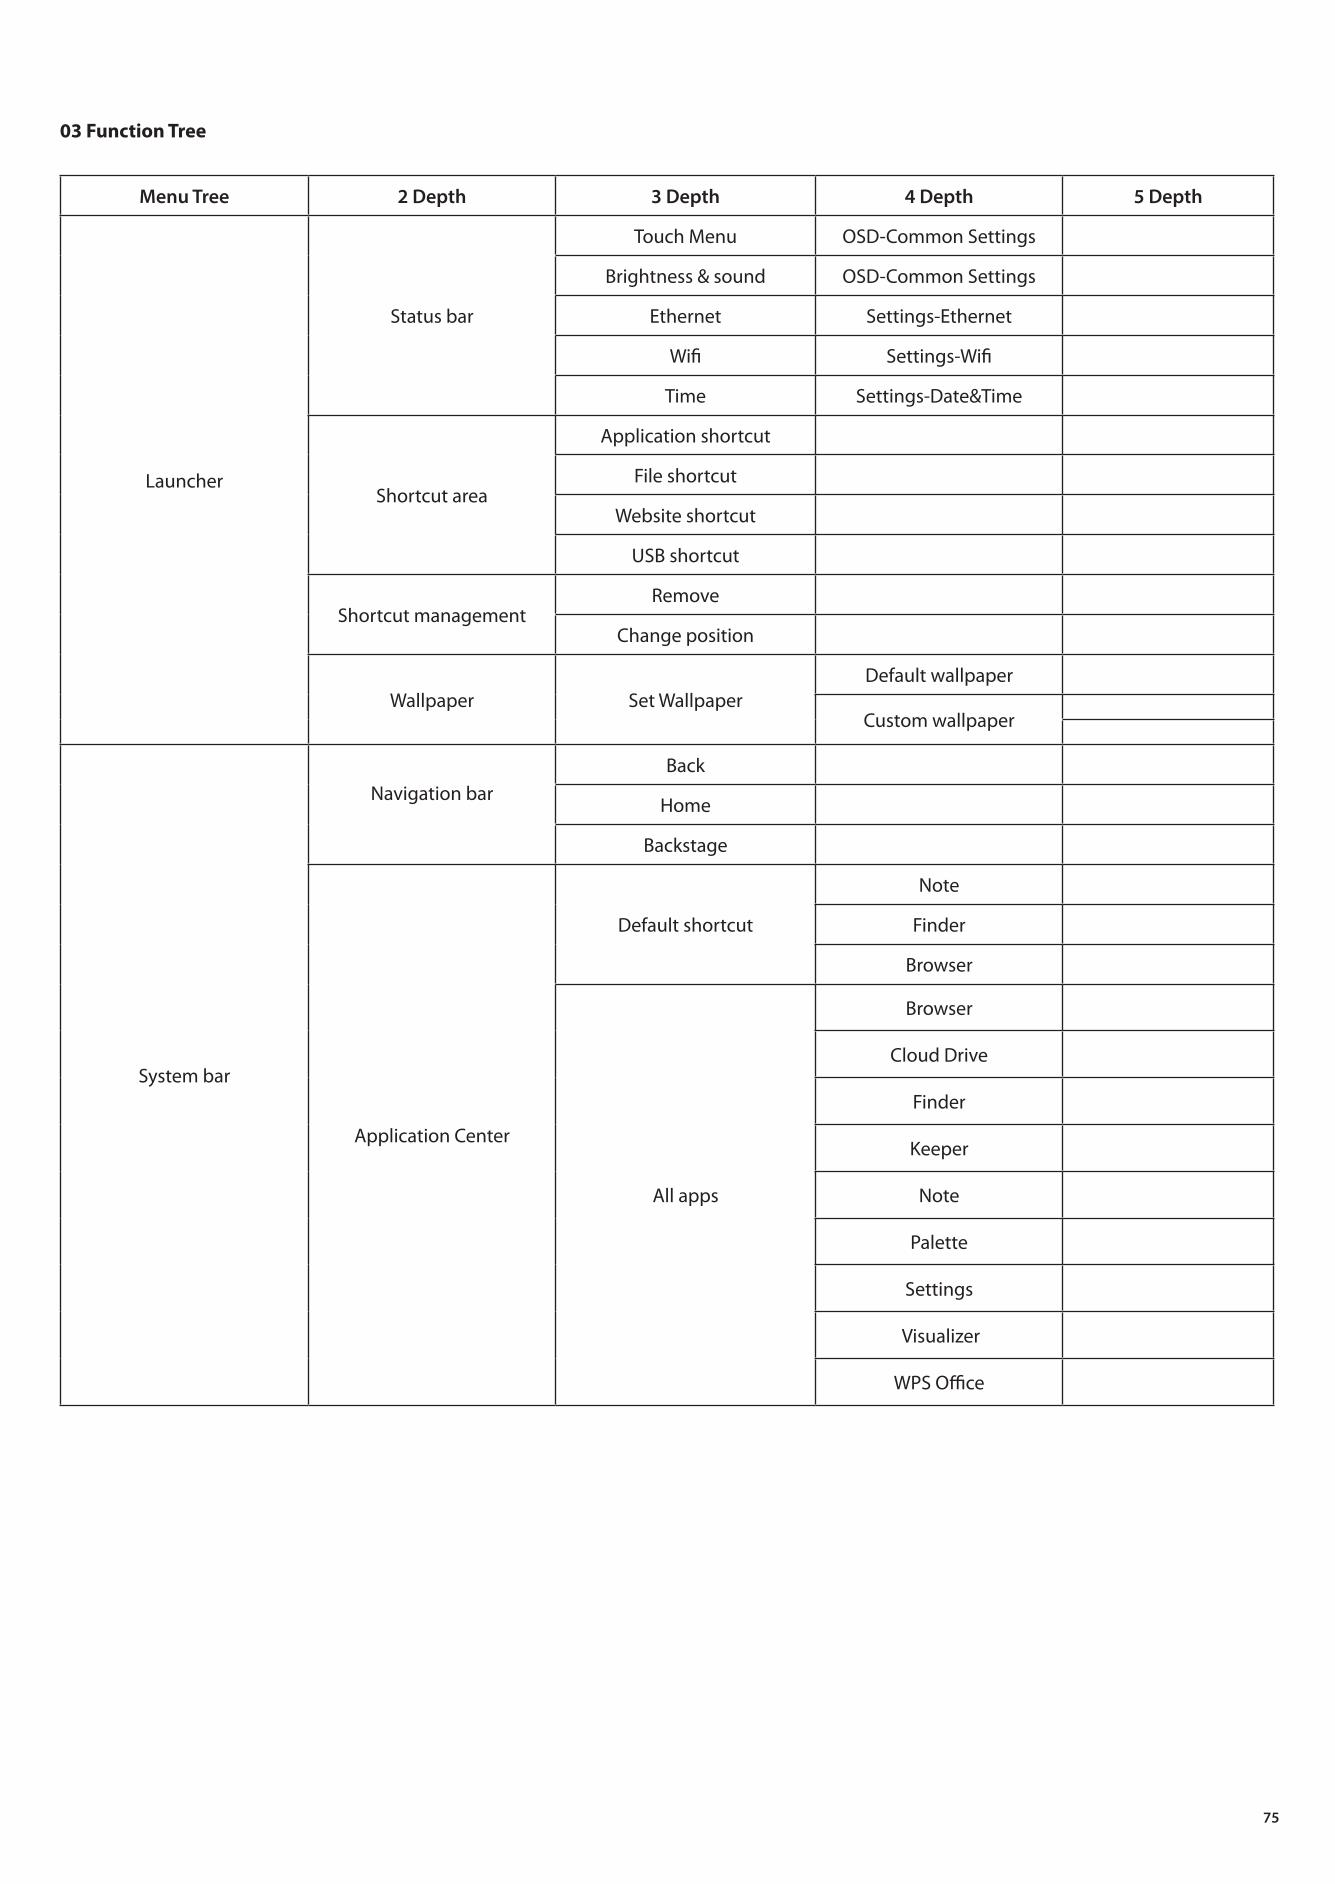
Menu Tree 2 Depth 3 Depth 4 Depth 5 Depth
Launcher
Status bar
Touch Menu OSD-Common Settings
Brightness & sound OSD-Common Settings
Ethernet Settings-Ethernet
Wifi Settings-Wifi
Time Settings-Date&Time
Shortcut area
Application shortcut
File shortcut
Website shortcut
USB shortcut
Shortcut managementRemove
Change position
Wallpaper Set WallpaperDefault wallpaper
Custom wallpaper
System bar
Navigation barBack
Home
Backstage
Application Center
Default shortcut
Note
Finder
Browser
All apps
Browser
Cloud Drive
Finder
Keeper
Note
Palette
Settings
Visualizer
WPS Office
03 Function Tree
75

System Bar
Small Tools
Default tool
Menu
Mark
Cast
Timer
More tool
Crop
Stopwatch
Airclass
Spotlight
Freeze
ScreenLock
Tools Customize Edit
System bar Settings
Multi-Windows
Top bar
Back
Name
Switch
Minimize
Maximize/Window
Close
Other Setting
Freely change the window size
Quickly change the window size
Quarter form size
Half the window size
Maximum window size
New Windows
Drag
Multi-Window mode Settings-Personal
76

Note
Left bottom Corner Menu
Menu
New
Open
Save
Import
IMG
SVG
Export
IMG
SVG
IWB
Background Color
Texture
Custom
Cloud Drive
Brightness Disable
Exit
Share
List
Bottom Menu
Select
Pen
Eraser
Clean All
Ruler
Shape
Table
Sticky-Notes
Preview
Undo
Redo
Right bottom Corner Menu
Add
Previous
Pages
Next
Drawing Board
Left bottom Corner Menu
Menu Save
Import
Share
Exit
Clear
Undo
Redo
Bottom Menu
Pen Group
Pen Stroke Slider
Palette
Color Picker
Predefined Colors
Hide Tool box
Show Tool box
Right bottom Corner MenuSample
Fill
77

Visualzer
Exit
Setting
Camera
Resolutions
1920*1080
1280*720
640*480
352*288
Annotation Tools
Exhibition Setting
SizeFull
Auto
Scaling+
-
RotationRight
Left
Type
N
T
P
Advanced Option
Brightness
Contrast
Saturation
Sharpness
Photo Taken
Picture Mode
Text Mode
View
Double
Four
Exit
Finder
Window Top bar
Back
Name
Minimize
Maximize/Window
Close
File Preview
Device
Storage
USB
Cloud Drive
File List
Preview
Address navigation Address
Search Bar Search
File Management
Grid Display
List Display
Order
Name
Type
Size
Time
Select
Select All
Copying
Pasting
Cutting
Deleting
Renaming
More Send
Create (New Folder) Create
New Window
Browser
Settings Wi-Fi
78

Settings
Wireless & Network
Ethernet
Hotspot
VPN
Personal
Wallpaper
Swipe up options at the bottom
Multi-Window Mode
Input & Output
Touch Sound
Input Naming Settings
External Source Display Set-tings
Application
Application Detail Info
Notification
Permission
Storage
Open by default
Memory
System
Date & Time
Language & Keybord
Lock Screen Password
Startup & Shutdown
Remote
Storage
Security
System Update
About
Legal Infomation
Module Number
Android Version
Kernel Version
Build Number
Cloud Drive
Add Account
Use The Default Account
Use The Default File Name When Save
WPS Office /
Photo
Rotate
Insert
Wallpaper
Music /
Video /
Keeper
One key Optimize Optimize Again
Clean Memory Optimize Again
Clean Trash Optimize Again
Detect System
Version Information
System Version
MCU Version
Touch Panel Version
Exit
79

TouchMenu
General Setting
PC
Android
HDMI1
HDMI2
HDMI3
VGA
Brightness
Volume
More Settings
Audio
Standard
Volume
Bass
Treble
Balance
Meeting
Volume
Bass
Treble
Balance
Class
Volume
Bass
Treble
Balance
Custom
Volume
Bass
Treble
Mute
Screen
Pixel Shift
4:03
16:09
PTP
Display
StandardBrightness
Contrast
BrightBrightness
Contrast
SoftBrightness
Contrast
CustomBrightness
Standard
Cold
Warm
Adjust
H Position
V Position
Clock
Phase
Auto
80

Mark
Pen
red
black
blue
green
Brush
yellow
orange
blue
green
Clean
Save
Share
Cloud
Close
Screenshare Pro
Network connection
Same network connection
Cross-subnet connection
Quick recovery from abnormal disconnection
Screenshare
Support 6 split screen projection
PC projection screen reverse touch
PC window projection
PPT projection screen control on computer
Media projection control on mobile phone
Mobile phone document
Mobile phone camera projection
Mobile picture projection screen control
Mobile phone remote
Overlord display
Screenshare method
AirPlay projection
Chromecast projection
Miracast projection
Dongle projection
Desktop synchronization
Multi-device simultaneous desktop synchronization
Reverse touch
Collaborative annotation
Device Management
Screencast preview
file transfer
Invite screencast
End screencastAuthorize other device
management
TimerStart
Pause
Reset
Ring When time is Up
81

Crop
Freedom
Full
Window
Save
Insert
Close
StopwatchStart
PauseContinue
Reset
Lap
Mini size
AirClass
Scan QR Code
Enter The Class
Vote
Single Choice
Multiple Choice
Start voting Finish
Responder Start
Selector Start Reset
Message Switch
Manager Scan QR Code
Exit
Spotlight SettingScale
Alpha
Screen Freezing
Zoom In
Zoom Out
Return
Exit
82