Embed Size (px)
Citation preview
INTERACTIVE TERMINAL EMULATOR
AN ASYNCHRONOUS COMMUNICATIONS PRODUCT PROVIDED BY FORTUNE SYSTEMS
I: PO RT UN E 3~o~a~~!u~a~ Belmont. CA 94002

Interactive Terminal Emulator (ITE) Reference Guide
I: 1:()RilJ N E SVSiE MS 300 Harbor Boulevard
Belmont, CA 94002

Copynght © 1984 Fortune Systems Corporation. All rights reserved.
No part of thls document may be copied, photocoPled, reproduced, translated, or reduced to any electronic medium or mach me-readable form wlthout prior consent m wrltmg from Fortune Systems CorporatiOn. For full details of the terms and condltlons for using Fortune software, please refer to the Fortune Systems Corporation Customer Software LICense Agreement.
The informatiOn in this document lS subject to change without notice and should not be construed as a commitment by Fortune Systems Corporatlon. Fortune Systems Corporation assumes no responsibility for any errors that may appear m this document.
UNIX is a trademark of Bell Laboratories.
Fortune 32:16lS a trademark of Fortune Systems Corporation.
FOR:PRO lS a trademark of Fortune Systems Corporation for the Fortune 32: 16 Operatmg System.
Prmted in U.S.A.
Consult an authonzed Fortune Systems Representative for coples of manuals and technical mformatiOn.
~ Interactive Terminal Emulator (ITE) Reference Guide
Order Number: 1000812-04 July 1984 for documentation without software
1000185-04 July 1984 for documentatlOn with software
ii

About This Guide
This book tells you how to use the FortUne Systems Interactive Terminal Emulator (ITE) to connect your Fortune system to another computer. This guide is divided into five chapters and three appendices:
• Chapter 1 introduces ITE, providing an overview of its features, capabilities, and requirements.
• Chapter 2 tells you how to install the ITE software and make the necessary physical and logical connections between systems.
• Chapter 3 tells how to start up ITE and introduces the ITE commands and function keys.
• Chapter 4 contains a reference list of all the ITE commands along with instructions for using them, examples, and helpful hints.
• Chapter 5 provides information about problems that can arise when you run ITE, as well as a list of ITE error messages.
• Appendix A contains information about connecting a Fortune system to a non-Fortune system.
• Appendix B contains information about double ITE connections.
• Appendix C explains ITE's flow control mechanisms.
Accompanying this book you should find your ITE Master disk and keystrip. Refer to Chapter 2 for information on installing the Master disk. Attach the keystrip to your keyboard just below the function keys so that you can use it as a reminder of what the keys mean. The keystrip is described in Chapter 3.
Throughout this guide, user input is indicated by boldfaced text. Remember that when you type information into your FortUne system, you must press the Return key afterwards. (A few exceptions to this rule are listed in Chapter 4.)
iii

Menu Shell vs. Command Shell You can run ITE entirely from within the menus on your Fortune system. If you use ITE to log into another Fortune system, you can also stay inside the menus on the second system. However, if you plan to copy files between two systems or perform certain other special ITE functions, you will need to operate from command level (rather than from the menus) once you have made your ITE connection. In the case of a Fortune-system-to-Fortune-system connection, this means you'll need to know how to use FOR:PRO commands.
The FOR:PRO operating system includes the ~_~, which is the standard command interface to UNIX. For an introduction to the Bourne shell commands and the shell concept, refer to Introduction to FOR:PRO.
Another command shell, the ~e.ll (or Berkeley shell), is available with the Fortune Systems Development Utilities. The C shell is described briefly in Introduction to EOR;fRQ and in more detail in the documentation supplied with the Development Utilities.
Chapter 4 of this guide tells you which ITE commands must be issued from command level rather than from menu level. Chapters 4 and 5 both assume some knowledge of Bourne shell commands. In addition, occasional notes relating to the C shell are included for interested readers.
iv

Contents
Abou t This Book iii
1 Introduction to the Interactive Terminal Emulator 1-1
What ITE Does 1-1 The Terms "Host" and "Guest" 1-4 When Not to Use ITE 1-5 Using ITE From a Satellite Workstation 1-5 Requirements, Connections, and Protocol 1-7
2 ITE Installation and Configuration 2-1
Physical Connections 2-1 Device Configuration 2-12 Software Installation 2-20
3 Using ITE 3-1
Typical Uses 3-1 Starting ITE 3-4 The ITE Function Keys 3-10
4 ITE Commands 4-1
liow to Enter ITE Commands 4-1 ITE Command Reference 4-7 ITE Command Syntax Summary 4-24
5 Problems and Error Messages 5-1
Problems 5-1 Error Messages 5-5
Appendix A Connecting to a Non-Fortune System A-1
Modem Connections A-1 Cable Connections A-1
v

Device Configuration A-4 ITE Communications Protocol A-4
Appendix B Making a Double ITE Connection B-1
Appendix C Flow Control C-1
ITE Flow Control Modes C-1 The TTY Driver C-1 Changing the Host System's DECCTLQ Parameter C-2 Stopping and Starting the Screen Display:
More on DECCTLQ C-3 Details on ITE's Flow Control Modes C-3
vi

vii

CHAPTER!
Introduction to the Interactive Terminal Emulator

The Interactive Terminal Emulator (ITE) is a communications package that enables asynchronous, full duplex communication between two Fortune systems or between a Fortune system and a non-Fortune system. ITE is based on the FOR:PRO cu command. However, you don't have to know about cu to use ITE.
WHAT ITE DOES
ITE has two main functions:
• Terminal emulation • File copy between systems
The two functions combine to allow resource sharing between systems.
NOTE: ITE file copies are only possible between two Fortune systems or between a Fortune system and another UNIX-based system.
Te rmi nal Emulation
As its name implies, ITE emulates a terminal. To a Fortune system, another Fortune system running ITE looks exactly like an FIS 1000 (satellite) workstation. To a non-Fortune system, a Fortune system running ITE looks like a non-intelligent terminal. (Refer to Figure 1-1.)
You can use ITE to connect a Fortune system to any UNIX-based computer. If you want to connect a Fortune to a non-UNIX computer, refer to the last section of Appendix A for information on the communications protocol used by ITE. Then check with the system manager of the non-UNIX system to see if that system accepts ITE protocol. Most systems can accept a Fortune system running ITE as a Model 33 or 37 Teletype.
ITE supports communications at baud rates of up to 9600. You can change the baud rate during an ITE session without breaking the connection between systems.
7/84 1-1 ITE Reference Guide

11"'11 ~UUU\""IIVI"\l
To Fortune System A, Fortune System B
Looks like a FIS 1000 workstation
Fortune System B
To the Non-Fortune System, Fortune System B
Looks like a Terminal
Fortune System B
Fortune System A
Non-Fortune System
Figure 1-1. Terminal Emulation
File CODies
FIS 1000
ITE can be used to copy ASCII text files between two Fortune systems or between a Fortune system and a non-Fortune UNIX system. (Refer to Figure 1-2.) Note that the non-Fortune system l1llJ.S.t be UNIX-based for file copies to work.
ITE can copy files between systems at baud rates of up to ~6UO. However, in some cases (for example, on heavily loaded systems), copies will be more reliable at lower rates. ITE does not keep records of the bytes transferred, and no error checking is done. Binary files cannot be copied. If you want to copy binary files, or copy many files in batch mode, you should use another Fortune
ITE Reference Guide 1-2 7/84

IN I KUUUL IIUI~
Fortune System
~TEJ Fortune System or
~~- Non-Fortune UNIX system
~ \ > I Send files
~ ITE line ~
.A Receive files I
'"14
Figure 1-2. File Copy Using ITE
Systems communications product called Fortune-to-Fortune Copy. The Fortune-to-Fortune Copy package (based on the FOR:PRO uucp command) performs error checking and keeps records of all copies and attempted copies. Refer to An ODerator's Guide to Fortune-to-Fortune CODY for further information.
Resource Sharin"
ITE allows you to use the resources of a system other than your own without leaving your terminal. From your Fortune system, you can connect to and log into another computer, send messages to other users on that system, make use of tools like compilers and databases, and use other resources like printers.
Suppose you had two Fortune systems, A and B, as shown in Figure 1-3. System B has a printer, but system A does not. You can connect system A to system B so that users of system A can log into system B, copy files from A to B, and print these files on system B's printer. Further, users on the two systems can share data files.
Other ITE Functions
Once you have connected two systems via ITE, you can do more than copy files back and forth. The ITE commands also let you execute command files remotely, divert output from one system to another, switch back and forth between systems, and dynamically change the baud rate of the line. Chapter 4 tells you how to perform these functions.
7/84 1-3 ITE Reference Guide

INTRODUCTION
System A System B
~TEJ D Pnnter
I I ""'---~ ""'--- / rl
~ I I!U \ L \
1
~ ) ~ ) Al020
ITE line Pn nter cable
Share System B's pnnter > Figure 1-3. Resource Sharing
THE TERMS "HOST" AND "GUEST"
In any ITE connection, the concepts of ~ and ~ are essential. One system is always the host, and the other, the guest.
The main distinction between the two systems is that users on the guest system can log into the host, but users on the host cannot log into the guest. The guest also initiates all file copies between the two systems. It is the user on the guest system who runs ITE and issues ITE commands. ITE does not have to be installed on the host system. (Refer to Figure 1-4.) With the exception of Appendix A, this guide assumes that the guest system is a Fortune system, since the ITE Master disk is made for Fortune systems.
Whenever you physically connect your Fortune system to another computer, you must decide which system is the guest and which is the host. You are asked to supply this information when you make the ~ connection between the two systems. (Logical connections are discussed in Chapter 2.)
You may be familiar with the use of the terms ~ and ~. These terms do not have the same meanings as hQ.s.t and~. A host and a guest may be physically close together or far apart. For example, the system in your office may be the host and the remote system may be the guest, or vice versa. On the other hand, both the guest and the host may be in your office. In this guide, the same person is assumed to be configuring both the guest system and the host system. The local/remote distinction is not used in this guide.
ITE Reference Guide 1-4 7/84

~
Guest
~TEJ ~ ~
~\ ("1dl-
l ~
<: No login I ITE line
Login "-a....--.-......yI' Initiate file copies
Issue ITE commands
INTRODUCTION
Host
D r-- "':-- L
J
f1- i
j A1021
Figure 1-4. The Concepts of Guest and Host
It is possible to connect two Fortune systems in such a way that each one can be either guest or host. However, to do this you must either make two entirely separate physical connections, or change the logical connection whenever the systems switch roles. (Refer to the section, "Making a Symmetric ITE Connection" in Chapter 2 for more information.)
WHEN NOT TO USE ITE
You do not need to use ITE to connect an FIS 1000 (satellite) workstation to a Fortune system. To do that, all you need is the CPU-to-Workstation cable or a pair of modems. For information on physically connecting a satellite workstation, refer to Meet Your Fortune System. For information on the necessary software configuration, refer to the FOR:PRO Installation Instryctions.
ITE is only needed when you are connecting two Fortune systems or when you are connecting a Fortune system to a non-Fortune system. (See Figure 1-5.)
USING ITE FROM A SATELLITE WORKSTATION
Suppose multiuser system A is connected as a guest to multiuser system B as shown in Figure 1-6. If you have an account on system B, you can use ITE to log into host system B from one of system A's FIS 1000 satellite workstations, or from system A's master console. The host system does not care whether you are working
7184 1-5 ITE Reference Guide

INTRODUCTION
FIS 1000
D
FIS 1000
D r----'--. /--
("1dI.
-c "\
Telephone I mes
! "YL
CPU-to-workstatlon cable
Fortune System
D
Fortune System
D """-- .-/
~\
) A1022
Figure 1-5. Cases in Which ITE Should Not Be Used
FIS 1000
~TE]I ~ .?---
(""1dI- "\
System A (Guest)
f@ "'--- ~
.. ) .,.
1
System B (Host)
D ~~
'=II- "\ ! '=II- ~\
\. ) A1023
"- ITE line
Figure 1-6. Using ITE from a Satellite Workstation
ITE Reference Guide 1-6 7/84

INTRODUCTION
on a satellite workstation or on the master console. Of course, only one of the users on a Fortune system can use a particular ITE line at any given time. If you want to allow several guest users to access a host simultaneously, you must make a separate connection for each user.
REQUIREMENTS, CONNECTIONS, AND PROTOCOL
Reguj rement s
To use ITE, you must have a copy of the ITE software to run on the guest system. The host system must be a multiuser system. You must physically connect the two systems, using either a cable or a pair of modems. Chapter 2 describes the equipment needed and provides instructions for making connections.
Each guest system user who plans to use ITE must have a login account on the host computer. You may want to set up one special "guest" account for all guest users, or you may want to give each guest user a separate account.
Connections
A physical connection is made by running a cable between two t!Qlli on the systems to be connected, or by joining these ports by a pair of modems. Intuitively, a port is where data enters and leaves the system. Physically, a port is an RS-2 3 2-C connector.
If you have enough ports available, you can connect your FortUne system to more than one remote device. One Fortune system can connect to other Fortune systems and at the same time to non-Fortune systems. For example, you could COllnect your local system to two other Fortune systems and to one non-Fortune system. Each connection supports one ITE user at a time.
Protocol
The communications protocol used by ITE is a subset of the proposed North American Presentation Level Protocol Standard (NAPLPS) developed by the American Telephone and Telegraph Company for videotex use. This may be relevant if you are connecting a Fortune system to a non-Fortune system. The technical details of this type of connection are covered briefly in Appendix A, "Connecting to a Non-Fortune System."
7/84 1-7 ITE Reference Guide

CHAPTER 2 ITE Installation and Configuration

Before you can use ITE, you must perform the following three tasks:
1. Physical Connection
Connect the guest system to the host system with a cable or a pair of modems.
2. ~e Confiiuration
On each system, configure a J.2Qt1, or ~, for the other system. This process establishes the logical connection between the systems.
3. Software Installation
Install and back up the ITE software on the guest system. Make sure the host is a multiuser system. Create accounts on the host for guest users.
In describing these three steps, this chapter assumes you are connecting two Fortune systems. If you are connecting a Fortune system to a non-Fortune system, first read about connecting two Fortune systems, then read Appendix A.
PHYSICAL CONNECTIONS
Aboyt Ports
Recall from Chapter 1 that a physical connection between two Fortune systems is made by connecting a port on one system with a port on the other system. The ports may be connected directly by cable, or by a pair of modems and telephone lines.
Ports have other uses besides connecting systems. For example, ports can be used to attach printers or workstations to a Fortune system.
The standard Fortune system has only a single port in the center of the backplane. This port is called the Serial Input/Output (SIO) port. You can increase the number of ports by adding Serial Asynchronous (Comm A) controllers to your system. Each Comm A controller supplies either two or four ports.
7/84 2-1 ITE Reference Guide

INSTALLATION AND CONFIGURATION
If you have a Fortune 32:16 or a Fortune 32:16 XP, you can add up to three Comm A controllers. If you have a Fortune 32:16 PS, you can add one Comm A controller. The Comm A and SIO ports are all equivalent. Anyone of them can be connected to a printer, modem, FIS 1000 workstation, Fortune system, or non-Fortune system. In some cases, the SIO port may be marginally faster than the Comm A ports.
Each port on a Fortune system has a number. You will need to identify your ports by number. The SIO port is port 01. Facing the back of the CPU cabinet, the ports on the leftmost Comm A are numbered 02 and 03 (for a two-port Comm A) or 02 through 05 (for a four-port Comm A), as shown in Figure 2-1.
The ports on the next leftmost Comm A are numbered following the same pattern, starting with 04 when the first Comm A has two ports, or 06 when the first Comm A has four ports.
Comm A ports are thus numbered consecutively, starting with the leftmost Comm A and continuing to the right. In assigning these numbers, disregard any other controllers in your CPU. For example, if you have an Intelligent Communications Controller (ICC) installed between two Comm A controllers, the ICC has no effect on the numbering of the Comm A ports.
A port is often referred to as ~, where ~ is the port number; for example, ~ refers to port 03.
02~~ 04 m~
03~~05 03~
Figure 2-1. Comm A Port Numbering
ITE Reference Guide 2-2 7/84

INSTALLATION AND CONFIGURATION
The illustrations below show the backplanes of Fortune systems:
• Figure 2-2 shows the back of the CPU of a Fortune 32:16 or a Fortune 32:16 XP. Note the five panels to the left of the SIO port. The middle three can be replaced by Comm A controllers.
• Figure 2-3 shows the back of the CPU of a Fortune 32:16 PS. Note the three panels to the left of the SIO port. The middle one can be replaced by a Comm A controller.
• Figure 2-4 shows a single Comm A controller with four ports labeled tty02 through tty05.
I 3 slots available 510 port
Figure 2-2. Fortune 32:16 or 32:16 XP: Back View of CPU
1 slot available 510 port
Figure 2-3. Fortune 32:16 PS: Back View of CPU
Figure 2-4. The Comm A Controller
7/84 2-3 ITE Reference Guide

INSTALLATION AND CONFIGURATION
The SIO port and all Comm A ports conform to the RS-232-C standard. This standard was developed by the Electronic Industries Association (EIA) and is widely used for computer communications. The SIO and Comm A ports are female (DB-25S) connectors, or sockets, with 25 holes. They accept male (DB-25P) connectors, or plugs, with up to 25 pins.
Port ttyOO is located at the front right-hand corner of your CPU cabinet. This port is used only for your keyboard, and is IlQ1 an RS-232-C port. You risk destroying this port if you try to use it for any purpose other than the one intended.
Choosinii' Ports
Before you make the physical connection between two Fortune systems, you need to choose a port on the guest system and a port on the host system. For each system, you may want to make a table of the ports and their functions for easy reference. If you have a complex set of connections, it's easy to forget which devices are connected to which ports. For example, the table for your guest system might look like the following:
~ , ________ ~P~u~r~~o~s~e~---------
tty01 tty02 tty03 tty04 tty05
Printer FIS 1000 -- Data Entry FIS 1000 -- Accounting ITE Line to Rost -- Training Modem for remote terminal
In the above setup, a printer is ~onnected to the SIO port. Two FIS 1000 workstations are connected to ports 02 and 03, respectively. Another Fortune system, owned by the training group, is connected to port 04. Port 5 is connected to a modem used by a remote user who calls in from a terminal in another building. (The remote user does llQ1 use ITE to call in. Refer to the section, "When Not to Use ITE," in Chapter 1.)
Connection Methods
Two Fortune systems can be connected either by direct cabling or by a pair of asynchronous modems that tie into telephone lines. Figure 2-5 shows these two different types of connections. The top half of the illustration shows two Fortune systems connected by cable. The bottom half of the illustration shows two Fortune systems connected by a pair of modems. The modem belonging to the guest is called the originate modem and the one belonging to the host is the ~ modem. You must have one modem for each system, and the two modems must use the same baud rate.
ITE Reference Guide 2-4 7/84

INSTALLATION AND CONFIGURATION
D D '- ~ ~ ~
t-Q[ ~\ f~ ~,
L
Conneclion by cable
D D
Connection by modem
Figure 2-5. Two Types of Connections: Modem and Cable
Modem connections can be used whenever a cable connection would be difficult or impossible--for example, when the guest and host systems are in different buildings, are far apart, or are separated by walls.
Connectin~ Two Systems by Cable
The following figures show three different ways of using a cable to connect the RS-232-C ports of two Fortune systems:
• Figure 2-6: an 810-to-810 connection • Figure 2-7: an 810-to-Comm A connection • Figure 2-8: a Comm A-to-Comm A connection
7/84 2-5 ITE Reference Guide

INSTALLATION AND CONFIGURATION
Figure 2-6. SIO-to-SIO Connection
Comm A controller
Figure 2-7. SIO-to-Comm A Connection
Figure 2-8. Comm A-to-Comm A Connection
Fortune-sur;>r;>lied Cables: To connect two Fortune systems by cable, use one of the CPU-to-CPU cables listed in Table 2-1.
Table 2-1. CPU-to-CPU Cables
Cable Number
1000633-05 1000633-06 1000633-07
ITE Reference Guide
Length
10 feet 20 feet 50 feet
2-6 7/84

INSTALLATION AND CONFIGURATION
Fortune System A
2 I--~-+_"",,-
3 I--if---+-~
4 1--1---+--,
6
20 I--i---r--
Fortune System B
.-----'---'-~ 2
""'---+---~ 3
.--1--~---1 4
'--t----+--I 6
---+---;--1 20
Figure 2-9. The CPU-to-CPU Cable
WARNING: IF YOU MAKE YOUR OWN CABLES, LEAVE PINS 9 AND 10 UNCONNECTED. THESE PINS CARRY A VOLTAGE THAT CAN DESTROY EQUIPMENT.
Fortune Systems does not support cable lengths of over 50 feet, since 50 feet is the maximum length in the RS-232-C standard. For distances of over 50 feet, you will need to research longer, non-standard cables. In some cases you may need to place one or more "short haul modems" or signal boosters at intervals along the line. (However, you may be able to omit signal boosters for distances of up to about 100 feet by using low-resistance cable.) Furthermore, you may have to use lower baud rates over longer cables. In case you need to make your own cable, Figure 2-9 is a map of the pin connections inside the CPU-to-CPU cable.
Connectin~ Two Systems by Modems
There are two varieties of asynchronous modems: the acoustic ~ and the direct connect. The acoustic coupler uses your telephone to connect to the phone system, while the direct connect modem generally connects to the phone system directly by a modular connection to the phone jack. The two types of modems are pictured in Figure 2-10. In either case, you will need to connect each Fortune system to its modem by a cable.
ConnectiDi a Fortune System to a Modem: To connect your Fortune system to a modem, use one of the Fortune Systems CPU-to-Modem cables listed in Table 2-2. (Please note that these cables are for connecting to asynchronous modems only.)
7/84 2-7 ITE Reference Guide

INSTALLATION AND CONFIGURATION
Table 2-2. CPU-to-Modem Cables
Cable Number
1000633-10 1000633-11 1000633-12
Length
10 Feet 20 feet 50 feet
These cables assume that the RS-232-C port on the modem is a female DCE (Data Circuit-Terminating Equipment) port. In case you need to make your own cable, Table 2-3 and Figure 2-11 should help. Table 2-3 identifies the wires in the RS-232-C female DCE connector on the Fortune system's Comm A board or SIO port. Figure 2-11 is a map of the wire connections inside the CPU-to-Modem cable.
Acoustic coupler modem
Figure 2-10. Two Types of Modems
Fortune System DCE
I 20""""""\--/-"-'
Direct connect modem
Modem DCE
2
--+--t----i 3
...-+---f--t 4
~.....,....--t--i 5
6
Figure 2-11. The CPU-to-Modem Cable
ITE Reference Guide 2-8 7/84

INSTALLATION AND CONFIGURATION
Table 2-3. The RS-232-C Female DCE
Connector of the Comm A or SIO
Pin Signal Name
1 Ground 2 Receive Data (RxDAT) 3 Transmit Data (TxDAT) 4 Clear To Send (CTS) 5 Request To Send (RTS) 6 Data Set Ready (DSR) 7 Signal Ground 8 Data Terminal Ready (DTR) 9 + 12 Volts
10 - 12 Volts 20 Data Carrier Detect (DCD) 22 Ring Indicator (RI) 25 Busy (used for printer)
WARNING: IF YOU MAKE YOUR OWN CABLES, LEAVE PINS 9 AND 10 UNCONNECTED. THESE PINS CARRY A VOLTAGE TliAT CAN DESTROY EQUIPMENT.
The two ends of the CPU-to-Modem cable are not identical. One end is marked "HOST" and plugs into the SIO port or Comm A port in the Fortune system CPU cabinet; the other end is marked "MODEM" and plugs into the RS-232-C port on the modem. Figure 2-12 illustrates the CPU-to-modem connection.
NOTE: The CPU-to-Modem cable can be used to connect either a guest Fortune system or a host Fortune system to an asynchronous modem. The label "host" on the CPU end of the cable is meant to distinguish that end from the modem end of the cable. In this case, the word "host" simply means "computer."
If you experience difficulty with the CPU-to-modem connection, you may need to check the manual that came with your modem to make sure that the RS-232-C port on the modem can properly interface with the Fortune system's RS-232-C ports.
Direct Connect Modems: Most modern telephones plug into a wall box known as an RJ11-C telephone jack. Such a connection is called a modular connection because the cord can be unclipped from the RJll-C jack or from the phone or from both. If you have this flexibility, you can use any of the connections shown in Figure 2-13.
7/84 2-9 ITE Reference Guide

INSTALLATION AND CONFIGURATION
CPU-Io-modem cable "----------------' End of cable
marked "MODEM"
Figure 2-12. The CPU-to-Modem Connection
The top of Figure 2-13 shows a modem that plugs directly into your telephone jack. If you intend to use this type of modem to dial a host site, you will have to learn how to issue dialing commands to the modem, since no telephone set is involved. Your modem documentation should tell you how to dial.
The middle of Figure 2-13 shows a modem with a built-in T adaptor that lets you plug the modem into both the telephone and the jack. With this setup, you generally use the telephone to dial the host site. The T adaptor lets you use the telephone for voice communications when the modem is off. Note that this particular modem draws power from the telephone system, so it doesn't have a separate power cord.
The bottom of Figure 2-13 shows a modem that plugs into the telephone but does not have a built-in T adaptor. In this case, you must purchase a T adaptor so the phone can be connected to both the modem and the jack.
If you do not have a modular clip connection at the RJU-C end of your phone wire, but your phone cord unclips from your phone, you might be able to connect your modem as illustrated in the top or bottom of Figure 2-13. If neither end of your phone cord is modular, you need to either have a modular cord installed or use an acoustic coupler modem.
Acoustic Coupler Modems: An acoustic coupler modem connects the Fortune system to the phone system by using your telephone as shown in Figure 2-14. The modem uses your phone's mouthpiece and earpiece to transmit and receive signals. You do not disconnect your telephone from the RJ11-C telephone jack. To use the modem, dial the number of the computer you want to reach; when you get the high-pitched data tone, place the handset into the cradle of the acoustic coupler.
ITE Reference Guide 2-10 7/84

INSTALLATION AND CONFIGURATION
Acoustic coupler modems are generally more sensitive to environmental noise than direct connect modems. This sensitivity can cause problems at high baud rates. For this reason, direct connect modems are sometimes considered preferable for ITE communications.
Fortune System
Power
Fortune System
T-odapter
Fortune System
Figure 2-13. Connecting a Direct Connect Modem
7/84 2-11
Phone
Phone jock
Phone jock
ITE Reference Guide

INSTALLATION AND CONFIGURATION
Fortune System
Acoustic coupler modem
Figure 2-14. Connecting an Acoustic Coupler Modem
Modem Qperation: When you set up your modem, be sure to read the modem documentation to find out about the various switch settings and indicators. In most cases, the modem must be set as either an originate (guest) modem or an answer (host) modem.
For originate modems, refer to the modem documentation to find out how to dial the host, and refer to Chapter 3 of this guide to find out when to dial. ITE does not support UNIX Automatic Calling Units (ACUs). This means that you must either dial the host manually or, if you are familiar with UNIX, write a shellscript to dial for you.
For answer modems, refer to the modem documentation to find out how to set the modem to accept incoming calls.
DEVICE CONFIGURATION
In addition to connecting the guest and host systems physically (by means of a cable or a pair of modems), you must connect the two systems l~ically. Making a logical connection means telling each system about the physical connection to the other system. On each system you must define the port to which the other system is connected. This process of making a logical connection is called device confie;uration or port definition.
Suppose you connect two Fortune systems, A and B, as shown in Figure 2-15. System B, the host, is connected to port tty03 of system A, the guest. System A is connected to port tty05 of system B. To configure the devices, you would do the following:
• Log into system B as manager and define port 05 as a guest connection.
• Log into system A as manager and define port 03 as a host connection.
ITE Reference Guide 2-12 7/84

INSTALLATION AND CONFIGURATION
System A (Guest)
System B (Host)
Figure 2-15. Sample System Connection
NOTE: On each system, you define a port for the Q.tll.e.r system. On the host, you define a port for a ~uest; on the guest, you define a port for a host.
This section tells you how to define ports on a Fortune system. If your host is a non-Fortune system, consult the host's system manager to find out how to tell the host about its connection to the guest.
If you want to set up two Fortune systems so that each one can be either guest or host, refer to the section, "Making a Symmetric ITE Connection," later in this chapter.
For general information about device configuration, refer to the FOR;PRO Installation Instructions.
Definin~ a Guest Port on a Host Fortune System
To define a guest port on a host Fortune system, use these steps;
1. Log into the host as manager.
2. From the Global menu, choose the System Management option.
3. On the next screen, the System Management menu, choose the Define Device Connections option.
4. On the first Device Connections menu, shown in Figure 2-16, you see a representation of the backplane of a Fortune
7/84
system. Choose the port to which the guest system is (or will be) physically attached.
2-13 ITE Reference Guide

INSTALLATION AND CONFIGURATION
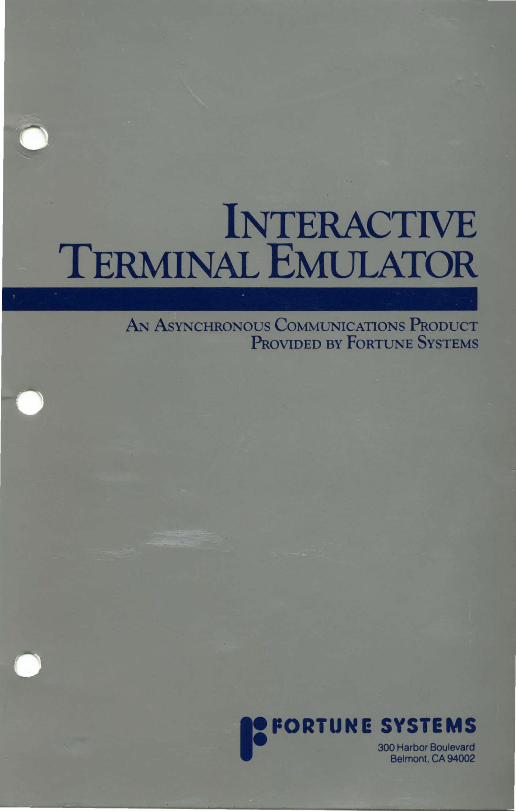
5. The next screen, the Port Definition Selections Menu, is shown in Figure 2-17. Select option 1, Define category of Device Connected to Port.
6. On the Category of Device menu, shown in Figure 2-18, select Terminal or Guest Computer.
7. The next screen, shown in Figure 2-19, asks you to enter the type of terminal or guest computer. With the exception of Appendix A, this guide assumes that the guest is a Fortune system, since the ITE Master disk is made for Fortune systems. Thus, choose Fortune.
8. The next screen, the Set Baud Rate menu, is shown in Figure 2-20. Select a baud rate. If you don't know which rate to use, refer to the section, "Selecting a Baud Rate," later in this chapter.
The baud rate that you set using this menu becomes the bQs.t baud rate for this particular ITE line. The host baud rate is the speed at which the host sends data to the guest and expects data from the guest.
DEFINE DEVICE CONNECTIONS
1 thru 17 Port Numbers Table List of Current Devices and settings
View Froll Back of FORTUNE 32:16
(Not all Fortune systells look identical to this drawing)
2 4 6 8 10 12 14 16
o 0 0 0 o 0 o 0 3 5 7 9 11 13 15 17 1
CRT o 0 0 0 o 0 o 0 (SID)
0 c:=J Press (HELP> For More Information Press (CANCEL> For Previous Menu
Bnter Selection , Press (RETURN>:
Figure 2-16. The Device Connections Menu
ITE Reference Guide 2-14 7/84
INSTALLATION AND CONFIGURATION
PORT DEFIBITION SELECTIONS
1 Dehne Category of Device Connected to Port 2 Set Baud Rate For Device 3 Define Port For Printer Messages .. Describe What This device Is Used For 5 Define Logical Device Number 6 Enable Device Use 7 Dl.sable Device use 8 Remove Configuration Information for Port
Select the option number that corresponds to the change you wish to make. Options l, 2, and 3 bring up additional menu screens. Press (HELP> for more information about these selections.
Press <HELP> For More Information or <CANCEL> For Previous Menu
Enter Selection Number' Press <RETURN>:
Figure 2-17. The Port Definition Selections Menu
CATEGORY OF DEVICE
Whl.ch category of device is connected to this port?
Printer Terminal or Guest Computer Bost Computer
To def lne any type of pr inter, type P. To def ine a Fortune terminal, type T. To deflne a communicatlons device, type H, if you can log into that device (Le., Host Computer). Type T, for Guest Computer, l.f you cannot log into the attached communications device. If you select P or H, you are then prompted for an optional Logical Device Number- (should not begln wlth 0).
Press <HELP> For More Information or <CANCEL> For Prevlous Menu
Enter Selection , Press <RETURN>:
Figure 2-18. The Category of Device Menu
7/84 2-15 ITE Reference Guide

INSTALLATION AND CONFIGURATION
9. You are now finished configuring the guest port on the host system. The system displays a table summarizing all of the device connections defined on the host system. Press the Return key to return to the menu system. If you made a mistake in your configuration, simply start over again from Step 4.
NOTE: After you define the guest port, you may need to shut down the host system and start it up again in order for the definition to take effect. In particular, you will need to perform a shutdown if the port you are defining was previously defined as a host computer or printer port.
Definin~ a Rost Port on a Guest Fortune System
To define a host port on a guest system, follow these steps:
1. Log into the guest as manager.
2. From the Global menu, choose the System Management option.
3. On the next screen, the System Management menu, choose the Define Device Connections option.
4. On the first Device Connections menu, shown in Figure 2-16, you see a representation of the backplane of a Fortune system. Choose the port to which the host system is (or will be) physically attached.
5. The next screen, the Port Definition Selections Menu, is shown in Figure 2-17. Select option 1, Define Category of Device Connected to Port.
6. On the Category of Device menu, shown in Figure 2-18, select Host Computer.
7. At the bottom of the screen, the prompt, "Enter Logical Computer Number & Press <RETURN>:" appears. Each port by which a host computer will be connected to the Fortune system must be assigned an identifying number. If you have not defined any other host connections, enter 1. If you already defined a host port with logical number 1, enter 2; and so on.
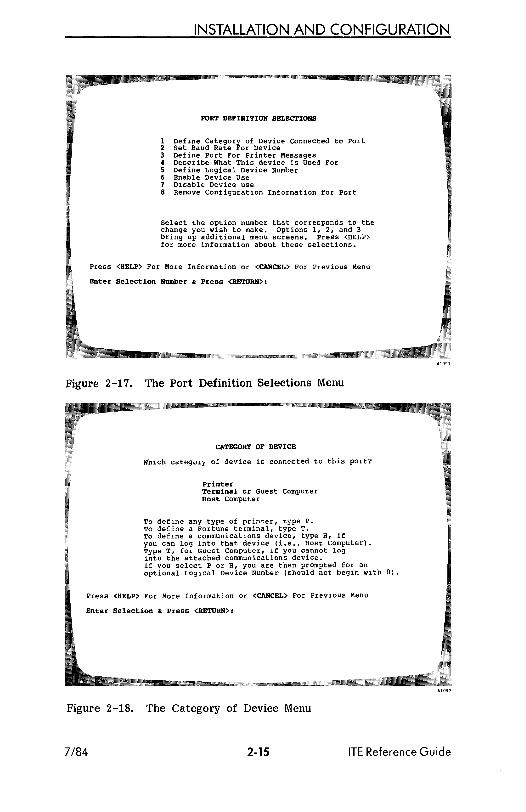
8. The next screen, the Type of Host menu, is shown in Figure 2-21. Use the following guidelines to make your choice:
• Choose Fortune 32:16 if the host is a Fortune system.
• Choose UNIX Computer if the host is a non-Fortune UNIX system.
ITE Reference Guide 2-16 7/84

INSTALLATION AND CONFIGURATION
TYPE OF TERMINAL OR GUEST COMPUTER
What type of terminal or guest computer is connected to thlos port?
Fortune Systems Equlopment, incl uding: FIS 1000 terminal (Satellite Workstation), or Fortune 32 :16 wloth Fortune termlonals, or Modern connected to Fortune equipment
NIT (Non-intelll.gent Terminal) Other
Choose the first optloon if you have any type of Fortune systems equlopment attached to thlos port. If you have a non-intelligent termlonal, choose the second opt loon • Press <HELP) for details. If you have any other type of terminal or computer, choose the ·Other" opt loon • You must then speclofy the terminal or computer type. Press <HELP) if you're not sure whloch opt loon to select.
Press <HELP) For More Informatloon or <CANCEL> For Prevloous Menu
Enter Selection' Press <RETURN>:
Figure 2-19. The Type of Terminal or Guest Computer Menu
8BT BAUD RATE
50 600 75 1200
110 1800 134 2400 150 4800 200 9600 300 19200
Choose the baud rate you want for this port. Not all devices work wloth every baud rate listed. Press <HELP) for deta101s.
Press <HELP> For More Information or <CANCEL) For Previous Menu
Enter Selection' Press <RBTURN>:
Figure 2-20. The Set Baud Rate Menu
A101l3
7/84 2-17 ITE Reference Guide
INSTALLATION AND CONFIGURATION
TYPE OF HOST COMPUTER
what type of host computer lS connected to thls port?
Fortune 32: 16 UNIX Computer (Other than Fortune 32:16) Unknown Computer Other Computer
Choose the first optlon lf the computer lS a Fortune 32:16. Choose the ·UNIX Computer· option if the computer runs UNIX, but lS not a Fortune 32: 16. If you do not know what klnd of computer the host lS, choose ·Unknown.· If you have a non-UNIX system, choose Other Computer.· You are then prompted for the name of this computer. If you are not sure WhlCh option to choose, press <HELP> for details.
Press <HELP> For More Information or <CANCEL> For Previous Menu
Enter Selection , Press <RETURN>:
Figure 2-21. The Type of host Computer Menu
• Choose Unknown Computer if you don't know what kind of computer the host is.
• Choose Other Computer if the host is a non-UNIX system. You will then be asked to enter the type of computer. Whatever you enter is placed in your device connections table as a comment.
9. The next screen, the Set Baud Rate menu, is shown in Figure 2-20. Select a baud rate. If you don't know which rate to use, refer to the section, "Selecting a Baud Rate," later in this chapter.
The baud rate that you set using this menu will become the default "uest baud rate for this particular ITE line. The guest baud rate is the speed at which the guest sends data to the host and expects data from the host.
During an ITE session, the guest baud rate must always match the host baud rate. Therefore, the default you set in this step should match the host baud rate that you set in the previous section.
Chapter 4 tells you how to change both the guest baud rate and the host baud rate in the middle of an ITE session.
ITE Reference Guide 2-18 7/84

INSTALLATION AND CONFIGURATION
10. You are now finished configuring the host port on the guest system. The system displays a table summarizing all of the device connections defined for your system. Press the Return key to return to the menu system. If you made a mistake in your configuration, simply start over again from Step 4.
NOTE: After you define the host port, you may need to shut down the guest system and start it up again in order for the definition to take effect. In particular, you will need to perform a shutdown if the port you are defining was previously defined as a guest computer or terminal port.
Selectini' a Baud Rate
ITE can use any standard baud rate up to 9600 baud. If you are using modems to connect guest and host, the baud rate you use will depend partly on the capabilities of the modems. For example, some modems provide a choice of 300 or 1200 baud.
If the guest and/or host system is heavily loaded, you may need to use a lower baud rate than you would normally use. If you find that you are losing data characters across the ITE line, lower the baud rate. You can do this either by redefining your ports or by using the CHANGE BAUD RATE command, which is described in Chapter 4. Remember that the guest and host baud rates must match. If they do not, characters will be received in garbled form.
You may find that you need to use a lower baud rate for copying files than for the rest of your ITE session. This would be true if terminal emulation worked correctly but data were lost from copied files. In this case, you could start up ITE at 9600 baud, and then use the CHANGE BAUD RATE command to lower the baud rate before copying files.
Makini' a Symmetric ITE Connection
When you set up an ITE connection between two systems, you usually know ahead of time that one system will play the role of guest and the other, host. You define the logical connection between the systems according to these roles. The single physical link (cable or phone line) between the systems is one-way; the guest can log into the host but the host cannot log into the guest.
But suppose you want each system to play the role of both guest and host. You may select one of the following procedures:
7184 2-19 ITE Reference Guide

INSTALLATION AND CONFIGURATION
• Make one ~hysical link between the two systems. Each time you want the systems to switch guest and host roles, change the logical connection--that is, change the port definitions on each system; then shut down and restart each system.
The advantage of this method is that you only use one port on each system and one physical connection. The disadvantage is that reconfiguration takes time.
Furthermore, the two systems cannot both be guests at once; tha t is, if a user on A is logged into B, no users on B may log into A.
• Make two enti rely se~arate and jnde~endent ~hysjcal links between the systems. Make two cor responding logical connections. For one physical link, define A as the guest and B as the host. For the other, define B as the guest and A as the host. The advantage of this method is that reconfiguration is unnecessary. In addition, if the two physical links are completely separate (including separate pairs of modems), two connections may be active between the systems at one time--one in each direction. The disadvantage of this method is that it uses extra ports, cables, and modems.
SOFTWARE INSTALLATION
Installin~ ITE on the Guest System
To install the ITE software, you need one copy of the ITE Master disk. The ITE software is installed on the guest system only; it need not be installed on the host.
Follow these steps to install ITE on the guest system:
1. Log into the guest system as manager.
2. Select the Product Maintenance option from the Global menu.
3. On the next screen, select the first option, Install a Product. The system displays a message that asks you to insert a flexible disk.
4. Insert the ITE Master disk. The system displays a message that indicates the name of the product. Check to be sure you have inserted the correct disk, and then enter y to answer "yes" to the question, "Proceed with installation?" The system displays various installation messages.
If you have one or more Comm A controllers installed, skip to Step 6.
ITE Reference Guide 2-20 7/84

INSTALLATION AND CONFIGURATION
5. If you do not have a Comm A controller installed, your SIO port (tty01) automatically becomes your default communications port. This means that you need not specify a port number when you invoke ITE. (If you're familiar with the UNIX logical device culO, you should know that ITE links culO to the file /dev/ttyOl.) Skip to Step 9.
6. The system, ~isplays the following message:
Do you want to define a default communications port? Type <Fl> for 'yes' or <F2) for 'no'.
7. The choice you make at this point will affect what happens when you start up ITE. Each time you start up ITE, ITE must decide which port to use--that is, which port leads to the host with which you'll be communicating. You can specify a port number when you start ITE. If you don't specify a port, ITE decides which port to use as follows:
• If you defined a default port during installation, ITE uses the default port.
• If you did not define a default port during installation, ITE uses the first host port listed in your device connections table.
You may find it convenient to define a default port if you plan to use one port for most of your ITE sessions. If you don't want to define a default port, enter n and go on to Step 9.
NOTE: Users who are familiar with the UNIX logical device culO should be aware of the following:
1. If you define port z.z as your default ITE device, ITE links the files /dev/ttyzz and /dev/cuIO. If you have already linked culO to a different device, ITE breaks your old link in order to create the new one.
2. If you enter n but you have already linked culO to a communications device, the device linked to culO automatically becomes your default communications port.
8. To define a default port, press the F1 key. The following message is displayed:
7/84
Enter default communications port number (01 - xx) and press <RETURN>:
2-21 ITE Reference Guide

INSTALLATION AND CONFIGURATION
Instead of u, you'll see the largest port number on your system. For example, if you have one Comm A controller installed, XX is replaced by 05.
Enter the number of the port you want to set up as a default. You may enter single-digit numbers with or without preceding zeros--for example, 3 or 03. If you enter a number that is outside the specified range, the system displays an error message and redisplays the previous prompt.
9. Further installation messages are displayed. When the installation is complete, you are returned to the Global menu.
Backin" uJ;> the ITE Software
After installing ITE, you should make a backup copy of the Master disk. Follow these steps to make the copy:
1. Log into the guest as manager.
2. Format a flexible disk using the System Utilities option on the Global menu.
3. Select the Product Maintenance option from the Global menu.
4. On the next screen, select the Backup option.
5. The next screen, the Product Selection menu, lists all of the software currently installed on your system. Enter cll to make a backup copy of the ITE Master Disk.
6. On the next screen, answer y to indicate that you want to back up ITE.
7. The next screen asks you to label and insert a blank flexible disk and press the Return key. After you do this, the system displays various messages indicating the progress of the backup. When the backup is complete, you are returned to the Global menu.
8. Keep your ITE Master disk and backup copy in separate safe places.
Is the Host a Multiuser System?
In order to allow remote access via ITE, the host must be a mul tiuser system. This is because the host regards the guest system as an FIS 1000 workstation. The host cannot tell the difference between a user logged in via ITE and a user logged in on a host FIS 1000. (Refer to Figure 2-22.)
ITE _Reference Guide 2-22 7/84

('='1-
INSTALLATION AND CONFIGURATION
Guest (Single user or multiuser)
~TEJ ~~
\
\ ITE line
['=l1-
Host (Only multiuser)
D ~~
~\
) A 1 O?~
Figure 2-22. The Host Must Be a Multiuser System
To find out if the host is already a multiuser system, follow these steps:
1. Log into the host system.
2. Select the Product Maintenance option from the Global menu.
3. On the next screen, select the Backup option.
4. On the next screen, the Product Selection menu, look for the entry:
For:Pro Multi-user OS
If this entry appears, the host is a multiuser system. Skip Steps 5 and 6.
5. If the "Multi-user" entry does not appear, you will need to install Multiuser FOR:PRO on the host system. To do this, log into the host as manager. Follow Steps 2 through 4 under "Installing ITE on the Guest System," earlier in this chapter, and substitute the Multiuser FOR:PRO disk for the ITE Master disk.
6. The system displays various installation messages and then returns you to the Global menu.
7. You may also need to change the swap space setting on the host system, and/or change the "Appx. # of users" parameter on the host system's cold boot configuration menu. For information on these procedures, refer to the FOR:PRO Installation Instructions.
7/84 2-23 ITE Reference Guide

INSTALLATION AND CONFIGURATION
CreatiIli Accounts on the Host
Every guest system user who intends to log into the host system using ITE must have an account on the host. You may choose to create a separate host account for each guest user. Alternatively, you may decide to create one account (for example, "guest") for all guest users.
ITE Reference Guide 2-24 7/84

2-25

CHAPTER 3 UsingITE

Once you've completed the physical and logical connections described in chapter 2, you are ready to use ITE. The first part of this chapter tells what you can do with ITE. The second part tells how to start ITE, and the third part introduces the ITE function keys.
TYPICAL USES
The first step in running ITE is always to connect to and log into the host system from the guest system. Once you have done that, you can issue any commands that are supported on the host, and use any host files to which you have access rights. You can also issue ITE commands to perform functions such as copying files between the systems, executing guest command files on the host, diverting output from the host to the guest, switching between host and guest shells, and dynamically changing the baud rate of the line. You can issue ITE commands by typing them in or by pressing function keys.
When you log into the host system, you also remain logged into the guest. You can return to the guest and execute commands without breaking the ITE connection to the host. Thus, while using ITE, you have access to the full ranges of both the guest and the host systems' software.
Table 3-1 summarizes some of the major functions of ITE, along with the associated commands. For detailed descriptions of these commands, see Chapter 4.
Table 3-1. What You Can Do with ITE
What You Can Do
Copy files from the guest system to the host system. (host must be a UNIX system.)
Copy files from the host system to the guest system. (Host must be a UNIX system.)
7/84 3-1
Command to Use
SEND FILE
RECEIVE FILE
ITE Reference Guide

USING ITE
What You Can Do
Execute a guest command file on the host system. (May not work if the host is a non-UNIX system.)
Switch back to the guest system without breaking the ITE connection.
Terminate the current operation on the host system.
Dynamically change the baud rate without breaking the connection to the host.
Disconnect from the host system and exit from ITE.
Divert output from a process on the host system to a guest file.
Turn display on guest screen on and off.
Execute command output from the guest system on the host system. (May not work if the host is a non-UNIX system.)
A Typjcal Scenario
Command to Use
liOST COMMAND EXECUTE
GUEST SHELL
BREAK
CHANGE BAUD RATE
DISCONNECT
APPEND DIVERT or DIVERT
DISPLAY TOGGLE
GUEST SHELL HOST DISPLAY
Suppose you have two Fortune systems connected via cable as shown in Figure 3-1.
System A is defined as the guest and system B as the host. Suppose you are a user on system A and you want access to B because it has a printer and a Pascal compiler. Assuming you have an account on system B, the following sketch suggests how you could access Bls resources. The ITE procedures listed here are described in more detail in the section, "Starting ITE," later in this chapter, and the section, "ITE Command Reference," in Chapter 4.
1. Connect to system Busing ITE.
2. Log into system B once the connection has been established.
ITE Reference Guide 3-2 7/84

USING ITE
FIS 1000 Pnnter
D I l IH-- -----1l1
.==.. = "/ I ll'"' 7
I > Send files Use Pascal
~TEJ Use Pnnter
tASCAj System B FIS 1000 (Host)
D ~ 7 ~ 7 ITE line
\ ~
SystemA< Al046
Receive files I (Gr')
D D FIS 1000 FIS 1000
Figure 3-1. Sharing System Resources
3. If your account on system B is set up so that you log into the Global menu, get into a command shell by entering .lsh (or, if your system has the C shell installed, .ksb) from the Global menu. (You must be at FOR:PRO command level in order to copy files between guest and host.)
4. Use the SEND FILE function key (FlO) to copy a text file from system A to system B for printing. Use SEND FILE again to copy a Pascal source program from system A to system B for compiling. Use it once again to copy- a data file to be processed by the Pascal program. Then print the text file, and compile and run the Pascal program.
5. Use the RECEIVE FILE function key (F9) to copy the Pascal program's output back to system A.
6. When finished, log out of system B; then press the DISCONNECT function key (Fl) to exit ITE and return to system A.
7/84 3-3 ITE Reference Guide

USING ITE
NOTE: Simply disconnecting does not log you out of the host system. It's very important to log out before disconnecting; otherwise, other users might be able to pick up your line and access your files on the host system.
STARTING ITE
This section tells you how to start ITE from both the menus and FOR:PRO shell level. Before starting ITE, be sure you have a login account on the host system. Please note that the host system must be up and running before you try to log into it. If you are using modems to connect the two systems, the modem on the host end must be turned on and ready to receive calls.
Startin~ ITE from the Global Menu
Follow these four steps to start ITE from the Global menu:
1. On the guest system, choose the Asynchronous Communications option from the Global menu.
2. The next screen is the Asynchronous Communications menu, shown in Figure 3-2. This menu has three options. Choose the Interactive Terminal Emulator option.
3. The next screen you see is the ITE Line Speed menu, shown in Figure 3-3. This menu asks you to choose the line speed (baud rate) at which you want to run. Choose the baud rate that matches the host baud rate. The host baud rate is the rate you defined for the ITE line when you configured the ITE connection on the host system. If you don't specify the correct rate, the connection will succeed but transmitted data will be garbled.
4. After you select the baud rate, you see the ITE Options menu, shown in Figure 3-4. You can either enter go, or enter a series of options.
Enterine- ,,0: If you enter go, your connection is made as follows:
• If a default port was created during installation of ITE, you are connected to the default port.
• If a default port was not created during installation, you are connected to the first host port listed in your device connections table. (To view this table, enter 82 39 t from the Global menu.)
ITE Reference Guide 3-4 7/84

USING ITE
ASYNCHRONOUS COMMUNICATIONS
Interactive Terminal Emulator
2 Fortune to Unix-Computer F1le Copy
Fortune to Unix-Computer Command Execut10n
Enter selection and press <RETURN):
Press <CANCEL) for Global Menu
Figure 3-2. The Asynchronous Communications Menu
INTERACTIVE TERMINAL EMULATOR LINE SPEED MENU
Description: The Fortune Systems Interactive Terminal Emulator allows your Fortune system to serve as a term1nal to many host computers, wh1ch may be other Fortune systems, other computers running Un1x, or any other computers support1ng a model 33 Teleytpe.
Line Speed
Entec Line Speed and press <RETURN>:
300 1200 2400 4800 9600
Press <CANCEL) for Asynchronous Commun1cat1ons Menu
Figure 3-3. The ITE Line Speed Menu
7/84 3-5 ITE Reference Guide

U!:)ING ITE
INTERACTIVE TERMINAL EMULATOR OPl'IONS MENU
Go Go. Select No Options
Options
Break Convert Nulls to Breaks
Functions Invoke Function Keys
Line Port Number (01 - 17)
Enter options (separated by a space) and press <RETURN>:
Press <CANCEL> for Line Speed Menu
Figure 3-4. The ITE Options Menu
In this connection, the ITE function keys are disabled. In some cases you may find this useful. In other cases you may want to enable the keys after you have logged into the host system. For information on the function keys, refer to the section, "The ITE Function Keys," later in this chapter.
Enterin~ Q!;>tions: The ITE options are summarized in Table 3-2. If you enter a series of options rather than entering go, ITE makes a connection using the options you enter. Enter options in the same order in which they appear on the screen (b, f, 1), separated by spaces. Type in one, two, or all three of the options, followed immediately by a Return.
For example, suppose you have a cable connecting your guest system to a host Fortune system. The cable is attached to port 04 (tty04) on your system and the line speed on the host system port is 4800. Furthermore, suppose you want the ITE function keys enabled when you connect to the host. To start up ITE, you would follow these steps:
1. Select the Asynchronous Communications option on the Global menu.
ITE Reference Guide 3-6 7/84

USING ITE
Table 3-2. ITE Options
Option
Break
Functions
Line
Description
Converts null characters to breaks. This option is not commonly used in a Fortunesystem-to-Fortune-system connection. It converts the character CTRL-Shift-@ to a BREAK command. This may be useful to you if you want to issue a BREAK in the middle of a command line.
Enables the function keys. Refer to the section, "The ITE Function Keys," later in this chapter, for information on the function keys.
Indicates that you want to specify a communications line. You will be prompted for the number of the port that leads to the host system. See example below. (Note that this option uses the letter "el," not the numeral "one.")
2. At the Asynchronous Communications menu, select the Interactive Terminal Emulator option.
3. At the ITE Line Speed menu, specify the baud rate as 4800.
4. At the ITE Options menu, type f 1, leaving spaces between the options but not after the "1" option. When you press the Return key, the system responds with the prompt, "Enter Port Number (01-17):" Type in the two-diiit number of the port that leads to your host--in this case, 04--and press the Return key.
NOTE: You can also enter the port number on the same line as the options (f 1 04). If you do this, be sure to type a space between the "1" and the port number.
You have now started up ITE. Your screen should display one of the following messages:
Connected Carrier is present
or
7/84 3-7 ITE Reference Guide

USING ITE
Connected Carrier is not present
To find out how to complete the connection to the host system, skip to the section, "Completing the Connection," below.
Startin~ lIE From FOR:PRO
To start up ITE from a FOR:PRO command shell, you must use the cu command. On the cu command line you supply the appropriate baud rate and port number, and indicate whether or not you want the function keys activated. Using cu from a command shell does the same thing the lTE menus do--it connects you to a host system via a specified communications line.
Ihe cu Command: The cu command has the following syntax:
cu [-s <baud rate> ] [-0] [-1 xx] [-<n>]
The options can be specified in any order, and have the following meanings:
-8 <baudrate>
-0
-1 xx or -1 /dev/ttyxx
-<n>
Specifies the baud rate of the line. For baud rate, SUbstitute the baud rate setting for the lIE line as defined on the host system.
Enables the function keys so you can use them to issue lTE commands once you have logged into the host.
Specifies the communications line (port) to be used. For~, substitute the number of the port that leads to your host system. For example, if the host is connected to port 02, include -1 02 in the command line. Note that this option uses the letter "el," not the numeral "one."
Specifies the communications line (port) to be used. For.D, SUbstitute the logical device number of the host. This number appears to the right of the word "Comm" in your device connections table. (To view this table, enter 82 39 t from the Global menu.)
The -1 and -<n> options serve the same purpose: both specify the communications port to be used. You can use either option, but don't include both options on the same command line.
ITE Reference Guide 3-8 7/84

USING ITE
For example, suppose you want to connect to a host system that is attached to your system's port 04. Assume the host baud rate for the line is 4800, and you want the function keys enabled.
To make the connection, you would enter the following command:
CU -8 4800 -0 -1 04
Defaults for eu: The following defaults are used if you don't supply options on the cu command line:
• If you don't specify a port, then you are connected either to your default ITE port (if a default port was created during installation of ITE), or to the first host port listed in your device connections table. To view the table, enter 82 39 t from the Global menu.
• If you don't include the -0 option, the function keys are disabled.
• If you specify neither a port nor a baud rate, ITE uses a baud rate of 1200.
• If you use the -<n> option to specify a port but do not specify a baud rate, ITE uses the port's associated baud rate. This baud rate is listed in your device connections table. The baud rate appears to the left of the word "Comm" in your device connections table.
• If you use the -1 option to specify a port but do not specify a baud rate, ITE uses a baud rate of 1200.
NOTE: Remember that the baud rate you use must always match the baud rate set on the host system. Otherwise, transmitted characters will be garbled.
ComJ,?leting the Connect jon
After you start up ITE from the menus or from FOR:PRO, you are connected to the host system. Your screen displays one of the following messages:
Connected Carrier is present
or
Connected Carrier is not present
7/84 3-9 ITE Reference Guide

USING ITE
These messages tell you the state of pin 20 of the RS-232-C connector you are using on the guest system. Pin 20, Data Carrier Detect, can be in either of two states: up ("Carrier is present") or down ("Carrier is not present"). Carrier is the electrical signal that carries data over wires.
If carrier is present: If you are using a modem, dial the host site at this point. If dialing is successful, you should receive a host prompt--for example, a login prompt. If dialing is unsuccessful, check your modem switch settings. Make sure the guest and host modems are both up and running. Check to be sure the device configurations are correct on the guest and host systems.
If you are using direct cabling, press the Return key once or twice until you receive a prompt from the host system. If you don't receive a prompt, you probably have a connection problem. Check to be sure you are using the correct cable. Also check the device configurations at the guest and host sites.
If carrier is not present: If you are using a modem, try dialing the host. You should receive a host prompt. If dialing does not work, try pressing the F2 key once or twice (if your function keys are enabled) or entering -, once or twice. You may receive a "Carrier is present" message. Try dialing again. If dialing still does not work, check your modem switch settings and device configurations, and make sure both modems are up and running.
If you are using direct cabling, press the F2 key once or twice (if your function keys are enabled) or enter -, once or twice. You should receive a "Carrier is present" message. If not, you probably have a connection problem. Check to be sure you are using the correct cables. Also check the device configurations at the guest and host sites.
When You Are Connected: When you see the host's login prompt, enter your account name (and password if you have one) to log in. If the host is a Fortune system, and if your account is set up so that you automatically enter the menu system, you may want to transfer to a FOR:PRO command shell before issuing ITE commands. In particular, you ..mull transfer to a FOR:PRO command shell if you want to use the CHANGE BAUD RATE, RECEIVE FILE, or SEND FILE commands. Refer to Chapter 4 for more information on issuing ITE commands from the menu shell versus a command shell.
THE ITE FUNCTION KEYS
Each ITE command has an associated function key. The keystrip supplied with ITE labels the function keys with their command names. Figure 3-5 shows the ITE keystrip. Your keystrip may substitute "local" for "guest" and "remote" for "host" in command names, as the one in Figure 3-5 does. If so, you may want to
ITE Reference Guide 3-10 7/84

USING ITE
use a felt-tip pen to change the terms to "guest" and "host." In addition, note that function key Fll (ChANGE BAUD RATE) may not be labeled on your keystrip.
Figure 3-5. The ITE Function Key Strip
If you enable the function keys when you connect to the host system, you can issue an ITE command by simply pressing the appropriate function key, and then supplying whatever command line arguments are needed. (For example, you may need to enter the names of files to be copied between the systems.) Regardless of whether the function keys are enabled or disabled, you can always type in ITE commands instead of using the function keys. Chapter 4 provides specific information about how to use commands and function keys.
You can use the ITE function keys only while logged into the host. After you have connected to the host, you can press the HELP key to remind yourself of the meanings of the function keys.
When the ITE function keys are enabled, you cannot use the function keys for other applications. The ITE commands take precedence over any uses for the function keys.
NOTE: Function keys F12 through F16 are not used by ITE. If you press one of these keys by accident, you will see the error message "Unknown local function." Press the Return key to get the host prompt back again.
Enablin~ the Function Keys
If you enable the function keys when you access the host system, they will be active when you log into the host system. However, if you did not enable the function keys prior to accessing the host system, you can still activate them once you log in. Simply type:
(The tilde, -, is a special character that is part of all ITE commands. See Chapter 4 for more information about the tilde.) Press the Return key twice. Now you can use the ITE function keys to initiate ITE commands.
7/84 3-11 ITE Reference Guide

USING ITE
Disabling the Function Keys
There are situations' in which you don't want to have the function keys enabied for ITE. For example, suppose you want to use Multiplan™ or Fortune:Word™ on the host system. In this case the function keys must be free for use by a product other than ITE. Turn off, or disable, the ITE function keys by typing
and pressing the Return key twice. When the ITE function keys are disabled, you can access Fortune:Word, Multiplan, or other applications that use the function keys, and the function keys will work properly for those products. You can always turn the function keys back on when you need them to perform ITE functions.
ITE Reference Guide 3-12 7/84

3-13

CHAPTER 4 ITE Commands

This chapter covers the format and usage of all ITE commands. The following topics are covered:
• How to enter ITE commands • ITE command reference • I TE command syntax summary
Keep the following points in mind as you prepare to run ITE:
• If your host system is another Fortune system, it may be running a different release of FOR:PRO than the guest, or may have different software and utility packages installed.
• If the function keys are enabled for ITE, you can't use them for other applications like Fortune:Word or Multiplan on the host system. You must disable the ITE function keys in order for them to be used with other applications. (Chapter 3 tells you how to enable and disable the function keys.)
• When the host system is a non-Fortune system running UNIX, beware of differences between the Fortune system and the host. While most UNIX systems run similar sets of commands and utilities, there are variations among the implementations of UNIX. The system programmer's or system administrator's manual for your particular host UNIX system should provide useful information.
NOTE: Many ITE commands are designed primarily to be used from command level on the host system. Thus, if your host is a Fortune system, you may need to transfer to a FOR:PRO command shell once you are logged into the host through ITE. This chapter assumes some knowledge of FOR:PRO's Bourne shell commands. For an introduction to these commands and to the shell concept, refer to Introduction to FOR:PRO.
HOW TO ENTER ITE COMMANDS
When you are logged into the host with function keys enabled and you press a function key, you will notice that a sequence of characters beginning with a tilde (-) appears on your screen.
7/84 4-1 ITE Reference Guide

ITE COMMANDS
For example, if you press the DISCONNECT key, Fl, you see tne following character sequence:
This character sequence represents the command you have entered--in this case, DISCONNECT.
Each ITE command has a ~ (such as DISCONNECT) and a character sequence (such as -.). If you want to enter an ITE command without using the function keys, you type the command's character sequence (not its name). Thus, entering -. has the same effect as pressing function key Fl. Typing a character sequence works regardless of whether your function keys are enabled.
All ITE commands begin with the tilde character. The tilde signals the guest operating system that the command line should be processed by ITE and not passed to the host system as data.
The last key you press before entering an ITE command should always be the Return key. For example, suppose you are logged into the host and you use the more command to display a long file. After reading each screen of data, you press the Spacebar for the next screen. After the last screen is displayed, the host prompt reappears. If you enter an ITE command at this point, you receive an error message, since the last key you pressed was the Spacebar rather than the Return key. Simply press the Return key and enter the ITE command again.
About the Tilde (-)
When you are logged into a host via ITE, don't use a single tilde as the first character of a line unless that line is an ITE command. This advice applies even if you are within an application such as Fortune:Word. Similarly, a file that you copy between systems via ITE should not contain a single tilde at the beginning of a line. ITE tries to interpret the characters following a single tilde as an ITE command. The tilde and its accompanying line are "caught" by the guest system rather than being sent to the host.
If you want to enter a tilde on the host system, type two tildes (--). In this case, the second tilde and the data following it are sent to the host. Similarly, if you want to copy a file that has a line starting with a tilde, edit the file and add a second tilde next to the first.
In a double ITE connection (guest to first host to second host), you would have to type in three tildes (---) to enter a tilde on the second host system. The guest system catches one tilde and passes the other two on; the first host system catches one tilde and
ITE Reference Guide 4-2 7/84

ITE COMMANU~
passes the last one on. (Refer to Appendix B for more information on double ITE connections.)
Table 4-1 lists the ITE commands. For each command, the table provides a brief description and shows the associated character sequence and function key.
Table 4-1. ITE Command Summary
Name
APPEND DIVERT
BREAK
CHANGE BAUD RATE
DISCONNECT
DISPLAY TOGGLE
DIVERT
7/84
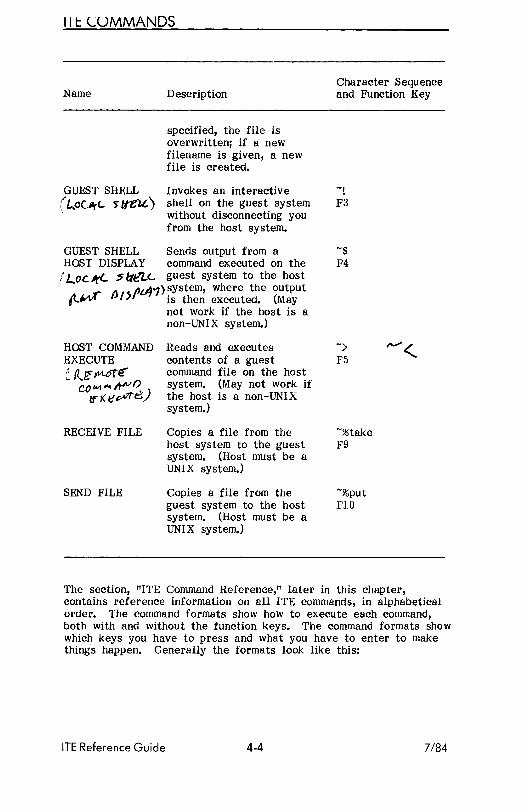
Description
Sends output from commands executed on the host system to a file on the guest system. If an existing guest file is specified, output is appended to it; if a new filename is given, a new file is created.
Terminates the current operation on the host system. In some cases, may disconnect your ITE line.
Dynamically changes baud rate on the current line. New baud rate is in effect until you change it again, or until you log out and disconnect from the host system.
Disconnects you from the host system. You should log out before disconnecting. If you don't, you will still have a process logged in on the host.
Turns data display on guest screen off and on.
Sends output from the host system to a file on the guest system. If an existing guest file is
4-3
Character Sequence and Function Key
F1
ITE Reference Guide
II t COMMANDS
Name
GUEST SHELL ( "'OCIlrc.. 5 u-eu.)
Description
specified, the file is overwritten; if a new filename is given, a new file is created.
Invokes an interactive shell on the guest system without disconnecting you from the host system.
Character Sequence and Function Key
GUEST SHELL Sends output from a -$ HOST DISPLAY command executed on the F4
f Lot. JtL ~ 1::teLc.. guest system to the host Ii • .,.. A bdj1) system, where the output
{LtvV' 1~l>r is then executed. (May
HOST COMMAND EXECUTE t rz.~ ?"tOt€'
CO"'l"",JtlVO I!"xe&Alf'~)
RECEIVE FILE
SEND FILE
not work if the host is a non-UNIX system.)
Reads and executes contents of a guest command file on the host system. (May not work if the host is a non-UNIX system.)
Copies a file from the host system to the guest system. (Host must be a UNIX system.)
Copies a file from the guest system to the host system. (Host must be a UNIX system.)
-)
F5
-%put FlO
The section, !lITE Command Reference," later in this chapter, contains reference information on all ITE commands, in alphabetical order. The command formats show how to execute each command, both with and without the function keys. The command formats show which keys you have to press and what you have to enter to make things happen. Generally the formats look like this:
ITE Reference Guide 4-4 7/84

lTE COMMANDS
FunctioILKey arguments or
Character_Sequence arguments
The arguments are items like filenames or command names, and are described below each command format. Pay careful attention to whether the arguments are preceded by a blank space.
As an example, consider the format of the DIVERT command:
or F6[:] <filename>
~>[:] <filename>
Arguments shown in angle brackets, such as <filename> in the example, are variables. When you enter a command, sUbstitute your own value for each variable. For example, in place of the variable <filename> you would substitute the name of a file.
Arguments shown in square brackets, [1, are optional. In the example, the colon (:) is optional. Note that it is not preceded by a space. Finally, note that pressing function key F6 is equival~ to entering -).
Usinli the Return Key
Whenever you type an ITE command followed by arguments, you must end the command line by pressing the Return key. The three ITE commands that do not have arguments (DISCONNECT, DISPLAY TOGGLE, and BREAK) do not require a Return before taking effect. Instead, they take effect as soon as you press the function key (or type the command sequence).
After certain ITE commands finish executing, you must press the Return key once more to get the host system prompt back. This is because entering the ITE command temporarily interrupted your communication with the host. The command descriptions provided below indicate whether this extra Return is needed.
Command Shell VS. Menu Shell
The following discussion assumes that your host system is a Fortune system.
You can use any ITE command while you are at command shell level on the host system. In addition, if your host is a Fortune system, certain ITE commands can be used from the host menu shell. To enter an ITE command from a menu, simply type the command at the menu prompt.
7/84 4-5 ITE Reference Guide

ITE COMMANDS
Many ITE commands are designed primarily for use in conjunction with FOR:PRO commands. For example, the DIVERT and APPEND DIVERT commands are usually followed by a series of FOR:PRO commands whose output is written to a file on the guest system. If your host account logs you into the Global menu, and if you plan to use ITE commands, you may find it simplest to transfer to a command shell after you log into the host.
To transfer to the Bourne shell from the Global menu, enter Ish at the Global menu prompt. (If your system has the Development Utilities installed, you may also transfer to the C shell, or Berkeley shell, by entering !esh at the Global menu prompt.)
For an introduction to the concepts of shells, refer to Introductjon to FQR:PRO.
The following two ITE commands are useful from both command and menu shells:
• BREAK (F2, -#) • DISCONNECT (FI, -.)
The following six ITE commands can also be used from a command shell or the menu shell. However, in most cases they should be used from a command shell. Using these six commands from a menu can lead to results you may not expect. For example, in some cases, if you issue the APPEND DIVERT or DIVERT command from a menu, the menu itself is copied (in garbled form) to the guest output file.
• APPEND DIVERT (F8, -») • DISPLAY TOGGLE (F7, -:) • DIVERT (F6, -» • GUEST SHELL (F3, -0 • GUEST SHELL HOST DISPLAY (F4, -$) • HOST COMMAND EXECUTE (F5, -<)
The following three commands may only be entered from a command shell:
• RECEIVE FILE (F9, -%take)
• SEND FILE (FlO, -%put)
• stty. This command is not an ITE command. However, if you wish to use the ITE CHANGE BAUD RATE command, you must issue an stty command immediately beforehand. Thus, for all practical purposes, you cannot use the CHANGE BAUD RATE command from a menu. For details, refer to CHANGE BAUD RATE, later in this chapter.
ITE Reference Guide 4-6 7/84

ITE COMMANDS
Documentation Conventions
Table 4-2 summarizes the documentation conventions used in the command reference in this chapter.
Table 4-2. Documentation Conventions
Convention
filename
<argument>
[argument]
bold text
GUEST$
HOST$
CTRL-D
Meaning
In place of a single name, you can always use a full or relative pathname.
Angle brackets indicate variable arguments.
Square brackets indicate optional arguments.
Commands, files, and user input are indicated by bold text.
This symbol indicates the guest system shell prompt in examples. The prompt on your guest system depends on the shell you are using and on any changes you may have made to your account there.
This symbol indicates the host system prompt in examples. The prompt on your host system depends on that particular system and on any changes you may have made to your account there.
Indicates the simultaneous use of both the CTRL key and the D key. (Press CRTL first and hold it down while pressing the D key.)
ITE COMMAND REFERENCE
APPEND DIVERT
The APPEND DIVERT command directs commands and output from the host system to a file on the guest system. If you specify the name of an existing guest file, the data are appended to the file. If you specify a new filename, the data are written to a new file that is created on the guest system.
7184 4-7 ITE Reference Guide

ITE COMMANDS
Command Format
The format of the APPEND DIVERT command is as follows:
or F8[:] <filename>
-»[:] <filename>
The filename argument is the name of the output file. If the optional colon (:) is supplied on the command line, your terminal screen display is suppressed for the duration of the diversion. The commands you type and their output are written solely to the specified file.
NOTE: The colon must come directly after the -», so if you use function key F8, you must press the Backspace key before you type the colon.
Usioli' APPEND DIVERT without the Colon Option
When you enter the APPEND DIVERT command, the host prompt does not reappear. Type the first command you would like diverted and press the Return key. The command is executed by the host system. The command and its output appear on your screen, as well as being diverted to the guest output file you specified. When the host prompt appears, type the next command you want diverted.
Continue in this way until you have finished entering the commands to be diverted. Then enter -> and press the Return key. This last step is necessary to close the output file. Until you terminate the diversion process with this step, all host system output is written to the guest file. If you forget to type ->, the guest file could get rather large. Finally, press the Return key once more to get the host prompt back.
For example, suppose you have a log file on the guest system, and you want to append the following information to that log:
• A list of all the users currently logged into the host • The current date and time
First, enter the APPEND DIVERT command and type the filename, as follows:
HOST$ -» log
Next, enter the who command, which generates a list of users currently active on the host system. When the host prompt reappears, enter the date command. Finally, type -> and press the Return key to close the log file and end the diversion. Then
ITE Reference Guide 4-8 7/84

ITE COMMANDS
press the Return key once more to get the host system prompt back. Assuming you did not use APPEND DIVERT's colon option, the session will look like this:
HOST$ -» log who liUard emily HOST$ date
console tty 0 5
Nov 11 10:27 Nov 11 08:05
Fri Nov 11 11:03:27 PST 1983 HOST$ -)
HOST$
The guest system file called log now contains a record of the who and date commands and their output.
Usin~ APPEND DIVERT with the Colon Option
After you enter the APPEND DIVERT command with the colon option, your cursor does not move. Type the commands you would like diverted and press the Return key after each command. The commands are executed by the host system. The commands and their output are written to the guest output file you specified, but do not appear on your screen.
When you have finished entering the commands you would like diverted, enter -) and press the Return key. Your terminal display starts again beginning with the -). Entering -) is necessary to close the output file. Until you terminate the diversion process with this step, all host system output is written to the guest file. If you forget to type -), the guest file could get rather large. Finally, press the Return key again to get the host prompt back.
After entering APPEND DIVERT with the colon option, you may change your mind and decide that you want to see the commands you are diverting. You can turn your terminal display on again by entering the DISPLAY TOGGLE command (F7) at any time during the diversion process. (DISPLAY TOGGLE is described later in this chapter.)
For example, suppose you wanted to enter the same commands as in the previous example, but you didn't want to see the list of host users or the current date on your screen. You would use APPEND DIVERT's colon option, and the session would look like this:
liOST$
7/84 4-9 ITE Reference Guide

ITE COMMANDS
The who and date commands would not appear on your screen as you typed. However, these commands and their output would be written to your log file.
BREAK
The BREAK command can be used to interrupt a process currently running on the host system. The specific effects of BREAK depend on the type of host computer involved. On some hosts, BREAK breaks the ITE connection. On others, BREAK kills the current host operation, or causes the current operation to pause and then resume.
If your host system is a Fortune system, the BREAK key does not affect the current host operation or the ITE connection. It may cause the host system to display a few stray characters in addition to the BREAK character sequence (-#). Instead of BREAK, use the Cancel key if you need to kill the current host operation.
Command Format
The format for the BREAK command is as follows:
F2 or
This command has no arguments. You need not press the Return key to make this command take effect. However, you may need to press Return afterwards to make the host system prompt reappear.
Suggestions
You may have to use the BREAK command more than once before the system responds. In some cases, you may find it necessary to press the Cancel key (in addition to entering the BREAK command) to get out of a program that is in a loop or has gone astray in some way.
CHANGE BAUD RATE
Use the CHANGE BAUD RATE command when you want to change the baud rate of the ITE line while ITE is running. CHANGE BAUD RATE dynamically resets the ~uest baud rate for the current ITE line. The new setting remains in effect until you change it again or until you disconnect from the host. The next time you connect to the host, the guest baud rate is set according to the rules given in Chapter 3.
ITE Reference Guide 4-10 7/84

ITE COMMANDS
Before you change the guest baud rate with the CHANGE BAUD RATE command, you .m.us1 change the host baud rate. If the host is a Fortune system or another UNIX computer, you can do this by using the stty command while you are logged into the host. (Details are provided below.) If the host is a non-UNIX computer, you must issue a command equivalent to stty. The guest and host baud rates must always match; otherwise the two systems will not understand one another.
The procedure for changing the baud rate during an ITE session thus consists of two steps:
1. While logged into the host and at command level, enter the command
stty <baudrate> (or equivalent, on a non-UNIX host)
where baudrate is the new baud rate you want to use. The available baud rates are listed below. The host baud rate that you set using this command will remain in effect until you use the stty command again or log out of the host system.
Recall that the stty command will not work from the menu shell on a Fortune host. You must transfer to a command shell before issuing this command.
2. After you change the host baud rate, you will see an unfamiliar sequence of characters rather than the host prompt. Disregard these characters. Issue the CHANGE BAUD RATE command as your very next command. Give the same baud rate you used in the stty command above.
Command Format
The format of the CHANGE BAUD RATE command is as follows:
FH <baudrate> or
-s <baudrate>
This command resets the guest baud rate to baud rate until the next time you reset it during the session or until you disconnect from the host system. This command does not affect the baud rate settings in your device connection table. The supported baud rate settings are as follows:
7/84
50 110 150 300
1200 2400 4800 9600
4-11 ITE Reference Guide

ITE COMMANDS
After the CHANGE BAUD RATE is executed, you must press the Return key again to get the host prompt back.
For example, the following commands reset the ITE line to 300 baud (assuming the host is a UNIX system):
HOST$ stty 300 'fx)-s 300
HOST$
Notes and Sug-~estions
If you want to return to the host's menu system after changing the baud rate, enter menu rather than COOrD. Entering CfRL-D can reset the host baud rate so that guest and host baud rates will no longer match.
You may want to lower the baud rate if you are consistently losing data when copying files via an ITE line. Keep in mind that communications lines are sensitive to system load and noise. In some cases, simply reducing the baud rate improves transmission accuracy and fixes the problem.
DISCONNECT
The DISCONNECT command breaks the connection between the guest and host systems.
NOTE: Before using the DISCONNECT command, log out of the host system. If you disconnect without logging out, another user could pick up your line and potentially access all your files on the host system.
Command Format
The DISCONNECT command has the following format:
FI or
No arguments are required. As soon as you enter this command, you should see the message:
Disconnected
followed by the guest system prompt.
ITE Reference Guide 4-12 7/84

ITE COMMANDS
Su""estions
If it appears that your terminal has hung while you are logged into the host system, try using the BREAK command before you disconnect. If BREAK does not help, try pressing the Cancel key and then pressing the Return key a few times. If nothing happens, press the Fl key or type -. to disconnect. Then reconnect and press the Return key. If you cannot disconnect, refer to the section, "Hung Terminal," in Chapter 5, for more information.
DISPLAY TOGGLE
A ~ is a switch-like device that turns a mechanism off and on. The DISPLAY TOGGLE command is a toggle that switches your terminal display off and on when you are logged into the host.
The DISPLAY TOGGLE command is used primarily in connection with the APPEND DIVERT and DIVERT commands. If you enter an APPEND DIVERT or DIVERT command with the colon option (:), your terminal display is suppressed for the duration of the diversion unless you use the DISPLAY TOGGLE command to restore the display.
For example, if you issued a DIVERT command using the optional colon (:) to suppress your terminal display, you could use DISPLAY TOGGLE while the diversion was in progress to turn the display on for a while, and then use it again to turn the display back off.
Command Format
The DISPLAY TOGGLE command has the following format:
F7 or
No arguments are required. After using DISPLAY TOGGLE to turn on your display, you must press the Return key to get the host prompt back.
DIVERT
The DIVERT command directs commands and output from the host system to a file on the guest system. DIVERT is the same as APPEND DIVERT, except that DIVERT overwrites an existing output file rather than appending output to it.
7/84 4-13 ITE Reference Guide

ITE COMMANDS
Command Format
The format of the DIVERT command is as follows:
F6[:] <filename> or
~>[:J <filename>
The filename argument can be the name of an existing file on the guest system, or the name of a new file into which commands and their output should be written.
NOTE: If you specify the name of an existing guest file, the file is overwritten.
If you want to append to an existing file rather than overwrite it, use the APPEND DIVERT command.
Usin~ DIVERT without the Colon Option
When you enter the DIVERT command, the host prompt does not reappear. Type the first command you would like diverted and press the Return key. The command is executed by the host system. The command and its output appear on your screen, as well as being diverted to the guest output file you specified. When the host prompt appears, type the next command you want diverted.
Continue in this way until you have finished entering the commands to be diverted. Then enter -) and press the Return key. This last step is necessary to close the output file. Until you terminate the diversion process with this step, all host system output is written to the guest file. If you forget to type -), the guest file could get rather large. Finally, press the Return key once more to get the host prompt back.
For example, suppose you want to create a new file called my.files on the guest system and record in it a list of your files on the host system.
First, go to your home directory on the host and enter the DIVERT command, supplying the guest filename:
HOST$ -) my.files
Next, enter some form of the Is command (for example, Is -1) to list the files in your home directory. When the host prompt reappears, type -) and press the Return key to close the log file and end the diversion. Then press the Return key once more to get the host system prompt back. Assuming you did not use the DIVERT colon option, the session will look like this:
ITE Reference Guide 4-14 7/84

HOST$ -) my.files Is -1 total 4 1 drwxrwxrwx12 emily 1 drwxrwxr-x 6 emily 1 drwx------ 2 emily 1 -rwx------ 4 emily HOST$ -)
HOST$
ITE COMMANDS
336 Mar 26 10:10 letters 144 Jan 31 13:53 memos 944 Mar 27 15:03 personal 272 Mar 26 17:30 report
The guest system file called my. files now contains a record of the Is -1 command and its output.
Usin" DI YERT with the Colon ODtion
After you enter the DIVERT command with the colon option, ,your cursor does not move. Type the commands you would like diverted and press the Return key after each command. The commands are executed by the host system. The commands and their output are written to the guest output file you specified, but do not appear on your screen.
When you have finished entering the commands you would like diverted, enter -) and press the Return key. Your terminal display starts again beginning with the ~). Entering -) is necessary to close the output file. Until you terminate the diversion process with this step, all host system output is written to the guest file. If you forget to type -), the guest file could get rather large. Finally, press the Return key again to get the host prompt back.
After entering DIVERT with the colon option, you may change your mind and decide that you want to see the commands you are diverting. You can turn your terminal display on again by entering the DISPLAY TOGGLE command (F7) at any time during the diversion process. (DISPLAY TOGGLE is described earlier in this chapter.)
For example, suppose you wanted to do the same thing as in the previous example, but you didn't want to see the list of your files on your screen. You would use DIVERT's colon option, and the session would look like this:
HOST$ -): my.files -)
HOST$
The Is -1 command would not appear on your screen. However, the command and its output would be written to the file my.files.
7/84 4-15 ITE Reference Guide

ITE COMMANDS
GUEST SHELL
This command switches you to a guest system command shell so that you can work on the guest system while still logged into the host. After executing one or more FOR:PRO commands on the guest system, you can switch back to the host.
Command Format
The format of the GUEST SHELL command is as follows:
or F3[<command) ]
-![ <command>]
If you want to execute only one FOR:PRO command on the guest system, include it as the optional command argument. The command is executed, and its output is followed by an exclamation point (1). Press the Return key to make the host prompt reappear. (An example is provided below.)
If you want to execute more than one FOR:PRO command in the guest shell, omit the command argument. Simply press the Return key after pressing the F3 key or after typing -I. You are switched to the guest system shell, and can enter any number of FOR:PRO commands in response to guest prompts. To exit from the guest shell, enter CTRL-D. Then press the Return key to make the host prompt reappear.
NOTE: The GUEST SHELL command starts up a new shell on the guest system rather than returning you to your current shell. Thus, the environment set in your .profile file will not take effect in the shell invoked by GUEST SHELL. (If you use the C shell on the guest system, the GUEST SHELL command executes your .cshrc file, but not your .login file.)
Examples
The first of the following examples shows how to use the GUEST SHELL command to execute a single command on the guest system. The second example shows how to perform multiple commands on the guest system.
ExecutillG' a Sin~le Guest Command: Suppose you are working on the host system and you need to remind yourself of the name of a file in your current guest system directory. You decide to switch to the guest shell and list the directory. The session might look like the following:
ITE Reference Guide 4-16 7/84

HOST$ -Us -1 total 3 -rwxr-xr-x 1 emily -rwxr-xr-x 1 emily -rwxr-xr-x 1 root
ROST$
ITE COMMANDS
30 Jul 26 12:31 file1 30 Aug 17 10:46 file2 40 May 15 11:20 file3
ExecutiOIi Several Guest Commands: Suppose in addition to listing the files in your current guest directory Uu/emily/notes), you wanted to list the files in a different guest directory Uu/emily/memos). The session might look like this:
HOST$ -! GUEST$ pwd /u/ emily /notes GUEST$ Is -1 total 3 -rwxr-xr-x 1 emily -rwxr-xr-x 1 emily -rwxr-xr-x 1 root GUEST$ cd /u/emily/melOOs GUEST$ Is -1 total 1 -rwxr-xr-x 1 emily GUEST$ !D
HOST$
30 Jul 26 12:31 file1 30 Aug 17 10:46 file2 40 May 15 11:20 file3
30 Jul 27 10:01 mem01
Your last command to the guest is CTRL-D, which is displayed as !D. Following that, you press Return for the host prompt.
GlJE)T SHELL HOOT DISPLAY
The GUEST SHELL HOST DISPLAY command does the following:
1. Executes a command on the guest system. 2. Sends the output of the command to the host system.
The output that is sent to the host in Step 2 is treated like input from the keyboard. Thus, using this command makes sense only if the host system "knows what to do" with the output you send it.
The GUEST SHELL HOST DISPLAY command may not work if the host is a non-UNIX system.
7/84 4-17 ITE Reference Guide

ITE COMMANDS
Command Format
The format of the GUEST SHELL HOST DISPLAY command is as follows:
F4<command) or
-$<command)
When you enter this command line, the guest system executes command. The output is sent to the host and is displayed on your screen. What happens next depends on the contents of the output.
Exam~le
The following example illustrates the most common use of GUEST SHELL HOST DISPLAY. Suppose you have a command file called cmdfile on the guest system. This file contains the commands:
who date
You want to execute this file on the host system. Starting from command shell level on the host, you enter the following:
HOST$ -$oot cmdfile
Here, the command argument is cat cmdfile. This command is executed on the guest system. The output consists of the following list of commands:
who date
This list of commands is sent to the host and displayed on your screen. Then, since you are at command shell level on the host, each command is executed. The entire sequence looks like this:
ROST$ -$oot cmdfile who date emily tty02 Mar 28 13:30 [result of who command] HOST$ Wed Mar 28 13:34:39 PST 1984 [result of date command] ROST$
Notice that the host prompt, HOST$, does not appear immediately before the who command is executed. In general, you may find that the host prompts are not precisely coordinated with the executing commands. However, a host prompt does appear after all commands are executed.
ITE Reference Guide 4-18 7/84

ITE COMMANDS
Reminders
If you use the GUEST SHELL HOST DISPLAY command as in the above example, be sure your guest command file is executable on the host. If it is not, error messages result.
Other uses of GUEST SHELL HOST DISPLAY are possible. For example, if you were running a host application that was expecting input data, you might be able to use GUEST SHELL HOST DISPLAY to execute a guest command that resulted in the required data, and then send the data to the host.
HOOT COMMAND EXECUfE
HOST COMMAND EXECUTE sends a guest system file to the host system. The contents of the file are treated like input from the keyboard. Thus, using this command makes sense only if the host "knows what to do" with the file contents.
This command may not work if the host is a non-UNIX system.
Command Format
The format of the HOST COMMAND EXECUTE command is as follows:
F5<filename>
- < <filename>
HOST COMMAND EXECUTE is most commonly used to execute guest command files on the host system. For example, suppose you have a command file called cmdfile on the guest system. The commands in cmdfile are:
who date
To execute cmdfile on the host system, enter the following command from the host system command shell:
%HOST -(cmdfile
The contents of cmdfile are sent to the host and treated as keyboard input. Since you are at command shell level, the host expects commands--so it executes the who and date commands. The entire sequence looks like this:
7/84 4-19 ITE Reference Guide

ITE COMMANDS
HOST$ -(cmdfile who date emily HOST$ HOST$
tty02 Mar 28 13:30 [result of who command] Wed Mar 28 13:34:39 PST 1984 [result of date commandJ
Notice that the host prompt, HOST$, does not appear immediately before the who command is executed. In general, you may find that the host prompts are not precisely coordinated with the executing commands. However, a host prompt does appear after all commands are executed.
Reminders
If you use the HOST COMMAND EXECUTE command as in the above example, be sure your guest command file can be executed on the host. If it cannot, error messages result.
Other uses of HOST COMMAND EXECUTE are possible. For example, if you were running a host application that expected input data, you might be able to use HOST COMMAND EXECUTE to send an appropriate data file from the guest to the host.
REcmVE FILE
The RECEIVE FILE command copies a file from a UNIX-based host system to the guest system. You must be in a FOR:PRO command shell (rather than the menu shell) on the host in order to issue this command. The RECEI VE FILE command should only be used to copy ASCII files. For binary files, use the Fortune Systems Fortune-to-Fortune Copy product.
NOTE: If the host is a Fortune system, the host's page mode must be off when you receive a file. The default setting for page mode on a Fortune system is off, so in most cases you need not worry about this requirement.
If you are uncertain whether page mode is off, before using the RECEIVE FILE command list a file that is longer than 24 lines (one screen). If page mode is on, the system displays only one screenload at a time, and the message «STOPPED» appears at the bottom of the screen. If page mode is off, the entire file scrolls without interruption.
To turn page mode off, press the Cancel key in response to the «STOPPED» message, then enter CTRL-Q.
ITE Reference Guide 4-20 7/84

ITE COMMANDS
To increase reliability, be sure the flexible disk drive on your system is not in use while you execute the RECEIVE FILE command.
Command Format
The RECEIVE FILE command has the following format:
or F9 <hostfile> [<guestfile>]
-%take <hostfile> [<guestfile> j
The bostfile argument is the name of the host file you wish to receive. The optional ~uestfile argument is the name you wish to assign to the file when it is received on the guest system. Both bostfile and ~uestfile may be simple filenames, relative pathnames, or full pathnames.
NOTE: If the destination filename already exists, RECEIVE FILE overwrites it.
It is recommended that you include ~uestfile; otherwise, the results can be confusing. If you omit guestfile, the RECEIVE FILE command tries to duplicate the bostfile pathname on the guest system.
For example:
• If bostfile is test! and ~uestfile is omitted, RECEIVE FILE copies test! to a file called test! in your current guest directory.
• If hostfile is memos/testl and ~uestfile is omitted, RECEIVE FILE looks for a subdirectory called memos in your current guest directory, and tries to copy testl into it. If your current guest directory doesn't contain a subdirectory called memos, the copy fails.
• If hostfile is /u/emily/memos/dally/testl and guestfile is omitted, RECEIVE FILE looks for a directory called /u/emily/memos/daily on the guest system, and tries to copy test! into it. If no sucb directory exists, the copy fails.
When copies fail for reasons such as these, the message "can't divert" is displayed. Although this message can have other meanings (see Chapter 5), the first thing to try when it appears is to re-enter the RECEIVE FILE command with ~uestfile included.
7/84
NOTE: Do not press the Cancel key While a RECEIVE FILE command is in progress. If you do, your terminal may hang, and you will have to kill the cu process in order to recover. Should this become necessary, refer
4-21 ITE Reference Guide

ITE COMMANDS
to the section, "Hung Terminal," in Chapter 5, for instructions.
Example
Suppose you want to copy a file named textfilel from your current directory on the host system to a directory called /u/pubs on the guest system. Suppose also that you want to name the guest copy of the file textfile2. Using full pathnames, you would enter the following command:
HOST$ -%take textfilel /u/pubs/textfile2
After you enter this command, ITE generates and displays the following messages:
echo '-):'/u/pubs/textfile2 tee /dev/null <textfilel echo '-)' -):/u/pubs/textfile2 -)
These messages indicate stages in the file copy process. When the process has finished, the host system prompt reappears.
NOTE: In files created by standard UNIX text editors such as vi and ed, the tab character is represented by CTRL-I (A1). When you receive a file that contains tab characters, the form in which you receive the tabs depends upon the stty parameter settings of the host terminal port. If the host port has sUy tabs set, then you receive tabs as AI characters. If the host port has stty -tabs set, then each tab character is expanded to a series of spaces when it is sent to your system. For information on stty parameters and how they are set, refer to Introduction to FOR:PRO.
Su~~estjon
If you find that incoming files are missing data, lower the guest and host baud rates. (See CHANGE BAUD RATE.)
SEND FILE
The SEND FILE command copies a file from the guest system to a UNIX-based host system. You must be in a FOR:PRO command shell (rather than the menu shell) on the host in order to issue this command. The SEND FILE command should only be used to copy ASCII files. For binary files, use the Fortune Systems Fortune-to-Fortune Copy product.
ITE Reference Guide 4-22 7/84

ITE COMMANDS
Command Format
The SEND FILE command has the following format:
FlO <guestfile> [<hostfile>] or
-%put <guestfile> [<hostfile>]
The ~uestfile argument is the name of the guest file you wish to send. The optional hostfile argument is the name you wish to assign to the file when it is received on the host system. Both ~uestfile and hostfile may be simple filenames, relative pathnames, or full pathnames.
NOTE: If the destination filename already exists, SEND FILE overwrites it.
It is strongly recommended that you include ho.s1fil.e; otherwise, the results can be confusing. If you omit ~, the SEND FILE command tries to duplicate the ~uestfile pathname on the guest system.
For example:
• If ~uestfile is testl and hostfile is omitted, SEND FILE copies test! to a file called test! in your current host directory.
• If ~uestfile is memos/testl and hostfile is omitted, SEND FILE looks for a subdirectory called memos in your current host directory, and tries to copy testl into it. If your current host directory doesn't contain a subdirectory called memos, the copy fails.
• If ~uestfile is /u/emily/memos/daily/testl and hQstfll~ is omitted, SEND FILE looks for a directory called /u/emily/memos/daily on the host system, and tries to copy test! into it. If no such directory exists, the copy fails.
When a copy fails for one of these reasons, there are two possible results:
• The message lICan't open file ll may be displayed. In this case, you must press the Return key to get the host prompt back. Re-enter the SEND FILE command with ~uestfile included. (Refer to Chapter 5 for other possible meanings of nCan't open file. lI )
• The guest system might send the file to the host even though there is no destination. In this case, the host receives the file as command input and tries to execute it. If the file
7/84 4-23 ITE Reference Guide

ITE COMMANDS
is executable, this could lead to results you did not intend. If the file is not executable, error messages result.
NOTE: Do not press the Cancel key while a SEND FILE command is in progress. If you do, your terminal may hang, and you will have to kill the cu process in order to recover. Should this become necessary, refer to the section, "Hung Terminal," in Chapter 5, for instructions.
Exanu;>le
Suppose you want to copy a file named textfile from a guest directory called /u/drafts to a host directory called /u/pubs/drafts. Using full pathnames, you would enter the following command:
BOST$ -%put /u/drafts/textfile /u/pubs/drafts/textfile
After you enter this command, ITE generates and displays a message that indicates that the file copy is in progress.
For example:
stty -echo; cat >/u/pubs/drafts/textfile ; stty echo
When the process has finished, the host system prompt reappears.
NOTE: In files created by standard UNIX text editors such as vi and ed, the tab character is represented by CTRL-I ("'I). When you send a file from a guest system to a host system, any tab characters in the file are passed to the host as "'I characters. That is, a tab character is not expanded to a series of spaces when it is sent to the host.
Su""estjon and Reminder
If you find that the files you send to the host are missing data, lower the guest and host baud rates. (See CHANGE BAUD RATE.) In a Fortune-system-to-Fortune-system connection, you may need to press the Return key once or twice to get your input to echo on the screen after the file copy is completed.
ITE COMMAND SYNTAX SUMMARY
Table 4-3 summarizes the syntax of the ITE commands.
ITE Reference Guide 4-24 7/84

ITE COMMANDS
Table 4-3. ITE Command Syntax Summary
Command Name
APPEND DIVERT
BREAK
CHANGE BAUD RATE
DISCONNECT
DISPLAY TOGGLE
DIVERT
GUEST SHELL
GUEST SHELL HOST DISPLAY
HOST COMMAND EXECUTE
RECEI VE FILE
SEND FILE
7/84
Command Format
F8[:] <filename> -»[:] <filename>
F2 #
Fll <baud rate> -s <baud rate>
Fl
F7
F6[:j <filename> ->[:] <filename>
F3[<command> j -![<command> ]
F4<command> -$<commands>
F5<filename> -«filename>
F9 <hostfile> [<guestfile> J -%take <hostfile> [<guestfile> J
FlO <guestfile> [<hostfile>] -%put <guestfile> [<hostfile>]
4-25 ITE Reference Guide

CHAPTER 5 Problems and Error Messages

This chapter discusses some of the problems you may encounter while using ITE. It offers some solutions to these problems and some hints on how to avoid them. The first section discusses several general problems. The second section contains a list of ITE error messages and their meanings.
Some of the suggestions in this chapter assume a knowledge of FOR:PRO Bourne shell commands. Refer to Introduction to FOR;PRO or the FOR;PRO Pro~rammerls Manual for information on these commands.
PROBLEMS
This section provides suggested solutions to the following problems;
• Failure to connect to the host system • Garbled screens • Hung terminal • Keyboard lock • Loss of data during file copies • Nonsense characters
Failure to Connect
If you receive the error message "Lock failed" when you start up ITE, it may be that the port you are trying to use has been locked by another process. Check and see whether another user is using that port to communicate with the host. If not, go to the directory /usr/spool/uucp and remove any file whose name begins with LCK and ends with either culO (if you are using your default ITE port) or ttyxx (if you are using port ~). Then go to the directory /usr/spool/locks and do the same thing.
You may also receive the message "Connect failed" followed by another explanatory message. Look for the explanatory message in the list of ITE messages later in this chapter.
Remember that the port number you supply when you start up ITE must belong to the port that leads to your host computer. If you supply the port number of a terminal or guest computer, you will receive the error message "Connect failed; tty access." If you run
7/84 5-1 ITE Reference Guide

PROBLEMS AND ERROR MESSAGES
ITE from a FIS 1000 workstation and supply the port number of your own terminal, you will receive the error message "Connect failed: illegal communication device."
NOTE: If you are logged in as root and you attempt to connect to a terminal or guest computer, you will not receive an error message. Your connection will appear to succeed, but you won't receive a login prompt. If this happens, disconnect in the normal way, using the F1 key or the -. command.
After you disconnect, the user on the terminal or guest computer may experience problems such as garbled characters. To solve these problems, the user should enter the command reset to reset the tty parameters.
Garbled Screens
In certain ITE configurations, menus and other screens may intermittently appear garbled when you are logged into the host system. This problem can occur while you are running a large application on the host, or during operations such as listing files or directories. The two configurations that can most commonly cause these problems are as follows:
• If the guest system is connected to two different hosts (Host 1 and Host 2), then you may see garbled screens on Host 1 while files are being copied between the guest and Host 2.
In this case, waiting until the file copies are finished should solve the problem.
• You may see garbled screens when using a double ITE connection. (Double ITE connections are described in Appendix B.)
If you intend to run a large application on a host system, or if you want to avoid the possibility of general problems with garbled screens, a single ITE connection is recommended.
Hurw; Terminal
If your ITE session appears to hang while you are connected to the host system, try using the BREAK command first. If this doesn't work, press the Cancel key, and then press the Return key a few times. If nothing happens and you still appear to be hung, press the F1 key (or type -.) to disconnect. Then reconnect and press the Return key. If you cannot disconnect, try one of the following procedures:
ITE Reference Guide 5-2 7/84

PROBLEMS AND ERROR MESSAGES
NOTE: The following procedures may cause loss of data. For example, if you were in the middle of editing a Fortune:Word file when your terminal hung, you may lose your latest changes.
1. Ask an operator on the host system to log your process out.
OR:
On a host Fortune system, this is accomplished as follows:
a. Determine which port is the connection to the guest system.
b. Log in as manager and enter the command ps -&xL The system displays a list of all processes currently running on the host. Each process has a process ID (PID) and an associated terminal (TTY). Each TTY entry is either "co" (for the console) or a number like "05" (for the terminal attached to port 5 on the back of the CPU cabinet). Look for the process(es) whose TTY entry is equal to the port number determined in Step a. Note the associated PID(s).
c. Use the kill command to kill those processes. For example, to kill the process with a PID of 78, enter the command
kill '18
Your guest prompt should reappear after these steps are taken on the host system.
2. Go to another terminal on the guest system and kill the cu process(es). Follow these steps:
7/84
a. Log in as manager and enter the command ps -axL The system displays a list of all processes currently running on the guest. Look for the process(es) whose TTY entry is equal to the port number of your terminal on the guest system. Of these, find the one(s) whose name(s) contain "cu." Note the associated PID(s).
b. Use the kill command to kill those processes.
c. If this does not free your terminal, note the PIDs of any other processes with the same TTY entry (that is, processes running on your terminal). Use the kill command to kill these processes. At this point, your terminal screen should clear and a new guest login message should appear.
5-3 ITE Reference Guide

PROBLEMS AND ERROR MESSAGES
OR:
3. If your guest system is a single-user system, reset the system by pressing the Reset button located at the bottom of the front of the CPU cabinet.
Keyboard Lock
There are several ways that your keyboard can become "locked" while you are using ITE. For example, if you are copying a file to the host system and you give an incorrect filename (such as one involving a non-existent or inaccessible directory), the host system responds with the error message:
can't open file '(filename)'
However, since the send and receive processes of ITE cannot communicate, the send process begins sending characters to a non-existent file. The host tries to interpret this stream of characters as shell commands. Occasionally, this may cause your keyboard to lock and its bell to ring. The send process of ITE may terminate, leaving the keyboard in "raw" mode. Raw mode is a special communications mode in which characters are passed on exactly as they are received with no translation or interpretation. In this situation, nothing you type at the keyboard seems to have any effect. Actually, either cu or some other process may still be waiting for input.
If this is the case, try typing this sequence:
stty -raw -nl echo (LF)
Press the LF (Line Feed) key instead of the Return key. This sequence should unlock your keyboard and put you back in normal ("cooked") mode.
You may want to make a command file containing the sequence:
stty -raw -nl echo
Then make the file executable by entering the command:
chmod '1'15 (filename>
where filename is the name you assign to the command file. Then if your keyboard locks, all you have to do is type:
(filename> (LF)
For more information on raw and cooked modes, refer to Introduction to FOR:PRO. In addition, you may want to read about the reset command in the FOR:PRO Pro~ammer' s Manual.
ITE Reference Guide 5-4 7/84

PROBLEMS AND ERROR MESSAGI:S
Lost Characters
If you are consistently losing data when copying files over an ITE connection, try lowering the baud rate. Keep in mind that communications lines are sensitive to system load and noise. In some cases, simply reducing the baud rate improves transmission accuracy and fixes the problem.
An ITE file copy to a Fortune System may be unreliable if the receiving system uses its flexible disk drive as the copy occurs. If you find that incoming files are missing characters, make sure other users are not accessing flexible disks while you are receiving files.
For an additional suggestion concerning data loss, refer to Appendix C.
Nonsense Characters
If a nonsensical sequence of characters (alphanumeric and/or nonalphanumeric) appears on your screen immediately after you make your ITE connection, the guest and host baud rates probably don't match. Refer to the section, "Device Configuration" in Chapter 2 to find out about guest and host baud rates.
ERROR MESSAGES
The following is an alphabetical list of error messages that may occur during the use of ITE. Each message is accompanied by an explanation and/or suggestion.
Error Mess~e
bad flag
call dropped
can't divert
7/84
Meani~
You have given the cu command an option it doesn't understand.
The connection is broken. Call again. If the problem persists, check your modem manual. Also check the cable to the modem or host and make sure it is tightly connected.
If this message occurs after you entered a DIVERT or APPEND DIVERT command, the file you specified for output may already be open (and therefore inaccessible to ITE). It is also possible that you do not have write access to the file. Check the permission rights and ownership
5-5 ITE Reference Guide

PROBLEMS AND ERROR MESSAGES
Error Messa~e
can't execute shell
can't open file
cannot fork
ITE Reference Guide
Meanin~
settings on the file and its parent directories and correct them if necessary by using the chmod or chow.o commands.
If "Can't divert" occurs after you entered a RECEIVE FILE command, ITE cannot copy the file to the destination <"uestfile) you specified. The destination directory may not exist, or you may not have write access to it. If you omitted the ~uestfile argument, try re-entering the command with "uestfile included. Make sure the pathname of "uestfile exists on the guest system. Check the permission rights and ownership settings on the path and correct them if necessary by using the chmod or chow.o commands.
The file /bin/sh (or, if you are using the C shell, the file /bin/ csh) has been moved or deleted.
If this message occurs after you entered a SEND FILE command, ITE cannot copy the file to the destination (hostfile) you specified. The destination directory may not exist, or you may not have write access to it. Press the Return key to get the host prompt back. If you omitted the hostfile argument, try re-entering the command with hostfile included. Make sure the pathname of hostfile exists on the host system.
Check the permission rights and ownership settings on the path and correct them if necessary by using the chmod or chown commands.
ITE wants to create a new process on the guest system, but it cannot do so because too many processes are already running. Use the ps command to list the active processes; then, if possible, kill some of them using the kill
5-6 7/84

Error MessBi'e
Carrier is [not] present
7/84
PROBLEMS AND ERROR MESSAGES
Meanini
command. (Be sure the processes you kill are your own, or are processes no one will miss.)
This message tells you the state of pin 20 of the RS-232-C connector on the guest system. Pin 20, Data Carrier Detect, can be in two states: up ("Carrier is present"), or down ("Carrier is not present"). Carrjer is the electrical signal that carries data over wires.
If carrier is I?resent: If you are using a modem, dial the host site at this point. If dialing is successful, you should receive a host prompt--for example, a login prompt. If dialing is unsuccessful, check your modem switch settings. Make sure the guest and host modems are both up and running. Check to be sure the device configurations are correct on the guest and host systems.
If you are using direct cabling, press the Return key once or twice until you receive a prompt from the host system. If you don't receive a prompt, you probably have a connection problem. Check to be sure you are using the correct cable. Also check the device configurations at the guest and host sites.
If carrier js not I?resent: If you are using a modem, try dialing the host. You should receive a prompt from the host. If dialing does not work, try pressing the F2 key once or twice (if your function keys are enabled) or entering -j: once or twice. You may receive a "Carrier is present" message. Try dialing again.
If dialing still does not work, check your modem switch settings and device configurations, and make sure both modems are up and running.
5-7 ITE Reference Guide

PROBLEMS AND ERROR MESSAGES
Error Message
character ntissed
connect failed
Connected
couldn't open temporary
create failed
ITE Reference Guide
Meaning
If you are using direct cabling, press the F2 key once or twice (if your function keys are enabled) or enter -, once or twice. You should receive a "Carrier is present" message. If not, you probably have a connection problem. Check to be sure you are using the correct cables. Also check the device configurations at the guest and host sites.
Characters were missed during transmission because of speed or noise. Try retransmitting with a reduced baud rate or try another dial-up line to the host.
If this message is followed by another explanatory message, see the entry for the second message. Otherwise, see the entry for "Lock failed: line busy."
ITE has successfully opened the port that you specified in the cu command or through the ITE menus. This message is followed by the message "Carrier is present" or "Carrier is not present." Refer to the entry for "Carrier is [not] present."
This is probably a temporary condition. Repeat your last command. If the message appears again, check to see if the directory Itmp exists. If it does not, log in as manager and create a directory named tmp in the I directory. Use the chmod command to make Itmp accessible to all processes (chmod 777 /tmp). Also, check to see if the file you have specified is currently being used by another user.
The file you specified can't be created because of a security restriction, lack of disk space, or a hard disk error. It's also possible that a directory in the pathname doesn't exist or cannot be executed.
5-8 7/84
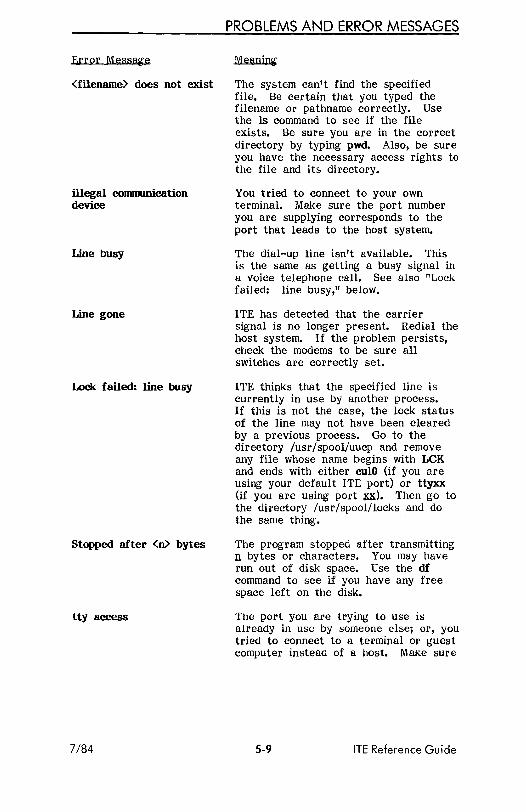
Error Message
<filename> does not exist
illegal communication device
Line busy
Line gone
Lock failed: line busy
Stopped after <0> bytes
tty access
7/84
PROBLEMS AND ERROR MESSAGES
Meaning
The system can't find the specified file. Be certain that you typed the filename or pathname correctly. Use the Is command to see if the file exists. Be sure you are in the correct directory by typing pwd. Also, be sure you have the necessary access rights to the file and its directory.
You tried to connect to your own terminal. Make sure the port number you are supplying corresponds to the port that leads to the host system.
The dial-up line isn't available. This is the same as getting a busy signal in a voice telephone call. See also "Lock failed: line busy," below.
1TE has detected that the carrier signal is no longer present. Redial the host system. If the problem persists, check the modems to be sure all switches are correctly set.
1TE thinks that the specified line is currently in use by another process. If this is not the case, the lock status of the line may not have been cleared by a previous process. Go to the directory /usr/spool/uucp and remove any file whose name begins with LCK and ends with either 0010 (if you are using your default 1TE port) or ttyxx (if you are using port ~). Then go to the directory /usr/spool/locks and do the same thing.
The program stopped after transmitting n bytes or characters. You may have run out of disk space. Use the df command to see if you have any free space left on the disk.
The port you are trying to use is already in use by someone else; or, you tried to connect to a terminal or guest computer instead of a host. Make sure
5-9 ITE Reference Guide

PROBLEMS AND ERROR MESSAGES
Error Messag-e
tty hung
Usage <format of co command)
ITE Reference Guide
Meaning
the port number you are supplying corresponds to the port that leads to the host system.
The tty program accessed by ITE has found an error. Restart ITE.
You may have used an incorrect cu command format, or you may have included the wrong number of arguments. Check the command syntax and try again. See Chapter 3 for cu syntax.
5-10 7/84

ApPENDIX A
Connecting to a Non-Fortune System
This appendix contains information about connecting your Fortune system to a non-Fortune system. The following topics are discussed:
• Modem connections • Cable connections • Device configuration • ITE's communications protocol
Most of this guide assumes that if you are connecting a Fortune system to a non-Fortune system, the Fortune system is the guest. This is because ITE software is installed on the guest, and the ITE Master disk is made specifically for Fortune systems.
However, it should be noted that a non-Fortune UNIX system equipped with the cu command may also be a guest, with a Fortune system aGting as host.
A non-Fortune guest may be either a single-user or a multiuser system. A non-Fortune host must be a multiuser system.
MODEM CONNECTIONS
If you are connecting a Fortune system to a non-Fortune system by a pair of modems, Chapter 2 should give you all the information you need to connect a modem to the Fortune system. Consult appropriate documentation from the manufacturer of the non-Fortune system to find out how to connect it to a modem. If the non-Fortune system is a mainframe, it may already have a modem attached.
CABLE CONNECTIONS
If you are connecting a Fortune system and a non-Fortune system via cable, you may be able to use one of the following Fortunesupplied cables:
• CPU-to-CPU Cable: You may be able to use this cable if the non-Fortune system has the same type of RS-232-C connector as the Fortune system's Comm A or SIO port. This connector (a female Data Circuit-terminating Equipment, or DCE, connector) is diagrammed in Table A-l.
7/84 A-l ITE Reference Guide

• CPU-to-Workstation Cable: You may be able to use this cable if the non-Fortune system has the same type of RS-232-C connector as the FIS 1000 workstation. This connector (a female Data Terminal Equipment, or DTE, connector) is diagrammed in Table A-2.
Table A-I. The RS-232-C Female DCE Connector of the Comm A or SIO
Pin Signal Name
1 Ground 2 Receive Data (RxDAT) 3 Transmit Data (TxDAT) 4 Clear To Send (CTS) 5 Request To Send (RTS) 6 Data Set Ready (DSR) 7 Signal Ground 8 Data Terminal Ready (DTR) 9 + 12 Volts
10 - 12 Volts 20 Data Carrier Detect (DCD) 22 Ring Indicator (RI) 25 Busy (used for printer)
Table A-2. The RS-232-C Female DTE Connector of the FIS 1000
Pin Signal Name
1 Ground 2 Transmit Data (TxDAT) 3 Receive Data (RxDAT) 4 Request to Send (RTS) 5 Clear to Send (CTS) 6 Data Set Ready (DSR) 7 Signal Ground 8 Data Carrier Detect (DCD) 9 +12 Volts
10 -12 Volts 20 Data Terminal Ready (DTR) 25 Busy (Used for printer)
ITE Reference Guide A-2 7/84

Figure A-I shows the pin mappings inside the CPU-to-CPU cable. Figure A-2 shows the pin mappings inside the CPU-to-Workstation cable. Table A -3 lists the part numbers of both cables.
WARNING: IF YOU MAKE YOUR OWN CABLES, LEAVE PINS 9 AND 10 UNCONNECTED. ThESE PINS CARRY A VOLTAGE THAT CAN DESTROY EQUIPMENT.
Fortune System A
2 I---'--+-__
3 1--1---+----
Fortune System B
6 1--1---+---'
7t--1---t-----+--1--I
8 ~--+-__
20 I--~-i-----
Figure A-I. The CPU-to-CPU Cable
CPU Workstation
6 ~~-+-----T-~~
20~~~-----+-~~
25~~-T-------+--'~
Figure A-2. The CPU-to-Workstation Cable
7/84 A-3 ITE Reference Guide
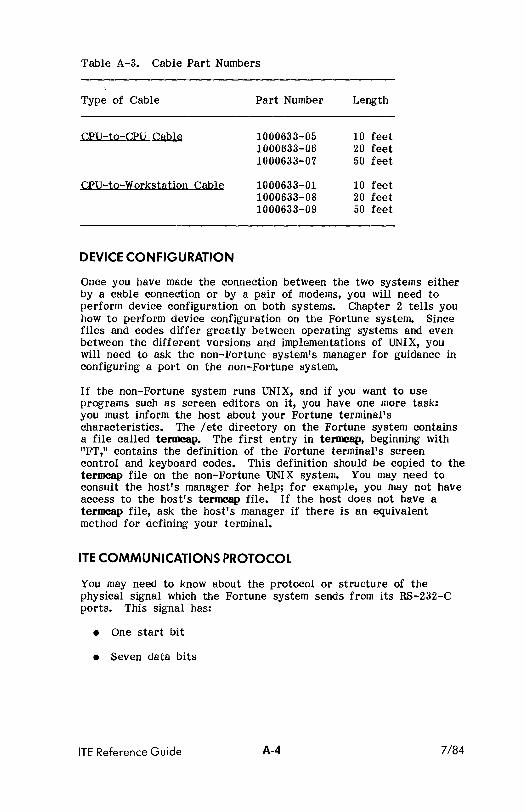
Table A-3. Cable Part Numbers
Type of Cable Part Number Length
CeU-1Q-CelI Cabl~ 1000633-05 10 feet 1000633-06 20 feet 1000633-07 50 feet
ceU-1Q-WQrkslatiQD Cabl~ 1000633-01 10 feet 1000633-08 20 feet 1000633-09 50 feet
DEVICE CONFIGURATION
Once you have made the connection between the two systems either by a cable connection or by a pair of modems, you will need to perform device configuration on both systems. Chapter 2 tells you how to perform device configuration on the Fortune system. Since files and codes differ greatly between operating systems and even between the different versions and implementations of UNIX, you will need to ask the non-Fortune system's manager for guidance in configuring a port on the non-Fortune system.
If the non-Fortune system runs UNIX, and if you want to use programs such as screen editors on it, you have one more task: you must inform the host about your Fortune terminal's characteristics. The / etc directory on the Fortune system contains a file called termcap. The first entry in tel'DlC8p, beginning with "FT," contains the definition of the Fortune terminal's screen control and keyboard codes. This definition should be copied to the termcap file on the non-Fortune UNIX system. You may need to consult the host's manager for help; for example, you may not have access to the host's termcap file. If the host does not have a termcap file, ask the host's manager if there is an equivalent method for defining your terminal.
ITE COMMUNICATIONS PROTOCOL
You may need to know about the protocol or structure of the physical signal which the Fortune system sends from its RS-232-C ports. This signal has:
• One start bit
• Seven data bits
ITE Reference Guide A-4 7/84

• One parity bit (set to Any Parity)
• Two stop bits (except at baud rates of 300 or less, in which case there is one stop bit)
These bits cannot be changed by ITE users.
Most systems can accept the Fortune system as a Model 33 or 37 Teletype. The communications protocol used by ITE is a subset of the proposed North American Presentation Level Protocol Standard developed by the American Telephone and Telegraph Company for videotex use.
"'1'( I "~'l, '>I" "(.,,
7/84 A-5 ITE Reference Guide

A-6

ApPENDIXB
Making a Double ITE Connection
This appendix provides information that you'll need if you want to make a double ITE connection: a connection through one host system to another host system. In this kind of connection, the middle system serves as both host and guest.
NOTE: You may experience problems if you run large applications (such as Multiplan or Fortune:Word) on a host system over a double ITE connection. For example, menus and other screens may intermittently appear garbled. These problems may sometimes also occur during operations such as listing files or directories. If you intend to run a large application on a host system, or if you want to avoid the possibility of general problems with garbled screens, a single ITE connection is recommended.
The following is an example of a typical double ITE connection. Suppose you have one Fortune system at home and one at your office, and the Fortune system at your office is connected to a UNIX mainframe. Both the home and office Fortune systems have ITE installed. You can use ITE to call the office system from home. After you have logged into the office system, you can use ITE again to call the mainframe.
Since you have used ITE twice, the mainframe "sees" your Fortune system at home as a standard terminal. The only complication is this: How do you use ITE functions on the mainframe? If you issue an ITE command in the normal way, the command affects the connection between your home and office systems, not between your office system and the mainframe. For example, suppose you want to disconnect from the mainframe. If you type a tilde followed by a period (-.), you disconnect your Fortune system at home from your Fortune system at the office, leaving your office system logged into the mainframe.
Similarly, suppose you enabled the ITE function keys in both connections that you made. If you press the Fl key to disconnect from the mainframe, your system at home understands the Fl and breaks the connection between home and office--but the office system remains logged into the mainframe.
There are two solutions to this problem:
7/84 B-1 ITE Reference Guide

• Disable the function keys in your first connection (home-tooffice). Any function keys you press are then interpreted by the mainframe. Mter you disconnect from the mainframe, you can use the -0 command to re-enable the function keys so you can use them in your home-to-office connection.
• Type ITE commands without using the function keys. However, use two tildes (--) in commands relating to the mainframe-tooffice connection, and one tilde (-) in commands relating to the office-to-home connection. For example, use --. to disconnect from the mainframe and remain connected to the office system, and then use -. to disconnect from the office system.
When you type two titles, your home system "catches" one and sends one to the office Fortune system. The office Fortune system then knows that the command line is an ITE command that is to be executed rather than data to be sent to the mainframe.
Suppose you want to copy the file memo! from the mainframe to your system at home. You would have to perform the following steps:
1. Log into the mainframe, using ITE once on your home system and once on the office system.
2. Use the --%take command to copy memo! from the mainframe to the office Fortune system.
3. Use the --I command to return to the office system shell.
4. Use the -%take command to copy memo! from the office Fortune system to your system at home.
These steps are illustrated in Figure B-1.
ITE Reference Guide B-2 7/84

t----- Login
Figure B-1. Copying a File over a Double ITE Connection
7/84 B-3 ITE Reference Guide

8-4

ApPENDIXC
Flow Control
You may find this appendix helpful if you have been consistently losing data over your ITE connection.
ITE FLOW CONTROL MODES
ITE has two flow control modes: ON and OFF. The default flow control mode is ON.
You can change ITE's flow control mode by means of the ITE command -F. If you enter -P while you are logged into the host, your ITE flow control mode changes from ON to OFF or from OFF to ON. (Note that you must type a capital "F" in this command.)
To prevent significant data loss, you should set ITE's flow control OFF in the following cases:
• If you are running a host application that uses "raw" mode. ("Raw" and "cooked" modes are described in Introduction to FOR:PRO.)
• If the application you are running on the host uses the characters CTRL-S and CTRL-Q for purposes other than stopping and restarting terminal display. (For example, the EMACS editor uses these characters for editing functions.)
If you turn ITE's flow control OFF, you may lose some characters in transmitted data. However, in the cases mentioned above, you avoid the possibility of more extensive losses.
Details about ITE's flow control modes can be found at the end of this appendix.
THE TTY DRIVER
When you turn ITE's flow control OFF or ON, you affect the behavior of the FOR:PRO tty driver. The tty driver is a piece of software that controls the flow of data to and from Fortune terminals--and, in the case of ITE, to and from your FortUne system.
7/84 C-l ITE Reference Guide

The tty driver has associated parameters that determine its behavior. Each Fortune terminal or port has its own tty parameter settings. For example, the tty driver may use one set of parameter settings, or rules, to control your local terminal, and another set to control the ITE communications port.
You can change the tty driver's parameters through the FOR:PRO stty command, which is described in Introduction to FOR:PRO. Turning ITE's flow control Off or On also changes some of the tty parameters. For details, refer to the section, "Details on ITE's Flow Control Modes," at the end of this appendix.
CHANGING THE HOST SYSTEM'S DECCTLQ PARAMETER
If ITE's flow control is ON, and if you are consistently losing data, you may need to change one of the tty parameters on the host m.teID. In particular, the parameter that is equivalent to the FOR:PRO tty driver's DECCTLQ parameter should be turned ON for the host's ITE port. Details on the DECCTLQ parameter follow.
ITE controls the flow of data from the host system to the guest system by sending the host special characters. When the guest is temporarily unable to accept incoming data, ITE sends a CTRL-S character to the host. This character causes the host to wait before sending out any more data. When the guest is again ready to accept data, ITE sends the host a CTRL-Q character, meaning "OK, start sending me data again."
The DECCTLQ parameter has two settings: ON and OFF. The DECCTLQ setting for a communications port determines whether an incoming CTRL-Q is recognized as a special "start" character. In order for the host to understand ITE's CTRL-Q, the DECCTLQ setting for the ~ ITE port must be ON.
If the host ITE port's DECCTLQ parameter is OFF, the host does not wait for a CTRL-Q from ITE. In fact, ITE's CTRL-Q has no special significance to the host. Instead, the first character the host receives from the guest following a CTRL-S causes the host to resume sending out data, even if the guest isn't ready to receive it. Until the guest ~ ready, any data the host sends out is lost. When the guest finally sends out a CTRL-Q, the character is ignored by the host.
On a Fortune system, the default DECCTLQ setting is ON. This means that if your host is a Fortune system, you probably don't have to worry about the host's DECCTLQ parameter. However, there is always the chance that someone on the host system has used the stty command to turn DECCTLQ OFF for the ITE port.
If your host is a UNIX system, its tty parameters are probably similar to those of the Fortune system; that is, the parameter
ITE Reference Guide C-2 7/84

you want to check probably has the same name, DECCTLQ. On many UNIX systems, the default setting of DECCTLQ is OFF.
If your host is a non-UNIX system, you may need to ask the manager of the host system which parameter is equivalent to the FOR:PRO DECCTLQ parameter.
If the host's DECCTLQ (or equivalent) parameter is set OFF and you cannot change it, be sure that you refrain from typing at your keyboard while the host is actively sending you characters. This will prevent the host from sending data at a rate that is faster than ITE can handle.
STOPPING AND STARTING THE SCREEN DISPLAY: MORE ON DECCTLQ
You can freeze the display on a Fortune terminal by typing CTRL-S. This character stops all system output to the terminal. The setting of the DECCTLQ parameter for your terminal determines whether or not the CTRL-Q character will restart the terminal display after you have typed CTRL-S.
If DECCTLQ is set ON for your terminal, typing CRTL-Q restarts the terminal.display. Until you type CTRL-Q, all characters you type are accepted by the system in the normal way; but your screen remains frozen.
If DECCTLQ is set OFF for your terminal, typing any character restarts the display after a CTRL-S. In this case, the CTRL-Q character has no special meaning.
Note that these DECCTLQ settings are for the user terminal, whereas the settings discussed in the section, "Changing the Rost System's DECCTLQ Parameter," above, were for the ITE port.
The Fortune system default setting for DECCTL is ON. Thus, if you log into your system, cat a long file, and type CTRL-S to freeze the screen, you must type CTRL-Q to "unfreeze" the screen.
However, when you are running ITE, the DECCTLQ parameter for your terminal is set to OFF. Thus, if you type CTRL-S to freeze your screen while you are connected to the host, the next character you type will "unfreeze" the screen.
DETAILS ON ITE's FLOW CONTROL MODES
The following definitions of the ITE flow control modes are intended for readers who are familiar with the FOR:PRO tty driver. You need not understand the tty driver (or these definitions) in order to use ITE.
When flow control is ON, the following are true:
7/84 C-3 ITE Reference Guide

• The OUTFLOW parameter is enabled on the guest's controlling terminal. All CRTL-S and CTRL-Q characters typed by the user are interpreted locally by the driver, freezing or restarting the local terminal as appropriate. These characters are also passed to ITE.
• TANDEM mode is enabled on the ITE communications line. This means that ITE automatically generates CTRL-S and CTRL-Q characters and passes them to the host to control the flow of data from the host to the guest. The OUTFLOW parameter is also enabled for the communications line.
• CTRL-S and CTRL-Q characters typed by the user are discarded after ITE reads them. These characters are not sent to the host by ITE, as this would interfere with TANDEM flow control.
When flow control is OFF, the above three features are disabled. Any CTRL-S or CTRL-Q characters typed by the user are passed unchecked through ITE to the host. No TANDEM flow control occurs.
ITE Reference Guide C-4 7/84


![NAME xterm - terminal emulator for X …1) XWindowSystem XTERM(1) NAME xterm - terminal emulator for X SYNOPSIS xterm [− toolkitoption ...] [− option ...] [shell] DESCRIPTION The](https://img.pdfslide.net/doc/110x75/5c84eee509d3f2ea4b8bb4a2/name-xterm-terminal-emulator-for-x-1-xwindowsystem-xterm1-name-xterm-terminal.jpg)