Embed Size (px)
Citation preview
Intro to Aeries.Net
July 12, 2013
Intro to Aeries.Net Page 1
1. Terms Used in Aeries.Net
2. Logon to Aeries.Net
3. Aeries.Net Home Page Current Version of Aeries.Net Utilizing the Navigation Tree Accessing Programs From the Navigation Tree Setting up My Favorites Accessing ALL Forms and Reports Generating Reports Change School Database Exiting Aeries.Net
4. Form Techniques Used in Aeries Record Selection Scroll Bar Drop Down List Radio Selection Buttons Selection Check Box Function Buttons and Icons Setting up Red Flags Using the Search Engine
5. Demographic Form and Form Tabs
6. School Options
Intro to Aeries.Net Page 2
Terms Used in Aeries.Net
The terms used by Aeries will differ slightly compared to other software terms.
Navigation Tree – displays categories where programs can be accessed
Node – resides in the Navigation tree and allows you to access a program
Form - refers to the screen displayed.
Table - referring to the File used to store the data.
Logon to Aeries.Net
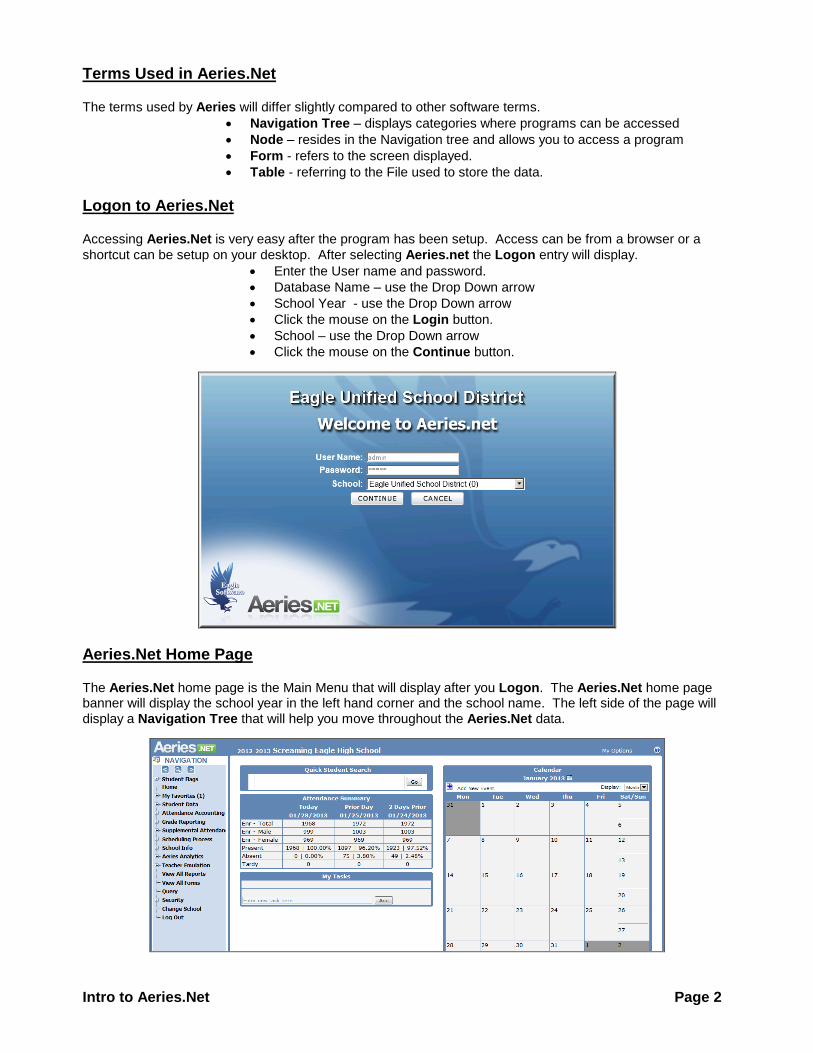
Accessing Aeries.Net is very easy after the program has been setup. Access can be from a browser or a
shortcut can be setup on your desktop. After selecting Aeries.net the Logon entry will display.
Enter the User name and password.
Database Name – use the Drop Down arrow
School Year - use the Drop Down arrow
Click the mouse on the Login button.
School – use the Drop Down arrow
Click the mouse on the Continue button.
Aeries.Net Home Page
The Aeries.Net home page is the Main Menu that will display after you Logon. The Aeries.Net home page banner will display the school year in the left hand corner and the school name. The left side of the page will
display a Navigation Tree that will help you move throughout the Aeries.Net data.
Intro to Aeries.Net Page 3
The middle section of the screen will display a Quick Student Search box. There is also an Attendance
Summary for today, as well as previous days. My Tasks displays under the Attendance Summaries. The
right side of the screen will display an Events Calendar.
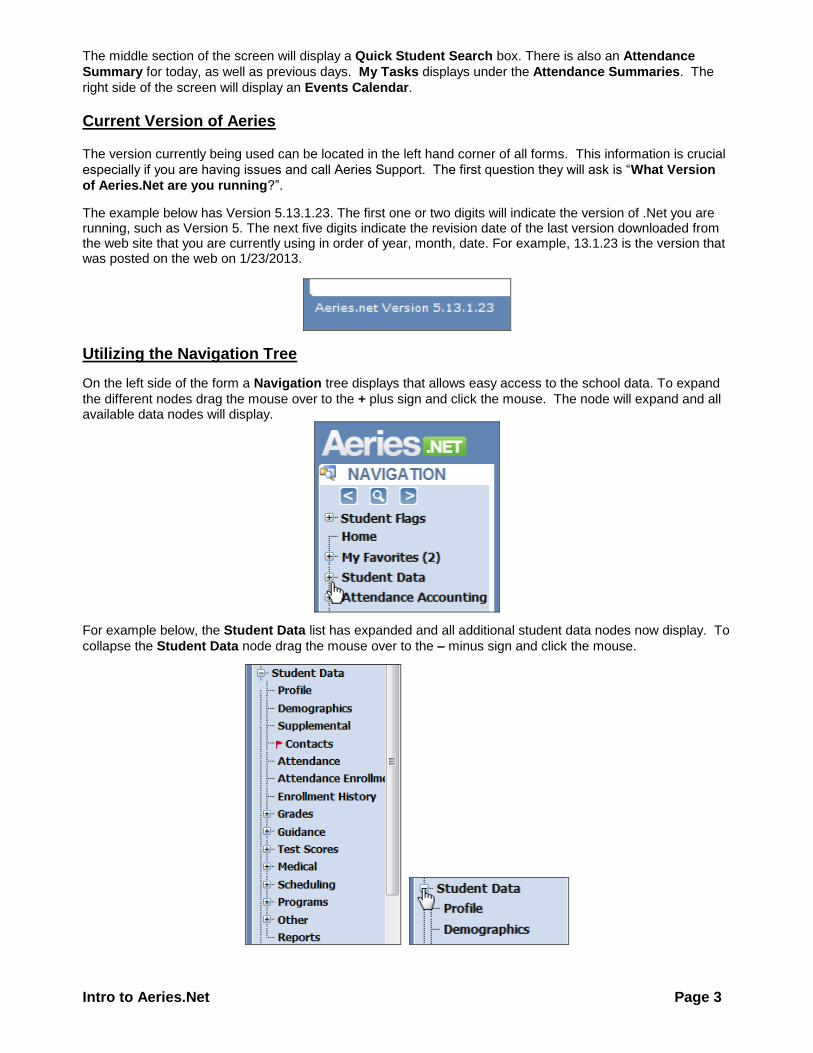
Current Version of Aeries
The version currently being used can be located in the left hand corner of all forms. This information is crucial
especially if you are having issues and call Aeries Support. The first question they will ask is “What Version
of Aeries.Net are you running?”.
The example below has Version 5.13.1.23. The first one or two digits will indicate the version of .Net you are running, such as Version 5. The next five digits indicate the revision date of the last version downloaded from the web site that you are currently using in order of year, month, date. For example, 13.1.23 is the version that was posted on the web on 1/23/2013.
Utilizing the Navigation Tree
On the left side of the form a Navigation tree displays that allows easy access to the school data. To expand
the different nodes drag the mouse over to the + plus sign and click the mouse. The node will expand and all available data nodes will display.
For example below, the Student Data list has expanded and all additional student data nodes now display. To
collapse the Student Data node drag the mouse over to the – minus sign and click the mouse.
Intro to Aeries.Net Page 4
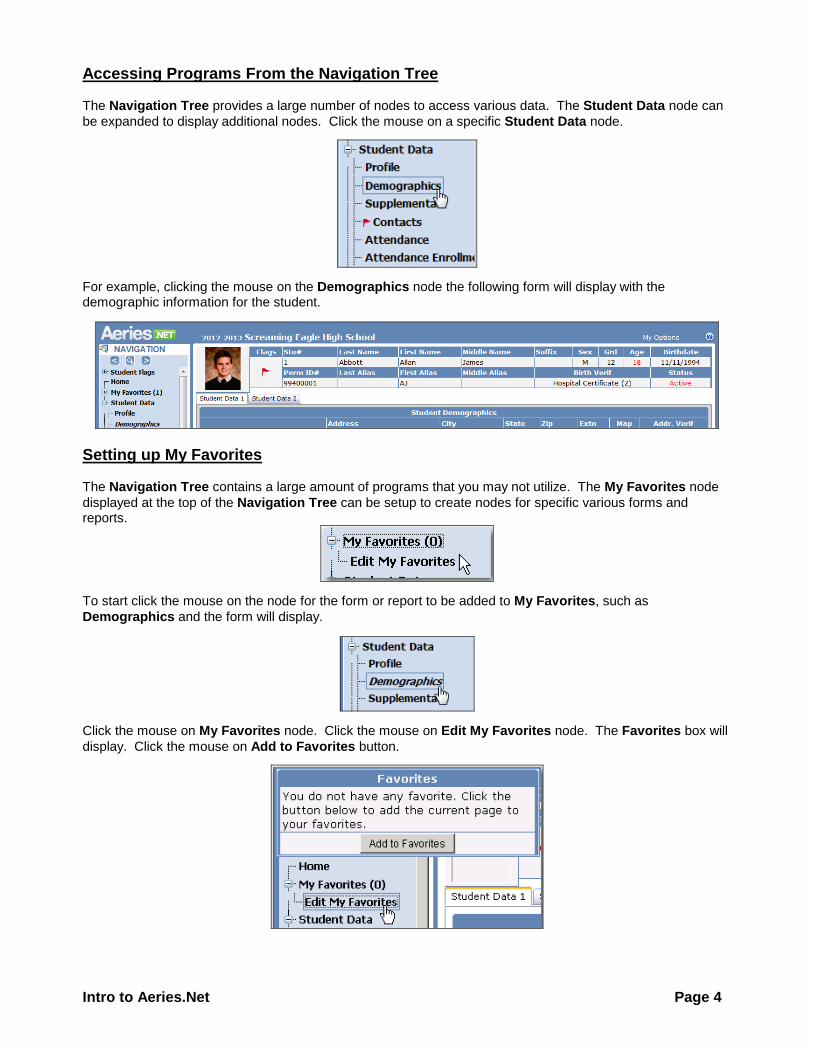
Accessing Programs From the Navigation Tree
The Navigation Tree provides a large number of nodes to access various data. The Student Data node can
be expanded to display additional nodes. Click the mouse on a specific Student Data node.
For example, clicking the mouse on the Demographics node the following form will display with the demographic information for the student.
Setting up My Favorites
The Navigation Tree contains a large amount of programs that you may not utilize. The My Favorites node
displayed at the top of the Navigation Tree can be setup to create nodes for specific various forms and reports.
To start click the mouse on the node for the form or report to be added to My Favorites, such as
Demographics and the form will display.
Click the mouse on My Favorites node. Click the mouse on Edit My Favorites node. The Favorites box will
display. Click the mouse on Add to Favorites button.
Intro to Aeries.Net Page 5
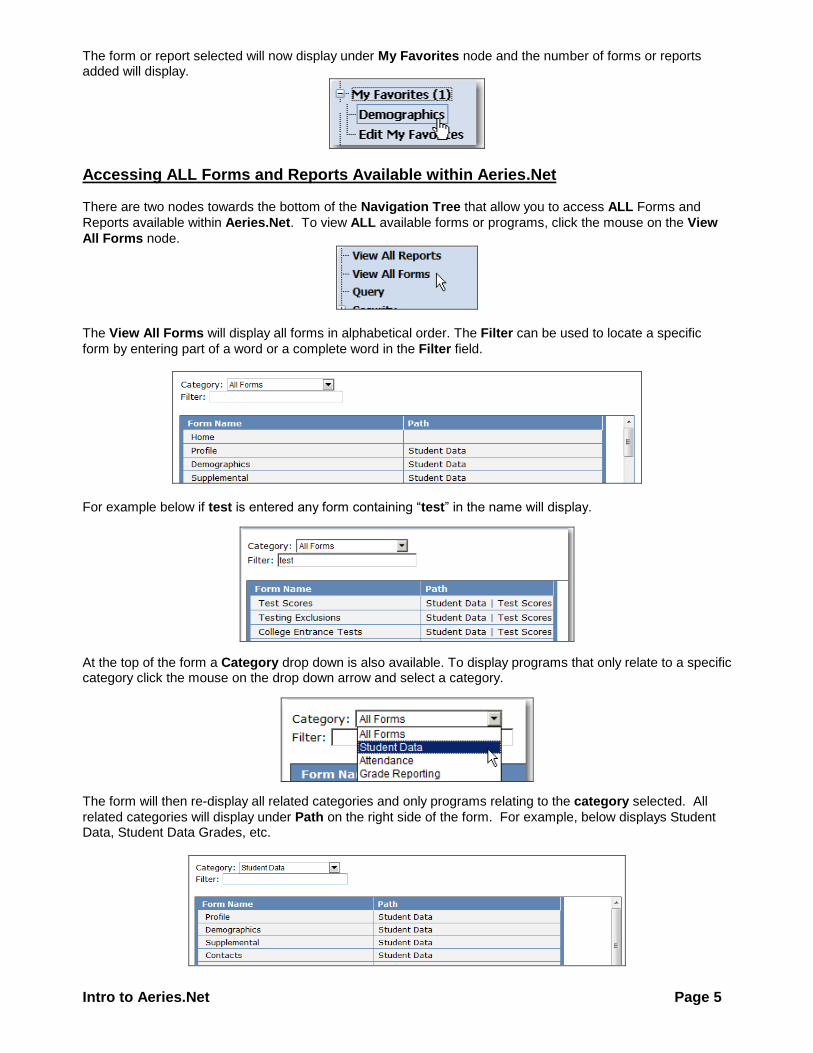
The form or report selected will now display under My Favorites node and the number of forms or reports added will display.
Accessing ALL Forms and Reports Available within Aeries.Net
There are two nodes towards the bottom of the Navigation Tree that allow you to access ALL Forms and
Reports available within Aeries.Net. To view ALL available forms or programs, click the mouse on the View
All Forms node.
The View All Forms will display all forms in alphabetical order. The Filter can be used to locate a specific
form by entering part of a word or a complete word in the Filter field.
For example below if test is entered any form containing “test” in the name will display.
At the top of the form a Category drop down is also available. To display programs that only relate to a specific category click the mouse on the drop down arrow and select a category.
The form will then re-display all related categories and only programs relating to the category selected. All
related categories will display under Path on the right side of the form. For example, below displays Student Data, Student Data Grades, etc.
Intro to Aeries.Net Page 6
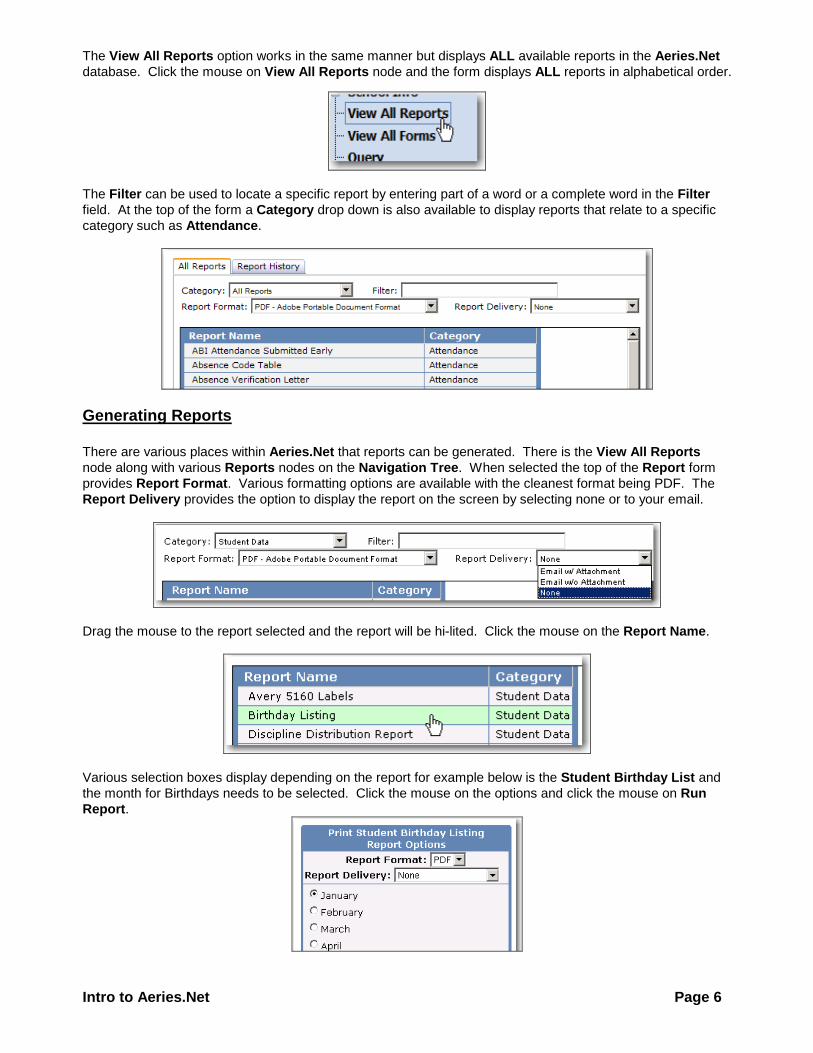
The View All Reports option works in the same manner but displays ALL available reports in the Aeries.Net
database. Click the mouse on View All Reports node and the form displays ALL reports in alphabetical order.
The Filter can be used to locate a specific report by entering part of a word or a complete word in the Filter
field. At the top of the form a Category drop down is also available to display reports that relate to a specific
category such as Attendance.
Generating Reports
There are various places within Aeries.Net that reports can be generated. There is the View All Reports
node along with various Reports nodes on the Navigation Tree. When selected the top of the Report form
provides Report Format. Various formatting options are available with the cleanest format being PDF. The
Report Delivery provides the option to display the report on the screen by selecting none or to your email.
Drag the mouse to the report selected and the report will be hi-lited. Click the mouse on the Report Name.
Various selection boxes display depending on the report for example below is the Student Birthday List and
the month for Birthdays needs to be selected. Click the mouse on the options and click the mouse on Run
Report.
Intro to Aeries.Net Page 7
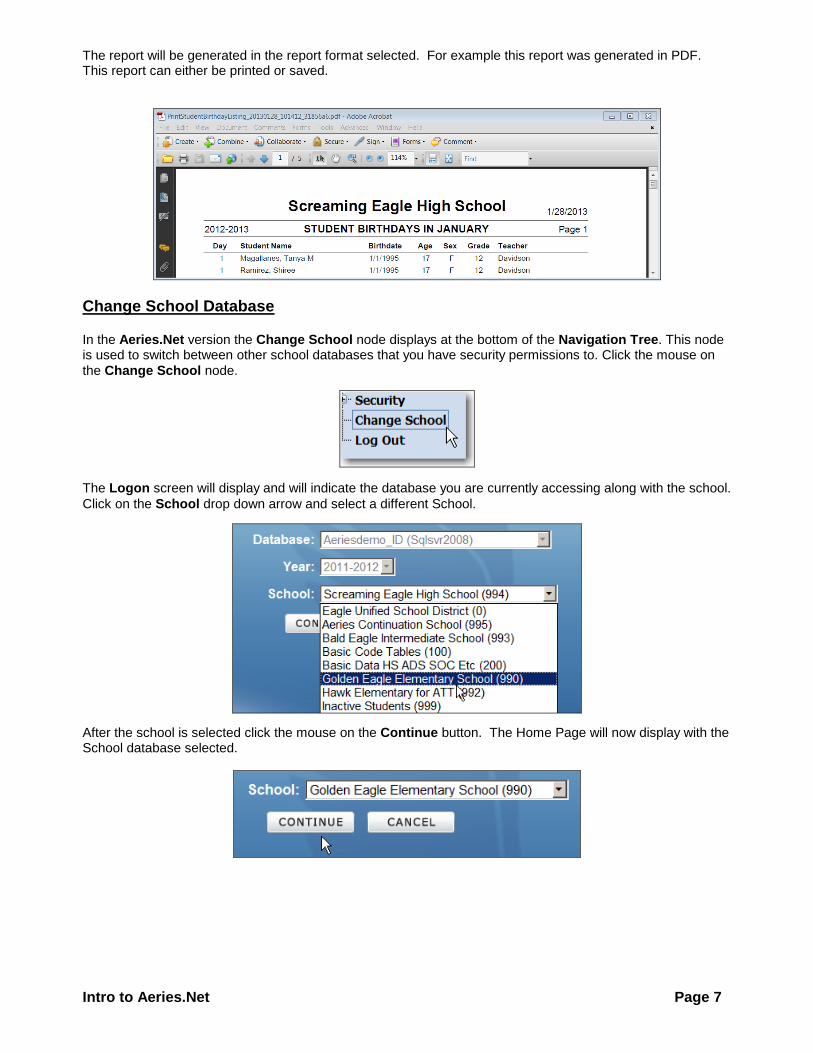
The report will be generated in the report format selected. For example this report was generated in PDF. This report can either be printed or saved.
Change School Database
In the Aeries.Net version the Change School node displays at the bottom of the Navigation Tree. This node is used to switch between other school databases that you have security permissions to. Click the mouse on
the Change School node.
The Logon screen will display and will indicate the database you are currently accessing along with the school.
Click on the School drop down arrow and select a different School.
After the school is selected click the mouse on the Continue button. The Home Page will now display with the School database selected.
Intro to Aeries.Net Page 8
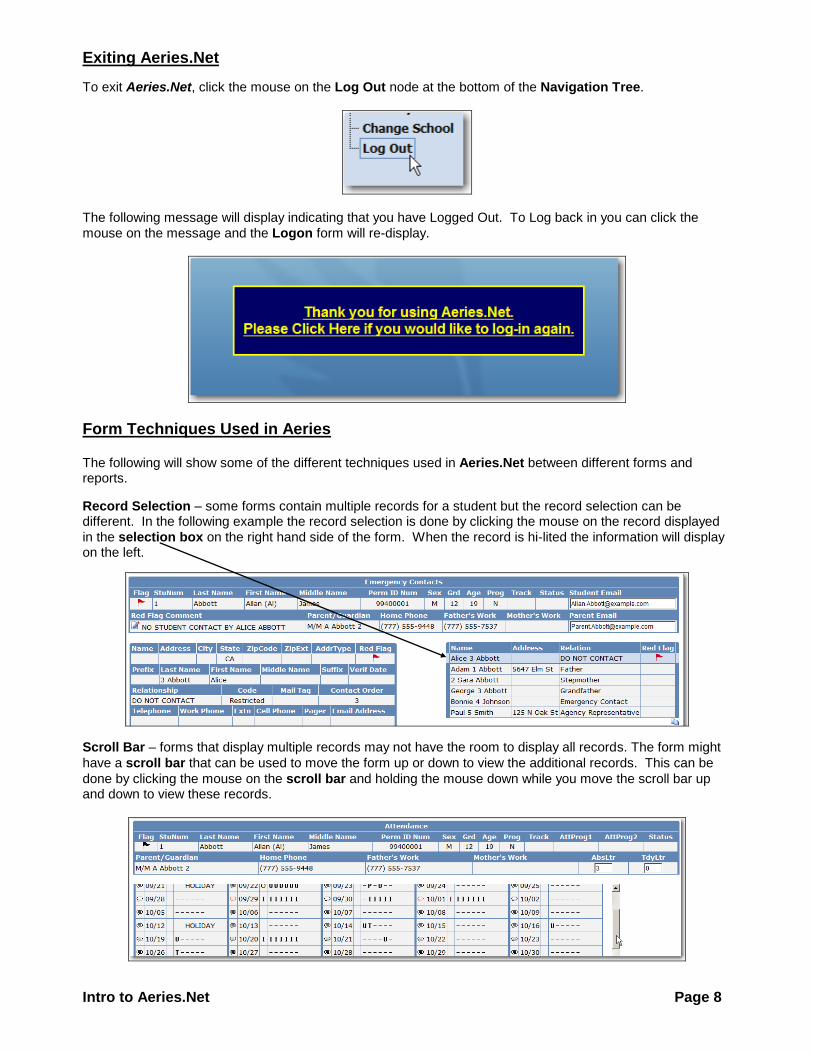
Exiting Aeries.Net
To exit Aeries.Net, click the mouse on the Log Out node at the bottom of the Navigation Tree.
The following message will display indicating that you have Logged Out. To Log back in you can click the
mouse on the message and the Logon form will re-display.
Form Techniques Used in Aeries
The following will show some of the different techniques used in Aeries.Net between different forms and reports.
Record Selection – some forms contain multiple records for a student but the record selection can be different. In the following example the record selection is done by clicking the mouse on the record displayed
in the selection box on the right hand side of the form. When the record is hi-lited the information will display on the left.
Scroll Bar – forms that display multiple records may not have the room to display all records. The form might
have a scroll bar that can be used to move the form up or down to view the additional records. This can be
done by clicking the mouse on the scroll bar and holding the mouse down while you move the scroll bar up and down to view these records.
Intro to Aeries.Net Page 9
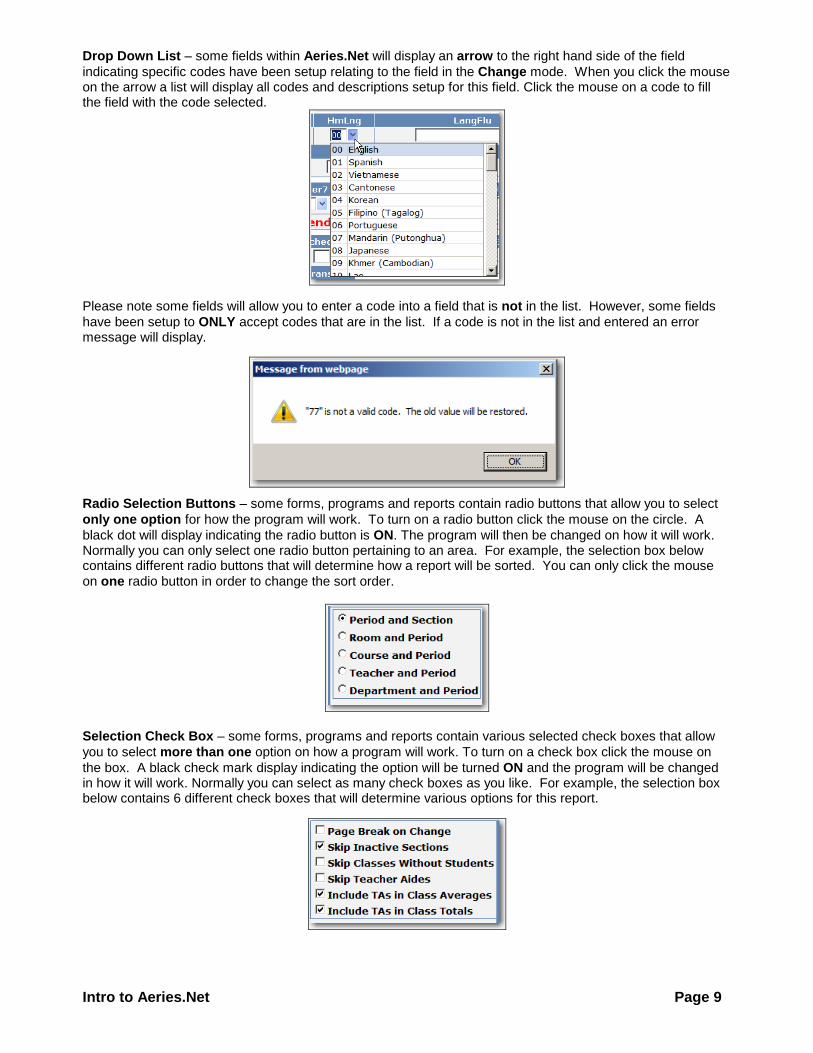
Drop Down List – some fields within Aeries.Net will display an arrow to the right hand side of the field
indicating specific codes have been setup relating to the field in the Change mode. When you click the mouse on the arrow a list will display all codes and descriptions setup for this field. Click the mouse on a code to fill the field with the code selected.
Please note some fields will allow you to enter a code into a field that is not in the list. However, some fields
have been setup to ONLY accept codes that are in the list. If a code is not in the list and entered an error message will display.
Radio Selection Buttons – some forms, programs and reports contain radio buttons that allow you to select
only one option for how the program will work. To turn on a radio button click the mouse on the circle. A
black dot will display indicating the radio button is ON. The program will then be changed on how it will work. Normally you can only select one radio button pertaining to an area. For example, the selection box below contains different radio buttons that will determine how a report will be sorted. You can only click the mouse
on one radio button in order to change the sort order.
Selection Check Box – some forms, programs and reports contain various selected check boxes that allow
you to select more than one option on how a program will work. To turn on a check box click the mouse on
the box. A black check mark display indicating the option will be turned ON and the program will be changed in how it will work. Normally you can select as many check boxes as you like. For example, the selection box below contains 6 different check boxes that will determine various options for this report.
Intro to Aeries.Net Page 10
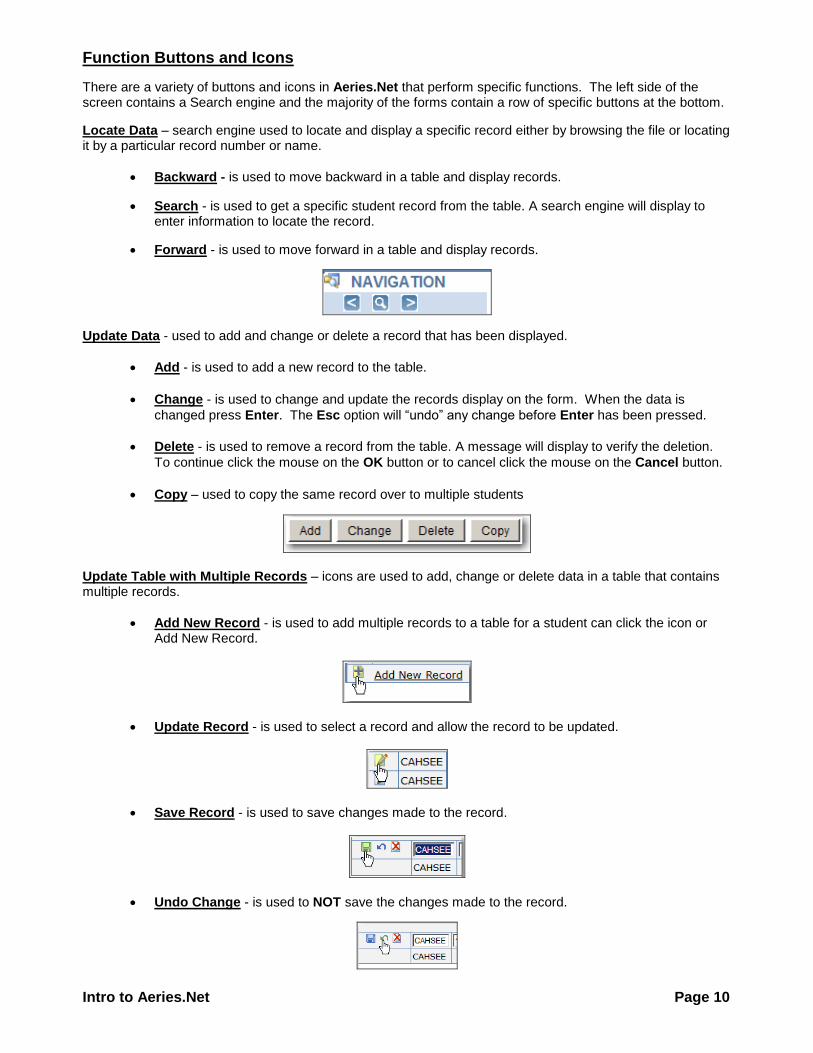
Function Buttons and Icons
There are a variety of buttons and icons in Aeries.Net that perform specific functions. The left side of the screen contains a Search engine and the majority of the forms contain a row of specific buttons at the bottom.
Locate Data – search engine used to locate and display a specific record either by browsing the file or locating it by a particular record number or name.
Backward - is used to move backward in a table and display records.
Search - is used to get a specific student record from the table. A search engine will display to enter information to locate the record.
Forward - is used to move forward in a table and display records.
Update Data - used to add and change or delete a record that has been displayed.
Add - is used to add a new record to the table.
Change - is used to change and update the records display on the form. When the data is
changed press Enter. The Esc option will “undo” any change before Enter has been pressed.
Delete - is used to remove a record from the table. A message will display to verify the deletion.
To continue click the mouse on the OK button or to cancel click the mouse on the Cancel button.
Copy – used to copy the same record over to multiple students
Update Table with Multiple Records – icons are used to add, change or delete data in a table that contains multiple records.
Add New Record - is used to add multiple records to a table for a student can click the icon or Add New Record.
Update Record - is used to select a record and allow the record to be updated.
Save Record - is used to save changes made to the record.
Undo Change - is used to NOT save the changes made to the record.
Intro to Aeries.Net Page 11
Delete Record - is used to Delete the record selected.
Other Functions
Print – is used to print the current record displayed on the screen which will generate a PDF.
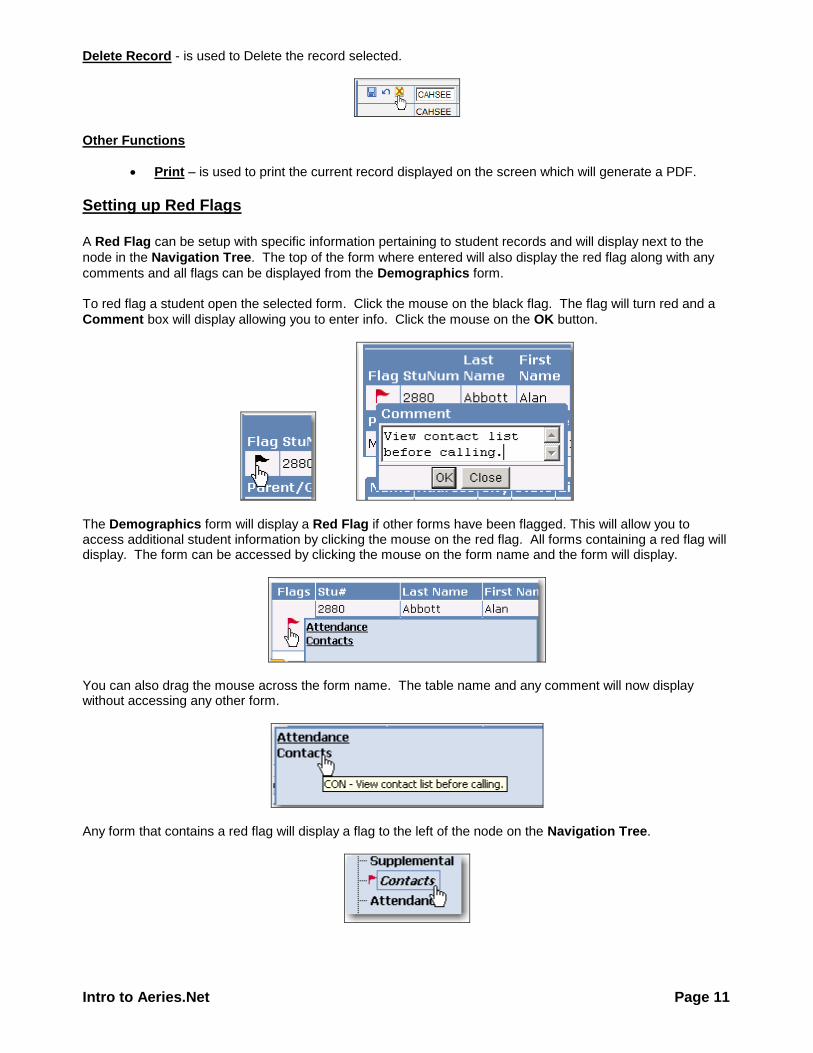
Setting up Red Flags
A Red Flag can be setup with specific information pertaining to student records and will display next to the
node in the Navigation Tree. The top of the form where entered will also display the red flag along with any
comments and all flags can be displayed from the Demographics form. To red flag a student open the selected form. Click the mouse on the black flag. The flag will turn red and a
Comment box will display allowing you to enter info. Click the mouse on the OK button.
The Demographics form will display a Red Flag if other forms have been flagged. This will allow you to access additional student information by clicking the mouse on the red flag. All forms containing a red flag will display. The form can be accessed by clicking the mouse on the form name and the form will display.
You can also drag the mouse across the form name. The table name and any comment will now display without accessing any other form.
Any form that contains a red flag will display a flag to the left of the node on the Navigation Tree.

Intro to Aeries.Net Page 12
Using the Student Search
The Student Search icon is a search engine and can be accessed by clicking the mouse on the eyeglass at
the top of the Navigation Tree.
A student can be located by entering the complete student name, the student’s last name, first couple letters of the student’s last name or first letter to locate all students starting with that letter. After the name has been
entered click the mouse on the GO button or press Enter and student’s meeting this criteria will display.
A student can also be located by entering the student number or permanent ID number into the Search
Engine. After the student number or ID number has been entered, click the mouse on the GO button or press
Enter and the student will display.
Quick Student Search
The Quick Student Search widget on the Home screen is a feature that makes it easier to search or get students immediately after logging into the system.

Intro to Aeries.Net Page 13
A student can be located by entering the complete student name, the student’s last name, first couple letters of the student’s last name or first letter to locate all students starting with that letter. After the name has been
entered click the mouse on the GO button or press Enter.
The student’s meeting this criteria will display.
Demographics Form
The Demographics form is utilized to add, update and display demographic information for each student enrolled at a school site. The following provides details about the form.
Title Bar – will display the school year and school name.
Student Photo – contains a picture of the student displayed.
Red Flag Indicator – red flags can be set from other forms that will display the corresponding flag in red to indicate that there is crucial information on file for this student.
Twelve Lines of Data Fields – contains specific demographic data related to the student displayed.
Message Line – will display in red if there is a mismatch between certain data. For example, a message displays that indicates when a student is active but not enrolled in the Attendance table
Intro to Aeries.Net Page 14
Form Tabs
There are various forms within Aeries.Net that contain a row of tabs at the top of the form. These tabs make it easy for you to click on the tab and display additional information that relates to the original form you are on.
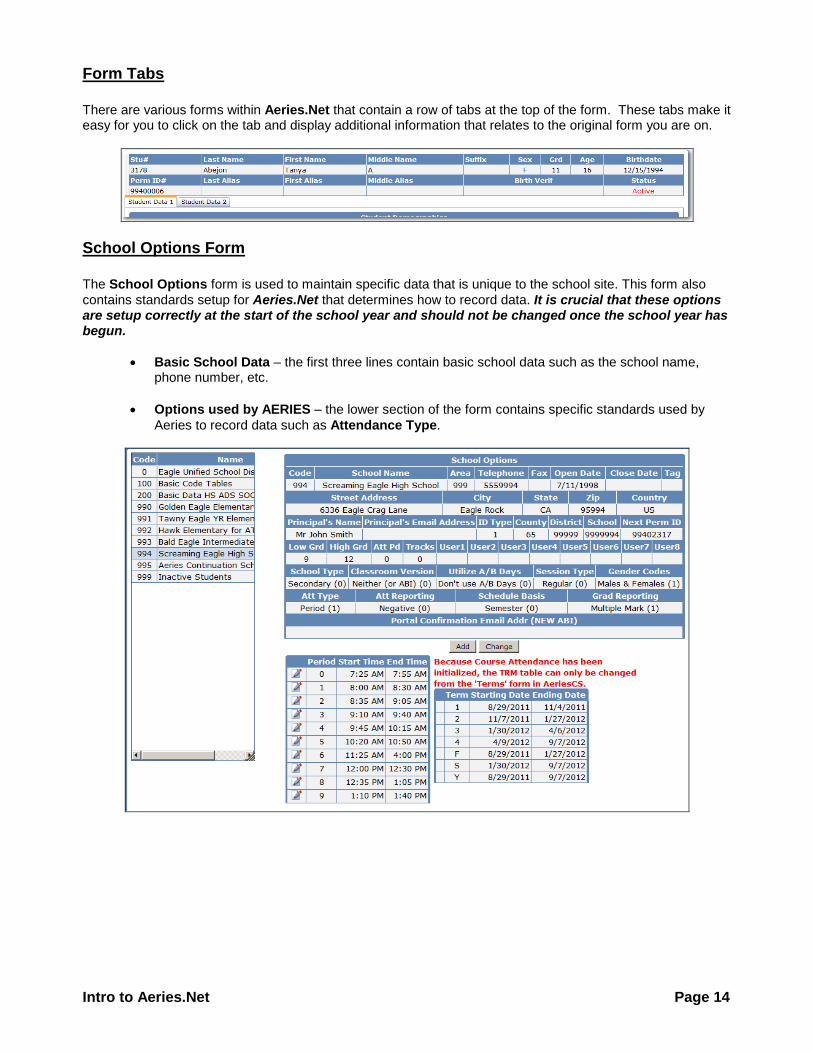
School Options Form
The School Options form is used to maintain specific data that is unique to the school site. This form also
contains standards setup for Aeries.Net that determines how to record data. It is crucial that these options are setup correctly at the start of the school year and should not be changed once the school year has begun.
Basic School Data – the first three lines contain basic school data such as the school name, phone number, etc.
Options used by AERIES – the lower section of the form contains specific standards used by
Aeries to record data such as Attendance Type.