Embed Size (px)
Citation preview

1
EXPERIMENT 4 – CLONING THE PROMOTER REGION OF THE GENE-OF-INTEREST
Purposes:
1. (Long term) To determine the activity of the promoter of the gene-of-interest at the cellular
and tissue levels in Arabidopsis plants via the expression of the Green Fluorescent Protein (GFP)
gene fused to the promoter.
2. (Short term) To clone the promoter region of the gene-of-interest into a plasmid vector.
Reference:1. KOD HiFi DNA Polymerase Technical Note (Novagen) (see Attachment 1)2. TOPO Cloning Instruction Manual (Invitrogen) (see Attachment 2)3. QIAprep Miniprep Handbook (see Attachment 3)
STRATEGY
I. AMPLIFICATION OF THE PROMOTER REGION OF THE GENE-OF INTEREST
USING HIGH FIDELITY (HIFI) DNA POLYMERASE
II. CLONING THE AMPLIFIED PROMOTER REGION INTO A PLASMID VECTOR A. LIGATING THE PCR PRODUCT AND A pCR-BLUNT II-TOPO VECTOR
B. TRANSFORMATION OF E. COLI CELLS WITH THE LIGATION
MIXTURE
C. SCREENING FOR E. COLI CELLS HARBORING THE RECOMBINANT
PLASMID AND ISOLATING RECOMBINANT PLASMID DNA
A. CONFIRMING THE AUTHENTICITY OF RECOMBINANT PLASMID
DNA VIA RESTRICTION ENZYME DIGESTION
E. VERIFYING THE SEQUENCE OF THE PROMOTER REGION BY
SEQUENCING ANALYSIS

2
STRATEGY OF PROMOTER ACTIVITY ANALYSIS

3
Materials Needed:
High quality Arabidopsis genomic DNA (12 ng/µL)PCR product of the promoter region tested with Ex-Taq DNA PolymeraseFilter tips for PCRKOD Hot Start DNA Polymerase kit (Cat.# 71086-3, Novagen)Sterile water12 µM Promoter Gene-specific Forward primer12 µM Promoter Gene-specific Reverse primerPipetman sets of P-10, P-20, P-200PCR tubes or strip of tubes1.5-mL Microcentrifuge tubesMicrocentrifuge-tube rackIce bucketpCR-BLUNT II-TOPO Cloning kit (Cat.# K2800-20, Invitrogen)One Shot Competent cells (Included in the TOPO Cloning kit)S.O.C. mediumSterile toothpicksTerrific Broth (TB) broth medium50 mg/mL KanamycinLB + Kanamycin plates containing x-gal and IPTG37oC Air incubatorOrbital shaker in the 37oC air incubator42oC Water bathBacterial cell spreaderA glass jar containing 95% ethanol solutionRegular Pipet tips for P-10, P-20, P-200, P-1000QIAgen Plasmid Miniprep kitNanodrop spectrophotometerTE buffer

4
PROCEDURE
I. AMPLIFICATION OF THE PROMOTER REGION OF THE GENE-OF-INTEREST
Note: ALWAYS wear gloves and use PCR filter tips when performing PCR preparation to
prevent contamination.
1. Get ice from an icemaker in room 2911 or 3906.
2. Thaw out tubes of 10x Buffer for KOD Hot Start DNA Polymerase, 25 mM MgSO4
and dNTPs (2 mM each) on a microcentrifuge rack for 1.5-mL microcentrifuge tubes at
room temperature for few minutes. Once the solutions are thawed out vortex for 5
seconds to mix the contents spin tubes for 10 seconds put the tubes on ice until
needed.
3. Thaw out Forward and Reverse primer solutions corresponding to a gene-of-interest as
in step 2.
4. Obtain THREE 0.2-mL sterile PCR tubes and set them on a PCR rack.
5. Label Name and Date on the lids and sides of the tubes as follows: (your TA will show
you how to write on the tubes)
Tube #1: "Name of a gene" (same name as primer's gene)
Tube #2: Pos. (Positive control for the gene-of-interest = PCR product using
Ex-Taq DNA polymerase)
Tube #3: Neg. (Negative control for the gene-of-interest containing same
components as in tube #1, but NO genomic DNA)
6. Obtain ONE 1.5-mL microcentrifuge tube and set them on a microcentrifuge-tube rack.
7. Write on the lid of the tube with black ultra-fine sharpie as "Mmix" (for Master mix).
Keep the tube on ice.

5
8. Prepare the Master Mix (Mmix) solution for 4 reactions (3 samples + 1 extra) as
follows:
Master Mix (Note: Amplification of targets greater than 3 kbp may require more DNA
polymerase)Mmix for1 Reaction
Mmix for4 Reactions
FinalConcentration
Sterile water 27.0 µL 108.0 µL
10x Buffer for KOD Hot Start DNA
polymerase
5.0 µL 20.0 µL 1x
dNTP mix (2 mM each dNTP) 5.0 µL 20.0 µL 0.2 mM
25 mM MgSO4 2.0 µL 8.0 µL 1.0 mM
12 µM Gene-specific Forward primer 1.0 µL 4.0 µL 0.24 µM
12 µM Gene-specific Reverse primer 1.0 µL 4.0 µL 0.24 µM
Hot Start DNA polymerase (1.0 Units/µL) 1.0 µL 4.0 µL 0.2 Unit
Total volume 42.0 µL 168.0 µL
a. Pipet into the tube the reagents with order from top down (example: water, 10x Buffer,
dNTP mix, etc.).
b. After pipetting all reagents into the master mix tube, close its lid. Mix the contents by
vortexing at setting of slow speed for 2 seconds. Caution: Do NOT vortex the mixture
with the enzyme, such as DNA polymerase, vigorously as well as for > 5 seconds because
these two factors will break down enzyme, resulting LOW or NO yield of PCR product.
Spin the tube in a microcentrifuge at full speed (13,200 rpm) for 10 seconds. Put the tube
back on ice.
6
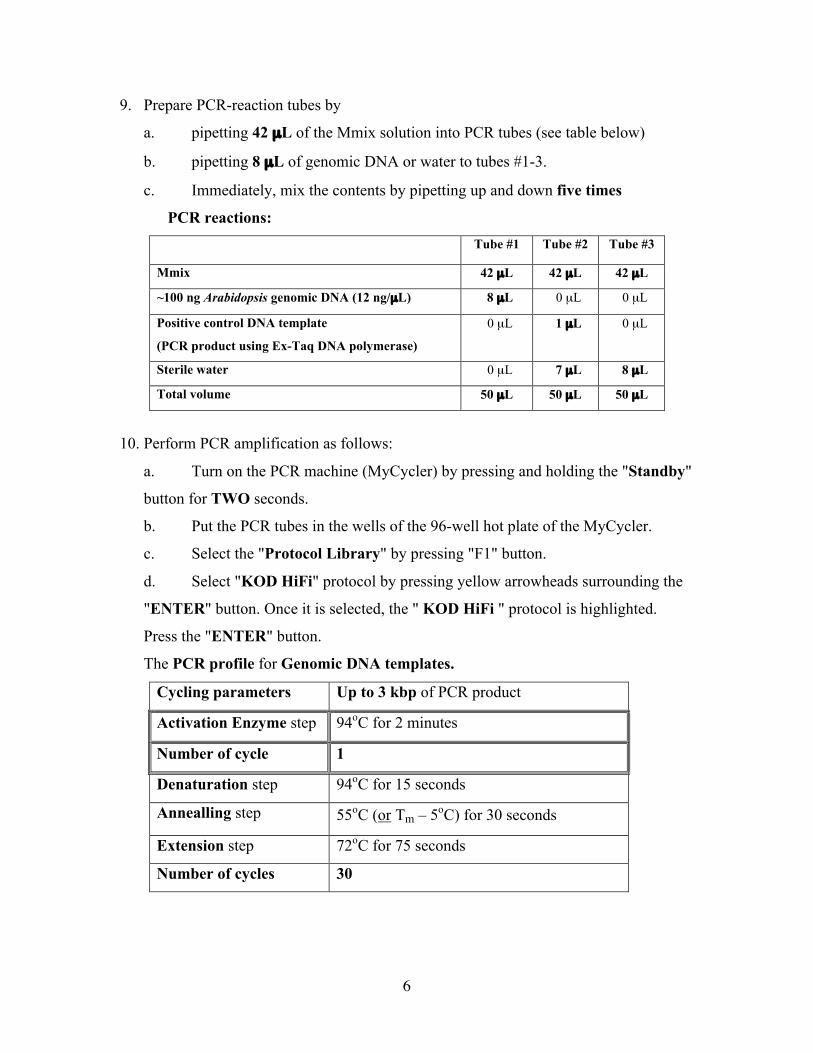
9. Prepare PCR-reaction tubes by
a. pipetting 42 µL of the Mmix solution into PCR tubes (see table below)
b. pipetting 8 µL of genomic DNA or water to tubes #1-3.
c. Immediately, mix the contents by pipetting up and down five times
PCR reactions:Tube #1 Tube #2 Tube #3
Mmix 42 µL 42 µL 42 µL
~100 ng Arabidopsis genomic DNA (12 ng/µL) 8 µL 0 µL 0 µL
Positive control DNA template
(PCR product using Ex-Taq DNA polymerase)
0 µL 1 µL 0 µL
Sterile water 0 µL 7 µL 8 µL
Total volume 50 µL 50 µL 50 µL
10. Perform PCR amplification as follows:
a. Turn on the PCR machine (MyCycler) by pressing and holding the "Standby"
button for TWO seconds.
b. Put the PCR tubes in the wells of the 96-well hot plate of the MyCycler.
c. Select the "Protocol Library" by pressing "F1" button.
d. Select "KOD HiFi" protocol by pressing yellow arrowheads surrounding the
"ENTER" button. Once it is selected, the " KOD HiFi " protocol is highlighted.
Press the "ENTER" button.
The PCR profile for Genomic DNA templates.
Cycling parameters Up to 3 kbp of PCR product
Activation Enzyme step 94oC for 2 minutes
Number of cycle 1
Denaturation step 94oC for 15 seconds
Annealling step 55oC (or Tm – 5oC) for 30 seconds
Extension step 72oC for 75 seconds
Number of cycles 30

7
e. Under the "Choose Operation" window, "Run Protocol" is highlighted. Press
the "ENTER" button to run the protocol.
f. Press "F5" button to "Begin Run" the protocol.
11. Analyze 10 µL of the reaction products on a 1% agarose gel containing 0.5 µg/mL
ethidium bromide and visualize the DNA bands under UV illumination.

8
II. CLONING THE AMPLIFIED PROMOTER REGION INTO A PLASMID VECTOR A. LIGATING THE PCR PRODUCT AND A pCR-BLUNT II-TOPO VECTOR
1. Thaw on ice a tube of TOPO vector.
2. Label a 1.5-mL microcentrifuge tube “pCR-Blunt + Gene Name” and Date. Place the labeled
tube on ice.
3a. Pipet the following reagents into the labeled tube as listed in the Table below:
Reagent
Freshly prepared PCR product 2.0 µL
Salt Solution 1.0 µL
Sterile water 2.5 µL
pCR-Blunt II – TOPO 0.5 µL
Total Volume 6.0 µL
3b. Mix reaction GENTLY by flicking the tube. Do NOT vortex the tube!

9
3c. Incubate the reaction for 5 minutes at room temperature (22-24oC).
Note: For most applications, 5 minutes will yield many colonies for analysis. The
length of the TOPO Cloning reaction can be varied from 30 seconds to 30
minutes. For routine subcloning of PCR products, 30 seconds may be sufficient.
For large PCR products (>1 kb), increase the reaction time will yield more
colonies (Taken from TOPO Cloning Manual, Invitrogen).
4. After the ligation reaction is done, place the ligation mixture tube on ice.
Note: If you don’t have time, you can store the ligation mixture at –20oC overnight.

10
B. TRANSFORMATION OF E. COLI CELLS WITH THE LIGATION
MIXTURE
1. Thaw on ice ONE vial of One Shot E. coli competent cells for transformation for a few
minutes.
2. Pipet 2 µL of the TOPO ligation mixture into the vial of One Shot E. coli competent
cells. Attention: Do NOT pipet the mixture up and down.
3. Incubate the cell mixture on ice for 10-20 minutes.
4. Heat-shock the cells for 30 seconds in the 42oC waterbath without shaking.
5. Immediately, transfer the tube back on ice. Leave it on ice for 2 minutes.
6. Transfer the tube to a rack for microcentrifuge tubes at room temperature.
7. In the bacterial hood, pipet 250 µL of room temperature S.O.C medium to the cell
mixture. Cap the tube tightly.
8. Incubate the tube at 100-150 rpm shaking on an orbital shaker in a 37oC incubator for 45-
60 minutes.
9. Meanwhile, label on the bottom of TWO prewarmed (37oC) selective (Kanamycin) plates
supplemented with x-gal and IPTG with the following information:
pCR II + “gene promoter”,
Date
10 µL or 50 µL
Your Initial
10. Spread 10-50 µL of transformation mixture on TWO prewarmed (37oC) selective
(Kanamycin) plates.
Plate #1: 10 µL of transformation mixture + 20 µL of S.O.C medium (for even
spreading of a small volume)
Plate #2: 50 µL of transformation mixture
11. Incubate the plates in the 37oC incubator overnight (14-16 hours).
12. Next day, count the number of WHITE and BLUE colonies. Seal the plates with pieces
of parafilm and then store them at 4oC (cold room or fridge) until inoculation step.

11
C. SCREENING FOR E. COLI CELLS HARBORING THE RECOMBINANT
PLASMID AND ISOLATING PLASMID DNA
INOCULATION OF MEDIUM WITH BACTERIAL COLONIES
1. Put SIX sterile glass tubes on a test tube rack.
2. Label on the side of each tube with your Initial and number (1-6).
3. Pipet ~1.5 mL of Terrific Broth (TB) medium containing 50 µg/mL Kanamycin into
each of 6 tubes.
4. Inoculate the TB medium + Kanamycin with individual WHITE colonies by using a
sterile toothpick to pick a single WHITE colony on the plate and drop that toothpick into
the tube #1.
5. Repeat step 4 for FIVE other tubes.
6. Incubate the tubes at 37oC overnight by
a. transferring all 6 tubes to a wired rack on an orbital shaker in the 37oC
incubator.
b. turning the SPEED dial (LEFT dial) to number 2 for 200 rpm shaking.
c. turning the TIME dial (RIGHT dial) clockwise to a CONSTANT position.
7. Close the incubator door.
Next day, Inspect the growth of cells (appearing very cloudy) in culture tubes. If plasmid DNA is
not isolated immediately, place culture tubes in the cold room.

12
ISOLATING PLASMID DNA
1. Label on the lids of 1.5-mL microcentrifuge tubes with your Initial and the number
(1-6). Set labeled tubes on the microcentrifuge rack.
2. Arrange the culture tubes and labeled microcentrifuge tubes in their corresponding order.
For example, 1 to 1, 2 to 2,… , 6 to 6.
3. Carefully, pour the liquid culture into the microcentrifuge tube. Close the lids of the
tubes. Note: if the culture tubes sit in the fridge or coldroom for more than ONE hour, vortex
the tubes for 5-10 seconds to mix the content before transfer it to the microcentrifuge tube.
4. Spin tubes in a microcentrifuge at FULL speed for 2 minutes.
5. Pour off the supernatant into a glass Erlenmyer flask labeled as “CULTURE WASTE”.
Dab off the extra liquid on a piece of paper towel.
6. Place the tubes back on the microcentrifuge rack.
7. Pipet 250 µL of Buffer P1 (Resuspension buffer + RNase A) to each tube. Close the
lid tightly.
8. Resuspend pelleted bacterial cells by either raking the tube on a microcentrifuge rack for
10 times or vortexing the tube for a few minutes until NO cell lumps are observed.
9. Place the tube back on the microcentrifuge rack.
10. Add 250 µL of Buffer P2 (Lysis buffer) to each tube. Close the lid.
11. Invert tubes for 10 times or until the mixture is clear. This step is for breaking open
bacterial cells to release their contents (chromosomal DNA, plasmid DNA, proteins,
carbohydrates) into the solution. Note: Do NOT vortex the contents to prevent shearing
bacterial chromosome DNA into many tiny pieces that have the same size as the plasmid
DNA.
12. Add 350 µL of Buffer N3 (Neutralization buffer) to each tube. Close the lid.
Immediately, invert the tube to mix the solution as in step 11. The solution appears cloudy.
Note: Do NOT vortex the mixture!
13. Repeat step 12 for other tubes (one by one)Spin tubes in the microcentrifuge at FULL
speed for 10 minutes.

13
14. Meanwhile, label on the SIDE of the QIAprep columns (Light blue) with your Initial and
the number. Set these columns in their collection tubes on the microcentrifuge rack.
15. Also, label on the lids and side of a new set of tubes with the following information:
pCR-“gene name”; Number, your initial, date. (Tubes will be used at step 26).
16. After 10 minutes of spinning, transfer the supernatant from step 14 to the QIAprep
column by pipetting. Caution: Make sure that the numbers on the lids of tubes and the SIDE
of QIAprep columns are corresponding.
17. Spin the columns in their collection tubes at full speed for 30 seconds.
18. Lift the column off the collection tube and discard the flow-through liquid into a glass
BEAKER.
19. Put the column back in its collection tube.
20. Pipet 500 µL of Buffer PB to each column. Spin the columns at FULL speed in the
microcentrifuge for 30 seconds.
21. Lift the column off the collection tube and discard the flow-through liquid into a glass
BEAKER.
22. Pipet 750 µL of Buffer PE to each column. Spin the columns at FULL speed in the
microcentrifuge for 30 seconds. This step is to wash off residual salt and proteins from the
membrane on the column. Note: Make sure that ethanol is added to the PE buffer before
use.
23. Lift the column off the collection tube and discard the flow-through liquid into a glass
BEAKER.
24. Spin the columns at FULL speed for 1 minute to remove residual wash buffer. Note: if
the residual wash buffer is NOT completely removed, DNA solution will float up when the
sample is loaded into the well of the agarose gel. Also, ethanol will inhibit enzyme activity in
later steps.
25. Transfer the QIAprep columns in NEWLY labeled tubes. Discard the collection tubes.
Note: make sure the numbers on the columns and microcentrifuge tubes matched.

14
26. Pipet 50 µL of Buffer EB (10 mM Tris-HCl, pH 8.5) to the center of each QIAprep
column.
27. Let the columns stand for 1 minute. Note: it is okay to incubate longer than 1 minute.
28. Spin the tubes with columns at FULL speed for 1 minute. Steps 28 and 29 are for
eluting plasmid DNA off the column.
29. After spinning, discard the columns. Save the eluted plasmid DNA in the
microcentrrifuge tubes.
30. Determine DNA concentration and its purity using the Nanodrop spectrophotometer.
Record DNA concentration,

15
D. CONFIRMING THE AUTHENTICITY OF RECOMBINANT PLASMIDDNA VIA RESTRICTION ENZYME DIGESTION
Purpose: To ensure that plasmid DNA isolated from WHITE colonies is recombinant plasmid
DNA, i.e. containing the cloned promoter region, not NON-recombinant DNA (i.e. the vector
alone).
Reagents and Materials Needed:1.5-mL Microcentrifuge tubesMicrocentrifuge-tube rackSterile waterEcoRI restriction enzyme (Invitrogen, 10 units/mL)React buffer #3 (came with EcoRI)37oC water bathAgaroseGel ApparatusGel Document system

16
PROCEDURE
1. Digest 300 - 500 ng of plasmid DNA with restriction enzyme EcoRI at 37oC for ONE
hour.
(Why EcoRI? Check the presence of EcoRI sites in the Multiple Cloning Site of the
pCRII-Blunt TOPO vector diagram in the previous page). Note: It is best to set up reactions
with a master mix to minimize the chance of leaving out one or several components in the
reactions.
a. Standard set up of a restriction enzyme reaction
Components
Standard
Reaction
Final
Concentration
Example
500 ng DNA
(@200 ng/µL)
DNA x µL ----- 2.5 µL
Sterile water y µL −−− 15.0 µL
*10x React buffer #2
(Invitrogen)
2.0 µL 1x 2.0 µL
EcoRI (10 U/µL, Invitrogen) 0.5 µL 0.25 U/µL 0.5 µL
Total Volume 20.0 µL −−− 20.0 µL
Explanation of volumes
x µL = Volume of Plasmid DNA depends on the amount (in ng) of DNA to be
digested and the concentration of plasmid DNA (in ng/µL)
Volume of 10x React buffer is 1/10th the total volume of the reaction so that
the final concentration of the React buffer in the reaction is 1x.
The volume of restriction enzyme depends on the amount of DNA to be
digested. Usually, ONE Unit of Restriction endonuclease (Enzyme) is defined
as the amount of enzyme required to digest 1 µg (or 1,000 ng) of the DNA
completely in ONE hour under the conditions specified for that enzyme (most
enzymes have optimal temperature at 37oC). To ensure that DNA is completely

17
digested after 1 hour, we use 2-10 units of enzyme per microgram of DNA.
y µL = The volume of sterile water is the remaining volume added to the reaction
for bringing up the total volume.
Note: *: Different restriction enzymes require Different 10x React buffers. Therefore,
Check the enzyme to be used and find the appropriate buffer for that enzyme.
b. Digestion set up for at least TWO DNA samples
Tip: When set up reactions for more than 2 DNA samples that are digested with
the same restriction enzyme(s), it is highly recommended to work with a Master
mix. Usually, the volume of DNA varies from sample to sample. To minimize
errors, it is recommended to work with 2x Enzyme mix as exemplified below. Note: the
volume of DNA + sterile water = the volume of 2x Enzyme mix!
Components Sample A
(300 ng/µL)
Sample B
(200 ng/µL)
Sample C
(100 ng/µL)
Final
Concentration
500 ng of DNA 1.7 µL 2.5 µL 5.0µL 25 ng/µL
Sterile water 8.3 µL 7.5 µL 5.0 µL −−−
2x Enzyme mix 10.0 µL 10.0 µL 10.0 µL 1x
Total volume 20.0 µL 20.0 µL 20.0 µL

18
c. Label on the lid of a microcentrifuge tube as “2x Enz Mix” and Prepare a 2x Enzyme
Mix for the number of plasmid DNA + 1 Extra reaction to be analyzed. Keep the
Enzyme Mix tube on ice. Mix the contents by flicking the tube gently.
How many DNA samples will be digested?
Components Enz Mix for
1 ReactionEnz Mix for
# Reactions
10x React buffer #3 2.0 µL µL
Sterile water 7.5 µL µL
EcoRI (10 U/µL) 0.5 µL µL
Total Volume 10.0 µL µL
d. Label on the lids of microcentrifuge tubes sample number, EcoRI, and your initial.Keep tubes on ice. Set up restriction digestion reactions for a number of plasmid DNA to
be analyzed by pipetting the following components into the tubes.
ComponentsSample 1
( ng/µL)
Sample 2
( ng/µL)
Sample 3
( ng/µL)
Sample 4
( ng/µL)
500 ng of DNA µL µL µL µL
Sterile water µL µL µL µL
2x Enzyme mix 10.0 µL 10.0 µL 10.0 µL 10.0 µL
Total volume 20.0 µL 20.0 µL 20.0 µL 20.0 µL
a. Mix the contents by flicking the tubes several times. Spin the tubes in the
microfuge for 10 seconds to bring down liquid to the bottom of the tubes.
b. Incubate the reactions in the 37oC water bath for 1 hour.
19
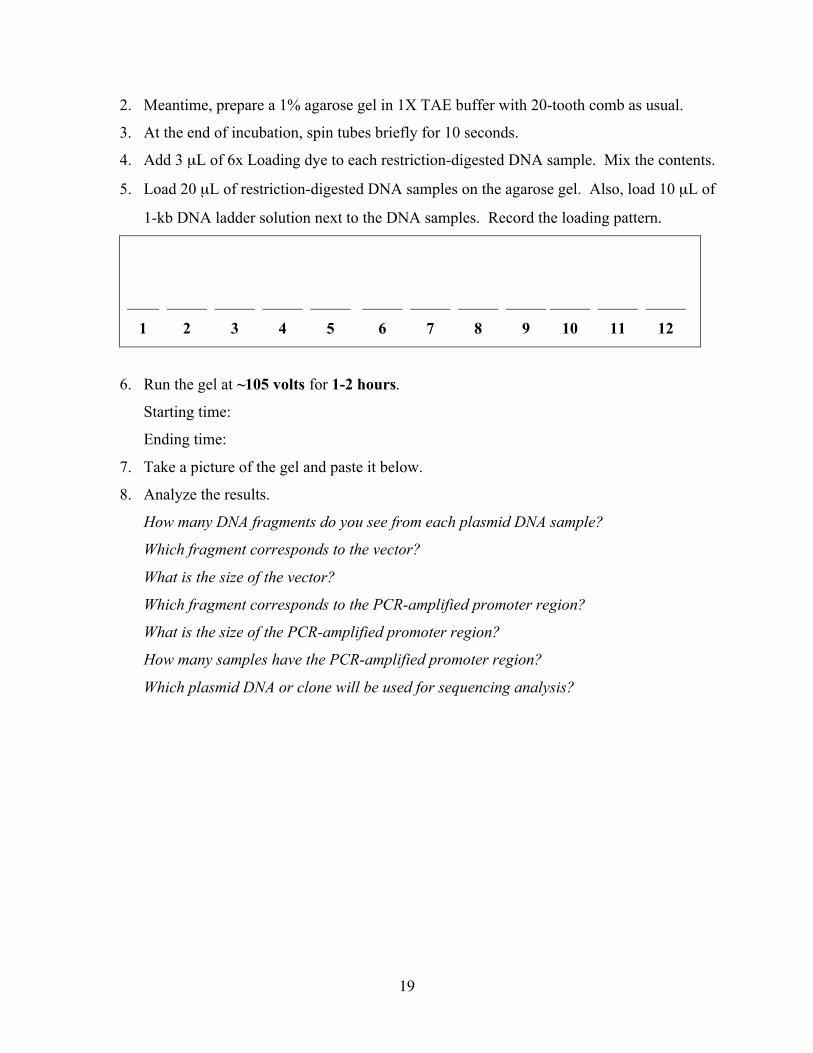
2. Meantime, prepare a 1% agarose gel in 1X TAE buffer with 20-tooth comb as usual.
3. At the end of incubation, spin tubes briefly for 10 seconds.
4. Add 3 µL of 6x Loading dye to each restriction-digested DNA sample. Mix the contents.
5. Load 20 µL of restriction-digested DNA samples on the agarose gel. Also, load 10 µL of
1-kb DNA ladder solution next to the DNA samples. Record the loading pattern.
____ _____ _____ _____ _____ _____ _____ _____ _____ _____ _____ _____
1 2 3 4 5 6 7 8 9 10 11 12
6. Run the gel at ~105 volts for 1-2 hours.
Starting time:
Ending time:
7. Take a picture of the gel and paste it below.
8. Analyze the results.
How many DNA fragments do you see from each plasmid DNA sample?
Which fragment corresponds to the vector?
What is the size of the vector?
Which fragment corresponds to the PCR-amplified promoter region?
What is the size of the PCR-amplified promoter region?
How many samples have the PCR-amplified promoter region?
Which plasmid DNA or clone will be used for sequencing analysis?

20
F. VERIFYING THE SEQUENCE OF THE PROMOTER REGION BY
SEQUENCING ANALYSIS
Purpose: To verify that the cloned promoter region has the exact sequence as the one reported in the
Arabidopsis database.
SEQUENCING REACTION WITH BIG DYE V. 3
Reference: Perkin Elmer/Applied Biosystems
Solutions Needed:
Applied Biosystems Big Dye version. 3 (Obtained from UCLA Sequencing Facility, 5th floor,Gonda Building)
Dye Dilution Mix (Sigma, Cat. # S3938; also, obtained from UCLA Sequencing Facility, 5th
floor, Gonda Building) 3 µM T7 primer 3 µM SP6 primer Sterile water
Materials Needed:
Applied Biosystems GeneAmp 9700 or BioRad MyCycler 0.2 mL PCR tubes or Strips of 8 tubes/strip PCR Rack Aerosol-barrier (or PCR) Pipet Tips Sequencing Reaction Purification Columns (Edge Biosystem) (can be bought directly from
Edge Biosystem or Obtained from UCLA Sequencing Facility, 5th floor, Gonda Building)
21
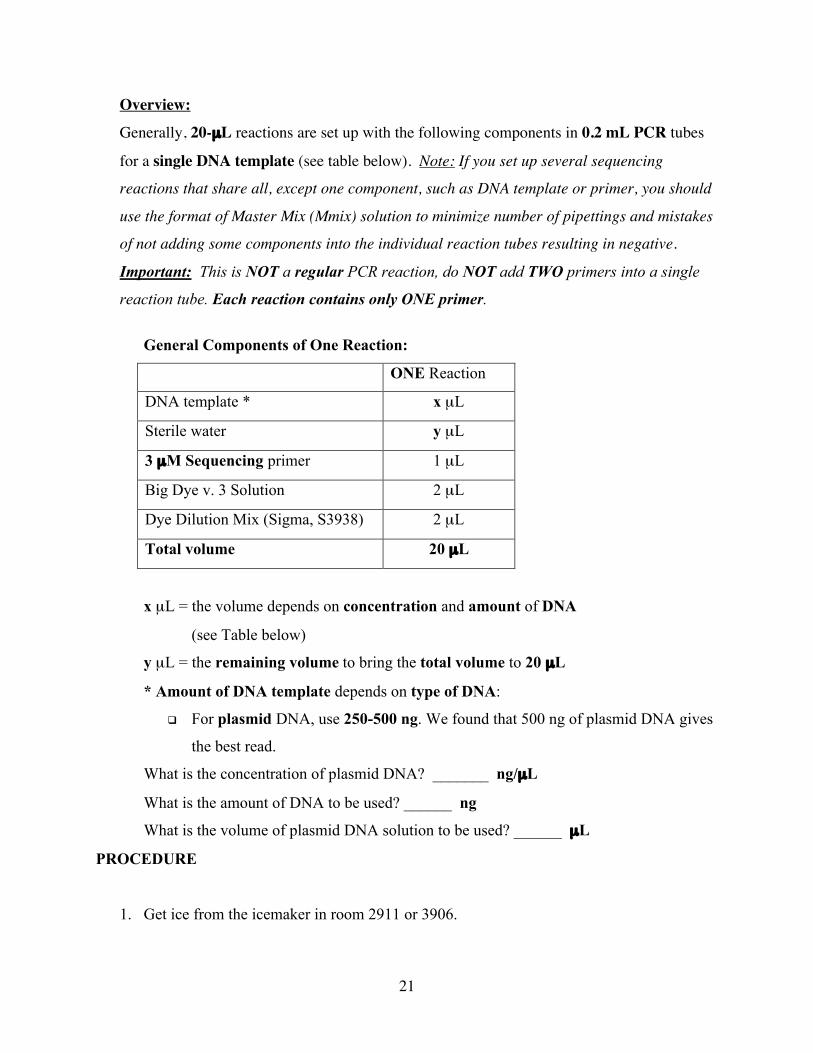
Overview:Generally, 20-µL reactions are set up with the following components in 0.2 mL PCR tubes
for a single DNA template (see table below). Note: If you set up several sequencing
reactions that share all, except one component, such as DNA template or primer, you should
use the format of Master Mix (Mmix) solution to minimize number of pipettings and mistakes
of not adding some components into the individual reaction tubes resulting in negative.
Important: This is NOT a regular PCR reaction, do NOT add TWO primers into a single
reaction tube. Each reaction contains only ONE primer.
General Components of One Reaction:
ONE Reaction
DNA template * x µL
Sterile water y µL
3 µM Sequencing primer 1 µL
Big Dye v. 3 Solution 2 µL
Dye Dilution Mix (Sigma, S3938) 2 µL
Total volume 20 µL
x µL = the volume depends on concentration and amount of DNA
(see Table below)
y µL = the remaining volume to bring the total volume to 20 µL
* Amount of DNA template depends on type of DNA:
For plasmid DNA, use 250-500 ng. We found that 500 ng of plasmid DNA gives
the best read.
What is the concentration of plasmid DNA? _______ ng/µL
What is the amount of DNA to be used? ______ ng
What is the volume of plasmid DNA solution to be used? ______ µL
PROCEDURE
1. Get ice from the icemaker in room 2911 or 3906.

22
2. Label on the side of TWO 0.2-mL PCR tubes with your initial and primer name. Set
the tube on a PCR rack sitting on ice.
3. Label on the lid and side of a 1.5-mL microcentrifuge tube as “Mmix” and your
initial. Set the tube on ice.
4. Prepare a master mix (Mmix) for 3 reactions (2 reactions + 1 extra) by pipetting the
following components into the Mmix tube as shown in the table below.
Note: use information on the previous page to fill in the volume of DNA solution
to be added and calculate the volume of water to be added to the Mmix tube for
3 reactions.
Master Mixes (Mmix) of Sequencing Reactions:
Components Mmix for ONE reaction Mmix for 3 reactions
250-500 ng of DNA
template
x µL x (x 3) µL
Sterile water y µL y (x 3) µL
Big Dye v. 3 2.0 µL 6.0 µL
Dye Dilution Mix
(Sigma, S3938)
2.0 µL 6.0 µL
Total Volume 19.0 µL 57.0 µL
Mix the content by flicking the tube five times or vortexing at the mixer setting of 2-3
for 5 seconds.
Spin the tube for 10 seconds to bring all the contents to the bottom of the tube.
Set the tube back on ice.

23
5. Pipet Mmix and gene-specific primer into TWO labeled 0.2-mL PCR tubes.
either or
Components T7 primer SP6 primer
Mmix 19 µL 19 µL
3 µM T7 primer 1 µL ----------
3 µM SP6 primer -------- 1 µL
Total volume 20 µL 20 µL
6. Carry out cycling reaction using either Applied Biosystems GeneAmp 9700USER: <<pe>>PROGRAM: Big DyeThe profile of the Big Dye program as:25 cycles of 96 oC, 10 sec. --> 50 oC, 5 sec. --> 60 oC, 4 min. Followed by 4 oC, ∞
or BioRad MyCycler with a Big Dye protocol with the same profile as above.
7. After the cycling reaction is finished, clean up sequencing reactions using Edge
Biosystems spin columns (stored in the cold room) as following:
a. Spin the pre-packed columns in a microcentrifuge at 3,000 rpm for 2 minutes at room
temperature.
b. Meanwhile, label a new set of 1.5 mL microcentrifuge tubes according to your
reactions.
c. Transfer the columns to new tubes.
d. Pipet 20 µL of sequencing reaction to appropriate columns.
e. Spin the columns as in step a.
f. Discard the columns.
8. Take the purified sequencing reaction to UCLA Sequencing Facility located on the 5th
floor in Gonda Building. Note: Make sure to copy down the assigned file number
(example, # 5678); that is, automatically given by the Facility, after you enter the
samples into the Facility computer.
9. After one to two days, retrieve your sequences from the Sequencing Facility web page.
RETRIEVING AND ANALYZING DNA SEQUENCES

24
Purpose: To verify that the sequence corresponds to that of the promoter region of the gene-of-
interest.
1. From any computers in the lab, Log in to the UCLA Sequencing Retrieval System via
http://www.genetics.ucla.edu/webseq/
2. Enter in the USER NAME field: goldberg_r
3. Enter in the PASSWORD field: embryo
4. Find your sequence files by looking up the assigned file number and the name of the
gene you are working on.
Example: the assigned file number is 5677, and the gene of interest is At5g09250. You
would see the following files:
5677 GOLDR_At5g09250Fw_080.ab1
5677 GOLDR_At5g09250Rv_081.ab1
What are the annotations?
5677 = assigned file number; GOLDR = user name; At5g09250Fw = sequence name
obtained with the Forward sequencing primer, 080 = capillary position used in loading
sequencing sample in the Sequencer ABI 7700 (Perkin-Elmer/Applied Biosystems); abi =
ABI file format. Select "PROCESS INDIVIDUAL SEQUENCES" instead of "PROCESS
COMPLETE SET OF 96 SEQUENCES".
5. Select sequences to be downloaded, and click "DOWNLOAD SELECTED" or click on
"SEQUENCE FILE TO DOWNLOAD".
6. Select "SAVE TO DISK" and choose "THE DESKTOP".
7. Open the saved file using a SEQUENCE VIEWER PROGRAM (CHROMAS on
Windows or EDITVIEW on Mac).
8. Copy DNA sequences to a Microsoft Word file. Note: Name the files according to the
name of gene of interest (for example, At5g09250).

25
9. Process the DNA sequences by "BLASTN" and "BLASTX" searches, respectively. Note:
Blast search may take a few minutes or longer to complete depending on how busy is the
NCBI server in Washington D.C (i.e. how many sequences have been processed by the
NCBI server at the fraction of time).
10. Determine if the DNA sequence corresponds to the gene of interest.
11. Print out the Blast results as hard-copy records.
12. Save the Blast results in the pdf format so that you can upload them in your webbook.