Embed Size (px)
Citation preview

AP/TCPBusiness Manager Training Manual
Written By: Vonda LeeMay 7, y
Table of Contents
Introduction.............................................................................................................................. 3
Requesting Access to ImageNow........................................................................................4
Logging Into WebNow............................................................................................................ 5
Document and Folder Views................................................................................................ 6AP Invoice Processing...................................................................................................................... 6TCP Documents.................................................................................................................................. 8TCP Travel......................................................................................................................................... 14
Creating Views called Filters............................................................................................. 16
Exiting WebNow.................................................................................................................... 18
document.docx 2

Introduction
This document will assist the department Business Managers with: Requesting access to ImageNow How to search for invoices and travel documents Check the status of those invoices and travel documents
document.docx 3

Requesting Access to ImageNowA Business Manager needing access to Accounts Payable and Travel & Complex Payments documents in ImageNow can request access by submitting an online form.
Before submitting the form, please make sure a University Confidentiality Agreement form has been signed, if not login to Banner SSB to access the Confidentiality Agreement link located under the Employee tab.
Perform the following steps:1. Click the link ITS ImageNow Add/Remove Access Request2. The online access request form will open in a browser.3. Enter in the user submitting the ImageNow access request 800 Number and
click the TAB key. (*Note: the user’s name will appear.)4. Enter in the user needing ImageNow access NinerNet credentials and click
the TAB key. (*Note: the user’s name will appear.)5. Enter in a Brief Description for the request. 6. Click on the Add or Remove drop-down list to select the permission:
a. Add Permissionb. Remove Permission
7. If Add Permission is selected and click the TAB key, a new parameter called Copy User From will appear.
8. You can select access from an exiting ImageNow user or select each security group(s) individually.
a. Enter the Copy User From ImageNow user’s NinerNet credentials and press the TAB key. (*Note: the user’s name will appear and all the security groups associated with that user will display.)
b. Or click the Add Another Group button and perform the following:i. Click on the first All Groups drop-down list to select AP and
click on the Access Group drop-down list to select AP Invoice External Viewer.
ii. Click on the next All Groups drop-down list to select TCP and click on the Access Group drop-down list to select TCP Invoice External Viewer.
9. All ImageNow users must verify that they have read and understand the ImageNow Data Security and PCI Compliance procedures located in the Moodle ImageNow Training Course. To access the documents click the Moodle link and then proceed to the Training section.
10. Select the I certify that the user has reviewed the Data Security and PCI Compliance procedures box.
11. Click the Submit Access Request button to submit the ImageNow Access Request Form.
document.docx 4
12. Click the Reset and Submit button to clear and submit another form for access.
13. To exit the form, close the browser or tab.
Logging Into WebNow(ImageNow web version)
1. To access the ImageNow web application, open a browser window, type the URL, https://imagenow.uncc.edu/, in the navigation toolbar to display the login screen. Enter your NinerNet credentials and press the CONNECT button as seen below:
2. Once logged into the application, a screen will appear displaying all the VIEWS on the left-hand side panel.
a. Documents i. AP Invoice Processing
ii. TCP Documentsb. Folders
i. TCP Travel
document.docx 5

Document and Folder Views
AP Invoice Processing
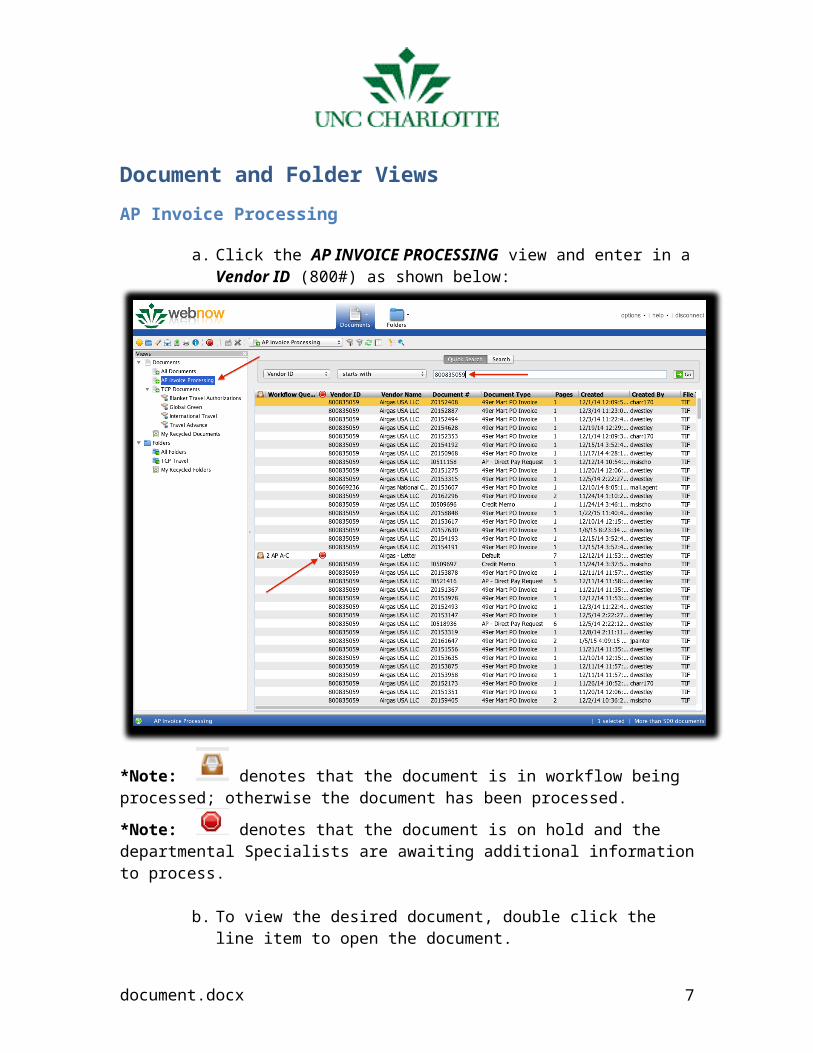
a. Click the AP INVOICE PROCESSING view and enter in a Vendor ID (800#) as shown below:
*Note: denotes that the document is in workflow being processed; otherwise the document has been processed.
*Note: denotes that the document is on hold and the departmental Specialists are awaiting additional information to process.
b. To view the desired document, double click the line item to open the document.
document.docx 6
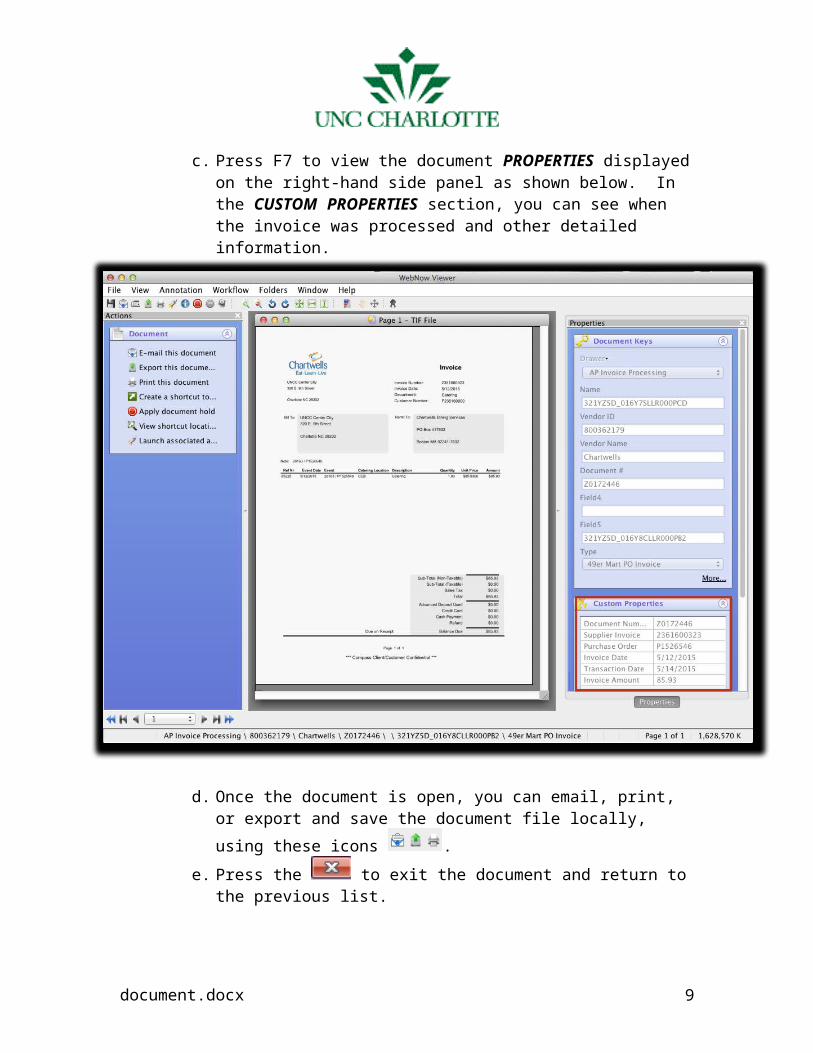
c. Press F7 to view the document PROPERTIES displayed on the right-hand side panel as shown below. In the CUSTOM PROPERTIES section, you can see when the invoice was processed and other detailed information.
d. Once the document is open, you can email, print, or export and save
the document file locally, using these icons .
e. Press the to exit the document and return to the previous list.
document.docx 7

TCP Documents
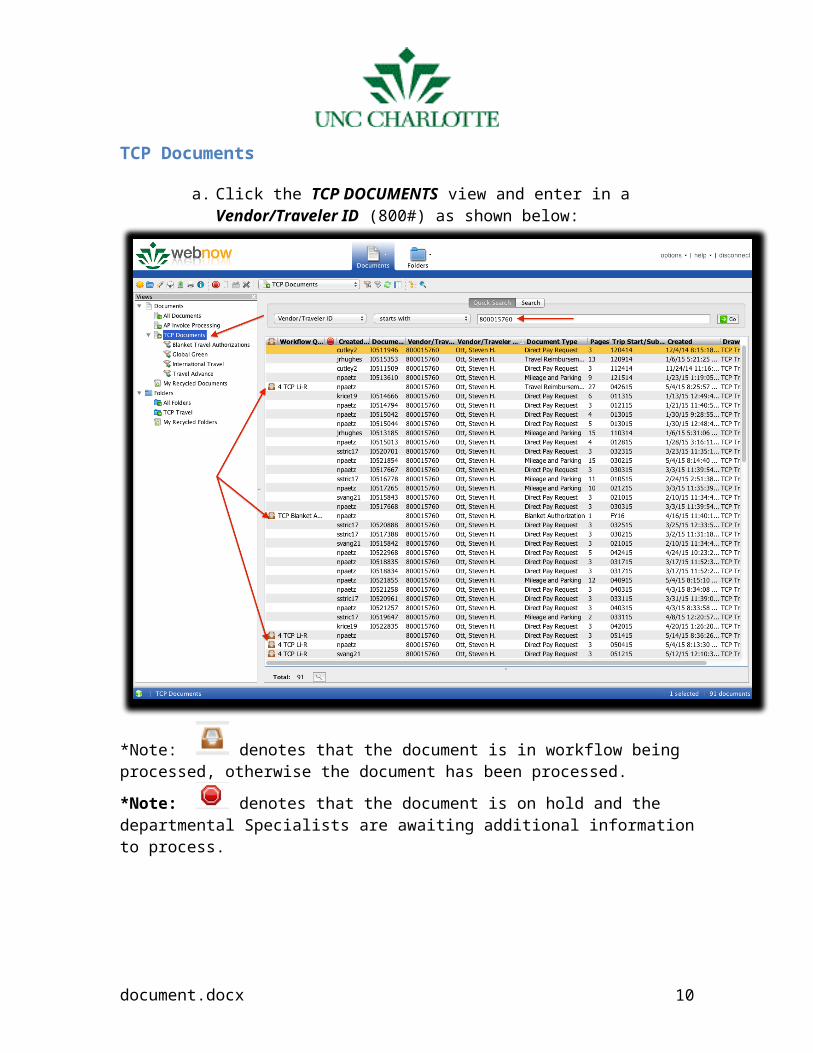
a. Click the TCP DOCUMENTS view and enter in a Vendor/Traveler ID (800#) as shown below:
*Note: denotes that the document is in workflow being processed, otherwise the document has been processed.
*Note: denotes that the document is on hold and the departmental Specialists are awaiting additional information to process.
document.docx 8
b. Click the button to open the find toolbar at the bottom of the screen. You can perform a more precise search, such as for a Vendor/Traveler’s Document Number in the list as shown below:
c. To view the desired document, double click the line item to open the document.
document.docx 9
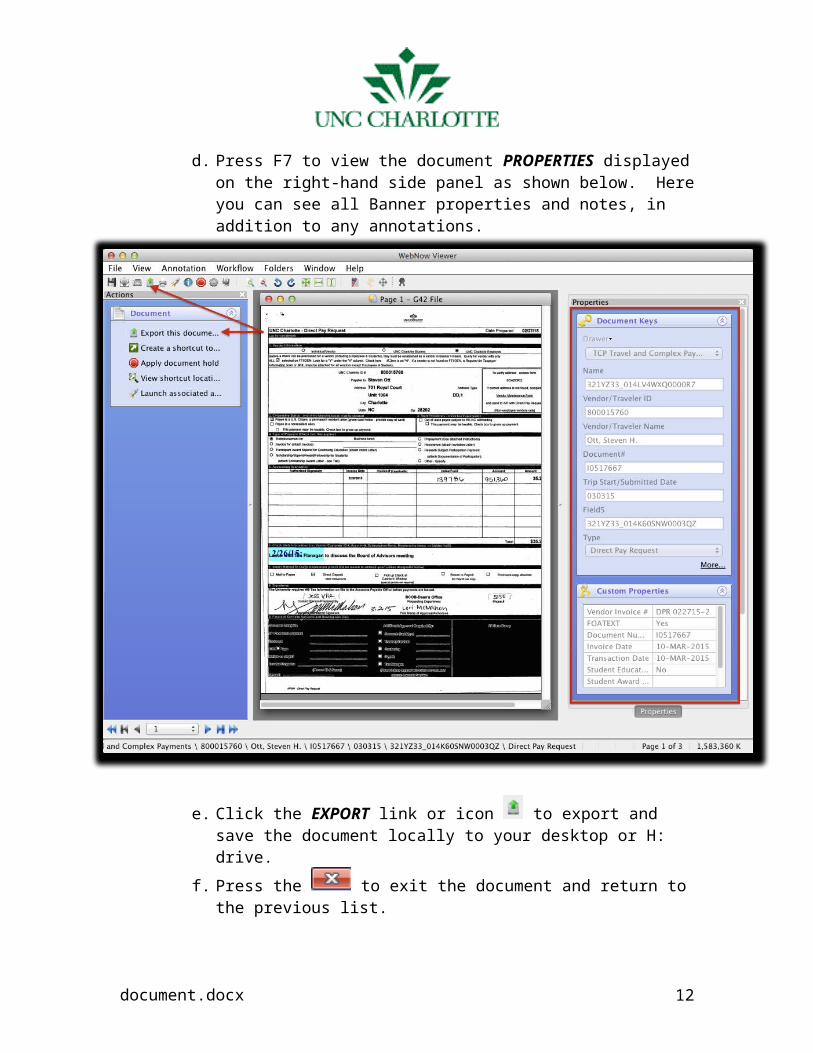
d. Press F7 to view the document PROPERTIES displayed on the right-hand side panel as shown below. Here you can see all Banner properties and notes, in addition to any annotations.
e. Click the EXPORT link or icon to export and save the document locally to your desktop or H: drive.
f. Press the to exit the document and return to the previous list.
document.docx 10

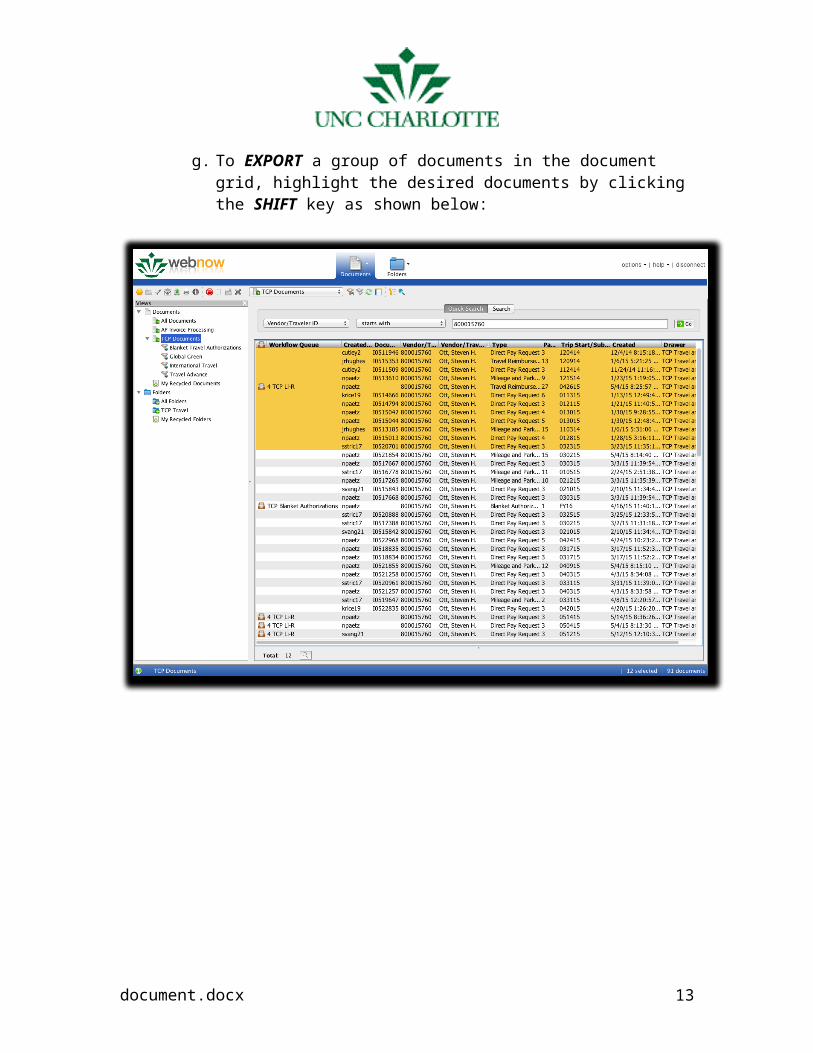
g. To EXPORT a group of documents in the document grid, highlight the desired documents by clicking the SHIFT key as shown below:
document.docx 11
h. Right-click and select the EXPORT GRID option as shown below:
document.docx 12
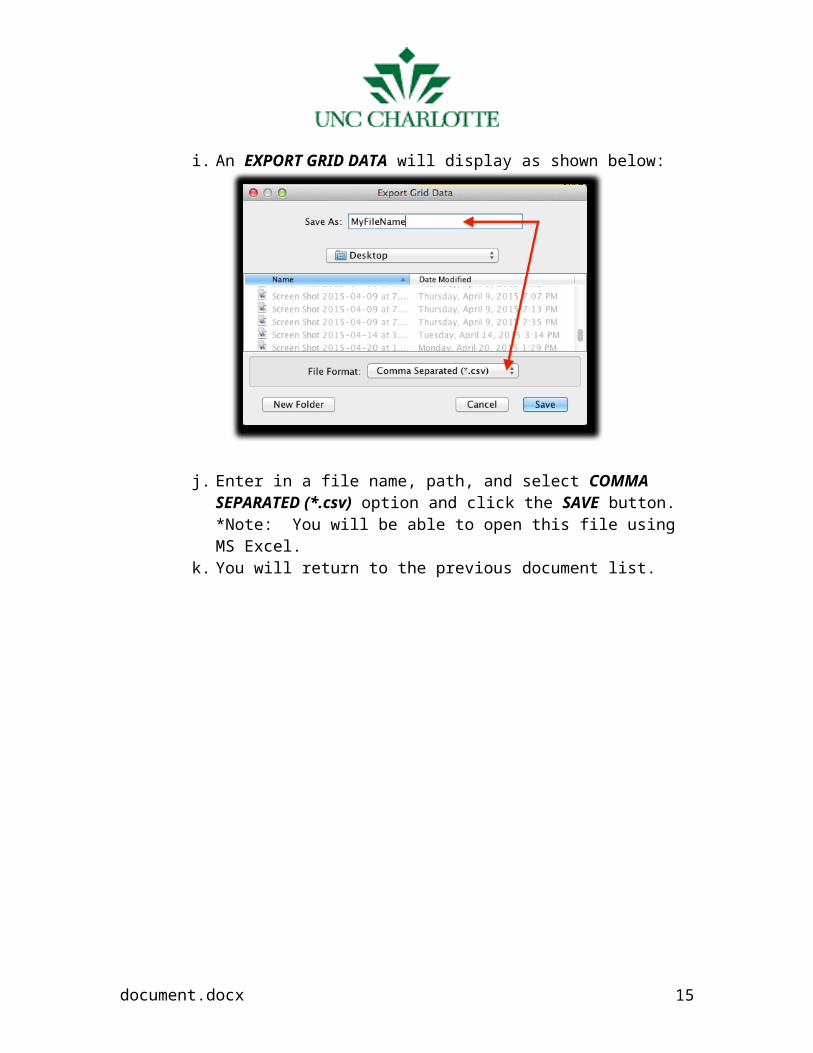
i. An EXPORT GRID DATA will display as shown below:
j. Enter in a file name, path, and select COMMA SEPARATED (*.csv) option and click the SAVE button. *Note: You will be able to open this file using MS Excel.
k. You will return to the previous document list.
document.docx 13

TCP Travel
a. To view a Vendor/Traveler’s FOLDER, click the TCP TRAVEL folder view and enter in Vendor/Traveler’s ID as shown below:
b. A list of folders, representing each travel date, will appear for the selected Vendor/Traveler’s ID as shown above.
c. Double-click the folder item to open and view all documents associated with that travel date folder.
document.docx 14
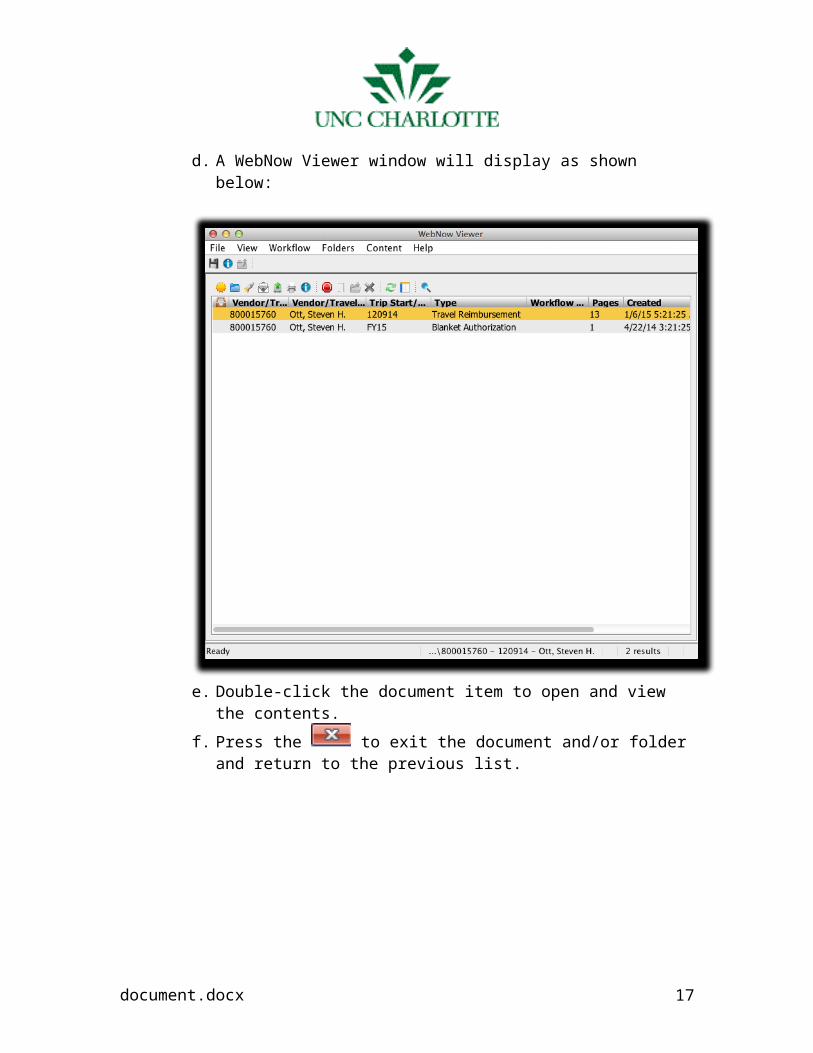
d. A WebNow Viewer window will display as shown below:
e. Double-click the document item to open and view the contents.
f. Press the to exit the document and/or folder and return to the previous list.
document.docx 15

Creating Views called Filters
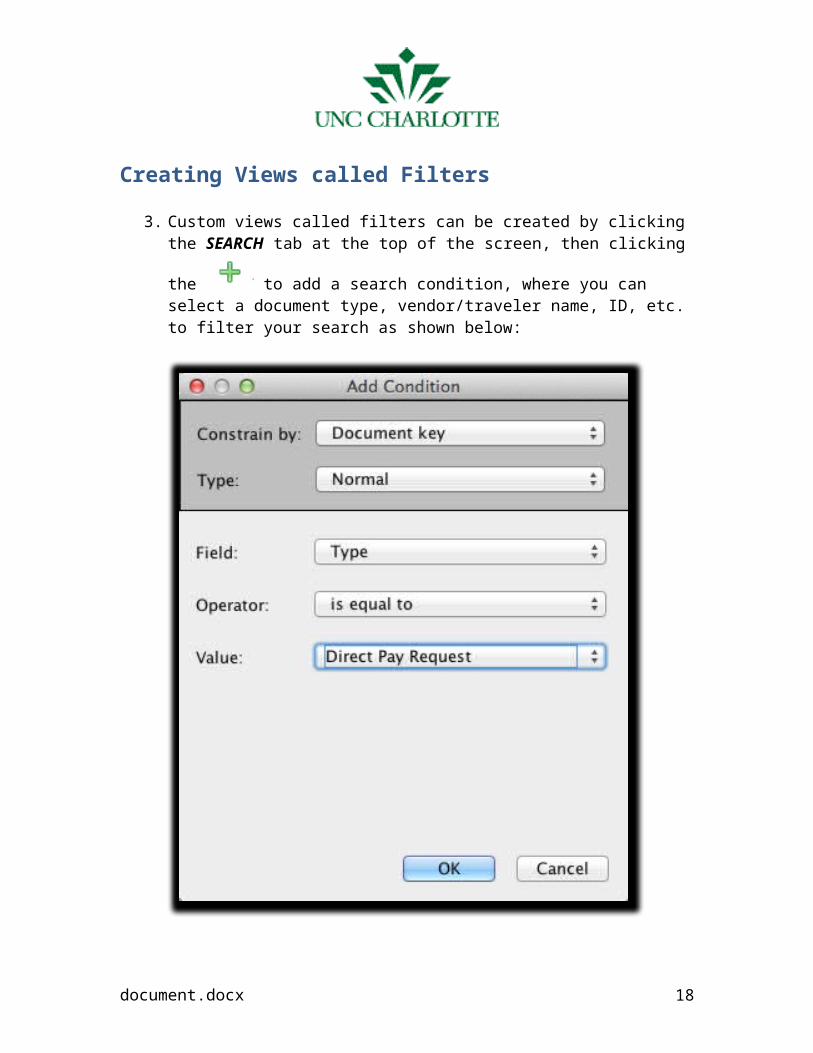
3. Custom views called filters can be created by clicking the SEARCH tab at the
top of the screen, then clicking the to add a search condition, where you can select a document type, vendor/traveler name, ID, etc. to filter your search as shown below:
4. After entering in all the criteria for the filter, click the button to continue.
document.docx 16
5. Click the button to display a list of all the documents the filter
criteria matches. Press the button to save the filter by entering a filter name and description in the pop-up window as seen below:
6. The custom filter will be listed in the view document list on the left-hand side panel as seen below:
document.docx 17
Exiting WebNow
7. To logoff the ImageNow web application, click the DISCONNECT link in the upper right-hand corner of the screen as seen above.
document.docx 18