Embed Size (px)
Citation preview


IntroductionIt is an in-house developed product for managing client’s management System which covers
Quotations, Order Processing, Installations Process, Customers’ day to day problems and keep tracking of Customer Complaints Pending and also keep history. Other parts cover HR details, office inventory, CRM module.
Each Employee has been assigned Unique Emp ID and Password and Every day each employee has to be logged in ERP(Enterprise Resource Program) System. ERP System keeps tracking of Logged in Time and Logged out Status of every employee.

Daily Login Process Follow the following steps to login clientinfo.exe: Double Click on clientinfo.exe icon

Following window will open
Note: User id & Password Given by Your ADMIN.
1.Enter user name
2.Enter Password
3.Click on login

After login following window will open
Click on DCR

Following window will open
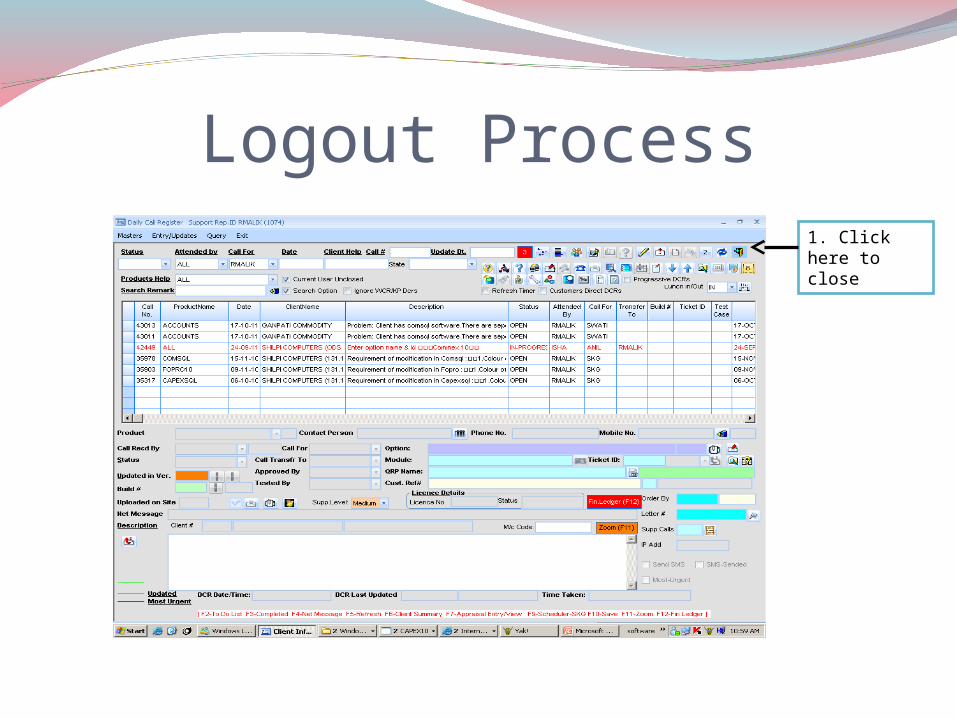
Logout Process1. Click here to close

Following window will open:
Note: Same User id & Password used at the time of login
2.Click on logout
6. Click on logout
5. Tick here
4. Enter password
3. Enter user name

Lunch in/out Process
1. Click here if you are going for lunch
2. It will ask for confirmation . Click on yes

3. Now your lunch status is updated. When you come out from lunch click here
4. Lunch status will disappear
Client’s Call Handling Before solving any client’s problem , make sure about the following:
O/S Amount :If you found any balance outstanding then transfers the related call to Account Department.
AMC due Date: If due date is exceed then consult account department . A/C Approval Date: If anyone ask to increasing the validity of the license (whose validity is
expired ) then please check a/c approval date. If it is approved then process the work otherwise ask the concerned person for approval date.
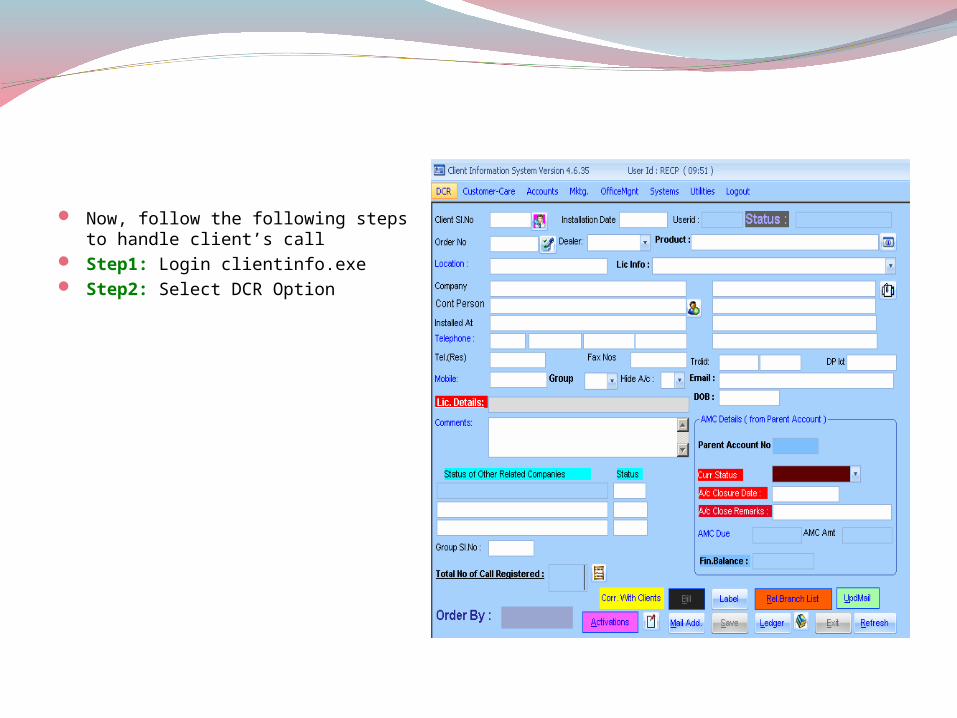
Now, follow the following steps to handle client’s call
Step1: Login clientinfo.exe Step2: Select DCR Option

Step3: Click on Daily Task Details from the Tool Bar as shown below:
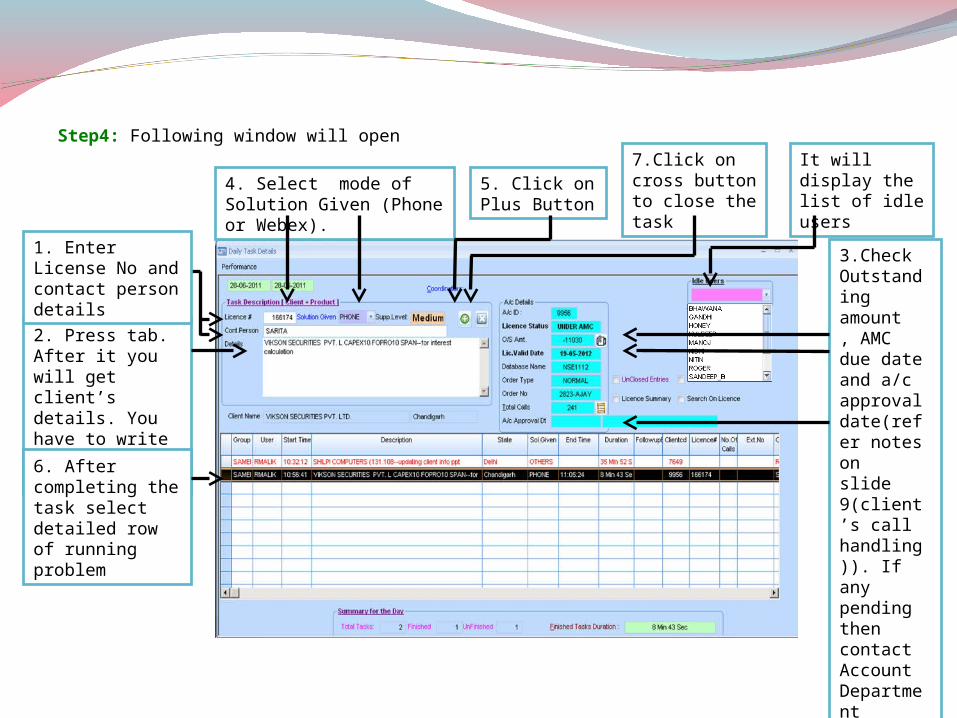
Step4: Following window will open
5. Click on Plus Button
2. Press tab. After it you will get client’s details. You have to write client’s problem
6. After completing the task select detailed row of running problem
4. Select mode of Solution Given (Phone or Webex).
7.Click on cross button to close the task
3.Check Outstanding amount , AMC due date and a/c approval date(refer notes on slide 9(client’s call handling)). If any pending then contact Account Department
It will display the list of idle users
1. Enter License No and contact person details

Useful links to help client for effective support
SMS Links Live Links

Live Links

SMS Link
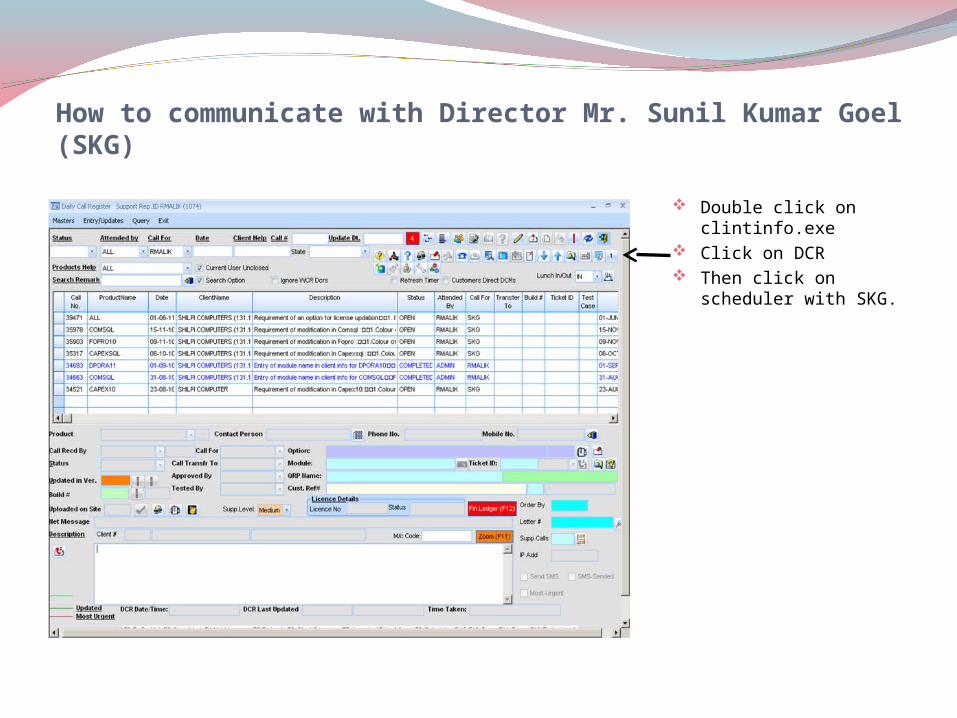
How to communicate with Director Mr. Sunil Kumar Goel (SKG)
Double click on clintinfo.exe Click on DCR Then click on scheduler with
SKG.

Following window will open
1. Mention all details in remarks
2. Enter DCR no then mention in DCR column & Extension in Extension column.
3. Enter Extension no.
4. Click on save
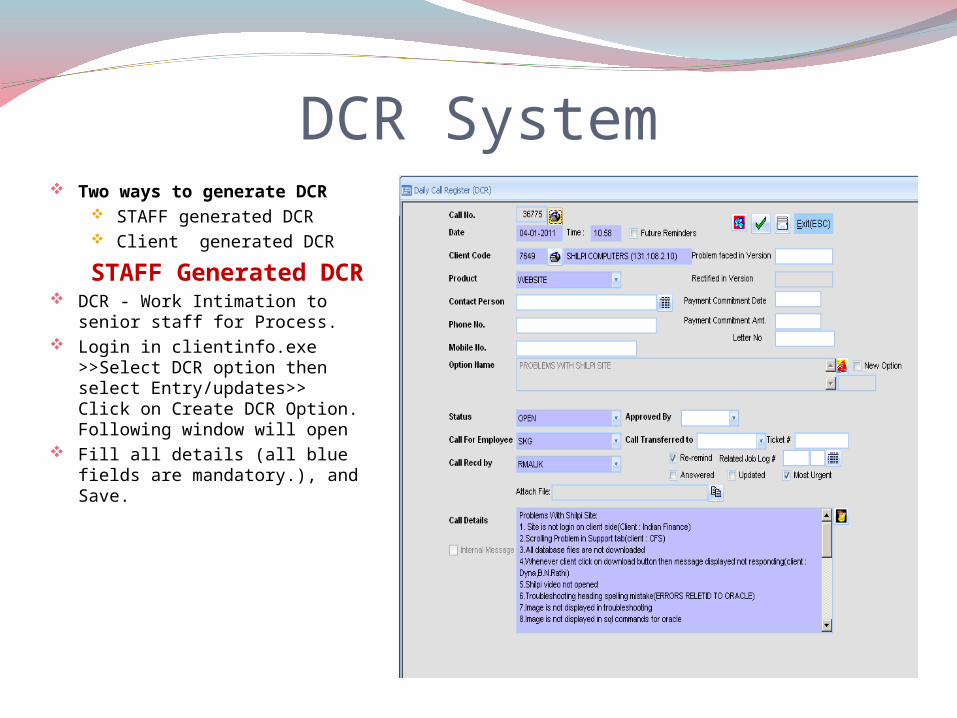
DCR System Two ways to generate DCR
STAFF generated DCR Client generated DCR
STAFF Generated DCR DCR - Work Intimation to senior staff
for Process. Login in clientinfo.exe >>Select DCR
option then select Entry/updates>> Click on Create DCR Option. Following window will open
Fill all details (all blue fields are mandatory.), and Save.

For Client Details, Select Client Code then you will get client details Select product with the help of product option. Select contact person & mobile no. with the help of Option Contact Person help Select Option Name>> Click in check box >>Select Option name selection Status always opens & also changes status as per work process. Call for employee/Call received (Your Name)/Approved by (Which is given you permission)/Call Transfer
(Whom you want to transfer this matter now) If your work is most important tick in check box of most urgent if you want to Re-remind this DCR then tick
on Re-remind check box. Mention all details in Call Details Option. Then save this DCR. When work is completed then close the DCR.

Generated DCR can be viewed by selecting a row as shown here:
DCR Status can be changed from here. Various DCR status are explained on coming slide.

Attention -----Self explanatory Billing ----- Self explanatory Closed ----- Self explanatory CNA ---Client is not available Completed ----- Self explanatory Discussion ----- Self explanatory Fupld --- file uploaded Hold ---If issue is keep pending for
future INFO ----Information Inform clnt -----Inform to client In progress---- Self explanatory Insuff Info -----Insufficient
information in DCR Invalid info ----Invalid information Keep Pending ---- Self
explanatory Open--- Self explanatory
Payement Due -- Self explanatory Prog Prob --Programming Problem Re-open---- Self explanatory Replied--- Replied by client /Staff Return---DCR is not acceted by the
person to whom you have transferred Tech Prob—Technical Problem Unlock Code ---To get password from sir
when data is locked Unreleased---DCR is not open to sir Updated ---Time to time updation in DCR U-testing--- Under Testing WCR---waiting for client response WFP---Waiting for File plug in WFU---waiting for file upload
DCR Status
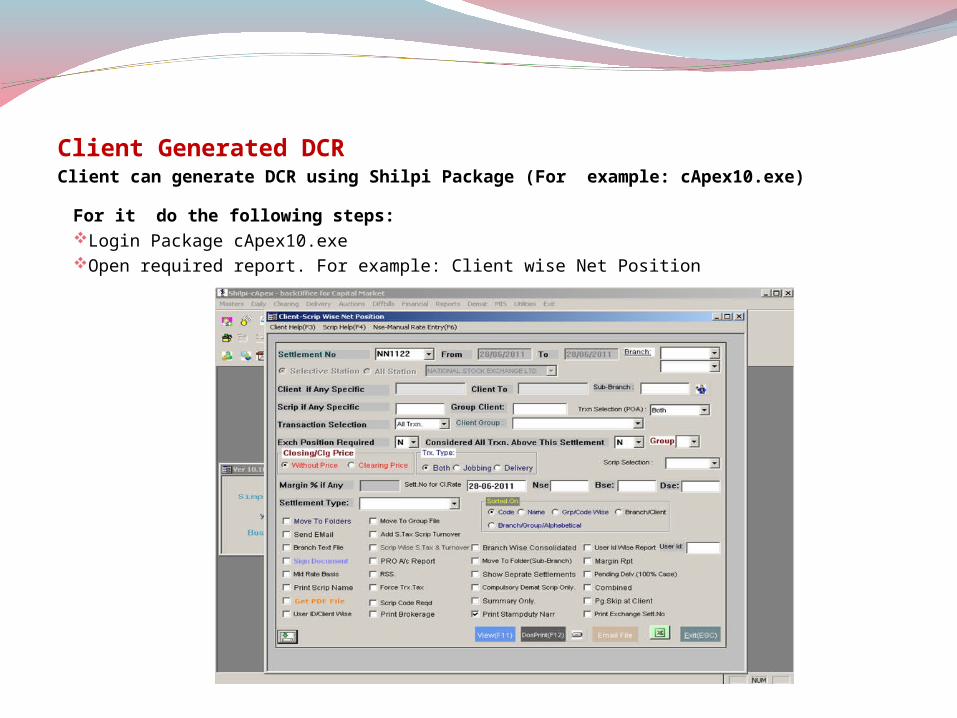
Client Generated DCRClient can generate DCR using Shilpi Package (For example: cApex10.exe)
For it do the following steps: Login Package cApex10.exeOpen required report. For example: Client wise Net Position

Click on Download QRP
Download QRP

Click on this to generate DCR

1.Select Support Engineer
2.Enter Your Name
3.Enter mobile number
4.Enter your Problem
5.Click on Submit
Following window will open:

After submitted all details, a DCR will be created and can be viewed by Shlipi Staff as shown below:
Tick on Customer Direct DCR

It will display all Client Direct DCRs

How to use TO DO LIST
Double click on clintinfo.exe Click on DCR Select to do list
To Do List

Following window will open :
1. Click on plus button to insert a row
2.Enter all details in this window
4. Click on save
3. Select employee name which you want to refer
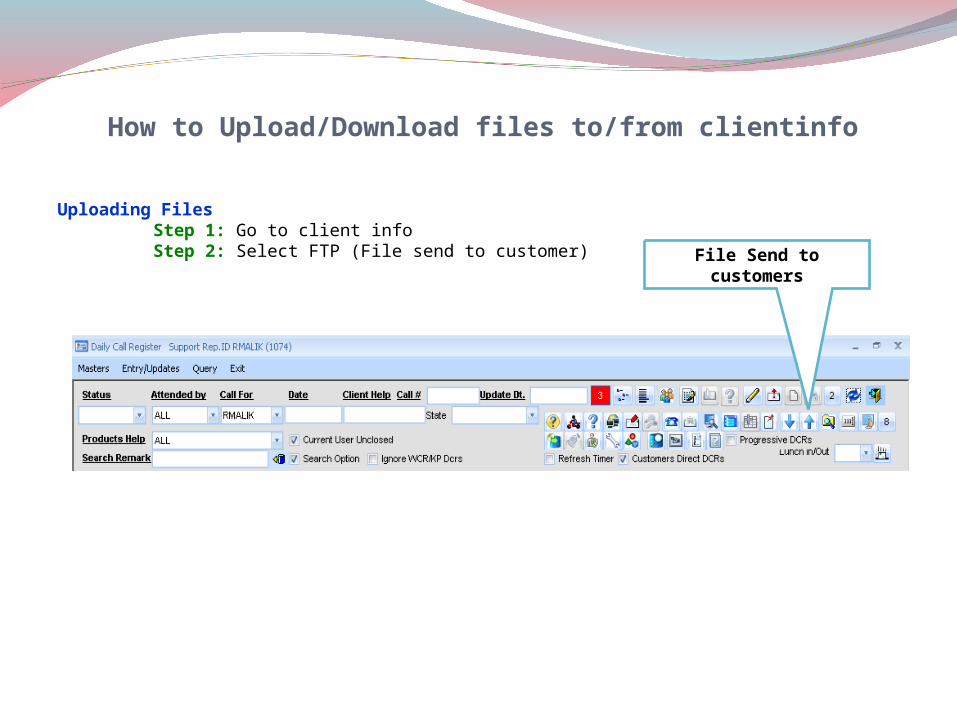
How to Upload/Download files to/from clientinfo
Uploading FilesStep 1: Go to client info Step 2: Select FTP (File send to customer)
File Send to customers

Step 3: Following window will open
Enter following details:Account IDWrite or select file name with full path Select segment
Step 4: Click on Upload file on customer account .It first check connectivity with FTP server then upload the file.
Click here; it will send file in
customer's account
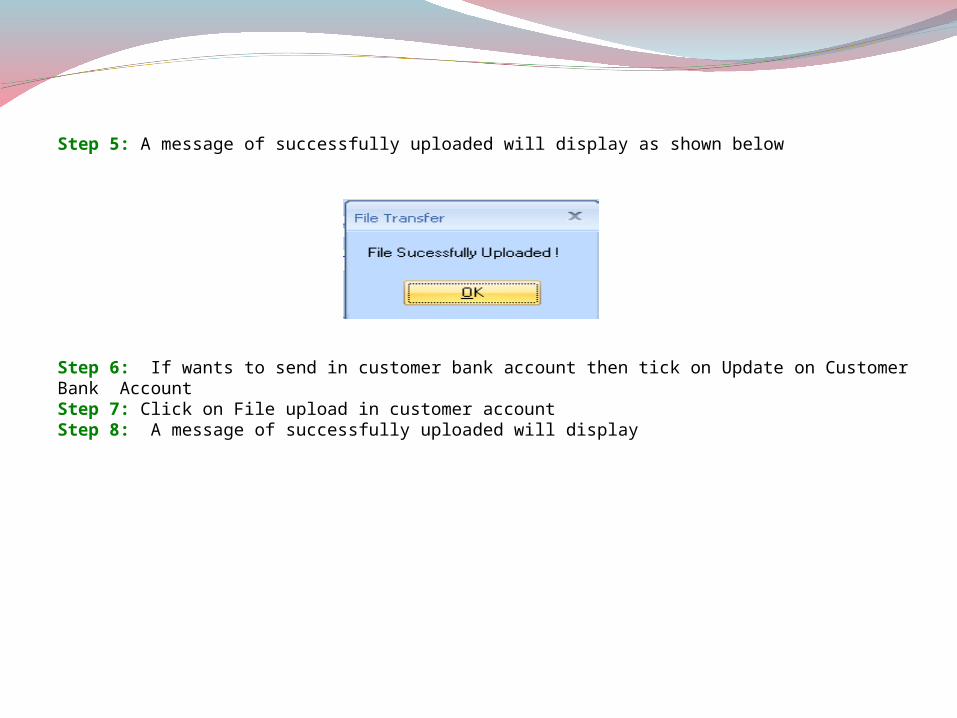
Step 5: A message of successfully uploaded will display as shown below
Step 6: If wants to send in customer bank account then tick on Update on Customer Bank AccountStep 7: Click on File upload in customer accountStep 8: A message of successfully uploaded will display

Downloading Files
Step1 : Select (File received from customers)Following window will open
FTP (File received from
customers)
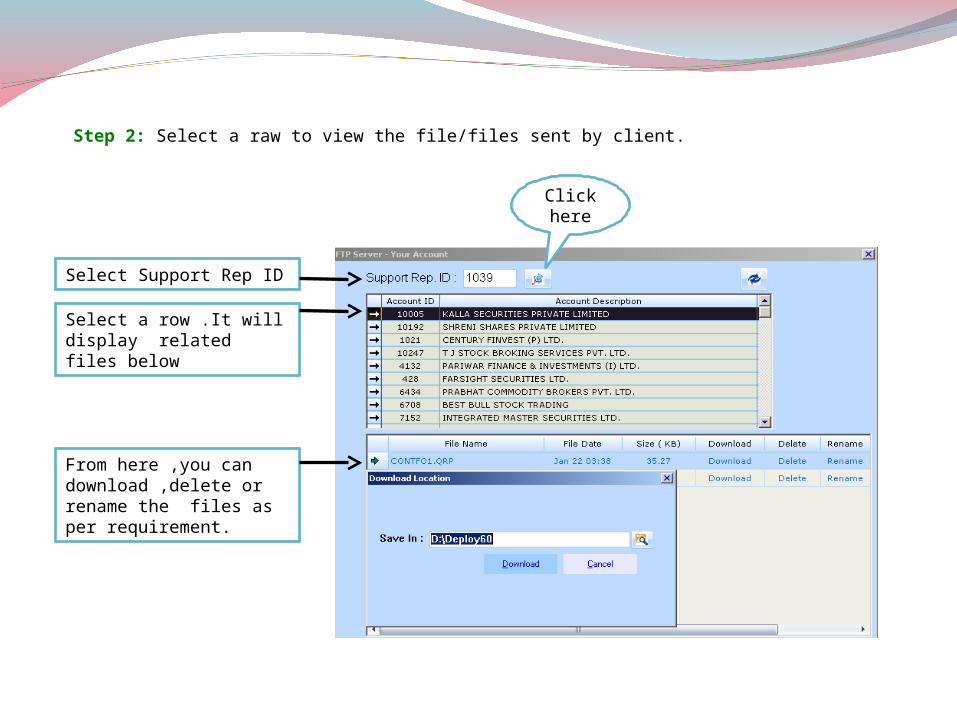
Select Support Rep ID
Select a row .It will display related files below
From here ,you can download ,delete or rename the files as per requirement.
Click here
Step 2: Select a raw to view the file/files sent by client.

Important Options in Client info
6. Client Software Parameters
3. Meeting Details
1.Product Version Report
2. Appraisal Entry/Edit
7. Find Customized QRP on Net
Note: Only general options are discussed here. Other options are for specific purpose and make enabled only to the related person
5. Explorer4. Remote Admin
8.DCRs in New Window
9. FAQ
10. Client Wise Pending DCR
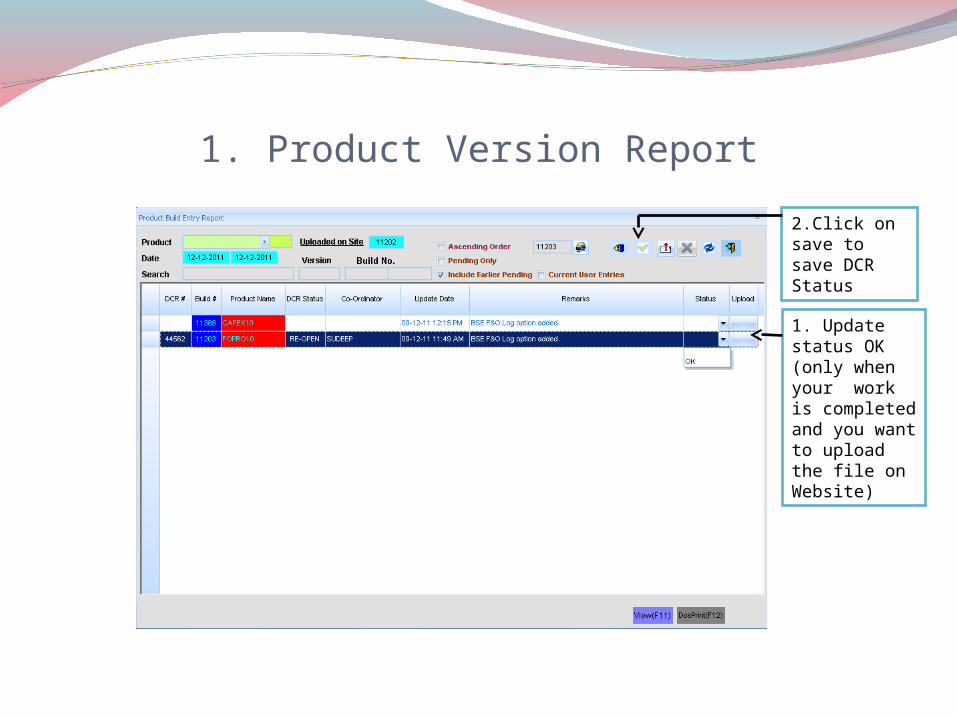
1. Product Version Report
1. Update status OK (only when your work is completed and you want to upload the file on Website)
2.Click on save to save DCR Status

2. Appraisal Entry/Edit
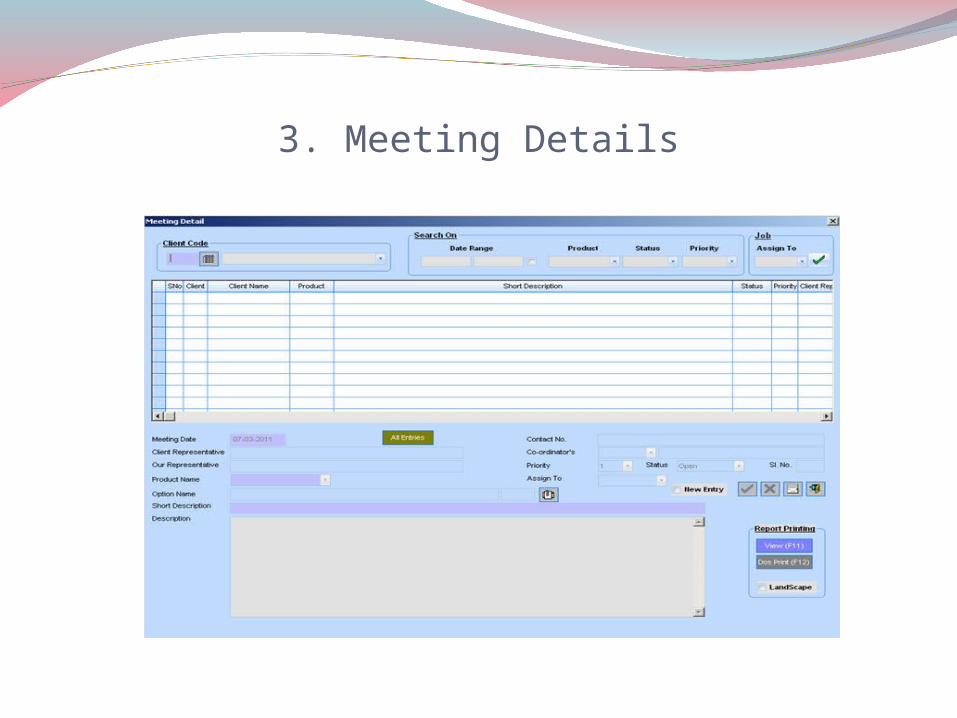
3. Meeting Details
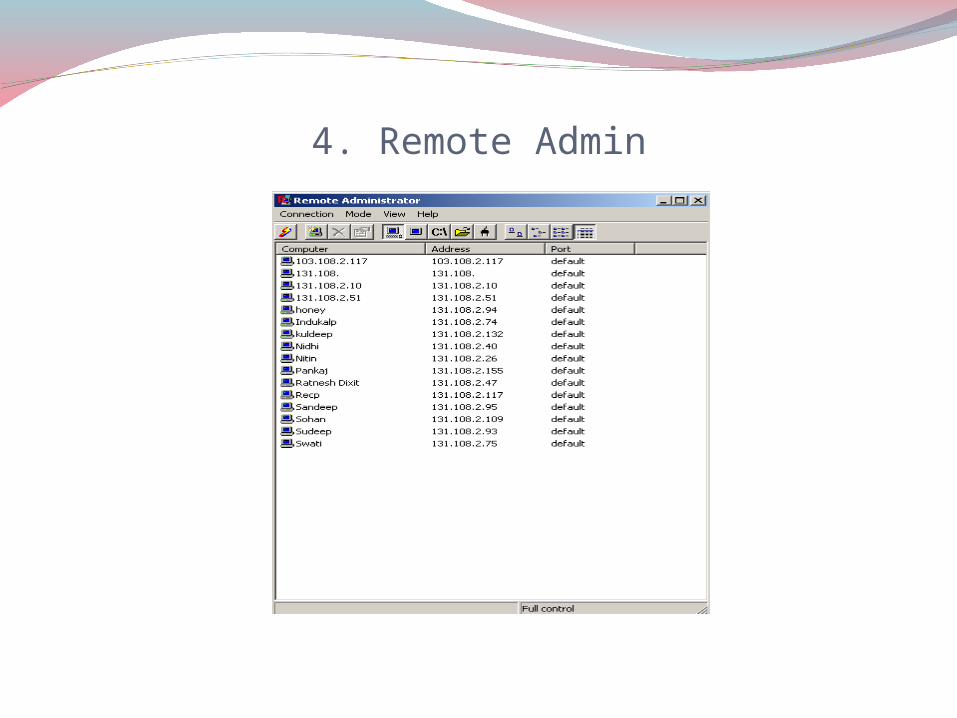
4. Remote Admin

5. Explorer

6. Client Software Parameters

7. Find customized QRP on Net
1.Enter account ID
2.Select Product Name 3. Click on find
4. All QRP will Display in the table
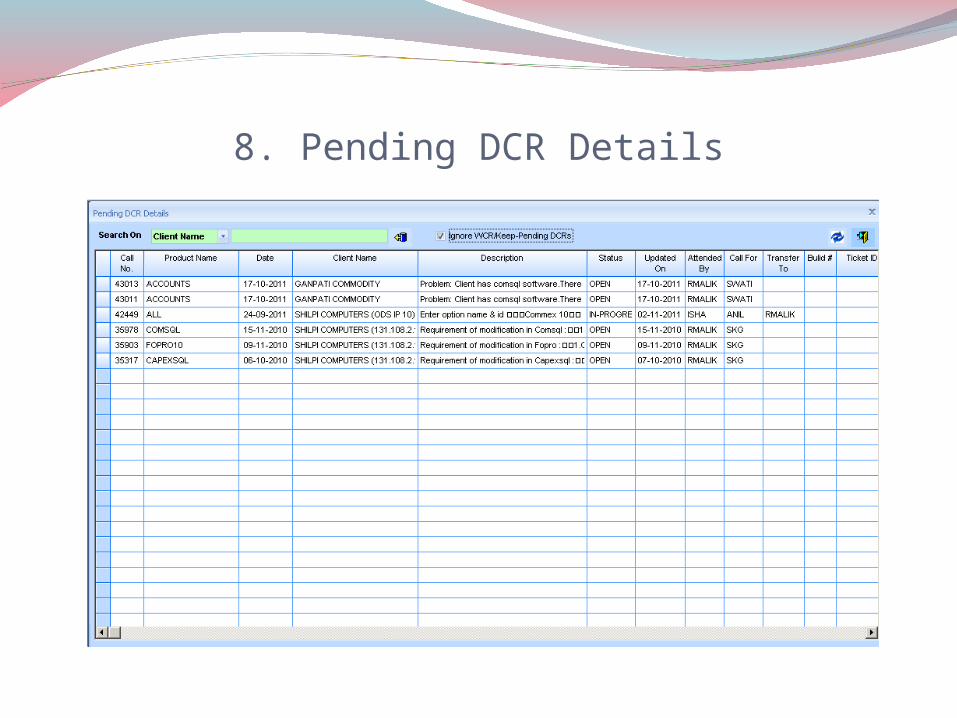
8. Pending DCR Details
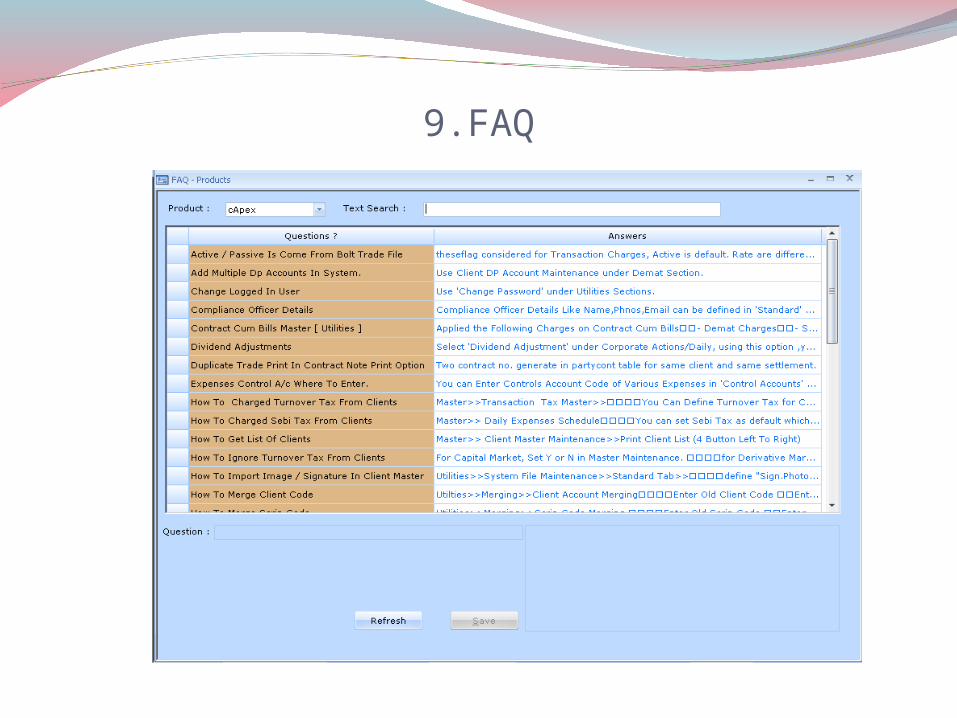
9.FAQ
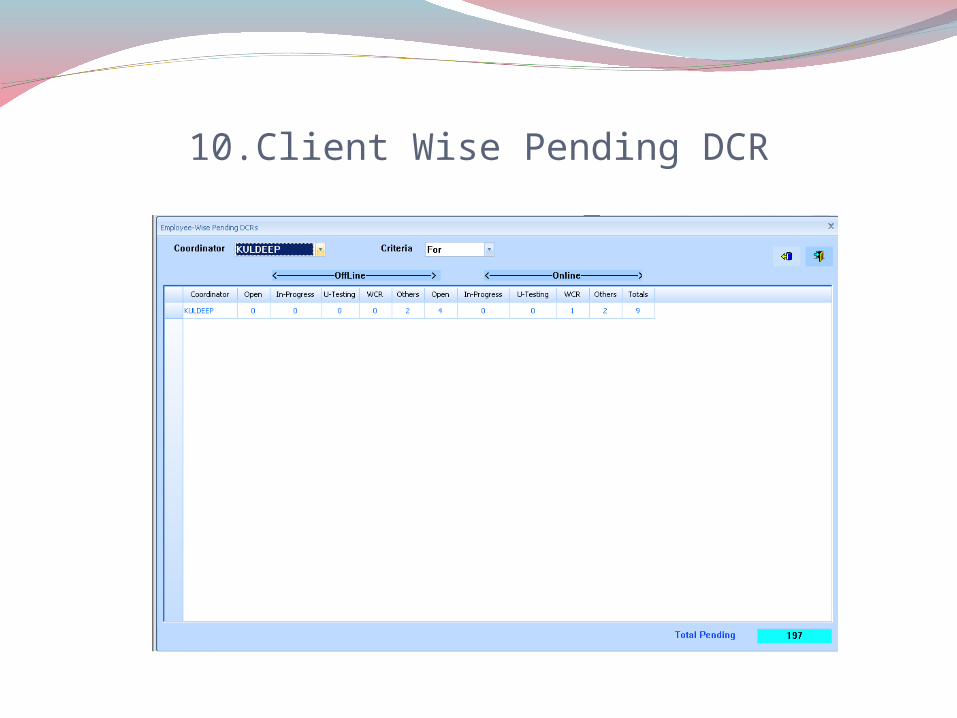
10.Client Wise Pending DCR