Embed Size (px)
Citation preview
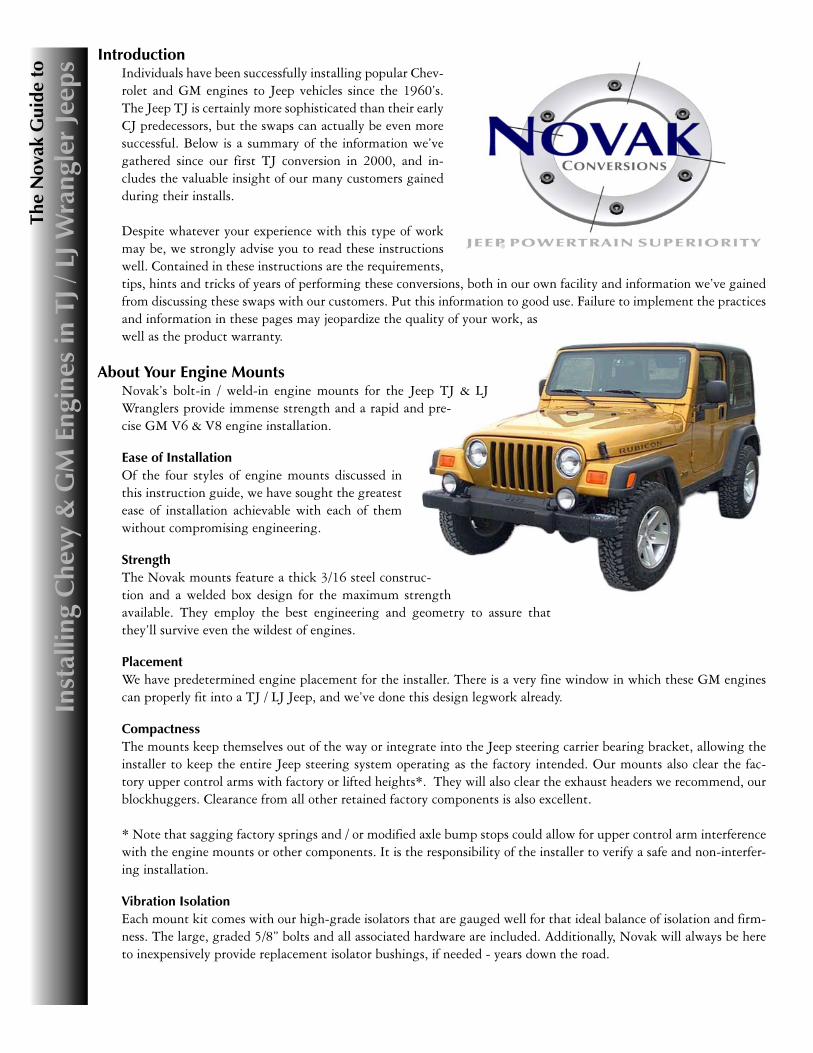
IntroductionIndividuals have been successfully installing popular Chev-rolet and GM engines to Jeep vehicles since the 1960’s. The Jeep TJ is certainly more sophisticated than their early CJ predecessors, but the swaps can actually be even more successful. Below is a summary of the information we’ve gathered since our first TJ conversion in 2000, and in-cludes the valuable insight of our many customers gained during their installs.
Despite whatever your experience with this type of work may be, we strongly advise you to read these instructions well. Contained in these instructions are the requirements, tips, hints and tricks of years of performing these conversions, both in our own facility and information we’ve gained from discussing these swaps with our customers. Put this information to good use. Failure to implement the practices and information in these pages may jeopardize the quality of your work, as well as the product warranty.
About Your Engine MountsNovak’s bolt-in / weld-in engine mounts for the Jeep TJ & LJ Wranglers provide immense strength and a rapid and pre-cise GM V6 & V8 engine installation.
Ease of InstallationOf the four styles of engine mounts discussed in this instruction guide, we have sought the greatest ease of installation achievable with each of them without compromising engineering.
StrengthThe Novak mounts feature a thick 3/16 steel construc-tion and a welded box design for the maximum strength available. They employ the best engineering and geometry to assure that they’ll survive even the wildest of engines.
PlacementWe have predetermined engine placement for the installer. There is a very fine window in which these GM engines can properly fit into a TJ / LJ Jeep, and we’ve done this design legwork already.
CompactnessThe mounts keep themselves out of the way or integrate into the Jeep steering carrier bearing bracket, allowing the installer to keep the entire Jeep steering system operating as the factory intended. Our mounts also clear the fac-tory upper control arms with factory or lifted heights*. They will also clear the exhaust headers we recommend, our blockhuggers. Clearance from all other retained factory components is also excellent.
* Note that sagging factory springs and / or modified axle bump stops could allow for upper control arm interference with the engine mounts or other components. It is the responsibility of the installer to verify a safe and non-interfer-ing installation.
Vibration IsolationEach mount kit comes with our high-grade isolators that are gauged well for that ideal balance of isolation and firm-ness. The large, graded 5/8” bolts and all associated hardware are included. Additionally, Novak will always be here to inexpensively provide replacement isolator bushings, if needed - years down the road.
The
Nov
ak G
uide
to
Inst
allin
g C
hevy
& G
M E
ngin
es in
TJ /
LJ W
rang
ler
Jeep
s

Jeep TJ InformationBy way of context, the Jeep TJ was conceived of in the early 1990’s as the progeny to the increasingly popular YJ Wran-gler. Much of the YJ had actually shared many features with the 1955 CJ and Jeep engineers envisioned a new Jeep uni-versal truck with some fundamental differences. The prima-ry difference with the new Jeep would be the coil suspen-sion in lieu of leaf springs. Secondly, significant interior and instrumentation changes were introduced. Interestingly, the TJ was released right after the entire automotive industry’s acceptance and implementation of the OBDII standard, whereas the 4.0 and 2.5 engines and powertrains made no significant changes in their move to the TJ.
Germane to this discussion is the frame and the coil suspen-sion system, which called for the frame rails to arc in towards the engine to clear the coils. Also, the upper control arms
posed a possible interference threat to conversion V6 & V8 engines and their accessories.
With all these things in mind, it was no small challenge to engineer a set of engine mounts that would put the GM engine in the right location that would allow for all the right steering, suspension, accessory, cooling, firewall and hood clearances required, and still be easily installed by installers with varying mechanical experience.
PreliminariesBody & Suspension LiftsContrary to conversion mythology, it is not necessary to install a body lift when installing a Chevrolet Small Block or GM Gen.III+ engine in a TJ Wrangler. It is also not necessary to install a suspension lift or extended suspension snubbers for the purpose of the conversion. A GM V6 & V8 can be installed in a factory TJ / LJ Jeep so long as factory springs are not exces-sively fatigued or collapsed.
Air ConditioningBecause of the inward arc of the frame, we recommend that you install our Air Conditioning Relocation kit, which provides a new compressor and mounts it up at the passenger side head location. This is a much more graceful method of clearance in lieu of cutting and welding the frame to clear the factory A/C compressor.
Factory Computer & GaugesYou will leave your factory Jeep powertrain control module (PCM) in place. For engine removal, you need only disconnect the plugs that are directly related to engine management, which are typically the black and white connectors. To have the Jeep PCM run your factory instrument cluster, you will reconnect these at a later point according to The Novak Guide to Wiring for Jeep PCI BUS Gauges, available with our TJ engine mount kits.
Jeep Transfer CasesThis guide is based on the retention of the 231 transfer case in your Jeep. They are extremely reliable, very durable, and easily and affordably adapted to your conversion powertrain. We do recommend the use of a heavy-duty output shaft or slip-yoke eliminator assembly with your NP231, for the sake of durability against your stronger motor and better driveshaft angles.
Your Powertrain AssemblyIf you have purchased a Novak Turn-Key powertrain, you can skip the fol-lowing preliminary step.
The Novak Gen. III+ A/C relocation kit, as assembled.
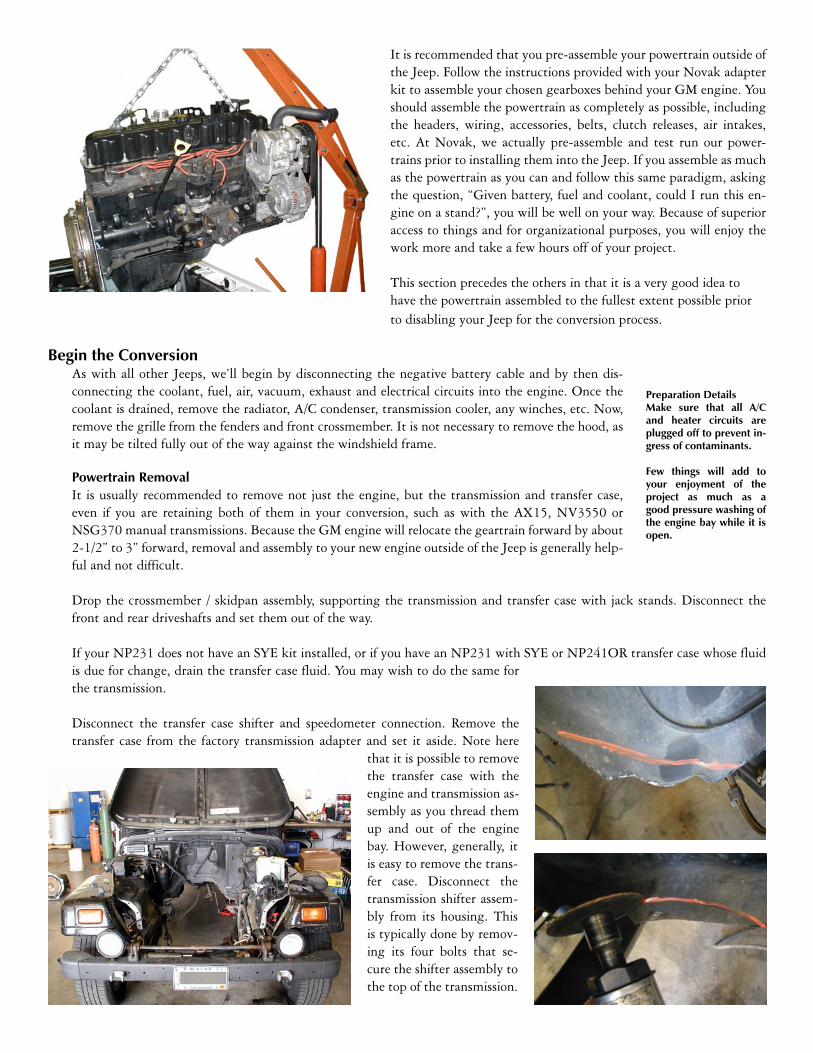
It is recommended that you pre-assemble your powertrain outside of the Jeep. Follow the instructions provided with your Novak adapter kit to assemble your chosen gearboxes behind your GM engine. You should assemble the powertrain as completely as possible, including the headers, wiring, accessories, belts, clutch releases, air intakes, etc. At Novak, we actually pre-assemble and test run our power-trains prior to installing them into the Jeep. If you assemble as much as the powertrain as you can and follow this same paradigm, asking the question, “Given battery, fuel and coolant, could I run this en-gine on a stand?”, you will be well on your way. Because of superior access to things and for organizational purposes, you will enjoy the work more and take a few hours off of your project.
This section precedes the others in that it is a very good idea to have the powertrain assembled to the fullest extent possible prior to disabling your Jeep for the conversion process.
Begin the ConversionAs with all other Jeeps, we’ll begin by disconnecting the negative battery cable and by then dis-connecting the coolant, fuel, air, vacuum, exhaust and electrical circuits into the engine. Once the coolant is drained, remove the radiator, A/C condenser, transmission cooler, any winches, etc. Now, remove the grille from the fenders and front crossmember. It is not necessary to remove the hood, as it may be tilted fully out of the way against the windshield frame.
Powertrain RemovalIt is usually recommended to remove not just the engine, but the transmission and transfer case, even if you are retaining both of them in your conversion, such as with the AX15, NV3550 or NSG370 manual transmissions. Because the GM engine will relocate the geartrain forward by about 2-1/2” to 3” forward, removal and assembly to your new engine outside of the Jeep is generally help-ful and not difficult.
Drop the crossmember / skidpan assembly, supporting the transmission and transfer case with jack stands. Disconnect the front and rear driveshafts and set them out of the way.
If your NP231 does not have an SYE kit installed, or if you have an NP231 with SYE or NP241OR transfer case whose fluid is due for change, drain the transfer case fluid. You may wish to do the same for the transmission.
Disconnect the transfer case shifter and speedometer connection. Remove the transfer case from the factory transmission adapter and set it aside. Note here
that it is possible to remove the transfer case with the engine and transmission as-sembly as you thread them up and out of the engine bay. However, generally, it is easy to remove the trans-fer case. Disconnect the transmission shifter assem-bly from its housing. This is typically done by remov-ing its four bolts that se-cure the shifter assembly to the top of the transmission.
Preparation DetailsMake sure that all A/C and heater circuits are plugged off to prevent in-gress of contaminants.
Few things will add to your enjoyment of the project as much as a good pressure washing of the engine bay while it is open.

Disconnect the hydraulic clutch release line.
Unbolt the factory engine mounts from the frame horns. Safely secure a lifting jig to your outgoing motor and carefully pull it from the bay. Typi-cally, the transmission causes the powertrain to tilt back and allows it to feed out from the engine bay at the proper angle, but having an assistant or two to guide it out is helpful.
Firewall ClearanceEssentially all V engine conversions will require very minor clearancing of the firewall-to-tub seam. This clearance is required at the passenger and driver side corners, as marked in the adjacent im-ages. There is no need to cut the spot welds. You may wish to seal the cut met-
al with enamel and an appropriate sealant.
Air Conditioning RelocationBecause TJ Jeeps have such a narrow and arced frame, Novak has developed an A/C compressor relocation assem-bly that will greatly ease the installa-tion process, and provide a very capable GM R4 style compressor for cooling your Wrangler. The A/C relocation kit will eliminate the need to modify your TJ frame rail to accommodate the A/C compressor as is normally found on most Gen.III+ LS & Vortec engines. Instructions for this process are includ-ed with the aforementioned kit.
We have found that we can some-times reuse the Jeep receiver/ dryer and the bracket holding it up by turning it 180 degrees and cutting the bracket in half and attaching the bracket to the original bottom firewall stud that it was attached to. You can trim the battery box to just fit the base of the
Remove the air conditioning dryer / receiver by detaching the bracket and removing the spring clip.
If one is not using the Novak A/C relocation kit, and you must use the frame cutting method to clear a factory Gen. III+ lower A/C compressor, this is the way to do it. Do a surgical cut of the frame rail with a separating disc as shown in the image. Turn the cut piece around so that the bulged side now faces inward, leav-ing the indentation outward. Weld and repaint as appropriate.
Though this allows clearance from the frame for the AC compres-sor, the compressor could interfere with the suspension upper track arm at full compression. Thus, the installer must consider a suspension lift and bump-stops as appropriate.
Again, we suggest relocating the A/C compressor to the upper portion of the engine. However, this information is useful for those who may be running two compressors, such as for an on-board air application.

battery which gives more room for the dryer. The large line coming out of the firewall hooks back up without modification, and you can then modify the line connectors going into the R4 compressor.
Engine Mount OptionsThese instructions cover the use of Novak’s four different versions of GM conversion mounts for the TJ / LJ Wranglers.
Engine Plate InstallationIn preparation for any of the four versions listed below, mount the provided engine block mount plates onto the engine block bosses. Insert the provided carriage bolt through the center hole of the block plate.
Notice that these engine plates are adjustable fore and aft with three conjoined holes. We recommend you install them in the rear-most hole location at first, and then adjust forward if you have sufficient fan / radiator clearance. Use the eight factory or Novak-provided M10 (Gen III+) or 3/8” (Gen I-II) bolts. We recommend the installer use of a drop of removable thread locking compound on these threads, such as Loctite Blue upon final installation, and torque to ~35 ft. lbs.
Slide the upper isolator onto the carriage bolt, with the radiused cup side towards the engine block. Note that the engine plate hole is radiused to allow the carriage bolt to droop downward. This will ease your installation as the engine is lowered into the mounts. At this point, we recommend that you temporarily wrap the carriage bolt threads with two or three wraps of vinyl tape. This will help keep the upper isolator from sliding off during assembly.
Now, choose your specific mount below for the remainder of the engine mount assembly instructions.
Important
Even though the engine mount location is predetermined on most of our TJ mounts, we still strongly recommend that you just tack in the engine mounts and not fully weld
them in so you can test fit the engine. This includes mocking up the radiator and fan and checking for adequate clearance. You should also check firewall clearance.
The frame brackets may be able to be slightly adjusted to optimize clearances. Remember that you also have the siamesed holes on the engine plates that you can use to slightly modify the position fore / aft if necessary.

Chevy 4.3L V6 Engines, Replacing I4 Engines, Novak #MMTJ-CV6These mounts are a purely bolt-in design when replacing the 2.5L I4 engine with the Chevrolet 4.3L V6 engine, utilizing the factory four-cylinder frame horns. We have predetermined engine placement for the installer. There is a very fine window in which the Chevrolet 4.3L V6 can properly fit into a TJ Jeep, and we’ve done this design legwork already.
The steering shaft carrier bracket will remain in its factory location. Trim back both factory frame horns between the second and third holes as indicated in the images below. Install the supplied Novak engine mount brackets over the I4 factory frame horns as illustrated. The forward-offset bracket goes on the passenger side. The non-offset one goes on the driver’s side. Use two bolts on the top to retain the mounts, but don’t fully tighten them. Preset the brackets to be 15-1/2” across from each other, center mount hole to center mount hole. Temporarily lower the engine down and check the fit of your V6 in the Jeep. The engine should be essentially centered in the Jeep and the carriage bolts should be centered in their holes.
Once you are content with all your variables, remove the engine. Now, notice the hole in each flank of the engine mount adapter brackets. You have two options here.
Option I - Bolt ThroughWith a 7/16” or 29/64” drill through the flank holes of the Novak brackets, using them as a template. Drill the factory frame horns from the front and then the back. Fasten through
with the provided 7/16” bolts and torque to 45 ft. lbs. to se-cure the mounts.
Option II - Plug WeldsThe second option is to weld through these bolt points using plug welds. The installer might also choose to weld any other seams they deem helpful. Natu-rally, you’ll want to be totally confident in the location of your mounts prior to

such welding.
Once you are content with all your variables, remove the engine.
We suggest you follow up by wire brushing and coating the Jeep brackets with primer and enamel as per your preference. Our #MMTJ mounts are black zinc coated for resistance against corrosion. However, if you have a certain theme to your installation, you may enamel, powdercoat or otherwise finish the bracketry and Jeep frame to your own style.
Continue with the installation by pick-ing up your reading at the Install The Powertrain section, below.
The 4.3L Chevy V6 is among the rowdiest of production V6’s ever produced, espe-cially in its later versions. It was first pro-duced in 1978 and that design stemmed from the 1955 Chevy Small Block V8. It holds a unique place at GM and in the au-tomotive industry in that it has been able to break through into this modern era, complying so well with emissions and effi-ciency standards among engines that were fundamentally more advanced from their inception.
The Chevrolet Small Block V8... enough said!
The Generation III+ GM V8’s. The smooth, broad power and efficiency are nearly a shocking experience to individuals that have tried one on in a Jeep Wrangler.
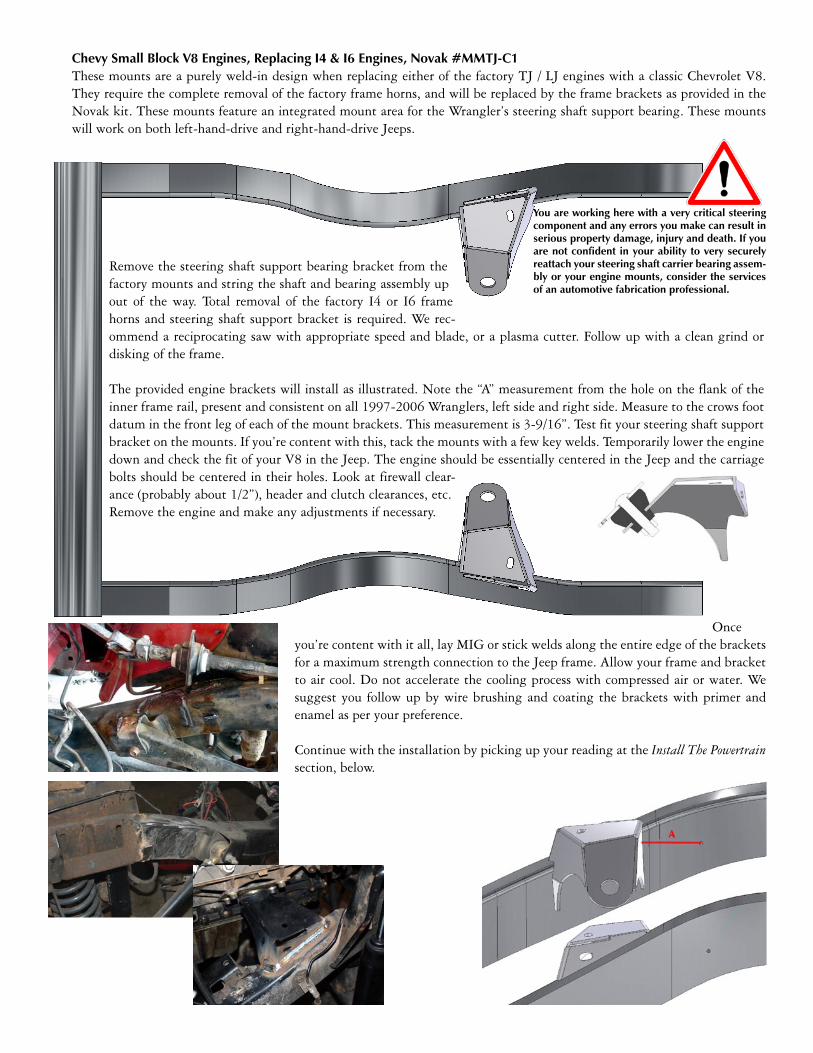
Chevy Small Block V8 Engines, Replacing I4 & I6 Engines, Novak #MMTJ-C1These mounts are a purely weld-in design when replacing either of the factory TJ / LJ engines with a classic Chevrolet V8. They require the complete removal of the factory frame horns, and will be replaced by the frame brackets as provided in the Novak kit. These mounts feature an integrated mount area for the Wrangler’s steering shaft support bearing. These mounts will work on both left-hand-drive and right-hand-drive Jeeps.
Remove the steering shaft support bearing bracket from the factory mounts and string the shaft and bearing assembly up out of the way. Total removal of the factory I4 or I6 frame horns and steering shaft support bracket is required. We rec-ommend a reciprocating saw with appropriate speed and blade, or a plasma cutter. Follow up with a clean grind or disking of the frame.
The provided engine brackets will install as illustrated. Note the “A” measurement from the hole on the flank of the inner frame rail, present and consistent on all 1997-2006 Wranglers, left side and right side. Measure to the crows foot datum in the front leg of each of the mount brackets. This measurement is 3-9/16”. Test fit your steering shaft support bracket on the mounts. If you’re content with this, tack the mounts with a few key welds. Temporarily lower the engine down and check the fit of your V8 in the Jeep. The engine should be essentially centered in the Jeep and the carriage bolts should be centered in their holes. Look at firewall clear-ance (probably about 1/2”), header and clutch clearances, etc. Remove the engine and make any adjustments if necessary.
Once you’re content with it all, lay MIG or stick welds along the entire edge of the brackets for a maximum strength connection to the Jeep frame. Allow your frame and bracket to air cool. Do not accelerate the cooling process with compressed air or water. We suggest you follow up by wire brushing and coating the brackets with primer and enamel as per your preference.
Continue with the installation by picking up your reading at the Install The Powertrain section, below.
You are working here with a very critical steering component and any errors you make can result in serious property damage, injury and death. If you are not confident in your ability to very securely reattach your steering shaft carrier bearing assem-bly or your engine mounts, consider the services of an automotive fabrication professional.
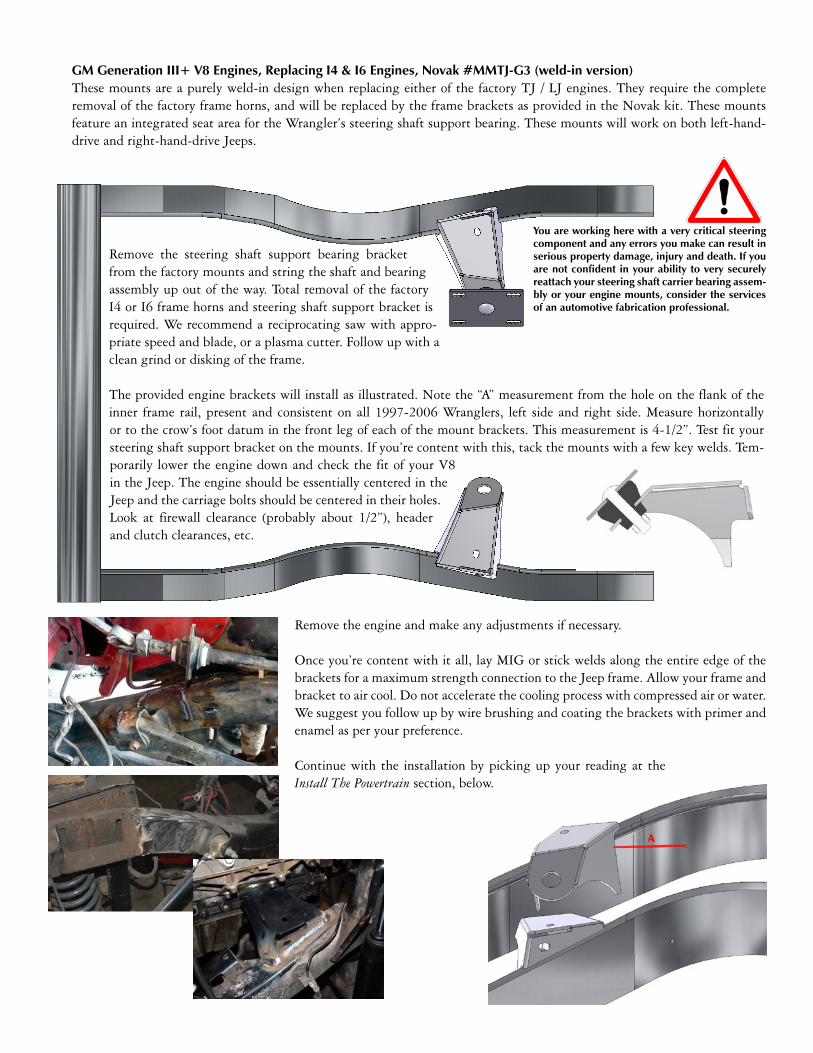
GM Generation III+ V8 Engines, Replacing I4 & I6 Engines, Novak #MMTJ-G3 (weld-in version)These mounts are a purely weld-in design when replacing either of the factory TJ / LJ engines. They require the complete removal of the factory frame horns, and will be replaced by the frame brackets as provided in the Novak kit. These mounts feature an integrated seat area for the Wrangler’s steering shaft support bearing. These mounts will work on both left-hand-drive and right-hand-drive Jeeps.
Remove the steering shaft support bearing bracket from the factory mounts and string the shaft and bearing assembly up out of the way. Total removal of the factory I4 or I6 frame horns and steering shaft support bracket is required. We recommend a reciprocating saw with appro-priate speed and blade, or a plasma cutter. Follow up with a clean grind or disking of the frame.
The provided engine brackets will install as illustrated. Note the “A” measurement from the hole on the flank of the inner frame rail, present and consistent on all 1997-2006 Wranglers, left side and right side. Measure horizontally or to the crow’s foot datum in the front leg of each of the mount brackets. This measurement is 4-1/2”. Test fit your steering shaft support bracket on the mounts. If you’re content with this, tack the mounts with a few key welds. Tem-porarily lower the engine down and check the fit of your V8 in the Jeep. The engine should be essentially centered in the Jeep and the carriage bolts should be centered in their holes. Look at firewall clearance (probably about 1/2”), header and clutch clearances, etc.
Remove the engine and make any adjustments if necessary.
Once you’re content with it all, lay MIG or stick welds along the entire edge of the brackets for a maximum strength connection to the Jeep frame. Allow your frame and bracket to air cool. Do not accelerate the cooling process with compressed air or water. We suggest you follow up by wire brushing and coating the brackets with primer and enamel as per your preference.
Continue with the installation by picking up your reading at the Install The Powertrain section, below.
You are working here with a very critical steering component and any errors you make can result in serious property damage, injury and death. If you are not confident in your ability to very securely reattach your steering shaft carrier bearing assem-bly or your engine mounts, consider the services of an automotive fabrication professional.

have achieved center and are satisfied with all clearances. You can then tighten the upper two bolts on each of the adapter mounts.
Now, notice the hole in each flank of the engine mount adapter brackets. You have two options here.
Option I - Bolt ThroughWith a 7/16” or 29/64” drill through the flank holes of the Novak brackets, using them as a template. Drill the factory frame horns from the front and then the back. Fasten through with the provided 7/16” bolts
and torque to 45 ft. lbs. to secure the mounts.
Option II - Plug WeldsThe second option is to weld through these bolt points using
GM Generation III+ V8 Engines, Replacing I6 Engines, Novak #MMTJ-G6 (bolt-in version)These mounts are a purely bolt-in design when replacing the 4.0L I6 engine with the GM Generation III+ V8 engines, utiliz-ing the factory six-cylinder frame horns.
The steering shaft carrier bracket will remain in its fac-tory location. Measure and mark out about 2-5/8” to 2-3/4” from the inner frame rail and cut. Drill a ~29/64” hole (clearance for a 7/16” bolt) in the top of each bracket, about 1” inboard from the existing threaded hole and about 5/8” to 3/4” in from your cut-off line.
Install the supplied Novak engine mount brackets over the I6 factory frame horns as illustrated. The small offset bracket goes on the passenger side. The large offset bracket goes on the driver’s side. Use two bolts on the top to retain the mounts, but don’t fully tighten them. Preset the brackets to be 15-1/2” across from each other, center mount hole to center mount hole. Temporarily lower the engine down and check the fit of your V8 in the Jeep. The engine should be essentially centered in the Jeep and the carriage bolts should be centered in their holes.
There is a slight amount of left-right adjustability in our mounts. With the engine still largely supported by a hoist, position the engine from left to right until you

plug welds. The installer might also choose to weld any other seams they deem helpful. Naturally, you’ll want to be totally confi-dent in the location of your mounts prior to such welding.
Once you are content with all your vari-ables, remove the engine.
We suggest you follow up by wire brush-ing and coating the Jeep brackets with primer and enamel as per your preference. Our #MMTJ mounts are black zinc coated for resistance against corrosion. However, if you have a certain theme to your installa-tion, you may enamel, powder coat or oth-erwise finish the bracketry and Jeep frame to your own style.
Continue with the installation by picking up your reading at the Install The Powertrain section, be-low.
- End of Engine Mount Options Section
Install the PowertrainIt’s now time to finally lower your motor into the Jeep engine bay if you haven’t already done so.
Very carefully and with assistance, lower your powertrain into the engine bay. You can thread your transfer case into the Jeep tunnel with someone guiding it.
Lower in your new engine. Install the underside isolator mounts and install the provided TopLock nuts under the isolator bushings. Do not squish the bushings. Tighten them only to where they just start to deform. Overly tight bushings can cause excessive engine vibrations through the Jeep and will cause premature bushing cracking and failure.
SteeringThe steering system essentially remains untouched with our bolt-in mounts, as described above. The Novak mounts will substitute for the factory steering support bearing base.
The GM power steering pump will drive the Jeep power steering gear perfectly well. Hose fittings vary over the production span of the TJ. If you have a 1997-2001 model, order a 2002-2006 TJ high-pressure power steering hose #52089168AD and your connections are likely to hook right up. 2002-2006 models can use their factory line. Once installed, only a minor amount of bending of the hard line is required.
The return line is simply low-pressure 3/8” hose, as is available from your local parts house. If you’re feeling creative, you can even run this line through an external cooler to add to the life of your pump and gear in hard service situations.

BrakesYou can retain you factory braking system all together. No changes are necessary from the standpoint of the conversion itself.
The GM engine provides vacuum at the rear of the manifold, whether it be a Small Block Chevy or a GM Gen.III+. It may be necessary to tap for a simple, barbed brass fitting on some manifolds that had the Hydroboost brakes.
The ABS computer is separate from all systems and runs independently. No mechanical, wiring or hydraulic changes need occur here.
Cooling SystemThe Jeep radiator will be both inadequate, poorly configured for a GM engine and has a reputation for a lack of durability.
The Novak Radlock Radiator is a tough and very efficient radiator. It is a cross-flow design and it bolts onto the Wrangler grille without mods. With it, we have seen success with the following coolant hoses: First try Gates #21912 for the upper and a Gates #20842 for the lower. Alternatively, the lower may be Napa #7473. For radiators with the neck on the driver’s side, try a Gates #21833 for the upper. We have also used Gates hoses #22438 and #22437. Trimming the hoses and sometimes the Vortec water pump outlet is often required.
It is possible to run a mechanical fan and they almost always have plenty of pulling power. Electric fans are becoming more of the norm. We recommend our aggressive electric fan with integrated shroud assembly. These fans are controlled by any GM computer equipped with a circuit to trigger a fan relay. Alternatively, you can install a fan control module and install it to our fan motor per the manufacturer’s recom-mendations.
ExhaustThere are no known factory exhaust manifolds in the Chevrolet Small Block nor GM Gen. III+ line-ups that will work in a TJ Jeep con-version, as they can interfere with the frame, body, steering, clutch release systems and even the provided mounts. As such, we recommend aftermarket headers for compatibility as well as performance.
TJ / LJ Jeep exhaust systems are not difficult to run. We recommend our #CCLS1 headers for Gen.III+ engines and our #CC158 head-ers for Chevrolet Small Block V8’s for opti-mal layout. Run the driver’s side down and in front of the oil pan over to the passenger’s
You are working here with a very critical steering component and any errors you make can result in serious property damage, injury and death. If you are not confident in your ability to very securely reattach your steer-ing shaft carrier bearing assembly or your engine mounts, consider the services of an automotive fabrication professional.

side. Merge it and the passenger bank into a Y pipe and send it out as a single circuit down the passenger side, up over the axle out exiting at the rear.
Fuel SystemIt is not only possible, but advantageous to use the factory Jeep fuel injection pump, should a future replacement ever be required. The Jeep fuel pump in 1991-2006 Wranglers is capable of natively producing ~100 PSI. This fuel sup-ply is, however regulated down to 40 PSI up through 45 PSI for the 2.5L & 4.0L engines.
For a little history and context, the 1991-1996 Jeep engine fuel rail featured a regulator. These systems have two connections: a high pressure supply connection and a low pressure return connection that feeds the bled fuel overage back into the fuel tank via a return line. In 1997, Jeep moved the regulator from the fuel rail into the fuel mod-ule in the fuel tank sending unit. This permitted the elimination of the return line from the engine back into the tank. Proper and regulated fuel pressure is achieved within the high pressure supply line. This is a simpler system in terms of manufacturing and reliability.
In 2005, Jeep bumped the fuel pressure from ~45 PSI to ~60 PSI. We and our customers have run many Gen.III+ engines on this pressure and without modifications and it works great. However, if you are installing a truly wild GM engine in a race-type Jeep, it may require a more robust solution for adequate fuel supply and modifications as described below.
GM multipoint fuel injection engines typically require between 45-58 PSI of fuel pressure. Gen.III+ engines require ~58 PSI. To facilitate this, Novak offers a fuel regulator bypass and bulkhead fitting assembly that fits into the Jeep fuel sending unit. The installer may then install a fuel regulator that will supply the proper pressure for their application. The regulator can be installed in proximity to the fuel tank so that a long return line is unnecessary. The installer will then drill and mount the bulkhead into the top of the Jeep’s plastic fuel sender housing for a return circuit.
Note that earlier Gen. III motors were regulated at the fuel rail. Starting in about 2002, GM started regulating fuel pressure at the fuel tank or elsewhere on the circuit as described above.
For a fast connection between the Jeep supply circuit to the GM engine, use a Dorman 800-058 fuel line quick connect (as supplied in the above Novak kit).
Throttle LinkageIf your engine has a cable throttle linkage, you can connect your Jeep pedal to the GM throttle body. However, the majority of GM engines now feature a “throttle by wire” or electronic throttle assembly. For these systems, you will need to install the GM electronic pedal assembly and its associated Throttle Actuator Control (TAC) module, if required. Note that most Gen.IV engines do not use a separate TAC module as this function is integrated into the Gen.IV powertrain computer itself.
Transfer Case LinkageWe cannot stress enough the advantages of replacing your Jeep’s shifter with the Novak transfer case shifter assembly. This shifter kit has become very popular for both the conversion and non-conversion crowds, simply because of its vast improvement
Novak’s TJ / LJ fuel system modification kit
over the factory linkage. Its added benefit is that it makes the conversion process and typical transfer case relocation go much more smoothly. It is a very affordable upgrade and highly adjustable to your installation, whether using
manual or automatic transmissions. Detailed instructions are supplied with this shifter kit.
If you must use the factory shifter assembly, you will need to lengthen or shorten linkage rods and relocate pivot and anchor points, taking into consideration the geometry required to actuate
the New Process transfer case shifter plate.
Transmission ShiftersIf you’re retaining your factory manual transmission, you will also retain your factory shifter cane and assembly. Instructions on how to best do this are included
with your Novak engine to transmission adapter kit. Instructions for GM automatic transmission shifters are included with your transfer case adapter assembly.
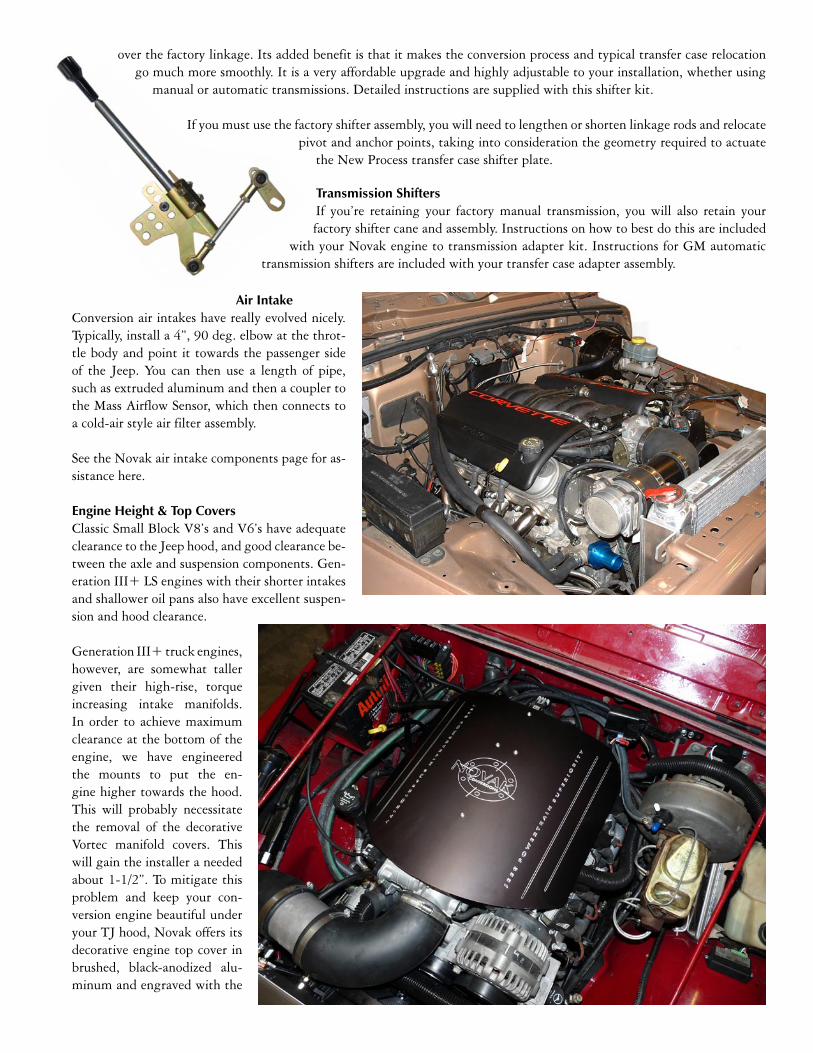
Air IntakeConversion air intakes have really evolved nicely. Typically, install a 4”, 90 deg. elbow at the throt-tle body and point it towards the passenger side of the Jeep. You can then use a length of pipe, such as extruded aluminum and then a coupler to the Mass Airflow Sensor, which then connects to a cold-air style air filter assembly.
See the Novak air intake components page for as-sistance here.
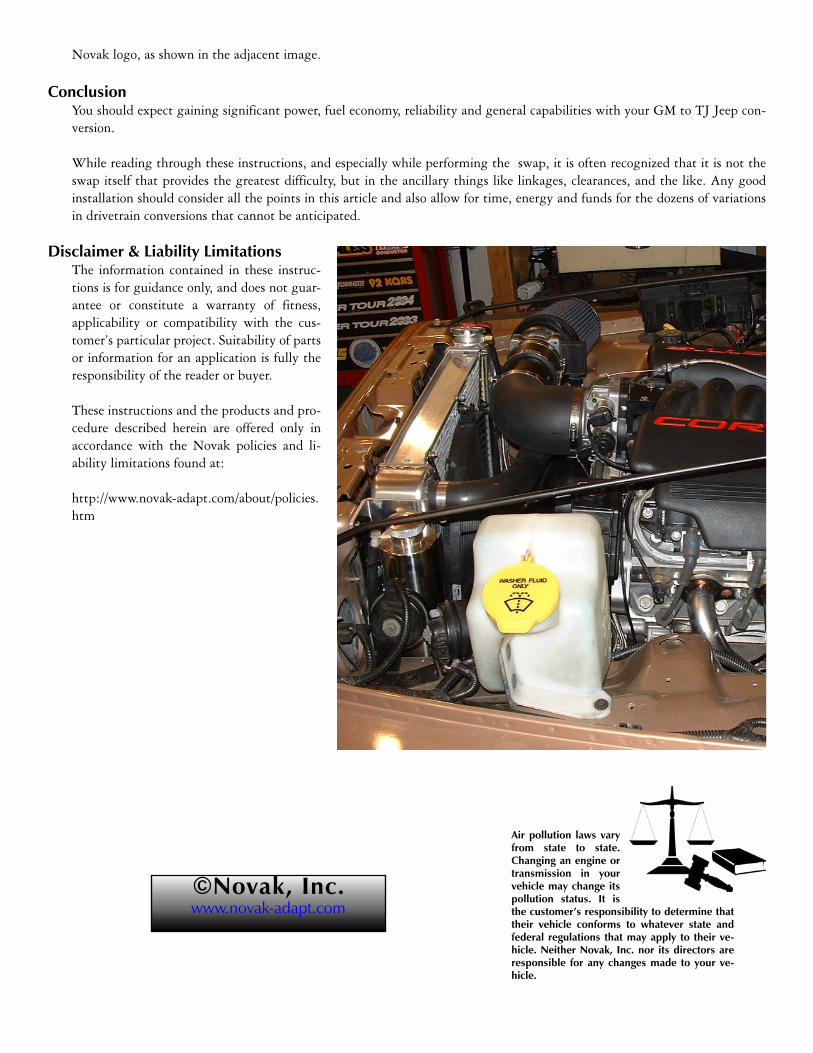
Engine Height & Top CoversClassic Small Block V8’s and V6’s have adequate clearance to the Jeep hood, and good clearance be-tween the axle and suspension components. Gen-eration III+ LS engines with their shorter intakes and shallower oil pans also have excellent suspen-sion and hood clearance.
Generation III+ truck engines, however, are somewhat taller given their high-rise, torque increasing intake manifolds. In order to achieve maximum clearance at the bottom of the engine, we have engineered the mounts to put the en-gine higher towards the hood. This will probably necessitate the removal of the decorative Vortec manifold covers. This will gain the installer a needed about 1-1/2”. To mitigate this problem and keep your con-version engine beautiful under your TJ hood, Novak offers its decorative engine top cover in brushed, black-anodized alu-minum and engraved with the
Air pollution laws vary from state to state. Changing an engine or transmission in your vehicle may change its pollution status. It is the customer’s responsibility to determine that their vehicle conforms to whatever state and federal regulations that may apply to their ve-hicle. Neither Novak, Inc. nor its directors are responsible for any changes made to your ve-hicle.
©Novak, Inc.www.novak-adapt.com
Novak logo, as shown in the adjacent image.
ConclusionYou should expect gaining significant power, fuel economy, reliability and general capabilities with your GM to TJ Jeep con-version.
While reading through these instructions, and especially while performing the swap, it is often recognized that it is not the swap itself that provides the greatest difficulty, but in the ancillary things like linkages, clearances, and the like. Any good installation should consider all the points in this article and also allow for time, energy and funds for the dozens of variations in drivetrain conversions that cannot be anticipated.
Disclaimer & Liability Limitations The information contained in these instruc-tions is for guidance only, and does not guar-antee or constitute a warranty of fitness, applicability or compatibility with the cus-tomer’s particular project. Suitability of parts or information for an application is fully the responsibility of the reader or buyer.
These instructions and the products and pro-cedure described herein are offered only in accordance with the Novak policies and li-ability limitations found at:
http://www.novak-adapt.com/about/policies.htm