Embed Size (px)
Citation preview

chapter 1
introduction to 2D-animation workingpractice
• how animation worksthe basics
• frames per second
• what you need for your studioanimation paperpeg barlight boxx-sheetsline testerpencils
• let’s get animatingkey to key animationanimating straight ahead
• flipping, flicking and rollingflippingflickingrolling
• how to use a line tester to help your animation
• how this book works
• exercisesball bouncinghow to relate your 2D animation to your3D animationoverview of the ‘ball drop’ exercise in 3D drawing!
chaptersummary
CH001.qxd 1/4/07 2:56 PM Page 1

During this chapter I will take you through two things – the equipment needed to make abasic animation studio and some simple animation. We will look at x-sheets and how theyhelp timing, flipping, flicking and rolling, how to use a line tester and how to put the lessonslearnt from your drawn exercises onto a 3D-computer program. By the end of the chapteryou will have learnt how to organize yourself and how to plan a piece of animation.
I make no apologies for taking you right back to basics. Many of you may know much ofthis but bear with me – it is worth refreshing your knowledge and reinforcing the basic prin-ciples behind animation.
how animation worksthe basics2D drawn animation consists of a series of drawings shot one after another and playedback to give the illusion of movement. This animation can be played back in a numberof ways.
● In the form of a ‘flipbook’ (basically a pile of drawings in sequence, bound together andflipped with the thumb).
● The drawings could be shot on film one drawing at a time with a movie camera andplayed back using a cinema projector.
● They could be shot on a video camera and played back with a video player.● They could be shot with a video camera attached to a computer and played back on the
same computer using an animation program.● Or they can be scanned into the computer and played back.
frames per secondAnimation shot on film and projected is played at 24 frames per second.
Animation for television in Europe, Africa, the Middle East and Australia is played at 25 framesper second. In these countries they use a television system called PAL which plays at 50 fields(frames) per second and 25 frames per second is compatible with this. If we played an animatedfilm at 24 frames per second on the television, we would see a black bar rolling up the screen.The Americas, the West Indies and the Pacific Rim countries use NTSC, which runs at 60 fieldsper second. This means you should be animating at 30 frames per second (60 is divisibleby 30). Quite often some sort of digital converter is used to transfer one speed of film toanother speed of video, allowing 24 frames per second film to be shown on a 60 fields persecond (NTSC) TV. If you stop frame through a video of an animated film, you will find thereare points at which one frame will blur into another. This is how they overcome the incom-patibility of the two systems (stop framing through animated movies is a very good way oflearning about animation). The most important thing to find out when animating somethingis at what speed the animation will be played back. All the animation taught in this book willbe played back at 25 frames per second.
2 character animation: 2D skills for better 3D
CH001.qxd 1/4/07 2:56 PM Page 2

what you need for your studioIn order to complete all the drawn exercises in this book you will need the following things(all of which are available from the professional animation equipment suppliers listed at theback of this book):
● animation paper● peg bar● light box● x-sheets● line tester● pencils
animation paperWhen animating, you often find that you are workingwith four or more layers of paper.A level of translu-cency is necessary to see all the drawings. Professionalanimation paper is made with this in mind.
It also comes in different sizes. These are referred toas field sizes – 12 field and 15 field are the most pop-ular; 15 field is 15 inches wide, 12 field being 12 inches wide (I’ll explain this in more detaillater in the chapter when I refer to field guides, the grid that measures field sizes).
Most professional animation paper comes with three punched holes. It is possible to buy thispaper with no holes. (This is cheaper but you will need a specialist animation punch, whichis very expensive). Used with a peg bar, theholes allow accurate placing of each pieceof paper with the next. This is important, asthe slightest movement in a drawing willshow when the sequence is shot.
It is possible to use A4 paper with standardring binder punched holes and a peg bar withtwo pins that fit the holes. This will work out farcheaper than professional animation paper.
peg barProfessional peg bars are a strip of steel orplastic with three pins. These are industry stan-dard and are used with professional anima-tion paper. These are used to register eachpiece of animation paper against the next.
It is possible to buy two pin peg bars – these are often called junior peg bars.
It is equally possible to make your own using a strip of wood with two pieces of dowel thatcorrespond to the holes in your paper, or even to tape two 5 mm countersunk bolts onto your
introduction to 2D-animation working practice 3
CH001.qxd 1/4/07 2:56 PM Page 3

light box. These can then be used with ringbinder punched A4 paper.
As with the paper, bear in mind that if youwant to use your animation professionally, itis advisable to buy a three-pin peg bar.
light boxIn its most basic form, a light box is a flat sheetof opal Perspex over a light. Professional lightboxes use a rotating disc. They should alsohave the ability to change the angle of thedrawing surface. This makes drawing easierboth on the wrist and on the back.
Simple light boxes are relatively straightfor-ward to make. You could use a wooden storage box with the top part cut off at an anglewith a neon bulb mounted inside. A piece of 6 mm opal Perspex is then fastened to thetopwith screws.
x-sheetsX-sheets are also referred to as dope sheets or exposure sheets. They are used by the anima-tor to record all the necessary information relating to how the animation should be shot.A standard x-sheet consists of several columns that run from top to bottom and 100 rows thatrun from left to right. Each row represents one frame of animation. If the animation is to beplayed back at 25 frames per second, 100 frames will equal 4 seconds of animation.
The columns on an x-sheet mean the following things.
1. sound columnThis contains the sounds that are relevant to the animation. Very often this is the dialoguespoken by the characters. For animation the dialogue is recorded first. It is then ‘broken down’.This means that someone, usually an editor, will go through the sound track frame by frame.They work out where each word starts and ends and where each of the major vowel andconsonant sounds are. These are then marked on the x-sheet in the sound column, frame byframe. You then know that at a certain frame in a scene a particular sound is made.
4 character animation: 2D skills for better 3D
CH001.qxd 1/4/07 2:56 PM Page 4

2. action columnThis contains the instructions on when a given piece of animation will start and end. An experi-enced animator will fill out this part of the x-sheet before they start animating. Sometimes thedirector will fill this out. The process is often referred to as ‘slugging out’.
introduction to 2D-animation working practice 5
This blank x-sheet can be photocopied or you can print up an x-sheet from thefolder X-SHEETS in chapter001 of the CD-ROM.
CH001.qxd 1/4/07 2:56 PM Page 5

3. the frame numbers columnAs the heading suggests, this is where the number of eachframe is inserted. One of the main ways of ‘cheating’ indrawn animation is to do your animation on ‘twos’. Thismeans that each of your drawings is shot for two frames.This saves a huge amount of work. For example, if youhave to animate 4 seconds you only have to do 50drawings, rather than 100 drawings if you did a draw-ing for each frame (assuming a rate of 25 frames persecond). You will also find that at times you will want to‘hold’ your animation. For example, at a given point inthe action a character may move into a position wherethey stand still for a second or so. At this point you couldjust have one drawing ‘held’ for however many framesare needed.
There are two ways to number your drawings. The firstway is to number them by the drawing. This means thatdrawing number one will be numbered 1, drawing num-ber two will be numbered 2, etc. The other way is tonumber them by the frame. This means that the drawingon frame one will be numbered 1. The drawing on framethree (if the sequence is shot on twos, this would be thesecond drawing) will be numbered 3, the drawing onframe five would be numbered 5, etc. Each method hasits advantages and disadvantages. It is probably better
6 character animation: 2D skills for better 3D
CH001.qxd 1/4/07 2:56 PM Page 6

for the aspiring computer animator tonumber drawings by the frame so thatwhen you look at your drawings inorder to copy their position with yourcomputer model you know exactlywhat frame that pose should be on. Allthe exercises done in this book will benumbered by the frame.
The columns show the order in whichthe levels are placed. Background at thebottom level, foreground at the top withthe character in the middle.
Each drawing will have its own number. Each unit represents aframe. The drawing number is inserted to show where that frameof animation will be in the sequence. This varies depending onhow many frames per second each drawing represents. The exam-ple shows a sequence that is shot on twos (i.e. each drawing is
introduction to 2D-animation working practice 7
CH001.qxd 1/4/07 2:56 PM Page 7
5. the camera columnInformation in this column instructs the camera how you wantthe scene to be shot and pinpoints the area within the artwork.
shot for two frames). When something is on twos the first row hasa number and the second is left blank. It is unnecessary to fill inevery frame, if at the end of a sequence the last drawing is heldfor 10 frames (i.e. the drawing is shot for 10 frames) a line shouldbe drawn for the 9 frames after the written number. This is indi-cated by the line that runs from the bottom of the drawing numberto the last frame that the drawing is held for. If the drawing is heldfor more than two frames, it is necessary to insert a line to showhow long the drawing is held for.
4. the levels columnsWhen a sequence is animated, even if there is only one character,the drawing for one frame of animation may be on several levelsof paper. If the body remains still during the sequence, but thehead and arms are moving, there will be only one drawing of thebody for the whole sequence. If the head is moving at a differentrate to the arms, the head will be on a separate piece of paperand the arms on a further piece. If there is a background and thecharacter is stood behind, for example a tree, this will again beon a separate piece of paper. However accurate the final draw-ings are, if you have to retrace exactly the same drawing 20 timesor more, there will be variations between the drawings that willshow when the animation is played. It also is an unnecessary useof time. Before the use of computers, the finished drawings weretraced and coloured onto Cel (cellulose acetate or clear plasticsheets). This allowed for a maximum of six levels before the thick-ness of the cell made the colours on the lower levels look muddy.Today, each of these levels would be painted and assembledtogether with programs such as Soft|Image Toonz or Animo. Thisallows for infinite levels without any loss of quality.
8 character animation: 2D skills for better 3D
CH001.qxd 1/4/07 2:56 PM Page 8

The most important piece of information is the fieldsize. The most popular paper is 12 field, whichmeans that the camera at its maximum setting willshoot an oblong area that is 12 inches wide.
Traditional 2D animators use a field guide, alsocalled a graticule, to work out the position of theshot. For example, to shoot your animation usingthe full size of the paper it is marked on the topof the camera column as 12-field centre. As a3D-computer animator, you won’t be using fieldsizes. However it is worth understanding howthey are worked out.
The field guide has North, South, East and West printed at thetop, bottom, right and left. It consists of 24 columns and 24 rowsin a grid. The columns are half an inch wide. By using thesecompass points and grid references you can specify any area
on your paper that youwant to be shot.
The illustration belowshows an oblong area atthe top right of the paperthat is 5 inches wide. Thiswould be 5 field at 7east/7 north of 12-fieldcentre. Using the fieldguide you work out where the centre of the oblong isin relation to 12-field centre (the centre of the field
guide). To find the centre you would count along 7lines east and 7 lines north from the centre of the fieldguide (12-field centre). See illustrations over page.
Using this method, you can place a field of any sizein any area.
All exercises in this book are at 12-field centre(or if you are using A4 photocopy paper, 10 field at2 south of 12-field centre).
line testerA line tester is a device that captures your drawingsand plays them back. It is a quick and easy way tosee if the roughly drawn sequence works. There area number of ways to set up a line tester. You coulduse a film camera, a video recorder that can record
introduction to 2D-animation working practice 9
CH001.qxd 1/4/07 2:56 PM Page 9

single frames or a line testing software programand a computer. The movie examples on the CD-ROM were produced using a program called‘Digicel Flipbook’ (there is a demonstration copyon the CD-ROM with instructions). Other alterna-tives are available. I would suggest looking for aprogram that contains anx-sheet, as this is best forworking out timing.
The simplest and cheapest way of setting up a linetester is to use a web-cam together with a computer and the line testing software. Set thecamera to point down onto the table. The camera could be mounted on a tripod or even stuckto a steel rule that is then attached to the top of your computer. Stick your peg bar to the table,put a piece of your animation paper onto it and align it under the camera. The peg bar isimportant for the accurate placing of drawings. It is also possible to scan drawings into thecomputer using a flatbed scanner, but it takes an awful lot longer than using a camera.
Now would be a good time to load the demo copy of Digicel Flipbook onto your PC andfamiliarize yourself with its operation.
10 character animation: 2D skills for better 3D
CH001.qxd 1/4/07 2:56 PM Page 10

pencilsWhen doing drawn animation it’s always best to work in rough with a Col-Erase blue pen-cil and then ‘clean up’ your drawings afterwards with a graphite pencil. This means you candefine the correct lines of the character and add details in graphite pencil on top of therough Col-Erase lines. Also, when you line test your animation the graphite line will show upmore distinctly than the blue lines underneath.
An HB or B pencil is needed for the cleandrawing whilst a coloured pencil is used forroughing out the animation. Sold under thetrade name of Col-Erase, these are colouredpencils that can be easily erased and aregreat for drawing with. You can work roughwith a graphite pencil but it can get veryconfusing when it comes to cleaning up the drawings.
let’s get animatingThere are two ways to animate a sequenceusing traditional 2D animation. These areanimating ‘key to key’ (also known as ‘poseto pose’) and ‘straight ahead’.
key to key animation‘Key drawings’, also referred to as ‘keys’, areimportant drawings that sum up the essenceof the action during a scene.
introduction to 2D-animation working practice 11
CH001.qxd 1/4/07 2:56 PM Page 11

Key to key animation is when the ‘key positions’ or ‘poses’ in a sequence are drawn beforecompleting the sections between them (‘in-betweening’). I always like to think of the key pos-itions as being the plot or a précis of a scene. They give a rough overall feel of the anima-tion. The in-between drawings (‘in-betweens’) provide the characterization or detail.
Animating key to key allows for a large degree of control over your animation. It can pre-vent the character or object from changing size or distorting where you don’t want it. It alsomeans you have control over the timing of your animation and can more easily predict whataction will happen when and where. By line testing the keys you can see the basic move-ment of a sequence before completing the full animation.
In the end all the frames of your animation are important and if you put too much emphasison the key positions the animation can look clunky and stiff.
Below is an example of key to key animation.
A man sits at a table with a glass of liquid on it. He picks up the glass and drinks from it.
● Key number 1 – He looks at the glass.● Key number 2 – He grasps the glass in his hand.● Key number 3 – He raises the glass to his lips.● Key number 4 – He tips the contents of the glass into his mouth.
How many in-betweens and where they are positioned (the timing) depends upon the char-acter and the mood of the man.
If he was thirsty, he would quickly grab the glass (only a few in-between drawings andspaced far apart) pull the glass up swiftly to his lips (maybe spilling some liquid), pullingback his head and tipping it straight down his throat.
To create the illusion of speed you have less in-betweens with larger gaps between eachdrawing.
If he was an alcoholic he may pick up the glass carefully to avoid spilling any liquid (a lotof in-between drawings, positioned closely together). Just before the glass reaches his lips hemight dip his head, so as to avoid spilling any liquid in case his arm fails. He would thendrink long and slowly.
To show slower movements there are more in-betweens and smaller gaps between the drawings.
If the man were hesitant about drinking the liquid, he may pull his hand back just beforegrasping the glass and, holding it with the tips of his fingers, bring it slowly and delicatelyto his lips so he could take a small sip.
12 character animation: 2D skills for better 3D
CH001.qxd 1/4/07 2:56 PM Page 12
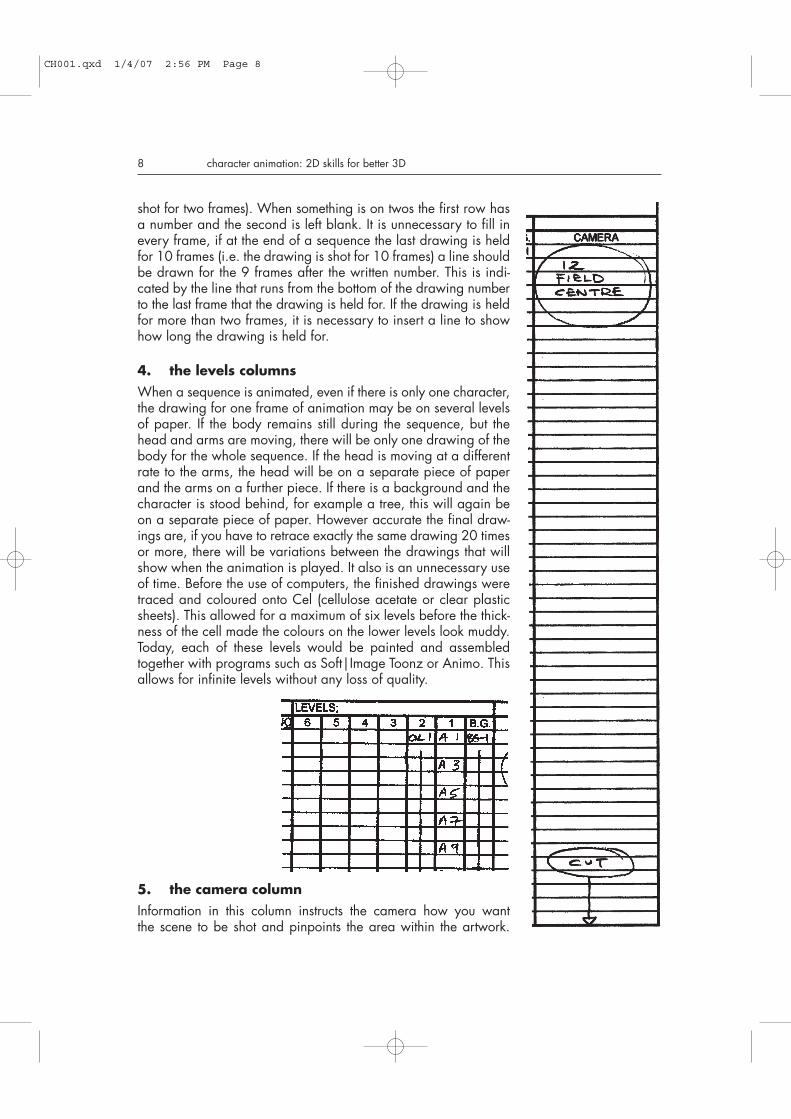
animating straight aheadThis is when images in the sequence are drawn directly oneafter the other. It can produce a more vibrant form of anima-tion with more energy and exuberance. Unfortunately there isfar less control with straight-ahead animation and distortionand changes in size are more likely. It is also more difficult towork out the timing because you can only check the animationwith a line tester when it is all done and then it may be wrongand you have to throw away a lot of drawings and redo it.
flipping, flicking androllingThere are three skills that are invaluable whenanimating with pencils and paper. Theseare flipping, flicking and rolling. These allowyou to see the drawings moving while youare animating. To practise these skills, weare going to animate a ball bouncing intothe screen, hitting the ground and then bouncing out of the screen. Each of these bouncesdescribes an arc, which is referred to as a parabola.
This is a good example of timing in animation. To create the dynamics of the movement ofthe ball, the drawings are spaced at different intervals. As the ball bounces, it acceleratestowards the ground in an arc, pulled by the force of gravity. At the fastest point the drawingsare furthest apart. At the highest point of the bounce (the apex) the ball is travelling moreslowly. Here the drawings are closer together. To create acceleration as the ball falls to theground, the drawings of the ball are placed further and further apart. As the ball hits theground, it squashes down, absorbing the energy of the fall. It then un-squashes and acceler-ates into the next bounce, slowing down as it reaches the apex of this next bounce.
This principle of animation timing is relevant to all animation. The closer the drawings aretogether, the slower the movement, the further apart they are then the quicker the movement.
flippingGrab an old exercise book, sketchbook or block of Post-It notes. With these we are going tomake a flipbook. We are going to use this flipbook to bounce a ball across the page usingstraight-ahead animation.
With the spine furthest away from you, lift the pages until the bottom page is facing you. Drawthe ball in the top left-hand corner of the bottom page of your flipbook. Following the illustrationdraw one ball on each subsequent page. When the ball hits the ground remember to squash itso that it is almost flat. As it leaves the ground, stretch the ball along the arc it is following.
When you have completed the sequence, hold the flipbook at the spine with your right hand,place your left thumb at the bottom of the flipbook, with the left-hand index and forefinger at
introduction to 2D-animation working practice 13
CH001.qxd 1/4/07 2:56 PM Page 13

the top page of the flipbook. Bend the flipbookup towards you with your left hand and allowthe pages of the flipbook to slide away fromyour thumb. All being well you should see yourball fall in an arc from the top left of the page tothe centre bottom of the page where it squashesand bounces up to the top right of the page(open flipbook.avi in chapter001 of the CD-ROMfor a demonstration of how to do this).
You have just created a piece of straight-aheadanimation, i.e. where images are drawn oneafter the other.
This exercise should have given you an ideaabout timing and spacing. Try experimenting with the distance between one ball and thenext (e.g. if the balls are very close together they will move slowly and appear to float).
Flipping is a good way to see how your anima-tion is working when you are using animationpaper. Arrange your drawings with the firstdrawing of the sequence at the bottom of thepile and the last drawing at the top. This iscalled the flipping order. Hold up your draw-ings with your right hand at the top of the pileand your left hand at the bottom. As with theflipbook, pull the drawings towards you and letthe drawings slide off your left-hand thumb oneat a time as they fall flat. If this is too awkward(your pile of drawings is too thin), try puttingsome blank pages on top of these drawings tomake the pile thicker (open up flipping.avi inmovies001, chapter001 of the CD-ROM).
flickingFlicking is a technique used to look at your animation while you are sitting at your light box.When mastered it means you can see how your animation is moving and you can adjustyour animation accordingly by re-drawing.
For this next exercise we will use our punched paper, the peg bar and light box. Put yourlight box on the table in front of you in a comfortable position.
Always animate with the peg bar at the bottom of your piece of paper. It’s much more diffi-cult to flip and flick with the peg bar at the top.
We are going to animate a piece of key to key animation using the same sequence as forthe flipping exercise. We will be numbering these drawings by the frame and each drawingwill be shot for two frames (twos).
14 character animation: 2D skills for better 3D
CH001.qxd 1/4/07 2:56 PM Page 14
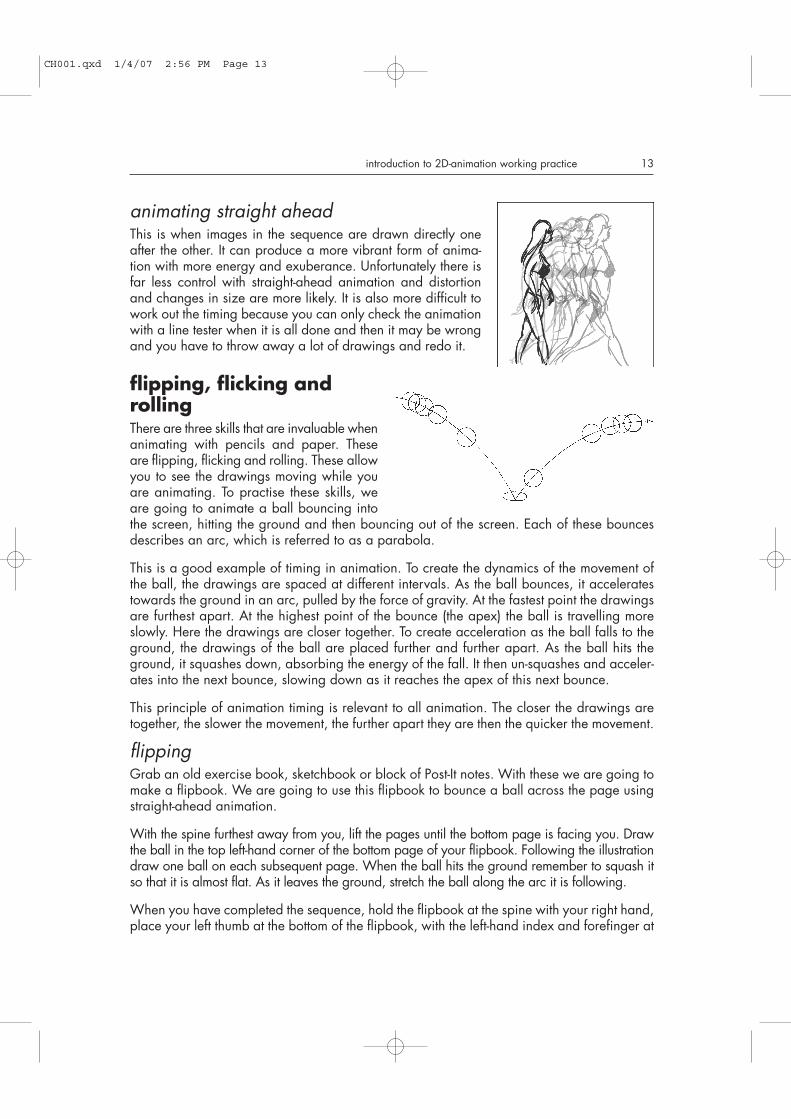
Place your first sheet of paper onto the pegbar. At the bottom right-hand corner of thepaper, label this drawing no.1. This is ourfirst key drawing.
Place a second sheet on top, using the pegbar to register it. Draw a squashed ball andlabel it drawing no.11. This is our secondkey drawing.
Lastly place a third sheet over the previoustwo and draw a ball at the top right-handcorner and label this drawing no.21. This isour third and final key drawing.
Remove drawing no.21. We will in-betweendrawings no.1 to no.11. This means we willdraw the drawings that go between no.1and no.11.
The first in-between we draw will be no.9. This ishalf way between no.1 and no.11. This may seemrather odd, but it will help give the impression ofthe ball speeding up as it hits the ground. If welook at the timing chart, we see that, because theball was at its slowest on the apex, there aremore drawings closer together at this point. Asthe ball falls out of the sky the drawings get fur-ther and further apart. This is why the drawinghalf way between no.1 and no.11, is drawingno.9.
The first drawing you do as an in-between is oftenreferred to as a ‘breakdown’ drawing. This is themajor in-between.
introduction to 2D-animation working practice 15
CH001.qxd 1/4/07 2:56 PM Page 15

Timing charts (also known as breakdown guides, in-betweening guides or telegraph poles)are used to show where the in-between images should be drawn. They are generally placedat the bottom of the key drawing and should relate to the drawings between that key and thenext. They consist of a horizontal line with a vertical line at each end representing the keydrawings. The breakdown (major in-between) drawings are indicated by a vertical line witha couple of arcs between it and the key drawings. The remaining in-between drawings arerepresented by shorter vertical marks.
This illustration shows the breakdown guidefor drawings no.1 to no.11.
Drawing no.7 is half way between no.1 andno.9, drawing no.5 is half way betweenno.1 and no.7 and drawing no.3 is half waybetween drawing no.1 and drawing no.5.
When we in-between our sequence, weneed to ‘flick’ our drawings. Place drawingno.11 over drawing no.1 and a clean sheetover these. Label it drawing no.9. Hold
drawing no.9 with your left thumb and fore-finger. Slip your index finger underneathdrawing no.11. Leave drawing no.1 flat onthe light box.
Now draw the ball on drawing no.9.Remember the ball is moving through an arcand that it should be half way between theballs on drawings no.1 and no.11.
In order to see how the ball is moving, foldback drawings no.11 and no.9 towards you
16 character animation: 2D skills for better 3D
CH001.qxd 1/4/07 2:56 PM Page 16

(while still attached to the peg bar) and lookat drawing no.1.
Fold drawings no.11 and no.9 flat againstthe light box and look at drawing no.9.
Then fold drawing no.9 up towards you andlook at drawing no.11.
When this is done in quick succession theball will move along the arc. You are nowflicking. Sometimes it helps to put a rubberband over the pins on the peg bar to stop thepaper slipping off. If the ball in drawing no.9doesn’t appear to be in the correct position,
rub it out and re-draw it. Keep flicking and drawing until it looks right.(See flicking.avi in movies001, chapter001 of the CD-ROM.)
Repeat the in-betweening process for drawing no.7 (between drawing no.1 and no.9),drawing no.5 (between drawing no.1 and no.7) and drawing no.3 (between drawing no.1and no.5). Once you’ve drawn all these you can have a go at rolling.
rollingPlace the first five drawings of the sequence onto the peg bar with drawing no.1 at the bottomand no.9 at the top. Interleave each of these drawings between the fingers of your left hand. Youcan only ever roll with five drawings.
Fold all the drawings towards you and lookat drawing no.1. By moving your little fingerforward allow drawing no.3 to fall flat overdrawing no.1 and look at this. See top illus-tration on p. 18.
Let drawing no.5 fall flat over drawing no.3.Look at this. Let drawing no.7 fall flat overdrawing no.5. Look at this. Finally allowdrawing no.9 to fall flat onto drawing no.7and look at this. Bring your hand back andrepeat the process. Make sure your fingersstay interleaved with the paper at all times.When this is done in quick succession, youwill see the ball falling from the top left of the
introduction to 2D-animation working practice 17
CH001.qxd 1/4/07 2:56 PM Page 17

page and hitting the ground, accelerating asit falls. You are now rolling (see rolling.avi inmovies001, chapter001 of the CD-ROM).
Complete the exercise by in-betweeningdrawings no.11 through to no.21.
This is the timing chart for drawing no.11,showing how you should in-between the draw-ings between drawing no.11 and no.21.
The X in the chart shows that the distance hasbeen divided into three. The first in-betweenyou will do is drawing no.15. This is thebreakdown drawing. It is one-third closer tono.21 and two-thirds further away fromno.11. (The X is there to show the relativeposition of drawing no.15.) The next draw-ing to do is no.17. This is half way betweenno.15 and no.21. Then do drawing no.19.This is half way between no.17 and no.21.
There is no drawing at the position X. Thenext drawing to do is no.13. This is half waybetween X and no.11. By using this spacing,the ball will accelerate from drawing no.9 and decelerate as it reaches no.17. Make surethe ball follows the arc through the sequence. When you have completed all the drawingshave a go at flipping them. Pick up all the drawings you’ve animated with the first numberat the bottom and the last at the top. Hold them up with the right hand and flip with the left.
Finally shoot the sequence with the line tester to see accurately how the animation moves.Each drawing should be shot for two frames each. If you haven’t worked out how to use aline tester yet, never fear! I’m going to take you through how to use one in the next section(see ball_bounce.avi in animations001, chapter001 of the CD-ROM).
how to use a line tester to help your animationIn the last exercise we looked at the timing for a ball bouncing across the screen. Learningthe timing for the key positions is one of the hardest things in animation to do. Using a linetester enables you to see how the timing is working and will hopefully help you to learn tim-ing skills more quickly.
For the next exercise we will make a ball drop into screen, fall straight to the ground andbounce a few times before coming to a halt.
The first thing to do is to animate and shoot the key drawings on the line tester. The resultingmovie is called a pose test or a key test. The number of frames that each of the key drawings
18 character animation: 2D skills for better 3D
CH001.qxd 1/4/07 2:56 PM Page 18

is played back for can be adjusted on the x-sheet part of the program. When this is workingsatisfactorily, the drawing numbers are marked onto a paper x-sheet and from this the tim-ing for the in-between drawings are worked out. Work out timing charts for where the in-betweens will go. Do the in-betweens and finally the entire sequence is shot on the line tester.
how this book worksEvery exercise in this book will follow the basic format below. Animate the exercise in 2Dand then use the drawings as a guide to how the animation will move in 3D. Computer pro-gram specific .pdf notes will be found on the CD-ROM.
introduction to 2D-animation working practice 19
exercisesball bouncingDraw the following key positions onto each subsequent piece of paper and numberthem as shown.
Open up DigiCel Flipbook on your computer. Click Create New Scene. Specify a FrameRate of 25. # of frames � 44. # of levels � 2. Click the radio button for PAL (768 � 576).Then click OK.
CH001.qxd 1/4/07 2:56 PM Page 19
20 character animation: 2D skills for better 3D
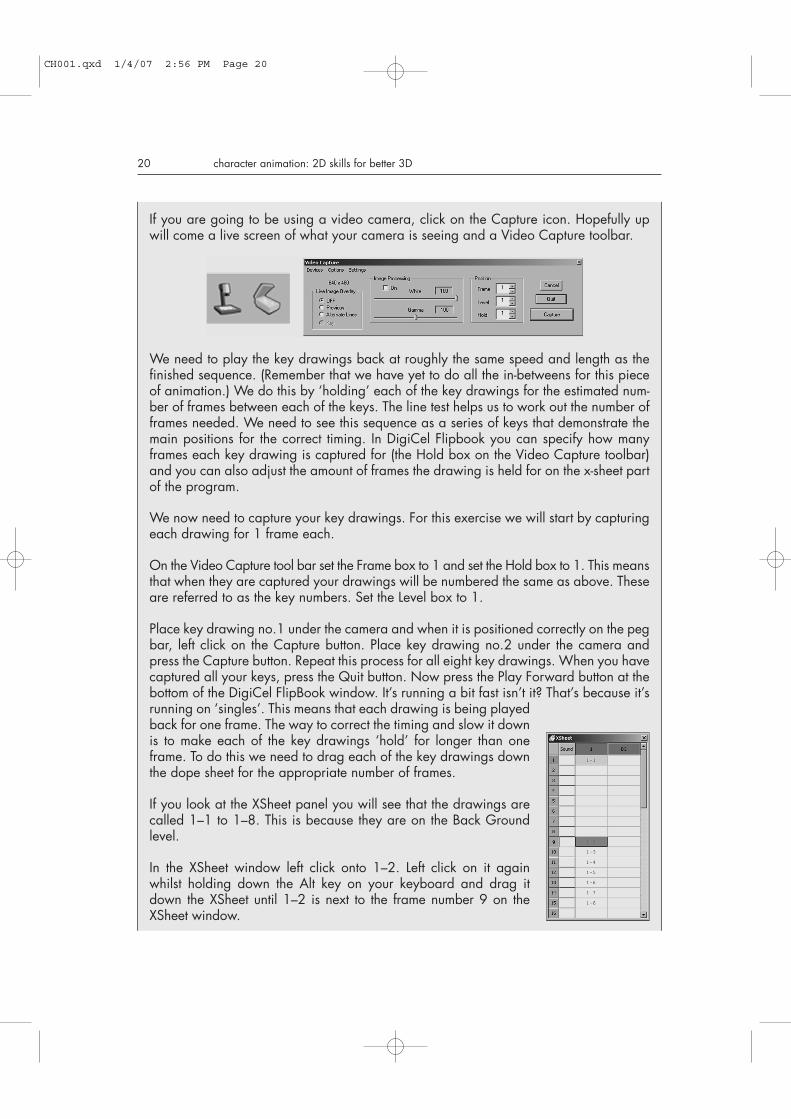
If you are going to be using a video camera, click on the Capture icon. Hopefully upwill come a live screen of what your camera is seeing and a Video Capture toolbar.
We need to play the key drawings back at roughly the same speed and length as thefinished sequence. (Remember that we have yet to do all the in-betweens for this pieceof animation.) We do this by ‘holding’ each of the key drawings for the estimated num-ber of frames between each of the keys. The line test helps us to work out the number offrames needed. We need to see this sequence as a series of keys that demonstrate themain positions for the correct timing. In DigiCel Flipbook you can specify how manyframes each key drawing is captured for (the Hold box on the Video Capture toolbar)and you can also adjust the amount of frames the drawing is held for on the x-sheet partof the program.
We now need to capture your key drawings. For this exercise we will start by capturingeach drawing for 1 frame each.
On the Video Capture tool bar set the Frame box to 1 and set the Hold box to 1. This meansthat when they are captured your drawings will be numbered the same as above. Theseare referred to as the key numbers. Set the Level box to 1.
Place key drawing no.1 under the camera and when it is positioned correctly on the pegbar, left click on the Capture button. Place key drawing no.2 under the camera andpress the Capture button. Repeat this process for all eight key drawings. When you havecaptured all your keys, press the Quit button. Now press the Play Forward button at thebottom of the DigiCel FlipBook window. It’s running a bit fast isn’t it? That’s because it’srunning on ‘singles’. This means that each drawing is being playedback for one frame. The way to correct the timing and slow it downis to make each of the key drawings ‘hold’ for longer than oneframe. To do this we need to drag each of the key drawings downthe dope sheet for the appropriate number of frames.
If you look at the XSheet panel you will see that the drawings arecalled 1–1 to 1–8. This is because they are on the Back Groundlevel.
In the XSheet window left click onto 1–2. Left click on it againwhilst holding down the Alt key on your keyboard and drag itdown the XSheet until 1–2 is next to the frame number 9 on theXSheet window.
CH001.qxd 1/4/07 2:56 PM Page 20

introduction to 2D-animation working practice 21
This means that key no.1 (1–1 on the XSheet window) is now held for 8 frames. Thismeans that when it is played back your audience will see it for 8 frames.
Click on 1–3 and (while holding the Alt key) drag that down to frame 17. This meansthat key no.2 (1–2) is held for 8 frames.
Drag 1–4 down to frame 23. Drag 1–5 down to frame 29, 1–6 down to frame 33, 1–7down to frame 37 and finally drag 1–8 down to frame 41.
When you have adjusted the XSheet, press the Play Forward button on the main screen.How does your animation look?(You can compare your key sequence with the ball_drop_keys.avi in animations001,chapter001 of the CD-ROM.)
It will be jerky, but at this stage that doesn’t matter. The important thing is to work out thetiming. You have to imagine what it would look like when it has all the in-between draw-ings included. This is a skill that comes with experience. The more you animate and lookat pose tests, the more adept you become at working out the correct timing.
If any of your key drawings appear to be playing for too long or too short a period,‘hold’ them for less or more frames. With Digicel Flipbook, highlight it on the XSheet byleft clicking on the image that you want to change the frame value of. Then click on it asecond time and hold the mouse button down, while holding down the Alt key on thekeyboard. Drag the column up or down depending on whether you want to lengthen orshorten the amount of frames.
When you are happy with the result, mark the key positions onto a paper x-sheet (photo-copy up the one I put in the book earlier or print the x-sheets found in the folder X-SHEETS in chapter001 of the CD-ROM). Use the far-left level column and use a pencil(these keys are marked here for temporary reference). If key drawing 1 starts on frame 1of the digicel XSheet, mark it into frame one of the paper x-sheet. If key drawing 2 startson frame 9 of the digicel XSheet mark it onto frame 9 of the paper x-sheet and so on. Ifthe animation is on twos we need to know where these will be during the sequence. Inthe far right level column mark in the correct drawing numbers, i.e. drawing 1 on frame1, drawing 3 on frame 3, etc. See illustration on p. 22.
You can now re-number your key drawings by the frame number they correspond to.Key drawing 2 corresponds with frame 9 so we re-number it drawing no.9! Key 3 isdrawing 17, key 4 is drawing 23, key 5 is drawing 29, key 6 is drawing 33, key 7 isdrawing 37 and key 8 is drawing 41. Draw a ring around each of the key drawingframe numbers (see top illustration on p. 23). Erase the key numbers in the far-left levelcolumn. Re-number your key animation drawings as per the frame number.
The next stage is to work out the in-between drawings and place a timing chart at thebottom of each key. Remember that to show a gain in speed as the ball is dropped, thedrawings will be further and further apart.
CH001.qxd 1/4/07 2:56 PM Page 21

22 character animation: 2D skills for better 3D
The bottom illustration on p. 23 shows the timing charts for all the keys and the correctnumbering. As the ball bounces up, it will accelerate to the optimum speed and thenstart to slow as gravity takes over, and it reaches the apex of the bounce. As the ball hitsthe ground for the second time, the squash will be slightly less (it will have fallen from alower height). This pattern is repeated for the remaining bounces. Each bounce will belower and lower until the ball comes to a stop.
Complete the in-between drawings for the sequence by following the timing charts andthen line test it (shoot each drawing for two frames each).
You may have or may want to work out your own timing for the sequence. The finishedpiece of animation should be similar to the balldrop.avi in animations001, chapter001of the CD-ROM.
how to relate your 2D animation to your 3D animationThere are specific .pdf files called Maya_info, XSI_info, 3DSMax_info and LightWave_infoin the file, chapter001 of the CD-ROM. These show the basics of each of these programs.
CH001.qxd 1/4/07 2:56 PM Page 22

introduction to 2D-animation working practice 23
It might be a good idea to print them upand stick them on the wall by your com-puter. (You could copy them onto anyPersonal organizer that will display .pdffiles, I have them all on my Psion organ-izer!) Take a look at the .pdf file thatrelates to your program and then have ago at the following exercise.
overview of the ‘ball drop’exercise in 3D(In order to do this exercise have a lookat 3DSMax_balldrop.pdf, LightWave_balldrop.pdf, Maya_balldrop.pdf orXSI_balldrop.pdf to find out how to dothis in more detail.)
Open up your 3D-computer programand take out the ‘balldrop’ animationdrawings and the related x-sheet (orhave a look at the illustration below).Create a ball. Make sure that theTimeslider or Frameslider is at the firstframe and move the ball to a positionsimilar to drawing no.1 of your 2D ani-mation. Set a key position.
Move the Timeslider/Frameslider to frame9 and position the ball as in drawingnumber 9 (the second key position).
Copy each of the key positions from your animation onto the computer in this way andsetting a key at the key positions of your drawn animation.
CH001.qxd 1/4/07 2:56 PM Page 23

24 character animation: 2D skills for better 3D
Play back your animation (or havea look at ball_drop_keys_3D.aviin animations001, chapter001 ofthe CD-ROM). It will look oddbecause of the way the programin-betweens the key positions. Itdoes this by accelerating out ofone key and decelerating into thenext. In order to adjust this weneed to manipulate the Curves (called either Animation Curves or Function Curves) thatrelate to the animation of the ball. In all 3D-computer animation programs the movementis broken down into a graph-like mathematical interpretation. If you take the up anddown movement of the ball as the vertical value and the time it takes to do it as the hori-zontal value, you will end up with a series of points on the graph where you haveset your key frames. Thecomputer program willjoin these points togetherto produce a curve andthis will provide the in-between movement ofyour object. The defaulttype of line linking thecurves is called a ‘Spline’.
You can change the waythe computer in-betweensyour key positions by adjusting these curves. There are a number of different options.‘Linear’ is a straight line between each key. ‘stepped’ or ‘constant’ line continues at thesame value as the first key, before jumping to the value of the next key.
The key points can also be given ‘handles’ making it possible to adjust the angle of thecurve (curves with handles can be called ‘bezier splines’).
For our bouncy ball we need to ‘break’ the curve at the key position where the ball hitsthe ground. This means we need to make the curve ascend and descend between thekeys in a nice parabola. From here we need to have a second parabola for the secondbounce, a third parabola for the third bounce and so on.
Take a look at ball_drop_3D.avi in animations001, chapter001 of the CD-ROM. Theball is now bouncing more like a ball should!
Of course I don’t expect you to always work this way, but while you are learning toanimate it will help you pick up timing all the quicker. By the end of the book you willonly need to work out the basic key positions in 2D (in a very rough form) before animatingin 3D.
CH001.qxd 1/4/07 2:56 PM Page 24

introduction to 2D-animation working practice 25
drawing!A good animator (whether 2D or 3D) should be able to sketch out a pose for a keyframe of animation in a simple concise form. You don’t have to be brilliant at drawing.However, drawing is the best way there is to interpret the world around you. So draw asmuch as possible. Drawing something means you observe it for a relatively long period
CH001.qxd 1/4/07 2:56 PM Page 25

26 character animation: 2D skills for better 3D
of time, helping you to understand the way itmoves.
Attend life drawing classes and focus on shortposes (less than 10 minutes). If the model isgoing to pose for an hour or two, draw themfrom one angle for a short period of time andthen move around the room and draw them fromanother angle. The reason for this is that itteaches you to capture the essence of a posewith a few simple lines. Concentrate on gettingthe structure, weight and balance correct.
Go to zoos and sketch the animals. You’ll have todraw quickly in order to capture an animal on themove! This will be far more informative than draw-ing from books or from the TV.
Sit at street cafés or in parks and draw the peo-ple around you. This is a great way to find outabout human nature. How do people talk toeach other, how do they walk, sit, run and play?
CH001.qxd 1/4/07 2:56 PM Page 26

introduction to 2D-animation working practice 27
The most important thing about drawing is that it makes you sit down and look at theworld around you in detail. Things that you would not normally notice, the way peoplepick things up, the faces they pull or the body language that they adopt become moreapparent to you. A sketchbook is valuable reference material for your animation.
CH001.qxd 1/4/07 2:56 PM Page 27