Embed Size (px)
Citation preview
1/12 Schrock/Love/Dietz 1
Introduction to Adobe Premiere Pro 5.5 Page 1 Table of Contents Part 1: The Interface 2 Introduction; Premiere Pro Interface Overview, Project Window 3 Project Window cont., Source Window 4 Source Window cont., Program Window, Media Browser/Effects Panel 5 Timeline 6 Audio Monitor, Toolbar Palette 7 Toolbar Palette cont. Part 2: Setting Up Your Project 7 Project and Sequence Settings 8 Project and Sequence Settings cont.: AVCHD, P2 9 Project and Sequence Settings cont.: Kodak Z-series, slideshows 10 Ingesting Material: Importing Files Stored on Your Computer or an
External Hard Drive; Capturing Video from Tape-based Devices 11 Capturing Video from Tape-based Devices cont. Part 3: Editing 11 Basic Use of the Source Window; Basic Audio Editing 12 Basic Audio Editing cont.; Selecting Source Audio Tracks; Advanced Use
of the Source Window: Different Types of Specialized Edits; Overlay Edits 13 Insert Edits, Replacement Edits, Three-Point Edits; Setting Target Tracks 14 Basic Still Image Editing; Editing in the Timeline 15 Editing in the Timeline cont.: Changing the Scale of Material in the
Timeline; Adjusting Audio 16 Sending Audio to Audition; Editing Imported Images in Photoshop;
Exporting a Splash Image for the Medill CMS; Adding Titles 17 Adding Titles cont. 18 Adding Titles cont.; Applying Transitions and Effects 19 Applying Transitions and Effects cont. Part 4: Exporting Your Finished Project 19 Downloading the Custom Medill Export Presets 20 Exporting For the Medill CMS; Exporting For the Broadcast 360 Playback
Servers 21 Exporting for 360 cont.; Batch Export Part 5: Appendix 22 Keyboard Shortcuts

1/12 Schrock/Love/Dietz 2
Introduction Adobe Premiere Pro is a powerful multimedia editor, capable of assembling video, photos, audio and graphics together into a single sequence and a single exported file. We start with an explanation of the interface and controls. We then go into setting up a project, ingesting material, editing your project and exporting it for viewing or posting. Take time to explore what Premiere can do before and between graded assignments.
Premiere Pro Interface
Pressing the tilde ( ` ) key on the keyboard will maximize the window you have your cursor over. Press it again to view the entire interface again.
1. Project Window The Project Window contains the bins, sequences and media that you are working with in your project. When a file is selected, a thumbnail of the file and information about the file, such as its pixel dimensions and audio format, are displayed at the top. This information is important because you want to make sure your sequence is properly set for the video and audio you’re using. For instance, if you record in two-channel mono, make sure your sequence contains mono tracks. We’ll explain this more in-depth later.
1 2 3
4 5 6
7
A
B
C

1/12 Schrock/Love/Dietz 3
You can view your media in List (A) or Icon (B) View and can create bins (video-editor-speak for subfolders) by clicking on the Folder icon (C). List View displays the metadata for your media while Icon View shows thumbnails of your media. Delete bins, sequences or media by selecting them and pressing the delete key on your keyboard or clicking on the trashcan icon. Move media into bins by dragging and dropping them into the folder(s). Rename media by right-clicking and selecting Rename. You can also play the thumbnail video by pressing the Play button. Use the search field to find media you’ve saved on your computer or external hard drive. 2. Source Window
A – Time code indicating playhead position M – Go to Next Marker B – Set In Point (I) N – Shuttle Control C – Set Out Point (O) O – Jog Control D – Playhead P – Drag Video Only E – Set Position Marker (Numberpad *) Q – Drag Audio Only F – Go to In Point (Q) R – Play Loop (Entire Clip) G – Go to Out Point (W) S – Safe Areas H – Play Loop In to Out Point T – Output Y – Time code indicating I – Go to Previous Marker U – Insert (,) clip duration J – Step Back (Left Arrow Key) K – Play (Spacebar) L – Step Forward (Right Arrow Key)
V – Overlay (.) W – Export Frame X – Timeline zoom controls
Letters in parentheses indicate shortcut keys on your computer’s keyboard.
A
B C
D
E
F G H
I J K L M
O N
P Q
R S T
U V W
X X Y

1/12 Schrock/Love/Dietz 4
You will usually want the drop-down list below the Source Window set to Fit, as shown on page 3, in order to see the entirety of your video. To see the video at its actual output size, select 100%. To see the video in your Source Window at full quality, right-click on the window and select Playback Resolution Full. White numbers (Y) indicate the clip’s duration. Yellow numbers (A) are the timecode generated by your recording device, in case you need to reference it. 3. Program Window Most of the buttons, shortcut keys and menus in the Program Window are the same as in the source window, except for the following:
4. Media Browser/Info/Effects/History Panel This docked panel area contains the windows listed above. If you need to use any of these four windows but you cannot see the tab for it, select the desired window from the Window menu. For example, Window Media Browser (used to Import media assets) or Window Effects.
The Media Browser Window On the far left side, the media browser will show all the internal and external drives connected to your computer and read by Premiere. To the right of that will be subfolders and the media contained in the drives. In this example, we are looking at G (Matt’s Hard Drive), the subfolder P2 Media and the cards subfolder containing our P2 footage (icons and info on the right). By default, captured and P2 media will show a thumbnail icon but AVCHD footage will not. If you are editing P2 footage, make sure the
“View as” drop-down list is set to Panasonic P2. If you are editing AVCHD footage, make sure “View as” is set to AVCHD. The Effects Window This is where you will find all your effects and transitions. You can browse through the folders to explore what’s available or use the search option to search for specific transitions or effects. In this case, we searched for and found dissolves.
A – Go to Previous Edit Point (Page Up) B – Go to Next Edit Point (Page Down) C – Lift (;) D – Extract (‘)
A B
C D

1/12 Schrock/Love/Dietz 5
5. The Timeline
A – Source Track Indicators J – Toggle Track Output B – Zoom Bar K – Toggle Sync Lock C – Timecode Indicator (Correlates to Playhead) L – Toggle Track Lock D – Snap (Toggle on and off) M – Set Display Style (of track) E – Set Encore Chapter Markers (For DVD) N – Show Keyframes or Volume menu F – Set Unnumbered Marker O – Add/Remove Keyframe G – Colored line indicates rendering needed P – Go to Previous or Next Keyframe H – Work area Q – Indicates Stereo tracks (2 Speakers + LR) I – Marker R – Indicates Mono track (1 Speaker) When using the Insert or Overlay buttons in the Source Window, make sure your source tracks (A) are targeted to the correct destinations in the Timeline. In this example, A1 and A2 are targeted to go on Audio 4 and Audio 5. This was done because the source audio is monaural and thus needs to be edited onto mono tracks (R) in the Timeline. If you drag your edited clip from the Source Window to the Timeline, you don’t need to worry about target tracks. Track Lock (L) prevents edits from being made to a track; diagonal lines, as seen in Video 3 in the above example, will run through it down the timeline to indicate when Track Lock is engaged. Sync Lock (K) determines whether a track will be affected when performing insert edits, deletes and trims. Track Output (J) determines whether a track will actually be seen or heard. Snap (D) determines whether the playhead or clips, when moved, will snap to adjacent clips, preventing an empty frame or frames (flash frames) from appearing in your project. The arrows next to the track names, when clicked, will reveal more options, such as the waveform of the audio or thumbnails of the video. If you’re editing HD MPEG files, do not scrub through them with the playhead as this can cause some underpowered computers to crash. Use the jog control (page 3) to quickly view files.
A
B
C D E F
G H I
J K L
M
N O
P
Q
R
1/12 Schrock/Love/Dietz 6
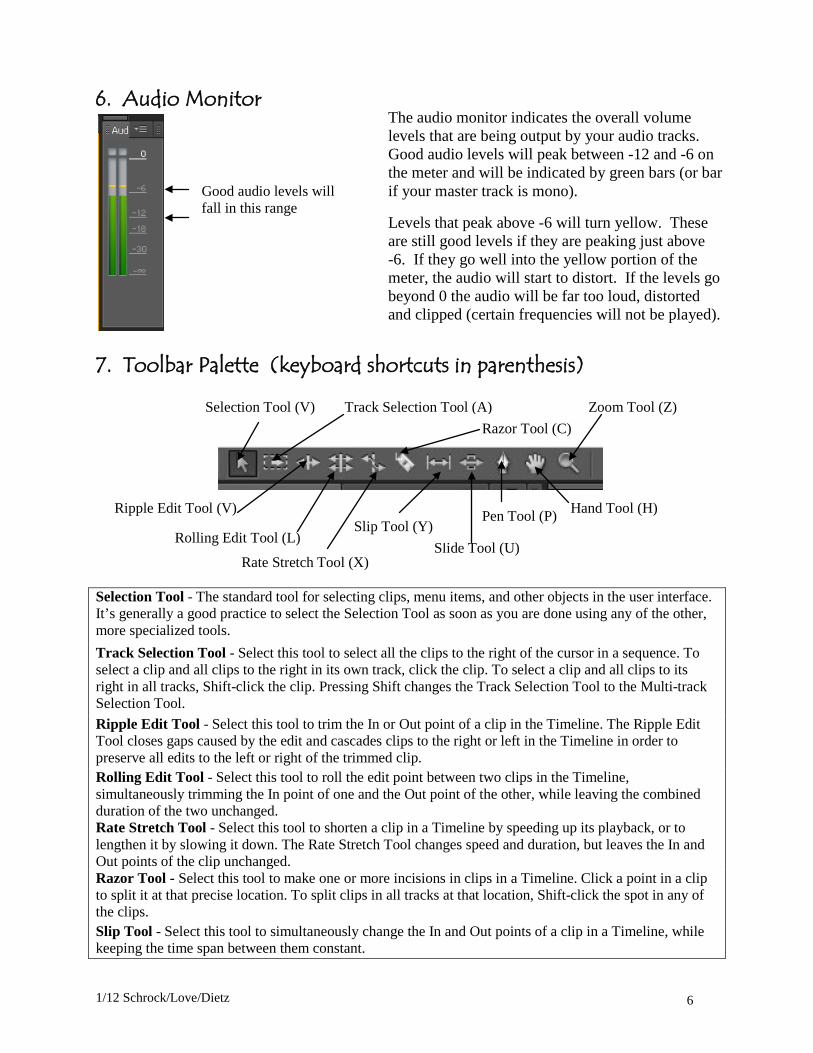
Good audio levels will fall in this range
The audio monitor indicates the overall volume levels that are being output by your audio tracks. Good audio levels will peak between -12 and -6 on the meter and will be indicated by green bars (or bar if your master track is mono).
Levels that peak above -6 will turn yellow. These are still good levels if they are peaking just above -6. If they go well into the yellow portion of the meter, the audio will start to distort. If the levels go beyond 0 the audio will be far too loud, distorted and clipped (certain frequencies will not be played).
6. Audio Monitor
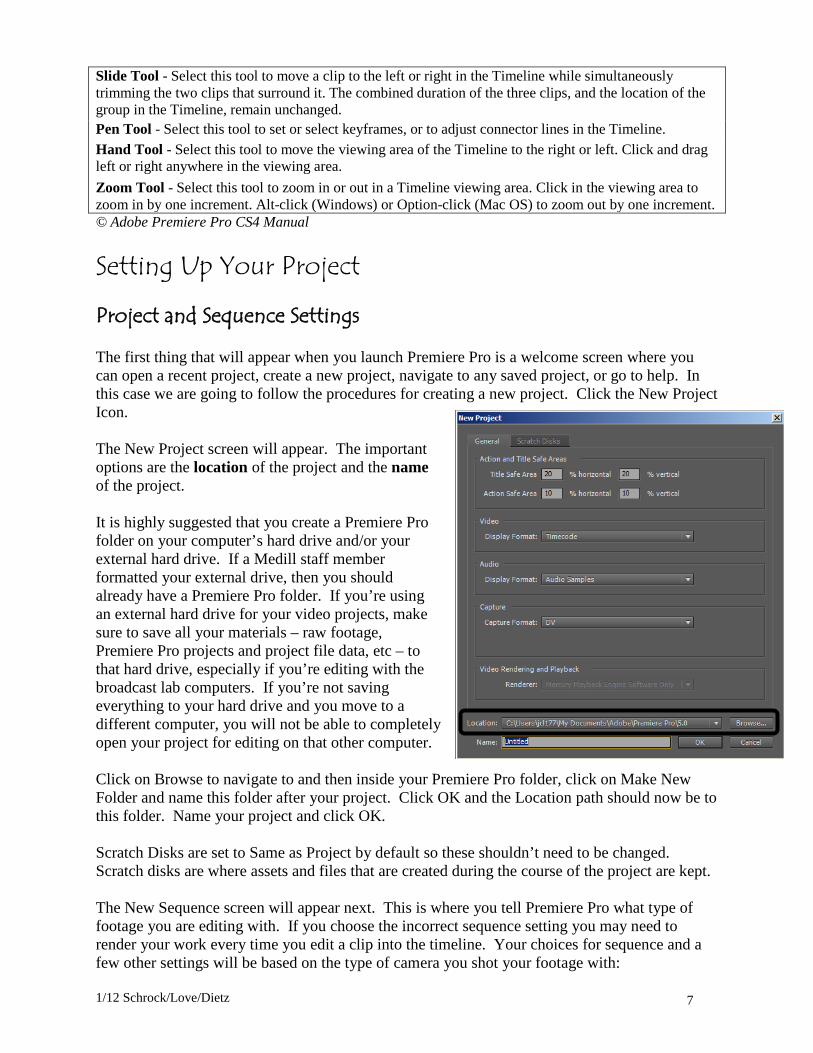
7. Toolbar Palette (keyboard shortcuts in parenthesis)
Selection Tool - The standard tool for selecting clips, menu items, and other objects in the user interface. It’s generally a good practice to select the Selection Tool as soon as you are done using any of the other, more specialized tools. Track Selection Tool - Select this tool to select all the clips to the right of the cursor in a sequence. To select a clip and all clips to the right in its own track, click the clip. To select a clip and all clips to its right in all tracks, Shift-click the clip. Pressing Shift changes the Track Selection Tool to the Multi-track Selection Tool. Ripple Edit Tool - Select this tool to trim the In or Out point of a clip in the Timeline. The Ripple Edit Tool closes gaps caused by the edit and cascades clips to the right or left in the Timeline in order to preserve all edits to the left or right of the trimmed clip. Rolling Edit Tool - Select this tool to roll the edit point between two clips in the Timeline, simultaneously trimming the In point of one and the Out point of the other, while leaving the combined duration of the two unchanged. Rate Stretch Tool - Select this tool to shorten a clip in a Timeline by speeding up its playback, or to lengthen it by slowing it down. The Rate Stretch Tool changes speed and duration, but leaves the In and Out points of the clip unchanged. Razor Tool - Select this tool to make one or more incisions in clips in a Timeline. Click a point in a clip to split it at that precise location. To split clips in all tracks at that location, Shift-click the spot in any of the clips. Slip Tool - Select this tool to simultaneously change the In and Out points of a clip in a Timeline, while keeping the time span between them constant.
Slide Tool (U)
Track Selection Tool (A)
Hand Tool (H) Pen Tool (P)
Slip Tool (Y)
Rate Stretch Tool (X)
Selection Tool (V)
Ripple Edit Tool (V)
Rolling Edit Tool (L)
Razor Tool (C) Zoom Tool (Z)
1/12 Schrock/Love/Dietz 7
Slide Tool - Select this tool to move a clip to the left or right in the Timeline while simultaneously trimming the two clips that surround it. The combined duration of the three clips, and the location of the group in the Timeline, remain unchanged. Pen Tool - Select this tool to set or select keyframes, or to adjust connector lines in the Timeline. Hand Tool - Select this tool to move the viewing area of the Timeline to the right or left. Click and drag left or right anywhere in the viewing area. Zoom Tool - Select this tool to zoom in or out in a Timeline viewing area. Click in the viewing area to zoom in by one increment. Alt-click (Windows) or Option-click (Mac OS) to zoom out by one increment. © Adobe Premiere Pro CS4 Manual
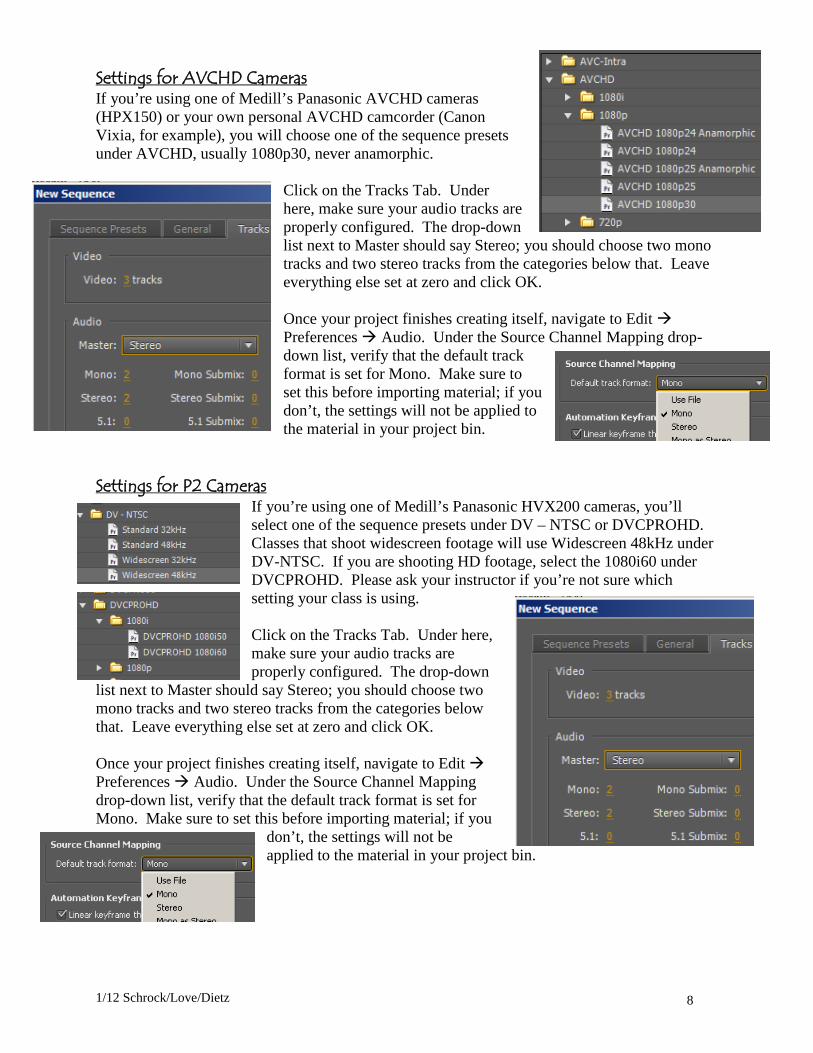
Setting Up Your Project Project and Sequence Settings The first thing that will appear when you launch Premiere Pro is a welcome screen where you can open a recent project, create a new project, navigate to any saved project, or go to help. In this case we are going to follow the procedures for creating a new project. Click the New Project Icon. The New Project screen will appear. The important options are the location of the project and the name of the project. It is highly suggested that you create a Premiere Pro folder on your computer’s hard drive and/or your external hard drive. If a Medill staff member formatted your external drive, then you should already have a Premiere Pro folder. If you’re using an external hard drive for your video projects, make sure to save all your materials – raw footage, Premiere Pro projects and project file data, etc – to that hard drive, especially if you’re editing with the broadcast lab computers. If you’re not saving everything to your hard drive and you move to a different computer, you will not be able to completely open your project for editing on that other computer. Click on Browse to navigate to and then inside your Premiere Pro folder, click on Make New Folder and name this folder after your project. Click OK and the Location path should now be to this folder. Name your project and click OK. Scratch Disks are set to Same as Project by default so these shouldn’t need to be changed. Scratch disks are where assets and files that are created during the course of the project are kept. The New Sequence screen will appear next. This is where you tell Premiere Pro what type of footage you are editing with. If you choose the incorrect sequence setting you may need to render your work every time you edit a clip into the timeline. Your choices for sequence and a few other settings will be based on the type of camera you shot your footage with:
1/12 Schrock/Love/Dietz 8
Settings for AVCHD Cameras If you’re using one of Medill’s Panasonic AVCHD cameras (HPX150) or your own personal AVCHD camcorder (Canon Vixia, for example), you will choose one of the sequence presets under AVCHD, usually 1080p30, never anamorphic.
Click on the Tracks Tab. Under here, make sure your audio tracks are properly configured. The drop-down list next to Master should say Stereo; you should choose two mono tracks and two stereo tracks from the categories below that. Leave everything else set at zero and click OK. Once your project finishes creating itself, navigate to Edit Preferences Audio. Under the Source Channel Mapping drop-down list, verify that the default track format is set for Mono. Make sure to set this before importing material; if you don’t, the settings will not be applied to the material in your project bin.
Settings for P2 Cameras
If you’re using one of Medill’s Panasonic HVX200 cameras, you’ll select one of the sequence presets under DV – NTSC or DVCPROHD. Classes that shoot widescreen footage will use Widescreen 48kHz under DV-NTSC. If you are shooting HD footage, select the 1080i60 under DVCPROHD. Please ask your instructor if you’re not sure which setting your class is using. Click on the Tracks Tab. Under here, make sure your audio tracks are properly configured. The drop-down
list next to Master should say Stereo; you should choose two mono tracks and two stereo tracks from the categories below that. Leave everything else set at zero and click OK. Once your project finishes creating itself, navigate to Edit Preferences Audio. Under the Source Channel Mapping drop-down list, verify that the default track format is set for Mono. Make sure to set this before importing material; if you
don’t, the settings will not be applied to the material in your project bin.

1/12 Schrock/Love/Dietz 9
Settings for Kodak Z-series cameras
You will use the AVCHD 720p 30 preset in the AVCHD category. Click on the Tracks Tab. Under here, make sure your audio tracks are properly configured. The drop-down list next to Master should say Stereo; you should choose two mono tracks and two stereo tracks from the categories below that. Leave everything else set at zero and click OK. Once your project finishes creating itself, navigate to Edit Preferences Audio. Under the Source Channel Mapping drop-down list, verify that the default track format is set for Mono. Make sure to set this before importing material; if you don’t, the settings will not be applied to the material in your project bin.
Settings for slideshows
You will use the Standard 48kHZ preset in the DV – NTSC category. Click on the Tracks Tab. Under here, make sure your audio tracks are properly configured. The drop-down list next to Master should say Stereo; you should
choose two mono tracks and two stereo tracks from the categories below that. Leave everything else set at zero and click OK. Once your project finishes creating itself, navigate to Edit Preferences Audio. Under the Source Channel Mapping drop-
down list, verify that the default track format is set for Mono. Make sure to set this before importing material; if you don’t, the settings will not be applied to the material in your project bin.
Once you finish with the audio settings, click the General tab under Preferences. Fill in the checkbox next to “Default scale to frame size” so your pictures are automatically sized properly for export. Under Still Image Default Duration, set the desired default duration for your images to the length you want in frames. Remember, 30 frames of video equal one second. Media Cache Settings for External Hard Drive Editing If you’re editing with an external hard drive, create a folder on that hard drive labeled Media Cache Database. In Premiere Pro, go to Edit Preferences Media and set Media Cache Files AND Media Cache Database so each of these items point to your external hard drive.

1/12 Schrock/Love/Dietz 10
Ingesting Material for Editing Please read all directions in this section carefully before starting the import process; depending on the type of media you’re importing, there may be extra steps you must take before you begin the import process. Importing Files Stored on Your Computer or an External Hard Drive Once you’ve copied your material from your camera, audio recorder or memory card to your computer, you’re ready to import it into Premiere using the following procedures. As discussed earlier, the easiest way to import footage is through the Media Browser. If the browser is not open, choose Window Media Browser and it should open on the bottom left side of the interface. To import assets to your project bin, navigate to the folder that contains your media, drag and drop the media into the Project Window. For P2: navigate to the root folder that the clips are in and make sure the View as: is set to Panasonic P2. Thumbnails of your clips will be shown and you can simply drag and drop the necessary clips into the Project Window. For AVCHD: navigate to your root folder that you transferred your SD card into and then navigate to the Private folder. Within the private folder will be your footage. Make sure that View as is set to AVCHD. Currently, thumbnails are not supported so you will see an audio/video icon. Drag and drop the necessary clips into the Project Window. You can also use File Import to import material into your Project Window. Capturing Video from a Tape-based Camera or Deck To capture footage from your tape-based device, first make sure that it is connected to the computer, turned on and set to play or VCR mode. This must be done before you launch Premiere Pro to ensure that it recognizes your camera or deck. Choose File Capture, or press the F5 on your keyboard to open the capture window. The capture window looks similar and has similar controls to both the source and program windows. You can play your footage by pressing play or record your footage by pressing the red Capture/Record button. You can also set In and Out points of your footage to capture a specific section. On the right side of the screen you will see various options to name your clip and add other metadata. Under the Settings tab you will find Capture Locations and Device Control.
Record button (G)

1/12 Schrock/Love/Dietz 11
Similar to setting the location to save your project, you can set a Capture Location to save your captured video footage to. We recommend using Same as Project, which is the default setting. Device Control allows Premiere to control your camera or deck. This should be set to DV/HDV Device Control. If you run into problems with Premiere controlling your device, you can click on Options and navigate through the drop-down menus to select your specific camera. To capture footage, press the press Record button. To stop the recording, press the record button again or the Esc key. When the “Save Captured Clip” window appears, name the clip and give it whatever additional metadata you want, then click OK. You will notice that a clip now exists in the Project Window. Continue with this process until you have all the footage that you need for your project. In each clip you capture, make sure to capture at least 10 seconds before and after the video that you want. This is called heads and tails of the clip; doing this will ensure that you don’t miss part of the clip and will allow you to add transitions and trim the clip during the editing process.
Editing Your Project Basic Use of the Source Window Double-click on a file or drag it from the Project Window to the Source Window. You will now see your video in the Source Window. Play through your video to find the portion you want to use for your first clip.
Once you know what material you want to use, you’ll need to set an In point and an Out point to tell Premiere what portion of your video you want to use for your first edited clip. Move the blue playhead to where you want the video to
start and press the Set In Point icon, or the I key on your keyboard. Move the playhead to where you want the video to end and press the
Set Out Point icon, or the O key on your keyboard.
Once you set your In and Out points, click on the video in the Source Window, drag your edited clip to the Timeline and place it in the desired location. To edit additional clips from the same piece of media, just set a new pair of in and out points in the Source Window and drag to the Timeline. To edit a clip from a different piece of media, select a new piece of media from the Project Window and move forward from there. Basic Audio Editing You can accomplish basic audio editing tasks in Adobe Premiere. If you have a lot of intricate edits to make to your audio, you may want to edit it in Adobe Soundbooth and import the finished audio into Premiere. There are ways to link your audio across the two programs, but for
1/12 Schrock/Love/Dietz 12
now we suggest editing your audio, exporting it as a WAV file and importing it into Premiere so you get more practice exporting material from Soundbooth and importing it into Premiere. When editing audio in the Source Window, you’ll see a waveform of your audio instead of an image, since there’s no video associated with this audio. To drag your audio to the timeline, place your cursor over the light green area of the Source Window until it turns into a hand (or
over the speaker icon to the left of the white timecode readout). Click and drag with the hand to one of the audio tracks in your timeline. Be careful as you do this; if you click on the grey handle that appears after setting your In and Out points,
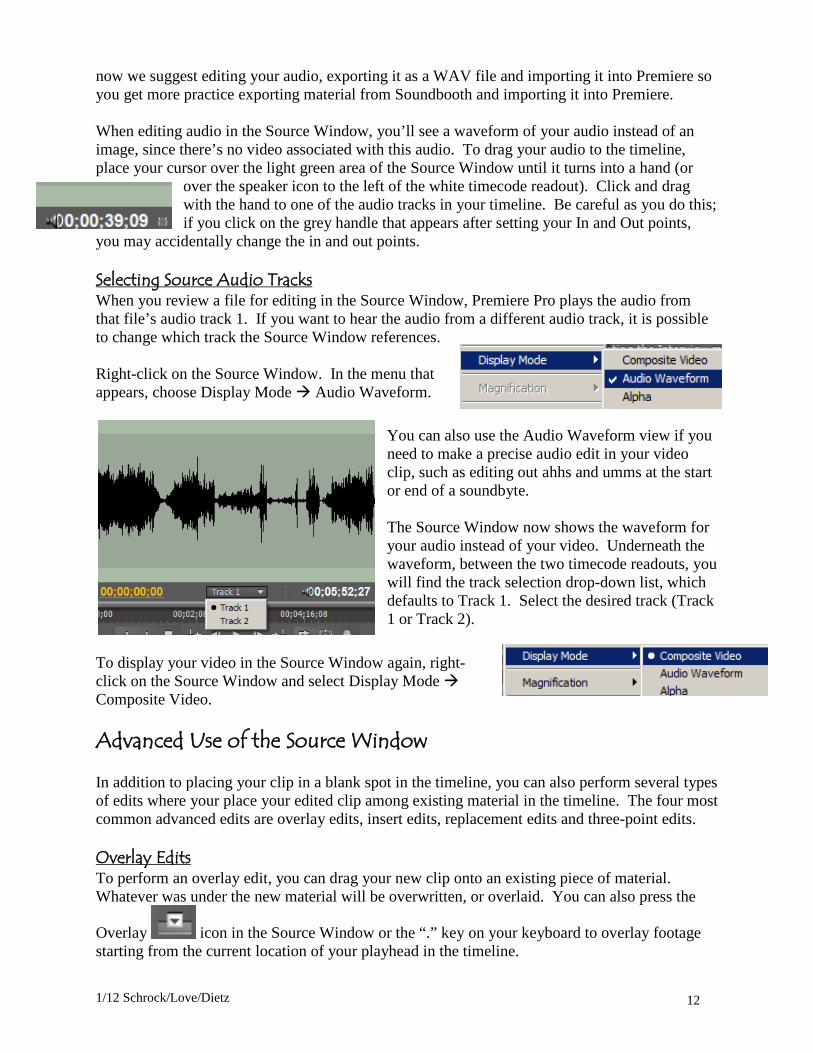
you may accidentally change the in and out points. Selecting Source Audio Tracks When you review a file for editing in the Source Window, Premiere Pro plays the audio from that file’s audio track 1. If you want to hear the audio from a different audio track, it is possible to change which track the Source Window references. Right-click on the Source Window. In the menu that appears, choose Display Mode Audio Waveform.
You can also use the Audio Waveform view if you need to make a precise audio edit in your video clip, such as editing out ahhs and umms at the start or end of a soundbyte. The Source Window now shows the waveform for your audio instead of your video. Underneath the waveform, between the two timecode readouts, you will find the track selection drop-down list, which defaults to Track 1. Select the desired track (Track 1 or Track 2).
To display your video in the Source Window again, right-click on the Source Window and select Display Mode Composite Video. Advanced Use of the Source Window In addition to placing your clip in a blank spot in the timeline, you can also perform several types of edits where your place your edited clip among existing material in the timeline. The four most common advanced edits are overlay edits, insert edits, replacement edits and three-point edits. Overlay Edits To perform an overlay edit, you can drag your new clip onto an existing piece of material. Whatever was under the new material will be overwritten, or overlaid. You can also press the
Overlay icon in the Source Window or the “.” key on your keyboard to overlay footage starting from the current location of your playhead in the timeline.

1/12 Schrock/Love/Dietz 13
Insert Edits To perform an insert edit, hold down the Ctrl key on your keyboard as you drag your material to the timeline. Whatever is under the current material will move down the timeline, making space
for the new material. You can also press the Insert icon in the Source Windown or the “,” key on your keyboard to insert footage starting from the current location of your playhead. Replacement Edits To replace one piece of footage with another, hold down the Alt key and drag material to the timeline. The current piece of material will be replaced with a selection of new material the exact length, regardless of the In and Out points set in the new material. Three-Point Editing Three-point editing consists of setting an In and an Out point in either the Source or Program/Timeline and either an In or an Out point in the other. For instance, if you know you need to edit a specific range of time in the Timeline, set your In and Out points in the Program Window and then the In Point in the Source Window. Then use either Insert or Overlay to edit the clip into your sequence. Setting Target Tracks When editing material into the Timeline, especially when using the Insert or Overlay commands, make sure have the correct target tracks selected in the Timeline: The squares in the far left column of the Timeline, labeled V, A1 and A2, represent the video and audio tracks in your source material. You can choose what tracks to put them on, in this case V on Video 1, A1 on Audio 4 and A2 on Audio 5 by clicking and dragging them up or down. Important: If your audio source is mono, you have to target your audio tracks to mono audio tracks in the Timeline (one speaker icon, like Audio 4 and Audio 5) If your audio source is stereo, you have to target your audio tracks to stereo audio tracks (two speaker icons, like Audio 1, Audio 2 and Audio 3).

1/12 Schrock/Love/Dietz 14
Basic Still Image Editing When editing images in Premiere Pro, you can either follow the steps under “Basic use of the Source Window,” or you can drag your images directly from the Project Window to the Timeline and edit in the timeline following the instructions listed under “Editing in the Timeline.” Editing in the Timeline Adding Additional Tracks to the Timeline On occasion, you might need additional or differently formatted space for your audio or video in the Timeline. To add additional tracks to the timeline, right-click on an un-highlighted area of the Timeline and choose Add Tracks; the window shown at the right will open. Select the appropriate settings (Mono, Stereo, 5.1) and click OK to add the track(s). You can also add more video tracks using this process. Moving the Playhead in the Timeline You can drag the playhead to a desired location by clicking and dragging it. Hold down the Shift key while clicking and dragging to snap to heads and tails of clips in the timeline. You can also use the Go to Previous/Next Edit Point buttons to place the playhead at an edit point. The Home and End keys on your keyboard will move the Playhead to the first and last frames of the sequence. Adding Material to or Removing Material from the Timeline To add material to the timeline, click and drag it from elsewhere in Premiere to the desired location in the timeline. You can also use the advanced techniques described on page 12. To remove material, click on the item and press the Delete key on your keyboard. Using Video 2 or Higher-numbered Tracks For Graphics or Cutaways The reason Video 2, Video 3, etc exist is for layering graphics and cutaways on top of your main video. For example, if you have a lower third or a locator graphic that should appear on top of your Video 1 video, covering part of the screen, you can put it in Video 2 and it will appear on top of Video 1. You can add, remove, move or change material in your other video tracks the same way you work with video in Video 1. Reordering Clips Once clips are in the timeline, you can use the Selection Tool to click and drag them to a different position in time or to a different track. By default, this is an Overlay edit; if you move a clip forward in time it will write over the existing clip for the duration of the clip you are moving. You can use an Insert edit by holding down the Ctrl key. When you drag the clip to a different time, it will push other clips back to its tail end and not write over any part of the previous clip. Experiment to see the difference in moving clips with and without the Ctrl key modifier.

1/12 Schrock/Love/Dietz 15
Changing In and Out Points, Ripple Deleting You can change the In point or the Out point of a clip in the timeline by using the Selection Tool. Place your cursor over either end of a clip until it changes into a red bracket with a double arrow
through it. This is your Trim Tool (Trim-in or Trim-out , depending on whether you’re at the beginning or end of a clip), also known informally as the Red Bracket Tool. Click and drag in either direction to shorten or lengthen the clip. Right-click in the gap between clips and choose Ripple Delete to close any gaps made between clips. All clips to the right of the gap will move to the left.
© Adobe Systems Razor Tool As explained on Page 6, you can use this tool to make one or more incisions in clips in a timeline. Click a point in a clip to split it at that precise location. To split clips in all tracks at that location, hold down the Shift key while clicking the spot in any of the clips. Changing the Scale of Material in your Timeline If you have photos or video that are zoomed in or zoomed out, right-click on the item in the timeline and select “Scale to Frame Size” so their scale matches the settings for your Timeline. Please review the Tool Palette section on pages 6 and 7 for more tools and processes. Adjusting Audio Adjusting Audio in Individual Clips To adjust the volume of individual audio clips in the Timeline, click and drag the yellow line that runs through the audio clip up or down. The default volume is set to 0db. To make several volume adjustments on a single clip, click on the clip to make it active, then
click on the Add-Remove Keyframe button on the specific track to add a keyframe at the current location of the playhead. Move the playhead and click the button again to add a second keyframe. Repeat this process until you have the desired number of keyframes.
Click and drag each keyframe up or down to adjust the volume as desired. Use multiple keyframes to get the desired results. Sometimes you will want to move your video and audio tracks separately, or delete one or the other completely. To separate them in the Timeline, right-click the clip in the timeline and select Unlink from the popup menu. Your video track is now unlinked from your audio track. To link them, select both, right-click and select Link from the menu. Adjusting the Volume of an Entire Track or Sequence To adjust the volume of an entire track or sequence, click on the Audio Mixer tab or navigate to Window Audio Mixer Sequence Name. The mixer will appear in the Source Window. When your editing is complete, you can normalize the audio for the entire sequence. Select Sequence Normalize Master Track. A dialog box will pop up and you can set the peak

1/12 Schrock/Love/Dietz 16
volume level. This will set the loudest sound in your sequence to that setting. Your audio should fall between -12 and -6, so setting this to -6 will normalize your highest sounds to the appropriate level. Note: This does not mix all your audio; it only sets a peak for your audio. You must still make adjustments through the course of editing to get a good mix of your narration, interviews and natural sounds/pops. Sending Audio to Adobe Audition for Editing To send audio to Adobe Audition for a finer level of editing, right-click on the audio in the Timeline and select Edit in Adobe Audition. After a few seconds, this will open the audio in Audition. When you finish making changes in Audition, press Save. This will create a WAV file of your edited audio in the Source Window of your project and place that WAV in your timeline in place of the original audio, labeled with the name of the clip, followed by “Audio Extracted.wav.” Editing Imported Images in Photoshop If you have images in your project that need additional editing in Photoshop, you can open the image in Photoshop, make your additional edits and save the edits in the current version of the image. Once you hit Save in Photoshop, the changes will flow through to Premiere. Exporting a Splash Image for the Medill CMS Place your playhead in the timeline at the frame of video you wish to use for your splash image.
Press the Export Frame icon near the bottom of the Program window. When the Export Frame window appears, give your splash image a name, choose JPEG from the drop-down list next to Format, click the Browse button to choose where you would like to export your frame to, and press the OK button. Once you’ve exported your splash image, open it in Photoshop and make sure it is sized correctly for use as a splash image in the CMS. It should be 640 pixels wide by 480 pixels tall. Adding Titles To add titles, select Title New Title Default Still. The Width and Height should default to
your sequence settings. Name your title and select OK. This will launch the Title Interface. Default Still is text that is not in motion when it is on screen; this is the selection you should choose for nearly everything you do at Medill. Default Roll would be the rolling credits at the end of a film; Default Crawl would be the crawling graphics across the bottom of CNBC or a news channel.
1/12 Schrock/Love/Dietz 17
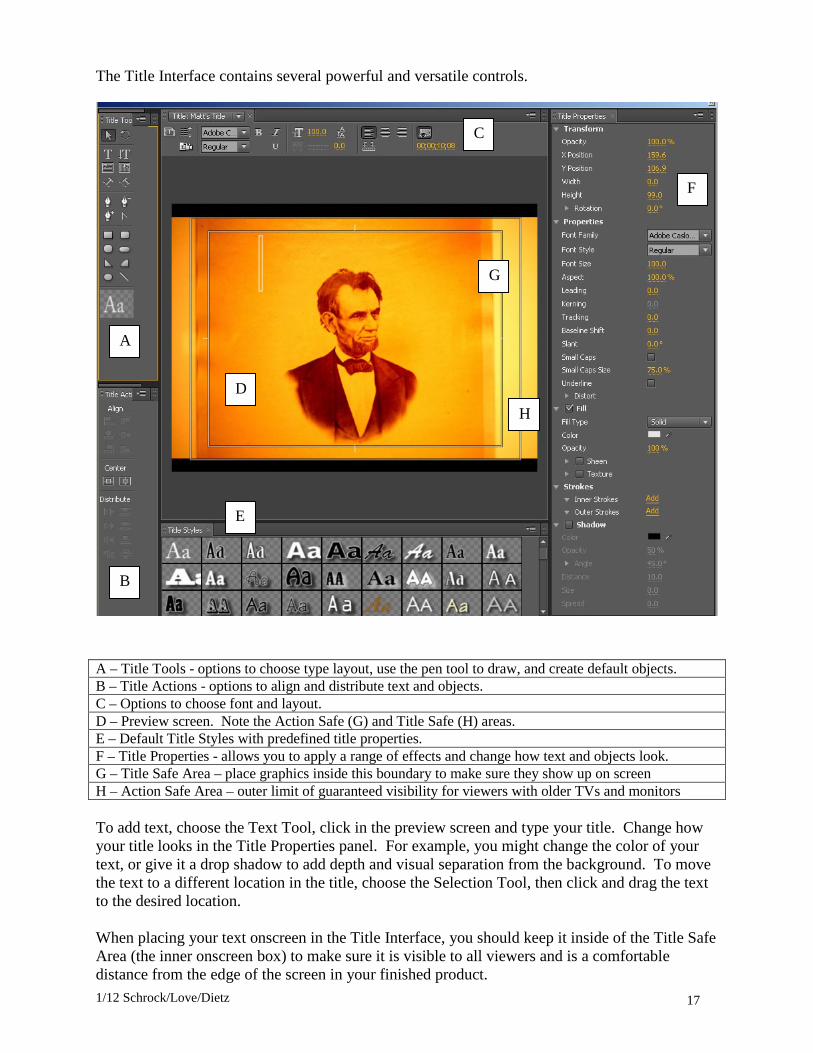
The Title Interface contains several powerful and versatile controls.
A – Title Tools - options to choose type layout, use the pen tool to draw, and create default objects. B – Title Actions - options to align and distribute text and objects. C – Options to choose font and layout. D – Preview screen. Note the Action Safe (G) and Title Safe (H) areas. E – Default Title Styles with predefined title properties. F – Title Properties - allows you to apply a range of effects and change how text and objects look. G – Title Safe Area – place graphics inside this boundary to make sure they show up on screen H – Action Safe Area – outer limit of guaranteed visibility for viewers with older TVs and monitors To add text, choose the Text Tool, click in the preview screen and type your title. Change how your title looks in the Title Properties panel. For example, you might change the color of your text, or give it a drop shadow to add depth and visual separation from the background. To move the text to a different location in the title, choose the Selection Tool, then click and drag the text to the desired location. When placing your text onscreen in the Title Interface, you should keep it inside of the Title Safe Area (the inner onscreen box) to make sure it is visible to all viewers and is a comfortable distance from the edge of the screen in your finished product.
A
B
C
D
E
F
H
G
1/12 Schrock/Love/Dietz 18
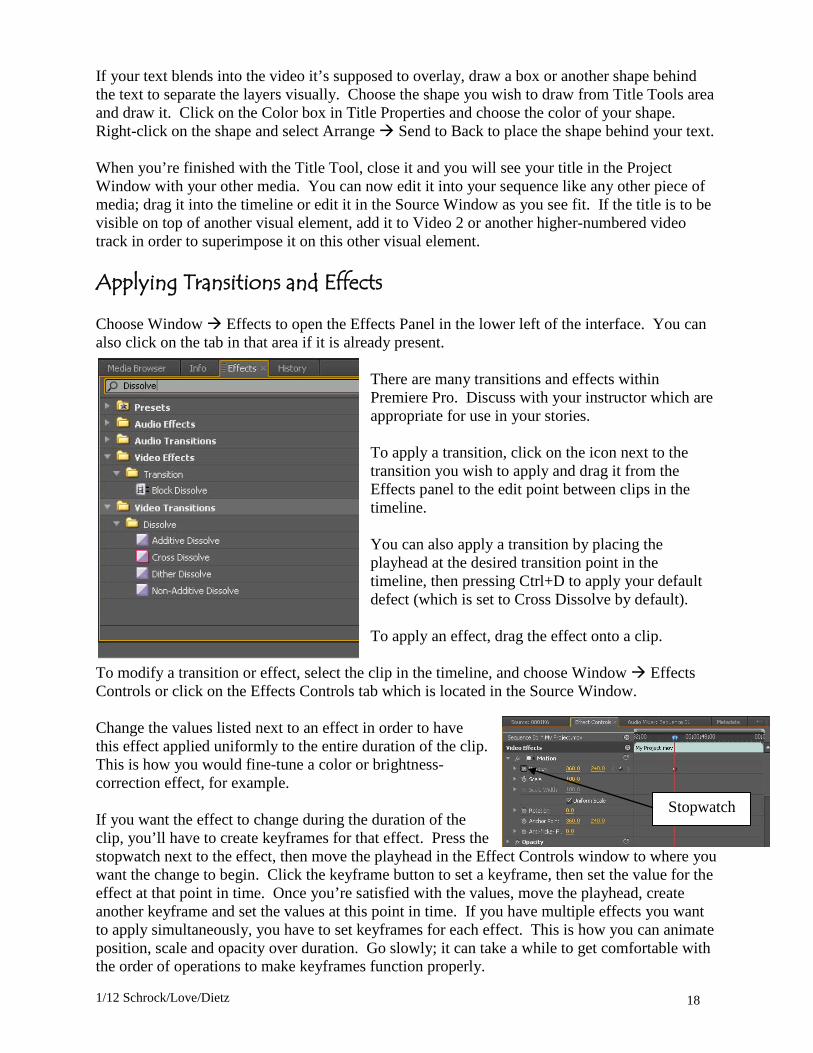
If your text blends into the video it’s supposed to overlay, draw a box or another shape behind the text to separate the layers visually. Choose the shape you wish to draw from Title Tools area and draw it. Click on the Color box in Title Properties and choose the color of your shape. Right-click on the shape and select Arrange Send to Back to place the shape behind your text. When you’re finished with the Title Tool, close it and you will see your title in the Project Window with your other media. You can now edit it into your sequence like any other piece of media; drag it into the timeline or edit it in the Source Window as you see fit. If the title is to be visible on top of another visual element, add it to Video 2 or another higher-numbered video track in order to superimpose it on this other visual element. Applying Transitions and Effects Choose Window Effects to open the Effects Panel in the lower left of the interface. You can also click on the tab in that area if it is already present.
There are many transitions and effects within Premiere Pro. Discuss with your instructor which are appropriate for use in your stories. To apply a transition, click on the icon next to the transition you wish to apply and drag it from the Effects panel to the edit point between clips in the timeline. You can also apply a transition by placing the playhead at the desired transition point in the timeline, then pressing Ctrl+D to apply your default defect (which is set to Cross Dissolve by default). To apply an effect, drag the effect onto a clip.
To modify a transition or effect, select the clip in the timeline, and choose Window Effects Controls or click on the Effects Controls tab which is located in the Source Window. Change the values listed next to an effect in order to have this effect applied uniformly to the entire duration of the clip. This is how you would fine-tune a color or brightness-correction effect, for example. If you want the effect to change during the duration of the clip, you’ll have to create keyframes for that effect. Press the stopwatch next to the effect, then move the playhead in the Effect Controls window to where you want the change to begin. Click the keyframe button to set a keyframe, then set the value for the effect at that point in time. Once you’re satisfied with the values, move the playhead, create another keyframe and set the values at this point in time. If you have multiple effects you want to apply simultaneously, you have to set keyframes for each effect. This is how you can animate position, scale and opacity over duration. Go slowly; it can take a while to get comfortable with the order of operations to make keyframes function properly.
Stopwatch

1/12 Schrock/Love/Dietz 19
Applying the Same Effect Multiple Times If you plan to apply the same effect in the same manner to multiple items in the Timeline, apply the effect to one of the items in the Timeline, then right-click on that item in the Timeline and select copy. Highlight all the other items in the Timeline you plan to apply the effect to and select “Paste Attributes.” All the effects applied to your first item will be applied in the same manner to the selected items. Only do this after you’re done with the effects you plan to apply to multiple items but before you apply any effects you don’t want to carry over. Rendering Effects In most cases, you do not need to render edits, effects or other changes you’ve made in your project before you can preview them, despite the presence of a red or yellow bar at the top of the timeline. If you find there’s an effect or edit that does not preview, press Enter on your keyboard to render your effects and edits.
Exporting Your Finished Project Once you finish editing your video or slideshow, you must export it as a video file from Adobe Premiere. This video file is what you will give to your instructors for grading or upload to the 360 playback server or the Medill Content Management System for playback. Downloading the Custom Medill Export Presets Medill has developed a set of custom export presets you should use for exporting your material from Adobe Premiere Pro or Adobe Media Encoder for Medill purposes. These presets have the exact settings you need for your video to look good and function well on Medill’s broadcast playback servers and the CMS. The broadcast export settings also include data that will tell Premiere or Media Encoder to upload the exported video to the desired playback server. If you are working on your own computer, you can download a ZIP file with all six Medill presets from the Medill Web site. You can find a link to the ZIP file in the Useful Links section of your class’ page on the CMS Info Section. You can also find a link on the IT section of the Medill Web site, on the same pages that have PDFs of the Premiere Pro documentation (Broadcast Info Editing Video or the appropriate section of the Multimedia Production area). Save the ZIP file to a safe location on your computer, such as My Documents, then extract (unzip) it. The files that you extract from the ZIP file should stay on your computer for the duration of your time at Medill. If you are working on a Medill broadcast workstation, the appropriate presets should be saved on the desktop of your machine under Broadcast Shortcuts (studio) Premiere Presets. If you’re working on a Medill classroom/lab workstation, you can download the ZIP file and save the presets on the desktop of your workstation. Once the presets are present on your computer, you are ready to use them during the export process, which is described on the next page.
1/12 Schrock/Love/Dietz 20
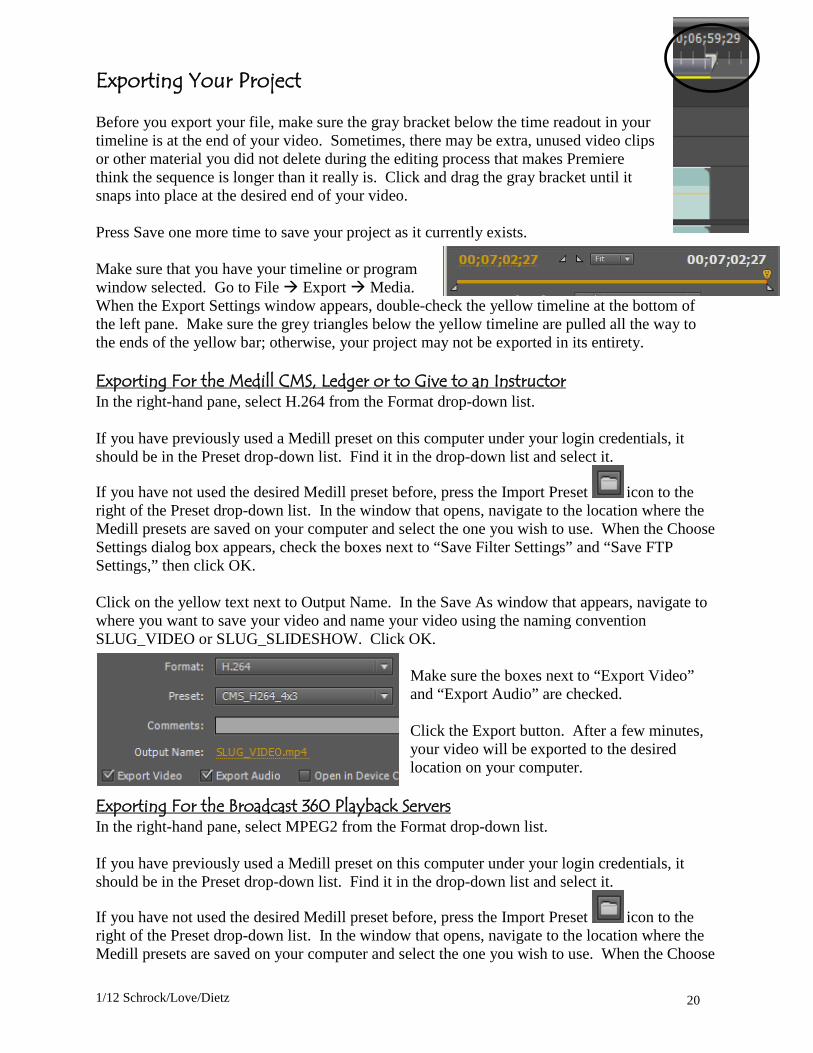
Exporting Your Project Before you export your file, make sure the gray bracket below the time readout in your timeline is at the end of your video. Sometimes, there may be extra, unused video clips or other material you did not delete during the editing process that makes Premiere think the sequence is longer than it really is. Click and drag the gray bracket until it snaps into place at the desired end of your video. Press Save one more time to save your project as it currently exists. Make sure that you have your timeline or program window selected. Go to File Export Media. When the Export Settings window appears, double-check the yellow timeline at the bottom of the left pane. Make sure the grey triangles below the yellow timeline are pulled all the way to the ends of the yellow bar; otherwise, your project may not be exported in its entirety. Exporting For the Medill CMS, Ledger or to Give to an Instructor In the right-hand pane, select H.264 from the Format drop-down list. If you have previously used a Medill preset on this computer under your login credentials, it should be in the Preset drop-down list. Find it in the drop-down list and select it.
If you have not used the desired Medill preset before, press the Import Preset icon to the right of the Preset drop-down list. In the window that opens, navigate to the location where the Medill presets are saved on your computer and select the one you wish to use. When the Choose Settings dialog box appears, check the boxes next to “Save Filter Settings” and “Save FTP Settings,” then click OK. Click on the yellow text next to Output Name. In the Save As window that appears, navigate to where you want to save your video and name your video using the naming convention SLUG_VIDEO or SLUG_SLIDESHOW. Click OK.
Make sure the boxes next to “Export Video” and “Export Audio” are checked. Click the Export button. After a few minutes, your video will be exported to the desired location on your computer.
Exporting For the Broadcast 360 Playback Servers In the right-hand pane, select MPEG2 from the Format drop-down list. If you have previously used a Medill preset on this computer under your login credentials, it should be in the Preset drop-down list. Find it in the drop-down list and select it.
If you have not used the desired Medill preset before, press the Import Preset icon to the right of the Preset drop-down list. In the window that opens, navigate to the location where the Medill presets are saved on your computer and select the one you wish to use. When the Choose

1/12 Schrock/Love/Dietz 21
Settings dialog box appears, check the boxes next to “Save Filter Settings” and “Save FTP Settings,” then click OK.
Click on the yellow text next to Output Name. In the Save As window that appears, navigate to where you want to save your video and name your video using the naming convention YYYYMMDD – SLUG – VIDEOTYPE. Click OK. Make sure the boxes next to “Export Video” and “Export Audio” are checked.
If you’re exporting video that is destined for the playback server, click on the FTP tab. Make sure the box next to FTP is checked and that the FTP address is in the Server Name field. Scroll down through that field and click the Test button to make sure you have connectivity to the server. If the message that appears says you are connected, proceed with export. If not, reimport the 360 preset you are trying to use or ask your instructor for assistance. Click the Export button. After a few minutes, your video will be exported to the desired location on your computer, then uploaded to the selected playback server. Batch Export If you have to export multiple versions of your file (one for the CMS and one for the 360 server, for example), you can perform a process know as a Batch Export. Instead of pressing the Export button, press the Queue button. This will open Adobe Media Encoder and add your exported file to a queue for processing. In Media Encoder, press the duplicate button to add copies of your timeline. Once you’re finished adding versions of the export to Media Encoder, you can press the Start button in Media Encoder to immediately begin the export process.
1/12 Schrock/Love/Dietz 22
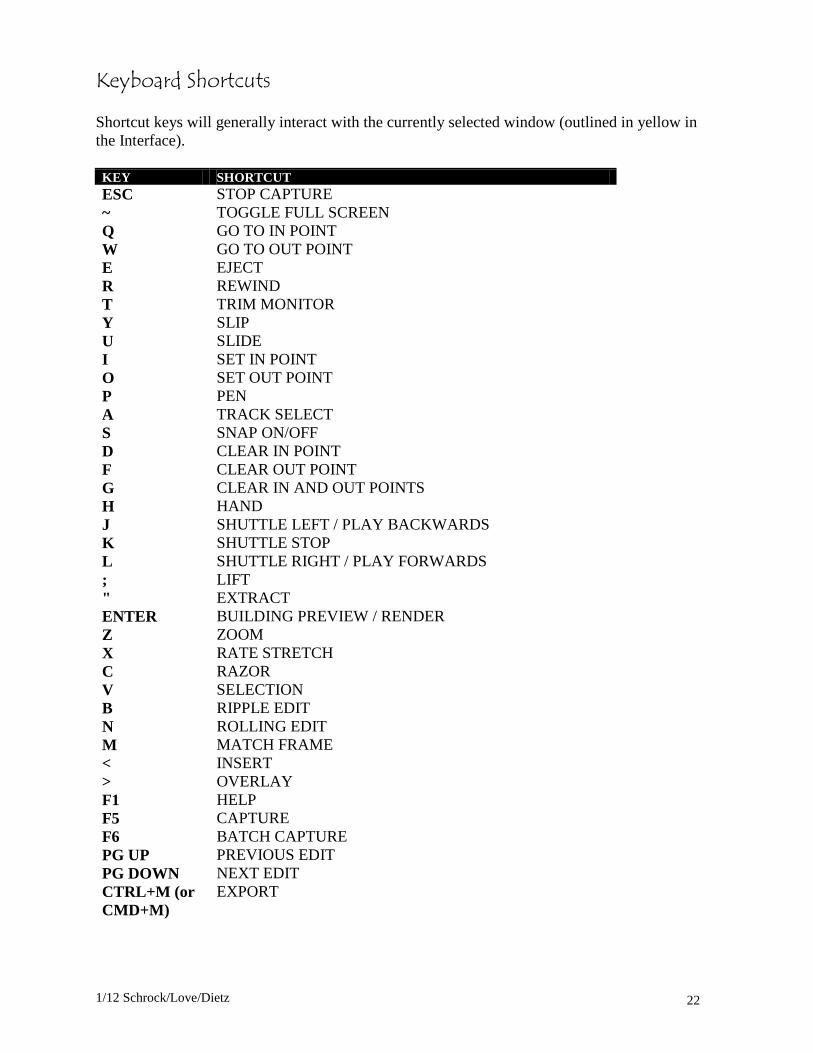
Keyboard Shortcuts Shortcut keys will generally interact with the currently selected window (outlined in yellow in the Interface). KEY SHORTCUT ESC STOP CAPTURE ~ TOGGLE FULL SCREEN Q GO TO IN POINT W GO TO OUT POINT E EJECT R REWIND T TRIM MONITOR Y SLIP U SLIDE I SET IN POINT O SET OUT POINT P PEN A TRACK SELECT S SNAP ON/OFF D CLEAR IN POINT F CLEAR OUT POINT G CLEAR IN AND OUT POINTS H HAND J SHUTTLE LEFT / PLAY BACKWARDS K SHUTTLE STOP L SHUTTLE RIGHT / PLAY FORWARDS ; LIFT " EXTRACT ENTER BUILDING PREVIEW / RENDER Z ZOOM X RATE STRETCH C RAZOR V SELECTION B RIPPLE EDIT N ROLLING EDIT M MATCH FRAME < INSERT > OVERLAY F1 HELP F5 CAPTURE F6 BATCH CAPTURE PG UP PREVIOUS EDIT PG DOWN NEXT EDIT CTRL+M (or CMD+M)
EXPORT