Embed Size (px)
Citation preview

Introduction to Big data and Hadoop

Classification of Digital data
Digital data
Structured data Semi-structured Unstructured data
• Spread sheets• OLTP systems• Oracle,DB2,MySql
• Spread sheets• OLTP systems• Oracle,DB2,MySql
• XML,HTML,SGML, JSON• Sensor data• Webserver log• document with
metadata
• XML,HTML,SGML, JSON• Sensor data• Webserver log• document with
metadata
• Web pages • Audio,video,images
,chat data• Body of Email• Text messages, Social
media• Documents
• Web pages • Audio,video,images
,chat data• Body of Email• Text messages, Social
media• Documents

According to technology research by
By Gartner
Unstructured data
Structured data
Semi structured data
To make things even more confusing , some data is also Multi structured data

Definition Big data Definition
Big Data is high-volume, high velocity, and high-variety information that demands cost effective, innovative forms of information processing for enhanced insight and decision making
Other characteristics of Big data
• Veracity(Truthful ness) • Volatility(change rapidly)

• Validity(officially acceptable)
• VariabilityWhat a great
day to start with coffee
Greatly disappointed...
Cafe closed

Why we need to analyse Big data
Note: Doug lancey,a Gartner analyst coined the term “Big data”
More dataMore data
More accurate results
More accurate results
More confidence in decision making
More confidence in decision making
Greater benefits likeTime reduction,cost
reduction
Greater benefits likeTime reduction,cost
reduction

Some Facts of big data

• The name "Hadoop" is made-up name from one of Doug Cutting's sons toy elephant. Doug used the name for his open source project because it was easy to pronounce and to Google.

Introduction to

• It is open source project of Apache foundation• It is written in java• Developed by Doug Cutting and Micheal J.Cafarella in 2005
For Nutch search engine project funded by yahoo, later in 2006 given to Apache software foundation
• Hadoop uses MapReduce algorithm (1995) to handle massive data sets• Google was first company to design tools that use MapReduce algorithm to
scale their data processing needs (It is proprietary)• Doug Cutting saw an opportunity to develop an open source version of
MapReduce system ,now it is called Hadoop

Building Blocks of Hadoop
1)Namenode(Master)2)Datanode(Slave)3)Secondary namenode
4)Job Tracker(Master)5)Task Tracker(Slave)
} Daemons of storage(HDFS)
} Daemons of Computations(MapReduce)

===

Job tracker and Task tracker

Overall topology of Hadoop cluster

Prerequisites to learn HadoopBasic knowledge in Java+LinuxJava is not strict prerequisite, you also work with
hadoop using other languages like python,perl,Ruby,C etc..

Acknowledgements
Images in this presentation are collected from
• http://blog.renaissance.com/wp-content/uploads/2014/07/ReliableValid1.jpg• http://www.facingdarkness.com/wp-content/uploads/2016/01/volatility_0.jpg• https://s3.amazonaws.com• http://www.wildix.com/wp-content/uploads/2014/04/logo_gartner.png• http://tickto.com/wp-content/uploads/2016/02/big-data-hadoop-retail.jpg• https://cdn.downdetector.com/static/uploads/c/300/cb960/twitter-
logo_15.png
Text Books• Big Data and Analytics by Seema Acharya Subhashini Chellappan• Hadoop Definitive guide by Tom white

Installing Hadoop in
Stand alone mode

a) Download hadoop-1.2.1.tar.gz from Apache websitehadoop.apache.org/
b) Extract hadoop-1.2.1.tar.gz to your user home directory/home/aliet/hadoop-1.2.1

c) Open hadop_env.sh (/home/aliet/hadoop-1.2.1/conf)
Uncomment JAVA_HOME statement and set JAVA_HOME=/usr

d) Now open command prompt and change to directory /home/aliet/hadoop-1.2.1
run the command bin/hadoop
It will display help of hadoop command and usage documentation for hadoop script

->We have completed the hadoop stand-alone installation->In this mode hadoop run as a single java process->Since hadoop is in standalone mode ,it doesn’t have any name mode,secondary name node, job tracker , task tracker etc..->In standalone mode input and output should present in local file system->Test hadoop installation by running simple example
Command to run a java hadoop program is
bin/hadoop jar <jar>
As the command implies,Hadoop programs written in java and packaged in jar files for execution
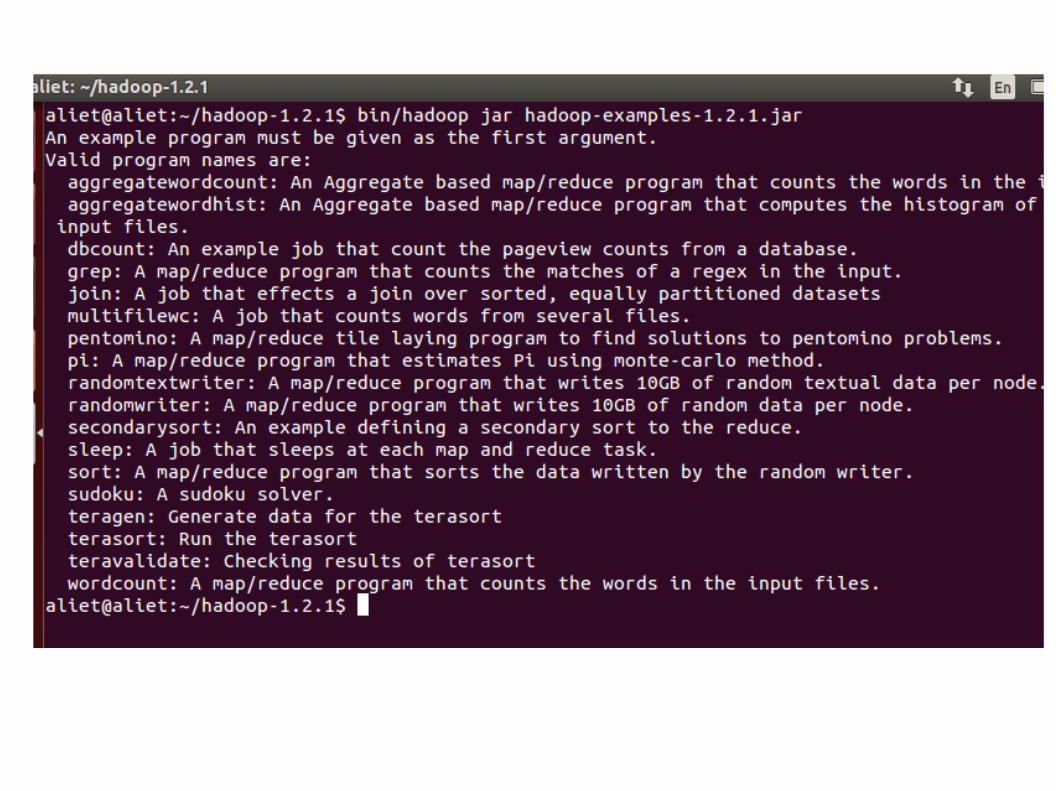
By default installation already contains several sample programs we can use to test hadoop installation.The following command shows what is available in the examples jar file.
bin/hadoop jar hadoop-*-examples.jar

Run Simple example
a) Ready with input file
b)Run example MapReduce program available in hadoop-examples-1.2.1.jar
$ bin/hadoop jar hadoop-examples-1.2.1.jar wordcount input output

c) Open output folder output available in directory hadoop-1.2.1
d)Open file part-r-00000 to see output

Another example
.
.
.

Installing Hadoop in
pseudo distributed mode

Open hadop_env.sh (/home/training/hadoop-1.2.1/conf)
Uncomment JAVA_HOME statement and set JAVA_HOME=/usr

SSH, also known as Secure Socket Shell, is a network protocol that provides administrators with a secure way to access a remote computer.
Since Master node(name node) remotely access every slave node in the cluster. It needs password less remote access on every time it starts
Hadoop uses passphrase less SSH for this purpose. SSH utilizes standard public key cryptography (like RSA) to create a pair of keys-one public and one private
• The public key is stored locally on every slave node and Name node in the cluster• The private key is kept with Master node• Master node sends this private key when attempting to access a slave nodes
If ssh is not password less, you have to go on each individual machine and start all the processes there
Setting up Passphrase less (or) password less SSH for Hadoop

a)If SSH is not installed,then install it using$ sudo apt-get install openssh-server
b) Open command prompt,in order to generate public and private keys use following commands
$ ssh-keygen

d) Now copy public key of localhost in authorized_keys file using command ssh-copy-id
e) open home directory and press ctrl+H to see .ssh direrctory.Now open .ssh directory to see public,private keys and authorized_keys files

f)Now check that you can ssh to the localhost without a passphrase:
$ ssh localhost

In pseudo-distributed mode hadoop runs with all deamons on single machine • Each Hadoop deamon run as a separate java process• It is used for debugging code• It allows you to examine memory usage• Input and output should be in HDFS
To install hadoop in this mode we need to configure three XML files(find them in /home/aliet/hadoop-1.2.1/conf)
core-site.xml:The core-site.xml file informs Hadoop daemon where NameNode runs in the cluster. It contains the configuration settings for Hadoop Core such as I/O settings that are common to HDFS and MapReduce.
hdfs-site.xml :The hdfs-site.xml file contains the configuration settings for HDFS daemons; the NameNode, the Secondary NameNode, and the DataNodes. Here, we can configure hdfs-site.xml to specify default block replication and permission checking on HDFS. The actual number of replications can also be specified when the file is created. The default is used if replication is not specified in create time.
mapred-site.xml:The mapred-site.xml file contains the configuration settings for MapReduce daemons; the job tracker and the task-trackers.

pseudo-distributed mode configurationconf/core-site.xml:
conf/hdfs-site.xml:
If fs.default.name is set to an an HDFS URI like
hdfs://<authority>:<port>then Hadoop tries to find the path on HDFS whose namenode is running at <authority>:<port>.
If dfs.replication is set to 1 ,HDFS doesn't replicate file system blocks by default factor of three

Delete temporary previous metadata from your system .Open path /tmp and delete all the files in it
`
conf/mapred-site.xml
"The host and port that the MapReduce job tracker runs at 9001

Format name node and File system• It is mandatory to format name node which formats it’s metadata and HDFS file system• It should be done only once during installation, other wise we will loss important meta data in name node• Do this by stopping all service currently running, change to directory hadoop-1.2.1
$ bin/hadoop namenode -format

Start all hadoop daemons $ bin/start-all.sh
Turn off safe mode of Name node
Safe mode?• Namenode enters safe mode automatically during its startup• When the namenode starts ,it loads it’s image file(fsimage) in to memory and apply the
edits from edits log• Once it has finish, it creates new fsimage file and an empty log• And then receives block reports from datanodes during safe mode• To leave safe mode namenode needs to collect block reports from datanodes upto
threshold percentage that satisfy minimum replication condition• Once all blocks reports are collected ,namenode starts block replication adjustment
activity i.e replicating under-replicated blocks ,deleting over-replicated blocks• After completion of block replication activity ,the namenode leaves safemode
automatically

● To see current java process running use “jps” command
The hadoop/bin directory contains some scripts used to launch Hadoop DFS and Hadoop Map/Reduce daemons.These are:
->start-dfs.sh - Starts the Hadoop DFS daemons, the namenode and datanodes. Use this before start-mapred.sh->stop-dfs.sh - Stops the Hadoop DFS daemons.->start-mapred.sh - Starts the Hadoop Map/Reduce daemons, the jobtracker and tasktrackers.->stop-mapred.sh - Stops the Hadoop Map/Reduce daemons.->start-all.sh - Starts all Hadoop daemons, the namenode, datanodes, the jobtracker and tasktrackers. Deprecated; use start-dfs.sh then start-mapred.sh->stop-all.sh - Stops all Hadoop daemons.Deprecated; use stop-mapred.sh then stop-dfs.sh

7) Browse the web interface for the NameNode and the JobTracker; by default they are available at:
NameNode - http://localhost:50070/
JobTracker - http://localhost:50030/
Run Simple example
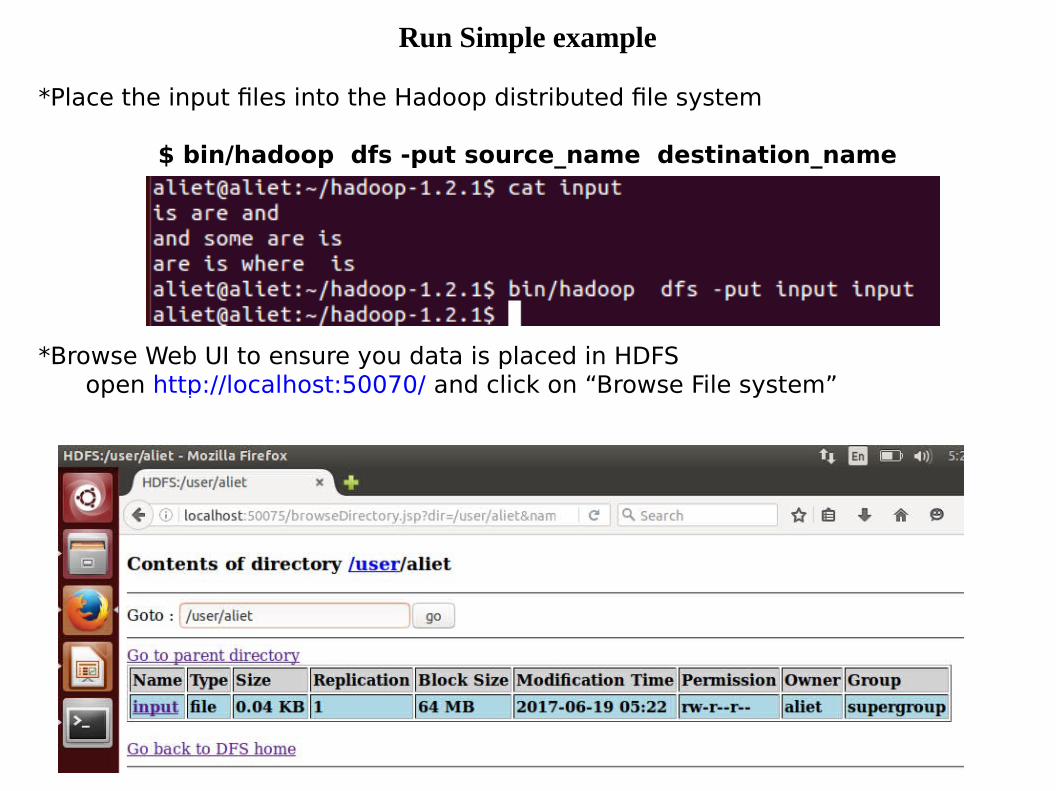
*Place the input files into the Hadoop distributed file system
$ bin/hadoop dfs -put source_name destination_name
*Browse Web UI to ensure you data is placed in HDFSopen http://localhost:50070/ and click on “Browse File system”

Run some of the examples provided by default:$ bin/hadoop jar hadoop-examples-*.jar wordcount input result
Open home directory through web UI http://localhost:50070/ to see output…click the file part-00000 to see actual output

You will get
Open JobTracker webUI at http://localhost:50030/ to view status different jobs
Installing Hadoop in
Fully Distributed modeUBUNTU 14.04


To check network connectivity between namenode and data node use “ping”
Namenode-172.16.7.85datanode1-172.16.7.84datanode2-172.16.7.86

Change hostame and list of hosts in all nodesa)change list of hostnames and IP address (do it in all Nodes)
$ sudo gedit /etc/hosts
b)change hostname of an virtual machine (do it in all Nodes)$sudo gedit /etc/hostname
==>
==>

c)Change Masters and slaves details (do it in all Nodes)
aliet@namenode:~$ cd hadoop-1.2.1aliet@namenode:~/hadoop-1.2.1$aliet@namenode:~/hadoop-1.2.1$ gedit masters
==>
==>
aliet@namenode:~/hadoop-1.2.1$ gedit masters

d)Restart all Nodese)Try to ping individual nodes using their names in command prompt (do it in all Nodes)
From namenode$ping datanode1$ping datanode2

From datanode1$ping namenode$ping datanode2

From datanode2$ping namenode$ping datanode1

Setting up Passphrase less(or)password less SSH for Hadoop(Do this in all nodes)
a)check whether ssh is installed or not
b) If ssh is not installed,use the following command to install ssh server
c) Try to login into nodes

Because password less environment is not yet established...system will keep on asking to enter password for login

● Goto your Home directory and press ctrl+H to see .ssh directory.This .ssh direrctory contains all private and public keys used to login i.e
● If want to login in to datanode1 from namenode.Namenode's .ssh directory should contain public key of datanode1

d) if any old keys present in .ssh, then delete old keys from /home/aliet/.ssh/ (Do this in all nodes)
e) Open command prompt and create public and private keys using following command (Do this in all nodes)

f) copy public key of a particular node to other nodes using copy-ssh-id command (Do this in all nodes)
From namenode to datanode2
From namenode to datanode1

From datanode1 to namenode
aliet@datanode1$ ssh-copy-id aliet@namenode
From datanode1 to datanode2
aliet@datanode1$ ssh-copy-id aliet@datanode2
From datanode2 to namenode
aliet@datanode2$ ssh-copy-id aliet@namenode
From datanode2 to datanode1
aliet@datanode2$ ssh-copy-id aliet@datanode1
datanode2
datanode1

g) Establishment of password less environment is complete.Now try to login into other nodes from particular node (Do this in all nodes)

If you have any problem in login after establishing passwordless environment
Try the following way of login

Modifying hadoop configuration files (Do this in all nodes)
● Now we have to edit configuration files hadoop-env.sh, core-site.xml,hdfs-site.xml,mapred-site.xml in all nodes
● We can do this from our namenode itself because we have created password less environment

Open command prompt at name node and modify hadoop-env.sh and change JAVA_HOME=/usr by uncommenting it

After modification of hadoop-env.sh. Save it and close it

Now try to login into datanode1 from namenode to modify datanode1's hadoop-env.sh
gedit will not work here ,use nano editor to modify other nodes configuration files
Use ctrl+o followed by Enterto save files in nano editor
To quit nano editor use ctrl+x

Now try to login into datanode2 from current node to modify datanode2's hadoop-env.sh
Modify datanode2 hadoop-env.sh using nano editor
Use ctrl+o followed by Enterto save files in nano editor
To quit nano editor use ctrl+x

Now try to login into datanode2 from current node to modify datanode2's hadoop-env.sh
Modify datanode2 hadoop-env.sh using nano editor
Use ctrl+o followed by Enterto save files in nano editor
To quit nano editor use ctrl+x

Login back to namenode to modify its core-site.xml
After modification core-site.xml looks like

Modify hdfs-site.xml of namenode
After modification hdfs-site.xml looks like

Modify mapred-site.xml of namenode
After modification mapred-site.xml looks like

Now try to login into datanode1 from name node to modify datanode1's core-site.xml
After modification core-site.xml looks like

Modify hdfs-site.xml of datanode1
After modification hdfs-site.xml looks like

Modify mapred-site.xml of datanode1
After modification mapred-site.xml looks like

Now try to login into datanode2 from datanode1 to modify datanode2's core-site.xml
After modification core-site.xml looks like

Modify hdfs-site.xml of datanode2
After modification hdfs-site.xml looks like

Modify mapred-site.xml of datanode2
After modification mapred-site.xml looks like

->Now try to login back into namenode from datanode2
->If present ,Delete temporary previous metadata from your system .Open path /tmp and delete all the files in it (Do this in all nodes)->Change to hadoop-1.2.1 directory
->Format HDFS (only from namenode)

->After successful completion of HDFS format from namenode you will see something like this

->Change the permission of HDFS metadata directory
->Start all hadoop deamons from namenode using following command
->Turnoff safemode of namenode using following command

->Browse the web interface for the NameNode and the JobTracker;NameNode - http://namenode:50070/->use jps command to see daemons running at namenode

->use jps command to see daemons running at datanode1
->use jps command to see daemons running at datanode2

->Click on Livenodes link to see datanodes information

->Click on Browse the filesystem to browse HDFS

JobTracker - http://localhost:50030/

Run Simple example
->Place the input files into the Hadoop distributed file system
$ bin/hadoop dfs -put source_name destination_name
->Browse Web UI to ensure your data is placed in HDFSOpen namenode:50070 and click on Browse File system

->Run some of the examples provided by default: hadoop-examples-1.2.1.jar

->wordcount program present in hadoop-examples-1.2.1.jar

->Change to hadoop-1.2.1 directory and execute simple wordcount program on input file
->Open JobTracker webUI at http://localhost:50030/ to view status different running jobs

->Open home directory through web UI namenode:50070 to see output->open /user/aliet/result trough Browse the filesystem
->click the file part-00000 to see actual output