Embed Size (px)
Citation preview
Hands-On Lab
Introduction to Coded UI Tests with Visual Studio 2010 Ultimate
Lab version: 1.0.0
Last updated: 12/10/2010
CONTENTS
OVERVIEW ............................................................................................................................................. 3
EXERCISE 1: INTRODUCTION TO CODE GENERATION FROM ACTION RECORDINGS.................... 4
EXERCISE 2: INTRODUCTION TO CODE GENERATION USING CODED UI TEST BUILDER .......... 12
EXERCISE 3: DATA DRIVEN DEMONSTRATION FOR CODED UI TEST............................................ 16
Overview
Coded UI tests are a new capability of Visual Studio 2010 which provide a way to create fully automated
tests to validate the functionality and behavior of your application’s user interface. In this lab you will
gain a basic understanding of coded UI tests by creating a new test and adding validation logic to it.
System Requirements
In order to complete this lab you will need the Visual Studio 2010 RC virtual machine provided by
Microsoft. For more information on acquiring and using this virtual machine, please see “Working with
the Visual Studio 2010 Virtual Machine”.
Exercises
This Hands-On Lab comprises the following exercises:
1. Introduction to Code Generation from Action Recordings
2. Introduction to Code Generation using Coded UI Test Builder
3. Data Driven Demonstration for Coded UI Test
Estimated time to complete this lab: 60 minutes.
Next Step
Exercise 1: Introduction to Code Generation from Action Recordings
Exercise 1: Introduction to Code
Generation from Action Recordings
In this exercise, you will be introduced to the Visual Studio 2010 code generation features that allow
testers to quickly and easily create coded UI tests directly from existing action recordings. Action
recordings contain the steps taken during manual testing of an application. To learn more about manual
testing and action recordings, please see the “Authoring and Running Manual Tests with Visual Studio
2010 using Microsoft Test Manager” lab.
1. Log in as Abu Obeida Bakhach (Dev) if you have not already done so. The password is P2ssw0rd
(capital letter P, the number two, the letter s, the letter s, the letter w, the number zero, the
letter r, and the letter d). Please see “Working with the Visual Studio 2010 Virtual Machine” for
instructions on how to log into the VM.
2. Open Microsoft Visual Studio from Start | All Programs | Microsoft Visual Studio 2010 |
Microsoft Visual Studio 2010.
3. Start a new testing project (File | New | Project…).
4. In the New Project window, select the Test Project template from Visual C# | Test and select
the OK button to create the test project.
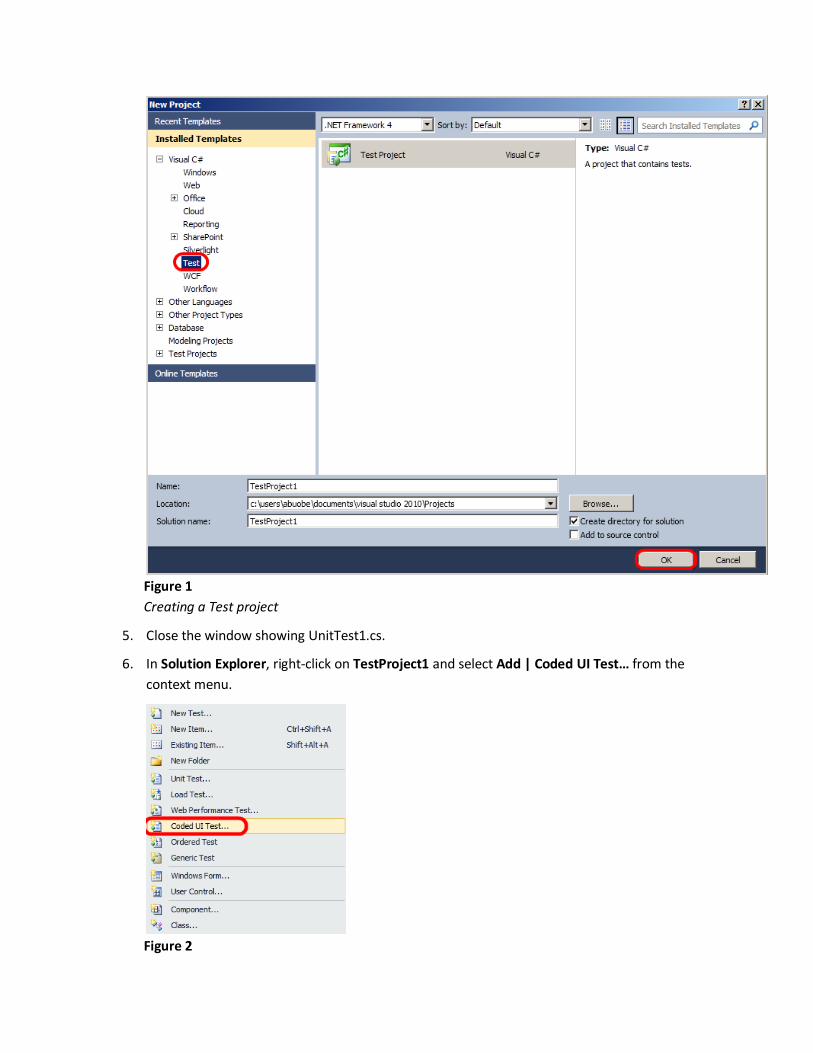
Figure 1
Creating a Test project
5. Close the window showing UnitTest1.cs.
6. In Solution Explorer, right-click on TestProject1 and select Add | Coded UI Test… from the
context menu.
Figure 2
Creating a Coded UI Test
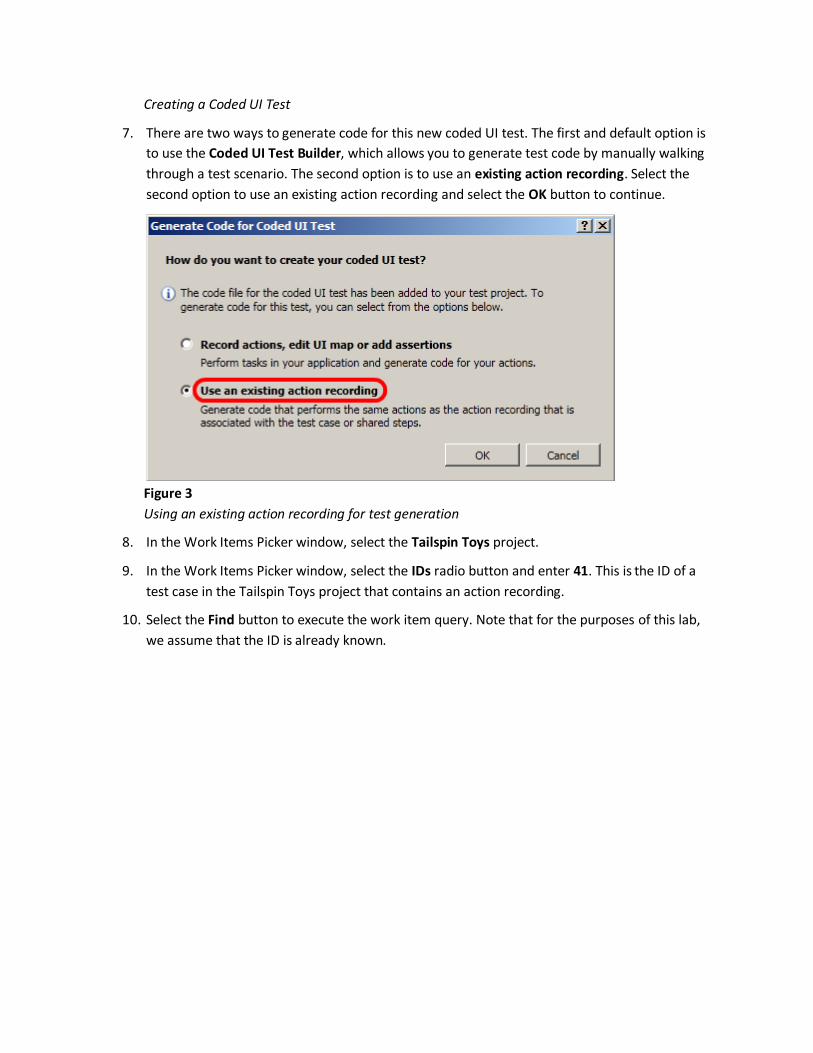
7. There are two ways to generate code for this new coded UI test. The first and default option is
to use the Coded UI Test Builder, which allows you to generate test code by manually walking
through a test scenario. The second option is to use an existing action recording. Select the
second option to use an existing action recording and select the OK button to continue.
Figure 3
Using an existing action recording for test generation
8. In the Work Items Picker window, select the Tailspin Toys project.
9. In the Work Items Picker window, select the IDs radio button and enter 41. This is the ID of a
test case in the Tailspin Toys project that contains an action recording.
10. Select the Find button to execute the work item query. Note that for the purposes of this lab,
we assume that the ID is already known.
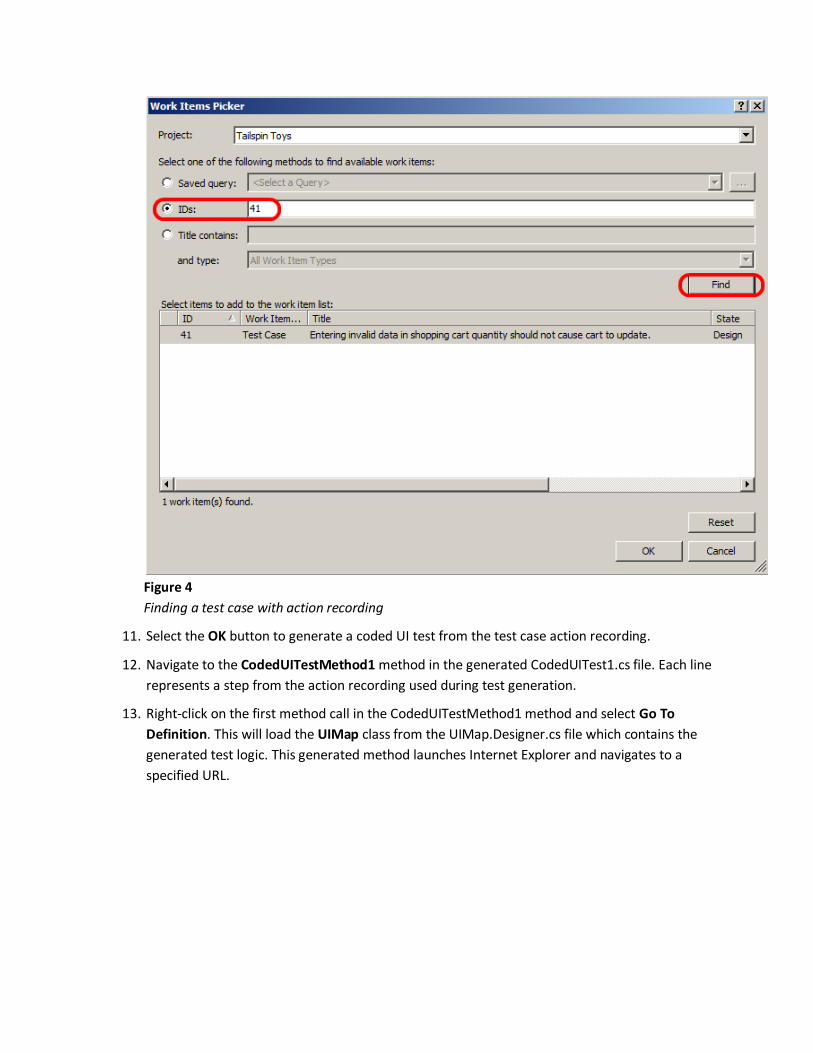
Figure 4
Finding a test case with action recording
11. Select the OK button to generate a coded UI test from the test case action recording.
12. Navigate to the CodedUITestMethod1 method in the generated CodedUITest1.cs file. Each line
represents a step from the action recording used during test generation.
13. Right-click on the first method call in the CodedUITestMethod1 method and select Go To
Definition. This will load the UIMap class from the UIMap.Designer.cs file which contains the
generated test logic. This generated method launches Internet Explorer and navigates to a
specified URL.
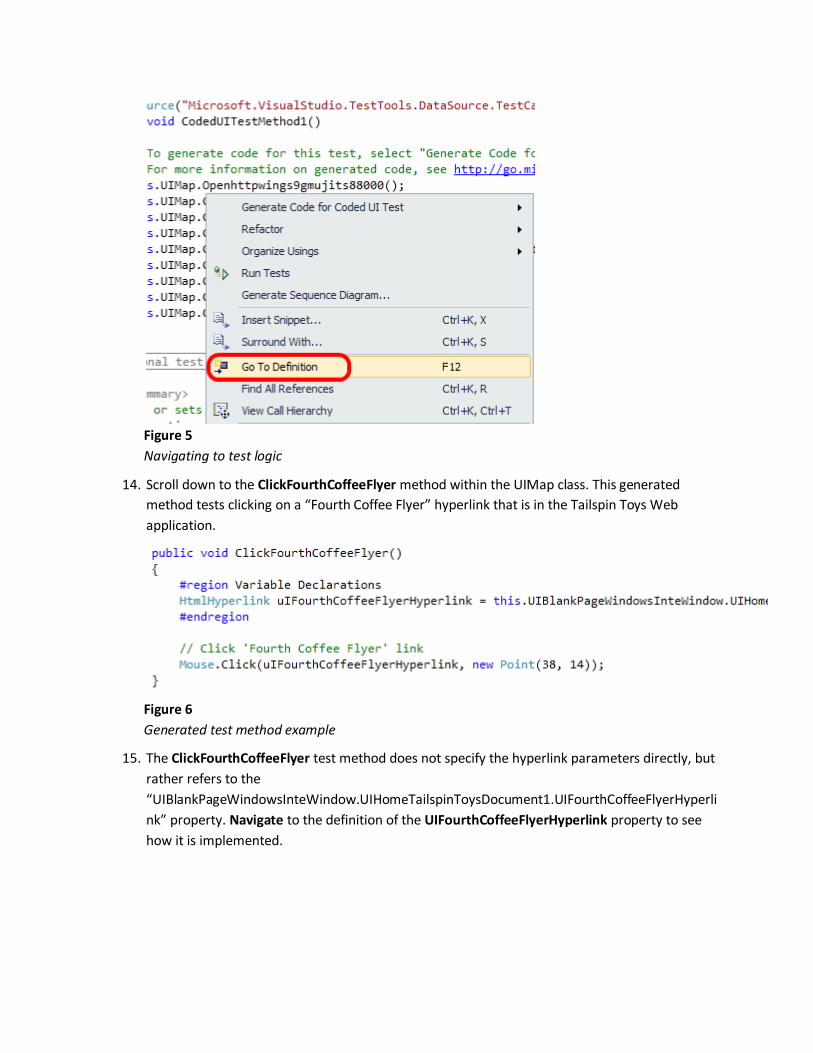
Figure 5
Navigating to test logic
14. Scroll down to the ClickFourthCoffeeFlyer method within the UIMap class. This generated
method tests clicking on a “Fourth Coffee Flyer” hyperlink that is in the Tailspin Toys Web
application.
Figure 6
Generated test method example
15. The ClickFourthCoffeeFlyer test method does not specify the hyperlink parameters directly, but
rather refers to the
“UIBlankPageWindowsInteWindow.UIHomeTailspinToysDocument1.UIFourthCoffeeFlyerHyperli
nk” property. Navigate to the definition of the UIFourthCoffeeFlyerHyperlink property to see
how it is implemented.
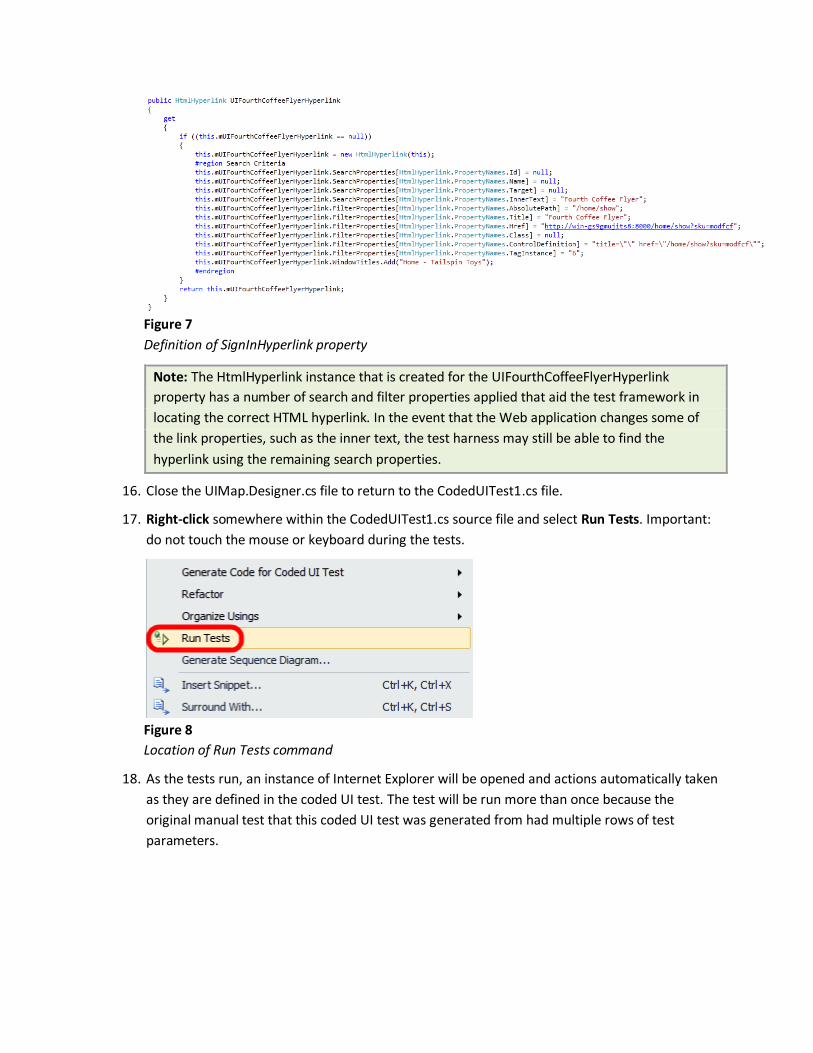
Figure 7
Definition of SignInHyperlink property
Note: The HtmlHyperlink instance that is created for the UIFourthCoffeeFlyerHyperlink
property has a number of search and filter properties applied that aid the test framework in
locating the correct HTML hyperlink. In the event that the Web application changes some of
the link properties, such as the inner text, the test harness may still be able to find the
hyperlink using the remaining search properties.
16. Close the UIMap.Designer.cs file to return to the CodedUITest1.cs file.
17. Right-click somewhere within the CodedUITest1.cs source file and select Run Tests. Important:
do not touch the mouse or keyboard during the tests.
Figure 8
Location of Run Tests command
18. As the tests run, an instance of Internet Explorer will be opened and actions automatically taken
as they are defined in the coded UI test. The test will be run more than once because the
original manual test that this coded UI test was generated from had multiple rows of test
parameters.
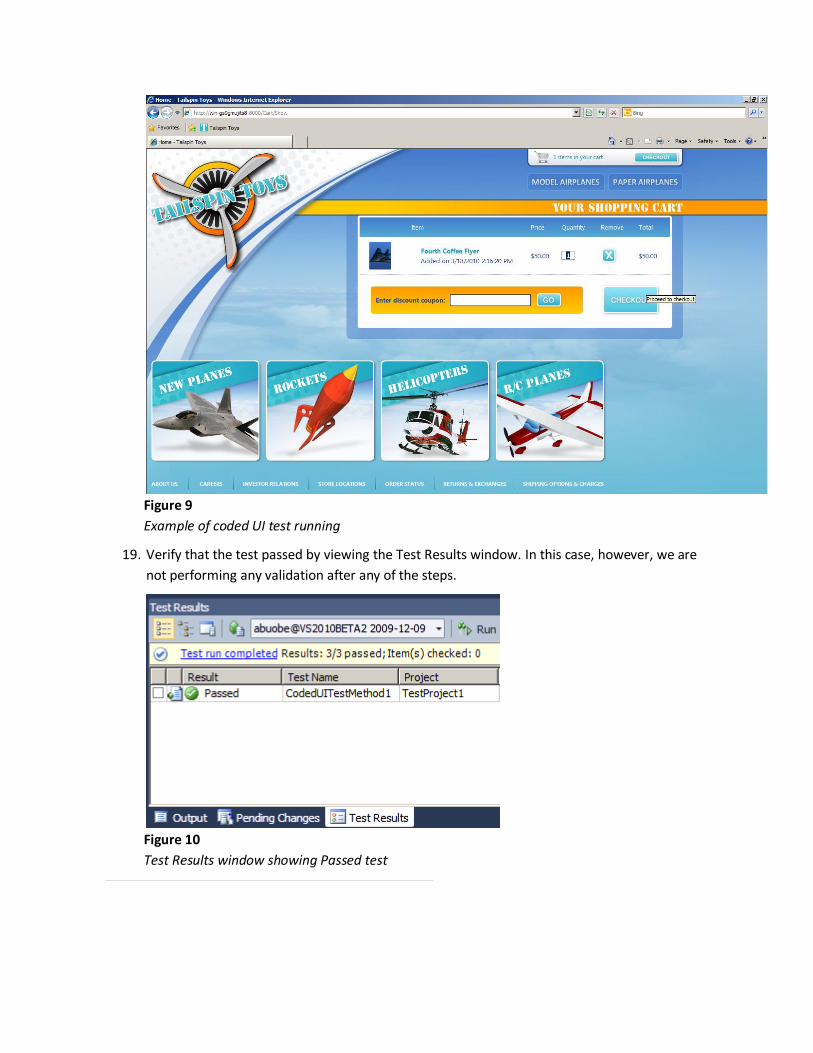
Figure 9
Example of coded UI test running
19. Verify that the test passed by viewing the Test Results window. In this case, however, we are
not performing any validation after any of the steps.
Figure 10
Test Results window showing Passed test

Next Step
Exercise 2: Introduction to Code Generation using Coded UI Test Builder
Exercise 2: Introduction to Code
Generation using Coded UI Test Builder
In this exercise, you will learn how to use the Coded UI Test Builder to generate test code for the Tailspin
Toys Web application and modify the generated code in order to enable data driven testing.
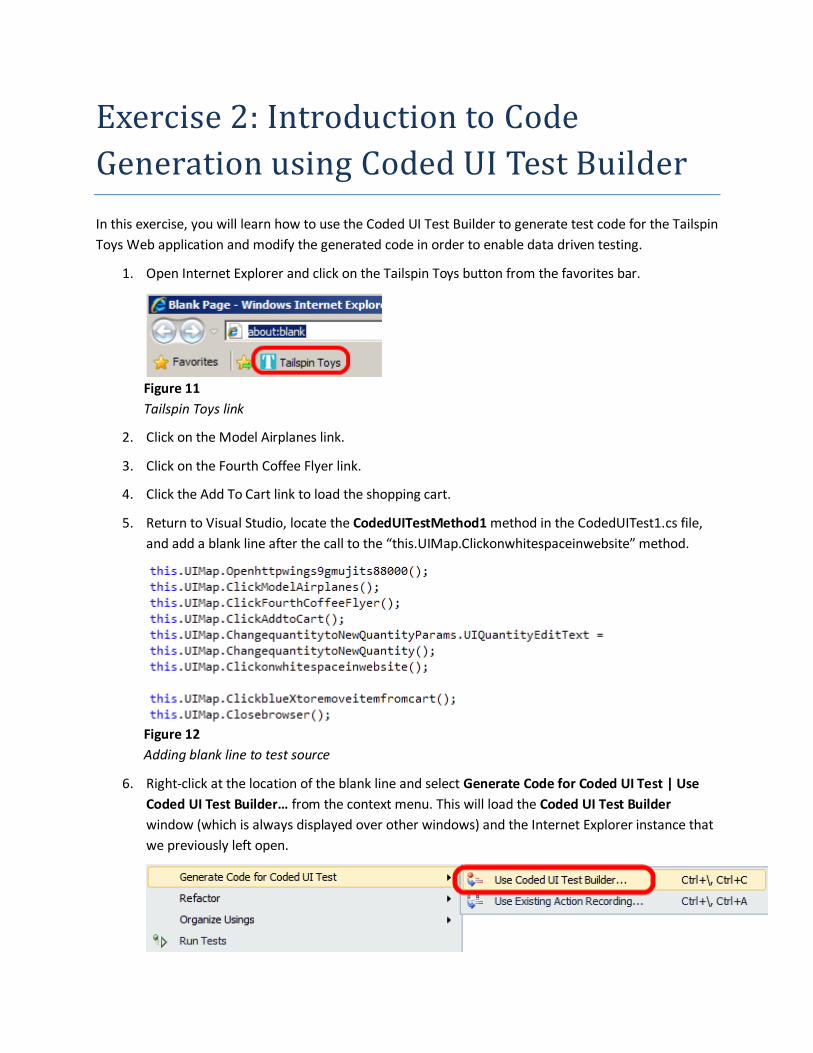
1. Open Internet Explorer and click on the Tailspin Toys button from the favorites bar.
Figure 11
Tailspin Toys link
2. Click on the Model Airplanes link.
3. Click on the Fourth Coffee Flyer link.
4. Click the Add To Cart link to load the shopping cart.
5. Return to Visual Studio, locate the CodedUITestMethod1 method in the CodedUITest1.cs file,
and add a blank line after the call to the “this.UIMap.Clickonwhitespaceinwebsite” method.
Figure 12
Adding blank line to test source
6. Right-click at the location of the blank line and select Generate Code for Coded UI Test | Use
Coded UI Test Builder… from the context menu. This will load the Coded UI Test Builder
window (which is always displayed over other windows) and the Internet Explorer instance that
we previously left open.

Figure 13
Starting the Coded UI Test Builder
Note: The Coded UI Test Builder is used to record actions and assertions within the user
interface which are then converted to code.
7. Now we will add an assertion to verify that the Quantity textbox is equal to 1. Drag and drop the
crosshair from the Coded UI Test Builder tool window onto the Quantity textbox in Internet
Explorer. This action will load a window showing the control properties.
Figure 14
Selecting an element to use for assertion
8. Select the Text property and click the Add Assertion button. This will load a dialog to finalize
the assertion options to use.
9. Verify that the Comparator to use is AreEqual and that the comparison value is ‘1’. Select the
OK button to continue.
Figure 15
Selecting the comparator type and value
10. Verify that a checkbox has been added to the Text property row in the Coded UI Test Builder
window.

Figure 16
Text property showing assertion checkbox
11. Click on the Generate Code button in the Coded UI Test Builder tool window.
Figure 17
Generate Code button location
12. In the Generate Code window, use QuantityEqualsOne for the Method Name and select the
Add and Generate button to generate the validation code.
Figure 18
Generating assertion code
13. Remove the “Fourth Coffee Flyer” item from the shopping cart.
14. Close the Coded UI Test Builder.
15. Close the Internet Explorer window and return to Visual Studio.

16. Note that the assertion code generation has added the new validation step.
Figure 19
Newly created assertion step for coded UI test
17. Right-click and select Run Tests to run the tests with the new validation steps.
Next Step
Exercise 3: Data Driven Demonstration for Coded UI Test
Exercise 3: Data Driven Demonstration
for Coded UI Test
In this exercise, you will add another set of test parameter values to the test case in order to
demonstrate that these test parameters are hooked up to the coded UI test and that the validation that
we recently added in is performing as expected.
1. Open Microsoft Test Manager from Start | All Programs | Microsoft Visual Studio 2010 |
Microsoft Test Manager 2010.
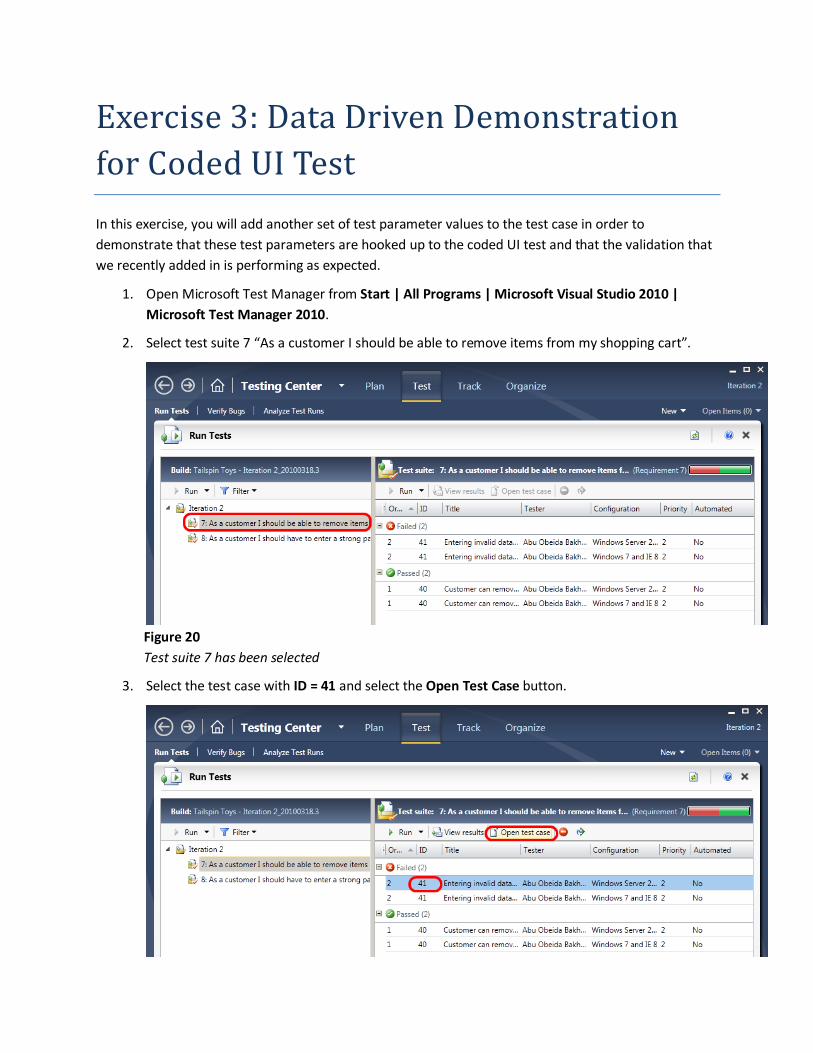
2. Select test suite 7 “As a customer I should be able to remove items from my shopping cart”.
Figure 20
Test suite 7 has been selected
3. Select the test case with ID = 41 and select the Open Test Case button.

Figure 21
Opening test case with ID = 41
4. In the Parameter Values section at the bottom, add a new row with quantity 10.
Note: A value of 10 is a legitimate value for the shopping cart, so the cart will refresh to show a
quantity of 10 when this value is entered. But since the purpose of this exercise is to show
what happens when a test iteration fails, we will pretend that this causes the test to fail in
order to demonstrate a test case failure. Our assertion expects that the quantity will remain at
1.
5. Save the changes to the test case and return to Visual Studio.
6. Run the tests again and note that the test fails on the fourth iteration.
7. Double-click on the Failed row within the Test Results window to open the test results. Under
the section for Data Driven Test Results we are notified that 3 out of 4 tests passed and that
the fourth data row failed.
Figure 22
Test results showing failed assertion
To give feedback please write to [email protected]
Copyright © 2010 by Microsoft Corporation. All rights reserved.