Embed Size (px)
Citation preview

Introduction to DropboxDebbie Young Villa Madonna Academy Library, Villa Hills, KY September, 2013
Dropbox is a free cloud storage app in which you can save photos, documents, and other projects. Files in Dropbox can be accessed from any internet-connected computer or tablet.
To get started, open Dropbox app on your iPad. If you don't have a Dropbox account, tap the link that says CREATE ACCOUNT.
Tap in the boxes to enter First Name, Last Name, Email address, and Password. Write down your user name and password and/or email them to yourself so you can
remember them in the future.
Tap CREATE FREE ACCOUNT

Your new Dropbox system will open. DO NOT tap "enable" to save your camera
roll photos to Dropbox. If you do, ALL your photos will automatically save to Dropbox, which will consume
a lot of your free storage space. Tap CANCEL.
NO

In your new Dropbox you'll only have one file, a welcome PDF.
If you tap the file, it opens in the
right side panel.
Notice the little Dropbox picture at the bottom.
That tells you that you're open to the Dropbox file
cabinet (There's only one file at the moment.)
If you click on the little photo icon at the bottom, it will ALWAYS ask you if you want to enable
Camera Upload. Again, DO NOT enable camera upload.
Instead, tap box icon to go back to Dropbox file view.

If you want a photos folder, Click on the three dots at the top of your Dropbox file screen.
Tap Create Folder. Create a folder and type its name - PHOTOS. Tap Create button.
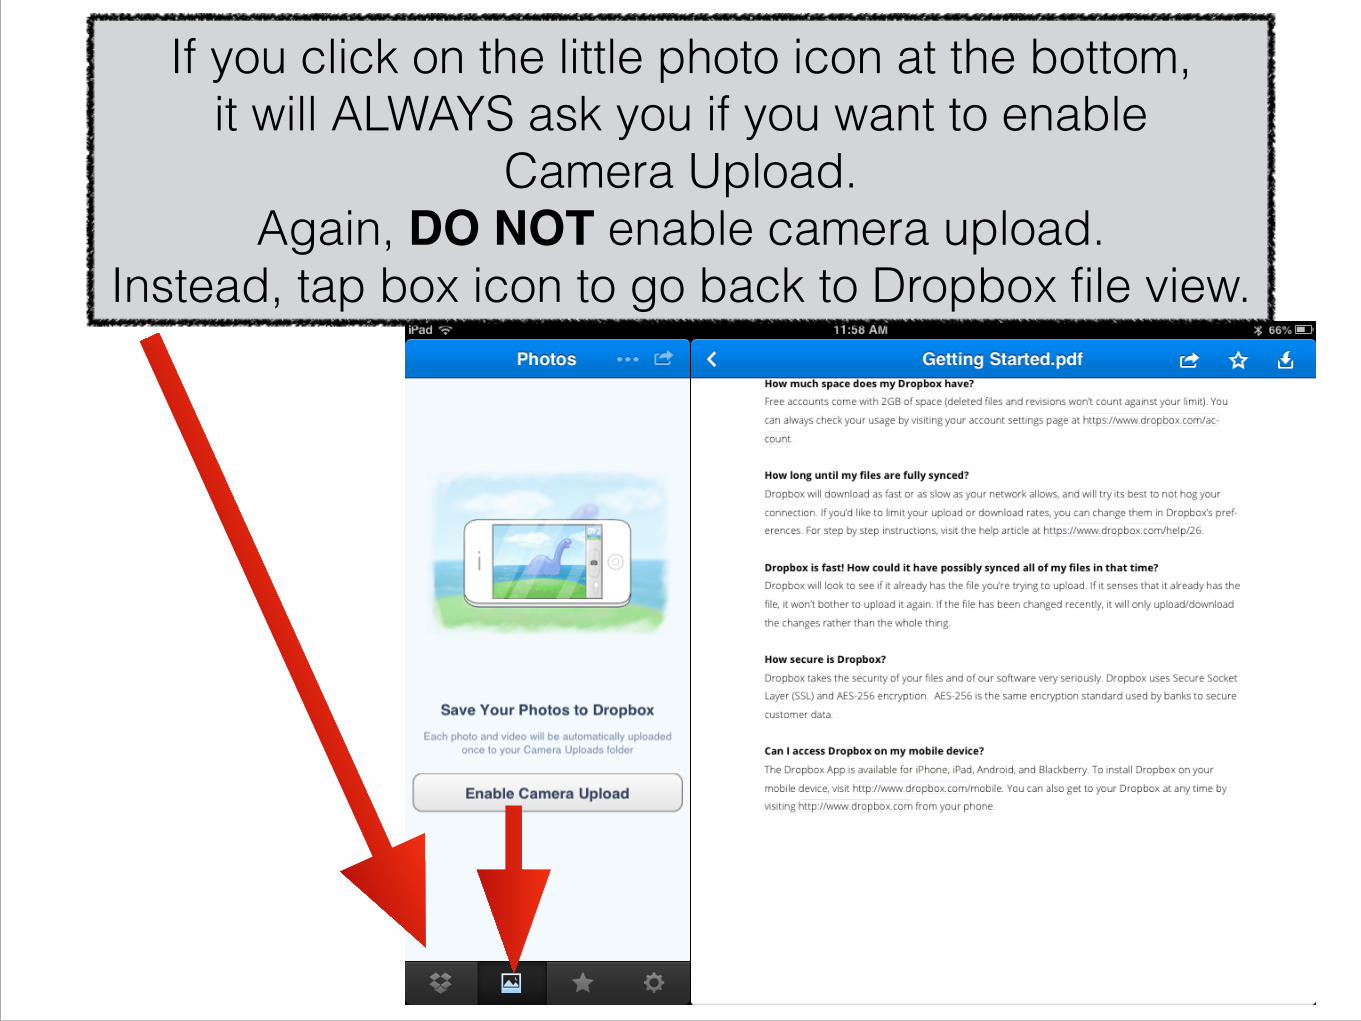
You will now have a photo folder, and it will be opened in your Dropbox file screen with a "Folder is Empty" message.
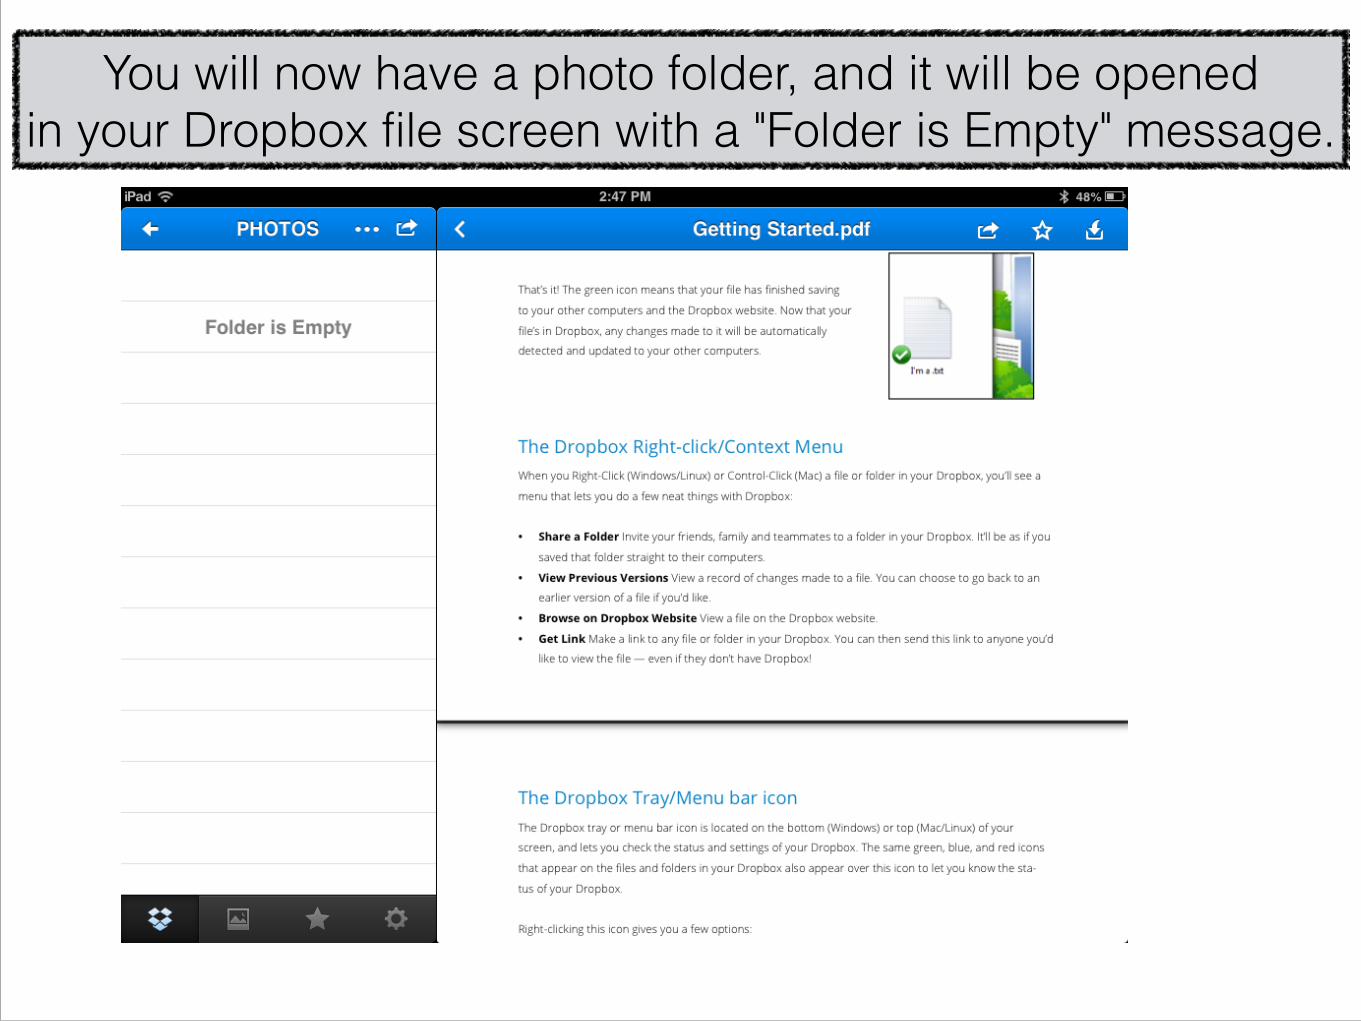
While the PHOTOS folder is open, click the white dots at the top and choose UPLOAD.
Choose Camera Roll

1. Your camera roll will open, and each photo will have a little black
checkmark on it. Find the photos you want,
and tap on any checkmark to turn it blue.
The photos with the blue checkmarks
are selected for upload to Dropbox.
2. Check "Upload to:" location at the bottom.
It says PHOTOS, so you're putting
your photos in the folder you've created for them.
3. Tap Upload

Your photos upload.
To get back to your Dropbox file folder
page, tap Left arrow.

Back on the Dropbox file cabinet page, tap the three dots at the top and create a couple more folders you'll likely need. Type a title for the folder, click Create.
When the new empty folder opens, tap the left arrow to get back to file cabinet page. Example folders are "English Papers" and "Religion Assignments"
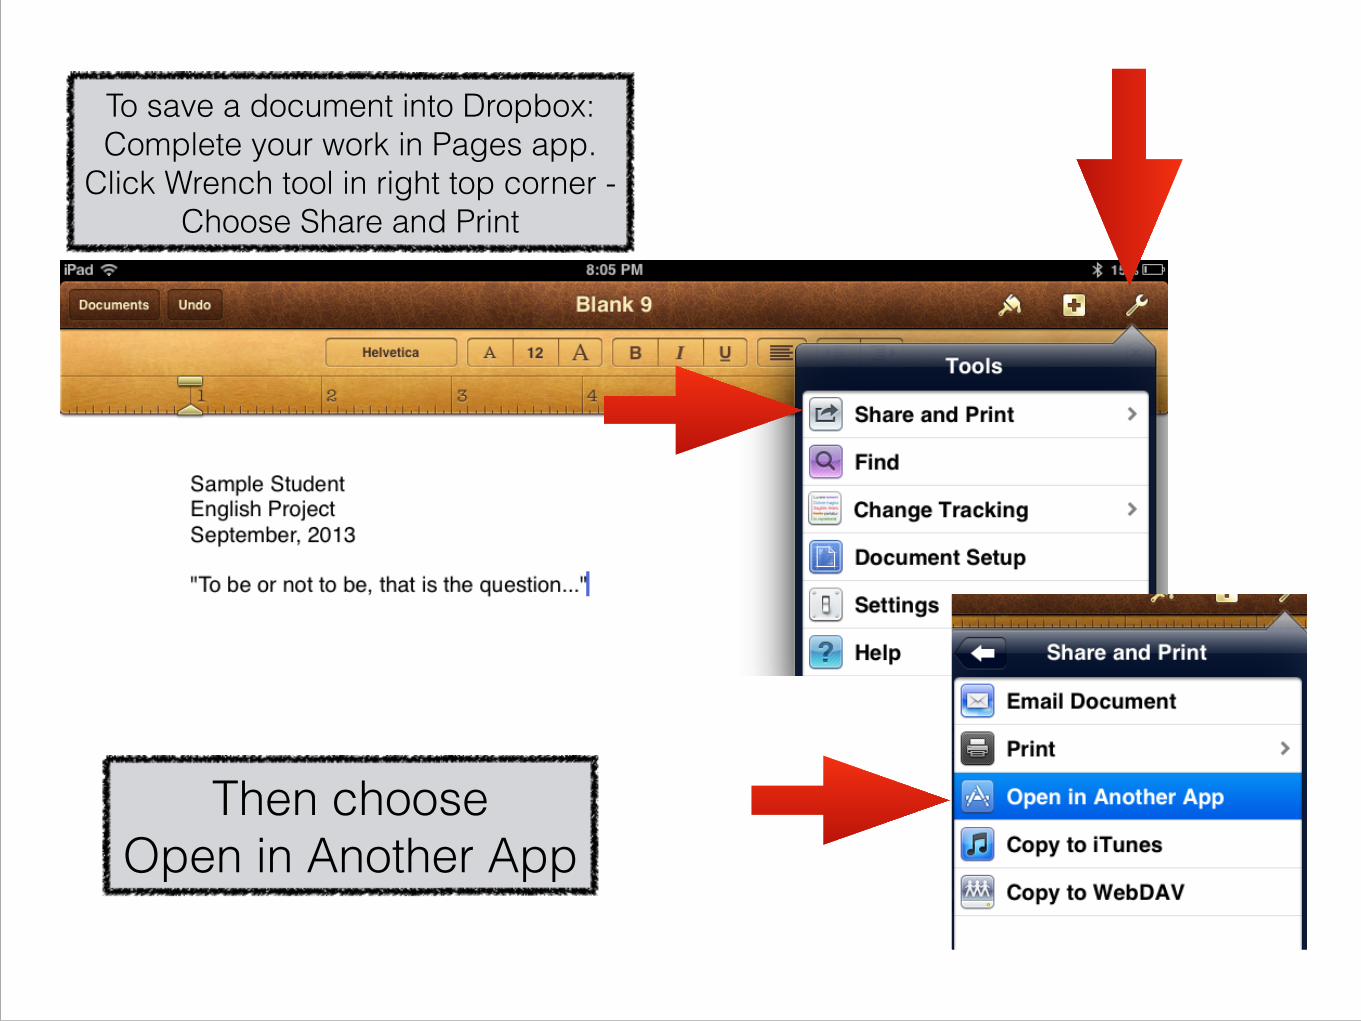
To save a document into Dropbox: Complete your work in Pages app.
Click Wrench tool in right top corner - Choose Share and Print
Then choose Open in Another App

Next, tap the format you want. Usually, it's Word.
After paper converts, tap Choose App

Tap Open in Dropbox
Dropbox will open
Tap Destination to get a choice of folders in which to save your paper.
Tap the folder you want. Once the folder is selected,
tap Choose.

Since destination folder is now correct,
tap Save.
Paper is now in English Papers folder.
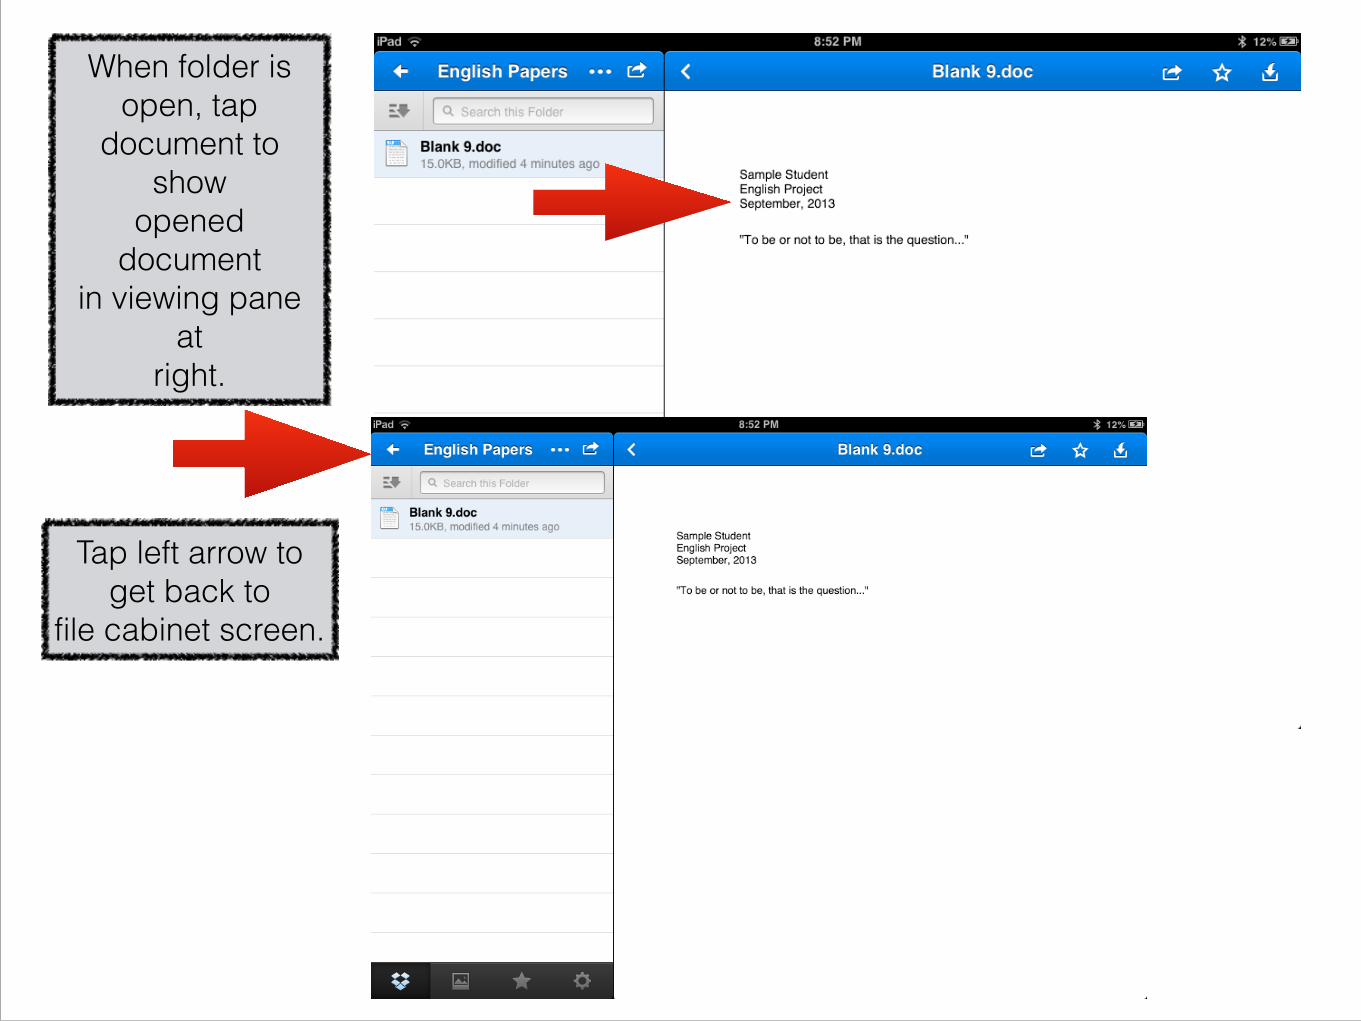
Tap left arrow to get back to
file cabinet screen.
When folder is open, tap
document to show
opened document
in viewing pane at
right.
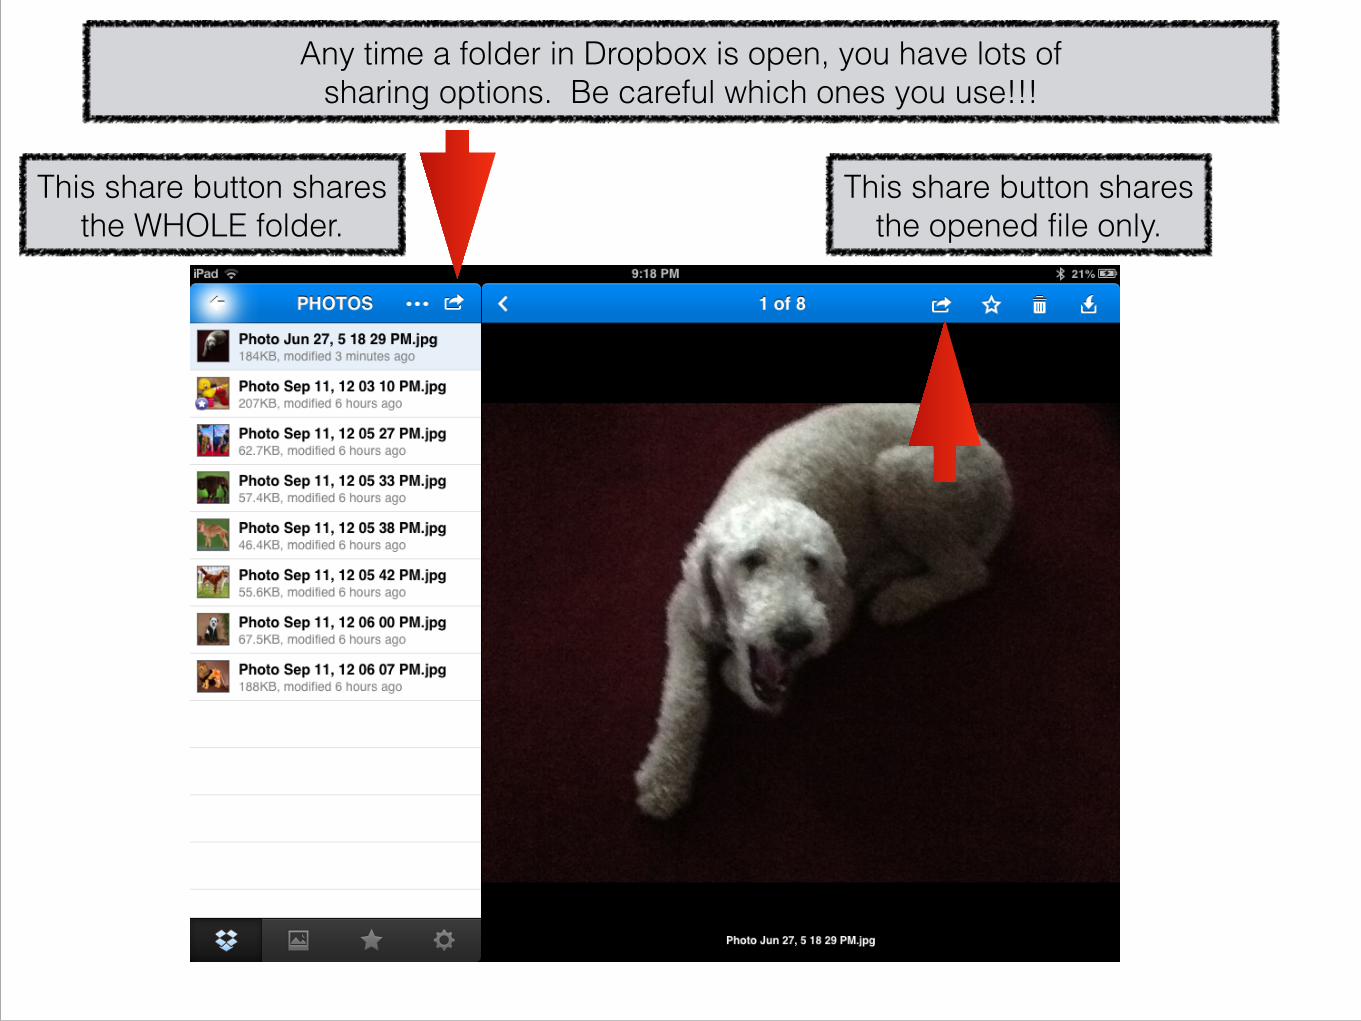
Any time a folder in Dropbox is open, you have lots of sharing options. Be careful which ones you use!!!
This share button shares the WHOLE folder.
This share button shares the opened file only.

Share options If you choose Copy Link to Clipboard, a link to the selected
file will be generated to the clipboard.
Tap on the screen and choose Paste to see the link:
https://www.dropbox.com/s/8o4injjs3ll4ojd/Photo%20Jun
%2027%2C%205%2018%2029%20PM.jpg
This link feature is very useful in
creating a QR code (use QRafter Pro app on VMA iPads)
or if your selected file is a movie that is too large to
email. You can share a large file by
sending the link in an email or by creating a QR code.
The file will be hosted by your Dropbox account.

Other tools Star makes a file a favorite, which makes it available even when iPad is not connected to Internet.
Trash can deletes file.
Save to Photo roll, copy to
clipboard, or
Cog tells which email address Dropbox is using, and allows user to disconnect Dropbox account from iPad. Files will still be retained "in the cloud"
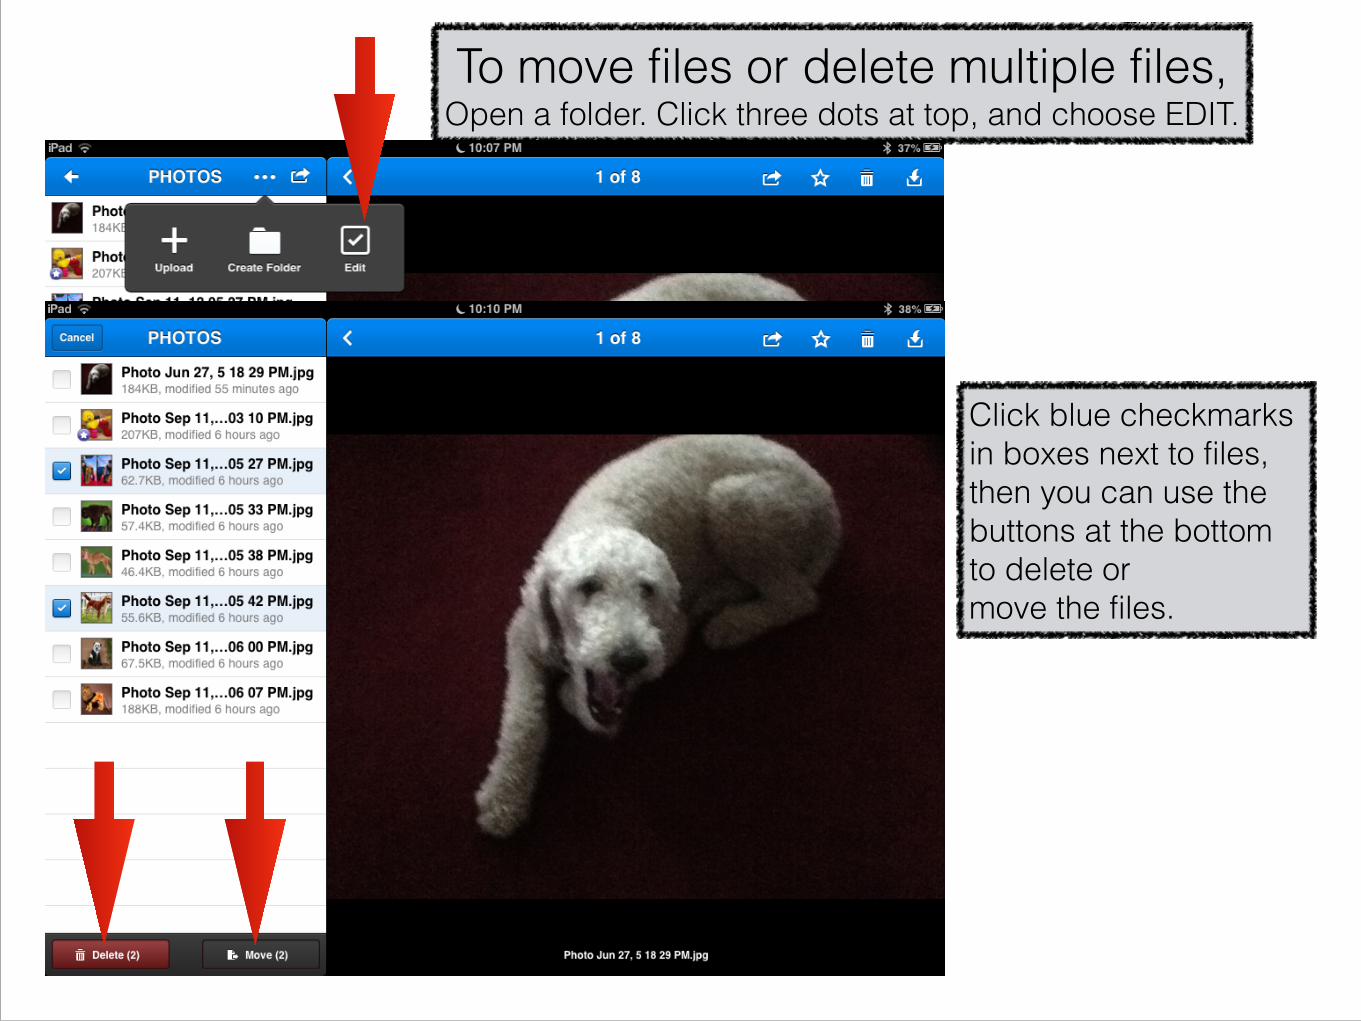
To move files or delete multiple files, Open a folder. Click three dots at top, and choose EDIT.
Click blue checkmarks in boxes next to files, then you can use the buttons at the bottom to delete or move the files.
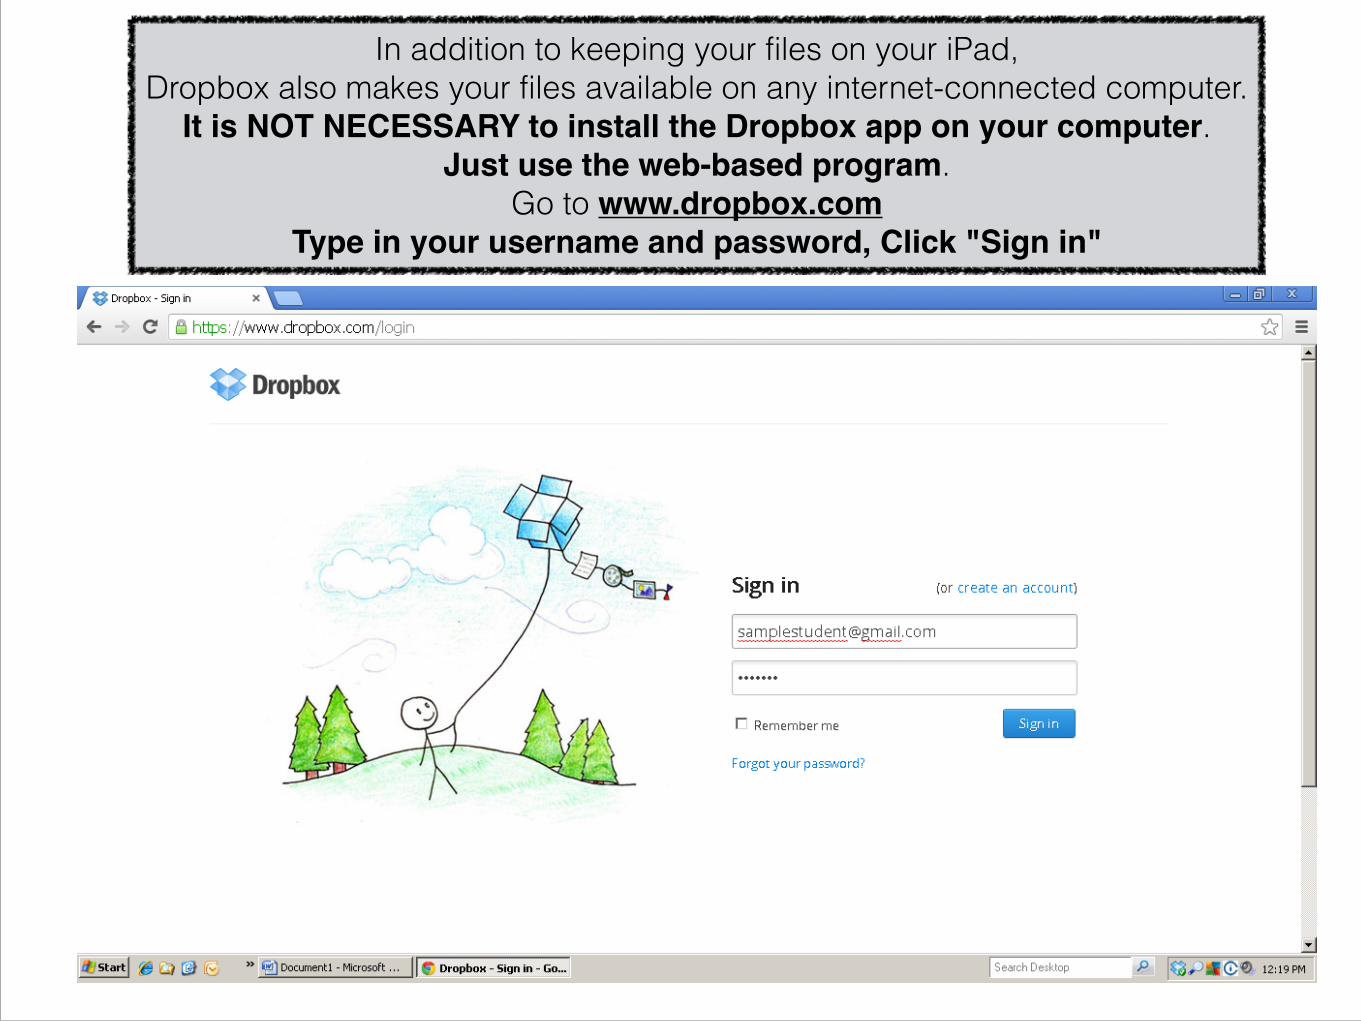
In addition to keeping your files on your iPad, Dropbox also makes your files available on any internet-connected computer.
It is NOT NECESSARY to install the Dropbox app on your computer. Just use the web-based program.
Go to www.dropbox.com Type in your username and password, Click "Sign in"
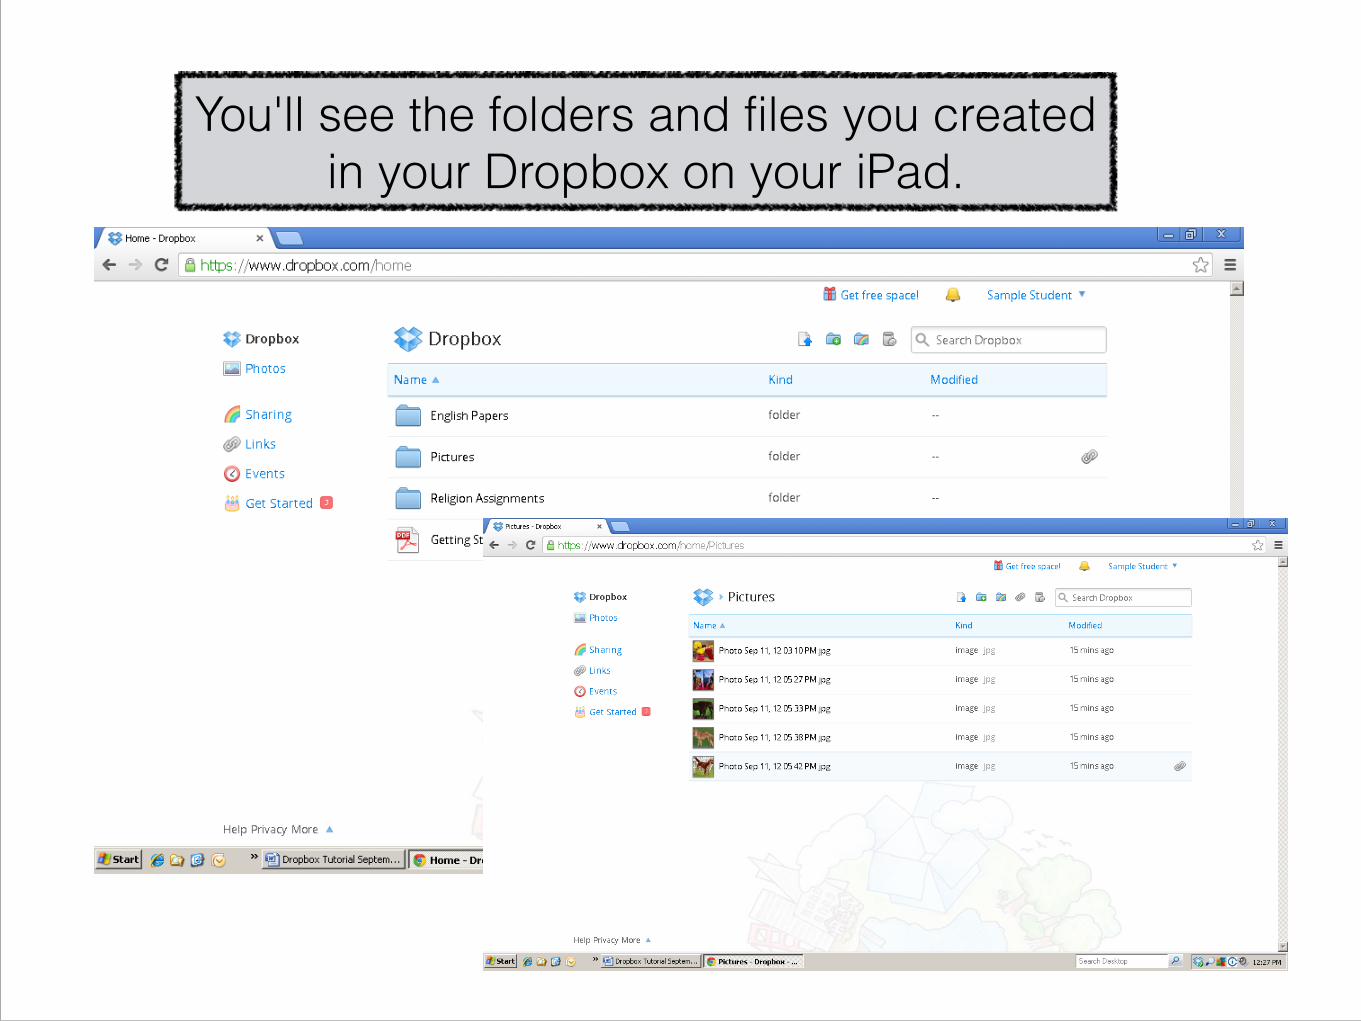
You'll see the folders and files you created in your Dropbox on your iPad.

To add files to Dropbox on a PC, click the Upload icon at the top
Click the "Choose Files" button.
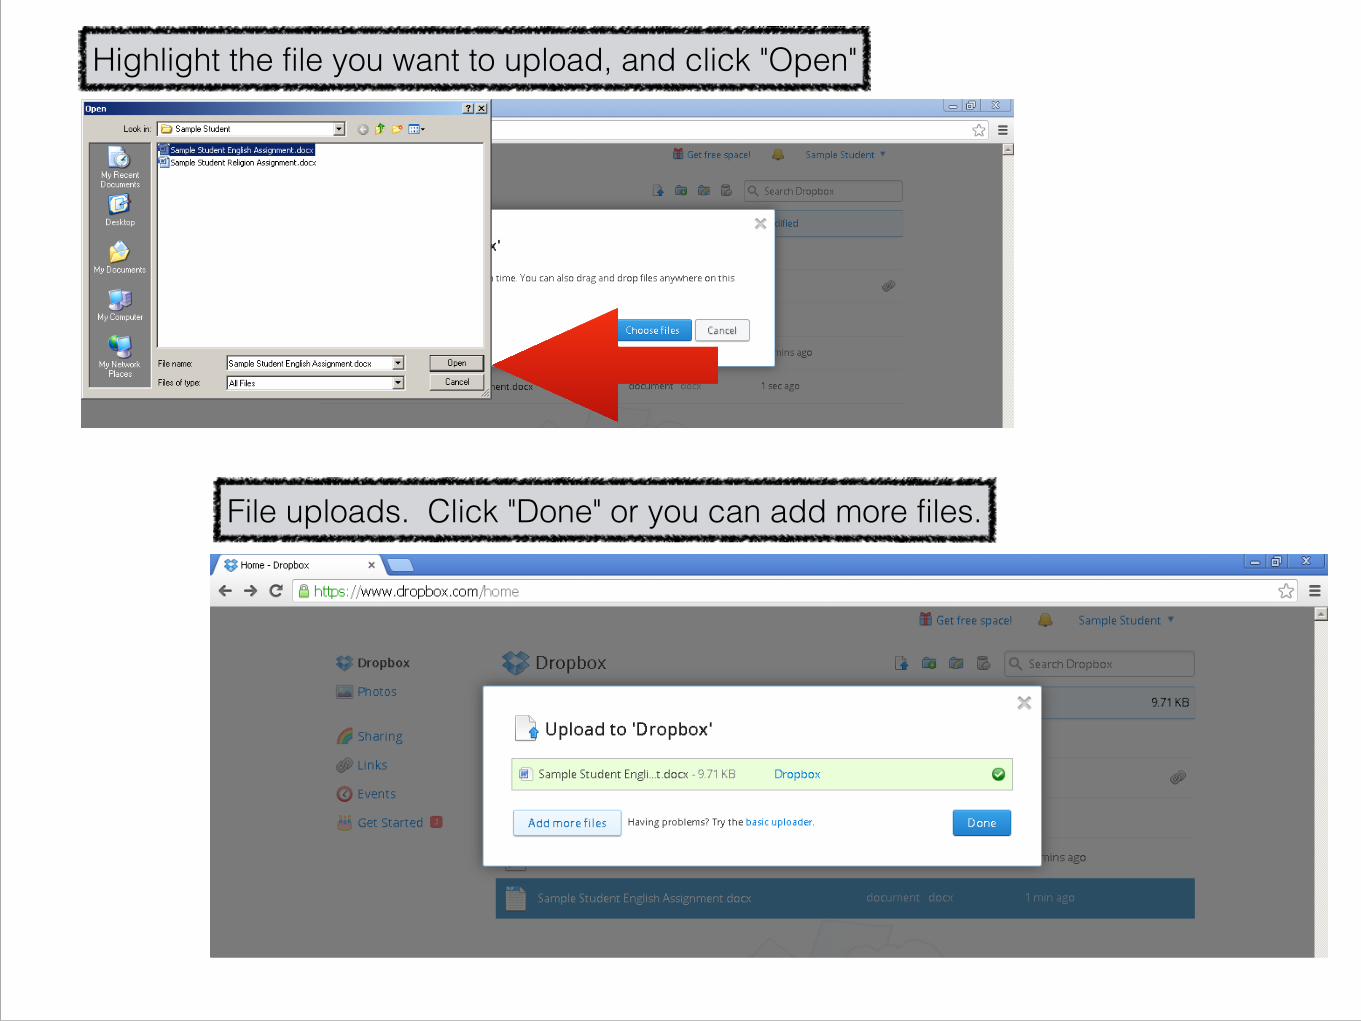
Highlight the file you want to upload, and click "Open"
File uploads. Click "Done" or you can add more files.
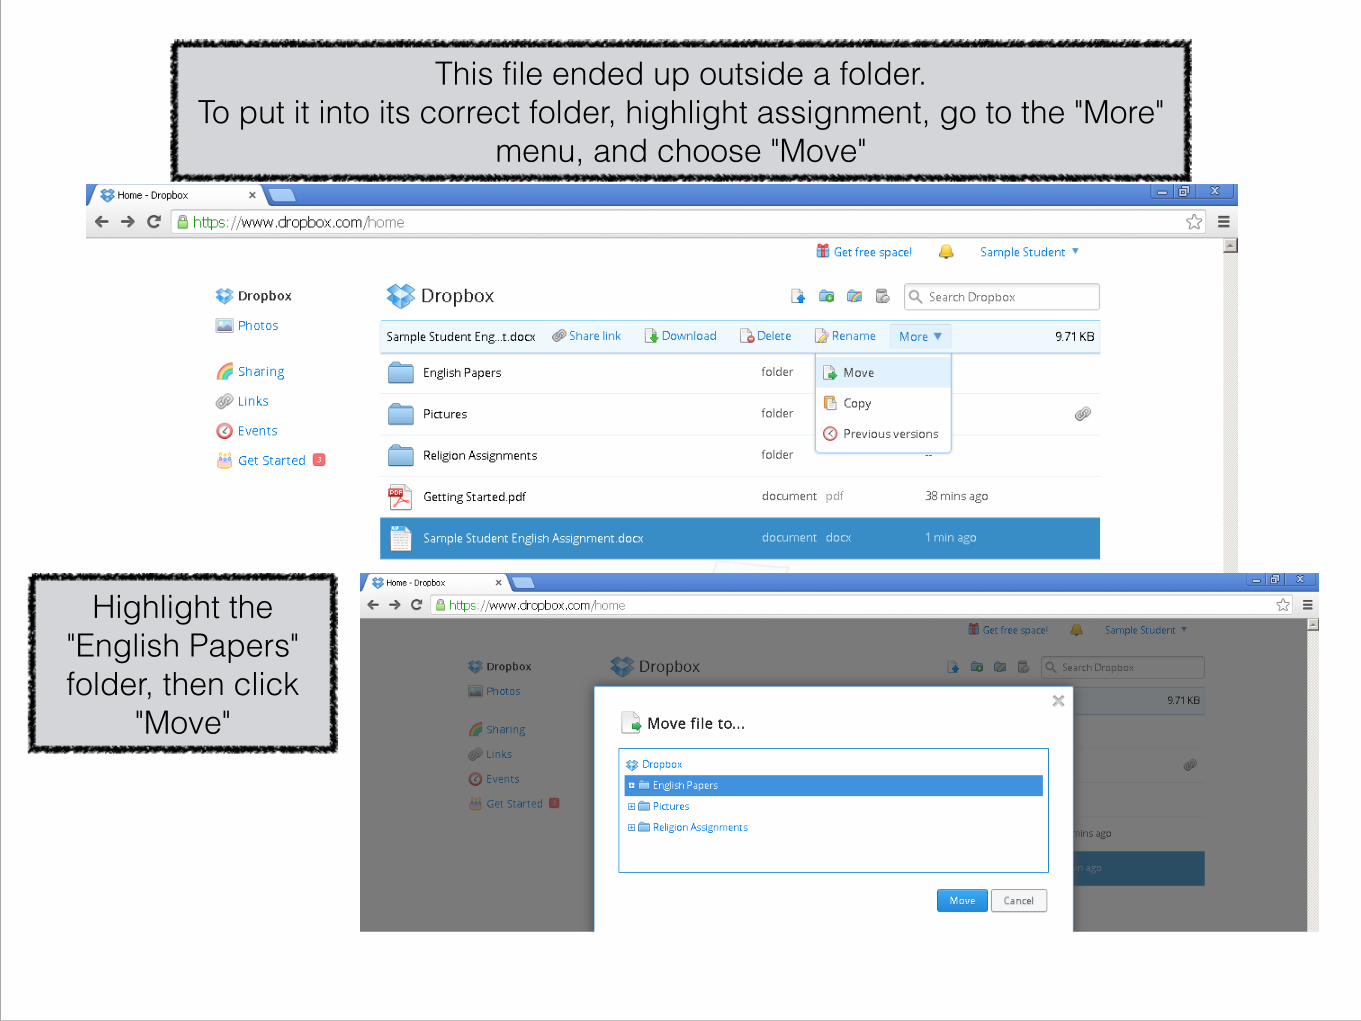
This file ended up outside a folder. To put it into its correct folder, highlight assignment, go to the "More"
menu, and choose "Move"
Highlight the "English Papers" folder, then click
"Move"
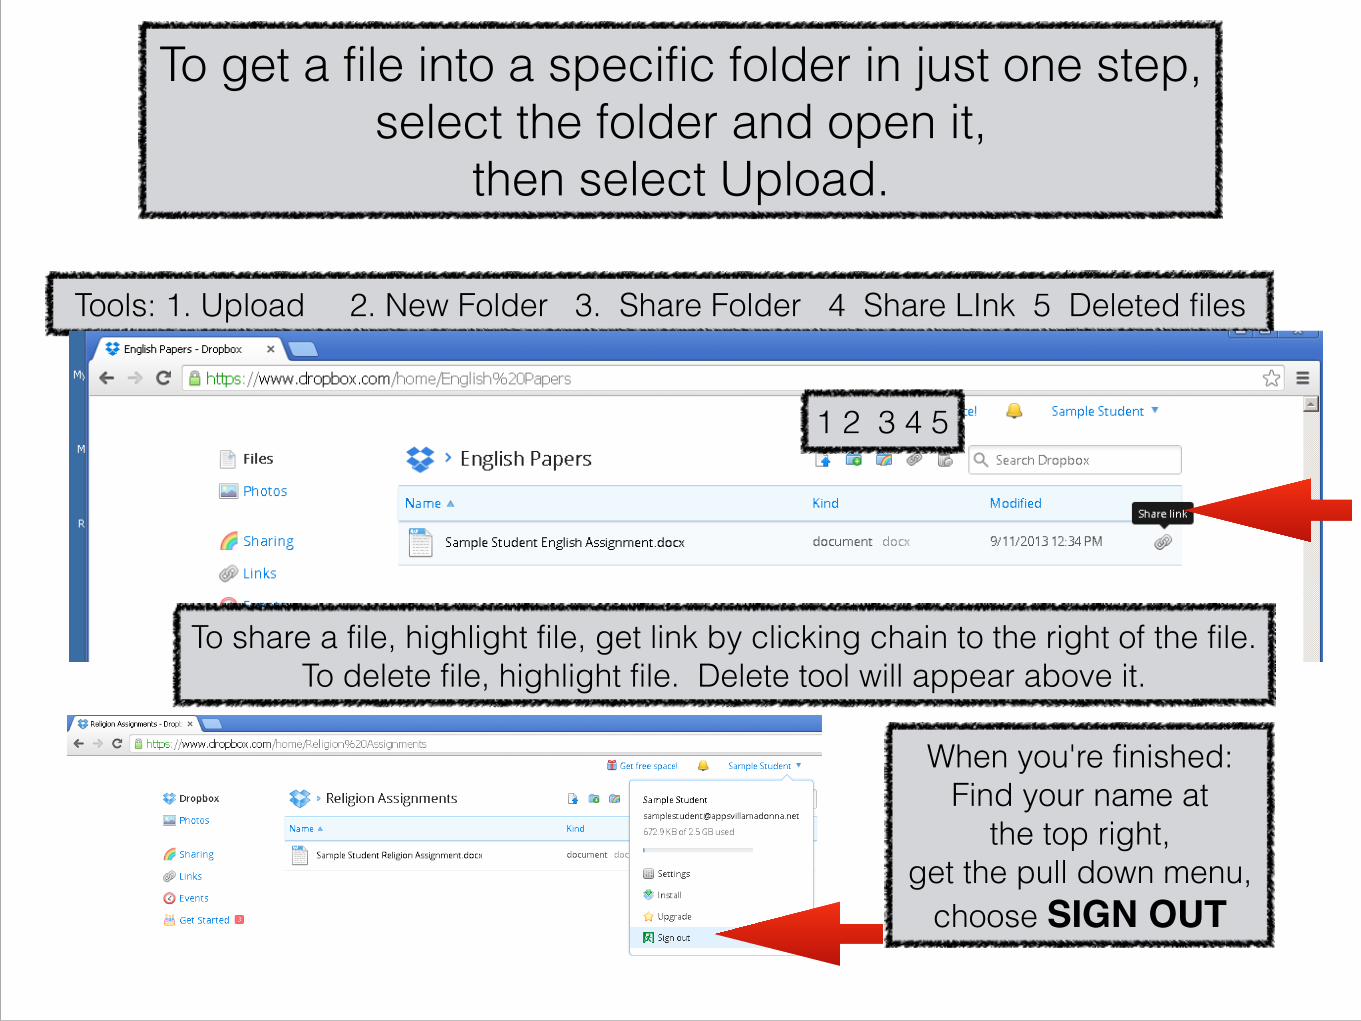
To get a file into a specific folder in just one step, select the folder and open it,
then select Upload.
Tools: 1. Upload 2. New Folder 3. Share Folder 4 Share LInk 5 Deleted files
1 2 3 4 5
To share a file, highlight file, get link by clicking chain to the right of the file. To delete file, highlight file. Delete tool will appear above it.
When you're finished: Find your name at
the top right, get the pull down menu,
choose SIGN OUT


![Configurando conta DropBox - dados.multilaser.com.brdados.multilaser.com.br/sac/Infograficos/Segurança/7 configurando... · Dropbox, Inc CUS] Experimente o Dropbox Business O Dropbox](https://img.pdfslide.net/doc/110x75/5e42b86a1c57b53c9c1e4678/configurando-conta-dropbox-dados-a7-configurando-dropbox-inc-cus-experimente.jpg)