Embed Size (px)
DESCRIPTION
Introduction to HTML Part 2. Outline 4.1 Introduction 4.2 Basic HTML Tables 4.3 Intermediate HTML Tables and Formatting 4.4 Basic HTML Forms 4.5 More Complex HTML Forms 4.6 Internal Linking 4.7 meta Elements 4.8 frameset Element 4.9 Nested frameset s - PowerPoint PPT Presentation
Citation preview

1
.
Introduction to HTML Part 2Outline4.1 Introduction4.2 Basic HTML Tables4.3 Intermediate HTML Tables and Formatting4.4 Basic HTML Forms4.5 More Complex HTML Forms4.6 Internal Linking4.7 meta Elements4.8 frameset Element4.9 Nested framesets4.10 Web Resources
2
.
Objectives
To be able to create tables with rows and columns of data.
To be able to control table formatting. To be able to create and use forms. To be able to create and use image maps to aid in Web-
page navigation. To be able to make Web pages accessible to search
engines using meta elements. To be able to use the frameset element to display
multiple Web pages in a single browser window.
3
.
4.1 Introduction
Tables: present information
Forms: collect information from visitor
Internal linking and image maps: Enhance Web page navigation
Frames: display multiple documents in the browser

4
.
4.2 Basic HTML Tables
Organize data into rows and columns
table element:<table></table>
Attributes Description
border specifies the table’s border width in pixels
summary describes the table’s contents
Caption (sub element) describes the table’s content and helps text-based browsers interpret table data
5
.
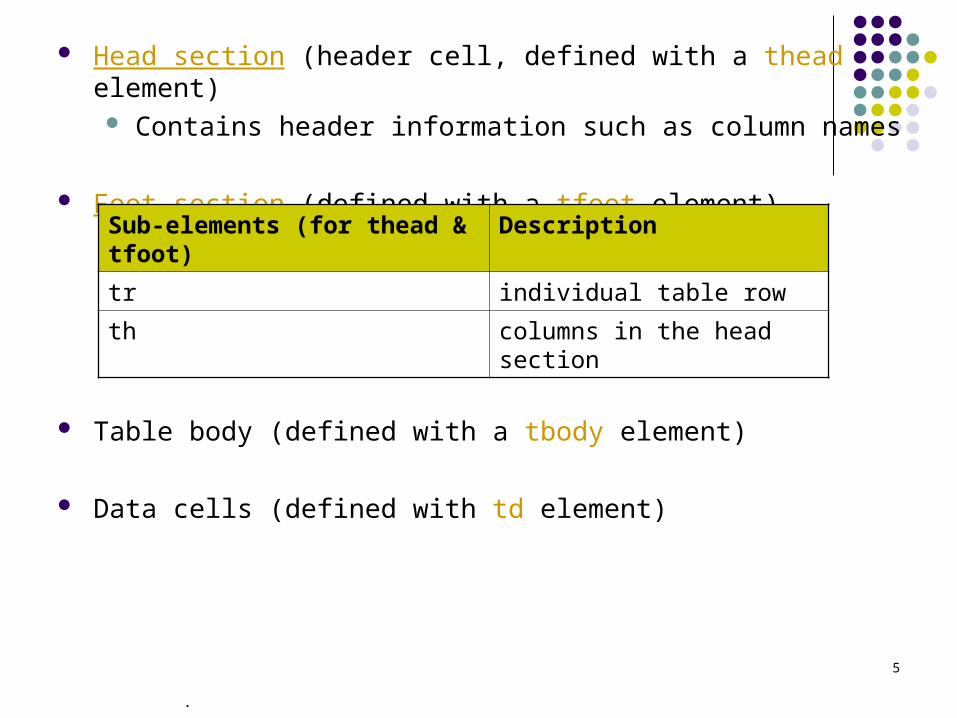
Head section (header cell, defined with a thead element) Contains header information such as column names
Foot section (defined with a tfoot element)
Table body (defined with a tbody element)
Data cells (defined with td element)
Sub-elements (for thead & tfoot) Description
tr individual table row
th columns in the head section
6
.
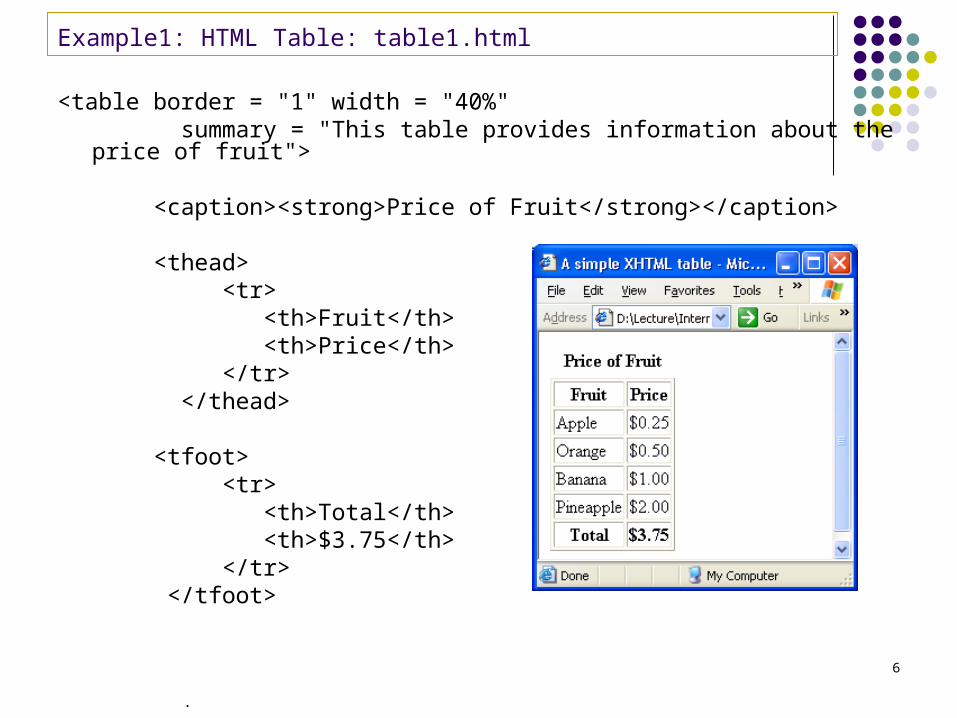
Example1: HTML Table: table1.html
<table border = "1" width = "40%" summary = "This table provides information about the price of fruit">
<caption><strong>Price of Fruit</strong></caption>
<thead> <tr> <th>Fruit</th> <th>Price</th> </tr> </thead>
<tfoot> <tr> <th>Total</th> <th>$3.75</th> </tr> </tfoot>
7
.
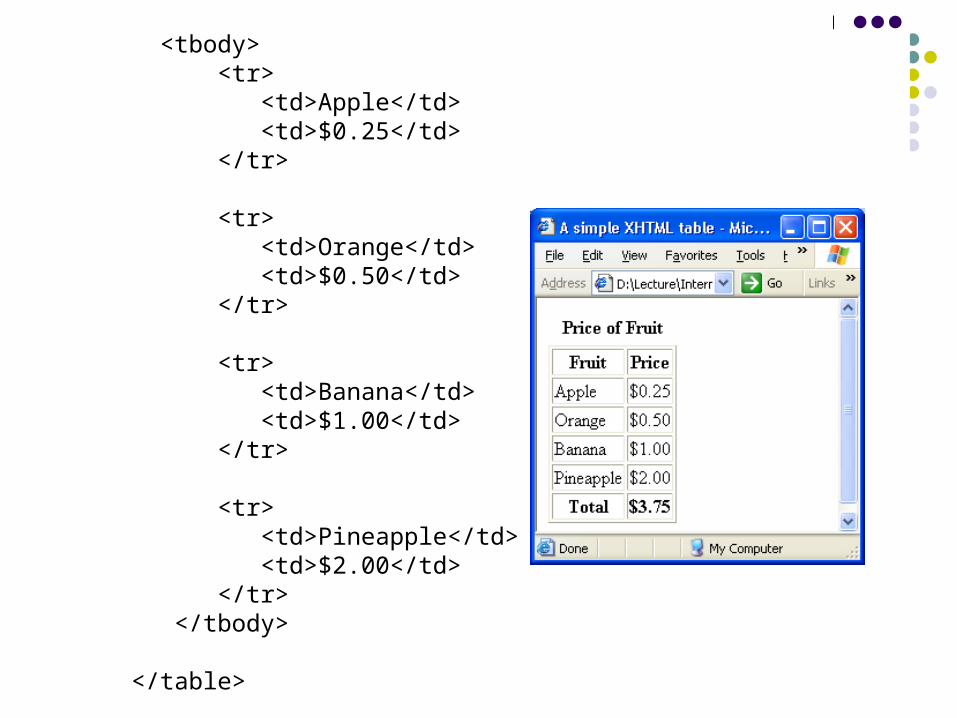
<tbody> <tr> <td>Apple</td> <td>$0.25</td> </tr>
<tr> <td>Orange</td> <td>$0.50</td> </tr>
<tr> <td>Banana</td> <td>$1.00</td> </tr>
<tr> <td>Pineapple</td> <td>$2.00</td> </tr> </tbody>
</table>

8
.
4.3 Intermediate HTML Tables &Formatting
Element colgroup: groups and formats columns
Element col:
tr and th attributes:
attributes Description
align determines the alignment of text in the column
span determines how many columns the col element formats
attributes Description
rowspan,colspan specify the number of rows or columns occupied by a cell
valign= top= middle= bottom= baseline
aligns data vertically

9
.
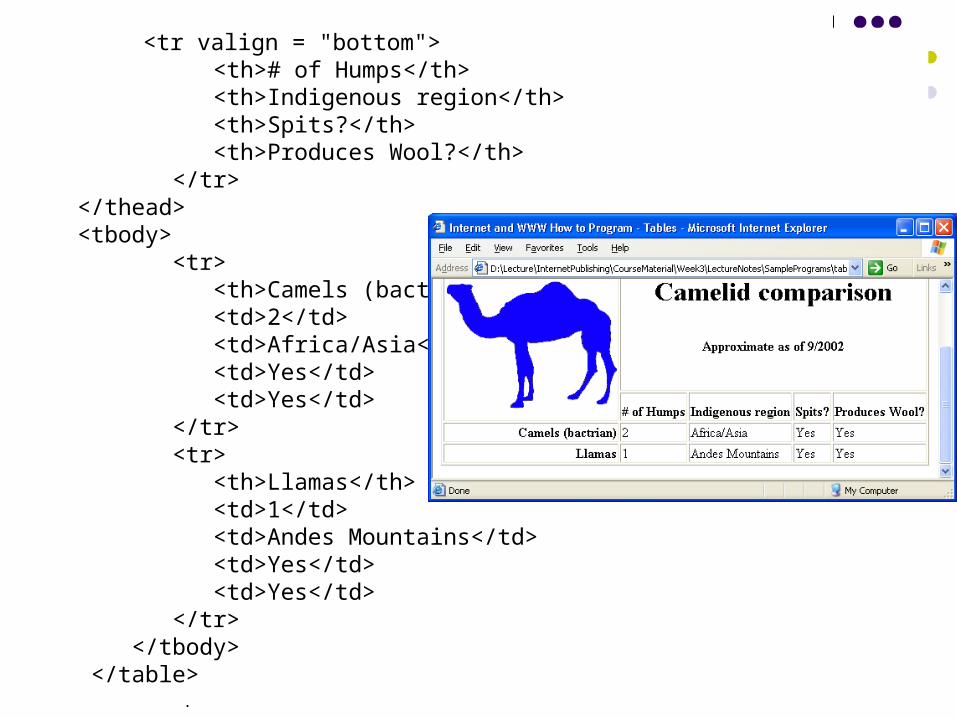
Example2: Complex HTML table: table2.html
<table border = "1"> <colgroup> <col align = "right" span = "1" /> </colgroup>
<thead> <tr> <th rowspan = "2"> <img src = "camel.gif" width = "205" height = "167" alt = "Picture of a camel" /> </th> <th colspan = "4" valign = "top"> <h1>Camelid comparison</h1><br /> <p>Approximate as of 9/2002</p> </th> </tr>
merge two rows
merge four columns
10
.
<tr valign = "bottom"> <th># of Humps</th> <th>Indigenous region</th> <th>Spits?</th> <th>Produces Wool?</th> </tr> </thead> <tbody> <tr> <th>Camels (bactrian)</th> <td>2</td> <td>Africa/Asia</td> <td>Yes</td> <td>Yes</td> </tr> <tr> <th>Llamas</th> <td>1</td> <td>Andes Mountains</td> <td>Yes</td> <td>Yes</td> </tr> </tbody> </table>
11
.
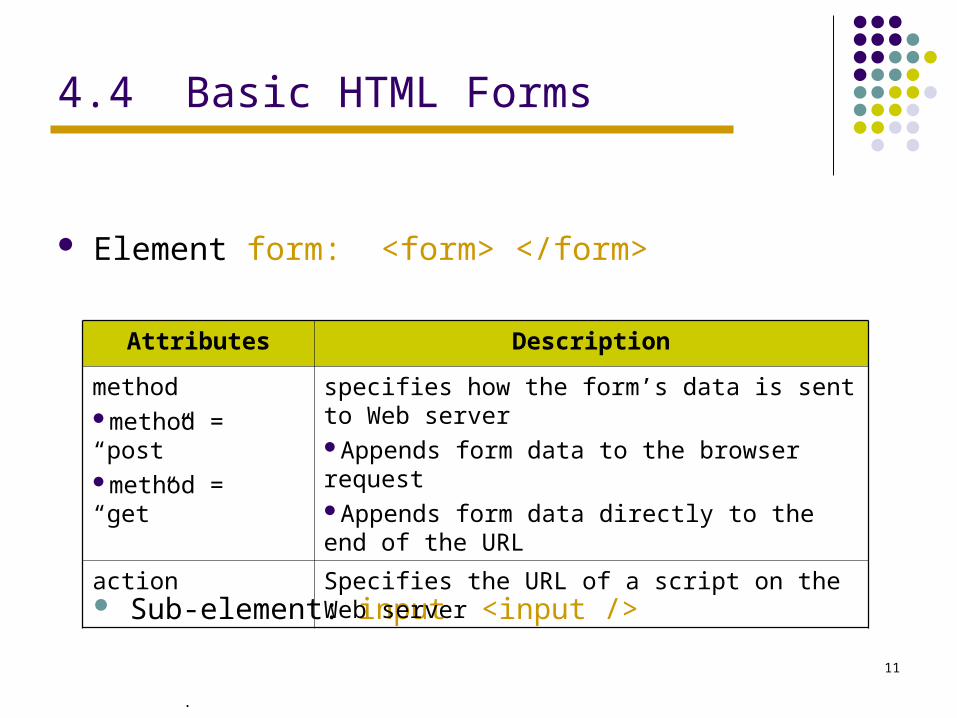
4.4 Basic HTML Forms
Element form: <form> </form>
Sub-element: input <input />
Attributes Description
methodmethod = “post”method = “get”
specifies how the form’s data is sent to Web serverAppends form data to the browser requestAppends form data directly to the end of the URL
action Specifies the URL of a script on the Web server
12
.
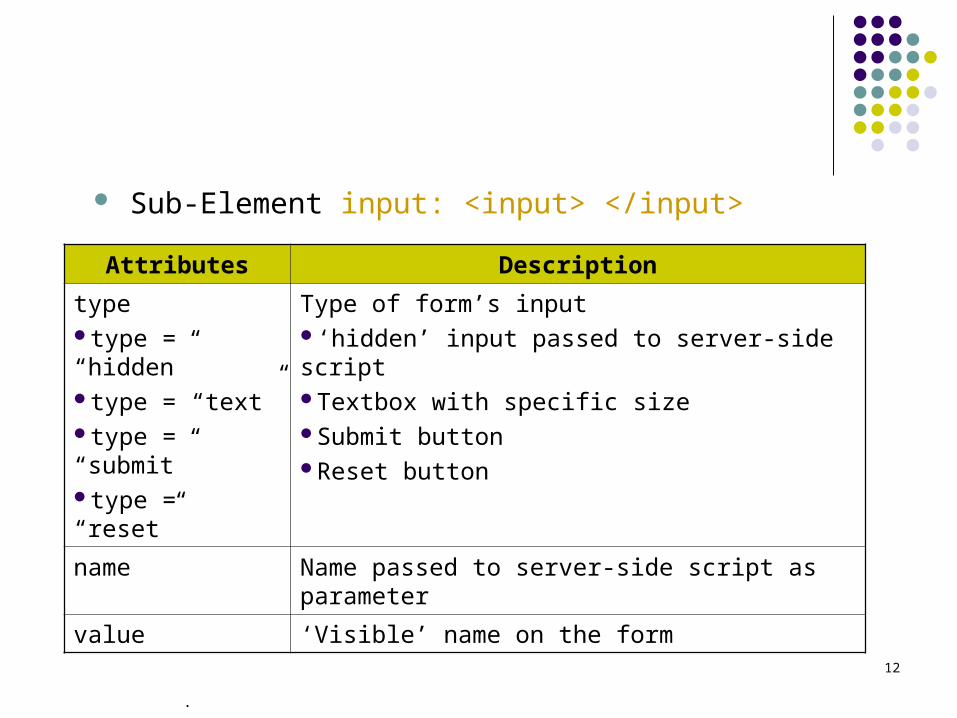
Sub-Element input: <input> </input>
Attributes Description
typetype = “hidden”type = “text”type = “submit”type = “reset”
Type of form’s input‘hidden’ input passed to server-side scriptTextbox with specific sizeSubmit buttonReset button
name Name passed to server-side script as parameter
value ‘Visible’ name on the form
13
.
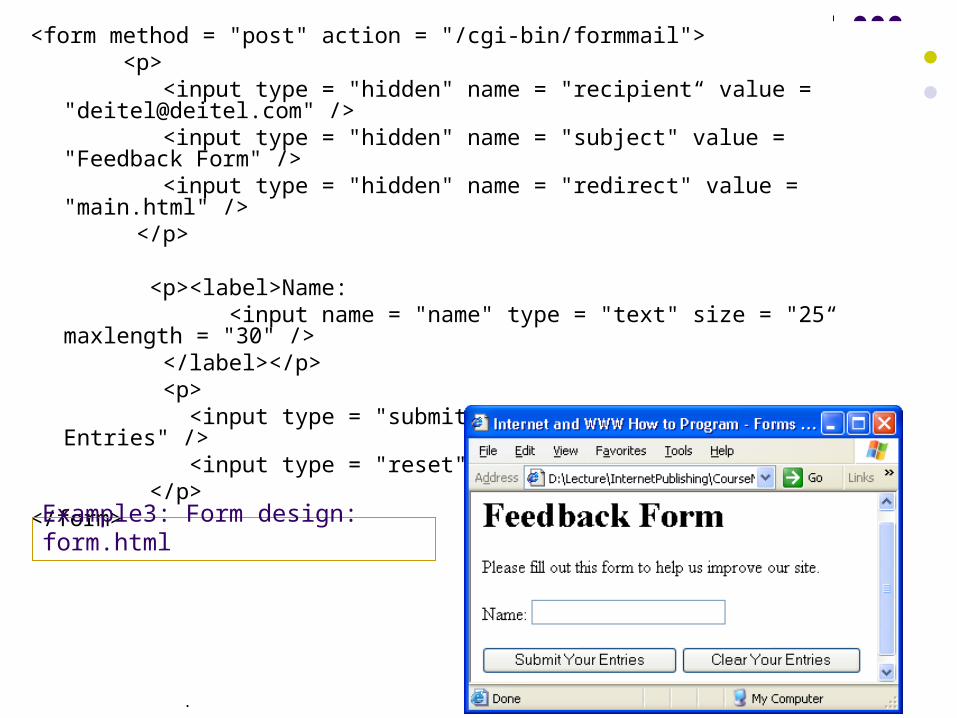
<form method = "post" action = "/cgi-bin/formmail"> <p> <input type = "hidden" name = "recipient“ value = "[email protected]" /> <input type = "hidden" name = "subject" value = "Feedback Form" /> <input type = "hidden" name = "redirect" value = "main.html" /> </p>
<p><label>Name: <input name = "name" type = "text" size = "25“ maxlength = "30" /> </label></p> <p> <input type = "submit" value = "Submit Your Entries" /> <input type = "reset" value = "Clear Your Entries" /> </p> </form>
Example3: Form design: form.html

14
.
4.5 More Complex HTML Forms
Sub-Element textarea: <textarea> </textarea> Inserts a multiline text box (text area)
Sub-Element input: <input> </input>
Attributes Description
rows Specifies the number of rows
cols Specifies the number columns
Attributes Description
typetype = “password”type = “checkbox”type = “radio”
Type of form’s inputPassword box with specific size Enable users to select from a set of optionsRadio button

15
.
Sub-Element select: <select> </select> Drop down list Contains element option: <option> </option>
Sub-Element option: Adds items to the drop-down list
Attributes Description
selected Specifies which item initially is displayed as the selected item
16
.
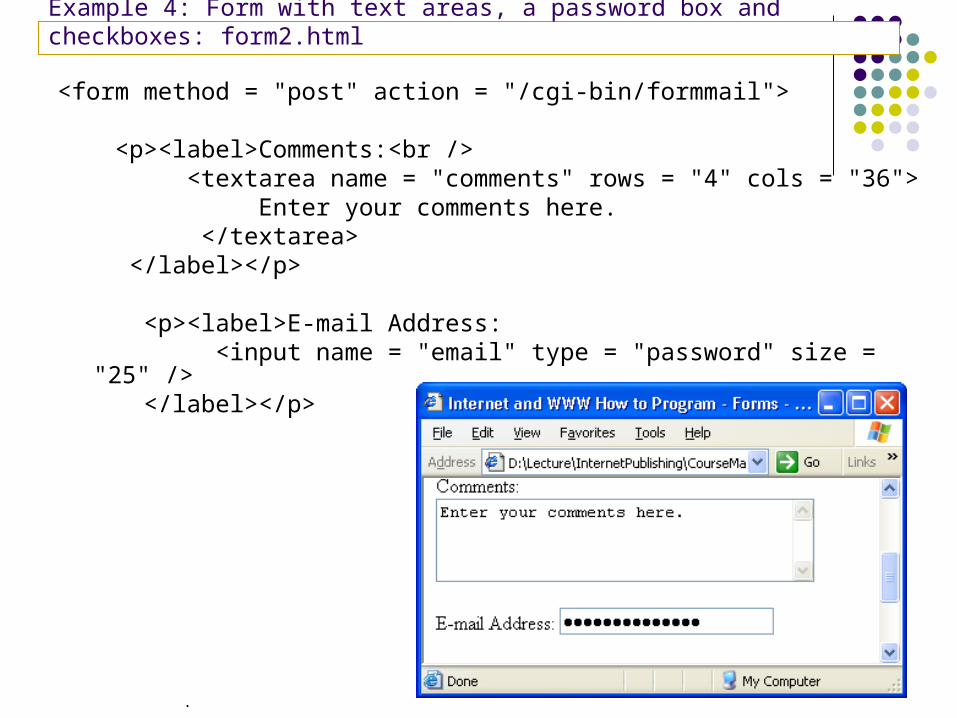
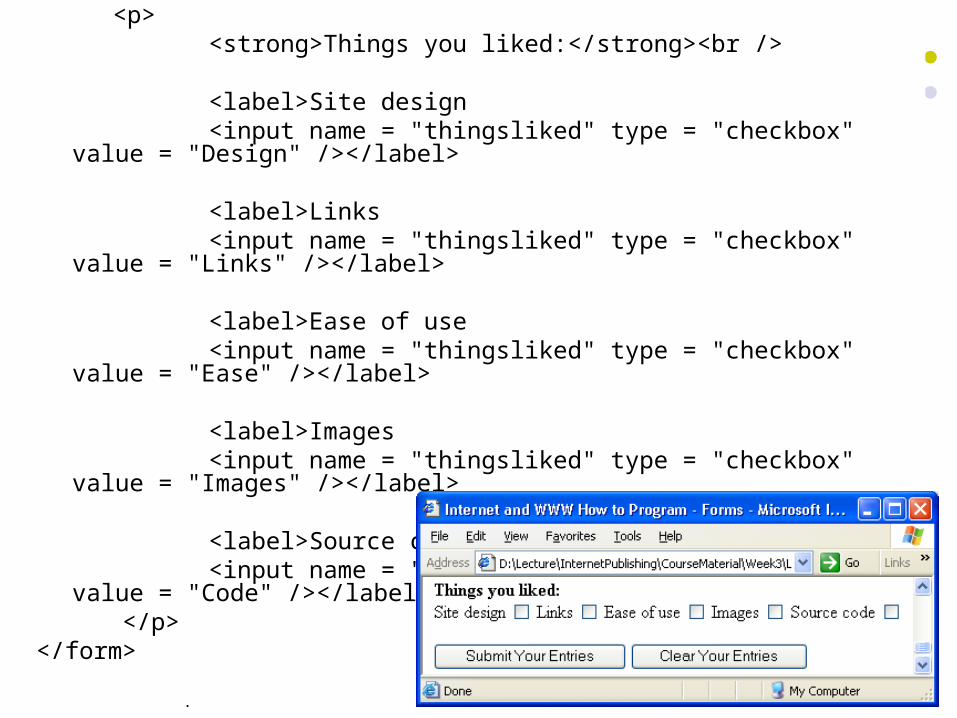
Example 4: Form with text areas, a password box and checkboxes: form2.html
<form method = "post" action = "/cgi-bin/formmail">
<p><label>Comments:<br /> <textarea name = "comments" rows = "4" cols = "36"> Enter your comments here. </textarea> </label></p> <p><label>E-mail Address: <input name = "email" type = "password" size = "25" /> </label></p>
17
.
<p> <strong>Things you liked:</strong><br />
<label>Site design <input name = "thingsliked" type = "checkbox" value = "Design" /></label> <label>Links <input name = "thingsliked" type = "checkbox" value = "Links" /></label>
<label>Ease of use <input name = "thingsliked" type = "checkbox" value = "Ease" /></label>
<label>Images <input name = "thingsliked" type = "checkbox" value = "Images" /></label>
<label>Source code <input name = "thingsliked" type = "checkbox" value = "Code" /></label> </p></form>

18
.
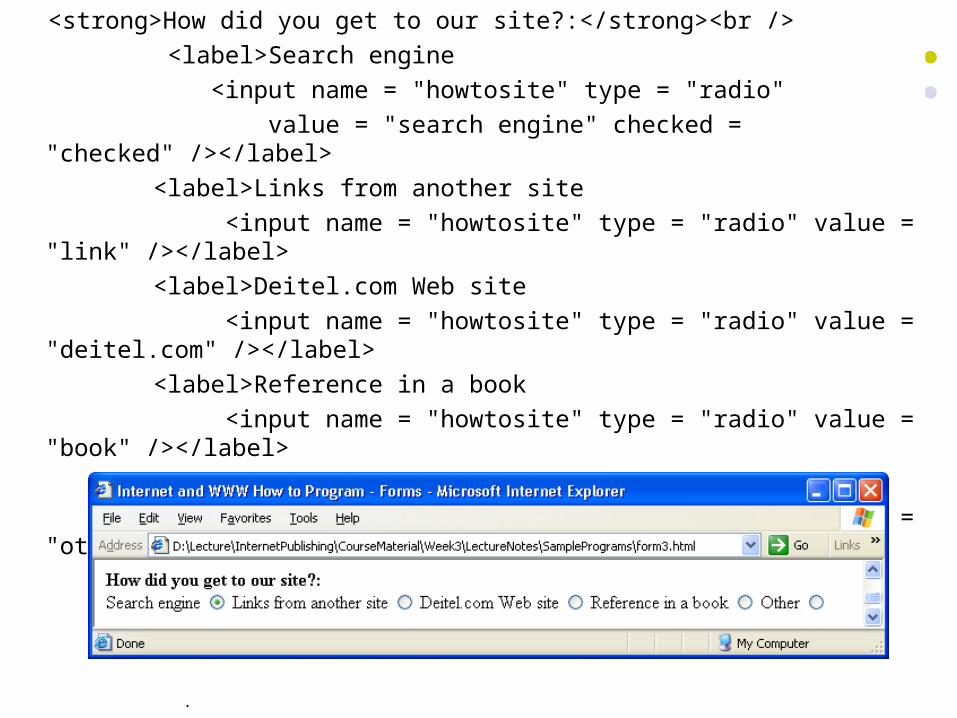
Example 5: Form including radio buttons and a drop-down list: form3.html
19
.
<strong>How did you get to our site?:</strong><br />
<label>Search engine
<input name = "howtosite" type = "radio"
value = "search engine" checked = "checked" /></label>
<label>Links from another site
<input name = "howtosite" type = "radio" value = "link" /></label>
<label>Deitel.com Web site
<input name = "howtosite" type = "radio" value = "deitel.com" /></label>
<label>Reference in a book
<input name = "howtosite" type = "radio" value = "book" /></label>
<label>Other
<input name = "howtosite" type = "radio" value = "other" /></label>
20
.
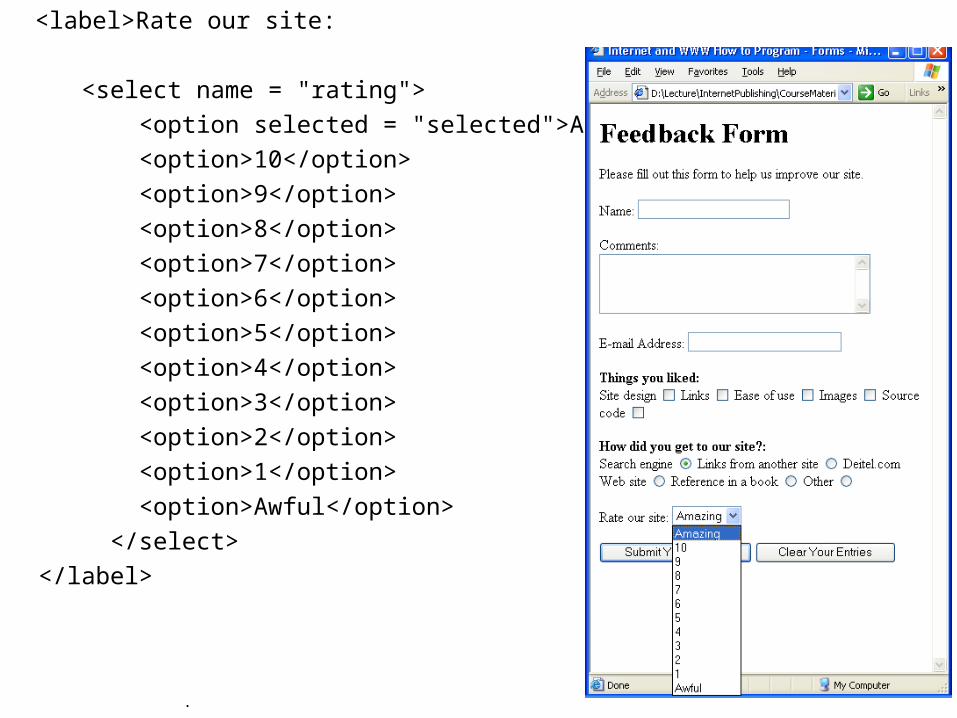
<label>Rate our site:
<select name = "rating">
<option selected = "selected">Amazing</option>
<option>10</option>
<option>9</option>
<option>8</option>
<option>7</option>
<option>6</option>
<option>5</option>
<option>4</option>
<option>3</option>
<option>2</option>
<option>1</option>
<option>Awful</option>
</select>
</label>
21
.
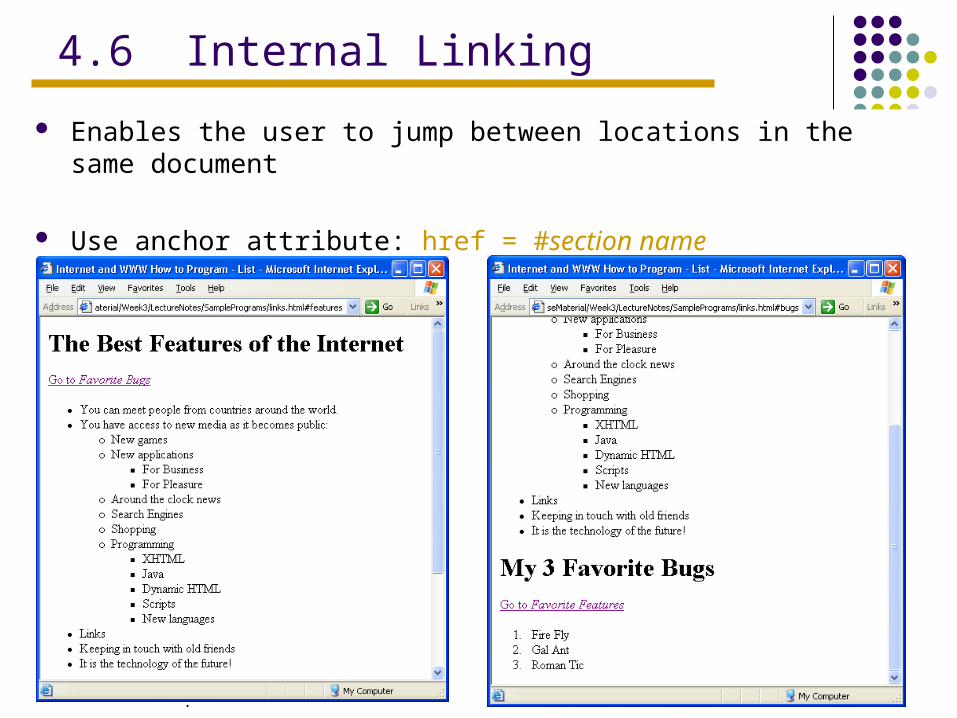
4.6 Internal Linking
Enables the user to jump between locations in the same document
Use anchor attribute: href = #section name

22
.
Example 6: Internal hyperlinks: links.html
<h1 id = "features">The Best Features of the Internet</h1>
<p><a href = "#bugs">Go to <em>Favorite Bugs</em></a></p>
<ul>
<li>You can meet people from countries around the world.</li>
<li>It is the technology of the future!</li>
</ul>
<h1 id = "bugs">My 3 Favorite Bugs</h1>
<p>
<a href = "#features">Go to <em>Favorite Features</em></a></p>
<ol>
<li>Fire Fly</li>
<li>Gal Ant</li>
<li>Roman Tic</li>
</ol>
id attribute creates an internal hyperlink destination
an internal link’s address is ‘#id’

23
.
4.7 meta Elements
Specify information about a document
Attributes Description
name
name = “keywords”
name = “description”
Identifies the type of meta element
Provides search engines with a list of words that describe a pageProvides a description of a site
content Provides the information search engine use to catalog pages

24
.
Example 7: meta tags provide keywords and a description: main.html
<head>
<title>Internet and WWW How to Program - Welcome</title>
<meta name = "keywords" content = "Web page, design, XHTML, tutorial,
personal, help, index, form, contact, feedback, list, links, frame, deitel" />
<meta name = "description" content = "This Web site will help you learn the basics
of XHTML and Web page design through the use of interactive examples and
instruction." />
</head>
<meta> tags provide search engines with information used to catalog a site
25
.
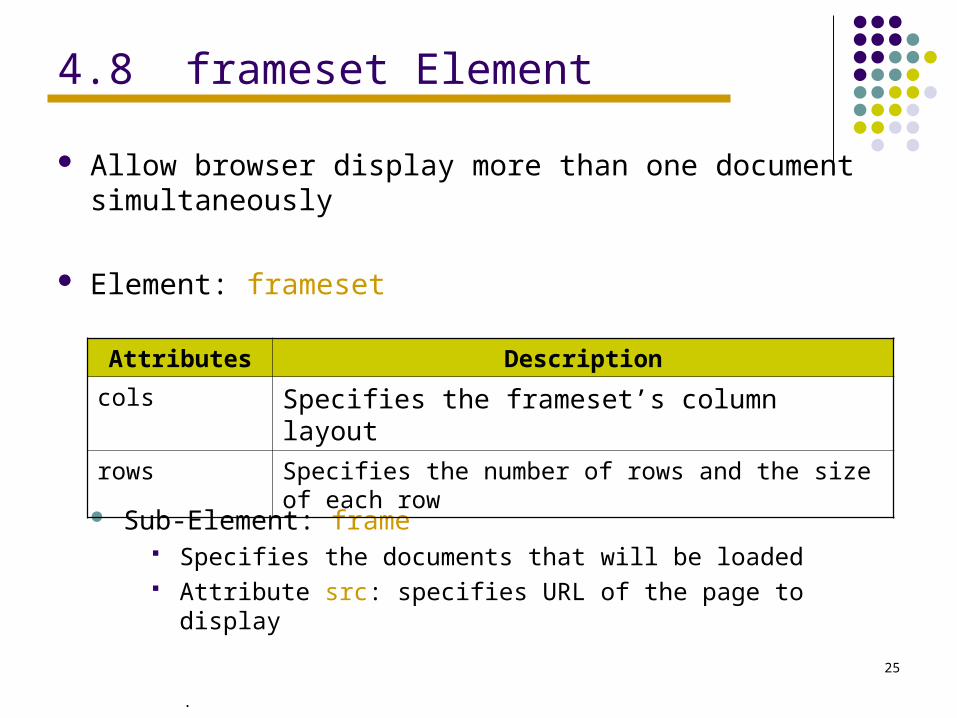
4.8 frameset Element
Allow browser display more than one document simultaneously
Element: frameset
Sub-Element: frame Specifies the documents that will be loaded Attribute src: specifies URL of the page to display
Attributes Description
cols Specifies the frameset’s column layout
rows Specifies the number of rows and the size of each row
26
.
27
.
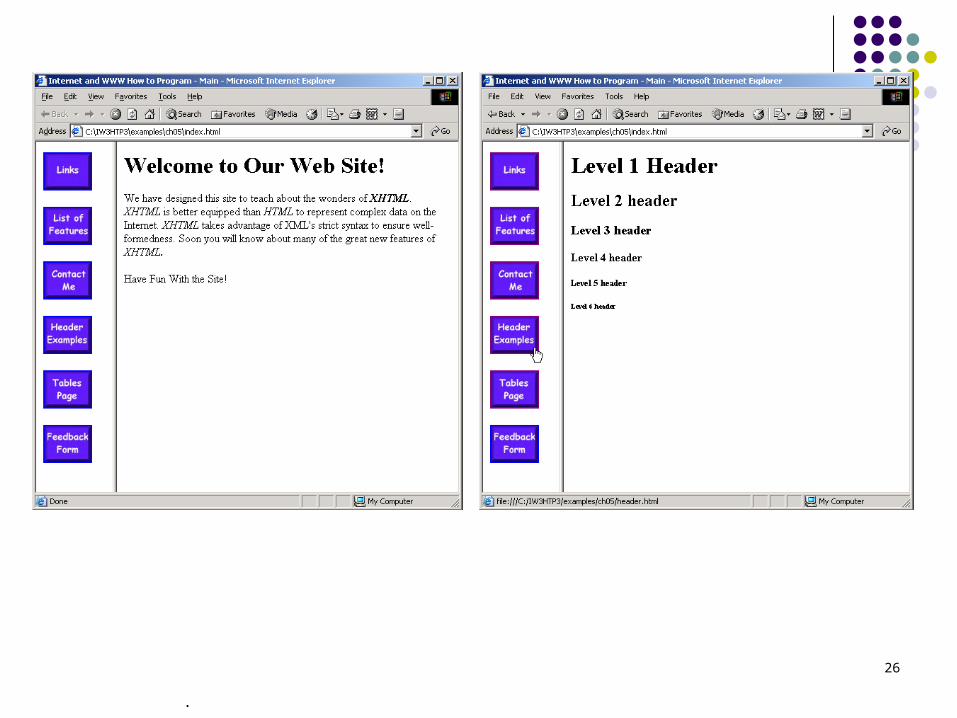
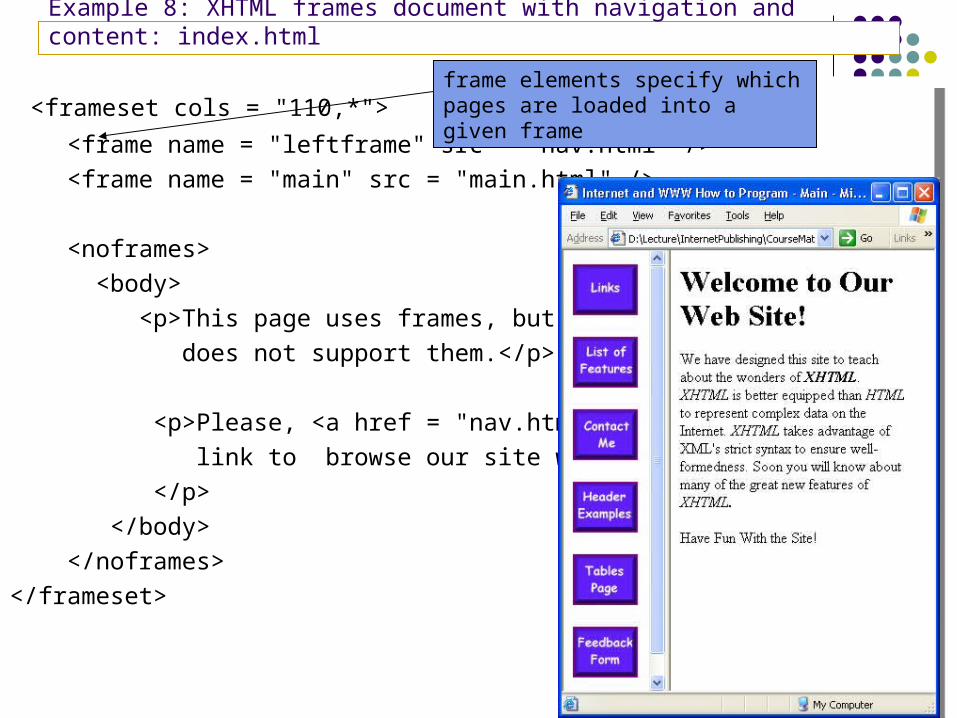
Example 8: XHTML frames document with navigation and content: index.html
<frameset cols = "110,*">
<frame name = "leftframe" src = "nav.html" />
<frame name = "main" src = "main.html" />
<noframes>
<body>
<p>This page uses frames, but your browser
does not support them.</p>
<p>Please, <a href = "nav.html">follow this
link to browse our site without frames</a>.
</p>
</body>
</noframes>
</frameset>
frame elements specify which pages are loaded into a given frame

28
.
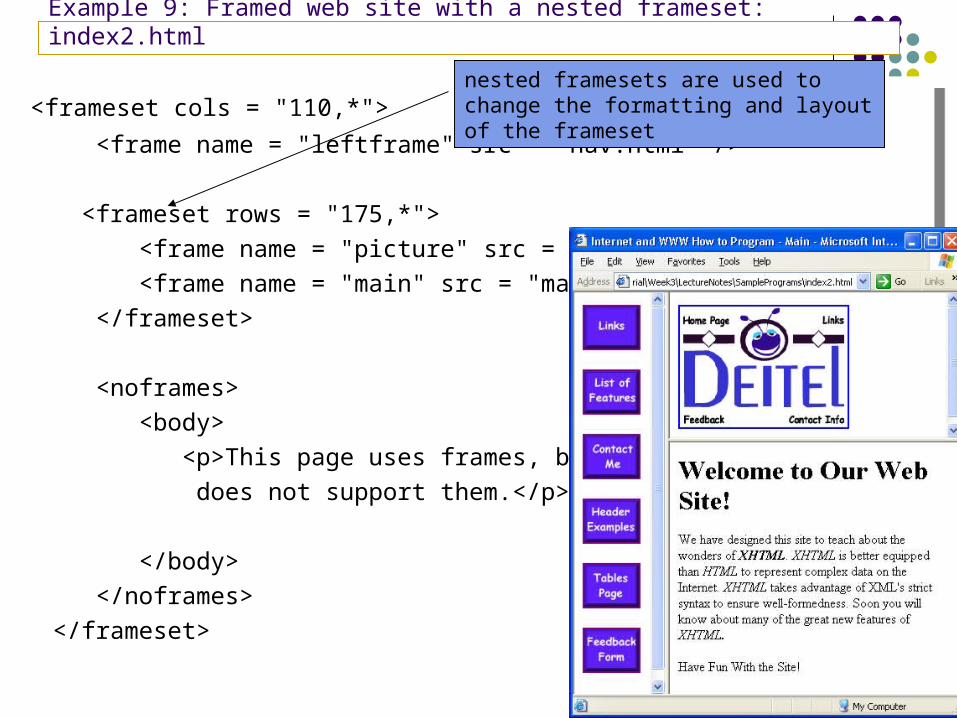
4.9 Nested framesets
framesets within framesets
29
.
Example 9: Framed web site with a nested frameset: index2.html
<frameset cols = "110,*">
<frame name = "leftframe" src = "nav.html" />
<frameset rows = "175,*">
<frame name = "picture" src = "picture.html" />
<frame name = "main" src = "main.html" />
</frameset>
<noframes>
<body>
<p>This page uses frames, but your browser
does not support them.</p>
</body>
</noframes>
</frameset>
nested framesets are used to change the formatting and layout of the frameset

30
.
4.10 Web Resources
www.vbxml.com/xhtml/articles/xhtml_tables www.webreference.com/xml/reference/xhtml.html