Embed Size (px)
Citation preview

Inveon™ User Notes Inveon Scanners and Inveon Acquisition Workplace 2.0
Legal Notice
© 2014 by Siemens Medical Solutions USA, Inc. All rights reserved.
Siemens reserves the right to modify the design and specifications contained herein without prior notice. Please contact your local Siemens Sales Representative for the most current information.
No part of this documentation may be reproduced or transmitted in any form by any means, electronic or mechanical, without written permission of Siemens Medical Solutions USA, Inc.
Siemens reserves the right to modify this software. Please contact your service representative for the most current information.
The parameters mentioned herein were specified to the best of our knowledge. We assume no responsibility whatsoever for the correctness of this information. Variations may prove necessary for individual subjects. The investigator bears the sole responsibility for all of the parameters selected.
Third-party software should not be added to your system except by Siemens-authorized personnel. Customer takes full responsibility for any damage or loss of data resulting from the use of unauthorized third-party software. Siemens Medical Solutions USA makes no warranty with respect to third-party software.
Inveon™ is a trademark of Siemens Medical Solutions USA, Inc.
Other trademarks are used for identification purposes only and are the property of their respective owners.
Printed in the United States of America.
The original language of this document is English.
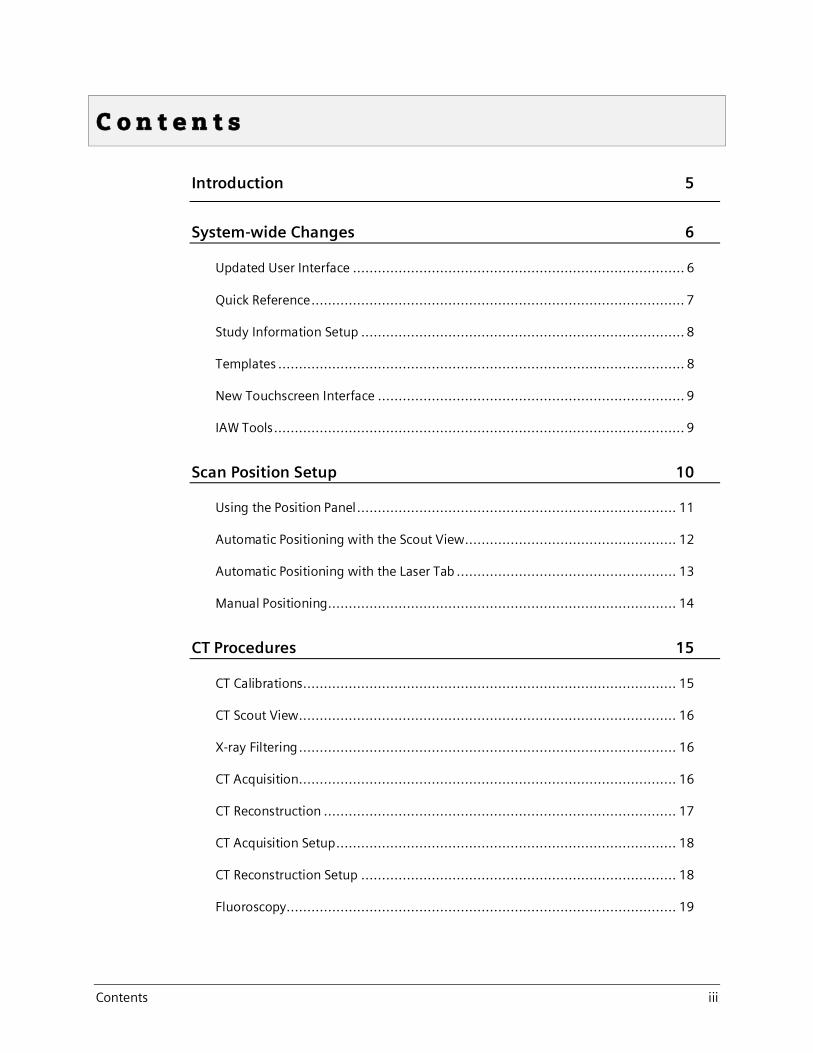
Contents iii
C o n t e n t s
Introduction 5
System-wide Changes 6
Updated User Interface ................................................................................ 6
Quick Reference .......................................................................................... 7
Study Information Setup .............................................................................. 8
Templates .................................................................................................. 8
New Touchscreen Interface .......................................................................... 9
IAW Tools ................................................................................................... 9
Scan Position Setup 10
Using the Position Panel ............................................................................. 11
Automatic Positioning with the Scout View ................................................... 12
Automatic Positioning with the Laser Tab ..................................................... 13
Manual Positioning .................................................................................... 14
CT Procedures 15
CT Calibrations .......................................................................................... 15
CT Scout View ........................................................................................... 16
X-ray Filtering ........................................................................................... 16
CT Acquisition ........................................................................................... 16
CT Reconstruction ..................................................................................... 17
CT Acquisition Setup .................................................................................. 18
CT Reconstruction Setup ............................................................................ 18
Fluoroscopy .............................................................................................. 19

iv Contents
PET Procedures 20
Motion Control (D-PET) .............................................................................. 20
PET Acquisitions ........................................................................................ 21
PET Histogram .......................................................................................... 22
PET Reconstruction .................................................................................... 22
PET Acquisition Setup ................................................................................ 24
PET Histogram Setup ................................................................................. 24
PET Reconstruction Setup ........................................................................... 25
Transformation Matrix ............................................................................... 25
Daily QC ................................................................................................... 26
PET Detector Setup .................................................................................... 26
SPECT Procedures 27
SPECT Scout View ...................................................................................... 27
SPECT Acquisition ...................................................................................... 28
SPECT Histogram ....................................................................................... 29
SPECT Reconstruction ................................................................................ 29
SPECT Detector Setup ................................................................................ 30
SPECT Collimator Calibration ....................................................................... 30
Normalization ........................................................................................... 30
Transformation Matrix ............................................................................... 30
Known Issues 31
IAW ......................................................................................................... 31
CT ........................................................................................................... 31
PET .......................................................................................................... 32
SPECT ...................................................................................................... 33
Inveon Research Workplace and ASIPro ........................................................ 33

Inveon™ User Notes 5
I n t r o d u c t i o n
Inveon Acquisition Workplace (IAW) 2.0 features:
· An improved method of positioning specimens;
· New and faster reconstructions for PET and CT;
· New and improved quality control tools for PET and CT;
· Easier and more flexible SPECT acquisition;
· More corrections for SPECT;
· A streamlined and simplified user interface;
· Automated transformation matrix creation;
· A new touchscreen interface;
· Greater stability; and
· A collection of IAW tools to automate some processes.
The following sections describe how these upgrades impact the functionality of IAW 2.0. Refer to the Operator Manual for complete instructions.
6 Inveon™ User Notes
S y s t e m - w i d e C h a n g e s
Note: All procedures which previously were required to be performed on the embedded computer are now performed on the workstation.
Note: IAW no longer supports post-processing on Linux clusters.
Note: IAW 1.x protocols are not compatible with IAW 2.0.
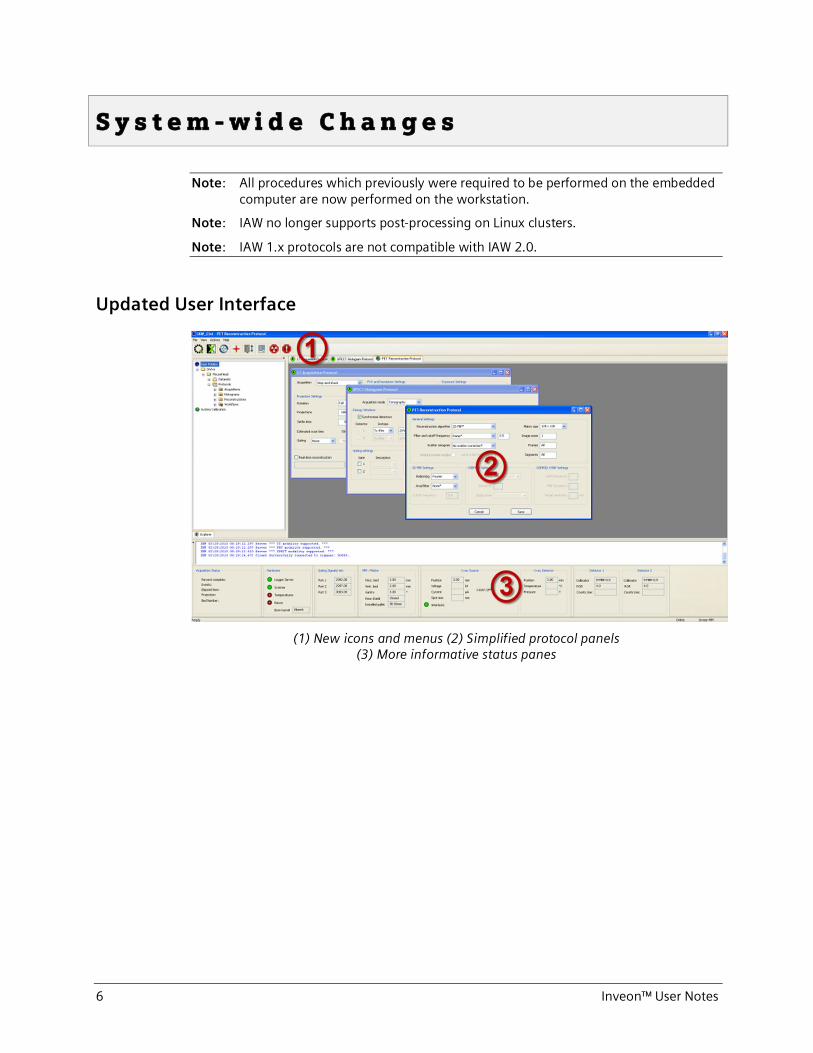
Updated User Interface
(1) New icons and menus (2) Simplified protocol panels (3) More informative status panes

Inveon™ User Notes 7
Quick Reference
Refer to the following table to perform actions with the new icons and new menus.
Task IAW 1.5 IAW 2.0
Laser on/off Previous icon
New icon
Reset E-stop Panels > Diagnostics > MM Acquisition Diagnostics >Reset e-stop
Actions > Reset E-stop
Study Information Setup
Panels > Acquisition > Study Info Protocol
Actions > Setup study information
Use as a Template Actions > Use as Template Actions > Unlock protocol
Open microQ Tools > Start microQ Viewer Actions > Start microQ viewer
microQ designated computer list
Tools > Options > microQ Actions > Set microQ properties
ASIPro Tools > Start ASIPro Actions > Start ASIPro
View System Information
Click the System Info tab at the bottom of the Explorer pane
The System Info tab is no longer available. Most of the information on this tab has been moved to the status panels.
MM Acquisition Diagnostics
Panels > Diagnostics > MM Acquisition Diagnostics
This information is now located on the status panels.
8 Inveon™ User Notes
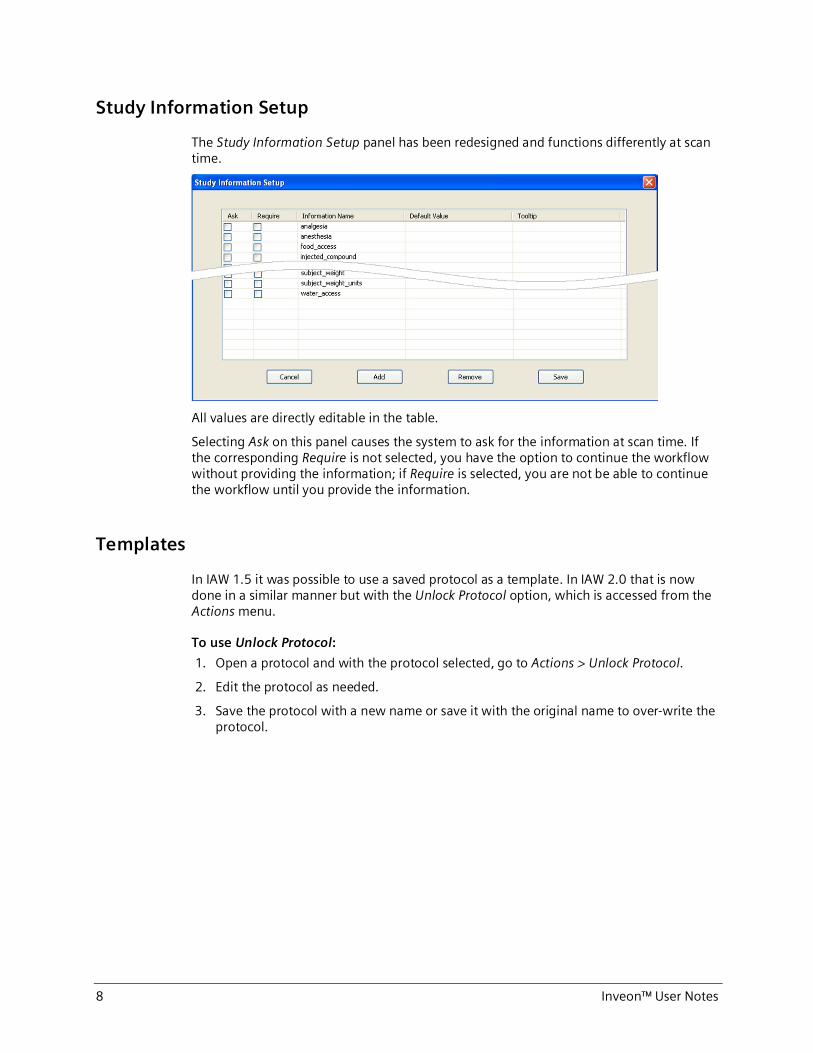
Study Information Setup
The Study Information Setup panel has been redesigned and functions differently at scan time.
All values are directly editable in the table.
Selecting Ask on this panel causes the system to ask for the information at scan time. If the corresponding Require is not selected, you have the option to continue the workflow without providing the information; if Require is selected, you are not be able to continue the workflow until you provide the information.
Templates
In IAW 1.5 it was possible to use a saved protocol as a template. In IAW 2.0 that is now done in a similar manner but with the Unlock Protocol option, which is accessed from the Actions menu.
To use Unlock Protocol:
1. Open a protocol and with the protocol selected, go to Actions > Unlock Protocol.
2. Edit the protocol as needed.
3. Save the protocol with a new name or save it with the original name to over-write the protocol.

Inveon™ User Notes 9
New Touchscreen Interface
The touchscreen interface starts automatically when the embedded PC boots. If it is not running, it can be started by double-tapping the touchscreen application icon on the touchscreen desktop.
From the touchscreen interface, you can:
· Change the bed type.
· View status panels similar to the status panels on the main IAW screen.
· Turn the lasers on or off.
· (CT only) Turn the source off.
· (SPECT only) Launch the collimator calibration wizard.
· Move the bed to the center of a modality's field of view.
· Start and stop the video camera. A live image is displayed when the camera is running. The system disables encoding during acquisitions to improve stability and data integrity.
· Home the gantry (MM), bed or both.
IAW Tools
From the Start menu you can access a collection of tools that allow you to automate some processes, such as:
· Change filter: Run this after you have physically changed the filter thickness.
· Change camera mode - Run this after you have physically changed the camera mode between rat and mouse.
· Dock/Undock system - Run this after docking or undocking the D-PET and MM.
10 Inveon™ User Notes
S c a n P o s i t i o n S e t u p
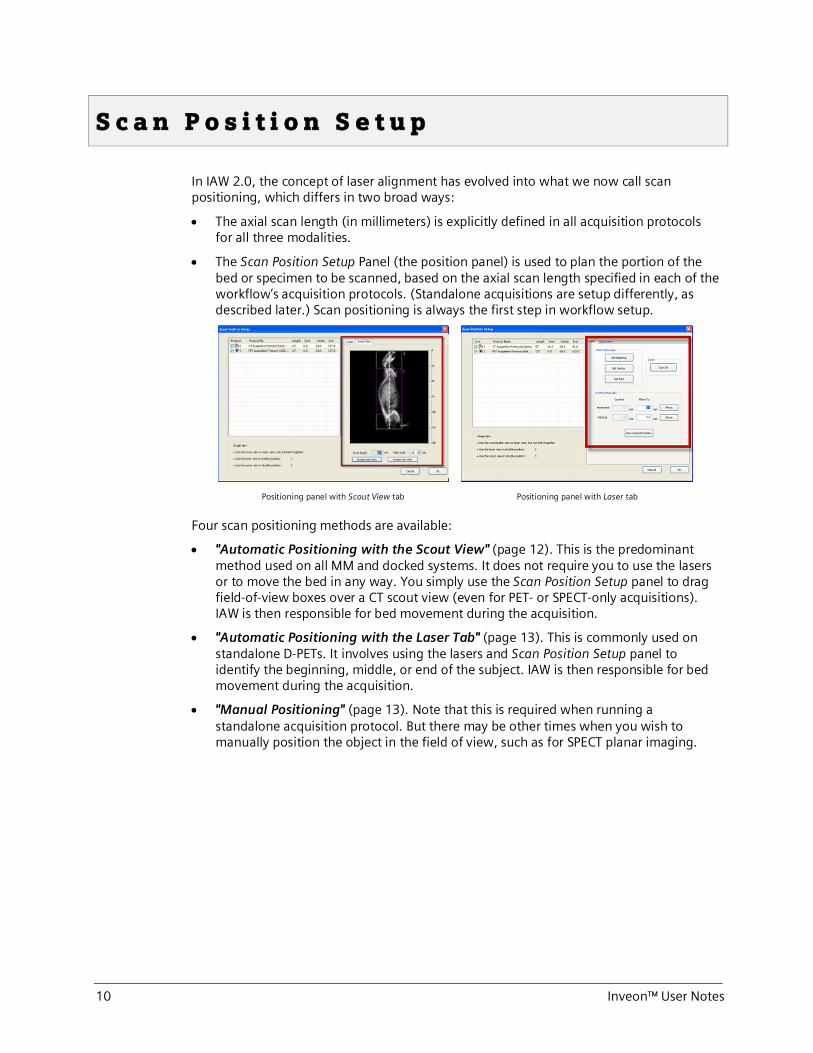
In IAW 2.0, the concept of laser alignment has evolved into what we now call scan positioning, which differs in two broad ways:
· The axial scan length (in millimeters) is explicitly defined in all acquisition protocols for all three modalities.
· The Scan Position Setup Panel (the position panel) is used to plan the portion of the bed or specimen to be scanned, based on the axial scan length specified in each of the workflow’s acquisition protocols. (Standalone acquisitions are setup differently, as described later.) Scan positioning is always the first step in workflow setup.
Positioning panel with Scout View tab Positioning panel with Laser tab
Four scan positioning methods are available:
· "Automatic Positioning with the Scout View" (page 12). This is the predominant method used on all MM and docked systems. It does not require you to use the lasers or to move the bed in any way. You simply use the Scan Position Setup panel to drag field-of-view boxes over a CT scout view (even for PET- or SPECT-only acquisitions). IAW is then responsible for bed movement during the acquisition.
· "Automatic Positioning with the Laser Tab" (page 13). This is commonly used on standalone D-PETs. It involves using the lasers and Scan Position Setup panel to identify the beginning, middle, or end of the subject. IAW is then responsible for bed movement during the acquisition.
· "Manual Positioning" (page 13). Note that this is required when running a standalone acquisition protocol. But there may be other times when you wish to manually position the object in the field of view, such as for SPECT planar imaging.
Inveon™ User Notes 11
Using the Position Panel
Important: Use the scout view method or the laser method—do not use them together.
When using automatic methods, do not move the bed into the field of view. You only need to indicate where on a bed to scan. It is IAW’s responsibility to move the bed as appropriate when each acquisition begins.
When viewing the position panel, all the acquisitions in the workflow are listed in a table on the left side of the screen. By default, all acquisitions are linked to each other, as indicated by checkmarks. Setting the position of one protocol automatically positions other linked protocols to the same axial center.
To scan with offset centers, you must unlink protocols from each other in the table. In multi-acquisition workflows, lengths do not have to match, and centers do not have to align axially. You may, for instance, perform a whole-body CT scan and brain-only SPECT scan in the same workflow.
The beginning, middle, and end values listed in the protocol table indicate the distance from the tip of the bed. While you may find these values useful occasionally, they are secondary information. Do not pay undue attention to them when learning how to use the position panel.
When you run a workflow protocol, IAW remembers the bed values and uses them as the default values the next time you run the same workflow protocol. This allows you to set position values once, and then automatically use the same positions every time you run the workflow protocol. You may, of course, use the Scan Position Setup panel to double-check the positions every time you run the workflow protocol, and modify the positions if necessary.
The position panel determines safe and valid bed positions by considering:
· The dimensions of the installed bed.
· The imageable portion of the bed.
· The axial distance between the fields of view.
· The physical limitations of bed travel.
· The length defined in each acquisition protocol.
· Collision risks within the gantry.
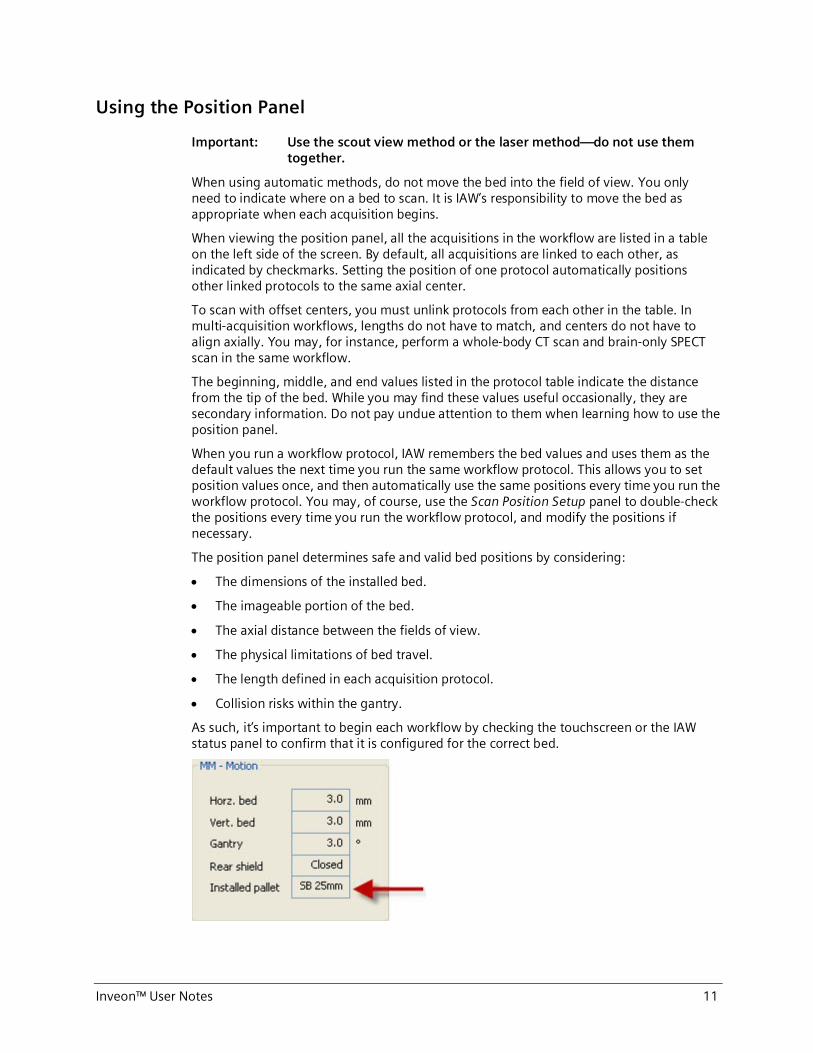
As such, it’s important to begin each workflow by checking the touchscreen or the IAW status panel to confirm that it is configured for the correct bed.
12 Inveon™ User Notes
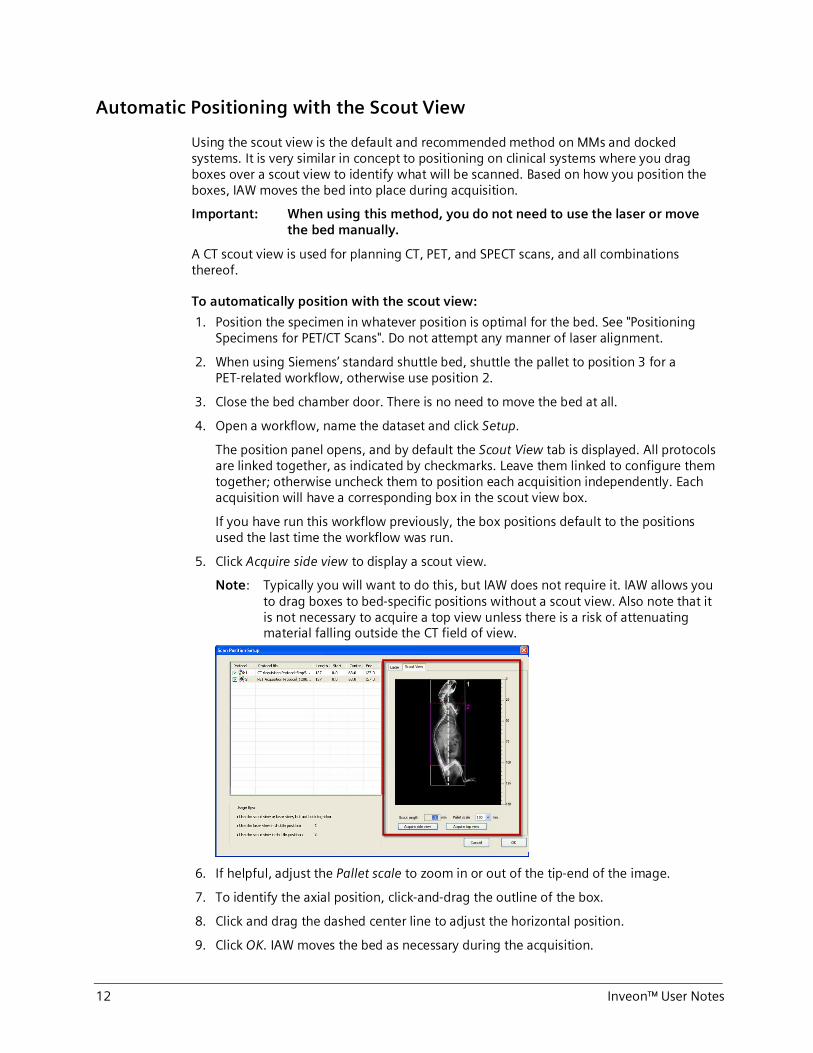
Automatic Positioning with the Scout View
Using the scout view is the default and recommended method on MMs and docked systems. It is very similar in concept to positioning on clinical systems where you drag boxes over a scout view to identify what will be scanned. Based on how you position the boxes, IAW moves the bed into place during acquisition.
Important: When using this method, you do not need to use the laser or move the bed manually.
A CT scout view is used for planning CT, PET, and SPECT scans, and all combinations thereof.
To automatically position with the scout view:
1. Position the specimen in whatever position is optimal for the bed. See "Positioning Specimens for PET/CT Scans". Do not attempt any manner of laser alignment.
2. When using Siemens’ standard shuttle bed, shuttle the pallet to position 3 for a PET-related workflow, otherwise use position 2.
3. Close the bed chamber door. There is no need to move the bed at all.
4. Open a workflow, name the dataset and click Setup.
The position panel opens, and by default the Scout View tab is displayed. All protocols are linked together, as indicated by checkmarks. Leave them linked to configure them together; otherwise uncheck them to position each acquisition independently. Each acquisition will have a corresponding box in the scout view box.
If you have run this workflow previously, the box positions default to the positions used the last time the workflow was run.
5. Click Acquire side view to display a scout view.
Note: Typically you will want to do this, but IAW does not require it. IAW allows you to drag boxes to bed-specific positions without a scout view. Also note that it is not necessary to acquire a top view unless there is a risk of attenuating material falling outside the CT field of view.
6. If helpful, adjust the Pallet scale to zoom in or out of the tip-end of the image.
7. To identify the axial position, click-and-drag the outline of the box.
8. Click and drag the dashed center line to adjust the horizontal position.
9. Click OK. IAW moves the bed as necessary during the acquisition.
Inveon™ User Notes 13
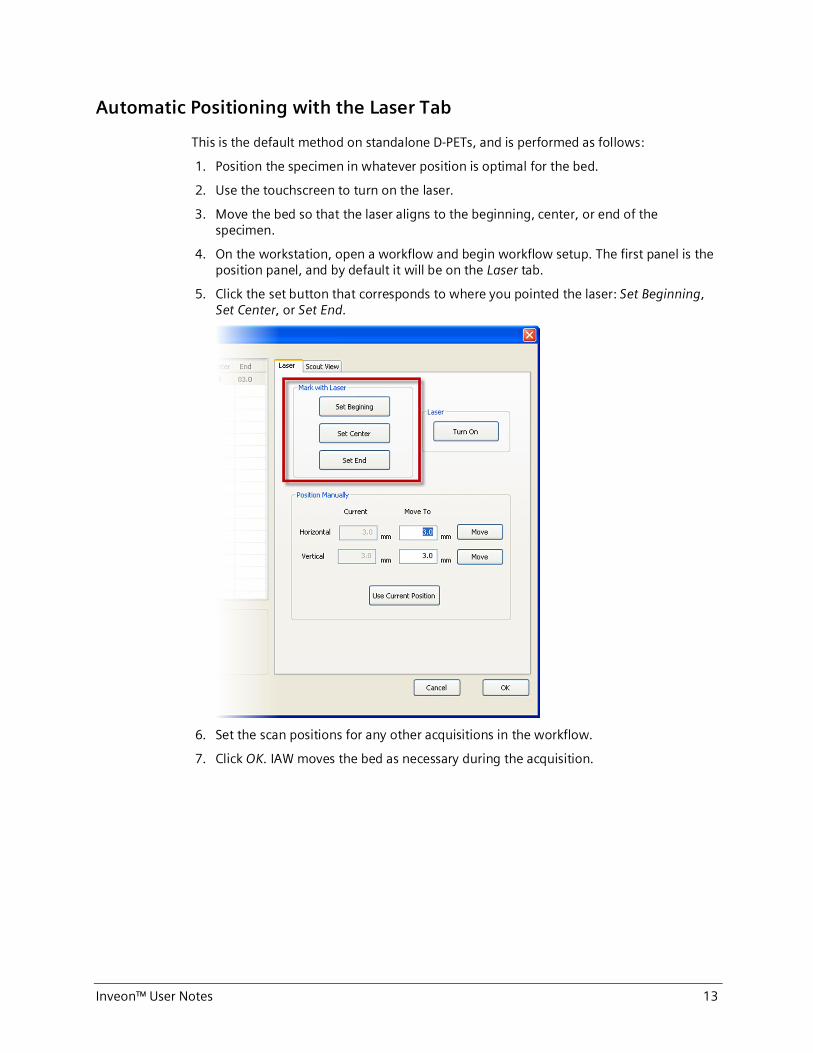
Automatic Positioning with the Laser Tab
This is the default method on standalone D-PETs, and is performed as follows:
1. Position the specimen in whatever position is optimal for the bed.
2. Use the touchscreen to turn on the laser.
3. Move the bed so that the laser aligns to the beginning, center, or end of the specimen.
4. On the workstation, open a workflow and begin workflow setup. The first panel is the position panel, and by default it will be on the Laser tab.
5. Click the set button that corresponds to where you pointed the laser: Set Beginning, Set Center, or Set End.
6. Set the scan positions for any other acquisitions in the workflow.
7. Click OK. IAW moves the bed as necessary during the acquisition.

14 Inveon™ User Notes
Manual Positioning
Important: You must perform manual positioning when running standalone acquisition protocols (i.e. not in a workflow).
Occasionally you may wish to move the bed into a field of view manually, such as for SPECT planar imaging. If you are running a standalone acquisition protocol, you must perform manual positioning. The procedure is as follows:
1. Position the specimen on the bed.
2. Use the touchscreen to turn on the laser.
3. When using the shuttle bed on an MM, shuttle the pallet to position 2.
4. Use the touchpad controls to move the bed so that the laser marks the vertical and horizontal centers of the specimen or object.
5. When using the shuttle bed on an MM for a PET workflow, shuttle the pallet to position 3.
6. On the touchscreen, press the tab that corresponds to the modality of the acquisition, and then press Center FOV.
The bed moves the laser marks to the center of the appropriate field of view.
7. If you are running a standalone acquisition protocol, start the acquisition.
OR
If are running a workflow, the Positioning panel will appear. On the Laser tab, click Use Current Position and then click OK to continue workflow setup.
Inveon™ User Notes 15
C T P r o c e d u r e s
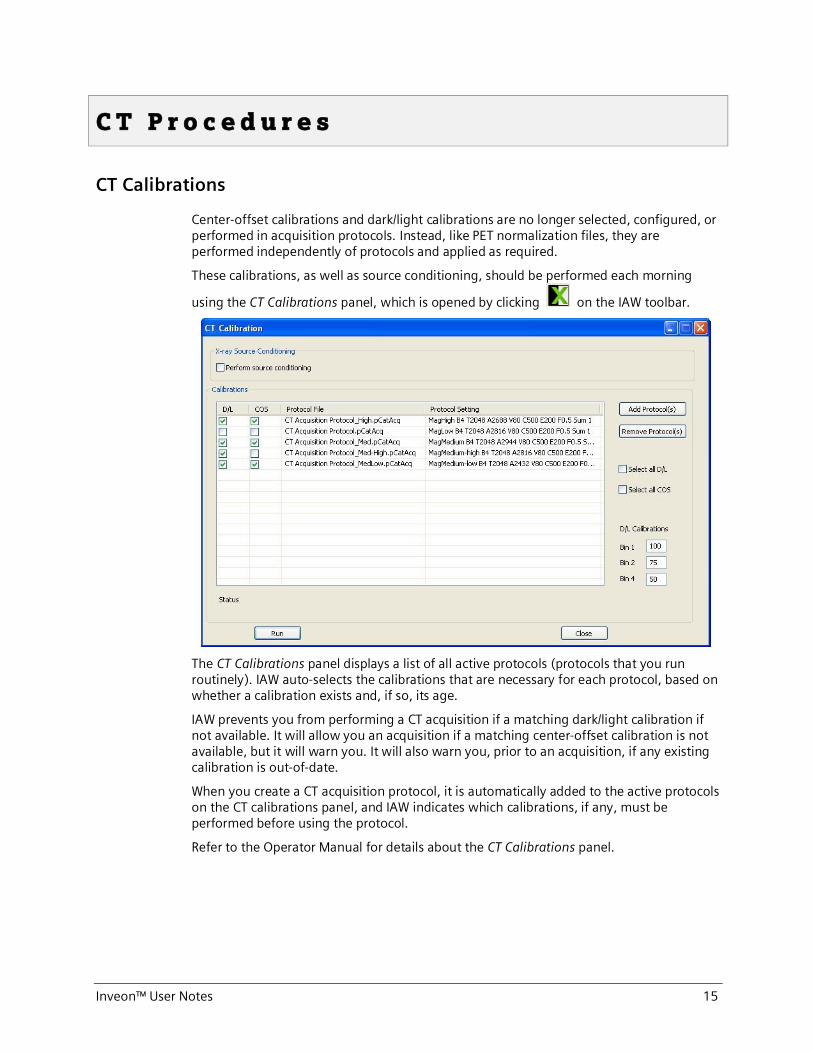
CT Calibrations
Center-offset calibrations and dark/light calibrations are no longer selected, configured, or performed in acquisition protocols. Instead, like PET normalization files, they are performed independently of protocols and applied as required.
These calibrations, as well as source conditioning, should be performed each morning
using the CT Calibrations panel, which is opened by clicking on the IAW toolbar.
The CT Calibrations panel displays a list of all active protocols (protocols that you run routinely). IAW auto-selects the calibrations that are necessary for each protocol, based on whether a calibration exists and, if so, its age.
IAW prevents you from performing a CT acquisition if a matching dark/light calibration if not available. It will allow you an acquisition if a matching center-offset calibration is not available, but it will warn you. It will also warn you, prior to an acquisition, if any existing calibration is out-of-date.
When you create a CT acquisition protocol, it is automatically added to the active protocols on the CT calibrations panel, and IAW indicates which calibrations, if any, must be performed before using the protocol.
Refer to the Operator Manual for details about the CT Calibrations panel.
16 Inveon™ User Notes
CT Scout View
Because of the new positioning panel, the CT scout view available from the CT acquisition no longer has controls for positioning (i.e. the red crosshairs). The primary purpose for this scout view accessed from the acquisition protocol panel is for checking exposure.
X-ray Filtering
IAW now keeps track of filter settings in order to prevent the use of CT acquisition protocol whose exposure time was set when the filter was in a different position. As such, whenever you change the filter on the CT source, you must update IAW.
To do this, click Start > All Programs > Inveon > IAW Tools, then select the X-ray filter tool and follow the on-screen instructions.
The new filter thickness is displayed on new CT acquisition protocol panels.
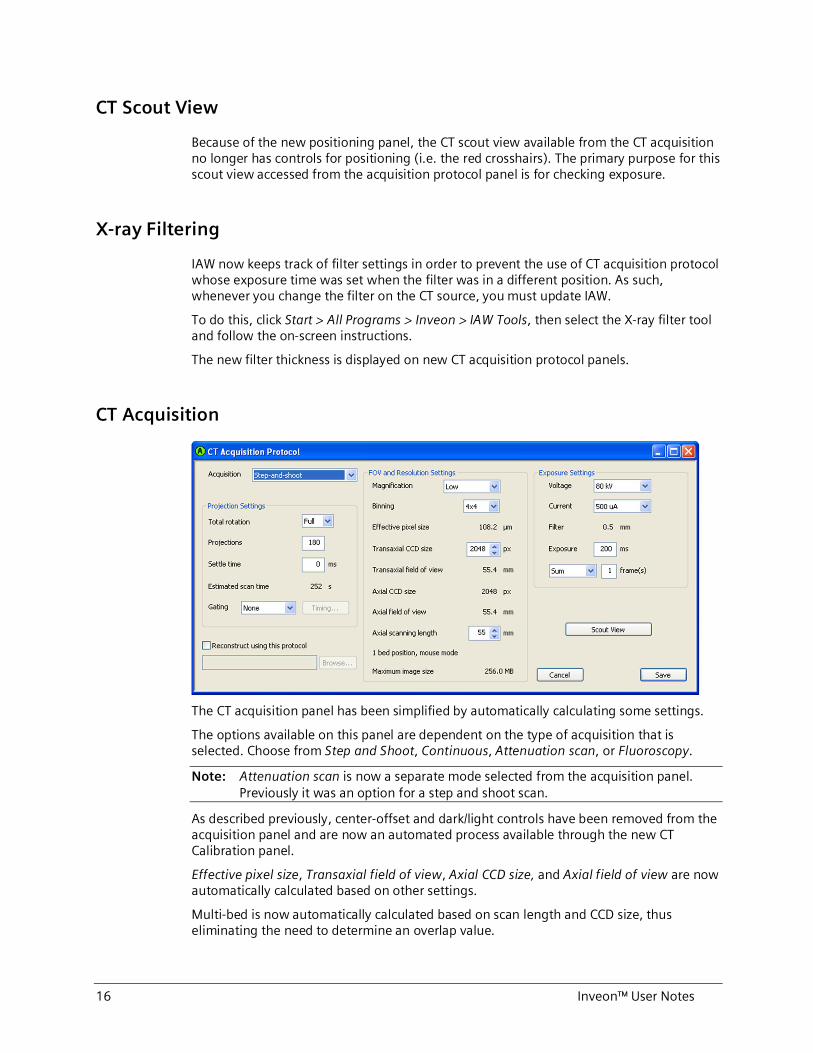
CT Acquisition
The CT acquisition panel has been simplified by automatically calculating some settings.
The options available on this panel are dependent on the type of acquisition that is selected. Choose from Step and Shoot, Continuous, Attenuation scan, or Fluoroscopy.
Note: Attenuation scan is now a separate mode selected from the acquisition panel. Previously it was an option for a step and shoot scan.
As described previously, center-offset and dark/light controls have been removed from the acquisition panel and are now an automated process available through the new CT Calibration panel.
Effective pixel size, Transaxial field of view, Axial CCD size, and Axial field of view are now automatically calculated based on other settings.
Multi-bed is now automatically calculated based on scan length and CCD size, thus eliminating the need to determine an overlap value.
Inveon™ User Notes 17
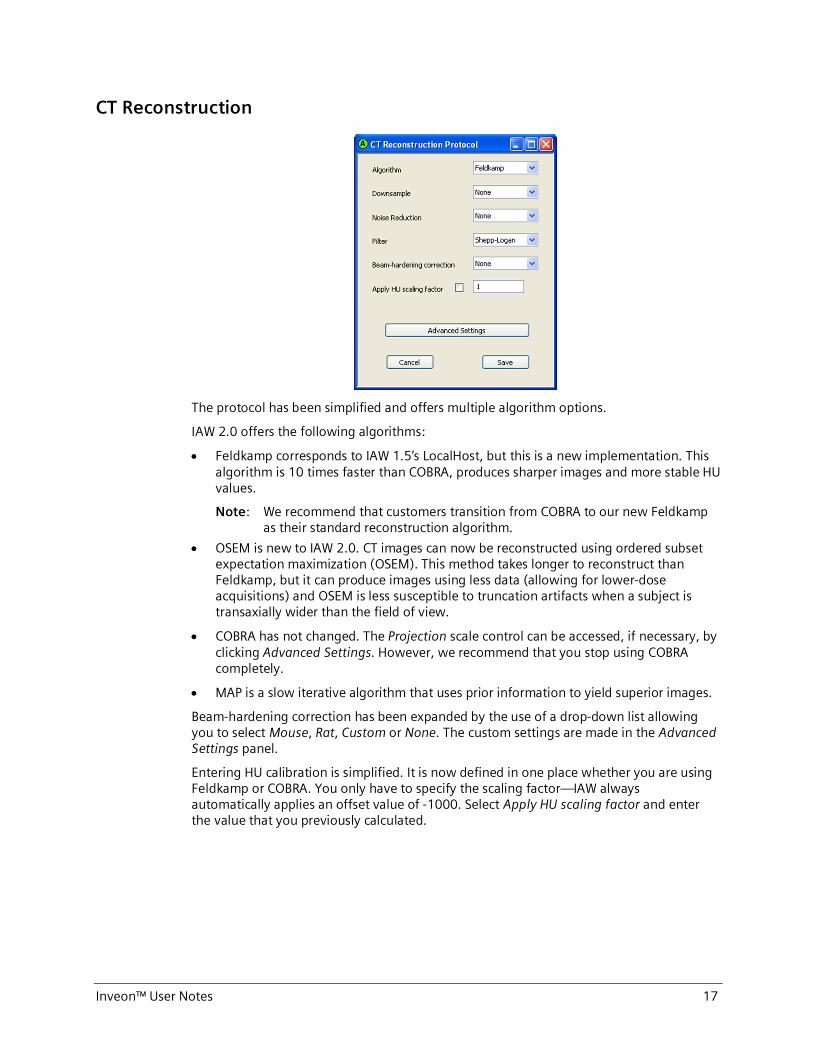
CT Reconstruction
The protocol has been simplified and offers multiple algorithm options.
IAW 2.0 offers the following algorithms:
· Feldkamp corresponds to IAW 1.5’s LocalHost, but this is a new implementation. This algorithm is 10 times faster than COBRA, produces sharper images and more stable HU values.
Note: We recommend that customers transition from COBRA to our new Feldkamp as their standard reconstruction algorithm.
· OSEM is new to IAW 2.0. CT images can now be reconstructed using ordered subset expectation maximization (OSEM). This method takes longer to reconstruct than Feldkamp, but it can produce images using less data (allowing for lower-dose acquisitions) and OSEM is less susceptible to truncation artifacts when a subject is transaxially wider than the field of view.
· COBRA has not changed. The Projection scale control can be accessed, if necessary, by clicking Advanced Settings. However, we recommend that you stop using COBRA completely.
· MAP is a slow iterative algorithm that uses prior information to yield superior images.
Beam-hardening correction has been expanded by the use of a drop-down list allowing you to select Mouse, Rat, Custom or None. The custom settings are made in the Advanced Settings panel.
Entering HU calibration is simplified. It is now defined in one place whether you are using Feldkamp or COBRA. You only have to specify the scaling factor—IAW always automatically applies an offset value of -1000. Select Apply HU scaling factor and enter the value that you previously calculated.
18 Inveon™ User Notes
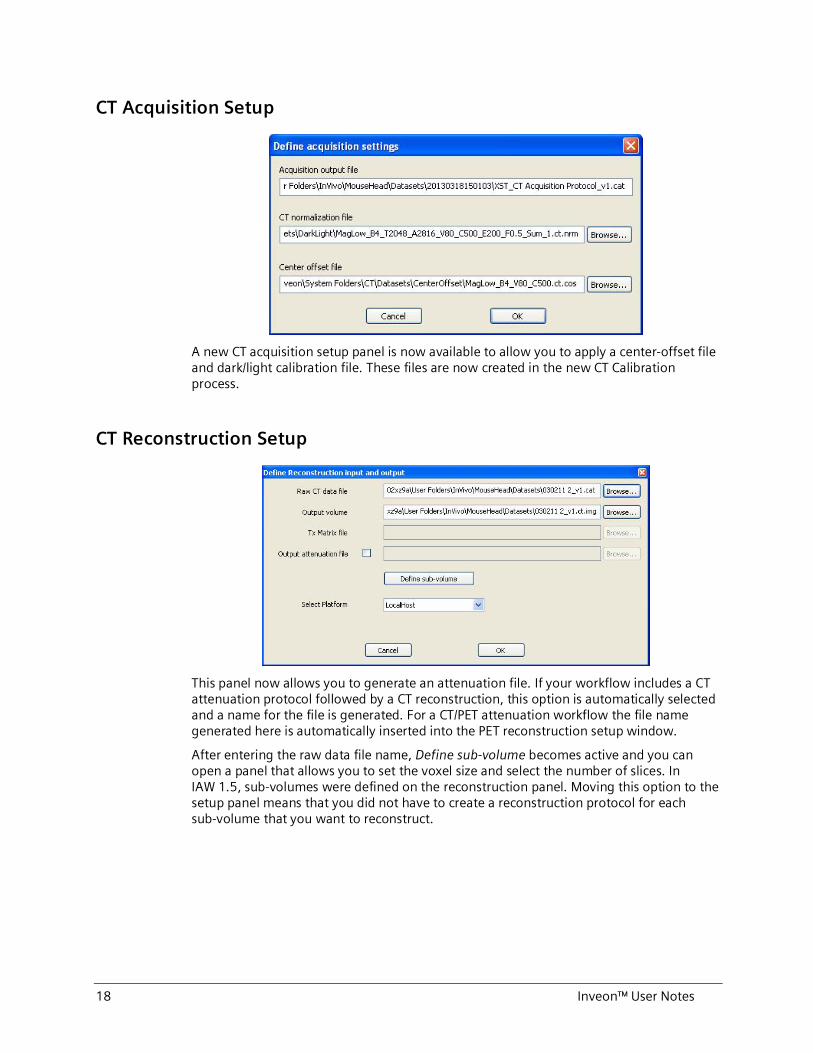
CT Acquisition Setup
A new CT acquisition setup panel is now available to allow you to apply a center-offset file and dark/light calibration file. These files are now created in the new CT Calibration process.
CT Reconstruction Setup
This panel now allows you to generate an attenuation file. If your workflow includes a CT attenuation protocol followed by a CT reconstruction, this option is automatically selected and a name for the file is generated. For a CT/PET attenuation workflow the file name generated here is automatically inserted into the PET reconstruction setup window.
After entering the raw data file name, Define sub-volume becomes active and you can open a panel that allows you to set the voxel size and select the number of slices. In IAW 1.5, sub-volumes were defined on the reconstruction panel. Moving this option to the setup panel means that you did not have to create a reconstruction protocol for each sub-volume that you want to reconstruct.

Inveon™ User Notes 19
Fluoroscopy
The checkbox to save fluoroscopy scans has been removed because in IAW 2.0, fluoroscopy scans are always saved.
20 Inveon™ User Notes
P E T P r o c e d u r e s
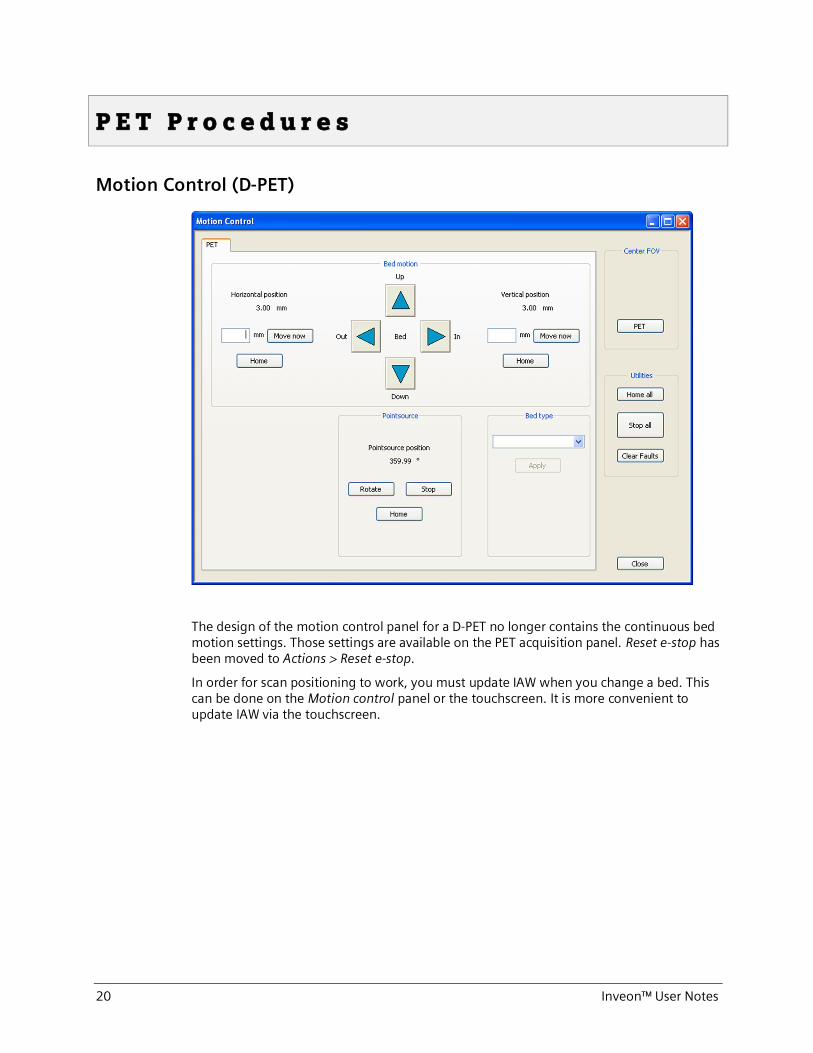
Motion Control (D-PET)
The design of the motion control panel for a D-PET no longer contains the continuous bed motion settings. Those settings are available on the PET acquisition panel. Reset e-stop has been moved to Actions > Reset e-stop.
In order for scan positioning to work, you must update IAW when you change a bed. This can be done on the Motion control panel or the touchscreen. It is more convenient to update IAW via the touchscreen.
Inveon™ User Notes 21
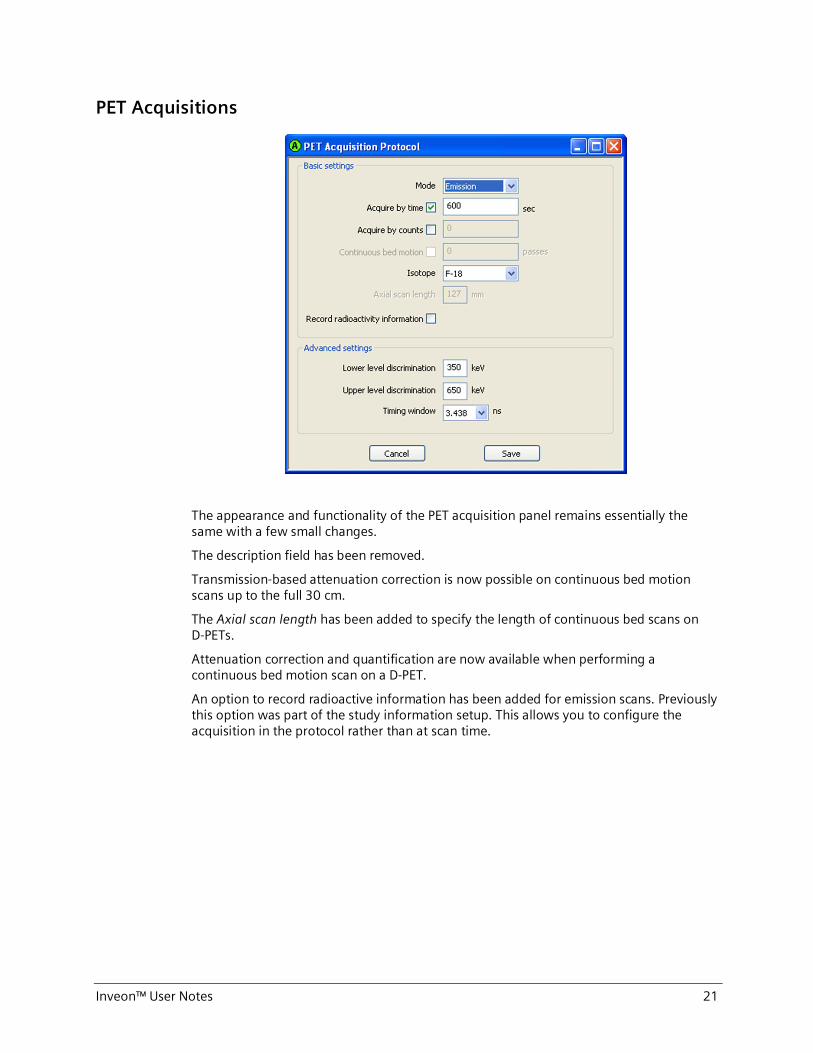
PET Acquisitions
The appearance and functionality of the PET acquisition panel remains essentially the same with a few small changes.
The description field has been removed.
Transmission-based attenuation correction is now possible on continuous bed motion scans up to the full 30 cm.
The Axial scan length has been added to specify the length of continuous bed scans on D-PETs.
Attenuation correction and quantification are now available when performing a continuous bed motion scan on a D-PET.
An option to record radioactive information has been added for emission scans. Previously this option was part of the study information setup. This allows you to configure the acquisition in the protocol rather than at scan time.

22 Inveon™ User Notes
PET Histogram
This panel was simplified by removing some settings.
As was forewarned in the release of IAW 1.5, the cylinder-inversion normalization is no longer supported.
PET Reconstruction
Inveon™ User Notes 23
The options available on this redesigned panel are dependent on the algorithm that you select.
To reconstruct all frames and segments, keep the default of All. Previously, you had to enter -1.
The scatter settings have been simplified by allowing you to choose from a drop-down list: None; Generate, Apply and Save; or Load and apply.
To simplify the panel, several controls have been removed. In lieu of the controls, IAW does the following:
· Arc correction. It is always applied.
· Image offset. The entire image is always reconstructed.
· Image data type. The image is always saved in 4-byte floating point.
· Hi-Res. Resolution is always set to the highest value that is appropriate to the reconstruction algorithm.
· Image rotation. The image is never rotated.
· Uniform Resolution/Variance. Reconstructions are always performed with uniform resolution.
· EM iterations. Full EM iterations are never performed.
Note: Linux reconstruction clusters are not supported for this version of IAW.
SSRB has been removed as a rebinning method, and exact Fourier (FOREX) has been added.
MAP is now at least 7 times faster on 8-core PCs, and over 2 times faster than fastMAP in IAW 1.5. As such, the fastMAP option has been removed.
3DRP is now 6 times faster.
24 Inveon™ User Notes
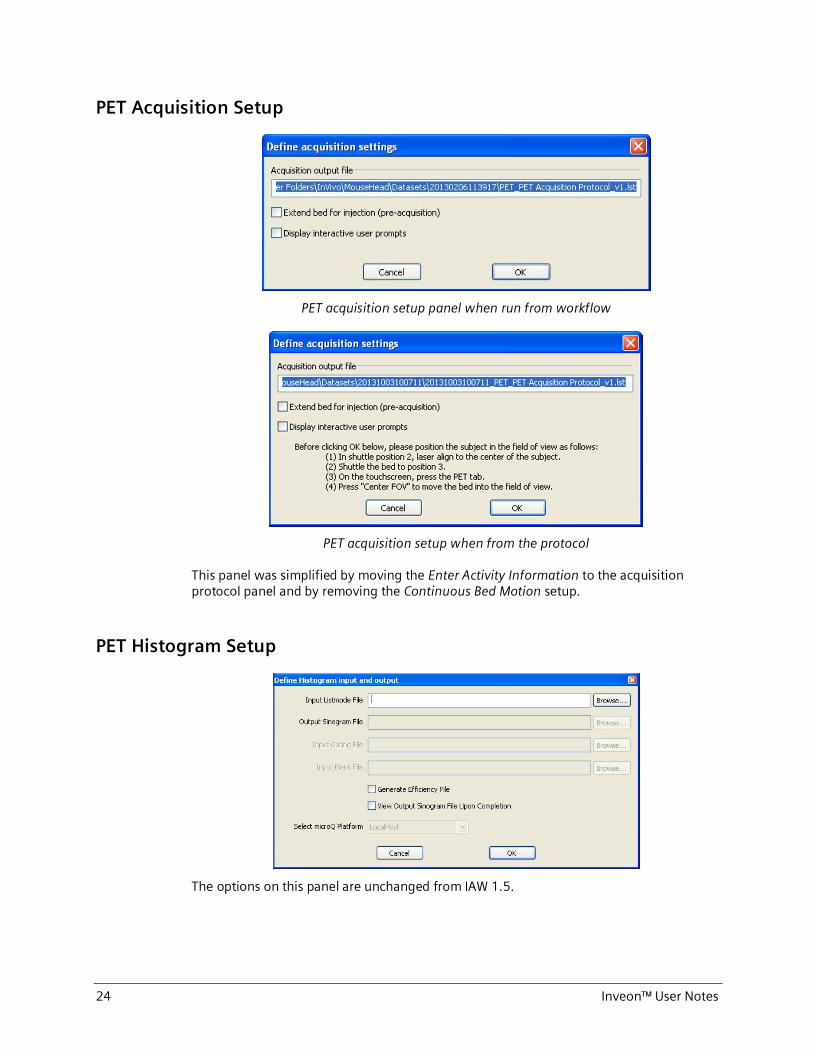
PET Acquisition Setup
PET acquisition setup panel when run from workflow
PET acquisition setup when from the protocol
This panel was simplified by moving the Enter Activity Information to the acquisition protocol panel and by removing the Continuous Bed Motion setup.
PET Histogram Setup
The options on this panel are unchanged from IAW 1.5.
Inveon™ User Notes 25
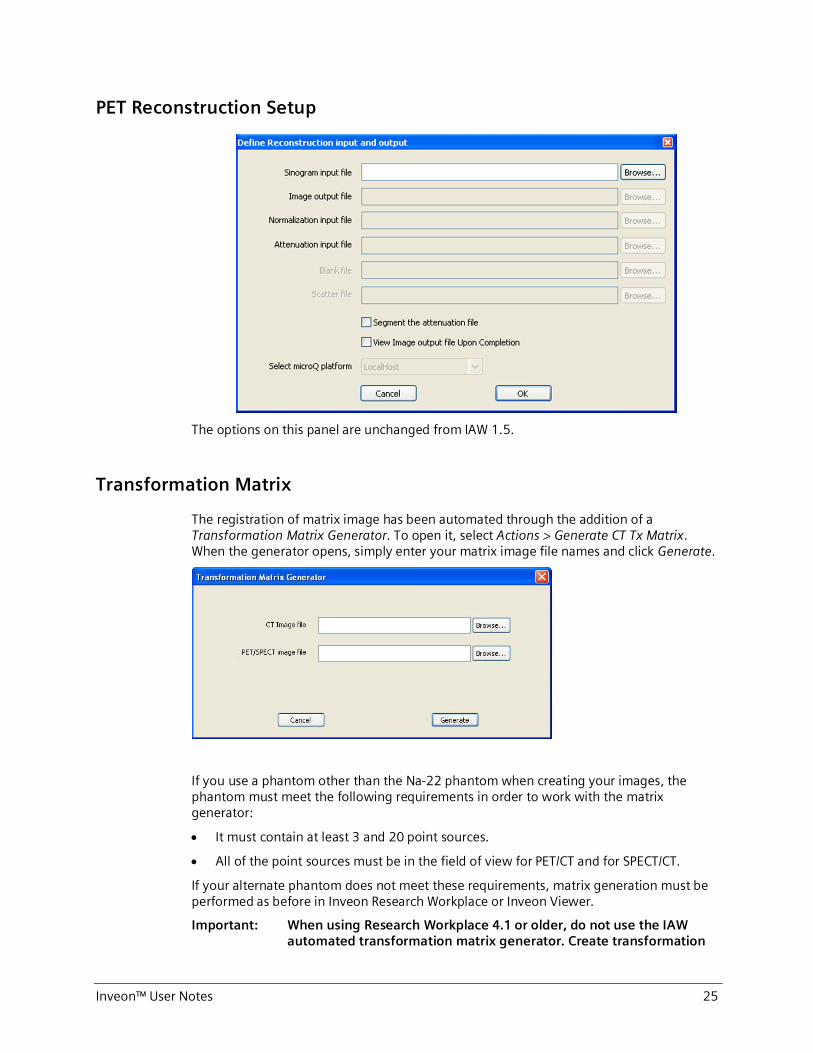
PET Reconstruction Setup
The options on this panel are unchanged from IAW 1.5.
Transformation Matrix
The registration of matrix image has been automated through the addition of a Transformation Matrix Generator. To open it, select Actions > Generate CT Tx Matrix. When the generator opens, simply enter your matrix image file names and click Generate.
If you use a phantom other than the Na-22 phantom when creating your images, the phantom must meet the following requirements in order to work with the matrix generator:
· It must contain at least 3 and 20 point sources.
· All of the point sources must be in the field of view for PET/CT and for SPECT/CT.
If your alternate phantom does not meet these requirements, matrix generation must be performed as before in Inveon Research Workplace or Inveon Viewer.
Important: When using Research Workplace 4.1 or older, do not use the IAW automated transformation matrix generator. Create transformation
26 Inveon™ User Notes
matrixes using Research Workplace or Inveon Viewer as is documented in the operator manual. This will create a combined correction for transformation and image offsets.
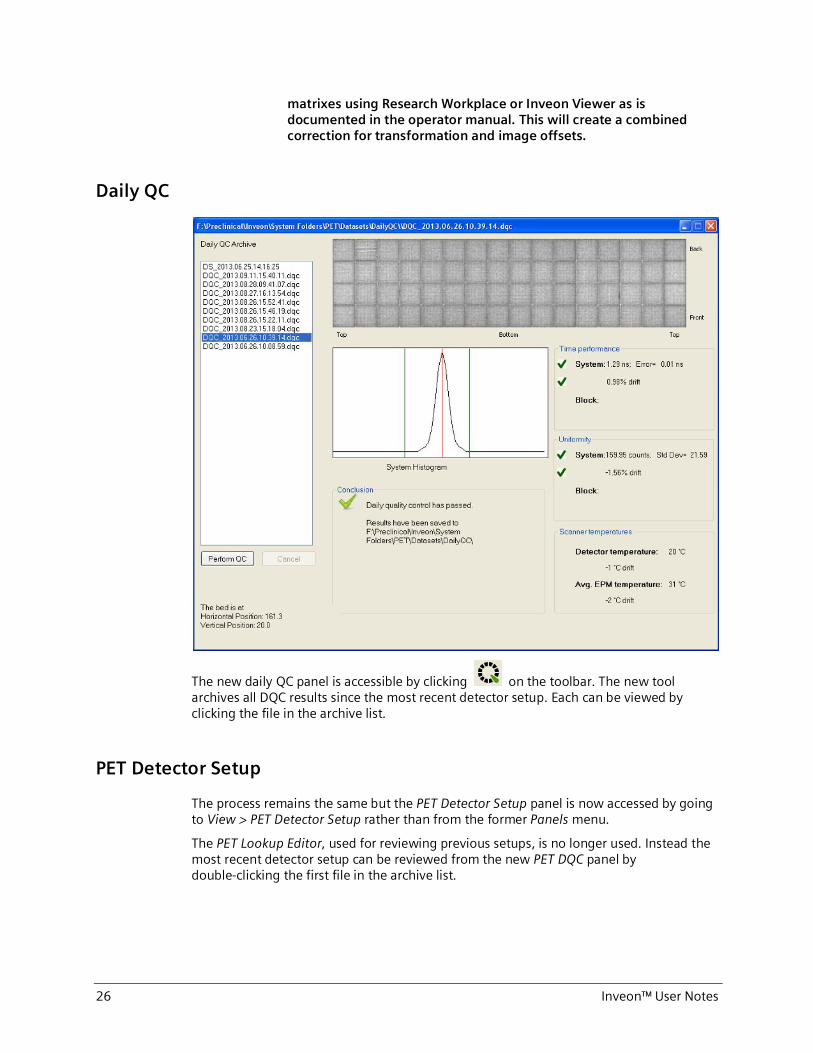
Daily QC
The new daily QC panel is accessible by clicking on the toolbar. The new tool archives all DQC results since the most recent detector setup. Each can be viewed by clicking the file in the archive list.
PET Detector Setup
The process remains the same but the PET Detector Setup panel is now accessed by going to View > PET Detector Setup rather than from the former Panels menu.
The PET Lookup Editor, used for reviewing previous setups, is no longer used. Instead the most recent detector setup can be reviewed from the new PET DQC panel by double-clicking the first file in the archive list.

Inveon™ User Notes 27
S P E C T P r o c e d u r e s
SPECT Scout View
As in IAW 1.5, you can access it by clicking Scout View on the acquisition protocol panel. You can also access it from the View menu if you wish to view the last projection.

28 Inveon™ User Notes
SPECT Acquisition
This panel has been redesigned and some new functionality has been added. Most notable is that different isotopes can now be configured for each detector allowing dual isotope scans.
Also, for tomography scans, you now have a choice of Custom or Standard options. Selecting Standard automatically calculates settings if you specify the specimen length and the first projection time (scan time). This automated option allows new users to become productive much sooner. Selecting Custom gives you full control over acquisition settings, as in IAW 1.5.
Options to record radioactivity information and to set optimal scan length have been moved here from the acquisition setup panel.
Inveon™ User Notes 29
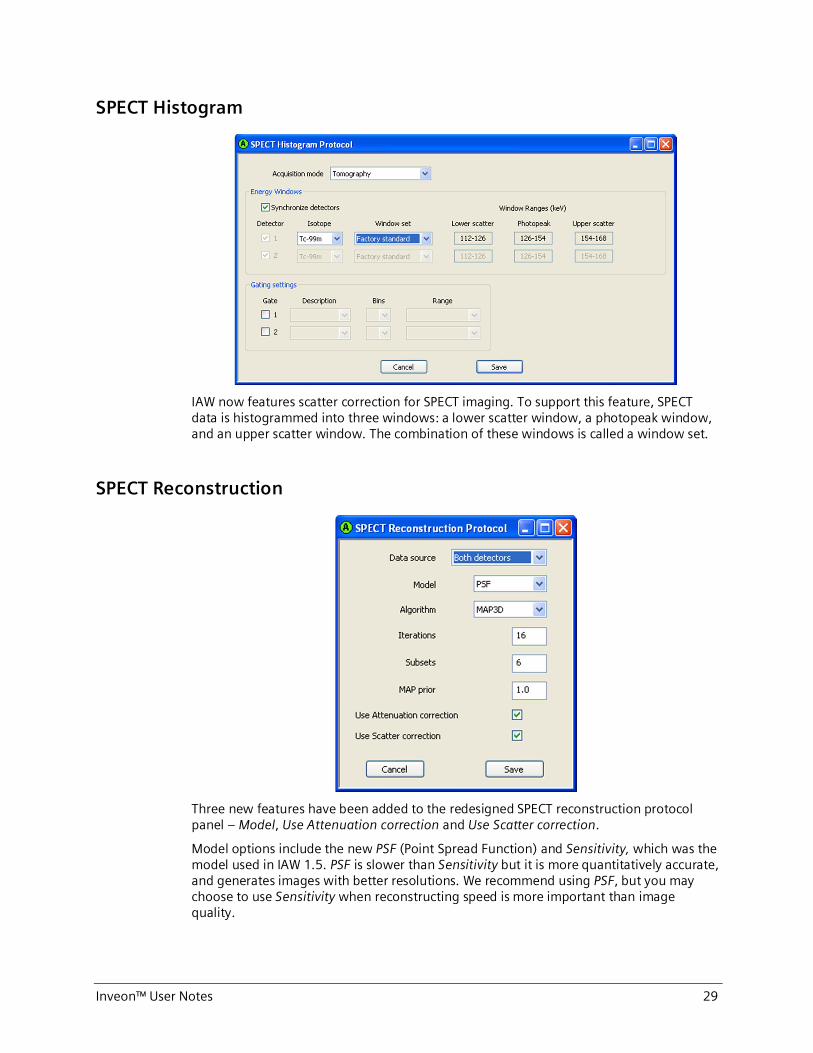
SPECT Histogram
IAW now features scatter correction for SPECT imaging. To support this feature, SPECT data is histogrammed into three windows: a lower scatter window, a photopeak window, and an upper scatter window. The combination of these windows is called a window set.
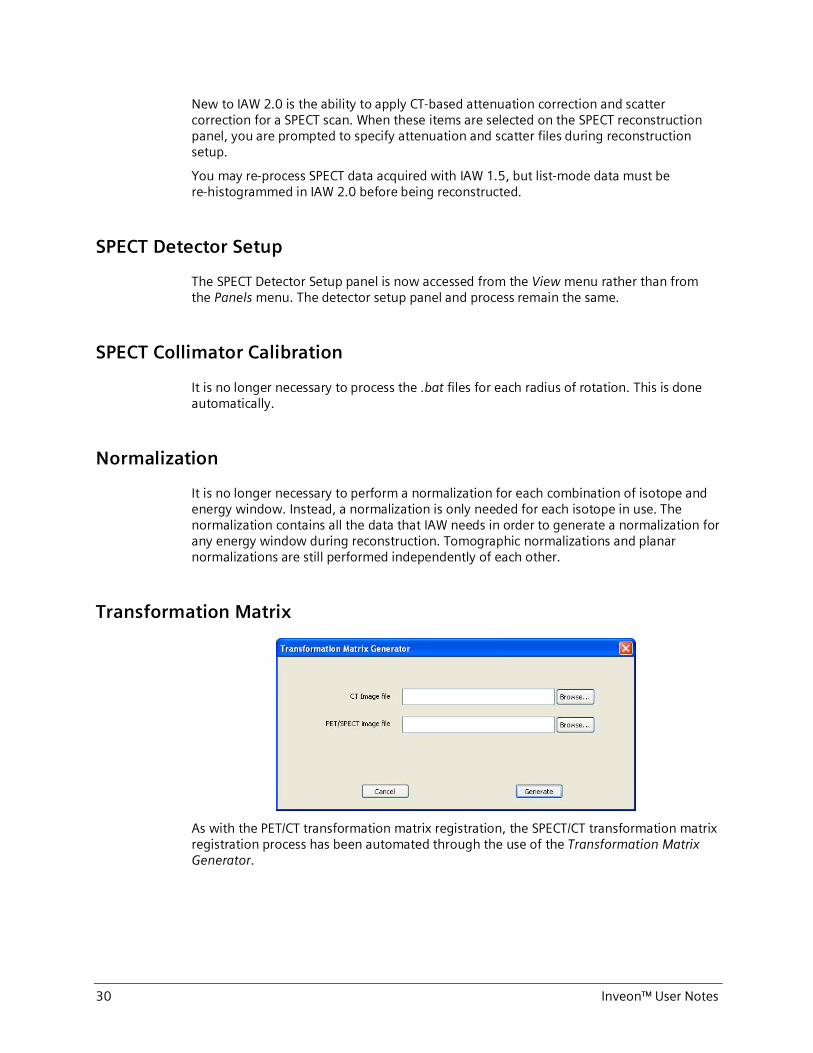
SPECT Reconstruction
Three new features have been added to the redesigned SPECT reconstruction protocol panel – Model, Use Attenuation correction and Use Scatter correction.
Model options include the new PSF (Point Spread Function) and Sensitivity, which was the model used in IAW 1.5. PSF is slower than Sensitivity but it is more quantitatively accurate, and generates images with better resolutions. We recommend using PSF, but you may choose to use Sensitivity when reconstructing speed is more important than image quality.
30 Inveon™ User Notes
New to IAW 2.0 is the ability to apply CT-based attenuation correction and scatter correction for a SPECT scan. When these items are selected on the SPECT reconstruction panel, you are prompted to specify attenuation and scatter files during reconstruction setup.
You may re-process SPECT data acquired with IAW 1.5, but list-mode data must be re-histogrammed in IAW 2.0 before being reconstructed.
SPECT Detector Setup
The SPECT Detector Setup panel is now accessed from the View menu rather than from the Panels menu. The detector setup panel and process remain the same.
SPECT Collimator Calibration
It is no longer necessary to process the .bat files for each radius of rotation. This is done automatically.
Normalization
It is no longer necessary to perform a normalization for each combination of isotope and energy window. Instead, a normalization is only needed for each isotope in use. The normalization contains all the data that IAW needs in order to generate a normalization for any energy window during reconstruction. Tomographic normalizations and planar normalizations are still performed independently of each other.
Transformation Matrix
As with the PET/CT transformation matrix registration, the SPECT/CT transformation matrix registration process has been automated through the use of the Transformation Matrix Generator.

Inveon™ User Notes 31
K n o w n I s s u e s
IAW
Issue: When using the Scan Positioning Setup panel, you cannot position the bed such that it partially fills the field of view. For instance, you cannot position the tip of the bed in the middle of the field of view.
Workaround: The new positioning system requires that the bed completely fill the field of view, but Siemens Service will be able to provide workarounds for this limitation.
Issue: IAW is not configured for custom or third-party beds.
Workaround: IAW can be configured to include your bed. Please contact Siemens Service for assistance.
Issue: After you restart the scanner, the touchscreen application may not display images from the video camera.
Workaround: Follow these instructions: 1. Close the touchscreen application. 2. Run C:\Program Files\Siemens\MI\Preclinical \Common\VideoStream.wme which will open a video window. 4. Close the new video stream window. 5. Start the touchscreen application.
Issue: On docked systems, IAW can access CT and SPECT norms, but does not display them in the IAW Explorer.
Workaround: None
Issue: Acquisition parameters are not preserved in header files of histogrammed or reconstructed data.
Workaround: None
CT
Issue: Gantry speed is not constant during continuous rotation scans.
Workaround: None, however, this does not affect data.

32 Inveon™ User Notes
Issue: Ring artifacts may appear in CT images when exposure time is less than 200 ms.
Workaround: This occurs most commonly because the CT detector needs cleaning by Siemens service.
Issue: It is possible for the interlock status on the touchpad to be incorrect.
Workaround: Consult the interlock status in IAW instead.
Issue: Moving the pointer over a CT scout view does not display/update the values.
Workaround: None.
Issue: If there are multiple reconstructions in a workflow corresponding to one .cat file, IAW suggests the same default filename for each output image. This causes image files to be overwritten during reconstruction and only the image file for the last reconstruction remains.
Workaround: Manually change the output image filename at workflow setup for each reconstruction in the workflow. Or you can avoid using multiple reconstruction protocols in the same workflow, and run the protocols independently.
Issue: When using COBRA for CT reconstructions, reconstructed images may be slightly shorter than the axial scan length specified in the acquisition protocol.
Workaround: COBRA sometimes does this when downsampling is applied in order to make the projection data compatible with its algorithm. For this and other reasons, we strongly suggest reconstructing with Feldkamp rather than COBRA. Alternatively, configure a larger axial length in your acquisition protocols.
PET
Issue: PET gated data appears as static (non-gated) data in IRW 3.0 or older.
Workaround: Check the header file and make sure that acquisition_mode is set to 4.
Issue: Default values in the Detector Setup panel are not restored when Reset Detector Setup tasks is selected.
Workaround: Defaults can be restored by reopening the panel.

Inveon™ User Notes 33
Issue: CT-based PET attenuation correction image is too small axially to cover the full PET field of view
Workaround: Add an additional 3 mm to the scan length in the CT acquisition.
Issue: An acquisition protocol may acquire data for several seconds longer than specified in the acquisition protocol when (1) the count rate is very low, and (2) the acquisition time is very short. This is due to the way data is buffered on the scanner hardware before being sent to the workstation for saving.
Workaround: Use dynamic framing to eliminate extra, unwanted date. For instance, if you wanted 15 seconds of data but the acquisition ran for 20 seconds, then histogram 15-second frames and reconstruct only the first frame of the resulting sinogram file.
SPECT
Issue: Estimated scan times are inaccurate if the number of revolutions is not an integer.
Workaround: None.
Issue: During SPECT acquisitions, the acquired projection is off by 1 in the status panel.
Workaround: None.
Issue: Image artifacts appear in SPECT reconstructions of uniform objects (e.g. cylinders) that were scanned with a 5-pinhole collimator.
Workaround: This is due to uniform projection overlap on the detector surface, for which there is no workaround. Note that this does happen when imaging animals and other non-uniform subjects.
Issue
Inveon Research Workplace and ASIPro
Issue: In ASIPro it is not possible to use the Avg option for bed stitching.
Workaround: None
Issue: ASIPro does not open DICOM images.
Workaround: Use IRW to open DICOM images.
34 Inveon™ User Notes
Issue: The transformation of an image that was oriented in IAW is inverted in IRW.
Workaround: IRW inverts the transformation matrix generated by IAW if the orientation is specified as anything other than Unknown and the _shift tag is set to 0 0 0. If a designation of feet first or head first is required, use the IAW automated transformation matrix tool to create the matrix rather than IRW or Inveon Viewer.
Issue: IRW 4.1 and older does not automatically orient CT images to functional images because they do not interpret a new image header tag that describes image alignment offsets.
Workaround: When using IRW 4.1 or older, do not use the IAW automated transformation matrix generator. Create transformation matrixes using IRW or Inveon Viewer as is documented in the operator manual. This will create a combined correction for transformation

Inveon™ User Notes 35
No part of this documentation may be reproduced or transmitted in any form by any means, electronic or mechanical, without written permission of Siemens Medical Solutions USA, Inc.
Contact Address Siemens Medical Solutions USA Molecular Imaging 2501 N. Barrington Road Hoffman Estates, IL 60192-2061 USA Telephone: +1-888-826-9702 www.siemens.com/preclinical
The authorized EU Representative is: Regional Manager — Europe Siemens AG, Medical Solutions Henkestrasse 127 D-91052 Erlangen Germany © 2014, Siemens Medical Solutions USA, Inc. Printed in USA Part Number: 10532103-VFT-000-01
Legal Manufacturer Siemens Medical Solutions USA Molecular Imaging 810 Innovation Drive Knoxville, TN 37932-2751 USA Telephone: +1-888-826-9702 www.siemens.com/preclinical
Siemens Medical Solutions USA, Inc. 51 Valley Stream Parkway Malvern, PA 19355-1406 USA
Headquarters Siemens Medical Solutions USA, Inc. 51 Valley Stream Parkway Malvern, PA 19355-1406 USA Telephone: +1-888-826-9702
www.siemens.com/preclinical
![Rainbow Heart - artecy.com · 7777777 777777777 7777777777777 ooooooo 77777 7777777 7777777777777 oooooo]]]]] ddd ddd ddd ddd ddd ™™™™™™™™™™™ ™™™™™™™™™™™™™™™™™](https://img.pdfslide.net/doc/110x75/5f4a4ec8ec2fea16bc048a6a/rainbow-heart-7777777-777777777-7777777777777-ooooooo-77777-7777777-7777777777777.jpg)