Embed Size (px)
Citation preview
iPhone 7 Lightning Connector AssemblyReplacement
Replace the Lightning connector assembly in an iPhone 7.
Written By: Scott Havard
iPhone 7 Lightning Connector Assembly R… Draft: 2020-01-19Guide ID: 78122 -
This document was generated on 2020-02-11 06:04:03 AM (MST).
© iFixit — CC BY-NC-SA www.iFixit.com Page 1 of 37
INTRODUCTION
Is your phone not detecting your charging cable? Does your charging port feel loose? It might betime to replace your Lightning connector assembly. Use this guide to replace the Lightning connectorassembly which includes the lower microphones, antenna cable, and Lightning connector.
Note that this repair does require a fair amount of disassembly, and it will require time and caution.
TOOLS:P2 Pentalobe Screwdriver iPhone (1)iOpener (1)Suction Handle (1)Spudger (1)iFixit Opening Picks set of 6 (1)Tri-point Y000 Screwdriver Bit (1)Tweezers (1)Phillips #000 Screwdriver (1)SIM Card Eject Tool (1)iPhone Standoff Screwdriver (1)
PARTS:iPhone 7 Lightning Connector Assembly
(1)iPhone 7 Lightning Connector Cable
Conductive Adhesive (1)iPhone 7 7 Plus Lightning Connector
Grounding Spring Contact (1)iPhone 7 Lightning Port Gaskets (1)iPhone 7 Lightning Port Bezel (1)iPhone 7 Display Assembly Adhesive (1)
iPhone 7 Lightning Connector Assembly R… Draft: 2020-01-19Guide ID: 78122 -
This document was generated on 2020-02-11 06:04:03 AM (MST).
© iFixit — CC BY-NC-SA www.iFixit.com Page 2 of 37

Step 1 — Pentalobe Screws
Before you begin, discharge youriPhone battery below 25%. Acharged lithium-ion battery cancatch fire and/or explode ifaccidentally punctured.
Power off your iPhone beforebeginning disassembly.
Remove the two 3.4 mm pentalobescrews on the bottom edge of theiPhone.
Opening the iPhone's display willcompromise its waterproof seals.Have replacement seals readybefore you proceed past this step, ortake care to avoid liquid exposure ifyou reassemble your iPhone withoutreplacing the seals.
iPhone 7 Lightning Connector Assembly R… Draft: 2020-01-19Guide ID: 78122 -
This document was generated on 2020-02-11 06:04:03 AM (MST).
© iFixit — CC BY-NC-SA www.iFixit.com Page 3 of 37
Step 2 — iPhone 7 Opening Procedure
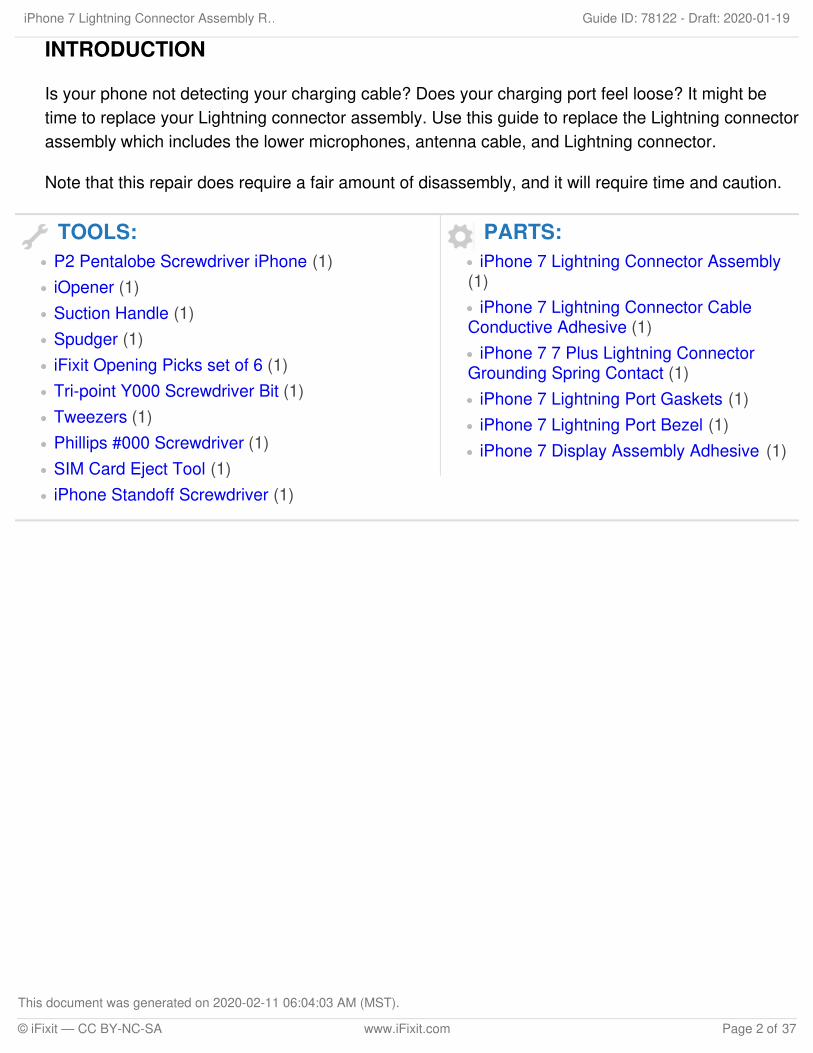
Heating the lower edge of theiPhone will help soften the adhesivesecuring the display, making iteasier to open.
Use a hairdryer or prepare aniOpener and apply it to the loweredge of the iPhone for about aminute in order to soften up theadhesive underneath.
Step 3
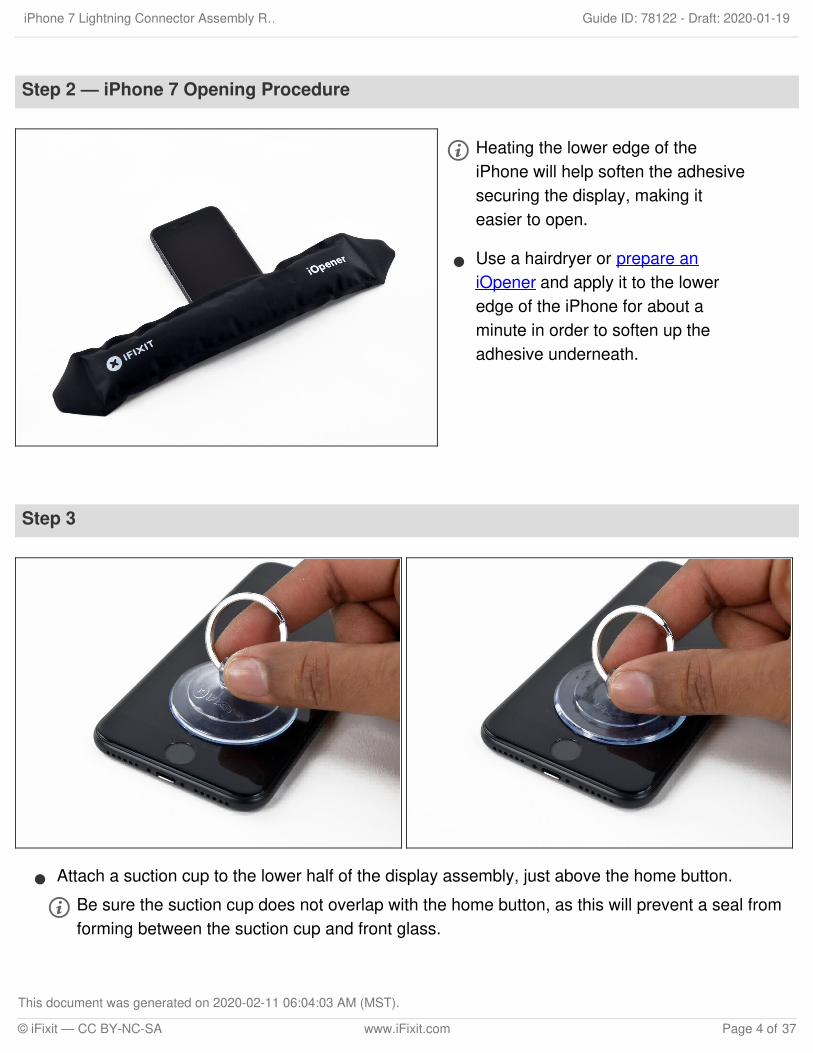
Attach a suction cup to the lower half of the display assembly, just above the home button.
Be sure the suction cup does not overlap with the home button, as this will prevent a seal fromforming between the suction cup and front glass.
iPhone 7 Lightning Connector Assembly R… Draft: 2020-01-19Guide ID: 78122 -
This document was generated on 2020-02-11 06:04:03 AM (MST).
© iFixit — CC BY-NC-SA www.iFixit.com Page 4 of 37
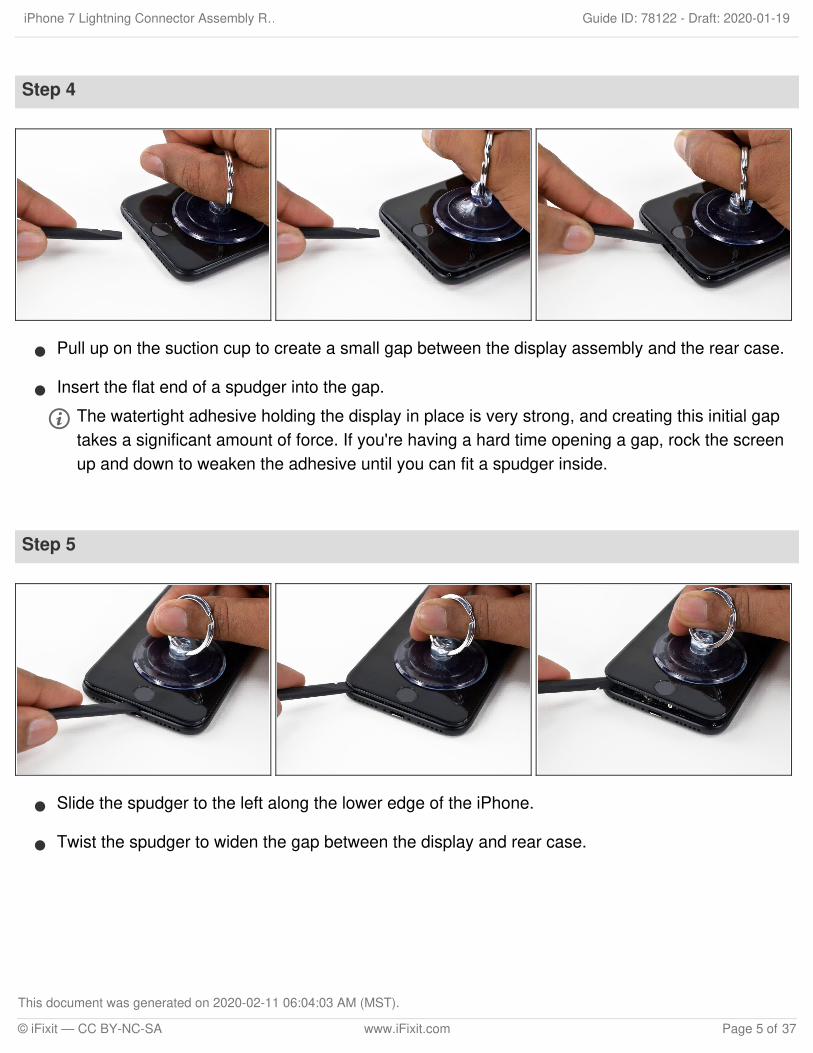
Step 4
Pull up on the suction cup to create a small gap between the display assembly and the rear case.
Insert the flat end of a spudger into the gap.
The watertight adhesive holding the display in place is very strong, and creating this initial gaptakes a significant amount of force. If you're having a hard time opening a gap, rock the screenup and down to weaken the adhesive until you can fit a spudger inside.
Step 5
Slide the spudger to the left along the lower edge of the iPhone.
Twist the spudger to widen the gap between the display and rear case.
iPhone 7 Lightning Connector Assembly R… Draft: 2020-01-19Guide ID: 78122 -
This document was generated on 2020-02-11 06:04:03 AM (MST).
© iFixit — CC BY-NC-SA www.iFixit.com Page 5 of 37
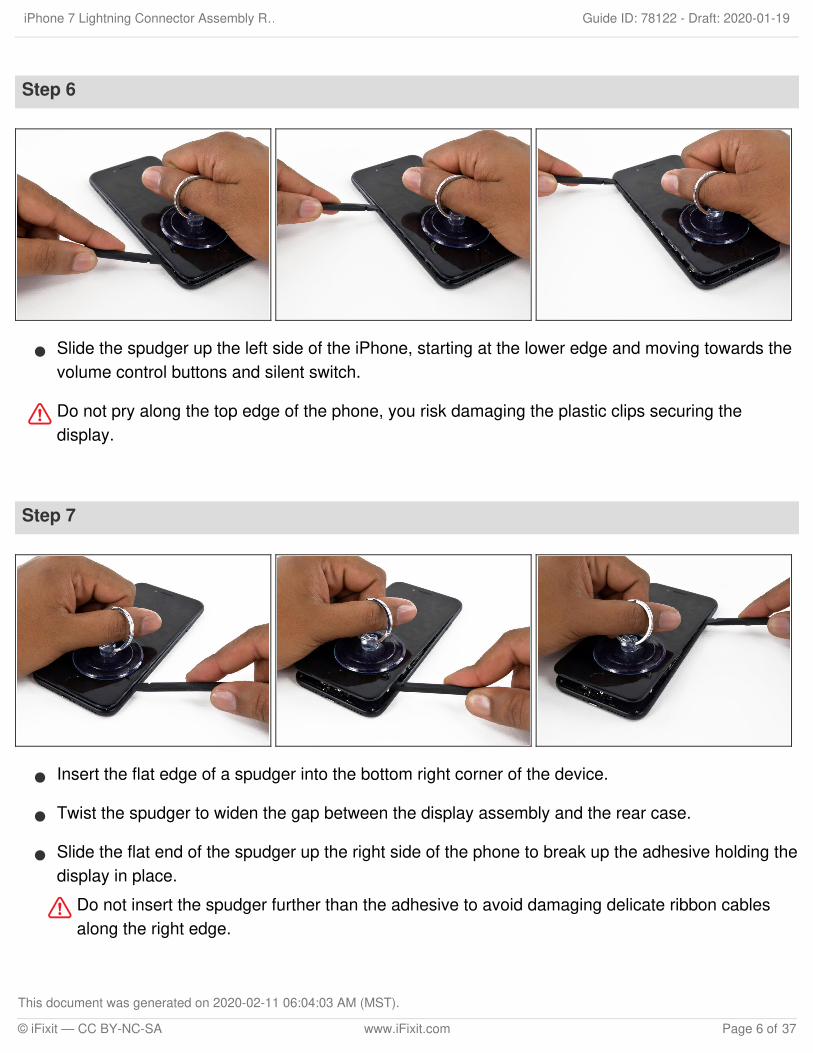
Step 6
Slide the spudger up the left side of the iPhone, starting at the lower edge and moving towards thevolume control buttons and silent switch.
Do not pry along the top edge of the phone, you risk damaging the plastic clips securing thedisplay.
Step 7
Insert the flat edge of a spudger into the bottom right corner of the device.
Twist the spudger to widen the gap between the display assembly and the rear case.
Slide the flat end of the spudger up the right side of the phone to break up the adhesive holding thedisplay in place.
Do not insert the spudger further than the adhesive to avoid damaging delicate ribbon cablesalong the right edge.
iPhone 7 Lightning Connector Assembly R… Draft: 2020-01-19Guide ID: 78122 -
This document was generated on 2020-02-11 06:04:03 AM (MST).
© iFixit — CC BY-NC-SA www.iFixit.com Page 6 of 37
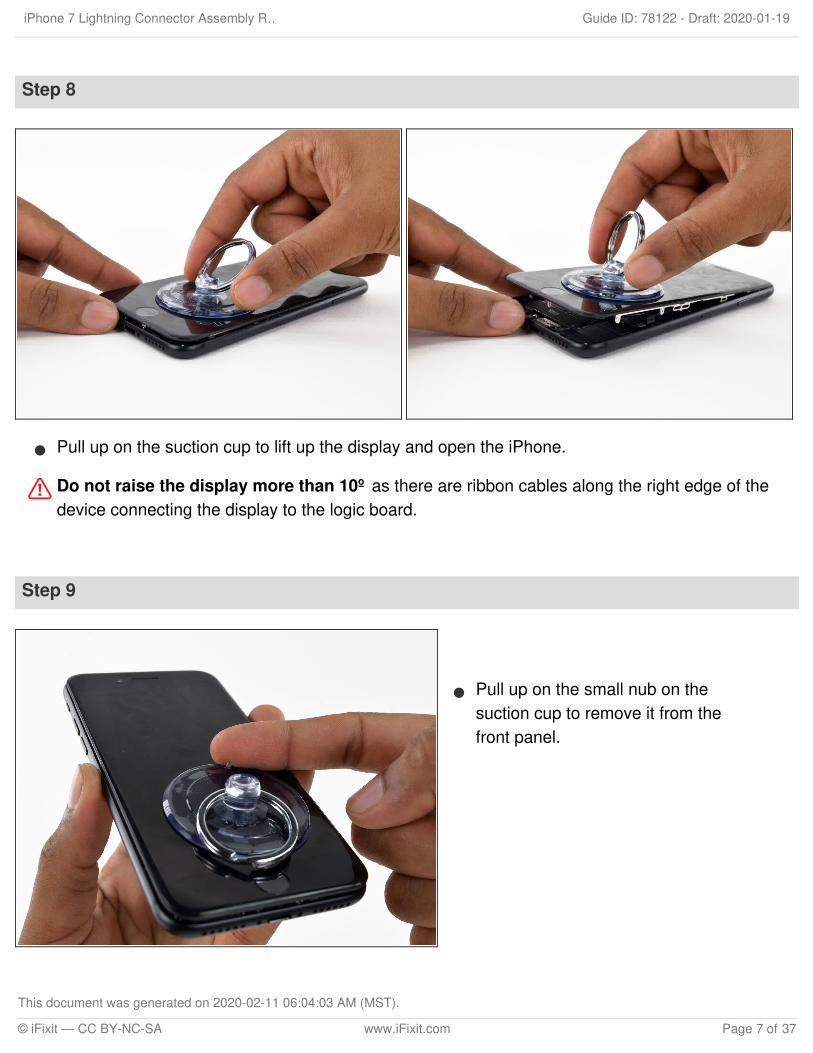
Step 8
Pull up on the suction cup to lift up the display and open the iPhone.
Do not raise the display more than 10º as there are ribbon cables along the right edge of thedevice connecting the display to the logic board.
Step 9
Pull up on the small nub on thesuction cup to remove it from thefront panel.
iPhone 7 Lightning Connector Assembly R… Draft: 2020-01-19Guide ID: 78122 -
This document was generated on 2020-02-11 06:04:03 AM (MST).
© iFixit — CC BY-NC-SA www.iFixit.com Page 7 of 37
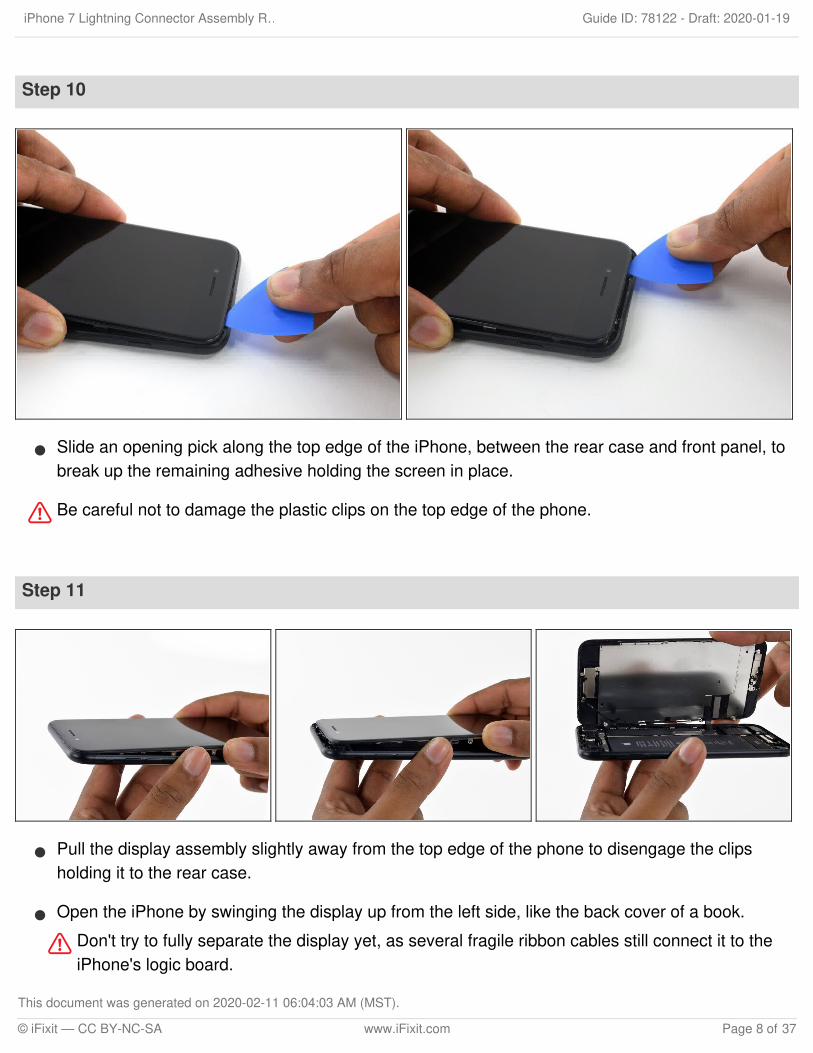
Step 10
Slide an opening pick along the top edge of the iPhone, between the rear case and front panel, tobreak up the remaining adhesive holding the screen in place.
Be careful not to damage the plastic clips on the top edge of the phone.
Step 11
Pull the display assembly slightly away from the top edge of the phone to disengage the clipsholding it to the rear case.
Open the iPhone by swinging the display up from the left side, like the back cover of a book.
Don't try to fully separate the display yet, as several fragile ribbon cables still connect it to theiPhone's logic board.
iPhone 7 Lightning Connector Assembly R… Draft: 2020-01-19Guide ID: 78122 -
This document was generated on 2020-02-11 06:04:03 AM (MST).
© iFixit — CC BY-NC-SA www.iFixit.com Page 8 of 37
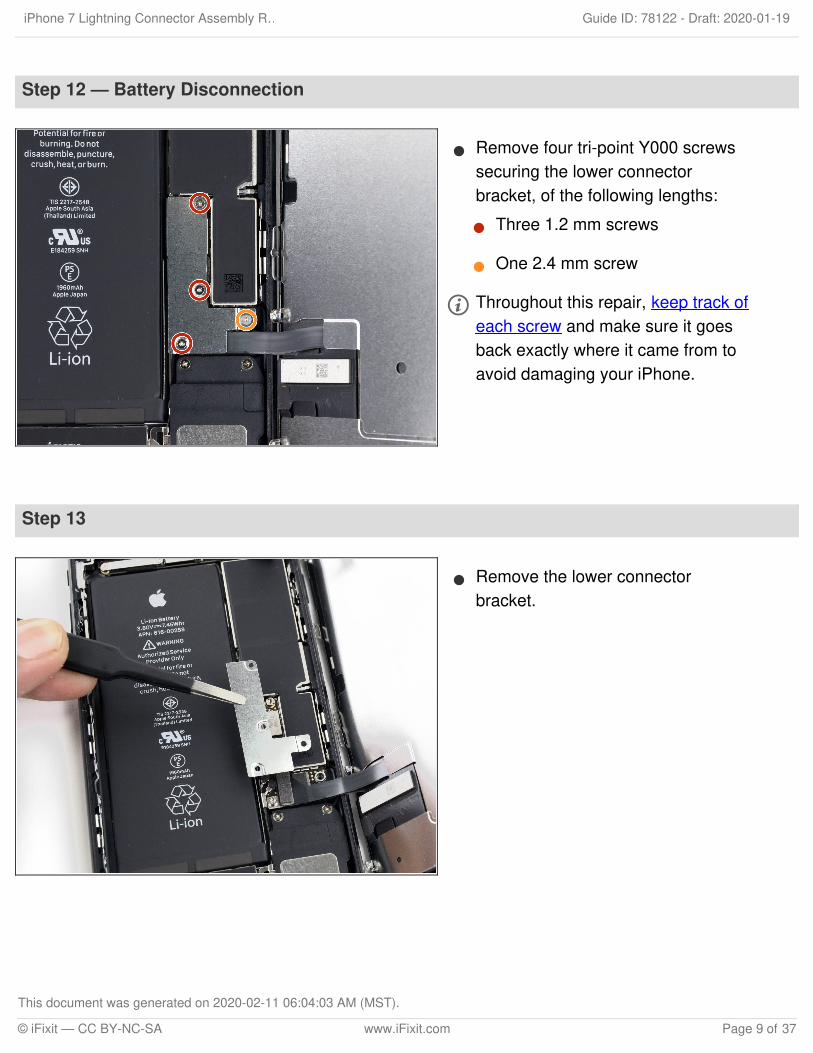
Step 12 — Battery Disconnection
Remove four tri-point Y000 screwssecuring the lower connectorbracket, of the following lengths:
Three 1.2 mm screws
One 2.4 mm screw
Throughout this repair, keep track ofeach screw and make sure it goesback exactly where it came from toavoid damaging your iPhone.
Step 13
Remove the lower connectorbracket.
iPhone 7 Lightning Connector Assembly R… Draft: 2020-01-19Guide ID: 78122 -
This document was generated on 2020-02-11 06:04:03 AM (MST).
© iFixit — CC BY-NC-SA www.iFixit.com Page 9 of 37
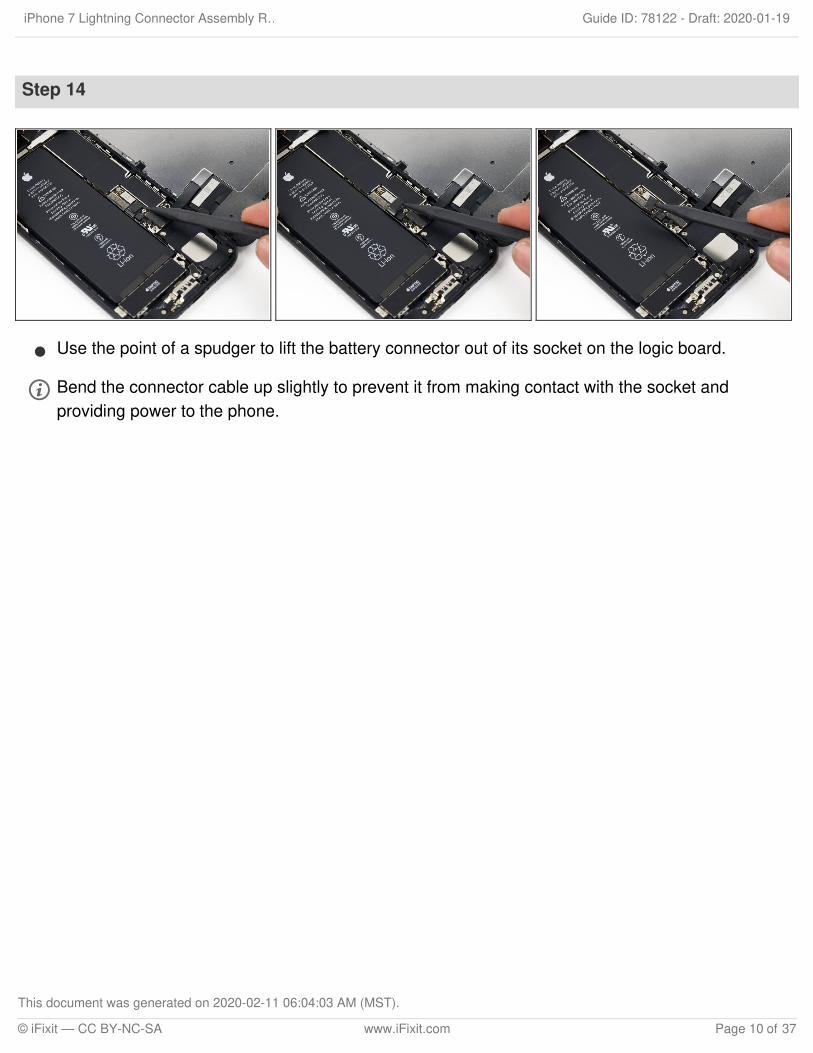
Step 14
Use the point of a spudger to lift the battery connector out of its socket on the logic board.
Bend the connector cable up slightly to prevent it from making contact with the socket andproviding power to the phone.
iPhone 7 Lightning Connector Assembly R… Draft: 2020-01-19Guide ID: 78122 -
This document was generated on 2020-02-11 06:04:03 AM (MST).
© iFixit — CC BY-NC-SA www.iFixit.com Page 10 of 37
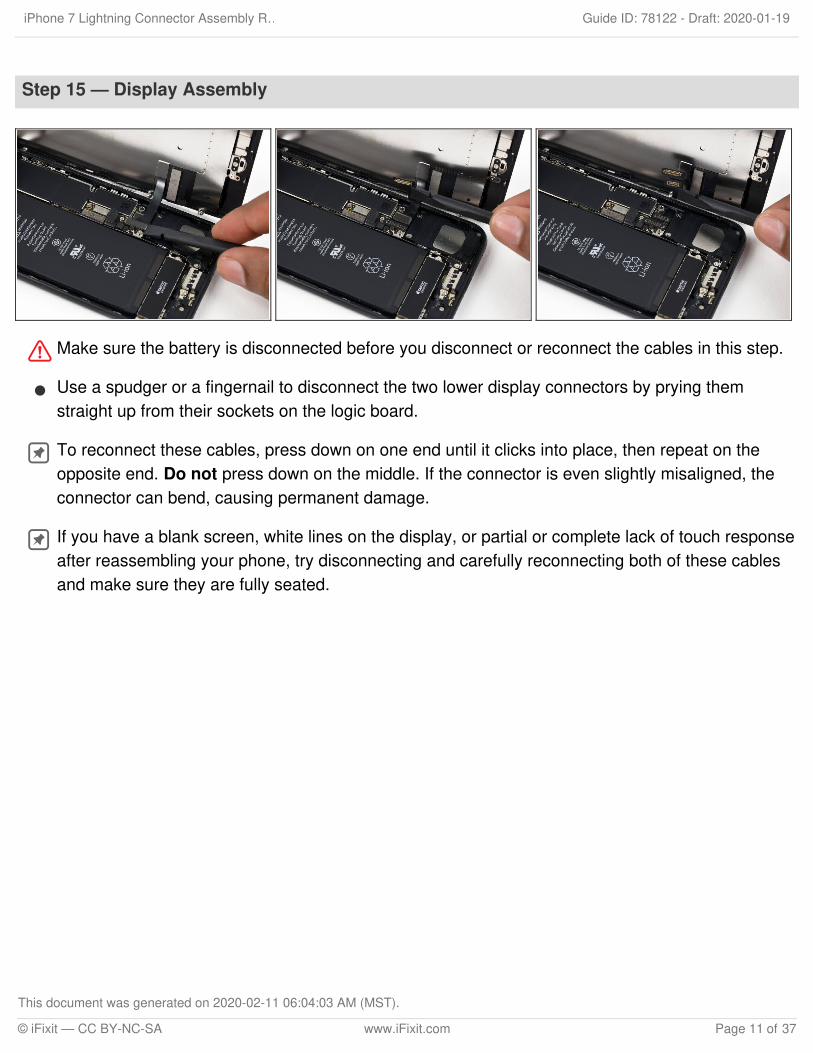
Step 15 — Display Assembly
Make sure the battery is disconnected before you disconnect or reconnect the cables in this step.
Use a spudger or a fingernail to disconnect the two lower display connectors by prying themstraight up from their sockets on the logic board.
To reconnect these cables, press down on one end until it clicks into place, then repeat on theopposite end. Do not press down on the middle. If the connector is even slightly misaligned, theconnector can bend, causing permanent damage.
If you have a blank screen, white lines on the display, or partial or complete lack of touch responseafter reassembling your phone, try disconnecting and carefully reconnecting both of these cablesand make sure they are fully seated.
iPhone 7 Lightning Connector Assembly R… Draft: 2020-01-19Guide ID: 78122 -
This document was generated on 2020-02-11 06:04:03 AM (MST).
© iFixit — CC BY-NC-SA www.iFixit.com Page 11 of 37
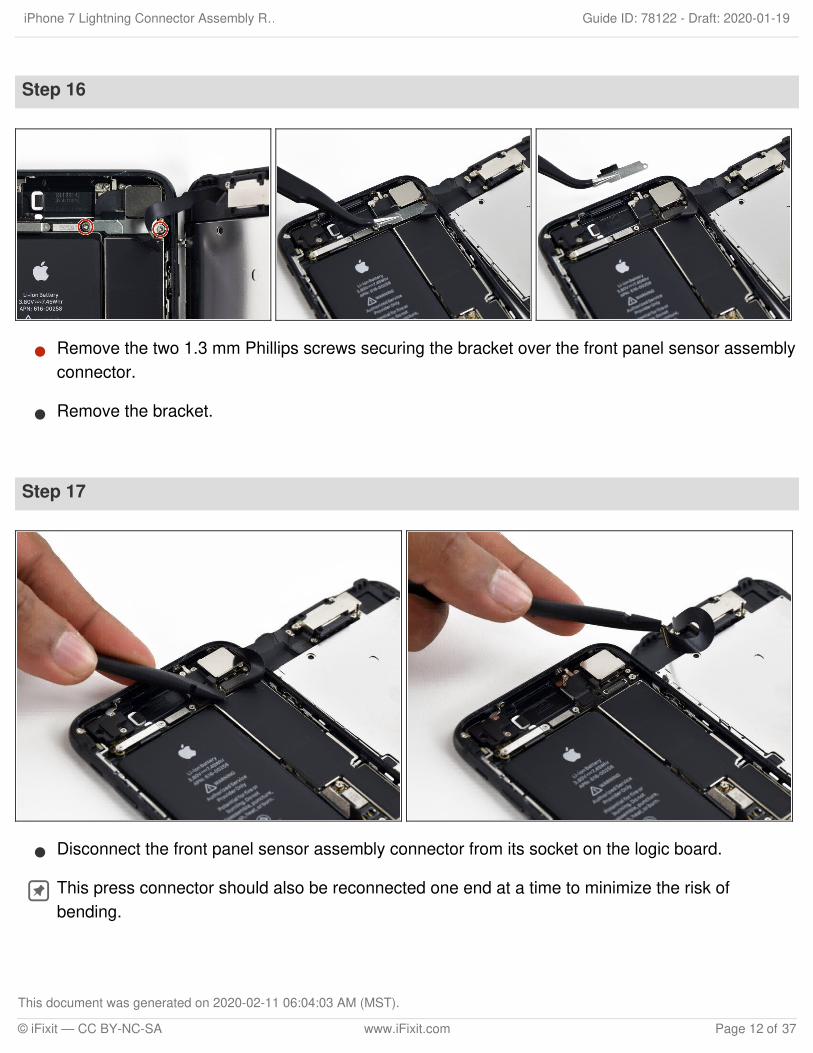
Step 16
Remove the two 1.3 mm Phillips screws securing the bracket over the front panel sensor assemblyconnector.
Remove the bracket.
Step 17
Disconnect the front panel sensor assembly connector from its socket on the logic board.
This press connector should also be reconnected one end at a time to minimize the risk ofbending.
iPhone 7 Lightning Connector Assembly R… Draft: 2020-01-19Guide ID: 78122 -
This document was generated on 2020-02-11 06:04:03 AM (MST).
© iFixit — CC BY-NC-SA www.iFixit.com Page 12 of 37
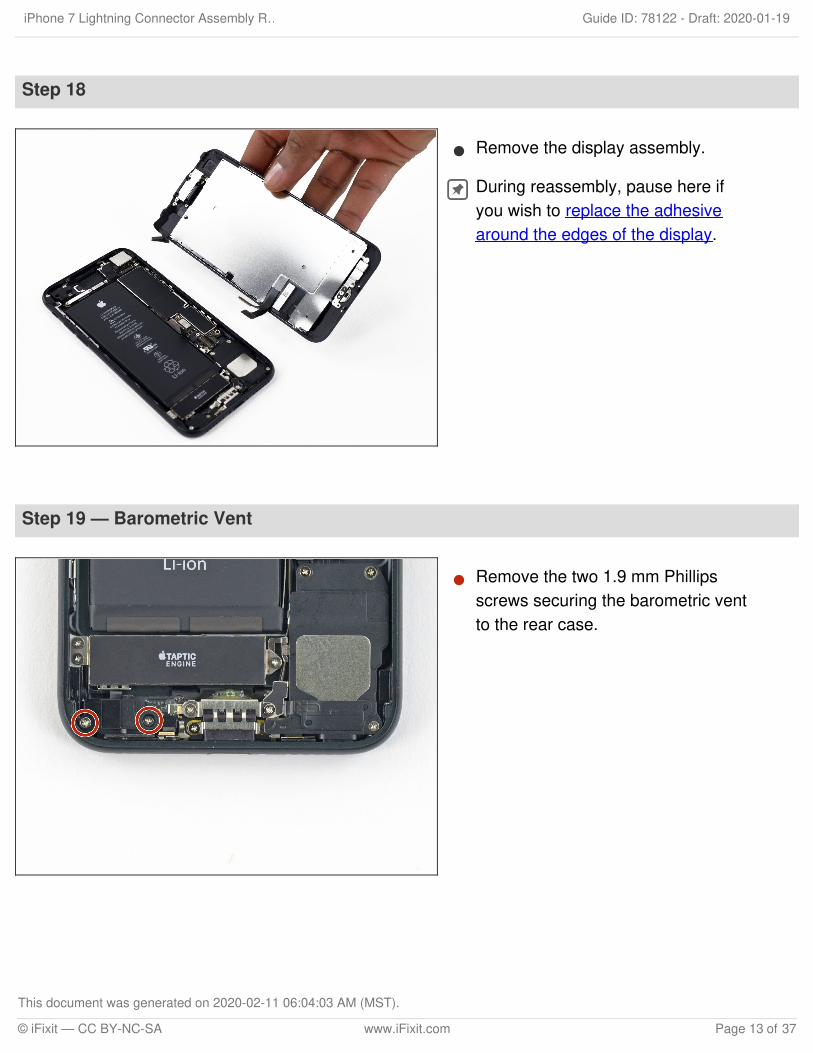
Step 18
Remove the display assembly.
During reassembly, pause here ifyou wish to replace the adhesivearound the edges of the display.
Step 19 — Barometric Vent
Remove the two 1.9 mm Phillipsscrews securing the barometric ventto the rear case.
iPhone 7 Lightning Connector Assembly R… Draft: 2020-01-19Guide ID: 78122 -
This document was generated on 2020-02-11 06:04:03 AM (MST).
© iFixit — CC BY-NC-SA www.iFixit.com Page 13 of 37
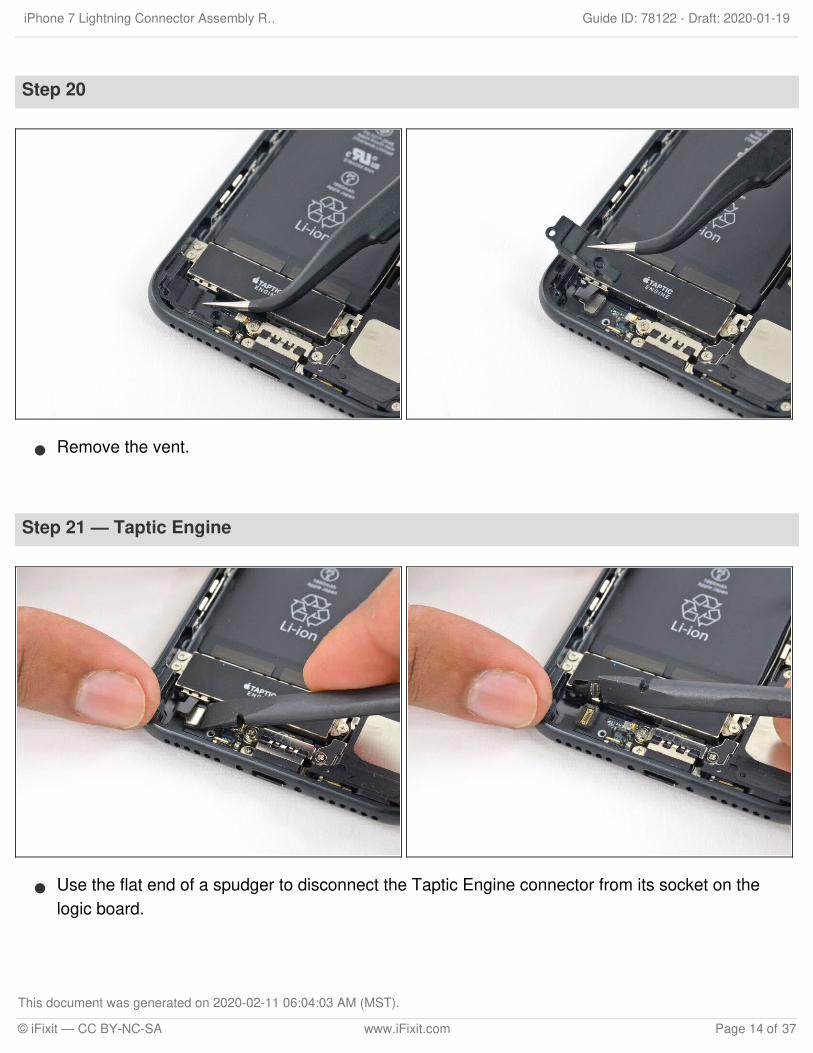
Step 20
Remove the vent.
Step 21 — Taptic Engine
Use the flat end of a spudger to disconnect the Taptic Engine connector from its socket on thelogic board.
iPhone 7 Lightning Connector Assembly R… Draft: 2020-01-19Guide ID: 78122 -
This document was generated on 2020-02-11 06:04:03 AM (MST).
© iFixit — CC BY-NC-SA www.iFixit.com Page 14 of 37
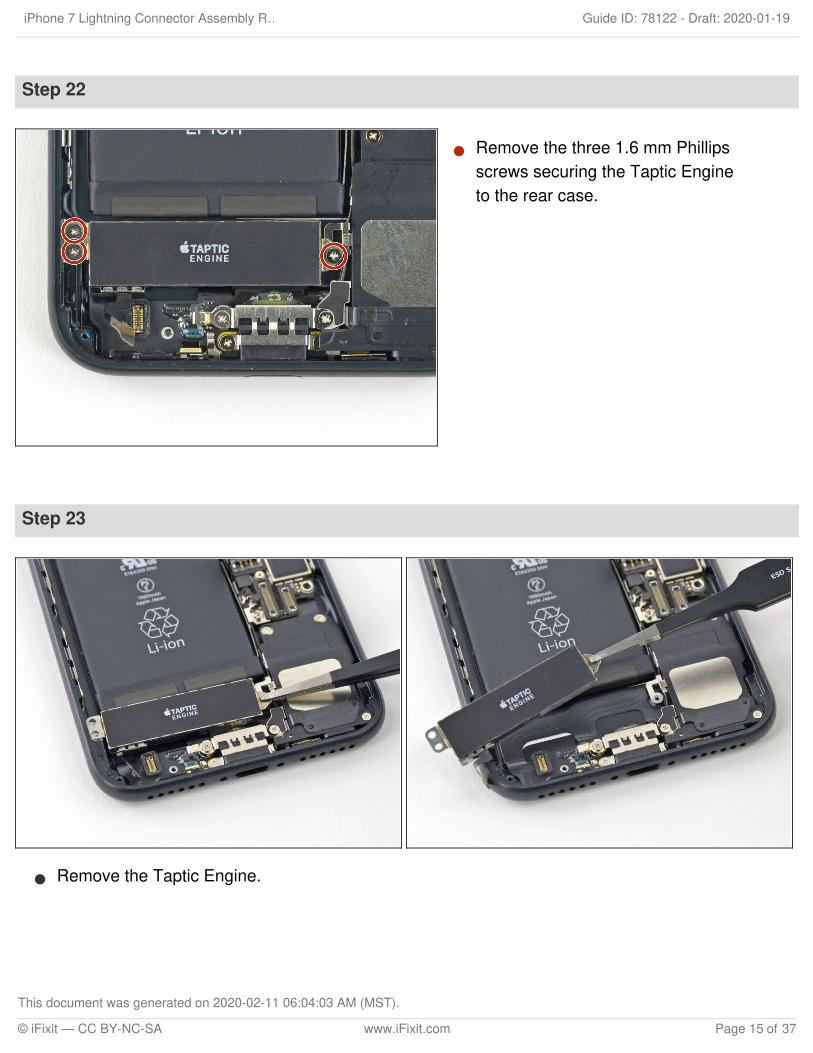
Step 22
Remove the three 1.6 mm Phillipsscrews securing the Taptic Engineto the rear case.
Step 23
Remove the Taptic Engine.
iPhone 7 Lightning Connector Assembly R… Draft: 2020-01-19Guide ID: 78122 -
This document was generated on 2020-02-11 06:04:03 AM (MST).
© iFixit — CC BY-NC-SA www.iFixit.com Page 15 of 37
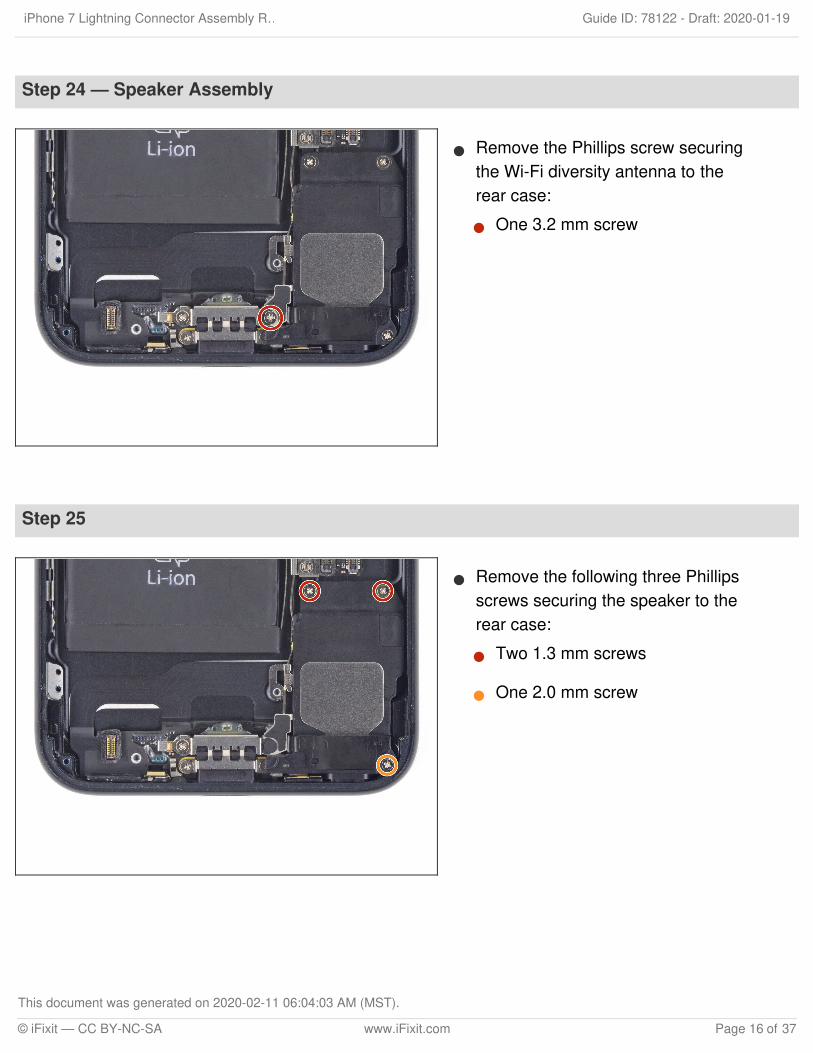
Step 24 — Speaker Assembly
Remove the Phillips screw securingthe Wi-Fi diversity antenna to therear case:
One 3.2 mm screw
Step 25
Remove the following three Phillipsscrews securing the speaker to therear case:
Two 1.3 mm screws
One 2.0 mm screw
iPhone 7 Lightning Connector Assembly R… Draft: 2020-01-19Guide ID: 78122 -
This document was generated on 2020-02-11 06:04:03 AM (MST).
© iFixit — CC BY-NC-SA www.iFixit.com Page 16 of 37
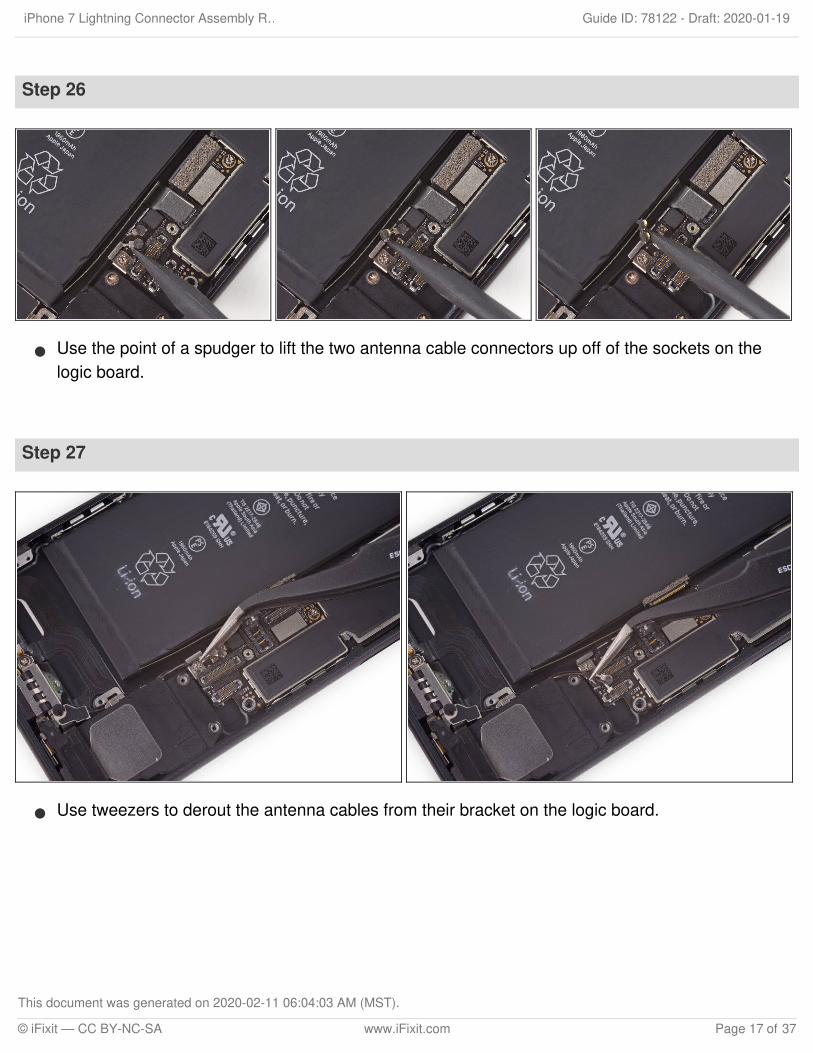
Step 26
Use the point of a spudger to lift the two antenna cable connectors up off of the sockets on thelogic board.
Step 27
Use tweezers to derout the antenna cables from their bracket on the logic board.
iPhone 7 Lightning Connector Assembly R… Draft: 2020-01-19Guide ID: 78122 -
This document was generated on 2020-02-11 06:04:03 AM (MST).
© iFixit — CC BY-NC-SA www.iFixit.com Page 17 of 37
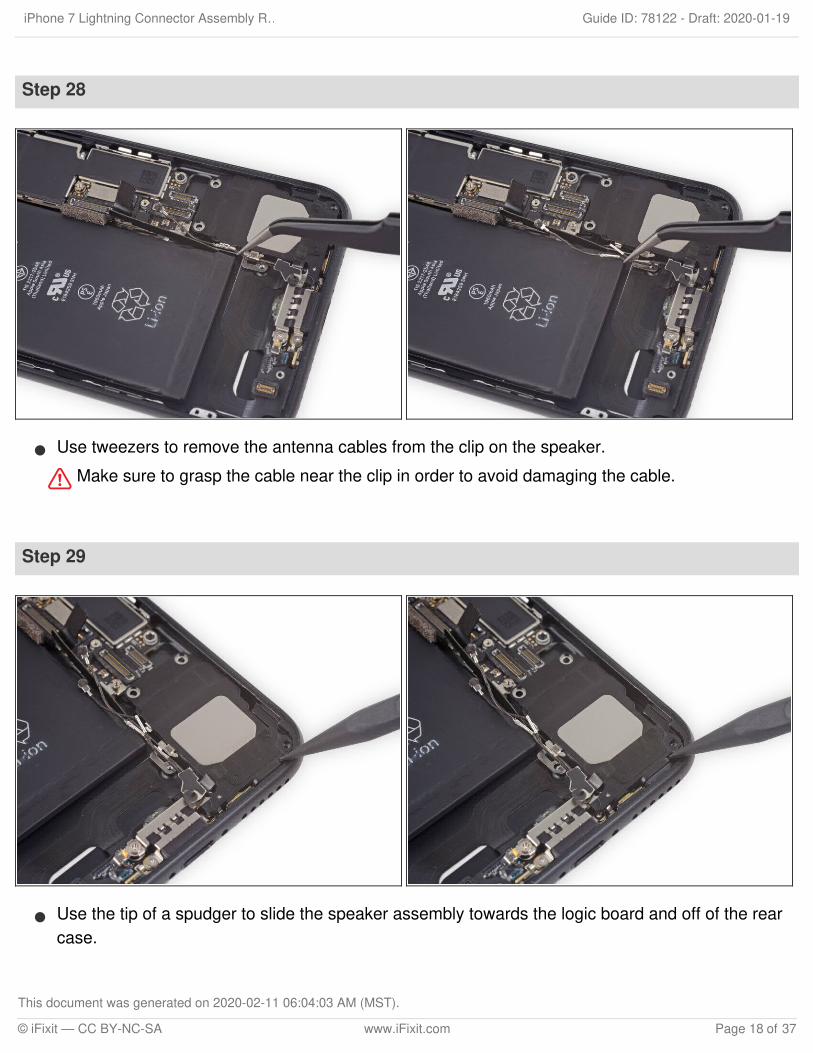
Step 28
Use tweezers to remove the antenna cables from the clip on the speaker.
Make sure to grasp the cable near the clip in order to avoid damaging the cable.
Step 29
Use the tip of a spudger to slide the speaker assembly towards the logic board and off of the rearcase.
iPhone 7 Lightning Connector Assembly R… Draft: 2020-01-19Guide ID: 78122 -
This document was generated on 2020-02-11 06:04:03 AM (MST).
© iFixit — CC BY-NC-SA www.iFixit.com Page 18 of 37

Step 30
Remove the speaker.
Step 31 — SIM Card
Insert a SIM card eject tool or a paperclip into the small hole in the SIM card tray.
Press to eject the tray.
This may require a significant amount of force.
Remove the SIM card tray assembly from the iPhone.
When reinserting the SIM card, ensure that it is in the proper orientation relative to the tray.
iPhone 7 Lightning Connector Assembly R… Draft: 2020-01-19Guide ID: 78122 -
This document was generated on 2020-02-11 06:04:03 AM (MST).
© iFixit — CC BY-NC-SA www.iFixit.com Page 19 of 37
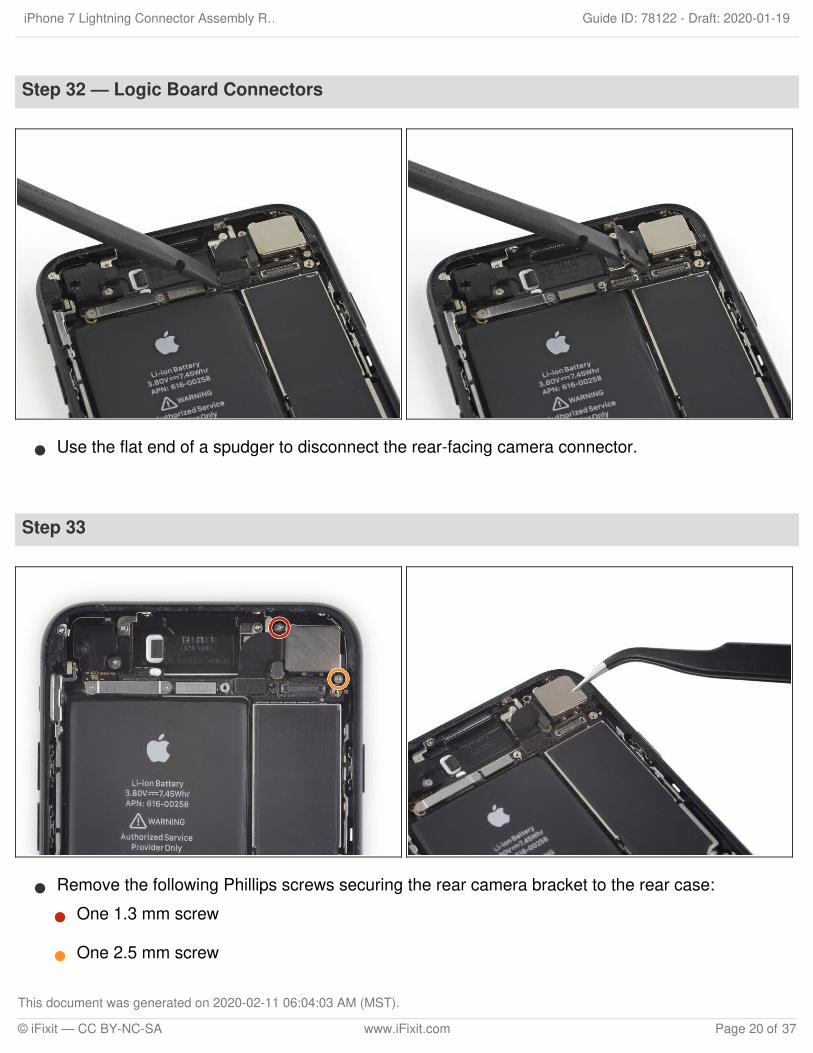
Step 32 — Logic Board Connectors
Use the flat end of a spudger to disconnect the rear-facing camera connector.
Step 33
Remove the following Phillips screws securing the rear camera bracket to the rear case:
One 1.3 mm screw
One 2.5 mm screw
iPhone 7 Lightning Connector Assembly R… Draft: 2020-01-19Guide ID: 78122 -
This document was generated on 2020-02-11 06:04:03 AM (MST).
© iFixit — CC BY-NC-SA www.iFixit.com Page 20 of 37
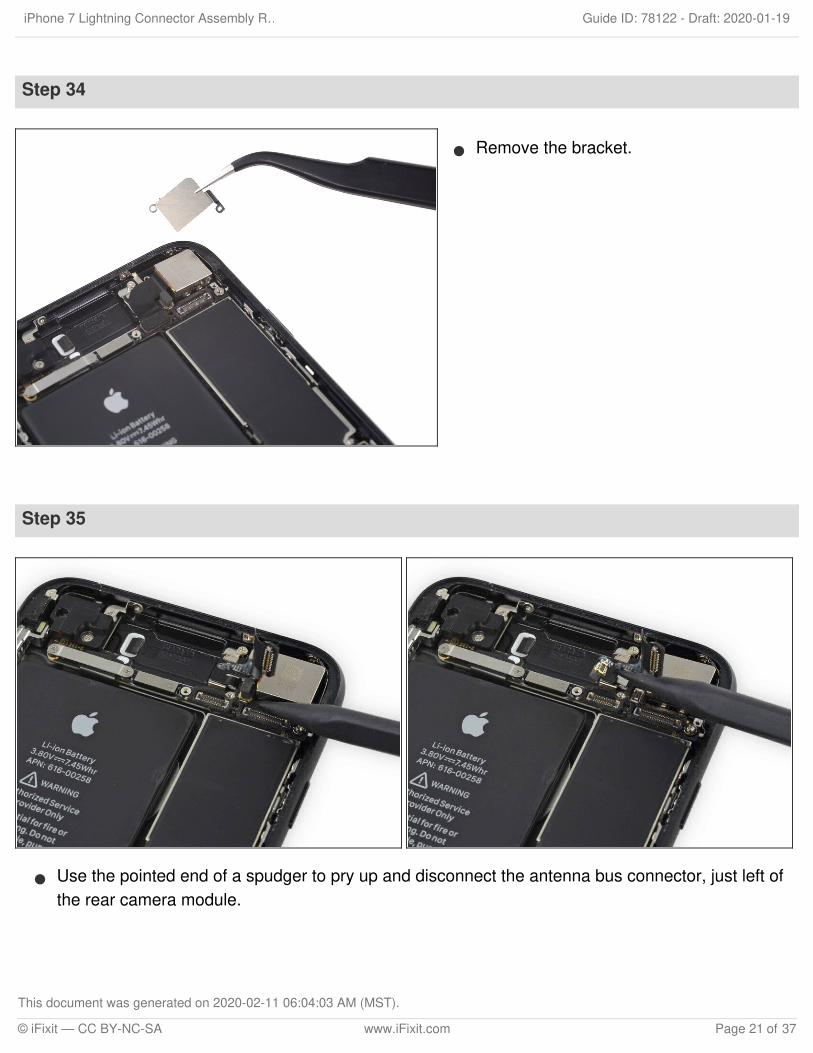
Step 34
Remove the bracket.
Step 35
Use the pointed end of a spudger to pry up and disconnect the antenna bus connector, just left ofthe rear camera module.
iPhone 7 Lightning Connector Assembly R… Draft: 2020-01-19Guide ID: 78122 -
This document was generated on 2020-02-11 06:04:03 AM (MST).
© iFixit — CC BY-NC-SA www.iFixit.com Page 21 of 37
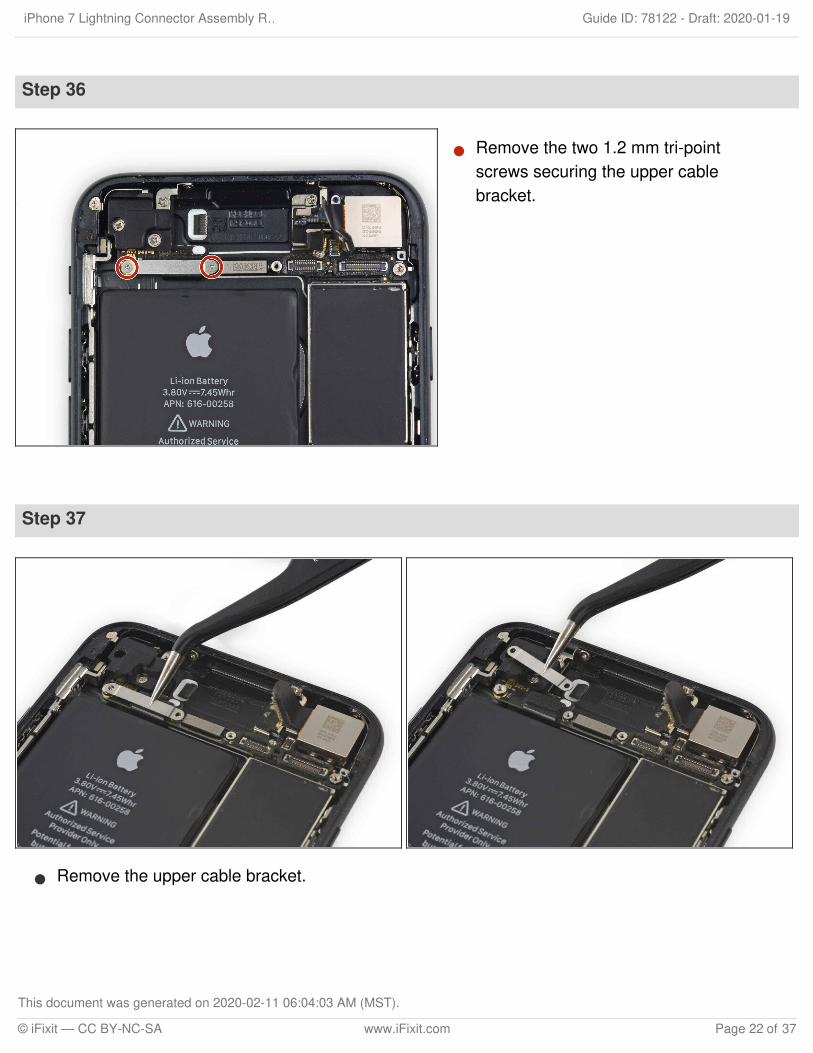
Step 36
Remove the two 1.2 mm tri-pointscrews securing the upper cablebracket.
Step 37
Remove the upper cable bracket.
iPhone 7 Lightning Connector Assembly R… Draft: 2020-01-19Guide ID: 78122 -
This document was generated on 2020-02-11 06:04:03 AM (MST).
© iFixit — CC BY-NC-SA www.iFixit.com Page 22 of 37
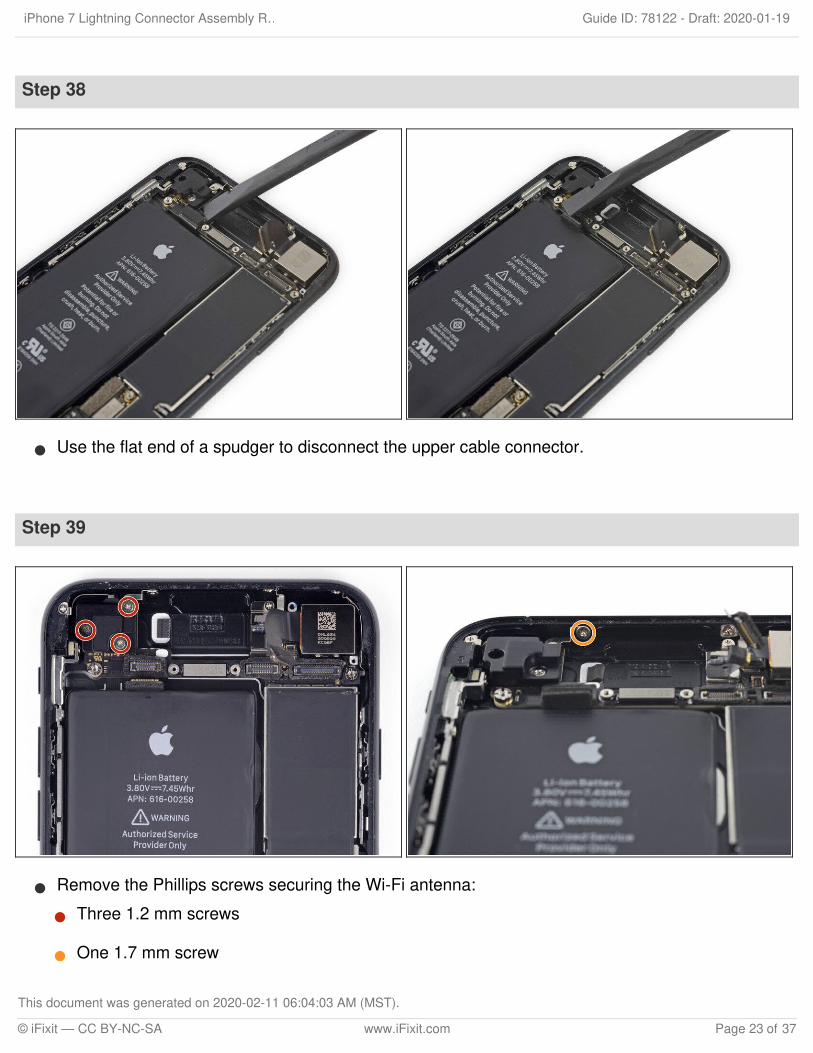
Step 38
Use the flat end of a spudger to disconnect the upper cable connector.
Step 39
Remove the Phillips screws securing the Wi-Fi antenna:
Three 1.2 mm screws
One 1.7 mm screw
iPhone 7 Lightning Connector Assembly R… Draft: 2020-01-19Guide ID: 78122 -
This document was generated on 2020-02-11 06:04:03 AM (MST).
© iFixit — CC BY-NC-SA www.iFixit.com Page 23 of 37
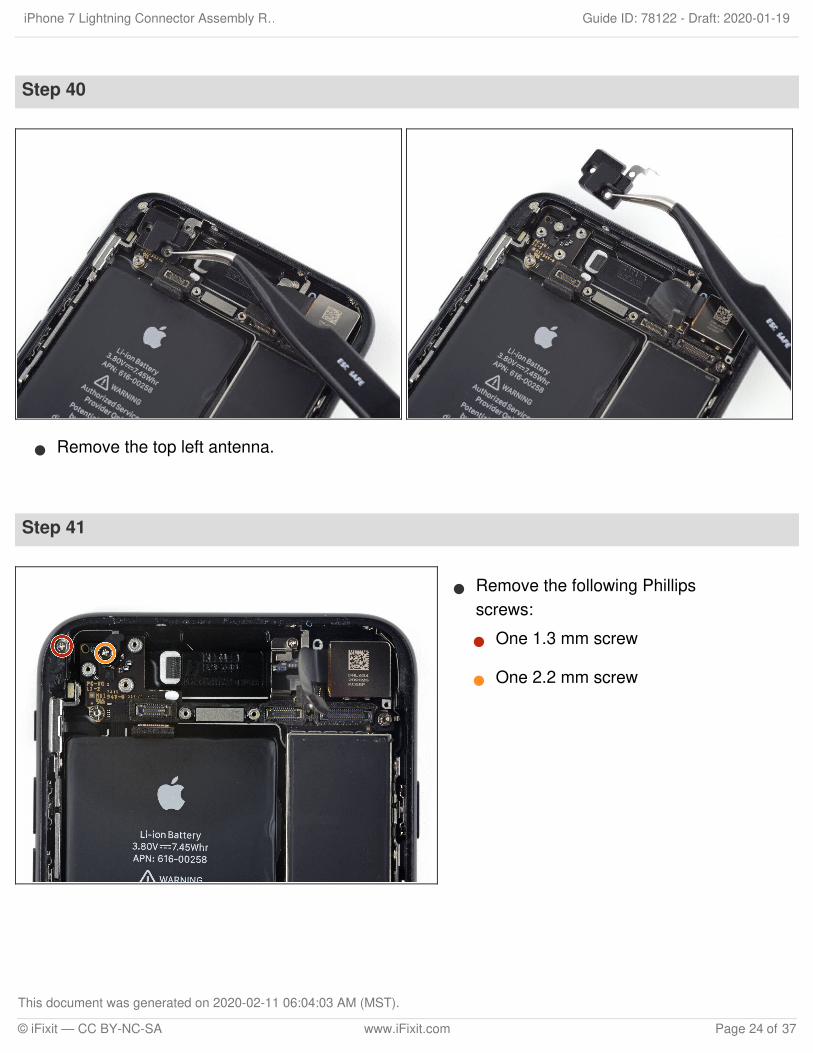
Step 40
Remove the top left antenna.
Step 41
Remove the following Phillipsscrews:
One 1.3 mm screw
One 2.2 mm screw
iPhone 7 Lightning Connector Assembly R… Draft: 2020-01-19Guide ID: 78122 -
This document was generated on 2020-02-11 06:04:03 AM (MST).
© iFixit — CC BY-NC-SA www.iFixit.com Page 24 of 37
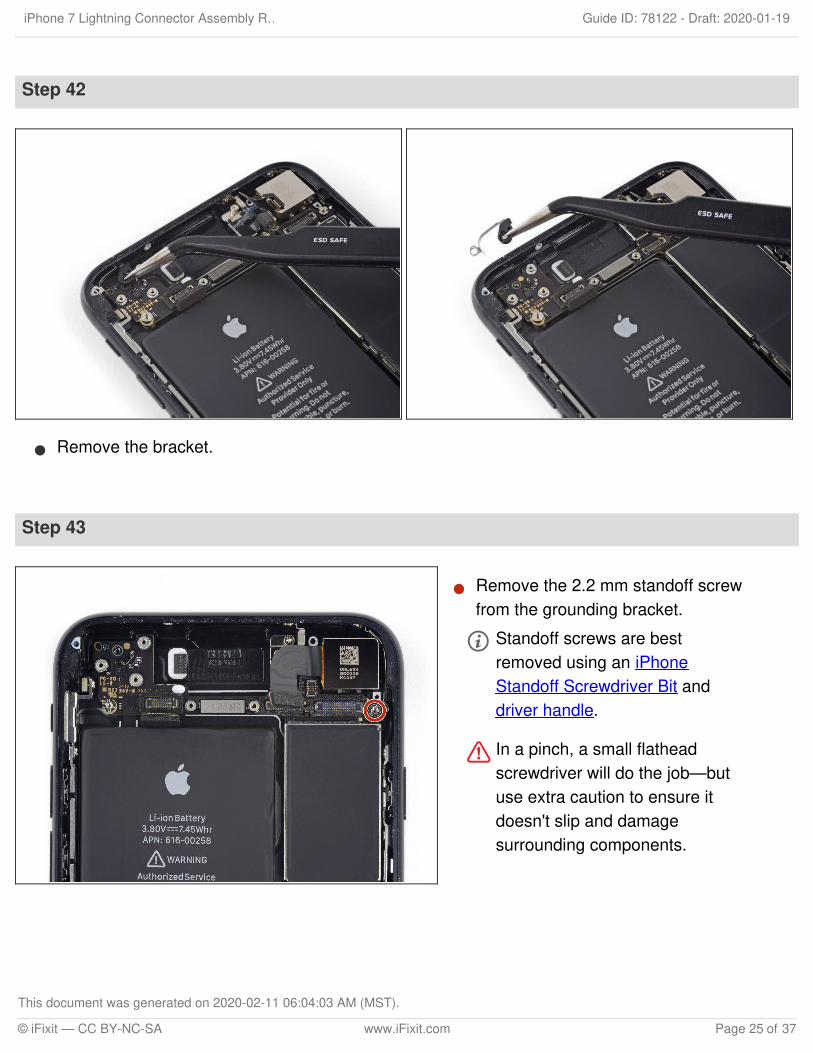
Step 42
Remove the bracket.
Step 43
Remove the 2.2 mm standoff screwfrom the grounding bracket.
Standoff screws are bestremoved using an iPhoneStandoff Screwdriver Bit anddriver handle.
In a pinch, a small flatheadscrewdriver will do the job—butuse extra caution to ensure itdoesn't slip and damagesurrounding components.
iPhone 7 Lightning Connector Assembly R… Draft: 2020-01-19Guide ID: 78122 -
This document was generated on 2020-02-11 06:04:03 AM (MST).
© iFixit — CC BY-NC-SA www.iFixit.com Page 25 of 37
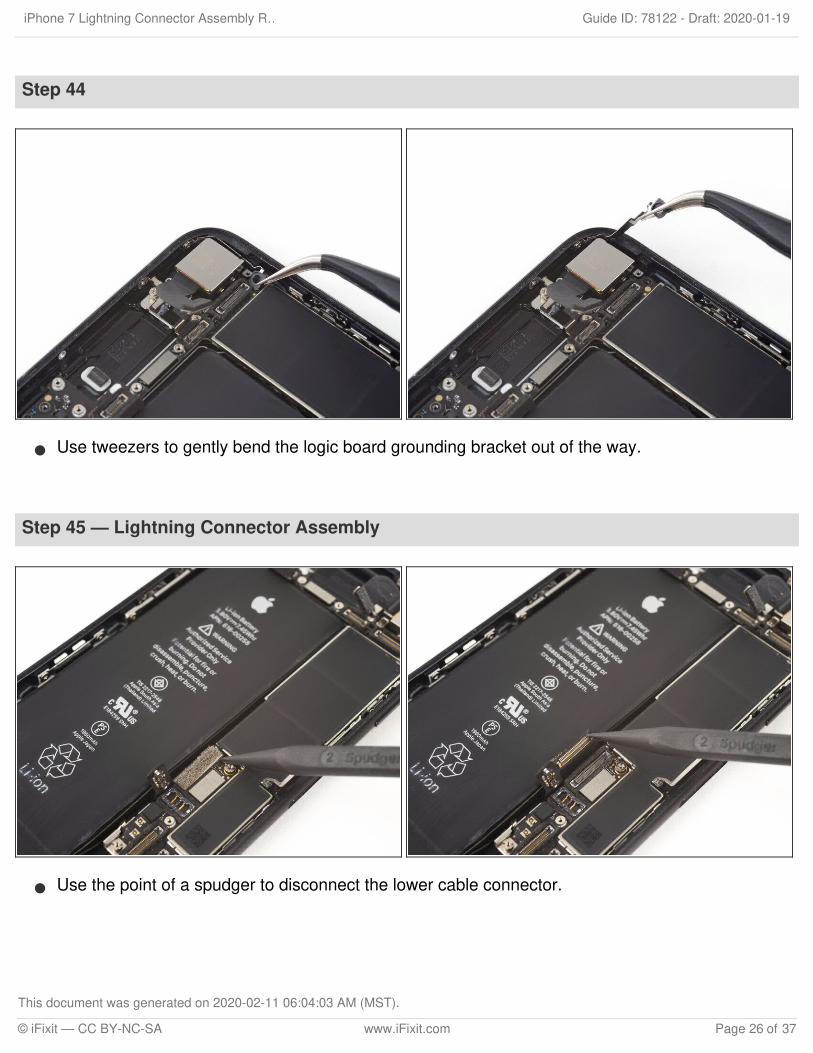
Step 44
Use tweezers to gently bend the logic board grounding bracket out of the way.
Step 45 — Lightning Connector Assembly
Use the point of a spudger to disconnect the lower cable connector.
iPhone 7 Lightning Connector Assembly R… Draft: 2020-01-19Guide ID: 78122 -
This document was generated on 2020-02-11 06:04:03 AM (MST).
© iFixit — CC BY-NC-SA www.iFixit.com Page 26 of 37
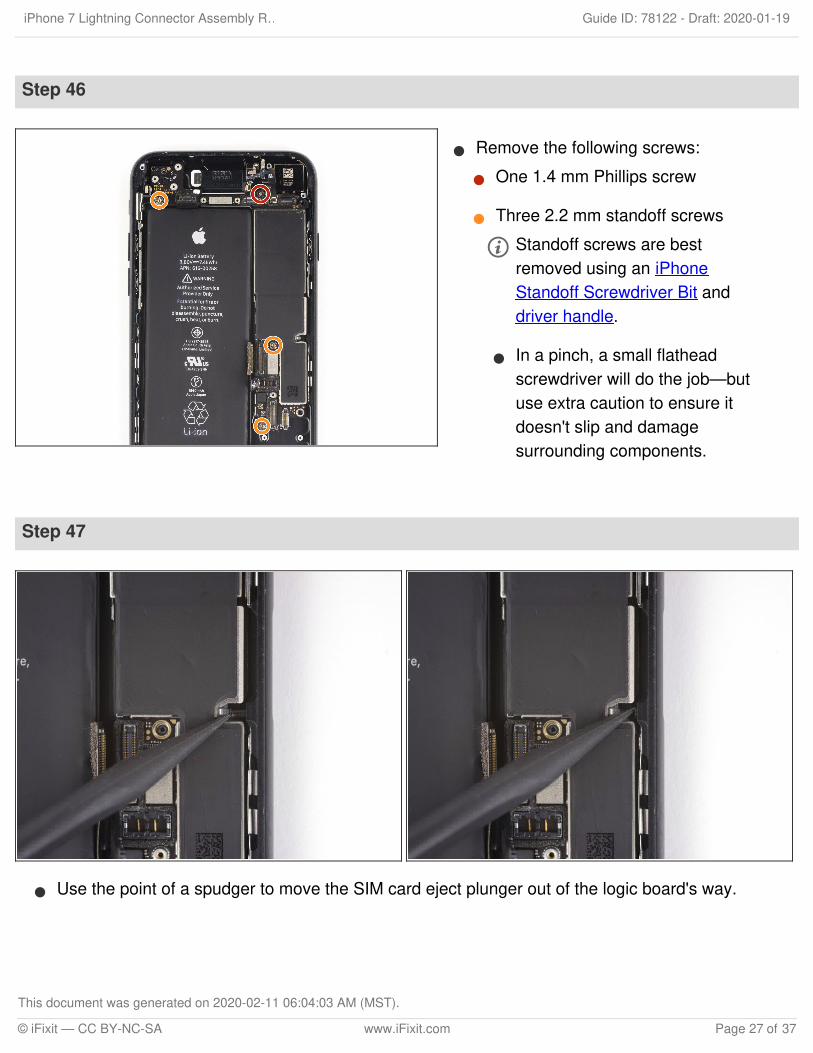
Step 46
Remove the following screws:
One 1.4 mm Phillips screw
Three 2.2 mm standoff screws
Standoff screws are bestremoved using an iPhoneStandoff Screwdriver Bit anddriver handle.
In a pinch, a small flatheadscrewdriver will do the job—butuse extra caution to ensure itdoesn't slip and damagesurrounding components.
Step 47
Use the point of a spudger to move the SIM card eject plunger out of the logic board's way.
iPhone 7 Lightning Connector Assembly R… Draft: 2020-01-19Guide ID: 78122 -
This document was generated on 2020-02-11 06:04:03 AM (MST).
© iFixit — CC BY-NC-SA www.iFixit.com Page 27 of 37
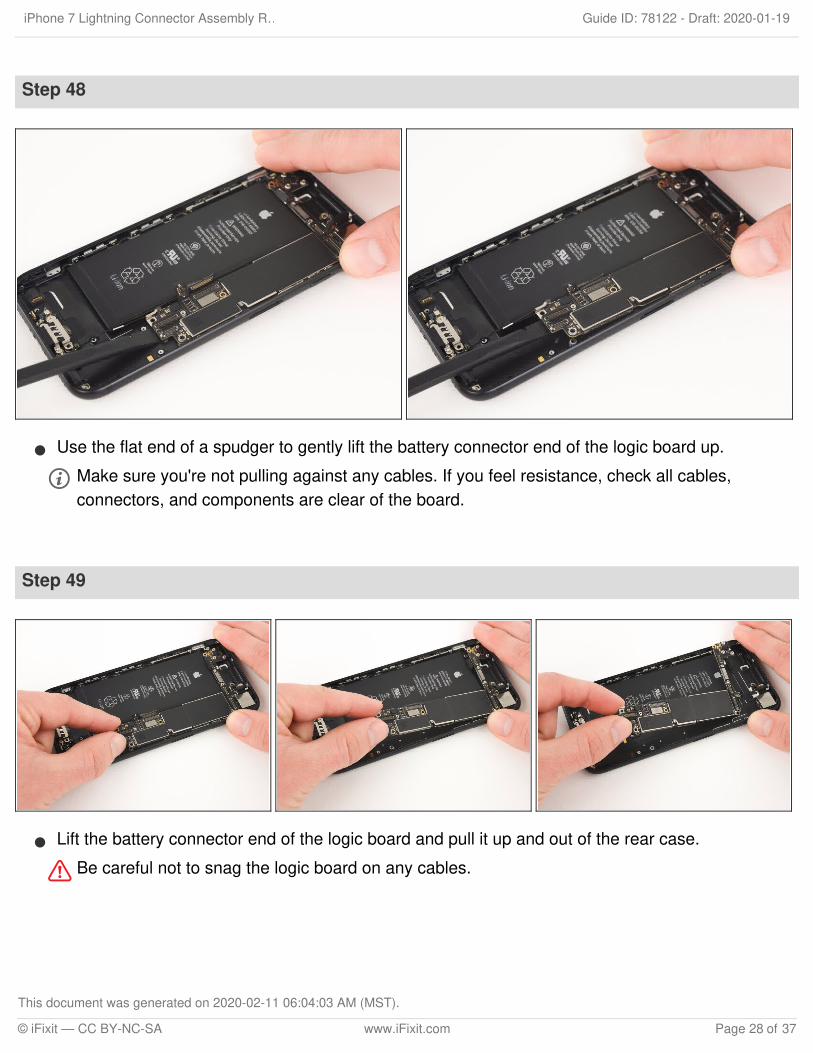
Step 48
Use the flat end of a spudger to gently lift the battery connector end of the logic board up.
Make sure you're not pulling against any cables. If you feel resistance, check all cables,connectors, and components are clear of the board.
Step 49
Lift the battery connector end of the logic board and pull it up and out of the rear case.
Be careful not to snag the logic board on any cables.
iPhone 7 Lightning Connector Assembly R… Draft: 2020-01-19Guide ID: 78122 -
This document was generated on 2020-02-11 06:04:03 AM (MST).
© iFixit — CC BY-NC-SA www.iFixit.com Page 28 of 37
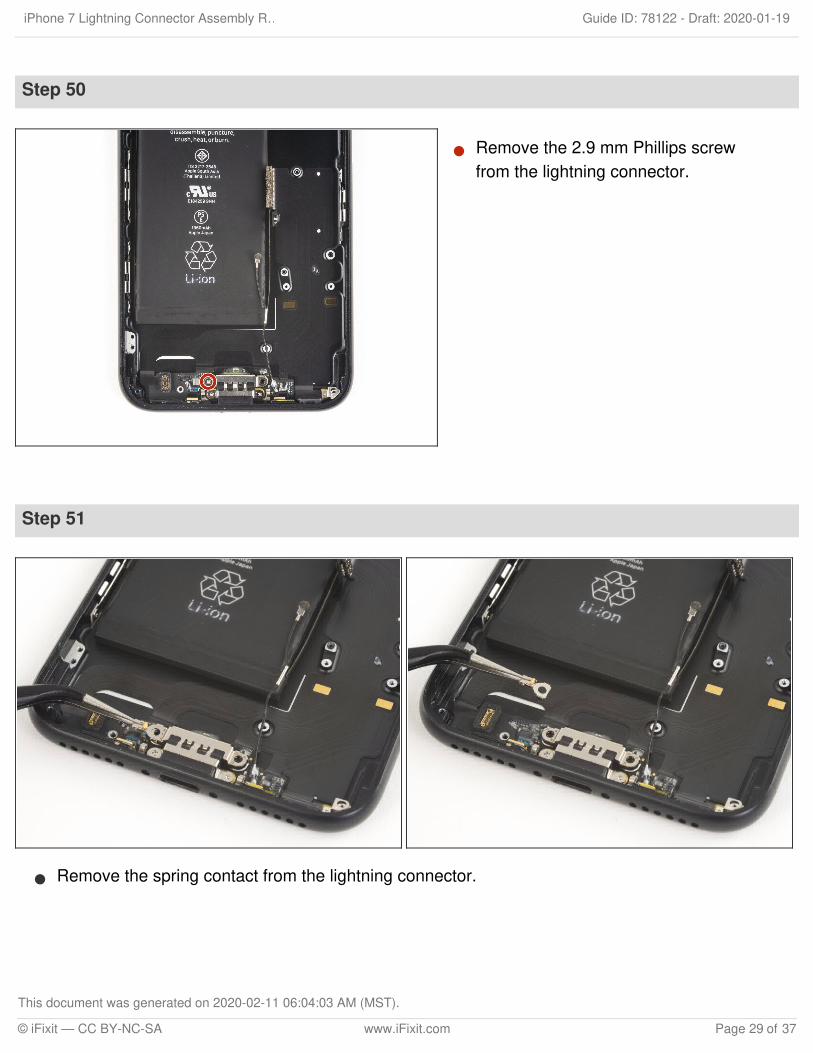
Step 50
Remove the 2.9 mm Phillips screwfrom the lightning connector.
Step 51
Remove the spring contact from the lightning connector.
iPhone 7 Lightning Connector Assembly R… Draft: 2020-01-19Guide ID: 78122 -
This document was generated on 2020-02-11 06:04:03 AM (MST).
© iFixit — CC BY-NC-SA www.iFixit.com Page 29 of 37

Step 52
Remove the two 1.6 mm Phillipsscrews securing the lightningconnector cable in place.
Step 53
Remove the two stickers covering the screws that secure the lightning connector to the bottom ofthe rear case.
iPhone 7 Lightning Connector Assembly R… Draft: 2020-01-19Guide ID: 78122 -
This document was generated on 2020-02-11 06:04:03 AM (MST).
© iFixit — CC BY-NC-SA www.iFixit.com Page 30 of 37
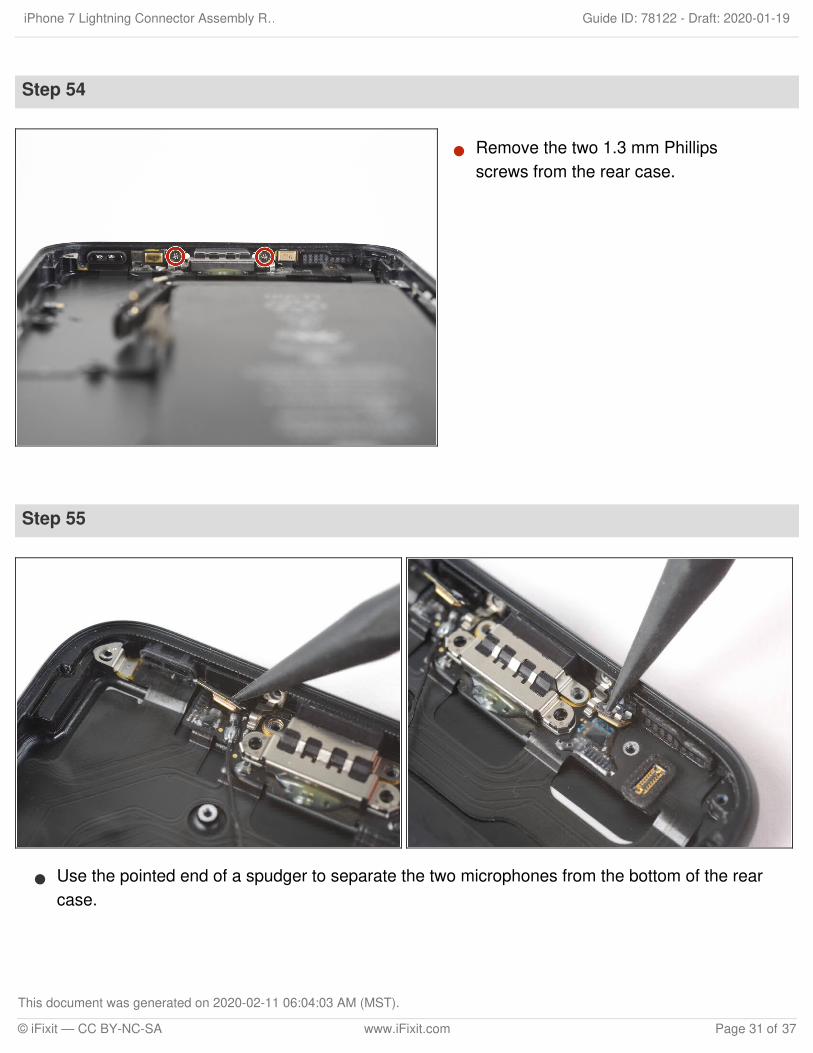
Step 54
Remove the two 1.3 mm Phillipsscrews from the rear case.
Step 55
Use the pointed end of a spudger to separate the two microphones from the bottom of the rearcase.
iPhone 7 Lightning Connector Assembly R… Draft: 2020-01-19Guide ID: 78122 -
This document was generated on 2020-02-11 06:04:03 AM (MST).
© iFixit — CC BY-NC-SA www.iFixit.com Page 31 of 37
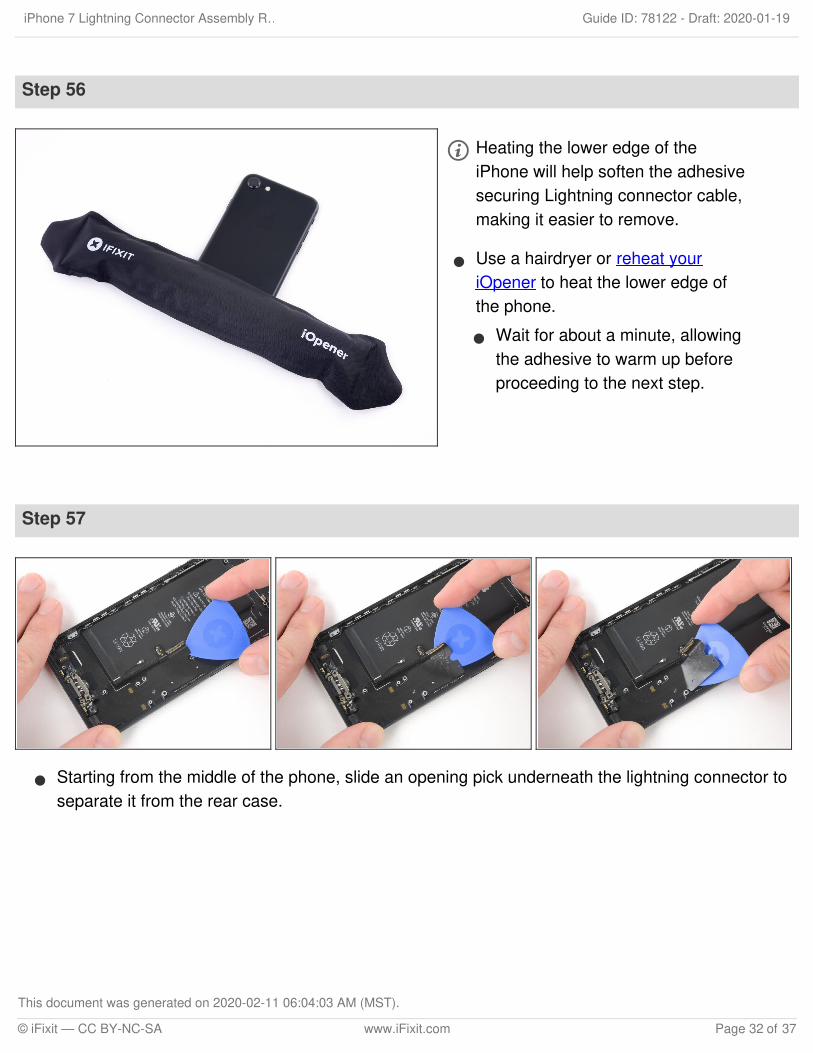
Step 56
Heating the lower edge of theiPhone will help soften the adhesivesecuring Lightning connector cable,making it easier to remove.
Use a hairdryer or reheat youriOpener to heat the lower edge ofthe phone.
Wait for about a minute, allowingthe adhesive to warm up beforeproceeding to the next step.
Step 57
Starting from the middle of the phone, slide an opening pick underneath the lightning connector toseparate it from the rear case.
iPhone 7 Lightning Connector Assembly R… Draft: 2020-01-19Guide ID: 78122 -
This document was generated on 2020-02-11 06:04:03 AM (MST).
© iFixit — CC BY-NC-SA www.iFixit.com Page 32 of 37
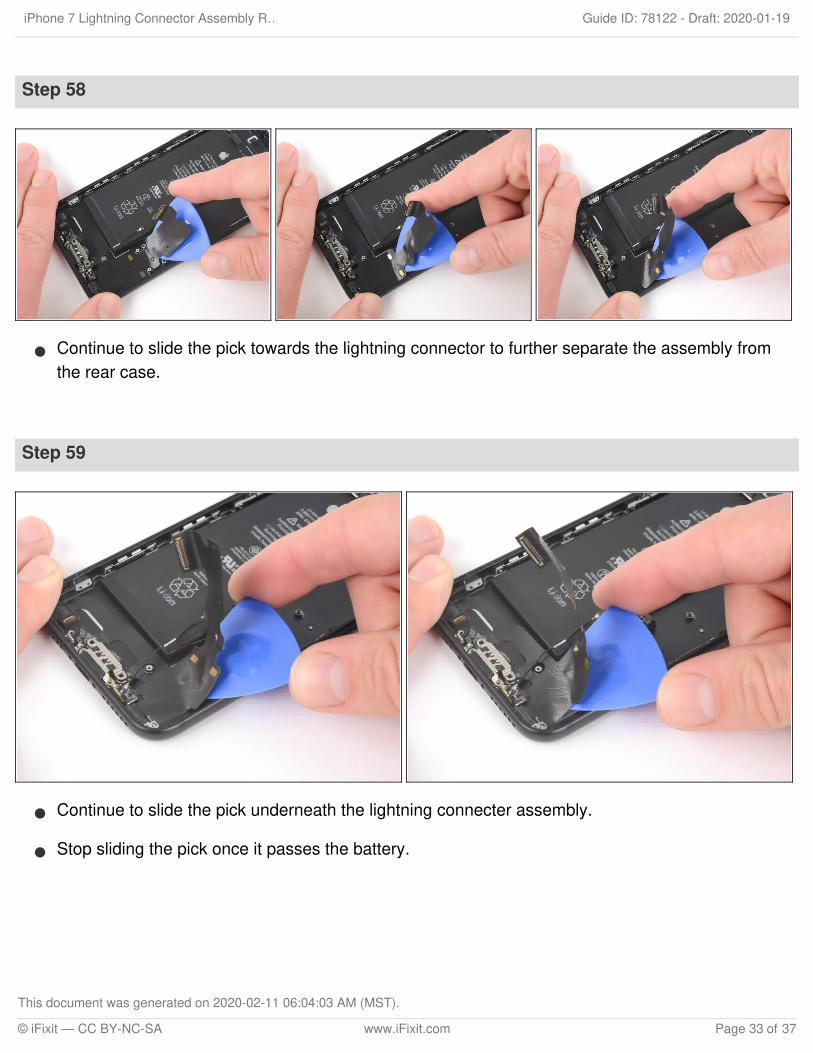
Step 58
Continue to slide the pick towards the lightning connector to further separate the assembly fromthe rear case.
Step 59
Continue to slide the pick underneath the lightning connecter assembly.
Stop sliding the pick once it passes the battery.
iPhone 7 Lightning Connector Assembly R… Draft: 2020-01-19Guide ID: 78122 -
This document was generated on 2020-02-11 06:04:03 AM (MST).
© iFixit — CC BY-NC-SA www.iFixit.com Page 33 of 37
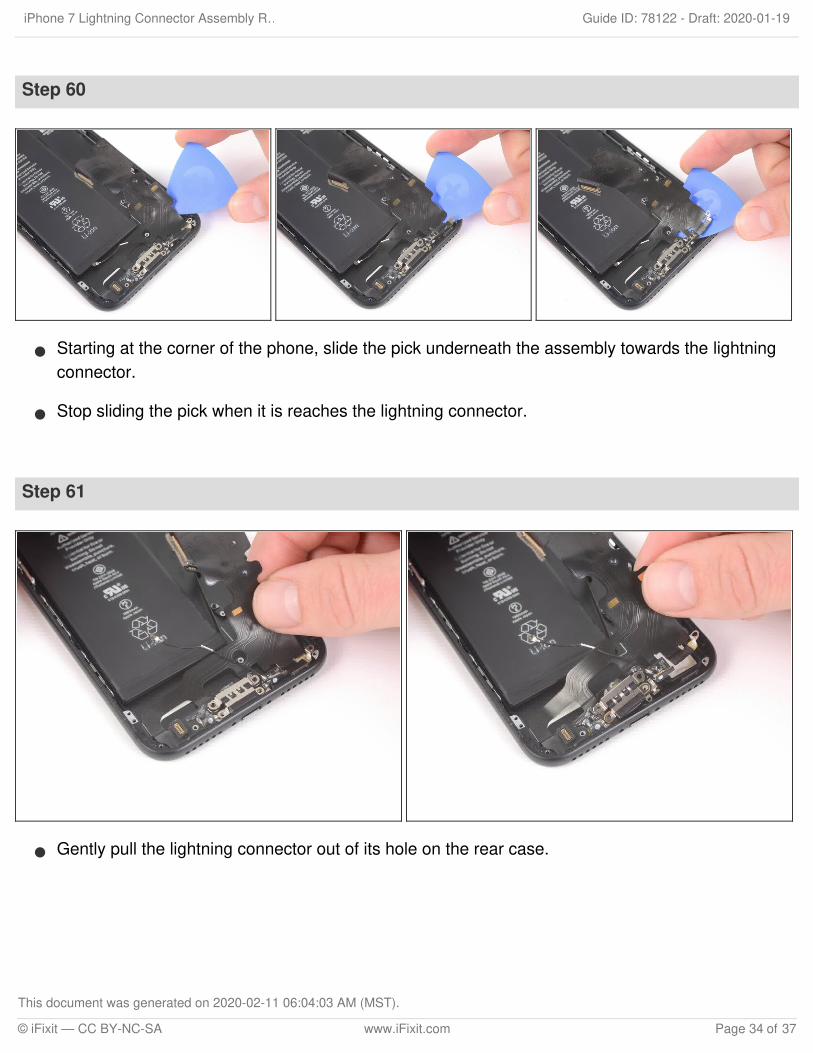
Step 60
Starting at the corner of the phone, slide the pick underneath the assembly towards the lightningconnector.
Stop sliding the pick when it is reaches the lightning connector.
Step 61
Gently pull the lightning connector out of its hole on the rear case.
iPhone 7 Lightning Connector Assembly R… Draft: 2020-01-19Guide ID: 78122 -
This document was generated on 2020-02-11 06:04:03 AM (MST).
© iFixit — CC BY-NC-SA www.iFixit.com Page 34 of 37
Step 62
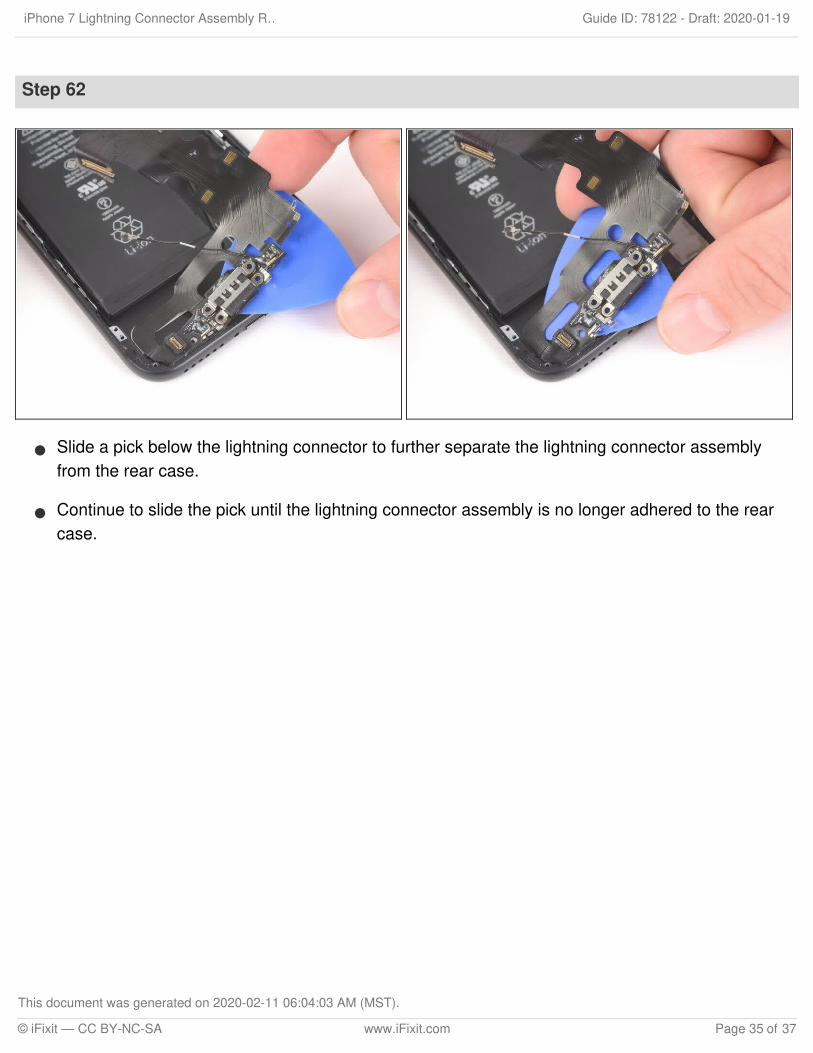
Slide a pick below the lightning connector to further separate the lightning connector assemblyfrom the rear case.
Continue to slide the pick until the lightning connector assembly is no longer adhered to the rearcase.
iPhone 7 Lightning Connector Assembly R… Draft: 2020-01-19Guide ID: 78122 -
This document was generated on 2020-02-11 06:04:03 AM (MST).
© iFixit — CC BY-NC-SA www.iFixit.com Page 35 of 37
Step 63
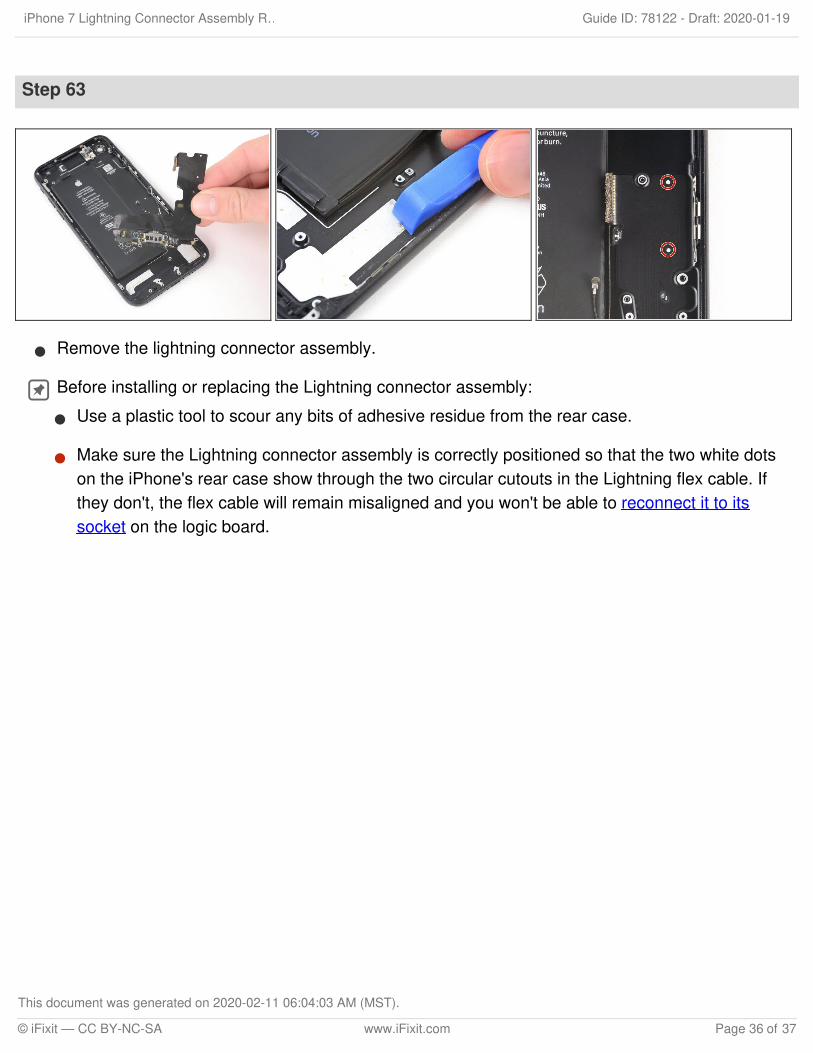
Remove the lightning connector assembly.
Before installing or replacing the Lightning connector assembly:Use a plastic tool to scour any bits of adhesive residue from the rear case.
Make sure the Lightning connector assembly is correctly positioned so that the two white dotson the iPhone's rear case show through the two circular cutouts in the Lightning flex cable. Ifthey don't, the flex cable will remain misaligned and you won't be able to reconnect it to itssocket on the logic board.
iPhone 7 Lightning Connector Assembly R… Draft: 2020-01-19Guide ID: 78122 -
This document was generated on 2020-02-11 06:04:03 AM (MST).
© iFixit — CC BY-NC-SA www.iFixit.com Page 36 of 37
To reassemble your device, reapply the display adhesive and follow these instructions in reverse order.
Take your e-waste to an R2 or e-Stewards certified recycler.
Repair didn’t go as planned? Check out our Answers community for troubleshooting help.
Step 64
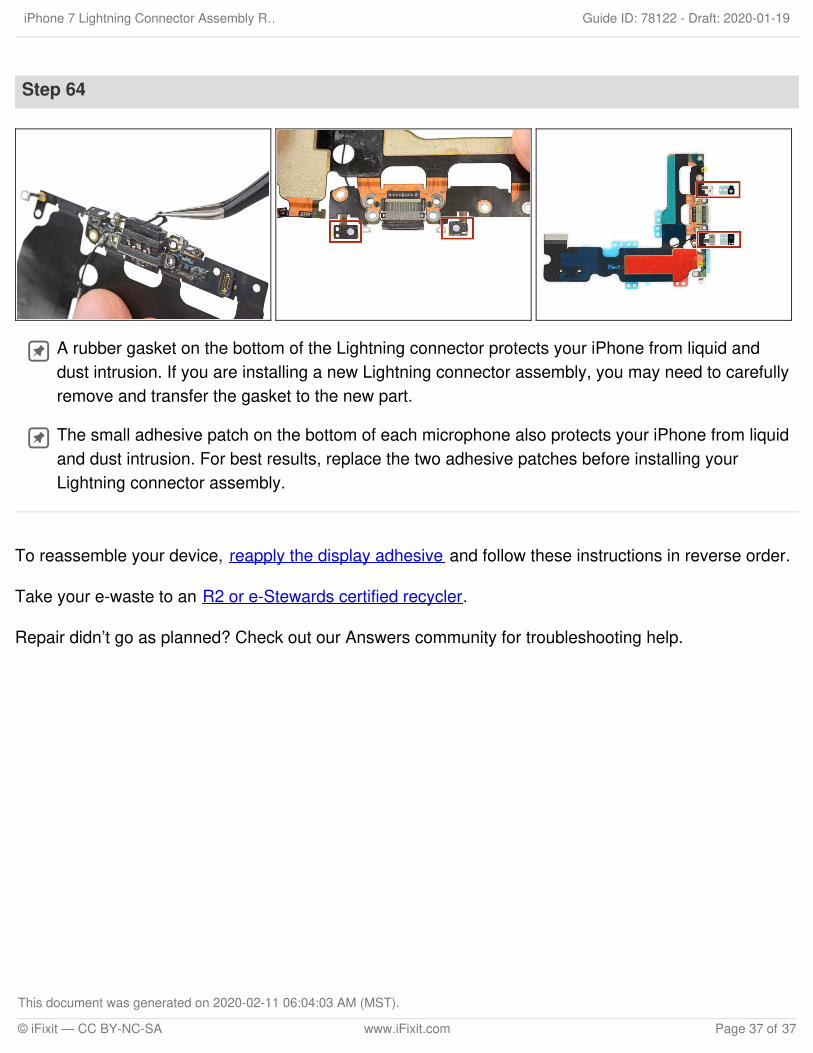
A rubber gasket on the bottom of the Lightning connector protects your iPhone from liquid anddust intrusion. If you are installing a new Lightning connector assembly, you may need to carefullyremove and transfer the gasket to the new part.
The small adhesive patch on the bottom of each microphone also protects your iPhone from liquidand dust intrusion. For best results, replace the two adhesive patches before installing yourLightning connector assembly.
iPhone 7 Lightning Connector Assembly R… Draft: 2020-01-19Guide ID: 78122 -
This document was generated on 2020-02-11 06:04:03 AM (MST).
© iFixit — CC BY-NC-SA www.iFixit.com Page 37 of 37