Embed Size (px)
Citation preview
iProFiler Automated Program Archiver
Server Guide Rev. Feb 23, 2007 for software version 2.5.x and later

Contacting Axia
By phone/Fax in the USA:
Customer service is available from 9:30 AM to 6:00 PM USA Eastern Time, Monday through
Friday at +1 216.241.7225. We’re sometimes here at times outside of these, as well – please feel
free to try at any time! Fax: +1 216.241.4103.
By phone/Fax in Europe:
Service is available from Axia Europe in Germany at +49 81 61 42 467.
Fax: +49 81 61 42 402.
By E-Mail:
The address is: [email protected].
Via World Wide Web:
The Axia Web site has a variety of information that may be useful for product selection and
support. The URL is: http://www.axiaaudio.com.
Notice:
All versions, claims of compatibility, trademarks, etc., of hardware and software products not
made by Axia mentioned in this manual or accompanying material are informational only. Axia
makes no endorsement of any particular product for any purpose, nor claims any responsibility
for operation or accuracy.
Axia 2101 Superior Avenue Cleveland, OH, 44114
USA +1 (216) 241-7225
+1 (216) 241-4103 (FAX)
Axia Europe Johannisstraβe 6 85354 Freising Germany +49 81 61 42 467 +49 81 61 42 402 (FAX)

Feedback
We welcome feedback on any aspect of the Axia iProFiler or this manual. In the past, many good
ideas from users have made their way into software revisions or new products. Please contact us
with your comments.
Copyright © 2002 to 2006 by TLS Corporation. Published by Axia, who reserves the right to
make improvements or changes in the products described in this manual, which may affect the
product specifications, or to revise the manual without notice. All rights reserved.

The page left blank to preserve pagination.

Table of Contents
Axia iProFiler Server Guide
Table of Contents Introduction ..................................................................................................................................... 1
iProFiler Features ........................................................................................................................ 1
Compatibility............................................................................................................................... 2
MP3 Files and iProFiler............................................................................................................... 3
iProFiler Application ................................................................................................................... 3
Server....................................................................................................................................... 3
NTP TimeSync ........................................................................................................................ 3
iProFiler Live Player ............................................................................................................... 4
iProFiler Archive Player.......................................................................................................... 4
Status Monitor ......................................................................................................................... 4
Installing iProFiler........................................................................................................................... 5
Server Software Installation ........................................................................................................ 5
Server Software Activation ......................................................................................................... 5
Configure the Livewire Audio Sources for the Audio Driver ..................................................... 6
Using the Server Software............................................................................................................... 7
Starting the Server ....................................................................................................................... 7
Configuring the iProFiler Server ................................................................................................. 7
Defining Audio Sources .......................................................................................................... 8
Configuring GPIO Inputs ........................................................................................................ 9
Defining Archives ................................................................................................................. 10
Defining Users....................................................................................................................... 15
Server Options....................................................................................................................... 17
Axia iProFiler Server Guide Page i

Table of Contents
Scheduled Recording............................................................................................................. 18
Recording Options................................................................................................................. 20
Backup Details ...................................................................................................................... 23
Monitor Recording ................................................................................................................ 24
Recording Live Broadcasts............................................................................................................ 27
Adjust the Recording Level....................................................................................................... 27
Testing the Server...................................................................................................................... 27
Running the Server .................................................................................................................... 28
Synchronizing the PC Clock ......................................................................................................... 29
Glossary......................................................................................................................................... 31
Page ii Axia iProFiler Server Guide

Introduction
Introduction Thank you for purchasing the Axia iProFiler Automated Program Archiver - the broadcast logging/skimming system that frees you from obsolete logging equipment once and for all. Now you can easily log your station’s audio using a PC. Say goodbye forever to fast-forwarding through endless piles of tapes: iProFiler lets you pinpoint and retrieve audio with a surgeon’s precision. And iProFiler’s time-stamped MP3 files can be auditioned from anywhere on your network or Web server. You can even send audio files to an FTP server, or via email. With iProFiler, radio stations can now make MP3 audio logs of their programs. MP3 audio compression technology helps reduce storage space requirements, eases searches for specific material, and can archive morning shows for on-air replay. The archived audio is saved as an MP3 file with additional time-of-day information. These files can then be played on any MP3 compatible system, can be sent over the Internet, be posted on Web sites for streaming audio, and be stored efficiently on high-capacity digital media. There’s an automatic skimmer that switches from low-bit-rate logging to high-bit-rate skimming on the fly – perfect for telescoped airchecks or high-quality station composites. iProFiler’s recording software (the “Server”) runs under Windows 2000/XP, and the playback software (the “client”) runs under Windows 95 or greater. The main record/play unit requires a single PC. Playback of audio files can be accomplished from the recording PC, or from a computer connected by network to the server. It is also possible to listen to audio as it is being recorded in real time, providing your connection can support the required bandwidth. From everyone at Axia, thank you again for choosing iProFiler!
iProFiler Features
Some of the more significant features of iProFiler include: • Playback from any PC that can reach the server via LAN, WAN, or the Internet.
• User-selectable bitrate allows adjustment of quality/drive space ratio.
• Audio is stored in easy-to-search, 15-minute blocks broken at quarter hour
intervals.
• Recording mode can be set for logging (continuous archival storage of program
material), skimming (records only when talent microphone is open), or soft-
skimming (low-bitrate logging switches to high-bitrate logging when microphone
is open).
• iProFiler can simultaneously record/encode audio and allow live or stored content
playback.
Axia iProFiler Server Manual Page 1

Introduction
• Locally stored audio can be archived to removable media.
• Audio can be extracted to a local file for further processing. Audio selections may
be sent by email directly from the client software.
Version 2 of iProFiler introduces the following changes: • Dual-mono support. Each stereo audio input device can be split into two separate
mono channels.
• Multiple Streams/Formats/Archives per audio source. Each audio source can be
recorded at different bitrates with different storage policies. For example, you
could record the talent at a high bitrate and keep this material for a maximum of 7
days at the same time that you record everything at a low bitrate and keep it for a
much longer period of time.
• Restrict the Stored Audio by Date. The stored audio can now also be restricted by
date regardless of disk space used (provided there is enough space on the disk).
This allows you to keep material for a fixed number of days to match your desired
storage policy.
• Integrated Recorder and Server. All streams are now configured and recorded
through a single instance of the recorder/server application. All streams can now
be accessed via a single server connection. The client software displays a list of
available sources. Each source can be accessed dependent on the users' access
rights specified by the administrator.
• Integrated Scheduler. iProFiler now has the ability to start and stop recording on a
weekly day-part schedule. This allows you to record specific shows only or record
them with different storage policies or bitrates.
Compatibility
iProFiler v2.5 server is backward compatible with all files recorded by a previous version of iProFiler. Server and client versions cannot be mixed however. A version 2.5 server can only be accessed with version 2.5 client software. Also, version 2.5 client software should not be used with older versions of the server.
Page 2 Axia iProFiler Server Manual

Introduction
MP3 Files and iProFiler
MP3 encoding is the best method for squeezing audio down to manageable size for the Internet or multimedia use. It’s based on internationally accepted MPEG Layer-3 compression, the universal standard for audio transfers via ISDN at broadcast stations and recording studios. MP3 lets you control the amount of compression, depending on transmission, storage, or audio quality requirements. Axia iProFiler uses genuine MPEG Layer-3 encoding algorithms developed by Fraunhofer-Geshellschaft (Fhg), an internationally respected audio research laboratory. The Fhg algorithms are the reference against which all others are measured.
iProFiler Application
The Axia iProFiler application consists of the software components listed below: • Server (Recording and Storage component)
• NTP TimeSync
• Live Player (Client component)
• Archive Player (Client component)
• Status Monitor (Management utility)
Each component is briefly described below:
Server
The Server component is responsible for: • Encoding the audio stream received from the Livewire network,
• Storing the encoded data on the hard drive,
• Backing up the data to a network drive, tape drive, or remote FTP server, and
• Making the audio data (either live or stored) available to the live player or archive
player.
Operation of the iProFiler Server is discussed starting on page 7 of this manual.
NTP TimeSync
NTP TimeSync is a utility designed to keep the clock on the iProFiler PC accurate by synchronizing it against an NTP time server on your LAN or via the Internet. Keeping the PC clock accurate is very important since all iProFiler files are time stamped using this clock. Of course there are other options for keeping your PC clock accurate, if you prefer. The operation of NTP TimeSync is discussed starting on page 29.
Axia iProFiler Server Manual Page 3

Introduction
iProFiler Live Player
The Live Player is a client application that allows the user to listen to a live audio stream as it is recorded by the Server. Note that the Live Player receives a continuous audio feed at the configured bitrate, regardless of the skim switch state. The user interface will seem familiar to users of the Windows Media player. It displays the date and time for the audio stream relative to the date and time set on the server. For example, when a user in California is listening to a live stream generated on the East Coast, the player would show the East Coast date and time. Please see the iProFiler Client User Guide document for more details about the Live Player.
iProFiler Archive Player
The Archive Player is a client application used to browse and listen to the audio stored on the server from any networked computer (on the local LAN or over the Internet). Using Archive Player, the user can extract audio portions and save them locally as iProFiler (AP3) files. AP3 files retain timestamp information for each segment, along with any user-entered notes. They can be opened at a later time with Archive Player. AP3 files can also be played by any MP3 player or be converted to .WAV files for further editing. Please see the iProFiler Client User Guide document for more details about the Archive Player.
Status Monitor
The Status Monitor provides a way for the user to see that the iProFiler Server is operating properly. It displays the audio levels as received by the Server from the sound device, the disk space used/available, and the number of clients currently connected to the server. Please see the iProFiler Client User Guide document for more details about the Status Monitor software.
Page 4 Axia iProFiler Server Manual

Installing iProFiler
Installing iProFiler The iProFiler installation consists of the following steps:
1. Install the Axia iProFiler Server software.
2. Activate the server application.
3. Configure the Livewire audio sources for the audio driver. This associates a
Livewire audio source with a Windows WAVE device.
Server Software Installation
This server software allows you to configure and control the audio recording and manages client connections to access the audio files.
To install the iProFiler Server software:
1. Make sure you are logged in with administrator privileges before you proceed
with the installation.
2. Insert the CD-ROM in the drive. If you have auto-run enabled on the drive, the
CD-ROM browser will start automatically. If the CD-ROM browser does not start
in a few seconds, run the iProFiler Setup.exe application from the CD-ROM.
3. Click the Install Server Software button.
4. A standard software installer is then displayed. You will be given the option to
select the destination directory for the application. If you’re not sure about these
choices, click the Next button to accept the defaults.
5. During installation you will be prompted for the software license number. Enter
the number provided to you with your order.
6. Once the programs have been successfully installed, click on Finish.
This ends the installation.
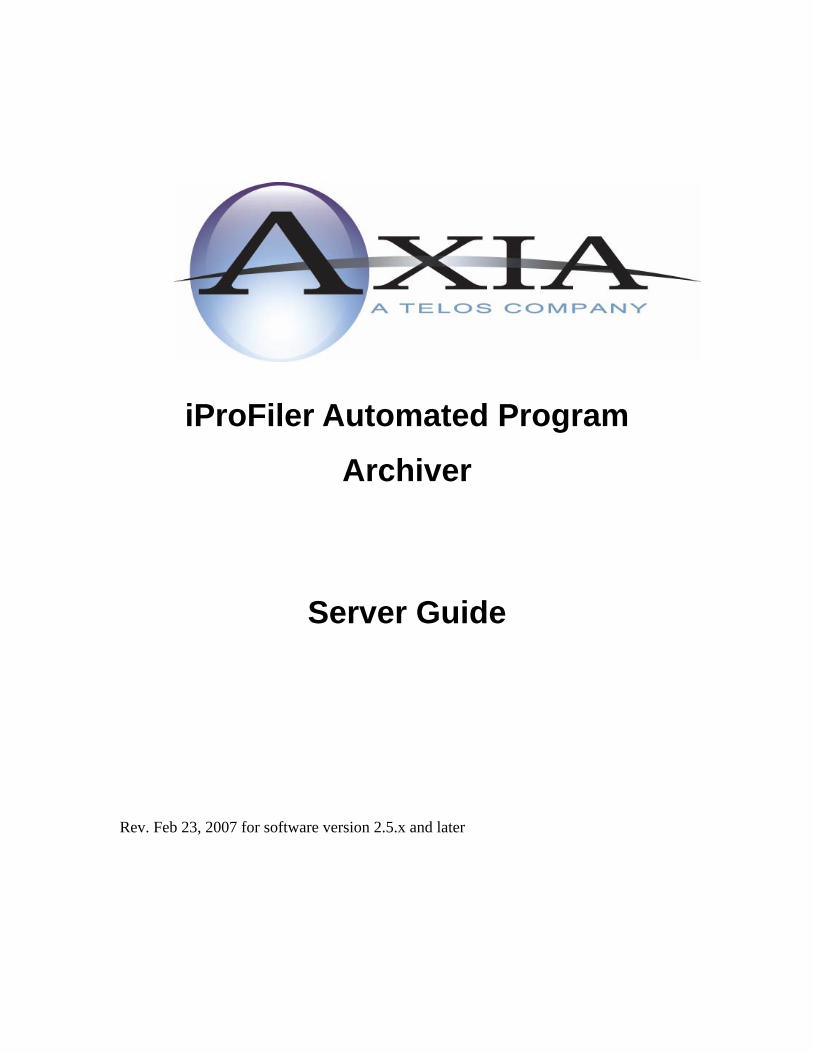
Server Software Activation
The server software needs to be activated within seven days after installation. The application reminds you of this by displaying the following dialog:
Axia iProFiler Server Manual Page 5
Installing iProFiler
If the server PC is connected to the Internet click the button next to option 1. A success message will be displayed then the Activation Required dialog goes away. If the server PC is not connected to the Internet you can follow these steps to activate the program: 1. Click the button next to option 2. The following dialog will be shown:
2. Click the Save button to save the request code to an HTML file. It is simplest to save
the HTML file to the desktop so it can be easily located.
3. Take the HTML file created to a PC that is connected to the Internet. Open the file
using Internet Explorer and click the Submit button displayed on the page.
4. If activation is successful you will see another page displaying your activation code.
The activation code has a ## prefix and suffix. Copy the activation code to a text file,
take it to the server PC then enter it in the activation dialog shown in step 1 above.
Configure the Livewire Audio Sources for the Audio Driver
Please see the IP-Audio driver (included) for information about driver configuration options to receive Livewire audio.
Page 6 Axia iProFiler Server Manual

Using the Server Software
Using the Server Software
Starting the Server
To start the server:
1. Click the Start button on your desktop toolbar.
2. Click Programs.
3. Select Axia then iProFiler Server.
4. Choose iProFiler Server entry. The main server window is displayed.
Configuring the iProFiler Server
After you install iProFiler server you generally go through these steps to configure the software and get it ready for use:
1. Define your audio sources: When you define an audio source you specify a
friendly name for each iProFiler audio source. You may also choose to split a
stereo input into two separate mono inputs.
2. Configure GPIO inputs: For each audio source you may configure up to eight
GPIO signals to activate and control the audio recording.
Axia iProFiler Server Manual Page 7

Using the Server Software
3. Define archives: For each audio source you can create one or more archives.
Each archive can be assigned different record and storage policies. For example,
separate archives can be scheduled to store different shows for the same radio
station at different audio quality settings. One archive could keep the audio
material for a short period while another may keep it for a much longer period.
4. Define users: Access to iProFiler is controlled by user name and password. The
administrator may grant or revoke individual access rights per archive.
5. Set server startup options: Here you choose the server port to use for iProFiler.
You may also have iProFiler start automatically when Windows starts.
6. Start archives and monitor recording: Once you finish configuring the server
you start the defined archives to begin recording or to enable the scheduled
actions. This is where you adjust audio levels and monitor the state of the
recording.
Defining Audio Sources
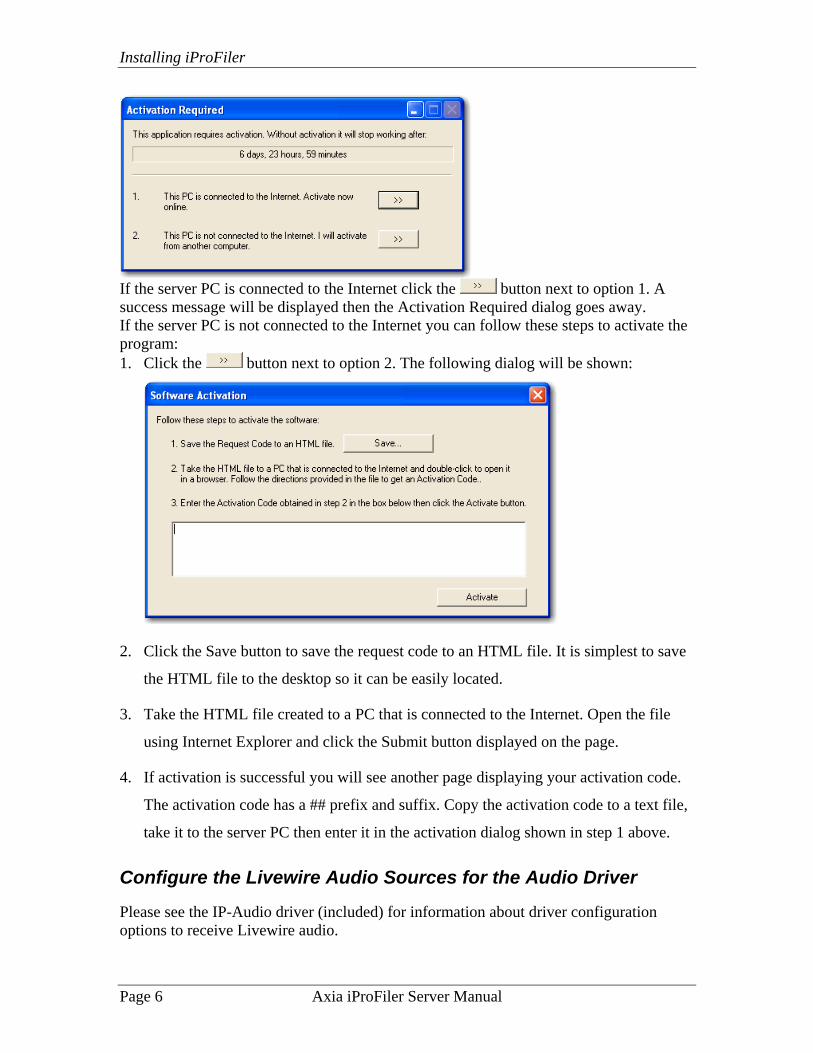
When you define an audio source you assign a friendly name and decide if you're going to split a stereo source into two mono signals. Follow these steps to define audio sources:
1. Click the Audio Sources button on the main server window to bring up the Audio
Source Manager:
2. Click the Add button. This will display the following dialog:
Page 8 Axia iProFiler Server Manual
Using the Server Software
3. Select the desired Windows audio device then enter a descriptive name in the
iProFiler source name field.
4. You may use an audio input as a single stereo source or you may split it into two
mono streams. Use the Channels field to select the desired mode then click the
OK button when done.
5. Repeat these steps for each audio source you wish to use with iProFiler.
Configuring GPIO Inputs
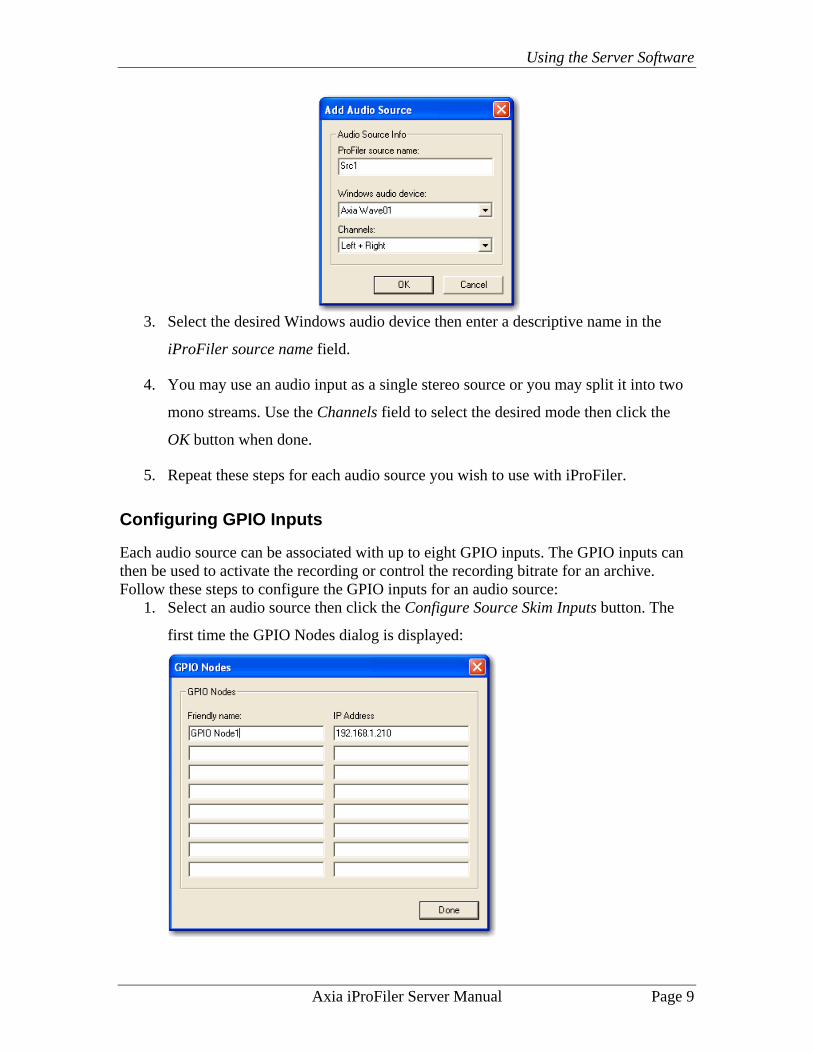
Each audio source can be associated with up to eight GPIO inputs. The GPIO inputs can then be used to activate the recording or control the recording bitrate for an archive. Follow these steps to configure the GPIO inputs for an audio source:
1. Select an audio source then click the Configure Source Skim Inputs button. The
first time the GPIO Nodes dialog is displayed:
Axia iProFiler Server Manual Page 9

Using the Server Software
In this dialog you enter the IP address and a descriptive name for each GPIO node
you wish to access. Click the Done button when you finished entering the GPIO
node information.
2. iProFiler has eight logical inputs. In the GPIO Configuration dialog you associate
iProFiler's logical inputs with a particular port and pin on a GPIO node. Please
note that the Pin field refers to the logical input signal for the given port, not the
physical pin number. Please see Appendix A for the GPIO port wiring diagram.
3. Once you finish defining all logical inputs desired, click the Done button.
The logical inputs you defined here will be available on the Record tab when creating an archive. Please note that the logical inputs are defined per audio source. They will be common to all archives that record that audio source. The same logical input can control any number of archives as long as they record the same audio source.
Defining Archives
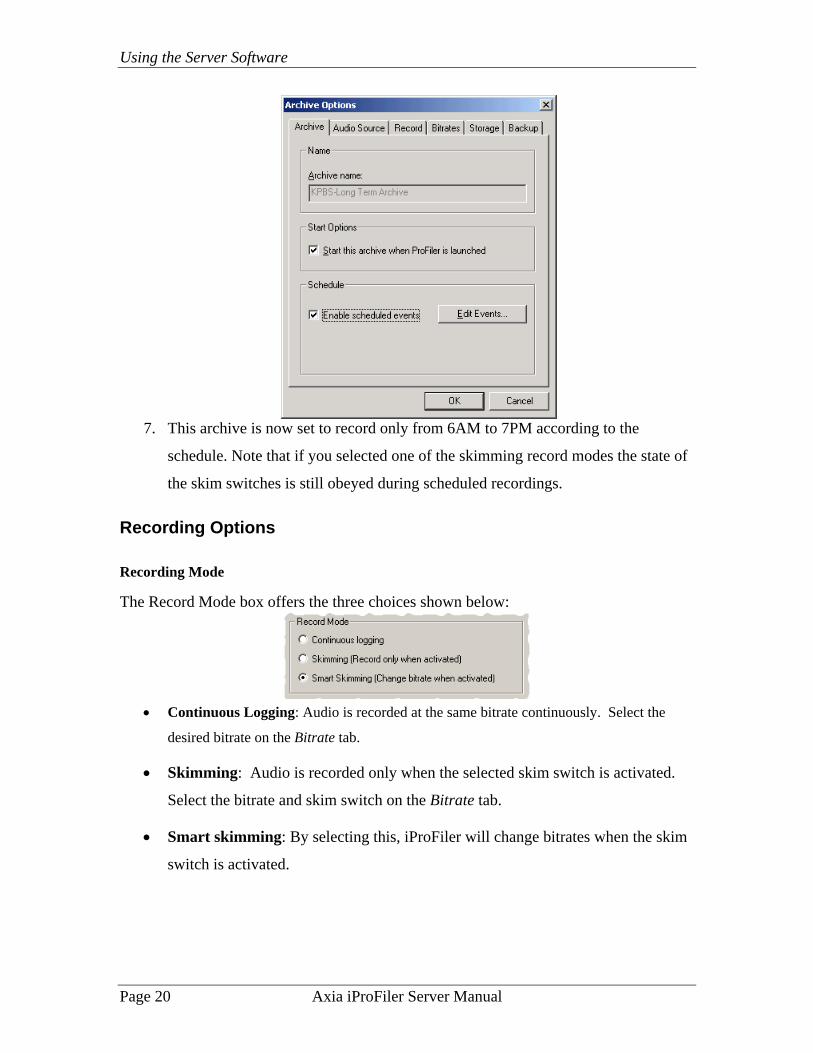
An archive definition includes all recording, storage and scheduling parameters associated with the archive. Click the Add button on the iProFiler server main window to bring up the Archive Options dialog. The individual options are organized under separate tabs. Click the desired tab to move from one page to the next. Follow these steps to configure the archive options:
1. On the first page enter a descriptive name for the archive. Under Start Options
you may choose to have this archive start automatically when iProFiler is started
Page 10 Axia iProFiler Server Manual

Using the Server Software
(a good choice for most cases) or you may choose to start the archive manually.
We'll leave the Schedule section alone for now. Take a look at the Scheduled
Recording section on page 18 for details on setting up a recording schedule.
2. Click the Audio Source tab to move to the next options page. From the Audio
Device drop-down list we select the audio source we want to use for this archive.
NOTE: If you select "<none>" for the audio source this archive becomes a "playback only" archive. This means that no new audio is recorded but users may continue to access already recorded material.
Axia iProFiler Server Manual Page 11

Using the Server Software
3. On the Record page we're going to choose continuous logging. This will record
the audio without interruption for the entire duration that the archive is active.
4. On the Bitrates page we get to choose the data rate for the MP3 encoding.
iProFiler provides you with bitrates from 8 to 320 kbps. The higher the bitrate, the
higher the audio quality but the audio data also has higher storage requirements.
The Storage Space vs. Bitrate calculator is a handy tool to allow you to choose
the appropriate bitrate given the amount of disk space you have available. Here
we choose 32 kbps for the recorded stream and 24 kbps for the live player stream.
Page 12 Axia iProFiler Server Manual

Using the Server Software
5. On the Storage page we specify the destination directory for the archive along
with the storage limits. For this archive we set aside a maximum of 35 GB and we
want to keep at most 100 days. The disk space and number of days must be set
with some care to achieve the desired results. For example, if you want to keep
100 days but you set the disk space to a small amount then iProFiler will begin to
recycle old files long before 100 days are recorded. Again, the Storage Space vs.
Bitrate calculator can help determine the right values here. Most of the time you
should allow iProFiler to manage the storage space by erasing old files when
limits are reached. This will ensure that audio will be recorded continuously.
Under special circumstances you may want to manage the storage space
manually. In this case you can tell iProFiler to never erase any files for this
archive. If iProFiler reaches the specified limits recording will stop.
Axia iProFiler Server Manual Page 13

Using the Server Software
NOTE: If you have used a previous version of iProFiler you may notice that there is no entry to specify the log file directory. In version 2.0 log files are always written to a Log subdirectory under the main archive directory. This allows you to keep all archive files (logs and audio) under a single directory.
6. On the Backup page you can select one or more locations for backing up audio
files. iProFiler can back up audio files to multiple locations. It can back up to a
separate hard drive, a network drive, a mounted tape or Jaz drive, or even to a
remote server via FTP. Take a look at the Backup Details on page 23 for details
on adding backup destinations.
Page 14 Axia iProFiler Server Manual

Using the Server Software
7. You are now done defining the archive. Click the OK button to save the choices
you have made. If iProFiler detects any problems it will display a message and
give you a chance to correct the problem.
Defining Users
All remote access to the iProFiler archives or live streams is controlled by user name and password. Click the Users button to bring up the User Manager window to define users and manage individual archive rights. iProFiler does not ship with any default users; you must create at least one user if you wish to allow remote access. Follow these steps to define a new user:
1. Under User Mananger click the Add button.
2. Enter the login name, full name and password for the user then click the OK
button. Please note that the login name and password are not case sensitive.
Axia iProFiler Server Manual Page 15

Using the Server Software
3. The User Access Rights window is displayed next. Here you can grant or revoke
access rights to individual archives for this user. Click the Done button when
finished.
4. You have now defined a new user. User Manager shows all users known to
iProFiler. You may change user information or grant / revoke archive access
rights at any time by selecting the user and clicking the appropriate buttons.
Page 16 Axia iProFiler Server Manual

Using the Server Software
5. Repeat the steps above to add additional users. Click the Done button when
finished.
Server Options
Under server options you can specify the server port number and application startup option.
The Server Port is the TCP/IP port used by client applications to connect to this server. The default value for a new installation is 9020 but you may choose any other value between 1 and 65,535. If version 2.0.x was previously installed on the PC then old port value will be used. Make special note of the server port you assign, as you will have to provide the port number along with the host address of the server PC to users wishing to connect to the server. IMPORTANT TIP: If you're not familiar with port number ranges please use port numbers above 5000 as some values less than 5000 may already be in use by other applications on your system. You may check the startup box to have iProFiler start automatically when Windows is started.
Axia iProFiler Server Manual Page 17

Using the Server Software
Scheduled Recording
The scheduler allows you to start or stop recording at different times. This allows you to select a specific show or time of day to record. Follow these steps to add events and enable the scheduler:
1. On the first page of Archive Options click the Edit Events button. The following
dialog is displayed:
2. Click the Add button to add an event. The new event dialog is displayed:
3. Enter a description of the event then the action and start time. Here we want to
start recording at 6 AM but choose to start five seconds early to make sure we
don't miss the start of the show. Select the days when this event will occur. Click
OK when done.
Page 18 Axia iProFiler Server Manual

Using the Server Software
4. Click the Add button again to add the stop event. Choose the Stop Recorder action
and an appropriate time for the event.
5. We now scheduled the recording to start at 6AM and stop at 7PM (with extra 5
seconds at start and stop). Click the Done button when finished adding events.
6. When you return to the Archive Options dialog make sure to check the Enable
scheduled events checkbox. Unless this box is checked the events entered will
have no effect.
Axia iProFiler Server Manual Page 19
Using the Server Software
7. This archive is now set to record only from 6AM to 7PM according to the
schedule. Note that if you selected one of the skimming record modes the state of
the skim switches is still obeyed during scheduled recordings.
Recording Options
Recording Mode
The Record Mode box offers the three choices shown below:
• Continuous Logging: Audio is recorded at the same bitrate continuously. Select the
desired bitrate on the Bitrate tab.
• Skimming: Audio is recorded only when the selected skim switch is activated.
Select the bitrate and skim switch on the Bitrate tab.
• Smart skimming: By selecting this, iProFiler will change bitrates when the skim
switch is activated.
Page 20 Axia iProFiler Server Manual

Using the Server Software
Axia iProFiler Server Manual Page 21
Skimming Inputs
• Skim switches: Enabled only when Skimming or Smart skimming has been selected and
you have associated a GPIO node input with the skim switch. You may use any of the
contact closure detection switches to control the skimming logic. You may also choose
more than one switch input if desired. The same switch input can be used for multiple
archives as long as the archives read audio from the same audio source.
• Activate when switch is: In most cases Closed should be selected. This will
activate skimming when the switch is closed. If Open is selected, the switch logic
is reversed; skimming is activated when the switch is open and inactive when it is
closed.
Skim Delays
• Activation pre-delay: iProFiler gives you the option to start recording or change
the bitrate some time before the talent microphone switch is activated. This way
you can record the context of the audio as well. The pre-delay amount determines
how far in advance the recording begins before the switch is activated1.
• Activations post-delay: When the talent microphone is turned off the recording
continues for a duration specified by the post-delay parameter. Used to make sure
the talent portion is not cut off too suddenly and to provide context for the audio
segment.
1 But how is this possible you ask! The software will buffer (delay) the recorded audio by the Activation
pre-delay amount. This allows it to record to disk audio received before the switch is activated.

Using the Server Software
Bitrate Selection
• Record at this bitrate when skim switch is not activated: Only enabled if
Continuous logging or Smart skimming is chosen. The bitrate determines how
much data will flow for each second of audio: this ultimately determines the audio
quality. The higher the bitrate, the better the audio sounds, but more disk space is
used.
• Record at this bitrate when skim switch is activated: Only enabled if Skimming or
Smart skimming is chosen. This is the record bitrate used when the skim switch is
activated.
• Stream audio at this bitrate: The bitrate should be chosen depending on the
bandwidth available to the listeners. If you have listeners that are connecting over
modems, you should keep the bitrate at about 16-24 kbps. If all the listeners are
connecting only through a LAN, you may choose to go higher. Remember that
the higher the bitrate, the better the audio will sound, however more bandwidth is
consumed to listen to the live stream. A higher bitrate also uses more CPU
power. Although this may not be an issue if you’re only recording one channel, it
may become one if you are logging multiple channels.
Page 22 Axia iProFiler Server Manual

Using the Server Software
Backup Details
Select one or more locations for backing up audio files. iProFiler can back up audio files to multiple locations. It can back up to a separate hard drive, a network drive, a mounted tape or Jaz drive, or even to a remote server via FTP.
Add Folder. Click this button to add a backup location on another hard drive, a network
drive or a mounted tape or Jaz drive. The following Select Backup Folder dialog is
displayed.
Add FTP. Click the Add FTP button to enable backup of audio files to a remote FTP server. The following dialog will be shown:
Axia iProFiler Server Manual Page 23

Using the Server Software
Follow these steps to add an FTP server as a backup destination:
1. Enter the server IP address and port (the default FTP port for most servers
is 21).
2. You may optionally specify an existing directory path where the files are
to be stored.
3. Enter the user name and password having upload rights on this particular
FTP server.
4. Click the Test Connection Parameters button. The program will attempt
to upload a small text file to the server to test the parameters provided. If
it succeeds, the OK button will become enabled and you will be able to
proceed.
NOTE: The program places no restriction on the number of backup destinations you may add. Care must be exercised however to ensure that the program is able to copy each file to all backup destination in real-time or faster. This means that a 15 minute file segment should take less than 15 minutes to backup to all backup destinations combined. Also note that backing up to FTP servers or network drives will consume a certain amount of bandwidth on your network. Depending on the amount of bandwidth available from the start, this may prevent the Archive or Live players from playing uninterrupted streaming audio. It is best to backup to a local device such as a tape or Jaz drive.
Monitor Recording
During recording you may wish to monitor the state of individual archives, audio level or storage space used and available. The main server window displays a brief summary of all archives defined.
Page 24 Axia iProFiler Server Manual

Using the Server Software
In front of each archive name there is an icon that indicates the state of the archive. The following icons are defined:
Icon Meaning
Archive is stopped. No audio is being recorded. The archive cannot be accessed remotely.
Archive is active and may be accessed remotely. It is recording according to the recording mode and state of skim inputs.
Archive is active and operating on schedule. It may be accessed remotely. Recording takes place according to the schedule, the recording mode and state of skim inputs.
Archive is active but not recording because no audio source was specified. Archive contents may be accessed remotely.
Another way to view archive information is through the archive monitor window. The archive monitor window shows all archive information at a glance. To display the monitor window select the archive of interest on the main server window and click the Show button. Multiple windows can be displayed at the same time. Click the button in the corner to close the window (this does not stop the archive, it just hides the window).
Axia iProFiler Server Manual Page 25

Using the Server Software
The top part displays the date range available for this archive, the disk space used and available and the current state. The waveform window displays the level of the received audio. Take a look at the next section, Recording Live Broadcasts, for details on how to select the input source for the audio device and how to adjust the recording level.
Page 26 Axia iProFiler Server Manual

Recording Live Broadcasts
Recording Live Broadcasts Before you can begin to record audio you have to to adjust the recording level to ensure that it is loud enough without clipping. The sections below describe the steps required.
Adjust the Recording Level
To adjust the recording level:
Select the archive for which you wish to adjust the audio level then click the Show button
on the iProFiler server window. Make sure the archive is active. You should see the audio
level area start to fill in as shown below.
The waveform may not look as above on the first try. It may be either too low or too
loud. You need to adjust the source audio level until the waveform stays within the
bordered area without constant clipping.
NOTE: It is often helpful to listen to the stream you are adjusting using the Live Player.
This will give you a good idea of how the recorded audio will sound.
Testing the Server
An audio waveform displayed in the status window is a good indication that the iProFiler server is receiving and recording audio. You can test the network connection to the server by installing the iProFiler client software on another PC on the same network, then connect and listen to the audio using the Live Player. Make sure you create at least one user before you attempt a remote connection. See Defining Users on page 15 for information on adding new users to the system. The client software will prompt you for the server address, user name and password. The server address uses the following format: server_host_name_or_ip_address:server_port_number
The first part is the host name of the server PC. You may use the host name provided this name is registered with DNS. If you're not sure of this you can always use the PC's IP
Axia iProFiler Server Manual Page 27

Recording Live Broadcasts
address instead. Following the name or IP address is a colon character then the port number you assigned to the server.
Running the Server
The server is designed to run unattended on the iProFiler PC. You may leave the server window up or you may choose to minimize it. When minimized, the server goes to the system tray area in the task bar:
Click on the iProFiler icon to show the program window again. All server activity is written to log files in the archive directory. There is one log file per day, and log files older than 30 days are erased. If you would like to keep all log files, you should back them up before 30 days have passed.
Page 28 Axia iProFiler Server Manual

Synchronizing the PC Clock
Synchronizing the PC Clock The iProFiler uses the PC clock to time stamp all audio files recorded. It is therefore very important to ensure that some method is used to maintain accuracy of the PC clock. NOTE: If you are already synchronizing the clock on the iProFiler PC using another method,
you do not need to install and run NTP TimeSync.
To assist with clock synchronization, the iProFiler CD includes the NTP TimeSync application. It uses the Network Time Protocol to request time information from an NTP server on you LAN or over the Internet then updates the PC clock at the interval specified.
To use NTP TimeSync, follow these steps:
1. Start the NTP TimeSync application.
2. In the NTP Server combo box you may choose a server address or enter a new
address. The addresses that ship with the application are listed in order by country
code followed by state abbreviation (for US only). Select the address of a server
nearest to you. The screen image above shows an NTP server located in
California. If you have an NTP server on your LAN you should use that server’s
address.
3. The default Synchronize Interval of 15 minutes works well for most cases. You
may change to another value if needed.
4. Click the Click here to start button. The application will query the NTP server
selected as often as specified by the Synchronize Interval and will update the PC’s
Axia iProFiler Server Manual Page 29

Synchronizing the PC Clock
clock. You may click Sync Now! at any time if you wish to synchronize the clock
manually.
5. Minimize the TimeSync application and leave it to run in the background. When
minimized the application will be shown in the tray area of the task bar.
6. Click on the red clock icon to show the program dialog again.
Page 30 Axia iProFiler Server Manual

Glossary
Glossary AP3: MP3-compatible format used by the archive player to store multiple annotated and time-stamped audio segments in a single file. If the file with an .ap3 extension is renamed with an .mp3 extension it can be played directly by most MP3 players (but the annotations will not be displayed). Bandwidth(1): /Audio Bandwidth/ The range between the lowest and highest frequency a piece of equipment can carry. Very high-quality audio typically has a bandwidth of 20 kHz. FM and television audio (in the U.S.) have a bandwidth of 15 kHz. Telephones have a bandwidth of 3.5 kHz. Bandwidth(2): /Data Bandwidth/ Bandwidth is also used to describe the data-carrying capacity of a communication channel. It is measured in bits-per-second (bps), or more often, in thousands of bits-per-second (kbps). Bitrate: The amount of bandwidth consumed by a particular stream. It is measured in bits-per-second (bps), or more often, in thousands of bits-per-second (kbps). Often used to describe the amount of compression applied by MP3 encoding. The bitrate for an uncompressed, 44.1 KHz stereo audio stream using 16 bits per sample is 1411.2 kbps. Using MP3 encoding you can reduce the bandwidth for this stream anywhere from 8 to 320 kbps. Hertz, Hz: Number of cycles per second. In analog audio, this indicates the pitch of a sound; in digital audio, it may refer to the number of samples per second when the signal is digitized. ISDN: Integrated Services Digital Network, a telephone technology that allows up to two 64 kbps digital connection over the same kind of copper wiring normally used for voice-grade telephone. ISDN connections are more reliable as well as being faster than modem connections, but the technology isn’t available in all areas. kbps: One thousand bits per second. Note, this is a measure of individual bits, not the 8-bits bytes normally used in computer terminology. kHz: One thousand Hertz (see above). Streaming: Digital audio signals transmitted at real-time speeds or faster. .wav, WAVE: the default format for audio files on DOS and Windows computers. The audio is often stored uncompressed using PCM encoding. WAVE files can also store encoded content, perhaps using MP3 or other compression method.
Axia iProFiler Server Manual Page 31