Embed Size (px)
Citation preview
Version: 1.0 / 28-Dec-2012
IRDA
SURVEYOR
User Manual
Surveyor User Manual Surveyor
Version: 1.0 i
Version History
Version No.
Date of Release
Prepared by (L&T side)
Reviewed by (L&T side)
Approved by (L&T side)
Approved by (IRDA - User department)
1.0 28/12/2012 Tinaz Bhathena
Divya Jain, Jayanti U
Yatindra Madaan
Mrs.Sudha Ramanujam
Surveyor User Manual Surveyor
Version: 1.0 ii
Table of Contents
Pre-requisites ............................................................................................................. 1
Introduction to BAP portal .......................................................................................... 1
Surveyor Responsibilities ........................................................................................... 2
Login Process ............................................................................................................ 3
Retrieving Credentials ................................................................................................ 5
User Profile ................................................................................................................ 8
Description of the menu tabs .................................................................................... 11
Trainer Selection ...................................................................................................... 13
Viewing Submitted Requests ................................................................................... 16
Submitting Form - 13 Trainee Surveyor Enrollment ................................................. 18
Trainee Personal Details ....................................................................................... 20
Trainee Occupation Details ................................................................................... 21
Trainer Details ....................................................................................................... 23
Upload Documents ................................................................................................ 24
Confirm Details ...................................................................................................... 26
Enrollment Confirmation by IRDA .......................................................................... 29
Trainer Acceptance Certificate ................................................................................. 30
Form – 15 - Quarterly Submission ........................................................................... 34
Training Completion Certificate ................................................................................ 37
Licensing ................................................................................................................. 39
Fresh License ........................................................................................................... 40
Renew License ......................................................................................................... 41
License Details ...................................................................................................... 44
Employment Details ............................................................................................... 45
Upload Documents ................................................................................................ 47
Form Overview ...................................................................................................... 48
Duplicate License ..................................................................................................... 52
Modification/Upgrading ............................................................................................. 56
View License Details ................................................................................................ 60
Corporate Surveyor Registration .............................................................................. 61
Login Process .......................................................................................................... 64
Retrieving Credentials .............................................................................................. 66
User Profile .............................................................................................................. 70
Digital Signature ....................................................................................................... 73
Description of the menu tabs .................................................................................... 78
Surveyor User Manual Surveyor
Version: 1.0 iii
Licensing ................................................................................................................. 79
Fresh License ........................................................................................................... 80
Surveyor Firm/Company Details ............................................................................ 81
Director Details ...................................................................................................... 83
License Details ...................................................................................................... 85
Upload Documents ................................................................................................ 87
Form Preview ........................................................................................................ 89
Renew License ......................................................................................................... 93
License Details ...................................................................................................... 96
Upload Documents ................................................................................................ 97
Form Overview ...................................................................................................... 98
Duplicate License ................................................................................................... 102
Modification/Upgrading ........................................................................................... 106
View License Details .............................................................................................. 113
View Application Status .......................................................................................... 114
Pending for Clarification ......................................................................................... 116
Returns - Submitting Form - 12 .............................................................................. 118
Reminder Notification for Submitting Form 12 ........................................................ 123
Frequently Asked Questions .................................................................................. 124
Glossary ............................................................................................................... 125
Error Handling ........................................................................................................ 127
Index ............................................................................................................... 130
Surveyor User Manual Surveyor
Version: 1.0 iv
List of Figures
Figure 1: IRDA BAP portal login screen ..................................................................... 3
Figure 2: Change Password screen ........................................................................... 4
Figure 3: Log Off Confirmation dialog box .................................................................. 4
Figure 4: Retrieve User ID/Password selection .......................................................... 5
Figure 5: Retrieve User ID options ............................................................................. 5
Figure 6: User ID retrieval confirmation notification .................................................... 5
Figure 7: Retrieve User ID/Password selection .......................................................... 6
Figure 8: Retrieve password options .......................................................................... 6
Figure 9: Additional Retrieve Password options ......................................................... 6
Figure 10: Retrieve password process ....................................................................... 7
Figure 11: Password retrieval confirmation notification .............................................. 7
Figure 12: Incorrect retrieval information error message ............................................ 7
Figure 13: User Profile screen .................................................................................... 8
Figure 14: User Profile - Change Password screen ................................................... 8
Figure 15: Password Change confirmation notification .............................................. 9
Figure 16: Update User Profile screen ....................................................................... 9
Figure 17: User Profile Update confirmation notification .......................................... 10
Figure 18: Surveyor Training and Enrollment tab ..................................................... 13
Figure 19: Select Department option ........................................................................ 13
Figure 20: Trainer Selection Table section ............................................................... 14
Figure 21: Trainer Selection list ................................................................................ 14
Figure 22: Trainer Details section ............................................................................ 14
Figure 23: User Confirmation Message for Trainer Selection ................................... 15
Figure 24: Trainer Selection confirmation notification .............................................. 15
Figure 25: Application Status ................................................................................... 17
Figure 26: Trainee Personal Details screen ............................................................. 20
Figure 27: Trainee Occupation Details screen ......................................................... 21
Figure 28: Trainer Details screen ............................................................................. 23
Figure 29: Upload Documents screen ...................................................................... 24
Figure 30: Confirm Details screen ............................................................................ 27
Figure 31: User confirmation message for Form 13 ................................................. 28
Figure 32: Form submitted successfully notification ................................................. 28
Figure 33: Surveyor Training and Enrollment tab ..................................................... 30
Surveyor User Manual Surveyor
Version: 1.0 v
Figure 34: List of applications ................................................................................... 30
Figure 35: Trainer Acceptance Certificate ................................................................ 30
Figure 36: User confirmation message for acceptance ............................................ 31
Figure 37: Trainer Acceptance Certificate accepted notification .............................. 31
Figure 38: Surveyor Training and Enrollment tab ..................................................... 31
Figure 39: List of applications ................................................................................... 31
Figure 40: Trainer Acceptance Certificate ................................................................ 32
Figure 41: User confirmation message for rejection ................................................. 32
Figure 42: Reason for Rejection field ....................................................................... 32
Figure 43: Trainer Acceptance Certificate rejected notification ................................ 33
Figure 44: Surveyor Training and Enrollment tab ..................................................... 34
Figure 45: Filling trainee details ............................................................................... 34
Figure 46: Form 15 screen ....................................................................................... 35
Figure 47: User confirmation message for Form 15 ................................................. 35
Figure 48: Form 15 successfully submitted notification ............................................ 36
Figure 49: Surveyor Training and Enrollment tab ..................................................... 37
Figure 50: Training Completion Certificate screen ................................................... 37
Figure 51: User confirmation message for Training Completion Certificate ............. 38
Figure 52: Form successfully submitted notification ................................................. 38
Figure 53: Message when renewing before 3 months from the date of expiry ......... 41
Figure 54: Message when attempting to renew before submitting Form 12 ............. 41
Figure 55: License Details screen ............................................................................ 44
Figure 56: Employment Details screen ..................................................................... 45
Figure 57: Upload Documents .................................................................................. 47
Figure 58: Form Overview screen ............................................................................ 48
Figure 59: User confirmation message for renewal form .......................................... 49
Figure 60: Make Payment screen ............................................................................ 49
Figure 61: Demand Draft Details screen .................................................................. 49
Figure 62: NEFT/RTGS Details screen .................................................................... 50
Figure 63: Form successfully submitted notification ................................................. 51
Figure 64: Surveyor Training and Enrollment tab ..................................................... 52
Figure 65: Duplicate License screen ........................................................................ 52
Figure 66: User confirmation message for Duplicate License form .......................... 53
Figure 67: Make Payment screen ............................................................................ 53
Figure 68: Demand Draft Details screen .................................................................. 53
Figure 69: NEFT/RTGS Details screen .................................................................... 54
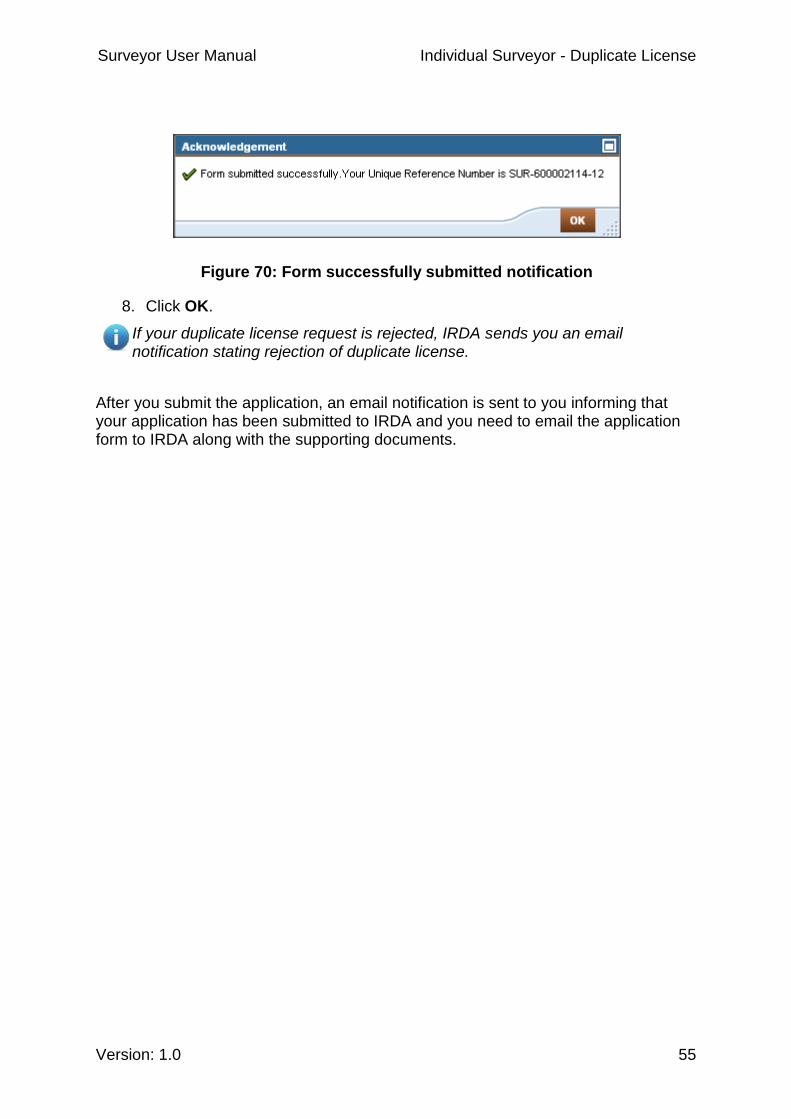
Figure 70: Form successfully submitted notification ................................................. 55
Surveyor User Manual Surveyor
Version: 1.0 vi
Figure 71: Surveyor Training and Enrollment tab ..................................................... 56
Figure 72: Modification types ................................................................................... 56
Figure 73: Name modification options ...................................................................... 57
Figure 74: Address modification options .................................................................. 57
Figure 75: Firm name modification options .............................................................. 58
Figure 76: Grant of additional departments options ................................................. 59
Figure 77: License Details screen ............................................................................ 60
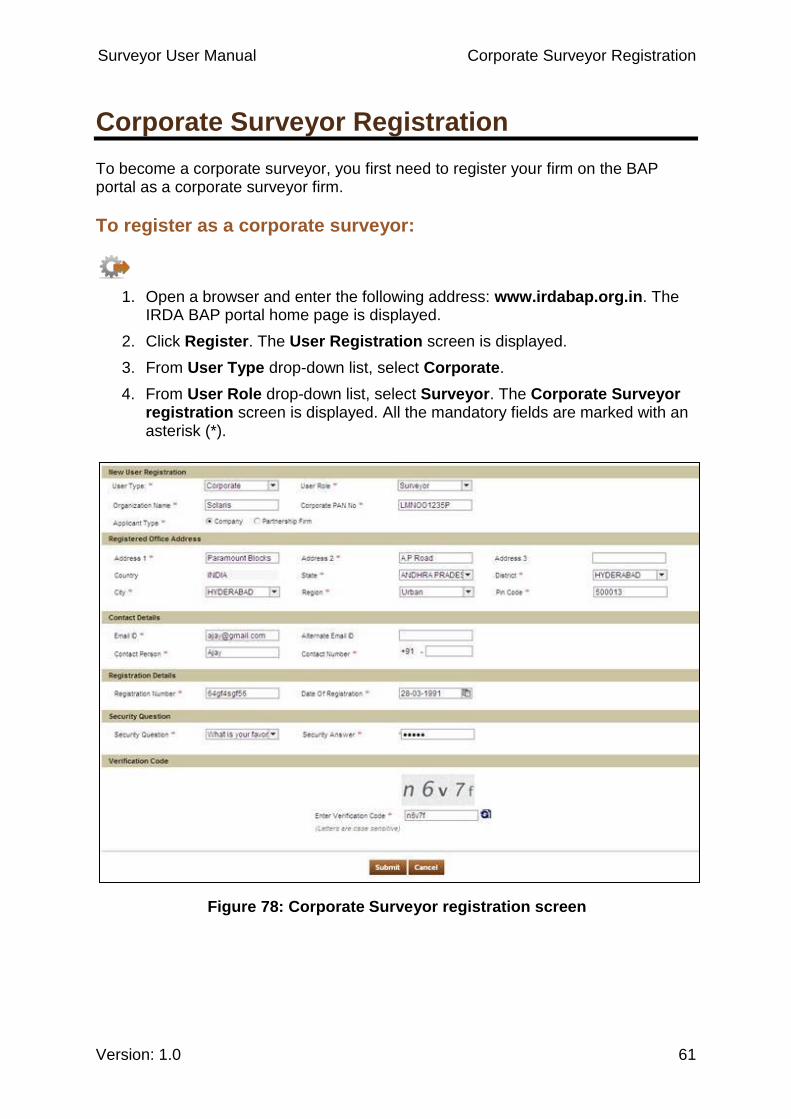
Figure 78: Corporate Surveyor registration screen .................................................. 61
Figure 79: Corporate surveyor registration notification ............................................. 63
Figure 80: Duplicate user error message ................................................................. 63
Figure 81: IRDA BAP portal login screen ................................................................. 64
Figure 82: Change Password screen ....................................................................... 65
Figure 83: Log Off Confirmation dialog box .............................................................. 65
Figure 84: Retrieve User ID/Password selection ...................................................... 66
Figure 85: Retrieve User ID options for corporate surveyor ..................................... 66
Figure 86: User ID retrieval confirmation notification ................................................ 67
Figure 87: Retrieve User ID/Password selection ...................................................... 67
Figure 88: Retrieve password options ...................................................................... 67
Figure 89: Additional Retrieve Password options ..................................................... 68
Figure 90: Retrieve password process ..................................................................... 68
Figure 91: Password retrieval confirmation notification ............................................ 68
Figure 92: Incorrect retrieval information error message .......................................... 69
Figure 93: User Profile screen .................................................................................. 70
Figure 94: User Profile - Change Password screen ................................................. 70
Figure 95: Password Change confirmation notification ............................................ 71
Figure 96: Update User Profile screen ..................................................................... 71
Figure 97: User Profile Update confirmation notification .......................................... 71
Figure 98: User Profile screen .................................................................................. 73
Figure 99: Web Signer dialog box ............................................................................ 74
Figure 100: Password Required dialog box .............................................................. 74
Figure 101: Web Signer dialog box displaying the uploaded signature .................... 75
Figure 102: Web Signer dialog box displaying the uploaded signature .................... 76
Figure 103: Password Required dialog box .............................................................. 76
Figure 104: Surveyor Firm/Company Details screen ................................................ 81
Figure 105: Director Details screen .......................................................................... 83
Figure 106: License Details screen .......................................................................... 85
Figure 107: Upload Documents screen .................................................................... 87
Surveyor User Manual Surveyor
Version: 1.0 vii
Figure 108: Form Preview screen ............................................................................ 89
Figure 109: User Confirmation message for Form 3AF ............................................ 90
Figure 110: Make Payment screen........................................................................... 90
Figure 111: Demand Draft Details screen ................................................................ 90
Figure 112: NEFT/RTGS Details screen .................................................................. 91
Figure 113: Form submitted successfully notification ............................................... 92
Figure 114: Message when renewing before 3 months from the date of expiry ....... 93
Figure 115: Message when attempting to renew before submitting Form 12 ........... 93
Figure 116: License Details screen .......................................................................... 96
Figure 117: Upload Documents ................................................................................ 97
Figure 118: Form Overview screen .......................................................................... 98
Figure 119: User confirmation message for renewal form ........................................ 99
Figure 120: Make Payment screen........................................................................... 99
Figure 121: Demand Draft Details screen ................................................................ 99
Figure 122: NEFT/RTGS Details screen ................................................................ 100
Figure 123: Form successfully submitted notification ............................................. 101
Figure 124: Duplicate License screen .................................................................... 102
Figure 125: User Confirmation message for Duplicate License form ..................... 103
Figure 126: Make Payment screen......................................................................... 103
Figure 127: Demand Draft Details screen .............................................................. 103
Figure 128: NEFT/RTGS Details screen ................................................................ 104
Figure 129: Form successfully submitted notification ............................................. 105
Figure 130: Surveyor Training and Enrollment tab ................................................. 106
Figure 131: Modification types ............................................................................... 106
Figure 132: Name modification options .................................................................. 107
Figure 133: Corporate/Registered address modification options ............................ 108
Figure 134: Adding a new director/partner options ................................................. 109
Figure 135: Removing a director partner options ................................................... 110
Figure 136: Grant of Additional Department ........................................................... 110
Figure 137: Adding a new employee options ......................................................... 111
Figure 138: Removing employee options ............................................................... 111
Figure 139: License Details screen ........................................................................ 113
Figure 140: View Application Status screen ........................................................... 114
Figure 141: Pending for clarification screen ........................................................... 116
Figure 142: Application seeking clarification .......................................................... 116
Figure 143: User Confirmation message for Pending for clarification .................... 117
Figure 144: Clarification successfully submitted notification ................................... 117

Surveyor User Manual Surveyor
Version: 1.0 viii
Figure 145: Selecting the year for Form 12 submission ......................................... 118
Figure 146: Active Fill Form button......................................................................... 118
Figure 147: Form 12 legends ................................................................................. 118
Figure 148: Surveyor Details and License Details of Individual Surveyor .............. 119
Figure 149: Firm Details and License Details of Corporate Surveyor ..................... 119
Figure 150: Entering the details of the qualifications obtained ............................... 119
Figure 151: Number of surveys tab ........................................................................ 120
Figure 152: Quantum of losses tab ........................................................................ 120
Figure 153: Entering income details and uploading necessary documents ............ 121
Figure 154: User confirmation message for Form 12 ............................................. 121
Figure 155: Form successfully saved notification ................................................... 121
Figure 156: Active Submit Forms button ................................................................ 121
Figure 157: Form successfully submitted notification ............................................. 122

Surveyor User Manual Pre-requisites
Version: 1.0 1
Pre-requisites
The below mentioned hardware and software infrastructure is needed to access the portal and its features.
Field Description
Hardware - Personal Computer / Laptop
Processor Intel processors Pentium 4 / i3 / i5 / i7 @ 1GHz or above
RAM 1 GB RAM or above (min 1GB recommended)
Hard Disk 80 GB or above HDD
Ethernet Card 10 / 100 Mbps Ethernet card
Printer Laser Jet
Software
Operating System Windows XP (with Service Pack2), Windows Vista, Windows 7, Mac OS v 10.5
Office Utility MS- Office 2003 or above
Browsers Internet Explorer 7.0 / 8.0, Apple Safari 5.0 (recommended IE 8.0)
Java Runtime JDK– 1.60
Adobe Acrobat Reader
9.0 version

Surveyor User Manual Introduction
Version: 1.0 1
Introduction to BAP portal
IRDA has taken an initiative of automation for facilitation of various activities that need to be undertaken by Insurance companies, surveyors, brokers and Third Party Administrators (TPAs) for regulatory compliance. This program is called the ‘Business Analytics Project’ or BAP as referred to henceforth.
In this current technology driven environment, portal delivers ease of use and uniformity in routine activities like online filing of returns, submitting applications for enrollment, Fresh License, renewals and other modifications to existing licenses. The application also supports on-line clarification of queries, and provides notifications, reminders and alerts for adherence to timelines.
This initiative will ensure good communication between insurance players and IRDA. Standardized and timely collection of industry data will help IRDA in efficient supervision of insurance operations, monitoring and tracking for the development of the insurance industry in India.
Surveyor User Manual Surveyor Responsibilities
Version: 1.0 2
Surveyor Responsibilities
The main responsibility of a surveyor is to conduct an unbiased survey of an event. Each surveyor is required to strictly adhere to the rules and regulations laid down by IRDA. If surveyors are found guilty of misconduct, then their license can be suspended or even cancelled.
A surveyor also needs to impart training to trainees. Only surveyors of category A and B are allowed to provide training. Each quarter the surveyor needs to provide IRDA the details of the training imparted to the trainees under them.
Every financial year the surveyor needs to submit a detailed performance report to IRDA about the number of surveys conducted and additional qualifications obtained (if any). Surveyors are also required to renew their license periodically. As per IRDA regulations, surveyors are required to renew their license every five years.

Surveyor User Manual Individual Surveyor - Login Process
Version: 1.0 3
Login Process
To access the portal:
To access the BAP portal, you need to login by entering valid credentials.
1. Open a browser and enter the following address: www.irdabap.org.in. The IRDA BAP portal home page is displayed.
2. Click Login. The IRDA BAP portal login screen is displayed.
Figure 1: IRDA BAP portal login screen
3. In User field, enter your user ID.
4. In Password field, enter your password.
5. Click Log On. The Change Password screen is displayed if you are logging in for the first time or if your current password is in use for 90 days or more. Otherwise, the User Profile page is displayed.
Surveyor User Manual Individual Surveyor - Login Process
Version: 1.0 4
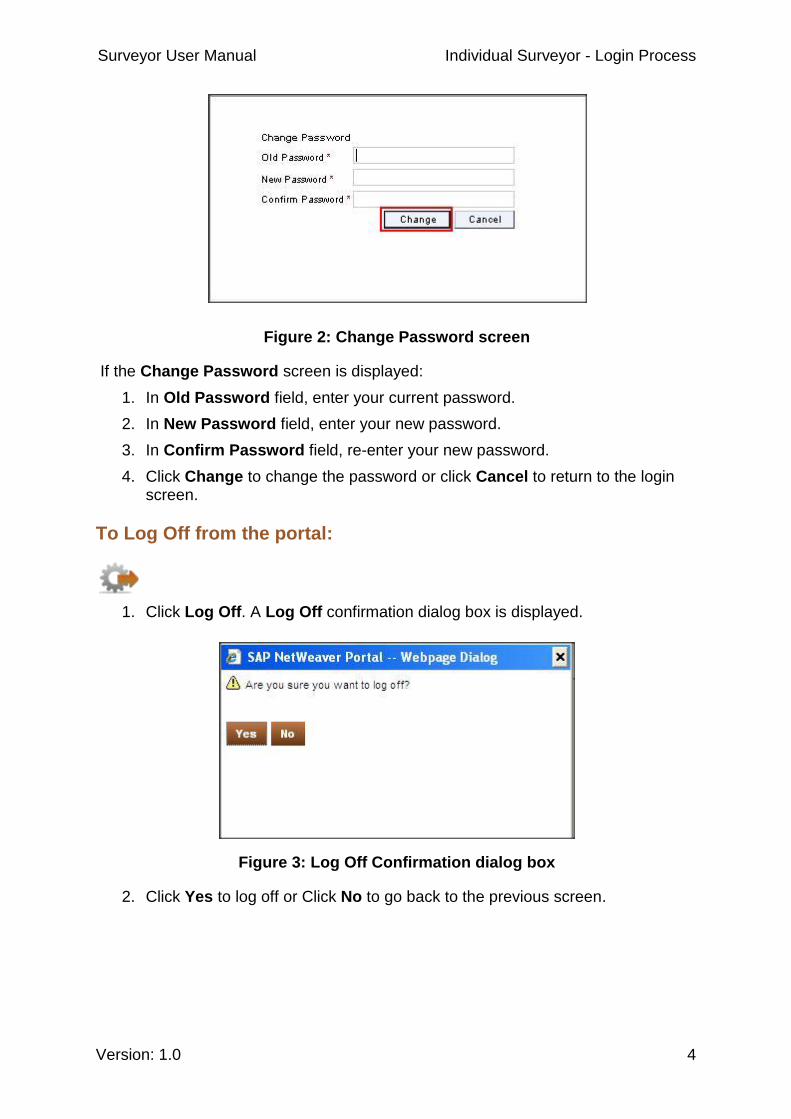
Figure 2: Change Password screen
If the Change Password screen is displayed:
1. In Old Password field, enter your current password.
2. In New Password field, enter your new password.
3. In Confirm Password field, re-enter your new password.
4. Click Change to change the password or click Cancel to return to the login screen.
To Log Off from the portal:
1. Click Log Off. A Log Off confirmation dialog box is displayed.
Figure 3: Log Off Confirmation dialog box
2. Click Yes to log off or Click No to go back to the previous screen.
Surveyor User Manual Individual Surveyor – Retrieving Credentials
Version: 1.0 5
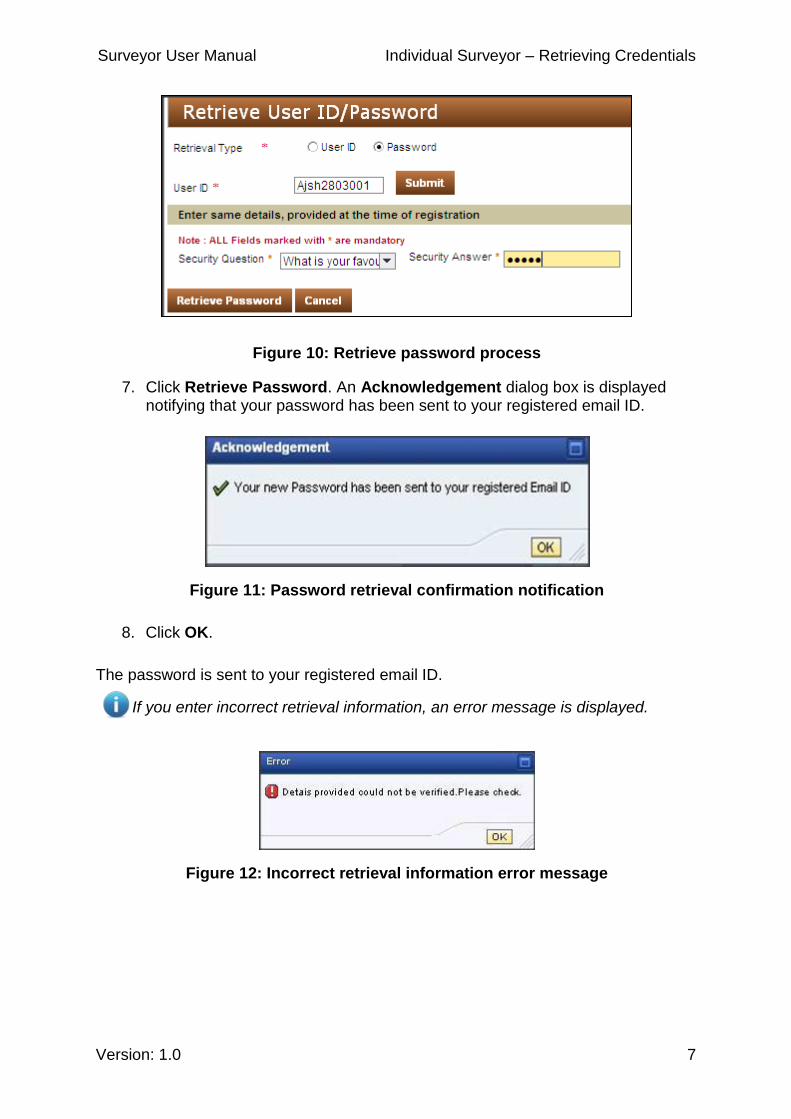
Retrieving Credentials
If you forget your login credentials, you can retrieve them using the Retrieve User ID/Password option.
To Retrieve User ID:
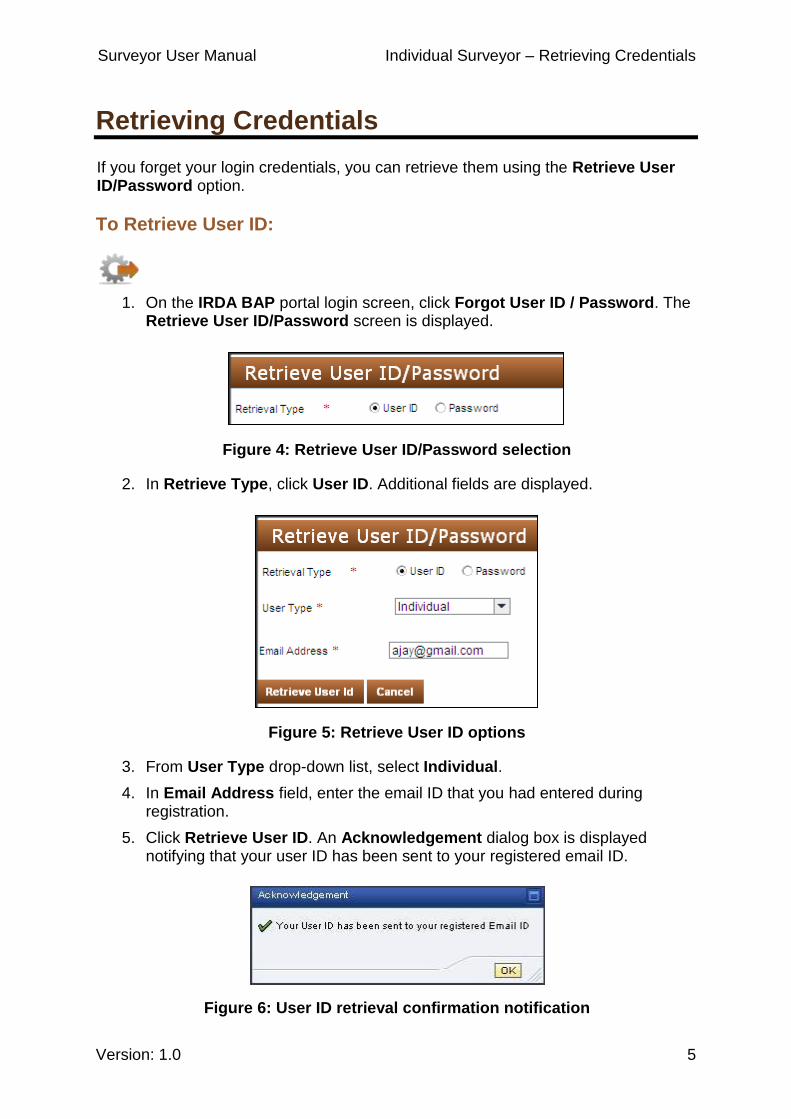
1. On the IRDA BAP portal login screen, click Forgot User ID / Password. The Retrieve User ID/Password screen is displayed.
Figure 4: Retrieve User ID/Password selection
2. In Retrieve Type, click User ID. Additional fields are displayed.
Figure 5: Retrieve User ID options
3. From User Type drop-down list, select Individual.
4. In Email Address field, enter the email ID that you had entered during registration.
5. Click Retrieve User ID. An Acknowledgement dialog box is displayed notifying that your user ID has been sent to your registered email ID.
Figure 6: User ID retrieval confirmation notification
Surveyor User Manual Individual Surveyor – Retrieving Credentials
Version: 1.0 6
6. Click OK.
The User ID is sent to your registered email ID.
To Retrieve Password:
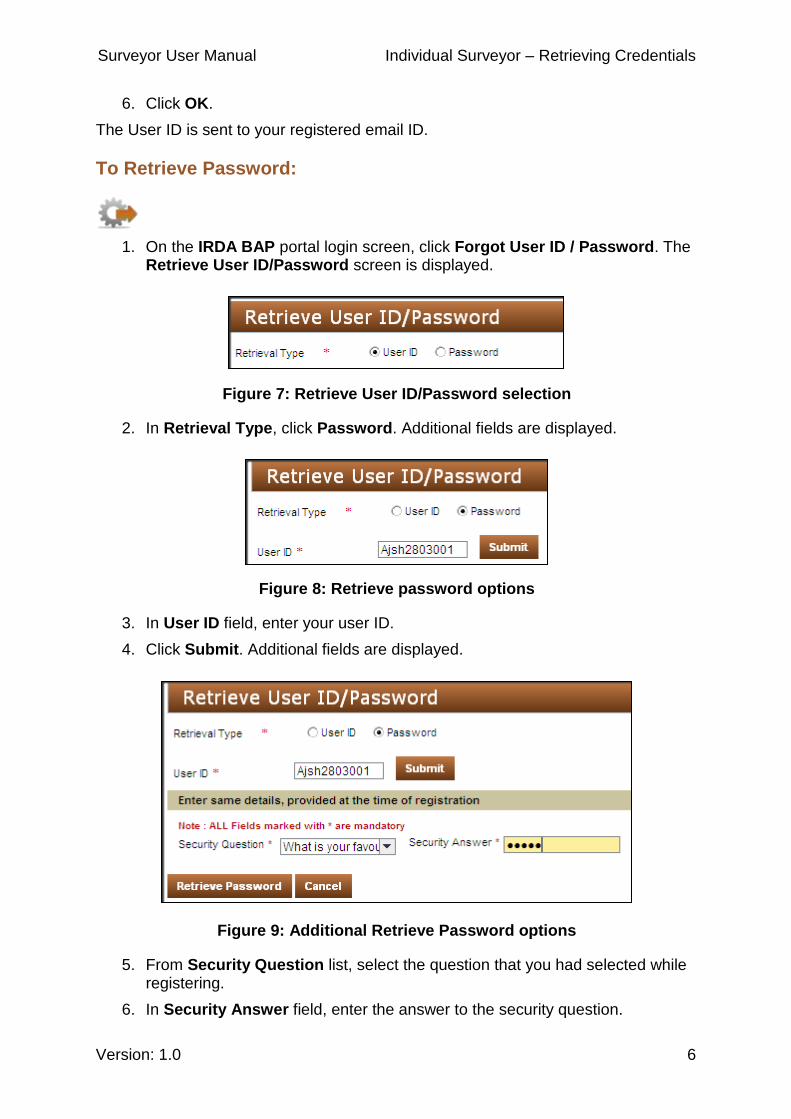
1. On the IRDA BAP portal login screen, click Forgot User ID / Password. The Retrieve User ID/Password screen is displayed.
Figure 7: Retrieve User ID/Password selection
2. In Retrieval Type, click Password. Additional fields are displayed.
Figure 8: Retrieve password options
3. In User ID field, enter your user ID.
4. Click Submit. Additional fields are displayed.
Figure 9: Additional Retrieve Password options
5. From Security Question list, select the question that you had selected while registering.
6. In Security Answer field, enter the answer to the security question.
Surveyor User Manual Individual Surveyor – Retrieving Credentials
Version: 1.0 7
Figure 10: Retrieve password process
7. Click Retrieve Password. An Acknowledgement dialog box is displayed notifying that your password has been sent to your registered email ID.
Figure 11: Password retrieval confirmation notification
8. Click OK.
The password is sent to your registered email ID.
If you enter incorrect retrieval information, an error message is displayed.
Figure 12: Incorrect retrieval information error message
Surveyor User Manual Individual Surveyor - User Profile
Version: 1.0 8
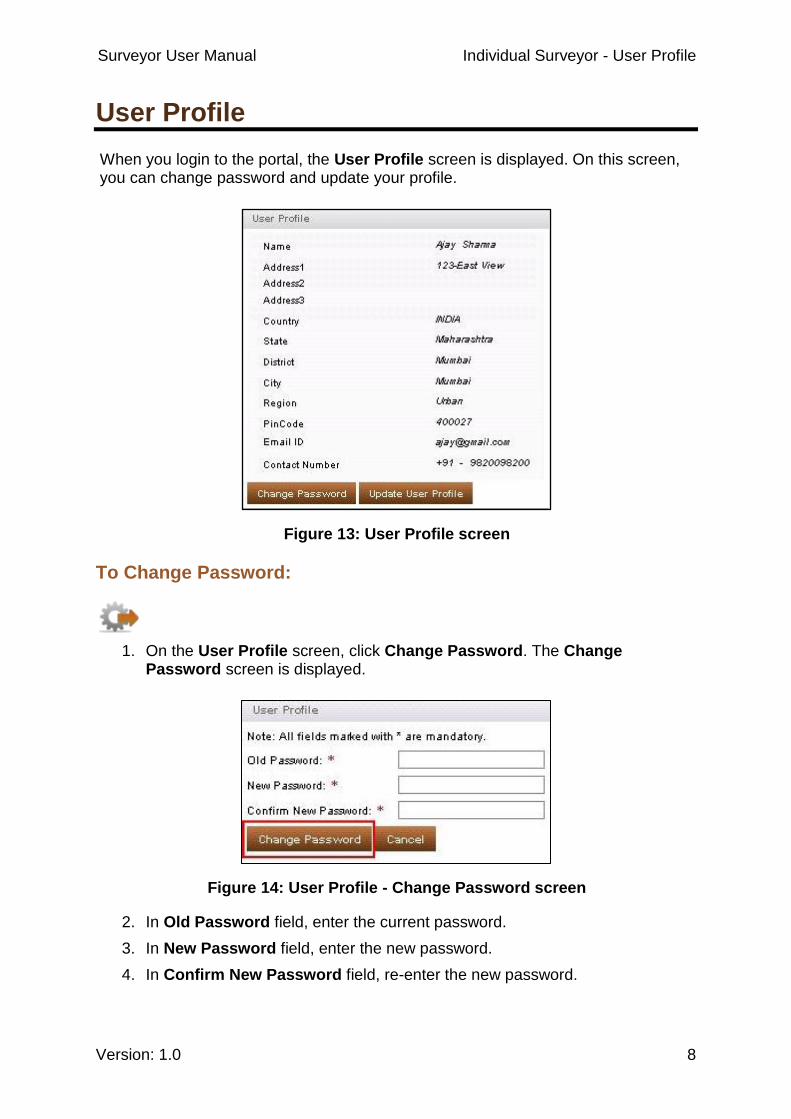
User Profile
When you login to the portal, the User Profile screen is displayed. On this screen, you can change password and update your profile.
Figure 13: User Profile screen
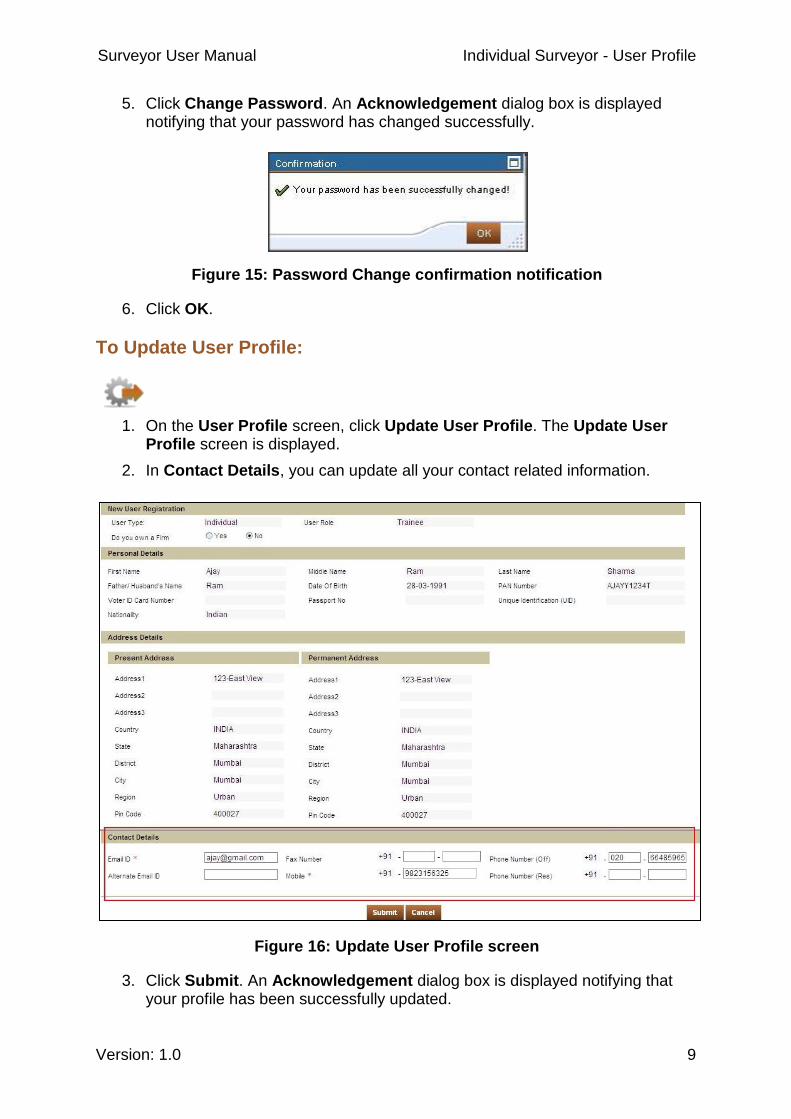
To Change Password:
1. On the User Profile screen, click Change Password. The Change Password screen is displayed.
Figure 14: User Profile - Change Password screen
2. In Old Password field, enter the current password.
3. In New Password field, enter the new password.
4. In Confirm New Password field, re-enter the new password.
Surveyor User Manual Individual Surveyor - User Profile
Version: 1.0 9
5. Click Change Password. An Acknowledgement dialog box is displayed notifying that your password has changed successfully.
Figure 15: Password Change confirmation notification
6. Click OK.
To Update User Profile:
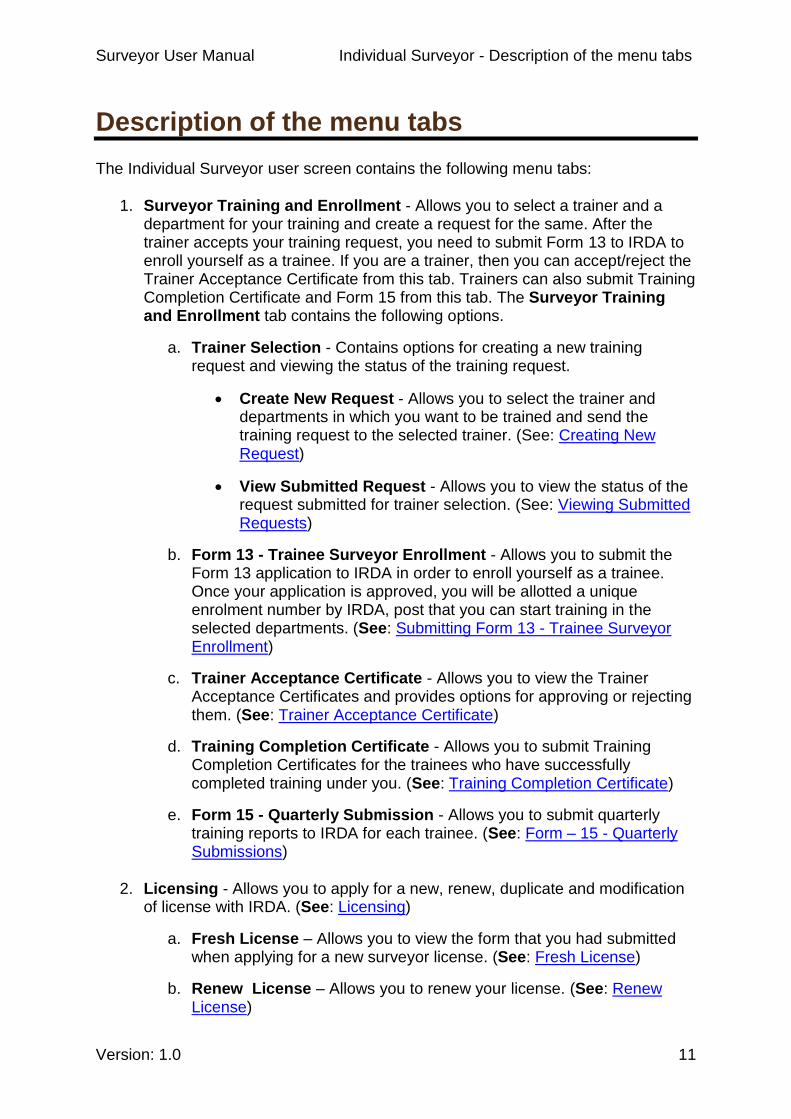
1. On the User Profile screen, click Update User Profile. The Update User Profile screen is displayed.
2. In Contact Details, you can update all your contact related information.
Figure 16: Update User Profile screen
3. Click Submit. An Acknowledgement dialog box is displayed notifying that your profile has been successfully updated.

Surveyor User Manual Individual Surveyor - User Profile
Version: 1.0 10
Figure 17: User Profile Update confirmation notification
4. Click OK.
You can update the rest of the details through the Modification tab.
Surveyor User Manual Individual Surveyor - Description of the menu tabs
Version: 1.0 11
Description of the menu tabs
The Individual Surveyor user screen contains the following menu tabs:
1. Surveyor Training and Enrollment - Allows you to select a trainer and a department for your training and create a request for the same. After the trainer accepts your training request, you need to submit Form 13 to IRDA to enroll yourself as a trainee. If you are a trainer, then you can accept/reject the Trainer Acceptance Certificate from this tab. Trainers can also submit Training Completion Certificate and Form 15 from this tab. The Surveyor Training and Enrollment tab contains the following options.
a. Trainer Selection - Contains options for creating a new training request and viewing the status of the training request.
Create New Request - Allows you to select the trainer and departments in which you want to be trained and send the training request to the selected trainer. (See: Creating New Request)
View Submitted Request - Allows you to view the status of the request submitted for trainer selection. (See: Viewing Submitted Requests)
b. Form 13 - Trainee Surveyor Enrollment - Allows you to submit the Form 13 application to IRDA in order to enroll yourself as a trainee. Once your application is approved, you will be allotted a unique enrolment number by IRDA, post that you can start training in the selected departments. (See: Submitting Form 13 - Trainee Surveyor Enrollment)
c. Trainer Acceptance Certificate - Allows you to view the Trainer Acceptance Certificates and provides options for approving or rejecting them. (See: Trainer Acceptance Certificate)
d. Training Completion Certificate - Allows you to submit Training Completion Certificates for the trainees who have successfully completed training under you. (See: Training Completion Certificate)
e. Form 15 - Quarterly Submission - Allows you to submit quarterly training reports to IRDA for each trainee. (See: Form – 15 - Quarterly Submissions)
2. Licensing - Allows you to apply for a new, renew, duplicate and modification of license with IRDA. (See: Licensing)
a. Fresh License – Allows you to view the form that you had submitted when applying for a new surveyor license. (See: Fresh License)
b. Renew License – Allows you to renew your license. (See: Renew License)
Surveyor User Manual Individual Surveyor - Description of the menu tabs
Version: 1.0 12
c. Duplicate License – Allows you to apply for a duplicate license. (See: Duplicate License)
d. Modification/ Upgrading License – Allows you to modify/upgrade your contact and license details. (See: Modification/Upgrading License)
3. Returns: Allows you to submit Form 12 that includes information related to the business conducted and qualifications acquired by the surveyor during the financial year. (See: Submitting Form - 12)
4. View Application Status - Allows you to track the status of the submitted applications. (See: View Application Status)
5. Pending for clarification - Allows you to upload additional documents and provide clarification required by IRDA during processing of applications. (See: Pending for Clarification)
6. Pay Penalty: In certain circumstances, IRDA imposes penalty on account of misconduct or violation of regulation. During such events, you have to adhere to guidelines and make the required payments within the specified time. (See: Pay Penalty)
Surveyor User Manual Trainer Selection
Version: 1.0 13
Trainer Selection
To enroll yourself as a trainee, you first need to select the department and the trainer under whom you want to undergo training.
Creating New Request
In Create New Request, you can select the departments in which you want to be trained and the trainer under whom you would like to undergo training. You can send the request to the trainer.
To Create New Request:
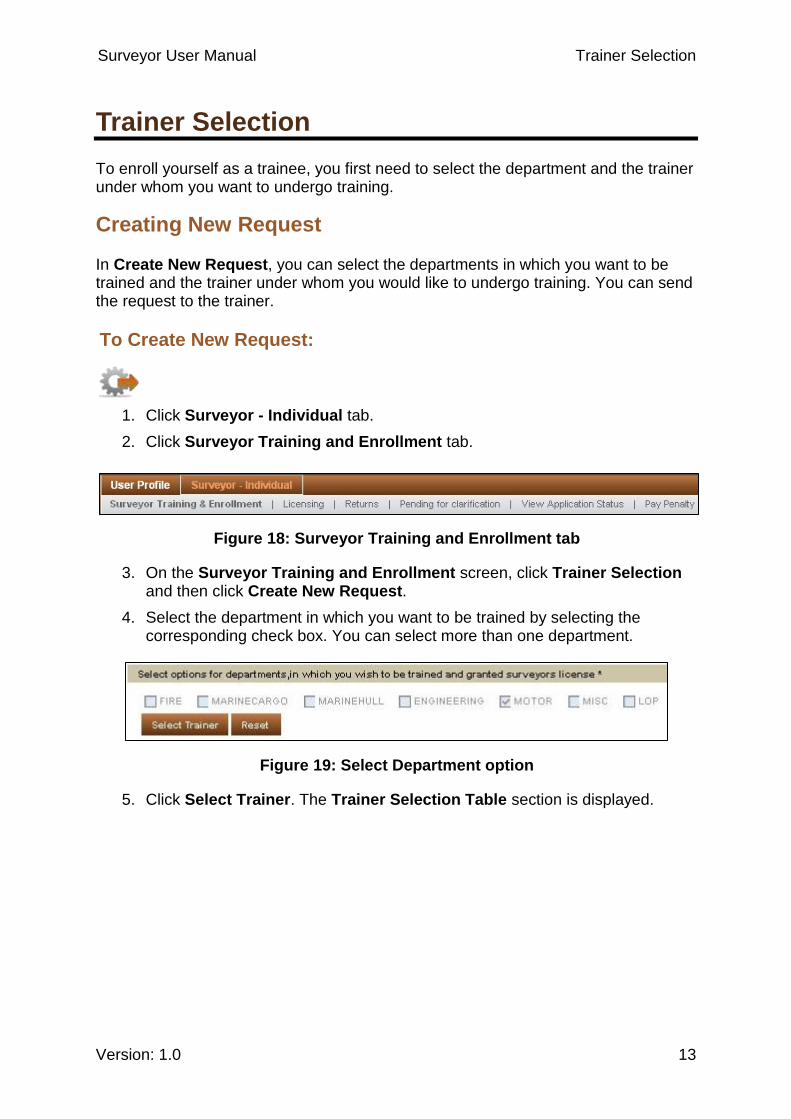
1. Click Surveyor - Individual tab.
2. Click Surveyor Training and Enrollment tab.
Figure 18: Surveyor Training and Enrollment tab
3. On the Surveyor Training and Enrollment screen, click Trainer Selection and then click Create New Request.
4. Select the department in which you want to be trained by selecting the corresponding check box. You can select more than one department.
Figure 19: Select Department option
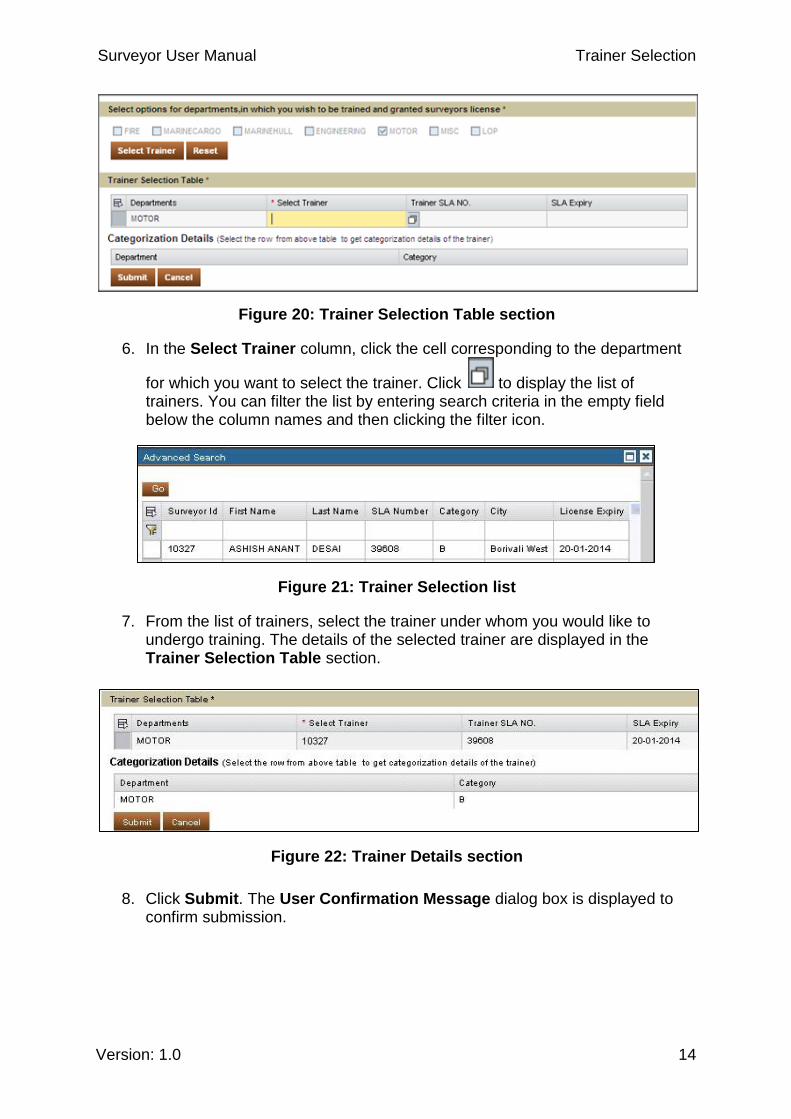
5. Click Select Trainer. The Trainer Selection Table section is displayed.
Surveyor User Manual Trainer Selection
Version: 1.0 14
Figure 20: Trainer Selection Table section
6. In the Select Trainer column, click the cell corresponding to the department
for which you want to select the trainer. Click to display the list of trainers. You can filter the list by entering search criteria in the empty field below the column names and then clicking the filter icon.
Figure 21: Trainer Selection list
7. From the list of trainers, select the trainer under whom you would like to undergo training. The details of the selected trainer are displayed in the Trainer Selection Table section.
Figure 22: Trainer Details section
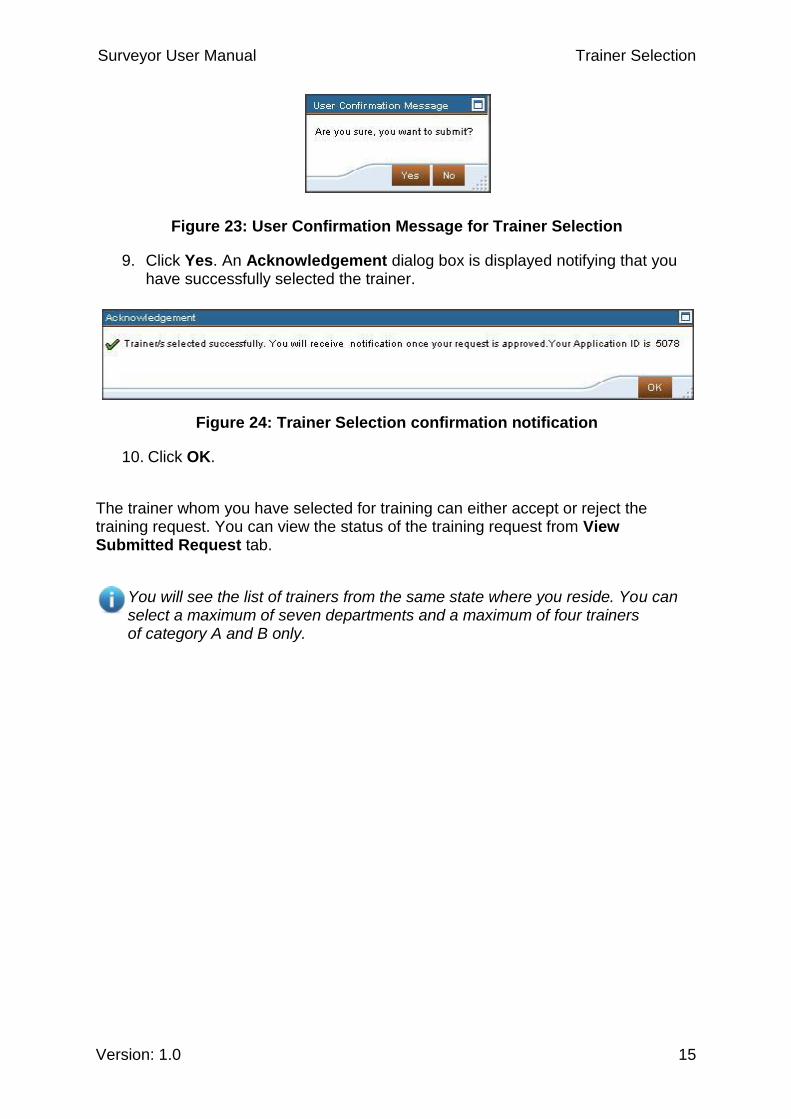
8. Click Submit. The User Confirmation Message dialog box is displayed to confirm submission.
Surveyor User Manual Trainer Selection
Version: 1.0 15
Figure 23: User Confirmation Message for Trainer Selection
9. Click Yes. An Acknowledgement dialog box is displayed notifying that you have successfully selected the trainer.
Figure 24: Trainer Selection confirmation notification
10. Click OK.
The trainer whom you have selected for training can either accept or reject the training request. You can view the status of the training request from View Submitted Request tab.
You will see the list of trainers from the same state where you reside. You can select a maximum of seven departments and a maximum of four trainers of category A and B only.
Surveyor User Manual Viewing Submitted Requests
Version: 1.0 16
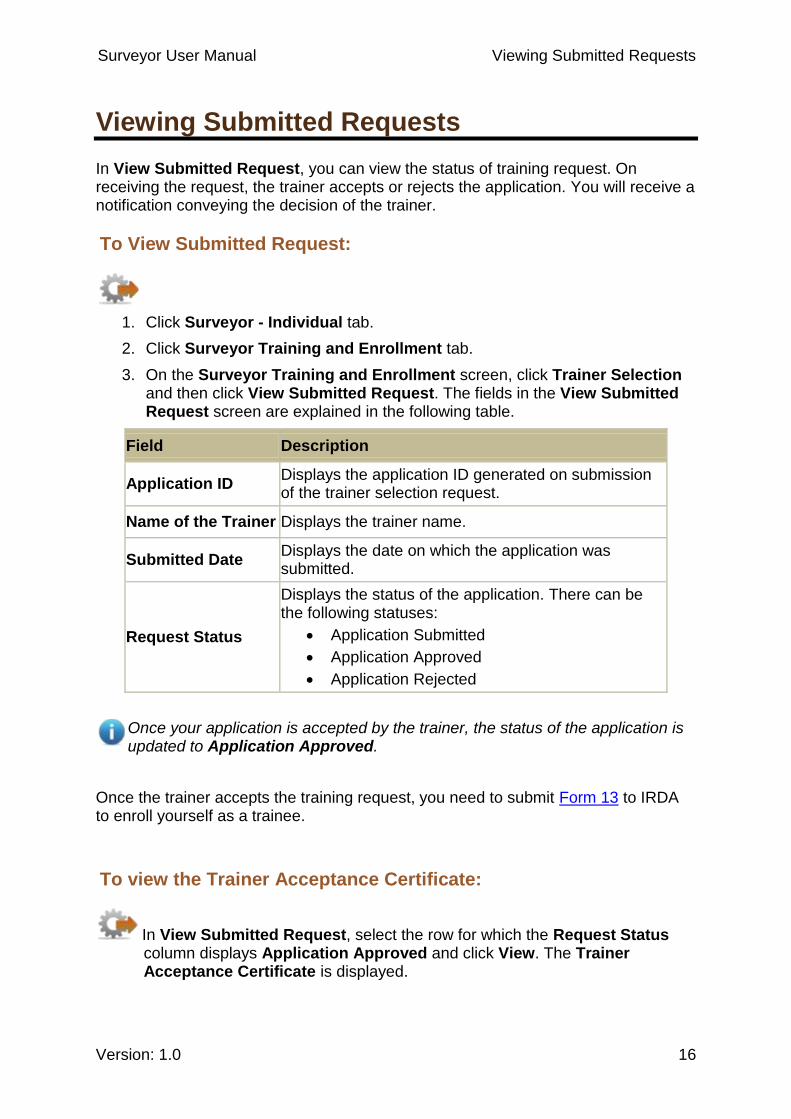
Viewing Submitted Requests
In View Submitted Request, you can view the status of training request. On receiving the request, the trainer accepts or rejects the application. You will receive a notification conveying the decision of the trainer.
To View Submitted Request:
1. Click Surveyor - Individual tab.
2. Click Surveyor Training and Enrollment tab.
3. On the Surveyor Training and Enrollment screen, click Trainer Selection and then click View Submitted Request. The fields in the View Submitted Request screen are explained in the following table.
Field Description
Application ID Displays the application ID generated on submission of the trainer selection request.
Name of the Trainer Displays the trainer name.
Submitted Date Displays the date on which the application was submitted.
Request Status
Displays the status of the application. There can be the following statuses:
Application Submitted
Application Approved
Application Rejected
Once your application is accepted by the trainer, the status of the application is updated to Application Approved.
Once the trainer accepts the training request, you need to submit Form 13 to IRDA to enroll yourself as a trainee.
To view the Trainer Acceptance Certificate:
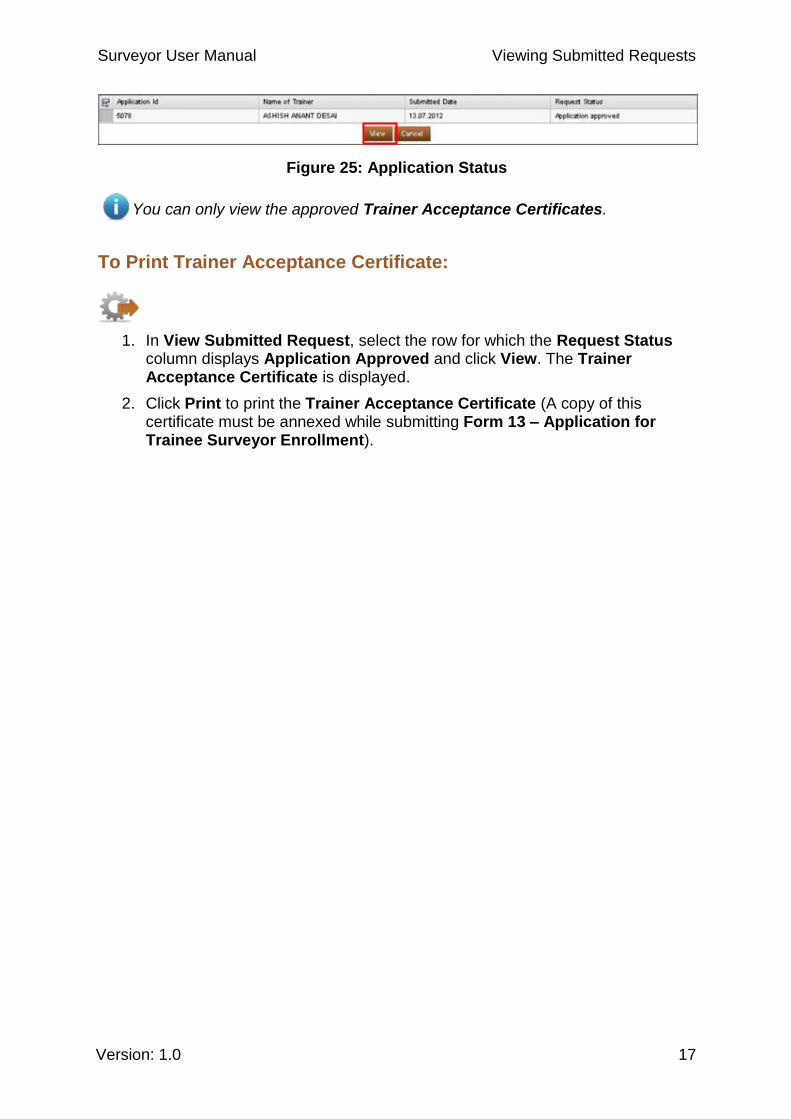
In View Submitted Request, select the row for which the Request Status column displays Application Approved and click View. The Trainer Acceptance Certificate is displayed.
Surveyor User Manual Viewing Submitted Requests
Version: 1.0 17
Figure 25: Application Status
You can only view the approved Trainer Acceptance Certificates.
To Print Trainer Acceptance Certificate:
1. In View Submitted Request, select the row for which the Request Status column displays Application Approved and click View. The Trainer Acceptance Certificate is displayed.
2. Click Print to print the Trainer Acceptance Certificate (A copy of this certificate must be annexed while submitting Form 13 – Application for Trainee Surveyor Enrollment).

Surveyor User Manual Submitting Form - 13 Trainee Surveyor Enrollment
Version: 1.0 18
Submitting Form - 13 Trainee Surveyor Enrollment
Once you complete trainer selection and the selected trainer accepts your training request, you need to submit Form – 13 application to IRDA and obtain approval to become a trainee in the selected department.
Instruction:
It is mandatory to attach the Trainer Acceptance Certificate along with the enrollment application.
To Submit Form- 13 Trainee Surveyor Enrollment:
1. Click Surveyor - Individual tab.
2. Click Surveyor Training and Enrollment tab.
3. On the Surveyor Training and Enrollment screen, click Form 13 - Trainee Surveyor Enrollment. The Enrollment of Trainee Surveyors and Loss Assessors screen is displayed. All the mandatory fields are marked with an asterisk (*).
The Trainee Surveyor Enrollment form comprises of the following sections:
1. Trainee Personal Details
2. Trainee Occupation Details
3. Trainer Details
4. Upload Documents
5. Confirm Details
Once you have successfully submitted the application, you can check its status through the View Application Status tab.
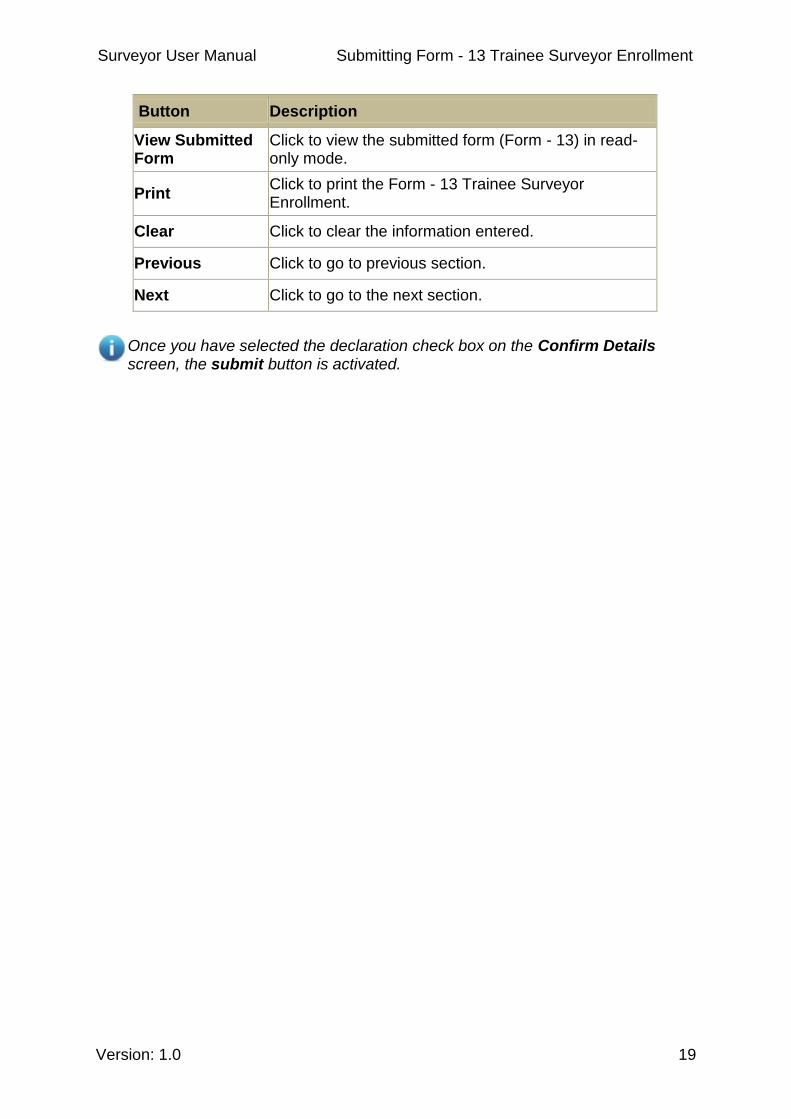
The buttons available in the Form 13 - Trainee Surveyor Enrollment form are explained in the following table.
Button Description
Submit Click to submit the application form once you have selected the declaration check box.
Cancel Click to stop the application process and return to the home page. This action will also clear all the information entered without saving it.
Save as Draft Click to save all the data entered in the form. You can use this option if you want to submit the form later.
Surveyor User Manual Submitting Form - 13 Trainee Surveyor Enrollment
Version: 1.0 19
Button Description
View Submitted Form
Click to view the submitted form (Form - 13) in read-only mode.
Print Click to print the Form - 13 Trainee Surveyor Enrollment.
Clear Click to clear the information entered.
Previous Click to go to previous section.
Next Click to go to the next section.
Once you have selected the declaration check box on the Confirm Details screen, the submit button is activated.
Surveyor User Manual Trainee Personal Details
Version: 1.0 20
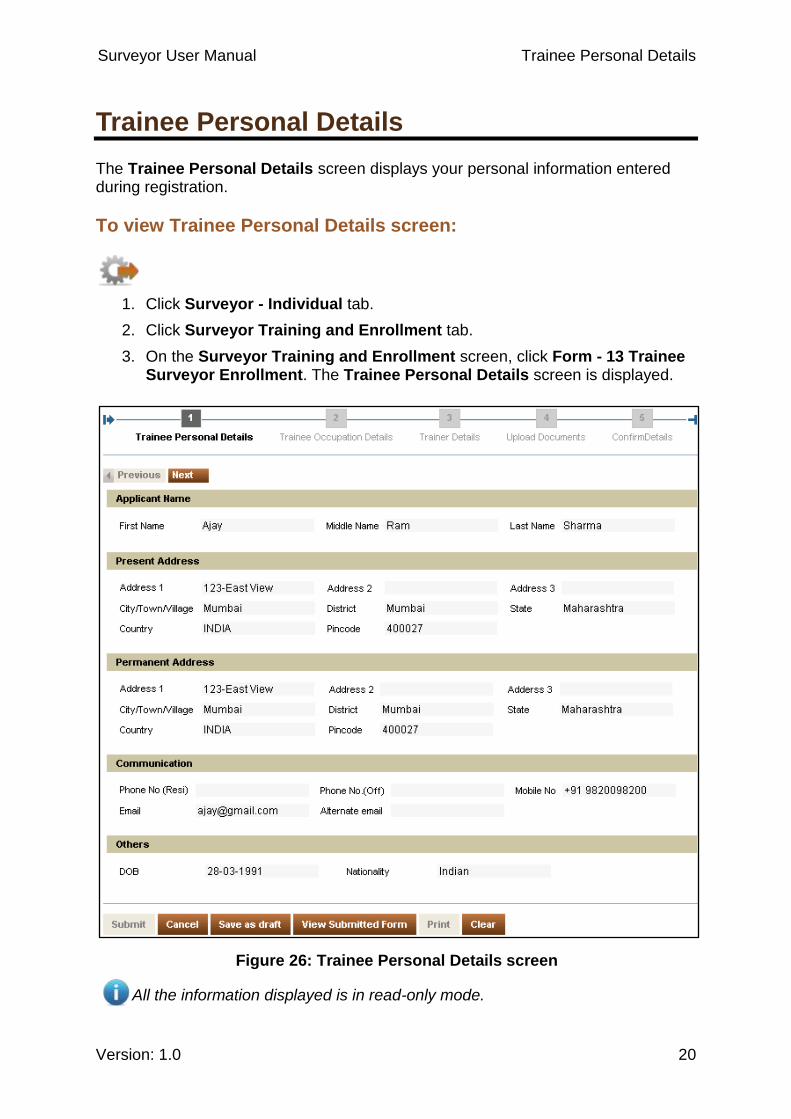
Trainee Personal Details
The Trainee Personal Details screen displays your personal information entered during registration.
To view Trainee Personal Details screen:
1. Click Surveyor - Individual tab.
2. Click Surveyor Training and Enrollment tab.
3. On the Surveyor Training and Enrollment screen, click Form - 13 Trainee Surveyor Enrollment. The Trainee Personal Details screen is displayed.
Figure 26: Trainee Personal Details screen
All the information displayed is in read-only mode.
Surveyor User Manual Trainee Occupation Details
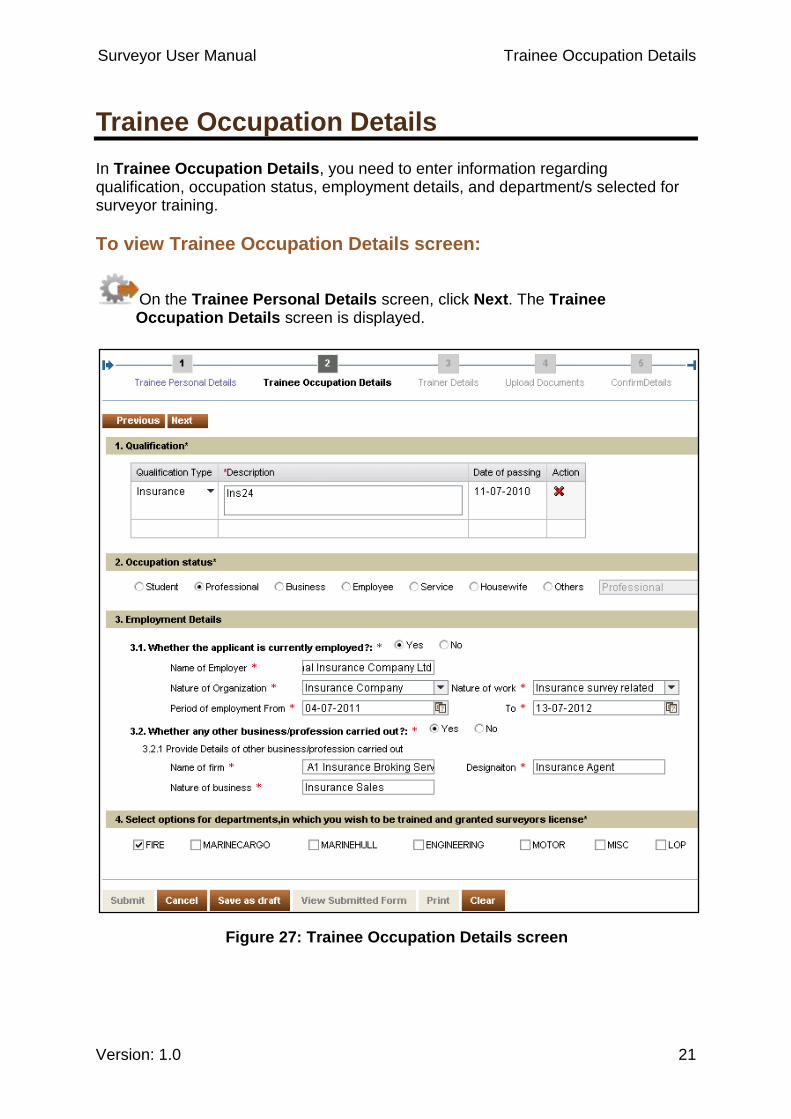
Version: 1.0 21
Trainee Occupation Details
In Trainee Occupation Details, you need to enter information regarding qualification, occupation status, employment details, and department/s selected for surveyor training.
To view Trainee Occupation Details screen:
On the Trainee Personal Details screen, click Next. The Trainee Occupation Details screen is displayed.
Figure 27: Trainee Occupation Details screen
Surveyor User Manual Trainee Occupation Details
Version: 1.0 22
The fields on the Trainee Occupation Details screen are explained in the following table.
Field Description
Qualification
Qualification Type Select the qualification type from the drop-down list.
Description Enter the details for the selected qualification.
Date of Passing Select the day, month, and year of passing.
Occupation Status
Occupation Status Select the occupation type. If your occupation type is not available, select Others and enter your occupation type in the corresponding field.
Employment Details
Whether applicant is currently employed
Select Yes or No. If Yes, enter the details of the current employment.
Whether any other business/profession carried out
Select Yes or No. If Yes, enter the details of the current business/profession.
Departments for Training and Surveyor License
Select options for departments, in which you wish to be trained and granted surveyors license
Select the department in which you want to be trained by selecting the corresponding check box.
Surveyor User Manual Trainer Details
Version: 1.0 23
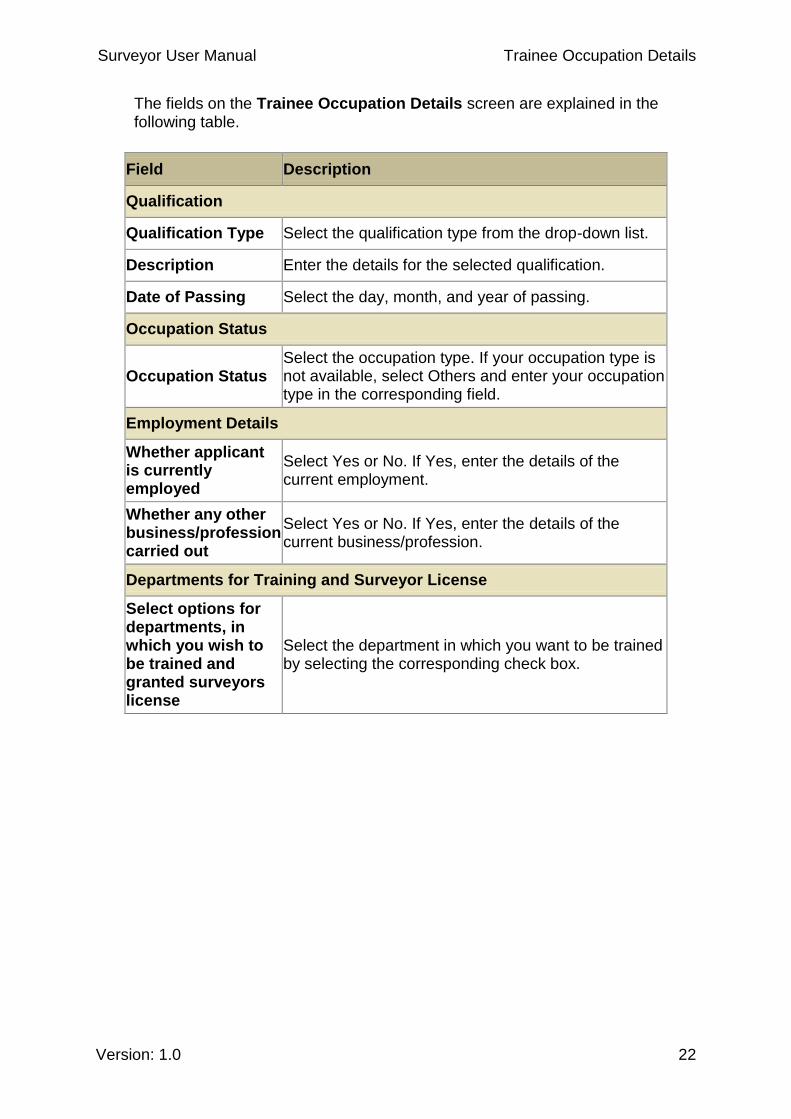
Trainer Details
In Trainer Details, select the trainer who has approved your training request in the department selected by you.
To view Trainer Details screen:
On the Trainee Occupation Details screen, click Next. The Trainer Details screen is displayed.
Figure 28: Trainer Details screen
To Select the Trainer:
From Trainer Surveyor Detail list, select the trainer. Detailed information about the trainer is displayed in read-only mode.
Surveyor User Manual Upload Documents
Version: 1.0 24
Upload Documents
In Upload Documents, you need to upload the necessary documents for the successful submission of the Form 13 application.
To view Upload Documents screen:
On the Trainee Details screen, click Next. The Upload Documents screen is displayed.
Figure 29: Upload Documents screen
To Upload Documents:
1. Under Checklist for documents to be uploaded, click Browse to search for the corresponding document.
Surveyor User Manual Upload Documents
Version: 1.0 25
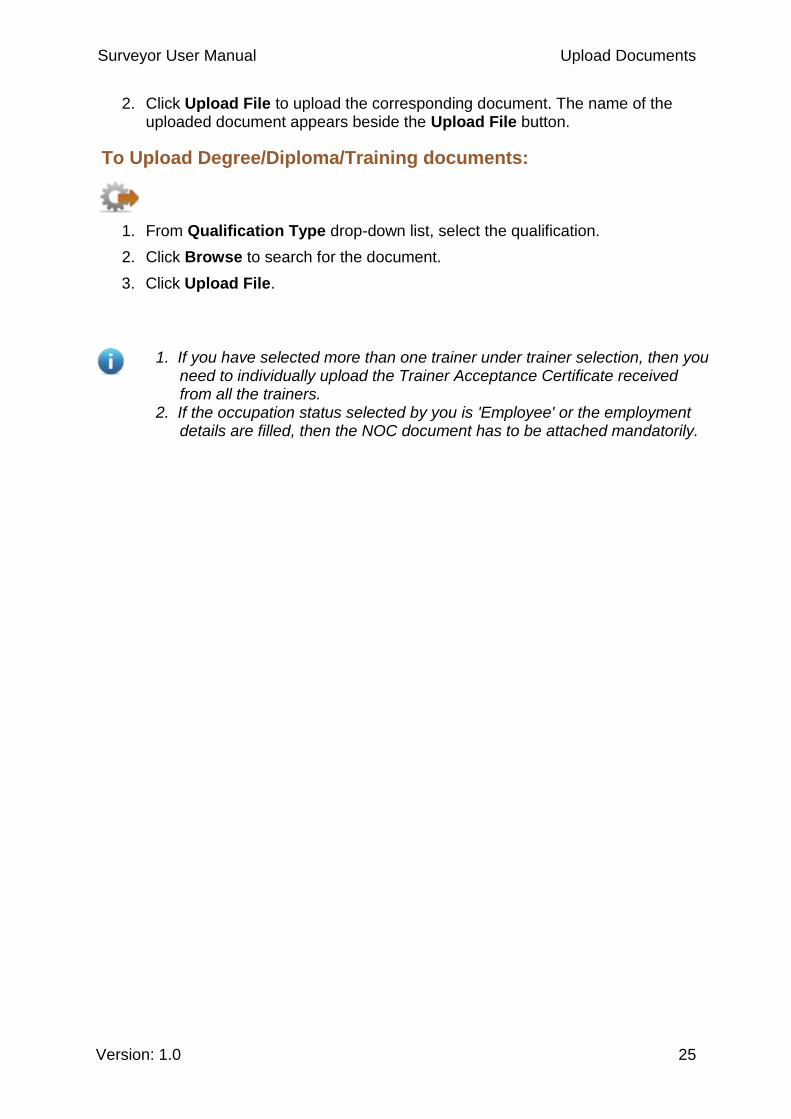
2. Click Upload File to upload the corresponding document. The name of the uploaded document appears beside the Upload File button.
To Upload Degree/Diploma/Training documents:
1. From Qualification Type drop-down list, select the qualification.
2. Click Browse to search for the document.
3. Click Upload File.
1. If you have selected more than one trainer under trainer selection, then you need to individually upload the Trainer Acceptance Certificate received from all the trainers.
2. If the occupation status selected by you is 'Employee' or the employment details are filled, then the NOC document has to be attached mandatorily.

Surveyor User Manual Confirm Details
Version: 1.0 26
Confirm Details
In Confirm Details, you need to validate and confirm the information that you have entered previously in the application, in order to proceed with submission.
To view Confirm Details screen:
On the Upload Documents screen, click Next. The Confirm Details screen is displayed.
Surveyor User Manual Confirm Details
Version: 1.0 27
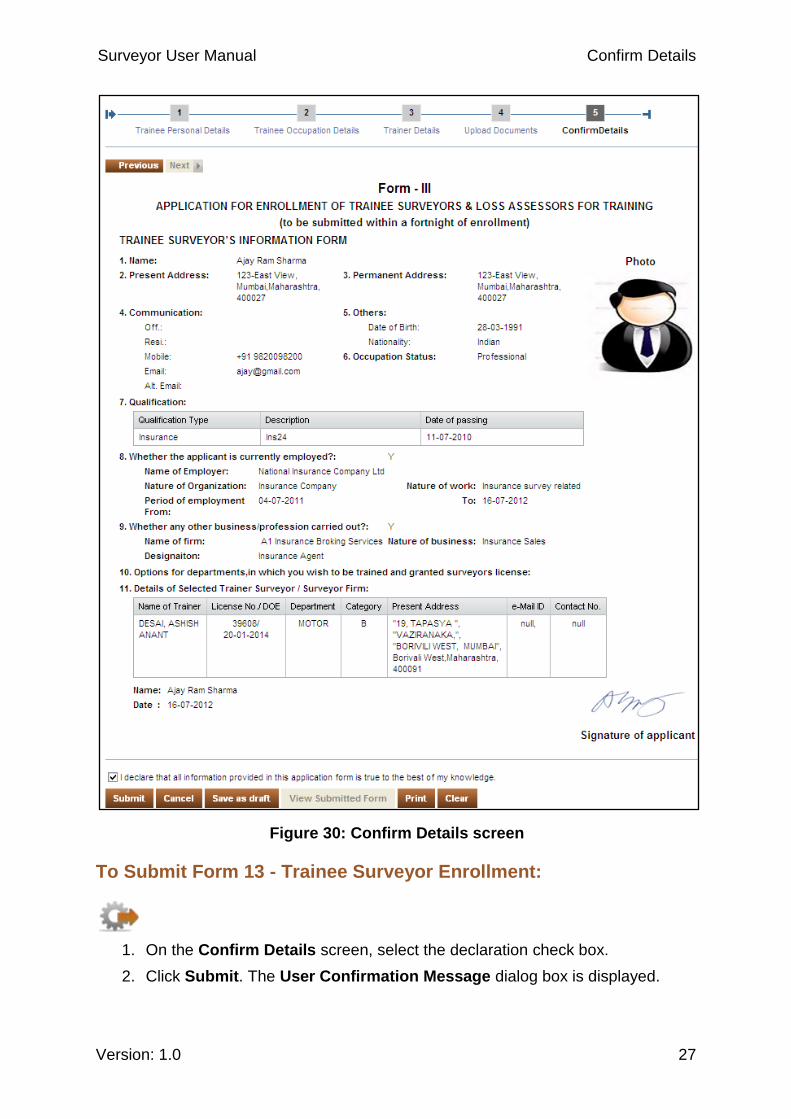
Figure 30: Confirm Details screen
To Submit Form 13 - Trainee Surveyor Enrollment:
1. On the Confirm Details screen, select the declaration check box.
2. Click Submit. The User Confirmation Message dialog box is displayed.

Surveyor User Manual Confirm Details
Version: 1.0 28
Figure 31: User confirmation message for Form 13
3. Click Yes to confirm the submission. An Acknowledgement dialog box is displayed containing the Unique Reference Number (URN).
Figure 32: Form submitted successfully notification
4. Click OK.

Surveyor User Manual Enrollment Confirmation by IRDA
Version: 1.0 29
Enrollment Confirmation by IRDA
Enrollment Application Approval
If your application is approved, IRDA sends you an email notification stating that your enrollment application has been approved.
Enrollment Application Rejection
If your application is rejected, IRDA sends you an email notification stating that your enrollment application has been rejected.
Clarification/Additional documents required on the submitted application
If IRDA requires any clarification on your submitted application, then it sends you an email notifying that clarification is required from your side. You can view and provide the required clarifications from the Pending for Clarification tab on the portal.
Closing of Application
When you do not respond to the clarification email sent by IRDA within a month, IRDA sends you an email notifying that it will close your application as it has not received any response from your side for the clarifications.
Surveyor User Manual Trainer Acceptance Certificate
Version: 1.0 30
Trainer Acceptance Certificate
Whenever an applicant selects you as a trainer, an email is sent to you notifying that an applicant has selected you as a trainer. As a trainer, you can accept or reject a training request by accepting or rejecting the Trainer Acceptance Certificate (Form 14). You can view the Trainer Acceptance Certificate from the Surveyor Training and Enrollment screen.
To accept a Trainer Acceptance Certificate:
1. Click Surveyor - Individual tab.
2. Click Surveyor Training and Enrollment tab.
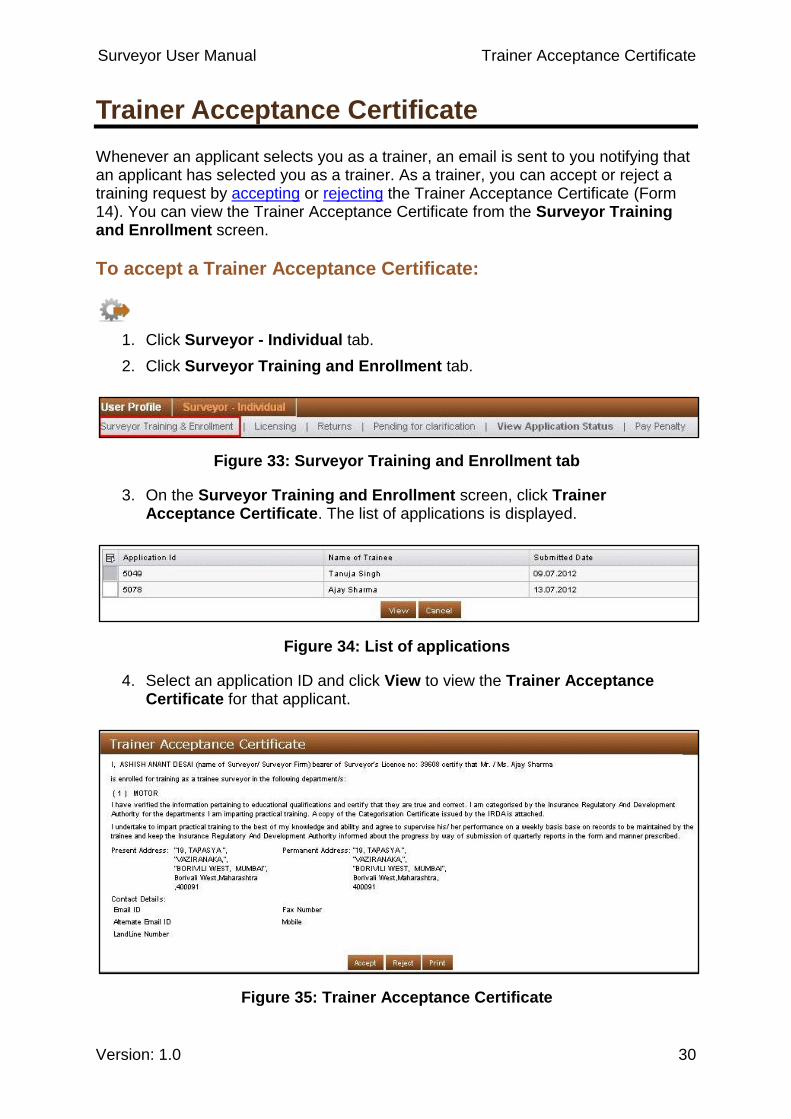
Figure 33: Surveyor Training and Enrollment tab
3. On the Surveyor Training and Enrollment screen, click Trainer Acceptance Certificate. The list of applications is displayed.
Figure 34: List of applications
4. Select an application ID and click View to view the Trainer Acceptance Certificate for that applicant.
Figure 35: Trainer Acceptance Certificate
Surveyor User Manual Trainer Acceptance Certificate
Version: 1.0 31
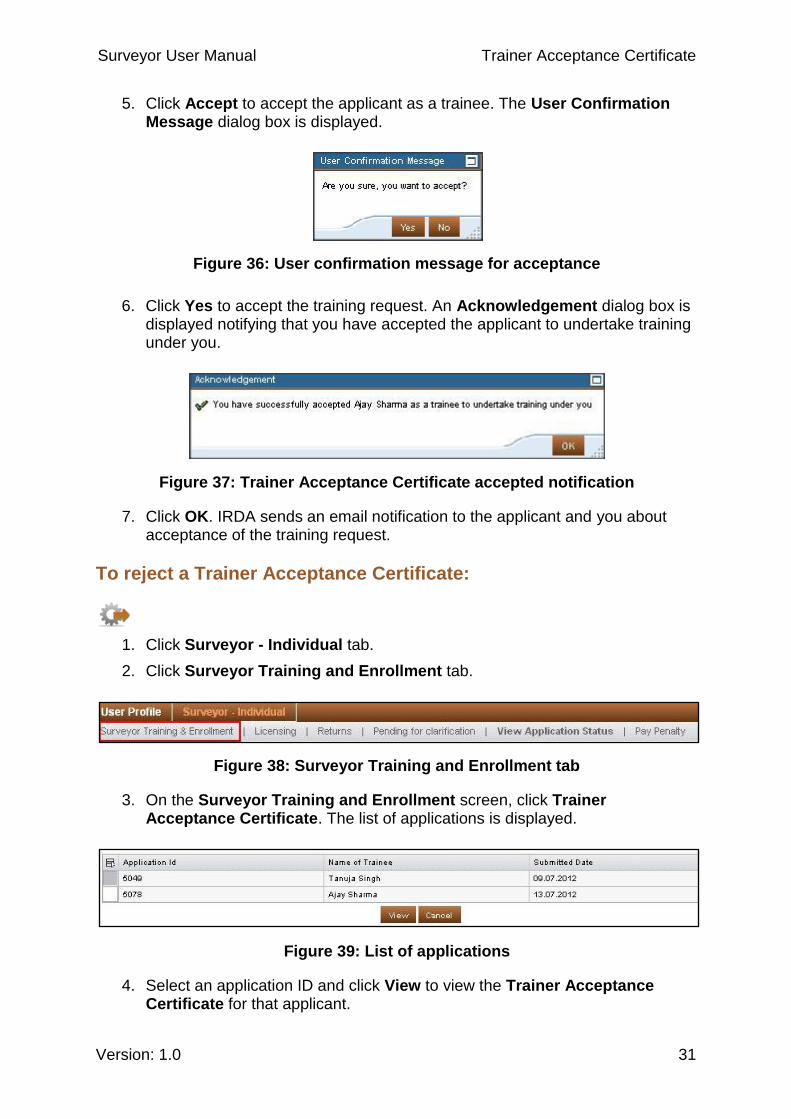
5. Click Accept to accept the applicant as a trainee. The User Confirmation Message dialog box is displayed.
Figure 36: User confirmation message for acceptance
6. Click Yes to accept the training request. An Acknowledgement dialog box is displayed notifying that you have accepted the applicant to undertake training under you.
Figure 37: Trainer Acceptance Certificate accepted notification
7. Click OK. IRDA sends an email notification to the applicant and you about acceptance of the training request.
To reject a Trainer Acceptance Certificate:
1. Click Surveyor - Individual tab.
2. Click Surveyor Training and Enrollment tab.
Figure 38: Surveyor Training and Enrollment tab
3. On the Surveyor Training and Enrollment screen, click Trainer Acceptance Certificate. The list of applications is displayed.
Figure 39: List of applications
4. Select an application ID and click View to view the Trainer Acceptance Certificate for that applicant.
Surveyor User Manual Trainer Acceptance Certificate
Version: 1.0 32
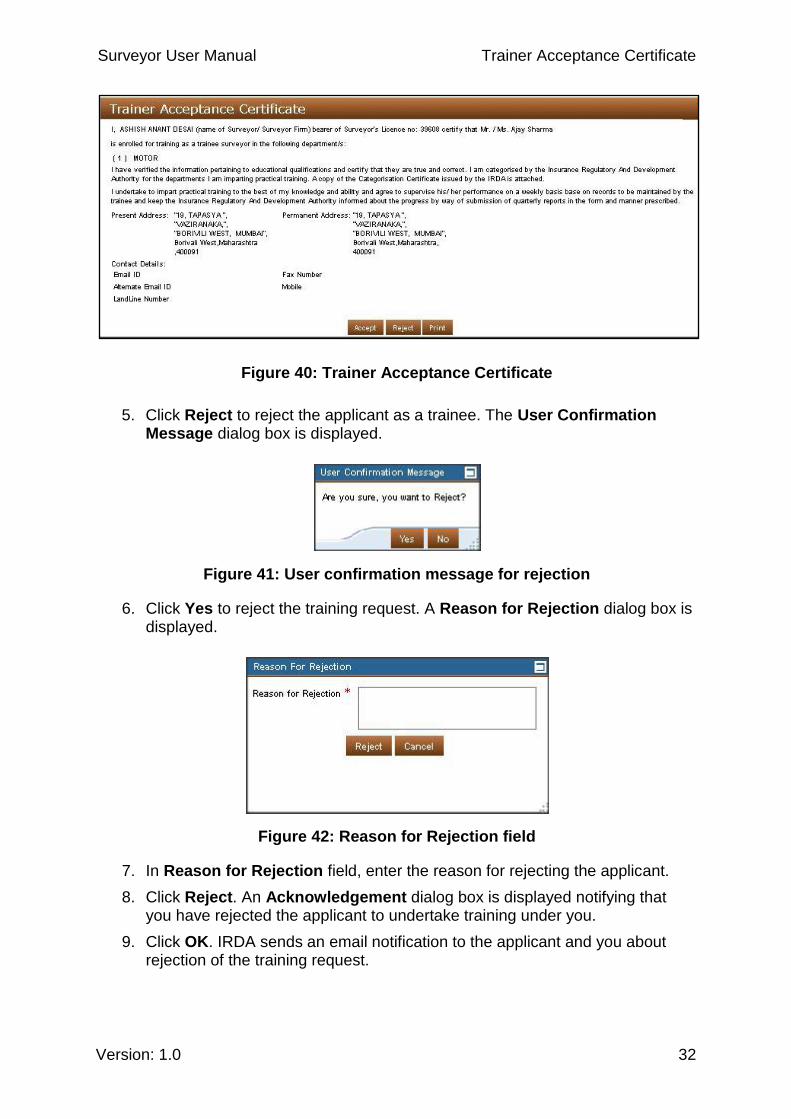
Figure 40: Trainer Acceptance Certificate
5. Click Reject to reject the applicant as a trainee. The User Confirmation Message dialog box is displayed.
Figure 41: User confirmation message for rejection
6. Click Yes to reject the training request. A Reason for Rejection dialog box is displayed.
Figure 42: Reason for Rejection field
7. In Reason for Rejection field, enter the reason for rejecting the applicant.
8. Click Reject. An Acknowledgement dialog box is displayed notifying that you have rejected the applicant to undertake training under you.
9. Click OK. IRDA sends an email notification to the applicant and you about rejection of the training request.

Surveyor User Manual Trainer Acceptance Certificate
Version: 1.0 33
Figure 43: Trainer Acceptance Certificate rejected notification
Surveyor User Manual Form IV Quarterly Submission
Version: 1.0 34
Form – 15 - Quarterly Submission
The trainer submits training reports to IRDA every quarter for each trainee. The Form - 15 Quarterly submissions contains details of trainee, communication, address and training.
Based on the last quarterly submission made, system displays Form - 15 for the following quarter.
To submit Form - 15:
1. Click Surveyor - Individual tab.
2. Click Surveyor Training and Enrollment tab.
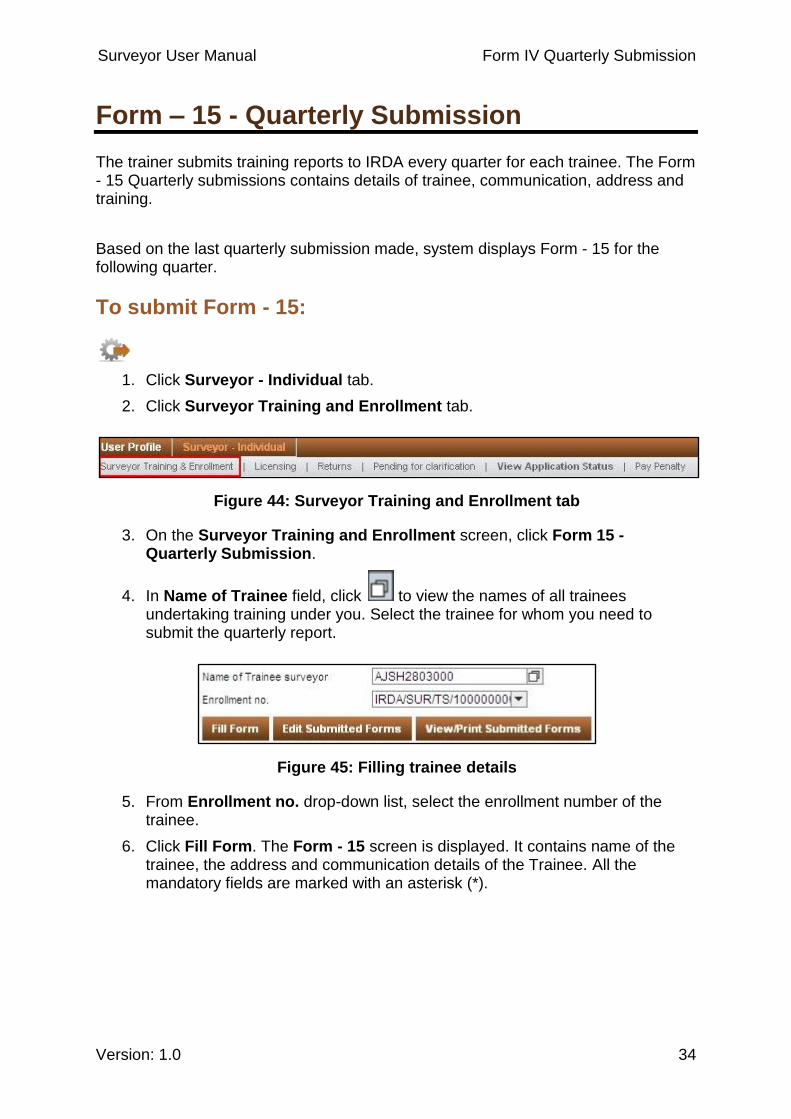
Figure 44: Surveyor Training and Enrollment tab
3. On the Surveyor Training and Enrollment screen, click Form 15 - Quarterly Submission.
4. In Name of Trainee field, click to view the names of all trainees undertaking training under you. Select the trainee for whom you need to submit the quarterly report.
Figure 45: Filling trainee details
5. From Enrollment no. drop-down list, select the enrollment number of the trainee.
6. Click Fill Form. The Form - 15 screen is displayed. It contains name of the trainee, the address and communication details of the Trainee. All the mandatory fields are marked with an asterisk (*).
Surveyor User Manual Form IV Quarterly Submission
Version: 1.0 35
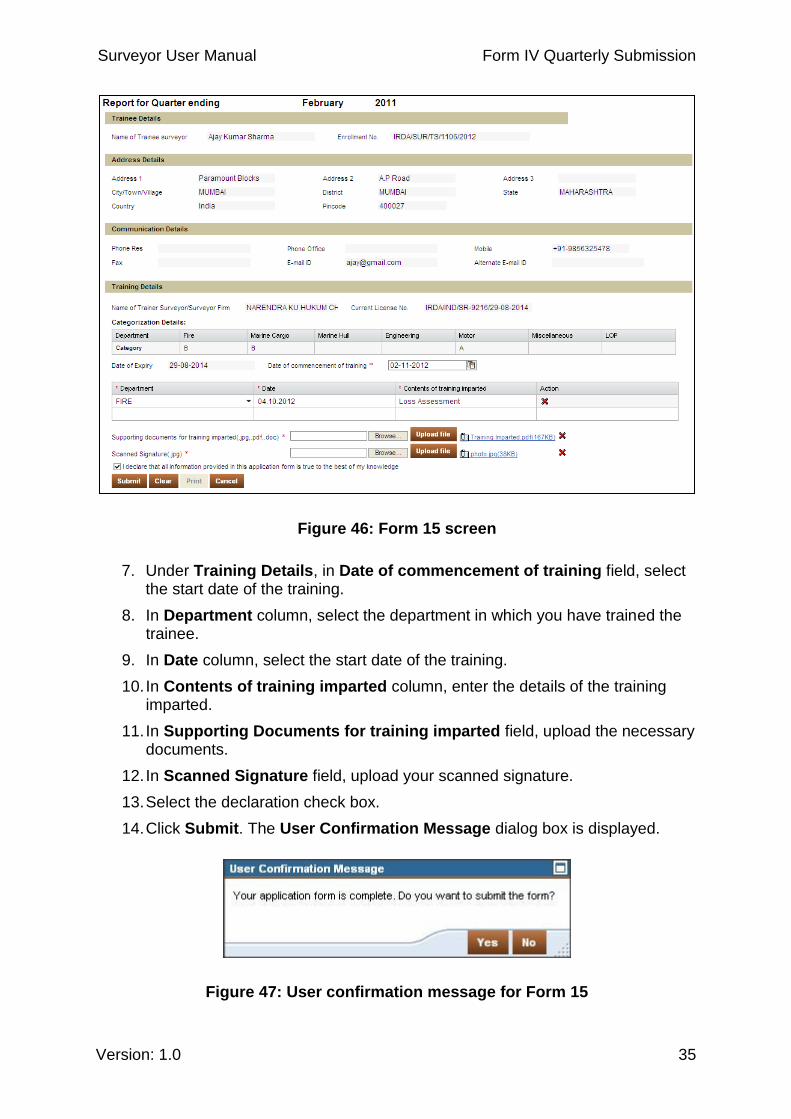
Figure 46: Form 15 screen
7. Under Training Details, in Date of commencement of training field, select the start date of the training.
8. In Department column, select the department in which you have trained the trainee.
9. In Date column, select the start date of the training.
10. In Contents of training imparted column, enter the details of the training imparted.
11. In Supporting Documents for training imparted field, upload the necessary documents.
12. In Scanned Signature field, upload your scanned signature.
13. Select the declaration check box.
14. Click Submit. The User Confirmation Message dialog box is displayed.
Figure 47: User confirmation message for Form 15

Surveyor User Manual Form IV Quarterly Submission
Version: 1.0 36
15. Click Yes to submit Form 15. An Acknowledgement dialog box is displayed with the Unique Reference Number (URN).
Figure 48: Form 15 successfully submitted notification
16. Click OK.
The buttons available in the Form 15 screen are explained in the following table.
Button Description
Fill Form Click to fill the Form 15 after you have selected the trainee and his/her enrollment number.
Edit Submitted Forms
Click to make changes in the submitted form. You need to send an offline request to IRDA to unlock the form. After IRDA approves your request, you can edit the form.
View/Print Submitted Forms
Click to view Form - 15 in read-only mode. To print the form, click Print in the displayed form.
Submit Click to submit the application form once you select declaration check box.
Clear Click to clear the data entered.
Print Click to print Form - 15.
Cancel Click to stop the application processing and return to the home page. This action will also clear all the information entered without saving it.
This completes the Form 15 submission process.
Surveyor User Manual Training Completion Certificate
Version: 1.0 37
Training Completion Certificate
If you are a trainer, then you need to submit the Training Completion Certificate (Form 16) to IRDA after a trainee who is receiving training from you, successfully completes the training in the selected departments.
To submit the Training Completion Certificate:
1. Click Surveyor - Individual tab.
2. Click Surveyor Training and Enrollment tab.
Figure 49: Surveyor Training and Enrollment tab
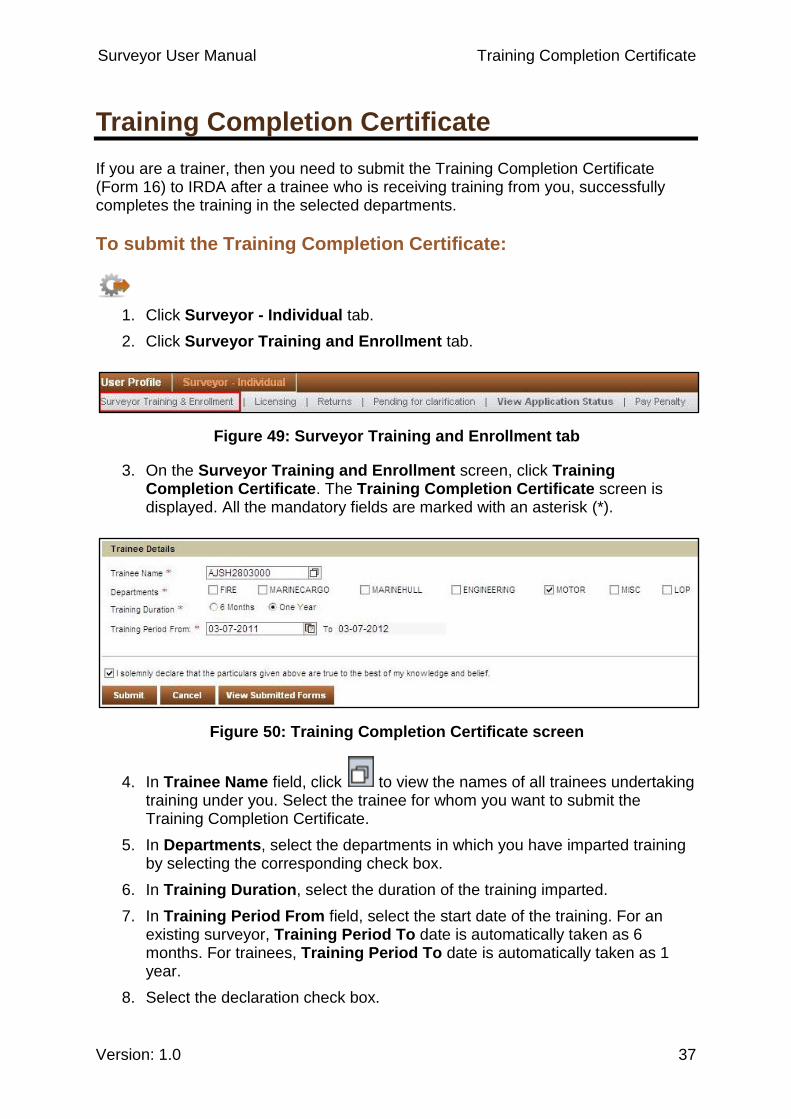
3. On the Surveyor Training and Enrollment screen, click Training Completion Certificate. The Training Completion Certificate screen is displayed. All the mandatory fields are marked with an asterisk (*).
Figure 50: Training Completion Certificate screen
4. In Trainee Name field, click to view the names of all trainees undertaking training under you. Select the trainee for whom you want to submit the Training Completion Certificate.
5. In Departments, select the departments in which you have imparted training by selecting the corresponding check box.
6. In Training Duration, select the duration of the training imparted.
7. In Training Period From field, select the start date of the training. For an existing surveyor, Training Period To date is automatically taken as 6 months. For trainees, Training Period To date is automatically taken as 1 year.
8. Select the declaration check box.
Surveyor User Manual Training Completion Certificate
Version: 1.0 38
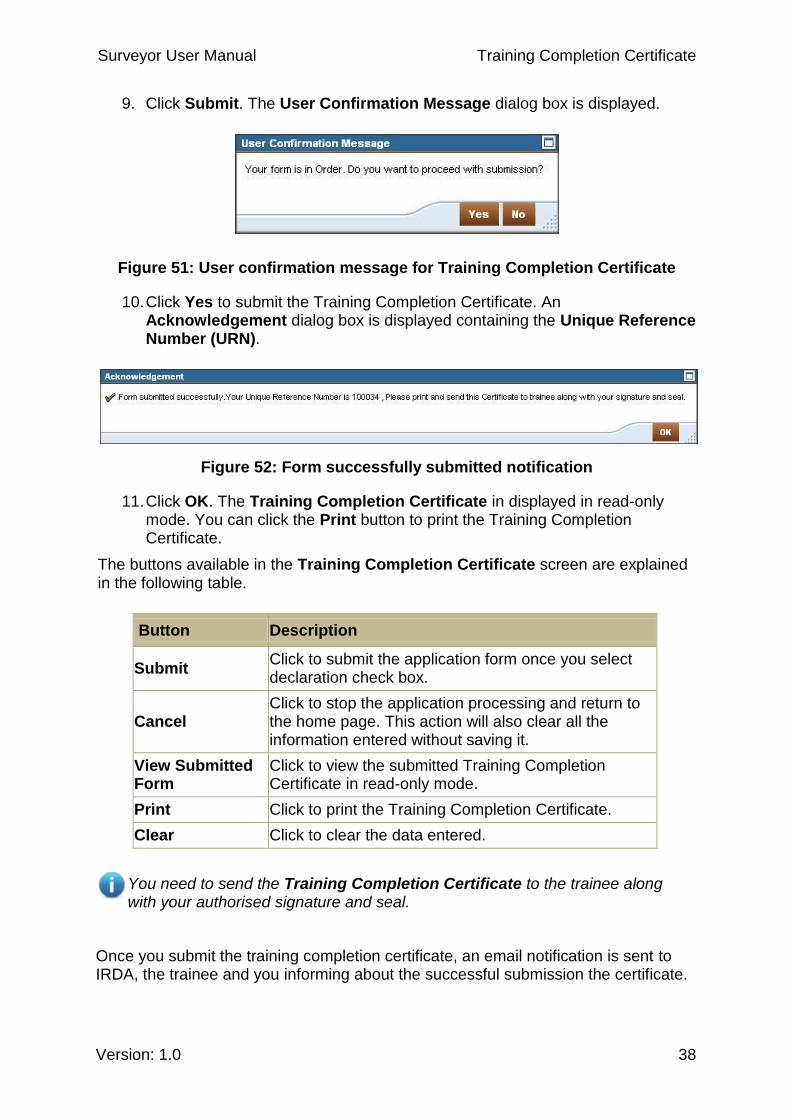
9. Click Submit. The User Confirmation Message dialog box is displayed.
Figure 51: User confirmation message for Training Completion Certificate
10. Click Yes to submit the Training Completion Certificate. An Acknowledgement dialog box is displayed containing the Unique Reference Number (URN).
Figure 52: Form successfully submitted notification
11. Click OK. The Training Completion Certificate in displayed in read-only mode. You can click the Print button to print the Training Completion Certificate.
The buttons available in the Training Completion Certificate screen are explained in the following table.
Button Description
Submit Click to submit the application form once you select declaration check box.
Cancel Click to stop the application processing and return to the home page. This action will also clear all the information entered without saving it.
View Submitted Form
Click to view the submitted Training Completion Certificate in read-only mode.
Print Click to print the Training Completion Certificate.
Clear Click to clear the data entered.
You need to send the Training Completion Certificate to the trainee along with your authorised signature and seal.
Once you submit the training completion certificate, an email notification is sent to IRDA, the trainee and you informing about the successful submission the certificate.
Surveyor User Manual Individual Surveyor - Licensing
Version: 1.0 39
Licensing
Once your Fresh License application is approved and issued, you receive your surveyor license from IRDA and you become eligible to operate as a surveyor. IRDA issues you a category C license. You are also required to renew your license periodically. As per IRDA regulations, surveyors are required to renew their license every five years. You can also apply for modification in your license.
Licensing comprises of the following sections:
1. Fresh License
2. Renew License
3. Duplicate License
4. Modification/Upgrading of License
5. View License Details
Surveyor User Manual Individual Surveyor - Fresh License
Version: 1.0 40
Fresh License
In Fresh License, you can view the form submitted to IRDA to act as Surveyor and Loss Assessor. All the information displayed is in read-only mode.
If your license has been cancelled, then you can apply for a Fresh License only after three years from the date of cancellation.
The buttons available in the Fresh License Application screen are explained in the following table.
Button Description
Cancel Click to return to the home page.
View Submitted Form
Click to view the submitted Fresh License form in read-only mode.
Surveyor User Manual Individual Surveyor - Renew License
Version: 1.0 41
Renew License
Each surveyor license has a validity period after which the license expires if it is not renewed. As per IRDA regulations you need to renew your surveyor license every five years. The system sends you a reminder email 3 months before the license expiration date informing you to renew your license before expiry. You are also required to pay the required renewal license fee. There are certain prerequisites and conditions that you need to remember while renewing your license.
Prerequisites for License Renewal
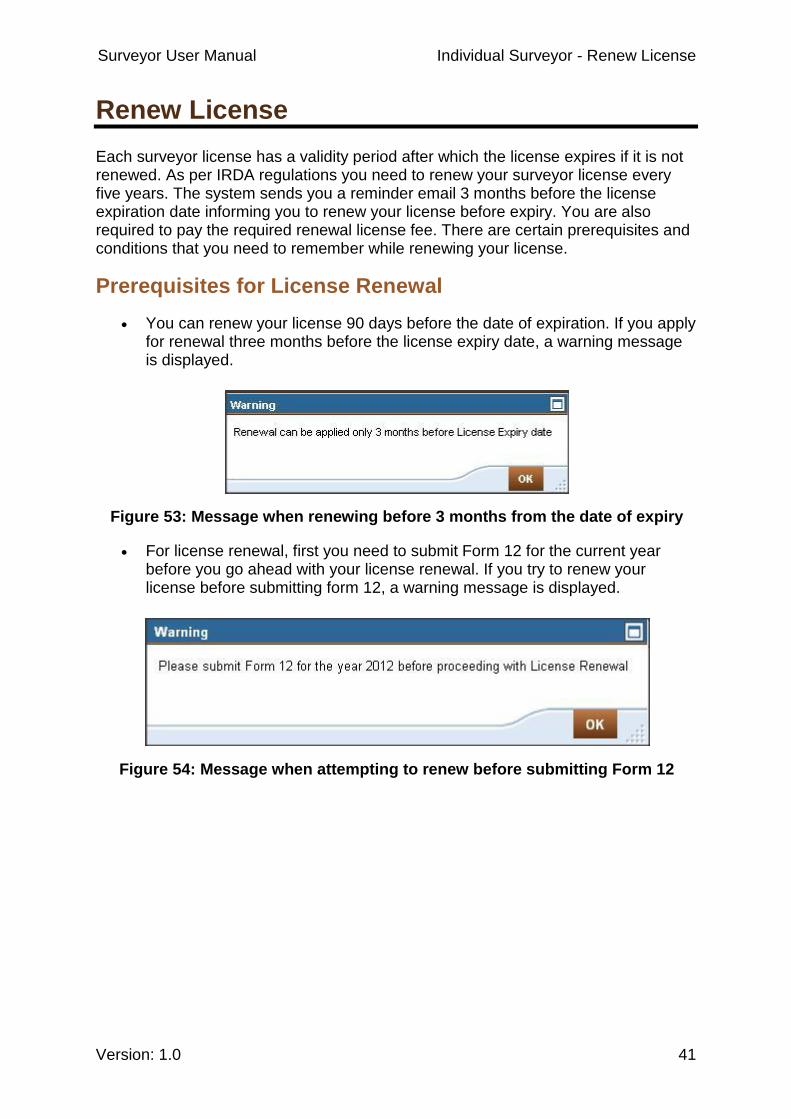
You can renew your license 90 days before the date of expiration. If you apply for renewal three months before the license expiry date, a warning message is displayed.
Figure 53: Message when renewing before 3 months from the date of expiry
For license renewal, first you need to submit Form 12 for the current year before you go ahead with your license renewal. If you try to renew your license before submitting form 12, a warning message is displayed.
Figure 54: Message when attempting to renew before submitting Form 12
Surveyor User Manual Individual Surveyor - Renew License
Version: 1.0 42
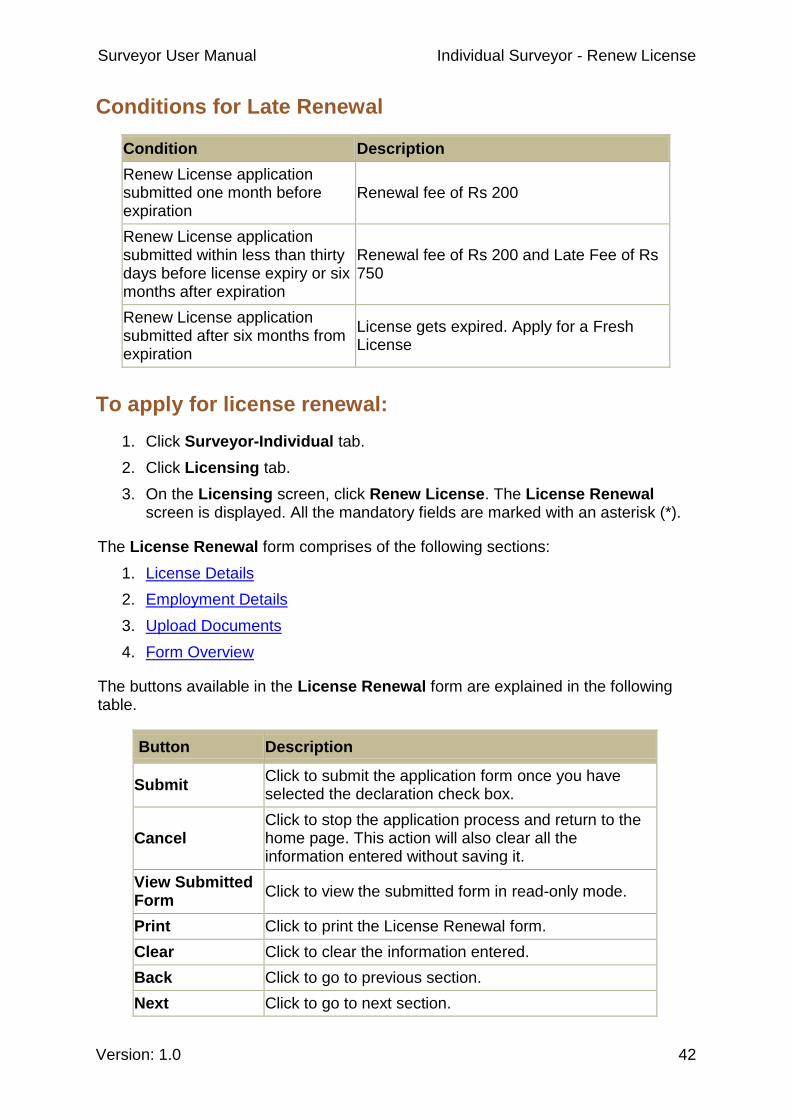
Conditions for Late Renewal
Condition Description
Renew License application submitted one month before expiration
Renewal fee of Rs 200
Renew License application submitted within less than thirty days before license expiry or six months after expiration
Renewal fee of Rs 200 and Late Fee of Rs 750
Renew License application submitted after six months from expiration
License gets expired. Apply for a Fresh License
To apply for license renewal:
1. Click Surveyor-Individual tab.
2. Click Licensing tab.
3. On the Licensing screen, click Renew License. The License Renewal screen is displayed. All the mandatory fields are marked with an asterisk (*).
The License Renewal form comprises of the following sections:
1. License Details
2. Employment Details
3. Upload Documents
4. Form Overview
The buttons available in the License Renewal form are explained in the following table.
Button Description
Submit Click to submit the application form once you have selected the declaration check box.
Cancel Click to stop the application process and return to the home page. This action will also clear all the information entered without saving it.
View Submitted Form
Click to view the submitted form in read-only mode.
Print Click to print the License Renewal form.
Clear Click to clear the information entered.
Back Click to go to previous section.
Next Click to go to next section.

Surveyor User Manual Individual Surveyor - Renew License
Version: 1.0 43
If you renew your license after it has expired, then, a warning message is displayed notifying that your license has expired and it also displays the amount of the late and renewal fee that you need to pay.
Surveyor User Manual License Details
Version: 1.0 44
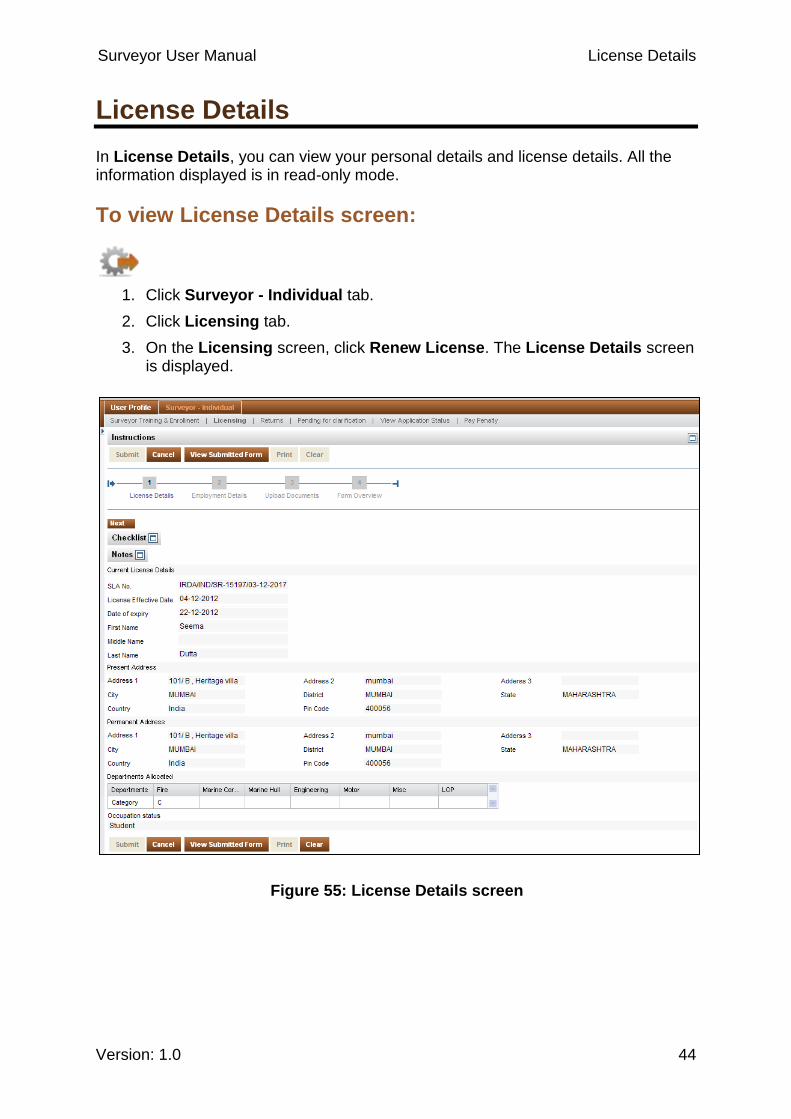
License Details
In License Details, you can view your personal details and license details. All the information displayed is in read-only mode.
To view License Details screen:
1. Click Surveyor - Individual tab.
2. Click Licensing tab.
3. On the Licensing screen, click Renew License. The License Details screen is displayed.
Figure 55: License Details screen
Surveyor User Manual Employment Details
Version: 1.0 45
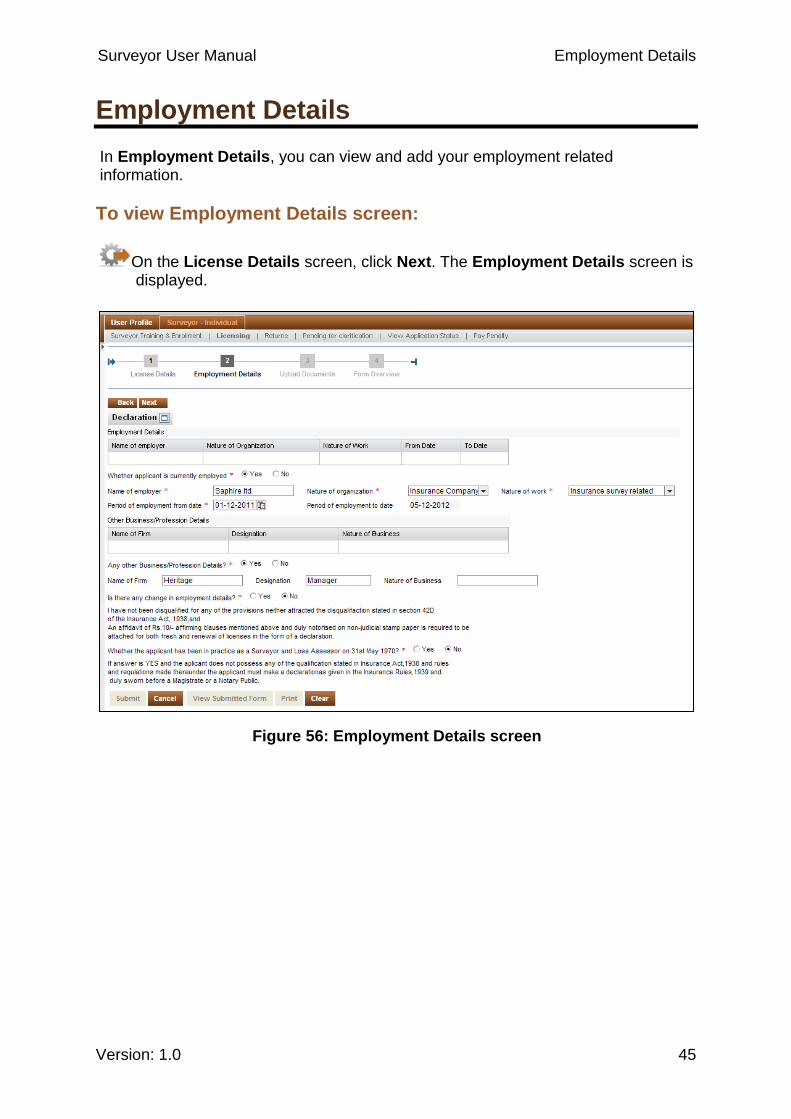
Employment Details
In Employment Details, you can view and add your employment related information.
To view Employment Details screen:
On the License Details screen, click Next. The Employment Details screen is displayed.
Figure 56: Employment Details screen

Surveyor User Manual Employment Details
Version: 1.0 46
The fields in the Employment Details screen are explained in the following table.
Field Description
Employment Details
Whether Applicant is currently employed
Select Yes or No. If Yes, enter the present employment details in the corresponding fields.
Name of Employer Enter the name of your employer.
Nature of Organization Select the nature of your organization from the drop-down list.
Nature of Work Select the nature of the work done from the drop-down list.
Period of Employment from date
Select the start date of the employment.
Period of Employment to date
Select the end date of the employment.
Other Business/Profession Details
Any Other Business/Profession details
Select Yes or No. If Yes, enter the business/profession details in the corresponding fields.
Name of firm Enter the name of the firm.
Designation Enter the designation held in the firm.
Nature of business Enter the type of business carried out by the firm.
Is there any change in Employment Details
Select Yes or No. If Yes, enter the modified employment details.
Whether the applicant has been in practice as a Surveyor and Loss Assessor on 31st May, 1970 ?
Select Yes or No.

Surveyor User Manual Upload Documents
Version: 1.0 47
Upload Documents
In Upload Documents, you need to submit the documents required for successfully renewing your license.
To view Upload Documents screen:
On the Employment Details screen, click Next. The Upload Documents screen is displayed.
Figure 57: Upload Documents
To Upload documents:
1. Under Documents to be attached, click Browse to search for the corresponding document.
2. Click Upload File to upload the corresponding document. The name of the uploaded document appears next to the Upload File button.
Surveyor User Manual Form Overview
Version: 1.0 48
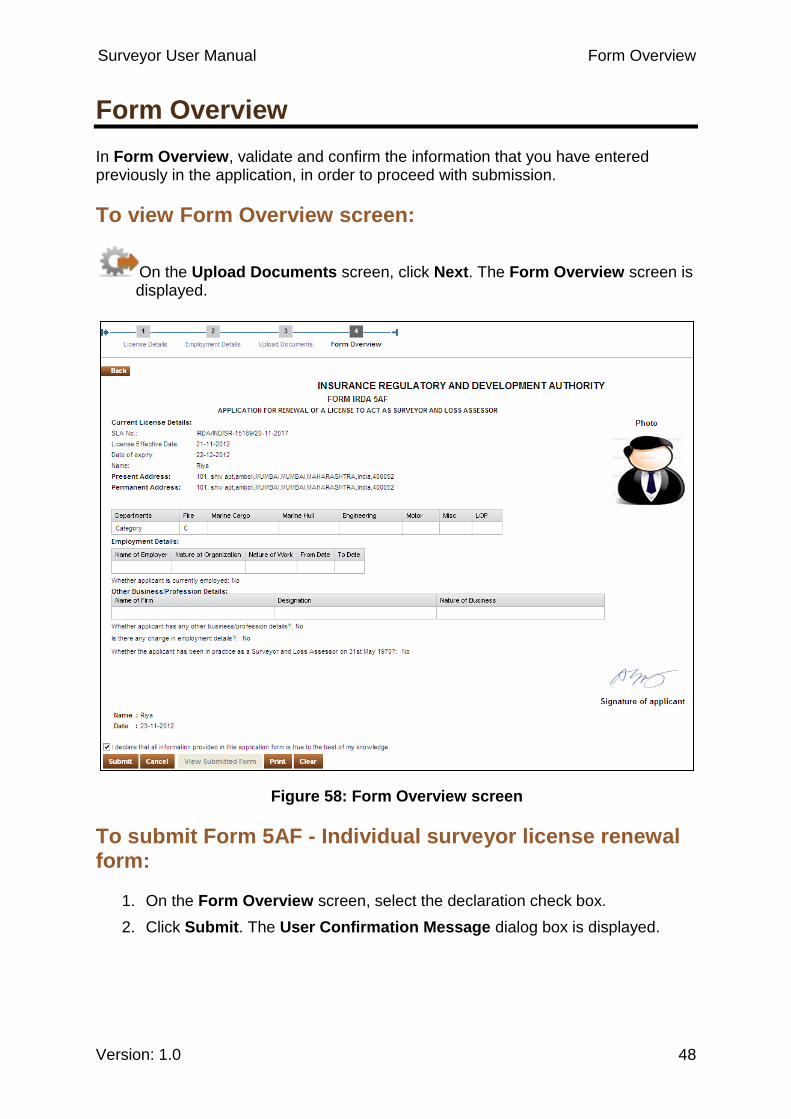
Form Overview
In Form Overview, validate and confirm the information that you have entered previously in the application, in order to proceed with submission.
To view Form Overview screen:
On the Upload Documents screen, click Next. The Form Overview screen is displayed.
Figure 58: Form Overview screen
To submit Form 5AF - Individual surveyor license renewal form:
1. On the Form Overview screen, select the declaration check box.
2. Click Submit. The User Confirmation Message dialog box is displayed.

Surveyor User Manual Form Overview
Version: 1.0 49
Figure 59: User confirmation message for renewal form
3. Click Yes to proceed to payment. The Make Payment screen is displayed.
Figure 60: Make Payment screen
4. Select the desired payment type and click Go to make payment through that type. The different payment types are explained below.
a. Payment through DD - Select this payment type if you want to make your payment through demand draft. You need to create the demand draft first and then enter its details in this payment type.
Figure 61: Demand Draft Details screen
The fields in this payment type are explained in the following table.
Field Description
Instrument number Enter the demand draft number.
Amount to be paid (Rs.)
The amount payable is displayed by default.
Bank Name Enter the name of the bank from which you created the demand draft.
Amount of Instrument (Rs.)
Enter the amount of the demand draft.
Instrument Date Select the date when you created the demand draft.

Surveyor User Manual Form Overview
Version: 1.0 50
Payment through NEFT/RTGS - Select this payment type if you want to make your payment through NEFT/RTGS. For this payment type, you need to make payment to IRDA through NEFT/RTGS and then enter the payment details in this payment type.
Figure 62: NEFT/RTGS Details screen
. The fields in this payment type are explained in the following table.
Field Description
Acknowledgement No.
Enter the acknowledgement number received after making the online payment.
Amount to be paid (Rs.)
The amount payable is displayed by default.
Bank Name Enter the name of the bank through which you made the payment.
Enter your IFSC code
Enter the IFSC code of your bank branch.
Date of Payment Select the date when you made the payment.
Enter your Account Number
Enter your bank account number.
Amount of Payment (Rs.)
Enter the amount of the payment made.
Online Payment - Select this payment type if you want to make the payment through net banking. For this payment type, a new window will open where you will need to enter the required details and make the payment.
5. Enter the necessary details for the selected payment type and click Submit. An Acknowledgement dialog box is displayed containing the Unique Reference Number (URN).
Surveyor User Manual Form Overview
Version: 1.0 51
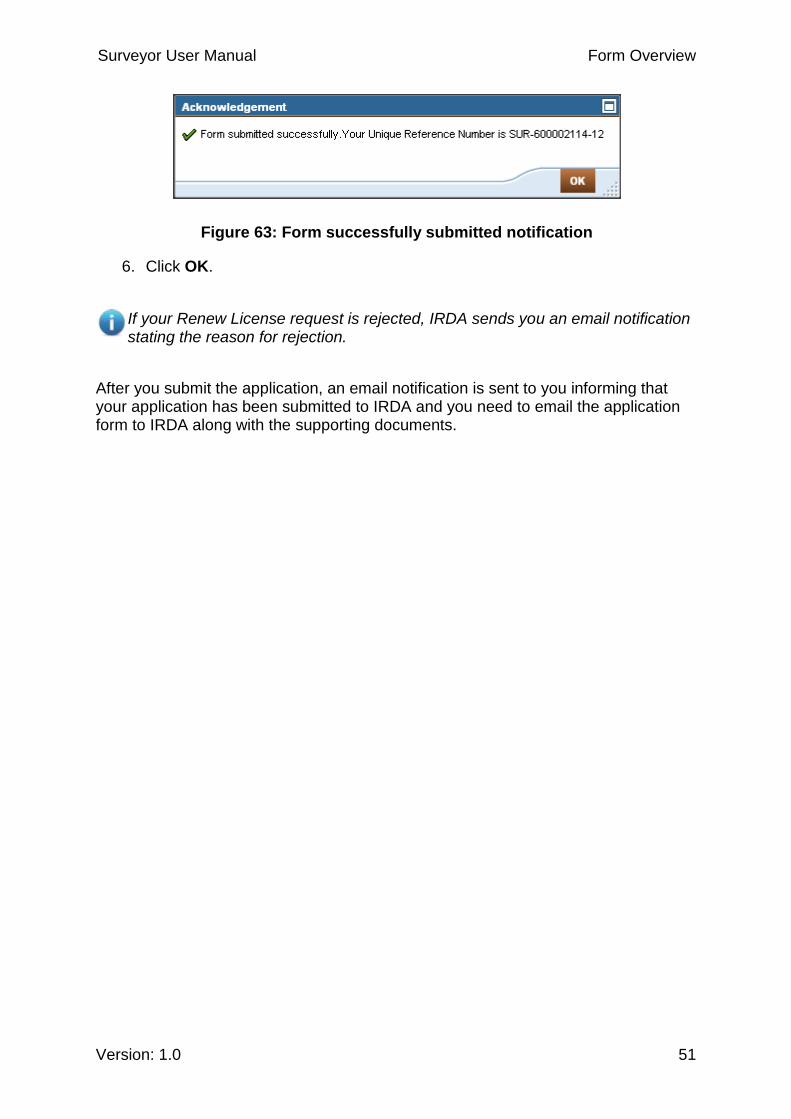
Figure 63: Form successfully submitted notification
6. Click OK.
If your Renew License request is rejected, IRDA sends you an email notification stating the reason for rejection.
After you submit the application, an email notification is sent to you informing that your application has been submitted to IRDA and you need to email the application form to IRDA along with the supporting documents.
Surveyor User Manual Individual Surveyor - Duplicate License
Version: 1.0 52
Duplicate License
In Duplicate License, you can apply for a duplicate license if your license has been lost, destroyed or mutilated.
To view Duplicate License screen:
1. Click Surveyor - Individual tab.
2. Click Licensing tab.
Figure 64: Surveyor Training and Enrollment tab
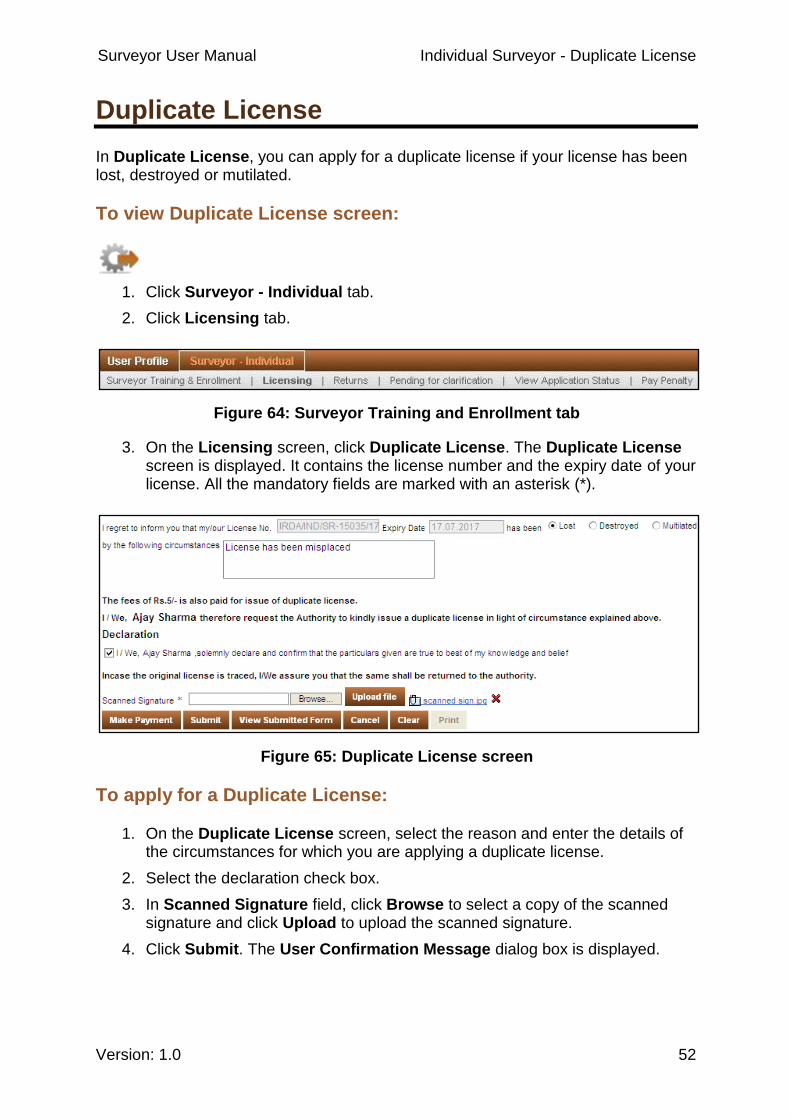
3. On the Licensing screen, click Duplicate License. The Duplicate License screen is displayed. It contains the license number and the expiry date of your license. All the mandatory fields are marked with an asterisk (*).
Figure 65: Duplicate License screen
To apply for a Duplicate License:
1. On the Duplicate License screen, select the reason and enter the details of the circumstances for which you are applying a duplicate license.
2. Select the declaration check box.
3. In Scanned Signature field, click Browse to select a copy of the scanned signature and click Upload to upload the scanned signature.
4. Click Submit. The User Confirmation Message dialog box is displayed.
Surveyor User Manual Individual Surveyor - Duplicate License
Version: 1.0 53
Figure 66: User confirmation message for Duplicate License form
5. Click Yes to proceed to payment. The Make Payment screen is displayed.
Figure 67: Make Payment screen
6. Select the desired payment type and click Go to make payment through that type. The different payment types are explained below.
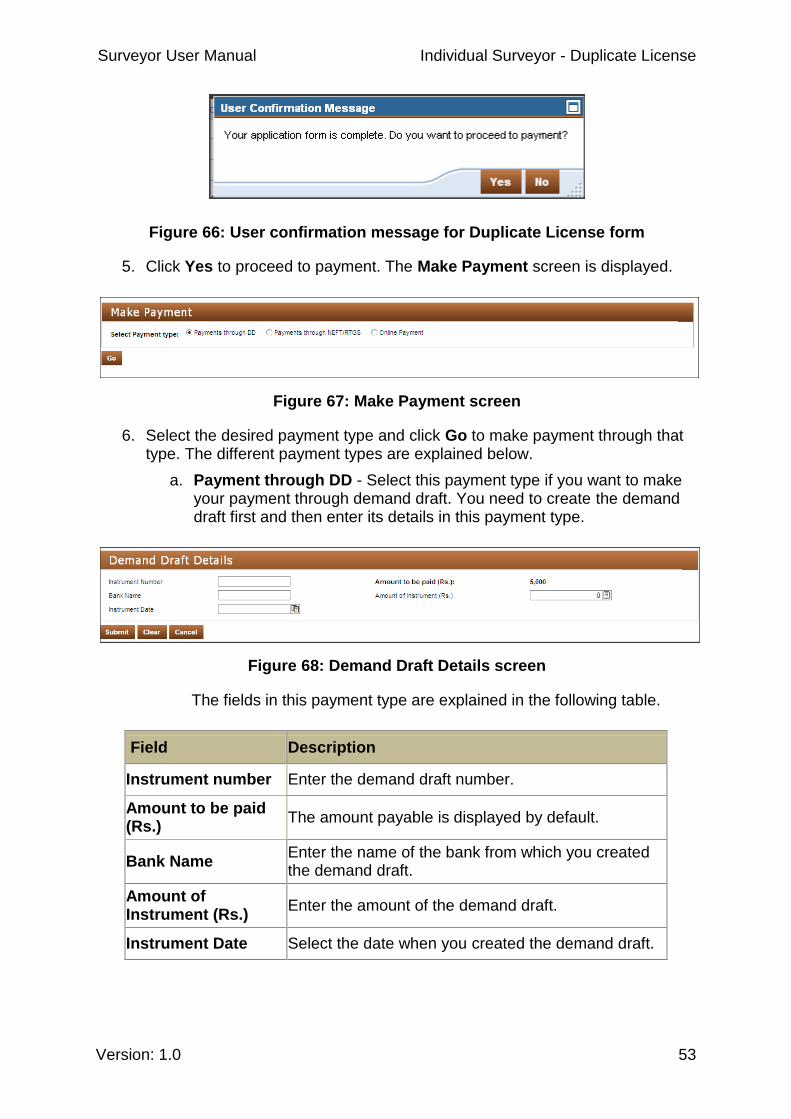
a. Payment through DD - Select this payment type if you want to make your payment through demand draft. You need to create the demand draft first and then enter its details in this payment type.
Figure 68: Demand Draft Details screen
The fields in this payment type are explained in the following table.
Field Description
Instrument number Enter the demand draft number.
Amount to be paid (Rs.)
The amount payable is displayed by default.
Bank Name Enter the name of the bank from which you created the demand draft.
Amount of Instrument (Rs.)
Enter the amount of the demand draft.
Instrument Date Select the date when you created the demand draft.
Surveyor User Manual Individual Surveyor - Duplicate License
Version: 1.0 54
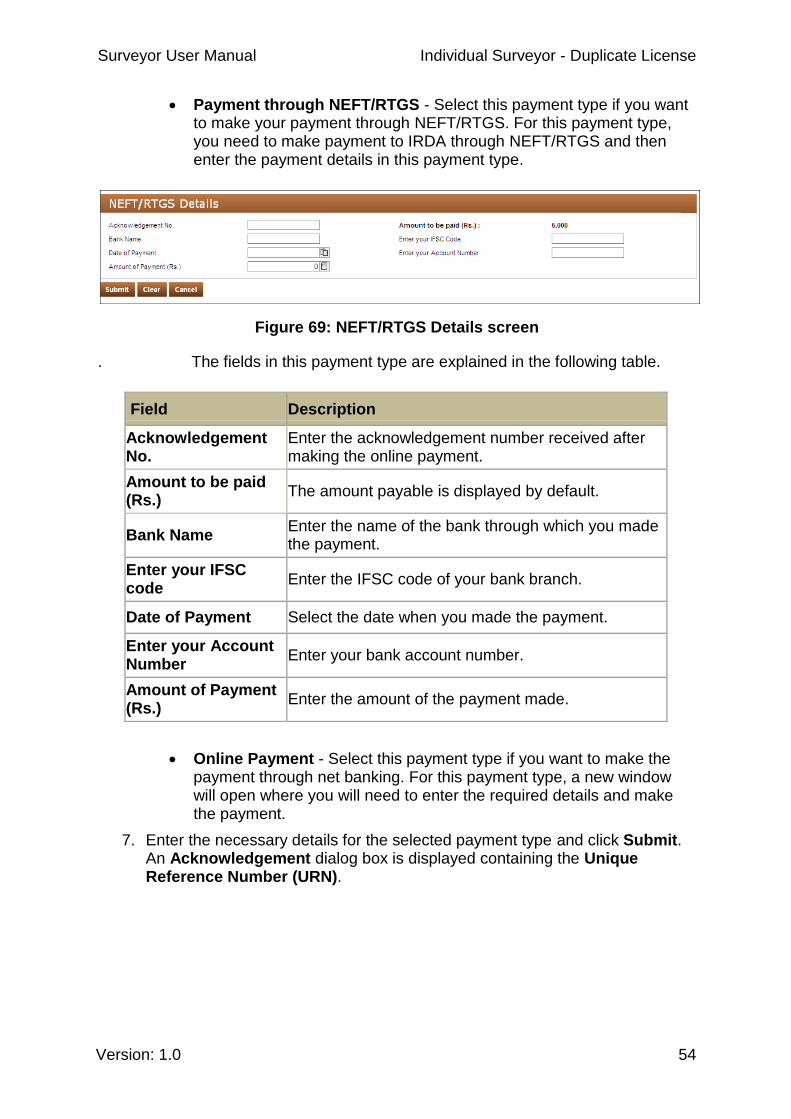
Payment through NEFT/RTGS - Select this payment type if you want to make your payment through NEFT/RTGS. For this payment type, you need to make payment to IRDA through NEFT/RTGS and then enter the payment details in this payment type.
Figure 69: NEFT/RTGS Details screen
. The fields in this payment type are explained in the following table.
Field Description
Acknowledgement No.
Enter the acknowledgement number received after making the online payment.
Amount to be paid (Rs.)
The amount payable is displayed by default.
Bank Name Enter the name of the bank through which you made the payment.
Enter your IFSC code
Enter the IFSC code of your bank branch.
Date of Payment Select the date when you made the payment.
Enter your Account Number
Enter your bank account number.
Amount of Payment (Rs.)
Enter the amount of the payment made.
Online Payment - Select this payment type if you want to make the payment through net banking. For this payment type, a new window will open where you will need to enter the required details and make the payment.
7. Enter the necessary details for the selected payment type and click Submit. An Acknowledgement dialog box is displayed containing the Unique Reference Number (URN).
Surveyor User Manual Individual Surveyor - Duplicate License
Version: 1.0 55
Figure 70: Form successfully submitted notification
8. Click OK.
If your duplicate license request is rejected, IRDA sends you an email notification stating rejection of duplicate license.
After you submit the application, an email notification is sent to you informing that your application has been submitted to IRDA and you need to email the application form to IRDA along with the supporting documents.
Surveyor User Manual Individual Surveyor - Modification/Upgrading
Version: 1.0 56
Modification/Upgrading
In Modification/Upgrading, you can modify your contact and license details.
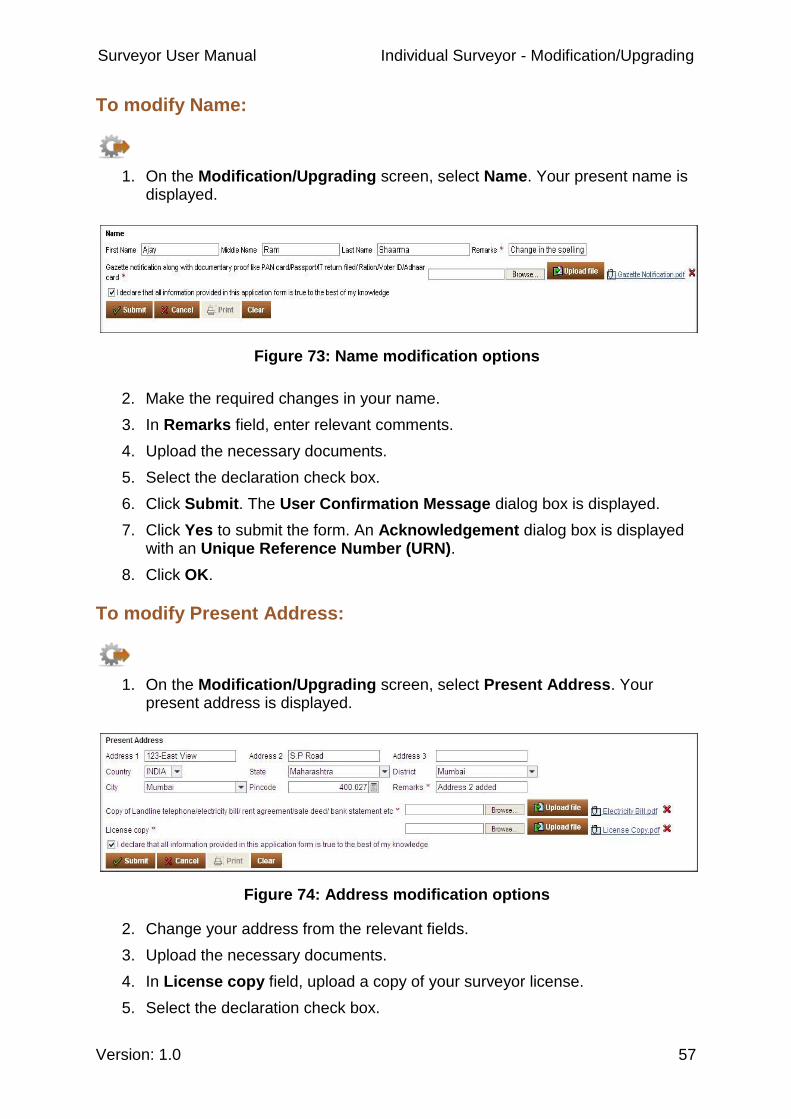
The following modification types are available:
Name
Present Address
Incorporation of Sole proprietary firm name
Grant of Additional departments
To view Modification/Upgrading screen:
1. Click Surveyor - Individual tab.
2. Click Licensing tab.
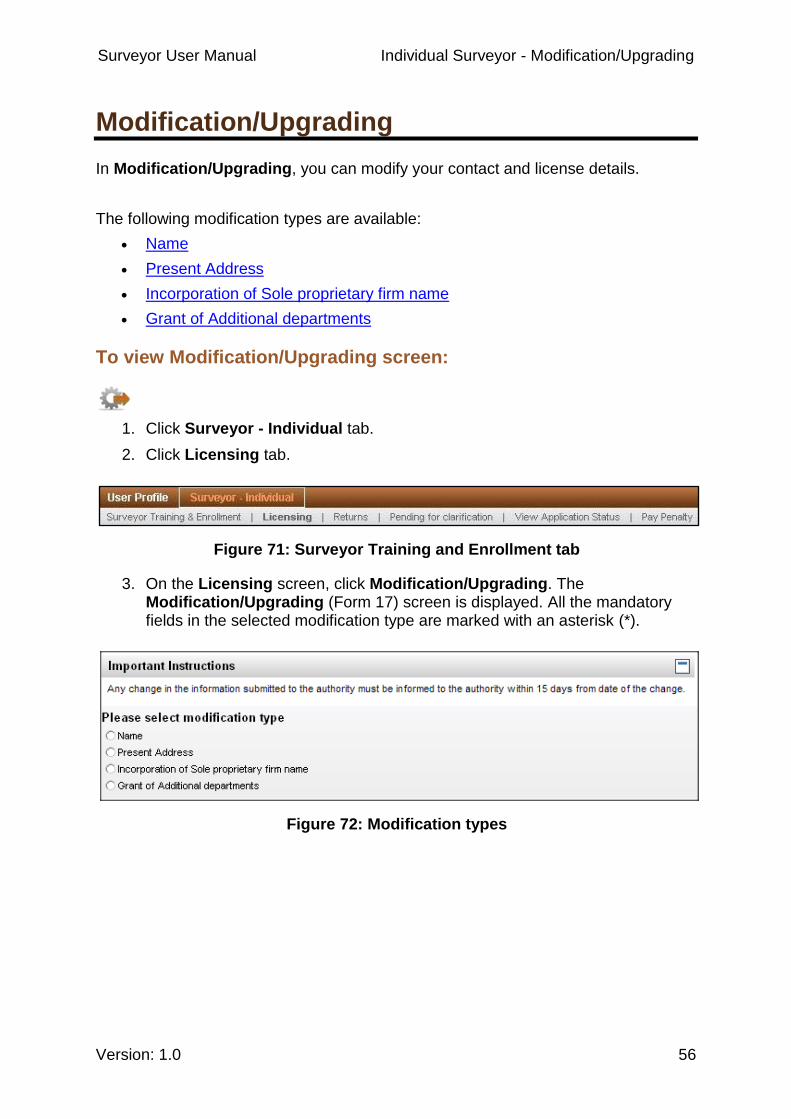
Figure 71: Surveyor Training and Enrollment tab
3. On the Licensing screen, click Modification/Upgrading. The Modification/Upgrading (Form 17) screen is displayed. All the mandatory fields in the selected modification type are marked with an asterisk (*).
Figure 72: Modification types
Surveyor User Manual Individual Surveyor - Modification/Upgrading
Version: 1.0 57
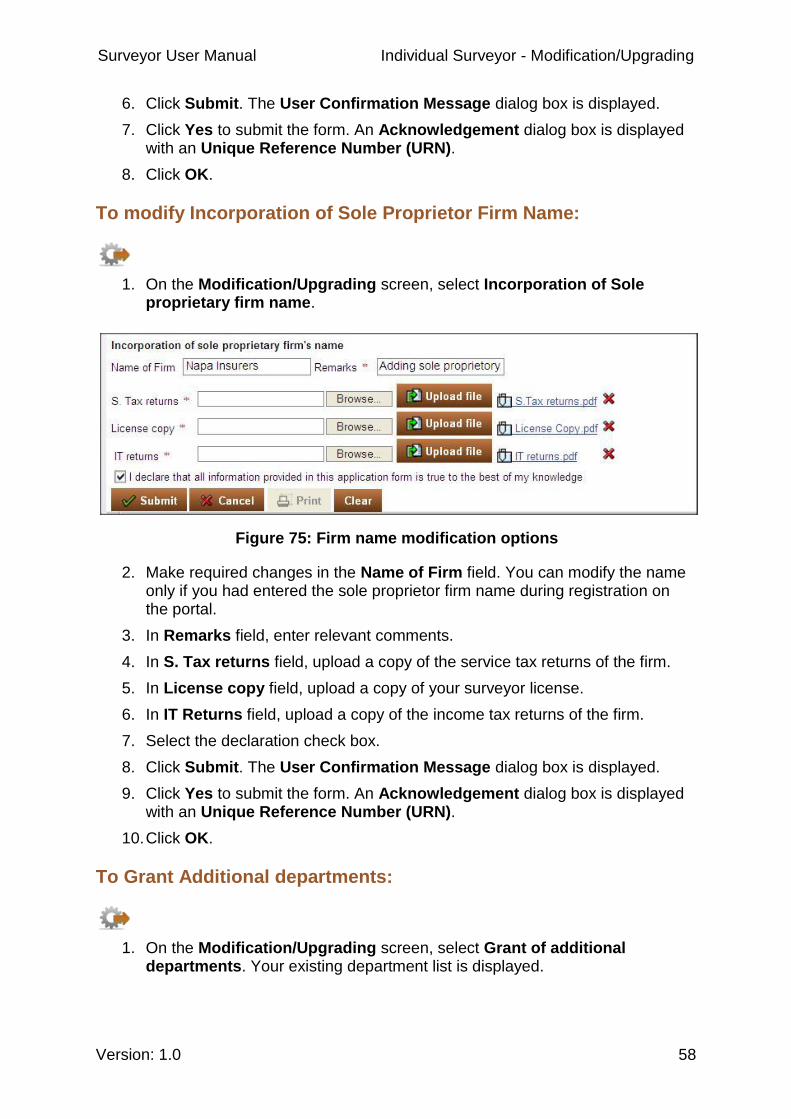
To modify Name:
1. On the Modification/Upgrading screen, select Name. Your present name is displayed.
Figure 73: Name modification options
2. Make the required changes in your name.
3. In Remarks field, enter relevant comments.
4. Upload the necessary documents.
5. Select the declaration check box.
6. Click Submit. The User Confirmation Message dialog box is displayed.
7. Click Yes to submit the form. An Acknowledgement dialog box is displayed with an Unique Reference Number (URN).
8. Click OK.
To modify Present Address:
1. On the Modification/Upgrading screen, select Present Address. Your present address is displayed.
Figure 74: Address modification options
2. Change your address from the relevant fields.
3. Upload the necessary documents.
4. In License copy field, upload a copy of your surveyor license.
5. Select the declaration check box.
Surveyor User Manual Individual Surveyor - Modification/Upgrading
Version: 1.0 58
6. Click Submit. The User Confirmation Message dialog box is displayed.
7. Click Yes to submit the form. An Acknowledgement dialog box is displayed with an Unique Reference Number (URN).
8. Click OK.
To modify Incorporation of Sole Proprietor Firm Name:
1. On the Modification/Upgrading screen, select Incorporation of Sole proprietary firm name.
Figure 75: Firm name modification options
2. Make required changes in the Name of Firm field. You can modify the name only if you had entered the sole proprietor firm name during registration on the portal.
3. In Remarks field, enter relevant comments.
4. In S. Tax returns field, upload a copy of the service tax returns of the firm.
5. In License copy field, upload a copy of your surveyor license.
6. In IT Returns field, upload a copy of the income tax returns of the firm.
7. Select the declaration check box.
8. Click Submit. The User Confirmation Message dialog box is displayed.
9. Click Yes to submit the form. An Acknowledgement dialog box is displayed with an Unique Reference Number (URN).
10. Click OK.
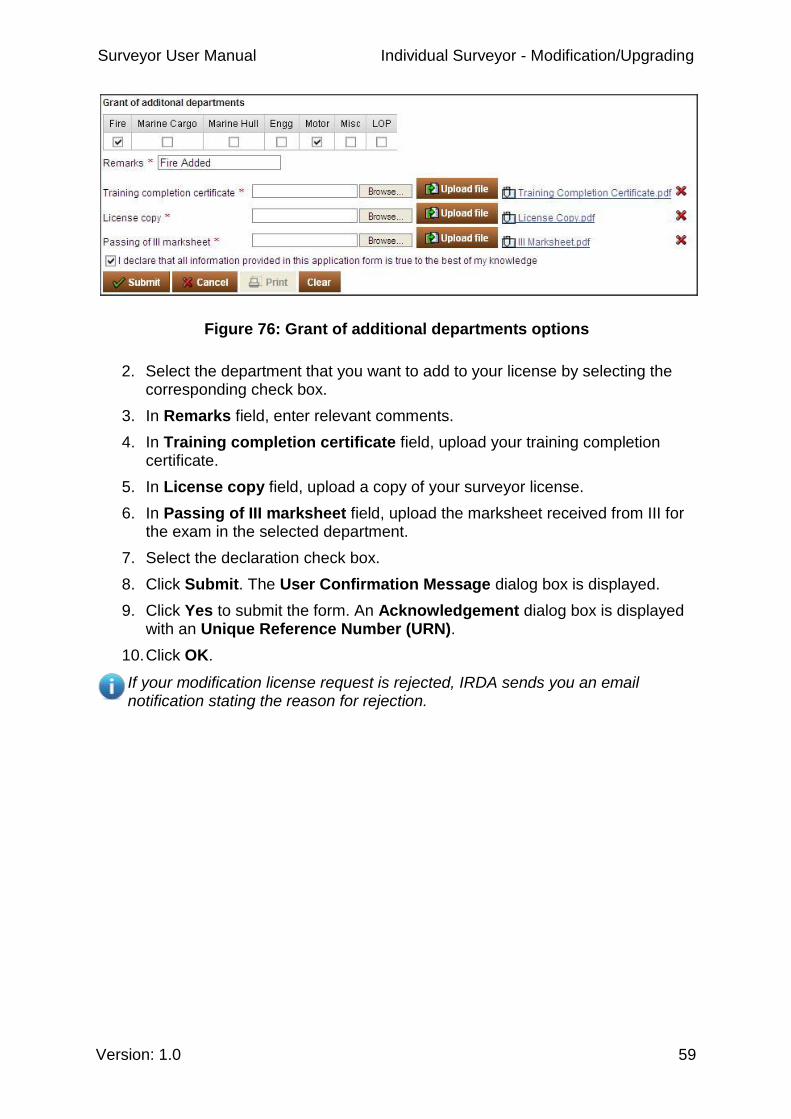
To Grant Additional departments:
1. On the Modification/Upgrading screen, select Grant of additional departments. Your existing department list is displayed.
Surveyor User Manual Individual Surveyor - Modification/Upgrading
Version: 1.0 59
Figure 76: Grant of additional departments options
2. Select the department that you want to add to your license by selecting the corresponding check box.
3. In Remarks field, enter relevant comments.
4. In Training completion certificate field, upload your training completion certificate.
5. In License copy field, upload a copy of your surveyor license.
6. In Passing of III marksheet field, upload the marksheet received from III for the exam in the selected department.
7. Select the declaration check box.
8. Click Submit. The User Confirmation Message dialog box is displayed.
9. Click Yes to submit the form. An Acknowledgement dialog box is displayed with an Unique Reference Number (URN).
10. Click OK.
If your modification license request is rejected, IRDA sends you an email notification stating the reason for rejection.

Surveyor User Manual Individual Surveyor – View License Details
Version: 1.0 60
View License Details
In View License Details, you can view your license number, status, categories in which you hold a license, effective date, expiry date and address.
To view License Details screen:
1. Click Surveyor - Individual tab.
2. Click Licensing tab.
3. On the Licensing screen, click View License. The View License screen is displayed. You can view your license details like license number, license status, surveyor name, license category, effective date, expiry date and address.
Figure 77: License Details screen
All the information displayed is in read-only mode.
Surveyor User Manual Corporate Surveyor Registration
Version: 1.0 61
Corporate Surveyor Registration
To become a corporate surveyor, you first need to register your firm on the BAP portal as a corporate surveyor firm.
To register as a corporate surveyor:
1. Open a browser and enter the following address: www.irdabap.org.in. The IRDA BAP portal home page is displayed.
2. Click Register. The User Registration screen is displayed.
3. From User Type drop-down list, select Corporate.
4. From User Role drop-down list, select Surveyor. The Corporate Surveyor registration screen is displayed. All the mandatory fields are marked with an asterisk (*).
Figure 78: Corporate Surveyor registration screen
Surveyor User Manual Corporate Surveyor Registration
Version: 1.0 62
The fields in the Corporate Surveyor registration screen are explained in the following table.
Field Description
New User Registration
Organization Name Enter the organization name.
Corporate PAN No. Enter the corporate pan number
Applicant Type Select Company or Partnership firm.
Registered Office Address
Address 1 Enter the first line of your registered office address.
Address 2 Enter the second line of your registered office address.
Address 3 Enter the third line of your registered office address.
Country India is displayed by default.
State Select the state from the drop-down list.
District Select the district from the drop-down list.
City Select the city from the drop-down list.
Region Select the region from the drop-down list.
Pin Code Enter the pin code number.
Contact Details
Email ID Enter your email ID.
Contact Person Enter the name of the contact person. This person will be the point of contact between your organization and IRDA.
Alternate Email ID Enter your alternate email ID.
Contact Number Enter your contact number.
Registration Details
Registration Number
Enter the registration number of your organization.
Date of Registration Select the day, month, and year of registration.
Security Question
Security Question Select a security question from the drop-down list.

Surveyor User Manual Corporate Surveyor Registration
Version: 1.0 63
Field Description
Security Answer
Enter the answer for the selected security question. Please note down the security question and answer as these would help you retrieve your User ID/Password in case you forget them.
Verification Code
Enter Verification Code
Enter the case-sensitive verification code.
5. Enter the relevant information and click Submit. An Acknowledgement dialog box is displayed along with your User ID, notifying that the registration is successful.
Figure 79: Corporate surveyor registration notification
6. Click OK. The user ID and password are sent to your registered email ID.
After you have registered the corporate surveyor firm in the portal, you can apply for a new corporate surveyor license.
If you try to create multiple accounts by entering same Registration number, a "User already exists" error message is displayed.
Figure 80: Duplicate user error message
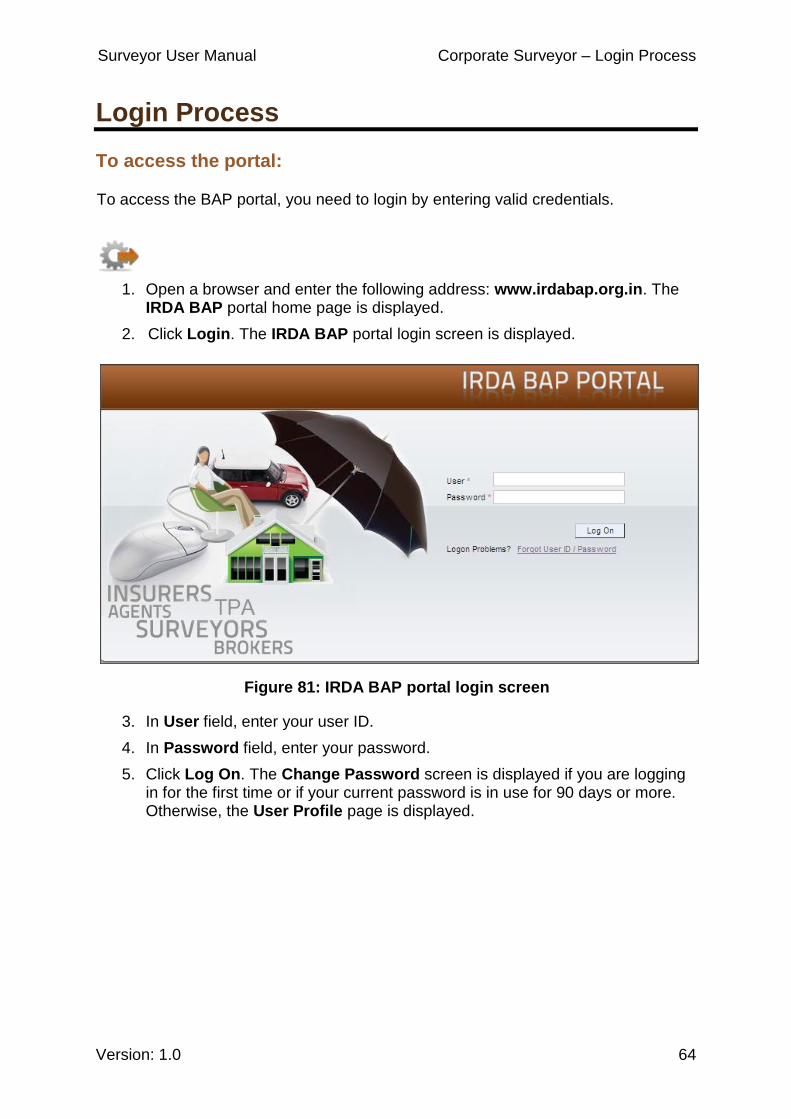
Surveyor User Manual Corporate Surveyor – Login Process
Version: 1.0 64
Login Process
To access the portal:
To access the BAP portal, you need to login by entering valid credentials.
1. Open a browser and enter the following address: www.irdabap.org.in. The IRDA BAP portal home page is displayed.
2. Click Login. The IRDA BAP portal login screen is displayed.
Figure 81: IRDA BAP portal login screen
3. In User field, enter your user ID.
4. In Password field, enter your password.
5. Click Log On. The Change Password screen is displayed if you are logging in for the first time or if your current password is in use for 90 days or more. Otherwise, the User Profile page is displayed.

Surveyor User Manual Corporate Surveyor – Login Process
Version: 1.0 65
Figure 82: Change Password screen
If the Change Password screen is displayed:
1. In Old Password field, enter your current password.
2. In New Password field, enter your new password.
3. In Confirm Password field, re-enter your new password.
4. Click Change to change the password or click Cancel to return to the login screen.
To Log Off from the portal:
1. Click Log Off. A Log Off confirmation dialog box is displayed.
Figure 83: Log Off Confirmation dialog box
2. Click Yes to log off or click No to go back to the previous screen.
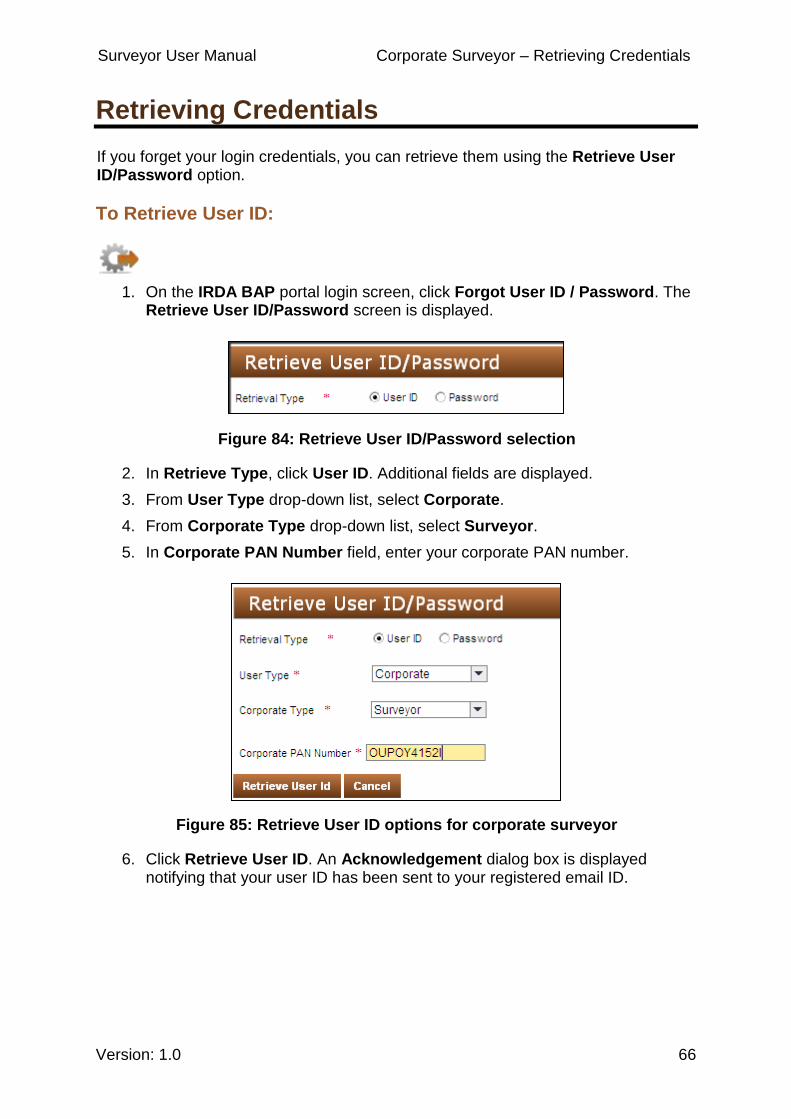
Surveyor User Manual Corporate Surveyor – Retrieving Credentials
Version: 1.0 66
Retrieving Credentials
If you forget your login credentials, you can retrieve them using the Retrieve User ID/Password option.
To Retrieve User ID:
1. On the IRDA BAP portal login screen, click Forgot User ID / Password. The Retrieve User ID/Password screen is displayed.
Figure 84: Retrieve User ID/Password selection
2. In Retrieve Type, click User ID. Additional fields are displayed.
3. From User Type drop-down list, select Corporate.
4. From Corporate Type drop-down list, select Surveyor.
5. In Corporate PAN Number field, enter your corporate PAN number.
Figure 85: Retrieve User ID options for corporate surveyor
6. Click Retrieve User ID. An Acknowledgement dialog box is displayed notifying that your user ID has been sent to your registered email ID.

Surveyor User Manual Corporate Surveyor – Retrieving Credentials
Version: 1.0 67
Figure 86: User ID retrieval confirmation notification
7. Click OK.
The User ID is sent to your registered email ID.
To Retrieve Password:
1. On the IRDA BAP portal login screen, click Forgot User ID / Password. The Retrieve User ID/Password screen is displayed.
Figure 87: Retrieve User ID/Password selection
2. In Retrieval Type, click Password. Additional fields are displayed.
Figure 88: Retrieve password options
3. In User ID field, enter your user ID.
4. Click Submit. Additional fields are displayed.
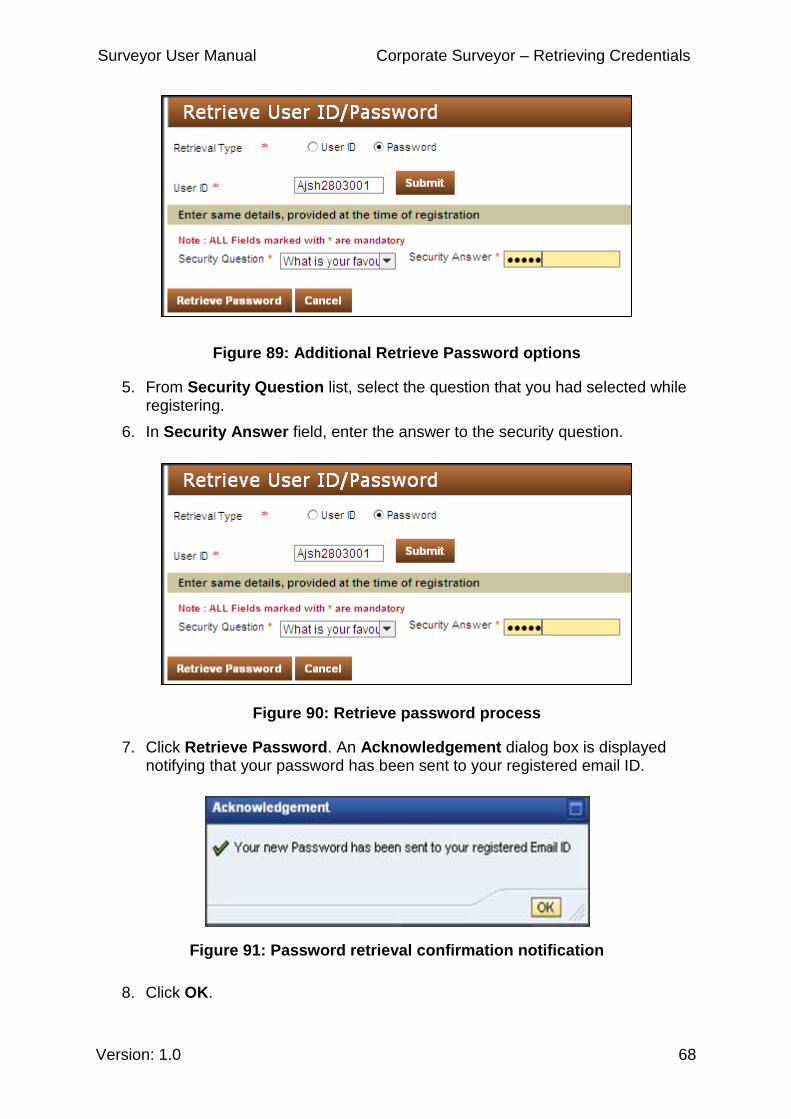
Surveyor User Manual Corporate Surveyor – Retrieving Credentials
Version: 1.0 68
Figure 89: Additional Retrieve Password options
5. From Security Question list, select the question that you had selected while registering.
6. In Security Answer field, enter the answer to the security question.
Figure 90: Retrieve password process
7. Click Retrieve Password. An Acknowledgement dialog box is displayed notifying that your password has been sent to your registered email ID.
Figure 91: Password retrieval confirmation notification
8. Click OK.
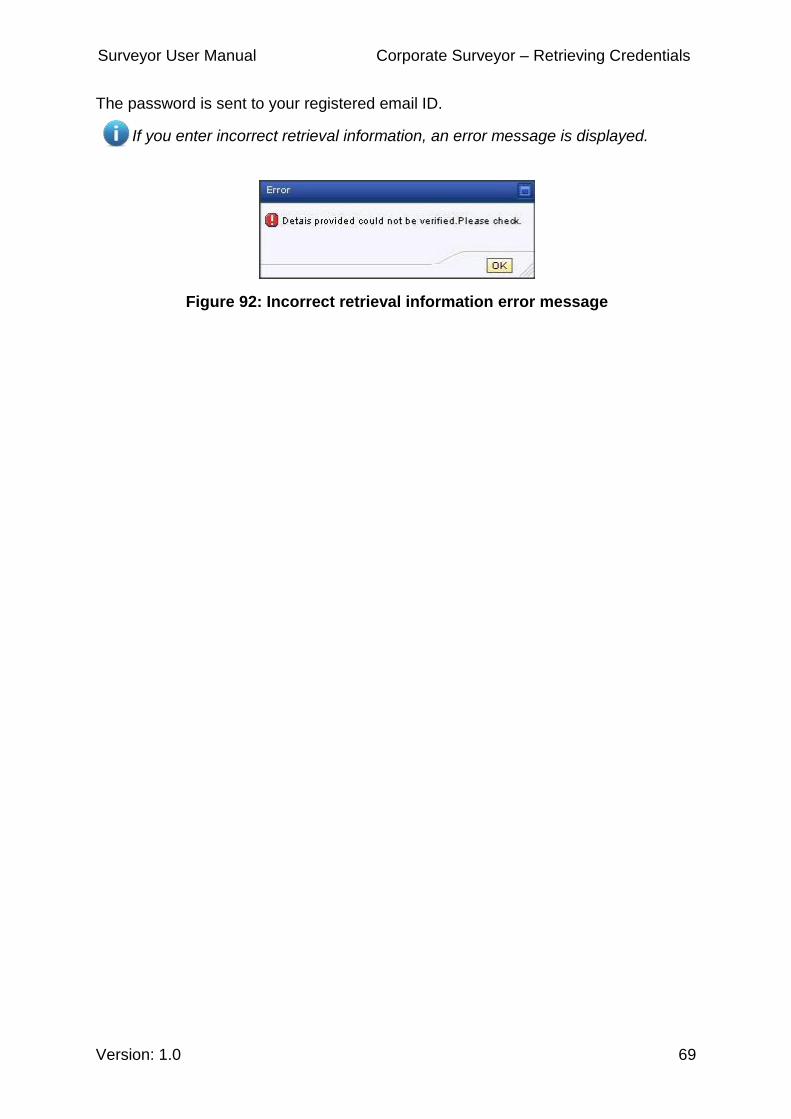
Surveyor User Manual Corporate Surveyor – Retrieving Credentials
Version: 1.0 69
The password is sent to your registered email ID.
If you enter incorrect retrieval information, an error message is displayed.
Figure 92: Incorrect retrieval information error message
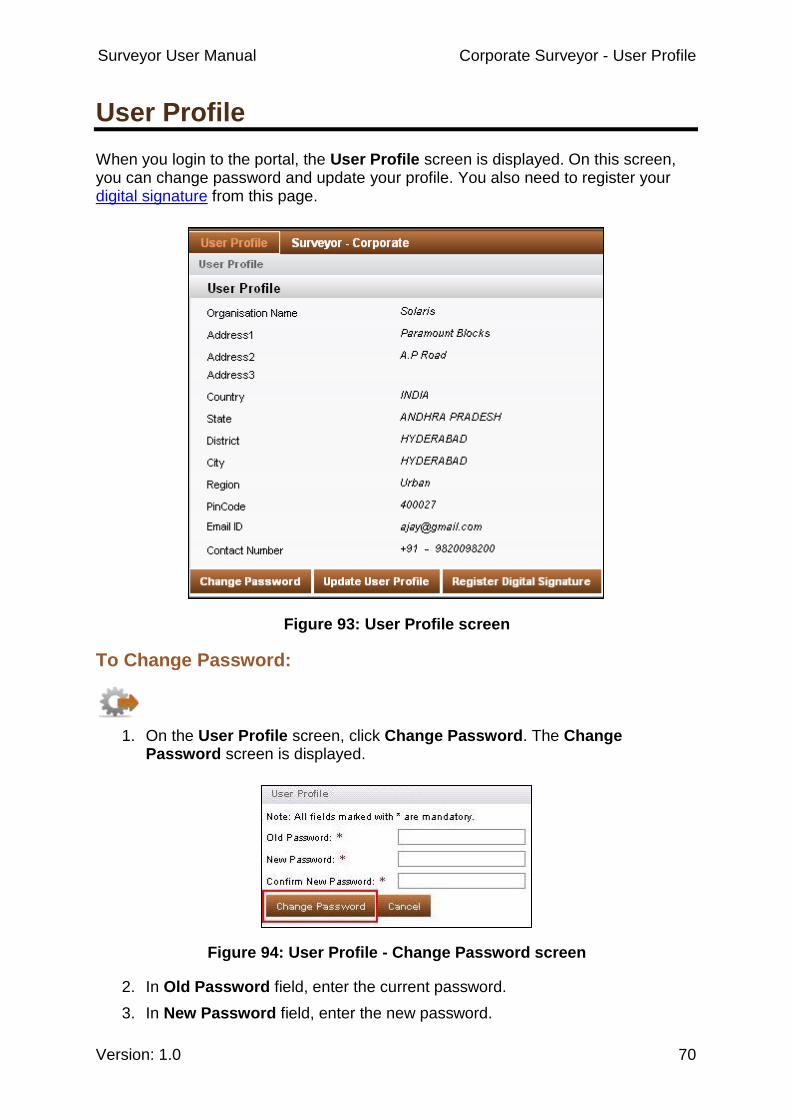
Surveyor User Manual Corporate Surveyor - User Profile
Version: 1.0 70
User Profile
When you login to the portal, the User Profile screen is displayed. On this screen, you can change password and update your profile. You also need to register your digital signature from this page.
Figure 93: User Profile screen
To Change Password:
1. On the User Profile screen, click Change Password. The Change Password screen is displayed.
Figure 94: User Profile - Change Password screen
2. In Old Password field, enter the current password.
3. In New Password field, enter the new password.

Surveyor User Manual Corporate Surveyor - User Profile
Version: 1.0 71
4. In Confirm New Password field, re-enter the new password.
5. Click Change Password. An Acknowledgement dialog box is displayed notifying that your password has been changed successfully.
Figure 95: Password Change confirmation notification
6. Click OK.
To Update User Profile:
1. On the User Profile screen, click Update User Profile. The Update User Profile screen is displayed.
2. In Contact Details, you can update all your contact related information.
Figure 96: Update User Profile screen
3. Click Submit. An Acknowledgement dialog box is displayed notifying that your profile has been successfully updated.
Figure 97: User Profile Update confirmation notification
Surveyor User Manual Corporate Surveyor - User Profile
Version: 1.0 72
4. Click OK.
You can update the rest of the details through the Modification tab.
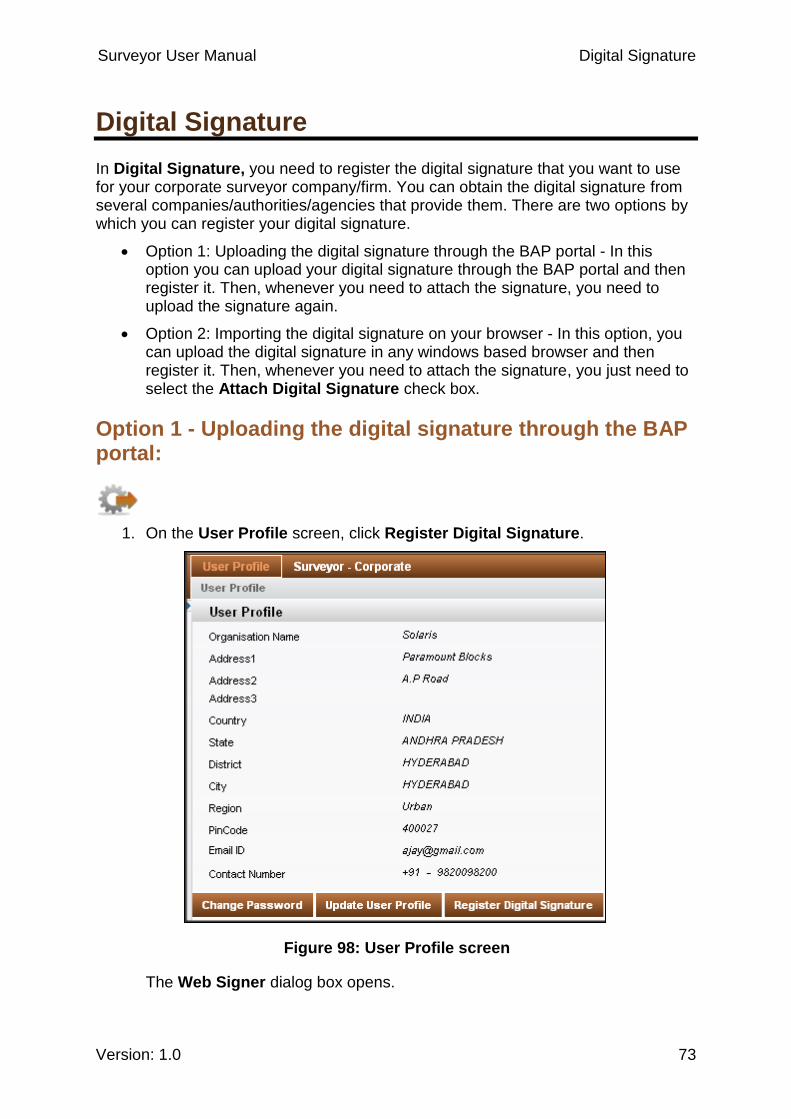
Surveyor User Manual Digital Signature
Version: 1.0 73
Digital Signature
In Digital Signature, you need to register the digital signature that you want to use for your corporate surveyor company/firm. You can obtain the digital signature from several companies/authorities/agencies that provide them. There are two options by which you can register your digital signature.
Option 1: Uploading the digital signature through the BAP portal - In this option you can upload your digital signature through the BAP portal and then register it. Then, whenever you need to attach the signature, you need to upload the signature again.
Option 2: Importing the digital signature on your browser - In this option, you can upload the digital signature in any windows based browser and then register it. Then, whenever you need to attach the signature, you just need to select the Attach Digital Signature check box.
Option 1 - Uploading the digital signature through the BAP portal:
1. On the User Profile screen, click Register Digital Signature.
Figure 98: User Profile screen
The Web Signer dialog box opens.
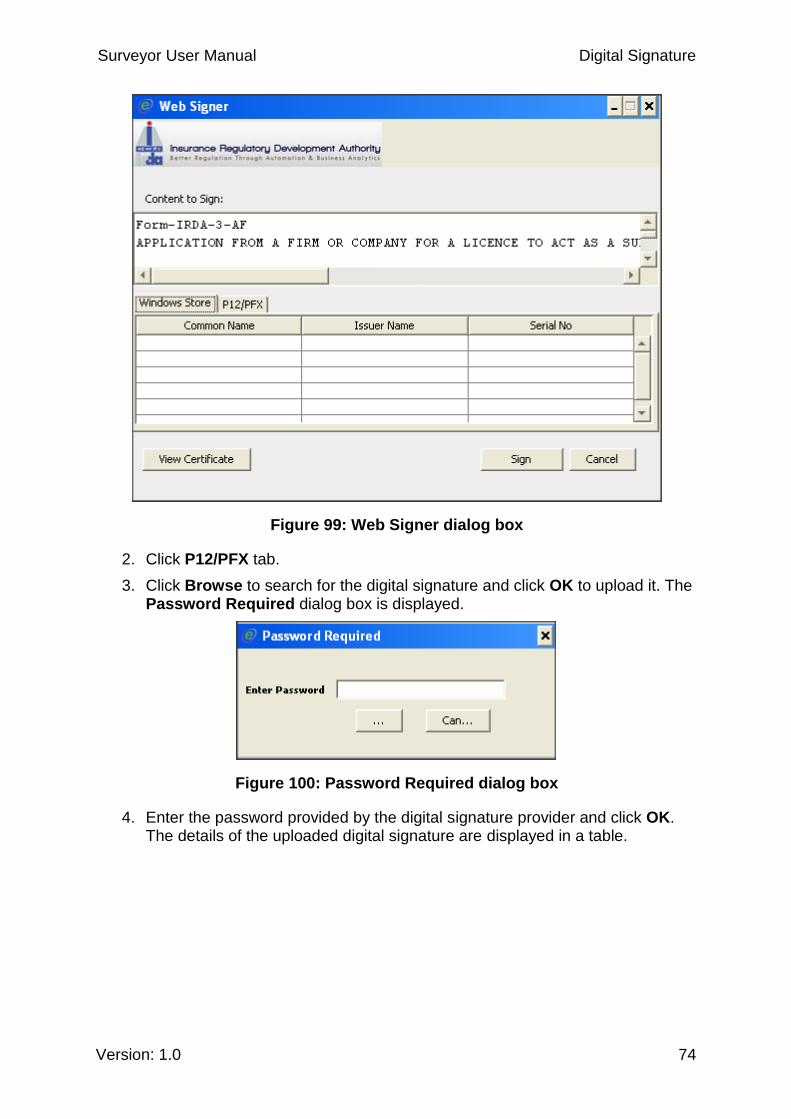
Surveyor User Manual Digital Signature
Version: 1.0 74
Figure 99: Web Signer dialog box
2. Click P12/PFX tab.
3. Click Browse to search for the digital signature and click OK to upload it. The Password Required dialog box is displayed.
Figure 100: Password Required dialog box
4. Enter the password provided by the digital signature provider and click OK. The details of the uploaded digital signature are displayed in a table.
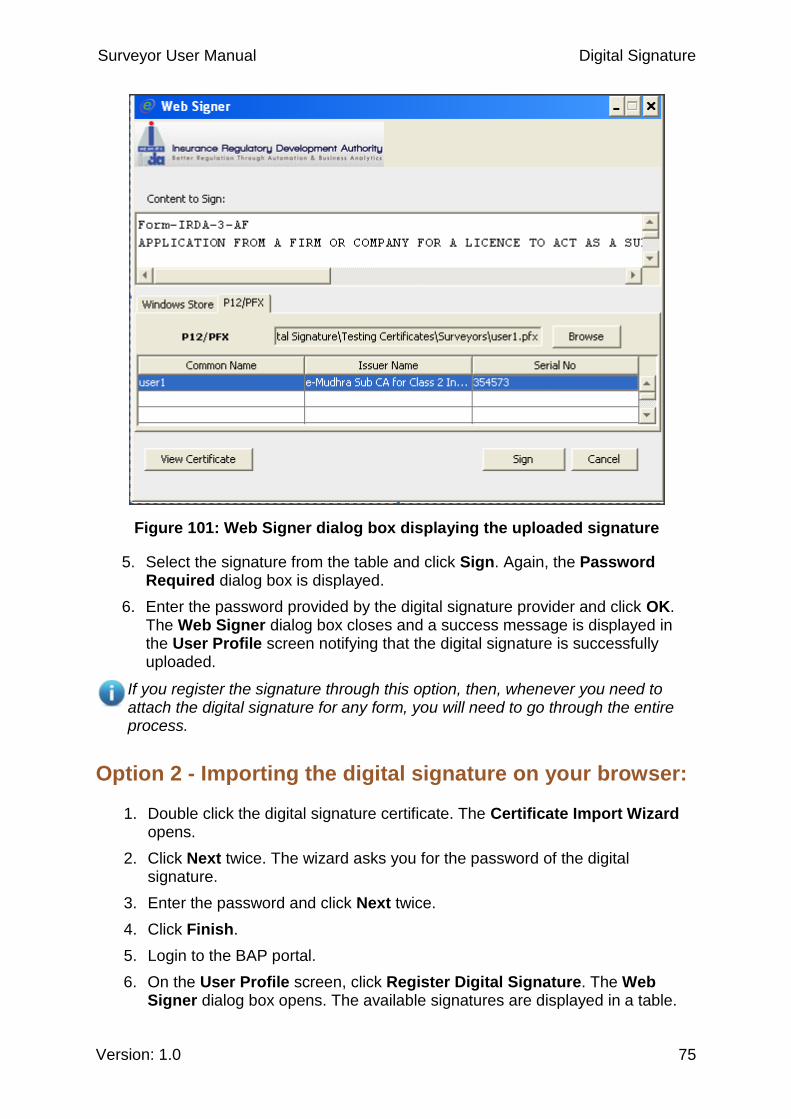
Surveyor User Manual Digital Signature
Version: 1.0 75
Figure 101: Web Signer dialog box displaying the uploaded signature
5. Select the signature from the table and click Sign. Again, the Password Required dialog box is displayed.
6. Enter the password provided by the digital signature provider and click OK. The Web Signer dialog box closes and a success message is displayed in the User Profile screen notifying that the digital signature is successfully uploaded.
If you register the signature through this option, then, whenever you need to attach the digital signature for any form, you will need to go through the entire process.
Option 2 - Importing the digital signature on your browser:
1. Double click the digital signature certificate. The Certificate Import Wizard opens.
2. Click Next twice. The wizard asks you for the password of the digital signature.
3. Enter the password and click Next twice.
4. Click Finish.
5. Login to the BAP portal.
6. On the User Profile screen, click Register Digital Signature. The Web Signer dialog box opens. The available signatures are displayed in a table.
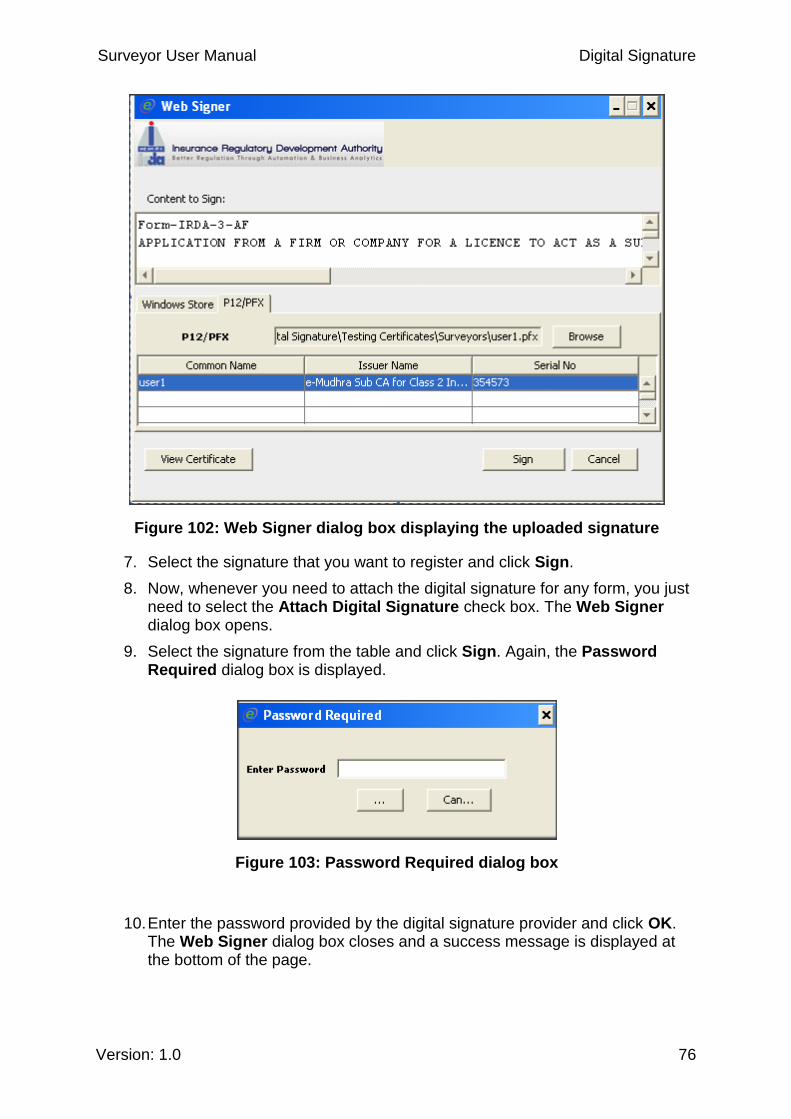
Surveyor User Manual Digital Signature
Version: 1.0 76
Figure 102: Web Signer dialog box displaying the uploaded signature
7. Select the signature that you want to register and click Sign.
8. Now, whenever you need to attach the digital signature for any form, you just need to select the Attach Digital Signature check box. The Web Signer dialog box opens.
9. Select the signature from the table and click Sign. Again, the Password Required dialog box is displayed.
Figure 103: Password Required dialog box
10. Enter the password provided by the digital signature provider and click OK. The Web Signer dialog box closes and a success message is displayed at the bottom of the page.

Surveyor User Manual Digital Signature
Version: 1.0 77
For importing the digital signature on your browser, you need to have the following installed:
Java Runtime Environment 1.6 and above
Internet Explorer 7 and above
Surveyor User Manual Corporate Surveyor - Description of the menu tabs
Version: 1.0 78
Description of the menu tabs
The Corporate Surveyor user screen contains the following menu tabs:
1. Licensing - Allows you to apply for a new, renew, duplicate, and modification license with IRDA. (See: Licensing)
a. Fresh License – Allows you to view the form that you had submitted when applying for a new surveyor license. (See: Fresh License)
b. Renew License – Allows you to renew your license. (See: Renew License)
c. Duplicate License – Allows you to apply for a duplicate license. (See: Duplicate License)
d. Modification/ Upgrading License – Allows you to modify/upgrade your contact and license details. (See: Modification/Upgrading License)
2. Returns: Allows you to submit Form 12 that includes information related to the business conducted by the firm during the financial year. (See: Submitting Form - 12)
3. View Application Status - Allows you to track the status of the submitted applications. (See: View Application Status)
4. Pending for clarification - Allows you to upload additional documents and provide clarification required by IRDA during processing of applications. (See: Pending for Clarification)
5. Pay Penalty: Allows you to view and pay the penalties imposed on you by IRDA. (See: Pay Penalty)
Surveyor User Manual Corporate Surveyor - Licensing
Version: 1.0 79
Licensing
If you want to become a corporate surveyor, then, you need to register as a corporate surveyor in the portal. After registration, you need to apply for a new corporate surveyor license. During the licensing process, you need to enter the details of the surveyors employed in your firm, enter the details of the director of the firm, upload the necessary documents and pay the required fee. After IRDA approves your license request, it issues you a separate license for acting as a corporate surveyor. You are also required to renew your license periodically. As per IRDA regulations, corporate surveyors are required to renew their license every five years. You can also apply for modification of your license.
Licensing comprises of the following sections:
1. Fresh License
2. Renew License
3. Duplicate License
4. Modification/Upgrading
5. View License Details
Surveyor User Manual Corporate Surveyor - Fresh License
Version: 1.0 80
Fresh License
In order to obtain a new corporate surveyor license, you need to fill and submit an application form to IRDA along with the scanned copies of the supporting documents. IRDA reviews and validates the application and then approves, rejects or closes it.
To apply for a Fresh License:
1. Click Surveyor-Corporate tab.
2. Click Licensing tab.
3. On the Licensing screen, click Fresh License. The Fresh License Application (Form 3AF) screen is displayed. All the mandatory fields are marked with an asterisk (*).
The Fresh License application process comprises of the following sections:
1. Surveyor Firm/Company Details
2. Director Details
3. License Details
4. Upload Documents
5. Form Preview
The buttons available on the Fresh License Application (Form 3AF) are explained in the following table.
Button Description
Submit Click to submit the application form once you have selected the declaration check box.
Cancel Click to stop the application processing and return to the home page. This action will also clear all the information entered without saving it.
Save as Draft Click to save all the data entered in the form. You can use this option if you want to submit the form at a later time.
View Submitted Form
Click to view the submitted Fresh License Application (Form 3AF) in read-only mode.
Print Click to print the Fresh License Application (Form 3AF).
Clear Click to clear the data entered.
Previous Click to go to previous section.
Next Click to go to the next section.
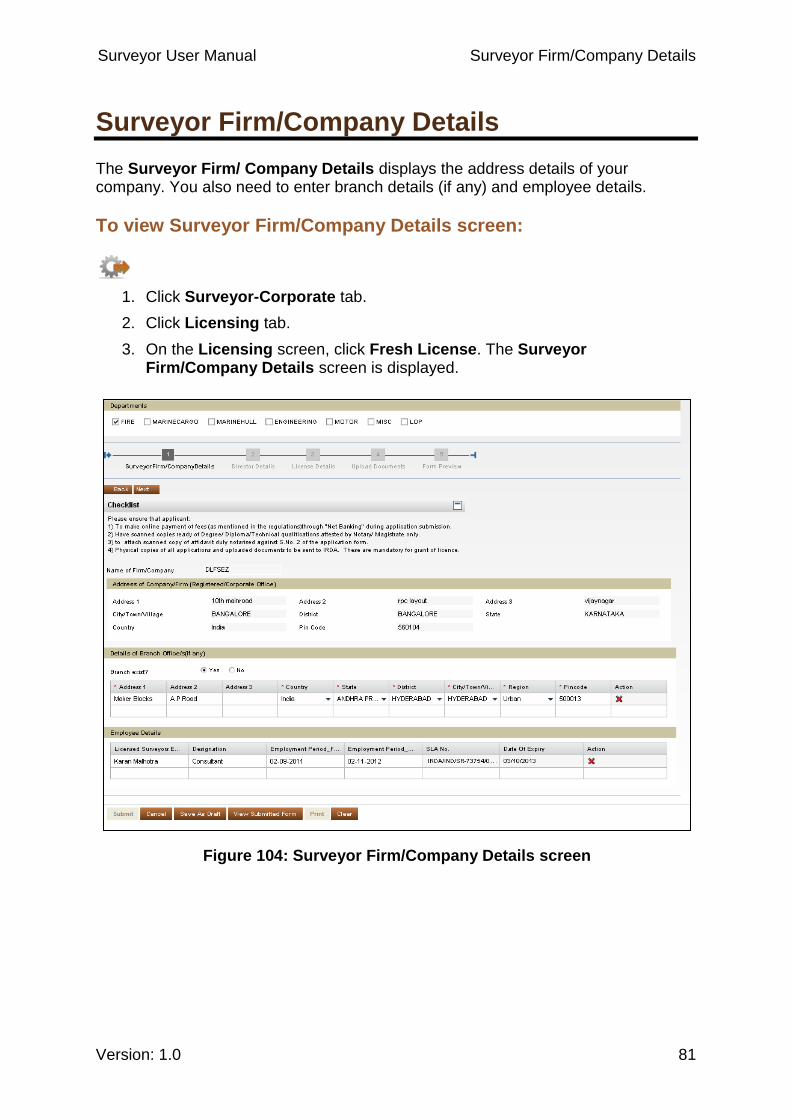
Surveyor User Manual Surveyor Firm/Company Details
Version: 1.0 81
Surveyor Firm/Company Details
The Surveyor Firm/ Company Details displays the address details of your company. You also need to enter branch details (if any) and employee details.
To view Surveyor Firm/Company Details screen:
1. Click Surveyor-Corporate tab.
2. Click Licensing tab.
3. On the Licensing screen, click Fresh License. The Surveyor Firm/Company Details screen is displayed.
Figure 104: Surveyor Firm/Company Details screen

Surveyor User Manual Surveyor Firm/Company Details
Version: 1.0 82
The fields in the Surveyor Firm/Company Details screen are explained in the following table.
Field Description
Details of Branch Office/s (if any)
Branch exist Select Yes or No. If Yes, enter the details of the branch in the corresponding fields.
Address1 Enter the first line of the address.
Address2 Enter the second line of the address.
Address3 Enter the third line of the address.
Country India is displayed by default.
State Select the state from the drop-down list.
District Select the district from the drop-down list.
City/Town/Village Select the city from the drop-down list.
Region Select the region from the drop-down list.
Pin Code Enter your pin code number.
Employee Details
Licensed Surveyor Employed in the Firm
Select the name of the surveyor employed in your firm.
Designation Enter the designation of the employee.
Employment Period From Date
Enter the joining date of the employee.
Employment Period to Date
Enter the last date of the employee in the organization.
SLA No. Displays the SLA number of the employee.
Date of Expiry Displays the surveyor license expiry date of the employee.
For each employee you will have to fill in the details separately.

Surveyor User Manual Director Details
Version: 1.0 83
Director Details
In Director Details, you need to select the name of the directors/partners and enter their last employment details.
To view the Director Details screen:
On the Surveyor Firm/Company Details screen, click Next. The Director Details screen is displayed.
Figure 105: Director Details screen
The fields in the Director Details screen are explained in the following table.
Field Description
Details of Directors/Partners
SLA No. Select the SLA number.
Date of Expiry Displays the date of expiry of the surveyor license.
Name Displays the name of the director/partner.
Address Displays the address of the director/partner.
Department (category) allocation
Displays the department and the category in which the director/partner hold a license.
Last Employment Details
Name of Employer Displays the name of the previous employer.
Nature of Organization
Select the nature of your organization from the drop-drop list.

Surveyor User Manual Director Details
Version: 1.0 84
Field Description
Nature of Work Select the nature of the work done from the drop-down list.
Designation Enter the designation held in the previous organization.
Period of Employment from date
Select the start date of the employment.
Period of Employment to date
Select the end date of the employment.
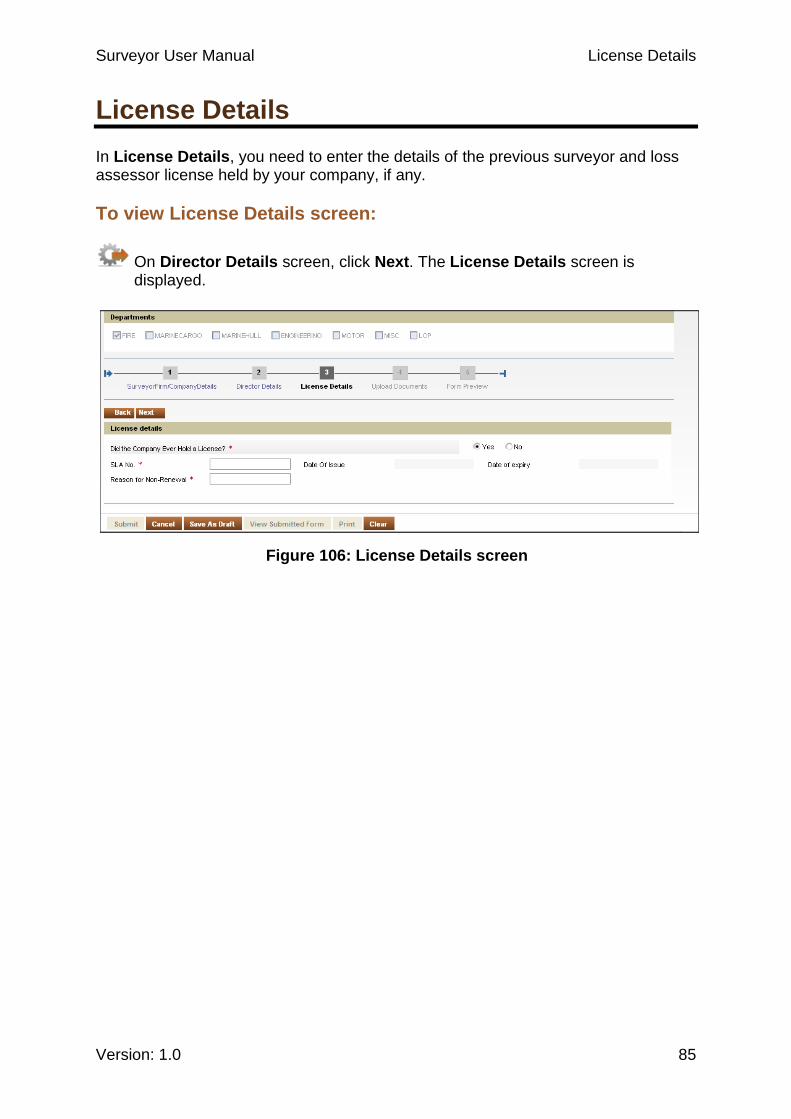
Surveyor User Manual License Details
Version: 1.0 85
License Details
In License Details, you need to enter the details of the previous surveyor and loss assessor license held by your company, if any.
To view License Details screen:
On Director Details screen, click Next. The License Details screen is displayed.
Figure 106: License Details screen
Surveyor User Manual License Details
Version: 1.0 86
The field in the License Details screen is described in the following table.
Field Description
Licensing Details
Did the company ever hold a license
Select Yes or No. If Yes, enter SLA No. to display additional information. The format of the SLA Number is as follows:
IRDA/<Type of surveyor>/SR-<serial number>/<Date of license expiry>.
CORP will be used as surveyor type for Corporate surveyor applications.
Reason for non-renewal
Enter the reason for non-renewal of the previously held license.
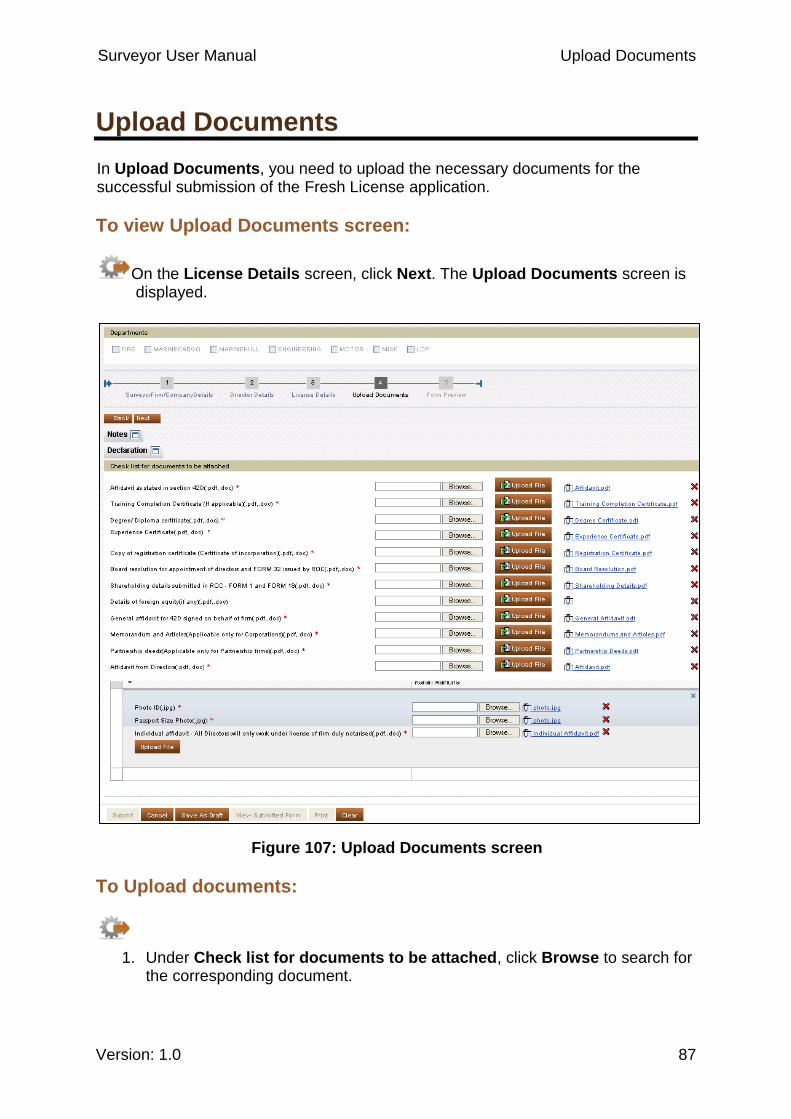
Surveyor User Manual Upload Documents
Version: 1.0 87
Upload Documents
In Upload Documents, you need to upload the necessary documents for the successful submission of the Fresh License application.
To view Upload Documents screen:
On the License Details screen, click Next. The Upload Documents screen is displayed.
Figure 107: Upload Documents screen
To Upload documents:
1. Under Check list for documents to be attached, click Browse to search for the corresponding document.

Surveyor User Manual Upload Documents
Version: 1.0 88
2. Click Upload File to upload the corresponding document. The name of the uploaded document appears next to the Upload File button.
3. Under Upload Director Document, click Browse to search for the corresponding document.
4. Click Upload File to upload all the selected documents.
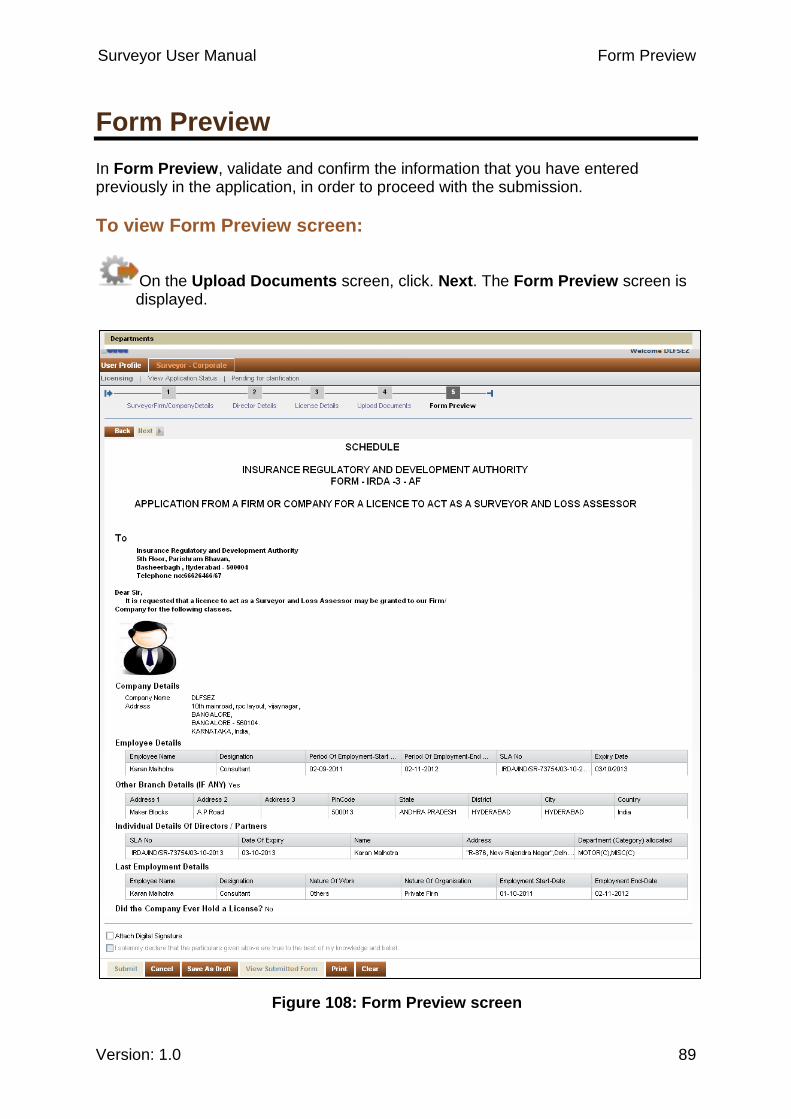
Surveyor User Manual Form Preview
Version: 1.0 89
Form Preview
In Form Preview, validate and confirm the information that you have entered previously in the application, in order to proceed with the submission.
To view Form Preview screen:
On the Upload Documents screen, click. Next. The Form Preview screen is displayed.
Figure 108: Form Preview screen
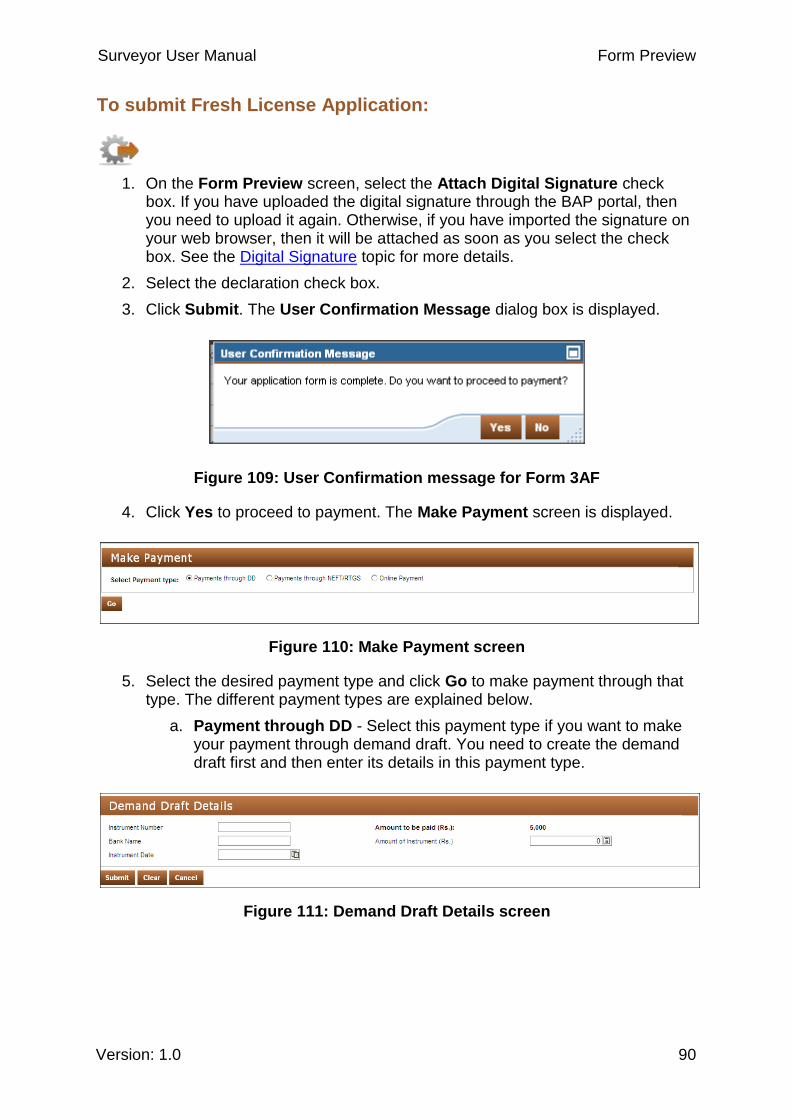
Surveyor User Manual Form Preview
Version: 1.0 90
To submit Fresh License Application:
1. On the Form Preview screen, select the Attach Digital Signature check box. If you have uploaded the digital signature through the BAP portal, then you need to upload it again. Otherwise, if you have imported the signature on your web browser, then it will be attached as soon as you select the check box. See the Digital Signature topic for more details.
2. Select the declaration check box.
3. Click Submit. The User Confirmation Message dialog box is displayed.
Figure 109: User Confirmation message for Form 3AF
4. Click Yes to proceed to payment. The Make Payment screen is displayed.
Figure 110: Make Payment screen
5. Select the desired payment type and click Go to make payment through that type. The different payment types are explained below.
a. Payment through DD - Select this payment type if you want to make your payment through demand draft. You need to create the demand draft first and then enter its details in this payment type.
Figure 111: Demand Draft Details screen
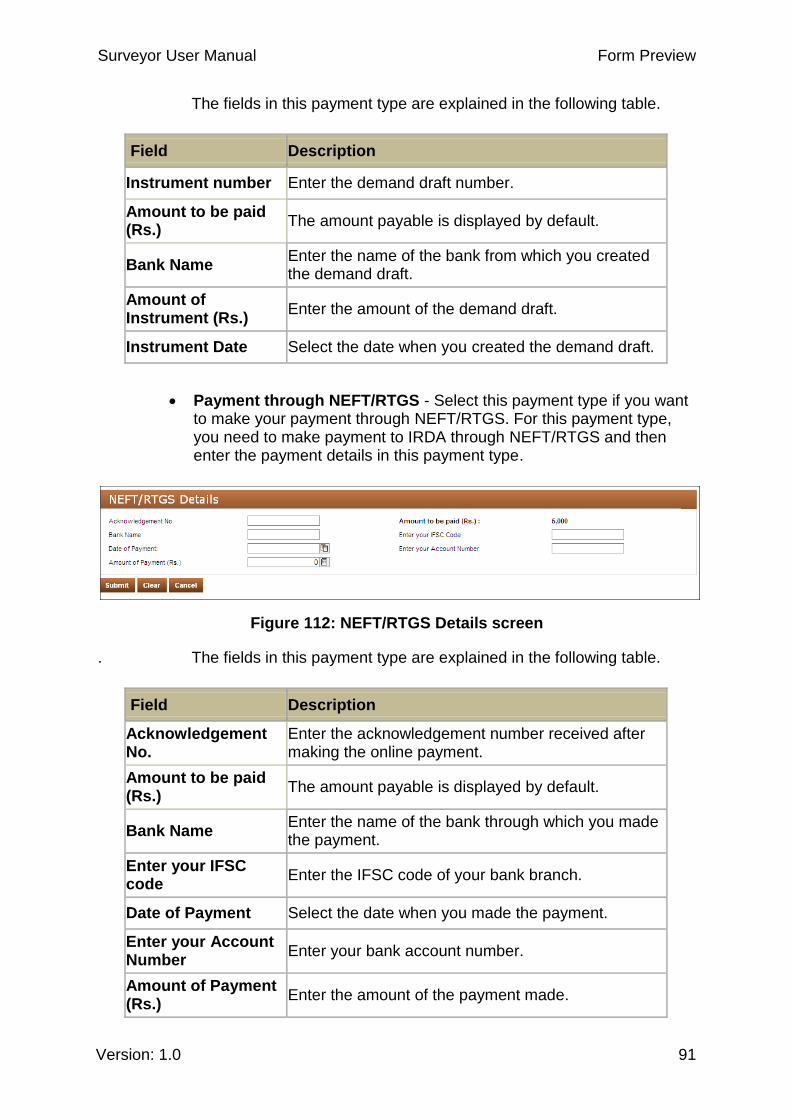
Surveyor User Manual Form Preview
Version: 1.0 91
The fields in this payment type are explained in the following table.
Field Description
Instrument number Enter the demand draft number.
Amount to be paid (Rs.)
The amount payable is displayed by default.
Bank Name Enter the name of the bank from which you created the demand draft.
Amount of Instrument (Rs.)
Enter the amount of the demand draft.
Instrument Date Select the date when you created the demand draft.
Payment through NEFT/RTGS - Select this payment type if you want to make your payment through NEFT/RTGS. For this payment type, you need to make payment to IRDA through NEFT/RTGS and then enter the payment details in this payment type.
Figure 112: NEFT/RTGS Details screen
. The fields in this payment type are explained in the following table.
Field Description
Acknowledgement No.
Enter the acknowledgement number received after making the online payment.
Amount to be paid (Rs.)
The amount payable is displayed by default.
Bank Name Enter the name of the bank through which you made the payment.
Enter your IFSC code
Enter the IFSC code of your bank branch.
Date of Payment Select the date when you made the payment.
Enter your Account Number
Enter your bank account number.
Amount of Payment (Rs.)
Enter the amount of the payment made.
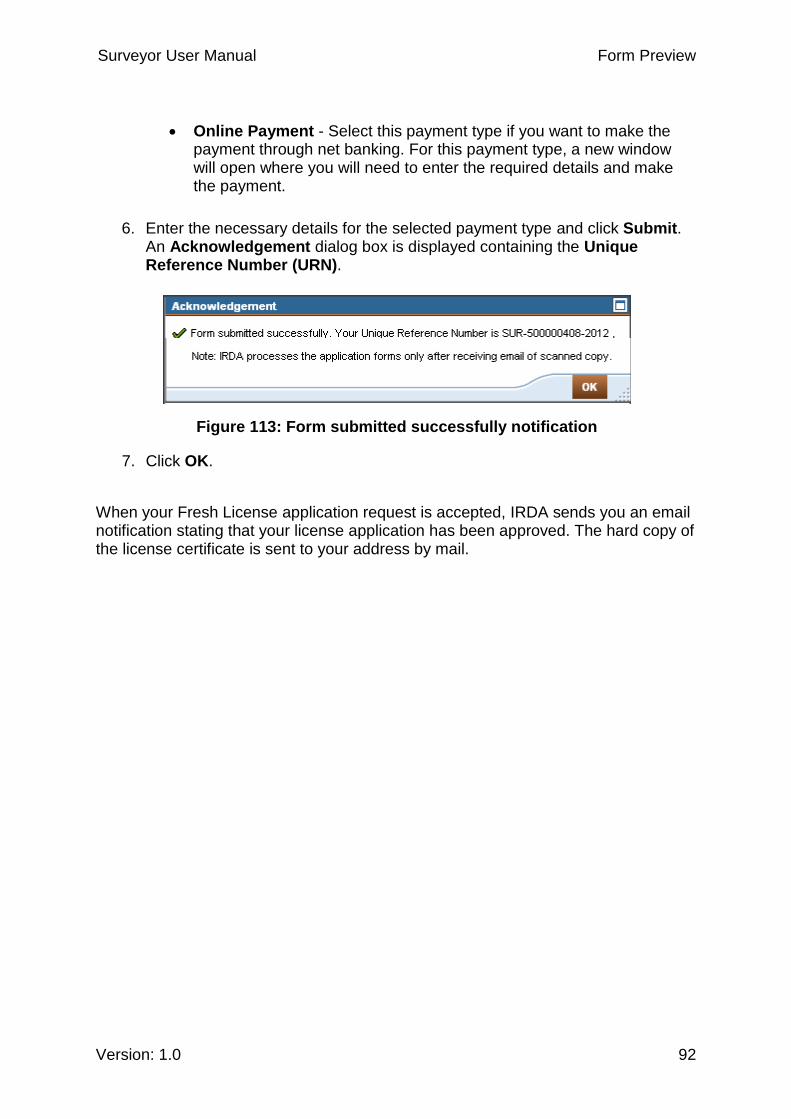
Surveyor User Manual Form Preview
Version: 1.0 92
Online Payment - Select this payment type if you want to make the payment through net banking. For this payment type, a new window will open where you will need to enter the required details and make the payment.
6. Enter the necessary details for the selected payment type and click Submit. An Acknowledgement dialog box is displayed containing the Unique Reference Number (URN).
Figure 113: Form submitted successfully notification
7. Click OK.
When your Fresh License application request is accepted, IRDA sends you an email notification stating that your license application has been approved. The hard copy of the license certificate is sent to your address by mail.

Surveyor User Manual Corporate Surveyor - Renew License
Version: 1.0 93
Renew License
Each corporate surveyor license has a validity period after which the license expires if it is not renewed. As per IRDA regulations, you need to renew your surveyor license every five years. The system sends you a reminder email 3 months before the license expiration date informing you to renew your license before expiry. You are also required to pay the required renewal license fee. There are certain prerequisites and conditions that you need to remember while renewing your license.
Prerequisites for License Renewal
You can renew your license 90 days before the date of expiration. If you apply for renewal three months before the license expiry date, a warning message is displayed.
Figure 114: Message when renewing before 3 months from the date of expiry
For license renewal, first you need to submit Form 12 for the current year before you go ahead with your license renewal. If you try to renew your license before submitting form 12, a warning message is displayed.
Figure 115: Message when attempting to renew before submitting Form 12
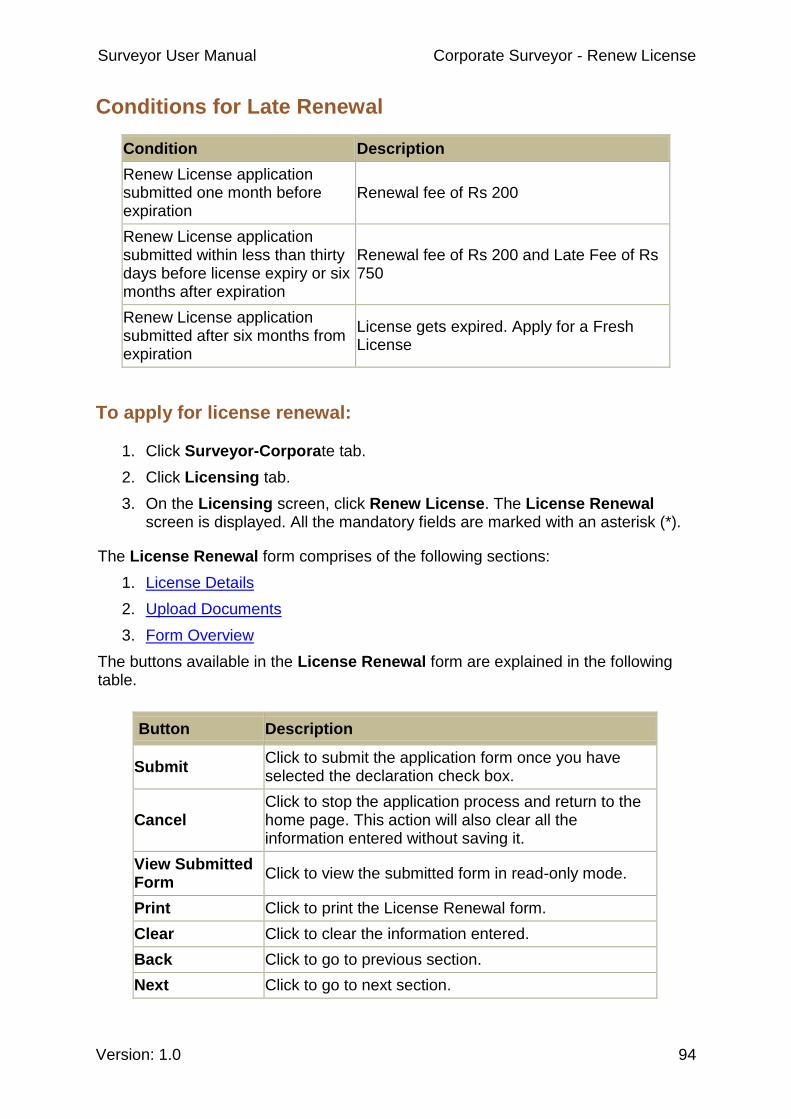
Surveyor User Manual Corporate Surveyor - Renew License
Version: 1.0 94
Conditions for Late Renewal
Condition Description
Renew License application submitted one month before expiration
Renewal fee of Rs 200
Renew License application submitted within less than thirty days before license expiry or six months after expiration
Renewal fee of Rs 200 and Late Fee of Rs 750
Renew License application submitted after six months from expiration
License gets expired. Apply for a Fresh License
To apply for license renewal:
1. Click Surveyor-Corporate tab.
2. Click Licensing tab.
3. On the Licensing screen, click Renew License. The License Renewal screen is displayed. All the mandatory fields are marked with an asterisk (*).
The License Renewal form comprises of the following sections:
1. License Details
2. Upload Documents
3. Form Overview
The buttons available in the License Renewal form are explained in the following table.
Button Description
Submit Click to submit the application form once you have selected the declaration check box.
Cancel Click to stop the application process and return to the home page. This action will also clear all the information entered without saving it.
View Submitted Form
Click to view the submitted form in read-only mode.
Print Click to print the License Renewal form.
Clear Click to clear the information entered.
Back Click to go to previous section.
Next Click to go to next section.

Surveyor User Manual Corporate Surveyor - Renew License
Version: 1.0 95
If you renew your license after it has expired, then, a warning message is displayed notifying that your license has expired and it also displays the amount of the late and renewal fee that you need to pay.
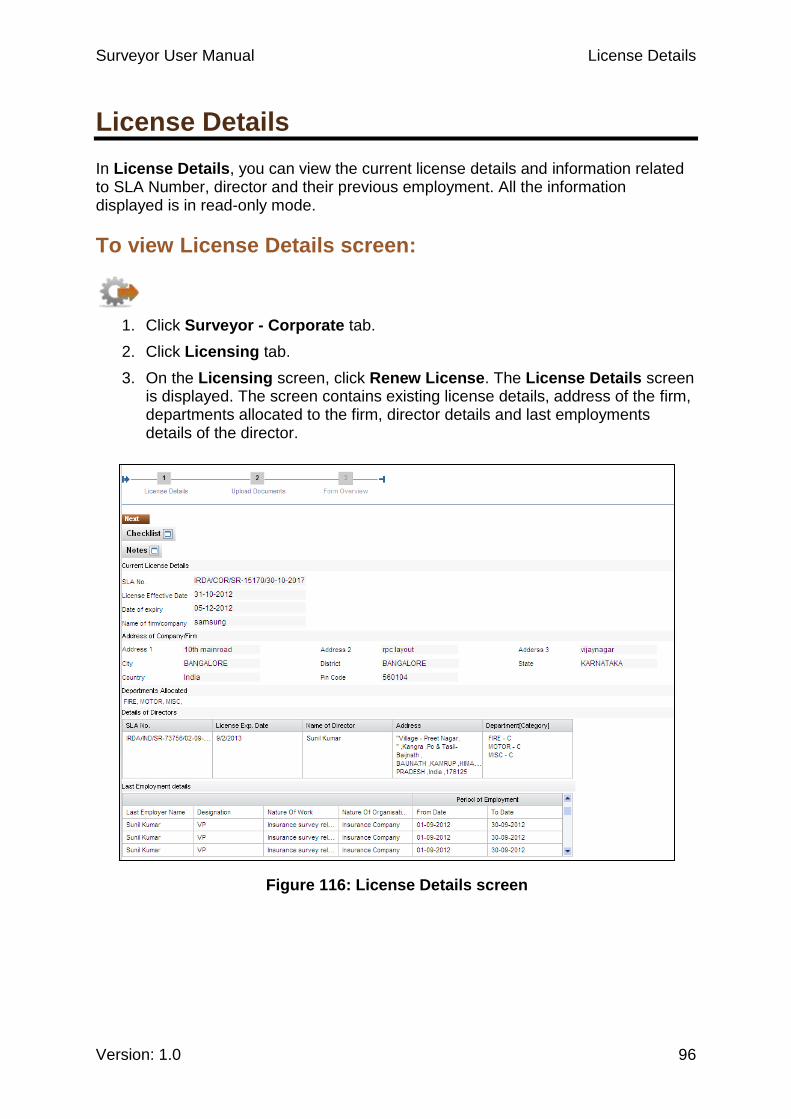
Surveyor User Manual License Details
Version: 1.0 96
License Details
In License Details, you can view the current license details and information related to SLA Number, director and their previous employment. All the information displayed is in read-only mode.
To view License Details screen:
1. Click Surveyor - Corporate tab.
2. Click Licensing tab.
3. On the Licensing screen, click Renew License. The License Details screen is displayed. The screen contains existing license details, address of the firm, departments allocated to the firm, director details and last employments details of the director.
Figure 116: License Details screen
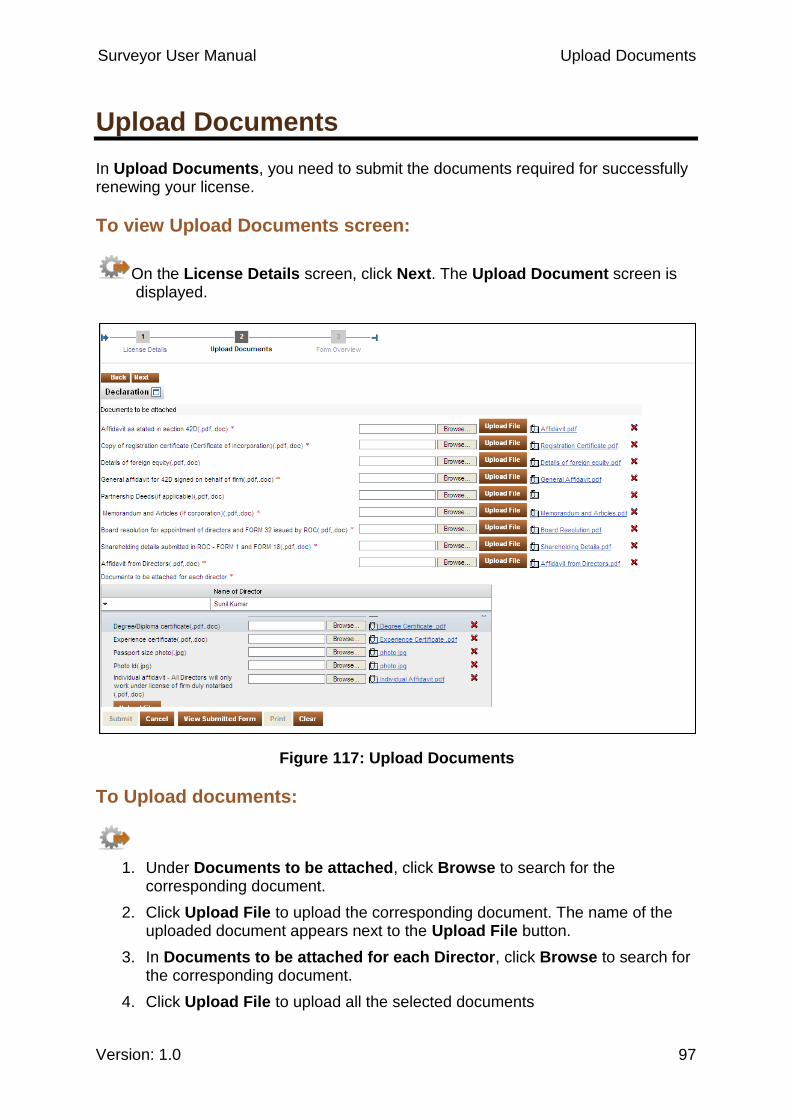
Surveyor User Manual Upload Documents
Version: 1.0 97
Upload Documents
In Upload Documents, you need to submit the documents required for successfully renewing your license.
To view Upload Documents screen:
On the License Details screen, click Next. The Upload Document screen is displayed.
Figure 117: Upload Documents
To Upload documents:
1. Under Documents to be attached, click Browse to search for the corresponding document.
2. Click Upload File to upload the corresponding document. The name of the uploaded document appears next to the Upload File button.
3. In Documents to be attached for each Director, click Browse to search for the corresponding document.
4. Click Upload File to upload all the selected documents
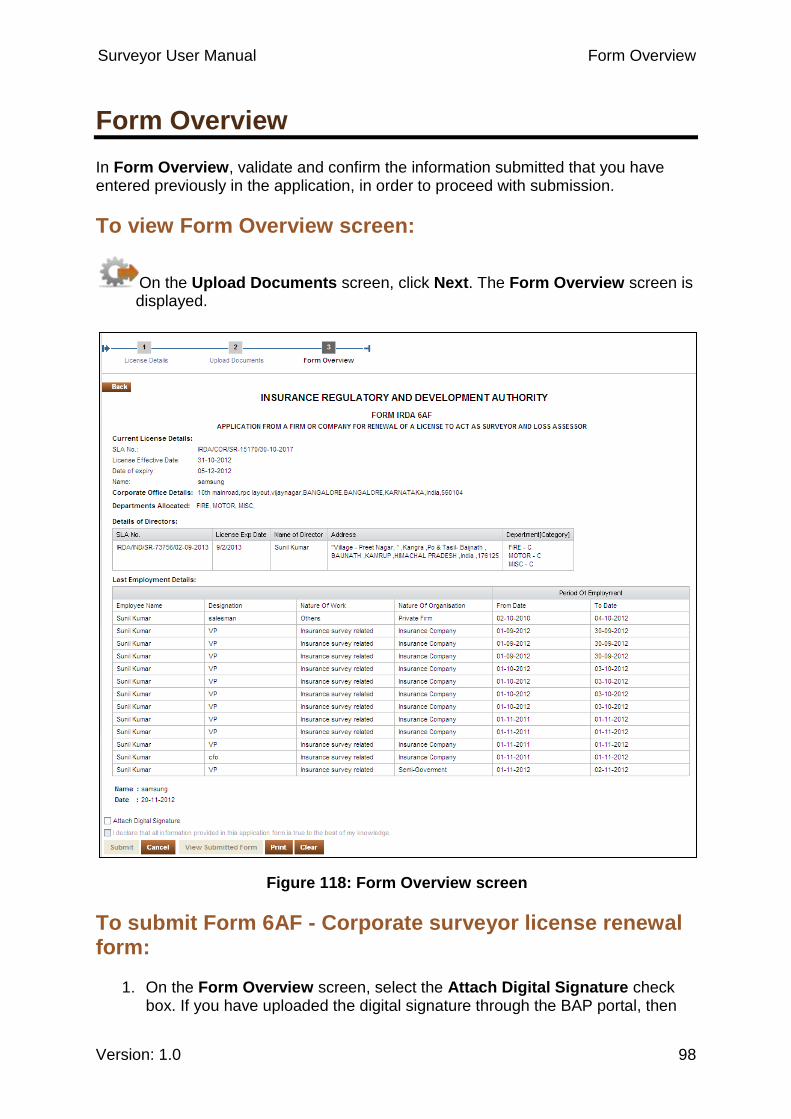
Surveyor User Manual Form Overview
Version: 1.0 98
Form Overview
In Form Overview, validate and confirm the information submitted that you have entered previously in the application, in order to proceed with submission.
To view Form Overview screen:
On the Upload Documents screen, click Next. The Form Overview screen is displayed.
Figure 118: Form Overview screen
To submit Form 6AF - Corporate surveyor license renewal form:
1. On the Form Overview screen, select the Attach Digital Signature check box. If you have uploaded the digital signature through the BAP portal, then
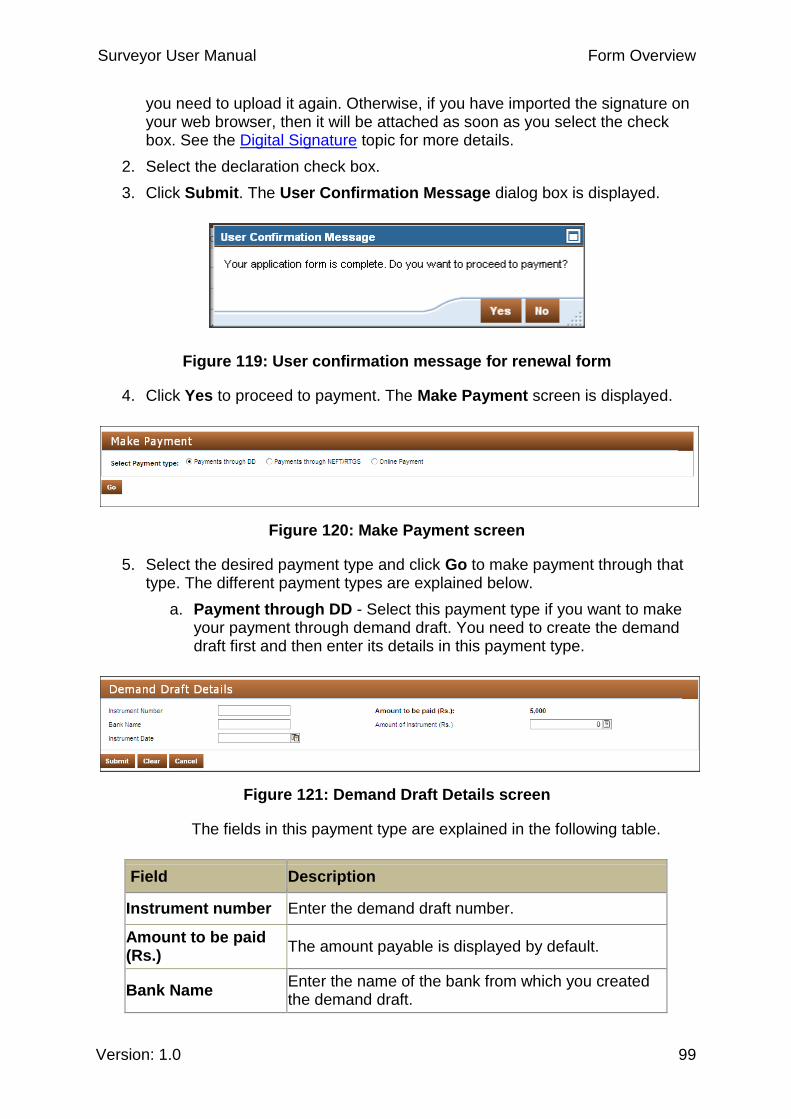
Surveyor User Manual Form Overview
Version: 1.0 99
you need to upload it again. Otherwise, if you have imported the signature on your web browser, then it will be attached as soon as you select the check box. See the Digital Signature topic for more details.
2. Select the declaration check box.
3. Click Submit. The User Confirmation Message dialog box is displayed.
Figure 119: User confirmation message for renewal form
4. Click Yes to proceed to payment. The Make Payment screen is displayed.
Figure 120: Make Payment screen
5. Select the desired payment type and click Go to make payment through that type. The different payment types are explained below.
a. Payment through DD - Select this payment type if you want to make your payment through demand draft. You need to create the demand draft first and then enter its details in this payment type.
Figure 121: Demand Draft Details screen
The fields in this payment type are explained in the following table.
Field Description
Instrument number Enter the demand draft number.
Amount to be paid (Rs.)
The amount payable is displayed by default.
Bank Name Enter the name of the bank from which you created the demand draft.

Surveyor User Manual Form Overview
Version: 1.0 100
Field Description
Amount of Instrument (Rs.)
Enter the amount of the demand draft.
Instrument Date Select the date when you created the demand draft.
Payment through NEFT/RTGS - Select this payment type if you want to make your payment through NEFT/RTGS. For this payment type, you need to make payment to IRDA through NEFT/RTGS and then enter the payment details in this payment type.
Figure 122: NEFT/RTGS Details screen
. The fields in this payment type are explained in the following table.
Field Description
Acknowledgement No.
Enter the acknowledgement number received after making the online payment.
Amount to be paid (Rs.)
The amount payable is displayed by default.
Bank Name Enter the name of the bank through which you made the payment.
Enter your IFSC code
Enter the IFSC code of your bank branch.
Date of Payment Select the date when you made the payment.
Enter your Account Number
Enter your bank account number.
Amount of Payment (Rs.)
Enter the amount of the payment made.
Online Payment - Select this payment type if you want to make the payment through net banking. For this payment type, a new window will open where you will need to enter the required details and make the payment.
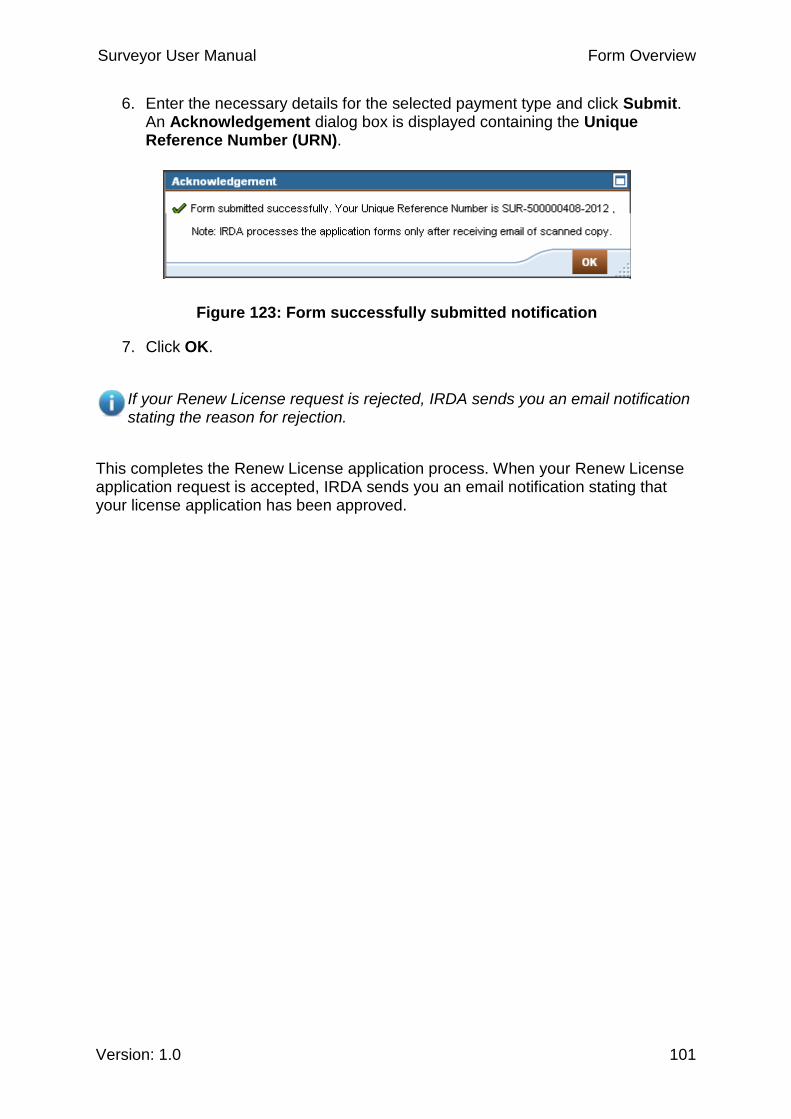
Surveyor User Manual Form Overview
Version: 1.0 101
6. Enter the necessary details for the selected payment type and click Submit. An Acknowledgement dialog box is displayed containing the Unique Reference Number (URN).
Figure 123: Form successfully submitted notification
7. Click OK.
If your Renew License request is rejected, IRDA sends you an email notification stating the reason for rejection.
This completes the Renew License application process. When your Renew License application request is accepted, IRDA sends you an email notification stating that your license application has been approved.
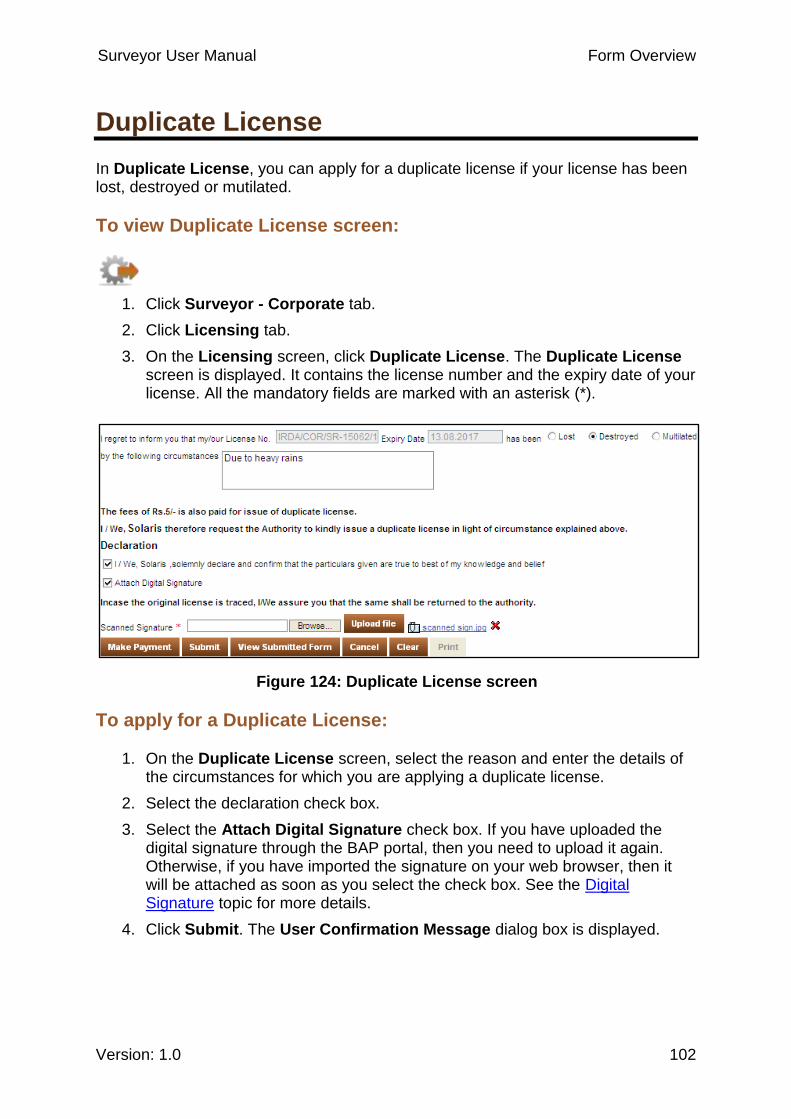
Surveyor User Manual Form Overview
Version: 1.0 102
Duplicate License
In Duplicate License, you can apply for a duplicate license if your license has been lost, destroyed or mutilated.
To view Duplicate License screen:
1. Click Surveyor - Corporate tab.
2. Click Licensing tab.
3. On the Licensing screen, click Duplicate License. The Duplicate License screen is displayed. It contains the license number and the expiry date of your license. All the mandatory fields are marked with an asterisk (*).
Figure 124: Duplicate License screen
To apply for a Duplicate License:
1. On the Duplicate License screen, select the reason and enter the details of the circumstances for which you are applying a duplicate license.
2. Select the declaration check box.
3. Select the Attach Digital Signature check box. If you have uploaded the digital signature through the BAP portal, then you need to upload it again. Otherwise, if you have imported the signature on your web browser, then it will be attached as soon as you select the check box. See the Digital Signature topic for more details.
4. Click Submit. The User Confirmation Message dialog box is displayed.
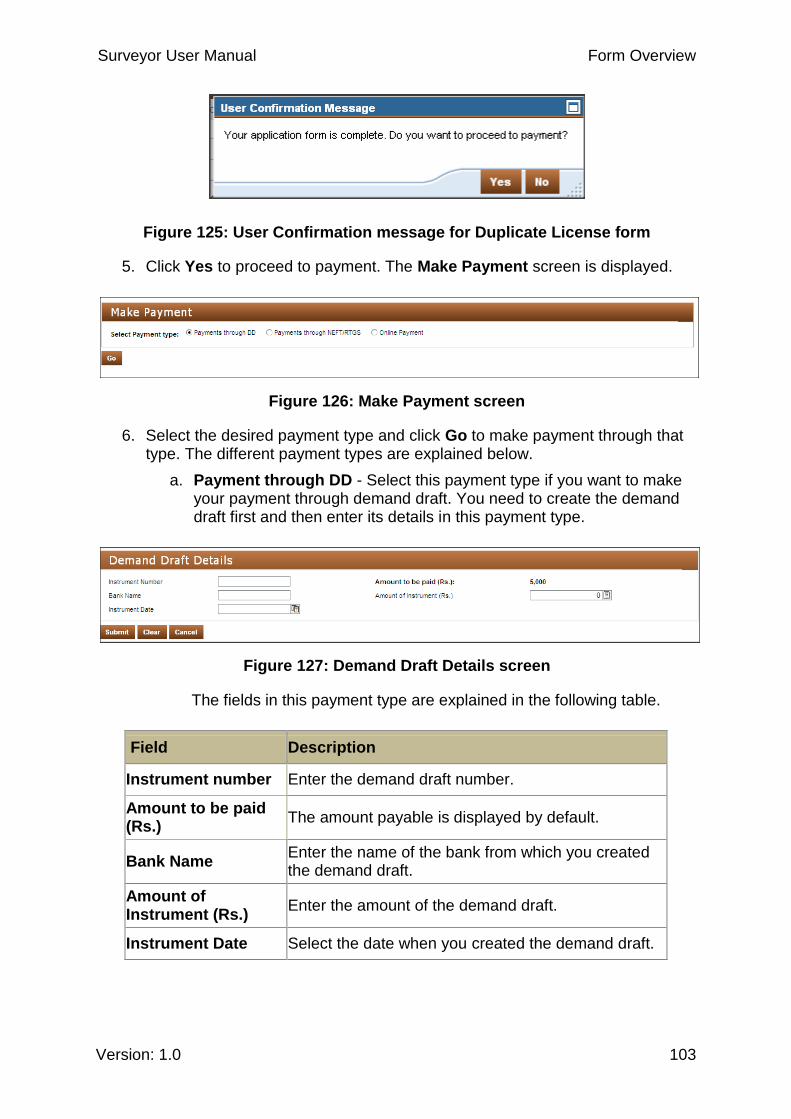
Surveyor User Manual Form Overview
Version: 1.0 103
Figure 125: User Confirmation message for Duplicate License form
5. Click Yes to proceed to payment. The Make Payment screen is displayed.
Figure 126: Make Payment screen
6. Select the desired payment type and click Go to make payment through that type. The different payment types are explained below.
a. Payment through DD - Select this payment type if you want to make your payment through demand draft. You need to create the demand draft first and then enter its details in this payment type.
Figure 127: Demand Draft Details screen
The fields in this payment type are explained in the following table.
Field Description
Instrument number Enter the demand draft number.
Amount to be paid (Rs.)
The amount payable is displayed by default.
Bank Name Enter the name of the bank from which you created the demand draft.
Amount of Instrument (Rs.)
Enter the amount of the demand draft.
Instrument Date Select the date when you created the demand draft.

Surveyor User Manual Form Overview
Version: 1.0 104
Payment through NEFT/RTGS - Select this payment type if you want to make your payment through NEFT/RTGS. For this payment type, you need to make payment to IRDA through NEFT/RTGS and then enter the payment details in this payment type.
Figure 128: NEFT/RTGS Details screen
. The fields in this payment type are explained in the following table.
Field Description
Acknowledgement No.
Enter the acknowledgement number received after making the online payment.
Amount to be paid (Rs.)
The amount payable is displayed by default.
Bank Name Enter the name of the bank through which you made the payment.
Enter your IFSC code
Enter the IFSC code of your bank branch.
Date of Payment Select the date when you made the payment.
Enter your Account Number
Enter your bank account number.
Amount of Payment (Rs.)
Enter the amount of the payment made.
Online Payment - Select this payment type if you want to make the payment through net banking. For this payment type, a new window will open where you will need to enter the required details and make the payment.
7. Enter the necessary details for the selected payment type and click Submit. An Acknowledgement dialog box is displayed containing the Unique Reference Number (URN).
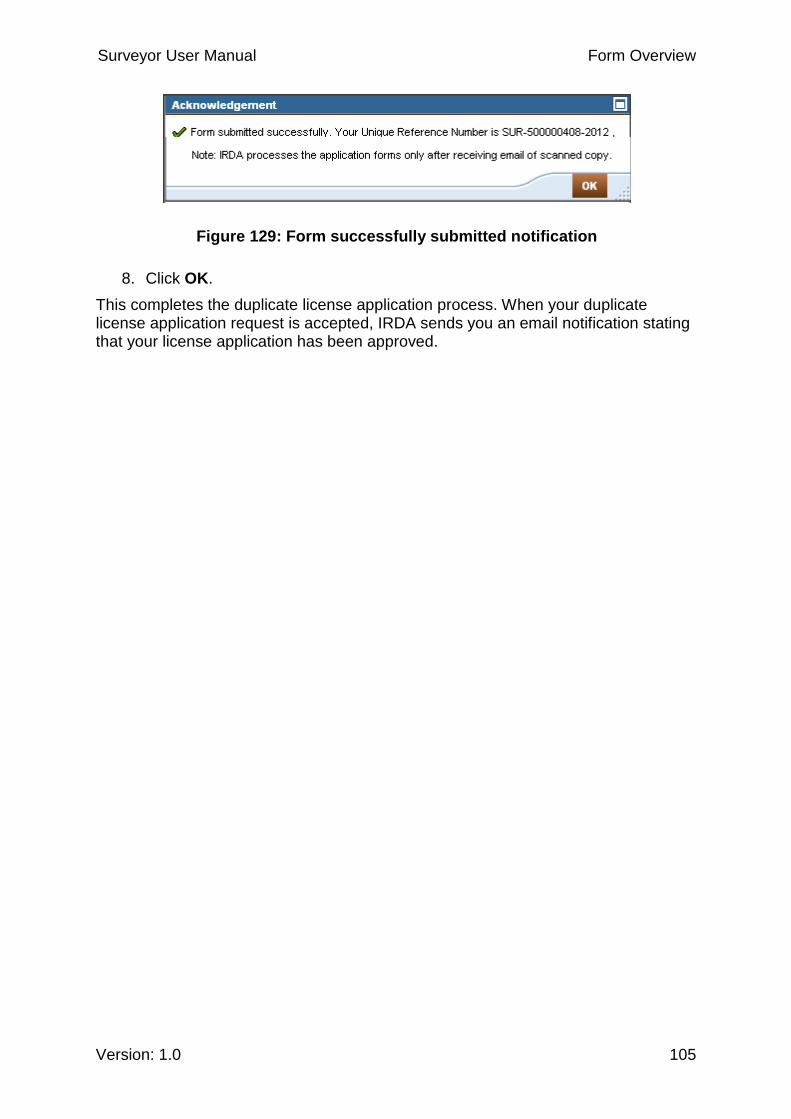
Surveyor User Manual Form Overview
Version: 1.0 105
Figure 129: Form successfully submitted notification
8. Click OK.
This completes the duplicate license application process. When your duplicate license application request is accepted, IRDA sends you an email notification stating that your license application has been approved.

Surveyor User Manual Corporate Surveyor – Modification/Upgrading
Version: 1.0 106
Modification/Upgrading
In Modification/Upgrading, you can modify your contact and license details.
The following modification types are available:
Name
Corporate/Registered office address
Branch office address
Change in director/partner details
Change in employee
To view Modification/Upgrading screen:
1. Click Surveyor - Corporate tab.
2. Click Licensing tab.
Figure 130: Surveyor Training and Enrollment tab
3. On the Licensing screen, click Modification/Upgrading. The Modification/Upgrading (Form 18) screen is displayed. All the mandatory fields in the selected modification type are marked with an asterisk (*).
Figure 131: Modification types

Surveyor User Manual Corporate Surveyor – Modification/Upgrading
Version: 1.0 107
To modify Name:
1. On the Modification/Upgrading screen, select Name. Your present firm/company name is displayed.
Figure 132: Name modification options
2. Make the required changes in your firm/company name.
3. In Remarks field, enter relevant comments.
4. Upload the necessary documents.
5. Select the Attach Digital Signature check box. If you have uploaded the digital signature through the BAP portal, then you need to upload it again. Otherwise, if you have imported the signature on your web browser, then it will be attached as soon as you select the check box. See the Digital Signature topic for more details.
6. Select the declaration check box.
7. Click Submit. The User Confirmation Message dialog box is displayed.
8. Click Yes to submit the form. An Acknowledgement dialog box is displayed with an Unique Reference Number (URN).
9. Click OK.
To modify Corporate/Registered office address:
1. On the Modification/Upgrading screen, select Corporate/Registered office address. Your present corporate/registered office address is displayed.

Surveyor User Manual Corporate Surveyor – Modification/Upgrading
Version: 1.0 108
Figure 133: Corporate/Registered address modification options
2. Change your corporate/registered office address from the relevant fields.
3. Upload the necessary documents.
4. In License copy field, upload a copy of your corporate surveyor license.
5. Select the declaration check box.
6. Click Submit. The User Confirmation Message dialog box is displayed.
7. Click Yes to submit the form. An Acknowledgement dialog box is displayed with an Unique Reference Number (URN).
8. Click OK.
To modify Branch office address:
1. On the Modification/Upgrading screen, select Branch office address. Addresses of all your branch offices are displayed.
2. Select the branch office whose address you want to change and change the address from the relevant fields.
3. In Remarks field, enter relevant comments.
4. Select the Attach Digital Signature check box. If you have uploaded the digital signature through the BAP portal, then you need to upload it again. Otherwise, if you have imported the signature on your web browser, then it will be attached as soon as you select the check box. See the Digital Signature topic for more details.
5. Select the declaration check box.
6. Click Submit. The User Confirmation Message dialog box is displayed.
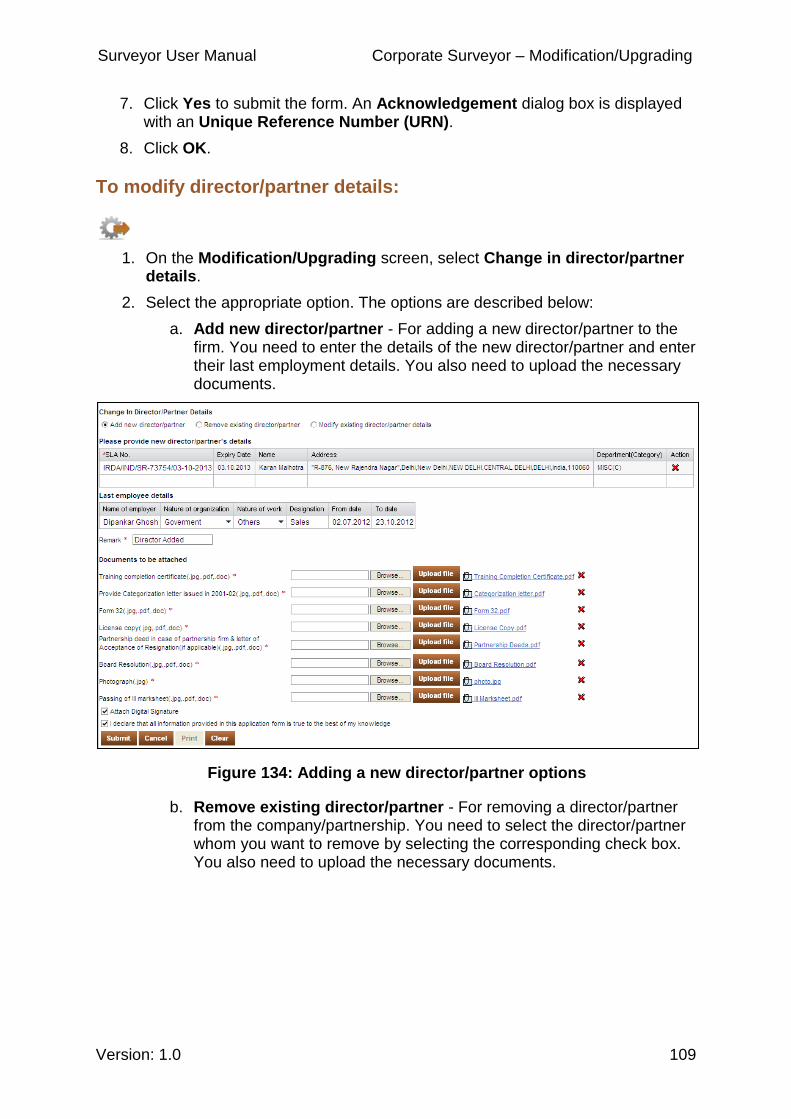
Surveyor User Manual Corporate Surveyor – Modification/Upgrading
Version: 1.0 109
7. Click Yes to submit the form. An Acknowledgement dialog box is displayed with an Unique Reference Number (URN).
8. Click OK.
To modify director/partner details:
1. On the Modification/Upgrading screen, select Change in director/partner details.
2. Select the appropriate option. The options are described below:
a. Add new director/partner - For adding a new director/partner to the firm. You need to enter the details of the new director/partner and enter their last employment details. You also need to upload the necessary documents.
Figure 134: Adding a new director/partner options
b. Remove existing director/partner - For removing a director/partner from the company/partnership. You need to select the director/partner whom you want to remove by selecting the corresponding check box. You also need to upload the necessary documents.
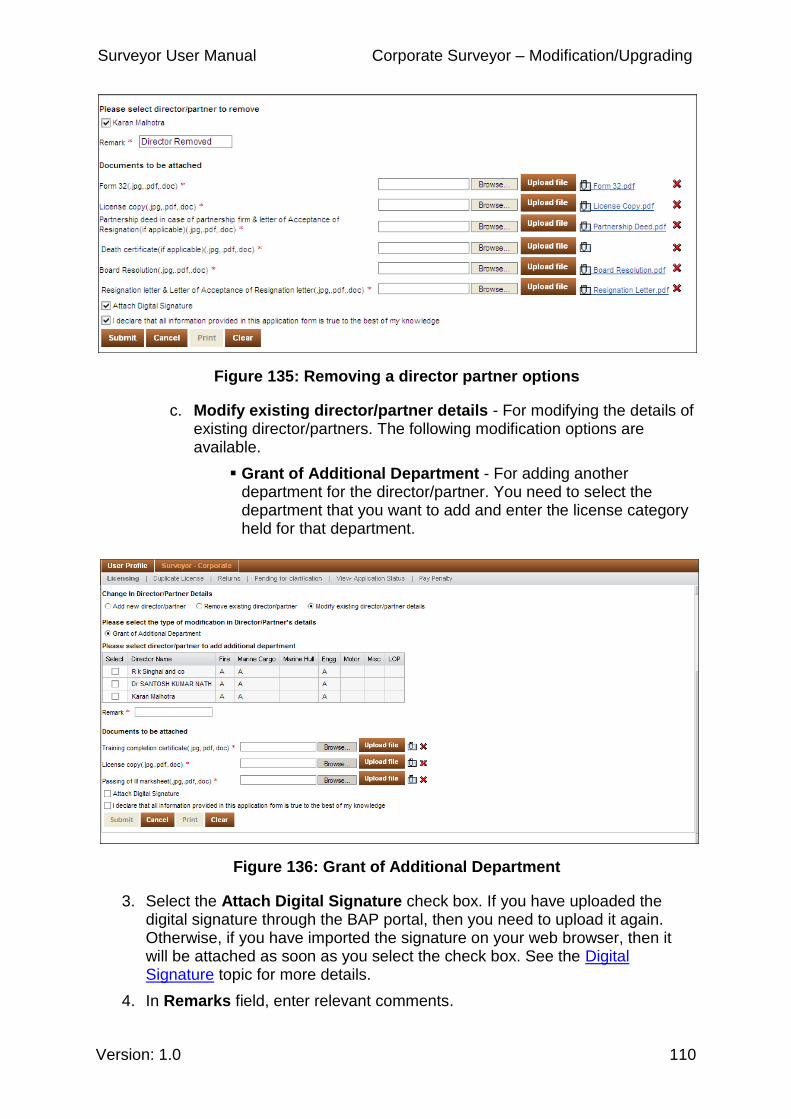
Surveyor User Manual Corporate Surveyor – Modification/Upgrading
Version: 1.0 110
Figure 135: Removing a director partner options
c. Modify existing director/partner details - For modifying the details of existing director/partners. The following modification options are available.
Grant of Additional Department - For adding another department for the director/partner. You need to select the department that you want to add and enter the license category held for that department.
Figure 136: Grant of Additional Department
3. Select the Attach Digital Signature check box. If you have uploaded the digital signature through the BAP portal, then you need to upload it again. Otherwise, if you have imported the signature on your web browser, then it will be attached as soon as you select the check box. See the Digital Signature topic for more details.
4. In Remarks field, enter relevant comments.
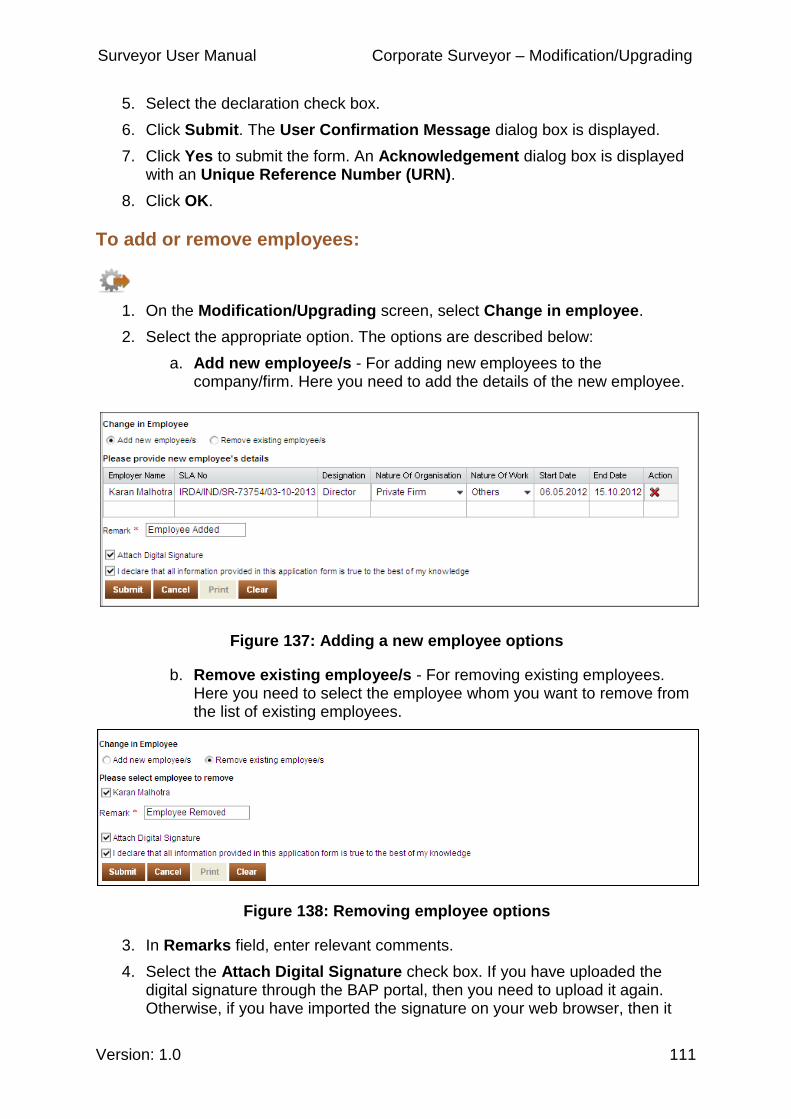
Surveyor User Manual Corporate Surveyor – Modification/Upgrading
Version: 1.0 111
5. Select the declaration check box.
6. Click Submit. The User Confirmation Message dialog box is displayed.
7. Click Yes to submit the form. An Acknowledgement dialog box is displayed with an Unique Reference Number (URN).
8. Click OK.
To add or remove employees:
1. On the Modification/Upgrading screen, select Change in employee.
2. Select the appropriate option. The options are described below:
a. Add new employee/s - For adding new employees to the company/firm. Here you need to add the details of the new employee.
Figure 137: Adding a new employee options
b. Remove existing employee/s - For removing existing employees. Here you need to select the employee whom you want to remove from the list of existing employees.
Figure 138: Removing employee options
3. In Remarks field, enter relevant comments.
4. Select the Attach Digital Signature check box. If you have uploaded the digital signature through the BAP portal, then you need to upload it again. Otherwise, if you have imported the signature on your web browser, then it

Surveyor User Manual Corporate Surveyor – Modification/Upgrading
Version: 1.0 112
will be attached as soon as you select the check box. See the Digital Signature topic for more details.
5. Select the declaration check box.
6. Click Submit. The User Confirmation Message dialog box is displayed.
7. Click Yes to submit the form. An Acknowledgement dialog box is displayed with an Unique Reference Number (URN).
8. Click OK.
If your modification license request is rejected, IRDA sends you an email notification stating the reason for rejection.
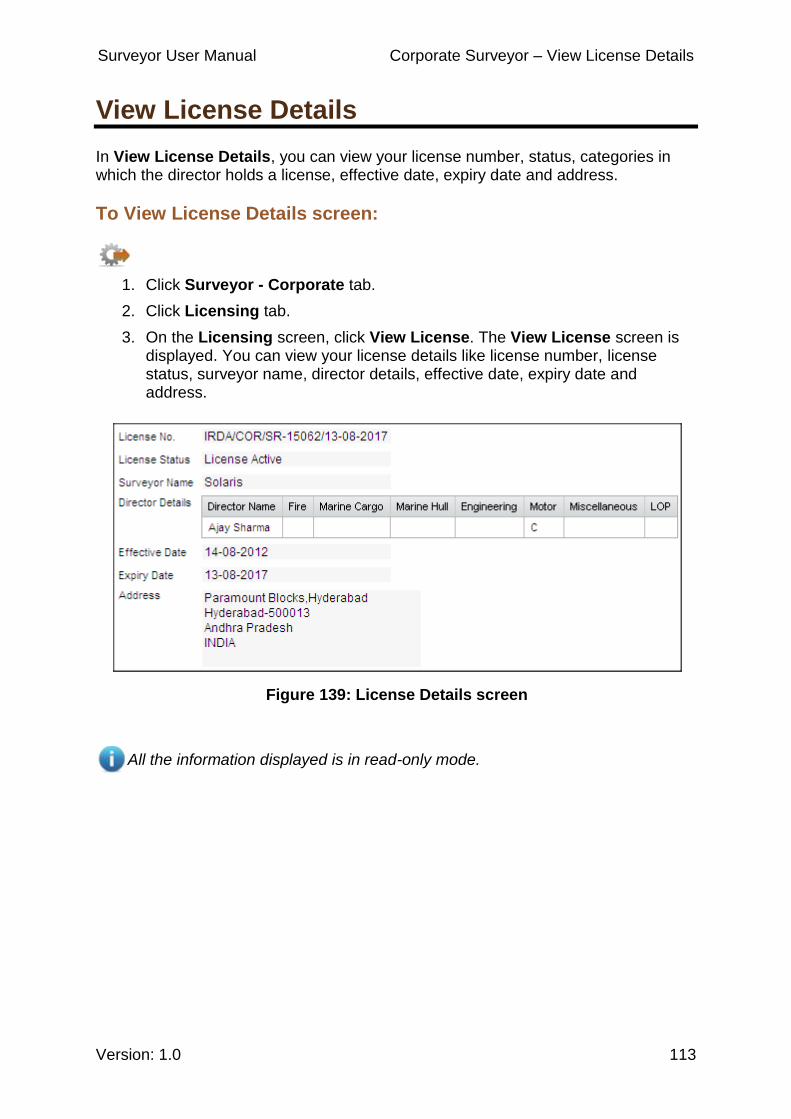
Surveyor User Manual Corporate Surveyor – View License Details
Version: 1.0 113
View License Details
In View License Details, you can view your license number, status, categories in which the director holds a license, effective date, expiry date and address.
To View License Details screen:
1. Click Surveyor - Corporate tab.
2. Click Licensing tab.
3. On the Licensing screen, click View License. The View License screen is displayed. You can view your license details like license number, license status, surveyor name, director details, effective date, expiry date and address.
Figure 139: License Details screen
All the information displayed is in read-only mode.
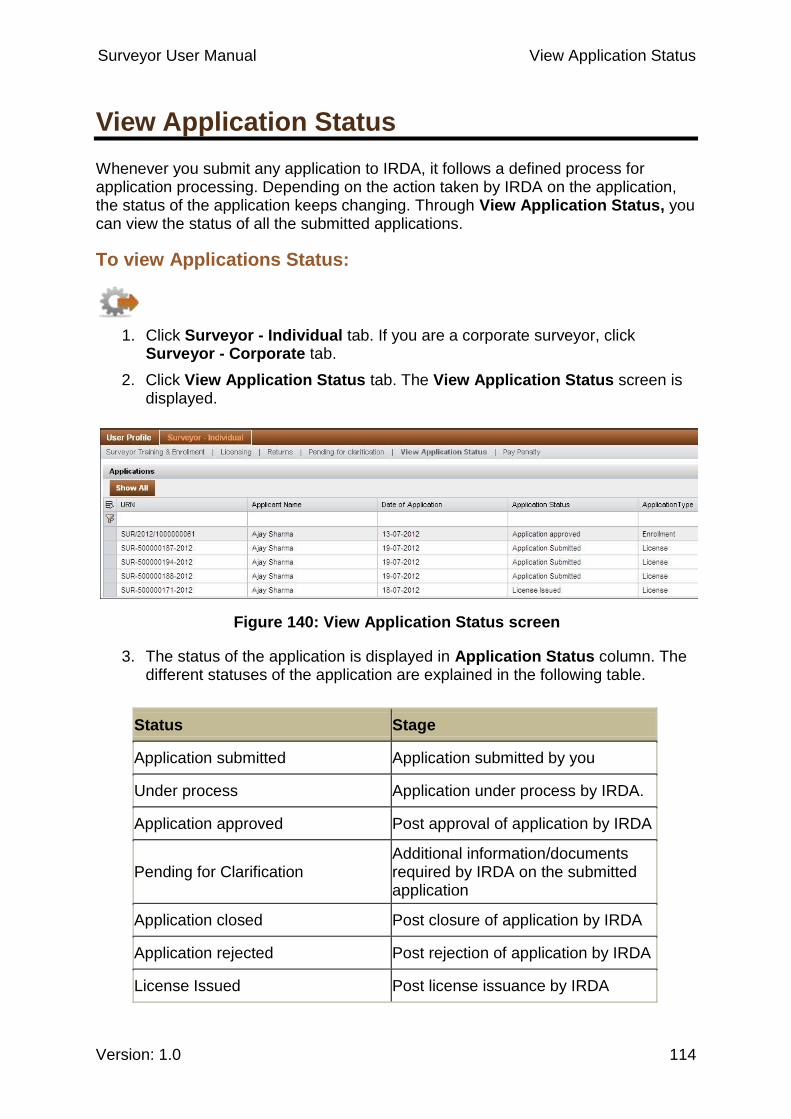
Surveyor User Manual View Application Status
Version: 1.0 114
View Application Status
Whenever you submit any application to IRDA, it follows a defined process for application processing. Depending on the action taken by IRDA on the application, the status of the application keeps changing. Through View Application Status, you can view the status of all the submitted applications.
To view Applications Status:
1. Click Surveyor - Individual tab. If you are a corporate surveyor, click Surveyor - Corporate tab.
2. Click View Application Status tab. The View Application Status screen is displayed.
Figure 140: View Application Status screen
3. The status of the application is displayed in Application Status column. The different statuses of the application are explained in the following table.
Status Stage
Application submitted Application submitted by you
Under process Application under process by IRDA.
Application approved Post approval of application by IRDA
Pending for Clarification Additional information/documents required by IRDA on the submitted application
Application closed Post closure of application by IRDA
Application rejected Post rejection of application by IRDA
License Issued Post license issuance by IRDA

Surveyor User Manual View Application Status
Version: 1.0 115
Status Stage
Approval Withdrawn Post withdraw of approval by IRDA from approved application.

Surveyor User Manual Pending for Clarification
Version: 1.0 116
Pending for Clarification
Once you have submitted an application, IRDA reviews it. If additional information or documents are required after submission, IRDA notifies you through an email.
Clarification email:
IRDA, during the enrollment or license stage, may seek for additional documents for processing your request. In such a stage, you will receive a clarification email from IRDA. After that, you will have to log into BAP portal to provide additional documents and comments.
To view Pending for Clarifications:
1. Click Surveyor - Individual tab. If you are a corporate surveyor, click Surveyor - Corporate tab.
2. Click Pending for clarification tab. The list of the URNs (Unique Reference Numbers) awaiting clarification is displayed.
Figure 141: Pending for clarification screen
3. Click the URN (Unique Reference Number) to view the pending clarifications for that application. The application screen is displayed. The clarification required by IRDA is displayed in Remarks by IRDA field.
Figure 142: Application seeking clarification
4. In Remarks by Applicant field, provide additional information required by IRDA.
5. Attach additional documents if required by IRDA.
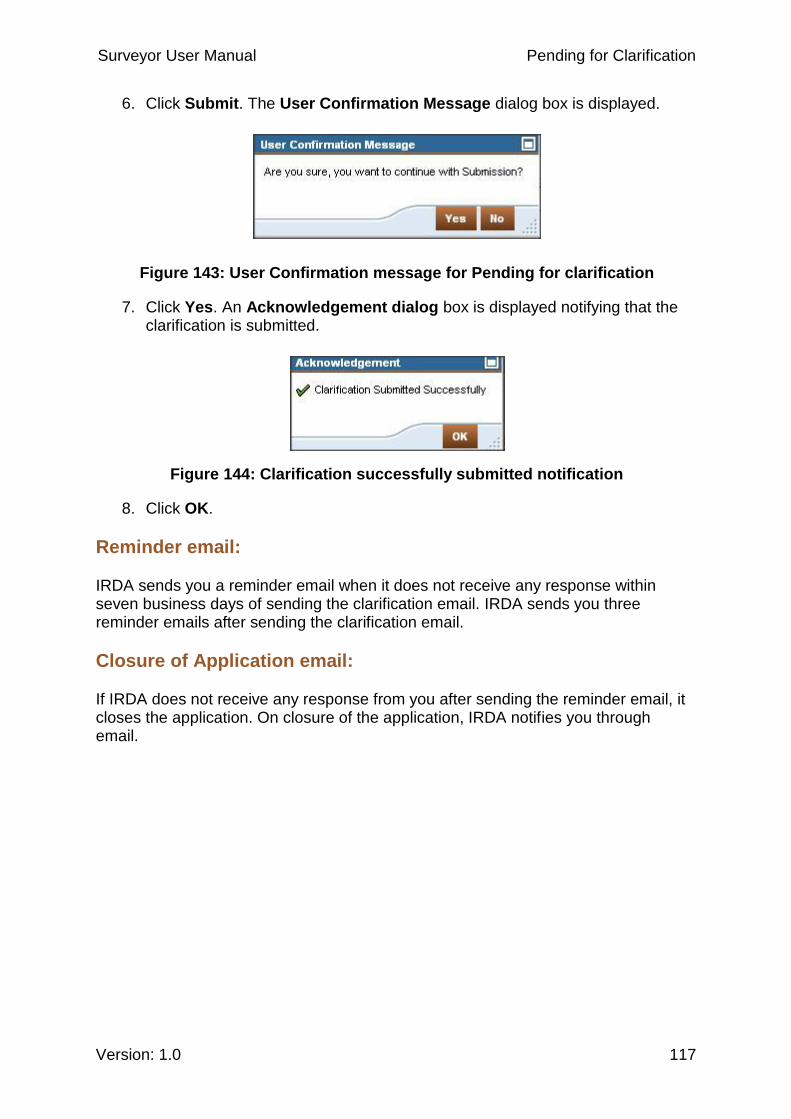
Surveyor User Manual Pending for Clarification
Version: 1.0 117
6. Click Submit. The User Confirmation Message dialog box is displayed.
Figure 143: User Confirmation message for Pending for clarification
7. Click Yes. An Acknowledgement dialog box is displayed notifying that the clarification is submitted.
Figure 144: Clarification successfully submitted notification
8. Click OK.
Reminder email:
IRDA sends you a reminder email when it does not receive any response within seven business days of sending the clarification email. IRDA sends you three reminder emails after sending the clarification email.
Closure of Application email:
If IRDA does not receive any response from you after sending the reminder email, it closes the application. On closure of the application, IRDA notifies you through email.

Surveyor User Manual Returns - Submitting Form - 12
Version: 1.0 118
Returns - Submitting Form - 12
In Returns, you need to submit the Form -12 to IRDA. The Form 12 includes information related to the number of surveys conducted and additional qualifications obtained (if any) during the financial year. It is mandatory to submit Form 12 for every financial year.
To submit Form -12:
1. Click Surveyor - Individual tab.
2. Click Returns tab.
Figure 145: Selecting the year for Form 12 submission
3. From Year drop-down list, select the year for which you want to file the returns. Fill Form button is active.
Figure 146: Active Fill Form button
4. Click Fill Form. The status of the form (Completed form, In progress form or Blank form) is displayed and a link is provided to the form.
Figure 147: Form 12 legends
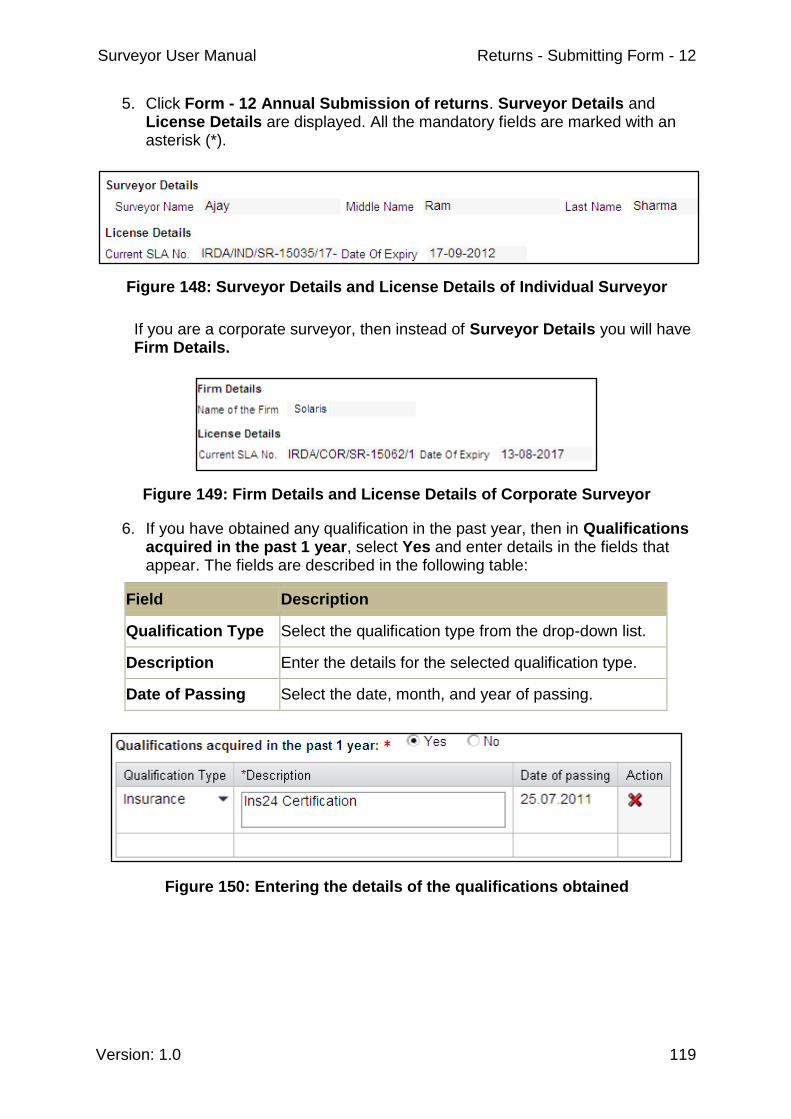
Surveyor User Manual Returns - Submitting Form - 12
Version: 1.0 119
5. Click Form - 12 Annual Submission of returns. Surveyor Details and License Details are displayed. All the mandatory fields are marked with an asterisk (*).
Figure 148: Surveyor Details and License Details of Individual Surveyor
If you are a corporate surveyor, then instead of Surveyor Details you will have Firm Details.
Figure 149: Firm Details and License Details of Corporate Surveyor
6. If you have obtained any qualification in the past year, then in Qualifications acquired in the past 1 year, select Yes and enter details in the fields that appear. The fields are described in the following table:
Field Description
Qualification Type Select the qualification type from the drop-down list.
Description Enter the details for the selected qualification type.
Date of Passing Select the date, month, and year of passing.
Figure 150: Entering the details of the qualifications obtained
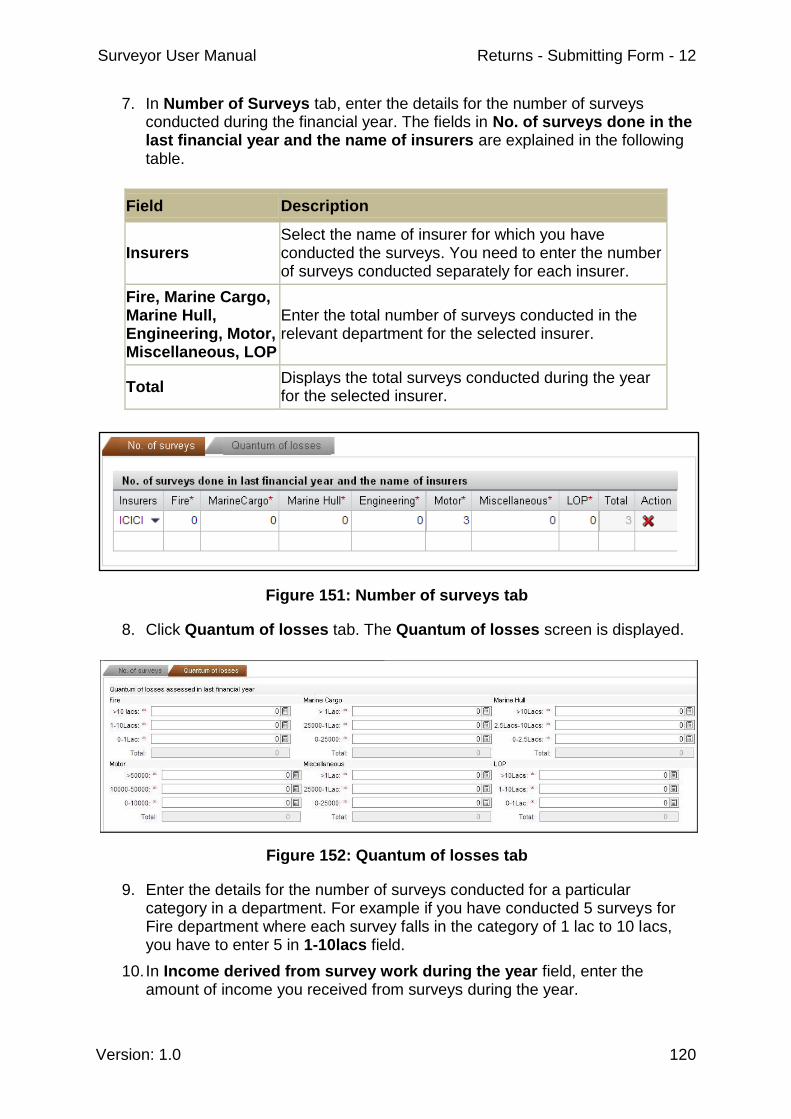
Surveyor User Manual Returns - Submitting Form - 12
Version: 1.0 120
7. In Number of Surveys tab, enter the details for the number of surveys conducted during the financial year. The fields in No. of surveys done in the last financial year and the name of insurers are explained in the following table.
Field Description
Insurers Select the name of insurer for which you have conducted the surveys. You need to enter the number of surveys conducted separately for each insurer.
Fire, Marine Cargo, Marine Hull, Engineering, Motor, Miscellaneous, LOP
Enter the total number of surveys conducted in the relevant department for the selected insurer.
Total Displays the total surveys conducted during the year for the selected insurer.
Figure 151: Number of surveys tab
8. Click Quantum of losses tab. The Quantum of losses screen is displayed.
Figure 152: Quantum of losses tab
9. Enter the details for the number of surveys conducted for a particular category in a department. For example if you have conducted 5 surveys for Fire department where each survey falls in the category of 1 lac to 10 lacs, you have to enter 5 in 1-10lacs field.
10. In Income derived from survey work during the year field, enter the amount of income you received from surveys during the year.
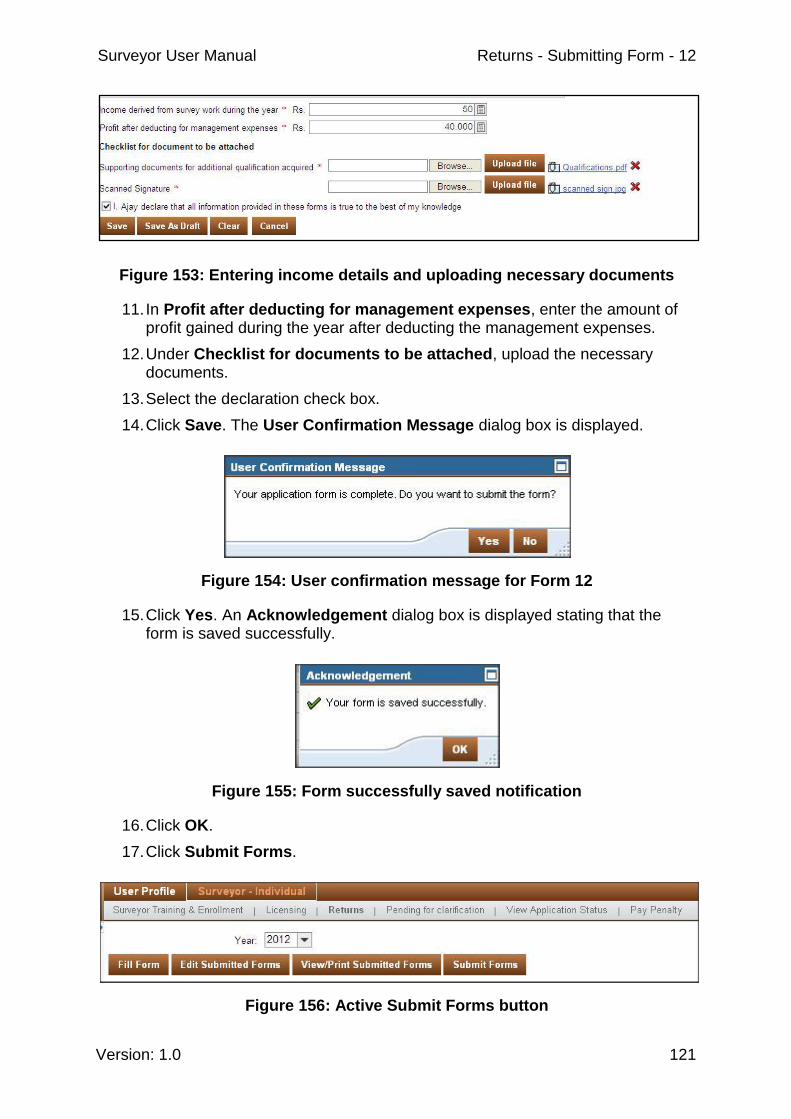
Surveyor User Manual Returns - Submitting Form - 12
Version: 1.0 121
Figure 153: Entering income details and uploading necessary documents
11. In Profit after deducting for management expenses, enter the amount of profit gained during the year after deducting the management expenses.
12. Under Checklist for documents to be attached, upload the necessary documents.
13. Select the declaration check box.
14. Click Save. The User Confirmation Message dialog box is displayed.
Figure 154: User confirmation message for Form 12
15. Click Yes. An Acknowledgement dialog box is displayed stating that the form is saved successfully.
Figure 155: Form successfully saved notification
16. Click OK.
17. Click Submit Forms.
Figure 156: Active Submit Forms button
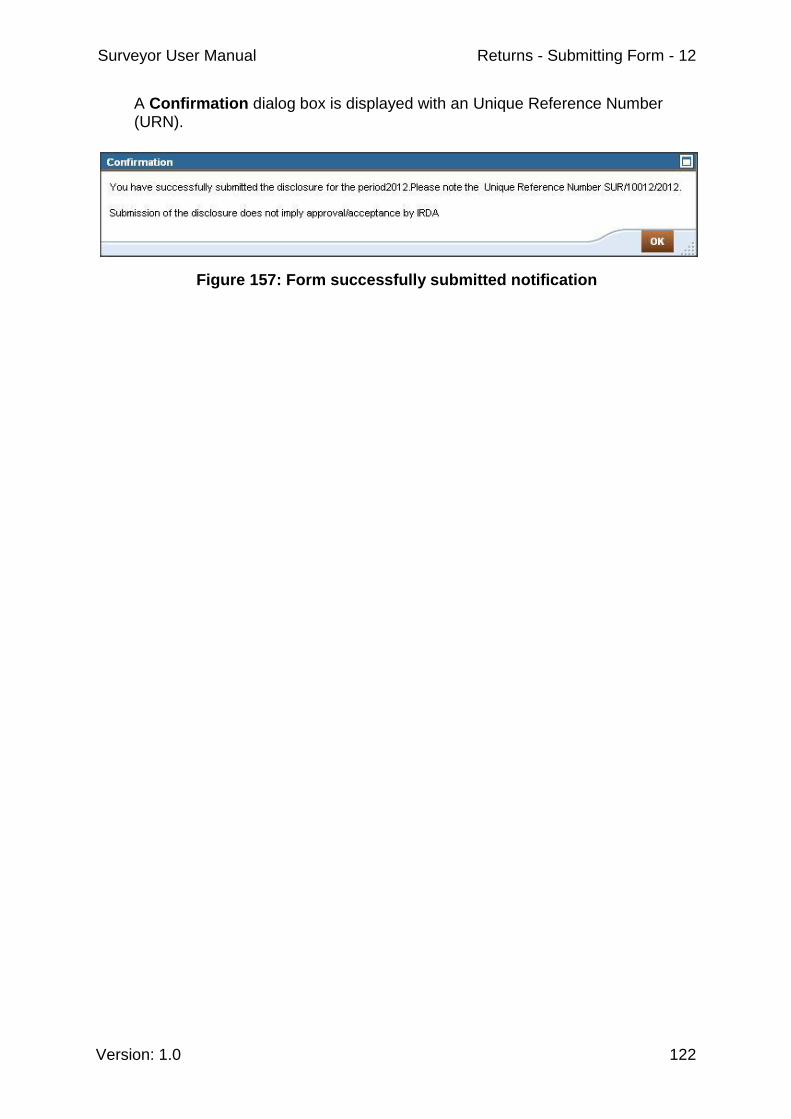
Surveyor User Manual Returns - Submitting Form - 12
Version: 1.0 122
A Confirmation dialog box is displayed with an Unique Reference Number (URN).
Figure 157: Form successfully submitted notification
Surveyor User Manual Reminder Notification for Submitting Form 12
Version: 1.0 123
Reminder Notification for Submitting Form 12
IRDA sends you the following email notifications about the annual submission of returns:
Two days before the due date to submit returns for the year.
On due date, informing about the last day of submission.
If you are submitting the form after due date, a notification dialog box is displayed notifying about the delay in form submission. Click OK to proceed with the form submission.
Surveyor User Manual Frequently Asked Questions
Version: 1.0 124
Frequently Asked Questions
1. Can I edit my submitted form?
Yes. You can edit or modify details in your submitted Form - 15 and Form - 12. For this you need to send an offline request to IRDA to unlock the form. After IRDA approves your request, you can edit the form. Application forms cannot be edited, once they are submitted
2. When do I have to fill Form 15?
You have to fill ‘Form – 15 Quarterly Submission’ for a trainee after the
applicant has completed the training, before filling the ‘Training Completion
Certificate’.
3. How am I supposed to reject a request raised by a trainee for training under me?
Login to the portal and Click on Trainer Acceptance Certificate .Select
The application you want to reject. Form is opened in read only mode .Click
on reject button.
4. How will I be informed after the trainee submits Form 13 and gets it approved from
IRDA?
This will be informed to you by IRDA through an offline communication after which you can fill the Form 16 – Training Completion Certificate for that particular trainee.
3. Can IRDA withdraw approval from an approved application?
Yes. IRDA can withdraw approval from an approved application before the license is issued. If your application is withdrawn, then IRDA will notify you through email.
4. What is the purpose of the Pending for Clarification tab?
When an application is submitted there might be situations where IRDA might require some additional information or documents to supplement the submitted application. IRDA halts the processing of the form until you submit the required documents. You can provide additional information/documents through the Pending for Clarification tab.
5. Do I get any notification if request for new/duplicate/Renew License has been rejected?
Yes. If your new, renew or duplicate license is rejected by IRDA, then an email notification is sent to you informing that your license is rejected.
Surveyor User Manual Glossary
Version: 1.0 125
Glossary
D
Duplicate License
Issued by IRDA when a surveyor's license has been lost, mutilated or destroyed.
F
Form 13
An application form submitted by the surveyor to IRDA for training in new departments.
Form IV
A quarterly report submitted by trainers every quarter to IRDA apprising about performance of trainees.
Form 12
An application form submitted by surveyor to IRDA covering business activities undertaken every financial year.
M
Make Payment
A payment made when applying for new, renew, and duplicate license.
Modification/Upgrading of License
Contains options for modifying and upgrading your existing license details.
N
Fresh License Application Rejection
An event when IRDA rejects Fresh License request from a surveyor.
P
Penalty
A fee charged to surveyors on account of violation of act or misconduct.
T
Training Acceptance Certificate
A certificate provided by the trainer surveyor in case of acceptance of training request of a trainee.
Surveyor User Manual Glossary
Version: 1.0 126
Training Completion Certificate
Issued to trainees after successfully completing the surveyor training.
U
Unique Reference Number
A reference number generated by the system when a user successfully submits an application to IRDA. Applicant can track the status of the submitted application with this number
V
View License Details
A tab under the licensing menu that allows you to view license details such as SLA number, surveyor name, office address etc.
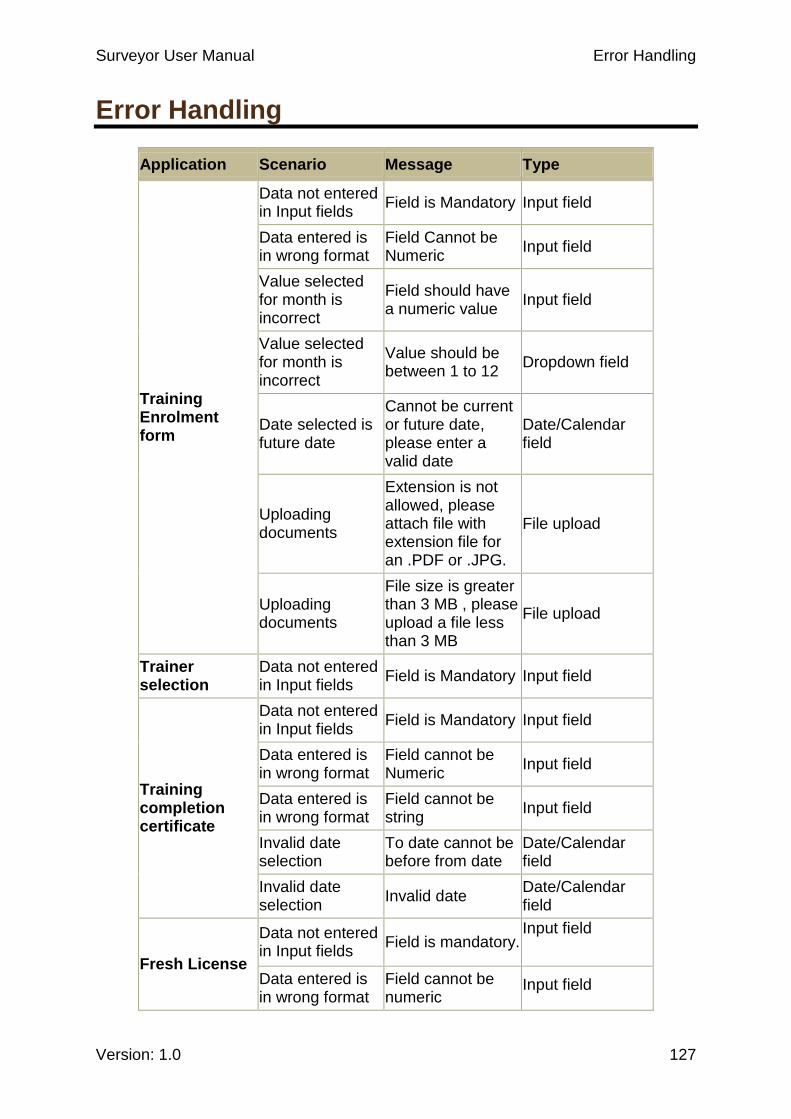
Surveyor User Manual Error Handling
Version: 1.0 127
Error Handling
Application Scenario Message Type
Training Enrolment form
Data not entered in Input fields
Field is Mandatory Input field
Data entered is in wrong format
Field Cannot be Numeric
Input field
Value selected for month is incorrect
Field should have a numeric value
Input field
Value selected for month is incorrect
Value should be between 1 to 12
Dropdown field
Date selected is future date
Cannot be current or future date, please enter a valid date
Date/Calendar field
Uploading documents
Extension is not allowed, please attach file with extension file for an .PDF or .JPG.
File upload
Uploading documents
File size is greater than 3 MB , please upload a file less than 3 MB
File upload
Trainer selection
Data not entered in Input fields
Field is Mandatory Input field
Training completion certificate
Data not entered in Input fields
Field is Mandatory Input field
Data entered is in wrong format
Field cannot be Numeric
Input field
Data entered is in wrong format
Field cannot be string
Input field
Invalid date selection
To date cannot be before from date
Date/Calendar field
Invalid date selection
Invalid date Date/Calendar field
Fresh License
Data not entered in Input fields
Field is mandatory. Input field
Data entered is in wrong format
Field cannot be numeric
Input field
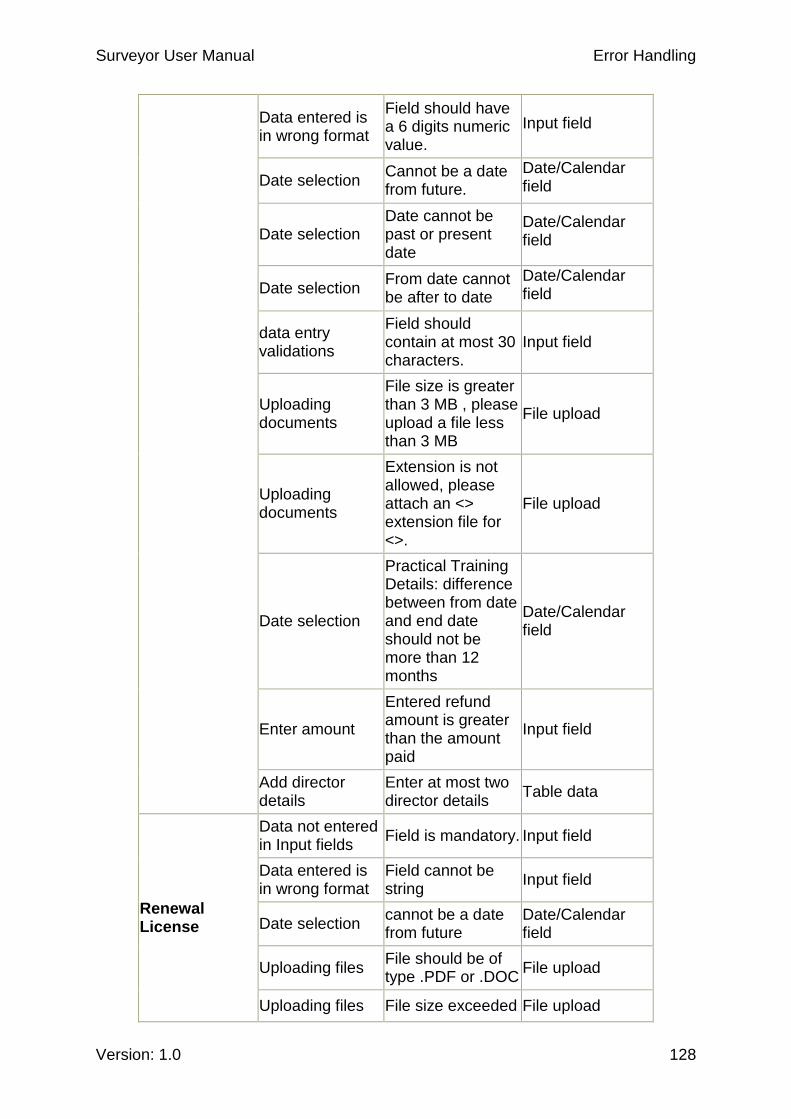
Surveyor User Manual Error Handling
Version: 1.0 128
Data entered is in wrong format
Field should have a 6 digits numeric value.
Input field
Date selection Cannot be a date from future.
Date/Calendar field
Date selection Date cannot be past or present date
Date/Calendar field
Date selection From date cannot be after to date
Date/Calendar field
data entry validations
Field should contain at most 30 characters.
Input field
Uploading documents
File size is greater than 3 MB , please upload a file less than 3 MB
File upload
Uploading documents
Extension is not allowed, please attach an <> extension file for <>.
File upload
Date selection
Practical Training Details: difference between from date and end date should not be more than 12 months
Date/Calendar field
Enter amount
Entered refund amount is greater than the amount paid
Input field
Add director details
Enter at most two director details
Table data
Renewal License
Data not entered in Input fields
Field is mandatory. Input field
Data entered is in wrong format
Field cannot be string
Input field
Date selection cannot be a date from future
Date/Calendar field
Uploading files File should be of type .PDF or .DOC
File upload
Uploading files File size exceeded File upload
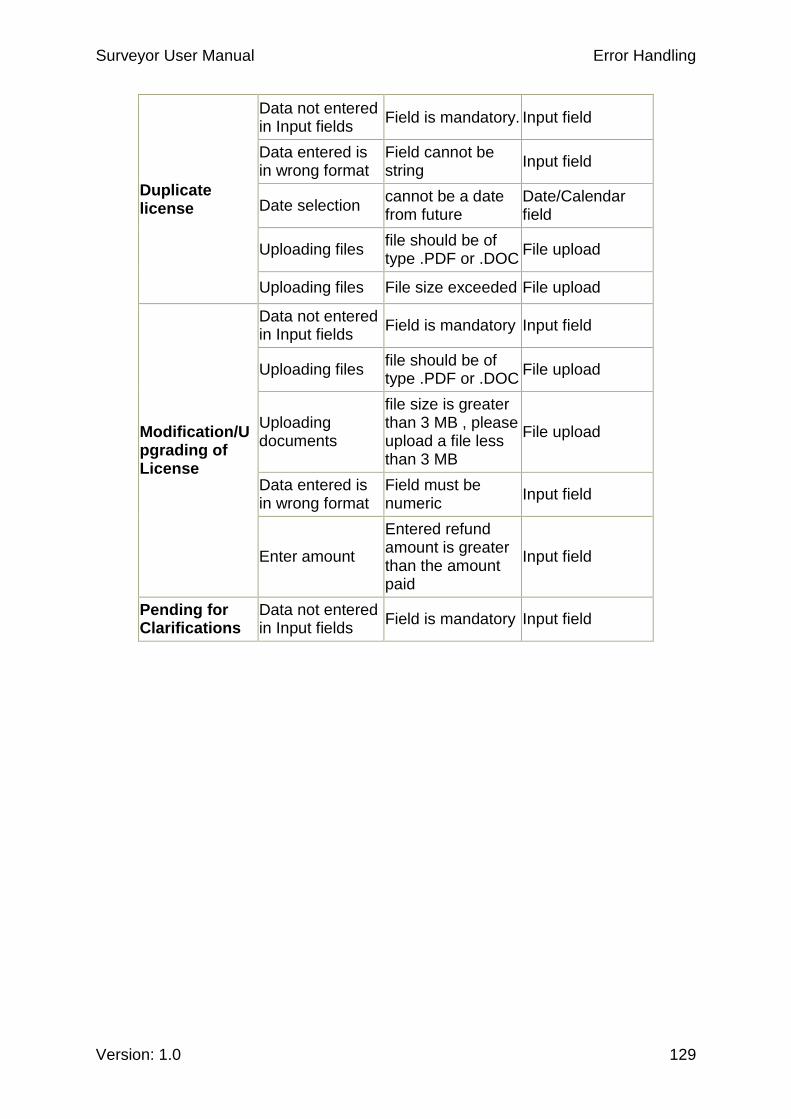
Surveyor User Manual Error Handling
Version: 1.0 129
Duplicate license
Data not entered in Input fields
Field is mandatory. Input field
Data entered is in wrong format
Field cannot be string
Input field
Date selection cannot be a date from future
Date/Calendar field
Uploading files file should be of type .PDF or .DOC
File upload
Uploading files File size exceeded File upload
Modification/Upgrading of License
Data not entered in Input fields
Field is mandatory Input field
Uploading files file should be of type .PDF or .DOC
File upload
Uploading documents
file size is greater than 3 MB , please upload a file less than 3 MB
File upload
Data entered is in wrong format
Field must be numeric
Input field
Enter amount
Entered refund amount is greater than the amount paid
Input field
Pending for Clarifications
Data not entered in Input fields
Field is mandatory Input field
Index
Version: 1.0 130
Index
C
Corporate Surveyor Registration ...... 63
Create new request .......................... 13
D
Duplicate license for Corporate…...103
Duplicate license for Individual……..53
F
Form IV………………………………..34
Form 12…………………………….119
L
License Details - Corporate .............. 62
License Details - Individual ............. 114
M
Modification of License - Individual...57
Modification License - Corporate…107
N
Fresh License - Corporate Surveyor…63
T
Trainer Acceptance Certificate……..30
Training Completion Certificate…….37
P
Pay Penalty………………………….125
Pending for Clarification ................. 102
R
Renew License - Individual .............. 41
Renew License - Corporate…………94
V
View License Status………………..115
View submitted request ................... 16