Embed Size (px)
Citation preview

Ironpie m6USER MANUAL

Safety Regulations
Note: Warn:
Before using this product, please read and follow all the following safety instructions, and keep this manual for future reference. Any operation inconsistent with this instruction manual may cause damage to this product.
1. Only authorized technicians can disassemble this product. Users are not recommended to disassemble this product by themselves.2.This product can only use the power adapter provided by the factory. If other adapters are used, the product may be damaged.3.Do not touch wires, sockets or power adapters when your hands are wet.4.Do not use cloth curtains or body parts to roll into the product’s drive wheels. 5. Do not place this product near cigarette butts, lighters and other smoldering fires.6.Please clean the product after charging.7.Do not bend wires excessively or place heavy objects and sharp objects on the product.8. This product is an indoor household product. Do not use it outdoors.9.Do not sit on the product.10.Do not use this product (e.g., bathroom) in wet environments.11.Before using this product, please remove all vulnerable items (e.g., glasses, lamps, etc.) on the ground as well as items (e.g., wires, paper sheets, curtains) that may entangle the side brushes and suction passages.12.Do not put this product in a place where it is easy to fall (e.g., on desks and chairs).13.Please carefully check whether the power adapter is connected to the socket before use, otherwise the battery may be damaged.14.To help prevent trips, please inform other members of the house when this product works.15.Please empty the dustbin before using this product when the dustbin is full.16.The temperature used for this product is 0°C to 40°C.17.Do not use this product in high temperature environments.18.Please remove the battery from the product before it is broken.19.Please make sure that this product is not powered on when removing the battery.20.Please recycle the discarded batteries safely.
1.Use only the original rechargeable battery and charging base specially equipped by the manufacturer. Non-rechargeable batteries are strictly prohibited. Please refer to the "Product Specifications" section for the battery information.2. It is forbidden to use this product in environments with open flames or fragile objects.3. It is forbidden to use this product in extremely hot (above 40°C) or extremely cold (below 0°C).4. It is forbidden for human hair, clothes, fingers and other parts to approach the opening and operating parts of the product.5. It is forbidden to use products on wet ground.6. It is forbidden for this product to absorb any items such as stones and waste paper that may cause products seized-up.7. It is forbidden for this product to absorb any inflammable substances, such as petrol, toner and toner for printers or photocopies. Prohibit the use of the product in clean areas with flammable items.8. It is forbidden for this product to absorb any burning items, such as cigarettes, matches, ashes and other items that may cause fire.9.It is forbidden to place items at the suction opening. Do not use this product when the suction port is blocked. Please clean up dust, cotton wool, hair, etc. at the suction opening to ensure smooth air circulation at the suction opening.10.Use the power cord carefully to avoid damage. It is forbidden to use the power cord to drag or pull this product or the product’s charging base. It is forbidden to use the power cord as a handle. It is forbidden to clamp the power cord under the door. It is forbidden to pull the power cord at sharp corners. It is forbidden for the product to run on the power cord. The power cord should be far away from the heat source.11.Do not use a damaged charging base.12.Even if the product has been severely damaged, burning of the product is prohibited, which may lead to explosion of the product’s battery.

Contents
Product Usage / Pause, Recharge, and Shutdown
Investigation of Common IssuesIndicator Lights Explanation
Product Usage / App Installation and Setting
Product Composition / Package ContentsProduct Composition / PartsProduct Usage / PreparationProduct Usage / ChargingProduct Usage / Start Cleaning
Component Maintenance / Charging Pole Piece, Cliff Sensor, Drive Wheel, and Caster Wheel
Component Maintenance / DustbinComponent Maintenance / Main Brush and Side Brush
8
8
9
11
14
15
16
18
Product Specifications 19
3
4
6
7
Customer Service 21

Robot Charging Base
Instructions Package
L R
Side Brush
Cleaning Brush
High Efficiency Filter
3
Power Adapter
Dustbin
Product Composition / Package Contents
InstructionsPackage

Product Composition / Parts
Power Button
Surface Cover
Omnidirectional Lens
Recharge ButtonCamera
Cliff Sensor
Side Brush
Drive Wheel
Dustbin
Charging Pole Piece
Caster Wheel
Main Brush Assembly
Battery
Dustbin Button
Front View Back View

High Efficiency StrainerHigh Efficiency Net Cover
Signal Indicator
DC Plug
Charging Pole PieceDustbin Side Cover
Dustbin Conductive Sheet
Primary Filter Strainer
Dustbin Metal Sheet
Dustbin Charging Base

Product Usage / Preparation
Remove Protection
Before using the robot, remove the protective strip on the robot and the protective film on the charging base.
Remove the protective strip Remove the protective film

Product Use / Charging
1. Place and charge: the charging base should be placed against the wall and on the flat ground. Do not place any items within the range of 0.5m left and right and 1.5m ahead.
2. Connect to the power supply.3. Install the side brush: on the left and right (L/R).
Attention:
4.Charging: place the robot on the charging base for charging. (The charging cycle takes about 5 hours.)
1. The charging base cannot be exposed to strong light or light reflection such as direct sunlight or mirrors. If there is any object with strong reflection, please cover it 7 cm from the bottom.2. In order to ensure the normal working hours of the robot, please fully charge it before use. The charging takes about 5 hours.
During the cleaning process, the robot can automatically enter the recharging mode and returns to the charging base when the power is insufficient. You can also control the robot to start the recharging mode with the recharge button on the robot or through the recharge button in your mobile app.
Product Use / Start Cleaning
Product Use / Pause, Recharge, and Shutdown
Based on your home environment, the robot will perform cleaning with a “zigzag” path to cover your home.
Setting method: When the robot is powered off, long press the Power button. After the start music is played which indicates the robot is powered on, short press the Power button, and the robot will start cleaning automatically.
Pause: When the robot is cleaning, press the Power button to pause the cleaning.Recharge: When the robot is cleaning or on pause, short press the Recharge button on the robot to enter the recharge mode. During recharge mode, short press the Power button to pause the recharging.Shutdown: After the robot completes cleaning, long press the Power button, and when the indicator light goes out, it indicates that the robot is shut down. *After the robot finishes cleaning, it is recommended to keep it being charged so it is well prepared for the next time cleaning.

9
Product Usage / App Installation and Settings
Search the “Trifo Home” app in iOS App Store or Android Play Store, download, and install. Please make sure your phone is connected to 2.4GHz and 802.11b/g/n bands Wi-Fi router.
2. Click “+” to add device;1. Open the “Trifo Home”, create an account with your email address or your phone number;
3. Select the product model you want to add;
4. Please first make sure the system is on, then press and hold the recharge button for at least 5 seconds until you hear the voice of entering network configuration and the light is blinking yellow and green, then click “Next”;
trifo
trifo-02
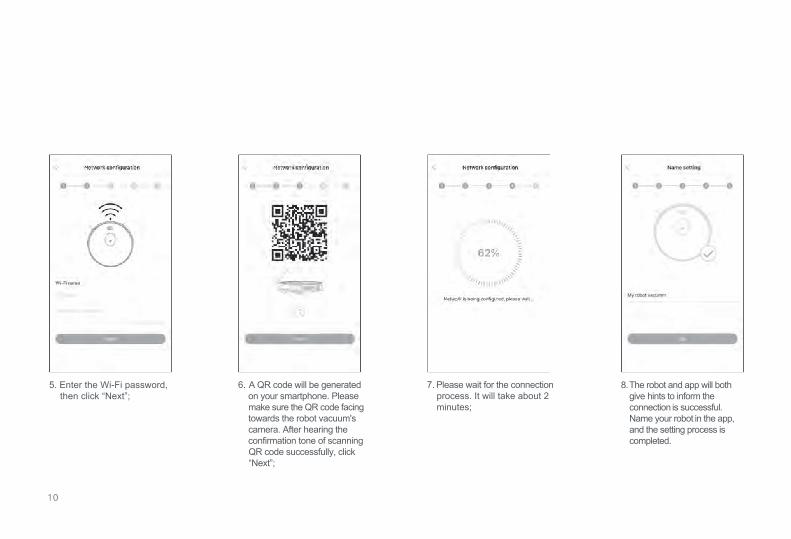
5. Enter the Wi-Fi password, then click “Next”;
6. A QR code will be generated on your smartphone. Please make sure the QR code facing towards the robot vacuum's camera. After hearing the confirmation tone of scanning QR code successfully, click“Next”;
7. Please wait for the connection process. It will take about 2 minutes;
8. The robot and app will both give hints to inform the connection is successful. Name your robot in the app, and the setting process is completed.

Component Maintenance / Dustbin
A. Press the dustbin button to remove the dustbin.
B. Open the side cover of the dustbin. D. Open the high efficiency net cover.
C. Empty the dustbin.

E.Open the high-efficiency screen cover, take out the high-efficiency screen and the primary-efficiency screen, and tap gently against the trash container to remove the debris. It is not recommended to wash the high-efficiency screen.
F.Rinse the primary filter screen.
G.Scrub the dustbin with a cloth. Please do not let water seep into the fan port during cleaning.

H. Dry the dustbin and filters, and keep it dry to maximize its lifespan.
I. Put the primary filter screen and the high efficiency filter screen back into the dustbin.
J. Close the dustbin cover and put the dustbin back to the robot.
Note: It is recommended to wash the primary strainer with water 15 - 30 days after it is used. The maximum lifespan of the high efficiency filter screen is 3 months.
Note: 1. Before installing the filter screen, please ensure that the high efficiency filter screen and the primary filter screen are dry. 2. Do not expose the high efficiency strainer and primary strainer directly under sunlight.
Note: Do not allow water to seep into the fan port when cleaning.

Component Maintenance / Main Brush and Side Brush 1. Open the main brush cover.
3. Clean the tangled hair.
2. Take out the main brush shaft.
Cleaning main brush
Cleaning side brush

Clean the charging pole piece.
Clean the cliff sensor.
Tips: The interior of the charging pole piece, the cliff sensor and the bumper contain sensitive electronic components. Please use dry cloth to clean. Please prevent any water contact or using a wet cloth to clean.
Clean the drive wheels and the caster wheel.
Component Maintenance / Charging Pole Piece, Cliff Sensor, Drive Wheel, and Caster Wheel
* If you do not use the robot for a long time, please fully charge it before storing it. Turn off the robot and supply power to it every 3 months to prevent the battery from being over-discharged.
* If the battery is over-discharged or not used for a long time, the robot may not be able to be charged. Please contact the customer service for maintenance and do not disassemble it yourself.

Transport robot back to dockPlug in power to charging base;Place charging base as instructed;Move robot close to charging base.
Drive wheel not on surface
Drive wheel stuck Check whether the drive wheel is entangled with objects and clean it up.
Check if the bumper can rebound normally and move to left, right and back to center; If not, please check if something is stuck in bumper.
Check if the fan is entangled; Check if the filter installed correctly.
Check if the side brush is entangled and clean it up.
Check if the main brush is entangled and clean it up.
Please put the robot back to the ground and press the Power button again.
Side brush stuck
Main brush stuck
Bumper stuck
Blower motor error
Prompt Tone Solution
Investigation of Common Issues

Charging error
Front wheel stuck Check if the the caster wheel can move freely to all directions.If not, please remove the screws and clean the wheel.
Check if the battery is installed correctly before being recharged. Please make sure the robot could be powered on. If any abnormal sign happens during recharging, it may be either robot or charging base displaced.
Make sure the Wi-Fi router is 2.4GHz and 802.11b/g/n bands, and make sure it’s working.Connection failed
Connection failed, password error Check if the correct Wi-Fi password is filled in the APP.
Put the dustbin back to the robot correctly.
Clean dustbin.
Dustbin missing
Dustbin full
17

Power button solid green and recharge button solid yellow
Power button solid green and recharge button flashing yellow
Power button solid green
Recharge button solid yellow Recharging
Network configuration mode
Malfunction
Normal working mode
Battery low
Looking for charging base
Power button flashing green and recharge button flashing yellow alternately
Power button solid red
18
Robot Working Status
Indicator Lights Explanation
Indicator Light

19
Projects Parameter
Physical size
Battery
Cleaning
Classification
System
Diameter 330 mm
74 mm
2.7 kg
14.4 volts
2500 mAh rechargeable lithium battery pack
600 ml
about 300 minutes
about 100 minutes
28 watts
14.4 volts
Height
Net weight
Voltage
Battery
Dustbin capacity
Each charging period
Each cleaning period
Rated power
Operating voltage
Product Specifications
* This information is subject to change, and Trifo reserves the right to update the product specifications.

Pb/Pbcompound
Hg/Hgcompound
Cd/Cdcompound
Cr(VI)Cr(VI)compound PBB PBDE
Harmful SubstanceComponent
Plastic
Host circuit module
Hardware
ElectronicBattery
Plug power cord
(Metal part)
20
Description: This form is prepared in accordance with the provisions of SJ/T 11364. 〇 : Indicates that the content of the hazardous substance in all homogeneous materials of the part is below the limit requirement specified in the current valid version of GB/T26572. × : Indicates that the content of the hazardous substance in at least one of the homogeneous materials of the part exceeds the limit requirement stipulated in the current effective version of GB/T26572, and there is no mature alternative in the industry, which meets the environmental protection requirements of the EU RoHS Directive.
The number in this logo indicates that the product has an environmental protection period of 10 years under normal use.
Executive standard: GB4706.1-2005 GB4706.7-2014 GB4343.1-2009 GB17625.1-2012

Customer Service
12 months Limited Warranty
Lifetime Technical Support
@TrifoRobotics
21

For FAQs and more information, please visit:
www.trifo.com