Embed Size (px)
Citation preview

Isabel Security Components Technical Documentation for the customer
• Subject: Technical document for the network manager of the customer • Revision: Version 2.4 • Date of last update: 11-01-2012 • Document owner: Isabel nv/sa • Content Type: Info, Content & Advice • ID: 091870007 (docx) & 091870008 (pdf)
© Copyright Isabel 2012. All rights reserved. No part of this document may be reproduced, stored in a database or a storage-and-retrieval system,
published or passed to others in any form, electronic or mechanical, including print, photocopy or microfilm without the prior written permission of Isabel NV/SA.

Isabel Security Components Technical Documentation for the customer Version 2.4 Page 2 of 72
TABLE OF CONTENTS
1. Document information ........................................................................................................ 3
1.1. Purpose of this document ........................................................................................ 3
2. Technical specifications ..................................................................................................... 4
2.1. Installation Requirements ........................................................................................ 4
2.2. Content ....................................................................................................................... 4
2.3. Standard procedure .................................................................................................. 5
2.3.1. Installation ....................................................................................................... 5 2.3.1.1. Supported installation modes ........................................................................ 5 2.3.1.2. User Rights ................................................................................................... 6 2.3.1.3. Installation Wizard Workflow ......................................................................... 7 2.3.1.4. Installation Screens (Production) ......................................................................... 8
2.3.2. Maintenance and upgrading ......................................................................... 32 2.3.2.1. Upgrading and downgrading ....................................................................... 32 2.3.2.2. Maintenance................................................................................................ 34 2.3.2.3. How to identify an installation package ....................................................... 40
3. Installation Details ............................................................................................................. 44
3.1. Local configuration ................................................................................................. 44
3.1.1. Installation location ....................................................................................... 44
3.1.2. Location Log-files and OCSP-responses ..................................................... 44
3.1.3. Environment configuration ............................................................................ 44
3.2. File handling ............................................................................................................ 46
3.3. Automatic Proxy Settings (WinHTTP) ................................................................... 52
3.4. Shortcuts created .................................................................................................... 53
3.5. Insert root CA in MS IE Certificate store ............................................................... 54
3.6. Digital signature ...................................................................................................... 54
3.7. Registry entries ....................................................................................................... 54
3.7.1. Registry entries Production environment ..................................................... 54
3.8. MSI Properties ......................................................................................................... 62
3.9. Command line options ............................................................................................ 69
3.10. Upgrades .................................................................................................................. 70

Isabel Security Components Technical Documentation for the customer Version 2.4 Page 3 of 72
1. Document information
1.1. Purpose of this document This document describes the ‘Isabel Security Components’ – Microsoft Installer Kit and is intended for network administrators and IT personnel who want in-depth technical information.

Isabel Security Components Technical Documentation for the customer Version 2.4 Page 4 of 72
2. Technical specifications
2.1. Installation Requirements The installation requirements of the most recent version can always be retrieved from our website:
• Search and read the article 2294; or
• Read http://www.isabel.be/support6/en-US/websupport/direct.php?id=2294
It is advisable that you have always installed the most recent version of the security components on your computer(s) and that you use the accordingly version of this document.
All these conditions are verified during the installation and presented on one comprehensive dialog screen. If one of these tests fails the installation is aborted but the user has the full overview of all items passing and/or failing.
2.2. Content The ‘Isabel Security Components’ MSI package version 6.24.0001 contains:
• Isabel CA (plus tools to get this certificate into the Microsoft Internet Explorer Trusted Roots Certificate Store)
• Isabel OfficeSign 6.0 (including branding support files) • Isabel Card Activator 6.0 • Isabel 6 eBanking mobile code (i.e. EXE, ActiveX and DLL files to be able to use
Isabel 6 eBanking) • Isabel 6 Control Panel • Client Isabel Synchronizer • Isabel Certificate Update (a systray program)
The installation package is available in 4 languages: English, Dutch, French and German (separate MSI or multi-language setup executable).

Isabel Security Components Technical Documentation for the customer Version 2.4 Page 5 of 72
2.3. Standard procedure
2.3.1. Installation
2.3.1.1.
Normal install (msiexec /i) in both attended (with User Interface) or unattended (without user interaction) is supported.
Supported installation modes
Unsupported installations:
• per-user installations: from version 6.24.0001 of the MSI the installation is always executed for all users (= per-machine installation).
• Admin install (/a), i.e. network installations. Executing an installation in this mode is not foreseen and not tested. There is no result guaranteed, and this type of installation is blocked with the following error message:
• Advertise install (/j) i.e. adding only menu items and references without copying the
actual files. This is not foreseen to work, all components are flagged as “Advertising not allowed”, this method is not tested, and this type of installation is blocked with the following error message:

Isabel Security Components Technical Documentation for the customer Version 2.4 Page 6 of 72
2.3.1.2.
• Stand-alone user rights necessary to complete an installation:
User Rights
o For a first install the user should belong to the “Administrators” group. Otherwise the registration of the Isabel OfficeSign CSP and the introduction of several system-global settings will fail.
o Afterwards, for doing Modify or Repair on the installed version, the “Power Users” user rights are sufficient to complete the file copies, as long as there are no new system-global settings to add or to change, but please note that under Vista and Windows 7, as there is no longer a “Power Users” group, you will need Administrator rights to accomplish these actions.
o Upgrading to a newer version of the product will always need Administrator rights, each new version of the MSI being delivered in the form of a major upgrade.
• Corporate installation procedures: In a corporate environment there are 3 ways to get the ‘Isabel Security Components’ installed: o If the user has full installation rights then preceding rules are valid. o If the user has limited installation rights (e.g. for “Users”), an administrator can
perform a manual installation of the ‘Isabel Security Components’ on the PC of the user.
o If the user has limited installation rights (e.g. for “Users”), installations can happen via a deploy tool (such as SMS, LANDesk, …). The installation is then executed with elevated privileges due to the use of the deployment tool. Please note that Active Directory is NOT supported as a deployment tool due to restrictions built into the MSI (see also 2.3.1.1 Supported installation modes, pg. 5).
• Available functionality under different User Rights: o User belongs to the “Administrators” group: the user is able to fully use and
configure the ‘Isabel Security Components’ (including ‘Isabel Office Sign’). o User belongs to the “Power Users” group (in XP: “Standard User”): the user
can fully use and configure the ‘Isabel Security Components’ (including ‘Isabel Office Sign’).
o User belongs to the “Users” group (in Vista: "Standard user"; in XP: "Restricted user" or, if not part of a domain, "Limited account"): the user is restricted in the use because among other restrictions he cannot write in the (system-global) registry, which makes adapting “Isabel Office Sign settings” in the control panel impossible. The other use of ‘Isabel Security Components’ (including ‘Isabel Office Sign’) is not limited.

Isabel Security Components Technical Documentation for the customer Version 2.4 Page 7 of 72
2.3.1.3.
MSI Initialisation
Maintenance Welcome
InstallRequir.
Installation Requirements
Ready To Install
Installing
Setup Complete Succes
Setup Interrupted
Cancel
Cancel
Repair
Ready To Remove
NOK
OK
Remove
RemovingCancel
Remove Complete Success
Cancel
Installed Install Welcome
License Agreement
Trusted Sites
Cancel
Cancel
CancelRequirements NOK
Cancel
Cancel
Y N
InstallRequir.
Modify
NOK
OK
Old IOS found
Old IOS Found
Cancel
Y
NCancel
Download Additonal Features
Additional Features
Destination Folder
Additional Shortcuts
Cancel
Y
N
Cancel
Installation Wizard Workflow

Isabel Security Components Technical Documentation for the customer Version 2.4 Page 8 of 72
2.3.1.4.
2.3.1.4.1. MSI Initialization
Installation Screens (Production)
While this screen is shown, the setup executes all the initialisation steps:
• Gathering system settings and configurations (like folder names, …).
• Verification Microsoft Installer (version 2.0 or later). This shouldn’t be an issue because another installation requirement is to have at least Internet Explorer 6.0 what includes version 3 of Microsoft Installer. If –for some reason—this version 2 (or newer) cannot be found then the installation cannot continue, and the user gets as message:
• The installation searches the Windows System32 folder for the Isabel OfiiceSign CSP (i.e. isabel_sc_csp1.dll). If this file is found its location is stored in the property OLD_IOS and then the installation knows that either IOS 5.0, either IOS 5.6 is installed. This older version is removed during the installation procedure.
• The installation searches the Windows folder for the file CapiCom.dll. If present, this file is used by Isabel Office Sign, otherwise a version of this file is installed with the ‘Isabel Security Components’ package in the Windows System32 folder. This file is not removed when executing an uninstall.

Isabel Security Components Technical Documentation for the customer Version 2.4 Page 9 of 72
• Installation checks for the presence of Isabel Business Suite 5.0 by looking for IBS5 installation registry parameters. The location of the IBS5 root is stored in the property IBS5_PATH. The property IBS5_FOUND contains whether or not the file ‘isabel.exe’, ‘isasign.exe’ or ‘inv_view.exe’ was found in [IBS5_PATH]\bin.
• Gathering all necessary information to verify the installation requirements (see also 2.3.1.4.4. Installation Requirements, pg. 11).
• Gathering all necessary installer configuration parameters and initialising the installer User Interface.
Remark:
2.3.1.4.2. Install Welcome
The ‘Isabel Security Components’ MSI is customised using several VBScripts. The system on which the installation is done should –of course– support the use of this kind of scripts, otherwise the MSI will react with the message:
This shouldn’t be a problem because VBScript support is a system component and is updated e.g. when installing Internet Explorer 6.

Isabel Security Components Technical Documentation for the customer Version 2.4 Page 10 of 72
This screen is the first User Interaction screen when starting the first installation of ‘Isabel Security Components’ or when executing the upgrade from a previous version of ‘Isabel Security Components’ version 6.00.
2.3.1.4.3. License agreement
The user has to accept the license agreement to continue.
The License Agreement text can be printed on the default Windows printer by clicking the ‘Print’ button. Printing is immediately started and will fail when there is no default printer available.

Isabel Security Components Technical Documentation for the customer Version 2.4 Page 11 of 72
2.3.1.4.4. Installation Requirements
An overview of the Installation Requirements is presented. If everything is OK, the installation can proceed, otherwise the installation is aborted.

Isabel Security Components Technical Documentation for the customer Version 2.4 Page 12 of 72
For every installation requirement the user can push the preceding status button to get a short description of the status or the requirement.

Isabel Security Components Technical Documentation for the customer Version 2.4 Page 13 of 72
A failed requirement gives, depending on an URL for more explanation is available or not,
- either the opening in the browser of an error HTML page:

Isabel Security Components Technical Documentation for the customer Version 2.4 Page 14 of 72
- either a critical error message in a standard VBScript message box:

Isabel Security Components Technical Documentation for the customer Version 2.4 Page 15 of 72
A passed requirement gives an ‘Informational’ message-box:
Non-blocking issues are flagged with a yellow icon and explained with a ‘Warning’ message-box:

Isabel Security Components Technical Documentation for the customer Version 2.4 Page 16 of 72
Installation Requirements:
• Read http://www.isabel.be/support6/en-US/websupport/direct.php?id=2294
• Supported Colour Range The screen settings should at least support High Colours, i.e. 16bit per pixel to guarantee a correct representation of the screens.
• Screen Resolution All screen layouts are created with the assumption that the user disposes of at least 1024 by 768 pixels. If the screen is configured with less visible pixels then part of the layouts will not be visible.
• Physical Memory To be able to run the Isabel 6 eBanking application, the system should have at least 512MB of physical memory.

Isabel Security Components Technical Documentation for the customer Version 2.4 Page 17 of 72
• PC/SC smartcard reader The security system enforced with the ‘Isabel Security Components’ is based on the use of smartcards. Therefore an operational PC/SC smartcard reader should be available to continue the installation.
• User with Administrative rights
• PC date and time A warning is given is the PC date and time differs too much from the Isabel server time. The PC date and time can be immediately changed, since this is not a blocking error (but at e-banking signing time the error will be blocking).
The results of all these verification steps are logged into a file called “Isa_MSI.log”, which is stored in the standard log-files location (see also 3.1.2. Location Log-files and OCSP-responses, pg. 44) – as soon as this location is defined during the install. Until then, this log file is created and updated in the TEMP folder. This log file can be printed on the default Windows printer by clicking the ‘Print report’ button. Printing is immediately started and will fail when there is no default printer available.
2.3.1.4.5. Old version of Isabel Office Sign found
When an Isabel Office Sign 5.x was found, this screen must inform the user about the removal of this older version.

Isabel Security Components Technical Documentation for the customer Version 2.4 Page 18 of 72
2.3.1.4.6. Change destination folder and installation location warning
On the Destination folder screen the installer can choose where to install the ‘Isabel Security Components’ (most files are copied into this folder, some shared files are automatically stored in the common program files folder – which is in many cases: C:\Program Files\Common Files –).
If an installation of Isabel Business Suite 5 is found, the user is blocked from installing in the same subdirectory, otherwise he would risk to lose the ‘Isabel Security Components’ installation when uninstalling IBS5.

Isabel Security Components Technical Documentation for the customer Version 2.4 Page 19 of 72
When no IBS5 was found this warning will not appear.
The default installation location for ‘Isabel Security Components’ doesn’t correspond with the default installation location of ‘Isabel Business Suite 5’, so normally there shouldn’t be any problem.
The installation procedure verifies the requested installation location for the ‘Isabel Security Components’ against the IBS5 location found on the system and will prevent to continue the installation (making the Next button disabled and greyed) as long as the user asks to install somewhere under the IBS5 path.

Isabel Security Components Technical Documentation for the customer Version 2.4 Page 20 of 72
If the user wants to upgrade an ‘Isabel Security Components’ 6.0 version, the user cannot change the installation location: labels and Change button are disabled and greyed-out.

Isabel Security Components Technical Documentation for the customer Version 2.4 Page 21 of 72
2.3.1.4.7. Additional Shortcuts
By default, the installation adds shortcuts to the Isabel login page on the user’s desktop, as well as shortcuts to the various Isabel websites in the Favorites folder of Internet Explorer.
By (de-)selecting the appropriate checkboxes, the user can choose whether or not to have shortcuts installed in these respective locations.

Isabel Security Components Technical Documentation for the customer Version 2.4 Page 22 of 72
2.3.1.4.8. Trusted Sites
The setup adds this list of Isabel Websites to the group of Internet Explorer “Trusted sites”. The trusted sites are well installed for all users but they are only visible in IE (Internet Options, tab Security) by the user who did the installation.
The settings can be verified in the Internet Explorer status bar (lower right corner): when working on a web site that has been added to the system-wide Trusted Sites, you should get:
Websites added:
https://*.IBS6.isabel.be https://gotoIBS6.isabel.be https://my.isabel.be https://pki.isabel.be http://www.isabel.be http://www.isabel.eu https://migration.isabel.be http://*.dexia.be https://*.dexia.be http://www.fortisbusiness.com https://www.fortisbusiness.com http://www.merchant.fortisbank.com http://*.bnpparibasfortis.com http://*.bnpparibasfortis.be https://finance.fortisbusiness.com https://stepup.finance.fortisbusiness.com

Isabel Security Components Technical Documentation for the customer Version 2.4 Page 23 of 72
https://businessportal.fortisbank.com https://stepup.businessportal.fortisbank.com https://secure.ios6.ing.be/ https://www.cbc.be http://cbc-pdf.cbc.be http://static.cbc.be https://www.cbc.eu https://cbconline.cbc.be https://www.kbc.be http://kbc-pdf.kbc.be http://static.kbc.be https://kbconline.kbc.be https://www.kbc.eu https://www.kbcgroup.eu https://multimediafiles.kbcgroup.eu http://www.kbcam.be https://www.kbcam.be http://www.kbcam.com https://www.kbcam.com https://*.minfin.fgov.be https://*.nbb.be https://*.socialsecurity.be

Isabel Security Components Technical Documentation for the customer Version 2.4 Page 24 of 72
2.3.1.4.9. Additional downloadable features
Isabel may provide via its website one or more additional programs that enhance ‘Isabel Security Components’ functionality, but are not vital to its core functionality. These programs are referred to as “downloadable features”. The ‘Isabel Security Components’ installation package can dynamically update this list of items by verifying the Isabel updates website. There, a file with the most recent ‘downloadable features’ can be downloaded and presented. If this file is absent or does not contain any (not yet installed) entries, the “Additional features to install” screen is not shown and the installation will continue with the next screen, 2.3.1.4.10 Ready to install (see pg. 25) instead.
Because these downloadable features are provided by Isabel, these will be downloaded during installation of ‘Isabel Security Components’ and their installation is started immediately afterwards, if the user chooses so in the last screen of the setup (see also 2.3.1.4.12. Setup has been executed successfully, pg. 28).
The downloadable feature of “Counterparty Converter”, however, may be made compulsory in some cases: when an installation of Isabel Business Suite 5 is found (see 2.3.1.4.6 Change destination folder and installation location warning, pg. 18) or when a previous version of Counterparty Converter is found. In these cases, the option for this downloadable feature will be selected and “greyed out”, i.e. made unavailable to the user, so this feature must be downloaded and installed (see also 2.3.1.4.12 Setup has been executed successfully, pg. 28).

Isabel Security Components Technical Documentation for the customer Version 2.4 Page 25 of 72
Isabel 6 also requires some external software to be present, for instance to view report files (which are in .pdf format) the user will need a PDF reader. If any such program is found to be missing, it will be dynamically added to the “Download only” section of this dialog. “Download only” because this concerns 3rd party programs for which Isabel is not the licensor, and for which the end user has to accept a separate licence agreement in order to install them. Since Isabel has no control over the actual download location of such software, the software isn’t actually downloaded. Instead a link to the download location of the software is copied in the folder specified in the “Download items to:” box in the screen above.
The selected feature packages will be downloaded to the folder specified in the “Download items to:” box in the screen above. The “download to” location is by default set to the folder “Isabel downloads” that will be created in the “Application Data” folder for All Users, and its value is stored in the property “DOWNLOADLOCATION”. This value can be changed by clicking the button with the three dots (…) to the right of this box or by editing the entry line directly.
Please note that the exact location of this folder may differ depending on the OS. For instance, under Windows XP, this folder - in a standard configuration - refers to “C:\Documents and Settings\All Users\Documents”, and under Vista and Windows 7, the same folder will be located under “C:\Users\Public\Documents”.
2.3.1.4.10. Ready to install
In the “Ready to install” screen a short summary of the selections made, is shown. Once the user has passed this screen, ‘Isabel Security Components’ gets installed.

Isabel Security Components Technical Documentation for the customer Version 2.4 Page 26 of 72
2.3.1.4.11. Installing
This dialog screen allows to follow the progress of the installation. In this snapshot Windows Installer is currently writing the registry values:
If any additional features were selected in the Additional downloadable features dialog (see also 2.3.1.4.9. Additional downloadable features, pg.24), these features are automatically downloaded at the beginning of the installation:

Isabel Security Components Technical Documentation for the customer Version 2.4 Page 27 of 72
If any of these downloads fail, the user is notified with a message box similar to this one:
Of course, this means the user will have to manually retry the failed download (and installation) of this particular feature on the Isabel website.

Isabel Security Components Technical Documentation for the customer Version 2.4 Page 28 of 72
2.3.1.4.12. Setup has been executed successfully
When the installation finalised successfully, the installation can verify the network settings by executing a connectivity test.
For a first install this option is selected by default. When upgrading an Isabel Office Sign 5.x, or an older ‘Isabel Security Components’ version, the connectivity test is not selected by default, but the user can still prefer to checkmark this option.
The connectivity test is the same as you can find in the ‘Isabel Security Components’ Control Panel and will verify the necessary URLs and network ports to guarantee a correct behaviour of Isabel OfficeSign 6 and the Isabel 6 applications:

Isabel Security Components Technical Documentation for the customer Version 2.4 Page 29 of 72
If any additional downloadable features have been selected in the Downloadable Features dialog screen (see also 2.3.1.4.9. Additional downloadable features, pg. 24), leaving the lower of the two checkboxes ticked will launch the installation of these features as soon as you have clicked the Finish button. De-selecting this checkbox will not launch the installation of these features when clicking the Finish button. Of course, these features can also be installed manually afterwards by launching the MSI in the folder where you downloaded the features. Take note that the dialog screen of the MSI will stay open until the installations of the selected features have been fully completed (whether successful or not) and that every installation launches in its own separate window:

Isabel Security Components Technical Documentation for the customer Version 2.4 Page 30 of 72
If no additional downloadable features have been selected in the Downloadable Features dialog screen, the lower checkbox and its accompanying text are not shown.
The downloadable feature of “Counterparty Converter”, however, may be made compulsory in some cases: when an installation of Isabel Business Suite 5 is found (see 2.3.1.4.6 Change destination folder and installation location warning, pg. 18) or when a previous version of Counterparty Converter is found. In these cases, the option for this downloadable feature will be selected and “greyed out”, i.e. made unavailable to the user, so this feature must be downloaded and installed (see also 2.3.1.4.9 Additional downloadable features, pg. 24)
2.3.1.4.13. Recommended IE settings
On action on the Finish button of the Setup Completed dialog and before launching, if applicable, the connectivity tests and the installation of additional features, the user is prompted for authorizing some Internet Explorer settings that are required: - for correct operation of the Isabel 6 application (those settings can not be changed), - for performance optimization of the application (those settings may be rejectedl).
This dialog is not displayed if the IE settings are found to have the expected value.
On a Vista platform the dialog looks like this:

Isabel Security Components Technical Documentation for the customer Version 2.4 Page 31 of 72
On a XP the Enable Protected Mode setting is not displayed.
2.3.1.4.14. Setup Interrupted
All over the installation procedure the user can choose to cancel the installation:
Once confirmed, the setup will rollback the changes that may have been made to the system (if applicable and possible) and will terminate with the following screen:
2.3.1.4.15. Launch Isabel start page
At the end of an installation, regardless of whether it was interrupted or not, and regardless of whether the installation completed successfully or not, the installer will launch Internet Explorer which opens the Isabel start page when the user clicks the Finish button.
Isabel Security Components Technical Documentation for the customer Version 2.4 Page 32 of 72
On this page, the user will see the actual status of the Isabel Security Components on his computer (installed or not) and of the current card status (activated or not), plus this page will guide the user through the process of accomplishing these two tasks.
The Isabel start page will not be launched in case of an uninstall, a repair or a modify of the MSI.
2.3.2. Maintenance and upgrading
2.3.2.1.
2.3.2.1.1. Upgrade from IOS 5.0 or IOS 5.6
Upgrading and downgrading
When upgrading from IOS 5, there is nearly no difference with a normal (clean) installation. The installation procedure installs the files and configuration items as it would have been done during a normal installation but it will also remove completely the IOS 5 installation:
• From windows\system32 the following files are removed: isabel_rip.dll, isabel_sc_csp1.dll and isabel_sc_csp1.sig.

Isabel Security Components Technical Documentation for the customer Version 2.4 Page 33 of 72
• The log files from IOS 5 are moved to a subfolder “logfiles.5x” under the ‘Isabel Services’ common data folder (see also 3.1.2. Location Log-files and OCSP-responses, pg. 44).
• The OCSP responses, probably saved in the “responses” folder for IOS 5 are all moved to a subfolder “responses.5x” under the ‘Isabel Services’ common data folder (see also 3.1.2. Location Log-files and OCSP-responses, pg. 44).
• The complete original installation folder (e.g. ‘OfficeSign’ under the “Isabel” folder) is removed. If the “Isabel” folder doesn’t contain other files or subfolders then this folder is removed too.
• The complete menu subfolder (Isabel OfficeSign 5.0 resp. Isabel OfficeSign 5.6) under “Isabel Software” is removed, deleting all menu items related to Isabel OfficeSign 5. If the menu folder “Isabel Software” doesn’t contain other menu items or menu subfolders, then this menu folder is removed too.
• In the registry the branch HKEY_LOCAL_MACHINE\Software\Isabel\UTC is completely removed. For IOS 5.6 there is no big difference in registry lay-out, so there everything is overwritten (where and when necessary).
2.3.2.1.2. Installing over an existing version of IBS 6
When there is already an older version of IBS 6 installed, this version is overwritten during the installation procedure by the new files and configurations. The menu items are replaced in the language of the current installation.
When the installed package has the same version as the launched MSI package, but with another language setting, then the installation cannot continue:
When you want to change the installation package language using the same MSI package version, you can only succeed by un-installing the current version and replacing it by the version in the required language. With this operation you can only change the language of the menu options, the installed executables have their own language selection options. The default, first-use language is the installation language but afterwards it’s the language selected by the user.
When the installed package has the same version and language indication then we have the case of the maintenance mode as discussed further (see 2.3.2.2.4. Entering Maintenance by re-launching the MSI kit, pg.35).

Isabel Security Components Technical Documentation for the customer Version 2.4 Page 34 of 72
2.3.2.1.3. Installing an older MSI package over an existing installation (Downgrade)
When the installed package has a newer version than the launched MSI package the installation cannot continue. It is not allowed to do a downgrade, the setup will warn you for it, and aborts the installation:
If this is really the aim of this action, the only way to get to this result is by uninstalling completely the current installation and then to re-execute the older installation package.
2.3.2.2.
Once the installation is done, the installation kit can be used to execute maintenance tasks on the local configuration. I.e. the installation kit is then used to reinstall (i.e. repair), modify or uninstall the files and configurations.
Maintenance
2.3.2.2.1. Modifying an installation
Modifying the installation allows a user to change the options chosen during the initial setup for the shortcuts on the desktop and in the ‘Favorites’: by modifying the installation options, these shortcuts can be added or removed as needed.
2.3.2.2.2. Repairing an installation
This is reinstalling the package as it was before, to repair possible loss of files or configurations:
o Force all files of the MSI package to be reinstalled to the initial installation location.
o Rewrite all required registry entries that go to the HKEY_LOCAL_MACHINE and HKEY_CURRENT_USER registry hives.
o Recreate all shortcuts and re-cache all icons overwriting any existing shortcuts and icons.

Isabel Security Components Technical Documentation for the customer Version 2.4 Page 35 of 72
2.3.2.2.3. Removing an installation
All files and registry entries related to the current MSI package are removed from the system.
2.3.2.2.4. Entering Maintenance by re-launching the MSI kit
When a MSI package is re-launched after having been installed on the system, the installation is started in maintenance mode. I.e. the user can maintain the installation already done on the system: he can repair, modify or remove the current installation.
Under Vista with User Account Control (UAC) turned on, Windows Installer behaviour is slightly different. We therefore strongly recommend that, when running Vista with UAC turned on, any maintenance installations such as Modify or Repair are to be performed through the Software Explorer that can be found in Control Panel (previously known in XP as “Add/Remove Programs”) (see also 2.3.2.2.5, “Entering Maintenance by Windows Control Panel: Add/Remove programs, pg. 38” and 2.3.2.3.2.3, “Programs and Features in Windows Vista” , pg. 43).
In Maintenance mode the installation starts quite differently. The Maintenance mode is already recognisable from the first page:

Isabel Security Components Technical Documentation for the customer Version 2.4 Page 36 of 72
On the second screen, the user selects the action to execute:
2.3.2.2.4.1. Maintenance using the MSI kit: Modify
The ‘Isabel Security Components’ package has only two optional components (shortcuts on the desktop and shortcuts in Favorites), so these are basically the only two alterations that can be made during a modify of the installation. When all installation requirements are still OK, the user goes directly to the “Additional Shortcuts” screen (see also 2.3.1.4.7. Additional Shortcuts, pg. 21). Otherwise the user is sent to the “Installation Requirements” screen (see also 2.3.1.4.4. Installation Requirements, pg. 11), where the installation will abort.
2.3.2.2.4.2. Maintenance using the MSI kit: Repair
When all installation requirements are still OK, the user goes directly to the “Ready to Install” screen (see also 2.3.1.4.10. Ready to install, pg. 25).
Otherwise the user is sent to the “Installation Requirements” screen (see also 2.3.1.4.4. Installation Requirements, pg. 11) , where the installation will abort.

Isabel Security Components Technical Documentation for the customer Version 2.4 Page 37 of 72
2.3.2.2.4.3. Maintenance using the MSI kit: Remove
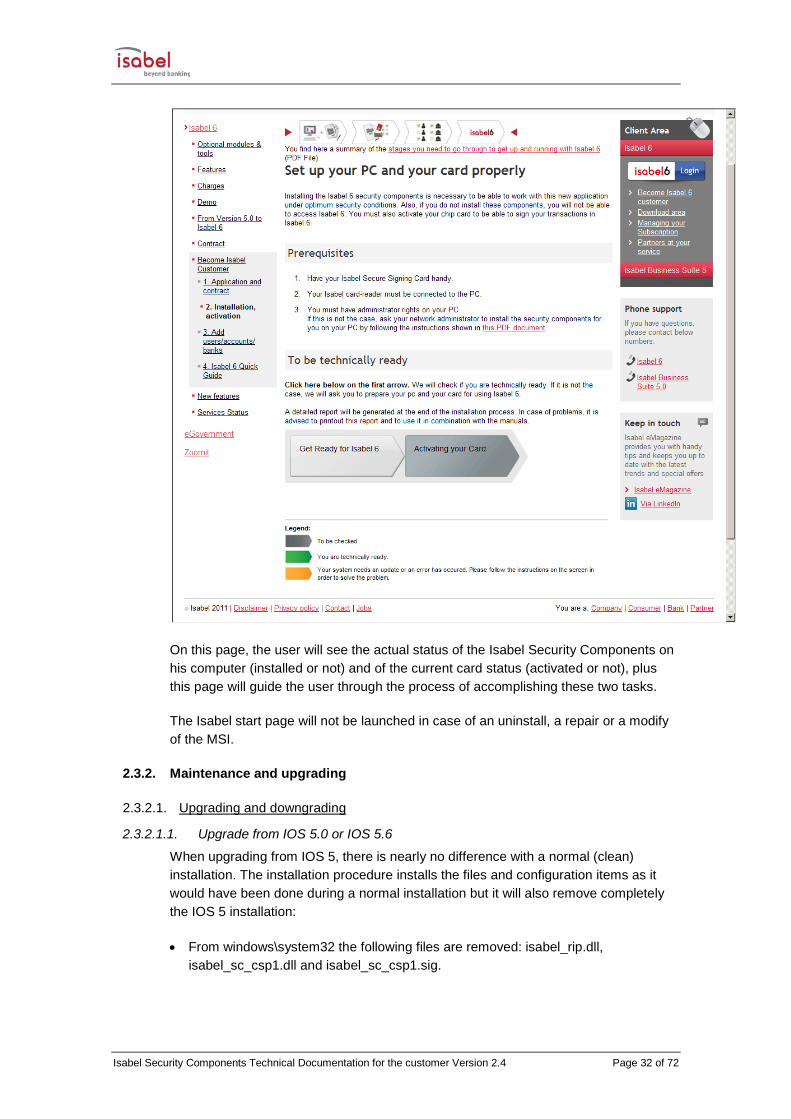
Isabel Security Components Technical Documentation for the customer Version 2.4 Page 38 of 72
Installed Additional Features are not automatically uninstalled when the ‘Isabel Security Components’ are removed. The installed Additional Features come in the form of separate MSIs and are to be treated as such (removal by launching the respective MSI kits or via Add/Remove Programs in Windows Control Panel).
Since the Additional Features depend on the presence of the ‘Isabel Security Components’ and have no function without it, it is strongly suggest to remove the installed Additional Features before removing the “Isabel Security Components’.
2.3.2.2.5. Entering Maintenance by Windows Control Panel: Add/Remove programs
The same maintenance functionalities are available when using the “Add/Remove Programs” applet in Windows Control Panel.
Under Vista with User Account Control (UAC) turned on, Windows Installer behaviour is slightly different. We therefore strongly recommend that, when running Vista with UAC turned on, any maintenance installations such as Modify or Repair are to be performed through the Software Explorer that can be found in Control Panel (previously known in XP as “Add/Remove Programs).
2.3.2.2.5.1. Maintenance using the Windows Control Panel: Remove
The “Remove” and “Change” actions are readily available in the list with installed programs:

Isabel Security Components Technical Documentation for the customer Version 2.4 Page 39 of 72
In Windows XP:
Clicking the “Remove” button and confirming the remove action
will silently uninstall the selected package completely. The only confirmation the user receives is the removal of the ‘Isabel Security Components’ entry in the applications list.
Installed Additional Features are not automatically uninstalled when the ‘Isabel Security Components’ are removed. The installed Additional Features come in the form of separate MSIs and are to be treated as such (removal by launching the respective MSI kits or via Add/Remove Programs in Windows Control Panel).
Since the Additional Features depend on the presence of the ‘Isabel Security Components’ and have no function without it, it is strongly suggest to remove the installed Additional Features before removing the “Isabel Security Components’.
2.3.2.2.5.2. Maintenance using the Windows Control panel: Modify
Clicking the “Change” Button will start the ‘Isabel Security Components’ package in maintenance mode, just as if the MSI was launched (see also 2.3.2.2.4. Entering Maintenance by re-launching the MSI kit, pg.35). The same actions (Modify, Repair, Remove) can then be launched.
2.3.2.2.5.3. Maintenance using the Windows Control Panel: Repair
To get the “Repair” action, one must first go to the “Support information”.

Isabel Security Components Technical Documentation for the customer Version 2.4 Page 40 of 72
When clicking the Repair button, the original MSI package is started and re-installed.
An alternative way of accomplishing this is using the “Change” button as stated earlier.
2.3.2.3.
2.3.2.3.1. How to identify a MSI package file
How to identify an installation package
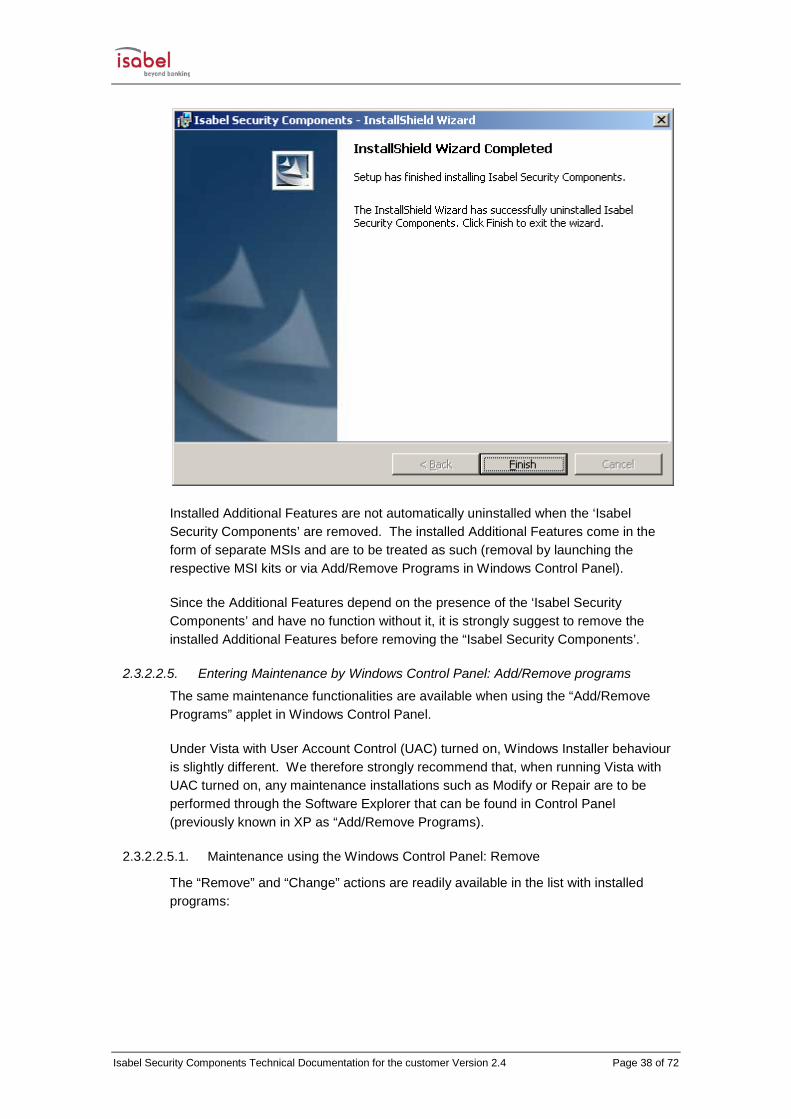
Every MSI package has its file properties updated such that one can easily identify the package. Right-click the MSI file, choose menu option “Properties” and then the tab “Summary”. The Subject item gives the most comprehensible information, i.e. version of the MSI and installation language code:
EN = English FR = French GE = German NL = Dutch
Isabel Security Components Technical Documentation for the customer Version 2.4 Page 41 of 72
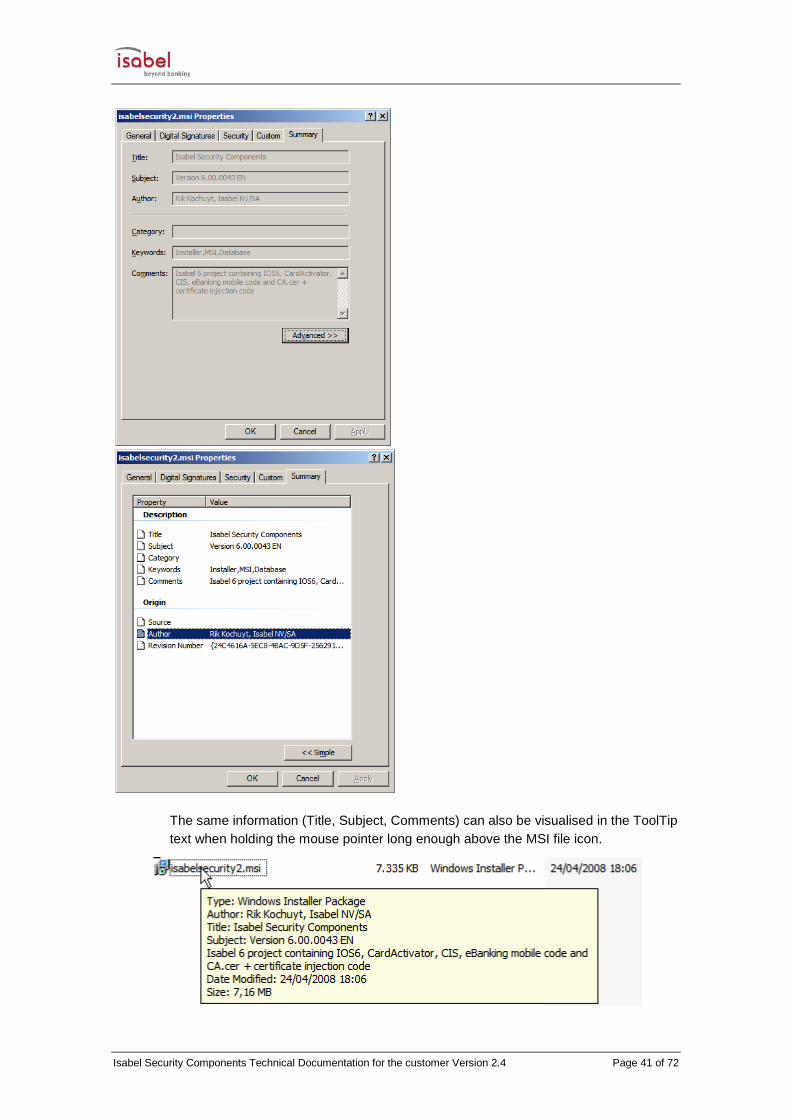
The same information (Title, Subject, Comments) can also be visualised in the ToolTip text when holding the mouse pointer long enough above the MSI file icon.

Isabel Security Components Technical Documentation for the customer Version 2.4 Page 42 of 72
Note that both these methods do not work anymore in Vista.
2.3.2.3.2. Package identification in Windows Control Panel: Add/Remove programs
2.3.2.3.2.1. Add/Remove Programs in Windows XP
On a Windows XP machine, the publisher name is also a URL link towards the Isabel website. However, in this OS the ToolTip text doesn’t appear, so there you can only detect the publisher URL by clicking on the publisher and seeing which site is opened.

Isabel Security Components Technical Documentation for the customer Version 2.4 Page 43 of 72
2.3.2.3.2.2. Programs and Features in Windows Vista
On a Windows Vista machine, to obtain this same information, go to “Programs and Features” in Control Panel (this is the new name used in Vista for what is called “Add/Remove Programs” on XP systems). Here, the “details” view needs to be
selected using the “Views” button1)
towards the top of the screen. Then, right-clicking
on one of the column headers2)
and selecting “More”, columns can be added to the
view and moved in the desired order. This results in a view similar to the one shown below, where all required information can be retrieved (installed version, support URL that links to the Isabel website, and an update URL from which the latest version of the MSI can be retrieved):
Note that in Vista, the Publisher column only contains the publisher name – it does not contain the URL to the Isabel website anymore. In Vista, this URL can be found in the Support Link column.
Under Vista with User Account Control (UAC) turned on, Windows Installer behaviour is slightly different. We therefore strongly recommend that, when running Vista with UAC turned on, any maintenance installations such as Modify or Repair are to be performed through the Software Explorer that can be found in Control Panel (previously known in XP as “Add/Remove Programs”).

Isabel Security Components Technical Documentation for the customer Version 2.4 Page 44 of 72
3. Installation Details
3.1. Local configuration
3.1.1. Installation location
The default installation location is Isabel Services in the Program Files folder, but this can be adapted by the user during installation (see also 2.3.1.4.6. Change destination folder and installation location warning, pg. 18). The actual installation location (and working environment) [INSTALLDIR] of the ‘Isabel Security Components’ is written on 2 places in the registry.
For the use of Isabel OfficeSign 6.0:
[HKEY_LOCAL_MACHINE\SOFTWARE\Isabel\IOS] "InstallRoot"="[INSTALLDIR]"
and for the eBanking mobile code, in:
[HKEY_LOCAL_MACHINE\SOFTWARE\Isabel] "InstallRoot"="[INSTALLDIR]"
When upgrading a previous version of ‘Isabel Security Components’ version 6 or when maintaining the current version, the installation location of the first installation is re-used for the following installations, and cannot be changed anymore.
3.1.2. Location Log-files and OCSP-responses
Because all users, also so-called “Restricted Users”, should be able to write log-files while using the different ‘Isabel Security Components’, the log-files folder is located under a standard Windows Folder “Common Application Data”. There is a folder “Isabel Services “ created under which a subfolder “Logfiles” can be found.
In the same location (and for the same reasons) the OCSP-responses are written in a subfolder “Responses”.
On many standard installations this “Common Application Data”-folder can be found in C:\Documents and Settings\All Users\Application Data
Because this location is not always visible on all systems, and it’s a rather deep path to follow, there is a link created in the support menu-subfolder to
C:\Documents and Settings\All Users\Application Data\Isabel services
Where the “Common Application Data”-folder is adapted following the local Windows configuration.
3.1.3. Environment configuration
As explained a bit higher the installation location is saved in the registry on 2 places, all other Isabel Office Sign related file locations (log files, response files, …) are stored in the registry folder HKEY_LOCAL_MACHINE\Software\Isabel\IOS (see also 3.7. Registry entries, pg. 54).
The configuration of the active environment is ruled on 2 levels (like it is for the installation location):

Isabel Security Components Technical Documentation for the customer Version 2.4 Page 45 of 72
For the use of Isabel OfficeSign 6.0:
[HKEY_LOCAL_MACHINE\SOFTWARE\Isabel\IOS] "System"="Prod"
and for the eBanking mobile code, in:
[HKEY_LOCAL_MACHINE\SOFTWARE\Isabel] "System"="Prod"
Both registry entries should be the same and the user is to use a Smart Card corresponding this environment setting. If this synchronisation is not held, in the eBanking application e.g. uploads will fail.

Isabel Security Components Technical Documentation for the customer Version 2.4 Page 46 of 72
3.2. File handling
FileName File Date/Time Size (Bytes) Version code
Registering
(*) Remark Location
Visual C++ Runtime (installed via Merge Modules Visual C++ 8.0 MFC & CRT (x86) WinSXS)
8.0.50727.762.cat 8355 C++80 Catalog file SxS
8.0.50727.762.policy 806 C++80 Policy file SxS
x86_Microsoft.VC80.CRT_1fc8b3b9a1e18e3b_8.0.50727.762_x-ww_6b128700.cat 8335 CRT80 Catalog file SxS
x86_Microsoft.VC80.CRT_1fc8b3b9a1e18e3b_8.0.50727.762_x-ww_6b128700.manifest 1869 CRT80 Manifest file SxS
x86_Microsoft.VC80.MFC_1fc8b3b9a1e18e3b_8.0.50727.762_x-ww_3bf8fa05.cat 8355 MFC80 Catalog file SxS
x86_Microsoft.VC80.MFC_1fc8b3b9a1e18e3b_8.0.50727.762_x-ww_3bf8fa05.manifest 2371 MFC80 Manifest file SxS
x86_Microsoft.VC80.MFCLOC_1fc8b3b9a1e18e3b_8.0.50727.762_x-ww_91481303.cat 8348 MFCLOC80 Catalog file SxS
x86_Microsoft.VC80.MFCLOC_1fc8b3b9a1e18e3b_8.0.50727.762_x-ww_91481303.manifest 1239 MFCLOC80 Manifest file SxS
mfc80.dll 1101824 8.0.50727.762 MFC80 dll SxS

Isabel Security Components Technical Documentation for the customer Version 2.4 Page 47 of 72
mfc80u.dll 1093120 8.0.50727.762 MFC80 dll SxS
mfcm80.dll 69632 8.0.50727.762 MFC80 dll SxS
mfcm80u.dll 57856 8.0.50727.762 MFC80 dll SxS
mfc80CHS.dll 40960 8.0.50727.762 MFCLOC80 dll SxS
mfc80CHT.dll 45056 8.0.50727.762 MFCLOC80 dll SxS
mfc80DEU.dll 65536 8.0.50727.762 MFCLOC80 dll SxS
mfc80ENU.dll 57344 8.0.50727.762 MFCLOC80 dll SxS
mfc80ESP.dll 61440 8.0.50727.762 MFCLOC80 dll SxS
mfc80FRA.dll 61440 8.0.50727.762 MFCLOC80 dll SxS
mfc80ITA.dll 61440 8.0.50727.762 MFCLOC80 dll SxS
mfc80JPN.dll 49152 8.0.50727.762 MFCLOC80 dll SxS
mfc80KOR.dll 49152 8.0.50727.762 MFCLOC80 dll SxS
msvcm80.dll 479232 8.0.50727.762 CRT80 dll SxS
msvcp80.dll 548864 8.0.50727.762 CRT80 dll SxS
msvcr80.dll 626688 8.0.50727.762 CRT80 dll SxS
CA certificate
ca.cer 12/09/2002 10:09 921 CA certificate ISA_COMMON
WinPutCACert.exe 15/04/2008 09:30 85576 1.1.0.1 Exe to insert CA certificate in MS IE cert store ISA_COMMON
capicom.dll 02/11/2004 13:41 516832 2.1.0.1 Only when no such file has been found in windows folder SystemFolder
eBanking Mobile code
BENEXPRT.exe 9/10/2010 14:33 467968 1.0.0.2 Beneficiary export utility INSTALLDIR
BrowserStarterActiveX.ocx 27/10/2006 14:24 40800 1.0.0.0 Support file to switch IE context ISA_COMMON
CIS_Module.dll 7/03/2011 11:02 1633864 1.0.0.13 Customer-side Isabel Synchroniser file INSTALLDIR
CISComWrapper.dll 7/03/2011 11:02 89680 6.23.0.3 Com library wrapping the CIS_Module API INSTALLDIR
ConfigChecker.ocx 10/10/2011 09:28 69200 1.0.0.8 B Configuration verification ISA_COMMON
CounterpartiesCollector.exe 23/04/2010 11:24 1374304 6.21.0.1 Counterparties import utility INSTALLDIR
FolderSelection.ocx 27/10/2006 14:24 44888 2.0.4.2 B Import/export support file ISA_COMMON

Isabel Security Components Technical Documentation for the customer Version 2.4 Page 48 of 72
IOSProxyWorkAround.dll 23/09/2008 09:27 433240 2.0.0.0 Support DLL to resolve certain proxy issues ISA_COMMON
Isabel_rip.dll 23/03/2006 15:05 388936 1.2.3.1 S Isabel certificate Revocation Information library ISA_COMMON
isacertupdate.exe 27/04/2011 09:33 1015376 6.23.0.2 Isabel certificate update systray program ISA_COMMON
IsaXerces-c_2_8.dll 3/07/2009 09:03 2817616 2.8.0.0 Customer-side Isabel Synchroniser support DLL ISA_COMMON
MultipleDownload.exe 27/04/2011 09:35 904784 6.23.0.2 Export support file INSTALLDIR
MultipleDownloadActiveX.ocx 9/10/1009 08:16 52832 6.2.0.2 B Export support file INSTALLDIR
MultipleDownloadDE.dll 1/06/2010 09:35 25176 6.21.0.1 Multiple download language file (German) ISA_COMMON
MultipleDownloadEN.dll 1/06/2010 09:35 24664 6.21.0.1 Multiple download language file (English) ISA_COMMON
MultipleDownloadES.dll 1/06/2010 09:36 24664 6.21.0.1 Multiple download language file (Spanish) ISA_COMMON
MultipleDownloadFR.dll 1/06/2010 09:36 25176 6.21.0.1 Multiple download language file (English) ISA_COMMON
MultipleDownloadNL.dll 1/06/2010 09:36 25176 6.21.0.1 Multiple download language file (Dutch) ISA_COMMON
MultipleDownloadPT.dll 1/06/2010 09:36 24664 6.21.0.1 Multiple download language file (Portuguese) ISA_COMMON
MultipleUpload.exe 27/04/2011 09:34 1121872 6.23.0.3 Import support file INSTALLDIR
MultipleUploadActivex.ocx 8/09/2009 08:04 56928 2.0.4.33 B Import support file INSTALLDIR
MultipleUploadDE.dll 8/09/2009 08:01 23120 2.0.4.33 Multiple upload language file (German) ISA_COMMON
MultipleUploadEN.dll 8/09/2009 08:00 22608 2.0.4.33 Multiple upload language file (English) ISA_COMMON
MultipleUploadES.dll 8/09/2009 08:02 23120 2.0.4.33 Multiple upload language file (Spanish) ISA_COMMON
MultipleUploadFR.dll 8/09/2009 08:00 23120 2.0.4.33 Multiple upload language file (French) ISA_COMMON
MultipleUploadNL.dll 8/09/2009 08:01 22608 2.0.4.33 Multiple upload language file (Dutch) ISA_COMMON
MultipleUploadPT.dll 8/09/2009 08:03 23120 2.0.4.33 Multiple upload language file (Portuguese) ISA_COMMON
MultipleUploadFileSelection.ocx 20/10/2009 11:38 77416 6.2.0.1 B Import file selection support file ISA_COMMON
OfficeSignControlPanel.exe 10/10/2011 09:28 589408 6.24.0.1 OfficeSign Control Panel executable ISA_COMMON
OfficeSignCPLanguage.dll 10/10/2011 09:28 50776 6.24.0.1 OfficeSign Control Panel Language file ISA_COMMON
tssip32.dll 17/11/2006 14:15 53584 ISA_COMMON
UploadBeneficiaries.ocx 14/04/2008 10:18 40024 1.0.5.0 B Counterparties upload utility INSTALLDIR
Isabel Office Sign
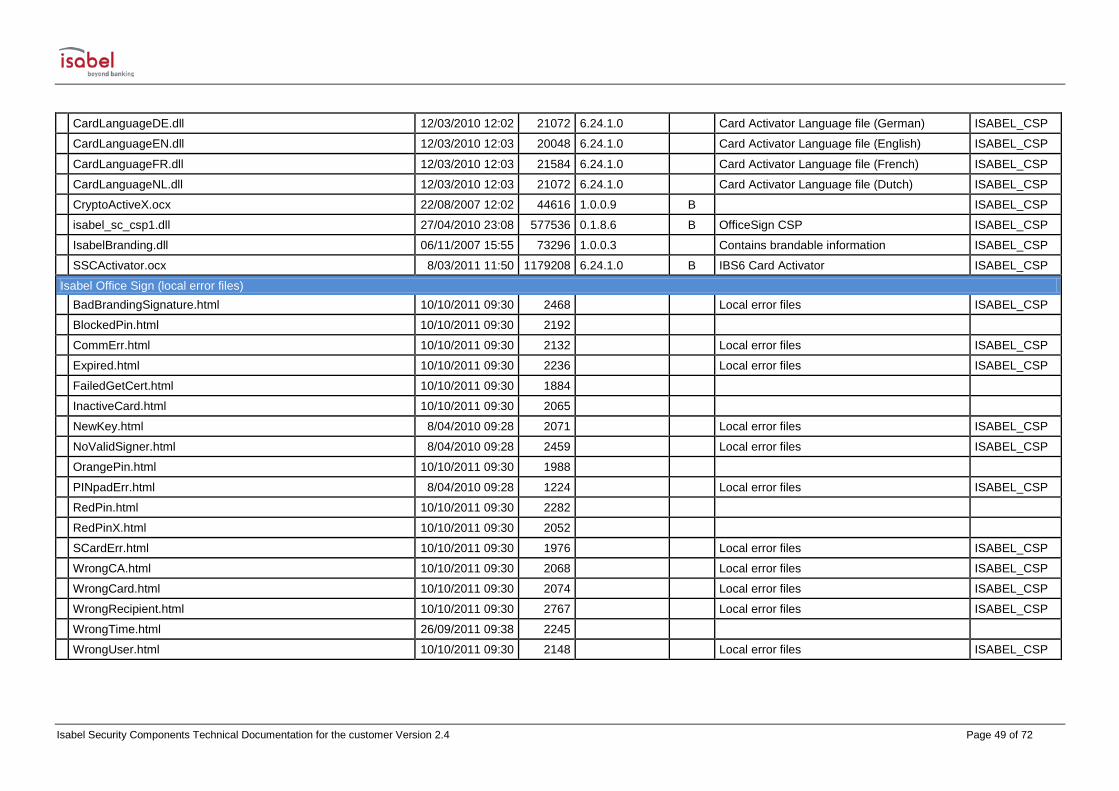
Isabel Security Components Technical Documentation for the customer Version 2.4 Page 49 of 72
CardLanguageDE.dll 12/03/2010 12:02 21072 6.24.1.0 Card Activator Language file (German) ISABEL_CSP
CardLanguageEN.dll 12/03/2010 12:03 20048 6.24.1.0 Card Activator Language file (English) ISABEL_CSP
CardLanguageFR.dll 12/03/2010 12:03 21584 6.24.1.0 Card Activator Language file (French) ISABEL_CSP
CardLanguageNL.dll 12/03/2010 12:03 21072 6.24.1.0 Card Activator Language file (Dutch) ISABEL_CSP
CryptoActiveX.ocx 22/08/2007 12:02 44616 1.0.0.9 B ISABEL_CSP
isabel_sc_csp1.dll 27/04/2010 23:08 577536 0.1.8.6 B OfficeSign CSP ISABEL_CSP
IsabelBranding.dll 06/11/2007 15:55 73296 1.0.0.3 Contains brandable information ISABEL_CSP
SSCActivator.ocx 8/03/2011 11:50 1179208 6.24.1.0 B IBS6 Card Activator ISABEL_CSP
Isabel Office Sign (local error files) BadBrandingSignature.html 10/10/2011 09:30 2468 Local error files ISABEL_CSP
BlockedPin.html 10/10/2011 09:30 2192
CommErr.html 10/10/2011 09:30 2132 Local error files ISABEL_CSP
Expired.html 10/10/2011 09:30 2236 Local error files ISABEL_CSP
FailedGetCert.html 10/10/2011 09:30 1884
InactiveCard.html 10/10/2011 09:30 2065
NewKey.html 8/04/2010 09:28 2071 Local error files ISABEL_CSP
NoValidSigner.html 8/04/2010 09:28 2459 Local error files ISABEL_CSP
OrangePin.html 10/10/2011 09:30 1988
PINpadErr.html 8/04/2010 09:28 1224 Local error files ISABEL_CSP
RedPin.html 10/10/2011 09:30 2282
RedPinX.html 10/10/2011 09:30 2052
SCardErr.html 10/10/2011 09:30 1976 Local error files ISABEL_CSP
WrongCA.html 10/10/2011 09:30 2068 Local error files ISABEL_CSP
WrongCard.html 10/10/2011 09:30 2074 Local error files ISABEL_CSP
WrongRecipient.html 10/10/2011 09:30 2767 Local error files ISABEL_CSP
WrongTime.html 26/09/2011 09:38 2245
WrongUser.html 10/10/2011 09:30 2148 Local error files ISABEL_CSP

Isabel Security Components Technical Documentation for the customer Version 2.4 Page 50 of 72
Offline Reporting
ORCCOLLC.EXE 25/03/2011 13:41 1195264 Offline reporting data collector utility (IBS5) IBS5_BIN
Schemas CIS_IsabelServices_schemas.cab 20/07/2011 09:31 12873 Customer-side Isabel Synchroniser schema INSTALLDIR
Cis_Orc_Schemas.cab 20/07/2011 09:31 5738 Isabel Synchroniser schema for offline reporting INSTALLDIR
Temporary files (i.e. not persisting after the installation)
BrowseForFile.dll 7/05/2010 10:14 56912 6.21.0.1
proxystat.dll 10/10/2011 09:29 73288 6.24.0.1
(*) In the column entitled Registering, S stands for Self-registering, B for Com extraction at build time. Files are copied into three different locations as can be seen in the schema above:
� [INSTALLDIR] , i.e. the installation location chosen by the user: in most Windows systems, the default location would be C:\Program Files\Isabel Services � [ISA_COMMON] : a subfolder named ‘Isabel’ in the “Common Program Files” folder. In most Windows systems, its location would be:
C:\Program Files\Common Files\Isabel. This location can not be altered by the user. � [ISABEL_CSP] : a subfolder named ‘Isabel CSP’ in the “Common Program Files” folder. In most Windows systems, its location would be:
C:\Program Files\Common Files\Isabel CSP. This location can not be altered by the user. The main reason that not all files are installed in INSTALLDIR is to have a common location for files that are common to the different installation possibilities of their respective components. These common files are then split into CSP-related files and other common files. The setup does not overwrite any file when its version/date is newer than the version/date of the file in the installation kit. Installed files have their file attributes changed such that they always have Read/Write access and no System nor Hidden flag set.
CapiCom.dll is an exception to these rules and is installed in the Windows\system32 folder (when necessary).

Isabel Security Components Technical Documentation for the customer Version 2.4 Page 51 of 72
The Visual C++ 8.0 Merge Modules are installed as a Side-by-Side Assembly. As such, the exact installation location of its components depends on the OS and is not controlled by the MSI.
Taking the brand-ability per so-called Contract Type into account, the file IsabelBranding.dll is duplicated into the ISABEL_CSP folder as many times as there are contract type names. The same source file (IsabelBranding.dll) is used in this case because there is no difference in branding between the various contract types for Isabel. This will result in the following files being present after the installation finishes (all having the same size, version & date as the IsabelBranding.dll): For Prod:
� e_link_FORTIS.dll � Isabel_Business_ID.dll � Partner_Contract.dll � TESTPKI_Isabel.dll
Except for the file copies, there is also a Create Folder task: during installation a subfolder “LogFiles” is created in the folder “{CommonAppDataFolder}\Isabel Services”. This subfolder must exist for WinPutCaCert.exe to put its result logging in a log file. This {CommonAppDataFolder} is a Windows-defined path which resolves to something like “C:\Documents and Settings\All Users\Application Data” (see also 3.1.2. Location Log-files and OCSP-responses, pg. 44).
All web URL files used for the Favorites are stored in a folder %USERPROFILE%\Favorites, these files are not listed above because they are part of the menu-items and not part of the files to be used by the applications.

Isabel Security Components Technical Documentation for the customer Version 2.4 Page 52 of 72
3.3. Automatic Proxy Settings (WinHTTP)
Starting from version 6, Isabel OfficeSign supports also the use of internet proxy. This support functionality is reused in all communication-aware binaries in the eBanking Mobile Code.
This support is obtained by using WinHTTP.dll version 5.1. This DLL is a system component for WinXP from Service Pack 1, and is only officially available on these systems and their newer versions/successors.
The proxy support in WinHTTP gives e.g. the possibility to reuse the same automatic proxy settings detection as being used in most internet browsers such as Internet Explorer, support for an authenticated proxy is not foreseen in Office Sign or the eBanking Mobile Code. If this DLL is not present, then no internet proxy is used.
On many systems, the user has flagged to automatically detect the proxy settings. When there is no Proxy Auto-Configuration (PAC) script configured, Internet Explorer (and OfficeSign) will use the Web Proxy Auto-Discovery (WPAD) protocol, to seek for such a PAC-script on a WPAD server. If no such server has been configured in the network, this call will fail1
Because of the Installation Requirements this last bug shouldn’t be an issue.
. In that case, OfficeSign will check if a manual proxy has been configured and if so, use the settings for this proxy (without taking into consideration any entries in the exception list, though!). If no manually configured proxy is found, the connection will be made without the use of a proxy.
1 With older versions of WinHTTP.dll (versions before 5.1.2600.1188) such a situation can also appear although there exists a proxy. This is because of a documented bug in the WinHTTP code handling the PAC script (see also Microsoft: http://support.microsoft.com/default.aspx?scid=kb;en-us;816941). If the setup detects such a condition (i.e. AND Auto Proxy Settings detection requested, AND WinHTTP.dll with version older then 5.1.2600.1188) then the user gets a warning message telling that the connections possibly cannot be made.

Isabel Security Components Technical Documentation for the customer Version 2.4 Page 53 of 72
3.4. Shortcuts created
Menu items are created in the program group “Isabel Services” (available for all users on Windows if not requested otherwise during installation). Every menu item has an icon available in the OfficeSignControlPanel.exe (see icon index). The menu options are added in the language used during installation.
The menu items are organised in 2 subfolders to facilitate the recognition and retrieval. All support oriented entries under the menu folder “Assistance”, all OfficeSign oriented entries under the menu folder “Office Sign”.
This gives:
Menu Target Icon Index Isabel Services
Assistance Counterparty Collector [INSTALLDIR]CounterpartiesCollector.exe 0 Isabel 6 Support http://www.isabel.eu/support6/en-US/ 9 Isabel Downloads [DF_DOWNLOADLOCATION] 14 Isabel OfficeSign 6.0 Support http://www.isabel.eu/officesign6/en-US/ 11 Logfiles [ISABEL_SERVICES_LOGS] 7 Isabel 6 Control Panel [ISA_COMMON]\OfficeSignControlPanel.exe IBS 8 Isabel 6 Login http://www.isabel.eu/login6/en-US/ 5 Isabel Website http://www.isabel.eu/isabel6/en-US/ 5
On the desktop, a similar set of shortcuts is created if the user chose so during the installation (see also 2.3.1.4.7. Additional Shortcuts, pg. 21), with the representation icons also found in the OfficeSignControlPanel.exe.
Shortcut name Target Icon Index Isabel 6 Login http://www.isabel.eu/login6/en-US/ 5
In the user’s ‘Favorites’ folder, another set of shortcuts is created in a subfolder called ‘Isabel Services’ if the user chose so during the installation (see also 2.3.1.4.7. Additional Shortcuts, pg. 21), this time with standard Internet Explorer icons (taken from C:\WINDOWS\system32\url.dll).
Shortcut name Target Isabel 6 Login http://www.isabel.eu/login6/ Isabel 6 Support http://www.isabel.eu/support6/ Isabel OfficeSign 6.0 Support http://www.isabel.eu/officesign6/ Isabel Website http://www.isabel.eu/isabel6/

Isabel Security Components Technical Documentation for the customer Version 2.4 Page 54 of 72
Please note that in Vista with UAC, the "Install Certification Authority" button in Isabel 6 Control panel won't work. Instead, you have to browse to the Isabel 6 Control Panel executable directly (called "OfficeSignControlPanel.exe" and found under C:\Program Files\Common Files\Isabel), and run this executable as Administrator (right-click the .exe, then select "Run as administrator"). Now the "Install Certification Authority" button will work correctly. We chose not to add an extra shortcut with "Run as administrator" functionality to the Program menu items so as not to clutter these locations too much, since the "Install Certification Authority" button is only used sporadically.
3.5. Insert root CA in MS IE Certificate store
The Isabel CA certificate is added to the Microsoft Internet Explorer Certificate-Store (“Trusted Root Certification Authorities”), by launching WinPutCAcert.exe in silent mode with the command line:
/FILE:ca.cer /BATCH /LOGFILE: [ISABEL_SERVICES_LOGS]\PutCert.log /REGSCHANNEL
The Office Sign Control Panel option to insert the root CA uses the same files but with other command line parameters.
3.6. Digital signature
All binaries within the ‘Isabel Security Components’ MSI are digitally signed using Microsoft Authenticode technology. Meaning, all executables (.EXE and .DLL) and ActiveX-es (.OCX) are signed by the Isabel Code signer with a Production certificate.
Besides the binaries within the MSI package, the MSI package itself is also digitally signed. Because in most cases the Isabel CA certificate is only made available by installing this MSI package, the certificate is published by VeriSign, one of the Certificate Authorities by default installed and updated with a Microsoft Windows Installation.
We digitally sign both MSI package and the individual Isabel Security Components because this gives the users the only possible guarantee, the code they are receiving and using has not been tampered with or altered.
3.7. Registry entries
In the subsequent registry definitions, during installation, - HKEY_USER_SELECTABLE will always be replaced by HKEY_LOCAL_MACHINE since
the 'Only for me' install is no longer supported - in the registry entry values containing a capitalized name enclosed with square brackets,
the capitalized name will be replaced by the current value of the MSI property with same name, see 3.9. MSI Properties, pg. 62.
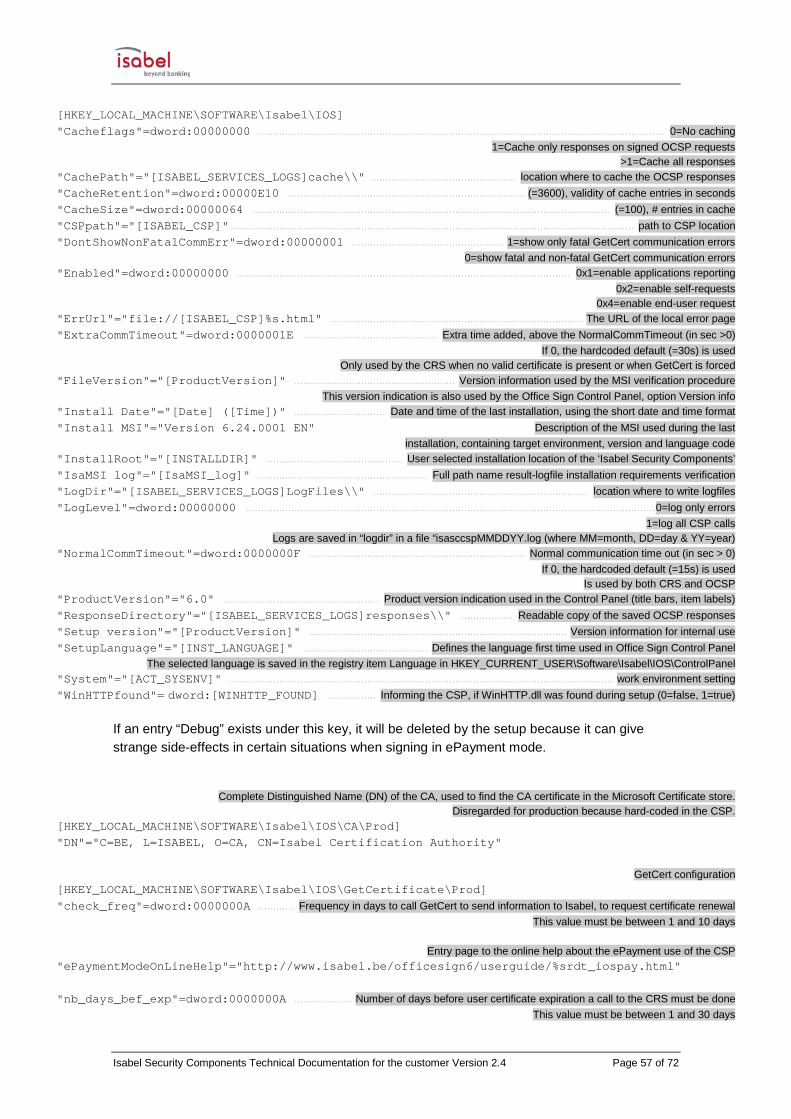
3.7.1. Registry entries Production environment
[HKEY_LOCAL_MACHINE\SOFTWARE\Isabel]

Isabel Security Components Technical Documentation for the customer Version 2.4 Page 55 of 72
"CommonRoot"="[ISA_COMMON]" .................................................. Fixed installation location of the shared Isabel Security Components "InstallRoot"="[INSTALLDIR]" .............................................. User selected installation location of the Isabel Security Components "LogDir"="[LOGFILES]" ........................................................................................................................... location where to write logfiles "System"="[ACT_SYSENV]" .............................................................................................................................. work environment setting
Complete Distinguished Name (DN) of the CA, used by the CardActivator to find the CA certificate in the Microsoft Certificate store. Disregarded for production because hard-coded in the CardActivator.
[HKEY_LOCAL_MACHINE\SOFTWARE\Isabel\CardActivator\CA\Prod] "DN"="C=BE, L=ISABEL, O=CA, CN=Isabel Certification Authority" Card Activator help link URLs in every language (environment dependent) [HKEY_LOCAL_MACHINE\SOFTWARE\Isabel\CardActivator\HelpLinks\Prod\DE] "ChangePassword"="https://gotoIBS6.isabel.be/SSCActivator/common/de-DE/help/Step_3.htm" "Identification"="https://gotoIBS6.isabel.be/SSCActivator/common/de-DE/help/Step_2.htm" "VerifyCard"="https://gotoIBS6.isabel.be/SSCActivator/common/de-DE/help/Step_4.htm" [HKEY_LOCAL_MACHINE\SOFTWARE\Isabel\CardActivator\HelpLinks\Prod\EN] "ChangePassword"="https://gotoIBS6.isabel.be/SSCActivator/common/en-US/help/Step_3.htm" "Identification"="https://gotoIBS6.isabel.be/SSCActivator/common/en-US/help/Step_2.htm" "VerifyCard"="https://gotoIBS6.isabel.be/SSCActivator/common/en-US/help/Step_4.htm" [HKEY_LOCAL_MACHINE\SOFTWARE\Isabel\CardActivator\HelpLinks\Prod\FR] "ChangePassword"="https://gotoIBS6.isabel.be/SSCActivator/common/fr-BE/help/Step_3.htm" "Identification"="https://gotoIBS6.isabel.be/SSCActivator/common/fr-BE/help/Step_2.htm" "VerifyCard"="https://gotoIBS6.isabel.be/SSCActivator/common/fr-BE/help/Step_4.htm" [HKEY_LOCAL_MACHINE\SOFTWARE\Isabel\CardActivator\HelpLinks\Prod\NL] "ChangePassword"="https://gotoIBS6.isabel.be/SSCActivator/common/nl-BE/help/Step_3.htm" "Identification"="https://gotoIBS6.isabel.be/SSCActivator/common/nl-BE/help/Step_2.htm" "VerifyCard"="https://gotoIBS6.isabel.be/SSCActivator/common/nl-BE/help/Step_4.htm" [HKEY_LOCAL_MACHINE\SOFTWARE\Isabel\CIS_Module\Prod] URL to request deletion of a banking file "deleteBankingFileRequestUrl"=" https://ebanking.IBS6.isabel.be/CIS/upload/DeleteSyncController" Schema reference to validate the ‘delete banking file’ request "deleteBankingFileRequestXsd"="Cis_IsabelServices_schemas.cab" URL to request deletion of a list of Report files "deleteReportFilesRequestUrl"="https://ebanking.IBS6.isabel.be/CIS/download/DownloadSyncController" Schema reference to validate the ‘delete Report files’ request "deleteReportFilesRequestXsd"="Cis_IsabelServices_schemas.cab" URL to request the download of Beneficiaries "downloadBeneficiariesRequestUrl"="https://ebanking.IBS6.isabel.be/CIS/tlol/TLOLDownloadBeneficiariesController" Schema reference to validate the ‘download Beneficiaries’ request "downloadBeneficiariesRequestXsd"="Cis_IsabelServices_Schemas.cab" URL to request the download of a list of report files "downloadReportFilesRequestUrl"="https://ebanking.IBS6.isabel.be/CIS/download/DownloadSyncController" Schema reference to validate the ‘download Report files’ request "downloadReportFilesRequestXsd"="Cis_IsabelServices_schemas.cab" URL to request static data "downloadStaticDataRequestUrl"="https://ebanking.IBS6.isabel.be/CIS/tlol/TLOLDownloadStaticDataController" Schema reference to validate the request for static data "downloadStaticDataRequestXsd"="Cis_IsabelServices_Schemas.cab" URL to request the signing of an ePayment "epaymentSignRequestUrl"="https://ebanking.IBS6.isabel.be/CIS/tlol/TLOLEPaymentController" Schema reference to validate the signing of an ePayment "epaymentSignRequestXsd"="Cis_IsabelServices_schemas.cab" URL to request the available encoding accounts "getAccountsRequestUrl"="https://ebanking.IBS6.isabel.be/CIS/accounts/AccountsSyncController"

Isabel Security Components Technical Documentation for the customer Version 2.4 Page 56 of 72
Schema reference to validate the ‘available encoding accounts’ request "getAccountsRequestXsd"="Cis_IsabelServices_schemas.cab" URL to request a list of available Report files "getAvailableReportFilesRequestUrl"="https://ebanking.IBS6.isabel.be/CIS/download/DownloadSyncController" Schema reference to validate the ‘available Report files’ request "getAvailableReportFilesRequestXsd"="Cis_IsabelServices_schemas.cab" URL to request contract information "getContractInfoRequestUrl"="https://ebanking.IBS6.isabel.be/CIS/contracts/ContractsSyncController" Schema reference to validate the contract information request "getContractInfoRequestXsd"="Cis_IsabelServices_schemas.cab" URL to request the download of configuration data "getParDivRequestUrl"="https://ebanking.IBS6.isabel.be/CIS/tlol/TLOLDownloadParDivController" Schema reference to validate the download of configuration data "getParDivRequestXsd"="Cis_IsabelServices_schemas.cab" URL to request the download ISANOT service " isanotRequestUrl"=" https://ebanking.IBS6.isabel.be/CIS/upload/IsanotSyncController" Schema reference to validate the download ISANOT request " isanotRequestXsd"="Cis_IsabelServices_schemas.cab" URL to request a list of Accounts "ORCgetAccountsListRequestUrl"="https://ebanking.IBS6.isabel.be/CIS/ORC/OrcSyncController" Schema reference to validate the Accounts request "ORCgetAccountsListRequestXsd"="Cis_Orc_Schemas.cab" URL to request a list of statements and transactions "ORCgetStatementsAndTransactionsRequestUrl"="https://ebanking.IBS6.isabel.be/CIS/ORC/OrcSyncController" Schema reference to validate the ‘statements and transactions’ request "ORCgetStatementsAndTransactionsRequestXsd"="Cis_Orc_Schemas.cab" URL to request the sending of a list of (payment) files "sendRequestUrl"="https://ebanking.IBS6.isabel.be/CIS/tlol/TLOLSendController" Schema reference to validate the sending of a list of (payment) files request "sendRequestXsd"="Cis_IsabelServices_schemas.cab" URL to request an Upload synchronisation "syncUploadRequestUrl"="https://ebanking.IBS6.isabel.be/CIS/tlol/TLOLSyncUploadController" Schema reference to validate the Upload synchronisation request "syncUploadRequestXsd"="Cis_IsabelServices_schemas.cab" URL to request Upload feedback detail of a list of (payment) files "uploadFeedBackDetailRequestUrl"="https://ebanking.IBS6.isabel.be/CIS/upload/UploadFeedbackSyncController" Schema reference to validate the Upload feedback detail request "uploadFeedBackDetailRequestXsd"="Cis_IsabelServices_schemas.cab" URL to request Upload feedback of a list of (payment) files "uploadFeedBackRequestUrl"="https://ebanking.IBS6.isabel.be/CIS/upload/UploadFeedbackSyncController" Schema reference to validate the Upload feedback request "uploadFeedBackRequestXsd"="Cis_IsabelServices_schemas.cab" URL to request the upload of a list of (payment) files "uploadRequestUrl"="https://ebanking.IBS6.isabel.be/CIS/upload/UploadSyncController" Schema reference to validate the upload request "uploadRequestXsd"="Cis_IsabelServices_schemas.cab"
List of sites (with port indication) to be verified during Isabel 6 Control Panel connectivity tests [HKEY_LOCAL_MACHINE\SOFTWARE\Isabel\IBS\ControlPanel\Prod\hosts] "Host1"="www.isabel.be:80" "Host2"=" www.isabel.eu:80" "Host3"="pki.isabel.be:443" "Host4"="gotoIBS6.isabel.be:443" "Host5"="my.isabel.be:443" "Host6"="upload.ibs6.isabel.be:443" "Host7"="download.ibs6.isabel.be:443" "Host8"="ebanking.ibs6.isabel.be:443" "Host9"="ebankingsupport.ibs6.isabel.be:443"
Isabel Security Components Technical Documentation for the customer Version 2.4 Page 57 of 72
[HKEY_LOCAL_MACHINE\SOFTWARE\Isabel\IOS] "Cacheflags"=dword:00000000 ...................................................................................................................................... 0=No caching 1=Cache only responses on signed OCSP requests >1=Cache all responses "CachePath"="[ISABEL_SERVICES_LOGS]cache\\" ............................................... location where to cache the OCSP responses "CacheRetention"=dword:00000E10 .............................................................................. (=3600), validity of cache entries in seconds "CacheSize"=dword:00000064 ...................................................................................................................... (=100), # entries in cache "CSPpath"="[ISABEL_CSP]" ..................................................................................................................................... path to CSP location "DontShowNonFatalCommErr"=dword:00000001 .................................................. 1=show only fatal GetCert communication errors 0=show fatal and non-fatal GetCert communication errors "Enabled"=dword:00000000 .............................................................................................................. 0x1=enable applications reporting 0x2=enable self-requests 0x4=enable end-user request "ErrUrl"="file://[ISABEL_CSP]%s.html" ................................................................................... The URL of the local error page "ExtraCommTimeout"=dword:0000001E ............................................ Extra time added, above the NormalCommTimeout (in sec >0) If 0, the hardcoded default (=30s) is used Only used by the CRS when no valid certificate is present or when GetCert is forced "FileVersion"="[ProductVersion]" ..................................................... Version information used by the MSI verification procedure This version indication is also used by the Office Sign Control Panel, option Version info "Install Date"="[Date] ([Time])" .............................. Date and time of the last installation, using the short date and time format "Install MSI"="Version 6.24.0001 EN" Description of the MSI used during the last installation, containing target environment, version and language code "InstallRoot"="[INSTALLDIR]" ............................................. User selected installation location of the ‘Isabel Security Components’ "IsaMSI log"="[IsaMSI_log]" ........................................................ Full path name result-logfile installation requirements verification "LogDir"="[ISABEL_SERVICES_LOGS]LogFiles\\" ....................................................................... location where to write logfiles "LogLevel"=dword:00000000 ....................................................................................................................................... 0=log only errors 1=log all CSP calls Logs are saved in “logdir” in a file “isasccspMMDDYY.log (where MM=month, DD=day & YY=year) "NormalCommTimeout"=dword:0000000F ....................................................................... Normal communication time out (in sec > 0) If 0, the hardcoded default (=15s) is used Is used by both CRS and OCSP "ProductVersion"="6.0" ................................................... Product version indication used in the Control Panel (title bars, item labels) "ResponseDirectory"="[ISABEL_SERVICES_LOGS]responses\\" ................. Readable copy of the saved OCSP responses "Setup version"="[ProductVersion]" ..................................................................................... Version information for internal use "SetupLanguage"="[INST_LANGUAGE]" ......................................... Defines the language first time used in Office Sign Control Panel The selected language is saved in the registry item Language in HKEY_CURRENT_USER\Software\Isabel\IOS\ControlPanel "System"="[ACT_SYSENV]" .............................................................................................................................. work environment setting "WinHTTPfound"= dword:[WINHTTP_FOUND] ................ Informing the CSP, if WinHTTP.dll was found during setup (0=false, 1=true)
If an entry “Debug” exists under this key, it will be deleted by the setup because it can give strange side-effects in certain situations when signing in ePayment mode.
Complete Distinguished Name (DN) of the CA, used to find the CA certificate in the Microsoft Certificate store.
Disregarded for production because hard-coded in the CSP. [HKEY_LOCAL_MACHINE\SOFTWARE\Isabel\IOS\CA\Prod] "DN"="C=BE, L=ISABEL, O=CA, CN=Isabel Certification Authority"
GetCert configuration [HKEY_LOCAL_MACHINE\SOFTWARE\Isabel\IOS\GetCertificate\Prod] "check_freq"=dword:0000000A ............ Frequency in days to call GetCert to send information to Isabel, to request certificate renewal This value must be between 1 and 10 days Entry page to the online help about the ePayment use of the CSP "ePaymentModeOnLineHelp"="http://www.isabel.be/officesign6/userguide/%srdt_iospay.html" "nb_days_bef_exp"=dword:0000000A ................... Number of days before user certificate expiration a call to the CRS must be done This value must be between 1 and 30 days

Isabel Security Components Technical Documentation for the customer Version 2.4 Page 58 of 72
Entry page to the online help about the Open use of the CSP "OpenModeOnLineHelp"="http://www.isabel.be/officesign6/userguide/%srdt_iosopen.html" Entry page to the online help about the use of the Revocation Information Protocol "RipOnLineHelp"="http://www.isabel.be/OfficeSign6/userguide/rdt_rip.html" "URI"="https://pki.isabel.be:443/get_cert" ..................................................................................... URI to call the GetCert
Complete URI to access the OCSP, only used when this info is not found in the certificate. [HKEY_LOCAL_MACHINE\SOFTWARE\Isabel\IOS\OCSP\Prod] "URI"="https://pki.isabel.be:443/ocsp"
Domain name where the Control Panel sites are to be found (see higher) [HKEY_LOCAL_MACHINE\SOFTWARE\Isabel\Web\Prod] "Domain"="www.isabel.be"
Vista-compatibility entries (making the mentioned binaries run in compatibility mode and with Administrator credentials [HKEY_LOCAL_MACHINE\SOFTWARE\Microsoft\Windows NT\CurrentVersion\AppCompatFlags\Layers] "[TempFolder]Launch.cmd"="WINXPSP2 RUNASADMIN" "[ISA_COMMON]WinPutCaCert.exe"="WINXPSP2 RUNASADMIN"
Pre-approved ocx file GUIDs (to avoid website pop-ups) [HKEY_USER_SELECTABLE\Software\Microsoft\Windows\CurrentVersion\Ext\PreApproved\{60A9863A-11FD-4080-850E-A8E184FC3A3C}] [HKEY_USER_SELECTABLE\Software\Microsoft\Windows\CurrentVersion\Ext\PreApproved\{DA815908-73DA-4010-A832-41A181B29433}] [HKEY_USER_SELECTABLE\Software\Microsoft\Windows\CurrentVersion\Ext\PreApproved\{61A3532F-3C15-4208-AEB2-D67574124C72}] [HKEY_USER_SELECTABLE\Software\Microsoft\Windows\CurrentVersion\Ext\PreApproved\{54BA1E8F-818D-407F-949D-BAE1692C5C18}] [HKEY_USER_SELECTABLE\Software\Microsoft\Windows\CurrentVersion\Ext\PreApproved\{A996E48C-D3DC-4244-89F7-AFA33EC60679}] [HKEY_USER_SELECTABLE\Software\Microsoft\Windows\CurrentVersion\Ext\PreApproved\{FBAB033B-CDD0-4C5E-81AB-AEA575CD1338}] [HKEY_USER_SELECTABLE\Software\Microsoft\Windows\CurrentVersion\Ext\PreApproved\{A440BD76-CFE1-4D46-AB1F-15F238437A3D}] [HKEY_USER_SELECTABLE\Software\Microsoft\Windows\CurrentVersion\Ext\PreApproved\{9B6C5FAF-0626-4931-B348-13F712444EB7}] [HKEY_USER_SELECTABLE\Software\Microsoft\Windows\CurrentVersion\Ext\PreApproved\{91D221C4-0CD4-461C-A728-01D509321556}] [HKEY_USER_SELECTABLE\Software\Microsoft\Windows\CurrentVersion\Ext\PreApproved\{76B8D623-492B-44BB-A028-DC4D9C5A738F}] [HKEY_USER_SELECTABLE\Software\Microsoft\Windows\CurrentVersion\Ext\PreApproved\{3C8D7D22-B8EA-42F9-AC1D-68570B52C24B}] [HKEY_USER_SELECTABLE\Software\Microsoft\Windows\CurrentVersion\Ext\PreApproved\{76090667-41A4-475D-8CC9-B03395144474}] [HKEY_USER_SELECTABLE\Software\Microsoft\Windows\CurrentVersion\Ext\PreApproved\{85B2E530-ECB0-4446-9075-966D0EB8AEFB}] [HKEY_USER_SELECTABLE\Software\Microsoft\Windows\CurrentVersion\Ext\PreApproved\{550C8FFB-4DC0-4756-828C-862E6D0AE74F}] [HKEY_USER_SELECTABLE\Software\Microsoft\Windows\CurrentVersion\Ext\PreApproved\{1D46BE0D-C314-4E20-A291-D1E66265725A}] [HKEY_USER_SELECTABLE\Software\Microsoft\Windows\CurrentVersion\Ext\PreApproved\{7BF3AC5C-CC84-429A-ACA5-74D916AD6B8C}] [HKEY_USER_SELECTABLE\Software\Microsoft\Windows\CurrentVersion\Ext\PreApproved\{9171C115-7DD9-46BA-B1E5-0ED50AFFC1B8}]

Isabel Security Components Technical Documentation for the customer Version 2.4 Page 59 of 72
[HKEY_USER_SELECTABLE\Software\Microsoft\Windows\CurrentVersion\Ext\PreApproved\{0A864E22-40FB-4AC1-8DBB-C4E219C46EF7}] [HKEY_USER_SELECTABLE\Software\Microsoft\Windows\CurrentVersion\Ext\PreApproved\{65104D73-BA60-4160-A95A-4B4782E7AA62}] [HKEY_USER_SELECTABLE\Software\Microsoft\Windows\CurrentVersion\Ext\PreApproved\{3CF75F0E-B2FA-48AE-B172-9597DBCDD42F}] [HKEY_USER_SELECTABLE\Software\Microsoft\Windows\CurrentVersion\Ext\PreApproved\{8C3E4934-9FA4-4693-9253-A29A05F99186}] [HKEY_USER_SELECTABLE\Software\Microsoft\Windows\CurrentVersion\Ext\PreApproved\{03ACC284-B757-4B8F-9951-86E600D2CD06}] [HKEY_USER_SELECTABLE\Software\Microsoft\Windows\CurrentVersion\Ext\PreApproved\{AC2EDAF8-6400-4B39-A52A-4A6019DDC2FA}] [HKEY_USER_SELECTABLE\Software\Microsoft\Windows\CurrentVersion\Ext\PreApproved\{17E3A1C3-EA8A-4970-AF29-7F54610B1D4C}] [HKEY_USER_SELECTABLE\Software\Microsoft\Windows\CurrentVersion\Ext\PreApproved\{E38FD381-6404-4041-B5E9-B2739258941F}] [HKEY_USER_SELECTABLE\Software\Microsoft\Windows\CurrentVersion\Ext\PreApproved\{A3D1D649-86FE-4DAB-8365-A1B51E3C6571}] [HKEY_USER_SELECTABLE\Software\Microsoft\Windows\CurrentVersion\Ext\PreApproved\{A6371F74-9DB0-43CD-BCA6-5890E5E4A87D}] [HKEY_USER_SELECTABLE\Software\Microsoft\Windows\CurrentVersion\Ext\PreApproved\{E18CD8C5-C88F-4A6F-B0FD-31F805AC834D}] [HKEY_USER_SELECTABLE\Software\Microsoft\Windows\CurrentVersion\Ext\PreApproved\{060EADF8-BADB-4970-8C8E-7897903E0013}] [HKEY_USER_SELECTABLE\Software\Microsoft\Windows\CurrentVersion\Ext\PreApproved\{F3A12E08-EDE9-4160-8B51-334D982A9AD0}] [HKEY_USER_SELECTABLE\Software\Microsoft\Windows\CurrentVersion\Ext\PreApproved\{94AFFFCC-6C05-4814-B123-A941105AA77F}] [HKEY_USER_SELECTABLE\Software\Microsoft\Windows\CurrentVersion\Ext\PreApproved\{22A85CE1-F011-4231-B9E4-7E7A0438F71B}] [HKEY_USER_SELECTABLE\Software\Microsoft\Windows\CurrentVersion\Ext\PreApproved\{CE32ABF6-475D-41F6-BF82-D27F03E3D38B}] [HKEY_USER_SELECTABLE\Software\Microsoft\Windows\CurrentVersion\Ext\PreApproved\{78E61E52-0E57-4456-A2F2-517492BCBF8F}] [HKEY_USER_SELECTABLE\Software\Microsoft\Windows\CurrentVersion\Ext\PreApproved\{9E7EA907-5810-4FCA-B817-CD0BBA8496FC}] [HKEY_USER_SELECTABLE\Software\Microsoft\Windows\CurrentVersion\Ext\PreApproved\{3E376A18-340C-41DC-BFE7-D65C76CA6A91}]
Trusted sites configuration [HKEY_USER_SELECTABLE\Software\Microsoft\Windows\CurrentVersion\Internet Settings\ZoneMap\Domains]
This registry key holds the definition of the trusted sites listed in 2.3.1.4.8.Trusted Sites, pg. 22. Each trusted site is stored in the form of: - a key with name = the name of the domain - an optional sub-key with name = an optional sub-domain - one DWORD entry with name "http", value 2 or/and one DWORD entry with name "https", value 2. For the "*" sub-domain the presence of a sub-key with name "*" is optional.
[HKEY_CURRENT_USER\Software\Microsoft\Windows\CurrentVersion\Internet Settings\ZoneMap\Domains]
This registry tree holds the same trusted sites definitions as the previous one. It is only intended for making the sites visible (under the Trusted Sites tab of the IE Options menu ) for the user who installs the MSI.

Isabel Security Components Technical Documentation for the customer Version 2.4 Page 60 of 72
Microsoft Visual C++ 8.0 merge modules
Depending on the target operating system, the Microsoft Visual C++ 8.0 merge modules listed in 3.2 File handling, pg. 46 are self-registered, for XP, under registry key
[HKEY_LOCAL_MACHINE\SOFTWARE\Microsoft\Windows\CurrentVersion\SideBySide\Installations]
or, for Vista and Windows 7, under
[HKEY_LOCAL_MACHINE\SOFTWARE\Microsoft\Windows\CurrentVersion\SideBySide\Winners]
This registration is not controlled by the MSI. Important notes: - these entries being not removed at MSI uninstall, the MSI test suite should always include
an installation test on a virgin OS - a patched version of the merge modules is used in order to solve a side-by-side error
occurring on Vista and Windows 7 systems when launching the OfficeSignControlPanel after a major upgrade of the MSI and due to the fact that the concerned assemblies were not reinstalled after such an upgrade. The problem has been worked around according to Method 1 of Microsoft article KB 905238; in practice, in the MsiAssemblyname table of each merge module, the entry with Name attribute = "version" has been changed from 8.0.50727.762 to 8.0.50727.763.
In order to configure the patched modules in the IS 2010 IDE, in the Redistributables view of the IDE: - uncheck Visual C++ 8.0 CRT (x86) WinSXS MSM, Visual C++ 8.0 MFC (x86) WinSXS
and Visual C++ 8.0 MFCLOC (x86) WinSXS MSM (the associated policy merge module will be automatically unchecked);
- for each of the two assemblies, right-click Browse for Merge Module and select the corresponding file in the folder holding the patched .msm files (the associated policy merge module will be automatically included).
In the log of the build it can be verified that the merge modules are well taken from the local location: there is one line logged for each merge module, like this one for the CRT module,
Merging Visual C++ 8.0 CRT (x86) WinSXS MSM: d:\pki.native.trunk\msi\commonlayer\ patched vs merge modules\Microsoft_VC80_CRT_x86.patched.msm
displaying the full path of the used .msm file.
During the installation the CSP is registered too, during this process some Cryptographic Service Provider registry keys are created:
Smart card identification data (ATR, ATRmask and responsible CSP)
“Old” Isabel 512bits Smart Card [HKEY_LOCAL_MACHINE\SOFTWARE\Microsoft\Cryptography\Calais\SmartCards\Isabel SAMOS] "ATR"=hex:3b,b0,11,00,81,31,90,73,f2 "ATRMask"=hex:ff,ff,ff,ff,ff,ff,ff,ff,ff
“New” Isabel 1024bits Smart Card (CardOS V4.0) [HKEY_LOCAL_MACHINE\SOFTWARE\Microsoft\Cryptography\Calais\SmartCards\Isabel SSC CardOS] "ATR"=hex:3b,e2,00,ff,c1,10,31,fe,55,c8,02,9c

Isabel Security Components Technical Documentation for the customer Version 2.4 Page 61 of 72
"ATRmask"=hex:ff,ff,ff,ff,ff,ff,ff,ff,ff,ff,ff,ff “New” Isabel 1024bits Smart Card (CardOS V4.4)
[HKEY_LOCAL_MACHINE\SOFTWARE\Microsoft\Cryptography\Calais\SmartCards\Isabel SSC CardOS 68K] "ATR"=hex:3b,d2,18,02,c1,0a,31,fe,58,c8,0d,51 "ATRmask"=hex:ff,ff,ff,ff,ff,ff,ff,ff,ff,ff,ff,ff
Isabel Cryptographic Service Provider configuration, used by Windows [HKEY_LOCAL_MACHINE\SOFTWARE\Microsoft\Cryptography\Defaults\Provider\Isabel SC Cryptographic Provider 1] "Image Path"=" C:\Program Files\Common Files\Isabel CSP\isabel_sc_csp1.dll" ........ Where to find the CSP "Type"=dword:00000001 ......................................................... CSP type PROV_RSA_FULL (see Microsoft MSDN for more information) "SigInFile"=dword:00000000 1=Electronic Signature (by Microsoft) to be found in a separate SIG file 0=Electronic Signature (by Microsoft) can be found in the CSP DLL
Once a user has executed a GetCert the time stamp of this last connection can be found in
[HKEY_CURRENT_USER\SOFTWARE\Isabel\IOS\GetCertificate\Prod\<UID>] "LAST_CONNECTION"="YYYYMMDDHHNNSS"
where: <UID> User ID for which the GetCert was executed YYYY Year in 4 digits MM Number of month in 2 digits DD Number of day (in month) in 2 digits HH Hour of the day in 2 digits NN Minutes in 2 digits SS Seconds in 2 digits

Isabel Security Components Technical Documentation for the customer Version 2.4 Page 62 of 72
3.8. MSI Properties
ACT_SYSENV = “Prod” Active System (i.e. working) environment, (see also 3.7. Registry entries, pg. 54). When given on the command line, one should give “PROD” in uppercase to force the production environment as the active environment setting, otherwise this setting is ignored.
ALLUSERS always = 1 since the 'Only for me install' is no longer supported.
ASKPATH Property set in Custom Action “IniConfig” = “OK” : enable the possibility to change the installation location in the User Interface = “” : disable, i.e. grey-out, the possibility to change the installation location in the User Interface Default value = “OK”.
ApplicationUsers always = “AllUsers” since the 'Only for me' install is no longer supported.
CAPICOM = “” Property set via an “Application Search”, gives the path in or under Windows of the capicom.dll (if any found). Used to allow (“”) or to skip (path) installation of this file.
DF_DOWNLOAD1..10 Properties where the various downloadable features found through the CallPropDisplay Custom Action are filled in.
DF_DOWNLOADLOCATION Property that stores the location where additional downloadable features are saved. This is a folder path obtained by appending “\Isabel downloads” to the string found in the registry entry “Common Documents” under under key “HKLM\Software\Microsoft\Windows\CurrentVersion\Explorer\Shell Folders” (obtained by means of a System Search). Its value can be changed by clicking the button with the three dots (…) to the right of the “Download items to:” box in the AdditionalFeatures screen.
DF_FEATDEFSELECT1..10 Properties that are set by the CallPropDisplay Custom Action in order to be first used in the DownloadFeatures screen for setting the checkbox of a downloadable feature in the state specified in the site.txt file (see DF_INFOTEXTURL). At install time the property will be used by the InstallFeatures Custom Action.
Isabel Security Components Technical Documentation for the customer Version 2.4 Page 63 of 72
DF_FeatDownloadOnly1.. 10 Properties that are set by the CallPropDisplay Custom Action in order to be first used in the DownloadFeatures screen for displaying the feature as Download Only, as a function of the Download only state specified in the site.txt file (see DF_INFOTEXTURL). At install time the property will be used by the InstallFeatures Custom Action.
DF_FeatureDescriptionText1..10 The descriptive texts of each downloadable feature in the DownloadFeatures screen.
DF_INFOTEXTURL Property that contains the URL that points to the info.txt file which contains the additional downloadable features, if any, plus their parameters (file locations, dependencies, download-only flags), see 3.8.4 CallPropDisplay, pg. Error! Bookmark not defined.. This URL is language-dependent as follows:
de: http://www.isabel.be/download/de-DE/info.txt en: http://www.isabel.be/download/en-US/info.txt fr: http://www.isabel.be/download/fr-BE/info.txt nl: http://www.isabel.be/download/nl-BE/info.txt
If this property is emptied on the command line, one can prevent showing the dialog screen.
DOWNGRADE_ERROR Localised error message, indicating it is not allowed to install an older version over the installed application. This property is used in the DownGrade custom action because in the custom action error message it is not possible to use a localised text.
ENV_PROD Property regulating the installation of the Production environment: = “OK” the Production environment is always installed and this cannot be changed by the user.
ERR_ADM_NOTSUPPORTED Property that contains the error message that is shown to the user when an administrative installation is attempted. This error message is localized (= depends on the language version of the MSI) See also 3.8.1. AdmNotSupported, pg. Error! Bookmark not defined..
ERR_ADV_NOTSUPPORTED Property that contains the error message that is shown to the user when an advertized installation is attempted. This error message is localized (= depends on the language version of the MSI) See also 3.8.2. AdvNotSupported, pg. Error! Bookmark not defined..
HASRUN_BU_REG = 0 (default) or 1

Isabel Security Components Technical Documentation for the customer Version 2.4 Page 64 of 72
Property set in Custom Action “RegBackup”, indicating whether (“1”) or not (“0”) the RegBackup Custom Action has been run, thus triggering the “RegRestore” Custom Action.
HASRUN_INI_CONF = 0 (default) or 1 Property set in Custom Action “IniConfig”, used to
indicate whether (“1”) or not (“0”) the IniConfig Custom Action has already been run. This is to ensure the “IniConfig” Custom Action runs each time the MSI is called (so also during a Repair or a Modify).
IBS5_FOUND = ”” Property set in Custom Action “IniConfig”, used to show (“OK”) or hide (“”) the path warning not to use the IBS5 folder when choosing an installation location.
IBS5_PATH = “” Long file name path of the Isabel Business Suite 5, if any found on the system in Custom Action “IniConfig”, used in the IBS5_FOUND warning.
IE6_LOCATION Property that holds the location of the Internet Explorer 6 executable. Its value is used in conjunction with several shortcuts installed by the MSI. The value is retrieved using a System Search of the registry on the default value of HKLM\SOFTWARE\Microsoft\Windows\
CurrentVersion\App Paths\IEXPLORE.EXE.
INSTALLDIR The installation location, default value is “Isabel Services” in the “Program Files” folder.
INSTALLLEVEL = 100 All the Production-features have “Install Level = 100” and are always installed.
INST_LANGUAGE Property used to write the installation language in the registry fields and to get the connectivity test with the right language interface. = “de” German installation = “en” English installation = “fr” French installation = “nl” Dutch installation
ISAMSI_LOG Full path of MSI installation requirements check log-file. Used to save this path in the registry and updated in the Custom Action “IniConfig” if a log-file could be created.

Isabel Security Components Technical Documentation for the customer Version 2.4 Page 65 of 72
LAUNCHPROGRAM 1 By default launch connectivity check at the end of the installation, except when there was already an IOS6 installed.
NEWCOBURL Property that contains the URL that points to the New Customer OnBoarding page on the Isabel website. This URL is language-dependent as follows:
de: http://www.isabel.be/start/en-US en: http://www.isabel.be/start/en-US fr: http://www.isabel.be/start/fr-BE nl: http://www.isabel.be/start/nl-BE
NEWPRODUCTFOUND = “” This property is set when a downgrade situation occurs, i.e. the user tries to install an older version over the existing installation which is not allowed. The property is used as condition in the DownGrade custom action and indicates False when empty, True when set (see also Microsoft “Windows Installer” documentation).
NoPDFReader = “” Property set via an “Application Search”, gives the value of the HKEY_CLASSES_ROOT\.pdf entry (if any found). Used to check for the presence of a PDF reader (invoked in the CallPropDisplay script). If none found, the “Download Only” feature of PDF Reader is activated (see also 2.3.1.4.9. Additional downloadable features, pg. 24).
OLD_IOS = “” Property set via an “Application Search”, gives the path in or under Windows System of the isabel_sc_csp1.dll (if any found). Used to handle the User Interface dialog screens flow (see earlier).
OptMaint Option selected on the standard maintenance screen (in which the Change control is disabled) : = “Reinstall” = Reinstall the current installation = “Remove” = Uninstall the current installation Default = “Repair”
PCSCreaders stores the result of the PCSCReaderAvailable() call = 0 no operational PC/SC reader found = 1 at least 1 operational PC/SC reader found
ProductCode = GUID code (see 3.11. Upgrades, pg. 70). Used for the Upgrade functionality
ProductName = “Isabel Security Components” Product identification use

Isabel Security Components Technical Documentation for the customer Version 2.4 Page 66 of 72
ProductVersion = “6.24.0001” Product identification use
PROGRAMFILETOLAUNCHATEND = “Launch” There is an application to launch: show the relevant checkbox on the “SetupCompleteSuccess” screen.
ReinstallModeText = “ecmus” manages the type of reinstall to perform: e = Reinstall if the file is missing, or is an equal or older version. c = Verify the checksum values, and reinstall the files if they are missing or corrupt. m = Rewrite all required registry entries from the Registry Table that go to the HKEY_LOCAL_MACHINE or HKEY_CLASSES_ROOT registry hive. u = Rewrite all required registry entries from the Registry Table that go to the HKEY_CURRENT_USER or HKEY_USERS registry hive. s = Reinstall all shortcuts and re-cache all icons overwriting any existing shortcuts and icons.
ReqWarning Organises in Maintenance mode if the Installation requirements screen is to show for a Change or Reinstall. This property is set in the Custom Action “IniConfig”. = “OK” a warning or error is to be shown, go to the Installation Requirements screen. = “” All OK, execute the requested action
SHOWLAUNCHPROGRAM = -1 Show the “Launch connectivity check” checkbox on the “SetupCompleteSuccess” screen
SecureCustomProperties = all the public properties that need to be passed to the Execute sequence (this is a Windows Installer property).
SHORTCUT_DESKTOP = 0 or 1 (default) Property that indicates to the MSI whether (“1”) or not
(“0”) the shortcuts on the desktop will be installed. This property value can be toggled by the user during installation, in the “Additional Shortcuts” dialog. See also 2.3.1.4.7. Additional Shortcuts, pg. 21.
SHORTCUT_FAVORITES = 0 or 1 (default) Property that indicates to the MSI whether (“1”) or not
(“0”) the shortcuts in the ‘Favorites’ folder will be installed. This property value can be toggled by the user during installation, in the “Additional Shortcuts” dialog. See also 2.3.1.4.7. Additional Shortcuts, pg. 21.

Isabel Security Components Technical Documentation for the customer Version 2.4 Page 67 of 72
UpgradeCode {9C98C726-F59D-49F4-88D1-A3FB9A801AD5} Used for the upgrade functionality (see also Microsoft “Windows Installer” documentation).
UPGRADEFOUND = “” Set when an upgrade condition is detected. Used to delete the previous installation before starting the actual installation (see also MSI documentation).
VERIF_ADM If empty (= the Property default), test the Admin installation requirement in the “IniConfig” custom action, otherwise the check is overruled as OK. After the “IniConfig” action, following results are valid: = 0 Admin rights requirement is not fulfilled = 1 user has enough admin rights = 2 warning: user has power user rights executing a maintenance install
VERIF_COL If empty (= the Property default), test the Colour depth installation requirement in the “IniConfig” custom action, otherwise the check is overruled as OK. After the “IniConfig” action, following results are valid: = “OK” Colour depth setting is sufficient = “” Colour depth setting failed, is insufficient
VERIF_IE If empty (= the Property default), test the Internet Explorer installation requirement in the “IniConfig” custom action, otherwise the check is overruled as OK. After the “IniConfig” action, following results are valid: = “OK” Internet Explorer is OK = “” Internet Explorer requirements are not fulfilled
VERIF_MEM If empty (= the Property default), test the physical memory installation requirement in the “IniConfig” custom action, otherwise the check is overruled as OK. After the “IniConfig” action, following results are valid: = “OK” Available physical memory is sufficient = “” Available physical memory is insufficient, NOK.
VERIF_OS If empty (= the Property default), test the Operating System installation requirement in the “IniConfig” custom action (inclusive the Service Pack level requirements), otherwise the check is overruled as OK. After the “IniConfig” action, following results are valid: = 0 Operating System is not supported, invalid = 1 Operating System is OK = 2 Operating System is not blocked but not supported
Isabel Security Components Technical Documentation for the customer Version 2.4 Page 68 of 72
VERIF_PCSC If empty (= the Property default), test the PC/SC layer Smart Card reader installation requirement in the “IniConfig” custom action, otherwise the check is overruled as OK. After the “IniConfig” action, following results are valid: = “OK” at least 1 operational PC/SC reader found = “” not OK: no operational PC/SC reader found
VERIF_RES If empty (= the Property default), test the screen resolution installation requirement in the “IniConfig” custom action, otherwise the check is overruled as OK. After the “IniConfig” action, following results are valid: = “OK” Screen resolution is sufficient = “” Screen resolution is insufficient, NOK.
VERIF_TIME If empty (= the Property default), test the PC date and time requirement in the “IniConfig” custom action, otherwise the check is overruled as OK. After the “IniConfig” action, following results are valid: = “OK” the time requirement is satisfied = “” not satisfied
VerifyFailed Property set in the “IniConfig” custom action, used to indicate when 1 or more installation requirements have failed. = “Fail” Installation cannot continue, not all installation requirements are fulfilled. = “” All installation requirements are fulfilled.
VerifySP Property set in the “IniConfig” custom action, used to indicate the status of the Service Pack level requirement = 0 Service Pack level is inadequate = 1 Service Pack level is OK = 2 Service Pack level is not taken into account
ViewTrusted Property indicating which Trusted Web sites to show, by default it is “Prod”
WINHTTP = “” Property set via an “Application Search”, gives the path in or under Windows System32 of WinHTTP.dll if any found.
WINHTTP_FOUND Property set in the “IniConfig” custom action, used in the registry to indicate: = 0, no WinHTTP.dll found during the installation = 1, a file WinHTTP.dll found during installation.
Isabel Security Components Technical Documentation for the customer Version 2.4 Page 69 of 72
3.9. Command line options
Following properties can be set on the command-line to overrule installation configurations. The property names are case-sensitive and must be given in uppercase to be taken into account. The explanations and the possible values are given in 3.9.

Isabel Security Components Technical Documentation for the customer Version 2.4 Page 70 of 72
MSI Properties, starting from pg. 62.
• ACT_SYSENV • ALLUSERS • DF_INFOTEXTURL • DOWNLOADLOCATION • LAUNCHPROGRAM • SHORTCUT_DESKTOP • SHORTCUT_FAVORITES • VERIF_ADM • VERIF_COL • VERIF_IE • VERIF_MEM • VERIF_OS • VERIF_PCSC • VERIF_RES • VERIF_TIME
3.10. Upgrades
To support an upgrade path, i.e. the possibility to install newer versions over an existing installation without the need to uninstall first this older installation, the major upgrade mechanism of MSI packages is implemented (see also Microsoft “Windows Installer” documentation).
This mechanism does not allow downgrades, i.e. you can not overwrite an existing installation with an older version without first uninstalling the current installation.
A MSI package has 5 parameters used to identify a package and to allow minor or major upgrades: Product Version, Upgrade Code, Product Code, Package Code and language.
The major upgrade mechanism requires that in the new version of the MSI: - the Product Code is changed, - the Upgrade Code is kept unchanged.
For each released new version of this MSI, we also apply the rule of increasing the Product Version number, although this is not mandatory for a major upgrade. Therefore we don't use the fourth field of the Version number, since the Windows Installer version comparisons are only taking into account the three first fields.
The Upgrade Code is {9C98C726-F59D-49F4-88D1-A3FB9A801AD5}.
A new Package Code is automatically generated at each build of the MSI (thus also when there is no change of the Product Code nor of the Product Version number).
Here follows an history of released Product Version and Product Code combinations:

Isabel Security Components Technical Documentation for the customer Version 2.4 Page 71 of 72
Version Product code 6.00.0018 prod {B6720344-233A-40C0-A1DE-C316B5F05E78}
6.00.0020 prod {F0E703C1-9566-4FBA-A2B6-99CE247C4AC3}
6.00.0021 prod {6FF12A7E-BE1C-4B3B-AE1A-7E763B3E9512}
6.00.0022 prod {EC877018-BBB4-4297-AFB3-09DC37E4DF77}
6.00.0024 {5094BBF0-92E7-45d0-BF31-94FB5DDCB1A0}
6.00.0029 {DDD80AD9-92D2-4C15-B3A6-628B9BA6A438}
6.00.0033 {218E0A3F-B08E-46A2-AC7B-3D823B398EAE}
6.00.0035 {F6A3CDA4-C576-4763-B4BE-B50B0B7F1CF6}
6.00.0037 {91D3D914-8F91-481C-9D03-059C3DCED0C1}
6.00.0039 {16E67375-8A1A-4B63-93DD-1B7FB7693980}
6.00.0041 {E8DB75F3-27DD-46A3-ADE5-D95FE8FD0E56}
6.00.0043 {9037EA55-0FB4-4E08-908A-5FC463777FEE}
6.00.0045 {AAB0C1ED-4DBB-4F4E-9EBC-01144CA77F6E}
6.00.0059 {C5751915-DECA-45ED-B3B0-C4E798996FCA}
6.23.0008 {76317853-A08B-40F4-A875-74CB575A64AA}
6.24.0001 {808F1376-345E-4A1B-82AD-FFEB6F20F299}
The Product Language can have 4 values (i.e. the 4 installation languages available): 1031 - German 1033 - English (United States) 1036 - French (France) 1043 - Dutch
Because for the same version all other parameters stay unchanged, the MSI will refuse to install another language MSI, if the first one isn’t uninstalled:
This should not be blocking because once installed, the user has all possibilities e.g. in the Office Sign Control Panel to choose his language on a user level.
The MSI upgrade table is configured as follows:

Isabel Security Components Technical Documentation for the customer Version 2.4 Page 72 of 72
For upgrade detection:
The upgrade system is configured to remove first the detected installed version before installing the MSI package. If the uninstall fails for some reason, the installation will not continue.
Upgrade code = {9C98C726-F59D-49F4-88D1-A3FB9A801AD5} VersionMin = 6.00.0000 VersionMax = 6.24.0001 => replace all installations between version 6.00.0000 and 6.00.0045 Language = Attributes = 0 => limits Min and Max version exclusive, => detect the range of versions to remove the product ActionProperty = UPGRADEFOUND
For downgrade detection: Upgrade code = {9C98C726-F59D-49F4-88D1-A3FB9A801AD5} VersionMin = 6.24.0001 VersionMax = => detect versions starting at 6.24.0001 Language = Attributes = 2 => limits Min and Max version exclusive => detect the product but does not remove ActionProperty = NEWPRODUCTFOUND
For detection of version 20 to 22:
For these versions, too much registry entries are getting removed (i.e. everything under HKLM\Software\Isabel) when uninstalling (automatically or manually) the MSI package. Therefore some Isabel Business Suite 5 related entries are back-uped and restored when such a version is found (see also
Upgrade code = {9C98C726-F59D-49F4-88D1-A3FB9A801AD5} VersionMin = 6.00.0020 VersionMax = 6.00.0022 => detect versions between 6.00.0020 and 6.00.0022 Language = Attributes = 770 => limits Min and Max version exclusive => detect the product but does not remove ActionProperty = B22_FOUND
3.8.34. RegBackup and 3.8.35. RegRestore, pg. Error! Bookmark not defined.)