Embed Size (px)
Citation preview

ISEC7 - B*Nator EMM Suite
Configuration GuideVersion 4.2.0December 8, 2014

c©2014 by ISEC7 Software Ltd.
The contents of this document are copyright protected, any guarantee is excluded. The reproduction of information or data, oftexts, sections of text, or images is subject to the prior permission of ISEC7 Software Ltd. The place of fulfillment and sole legaldomicile is Hamburg.
The company names Apple, Google, IBM, Microsoft, Novell, Palm, Research In Motion Symbian and ISEC7 Software, usedin this document are the registered trademarks of these companies. The product names in this document are registered trade-marks of the aforementioned companies as follows: iPhone, iPad (Apple), Android (Google), Lotus Domino (IBM), Lotus Notes(IBM), Lotus Notes Traveler (IBM), Novell GroupWise (Novell), Palm, webOS (Palm), BlackBerry, BlackBerry Enterprise Server(RIM-Research In Motion), Microsoft ActiveSync, Microsoft Exchange, Microsoft IIS, Microsoft Outlook, Microsoft SQL Server,Microsoft SQL Server Desktop Engine, Windows Mobile, Windows Phone (Microsoft), Symbian platform (Symbian) and B*Nator(ISEC7 Software).

Contents
1 Introduction 11.1 Installation . . . . . . . . . . . . . . . . . . . . . . . . . . . . . . . . . . . . . . . . . . . . . 11.2 Installation resources . . . . . . . . . . . . . . . . . . . . . . . . . . . . . . . . . . . . . . . 11.3 Support contact . . . . . . . . . . . . . . . . . . . . . . . . . . . . . . . . . . . . . . . . . . 1
2 Trust Store for Verifying Certificates 22.1 Overview . . . . . . . . . . . . . . . . . . . . . . . . . . . . . . . . . . . . . . . . . . . . . . 22.2 Using the Windows Trust Store . . . . . . . . . . . . . . . . . . . . . . . . . . . . . . . . . . 2
2.2.1 Accessing the Windows Trust Store . . . . . . . . . . . . . . . . . . . . . . . . . . . 22.2.2 Apache Tomcat Configuration . . . . . . . . . . . . . . . . . . . . . . . . . . . . . . 32.2.3 B*Nator Monitor Configuration . . . . . . . . . . . . . . . . . . . . . . . . . . . . . . 3
3 Proxy Server Settings 43.1 Proxy Settings via Configuration File . . . . . . . . . . . . . . . . . . . . . . . . . . . . . . . 4
4 BlackBerry Enterprise Server environments 64.1 Overview . . . . . . . . . . . . . . . . . . . . . . . . . . . . . . . . . . . . . . . . . . . . . . 64.2 Adding the BlackBerry Configuration Database . . . . . . . . . . . . . . . . . . . . . . . . . 8
4.2.1 Preparation and Requirements . . . . . . . . . . . . . . . . . . . . . . . . . . . . . . 84.2.2 Adding the Database in B*Nator . . . . . . . . . . . . . . . . . . . . . . . . . . . . . 84.2.3 Module Tuning . . . . . . . . . . . . . . . . . . . . . . . . . . . . . . . . . . . . . . 10
4.3 Basic Server Monitoring . . . . . . . . . . . . . . . . . . . . . . . . . . . . . . . . . . . . . . 114.3.1 Log Parsing . . . . . . . . . . . . . . . . . . . . . . . . . . . . . . . . . . . . . . . . 114.3.2 SNMP Monitoring . . . . . . . . . . . . . . . . . . . . . . . . . . . . . . . . . . . . . 114.3.3 Notifications . . . . . . . . . . . . . . . . . . . . . . . . . . . . . . . . . . . . . . . . 11
4.4 Administration Configuration . . . . . . . . . . . . . . . . . . . . . . . . . . . . . . . . . . . 124.4.1 Authentication . . . . . . . . . . . . . . . . . . . . . . . . . . . . . . . . . . . . . . . 124.4.2 Installing the BUA . . . . . . . . . . . . . . . . . . . . . . . . . . . . . . . . . . . . . 134.4.3 Adding the BUA to B*Nator . . . . . . . . . . . . . . . . . . . . . . . . . . . . . . . 134.4.4 Configuration of the BUA . . . . . . . . . . . . . . . . . . . . . . . . . . . . . . . . . 144.4.5 Verifying the Administration Functionality . . . . . . . . . . . . . . . . . . . . . . . . 14
4.5 Optional Feature . . . . . . . . . . . . . . . . . . . . . . . . . . . . . . . . . . . . . . . . . . 164.6 Host Monitoring . . . . . . . . . . . . . . . . . . . . . . . . . . . . . . . . . . . . . . . . . . 16
5 BlackBerry Enterprise Service 10 environments 175.1 Overview . . . . . . . . . . . . . . . . . . . . . . . . . . . . . . . . . . . . . . . . . . . . . . 175.2 Adding BlackBerry Web Services . . . . . . . . . . . . . . . . . . . . . . . . . . . . . . . . . 19
5.2.1 Preparation and Requirements . . . . . . . . . . . . . . . . . . . . . . . . . . . . . . 195.2.2 Adding the BlackBerry Web Services in B*Nator . . . . . . . . . . . . . . . . . . . . 19
i

CONTENTS ii
5.2.3 Module Tuning . . . . . . . . . . . . . . . . . . . . . . . . . . . . . . . . . . . . . . 215.3 Server Monitoring . . . . . . . . . . . . . . . . . . . . . . . . . . . . . . . . . . . . . . . . . 22
5.3.1 SNMP Monitoring Configuration . . . . . . . . . . . . . . . . . . . . . . . . . . . . . 225.3.2 Notifications . . . . . . . . . . . . . . . . . . . . . . . . . . . . . . . . . . . . . . . . 22
5.4 Host Monitoring . . . . . . . . . . . . . . . . . . . . . . . . . . . . . . . . . . . . . . . . . . 23
6 BlackBerry Enterprise Service 12 environments 246.1 Overview . . . . . . . . . . . . . . . . . . . . . . . . . . . . . . . . . . . . . . . . . . . . . . 246.2 Adding BlackBerry Web Services . . . . . . . . . . . . . . . . . . . . . . . . . . . . . . . . . 26
6.2.1 Preparation and Requirements . . . . . . . . . . . . . . . . . . . . . . . . . . . . . . 266.2.2 Adding the BlackBerry Web Services in B*Nator . . . . . . . . . . . . . . . . . . . . 266.2.3 Module Tuning . . . . . . . . . . . . . . . . . . . . . . . . . . . . . . . . . . . . . . 28
6.3 Server Monitoring . . . . . . . . . . . . . . . . . . . . . . . . . . . . . . . . . . . . . . . . . 296.3.1 SNMP Monitoring Configuration . . . . . . . . . . . . . . . . . . . . . . . . . . . . . 296.3.2 Notifications . . . . . . . . . . . . . . . . . . . . . . . . . . . . . . . . . . . . . . . . 29
6.4 Host Monitoring . . . . . . . . . . . . . . . . . . . . . . . . . . . . . . . . . . . . . . . . . . 30
7 Microsoft Exchange Server Monitoring 317.1 Overview . . . . . . . . . . . . . . . . . . . . . . . . . . . . . . . . . . . . . . . . . . . . . . 317.2 Basic Exchange Server Configuration . . . . . . . . . . . . . . . . . . . . . . . . . . . . . . . 32
7.2.1 Adding Exchange Servers . . . . . . . . . . . . . . . . . . . . . . . . . . . . . . . . . 327.2.2 Configuring Exchange Servers . . . . . . . . . . . . . . . . . . . . . . . . . . . . . . . 32
7.3 Mailbox Monitoring . . . . . . . . . . . . . . . . . . . . . . . . . . . . . . . . . . . . . . . . 337.3.1 Enabling the Mailbox Monitoring . . . . . . . . . . . . . . . . . . . . . . . . . . . . . 337.3.2 Update Interval . . . . . . . . . . . . . . . . . . . . . . . . . . . . . . . . . . . . . . 337.3.3 Verifying the Functionality . . . . . . . . . . . . . . . . . . . . . . . . . . . . . . . . 33
7.4 ActiveSync Monitoring . . . . . . . . . . . . . . . . . . . . . . . . . . . . . . . . . . . . . . 347.4.1 Enabling the ActiveSync Monitoring . . . . . . . . . . . . . . . . . . . . . . . . . . . 347.4.2 Exchange 2007, 2010 and 2013 . . . . . . . . . . . . . . . . . . . . . . . . . . . . . . 347.4.3 Exchange 2003 . . . . . . . . . . . . . . . . . . . . . . . . . . . . . . . . . . . . . . 357.4.4 Verifying the Functionality . . . . . . . . . . . . . . . . . . . . . . . . . . . . . . . . 35
8 Apple Mobile Device Management 368.1 Certification Authority with SCEP Service . . . . . . . . . . . . . . . . . . . . . . . . . . . . 37
8.1.1 SCEP Challenge . . . . . . . . . . . . . . . . . . . . . . . . . . . . . . . . . . . . . . 378.1.2 Client certificates . . . . . . . . . . . . . . . . . . . . . . . . . . . . . . . . . . . . . 378.1.3 Recommendation . . . . . . . . . . . . . . . . . . . . . . . . . . . . . . . . . . . . . 378.1.4 Installation . . . . . . . . . . . . . . . . . . . . . . . . . . . . . . . . . . . . . . . . . 378.1.5 Issuing Certificates Automatically . . . . . . . . . . . . . . . . . . . . . . . . . . . . . 408.1.6 Configuration in B*Nator Web Interface . . . . . . . . . . . . . . . . . . . . . . . . . 408.1.7 Troubleshooting Network Device Enrollment Service . . . . . . . . . . . . . . . . . . . 41
8.2 Device Management Server Identity for B*Nator . . . . . . . . . . . . . . . . . . . . . . . . . 428.2.1 Validity of Identity Certificate Signature . . . . . . . . . . . . . . . . . . . . . . . . . 428.2.2 Creating the MDM Keystore . . . . . . . . . . . . . . . . . . . . . . . . . . . . . . . 428.2.3 Signing the Device Management Server Identity by a Certification Authority . . . . . . 448.2.4 Importing the CA Reply into the MDM Alias . . . . . . . . . . . . . . . . . . . . . . 468.2.5 Configuration in B*Nator Web Interface . . . . . . . . . . . . . . . . . . . . . . . . . 468.2.6 Renewing the Device Management Server Identity . . . . . . . . . . . . . . . . . . . . 47
8.3 Push Certificate for Apple Push Notification System . . . . . . . . . . . . . . . . . . . . . . . 48

CONTENTS iii
8.3.1 Short Description . . . . . . . . . . . . . . . . . . . . . . . . . . . . . . . . . . . . . 488.3.2 Creating the APNS Keystore . . . . . . . . . . . . . . . . . . . . . . . . . . . . . . . 488.3.3 Creating a signed Certificate Signing Request from the APNS Alias . . . . . . . . . . 508.3.4 Creating a Push Certificate in the Apple Push Certificate Portal . . . . . . . . . . . . 518.3.5 Importing the Push Certificate into the APNS Alias . . . . . . . . . . . . . . . . . . . 528.3.6 Configuration in B*Nator Web Interface . . . . . . . . . . . . . . . . . . . . . . . . . 538.3.7 Renewing the Push Certificate . . . . . . . . . . . . . . . . . . . . . . . . . . . . . . 53
9 Host Monitoring 559.1 Setting the Monitoring Options . . . . . . . . . . . . . . . . . . . . . . . . . . . . . . . . . . 56
9.1.1 SNMP Configuration . . . . . . . . . . . . . . . . . . . . . . . . . . . . . . . . . . . 579.2 Reachability . . . . . . . . . . . . . . . . . . . . . . . . . . . . . . . . . . . . . . . . . . . . 57
9.2.1 Configuring the Threshold . . . . . . . . . . . . . . . . . . . . . . . . . . . . . . . . 579.2.2 Possible Statuses . . . . . . . . . . . . . . . . . . . . . . . . . . . . . . . . . . . . . 579.2.3 Ping Interval . . . . . . . . . . . . . . . . . . . . . . . . . . . . . . . . . . . . . . . . 589.2.4 Notifications . . . . . . . . . . . . . . . . . . . . . . . . . . . . . . . . . . . . . . . . 58
9.3 Host Information . . . . . . . . . . . . . . . . . . . . . . . . . . . . . . . . . . . . . . . . . 589.4 System Services . . . . . . . . . . . . . . . . . . . . . . . . . . . . . . . . . . . . . . . . . . 589.5 CPU Usage . . . . . . . . . . . . . . . . . . . . . . . . . . . . . . . . . . . . . . . . . . . . 589.6 Memory Usage . . . . . . . . . . . . . . . . . . . . . . . . . . . . . . . . . . . . . . . . . . . 589.7 Network Usage . . . . . . . . . . . . . . . . . . . . . . . . . . . . . . . . . . . . . . . . . . . 589.8 Data Storage Devices . . . . . . . . . . . . . . . . . . . . . . . . . . . . . . . . . . . . . . . 59
9.8.1 Configuring the Threshold . . . . . . . . . . . . . . . . . . . . . . . . . . . . . . . . 599.8.2 Possible Statuses . . . . . . . . . . . . . . . . . . . . . . . . . . . . . . . . . . . . . 599.8.3 Update Interval . . . . . . . . . . . . . . . . . . . . . . . . . . . . . . . . . . . . . . 599.8.4 Notifications . . . . . . . . . . . . . . . . . . . . . . . . . . . . . . . . . . . . . . . . 60
9.9 System Time Drift . . . . . . . . . . . . . . . . . . . . . . . . . . . . . . . . . . . . . . . . . 60
10 System Configurations 6110.1 Changing the Logging Level . . . . . . . . . . . . . . . . . . . . . . . . . . . . . . . . . . . . 6110.2 LDAP Configurations . . . . . . . . . . . . . . . . . . . . . . . . . . . . . . . . . . . . . . . 62
10.2.1 Adding new LDAP Configurations . . . . . . . . . . . . . . . . . . . . . . . . . . . . 6210.2.2 Editing LDAP Configurations . . . . . . . . . . . . . . . . . . . . . . . . . . . . . . . 6210.2.3 Using Active Directory Logins . . . . . . . . . . . . . . . . . . . . . . . . . . . . . . . 64
10.3 Managing Access to the Web Application . . . . . . . . . . . . . . . . . . . . . . . . . . . . 6510.3.1 Global Permissions . . . . . . . . . . . . . . . . . . . . . . . . . . . . . . . . . . . . 6510.3.2 User Self Service Permissions . . . . . . . . . . . . . . . . . . . . . . . . . . . . . . . 6610.3.3 Permission Editor . . . . . . . . . . . . . . . . . . . . . . . . . . . . . . . . . . . . . 67
10.4 Notifications . . . . . . . . . . . . . . . . . . . . . . . . . . . . . . . . . . . . . . . . . . . . 6910.4.1 Overview . . . . . . . . . . . . . . . . . . . . . . . . . . . . . . . . . . . . . . . . . . 6910.4.2 Notification Recipient Lists . . . . . . . . . . . . . . . . . . . . . . . . . . . . . . . . 6910.4.3 Working with Notification Recipient Lists . . . . . . . . . . . . . . . . . . . . . . . . 71
10.5 Outgoing Mail Server Configuration . . . . . . . . . . . . . . . . . . . . . . . . . . . . . . . 7210.5.1 Connection Security . . . . . . . . . . . . . . . . . . . . . . . . . . . . . . . . . . . . 7210.5.2 Send-from Address and Authentication . . . . . . . . . . . . . . . . . . . . . . . . . . 7210.5.3 Configuring the SMTP Gateway . . . . . . . . . . . . . . . . . . . . . . . . . . . . . 7210.5.4 Testing the Outgoing Mail Server Configuration . . . . . . . . . . . . . . . . . . . . . 73
10.6 B*Nator Local Users and Groups . . . . . . . . . . . . . . . . . . . . . . . . . . . . . . . . . 7410.6.1 Users . . . . . . . . . . . . . . . . . . . . . . . . . . . . . . . . . . . . . . . . . . . . 74

CONTENTS iv
10.6.2 Groups . . . . . . . . . . . . . . . . . . . . . . . . . . . . . . . . . . . . . . . . . . . 7510.7 Installing B*Nator Agents . . . . . . . . . . . . . . . . . . . . . . . . . . . . . . . . . . . . . 76

Chapter 1
Introduction
After the installation was successful, the configuration of the environment to be monitored and managed cantake place. It consists of several key aspects, which are described in this guide. The configuration of B*Natoris the bigger part of the installation and configuration process. Related to each environment to be monitoredand managed, several smaller configurations are required to enable the entire functionality of all features.
1.1 InstallationThe installation of B*Nator already needs to be successful finished before performing configurations describedin this guide. For more information about installing B*Nator, please refer to the Installation Guide.
1.2 Installation resourcesAll resources, like documentations, installers or 3rd party software required for configuring all components ofB*Nator are available from the B*Nator download area1.
1.3 Support contactFor further details or assistance while configuring B*Nator you can also contact the support team at:
EuropeEmail: [email protected]: +49 40 32 50 76 60
United StatesEmail: [email protected]: +1-908-279-7977
1http://www.bnator.com/releasenotes
1

Chapter 2
Trust Store for Verifying Certificates
This chapter covers the required configurations for trusting certificates when using Secure Sockets Layer (SSL)connections. For those it is required that the peer certificate can be verified by the client, like the ’ApacheTomcat’, ’B*Nator Monitor’ or the ’B*Nator Agent’ services for connections like:
• HTTPS connections to web services, like the BlackBerry Web Services
• Encrypted SQL connections to BlackBerry Configurations Databases
• LDAPS connections for secured logins
• Secured SMTP connections for sending notifications
2.1 OverviewBecause of ’Apache Tomcat’ and ’B*Nator’ are Java applications they will use the Java trust store, that comeswith the Java installation that each application uses. For a better understanding and an easier managementof the certificates that each application trusts, they should be configured to use the same trust store.Followed by the recommended installation settings, the ’Apache Tomcat’ and ’B*Nator Monitor’ services bothoperate using the same service account. This service account has a trust store in Windows, which can also beused by Java applications after they have been configured for this.
2.2 Using the Windows Trust StoreTo configure the ’Apache Tomcat’ and ’B*Nator Monitor’ for using the Windows trust store of the serviceaccount, both services need to run as the service account. The configuration itself is done in the processrunner configuration of each service.
2.2.1 Accessing the Windows Trust StoreWhile logged in to the B*Nator server using the service account, run certmgr.msc to access the serviceaccount’s (’Current User’, not ’Local Computer’) ’Certificates’ Management Console.The ’Trusted Root Certification Authorities / Certificates’ store is the one, that Java applications can beconfigured to use.
Importing Certificates
When it comes to import a certificate into this store, it can be done as follows:
1. Open the Windows Certificates Management Console of the service account, as described before
2. Expand ’Trust Root Certification Authorities’
2
CHAPTER 2. TRUST STORE FOR VERIFYING CERTIFICATES 3
3. Select ’Certificates’
4. Right click it or use the MSC ’Action’ menu and navigate to ’All Tasks / Import. . . ’
5. Follow the wizard to navigate to the root certificate that should be imported and finish it
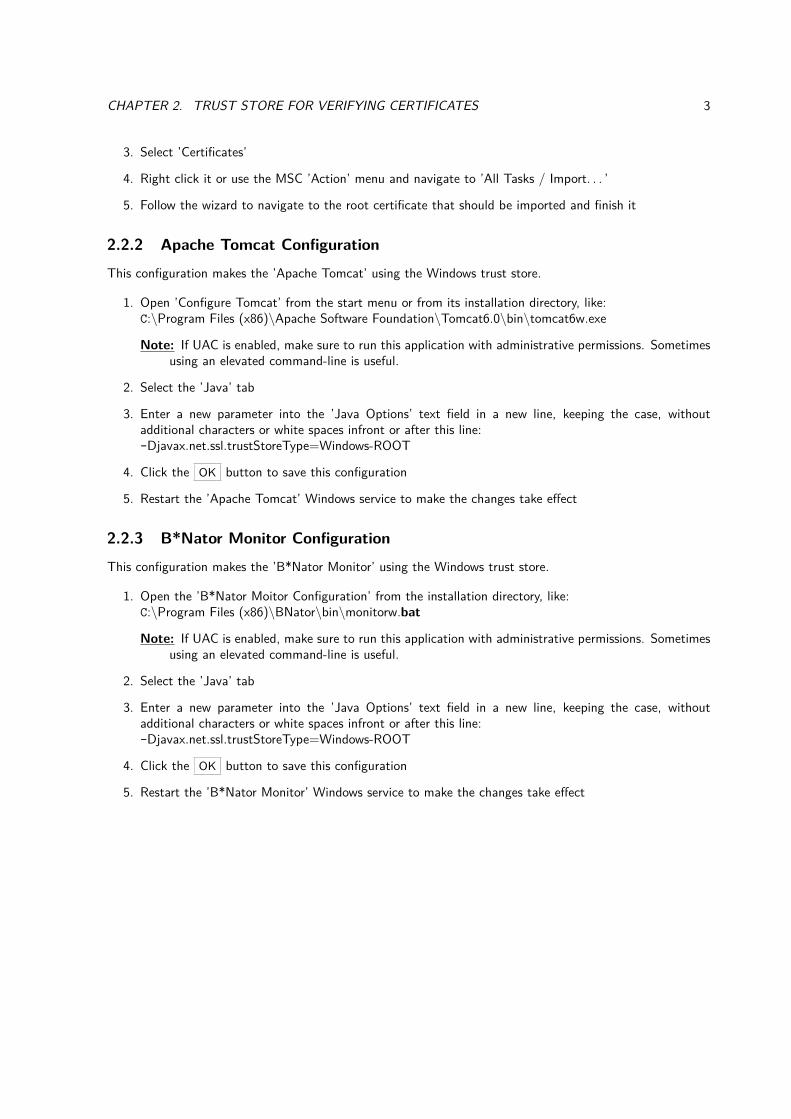
2.2.2 Apache Tomcat ConfigurationThis configuration makes the ’Apache Tomcat’ using the Windows trust store.
1. Open ’Configure Tomcat’ from the start menu or from its installation directory, like:C:\Program Files (x86)\Apache Software Foundation\Tomcat6.0\bin\tomcat6w.exe
Note: If UAC is enabled, make sure to run this application with administrative permissions. Sometimesusing an elevated command-line is useful.
2. Select the ’Java’ tab
3. Enter a new parameter into the ’Java Options’ text field in a new line, keeping the case, withoutadditional characters or white spaces infront or after this line:-Djavax.net.ssl.trustStoreType=Windows-ROOT
4. Click the OK button to save this configuration
5. Restart the ’Apache Tomcat’ Windows service to make the changes take effect
2.2.3 B*Nator Monitor ConfigurationThis configuration makes the ’B*Nator Monitor’ using the Windows trust store.
1. Open the ’B*Nator Moitor Configuration’ from the installation directory, like:C:\Program Files (x86)\BNator\bin\monitorw.bat
Note: If UAC is enabled, make sure to run this application with administrative permissions. Sometimesusing an elevated command-line is useful.
2. Select the ’Java’ tab
3. Enter a new parameter into the ’Java Options’ text field in a new line, keeping the case, withoutadditional characters or white spaces infront or after this line:-Djavax.net.ssl.trustStoreType=Windows-ROOT
4. Click the OK button to save this configuration
5. Restart the ’B*Nator Monitor’ Windows service to make the changes take effect

Chapter 3
Proxy Server Settings
This chapter covers the proxy server configuration settings. The following proxy server configurations can bemade in order of their priority if configured:
1. Configuration via web application: In this case, the proxy server settings can be provided in the webapplication. They will be stored in the B*Nator database and will be used for every HTTP/S connection.
Note: No exceptions can be configured.
2. Configuration via configuration file: In this case, the proxy server settings can be provided in the’config.properties’ files in the ’/conf’ subfolder of the installation directory.
Note: Exceptions are fully supported. The Apache Tomcat and B*Nator Monitor services have to berestarted after the configuration files was modified.
3. Configuration via ’Windows Internet Settings’: This type of configuration is enabled by default,because the others are unconfigured by default.
Note: Exceptions won’t work with wildcards. Always full hostnames have to be configured in the’Windows Internet Settings’. Somtimes ’localhost’ has to be as an exception, too.
If proxy server settings are required, it is recommended to use the configuration file.
3.1 Proxy Settings via Configuration FileThe configuration file is located in the ’/conf’ subfolder of the B*Nator installation directory. It can bemodified using a text editor.
C:\Program Files (x86)\BNator\conf\config.properties
Note: When User Account Control (UAC) is activated, the editor should be started with administrativepermissions, otherwise the file cannot be saved to its location. As a workaround, the file can be savedto the desktop and moved back to its origin.
Add each of the following configuration parameters to new lines. Make sure to keep the correct case and tonot enter other characters or white spaces at the beginning or the end of each line.
• http.proxyHost=proxy.company.com
• http.proxyPort=8080
• http.nonProxyHosts=*.company.com|192.168.*|srv-bes1
4

CHAPTER 3. PROXY SERVER SETTINGS 5
For more information about these parameters and the syntax for providing the non proxy hosts, please referto the ’Java Networking Properties Documentation’ about ’Proxies’1.When the file was modified, the ’Apache Tomcat’ and ’B*Nator Monitor’ services need to be restarted tomake the changes take effect.
1https://docs.oracle.com/javase/7/docs/api/java/net/doc-files/net-properties.html#Proxies

Chapter 4
BlackBerry Enterprise Serverenvironments
This chapter covers the required configuration to add a BlackBerry Enterprise Server environment (domain)to B*Nator.
4.1 OverviewThe main information sources of a BlackBerry Enterprise Server domain is the ’BlackBerry ConfigurationDatabase’. It will be access using a ’BES DB Parser’ module via TSQL connections, to get details aboutBlackBerry servers, mail server, users, devices, groups, policies etc.
Note: All servers that are found, will automatically be added to the monitoring, so that those will not haveto be added manually later.
For additional monitoring features, a ’B*Nator Agent’ has to be installed on each server to get local informationabout the system performance and for accessing the BDS log files.Further monitoring information about BDS servers is received using the ’SNMP Collector’ module. For thisreason the Windows ’SNMP Service’ has to be installed on each server, too.For administration features, a ’BlackBerry User Administration’ command-line tool has to be installed on anyserver on the network, that will be manually added to B*Nator and is executed by a local ’B*Nator Agent’.
6

CHAPTER 4. BLACKBERRY ENTERPRISE SERVER ENVIRONMENTS 7
The following picture shows an overview of the required components and connections:
Windows Management Instrumentation (WMI)
BlackBerry Enterprise Server values
BlackBerry Enterprise Server Details
SNMP Collector
BES Log Parser
BES Registry Parser
Host Information Collector
Host Resource values
BES Log Files
Host Monitor
Host Resource values
Agent Log Parser
BlackBerry Configuration Database (BESMgmt)
BES DB Parser
BlackBerry Administration ServiceBlackBerry Administration API
BES Administration Executor Command-Line ToolBES User Admin
Client Service

CHAPTER 4. BLACKBERRY ENTERPRISE SERVER ENVIRONMENTS 8
4.2 Adding the BlackBerry Configuration DatabaseAs stated before, the ’BlackBerry Configuration Database’ is the main source of information about a BlackBerryEnterprise Server environment. It needs to be added to B*Nator.
4.2.1 Preparation and RequirementsIn order to access the BlackBerry Configuration Database, it has to be accessible for TCP/IP connections overthe network and an account to read the database is required.
TCP/IP Access
TCP/IP connections have to enabled for the SQL Server, which is not enabled by default. Additional infor-mation that is needed is either the ’Instance Name’ of the SQL Server where the BlackBerry database locatedor it TCP/IP port, if this a static port is used.
Database Access
To access the BlackBerry database an account is need with ’datareader’ permissions on it. It is recommendedto use the B*Nator service account if possible.If the BlackBerry database is the target for BlackBerry user migrations with B*Nator, also the ’datawriter’permission is required.
Verifying the Accessibility of the Database
The database is located on a local or remote SQL Server Instance. The connection can be established usingthe SQL Server ’Instance Name’, which will be used to detect the current port for TCP connections to theSQL Server. Alternatively a static port can be used for the connection.The default ’Instance Name’ of local SQL Server installations usually is ’BLACKBERRY’. The default staticport of an SQL Server Instance is ’1433’.The connectivity can be verified by opening a connection using a ’Telnet’ Client.
telnet sql.company.com 1433
4.2.2 Adding the Database in B*NatorAdding BlackBerry Configuration Databases to B*Nator is only available with administrative permissions. TheSQL Server hostname, instance name or port as well as the databse name and the login has to be provided,which then is used to create a new ’BES DB Parser’ module in B*Nator. Then the new module can beactivated to retrieve information from the database.
Providing the Database Details
1. Use menu ’ADMINISTRATION\Infrastructure\Add Systems\Add BES Management Database’
2. Choose to create a new ’Microsoft SQL Server’, if the SQL Server instance that holds the BlackBerryConfiguration Database was not already added to B*Nator. Otherwise an existing SQL Server can beselected from the drop-down menu, to provide the information that the database is located there. Inthis case, you can skip the next steps until the ’Details for MSSQL Database’ have to be entered.
3. Provide the ’Details for Host of SQL Server’
(a) Enter the ’Hostname’ of the host, where the SQL Server is located(b) The ’IP Address’ is optional and only required, if the ’Hostname’ cannot be resolved

CHAPTER 4. BLACKBERRY ENTERPRISE SERVER ENVIRONMENTS 9
(c) Selecting a ’Tunneling host’ is optional. This can be used to selected a host from the drop-downmenu, where a B*Nator Agent is installed, that should be used to tunnel the connection from theB*Nator Monitor to the BlackBerry database through a local B*Nator Agent on a third host.
4. Prodivde the ’Details for MSSQL Server’
(a) Enter the name of the SQL Server ’Instance’ where the database is located or leave it blank(b) The ’Port’ number of the SQL Server Instance is optional and can be used if no ’Instance’ name
should be used. If a ’Port’ is entered, it will always be used for the connection, even if an ’Instance’name was entered. If the ’Port’ is left blank, the default port is ’1433’.Note: If no ’Instance’ name and no ’Port’ number was given, B*Nator will try to establish a
connection with the default values.(c) Choose if an ’Encryption’ method should be used for the connection to the SQL Server. Hover
with the mouse over the ’Encryption’ text for more details about each option.Note: Since SQL Server 2005 and Express encryption is supported and enabled by default. Choos-
ing ’Request’ as an encryption method will request the SQL Server to use encryption and willfall back to no encryption, if the SQL Server does not support it.
(d) The option to ’Create SQL Server without database’ will only create the SQL Server in B*Nator,without creating a BlackBerry database and a related ’BES DB Parser’ module
5. Provide the ’Details for MSSQL Database’
(a) Enter the ’Name’ of the BlackBerry database. The default name ’BESMgmt’ is already prefilled,but can be modified.
(b) Select the method for the ’Authentication’ with the database.• SQL Authentication: Login using an SQL Server account by providing ’Username’ and ’Pass-word’.
• Windows Authentication (Username and Password): Login using Windows Authenticationpy provoding ’Username’, ’Password’ and ’Domain’.
• Windows Authentication (Single Sign-On): Login using the credentials that the ’B*NatorMonitor’ service logs on with, i.e. using the B*Nator service account.Note: If a ’Tunneling Host’ was selected, the credentials that the ’B*Nator Agent’ service on
the selected tunneling host logs on with are used.(c) Enter the ’Username’ of a login with permissions to access the BlackBerry database, if required for
the selected ’Authentication’ method(d) Enter the ’Password’ for the given ’Username’, if required for the selected ’Authentication’ method(e) Enter the ’Domain’ name for the given ’Username’, if required for the selected ’Authentication’
method

CHAPTER 4. BLACKBERRY ENTERPRISE SERVER ENVIRONMENTS 10
Add BES Management DatabaseSQL Server Microsoft SQL Server vDetails for Host of SQL ServerHostname sql.company.comIP AddressTunneling Host - - - vDetails for MSSQL ServerInstancePort (Optional)Encryption Request v
Create SQL Server without databaseDetails for MSSQL DatabaseName BESMgmtAuthentication Windows Authentication (Username and Password) vUsername svc-emmPassword ····················
Domain COMPANY
add
After clicking the add button the new environment with a related ’BES DB Parser’ module is added. Theweb application switches to the ’Infrastructure Management’ page and preloads the newly added SQL Serverconfiguration.
Starting the new BES DB Parser module
1. Use menu ’ADMINISTRATION\B*Nator\Modules’
2. Look for the newly added ’BES DB Parser’ that shows the entered BlackBerry database configurationin brackets, like BES DB Parser (sql.company.com.BESMgmt).
3. Click Activate to start the module.
4. Open the modules page again from the menu to verify if the modules makes progress.
If the module stops working, review the ’BESDBParser_xxx.log’ file in the B*Nator logs folder for furtherdetails. Possible issue are network connection problems, invalid credentials or insufficient permissions.If the module makes progress, the BlackBerry Enterprise Servers should appear in the server ’Navigation’ baron the left abd the users and devices should show up in the ’Users & Devices’ list.
4.2.3 Module TuningThe ’BES DB Parser’ module will operate in its configured interval. Depending on the database size and theconnection quality to it, it may take more or less time than the configured interval, which can be adopted tothe environment’s performance.When the module is activated and started, it constantly updates the information from the environment.

CHAPTER 4. BLACKBERRY ENTERPRISE SERVER ENVIRONMENTS 11
4.3 Basic Server MonitoringThe monitoring configuration for BlackBerry Enterprise Servers is done in the ’Infrastructure Management’page.
1. Use menu ADMINISTRATION\Infrastructure\Management
2. Expand the name of the host that has a ’BlackBerry Enterprise Server’
3. Select the ’BlackBerry Enterprise Server’ service type
4.3.1 Log ParsingThe BlackBery Enterprise Server log files are a source for several events on the server as well as for possible’Compliance’ issues. There are two types of log parsing that can be activated.
• Service Logs: Enables parsing the default log files for common events and all types or ’Error’ or’Warning’ entries. It it recommended to enabled this option.
• Compliance Logs: Enables parsing ’PIN’, ’SMS’ and ’PhoneCall’ logs for entries that conflict withspecific black listed criteria.
Note: Even if this feature is enabled, reading those logs is only possible, if they were activated to belogged by the BlackBerry server itself.
Log ParsingService LogsCompliance Logs
Change
Clicking the Change button saves the configuration.Reading the server log files requires to install a local ’B*Nator Agent’ on the server, as it is described insection 10.7.
4.3.2 SNMP MonitoringThe ’SNMP’ tab contains a single setting, that enables this server to be monitored by the ’SNMP Collector’module.
SNMPUse for Service Monitoring
Change
When this setting is enabled, it is required to configure the SNMP ’Community Name’ on the ’SNMP’ tab insever’s host configtion, too. For more information about this please refer to subsection 9.1.1.
4.3.3 NotificationsWith this configuration tab the notifications recipients lists can be selected as described in section 10.4.3, tocontrol the recipients of notifications about this server. For general information about notifications, pleaserefer to section 10.4.

CHAPTER 4. BLACKBERRY ENTERPRISE SERVER ENVIRONMENTS 12
4.4 Administration ConfigurationFor administration features, at least one ’BlackBerry User Administration’ Tool (BUA) or Service has to beinstalled per BlackBerry domain, depending on the BlackBerry Enterprise Server version.
• BlackBerry Enterprise Server 4.x: ’BlackBerry User Administration Service’. Installed as a WindowsService that accesses the BlackBerry Configuration Database.
• BlackBerry Enterprise Server 5.x: ’BlackBerry User Administration Tool’. Installed only as a toolthat connects to the ’BlackBerry Administration Service - BlackBerry Administration API’.
This is a command-line tool that is part of the ’BlackBerry Ressource Kit’. Basically the tool can be installedon any server in the network. It is executed using a local ’B*Nator Agent’, that will execute the command-linesand report the specific results back to the B*Nator server.The following picture shows an overview about this functionality for a BlackBerry Enterprise Server 5 environ-ment using a BlackBerry User Administration Tool.
BlackBerry Administration ServiceBlackBerry Administration API
BES Administration Executor Command-Line ToolBES User Admin
Client Service
For BlackBerry user migrations with B*Nator, it is recommended to install and configure more than one BUAfor load balancing reasons.
4.4.1 AuthenticationThe BUA authentication is different between the ’Service’ and the ’Tool’.
• BlackBerry User Administration Service (4.x): During the installation of the service, a password hasto be provided that is required to execute it later.
• BlackBerry User Administration Tool (5.x): The tool connects to the ’BlackBerry AdministrationService - BlackBerry Administration API’ and requires to provide credentials of an account, that hasa sufficient role on the BlackBerry Administration Service. For the full range of B*Nator features a’BlackBerry Administration Service’ login (local user) with the ’Enterprise Administrator’ role is requriedon the BAS.
Creating a local BES5 Enterprise Administrator login
1. Log on to the BlackBerry Administration Service with a ’Security Administrator’ login
2. Create an ’Administrator User’
3. Provide a ’Display Name’
4. Select the ’BlackBerry Administration Service’ authentication type from the drop-down menu

CHAPTER 4. BLACKBERRY ENTERPRISE SERVER ENVIRONMENTS 13
5. Provide a login ’Name’
6. Provide a password for the user
7. Repeat the password
8. Enter the ’Administrator Password’ of the account that you are currently logged in with
9. Select the ’Enterprise Administrator’ role from the drop-down menu
10. Create the user account
11. Log out and log in with the newly created account for verification
Note: The password of this user account expires after one year. Make sure to renew the password in time.
4.4.2 Installing the BUAThe BUA that is used should match the BlackBerry Enterprise Server version that it works for. The downloadis available in the B*Nator download area1
The installation of the BUA is different between the service and the ’Tool’. Please follow the related officialinstallation documentation for further details.
• BlackBerry User Administration Service (4.x): The service is installed on the command-line. Duringthe installation a ’client password’ has to be provided that is required to execute it later. This passwordmust not be blank, but consist of numbers and letters only and be at least 5 characters long.
• BlackBerry User Administration Tool (5.x): The tool is installed using a Windows installer that needsto be provided with the full qualified domain name of host where the related ’BlackBerry AdministrationService’ is installed. It then will validate the access to the BAS using the given FQDN and also verifythe web server’s certificate.
Hint: If the BAS is not available using the HTTPS default port ’443’, the port number can be enteredmanually with the FQDN, e.g. bas.company.com:38443
4.4.3 Adding the BUA to B*NatorB*Nator cannot find a BUA installation automatically so it has to be added manually.
1. Use menu ’ADMINISTRATION\Infrastructure\Add Systems\Add Host’
2. Enter the ’Hostname’ of the host, where the BUA is installed
3. The ’IP Address’ is optional and only required, if the ’Hostname’ cannot be resolved
4. Select ’BES User Administration Tool’ from the ’Type’ drop-down menu.
Note: BlackBerry User Administration ’Services’ and ’Tools’ both are ’BES User Administration Tools’in B*Nator.
Add HostHostname bes-app.company.comIP AddressType BES User Administration Tool v
Add
After clicking the Add button the BUA is added and the web application switches to the ’InfrastructureManagement’ page and preloads its configuration.
1http://www.bnator.com/releasenotes

CHAPTER 4. BLACKBERRY ENTERPRISE SERVER ENVIRONMENTS 14
4.4.4 Configuration of the BUA1. At first, the ’BES Management Database for which the BES User Administration Tool is configured on
this host’ has to be selected from the drop-down list.
2. The ’BES User Administration Tool Path’ is the local directory where the tool is installed in the host,e.g.’C:\Program Files (x86)\Research in Motion\BlackBerry Enterprise Server Resource Kit\BlackBerryUser Administration Tool Client
3. Select the ’BES User Administration Tool version’ from the drop-demo menu
4. The ’BES User Administration Tool username’ is login name of the BlackBerry Administration Servicelogin that should be used for the BUA.
Note: The username is not requried for version 4.x
5. The ’BES User Administration Tool password’ has to be typed in twice. It must not contain one of thefollowing characters: ’&’ or ’-’
Note: For version 5.x it is the password for the given username. For version 4.x, it is the passward forthe service, that was configured during the installation.
ConfigurationBES Management Database for which the BESUser Administration Tool is configured on thishost
sql.company.com.BESMgmt v
BES User Administration Tool Path C:\Program Files (x86)\Research in Mo. . .BES User Administration Tool version BES 5.x vBES User Administration Tool username svc-emmBES User Administration Tool password ····················
Type in twice. Do not use one of the follow-ing characters for your BES User AdministrationTool password: & -
····················
Change
4.4.5 Verifying the Administration FunctionalityThe functionality of the administration configuration can be verified by executing a harmless administrativeaction, like resending the service book to a BlackBerry device.
1. Use the main menu ’Users & Devices’
2. Lookup a test user of the environment, the BUA was installed for
3. Click the ’Display Name’ to open the relationship detail page
4. Select the ’Administration’ tab
5. Execute the ’Resend Service Book’ action
6. Verify the executing of the from the panel that is displayed above the page.
Time Agent host Action type Server Description ResultMay 8, 2014 3:25:26 PM BES-APP Resend Service Book BES [email protected] Pending. . .
Refresh
Clicking the Refresh button refreshes the administrative action panel with the action ’Result’.

CHAPTER 4. BLACKBERRY ENTERPRISE SERVER ENVIRONMENTS 15
Results
Administrative actions can the following results.
• Pending. . . : The administrative action is executed by the ’B*Nator Agent’ on the ’Agent host’ and aresult is not yet received
• Done: The administrative action was successfully executed. Hovering with the mouse over the under-lined text shows the command-line output of the BUA for further details.
• Problem: The administrative action was not successfully executed. Hovering with the mouse over theunderlined text shows the command-line output of the BUA for further details.
Example: If the username and/or password in the configuration of a BUA version 5.x is incorrect, theBUA will be executed using wrong credentials. This means, the BUA will authenticate with theBlackBerry Administration Service using invalid credentials, so the result in BUA might be:Unauthorized: User is not authorized to perform this operation.
• No useable BES User Administration Tool found: The administrative action was not executed,because no BUA configuration was found or all existing tools are either not in a good shape or theunderlying hosts do not have a good status.
Example: If a BUA is installed on host ’A’ that works for BlackBerry domain ’B’, but the ’AveragePing Time’ of host ’A’ has a ’Warning’ status, this host cannot be used for BUA features. If noother host has a BUA for BlackBerry domain ’B’ installed, the result is:No useable BES User Administration Tool found

CHAPTER 4. BLACKBERRY ENTERPRISE SERVER ENVIRONMENTS 16
4.5 Optional FeatureThe following feature are optional to be configured.
Info Channel Push: Pushes a B*Nator icon to the home screen of the BlackBerry devices, providing a deeplink into the B*Nator web application, showing detailed traffic usage information for the user.
B*Nator Remote Control: BlackBerry client application, providing remote control for BlackBerry devices.
MailRoundTrip Client: BlackBerry client application, monitoring the entire message runtime from sendinga mail until receiving it on a specific BlackBerry device, which is fully BlackBerry activated and in useonly for B*Nator.
B*Nator Agent mobile: BlackBerry client application, providing GPS tracking features for BlackBerry de-vices.
Application Portal: B*Nator provides a built-in portal to publish applications for mobile device users. Ap-plications can be managed and published to a specific selection of users in a groupware directory
4.6 Host MonitoringEach host that has a BlackBerry Enterprise Server on it, should also be configured for the default hostmonitoring features, as described in chapter 9.

Chapter 5
BlackBerry Enterprise Service 10environments
This chapter covers the required configuration to add a BlackBerry Enterprise Service 10 environment toB*Nator.
5.1 OverviewA BlackBerry Enterprise Service 10 environment can consist of the following services:
BlackBerry Device Service: The ’BDS’ manages the BlackBerry devices.
Universal Device Service: The ’UDS’ manages the Apple iOS and Android devices.
For both services, the main information sources are the ’BlackBerry Web Services for Enterprise Administration’.Each service has it’s own web service, that B*Nator will access using a ’BlackBerry Domain Monitor’ modulevia HTTPS connections, to get details about servers, users, devices, groups, policies, profiles etc. and toperform administrative tasks.
Note: All BDS hosts that are found, will automatically be added to the monitoring, so that those will nothave to be added manually later. UDS host details cannot be retrieved using the web service, but theUDS is usually installed on a BDS. Otherwise the UDS host can manually be added as a ’Network Host’to the monitoring.
For additional monitoring features, a ’B*Nator Agent’ has to be installed on each server to get local informationabout the system performance and for accessing the BDS log files.Further monitoring information about BDS servers is received using the ’SNMP Collector’ module. For thisreason the Windows ’SNMP Service’ has to be installed on each server, too.
17

CHAPTER 5. BLACKBERRY ENTERPRISE SERVICE 10 ENVIRONMENTS 18
The following picture shows an overview of the required components and connections:
Windows Management Instrumentation (WMI)
BlackBerry Web Servicesfor Enterprise Administration
BlackBerry Domain Monitor
BDS Service values
BDS Service Details
SNMP Collector
BDS Log Parser
BDS Registry Parser
Host Information Collector
Host Resource values
BDS Log Files
Agent Log Parser
Host Resource values
Host Monitor
BlackBerry Web Servicesfor Enterprise Administration
BlackBerry Domain Monitor

CHAPTER 5. BLACKBERRY ENTERPRISE SERVICE 10 ENVIRONMENTS 19
5.2 Adding BlackBerry Web ServicesAs stated before, the BlackBerry Web Services are the main source of information about a BlackBerry EnterpriseService 10 environment. They need to be added to B*Nator.
5.2.1 Preparation and Requirements
In order to access the BlackBerry Web Services, thay have to accessible over the network and the web server’scertificate has to be valid and trusted.
Verifying the Accessibility of the BlackBerry Web Services
By default, the BlackBerry Web Services are available on the following ports:
BlackBerry Device Service: Same port that the ’BlackBerry Administration Service’ uses, like theinstallation default port ’38443’ or maybe the HTTPS protocol default port ’443’.
Universal Device Service: Not the same port that the ’Administration Console’ uses. Instead it is port’8082’ or maybe also ’18082’.
This connection can be verified by accessing the web services using a web browser from the B*Nator server.
https://bes10.company.com:<port>/enterprise/admin/ws?wsdl
Note: It may be required to use or bypass a proxy server. If proxy settings are required, they may have to beconfigured for B*Nator as described in chapter 3.
Trusting the Web Server Certificate
The BlackBerry Web Services are accessed using HTTPS connections. For that reason, the web server’scertificate has to be valid and trusted when it is validated against the trust store, that was configured for theB*Nator Monitor as described in chapter 2.It is required to import the certificate of the root certification authority, that issued the web server’s certificate,to the trust store, if it is not already available there. Otherwise the validation of the web server’s certificatewill fail.
5.2.2 Adding the BlackBerry Web Services in B*NatorAdding BlackBerry Web Services to B*Nator is only available with administrative permissions. The locationof the web services have to be provided, which then are used to create a new ’BlackBerry Domain Monitor’module in B*Nator. After that, the credentials for the accessing these web services have to be provided. Thenthe new module can be activated to retrieve information from the web services.
Providing the Web Service Details
1. Use menu ’ADMINISTRATION\Infrastructure\Add Systems\Add BlackBerry Web Services’
2. Select ’BlackBerry Device Service’ or ’Universal Device Service’
3. Enter the ’Hostname’ of the server
Note: This hostname will be used for the HTTPS connection to the BlackBerry Web Services, so theweb server’s certificate has to be valid for this hostname.
4. The ’IP Address’ is optional and only required, if the ’Hostname’ cannot be resolved
5. Enter the port number
6. Enter a ’Display name’ that is used to identify this environment later within B*Nator.

CHAPTER 5. BLACKBERRY ENTERPRISE SERVICE 10 ENVIRONMENTS 20
Add BlackBerry Web ServicesBlackBerry domain BlackBery Device Service vDetails for BlackBerry Web ServicesHostname bes10.company.comIP Address (Optional)Port (Optional) 38443Details for BlackBerry domainDisplay name Company BDS
add
After clicking the add button the new environment is added and the web application switches to the ’Infras-tructure Management’ page and preloads the newly added BlackBerry Web Services configuration.
Note: While this configuration section is loaded B*Nator connects to the BlackBerry Web Services to loadthe available login methods.
Providing the Credentials
Select the ’BlackBerry Domain’ tab to enter the login credentials for an account that has the ’EnterpriseAdministrator’ role on the ’BDS’ or the ’UDS’. It is recommended to use the B*Nator service account.
BlackBerry DomainType BlackBerry Device ServiceDisplay name Company BDSUsername svc-emmPassword ····················
Domain COMPANYLog in using Active Directory v
Change
Clicking the Change button saved the given configuration.
Note: If an error message is displayed, the connection to the web service was not successful. Review the’BlackBerryDomainMonitor_xxx.log’ file in the B*Nator logs folder for further details.
Starting the new BlackBerry Domain Monitor module
When the credentials are entered, the new ’BlackBerry Domain Monitor’ module can be activated.
1. Use menu ’ADMINISTRATION\B*Nator\Modules’
2. Look for the newly added ’BlackBerry Domain Monitor’ that shows the entered domain display name inbrackets, like BlackBerry Domain Monitor (Company BDS).
3. Click Activate to start the module.
4. Open the modules page again from the menu to verify if the modules makes progress.
If the module stops working, review the ’BlackBerryDomainMonitor_xxx.log’ file in the B*Nator logs folderfor further details. Possible issue are network connection problems, certificate validation failuers or invalidcredentials.If the module makes progress, the BDS servers should appear in the server ’Navigation’ bar on the left, if itis a BDS domain and the users should show up in the ’Users & Devices’ list.

CHAPTER 5. BLACKBERRY ENTERPRISE SERVICE 10 ENVIRONMENTS 21
5.2.3 Module TuningThe ’BlackBerry Domain Monitor’ module will operate in its configured interval. Depending on the size of theenvironment, it takes more or less time than the configured interval, which can be adopted to the environment’sperformance.When the module is activated and started, it constantly updates the information from the environment.

CHAPTER 5. BLACKBERRY ENTERPRISE SERVICE 10 ENVIRONMENTS 22
5.3 Server MonitoringServer specific monitoring features for BlackBerry Enterprise Service 10 environments are available for BDSservers only. UDS servers, as well as BDS servers, can also be monitoring with the default host monitoringfeatures as described in section 5.4.The monitoring configuration for BDS servers is done in the ’Infrastructure Management’ page:
1. Use menu ADMINISTRATION\Infrastructure\Management
2. Expand the name of the host that has a ’BlackBerry Device Service’ server
3. Select the ’BlackBerry Device Service’ service type
4. Select the ’Monitoring’ tab
MonitoringService DetailsService LogsComponent VersionsDispatcher ConfigurationDatabase Connection StatusTraffic InformationSRP Connection Details
Change
Each monitoring option can be enabled or disabled. It is recommended to enable all options. Clicking theChange button saves the configuration.Some options require to install a local ’B*Nator Agent’ on the server, as it is described in section 10.7, whileothers require additional configuration on the ’SNMP’ tab.
5.3.1 SNMP Monitoring ConfigurationThe ’SNMP’ tab contains a single setting, that enables this server to be monitored by the ’SNMP Collector’module with the range of features, that are SNMP related and enabled on the ’Monitoring’ tab.
SNMPUse for Service Monitoring
Change
When this setting is enabled, it is required to configure the SNMP ’Community Name’ on the ’SNMP’ tab insever’s host configtion, too. For more information about this please refer to subsection 9.1.1.
5.3.2 NotificationsWith this configuration tab the notifications recipients lists can be selected as described in section 10.4.3, tocontrol the recipients of notifications about this server. For general information about notifications, pleaserefer to section 10.4.

CHAPTER 5. BLACKBERRY ENTERPRISE SERVICE 10 ENVIRONMENTS 23
5.4 Host MonitoringEach host that has a BlackBerry Enterprise Service 10 server on it, should also be configured for the defaulthost monitoring features, as described in chapter 9.

Chapter 6
BlackBerry Enterprise Service 12environments
This chapter covers the required configuration to add a BlackBerry Enterprise Service 12 environment toB*Nator.
6.1 OverviewThe main information source for BlackBerry Enterprise Service 12 environments are the ’BlackBerry WebServices for Enterprise Administration’. B*Nator will access them using a ’BlackBerry Domain Monitor’module via HTTPS connections to get details about servers, users, devices, groups, policies, profiles etc. andto perform administrative tasks.
Note: All servers that are found, will automatically be added to the monitoring, so that those will not haveto be added manually later.
For additional monitoring features, a ’B*Nator Agent’ has to be installed on each found BlackBerry server toget local information about the system performance.Further monitoring information is received using the ’SNMP Collector’ module. For this reason the Windows’SNMP Service’ has to be installed on each BlackBerry server, too.
24

CHAPTER 6. BLACKBERRY ENTERPRISE SERVICE 12 ENVIRONMENTS 25
The following picture shows an overview of the required components and connections:
Windows Management Instrumentation (WMI)
BlackBerry Web Servicesfor Enterprise Administration
BlackBerry Domain Monitor
BlackBerry Server valuesSNMP Collector
Host Information Collector Host Resource values
Agent Log Parser
Host Resource values
Host Monitor
BES12 Log Files
BES12 Log Parser

CHAPTER 6. BLACKBERRY ENTERPRISE SERVICE 12 ENVIRONMENTS 26
6.2 Adding BlackBerry Web ServicesAs stated before, the BlackBerry Web Services are the main source of information about a BlackBerry EnterpriseService 12 environment. They need to be added to B*Nator.
6.2.1 Preparation and RequirementsIn order to access the BlackBerry Web Services, thay have to accessible over the network and the web server’scertificate has to be valid and trusted.
Verifying the Accessibility of the BlackBerry Web Services
By default, the BlackBerry Web Services are available on port ’18082’ using HTTPS connections. Thisconnection can be verified by accessing the web services using a web browser from the B*Nator server.
https://bes12.company.com:18082/enterprise/admin/ws?wsdl
Note: It may be required to use or bypass a proxy server. If proxy settings are required, they may have to beconfigured for B*Nator as described in chapter 3.
Trusting the Web Server Certificate
The BlackBerry Web Services are accessed using HTTPS connections. For that reason, the web server’scertificate has to be valid and trusted when it is validated against the trust store, that was configured for theB*Nator Monitor as described in chapter 2.It is required to import the certificate of the root certification authority, that issued the web server’s certificate,to the trust store, if it is not already available there. Otherwise the validation of the web server’s certificatewill fail.
6.2.2 Adding the BlackBerry Web Services in B*Nator
Adding BlackBerry Web Services to B*Nator is only available with administrative permissions. The locationof the web services have to be provided, which then are used to create a new ’BlackBerry Domain Monitor’module in B*Nator. After that, the credentials for the accessing these web services have to be provided. Thenthe new module can be activated to retrieve information from the web services.
Providing the Web Service Details
1. Use menu ’ADMINISTRATION\Infrastructure\Add Systems\Add BlackBerry Web Services’
2. Select ’BlackBerry Enterprise Service 12’
3. Enter the ’Hostname’ of the server
Note: This hostname will be used for the HTTPS connection to the BlackBerry Web Services, so theweb server’s certificate has to be valid for this hostname.
4. The ’IP Address’ is optional and only required, if the ’Hostname’ cannot be resolved
5. Enter the port number ’18084’
6. Enter a ’Display name’ that is used to identify this environment later within B*Nator.

CHAPTER 6. BLACKBERRY ENTERPRISE SERVICE 12 ENVIRONMENTS 27
Add BlackBerry Web ServicesBlackBerry domain BlackBery Enterprise Service 12 vDetails for BlackBerry Web ServicesHostname bes12.company.comIP Address (Optional)Port (Optional) 18084Details for BlackBerry domainDisplay name Company BES12
add
After clicking the add button the new environment is added and the web application switches to the ’Infras-tructure Management’ page and preloads the newly added BlackBerry Web Services configuration.
Note: While this configuration section is loaded B*Nator connects to the BlackBerry Web Services to loadthe available login methods.
Providing the Credentials
Select the ’BlackBerry Domain’ tab to enter the login credentials for an account that has the ’EnterpriseAdministrator’ role on the BlackBerry Enterprise Service 12. It is recommended to use the B*Nator serviceaccount.
BlackBerry DomainType BlackBerry Enterprise Service 12Display name Company BES12Username svc-emmPassword ····················
Domain COMPANYLog in using Active Directory v
Change
Clicking the Change button saved the given configuration.
Note: If an error message is displayed, the connection to the web service was not successful. Review the’BlackBerryDomainMonitor_xxx.log’ file in the B*Nator logs folder for further details.
Starting the new BlackBerry Domain Monitor module
When the credentials are entered, the new ’BlackBerry Domain Monitor’ module can be activated.
1. Use menu ’ADMINISTRATION\B*Nator\Modules’
2. Look for the newly added ’BlackBerry Domain Monitor’ that shows the entered domain display name inbrackets, like BlackBerry Domain Monitor (Company BES12).
3. Click Activate to start the module.
4. Open the modules page again from the menu to verify if the modules makes progress.
If the module stops working, review the ’BlackBerryDomainMonitor_xxx.log’ file in the B*Nator logs folderfor further details. Possible issue are network connection problems, certificate validation failuers or invalidcredentials.If the module makes progress, the BlackBerry servers should appear in the server ’Navigation’ bar on the leftand the users should show up in the ’Users & Devices’ list.

CHAPTER 6. BLACKBERRY ENTERPRISE SERVICE 12 ENVIRONMENTS 28
6.2.3 Module TuningThe ’BlackBerry Domain Monitor’ module will operate in its configured interval. Depending on the size of theenvironment, it takes more or less time than the configured interval, which can be adopted to the environment’sperformance.When the module is activated and started, it constantly updates the information from the environment.

CHAPTER 6. BLACKBERRY ENTERPRISE SERVICE 12 ENVIRONMENTS 29
6.3 Server MonitoringThe monitoring configuration for BlackBerry Enterprise Service 12 servers is done in the ’Infrastructure Man-agement’ page:
1. Use menu ADMINISTRATION\Infrastructure\Management
2. Expand the name of the host that has a ’BlackBerry Enterprise Service 12’ server
3. Select the ’BlackBerry Enterprise Service 12’ service type
4. Select the ’Monitoring’ tab
MonitoringService DetailsService LogsComponent VersionsDispatcher ConfigurationDatabase Connection StatusTraffic InformationSRP Connection Details
Change
Each monitoring option can be enabled or disabled. It is recommended to enable all options, which is set bydefault. Clicking the Change button saves the configuration.Some options require to install a local ’B*Nator Agent’ on the server, as it is described in section 10.7, whileothers require additional configuration on the ’SNMP’ tab.
6.3.1 SNMP Monitoring ConfigurationThe ’SNMP’ tab contains a single setting, that enables this server to be monitored by the ’SNMP Collector’module with the range of features, that are SNMP related and enabled on the ’Monitoring’ tab.
SNMPUse for Service Monitoring
Change
When this setting is enabled, it is required to configure the SNMP ’Community Name’ on the ’SNMP’ tab insever’s host configtion, too. For more information about this please refer to subsection 9.1.1.
6.3.2 NotificationsWith this configuration tab the notifications recipients lists can be selected as described in section 10.4.3, tocontrol the recipients of notifications about this server. For general information about notifications, pleaserefer to section 10.4.

CHAPTER 6. BLACKBERRY ENTERPRISE SERVICE 12 ENVIRONMENTS 30
6.4 Host MonitoringEach host that has a BlackBerry Enterprise Service 12 server on it, should also be configured for the defaulthost monitoring features, as described in chapter 9.

Chapter 7
Microsoft Exchange Server Monitoring
This chapter covers the required configurations for monitoring Microsoft Exchange Servers. They can be usedfor monitoring and managing the ’ActiveSync’ partnerships as well as for retrieving details about ’Mailboxes’that are accessed by monitored mobile devices.
7.1 OverviewDetails about Exchange environments are collected using a local B*Nator Agent installed on an Exchangeserver. Depending on the Exchange version the Agent utilizes different techniques to collect the data.
• For Exchange 2007, 2010 and 2013 the PowerShell is used to retrieve the details. With this, Agentscan request information from the entire Exchange organization that the Exchange server is a part of. Butit can only access information that have the same Exchange version. So if a mixed Exchange organizationis used, e.g. with Exchange 2010 and Exchange 2013, at least one Agent has to be installed per Exchangeversion, to be able requesting the details about both versions.
Note: Because of that the Agent is 32bit process and that the PowerShell is a 64bit process, a 64bitJava Runtime Environment has to be installed on this system in addition to the 32bit JRE, whichis requried for the Agent.
• For Exchange 2003 the Windows Management Instrumentation (WMI) service and WebDAV is usedto retrieve the details. Every Exchange server can only provide details about the data it stores. Ifinformation, like mailboxes, is required from several servers, each server requires to have an Agentinstalled.
The ’B*Nator Monitor’ services analyzes the Exchange data sent by Agents using the ’Exchange Monitor’module, which has to be stared in order to operate correctly.
PowerShell Executor Exchange ManagementExchange Monitor
ActiveSync partnerships
Exchange Server details
Mailbox information
Mailbox policies
31

CHAPTER 7. MICROSOFT EXCHANGE SERVER MONITORING 32
7.2 Basic Exchange Server ConfigurationExchange servers are added automatically to the monitoring if they are found to be in use for another monitoredmanagement system. If a server that should be monitored is not already available in B*Nator, it can be addedmanually.
7.2.1 Adding Exchange ServersExchange servers can be manually as follows:
1. Use menu ’ADMINISTRATION\Infrastructure\Add Host’
2. Enter the ’Hostname’ of the server
3. The ’IP Address’ is optional and only required, if the ’Hostname’ cannot be resolved
4. Select ’Exchange’
Add HostHostname srv-ex1.company.comIP AddressType Exchange v
Add
After clicking the ’Add’ button the new server is added and the web application switches to the ’InfrastructureManagement’ page and preloads the newly added ’Microsoft Exchange Server’ configuration.
7.2.2 Configuring Exchange Servers
The configuration for ’Microsoft Exchange Servers’ is available in the ’Infrastructure Management’ page:
1. Use menu ’ADMINISTRATION\Infrastructure\Management’
2. Expand the name of the host where the ’Microsoft Exchange Server’ is installed
3. Select the ’Microsoft Exchange Server’ type
4. Select the ’type of exchange server’ from the drop-down menu
5. If ’Exchange 2007’ was selected, enter the local ’installation path’ of the Exchange server into the textfield, e.g.: ’C:\Program Files\Microsoft\Exchange Server’
6. Click the Change button to save the configuration
x64 Java Runtime Environment Configuration
When a 64bit Java Runtime Environment is requried for the B*Nator Agent to access the Exchange serverdetails, it has to be installed on the server and the installation path of the x64 JRE has to be configured inthe ’Infrastructure Management’ page for the host where the Exchange is located.
1. Use menu ’ADMINISTRATION\Infrastructure\Management
2. Click the name of the host where the ’Microsoft Exchange Server’ is installed
3. Select the ’Agent’ tab
Note: This tab is only available, if a local B*Nator Agent is installed and active on the host.
4. Enter the local ’installation path’ of the 64bit Java Runtime Environment into the text field, e.g.:’C:\Program Files\Java\jre7’
5. Click the Change button to save the configuration

CHAPTER 7. MICROSOFT EXCHANGE SERVER MONITORING 33
7.3 Mailbox MonitoringAdditional information about the mailboxes that mobile device connect to, are availble for management systemsthat provide the mailbox location for their relationships:
• BlackBerry Enterprise Server
• Microsoft Exchange (ActiveSync)
With this information, a local B*Nator Agent on an Exchange server can be used to request the details aboutmailboxes that are located on the same Exchange server. If the mailboxes that should be monitored are spreadover several servers, each server requires to have a local B*Nator Agent installed for retrieving the detailsabout the mailboxes.
7.3.1 Enabling the Mailbox MonitoringTo enable the mailbox monitoring for an Exchange server, it has to added and configured as described insection 7.2. After that, the mailbox monitoring can be enabled by simply activating the ’server and mailboxinformation monitoring’ for the server:
1. Use menu ’ADMINISTRATION\Infrastructure\Management’
2. Expand the name of the host where the ’Microsoft Exchange Server’ is installed
3. Select the ’Microsoft Exchange Server’ type
4. Activate the ’server and mailbox information monitoring’ checkbox
5. Click the Change button to save the configuration
This configuration change is notified to the Agent on the server, which updates its configuration and restartsitself.
7.3.2 Update Interval
The mailbox information is updated every 60 minutes. In order to analyze the data sent by the Agents, the’Exchange Monitor’ module has to be started in the ’B*Nator Monitor’ service.
7.3.3 Verifying the Functionality
If the mailbox monitoring was enabled and active for a while, there should be a ’Mailboxes’ box on theExchange server detail page in the B*Nator web application, that hosts mailboxes which are monitored.If something seems not to work, check the log file in the /logs/agent/ subfolder in the installation directoryof the B*Nator Agent , that should collect the data. Additionally it should be verified, that the ’ExchangeMonitior’ module is started.

CHAPTER 7. MICROSOFT EXCHANGE SERVER MONITORING 34
7.4 ActiveSync MonitoringThe configuration of Microsoft Exchange ActiveSync monitoring depends on the Exchange version that shouldbe monitored.
• For Exchange 2007, 2010 and 2013 Exchange Servers with the ’Client Access Server’ (CAS) roleare used to get the information about all Exchange ActiveSync partnerships and mailbox policies in theentire Exchange organization, that have the same Exchange version like the CAS.
• For Exchange 2003 a local B*Nator Agent has to be installed on those Exchange servers, that hostmailboxes which should be monitored for mobile access. The Agent utilizes the Windows ManagementInstrumentation (WMI) service to retrieve information about mailboxes, that are accessed remotely. Theinformation about the actual devices is retrieved by accessing a hidden folder of the mailboxes, whichis done by accessing the ’EXCHANGE’ web application, also known as Outlook Web Access but usingWebDAV with this URL:http://<hostname>:<port>/exchange/<mailbox>/NON_IPM_SUBTREE/Microsoft-Server-ActiveSync
Note: This requires a service account with access to the mailboxes, like the ’besadmin’ account inBlackBerry Enterprise Server environments.
7.4.1 Enabling the ActiveSync MonitoringThe configuration again depends on the Exchange server version that should be used for the monitoring. Inall cases, the Exchange server has to be to added and configured as described in section 7.2.After that, the ActiveSync monitoring can be enabled on the ’Infrastructure Management’ page for the ’Mi-crosoft Exchange Server’:
1. Use menu ’ADMINISTRATION\Infrastructure\Management’
2. Expand the name of the host where the ’Microsoft Exchange Server’ is installed
3. Select the ’Microsoft Exchange Server’ type
4. The configuration options are shown be below the ’ActiveSync’ headline
7.4.2 Exchange 2007, 2010 and 2013These Exchange versions require to activate the ActiveSync monitoring for Exchange servers with the ’ClientAccess Server’ (CAS) role. By default B*Nator does not know if the server is a CAS or not. For that reason,the local B*Nator Agent on the Exchange server will automatically identify if it has the CAS role or not.Once the CAS role was identified for the Exchange server, the following monitoring options are shown:
• Monitoring Enabled: Checkbox to enable the monitoring of ActiveSync partnerships and mailboxpolicies using this Exchange server
• Interval in minutes: The time in minutes of how often the data should be collected by the Agent onthe server
• Administration enabled: Checkbox to enable the execution of administration features using the Agenton this Exchange server
Clicking the Change button saves the configurationand notifies it to the Agent on the server, which updatesits configuration and restarts itself to start with this work.

CHAPTER 7. MICROSOFT EXCHANGE SERVER MONITORING 35
7.4.3 Exchange 2003• Monitoring Enabled: Checkbox to enable the monitoring and management of ActiveSync partnershipsusing this Exchange server
• Interval in minutes: The time in minutes of how often the data should be collected by the Agent onthe server
• IIS Server: Drop-down list to select the IIS server, that should be used to access the ’EXCHANGE’WebDAV application.
Clicking the Change button saves the configurationand notifies it to the Agent on the server, which updatesits configuration and restarts itself to start with this work.
IIS Server Configuration
For Exchange 2003, IIS servers are usually located on the same server. If they are not already available inthe ’Infrastructure Management’ page, they can be added to the monitoring using the ’Add Host’ page in the’Infrastructure’ menu:
1. Use menu ’ADMINISTRATION\Infrastructure\Add Host’
2. Enter the ’Hostname’ of the server, which may be the name of the already existing Exchange 2003 server
3. The ’IP Address’ is optional and only required, if the ’Hostname’ cannot be resolved
4. Select ’IIS Server’
Add HostHostname srv-ex1.company.comIP AddressType IIS Server v
Add
After clicking the ’Add’ button the new server is added and the web application switches to the ’InfrastructureManagement’ page and preloads the newly added ’IIS Server’ configuration, which contains the followingoptions:
• SSL: Checkbox to enable HTTPS connections to this IIS server
• Port: Port that is used for the connection to the ’EXCHANGE’ WebDAV application
• Username: Username to authenticate with the web application. This user requires access to all mail-boxes that are monitored for mobile accesses.
• Password: Password for the given ’Username’
7.4.4 Verifying the FunctionalityIf the ActiveSync monitoring was enabled and active for a while, there should be Exchange ActiveSync part-nerships in the ’Users & Decvies’ list in the B*Nator web application.If something seems not to work, check the log file in the /logs/agent/ subfolder in the installation directoryof the B*Nator Agent , that should collect the data. Additionally it should be verified, that the ’ExchangeMonitior’ module is started.

Chapter 8
Apple Mobile Device Management
This chapter is focused on describing all required steps or at least to point to the correct information sourceabout the configuration of 3rd party components, to finally enable Apple iOS devices to be managed directlyby B*Nator. Configuring B*Nator as a mobile device management server for Apple iOS devices requires thefollowing:
• Certification Authority with support for the Simple Certificate Enrollment Protocol (SCEP), to enableApple iOS devices enrolling their own identity certificates (private keys) for the communication withB*Nator. This Certification Authority will be installed as trusted root CA on the Apple iOS devicesduring the MDM rollout by the user.
• Java keystore with identity certificate for B*Nator to sign and encrypt configuration profiles foreach identity certificate of any Apple iOS device.
• Java keystore with push certificate for B*Nator to access the Apple Push Notification Service(APNS), which is required to initiate communications with Apple iOS devices.
• Availability of the B*Nator and the SCEP web services via HTTPS connections from the internet orat least via permanent VPN connection.
There are many different solutions for each single configuration. This document will focus on a configurationwith:
• One service account for B*Nator and the related systems
• Standalone Certificate Authority on the B*Nator server
• External HTTPS connections from the internet terminating on an Internet Information Services (IIS)Server 7 or higher in a DMZ, acting as a reverse proxy.
36

CHAPTER 8. APPLE MOBILE DEVICE MANAGEMENT 37
8.1 Certification Authority with SCEP ServiceThe Simple Certificate Enrollment Protocol is used as an interface for network devices to let them requestclient certificates on their own automatically. It is designed, that an authenticated administrator with sufficientpermissions generates an one-time password (challenge) on the SCEP service and configures the device withthe location of the SCEP service and the challenge. Then the device will contact the SCEP service, which willhandle the certification request with the Certification Authority and report the certificate back to the device.B*Nator will fully automatically act as the SCEP service administrator.
8.1.1 SCEP ChallengeB*Nator automatically requests a SCEP challenge for every single SCEP configuration that is sent to AppleiOS devices from the SCEP web service with support for authentication on that web service. Using predefinedXPath expressions for the supported SCEP services as well as self-defined XPath expressions for any otherSCEP service, B*Nator can extract the challenge from that web sites.
8.1.2 Client certificatesThe Apple iOS devices will automatically enroll two certificates every time they are enrolled with the MDMservice of B*Nator. One is used for document signing purpose to sign and encrypt configuration profiles. Theother is used by the devices for accessing the B*Nator MDM web interface via HTTPS, which requires clientcertificates for the connection establishment.
8.1.3 RecommendationIt is recommended to:
• Install a new standalone Microsoft CA with the NDES. This can be done on the same server whereB*Nator is installed.
• Use the same service account for B*Nator and the CA/NDES, if the CA is in use for B*Nator AppleiOS MDM only.
• Use this CA for signing the MDM private key of B*Nator as described in subsection 8.2.3.
• Use this CA for signing the web server certificate, that will be used for publishing the B*Nator webinterface and the SCEP enrollment web service to the internet, if no officially signed certificate can beused.
8.1.4 Installation
The SCEP service interacts with a Certification Authority. Both, the Certification Authority and the SCEPservice are required to be ready for use with B*Nator.If no Certification Authority with a SCEP service is available or the existing one should not be used, it isrecommended to install a standalone Certification Authority with the Network Device EnrollmentService (NDES) on a Windows Server 2008 R2 Datacenter or Enterprise edition or a Windows Server 2012Standard edition or higher.

CHAPTER 8. APPLE MOBILE DEVICE MANAGEMENT 38
Brief installation overview for Windows Server 2008 R2 AD CS with NDES
This is a very short description of installing the Active Directory Certificate Services and the Network DeviceEnrollment Service. For a detailed description, please refer to the Microsoft SCEP Implementation Whitepa-per1.
Service AccountAs described in theMicrosoft SCEP Implementation Whitepaper different service accounts should be used wheninstalling the NDES with an Enterprise CA, but for a Standalone CA its basically a typical local administrator.When installing a Standalone CA only for B*Nator, the B*Nator service account can be used for the CA/NDES,too.
Active Directory Certificate Services
1. Log on to the desired Certificate Authority server with the service account.
(a) Use the Server Manager to Add Roles to it.(b) Select the Active Directory Certificate Services role.(c) Select the Certificate Authority and Certificate Authority Web Enrollment on
the Role Services page. The CA Web Enrollment role service requires to install a Web Server(IIS), too.
2. Configure the Certificate Authority role with the following settings:
(a) Select Standalone.(b) Keep Root CA selected.(c) Keep Create a new private key selected.(d) Keep the RSA. . . cryptographic service povider selected and do not use more than 4096 key
character length, otherwise Apple iOS devices cannot use that key.(e) Keep the default Common name for this CA and Distinguished name suffix or choose new ones.(f) Keep the validity period for the certificate generated for this CA of 5 years or
even choose a higher value.(g) Keep the location of the Certificate Database and its Log or choose any other location.
3. Keep the given settings for the Web Server (IIS) role.
4. Confirm the chosen settings and hit the Install button.
5. Restart the server.
NOTE: If the IIS web server was installed on the same server where B*Nator is installed, make sure that bothweb servers do not use the same HTTP/S ports, otherwise they will conflict with each other.For the Apache Tomcat web server of B*Nator, this can be configured in the \conf\server.xml filein the Apache Tomcat installation directory.For the IIS web server of the Certification Authority, this is done in the Bindings configuration foreach Web Site, which is configurable using the IIS Manager.
1http://social.technet.microsoft.com/wiki/contents/articles/9063.network-device-enrollment-service-ndes-in-active-directory-certificate-services-ad-cs.aspx

CHAPTER 8. APPLE MOBILE DEVICE MANAGEMENT 39
Network Device Enrollment Service
1. Log on to the desired Certificate Authority server with the service account.
2. Run lusrmgt.msc from the start menu or the command line and add the service account to the localIIS_IUSRS group.
3. Use the Server Manager to Add Roles Services to the Active Directory CertificateServices role.
4. Select the Network Device Enrollment Service role service with the following settings:
(a) Specify the service account to let the NDES work and request certificates from the CA using thisaccount.
(b) Keep the default Required Information for the RA Name and Country/Region or choose newones.
(c) Keep the Microsoft Strong Cryptographic Provider selected for both, Signature keyCSP and Encryption Key CSP and do not use more than 4096 key character length for them,otherwise Apple iOS devices cannot use that keys.
5. Confirm the chosen settings and hit the Install button.
NOTE: If the NDES was installed for an Enterprise CA an additional value has to be configured in the WindowRegistry of the server, to point to the correct certificate template that should be used by the NDES.This is described in more detail in the Microsoft SCEP Implementation Whitepaper2.
Verifying the Installation
When the Certification Authority was installed with all additionally required components, the following shouldbe available:
Certification Authority: Run certsrv.msc from the start menu or the command line to access the Certifi-cation Authority.
Internet Information Services (IIS) Web Server: Run InetMgr.exe from the start menu or the com-mand line to access the IIS Manager.
CA web sites: Using the IIS Manager the Default Web Site should have the following sub applications.Depending on the HTTP/S and port settings, that pages can be accessed with the browser.
/ certsrv/ is the web enrollment application for the Certification Authority./ certsrv/mscep/ is NDES (SCEP) front end for the network devices./ certsrv/mscep_admin/ is the NDES front end for the SCEP Administrator, which directly createsand shows a challenge when accessing the page, and opening with a valid account, like the serviceaccount that was used to install the NDES.
2http://social.technet.microsoft.com/wiki/contents/articles/9063.network-device-enrollment-service-ndes-in-active-directory-certificate-services-ad-cs.aspx

CHAPTER 8. APPLE MOBILE DEVICE MANAGEMENT 40
8.1.5 Issuing Certificates AutomaticallyBy default, certificates have to be manually issued by an administrator on the Certification Authority. Foran automatic rollout of devices, this is not useful. The Certification Authority needs to be configured toautomatically issue certificates if the signing request was correct.
Example for Windows Server 2008 R2 ActiveDirectory Certificate Services
1. Log in to the CA server with a CA administrator account
2. Run certsrv.msc from the start menu or the command line to open the local Certification AuthorityMMC snap in.
3. Right click on the CA object and select Properties.
4. Switch to the Policy Module tab and click the Properties. . . button.
5. Select ’Follow the settings in the certificate template, it applicable. Otherwise, automatically issue thecertificate.’ and exit the dialog with the OK button.
6. Restart the ActiveDirectory Certificate Services (CertSvc) service to make the changes take effect.
8.1.6 Configuration in B*Nator Web InterfaceIf a SCEP service is ready for use with B*Nator, the following configuration is required within the webinterface in menu ADMINISTRATION/ Configuration / Apple Device Management / DeviceEnrollment in the Simple Certificate Enrollment Protocol box:
URL for SCEP requests: The URL that the devices will use to access the SCEP server’s web interface, like:https://scep.company.com:443/certsrv/mscep/Usually this would be an external hostname.
Subject prefix for certificates: The devices will be configured to request certificates with a subject of twocommon names - the user’s display name and the device’s UUID. This string can be used to extend thecertificate’s subject like OU=Apple,OU=Devices,O=COMPANY.
Keysize: The keysize of the private key in bits.
Name of the instance: The name of the SCEP registration authority instance that needs to be used.
URL for SCEP challenge: Uniform resource locator of where B*Nator can log in and parse the SCEP chal-lenge information from. Usually the internal hostname would be used for the URL, like:http://scep-ca01.company.com/certsrv/mscep_admin/
NOTE: If HTTPS is used with a not officially trusted SCEP web server certificate, please refer tochapter 2 for information about how to configure the B*Nator Monitor and Apache Tomcatservices Java settings to accept the certificate.
Server type: The server type of the CA that is in use. This information is required to parse the challengeinformation from the CA’s website. The following server types are available:
• None: No challenge will be obtained by B*Nator.• Windows Server 2003 - Certificate Services with SCEP Add-On• Windows Server 2008 - Network Device Enrollment Service• Custom: With a custom server type an additional textfield XPath expression for challengeappears that can be used to enter an XPath expression, that points to the SCEP challende on thewebsite.
Username: Username of the website login.
Password: Password of the website login.

CHAPTER 8. APPLE MOBILE DEVICE MANAGEMENT 41
Domain (Optional for NTLM authentication): Domain name of the website login.
The Save button stores the information in the database.
8.1.7 Troubleshooting Network Device Enrollment ServiceWhen encountering issues with the NDES on a Windows Server, please refer to the Windows Event Viewer forerror messages related to the NDES. Additionally the Microsoft TechNet3 can be consulted for troubleshootingsupport. The following subsections describe some common issues and their solutions.
’The SCEP server returned an invalid response.’
If the Apple iOS device displays that error message after the Enrolling certificate. . . stage while installingthe B*Nator MDM profile, check the Windows Event Viewer on the NDES server for error messages fromthe same time, when device tried to enroll the certificate. If there is the error message ’The Network DeviceEnrollment Service received an http message without the "Operation" tag, or with an invalid "Operation" tag’,please refer to the Microsoft KB24835644 to apply the hotfix in the NDES server.
Internal Server Error (http 500) when accessing SCEP Web Sites
If the NDES web sites /certsrv/mscep/ and /certsrv/mscep_admin/ cannot be accessed without aninternal error (http status 500), check if the two NDES certificates are valid. They are located in the personalcertificates store of the local computer account of the NDES Windows Server, which can be opened as follows:
1. Log in to NDES Windows Server as a local administrator.
2. Run mmc from the start menu or the command line.
3. Select menu File and choose Add/Remove Snap-in. . . Ctrl+M.
4. In the list of Available snap-ins select Certificates and move it to the list of Selected snap-ins using theAdd > button.
(a) Select Computer account and click the Next > button.
(b) Select Local computer: (the computer this console is running on) and click the Finish button.
5. Close the Add or Remove Snap-ins dialog with the OK button.
6. Expand Certificates (Local Computer)
7. Expand Personal
8. Select Certificates
Within that local computer personal certificates store look for the two NDES certificates. The default name,if it was not modified during the installation of the NDES, is <Hostname>-MSCEP-RA.If the certificate has expired, remove the Network Device Enrollment Service role-service from the ActiveDi-rectory Certificate Services role using the server manager role wizard. Then restart the server and reinstall theNDES role-service again, as described in subsection 8.1.4.For more information about the certificates of the NDES and renewing them before they expire, please referto the Microsoft TechNet5.
3http://technet.microsoft.com/en-us/library/ff955644(v=ws.10).aspx4http://support.microsoft.com/kb/2483564/en5http://technet.microsoft.com/en-us/library/ff955642(v=ws.10).aspx#BKMK_Renewing

CHAPTER 8. APPLE MOBILE DEVICE MANAGEMENT 42
8.2 Device Management Server Identity for B*NatorB*Nator requires to have an own identity certificate for signing and encrypting configuration profiles foreach Apple iOS device specifically. This identity certificate is stored in a Java keystore, which is stored inthe B*Nator database. This store will be called MDM keystore in this document.
8.2.1 Validity of Identity Certificate Signature
On Apple iOS devices the signature of each configuration profile is displayed when viewing its details. It is shownas Signed by and gives the common name (CN) attribute of the identity certificate’s subject. Dependingon that signature the profile is displayed as Verified or not, which is mandatory for MDM functionality. Ifthis signing certificate is signed by a non-offical Certification Authority, the root Certification Authority of theidentity certificate chain must be manually trusted on the Apple iOS device by installing that root CertificationAuthority certificate.
Recommended Configuration
To sign the B*Nator MDM identity, the same Certification Authority should be used, that is also in use forthe SCEP service, as described in section 8.1. Then only one root Certification Authority needs to be madetrusted on the devices.
8.2.2 Creating the MDM KeystoreThe device management server identity certificate is stored in the MDM keystore, which is a Java keystore.Java keystores can be managed with the Java keytool on the command line, which is part of each JREinstallation. There are also some free third-party tools, like Portecle6, that provide a GUI for the Java keytool.
NOTE: Using any additional third-party Java keytool GUI tools is done at your own risk!
MDM Keystore Facts
Purpose: The MDM keystore file is used to create and renew the identity certificate, but B*Nator will workwith an uploaded copy of the file, which is stored in the B*Nator database. The MDM keystore file isnot in use unless the identity certificate singing must be renewed.
Location: The file should be stored in the \conf subfolder of the B*Nator installation directory.
Name: MDM.jks
Type: JKS (Java Keystore)
Private Key: 2048bit RSA
Passwords: The keystore as well as each private key entry usually can be secured with different passwords.For this keystore the same password must be used for the entire keystore and the private key in it.
6http://portecle.sourceforge.net/

CHAPTER 8. APPLE MOBILE DEVICE MANAGEMENT 43
Example Creation on the Command Line
The following description shows the creation of the MDM keystore with default values using the Java keytoolon the command line, which is usually located in the \bin subfolder of Java RE installation directory. Formore help and information about the Java keytool, please refer to the Java keytool documentation7.
1. On the B*Nator server execute the keytool.exe on the command line with the following parameters:
-genkey-keystore “C:\Program Files (x86)\BNator\conf\MDM.jks”-alias MDM-keysize 2048-keyalg RSA
2. Enter a password for the entire keystore twice.
3. Now the Java keytool is asking for the details of the identity’s subject.
(a) First and last name for the new private key, like Company MDM Service. This is the commonname (CN) of the subject, that will be visible as Signed by in the configuraton profiles’ detailson the Apple iOS devices.
(b) Organizational unit (OU), like IT Department.(c) Organization (O), like Company Ltd..(d) City or Locality (L), like Hamburg.(e) State or Province (ST), like HH.(f) Two-letter contry code (C), like DE.
4. After that, the Java keytool shows the entire subject line and asks if the given information is correct(CN=Company MDM Service, OU=IT Department, O=Company Ltd., L=Hamburg, ST=HH, C=DE).If the answer is n, the subject information can be retyped again. If the answer is y, the private key willbe generated with the given subject.
5. As last step, a new password for the private key entry (alias) could be entered. Do not enter a password.Use RETURN instead, to use the same password that was entered for the entire keystore before.
After that, there is a new file MDM.jks in the \conf subfolder of the B*Nator installation directory with aself-signed private key entry.
Verifying the self-signed Device Management Server Identity
The MDM.jks keystore file can be accessed with the Java keytool to view its details like follows:
1. On the B*Nator server execute the keytool.exe on the command line with the following parameters:
-list-keystore “C:\Program Files (x86)\BNator\conf\MDM.jks”-alias MDM-v
2. Enter the password for the keystore.
3. In the verbose output (-v) look for the details about the Owner: CN= and Issuer: CN=, which shouldthe same - so it is self-signed.
7http://java.sun.com/javase/7/docs/technotes/tools/windows/keytool.html

CHAPTER 8. APPLE MOBILE DEVICE MANAGEMENT 44
8.2.3 Signing the Device Management Server Identity by a Certification AuthorityTo not have the self-signed identity certificate installed as a trusted root CA on Apple iOS device, it shouldbe signed by a Certificate Authority.
Recommendation: As mentioned in subsection 8.2.1, the same Certification Authority should be used, thatis also in use for the SCEP service to only have one CA made trusted manually on the Apple iOS devices.
Using the Java keytool, a certificate signing request (CSR) can be created from the MDM alias in theMDM keystore. With that CSR, a certificate can be issued by the Certification Authority. The purposeof that certificate is document signing. If no certificate template is available for that purpose, also a webserver template can be used for that certificate. After the certificate was issued, the entire certificate chain(identity certificate and all related certificates of higher issuing Certification Authorites including the root CAcertificate) can be stored as P7B file. That certificate chain file then needs to be imported as CA reply intothe MDM alias of the MDM keystore.
Creating the CSR from the MDM Alias
1. On the B*Nator server execute the keytool.exe on the command line with the following parameters:
-certreq-keystore “C:\Program Files (x86)\BNator\conf\MDM.jks”-alias MDM
2. Enter the password for the keystore.
3. The keytool shows the base64 encoded certificate signing request.Example:
-----BEGIN NEW CERTIFICATE REQUEST-----MIIC2jCCAcICAQAwZTELMAkGA1UEBhMCREUxCzAJBgNVBAgTAkhIMRAwDgYDVQQHEwdIYW1idXJn...Lu4ty/j9SPu8A9Uc1XCJP1ba8K9+5akgdNCAtbbMEYnZMA64lP9LxUs062fW/fIJt1I=
-----END NEW CERTIFICATE REQUEST-----

CHAPTER 8. APPLE MOBILE DEVICE MANAGEMENT 45
Requesting a Certificate from the Certification Authority
This is an example for the ActiveDirectory Certificate Services of a Windows Server 2008 R2.
1. Use the browser and open the Certification Authority Web Service (/certsrv) of the CA server and login as an account with sufficient permissions, if requested by the browser.
2. From the Welcome page select the task Request a certificate.
3. From the Request a Certificate page, select to submit an advanced certificate request.
4. From the Advanced Certificate Request page, select to Submit a certificate request by using a base-64-encoded CMC or PKCS #10 file, or submit a renewal request by using a base-64-encodedPKCS #7 file.
5. From the Submit a Certificate Request or Renewal Request page, provide the following information:
Saved Request: Copy and paste the CSR from the command line into this text box.Example:
-----BEGIN NEW CERTIFICATE REQUEST-----MIIC2jCCAcICAQAwZTELMAkGA1UEBhMCREUxCzAJBgNVBAgTAkhIMRAwDgYDVQQHEwdIYW1idXJn...Lu4ty/j9SPu8A9Uc1XCJP1ba8K9+5akgdNCAtbbMEYnZMA64lP9LxUs062fW/fIJt1I=-----END NEW CERTIFICATE REQUEST-----
Certificate Template: This drop-down menu is only visible on enterprise CAs. If available, choose atemplate for document signing purpose, otherwise also a web server template works well.
Additional Attributes: No additional attributes are required to the device management server identity,so this text box can be left blank.
6. Using the Submit > the certificate request will be handled by the CA. The certificate can be down-loaded on the next page, if the CA was configured to issue certificates automatically, as described insubsection 8.1.5.
7. From the Certificate Issued page, keep the checkbox selection forDER encoded, clickDownload certifi-cate chain and save the P7B certificate chain file in a temporarily location, like C:\temp\MDM_chain.p7b.
Verifying the certificate chain file
The P7B certificate chain file can be opened in Windows. It should contain the certificate with the subjectinformation from the identity created in subsection 8.2.2 as well as the related certificates of the higher issuingCertification Authorities.

CHAPTER 8. APPLE MOBILE DEVICE MANAGEMENT 46
8.2.4 Importing the CA Reply into the MDM AliasUsing the Java keytool, the P7B certificate chain file (CA reply) can be imported into the MDM alias inthe MDM keystore, which will update the signature of the private key to the new issuer - the CertificationAuthority.
1. On the B*Nator server execute the keytool.exe on the command line with the following parameters:
-import-keystore “C:\Program Files (x86)\BNator\conf\MDM.jks”-alias MDM-file C:\temp\MDM_chain.p7b
2. Enter the password for the keystore.
3. The keytool will show a warning message, that the Top-level certificate in reply is not trusted and askto proceed anyway, which needs to be answered with y, to make that Root CA trusted in the keystore.After that, the keystore trusts the signature of the Root CA and the CA reply will be installed.
Verifying the final Device Management Server Identity in the MDM Alias
As described in subsection 8.2.2, the management server identity in the MDM alias of the MDM keystorecan be verified using the Java keytool. In the verbose output look for the details about the Owner: CN=and Issuer: CN=, which should now show different information about each attribute.When the presence of the device management server identity and its correct signature from a CertificationAuthority was verified, the temporarily files, like CSR or P7B files, can be deleted, because all of that datais stored in the MDM keystore file and can be recovered anytime if required.
8.2.5 Configuration in B*Nator Web InterfaceAs mentioned in section 8.2, the MDM keystore file is only used to create and renew the identity certificateof the device management server. It is uploaded to the B*Nator web interface and B*Nator will then use itfrom the database.To upload the MDM keystore to B*Nator navigate within the web interface to menu ADMINISTRATION/Configuration / Apple Device Management / Device Enrollment. In the Device Manage-ment Server Identity box, use the Browse. . . button to select the MDM Key Store File from the filesystem and the enter the Key Store Password in the corresponding textfield. After clicking the Uploadbutton, the MDM keystore is stored in the B*Nator database. If the keystore could be accessed correctly, thepage reloads and the box now shows Issued to, Issuesd by and Valid from. . . to. . . information from thekeystore.

CHAPTER 8. APPLE MOBILE DEVICE MANAGEMENT 47
8.2.6 Renewing the Device Management Server IdentityWhen the device management server identity certificate is about to expire, the following process is requiredto renew certificate.The certificate was configured in B*Nator by uploading the entire MDM keystore to it. When it needs to berenwed, this has to be done with the original MDM keystore file on the file system. Using the Java keytool,a certificate signing request (CSR) has to be created from the MDM alias in the MDM keystore file. Thenthis CSR has to be signed again by the Certification Authority and the entire certificate chain (CA reply)has to be imported into the MDM alias in the MDM keystore.For a more detailed description of the process of updating the private key’s signature, the initial descriptionin subsection 8.2.3 can be consulted.When the device management server identity certificate is updated in the MDM keystore file, it has to beuploaded to the B*Nator web interface by following these steps:
1. Stop the B*Nator Monitor Windows service on the B*Nator server.
2. Navigate to menu ADMINISTRATION/ Configuration / Apple Device Management /Device Enrollment
3. In the Device Management Server Identity box, use the Remove button to delete the existing(old) MDM keystore from the database.
4. After the page has reloaded, use the Browse. . . button to select the updated MDM Key Store Filefrom the file system and the enter the Key Store Password in the corresponding textfield. After clickingthe Upload button, the MDM keystore is stored in the B*Nator database.
5. If the keystore could be accessed correctly, the page reloads and the box now shows Issued to, Issuesdby and Valid from. . . to. . . information from the keystore.

CHAPTER 8. APPLE MOBILE DEVICE MANAGEMENT 48
8.3 Push Certificate for Apple Push Notification SystemThe Apple Push Notification System (APNS) is an important link in the functional chain of managing andcontacting Apple iOS devices from third-party software, like the B*Nator. Every initial contact from theoutside to an Apple device always has to go through the APNS. In fact, B*Nator has to request the APNS totell the iOS device, that it should contact B*Nator. Then B*Nator has to trust the APNS, that it will pushthis notification to the device and has to wait for a connection initiated directly by the device.
8.3.1 Short DescriptionTo be able to connect to the APNS, a valid push certificate is required - otherwise the APNS will not acceptthe connection request. In a mostly similar way, as described in subsection 8.2.2, the following procedure isrequired to obtain a push certificate and let B*Nator work with it:
1. A new Java keystore file with a private key entry has to be created - the APNS keystore.
2. Then a certificate signing request (CSR) has to be generated from the private key entry.
3. This CSR must be additionally signed by a valid Apple MDM vendor - ISEC7.
4. With that signed CSR, a push certificate can created with an Apple ID in the Apple Push CertificatesPortal8.
5. This push certificate can be downloaded as PEM file from the Apple Push Certificates Portal.
6. Additionally the related higher Certification Authority certificates are also required. They can be down-loaded from apple.com/certificateauthority9.
Apple Root Certificates / Apple Inc. Root Certificate: This is the Apple root CA.Apple Intermediate Certificates / Application Integration: This is the intermediate CA, that is-
sued the push certificate.
7. Then the Apple Inc. Root Certificate has to be imported as new trusted key entry into the APNSkeystore, to make the Appe root CA trusted in that keystore.
8. After that, the Application Integration CA has to be imported as new trusted key entry into the APNSkeystore, to make that intermediate CA trusted in that keystore as well.
9. With those two trusted key entries, the keystore can build a valid PKI path to the push certificatewhen this is imported as CA reply into the private key entry of the APNS keystore.
10. After all, the APNS keystore can be verified and has to be uploaded to the B*Nator web interface, sothat B*Nator can work with it.
8.3.2 Creating the APNS KeystoreThe following facts are related to the APNS keystore:
Purpose: The APNS keystore file is used to create and renew the push certificate, but B*Nator will workwith an uploaded copy of the file, which is stored in the B*Nator database. The APNS keystore file isnot in use unless the identity certificate singing must be renewed.
Location: The file should be stored in the \conf subfolder of the B*Nator installation directory.
Name: APNS.jks
Type: JKS (Java Keystore)
Private Key: 2048bit RSA
Passwords: The keystore as well as each private key entry usually can be secured with different passwords.For this keystore the same password must be used for the entire keystore and the private key in it.
8https://identity.apple.com/pushcert/9http://www.apple.com/certificateauthority/

CHAPTER 8. APPLE MOBILE DEVICE MANAGEMENT 49
Example Creation on the Command Line
The following description shows the creation of the APNS keystore with default values using the Java keytoolon the command line, which is usually located in the \bin subfolder of Java RE installation directory. Formore help and information about the Java keytool, please refer to the Java keytool documentation10.
1. On the B*Nator server execute the keytool.exe on the command line with the following parameters:
-genkey-keystore “C:\Program Files (x86)\BNator\conf\APNS.jks”-alias APNS-keysize 2048-keyalg RSA
2. Enter a password for the entire keystore twice.
3. Now the keytool is asking for the details of the identity’s subject. All of the following information willbe overwritten by Apple, except the contry code (C) attribute.
(a) First and last name for the new private key, like Company MDM Service. This is the commonname (CN) of the subject.
(b) Organizational unit (OU), like IT Department.(c) Organization (O), like Company Ltd..(d) City or Locality (L), like Hamburg.(e) State or Province (ST), like HH.(f) Two-letter contry code (C), like DE.
4. After that, the Java keytool shows the entire subject line and asks if the given information is correct(CN=Company MDM Service, OU=IT Department, O=Company Ltd., L=Hamburg, ST=HH, C=DE).If the answer is n, the subject information can be retyped again. If the answer is y, the private key willbe generated with the given subject.
5. As last step, a new password for the private key entry (alias) could be entered. Do not enter a password.Use RETURN instead, to use the same password that was entered for the entire keystore before.
After that, there is a new file APNS.jks in the \conf subfolder of the B*Nator installation directory with aself-signed private key entry.
Verifying the self-signed Push Certificate
The APNS.jks keystore file can be accessed with the Java keytool to view its details like follows:
1. On the B*Nator server execute the keytool.exe on the command line with the following parameters:
-list-keystore “C:\Program Files (x86)\BNator\conf\APNS.jks”-alias APNS-v
2. Enter the password for the keystore.
3. In the verbose output (-v) look for the details about the Owner: CN= and Issuer: CN=, which shouldthe same - so it is self-signed.
10http://java.sun.com/javase/7/docs/technotes/tools/windows/keytool.html

CHAPTER 8. APPLE MOBILE DEVICE MANAGEMENT 50
8.3.3 Creating a signed Certificate Signing Request from the APNS AliasUsing the Java keytool, a certificate signing request (CSR) can be created from the APNS alias in the APNSkeystore. This CSR then has to signed as well - by ISEC7.
Creating the CSR from the APNS Alias
1. On the B*Nator server execute the keytool.exe on the command line with the following parameters:
-certreq-keystore “C:\Program Files (x86)\BNator\conf\APNS.jks”-alias APNS-file C:\temp\APNS_csr.txt
2. Enter the password for the keystore.
3. The keytool then writes the base64 encoded certificate signing request into the file, provided with the-file parameter. This file can be opened in Windows with the Editor and should contain the followingtext.Example:
-----BEGIN NEW CERTIFICATE REQUEST-----MIIC2jCCAcICAQAwZTELMAkGA1UEBhMCREUxCzAJBgNVBAgTAkhIMRAwDgYDVQQHEwdIYW1idXJn...Lu4ty/j9SPu8A9Uc1XCJP1ba8K9+5akgdNCAtbbMEYnZMA64lP9LxUs062fW/fIJt1I=
-----END NEW CERTIFICATE REQUEST-----
Signing the CSR by ISEC7
After the CSR file was created and verified to contain the correct content, it can be sent by email [email protected]. If the request is valid, the CSR will be signed and sent back to sender with the newsigned certificate signing request (sCSR) file as an attachment to the response email.

CHAPTER 8. APPLE MOBILE DEVICE MANAGEMENT 51
8.3.4 Creating a Push Certificate in the Apple Push Certificate PortalWith the sCSR file, a push certificate can be issued in the Apple Push Certificates Portal11 on the followingway:
1. Open the browser and navigate to https://identity.apple.com/pushcert/
2. Sign in using an Apple ID. It is recommended to use a company Apple ID, because the push certificateneeds to be renewed once a year with the same Apple ID.
NOTE: If no company Apple ID is available or a new one should be used, navigate tohttps://appleid.apple.com/ to create a new Apple ID with a valid email address.
3. After the login, there are either already existing certificates visible and/or only the Create a Certificatebutton is available, which is required to proceed.
4. After using the button, follow the instructions on the screen to agree and Accept Apple’s termins ofuse.
5. Finally the sCSR file can be uploaded on the Create a New Push Certificate page.
6. If the sCSR file was OK, the certificate as well as a Download button appears.
NOTE: Sometimes there is a bug in the browser after uploading the sCSR file, that a file download isinitiated as a browser dialoag. In that case just reopen https://identity.apple.com/pushcert/again from the address bar of the browser. Then the new certificate should appear and can bedownloaded.
7. Download the push certificate (PEM file) and save it in a temporarily location, likeC:\temp\APNS_cert.pem.
11https://identity.apple.com/pushcert/

CHAPTER 8. APPLE MOBILE DEVICE MANAGEMENT 52
8.3.5 Importing the Push Certificate into the APNS AliasUsing the Java keytool, the push certificate (CA reply) can be imported into the APNS alias in the APNSkeystore, which will update the signature of the private key to the new issuer - Apple.But before it can uploaded, the certificates of the higher issuing Certification Authorities have to be importedinto the keystore as trusted certificate entries first. This is required for the APNS keystore, to build a valid PKIpath to the push certificate. The certificates of Apple’s Certification Authorities are available for downloadonline at apple.com/certificateauthority12.
Downloading the required Apple Certification Authoritiy certificates
When viewing the push certificate details of the PEM file, which is not possible by default in Windows, itwould be visible, that the push certificate was issued by the Apple Application Integration CertificationAuthroity (AAICA). So this is the first certificate that needs to be downloaded and stored in a temporarilylocation, like C:\temp\AppleAAICA.cer.
NOTE: To optionally view the details of the push certificate PEM file in Windows, just rename the fileextension to CER and open it in Windows. Afterwards, rename the file back to PEM.
When viewing the details of the AAICA certificate, it is visible, that this is an intermediate CA, which wasissued by the Apple Inc. Root Certificate, which also needs to be downloaded and stored in a temporarilylocation, like C:\temp\AppleIncRootCertificate.cer.
Importing the certificates into the APNS keystore
With the certificates of the higher Certification Authorites and the push certificate available, they all can beimported into the APNS keystore using the following description:
1. On the B*Nator server execute the keytool.exe on the command line with the following parameters toimport the Apple Inc. Root Certificate first.
-import-keystore “C:\Program Files (x86)\BNator\conf\APNS.jks”-alias AppleIncRootCA-file C:\temp\AppleIncRootCertificate.cer
2. Enter the password for the keystore.
3. The keytool will show a warning message, that the certificate is not trusted and ask to proceed anyway,which needs to be answered with y, to make that Root CA trusted in the keystore.
4. Execute the keytool.exe again to import the Apple Application Integration Certification Authroity next.
-import-keystore “C:\Program Files (x86)\BNator\conf\APNS.jks”-alias AppleAAICA-file C:\temp\AppleAAICA.cer
5. Enter the password for the keystore.
NOTE: The keytool will not show a warning message again, because the related issuing CA is alreadytrusted in the keystore.
6. Execute the keytool.exe again to import the push certificate last.
-import-keystore “C:\Program Files (x86)\BNator\conf\APNS.jks”
12http://www.apple.com/certificateauthority/

CHAPTER 8. APPLE MOBILE DEVICE MANAGEMENT 53
-alias APNS-file C:\temp\APNS_cert.pem
7. Enter the password for the keystore.
8.3.6 Configuration in B*Nator Web InterfaceAs mentioned in subsection 8.3.2, the APNS keystore file is only used to create and renew the push certificateto contact the Apple Push Notification Service. It is uploaded to the B*Nator web interface and B*Natorwill then use it from the database.To upload the APNS keystore to B*Nator navigate within the web interface to menu ADMINISTRATION/Configuration / Apple Device Management / Device Enrollment. In the Push NotificationService Identity box, use the Browse. . . button to select the APNS Key Store File from the file systemand the enter the Key Store Password in the corresponding textfield. After clicking the Upload button, theAPNS keystore is stored in the B*Nator database. If the keystore could be accessed correctly, the page reloadsand the box now shows Issued to, Issuesd by and Valid from. . . to. . . information from the keystore.
8.3.7 Renewing the Push CertificateThe push certificate was configured in B*Nator by uploading the entire APNS keystore to it. When it is aboutto expire it needs to be renwed, which has to be done with the original APNS keystore file on the file systemby following this process:
1. Navigate to menu ADMINISTRATION/ Configuration / Modules and Deactivate the Ap-ple Device Management Monitor module in the B*Nator web interface, to not have B*Natorcontacting the Apple Push Notification System with the current certificate, while it is being renewed.
2. Using the Java keytool on the B*Nator server, a certificate signing request (CSR) has to be createdfrom the APNS alias in the APNS keystore file. Then this CSR has to be signed again by ISEC7, toget a signed CSR (sCSR) file. Both steps are described in detail in subsection 8.3.3.
3. After signing in to the Apple Push Certificate Portal, with the same Apple ID that was used to createthe push certificate, as described in subsection 8.3.4, the push certificate is listed directly after the loginand can be renewed, with the Renew button, which requires to upload the new sCSR file.
NOTE: If there are several push certificates listed, try to find the correct one by looking for an entrywith matching Service, Vendor and Expiration Date.
4. Then the new push certificate can be downloaded as PEM file which has to be imported into the APNSalias in the APNS keystore to update the private key’s signature, as describend in subsection 8.3.5.
NOTE: Only in the unlikely event, that one of the Apple CA certificates were renewed in the meantime,they have to be imported again as well. Otherwise only the new PEM file has to be imported.
5. When the push certificate is updated in the APNS keystore file, it has to be uploaded to the B*Natorweb interface by following these steps:
(a) Navigate to menu ADMINISTRATION/ Configuration / Apple Device Management/ Device Enrollment
(b) In the Push Notification Service Identity box, use the Remove button to delete theexisting (old) APNS keystore from the database.
(c) After the page has reloaded, use the Browse. . . button to select the updated APNS Key StoreFile from the file system and the enter the Key Store Password in the corresponding textfield.After clicking the Upload button, the APNS keystore is stored in the B*Nator database.
(d) If the keystore could be accessed correctly, the page reloads and the box now shows Issued to,Issuesd by and Valid from. . . to. . . information from the keystore.

CHAPTER 8. APPLE MOBILE DEVICE MANAGEMENT 54
6. Finally Activate the Apple Device Management Monitor module again in the B*Nator webinterface and verify the functionality by simply checking if the Last activity timestamp is updated shortlyfor active devices with an Enrolled management relationship status.
Chapter 9
Host Monitoring
This chapter covers the required configuration to monitor any host that was added to B*Nator. If the hostshould be monitored that is not available in B*Nator yet, it has to be added first, as described in a correspondingchapters of this document. Not all monitoring options are available for all hosts. Most options are availablefor hosts with a Microsoft Windows operating system and a local ’B*Nator Agent’ installed.Available monitoring options are:
• Reachability: Monitors a hosts availability via ICMP echo (ping) requests using the ’Host Monitor’module of the ’B*Nator Monitor’ service. This feature is basically available for any type of host, thatcan reply to ping requests.
• Host Information: Monitors details about the operating system, CPU, RAM etc. using a ’B*NatorAgent’.
• System Services: Monitors the services of a Microsoft Windows system using a ’B*Nator Agent’.
• CPU Usage: Monitors the CPU usage of a Microsoft Windows system using a ’B*Nator Agent’.
• Memory Usage: Monitors the memory usage of a Microsoft Windows system using a ’B*Nator Agent’.
• Network Usage: Monitors the network usage of a Microsoft Windows system using a ’B*Nator Agent’.
• Data Storage Devices: Monitors the data storage devices of any host either using SNMP or a local’B*Nator Agent’ on Microsoft Windows systems.
• System Time Drift: Monitors the system clock’s drift of any host compared to the B*Nator serverusing the ’SNMP Collector’ module of the ’B*Nator Monitor’ service.
55

CHAPTER 9. HOST MONITORING 56
The following picture shows an overview about the several options:
Windows Management Instrumentation (WMI)
SNMP Collector
Host Information Collector Host Information Details
Agent Log Parser
Host MonitorSystem Services
Memory Usage Details
Network Usage Details
Data Storage Devices
CPU Usage Details
System Date
Network Monitor
Data Storage Devices
Some monitoring options lead to futher configuration options, like the ’System Services’ monitoring, that laterallows to configure which services actually should be monitoring and which not. These details are covered inthe next sections.
9.1 Setting the Monitoring OptionsThe host monitoring features are part of the host configuration in the ’Infrastructure Management’ page.
1. Use menu ’ADMINISTRATION\Infrastructure\Management’
2. Select a host from the list to access its host configuration
3. Select the ’Monitoring’ tab
4. Enable all options that should be monitored for this host
5. Click the Change button to make the changes take effect

CHAPTER 9. HOST MONITORING 57
MonitoringReachabilityHost InformationSystem ServicesCPU UsageMemory UsageNetwork UsageData Storage DevicesSystem Time Drift
Change
9.1.1 SNMP Configuration
Some monitoring options require to configure using SNMP for the host that is monitored, which can be doneon the ’SNMP’ tab. It contains a setting that enables the host to be monitored by the ’SNMP Collector’module with the range of features, that are SNMP related and enabled on the ’Monitoring’ tab. In order toaccess the host’s SNMP service, a ’Community Name’ has to be configured, too.
SNMPUse for Host MonitoringCommunity Name ····················
Change
9.2 ReachabilityWhen the ’Reachability’ option is enabled the host’s reachability on the network is monitored by the ’NetworkMonitor’ module, the next time it starts working again. The module will contantly send ICMP echo (ping)requests to the host and analyze the responses to calculate an ’Average Ping Time’ for the host. Additionally,it uses the configured ’Threshold’ to calculate a ’Status’ for this information.This type of monitoring is basically available for any type of host that can reply to ping requests.
9.2.1 Configuring the Threshold
The threshold for the ’Reachability’ monitoring is configured in the main settings page.
1. Use menu ’ADMINISTRATION\B*Nator\Settings’
2. Locate the ’Thresholds’ box
3. Enter a value for the ’threshold for max host ping in ms’
4. Click the update button on the bottom of the page to make the changes take effect
9.2.2 Possible Statuses
When the ’Reachability’ monitoring is enabled and the ’Network Monitor’ module did not yet operate again,the status for the hosts’ reachability will be set to:
Unknown
When the ’Network Monitor’ module did operate the host, it will set the corresponding status depending onthe result:
Good: The ping time is below the configured threshold
Warning: The ping time is above the configured threshold
Critical: The host could not be pinged

CHAPTER 9. HOST MONITORING 58
9.2.3 Ping IntervalThe interval of how often the hosts reachability on the network is checked can be controlled with the ’NetworkMonitor’ module update interval.
1. Use menu ’ADMINISTRATION\B*Nator\Modules’
2. Locate the ’Network Monitor’ module
3. Enter the update interval
4. Click the update button to make the changes take effect
9.2.4 NotificationsIf a host’s reachability exceeds the threshold, a notification is sent to all ’recipient notification lists’, that areselected on the ’Notifications’ tab of every server that is added to the host, as described in section 10.4.3. Forgeneral information about notifications, please refer to section 10.4.
9.3 Host InformationWhen the ’Host Information’ option is enabled additional details about the host is collected by a locally installed’B*Nator Agent’ that uses the Windows Management Instrumentation (WMI) service to get this information.For instructions about how to install a ’B*Nator Agent’ on a host, please refer to section 10.7.
9.4 System ServicesWhen the ’System Services’ option is enabled the host’s service details are collected by a locally installed’B*Nator Agent’ that uses the Windows Management Instrumentation (WMI) service to get this information.For instructions about how to install a ’B*Nator Agent’ on a host, please refer to section 10.7.
9.5 CPU UsageWhen the ’CPU Usage’ option is enabled the host’s processor usage is collected by a locally installed ’B*NatorAgent’ that uses the Windows Management Instrumentation (WMI) service to get this information.For instructions about how to install a ’B*Nator Agent’ on a host, please refer to section 10.7.
9.6 Memory UsageWhen the ’Memory Usage’ option is enabled the host’s memory usage is collected by a locally installed ’B*NatorAgent’ that uses the Windows Management Instrumentation (WMI) service to get this information.For instructions about how to install a ’B*Nator Agent’ on a host, please refer to section 10.7.
9.7 Network UsageWhen the ’Network Usage’ option is enabled the network usage is collected by a locally installed ’B*NatorAgent’ that uses the Windows Management Instrumentation (WMI) service to get this information.For instructions about how to install a ’B*Nator Agent’ on a host, please refer to section 10.7.

CHAPTER 9. HOST MONITORING 59
9.8 Data Storage DevicesWhen the ’Data Storage Devices’ option is enabled the details about the host’s drives is collected by usingSNMP or a locally installed ’B*Nator Agent’ that uses the Windows Management Instrumentation (WMI)service to get this information. If SNMP is configured and an Agent is installed, both sources are used toretrieve the data storage devices details.In order to collect data storage device details using SNMP, the SNMP configuration for the host itself has tobe configured, as described in subsection 9.1.1.For instructions about how to install a local ’B*Nator Agent’ on a host, please refer to section 10.7.
9.8.1 Configuring the Threshold
When data storage device details are available from the monitoring, they are visible but not actively monitoredby default. A threshold can be defined for the minimum amount of ’free space’ that should be available ona each device, before a notification is sent to the host’s ’recipients lists’. This threshold configuration is doneusing the ’Data Storage Devices’ tab on the host.
1. Use menu ’ADMINISTRATION\Infrastructure\Management’
2. Select a host from the list to access its configuration
3. Select the ’Data Storage Devices’ tab
4. Enter the ’Threshold’ for the free space of the devices to be monitored
5. Select the ’eye’ icon to enable the monitoring of the devices
6. Click the ’Change’ button to make the changes take effect
Label Free Space Threshold Monitoring
C: (System) 226,834/285,879 MB 10240 MB
D: 0/4,071 MB 0 MB
Change
9.8.2 Possible StatusesThe following statuses are displayed when the device’s free space is:
. . . above the threshold
. . . below the threshold
. . . below 20 MB
. . . not monitored
9.8.3 Update IntervalThe interval in that the information is updated depends on the source that is used to retrieve the data storagedevice details.

CHAPTER 9. HOST MONITORING 60
SNMP
If SNMP is used, the interval can be controlled with the ’SNMP Collector’ module update interval.
1. Use menu ’ADMINISTRATION\B*Nator\Modules’
2. Locate the ’SNMP Collector’ module
3. Enter the update interval
4. Click the update button to make the changes take effect
B*Nator Agent
Locally installed Agents update the data storage device details every 5 minutes. This interval can not bechanged.
9.8.4 NotificationsIf a data storage device’s free space falls below the configured threshold, a notification is sent to all ’recipientnotification lists’, that are selected on the ’Notifications’ tab of every server that is added to the host, asdescribed in section 10.4.3. For general information about notifications, please refer to section 10.4.
9.9 System Time DriftWhen the ’System Time Drift’ option is enabled the host’s system clock drift is collected via SNMP using the’SNMP Collector’ module and compared to the B*Nator Monitor host’s system clock.

Chapter 10
System Configurations
This chapter covers several configurations of B*Nator it self.
10.1 Changing the Logging LevelDuring the configuration of B*Nator or while troubleshooting issues the log level should be set to the ’Debug’level for the best depth of information in the logs.The log level can be changed in the web application with the ’loglevel’ box on the ’Modules’ configurationpage using menu:
ADMINISTRATION\B*Nator\Modules
loglevel
Debug v change loglevel
1. Select ’Debug’ from the drop-down menu
2. Click ’change loglevel’ button to make the changes take effect
The new log level is used immediately for the logs of the ’Monitor’ service the web application, so the servicesdo not have to be restarted.For more detailed information about the log files, please consult to ’Software Documentation’ document.
61

CHAPTER 10. SYSTEM CONFIGURATIONS 62
10.2 LDAP ConfigurationsThe ’Lightweight Directory Access Protocol’ is used to lookup user information for several purposes:
• user credentials to access B*Nator and the User Self Service using company directory credentials
• user identifier, when adding users to servers or when migrating users to BlackBerry Enterprise Serverenvironments
The list of the currently set up LDAP configurations is available in menu:
ADMINISTRATION\B*Nator\LDAP
host port namespace account typeDC01 636 DC=company,DC=com COMPANY\Administrator Active Directory edit deleteUS-DC01 636 DC=us,DC=company,DC=com [email protected] Active Directory edit deleteDomino01 389 O=COMPANY CN=Domino Admin/O=COMPANY Lotus Domino edit deleteeDirectory05 389 O=COMPANY CN=Admin,O=COMPANY Novell eDirectory edit delete
Existing LDAP configurations can be edited by using the edit link or deleted by clicking the delete link at theend of the line.
10.2.1 Adding new LDAP ConfigurationsTo add a new LDAP configuration to B*Nator, select the directory type of the LDAP server from the drop-downmenu. Supported directory types are:
• Active Directory
• Lotus Domino
• Novell eDirectory
After clicking the Add new LDAP button the LDAP configuration editor is displayed for providing the con-nection details.
10.2.2 Editing LDAP Configurations
After adding a new LDAP configuration or when editing an existing one, the LDAP configuration editor isdisplayed.
LDAP Configurationhost dc1.company.comport 636SSLnamespace DC=company,DC=comaccount [email protected] ····················Use for loginTest configuration Perform Test
Change
• Host: The name or the IP address of the host on which the LDAP server is running, i.e. a ’DomainController’ or a ’Domino server’ with an ’LDAP Server’ task.

CHAPTER 10. SYSTEM CONFIGURATIONS 63
• Port: LDAP server connection port. By default port 389 is used for unencrypted connections.
• SSL: Checkbox to enable ’Secure Sockets Layer’ encryption for the LDAP connection. By activating thecheckbox the port will automatically be changed to the default LDAPs port 636, if the default LDAPport was configured before, and back from 636 to 389 when deactivating the checkbox.
Note: To establish SSL connections to the LDAP server it is required that the server certificate can bevalidated for each connection. Also the given ’Host’ name must be part of the certificate’s subject.For more information about working with certificates, please refer to chapter 2.
• Namespace: Base namespace for LDAP lookups. It consists of several objects, like organizations ordomain components. Here are some examples:
– Active Directory: DC=company,DC=com– Domino Directory: O=company– Novell eDirectory: O=company
• Account: Login name of an account for authenticating with the LDAP server to perform lookups.Depending on the LDAP server and the directory type, different account name types can be valid:
– Down-level logon names, e.g. ’COMPANY\Administrator’– User principal names, e.g. ’[email protected]’– Usernames, e.g. ’Administrator’– Distinguished names, e.g. ’CN=Administrator,OU=Users,DC=COMPANY,DC=COM’– Any other login name that is accepted by the given LDAP server ’host’
• Password: The password for the given ’account’.
• Use for login: Checkbox to select if this LDAP configuration should be used to provide the resultingActive Directory domain as an option for logging in to B*Nator on the login page.
Note: This option is only available for Active Directory LDAP configurations.
• Append domain to common names (with @DOMAIN): Option to add the name of the domain tothe common names of the users, if it is required to add users to a BlackBerry Enterprise Server for LotusDomino.
Note: This option is only available for Lotus Domino LDAP configurations.
Testing Configurations
The entered configurations can be tested using the Perform test button, which executes a connection andlogin test against the LDAP server. The result of the test is displayed afterwards. Here are some commonerror messages if the configuration is incorrect:
• Hostname: If only the hostname is reported, the given ’host’ is not reachable.
• Connection refused: connect The connection to the given ’port’ was refused by the ’host’.
• Error Code 32:The given ’namespace’ is incorrect.
• Error Code 49: The given ’account’ and ’password’ information is not a valid login for the LDAP server.
• The SSL certificate of the LDAP server could not be verified: If the certificate is basically valid,please refer to chapter 2 for information about working with certificates for the ’B*Nator Monitor’ and’Apache Tomcat’.
Changes to the configuration can be saved by clicking the Save button.
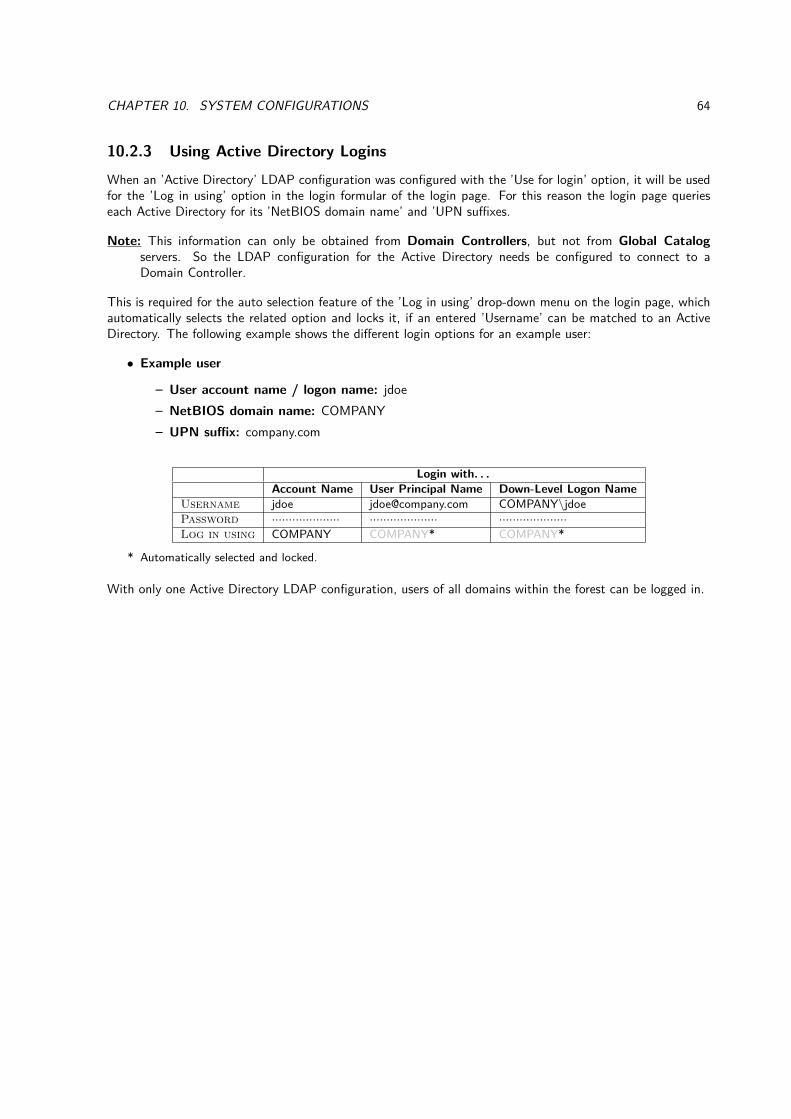
CHAPTER 10. SYSTEM CONFIGURATIONS 64
10.2.3 Using Active Directory LoginsWhen an ’Active Directory’ LDAP configuration was configured with the ’Use for login’ option, it will be usedfor the ’Log in using’ option in the login formular of the login page. For this reason the login page querieseach Active Directory for its ’NetBIOS domain name’ and ’UPN suffixes.
Note: This information can only be obtained from Domain Controllers, but not from Global Catalogservers. So the LDAP configuration for the Active Directory needs be configured to connect to aDomain Controller.
This is required for the auto selection feature of the ’Log in using’ drop-down menu on the login page, whichautomatically selects the related option and locks it, if an entered ’Username’ can be matched to an ActiveDirectory. The following example shows the different login options for an example user:
• Example user
– User account name / logon name: jdoe– NetBIOS domain name: COMPANY– UPN suffix: company.com
Login with. . .Account Name User Principal Name Down-Level Logon Name
Username jdoe [email protected] COMPANY\jdoePassword ···················· ···················· ····················Log in using COMPANY COMPANY* COMPANY*
* Automatically selected and locked.
With only one Active Directory LDAP configuration, users of all domains within the forest can be logged in.

CHAPTER 10. SYSTEM CONFIGURATIONS 65
10.3 Managing Access to the Web ApplicationThe B*Nator web application provides two main sections:
• Administrative Interface: Management access for ’Administrator’, ’Full Access’ and ’First-Level Access’users. They are configured in the Global Permissions configuration, as described in subsection 10.3.1.
• User Self Service: Interface for users with details and administrative features for their devices. Thisaccess and the range of available features is configured by an ’Administrator’ in the User Self ServicePermission configuration, as described later in this section.
Each section is only available with a valid login of an available user directory, that was configured with accessto the B*Nator web application. Possible directories are:
• Active Directory: User accounts from an Active Directory. This requires to add an ’LDAP Configura-tion’ as described in section 10.2.
• Domino Directory: User accounts from a Domino directory. This requries to configured ’DIIOP’ for a’Domino Server’ in B*Nator and to enable the ’Use for Login’ configuration.
• B*Nator: Local user accounts in B*Nator, as described in section 10.6.
Users, groups or even entire directories can be assigned with ’permissions’ to specific sections of the webapplication. So each account can be provided with access to a different range of features for the entireB*Nator web application.
10.3.1 Global PermissionsThe ’Global Permissions’ are used to provide ’administrative’ access to the B*Nator web application. Theycan be configured in menu:
ADMINISTRATION\B*Nator\Global Permissions
Using the ’Permissions Editor’ that is described in subsection 10.3.3 the specific ’Permissions’ can be assignedto each ’Principal’. The following permissions are available:
• Administrator: Unrestricted access to the B*Nator web application.
• Full Access: Access to all areas of the web application except the B*Nator configurations and settings.The visible users, devices, servers and the related range of features depend on the permissions on eachspecific systems that were granted by an ’Administrator’.
• First-Level Access: Access only to user and device administration as well as user migrations. The visibleusers and devices as well as the related range of administration features depend on the permissions oneach specific systems that were granted by an ’Administrator’.
Example for adding ’Administrator’ users from an Active Directory:
1. Use menu ’ADMINISTRATION\B*Nator\Global Permissions’
2. Click the Add Princiapl button in the ’Principals’ box
3. Select the Active Directory from the ’Principals of’ drop-down menu
4. Type the name of the user or a group into the ’Search for’ text field
5. Wait for the lookup to show results and select one entry from the list
6. Click the Add button which will close the search dialog to add the selected principal to the list of’Principals’ and select it, so that the permissions can be set up in the ’Permissions’ box.

CHAPTER 10. SYSTEM CONFIGURATIONS 66
7. Activate the ’Administrator’ checkbox
8. Click the Save permissions button to save the ’permission’ to the selected ’principal’.
Now the newly added user or all users of the newly added group can login to the B*Nator web applicationusing their Active Directory credentials with ’Administrator’ permissions.
10.3.2 User Self Service PermissionsThe ’User Self Service Permissions’ are used to provide users with access to the User Self Service portal. Theycan be configured in menu:
ADMINISTRATION\User Self Service\Permissions
Using the ’Permissions Editor’ that is described in subsection 10.3.3 the specific ’Permissions’ can be assignedto each ’Principal’. The following permissions are available:
• Access
– Login enabled
• Device information
– View common details– View hardware details– View software details– View message details– View traffic details– View traffic applications
• Device Management
– Set enterprise activation password– Change handheld password– Change traffic push– Kill handheld– Change owner Info– Manage favorites
• Provisioning
– Provisioning of Apple devices– Provisioning of BlackBerry devices
Note: If users have permissions to log in to the User Self Service but there would be nothing available, e.g.if they do not have a device, they will see a message that there is nothing to show and an option tologout again.
Note: Not all features are available for all device types. If features were allowed by permissions that are notavailable for a device, they will not show up in the User Self Service.

CHAPTER 10. SYSTEM CONFIGURATIONS 67
Example for adding all users from an Active Directory with permissions to login and view information aboutthe device.
1. Use menu ’ADMINISTRATION\B*Nator\User Self Service Permissions’
2. Click the Add Princiapl button in the ’Principals’ box
3. Select the Active Directory from the ’Principals of’ drop-down menu
4. Type the name of the Active Directory into the ’Search for’ text field
5. Wait for the lookup to show results and select it from the list
6. Click the Add button which will close the search dialog to add the selected principal to the list of’Principals’ and select it, so that the permissions can be set up in the ’Permissions’ box.
7. Activate the checkboxes for all ’Access’ and ’Device Information’ permissions.
8. Click the Save permissions button to save the ’permissions’ to the selected ’principal’.
Now user from the newly added Active Directory can login to the User Self Service using their Active Directorycredentials and view information about the device.
10.3.3 Permission Editor
At any section when permissions need to be assigned to distinguish which users should be provided with whichpermission, the ’permission editor’ is used to provide a ’principals’ box where the users can be added from thedifferent directories and a ’permissions field’ where the specific permissions can be assigned to each user.
Principals
The ’principals’ box provides the list of all principals, that were added to be able assigning permissions tothem. With a click on each principal in the list, the related permission are shown in the ’permissions’ boxbelow.

CHAPTER 10. SYSTEM CONFIGURATIONS 68
Managing Principals
Using the Add principal button, additional principals can be added to assign permissions to them.
Using the top drop-down menu the directory of where the desired principal is located must be selected. Afterthat the search for the principal is executed directly by typing the name into the search field, which will resultin providing the top 10 search results in the list below. Principals could be:
• B*Nator: B*Nator users and groups or BlackBerry Enterprise Server user groups monitored by B*Nator.
• Directories: Objects of configured directories like users, groups or even entire domains.
By selecting a principal and clicking the Add button, it is added to the permission editor, so that permissionscan be assigned to it.Using the Delete principal button, the selected principal and all its related permissions is removed from thepermission editor.
Permissions
The ’permissions’ box provides the specific permissions that are available for the edited object. Each permissioncan be controlled for the principal selected above, by using the checkboxes for the permissions provided. Usingthe Save permissions button, the permission configuration is stored to the selected principal.

CHAPTER 10. SYSTEM CONFIGURATIONS 69
10.4 NotificationsMany events can be notified to ’recipients’ when they are recognized by the monitoring features so that it isnot neccessary to manually review the dashboards, reports or detail pages for not good statusses.
10.4.1 OverviewWhen an event occurs for a system it is sent to all ’ Notification Recipients Lists’ that are configured for thissystems. Those lists contain ’recipients’ that will receive a notification about the event. A recipient can bepart of several lists to receive different notifications.
Notification Types
The following the methods for sending notifications are available:
• Email: Notifications by text email. This requires to configure the outgoing email setting for B*Natoras described in section 10.5.
• BES User: Notifications by BlackBerry PIN messages to BlackBerry Enterprise Server activated devices.This requires a configured BlackBerry Enterprise Server environment with BlackBerry User Administra-tion features as described in chapter 4.
10.4.2 Notification Recipient Lists’Notification Recipient Lists’ contain recipients. Their configuration is available using menu:
ADMINISTRATION\B*Nator\Notifications\Recipients Lists
From here all existing ’recipient lists’ are available. Lists can be added, edited, deleted and assigned to systemswho’s events it should notify to its containg recipients.
Name Description RecipientsAll server notifications Recipients of notifications for all servers in the environment 2System notifications Recipients of notifications about the monitoring system itself 2Internal BES12 Notifications Notifications about the internal BES12 servers 5
Assign to hosts
Note: Hovering with the mouse over a row in the list shows available buttons at the end of each row.
• Checkbox: Checkbox to select the list to use the ’Assign to hosts’ button. Both predefined lists don’thave a checkbox, because their assignment cannot be changed.
• Name: Name of the list.
• Description: More detailed description of the list.
• Recipients: Total count of recipients added to the list.
• Edit : Leads to the edit page to change the ’Name’ and ’Description’ and to add or remove recipients.
• Delete : Removes the list. Predefined lists cannot be deleted.
• Assign to hosts : Assigns or also removes the selected lists to all or specific monitored hosts.

CHAPTER 10. SYSTEM CONFIGURATIONS 70
Predefined Notification Recipient Lists
There are two predefined lists. They are automatically assigned to all systems that can produce notifications.For that reason, they can not be deleted or manually assigned to systems. Only adding recipients is possiblefor these lists.
• All server notifications: This list is automatically assigned to all servers that are monitored. Its recipientswill receive all notifications except notifications about B*Nator itself.
• System notifications: Recipients of this list receive notifications only regarding B*Nator itself.
Adding Notification Recipient Lists
New lists can be added by entering a ’name’ into the ’Add list’ box and clicking the ’Add’ button, which thenopens editor for the newly created list.
Add listName
Add
Editing Notification Recipient Lists
When editing a list there are two boxes displayed. An ’Information’ box for changing the ’Name’ and the’Description’ of the list and the other for managing the recipients in the list.
InformationNameInternal BES12 Notifications
DescriptionNotifications about the internal BES12 servers
Save
Recipient [email protected] [email protected] English
Send test notificationAdd recipient:Type Email vEmail addressLanguage English v
Add
The ’Send test notification’ button sends a test message to all recipients in the list.
Adding recipients to a list is done by:
1. Selecting the notification ’Type’
2. Entering the correspoding address which is
• ’Email address’ when the ’Type’ is ’Email’• ’BES User’ when the ’Type’ is ’BES User’. In this case, a lookup is executed while entering a nameof a BlackBerry Enterprise Server activated user and a user must be selected from the displayedresults list.
3. Selecting the ’Language’ for the notifications that are sent to the recipient
4. Clicking the ’Add’ button

CHAPTER 10. SYSTEM CONFIGURATIONS 71
10.4.3 Working with Notification Recipient ListsIn order to make recipients receive notifications, the ’Notification Recipient Lists’ need to be configured onthe systems who’s events should be notified to the recipients in the lists. This is automatically configured forthe two predefined lists.If custom notification recipient lists are created, they have to assigned manually to the systems, who’s notifica-tions it should notify to the recipients in the list. This can be done using the ’Notifications’ tab in the system’sconfiguration on the ’Infrastructure Management’ page or in a mass (un)assignment way in the ’NotificationRecipient Lists’ configuration using the ’Assign to hosts’ feature.
’Notification’ Tab in Infrastructure Management Page
For some of the server configurations there will be available a configuration tab for ’Notifications’. On thattab the available ’Notification Receipient Lists’ can be selected and unselected to control, which lists shouldreceive notifications related to the specific server.

CHAPTER 10. SYSTEM CONFIGURATIONS 72
10.5 Outgoing Mail Server ConfigurationBefore mails can be sent out by B*Nator, it has to be configured that mails can be sent using an SMTPgateway.Mails are sent because of different reasons, like:
• Notifications to administrators about events
• Information to users about migrations
• Individual messages to users by administrators
10.5.1 Connection Security
The connection to the SMTP gateway can either be unencrypted, what is enabled by default or encrypted.The following ’conenction security’ methods are available:
• None: Default unencrypted SMTP will be used. The default connection port is 25.
• STARTTLS: The connection is initiated unencrypted but then requires the SMTP gateway to proceedwith TLS encryption on the same port. Default port is 25.
• SSL/TLS: The connection directly starts with encryption enabled. Default port is 465. This requiresthat the SMTP gateway’s certificate is trusted by the ’Apache Tomcat’ and ’B*Nator Monitor’ services,as described in chapter 2.
10.5.2 Send-from Address and AuthenticationDepending on what authentication methods the SMTP gateway allows for sending emails, B*Nator can sendthose either with any send-from address, e.g. ’[email protected]’ and without authentication, or with anexisting send-from address and with the corresponding credentials for authentication.
10.5.3 Configuring the SMTP GatewayThe settings for using SMTP to send emails are configured in the ’SMTP configuration for notfications’ boxusing menu:
ADMINISTRATION\B*Nator\Settings
SMTP configuration for notficationsFrom address [email protected] smtp.company.comUserPasswordConfirm passwordPort 25Connection security STARTTLS v
• From address: Send-from email address of B*Nator.
• Host: SMTP gateway or relay server.
• User: User for SMTP authentication, if required by the ’Host’.
• (Confirm) Password: Password for the given ’User’.
• Port: Port for connecting to the ’Host’.
• Connection security: Sets the security level to use for the connection to the ’Host’.

CHAPTER 10. SYSTEM CONFIGURATIONS 73
10.5.4 Testing the Outgoing Mail Server ConfigurationWhen the outgoing mail server configuration is done it can be tested using the ’Send test notification’ buttonin a ’Notification Recipient List’, as described in subsection 10.4.2.This button immediately will send a test notification to all recipients in the list. If no mail does arrive in therecipients’ inbox, the ’Services’ log file in the ’/logs/web’ subfolder of the B*Nator installation directory maycontain details about the issue.
C:\Program Files (x86)\BNator\logs\web\Services_2014-12-08.log
Hint: For better troubleshooting the log level should be set to ’Debug , as described in section 10.1, for thefull range of possible logging.
Possible issues are network connection problems, certificate validation issues when the connection is encryptedor that the gateway does accept the request with an error message like ’550 5.7.1 Client does not havepermissions to send as this sender’.
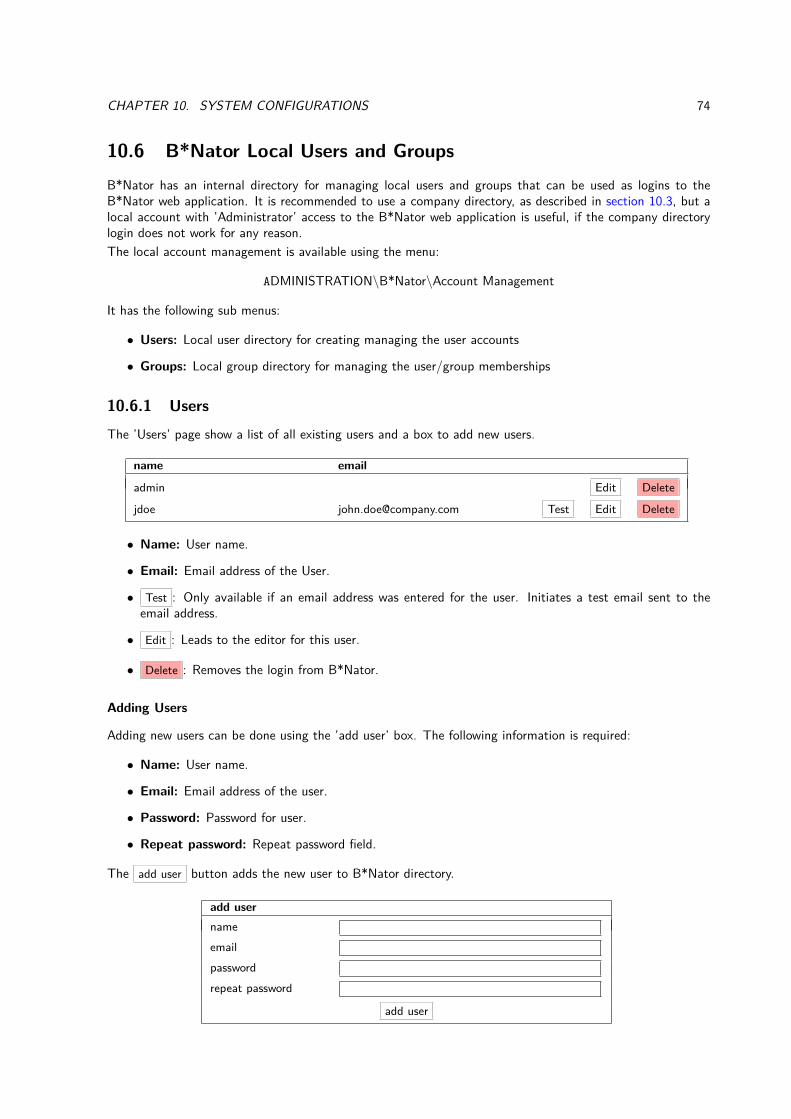
CHAPTER 10. SYSTEM CONFIGURATIONS 74
10.6 B*Nator Local Users and GroupsB*Nator has an internal directory for managing local users and groups that can be used as logins to theB*Nator web application. It is recommended to use a company directory, as described in section 10.3, but alocal account with ’Administrator’ access to the B*Nator web application is useful, if the company directorylogin does not work for any reason.The local account management is available using the menu:
ADMINISTRATION\B*Nator\Account Management
It has the following sub menus:
• Users: Local user directory for creating managing the user accounts
• Groups: Local group directory for managing the user/group memberships
10.6.1 UsersThe ’Users’ page show a list of all existing users and a box to add new users.
name email
admin Edit Delete
jdoe [email protected] Test Edit Delete
• Name: User name.
• Email: Email address of the User.
• Test : Only available if an email address was entered for the user. Initiates a test email sent to theemail address.
• Edit : Leads to the editor for this user.
• Delete : Removes the login from B*Nator.
Adding Users
Adding new users can be done using the ’add user’ box. The following information is required:
• Name: User name.
• Email: Email address of the user.
• Password: Password for user.
• Repeat password: Repeat password field.
The add user button adds the new user to B*Nator directory.
add usernameemailpasswordrepeat password
add user

CHAPTER 10. SYSTEM CONFIGURATIONS 75
Editing Users
Using the Edit button the user account details can be modified. Additionally there is a login disabledcheckbox to temporarily deactivate the account.
edit username jdoeemail [email protected] ····················
repeat password ····················login disabled
edit user
10.6.2 GroupsAt this section ’B*Nator users’ can be assigned to groups. The ’Groups’ page shows a list of all existinggroups.
nameLocal Users Edit DeleteExternal Users Edit DeleteLocal Admins Edit Delete
Name: The name of the group.
Edit : Leads to the editor for this group.
Delete : Removes the group from B*Nator.
Adding Groups
Adding new groups is available from the ’add group’ box by entering a ’name’ for the group into the text fieldand clicking the add group button.
add user
name add group
Editing Groups
Using the ’Edit’ link provides the option to move user into to a group as well as to remove users from a groupby selecting from the pool of ’available users’ or ’selected users’ and using either the ’to right’ button to movean ’available user’ into the group, or the ’to left’ button to remove a ’selected user’ from the group.Also the group’s name can be changed by modifing the text field and using the ’change’ button.
name Local Users change
available usersadmin
- - >
< - -
selected usersjdoe

CHAPTER 10. SYSTEM CONFIGURATIONS 76
10.7 Installing B*Nator AgentsThe installation of ’B*Nator Agents’ is described in detail in the Installation Guide document.