Embed Size (px)
Citation preview
ITEM # 0526013
DEHUMIDIFIERMODEL # WDH-945EL-1
ATTACH YOUR RECEIPT HERESerial Number__________ Purchase Date__________
Printed in China(P.R.C)
1
Questions, problems, missing parts? Before returning to your retailer, call our customer service department at 1-855-900-1298, Monday - Thursday, 8 a.m. - 6 p.m., EST, Friday, 8 a.m. - 5 p.m., EST.
TM
AeonAir.comTM

TABLE OF CONTENTS
2
PACKAGE CONTENTS…………………………………………………………………….. 4
SAFETY INFORMATION…………………………………………………………...............5
CASTER INSTALLATION………………………………………………………..................5
CAUTIONS……………………………………………………………………......................6
OPERATING INSTRUCTIONS……………………………………………………………..7
OPERATING INSTRUCTIONS (cont’d) ………………………………………………......8
CARE AND MAINTENANCE……………………………………………..........................13
TROUBLESHOOTING……………………………………………...................................13
WARRANTY……………………………………………………………................………..14
AeonAir.comTM
!"#$%&'(&)
1. Remove the bucket. 2. Remove the strip of tape that covers the float switch inside the bucket. 3. Return the bucket to the unit.
Let unit stand upright for 30 minutes before powering on.Unit only reduces humidity when your set humidity is lower
the current room humidity level.
The TIMER MODE:
When unit is operating, it displays the current humidity. Press the TIMER
retfa sdnoces the
When unit is off, press the TIMER button to set the machine to turn on
5
displaying the timer,
to turn off automatically, as per the below timer
4 hours 8 hours 12 hours Cancel Timer Setting
button to set the machine timer,
automatically, as per the below timer setting table.retfa sdnoces 5
confirm the set timer.
41°F (5°C) to 89°F(32°C).
This machine can automatically turn on/off depending on your humidity (%RH) setting. Timer mode is to allow you to switch theON/OFF at your desired time if you so desire.
timer.
Before first use:
Before operating:
Operation:
Recommended Operating Temperature Range:
than
unit
displaying confirm the set
settings table. Timer "off " light will be ON,room humidity and
Timer " on " light will be ON,the display will display to turn on time and
the display will change back to current
TIMER SETTING TABLE:
3
SPECIFICATIONS
Operating environment !"#$%&'#$()*+,%&+,-./
Fuse rating ( type ) 3.15A 250V (3N or 30T)
Schematic wiring diagram
0(The appliance shall be installed in accordance with national wiring regulations.
0(This appliance is not intended for use by children or other persons without assistance or supervision if their physical, sensory or mental capabilities prevent them from using it safely. Children should be supervised to ensure that they do not play with the appliance. A damaged cord must be replaced with one supplied by the unit manufacturer and not be repaired
AeonAir.comTM
SPECIFICATIONS ...................................................................................................... 3
Please read and understand this entire manual before attempting to assemble, operate or install the product.• Check available power supply and resolve any wiring problems BEFORE installation and operation of this unit. All wiring must comply with local and national electrical codes and be
• This appliance draws 4.7 amps and may be used in any properly wired general purpose 15 amp household grounded receptacle.• For your safety and protection, this unit is grounded through the power cord plug when plugged into a matching wall outlet. If you are not sure whether the wall outlets in your home are properly
DANGER• Do not leave this unit unattended in a space where people or animals that cannot react to a failed unit are located. A failed unit can cause extreme overheating or death in such an enclosed, unattended space.
WARNING
doubt that the appliance is properly grounded.• DO NOT USE PLUG ADAPTERS OR EXTENSION CORDS WITH THIS UNIT. If it is necessary to use an extension cord with this unit, use an approved “air conditioner” extension cord only.
Before beginning assembly of product, make sure all parts are present. Compare parts with package contents list. If any part is missing or damaged, do not attempt to installation the product.Estimated Assembly Time: 20 minutes
the caster according to the arrow direction. 4. Slide the caster in as far as it will go. The caster will snap into place. 5. Repeat steps 1 to 4 for the other 3 casters.
SAFETY INFORMATION
5
PREPARATION
CASTER INSTALLATION
AeonAir.comTM
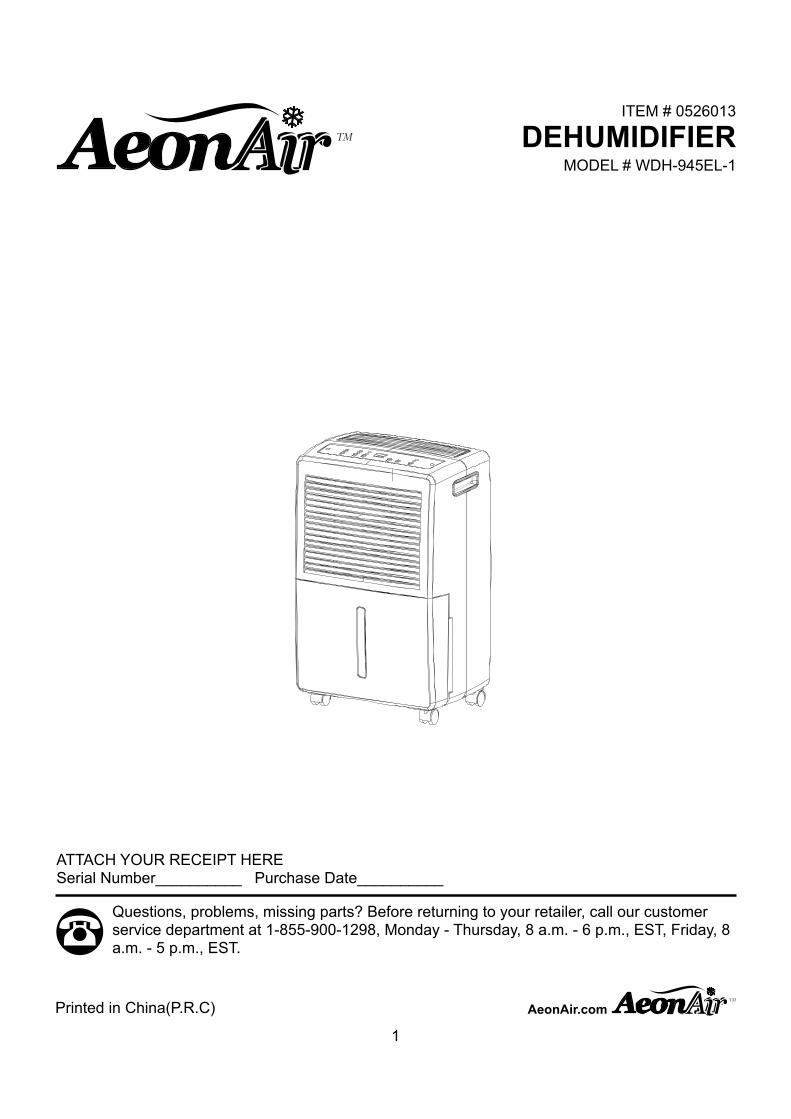
PACKAGE CONTENTS
PART DESCRIPTION QUANTITYA Control Panel 1B Air Intake 1C Air Filter 1D Drain Bucket (Water Tank) 1E Castors 4F Handle 2G Air Vent 1H Continuous Drain Outlet 1
A
D
E
C
B
H
GF
AeonAir.comTM
4
7
CAUTIONS
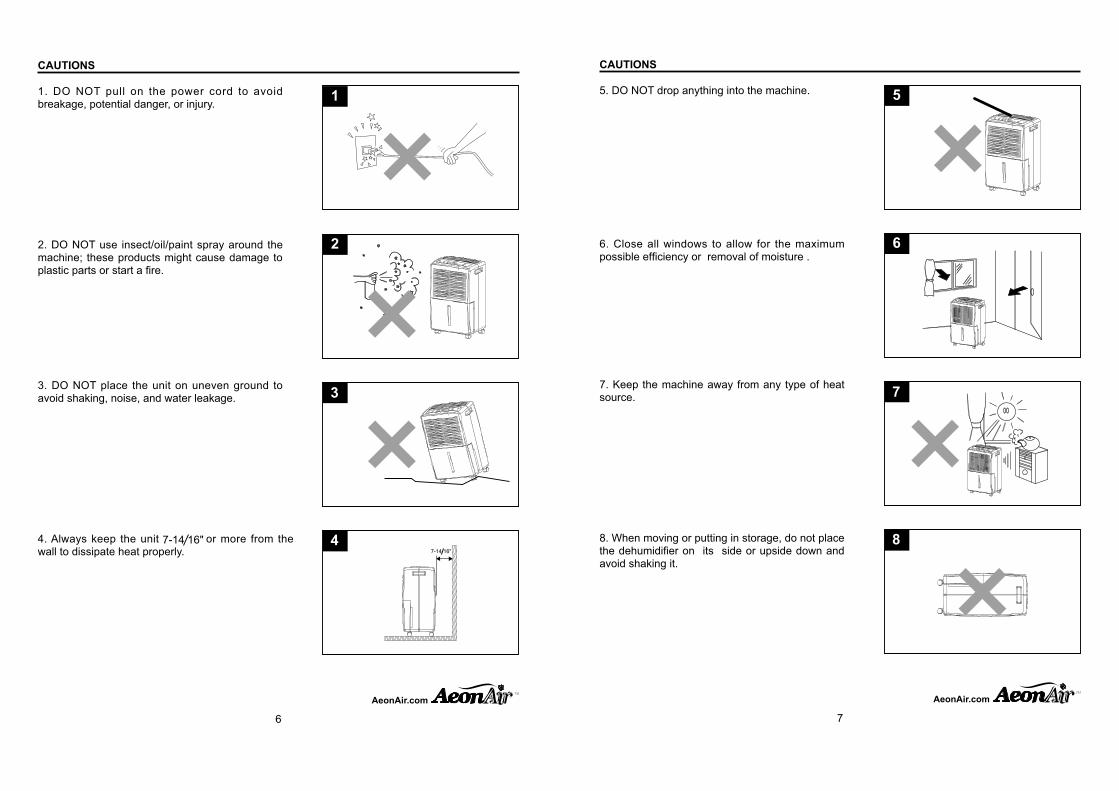
5. DO NOT drop anything into the machine.
6. Close all windows to allow for the maximum
7. Keep the machine away from any type of heat source.
8. When moving or putting in storage, do not place
avoid shaking it.
5
6
7
8
AeonAir.comTM
CAUTIONS
6
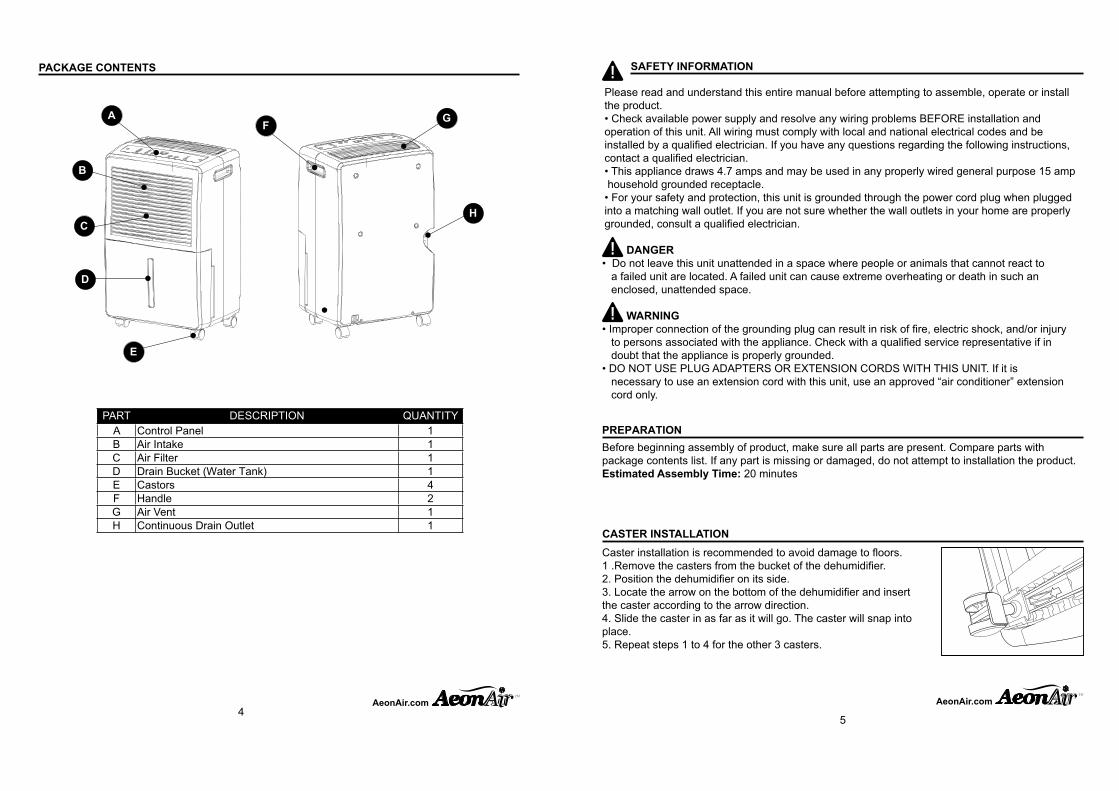
1. DO NOT pull on the power cord to avoid
machine; these products might cause damage to
3. DO NOT place the unit on uneven ground to avoid shaking, noise, and water leakage.
4. Always keep the unit or more from the wall to dissipate heat properly.
1
2
3
4
AeonAir.comTM
7-14 16"7-14 16"
OPERATING INSTRUCTIONS
9
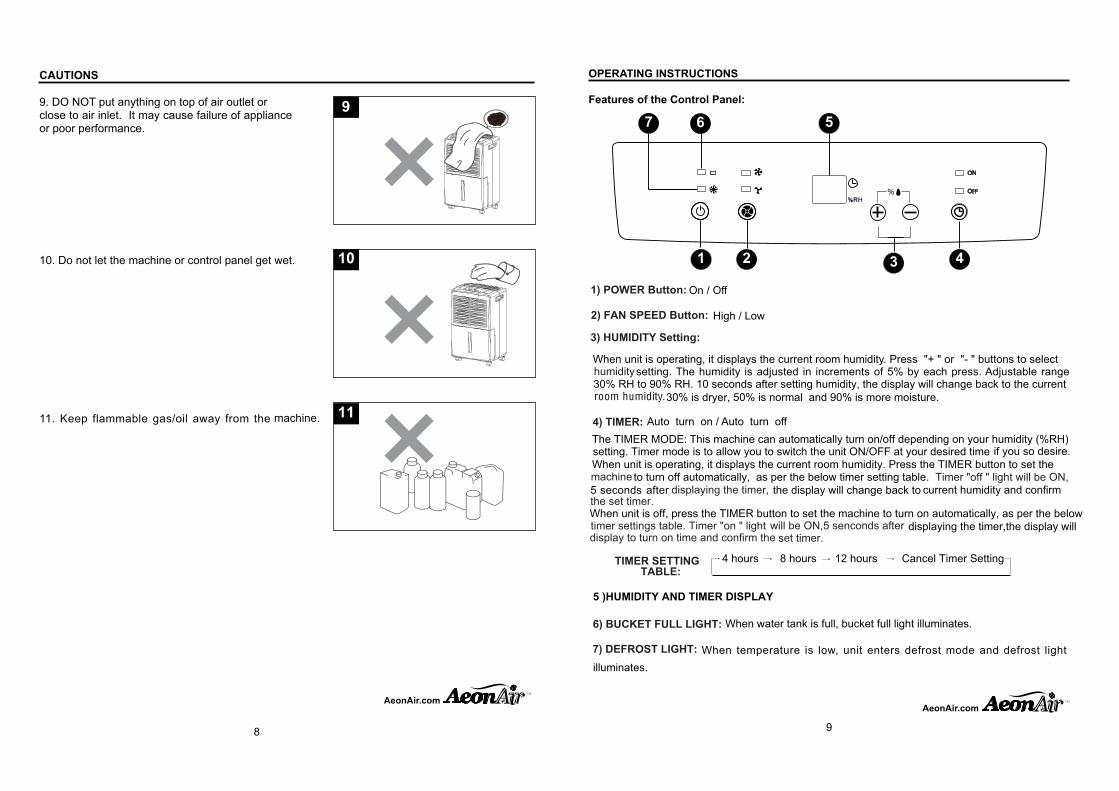
Features of the Control Panel:
When water tank is full, bucket full light illuminates.
When temperature is low, unit enters defrost mode and defrost light illuminates.
1 2 3 4
567
AeonAir.comTM
CAUTIONS
9. DO NOT put anything on top of air outlet or close to air inlet. It may cause failure of appliance or poor performance.
10. Do not let the machine or control panel get wet.
11. Keep flammable gas/oil away from the machine.
5
6
7
9
10
11
AeonAir.comTM
The TIMER MODE:
When unit is operating, it displays the current room humidity. Press the TIMER button to set the
retfa sdnoces the display will change back to
When unit is off, press the TIMER button to set the machine to turn on automatically, as per the below
5
displaying the timer,the display will
to turn off automatically, as per the below timer setting table.
This machine can automatically turn on/off depending on your humidity (%RH) setting. Timer mode is to allow you to switch the unit ON/OFF at your desired time if you so desire.
current humidity and confirm Timer "off " light will be ON,
displaying the timer,machine
will be ON,5 senconds after set timer.
the set timer.
timer settings table. Timer "on " lightdisplay to turn on time and confirm the
4 hours 8 hours 12 hours Cancel Timer SettingTIMER SETTING TABLE:
1234(5467(68(9:3;<764=>(67(?68:@<A8(723(B5;;347(;99C(25C6?67AD(E;388((FG(F(9;((F%(F(H577948(79(83@3B7((837764=D(I23(25C6?67A( 68(<?J5873?( 64( 64B;3C3478(9K(L,(HA(3<B2(:;388D(M?J587<H@3(;<4=3((
*+,(-.(79('+,(-.D("+(83B94?8(<K73;(837764=(25C6?67A>(723(?68:@<A(N6@@(B2<4=3(H<BO(79(723(B5;;347room humidity.30% is dryer, 50% is normal and 90% is more moisture.
humidity
8
5 )HUMIDITY AND TIMER DISPLAY
2) FAN SPEED Button:
6) BUCKET FULL LIGHT:
7) DEFROST LIGHT:
4) TIMER:
3) HUMIDITY Setting:
1) POWER Button:
OPERATING INSTRUCTIONS (cont’d)
10
OPERATING INSTRUCTIONS (cont’d)
11
START OPERATION
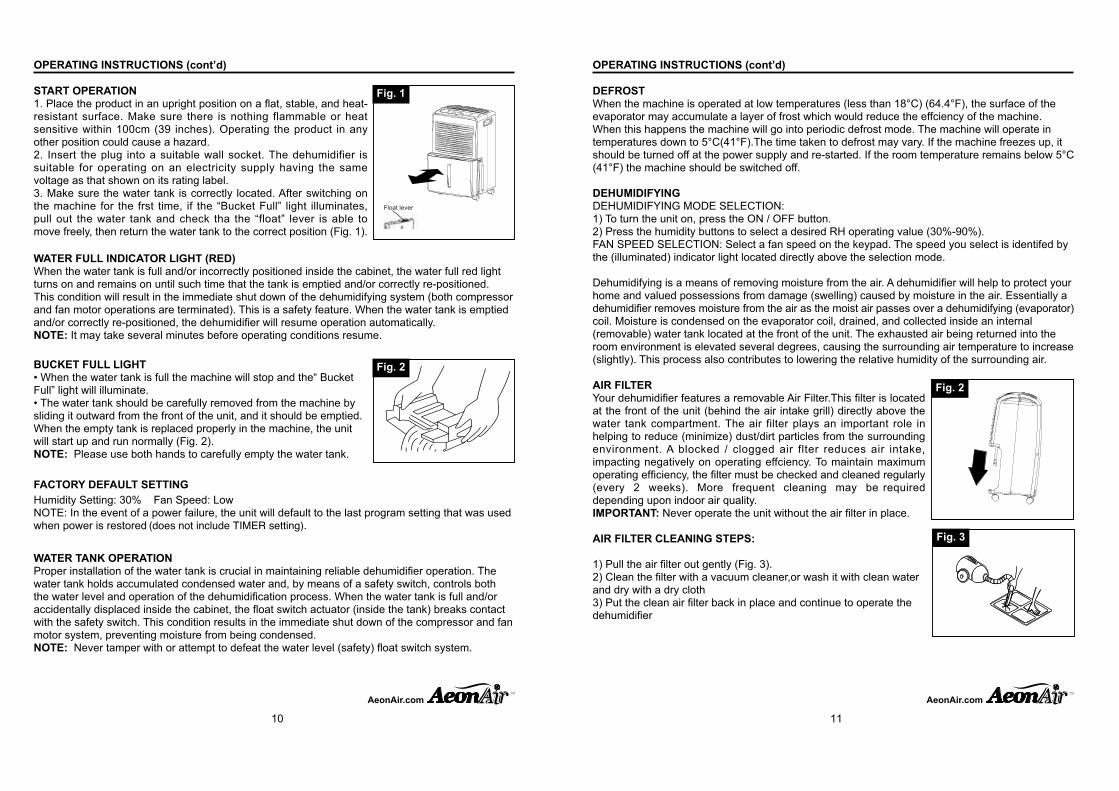
resistant surface. Make sure there is nothing flammable or heat sensitive within 100cm (39 inches). Operating the product in any other position could cause a hazard.2. Insert the plug into a suitable wall socket. The dehumidifier is suitable for operating on an electricity supply having the same voltage as that shown on its rating label. 3. Make sure the water tank is correctly located. After switching on the machine for the frst time, if the “Bucket Full” light illuminates, pull out the water tank and check tha the “float” lever is able to move freely, then return the water tank to the correct position (Fig. 1).
DEFROST When the machine is operated at low temperatures (less than 18°C) (64.4°F), the surface of the evaporator may accumulate a layer of frost which would reduce the effciency of the machine. When this happens the machine will go into periodic defrost mode. The machine will operate in temperatures down to 5°C(41°F).The time taken to defrost may vary. If the machine freezes up, it should be turned off at the power supply and re-started. If the room temperature remains below 5°C (41°F) the machine should be switched off.
DEHUMIDIFYINGDEHUMIDIFYING MODE SELECTION:
FAN SPEED SELECTION: Select a fan speed on the keypad. The speed you select is identifed by the (illuminated) indicator light located directly above the selection mode.
home and valued possessions from damage (swelling) caused by moisture in the air. Essentially a
coil. Moisture is condensed on the evaporator coil, drained, and collected inside an internal (removable) water tank located at the front of the unit. The exhausted air being returned into the room environment is elevated several degrees, causing the surrounding air temperature to increase (slightly). This process also contributes to lowering the relative humidity of the surrounding air. BUCKET FULL LIGHT
• When the water tank is full the machine will stop and the“ Bucket Full” light will illuminate. • The water tank should be carefully removed from the machine by sliding it outward from the front of the unit, and it should be emptied. When the empty tank is replaced properly in the machine, the unit will start up and run normally (Fig. 2). NOTE: Please use both hands to carefully empty the water tank.
WATER FULL INDICATOR LIGHT (RED)
This condition will result in the immediate shut down of the dehumidifying system (both compressor and fan motor operations are terminated). This is a safety feature. When the water tank is emptied
NOTE: It may take several minutes before operating conditions resume.
FACTORY DEFAULT SETTING
NOTE: In the event of a power failure, the unit will default to the last program setting that was used when power is restored
WATER TANK OPERATION
water tank holds accumulated condensed water and, by means of a safety switch, controls both
with the safety switch. This condition results in the immediate shut down of the compressor and fan motor system, preventing moisture from being condensed. NOTE:
Fig. 1
Fig. 2
Fig. 2
Fig. 3
AIR FILTER
at the front of the unit (behind the air intake grill) directly above the water tank compartment. The air filter plays an important role in
impacting negatively on operating effciency. To maintain maximum
(every 2 weeks). More frequent cleaning may be required depending upon indoor air quality.IMPORTANT:
AIR FILTER CLEANING STEPS:
and dry with a dry cloth
AeonAir.comTM
AeonAir.comTM
Float lever
(does not include TIMER setting).
OPERATING INSTRUCTIONS (cont’d)
12
CARE AND MAINTENANCE
TROUBLESHOOTING
13
CLEANINGCAUTION: disconnect the power supply cord from the electrical supply outlet.
1) DO NOT use gasoline, benezene. paint thinner, or any other chemicals to clean this unit, as
2) Never attempt to clean the unit by pouring water directly over any of the surface areas, as this will cause deterioration of electrical components and wiring insulation. 3) Use only a mild dish washing detergent, lukewarm water, and a soft cloth to wipe the exterior surface of the unit and dry thoroughly.
STORAGE When the dehumidifer is not being used for long time periods, please follow these instructions: 1) Disconnect the power cord from the power supply. 2) Empty the water tank and wipe (dry) thoroughly.
4) Re-package the unit in the original carton. 5) Store the unit upright in a dry location.
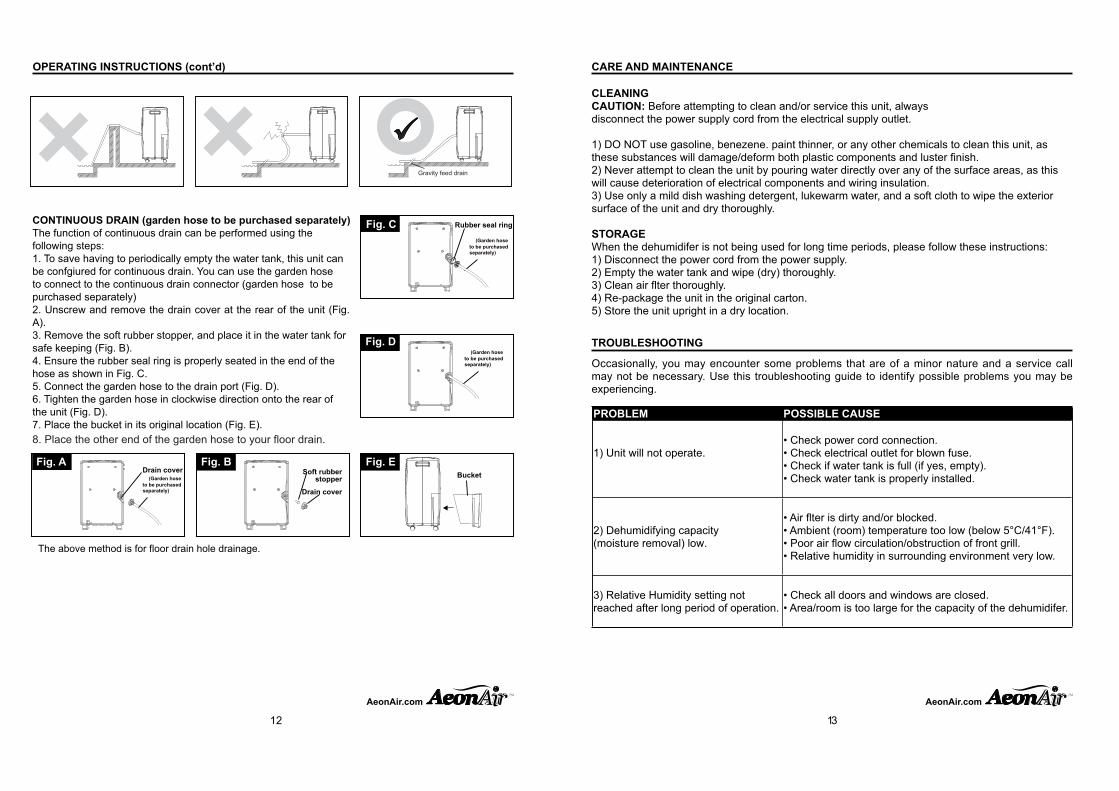
CONTINUOUS DRAIN (garden hose to be purchased separately)The function of continuous drain can be performed using thefollowing steps: 1. To save having to periodically empty the water tank, this unit canbe confgiured for continuous drain. You can use the garden hose to connect to the continuous drain connector (garden hose to be purchased separately)2. Unscrew and remove the drain cover at the rear of the unit (Fig. A).3. Remove the soft rubber stopper, and place it in the water tank forsafe keeping (Fig. B). 4. Ensure the rubber seal ring is properly seated in the end of the hose as shown in Fig. C. 5. Connect the garden hose to the drain port (Fig. D). 6. Tighten the garden hose in clockwise direction onto the rear ofthe unit (Fig. D). 7. Place the bucket in its original location (Fig. E).
Drain cover
Rubber seal ring
Bucket Soft rubber stopper
Drain cover
Occasionally, you may encounter some problems that are of a minor nature and a service call may not be necessary. Use this troubleshooting guide to identify possible problems you may be experiencing.
PROBLEM POSSIBLE CAUSE
1) Unit will not operate.• Check power cord connection. • Check electrical outlet for blown fuse. • Check if water tank is full (if yes, empty). • Check water tank is properly installed.
2) Dehumidifying capacity (moisture removal) low.
• Relative humidity in surrounding environment very low.
3) Relative Humidity setting not reached after long period of operation.
• Check all doors and windows are closed.
AeonAir.comTM
AeonAir.comTM
Fig. A Fig. B
Fig. C
Fig. D
Fig. E(Garden hose
to be purchased separately)
(Garden hose to be purchased separately)
(Garden hose to be purchased separately)
The above method is for floor drain hole drainage.
8. Place the other end of the garden hose to your floor drain.
Gravity feed drain
WARRANTY
14
LIMITED APPLIANCE WARRANTYThis quality product is warranted to be free from manufacturer’s defects in material and workmanship, provided that the unit is used under the normal operating conditions intended by the manufacturer. This warranty is available only to the person to whom the unit was originally sold by manufacturer or by an authorized distributor of manufacturer, and is non-transferable.
TERMS OF WARRANTYPlastic parts, are warranted for thirty (30) days only from purchase date, with no extensions provided.
First 12 Months:
be repaired or replaced, at warrantor’s option, at no charge to the ORIGINAL purchaser.
To obtain service: Call 1-855-900-1298 or RETURN TO THE STORE WHERE PURCHASEDFOR REPLACEMENT.
EXCLUSIONSSave as herein provided by manufacturer, there are no other warranties, conditions, representations or guarantees, express or implied, made or intended by manufacturer or its authorized distributors and all other warranties, conditions, representations or guarantees, including any warranties, conditions, representations or guarantees under any Sale of Goods Act or like legislation or statue is hereby expressly excluded. Save as herein provided, manufacturer shall not be responsible for any damages to persons or property, including the unit itself, howsoever caused or any consequential damages arising from the malfunction of the unit and by the purchase of the unit, the purchaser does hereby agree to indemnify and hold harmless manufacturer from any claim for damages to persons or property caused by the unit.
As some states do not allow the limitation or exclusion of incidental or consequential damages, or do not allow limitation on implied warranties, the above limitations and exclusions may not apply
from state to state.
GENERAL PROVISIONSNo warranty or insurance herein contained or set out shall apply when damage or repair is caused by any of the following: 1) Power failure. 2) Damage in transit or when moving the appliance. 3) Improper power supply such as low voltage, defective house wiring or inadequate fuses. 4) Accident, alteration, abuse or misuse of the appliance such as inadequate air circulation in the room or abnormal operating conditions (extremely high or low room temperature). 5) Use for commercial or industrial purposes (ie. If the appliance is not installed in a domestic residence). 6) Fire, water damage, theft, war, riot, hostility, acts of God such as hurricanes, floods, etc. 7) Service calls resulting in customer education. 8) Improper Installation (ie. Building-in of a free standing appliance or using an appliance outdoors that is not approved for outdoor application).
Proof of purchase date will be required for warranty claims; so, please retain bills of sale.
AeonAir.comTM
ARTÍCULO Nº 0526013
DESHUMIDIFICADORMODELO No WDH-945EL-1
ADJUNTE SU RECIBO AQUÍNúmero de serie__________ Fecha de compra__________
Impreso en China (P.R.C)
15
¿Alguna pregunta, problema o pieza perdida? Antes de acudir a su distribuidor, llame a nuestro departamento de servicio de atención al cliente al 1-855-900-1298, en el siguiente
TM
AeonAir.comTM
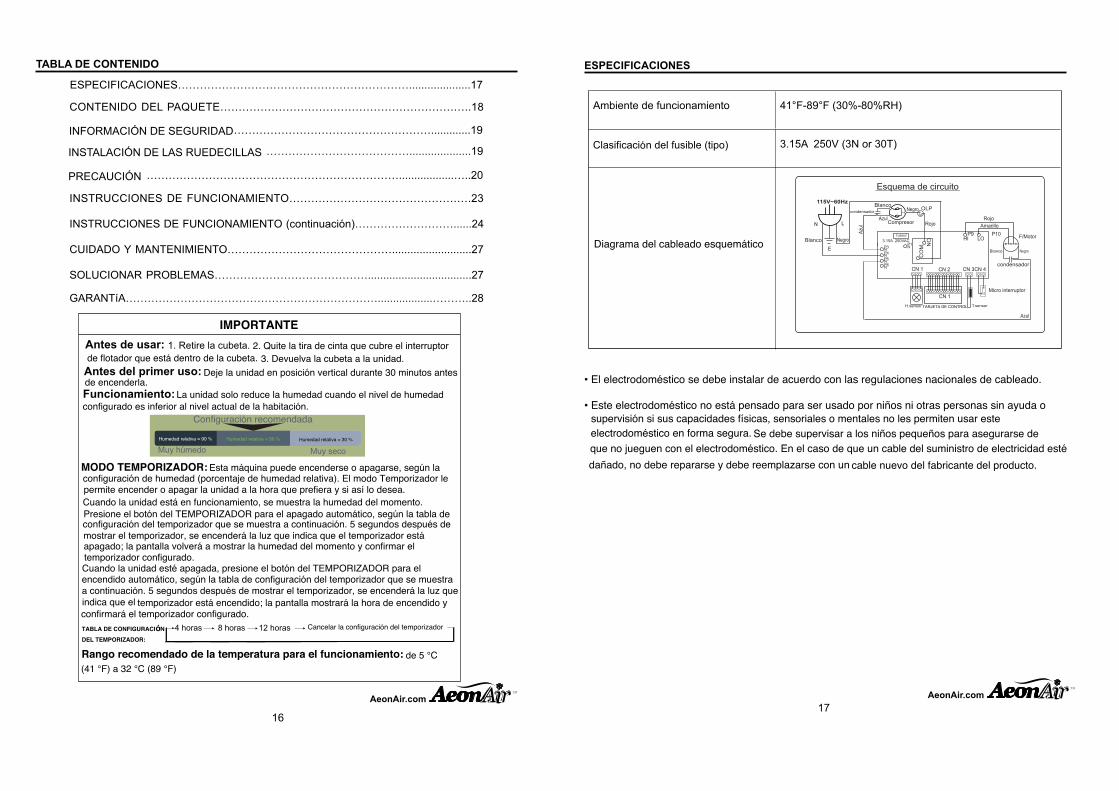
TABLA DE CONTENIDO
16
CONTENIDO DEL PAQUETE……………………………………………………….…..18
……………………………………………….............19
INSTRUCCIONES DE FUNCIONAMIENTO……………………………………….….23
INSTRUCCIONES DE FUNCIONAMIENTO (continuación)………………………......24
CUIDADO Y MANTENIMIENTO………………………………………..........................27
SOLUCIONAR PROBLEMAS……………………………………..................................27
GARANTíA……………………………………………………………..................………..28
AeonAir.comTM
1. Retire la cubeta.
4 horas 8 horas 12 horas
Antes del primer uso:
Antes de usar:
Funcionamiento:
IMPORTANTE2. Quite la tira de cinta que cubre el interruptor
de flotador que está dentro de la cubeta. 3. Devuelva la cubeta a la unidad.Deje la unidad en posición vertical durante 30 minutos antes
de encenderla.La unidad solo reduce la humedad cuando el nivel de humedad
configurado es inferior al nivel actual de la habitación.Configuración recomendada
Humedad relativa = 90 % Humedad relativa = 50 % Humedad relativa = 30 %
Muy húmedo Muy seco
MODO TEMPORIZADOR: Esta máquina puede encenderse o apagarse, según la configuración de humedad (porcentaje de humedad relativa). El modo Temporizador le permite encender o apagar la unidad a la hora que prefiera y si así lo desea. Cuando la unidad está en funcionamiento, se muestra la humedad del momento. Presione el botón del TEMPORIZADOR para el apagado automático, según la tabla de configuración del temporizador que se muestra a continuación. 5 segundos después de mostrar el temporizador, se encenderá la luz que indica que el temporizador está apagado; la pantalla volverá a mostrar la humedad del momento y confirmar el temporizador configurado.Cuando la unidad esté apagada, presione el botón del TEMPORIZADOR para el encendido automático, según la tabla de configuración del temporizador que se muestra a continuación. 5 segundos después de mostrar el temporizador, se encenderá la luz que indica que el temporizador está encendido; la pantalla mostrará la hora de encendido y
confirmará el temporizador configurado.TABLA DE CONFIGURACI N
DEL TEMPORIZADOR:
Cancelar la configuración del temporizador
Rango recomendado de la temperatura para el funcionamiento: de 5 °C (41 °F) a 32 °C (89 °F)
17
ESPECIFICACIONES
Ambiente de funcionamiento !"#$%&'#$()*+,%&+,-./
3.15A 250V (3N or 30T)
0(El electrodoméstico se debe instalar de acuerdo con las regulaciones nacionales de cableado.
0(Este electrodoméstico no está pensado para ser usado por niños ni otras personas sin ayuda o
Clasificaci n del fusible (tipo)
Diagrama del cableado esquemático
supervisión si sus capacidades físicas, sensoriales o mentales no les permiten usar este electrodoméstico en forma segura.
que no jueguen con el electrodoméstico. En el caso de que un cable del suministro de electricidad esté dañado, no debe repararse y debe reemplazarse con un cable nuevo del fabricante del producto.
Se debe supervisar a los niños pequeños para asegurarse de
ESPECIFICACIONES………………………………………………………....................17
ó …………………………………....................19
……………………………………………………………..................…..20PRECAUCIÓN
INFORMACIÓN DE SEGURIDAD
INSTALACIÓN DE LAS RUEDECILLAS
ó
AeonAir.comTM
FUSIBLE
TARJETA DE CONTROL
Lee y comprenda este manual completamente antes de montar, utilizar o instalar el producto.• Compruebe el suministro de energía eléctrica disponible y resuelva cualquier problema de cableado ANTES de instalar o utilizar esta unidad. Todo el cableado debe cumplir los códigos eléctricos locales y nacionales y debe ser realizado por un electricista profesional. Si tiene alguna pregunta relacionada con las siguientes instrucciones, póngase en contacto con un electricista profesional.
toma de corriente doméstica conectada tierra de 15 A de uso general.• Para su seguridad y protección, esta unidad se conecta a tierra través del enchufe del cable de
consulte a un electricista profesional.
PELIGRO
no puedan reaccionar ante un error de la misma. Una unidad defectuosa puede causar un sobrecalentamiento extremo o la muerte en un espacio cerrado y desatendido de tales características.
ADVERTENCIA• La conexión inadecuada del enchufe con toma de tierra puede provocar riesgo de incendio,
tierra.• NO UTILICE ADAPTADORES DE ENCHUFE O ALARGADORES CON ESTA UNIDAD. Si es necesario utilizar un alargador con esta unidad, utilice solamente un alargador de “aire acondicionado” homologado.
INFORMACIÓN DE SEGURIDAD
Antes de montar el producto, asegúrese de que dispone de todas las piezas. Compare las piezas
producto.Tiempo estimado de montaje: 20 minutos
INSTALACIÓN DE LAS RUEDECILLAS
Es recomendable instalar las ruedecillas para evitar dañar los suelos.
dicha fecha.
5. Repita los pasos 1 a 4 para las otras 3 ruedecillas.
INFORMACIÓN DE SEGURIDAD
19
AeonAir.comTM
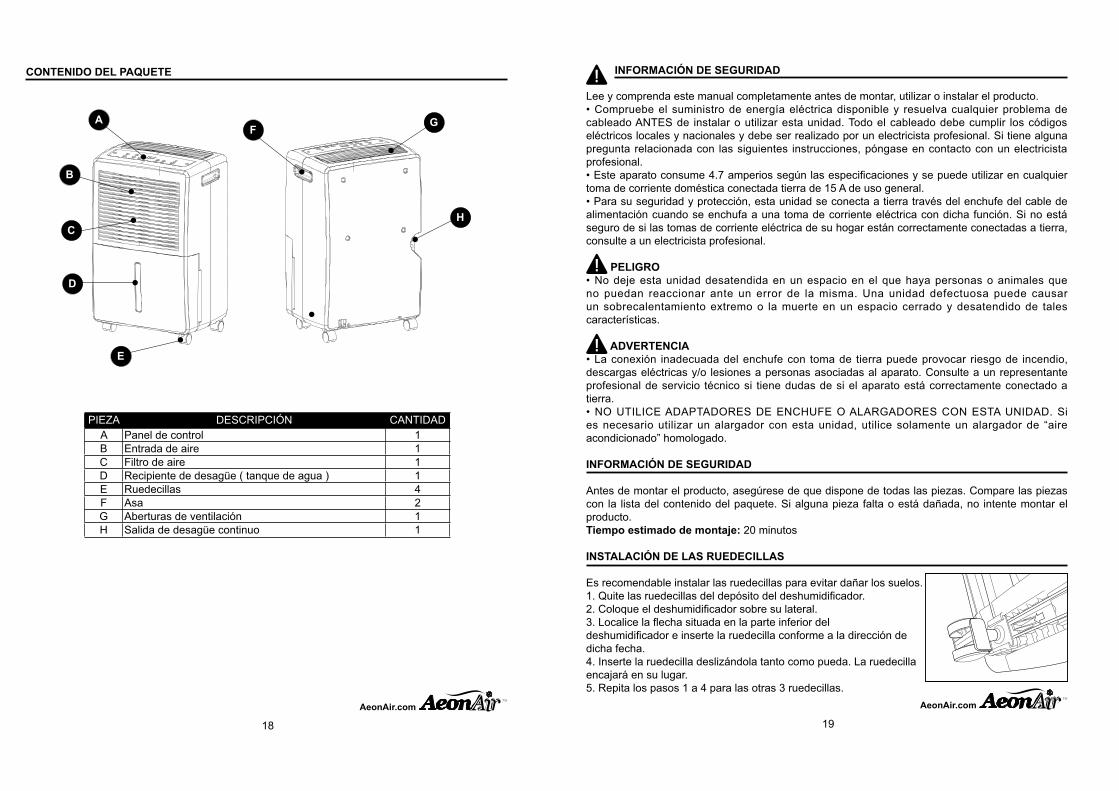
CONTENIDO DEL PAQUETE
18
PIEZA DESCRIPCIÓN CANTIDADA Panel de control 1B Entrada de aire 1C Filtro de aire 1D Recipiente de desagüe ( tanque de agua ) 1E Ruedecillas 4F Asa 2G Aberturas de ventilación 1H Salida de desagüe continuo 1
A
D
E
C
B
H
GF
AeonAir.comTM
21
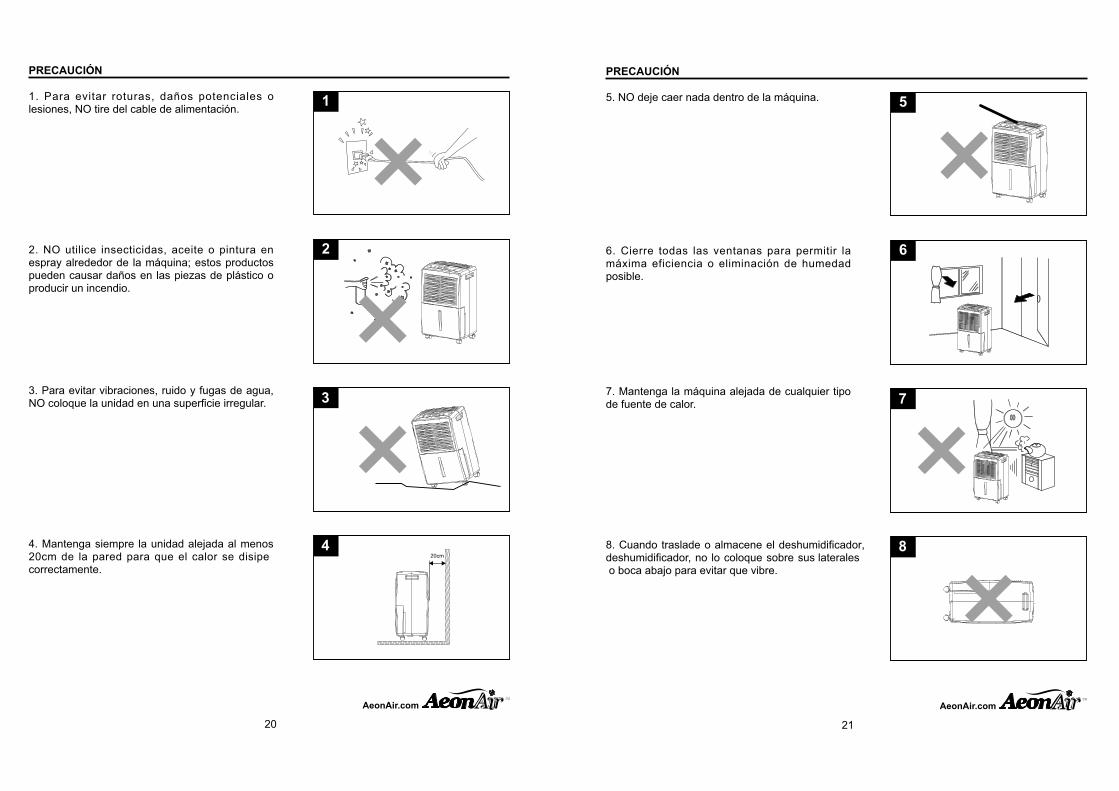
PRECAUCIÓN
6. Cierre todas las ventanas para permitir la
posible.
de fuente de calor.
8. Cuando traslade o almacene el deshumidificador, deshumidificador, no lo coloque sobre sus laterales
5
6
7
8
AeonAir.comTM
PRECAUCIÓN
20
1. Para evitar roturas, daños potenciales o lesiones, NO tire del cable de alimentación.
2. NO utilice insecticidas, aceite o pintura en
producir un incendio.
3. Para evitar vibraciones, ruido y fugas de agua,
20cm de la pared para que el calor se disipe correctamente.
1
2
3
4
AeonAir.comTM
20cm
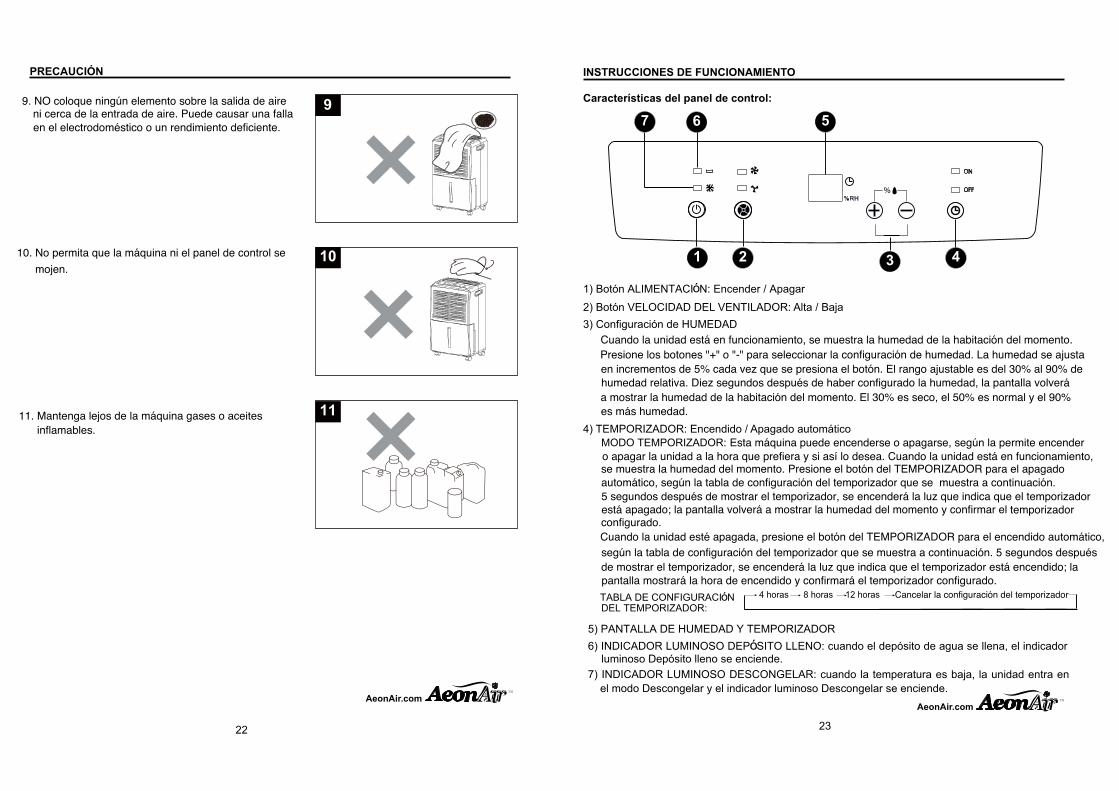
INSTRUCCIONES DE FUNCIONAMIENTO
23
Características del panel de control:
5) PANTALLA DE HUMEDAD Y TEMPORIZADOR6) INDICADOR LUMINOSO DEP SITO LLENO: cuando el depósito de agua se llena, el indicador
luminoso Depósito lleno se enciende.
el modo Descongelar y el indicador luminoso Descongelar se enciende.AeonAir.com
TM
5
6
7
9
10
11
AeonAir.comTM
22
9. NO coloque ningún elemento sobre la salida de aire ni cerca de la entrada de aire. Puede causar una falla en el electrodoméstico o un rendimiento deficiente.
10. No permita que la máquina ni el panel de control se mojen.
11. Mantenga lejos de la máquina gases o aceites inflamables.
Cuando la unidad está en funcionamiento, se muestra la humedad de la habitación del momento. Presione los botones "+" o "-" para seleccionar la configuración de humedad. La humedad se ajusta en incrementos de 5% cada vez que se presiona el botón. El rango ajustable es del 30% al 90% de humedad relativa. Diez segundos después de haber configurado la humedad, la pantalla volverá a mostrar la humedad de la habitación del momento. El 30% es seco, el 50% es normal y el 90% es más humedad.
4 horas 8 horas 12 horas
MODO TEMPORIZADOR: Esta máquina puede encenderse o apagarse, según la permite encender o apagar la unidad a la hora que prefiera y si así lo desea. Cuando la unidad está en funcionamiento, se muestra la humedad del momento. Presione el botón del TEMPORIZADOR para el apagado automático, según la tabla de configuración del temporizador que se muestra a continuación. 5 segundos después de mostrar el temporizador, se encenderá la luz que indica que el temporizador está apagado; la pantalla volverá a mostrar la humedad del momento y confirmar el temporizador
Cuando la unidad esté apagada, presione el botón del TEMPORIZADOR para el encendido automático, según la tabla de configuración del temporizador que se muestra a continuación. 5 segundos después de mostrar el temporizador, se encenderá la luz que indica que el temporizador está encendido; la
TABLA DE CONFIGURACI N DEL TEMPORIZADOR:
Cancelar la configuración del temporizador
configurado.
pantalla mostrará la hora de encendido y confirmará el temporizador configurado.
1 2 3 4
567
PRECAUCIÓN
ó
ó
ó
INSTRUCCIONES DE FUNCIONAMIENTO (continuación)
24AeonAir.com
TM
INICIAR FUNCIONAMIENTO1. Coloque el producto en posición vertical sobre una superficie plana, estable y resistente al calor. Asegúrese de que no hay nada inflamable o sensible al calor en un radio de 100 cm (39 pulgadas). El uso del producto en cualquier otra posición podría ser peligroso.2 . Inser te e l enchu fe en una toma de cor r ien te e léc t r i ca adecuada. El deshumidi f icador es adecuado para ut i l izarse en una fuente de sumin is t ro e léct r ico que tenga e l mismo
INDICADOR LUMINOSO DEPÓSITO LLENO
continuación, debe vaciarlo. Cuando el depósito vacío se vuelva a
en funcionamiento normalmente (Fig. 2).NOTA: Utilice ambas manos para vaciar con cuidado el depósito de agua.
INDICADOR LUMINOSO AGUA LLENA (ROJO)
se vuelve a colocar correctamente.
NOTA: Pueden pasar varios minutos hasta que el estado de funcionamiento se restablezca.
USO DEL DEPÓSITO DE AGUA
del deshumidificador. El depósito de agua almacena el agua condensada que se acumula y mediante un interruptor de seguridad, controla tanto el nivel del agua como el funcionamiento del
accidentalmente dentro de la unidad, el activador del
CONFIGURACIÓN PREDETERMINADA DE FÁBRICA
NOTA:predeterminada la última configuración de programa utilizada cuando se restablezca dicho suministro
Fig. 2
continuación, vuelva a colocar el depósito de agua en la posición correcta (Fig. 1).
INSTRUCCIONES DE FUNCIONAMIENTO (continuación)
25
con el interruptor de seguridad. Esta situación provoca la desconexión inmediata del sistema del compresor y del motor del ventilador, impidiendo que la unidad se condense.NOTA: Nunca manipule o intente vencer el sistema de conmutación flotante del nivel del agua (seguridad).DESCONGELAR
DESHUMIDIFICACIÓNSELECCIÓN DEL MODO DE DESHUMIDIFICACIÓN:
SELECCIÓN DE LA VELOCIDAD DEL VENTILADOR: seleccione la velocidad del ventilador en el teclado numérico. La velocidad seleccionada se identifica mediante el indicador luminoso
proteger su hogar y propiedades valiosas contra el daño (hinchazón) que causa la humedad del
del evaporador, se drena y se recoge en un depósito de agua interno (extraíble) ubicado en la parte frontal de la unidad. La temperatura del aire evacuado que se devuelve al entorno aumenta varios grados, lo que provoca que la temperatura del aire circundante incremente (ligeramente).
Fig. 2
Fig. 3
FILTRO DEL AIRE
en ayudar a reducir (minimizar) las partículas de polvo y suciedad
funcionamiento. Para mantener la eficiencia de funcionamiento
frecuentemente en función de la calidad del aire de entrada.
colocado.
PASOS PARA LIMPIAR EL FILTRO DEL AIRE:
séquelo con un paño.3) Vuelva a colocar el filtro del aire limpio en su lugar y continúe
AeonAir.comTM
Fig. 1
Palanca del flotador
(No incluye la configuración del TEMPORIZADOR).
INSTRUCCIONES DE FUNCIONAMIENTO (continuación)
26
DESAGUADO CONTINUO
La función de desaguado continuo se puede realizar siguiendo los pasos que se indican a continuación:1. Para no tener que vaciar el depósito de agua periódicamente,
utilizar la manguera para unirla al conector de desaguado continuo (manguera no incluida).2. Desatornille la tapa de desagüe y quítela de la unidad (Fig. A).3. Quite el tope de goma mullido y colóquelo en el depósito de agua para que no se pierda (Fig. B).
correctamente asentado en el extremo de la manguera tal y como se muestra en la Fig. C.5. Conecte la manguera a la toma de desagüe (Fig. D).
7. Coloque el depósito en su posición original (Fig. E).
Tapa de desagüe
Anillo de sellado de goma
DepósitoTope de goma
mullido
Tapa de desagüe
AeonAir.comTM
Fig. A Fig. B
Fig. C
Fig. D
Fig. E
CUIDADO Y MANTENIMIENTO
SOLUCIONAR PROBLEMAS
27
LIMPIEZAPRECAUCIÓN: desconecte el cable de alimentación de la toma de corriente eléctrica.1) NO utilice gasolina, benceno, disolvente o cualquier otra sustancia química para limpiar esta
acabado.
3) Utilice solamente detergente suave para lavar platos, agua tibia y un paño suave para limpiar la
ALMACENAMIENTOSi no va a utilizar el deshumidificador durante prolongados períodos de tiempo, siga estas instrucciones:1) Desconecte el cable de alimentación de la fuente de alimentación.2) Vacíe el depósito de agua y límpielo (séquelo) completamente.
5) Guarde la unidad en posición vertical y en un lugar seco.
Ocasionalmente, puede encontrar algunos problemas de menor importancia para los que puede no
los posibles problemas que pueda tener.
PROBLEMA CAUSA POSIBLE
1) La unidad no funciona.
• Compruebe la conexión del cable de alimentación.• Compruebe la toma de corriente eléctrica para ver si el
instalado.
2) Capacidad de deshumidificación
3) El valor de la humedad relativa no se alcanza después de un largo período de funcionamiento.
cerradas.
AeonAir.comTM
(manguera para jardín que se puede comprar por separado)
(manguera para jardín que se puede comprar
por separado)
(manguera para jardín que se puede comprar
por separado)
(manguera para jardín que se puede comprar
por separado)
8. Coloque el otro extremo de la manguera para jardín para el desagüe del suelo.
El método antes mencionado es para desagüe con orificio de desagüe en el suelo.
La gravedad de drenaje feed

28
AeonAir.comTM
GARANTÍA
GARANTÍA LIMITADA DEL APARATO
las que ha sido diseñada por el fabricante. Solamente puede hacer uso de esta garantía, la cual no es transferible, la persona a la el fabricante o un distribuidor o fabricante autorizado vendió originalmente la unidad.
TÉRMINOS DE LA GARANTÍA
de compra, sin extensión.
Primeros 12 meses:Durante los primeros doce (12) meses, cualquier parte funcional defectuosa de este producto,
comprador ORIGINAL.
Para obtener servicio técnico: llame al 1-855-900-1298 o ACUDA A LA TIENDA DONDE ADQUIRIÓ EL PRODUCTO PARA QUE SE LO CAMBIEN.
EXCLUSIONESSalvo disposición en contrario en el presente documento, o por el fabricante, no hay otras garantías, condiciones o representaciones, expresas o implícitas, realizadas o pensadas por el fabricante o sus distribuidores autorizados y el resto de garantías, condiciones o representaciones, incluidas las garantías, condiciones o representaciones en virtud de cualquier Ley de venta de mercancías o legislación o estatuto similar, quedan expresamente excluidas. Salvo disposición en
daño a personas o propiedades, incluida la propia unidad, independientemente de su causa, o por cualquier daño consecuente ocasionado por el mal funcionamiento de la unidad y por la compra de la unidad; el comprador acepta por la presente indemnizar y eximir al fabricante de cualquier reclamación por daños a personas o propiedades causados por la unidad.
Dado que algunos estados no permiten limitaciones o exclusiones de daños incidentales o consecuentes, o no permiten la limitación en garantías implícitas, puede que las limitaciones y exclusiones anteriores no sean aplicables en su caso. Esta garantía le otorga determinados derechos legales. También puede tener otros derechos que pueden variar según el estado en el que se encuentre.
DISPOSICIONES GENERALES
el daño o la reparación se derive de cualquiera de las causas siguientes:1) Avería en el suministro eléctrico.2) Daños durante el transporte o el traslado del aparato.
o fusibles inadecuados.
del aire en la habitación o condiciones anómalas de funcionamiento (temperatura de la
residencia doméstica).
huracanes, inundaciones, etc.7) Llamadas al servicio técnico que den lugar a la formación del cliente.
un aparato en exteriores que no esté homologado para este uso).
conserve las facturas de venta.