Embed Size (px)
Citation preview
IVT BlueSoleil™ Standard Edition
User Manual
Version: 3.0
Contents 1 Introduction to BlueSoleil™ 4
1.1 Bluetooth Functions 4
1.2 Main Window 5
2 Claim 7
3 Basic Operations 8
3.1 Insert Adapter 8
3.2 Install the Software 8
3.3 Start BlueSoleil 8
3.4 Activation 9
3.5 Search for Other Bluetooth Enabled Devices 10
3.6 Establish Connection 11
3.7 Bluetooth Security 13
4 What is new in Standard edition 14
Using “Send To” 14
5 Getting Started 15
5.1 Advanced Audio 15
5.2 Basic Imaging 15
5.3 Dial-up Networking 16
5.4 FAX 17
5.5 File Transfer 18
5.6 Headset 19
5.7 Human Interface Device 20
5.8 LAN Access 20
5.9 Object Push 23
5.10 Personal Area Networking 25
5.11 Printer 28
5.12 Serial Port 29
5.13 Bluetooth Synchronization 29
6 BlueSoleil User Guides 31
6.1 BlueSoleil Environment 31
2

6.1.1 Main Window 31 6.1.2 Service Window 34 6.1.3 Menus 35
6.2 Device Configurations 39 6.2.1 Hardware Configuration 39 6.2.2 Properties Configuration 39
6.3 Security Configuration 40 6.3.1 Pair / Un-pair Devices 41 6.3.2 General Security 41 6.3.3 Managing Device Pairings 42 6.3.4 Local Services Security 43
3
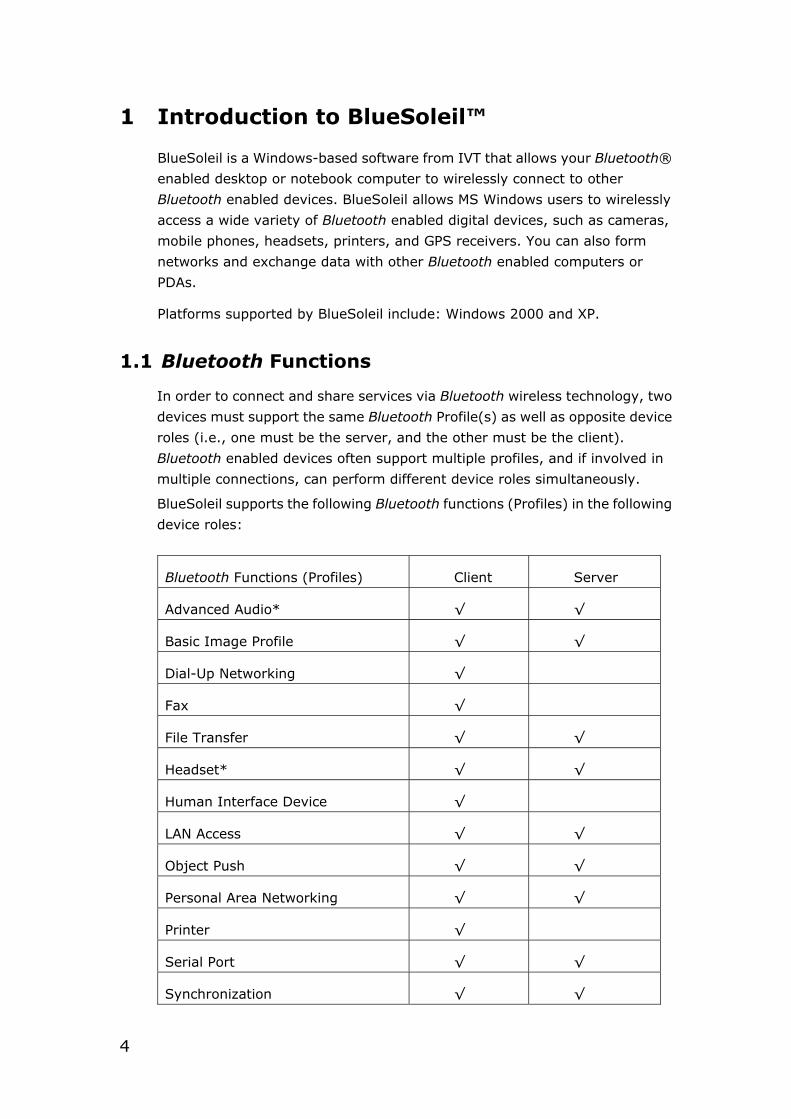
1 Introduction to BlueSoleil™
BlueSoleil is a Windows-based software from IVT that allows your Bluetooth®
enabled desktop or notebook computer to wirelessly connect to other
Bluetooth enabled devices. BlueSoleil allows MS Windows users to wirelessly
access a wide variety of Bluetooth enabled digital devices, such as cameras,
mobile phones, headsets, printers, and GPS receivers. You can also form
networks and exchange data with other Bluetooth enabled computers or
PDAs.
Platforms supported by BlueSoleil include: Windows 2000 and XP.
1.1 Bluetooth Functions
In order to connect and share services via Bluetooth wireless technology, two
devices must support the same Bluetooth Profile(s) as well as opposite device
roles (i.e., one must be the server, and the other must be the client).
Bluetooth enabled devices often support multiple profiles, and if involved in
multiple connections, can perform different device roles simultaneously.
BlueSoleil supports the following Bluetooth functions (Profiles) in the following
device roles:
Bluetooth Functions (Profiles) Client Server
Advanced Audio* √ √
Basic Image Profile √ √
Dial-Up Networking √
Fax √
File Transfer √ √
Headset* √ √
Human Interface Device √
LAN Access √ √
Object Push √ √
Personal Area Networking √ √
Printer √
Serial Port √ √
Synchronization √ √
4
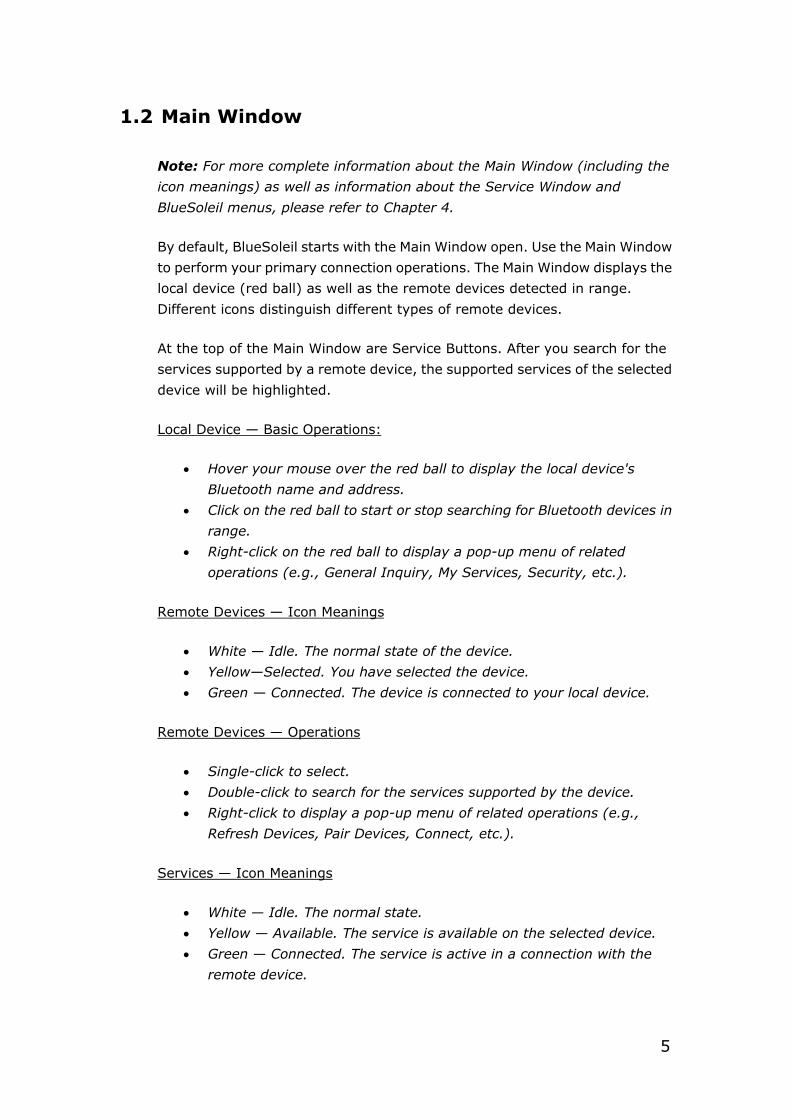
1.2 Main Window
Note: For more complete information about the Main Window (including the
icon meanings) as well as information about the Service Window and
BlueSoleil menus, please refer to Chapter 4.
By default, BlueSoleil starts with the Main Window open. Use the Main Window
to perform your primary connection operations. The Main Window displays the
local device (red ball) as well as the remote devices detected in range.
Different icons distinguish different types of remote devices.
At the top of the Main Window are Service Buttons. After you search for the
services supported by a remote device, the supported services of the selected
device will be highlighted.
Local Device — Basic Operations:
• Hover your mouse over the red ball to display the local device's
Bluetooth name and address.
• Click on the red ball to start or stop searching for Bluetooth devices in
range.
• Right-click on the red ball to display a pop-up menu of related
operations (e.g., General Inquiry, My Services, Security, etc.).
Remote Devices — Icon Meanings
• White — Idle. The normal state of the device.
• Yellow—Selected. You have selected the device.
• Green — Connected. The device is connected to your local device.
Remote Devices — Operations
• Single-click to select.
• Double-click to search for the services supported by the device.
• Right-click to display a pop-up menu of related operations (e.g.,
Refresh Devices, Pair Devices, Connect, etc.).
Services — Icon Meanings
• White — Idle. The normal state.
• Yellow — Available. The service is available on the selected device.
• Green — Connected. The service is active in a connection with the
remote device.
5

Services — Operations
• Hover your mouse over the service icon to display the name of the
service.
• Single-click on the service icon to connect.
• Right-click on the service icon to display a pop-up menu of related
operations.
6
2 Claim
The manufacturer may, at any time and without notice, make changes or
improvements to the products offered, and will provide necessary additions to
this manual or release a new version of this manual.
The contents contained in this user manual are provided “as is”, except as
required by applicable law, no warranties of any kind, either express or
implied, including, but not limited to, the implied warranties of
merchantability and fitness for a particular purpose, are made in relation to
the accuracy, reliability, or contents of this guide.
Copyright ©2006, IVT Corporation. All rights reserved.
IVT reserves the right to change or modify any information or specifications
without notice.
Bluetooth® is the trademark owned by Bluetooth SIG, Inc, and licensed to
IVT Corporation.
7
3 Basic Operations
3.1 Insert Adapter
BlueSoleil supports Windows systems enabled with Bluetooth wireless
technology via either a USB adapter or a CompactFlash (CF) card.
IMPORTANT! Be sure to insert the Bluetooth adapter BEFORE you
install the software!
USB Adapter:
1. Insert the USB adapter into the USB port of your computer.
CompactFlash Card:
1. Insert the CompactFlash card into your computer. To use a CF card in a PC
Card (PCMCIA) slot, first plug the card into a CF-to-PC Card adapter.
2. The Found New Hardware Wizard will automatically start. Make sure the
installation CD is still in your computer. Follow the wizard to install the
card drivers.
3.2 Install the Software
IMPORTANT! If you have any Bluetooth software previously installed
on your computer, you must completely remove it first!
1. Insert the BlueSoleil software installation CD into the CD drive of your
computer.
2. Use My Computer or Windows Explorer to access your CD drive. In the CD,
click on SETUP.EXE.
3. Follow the directions on your screen to install the software.
4. In some cases, you may need to restart your computer as prompted when
software installation is complete.
3.3 Start BlueSoleil
1. Start BlueSoleil. Click on the BlueSoleil icon on your desktop, or go to Start
| Programs | IVT BlueSoleil | BlueSoleil.
Note: BlueSoleil will detect each insertion or removal of the USB adapter.
Alternatively, you can start BlueSoleil before plugging in the USB adapter.
8
2. The very first time you use BlueSoleil, the Welcome to Bluetooth screen
will appear. Assign your Windows system a name and device type, to be
shown to other Bluetooth enabled devices. In most cases, you should
leave the security setting checked. Click OK.
Note: You should have administrator priviledge when using BlueSoleil.
Check Upgrade
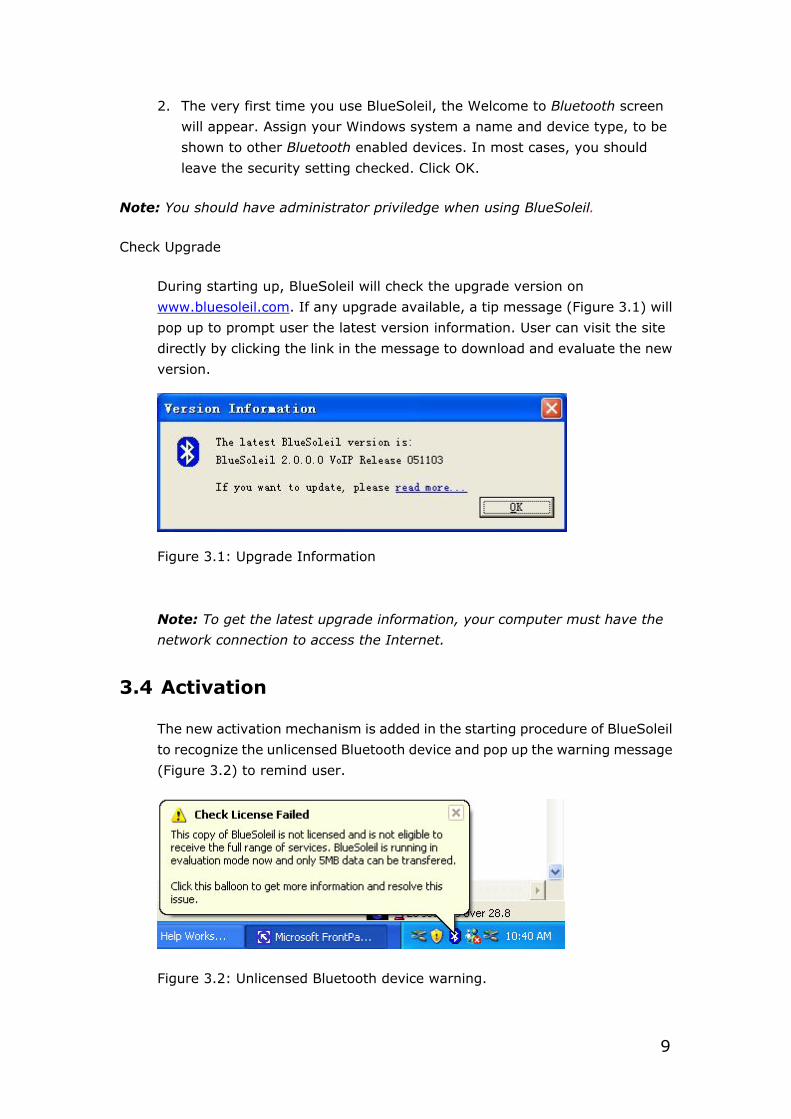
During starting up, BlueSoleil will check the upgrade version on
www.bluesoleil.com. If any upgrade available, a tip message (Figure 3.1) will
pop up to prompt user the latest version information. User can visit the site
directly by clicking the link in the message to download and evaluate the new
version.
Figure 3.1: Upgrade Information
Note: To get the latest upgrade information, your computer must have the
network connection to access the Internet.
3.4 Activation
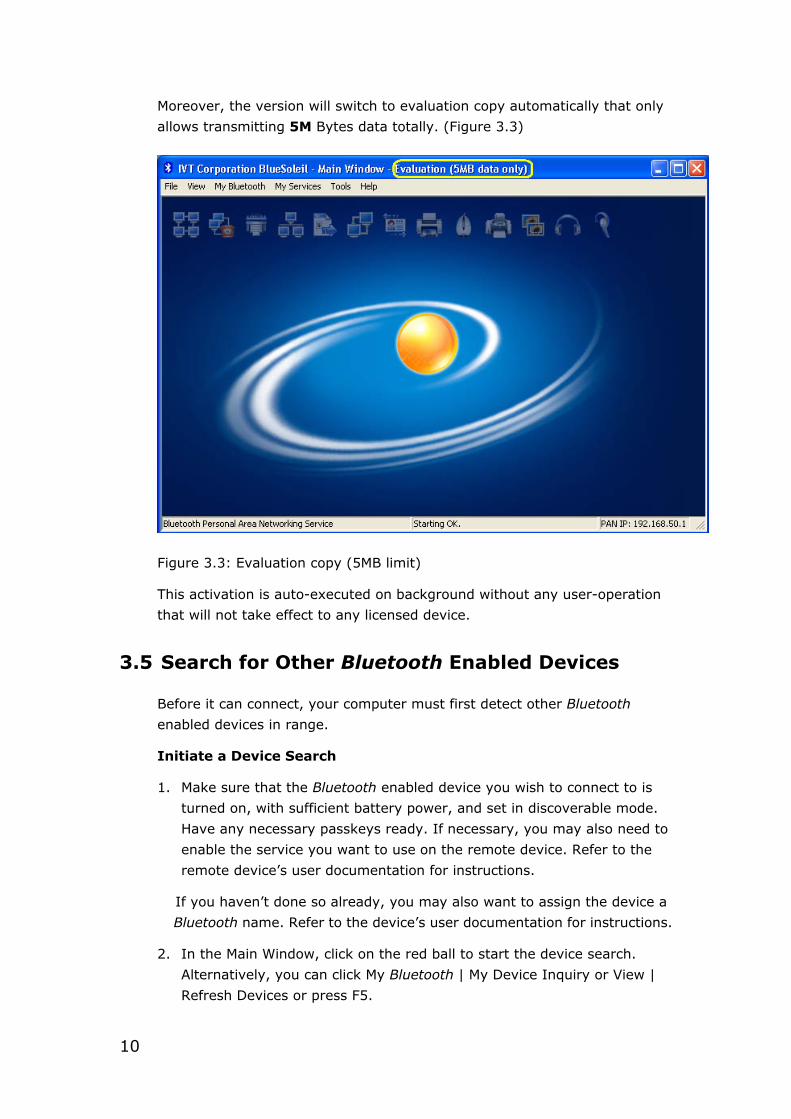
The new activation mechanism is added in the starting procedure of BlueSoleil
to recognize the unlicensed Bluetooth device and pop up the warning message
(Figure 3.2) to remind user.
Figure 3.2: Unlicensed Bluetooth device warning.
9
Moreover, the version will switch to evaluation copy automatically that only
allows transmitting 5M Bytes data totally. (Figure 3.3)
Figure 3.3: Evaluation copy (5MB limit)
This activation is auto-executed on background without any user-operation
that will not take effect to any licensed device.
3.5 Search for Other Bluetooth Enabled Devices
Before it can connect, your computer must first detect other Bluetooth
enabled devices in range.
Initiate a Device Search
1. Make sure that the Bluetooth enabled device you wish to connect to is
turned on, with sufficient battery power, and set in discoverable mode.
Have any necessary passkeys ready. If necessary, you may also need to
enable the service you want to use on the remote device. Refer to the
remote device’s user documentation for instructions.
If you haven’t done so already, you may also want to assign the device a
Bluetooth name. Refer to the device’s user documentation for instructions.
2. In the Main Window, click on the red ball to start the device search.
Alternatively, you can click My Bluetooth | My Device Inquiry or View |
Refresh Devices or press F5.
10
3. After a few seconds, an icon will appear around the center ball for each
Bluetooth enabled device detected within the radio range.
Note:
• The Main Window can display only eight discovered devices at a time.
If BlueSoleil discovered more than eight devices, use the scroll bar to
view the remaining devices discovered by BlueSoleil.
• You could delete a device in the orbit via right clicking the icon of the
device and selecting “Delete”.
• To sort the devices by device name, device address, or device type,
click View | Arrange Devices.
4. Wait several seconds until BlueSoleil reports the name of each device.
Note: The remote device name can also be obtained by right clicking the
icon of the device and selecting “Get device name”.
5. If the device you want is not listed, make sure that the device is turned on
and discoverable and try searching again. You have multiple options for
starting another search:
• If you start another search by double-clicking on the red ball or clicking
My Bluetooth | My Device Inquiry or View | Refresh Devices, then the
list of previously detected devices will not be cleared.
• If you start another search by pressing F5, then the list of previously
detected devices will be cleared.
3.6 Establish Connection
Note: These are generic instructions for any type of Bluetooth enabled device.
Refer to the instructions in Chapter 3 for specific details for the type of service
you plan to use.
Normally, a connection is initiated from the client. Check the chart in Chapter
1 to verify which device role BlueSoleil supports for the service you wish to
use.
• On the server side, start the service
• On the client side, initiate the connection
Start the Service
If you would like to use your computer as a server in a Bluetooth connection,
you must first start (enable) the appropriate service(s) on your system.
1. Access the Service Window. Click View | Service Window.
11
2. If the icon for a service is highlighted (yellow), then the service has already
been started. If the icon is white, then you need to start the service in
order to use it. Right-click the icon. In the pop-up menu, select Start
Service. The icon should now be highlighted (yellow). Serial Port icons will
also report which COM port is assigned to them.
Note:
• Icons will appear only for Bluetooth functions (Profiles) which
BlueSoleil supports in the Server device role. See chart in the 1.1
Bluetooth Functions.
• Depending on your system, multiple icons for Serial COM ports may
appear.
3. After you have started the service in BlueSoleil, now you are ready to
initiate the connection from the remote device. For instructions, refer to
the user documentation for the remote device.
Initiate the Connection
If you would like to use your computer as a client in a Bluetooth connection,
make sure that you have started (enabled) the service on the remote device.
Otherwise, BlueSoleil will not be able to discover the service and connect to it.
For instructions, refer to the device’s user documentation.
1. Return to the Main Window. Click View | Main Window.
2. Double-click on the icon for the device you wish to connect to. BlueSoleil
will begin to search for information about which services the device
supports.
3. After the search, icons will be highlighted (yellow) at the top of the
BlueSoleil Main Window for services that are supported by the device.
Verify that the service you want to use is supported.
4. Right-click on the device icon. In the pop-up menu, click Connect, then
select the service. BlueSoleil will start the connection. Depending on the
security settings of each device, you may need to enter the same passkey
on each device in order to bond the two devices.
5. A screen may appear asking if you want to set up automatic connections.
Click Yes or No.
6. If you are connecting to a phone, your phone may ask if you want to ask
the BlueSoleil computer to your device list. Enter Yes and enter a passkey.
7. When the devices have successfully connected, the device icon in the Main
Window will turn green, and a green line will appear between the red ball
and the device icon. A red dot will travel along the green line from the
12
client to the server. A signal strength icon will also appear next to the
device icon.
The BlueSoleil icon in the task tray will also turn green to indicate an
active connection.
Note: A red check mark will appear next to the name of any device that
you have previously paired with your computer.
8. Depending on which services you are using, additional screens may appear,
and/or you may need to configure additional connection settings (e.g.,
user name, password, COM port number, etc.). Refer to the instructions in
Chapter 3 for your specific service. After configuring the appropriate
connection settings, you should be ready to use your application.
9. To end a connection, in the Main Window, right-click on the icon for a
connected device. In the pop-up menu, click Disconnect.
Note: You can only disconnect this way if your computer is acting as a client
device. If your computer is acting as a server device, then you can disconnect
in BlueSoleil by clicking View | Service Window, then right-clicking on the
service icon. In the pop-up menu, click Stop Service. Alternatively, you can
disconnect from the remote device.
3.7 Bluetooth Security
To modify your connection’s security settings, click My Bluetooth | Security.
BlueSoleil offers three security levels:
• Low (Security Mode 1, Non-secure)
No security procedure is needed for connections.
• Medium (Security Mode 2, Service level enforced security)
Authentication or Authorization is requested when a specific service is
accessed by other Bluetooth enabled devices. If two devices are
connecting for the first time, or if two devices do not have a trusted
relationship, then the same passkey must be provided on both sides to
complete the Authentication. This mode allows you to assign different
access rights for each service supported by the server device.
• High (Security Mode 3, Link level enforced security)
If either of two devices is in Mode 3, Authentication is requested
whenever a link connection is initiated between two Bluetooth enabled
devices. The passkey must be provided on both sides to complete
Authentication.
Note: In Security Mode 2, the user can add each authenticated device into a
trusted device list to expedite future connections.
13
4 What is new in Standard edition
Using “Send To”
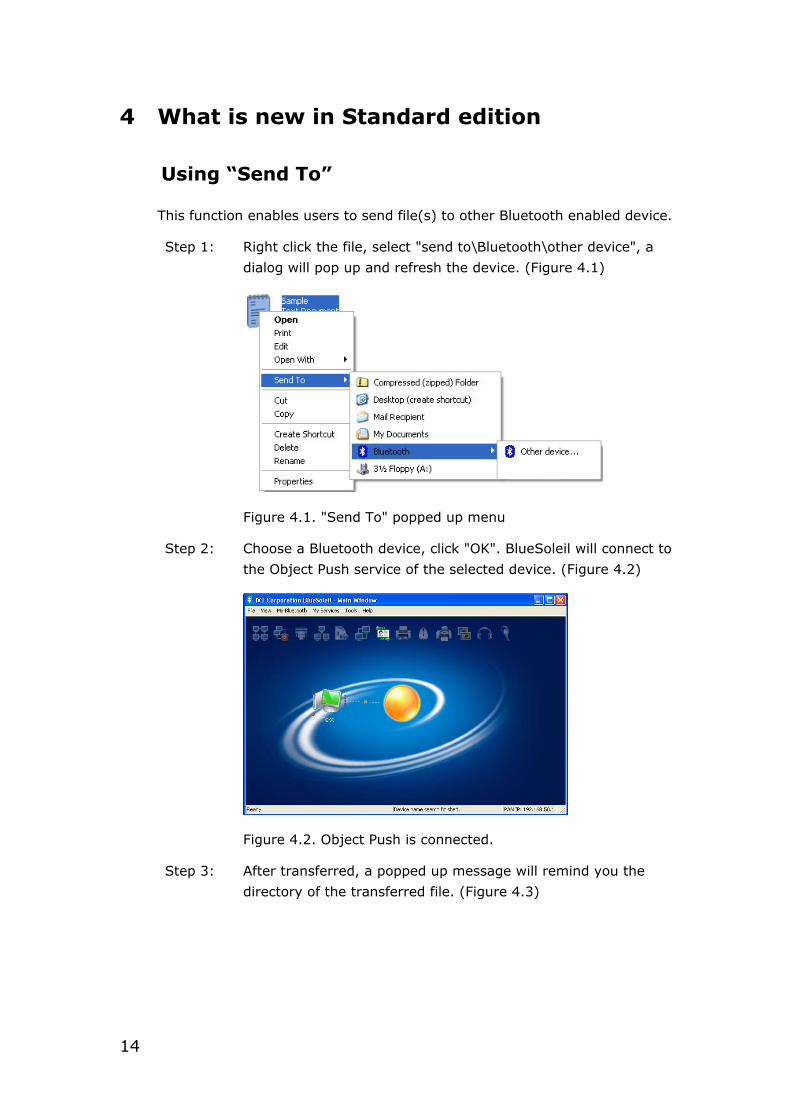
This function enables users to send file(s) to other Bluetooth enabled device.
Step 1: Right click the file, select "send to\Bluetooth\other device", a
dialog will pop up and refresh the device. (Figure 4.1)
Figure 4.1. "Send To" popped up menu
Step 2: Choose a Bluetooth device, click "OK". BlueSoleil will connect to
the Object Push service of the selected device. (Figure 4.2)
Figure 4.2. Object Push is connected.
Step 3: After transferred, a popped up message will remind you the
directory of the transferred file. (Figure 4.3)
14
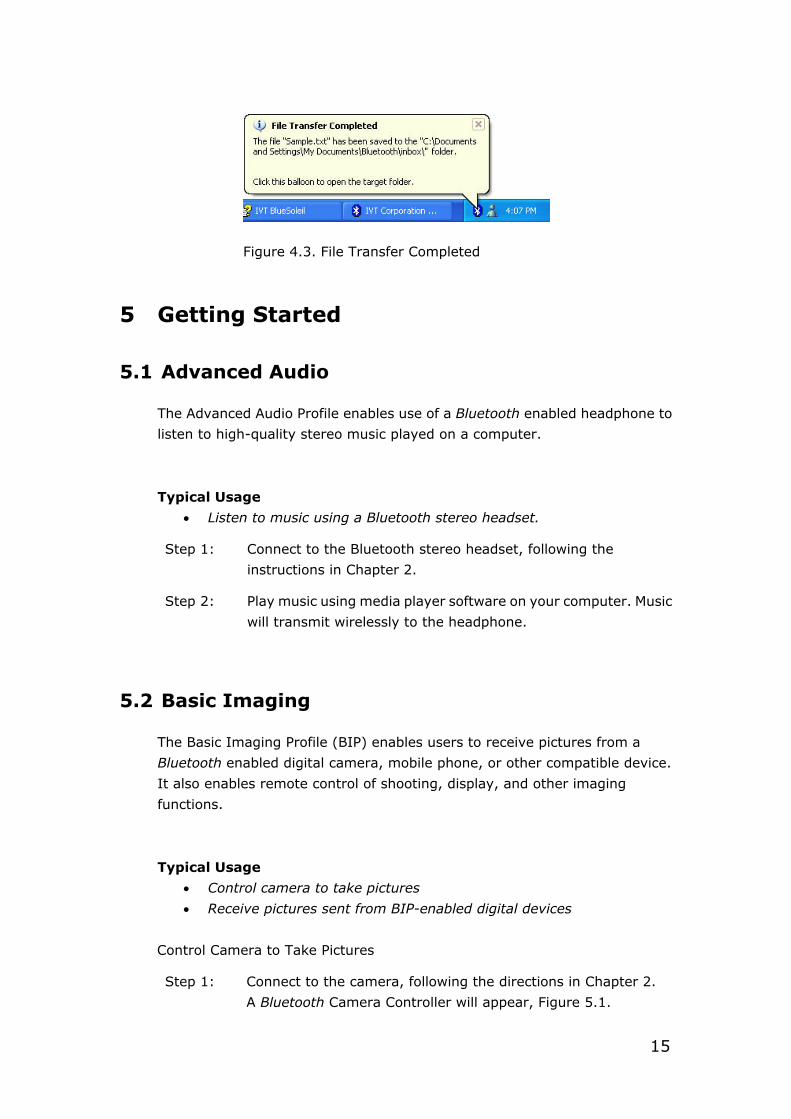
Figure 4.3. File Transfer Completed
5 Getting Started
5.1 Advanced Audio
The Advanced Audio Profile enables use of a Bluetooth enabled headphone to
listen to high-quality stereo music played on a computer.
Typical Usage
• Listen to music using a Bluetooth stereo headset.
Step 1: Connect to the Bluetooth stereo headset, following the
instructions in Chapter 2.
Step 2: Play music using media player software on your computer. Music
will transmit wirelessly to the headphone.
5.2 Basic Imaging
The Basic Imaging Profile (BIP) enables users to receive pictures from a
Bluetooth enabled digital camera, mobile phone, or other compatible device.
It also enables remote control of shooting, display, and other imaging
functions.
Typical Usage
• Control camera to take pictures
• Receive pictures sent from BIP-enabled digital devices
Control Camera to Take Pictures
Step 1: Connect to the camera, following the directions in Chapter 2.
A Bluetooth Camera Controller will appear, Figure 5.1.
15
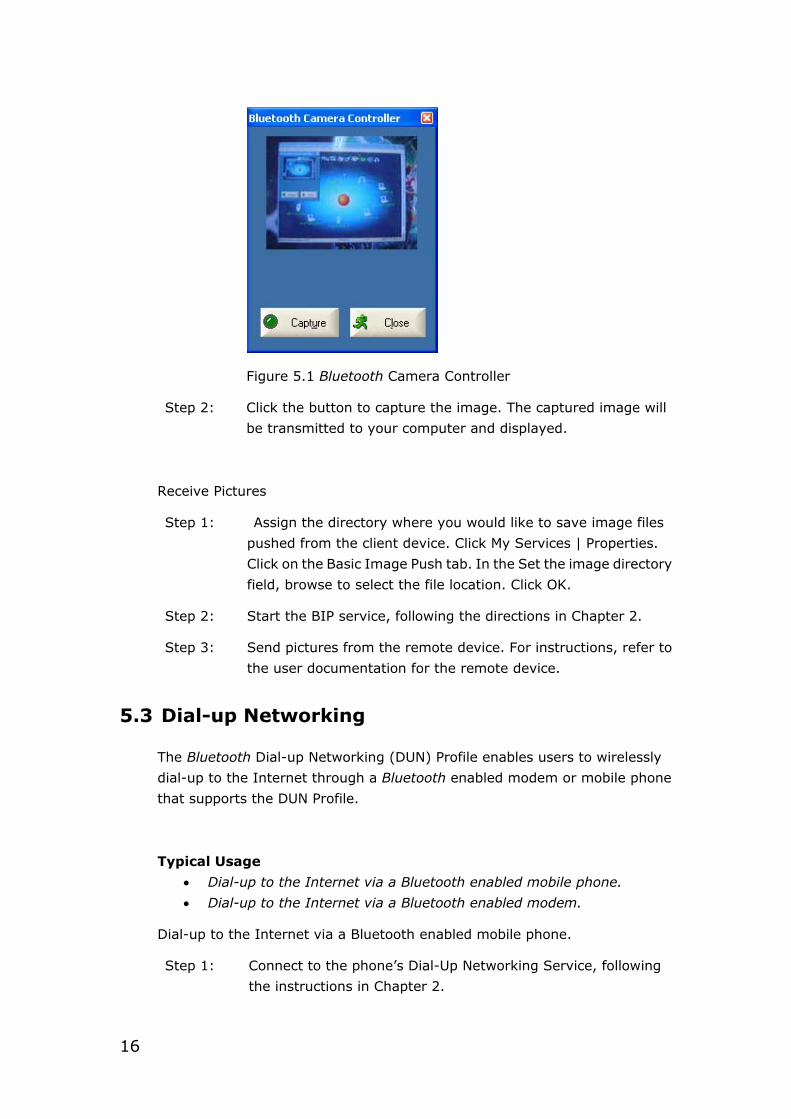
Figure 5.1 Bluetooth Camera Controller
Step 2: Click the button to capture the image. The captured image will
be transmitted to your computer and displayed.
Receive Pictures
Step 1: Assign the directory where you would like to save image files
pushed from the client device. Click My Services | Properties.
Click on the Basic Image Push tab. In the Set the image directory
field, browse to select the file location. Click OK.
Step 2: Start the BIP service, following the directions in Chapter 2.
Step 3: Send pictures from the remote device. For instructions, refer to
the user documentation for the remote device.
5.3 Dial-up Networking
The Bluetooth Dial-up Networking (DUN) Profile enables users to wirelessly
dial-up to the Internet through a Bluetooth enabled modem or mobile phone
that supports the DUN Profile.
Typical Usage
• Dial-up to the Internet via a Bluetooth enabled mobile phone.
• Dial-up to the Internet via a Bluetooth enabled modem.
Dial-up to the Internet via a Bluetooth enabled mobile phone.
Step 1: Connect to the phone’s Dial-Up Networking Service, following
the instructions in Chapter 2.
16
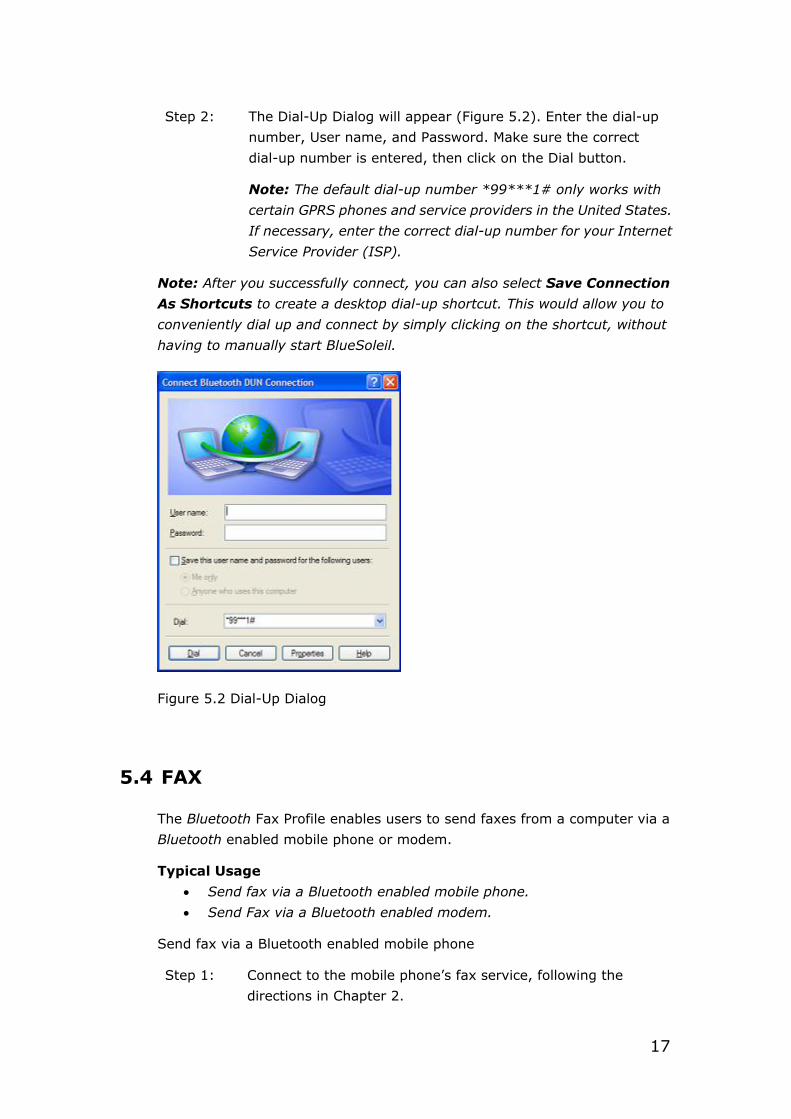
Step 2: The Dial-Up Dialog will appear (Figure 5.2). Enter the dial-up
number, User name, and Password. Make sure the correct
dial-up number is entered, then click on the Dial button.
Note: The default dial-up number *99***1# only works with
certain GPRS phones and service providers in the United States.
If necessary, enter the correct dial-up number for your Internet
Service Provider (ISP).
Note: After you successfully connect, you can also select Save Connection
As Shortcuts to create a desktop dial-up shortcut. This would allow you to
conveniently dial up and connect by simply clicking on the shortcut, without
having to manually start BlueSoleil.
Figure 5.2 Dial-Up Dialog
5.4 FAX
The Bluetooth Fax Profile enables users to send faxes from a computer via a
Bluetooth enabled mobile phone or modem.
Typical Usage
• Send fax via a Bluetooth enabled mobile phone.
• Send Fax via a Bluetooth enabled modem.
Send fax via a Bluetooth enabled mobile phone
Step 1: Connect to the mobile phone’s fax service, following the
directions in Chapter 2.
17
Step 2: Use your fax software to send the message.
Send fax via a Bluetooth enabled modem
Step 1: Connect to the modem’s fax service, as described in Chapter 2.
Step 2: Start your fax software. Configure your fax software for the
Bluetooth Fax Modem (NOT the Bluetooth Modem). Refer to
your fax software’s user documentation for instructions.
Step 3: Use your fax software to send the message.
5.5 File Transfer
The File Transfer Profile (FTP) enables users to transfer files and/or folders
between Bluetooth enabled laptops, desktops, PDAs, mobile phones, etc.
Typical Usage
• Connect to a Bluetooth enabled mobile phone and transfer files or
folders to/from the phone.
• Share a folder on your computer with other Bluetooth enabled devices.
• Access a shared folder on another Bluetooth enabled device.
Connect to a Mobile Phone
Step 1: Connect to the mobile phone's FTP service, following the
instructions in Chapter 2.
Step 2: The phone's folders are shown in a window. Users can
copy/paste/delete files or folders.
Share a Folder on Your Computer with other Bluetooth Enabled Devices
Step 1: Select the folder you would like to use for file sharing and define
the remote user privileges.
Click My Services | Properties. Click on the File Transfer tab.
Share this folder: Browse to select the folder you would like to
share.
Share Permissions: Select Read and Write to allow others to
copy, paste or delete files/folders in this folder. Select Read Only
to allow others to only browse and copy files/folders from this
folder.
18
Step 2: Start the FTP service in BlueSoleil, following the instructions in
Chapter 2. Do not initiate the connection in BlueSoleil.
Step 3: Browse your computer from the remote device. For instructions,
refer to the user documentation for the remote device. When the
remote device attempts to connect to your computer, the
Bluetooth Service Authorization screen may appear. Click Yes.
Step 4: After successfully connecting, the remote device can browse,
copy, paste, and/or delete files on your computer, depending on
the remote folder privileges you allowed. For instructions, refer
to the user documentation for the remote device.
Access a Shared Folder on Another Bluetooth Enabled Device
Step 1: On the remote device, designate the folder/files to share. Enable
file sharing on the remote device. For instructions, refer to the
user documentation for the remote device.
Note: If you do not enable file sharing on the remote device,
BlueSoleil will not be able to discover the device’s file sharing
service.
Step 2: Start the FTP service and initiate the connection in BlueSoleil,
following the instructions in Chapter 2.
Step 3: A Remote Shared Folder screen will appear, displaying shared
files/folders on the remote device, Use the screen to browse,
copy, paste, and/or delete files, depending on your folder
privileges.
5.6 Headset
The Headset Profile enables users to use a Bluetooth enabled headset as
wireless earplug or microphone.
Typical Usage
• Use Headset as a device for audio input/output.
Step 1: Connect to the Bluetooth enabled headset, following the
directions in Chapter 2.
Step 2: Play music on your computer, or chat using network meeting
tools. You may need to press a multifunction button on your
headset to transmit audio between the computer and the
headset.
19
Note: For most Bluetooth enabled headsets, after you have successfully
connected for the first time, you can quickly reconnect to BlueSoleil by simply
pressing a multifunction button on the headset.
5.7 Human Interface Device
The Bluetooth Human Interface Device (HID) Profile enables users to use
Bluetooth enabled HID Devices such as keyboards, mice or joysticks to control
your computer.
Typical Usage
• Connect a Bluetooth enabled Mouse and a Keyboard to Your Computer
Step 1: Connect the Bluetooth enabled mouse to your computer,
following the instructions in Chapter 2.
Step 2: Connect the Bluetooth enabled keyboard to your computer,
following the instructions in Chapter 2. Before you can use
BlueSoleil to connect, you may need to press a button on the
keyboard to make it discoverable.
Note:
• The first time you connect the mouse or keyboard to your computer,
the Found New Hardware Wizard will automatically launch. In the first
screen of the wizard, DO NOT INSERT ANY CD and click Next. Follow
the next screens until you complete the wizard. If the wizard
reappears, cancel the wizard. You should be able to use the mouse or
keyboard with your computer.
• The Bluetooth enabled mouse/keyboard can automatically re-connect
to your computer after you successfully establish the initial
connection.
5.8 LAN Access
The Bluetooth LAN Access Profile (LAP) allows users to access a Local Area
Network (LAN) via a Bluetooth enabled LAN access point.
Typical Usage
• Access a Local Area Network via a Bluetooth enabled LAN access point
• Use your computer as a LAN Access Point
20
Access a LAN via a Bluetooth enabled Access Point (AP)
Step 1: Connect to the LAN AP's LAP service, following the instructions in
Chapter 2.
Step 2: In the Connect Bluetooth LAP Connection dialog, enter the user
name and password if necessary. Click Connect.
Use your computer as a LAN Access Point (ADVANCED USERS ONLY)
Step 1: Start the Bluetooth LAN Access service on BlueSoleil, following the
instructions in Chapter 2.
Step 2: Specify any static IP addresses necessary for LAP clients.
(Alternatively, you can use DHCP to have the system dynamically
assign IP addresses).
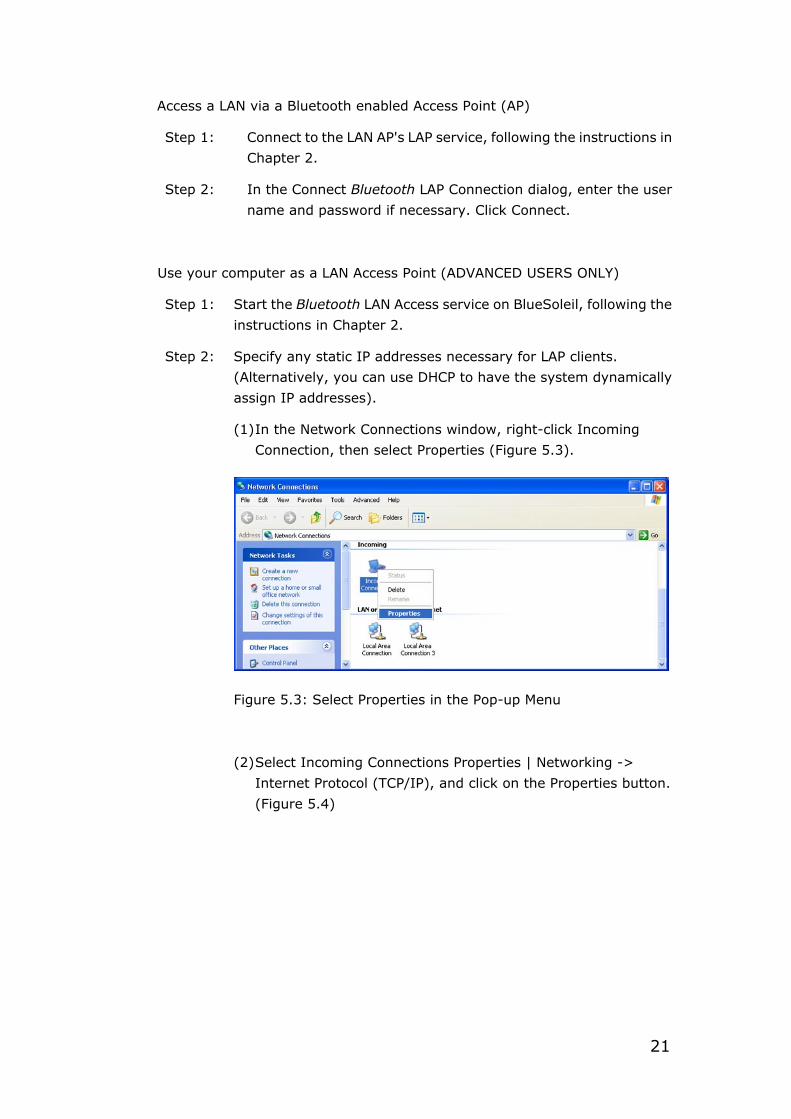
(1) In the Network Connections window, right-click Incoming
Connection, then select Properties (Figure 5.3).
Figure 5.3: Select Properties in the Pop-up Menu
(2) Select Incoming Connections Properties | Networking ->
Internet Protocol (TCP/IP), and click on the Properties button.
(Figure 5.4)
21
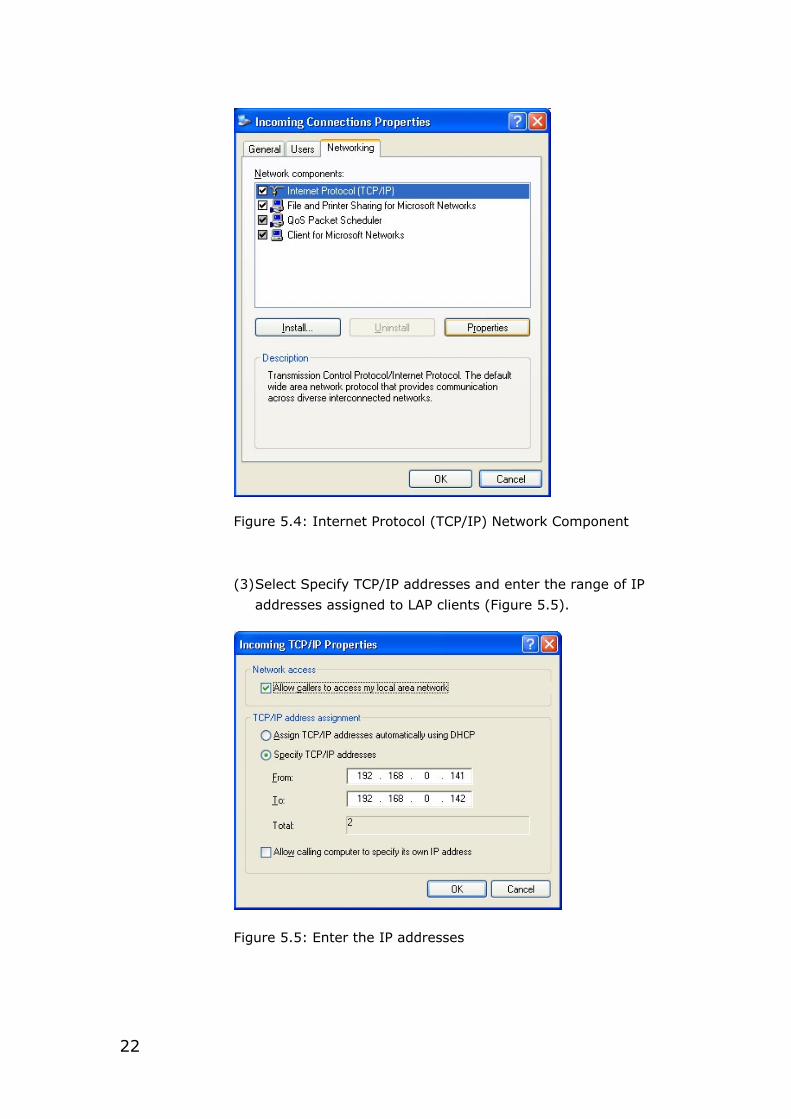
Figure 5.4: Internet Protocol (TCP/IP) Network Component
(3) Select Specify TCP/IP addresses and enter the range of IP
addresses assigned to LAP clients (Figure 5.5).
Figure 5.5: Enter the IP addresses
22
5.9 Object Push
The Bluetooth Object Push Profile (OPP) enables users to send and receive
Personal Information Management (PIM) data objects (including messages,
notes, calendar items, and business cards) to and from a Bluetooth enabled
PDA or mobile phone.
The objects supported include:
• Contacts (*.vcf)
• Calendar items (*.vcs)
• Notes (*.vnt)
• Messages (*.vmg)
Typical Usage
• Push objects to a Bluetooth enabled mobile phone or PDA
• Receive objects from a Bluetooth enabled mobile phone or PDA
Note: If you would like to push PIM objects to a PDA, make sure that the PDA
is ready to receive a PIM object before you start. If necessary, enable Object
Push on the PDA. For instructions, refer the PDA’s user documentation.
Push Objects to a Bluetooth Enabled Mobile Phone
There are two methods to push objects:
Method
1:
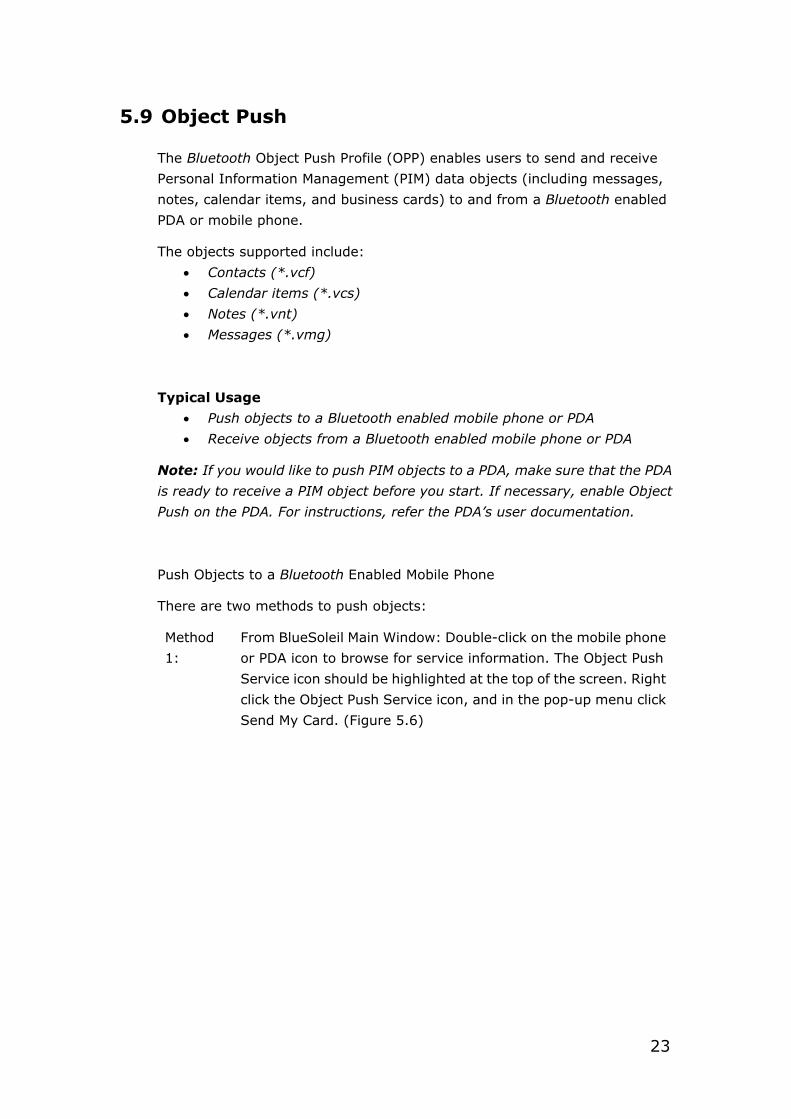
From BlueSoleil Main Window: Double-click on the mobile phone
or PDA icon to browse for service information. The Object Push
Service icon should be highlighted at the top of the screen. Right
click the Object Push Service icon, and in the pop-up menu click
Send My Card. (Figure 5.6)
23
Figure 5.6: Send Object
Send My Card:
Send your default business card.
Get Card:
Get the phone’s default business card.
Send Objects:
Select objects (PIM files ending in .vcf, .vcs, .vnt, or .vmg)
and send them to the phone.
Exchange cards:
Have your computer and the phone to exchange their default
business cards.
Method
2:
From MS Outlook:
(1) Select the contact that you would like to send.
(2) In Outlook, click on the Push button on the toolbar, or click
File | Push.
(3) The Bluetooth Neighbors screen will appear. In the device
list, select the phone or PDA that you wish to push the contact to.
Click on the Push button.
Receive Objects from a Bluetooth Enabled Mobile Phone
Step 1: Configure the parameters for the object push. From the Main
Window, click My Services | Properties. Click on the Object Push
tab.
24
Step 2: Start the Object Push service, following the instructions in
Chapter 2. Do not initiate a connection, only start the service so
that your computer will be ready to receive objects.
Step 3: Send objects from the phone. For instructions, refer to your
phone’s user documentation.
Notes:
• BlueSoleil creates a Bluetooth folder (with Inbox and Outbox
subfolders) in your My Documents folder for use with Object Push. The
Inbox is used to save objects received from other devices. The Outbox
is used to save objects sent out from your computer.
• Your can set your default business card by clicking My Services |
Object Push. In the Send My Business Card field, browse to select a
contact as your default business card.
5.10 Personal Area Networking
The Bluetooth Personal Area Networking (PAN) Profile enables PCs, laptops,
PDAs, and other Bluetooth enabled devices to form either of two kinds of PAN
networks. In a Group ad-hoc Network (GN), which functions as an isolated
network, multiple PAN Users (PANUs) are linked together via a GN controller.
Alternatively, a PAN can consist of multiple PANUs linked to a Network Access
Point (NAP), which provides access to external Local Area Network (LAN)
infrastructure. BlueSoleil supports all three of these device roles — GN
(controller), PANU, and NAP.
Typical Usage
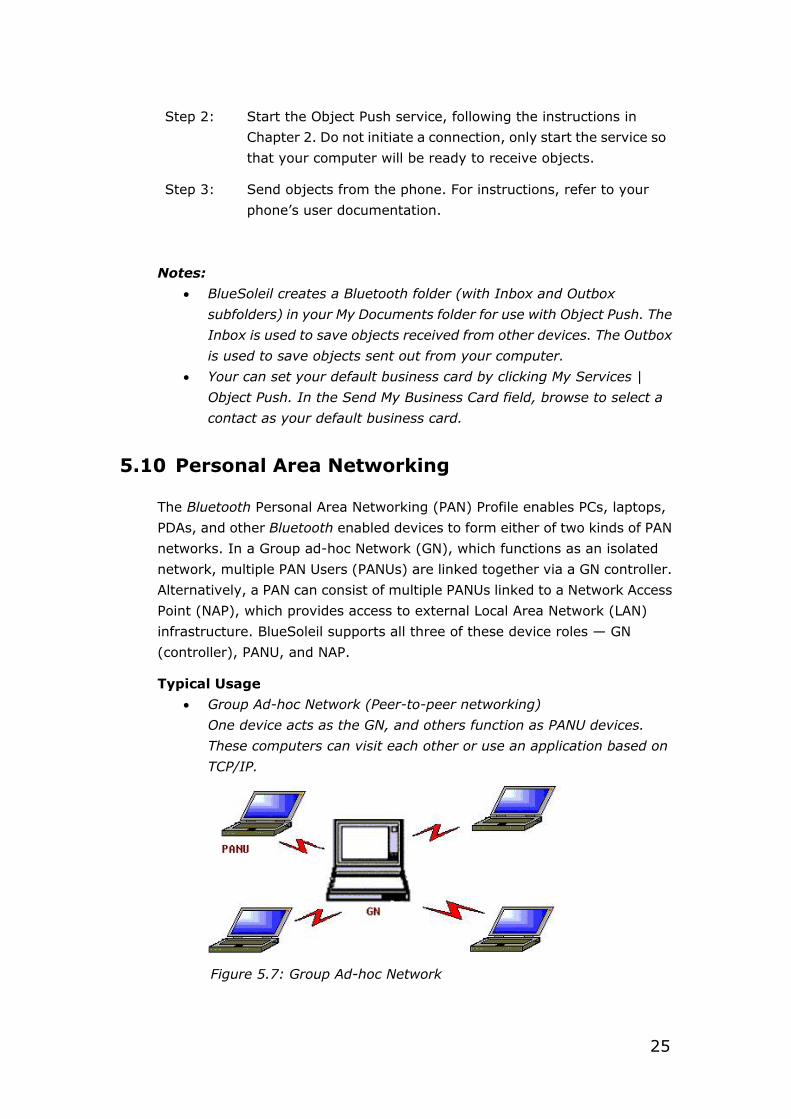
• Group Ad-hoc Network (Peer-to-peer networking)
One device acts as the GN, and others function as PANU devices.
These computers can visit each other or use an application based on
TCP/IP.
Figure 5.7: Group Ad-hoc Network
25
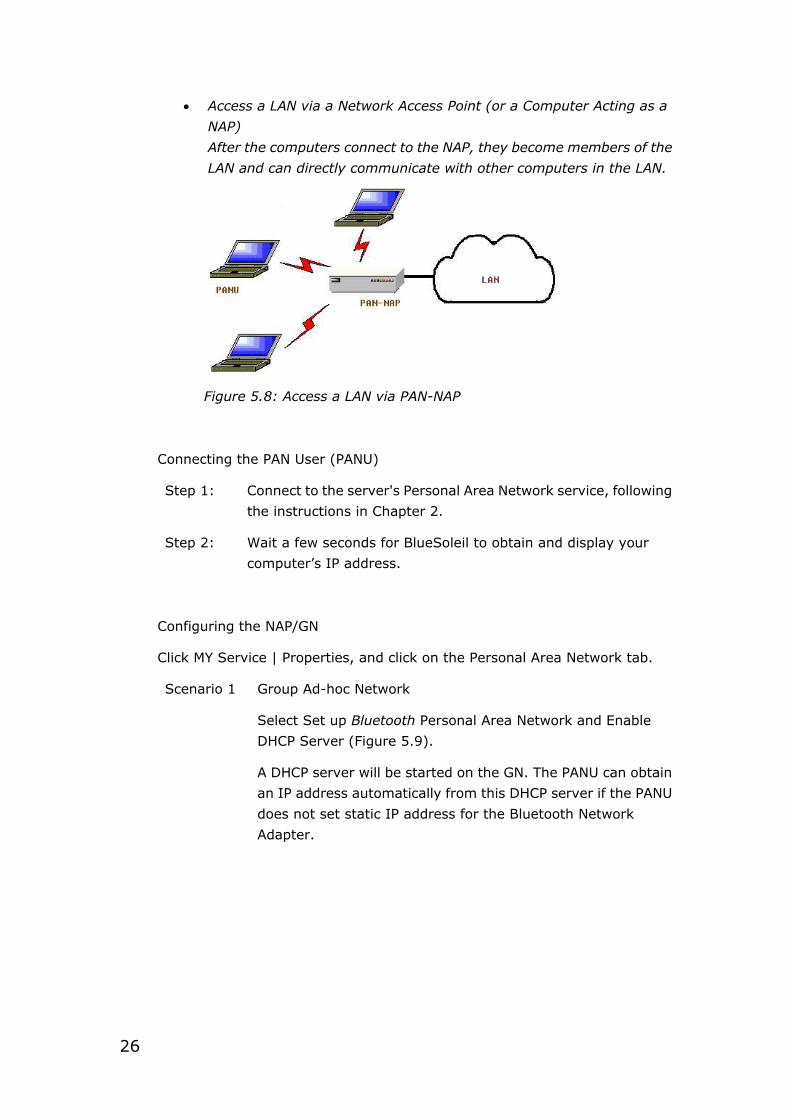
• Access a LAN via a Network Access Point (or a Computer Acting as a
NAP)
After the computers connect to the NAP, they become members of the
LAN and can directly communicate with other computers in the LAN.
Figure 5.8: Access a LAN via PAN-NAP
Connecting the PAN User (PANU)
Step 1: Connect to the server's Personal Area Network service, following
the instructions in Chapter 2.
Step 2: Wait a few seconds for BlueSoleil to obtain and display your
computer’s IP address.
Configuring the NAP/GN
Click MY Service | Properties, and click on the Personal Area Network tab.
Scenario 1 Group Ad-hoc Network
Select Set up Bluetooth Personal Area Network and Enable
DHCP Server (Figure 5.9).
A DHCP server will be started on the GN. The PANU can obtain
an IP address automatically from this DHCP server if the PANU
does not set static IP address for the Bluetooth Network
Adapter.
26

Figure 5.9: Set Up a Bluetooth Enabled Personal Area Network
Scenario 2 Access LAN via PAN-NAP
Select Access LAN Network and select a physical network
adapter, through which the NAP connects to a LAN, as the LAN
Adapter (Figure 5.10).
27
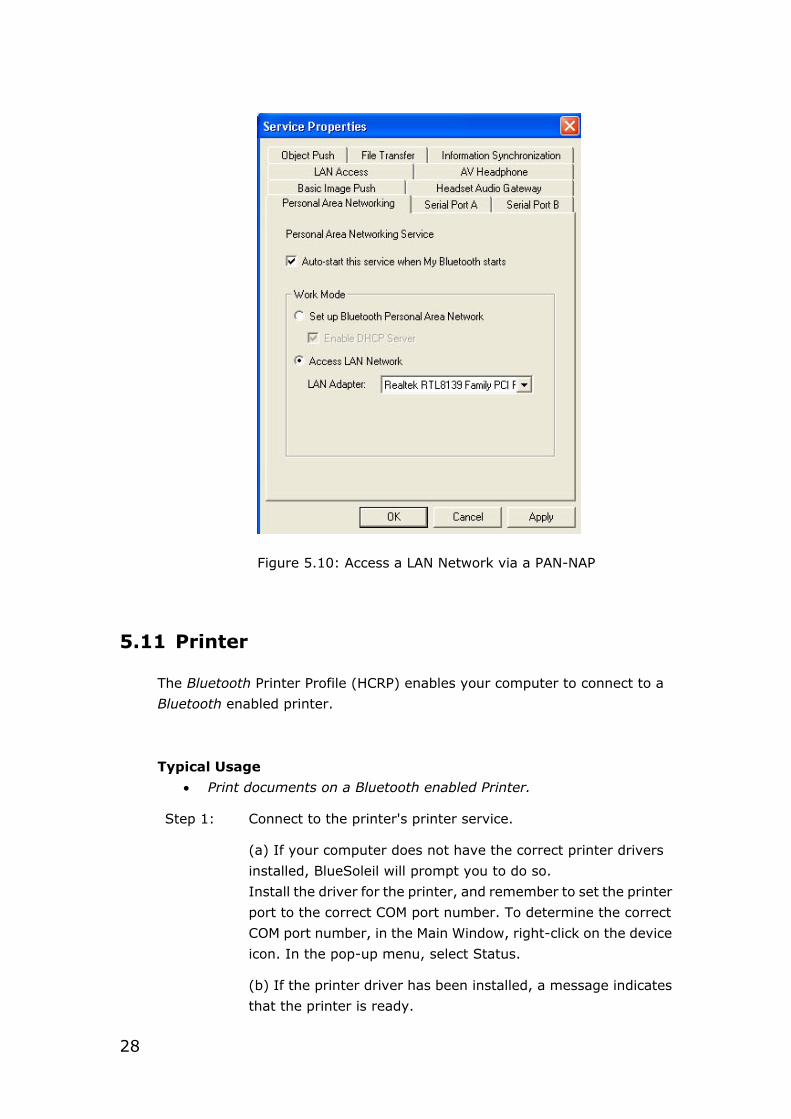
Figure 5.10: Access a LAN Network via a PAN-NAP
5.11 Printer
The Bluetooth Printer Profile (HCRP) enables your computer to connect to a
Bluetooth enabled printer.
Typical Usage
• Print documents on a Bluetooth enabled Printer.
Step 1: Connect to the printer's printer service.
(a) If your computer does not have the correct printer drivers
installed, BlueSoleil will prompt you to do so.
Install the driver for the printer, and remember to set the printer
port to the correct COM port number. To determine the correct
COM port number, in the Main Window, right-click on the device
icon. In the pop-up menu, select Status.
(b) If the printer driver has been installed, a message indicates
that the printer is ready.
28
Step 2: Print documents using the Bluetooth enabled printer. In the
application, be sure to select the correct printer and printer port.
5.12 Serial Port
The Bluetooth Serial Port Profile (SPP) provides PCs, laptops, PDAs, GPS
receivers, cordless serial adapters, and other Bluetooth enabled devices with
a virtual serial port, enabling them to connect with each other wirelessly via
Bluetooth instead of with a serial cable.
BlueSoleil supports four Bluetooth Serial Ports for outgoing connections and
two Bluetooth Serial Ports for incoming connections.
Typical Usage
• Connect to other Bluetooth enabled devices via the Serial Port
Connect to a PDA
Step 1: Connect to the PDA's Serial Port service, following the
instructions in Chapter 2.
Step 2: Use ActiveSync or any other application that uses a serial
connection.
Note:
• Serial Port Auto-Connection function
Once a target device is assigned to a specific serial port, (e.g., COM5),
whenever an application opens that serial port number, BlueSoleil will
automatically connect to the target device. Similarly, whenever an
application closes the Bluetooth serial port, BlueSoleil will stop the
connection. To check which devices are assigned to which COM ports,
click Tools | Configurations | Quick Connect.
• Some applications only allow you to use a limited range of COM port
numbers. If the application does not allow you to use a COM port
number assigned by BlueSoleil, you will not be able to use BlueSoleil
with your application.
5.13 Bluetooth Synchronization
The Bluetooth Synchronization (SYNC) Profile enables users to synchronize
PIM objects on their computer with that of other Bluetooth enabled computers
as well as Bluetooth enabled mobile phones, PDAs, and other devices.
29
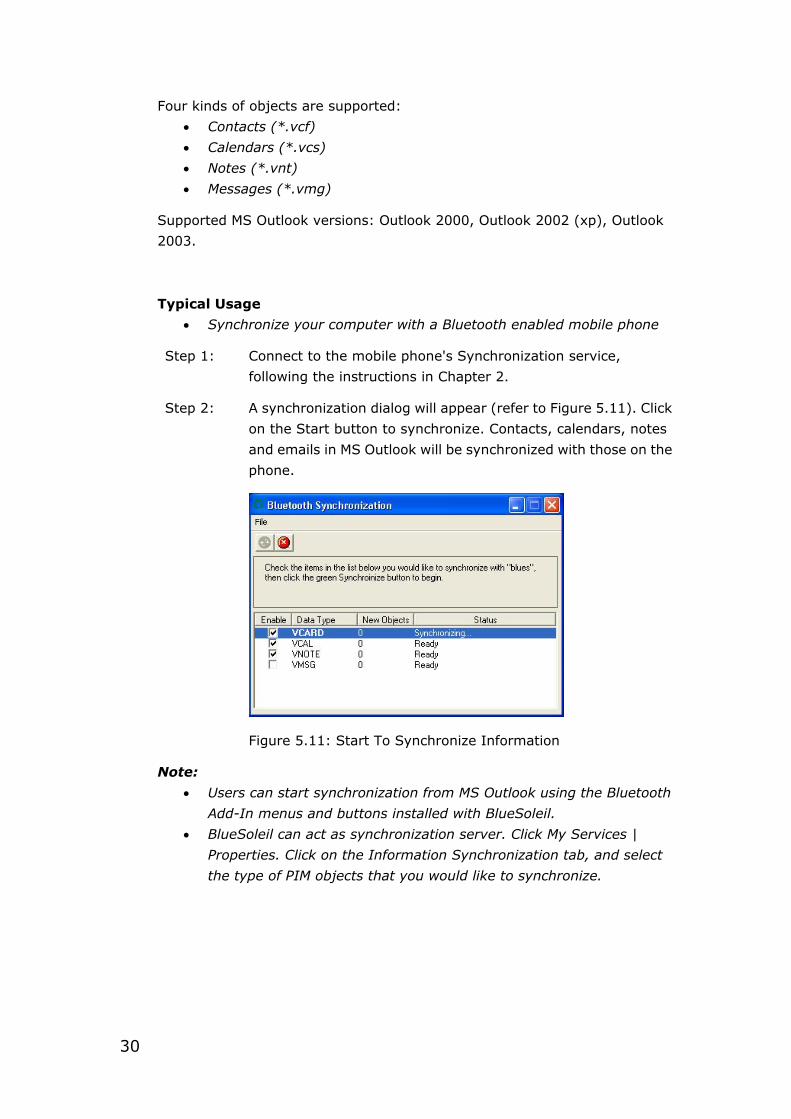
Four kinds of objects are supported:
• Contacts (*.vcf)
• Calendars (*.vcs)
• Notes (*.vnt)
• Messages (*.vmg)
Supported MS Outlook versions: Outlook 2000, Outlook 2002 (xp), Outlook
2003.
Typical Usage
• Synchronize your computer with a Bluetooth enabled mobile phone
Step 1: Connect to the mobile phone's Synchronization service,
following the instructions in Chapter 2.
Step 2: A synchronization dialog will appear (refer to Figure 5.11). Click
on the Start button to synchronize. Contacts, calendars, notes
and emails in MS Outlook will be synchronized with those on the
phone.
Figure 5.11: Start To Synchronize Information
Note:
• Users can start synchronization from MS Outlook using the Bluetooth
Add-In menus and buttons installed with BlueSoleil.
• BlueSoleil can act as synchronization server. Click My Services |
Properties. Click on the Information Synchronization tab, and select
the type of PIM objects that you would like to synchronize.
30
6 BlueSoleil User Guides
6.1 BlueSoleil Environment
6.1.1 Main Window
The Main Window displays the local device (red ball) and the remote devices
detected in range. Connecting and disconnecting operations are conducted
here. Connections are indicated by green dashed lines between the local
device and connected remote devices.
By default BlueSoleil starts with the Main Window open. To return to the Main
Windows after switching views, click View | Main Window.
Local Bluetooth Device
The Local Bluetooth enabled device, known as "My Device," represents the
user’s computer that is running BlueSoleil.
Operations
• Hover your mouse over the red ball to display the local device's
Bluetooth name and address.
• Click on the red ball to start or stop searching for Bluetooth devices in
range.
• Right-click on the red ball to display a pop-up menu of related
operations (e.g., Inquiry, My Services, Security, etc.).
Remote Bluetooth Devices
Remote devices are other Bluetooth enabled devices that are in the radio
range of your local device. BlueSoleil uses different icons to indicated different
types of remote devices.
31
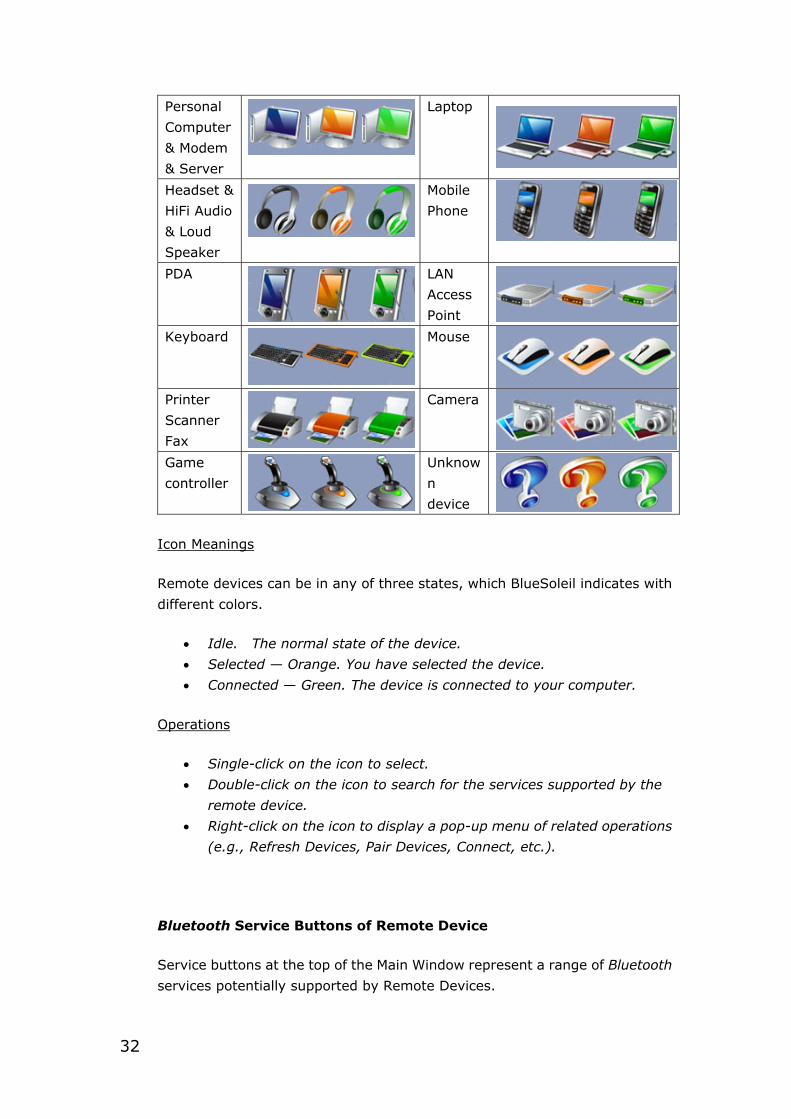
Personal
Computer
& Modem
& Server
Laptop
Headset &
HiFi Audio
& Loud
Speaker
Mobile
Phone
PDA
LAN
Access
Point Keyboard
Mouse
Printer
Scanner
Fax
Camera
Game
controller
Unknow
n
device
Icon Meanings
Remote devices can be in any of three states, which BlueSoleil indicates with
different colors.
• Idle. The normal state of the device.
• Selected — Orange. You have selected the device.
• Connected — Green. The device is connected to your computer.
Operations
• Single-click on the icon to select.
• Double-click on the icon to search for the services supported by the
remote device.
• Right-click on the icon to display a pop-up menu of related operations
(e.g., Refresh Devices, Pair Devices, Connect, etc.).
Bluetooth Service Buttons of Remote Device
Service buttons at the top of the Main Window represent a range of Bluetooth
services potentially supported by Remote Devices.
32
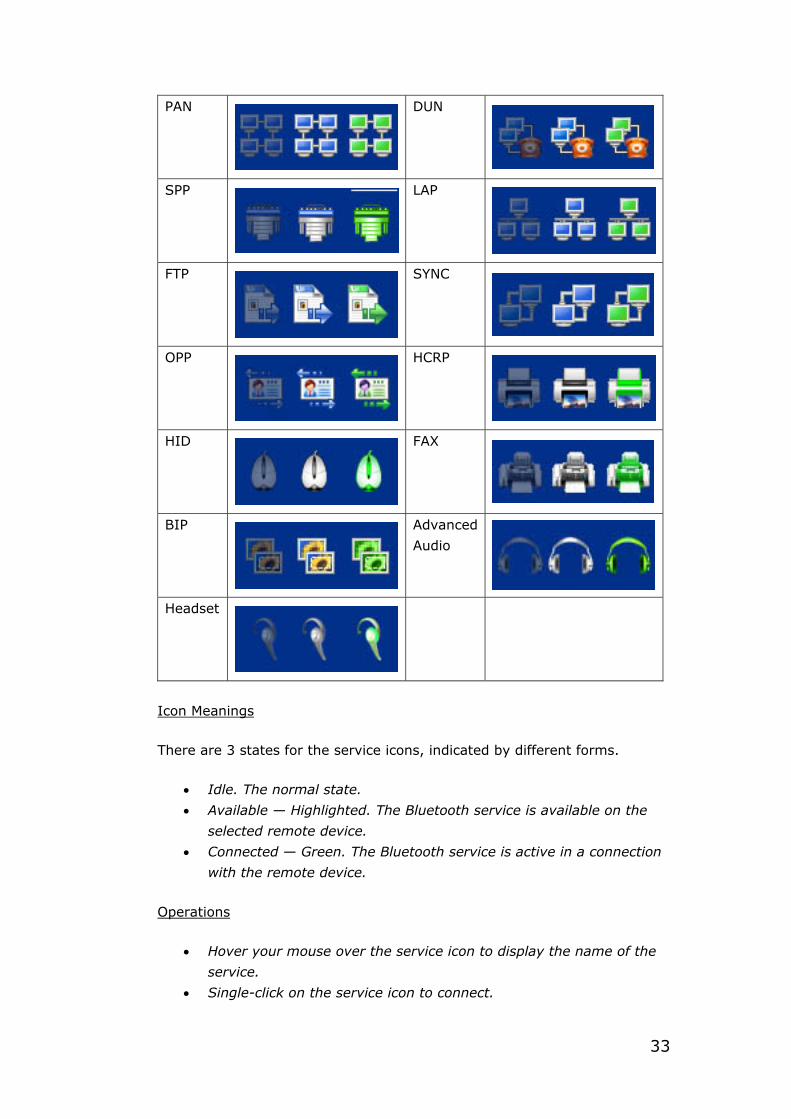
PAN
DUN
SPP
LAP
FTP
SYNC
OPP
HCRP
HID
FAX
BIP
Advanced
Audio
Headset
Icon Meanings
There are 3 states for the service icons, indicated by different forms.
• Idle. The normal state.
• Available — Highlighted. The Bluetooth service is available on the
selected remote device.
• Connected — Green. The Bluetooth service is active in a connection
with the remote device.
Operations
• Hover your mouse over the service icon to display the name of the
service.
• Single-click on the service icon to connect.
33
• Right-click on the service icon to display a pop-up menu of related
operations.
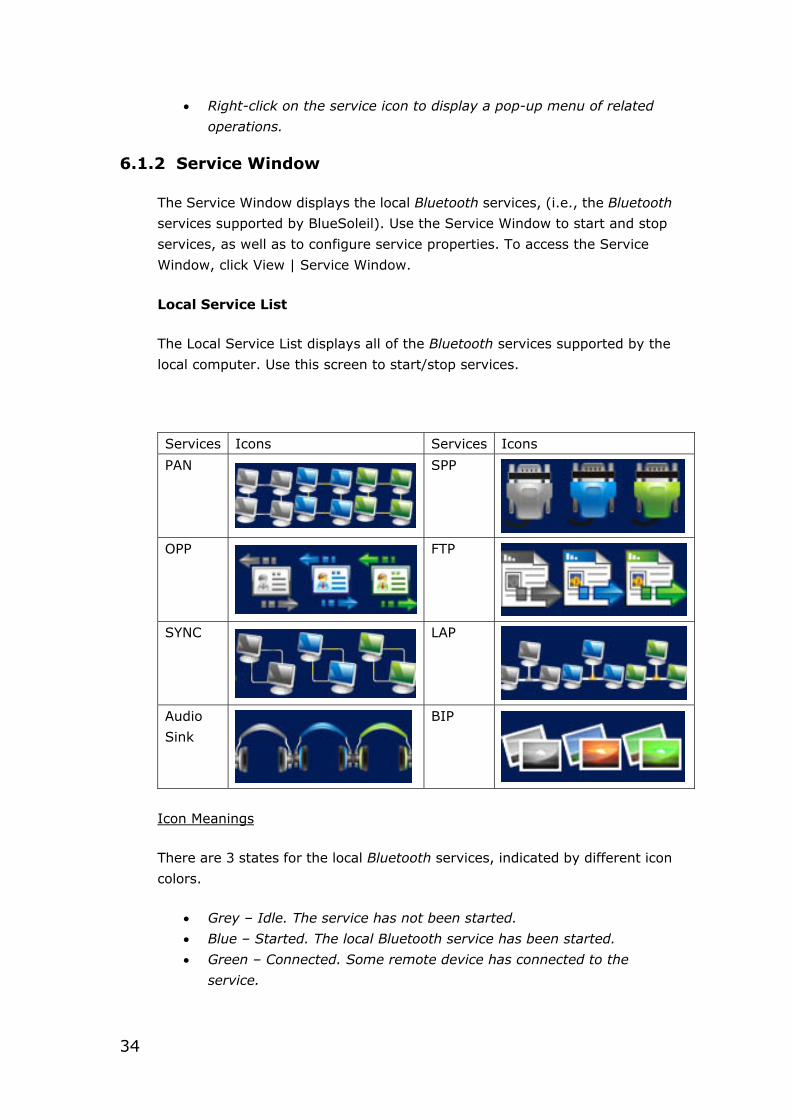
6.1.2 Service Window
The Service Window displays the local Bluetooth services, (i.e., the Bluetooth
services supported by BlueSoleil). Use the Service Window to start and stop
services, as well as to configure service properties. To access the Service
Window, click View | Service Window.
Local Service List
The Local Service List displays all of the Bluetooth services supported by the
local computer. Use this screen to start/stop services.
Services Icons Services Icons
PAN
SPP
OPP
FTP
SYNC
LAP
Audio
Sink
BIP
Icon Meanings
There are 3 states for the local Bluetooth services, indicated by different icon
colors.
• Grey – Idle. The service has not been started.
• Blue – Started. The local Bluetooth service has been started.
• Green – Connected. Some remote device has connected to the
service.
34
Operations
• Single-click on the icon to select the service.
• Double-click on the icon to Start/Stop a service.
• Right-click to display a pop-up menu of related operations.
6.1.3 Menus
BlueSoleil contains the following six menus:
• File Menu
• View Menu
• My Bluetooth Menu
• My Services Menu
• Tools Menu
• Help Menu
File Menu
Hide --- Hide the BlueSoleil window. Connections can still run when the
window is hidden.
Always on Top --- Keep the BlueSoleil window always on top.
Exit --- Exit BlueSoleil.
You can also exit BlueSoleil by right-clicking on the task tray icon at the
bottom of your screen. In the pop-up menu, click Exit.
View Menu
Main Window --- Show the BlueSoleil Main Window.
Service Window --- Show the BlueSoleil Service Window.
Arrange Devices --- Arrange remote devices by Device Name, Device Address,
or Device Type
Refresh Devices --- Refresh the list of remote devices detected by BlueSoleil.
Note: If you select Refresh Devices, the list of previously detected devices will
not be cleared. To initiate a new device search that will first clear the list, press
F5.
My Bluetooth Menu
Bluetooth Device Inquiry --- Search for other Bluetooth enabled devices in
range.
35
Bluetooth Service Browsing --- Browse for the services of the selected remote
device.
Security --- Configure the security settings of the local device (e.g., passkey
requirements, data encryption, etc.).
Device Properties --- Configure the properties of the local device (e.g., device
name, accessibility, etc.).
My Services Menu
Start Service --- Start the selected local Bluetooth service.
Stop Service --- Stop the selected local Bluetooth service.
Status --- View the status of the selected local Bluetooth service.
Properties --- Configure the properties of the local Bluetooth services (e.g.,
automatic connections, shared file locations, etc.).
Tools Menu
Find Device --- Click to find a device, by either of two search criteria:
By Bluetooth Device Address:
Enter a Bluetooth device address, in standard format (xx:xx:xx:xx:xx:xx),
and click on the Find button. The device with the specified address will appear
highlighted in the Main Window.
By Name:
Check the By Name box, enter the Name of the device, and click on the Find
button. The device with the specified name will appear highlighted in the Main
Window.
Add New Device --- Add a remote device by entering its Bluetooth device
address.
Add Device From History --- Add a remote device from the history list.
Add: Add the selected device.
Delete: Clear the selected device from the history list.
Configurations->Quick Connect… --- If desired, assign a remote device to
automatically connect with a Bluetooth serial port whenever an application
opens the specified port.
Assign: Assign a device to the selected port.
Remove: Remove the Auto-Connection device assignment for the selected
port.
36

Configurations-> Unplug HID --- Remove Human Interface Devices from
BlueSoleil.
Unplug: Unplug the selected HID device.
When you first connect the HID device to your computer, BlueSoleil sets up
the devices so that they will automatically reconnect in case the connection is
ever broken. After you unplug an HID device, it will no longer automatically
reconnect to your computer.
My Bluetooth Device --- Advanced hardware configuration, recommended
for advanced users only. Please refer to 4.2 Hardware Configuration for more
details.
Options --- Enable/Disable some other features like making BlueSoleil starts
up with Windows, auto-checking online update or enable/disable prompts
when doing some operations by checking/unchecking the related option.
Startup:
(1) Start BlueSoleil when I start Windows --- BlueSoleil will start up with
Windows if this option is enabled.
(2) Check for updates automatically --- A prompt will pop up to inform user
checking update from BlueSoleil web site once BlueSoleil starting up.
Note: The checking update function is enabled by default.
Others:
(1) Prompt me before adding a "Quick Connect" item --- Inquiry if adding a
new Quick Connect item once establishing a new outgoing SPP connection.
(2) Prompt me before stopping a service to connect out --- Inquiry if stopping
local service before connecting out. It only applies to PAN and Synchronization
profiles.
Help Menu
Contents and Index --- Access BlueSoleil Online Help.
Check for Update --- Access BlueSoleil web site to check if any update
available.
Buy --- Open the BlueSoleil online store page to buy a license for current
version.
37

Register --- Make the current BlueSoleil copy to full version by entering the
license key.
Online support --- Find solutions or submit problem from the Web
About BlueSoleil --- Information about your version of BlueSoleil.
Note: Please visit www.bluesoleil.com to get more details about how to Buy
and Register BlueSoleil version.
38
6.2 Device Configurations
6.2.1 Hardware Configuration
BlueSoleil supports the following kinds of Bluetooth radio adapters: USB and
CF card.
To access the hardware configuration screens, click Tools | My Bluetooth
Device…,
Bluetooth Device
Select the type of Bluetooth enabled device that you plan to use, either a USB
adapter or a CompactFlash (CF) card.
Advanced Configuration
The Advanced Configuration page will be enabled only if you selected CF in the
Bluetooth Device screen. Use the Advanced Configuration screen to configure
detailed parameters including COM Port, Baud Rate, Byte Size, Parity, Stop
Bits, and Flow Control.
6.2.2 Properties Configuration
To configure the properties of your local device, click My Bluetooth | Device
Properties…,
General
Device Name
The local device's name, which will be shown to other Bluetooth enabled
devices.
Device Type
The device type of your local computer, (i.e., Desktop, Laptop or Server).
Device Address
The address of the local device. Every Bluetooth enabled device has a unique
device.
39
Accessibility
Connecting Mode
• Connectable: Permits other Bluetooth enabled devices to connect with
your computer.
• Non-Connectable: Prohibits other Bluetooth enabled devices from
connecting with your computer.
Discovery Mode
• General Discoverable: Permits other Bluetooth enabled devices to
detect your computer.
• Limited Discoverable: Permits other Bluetooth enabled devices to
detect your computer with Limited Inquiry.
• Non-Discoverable: Prohibits other Bluetooth enabled devices from
detecting your computer.
Bonding Mode (Pairing Mode)
• Accepts Bonding: Allow other Bluetooth enabled devices to pair with
your computer. If the other device initiates a pairing procedure with
your computer, each device must enter the same passkey before the
they will be paired.
• Does Not Accept Bonding: Rejects pairing attempts initiated by other
Bluetooth enabled devices.
Hardware
View information about your Bluetooth hardware.
• Manufacturer: The manufacturer of the local Bluetooth device.
• HCI Version: The HCI version of the local Bluetooth device.
• HCI Edition: The HCI edition of the local Bluetooth device.
• LMP Version: The LMP version of the local Bluetooth device.
• LMP Subversion: The LMP subversion of the local Bluetooth device.
6.3 Security Configuration
Use the Security Configuration screens to specify the security settings of your
local device.
40
6.3.1 Pair / Un-pair Devices
Once a remote device has paired with your computer by exchanging passkeys,
passkeys will no longer be required for further connections between your
computer and the device.
How to pair with another device
Automatically
If a passkey is required for connection, the devices will be paired automatically
the first time they successfully exchange passkeys and connect. After a device
has successfully paired with your computer, the remote device icon in the
Main Window will have a red checkmark next to it.
Manually
In the Main Window, right click on the device icon, and in the pop-up menu,
select Pair Device. In the Enter Bluetooth Passkey screen, enter the same
passkey that you enter on the remote device. After a device has successfully
paired with your computer, the remote device icon will have a red checkmark
next to it.
How to un-pair with another device
In the Main Window, right-click on the device icon, and in the pop-up menu,
select Unpair. The red checkmark next to the device icon will disappear.
6.3.2 General Security
To access the security configuration screen, click My Bluetooth | Security…
Security Level
Low
If checked, other devices will be able to access your device freely without
entering a passkey.
However, if the remote device requires a passkey to connect, then both
devices need to exchange passkeys.
Medium
41
The medium level provides service level security. You can assign the
appropriate level of access for each specific service. For more details, see
4.3.4 Local Services Security.
High
If checked, passkeys must be exchanged for every incoming and outgoing
connection, unless the two devices have already paired in the past.
Bluetooth Passkey
Set Default Passkey
Use this setting to create a default passkey for all connections. This saves you
the effort of manually creating a passkey whenever one is required.
Data Encryption
Enable Data Encryption
If checked, the data transmitted will be encrypted.
6.3.3 Managing Device Pairings
To access the device security configuration screen, click My Bluetooth |
Security and click on the Devices tab.
Paired Devices
This screen lists devices which have already paired with the local device.
Remove Pairing
Click to remove the pairing relationship between the selected device and the
local device.
Authorization
Click to select the local Bluetooth services that you wish to allow the selected
paired device to use. A list of local services will appear. Select the services you
wish to allow on the remote device, then click OK.
Note:
The screen will only list the local services that require authentication. The local
services that do not require authentication can be accessed freely.
42
The Authorization button is enabled only when the Security Level is set to
Medium.
6.3.4 Local Services Security
To access the local services security configuration screen, click My Bluetooth |
Security and click on the Services tab. You can only configure security for local
services when the Security Level is set to Medium. (Set the Security Level in
the General Security screen.)
Local Services:
Authentication
If checked, a passkey is required whenever a remote device attempts to
connect with this service.
Encryption
If checked, data transmitted between devices for this service will be
encrypted.
Authorization
Click to select the devices you wish to allow to use the selected service.
In the Service Authorization screen, enter the following settings:
Trusted Devices
Select to trust devices listed in this screen to use the selected service on your
device.
A device can freely access the service from your local device when trusted.
Click Add/Remove to edit the device list.
Trust all devices
Connection requests will be accepted from every device.
Prompt user if the device is not trusted for this service
If a non-trusted device attempts to access the service, a dialog will appear to
allow you to accept or reject the connection.
43

Reject devices from using the service if not trusted for the service
If a non-trusted device attempts to access the service, the connection will be
rejected automatically without informing the user.
Notes:
If a device is trusted for a service, it may connect to this service on your local
device without informing you.
44