Embed Size (px)
Citation preview

IxNetwork TestComposer User Guide
Release 7.00 EA
Part No. 913-1604 Rev A December 2012

ii IxNetwork TestComposer User Guide, Release 7.00
Copyright © 2012 Ixia. All rights reserved.This publication may not be copied, in whole or in part, without Ixia’s consent.RESTRICTED RIGHTS LEGEND: Use, duplication, or disclosure by the U.S. Government is subject to the restrictions set forth in subparagraph (c)(1)(ii) of the Rights in Technical Data and Computer Software clause at DFARS 252.227-7013 and FAR 52.227-19.Ixia, the Ixia logo, and all Ixia brand names and product names in this document are either trademarks or registered trademarks of Ixia in the United States and/or other countries. All other trademarks belong to their respective owners.The information herein is furnished for informational use only, is subject to change by Ixia without notice, and should not be con-strued as a commitment by Ixia. Ixia assumes no responsibility or liability for any errors or inaccuracies contained in this publica-tion.
For viewing the FAQs related to the product, go to Ixia Technical Support Online:https://ebsoprod.ixiacom.com/OA_HTML/jtflogin.jspPart No. 913-1604 Rev ADecember 2012
Corporate Headquarters
Ixia Worldwide Headquarters 26601 W. Agoura Rd. Calabasas, CA 91302 USA +1 877 FOR IXIA (877 367 4942) +1 818 871 1800 (International) (FAX) +1 818 871 1805 [email protected]
Web site: www.ixiacom.com General: [email protected] Investor Relations: [email protected] Training: [email protected] Support: [email protected] +1 818 595 2599For the online support form, go to:http://www.ixiacom.com/support/inquiry/
EMEA Ixia Technologies Europe Limited Part 2nd floor, Clarion House, Norreys DriveMaidenhead, UK SL6 4FL+44 (1628) 408750 FAX +44 (1628) [email protected]
Support: [email protected] +40 21 3015699For the online support form, go to:http://www.ixiacom.com/support/inquiry/?location=emea
Asia Pacific Ixia Pte Ltd 210 Middle Road #08-01 IOI Plaza Singapore 188994
Support: [email protected] +65 6332125 For the online support form, go to:http://www.ixiacom.com/support/inquiry/
Japan Ixia Communications KKNishi-Shinjuku Mitsui Bldg 11F6-24-1, Nishi-Shinjuku, Shinjuku-kuTokyo 160-0023Japan
Support: [email protected] +81 3 5326 1948For the online support form, go to:http://www.ixiacom.com/support/inquiry/
India Ixia Technologies Pvt LtdTower 1, 7th Floor, UMIYA Business BayCessna Business ParkSurvey No. 10/1A, 10/2, 11 & 13/2Outer Ring Road, Varthur HobliKadubeesanahalli VillageBangalore East TalukBangalore-560 037, Karnataka, India+91 80 42862600
Support: [email protected]+91 80 49396400For the online support form, go to:http://www.ixiacom.com/support/inquiry/?location=india
Contents
Chapter 1 About This Guide
Purpose . . . . . . . . . . . . . . . . . . . . . . . . . . . . . . . . . . . . . . . . . . . . . . 1-1Manual Content . . . . . . . . . . . . . . . . . . . . . . . . . . . . . . . . . . . . . . . . 1-1Technical Support . . . . . . . . . . . . . . . . . . . . . . . . . . . . . . . . . . . . . . 1-3
What’s New in this Release. . . . . . . . . . . . . . . . . . . . . . . . . . 1-3
Related Documentation. . . . . . . . . . . . . . . . . . . . . . . . . . . . . 1-3
Chapter 2 Introduction to IxNetwork TestComposer
TestComposer Overview . . . . . . . . . . . . . . . . . . . . . . . . . . . 2-1
On IxNetwork Configurations and TestComposer Scripts . . 2-2
The TestComposer GUI. . . . . . . . . . . . . . . . . . . . . . . . . . . . 2-3Edit Mode GUI . . . . . . . . . . . . . . . . . . . . . . . . . . . . . . . . . . . . . . . . . 2-3Debug Mode GUI. . . . . . . . . . . . . . . . . . . . . . . . . . . . . . . . . . . . . . . 2-5
The Structure of a TestComposer Script . . . . . . . . . . . . . . . 2-5
TestComposer: A Tcl-Enabled Plug-in. . . . . . . . . . . . . . . . . 2-6
IxNetwork TestComposer User Guide, Release 7.00 iii

Table of Contents
A Sample IxNetwork TestComposer Workflow . . . . . . . . . . 2-7
Chapter 3 Creating and Editing a TestComposer Script
Using the TestComposer Edit Mode . . . . . . . . . . . . . . . . . . 3-1Creating a Main Procedure Script. . . . . . . . . . . . . . . . . . . . . . . . . . 3-3Creating Additional Procedure Scripts . . . . . . . . . . . . . . . . . . . . . . 3-3Defining Script Properties . . . . . . . . . . . . . . . . . . . . . . . . . . . . . . . . 3-4Configuring a Test Script. . . . . . . . . . . . . . . . . . . . . . . . . . . . . . . . . 3-5
The Edit Mode GUI . . . . . . . . . . . . . . . . . . . . . . . . . . . . . . . . . . . . . . . . . . . . . 3-5The Edit Mode Commands Toolbar. . . . . . . . . . . . . . . . . . . . . . . . . . . . . . . . . 3-7The Edit Mode Tabs . . . . . . . . . . . . . . . . . . . . . . . . . . . . . . . . . . . . . . . . . . . . 3-9Validation Messages . . . . . . . . . . . . . . . . . . . . . . . . . . . . . . . . . . . . . . . . . . . . 3-9Execution Messages . . . . . . . . . . . . . . . . . . . . . . . . . . . . . . . . . . . . . . . . . . . . 3-9Find/Replace . . . . . . . . . . . . . . . . . . . . . . . . . . . . . . . . . . . . . . . . . . . . . . . . . 3-10Variables . . . . . . . . . . . . . . . . . . . . . . . . . . . . . . . . . . . . . . . . . . . . . . . . . . . . 3-10Breakpoints . . . . . . . . . . . . . . . . . . . . . . . . . . . . . . . . . . . . . . . . . . . . . . . . . . 3-12Command Response . . . . . . . . . . . . . . . . . . . . . . . . . . . . . . . . . . . . . . . . . . . 3-12Tcl Packages . . . . . . . . . . . . . . . . . . . . . . . . . . . . . . . . . . . . . . . . . . . . . . . . . 3-13Events . . . . . . . . . . . . . . . . . . . . . . . . . . . . . . . . . . . . . . . . . . . . . . . . . . . . . . 3-14
Adding Scrips Steps . . . . . . . . . . . . . . . . . . . . . . . . . . . . . . . . . . . 3-14Using the Step Configuration Wizard . . . . . . . . . . . . . . . . . . . . . . . . . . . . . . 3-15By Capturing Commands on Established Sessions . . . . . . . . . . . . . . . . . . . 3-16
The Session Consoles Pane. . . . . . . . . . . . . . . . . . . . . . . . . . . . . . . . . . 3-16By Inserting a Procedure . . . . . . . . . . . . . . . . . . . . . . . . . . . . . . . . . . . . . . . . 3-17
Editing Script Steps In-Place. . . . . . . . . . . . . . . . . . . . . . . . . . . . . 3-18Defining Input Parameters . . . . . . . . . . . . . . . . . . . . . . . . . . . . . . 3-19Using Attached Script Files. . . . . . . . . . . . . . . . . . . . . . . . . . . . . . 3-20Defining User Events . . . . . . . . . . . . . . . . . . . . . . . . . . . . . . . . . . 3-23Retrieving Step Results using Response Templates . . . . . . . . . . 3-25Specifying Exported Statistics . . . . . . . . . . . . . . . . . . . . . . . . . . . . 3-25Specifying a Script Pass/Fail Result . . . . . . . . . . . . . . . . . . . . . . . 3-27Validating a Script . . . . . . . . . . . . . . . . . . . . . . . . . . . . . . . . . . . . . 3-27Saving a Script into an IxNetwork Test Configuration . . . . . . . . . . 3-28Executing Selected Steps . . . . . . . . . . . . . . . . . . . . . . . . . . . . . . . 3-28
Chapter 4 Additional Editing Options
Additional Editing Options . . . . . . . . . . . . . . . . . . . . . . . . . . 4-1
iv IxNetwork TestComposer User Guide, Release 7.00
Table of Contents
Using Copy / Paste Operations . . . . . . . . . . . . . . . . . . . . . . . . . . . . 4-1Using Drag and Drop Operations . . . . . . . . . . . . . . . . . . . . . . . . . . 4-1Including and Excluding Steps from Execution . . . . . . . . . . . . . . . . 4-2Marking Steps For Parallel Execution . . . . . . . . . . . . . . . . . . . . . . . 4-2Re-arranging the Steps Sequence . . . . . . . . . . . . . . . . . . . . . . . . . 4-3Surrounding Steps with Control Blocks . . . . . . . . . . . . . . . . . . . . . . 4-3Using Find / Replace Operations. . . . . . . . . . . . . . . . . . . . . . . . . . . 4-4Using the Undo / Redo Functionality . . . . . . . . . . . . . . . . . . . . . . . . 4-4Customizing the Script Steps Table Layout . . . . . . . . . . . . . . . . . . . 4-5
Chapter 5 Using the Capture Functionality
Capture Functionality Overview . . . . . . . . . . . . . . . . . . . . . 5-1The TestComposer GUI with Capture Functionality Enabled . . . . . 5-2
Creating, Configuring, and Using Device Sessions. . . . . . . 5-4Creating a New Device Session . . . . . . . . . . . . . . . . . . . . . . . . . . . 5-4Creating a Device Session Based on an Existing Resource . . . . . . 5-4Configuring Session Parameters. . . . . . . . . . . . . . . . . . . . . . . . . . . 5-5
Variables as Session Id . . . . . . . . . . . . . . . . . . . . . . . . . . . . . . . . . . . . . . 5-5Defining Connection Settings . . . . . . . . . . . . . . . . . . . . . . . . . . . . . . . . . . . . . 5-7
Telnet Connection Settings. . . . . . . . . . . . . . . . . . . . . . . . . . . . . . . . . . . . 5-8IxEmail Connection Settings. . . . . . . . . . . . . . . . . . . . . . . . . . . . . . . . . . . 5-8CmdTool Connection Settings . . . . . . . . . . . . . . . . . . . . . . . . . . . . . . . . . 5-9SSH1/SSH2/SSHAuto Connection Settings. . . . . . . . . . . . . . . . . . . . . . . 5-9Raw Interface Connection Settings . . . . . . . . . . . . . . . . . . . . . . . . . . . . 5-10TclSh Connection Settings . . . . . . . . . . . . . . . . . . . . . . . . . . . . . . . . . . . 5-10COM Connection Settings . . . . . . . . . . . . . . . . . . . . . . . . . . . . . . . . . . . 5-11TL1 Connection Settings . . . . . . . . . . . . . . . . . . . . . . . . . . . . . . . . . . . . 5-11SNMP Connection Settings . . . . . . . . . . . . . . . . . . . . . . . . . . . . . . . . . . 5-12Syslog Connection Settings . . . . . . . . . . . . . . . . . . . . . . . . . . . . . . . . . . 5-13CSVAnalyzer Connection Settings . . . . . . . . . . . . . . . . . . . . . . . . . . . . . 5-14Reporter Connection Settings . . . . . . . . . . . . . . . . . . . . . . . . . . . . . . . . 5-14PacketDecoder Connection Settings . . . . . . . . . . . . . . . . . . . . . . . . . . . 5-14
Defining Terminal Settings . . . . . . . . . . . . . . . . . . . . . . . . . . . . . . . . . . . . . . 5-15Defining Device Prompts. . . . . . . . . . . . . . . . . . . . . . . . . . . . . . . . . . . . . . . . 5-19Defining Capture Mode Exceptions. . . . . . . . . . . . . . . . . . . . . . . . . . . . . . . . 5-22Specifying a Response Templates Folder . . . . . . . . . . . . . . . . . . . . . . . . . . 5-23Saving Device Sessions . . . . . . . . . . . . . . . . . . . . . . . . . . . . . . . . . . . . . . . . 5-24
Connecting to a Device and Capturing Commands . . . . . . . . . . . 5-25Using Multiple Device Sessions . . . . . . . . . . . . . . . . . . . . . . . . . . 5-28
IxNetwork TestComposer User Guide, Release 7.00 v

Table of Contents
Chapter 6 Script Steps Reference Information
Control Statement Steps . . . . . . . . . . . . . . . . . . . . . . . . . . . 6-1Comment Statement Step . . . . . . . . . . . . . . . . . . . . . . . . . . . . . . . 6-2
Comment Step in Step Configuration Wizard. . . . . . . . . . . . . . . . . . . . . . . . . 6-2Comment Step In-Place Editing . . . . . . . . . . . . . . . . . . . . . . . . . . . . . . . . . . . 6-2
Assign Statement Step. . . . . . . . . . . . . . . . . . . . . . . . . . . . . . . . . . 6-3Assign Statement Step in Step Configuration Wizard . . . . . . . . . . . . . . . . . . 6-3Assign Step In-Place Editing . . . . . . . . . . . . . . . . . . . . . . . . . . . . . . . . . . . . . 6-5
ReadWriteGlobal Statement Step . . . . . . . . . . . . . . . . . . . . . . . . . 6-6ReadWriteGlobal Statement Step in Step Configuration WIzard . . . . . . . . . . 6-6ReadWriteGlobal Step In-Place Editing. . . . . . . . . . . . . . . . . . . . . . . . . . . . . . 6-8
For Statement Step . . . . . . . . . . . . . . . . . . . . . . . . . . . . . . . . . . . . 6-8For Statement Step in Step Configuration Wizard . . . . . . . . . . . . . . . . . . . . . 6-9For Step In-Place Editing. . . . . . . . . . . . . . . . . . . . . . . . . . . . . . . . . . . . . . . . 6-11
While Statement Step. . . . . . . . . . . . . . . . . . . . . . . . . . . . . . . . . . 6-12While Statement Step in Step Configuration Wizard . . . . . . . . . . . . . . . . . . . 6-12While Step In-Place Editing . . . . . . . . . . . . . . . . . . . . . . . . . . . . . . . . . . . . . . 6-14
Do...While Statement Step . . . . . . . . . . . . . . . . . . . . . . . . . . . . . . 6-14Do...While Statement in Configuration Wizard . . . . . . . . . . . . . . . . . . . . 6-14
Do...While Step In-Place Editing . . . . . . . . . . . . . . . . . . . . . . . . . . . . . . . . . 6-16StepSearch Statement Step . . . . . . . . . . . . . . . . . . . . . . . . . . . . . 6-17
StepSearch Statement Step in Step Configuration Wizard . . . . . . . . . . . . . 6-17StepSearch Step In-Place Editing . . . . . . . . . . . . . . . . . . . . . . . . . . . . . . . . 6-19
BinarySearch Statement Step . . . . . . . . . . . . . . . . . . . . . . . . . . . 6-20BinarySearch Statement Step in Step Configuration Wizard . . . . . . . . . . . . 6-20BinarySearch Step In-Place Editing . . . . . . . . . . . . . . . . . . . . . . . . . . . . . . . 6-24
Break Statement Step . . . . . . . . . . . . . . . . . . . . . . . . . . . . . . . . . 6-25Break Statement Step in Step Configuration Wizard . . . . . . . . . . . . . . . . . . 6-25Break Step In-Place Editing . . . . . . . . . . . . . . . . . . . . . . . . . . . . . . . . . . . . . 6-27
Return Statement Step. . . . . . . . . . . . . . . . . . . . . . . . . . . . . . . . . 6-27Return Statement Step in Step Configuration Wizard . . . . . . . . . . . . . . . . . 6-27Return Step In-Place Editing . . . . . . . . . . . . . . . . . . . . . . . . . . . . . . . . . . . . 6-28
Exit Statement Step . . . . . . . . . . . . . . . . . . . . . . . . . . . . . . . . . . . 6-29Exit Statement Step in Step Configuration Wizard . . . . . . . . . . . . . . . . . . . . 6-29Exit Step In-Place Editing . . . . . . . . . . . . . . . . . . . . . . . . . . . . . . . . . . . . . . . 6-30
If Statement Step . . . . . . . . . . . . . . . . . . . . . . . . . . . . . . . . . . . . . 6-30If Statement Step in Step Configuration Wizard . . . . . . . . . . . . . . . . . . . . . . 6-30If Step In-Place Editing . . . . . . . . . . . . . . . . . . . . . . . . . . . . . . . . . . . . . . . . . 6-31
Else Statement Step . . . . . . . . . . . . . . . . . . . . . . . . . . . . . . . . . . . 6-31Else Statement Step in Step Configuration Wizard . . . . . . . . . . . . . . . . . . . . 6-31Else Step In-Place Editing . . . . . . . . . . . . . . . . . . . . . . . . . . . . . . . . . . . . . . . 6-33
vi IxNetwork TestComposer User Guide, Release 7.00

Table of Contents
Join Statement Step . . . . . . . . . . . . . . . . . . . . . . . . . . . . . . . . . . . 6-33Join Statement Step in Step Configuration Wizard . . . . . . . . . . . . . . . . . . . 6-33Join Step In-Place Editing . . . . . . . . . . . . . . . . . . . . . . . . . . . . . . . . . . . . . . 6-35
RunProcedure Step . . . . . . . . . . . . . . . . . . . . . . . . . . . . . . . . . . . 6-35RunProcedure Step in Step Configuration Wizard. . . . . . . . . . . . . . . . . . . . 6-35RunProcedure Step In-Place Editing . . . . . . . . . . . . . . . . . . . . . . . . . . . . . . 6-37
RunProcess Step . . . . . . . . . . . . . . . . . . . . . . . . . . . . . . . . . . . . . 6-38RunProcess Step in Configuration Wizard . . . . . . . . . . . . . . . . . . . . . . 6-38
RunProcess Step In-Place Editing . . . . . . . . . . . . . . . . . . . . . . . . . . . . . . . . 6-40Sleep Step . . . . . . . . . . . . . . . . . . . . . . . . . . . . . . . . . . . . . . . . . . 6-41
Sleep Step in Step Configuration Wizard. . . . . . . . . . . . . . . . . . . . . . . . . . . 6-41Sleep Step In-Place Editing . . . . . . . . . . . . . . . . . . . . . . . . . . . . . . . . . . . . . 6-42
Command Steps . . . . . . . . . . . . . . . . . . . . . . . . . . . . . . . . 6-43StartSession . . . . . . . . . . . . . . . . . . . . . . . . . . . . . . . . . . . . . . . . . 6-44
StartSession Command Step in Configuration Wizard . . . . . . . . . . . . . . . . . 6-44Editing In-Place a StartSession Step . . . . . . . . . . . . . . . . . . . . . . . . . . . . . . 6-46
Execute . . . . . . . . . . . . . . . . . . . . . . . . . . . . . . . . . . . . . . . . . . . . . 6-46Execute Command in Step Configuration Wizard. . . . . . . . . . . . . . . . . . . . . 6-47Editing In-Place an Execute Step . . . . . . . . . . . . . . . . . . . . . . . . . . . . . . . . . 6-52
StopSession. . . . . . . . . . . . . . . . . . . . . . . . . . . . . . . . . . . . . . . . . . 6-53StopSession Command Step in Step Configuration WIzard . . . . . . . . . . 6-53
StopSession Step In-Place Editing . . . . . . . . . . . . . . . . . . . . . . . . . . . . . . . . 6-54Get Time . . . . . . . . . . . . . . . . . . . . . . . . . . . . . . . . . . . . . . . . . . . . 6-55
GetTime Step in Step Configuration Wizard . . . . . . . . . . . . . . . . . . . . . . . . 6-55GetTime Step In-Place Editing. . . . . . . . . . . . . . . . . . . . . . . . . . . . . . . . . . . 6-58
TclEval Step . . . . . . . . . . . . . . . . . . . . . . . . . . . . . . . . . . . . . . . . . . 6-60TclEval Command Step in Step Configuration Wizard . . . . . . . . . . . . . . . . . 6-60TclEval Step In-Place Editing . . . . . . . . . . . . . . . . . . . . . . . . . . . . . . . . . . . . 6-61
Watch. . . . . . . . . . . . . . . . . . . . . . . . . . . . . . . . . . . . . . . . . . . . . . . 6-62Watch Command Step in Step Configuration Wizard . . . . . . . . . . . . . . . 6-62
Trace . . . . . . . . . . . . . . . . . . . . . . . . . . . . . . . . . . . . . . . . . . . . . . . 6-66Trace Command Step in Step Configuration Wizard . . . . . . . . . . . . . . . . . . 6-66Trace Step In-Place Editing . . . . . . . . . . . . . . . . . . . . . . . . . . . . . . . . . . . . . 6-68
ShowMessage . . . . . . . . . . . . . . . . . . . . . . . . . . . . . . . . . . . . . . . . 6-68ShowMessage Step in Step Configuration Wizard . . . . . . . . . . . . . . . . . . . . 6-68ShowMessage Step In-Place Editing . . . . . . . . . . . . . . . . . . . . . . . . . . . . . . 6-70
ReadFile . . . . . . . . . . . . . . . . . . . . . . . . . . . . . . . . . . . . . . . . . . . . 6-71ReadFile Command Step in Step Configuration Wizard . . . . . . . . . . . . . . . . 6-71ReadFile Command Step In-Place Editing . . . . . . . . . . . . . . . . . . . . . . . . . . 6-73
WriteCSV. . . . . . . . . . . . . . . . . . . . . . . . . . . . . . . . . . . . . . . . . . . . 6-73WriteCSV Command Step in Step Configuration WIzard . . . . . . . . . . . . . . . 6-73
IxNetwork TestComposer User Guide, Release 7.00 vii

Table of Contents
WriteCSV Step In-Place Editing . . . . . . . . . . . . . . . . . . . . . . . . . . . . . . . . . . 6-76GetValue . . . . . . . . . . . . . . . . . . . . . . . . . . . . . . . . . . . . . . . . . . . . 6-76
GetValue Command Step in Step Configuration Wizard. . . . . . . . . . . . . . . . 6-77GetValue Step In-Place Editing . . . . . . . . . . . . . . . . . . . . . . . . . . . . . . . . . . . 6-79
Config Get. . . . . . . . . . . . . . . . . . . . . . . . . . . . . . . . . . . . . . . . . . . 6-80Config Get Command Step in Step Wizard . . . . . . . . . . . . . . . . . . . . . . . . . . 6-80Config Get Step in-Place Editing . . . . . . . . . . . . . . . . . . . . . . . . . . . . . . . . . . 6-83
Config Set . . . . . . . . . . . . . . . . . . . . . . . . . . . . . . . . . . . . . . . . . . . 6-85Config Set Command Step in Step Wizard . . . . . . . . . . . . . . . . . . . . . . . . . . 6-85Config Set Command Step In-Place Editing . . . . . . . . . . . . . . . . . . . . . . . . . 6-87
Config Add . . . . . . . . . . . . . . . . . . . . . . . . . . . . . . . . . . . . . . . . . . 6-89Config Add Command Step in Step Wizard . . . . . . . . . . . . . . . . . . . . . . . . . 6-89Config Add Step in-Place Editing . . . . . . . . . . . . . . . . . . . . . . . . . . . . . . . . . 6-91
Config Remove . . . . . . . . . . . . . . . . . . . . . . . . . . . . . . . . . . . . . . . 6-93Config Remove Command Step in Step Wizard . . . . . . . . . . . . . . . . . . . . . . 6-93Config Remove Step in-Place Editing . . . . . . . . . . . . . . . . . . . . . . . . . . . . . . 6-95
Config Action. . . . . . . . . . . . . . . . . . . . . . . . . . . . . . . . . . . . . . . . . 6-97Config Action Command Step in Step Wizard. . . . . . . . . . . . . . . . . . . . . . . . 6-97Config Action Step in-Place Editing. . . . . . . . . . . . . . . . . . . . . . . . . . . . . . . . 6-99
Group . . . . . . . . . . . . . . . . . . . . . . . . . . . . . . . . . . . . . . . . . . . . . 6-101Group Step in Step Wizard . . . . . . . . . . . . . . . . . . . . . . . . . . . . . . . . . . . . . 6-101Group Step in-Place Editing . . . . . . . . . . . . . . . . . . . . . . . . . . . . . . . . . . . . 6-101
Procedure Step . . . . . . . . . . . . . . . . . . . . . . . . . . . . . . . . 6-101New Procedure Step . . . . . . . . . . . . . . . . . . . . . . . . . . . . . . . . . .6-101
QuickTest Structure Steps . . . . . . . . . . . . . . . . . . . . . . . . 6-103ApplyConfig. . . . . . . . . . . . . . . . . . . . . . . . . . . . . . . . . . . . . . . . . 6-103Trial . . . . . . . . . . . . . . . . . . . . . . . . . . . . . . . . . . . . . . . . . . . . . . . 6-103FrameSize. . . . . . . . . . . . . . . . . . . . . . . . . . . . . . . . . . . . . . . . . . 6-103Iteration . . . . . . . . . . . . . . . . . . . . . . . . . . . . . . . . . . . . . . . . . . . . 6-104Iteration . . . . . . . . . . . . . . . . . . . . . . . . . . . . . . . . . . . . . . . . . . . . 6-106StartTraffic. . . . . . . . . . . . . . . . . . . . . . . . . . . . . . . . . . . . . . . . . . 6-106StartProtocols . . . . . . . . . . . . . . . . . . . . . . . . . . . . . . . . . . . . . . . 6-106TestUnderSize. . . . . . . . . . . . . . . . . . . . . . . . . . . . . . . . . . . . . . . 6-107Framesize
Undersize . . . . . . . . . . . . . . . . . . . . . . . . . . . . . . . . . . . . . . . . . 6-107TestOverSize. . . . . . . . . . . . . . . . . . . . . . . . . . . . . . . . . . . . . . . . 6-107Framesize
Oversize . . . . . . . . . . . . . . . . . . . . . . . . . . . . . . . . . . . . . . . . . . 6-107TestBadCRC . . . . . . . . . . . . . . . . . . . . . . . . . . . . . . . . . . . . . . . . 6-107
viii IxNetwork TestComposer User Guide, Release 7.00

Table of Contents
FramesizeBadCRC . . . . . . . . . . . . . . . . . . . . . . . . . . . . . . . . . . . . . . . . . . 6-108
TestFragment. . . . . . . . . . . . . . . . . . . . . . . . . . . . . . . . . . . . . . . . 6-108Framesize
Fragment . . . . . . . . . . . . . . . . . . . . . . . . . . . . . . . . . . . . . . . . . 6-108
Chapter 7 Using the Composer Expression Builder
About Variables . . . . . . . . . . . . . . . . . . . . . . . . . . . . . . . . . . 7-1Variable Scope . . . . . . . . . . . . . . . . . . . . . . . . . . . . . . . . . . . . . . . . 7-1Variable Types . . . . . . . . . . . . . . . . . . . . . . . . . . . . . . . . . . . . . . . . . 7-2Variables Creation Statements . . . . . . . . . . . . . . . . . . . . . . . . . . . . 7-2
Creating Expressions in the Expression Builder . . . . . . . . . 7-3Expression Builder - Basic Mode. . . . . . . . . . . . . . . . . . . . . . . . . . . 7-3Expression Builder - Advanced Mode . . . . . . . . . . . . . . . . . . . . . . . 7-5
The Expression Builder Panes . . . . . . . . . . . . . . . . . . . . . . . . . . . . . . . . . . . . 7-5The Tcl Commands Pane . . . . . . . . . . . . . . . . . . . . . . . . . . . . . . . . . . . . . 7-6The Test Variables Pane. . . . . . . . . . . . . . . . . . . . . . . . . . . . . . . . . . . . . . 7-7The Operators Pane . . . . . . . . . . . . . . . . . . . . . . . . . . . . . . . . . . . . . . . . 7-10The Expression Pane . . . . . . . . . . . . . . . . . . . . . . . . . . . . . . . . . . . . . . . 7-10
Building An Expression . . . . . . . . . . . . . . . . . . . . . . . . . . . . . . . . . . . . . . . . . 7-10
Chapter 8 Executing a TestComposer Script
Execution from the TestComposer GUI. . . . . . . . . . . . . . . . 8-1Executing Script Steps in Edit Mode . . . . . . . . . . . . . . . . . . . . . . . . 8-1Executing a Script in Debug Mode . . . . . . . . . . . . . . . . . . . . . . . . . 8-1
The Debug Mode GUI . . . . . . . . . . . . . . . . . . . . . . . . . . . . . . . . . . . . . . . . . . . 8-2The Debug Mode Toolbar . . . . . . . . . . . . . . . . . . . . . . . . . . . . . . . . . . . . . 8-3
Using the Autoscroll Functionality in Debug Mode . . . . . . . . . . . . . 8-4The Debug Window Tabs . . . . . . . . . . . . . . . . . . . . . . . . . . . . . . . . . . . . . 8-4Execution Messages . . . . . . . . . . . . . . . . . . . . . . . . . . . . . . . . . . . . . . . . 8-5Expressions . . . . . . . . . . . . . . . . . . . . . . . . . . . . . . . . . . . . . . . . . . . . . . . 8-5Threads . . . . . . . . . . . . . . . . . . . . . . . . . . . . . . . . . . . . . . . . . . . . . . . . . . 8-6Global Output . . . . . . . . . . . . . . . . . . . . . . . . . . . . . . . . . . . . . . . . . . . . . . 8-7Call Stack . . . . . . . . . . . . . . . . . . . . . . . . . . . . . . . . . . . . . . . . . . . . . . . . . 8-7Variables . . . . . . . . . . . . . . . . . . . . . . . . . . . . . . . . . . . . . . . . . . . . . . . . . . 8-8Sessions Output . . . . . . . . . . . . . . . . . . . . . . . . . . . . . . . . . . . . . . . . . . . . 8-9Breakpoints. . . . . . . . . . . . . . . . . . . . . . . . . . . . . . . . . . . . . . . . . . . . . . . 8-10
IxNetwork TestComposer User Guide, Release 7.00 ix

Table of Contents
Using Breakpoints . . . . . . . . . . . . . . . . . . . . . . . . . . . . . . . . . . . . . . . . . . . . . 8-11Running a TestComposer Script without Procedures . . . . . . . . . . . . . . . . . . 8-12Running a TestComposer Script with Procedures. . . . . . . . . . . . . . . . . . . . . 8-13Running a TestComposer Script with Parallel Steps. . . . . . . . . . . . . . . . . . . 8-14
Test Status Indicator . . . . . . . . . . . . . . . . . . . . . . . . . . . . . . . . . . . 8-15
Execution from the IxNetwork GUI. . . . . . . . . . . . . . . . . . . 8-17Execution From the IxNetwork QuickTests Page . . . . . . . . . . . . . 8-17Execution As a Custom Test . . . . . . . . . . . . . . . . . . . . . . . . . . . . . 8-17
Chapter 9 Working with Multiple Test Scripts in TestComposer
Working with Multiple Scripts . . . . . . . . . . . . . . . . . . . . . . . . 9-1Opening Multiple Scripts with MDI . . . . . . . . . . . . . . . . . . . . . . . . . 9-2Debugging nested scripts . . . . . . . . . . . . . . . . . . . . . . . . . . . . . . . . 9-3Using Copy / Paste Operations. . . . . . . . . . . . . . . . . . . . . . . . . . . . 9-3Capturing Steps with MDI . . . . . . . . . . . . . . . . . . . . . . . . . . . . . . . . 9-3Executing Steps with MDI . . . . . . . . . . . . . . . . . . . . . . . . . . . . . . . . 9-3Saving to Resources. . . . . . . . . . . . . . . . . . . . . . . . . . . . . . . . . . . . 9-4
Chapter 10 Viewing Script Execution Files in IxNetwork
Script Execution Results Integration in Data Miner . . . . . . 10-1
Chapter 11 Persisting TestComposer Scripts
Saving a Script into an IxNetwork Configuration . . . . . . . . 11-1
Exporting a Script as a Procedure Resource. . . . . . . . . . . 11-1
Exporting as a Script To Test Conductor . . . . . . . . . . . . . . 11-2
Exporting a script as Custom QuickTest resource . . . . . . . 11-3
x IxNetwork TestComposer User Guide, Release 7.00

Table of Contents
Chapter 12 Exporting TestComposer Scriptsto Tcl Code
Exporting as a Tcl Script . . . . . . . . . . . . . . . . . . . . . . . . . . 12-1
Chapter 13 Managing IxNetwork TestComposer Resources
What Is an IxNetwork TestComposer Resource? . . . . . . . 13-1
Creating Device Sessions . . . . . . . . . . . . . . . . . . . . . . . . . 13-3
Creating Procedure Resources . . . . . . . . . . . . . . . . . . . . . 13-5
Creating Response Templates . . . . . . . . . . . . . . . . . . . . . 13-7The Response Template Editor . . . . . . . . . . . . . . . . . . . . . . . . . . . 13-8About Regions, Targets, and Markers . . . . . . . . . . . . . . . . . . . . . 13-10Free-Form Response Templates . . . . . . . . . . . . . . . . . . . . . . . . . 13-13Detecting matches in Response Templates . . . . . . . . . . . . . . . . 13-19RepeatingBlock Response Templates. . . . . . . . . . . . . . . . . . . . . 13-19
Note: Response template can recognize some patterns when you create targets and it names the created target according to the pattern. Example: If you select an ipv4 address say (10.1.12.13) and create a target, the application will name it IPv4_1 automatically. This field also allows you to rename the created target.. . . . . . . . . . . . . . . . . . . . . . . . . . . . . . . . . . . . . . . . . . . . . . . . . . . . .13-20
Table-Form Response Templates . . . . . . . . . . . . . . . . . . . . . . . . 13-23Mini Toolbar . . . . . . . . . . . . . . . . . . . . . . . . . . . . . . . . . . . . . . . . . 13-27Defining a Response Template - Command Association . . . . . . 13-28
Creating CSV Template Resources. . . . . . . . . . . . . . . . . 13-30
Handling MIB Resources. . . . . . . . . . . . . . . . . . . . . . . . . 13-33
Handling Quicktest template resources. . . . . . . . . . . . . . 13-34
The Resource Manager. . . . . . . . . . . . . . . . . . . . . . . . . . 13-35Resource Manager Common Operations . . . . . . . . . . . . . . . . . . . . . . . . . . 13-36
IxNetwork TestComposer User Guide, Release 7.00 xi

Table of Contents
Chapter 14 Capturing IxNetwork Actions with Macro Recorder
Macro Recorder Overview . . . . . . . . . . . . . . . . . . . . . . . . . 14-1What Actions are Recorded? . . . . . . . . . . . . . . . . . . . . . . . . . . . . 14-1
Capturing Actions to TestComposer Steps . . . . . . . . . . . . 14-3
Chapter 15 TestComposer Menu Commands Reference
Script Ribbon . . . . . . . . . . . . . . . . . . . . . . . . . . . . . . . . . . . 15-1Play . . . . . . . . . . . . . . . . . . . . . . . . . . . . . . . . . . . . . . . . . . . . . . . .15-1
Play all . . . . . . . . . . . . . . . . . . . . . . . . . . . . . . . . . . . . . . . . . . . . . . . . . . . . . . 15-1Play all with user delay . . . . . . . . . . . . . . . . . . . . . . . . . . . . . . . . . . . . . . . . . 15-1Play selected only . . . . . . . . . . . . . . . . . . . . . . . . . . . . . . . . . . . . . . . . . . . . . 15-1
Pause . . . . . . . . . . . . . . . . . . . . . . . . . . . . . . . . . . . . . . . . . . . . . . .15-2Stop . . . . . . . . . . . . . . . . . . . . . . . . . . . . . . . . . . . . . . . . . . . . . . . .15-2Toggle Breakpoint . . . . . . . . . . . . . . . . . . . . . . . . . . . . . . . . . . . . .15-2Edit . . . . . . . . . . . . . . . . . . . . . . . . . . . . . . . . . . . . . . . . . . . . . . . . .15-2Debug . . . . . . . . . . . . . . . . . . . . . . . . . . . . . . . . . . . . . . . . . . . . . .15-2New . . . . . . . . . . . . . . . . . . . . . . . . . . . . . . . . . . . . . . . . . . . . . . . .15-2
New Script . . . . . . . . . . . . . . . . . . . . . . . . . . . . . . . . . . . . . . . . . . . . . . . . . . . 15-2New Procedure . . . . . . . . . . . . . . . . . . . . . . . . . . . . . . . . . . . . . . . . . . . . . . . 15-3New Device Resource . . . . . . . . . . . . . . . . . . . . . . . . . . . . . . . . . . . . . . . . . . 15-3Create New CSV Template . . . . . . . . . . . . . . . . . . . . . . . . . . . . . . . . . . . . . . 15-3Create New Response Template . . . . . . . . . . . . . . . . . . . . . . . . . . . . . . . . . 15-3
Append Last Step . . . . . . . . . . . . . . . . . . . . . . . . . . . . . . . . . . . . . .15-3Add Control Step . . . . . . . . . . . . . . . . . . . . . . . . . . . . . . . . . . . . . . . . . . . . . . 15-3Add Command. . . . . . . . . . . . . . . . . . . . . . . . . . . . . . . . . . . . . . . . . . . . . . . . 15-4Append Last Step . . . . . . . . . . . . . . . . . . . . . . . . . . . . . . . . . . . . . . . . . . . . . 15-4New Step . . . . . . . . . . . . . . . . . . . . . . . . . . . . . . . . . . . . . . . . . . . . . . . . . . . . 15-4Insert above. . . . . . . . . . . . . . . . . . . . . . . . . . . . . . . . . . . . . . . . . . . . . . . . . . 15-5Insert below . . . . . . . . . . . . . . . . . . . . . . . . . . . . . . . . . . . . . . . . . . . . . . . . . . 15-5
Place Inside . . . . . . . . . . . . . . . . . . . . . . . . . . . . . . . . . . . . . . . . . .15-5Delete . . . . . . . . . . . . . . . . . . . . . . . . . . . . . . . . . . . . . . . . . . . . . . .15-5Clear Script . . . . . . . . . . . . . . . . . . . . . . . . . . . . . . . . . . . . . . . . . .15-5Edit . . . . . . . . . . . . . . . . . . . . . . . . . . . . . . . . . . . . . . . . . . . . . . . . .15-6Move Up / Down . . . . . . . . . . . . . . . . . . . . . . . . . . . . . . . . . . . . . .15-6Cut . . . . . . . . . . . . . . . . . . . . . . . . . . . . . . . . . . . . . . . . . . . . . . . . .15-6Copy . . . . . . . . . . . . . . . . . . . . . . . . . . . . . . . . . . . . . . . . . . . . . . . .15-6
xii IxNetwork TestComposer User Guide, Release 7.00

Table of Contents
Paste . . . . . . . . . . . . . . . . . . . . . . . . . . . . . . . . . . . . . . . . . . . . . . 15-6Include / Exclude . . . . . . . . . . . . . . . . . . . . . . . . . . . . . . . . . . . . . 15-6Expand/Collapse . . . . . . . . . . . . . . . . . . . . . . . . . . . . . . . . . . . . . 15-6Select all
. . . . . . . . . . . . . . . . . . . . . . . . . . . . . . . . . . . . . . . . . . . . . . . . . . 15-6Undo . . . . . . . . . . . . . . . . . . . . . . . . . . . . . . . . . . . . . . . . . . . . . . . 15-7Redo . . . . . . . . . . . . . . . . . . . . . . . . . . . . . . . . . . . . . . . . . . . . . . . 15-7Validate . . . . . . . . . . . . . . . . . . . . . . . . . . . . . . . . . . . . . . . . . . . . . 15-7Find/Replace . . . . . . . . . . . . . . . . . . . . . . . . . . . . . . . . . . . . . . . . 15-7Go to . . . . . . . . . . . . . . . . . . . . . . . . . . . . . . . . . . . . . . . . . . . . . . . 15-7
Go to step . . . . . . . . . . . . . . . . . . . . . . . . . . . . . . . . . . . . . . . . . . . . . . . . . . . .15-7Go to procedure . . . . . . . . . . . . . . . . . . . . . . . . . . . . . . . . . . . . . . . . . . . . . . .15-7
Debug Views . . . . . . . . . . . . . . . . . . . . . . . . . . . . . . . . . . . . . . . . 15-7Events . . . . . . . . . . . . . . . . . . . . . . . . . . . . . . . . . . . . . . . . . . . . . . . . . . . . . . .15-8Tcl Packages. . . . . . . . . . . . . . . . . . . . . . . . . . . . . . . . . . . . . . . . . . . . . . . . . .15-8Validation Messages. . . . . . . . . . . . . . . . . . . . . . . . . . . . . . . . . . . . . . . . . . . .15-8Execution Messages . . . . . . . . . . . . . . . . . . . . . . . . . . . . . . . . . . . . . . . . . . . .15-8Command Response . . . . . . . . . . . . . . . . . . . . . . . . . . . . . . . . . . . . . . . . . . .15-8Find/Replace. . . . . . . . . . . . . . . . . . . . . . . . . . . . . . . . . . . . . . . . . . . . . . . . . .15-8Global Output . . . . . . . . . . . . . . . . . . . . . . . . . . . . . . . . . . . . . . . . . . . . . . . . .15-8Sessions Output . . . . . . . . . . . . . . . . . . . . . . . . . . . . . . . . . . . . . . . . . . . . . . .15-8Call Stack . . . . . . . . . . . . . . . . . . . . . . . . . . . . . . . . . . . . . . . . . . . . . . . . . . . .15-8Breakpoints . . . . . . . . . . . . . . . . . . . . . . . . . . . . . . . . . . . . . . . . . . . . . . . . . . .15-9
Console . . . . . . . . . . . . . . . . . . . . . . . . . . . . . . . . . . . . . . . . . . . . 15-9Reset Layout . . . . . . . . . . . . . . . . . . . . . . . . . . . . . . . . . . . . . . . . 15-9
Test Ribbon . . . . . . . . . . . . . . . . . . . . . . . . . . . . . . . . . . . . 15-9Test Parameters . . . . . . . . . . . . . . . . . . . . . . . . . . . . . . . . . . . . . . 15-9Import Procedure . . . . . . . . . . . . . . . . . . . . . . . . . . . . . . . . . . . . . 15-9Export Procedure . . . . . . . . . . . . . . . . . . . . . . . . . . . . . . . . . . . . . 15-9Manage Resources . . . . . . . . . . . . . . . . . . . . . . . . . . . . . . . . . . . 15-9QuickTest Templates . . . . . . . . . . . . . . . . . . . . . . . . . . . . . . . . . . 15-10Export as QuickTestTemplate . . . . . . . . . . . . . . . . . . . . . . . . . . . 15-10Exported Stats . . . . . . . . . . . . . . . . . . . . . . . . . . . . . . . . . . . . . . 15-11User Events . . . . . . . . . . . . . . . . . . . . . . . . . . . . . . . . . . . . . . . . 15-11Files Catalog . . . . . . . . . . . . . . . . . . . . . . . . . . . . . . . . . . . . . . . . 15-11Options . . . . . . . . . . . . . . . . . . . . . . . . . . . . . . . . . . . . . . . . . . . . 15-12
Appearance. . . . . . . . . . . . . . . . . . . . . . . . . . . . . . . . . . . . . . . . . . . . . . . . . 15-12Debugging. . . . . . . . . . . . . . . . . . . . . . . . . . . . . . . . . . . . . . . . . . . . . . . . . . 15-13
Reset Tcl Interpreter . . . . . . . . . . . . . . . . . . . . . . . . . . . . . . . . . . 15-14Reset Built-In Event Session . . . . . . . . . . . . . . . . . . . . . . . . . . . 15-14
IxNetwork TestComposer User Guide, Release 7.00 xiii

Table of Contents
Refresh Protocols Configuration Tree . . . . . . . . . . . . . . . . . . . . .15-14Show Summary, Show Detailed . . . . . . . . . . . . . . . . . . . . . . . . . 15-15Text Wrap . . . . . . . . . . . . . . . . . . . . . . . . . . . . . . . . . . . . . . . . . . 15-15
Automation Ribbon . . . . . . . . . . . . . . . . . . . . . . . . . . . . . 15-15Export Script . . . . . . . . . . . . . . . . . . . . . . . . . . . . . . . . . . . . . . . 15-15Tcl ScriptGen . . . . . . . . . . . . . . . . . . . . . . . . . . . . . . . . . . . . . . . 15-15
Appendix A Creating a Sample TestComposer Script
Test Overview . . . . . . . . . . . . . . . . . . . . . . . . . . . . . . . . . . . A-1
Creating the Composer Test . . . . . . . . . . . . . . . . . . . . . . . . A-2
Appendix B Response Templates Creation Samples
Creating a Text-Format Response Template . . . . . . . . . . . . B-1
Creating a RepeatingBlock Response Template . . . . . . . . . B-2
Creating a Table Format Response Template . . . . . . . . . . . B-4
Appendix C Executing IxNetwork QuickTests from TestComposer
Executing IxNetwork QuickTests . . . . . . . . . . . . . . . . . . . . . C-1
Creating Custom QuickTest Template . . . . . . . . . . . . . . . . . C-2
Adding Input Parameters to QuickTests in IxNetwork Test Composer . . . . . . . . . . . . . . . . . . . . . . . . . . . . . . . . . . . . . C-3
Exporting Quicktest as Custom Quicktest . . . . . . . . . . . . . . C-4
xiv IxNetwork TestComposer User Guide, Release 7.00

Table of Contents
Appendix D IxNetwork Events
IxNetwork Events . . . . . . . . . . . . . . . . . . . . . . . . . . . . . . . . D-1
Appendix E Predefined Commands for Miscellaneous Other Session Types
SNMP Session Commands. . . . . . . . . . . . . . . . . . . . . . . . . .E-1SNMP Get . . . . . . . . . . . . . . . . . . . . . . . . . . . . . . . . . . . . . . . . . . . . E-1SNMP Set . . . . . . . . . . . . . . . . . . . . . . . . . . . . . . . . . . . . . . . . . . . . E-2SNMP GetTable. . . . . . . . . . . . . . . . . . . . . . . . . . . . . . . . . . . . . . . . E-3SNMP Walk . . . . . . . . . . . . . . . . . . . . . . . . . . . . . . . . . . . . . . . . . . . E-4SNMP Listen . . . . . . . . . . . . . . . . . . . . . . . . . . . . . . . . . . . . . . . . . . E-5SNMP WaitForTraps . . . . . . . . . . . . . . . . . . . . . . . . . . . . . . . . . . . . E-6Custom Commands. . . . . . . . . . . . . . . . . . . . . . . . . . . . . . . . . . . . . E-7
Syslog Session Commands . . . . . . . . . . . . . . . . . . . . . . . . .E-8WaitForMessage . . . . . . . . . . . . . . . . . . . . . . . . . . . . . . . . . . . . . . . E-8Pause . . . . . . . . . . . . . . . . . . . . . . . . . . . . . . . . . . . . . . . . . . . . . . . E-9Resume . . . . . . . . . . . . . . . . . . . . . . . . . . . . . . . . . . . . . . . . . . . . . . E-9ShowMessages . . . . . . . . . . . . . . . . . . . . . . . . . . . . . . . . . . . . . . . . E-9
CSVAnalyzer Session Commands . . . . . . . . . . . . . . . . . . . .E-9StatQuery. . . . . . . . . . . . . . . . . . . . . . . . . . . . . . . . . . . . . . . . . . . . . E-9Clear . . . . . . . . . . . . . . . . . . . . . . . . . . . . . . . . . . . . . . . . . . . . . . . E-11WriteBlock . . . . . . . . . . . . . . . . . . . . . . . . . . . . . . . . . . . . . . . . . . . E-11WriteLines . . . . . . . . . . . . . . . . . . . . . . . . . . . . . . . . . . . . . . . . . . . E-12
Reporter Session Commands . . . . . . . . . . . . . . . . . . . . . . .E-13AddTextToReport . . . . . . . . . . . . . . . . . . . . . . . . . . . . . . . . . . . . . . E-13AddHTMLToReport . . . . . . . . . . . . . . . . . . . . . . . . . . . . . . . . . . . . E-14AddImageToReport . . . . . . . . . . . . . . . . . . . . . . . . . . . . . . . . . . . . E-14AddTableToReport . . . . . . . . . . . . . . . . . . . . . . . . . . . . . . . . . . . . . E-14AddSectionTo
Report . . . . . . . . . . . . . . . . . . . . . . . . . . . . . . . . . . . . . . . . . . . . . E-15GenerateXYPlot. . . . . . . . . . . . . . . . . . . . . . . . . . . . . . . . . . . . . . . E-15GenerateBarChart . . . . . . . . . . . . . . . . . . . . . . . . . . . . . . . . . . . . . E-16
IxNetwork TestComposer User Guide, Release 7.00 xv

Table of Contents
GenerateReport . . . . . . . . . . . . . . . . . . . . . . . . . . . . . . . . . . . . . . E-17
Packet Decoder Session Commands . . . . . . . . . . . . . . . . E-18Load Capture . . . . . . . . . . . . . . . . . . . . . . . . . . . . . . . . . . . . . . . . E-18Filter . . . . . . . . . . . . . . . . . . . . . . . . . . . . . . . . . . . . . . . . . . . . . . . E-18Get Data . . . . . . . . . . . . . . . . . . . . . . . . . . . . . . . . . . . . . . . . . . . . E-19Show Data . . . . . . . . . . . . . . . . . . . . . . . . . . . . . . . . . . . . . . . . . . E-20
Appendix F IxiaTestComposer Tcl Commands
Supported Additional Tcl Commands. . . . . . . . . . . . . . . . . . F-1SetBaseline. . . . . . . . . . . . . . . . . . . . . . . . . . . . . . . . . . . . . . . . . . . F-1GetBaseline . . . . . . . . . . . . . . . . . . . . . . . . . . . . . . . . . . . . . . . . . . F-1GetValue . . . . . . . . . . . . . . . . . . . . . . . . . . . . . . . . . . . . . . . . . . . . . F-2
Appendix G Configuring the IxNetwork StatQuery Command
IxNetwork StatQuery Command Configuration . . . . . . . . . . G-1
Appendix H TestComposer Licensing Information
Supported Licensing Schemes . . . . . . . . . . . . . . . . . . . . . . H-1Basic . . . . . . . . . . . . . . . . . . . . . . . . . . . . . . . . . . . . . . . . . . . . . . . . H-2Device Configuration. . . . . . . . . . . . . . . . . . . . . . . . . . . . . . . . . . . . H-2Advanced License. . . . . . . . . . . . . . . . . . . . . . . . . . . . . . . . . . . . . . H-2
Appendix I The MIB Browser
Using the MIB Browser . . . . . . . . . . . . . . . . . . . . . . . . . . . . I-1
Appendix J Parallel Steps Configuration Hints
Parallel Steps Execution Examples . . . . . . . . . . . . . . . . . . . .J-1Example 1 . . . . . . . . . . . . . . . . . . . . . . . . . . . . . . . . . . . . . . . . . . . . . J-1Example 2 . . . . . . . . . . . . . . . . . . . . . . . . . . . . . . . . . . . . . . . . . . . . . J-2Example 3 . . . . . . . . . . . . . . . . . . . . . . . . . . . . . . . . . . . . . . . . . . . . . J-3
xvi IxNetwork TestComposer User Guide, Release 7.00

Table of Contents
Appendix K TestComposer Menu Shortcuts
Command Shortcuts . . . . . . . . . . . . . . . . . . . . . . . . . . . . . . .K-1
IxNetwork TestComposer User Guide, Release 7.00 xvii

Table of Contents
xviii IxNetwork TestComposer User Guide, Release 7.00

1Chapter 1: About This Guide
The information in this section is provided to help you navigate this manual and make better use of its content.
Purpose This manual provides information about the IxNetwork TestComposer features, functions, and options.
Manual Content This manual contains the following sections:
Section Description
Chapter 1, About This Guide Provides information on this manual, including its purpose, content, and related documentation. Also explains how to contact technical support.
Chapter 2, Introduction to IxNetwork TestComposer
Provides an overview of the IxNetwork TestComposer plugin and a description of its GUI.
Chapter 3, Creating and Editing a TestComposer Script
Describes Edit mode operations performed for creating and editing TestComposer scripts.
Chapter 4, Additional Editing Options Describes more editing operations that are available in the TestComposer Edit mode.
Chapter 5, Using the Capture Functionality
Describes working in the plugin’s Capture functionality, which extends the Edit mode with the ability to configure steps while inter-acting directly with the configured test devices.
Chapter 6, Script Steps Reference Information
Provides step configuration reference information.
Chapter 7, Using the Composer Expression Builder
Provides detailed information on the Expression Builder functionality that supports the creation of complex expression comprising TestComposer variables and Tcl constructs.
Chapter 8, Executing a TestComposer Script
Describes executing a script in the plugin’s Debug mode.
Chapter 9, Working with Multiple Test Scripts in TestComposer
Provides guidelines for working with multiple test scripts that are open at the same time.
IxNetwork TestComposer User Guide, Release 7.00 1-1

About This Guide1
Chapter 10, Viewing Script Execution Files in IxNetwork
Describes viewing script execution results in the Data Miner plug-in of IxNetwork.
Chapter 11, Persisting TestComposer Scripts
Provides summary information on all supported modes for persist-ing a TestComposer script.
Chapter 13, Managing IxNetwork TestComposer Resources
Describes creating and working with TestComposer resources—Procedures, Device Sessions, Response Templates, CSV Tem-plates, and MIBs.
Chapter 14, Capturing IxNetwork Actions with Macro Recorder
Describes capturing IxNetwork configuration actions as TestComposer steps using the Macro Recorder functionality.
Chapter 15, TestComposer Menu Commands Reference
Describes menu commands and other TestComposer commands that are accessible through the GUI.
Appendix A, Creating a Sample TestComposer Script
Describes a sample operations sequence for creating a TestComposer script.
Appendix B, Response Templates Creation Samples
Provides examples for creating free form and table format Response Templates.
Appendix C, Executing IxNetwork QuickTests from TestComposer
Provides an overview of configuring a test for executing IxNetwork Quick Tests from within TestComposer.
Appendix D, IxNetwork Events Provides a listing of IxNetwork predefined commands supported as script steps.
Appendix E, Predefined Commands for Miscellaneous Other Session Types
Provides a listing of SNMP, Syslog, and CSVAnalyzer predefined commands supported as script steps on sessions of these types.
Appendix F, IxiaTestComposer Tcl Commands
Provides a description of predefined Ixia TestComposer Tcl commands available in the Expression Builder.
Appendix G, Configuring the IxNetwork StatQuery Command
Provides information on the configuration of the IxNetwork StatQuery event.
Appendix H, TestComposer Licensing Information
Provides information on the TestComposer licensing requirements.
Appendix I, The MIB Browser Provides a description of the MIB browser that is used by SNMP session commands.
Appendix J, Parallel Steps Configuration Hints
Provides best practice information and examples for configuring parallel TestComposer scripts.
Appendix K, TestComposer Menu Shortcuts
Provides a description of the keyboard shortcuts associated with TestComposer commands and operations.
Section Description
1-2 IxNetwork TestComposer User Guide, Release 7.00

About This GuideWhat’s New in this Release
Technical Support You can obtain technical support for any Ixia product by contacting Ixia Techni-cal Support by any of the methods mentioned on the inside cover of this manual. Technical support from Ixia’s corporate headquarters is available Monday through Friday from 6 a.m. to 6 p.m., Pacific Standard Time (excluding Ameri-can holidays). Technical support from Ixia’s EMEA and India locations is avail-able Monday through Friday, 8 a.m. to 5 p.m. local time (excluding local holidays).
What’s New in this Release• Debugging nested script: You can debug multiple shared procedures and
add breakpoints to them during execution..
• Enhanced response map workflow: The improved command response template allows having a side-by-side view which enables comparing the existing response template to the current command response, if any.
Related DocumentationThe following manuals may help you learn more about IxNetwork TestComposer. The manuals are available on the CD shipped with the applica-tion, as well as on the Ixia website at www.ixiacom.com.
• IxNetwork User Guide – This manual provides you with detailed information on the use of the Ixia IxNetwork test application.
• TestComposer ScriptGen Tcl Reference – This manual provides you with detailed information about the structure of a Tcl test script generated using the TestComposer ScriptGen command and deployment details required for run-ning such a script remotely from Tcl-enabled network hosts.
IxNetwork TestComposer User Guide, Release 7.00 1-3

About This GuideRelated Documentation1
1-4 IxNetwork TestComposer User Guide, Release 7.00

2Chapter 2: Introduction to IxNetwork TestComposer
This chapter provides an overview of the IxNetwork TestComposer functionality and its GUI, comprising the following sections:
• TestComposer Overview on page 2-1
• The TestComposer GUI on page 2-3
• The Structure of a TestComposer Script on page 2-5
• TestComposer: A Tcl-Enabled Plug-in on page 2-6
• A Sample IxNetwork TestComposer Workflow on page 2-7
TestComposer OverviewTestComposer is a plugin integrated into IxNetwork that permits the creation of complex multi-step test scripts integrating Event Scheduler events, DUT config-uration commands, local or external procedure calls, and flow control instruc-tions that permit branching the script flow based on a step result evaluation.
Test scripts created using the TestComposer plugin support multiple simulta-neous connections to test devices that can be configured using a variety of proto-col interfaces: Telnet, TL1, SSH1/SSH2/SSHAuto, CmdTool, TclSh, Raw, IxEmail, COM, SNMP, Syslog, CSVAnalyzer, Reporter, and Packet Decoder.
In addition to these protocol interfaces, TestComposer scripts also support a default session of the IxNetwork type. For this default IxNetwork session that is automatically created for every TestComposer script, a number of pre-configured events are available for configuring Ixia chassis ports, applying test configuration files, starting protocol traffic, launching tests, and retrieving test run results.
IxNetwork TestComposer User Guide, Release 7.00 2-1

Introduction to IxNetwork TestComposer2
On IxNetwork Configurations and TestComposer ScriptsA TestComposer script is a complex, multi-steps sequence of Event Scheduler events, commands and flow instructions.
A TestComposer script comprises one or more steps of the following types:
• Protocol commands: Device commands issued for a variety of different pro-tocol interfaces, including Telnet, SSH1/SSH2/SSHAuto, CmdTool, TclSh, IxEmail, TL1, COM, Raw, SNMP, Syslog, CSVAnalyzer, Reporter, and Packet Decoder.
For some commands, a GUI-based Response Template Editor allows you to define templates for the response expected from the device. At runtime, such a Response Template is then used for parsing and retrieving parameters from the command output.
• Events: For every TestComposer script, a default IxNetwork session that con-nects to an IxNetwork Tcl server is automatically created. This default ses-sion supports a number of predefined IxNetwork events for configuring Ixia chassis ports, applying IxNetwork test configuration files, starting protocol traffic, launching tests, and retrieving test run results.
• Flow control instructions: Common programming instructions such as If, For, While, Break permit the branching of the script flow based on the evaluation of a criterion associated with the step.
• Procedures: Scripts having been created in the TestComposer plugin and saved as procedure resources in the resources database can be imported as procedures into other TestComposer scripts. External procedure resources can also be called from a script using a RunProcedure control step.
Procedures can also be defined within the body of a script and can be called locally, without the need for saving them to the database.
A TestComposer script can have an associated pass/fail criterion that determines if the script executed successfully or not. Complex pass/fail criterion expressions can be created using an Expression Builder GUI that supports the creation of expressions based on TestComposer variables, and Tcl commands and operators.
A TestComposer script is saved as part of an IxNetwork configuration (ixncfg) and can be accessed only from the test that contains it, or it can be saved as a pro-cedure resource. When saved as a procedure resource, the script can be re-used across multiple TestComposer scripts.
Note: There is a limit to the number of characters that you can capture in the command string. If you exceed the limit the command is ignored or some part of the command may not be captured. At present you can enter upto 100 characters, depending on the device that is used for this session. This limit also includes the prompt of the terminal, the longer the prompt, the shorter the command that can be entered.
2-2 IxNetwork TestComposer User Guide, Release 7.00
Introduction to IxNetwork TestComposer
When contained in an IxNetwork configuration, a TestComposer script can be run from any context of IxNetwork, or it can be executed as a custom test from the Quick Tests IxNetwork configuration page.
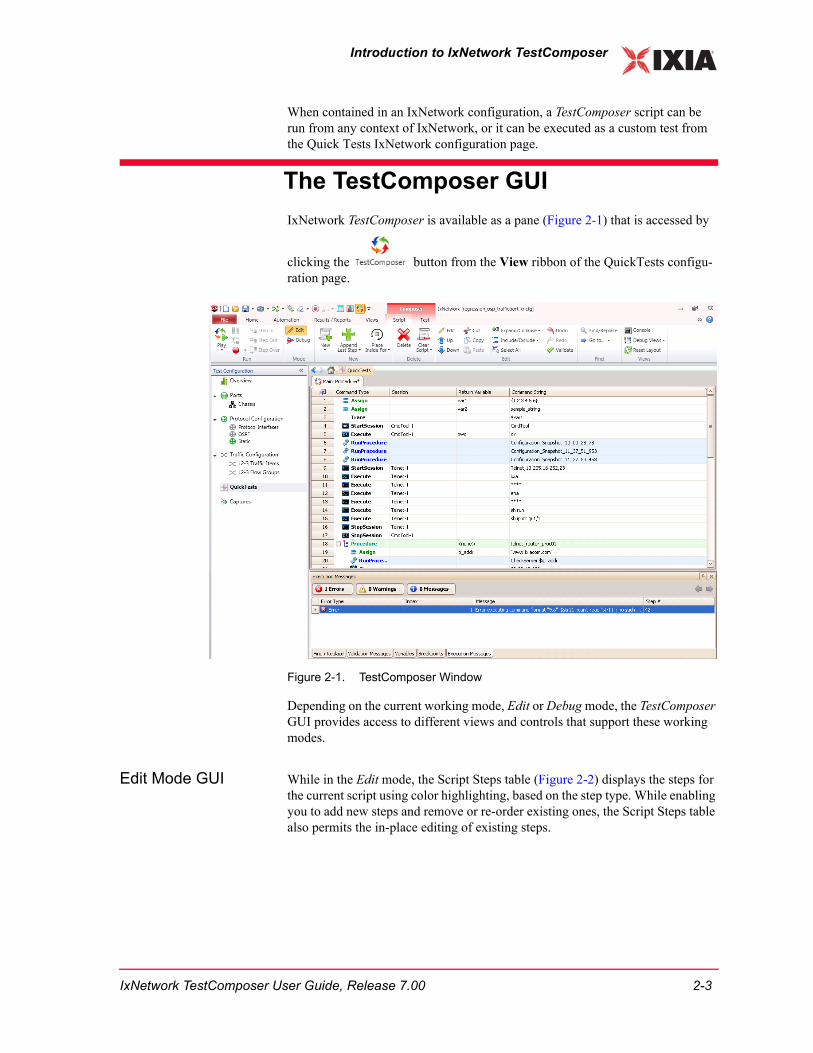
The TestComposer GUIIxNetwork TestComposer is available as a pane (Figure 2-1) that is accessed by
clicking the button from the View ribbon of the QuickTests configu-ration page.
Figure 2-1. TestComposer Window
Depending on the current working mode, Edit or Debug mode, the TestComposer GUI provides access to different views and controls that support these working modes.
Edit Mode GUI While in the Edit mode, the Script Steps table (Figure 2-2) displays the steps for the current script using color highlighting, based on the step type. While enabling you to add new steps and remove or re-order existing ones, the Script Steps table also permits the in-place editing of existing steps.
IxNetwork TestComposer User Guide, Release 7.00 2-3
Introduction to IxNetwork TestComposer2
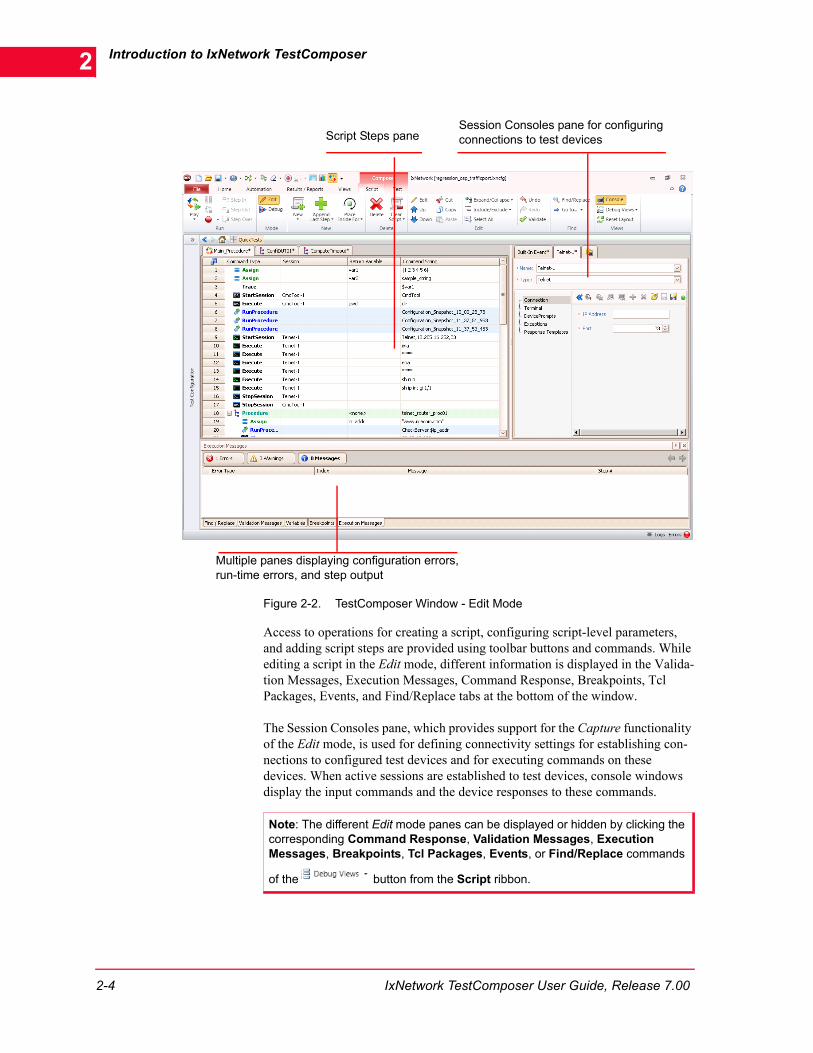
Figure 2-2. TestComposer Window - Edit Mode
Access to operations for creating a script, configuring script-level parameters, and adding script steps are provided using toolbar buttons and commands. While editing a script in the Edit mode, different information is displayed in the Valida-tion Messages, Execution Messages, Command Response, Breakpoints, Tcl Packages, Events, and Find/Replace tabs at the bottom of the window.
The Session Consoles pane, which provides support for the Capture functionality of the Edit mode, is used for defining connectivity settings for establishing con-nections to configured test devices and for executing commands on these devices. When active sessions are established to test devices, console windows display the input commands and the device responses to these commands.
Script Steps pane
Multiple panes displaying configuration errors, run-time errors, and step output
Session Consoles pane for configuring connections to test devices
Note: The different Edit mode panes can be displayed or hidden by clicking the corresponding Command Response, Validation Messages, Execution Messages, Breakpoints, Tcl Packages, Events, or Find/Replace commands
of the button from the Script ribbon.
2-4 IxNetwork TestComposer User Guide, Release 7.00

Introduction to IxNetwork TestComposer
Debug Mode GUI In Debug mode, which enables you to execute an entire test script while offering adanced debugging support, the Script Steps table displays the steps in read-only mode. While the script is executed, the bottom panes display detailed script out-put, execution, and environment runtime information (Figure 2-3).
Figure 2-3. TestComposer GUI - Debug Mode
An additional grid on the left of the Script Steps table permits you to set and visu-alize breakpoints that halt the script execution at specified script locations, enabling you to inspect the execution information.
The Structure of a TestComposer ScriptSince TestComposer is an MDI (Multiple Document Interface) enabled applica-tion, it enables you to have multiple test scripts – a main script called by default Main_Procedure and additional procedures – open in the GUI at any given time.
Any such script may contain a variable number of steps of any of the types below:
• Control step
Read-only Script Steps view
Panes displaying output, errors, variables and other execution-related information
IxNetwork TestComposer User Guide, Release 7.00 2-5

Introduction to IxNetwork TestComposer2
• Command step
• Procedure step
Any TestComposer script may contain in its body any number of steps of the sup-ported types listed above, and a procedure definition section including one or more inline procedures, in case it contains any local procedure calls. Once a pro-cedure has been defined within a script, a procedure call can be performed repeatedly within that script, possibly with different arguments for each call.
Figure 2-4 below illustrates the case of a Main_Procedure script containing a main script body and an inline procedure definition:
Figure 2-4. Composer Script Structure
A TestComposer script other than the Main_Procedure script has a similar struc-ture and may contain any number of steps of the supported types.
TestComposer: A Tcl-Enabled Plug-inTestComposer enables you to define variables that you can then use as step parameters, step return values, procedure arguments, or for creating Tcl expres-sions.
The For step, for example, uses a loop variable initialized to a start value and loops over a values domain for executing the nested steps a number of times. Other looping constructs, such as for example the While step, also rely on vari-ables for defining expressions that are evaluated by the looping commands and determine the script flow.
Variables can also be assigned to command steps so as to retrieve specified por-tions of a step output. Variables retrieved this way can be used in subsequent steps for defining complex Tcl expressions using the Expression Builder.
Main_Procedure body comprising steps of the supported types, including procedure calls
Additional procedure definitions enclosed in the Procedure and EndProcedure keywords
2-6 IxNetwork TestComposer User Guide, Release 7.00

Introduction to IxNetwork TestComposer
The Expression Builder is a component of the TestComposer plugin that is used for creating and editing Tcl code fragments and Tcl expressions as part of TestComposer script steps.
Using the Expression Builder enables you to add multi-line Tcl code, create logi-cal or arithmetic expressions that are evaluated in Tcl, and reference local vari-ables in Tcl code or expressions.
The Expression Builder, which is available from a number of TestComposer steps, such as Assign or TclEval, is described in detail in Chapter 7, Using the Composer Expression Builder.
A Sample IxNetwork TestComposer WorkflowThe following is a sample operations sequence used for creating, editing, persist-ing, and executing a TestComposer script:
• A new TestComposer main procedure script is created as described in Creating a Main Procedure Script on page 3-3.
In addition to the main procedue script, you can create multiple other scripts that you can work with at the same time, as described in Creating Additional Procedure Scripts on page 3-3.
• Configure global script parameters as described in Defining Script Properties on page 3-4.
• Start adding script steps as described in Adding Scrips Steps on page 3-14, which covers the addition of command using multiple supported approaches, such as using the Step Configuration wizard or using the plug-in’s Capture functionality.
Detailed reference information for all supported steps is given in Script Steps Reference Information on page 6-1.
• A script can have associated parameters, which can be assigned specific val-ues when the script is run as a custom test from the IxNetwork QuickTests configuration page. Specifying such script parameters is described in Defining Input Parameters on page 3-19.
• For any TestComposer script you can define user events that possibly occur at script execution time and configure the response to such events. See Defining User Events on page 3-23.
• Results of Execute-type steps can be retrieved in order to be further evaluated in subsequent steps and determine the script execution flow. Retrieving user-defined portions of step results is done using Response Templates, as described in Retrieving Step Results using Response Templates on page 3-25.
• The values of script variables can be specified as statistics to be exported at script execution time. See Specifying Exported Statistics on page 3-25.
• A TestComposer script can have an associated pass/fail expression, which defines whether the script executed successfully or not. Defining a script
IxNetwork TestComposer User Guide, Release 7.00 2-7

Introduction to IxNetwork TestComposer2
pass/fail expression is described in Specifying a Script Pass/Fail Result on page 3-27.
• Eventually, after having finished the editing operations, in order for the script to be saved, it has to be validated first, as described in Validating a Script on page 3-27.
• The most simple mode of persisting a script is saving it into the IxNetwork configuration that contains it. See Saving a Script into an IxNetwork Test Configuration on page 3-28. Alternatively, a script can be saved as a proce-dure resource for re-use across different scripts, as described in Creating Procedure Resources on page 13-5.
• Complex debugging features, such as the use of breakpoints that halt the script execution at user-defined locations and permit the inspection of the runtime parameters in those occurrences, can be used while in the plugin’s Debug mode. See Executing a Script in Debug Mode on page 8-1.
• After having been edited and debugged, a script can be run from any IxNet-work context, or as a custom test from the IxNetwork QuickTests configura-tion page, as described in Execution from the IxNetwork GUI on page 8-17.
• Eventually, a script can be exported to Test Conductor for further editing and execution in an automated manner. See Exporting as a Script To Test Conductor on page 11-2.
2-8 IxNetwork TestComposer User Guide, Release 7.00

3Chapter 3: Creating and Editing a TestComposer Script
This chapter provides information on creating and editing an IxNetwork TestComposer script and comprises the following sections:
• Using the TestComposer Edit Mode on page 3-1.
Using the TestComposer Edit ModeCreating a TestComposer script, adding or editing commands of the different sup-ported types, and validating the script for correctness is done using the Edit mode of the TestComposer plugin.
While in the QuickTests configuration page of IxNetwork, clicking the
TestComposer button from the View ribbon displays the TestCom-poser pane (Figure 3-1).
IxNetwork TestComposer User Guide, Release 7.00 3-1

Creating and Editing a TestComposer Script3
Figure 3-1. IxNetwork TestComposer Window
For each IxNetwork test, a TestComposer main procedure script is created, that represents the main IxNetwork entry point. At the same time, for every TestComposer script, a default IxNetwork session of the specific Built-in Event identifier is automatically established to the IxNetwork server, enabling you to configure IxNetwork commands (‘events’) that are to be transmitted to the IxNetwork test application.
The main procedure script with steps of the supported types—flow control and command steps—, Execute commands that invoke IxNetwork events, inline pro-cedures, and procedure calls to other scripts.
Default Built-in Event session of the IxNetwork type
Test Steps table
3-2 IxNetwork TestComposer User Guide, Release 7.00

Creating and Editing a TestComposer Script
Creating a Main Procedure Script
For every IxNetwork test, an empty script namedby default Main_Procedure is automatically created and represents the main IxNetwork entry point to TestComposer. In addition to the main procedure script, you can create multiple other scripts, each in its own TestComposer tab; these scripts can be called by the main procedure script, or can be used for creating precedure resources to be shared by all scripts.
Since the main script exists at all times and cannot be closed, you can only dis-card its content and start configuring it anew, if necessary.
To create a new TestComposer main script:
1. While in the Detailed viewing mode of TestComposer, click the Clear Script
button from the Test ribbon, then click Close all scripts and Clear Main Procedure.
The content of the main procedure script is deleted.
2. Similar to main procedure script, you can define the general script properties, as described in Defining Script Properties on page 3-4, and then start config-uring the script.
Creating Additional Procedure Scripts
In addition to the main procedure script, you can create other scripts that can be called by the main procedure script, or can be used for creating precedure resources to be used by other scripts.
To create a new TestComposer script:
Important: The TestComposer GUI supports two different viewing modes:• Summary Mode: This is the default mode that is enforced when the
TestComposer plug-in starts for the first time. It displays a limited functional-ity GUI characterized by a reduced number of toolbar buttons and a simpli-fied view of the Test Steps table, so as to ease the configuration of test scripts.
• Detailed Mode: In this mode the full-fledged GUI is displayed, characterized by the rendering of all available toolbar buttons and the detailed view of the Test Steps table.
Switching between the two viewing modes is done by clicking the
and buttons respectively from the Script ribbon.
Note: Although you can open multiple scripts in the TestComposer GUI, a single
main procedure script, identified by a icon, can be open at any time; this
main script cannot be closed, as its tab has no associated Close button.
IxNetwork TestComposer User Guide, Release 7.00 3-3

Creating and Editing a TestComposer Script3
1. While in the Detailed viewing mode of TestComposer, click the New button from the Test ribbon, then click New Script.
A new procedure script, named by default Main_Procedure, is created in a
new tab. Opposed to the main script, which is marked by the symbol in
its page, additional procedure scripts are identified by icons in their page headers.
2. Similar to main procedure script, for additional you can define the general script properties, as described in Defining Script Properties on page 3-4, and then start configuring the script.
Defining Script Properties
The first step to configuring a TestComposer is script is defining the general script parameters, such as name, an associated runtime report level, and possible actions to take when predefined system events occur at script runtime.
To define the script parameters:
1. Right-click a tab header and choose the Properties command from the context menu that appears.
2. In the Properties window (Figure 3-2) specify a script name and an optional description for reference purposes.
Figure 3-2. Script Properties Window
3. Define the script parameters as described in Table 3-1:
Note: Owing to its MDI-enabled GUI, additionally to the Main_Procedure script you can open more test scripts (procedures) in separate TestComposer tabs and thus work with multiple scripts at the same time. For detailed information on opening additional test scripts refer to Working with Multiple Test Scripts in TestComposer on page 9-1.
3-4 IxNetwork TestComposer User Guide, Release 7.00

Creating and Editing a TestComposer Script
4. Before actually starting to define a test script, you may want to configure additional Tcl packages to be used by the test, or configure global test-level conditional processing, as described in Tcl Packages on page 3-15 and Events on page 3-15 respectively.
Configuring a Test Script
After having defined the global script parameter, most of the script configuration operations, such as adding and editing steps, configuring the retrieval of step results, defining the script execution flow, executing selected steps, and validat-ing the script is done in the Edit mode of the TestComposer plug-in.
Table 3-1. Global Script Parameters
Parameter Description
Stop execution after <hh:mm:ss>
Specifies a time interval after which the script execution is stopped unconditionally.
Execute in real time mode
A step that has been created in direct interaction with a configured device could possibly have a user delay, i.e. the user might first open a session and wait some time before inputting subsequent session commands. When this option is selected, scripts that are run as part of an IxNetwork test ignore the user delay.
Report level When run as an custom test from IxNetwork, script run report information can be accessed from the IxNetwork Data Miner page, as described in Script Execution Results Integration in Data Miner on page 10-1. The report information level is based on the following settings:• None: No report information is displayed.• Test Summary: Script-level summary information, such
as start and completion time, number of steps, pass / fail condition, is displayed.
• Step Summary: Each executed step is listed in the report. Steps that are part of any loop are listed multiple times.
• Detail: Each executed step is listed in the report, with step information including the step response. In case of large responses, the information is truncated and you are referred to inspect the summary log.
To end test use Defines whether an Abort (graceful termination) or a Stop (forceful termination) is used to end the test. when a timeout condition is encountered.
Note: In addition to the Edit mode, TestComposer features additional working modes that enable you to establish a connection to a configured device and issue commands that are captured as steps, or to run a script step-by step in debugging mode. The other modes are covered in Using the Capture Functionality on page 5-1 and Executing a Script in Debug Mode on page 8-1.
IxNetwork TestComposer User Guide, Release 7.00 3-5

Creating and Editing a TestComposer Script3
The Edit Mode GUI
The Edit mode GUI of the TestComposer module contains an MDI-enabled view with multiple tabs, one for each open test script. Each tab’s Test Steps table con-tains the steps that make up the test script, while a common multi-tab lower pane displays validation and execution information for the currently active tab (Figure 3-3).
Figure 3-3. Edit Mode Window
Edit Mode panes displaying validation and error messages, script variables, and steps output information
Script Steps table with in-place editing capability
Session Consoles pane for connecting to configured test devices
3-6 IxNetwork TestComposer User Guide, Release 7.00

Creating and Editing a TestComposer Script
The Edit Mode Commands Toolbar
The following operations for script creation and editing are available in the Script ribbon:
Important: As mentioned before, the TestComposer GUI supports two different view modes so as to enable choosing between a more simple and a complex application interface:• Summary Mode: This view displays a limited functionality GUI characterized
by a reduced number of toolbar buttons and a simplified view of the Test Steps table, so as to ease the configuration of tests.
• Detailed Mode: In this view the full-fledged GUI is displayed, characterized by the rendering of all available toolbar buttons and a detailed view of the Test Steps table. This is the default mode that is enforced when TestComposer starts for the first time.
Switching between the two viewing modes is done by clicking the
and buttons in the Test ribbon.
Table 3-2. Edit Mode - Step Commands Toolbar Buttons
Toolbar Button
Action Description
Groups commands for creating an empty script in a new TestComposer tab, adding into the current tab an inline procedure delimited by Procedure - EndProcedure statements, and creating TestComposer Device Session, CSV Template, or Response Template resources.
Groups commands for adding a control or a command step, re-appending the step that was added last (Append last step), or adding a step that is configured using the Step Configuration wizard (New step). When selecting the Insert above selected step or Insert below selected step commands, a new step is inserted above or below respectively the current step selection.
Groups commands for placing the selected step(s) inside an If - EndIf, For - EndFor, While - EndWhile, Do - While, StepSearch, BinarySearch, or Procedure - EndProcedure construct.
Deletes the currently selected (highlighted) step(s). This toolbar command is equivalent to choosing the Delete command of the Script Steps table context menu.
Groups commands for closing all open scripts–other than the main procedure script–and deleting all configured steps of the main procedure script.
IxNetwork TestComposer User Guide, Release 7.00 3-7

Creating and Editing a TestComposer Script3
Accesses the Step Configuration wizard enabling you to edit a step. Clicking this button is equivalent to double-clicking a Script Steps table entry or right-clicking the table and choosing the Edit step menu command.
Moves the selected step(s) up or down.Note: Alternatively, a step(s) can be moved using drag and drop operations.
Removes and prepares for pasting (Cut), copies and prepares for pasting (Copy), or copies the selected step(s) into a new location of the same script, or to another script (Paste).
Expands or collapses the currently selected step(s) in the Script Steps table. When you click Expand All or Collapse All, the operation affects the entire table.
When the currently selected step(s) is (are) excluded from execution, the Include command enables it (them) for execution.When the currently selected step(s) is (are) included in the execution, choosing the Exclude command disables it (them) from execution. Excluded steps are displayed gray in the Script Steps table.
Selects all steps from the currently active tab.
Reverts most of the previously performed script editing operations.Note: The following actions are not supported by the Undo/Redo functionality:• Performing find & replace operations• Configuring breakpoints
Performs again an action that was reverted using an Undo command.
Displays or hides the Find/Replace pane that enables you to perform script-level editing operations using a find and replace functionality.
Clicking Goto step enables you to navigate to a user-specified step in the Script Steps table. When the currently selected step is a RunProcedure step, clicking Goto procedure enables you to navigate to the procedure referenced by the RunProcedure step.
Performs a global on-demand validation check on the script from the active tab. If errors are found, these are displayed in the Validation Messages tab of the Edit mode window.
Table 3-2. Edit Mode - Step Commands Toolbar Buttons
Toolbar Button
Action Description
3-8 IxNetwork TestComposer User Guide, Release 7.00

Creating and Editing a TestComposer Script
The Edit Mode Tabs
The multiple tabs in the lower pane of the Edit mode window (Figure 3-3) enable you to visualize validation and execution errors, edit the Response Template assigned to a step, and perform global editing on script steps, such as for example searching for a string and replacing it throughout the entire script.
For details se the following sections:
• Validation Messages
• Execution Messages
• Find/Replace
• Variables
• Breakpoints
• Command Response
• Tcl Packages
• Events
The following tabs are available:
Validation MessagesThis tab (Figure 3-4) displays error, warning and information-level messages for defined script steps. The category of messages displayed in this tab can be filtered by clicking the corresponding toolbar buttons.
For example, to display only error and warning messages, click the Errors and Warnings buttons such that they appear pressed.
Plays all script steps or only the selected step(s). Alternatively, plays selected steps also taking into account any user delay between steps that may have been inserted when capturing the steps over an established session.When steps are played, execution information ranging from informational to error messages, variables assignation, and so on, is displayed in the Execution Messages tab.
While playing a step or a number of steps, clicking this button pauses the step(s) execution.
While playing a number of steps, clicking this button once gracefully terminates the step(s) execution. If you click this button a second time, the script execution is stopped forcibly.
Adds a breakpoint to the currently selected step. When a defined breakpoint is clicked repeatedly, it is first inactivated and is eventually removed.
Table 3-2. Edit Mode - Step Commands Toolbar Buttons
Toolbar Button
Action Description
IxNetwork TestComposer User Guide, Release 7.00 3-9

Creating and Editing a TestComposer Script3
Figure 3-4. The Validation Errors Tab
Execution MessagesThis tab (Figure 3-5) displays steps execution information, ranging from informational messages to error messages, generated when playing back (a) script step(s) in the Edit mode.
Figure 3-5. The Execution MessagesTab
You can filter out a message category by clicking the corresponding toolbar button.
Find/Replace This tab (Figure 3-6) provides script-level editing functionality using Find/Replace operations. For all script steps, a string input into the Find field is searched for in the script parameters specified in the Location field, with the search results being displayed in the Search Target pane that appears inside the Find/Replace tab.
Note: When working with multiple scripts opened at the same time (MDI functionality), this tab displays information for the currently active test script.
Note: The content of this tab is limited to the display of ten thousand messages.
Note: When working with multiple scripts opened at the same time (MDI functionality), this tab displays information for the currently active test script.
3-10 IxNetwork TestComposer User Guide, Release 7.00

Creating and Editing a TestComposer Script
Figure 3-6. Find Replace Tab with Additional Search Targets Pane
When the Replace with option is selected, the input string is searched and replaced by a string specified in the adjoining field.
The Find/Replace pane provides the following functionalities through its but-tons:
• Find: Launches the search operation and pauses for each found occurrence of the searched string.
• Find All: Launches the search operation and displays all occurrences of the searched string.
• Replace: For a given occurrence of the searched string a replace operation is performed.
• Replace All: For all occurrences of the searched string a replace operation is performed.
When the Keep Session Search History option is selected, previous search operations results from the current editing session are maintained in the Search Target pane and results of the current search operation are appended after the displayed results.
Variables
After having executed a number of steps from the Edit mode, this tab (Figure 3-7) displays information on the variables values, both simple and composite, referenced by the executed steps. Any variable shown in this tab can be modified,
Search Target pane displaying a list of found occurrences
Note: When working with multiple scripts opened at the same time (MDI functionality), this tab displays information for the currently active test script.
IxNetwork TestComposer User Guide, Release 7.00 3-11

Creating and Editing a TestComposer Script3
so as to run subsequent tests using the new value.You can inspect the variable’s values at the end of a run.
Figure 3-7. Variables Tab
Predefined system variables, such as the UserResults-Directory variable that is used by the Files Catalog window, are always displayed.
When working with multiple scripts opened at the same time (MDI functionality), this tab displays information for the currently active script.
If an error is encountered at execution time, the variable from the offending step is assigned the execution error value. For example, if a step error occurs in an Assign step for a variable x, then x is assigned the "Can't read "x". No such variable" value, which is the error message generated for the erroneous step.
If you switch from the Edit mode to the Debug mode, the variable values in the Variables tab are cleared. The variables are also cleared when resetting the Tcl
interpreter by clicking the button.
Switching betwween the Detail and Summary view of TestComposer, however, does not affect the variable values.
View and Edit Variable
The visualizer allows you to view entire content of a variable and edit them.
Select the variable from the list in the Variables window and click to open the visualizer. Depending on the visualizer settings, any of the following visualizer window opens:
• List Visualizer window: The List Visualizer window displays the variable values in the form of a list. You can view the entire content of the variable and edit them.
Note: Although you can inspect the value at the end of the debug run, you cannot modify them. Its in Read-Only mode.
Variables tab displaying a list of currently active variables and their values
Note: The modification of input arguments values in the Variables tab (Edit mode) cannot be persisted between two subsequent test executions.
3-12 IxNetwork TestComposer User Guide, Release 7.00

Creating and Editing a TestComposer Script
• Text Visualizer window: The Text Visualizer window displays the variable values in a text editior. It allows you to view entire content of a variable and edit them. The text editor has scrollbars that can be used to access parts of the text that do not fit into the text editor. Instead of using the horizontal scrollbar, you can also select the Wrap check-box to enable text wrapping so that the portions that do not fit in a single line appear in the next line.
The visualizer window that opens when you click depends on the visualizer settings. The visualizer settings are defined at the variable level, that means settings defined for one variable is not applicable for the others. Also, the default visualizer settings are not same for all the variables.
To change the visualizer settings, do the following:
1. Click the drop-down arrow next to the variable.
The list of available options appears.
2. Select either List Visualizer or Text Visualizer.
If List Visualizer is selected, the List Visualizer window opens when you
click next to the variable in the Variables window.
If Text Visualizer is selected, the Text Visualizer window opens when you
click next to the variable in the Variables window.
The changes you make to the visualizer settings are retained untill you run a test in TestComposer. When you run a test, at each breakpoint the visualizer settings are changed to their default settings.
BreakpointsWhile playing back selected steps in the Edit mode, defined breakpoints halt the steps execution at the defined locations. The Breakpoint tab (Figure 3-8) displays a list of defined breakpoints.
Figure 3-8. The Breakpoints Tab
When you switch to the Debug mode of TestComposer, breakpoints defined while in the Edit mode are preserved.
Note: When working with multiple scripts opened at the same time (MDI functionality), this tab displays information for the currently active test script.
IxNetwork TestComposer User Guide, Release 7.00 3-13

Creating and Editing a TestComposer Script3
Command ResponseSome command steps, such as Execute and ReadFile, can have associated Response Templates that are used to parse the command’s output and retrieve the values of user-defined tokens (‘targets’).
Retrieving portions of the command output is based on defining tokens (‘tar-gets’) in the Response Templates associated with the step and then assigning Composer return variables to the command steps. In subsequent script steps, target values are then obtained by referencing the resulting composite vari-able and the target identifier.
For the currently selected step from the Script Steps table, the Command Response tab (Figure 3-9) displays the command output and enables you to create a Response Template starting from the command response, or to assign an existing Response Template to the step.
Figure 3-9. The Command Response Tab
If the script step was created using the GUI scripting support of the Edit mode and was never played, it has no command output and no associated Response Template. To such a script step you can either assign an existing Response Template resource, or, while still in Edit mode, play back the step in order to assign it a Response Template based on the actual command output called Local Step Response.
If a script step was added while directly interacting with a configured device using the Capture functionality available in the Edit mode, it has an associ-ated Local Step Response template based on the command output.
For detailed information on defining a Response Template refer to Creating Response Templates on page 13-7.
Command Response pane
Marked Regions and Targets pane
Note: When working with multiple scripts opened at the same time (MDI functionality), this tab displays information for the currently active test script.
3-14 IxNetwork TestComposer User Guide, Release 7.00

Creating and Editing a TestComposer Script
Tcl PackagesThis tab (Figure 3-10) enables you to define any additional Tcl package whose commands you wish to be able to access in the Expression Builder, a software module used for generating simple expressions or multi-line Tcl code fragments. Since, by default, only standard Tcl commands are accessible in the Expression Builder, you could, for example, make xml parsing com-mands available by specifying an xmlParser package.
Figure 3-10. Tcl Packages Tab
To effectively add a Tcl package, click the button and edit the entry such as to define a location (Path field) and a package name (Tcl Package Name
field). Eventually click the button to parse the package content and make its commands accessible in TestComposer.
EventsThe Conditional Execution tab (Figure 3-11) enables you to define test-level conditional settings as explained below. Conditional Execution settings enable you to define a procedure to execute and an additional action to take when a timeout or a error condition is encountered at runtime. For example, on encountering a step error, you could determine the test to terminate or to continue running.
Note: By default, this tab is hidden in the TestComposer GUI. To display it, choose the View > Tcl Packages menu command.
Note: When working with multiple scripts opened at the same time (MDI functionality), this tab displays information for the currently active test script.
IxNetwork TestComposer User Guide, Release 7.00 3-15

Creating and Editing a TestComposer Script3
Figure 3-11. Events Tab
The pane displays the list of predefined conditions – TimeOut or Error – a script is monitored for, while for each condition the associated procedure and action is displayed.
Check the Step TimeOut option if you want the test to be monitored for any step time-out.
Check the Step Error option if you want the test to be monitored for errors (other than a timeout) encountered in any of the test steps.
Specify the procedure associated with an error or timeout condition by click-
ing the control of the Procedure field and selecting a procedure – local or shared (external) – from the the drop-down pane that appears.
For the selected procedure you can view the defined arguments by clicking
the control of the Input Arguments field, which displays a cascading table-format pane containing the argument list. To specify the actual runtime argument(s) enter the desired values in the Current Value field(s).
In addition to executing the procedure, an action to take can also be config-ured, possible choices being the following:
• Continue: When selected, the procedure is executed and the test continues running.
• Exit test: When selected, the procedure is executed and the test exits.
Adding Scrips Steps While you mostly add script steps from the Script Steps table using the GUI scripting support of the Edit mode, steps can also be added by establishing device
Important: These conditional processing settings apply to a test as a whole. A similar functionality is available for individual test steps, enabling you to test for error or timeout conditions and execute specific actions in case the condition is encountered. The step-level takes precedence over the test-level conditional configuration.
Note: When working with multiple scripts opened at the same time (MDI functionality), this tab displays information for the currently active test script.
3-16 IxNetwork TestComposer User Guide, Release 7.00
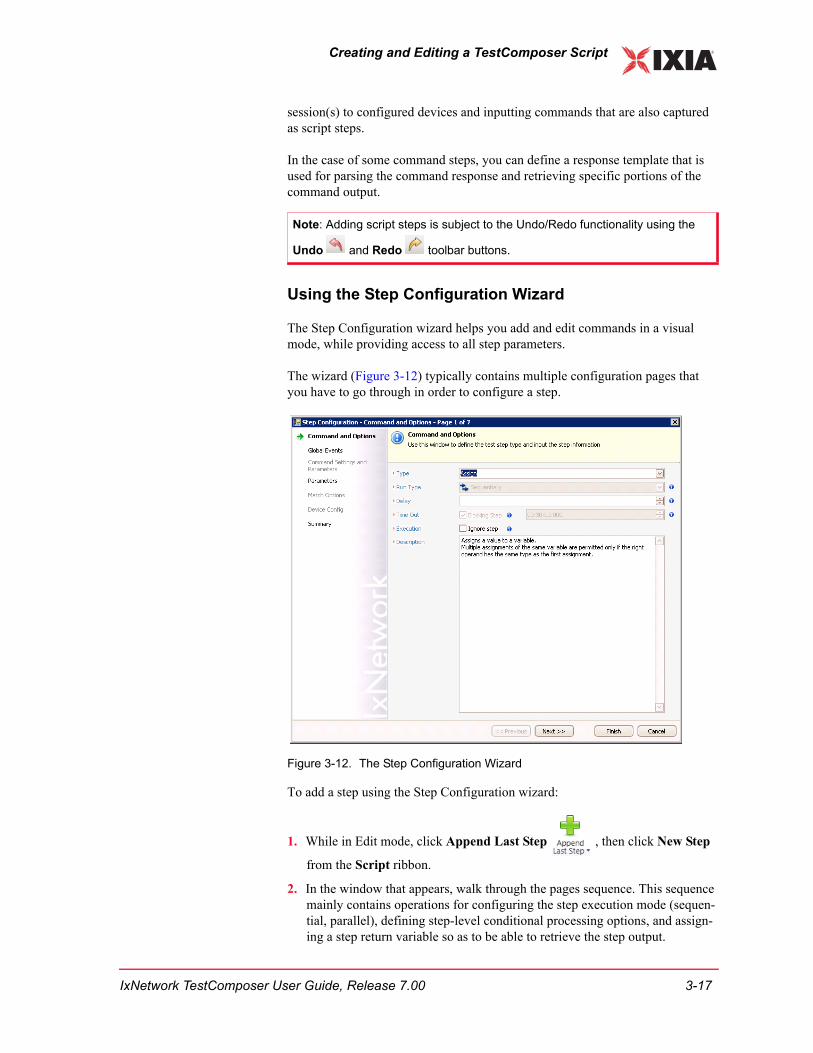
Creating and Editing a TestComposer Script
session(s) to configured devices and inputting commands that are also captured as script steps.
In the case of some command steps, you can define a response template that is used for parsing the command response and retrieving specific portions of the command output.
Using the Step Configuration Wizard
The Step Configuration wizard helps you add and edit commands in a visual mode, while providing access to all step parameters.
The wizard (Figure 3-12) typically contains multiple configuration pages that you have to go through in order to configure a step.
Figure 3-12. The Step Configuration Wizard
To add a step using the Step Configuration wizard:
1. While in Edit mode, click Append Last Step , then click New Step
from the Script ribbon.
2. In the window that appears, walk through the pages sequence. This sequence mainly contains operations for configuring the step execution mode (sequen-tial, parallel), defining step-level conditional processing options, and assign-ing a step return variable so as to be able to retrieve the step output.
Note: Adding script steps is subject to the Undo/Redo functionality using the
Undo and Redo toolbar buttons.
IxNetwork TestComposer User Guide, Release 7.00 3-17

Creating and Editing a TestComposer Script3
A complete reference of the editing options that are available for all steps is given in Chapter 6, Script Steps Reference Information.
By Capturing Commands on Established Sessions
In addition to adding script steps using the GUI scripting support, you can also add steps by connecting to a configured device via a console session and input commands to the device. The input commands are both executed on the device and also captured as script steps.
The Capture functionality, which adds command capturing capabilities to the basic Edit mode, enables you to establish multiple device sessions to different configured devices at once and to add steps in direct interaction with those devices.
Commands to the configured devices can be issued using a wide range of sup-ported protocol interfaces, such as Telnet, TclSh, IxEmail, TL1, SSH1/SSH2/SSHAuto, Raw, SNMP, Syslog, and COM.
In addition to these, for every TestComposer script an implicit IxNetwork session with the specific Built-in Event identifier is automatically established to the IxNetwork server, enabling you to configure and execute IxNetwork test applica-tion commands (‘events’).
The Capture mode functionality is described in detail in Chapter 5, Using the Capture Functionality.
The Session Consoles Pane
To add steps using the Capture functionality:
1. If not already displayed, make the Session Consoles pane (Figure 3-13) visi-
ble by clicking the button from the Script ribbon or by pressing the Alt+Shift+C keyboard shortcut.
Important: Working using the Capture functionality can be combined with working in the basic Edit mode and adding steps manually using the GUI scripting support. For example, you can start working in the basic Edit mode and add commands using the GUI scripting support, then configure a device
session and click the button of the Session Console pane to connect to a configured device. While connected to the device, input commands are both executed on the device and captured as script steps into the Script Steps table.Eventually, after having added a number of captured script steps, you can revert to adding more steps in the basic Edit mode using the GUI scripting support.
3-18 IxNetwork TestComposer User Guide, Release 7.00

Creating and Editing a TestComposer Script
Figure 3-13. The Session Console Pane
2. Create a new session by clicking the button. For the newly created ses-sion, configure connectivity settings as described in Configuring Session Parameters on page 5-5.
3. Connect to the DUT by clicking the button. A StartSession step is auto-matically added to the Script Steps table.
4. Over the established connection, input commands into the console window and note the command output being displayed in the console. At the same time, the command is added as a step to the Script Steps table.
5. Eventually, after having finished inputting commands, click the button to disconnect the session. A StopSession step is automatically added to the Script Steps table.
By Inserting a Procedure
Script steps can also be added by inserting a procedure resource that was previ-ously created using IxNetwork TestComposer and saved as a reusable resource into the resources database. In a similar manner, you can add script steps by inserting procedures stored in .tcp files, which could have been generated, for
Session Console windows enabling you to type in commands to a configured test device over an active session
IxNetwork TestComposer User Guide, Release 7.00 3-19

Creating and Editing a TestComposer Script3
example, following an export operation from the TestComposer resource data-base.
To insert a procedure into a TestComposer script:
1. While in the Script Steps pane, click the New procedure button, then click Import Procedure.
2. In the Resource Manager window that appears, displaying all saved proce-dure resources under the Procedures folder, select a procedure to add.
The steps making up the procedure are added to the Script Steps table enclosed in the Procedure and Endproc steps. If the imported procedure con-tains calls to other procedures, these procedure definitions are appended at the end of the script.
Alternatively click the New procedure button, then click Import procedure from disk and choose the .tcp file containing the procedure.
Editing Script Steps In-Place
While in the Edit mode, steps displayed in the Script Steps table can be edited inline by clicking into a step parameters field (column) and manually editing the parameter values in-place, or by editing parameter values in the drop-down box
that appears when clicking a column’s control (Figure 3-14).
Figure 3-14. Tests Table In-Place Editing
Note: For a description of the required operations for creating a procedure resource, refer to Creating Procedure Resources on page 13-5.
Note: The variables defined in the Files Catalog window (other than the predefined UserResultsDirectory variable) are not accessible in procedure bodies.
3-20 IxNetwork TestComposer User Guide, Release 7.00

Creating and Editing a TestComposer Script
In addition to editing in place, other editing options, such as cut/copy/paste, including and excluding from execution, re-arranging the steps sequence, etc. are also available.
A complete reference of the editing options that are available for all steps is given in Chapter 6, Script Steps Reference Information.
Defining Input Parameters
An IxNetwork TestComposer script can have associated input parameters that represent run-time arguments passed to the script when executed from the IxNetwork Quick Tests configuration page. Input script parameters are similar to variables in that they can be used in script steps for creating conditional expres-sions assigned to flow control steps.
A script can also have an output parameter, which represents a value returned by the script’s main procedure.
To specify input and output script parameters:
1. Click the Test Parameters button from the Test ribbon.
Note: In support of in-place editing, Test Steps table fields offer an autocomplete functionality for TestComposer variables and commands. When typing text manually into an editor, the Autocomplete functionality shows a list of possible commands names matching the input string. When typing into a field the $ character denoting a reference to a variable, all existing variables are shown in the drop-down box that appears below the field. Autocomplete functionality can also be invoked by using CTRL + Space combination :
Note: By default, the Script Steps table displays only the Command type, Session, Return variable and Command string columns. More columns can be
displayed by clicking the upper-left button and selecting additional categories from the window that appears.
Note: Script parameters defined in the Parameters window can be assigned default values, such that a script can be run without specifying runtime parameters, but using the default values.
IxNetwork TestComposer User Guide, Release 7.00 3-21

Creating and Editing a TestComposer Script3
2. Define an output parameter by choosing a return type (None, String, Numeric, or Composite) and optionally a default value. Procedure output parameters are also persisted when saving a procedure, or when exporting it.
3. Define the input parameters by clicking the button to add a new parame-ter, then specify it by editing the entry in-place according to the information provided in Table 3-3.
4. Repeat step #3 to add more input parameters.
Eventually, click the Ok button to close the Parameters window.
Using Attached Script Files
Each TestComposer script has a number of attached files comprising baseline results, IxNetwork-generated files such as configuration ‘snapshots’, and the def-inition of associated statistics. In addition to these files that are attached by default, you can also add additional files that you can read from or write into at script execution time using CSVAnalyzer session commands.
To specify attached files:
1. Click the Files Catalog button from the Test ribbon to display the Files Catalog window (Figure 3-15):
Note: String and Numeric output parameters support the defining of default values, whereas no default values can be specified for composite variables.
Table 3-3. Input Parameters Information
Field Description
Parameter Name The parameter name.
Parameter Type The type of the parameter, String, Numeric, or Composite.
Default Value The default script value. When no arguments are passed to the script from within IxNetwork, then the default value of the parameter is used.
Description This is an optional parameter description.
Note: An existing parameter entry can be removed by clicking the button. The parameters order can be changed by selecting a parameter entry and
moving it up or down using the buttons.
Important: When a script is run as a custom test from the IxNetwork Quick Tests configuration page, the attached script files are saved on the IxNetwork host and can be accessed from the Data Miner plug-in of IxNetwork, as described in Data Miner Results Display on page 10-2.
3-22 IxNetwork TestComposer User Guide, Release 7.00

Creating and Editing a TestComposer Script
Figure 3-15. FIles Catalog Window
The catalog displays the following files that are attached to the script by default:
• Baseline_results.txt: This file, which comprises script baseline values, is populated only if Tcl baseline commands – getbaseline, setbaseline – are used in the script.
• PassFailStats.csv: This file comprises the exported stats in CSV format.
• PassFailStats.xml: This file comprises an XML schema defining the exported statistics.
• SummaryReport.html: This file contains a script summary report in HTML format.
• SummaryReport.xml: This file contains a script summary report in XML format.
• IxNetwork Snapshot files: A snapshot file ‘captures’ the state of a specific IxNetwork test configuration at the time the snapshot is taken, and is used by the IxNetwork Restore Snapshot event to restore the configuration to that state. The Files Catalog may contain multiple snapshot files (multiple such files for the same test configuration can exist) referenced using TestComposer variables.
In addition to these files, a predefined system variable named UserResults-Directory defines a folder on the local host that can be used by the IxNetwork application for storing dynamically generated files. When the TestComposer script is executed from as a custom test from the IxNetwork QuickTests con-figuration page, all files from that folder also become available from the IxNetwork Data Miner plug-in.
Note: The UserResultsDirectory variable value can be changed. Once changed, subsequent script steps or script runs use the modified value for specifying the folder where the generated files are stored in.
IxNetwork TestComposer User Guide, Release 7.00 3-23

Creating and Editing a TestComposer Script3
2. Add an attached file by clicking the button.
For the new table entry specify a file by clicking into the File Location co-lumn and selecting a file from the standard Open window that appears.
Define other parameters as follows:
• Composer variable: A variable that is used to reference an attached file, such as for example for the purpose of reading a file value.
• Type: Source or Result. If defined as a source file, it must be existing prior to script execution. If defined as a result, it is generated by the script exe-cution and can be used for writing into it using the WriteBlock command of a CSVAnalyzer session.
• Global: Indicates if the variable is global or local. A global variable that is defined within the main script body is still visible in the bodies of inline or external procedures.
For all configuration snapshot files, which store a IxNetwork test configu-ration state, this parameter is always Global.
• Description: An optional description information.
The File location (indicating the location of the attached file with respect to the TestComposer-specific folder) and the Modified Time (indicating the date of the last modification to the file) are updated automatically.
3. Alternatively, add several existing files at once by clicking the button. In the standard Open dialog that appears specify multiple files, possibly using wildcard (* and ?) characters and click the Ok button.
In the window that appears choose to add the files as source files (by clicking the Yes button) or as result files (by clicking the No button).
4. Files having an active adjoining symbol can be visualized by double-clicking the table entry. An alternative mode to visualize the content is to
select the entry and click the button.
When the repository folder specified by the UserResultsDirectory variable
exists, clicking its adjoining button displays a Windows Explorer window that enables you to visualize the stored files.
Note: Variables referencing File Catalog items (other than the predefined UserResultsDirectory variable) are only available in a script’s main procedure body and cannot be referenced in inline or external (shared) procedures.
3-24 IxNetwork TestComposer User Guide, Release 7.00

Creating and Editing a TestComposer Script
Defining User Events
An Execute command output or a device session to configured test devices can be monitored for the occurrence of specified messages. When a matching mes-sage is received by either an Execute or a Watch script step, an event is triggered and processing for the event can be configured.
• Local user events: Local events, which are only available inside a script step (local), can have an associated procedure (local or shared) that is executed when the event occurs.
• Global user events: Global events, which are available to all script steps, are those defined in the User Events Catalog. Each global event can be config-ured with an associated procedure (local or shared) and an additional action that is performed when the event occurs – such as for example continuing with the current script step or advancing the execution to the next one.
Defining global user events and associating them with executed procedures and additional actions is done using the User Events Catalog (Figure 3-16).
Figure 3-16. User Events Catalog
To define global user events:
Example: Considering, for example, that we have defined an output file referenced by the file_out variable, we could perform the following Tcl commands sequence to open the file and write into it a string specifying a script result status:
TclEval set f [open $file_out w]
TclEval puts $f “The test script executed successfully”
TclEval close $f
Note: A local procedure is a procedure that is defined within the script body. A shared procedure is an external procedure resource stored in the plugin’s resources database.
IxNetwork TestComposer User Guide, Release 7.00 3-25

Creating and Editing a TestComposer Script3
1. Click the User Events button from the Test ribbon.
2. In the User Events Catalog window that appears, click the button. A new global event definition entry is added.
3. Click into the Procedure to Run column and select a procedure – local or shared – that is executed when the event occurs.
If the procedure has parameters, each parameter can be assigned a predefined portion of the received message that triggered the event.
To assign parameters:
a: Click the button.
b: In the window that appears, the Parameter name and Type fields are auto-matically populated with the appropriate value from the procedure defini-tion.
c: For the Value field select a predefined portion of the matching message, or a constant string:
• <value of message>: The entire message string is assigned to the parameter.
• <search result>: The matched expression is assigned to the param-eter.
• <constant value>: A constant user-defined value is assigned to the parameter.
4. Define an additional action that is executed when the event occurs:
• Continue with Current Step: If an associated procedure is configured, the procedure is launched and the script execution continues with the script step that triggered the event.
• Proceed to Next Step: If an associated procedure is configured, the proce-dure is launched, a device terminator is sent, the event-triggering step is stopped, and the execution advances to the next script step.
5. Define an event processing mode as either of the following:
• Scheduled: When queued, processing of the current event is done as scheduled.
• Prioritary: When queued, processing of the current event is done priori-tary.
Note: A device terminator is a control character sequence that is sent to a configured device in order to stop a continuous device output, such as for example that of a ping -t or tcpdump command. For information on configuring a device terminator, refer to Defining Terminal Settings on page 5-15.
3-26 IxNetwork TestComposer User Guide, Release 7.00

Creating and Editing a TestComposer Script
Retrieving Step Results using Response Templates
Some steps of the command type, such as Execute, can have one or more an asso-ciated response templates that are used to parse and evaluate the step’s output.
A response template—which is created using the Response Template Editor on a device’s expected response following protocol or session commands—specifies the tokens (named ‘targets’ when creating the template) to be retrieved from the command’s output after execution.
For example, assuming we had an Execute step that defines a var1 return vari-able, and that its associated RT has two targets, min_latency and max_latency, assigned, the ($var1.min_latency+ $var1.max_latency)/2 expression could be used in a subsequent TclEval step to compute a mean latency value.
For detailed information on working with Response Templates refer to Creating Response Templates on page 13-7.
Specifying Exported Statistics
For a TestComposer script you can specify the statistics that are exported by it, either to the IxNetwork StatViewer module or to output files that are associated by default with the Composer script.
The TestComposer statistics to be exported can be selected from local script vari-ables, or from targets defined within Response Templates that are associated with
Important: The Execute (see Execute on page 6-46) and Watch (see Watch on page 6-62) steps, which monitor session and a command outputs respectively, are capable of triggering user events when a specified device output pattern is received. The triggered events are placed in a global (script-level) events queue, whose processing is done sequentially, in a separate thread. For each event processed, first a configured additional action is performed and then an event-associated procedure is executed. Upon completion of the procedure execution, the next event from the queue is processed.When configuring user events, pay special attention to select associated procedures that execute reasonably rapidly, such as to not excessively delay the processing of subsequent queued events. In the opposite case, for example when configuring a long procedure, the processing of subsequent queued events would be blocked for the procedure execution time and the script could possibly terminate before all queued events have had a chance of being processed.Special attention is also required for avoiding inconsistent device output monitoring, such as that illustrated by the case below:Assuming, for example, that we have an Execute command that generates continuous, multi-portion output, and that the command output is monitored for multiple expressions triggering multiple events, say E1 and E2.Given the continuous nature of the output, it could happen that at one moment an output portion matches one of the specified expressions and that the corresponding event, say E1, is triggered by this occurrence. Now, assuming that E1 is configured with the “Proceed with Next Step” additional action, it could happen that, while E1 is being processed, and before the Device Terminator is sent, another event, E2, is triggered. This would result in both events, E1 and E2, being processed, irrespective of E1’s configured “Proceed with Next Step” option.
IxNetwork TestComposer User Guide, Release 7.00 3-27

Creating and Editing a TestComposer Script3
script steps. Global variables created using the ReadWriteGlobal command can also be exported.
When statistics are exported to IxNetwork StatViewer, the statistics are displayed in a new Main_Procedure statistics view that is located in the Test Composer folder. For each additional IxNetwork QuickTest that is executed from IxNetwork GUI or is called by the Main_Procedure script, an additional view is created in the Test Composer folder if the QuickTest exports statistics.
When exported to files attached to the test script, the PassFailStats.csv and PassFailStats.xml output files are created.
To define the script-exported statistics:
1. Click the Exported Stats button from the Test ribbon. Alternatively choose the Export to Statistics View command that becomes accessible when right-clicking the Steps Table.
2. In the window that appears (Figure 3-17), listing all associated script parame-ters and script variables, select the statistics to be exported by clicking the corresponding check boxes.
Important: Please note that exported TestComposer statistics must be selected from the set of statistics visible at the end of the main script body in order to be available for the creation of trend reports. Statistics that are local to procedures are temporary statistics and as such are not visible at the end of a script.As such, if you wish to export such local statistics, you need to define them within the procedure body using ReadWriteGlobal commands.
Notes: • When a script is run as an IxNetwork custom test, these attached script files
are saved to the IxNetwork host and can be accessed from the Data Miner plug-in of IxNetwork, as described in Data Miner Results Display on page 10-2.
• When a script is exported from IxNetwork to Test Conductor TestComposer, these files are preserved and are being created for every script run.
3-28 IxNetwork TestComposer User Guide, Release 7.00

Creating and Editing a TestComposer Script
Figure 3-17. Exported Statistics Window
Specify the statistics to be exported to IxNetwork StatViewer by clicking the Export to Statistic View option, and those to be exported to script output files by clicking the Export to Files Catalog option.
For variables of the Composite type you need to expand the members list by
clicking the button preceding the variable name, then select the mem-ber(s) to be exported.
For each exported variable other than variables of the Composite type, spec-ify its type as one of the following: Numeric, String, Numeric List, or String List.
Specifying a Script Pass/Fail Result
A script pass/fail result specifies whether a TestComposer script completed suc-cessfully or not.
Hint: For some exported variables you might have to explicitely change their type, such as for example in the case of variables that actually represent a numeric list but whose Tcl representation is that of string, which requires a change from String to Numeric List.The type of composite variables, that represent response templates targets or variables retrieved from IxNetwork StatQuery commands, cannot be changed from the Exported Stats window, but only from the Response Template definition window.
Note: For more information on variables, refer to About Variables on page 7-1.
Note: TestComposer statistics (up to 50 ) that were selected for export to IxNetwork StatViewer can be displayed in default views of the TestComposer folder. If you selected more than 50 exported statistics, the rest will be available for display in user-defined statistics views under the Custom Views folder. For detailed information on the rendering of TestComposer statistics in StatViewer, refer to the StatViewer User Guide that is shipped with IxNetwork.
IxNetwork TestComposer User Guide, Release 7.00 3-29

Creating and Editing a TestComposer Script3
A script pass/fail result is defined using a Return step that returns a non-zero numeric value or a variable evaluating to a non-zero value for a success status, and a numeric ‘0’ value or a a variable evaluating to ‘0’ for a failed status.
For a detailed description on how to add a Return step, see Return Statement Step on page 6-27.
Validating a Script Although validation is done every time a step is added, after having completed adding or editing all script steps, an additional script-level validation is recom-mended.
To perform an on-demand global script validation:
1. Click the Validate button from the Script ribbon.
The Validation Messages tab (Figure 3-18) displays script errors – such as control statements errors, improper variables use, or improper use of input step arguments – and warnings.
Figure 3-18. Validation Messages Tab
In addition to the script errors being displayed in the Validation Messages tab,
steps containing errors also appear marked with a red cross in the left-most table column. For steps that generate warnings, a yellow arrow icon is used.
2. If you wish to inspect or correct a particular error, double-click the validation error entry and the corresponding step is selected as current step in the Script Steps table.
Navigating up and down the messages list is done using the buttons.
Note: When a script is run as a custom test from the IxNetwork Quick Tests configuration page, the pass/fail result is displayed in the Data Miner plug-in of IxNetwork, as described in Data Miner Results Display on page 10-2.
Note: Validation checking does not ensure that the script is error free, but it catches only manifest step inconsistencies. Extensive runtime verification of a test script is done using the Debug mode, described in Executing a Script in Debug Mode on page 8-1.
3-30 IxNetwork TestComposer User Guide, Release 7.00

Creating and Editing a TestComposer Script
Saving a Script into an IxNetwork Test Configuration
A TestComposer main script can be persisted by either saving it as a as part of the IxNetwork configuration file (ixncfg), or by saving it as a procedure resource in the resource database, along with other resources, such as device sessions and response templates.
To save a main procedure script as part of the IxNetwork configuration:
1. In the TestComposer GUI, click the Save button from the IxNetwork Quick Access toolbar.
The script is saved as part of the IxNetwork configuration file and can be edited and run from within the IxNetwork GUI.
Executing Selected Steps
While in Edit mode, steps can be run directly from the Script Steps table with the step execution information displayed in the Execution Messages tab.
To run a script:
1. In the Script Steps table select the step(s) to run.
Multiple steps can be selected using the common Ctrl + Click for non-contig-uous or Shift + Click for contiguous selection paradigm.
2. Click the Play button, then click Play selected only to run the selected steps. If the steps contain TestComposer variables, these are evaluated and the steps are run with the variables substituted by their actual values.
If breakpoints have been defined, these are not taken into account when play-ing back the selected steps.
While the step(s) is/are running, the Play button appears grayed and cannot be accessed.
For executing steps, the command output is displayed as follows:
• For all steps, the error-, warning-, and information-level output is dis-played in the Execution Messages tab. For some step commands that have multi-line output, only the first line is displayed. In such cases, you can
Note: TestComposer scripts – both the main procedure and additional procedure scripts – can also be persisted by exporting them to the plug-in’s resource repository, as described in Creating Procedure Resources on page 13-5.
Note: An additional mode of persisting a script is provided by the Export TC Script... command from the IxNetwork GUI, which enables you to export it to the TestComposer application that is integrated into Test Conductor. For information on this functionality, refer to Exporting as a Script To Test Conductor on page 11-2.
IxNetwork TestComposer User Guide, Release 7.00 3-31
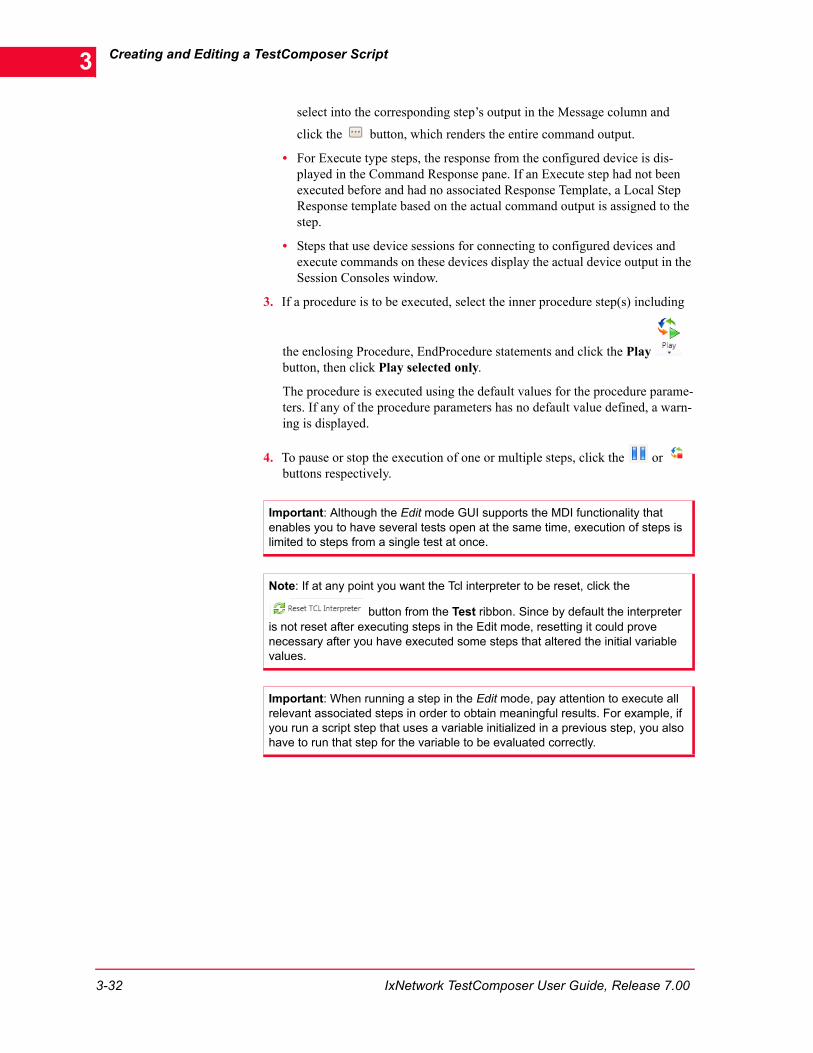
Creating and Editing a TestComposer Script3
select into the corresponding step’s output in the Message column and
click the button, which renders the entire command output.
• For Execute type steps, the response from the configured device is dis-played in the Command Response pane. If an Execute step had not been executed before and had no associated Response Template, a Local Step Response template based on the actual command output is assigned to the step.
• Steps that use device sessions for connecting to configured devices and execute commands on these devices display the actual device output in the Session Consoles window.
3. If a procedure is to be executed, select the inner procedure step(s) including
the enclosing Procedure, EndProcedure statements and click the Play button, then click Play selected only.
The procedure is executed using the default values for the procedure parame-ters. If any of the procedure parameters has no default value defined, a warn-ing is displayed.
4. To pause or stop the execution of one or multiple steps, click the or buttons respectively.
Important: Although the Edit mode GUI supports the MDI functionality that enables you to have several tests open at the same time, execution of steps is limited to steps from a single test at once.
Note: If at any point you want the Tcl interpreter to be reset, click the
button from the Test ribbon. Since by default the interpreter is not reset after executing steps in the Edit mode, resetting it could prove necessary after you have executed some steps that altered the initial variable values.
Important: When running a step in the Edit mode, pay attention to execute all relevant associated steps in order to obtain meaningful results. For example, if you run a script step that uses a variable initialized in a previous step, you also have to run that step for the variable to be evaluated correctly.
3-32 IxNetwork TestComposer User Guide, Release 7.00

4Chapter 4: Additional Editing Options
This chapter provides a description of additional editing operations that can be performed while in the Edit mode of IxNetwork TestComposer and comprises the following sections:
• Additional Editing Options on page 4-1
Additional Editing OptionsWhile in the Edit mode, additional editing operations that are available using toolbar buttons, menu commands, or commands from the Script Steps table context menu, enable you, for example, to add steps using copy /paste operations, enclose a block of statements within If, For or While statements, or re-order the steps sequence using the toolbar buttons.
Using Copy / Paste Operations
Using copy/paste operations, steps can be pasted from another location, or another script.
To add a step:
1. Select a single step or a number of contiguous steps. For selecting multiple steps you can use the Ctrl + Shift selection paradigm.
2. Press the Ctrl + C keyboard shortcut.
3. Select the insertion place and press the Ctrl + V keyboard shortcut.
Using Drag and Drop Operations
Using drag and drop operations, steps can be copied from one location to another location within the same script, or to another script.
To add a step using Drag and Drop:
Note: Adding steps using paste operations benefits from the TestComposer undo / redo functionality.
IxNetwork TestComposer User Guide, Release 7.00 4-1

Additional Editing Options4
1. Select a single step or a number of contiguous steps. For selecting multiple steps you can use the Ctrl + Shift selection paradigm.
2. Drag the step(s) to the new location.
Including and Excluding Steps from Execution
Using the Exclude/Include functionality, existing steps from the Script Steps table can be marked to be skipped at script execution time.
To mark the steps for exclusion or re-inclusion into execution:
1. Select a single step or a number of contiguous steps. For selecting multiple steps you can use the Ctrl + Shift selection paradigm.
2. Press the Ctrl + R and Ctrl + I shortcuts to keep the steps defined, but to skip them at script execution time. The excluded steps are displayed dimmed in the Script Steps table.
Alternatively, if some steps have been excluded from execution, select them and press the Ctrl + R and Ctrl + E shortcuts to re-include them into the executed script flow.
Marking Steps For Parallel Execution
TestComposer script steps can be executed both sequentially and in parallel.
Running a step in parallel basically entails creating a new thread for the parallel step and then advancing the execution flow to the next step, without waiting for the parallel thread to finish first.
To mark a step for parallel execution:
1. Select a single step or a number of contiguous steps. For selecting multiple steps you can use the Ctrl + Shift selection paradigm.
2. Choose the Actions > Run > Parallel menu command.
The step is highlighted in the Script Steps table using light blue .
Hint: Using the Ctrl or Shift modifiers while dragging the step(s) to the new location enables you to paste it (them) above or below the selected location.
Note: Adding steps using paste operations benefits from the TestComposer undo / redo functionality.
Note: Including or excluding steps into or from execution benefits from the TestComposer undo / redo functionality.
4-2 IxNetwork TestComposer User Guide, Release 7.00

Additional Editing Options
Re-arranging the Steps Sequence
The steps sequence can be re-arranged using the toolbar buttons.
To re-order the steps sequence:
1. Select a single step or number of contiguous steps. For selecting multiple steps you can use the Ctrl + Shift selection paradigm.
2. Click the button to move the selected steps upwards in the Script Steps
table. Alternatively click the button to move the selection downwards.
Surrounding Steps with Control Blocks
Once you have added steps, it is also possible to surround one or more non-control steps with looping – For, While, StepSearch, BinarySearch– and script flow control instructions – If, Else – using the Script Steps table context menu commands.
To enclose a number of step(s) in looping or flow control statements:
1. Select the contiguous steps to be surrounded using the common Shift + Click selection paradigm.
2. Right-click the Script Steps pane and select the one of the Place Inside
commands.
Figure 4-1 below shows a number of instructions enclosed within an If / EndIf statement:
Figure 4-1. If - Enclosed Steps
Important: At step creation time, a parallel step is assigned an Id that can be used subsequently in Join statements to force the step termination. Since this Id has a global scope, no two active threads with the same Id can exist at one time.For example, assuming we had a RunProcedure step inside a For loop, such as in the following example:
For i in {0 9 1}
RunProcedure P1 // parallel step
EndFor
then a thread is spawned for the first procedure call, but no threads would be created for the rest of calls, since a thread Id needs to be globally unique.
IxNetwork TestComposer User Guide, Release 7.00 4-3

Additional Editing Options4
Using Find / Replace Operations
TestComposer enables you to globally edit a script by searching a range of steps for user-defined strings and replacing the found occurrences with other strings.
To search for a string and replace it:
1. Click the button in the Test ribbon which accesses the Find/Replace pane.
2. In the Find field type in a string to search for in the entire script.
When the Replace with option is selected, the input string is searched and replaced by a string specified in the adjoining field.
3. Clicking the Find button launches the search operation and pauses for each found occurrence of the searched string. Click again the Find button to advance to the next occurrence.
Alternatively, clicking the Find All button launches the search operation and displays all occurrences of the searched string.
Using the Undo / Redo Functionality
Most of the script editing operations can be undone using the Undo button, while commands that were undone previously can be re-applied using the Redo
button.
Specifically, the following commands benefit from the TestComposer Undo / Redo functionality:
• Adding steps: After adding a step using the Step Configuration Wizard, a
paste operation, or by clicking the Append last step button, the step
is removed if you click the button. A step that was removed this way is
re-inserted by clicking again the toolbar button.
• Adding an imported procedure.
• Adding a new step using the Insert Above / Insert below buttons.
Note: The surrounding of steps with looping or flow control instructions benefits from the TestComposer undo / redo functionality.
Note: When the Keep Session Search History option is selected, previous search operations results from the current editing session are maintained in the Search Target pane and results of the current search operation are appended after the displayed results.
4-4 IxNetwork TestComposer User Guide, Release 7.00

Additional Editing Options
• Adding a new step using the Place Inside button.
• Deleting a step using a Delete or Cut operation.
• Moving a step using a Move Up / Move down operation:
• Moving the step using drag & drop operations.
• Performing Exclude step / Include step operations.
Customizing the Script Steps Table Layout
The Script Steps table can be customized such as to display a different level of step information.
To customize the Script Steps table layout:
1. Click the button in the upper left corner of the Script Steps table.
2. In the window that appears (Figure 4-2) select the columns to be displayed.
Figure 4-2. Column Selection Window
3. If, at some point during the editing process, the Script Steps table columns become too small, cells might display only truncated command or parameter strings. In such cases, you can enable a ‘word-wrap’ functionality and
determine the full command text to display by clicking the toolbar button.
Figure 4-3 shows the rendering of text in a table cell having the ‘word wrap’ functionality disabled (left image) and in the same cell which has this functionality enabled.
Note: The Undo/Redo functionality is limited to the last 10 operations.
Note: The following actions are not supported by the Undo/Redo functionality:• Performing find & replace operations• Configuring breakpoints.
IxNetwork TestComposer User Guide, Release 7.00 4-5

Additional Editing Options4
Figure 4-3. Word-Wrap Functionality Illustration
4-6 IxNetwork TestComposer User Guide, Release 7.00

5Chapter 5: Using the Capture Functionality
This chapter describes the Capture functionality of the TestComposer Edit mode and comprises the following sections:
• Capture Functionality Overview on page 5-1
• Creating, Configuring, and Using Device Sessions on page 5-4
Capture Functionality OverviewIn addition to adding script steps using the GUI scripting support, you can also add steps by connecting to a configured device via a console session and input commands to the device. The input commands are both executed on the device are also captured as script steps.
The Capture functionality, which adds command capturing capabilities to the basic Edit mode, enables you to establish multiple device sessions at once to dif-ferent test devices and to add steps in direct interaction with those devices.
Commands can be issued using a wide range of supported protocol and applica-tion interfaces, such as Telnet, TclSh, IxEmail, TL1, SSH1/SSH2/SSHAuto, Raw, COM, SNMP, Syslog, Reporter, and PacketDecoder.
In addition to these, a predefined session type of the IxNetwork type exists and is automatically established when TestComposer is launched from IxNetwork. This predefined session with the Builtin Event identifier connects to an IxNetwork Tcl server and permits you to execute IxNetwork predefined events on that session.
IxNetwork TestComposer User Guide, Release 7.00 5-1

Using the Capture Functionality5
Device sessions specifying connectivity parameters that range from physical to exceptions, can be saved as resources and re-used across multiple tests.
The TestComposer GUI with Capture Functionality Enabled
When switching to the Capture functionality of the Edit mode by clicking the
Console button in the Test ribbon (or alternatively by pressing the Alt+Shift+C keyboard shortcut), in addition to the Script Steps table the Session Consoles pane is displayed containing a tabbed view for managing multiple simultaneous connections to configured devices (Figure 5-1).
Figure 5-1. TestComposer GUI with Session Consoles Pane
Important: Working using the Capture functionality can be combined with working in the basic Edit mode and adding steps manually using the GUI scripting support. For example, you can start working in the basic Edit mode and add commands using the GUI scripting support, then configure a device
session and click the button of the Session Console pane to connect to a configured device. While connected to the device, input commands are both executed on the device and captured as script steps into the Script Steps table.Eventually, after having added a number of captured script steps, you can revert to adding more steps in the basic Edit mode using the GUI scripting support.
Session Consoles pane with active session to configured deviceScript Steps table
5-2 IxNetwork TestComposer User Guide, Release 7.00

Using the Capture Functionality
While using the Capture functionality, the bottom pane displays the Command Response, Validation Errors, Execution Errors, Breakpoints, and Find/Replace tabs described in The Edit Mode GUI on page 3-5.
Table 5-1 describes the toolbar buttons for performing device session related operations that are accessible when using the Capture functionality:
Important: As stated before, for every TestComposer script exists a default session type of the IxNetwork type that is automatically established when the script is created. This session with the Builtin Event identifier is however only visible in the Session Consoles pane if the Show IxNetwork Builtin Event console option is selected in the Options | Appearance window accessed by choosing the Tools > Options command.
Table 5-1. Capture Functionality Toolbar Buttons and Options
Button Action
Connects to the configured device using the selected interface.
Disconnects the current session.
Switches to a read-only view of session settings.
Clears the current Console Session pane.
When in the Device Prompts and Exceptions categories, clicking this button adds Device Prompt and Exceptions table entries.
When in the Device Prompts and Exceptions categories, clicking this button removes Device Prompt and Exceptions table entries.
Opens an existing device session saved as a reusable resource.
Saves a device session as a reusable resource.
Opens the console pane in a separate window in Edit Mode.
This toggle type button switches the capturing functionality on or off. On a connected session, switching capturing off would enable you, for example, to input some device commands that are not added as script steps. Eventually, when you wish to add some more script steps while interacting with the device, switch again capturing to on.For an unconnected session, when the capturing functionality is off, you can still connect to the device and issue commands, but without any of the StartSession or subsequent command steps to be added to the Script Steps table.
IxNetwork TestComposer User Guide, Release 7.00 5-3

Using the Capture Functionality5
Creating, Configuring, and Using Device SessionsDevice sessions specify connection parameters to configured test devices, with parameters ranging from basic and physical connection settings to exceptions raised by the configured devices.
Once a device session has been configured, it can be saved as a session resource for subsequent use across multiple test scripts, so as to ease the creation of new TestComposer script.
See Also
Capture Functionality Overview
Related Subtopics
Creating a New Device Session
Creating a Device Session Based on an Existing Resource
Configuring Session Parameters
Creating a New Device Session
To create a new device session:
1. While in the Session Consoles pane, select the default Session Name tab and choose an interface type.
2. Configure the session parameters as described in Configuring Session Parameters on page 5-5.
3. Eventually save the session as a session resource, as described in Saving Device Sessions on page 5-25.
Creating a Device Session Based on an Existing Resource
To create a device session based on an existing session:
1. Select the default Session Name tab of the Session Consoles pane and click
the Load from Storage... button.
2. From the window that appears select a session resource.
3. Choose Load | Open as Local to open the resource in editable mode, in which case a local copy of the resource is accessed.
Note: An IxNetwork session needs not created explicitly, since this special session with the Builtin Event identifier is automatically established each time TestComposer is launched from IxNetwork. However, this session is only displayed if the Show IxNetwork Builtin Event console option is selected in the Options | Appearance window accessed by choosing the Options command from the Test ribbon.
5-4 IxNetwork TestComposer User Guide, Release 7.00

Using the Capture Functionality
4. Modify the configured session parameters as described in Configuring Session Parameters on page 5-5.
5. Eventually save the modified session resource as described in Saving Device Sessions on page 5-25.
See Also
Configuring Session Parameters
Connecting to a Device and Capturing Commands
Using Multiple Device Sessions
Configuring Session Parameters
Depending on the interface to the configured device – Telnet, CmdTool, SSH1/SSH2/SSHAuto, Raw, TclSh, IxEmail, COM, TL1, SNMP, Syslog, Reporter, PacketDecoder, or IxNetwork – different connection parameters can be config-ured. Configurable parameters fall into the following categories:
• Connection: This category defines physical connection parameters, such as for example IP address and listening port of the configured device for proto-col interfaces. See Defining Connection Settings on page 5-7.
• Terminal: This category defines physical connection parameters. See Defining Terminal Settings on page 5-15.
• DevicePrompts: This category specifies expected prompts to be received from the configured device. See Defining Device Prompts on page 5-19.
• Exceptions: This category defines connection exceptions. See See Also on page 5-22.
• Response Templates: This category defines a folder storing response tem-plates that can be used with the session. See Specifying a Response Templates Folder on page 5-23.
Variables as Session Id
The StartSession command can accept a variable as the session name. This allows you to use this session name as variable inside procedures or loops.
The variable can be an integer or a string and the session name can be a combina-tion of variables and constant string.
When you use variables as arguments in the StartSession command they need to be assigned, initialized, and have a default value. They may not be assigned, defined or have a default value unless the step is run. If the variable is not initial-ized, and a default value is not defined for it based on the structure of the session name the following scenarios occur when you try to execute the step in edit mode.
Note: Click the Floating Console button to open the console pane in a separate window in Edit Mode.
IxNetwork TestComposer User Guide, Release 7.00 5-5

Using the Capture Functionality5
• Session name contains only the input parameter name-the following message is displayed “The session name cannot be empty. Please set a valid name for the session.”
• Session name contains other text and the input parameter name, the session starts successfully.
After variables are defined in the test—using Assign Step, input parameters or variable returned by other commands—if you type ‘$’ in the session column a list of available variables is available in a list from which you can select the appropriate one. As you continue typing the list gets filtered and only the vari-ables matching to the characters that you typed appear in the list. If variables are not defined in a test, they are not available for selection as session names.
After you created a Session Id with a variable, it can be used in shared as well as local procedures. When the same Session Id is used in in two procedures having different set of settings of a session type, the device settings in the shared proce-dure are updated with new settings when the procedures are executed in edit mode and a message appears.
When the variable is updated all reference to it needs to be updated. A message appears asking your permission to update the session name for all steps which uses the variable. If you grant permission, all reference to the variable are updated.
The sessions can be transferred to other procedures by simply specifying the name of the session.
If a parameterized session is started and the StatSession step is executed in edit mode the session tab opens in the console pane. Usually the tab name is the name of the session, however when variables are used as session IDs, the tab name is the actual value of the variable and not the variable name.
Example
The following example illustrates how variables can be used in session Id:
StartSession ‘Telnet-1’
StartSession ‘Telnet-2
For i from 1 to 2
Assign x ‘Telnet-$i’
Execute $x ‘show version’
Endfor
5-6 IxNetwork TestComposer User Guide, Release 7.00

Using the Capture Functionality
See Also
Connecting to a Device and Capturing Commands
Using Multiple Device Sessions
Related Subtopics
Defining Connection Settings
Defining Terminal Settings
Defining Device Prompts
See Also
Specifying a Response Templates Folder
Saving Device Sessions
Defining Connection Settings
Connection settings define basic session parameters, such as IP address and lis-tening port of the configured device for different protocol interfaces.
Depending on the chosen interface type—Telnet, TclSh, IxEmail, CmdTool, SSH1/SSH2/SSHAuto, Raw, COM, TL1, SNMP, Syslog, CSVAnalyzer, Syslog, Reporter, PacketDecoder — different sets of session parameters become avail-able.
• Telnet Connection Settings
• IxEmail Connection Settings
• CmdTool Connection Settings
• SSH1/SSH2/SSHAuto Connection Settings
• Raw Interface Connection Settings
• TclSh Connection Settings
• COM Connection Settings
• TL1 Connection Settings
• SNMP Connection Settings
IxNetwork TestComposer User Guide, Release 7.00 5-7

Using the Capture Functionality5
• Syslog Connection Settings
• CSVAnalyzer Connection Settings
• Reporter Connection Settings
• PacketDecoder Connection Settings
In addition to these protocol interfaces, TestComposer supports a predefined ses-sion of the IxNetwork type that is automatically established when TestComposer is launched from IxNetwork, or when a new script is created. This predefined session with the Builtin Event identifier connects to an IxNetwork Tcl server and permits you to execute IxNetwork predefined events on that session.
See Also
Defining Terminal Settings
Defining Device Prompts
Specifying a Response Templates Folder
Saving Device Sessions
Telnet Connection Settings
To define Telnet connection settings:
1. Choose a Telnet session type
2. Specify the appropriate connection settings listed in Table 5-2:
IxEmail Connection Settings
To define IxEmail connection settings:
1. Choose an IxEmail session type
2. Specify the appropriate connection settings listed in Table 5-3:
Table 5-2. Basic Session Settings - Telnet Parameters
Parameter Description
Name The session name.
Type Telnet
IP Address The IPv4 or IPv6 address of the configured device, specified using a numeric value or a defined TestComposer variable.
Port The configured device Telnet listening port, specified using a numeric value or a defined TestComposer variable.
5-8 IxNetwork TestComposer User Guide, Release 7.00

Using the Capture Functionality
CmdTool Connection Settings
To define CmdTool connection settings:
1. Choose a CmdTool session type
2. Specify the appropriate connection settings listed in Table 5-4:
SSH1/SSH2/SSHAuto Connection Settings
To define SSH1/SSH2/SSHAuto connection settings:
1. Choose a SSH1/SSH2/SSHAuto session type.
2. Specify the appropriate connection settings listed in Table 5-5:
Table 5-3. Basic Session Settings - IxEmail Parameters
Parameter Description
Name The session name.
Type IxEmail
Server The SMTP server to be used for sending email.
Port The port on which the smtp server is listening.
Sender name An optional display name that will be shown to the recipients.
Sender address A valid email address registered on the server.
Username The username that will be used to authenticate the sender to the SMTP server. This only needs to be specified if the server requires authentication.
Password The password that corresponds to the username. This only needs to be specified if the server requires authentication.
Table 5-4. Basic Session Settings - CmdTool Parameters
Parameter Description
Name The session name.
Type CmdTool
Table 5-5. Basic Session Settings - SSH1/SSH2, and SSHAuto Parameters
Parameter Description
Name The session name.
Type SSH1/SSH2/SSHAuto
IxNetwork TestComposer User Guide, Release 7.00 5-9

Using the Capture Functionality5
Raw Interface Connection Settings
To define Raw connection settings:
1. Choose a Raw session type.
2. Specify the appropriate connection settings listed in Table 5-6:
TclSh Connection Settings
To define TclSh connection settings:
1. Choose a Tclsh session type.
2. Specify the appropriate connection settings listed in Table 5-7:
IP Address The IPv4 or IPv6 address of the configured device, specified using a numeric value or a defined TestComposer variable.
Port The configured device SSH1/SSH2/SSHAuto listening port, specified using a numeric value or a defined TestComposer variable.
Login The login name.
Password The password corresponding to the login name.
Table 5-6. Basic Session Settings - Raw Interface Parameters
Parameter Description
Name The session name
Type Raw
IP Address The IPv4 address of the configured device, specified using a numeric value or a defined TestComposer variable.
Port The configured device Raw listening port, specified using a numeric value or a defined TestComposer variable.
Table 5-7. Basic Session Settings - TclSh Parameters
Parameter Description
Name The session name
Type TclSh
Note: The Tclsh interface supports Tcl version 8.4.
Table 5-5. Basic Session Settings - SSH1/SSH2, and SSHAuto Parameters
Parameter Description
5-10 IxNetwork TestComposer User Guide, Release 7.00

Using the Capture Functionality
COM Connection Settings
To define COM connection settings:
1. Choose a COM session type.
2. Specify the appropriate connection settings listed in Table 5-8:
TL1 Connection Settings
To define TL1 connection settings:
1. Choose a TL1 session type.
2. Specify the appropriate connection settings listed in Table 5-9:
Table 5-8. Basic Session Settings - COM Parameters
Parameter Description
Name The session name
Type COM
Connect Using The COM port to which the application connects.
Bits per Second The bitrate per second.
Data Bits The number of data bits.
Parity The number of parity bits.
Stop Bits The number of stop bits
Flow Control The flow control type: None, Hardware, Xon/Xoff
Table 5-9. Basic Session Settings - TL1 Parameters
Parameter Description
Name The session name
Type TL1
IP address The IPv4 address of the configured device, specified using a numeric value or a defined TestComposer variable.
Port The configured device TL1 listening port, specified using a numeric value or a defined TestComposer variable.
TID The target ID.
UID/User ID The user ID.
PID/Password The password corresponding to the UID.
IxNetwork TestComposer User Guide, Release 7.00 5-11

Using the Capture Functionality5
SNMP Connection Settings
To define SNMP connection settings:
1. Choose a SNMP session type.
2. Specify the appropriate connection settings listed in Table 5-10:
Table 5-10. Basic Session Settings - SNMP Parameters
Parameter Description
Name The session name
Type SNMP
DUT The IPv4 or IPv6 address of the SNMP-monitored devices.
Protocol The transport protocol, TCP or UDP.
Port The configured device SNMP listening port, specified using a numeric value or a defined TestComposer variable.
Version The SNMP protocol version, v1, v2c, or v3.
ReadOnly Community
The read-only community string (valid for SNMP v1 and v2c).
ReadWrite Community
The read-write community string (valid for SNMP v1 and v2c).
Security Name The security user name. This parameter is only valid for SNMP v3.
Security Level A security level (for SNMP v3 only) as one of the following:• noAuthNoPriv: The session uses neither authentica-
tion nor encryption.• authNoPriv: The session uses neither authentication
but no encryption.• authPriv: The session uses both authentication and
encryption.
Authentication protocol
When authentication is configured at security level, this specifies the authentication protocol used (MD5, SHA).This parameter is only valid for SNMP v3.
Authentication password
When authentication is configured at security level, this specifies the authentication password used. This parameter is only valid for SNMP v3.
Privacy protocol When encryption is configured at security level, this specifies the encryption protocol used (AES, DES). This parameter is only valid for SNMP v3.
5-12 IxNetwork TestComposer User Guide, Release 7.00

Using the Capture Functionality
Syslog Connection Settings
To define Syslog connection settings:
1. Choose a Syslog session type.
2. Specify the appropriate connection settings listed in Table 5-11:
Privacy password When encryption is configured at security level, this specifies the encryption password used. This parameter is only valid for SNMP v3.
Context An additional parameter (for SNMP v3 only) that may be interpreted differently by different SNMP agents. As a common example, in the case of network routers this could reference the VLAN id for a router interface.
Note: For a description of the predefined commands that can be executed on an established SNMP session, refer to SNMP Session Commands on page E-1.
Table 5-11. Basic Session Settings - Syslog Parameters
Parameter Description
Name The session name
Type Syslog
Protocol The transport protocol, TCP or UDP.
Starting port The actual listening syslog port is the first available port starting from the starting port specified by this field. The starting port value can be specified using a numeric value or a defined TestComposer variable.
Hosts The hosts to receive syslog messages from. If a message is received from a host that is not contained in the list, the message is discarded. If no host is specified, the syslog daemon accepts messages from all the hosts configured to send syslog messages to the syslog deamon.
Message delimiters A predefined message delimiter, which can be either NULL, CR, LF, or CRLF. This parameter is valid for TCP transport only.Specifying an appropriate message delimiter, which indicates a syslog message end, is of paramount importance.
Important: The listening syslog port number value can be retrieved as the StartSession (Syslog) step return variable.
Table 5-10. Basic Session Settings - SNMP Parameters
Parameter Description
IxNetwork TestComposer User Guide, Release 7.00 5-13

Using the Capture Functionality5
CSVAnalyzer Connection Settings
To define CSVAnalyzer connection settings:
1. Choose a CSVAnalyzer session type.
2. Specify the appropriate connection settings listed in Table 5-12:
Reporter Connection Settings
No connection settings need to be configured for a Reporter session.
PacketDecoder Connection Settings
To define PacketDecoder connection settings:
1. Choose a PacketDecoder session type.
2. Specify the appropriate connection settings listed in Table 5-13:
Note: After starting the syslog daemon, the execution continues with the next step, while the daemon continues to run in the background until the Syslog session is disconnected.
Note: For a description of the predefined commands that can be executed on an established Syslog session, refer to Syslog Session Commands on page E-8.
Table 5-12. Basic Session Settings - CSVAnalyzer Parameters
Parameter Description
Name The session name
Type CSVAnalyzer
CSV File The CSV file to be processed according to the CSV Template.
CSV Template The schema file that specifies processing rules for retrieving statistics from the actual CSV file.
Note: The StartSession command returns a composite variable containing the input parameter values.
Note: For a description of the predefined commands that can be executed on an established Syslog session, refer to Reporter Session Commands on page E-13.
5-14 IxNetwork TestComposer User Guide, Release 7.00

Using the Capture Functionality
Defining Terminal Settings
Terminal settings configure physical connection parameters, such as transmis-sion with or without echoing, delays, and terminal emulation.
Once you have defined the interface, click the Terminal button to access the Ter-minal settings and configure the parameters listed Table 5-14.
Table 5-13. Basic Session Settings - PacketDecoder Parameters
Parameter Description
Name The session name
Type PacketDecoder
Capture File The capture file to be analyzed. This is an optional parameter, since a capture file can also be specified using the Load Capture File command.
Note: For a description of the predefined commands that can be executed on an established PacketDecoder session, refer to Packet Decoder Session Commands on page E-18.
Table 5-14. Terminal Settings
Parameter Description
Use Putty This option allows you to choose the type of terminal when you connect to a remote device through Telnet or through SSH. If this option is selected, different configuration options are available. By default, Use Putty option is not selected.
ASCII Sending - Echo typed characters locally
If selected, this option locally echoes the typed characters and provides visual feedback for devices that do not echo the typed input via the communications channel.
IxNetwork TestComposer User Guide, Release 7.00 5-15

Using the Capture Functionality5
Characters delay The character delay (in milliseconds)Note: In an automated environment, some devices do not respond when they receive characters too quickly; instead, they work when the characters are typed in. This option provides a delay between characters that is sent during playback so that the device can respond.Important: When playing back test steps, commands sent to a DUT over an established session might be transmitted at a rate that is too high, causing the remote device to respond inappropriately. For this reason, for some CLI sessions, such as telnet, COM, or SSH, whenever connectivity problems arise, we recommend configuring a value of 200 ms for the Character delay parameter in the TestComposer Consoles window. Although this value will cause the typed characters to appear slightly delayed at capture time, it ensures that at execution time the DUT handles input correctly.This option is unavailable when Use Putty option is selected.
Command Line Terminator
The command terminating sequence, \r (return) or \r\n (return and new line).
Device Terminator A device terminator is a control character sequence, such as for example CTRL C, that is sent to a configured device in order to stop a continuous device output, such as for example that of a ping -t or tcpdump command.
Table 5-14. Terminal Settings (Continued)
Parameter Description
5-16 IxNetwork TestComposer User Guide, Release 7.00

Using the Capture Functionality
Device Encoding The command encoding.If Use Putty is enabled only the following device encodings are available:• {51932, "EUC-JP"}• {50220, "ISO-2022-JP"}• {51949, "EUC-KR"}• {950, "Big5"}• {51936, "EUC-CN"}• {65001, "UTF-8/Auto-Detect Japanese"}• {20932, "EUC-JP/Auto-Detect Japanese"}• {932, "MS_Kanji/Shift_JIS/Auto-Detect Japanese"}• {28591, "CP819/ISO-8859-1:1998 (Latin-1, West
Europe)"}• {28592, "ISO-8859-2:1999 (Latin-2, East Europe)"}• {28593, "ISO-8859-3:1999 (Latin-3, South Europe)"}• {28594, "ISO-8859-4:1998 (Latin-4, North Europe)"}• {28595, "ISO-8859-5:1999 (Latin/Cyrillic)"}• {28596, "ISO-8859-6:1999 (Latin/Arabic)"}• {28597, "ISO-8859-7:1987 (Latin/Greek)"}• {28598, "ISO-8859-8:1999 (Latin/Hebrew)"}• {28599, "ISO-8859-9:1999 (Latin-5, Turkish)"}• {96, "ISO-8859-11:2001 (Latin/Thai)/ ISO-8859-
10:1998 (Latin-6, Nordic)"}• {28603, "ISO-8859-13:1998 (Latin-7, Baltic)"}• {28605, "ISO-8859-15:1999 (Latin-9, \"euro\")"}• {-1, "(Mazovia)/DEC-MCS/VSCII/HP-ROMAN8/ISO-
8859-14:1998 (Latin-8, Celtic)/ ISO-8859-16:2001 (Latin-10, Balkan)"}
• {21866, "KOI8-U"}• {20866, "CP878/KOI8-R"}• {1250, "Win1250 (Central European)"}• {1251, "Win1251 (Cyrillic)"}• {1252, "Win1252 (Western)"}• {1253, "Win1253 (Greek)"}• {1254, "Win1254 (Turkish)"}• {1255, "Win1255 (Hebrew)"}• {1256, "Win1256 (Arabic)"}• {1257, "Win1257 (Baltic)"}• {1258, "Win1258 (Vietnamese)"}• {437, "CP437"}If Use Putty is disabled the entire list of encodings are available
Table 5-14. Terminal Settings (Continued)
Parameter Description
IxNetwork TestComposer User Guide, Release 7.00 5-17

Using the Capture Functionality5
Prelogin setting: Wait for startup device prompt
When selected (default), the login sequence expects and waits for a prompt from the configured device. For some devices that do not generate prompts, such as terminal servers, this option needs to be unselected. This option is only available for Telnet, SSH, and Raw sessions.
Backspace Key Specifies the default value that is sent when pressing the Backspace key as either of the following:• Code 8 (Control-H): This is the setting used by most
Windows terminals.• Code 127 (Control-?): This is a setting most com-
monly encountered on *nix devices.
Home and End Keys Specifies the behavior for these keys as either of the following:• Standard: The standard behavior that matches most
terminals.• RXVT: In this mode ESC [H for the Home key and
ESC [Ow for the End key are sent.• Terminal: In this mode the sent device codes are
those most commonly used in emacs-type terminals and usually match the telnet/SSH interface:• Home: ^A (Ctrl-A) or Start of heading character
(SOH) - x0001• End: ^E (Ctrl-E) or Enquiry character (ENQ) -
x0005
Application Cursor Keys mode
Specifies the mode for sending control sequences when pressing the arrow keys. The following modes are implemented:• Normal: The sent codes are ESC [A to ESC [D. • Application: The sent codes are ESC OA to ESC
OD.• Terminal: The sent codes are those most commonly
used in emacs-type terminals and usually match the telnet/SSH interface:• Arrow Up: ^P (CTRL-P) or Data link escape char-
acter (DLE) - x0010• Arrow Down: ^N (CTRL-N) or Shift Out character
(SO) - x000e• Arrow Left: ^B (CTRL-B) or Start of text character
(STX) - x0002• Arrow Right: ^F (CTRL-F) or Acknowledge char-
acter (ACK) - x0006
Table 5-14. Terminal Settings (Continued)
Parameter Description
5-18 IxNetwork TestComposer User Guide, Release 7.00

Using the Capture Functionality
See Also
Defining Connection Settings
Defining Device Prompts
See Also
Specifying a Response Templates Folder
Saving Device Sessions
Defining Device Prompts
When establishing a device session to a configured device, the device might issue prompts and expect user input, such as, for example, when performing an authen-tication operation. For example, the logon sequence below represents a typical logon sequence for a router device that puts the device into a well-defined state.
The Device Prompts page contains the captured device responses of a logon sequence. The Device Prompts table initially comprises a set of predefined set of prompts based on regular expressions.
Terminal type The type of terminal used.If Use Putty is disabled default value is “dumb”. If Use Putty is enabled default value is “xterm”
Line Size The size of the line is dispalyed.The value is between 80-250 characters.This option is unavailable when Use Putty option is disabled.
Note: In the current implementation, function keys are not supported by active sessions in the Session Consoles window.
Prompt Valueusername: <username>
password: <password>
GW-IXIA01> en
password: <password>
Table 5-14. Terminal Settings (Continued)
Parameter Description
IxNetwork TestComposer User Guide, Release 7.00 5-19
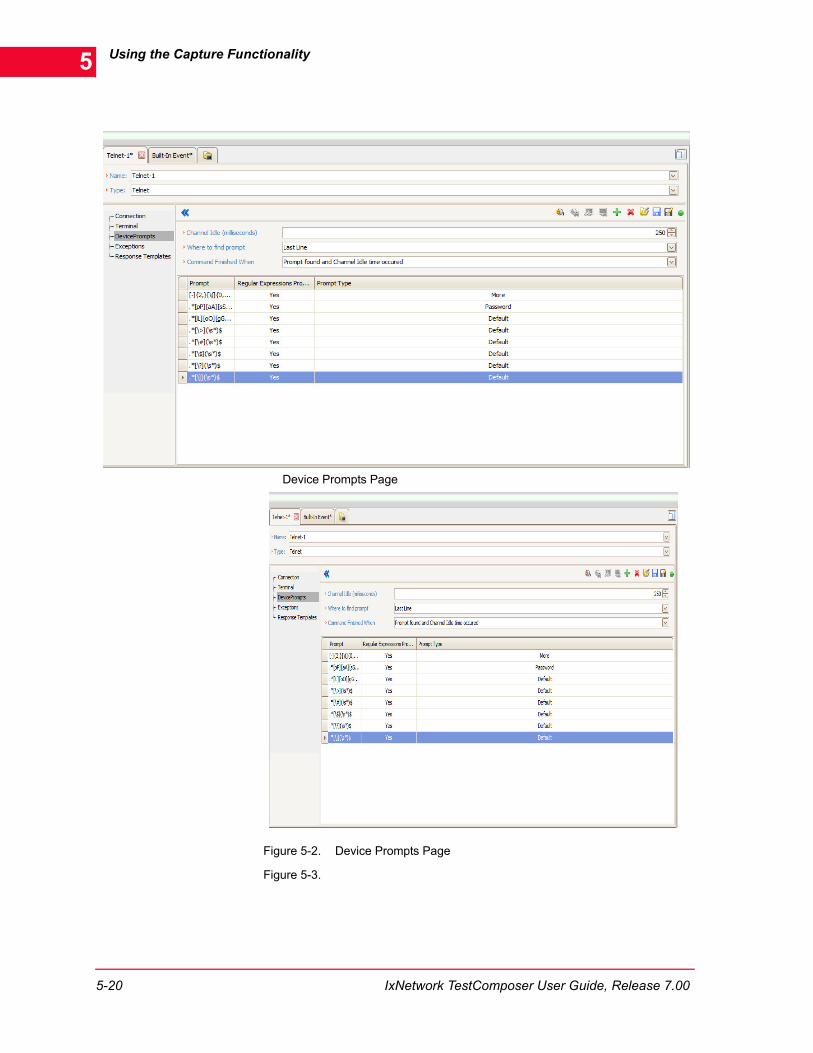
Using the Capture Functionality5
Device Prompts Page
Figure 5-2. Device Prompts Page
Figure 5-3.
5-20 IxNetwork TestComposer User Guide, Release 7.00

Using the Capture Functionality
When adding script steps using the Capture functionality, encountered prompts are automatically added to the Device Prompts table, while the input strings are added to the Steps Table as Execute-type steps.
The Channel idle parameter defines the time interval following a response from the device, after which the system assumes no future responses will arrive and consequently considers the last response line as a the prompt, adding it to the prompts list.
To add prompts, configure a reasonable (default is 250 ms) value for the Channel Idle parameter, establish a connection to the configured device, and per-form the appropriate login sequence.
Select a parameter from the Where to find Prompt list for the location of the prompt.
The Command Finished When parameter is available only when you enable Use Putty in the terminal tab. It has got two options:
Prompt found and Channel Idle time occurred: The Prompt found and Channel Idle time occurred parameter considers both Prompt found and Channel idle parameters to decide when a command has finished its execution.
Prompt found: The Prompt found parameter gives you increased execution rate at run-time.
An alternative mode of adding a prompt is by clicking the button and defin-ing the prompt parameters manually, as described in Table 5-15.
Note: The set of pre-defined prompts is session-specific. A special --More-- prompt, available for Telnet sessions, is intended for handling multi-page device responses.
Notes: • A reasonable time out value in the context above indicates a value that
should be neither too low (for high latency devices the actual response might take longer to arrive than the configured timeout), nor too high (more than one step commands instead of a single one could possibly be executed in the configured period of time).
• When connecting to devices over networks that have an higher latency, it is recommended to configure a channel timeout higher than 250 ms, such as to be able to receive a response from the device.
• A zero channel timeout value disables the prompt autocapture functionality.
IxNetwork TestComposer User Guide, Release 7.00 5-21

Using the Capture Functionality5
To remove a prompt list entry, select it and click the button.
See Also
Defining Connection Settings
Defining Terminal Settings
Defining Capture Mode Exceptions
Specifying a Response Templates Folder
Table 5-15. Advanced Settings - Device Prompts
Parameter Description
Prompt The expected prompt, which can be a string or a regular expression.
Prompt Type The prompt type, which can be any of the following:• Default: A prompt that is neither a More nor a Pass-
word prompt.• More prompt: When a More prompt is encountered, a
space character is automatically generated such as to advanced the device output to the next page.
• Password prompt: When a Password prompt is encountered, the subsequent captured command step has the Encrypt option selected and the Com-mand String column entry of the Script Steps table is shown using wildcard (*) characters.
Regular Expression Prompt
The prompt is expected to match a regular expression. For example, using the [.]+> regular expression means one or more characters are expected, followed by the ‘>’, which might be a valid prompt for a Cmdtool session.
Note: As an example, considering a sample login sequence shown previously, the captured prompts list is shown in the figure below, with the Password: entry defined as a Password Prompt, such as to show the captured step entry of the Script Steps table using * characters.
5-22 IxNetwork TestComposer User Guide, Release 7.00

Using the Capture Functionality
Defining Capture Mode Exceptions
When configuring a device, a procedure command could time out – the response from the device exceeds a specified amount of time, generating a timeout excep-tion – or the configured device could throw a run-time error.
Clicking the Exceptions links displays the Exception Response list that enables you to define a list of possible errors strings to look for in a command output (Table 5-16). When an error string is encountered that matches a table entry, an error is considered to have occurred in the script and a response action can be configured in the Information pane, as described in Defining Script Properties on page 3-4.
Clicking into the No Response Exception Timeout field enables you to specify a timeout value when trying to connect to a configured device. Upon connecting, if no response is received from the device within the configured interval, an error message is displayed.
See Also
Defining Connection Settings
Defining Terminal Settings
Defining Device Prompts
Specifying a Response Templates Folder
Specifying a Response Templates Folder
The Response Templates folder specified in the session configuration is a folder that stores templates applicable to that device session. When you then add or edit commands for the session, the commands are checked against the Response
Table 5-16. Advanced Settings - Exception Response List
Parameter Description
Match index The match index defines the order in which encountered exceptions are matched against exception list entries, with higher-ranked exceptions being matched first.
Match data This is a regular expression used to monitor the device output for exceptions thrown by the configured device. If the specified Match data string is found in the command output, a message is displayed signaling the match and an error is considered to have occurred.Note: Upon successfully matching a data string in the command output, the remaining match data entries are no longer compared.
Severity action Enables you to specify if the match is to be considered an error or not.
IxNetwork TestComposer User Guide, Release 7.00 5-23

Using the Capture Functionality5
Templates from the specified folder, and, if a command matches any regular expression (RegEx) specified in one of the Response Templates, that template automatically becomes available for the command.
To specify a Response Templates folder, click the button in the Response Templates page and select an existing folder from the window that appears (Figure 5-10).
Figure 5-4. Response Templates Selection Window
See Also
Defining Connection Settings
Defining Terminal Settings
Defining Device Prompts
Defining Capture Mode Exceptions
Note: Configuring a command associated with a Response Template resource is described in Defining a Response Template - Command Association on page 13-28.
5-24 IxNetwork TestComposer User Guide, Release 7.00

Using the Capture Functionality
Figure 5-5. Response Templates Selection Window
Saving Device Sessions
Sessions can be saved as resources for subsequent use, making the script config-uration easier.
To save a device session:
1. Click the Save as Resource button, choose the Reusable Resources cat-egory from the dialog that opens and click the Ok button.
2. When prompted, specify a device session name.
The device session is saved as a reusable procedure resource and can be re-
used across multiple tests by clicking the Load from Storage... button in the Session Consoles window.
Connecting to a Device and Capturing Commands
To connect to a configured device:
1. Activate the Session Consoles pane by clicking the button or press-ing the Alt+Shift+C keyboard shortcut.
2. Configure the device session settings as described in Configuring Session Parameters on page 5-5.
Alternatively you can you can load a previously configured session by click-
ing the Load from Storage... button. This opens a standard selection
Note: When saving a device session as a resource, it is saved in a folder under the Device Sessions folder comprising all device session resources. If you want to save a device session to a different location, either on the same machine or on another network machine, use the Export command from the Manage Resources window instead, as described in Manage Resources on page 15-9.
IxNetwork TestComposer User Guide, Release 7.00 5-25

Using the Capture Functionality5
window (Figure 5-10), which enables you to choose an existing session from those stored in the Resources/Device Sessions folder.
Figure 5-6. Load Session window
Figure 5-7. Load Session Window
3. Click the Connect button. A connection to the configured device is estab-lished, enabling you to input commands in the Session Consoles window that appears (Figure 5-10). A StartSession command is automatically captured as
5-26 IxNetwork TestComposer User Guide, Release 7.00

Using the Capture Functionality
a script step and is added to the end of the Script Steps table.
Figure 5-8. Command Line Interface in Session Console
Figure 5-9. Command Line Interface in Session Console
IxNetwork TestComposer User Guide, Release 7.00 5-27

Using the Capture Functionality5
4. As you type in CLI commands, if the capturing functionality is enabled
( ), these are automatically captured and new steps are added to the Script Steps table of the current script tab.
If at any moment you wish to issue a command that is not supposed to be cap-
tured, switch capturing off ( ) and continue interacting with the device. Eventually switch capturing on again when you wish to add more script steps while interacting with the test device.
When the step is added, a response template called Local Step Response is associated with the step. It can be edited such as to define specific portions of the command response as targets, as described in Creating Response Templates on page 13-7.
5. As an alternative to typing in the commands manually, steps can also be added by pasting multi-line commands from the an external file to the Console window, whereby each pasted line is captured as a separate script step.
6. While connected to the configured device, you can re-run selected steps from
the Script Steps table by selecting (a) step(s) and clicking the button, then clicking Play selected only.
Note: The Connect button is not available when the device session uses variables as parameters. In such a case, when attempting to connect to a device, you are prompted to select the steps that initialize the variables and first replay these steps.
Notes: • Depending on the active session type, the console supports the history and
autocompletion functionality that is made available when pressing special keys on the keyboard, such as Backspace, Home/End, or arrow keys. For information on configuring the actual character sequences that are transmit-ted to devices for the special keys, refer to Defining Terminal Settings on page 5-15.
• For all session types, pressing the Enter keys on a connected session adds an empty test step. When the step is executed, an Enter character is sent to the configured device.
• In the case of the CmdTool and Tclsh sessions, you can change the cursor position using both the keyboard input and mouse interaction. For Telnet and SSH sessions, you can can move inside the command text only using the keyboard, while the mouse can only be used for local operations such as copy and paste.
Note: Upon connecting to a device, a device logon sequence might unfold requiring the input of user name and a password in response to device prompts. If such a case the device-generated prompts are captured into the DevicePrompts tab of the Session Consoles window, and any user input is recorded as script steps.
5-28 IxNetwork TestComposer User Guide, Release 7.00

Using the Capture Functionality
7. At any moment, if you want to clear the contents of the Session Consoles
pane, click the Clear Screen button.
Eventually click the Disconnect button to terminate the session. Upon closing the session, a StopSession command is automatically captured as a last script step if the capturing functionality is switched on.
See Also
Configuring Session Parameters
Using Multiple Device Sessions
Using Multiple Device Sessions
While in the Capture mode, you can simultaneously connect to multiple test devices using different sessions and thus capture into the script any number of steps originating from multiple configured devices (Figure 5-10).
Figure 5-10. Multiple Session Tabs in Capture Mode Window
To establish multiple device sessions simultaneously:
Note: While connected to a configured test device, it is recommended to avoid executing exit commands to the device. The preferred solution is to disconnect using a StopSession step, which can be automatically generated
by clicking the Disconnect button.However, if you still need to use an exit command, be aware that when running the step, it will be marked as having had an error because the session was disconnected by the device and not by the TestComposer plug-in.
IxNetwork TestComposer User Guide, Release 7.00 5-29

Using the Capture Functionality5
1. Click the New Session tab, or press the Ctrl + T keyboard shortcut, to create a new session and configure it.
Alternatively re-use an existing device session resource by clicking the Load
from Storage... button.
2. Click the Connect button to connect using the configured device settings.
3. Repeat step 1 and 2 for opening multiple device sessions in parallel.
4. Select in turn a device session by clicking its tab, click into the CLI pane and input commands. If the capturing functionality is enabled for the currently
selected session ( ), commands are automatically captured and added as new steps to the Script Steps table.
5. To close an open session, select its corresponding tab and click the
Disconnect button.
Alternatively close the session by clicking its button.
See Also
Configuring Session Parameters
Connecting to a Device and Capturing Commands
Note: On occasions you might have started a session and entered a command that takes a long time to complete (or possibly never completes), such as for example a recursive dir C:\ command in a CmdTool session.
In such a situation, clicking the Disconnect button once waits for the command to complete its execution. To effectively abort the session, you need
to click the Disconnect button a second time.
Note: Displayed sessions tabs can be accessed using the following shortcuts:• CTRL+TAB: Activates the next session tab. • CTRL+SHIFT+TAB: Activates the previous session tab. If the first tab is hit,
the last session tab is selected (the tab near the New session tab).• CTRL+F4, CTRL+W: Closes the selected tab. The Console Sessions win-
dow always has two tabs, Default Session and New Session, which cannot be closed.
• CTRL+T: Creates a new tab.
5-30 IxNetwork TestComposer User Guide, Release 7.00

6Chapter 6: Script Steps Reference Information
This chapter provides step reference information and comprises the following sections:
• Control Statement Steps on page 6-1.
• Command Steps on page 6-43
• Procedure Step on page 6-101
• QuickTest Structure Steps on page 6-103
Control Statement StepsThis describes the following control statements:
• Comment: Defines a non-executable comment that is displayed in the Script Steps table.
• Assign: Defines a local TestComposer variable and assigns it a user-specified value or an expression.
• ReadWriteGlobal: Defines a global TestComposer variable and assigns it a user-specified value or an expression that may contain local variables.
• For: Executes a loop comprising a number of steps by cycling over a counter variable or a set of values.
• While: Executes a loop comprising a number of steps until the loop condition evaluates to ‘false’.
• Do...While: Executes a loop comprising a number of steps while the loop condition evaluates to ‘true’.
• StepSearch: Executes a counter type loop containing a number of steps until a user-defined condition evaluates to ‘false’.
• BinarySearch: Searches over a continuous interval by selecting the middle element in the interval, thus progressively closing in on a sought value. For every pass, a user-defined condition is evaluated and the search interval is reduced. The search ends when the interval falls below a user-specified value.
IxNetwork TestComposer User Guide, Release 7.00 6-1

Script Steps Reference Information6
• Break: Unconditionally breaks a for or while loop.
• Exit: Terminates the script execution.
• Return: A Return statement is used within a procedure for returning the value of a variable or of a constant. When used in the main body of a script, it is used for specifying a script pass/fail result.
• If, Else: The If control statement evaluates a condition and executes the fol-lowing step(s) if the condition evaluates to ‘true’. The Else control statement is used within an If statement specifies an execution path when the If-associ-ated condition evaluates ‘false’.
• Join: Waits for one or more steps executing in parallel to finish.
• RunProcedure: Runs a procedure that was defined locally in the script body, or an external procedure resource. A procedure, comprising one or more steps, enables you to define an operations sequence and execute it repeatedly within a script.
• RunProcess: Runs an external command, such as an .exe command file or a Tcl script.
• Sleep: Pauses the script execution for a specified period of time.
Comment Statement Step
A Comment step defines a non-executing comment that displays in the Script Steps table.
Comment Step in Step Configuration Wizard
A Comment step defines a non-executing comment that displays in the Script Steps table.
To add a Comment statement step:
1. While in the Script Steps pane, add a step by choosing the Actions > Add step... command.
2. Select a Comment step type, click the button to validate the selection.
Click Next.
3. Type in the comment text. Click Next.
4. Verify the step summary information and revert to a previous configuration step if needed. Click Finish.
Comment Step In-Place Editing
To edit a Comment script step:
1. Select the step in the Script Steps table.
2. Edit the step parameters as follows:
• Session: This column displays no session at all.
6-2 IxNetwork TestComposer User Guide, Release 7.00

Script Steps Reference Information
• Return variable: This column uses no return variable.
• Command String: This column displays a comment text.
Click into the column and define a comment by editing it in-place, or click
the button and create a comment in the drop-down pane that appears.
Assign Statement Step
An Assign step defines a local TestComposer variable and assigns it a user-defined value or an expression.
Assign Statement Step in Step Configuration Wizard
An Assign step defines a local TestComposer variable and assigns it a user-defined value or an expression.
To add an Assign statement step:
1. While in the Script Steps pane, add a step by choosing the Actions > Add step... command.
2. Select an Assign step type, click the button to validate the selection, and specify the following parameters:
• Run Type: An Assign step can only be executed sequentially (Sequential).
• Delay: A delay specifying by how much step start is delayed. A delay value is automatically set when the step is added using the Capture func-tionality.
• Timeout: A period of time after which the step execution is considered to have timed out.
• Ignore step: When this option is selected, the step is skipped at execution time. Selecting this option is equivalent to right-clicking a step in the Script Steps table and choosing the Exclude command from the context menu that appears.
• Description: An optional step description can be associated with the step.
Click Next.
3. Define the Conditional Execution settings as explained below.
Conditional Execution settings enable you to define the system conditions a script step execution is monitored for. When such a predefined condition occurs – a step error or a step timeout – an user-defined procedure is executed and an additional action is performed. For example, on encountering a step error, you could enforce the execution of a cleanup procedure and then termi-nate the script.
To monitor the step for a predefined Timeout or Error condition, select the corresponding condition, then define the associated procedure – local or
Note: For an explanation of the local variable type refer to About Variables on page 7-1.
IxNetwork TestComposer User Guide, Release 7.00 6-3

Script Steps Reference Information6
shared (external) – by clicking the control of the Procedure field and selecting a procedure from the the drop-down pane that appears.
For the selected procedure you can view its defined arguments by clicking the
control of the Input Arguments field, which displays a cascading table-format pane containing the argument list. To specify the actual runtime argu-ment(s) enter the desired values in the Current Value field(s).
Configure an additional action by clicking into additional actions column and selecting either of the following options:
• Continue: After performing the specified procedure, the script execution continues.
• Exit Test: After performing the specified procedure, the script execution is terminated.
Click Next.
4. Specify the variable to create by clicking into the field and editing its name in
place. Alternatively select an existing variable by clicking the button and choosing it from the window that appears.
Create an expression to assign to the variable by clicking into the Expression field which brings up the Expression Builder GUI.
Define a valid Tcl expression or a multi-line code fragment by double-click-ing in turn the desired Tcl commands and operators, and TestComposer vari-ables. For detailed information on using the Expression Builder and creating Tcl expressions refer to Using the Composer Expression Builder on page 7-1.
Click Next.
5. Verify the step summary information and revert to a previous configuration step if needed. Click Finish.
Note: Whenever the step execution is monitored for predefined events, an icon is displayed in the step’s corresponding Events selected column entry. For information on turning on the displaying of the Events selected column refer to Customizing the Script Steps Table Layout on page 4-5.
6-4 IxNetwork TestComposer User Guide, Release 7.00

Script Steps Reference Information
Assign Step In-Place Editing
To edit an Assign script step:
1. Select the step in the Script Steps table.
2. Edit the step parameters as follows:
• Session: This column displays no session at all.
• Return variable: This column displays the name of the script variable that is assigned a value or a Tcl expression.
A new variable can be specified by clicking into the column and defining it in-place.
Alternatively, click the button that displays a drop-down pane listing
all defined variables, then click the button to select a variable.
• Command String: This column displays the numeric value or the Tcl expression assigned to the variable.
Click into the column and define an expression by editing it in-place.
Alternatively, click the button and create a valid expression using the Expression Builder GUI, as described in Using the Composer Expression Builder on page 7-1.
Examples:
Assign i 10 // number assignment
Assign str “string with spaces” // string assignment
Assign a $b //variable assignment
Assign lst {1 2 3 4} // list assignment
Assign lst {1 2 {one two} 3} //composite list assignment
Assign result [expr {$a +$b}] // expression assignment
Assign lst [list a b c d] // tcl command assignment
Assign path [pwd] // tcl command assignment
Assign time [clock seconds] //tcl command assignment
IxNetwork TestComposer User Guide, Release 7.00 6-5

Script Steps Reference Information6
ReadWriteGlobal
Statement Step
A ReadWriteGlobal statement defines a global TestComposer variable and assigns it a user-specified value or an expression that may contain local variables.
ReadWriteGlobal Statement Step in Step Configuration WIzard
Defines a global TestComposer variable and assigns it a user-specified value or an expression that may contain local variables. Alternatively, the statement is also used for assigning to a local variable the value of a global variable.
To add a ReadWriteGlobal statement step:
1. While in the Script Steps pane, add a step by choosing the Actions > Add step... command.
2. Select a ReadWriteGlobal step type, click the button to validate the selection, and specify the following parameters:
3. Define the Conditional Execution settings as explained below.
Conditional Execution settings enable you to define the system conditions a script step execution is monitored for. When such a predefined condition occurs – a step error or a step timeout – an user-defined procedure is executed and an additional action is performed. For example, on encountering a step error, you could enforce the execution of a cleanup procedure and then termi-nate the script.
Examples:
Assign i 10 // number assignment
Assign str “string with spaces” // string assignment
Assign a $b //variable assignment
Assign lst {1 2 3 4} // list assignment
Assign lst {1 2 {one two} 3} //composite list assignment
Assign result [expr {$a +$b}] // expression assignment
Assign lst [list a b c d] // tcl command assignment
Assign path [pwd] // tcl command assignment
Assign time [clock seconds] //tcl command assignment
Note: Opposed to local variables, defined and visible either in the main script procedure or in the bodies of local procedures, global variables are visible throughout the entire script. Because of this behavior, global variables are used for transferring the value of local variables between the main script body and the bodies of procedures, or from a procedure body to another procedure. For more information on the global variable type refer to About Variables on page 7-1.
6-6 IxNetwork TestComposer User Guide, Release 7.00

Script Steps Reference Information
To monitor the step for a predefined Timeout or Error condition, select the corresponding condition, then define the associated procedure – local or
shared (external) – by clicking the control of the Procedure field and selecting a procedure from the the drop-down pane that appears.
For the selected procedure you can view its defined arguments by clicking the
control of the Input Arguments field, which displays a cascading table-format pane containing the argument list. To specify the actual runtime argu-ment(s) enter the desired values in the Current Value field(s).
Configure an additional action by clicking into additional actions column and selecting either of the following options:
• Continue: After performing the specified procedure, the script execution continues.
• Exit Test: After performing the specified procedure, the script execution is terminated.
Click Next.
4. With the Global option selected, specify a global variable to create by click-ing into the field and editing its name in place. At the next step, you can assign it a local variable or a constant value.
Alternatively, when the Local option is selected, you can specify a local vari-able, whom you can then assign it a global variable.
Click Next.
5. Select the Local or Constant options and assign a local variable or a constant value to the previously defined global variable.
Alternatively, if a local variable was specified at the previous step, you can assign it the value of a global variable.
Click Next.
6. Verify the step summary information and revert to a previous configuration step if needed. Click Finish.
The global variable that was initialized with the value of a local variable can then be used in a procedure body to transfer the value to a local procedure variable using another ReadWriteGlobal statement.
Note: Whenever the step execution is monitored for predefined events, an icon is displayed in the step’s corresponding Events selected column entry. For information on turning on the displaying of the Events selected column refer to Customizing the Script Steps Table Layout on page 4-5.
IxNetwork TestComposer User Guide, Release 7.00 6-7

Script Steps Reference Information6
ReadWriteGlobal Step In-Place Editing
A ReadWriteGlobal step is used for assigning the value of a local variable to a global variable, or conversely. Using two symmetrical ReadWriteGlobal state-ments (local -> global -> local variable assignment), you can transfer a variable value between the main script body and the bodies of local procedures.
To edit a ReadWriteGlobal script step:
1. Select the step in the Script Steps table.
2. Edit the step parameters as follows:
• Session: This column displays no session at all.
• Return variable: This column displays the name of a local or global vari-able.
Click into the column and edit in-place the variable name. Alternatively,
click the button, choose a variable type (Local or Global) and spec-ify a variable name in the drop-down pane that appears.
• Command string: This column displays the name of a local (if the variable selected in the Return variable column is global) or global variable (if the variable selected in the Return variable column is local), or an expression comprising variables.
Click into thee column and edit in-place the variable name. Alternatively,
click the button, choose a variable type (Local or Global) or a con-stant (Constant), and specify a variable name in the drop-down pane that appears.
For Statement Step
A For step executes a loop over a counter variable.
Note: The operations sequence above illustrated the case of a local variable that needs to be referenced in a procedure body.A symmetrical case involving a local procedure variable whose value needs transferred to the main script body would require creating a global variable in the procedure body (at step 4) and then assigning it the value of the local procedure variable (at step 5). In the main script body an additional ReadWriteGlobal statement would need to assign a local variable the global variable defined within the procedure body.
Important: As evident from the examples above, transferring a local variable value between the main script body and any of the procedures is done using a number of two ReadWriteGlobal statements.
6-8 IxNetwork TestComposer User Guide, Release 7.00

Script Steps Reference Information
For Statement Step in Step Configuration Wizard
A For step executes a loop over a counter variable.
To add a For statement step:
1. While in the Script Steps pane, add a step by choosing the Actions > Add step... command.
2. Select a For step type, click the button to validate the selection, and spec-ify the following parameters:
• Run Type: A For step can only be executed sequentially (Sequentially).
• Delay: A delay specifying by how much step start is delayed. A delay value is automatically set when the step is added using the Capture func-tionality.
• Timeout: A period of time after which the step execution is considered to have timed out.
• Ignore step: When this option is selected, the step is skipped at execution time. Selecting this option is equivalent to right-clicking a step in the Script Steps table and choosing the Exclude command from the context menu that appears.
• Description: An optional step description can be associated with the step.
Click Next.
3. Define the Conditional Execution settings as explained below.
Conditional Execution settings enable you to define the system conditions a script step execution is monitored for. When such a predefined condition occurs – a step error or a step timeout – an user-defined procedure is executed and an additional action is performed. For example, on encountering a step error, you could enforce the execution of a cleanup procedure and then termi-nate the script.
To monitor the step for a predefined Timeout or Error condition, select the corresponding condition, then define the associated procedure – local or
shared (external) – by clicking the control of the Procedure field and selecting a procedure from the the drop-down pane that appears.
For the selected procedure you can view its defined arguments by clicking the
control of the Input Arguments field, which displays a cascading table-format pane containing the argument list. To specify the actual runtime argu-ment(s) enter the desired values in the Current Value field(s).
Configure an additional action by clicking into additional actions column and selecting either of the following options:
• Continue: After performing the specified procedure, the script execution continues.
• Exit Test: After performing the specified procedure, the script execution is terminated.
IxNetwork TestComposer User Guide, Release 7.00 6-9

Script Steps Reference Information6
Click Next.
4. Specify the loop parameters defining how the loop is executed:
• Assign to variable: Defines the loop variable.
• Loop type: Defines the loop type as either of the following:
• Counter: When this type is selected, the variable takes an initial value and loops until the incremented variable reaches an end value.
• Set: When this type is selected, the variable cycles through the dis-crete values of a set.
• Count from, Count to, Step size: These parameters that are valid only for the Counter loop type represent the loop variable start, final, and step value. Parameters can be defined using either numeric values or
TestComposer variables, selected by clicking a parameter’s button and choosing an existing variable from the window that appears.
• Values: This parameters that is valid only for the Set loop type represents the set values that the variable takes.
Click Next.
5. Verify the step summary information and revert to a previous configuration step if needed. Click Finish.
The For statement is added to the steps list. For compound control statements, such as this, the closing pair EndFor statement is also added.
Compound statements comprising both a start and an end instruction are shown
as displayed in Figure 6-1 and can be collapsed by clicking the : control adja-cent to the For statement.
Figure 6-1. Compound Statement Step
Note: Whenever the step execution is monitored for predefined events, an icon is displayed in the step’s corresponding Events selected column entry. For information on turning on the displaying of the Events selected column refer to Customizing the Script Steps Table Layout on page 4-5.
Note: If the value of the Count to parameter is lower than that of the Count from parameter, the increment is considered to have a negative value and the loop executes with a decrementing loop variable.
6-10 IxNetwork TestComposer User Guide, Release 7.00

Script Steps Reference Information
For Step In-Place Editing
To edit a For script step:
1. Select the step in the Script Steps table.
2. Edit the step parameters as follows:
• Session: This column displays no session at all.
• Return Variable: This step type does not use return variables.
• Command String: Displays the name of the looping variable and the loop-ing condition.
Click into the column and edit in-place the variable name or the looping condition values.
Alternatively, click the button displaying a drop-down pane and spec-ify the following parameters:
• Assign to variable: Defines the loop variable name.
• Loop type: Defines the loop type as either of the following:
Counter: When this type is selected, the variable takes an initial value and loops until the incremented variable reaches an end value.
Set: When this type is selected, the variable cycles through the dis-crete values of a set.
• Count from, Count to, Step size: These parameters that are valid only for the Counter loop type represent the variable start, final, and step value. Parameters can be defined using either numeric val-ues or TestComposer variables.
• Values: This parameters that is valid only for the Set loop type rep-resents the set values that the variable takes.
Examples:
For $count in (1,3,1) //counter loop
RunProcedure (P1)
EndFor
StartSession session1 Telnet,10.205.19.237,23
For $interface in {"eth0", "eth1", "eth3"} //set loop
Execute session1 show interface $interface
EndFor
Note: If the value of the Count to parameter is lower than that of the Count from parameter, the increment is considered to have a negative value and the loop executes with a decrementing loop variable.
IxNetwork TestComposer User Guide, Release 7.00 6-11

Script Steps Reference Information6
While Statement Step
A While statement executes one or more script steps until the loop condition evaluates to ‘false’.
While Statement Step in Step Configuration Wizard
A While statement executes one or more script steps until the loop condition evaluates to ‘false’.
To add a While statement step:
1. While in the Script Steps pane, add a step by choosing the Actions > Add step... command.
2. Select a While step type, click the button to validate the selection, and specify the following parameters:
• Run Type: A While step can only be executed sequentially (Sequential).
• Delay: A delay specifying by how much step start is delayed. A delay value is automatically set when the step is added using the Capture func-tionality.
• Timeout: A period of time after which the step execution is considered to have timed out.
• Ignore step: When this option is selected, the step is skipped at execution time. Selecting this option is equivalent to right-clicking a step in the Script Steps table and choosing the Exclude command from the context menu that appears.
• Description: An optional step description can be associated with a step.
Click Next.
3. Define the Conditional Execution settings as explained below.
Conditional Execution settings enable you to define the system conditions a script step execution is monitored for. When such a predefined condition occurs – a step error or a step timeout – an user-defined procedure is executed and an additional action is performed. For example, on encountering a step
Examples:
For $count in (1,3,1) //counter loop
RunProcedure (P1)
EndFor
StartSession session1 Telnet,10.205.19.237,23
For $interface in {"eth0", "eth1", "eth3"} //set loop
Execute session1 show interface $interface
EndFor
6-12 IxNetwork TestComposer User Guide, Release 7.00

Script Steps Reference Information
error, you could enforce the execution of a cleanup procedure and then termi-nate the script.
To monitor the step for a predefined Timeout or Error condition, select the corresponding condition, then define the associated procedure – local or
shared (external) – by clicking the control of the Procedure field and selecting a procedure from the the drop-down pane that appears.
For the selected procedure you can view its defined arguments by clicking the
control of the Input Arguments field, which displays a cascading table-format pane containing the argument list. To specify the actual runtime argu-ment(s) enter the desired values in the Current Value field(s).
Configure an additional action by clicking into additional actions column and selecting either of the following options:
• Continue: After performing the specified procedure, the script execution continues.
• Exit Test: After performing the specified procedure, the script execution is terminated.
Click Next.
4. In the Expression Builder GUI define the looping condition by double-click-ing in turn the desired Tcl commands and operators, and TestComposer vari-ables. For detailed information on using the Expression Builder and creating Tcl expressions refer to Using the Composer Expression Builder on page 7-1.
Click Next.
5. Verify the step summary information and revert to a previous configuration step if needed. Click Finish.
The While statement is added to the steps list. For compound control statements, such as this, the closing pair EndWhile statement is also added.
Note: Whenever the step execution is monitored for predefined events, an icon is displayed in the step’s corresponding Events selected column entry. For information on turning on the displaying of the Events selected column refer to Customizing the Script Steps Table Layout on page 4-5.
Example:
Assign a 1
While ($a <10)
TclEval puts “loop number: $a”
TclEval incr a
EndWhile
IxNetwork TestComposer User Guide, Release 7.00 6-13

Script Steps Reference Information6
While Step In-Place Editing
To edit a While script step:
1. Select the step in the Script Steps table.
2. Edit the step parameters as follows:
• Session: This column displays no session at all.
• Return Variable: This step type does not return any variable.
• Command String: Displays the looping condition.
Click into the column and define an expression by editing it in-place.
Alternatively, click the button and create a valid expression using the Expression Builder GUI, as described in Using the Composer Expression Builder on page 7-1.
Do...While Statement Step
A Do...While statement executes a loop comprising a number of steps while the loop condition evaluates to ‘true’.
Do...While Statement in Configuration Wizard
A Do...While statement executes a loop comprising a number of steps while the loop condition evaluates to ‘true’.
To add a Do statement step:
1. While in the Test Steps pane, add a step by choosing the Actions > Add step... command.
2. Select a Do step type, click the button to validate the selection, and spec-ify the following parameters:
• Run Type: A While step can only be executed sequentially (Sequential).
• Delay: A delay specifying by how much step start is delayed. A delay value is automatically set when the step is added using the Capture func-tionality.
Example:
Assign a 1
While ($a <10)
TclEval puts “loop number: $a”
TclEval incr a
EndWhile
Note: The difference between this statement and the similar While statement is that for the Do...While statement the loop is executed at least once.
6-14 IxNetwork TestComposer User Guide, Release 7.00

Script Steps Reference Information
• Timeout: A period of time after which the step execution is considered to have timed out.
• Ignore step: When this option is selected, the step is skipped at execution time. Selecting this option is equivalent to right-clicking a step in the Test Steps table and choosing the Exclude command from the context menu that appears.
• Description: An optional step description can be associated with a step.
Click Next.
3. Define the Conditional Execution settings as explained below.
Conditional Execution settings enable you to define the system conditions a test step execution is monitored for. When such a predefined condition occurs – a step error or a step timeout – an user-defined procedure is executed and an additional action is performed. For example, on encountering a step error, you could enforce the execution of a cleanup procedure and then terminate the test.
To monitor the step for a predefined Timeout or Error condition, select the corresponding condition, then define the associated procedure – local or
shared (external) – by clicking the control of the Procedure field and selecting a procedure from the the drop-down pane that appears.
For the selected procedure you can view its defined arguments by clicking the
control of the Input Arguments field, which displays a cascading table-format pane containing the argument list. To specify the actual runtime argu-ment(s) enter the desired values in the Current Value field(s).
Configure an additional action by clicking into additional actions column and selecting either of the following options:
• Continue: After performing the specified procedure, the test execution continues.
• Exit Test: After performing the specified procedure, the test execution is terminated.
Click Next.
4. In the Expression Builder GUI define a conditional expression that is associ-ated with the step. The number of commands enclosed within the Do...While statement execute as long as the conditional expression evaluates to ‘true’.
The Expression Builder GUI used for defining the conditional expression has two working modes that you can use interchangeably, a Basic mode – which uses a natural-like expression format based on mathematical operators and Composer variables – and an Advanced mode, which permits the creation of
Note: Whenever the step execution is monitored for predefined events, an icon is displayed in the step’s corresponding Events selected column entry. For information on turning on the displaying of the Events selected column refer to Customizing the Script Steps Table Layout on page 4-5.
IxNetwork TestComposer User Guide, Release 7.00 6-15

Script Steps Reference Information6
more complex conditional expressions that include variables and Tcl com-mands, operators and even Tcl code portions.
For detailed information on using the Expression Builder and creating Tcl expressions refer to Using the Composer Expression Builder.
Click Next.
5. Verify the step summary information and revert to a previous configuration step if needed. Click Finish.
The Do statement is added to the steps list. For compound control statements, such as this, the closing pair While statement is also added.
Do...While Step In-Place Editing
To edit a Do test step:
1. Select the step in the Test Steps table.
2. Edit the step parameters as follows:
• Session: This column displays no session at all.
• Return Variable: This step type does not return any variable.
• Command String: Displays the looping condition that is associated with the step. The number of commands enclosed within the Do...While statement execute as long as the conditional expression evaluates to ‘true’.
Click into the column and define a conditional expression by editing it in-place.
Alternatively, click the button and edit the conditional expression using the Expression Builder GUI. The Expression Builder GUI has two working modes that you can use interchangeably, a Basic mode – which uses a natural-like expression format including mathematical operators and Composer variables – and an Advanced mode, which permits the defining of more complex conditional expressions that include Composer variables and Tcl commands, operators and even Tcl code portions.
For detailed instructions on creating and editing a conditional expression see Using the Composer Expression Builder on page 7-1.
Example:
Assign a 1
Do
TclEval puts “loop number: $a”
TclEval incr a
While ($a <10)
Note: The difference between this statement and the similar While statement is that for the Do...While statement the loop is executed at least once.
6-16 IxNetwork TestComposer User Guide, Release 7.00
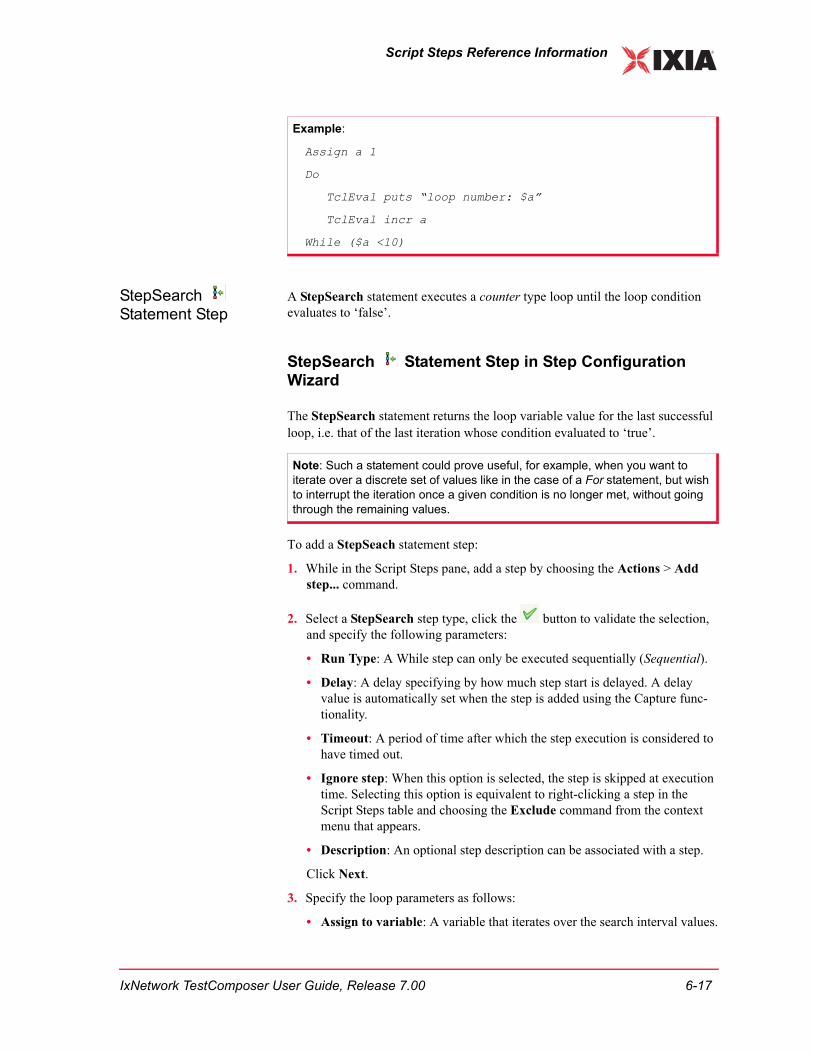
Script Steps Reference Information
StepSearch Statement Step
A StepSearch statement executes a counter type loop until the loop condition evaluates to ‘false’.
StepSearch Statement Step in Step Configuration Wizard
The StepSearch statement returns the loop variable value for the last successful loop, i.e. that of the last iteration whose condition evaluated to ‘true’.
To add a StepSeach statement step:
1. While in the Script Steps pane, add a step by choosing the Actions > Add step... command.
2. Select a StepSearch step type, click the button to validate the selection, and specify the following parameters:
• Run Type: A While step can only be executed sequentially (Sequential).
• Delay: A delay specifying by how much step start is delayed. A delay value is automatically set when the step is added using the Capture func-tionality.
• Timeout: A period of time after which the step execution is considered to have timed out.
• Ignore step: When this option is selected, the step is skipped at execution time. Selecting this option is equivalent to right-clicking a step in the Script Steps table and choosing the Exclude command from the context menu that appears.
• Description: An optional step description can be associated with a step.
Click Next.
3. Specify the loop parameters as follows:
• Assign to variable: A variable that iterates over the search interval values.
Example:
Assign a 1
Do
TclEval puts “loop number: $a”
TclEval incr a
While ($a <10)
Note: Such a statement could prove useful, for example, when you want to iterate over a discrete set of values like in the case of a For statement, but wish to interrupt the iteration once a given condition is no longer met, without going through the remaining values.
IxNetwork TestComposer User Guide, Release 7.00 6-17

Script Steps Reference Information6
• Exit value of loop index: The step return value, which can be either of the following:
• Best: The loop variable value that corresponds to the last successful iteration (condition evaluating to true).
• Last: The loop variable value that corresponds to the last executed iteration (condition evaluating to false) before the command com-pleted execution.
• Initial Value: The loop variable initial value.
• Limit Value: The loop variable end value.
• Step Value: The step value, which can be either a positive or a negative value.
4. Define the Conditional Execution settings as explained below.
Conditional Execution settings enable you to define the system conditions a script step execution is monitored for. When such a predefined condition occurs – a step error or a step timeout – an user-defined procedure is executed and an additional action is performed. For example, on encountering a step error, you could enforce the execution of a cleanup procedure and then termi-nate the script.
To monitor the step for a predefined Timeout or Error condition, select the corresponding condition, then define the associated procedure – local or
shared (external) – by clicking the control of the Procedure field and selecting a procedure from the the drop-down pane that appears.
For the selected procedure you can view its defined arguments by clicking the
control of the Input Arguments field, which displays a cascading table-format pane containing the argument list. To specify the actual runtime argu-ment(s) enter the desired values in the Current Value field(s).
Configure an additional action by clicking into additional actions column and selecting either of the following options:
• Continue: After performing the specified procedure, the script execution continues.
• Exit Test: After performing the specified procedure, the script execution is terminated.
Click Next.
5. In the Expression Builder GUI define the looping condition by double-click-ing in turn the desired Tcl commands and operators, and TestComposer vari-ables. For detailed information on using the Expression Builder and creating Tcl expressions refer to Using the Composer Expression Builder on page 7-1.
Note: Whenever the step execution is monitored for predefined events, an icon is displayed in the step’s corresponding Events selected column entry. For information on turning on the displaying of the Events selected column refer to Customizing the Script Steps Table Layout on page 4-5.
6-18 IxNetwork TestComposer User Guide, Release 7.00

Script Steps Reference Information
Click Next.
6. Verify the step summary information and revert to a previous configuration step if needed. Click Finish.
The StepSearch and SearchCondition statements are added to the steps list. For compound control statements, such as this, the closing pair EndStepSearch statement is also added.
StepSearch Step In-Place Editing
Example:
StepSeach Best frameRate in (10 100 10)
Assign fR $frameRate
Configure FrameRateSet ports=(1.1.1) streamno="1" rate="$fR" rateMode=streamRateModePercentRate
Transmit Start ports=(1.1.1)
fL Get Stat ports=(1.1.2) stats=frameLoss
SearchCondition $fL == 0
EndStepSearch
Important: A single StepSearch statement can be run on multiple chassis ports at once, in which case each of the start, end, step parameters needs defined as a numeric list of values, one per port. The sample command below illustrates the case of a StepSearch statement that is run on 2 ports:
StepSearch Best fR in ({10 110} {100 10} {10 -10})
...
SearchCondition “[expr $fL1 < 20] [expr $fL2 < 10]”
EndStepSearch
When running the StepSearch command on multiple ports, the following behavior applies:• All parameter lists must have the same number of values.• The command returns a list of values which can be assigned to a simple
TestComposer variable. • If all search conditions are ‘true’ and none of the current loop variable values
is greater (or smaller for a negative loop step) than the corresponding limit value, the search continues. The search stops when all search conditions become ‘false’, or when all limits are reached.
Note: A StepSearch statement executes a counter-type loop until the loop condition evaluates to ‘false’. Such a statement could prove useful, for example, when you want to iterate over a discrete set of values like in the case of a For statement, but wish to interrupt the iteration once a given condition is no longer met, without going through the remaining values.
IxNetwork TestComposer User Guide, Release 7.00 6-19

Script Steps Reference Information6
To edit a StepSearch script step:
1. Select the step in the Script Steps table.
2. Edit the step parameters as follows:
• Session: This column displays no session at all.
• Return Variable: This step type does not return any variable.
• Command String: Depending on the statement, initial or ending, the fol-lowing is displayed:
• StepSearch statement: Displays the loop variable, the returned loop index value (the variable value that corresponds to the last successful iteration (condition evaluating to true) for Best, or the variable value that corresponds to the last iteration (condition evaluating to false) before completing execution of the command for Last), initial value, the end value, and the increment.
Click into the column and edit in-place the variable name or the loop-ing condition values.
• StepCondition statement: Displays the looping condition.
Click into the column and define an expression by editing it in-place.
Alternatively, click the button and create a valid expression using the Expression Builder GUI, as described in Using the Composer Expression Builder on page 7-1.
BinarySearch Statement Step
A BinarySearch statement uses a loop variable to search over a continuous inter-val by selecting the middle element in the interval, thus progressively closing in on a sought value.
BinarySearch Statement Step in Step Configuration Wizard
A BinarySearch statement uses a loop variable to search over a continuous inter-val by selecting the middle element in the interval, thus progressively closing in
Example:
StepSeach Best frameRate in (10 100 10)
Assign fR $frameRate
Configure FrameRateSet ports=(1.1.1) streamno="1" rate="$fR" rateMode=streamRateModePercentRate
Transmit Start ports=(1.1.1)
frameLoss Get Stat ports=(1.1.2) stats=frameLoss
SearchCondition $frameLoss == 0
EndStepSearch
6-20 IxNetwork TestComposer User Guide, Release 7.00

Script Steps Reference Information
on a sought value. For every pass, a user-defined condition is evaluated, the inter-val is reduced and, depending on whether the search condition is met or not, the lower or upper interval is selected as the current interval for the next pass. When the search condition is met, the loop variable value corresponding to the current pass is stored.
When the values interval becomes smaller than a user-defined resolution value, the BinarySearch operation completes executing the current iteration and then ends.
The BinarySearch statement can be configured to return the loop variable Best value (the loop variable that corresponds to the last pass when the condition was met) or the Last value (the loop variable that corresponds to the pass when the domain value was reduced below the resolution value, causing the command exe-cution to complete).
To add a BinarySeach statement step:
1. While in the Script Steps pane, add a step by choosing the Actions > Add step... command.
2. Select a BinarySearch step type, click the button to validate the selec-tion, and specify the following parameters:
• Run Type: A BinarySearch step can only be executed sequentially (Sequential).
• Delay: A delay specifying by how much step start is delayed. A delay value is automatically set when the step is added using the Capture func-tionality.
• Timeout: A period of time after which the step execution is considered to have timed out.
• Ignore step: When this option is selected, the step is skipped at execution time. Selecting this option is equivalent to right-clicking a step in the Script Steps table and choosing the Exclude command from the context menu that appears.
• Description: An optional step description can be associated with a step.
Click Next.
3. Define the Conditional Execution settings as explained below.
Note: Given an IxExplorer session that sends traffic to a network device, let us assume that we want to run a test across a frameRate values interval and determine the first frameRate value that generates a non-zero frameLoss value.In such a case we could use a BinarySearch step that uses a frameRate loop variable within the given domain as min and max values and the Best option configured as step return value. Inside the BinarySearch step, we would then use GetStat statements for retrieving the frameLoss value into a fL variable and configure the step’s associated condition to test for a zero fL value.
IxNetwork TestComposer User Guide, Release 7.00 6-21

Script Steps Reference Information6
Conditional Execution settings enable you to define the system conditions a script step execution is monitored for. When such a predefined condition occurs – a step error or a step timeout – an user-defined procedure is executed and an additional action is performed. For example, on encountering a step error, you could enforce the execution of a cleanup procedure and then termi-nate the script.
To monitor the step for a predefined Timeout or Error condition, select the corresponding condition, then define the associated procedure – local or
shared (external) – by clicking the control of the Procedure field and selecting a procedure from the the drop-down pane that appears.
For the selected procedure you can view its defined arguments by clicking the
control of the Input Arguments field, which displays a cascading table-format pane containing the argument list. To specify the actual runtime argu-ment(s) enter the desired values in the Current Value field(s).
Configure an additional action by clicking into additional actions column and selecting either of the following options:
• Continue: After performing the specified procedure, the script execution continues.
• Exit Test: After performing the specified procedure, the script execution is terminated.
Click Next.
4. Define the looping parameters as follows:
• Assign to variable: The loop variable, whose current value for each pass is computed using the following formula:
loop_var = loop_var +/- (max – min) * backoff
• Exit value of loop index: The loop variable value at loop exit time, which can be configured as either of the following:
• Best: The loop variable value that corresponds to the last pass when the search condition was met (the search condition evaluated to ‘true’).
• Last: The loop variable value that corresponds to the last executed pass, which corresponds to the pass when the domain value was reduced below the resolution value.
• Initial value: The initial value assigned to the loop variable.
• Minimum value, Maximum value: The minimum and maximum domain value respectively. These values get updated for every pass of the binary search operation.
Note: Whenever the step execution is monitored for predefined events, an icon is displayed in the step’s corresponding Events selected column entry. For information on turning on the displaying of the Events selected column refer to Customizing the Script Steps Table Layout on page 4-5.
6-22 IxNetwork TestComposer User Guide, Release 7.00

Script Steps Reference Information
• Resolution: When the difference between the minimum and maximum values falls below the resolution value, the search operation ends.
• Backoff: This is a measure of the interval convergence and has the follow-ing implications on the binary search operation behavior:
For backoff values higher than 0.5, the current loop variable value is more to the right, with the effect that the search operation converges more rap-idly to the right of the interval.
For backoff values lower than 0.5, the current loop variable value is more to the left of the interval.
For a typical binary search operation, this value is 0.5.
5. In the Expression Builder GUI define the looping condition by double-click-ing in turn the desired Tcl commands and operators, and TestComposer vari-ables. For detailed information on using the Expression Builder and creating Tcl expressions refer to Using the Composer Expression Builder on page 7-1.
Click Next.
6. Verify the step summary information and revert to a previous configuration step if needed. Click Finish.
The BinarySearch and SearchCondition statements are added to the steps list. For compound control statements, such as this, the closing pair EndBinary-Search statement is also added.
Example:
BinarySeach frameRate in (10 100 100 0.1)
Configure FrameRateSet ports="1.1.1" streamno="1" rate="$frameRate" rateMode=streamRateModePercentRate
Transmit Start ports=1.1.1""
fL Get Stat ports=”1.1.2” stats=frameLoss
SearchCondition $fL == 0
EndBinarySearch
IxNetwork TestComposer User Guide, Release 7.00 6-23

Script Steps Reference Information6
BinarySearch Step In-Place Editing
To edit a BinarySearch script step:
1. Select the step in the Script Steps table.
2. Edit the step parameters as follows:
• Session: This column displays no session at all.
• Return Variable: This step type does not return any variable.
• Command String: Depending on the statement, initial or ending, the fol-lowing is displayed:
• BinarySearch statement: Displays the loop variable, the initial value, the end value, and the increment.
Click into the column and edit in-place the variable name or the loop-ing condition values.
Important: A single BinarySearch statement can be run on multiple chassis ports at once, in which case each of the Maximum, Minimum, Initial, Resolution, and Back-off parameters needs defined as a numeric list of values, one per port.The sample command below illustrates the case of the BinarySearch statement that is run on 2 ports:
BinarySearch frameRate in ({100 70} {0 0} {100 70} {0.1 0.2} {0.5 0.5})
...
SearchCondition “[expr $fL1 == 0] [expr $fL2 == 0]”
EndBinarySearch
When running the BinarySearch command on multiple ports, the following behavior applies:• All lists must have the same number of parameters.• The command returns a list of values which can be assigned to a simple
TestComposer variable. • The search continues as long as any of the search intervals is larger than its
corresponding resolution value. The search completes when all search inter-vals have been reduced below their corresponding resolution values.
Note: A BinarySearch statement uses a loop variable to search over a continuous interval by selecting the middle element in the interval, thus progressively closing in on a sought value. For every pass, a user-defined condition is evaluated, the interval is reduced and, depending on whether the search condition is met or not, the lower or upper interval is selected as the current interval for the next pass. When the search condition is met, the loop variable value corresponding to the current pass is stored.When the values interval becomes smaller than a user-defined resolution value, the BinarySearch operation completes executing the current iteration and then ends.
6-24 IxNetwork TestComposer User Guide, Release 7.00

Script Steps Reference Information
• SearchCondition statement: Displays the search condition.
Click into the column and define an expression by editing it in-place.
Alternatively, click the button and create a valid expression using the Expression Builder GUI, as described in Using the Composer Expression Builder on page 7-1.
Break Statement Step
A Break step unconditionally breaks a for or while loop.
Break Statement Step in Step Configuration Wizard
A Break step unconditionally breaks a for or while loop.
To add a Break statement step:
1. While in the Script Steps pane, add a step by choosing the Actions > Add step... command.
2. Select an Break step type, click the button to validate the selection, and specify the following parameters:
• Run Type: A Break step can only be executed sequentially (Sequential).
• Delay: A delay specifying by how much step start is delayed. A delay value is automatically set when the step is added using the Capture func-tionality.
• Timeout: A period of time after which the step execution is considered to have timed out.
• Ignore step: When this option is selected, the step is skipped at execution time. Selecting this option is equivalent to right-clicking a step in the Script Steps table and choosing the Exclude command from the context menu that appears.
• Description: An optional step description can be associated with a step.
Click Next.
3. Define the Conditional Execution settings as explained below.
Example:
BinarySeach frameRate in (10 100 100 0.1)
Configure FrameRateSet ports="1.1.1" streamno="1" rate="$frameRate" rateMode=streamRateModePercentRate
Transmit Start ports=1.1.1""
fL Get Stat ports=”1.1.2” stats=frameLoss
SearchCondition $fL == 0
EndBinarySearch
IxNetwork TestComposer User Guide, Release 7.00 6-25

Script Steps Reference Information6
Conditional Execution settings enable you to define the system conditions a script step execution is monitored for. When such a predefined condition occurs – a step error or a step timeout – an user-defined procedure is executed and an additional action is performed. For example, on encountering a step error, you could enforce the execution of a cleanup procedure and then termi-nate the script.
To monitor the step for a predefined Timeout or Error condition, select the corresponding condition, then define the associated procedure – local or
shared (external) – by clicking the control of the Procedure field and selecting a procedure from the the drop-down pane that appears.
For the selected procedure you can view its defined arguments by clicking the
control of the Input Arguments field, which displays a cascading table-format pane containing the argument list. To specify the actual runtime argu-ment(s) enter the desired values in the Current Value field(s).
Configure an additional action by clicking into additional actions column and selecting either of the following options:
• Continue: After performing the specified procedure, the script execution continues.
• Exit Test: After performing the specified procedure, the script execution is terminated.
Click Next.
4. Verify the step summary information and revert to a previous configuration step if needed. Click Finish.
Note: Whenever the step execution is monitored for predefined events, an icon is displayed in the step’s corresponding Events selected column entry. For information on turning on the displaying of the Events selected column refer to Customizing the Script Steps Table Layout on page 4-5.
Example:
Assign a 1
Assign b 1
While $a
TclEval puts “looping...”
TclEval incr b
If $b==10
Break
EndIf
EndWhile
6-26 IxNetwork TestComposer User Guide, Release 7.00

Script Steps Reference Information
Break Step In-Place Editing
A Break script step, whose only displayed parameter indicates the loop it refers to, is not editable in-place.
Return Statement Step
A Return statement is used within a procedure for returning a constant numeric value or the value of a variable. When used in the Main_Procedure portion of a TestComposer script, it returns the pass/fail result of the script and a message string.
Return Statement Step in Step Configuration Wizard
A Return statement is used within a procedure for returning a constant numeric value or the value of a variable. When used in the Main_Procedure portion of a TestComposer script, it returns the pass/fail result of the script and a message string.
To add a Return control step:
1. While in the Script Steps pane, add a step by choosing the Actions > Add step... command.
2. Select a Return step type, click the button to validate the selection, and specify the following parameters:
• Run Type: A Return step can only be executed sequentially (Sequential).
• Delay: A delay specifying by how much step start is delayed. A delay value is automatically set when the step is added using the Capture func-tionality.
• Timeout: A period of time after which the step execution is automatically terminated.
• Ignore step: When this option is selected, the step is skipped at execution time. Selecting this option is equivalent to right-clicking a step in the
Example:
Assign a 1
Assign b 1
While $a
TclEval puts “looping...”
TclEval incr b
If $b==10
Break
EndIf
EndWhile
IxNetwork TestComposer User Guide, Release 7.00 6-27

Script Steps Reference Information6
Script Steps table and choosing the Exclude command from the context menu that appears.
• Description: An optional step description can be associated with a step.
Click Next.
3. In the Value field, specify a TestComposer variable by clicking into the field
and editing its name in place, or select an existing variable by clicking the button and choosing it from the window that appears. Alternatively specify a constant value denominating a script success status (any non-zero value) or a script failure status (0).
In the Message field specify a message string that appears in the application logs.
Click Next.
4. Verify the step summary information and revert to a previous configuration step if needed. Click Finish.
Return Step In-Place Editing
To edit a Return script step:
1. Select the step in the Script Steps table.
2. Edit the step parameters as follows:
• Session: This column displays no session at all.
• Return Variable: This step does not use a return variable.
• Command String: Displays the numeric value or the TestComposer vari-able specifying the script pass/fail status (a non-zero value for a success status, ‘0’ for a fail status), and a message string that is displayed in the application logs.
Click into the column and edit in-place a numeric value or a variable, and the message string.
Alternatively, click the button and define the return value and the message in the drop-down window that appears.
Examples:
If $result == “pass”
TclEval puts “execution successful!”
Return 1 “test passed”
EndIf
Assign status 1
Return $status “test passed”
6-28 IxNetwork TestComposer User Guide, Release 7.00

Script Steps Reference Information
Exit Statement Step
An Exit step terminates the script execution.
Exit Statement Step in Step Configuration Wizard
An Exit step terminates the script execution.
To add an Exit control step:
1. While in the Script Steps pane, add a step by choosing the Actions > Add step... command.
2. Select an Exit step type, click the button to validate the selection and specify the following parameters:
• Run Type: An Exit step can only be executed sequentially (Sequential).
• Delay: A delay specifying by how much step start is delayed. A delay value is automatically set when the step is added using the Capture func-tionality.
• Timeout: A period of time after which the step execution is considered to have timed out.
• Ignore step: When this option is selected, the step is skipped at execution time. Selecting this option is equivalent to right-clicking a step in the Script Steps table and choosing the Exclude command from the context menu that appears.
• Description: An optional step description can be associated with a step.
Click Next.
3. Specify an Exit code that can be used for detailing the status of the script when termination occurred.
Click Next.
IMPORTANT: A constant non-zero value or a variable that evaluates to a non-zero value denominates a script success status, whereas a value of ‘0’ or a variable that evaluates to ‘0’ denominates a script failure status.
Examples:
If $result == “pass”
TclEval puts “execution successful!”
Return 1 “test passed”
EndIf
Assign status 1
Return $status “test passed”
IxNetwork TestComposer User Guide, Release 7.00 6-29

Script Steps Reference Information6
4. Verify the step summary information and revert to a previous configuration step if needed. Click Finish.
Exit Step In-Place Editing
To edit an Exit script step:
1. Select the step in the Script Steps table.
2. Edit the step parameters as follows:
• Command string: Displays an Exit code that can be used for detailing the status of the script when termination occurred.
Click into the column and edit in-place a numeric value.
If Statement Step
An If step evaluates a condition and executes the following step(s) if the condi-tion evaluates to ‘true’.
If Statement Step in Step Configuration Wizard
An If step evaluates a condition and executes the following step(s) if the condi-tion evaluates to ‘true’.
To add an If control step:
1. While in the Script Steps pane, add a step by choosing the Actions > Add step... command.
2. Select an If step type, click the button to validate the selection, and spec-ify the following parameters:
• Run Type: An If step can only be executed sequentially (Sequential).
• Delay: A delay specifying by how much step start is delayed. A delay value is automatically set when the step is added using the Capture func-tionality.
• Timeout: A period of time after which the step execution is considered to have timed out.
• Ignore step: When this option is selected, the step is skipped at execution time. Selecting this option is equivalent to right-clicking a step in the Script Steps table and choosing the Exclude command from the context menu that appears.
• Description: An optional step description can be associated with a step.
Click Next.
3. In the Expression Builder specify a condition expression by double-clicking in turn the desired Tcl commands and operators, and TestComposer variables. For detailed information on using the Expression Builder and creating Tcl expressions refer to Using the Composer Expression Builder on page 7-1.
6-30 IxNetwork TestComposer User Guide, Release 7.00

Script Steps Reference Information
Click Next.
4. Verify the step summary information and revert to a previous configuration step if needed. Click Finish.
The If statement is added to the steps list. For compound control statements, such as the If instruction, the closing pair EndIf statement is also added.
If Step In-Place Editing
To edit an If script step:
1. Select the step in the Script Steps table.
2. Edit the step parameters as follows:
• Session: This column displays no session at all.
• Return Variable: This step does not use a return variable.
• Command String: Displays the numeric value or the Tcl expression assigned to the variable.
Click into the column and edit in-place a numeric value or an expression.
Alternatively, click the button and create a valid expression using the Expression Builder GUI, as described in Using the Composer Expression Builder on page 7-1.
Else Statement Step An Else statement is used conjointly with an If statement for specifying the steps to be executed if the If-associated condition returns ‘false’.
Else Statement Step in Step Configuration Wizard
An Else statement is used conjointly with an If statement for specifying the steps to be executed if the If-associated condition returns ‘false’.
To add an Else control statement:
Example:
If $result == “pass”
TclEval puts “operation successful”
EndIf
Example:
If $result == “pass”
TclEval puts “operation successful”
EndIf
IxNetwork TestComposer User Guide, Release 7.00 6-31

Script Steps Reference Information6
1. While in the Script Steps pane, add a step by choosing the Actions > Add step... command.
2. Select an Else step type, click the button to validate the selection, and specify the following parameters:
• Run Type: An Else step can only be executed sequentially (Sequential).
• Delay: A delay specifying by how much step start is delayed. A delay value is automatically set when the step is added using the Capture func-tionality.
• Timeout: A period of time after which the step execution is considered to have timed out.
• Ignore step: When this option is selected, the step is skipped at execution time. Selecting this option is equivalent to right-clicking a step in the Script Steps table and choosing the Exclude command from the context menu that appears.
• Description: An optional step description can be associated with the step.
Click Next.
3. Define the Conditional Execution settings as explained below.
Conditional Execution settings enable you to define the system conditions a script step execution is monitored for. When such a predefined condition occurs – a step error or a step timeout – an user-defined procedure is executed and an additional action is performed. For example, on encountering a step error, you could enforce the execution of a cleanup procedure and then termi-nate the script.
To monitor the step for a predefined Timeout or Error condition, select the corresponding condition, then define the associated procedure – local or
shared (external) – by clicking the control of the Procedure field and selecting a procedure from the the drop-down pane that appears.
For the selected procedure you can view its defined arguments by clicking the
control of the Input Arguments field, which displays a cascading table-format pane containing the argument list. To specify the actual runtime argu-ment(s) enter the desired values in the Current Value field(s).
Configure an additional action by clicking into additional actions column and selecting either of the following options:
• Continue: After performing the specified procedure, the script execution continues.
• Exit Test: After performing the specified procedure, the script execution is terminated.
Click Next.
6-32 IxNetwork TestComposer User Guide, Release 7.00

Script Steps Reference Information
4. Verify the step summary information and revert to a previous configuration step if needed. Click Finish.
Else Step In-Place Editing
An Else script step, whose only displayed parameter indicates the If step it refers to, is not editable in-place.
Join Statement Step
A Join statement waits for one or more step executing in parallel to finish, or ter-minates them forcefully.
Join Statement Step in Step Configuration Wizard
A Join statement waits for one or more step executing in parallel to finish, or ter-minates them forcefully.
To add a Join statement step:
1. While in the Script Steps pane, add a step by choosing the Actions > Add step... command.
2. Select a Join step type, click the button to validate the selection, and specify the following parameters:
Note: Whenever the step execution is monitored for predefined events, an icon is displayed in the step’s corresponding Events selected column entry. For information on turning on the displaying of the Events selected column refer to Customizing the Script Steps Table Layout on page 4-5.
Example:
If $result == “pass”
TclEval puts “operation successful”
Else
TclEval puts “operation unsuccessful”
EndIf
Example:
If $result == “pass”
TclEval puts “operation successful”
Else
TclEval puts “operation unsuccessful”
EndIf
IxNetwork TestComposer User Guide, Release 7.00 6-33

Script Steps Reference Information6
• Run Type: A Join step can only be executed sequentially (Sequential).
• Delay: A delay specifying by how much step start is delayed. A delay value is automatically set when the step is added using the Capture func-tionality.
• Timeout: A period of time after which the step execution is considered to have timed out.
• Ignore step: When this option is selected, the step is skipped at execution time. Selecting this option is equivalent to right-clicking a step in the Script Steps table and choosing the Exclude command from the context menu that appears.
• Description: An optional step description can be associated with a step.
Click Next.
3. Define the Conditional Execution settings as explained below.
Conditional Execution settings enable you to define the system conditions a script step execution is monitored for. When such a predefined condition occurs – a step error or a step timeout – an user-defined procedure is executed and an additional action is performed. For example, on encountering a step error, you could enforce the execution of a cleanup procedure and then termi-nate the script.
To monitor the step for a predefined Timeout or Error condition, select the corresponding condition, then define the associated procedure – local or
shared (external) – by clicking the control of the Procedure field and selecting a procedure from the the drop-down pane that appears.
For the selected procedure you can view its defined arguments by clicking the
control of the Input Arguments field, which displays a cascading table-format pane containing the argument list. To specify the actual runtime argu-ment(s) enter the desired values in the Current Value field(s).
Configure an additional action by clicking into additional actions column and selecting either of the following options:
• Continue: After performing the specified procedure, the script execution continues.
• Exit Test: After performing the specified procedure, the script execution is terminated.
Click Next.
4. Select one or more parallel step(s) whose termination is awaited. When selecting the Force parallel step(s) to finish option, the parallel steps are forcibly terminated.
Note: Whenever the step execution is monitored for predefined events, an icon is displayed in the step’s corresponding Events selected column entry. For information on turning on the displaying of the Events selected column refer to Customizing the Script Steps Table Layout on page 4-5.
6-34 IxNetwork TestComposer User Guide, Release 7.00

Script Steps Reference Information
Click Next.
5. Verify the step summary information and revert to a previous configuration step if needed. Click Finish.
Join Step In-Place Editing
To edit a Join script step:
1. Select the step in the Script Steps table.
2. Edit the step parameters as follows:
• Session: This column displays no session at all.
• Return Variable: This step does not use a return variable.
• Command String: This column displays the parallel steps whose comple-tion is awaited.
Click into the column and edit in-place the parallel steps names.
Alternatively, click the button displaying a drop-down pane and select the steps from a list.
RunProcedure Step
A RunProcedure statement runs a local procedure (one that was defined locally in the script body) or a shared procedure (one from the plugin resource database).
RunProcedure Step in Step Configuration Wizard
A RunProcedure statement runs a local or a shared procedure. This permits you to define a local sequence of steps that you can run repeatedly within a test script, or to call an external procedure.
To add a RunProcedure statement step:
1. While in the Script Steps pane, add a step by choosing the Actions > Add step... command.
2. Select a RunProcedure step type, click the button to validate the selec-tion, and specify the following parameters:
• Run Type: A RunProcedure step can be executed sequentially (Sequential) or in parallel with other steps (Parallel). When a step is defined as parallel,
Example:
Join Parallel1; Parallel2; Parallel3;
Example:
Join Parallel1; Parallel2; Parallel3;
IxNetwork TestComposer User Guide, Release 7.00 6-35

Script Steps Reference Information6
it needs to be assigned a step Id that is used for referencing the parallel step within a subsequent Join statement.
• Delay: A delay specifying by how much step start is delayed. A delay value is automatically set when the step is added using the Capture func-tionality.
• Timeout: A period of time after which the step execution is considered to have timed out.
• Ignore step: When this option is selected, the step is skipped at execution time. Selecting this option is equivalent to right-clicking a step in the Script Steps table and choosing the Exclude command from the context menu that appears.
• Description: An optional step description can be associated with the step.
Click Next.
3. Define the Conditional Execution settings as explained below.
Conditional Execution settings enable you to define the system conditions a script step execution is monitored for. When such a predefined condition occurs – a step error or a step timeout – an user-defined procedure is executed and an additional action is performed. For example, on encountering a step error, you could enforce the execution of a cleanup procedure and then termi-nate the script.
To monitor the step for a predefined Timeout or Error condition, select the corresponding condition, then define the associated procedure – local or
shared (external) – by clicking the control of the Procedure field and selecting a procedure from the the drop-down pane that appears.
For the selected procedure you can view its defined arguments by clicking the
control of the Input Arguments field, which displays a cascading table-format pane containing the argument list. To specify the actual runtime argu-ment(s) enter the desired values in the Current Value field(s).
Configure an additional action by clicking into additional actions column and selecting either of the following options:
• Continue: After performing the specified procedure, the script execution continues.
• Exit Test: After performing the specified procedure, the script execution is terminated.
Click Next.
4. Specify the following parameters:
• Return variable: The variable that stores the procedure return value.
Note: Whenever the step execution is monitored for predefined events, an icon is displayed in the step’s corresponding Events selected column entry. For information on turning on the displaying of the Events selected column refer to Customizing the Script Steps Table Layout on page 4-5.
6-36 IxNetwork TestComposer User Guide, Release 7.00

Script Steps Reference Information
Specify the return variable by clicking into the field and editing its name
in place. Alternatively select an existing variable by clicking the but-ton and choosing it from the window that appears.
• Procedure: An existing procedure to execute and an invocation mode:
• Local: The step calls a procedure that was defined locally within the TestComposer script.
• Shared: The step calls an external procedure saved in the plugin’s resource database, possibly shared by multiple TestComposer test scripts.
Specify the procedure by clicking into the field and selecting a procedure from the window that appears.
For the selected procedure you can view its defined arguments by clicking
the control of the Input Arguments field, which displays a table-for-mat pane containing the argument list. To specify the actual runtime argu-ment(s) enter the desired values in the Current Value field(s).
• Input arguments: The multiple line procedure arguments list, with one argument defined per line. When the procedure is executed, these argu-ments are passed to the procedure call.
Click Next.
5. Verify the step summary information and revert to a previous configuration step if needed. Click Finish.
RunProcedure Step In-Place Editing
To edit a RunProcedure script step:
1. Select the step in the Script Steps table.
2. Edit the step parameters as follows:
• Session: This column displays no session at all.
Note: Whenever a shared (external) procedure is updated, an update of the TestComposer test script referencing the procedure also occurs every time the script is loaded anew.
Example:
RunProcedure P1 1 2
....
Procedure P1 {Integer:a Integer:b}
...
...
EndProcedure
IxNetwork TestComposer User Guide, Release 7.00 6-37

Script Steps Reference Information6
• Return Variable: This column displays the return variable name.
A new variable is specified by clicking into the column and editing in-
place. Alternatively, click the button displaying a drop-down pane,
then click the button to select an existing variable.
• Command String: This column displays the name of the called procedure and a space-separated list of arguments.
Click into the column and edit in-place the procedure name and the argu-ment value(s).
Alternatively, click the control displaying a drop-down pane and select the procedure – local or shared – from a list. To edit the procedure
arguments, in the drop-down pane click the control of the Input Argu-ments field and enter the desired values in the Current Value column of the cascading drop-down pane that displays.
RunProcess Step
A RunProcess statement runs an external command, such as .exe or a script file.
RunProcess Step in Configuration Wizard
A RunProcess statement runs an external command, such as .exe or a script file.
To add a RunProcess statement step:
1. While in the Test Steps pane, add a step by choosing the Actions > Add step... command.
2. Select a RunProcess step type, click the button to validate the selection, and specify the following parameters:
• Run Type: A RunProcess step can be executed only sequentially (Sequen-tially).
• Delay: A delay specifying by how much step start is delayed. A delay value is automatically set when the step is added using the Capture func-tionality.
• Timeout: A period of time after which the step execution is considered to have timed out.
Example:
RunProcedure P1 1 2
....
Procedure P1 {Integer:a Integer:b}
...
...
EndProcedure
6-38 IxNetwork TestComposer User Guide, Release 7.00

Script Steps Reference Information
• Ignore step: When this option is selected, the step is skipped at execution time. Selecting this option is equivalent to right-clicking a step in the Test Steps table and choosing the Exclude command from the context menu that appears.
• Description: An optional step description can be associated with the step.
Click Next.
3. Define the Conditional Execution settings as explained below.
Conditional Execution settings enable you to define the system conditions a test step execution is monitored for. When such a predefined condition occurs – a step error or a step timeout – an user-defined procedure is executed and an additional action is performed. For example, on encountering a step error, you could enforce the execution of a cleanup procedure and then terminate the test.
To monitor the step for a predefined Timeout or Error condition, select the corresponding condition, then define the associated procedure – local or
shared (external) – by clicking the control of the Procedure field and selecting a procedure from the the drop-down pane that appears.
For the selected procedure you can view its defined arguments by clicking the
control of the Input Arguments field, which displays a cascading table-format pane containing the argument list. To specify the actual runtime argu-ment(s) enter the desired values in the Current Value field(s).
Configure an additional action by clicking into additional actions column and selecting either of the following options:
• Continue: After performing the specified procedure, the test execution continues.
• Exit Test: After performing the specified procedure, the test execution is terminated.
Click Next.
4. Specify the following parameters:
• External command: An existing external command to execute. Specify the command by clicking into the field and selecting a command file from the window that appears.
• Process arguments: A list of arguments to pass to the command.The multiple line procedure arguments list, with one argument defined per line. When the procedure is executed, these arguments are passed to the procedure call.
• Run in background: If selected, a new thread is spawned and the com-mand is run in the background.
Note: Whenever the step execution is monitored for predefined events, an icon is displayed in the step’s corresponding Events selected column entry. For information on turning on the displaying of the Events selected column refer to Customizing the Script Steps Table Layout on page 4-5.
IxNetwork TestComposer User Guide, Release 7.00 6-39

Script Steps Reference Information6
• Kill process on timeout: If selected, the process is killed unconditionally when the step timeput expires.
• Working directory: A directory in which the external command is started. If the external command generates any output files, this is the directory these files are stored in.
Click Next.
5. Verify the step summary information and revert to a previous configuration step if needed. Click Finish.
RunProcess Step In-Place Editing
A RunProcess statement runs an external command, such as .exe or a script file.
To edit a RunProcess test step:
1. Select the step in the Test Steps table.
2. Edit the step parameters as follows:
• Session: This column displays no session at all.
• Return Variable: This column displays the return variable name.
A new variable is specified by clicking into the column and editing in-
place. Alternatively, click the button displaying a drop-down pane,
then click the button to select an existing variable.
• Command String: This column displays the name of the called program or external command and a space separated list of arguments.
Click into the column and edit in-place the command name and the argu-ment value.
Alternatively, click the button displaying a drop-down pane that pro-vides acces to the following additional parameters:
• Run in background: If selected, a new thread is spawned and the command is run in the background.
• Kill process on timeout: If selected, the process is killed uncondi-tionally when the step timeput expires.
• Working directory: A directory in which the external command is started. If the external command generates any output files, this is the directory these files are stored in.
Example:
RunProcess C:\WINDOWS\system32\arp.exe -a
....
6-40 IxNetwork TestComposer User Guide, Release 7.00

Script Steps Reference Information
Sleep Step A Sleep statement pauses the script execution for a specified period of time.
Sleep Step in Step Configuration Wizard
A Sleep statement pauses the script execution for a specified period of time.
To add a Sleep statement step:
1. While in the Script Steps pane, add a step by choosing the Actions > Add step... command.
2. Select a Sleep step type, click the button to validate the selection, and specify the following parameters:
• Run Type: A Sleep step can be executed only sequentially (Sequential).
• Delay: A delay specifying by how much step start is delayed. A delay value is automatically set when the step is added using the Capture func-tionality.
• Timeout: A period of time after which the step execution is considered to have timed out.
• Ignore step: When this option is selected, the step is skipped at execution time. Selecting this option is equivalent to right-clicking a step in the Script Steps table and choosing the Exclude command from the context menu that appears.
• Description: An optional step description can be associated with the step.
Click Next.
3. Define the Conditional Execution settings as explained below.
Conditional Execution settings enable you to define the system conditions a script step execution is monitored for. When such a predefined condition occurs – a step error or a step timeout – an user-defined procedure is executed and an additional action is performed. For example, on encountering a step error, you could enforce the execution of a cleanup procedure and then termi-nate the script.
To monitor the step for a predefined Timeout or Error condition, select the corresponding condition, then define the associated procedure – local or
shared (external) – by clicking the control of the Procedure field and selecting a procedure from the the drop-down pane that appears.
For the selected procedure you can view its defined arguments by clicking the
control of the Input Arguments field, which displays a cascading table-
Example:
RunProcess C:\WINDOWS\system32\arp.exe -a
....
IxNetwork TestComposer User Guide, Release 7.00 6-41

Script Steps Reference Information6
format pane containing the argument list. To specify the actual runtime argu-ment(s) enter the desired values in the Current Value field(s).
Configure an additional action by clicking into additional actions column and selecting either of the following options:
• Continue: After performing the specified procedure, the script execution continues.
• Exit Test: After performing the specified procedure, the script execution is terminated.
Click Next.
4. Specify the following parameters:
• Wait For: The idle duration in the hh:mm:ss:fff format. Specify this value by clicking into the field and editing in-place.
Click Next.
5. Verify the step summary information and revert to a previous configuration step if needed. Click Finish.
Sleep Step In-Place Editing
To edit a Sleep script step:
1. Select the step in the Script Steps table.
2. Edit the step parameters as follows:
• Session: This column displays no session at all.
• Return Variable: This step type does not use a return variable.
• Command String: Displays the idle period duration in the hh:mm:ss:fff for-mat. Click into the column and edit in-place a numeric value.
Note: Whenever the step execution is monitored for predefined events, an icon is displayed in the step’s corresponding Events selected column entry. For information on turning on the displaying of the Events selected column refer to Customizing the Script Steps Table Layout on page 4-5.
6-42 IxNetwork TestComposer User Guide, Release 7.00

Script Steps Reference Information
Command StepsThe following command steps are supported:
• StartSession: Opens a connection to a configured test device (DUT) or to an IxNetwork Tcl server (in the case of the default IxNetwork session). On an established session, you can input commands to the device or the chassis.
• Execute: Executes a protocol interface command – Telnet, Tclsh, CmdTool, TL1, SSH1/SSH2/ SSHAuto, SNMP, Syslog, COM, and Raw – on the con-figured test device.
In the case of the default IxNetwork session type that is automatically created for every TestComposer script and which connects to an IxNetwork Tcl server, commands encapsulate predefined IxNetwork events.
• StopSession: Closes an open connection to the configured test device.
• GetTime: Retrieves the time the test script is run at.
• TclEval: Evaluates a user-defined Tcl expression or a code fragment contain-ing Tcl commands, operators and TestComposer variables.
• Watch: Monitors a device session for a specified message or trap (for SNMP sessions).
• Trace: Logs an argument string to the TestComposer logs.
• ReadFile: Reads an ASCII format input file and retrieves user-specified parts from it.
• WriteCSV: Writes one or more TestComposer variables to an associated out-put file using a C(omma)S(eparated)V(alues) format.
• GetValue: A GetValue command retrieves the value of fields from composite variables, possibly filtering by the values of the retrieved fields.
• Config Get: A Config Get command retrieves the value of an IxNetwork test configuration element.
• Config Set: A Config Set command modifies the value of an IxNetwork test configuration element.
• Config Add: A Config Add command creates an IxNetwork test configura-tion element.
• Config Remove: A Config Remove command removes an IxNetwork test configuration element.
• Config Action: A Config Action command performs an action on an IxNet-work test configuration element.
• Group: A Group command delimits a group of related configuration actions that were captured using the Macro Recorder functionality of IxNetwork.
IxNetwork TestComposer User Guide, Release 7.00 6-43

Script Steps Reference Information6
StartSession A StartSession command opens a connection to a configured test device (DUT) or to an IxNetwork Tcl server (in the case of the default IxNetwork session). On an established session, you can input commands to the device or the chassis.
StartSession Command Step in Configuration Wizard
A StartSession command opens a connection to a configured test device or to an IxNetwork Tcl server (in the case of the default IxNetwork session). On an estab-lished session, you can input commands to the test device or the chassis.
To add a StartSession command step using the GUI scripting support:
1. While in the Script Steps pane, add a step by choosing the Actions > Add step... command.
2. Select a StartSession command, click the button to validate the selection, and specify the following parameters:
• Run Type: A StartSession step can only be executed sequentially (Sequen-tial).
• Delay: A delay specifying by how much step start is delayed. A delay value is automatically set when the step is added using the capture func-tionality.
• Timeout: A period of time after which the step execution is considered to have timed out.
• Ignore step: When this option is selected, the step is skipped at execution time. Selecting this option is equivalent to right-clicking a step in the Script Steps table and choosing the Exclude command from the context menu that appears.
• Description: An optional step description can be associated with a step.
Click Next.
3. Define the Conditional Execution settings as explained below.
Conditional Execution settings enable you to define the system conditions a script step execution is monitored for. When such a predefined condition occurs – a step error or a step timeout – a user-defined procedure is executed and an additional action is performed. For example, on encountering a step error, you could enforce the execution of a cleanup procedure and then termi-nate the script.
To monitor the step for a predefined Timeout or Error condition, select the corresponding condition, then define the associated procedure – local or
Note: The operations sequence described in this section assumes that Response Templates have already been created and are available for assignment to a command step. For information on actually creating a Response Template refer to Creating Response Templates on page 13-7.
6-44 IxNetwork TestComposer User Guide, Release 7.00

Script Steps Reference Information
shared (external) – by clicking the control of the Procedure field and selecting a procedure from the the drop-down pane that appears.
For the selected procedure you can view its defined arguments by clicking the
control of the Input Arguments field, which displays a cascading table-format pane containing the argument list. To specify the actual runtime argu-ment(s) enter the desired values in the Current Value field(s).
Configure an additional action by clicking into additional actions column and selecting either of the following options:
• Continue: After performing the specified procedure, the script execution continues.
• Exit Test: After performing the specified procedure, the script execution is terminated.
Click Next.
4. Start defining a new device session by specifying a session name and config-ure an interface type and its parameters, spanning basic physical connectivity parameters such as IP address and port number, and more advanced parame-ters that specify, for example, what responses to expect from the configured devices. For a detailed description of parameters that need to be configured, refer to Configuring Session Parameters on page 5-5.
Alternatively load an existing device session resource by clicking the Load
from storage... button. When selecting a device session in the Open Device Settings window that appears, depending on the Open button selec-tion mode, the session can be opened using either of the following modes:
• Add to Session Step Local: The StartSession steps accesses a local copy of the session resource, meaning that session parameters are editable.
• Add to Session Step Shared: The StartSession step accesses a database copy of the session resource with read-only parameters.
Click Next.
5. Verify the step summary information and revert to a previous configuration step if needed. Click Finish.
Note: Whenever the step execution is defined for predefined events, an icon is displayed in the step’s corresponding Events selected column entry. For information on turning on the displaying of the Events selected column refer to Customizing the Script Steps Table Layout on page 4-5.
Important: In the case of Syslog sessions, the StartSession step returns the actual listening syslog port number. This value can be retrieved by assigning a step return variable to the step.
IxNetwork TestComposer User Guide, Release 7.00 6-45

Script Steps Reference Information6
Editing In-Place a StartSession Step
To edit a StartSession script step:
1. Select the step in the Script Steps table.
2. Edit the step parameters as follows:
• Session: This column displays the current session.
• Return Variable: This step type does not use a return variable.
• Command String: This column displays the session type – Telnet, Tclsh, CmdTool, TL1, SSH1/SSH2/SSHAuto, COM, Raw, IxNetwork – and a comma-separated list of parameters relevant for that session.
Click into the column and edit in-place the session type or a parameter value. See Defining Connection Settings on page 5-7.
Alternatively, click the button displaying a drop-down pane and edit the desired parameters in the window that appears. See Defining Connection Settings on page 5-7.
In the Session column, click the respective session for a command type to get a list of all the applicable sessions. The sessions are grouped in the list according to their names and type. Example:Consider that there are two sessions, one being a Telnet session, and the other an SSH session. These two sessions appear in the Session box under the same name, for example, Session 1. Both these sessions will have different images appearing next to them, indicating whether it is a Telnet session or an SSH session.
Execute An Execute step executes a protocol interface command – Telnet, Tclsh, Cmd-Tool, TL1, SSH1/SSH2/ SSHAuto, SNMP, Syslog, COM, CSVAnalyzer, and Raw – on a configured test device.
In the case of the default IxNetwork session type that is automatically created for every TestComposer script and which connects to an IxNetwork Tcl server, com-mands encapsulate predefined IxNetwork events.
6-46 IxNetwork TestComposer User Guide, Release 7.00

Script Steps Reference Information
Execute Command in Step Configuration Wizard
To add an Execute command step using the GUI scripting support:
1. While in the Test Steps pane, add a step by choosing the Actions > Add step... command.
2. Select an Execute command, click the button to validate the selection, and specify the following parameters:
• Run Type: An Execute step can be executed sequentially (Sequential) or in parallel with other steps (Parallel). When defining a step as parallel, an step Id needs defined, such as to be able to access the step using a Join command step.
• Delay: A delay specifying by how much step start is delayed. A delay value is automatically set when the step is added using the Capture func-tionality.
• Timeout: A period of time after which the step execution is considered to have timed out.
• Blocking: A read-only option that defines the script step execution behav-ior as either of the following, and which becomes editable only for some IxNetwork commands:
• blocking: the next step only starts after the current step finishes executing
• non-blocking: the current step starts execution and then execution advances to the next step.
• Ignore step: When this option is selected, the step is skipped at execution time. Selecting this option is equivalent to right-clicking a step in the Script Steps table and choosing the Exclude command from the context menu that appears.
• Description: An optional step description can be associated with a step.
Click Next.
3. Define the Conditional Execution settings as explained below.
Conditional Execution settings enable you to define the system conditions a script step execution is monitored for. When such a predefined condition occurs – a step error or a step timeout – a user-defined procedure is executed and an additional action is performed. For example, on encountering a step error, you could enforce the execution of a cleanup procedure and then termi-nate the script.
To monitor the step for a predefined Timeout or Error condition, select the corresponding condition, then define the associated procedure – local or
shared (external) – by clicking the control of the Procedure field and selecting a procedure from the the drop-down pane that appears.
For the selected procedure you can view its defined arguments by clicking the
control of the Input Arguments field, which displays a cascading table-
IxNetwork TestComposer User Guide, Release 7.00 6-47

Script Steps Reference Information6
format pane containing the argument list. To specify the actual runtime argu-ment(s) enter the desired values in the Current Value field(s).
Configure an additional action by clicking into additional actions column and selecting either of the following options:
• Continue: After performing the specified procedure, the script execution continues.
• Exit Test: After performing the specified procedure, the script execution is terminated.
Click Next.
4. Select an existing session and a command appropriate for that session type, as described in Table 6-1.
Note: Whenever the step execution is monitored for predefined or user-defined
events, an icon is displayed in the step’s corresponding Events selected column entry. For information on turning on the displaying of the Events selected column refer to Customizing the Script Steps Table Layout on page 4-5.
Table 6-1. Execute Command Step Parameters
Field Description
Session An existing session to the configured device. Depending on the selected session type, the Command String field below accepts a command that is available for that type.
Return Variable A return variable can be used to retrieve the step result. Specify a return variable by editing it in place, or by clicking
the button and selecting a variable from those defined in the previous script steps.
Command String A command accepted by the selected interface and the configured device, ranging from CLI protocol commands to pre-configured IxNetwork test application command (‘event’). A complete listing of IxNetwork test application events that can be executed on the default IxNetwork session is given in IxNetwork Events on page D-1.A complete listing of commands for SNMP, Syslog, and CSVAnalyzer session types is given in Predefined Commands for Miscellaneous Other Session Types on page E-1.
Control characters
A control character sequence can be sent along with the command by choosing a CTRL + <char> entry and clicking
the Add value button.
Encrypt If selected, the command string is displayed using * characters instead of being displayed in clear.
6-48 IxNetwork TestComposer User Guide, Release 7.00

Script Steps Reference Information
Click Next.
5. Response Templates enable you to parse the command output and retrieve -user-defined portions marked as targets in the template.
Select one or multiple Response Template by performing either of the follow-ing:
• Click into the Response Template field, which displays a list of matching Response Templates, and choose a Response Template entry. Matching Response Templates are template resources that have been associated with a command of the current type and are located in a user-defined Response Template folder specified in the configuration of the current device ses-sion.
For a detailed description of creating Response Templates and defining a Response Template - command association refer to Creating Response Templates on page 13-7 and Defining a Response Template - Command Association on page 13-28.
• Click into the Response Template field and then click the button to associate a Response Template from another resources location. In the Resource Manager window that appears, navigate to the desired location and select a Response Template.
In both cases, after you have selected a Response Template, the Exported Tar-gets pane below is populated with a list of tokens defined as targets in the template(s).
Alternatively, if no Response Template is specified, you can later execute the script step (also in the Edit mode), which produces a Local Step Response containing the actual step output. Based on the Local Step Response you can then define a Response Template, as described in Creating Response Templates on page 13-7.
Click Next.
6. Depending on the session type, the Match Options page enables you to mon-itor the command output for specified messages or traps.
Replace Composer variables
If selected (default), string command parameters using a prepended $ character, such as for example $a, are treated as TestComposer variables. When this option is not selected, the character sequence is treated as a literal value and is passed to the session as typed.
Note: Assuming, for example, that you have selected two templates, say RT01 and RT02, which are exposing the sent_bytes and received_bytes targets respectively, then both sent_bytes and received_bytes are displayed in the Targets pane. Assuming also that the var1 return variable was assigned to the step, in subsequent script steps you will be able to reference both targets using the var1.sent_bytes and var1.received_bytes expressions respectively.
Table 6-1. Execute Command Step Parameters
Field Description
IxNetwork TestComposer User Guide, Release 7.00 6-49

Script Steps Reference Information6
When a message or a trap is received that matches a specified regular expres-sion, an user event (local or global) is triggered and a configured (local to the script or shared) procedure is executed. If the procedure to be executed has arguments, these can be assigned a number of predefined portions of the received message.
Click the button and define an expression to match, associated with the performing of an action and the execution of a procedure.
• For sessions other than SNMP and Syslog configure event processing as follows:
Specify a regular expression (Search For column).
Select a local event or an existing global event (Event column). Alterna-tively, define a new global event by clicking the field’s <add user event entry>, which brings up the User Events Catalog. See Defining User Events on page 3-23.
If a local event is selected, you can configure an executed procedure, local or shared (Procedure to Run column). If a global event is selected, the pro-cedure that is associated with that event automatically becomes selected in the Procedure to Run column.
Eventually, if the associated procedure has arguments, click the button to assign one of the following entities to a procedure parameter:
• value of message: The entire message string is assigned to the parameter.
• search result: The matched expression is assigned to the parameter.
• constant value: A constant user-defined value is assigned to the parameter.
• For SNMP sessions configure event processing as follows:
Specify the expected trap by clicking into the Look For field and editing
in-place, or by clicking into the field and then clicking the button in the drop-down pane that appears. From the MIB Browser window that appears select a trap id. See Using the MIB Browser on page I-1.
Select a local event or an existing global event (Event column). Alterna-tively, define a new global event by clicking the field’s <add user event entry>, which brings up the User Events Catalog. See Defining User Events on page 3-23.
If a local event is selected, you can configure an executed procedure, local or shared (Procedure to Run column). If a global event is selected, the pro-cedure that is associated with that event automatically becomes selected in the Procedure to Run column.
Note: The main difference between local and global user events is that local events are defined and used only within a single script step, whereas global events can be accessed from all script steps. For information on defining global user events, refer to Defining User Events on page 3-23.
6-50 IxNetwork TestComposer User Guide, Release 7.00

Script Steps Reference Information
Eventually, if the associated procedure has arguments, click the button to assign one of the following entities to a procedure parameter:
• value of message: The entire message string is assigned to the parameter.
• search result: The matched expression is assigned to the parameter.
• constant value: A constant user-defined value is assigned to the parameter.
• For Syslog sessions configure event processing as follows:
Specify a message to match by defining a message pattern, possibly using regular expressions. Received messages can be further filtered by specify-ing additional filtering expressions in the Facility, Severity, and Host fields.
Select a local event or an existing global event (Event column). Alterna-tively, define a new global event by clicking the field’s <add user event entry>, which brings up the User Events Catalog. See Defining User Events on page 3-23.
If a local event is selected, you can configure an executed procedure, local or shared (Procedure to Run column). If a global event is selected, the pro-cedure that is associated with that event automatically becomes selected in the Procedure to Run column.
Eventually, if the associated procedure has arguments, click the button to assign one of the following entities to a procedure parameter:
• value of message: The entire message string is assigned to the parameter.
• search result: The matched expression is assigned to the parameter.
• constant value: A constant user-defined value is assigned to the parameter.
Click Next.
7. Verify the step summary information and revert to a previous configuration step if needed. Click Finish.
Important: Special attention is required when configuring user event processing such as to avoid inconsistent device output monitoring:Assuming, for example, that we have an Execute command that generates continuous, multi-portion output, and that the command output is monitored for multiple expressions triggering multiple events, say E1 and E2.Given the continuous nature of the output, it could happen that at one moment an output portion matches one of the specified expressions and that the corresponding event, say E1, is triggered by this occurrence. Now, assuming that E1 is configured with the “Proceed with Next Step” additional action, it could happen that, while E1 is being processed, and before the Device Terminator is sent, another event, E2, is triggered. This would result in both events, E1 and E2, being processed, irrespective of E1’s configured “Proceed with Next Step” option.
IxNetwork TestComposer User Guide, Release 7.00 6-51

Script Steps Reference Information6
Editing In-Place an Execute Step
To edit an Execute script step:
1. Select the step in the Script Steps table.
2. Edit the step parameters as follows:
• Session: This column displays the current session.
• Return Variable: This column displays the return variable name, which enables you for example to retrieve defined portions of the command out-put.
• Command String: This column displays the executed command. If the command is actually a multi-line commands sequence, only the first com-mand line is shown.
Click into the column and edit in-place the command. See Execute Command in Step Configuration Wizard on page 6-47.
Alternatively, click the button displaying a drop-down pane and edit the command in the pane that appears. See Execute Command in Step Configuration Wizard on page 6-47.
• Run Type: This column displays the run mode, sequential or parallel.
Click into the column and edit in-place.
Alternatively, click the button displaying a drop-down pane and select the run type.
In the Session column, click the respective session for a command type to get a list of all the applicable sessions. The sessions are grouped in the list according to their names and type. Example:Consider that there are two sessions, one being a Telnet session, and the other an SSH session. These two sessions appear in the Session box under the same name, for example, Session 1. Both these sessions will have different images appearing next to them, indicating whether it is a Telnet session or an SSH session.
Note: A complete, detailed listing of all supported IxNetwork test application commands (‘events’) and their syntax is provided in IxNetwork Events on page D-1.
6-52 IxNetwork TestComposer User Guide, Release 7.00

Script Steps Reference Information
StopSession A StopSession command terminates an open connection to a configured device.
StopSession Command Step in Step Configuration WIzard
A StopSession command closes an open connection to a configured device.
To add a StopSession command step using the GUI scripting support:
1. While in the Script Steps pane, add a step by choosing the Actions > Add step... command.
2. Select a StopSession command, click the button to validate the selection, and specify the following parameters:
• Run Type: A StopSession command can only be executed sequentially (Sequential).
• Delay: A delay specifying by how much step start is delayed. A delay value is automatically set when the step is added using the Capture func-tionality.
• Timeout: A period of time after which the step execution is considered to have timed out.
• Ignore step: When this option is selected, the step is skipped at execution time. Selecting this option is equivalent to right-clicking a step in the Script Steps table and choosing the Exclude command from the context menu that appears.
• Description: An optional step description can be associated with a step.
Click Next.
3. Define the Conditional Execution settings as explained below.
Conditional Execution settings enable you to define the system conditions a script step execution is monitored for. When such a predefined condition occurs – a step error or a step timeout – a user-defined procedure is executed and an additional action is performed. For example, on encountering a step error, you could enforce the execution of a cleanup procedure and then termi-nate the script.
To monitor the step for a predefined Timeout or Error condition, select the corresponding condition, then define the associated procedure – local or
shared (external) – by clicking the control of the Procedure field and selecting a procedure from the the drop-down pane that appears.
For the selected procedure you can view its defined arguments by clicking the
control of the Input Arguments field, which displays a cascading table-format pane containing the argument list. To specify the actual runtime argu-ment(s) enter the desired values in the Current Value field(s).
Configure an additional action by clicking into additional actions column and selecting either of the following options:
• Continue: After performing the specified procedure, the script execution continues.
IxNetwork TestComposer User Guide, Release 7.00 6-53

Script Steps Reference Information6
• Exit Test: After performing the specified procedure, the script execution is terminated.
Click Next.
4. Specify the session that is to be closed by clicking into the Session field and selecting an active session from those displayed in the window that appears.
Click Next.
5. Verify the step summary information and revert to a previous configuration step if needed. Click Finish.
StopSession Step In-Place Editing
To edit a StopSession script step:
1. Select the step in the Test Steps table.
2. Edit the step parameters as follows:
• Session: This column displays the current session.
• Return Variable: This step type does not use a return variable.
• Command String: This step does not display a command string.
In the Session column, click the respective session for a command type to get a list of all the applicable sessions. The sessions are grouped in the list according to their names and type. Example:Consider that there are two sessions, one being a Telnet session, and the other an SSH session. These two sessions appear in the Session box under the same name, for example, Session 1. Both these sessions will have different images appearing next to them, indicating whether it is a Telnet session or an SSH session.
Note: Whenever the step execution is monitored for predefined events, an icon is displayed in the step’s corresponding Events selected column entry. For information on turning on the displaying of the Events selected column refer to Customizing the Script Steps Table Layout on page 4-5.
6-54 IxNetwork TestComposer User Guide, Release 7.00

Script Steps Reference Information
Get Time A Get Time step retrieves the time a test script is run at and returns it in a script variable.
GetTime Step in Step Configuration Wizard
A Get Time step retrieves the time a test script is run at and returns it in a script variable.
To add a Get Time statement step:
1. While in the Script Steps pane, add a step by choosing the Actions > Add step... command.
2. Select a Get Time step type, click the button to validate the selection, and specify the following parameters:
• Run Type: A Get Time step can only be executed sequentially (Sequen-tial).
• Delay: A delay specifying by how much step start is delayed. A delay value is automatically set when the step is added using the Capture func-tionality of TestComposer.
• Timeout: A period of time after which the step execution is considered to have timed out.
• Ignore step: When this option is selected, the step is skipped at execution time. Selecting this option is equivalent to right-clicking a step in the Script Steps table and choosing the Exclude command from the context menu that appears.
• Description: An optional step description can be associated with the step.
Click Next.
3. Define the Conditional Execution settings as explained below.
Conditional Execution settings enable you to define the system conditions a script step execution is monitored for. When such a predefined condition occurs – a step error or a step timeout – an user-defined procedure is executed and an additional action is performed. For example, on encountering a step error, you could enforce the execution of a cleanup procedure and then termi-nate the script.
To monitor the step for a predefined Timeout or Error condition, select the corresponding condition, then define the associated procedure – local or
shared (external) – by clicking the control of the Procedure field and selecting a procedure from the the drop-down pane that appears.
For the selected procedure you can view its defined arguments by clicking the
control of the Input Arguments field, which displays a cascading table-format pane containing the argument list. To specify the actual runtime argu-ment(s) enter the desired values in the Current Value field(s).
IxNetwork TestComposer User Guide, Release 7.00 6-55

Script Steps Reference Information6
Configure an additional action by clicking into additional actions column and selecting either of the following options:
• Continue: After performing the specified procedure, the script execution continues.
• Exit Test: After performing the specified procedure, the script execution is terminated.
Click Next.
4. Specify the time information to be retrieved using one or more format string(s) from those listed in Table 6-2.
Note: Whenever the step execution is monitored for predefined events, an icon is displayed in the step’s corresponding Events selected column entry. For information on turning on the displaying of the Events selected column refer to Customizing the Script Steps Table Layout on page 4-5.
Table 6-2. GeTime Format Strings
String Action
%% Inserts a %.
%a Inserts an abbreviated weekday name (Mon, Tue, and so on.).
%A Inserts a full weekday name (Monday, Tuesday, etc.).
%b Inserts an abbreviated month name (Jan, Feb, etc.).
%B Inserts a full month name.
%c Inserts a locale-specific date and time. The format for date and time in the default "C" locale on Unix or Mac is "%a %b %d %H:%M:%S %Y". On Windows hosts, this value is the locale specific long date and time, as specified in the Regional Options control panel settings.
%C Inserts the first two digits of the four-digit year (19 or 20).
%d Inserts the day of month (01 - 31).
%D Formats the date as %m/%d/%y.
%e Inserts the day of month (1 - 31), no leading zeros.
%g Inserts the ISO8601 year number corresponding to the ISO8601 week (%V), expressed as a two-digit year-of-the-century, with leading zero if necessary.
%G Inserts the ISO8601 year number corresponding to the ISO8601 week (%V), expressed as a four-digit number.
%h Inserts the abbreviated month name.
%H Inserts the hour in 24-hour format (00 - 23).
%I Inserts the hour in 12-hour format (01 - 12).
6-56 IxNetwork TestComposer User Guide, Release 7.00

Script Steps Reference Information
5. Verify the step summary information and revert to a previous configuration step if needed. Click Finish.
%j Inserts the day of year (001 - 366).
%k Inserts the hour in 24-hour format, without leading zeros (0 - 23).
%l Inserts the hour in 12-hour format, without leading zeros (1 - 12).
%m Inserts the month number (01 - 12).
%M Inserts the minute (00 - 59).
%n Inserts a newline.
%p Inserts an AM or PM indicator.
%r Formats the time in a locale-specific "meridian" format. The "meridian" format in the default "C" locale is "%I:%M:%S %p".
%R Format the time as %H:%M.
%s Inserts the count of seconds since the epoch, expressed as a decimal integer.
%S Inserts the count of seconds (00 - 59).
%t Inserts a tab.
%T Formats the time as %H:%M:%S.
%u Inserts the weekday number (Monday = 1, Sunday = 7).
%U Inserts the week of the year (00 - 52), Sunday being the first day of the week.
%V Inserts the week of the year according to ISO-8601 rules. Week 1 of a given year is the week containing 4 January.
%w Inserts the weekday number (Sunday = 0, Saturday = 6).
%W Inserts the week of the year (00 - 52), Monday being the first day of the week.
%x Uses a locale-specific date format. The format for a date in the default "C" locale for Unix or Mac is "%m/%d/%y". On Windows, this value is the locale specific short date format, as specified in the Regional Options control panel settings.
%X Uses a locale-specific 24-hour time format. The format for a 24-hour time in the default "C" locale for Unix or Mac is "%H:%M:%S". On Windows, this value is the locale- specific time format, as specified in the Regional Options control panel settings.
%y Inserts the year without century (00 - 99).
%Y Inserts the year with century (e.g. 1990)
%Z Inserts the time zone name.
Table 6-2. GeTime Format Strings
String Action
IxNetwork TestComposer User Guide, Release 7.00 6-57

Script Steps Reference Information6
GetTime Step In-Place Editing
A Get Time step retrieves the time a test script is run at and returns it in a script variable.
To edit a Get Time script step:
1. Select the step in the Script Steps table.
2. Edit the step parameters as follows:
• Session: This column displays no session type.
• Return variable: This column displays the name of the script variable that is assigned a time value.
A new variable can be specified by clicking into the column and defining it in-place.
• Command String: This column displays a format string–simple or com-pound–used for specifying the returned time information. Supported for-mat strings are listed in Table 6-3:
Table 6-3. GetTime Format Strings
String Action
%% Inserts a %.
%a Inserts an abbreviated weekday name (Mon, Tue, and so on.).
%A Inserts a full weekday name (Monday, Tuesday, etc.).
%b Inserts an abbreviated month name (Jan, Feb, etc.).
%B Inserts a full month name.
%c Inserts a locale-specific date and time. The format for date and time in the default "C" locale on Unix or Mac is "%a %b %d %H:%M:%S %Y". On Windows hosts, this value is the locale specific long date and time, as specified in the Regional Options control panel settings.
%C Inserts the first two digits of the four-digit year (19 or 20).
%d Inserts the day of month (01 - 31).
%D Formats the date as %m/%d/%y.
%e Inserts the day of month (1 - 31), no leading zeros.
%g Inserts the ISO8601 year number corresponding to the ISO8601 week (%V), expressed as a two-digit year-of-the-century, with leading zero if necessary.
%G Inserts the ISO8601 year number corresponding to the ISO8601 week (%V), expressed as a four-digit number.
%h Inserts the abbreviated month name.
6-58 IxNetwork TestComposer User Guide, Release 7.00

Script Steps Reference Information
%H Inserts the hour in 24-hour format (00 - 23).
%I Inserts the hour in 12-hour format (01 - 12).
%j Inserts the day of year (001 - 366).
%k Inserts the hour in 24-hour format, without leading zeros (0 - 23).
%l Inserts the hour in 12-hour format, without leading zeros (1 - 12).
%m Inserts the month number (01 - 12).
%M Inserts the minute (00 - 59).
%n Inserts a newline.
%p Inserts an AM or PM indicator.
%r Formats the time in a locale-specific "meridian" format. The "meridian" format in the default "C" locale is "%I:%M:%S %p".
%R Format the time as %H:%M.
%s Inserts the count of seconds since the epoch, expressed as a decimal integer.
%S Inserts the count of seconds (00 - 59).
%t Inserts a tab.
%T Formats the time as %H:%M:%S.
%u Inserts the weekday number (Monday = 1, Sunday = 7).
%U Inserts the week of the year (00 - 52), Sunday being the first day of the week.
%V Inserts the week of the year according to ISO-8601 rules. Week 1 of a given year is the week containing 4 January.
%w Inserts the weekday number (Sunday = 0, Saturday = 6).
%W Inserts the week of the year (00 - 52), Monday being the first day of the week.
%x Uses a locale-specific date format. The format for a date in the default "C" locale for Unix or Mac is "%m/%d/%y". On Windows, this value is the locale specific short date format, as specified in the Regional Options control panel settings.
%X Uses a locale-specific 24-hour time format. The format for a 24-hour time in the default "C" locale for Unix or Mac is "%H:%M:%S". On Windows, this value is the locale- specific time format, as specified in the Regional Options control panel settings.
%y Inserts the year without century (00 - 99).
%Y Inserts the year with century (e.g. 1990)
%Z Inserts the time zone name.
Table 6-3. GetTime Format Strings
String Action
IxNetwork TestComposer User Guide, Release 7.00 6-59

Script Steps Reference Information6
Click into the column and define an expression by editing it in-place.
TclEval Step A TclEval step evaluates a simple Tcl expression or interprets a multi-line code fragment containing Tcl commands, operators and TestComposer variables.
TclEval Command Step in Step Configuration Wizard
A TclEval step evaluates a simple Tcl expression or interprets a multi-line code fragment containing Tcl commands, operators and TestComposer variables.
To add a TclEval command step using the GUI scripting support:
1. While in the Test Steps pane, add a step by choosing the Actions > Add step... command.
2. Select a TclEval command, click the button to validate the selection, and specify the following parameters:
• Run Type: A TclEval step can only be executed sequentially (Sequential).
• Delay: A delay specifying by how much step start is delayed. A delay value is automatically set when the step is added using the Capture func-tionality.
• Timeout: A period of time after which the step execution is considered to have timed out.
• Ignore step: When this option is selected, the step is skipped at execution time. Selecting this option is equivalent to right-clicking a step in the Test Steps table and choosing the Exclude command from the context menu that appears.
• Description: An optional step description can be associated with a step.
Click Next.
3. Define the Conditional Execution settings as explained below.
Conditional Execution settings enable you to define the system conditions a script step execution is monitored for. When such a predefined condition occurs – a step error or a step timeout – an user-defined procedure is executed and an additional action is performed. For example, on encountering a step error, you could enforce the execution of a cleanup procedure and then termi-nate the script.
To monitor the step for a predefined Timeout or Error condition, select the corresponding condition, then define the associated procedure – local or
shared (external) – by clicking the control of the Procedure field and selecting a procedure from the the drop-down pane that appears.
For the selected procedure you can view its defined arguments by clicking the
control of the Input Arguments field, which displays a cascading table-format pane containing the argument list. To specify the actual runtime argu-ment(s) enter the desired values in the Current Value field(s).
6-60 IxNetwork TestComposer User Guide, Release 7.00

Script Steps Reference Information
Configure an additional action by clicking into additional actions column and selecting either of the following options:
• Continue: After performing the specified procedure, the script execution continues.
• Exit Test: After performing the specified procedure, the script execution is terminated.
Click Next.
4. In the Expression Builder GUI, create a valid Tcl expression or a Tcl code fragment by double-clicking in turn the desired Tcl commands and operators, and TestComposer variables.
For detailed information on using the Expression Builder and creating Tcl expressions refer to Using the Composer Expression Builder on page 7-1.
Click Next.
5. Verify the step summary information and revert to a previous configuration step if needed. Click Finish.
TclEval Step In-Place Editing
To edit a TclEval script step:
1. Select the step in the Script Steps table.
2. Edit the step parameters as follows:
• Session: This column displays no current session.
• Return Variable: This step type does not use a return variable.
Note: Whenever the step execution is monitored for predefined events, an icon is displayed in the step’s corresponding Events selected column entry. For information on turning on the displaying of the Events selected column refer to Customizing the Script Steps Table Layout on page 4-5.
Example:Assuming we have a list variable named Tput_fps containing f(rame)p(er)s(econd) test statistics, the code sample below would iterate through the entire list searching for the maximum value, which is then assigned to the Max_Tput_fps variable. The last instruction converts the frame per second value to a bit per second value and uses the computed value to initialize the Max_Tput_bps variable:
# find the max in the Tput_fps list
foreach tput ${x.Tput_fps} {
if {$tput > $Max_Tput_fps} { set Max_Tput_fps $tput }
}
# calculate the max bps value
set Max_Tput_bps [expr {$Max_Tput_fps * $framesize * 8}]
IxNetwork TestComposer User Guide, Release 7.00 6-61

Script Steps Reference Information6
• Command String: This column displays a simple Tcl expression or a multi-line code Tcl code fragment.
Click into the column and edit in-place the Tcl expression.
Alternatively, click the button and edit the expression or code in the Expression Builder GUI, as described in as described in Using the Composer Expression Builder on page 7-1.
Watch A Watch command step can be added using the Step Configuration Wizard or it can be edited in-place in the Script Steps table.
Watch Command Step in Step Configuration Wizard
A Watch step monitors a device session for specified messages or traps (for SNMP sessions). When a message or a trap is received that matches a specified regular expression, an user event is triggered and a configured procedure is exe-cuted. If the procedure to be executed has arguments, these can be assigned a number of predefined portions of the received message.
To add a Watch command step using the GUI scripting support:
1. While in the Script Steps pane, add a step by choosing the Actions > Add step... command.
2. Select a Watch command, click the button to validate the selection, and specify the following parameters:
• Run Type: A Watch step can be executed sequentially (Sequential) or with other steps (Parallel). When defining a step as parallel, a step Id needs defined, such as to be able to access the step using a Join command step.
• Delay: A delay specifying by how much step start is delayed. A delay value is automatically set when the step is added using the Capture func-tionality.
• Timeout: This parameter is not available for a Watch step.
• Ignore step: When this option is selected, the step is skipped at execution time. Selecting this option is equivalent to right-clicking a step in the Script Steps table and choosing the Exclude command from the context menu that appears.
• Description: An optional step description can be associated with a step.
3. Define the Conditional Execution settings as explained below.
Conditional Execution settings enable you to define the system conditions a script step execution is monitored for. When such a predefined condition occurs – a step error or a step timeout – a user-defined procedure is executed and an additional action is performed. For example, on encountering a step error, you could enforce the execution of a cleanup procedure and then termi-nate the script.
To monitor the step for a predefined Timeout or Error condition, select the corresponding condition, then define the associated procedure – local or
6-62 IxNetwork TestComposer User Guide, Release 7.00

Script Steps Reference Information
shared (external) – by clicking the control of the Procedure field and selecting a procedure from the the drop-down pane that appears.
For the selected procedure you can view its defined arguments by clicking the
control of the Input Arguments field, which displays a cascading table-format pane containing the argument list. To specify the actual runtime argu-ment(s) enter the desired values in the Current Value field(s).
Configure an additional action by clicking into additional actions column and selecting either of the following options:
• Continue: After performing the specified procedure, the script execution continues.
• Exit Test: After performing the specified procedure, the script execution is terminated.
Click Next.
4. Define the command evaluation parameters as follows:
• Session: The device session that is monitored for a user-defined event.
• Watch For: A period of time after which monitoring is suspended.
• Watch: If the Watch step was defined as a parallel executing step, select-ing the Always option monitors the session for the entire script duration.
Click Next.
5. Depending on the session type, the Match Options page enables you to mon-itor the command output for specified messages or traps.
When a message or a trap is received that matches a specified regular expres-sion, an user event (local or global) is triggered and a configured (local to the script or shared) procedure is executed. If the procedure to be executed has arguments, these can be assigned a number of predefined portions of the received message.
Click the button and define an expression to match, associated with the performing of an action and the execution of a procedure.
• For sessions other than SNMP and Syslog configure event processing as follows:
Note: Whenever the step execution is monitored for predefined or user-defined
events, an icon is displayed in the step’s corresponding Events selected column entry. For information on turning on the displaying of the Events selected column refer to Customizing the Script Steps Table Layout on page 4-5.
Note: The main difference between local and global user events is that local events are defined and used only within a single script step, whereas global events can be accessed from all script steps. For information on defining global user events, refer to Defining User Events on page 3-23.
IxNetwork TestComposer User Guide, Release 7.00 6-63

Script Steps Reference Information6
Specify a regular expression (Search For column).
Select a local event or an existing global event (Event column). Alterna-tively, define a new global event by clicking the field’s <add user event entry>, which brings up the User Events Catalog. See Defining User Events on page 3-23.
If a local event is selected, you can configure an executed procedure, local or shared (Procedure to Run column). If a global event is selected, the pro-cedure that is associated with that event automatically becomes selected in the Procedure to Run column.
Eventually, if the associated procedure has arguments, click the button to assign one of the following entities to a procedure parameter:
• value of message: The entire message string is assigned to the parameter.
• search result: The matched expression is assigned to the parameter.
• constant value: A constant user-defined value is assigned to the parameter.
• For SNMP sessions configure event processing as follows:
Specify the expected trap by clicking into the Look For field and editing in-place (possibly using a regular expression), or by clicking into the field
and then clicking the button in the drop-down pane that appears. From the MIB Browser window that appears select a trap id. See Using the MIB Browser on page I-1.
Select a local event or an existing global event (Event column). Alterna-tively, define a new global event by clicking the field’s <add user event entry>, which brings up the User Events Catalog. See Defining User Events on page 3-23.
If a local event is selected, you can configure an executed procedure, local or shared (Procedure to Run column). If a global event is selected, the pro-cedure that is associated with that event automatically becomes selected in the Procedure to Run column.
Eventually, if the associated procedure has arguments, click the button to assign one of the following entities to a procedure parameter:
• value of message: The entire message string is assigned to the parameter.
• search result: The matched expression is assigned to the parameter.
• constant value: A constant user-defined value is assigned to the parameter.
• For Syslog sessions configure event processing as follows:
Specify a message to match by defining a message pattern, possibly using regular expressions. Received messages can be further filtered by specify-ing additional filtering expressions in the Facility, Severity, and Host fields.
6-64 IxNetwork TestComposer User Guide, Release 7.00

Script Steps Reference Information
Select a local event or an existing global event (Event column). Alterna-tively, define a new global event by clicking the field’s <add user event entry>, which brings up the User Events Catalog. See Defining User Events on page 3-23.
If a local event is selected, you can configure an executed procedure, local or shared (Procedure to Run column). If a global event is selected, the pro-cedure that is associated with that event automatically becomes selected in the Procedure to Run column.
Eventually, if the associated procedure has arguments, click the button to assign one of the following entities to a procedure parameter:
• value of message: The entire message string is assigned to the parameter.
• search result: The matched expression is assigned to the parameter.
• constant value: A constant user-defined value is assigned to the parameter.
Click Next.
Important: The expressions entered in the Message Pattern, Facility, Severity, and Host fields are regarded as regular expressions and message filtering is done based on these expressions. As such, the expression from the Host field is also regarded as a regular expression that is sought in incoming messages, and no DNS resolution is performed on any specified host name.
Notes: • This syslog processing functionality is also provided by the WaitForMes-
sage command that can be executed on an active Syslog session. For infor-mation on the WaitForMessage command refer to Syslog Session Commands on page E-8.
• This SNMP trap processing functionality is also provided by the WaitFor-Traps command that can be executed on an active SNMP session. For infor-mation on the WaitForTraps command refer to SNMP Session Commands on page E-1.
Important: Special attention is required when configuring user event processing such as to avoid inconsistent device output monitoring:Assuming, for example, that we have an Execute command that generates continuous, multi-portion output, and that the command output is monitored for multiple expressions triggering multiple events, say E1 and E2.Given the continuous nature of the output, it could happen that at one moment an output portion matches one of the specified expressions and that the corresponding event, say E1, is triggered by this occurrence. Now, assuming that E1 is configured with the “Proceed with Next Step” additional action, it could happen that, while E1 is being processed, and before the Device Terminator is sent, another event, E2, is triggered. This would result in both events, E1 and E2, being processed, irrespective of E1’s configured “Proceed with Next Step” option.
IxNetwork TestComposer User Guide, Release 7.00 6-65

Script Steps Reference Information6
6. Verify the step summary information and revert to a previous configuration step if needed. Click Finish.
Trace A Trace step logs an argument string to the application logs.
Trace Command Step in Step Configuration Wizard
A Trace step logs an argument string to the application logs.
To add a Trace command step using the GUI scripting support:
1. While in the Script Steps pane, add a step by choosing the Actions > Add step... command.
2. Select a Trace command, click the button to validate the selection, and specify the following parameters:
• Run Type: A Trace step can only be executed sequentially (Sequential).
• Delay: A delay specifying by how much step start is delayed. A delay value is automatically set when the step is added using the Capture func-tionality.
• Timeout: A period of time after which the step execution is considered to have timed out.
• Ignore step: When this option is selected, the step is skipped at execution time. Selecting this option is equivalent to right-clicking a step in the Script Steps table and choosing the Exclude command from the context menu that appears.
• Description: An optional step description can be associated with a step.
Click Next.
3. Define the Conditional Execution settings as explained below.
Conditional Execution settings enable you to define the system conditions a script step execution is monitored for. When such a predefined condition occurs – a step error or a step timeout – an user-defined procedure is executed and an additional action is performed. For example, on encountering a step error, you could enforce the execution of a cleanup procedure and then termi-nate the script.
To monitor the step for a predefined Timeout or Error condition, select the corresponding condition, then define the associated procedure – local or
shared (external) – by clicking the control of the Procedure field and selecting a procedure from the the drop-down pane that appears.
For the selected procedure you can view its defined arguments by clicking the
control of the Input Arguments field, which displays a cascading table-format pane containing the argument list. To specify the actual runtime argu-ment(s) enter the desired values in the Current Value field(s).
6-66 IxNetwork TestComposer User Guide, Release 7.00

Script Steps Reference Information
Configure an additional action by clicking into additional actions column and selecting either of the following options:
• Continue: After performing the specified procedure, the script execution continues.
• Exit Test: After performing the specified procedure, the script execution is terminated.
Click Next.
4. In the Expression Builder GUI, define a message and optionally a logging format specifier, such as for example %s for string formatting or %d for deci-mal formatting.
The message, a valid Tcl expression or a Tcl code fragment, is defined by double-clicking in turn the desired Tcl commands and operators, and TestComposer variables. For detailed information on using the Expression Builder and creating Tcl expressions refer to Using the Composer Expression Builder on page 7-1.
Click Next.
5. Verify the step summary information and revert to a previous configuration step if needed. Click Finish.
Note: Whenever the step execution is monitored for predefined events, an icon is displayed in the step’s corresponding Events selected column entry. For information on turning on the displaying of the Events selected column refer to Customizing the Script Steps Table Layout on page 4-5.
Examples:
Assign x 13
Trace "Numeric %d" $x // returns ‘Numeric 13’
Trace "%d" $x // returns 13
Trace $x // returns 13
Assign y "some text"
Trace "String %s" $y // returns ‘some text’ string
Assign z 12.34
Trace "Float %f" $z // returns ‘Float 12.34’
Trace "Text without variables" // returns ‘Text without //variables’ string
IxNetwork TestComposer User Guide, Release 7.00 6-67

Script Steps Reference Information6
Trace Step In-Place Editing
To edit a Trace script step:
1. Select the step in the Test Steps table.
2. Edit the step parameters as follows:
• Session: This column displays no current session.
• Return Variable: This step type does not use a return variable.
• Command String: This column displays the optional format specifier enclosed in “ “ characters – such as for example %s for string formatting or %d for decimal formatting – and the message to log.
Click into the column and edit in-place the format specifier or the message.
Alternatively, click the button and edit the message in the Expression Builder GUI, as described in as described in Using the Composer Expression Builder on page 7-1.
ShowMessage A ShowMessage step represents a mode of providing some user input at test exe-cution time.
ShowMessage Step in Step Configuration Wizard
A ShowMessage step allows to capture user inputs while running the test in the TestComposer environment. When the ShowMessage step is executed the message dialog box opens. The message dialog box either, contains a message to which you can response by selecting an option from a list of options provided in the dialog box, or contains a message to which you respond by entering textual information.
Based on your response to the message the next step is carried out.
To add a ShowMessage command step using the GUI scripting support:
1. While in the Test Steps pane, add a step by choosing the Actions > Add step... command.
2. Select a ShowMessage command, click the button to validate the selec-tion, and specify the following parameters:
• Run Type: A ShowMessage step can be executed sequentially (Sequen-tial) or in parallel (Parallel) with other steps.
• Delay: A delay specifying by how much step start is delayed.
• Timeout: A period of time after which the step execution is considered to have timed out. By default, a 1 minute timeout is configured for this step. At runtime, if no input is provided within this time, the default response is chosen as input.
• Ignore step: When this option is selected, the step is skipped at execution time. Selecting this option is equivalent to right-clicking a step in the Test
6-68 IxNetwork TestComposer User Guide, Release 7.00

Script Steps Reference Information
Steps table and choosing the Exclude command from the context menu that appears.
• Description: An optional step description can be associated with a step.
Click Next.
3. Define the Conditional Execution settings as explained below.
Conditional Execution settings enable you to define the system conditions a test step execution is monitored for. When such a predefined condition occurs – a step error or a step timeout – an user-defined procedure is executed and an additional action is performed. For example, on encountering a step error, you could enforce the execution of a cleanup procedure and then terminate the test.
To monitor the step for a predefined Timeout or Error condition, select the corresponding condition, then define the associated procedure – local or
shared (external) – by clicking the control of the Procedure field and selecting a procedure from the the drop-down pane that appears.
For the selected procedure you can view its defined arguments by clicking the
control of the Input Arguments field, which displays a cascading table-format pane containing the argument list. To specify the actual runtime argu-ment(s) enter the desired values in the Current Value field(s).
Configure an additional action by clicking into additional actions column and selecting either of the following options:
• Continue: After performing the specified procedure, the test execution continues.
• Exit Test: After performing the specified procedure, the test execution is terminated.
Click Next.
4. Specify the following parameters:
• Display message: The message that is displayed when the ShowMessage step is executed. The displayed message may contain TestComposer vari-ables and cannot exceed a size of 125 characters.
• Input Type: The type of response that is required for the message. It can be either Multiple choice or Text Input.
Select Multiple choice, if you want the message to show a list of available responses and requires you to select a response from the available ones when the ShowMessage step is executed.
Select Text Input, if you want the message to show a text input box in which you have to type in textual information.
Note: Whenever the step execution is monitored for predefined events, an icon is displayed in the step’s corresponding Events selected column entry. For information on turning on the displaying of the Events selected column refer to Customizing the Script Steps Table Layout.
IxNetwork TestComposer User Guide, Release 7.00 6-69

Script Steps Reference Information6
• Response Configuration: This pane allows you to define the acceptable response when the ShowMessage step is executed. The Response Configuration pane is dependent on the selected Input Type.
If you select Multiple choice as the Input Type, enter the options that you want to be displayed in the Message dialog box in the Response Text
field. To add multiple options click , . You can enter at most 10 responses. Also, indicate the default response by selecting IsDefault against the Response Text. When the ShowMessage step is executed all the options are displayed in the Message dialog box and the default response is selected. If you have not indicated any of the responses as the default response the first response the appears in the list is used as the default response.
If you select Text Input as the Input Type, a text editor opens in the Response Configuration section and you can enter a default response text. You can also choose to leave it blank. When the ShowMessage step is executed the default response appears in the Message dialog box.
Click Next.
5. Verify the step summary information and revert to a previous configuration step if needed. Click Finish.
ShowMessage Step In-Place Editing
Steps displayed in the Test Steps table can be edited in-line by clicking on a step parameters field (column) and manually editing the parameter values in-place, or by editing parameter values in the drop-down box.
To edit a ShowMessage test step:
1. Select the step in the Test Steps table.
2. Edit the step parameters as follows:
• Session: This column stores the session Id when this step is executed. This information is not editable.
• Return Variable: This column stores the response that you enter when this step is executed. This field is not editable and it automatically stores the response when the ShowMessage step is executed.
• Command String: This contains the command editor which is used to enter the Display Message, Input Type, and Response Configuration. Click on the drop-down arrow to open the command editor.
Description of the fields in the command editor are as follows:
Display Message—This field allows you to enter the message that appears when the ShowMessage step is executed.
Note: While the displayed message may contain TestComposer variables, the actual response texts may not be parameterized.
6-70 IxNetwork TestComposer User Guide, Release 7.00

Script Steps Reference Information
Input Type—This field allows you to select the response input type. You can select Multiple choice or Text Input.
Select Multiple choice, if you want the message to show a list of available responses and requires you to select a response from the available ones when the ShowMessage step is executed.
Select Text Input, if you want the message to show a text input box in which you have to type in textual information.
Response Configuration—This option is used to define the acceptable response when the ShowMessage step is executed. The Response Config-uration is dependent on the selected Input Type.
If you select Multiple choice as the Input Type, enter the Response Text. You can enter at most 10 responses. Also, indicate the default response by selecting IsDefault against the Response Text. When the ShowMessage step is executed this response is selected by default.
If you select Text Input as the Input Type, a text editor opens in the Response Configuration section and you can enter a default response text. You can also choose not to leave it blank. When the ShowMessage step is executed the default response appears in the Message dialog box.
3. Click Ok after you have finished editing the Command String.
ReadFile A ReadFile command reads an ASCII formatted input file and retrieves user-defined portions from it.
ReadFile Command Step in Step Configuration Wizard
A ReadFile command reads an ASCII formatted input file and retrieves parts from it.
To add a ReadFile command step using the GUI scripting support:
1. While in the Test Steps pane, add a step by choosing the Actions > Add step... command.
2. Select a ReadFile command, click the button to validate the selection, and specify the following parameters:
• Run Type: A ReadFile step can only be executed sequentially (Sequen-tial).
• Delay: A delay specifying by how much step start is delayed. A delay value is automatically set when the step is added using the Capture func-tionality.
• Timeout: A period of time after which the step execution is considered to have timed out.
• Ignore step: When this option is selected, the step is skipped at execution time. Selecting this option is equivalent to right-clicking a step in the Test Steps table and choosing the Exclude command from the context menu that appears.
IxNetwork TestComposer User Guide, Release 7.00 6-71

Script Steps Reference Information6
• Description: An optional step description can be associated with a step.
Click Next.
3. Define the Conditional Execution settings as explained below.
Conditional Execution settings enable you to define the system conditions a script step execution is monitored for. When such a predefined condition occurs – a step error or a step timeout – an user-defined procedure is executed and an additional action is performed. For example, on encountering a step error, you could enforce the execution of a cleanup procedure and then termi-nate the script.
To monitor the step for a predefined Timeout or Error condition, select the corresponding condition, then define the associated procedure – local or
shared (external) – by clicking the control of the Procedure field and selecting a procedure from the the drop-down pane that appears.
For the selected procedure you can view its defined arguments by clicking the
control of the Input Arguments field, which displays a cascading table-format pane containing the argument list. To specify the actual runtime argu-ment(s) enter the desired values in the Current Value field(s).
Configure an additional action by clicking into additional actions column and selecting either of the following options:
• Continue: After performing the specified procedure, the script execution continues.
• Exit Test: After performing the specified procedure, the script execution is terminated.
Click Next.
4. Specify the following parameters:
• File to Read: The file to parse is specified by clicking the button and selecting a file from the window that appears.
• Content Type: This version of the TestComposer plugin supports only ASCII format files.
• Return Variable: A return variable is used for retrieving a specified por-tion of the parsed file. Specify a new return variable by editing its name in
place, or click the button and select a variable from those defined in the previous script steps.
Click Next.
5. Select a Response Template defining the portions to be retrieved from the parsed file. To specify the template, click into the Response Template field,
Note: Whenever the step execution is monitored for predefined events, an icon is displayed in the step’s corresponding Events selected column entry. For information on turning on the displaying of the Events selected column refer to Customizing the Script Steps Table Layout on page 4-5.
6-72 IxNetwork TestComposer User Guide, Release 7.00

Script Steps Reference Information
click the button and select an existing resource template. Once the response template has been selected, the Exported Targets pane below is pop-ulated with a list of tokens defined as targets.
Alternatively, if no Response Template is specified, you can later execute the step (also in the Edit mode), which produces a Local Step Response contain-ing the actual file input. Based on the Local Step Response you can then define a Response Template, as described in Creating Response Templates on page 13-7.
Click Next.
6. Verify the step summary information and revert to a previous configuration step if needed. Click Finish.
ReadFile Command Step In-Place Editing
To edit a ReadFile script step:
1. Select the step in the Test Steps table.
2. Edit the step parameters as follows:
• Session: This column displays no current session.
• Return Variable: This column displays the return variable name, which enables you for example to retrieve defined portions of the input file.
A new variable is specified by clicking into the column and editing in-
place. Alternatively, click the button displaying a drop-down pane,
then click the button to select an existing variable.
• Command String: This column displays the name of the input file or a vari-able used for referencing the file.
Click into the column and edit the file or the variable name in-place.
Alternatively, click the button displaying a drop-down pane and select
the file name by clicking the button, or select a variable by clicking
the button.
WriteCSV A WriteCSV command writes one or more TestComposer variables to an attached output file using a CSV format.
WriteCSV Command Step in Step Configuration WIzard
Important: Since the use of this command is deprecated and will no longer be supported in future releases of the software, you are advised to use the WriteBlock command of the CSVAnalyzer session instead.
IxNetwork TestComposer User Guide, Release 7.00 6-73

Script Steps Reference Information6
A WriteCSV command writes one or more TestComposer variables to an attached output file using a CSV format.
To add a WriteCSV command step using the GUI scripting support:
1. While in the Test Steps pane, add a step by choosing the Actions > Add step... command.
2. Select a WriteCSV step type, click the button to validate the selection, and specify the following parameters:
• Run Type: A WriteCSV step can only be executed sequentially (Sequen-tial).
• Delay: A delay specifying by how much step start is delayed. A delay value is automatically set when the step is added using the Capture func-tionality.
• Timeout: A period of time after which the step execution is considered to have timed out.
• Ignore step: When this option is selected, the step is skipped at execution time. Selecting this option is equivalent to right-clicking a step in the Test Steps table and choosing the Exclude command from the context menu that appears.
• Description: An optional step description can be associated with a step.
Click Next.
3. Define the Conditional Execution settings as explained below.
Conditional Execution settings enable you to define the system conditions a script step execution is monitored for. When such a predefined condition occurs – a step error or a step timeout – an user-defined procedure is executed and an additional action is performed. For example, on encountering a step error, you could enforce the execution of a cleanup procedure and then termi-nate the script.
To monitor the step for a predefined Timeout or Error condition, select the corresponding condition, then define the associated procedure – local or
shared (external) – by clicking the control of the Procedure field and selecting a procedure from the the drop-down pane that appears.
For the selected procedure you can view its defined arguments by clicking the
control of the Input Arguments field, which displays a cascading table-format pane containing the argument list. To specify the actual runtime argu-ment(s) enter the desired values in the Current Value field(s).
Configure an additional action by clicking into additional actions column and selecting either of the following options:
• Continue: After performing the specified procedure, the script execution continues.
• Exit Test: After performing the specified procedure, the script execution is terminated.
6-74 IxNetwork TestComposer User Guide, Release 7.00

Script Steps Reference Information
Click Next.
4. Specify the following parameters:
• File Name: The output file, using either an absolute or a relative path, is specified by editing its name in place.
Alternatively to specifying a file name, you can specify a variable associ-
ated with an attached output file by clicking the button and selecting a variable from the window that appears.
• Variable List: The space-separated variables whose values are written to the output file.
• Custom headers: If selected, this option enables you to use custom col-umn headers for the CSV table. By default, these headers are named after the variables that are contained in the table columns.
5. Verify the step summary information and revert to a previous configuration step if needed. Click Finish.
Note: Whenever the step execution is monitored for predefined events, an icon is displayed in the step’s corresponding Events selected column entry. For information on turning on the displaying of the Events selected column refer to Customizing the Script Steps Table Layout on page 4-5.
Note: The variables to be written into the file are treated as list-type variables, as illustrated by the examples below.
Examples:• Assuming we had a composite variable named volume containing 2 numeric
variables target_1 and target_2, then a WriteCsv($file1;$volume) would gen-erate an output such as the following:
• Assuming we had the following variable assignation command:
Assign var1 “1 {2 3 4} 5”
then a WriteCSV($file1; $var1) command would yield a result such as the following:
var1
1
2 3 4
5
Note: If you want to write a variable with spaces on a single line of the output file, then you have to enclose that variable into {} characters, such as for example in {1 2 “the fox jumped over” 3 fences}.
IxNetwork TestComposer User Guide, Release 7.00 6-75

Script Steps Reference Information6
WriteCSV Step In-Place Editing
To edit a WriteCSV script step:
1. Select the WriteCSV step in the Test Steps table.
2. Edit the step parameters as follows:
• Session: This column displays no current session.
• Return Variable: This column displays no return variable name.
• Command String: This column displays the output file name or a variable associated with an output file, and the variable(s) whose value(s) is (are) to be written into the file. In case multiple variable values are written to the CSV file, the variable names are space-separated.
Click into the column and edit in-place the file name, using either relative or absolute location, or a variable referencing an output file. Edit in place the variable(s) whose value(s) is (are) to be written into the file.
Alternatively, click the button displaying a drop-down pane and edit the output file name or the variable referencing an output file, and the vari-able(s) whose value(s) is (are) to be written into the file.
GetValue A GetValue command retrieves the value of fields from composite variables, possibly filtering by the values of retrieved fields. Additionally, if the filtering operation yields multiple values, an aggregation operator can be applied to the values list.
Note: Opposed to all other TestComposer commands, including the WriteBlock command of the CSV Analyzer session, the WriteCSV command can access File Catalog variables regardless of their script location - i.e. in the script main procedure or in procedure bodies. This is a different behavior than that of the WriteBlock command, which is capable of accessing such variables only when the command is part of the script main procedure.
Important: Since the use of this command is deprecated and will no longer be supported in future releases of the software, you are advised to use the WriteBlock command of the CSVAnalyzer session instead.
Note: Opposed to all other TestComposer commands, including the WriteBlock command of the CSV Analyzer session, the WriteCSV command can access File Catalog variables regardless of their script location - i.e. in the script main procedure or in procedure bodies. This is a different behavior than that of the WriteBlock command, which is capable of accessing such variables only when the command is part of the script main procedure.
6-76 IxNetwork TestComposer User Guide, Release 7.00
Script Steps Reference Information
GetValue Command Step in Step Configuration Wizard
A GetValue command retrieves the value of a field from a composite variable, possibly filtering by the values of other fields. Additionally, if the filtering opera-tion yields multiple values, an aggregation operator can be applied to the values list.
To add a GetValue command step using the GUI scripting support:
1. While in the Test Steps pane, add a step by choosing the Actions > Add step... command.
2. Select a GetValue step type, click the button to validate the selection, and specify the following parameters:
• Run Type: A GetValue step can only be executed sequentially (Sequen-tial).
• Delay: A delay specifying by how much step start is delayed. A delay value is automatically set when the step is added using the Capture func-tionality.
• Timeout: A period of time after which the step execution is considered to have timed out.
• Ignore step: When this option is selected, the step is skipped at execution time. Selecting this option is equivalent to right-clicking a step in the Test Steps table and choosing the Exclude command from the context menu that appears.
• Description: An optional step description can be associated with a step.
Click Next.
3. Define the Conditional Execution settings as explained below.
Conditional Execution settings enable you to define the system conditions a script step execution is monitored for. When such a predefined condition occurs – a step error – an user-defined procedure is executed and an addi-tional action is performed. On encountering a step error, you could enforce the execution of a cleanup procedure and then terminate the script.
To monitor the step for a predefined Error condition, select the corresponding condition, then define the associated procedure – local or shared (external) –
by clicking the control of the Procedure field and selecting a procedure from the the drop-down pane that appears.
For the selected procedure you can view its defined arguments by clicking the
control of the Input Arguments field, which displays a cascading table-format pane containing the argument list. To specify the actual runtime argu-ment(s) enter the desired values in the Current Value field(s).
Configure an additional action by clicking into additional actions column and selecting either of the following options:
• Continue: After performing the specified procedure, the script execution continues.
IxNetwork TestComposer User Guide, Release 7.00 6-77

Script Steps Reference Information6
• Exit Test: After performing the specified procedure, the script execution is terminated.
Click Next.
4. Specify the following Command String parameters:
• Composite variable—select the composite variable for which you want to retrieve the field values. The list of variables is available in the list that appears when you click the down arrow present on the field.
• Composite statistic to query—select the statistics you want to retrieve. The list of available statistics for the selected variable is available in the list that appears when you click the down arrow present on the field. You can select multiple statistics from the list.
• Filter values—specify the filter values for the selected statistics.
To enable filters for selected statistics and define the filter values, do the following:
a: Click the drop-down button ( ) at the end of the field.
The filter editor appears. The filter editor contains a list of statistics avail-able for the selected composite variable.
b: Select the check-box against the statistics for which you want to enable fil-ters.
c: Select a Condition for the filter.
You can select from any of the following conditions:
Equals—to filter statistics that are equal to the value specified in the Value column.
InRange—to filter statistics within a range specified.
Contains—to filter statistics that contain the specified value.
Match—to filter statistics that match the specified regular expression.
d: Enter Value for the selected condition.You can select a value from the list that appears when you click the down-arrow. The list contains actual values of the selected statistics.You can also type in an expression yourself. Variable autocomplete is available for this field so if you type ‘$’ in the field a list of available vari-able names appears.If the selected condition type is ‘Matches’ you can also insert basic regular expressions. To access the list of regular expressions templates click the browse button that appears when ‘Matches’ is selected as the Condition. The list contain only basic regular expressions, advanced expressions however, have to be typed in.
e: Click Ok.
Note: Whenever the step execution is monitored for predefined events, an icon is displayed in the step’s corresponding Events selected column entry. For information on turning on the displaying of the Events selected column refer to Customizing the Script Steps Table Layout on page 4-5.
6-78 IxNetwork TestComposer User Guide, Release 7.00

Script Steps Reference Information
• Aggregation—if the filter result is a list of values, an aggregation operator (Avg, Min, Max, Med, Sum, First, Last) can be applied to the list such as to reduce it to a single value. For results that are enclosed in quotes, you can use the Merge operator to remove the leading and trailing quotes.
If an aggregator is not campatible with a statistics, the result of the aggre-gation is a NULL value. For example, if Interface Name, and Memory Utilization are the two fields selected and Average is selected as the Aggregation, the step returns NULL for the Interface Name and the average value in the Memory Utilization field.
• Return Variable—the TestComposer variable that is assigned the retrieved field value.
After you have specified the composite variables, statistics, filters, and aggre-gation the Command String resembles a Tcl-like expression.
5. Verify the step summary information and revert to a previous configuration step if needed. Click Finish.
GetValue Step In-Place Editing
A GetValue command retrieves the value of a field from a composite variable, possibly filtering by the values of other fields. Additionally, if the filtering opera-tion yields multiple values, an aggregation operator can be applied to the values list.
To edit a GetValue script step:
1. Select the GetValue step in the Test Steps table.
2. Edit the step parameters as follows:
• Return Variable: This column displays the return variable name. You can specify the return variable.
• Command String: This column displays the composite variable name, the field whose value is to be retrieved, and the filtering expression. If the fil-ter result is a list of values, an aggregation operator (Avg, Min, Max, Med, Count, Sum, First, Last) can be applied to the list such as to reduce it to a
Example:Assuming we had a composite_var variable holding two numeric lists, listA (1, 1, 2, 3, 1) and listB (a, b, a, c, d), you could use the following command to filter listB for the fields of listA that have a value of 1:
GetValue var1 composite_var listB listA 1
which would return a var1 variable having the “a b d” value.The following command that also uses an aggregator:
GetValue var1 composite_var Count composite_var listB listA 1
would instead return a var1 variable the “3” value.
IxNetwork TestComposer User Guide, Release 7.00 6-79

Script Steps Reference Information6
single value. For results that are enclosed within quotes, you can use the Merge operator to remove the leading and trailing quotes.
For example, assuming we had a composite_var variable holding two numeric lists, listA (1, 1, 2, 3, 1) and listB (a, b, a, c, d), you could use the following command to filter listB for the fields of listA that have a value of 1:
GetValue var1 composite_var listB listA 1
which would return a var1 variable having the “a b d” value.
As another example, the following command that also uses an aggregator:
GetValue var1 composite_var Count listB listA 1
would instead return a var1 variable having the “3” value.
Click into the column and edit in-place the composite variable name, the name of the field to retrieve, the filtering expression, and the aggregation operator (optional).
Alternatively, click the button displaying a drop-down pane and edit these parameters using the form fields.
Config Get A Config Get command retrieves the value of an IxNetwork test configuration element.
Config Get Command Step in Step Wizard
A Config Get command retrieves the value of an IxNetwork test configuration element into a composite TestComposer variable.
To add a Config Get command step using the GUI scripting support:
1. While in the Test Steps pane, add a step by choosing the Actions > Add step... command.
2. Select a Config Get step type, click the button to validate the selection, and specify the following parameters:
Example:Assuming we had a composite_var variable holding two numeric lists, listA (1, 1, 2, 3, 1) and listB (a, b, a, c, d), you could use the following command to filter listB for the fields of listA that have a value of 1:
GetValue var1 composite_var listB listA 1
which would return a var1 variable having the “a b d” value.The following command that also uses an aggregator:
GetValue var1 composite_var Count composite_var listB listA 1
would instead return a var1 variable the “3” value.
6-80 IxNetwork TestComposer User Guide, Release 7.00

Script Steps Reference Information
• Run Type: A Config Get step can be executed sequentially (Sequential) or in parallel (Parallel) with other steps.
• Delay: A delay specifying by how much step start is delayed. A delay value is automatically set when the step is added using the Capture func-tionality.
• Timeout: A period of time after which the step execution is considered to have timed out.
• Ignore step: When this option is selected, the step is skipped at execution time. Selecting this option is equivalent to right-clicking a step in the Test Steps table and choosing the Exclude command from the context menu that appears.
• Description: An optional step description can be associated with a step.
Click Next.
3. Define the Conditional Execution settings as explained below.
Conditional Execution settings enable you to define the system conditions a test step execution is monitored for. When such a predefined condition occurs – a step error or a step timeout – an user-defined procedure is executed and an additional action is performed. For example, on encountering a step error, you could enforce the execution of a cleanup procedure and then terminate the test.
To monitor the step for a predefined Timeout or Error condition, select the corresponding condition, then define the associated procedure – local or
shared (external) – by clicking the control of the Procedure field and selecting a procedure from the the drop-down pane that appears.
For the selected procedure you can view its defined arguments by clicking the
control of the Input Arguments field, which displays a cascading table-format pane containing the argument list. To specify the actual runtime argu-ment(s) enter the desired values in the Current Value field(s).
Configure an additional action by clicking into additional actions column and selecting either of the following options:
• Continue: After performing the specified procedure, the test execution continues.
• Exit Test: After performing the specified procedure, the test execution is terminated.
Click Next.
4. Specify the following command parameters:
• Session: The Built-In Event session type.
Note: Whenever the step execution is monitored for predefined events, an icon is displayed in the step’s corresponding Events selected column entry. For information on turning on the displaying of the Events selected column refer to Customizing the Script Steps Table Layout.
IxNetwork TestComposer User Guide, Release 7.00 6-81

Script Steps Reference Information6
• Return variable: A composite return variable that is populated with the sought attribute(s).
• Select: The command name followed by an X-Path expression that selects the configuration element instance(s) whose attributes are to be retrieved.
In addition to the X-Path notation, the select statement also supports the notation that is used by the IxNetwork Tcl API, whereby a configuration element is specified using an expression composed of the tree path, an “:” string, and an element index. For example, the “/traffic/trafficItem[2]” expression could be rewritten using the “/traffic/trafficItem:6” specifier, which illustrates the fact that the X-Path index and the Tcl API index referencing an entity of a configuration element are not necessarily the same.
• Get Attributes: One or more element attribute names whose values are to be retrieved, attributes being separated by whitespace. For each sought attribute, a member field of the composite return variable is created.
5. Verify the step summary information and revert to a previous configuration step if needed. Click Finish.
Example1:Assuming we had the following Config Get command:
Config Get Built-In Event var1 Configuration Get select="/vport[1]" get="actualSpeed owner"
this would return into the var1.actualSpeed and var1.owner variables the attributes for the port element specified by the select statement.If we applied this command to multiple ports, say port 1, 2, and 3, the var1.actualSpeed and var1.owner variables would contain each a space-separated list of attribute values, one value per port.Alternatively, you could also reference an element using any other of its attributes, as in the following example which uses a port’s name attribute:
Configuration Get Built-In Event var1 Configuration Get select="/vport[@name='PortB2B']" get="actualSpeed owner"
Example2:Assuming we had the following Config Get command aiming to return references to all Quick Tests defined within an IxNetwork configuration :
Config Get Built-In Event var2 Configuration Get select="/quickTest" get="testIds"
and assuming two such Quick Tests were defined, this would return into the var2.testIds variable a space-separated list such as the following, whereby the indices specify the index of a test in its category, RFC2544Throughput and RFC2889AddressRate respectively:
/quickTest/rfc2544Throughput:1 /quickTest/rfc2889AddressRate:1
6-82 IxNetwork TestComposer User Guide, Release 7.00

Script Steps Reference Information
Config Get Step in-Place Editing
A Config Get test command retrieves the value of an IxNetwork test configura-tion element into a composite TestComposer variable.
To edit a Config Get test command:
1. Select the Config Get step in the Test Steps table.
2. Edit the step parameters as follows:
• Session: This column displays an IxNetwork session name.
• Return Variable: This column displays a composite return variable name. For each element attribute to be retrieved, a variable member field is cre-ated.
• Command String: This column displays the Configuration Get string, followed by an X-Path expression that corresponds to the IxNetwork con-figuration element whose value is to be retrieved.
In addition to the X-Path notation, the select statement also supports the notation that is used by the IxNetwork Tcl API, whereby a configuration element is specified using an expression composed of the tree path, an “:” string, and an element index. For example, the “/traffic/trafficItem[2]” expression could be rewritten using the “/traffic/trafficItem:6” specifier, which illustrates the fact that the X-Path index and the Tcl API index referencing an entity of a configuration element are not necessarily the same.
Click into the column and then click the button that displays a drop-down pane as shown in Figure 6-2:
Important: Since object references returned by the Config Get command are not in the X-Path format used by all other IxNetwork session commands, these references can only be passed to commands from the Config category, but not to other IxNetwork session commands.
IxNetwork TestComposer User Guide, Release 7.00 6-83

Script Steps Reference Information6
Figure 6-2. Config Get GUI
In the left pane, navigate the IxNetwork configuration tree (which mimics the IxNetwork Tcl API object hierarchy) and select an element whose value you wish to read. To quickly locate an element in the tree, enter its name in the
Search field at the top of the pane and click the adjoining button.
From the middle pane select the instance(s) of the element currently active in the left pane.
From the right pane, which displays all attributes of the current element
instance, choose one or more attributes by selecting its (their) asssociated control(s).
Pane displaying the IxNetwork test configuration tree
Pane displaying instances of the selected element
Pane displaying attributes of the selected element instance
Example1:Assuming we had the following Config Get command:
Config Get Built-In Event var1 Configuration Get select="/vport[1]" get="actualSpeed owner"
this would return into the var1.actualSpeed and var1.owner variables the attributes for the port element specified by the select statement.If we applied this command to multiple ports, say port 1, 2, and 3, the var1.actualSpeed and var1.owner variables would contain each a space-separated list of attribute values, one value per port.Alternatively, you could also reference an element using any other of its attributes, as in the following example which uses a port’s name attribute:
Config Get Built-In Event var1 Configuration Get select="/vport[@name='PortB2B']" get="actualSpeed name"
6-84 IxNetwork TestComposer User Guide, Release 7.00

Script Steps Reference Information
Config Set A Config Set command modifies the value of an IxNetwork test configuration element.
Config Set Command Step in Step Wizard
A Config Set command modifies the value of an IxNetwork test configuration element.
To add a Config Set command step using the GUI scripting support:
1. While in the Test Steps pane, add a step by choosing the Actions > Add step... command.
2. Select a Config Set step type, click the button to validate the selection, and specify the following parameters:
• Run Type: A Config Set step can be executed sequentially (Sequential) or in parallel (Parallel) with other steps.
• Delay: A delay specifying by how much step start is delayed. A delay value is automatically set when the step is added using the Capture func-tionality.
• Timeout: A period of time after which the step execution is considered to have timed out.
• Ignore step: When this option is selected, the step is skipped at execution time. Selecting this option is equivalent to right-clicking a step in the Test Steps table and choosing the Exclude command from the context menu that appears.
• Description: An optional step description can be associated with a step.
Click Next.
Example2:Assuming we had the following Config Get command aiming to return references to all Quick Tests defined within an IxNetwork configuration :
Config Get Built-In Event var2 Configuration Get select="/quickTest" get="testIds"
and assuming two such Quick Tests were defined, this would return into the var2.testIds variable a space-separated list such as the following, whereby the indices specify the index of a test in its category, RFC2544Throughput and RFC2889AddressRate respectively:
/quickTest/rfc2544Throughput:1 /quickTest/rfc2889AddressRate:1
Important: Since object references returned by the Config Get command are not in the X-Path format used by all other IxNetwork session commands, these references can only be passed to commands from the Config category, but not to other IxNetwork session commands.
IxNetwork TestComposer User Guide, Release 7.00 6-85

Script Steps Reference Information6
3. Define the Conditional Execution settings as explained below.
Conditional Execution settings enable you to define the system conditions a test step execution is monitored for. When such a predefined condition occurs – a step error or a step timeout – an user-defined procedure is executed and an additional action is performed. For example, on encountering a step error, you could enforce the execution of a cleanup procedure and then terminate the test.
To monitor the step for a predefined Timeout or Error condition, select the corresponding condition, then define the associated procedure – local or
shared (external) – by clicking the control of the Procedure field and selecting a procedure from the the drop-down pane that appears.
For the selected procedure you can view its defined arguments by clicking the
control of the Input Arguments field, which displays a cascading table-format pane containing the argument list. To specify the actual runtime argu-ment(s) enter the desired values in the Current Value field(s).
Configure an additional action by clicking into additional actions column and selecting either of the following options:
• Continue: After performing the specified procedure, the test execution continues.
• Exit Test: After performing the specified procedure, the test execution is terminated.
Click Next.
4. Specify the following command parameters:
• Session: The Built-In Event session type.
• Return variable: No return variable needs assigned to this command.
• Select: The Configuration Set string, followed by an X-Path expres-sion that selects the element instance(s) whose attributes are to be config-ured.
In addition to the X-Path notation, the select statement also supports the notation that is used by the IxNetwork Tcl API, whereby a configuration element is specified using an expression composed of the tree path, an “:” string, and an element index. For example, the “/traffic/trafficItem[2]” expression could be rewritten using the “/traffic/trafficItem:6” specifier, which illustrates the fact that the X-Path index and the Tcl API index referencing an entity of a configuration element are not necessarily the same.
Note: Whenever the step execution is monitored for predefined events, an icon is displayed in the step’s corresponding Events selected column entry. For information on turning on the displaying of the Events selected column refer to Customizing the Script Steps Table Layout.
6-86 IxNetwork TestComposer User Guide, Release 7.00

Script Steps Reference Information
• Set Attributes: An element attribute name and the configured value. In addition to specifying a value, an attribute can also configured using a TestComposer variable.
5. Verify the step summary information and revert to a previous configuration step if needed. Click Finish.
Config Set Command Step In-Place Editing
A Config Set command modifies the value of an IxNetwork test configuration element.
To edit a Config Set test command:
1. Select the Config Set step in the Test Steps table.
2. Edit the step parameters as follows:
• Session: This column displays an Built-In Event session type.
• Return Variable: No return variable needs specified for this command.
• Command String: This column displays Configuration Set string, fol-lowed by an X-Path expression that corresponds to the IxNetwork configu-ration element whose value is to be set (inside a select statement), an attribute and the configured value (inside a set statement).
In addition to the X-Path notation, the select statement also supports the notation that is used by the IxNetwork Tcl API, whereby a configuration element is specified using an expression composed of the tree path, an “:” string, and an element index. For example, the “/traffic/trafficItem[2]” expression could be rewritten using the “/traffic/trafficItem:6” specifier, which illustrates the fact that the X-Path index and the Tcl API index referencing an entity of a configuration element are not necessarily the same.
You can modify it directly in the GUI by selecting the element, an attribute of that element and editing the attribute value.
Alternatively, click into the column and click the button displaying a drop-down pane as shown in Figure 6-3:
Example:Assuming we had the following Config Set command:
Config Set Built-In Event Configuration Set select="/vport[1]/protocols/arp" set="enabled True"
this would set the enabled attribute for the arp protocol element specified by the select statement to the True value.Alternatively, you could also reference an element using any other of its attributes, as in the following example which uses a port’s name attribute:
Config Set Built-In Event Configuration Set select="/vport[@name='PortB2B']/protocols/arp" set="enabled True"
IxNetwork TestComposer User Guide, Release 7.00 6-87

Script Steps Reference Information6
Figure 6-3. Config Set GUI
In the left pane, navigate the IxNetwork configuration tree (which mimics the IxNetwork Tcl API object hierarchy) and select the element whose value you wish to set. To quickly locate an element in the tree, enter its name in the
Search field at the top of the pane and click the adjoining button.
From the middle pane select the instance of the element currently active in the left pane.
From the right pane, which displays all attributes of the current element
instance, choose an attribute by clicking its associated control, then click in the adjacent field and choose an attribute value. Alternatively define an attribute value using a TestComposer variable.
Pane displaying the IxNetwork test configuration tree
Pane displaying instances of the selected element
Pane displaying attributes of the selected element instance
Example:Assuming we had the following Config Set command:
Config Set Built-In Event Configuration Set select="/vport[1]/protocols/arp" set="enabled True"
this would set the enabled attribute for the arp protocol element specified by the select statement to the True value.Alternatively, you could also reference an element using any other of its attributes, as in the following example which uses a port’s name attribute:
Config Set Built-In Event Configuration Set select="/vport[@name='PortB2B']/protocols/arp" set="enabled True"
6-88 IxNetwork TestComposer User Guide, Release 7.00

Script Steps Reference Information
Config Add A Config Add command creates an IxNetwork test configuration element.
Config Add Command Step in Step Wizard
A Config Add command creates an IxNetwork test configuration element.
To add a Config Add command step using the GUI scripting support:
1. While in the Test Steps pane, add a step by choosing the Actions > Add step... command.
2. Select a Config Add step type, click the button to validate the selection, and specify the following parameters:
• Run Type: A Config Add step can be executed sequentially (Sequential) or in parallel (Parallel) with other steps.
• Delay: A delay specifying by how much step start is delayed. A delay value is automatically set when the step is added using the Capture func-tionality.
• Timeout: A period of time after which the step execution is considered to have timed out.
• Ignore step: When this option is selected, the step is skipped at execution time. Selecting this option is equivalent to right-clicking a step in the Test Steps table and choosing the Exclude command from the context menu that appears.
• Description: An optional step description can be associated with a step.
Click Next.
3. Define the Conditional Execution settings as explained below.
Conditional Execution settings enable you to define the system conditions a test step execution is monitored for. When such a predefined condition occurs – a step error or a step timeout – an user-defined procedure is executed and an additional action is performed. For example, on encountering a step error, you could enforce the execution of a cleanup procedure and then terminate the test.
To monitor the step for a predefined Timeout or Error condition, select the corresponding condition, then define the associated procedure – local or
shared (external) – by clicking the control of the Procedure field and selecting a procedure from the the drop-down pane that appears.
For the selected procedure you can view its defined arguments by clicking the
control of the Input Arguments field, which displays a cascading table-format pane containing the argument list. To specify the actual runtime argu-ment(s) enter the desired values in the Current Value field(s).
Configure an additional action by clicking into additional actions column and selecting either of the following options:
IxNetwork TestComposer User Guide, Release 7.00 6-89

Script Steps Reference Information6
• Continue: After performing the specified procedure, the test execution continues.
• Exit Test: After performing the specified procedure, the test execution is terminated.
Click Next.
4. Specify the following command parameters:
• Session: The Built-in Event session type.
• Return variable: A TestComposer composite variable whose only mem-ber contains the object reference of the newly added configuration ele-ment.
• Command string: The Configuration Add command, whose parame-
ters are configured by clicking the button, which displays the GUI shown in Figure 6-4. The following parameters are populated:
• select: An X-Path expression that corresponds to the IxNetwork configuration element that is to be added.
In addition to the X-Path notation, the select statement also supports the notation that is used by the IxNetwork Tcl API, whereby a con-figuration element is specified using an expression composed of the tree path, an “:” string, and an element index. For example, the “/traffic/trafficItem[2]” expression could be rewritten using the “/traffic/trafficItem:6” specifier, which illustrates the fact that the X-Path index and the Tcl API index referencing an entity of a configu-ration element are not necessarily the same.
• type: The type of the selected child element.
• attributes: A list of space-separated attribute-value pairs to be set on the configuration object that is being created.
5. Verify the step summary information and revert to a previous configuration step if needed. Click Finish.
Note: Whenever the step execution is monitored for predefined events, an icon is displayed in the step’s corresponding Events selected column entry. For information on turning on the displaying of the Events selected column refer to Customizing the Script Steps Table Layout.
6-90 IxNetwork TestComposer User Guide, Release 7.00

Script Steps Reference Information
Config Add Step in-Place Editing
A Config Add test command creates an IxNetwork test configuration element.
To edit a Config Add test command:
1. Select the Config Add step in the Test Steps table.
2. Edit the step parameters as follows:
• Session: This column displays the Built-In Event session name.
• Return Variable: This column displays the name of a TestComposer com-posite variable whose only member contains the object reference of the newly added configuration element.
• Command String: This column displays the Configuration Add com-mand followed by the following strings:
• select: An X-Path expression that corresponds to the IxNetwork configuration element that is to be added.
In addition to the X-Path notation, the select statement also supports the notation that is used by the IxNetwork Tcl API, whereby a con-figuration element is specified using an expression composed of the tree path, an “:” string, and an element index. For example, the “/traffic/trafficItem[2]” expression could be rewritten using the “/traffic/trafficItem:6” specifier, which illustrates the fact that the X-Path index and the Tcl API index referencing an entity of a configu-ration element are not necessarily the same.
• type: The type of the selected child element.
• attributes: A list of space-separated attribute-value pairs to be set on the configuration object that is being created.
Example:Assuming we had the following Config Add command:
Config Add Built-In Event obj1 Configuration Add select="/vport[1]/protocols/ospf/router[1] " type="interface" attributes="enabled True"
this would return into the obj1 variable the reference of the added router interface element, configured with the enabled attribute.Alternatively, you could also reference an element using any other of its attributes, as in the following example which uses a port’s name attribute:
Config Add Built-In Event obj1 Configuration Add select="/vport[@name='PortB2B']/protocols/ospf/router[1]" type="interface" attributes="enabled True"
Note: Fully configured Config Add steps that capture IxNetwork configuration operations can also be added in an automated mode using the Macro Recorder functionality, as described in Appendix 14, Capturing IxNetwork Actions with Macro Recorder.
IxNetwork TestComposer User Guide, Release 7.00 6-91

Script Steps Reference Information6
Click into the column and then click the button that displays a drop-down pane as shown in Figure 6-4:
Figure 6-4. Config Add GUI
In the left pane, navigate the IxNetwork configuration tree (which mimics the IxNetwork Tcl API object hierarchy) and select an element under which you want to add an element. To quickly locate an element in the tree, enter its
name in the Search field at the top of the pane and click the adjoining button.
From the middle pane select the instance(s) of the element currently active in the left pane.
From the right pane, select a child element that is appropriate for the currently selected configuration element; from its attributes list choose one or more attributes to be applied to the new element by selecting its (their) asssociated
control(s), and configure them with the desired values.
Pane displaying the IxNetwork test configuration tree
Pane displaying instances of the selected element
Pane displaying attributes of the selected child element instance
6-92 IxNetwork TestComposer User Guide, Release 7.00

Script Steps Reference Information
Config Remove A Config Remove command removes an IxNetwork test configuration element.
Config Remove Command Step in Step Wizard
A Config Remove command removes an IxNetwork test configuration element.
To add a Config Remove command step using the GUI scripting support:
1. While in the Test Steps pane, add a step by choosing the Actions > Add step... command.
2. Select a Config Remove step type, click the button to validate the selec-tion, and specify the following parameters:
• Run Type: A Config Remove step can be executed sequentially (Sequen-tial) or in parallel (Parallel) with other steps.
• Delay: A delay specifying by how much step start is delayed. A delay value is automatically set when the step is added using the Capture func-tionality.
• Timeout: A period of time after which the step execution is considered to have timed out.
• Ignore step: When this option is selected, the step is skipped at execution time. Selecting this option is equivalent to right-clicking a step in the Test Steps table and choosing the Exclude command from the context menu that appears.
• Description: An optional step description can be associated with a step.
Click Next.
3. Define the Conditional Execution settings as explained below.
Conditional Execution settings enable you to define the system conditions a test step execution is monitored for. When such a predefined condition occurs – a step error or a step timeout – an user-defined procedure is executed and an additional action is performed. For example, on encountering a step error, you
Example:Assuming we had the following Config Add command:
Config Add Built-In Event obj1 Configuration Add select="/vport[1]/protocols/ospf/router[1] " type="interface" attributes="enabled True"
this would return into the obj1 variable the reference of the added router interface element, configured with the enabled attribute.Alternatively, you could also reference an element using any other of its attributes, as in the following example which uses a port’s name attribute:
Config Add Built-In Event obj1 Configuration Add select="/vport[@name='PortB2B']/protocols/ospf/router[1]" type="interface" attributes="enabled True"
IxNetwork TestComposer User Guide, Release 7.00 6-93
Script Steps Reference Information6
could enforce the execution of a cleanup procedure and then terminate the test.
To monitor the step for a predefined Timeout or Error condition, select the corresponding condition, then define the associated procedure – local or
shared (external) – by clicking the control of the Procedure field and selecting a procedure from the the drop-down pane that appears.
For the selected procedure you can view its defined arguments by clicking the
control of the Input Arguments field, which displays a cascading table-format pane containing the argument list. To specify the actual runtime argu-ment(s) enter the desired values in the Current Value field(s).
Configure an additional action by clicking into additional actions column and selecting either of the following options:
• Continue: After performing the specified procedure, the test execution continues.
• Exit Test: After performing the specified procedure, the test execution is terminated.
Click Next.
4. Specify the following command parameters:
• Session: The Built-In Event session type.
• Return variable: No return variable needs to be configured for this com-mand.
• Command string: The Configuration Remove command. Click the
button and configure the command parameters using the GUI shown in Figure 6-5. The following parameters are populated:
• select: An X-Path expression that selects the element instance(s) that is to be removed.
In addition to the X-Path notation, the select statement also supports the notation that is used by the IxNetwork Tcl API, whereby a con-figuration element is specified using an expression composed of the tree path, an “:” string, and an element index. For example, the “/traffic/trafficItem[2]” expression could be rewritten using the “/traffic/trafficItem:6” specifier, which illustrates the fact that the X-Path index and the Tcl API index referencing an entity of a configu-ration element are not necessarily the same.
5. Verify the step summary information and revert to a previous configuration step if needed. Click Finish.
Note: Whenever the step execution is monitored for predefined events, an icon is displayed in the step’s corresponding Events selected column entry. For information on turning on the displaying of the Events selected column refer to Customizing the Script Steps Table Layout.
6-94 IxNetwork TestComposer User Guide, Release 7.00

Script Steps Reference Information
Config Remove Step in-Place Editing
A Config Remove test command removes an IxNetwork test configuration ele-ment.
To edit a Config Remove test command:
1. Select the Config Remove step in the Test Steps table.
2. Edit the step parameters as follows:
• Session: This column displays an Built-In Event session name.
• Return Variable: This column displays no variable.
• Command String: This column displays the command name (Configuration Remove), followed by a select statement that speci-fies the IxNetwork configuration element that is to be removed using an X-Path expression.
Click into the column and then click the button that displays a drop-down pane as shown in Figure 6-5:
Example:Assuming we had the following Config Remove command:
Config Remove Built-In Event Configuration Remove select="/vport[2]"
this would remove the second port that is configured in the IxNetwork test.Alternatively, you could also reference an element using any other of its configured attributes, as in the following example which uses a port’s name attribute:
Config Remove Built-In Event Configuration Remove select="/vport[@name='Port2']"
Important: When attempting to remove a configuration element based on its index in the list of elements, pay attention not to reference an element that was removed otherwise, for example from the IxNetwork GUI.For example, assuming your test contains 3 traffics and you remove traffic with index 2, the remaining traffic elements can then be referenced by indices 1 and 2 respectively, while element with index 3 is no longer existing. As such, attempting a remove operation on this element will generate an execution error.
Note: Fully configured Configuration Remove steps that capture IxNetwork configuration operations can also be added in an automated mode using the Macro Recorder functionality, as described in Appendix 14, Capturing IxNetwork Actions with Macro Recorder.
IxNetwork TestComposer User Guide, Release 7.00 6-95
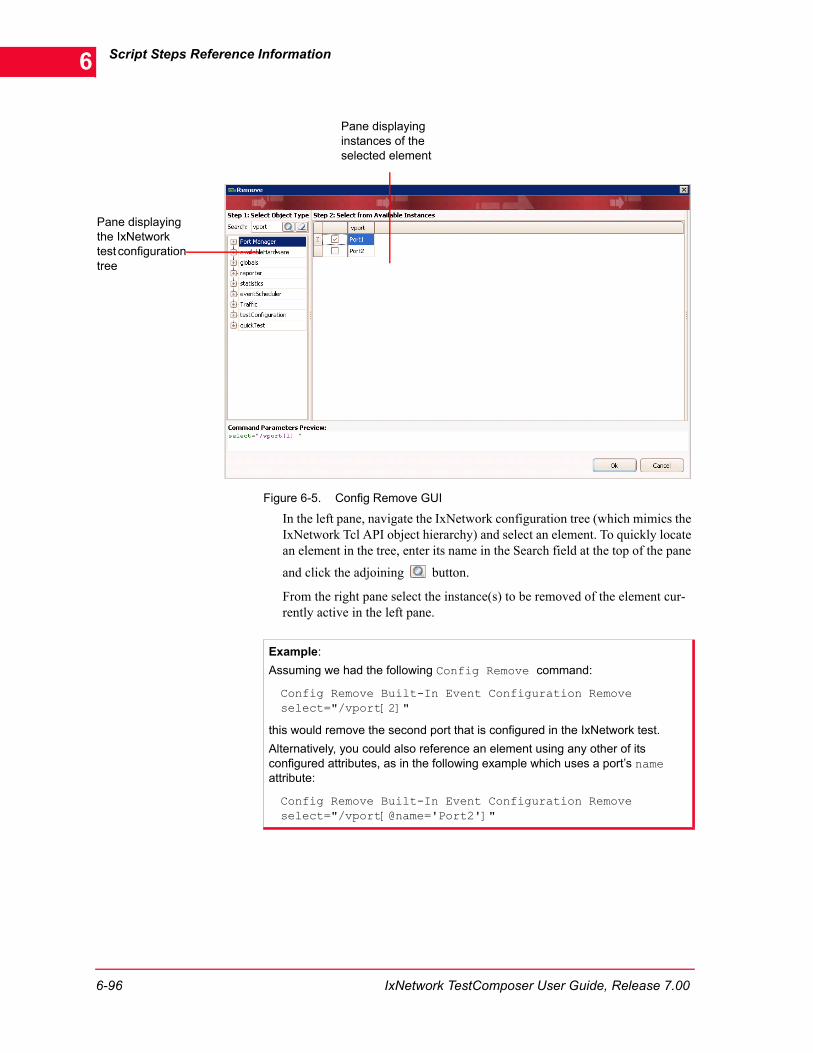
Script Steps Reference Information6
Figure 6-5. Config Remove GUI
In the left pane, navigate the IxNetwork configuration tree (which mimics the IxNetwork Tcl API object hierarchy) and select an element. To quickly locate an element in the tree, enter its name in the Search field at the top of the pane
and click the adjoining button.
From the right pane select the instance(s) to be removed of the element cur-rently active in the left pane.
Pane displaying the IxNetwork test configuration tree
Pane displaying instances of the selected element
Example:Assuming we had the following Config Remove command:
Config Remove Built-In Event Configuration Remove select="/vport[2]"
this would remove the second port that is configured in the IxNetwork test.Alternatively, you could also reference an element using any other of its configured attributes, as in the following example which uses a port’s name attribute:
Config Remove Built-In Event Configuration Remove select="/vport[@name='Port2']"
6-96 IxNetwork TestComposer User Guide, Release 7.00

Script Steps Reference Information
Config Action A Config Action command performs an action on an IxNetwork test configura-tion element.
Config Action Command Step in Step Wizard
A Config Action command performs an action on an IxNetwork test configura-tion element.
To add a Config Action command step using the GUI scripting support:
1. While in the Test Steps pane, add a step by choosing the Actions > Add step... command.
2. Select a Config Action step type, click the button to validate the selec-tion, and specify the following parameters:
• Run Type: A Config Action step can be executed sequentially (Sequen-tial) or in parallel (Parallel) with other steps.
• Delay: A delay specifying by how much step start is delayed. A delay value is automatically set when the step is added using the Capture func-tionality.
• Timeout: A period of time after which the step execution is considered to have timed out.
• Ignore step: When this option is selected, the step is skipped at execution time. Selecting this option is equivalent to right-clicking a step in the Test Steps table and choosing the Exclude command from the context menu that appears.
• Description: An optional step description can be associated with a step.
Click Next.
3. Define the Conditional Execution settings as explained below.
Conditional Execution settings enable you to define the system conditions a test step execution is monitored for. When such a predefined condition occurs – a step error or a step timeout – an user-defined procedure is executed and an additional action is performed. For example, on encountering a step error, you could enforce the execution of a cleanup procedure and then terminate the test.
To monitor the step for a predefined Timeout or Error condition, select the corresponding condition, then define the associated procedure – local or
Important: When attempting to remove a configuration element based on its index in the list of elements, pay attention not to reference an element that was removed otherwise, for example from the IxNetwork GUI.For example, assuming your test contains 3 traffics and you remove traffic with index 2, the remaining traffic elements can then be referenced by indices 1 and 2 respectively, while element with index 3 is no longer existing. As such, attempting a remove operation on this element will generate an execution error.
IxNetwork TestComposer User Guide, Release 7.00 6-97

Script Steps Reference Information6
shared (external) – by clicking the control of the Procedure field and selecting a procedure from the the drop-down pane that appears.
For the selected procedure you can view its defined arguments by clicking the
control of the Input Arguments field, which displays a cascading table-format pane containing the argument list. To specify the actual runtime argu-ment(s) enter the desired values in the Current Value field(s).
Configure an additional action by clicking into additional actions column and selecting either of the following options:
• Continue: After performing the specified procedure, the test execution continues.
• Exit Test: After performing the specified procedure, the test execution is terminated.
Click Next.
4. Specify the following command parameters:
• Session: The Built-In Event session type.
• Return variable: A composite return variable.
• Command string: The Configuration Action command. Click the
button and configure the command parameters using the GUI shown in Figure 6-6. The following parameters are populated:
• select: An X-Path expression that selects the IxNetwork configura-tion element instance(s) you want to perform an action on.
In addition to the X-Path notation, the select statement also supports the notation that is used by the IxNetwork Tcl API, whereby a con-figuration element is specified using an expression composed of the tree path, an “:” string, and an element index. For example, the “/traffic/trafficItem[2]” expression could be rewritten using the “/traffic/trafficItem:6” specifier, which illustrates the fact that the X-Path index and the Tcl API index referencing an entity of a configu-ration element are not necessarily the same.
• action: An action to be performed on the selected element instance, which can be selected from a list of actions that are relevant to the current element.
5. Verify the step summary information and revert to a previous configuration step if needed. Click Finish.
Note: Whenever the step execution is monitored for predefined events, an icon is displayed in the step’s corresponding Events selected column entry. For information on turning on the displaying of the Events selected column refer to Customizing the Script Steps Table Layout.
6-98 IxNetwork TestComposer User Guide, Release 7.00

Script Steps Reference Information
Config Action Step in-Place Editing
A Config Action test command performs an action on an IxNetwork test config-uration element.
To edit a Config Action test command:
1. Select the Config Action step in the Test Steps table.
2. Edit the step parameters as follows:
• Session: This column displays an Built-In Event session name.
• Return Variable: This column displays a composite return variable name.
• Command String: This column displays the Configuration Action string, followed by an X-Path expression that corresponds to the IxNet-work configuration element you want to perform an action on, and an action string:
• select: An X-Path expression that selects the IxNetwork configura-tion element instance(s) you want to perform an action on.
In addition to the X-Path notation, the select statement also supports the notation that is used by the IxNetwork Tcl API, whereby a con-figuration element is specified using an expression composed of the tree path, an “:” string, and an element index. For example, the “/traffic/trafficItem[2]” expression could be rewritten using the “/traffic/trafficItem:6” specifier, which illustrates the fact that the X-Path index and the Tcl API index referencing an entity of a configu-ration element are not necessarily the same.
• action: An action to be performed on the selected element instance, which can be selected from a list of actions that are relevant to the current element.
Example:Assuming we had the following Config Action command:
Config Action Built-In Event Configuration Action select="/vport[1]/protocols/ospf" action="start"
this would start (action=start) the ospf protocol (specified by the select statement) on the first port from the IxNetwork test configuration. Alternatively, you could also reference an element using any other of its configured attributes, as in the following example which uses a port’s name attribute:
Config Action Built-In Event Configuration Action select="/vport[@name='Port1']/protocols/ospf" action="start"
Note: Fully configured Configuration Action steps that capture IxNetwork configuration operations can also be added in an automated mode using the Macro Recorder functionality, as described in Appendix 14, Capturing IxNetwork Actions with Macro Recorder.
IxNetwork TestComposer User Guide, Release 7.00 6-99

Script Steps Reference Information6
Click into the column and then click the button that displays a drop-down pane as shown in Figure 6-6:
Figure 6-6. Config Action GUI
In the left pane, navigate the IxNetwork configuration tree (which mimics the IxNetwork Tcl API object hierarchy) and select an element. To quickly locate an element in the tree, enter its name in the Search field at the top of the pane
and click the adjoining button.
From the middle pane select the instance(s) of the element currently active in the left pane.
From the right pane, which displays the actions relevant to the current child element instance, choose an action to perform.
Pane displaying the IxNetwork test configuration tree
Pane displaying instances of the selected element
Pane displaying actions relevant to the selected element
Example:Assuming we had the following Config Action command:
Config Action Built-In Event Configuration Action select="/vport[1]/protocols/ospf" action="start"
this would start (action=start) the ospf protocol (specified by the select statement) on the first port from the IxNetwork test configuration. Alternatively, you could also reference an element using any other of its configured attributes, as in the following example which uses a port’s name attribute:
Config Action Built-In Event Configuration Action select="/vport[@name='Port1']/protocols/ospf" action="start"
6-100 IxNetwork TestComposer User Guide, Release 7.00

Script Steps Reference Information
Group A Group command delimits a group of related configuration actions that were captured using the Macro Recorder functionality of IxNetwork.
Group Step in Step Wizard
A Group step is automatically added by the IxNetwork Macro Recorder for grouping multiple steps that were captured from GUI-related actions, such as adding ports or or creating traffics.
The purpose of this step is to enable you to easiliy identify a logical sequence of captured steps.
Group Step in-Place Editing
A Group step is automatically added by the IxNetwork Macro Recorder for grouping multiple steps that were captured from GUI-related actions, such as adding ports or or creating traffics.
The purpose of this step is to enable you to easiliy identify a logical sequence of captured steps.
Procedure StepThis describes adding and configuring a new procedure.
A procedure step contains one or more steps that can be re-used within the same script or across multiple scripts. You could, for example, define a procedure and run it repeatedly within a script, each time with different arguments.
New Procedure Step
To add an empty procedure step:
1. While in the Script Steps pane, click the Add new procedure... toolbar button.
2. An empty procedure body containing the Procedure and EndProcedure key-words is added to the bottom of the steps table and can be populated subse-quently with script statements.
3. Double-click the Procedure statement to access the Step Configuration wiz-ard, navigate to the Properties page and specify the following parameters:
Note: Running a procedure is done using the RunProcedure control statement.
Note: The Procedure statement is highlighted light green such as to permit visual delimitation from the script body, as shown in the figure below:
IxNetwork TestComposer User Guide, Release 7.00 6-101

Script Steps Reference Information6
• Procedure name: A name the procedure will be referenced by in a RunProcedure step.
• End action: For procedures that spawn parallel threads, this option speci-fies an action to be taken at the end of the procedure with regard to the spawned threads. This command could prove useful, for example, to termi-nate all spawned threads that were not explicitly joined within the proce-dure using a Join statement.
The following options are available:
• Take no action: No specific action with regard to spawned proce-dures is taken at the end of the procedure execution.
• Wait for active parallel steps to complete: Choosing this option results in waiting for any parallel steps to finish when the end of the procedure is reached.
• Abort pending parallel steps: Choosing this option results in forc-ibly terminating any parallel steps that are still running when the end of the procedure is reached.
Click Next.
4. Specify the procedure arguments by clicking the button and defining for each argument a name, a type (String, Numeric, or Composite), a default value, and an optional description.
When the arguments list contains more than one entry, you can change the
arguments position by clicking the arrow buttons.
Click Next.
5. Specify the procedure output by defining the following parameters:
• Return type: The procedure result type, which can be either of the follow-ing: None, String, Numeric, or Composite.
• Default value: The default return value needs specified in case you have chosen a Numeric or a String return type.
Click Next.
6. Verify the step summary information and revert to a previous configuration step if needed. Click Finish.
Note: Composite procedure arguments cannot be set to default values.
Example:
Procedure P {Numeric:a Composite:b}
Trace ${b.target_1}
Return $a
EndProcedure
6-102 IxNetwork TestComposer User Guide, Release 7.00

Script Steps Reference Information
QuickTest Structure StepsWhen opening an IxNetwork QuickTest in TestComposer, the test structure con-tains some predefined steps that cannot be removed.
ApplyConfig This step applies the test configuration to the configured hardware.
The ApplyConfig step has no parameters.
Trial This step, which implements an execution looping construct, corresponds to a Quick Test’s Trials entity.
The Trial step has the following parameters:
• numtrials: The number of trials to execute.
FrameSize This step, which implements an execution looping construct, corresponds to a Quick Test’s FrameSize entity.
The FrameSize step has the following parameters:
• enableMinFrameSize: If configured True, the use of smaller packet sizes is enabled (in the case of IPv4 and Ethernet, 64 bytes will be allowed). This is achieved by reducing the size of the instrumentation tag, which is identi-fied by receiving ports.
• frameSizeMode: The mode for the traffic item, which can be either of the following:
• Increment: The frame size is incremented.
• Random: The frame size is generated randomly.
• Custom: The framesize is specified using custom values.
• Unchanged: The traffic level settings from the IxNetwork test con-figuration are preserved.
• minIncrementFrameSize: The minimum incremental value of the frame size.
• minIncrementFrameSize: The minimum incremental value of the frame size.
• maxIncrementFrameSize: The maximum incremental value of the frame size.
Example:
ApplyConfig
Example:
Trial trials {numtrials=1}
IxNetwork TestComposer User Guide, Release 7.00 6-103

Script Steps Reference Information6
Iteration This step, which implements an execution looping construct, corresponds to a Quick Test’s Iteration entity.
The Iteration step has the following parameters:
• loadType: The search mode used, which is either of the following:
• Custom: A custom search is performed
• Step: A step search is performed
• Binary: A binary search is performed
• Combo: A binary search followed by a step search is performed
• binaryLoadUnit: The load unit for binary search, which can be either of the following:
• Kbits/Second
• Mbits/Second
• Gbits/Second
• Kbytes/Second
• Mbytes/Second
• GBytes/Second
• %Line Rate
• Frames/Sec
• Layer 2 Bit Rate
• binarySearchType: The binary search type value. Possible values are the following:
• linear
• perFlow
• perPort
• unchangedInitial: The first value of the variable parameter that is unchanged throughout the test.
• initialBinaryLoadRate: The initial rate of the binary search algorithm.
Example:
FrameSize framesizes {enableMinFrameSize=False} {frameSizeMode=Increment}{minIncrementFrameSize=64} {stepIncrementFrameSize=64}{maxIncrementFrameSize=1518}
Note: Some tests, such as these from the Control Plane category, do not contain the Framesize step.
Note: This Iteration step is characteristic of Data Plane tests.
6-104 IxNetwork TestComposer User Guide, Release 7.00

Script Steps Reference Information
• minBinaryLoadRate: The minimum rate of the binary search algorithm.
• maxBinaryLoadRate: The maximum rate of the binary search algorithm.
• binaryResolution: The resolution of the iteration. The difference between the real rate transmission in two consecutive iterations, expressed as a percentage, is compared with the resolution value. When the difference is smaller than the value specified for the resolution, the test stops.
• binaryBackoff: Specifies the percentage of binary search backoff.
• binaryTolerance: The binary search tolerance level.
• enableBackoffIteration: If configured True, enables back-off iteration testing (using a throughput value lower than the value for the best iteration).
• backoffIteration: The back off value used when performing back off iteration testing (using a throughput value higher than the value for the best iteration).
• enableSaturationIteration: If configured True, enables saturation iteration testing.
• saturationIteration: The saturation value when performing saturation saturation.
• enableBackoffUseAsPercentage: If configured True, the backoffIteration and saturationIteration parameters are interpreted as a percentage.
• enableStopTestOnHighLoss: If configured True, stops the test in case of a high loss.
• stopTestOnHighLoss: If configured True, the test stops in case of a high loss.
• enableFastConvergence: If configured True, the test perform iterations using the fast convergence duration configured.
• fastConvergenceDuration: The fast convergence duration for which iterations are performed.
• fastConvergenceThreshold: The fast convergence threshold for which iterations are performed.
IxNetwork TestComposer User Guide, Release 7.00 6-105

Script Steps Reference Information6
Iteration This step, which implements an execution looping construct, corresponds to a Quick Test’s Iteration entity.
The Iteration step has the following parameters:
• algorythmType: The type of algorithm used to modify the variable parameter value. Possible values include:
• Custom: A custom algorithm.
• Increment: An incremental algoritm.
• step: The step increase value.
• parameterName: The name of the variable parameter. The variable parameter changes as the test runs, based on the selected algorithm.
• initialValue: The first value of the variable parameter.
• maximumValue: The maximum value of the variable parameter.
• incrementValue: The amount to increment the variable for each test iteration.
• waitTimeBeforeStatCollection: The time (in seconds) to wait before collecting statistics, following the end of protocol negotiations.
StartTraffic This step starts the configured test traffic.
The StartTraffic step has no parameters.
StartProtocols For Quick Tests from the Control Plane category the StartTraffic step is replaced by the StartProtocols steps, which starts the configured protocols.
Example:
Iteration iteration {loadType=binary} {binaryLoadUnit=percentMaxRate} {binarySearchType=linear}{unchangedInitial=False} {initialBinaryLoadRate=10}{minBinaryLoadRate=10} {maxBinaryLoadRate=100}{binaryResolution=1} {binaryBackoff=50}{binaryTolerance=0} {enableBackoffIteration=False} {backoffIteration=0}{saturationIteration=0} {enableSaturationIteration=False} {enableBackoffUseAs%=False} {enableStopTestOnHighLoss=False} {stopTestOnHighLoss=0}{enableFastConvergence=False} {fastConvergenceDuration=10} {fastConvergenceThreshold=10}
Note: This Iteration step is characteristic of Control Plane tests.
Example:
StartTraffic
6-106 IxNetwork TestComposer User Guide, Release 7.00

Script Steps Reference Information
The StartProtocols step has no parameters.
TestUnderSize This step is characteristic of RFC2889 Quick Tests and tests for an undersized frames condition.
The TestUnderSize step has no parameters.
FramesizeUndersize
This step is nested within a TestUnderSize step and specifies a list of frame sizes.
The FramesizeUndersize step has the following parameters:
• UnderSizeFrameSizeList: A list of frame size values.
TestOverSize This step is characteristic of RFC2889 Quick Tests and tests for oversized frames condition.
The TestOverSize step has no parameters.
FramesizeOversize
This step is nested within a TestOverSize step and specifies a list of frame sizes.
The FramesizeOversize step has the following parameters:
• OverSizeFrameSizeList: A list of frame size values.
TestBadCRC This step is characteristic of RFC2889 Quick Tests and tests for a condition whereby frames with erroneous CRC values are generated.
Example:
StartProtocols
Example:
TestUnderSize undersize
Example:
FramesizeUndersize framesizes {UnderSizeFrameSizeList=32,64}
Example:
TestOverSize oversize
Example:
FramesizeOversize framesizes {OverSizeFrameSizeList=1519,2000}
IxNetwork TestComposer User Guide, Release 7.00 6-107

Script Steps Reference Information6
The TestBadCRC step has no parameters.
FramesizeBadCRC
This step is nested within a TestBadCRC step and specifies a framesize build mode.
The FramesizeBadCRC step has the following parameters:
• frameSizeMode: The frame size mode for the Quad Gaussian mode, whereby the Quad Gaussian is the superposition of four Gaussian distributions. Possi-ble values are the following:
• fixed: Sets frames to a constant size that is specified by the size parameter. The default frame size is 64 bytes.
• increment: Sets frames to have a set of incrementing sizes, between the specified min and max lengths, in bytes. The default increment is 1 byte.
• random: Sets frames to have random sizes, varying between the specified min and max lengths, in bytes (default values are 64 bytes).
• predefinedDistribution: Sets frames to use a predefined distribution of frame sizes.
• weightPairs: Sets frames to use a pair of frameSize and frameWeight val-ues.
• quadGaussian: Sets frames to use a calculated distribution of frame sizes.
• minIncrementFrameSize: The minimum incremental value of the frame size.
TestFragment This step is characteristic of RFC2889 Quick Tests and tests for a fragmented frames condition.
The TestFragment step has no parameters.
FramesizeFragment
This step is nested within a TestFragment step and specifies a list of frame sizes.
The FramesizeFragment step has the following parameters:
• fragmentFrameSizeList: A list of frame size values.
Example:
TestBadCRC badcrc
Example:
FramesizeBadCRC framesizes {frameSizeMode=Increment} {minIncrementFrameSize=64}
Example:
TestFragment fragment
6-108 IxNetwork TestComposer User Guide, Release 7.00

Script Steps Reference Information
Example:
FramesizeFragment framesizes {fragmentFrameSizeList=32,63}
IxNetwork TestComposer User Guide, Release 7.00 6-109

Script Steps Reference Information6
6-110 IxNetwork TestComposer User Guide, Release 7.00

7Chapter 7: Using the Composer Expression Builder
This chapter describes the Expression Builder functionality and comprises the following sections:
• About Variables on page 7-1
• Creating Expressions in the Expression Builder on page 7-3
About VariablesTestComposer enables you to define variables that you can then use as step parameters, step return values, procedure arguments, or for creating Tcl expres-sions.
The For step, for example, uses a loop variable initialized to a start value and loops over a values domain for executing the nested steps a predefined or vari-able number of times. Considering another example, some steps of the Execute type which return a result can be assigned a return variable that is then used for retrieving the step output.
Variable Scope Variables can be created and used both in the main script body and in within the procedures that are defined in a TestComposer script.
Depending on their scope, variables fall into the two categories below:
• Local: These variables, which are defined in the main body of a script or in the body of procedures, have a limited scope and cannot be accessed outside that scope. For example, a variable that was defined in the main script body cannot be used inside a procedure.
Variables defined in the Files Catalog are considered to have a local scope that is attached to the main script body and, as such, cannot be accessed from the body of procedures.
• Global: These variables are defined at any location of the script using a ReadWriteGlobal statement and are used only for facilitating the transfer of variable values between the main body and the procedure bodies.
IxNetwork TestComposer User Guide, Release 7.00 7-1
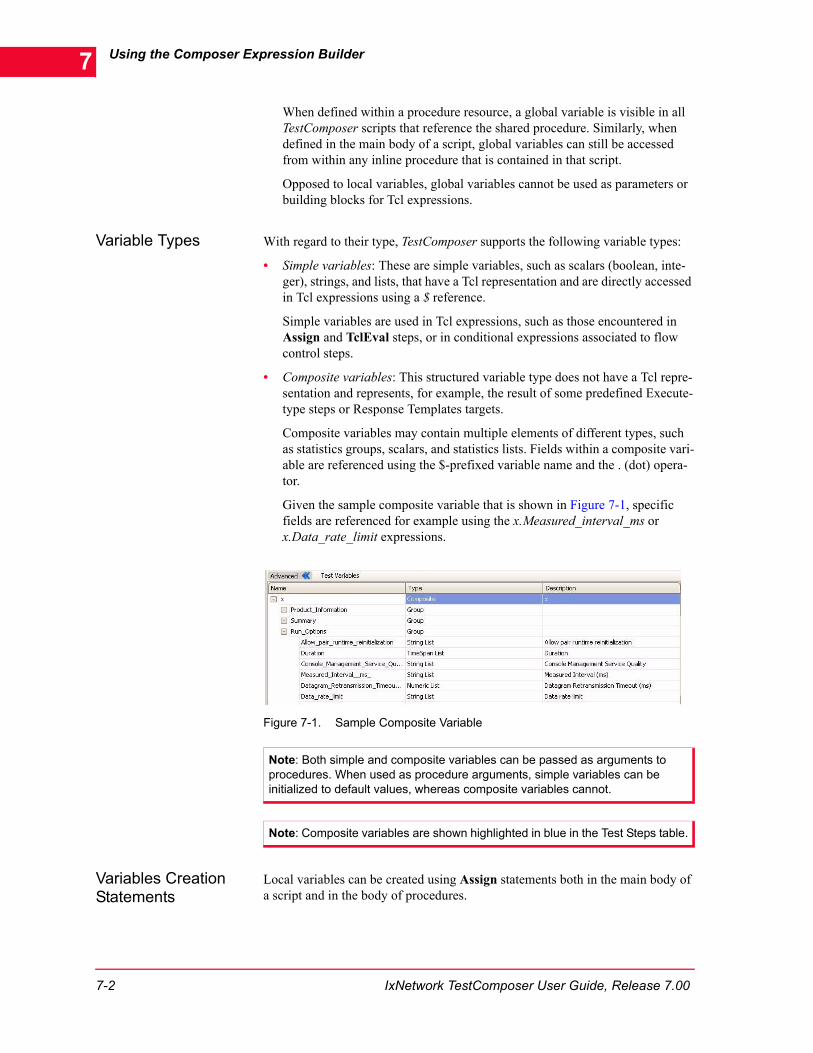
Using the Composer Expression Builder7
When defined within a procedure resource, a global variable is visible in all TestComposer scripts that reference the shared procedure. Similarly, when defined in the main body of a script, global variables can still be accessed from within any inline procedure that is contained in that script.
Opposed to local variables, global variables cannot be used as parameters or building blocks for Tcl expressions.
Variable Types With regard to their type, TestComposer supports the following variable types:
• Simple variables: These are simple variables, such as scalars (boolean, inte-ger), strings, and lists, that have a Tcl representation and are directly accessed in Tcl expressions using a $ reference.
Simple variables are used in Tcl expressions, such as those encountered in Assign and TclEval steps, or in conditional expressions associated to flow control steps.
• Composite variables: This structured variable type does not have a Tcl repre-sentation and represents, for example, the result of some predefined Execute-type steps or Response Templates targets.
Composite variables may contain multiple elements of different types, such as statistics groups, scalars, and statistics lists. Fields within a composite vari-able are referenced using the $-prefixed variable name and the . (dot) opera-tor.
Given the sample composite variable that is shown in Figure 7-1, specific fields are referenced for example using the x.Measured_interval_ms or x.Data_rate_limit expressions.
Figure 7-1. Sample Composite Variable
Variables Creation Statements
Local variables can be created using Assign statements both in the main body of a script and in the body of procedures.
Note: Both simple and composite variables can be passed as arguments to procedures. When used as procedure arguments, simple variables can be initialized to default values, whereas composite variables cannot.
Note: Composite variables are shown highlighted in blue in the Test Steps table.
7-2 IxNetwork TestComposer User Guide, Release 7.00

Using the Composer Expression Builder
Global variables can be created anywhere in the script using ReadWriteGlobal statements and serve the purpose of transferring the values of local variables between the main body of a script and the procedure bodies. See ReadWriteGlobal Statement Step on page 6-6.
Creating Expressions in the Expression BuilderThe Expression Builder is a software component of TestComposer that is used for creating conditional expressions contained in looping and flow control steps such as For, While, Do...While, and For. The Expression Builder can also be used for creating and editing simple or multi-line Tcl code fragments and Tcl expressions as part of Composer test steps.
The Expression Builder GUI used for defining the conditional expression has two working modes that you can use interchangeably, a Basic mode – which uses a natural-like expression format based on mathematical operators and Composer variables – and an Advanced mode, which permits the creation of more complex conditional expressions that include variables and Tcl commands, operators and even Tcl code portions.
Expression Builder - Basic Mode
This working mode uses a natural-like conditional expression format based on logical and comparison operators and Composer variables.
The Basic working mode is available for conditional looping and flow control constructs, such as While, Do...While, and If.
To define a conditional expression using the Basic mode:
1. Click into the Command String column and then click the button. The Expression Builder GUI appears as shown in Figure 7-2:
Note: The Expression Builder working mode – Basic or Advanced – that is selected by default when creating or editing conditional expressions is determined by the Default expression editor for conditional steps option configured in the Appearance page of the Options window (Tools | Options...).
IxNetwork TestComposer User Guide, Release 7.00 7-3

Using the Composer Expression Builder7
Figure 7-2. Expression Builder - Basic Mode GUI
2. Define an expression as follows:
a: Click into the Variable column and choose a variable from those defined in the previous test steps. Both simple and composite variables are shown.
b: From the Relation column choose a comparison operator.
c: From the Value column specify a value or an expression (possibly contain-ing other Composer variables) to compare against.
d: If the variable involved in the conditional expression is a list, you can use an aggregator from the Aggregation column to reduce it to a single value.
The supported aggregators are the following:
• Any: When applied to a list, any list member must meet the condi-tion. For example, a condition such as all: var_list >11 yields true if any list member is greater that ‘11’.
• All: When applied to a list, all list members must meet the condi-tion. For example, a condition such as all: var_list >11 yields true if all list members are greater that ‘11’.
• Last: Selects the last list member in order to evaluate the expres-sion.
• Min, Max, Med: Selects the minimum, maximum, or median value of all list elements in order to evaluate the expression. If the list contains an odd number of elements, after list sorting the middle element is selected. If the list contains an even number of elements, after performing a list sorting, the average of the middle two ele-ments is selected.
• Mean: Computes the mean value of list member values before evaluating the expression.
• Count: Computes the number of list elements.
• Sum: Computes the sum of list member values before evaluating the expression.
7-4 IxNetwork TestComposer User Guide, Release 7.00

Using the Composer Expression Builder
3. If you want to create multiple sub-expressions joined by a logical operator –
AND (default), OR – click the > Condition button and perform the steps sequence repeatedly.
Eventually click the button to complete the operation.
Expression Builder - Advanced Mode
The Expression Builder is accessed in various contexts of the TestComposer plu-gin that require creating an expression or adding Tcl code, such as:
• Creating an assignment step
• Building an expression for conditional steps (If, While, Do...While)
• Adding a TclEval or Trace command step
At runtime, an in-built Tcl Interpreter evaluates the defined expressions or Tcl code associated with script steps and provides return values that can be assigned to variables, or can be used in steps of the control type.
See Also
The Expression Builder Panes
Building An Expression
The Expression Builder Panes
The Expression Builder GUI appears as shown in Figure 7-3:
Important: After having defined an expression using the Basic mode you can convert it to a Tcl-enabled expression by clicking the Advanced radio button. A warning message appears indicating this is an operation that cannot be undone and the expression is converted to an advanced expression that contains Tcl functions and operators.
IxNetwork TestComposer User Guide, Release 7.00 7-5

Using the Composer Expression Builder7
Figure 7-3. The Expression Builder GUI
Using Tcl commands and operators, and TestComposer variables, a Tcl expres-sion or a multi-line Tcl code fragment is created and displayed in the Expression pane.
The Tcl Commands Pane
The Tcl Commands pane contains all available Tcl commands, grouped by their type.
Tcl Operators pane comprising supported Tcl operators filtered by category
Tcl Commands pane containing supported Tcl commands and functions
Expression pane supporting Tcl expressions and multi-line code fragments
Test Variables pane displaying simple and composite (structured) variables
7-6 IxNetwork TestComposer User Guide, Release 7.00

Using the Composer Expression Builder
A Tcl command is added to the Expression pane by double-clicking the com-mand in the Commands pane.
The Test Variables Pane
The Test Variables pane enables you to reference and use local variables in Tcl expressions and code fragments.
When accessed, the Test Variables pane displays the TestComposer variables defined in the previous steps, either through assignment operations or specified as variables holding return values for other steps. In addition to variables, defined script parameters are also displayed in the Test Variables list.
The following local variables types are supported:
• Simple variables: These are simple variables, such as scalars (boolean, inte-ger), strings, and lists, that have a Tcl representation and are directly accessed in Tcl expressions using a $ reference.
Simple variables are used in Tcl expressions, such as those encountered in Assign and TclEval steps, or in conditional expressions associated to flow control steps.
• Composite variables: This structured variable type does not have a Tcl repre-sentation and represents, for example, Response Templates targets. Compos-
Note: While in the Expression Builder, Tcl commands help is available via tooltips that are displayed when hovering the mouse cursor over a command:
Clicking the More Info link, a popup window is displayed containing detailed help related to the command.When typing commands manually into an editor, the Autocomplete functionality (CTRL + Space) shows a list of possible commands matching the input string. If the text begins with $ (denoting a reference to a variable) and CTRL + Space combination is used, all existing variables are shown in the drop-down box.
Note: In addition to the standard Tcl commands available in the Expression Builder, TestComposer enables you to load additional Tcl packages such as to gain access to their inbuilt commands. For information on adding additional Tcl packages, refer to Defining Script Properties on page 3-4.
Note: As stated before, global variables cannot be referenced in expressions or Tcl code fragments.
IxNetwork TestComposer User Guide, Release 7.00 7-7

Using the Composer Expression Builder7
ite variables may contain multiple elements, such as statistics groups, dimensions, and statistics values.
TestComposer composite variables are displayed in tree form expanding below the variable name and may comprise statistics aggregated into groups, as shown for example in Figure 7-4:
Figure 7-4. Structured Variables Representation
Since composite variables do not have a Tcl representation, accessing these variables is commonly done using the GetValue command.
Filters can be used on composite variables. To enable filters for selected sta-tistics and define the filter values, do the following:
a: Click the browse button at the end of the field.
The filter editor appears. The filter editor contains the list of statistics.
b: Select the check-box against the statistics for which you want to enable fil-ters.
c: Select a Condition for the filter.
You can select from any of the following conditions:
Equals—to filter statistics that are equal to the value specified in the Value column.
InRange—to filter statistics within a range specified.
Contains—to filter statistics that contain the specified value.
Match—to filter statistics that match the specified variable.
d: Enter Value for the selected condition.
You can select a value from the list of available regular expressions that appears when you click the down-arrow.
You can also type in the expression yourself. The list of expressions con-tain only regular expressions, advanced expressions however, have to be typed in.
e: Click Ok.
• Return Variable—the TestComposer variable that is assigned the retrieved field value.
7-8 IxNetwork TestComposer User Guide, Release 7.00

Using the Composer Expression Builder
Composite variables are created following an association with either of the following entities:
• Resource Template: Targets defined in Response Templates associated to command steps are ‘wrapped’ in composite variables.
• Execute steps: The return values of a number of Execute-type steps for dif-ferent protocols, such as SNMP for example, are also contained in com-posite- type variables.
Variables of this type are referenced using the . (dot) operator following the composite variable name.
When the composite variable fields contain lists, such variables can also be referenced using dimensions; considering, for example, the results vari-able containing the Protocol_HTTP_Client statistics group (Figure 7-5):
Figure 7-5. Sample Composite Variable Access
and the following GetValue function call:
GetValue results.Protocol_HTTP_Client HTTP_SimulatedUsers Elapsed_Time 10
this call returns the HTTP_SimulatedUsers statistic value for an Elapsed_Time value of ‘10’.
• Matrix: These composite variables, which contain statistics results in matrix format from IxNetwork commands, are obtained using Stat Get or StatQuery function calls.
Considering, for example, the following command call:
Stat Get ports=(6.1,6.2) stats=-framesSent, -framesReceived
results in a three column result matrix with the ports, framesSent, frames-Received columns containing each a numeric values list.
To retrieve the framesSent value for the first chassis port you would then use a function call as follows:
GetValue results framesSent ports (1.6.1)
Note: For additional information on the GetValue Tcl function refer to GetValue on page F-2.
Note: The structure of composite return variables assigned to Execute steps for the IxNetwork session are made available without previously executing the step command, provided the session is active.
IxNetwork TestComposer User Guide, Release 7.00 7-9

Using the Composer Expression Builder7
See Also
The Tcl Commands Pane
The Operators Pane
The Expression Pane
The Operators Pane
The Operators pane contains all the operators available for a Tcl expression.
Since operators are grouped by categories – logical, math or grouping ("" [] {} ()) – filtering is supported by the pane.
An operator is added to the Expression pane by double-clicking it in the Opera-tors pane.
See Also
The Tcl Commands Pane
The Test Variables Pane
The Expression Pane
The Expression Pane
The Expression pane is used for creating a multi-line Tcl expression or code frag-ment comprising variables, operators and Tcl functions.
The Expression pane uses syntax highlighting for displaying the different Tcl programming language elements an expression or code fragment is composed of.
See Aso
The Tcl Commands Pane
The Test Variables Pane
The Operators Pane
Building An Expression
To create an expression or a Tcl code fragment:
1. Click in turn Tcl commands, variables and Tcl operators.
Double-clicking a command adds it to the expression created in the Expressions pane.
7-10 IxNetwork TestComposer User Guide, Release 7.00

Using the Composer Expression Builder
Double-clicking a simple variable adds a reference to the Expressions pane. For example, clicking the var1 entry in the Test Variables pane adds $var1 to the Expression pane.
Double-clicking an operator adds it to the Expressions pane.
2. Check the syntax of the resulting Tcl expression by clicking the button.
When errors are found, these are displayed in list format in a Syntax Errors pane that appears below the Expressions pane. Double-clicking an error entry in the Syntax Errors pane automatically selects the offending expression in the Expressions pane above.
See Also
The Expression Builder Panes
IxNetwork TestComposer User Guide, Release 7.00 7-11

Using the Composer Expression Builder7
7-12 IxNetwork TestComposer User Guide, Release 7.00

8Chapter 8: Executing a TestComposer Script
This chapter provides information on executing an TestComposer script and com-prises the following sections:
• Execution from the TestComposer GUI on page 8-1
• Execution from the IxNetwork GUI on page 8-17
• Execution from an IxNetwork Tcl API Script on page 8-19
Execution from the TestComposer GUIWhen run from the TestComposer GUI, a test script can be executed in either the Edit or the Debug mode.
Executing Script Steps in Edit Mode
While in the Edit mode, steps can be played back and execution can be monitored using the Command Response, Validation Messages, Execution Errors, and Find/Replace tabs, as previously described in Executing Selected Steps on page 3-28.
Executing a Script in Debug Mode
The Debug mode enables you to run the entire script in the TestComposer envi-ronment and debug the execution flow by visually following the steps execution and inspecting the displayed real-time commands and sessions output informa-tion.
While in Debug mode, breakpoints can be added to halt the script execution at a particular step. When a breakpoint is reached, or when a script is paused using
the button, all active threads are stopped and the execution context enables you to visualize the call stack, the currently executing threads, or to retrieve the variables values at that moment.
IMPORTANT: Scripts cannot be edited while in Debug mode. If you wish to edit a script that is running in Debug mode, you have to switch to the Edit mode, perform the desired changes and then revert to the Debug mode.
IxNetwork TestComposer User Guide, Release 7.00 8-1

Executing a TestComposer Script8
The Debug Mode GUI
Running a TestComposer script for debugging purposes is done in the Debug mode window, shown in Figure 8-1:
Figure 8-1. Debug Mode Window
IMPORTANT: The Debug mode GUI is also MDI enabled, meaning that switching between the Edit mode and the Debug mode while multiple tests are open in the TestComposer GUI preserves all open tests. However, since Debug mode execution is limited to executing a single test at once, you cannot run multiple tests in parallel. Thus, after having launched the execution of a script, you cannot execute any other script before the first script completes execution.
Note: The Exclude/Include functionality described in Including and Excluding Steps from Execution on page 4-2, which enables the marking of script steps to be skipped at execution is also available in the Debug mode.
Execution parameter tabs displaying script output, logs, variables, breakpoints and threads information
Test Steps table with adjacent (left) Breakpoints pane displaying defined active and inactive breakpoints
8-2 IxNetwork TestComposer User Guide, Release 7.00

Executing a TestComposer Script
To switch to the TestComposer Debug mode:
1. In the Script ribbon click the Debug button in the Test ribbon.
2. If the current script was not saved, on entering the Debug mode you are prompted to save it. Also, on switching to the Debug mode, the Test Steps
table background changes to light grey , as a visual indication of the non-editing mode you are in.
While in Debug mode, runtime information on steps execution is displayed using highlighting based on the following colors:
• : A currently executing step on the selected thread is highlighted green,
with an adjacent arrow icon.
• : Currently executing steps that are paused because of encountered
breakpoints, or because the Pause button was clicked, are highlighted yellow.
• : Active steps, such as a For or a RunProcedure step for example, whose execution has not completed yet because they are waiting for inner steps to finish, are highlighted using light green.
• : Steps executing in parallel are highlighted in light purple. A step exe-cuting in parallel is said to spawn a thread.
• : When a parallel step currently executing is selected in the Threads drop-down control, its entry point in the Test Steps table becomes highlighted purple.
The Debug Mode Toolbar
The Debug mode toolbar buttons, listed in table Table 8-1 below, enable you to perform operations such as running a script or pausing the script execution.
IxNetwork TestComposer User Guide, Release 7.00 8-3

Executing a TestComposer Script8
Table 8-1. Debug Mode Toolbar Buttons
Toolbar Button Action
Executes script steps from script start until reaching a breakpoint or the script end. Clicking the arrow on the right of the Start button selects the playback mode from one of the following:• Play all: Plays all script steps.• Play with user delay: Starts script execution also taking
into account possible delays encountered when the script steps were captured.
• Play selected only: Plays the selected script steps only.
When a script is executing, clicking this button pauses the
script execution. Upon clicking the Play button again, script execution resumes from the position where it was paused.
When clicked once, a graceful script execution stop is attempted. If the TestComposer execution engine is not set into an idle state, the button remains active and needs to be clicked again for terminating the script forcibly.
Sets a breakpoint, toggles it to inactive state, or removes it from the currently selected step.
When a breakpoint is encountered that defined on a RunProcedure step, clicking this button steps into the pertaining procedure body and stops after executing the first step of the procedure.
Executes the current step within a procedure body and then stops. This provides a way of executing a script one step at a time.
When clicking this button while in a procedure body, the subsequent procedure steps are executed, and execution stops at the script step following the RunProcedure step.
Each script executes a Main thread for the main script body and one additional thread for each step that executes in parallel. The Threads drop-down lists all currently active threads and enables you to select one of the active threads for visualizing its execution.Note: When an active thread is selected in the Threads control, its entry point in the Test Steps table is displayed using darker magenta.
If selected, autoscolling is enabled during test execution, so as to focus the Debug window on the currently executing step.
8-4 IxNetwork TestComposer User Guide, Release 7.00

Executing a TestComposer Script
Using the Autoscroll Functionality in Debug Mode
When you are executing long scripts or scripts that use RunProcedure steps and wish to track the currently executing step, you can turn on the Autoscroll
option. As a result, at execution time any steps that were initially shown collapsed in the Test Steps table are rendered in an expanded mode and the GUI automatically scrolls such as to display the currently executing step.
Enabling this functionality can prove useful, for example, when your test con-tains a RunProcedure step that calls a procedure with multiple steps, but the pro-cedure body itself is located at a remote location in the test script.
In the Debug window if you scroll manually to another step, while autoscroll option is enabled, the Autoscroll check box is cleared and autoscrolling is dis-abled.
Selecting the Autoscroll option is equivalent to selecting the Autoscroll test to track step being executed option in the Debugging pane of the Test | Options window.
By default autoscroll is disabled. You can enable it from the Test menu in the ribbon.
The Debug Window Tabs
The Debug mode window lower pane is a multi-tab view displaying a number of panes that contain script execution information, such as script and sessions out-put messages, defined breakpoints, and variables values.
The following tabs are displayed:
• Execution Messages
• Expressions
• Threads
• Global Output
• Call Stack
• Variables
• Sessions Output
• Breakpoints
Execution Messages
At any moment during the execution of a script, or after the script has finished, this tab displays encountered run-time errors (Figure 8-2).
Hint: As an alternative for navigating to the currently executing step, you can choose the Go to executing step command that is accessible by right-clicking the Test Steps table and choosing this command from the popup menu that appears. When you choose this command, the Debug mode scrolls such as to display the current step, but does not follow subsequently executing steps.
IxNetwork TestComposer User Guide, Release 7.00 8-5

Executing a TestComposer Script8
Figure 8-2. Execution Messages Tab
Displayed informational categories – Messages, Warnings, and Errors – can be filtered out by clicking the category’s corresponding button. To navigate to the step that generated an error condition, double-click the corresponding table entry.
Expressions
At run time, when a breakpoint is encountered or when execution is paused, this tab enables you to create an expression comprising variables defined up to that moment, and evaluates that expression (Figure 8-3).
Figure 8-3. Expressions Tab
When clicking into the Expression column, the Expression Builder window appears and enables you to create an expression using TestComposer variables and Tcl constructs, as described in Using the Composer Expression Builder on page 7-1.
Note: When working with multiple scripts opened at the same time in the GUI (MDI functionality), this tab displays information for the currently executing test script.
Note: The evaluated expression need to be prefixed by the standard Tcl command for expression evaluation, expr. For example, assuming you had a variable named var1 and wished to test whether its value equals 21, you would then have to type the expr $var1==21 command into the Expression field.
Note: When working with multiple scripts opened at the same time in the GUI (MDI functionality), this tab displays information for the currently executing test script.
8-6 IxNetwork TestComposer User Guide, Release 7.00

Executing a TestComposer Script
Threads
When a script is executing parallel steps, in addition to the Main thread addi-tional threads are generated for each parallel step.
At run time, when a breakpoint is encountered or when the execution is paused, this tab displays information on threads currently executing (Figure 8-4). For example, the figure below illustrates the case of a script that at one particular moment executes the Main thread and two other threads, Parallel1 and Parallel2.
Figure 8-4. Threads Tab
Double-clicking a thread entry switches to the Call Stack tab with the currently executing procedure on that thread selected. At the same time, the context of the Expressions tab is updated with information pertaining to the current thread and procedure, enabling you to define and evaluate expressions that are valid for the given context.
Global Output
At any moment during the execution of a script, or after the script has finished, the Global Output pane contains script output information for all steps of the last run (Figure 8-5).
Figure 8-5. Global Output Tab
Note: When working with multiple scripts opened at the same time in the GUI (MDI functionality), this tab displays information for the currently executing test script.
Note: For tests executing parallel steps that spawn one thread for each running parallel step, upon reaching a breakpoint all threads are halted, not only the thread that has a breakpoint defined.
IxNetwork TestComposer User Guide, Release 7.00 8-7

Executing a TestComposer Script8
Although, by default, output information is displayed for all script steps, you can choose to display only the output of a particular step by clicking into the Show output from: drop-down and selecting the step.
To display the output of multiple steps you can also specify a set of values or a range, such as for example 2, 3 or 1 - 3 respectively.
Call Stack
At run time, when a breakpoint is encountered or when the execution is paused, the tab is populated with the stack contents, comprising the Main( ) entry fol-lowed by list of all procedures that are executed at that moment. For example, assuming a script calls a Proc1, which itself calls a Proc2 procedure, when the execution is halted inside procedure Proc2, the Call Stack lists a Proc2, Proc1, Main sequence (Figure 8-6).
Figure 8-6. Call Stack Tab
Variables
At run time, when a breakpoint is encountered or when execution is paused, this tab is populated with the variables values computed at that moment.
Note: For each step of an executed shared procedure, the Show output from: drop-down control displays a step entry prefixed by the procedure name.
Note: When working with multiple scripts opened at the same time in the GUI (MDI functionality), this tab displays information for the currently executing test script.
Important: At script execution time, when a pane’s content exceeds a predefined defined size (1 MByte), messages in excess are dropped and are no
longer displayed in the GUI. This condition is indicated by a icon that appears in the pane upper right corner. When messages pertaining to a particular step are dropped, that stepped is also removed from the Show output from: drop-down control.
Note: When working with multiple scripts opened at the same time in the GUI (MDI functionality), this tab displays information for the currently executing test script.
8-8 IxNetwork TestComposer User Guide, Release 7.00

Executing a TestComposer Script
Both simple and composite variables are shown, the latter using a tree representa-tion (Figure 8-7).
Figure 8-7. Variables Tab
While in the Variables tab, variables values can be edited, and script execution is then resumed with the new values.
View and Edit Variable
The visualizer allows you to view content of a variable and edit them. Select the
variable from the list in the Variables window and click to open the visualizer. Depending on the visualizer settings, any of the following visualizer window opens:
• List Visualizer window: The List Visualizer window displays the variable values in the form of a list. You can view the entire content of the variable and edit them.
• Text Visualizer window: The Text Visualizer window displays the variable values in a text editior. It allows you to view entire content of a variable and edit them. The text editor has scrollbars that can be used to access parts of the text that do not fit into the text editor. Instead of using the horizontal scrollbar, you can also select the Wrap check-box to enable text wrapping so that the portions that do not fit in a single line appear in the next line.
The visualizer window that opens when you click depends on the visualizer settings. The visualizer settings are defined at the variable level, that means settings defined for one variable is not applicable for the others. Also, the default
Important: Only variables valid for the current context are shown, for example, if execution is halted in a procedure call, only local procedure variables are shown.
Note: For a description of the supported variables types, see About Variables on page 7-1.
Note: When working with multiple scripts opened at the same time in the GUI (MDI functionality), this tab displays information for the currently executing test script.
IxNetwork TestComposer User Guide, Release 7.00 8-9

Executing a TestComposer Script8
visualizer settings are not same for all the variables. Depending on the variable type the default visualizer settings are defined.
Sessions Output
At any moment during the execution of a script, or after the script has finished, this tab contains a Tcl Code/Expression Analyzer tab for the Main execution thread and additional tabs for every parallel script step or connected device ses-sion (Figure 8-8).
Figure 8-8. Sessions Output Tab
The Tcl Code/Expression Analyzer displays Tcl code- and expressions-related runtime information for all script steps pertaining to the Main thread. You can choose to show only the output of a particular step by clicking into the Show output from: drop-down and selecting a step.
In addition to the main Tcl Code/Expression Analyzer tab, at script execution time additional tabs are created as follows:
• A new Tcl Code/Expression Analyzer tab is created for every script step exe-cuting in parallel.
• When the script steps connect to configured devices using device sessions, a new tab is created for each connected session, displaying the output of the pertaining steps.
While in the Sessions Output tab, the following operations can also be performed using the toolbar buttons:
Tcl Code/Expression Analyzer tab with additional tabs for each connected device session
Note: When working with multiple scripts opened at the same time in the GUI (MDI functionality), this tab displays information for the currently executing test script.
Note: For each step of an executed shared procedure, the Show output from: drop-down control displays a step entry prefixed by the procedure name.
8-10 IxNetwork TestComposer User Guide, Release 7.00

Executing a TestComposer Script
Breakpoints
This tab displays all breakpoints defined within the script and enables you to per-form various operations, such as delete some or all breakpoint, or select and deselect configured breakpoints (Figure 8-9).
Figure 8-9. Breakpoints Tab
While in the Breakpoints tab, the following operations can be performed using the toolbar buttons:
Table 8-2. Session Output Tab Toolbar Buttons
Button Action Performed
Navigate the messages sequence up or down by highlighting the corresponding text output.
Clears the information from the current tab.
Adjusts the width of the information messages such that they fit into the current dimension of the pane.
Brings up a dialog enabling you input a string that is searched for in all panes. Search can be performed taking into account the case or not.
Enables you to save the tab content into a .txt file.
Important: At script execution time, when a pane’s content exceeds a predefined defined size (1 MByte), messages in excess are dropped and are no
longer displayed in the GUI. This condition is indicated by a icon that appears in the pane upper right corner. When messages pertaining to a particular step are dropped, that stepped is also removed from the Show output from: drop-down control.
Note: When working with multiple scripts opened at the same time in the GUI (MDI functionality), this tab displays information for the currently executing test script.
IxNetwork TestComposer User Guide, Release 7.00 8-11

Executing a TestComposer Script8
Using Breakpoints
Execution breakpoints represent user-defined locations where the script execu-tion is halted, such as for example, for visualizing and inspecting execution envi-ronment information, such as TestComposer variables and executing threads.
Active breakpoints are symbolized by icons placed in the Breakpoints pane at the left of the Test Steps table.
To define breakpoints:
1. While in Debug mode, hover the mouse button over the left Breakpoints pane,
waiting for the cursor to change its shape to , then click once into the pane to add a breakpoint. The step is also selected as current step.
Alternatively, you can define a breakpoint on the currently selected step by
clicking the button, then clicking Enable breakpoint.
2. Click again the breakpoint location to keep the breakpoint defined, but to tog-gle it off (inactive), such that it will not halt the script execution.
Click the same location once again to completely remove the breakpoint.
Table 8-3. Session Output Tab Toolbar Buttons
Button Action Performed
Deletes the breakpoint corresponding to the current entry.
Deletes all breakpoints defined in the script.
Toggle a defined breakpoint on/off. A breakpoint in an off state
(shown with light red opposed to a darker red for the on
state ) is still present, but does not cause the script execution to stop at that step.
Navigates in the Script Steps table directly to the step which has the associated breakpoint defined.
Navigate the breakpoints table up or down, with the corresponding step highlighted in the Script Steps table.
Important: For script executing parallel steps that spawn one thread for each running parallel step, upon reaching a breakpoint all threads are halted, not only the thread that has a breakpoint defined, and no other instruction is executed until the Play button is clicked.
8-12 IxNetwork TestComposer User Guide, Release 7.00
Executing a TestComposer Script
Running a TestComposer Script without Procedures
To run an TestComposer script that does not contain any procedures:
1. Click the Play toolbar button and start running the script according to the current playback mode.
The steps sequence is executed with the currently executing step shown green
and marked by an arrow icon in the Breakpoints pane.
When a breakpoint is encountered, execution stops at that location and the
corresponding step is shown highlighted yellow .
2. To resume execution at a breakpoint location, click the Play button again. Alternatively, if you want to execute steps in turn and pause after each
step, click the Step over button.
3. At any time while the script is executing, you can pause or stop the execution
by clicking the or buttons. In case the execution was paused,
resuming is done by clicking again the Play button.
4. The script execution terminates after the last script step was run.
If the script uses sessions for establishing connections to configured devices, the Sessions Output tab displays a main tab for the Tcl Code/Expression Ana-lyzer and one additional tab for each session used by the script.
When multiple tests are open in the TestComposer GUI, the tab that corre-sponds to the test having completed execution flashes briefly.
Running a TestComposer Script with Procedures
A TestComposer script may contain procedures (executed sequentially), either defined inline within the script body or procedures that have been imported from the plugin’s resources repository.
To run a TestComposer script containing procedures:
1. Click the Play toolbar button and start running the script according to the current playback mode.
Note: Toggling a breakpoint on or off, as well as performing other breakpoint-related operations, can be also done from the Breakpoints tab, as described in Breakpoints on page 8-11.
IxNetwork TestComposer User Guide, Release 7.00 8-13

Executing a TestComposer Script8
The steps sequence is executed with the currently executing step shown dark
green and marked by an arrow icon in the Breakpoints pane.
2. When a RunProcedure step is reached and starts executing, the step is high-
lighted light green for the duration of the procedure body execution. The currently executing step within the procedure body is still shown highlighted
dark green . If no further procedure call is encountered and after the pro-cedure body steps finish running, control returns to the step following the RunProcedure step.
3. If a breakpoint is encountered defined for a RunProcedure step, clicking the
Step in button descends into the procedure body and stops after execut-ing the first procedure step.
While in the procedure block, click the Step over button to execute one
step at a time, or click the Step out button to execute all remaining pro-cedure steps, exit the procedure and stop at the step following the executed RunProcedure step.
4. At any time while the script is executing, you can pause or stop the execution
by clicking the or buttons. If the execution was paused, click the
Play button to resume execution.
Alternatively, if you want to execute steps in turn and pause after each step,
click the Step over button repeatedly.
The script execution terminates after the last script step was run. When multi-ple tests are open in the TestComposer GUI, the tab that corresponds to the test having completed execution flashes briefly.
Running a TestComposer Script with Parallel Steps
This describes launching the run and inspecting information.
Whenever an TestComposer script executes parallel steps, in addition to the Main thread that is present in every script, a new thread is generated for each parallel step. At any moment during the script execution time or while execution is paused by the user or halted by a breakpoint, all active threads are listed in the Threads drop-down control and in the Threads tab.
From all active threads, the thread selected at one moment in the Threads drop-down is the thread whose currently executing steps are displayed.
Note: If a procedure resource contains breakpoints, when that procedure is called as shared procedure within a script, at runtime the breakpoints will not be taken into account.
8-14 IxNetwork TestComposer User Guide, Release 7.00

Executing a TestComposer Script
Whenever the execution of a thread is halted, either by reaching a breakpoint or
when execution is halted by clicking the toolbar button, the script execution is halted on both the Main and all parallel threads.
To run a TestComposer script with parallel steps:
1. Click the Play toolbar button and run the script according to the current play mode.
The Main thread steps sequence executes with the currently executing step
shown green .
2. When a parallel step is reached and starts executing, its highlighting in the
Test Steps table changes from light blue to light magenta and a new thread is created.
While the parallel step is executing, you can navigate to the Threads drop-down control and select the parallel thread. The thread’s entry point in the
Test Steps table becomes highlighted using dark magenta and the steps
shown as executing currently (highlighted green ) are the steps pertain-ing to the parallel thread instead of to the Main thread.
3. When a breakpoint is reached, the execution stops at that location and the step on the current thread, Main or another parallel thread, is shown highlighted
yellow . If the reached breakpoint was defined on a parallel thread, the
thread’s entry point in the Test Steps table is highlighted dark magenta .
You can visualize the halted steps on any of the other active threads by select-ing a thread from those available in the Threads drop-down.
4. When the execution of a parallel thread ends, its highlighting changes from
light magenta to light blue .
The TestComposer script execution ends after the last step of the Main thread is terminated.
In the Sessions Output pane, in addition to the main tab for the Tcl Code/Expression Analyzer, for each executed parallel step an additional informa-tion tab is displayed.
Note: A parallel thread executes simultaneously with the Main thread and can terminate before it, in which case the control is returned to Main. For threads that take longer to execute than the duration of the Main thread, the behavior at the termination of Main can be specified as script creation time, as described in Defining Script Properties on page 3-4.
IxNetwork TestComposer User Guide, Release 7.00 8-15

Executing a TestComposer Script8
Test Status Indicator The status bar at the bottom of the GUI shows the status of the currently active test. Test status is shown only at the end of a test. The status is determined by the Return Value of the last executed test.
The Return Value and the indicated status is as follows:
The color on the indicator and their corresponding status is as follows:
• Green ( )—test has passed
• Red ( )—test has failed
• Grey ( )—test has not been executed
• Yellow ( )—return value not specified
When a test is being executed the status indicator is replaced by the Timer. The status indicator appears only at the end of the test.
If the test is paused the indicators are not available.
If the test is aborted the indicator shows the default return value. The default return value is defined from the Parameters window.
If you change to Debug mode from Edit mode or to Edit mode from Debug mode, the indicator retains the existing status unless a new test is executed.
Important: In order to avoid an unpredictable behavior at script runtime, special care has to be taken when configuring and executing parallel steps, as described in Parallel Steps Configuration Hints on page J-1.
Return Value Status Indicated
0 Test failed
Any value other than ‘0’
Test passed
No return value Not specified
8-16 IxNetwork TestComposer User Guide, Release 7.00

Executing a TestComposer Script
Execution from the IxNetwork GUIWhile in IxNetwork, the main TestComposer script, or other procedure scripts, can be run from the IxNetwork QuickTests configuration page.
Execution From the IxNetwork QuickTests Page
While working on an IxNetwork test configuration, its associated main script procedure can be run from the QuickTests configuration page.
Since this mode is equivalent to running the script in the Edit mode of the TestComposer plug-in, you might want to refer to Executing Selected Steps on page 3-28 first for an overview of supported operations.
To run the TestComposer main procedure from the IxNetwork GUI, click the
button in the Home ribbon.
Execution As a Custom Test
Any procedure script (both the Main_Procedure and other scripts) that is con-tained in an IxNetwork test configuration can also be run as a custom test from the QuickTests configuration page of IxNetwork. If the executed procedure has input parameters defined, this execution mode supports the passing of values to the input parameters.
When run as a custom test, all runtime information from the TestComposer Debug mode is available.
To run a TestComposer script as a custom test:
1. Go to the IxNetwork QuickTests configuration page.
2. In the Home ribbon click the button to create a new QuickTest.
3. In the QuickTest window that appears (see Figure 8-10), select the select the User defined Tests > Event Scheduler option in the Test Selection page.
IxNetwork TestComposer User Guide, Release 7.00 8-17

Executing a TestComposer Script8
Figure 8-10. IQuickTest Window
4. In the subsequent Test Items page, which lists all procedures defined in the current IxNetwork configuration, select a procedure to execute by clicking its
associated control.
5. In the Finish page assign a name to the QuickTest to be created. When com-pleting this operation, a new QuickTest is created and becomes selected in the list of defined QuickTests.
6. Click the button to launch the script execution.
After completing the script execution, detailed runtime information is dis-played in the IxNetwork Data Miner page, as described in Script Execution Results Integration in Data Miner on page 10-1.
8-18 IxNetwork TestComposer User Guide, Release 7.00

Executing a TestComposer Script
Execution from an IxNetwork Tcl API ScriptA TestComposer test script can also be run from an IxNetwork Tcl API script.
For running a TestComposer test, you need to create a new IxNetwork QuickTest of the User Defined Test type that ‘wraps’ the Composer test, then use the ixNet exec start <test_reference> API command to launch the test.
Example: Given a QuickTest referenced in the IxNetwork configuration by the /quickTest/eventScheduler[1] string, you can use the following Tcl API commands to launch it into execution and wait for it to finish:
Set testID {/quickTest/eventScheduler[1]}
ixNet exec start $testID
ixNet exec waitForTest $testID
IxNetwork TestComposer User Guide, Release 7.00 8-19

Executing a TestComposer Script8
8-20 IxNetwork TestComposer User Guide, Release 7.00

9Chapter 9: Working with Multiple Test Scripts in TestComposer
This section provides information on working with multiple test scripts that are open at the same time in the TestComposer GUI. It contains the following sec-tion:
• Working with Multiple Scripts on page 9-1
Working with Multiple ScriptsTestComposer is an MDI (Multiple Document Interface) enabled application, i.e. it enables you to have multiple test scripts – the main script called Main_Procedure and additional procedures– open in the GUI at any given time. Although not restricted to this particular work scenario, using the MDI function-ality is mostly useful when editing a test script that references inside its body one or more shared (external) procedures.
Assuming, for example, that you have a test script that calls shared procedures, you can view and edit the referenced procedures at the same time. If at any moment you wish to modify a referenced procedure, you can open it in a separate tab and work on it, while also keeping the initial test script open (Figure 9-1). Eventually, when you save the procedure, the changes become visible in the script that calls the procedure.
IxNetwork TestComposer User Guide, Release 7.00 9-1

Working with Multiple Test Scripts in TestComposer9
Figure 9-1. MDI Functionality - Supporting Multiple Open Test Scripts
When you switch between the TestComposer Edit and the Debug mode, the mul-tiple open scripts/procedures are preserved.
Opening Multiple Scripts with MDI
The TestComposer GUI enables you to work at the same time on any number of scripts, the main test script, which exists for every IxNetwork test configuration, and multiple other scripts or shared procedures from the application’s resource database.
Since the main procedure can never be closed, if you want to work with multiple scripts at the same time, you can only create additional scripts in new
Note: When working with multiple scripts, the information tabs from the Edit and the Debug views, common for all scripts, display information pertaining to the currently active test script.
Note: Since the Main_Procedure test script cannot be closed, its tab has no
associated Close button. You can, however, discard its entire content by
clicking the button, and then clicking Close all script and clear main procedure.
9-2 IxNetwork TestComposer User Guide, Release

Working with Multiple Test Scripts in TestComposer
TestComposer tabs by clicking the New button, then clicking New Script. A new empty script is created in a separate tab and can be edited as you would normally edit any TestComposer script.
Alternatively to creating new scripts from scratch, you can open existing scripts
from the Resource Manager by clicking the Manage Resources button from the test ribbon and selecting an existing script from the Procedures cate-
gory. Eventually click the Edit button and the script is opened in a new tab.
Debugging nested scripts
You can debug multiple shared procedures and add breakpoints to them. During execution when a shared procedure has a breakpoint in it, it pauses in the step where the breakpoint is enabled and switches automatically to the shared proce-dure when Autoscroll is enabled.
Using Copy / Paste Operations
While multiple scripts are open in the TestComposer GUI, you can copy steps from one tab to another using copy / paste operations.
The Undo/Redo functionality is also supported by the MDI GUI, with the amend-ment that operations can be undone/redone only from the tab the initial operation has been performed in. For example, if you wish to undo some operations that were performed in, say, Test2, you need to make Test2 the currently active tab
and click the Undo button in the Test ribbon while in that tab.
Capturing Steps with MDI
TestComposer supports the capture functionality with multiple scripts open at the same time.
When capturing steps while multiple test scripts are open in the GUI, remember however that a step is always captured to the currently active script, i.e. the script in the tab that has the focus.
Executing Steps with MDI
When you have multiple scripts open at the same time in the TestComposer GUI, you can execute only steps from a single script at any time.
Assuming, for example, that you have multiple scripts open in the GUI, and you
select a number of steps in one tab, then click the Play button in the Test ribbon for executing the steps in the Edit mode. If you then want to execute steps
Note: Since the active script may be a different one that the script having initially opened the session to the Ixia chassis or the configured DUT, steps captured into a ‘foreign’ tab cannot be executed.
IxNetwork TestComposer User Guide, Release 7.00 9-3
Working with Multiple Test Scripts in TestComposer9
from another script that is open, you need to wait for the running steps to com-plete execution before executing any other steps selection.
The same consideration applies for the execution in Debug mode.
Saving to Resources
A TestComposer script – the Main_Procedure script or any of the open procedure scripts – can be saved as a procedure resource to the resources repository.
To save a script as a resource, click the Export button from the Test rib-bon, and select the entity to be saved – either the top-level procedure of the cur-rent tab, or any procedure defined inline within the tab – from the window that appears.
9-4 IxNetwork TestComposer User Guide, Release

10Chapter 10: Viewing Script Execution Files in IxNetwork
This chapter provides information on retrieving the TestComposer script execu-tion result files in IxNetwork, comprising the following sections:
• Script Execution Results Integration in Data Miner on page 10-1.
Script Execution Results Integration in Data MinerWhen running a script procedure as an IxNetwork QuickTest, detailed execution information – debugging and information contained in files associated with the script – is displayed and can be accessed through the Data Miner plug-in of IxNetwork.
For each executed script procedure, an entry is created and displayed in the User Defined Tests/Event Scheduler folder of the Data Miner left pane (Figure 10-1).
IxNetwork TestComposer User Guide, Release 7.00 10-1

Viewing Script Execution Files in IxNetwork10
Figure 10-1. Data Miner Results Display
For each procedure, run entries are created in the upper Data Miner pane contain-ing general run information, such as run name, date, time, and duration, total number of trials and passed number of trials.
At the same time, the execution result files are stored on the IxNetwork host and
can be accessed by clicking the button in the Data Miner upper pane.
In addition to these files, the special folder specified in the Files Catalog window by the userResultsDirectory system variable is also available from the IxNetwork Data Miner plug-in.
For each run, in the lower Data Miner pane detailed runtime and debugging information is displayed in the following categories:
• Global Session: The information from this page contains information for all sessions established by a script and corresponds to the Global Output tab of the TestComposer Debug mode window.
Script entry in User Defined Tests folder
List of script executions
Script execution information grouped in global and per-session information pages
Note: The content of these files corresponds to the script-associated files defined using the Files Catalog. See Using Attached Script Files on page 3-20.
10-2 IxNetwork TestComposer User Guide, Release 7.00

Viewing Script Execution Files in IxNetwork
• Session logs: For each command session established, a tab is displayed.
• PassFailStats: If the TestComposer script is configured so as to export statis-tics, this tab contains the statistic values.
• Summary report: A test summary report.
• Tcl Expression Analyzer: Displays Tcl code– and expressions–related runtime information for all script steps pertaining to the Main script thread.
IxNetwork TestComposer User Guide, Release 7.00 10-3

Viewing Script Execution Files in IxNetwork10
10-4 IxNetwork TestComposer User Guide, Release 7.00

11Chapter 11: Persisting TestComposer Scripts
This chapter provides summary information on the multiple modes of persisting a TestComposer script and comprises the following sections:
• Saving a Script into an IxNetwork Configuration on page 11-1
• Exporting a Script as a Procedure Resource on page 11-1
• Exporting as a Script To Test Conductor on page 11-2
• Exporting a script as Custom QuickTest resource on page 11-3
Saving a Script into an IxNetwork ConfigurationA TestComposer main procedure script can be saved as part of the IxNetwork configuration it was created in, as described in Saving a Script into an IxNetwork Test Configuration on page 3-28.
When saved within an IxNetwork configuration, the script can be run from the IxNetwork GUI or as an custom test from the IxNetwork Quick Tests configura-tion page.
Exporting a Script as a Procedure ResourceAny TestComposer script – the main procedure script or additional test scripts that are open in the GUI – can be saved as a procedure resource in the resource database, along with other resources, such as device sessions and response tem-plates. Procedure resources can be re-used repeatedly within the same script, or across multiple scripts, such as to facilitate configuration and resource items re-use.
Saving TestComposer scripts as procedure resources is described in detail in Creating Procedure Resources on page 13-5.
IxNetwork TestComposer User Guide, Release 7.00 11-1

Persisting TestComposer Scripts11
Exporting as a Script To Test ConductorIn addition to the options above, IxNetwork TestComposer main scripts can also be exported to the Test Conductor application.
When exporting a main script, a conversion process adds explicit IxNetwork StartSession and StopSession steps for the Built-in Event session type, before the converted script is saved as a procedure file (tcp) on disk. An additional IxNetwork Load Configuration step that loads the pertaining IxNetwork test con-figuration into the script is also added.
Figure 11-1 shows an example of the conversion operation, illustrating the explicit IxNetwork StartSession, StopSession, and Execute steps, while the other steps correspond to the existing script steps from IxNetwork TestComposer.
Figure 11-1. Exported TestComposer Script
As evident from the previous figure, the Execute-type step that was added fol-lowing the conversion calls an Load Configuration event that references the IxNetwork test configuration using the $IxNConfig script variable.
To export a script to Test Conductor:
1. At any moment while working on an IxNetwork configuration that contains a
TestComposer script, click the Export TC Script button from the Automation ribbon. Enter a name for the tcp file and click the Ok button.
2. The current IxNetwork test configuration file (ixncfg) is automatically added to the Files Catalog and is preserved during the Export process.
Note: The main benefit of exporting a script to TC TestComposer is that it can be run in an automated mode as part of a TC regression, as described in the TestComposer User Guide that is shipped with Test Conductor.
Note: The TestComposer plug-in must be up and running when you perform the export operation, otherwise an error message is displayed.
11-2 IxNetwork TestComposer User Guide, Release 7.00

Persisting TestComposer Scripts
An Execute Load Configuration step is also automatically added as the next step after the StartSession step.
Exporting a script as Custom QuickTest resourceAny script that is open in the GUI – can be saved as a Quicktest resource in the resource database, along with other resources, such as device sessions and response templates.
See Also
Handling Quicktest template resources on page 13-34
Creating Custom QuickTest Template on page C-2
Exporting a script as Custom QuickTest resource on page 11-3
IxNetwork TestComposer User Guide, Release 7.00 11-3

Persisting TestComposer Scripts11
11-4 IxNetwork TestComposer User Guide, Release 7.00

12Chapter 12: Exporting TestComposer Scriptsto Tcl Code
This chapter provides summary information on generating Tcl code from a TestComposer script and comprises the following sections:
• Exporting as a Tcl Script on page 12-1
Exporting as a Tcl ScriptSimilar to other Ixia test applications, an IxNetwork test configuration can be translated to Tcl code that performs the same functionality as the original test. When generating the Tcl code for an IxNetwork configuration using the IxNet-work ScriptGen command, you can also choose to generate the Tcl code that cor-responds to a TestComposer script that is part of the configuration.
To export an IxNetwork configuration to Tcl code:
1. At any moment while working on an IxNetwork configuration that contains a
TestComposer script, click the Scriptgen button from the Automation ribbon of the IxNetwork GUI.
2. In the window that appears, select a file path and an export option, Low Level Tcl or HLT API.
Select further export options from those listed below:
Note: The main benefit of exporting a TestComposer script to Tcl code is that it can then be run from a Tcl Console on any network host that has such an application installed.
Important: The structure of the generated Tcl code, as well as deployment considerations for running the resulting code files in an automated mode, is described in detail in the TestComposer ScriptGen Tcl Reference manual that is shipped with IxNetwork TestComposer.
IxNetwork TestComposer User Guide, Release 7.00 12-1
Exporting TestComposer Scripts to Tcl Code12
• Overwrite existing file: If selected, a previously generated file is over-written.
• Launch text editor: If selected, the resulting Tcl code file is opened in Notepad (or the application currently associated with .tcl files).
• Include connect statement: If selected, the generated Tcl contains a spe-cial ixtc_connect command that is used for connecting the script execu-tion environment to the Composer Runtime Environment, a software component required for the execution of the Tcl code files in an automated mode.
• Include TestComposer script: If selected, the TestComposer script is also translated to Tcl and saved within the generated Tcl code file for the IxNetwork configuration.
If the TestComposer script containes any inline (local) procedures, the Tcl code file also contains the code for the procedures.
• Include protocol templates: If selected, the protocol stack configuration of IxNetwork traffic items is also saved within the generated Tcl file.
• Include flow groups: If selected, the IxNetwork flow group information is also saved within the generated Tcl file.
• Include quick test: If selected, the IxNetwork configuration for quick tests is also saved within the generated Tcl file.
• Include traffic: If selected, the IxNetwork traffic information is saved along with the generated Tcl file.
In addition to the Tcl file that corresponds to the IxNetwork configuration file, the IxnScriptGen_Composer.tcp file containing the TestComposer script in binary format is also generated.
Note: In the current implementation, choosing the HLT API option results in generating the same TestComposer code as the Low level Tcl option.
12-2 IxNetwork TestComposer User Guide, Release 7.00

13Chapter 13: Managing IxNetwork TestComposer Resources
This chapter provides an overview of TestComposer resources and describes how to create, edit, or manage them. It comprises the following sections:
• What Is an IxNetwork TestComposer Resource? on page 13-1
• Creating Procedure Resources on page 13-5
• Creating Response Templates on page 13-7
• Creating CSV Template Resources on page 13-30
• Handling MIB Resources on page 13-33
• Handling Quicktest template resources on page 13-34
• The Resource Manager on page 13-35
What Is an IxNetwork TestComposer Resource?Response Templates, Device Sessions, CSV Templates, and Procedures are resources that enable you to configure more easily TestComposer scripts by starting from existing resource entities.
A special category of external read-only resources, Management Information Base (MIB) that facilitates the management of SNMP-enabled network devices devices, is also supported.
• Procedures: A steps sequence that was previously saved into the resource database can be re-used in multiple Composer tests via an Import procedure or Import procedure from disk operation.
Resource procedures can also be called by other TestComposer steps using a RunProcedure control step, without the need for importing the procedure into the script.
• Response Templates: Some steps of the command type, such as Execute, can have an associated response template that is used to parse and evaluate the step’s output.
IxNetwork TestComposer User Guide, Release 7.00 13-1

Managing IxNetwork TestComposer Resources13
A response template—which is created using the Response Template Editor on a device’s expected response following protocol or session commands—specifies the tokens (named ‘targets’ when creating the template) retrieved from the command’s output after execution.
• Device Sessions: Command steps are used for connecting to a configured test device and executing commands on an interface supported by the device, such as Telnet, TclSh, TL1, CmdTool, SSH1/SSH2/SSHAuto, SNMP, Syslog, CSVAnalyzer.
Device sessions, which specify device connection parameters, enable you to save and re-use device connection settings across multiple scripts. When the configuration of a session resource changes, the new configuration automatically applies to all script that are using the resource.
• MIBs: Management Information Base entities describe data objects managed by a SNMP agent within a network device. MIBs are simple text files, and values of MIB data objects are either configured on or retrieved from the SNMP-aware devices.
• CSV Templates: These resources are similar to Response Templates in that they define a schema for retrieving data from a device output that has CSV format. Similar to Response Templates, CSV Templates are created and edited using an editor that is capable of parsing CSV format files and ‘marking’ portions of interest in such files.
• Quicktest Templates: These resources manage all your Quicktest template resources. They are used to create a new custom quicktest based on script in Testcomposer.
TestComposer resources are accessed and handled using the Resource Manager window, which supports the exporting and importing of resources, as described in Manage Resources on page 15-9.
See Also
Creating Device Sessions
Creating Procedure Resources
Creating Response Templates
Creating CSV Template Resources
Handling MIB Resources
The Resource Manager
13-2 IxNetwork TestComposer User Guide, Release 7.00

Managing IxNetwork TestComposer Resources
Creating Device SessionsDevice sessions specify connection parameters to a remote configured device, ranging from basic or physical connection settings to exceptions raised by the configured device.
You can create new sessions or edit existing ones.
After having created a session, you can save it as a reusable resource in the Device Sessions folder of the Reusable Resources category.
To create a new device session resource:
1. While in Edit mode, choose the Device Resource command from the Test ribbon, or press the equivalent Ctrl + N, Ctrl + D keyboard shortcut.
The Session Editor window (Figure 13-1) appears, enabling you to configure the device session parameters and save the resulting session as a resource.
Figure 13-1. Session Editing Window
2. Input a session name and choose an interface type.
Note: When creating a test, using existing device sessions enables you to create the test more easily. Existing configured sessions can be loaded by
clicking the Load from storage button from the Session Consoles pane, which opens a standard selection window.
Basic Connection parameters
Advanced Connection parameters comprising responses to device prompts and device exceptions
IxNetwork TestComposer User Guide, Release 7.00 13-3

Managing IxNetwork TestComposer Resources13
3. Define connection parameters for the Connection (refer to Defining Connection Settings on page 5-7), Terminal (Defining Terminal Settings on page 5-15), DevicePrompts (Defining Device Prompts on page 5-19), Exceptions (See Also on page 5-22), and Response Templates categories (Specifying a Response Templates Folder on page 5-23).
4. Save the session resource by choosing the File > Save menu command. In the Save As window that appears specify a device session name and navigate to the desired location underneath the Device Settings folder that is used for storing all session resources. Alternatively you can also save the session under another name using the File > Save As menu command.
The device session is saved as a reusable resource in the application database and can be re-used across multiple tests by clicking the Load from Storage...
button in the Session Consoles window.
Note: When saving a device session as a resource, it is saved in a folder under the Device Sessions folder comprising all device session resources. If you want to save a device session to a different location, either on the same machine or on another network machine, use the Export command from the Manage Resources window instead, as described in Manage Resources on page 15-9.
13-4 IxNetwork TestComposer User Guide, Release 7.00

Managing IxNetwork TestComposer Resources
Creating Procedure ResourcesProcedure resources are TestComposer scripts that were exported to the application’s resource database for re-use in the same script or across multiple scripts.
A procedure resource from the resources database can be inserted into a
TestComposer script using an Import Procedure operation, or it can be invoked from a test script using a RunProcedure step.
To create a procedure resource:1. While in Edit mode, create a step sequence as you would normally create any
script, adding any number of steps. The step sequence can contain calls to inline procedure blocks.
2. Click the Export Procedure button.
3. From the window that appears (Figure 13-2), select the entity – the upper level procedure of the current tab or any of the procedures defined inline within the tab – that you wish to save as a procedure resource.
Figure 13-2. Procedure Selection Window
Multiple procedures can be saved at once using the common Windows Shift + Click selection paradigm. Click Ok.
Note: Alternatively, if the procedure resource was exported from the resources database to an external file, the procedure can also be inserted into a
TestComposer script using the Import Procedure > Import Procedure from disk command.
IxNetwork TestComposer User Guide, Release 7.00 13-5

Managing IxNetwork TestComposer Resources13
4. In the Resource Manager window that appears, navigate to a folder under the
Procedures category and click the Save button.
See Also
What Is an IxNetwork TestComposer Resource?
Creating Device Sessions
Creating Response Templates
Creating CSV Template Resources
Handling MIB Resources
The Resource Manager
Note: Since the Export Procedure command works on the script from the currently active tab, make sure to select the appriate tab whose contained procedure you wish to save.
Hint: Procedure resources can also be created using the Save As command, which saves the entire content of a TestComposer tab. To save en entire tab as
a procedure resource, right-click the tab header , then choose the Save as command from the popup menu that appears.
Note: When saving a script as a procedure resource, it is saved in a folder under the Resources folder comprising all procedure resources. If you want to save a procedure to a different location, either on the same machine or on another network machine, use the Export command from the Manage Resources window instead, as described in Manage Resources on page 15-9.
13-6 IxNetwork TestComposer User Guide, Release 7.00

Managing IxNetwork TestComposer Resources
Creating Response TemplatesCommand steps, such as the Execute command, can have one or more associated response templates that are used to parse and evaluate the step’s output.
Response Templates, defined on a device’s expected response following configuration commands, specify well-known tokens/regions (named ‘targets’ when creating the template) in the command’s output. Based on these specifications, the command’s output is parsed and the parameters corresponding to these areas are retrieved into script variables, such as, for example, for evaluating if a command executed successfully or not.
Once a Response Templates was created, it can be saved for later use and is stored as a resource in the Reusable Resources database.
To create a Response Template in TestComposer:
1. While in the Edit mode, select the command step for which a Response Template needs to be defined.
For steps that were created using the GUI scripting support, since the command output is non-existent at step creation time, you have to play the
step first by clicking the button.
For steps that were added using the Capture functionality, the command output was already captured when adding the step.
2. Select the Command Response pane which displays the command output.
3. Click the Edit button to access the Response Template Editor on the command output.
Define the Response Template as described in The Response Template Editor on page 13-8, About Regions, Targets, and Markers on page 13-10, Free-Form Response Templates on page 13-13, and Table-Form Response Templates on page 13-23.
Note: More than one response template can be associated with a command step, in which case target values from all associated Response Templates are available by referencing the composite step return variable. Assuming, for example, that a step has two associated templates, say RT01 and RT02, which expose the Target_1 and Target_2 targets respectively, then both Target_1 and Target_2 are retrieved at step execution time. Assuming also that var1 is the assigned step return variable, you will be able to reference both targets using the var1.Target_1 and var1.Target_2 expressions respectively.
Note: Since Response Templates can be saved into the application’s resource database, associating a response template with a step is done either by assigning an existing Response Template or by creating a new one using the Response Template editor, as described in this section.
IxNetwork TestComposer User Guide, Release 7.00 13-7

Managing IxNetwork TestComposer Resources13
4. For Response Templates that have been saved as resources, you can perform an additional operation that associates a command with the template, as described in Defining a Response Template - Command Association on page 13-28.
5. You can replace the current Response template with the Execution Response. Select a step that has a response template assigned. To replace the current
Response template with the Command Response, Click . A confirmation message box appears before the deletion of the created targets. Click OK to continue with the replacement. Click Cancel to retain the targets and cancel the replacement.
See Also
What Is an IxNetwork TestComposer Resource?
Creating Device Sessions
Creating Procedure Resources
Creating CSV Template Resources
Handling MIB Resources
The Resource Manager
Related Subtopics
The Response Template Editor
About Regions, Targets, and Markers
Free-Form Response Templates
RepeatingBlock Response Templates
Table-Form Response Templates
Defining a Response Template - Command Association
The Response Template Editor
Response Templates are created and edited using the Response Template Editor (Figure 13-3) on a device’s expected response following configuration commands.
Note: Alternatively to starting from the captured command output, you can also create a new Response Template from scratch by choosing the CTRL + N, CTRL + R command. When taking this approach, you can paste into the editor text that represents a functional command output from another source and start defining regions and targets based on that text.
13-8 IxNetwork TestComposer User Guide, Release 7.00

Managing IxNetwork TestComposer Resources
Figure 13-3. Response Template Configuration
The left hand pane displays the captured command output, while the right-hand pane display the regions of interest —tables, markers, or targets — that were selected in the command output.
For a region or target selected in the Targets pane, the Properties pane below displays the item’s properties. For a selected target, the corresponding output text is highlighted in the Command Response view.
Defining a response template mainly involves specifying, or ‘marking,’ the tokens to collect in the command’s output. Depending on the command’s output format, response templates can be created for free-form or table-form command outputs.
See Also
About Regions, Targets, and Markers
Free-Form Response Templates
RepeatingBlock Response Templates
Table-Form Response Templates
Defining a Response Template - Command Association
Command Response view
Regions and Targets pane
Target Properties pane
IxNetwork TestComposer User Guide, Release 7.00 13-9

Managing IxNetwork TestComposer Resources13
The Resource Manager
About Regions, Targets, and Markers
Each token (statistic) that you want to retrieve from a command output has to be marked as a target. Targets are not standalone entities, but live in the comprising free from or table output region.
• Free-form region: When working inside a free-format region, the data is assumed to consist of lines and words, separated by white space. Upon selecting a word as a target, the target is marked in the original response based on the word number and the line number.
However, there are cases when the device response may contain a variable number of lines, as shown below:
<table header>
<table data with variable number of rows>
Expression = 23
Supposing that you want to retrieve the number that is generated after the ‘=’ string, you cannot use targets the common way, because targets use fixed line/word counting. Instead, the Response Template Editor provides a way to mark a variable position within the response that the target can use as a reference point. At runtime, these reference points called markers are looked for in the command response and help reference the target.
For the purpose of our example, defining the Expression string as a marker would allow the parser to determine which output line you are interested in.
• RepeatingBlock region: For this region type, the command output data is assumed to contain a portion that repeats several times.
When marking a target in a defined RepeatingBlock region, all occurrences of the repeating portion are analyzed and a vector of values is retrieved, with one value for every occurrence. The result of such an evaluation can then be used within other variables and Tcl commands.
Note: The following general rules apply to markers:• There can be only one marker per response template. Multiple targets can
be defined, not necessarily on the same line as the marker.• Since some devices may give spurious output at any time, the best practice
is to place the marker and target on the same line, as close as possible to each other.
• The target's word count in the response output can not change; instead, only the line number in the response can.
• Targets can appear before or after the line with the marker; the only restric-tion is that the number of lines between the marker and all the targets cannot vary in the real response.
Note: For information on defining targets within free format regions refer to Free-Form Response Templates on page 13-13.
13-10 IxNetwork TestComposer User Guide, Release 7.00

Managing IxNetwork TestComposer Resources
A sample RepeatingBlock region (highlighted red) with a target defined within it is shown in Figure 13-4:
Figure 13-4. Repeating Block Region with Timestamp Target
• Table-format region: When working inside a table region, the data is assumed to be organized as rows and columns. A table starts at the first line in the marked area and ends at an empty line or the end of the response.
Normally, you must select a table region that includes one or more header lines and the first line(s) as a header.
The following types of table blocks exist:
• Regular table: A regular table is one that has columns and rows, with the data occurring right after the header line(s). For such tables that comprise multiple header lines, a mechanism is provided enabling you to specify the offset from the header of the first row that actually contains data.
• Line table: A line table is similar to the form below, comprising a literal line separator between the header and the data. For this type of table, data exists only on one line.
<header column1> <header column2> <etc.>
---------------- ---------------- ------
<value for col1> <value for col2> <etc.>
For such tables, you do not have to define the header, since it is already in a well-defined format, nor do you have to specify the row index because there is only one data value.
Repeating portion with highlighted target defined within it
Note: For information on defining targets within free RepeatingBlock regions refer to RepeatingBlock Response Templates on page 13-19.
IxNetwork TestComposer User Guide, Release 7.00 13-11

Managing IxNetwork TestComposer Resources13
Table targets can be referenced in either of the following ways:
• Row-indexed tables: When referencing a row-indexed table, you must specify the row index for a particular column.
• Column-indexed targets: When referencing a column-index table, the value of a specific column is retrieved by specifying the value (reference value) in another column (reference column). The row index corresponding to the reference column entry that has a matching value is used to access a value in the specific column.
For example, given the table in Figure 13-5, and considering that we are searching for the value of the actual column corresponding to a reference value of 50 in the reference column, then the resulting value is 78.
Figure 13-5. Sample Column-Indexed Table
See Also
The Response Template Editor
Free-Form Response Templates
RepeatingBlock Response Templates
Table-Form Response Templates
Defining a Response Template - Command Association
The Resource Manager
Note: Line table type outputs can be found, for example, in Cisco routers’ command responses.
Note: Column-indexed table targets are created anywhere in the column where the data should be.
Note: For information on defining targets within free RepeatingBlock regions refer to Table-Form Response Templates on page 13-23.
13-12 IxNetwork TestComposer User Guide, Release 7.00

Managing IxNetwork TestComposer Resources
Free-Form Response Templates
The command output of free-form templates consists of lines and words.
A free-format region can contain simple targets, Regex targets, or a combination of these.
To edit a free-form response template:
1. Click into the Response Template column, then click the Edit Response button next to the template that you want to edit.
The Response Template Editor appears as shown in Figure 13-6, with the command’s output displayed in the Command Response pane at the left.
Figure 13-6. Response Template Editor Window
2. Select a marker area and click the Create marker button.
A Marker item is added to the Regions and Targets pane. In the Properties pane below, which displays the item’s properties, edit the name and the optional description as desired.
3. For adding a simple target, select a token in the command output and click the Create target button.
A Free-format and a Target item are added to the Regions pane.
Note: Before reading on, please refer to the previous About Regions, Targets, and Markers section for general information on output blocks and targets.
Note: When specifying targets in free-form outputs, you might need to use markers to support target resolution. Markers represent a mode of identifying a well-defined piece of response text, as described in About Regions, Targets, and Markers on page 13-10.
IxNetwork TestComposer User Guide, Release 7.00 13-13

Managing IxNetwork TestComposer Resources13
In the Properties pane, edit the properties of the Target item as follows:
• Target name: A target name reflecting the target type that is automatically assigned upon creation.
• Target data type: The target data type, which can be String or Number.
• Target description: An optional target description.
• Type of target: For plain targets this parameter is set to the Text target value.
• Name of column to get value from: For free-format response templates, this information is N/A.
• Value selected: The actual value of the selected target.
• Export results: When this option is selected, the target value becomes available as a statistic via the step return variable.
4. To add a target that matches a user-defined regular expression, click the Regex target button.
The entire command output appears selected and a Free-format and a RegexSearch item are added to the Regions pane.
In the Properties pane, specify the properties of the Regex target in place as follows:
Note: For simple targets within free-format regions, the Regular expression template, Regular expression, Value of C1, and Repeating search fields are not available.
Example: Let us consider the response of a ping command as illustrated by the image below:
and assume we were interested in retrieving the number of lost packets displayed in the command output.If we marked the 0 output portion as a simple target, for the given example the target value displayed in the Value selected field would then be 0.
13-14 IxNetwork TestComposer User Guide, Release 7.00

Managing IxNetwork TestComposer Resources
• Target name: A target name reflecting the target type that is automatically assigned upon creation.
• Target data type: The target data type, which can be String or Number.
• Target description: An optional target description.
• Type of target: This parameter is set to a Regex target value.
• Name of column to get value from: For free-format response templates, this information is N/A.
• Regular expression template: A regular expression specifying a pattern to match. The regular expression template comprises a regular expression part, which corresponds to the target value that is actually retrieved, and a user-specified sub-string defined in the Value of C1 field.
For example, a [0-9]* C1 template contains a variable length digits sequence followed by a space and the C1 sub-string.
IxNetwork TestComposer User Guide, Release 7.00 13-15

Managing IxNetwork TestComposer Resources13
• Regular expression: An editable regular expression corresponding to the selected regular expression template.
For example, for the sample [0-9]* C1 template considered above, the corresponding formula is (?<end>\d+)(?<md>[\s]+)(?<ft>C1).
The formula comprises three sections, <end>, <m(id)d(le)>, and <f(irs)t>, which correspond to the [0-9]*, the space, and the C1 parts respectively.
Note: The following regular expression templates are supported: • [0-9]* C1 : Denotes all strings consisting of any number of digits, followed by a user-defined
C1 string.• [0-9]* =C1 : Denotes all strings consisting of any number of digits, terminated by the ‘=’ char-
acter, and followed by a user-defined C1 string.• [0-9]* %C1 : Denotes all strings consisting of any number of digits, terminated by the ‘%’
character, and followed by a user-defined C1 string.• [0-9]* ,C1 : Denotes all strings consisting of any number of digits, terminated by the ‘,’ char-
acter, and followed by a user-defined C1 string.• [0-9]* :C1 : Denotes all strings consisting of any number of digits, terminated by the ‘:’ char-
acter, and followed by a user-defined C1 string.• [0-9a-zA-Z]* C1 : Denotes all strings consisting of any number of digits, lower-case or
upper-case characters, and followed by a user-defined C1 string.• [0-9a-zA-Z]* =C1 : Denotes all strings consisting of any number of digits, lower-case or
upper-case characters, terminated by the ‘=’ character, and followed by a user-defined C1 string.
• [0-9a-zA-Z]* %C1 : Denotes all strings consisting of any number of digits, lower-case or upper-case characters, terminated by the ‘%’ character, and followed by a user-defined C1 string.
• [0-9a-zA-Z]* , C1 : Denotes all strings consisting of any number of digits, lower-case or upper-case characters, terminated by the ‘,’ character, and followed by a user-defined C1 string.
• [0-9a-zA-Z]* :C1: Denotes all strings consisting of any number of digits, lower-case or upper-case characters, terminated by the ‘:’ character, and followed by a user-defined C1 string.
• C1 [0-9]* : Denotes all strings preceded by a user-defined C1 string, and followed by a string consisting of any number of digits.
• C1 =[0-9]* : Denotes all strings preceded by a user-defined C1 string and the ‘=’ character, and followed by a string consisting of any number of digits.
• C1 %[0-9]* : Denotes all strings preceded by a user-defined C1 string and the ‘%’ character, and followed by a string consisting of any number of digits.
• C1 , [0-9]* : Denotes all strings preceded by a user-defined C1 string and the ‘,’ character, and followed by a string consisting of any number of digits.
• C1 :[0-9]* : Denotes all strings preceded by a user-defined C1 string and the ‘:’ character, and followed by a string consisting of any number of digits.
• C1 [0-9a-zA-Z]* : Denotes all strings preceded by a user-defined C1 string, and followed by a string consisting of any number of digits, lower-case or upper-case characters.
• C1 =[0-9a-zA-Z]* : Denotes all strings preceded by a user-defined C1 string and the ‘=’ char-acter, and followed by a string consisting of any number of digits, lower-case or upper-case characters.
• C1 %[0-9a-zA-Z]* : Denotes all strings preceded by a user-defined C1 string and the ‘%’ character, and followed by a string consisting of any number of digits, lower-case or upper-case characters.
• C1 ,[0-9a-zA-Z]* : Denotes all strings preceded by a user-defined C1 string and the ‘,’ char-acter, and followed by a string consisting of any number of digits, lower-case or upper-case characters.
• C1 :[0-9a-zA-Z]* : Denotes all strings preceded by a user-defined C1 string and the ‘:’ char-acter, and consisting of any number of digits, lower-case or upper-case characters.
13-16 IxNetwork TestComposer User Guide, Release 7.00

Managing IxNetwork TestComposer Resources
• Value of C1: A user-defined sub-string that is part of the previously defined regular expression template.
• Value selected: The actual value of the selected target, which corresponds to the <end> portion of the regular expression.
• Repeating search: When this option is selected, the defined Regex target is searched repeatedly in the defined free-format region. If more than one occurrence is found, the Value selected field displays a list of values.
• Export results: When this option is selected, the target value becomes available as a statistic via the step return variable.
5. To add more than one target, repeat step 3 and/or 4.
Alternatively, selecting a region or a target entry in the Regions pane and
clicking the button removes it from the pane.
Note: The regular expression language specification is documented at the Microsoft website located at the following location: http://msdn.microsoft.com/en-us/library/az24scfc.aspx.
Examples: Example 1: Given the response of a ping command illustrated by the image below, let us assume we were interested in retrieving the number of lost packets displayed in the command output.
If we defined a Regex target, specified a C1 = [0-9]* regular expression template and chose a ‘Lost’ value for the C1 string, for the given example the target value displayed in the Value selected field would then be 0.Example 2: Also considering the previous command output, let us assume we were interested in obtaining the minimum, maximum, and average round trip values. If we define a Regex target, specified a C1 = [0-9]* regular expression template, chose a ‘Minimum | Maximum | Average’ value for the C1 string, and selected the Repeating Search option, for the given example the target values displayed in the Value selected field would then be 129 131 130.
IxNetwork TestComposer User Guide, Release 7.00 13-17

Managing IxNetwork TestComposer Resources13
6. Choose the File > Save or File > Save as command to save the Response Template into the resources database.
See Also
The Response Template Editor
RepeatingBlock Response Templates
Table-Form Response Templates
Defining a Response Template - Command Association
The Resource Manager
Note: While working with the Response Template Editor, when you choose an item in the Regions and Targets pane, the corresponding area in the command output in the Response Command pane is highlighted, as shown below:
Note: While working with the Response Template Editor, you can use the Edit > Paste command to replace the Command Response pane content with some pasted text.
Note: When saving a template from the Response Template Editor, it is saved in a folder under the Response Templates folder comprising all templates. If you want to save a Response Template to a different location, either on the same machine or on another network machine, use the Export command from the Manage Resources window instead, as described in Manage Resources on page 15-9.
Note: More sample Response Template creation procedures are given in Appendix B, Response Templates Creation Samples.
13-18 IxNetwork TestComposer User Guide, Release 7.00

Managing IxNetwork TestComposer Resources
Detecting matches in Response Templates
You can detect free-form and table targets from the command prompt automatically. The words that contain at least a Digit are possible free-form target. These targets can also contain a Digit, Colon, Point, Comma, Underscore, Backslash, Forwardslash and Caret.
A section of the text is a possible table target if it meets the following conditions:
• A table delimited by empty rows.
• The second row is aligned with the first row..
• The minimum number of rows in the table should be two (header and another row).
Auto-detected targets (both free forms and table) are purple in color. When you are moving the cursor over these targets a black box encloses them.You can create all kinds of targets from these matches with the context menu or with the help of a mini toolbar for tables.
RepeatingBlock Response Templates
A RepeatingBlock region contains a text portion that repeats several times within the command output. The repeating portion is similar to the free-form region in that it consists of lines and words.
A RepeatingBlock region can contain simple targets, Regex targets, or a combination of these.
To edit a RepeatingBlock-based response template:
1. Click into the Response Template column, then click the Edit Response button next to the template that you want to edit.
The Response Template Editor appears as shown in Figure 13-6, with the command’s output displayed in the Command Response pane at the left.
2. Select the repeating portion of the command output and click the Mark repeating block button.
If the selection’s end string is found to appear multiple times within the selection, a window appears enabling you to specify the RepeatingBlock region using the following options:
• Accept updated block: Defines a RepeatingBlock region extending to the first occurrence of the end string.
• Update end expression to match the original selection: Defines a RepeatingBlock region based on the initial selection.
Note: The second row should have at least the same number of words as the first row and each word from the first row should be aligned (start on the same position)with one word from the second row.
Note: Before reading on, please refer to the previous About Regions, Targets, and Markers section for general information on output blocks and targets.
IxNetwork TestComposer User Guide, Release 7.00 13-19
Managing IxNetwork TestComposer Resources13
• Manually modify end expression: Defines a RepeatingBlock region extending to the string specified in the adjacent field.
Using this option could prove useful, for example, when selecting a RepeatingBlock region that has different end string for each of its occurrences. In such a case, you would then have to specify the \n end string, in order to select the entire line up to the end.
A RepeatingBlock item is added to the Regions pane, with the Block region start and Block region end parameters containing regular expressions that reflect the regions boundaries.
3. For adding a simple target, select a target within the defined repeating portion and click the Create target button, which adds a Target item to the Regions pane.
In the Properties pane, edit the properties of the Target item as follows:
• Target name: A target name reflecting the target type that is automatically assigned upon creation.
• Target data type: The target data type, which can be String or Number.
• Target description: An optional target description.
• Type of target: For plain targets this parameter is set to the Text target value.
• Name of column to get value from: For simple targets in RepeatingBlock-format templates, this information is N/A.
• Execution Value : The actual value of the selected target.
• Response template value: The value for the selected target from the original text.
• Export results: When this option is selected, the target value becomes available as a statistic via the step return variable.
Note: Response template can recognize some patterns when you create targets and it names the created target according to the pattern. Example: If you select an ipv4 address say (10.1.12.13) and create a target, the application will name it IPv4_1 automatically. This field also allows you to rename the created target.
Note: For simple targets within RepeatingBlock regions, the Regular expression template, Regular expression, Value of C1, and Repeating search fields are not available.
13-20 IxNetwork TestComposer User Guide, Release 7.00

Managing IxNetwork TestComposer Resources
4. For adding a target that matches a user-defined regular expression, click the Create Regex target button, which adds a RegexSearch item to the Regions pane.
In the Properties pane, specify in-place the properties of the Regex target as follows:
• Target name: A target name reflecting the target type that is automatically assigned upon creation.
• Target data type: The target data type, which can be String or Number.
• Target description: An optional target description.
• Type of target: This parameter is set to a Regex target value.
• Name of column to get value from: For RepeatingBlock-based response templates, this information is N/A.
• Regular expression template: A regular expression specifying a pattern to match. The regular expression template comprises a regular expression part, which corresponds to the target value that is actually retrieved, and a user-specified sub-string defined in the Value of C1 field.
For example, a [0-9]* C1 template contains a variable length digits sequence followed by a space and the C1 sub-string.
Example: Considering the response of a ping command as illustrated by the image below:
and assuming we were interested in retrieving the percentage of lost packets displayed in the command output.If we marked an entire line as a repeating block, and the response time within a line as a simple target, for the given example the target value displayed in the Value selected field would then be {129 130 130 131}.
IxNetwork TestComposer User Guide, Release 7.00 13-21

Managing IxNetwork TestComposer Resources13
• Regular expression: An editable regular expression corresponding to the selected regular expression template.
For example, for the sample [0-9]* C1 template considered above, the corresponding formula is (?<end>\d+)(?<md>[\s]+)(?<ft>C1).
The formula comprises three sections, <end>, <m(id)d(le)>, and <f(irs)t>, which correspond to the [0-9]*, the space, and the C1 parts respectively.
Note: The following regular expression templates are supported: • [0-9]* C1 : Denotes all strings consisting of any number of digits, followed by a user-defined
C1 string.• [0-9]* =C1 : Denotes all strings consisting of any number of digits, terminated by the ‘=’ char-
acter, and followed by a user-defined C1 string.• [0-9]* %C1 : Denotes all strings consisting of any number of digits, terminated by the ‘%’
character, and followed by a user-defined C1 string.• [0-9]* ,C1 : Denotes all strings consisting of any number of digits, terminated by the ‘,’ char-
acter, and followed by a user-defined C1 string.• [0-9]* :C1 : Denotes all strings consisting of any number of digits, terminated by the ‘:’ char-
acter, and followed by a user-defined C1 string.• [0-9a-zA-Z]* C1 : Denotes all strings consisting of any number of digits, lower-case or
upper-case characters, and followed by a user-defined C1 string.• [0-9a-zA-Z]* =C1 : Denotes all strings consisting of any number of digits, lower-case or
upper-case characters, terminated by the ‘=’ character, and followed by a user-defined C1 string.
• [0-9a-zA-Z]* %C1 : Denotes all strings consisting of any number of digits, lower-case or upper-case characters, terminated by the ‘%’ character, and followed by a user-defined C1 string.
• [0-9a-zA-Z]* , C1 : Denotes all strings consisting of any number of digits, lower-case or upper-case characters, terminated by the ‘,’ character, and followed by a user-defined C1 string.
• [0-9a-zA-Z]* :C1: Denotes all strings consisting of any number of digits, lower-case or upper-case characters, terminated by the ‘:’ character, and followed by a user-defined C1 string.
• C1 [0-9]* : Denotes all strings preceded by a user-defined C1 string, and followed by a string consisting of any number of digits.
• C1 =[0-9]* : Denotes all strings preceded by a user-defined C1 string and the ‘=’ character, and followed by a string consisting of any number of digits.
• C1 %[0-9]* : Denotes all strings preceded by a user-defined C1 string and the ‘%’ character, and followed by a string consisting of any number of digits.
• C1 , [0-9]* : Denotes all strings preceded by a user-defined C1 string and the ‘,’ character, and followed by a string consisting of any number of digits.
• C1 :[0-9]* : Denotes all strings preceded by a user-defined C1 string and the ‘:’ character, and followed by a string consisting of any number of digits.
• C1 [0-9a-zA-Z]* : Denotes all strings preceded by a user-defined C1 string, and followed by a string consisting of any number of digits, lower-case or upper-case characters.
• C1 =[0-9a-zA-Z]* : Denotes all strings preceded by a user-defined C1 string and the ‘=’ char-acter, and followed by a string consisting of any number of digits, lower-case or upper-case characters.
• C1 %[0-9a-zA-Z]* : Denotes all strings preceded by a user-defined C1 string and the ‘%’ character, and followed by a string consisting of any number of digits, lower-case or upper-case characters.
• C1 ,[0-9a-zA-Z]* : Denotes all strings preceded by a user-defined C1 string and the ‘,’ char-acter, and followed by a string consisting of any number of digits, lower-case or upper-case characters.
• C1 :[0-9a-zA-Z]* : Denotes all strings preceded by a user-defined C1 string and the ‘:’ char-acter, and consisting of any number of digits, lower-case or upper-case characters.
Note: The regular expression language specification is documented at the Microsoft website located at the following location: http://msdn.microsoft.com/en-us/library/az24scfc.aspx.
13-22 IxNetwork TestComposer User Guide, Release 7.00

Managing IxNetwork TestComposer Resources
• Value of C1: A user-defined sub-string that is part of the previously defined regular expression template.
• Value selected: The actual value of the selected target, which corresponds to the <end> portion of the regular expression. Since the target value is collected from all repeating blocks, this yields a ‘:’-separated list of values.
• Repeating search: When this option is selected, the defined Regex target is searched repeatedly in the defined RepeatingBlock-format region. If more than one occurrence is found, the Value selected field displays a list of values for each region.
• Export results: When this option is selected, the target value becomes available as a statistic via the step return variable.
5. To add more than one target, repeat step 3 and/or 4.
Alternatively, selecting a region or a target entry in the Regions pane and
clicking the button removes it from the pane.
6. Choose the File > Save or File > Save as command to save the Response Template into the resources database.
Table-Form Response Templates
Table-form Response Templates are based on device output formatted as a table that comprises rows and columns and containing one or more header rows.
To edit a table-form Response Template:
1. Click into the Response Template column, then click the Edit Response button next to the template that you want to edit.
The Response Template Editor appears the same as shown in Figure 13-6 on page 13-13, with the command’s output displayed in the Command Response pane at the left.
2. Select an area and click the Mark table area button.
A TableArea item is added to the Regions pane. In the Properties pane, which displays the item’s properties, edit the name and optional description as desired.
If the marked table is contained repeatedly in the output command, and provided you want to retrieve the target values corresponding to the multiple occurrences, select the Repeating search option for the table region.
Note: More sample Response Template creation procedures are given in Appendix B, Response Templates Creation Samples.
Note: Before reading on, please refer to the previous About Regions, Targets, and Markers section for general information on output blocks and targets.
Important: A table-form template enables you to retrieve the values of individual targets, multiple occurrences of individual targets, and the values of entire table columns.
IxNetwork TestComposer User Guide, Release 7.00 13-23

Managing IxNetwork TestComposer Resources13
3. Select a header, possibly containing multiple lines, and click the Mark header button.
A Header item is added to the Regions pane. In the Properties pane, which displays the item’s properties, edit the name and the optional description as desired. If there are additional lines that separate the table header from the actual data area, configure the Non-data lines following header parameter to the number of separating lines.
4. Select a column’s header within the header line and click the Mark full column header button.
A Column item is added to the Regions pane. In the Properties pane, which displays the item’s properties, edit the column name and the optional description as desired. Set the column’s data type to either Number or String.
The Values field displays a list of all the column values.
If you wish to retrieve the column values list, select the Export results option and choose the Save or Save as commands from the File menu to save the Response Template into the plugin’s resources database.
Skip the remaining steps of this procedure.
5. For defining a simple target, select a target in the previously defined column and click the Create target in table button.
In the Properties pane, edit as follows the properties of the Target item that is added to the Regions pane:
• Target name: An automatically assigned target name
• Target data type: The target data type, which can be String or Number
• Target description: An optional target description
• Type of target: Table target
• Name of column to get value from: The name of the column containing the target
Note: When using the Mark Full column header, take care to mark an area that occupies the maximum anticipated number of characters for the column, or which spans the entire width of the data column. Failing to do so may result in retrieving incorrect results from the command output.For example, considering that you have the following command output:
for the PID column, the values of the first column can be is fully collected only if you also select the spaces in front of the ‘PID’ text as being part of the column, as shown in the sample image above.
13-24 IxNetwork TestComposer User Guide, Release 7.00

Managing IxNetwork TestComposer Resources
• Type of table reference: The reference type, which can be any of the following:
• Search by row index: To retrieve the table value, specify the explicit row number of a particular column.
• Search by value of other column: To retrieve the table value, specify the value of a reference column. The retrieved value then corresponds to the row entry having a specified reference in the reference column.
• Column row index: The table row index of the target
• Name of column to reference: The reference column that must be specified when you choose the Search by value of other column option.
• Comparison operator: When you have chosen to define a target that re-ferences the value of another column, this operator determines the comparison operation performed on the reference column.
For example, in the case of the default value, the ‘=’ operator, the value searched for in the reference column is a value that matches the Value of the reference column.
• Value of the reference column: The reference value that must be specified when you choose the Search by value of other column option. If you have previously chosen the Search by row index option, this value is set to N/A.
• Value selected: The actual value of the selected target.
• Export results: When this option is selected, the target becomes available as a statistic via the step return variable.
6. To add multiple targets, repeat step 5 for each target that you want to add.
Alternatively, selecting a region or a target entry in the Regions pane and
clicking the button removes it from the pane.
7. Choose the Save or Save as commands from the File menu to save the Response Template into the TestComposer resources database.
Note: For targets within table-format regions, the Regular expression template, Regular expression, Value of C1, and Repeating search fields are not available.
Note: If at step 3 above the Repeating search option was selected, the selected value is a list of values corresponding to the multiple occurrences of the marked table.
IxNetwork TestComposer User Guide, Release 7.00 13-25

Managing IxNetwork TestComposer Resources13
Example 1: Considering the command output shown by the image below, containing three occurrences, and assuming we were interested in retrieving the IP addresses from the Link ID column, we would mark the first table occurrence as a table region with the Repeating search parameter selected, the upper table row as a header, the Link ID column as a full column header, and the IP address as a simple target.
For the given example, the target value displayed in the Value selected field would then be {172.21.254.1 173.22.254.1 101.0.0.1}.
Example 2: Considering the command output shown by the image below and assuming we were interested in retrieving the IP addresses from the Gateway IP column, we would mark the table area as delimited by the red rectangle, the header containing the upper 2 table rows as delimited by the green rectangle, and the ‘Gateway’ word as a full column header.
For the given example, the target value displayed in the Value selected field would then be a list of IP address values, each entry separated by ‘{‘ and ‘}’ characters. Note that for this example, since there are no additional lines between the table header and the actual data area, you can leave the Non-data lines following header parameter to its default ‘0’ value.
13-26 IxNetwork TestComposer User Guide, Release 7.00

Managing IxNetwork TestComposer Resources
Mini Toolbar It allows you to quickly create targets without accessing context menu or left panel buttons. All the actions listed in the context menu can be performed from the Mini toolbar. Mini toolbar appears during following actions:
• If a section of a text is selected
• If no text is selected and a table auto-detected target is highlighted
• If no text is selected and a free form auto-detected target is highlighted
The Mini toolbar disappears when the text is not selected any more, or when no auto-detected targets are highlighted.
Note: While working with the Response Template editor, when you choose an item in the Regions pane, the corresponding area in the command output is highlighted, as shown below:
Note: While working with the Response Template editor, you can use the Edit > Paste command to replace the Command Response pane content with some pasted text.
Note: A LineTable region is a simplified table, containing a header row, a delimiter row, and a single or multiple data row(s). When defining such a region, the entire table needs selected and the retrieved value is the first entry below the delimiter line on a specified column. Similar to the regular tables, a LineTable region can be marked as repeating by selecting its Repeating search option.For example, considering the sample output below, if we marked the entire text area as a LineTable and the Line ID string as a target (using the Create target in Table button), the retrieved value would be the IP address below the delimiter.
Note: More sample free-form and table format Response Template creation procedures are given in Appendix B, Response Templates Creation Samples.
IxNetwork TestComposer User Guide, Release 7.00 13-27

Managing IxNetwork TestComposer Resources13
See Also
The Response Template Editor
About Regions, Targets, and Markers
Free-Form Response Templates
Defining a Response Template - Command Association
The Resource Manager
Defining a Response Template - Command Association
After having saved a Response Template as a resource, you can define a Response Template - command association, which provides a means for making the template available for all script steps based on commands that match a regular expression (RegEx) defined in the template.
To define a Response Template - command association:
1. In the Resource Manager, open the Response Template for editing.
2. In the Response Template Editor, an additional Command Expressions pane is displayed (Figure 13-7).
Figure 13-7. RT Editor GUI with Additional Command Expressions Pane
Important: At device session creation time you can specify a folder containing Response Templates that apply to that session. When you then add commands for the session, the commands are checked against the Response Templates from that folder, and, if a command matches the RegEx specified in one of the Response Templates, that template automatically becomes available for the command.
Regular expression specifying all commands the Response Template is associated with
13-28 IxNetwork TestComposer User Guide, Release 7.00

Managing IxNetwork TestComposer Resources
3. Click the button and specify a fixed or a regular expression in the new entry.
IxNetwork TestComposer User Guide, Release 7.00 13-29

Managing IxNetwork TestComposer Resources13
Creating CSV Template ResourcesA CSV Template, which is a resource type associated with CSVAnalyzer session types, basically defines the schema of a CSV file such that at script execution time the CSVAnalyzer session commands can read a CSV file and extract from it the statistics of interest.
A CSV Template may contain multiple tabular sections, each containing a row for the column header and defining the columns which are to be include during the processing of the CSV file. The sample CSV file shown in Figure 13-8 for example contains three tabular sections, each comprising a different number of rows:
Figure 13-8. Sample CSV-Format File
For CSV Templates that contain multiple tabular sections, a statistics group containing multiple statistics each can be defined for each section.
To create a CSV Template resource:
1. In the TestComposer application, open the Custom Template editor by clicking the New CSV Template button in the Test ribbon.
2. In the CSV Template Editor, select a CSV file. After selecting the CSV source file, the Custom Template editor is populated with the data contained in the CSV file, as shown in Figure 13-9:
13-30 IxNetwork TestComposer User Guide, Release 7.00

Managing IxNetwork TestComposer Resources
Figure 13-9. CSV Templates Editor
3. Select a tabular section content and click the Mark as table button. For each marked tabular section, an empty statistic group is created in the bottom Targets pane.
4. Select the section’s header row and click the Mark as table header button.
5. Within the current section select a specific column (at any position in that column) and click the Mark as target button.
The statistic corresponding to that column becomes highlighted magenta in the file content pane and is added to the Targets pane, while its properties are displayed in the Properties pane. Edit the target properties in place as follows:
• Name: The name displayed for the statistic
• Description: The optional statistic description.
• Type: The statistic type, which can be only Statistic.
• Data Type: The statistic data type, which can be String or Number. Please note that the accurate specification of the statistic type is essential to the correct retrieval of the statistic value(s).
6. To add more than one statistic to the Targets pane, repeat step 5 for each statistic to be exposed by the section.
An added statistic can be removed by selecting its Table pane entry and pressing the Del keyboard key.
7. In the case of CSV Templates that contain multiple tabular sections, for each section you can define a statistics group by performing repeatedly steps 3 to 6.
8. By default, the Custom Template is named after the CSV file it is based on.
If desired, type in a new template name (Name field) and a description (Description field), and save the template by clicking OK.
Targets pane comprising groups of marked targets
CSV file content pane
Target Properties pane
IxNetwork TestComposer User Guide, Release 7.00 13-31

Managing IxNetwork TestComposer Resources13
The newly created custom template is saved into the Resource Manager and can be re-used across different steps and tests by CSVAnalyzer session commands.
Example: The sample CSV Template shown in the figure below defines two statistic groups, the first exposing two statistics, S2 and S4, while the second group exposes a single statistic, Elapsed Time. Note that the statistic values are shown highlighted magenta.
13-32 IxNetwork TestComposer User Guide, Release 7.00

Managing IxNetwork TestComposer Resources
Handling MIB ResourcesManagement Information Base (MIB) entities describe data objects managed by a SNMP agent within a network device. MIBs are simple text files, and values of MIB data objects are either configured on or retrieved from the SNMP-aware devices.
TestComposer MIBs represent read-only resources that are stored in the plugin’s resources database. In addition to the MIBs that are contained in the database, other MIBs can be imported in order to be used by SNMP commands.
To import a MIB:
1. While in the Resource Manager window, select the mibs folder and click the
Import Resource button.
2. In the Browse window that appears, navigate to the desired location and select a MIB file (.mibs).
The MIB is added to the resources database in the MIBs resources category.
See Also
What Is an IxNetwork TestComposer Resource?
Creating Device Sessions
Creating Response Templates
Creating CSV Template Resources
Note: A centrally stored MIB is loaded onto the TestComposer host after successful execution of a StartSession step initiating a SNMP session.
IxNetwork TestComposer User Guide, Release 7.00 13-33

Managing IxNetwork TestComposer Resources13
Handling Quicktest template resourcesAny Quicktest template that is open in the GUI – the parameters assigned to it can be edited in the Testcomposer. This resource can be edited, deleted, exported and imported only in Test composer. It adds Ixnetwork functionality in it and creates a standalone runnable Quick test with results.
See Also
What Is an IxNetwork TestComposer Resource?
Creating Device Sessions
Creating Response Templates
Creating CSV Template Resources
13-34 IxNetwork TestComposer User Guide, Release 7.00
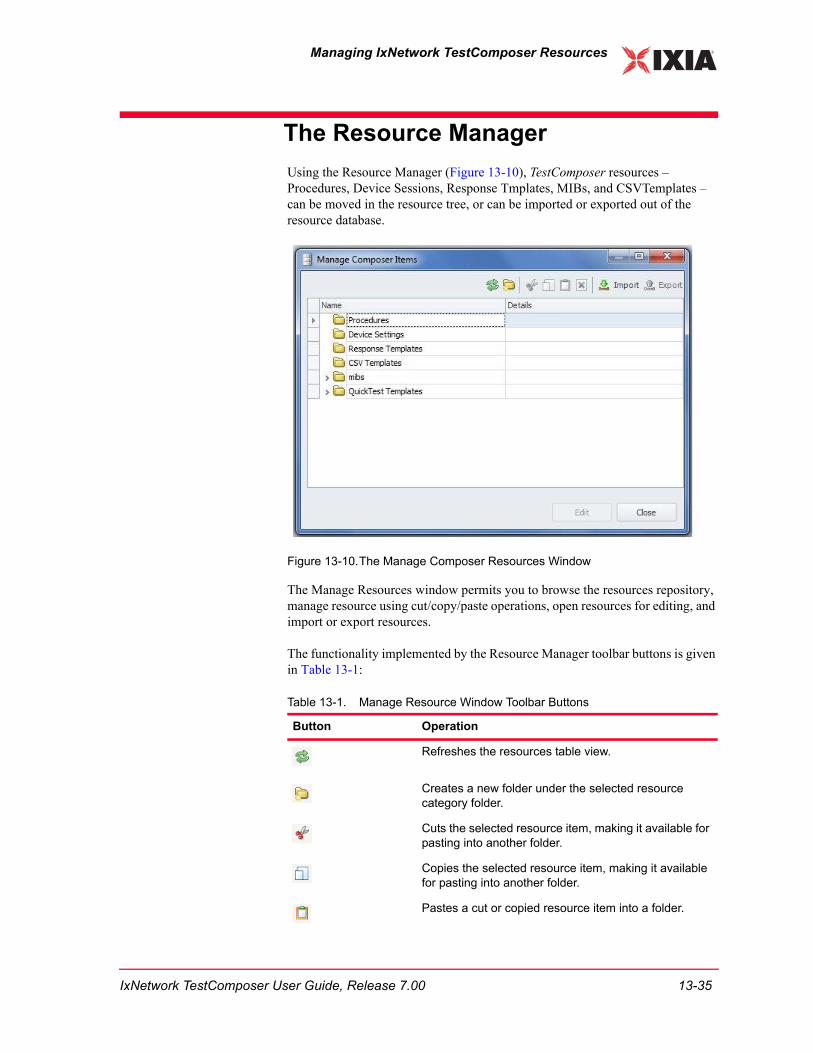
Managing IxNetwork TestComposer Resources
The Resource ManagerUsing the Resource Manager (Figure 13-10), TestComposer resources – Procedures, Device Sessions, Response Tmplates, MIBs, and CSVTemplates – can be moved in the resource tree, or can be imported or exported out of the resource database.
Figure 13-10.The Manage Composer Resources Window
The Manage Resources window permits you to browse the resources repository, manage resource using cut/copy/paste operations, open resources for editing, and import or export resources.
The functionality implemented by the Resource Manager toolbar buttons is given in Table 13-1:
Table 13-1. Manage Resource Window Toolbar Buttons
Button Operation
Refreshes the resources table view.
Creates a new folder under the selected resource category folder.
Cuts the selected resource item, making it available for pasting into another folder.
Copies the selected resource item, making it available for pasting into another folder.
Pastes a cut or copied resource item into a folder.
IxNetwork TestComposer User Guide, Release 7.00 13-35

Managing IxNetwork TestComposer Resources13
Resource Manager Common Operations
To quickly select a resource item:
1. Select the resource category folder in the resources tree.
2. As you start typing the resource item name, the resource becomes selected in the table.
3. Click the Edit button. If the resource is editable – this holds true for all resources except MIBs – the selected resource is opened in its associated editor.
In the case of procedure resources, the procedure is opened in a new tab of the TestComposer GUI.
To export a resource:
1. Select the resource in the tree.
2. Click the Export button.
Deletes the currently selected resource item(s).
, Imports or exports resource item into/from the application’s resource database.
Opens the selected resource for editing (if the resource is editable). For example, if the resource is a procedure resource, it is opened in a new TestComposer tab,
Important: As explained in Specifying a Response Templates Folder on page 5-23, device sessions are configured with associated Response Template folders that store templates applicable to that session. When you then add or edit commands for the session, the configured Response Template folder is searched and matching templates become available for the command.While working on a script that uses a device session resource, if you edit the templates in the session associated folder, or modify the Resource Manager file structure using cut/copy/paste operations, the Response Template resources associated with the session are not updated. Updates only occur when loading the session anew into the script.For example, if you edit or move Response Templates to another folder after a script was opened and while script editing is in progress, the script does not take into account that templates have been moved, but displays the same Response Template associations.
Note: When attempting to import a MIB file with the same name as an existing MIB but with a different extension, you are prompted for a confirmation to overwrite the stored MIB.
Table 13-1. Manage Resource Window Toolbar Buttons
Button Operation
13-36 IxNetwork TestComposer User Guide, Release 7.00

Managing IxNetwork TestComposer Resources
3. Browse to the desired location and click the Ok button.
Procedures, Response Templates, CSV Templates, Device Sessions, and MIBs are saved as .tcp, .cst, csvt, .dev, and .MIB files respectively.
To import a resource:
1. Select a resource category folder in the table. For example, if you wish to import a Response Template, select the corresponding folder.
2. Click the Import button.
3. In the Open window that appears, navigate to the folder that stores the resource(s) you want to import. All resource files of the selected category (.TCP, .CST, and .DEV files for procedures, sessions, and response templates respectively) are displayed.
4. Select a resource and click the Open button.
The resource is added to the Resource Manager.
See Also
What Is an IxNetwork TestComposer Resource?
Creating Device Sessions
Creating Response Templates
Creating CSV Template Resources
Handling MIB Resources
Hint: Using the export operation you can export at once several resources, even of different types.
IxNetwork TestComposer User Guide, Release 7.00 13-37

Managing IxNetwork TestComposer Resources13
13-38 IxNetwork TestComposer User Guide, Release 7.00

14Chapter 14: Capturing IxNetwork Actions with Macro Recorder
This chapter contains information on the use of Macro Recorder and contains the following sections:
• Macro Recorder Overview on page 14-1
• Capturing Actions to TestComposer Steps on page 14-3
Macro Recorder OverviewWhen performing IxNetwork configuration actions, such as adding or deleting configuration elements, the Macro Recorder functionality enables you to capture the performed GUI operations as TestComposer steps.
By recording these configuration operations, the creation of tests can be auto-mated, with the benefit that recorded scripts can subsequently be edited, enhanced with other commands, and parameterized.
During recording, the timing between operations can be adjusted using Sleep steps that are being inserted automatically when the Insert Sleep between recorded steps option is enabled. This can be of help when you wish to perform two subsequent actions that need to be spatiated in time, for example when start-ing a traffic and then waiting for it to be started, before modifying the traffic parameters on-the-fly.
Within the same macro recording session, you can both pause and then resume to recording, enabling you to prevent specifc operations from being recorded.
What Actions are Recorded?
The following configuration actions are recorded by Macro Recorder:
• Ports/chassis-related actions from the Ports view, such as port or chassis selection, adding and removing ports, changing of port properties. Also cap-tured are port actions, such as SimulateLinkUp, SimulateLinkDown, Connect, Release etc.
• Traffic-related actions that fall into the following categories:
IxNetwork TestComposer User Guide, Release 7.00 14-1

Capturing IxNetwork Actions with Macro Recorder14
• Global traffic actions, such as for example starting, stopping, or applying the traffic.
• Traffic Item–related actions (both Layer 2-Layer3 and Layer4-Layer7 operations), such as adding or deleting Traffic Items, changes performed on the Traffic Item configuration, editing Traffic Items, or specific actions on Traffic Items (for example start or stop transmitting, regenerating, duplicating, converting to raw, and so on).
• Flow Groups related changes, such as changes to Flow Group configura-tion, editing Flow Groups, actions on Flow Group (for example start or stop transmitting, on-the-fly changing of the rate or size, and so on).
• Quick Flow Groups related actions, such as adding or deleting Quick Flow groups, changing the Quick Flow group configuration, Quick Flow group grid changes, editing Quick Flow group, actions on Quick Flow groups (for example start or stop transmitting, on-the-fly changing of the rate or size, and so on).
• Protocol-related actions (while working in the Protocol Configuration pane), such as:
• Enabling or disabling protocols (adding or removing protocol), and actions on protocols (for example starting or stopping).
• Protocol configuration changes.
• Adding or deleting of ranges or interfaces.
Using Macro Recorder, the captured IxNetwork operations are translated into one of the following TestComposer steps:• Config Get
• Config Set
• Config Add
• Config Remove
• Config Action
Note: The following operations are not being recorded: • File selection actions• Actions performed on QuickTests, such as adding or deleting a QuickTest,
editing a QuickTest, or specific actions peformed on a QuickTest (for exam-ple starting or stopping a test).
• Actions performed in the Preferences configuration window• Actions related to the exporting of Tcl scripts using the ScriptGen functional-
ity• Actions related to the Licensing or Diagnostics modules• Actions related to the legacy EventScheduler module of IxNetwork, or
TestComposer GUI actions• Actions related to the Analyzer or Capture functionalities• GUI actions, such as validating configured traffic items, obtaining help infor-
mation using the Help menu, and so on.
14-2 IxNetwork TestComposer User Guide, Release 7.00

Capturing IxNetwork Actions with Macro RecorderCapturing Actions to TestComposer Steps
Capturing Actions to TestComposer StepsTo capture an IxNetwork actions sequence:
1. Start recording by clicking the Start Recording button from the
Automation ribbon.
The captured steps are added as an in-line procedure (enclosed in Procedure - EndProcedure steps) to the Main_Procedure TestComposer script, which is the main entry point for scripts. If TestComposer is not open at that time, the module is initialized and an empty Main_Procedure script is created.
If you initially selected the Insert Snapshot when start recording com-mand, an additional restore command (a TestComposer Execute-type com-mand that invokes a Restore Snapshot event) is inserted at the start. This step captures the state of the IxNetwork test configuration before recording is started, and permits you to restore that state when playing back the captured TestComposer script.
2. Perform some configuration actions in IxNetwork. These actions are recorded as TestComposer steps contained in a procedure. In order for the configura-tion steps to be more easility identified and undone (if necessary), multiple actions performed from the GUI, such as adding ports or traffics, are grouped within a Group step.
If you initially chose the Insert Sleep between recorded steps option, addi-tional Sleep steps are inserted to TestComposer between the action steps, each configured to a value that replicates your delay between actions performed in the GUI. When this option is not activated, any delay in performing your actions is not translated in any way into the recorded script.
3. If at some moment you want to perform some changes that should be omitted
from the captured sequence, pause recording by clicking the Pause but-ton. As you perform more configuration changes, these changes do not pro-duce TestComposer steps.
4. Resume recording by clicking the Resume Recording button. Con-tinue performing IxNetwork actions that are to be recorded.
At any time while performing configuration action using the IxNetwork GUI, you can take one or multiple snapshots of the IxNetwork test configuration
using the Take snapshot command from the Automation ribbon of IxNetwork.
Similar to the case when taking a snapshot using the Insert Snapshot when start recording command, the test configuration restore command is added
IxNetwork TestComposer User Guide, Release 7.00 14-3

Capturing IxNetwork Actions with Macro RecorderCapturing Actions to TestComposer Steps14
within the Main_Procedure script. The command is enclosed in a procedure body delimited by Procedure - EndProcedure statements.
The configuration snapshot file is also saved to the Files Catalog. See Using Attached Script Files on page 3-20.
5. Eventually stop recording by clicking the Stop button.
14-4 IxNetwork TestComposer User Guide, Release 7.00

15Chapter 15: TestComposer Menu Commands Reference
This chapter provides a description of the TestComposer GUI commands, comprising the following sections:
• Script Ribbon on page 15-1
• Test Ribbon on page 15-9
• Automation Ribbon on page 15-15
Script RibbonThe Script ribbon provides access to the following commands:
Play Groups commands for playing the script step(s) in one of the following modes:
Play all
Plays all script steps.
Play all with user delay
Plays the entire script taking into account any delay that may have been inserted when capturing the steps over an established test session.
Play selected only
Executes the currently selected step(s) selection in Edit mode.
This menu command is equivalent to pressing the Ctrl + R keyboard shortcut followed by another Ctrl + P shortcut.
IxNetwork TestComposer User Guide, Release 7.00 15-1

TestComposer Menu Commands Reference15
Pause Pauses the script execution.
Stop When clicking once, a graceful stop of the running script is attempted. If you click a second time, the script execution is stopped forcibly.
Toggle Breakpoint When working in the Edit/Debug mode, this command enables you to set an active breakpoint (enabled), to change it to an inactive state (disabled), or to remove it.
These menu commands are equivalent to pressing the Ctrl + B keyboard shortcut followed by another Ctrl + E, Ctrl + D, or Ctrl + Delete.
Edit Switches the TestComposer plugin to Edit mode. See Using the TestComposer Edit Mode on page 3-1.
This menu command is equivalent to pressing the Ctrl + Shift + E keyboard shortcut.
Debug Switches the TestComposer plugin to Debug mode. See Executing a Script in Debug Mode on page 8-1.
This menu command is equivalent to pressing the Ctrl + Shift + D keyboard shortcut.
New Groups commands for creating a new empty script in a new TestComposer tab, adding an inline procedure delimited by Procedure - EndProcedure statements, and creating TestComposer Device Session, CSV Template, or Response Template resources.
New Script
Creates an empty script in a new TestComposer tab.
This menu command is equivalent to pressing the Ctrl + N, Ctrl + P keyboard shortcut.
Note: Although breakpoint can be set both in the Edit and the Debug mode, configured breakpoints only work when running the test in Debug mode. In the Edit mode, any set breakpoints are ignored.
Note: On switching to the Debug mode, the Test Steps table background
changes to light grey , as a visual indication of the non-editing mode you are in.
15-2 IxNetwork TestComposer User Guide, Release 7.00

TestComposer Menu Commands Reference
New Procedure
Adds into the current script an empty procedure body delimited by the Procedure / EndProcedure statements. See Procedure Step on page 6-101.
This menu command is equivalent to pressing the Ctrl + I, Ctrl + P keyboard shortcut.
New Device Resource
This command creates a new session resource that defined connectivity parameters to remote test devices. See Creating Device Sessions on page 13-3.
The equivalent menu shortcut for theis command is Ctrl + N, Ctrl + D.
Create New CSV Template
This command creates a new CSV Template resource that can be used by a CSVAnalyzer test session. See Creating CSV Template Resources on page 13-30.
The equivalent menu shortcut for theis command is Ctrl + N, Ctrl + C.
Create New Response Template
This command creates a new Response Template resource that can be used for retrieving specified portions of the output generated by a configured test device. See Creating Response Templates on page 13-7.
The equivalent menu shortcut for theis command is Ctrl + N, Ctrl + R.
Append Last Step Groups commands for adding a control or a command step, re-appending the step that was added last, or adding a step configured using the Step Configuration wizard.
Add Control Step
Adds one of the following control steps:
• For
• While
• Do While
• Step Search
• Binary Search
• Break
• Return
IxNetwork TestComposer User Guide, Release 7.00 15-3

TestComposer Menu Commands Reference15
• If
• Else
• Exist
• Assign
• Sleep
• Comment
• ReadWrite Global
• Join
• RunProcedure
• Runprocess
Add Command
Adds one of the following command steps:
• StartSession
• Execute
• StopSession
• TclEval
• ReadFile
• Trace
• WriteCSV
• Watch
• ShowMessage
• getValue
• GetTime
Append Last Step
Adds a step of the last inserted type to the bottom of the Script Steps table.
This menu command is equivalent to pressing the Ctrl + I, Ctrl + N keyboard shortcuts.
New Step
Adds a step to the bottom of the Script Steps table using the Step Configuration wizard. See Adding Scrips Steps on page 3-14.
This menu command is equivalent to pressing the Ctrl + I, Ctrl + W keyboard shortcuts.
15-4 IxNetwork TestComposer User Guide, Release 7.00

TestComposer Menu Commands Reference
Insert above
Inserts a step above the currently selected step.
This menu command is equivalent to pressing the Ctrl + I, Ctrl + A keyboard shortcut.
Insert below
Inserts a step below the currently selected step.
This menu command is equivalent to pressing the Ctrl + I, Ctrl + B keyboard shortcut.
Place Inside Places the selected step(s) into one of the following looping, conditional, or procedure constructs:
• If
• For
• While
• Do While
• StepSearch
• BinarySearch
• Procedure
These menu commands are equivalent to pressing the Ctrl + P keyboard shortcut followed by another Ctrl + I, Ctrl + F, Ctrl + W, Ctrl + D, Ctrl + S, Ctrl + B, or Ctrl + P.
Delete Deletes the selected step(s).
This menu command is equivalent to pressing the Delete key.
Clear Script Groups commands for closing all open scripts—other than the main procedure script—and deleting all steps of the main procedure.
The equivalent keyboard shortcut for the Close all scripts command is Ctrl + F4.
IxNetwork TestComposer User Guide, Release 7.00 15-5

TestComposer Menu Commands Reference15
Edit Opens the currently selected steps for editing in the Step Configuration wizard.
This menu command is equivalent to pressing the Ctrl + E keyboard shortcut.
Move Up / Down Moves the selected step(s) up or down. Alternatively, a step(s) can be moved using drag and drop operations.
These menu commands are equivalent to pressing the Ctrl + U and Ctrl + D keyboard shortcuts respectively.
Cut Removes a script step and makes it available for pasting at another location of the Script Steps table, or to another script.
Copy Copies a script step and makes it available for pasting at another location of the Script Steps table.
Paste Pastes the cut or copied script step after the currently selected step of the Script Steps table, or to another script.
Include / Exclude When the currently selected step(s) is (are) excluded from execution, the Include command enables it (them) for execution. This menu command is equivalent to pressing the Ctrl + R and Ctrl + I keyboard shortcuts.
When the currently selected step(s) is (are) included in the execution, the Exclude command disables it (them) from execution. Excluded steps are displayed gray in the Script Steps table. This menu command is equivalent to pressing the Ctrl + R and Ctrl + E keyboard shortcuts.
Expand/Collapse Expands or collapses the currently selected step(s) in the Script Steps table. When you click Expand All or Collapse All, the operation affects the entire table.
Select all Selects all steps from the currently active tab.
This menu command is equivalent to pressing the Ctrl + A keyboard shortcut.
Notes: The Cut, Copy, and Paste commands can also be used for moving script steps to another script or procedure.The Cut, Copy, and Paste commands can also be accessed by clicking the
, , and tool bar buttons, or clicking the common Ctrl + X, Ctrl + C, and Ctrl + V keyboard shortcuts.
15-6 IxNetwork TestComposer User Guide, Release 7.00

TestComposer Menu Commands Reference
Undo Reverts most of the script editing actions performed in the Script Steps table.
This menu command is equivalent to pressing the Ctrl + Z keyboard shortcut.
Redo Re-applies commands that were undone previously using an Undo command.
This menu command is equivalent to pressing the Ctrl + Y keyboard shortcut.
Validate Performs a global on-demand validation check on the script. If errors are found, these are displayed in the Validation Messages tab of the Edit mode window.
This menu command is equivalent to pressing the Ctrl + Shift + V keyboard shortcut.
Find/Replace While in the Edit mode, choosing this command switches to the Find/Replace tab enabling you to perform script-level editing operations using a find and replace functionality. See The Edit Mode Tabs on page 3-9.
This menu command is equivalent to pressing the Ctrl + F keyboard shortcut.
Go to Groups commands for navigating to a user-specified step in the Script Steps table, or to a procedure referenced by a RunProcedure step.
Go to step
The Go to step command enables you to navigate to a user-specified step in the Script Steps table.
This menu command is equivalent to pressing the Ctrl + G keyboard shortcut.
Go to procedure
When the currently selected step is a RunProcedure step, this command enables you to navigate to the procedure referenced by the RunProcedure step.
This menu command is equivalent to pressing the Ctrl + Shift + G keyboard shortcut.
Debug Views This commands enable you to customize the appearance of the TestComposer GUI, enabling you to display or hide information panes.
Note: The following actions are not supported by the Undo/Redo functionality:• Performing find & replace operations• Configuring breakpoints
IxNetwork TestComposer User Guide, Release 7.00 15-7

TestComposer Menu Commands Reference15
Events
Displays or hides the Events tab that enables to define test-level conditional settings.
Conditional Execution settings enable you to define a procedure to execute and an additional action to take when a timeout or a error condition is encountered at script runtime. For example, on encountering a step error, you could determine the script to terminate or to continue running.
Tcl Packages
Displays or hides the Tcl Packages tab that enables you to define additional packages available to the Tcl Expression Builder.
Validation Messages
Displays or hides the Validation Messages pane of the Edit mode window.
Execution Messages
Displays or hides the Execution Messages pane of the Edit mode window.
Command Response
Displays or hides the Command Response pane of the Edit mode window. Using the functionality of this pane, you can create Response Templates that are associated with some step types, such as Execute, and are used to parse the command output and retrieve user-specified portions of it.
Find/Replace
Displays or hides the Find/Replace pane that enables you to perform script-level editing operations using a find and replace functionality.
Global Output
Displays or hides the Global Output pane of the Debug mode window.
Sessions Output
Displays or hides the Sessions Output pane of the Debug mode window.
Call Stack
Displays or hides the Call Stack pane. At run time, when a breakpoint is encountered or when the execution is paused, this tab is populated with the stack
15-8 IxNetwork TestComposer User Guide, Release 7.00

TestComposer Menu Commands Reference
contents, comprising the Main( ) entry (corresponding to the Main_Procedure), followed by list of all procedures that are executed at that moment.
Breakpoints
Displays or hides the Breakpoints pane.
Console Switches to the Session Consoles pane, enabling you to connect to configured test devices supporting the Telnet, Tclsh, TL1, SSH1/SSH2/SSHAuto, IxEmail, CmdTool, COM, and Raw protocol interfaces, or the IxNetwork test application interfaces. Once connected, commands input to the test devices are also captured as script steps.
This menu command is equivalent to pressing the Alt + Shift + C keyboard shortcut.
See Using the Capture Functionality on page 5-1.
Reset Layout If you have altered the TestComposer GUI, such as for example by closing information panes or toolbars that are displayed by default, this command resets the plugin’s GUI to the default setting.
Test RibbonThe Test ribbon comprises the following commands:
Test Parameters Enables you to defines script input and output parameters. See Defining Input Parameters on page 3-19.
This menu command is equivalent to pressing the Ctrl + Shift + T keyboard shortcut.
Import Procedure Inserts into the current script a procedure resource from the Resource Manager, or a procedure contained in an external .tcp file. In both cases, the script commands are enclosed in Procedure - EndProcedure statements.
Export Procedure Saves one or more inline procedures from the current script as procedure resources. See Creating Procedure Resources on page 13-5.
Manage Resources This command enables you to manage TestComposer resources, such as procedures, device sessions, response templates, CSV templates and Quicktest templates.
IxNetwork TestComposer User Guide, Release 7.00 15-9
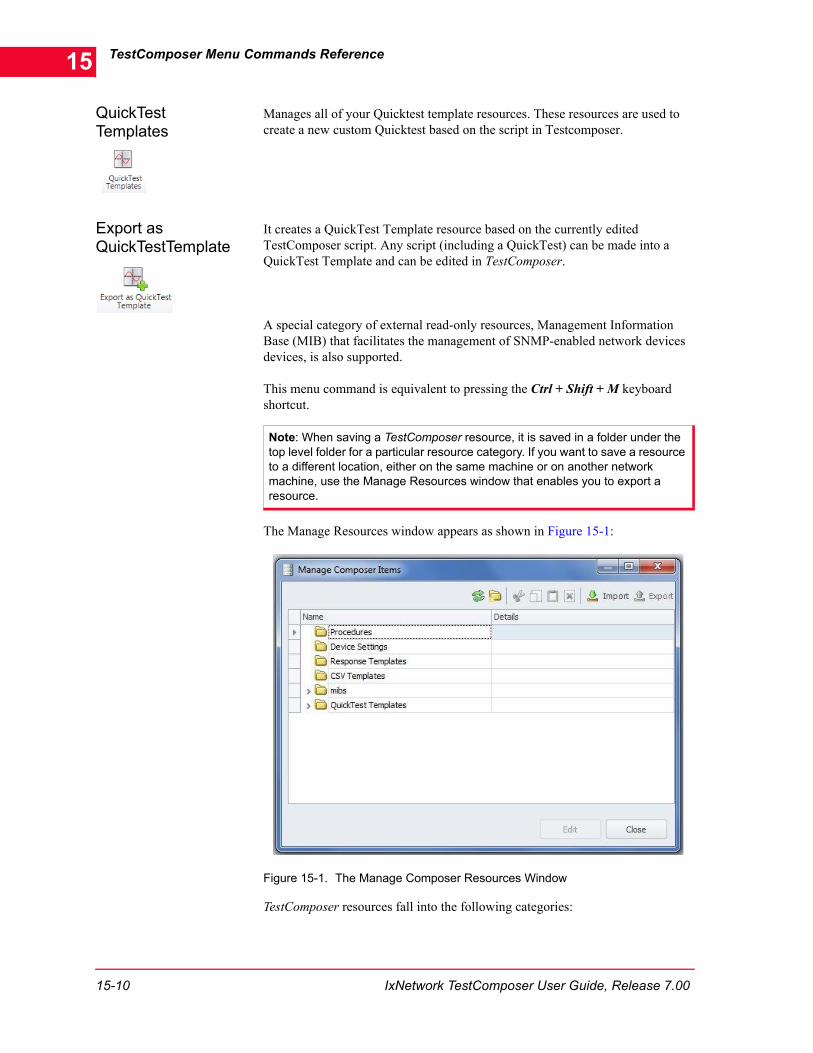
TestComposer Menu Commands Reference15
QuickTest Templates
Manages all of your Quicktest template resources. These resources are used to create a new custom Quicktest based on the script in Testcomposer.
Export as QuickTestTemplate
It creates a QuickTest Template resource based on the currently edited TestComposer script. Any script (including a QuickTest) can be made into a QuickTest Template and can be edited in TestComposer.
A special category of external read-only resources, Management Information Base (MIB) that facilitates the management of SNMP-enabled network devices devices, is also supported.
This menu command is equivalent to pressing the Ctrl + Shift + M keyboard shortcut.
The Manage Resources window appears as shown in Figure 15-1:
Figure 15-1. The Manage Composer Resources Window
TestComposer resources fall into the following categories:
Note: When saving a TestComposer resource, it is saved in a folder under the top level folder for a particular resource category. If you want to save a resource to a different location, either on the same machine or on another network machine, use the Manage Resources window that enables you to export a resource.
15-10 IxNetwork TestComposer User Guide, Release 7.00
TestComposer Menu Commands Reference
• Procedures: Procedures are used for re-using the same defined operations sequence across multiple tests.
• Device Sessions: Device sessions are used for storing connectivity parameters to configured devices.
• Response Templates: Response templates are associated to some command steps, such as Execute, for retrieving specified portions of the command output.
• MIBs: Management Information Base entities describe data objects managed by a SNMP agent within a networked device. MIBs are simple text files, and values of MIB data objects are either configured on or retrieved from the SNMP-aware devices.
• CSV Templates: CSV templates, which are associated with CSVAnalyzer sessions, basically define the schema of a CSV file such that session commands can interpret a file in CSV format and retrieve from it portions of interest, such as statistics.
• Quicktest Templates: These resources manage all your Quicktest template resources. They are used to create a new custom quicktest based on script in Testcomposer.
For detailed information on the functionality of the Resource Manager window, as well as the most common resource-related operations, such as exporting and importing resources, refer to The Resource Manager on page 13-35.
Exported Stats Enables you to specify the statistics that are exported by the test script to the IxNetwork Statviewer module or to TestComposer-generated files. See Specifying Exported Statistics on page 3-25.
This menu command is equivalent to pressing the Ctrl + Shift + S keyboard shortcut.
User Events Enables you to define specific messages an Execute command output or an active session to configured test devices is monitored for. See Defining User Events on page 3-23.
This menu command is equivalent to pressing the Ctrl + Shift + U keyboard shortcut.
Files Catalog Enables you to visualize the script-attached files and to specify additional input or output files used by the script. See Using Attached Script Files on page 3-20.
This menu command is equivalent to pressing the Ctrl + Shift + F keyboard shortcut.
IxNetwork TestComposer User Guide, Release 7.00 15-11

TestComposer Menu Commands Reference15
Options This command permits you to customize the TestComposer environment based on options falling into the two categories below:
• Appearance
• Debugging
This menu command is equivalent to pressing the Ctrl + Shift + O keyboard shortcut.
Appearance
This category enables you to customize the following parameters affecting the Edit mode GUI:
• Show tooltip information buttons: If selected, tooltip information buttons are displayed in the Step Configuration wizard and can be clicked for obtaining information on the adjacent GUI element.
• Enable animated transition of ‘Capture sessions’ window splitter: If selected, the Session Consoles pane of the Edit window is shown and hidden using an animation effect.
• Tile horizontally the ‘Capture sessions’ window: If selected, the Session Consoles window is displayed as a pane above the Edit mode window.
• Insert captured steps below the focused step: If selected, captured steps are inserted below the current step, otherwise they are appended to the bottom of the Test Steps table.
• Automatically add comment within block step: If selected, a comment step is added within every block step such as If, While, and For.
• Show Target properties in Command Response panel: If selected, the properties of targets marked in Response Templates associated with command steps are shown in the Command Response tab of the Edit mode
window. The button in the Response Template pane performs the same function
• Confirm reloading of test or procedure when MIB files are imported and deleted: If selected, when MIB files are modified, a dialog appears prompting you to reload the currently active test or procedure.
• Enlarge step row hight to show text wrapped: If, at some point during the editing process, the Test Steps table columns become too small, cells might display only truncated command or parameter strings. In such cases, you can enable a ‘word-wrap’ functionality and determine the full command text to display by selecting this option.
• Show IxNetwork Built-in Event Console: If selected, the Built-in Event console window for the automatically created IxNetwork session is displayed in the TestComposer Session Consoles pane.
15-12 IxNetwork TestComposer User Guide, Release 7.00

TestComposer Menu Commands Reference
• Confirm that IxNetwork views will be invalidated: If selected, when you rename variables that are exported to StatViewer, a window is displayed stating that the statistics are marked for export to IxNetwork and that the views are updated accordingly.
Debugging
This category enables you to customizes the following parameters affecting the Debug mode behavior.
• Use debugger when playing steps in Edit mode (Summary view only): If selected, TestComposer autiomatically switches to Debug mode when steps are played while in the Edit mode (Summary view).
When selecting this option, you might also consider also selecting the Switch to Edit mode when execution completes in Debug mode option at the same time, in order to return to the Edit mode after execution completes.
• Switch to Edit mode when execution completes in Debug mode: If selected, when running a script in Debug mode and the script execution terminates, the application automatically switches to the Edit mode.
• Automatically start the test execution on entering Debug mode: If selected, upon entering the Debug mode, test execution is initiated.
• Confirm switching to Debug mode on warnings: If selected, the application switches to debug mode when warnings are encountered.
• Enable steps execution with user delay: This option determines the current
playback mode selection of the Debug mode button.
• Always show errors list on Execution Errors: When running a script, both in Edit and in Debug mode, and the Execution Errors tab is hidden, selecting this option determines the automatic displaying of the tab when encountering runtime errors.
• Automatically switch to originating thread when breakpoint is reached: If selected, when a breakpoint is reached, the focus changes to the thread containing the step on which the breakpoint was defined.
• Dump debug information: If selected, debug-level log files are created and populated with data.
• Automatically play child steps in Edit mode: If selected, steps that are children of compound statements, such as For and While, are also executed when their parents are played.
• Autoscroll test to track step being executed: If selected, the currently executing step is focused while running the script in debugging mode. As a result, when a script is executed, any executing steps that were initially shown collapsed in the Test Steps table is expanded and the executing step is always focused.
In the Debug window if you scroll manually to another step, while autoscroll option is enabled, the Autoscroll test to track step be ing executed check box is cleared and autoscrolling is disabled.
IxNetwork TestComposer User Guide, Release 7.00 15-13

TestComposer Menu Commands Reference15
Enabling autoscroll option can be useful, for example, when your test contains a RunProcedure step that calls a procedure with multiple steps, but the procedure body itself is located at a remote location in the test script.
• Logs should contains Support Level Information: If selected, information is logged that can help support teams troubleshoot test configuration problems.
• Global output debug information level, Session output debug information level: Enables you to select the debug information level for the Global Output tab as one of the following:
• User trace commands: Only information for Trace commands is logged.
• Step execution: A single line of execution information per step is logged.
• Step response: Both step execution information and results are logged.
• Troubleshoot: Detailed debug information is logged.
• Session output debug information level, Session output debug information level: Enables you to select the debug information level for the Session Output tab as one of the following:
• User trace commands: Only information for Trace commands is logged.
• Step execution: A single line of execution information per step is logged.
• Step response: Both step execution information and results are logged.
• Troubleshoot: Detailed debug information is logged.
• Log format: Enables you to specify the log format based on a number of predefined items (Time stamp, Session name, Message source, Message category, Security level, Text), or to define a custom format. In the latter case, select the Custom log format option and edit the format as desired in the field below.
Reset Tcl Interpreter Resets the Tcl interpreter–and implicitly all script variable –that is responsible for executing the test steps.
Since, by default, the interpreter is not reset after executing a number of steps in the Edit mode, resetting it could prove necessary after you have executed some steps that altered the initial variable values.
This menu commands is equivalent to pressing the Ctrl + R keyboard shortcut followed by another Ctrl + R.
Reset Built-In Event
Session
Performs a reset on the default IxNetwork session that is automatically created for every TestComposer script.
Refresh Protocols Configuration Tree
This command is used to enforce a refresh of the an IxNetwork command's parameters (accessed through the Available Items field in the TestComposer GUI).
15-14 IxNetwork TestComposer User Guide, Release 7.00

TestComposer Menu Commands Reference
Using this command could prove useful in situations when, after switching to IxNetwork for performing protocol configuration changes, you return to the TestComposer script and notice these changes are not reflected in the parameters of existing IxNetwork commands.
Show Summary, Show Detailed
Selects the TestComposer GUI display mode as either fo the following:
• Summary : This is the default mode that is enforced when the TestComposer plugin starts for the first time. It displays a limited functionality GUI characterized by a reduced number of toolbar buttons and a simplified view of the Test Steps table, so as to ease the configuration of test scripts.
• Detailed : In this mode the full-fledged GUI is displayed, characterized by the rendering of all available toolbar buttons and the detailed view of the Test Steps table.
Text Wrap This command enables a ‘word-wrap’ functionality for the Test Steps table and determines the full command text to display. Enabling this functionality can prove useful in case you have long commands or parameters, which are displayed truncated in table cells.
Automation RibbonAdditional TestComposer–related commands are available from the Automation ribbon of the IxNetwork GUI:
Export Script Exports the main TestComposer script to a tcp file on external storage. Upon saving, the script is automatically converted so it can be loaded into Test Conductor TestComposer, in order to be run in an automated mode.
The conversion process adds explicit IxNetwork StartSession and StopSession steps for the Built-in Event session type, and an Execute step invoking the Load Configuration event, which loads the pertaining IxNetwork configuration into the script. See Exporting as a Script To Test Conductor on page 11-2.
Tcl ScriptGen This command generates a Tcl script that corresponds to the currently active TestComposer script. For detailed information on the structure of the generated script, refer to the IxNetwork TestComposer Tcl ScriptGen Reference manual that is shipped with IxNetwork.
IxNetwork TestComposer User Guide, Release 7.00 15-15

TestComposer Menu Commands Reference15
15-16 IxNetwork TestComposer User Guide, Release 7.00

AAppendix A: Creating a Sample TestComposer Script
This appendix describes a sample operations sequence for defining a TestCom-poser test script.
Test OverviewFor the purpose of our example, we are considering a TestComposer test script that runs against a router DUT that is connected to an Ixia chassis port. The test starts the PPoE and DHCP protocols on the chassis port and tests repeatedly for a steady state condition with a total number of sessions below a configured amount no failed sessions and no sessions that are in an unconsistent state.
Initially the test script starts the protocols on the selected chassis port using the automatically created Builtin Event session of the IxNetwork type, waits for a period of 3 minutes and then writes all statistics to CSV files using the Write CSVs for all views command.
The resulting CSV file is opened by a CSVAnalyzer session and the Sessions_Initiated, Sessions_Successful and Sessions_Failed statistics are retrieved into the ProtocolStats composite variable using the CSVAnalyzer StatQuery command. The statistic values are displayed using Trace commands that reference the composite variable retrieved previously.
The script then tests for a steady DUT condition that translates into a state whereby the number of initiated sessions equals the sum of successful and failed sessions. In addition, this state is characterized by a number of session lower than a configured amount, and no failed sessions. While this condition is not met, the script loops repeatedly (using a While statement) with a 1 minute frequency (Sleep statement), whereby at each new iteration the session statistics are written anew into CSV files, retrieved by the StatQuery function and then displayed. Inside the While loop, an If statement tests if the initially allocated time of 15
Note: This appendix covers a TestComposer script creation example. For instructions on creating sample Response Templates, refer to Response Templates Creation Samples on page B-1.
IxNetwork TestComposer User Guide, Release 7.00 A-1

Creating the Composer TestA
minutes, or 900 seconds, expired, after which the test script calls an inline log-ging procedure and exits using a fail condition.
Figure A-1. Sample Test Overview
Creating the Composer TestTo create the test script described in Test Overview proceed as follows:
1. While in the TestComposer plugin, right-click the script tab and click the
Properties button, then type in a test name and an optional description in the Information window that appears.
2. Start adding the steps sequence described below.
Click the Append last Step button and add an Execute (All Protocols Start) step on the default Builtin Event session that is created automatically for every TestComposer script. This command starts two proto-cols, PPoE and DHCP, on the selected Ixia chassis port.
All Protocols Start IxN::availableItems="{::ixNet::OBJ-/eventScheduler/availableEvents:\"REG_Start\"/availableItems/node:\"aptixia.1\"} {::ixNet::OBJ-/eventScheduler/availableEvents:\"REG_Start\"/availableItems/node:\"aptixia.2\"} "
3. After pausing the script execution for 3 minutes using a Sleep statement, add an Execute step that writes all statistics to CSV files using the Write CSVs for all Views command on the Builtin Event Session:
Statistics Write CSVs for all Views content="All Pages" newcsvfile/overwrite=Overwrite csvfilelocation="$stat/../"
A-2 IxNetwork TestComposer User Guide, Release 7.00

Creating the Composer Test
4. Add a startSession step that opens a CSVAnalyzer session to the file ref-erenced by the $port_stats variable:
CSVAnalyzer, startSession csvFileName="$port_stats" csvTemplateName="$stat_template"
5. Using the previously created CSVAnalyzer session, add a statQuery step that retrieves the aggregate Sessions_Initiated, Sessions_Succeeded, and Sessions_Failed values using the Protocol-Stats return variable assigned to the step:
StatQuery category="Statistics_1" filter="" items="{{Statistics_1.Sessions_Initiated} with caption: {Sessions_Initiated} aggregation: Sum}{{Statistics_1.Sessions_Succeeded} with caption: {Sessions_Succeeded} aggregation: Sum}{{Statistics_1.Sessions_Failed} with caption: {Sessions_Failed} aggregation: Sum}"
6. Output all three variables to the screen using the Trace commands that refer-ence the ${ProtocolStats.Statistics_1.Sessions_Failed}, ${ProtocolStats.Statistics_1.Sessions_Failed}, and ${ProtocolStats.Statistics_1.Sessions_Failed} variables respectively.
7. Configure a maxtime timeout value using the following Tcl expression inside an Assign statement:
Assign maxtime [expr [clock seconds] + 900]
8. Inside a While statement test for the steady state condition using a condi-tional expression that evaluates if the number of initiated sessions equals the sum of successful and failed sessions. In addition, the number of initiated ses-sions should be lower than 1000 and there should be no failed sessions:
(${ProtocolStats.Statistics_1.Sessions_Initiated} != ${ProtocolStats.Statistics_1.Sessions_Succeeded} + ${ProtocolStats.Statistics_1.Sessions_Failed} ) || ( ${ProtocolStats.Statistics_1.Sessions_Failed}== 0 ) || (${ProtocolStats.Statistics_1.Sessions_Initiated} < 1000)
9. Nested within the While loop configure an If statement to test if the time expired since test start exceeds the initially configured amount (maxtime); while the initial time was not exceeded, similar operations with those from steps 4, 5, and 6 are performed repeatedly with a frequency of 1 minute, with the session statistics being retrieved and displayed.
When the timeout expires, a RunProcedure statement calls the UGS-info logging procedure and terminates the test execution using a fail status (zero value) as an argument to the Return statement.
Return 0 "Failed to start protocols in 15 minutes"
10. Click the Save button. The TestComposer script is saved into the IxNetwork configuration using the name specified at step 1.
IxNetwork TestComposer User Guide, Release 7.00 A-3

Creating the Composer TestA
As part of the IxNetwork test configuration, it can then be run by clicking the
button from the Home ribbon of IxNetwork. When run in this mode, script-generated logs and files are can be accessed from the IxNetwork Data Miner, while statistics exported by the script are displayed in the IxNet-work StatViewer pugin.
A-4 IxNetwork TestComposer User Guide, Release 7.00

BAppendix B: Response Templates Creation Samples
This appendix provides sample operations sequences for defining both text- and table-format Response Templates (RT).
Creating a Text-Format Response TemplateAssuming that we have a procedure configuration step containing the ping command step yielding the output shown in Figure B-1, for the purpose of our example we are interested in defining a target that represents the icmp_seq value on the interface.
Figure B-1. Step Command Output
To create the Response Template:
1. Select the target, comprising the text before the actual byte number (Figure B-2) and click the Regex target button.
IxNetwork TestComposer User Guide, Release 7.00 B-1

Creating a RepeatingBlock Response TemplateB
Figure B-2. RegEx Target Selection
A FreeFormat region with a contained Regex target is added.
2. Choose the C1 = [0-9]* regular expression, choose the icmp_seq value for the C1 constant, and select the Repeating Search option to capture all occur-rences.
As shown in Figure B-3, the target appears highlighted in red in the command output.
Figure B-3. Regex Target Settings
3. Choose the Save or Save as command to save the Response Template.
Eventually, click the OK button to close the Response Template Editor.
Creating a RepeatingBlock Response TemplateGiven the hypothetical command output shown in Figure B-4, for the purpose of our example we are interested in defining a target that retrieves the bytes values from each response line.
B-2 IxNetwork TestComposer User Guide, Release 7.00

Creating a RepeatingBlock Response Template
Figure B-4. Step Command Output
To create the Response Template:
1. Select the first command response line and click the Mark Repeating Block button. A RepeatingBlock region delimited by the Reply and \n strings is added (Figure B-5).
Figure B-5. Repeating Block Region Selection
2. Choose the C1 = [0-9]* regular expression and choose the bytes value for the C1 constant. The first occurrence of the target within the RepeatingBlock region is selected (Figure B-6).
Figure B-6. First Occurrence Selection
3. Select the Repeating Search option to capture all target occurrences within the RepeatingBlock region. As shown in Figure B-7, two targets appear high-lighted in red in the command output.
IxNetwork TestComposer User Guide, Release 7.00 B-3

Creating a Table Format Response TemplateB
Figure B-7. Regex Target Selection and Highlighting
In the Value selected field of the Regions pane, for each RepeatingBlock region an entry is displayed comprising two target values enclosed in { and } characters.
4. Choose the Save or Save as command to save the Response Template.
Eventually, click the OK button to close the Response Template Editor.
Creating a Table Format Response TemplateGiven the procedure configuration step containing the arp -a command step, which yields the output shown in Figure B-8, for the purpose of our example we are interested in defining a target that holds a list of all values from the Internet Address column.
Figure B-8. Command Output
To define the Response Template:
1. Select the table area and click the Mark table area button.
In this case, the table area is only a part of the command output (Figure B-9).
Figure B-9. Table Area Marking
2. Select the entire table header row and click the Mark header button. The marking appears as shown in Figure B-10.
B-4 IxNetwork TestComposer User Guide, Release 7.00

Creating a Table Format Response Template
Figure B-10. Table Header Marking
3. Mark a column header – the Internet Address column for the purpose of our example – and click the Mark full column header button (Figure B-11).
Figure B-11. Table Column Marking
As you can notice, the Column_1 target that was added to the Regions pane holds the values of all IP address from the Internet Address column.
Hint: Since the Export results option is selected, the IP addresses list is exposed for processing in subsequent steps of theTestComposer script. Assuming for example, that we assigned an arp_table return variable to the Execute step that is running the arp -a command, we could subsequently use a steps sequence such as the following to obtain the list length and print out its elements:
In the sample code above, at step 4 the l variable is initialized to the dimension (length) of the arp_table.Column_1 list using the Tcl llength function.Step 5 then prints out the dimension of the list, while step 6 defines a counter i variable that iterates over all arp_table.Column_1 list elements and prints them out at runtime.
IxNetwork TestComposer User Guide, Release 7.00 B-5

Creating a Table Format Response TemplateB
B-6 IxNetwork TestComposer User Guide, Release 7.00

CAppendix C: Executing IxNetwork QuickTests from TestComposer
This appendix illustrates the possibility of executing IxNetwork QuickTests from within TestComposer.
• Executing IxNetwork QuickTests
• Creating Custom QuickTest Template
• Adding Input Parameters to QuickTests in IxNetwork Test Composer
• Exporting Quicktest as Custom Quicktest
Executing IxNetwork QuickTestsIxNetwork QuickTests represent easily configurable tests with a predefined structure that implement specific test algorithms, and which can be parameterized and run from within the IxNetwork GUI.
For the purpose of automating IxNetwork tests, a number of predefined commands (‘events’) supported by the IxNetwork TestComposer test application session can be used for executing QuickTests directly from IxNetwork TestComposer.
Assuming, for example, that you wish to run two QuickTests from an IxNetwork configuration and determine an aggregate pass/fail result that takes into account the result status of both tests, you may configure the following commands sequence in IxNetwork TestComposer.
IxNetwork TestComposer User Guide, Release 7.00 C-1

C
Figure C-1. TestComposer Script Configuration For QuickTest Execution
As evident from the figure above, the first test is executed and, if it completes successfully (if the result is ‘pass’), the second QuickTest is launched. Following execution of the second QuickTest, a pass/fail criterion is computed for the entire test and it returns ‘1’ for successful execution and ‘0’ otherwise.
As illustrated by the sample test, a Start Test command is used for launching a QuickTest execution, and, since multiple QuickTests cannot execute in parallel, a WaitForTestEnd command ensures that an executing test completes before another test is run. For a detailed description of all QuickTest related commands refer to QuickTest on page D-53.
For a completed test, its pass/fail result is retrieved from the IxNetwork configuration tree into a step return variable using a TestComposer Config Get command.
Similar to ’native’ TestComposer scripts—the scripts created using the functionality exposed by the TestComposer GUI—for QuickTests you can also define statistics to be exported to script-attached files or to the IxNetwork StatViewer module. See Specifying Exported Statistics on page 3-25.
Creating Custom QuickTest TemplateThe following steps describe how to create a Custom QuickTest Template:
Important: A QuickTest’s pass / fail result (based on the settings from IxNetwork QuickTest configuration wizard) is available as an element in the IxNetwork configuration tree under the results element and can be retrieved using the Config Get command (see Config Get on page 6-80). For example, assuming we have a rfc2544FrameLoss test, we could use the following TestComposer command to retrieve its result:Configuration Get select=/quickTest/rfc2544frameLoss[1]/results get="result"
C-2 IxNetwork TestComposer User Guide, Release 7.00

1. Click Export as QuickTest Template in the Test ribbon.
2. Add description for the following fields in the Properties window:
3. Click Ok. This Custom QuickTest template is available in the following sections:
• Manage resources
• QuickTest template
• Test selection pane of QuickTest Wizard
Any script (including a QuickTest) can be made into a QuickTest Template and can be edited in TestComposer.
Adding Input Parameters to QuickTests in IxNetwork Test ComposerYou can assign Input Parameters to QuickTests in IxNetwork. To assign input parameters, do the following:
4. On the QuickTest Tools page, select one of the QuickTests already created, and then click Edit script. The QuickTest tab opens in Test Composer.
5. On the Test Composer ribbon, click Test Parameters button, under the Test tab. A table appears which allows you to enter input parameters
6. Enter the variable names and the corresponding values for the variables. You can enter parameters of type numeric and string. You can also assign default values for the Input Parameters.
7. In the QuickTest script, use the defined Input Parameters to parametrize the desired command.
You can start the QuickTest with Input Parameters from the AES GUI, AES command or from wish console with a TCL command as follows:
AES GUI:
Field Description
Name Name of the Custom QuickTest template.
Description Description of the Custom Quicktest template. On selecting this template in the QuickTest wizard, this description appears in the right pane.
Image An illustration describing this custom QuickTest. This is an optional field. This image appears in the right pane of the QuickTest wizard on selecting this template.
IxNetwork TestComposer User Guide, Release 7.00 C-3

C
Add an Execute Built-in-Event step, select QuickTests from the available list in the Command Filter on the left, and then select the Start Test command. Select the desired QuickTest in Available Items field, then in Input Parameters field click the Expand button to modify the Input Parameters.
AES command:
QuickTests Start Test { IxN::availableItems=/quickTest/rfc2544throughput[1] { {Name1 Value1} {Name2 Value2} } }
TCL command:
ixNet exec start {::ixNet::OBJ-/quickTest/rfc2544throughput:1 { {Name1 Value1} {Name2 Value2}} }
Exporting Quicktest as Custom QuicktestYou can export a Quicktest in Testcomposer. Add or Edit input parameters as mentioned in Adding Input Parameters to QuickTests in IxNetwork Test Composer. Export this Quicktest as a new custom quicktest resource and make instances from Ixnetwork Add Quicktest wizard.
See Also
Handling Quicktest template resources on page 13-34
Creating Custom QuickTest Template on page C-2
C-4 IxNetwork TestComposer User Guide, Release 7.00
DAppendix D: IxNetwork Events
This appendix describes the predefined IxNetwork events that can be configured on the default IxNetwork session in TestComposer.
IxNetwork Events
Note: The TestComposer GUI currently supports table-format controls for user input fields for command configuration. In the case of the table-format controls, the current implementation provides validation for the specified parameters and displays appropriate error messages when incorrect values have been entered.
Important: When entering a value into a table field of the MAC type, make sure the value, or the variable reference if a variable is used, is enclosed in \" \" characters (escaped double quotes).
Note: The former opaque and device-dependent GUI representation of selected IxNetwork event items has been replaced by an XPath representation that is both easy to read and to parameterize. It also has the benefit of abstracting the data content and allowing for virtualization in TestComposer, meaning that same script can be used with multiple IxNetwork configurations that have the same data structure.As an example, given a /vport[1]/protocols/bgp/neighborRange[1] representation of a BGP event item, event item components can be easily identified as follows:• vport[1]: the port with index ‘1’ (‘1’- based index)• protocols: the protocols emulated on the chassis port• bgp - the bgp protocol • neighborRange[1] - the BGP router peer with index ‘1’ ( ‘1’- based index).Regarding backward compatibility, scripts created in previous TestComposer versions can be run without any changes in the current version. Modifying an item in the items list of an old script requires, however, deleting of the old item and selecting a new item in the GUI.
IxNetwork TestComposer User Guide, Release 7.00 D-1

D
For the default IxNetwork session that is automatically created for every TestComposer script, a number of pre-configured events are available for config-uring Ixia chassis ports, applying test configuration files, starting protocol traffic, launching tests, and retrieving test run results, as listed in Table D-1:
Table D-1. IxNetwork Commands
Command Category
Command Syntax
Load Configuration
Load Configuration IxN::configurationFile="<filename>" IxN::waitForHardware=<True|False>
Loads IxNetwork configuration and maps physical ports.
Arguments:• configurationFile – The name of the IxNetwork configu-
ration file to load.• waitForHardware – Waits for hardware to connect after
configuration was loaded.
Port Simulate Link Up
Simulates a port link being up.
Arguments:• Available Items - A list of ranges selected in IxNetwork.
Simulate Link Down
Simulates a port link being down.
Arguments:• Available Items - A list of ranges selected in IxNetwork.
ANCP ANCP Clear Stats
Clears ANCP statistics for the selected ranges.
Arguments:• Available Items - A list of ranges of the ANCP type
selected in IxNetwork.
ANCP Start
Negotiates ANCP sessions for the selected ranges.
Arguments:• Available Items - A list of ranges of the ANCP type
selected in IxNetwork.
D-2 IxNetwork TestComposer User Guide, Release 7.00

ANCP Stop
Tears down ANCP sessions for the selected ranges.
Arguments:• Available Items - A list of ranges of the ANCP type
selected in IxNetwork.
ANCP Re-Sync
Starts the resync ANCP DSL line capabilities for the selected ranges.
Arguments:• Iteration Count - The number of iterations• Iteration Gap - The gap between iterations• Available Items - A list of ranges of the ANCP type
selected in IxNetwork.
DHCP DHCP Clear Stats
Clears DHCP statistics.
Arguments:• Available Items - A list of ranges of the DHCP type
selected in IxNetwork.
DHCP Server Start
Starts the DHCP server.
Arguments:• Available Items - A list of ranges of the DHCP type
selected in IxNetwork.
DHCP Server Stop
Stops the DHCP server.
Arguments:• Available Items - A list of ranges of the DHCP type
selected in IxNetwork.
DHCP Start
Obtains DHCP lease.
Arguments:• Available Items - A list of ranges of the DHCP type
selected in IxNetwork.
Table D-1. IxNetwork Commands
Command Category
Command Syntax
IxNetwork TestComposer User Guide, Release 7.00 D-3

D
DHCP Stop
Releases DHCP lease.
Arguments:• Available Items - A list of ranges of the DHCP type
selected in IxNetwork.
PTP PTP Start
Negotiates the PTP protocol for selected plugins and ranges.
Arguments:• Available Items - A list of ranges of the PTP type
selected in IxNetwork.
PTP Stop
Releases PTP for selected plugins and ranges.
Arguments:• Available Items - A list of ranges of the PTP type
selected in IxNetwork.
PTP Pause
Pauses negotiation of PTP for selected plugins and ranges.
Arguments:• Available Items - A list of ranges of the PTP type
selected in IxNetwork.
PTP Resume
Resumes previously paused negotiation of PTP for selected plugins and ranges.
Arguments:• Available Items - A list of ranges of the PTP type
selected in IxNetwork.
PTP Clear Stats
Clears PTP statistics for selected plugins
Arguments:• Available Items - A list of ranges of the PTP type
selected in IxNetwork.
Table D-1. IxNetwork Commands
Command Category
Command Syntax
D-4 IxNetwork TestComposer User Guide, Release 7.00

Change BMC Parameters
Changes BMC Parameters.
Arguments:• Priority 1 - PTP priority 1• Priority 2 - PTP priority 2• Clock Class - Specifies the PTP clock class• Clock Accuracy - Specifies the clock accuracy.• Available Items - A list of ranges of the PTP type
selected in IxNetwork.
Change Log Message Intervals
Changes the Log Message intervals.
Arguments:• Log Announce Interval - Specifies the logarithmic mean
time interval between successive Announce messages.• Log Sync Interval - Specifies the logarithmic mean time
interval between successive Sync messages.• Log Delay Request Interval - Specifies the logarithmic
mean time interval between successive Delay_Req mes-sages.
• Available Items - A list of ranges of the PTP type selected in IxNetwork.
Table D-1. IxNetwork Commands
Command Category
Command Syntax
IxNetwork TestComposer User Guide, Release 7.00 D-5

D
Change Negative Testing Parameters
Changes PTP parameters for negative testing.
Arguments:• Follow Up Delay - Specifies an additional delay intro-
duced in the PreciseOriginTimestamp field of the Follow_Up message (nanoseconds).
• Follow Up Delay Insertion Rate - Specifies a percent-age of Follow_Up messages in which the delay is intro-duced.
• Delay Response Delay - Specifies an additional delay introduced in the receiveTimestamp field of the Delay_Resp message (nanoseconds).
• Delay Response Delay Insertion Rate - Specifies a per-centage of Delay_Resp messages in which delay is intro-duced.
• Announce Drop Rate - Specifies a percentage of dropped Announce messages.
• Follow Up Drop Rate - Specifies a percentage of dropped Follow_Up messages.
• Delay Response Drop Rate - Specifies a percentage of dropped Delay_Resp messages.
• Follow Up BadCrc Rate - Specifies a percentage of Follow_Up messages with bad checksums.
• Available Items - A list of ranges of the PTP type selected in IxNetwork.
Change Misc Parameters
Changes PTP parameters, such as domain and the Announce Receipt timeout.
Arguments:• Domain - The PTP domain.• Announce Receipt Timeout - The number of announce-
Interval that has to pass without receipt of an Announce message
• Available Items - A list of ranges of the PTP type selected in IxNetwork.
IPv6 IPv6 Send NDP RS
Sends RS on NDP for IPv6 ports.
Arguments:• Rate (mess/sec) - The IPv6 NDP rate for RS messages.• Available Items - A list of ports of the IPv6 type selected
in IxNetwork.
Table D-1. IxNetwork Commands
Command Category
Command Syntax
D-6 IxNetwork TestComposer User Guide, Release 7.00

IPv6 Send NDP NS
Sends NS on NDP for IPv6 ports.
Arguments:• Rate (mess/sec) - The IPv6 NDP rate for NS messages.• Available Items - A list of ranges of the IPv6 type
selected in IxNetwork.
FCoE FCoE Client Start
Negotiates FCoE sessions for all ranges of a port.
Arguments:• Available Items - A list of ports of the FCoE type
selected in IxNetwork.
FCoE Client Pause
Pauses the FCoE sessions for all ranges of a port.
Arguments:• Available Items - A list of ports of the FCoE type
selected in IxNetwork.
FCoE Client Resume
Resumes previously paused FCoE sessions for all ranges of a port.
Arguments:• Available Items - A list of ports of the FCoE type
selected in IxNetwork.
FCoE Client Stop
Tears down FCoE sessions for all ranges of a port.
Arguments:• Available Items - A list of ports of the FCoE type
selected in IxNetwork.
FCoE Client Clear Stats
Clears FCoE statistics for all ranges of a port.
Arguments:• Available Items - A list of ports of the FCoE type
selected in IxNetwork.
Table D-1. IxNetwork Commands
Command Category
Command Syntax
IxNetwork TestComposer User Guide, Release 7.00 D-7
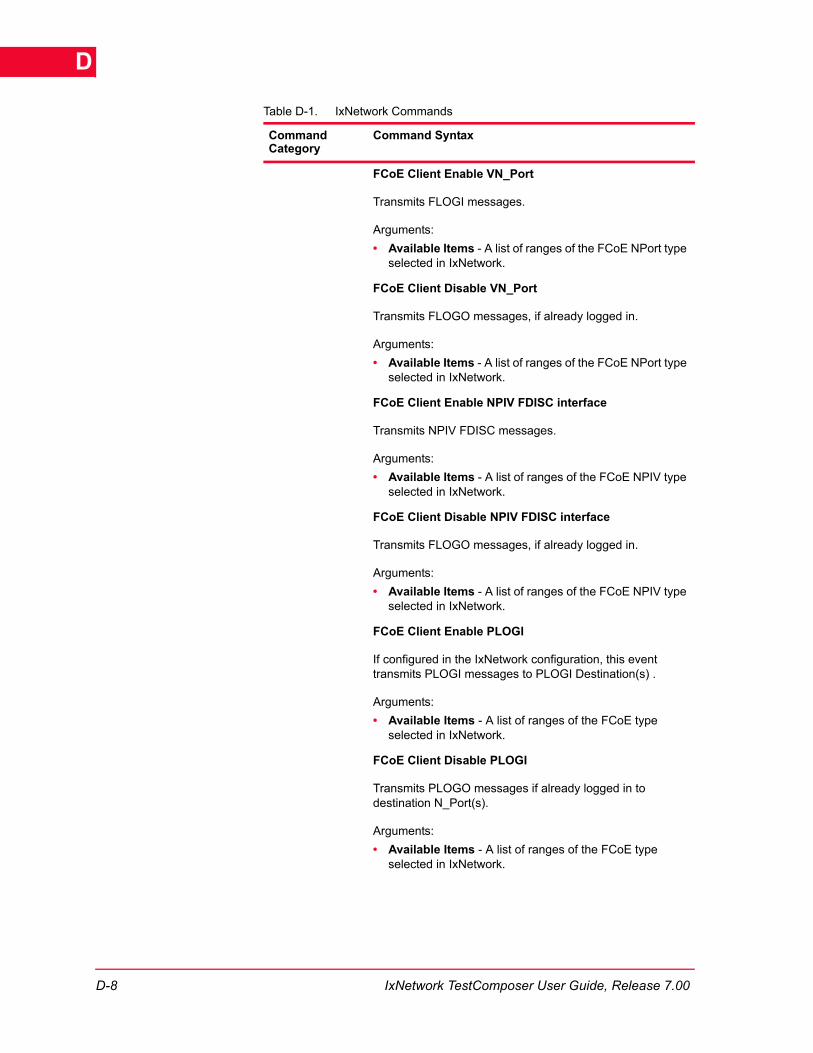
D
FCoE Client Enable VN_Port
Transmits FLOGI messages.
Arguments:• Available Items - A list of ranges of the FCoE NPort type
selected in IxNetwork.
FCoE Client Disable VN_Port
Transmits FLOGO messages, if already logged in.
Arguments:• Available Items - A list of ranges of the FCoE NPort type
selected in IxNetwork.
FCoE Client Enable NPIV FDISC interface
Transmits NPIV FDISC messages.
Arguments:• Available Items - A list of ranges of the FCoE NPIV type
selected in IxNetwork.
FCoE Client Disable NPIV FDISC interface
Transmits FLOGO messages, if already logged in.
Arguments:• Available Items - A list of ranges of the FCoE NPIV type
selected in IxNetwork.
FCoE Client Enable PLOGI
If configured in the IxNetwork configuration, this event transmits PLOGI messages to PLOGI Destination(s) .
Arguments:• Available Items - A list of ranges of the FCoE type
selected in IxNetwork.
FCoE Client Disable PLOGI
Transmits PLOGO messages if already logged in to destination N_Port(s).
Arguments:• Available Items - A list of ranges of the FCoE type
selected in IxNetwork.
Table D-1. IxNetwork Commands
Command Category
Command Syntax
D-8 IxNetwork TestComposer User Guide, Release 7.00

FCoE Forwarder Start
Starts the forwarder FCoE session negotiations with clients.
Arguments:• Available Items - A list of ranges of the FCoE type
selected in IxNetwork.
FCoE Forwarder Pause
Pauses the forwarder FCoE session negotiation with clients.
Arguments:Available Items - A list of ranges of the FCoE type selected in IxNetwork.
FCoE Forwarder Resume
Resumes previously paused FCoE session negotiations with clients.
Arguments:• Available Items - A list of ranges of the FCoE type
selected in IxNetwork.
FCoE Forwarder Stop
Stops the forwarder FCoE session negotiation with clients.
Arguments:• Available Items - A list of ranges of the FCoE type
selected in IxNetwork.
FCoE Forwarder Clear Stats
Clears the FCoE forwarder statistics.
Arguments:• Available Items - A list of ranges of the FCoE type
selected in IxNetwork.
FCoE Forwarder Clear Virtual Link
Deallocates logged FCoE clients.
Arguments:• Available Items - A list of ranges of the FCoE type
selected in IxNetwork.
Table D-1. IxNetwork Commands
Command Category
Command Syntax
IxNetwork TestComposer User Guide, Release 7.00 D-9
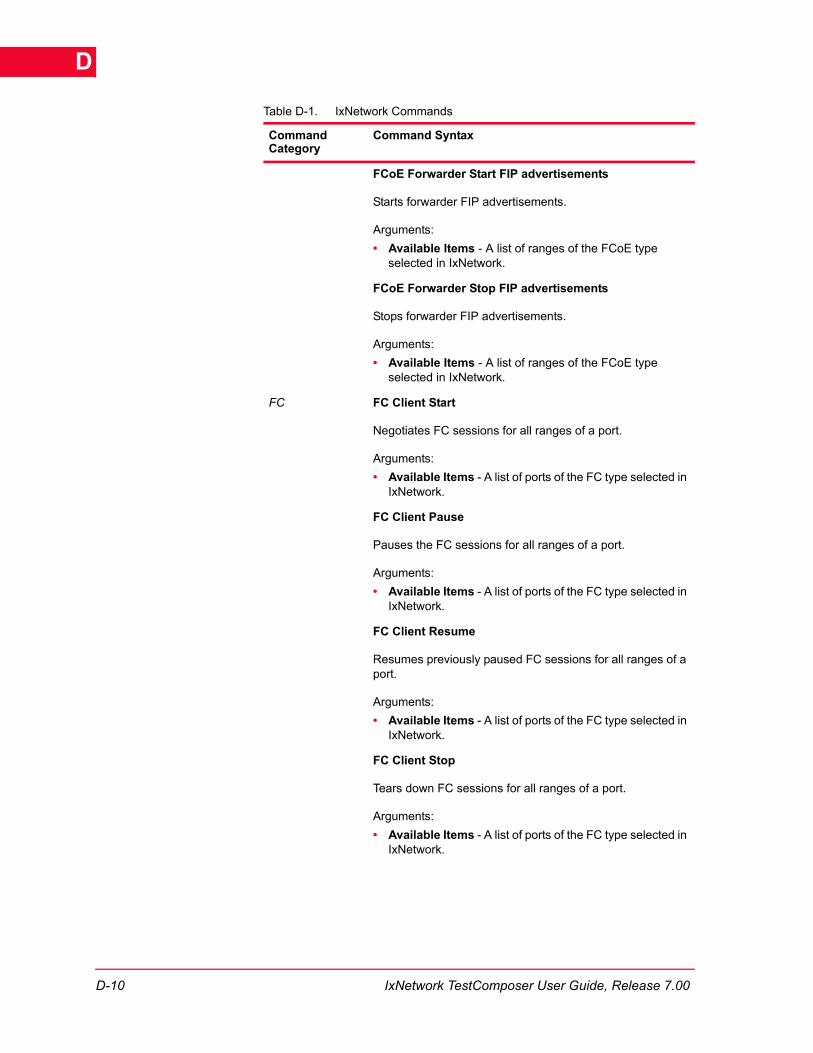
D
FCoE Forwarder Start FIP advertisements
Starts forwarder FIP advertisements.
Arguments:• Available Items - A list of ranges of the FCoE type
selected in IxNetwork.
FCoE Forwarder Stop FIP advertisements
Stops forwarder FIP advertisements.
Arguments:• Available Items - A list of ranges of the FCoE type
selected in IxNetwork.
FC FC Client Start
Negotiates FC sessions for all ranges of a port.
Arguments:• Available Items - A list of ports of the FC type selected in
IxNetwork.
FC Client Pause
Pauses the FC sessions for all ranges of a port.
Arguments:• Available Items - A list of ports of the FC type selected in
IxNetwork.
FC Client Resume
Resumes previously paused FC sessions for all ranges of a port.
Arguments:• Available Items - A list of ports of the FC type selected in
IxNetwork.
FC Client Stop
Tears down FC sessions for all ranges of a port.
Arguments:• Available Items - A list of ports of the FC type selected in
IxNetwork.
Table D-1. IxNetwork Commands
Command Category
Command Syntax
D-10 IxNetwork TestComposer User Guide, Release 7.00

FC Client Clear Stats
Clears FC statistics for all ranges of a port.
Arguments:• Available Items - A list of ports of the FC type selected in
IxNetwork.
FC Client Enable N_Port
Transmits FLOGI messages.
Arguments:• Available Items - A list of ranges of the FC NPort type
selected in IxNetwork.
FC Client Disable N_Port
Transmits FLOGO messages, if client is already logged in.
Arguments:• Available Items - A list of ranges of the FC NPort type
selected in IxNetwork.
FC Client Enable NPIV FDISC interface
Transmits NPIV FDISC messages.
Arguments:• Available Items - A list of ranges of the FC NPIV type
selected in IxNetwork.
FC Client Disable NPIV FDISC interface
Transmits FLOGO messages, if already logged in.
Arguments:• Available Items - A list of ranges of the FC NPIV type
selected in IxNetwork.
FC Client Enable PLOGI
If configured in the IxNetwork configuration, this event transmits PLOGI messages to PLOGI Destination(s).
Arguments:• Available Items - A list of ranges of the FC type selected
in IxNetwork.
Table D-1. IxNetwork Commands
Command Category
Command Syntax
IxNetwork TestComposer User Guide, Release 7.00 D-11

D
FCClient Disable PLOGI
Transmits PLOGO messages if already logged in to destination N_Port(s).
Arguments:• Available Items - A list of ranges of the FC type selected
in IxNetwork.
ESMC ESMC Start
Starts the ESMC protocol on the selected ranges.
Arguments:• Available Items - A list of ranges of the ESMC type
selected in IxNetwork.
ESMC Stop
Stops the ESMC protocol on the selected ranges.
Arguments:• Available Items - A list of ranges of the ESMC type
selected in IxNetwork.
ESMC Clear Stats
Clears the ESMC statistics.
Arguments:• Available Items - A list of ranges of the ESMC type
selected in IxNetwork.
Change ESMC Range
Changes the ESMC settings.
Arguments:• Rate per second - Indicates the rate at which messages
are sent.• Quality Level - Indicates a Quality Level setting for the
selected item.• Flag mode - Indicates the behavior for the SSM flag bit.• Available Items - A list of ranges of the ESMC type
selected in IxNetwork.
DCBX LLDP Start
Starts the LLDP protocol on the selected ranges.
Arguments:• Available Items - A list of ranges of the DCBX type
selected in IxNetwork.
Table D-1. IxNetwork Commands
Command Category
Command Syntax
D-12 IxNetwork TestComposer User Guide, Release 7.00

LLDP Stop
Stops the LLDP protocol on the selected ranges.
Arguments:• Available Items - A list of ranges of the DCBX type
selected in IxNetwork.
DCBX Start
Starts the DCBX protocol.
Arguments:• Available Items - A list of ranges of the DCBX type
selected in IxNetwork.
DCBX Stop
Stops the DCBX protocol.
Arguments:• Available Items - A list of ranges of the DCBX type
selected in IxNetwork.
DCBX Clear Stats
Clears the DCBX statistics.
Arguments:• Available Items - A list of ranges of the DCBX type
selected in IxNetwork.
Enable DCBX TLVs
Enables DCBX TLVs.
Arguments:• Available Items - A list of ranges of the DCBX type
selected in IxNetwork.
Disable DCBX TLVs
Disable DCBX TLVs.
Arguments:• Available Items - A list of ranges of the DCBX type
selected in IxNetwork.
Table D-1. IxNetwork Commands
Command Category
Command Syntax
IxNetwork TestComposer User Guide, Release 7.00 D-13

D
Change DCBX TLVs
Changes the DCBX TLVs.
Arguments:• Error - Indicates that an error has occurred during the
configuration exchange with the peer.• Willing - Indicates whether this feature accepts its con-
figuration from the peer or not.• Feature Enable - Indicates whether the DCB feature is
enabled or not.• Available Items - A list of ranges of the DCBX type
selected in IxNetwork.
L2TP L2TP Clear Starts
Clears L2TP tunnel statistics.
Arguments:• Available Items - A list of ranges of the L2TP type
selected in IxNetwork.
L2TP Negotiate To
Negotiates specified number of L2TP sessions.
Arguments:• Session Count - The number of L2TP sessions• Available Items - A list of ranges of the L2TP type
selected in IxNetwork.
L2TP Start
Negotiates L2TP tunnels for the selected ranges.
Arguments:• Available Items - A list of ranges of the L2TP type
selected in IxNetwork.
L2TP Stop
Tears down L2TP tunnels for the selected ranges.
Arguments:• Available Items - A list of ranges of the L2TP type
selected in IxNetwork.
Table D-1. IxNetwork Commands
Command Category
Command Syntax
D-14 IxNetwork TestComposer User Guide, Release 7.00

PPPoX PPPoX Clear Stats
Clears PPPoX statistics.
Arguments: • Available Items - A list of ranges of the PPPoX type
selected in IxNetwork.
PPPoX Start
Negotiates PPPoX sessions for selected ranges.
Arguments: • Available Items - A list of ranges of the PPPoX type
selected in IxNetwork.
PPPoX Stop
Tears down PPPoX sessions for selected ranges.
Arguments: • Available Items - A list of ranges of the PPPoX type
selected in IxNetwork.
PPPoX Negotiate To
Negotiates specified number of PPPoX sessions.
Arguments:• Session Count - The number of negotiated sessios• Available Items - A list of ranges of the PPPoX type
selected in IxNetwork.
TWAMP TWAMP Server Start
Initiates TWAMP control and test sessions for selected ranges and starts measurements.
Arguments:• Available Items - A list of ranges of the TWAMP type
selected in IxNetwork.
TWAMP Server Stop
Tears down TWAMP sessions for selected ranges.
Arguments:• Available Items -A list of ranges of the TWAMP type
selected in IxNetwork.
Table D-1. IxNetwork Commands
Command Category
Command Syntax
IxNetwork TestComposer User Guide, Release 7.00 D-15

D
TWAMP Server Clear Stats
Clears TWAMP statistics for selected plugins.
Arguments:• Available Items - A list of ranges of the TWAMP type
selected in IxNetwork.
TWAMP Start
Initiates TWAMP control and test sessions for selected ranges and starts measurements.
Arguments:• Available Items -A list of ranges of the TWAMP type
selected in IxNetwork.
TWAMP Stop
Tears down TWAMP sessions for the selected ranges.
Arguments: • Available Items - A list of ranges of the TWAMP type
selected in IxNetwork.
TWAMP Start Control
Initiates TWAMP control sessions
Arguments:• Available Items - A list of ranges of the TWAMP type
selected in IxNetwork.
TWAMP Start Measurement
Commences active two-way measurement.
Arguments:• Available Items - A list of ranges of the TWAMP type
selected in IxNetwork.
TWAMP Start Test
Requests the TWAMP test sessions from the Control-Server.
Arguments:• Available Items - A list of ranges of the TWAMP type
selected in IxNetwork.
Table D-1. IxNetwork Commands
Command Category
Command Syntax
D-16 IxNetwork TestComposer User Guide, Release 7.00

TWAMP Clear Stats
Clears TWAMP statistics for the selected plugins.
Arguments:• Available Items - A list of ranges of the TWAMP type
selected in IxNetwork.
All Auth/Access/DCB Protocols
Abort
Aborts protocols on all selected plugins.
Arguments• None
BFD Start BFDStarts BFD protocol on the selected ports.
Stop BFDStops BFD protocol on the selected ports.
Stop PDUStops sending out BFD PDUs for a BFD session used by the selected protocols, over the selected interfaces.argument id: Session Used By ProtocolDescription: Event will take effect on sessions used by the selected protocol. The protocols against their corresponding values are as follows:• 4: OSPF• 5: OSPFv3• 6: BGP• 7: LDP• 8: RSVP• 9: ISIS• 10: PIM• 17: EIGRP• 18: BFD
Table D-1. IxNetwork Commands
Command Category
Command Syntax
IxNetwork TestComposer User Guide, Release 7.00 D-17

D
Resume PDUResumes sending out BFD PDUs for a BFD session used by the selected protocols, over the selected interfaces.argument id: Session Used By ProtocolDescription: Event will take effect on sessions used by the selected protocol. The protocols against their corresponding values are as follows:• 4: OSPF• 5: OSPFv3• 6: BGP• 7: LDP• 8: RSVP• 9: ISIS• 10: PIM• 17: EIGRP• 18: BFD
Set Diagnostic StateSets diagnostic state in PDUs for sessions used by the selected protocols, over the selected interfaces.argument id: Session Used By ProtocolDescription: Event will take effect on sessions used by the selected protocol. The protocols against their corresponding values are as follows:• 4: OSPF • 5: OSPFv3 • 6: BGP • 7: LDP• 8: RSVP• 9: ISIS• 10: PIM• 17: EIGRP• 18: BFD argument id: Diagnostic CodeDescription: Diagnostic code, which can have the following values:• 1: Control Detection Time Expired• 2: Echo Function Failed• 3: Neighbor Signaled Session Down• 4: Forwarding Plane Reset• 5: Path Down• 6: Concatenated Path Down• 7: Administratively Down• 8: Reverse Concatenated Path Down• 9: Reserved
Table D-1. IxNetwork Commands
Command Category
Command Syntax
D-18 IxNetwork TestComposer User Guide, Release 7.00

Set Admin DownSets admin down for sessions used by the selected protocols, over the selected interfaces.argument id: Session Used By ProtocolDescription: Event will take effect on sessions used by the selected protocol. The protocols against their corresponding values are as follows:• 4: OSPF• 5: OSPFv3• 6: BGP• 7: LDP• 8: RSVP• 9: ISIS• 10: PIM• 17: EIGRP• 18: BFD
Set Admin UpSets admin up for sessions used by the selected protocols, over the selected interfaces.argument id: Session Used By ProtocolDescription: Event will take effect on sessions used by the selected protocol. The protocols against their corresponding values are as follows:• 4: OSPF• 5: OSPFv3• 6: BGP• 7: LDP• 8: RSVP• 9: ISIS• 10: PIM• 17: EIGRP• 18: BFD
Table D-1. IxNetwork Commands
Command Category
Command Syntax
IxNetwork TestComposer User Guide, Release 7.00 D-19

D
Enable Demand ModeMakes available the demand mode for sessions used by the selected protocols, over the selected interfaces.argument id: Session Used By Protocol Description: Event will take effect on sessions used by the selected protocol. The protocols against their corresponding values are as follows:• 4: OSPF• 5: OSPFv3• 6: BGP• 7: LDP• 8: RSVP• 9: ISIS• 10: PIM• 17: EIGRP• 18: BFD
Disable Demand ModeMakes unavailable the demand mode for sessions used by the selected protocols, over the selected interfaces.argument id: Session Used By ProtocolDescription: Event will take effect on sessions used by the selected protocol. The protocols against their corresponding values are as follows:• 4: OSPF• 5: OSPFv3• 6: BGP• 7: LDP• 8: RSVP• 9: ISIS• 10: PIM• 17: EIGRP• 18: BFD
Table D-1. IxNetwork Commands
Command Category
Command Syntax
D-20 IxNetwork TestComposer User Guide, Release 7.00

Initiate PollInitiates poll for sessions used by the selected protocols, over the selected interfaces.argument id: Session Used By ProtocolDescription: Event will take effect on sessions used by the selected protocol. The protocols against their corresponding values are as follows:• 4: OSPF• 5: OSPFv3• 6: BGP• 7: LDP• 8: RSVP• 9: ISIS• 10: PIM• 17: EIGRP• 18: BFD
Activate RouterActivates the selected routers.
Deactivate RouterDeactivates the selected routers.
Activate InterfaceActivates the selected interfaces.
Deactivate InterfaceDeactivates the selected interfaces.
Activate ConfiguredSessionActivates the selected configured sessions.
Deactivate Configured SessionDeactivates the selected configured sessions.
BGP Start BGPStarts BGP protocol on the selected ports.
Stop BGPStops BGP protocol on the selected ports.
Gracefully RestartGracefully restarts peers on the selected peer ranges both in helper mode and restarting modeargument id: Restart AfterDescription: Router will come back up after input time.
Table D-1. IxNetwork Commands
Command Category
Command Syntax
IxNetwork TestComposer User Guide, Release 7.00 D-21

D
Break TCP SessionBreaks TCP session by sending notification messages for the peers on the selected peer ranges.argument id: Notification CodeDescription: Notification code in notification message.argument id: Notification SubCodeDescription: Notification sub-code in notification message.
Stop KeepaliveStops sending keepalive messages for peers on the selected peer ranges.
Resume KeepaliveResumes sending keepalive messages for peers on the selected peer ranges.
Withdraw IP RouteWithdraws routes from the selected IP route ranges.argument id: Percentage WithdrawDescription: Percentage of configured route count to withdraw.
Readvertise IP RouteAdvertises again the previously withdrawn IP routes from the selected IP route ranges.
Withdraw MPLS RouteWithdraws routes from the selected MPLS route ranges.argument id: Percentage WithdrawDescription: Percentage of configured route count to withdraw.
Readvertise MPLSRouteAdvertises again the previously withdrawn routes from the selected MPLS route ranges.
Withdraw VPN RouteWithdraws routes from the selected VPN route ranges.argument id: Percentage WithdrawDescription: Percentage of configured route count to withdraw.
Readvertise VPN RouteAdvertises again the previously withdrawn routes from the selected VPN route ranges.
Activate PeerActivates the selected peer ranges.
Deactivate PeerDeactivates the selected peer ranges.
Table D-1. IxNetwork Commands
Command Category
Command Syntax
D-22 IxNetwork TestComposer User Guide, Release 7.00

Activate IP RouteActivates the selected IP route ranges.
Deactivate IP RouteDeactivates the selected IP route ranges.
Activate MPLS RouteActivates the selected MPLS route ranges.
Deactivate MPLS RouteDeactivates the selected MPLS route ranges.
Activate VPN RouteActivates the selected VPN route ranges.
Deactivate VPN RouteDeactivates the selected VPN route ranges.
Activate L2 Label BlockActivates the selected L2 label blocks.
Deactivate L2 LabelBlockDeactivates the selected L2 label blocks.
Resume TCP SessionResumes TCP session for peers on the selected peer ranges.
Activate MulticastSender SiteActivates the selected multicast sender sites.
Deactivate MulticastSender SiteDeactivates the selected multicast sender sites.
Activate MulticastReceiver SiteActivates the selected multicast receiver sites.
Deactivate MulticastReceiver SiteDeactivates the selected multicast receiver sites.
Multicast Sender SiteSwitch To SPMSISwitches the multicast sender site to S-PMSI if not already switched.
CFM Start CFMStarts the CFM protocol on the selected ports.
Stop CFMStops the CFM protocol on the selected ports.
Activate BridgeActivates the selected bridges.
Table D-1. IxNetwork Commands
Command Category
Command Syntax
IxNetwork TestComposer User Guide, Release 7.00 D-23

D
Deactivate BridgeDeactivates the selected bridges.
Activate InterfaceActivates the selected interfaces.
Deactivate InterfaceDeactivates the selected interfaces.
* Activate MD or MEGLevelActivates the selected MD/MEG levels.This event is only available for bridges configured in CFM/Y.1371 ITU mode. PBT trunks do not show up as available items for this event.
* Deactivate MD or MEGLevelDeactivates the MD/MEG levels.This event is only available for bridges configured in CFM/Y.1371 ITU mode. PBT trunks do not show up as available items for this event.
* Activate MIP or MEPActivates the selected MIPs/MEPs.This event is only available for bridges configured in CFM/Y.1371 ITU mode. PBT trunks do not show up as available items for this event.
* Deactivate MIP or MEPDeactivates the selected MIPs/MEPs.This event is only available for bridges configured in CFM/Y.1371 ITU mode. PBT trunks do not show up as available items for this event.
* Activate LinkActivates the selected links.This event is only available for trunks configured with bridge mode PBT.
* Deactivate LinkDeactivates the selected links.This event is only available for trunks configured with bridge mode PBT.
* Activate VLANActivates the selected VLANs.
Table D-1. IxNetwork Commands
Command Category
Command Syntax
D-24 IxNetwork TestComposer User Guide, Release 7.00

* Deactivate VLANDeactivates the selected VLANs.NOTE: The events marked with an * are applicable for the bridges configured in CFM/Y.173 (ITU) mode. PBT trunk does not show up as available items for these events.
Activate TrunkActivates the selected trunks.
Deactivate TrunkDeactivates the selected trunks.NOTE: Activate/Deactivate Trunk events are only applicable for the trunks configured with Bridge mode PBT.
Activate Custom TLVActivates the selected custom TLVs.
Deactivate Custom TLVDeactivates the selected custom TLVs.
Change Port StatusChanges the port status in the port TLV for selected MEPs or trunk local endpoints.argument id: Port StatusDescription: The port status with their corresponding values that are to be sent in port TLVs are as follows:• 1: Blocked• 2: Up
Change Interface StatusChanges the interface status in the interface TLV for the selected MEPs or trunk local endpoints.argument id: Interface StatusDescription: The interface status with their corresponding values that are to be sent in interface TLVs are as follows:• 1: Up• 2: Down• 3: Testing• 4: Unknown• 5: Dormant• 6: NotPresent• 7: LowerLayerDown
Start Auto MEP DiscoveryStarts processing CCM on the remote MEPs.
Table D-1. IxNetwork Commands
Command Category
Command Syntax
IxNetwork TestComposer User Guide, Release 7.00 D-25
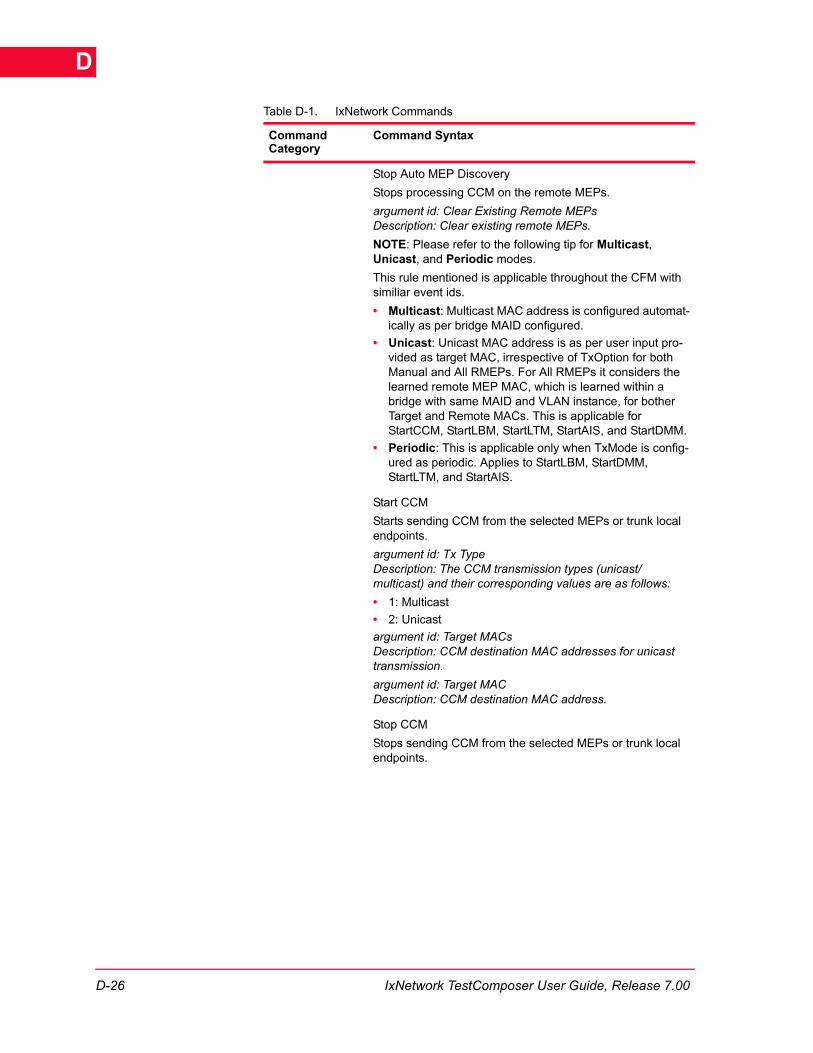
D
Stop Auto MEP DiscoveryStops processing CCM on the remote MEPs.argument id: Clear Existing Remote MEPsDescription: Clear existing remote MEPs.NOTE: Please refer to the following tip for Multicast, Unicast, and Periodic modes. This rule mentioned is applicable throughout the CFM with similiar event ids. • Multicast: Multicast MAC address is configured automat-
ically as per bridge MAID configured.• Unicast: Unicast MAC address is as per user input pro-
vided as target MAC, irrespective of TxOption for both Manual and All RMEPs. For All RMEPs it considers the learned remote MEP MAC, which is learned within a bridge with same MAID and VLAN instance, for bother Target and Remote MACs. This is applicable for StartCCM, StartLBM, StartLTM, StartAIS, and StartDMM.
• Periodic: This is applicable only when TxMode is config-ured as periodic. Applies to StartLBM, StartDMM, StartLTM, and StartAIS.
Start CCMStarts sending CCM from the selected MEPs or trunk local endpoints.argument id: Tx TypeDescription: The CCM transmission types (unicast/multicast) and their corresponding values are as follows:• 1: Multicast• 2: Unicastargument id: Target MACsDescription: CCM destination MAC addresses for unicast transmission.argument id: Target MACDescription: CCM destination MAC address.
Stop CCMStops sending CCM from the selected MEPs or trunk local endpoints.
Table D-1. IxNetwork Commands
Command Category
Command Syntax
D-26 IxNetwork TestComposer User Guide, Release 7.00

Start LTMStarts sending LTM from the selected MEPs or trunk local endpoints.OptionDescription: The transmission options (manually specify destinations/all remote MEPs) and their corresponding values are as follows:• 1: Manual• 2: All RMEPsargument id: Target MACsDescription: LTM destination MAC addresses for manual configuration.argument id: Target MACDescription: LTM destination MAC address.
Stop LTMStops sending LTM from the selected MEPs or trunk local endpoints.
Table D-1. IxNetwork Commands
Command Category
Command Syntax
IxNetwork TestComposer User Guide, Release 7.00 D-27

D
Start LBMStarts sending LBM from the selected MEPs or trunk local endpoints.argument id: TxT ypeDescription: The transmission types (unicast/multicast) and their corresponding values are as follows:• 1: Multicast• 2: Unicastargument id: Initial Transaction IdDescription: Initial transaction Id to be set in LBM.argument id: Tx ModeDescription: The transmission modes (single/periodic) and their corresponding values are as follows:• 1: Single• 2: Periodicargument id: Periodic IntervalDescription: Send LBM in every specified seconds.argument id: Wait For All ResponseDescription: Event completes after receiving LBR from all remote MPs.argument id: Response TimeoutDescription: LBR response timeout in seconds.argument id: Tx OptionDescription: The transmission options (manually specify destionations/all remote MEPs) and their corresponding values are as follows:• 1: Manual• 2: All RMEPsargument id: Target MACsDescription: LBM destination MAC addresses for manul configuration.argument id: Target MACDescription: LBM destination MAC address.
Stop LBMStops sending LBM from the selected MEPs or trunk local endpoints.
Table D-1. IxNetwork Commands
Command Category
Command Syntax
D-28 IxNetwork TestComposer User Guide, Release 7.00

Start Delay MeasurementStarts sending DMM from the selected MEPs or trunk local endpoints.This event is only applicable for bridges configured with PBT/ITU mode. Any MEP of CFM bridges will not show up as avaliable list items.argument id: Tx TypeDescription: The transmission type (unicast/multicast) and their corresponding values are as follows:• 1: Multicast• 2: Unicastargument id: DM MethodDescription: The delay measurement methods (two way/one way) and their corresponding values are as follows:• 1: Two-Way• 2: One-Wayargument id: Response TimeoutDescription: DMR response timeout in seconds.argument id: Tx ModeDescription: The transmission modes (single/periodic) and their corresponding values are as follows:• 1: Single• 2: Periodicargument id: Periodic IntervalDescription: Send DMM in every specified seconds.argument id: Wait For All ResponseDescription: Event completes after receiving DMR from all remote MPs.argument id: Tx OptionDescription: The transmission options (manually specify destionations/all remote MEPs) and their corresponding values are as follows:• 1: Manual• 2: All RMEPsargument id: Target MACsDescription: DMM destination MAC addresses for manul configuration.argument id: Target MACDescription: DMM destination MAC address.
Stop Delay MeasurementStops sending DMM from the selected MEPs or trunk local endpoints.This event is only applicable for bridges configured with PBT/ITU mode. Any MEP of CFM bridges will not show up as avaliable list items.
Table D-1. IxNetwork Commands
Command Category
Command Syntax
IxNetwork TestComposer User Guide, Release 7.00 D-29

D
Start AISStarts sending AIS from the selected MEPs or trunk local endpoints.This event is only applicable for bridges configured with PBT/ITU mode. Any MEP of CFM bridges or any trunk of PBT bridges will not show up as avaliable list items.argument id: Tx TypeDescription: The transmission types (unicast/multicast) and their corresponding values are as follows:• 1: Multicast• 2: Unicastargument id: Target MACsDescription: AIS destination MAC addresses for unicast configuration.argument id: Target MACDescription: AIS destination MAC address.argument id: Tx ModeDescription: The transmission modes (single/periodic) and their corresponding values are as follows:• 1: Single• 2: Periodicargument id: Periodic IntervalDescription: Send AIS in every specified seconds.
Stop AISStops sending AIS from the selected MEPs or trunk local endpoints.This event is only applicable for bridges configured with ITU mode. Any MEP of CFM bridges or any trunk of PBT bridges will not show up as avaliable list items.
Note: All events such as Start CCM/Stop CCM never collide with control plane operations. For example, if CCM is transmitting, if you re-trigger CCM from TestComposer, this does not have any effect and packets generated by the protocol state machine keep flowing. No packets are generated for the TestComposer event, even if the application may show that the event completed successfully.You need to stop the existing packet flow and then re-trigger the same event to get the effective transmission as per the TestComposer input.This behavior applies to other control operations, such as periodic LTM, LBM, DMM, AIS in bridges configured with the ITU mode.
EIGRP Start EIGRPStarts EIGRP protocol on the selected ports.
Stop EIGRPStops EIGRP protocol on the selected ports.
Table D-1. IxNetwork Commands
Command Category
Command Syntax
D-30 IxNetwork TestComposer User Guide, Release 7.00

Activate RouterActivates the selected routers.
Deactivate RouterDeactivates the selected routers.
Activate InterfaceActivates the selected interfaces.
Deactivate InterfaceDeactivates the selected interfaces.
Stop HelloStops sending Hello messages from the selected interfaces.
Resume HelloResumes sending Hello messages from the selected interfaces.
IGMP Start IGMPStarts IGMP protocol on the selected ports.
Stop IGMPStops IGMP protocol on the selected ports.
Stop PeriodicGeneral QueryStops sending periodic general query from the selected queriers.
Resume PeriodicGeneral QueryResumes sending periodic general query from the selected queriers.
Send Specific QuerySends specific query from the selected queriers.argument id: Start Group AddressDescription: Start group address.argument id: Group CountDescription: Group count.argument id: Start Source AddressDescription: Start source address.argument id: Source CountDescription: Source count.argument id: Source Increment StepDescription: Source increment step.
Rejoin GroupSends single Join message for groups in the selected group ranges.
Table D-1. IxNetwork Commands
Command Category
Command Syntax
IxNetwork TestComposer User Guide, Release 7.00 D-31

D
Leave GroupMakes unavailable the selected group ranges.
Stop QuerierMakes unavailable the selected queriers.
Stop HostMakes unavailable the selected hosts.
Start QuerierMakes available the selected queriers.
Start HostMakes available the selected hosts.
JoinGroupMakes available the selected group ranges.
RIP Start RIPStarts RIP protocol on the selected ports.
Stop RIPStops RIP protocol on the selected ports.
Activate RouterActivates the selected routers.
Deactivate RouterDeactivates the selected routers.
Activate RouteActivates the selected route ranges.
Deactivate RouteDeactivates the selected route ranges.
Pause UpdatePauses sending Update messages from the selected routers.
Resume UpdateResumes sending Update messages from the selected routers.
Withdraw RouteWithdraws routes from the selected route ranges.argument id: Percentage WithdrawDescription: Percentage of configured route count to withdraw.
Table D-1. IxNetwork Commands
Command Category
Command Syntax
D-32 IxNetwork TestComposer User Guide, Release 7.00

Readvertise RouteAdvertises again the previously withdrawn routes from the selected route ranges.
LDP Start LDPStarts LDP protocol on the selected ports.
Stop LDPStops LDP protocol on the selected ports.
Resume KeepaliveResumes sending Keepalive messages for sessions on the selected routers.
Stop KeepaliveStops sending Keepalive messages for sessions on the selected routers.
Resume Basic HelloResumes sending Hello messages for basic sessions on the selected interfaces.
Stop Basic HelloStops sending Hello messages for basic sessions on the selected interfaces.
Resume Targeted HelloResumes sending Hello messages for the selected targeted sessions.
Stop Targeted HelloStops sending Hello messages for the selected targeted sessions.
Gracefully RestartGracefully restarts the selected routers.argument id: Restart AfterDescription: Router will come back up after input time.
Activate RouterActivates the selected routers.
Deactivate RouterDeactivates the selected routers.
Activate InterfaceActivates the selected interfaces.
Deactivate InterfaceDeactivates the selected interfaces.
Table D-1. IxNetwork Commands
Command Category
Command Syntax
IxNetwork TestComposer User Guide, Release 7.00 D-33

D
Activate Targeted PeerActivates the selected targeted peers.
DeactivateTargeted PeerDeactivates the selected targeted peers.
Activate ReqFECActivates the selected requesting FEC ranges.
Deactivate Req FECDeactivate the selected requesting FEC ranges.
Activate Adv FECActivates the selected advertising FEC ranges.
Deactivate AdvF ECDeactivates the selected advertising FEC ranges.
Activate L2 InterfaceActivates the selected L2 interfaces.
Deactivate L2 InterfaceDeactivates the selected L2 interfaces.
Setup Virtual CircuitSets up VCs and makes available the selected VC ranges.
Teardown Virtual CircuitMakes unavailable the selected VC ranges.
Purge MACSends MAC TLV in Address Withdraw messages for all active VCs on the selected VC ranges.argument id: Start MACDescription: Start MAC address to withdraw.argument id: Mac CountDescription: Number of MAC addresses to withdraw per VC.argument id: Generate UniqueDescription: When checked, generate different MAC addresses for different VCs. When unchecked, generate same MAC addresses for all selected VCs.
Purge Virtual CircuitSends empty MAC TLV in Address Withdraw messages for all active VCs on the selected VC ranges.
MLD Start MLDStarts MLD protocol on the selected ports.
Stop MLDStops MLD protocol on the selected ports.
Table D-1. IxNetwork Commands
Command Category
Command Syntax
D-34 IxNetwork TestComposer User Guide, Release 7.00

Stop PeriodicGeneral QueryStops sending periodic general query from the selected queriers.
Resume PeriodicGeneral QueryResumes sending periodic general query from the selected queriers.
Send Specific QuerySends specific query from the selected queriers.argument id: Start Group AddressDescription: Start group address.argument id: Group CountDescription: Group count.argument id: Start Source AddressDescription: Start source address.argument id: Source CountDescription: Source count.argument id: Source Increment StepDescription: Increment step.
Rejoin GroupSends single Join message for groups in the selected group ranges.
Leave GroupMakes unavailable the selected group ranges.
Stop QuerierMakes unavailable the selected queriers.
Stop HostMakes unavailable the selected hosts.
Start QuerierMakes available the selected queriers.
Start HostMakes available the selected hosts.
Join GroupMakes available the selected group ranges.
OAM Start OAMStarts link OAM protocol on the selected ports.
Stop OAMStops link OAM protocol on the selected ports.
Wait For DiscoveryWaits for discovery.
Table D-1. IxNetwork Commands
Command Category
Command Syntax
IxNetwork TestComposer User Guide, Release 7.00 D-35

D
Pause DiscoveryPauses discovery.argument id: • Pause At: The values corresponding to pause the state
machine at are as follows:• 1: NONE• 2: FAULT• 3: ACTIVE_SEND_LOCAL/PASSIVE_WAIT• 4: SEND_LOCAL_REMOTE• 5: SEND_LOCAL_REMOTE_OK• 6: SEND_ANY
Resume DiscoveryResumes the discovery session from the point where it was paused.argument id: • Pause At: The values corresponding to resume the state
machine and pause at are as follows:• 1: NONE• 2: FAULT• 3: ACTIVE_SEND_LOCAL/PASSIVE_WAIT• 4: SEND_LOCAL_REMOTE• 5: SEND_LOCAL_REMOTE_OK• 6: SEND_ANY
Restart DiscoveryRestarts the discovery session.argument id:• Available Items - The ranges of the OAM type selected in
IxNetwork.
Start Sending EnableRemote LoopbackStarts sending Enable Loopback PDUs.argument ids: • Tx Type - Single or Periodic• Periodic Interval(s) - Interval period (default = 1)• Available Items - A list of ranges of the OAM type
selected in IxNetwork.
Stop Sending EnableRemote LoopbackStops Sending Enable Loopback PDUs.
argument id:• Available Items - A list of ranges of the OAM type
selected in IxNetwork.
Table D-1. IxNetwork Commands
Command Category
Command Syntax
D-36 IxNetwork TestComposer User Guide, Release 7.00

Start Sending DisableRemote LoopbackStarts sending Disable Loopback PDUs.
argument id:• Tx Type - Single or Periodic• Periodic Interval(s) - Interval period (default = 1) • Available Items - The ranges of the OAM type selected in
IxNetwork.
Stop Sending DisableRemote LoopbackStops sending Disable Loopback PDUs.argument id: • Available Items - The ranges of the OAM type selected in
IxNetwork.
Simulate Link FaultSimulates a link fault by sending Info PDUs with Link Fault bit set.argument id:• Available Items - The ranges of the OAM type selected in
IxNetwork.
Recover Link FaultRecovers link fault by starting to send Info PDUs with the Link Fault bit unset.argument id:• Available Items - The ranges of the OAM type selected in
IxNetwork.
Start Sending Org Spec PDUsStarts sending Org Specific PDUs.argument id:• Tx Type - Single or Periodic• Periodic Interval(s) - Interval period (default = 1) • Available Items -The ranges of that the OAM selected in
IxNetwork.
Stop Sending Org Spec PDUsStops sending Org Specific PDUs.argument id:• Available Items - The ranges of the OAM type selected in
IxNetwork.
Table D-1. IxNetwork Commands
Command Category
Command Syntax
IxNetwork TestComposer User Guide, Release 7.00 D-37

D
Start Sending Variable RequestStarts sending Variable Request PDUs.argument id:• Branch - The branch value (default = 0) • Leaf - The leaf value (default = 0) • Tx Type - Single or Periodic• Periodic Interval(s) - Interval period (default = 1) • Available Items - The ranges of the OAM type selected in
IxNetwork.
Stop Sending Variable RequestStops sending variable request.argument id:Available Items - The ranges of the OAM type selected in IxNetwork.
Enable LinkEnables OAM link.argument id:Available Items - The ranges of the OAM type selected in IxNetwork.
Disable LinkDisables OAM link.argument id:Available Items - The ranges of the OAM type selected in IxNetwork.
Start SendingInformation PDUStarts sending Information PDU based on PDU count per second.argument id:• PDU Count per sec - Number of OAM PDU per second. • Available Items - The ranges of the OAM type selected in
IxNetwork.
Stop SendingInformation PDUStops sending Information PDU.argument id:• Available Items - The ranges of the OAM type selected in
IxNetwork.
Table D-1. IxNetwork Commands
Command Category
Command Syntax
D-38 IxNetwork TestComposer User Guide, Release 7.00

Start Sending EventNotificationPDUsStarts sending Event Notification PDUs.
argument ids:• Tx Type - Single or Periodic • Periodic Interval(s) - Interval period (default = 1) • Available Items - The ranges of the OAM type selected in
IxNetwork.
Stop Sending EventNotification PDUsStops sending Event Notification PDUs.argument id:• Available Items - The ranges of the OAM type selected in
IxNetwork.
OSPF Start OSPFStarts OSPF protocol on the selected ports.
Stop OSPFStops OSPF protocol on the selected ports.
Activate RouterActivates the selected routers.
Deactivate RouterDeactivates the selected routers.
Activate InterfaceActivates the selected interfaces.
Deactivate InterfaceDeactivates the selected interfaces.
Activate RouteActivates the selected route ranges.
Activate LSAActivates the selected user LSAs.
Deactivate RangeDeactivates the selected route ranges.
Deactivate LSADeactivates LSADeactivate the selected user LSAs.
Resume HelloResumes sending Hello messages from the selected interfaces
Stop HelloStops sending Hello messages from the selected interfaces.
Table D-1. IxNetwork Commands
Command Category
Command Syntax
IxNetwork TestComposer User Guide, Release 7.00 D-39
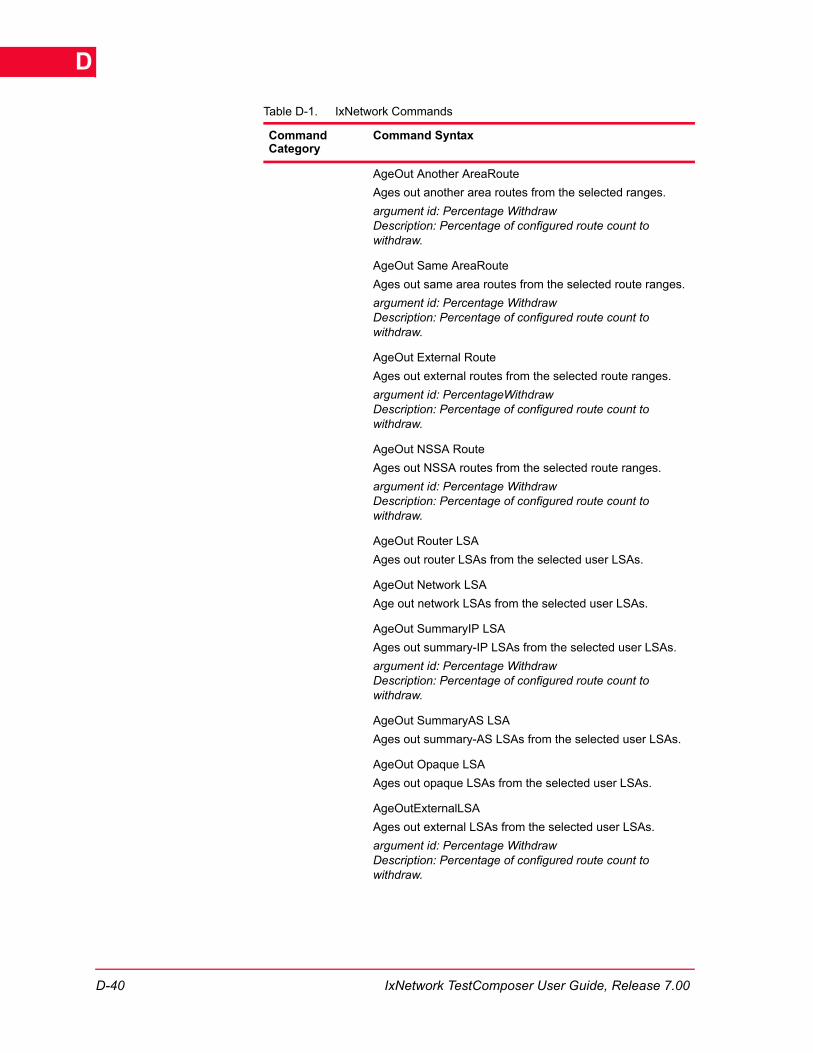
D
AgeOut Another AreaRouteAges out another area routes from the selected ranges.argument id: Percentage WithdrawDescription: Percentage of configured route count to withdraw.
AgeOut Same AreaRouteAges out same area routes from the selected route ranges.argument id: Percentage WithdrawDescription: Percentage of configured route count to withdraw.
AgeOut External RouteAges out external routes from the selected route ranges.argument id: PercentageWithdrawDescription: Percentage of configured route count to withdraw.
AgeOut NSSA RouteAges out NSSA routes from the selected route ranges.argument id: Percentage WithdrawDescription: Percentage of configured route count to withdraw.
AgeOut Router LSAAges out router LSAs from the selected user LSAs.
AgeOut Network LSAAge out network LSAs from the selected user LSAs.
AgeOut SummaryIP LSAAges out summary-IP LSAs from the selected user LSAs.argument id: Percentage WithdrawDescription: Percentage of configured route count to withdraw.
AgeOut SummaryAS LSAAges out summary-AS LSAs from the selected user LSAs.
AgeOut Opaque LSAAges out opaque LSAs from the selected user LSAs.
AgeOutExternalLSAAges out external LSAs from the selected user LSAs.argument id: Percentage WithdrawDescription: Percentage of configured route count to withdraw.
Table D-1. IxNetwork Commands
Command Category
Command Syntax
D-40 IxNetwork TestComposer User Guide, Release 7.00
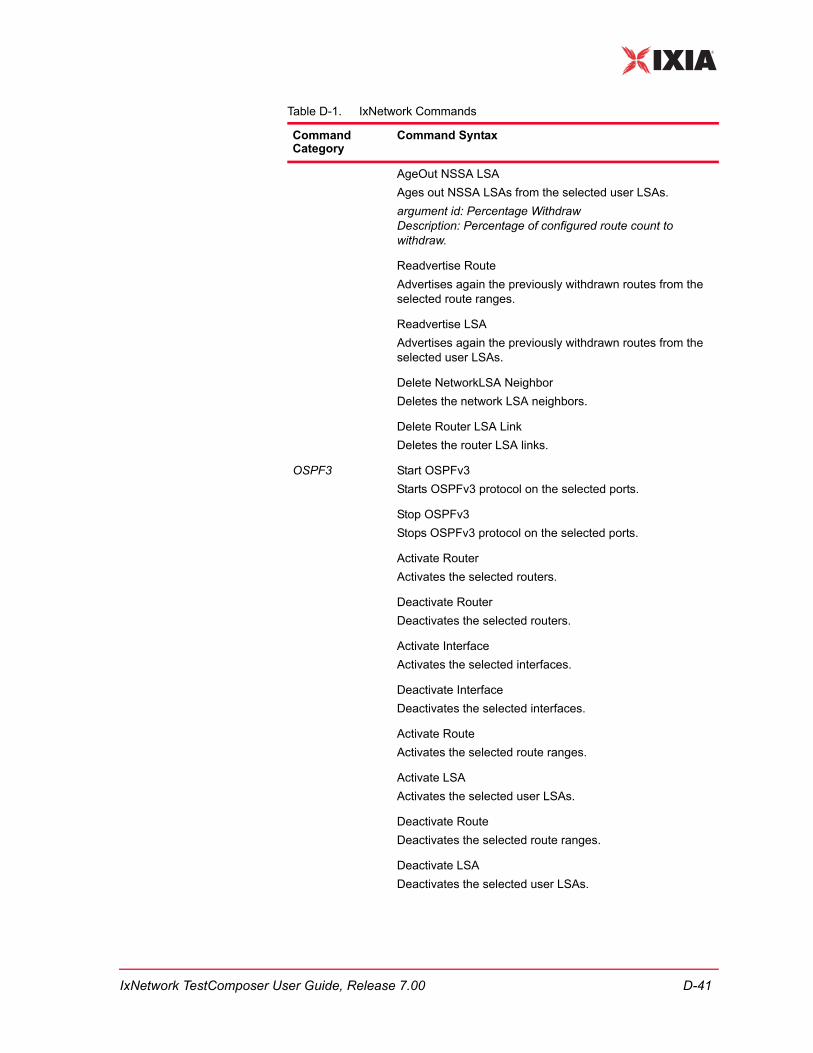
AgeOut NSSA LSAAges out NSSA LSAs from the selected user LSAs.argument id: Percentage WithdrawDescription: Percentage of configured route count to withdraw.
Readvertise RouteAdvertises again the previously withdrawn routes from the selected route ranges.
Readvertise LSAAdvertises again the previously withdrawn routes from the selected user LSAs.
Delete NetworkLSA NeighborDeletes the network LSA neighbors.
Delete Router LSA LinkDeletes the router LSA links.
OSPF3 Start OSPFv3Starts OSPFv3 protocol on the selected ports.
Stop OSPFv3Stops OSPFv3 protocol on the selected ports.
Activate RouterActivates the selected routers.
Deactivate RouterDeactivates the selected routers.
Activate InterfaceActivates the selected interfaces.
Deactivate InterfaceDeactivates the selected interfaces.
Activate RouteActivates the selected route ranges.
Activate LSAActivates the selected user LSAs.
Deactivate RouteDeactivates the selected route ranges.
Deactivate LSADeactivates the selected user LSAs.
Table D-1. IxNetwork Commands
Command Category
Command Syntax
IxNetwork TestComposer User Guide, Release 7.00 D-41

D
Resume HelloResumes sending Hello messages from the selected interfaces.
Stop HelloStops sending Hello messages from the selected interfaces.
AgeOut Another AreaRouteAges out another area routes from the selected route rangesargument id: PercentageWithdrawDescription: Percentage of configured route count to withdraw.
AgeOut External RouteAges out external routes from the selected route ranges.argument id: PercentageWithdrawDescription: Percentage of configured route count to withdraw.
AgeOut Router LSAAges out router LSAs from the user LSAs.
AgeOut Network LSAAges out network LSAs from the user LSAs.
AgeOut InterAreaPrefix LSAAges out inter area prefix LSAs from the user LSAs.argument id: PercentageWithdrawDescription: Percentage of configured User LSA count to withdraw.
AgeOut Inter AreaRouter LSAAges out inter area router LSAs from the user LSAs.argument id: Percentage WithdrawDescription: Percentage of configured User LSA count to withdraw.
AgeOut AS ExternalLSAAges out AS-external LSAs from the user LSAs.argument id: Percentage WithdrawDescription: Percentage of configured User LSA count to withdraw.
AgeOut Link LSAAges out link LSAs from the user LSAs.argument id: Percentage WithdrawDescription: Percentage of configured User LSA count to withdraw.
Table D-1. IxNetwork Commands
Command Category
Command Syntax
D-42 IxNetwork TestComposer User Guide, Release 7.00

AgeOut Intra AreaPrefixLSAAges out intra area prefix LSAs from the user LSAs.argument id: Percentage WithdrawDescription: Percentage of configured User LSA count to withdraw.
Readvertises RouteAdvertises again the previously withdrawn routes from the selected route ranges.
Readvertises LSAAdvertises again the previously withdrawn LSA from the selected user LSA.
Delete NetworkLSA NeighborDeletes the network LSA neighbors.
Delete Router LSA LinkDeletes the router LSA links.
LACP Start LACPStarts LACP protocol on the selected ports.
Stop LACPStops LACP protocol on the selected ports.
Enable LinkEnables the LACP link.
Disable LinkDisables LinkDisable the LACP link
Start PDUStart LACP PDU.
Stop PDUStops LACP PDU.
Send MarkerSends marker PDUs from the selected ports.
PIMSM Start PIMStarts PIM protocol on the selected ports.
Stop PIMStops PIM protocol on the selected ports.
Stop HelloStops sending Hello messages from the selected interfaces.
Table D-1. IxNetwork Commands
Command Category
Command Syntax
IxNetwork TestComposer User Guide, Release 7.00 D-43

D
Resume HelloResumes sending Hello messages from the selected interfaces.
Increment GenIDIncrements GenID in Hello message for the selected interfaces.
Stop Periodic JoinStops sending Join messages from the selected join/prune ranges.
Resume Periodic JoinResumes sending Join messages from the selected join/prune ranges.
Send JoinSends single Join message for groups in the selected group ranges.
Send PruneSends single Prune message and suspend Join messages for groups in the selected group ranges.
Stop Periodic BSMStops sending periodic Periodic BSM from the selected interfaces
Resume Periodic BSMResumes sending periodic Periodic BSM from the selected interfaces.
Send BSMSends single BSM for the selected interfaces (applicable for elected BSR).
Activate GroupActivate the selected join/prune ranges.
Deactivate GroupDeactivates the selected join/prune ranges.
Activate InterfaceActivate the selected interfaces.
Deactivate InterfaceDeactivates the selected interfaces.
Activate RouterActivate the selected routers.
Table D-1. IxNetwork Commands
Command Category
Command Syntax
D-44 IxNetwork TestComposer User Guide, Release 7.00

Deactivate RouterDeactivate the selected routers.
Activate CandidateRPActivates the selected candidate RP ranges.
DeactivateCandidate RPDeactivates the selected candidate RP ranges.
Activate Data MDTActivates the selected data MDT ranges.
Deactivate Date MDTDeactivates the selected data MDT ranges.
Activate SourceActivates the selected source ranges.
Deactivate SourceDeactivates the selected source ranges.
RIPNG Start RIPngStarts RIPngStart RIPng protocol on the selected ports.
Stop RIPngStops RIPng protocol on the selected ports.
Pause UnsolicitedUpdatePauses sending Unsolicited Update messages from the selected router.
Resume UnsolicitedUpdateResumes sending Unsolicited Update messages from the selected router.
Withdraw RouteWithdraws routes from the selected route ranges.argument id: Percentage WithdrawDescription: Percentage of configured route count to withdraw.
Readvertise RouteAdvertises again the previously withdrawn routes from the selected route ranges.
Activate RouterActivates the selected routers.
Deactivate RouterDeactivates the selected routers.
Table D-1. IxNetwork Commands
Command Category
Command Syntax
IxNetwork TestComposer User Guide, Release 7.00 D-45

D
Activate RouteActivates the selected route ranges.
Deactivate RouteDeactivates the selected route ranges.
RSVP Start RSVPStarts RSVP-TE protocol on the selected ports.
Stop RSVPStops RSVP-TE protocol on the selected ports.
Restart NeighborGracefully restarts the selected neighbors.
Stop HelloStops HelloStop sending Hello messages from the selected neighbors.argument id: Enable HelloDescription: If selected, the sending of Hello messages is stopped.
Resume HelloResumes sending Hello messages from the selected neighbors.argument id: Enable HelloDescription: If selected, the sending of Hello messages is resumed.
Start SRefreshStart sending SRefresh messages from the selected neighbors.argument id: Enable SRefreshDescription: If selected, the sending of SRefresh messages is started.
Stop SRefreshStops sending SRefresh messages from the selected neighbors.argument id: Enable SRefreshDescription: If selected, the sending of SRefresh messages is stopped.
Graft Ingress P2MPSubLSPGrafts Ingress P2MP SubLSP for the selected leaf ranges.
Graft Egress P2MPSubLSPGrafts Egress P2MP SubLSP for the selected leaf ranges.argument id: Graft Egress P2MPDescription: Disable "Bring down sub-lsp" on enabled egress leaf range (Leaf Range).
Table D-1. IxNetwork Commands
Command Category
Command Syntax
D-46 IxNetwork TestComposer User Guide, Release 7.00

Prune Ingress P2MPSubLSPPrune Ingress P2MP SubLSP for the selected leaf ranges.
Prune Egress P2MPSubLSPPrune Egress P2MP SubLSP for the selected leaf ranges.argument id: Prune Egress P2MPDescription: Enable "Bring down sub-lsp" on enabled egress leaf range.
Initiate Make BeforeBreakInitiates Make Before Break for the selected head ranges.
Complete Make BeforeBreakTears down old LSPs after new LSPs are setup for the selected head ranges.
Initiate PathReOptimizationSends Path with re-evaluation request bit of SESSION-ATTRIBUTE object set, for selected head ranges.
Activate NeighborActivates the selected neighbor pairs.
Deactivate NeighborDeactivates the selected neighbor pairs.
Activate Tunnel TailActivates the selected tunnel tail ranges.
Deactivate Tunnel TailDeactivates the selected tunnel tail ranges.
Activate Tunnel HeadActivates the tunnel selected head ranges.
Deactivate Tunnel HeadDeactivates the selected tunnel head ranges.
Activate Head To LeafActivates the selected head to leaf ranges.
Deactivate Head To LeafDeactivates the selected head to leaf ranges.
STP Start STPStarts STPStart STP protocol on the selected ports.
Stop STPStop STP protocol on the selected ports.
Table D-1. IxNetwork Commands
Command Category
Command Syntax
IxNetwork TestComposer User Guide, Release 7.00 D-47
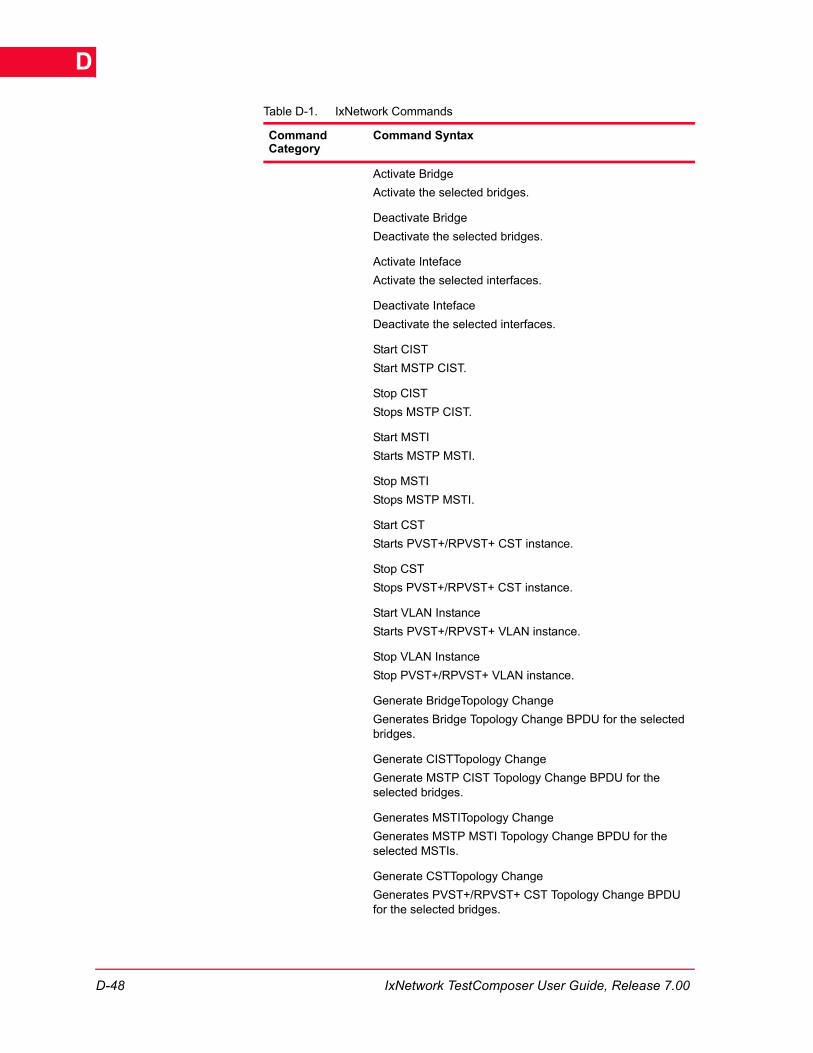
D
Activate BridgeActivate the selected bridges.
Deactivate BridgeDeactivate the selected bridges.
Activate IntefaceActivate the selected interfaces.
Deactivate IntefaceDeactivate the selected interfaces.
Start CISTStart MSTP CIST.
Stop CISTStops MSTP CIST.
Start MSTIStarts MSTP MSTI.
Stop MSTIStops MSTP MSTI.
Start CSTStarts PVST+/RPVST+ CST instance.
Stop CSTStops PVST+/RPVST+ CST instance.
Start VLAN InstanceStarts PVST+/RPVST+ VLAN instance.
Stop VLAN InstanceStop PVST+/RPVST+ VLAN instance.
Generate BridgeTopology ChangeGenerates Bridge Topology Change BPDU for the selected bridges.
Generate CISTTopology ChangeGenerate MSTP CIST Topology Change BPDU for the selected bridges.
Generates MSTITopology ChangeGenerates MSTP MSTI Topology Change BPDU for the selected MSTIs.
Generate CSTTopology ChangeGenerates PVST+/RPVST+ CST Topology Change BPDU for the selected bridges.
Table D-1. IxNetwork Commands
Command Category
Command Syntax
D-48 IxNetwork TestComposer User Guide, Release 7.00

Generate VLANInstance TopologyChangeGenerates PVST+/RPVST+ VLAN Instance Topology Change BPDU for the selected VLANs.
ISIS Start ISISStarts ISIS protocol on the selected ports.
Stop ISISStops ISIS protocol on the selected ports.
Clear Overload BitClear overload bit in 0th LSP for the selected routers.argument id: Overload BitDescription: When a router sets the overload bit, its neighbor does not send any more traffic through the router and re-calculates the path afresh for the same destination.
Readvertise RouteAdvertises again the previously withdrawn routes from the selected L3 route ranges.
Remove LSP NeighborRemoves the LSP neighbors.
Gracefully RestartGracefully restarts the selected routers.
Resume HelloResumes sending Hello messages from the selected routers.
Set Overload BitSet overload bit in 0th LSP for the selected routers.argument id: Overload BitDescription: When a router sets the overload bit, its neighbor does not send any more traffic through the router and re-calculates the path afresh for the same destination.
Stop HelloStops sending Hello messages from the selected routers.
Withdraw RouteWithdraw routes from the selected L3 route ranges.argument id: Percentage WithdrawDescription: Percentage of configured route count to withdraw.
Zero Age LSPZero Age LSPs.
Table D-1. IxNetwork Commands
Command Category
Command Syntax
IxNetwork TestComposer User Guide, Release 7.00 D-49

D
Activate RouterActivates the selected routers.
Deactivate RouterDeactivates the selected routers.
Activate InterfaceActivates the selected interfaces.
Deactivate InterfaceDeactivates the selected interfaces.
Activate RouteActivates the selected L3 route ranges.
Deactivate RouteDeactivates the selected L3 route ranges.
Activate NetworkRangeActivates the selected L3 network ranges.
Deactivate NetworkRangeDeactivates the selected L3 network ranges.
IPTV IPTV Start
Starts IPTV on the selected plugins and ranges.
Arguments:• Available Items - A list of ranges of the IPTV type
selected in IxNetwork.
IPTV Stop
Stops IPTV on the selected plugins and ranges.
Arguments:• Available Items - A list of ranges of the IPTV type
selected in IxNetwork.
All Protocols Start
Starts selected protocol emulations.
Arguments: • Available Items - A list of ranges selected in IxNetwork.
Stop
Stops selected protocol emulations.
Arguments: • Available Items - A list of ranges selected in IxNetwork.
Table D-1. IxNetwork Commands
Command Category
Command Syntax
D-50 IxNetwork TestComposer User Guide, Release 7.00

Enable
Enables selected protocol configurations.
Arguments:• Available Items - A list of ranges selected in IxNetwork.
Disable
Disables the selected protocol configurations.
Arguments:• Available Items - A list of ranges selected in IxNetwork.
Traffic Apply L2-L3 Traffic
Generates and applies L2-L3 traffic.
Apply L4-L7 Traffic
Generates and applies L4-L7 traffic.
L2-L3 Traffic Start
Starts configured L2-L3 traffic.
L2-L3 Traffic Stop
Stops configured L2-L3 traffic.
Application Traffic Start
Starts application traffic.
Application Traffic Stop
Stops application traffic.
Statistics Clear CP/DP Stats
Clears the control plane and data plane statistics.
Clear Statistics
Clears all statistics.
Table D-1. IxNetwork Commands
Command Category
Command Syntax
IxNetwork TestComposer User Guide, Release 7.00 D-51

D
Write CSVs for Selected Views
Creates a CSV file populated with statistics from the selected views.
Arguments: • Content - The statistics to be written into the file, either
the selected pages or all pages• New CSV File/Overwrite - Specifies whether the files is
to be created anew or if a previous version is being over-written.
• CSV File Location - Specifies the file location• Available Items - The views whose statistics are to be
written to the CSV file.Important: All views available for the current test configuration are only displayed in the Available Items field only after having applied the configured protocols or having started the L2-3 traffic from the IxNetwork GUI.
Get Protocol Statistics IxN::availableStatCatalogs="<stat catalog object>" IxN::availableFilterTypes="<filter type object>" IxN::availableFilters="<filter object>" IxN::availableStats="<stat objects>" IxN::aggregator="<aggregator>"
Retrieves a matrix of data for selected statistics and filters with the selected aggregation.
Arguments:• statCatalog – The catalog to retrieve statistics for• availableFilterTypes – The type of filter to use• availableFilters – The items to filter over• availableStats – The statistics in the selected catalog to
use• aggregation – The aggregation type to use.
StatQuery category="enumValue" filter="{element1 operator filterString1} {element2 operator filterString2}" resources="NodeId1 NodeId2 NodeId3" items="{stat {option value} {option value}}"
Retrieves the statistics values from a number of predefined IxNetwork categories into a composite variable.
Table D-1. IxNetwork Commands
Command Category
Command Syntax
D-52 IxNetwork TestComposer User Guide, Release 7.00

Restore Snapshot
Restore Snapshot IxN::file=<snapshot_file>
Restores the IxNetwork test configuration to a state contained in a snapshot file. This command is automatically added when the Configuration Snapshot button is clicked in the IxNetwork GUI, or when the IxNetwork MacroRecorder functionality with automatic snapshot insertion is used.
Arguments:• IxN::file: The variable that is used for referencing a snap-
shot file in the TestComposer Files Catalog.
QuickTest Start Test availableItems=<test_item>
Starts the specified IxNetwork quick test. This is a non-blocking command. If the specified test does not exist, an error is returned.If an error occurs while the test is being started, or if a test is already running, the command fails.
Arguments:• AvailableItems: The name of a quick test that is defined
in the IxNetwork test configuration.
IsTestRunning
Probes if a test is currently executing and returns true if test is running, false otherwise.
Arguments: None
WaitForTestEnd availableItems=<test_item>
Blocks the test script execution and waits for the quick test to end. If no test is currently running, control is returned immediately.
Arguments: • AvailableItems: The name of a quick test that is defined
in IxNetwork
GetRunFiles path=<path> availableItems=<item>
Copies the test result files of the last executed quick test to a specified folder (path).
Arguments:• Path: The fully specified name of the folder where result
files are to be copied to. • AvailableItems: The name of a quick test that is defined
in IxNetwork.
Table D-1. IxNetwork Commands
Command Category
Command Syntax
IxNetwork TestComposer User Guide, Release 7.00 D-53

D
Stop Test
Stops the currently executing quick test. This is a blocking command.
Arguments: • AvailableItems: The name of a quick test that is defined
in IxNetwork.
Reporter EnableCSVLogging
Saves the statistics contained in a specified view to a CSV file. Saving is done continuously until a DisableCSVLogging function is called.
Arguments:• Available items –The view whose statistics are to be
saved.
DisableCSVLogging
Ends saving the statistics from a specified view to a CSV file.
Arguments:• Available items –The view whose statistics are no longer
to be saved.
SaveDetailedResults
Saves a detailed ‘snapshot’ of the test configuration information and the statistic values computed for the test.The snapshot information is used for creating a test report using the GenerateReport event.
SaveSummaryResults
Saves a ‘snapshot’ of the test configuration information, which does not include the following categories:• Per-flow statistics• Per-session and per-range statistics• Learn information• Flow group information• Protocol interface information• Router range informationThe snapshot information is used for creating a test report using the GenerateReport event.
Table D-1. IxNetwork Commands
Command Category
Command Syntax
D-54 IxNetwork TestComposer User Guide, Release 7.00
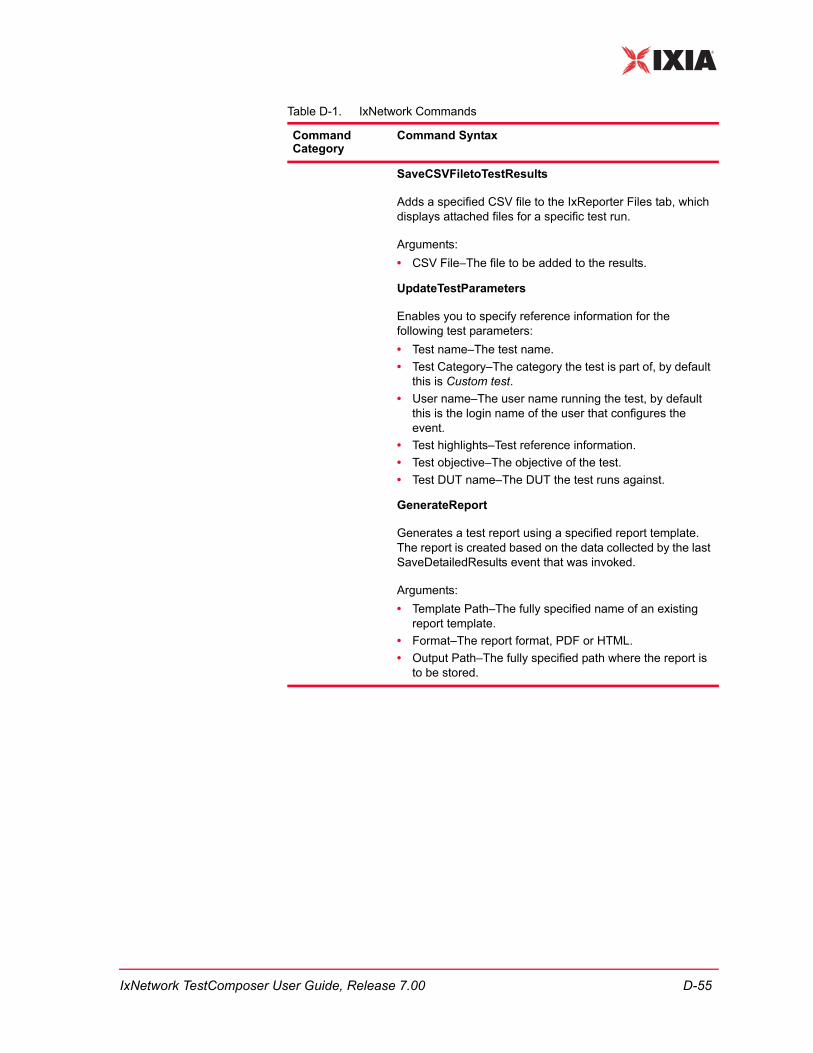
SaveCSVFiletoTestResults
Adds a specified CSV file to the IxReporter Files tab, which displays attached files for a specific test run.
Arguments:• CSV File–The file to be added to the results.
UpdateTestParameters
Enables you to specify reference information for the following test parameters:• Test name–The test name.• Test Category–The category the test is part of, by default
this is Custom test.• User name–The user name running the test, by default
this is the login name of the user that configures the event.
• Test highlights–Test reference information.• Test objective–The objective of the test.• Test DUT name–The DUT the test runs against.
GenerateReport
Generates a test report using a specified report template. The report is created based on the data collected by the last SaveDetailedResults event that was invoked.
Arguments:• Template Path–The fully specified name of an existing
report template.• Format–The report format, PDF or HTML.• Output Path–The fully specified path where the report is
to be stored.
Table D-1. IxNetwork Commands
Command Category
Command Syntax
IxNetwork TestComposer User Guide, Release 7.00 D-55

D
D-56 IxNetwork TestComposer User Guide, Release 7.00

EAppendix E: Predefined Commands for Miscellaneous Other Session TypesThis appendix provides a description of the SNMP, Syslog, CSVAnalyzer, and Reporter predefined commands that can be executed as TestComposer steps.
It contains the following sections:
• SNMP Session Commands on page E-1
• Syslog Session Commands on page E-8
• CSVAnalyzer Session Commands on page E-9
• Reporter Session Commands on page E-13
• Packet Decoder Session Commands on page E-18
SNMP Session CommandsThe following commands can be executed on an established SNMP session.
SNMP Get Retrieves the statistic value(s) specified by an object id (oid) from a SNMP host.
This step can be assigned a composite return variable that contains a string list of the specified oid value(s).
Syntax:
Get oid=<oid_value> ... context=”<string>”
where the command parameters have the following meaning:
• oid: The oid parameter, which can be in either string format (for example .iso.org.dod.internet.mgmt.mib-2.system.sysContact that corresponds to a sysContact parameter) or numeric format (for example .1.3.6.1.2.1.1.4 that corresponds to the same parameter). See Using the MIB Browser on page I-1.
• context: An additional parameter (for SNMP v3 only) that may be interpreted differently by different SNMP agents. As a common example, in the case of network routers this could reference the VLAN id for a router interface.
IxNetwork TestComposer User Guide, Release 7.00 E-1

SNMP Session CommandsE
SNMP Set Updates the statistic value specified by an oid parameter from a SNMP host. The command takes the oid and the configured value as parameters.
This step can be assigned a composite return variable.
Syntax:
Set oid=<oid_value> type=<object_type> value=<new_value> context=”<string>”
where the command parameters have the following meaning:
• oid: The oid parameter, which can be in either string format (for example .iso.org.dod.internet.mgmt.mib-2.system.sysContact that corresponds to a sysContact parameter) or numeric format (for example .1.3.6.1.2.1.1.4 that corresponds to the same parameter). See Using the MIB Browser on page I-1.
• type: Any of the supported types, or the Auto value that determines TestComposer to automatically detect the oid type:
• Integer (a 32 bit number)
• Octet string (interpreted as an ASCII string)
• IpAddress (an IPv4 or IPv6 address interpreted as a string)
• Counter
• Gauge
• TimeTicks
• value: A value the oid is configured to.
Note: The composite return variable that can be assigned to a Get command contains the predefined ErrorCode, StringCode, and ErrorMessage fields, which are initialized at runtime with the appropriate values. After execution of this command you can thus test for a zero ErrorCode value which indicates a successful (error-free) termination.
Note: The following error types can appear with relation to SNMP commands in the SNMPErrorCode field of a step return variable following:1. SNMP agent errors with a well defined SNMP error code in the
SNMPErrorCode field of a step return variable.2. SNMP agent errors without a well defined SNMP code, in which case an
error code -2 is set in the SNMPErrorCode field, meaning that this is a custom error.
3. Exceptions generated by an improper use of methods in the application. Such errors, which can be detected before doing a query, can appear, for example, in the following cases:• When using an opaque oid (not know to the MIB) and setting the type to
the Auto value. In this case no error code is returned but the step fails.• When using an invalid oid value.• When using a Set command on a table object.
E-2 IxNetwork TestComposer User Guide, Release 7.00

SNMP Session Commands
• context: An additional parameter (for SNMP v3 only) that may be interpreted differently by different SNMP agents. As a common example, in the case of network routers this could reference the VLAN id for a router interface.
SNMP GetTable Retrieves all values of a table-format oid.
The command accepts the usegetbulk parameter, indicating a bulk mode retrieval, and the maxrepetitions parameter, which specifies the total number of retrieved oid values.
This step can be assigned a composite return variable that contains the specified oid values.
Syntax:
GetTable oid=<oid_value> usegetbulk=[False|True] maxrepetitions=<value>
where the command parameters have the following meaning:
• oid: The oid parameter, which can be in either string format (for example .iso.org.dod.internet.mgmt.mib-2.system.sysContact that corresponds to a sysContact parameter) or numeric format (for example .1.3.6.1.2.1.1.4 that corresponds to the same parameter). See Using the MIB Browser on page I-1.
• usegetbulk: If configured ‘True’, multiple oids are retrieved using a single query, instead of using one query for each oid. Although selection of this parameter improves the performance of queries, not all SNMP agents support it.
Note: The composite variable that can be assigned to a Set command contains the predefined ErrorCode, StringCode, and ErrorMessage fields, which are initialized at runtime with the appropriate values. After execution of this command you can thus test for a zero ErrorCode value which indicates a successful (error-free) termination.
Note: The following error types can appear with relation to SNMP commands in the SNMPErrorCode field of a step return variable following:1. SNMP agent errors with a well defined SNMP error code in the
SNMPErrorCode field of a step return variable.2. SNMP agent errors without a well defined SNMP code, in which case an
error code -2 is set in the SNMPErrorCode field, meaning that this is a custom error.
3. Exceptions generated by an improper use of methods in the application. Such errors, which can be detected before doing a query, can appear, for example, in the following cases:• When using an opaque oid (not know to the MIB) and setting the type to
the Auto value. In this case no error code is returned but the step fails.• When using an invalid oid value.• When using a Set command on a table object.
IxNetwork TestComposer User Guide, Release 7.00 E-3

SNMP Session CommandsE
• maxrepetitions: When usegetbulk is configured ‘True’, this parameter speci-fies the number of oids that are queried using a single statement.
SNMP Walk Retrieves the values of all MIB nodes below a specified oid.
This step can be assigned a composite return variable that contains the specified oid values.
Syntax:
Walk oid=<oid_value> usegetbulk=[False|True] maxrepetitions=<value>
where the command parameters have the following meaning:
• oid: The oid parameter, which can be in either string format (for example .iso.org.dod.internet.mgmt.mib-2.system.sysContact that corresponds to a sysContact parameter) or numeric format (for example .1.3.6.1.2.1.1.4 that corresponds to the same parameter). See Using the MIB Browser on page I-1.
• usegetbulk: If configured ‘True’, multiple oids are retrieved using a single query, instead of using one query for each oid. Although selection of this
Example:Considering the ifInterface composite variable assigned to a SNMP GetTable command, the sample image below illustrates the tabular nature of the command output. As evident from the image, the composite variable contains a list of numeric or string lists (ifIndex, ifDescr, and ifMtu), one for each table column.
Note: The following error types can appear with relation to SNMP commands in the SNMPErrorCode field of a step return variable following:1. SNMP agent errors with a well defined SNMP error code in the
SNMPErrorCode field of a step return variable.2. SNMP agent errors without a well defined SNMP code, in which case an
error code -2 is set in the SNMPErrorCode field, meaning that this is a custom error.
3. Exceptions generated by an improper use of methods in the application. Such errors, which can be detected before doing a query, can appear, for example, in the following cases:• When using an opaque oid (not know to the MIB) and setting the type to
the Auto value. In this case no error code is returned but the step fails.• When using an invalid oid value.• When using a Set command on a table object.
E-4 IxNetwork TestComposer User Guide, Release 7.00

SNMP Session Commands
parameter improves the performance of queries, not all SNMP agents support it.
• maxrepetitions: When usegetbulk is configured ‘true’, this parameter speci-fies the number of oids that are queried using a single statement.
SNMP Listen Starts the trap daemon (netsnmpd) on the specified port of the TestComposer host.
The step accepts the <port> parameter which specifies the trap daemon listening port. If the specified port is already used by another application, the daemon chooses the next free port.
Syntax:
Listen port=<port_value> protocol=[udp|tcp] maxtraps=<value> <engineID>=”value”
where the command parameters have the following meaning:
• port: The SNMP listening port.
• protocol: The trap transport protocol.
• maxtraps: The trap queue size. When the queue is full and new traps are received, these overwrite old traps that are present in the queue.
• engineID: A ‘0x’-prefixed parameter configured by the trap daemon (for SNMPv3 only). Please note that prefixing the engineID parameter with the ‘0x’- string is mandatory.
Note: The composite variable that can be assigned to a Walk command contains the predefined SNMPErrorCode, SNMPStringCode, and SNMPErrorMessage fields, which are initialized at runtime with the appropriate values. After execution of this command you can thus test for a zero ErrorCode value which indicates a successful (error-free) termination.
Note: The following error types can appear with relation to SNMP commands in the SNMPErrorCode field of a step return variable following:1. SNMP agent errors with a well defined SNMP error code in the
SNMPErrorCode field of a step return variable.2. SNMP agent errors without a well defined SNMP code, in which case an
error code -2 is set in the SNMPErrorCode field, meaning that this is a custom error.
3. Exceptions generated by an improper use of methods in the application. Such errors, which can be detected before doing a query, can appear, for example, in the following cases:• When using an opaque oid (not know to the MIB) and setting the type to
the Auto value. In this case no error code is returned but the step fails.• When using an invalid oid value.• When using a Set command on a table object.
IxNetwork TestComposer User Guide, Release 7.00 E-5

SNMP Session CommandsE
This step can be assigned a composite return variable that contains the actual lis-tening port value.
SNMP WaitForTraps
Blocks the execution of the SNMP session until a specified trap, or any trap (when no trap oid is specified), is received. When the specified trap is received, a confirmation message is displayed and execution advances to the next test step. Using the same WaitForTraps command step, this message can be configured to trigger an event that causes a specified procedure to be executed when the trap is received.
Syntax:
WaitForTraps oid =<oid_value> var_bind=<oid_value> clean=[True|False] [context]
where the command parameters have the following meaning:
• oid: The oid parameter, which can be in either string format (for example .iso.org.dod.internet.mgmt.mib-2.system.sysContact that corresponds to a sysContact parameter) or numeric format (for example .1.3.6.1.2.1.1.4 that corresponds to the same parameter). See Using the MIB Browser on page I-1.
If multiple trap oids are specified, the WaitForTraps command waits for any of these traps (OR aggregation).
• varbind: An oid parameter in either string or numeric format. See Using the MIB Browser on page I-1.
If a single trap is specified by the oid parameter, and if more than one varbind parameters is specified, the expected message must contain all varbinds (AND aggregation).
Important: In order for the trap daemon on the TestComposer host to be able to receive traps sent by remote SNMP agents, the agents need to be configured as follows:• For v1 and v2c, the Read and Write community need to be supplied by the
trap sender.• For v3, the Security Name, Security Level, Auth Protocol, Auth Password,
Privacy Protocol, and Privacy Password need to be supplied by the trap sender.
• For v3, if the EngineId parameter is specified in the Listen command, the system is able to receive only traps which are sent by specifying the config-ured EngineId. The trap daemon is not able to receive any inform-type notifi-cations.Alternatively, if the EngineId parameter is not specified in the Listen command, the trap daemon is able to receive only inform-type notifications.
Note: A similar trap monitoring functionality without the blocking of the current thread is provided by the Watch test step.
E-6 IxNetwork TestComposer User Guide, Release 7.00

SNMP Session Commands
• clean: If selected, this enforces a flushing of the trap buffer after a trap is read (optional).
• context: An additional parameter (for SNMP v3 only) that may be interpreted differently by different SNMP agents. As a common example, in the case of network routers this could reference the VLAN id for a router interface.
This step can be assigned a composite return variable that contains the fields of the matched SNMP trap.
Custom Commands In addition to the commands described in the previous sections, the following SNMP commands are also supported and can be type in manually into the Console window of an established SNMP session:
• snmpset
• snmpget
• snmpgetnext
• snmpbulkget
• snmpbulkwalk
• snmpwalk
• snmptranslate
• snmptable
Important: If a single trap and multiple varbinds are specified, the expected message must contain the trap AND all the varbinds. When multiple trap oids are specified by the oid parameter, you cannot specify varbinds.
Note: The following error types can appear with relation to SNMP commands in the SNMPErrorCode field of a step return variable following:1. SNMP agent errors with a well defined SNMP error code in the
SNMPErrorCode field of a step return variable.2. SNMP agent errors without a well defined SNMP code, in which case an
error code -2 is set in the SNMPErrorCode field, meaning that this is a custom error.
3. Exceptions generated by an improper use of methods in the application. Such errors, which can be detected before doing a query, can appear, for example, in the following cases:• When using an opaque oid (not know to the MIB) and setting the type to
the Auto value. In this case no error code is returned but the step fails.• When using an invalid oid value.• When using a Set command on a table object.
IxNetwork TestComposer User Guide, Release 7.00 E-7
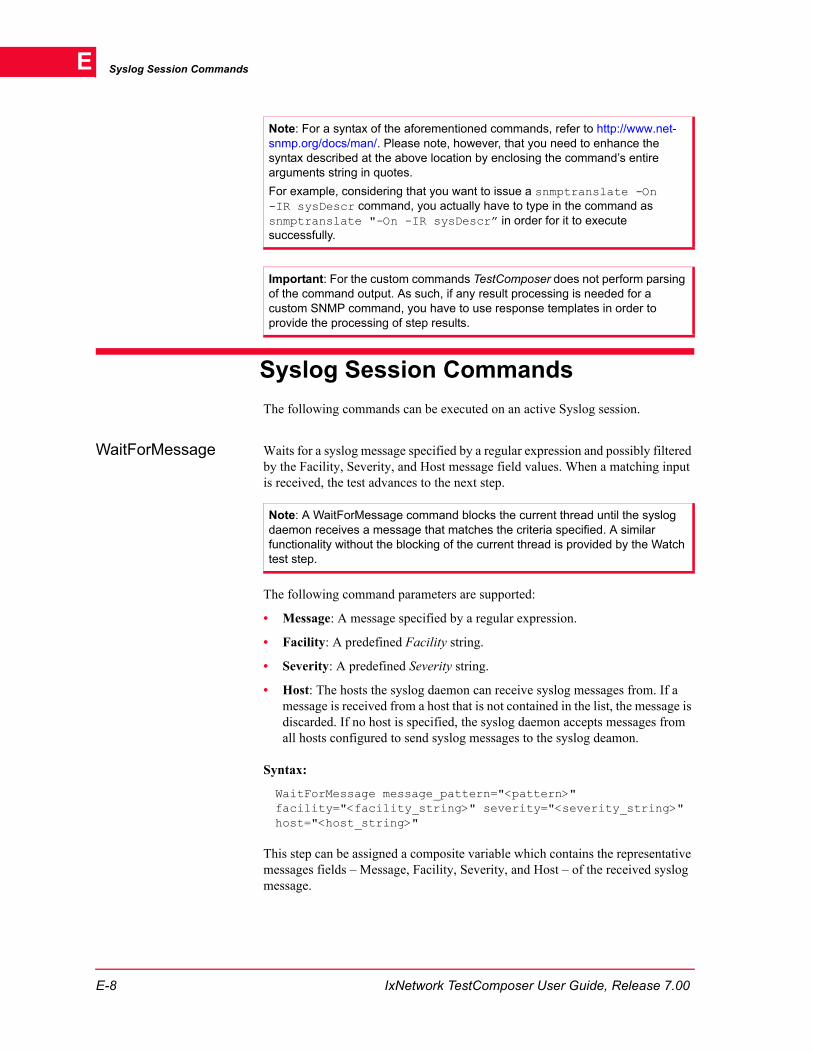
Syslog Session CommandsE
Syslog Session CommandsThe following commands can be executed on an active Syslog session.
WaitForMessage Waits for a syslog message specified by a regular expression and possibly filtered by the Facility, Severity, and Host message field values. When a matching input is received, the test advances to the next step.
The following command parameters are supported:
• Message: A message specified by a regular expression.
• Facility: A predefined Facility string.
• Severity: A predefined Severity string.
• Host: The hosts the syslog daemon can receive syslog messages from. If a message is received from a host that is not contained in the list, the message is discarded. If no host is specified, the syslog daemon accepts messages from all hosts configured to send syslog messages to the syslog deamon.
Syntax:
WaitForMessage message_pattern="<pattern>" facility="<facility_string>" severity="<severity_string>" host="<host_string>"
This step can be assigned a composite variable which contains the representative messages fields – Message, Facility, Severity, and Host – of the received syslog message.
Note: For a syntax of the aforementioned commands, refer to http://www.net-snmp.org/docs/man/. Please note, however, that you need to enhance the syntax described at the above location by enclosing the command’s entire arguments string in quotes. For example, considering that you want to issue a snmptranslate -On -IR sysDescr command, you actually have to type in the command as snmptranslate "-On -IR sysDescr” in order for it to execute successfully.
Important: For the custom commands TestComposer does not perform parsing of the command output. As such, if any result processing is needed for a custom SNMP command, you have to use response templates in order to provide the processing of step results.
Note: A WaitForMessage command blocks the current thread until the syslog daemon receives a message that matches the criteria specified. A similar functionality without the blocking of the current thread is provided by the Watch test step.
E-8 IxNetwork TestComposer User Guide, Release 7.00

CSVAnalyzer Session Commands
Pause Pauses the syslog daemon (syslogd). When the syslog daemon is paused, incom-ing messages are discarded.
Resume Resumes the operation of the syslog daemon (syslogd).
ShowMessages Displays a list of all syslog messages received since the last call of the command.
This step can be assigned a composite variable which contains the representative messages fields – Message, Facility, Severity, and Host – of the received syslog message.
CSVAnalyzer Session CommandsA CSVAnalyzer session is aimed at analyzing the results collected by a test in the form of CSV files, without having to write specialized Tcl script code for reading and parsing these files.
The following commands can be executed on an active CSVAnalyzer session.
StatQuery This command parses the CSV file associated with the session and retrieves the values of specified statistics from those exposed by the CSV template. The retrieved statistics can be filtered by the values of other statistics.
For example, assuming that the CSV file exposes the S1, S2, S4, and S5 statistics of the Number type shown highlighted magenta in Figure E-1, this command could enable you to retrieve the values of S4 and S5 that match a filtering crite-rion such as (50 < S1 < 150) AND (70 < S2 <150).
Figure E-1. Sample CSV File With Filtered Results
The command can be assigned a composite return variable that contains a field for every sought statistics. For example, for the previous example, the return
Note: CSVAnalyzer sessions work conjointly with a newly defined Composer resource called CSV Templates. Creating a CSV Template, which basically defines the schema of a CSV file such that the session can interpret the file, is described in Creating CSV Template Resources on page 13-30.
IxNetwork TestComposer User Guide, Release 7.00 E-9

CSVAnalyzer Session CommandsE
variable would contain 2 fields, one for the list of S4 values and a second one for the list of S5 values.
To define the statistics retrieved by the StatQuery command:
1. Select the Command Settings and Parameters page of the Step Configuration wizard. In the Select Category field, choose a statistic group from those defined within the CSV Template file.
Figure E-2. Filters Pane
2. Start defining a new compound filtering expression first by clicking into the Filters pane and proceeding as follows:
a: Click the Add button to add a first filtering expression.
Click into the added expression line, select a statistic from those available for the selected group and define a filter expression; for example, in the case of the sample statistic we have considered initially, choose an S1 is between 50 and 150 expression.
b: Add one or more filtering expressions by clicking the Add button repeatedly, which adds new expression lines. For each newly added line, define another expression in a similar manner as for a:; for example, in the case of the sample stats we have considered initially, define the S2 is between 70 and 150 expression.
c: After having defined several such conditions, the CSV file is filtered for matching rows using a compound filtering expression composed of the individual expressions joined by an AND operator.
Note: Supported filter operators differ based on the statistic type defined by the CSV template, Number or String. While both the equals and is between operators are available for statistics of the Number type, for the String type only the equals operator can be used.
E-10 IxNetwork TestComposer User Guide, Release 7.00

CSVAnalyzer Session Commands
For the purpose of our example, the resulting compound filtering expres-sion is S1 is between 50 and 150 AND S2 is between 70 and 150.
3. Click the Select Statistics button to advance to the Statistics pane, which enables you to specify the sought statistics.
Figure E-3. Statistics Pane
a: Specify the statistic to be retrieved by selecting it in the left pane and
clicking the button.
The stat is added to the right pane and enables you to define its properties, such as an associated caption string or a scale factor. If the retrieved statis-tic has multiple values, an aggregator (min, max, average, sum) can be added for reducing it to a single value.
b: After several statistics have been selected for retrieval, the statistics list
can be re-ordered using the and buttons.
Clear This command deletes a CSV file from the disk such that a subsequent command that handles CSV files, such as for example a WriteBlock command, can operate on a new file.
This command has no parameters.
WriteBlock This command takes a list of simple, composite, or mixed variables and writes these values as an N-by-M matrix into the associated CSV file, where N is the number of variables and M is the length of the longest variable in the list.
This command has the following parameters:
Important: The WriteBlock command replace the functionality of the WriteCsv command used in previous TestComposer versions.
IxNetwork TestComposer User Guide, Release 7.00 E-11

CSVAnalyzer Session CommandsE
• Variable list: The space-separated variables whose values are written to the output file.
• Use Custom headers: If selected, this option enables you to use custom col-umn headers for the CSV table. By default, these headers are named after the variables that are contained in the table columns.
When the Use Custom headers option is selected, an additional parameter, Custom Headers, becomes available, enabling you to specify the custom headers.
WriteLines The WriteLines command allows you to add new lines to the CSV file corresponding to the CSV Analyzer session. If the CSV file does not exist, this command creates a new CSV file and then adds the corresponding values to it. But if the existing CSV file is open, the new line is not added and a message appears.
To add a WriteLines step to the script, do the following:
1. Open Test Composer.
2. Open a valid CSVAnalyzer Session.
3. Add an Execute step for the CSVAnalyzer session.
4. Open the Command String editor.
5. Select the WriteLines command from Command Filter section.
A box appears on the right side of the Command String editor which allows you to type the text that you want to include in the CSV.
You can add multiple rows in the CSV file.The values that should appear in different columns of the CSV should be separated by comma and the rows
Example:• Assuming we had a composite variable named volume containing 2 numeric
variables, target_1 and target_2, then a WriteBlock variableList “$volume)” command would generate an output such as the following:
• Assuming we had the following variable assignation command:
Assign var1 “1 {2 3 4} {5 6}”
then a WriteBlock variableList “$var1” command would yield a result such as the following:
var1
1
2 3 4
5 6
E-12 IxNetwork TestComposer User Guide, Release 7.00

Reporter Session Commands
should be separated by pressing the ENTER key. Other punctuations except comma and the carriage return will be treated as text.
You can add an empty row or an empty cell in the CSV. To add an empty row, include an empty row in the box. To add an empty cell in the CSV, add commas without entering any text. See Example 3.
You can also add a variable using the WriteLines command. To add a variable add a dollar sign ($) in front of the variable name. A combination of string and variable is permitted.
Reporter Session CommandsThe following commands can be executed on an established Reporter session.
AddTextToReport Adds an user-specified text to the report.
Syntax:
Example 1:If you want to add 2 different rows in the CSV file, first row containing the values ”static”,”ff-ff-ff-ff-ff-ff”,”255.255.255.255” in separate columns, and the second containing the values ”dynamic”,”01-00-5e-00-00-ea”,”10.205.20.252”, in separate columns, the command is as follows:
static,ff-ff-ff-ff-ff-ff,255.255.255.255
dynamic,01-00-5e-00-00-ea,10.205.20.252
Example 2:If you want to add a combination of variable and string, the input command is as follows:
dynamic,$a,10.205.20.252
You can also use dollar ($) character as a input text by preceding it with a backslash (\).For example passing the following text as command input:
chri\$tmass rock\$
provides the following output:chri$tmass rock$
Example 3:If you want to add the following table:
The input command should be: EmptyColumn1,Title,EmptyColumn2,Value
,SomeTitle1,,SomeValue1,SomeTitle2,,SomeValue2,SomeTitle3,,SomeValue3
IxNetwork TestComposer User Guide, Release 7.00 E-13

Reporter Session CommandsE
AddTextToReport text="<text_to_add>" fontStyle=<Regular | Italic | Bold | BoldItalic> fontSize=<font_size>
where the command parameters have the following meaning:
• text: The text to be added to the report.
• fontStyle: The style of the added text.
• fontSize: The font size of the added text.
AddHTMLToReport Adds custom user-specified HTML code to the report.
Syntax:
AddHTMLToReport text="<HTML_code_to_add>"
where the command parameters have the following meaning:
• text: The HTML code to be added to the report.
AddImageToReport Adds an user-defined image to the report.
Syntax:
AddImageToReport image="<image>" width="<image_width>" height="<image_height>" align=<left | center | right>
where the command parameters have the following meaning:
• image: The image to be added to the report.
• width: The image width expressed in pixels or percent (%).
• height: The image height expressed in pixels or percent (%).
• align: The align mode, which can be left, right, or center.
AddTableToReport Adds a table with user-specified data to the report. The data that populates the table can be specified using one or more series, or it can originate from a speci-fied CSV file.
Syntax:
AddTableToReport tableCaption="<caption>" tableHeader="<header>" definedBy <row | column> tableData="<data_list>" useCSVfile=<False | True> CSVfile="<CSV_file_name>"
where the command parameters have the following meaning:
• tableCaption: The table caption.
• tableHeader: The table header.
• definedBy: Specifies if the data series is defined by rows (row value) or by columns (column value).
E-14 IxNetwork TestComposer User Guide, Release 7.00

Reporter Session Commands
• tableData: When useCSVFile is configured False, this parameter specifies the data that is used for populating the table. The table data should be enclosed in { and } parentheses.
• useCSVFile: If configured True, the table is populated with data that origi-nates from a CSV file. When this parameter is configured False, the table data is that specified by the tableData parameter.
• CSVFile: When useCSVFile is configured True, this specifies the CSV file that is used for providing the data.
AddSectionToReport
Adds a section to the report. For each added section you can specifiy a heading level.
Syntax:
AddSectionToReport sectiontext="<text>" level=<heading_level>
where the command parameters have the following meaning:
• sectionText: The image to be added to the report.
• level: The heading level applied to the text.
GenerateXYPlot Plots a continuous (x,y) graph representation of user-specified x and y data series.
Syntax:
GenerateGraphs GenerateXYPlot title="<title>" xAxis="<x_axis_name>" yAxis="<y_axis_name>" xAxisValues="<x_data_series>" yAxisSeries="<y_axis_series>" yMin="<min_ y_value>" yMax="<max_y_value>"
Note: In the current implementation, the table width is restricted to a maximum number of 10 columns.
Example:Assuming we had a table defined by rows, and the following three data series: {1 2 3 4 5}, {2 3 4 5 6}, and {3 4 5 6 7}, the table would look as as follows:
IxNetwork TestComposer User Guide, Release 7.00 E-15

Reporter Session CommandsE
where the command parameters have the following meaning:
• title: The image to be added to the report.
• xAxisLabel: The label attached to the x axis.
• yAxisLabel: The label attached to the y axis.
• xAxisValues: A data series for the x axis, enclosed in { and } parentheses.
• yAxisSeries: The corresponding values series for the y axis, enclosed in { and } parentheses.
• yMin, yMax: Minimal and maximal y axis values. When these parameters are specified, values lower than yMin are approximated to yMin, and values higher than yMax are approximated to yMax.
GenerateBarChart Generates a bar chart for user-defined x and y data series. The bar chart displays a series of values on the x axis, and the corresponding values on the y axis.
Syntax:
GenerateGraphs GenerateBarchart title="<title>" xAxisLabel="<x_axis_name>" yAxisLabel="<y_axis_name>" xAxisSeries="<x_data_series>" data="<y_axis_values>"
where the command parameters have the following meaning:
• title: The image to be added to the report.
• xAxisLabel: The label attached to the x axis.
• yAxisLabel: The label attached to the y axis.
• xAxisSeries: A discrete series of values that are displayed on the x axis, enclosed in { and } parentheses.
Example:Assuming we had a ‘1 2 3 4 5 6 7’ series on the x axis, and two series {30 40 50 60 50 10 10} and {20 30 80 90 60 20 20} on the y axis, the generated chart would look as as follows:
E-16 IxNetwork TestComposer User Guide, Release 7.00

Reporter Session Commands
• data: The values displayed on the y axis.
GenerateReport Generates an HTML report and displays it in a new window.
Syntax:
GenerateReport outputFile="<html_report_file>"
where the command parameters have the following meaning:
• outputFile: The file the HTML report is written to.
Example:Assuming we had a ‘Mon Tue Wed Thu Fri Sat Sun’ series on the x axis, and two series {30 40 50 60 50 10 10} and {20 30 80 90 60 20 20} on the y axis, the generated chart would look as as follows:
IxNetwork TestComposer User Guide, Release 7.00 E-17

Packet Decoder Session CommandsE
Packet Decoder Session CommandsThis session adds protocol analysis support by enabling you to load and analyze capture files in the common .cap or .pcap formats.
The following commands can be executed on an established Packet Decoder ses-sion.
Load Capture Loads a specified capture file in any of the common capture file formats. The file can be specified using its name or using a TestComposer variable.
Syntax:
Load capture File <captureFileName>
where the command parameters have the following meaning:
• captureFileName: The capture file to analyze.
Filter This command enables you to define a filtering expression, possibly containing multiple simple expressions. After you have defined the filtering expression, you can use the Get Data command to actually process the capture file.
Syntax:
Filter filterexpression=”<expression>”
where the command parameters have the following meaning:
• expression: The filter expression to use in filtering the packet data; it is made up of a packet field, an operator, and possibly a value.
For example, the ip.tos==3 filter selects packets having a tos value of 3, while the ip.ttl==0 filter selects packets that have a ttl field equal to 0.
Defining the filter expression is done using the GUI shown in Figure E-4:
E-18 IxNetwork TestComposer User Guide, Release 7.00

Packet Decoder Session Commands
Figure E-4. Filter Definition Window
Defining a simple filter expression is done by selecting in turn a protocol field, an operator, and a value. Depending on the filtering expression type, a range operator can be used for analyzing only a portion of the selected field; for example, the http.content[0:4]==text expression would ‘slice’ the http content field starting from position 0 for a length of 4 digits and compare it to the text string.
Several such simple expressions can be aggregated into a complex filtering expression based one two or more simple expressions connected using AND, OR, NOT operators.
Get Data This command processes the capture file, possibly using a filter defined by a Filter command, and retrieves the specified packet fields into a composite vari-able (the command return variable).
The composite variable assigned to this step contains an automatically added packetnumber field, and one member for every selected packet field. For exam-ple, if you selected the tcp_source_port and tcp_destination_port packet fields, the structure of a return variable called var1 would be as shown in the figure below:
Protocol fields
Resulting filter expression containing field name, operator, and value to match
Predefined values for the selected
Note: Since the command does not actually display the filtered result, you have to use a TestComposer command such as Trace for this purpose.
var1.packetumber list of packet indexes
var1.tcp_source_port list of source ports
var1. tcp_destination_port list of destination ports
IxNetwork TestComposer User Guide, Release 7.00 E-19

Packet Decoder Session CommandsE
Syntax:
Get Data usefilter”true | false” startindex=<value> endindex=<value> items=“<list of items to retrieve>”
where the parameters have the following meaning:
• usefilter: If configured true, the filter defined by the Filter command is used, otherwise specified fields are retrieved for all packets contained in the cap-ture. When this parameter is configured false, the specified fields are retrieved from packets ‘filtered’ by the startindex and endindex values.
• startindex, endindex: Indexes specifying a packet range.
• items: The space-separated list of packet fields to be retrieved. Each selected field results in the creation of a member of the composite variable assigned to the step.
Show Data This command processes the capture file and outputs the filtering result to the console output. When a return variable of the string type is assigned, the entire output is assigned to that string.
Syntax:
Show Data usefilter=”true | false” startindex=”<index1>” endindex=”<index2>” format=“decode | raw | summary”
where the command parameters have the following meaning:
• startindex, endindex: the packet range displayed.
• usefilter: If configured true, the filter defined by the Filter command is used, otherwise all packets within the specified range are displayed at the console output.
• format: the format in which the packet data is displayed, one of the follow-ing:
• raw - This options shows the packet information available as it is from the capture file;
• decode - This option shows the packet information in readable text format;
• summary - This option shows the packet information in a high-level sum-marized format.
Note: Similar to any other composite variable, these can subsequently be used from within the Expression Builder, or with TestComposer commands that operate on composite variables, such as GetValue.
Note: For example, assuming the capture file contains a number of 100 packets, if no filter is used, then a specified packet field results in a list of 100 values retrieved within the step composite variable. Alternatively, assuming that the usefilter parameter is configured True, and that applying the filter reduces this amount to 10 packets matching the filtering criteria, then a specified field results in a list of 10 values only.
E-20 IxNetwork TestComposer User Guide, Release 7.00

Packet Decoder Session Commands
IxNetwork TestComposer User Guide, Release 7.00 E-21

Packet Decoder Session CommandsE
E-22 IxNetwork TestComposer User Guide, Release 7.00

FAppendix F: IxiaTestComposer Tcl Commands
This appendix provides a description of Ixia TestComposer Tcl commands.
Supported Additional Tcl CommandsIn addition to the standard Tcl commands, the following additional TestComposer Tcl commands are accessible in the Expression Builder:
• SetBaseline
• GetBaseline
• GetValue
SetBaseline This command sets the baseline value for a TestComposer variable. The baseline value is persistent across Composer test runs and can be retrieved subsequently using the GetBaseline function and can be used in expressions.
Synopsis:
SetBaseline arg value
Example:
The command:
SetBaseline a 10
sets the value of a baseline variable to a value of 10.
GetBaseline This command retrieves the baseline value for a TestComposer variable.
Synopsis:
GetBaseline arg
Example:
IxNetwork TestComposer User Guide, Release 7.00 F-1

Supported Additional Tcl CommandsF
The command:
set b [GetBaseline a]
sets the value of the b variable to the value of a.
GetValue This command retrieves an element value, or list of values (var1), from a com-posite TestComposer variable. A composite variable is assumed to have a matrix format, with var1....varN and dim1...dimN columns populated by statistic values.
Synopsis:
GetValue matrixVariableName var1 ?dim1 value_dim1...?
whereby var1 is the value to be retrieved, and value_dim1 specifies a value for the dim1 reference column.
Example1:
For example, considering we have a matrixVariableName variable that contains the following values:
the FramesReceived value on port 1.1.2 is retrieve using the following expres-sion:
[GetValue matrixVariableName FramesReceived Port 1.1.2]
Considering another example, whereby an ixiaResult variable contains the fol-lowing values:
the following expression:
[GetValue ixiaResult Throughput Iteration *]
returns a list containing the list of Throughput values for all possible Iteration values.
Another expression:
[GetValue ixiaResult Throughput Iteration 1-3]
returns the Throughput values list for Iteration values 1 to 3.
Port FramesSent FramesReceived
1.1.1 10000 20000
1.1.2 20000 10000
Iteration Throughput Latency
1 1000 1
2 1200 2
3 1200 1
4 1300 3
F-2 IxNetwork TestComposer User Guide, Release 7.00

Supported Additional Tcl Commands
Example2:
Defining the parameters of the GetValue function can also be done using the GUI, by right-clicking the statistic elements whose value(s) you wish to retrieve (Consecutive_Lost_Diagrams__1 in the sample Figure F-1 below), selecting the reference statistics in the drop-down window (Pair and Record_Number for the purpose of our example) and defining their filters.
To enable filters for selected statistics and define the filter values, do the follow-ing:
1. Click the browse button at the end of the field.
The filter editor appears. The filter editor contains the list of statistics.
2. Select the check-box against the statistics for which you want to enable fil-ters.
3. Select a Condition for the filter.
You can select from any of the following conditions:
Equals—to filter statistics that are equal to the value specified in the Value column.
InRange—to filter statistics within a range specified.
Contains—to filter statistics that contain the specified value.
Match—to filter statistics that match the specified variable.
4. Enter Value for the selected condition.
You can select a value from the list of available regular expressions that appears when you click the down-arrow.
You can also type in the expression yourself. The list of expressions contain only regular expressions, advanced expressions however, have to be typed in.
5. Click Ok.
Figure F-1. Specifying GetValue Parameters Using the GUI
IxNetwork TestComposer User Guide, Release 7.00 F-3

Supported Additional Tcl CommandsF
F-4 IxNetwork TestComposer User Guide, Release 7.00

GAppendix G: Configuring the IxNetwork StatQuery Command
This appendix provides a description of the IxNetwork StatQuery command configuration and contains the following sections:
• IxNetwork StatQuery Command Configuration on page G-1
IxNetwork StatQuery Command ConfigurationThe StatQuery command provides access to the IxNetwork Protocol and Traffic statistics and enables you to retrieve the values of specified protocol or traffic statistics from those exposed by the application-generated files.
The StatQuery command can be assigned a composite return variable that contains a field for every sought statistics. The field can contain either a list of values, or a single string or numeric value, in case an aggregation function was selected in the StatQuery command that reduces a values list to a single value.
The StatQuery command is capable of retrieving statistics from different categories, whereby some categories enable the filtering by resources, such as chassis ports or traffic items.
The StatQuery command provides access to the following statistic categories:
• Protocols > Ports: This category contains port statistics that can be filtered by port resources.
• Protocols -> Routing/Switching Protocols: This category contains routing and switching protocol statistics that can be filtered by port resources.
Important: For any specified statistic whose values are to be retrieved, the command is limited to retrieving a list of 5000 values. If you wish to access more values, you are advised to use the IxNetwork Get Statistics command instead.
Note: The Traffic > FlowFilter and Traffic > FlowDetective statistic categories can be configured without first having to apply L2/L3 traffic to the chassis ports.
IxNetwork TestComposer User Guide, Release 7.00 G-1

G
• Traffic > Port: This category contains traffic statistics that can be filtered by port resources.
• Traffic > Traffic Item: This category contains traffic statistics that can be filtered by port and traffic item resources.
• Traffic > Flow Filtering: This category contains traffic flow statistics filtered by flows that match user-defined filtering criteria.
• Traffic > Flow Detective: This category contains traffic flow statistics from a filtered subset of flows and that have a specified status, such as inactive.
To configure the StatQuery command and specify the sought statistics:
1. Configure the Command and Options, Global Events pages as you would normally configure any other Execute-type step.
2. Select the Command Settings and Parameters page of the Step Configuration wizard. In the Select Category field, choose a statistic category from the supported categories.
Select the Statistics > StatQuery event in the Command String field. In the Select Category field, choose a statistic category from the supported categories.
For categories that have associated resources (Protocols > Ports, Protocols > Routing/Switching Protocols, Traffic > Port, or Traffic > Traffic Item), read on at step 3, for the Traffic > Flow Filtering and the Traffic > Flow Detective category advance directly to step 4 or 5, respectively.
3. For the Protocols > Ports, Traffic > Port, Protocols > Routing/Switching Protocols, and Traffic > Traffic Item categories, the Filters pane appears as shown in Figure G-1, with an upper pane for defining a compound filter, and a lower pane for filtering by associated port and traffic item resources.
Figure G-1. Filter Pane
Filtering Expression pane
Resource pane that operates on associated resources
G-2 IxNetwork TestComposer User Guide, Release 7.00

Define a new filter by clicking the button and refine it by adding one or more sub-expressions by proceeding as follows:
a: Click the Add button to add a first filtering expression. Click into the added expression line, select a filter entity from those available for the selected group, define an operator and a value to match. For all portions that make up the expression – entity, operator, and value – you can either use in-place editing or, in case of portions that have multiple values, click the entity to display a drop-down list containing all available values.
Note that the supported filter operators differ based on the currently selected filter entity type.
b: Add one or more filtering expressions by clicking the Add button repeatedly, which adds new expression lines. For each newly added line, define another expression in a similar manner as for a:.
After having defined several such conditions, the resources are filtered using a compound filtering expression composed of the individual expressions joined by an AND operator.
At this moment you can optionally save the defined compound filter for
later use by clicking the button.
c: Apply the filter by clicking the Apply button. The lower pane which initially contained all resources (ports and traffic items) for the
current category, becomes highlighted green and displays only resources matching the filtering expression from the upper pane.
From the matching resources shown in the lower pane, you can select only
a subset by clicking their associated controls, which reduces the sought statistics to these associated with the current resource(s). To filter the Resource pane, so as to display only the selected or the unselected
resources, click the button in the upper pane and choose the Show checked or Show unchecked command respectively.
Entering a string in the Find field of the bottom pane enables you to additionally filter the matching resources set. After you have entered a filtering string, you can navigate through the sequence of matching results
by clicking the and buttons respectively.
Clicking the button displays all matching resources results
using yellow highlighting.
d: While working on the filter, if at some moment you wish to clear the entire
compound expression and start defining it from scratch, click the button.
IxNetwork TestComposer User Guide, Release 7.00 G-3

G
4. For Flow Filtering items, which have no associated resources, the Filters pane appears as shown in Figure G-2. Similar to other categories, the upper pane enables you to define a compound filter expression, while the lower pane displays additional sorting options.
Figure G-2. Filter Pane For the Flow Filtering Category
Define a new filter by clicking the button and refine it by adding one or more sub-expressions by proceeding as follows:
a: Click the Add button to add a first filtering expression. Click into the added expression line, select an entity from those available for the selected group, define an operator and a value to match. For all portions that make up the expression – entity, operator, and value – you can either use in-place editing or, in case of portions that have multiple values, click the entity to display a drop-down list containing all available values.
Note that the supported filter operators differ based on the currently selected filter entity type.
Note: For the Protocols > Routing/Switching Protocols category you have to create a coumpound filtering expression, since you can filter the category statistics both by the routing/switching protocol and the associated port resources.
Note: While in the Filters pane, clicking the button displays or hides the
Filter pane, while the button has a similar functionality that affects the bottom pane.
G-4 IxNetwork TestComposer User Guide, Release 7.00

b: Add one or more filtering expressions by clicking the Add button repeatedly, which adds new expression lines. For each newly added line, define another expression in a similar manner as for a:.
After having defined several such conditions, the resources are filtered using a compound filtering expression composed of the individual expressions joined by an AND operator.At this moment you can optionally save the defined compound filter for
later use by clicking the button.
c: In the Sorting Hierarchy pane below, which is populated with items which have been selected for flow tracking in the current IxNetwork configuration, you can sort by one or more such items.
To enable sorting by an item, click its associated control. For each item, the sorting order – ascending or descending – can also be set by clicking into the item’s line and choosing the desired order (Ascending, Descending) from the drop-down control.In case sorting was configured for several items, you can change the
default sort hierarchy by clicking the to move an item up in the
hierarchy, or clicking the button to move it down.
IxNetwork TestComposer User Guide, Release 7.00 G-5

G
5. For Flow Detective items which have no associated resources either, the Filters pane appears as shown in Figure G-3. Similar to the Flow Filtering category, the upper pane enables you to define a compound filter expression, additionally including filtering by flow status (active, inactive, dead). The lower pane displays filter and sorting options, including the capability to limit the number of flows to a user-specified value (Show field) in ascending or descending order, and sorted by the values of the Sorted by field. Flows that have not sent or received frames for a user-specified number of seconds are considered dead and can be used as a filter criteria in the upper pane.
Figure G-3. Filter Pane For the Flow Detective Category
6. The Show Egress Flows is available when traffic is generated using Egress Tracking. The Show Egress Flows check box is seen as shown in Filter Pane For the Flow Detective Category on page G-6
For you to be able to view the Show Egress Flows check box, do the following:
a: In the IxNetwork main window, add the required number of ports.
b: Click Traffic in the left pane.
c: On the Configuration menu, click Add L2-3 Traffic. The Advanced Traffic Wizard window appears.
d: In the left pane, click Flow Tracking.
Note: When applying a filter to a category which has associated ressources, such as, for example, the Protocol->Port category, the filter is both saved in the StatQuery command and is applied at run time. This is a different behavior than that of the Setup View window of IxNetwork, where the filter is applied to the GUI only.
G-6 IxNetwork TestComposer User Guide, Release 7.00

e: In the Track Flows by section, select the Source/Dest Port Pair check box. On selecting this check box, the Traffic Item check box gets selected by default.
f: In the Egress Tracking section, select the Enable Egress Tracking check box.
g: Click Finish.
h: In the Main_Procedure tab, click the Command String list.
i: In this list, click Statistics, and then click StatQuery.
j: In the Select Category list, under Traffic, click Flow Detective. You can now view the Show Egress Flows check box.
7. Alternatively to defining a filter from scratch at the previous 5, 6, or 7 steps respectively, you can choose an existing filter to apply by clicking into the Saved filters field and selecting a filter from the drop-down.
8. Click the Select Statistics button to advance to the Statistics pane (Table G-4), which enables you to specify the sought statistics for the resources previously filtered.
Initially, the left pane is populated with statistics appropriate to the selected category and filtered according to the filtering expression previously defined in the Filter pane.
Figure G-4. Statistics Pane
a: Specify the statistic to be retrieved by selecting it in the left pane and
clicking the button.
The statistic is added to the right pane and enables you to define its properties, such as an associated caption string or a scale factor.
IxNetwork TestComposer User Guide, Release 7.00 G-7

G
b: For some statistic categories, such as the Protocol->Port category, for which aggregation functions are available (None, Sum, Min, Max, Average), select the appropriate aggregation.
c: After several statistics have been selected for retrieval, the statistics list
can be re-ordered using the and buttons.
9. Configure the remaining pages as you normally would for any other Execute-type step.
10. When clicking the Finish button of the Step Configuration wizard, an expression such as the following is added to the Test Steps table:
Statistics StatQuery category="enumValue" filter="{element1 operator filterString1} {element2 operator filterString2}" resources="NodeId1 NodeId2 NodeId3" items="{stat {option value} {option value}}"
Hint: Since a statistics can be added more than once, provided the associated caption string is different for every occurrence, you could for example add it twice, the second time with a different scale factor.
Example: The following example starts an IxNetwork session, loads a configuration, applies and starts the L2/L3 traffic, and eventually retrieves the framesSent port statistics with the Sum aggregation into the var1 variable:StartSession IxNetwork, Session Start tclServer=localhost tclPort=8009 tclVersion=default
Execute Load Configuration configurationFile=sample01 waitForHardware=True waitForPortsUp=True
Execute Traffic Apply L2-L3 Traffic
Execute Traffic Start All L2-L3 Traffic
Execute var1 Statistics StatQuery category= Layer23Protocols-> Port filter="" resources="1:10.205.11.30:03:03-Ethernet" items="{{10//100//1000 STXS4-256MB->Frames Tx.} with caption: {Frames Tx.} aggregation: Sum scale: Divide 1}"
G-8 IxNetwork TestComposer User Guide, Release 7.00

HAppendix H: TestComposer Licensing Information
This appendix provides information on the licensing schemes supported by IxNetwork TestComposer.
Supported Licensing SchemesThe IxNetwork TestComposer functionality is subject to the following three lev-els:
• Basic
• Device Configuration
• Advanced
Setting up a license server and configuring the license type is done using the Help > Licensing command of the IxNetwork client host.
Important: A license verification occurs each time a CmdTool, COM, SSH, IxEmail, Telnet, TL1, SNMP, Syslog, and Reporter session connects to a configured test device, and remains checked out until TestComposer exits. For node-locked licenses, if a license is found at session connection time, this means that the session can be used on that particular host.For floating licenses, if a license is found session connection time, the number of available licenses is decremented by a unit for the remaining duration until TestComposer exits.
Note: Using the IxNetwork Licensing window, you have the option of installing the TestComposer license on either a chassis or a standalone license manager host:• On Chassis: If you installed the TestComposer license on a chassis, you
need to select this option.• On Server: If you installed the TestComposer license on a standalone
license server host, which could also be the local IxNetwork client machine, you need to select this option. In the Server field add the name of the machine (or localhost). In case your licenses are installed on different machines, this field contains a list of hosts.
IxNetwork TestComposer User Guide, Release 7.00 H-1

H
Basic This functionality level supports the following features:
• The ability to edit IxNetwork events, including the ability to retrieve statistics using the IxNetwork StatQuery command.
• The ability to use the breakpoints and use other advanced debugging features, such as variable watches and thread list.
• The ability to configure test devices using the default TclSh and Raw device session types.
Device Configuration
In addition to the functionality supported by the Basic license, this level provides the ability to configure test devices using CmdTool, COM, IxEmail, SSH1/SSH2/SSHAuto, Telnet, and TL1 session types.
Advanced License In addition to the functionality supported by the Device Configuration level, this license level provides the ability to execute Syslog, SNMP, and Reporter session types, each of these session types being licensed independently.
Note: The Basic functionality is not subject to licensing.
H-2 IxNetwork TestComposer User Guide, Release 7.00

IAppendix I: The MIB Browser
This appendix provides a description of the MIB Browser used by TestComposer SNMP session commands and contains the following sections:
• Using the MIB Browser on page I-1
Using the MIB BrowserThe MIB Browser is used by several SNMP commands, such as Set, Get, Walk, GetTable to specify an object id (oid) of nodes in a Management Information Base (MIB) entity.
When called from a TestComposer SNMP command step over an established ses-sion, the MIB browser (Figure I-1) displays a tree representation of all known MIBs and permits you to visually navigate the MIBs tree.
IxNetwork TestComposer User Guide, Release 7.00 I-1

I
Figure I-1. The MIB Browser GUI
For each node, the MIB browser displays name, type, equivalent numeric format, and description information.
Navigating the MIBs tree is done using the common Expand (by clicking the
button) and Collapse (by clicking the button) paradigm implemented by most applications that handle tree structure rendering and node selection using the GUI.
Returning the oid of the selected node is done by clicking the Ok button.
Note: The MIB browser displays all MIBs known to the TestComposer application. As MIB resources can be added at any moment using the Resource Manager window, an enlarged set of MIBs can be displayed in the browser by adding new MIB definitions. For information on how to import additional MIB resources, see Handling MIB Resources on page 13-33.
Note: The MIBs tree also supports navigation by typing in a node name. As you type, the appropriate node underneath the initially selected node becomes selected in the tree.
Important: When performing node selection using the MIB browser, the oid returned to the TestComposer GUI is in a short format and does not contain the entire MIB path: for example, selection of the CISCO-VTP-MIB::ciscoVtpMIB.vtpNotifications.vtpNotificationsPrefix.vtpVlanDeleted node only returns the CISCO-VTP-MIB::vtpVlanDeleted string.
I-2 IxNetwork TestComposer User Guide, Release 7.00

JAppendix J: Parallel Steps Configuration Hints
This section provides hints on configuring and running test scripts that comprise parallel steps opening device sessions to configured devices and executing com-mands on the established sessions.
Parallel Steps Execution ExamplesExecution of parallel steps that establish connections to configured devices and execute commands on the established connections should be considered with care.
The subsequent examples illustrate by way of example that unique session identi-fiers must exist within each Composer test execution in order to obtain a predict-able behavior at test execution time.
Example 1 This example illustrates the case of a procedure P that opens a session to a con-figured device, executes some commands on the device, and eventually closes the connection. In the main test body, this procedure is called by two RunProce-dure steps configured for running in parallel.
Assuming, for example, that we had the four step procedure defined below:
Procedure
StartSession Router_01 //S1
Execute Router_01 <some_command> //S2
Execute Router_01 <some_command> //S3
StopSession Router_01 //S4
EndProcedue
and that we wanted to call the procedure twice, with the corresponding RunProcedure steps configured as parallel:
IxNetwork TestComposer User Guide, Release 7.00 J-1

Parallel Steps Execution ExamplesJ
...
RunProcedure P // instance P1 launched as parallel step
RunProcedure P // instance P2 launched as parallel step
...
In this case, since the application’s execution engine does not enforce an exclu-sive per-session access to the configured device, the actual executed steps sequence is largely unpredictable and the obtained test execution flow could be for example that shown in Figure J-1 below:
Figure J-1. Steps Execution Sequence
In the diagram above, the step first index refers to the procedure instance, while the second index references the step number within the procedure. For example, S12 denominates the second procedure step that is executed by the first instance of the called procedure P.
An execution flow such as that shown in Figure J-1 would set the configured device in an unpredictable state, since at the time of the execution of step S21 the connection would already be open (it was opened by S11), or at the time of the execution of S23 the connection would already be closed (it was terminated by S14).
To avoid such a situation, you would have to avoid executing in parallel steps that execute commands referencing the same session.
Example 2 This example illustrates the case of a procedure P opening a session to a config-ured device, executing some commands on the device, and closing. The proce-dure accepts an IP address as argument, which is used inside the procedure to connect to a device specified by that argument.
Procedure P {String: IP_addr}
StartSession Router_01 $IP_addr //S1
Execute <some_command> Router_01 //S2
Execute <some_command> Router_01 //S3
StopSession Router_01 //S4
EndProcedure
J-2 IxNetwork TestComposer User Guide, Release 7.00

Parallel Steps Execution Examples
and that we tried to use the procedure in the main test body to configure two dif-ferent devices (10.0.0.1 and 10.0.0.2) in parallel, using in a loop construct such as a following:
...
For IP_addr in {10.0.0.1, 10.0.0.2}
RunProcedure P $IP_addr //PunProcedure step is parallel
EndFor
...
Instead of opening a Router_01 session with the device at IP address 10.0.0.1 and another Router_01 session with he device at IP address 10.0.0.2, such an execu-tion would open a single session 10.0.0.1, and no configuration command would reach device 10.0.0.2.
Such a behavior again highlights the requirement of using a single, unique ses-sion identifier per test.
Example 3 Another example that illustrates the requirement of using a single, unique session identifier per test is the following.
Let us consider the case of a test that opens a session to a configured device and then executes some commands on the device.
StartSession Router_01 $IP_addr //S1
Execute <some_command> Router_01 //S2
Execute <some_command> Router_01 //S3
StopSession Router_01 //S4
Let us also assume that step S2 is configured as monitoring the command response and triggering the execution of a local procedure P that uses the same session Router_01 opened by the test (S1).
Procedure P
Execute <some_command> Router_01 //P1
EndProcedure
In such a case, if at test execution time step S2 would encounter a matching com-mand response from the configured device and would effectively trigger the pro-cedure P, then the procedure-triggering step (S2) would time out.
IxNetwork TestComposer User Guide, Release 7.00 J-3

Parallel Steps Execution ExamplesJ
J-4 IxNetwork TestComposer User Guide, Release 7.00

KAppendix K: TestComposer Menu Shortcuts
This appendix provides a listing of IxNetwork TestComposer menu shortcuts that can be used for accessing plugin commands.
Command ShortcutsThe following table lists command assignments for the keys:
Table K-1. Keyboard Shortcuts
Keyboard Shortcut
Action Context
Ctrl+Shift+N Creates a new TestComposer main script. All
Ctrl+N, Ctrl+P Creates a new TestComposer procedure. All
Ctrl+N, Ctrl+D Creates a new TestComposer device session.
All
Ctrl+N, Ctrl+C Creates a new TestComposer CSV template. All
Ctrl+N, Ctrl+R Creates a new TestComposer response template.
All
Ctrl+S Saves the currently open script into the current IxNetwork configuration.
All
Ctrl+F4 Closes all procedure windows other than the main procedure window.
All
Ctrl+X Removes the currently selected step(s), making them available for pasting into another location of the same test, or into another test or procedure.
Edit
Ctrl+C Copies the currently selected step(s), making them available for pasting into another location of the same test, or into another test or procedure.
Edit
IxNetwork TestComposer User Guide, Release 7.00 K-1

Command ShortcutsK
Ctrl+V Pastes the cut or copied step(s) into the current location.
Edit
Ctrl+Z Undoes most of the test editing operations performed in the Test Steps table.
Edit, Debug
Ctrl+Y Re-applies commands that were undone previously using an Undo command.
Edit, Debug
Ctrl+A Selects all steps in the Test Steps table. Edit, Debug
Ctrl+F Switches the focus to the Find tab that enables you to perform search and replace operations on the Test Steps table.
Edit
Ctrl+I, Ctrl+W Creates a new step using the Step Configuration wizard and appends it at the end of the Test Steps table.
Edit
Ctrl+I, Ctrl+N Appends a new step having the same type as the last added step at the end of the Test Steps table.
Edit
Ctrl+I, Ctrl+P Adds an empty procedure at the end of the Test Steps table.
Edit
Ctrl+I, Ctrl+A Adds a new step above the currently selected step.
Edit
Ctrl+I, Ctrl+B Adds a new step below the currently selected step.
Edit
Ctrl+P, Ctrl+I Encloses the currently selected step(s) in an If statement.
Edit
Ctrl+P, Ctrl+F Encloses the currently selected step(s) in a For statement.
Edit
Ctrl+P, Ctrl+W Encloses the currently selected step(s) in a While statement.
Edit
Ctrl+P, Ctrl+S Encloses the currently selected step(s) in a StepSearch command.
Edit
Ctrl+P, Ctrl+B Encloses the currently selected step(s) in a BinarySearch command.
Edit
Ctrl+P, Ctrl+P Encloses the currently selected step(s) in a procedure step.
Edit
Ctrl+G Displays a window that enables you to navigate to a specific step indicated by its step number.
Edit, Debug
Ctrl+Shift+G Enables you to navigate to the procedure definition referenced by the RunProcedure step.
Edit, Debug
Table K-1. Keyboard Shortcuts
Keyboard Shortcut
Action Context
K-2 IxNetwork TestComposer User Guide, Release 7.00

Command Shortcuts
Ctrl+R, Ctrl+S Defines the selected step(s) as sequential. Edit
Ctrl+R, Ctrl+F Defines the selected step(s) as sequential. Edit
Ctrl+R, Ctrl+P Plays the selected step(s). Edit
Ctrl+R, Ctrl+R Resets the Tcl interpreter. Edit
Ctrl+R, Ctrl+I When the currently selected step(s) is (are) excluded from execution, this shortcut enables it (them) for execution.
Edit, Debug
Ctrl+R, Ctrl+E When the currently selected step(s) is (are) included in the execution, this shortcut disables it (them) from execution.
Edit, Debug
Ctrl+E Edits the selected step in the Step Configuration wizard.
Edit
Del Deletes the currently selected step(s). Edit
Ctrl+U Moves the selected step(s) up in the Test Steps table.
Edit
Ctrl+D Moves the selected step(s) down in the Test Steps table.
Edit
Ctrl+B, Ctrl+E Sets an active breakpoint (enabled). Debug
Ctrl+B, Ctrl+D Changes a breakpoint to an inactive state (disabled).
Debug
Ctrl+B, Ctrl+Delete
Removes an existing breakpoint. Debug
Ctrl+Shift+M Accesses the Resource Manager window, which enables you to manage TestComposer resources, such as procedures, device sessions, response templates, and MIBs.
Edit, Debug
Ctrl+Shift+N Accesses the CSV Template editor. Edit, Debug
Alt+Shift+C Accesses the Session Console window. Edit
Ctrl+Shift+P While the Session Console pane is displayed, this shortcut displays or hides the Setting Options pane.
Edit
Ctrl+Shift+E Switches to the Edit mode. Edit, Debug
Ctrl+Shift+D Switches to the Debug mode. Edit, Debug
Ctrl+Shift+T Accesses the Test Parameters window. Edit, Debug
Ctrl+Shift+F Accesses the Files Catalog window. Edit, Debug
Ctrl+Shift+S Accesses the Exported stats window. Edit, Debug
Table K-1. Keyboard Shortcuts
Keyboard Shortcut
Action Context
IxNetwork TestComposer User Guide, Release 7.00 K-3

Command ShortcutsK
Ctrl+Shift+U Accesses the User Events catalog. Edit, Debug
Ctrl+Shift+V Validates the current test. Edit
Ctrl+Shift+O Accesses the Options window. Edit, Debug
F1 Brings up the context sensitive help file. All
Table K-1. Keyboard Shortcuts
Keyboard Shortcut
Action Context
K-4 IxNetwork TestComposer User Guide, Release 7.00