Embed Size (px)
Citation preview
COMMONWEALTH SUSTAINABILITY WORKS 540/219-8912 / PO Box 633, Culpeper, Virginia 22701
www.commonwealthsustainability.com
GREEN BUILDING + SUSTAINABLE COMMUNITIES + STRATEGIC PLANNING
SAMPLE ENERGY AUDIT REPORT – PAGE 1 OF 22
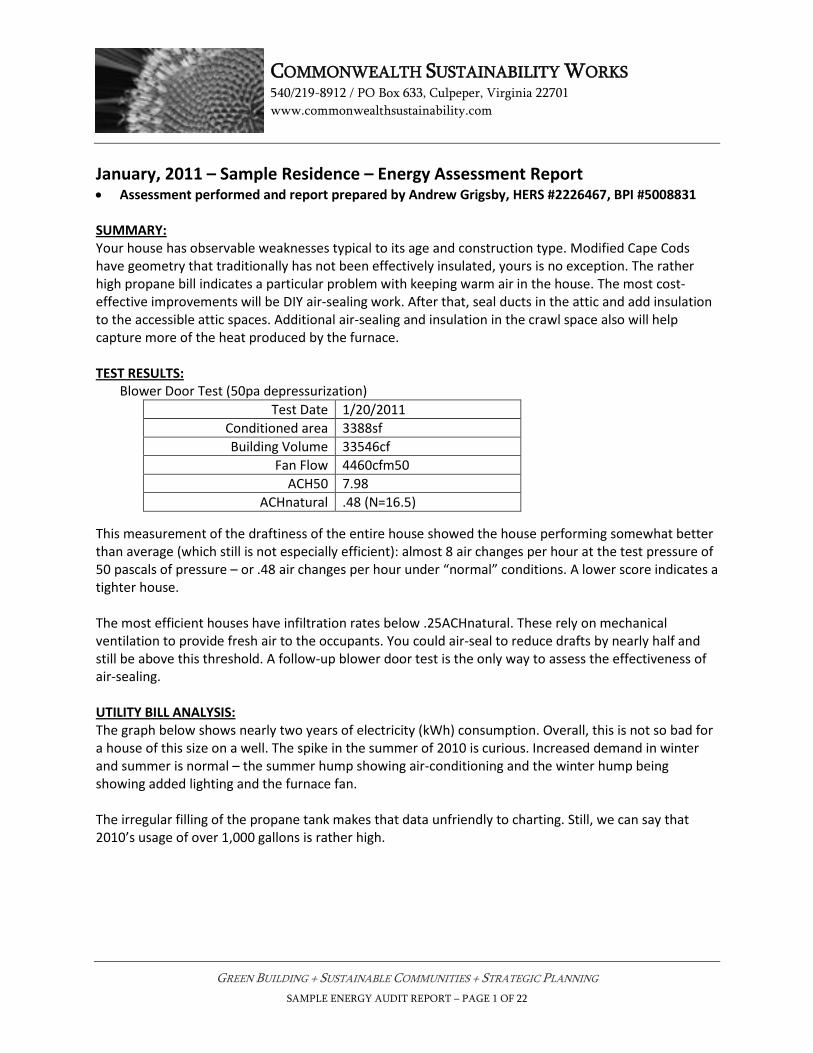
January, 2011 – Sample Residence – Energy Assessment Report Assessment performed and report prepared by Andrew Grigsby, HERS #2226467, BPI #5008831 SUMMARY: Your house has observable weaknesses typical to its age and construction type. Modified Cape Cods have geometry that traditionally has not been effectively insulated, yours is no exception. The rather high propane bill indicates a particular problem with keeping warm air in the house. The most cost-effective improvements will be DIY air-sealing work. After that, seal ducts in the attic and add insulation to the accessible attic spaces. Additional air-sealing and insulation in the crawl space also will help capture more of the heat produced by the furnace. TEST RESULTS:
Blower Door Test (50pa depressurization)
Test Date 1/20/2011
Conditioned area 3388sf
Building Volume 33546cf
Fan Flow 4460cfm50
ACH50 7.98
ACHnatural .48 (N=16.5)
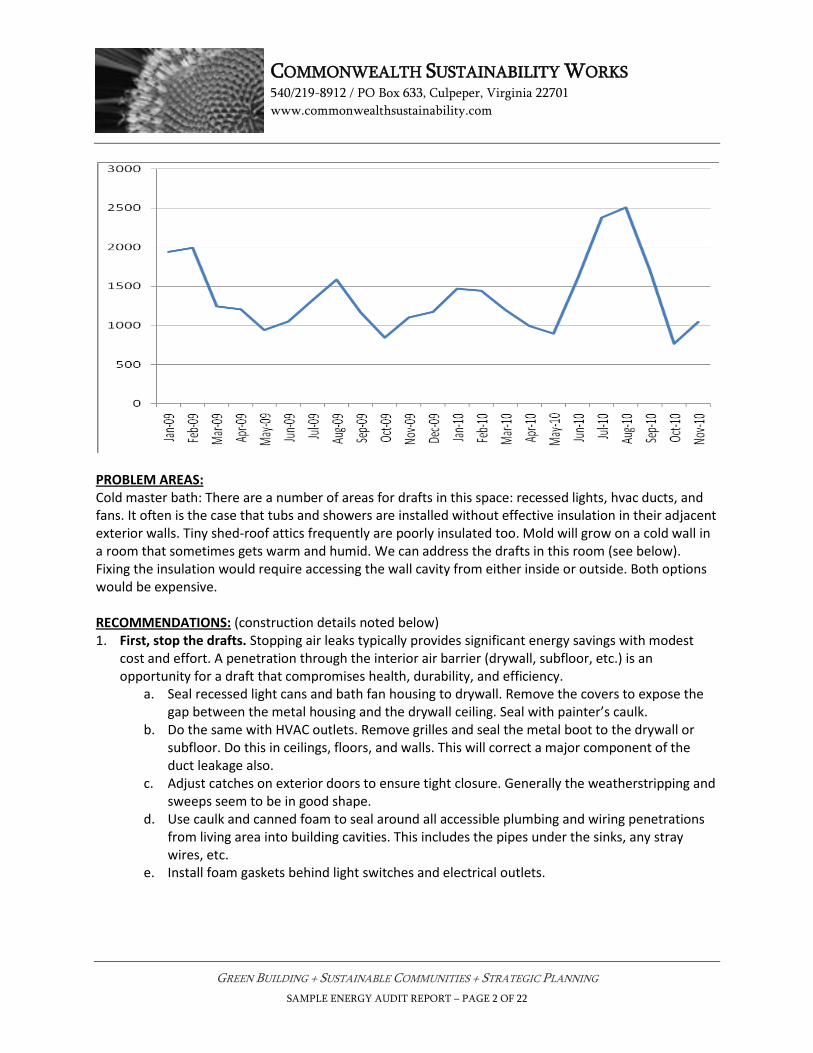
This measurement of the draftiness of the entire house showed the house performing somewhat better than average (which still is not especially efficient): almost 8 air changes per hour at the test pressure of 50 pascals of pressure – or .48 air changes per hour under “normal” conditions. A lower score indicates a tighter house. The most efficient houses have infiltration rates below .25ACHnatural. These rely on mechanical ventilation to provide fresh air to the occupants. You could air-seal to reduce drafts by nearly half and still be above this threshold. A follow-up blower door test is the only way to assess the effectiveness of air-sealing. UTILITY BILL ANALYSIS: The graph below shows nearly two years of electricity (kWh) consumption. Overall, this is not so bad for a house of this size on a well. The spike in the summer of 2010 is curious. Increased demand in winter and summer is normal – the summer hump showing air-conditioning and the winter hump being showing added lighting and the furnace fan. The irregular filling of the propane tank makes that data unfriendly to charting. Still, we can say that 2010’s usage of over 1,000 gallons is rather high.
COMMONWEALTH SUSTAINABILITY WORKS 540/219-8912 / PO Box 633, Culpeper, Virginia 22701
www.commonwealthsustainability.com
GREEN BUILDING + SUSTAINABLE COMMUNITIES + STRATEGIC PLANNING
SAMPLE ENERGY AUDIT REPORT – PAGE 2 OF 22
PROBLEM AREAS: Cold master bath: There are a number of areas for drafts in this space: recessed lights, hvac ducts, and fans. It often is the case that tubs and showers are installed without effective insulation in their adjacent exterior walls. Tiny shed-roof attics frequently are poorly insulated too. Mold will grow on a cold wall in a room that sometimes gets warm and humid. We can address the drafts in this room (see below). Fixing the insulation would require accessing the wall cavity from either inside or outside. Both options would be expensive. RECOMMENDATIONS: (construction details noted below) 1. First, stop the drafts. Stopping air leaks typically provides significant energy savings with modest
cost and effort. A penetration through the interior air barrier (drywall, subfloor, etc.) is an opportunity for a draft that compromises health, durability, and efficiency.
a. Seal recessed light cans and bath fan housing to drywall. Remove the covers to expose the gap between the metal housing and the drywall ceiling. Seal with painter’s caulk.
b. Do the same with HVAC outlets. Remove grilles and seal the metal boot to the drywall or subfloor. Do this in ceilings, floors, and walls. This will correct a major component of the duct leakage also.
c. Adjust catches on exterior doors to ensure tight closure. Generally the weatherstripping and sweeps seem to be in good shape.
d. Use caulk and canned foam to seal around all accessible plumbing and wiring penetrations from living area into building cavities. This includes the pipes under the sinks, any stray wires, etc.
e. Install foam gaskets behind light switches and electrical outlets.

COMMONWEALTH SUSTAINABILITY WORKS 540/219-8912 / PO Box 633, Culpeper, Virginia 22701
www.commonwealthsustainability.com
GREEN BUILDING + SUSTAINABLE COMMUNITIES + STRATEGIC PLANNING
SAMPLE ENERGY AUDIT REPORT – PAGE 3 OF 22
f. Make sure the damper in the fireplace is securely shut when not in use. Consider a chimney pillow or the equivalent – or a chimney-top damper with a sealing gasket.
2. Windows: Curtains and thermal blinds are good ways to reduce heat loss in winter nights and heat gain in summer days. The closer they fit to the frame the better they will work. Rarely used rooms are great candidates. IR photo to side shows how much warmer the blinds are compared to the wood framing.
3. In the attic: a. First, use caulk or canned foam to seal around all wiring and
plumbing penetrations through the attic floor and framing. Also seal over top plates of all accessible walls.
b. To reduce duct leakage (which I did not test but suspect to be a problem), rebuild the joints between flexduct and the plenum and boots. Seal with mastic for a durable, air-tight seal. Also, paint over the taped joints on the air handler with mastic.
c. Insulated kneewalls abutting attic space need attic-side sheathing for the fiberglass batts to be effective (photos below). I recommend foamboard as it’s lightweight, easy to cut, and adds R-Value. Caulk in place to make air-tight. R-5 is good. R-10 is great. Some places will need batts replaced first. Where there is insulation above the kneewall, run sheathing 14” above the top plate to create a dam for insulation piled on the adjacent ceiling.
d. I adjusted the thermostat on the attic fan up to 115o. It should only operate in the hottest
summer months. One needs a well-sealed attic floor, otherwise the fan will suck conditioned air out of the house.
e. Install metal flashing around the chimney to keep combustible materials 2” away. Seal with fire-rated caulk to stop air movement.
f. Once all of the air-sealing, duct-sealing, and sheathing work is done, add loose cellulose to the attic floor.
i. Where R30 batts are in good shape, add 6-8 inches. ii. Where batts are missing, install cellulose to 13 inches deep.

COMMONWEALTH SUSTAINABILITY WORKS 540/219-8912 / PO Box 633, Culpeper, Virginia 22701
www.commonwealthsustainability.com
GREEN BUILDING + SUSTAINABLE COMMUNITIES + STRATEGIC PLANNING
SAMPLE ENERGY AUDIT REPORT – PAGE 4 OF 22
iii. There are many gaps in the batt coverage over the vault, by the chimney, and around complicated framing. Be sure to airseal these areas well first.
iv. Don’t forget the small front dormers. Framing blocks the view, but the installer can shove his hose into the area to add loose insulation.
v. Cover top plates of kneewalls where accessible. vi. Cover flexduct wherever possible.
Gaps around framing
Missing batts around chimney – from attic and room below
COMMONWEALTH SUSTAINABILITY WORKS 540/219-8912 / PO Box 633, Culpeper, Virginia 22701
www.commonwealthsustainability.com
GREEN BUILDING + SUSTAINABLE COMMUNITIES + STRATEGIC PLANNING
SAMPLE ENERGY AUDIT REPORT – PAGE 5 OF 22
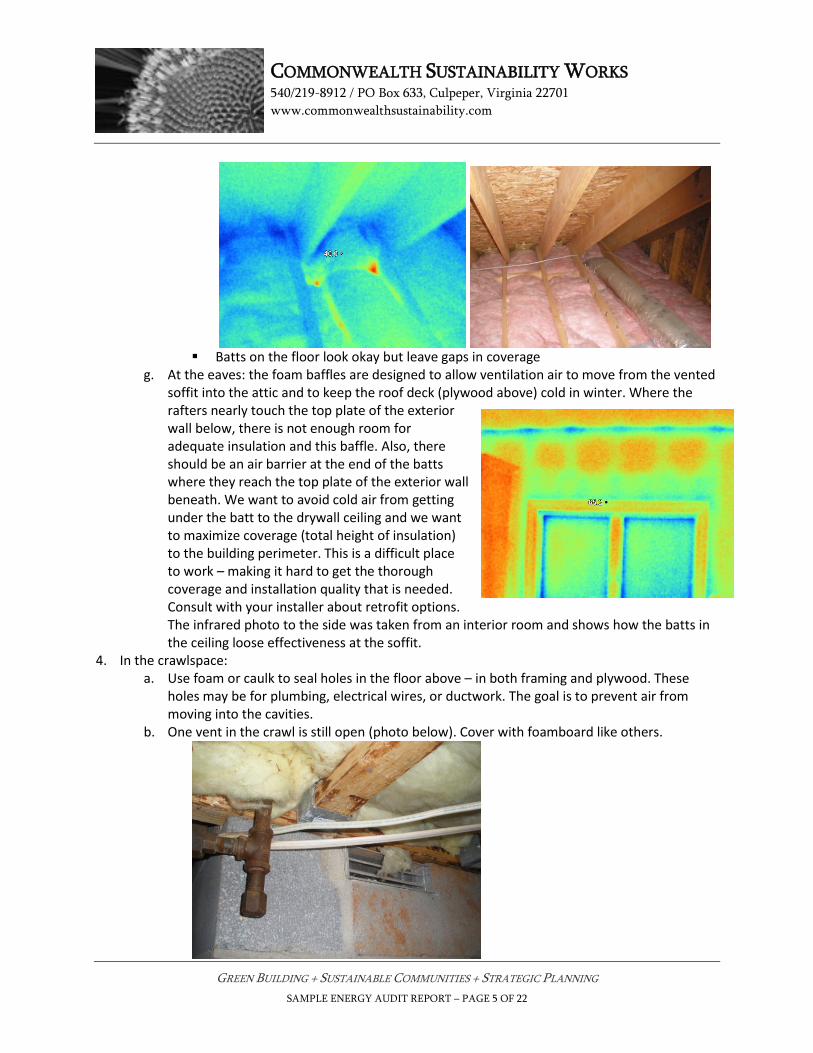
Batts on the floor look okay but leave gaps in coverage
g. At the eaves: the foam baffles are designed to allow ventilation air to move from the vented soffit into the attic and to keep the roof deck (plywood above) cold in winter. Where the rafters nearly touch the top plate of the exterior wall below, there is not enough room for adequate insulation and this baffle. Also, there should be an air barrier at the end of the batts where they reach the top plate of the exterior wall beneath. We want to avoid cold air from getting under the batt to the drywall ceiling and we want to maximize coverage (total height of insulation) to the building perimeter. This is a difficult place to work – making it hard to get the thorough coverage and installation quality that is needed. Consult with your installer about retrofit options. The infrared photo to the side was taken from an interior room and shows how the batts in the ceiling loose effectiveness at the soffit.
4. In the crawlspace: a. Use foam or caulk to seal holes in the floor above – in both framing and plywood. These
holes may be for plumbing, electrical wires, or ductwork. The goal is to prevent air from moving into the cavities.
b. One vent in the crawl is still open (photo below). Cover with foamboard like others.
COMMONWEALTH SUSTAINABILITY WORKS 540/219-8912 / PO Box 633, Culpeper, Virginia 22701
www.commonwealthsustainability.com
GREEN BUILDING + SUSTAINABLE COMMUNITIES + STRATEGIC PLANNING
SAMPLE ENERGY AUDIT REPORT – PAGE 6 OF 22
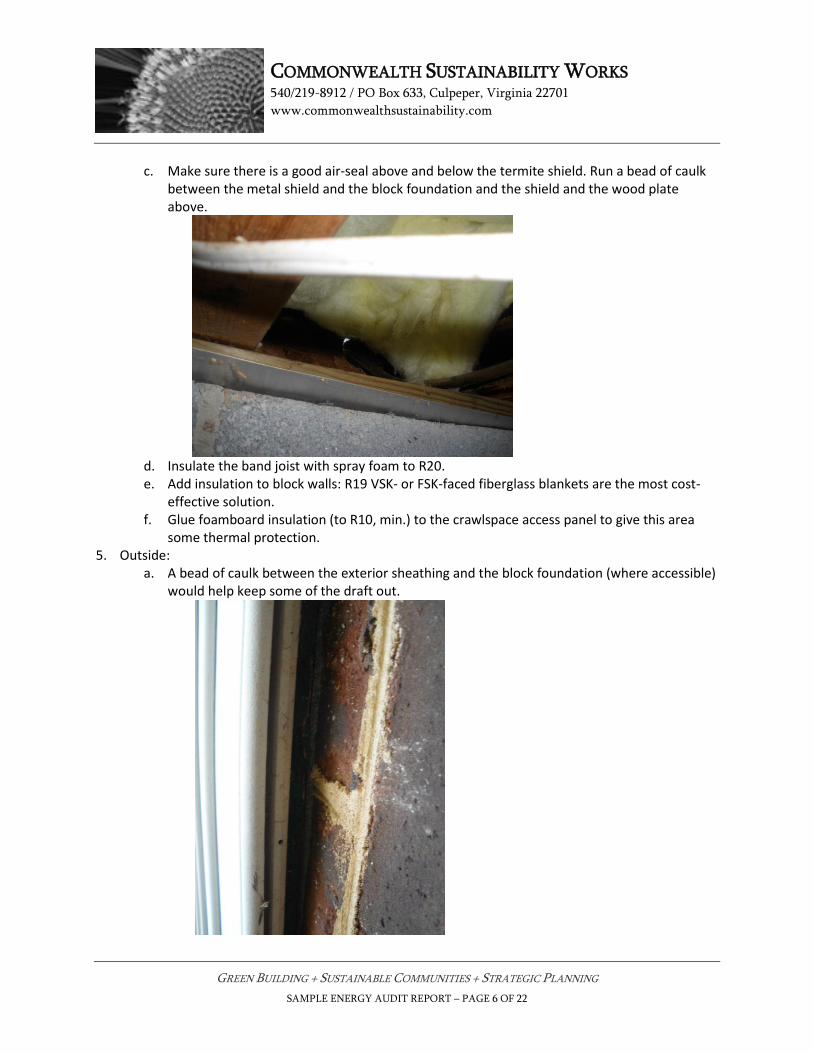
c. Make sure there is a good air-seal above and below the termite shield. Run a bead of caulk between the metal shield and the block foundation and the shield and the wood plate above.
d. Insulate the band joist with spray foam to R20. e. Add insulation to block walls: R19 VSK- or FSK-faced fiberglass blankets are the most cost-
effective solution. f. Glue foamboard insulation (to R10, min.) to the crawlspace access panel to give this area
some thermal protection. 5. Outside:
a. A bead of caulk between the exterior sheathing and the block foundation (where accessible) would help keep some of the draft out.
COMMONWEALTH SUSTAINABILITY WORKS 540/219-8912 / PO Box 633, Culpeper, Virginia 22701
www.commonwealthsustainability.com
GREEN BUILDING + SUSTAINABLE COMMUNITIES + STRATEGIC PLANNING
SAMPLE ENERGY AUDIT REPORT – PAGE 7 OF 22
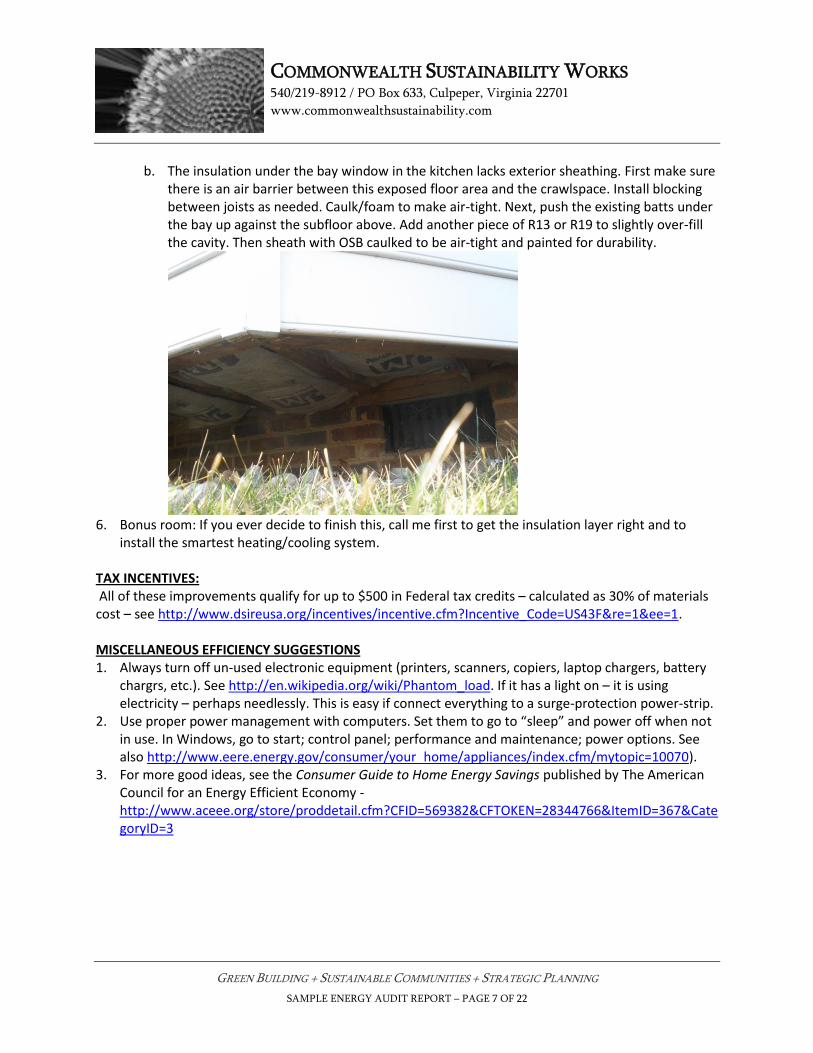
b. The insulation under the bay window in the kitchen lacks exterior sheathing. First make sure there is an air barrier between this exposed floor area and the crawlspace. Install blocking between joists as needed. Caulk/foam to make air-tight. Next, push the existing batts under the bay up against the subfloor above. Add another piece of R13 or R19 to slightly over-fill the cavity. Then sheath with OSB caulked to be air-tight and painted for durability.
6. Bonus room: If you ever decide to finish this, call me first to get the insulation layer right and to
install the smartest heating/cooling system. TAX INCENTIVES: All of these improvements qualify for up to $500 in Federal tax credits – calculated as 30% of materials cost – see http://www.dsireusa.org/incentives/incentive.cfm?Incentive_Code=US43F&re=1&ee=1. MISCELLANEOUS EFFICIENCY SUGGESTIONS 1. Always turn off un-used electronic equipment (printers, scanners, copiers, laptop chargers, battery
chargrs, etc.). See http://en.wikipedia.org/wiki/Phantom_load. If it has a light on – it is using electricity – perhaps needlessly. This is easy if connect everything to a surge-protection power-strip.
2. Use proper power management with computers. Set them to go to “sleep” and power off when not in use. In Windows, go to start; control panel; performance and maintenance; power options. See also http://www.eere.energy.gov/consumer/your_home/appliances/index.cfm/mytopic=10070).
3. For more good ideas, see the Consumer Guide to Home Energy Savings published by The American Council for an Energy Efficient Economy - http://www.aceee.org/store/proddetail.cfm?CFID=569382&CFTOKEN=28344766&ItemID=367&CategoryID=3
COMMONWEALTH SUSTAINABILITY WORKS 540/219-8912 / PO Box 633, Culpeper, Virginia 22701
www.commonwealthsustainability.com
GREEN BUILDING + SUSTAINABLE COMMUNITIES + STRATEGIC PLANNING
SAMPLE ENERGY AUDIT REPORT – PAGE 8 OF 22
CONSTRUCTION DETAILS INTERIOR AIR SEALING
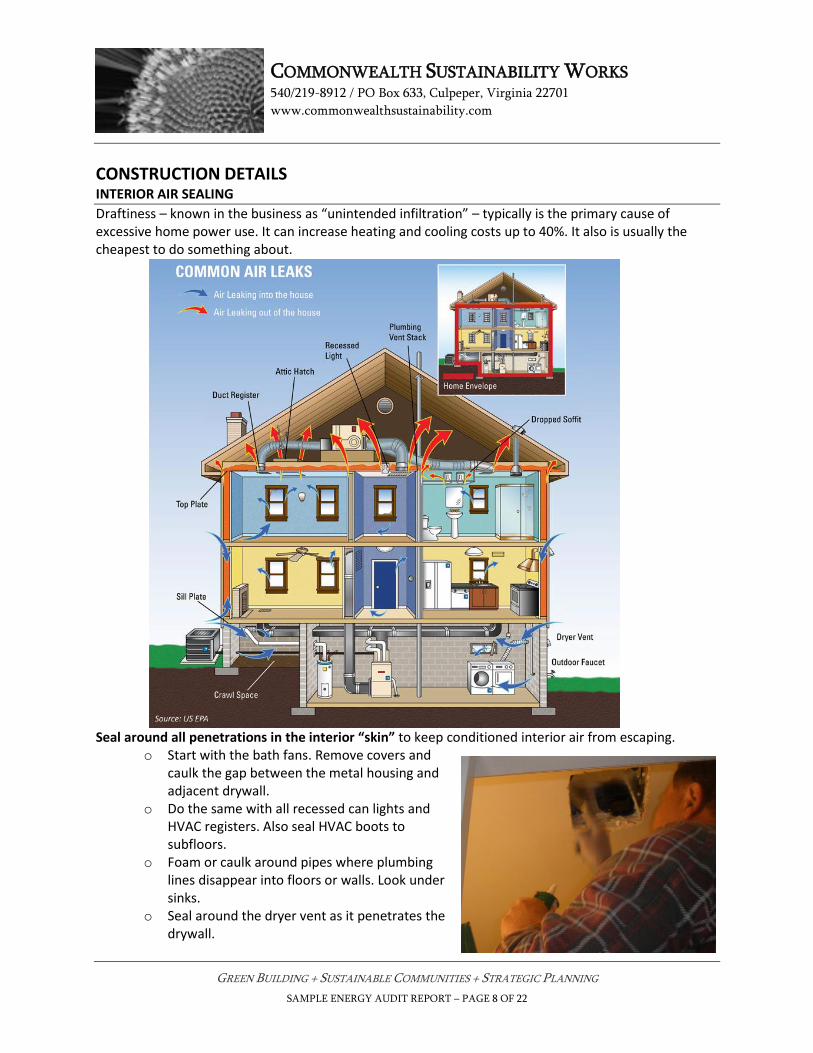
Draftiness – known in the business as “unintended infiltration” – typically is the primary cause of excessive home power use. It can increase heating and cooling costs up to 40%. It also is usually the cheapest to do something about.
Seal around all penetrations in the interior “skin” to keep conditioned interior air from escaping. o Start with the bath fans. Remove covers and
caulk the gap between the metal housing and adjacent drywall.
o Do the same with all recessed can lights and HVAC registers. Also seal HVAC boots to subfloors.
o Foam or caulk around pipes where plumbing lines disappear into floors or walls. Look under sinks.
o Seal around the dryer vent as it penetrates the drywall.
COMMONWEALTH SUSTAINABILITY WORKS 540/219-8912 / PO Box 633, Culpeper, Virginia 22701
www.commonwealthsustainability.com
GREEN BUILDING + SUSTAINABLE COMMUNITIES + STRATEGIC PLANNING
SAMPLE ENERGY AUDIT REPORT – PAGE 9 OF 22
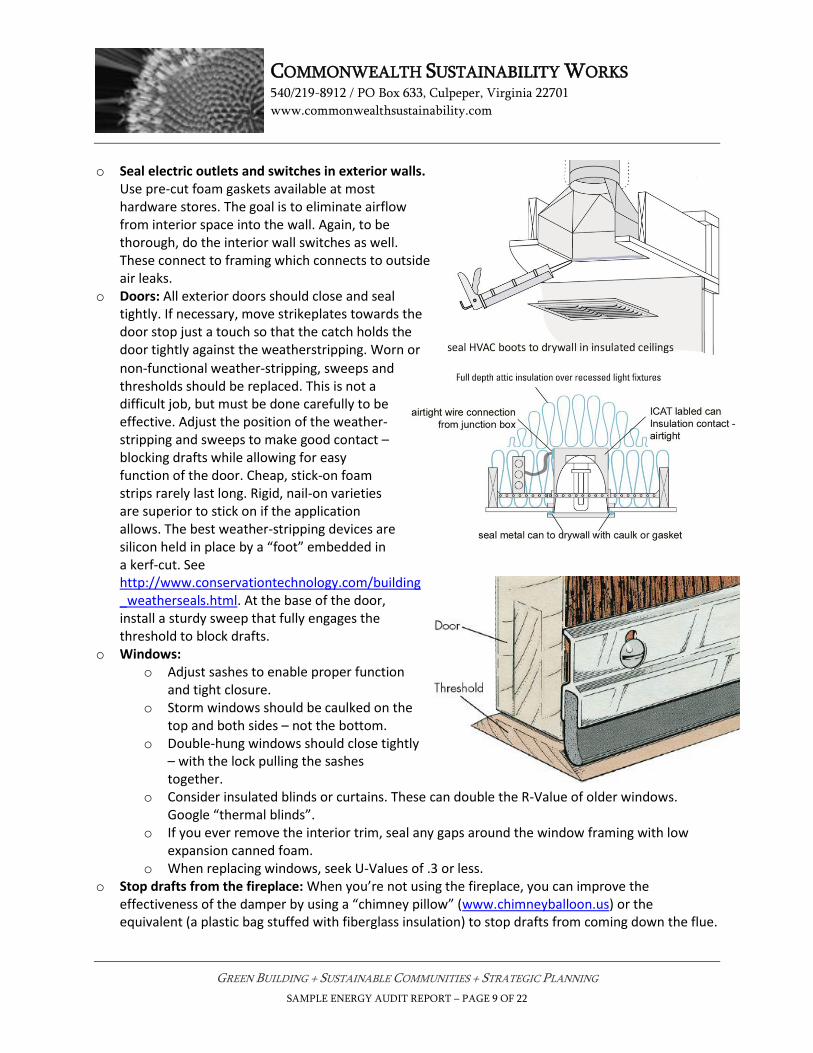
o Seal electric outlets and switches in exterior walls. Use pre-cut foam gaskets available at most hardware stores. The goal is to eliminate airflow from interior space into the wall. Again, to be thorough, do the interior wall switches as well. These connect to framing which connects to outside air leaks.
o Doors: All exterior doors should close and seal tightly. If necessary, move strikeplates towards the door stop just a touch so that the catch holds the door tightly against the weatherstripping. Worn or
non-functional weather-stripping, sweeps and thresholds should be replaced. This is not a difficult job, but must be done carefully to be effective. Adjust the position of the weather-stripping and sweeps to make good contact – blocking drafts while allowing for easy function of the door. Cheap, stick-on foam strips rarely last long. Rigid, nail-on varieties are superior to stick on if the application allows. The best weather-stripping devices are silicon held in place by a “foot” embedded in a kerf-cut. See http://www.conservationtechnology.com/building_weatherseals.html. At the base of the door, install a sturdy sweep that fully engages the threshold to block drafts.
o Windows: o Adjust sashes to enable proper function
and tight closure. o Storm windows should be caulked on the
top and both sides – not the bottom. o Double-hung windows should close tightly
– with the lock pulling the sashes together.
o Consider insulated blinds or curtains. These can double the R-Value of older windows. Google “thermal blinds”.
o If you ever remove the interior trim, seal any gaps around the window framing with low expansion canned foam.
o When replacing windows, seek U-Values of .3 or less. o Stop drafts from the fireplace: When you’re not using the fireplace, you can improve the
effectiveness of the damper by using a “chimney pillow” (www.chimneyballoon.us) or the equivalent (a plastic bag stuffed with fiberglass insulation) to stop drafts from coming down the flue.
COMMONWEALTH SUSTAINABILITY WORKS 540/219-8912 / PO Box 633, Culpeper, Virginia 22701
www.commonwealthsustainability.com
GREEN BUILDING + SUSTAINABLE COMMUNITIES + STRATEGIC PLANNING
SAMPLE ENERGY AUDIT REPORT – PAGE 10 OF 22
Tie a red yarn to the bag to alert users to the bag’s presence. These aren’t convenient if you use the fireplace often. Or – install a chimney top damper with a sealing gasket.
o Stop drafts from the insert: Be certain that chimney’s damper is shut when not in use. Close insert doors tightly when not in use. Use high-temperature gasket cement (e.g. 500 RTV High Heat Silicone Sealant) to seal the gap between the hearth and the insert.
o Stop drafts from the woodstove: Be certain that stove’s dampers are tightly shut when not in use. Rope seal on the stove door should be in good shape to provide a good seal. Use gasket cement (e.g. 500 RTV High Heat Silicone Sealant) to seal any gaps in the stove pipe including where the pipe enters the chimney.
More air-sealing tips and details at
http://www.southface.org/web/resources&services/publications/technical_bulletins/AS-Airsealing%2000-767.pdf
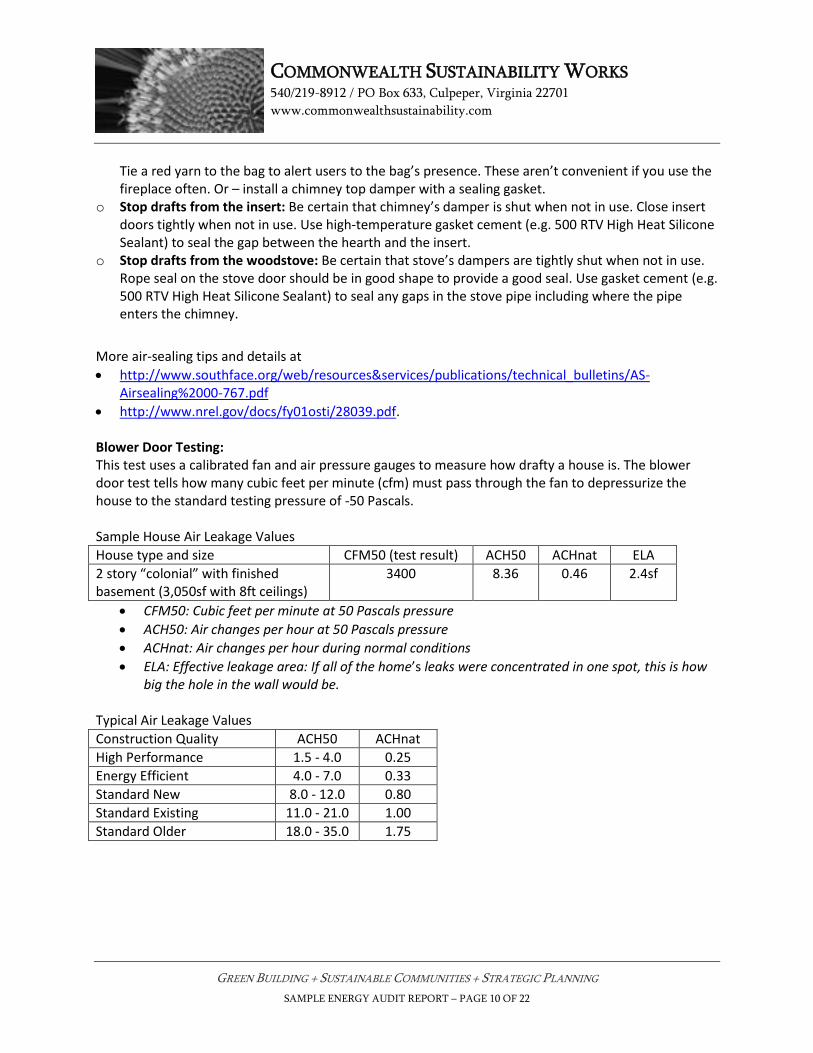
http://www.nrel.gov/docs/fy01osti/28039.pdf. Blower Door Testing: This test uses a calibrated fan and air pressure gauges to measure how drafty a house is. The blower door test tells how many cubic feet per minute (cfm) must pass through the fan to depressurize the house to the standard testing pressure of -50 Pascals. Sample House Air Leakage Values
House type and size CFM50 (test result) ACH50 ACHnat ELA
2 story “colonial” with finished basement (3,050sf with 8ft ceilings)
3400 8.36 0.46 2.4sf
CFM50: Cubic feet per minute at 50 Pascals pressure
ACH50: Air changes per hour at 50 Pascals pressure
ACHnat: Air changes per hour during normal conditions
ELA: Effective leakage area: If all of the home’s leaks were concentrated in one spot, this is how big the hole in the wall would be.
Typical Air Leakage Values
Construction Quality ACH50 ACHnat
High Performance 1.5 - 4.0 0.25
Energy Efficient 4.0 - 7.0 0.33
Standard New 8.0 - 12.0 0.80
Standard Existing 11.0 - 21.0 1.00
Standard Older 18.0 - 35.0 1.75
COMMONWEALTH SUSTAINABILITY WORKS 540/219-8912 / PO Box 633, Culpeper, Virginia 22701
www.commonwealthsustainability.com
GREEN BUILDING + SUSTAINABLE COMMUNITIES + STRATEGIC PLANNING
SAMPLE ENERGY AUDIT REPORT – PAGE 11 OF 22
IN THE ATTIC
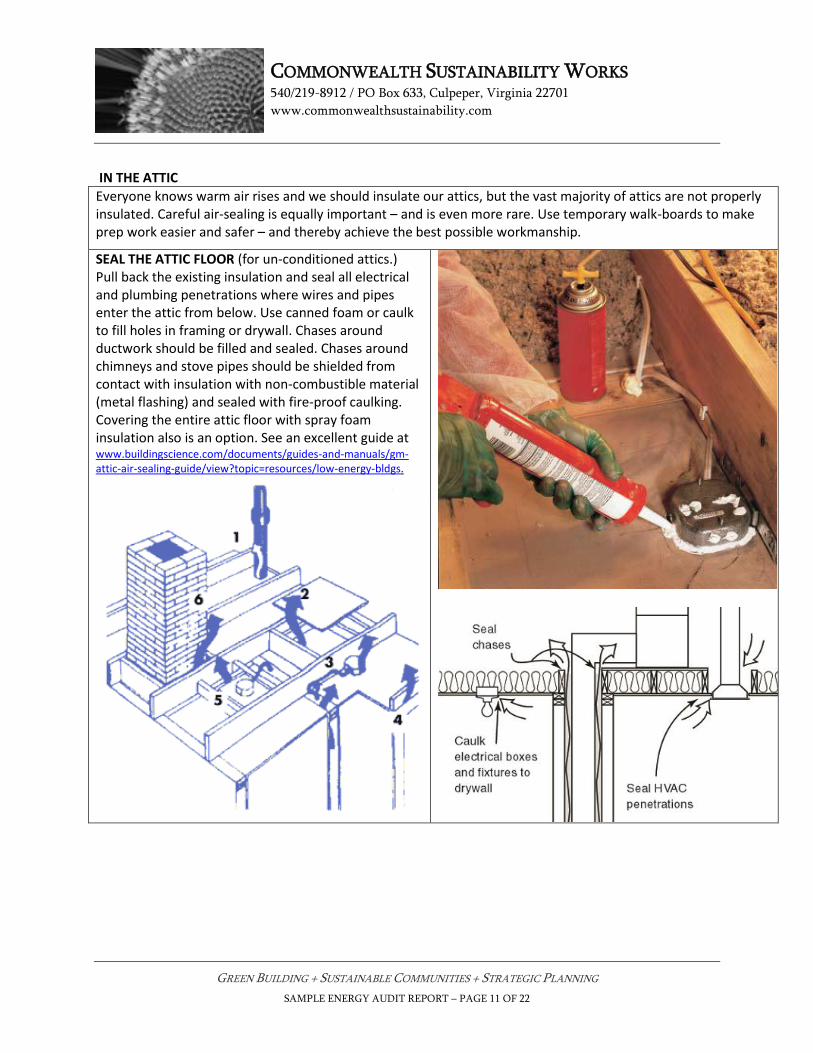
Everyone knows warm air rises and we should insulate our attics, but the vast majority of attics are not properly insulated. Careful air-sealing is equally important – and is even more rare. Use temporary walk-boards to make prep work easier and safer – and thereby achieve the best possible workmanship.
SEAL THE ATTIC FLOOR (for un-conditioned attics.) Pull back the existing insulation and seal all electrical and plumbing penetrations where wires and pipes enter the attic from below. Use canned foam or caulk to fill holes in framing or drywall. Chases around ductwork should be filled and sealed. Chases around chimneys and stove pipes should be shielded from contact with insulation with non-combustible material (metal flashing) and sealed with fire-proof caulking. Covering the entire attic floor with spray foam insulation also is an option. See an excellent guide at
www.buildingscience.com/documents/guides-and-manuals/gm-attic-air-sealing-guide/view?topic=resources/low-energy-bldgs.
COMMONWEALTH SUSTAINABILITY WORKS 540/219-8912 / PO Box 633, Culpeper, Virginia 22701
www.commonwealthsustainability.com
GREEN BUILDING + SUSTAINABLE COMMUNITIES + STRATEGIC PLANNING
SAMPLE ENERGY AUDIT REPORT – PAGE 12 OF 22
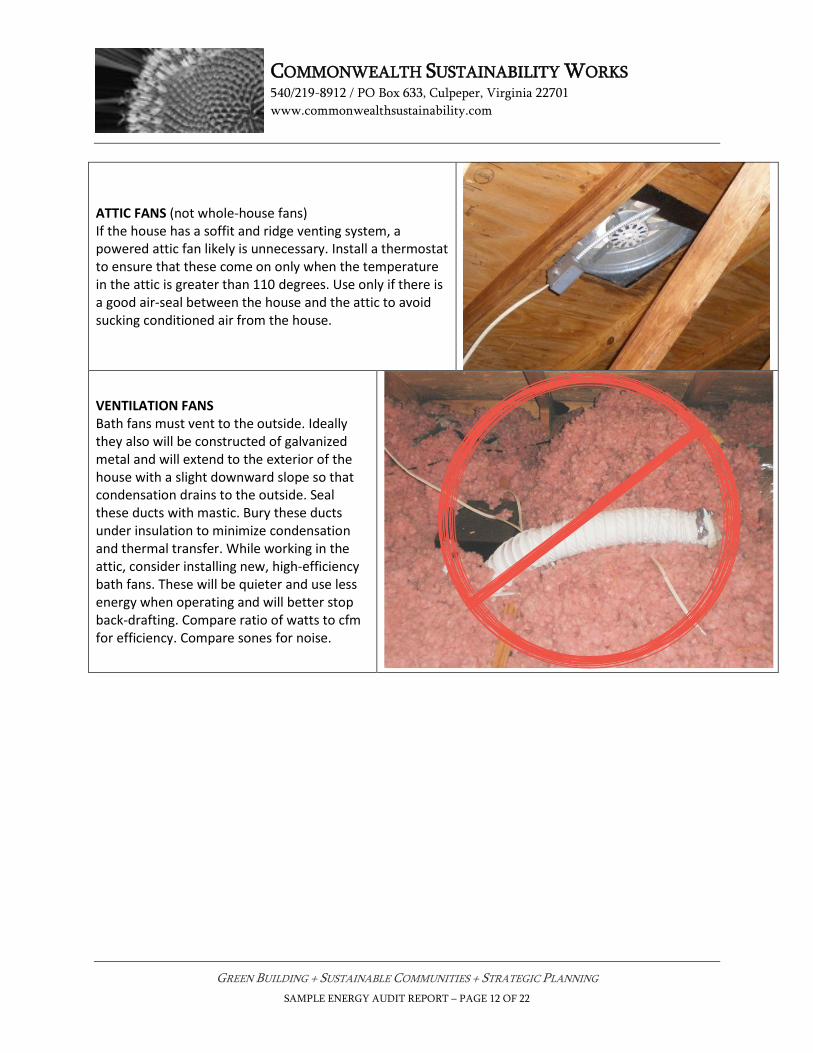
ATTIC FANS (not whole-house fans) If the house has a soffit and ridge venting system, a powered attic fan likely is unnecessary. Install a thermostat to ensure that these come on only when the temperature in the attic is greater than 110 degrees. Use only if there is a good air-seal between the house and the attic to avoid sucking conditioned air from the house.
VENTILATION FANS Bath fans must vent to the outside. Ideally they also will be constructed of galvanized metal and will extend to the exterior of the house with a slight downward slope so that condensation drains to the outside. Seal these ducts with mastic. Bury these ducts under insulation to minimize condensation and thermal transfer. While working in the attic, consider installing new, high-efficiency bath fans. These will be quieter and use less energy when operating and will better stop back-drafting. Compare ratio of watts to cfm for efficiency. Compare sones for noise.
COMMONWEALTH SUSTAINABILITY WORKS 540/219-8912 / PO Box 633, Culpeper, Virginia 22701
www.commonwealthsustainability.com
GREEN BUILDING + SUSTAINABLE COMMUNITIES + STRATEGIC PLANNING
SAMPLE ENERGY AUDIT REPORT – PAGE 13 OF 22
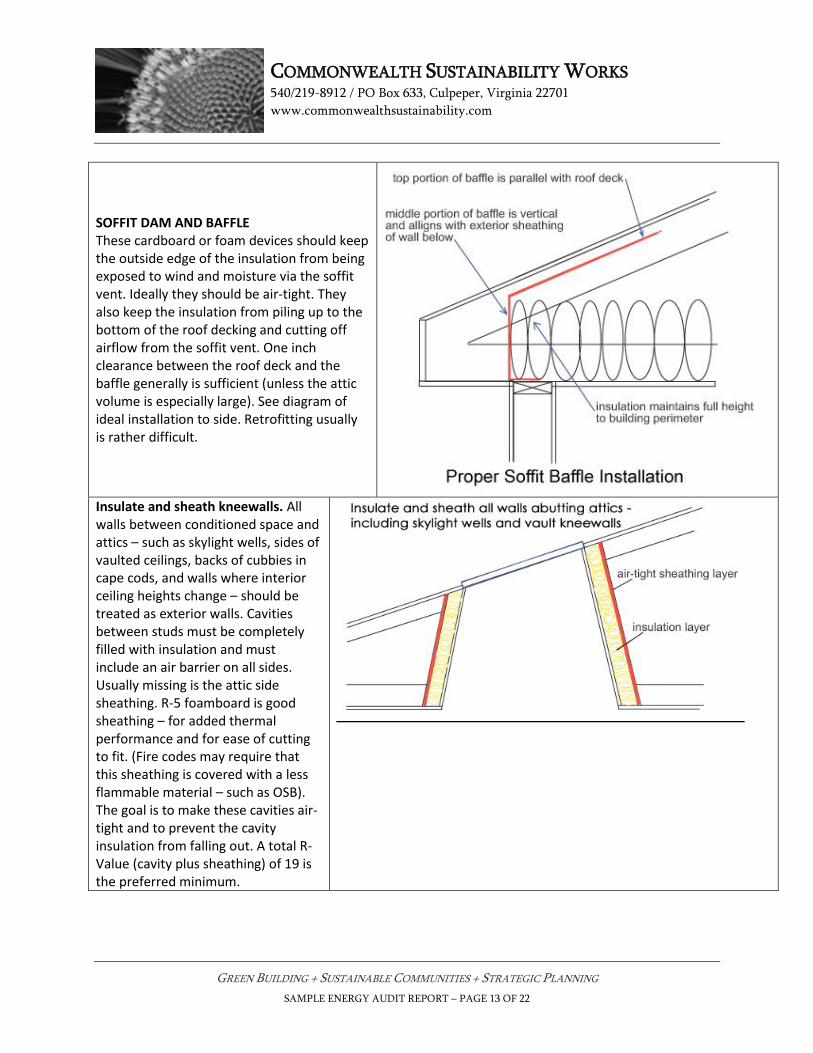
SOFFIT DAM AND BAFFLE These cardboard or foam devices should keep the outside edge of the insulation from being exposed to wind and moisture via the soffit vent. Ideally they should be air-tight. They also keep the insulation from piling up to the bottom of the roof decking and cutting off airflow from the soffit vent. One inch clearance between the roof deck and the baffle generally is sufficient (unless the attic volume is especially large). See diagram of ideal installation to side. Retrofitting usually is rather difficult.
Insulate and sheath kneewalls. All walls between conditioned space and attics – such as skylight wells, sides of vaulted ceilings, backs of cubbies in cape cods, and walls where interior ceiling heights change – should be treated as exterior walls. Cavities between studs must be completely filled with insulation and must include an air barrier on all sides. Usually missing is the attic side sheathing. R-5 foamboard is good sheathing – for added thermal performance and for ease of cutting to fit. (Fire codes may require that this sheathing is covered with a less flammable material – such as OSB). The goal is to make these cavities air-tight and to prevent the cavity insulation from falling out. A total R-Value (cavity plus sheathing) of 19 is the preferred minimum.
COMMONWEALTH SUSTAINABILITY WORKS 540/219-8912 / PO Box 633, Culpeper, Virginia 22701
www.commonwealthsustainability.com
GREEN BUILDING + SUSTAINABLE COMMUNITIES + STRATEGIC PLANNING
SAMPLE ENERGY AUDIT REPORT – PAGE 14 OF 22
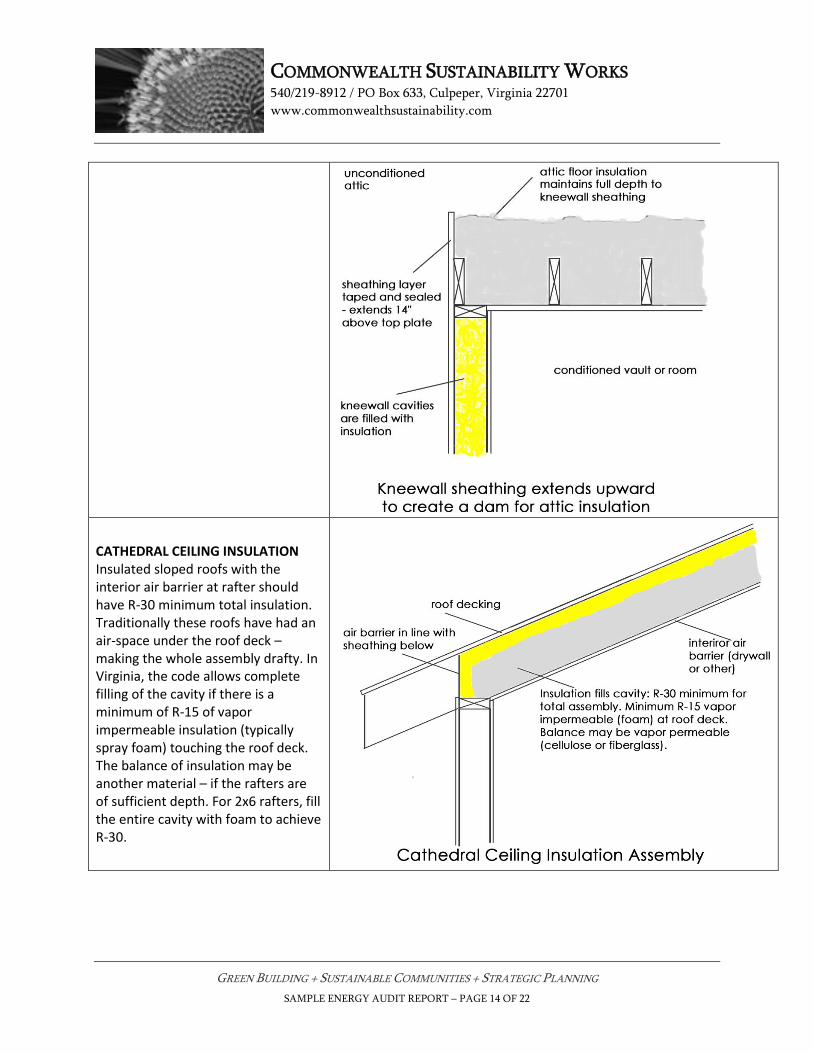
CATHEDRAL CEILING INSULATION Insulated sloped roofs with the interior air barrier at rafter should have R-30 minimum total insulation. Traditionally these roofs have had an air-space under the roof deck – making the whole assembly drafty. In Virginia, the code allows complete filling of the cavity if there is a minimum of R-15 of vapor impermeable insulation (typically spray foam) touching the roof deck. The balance of insulation may be another material – if the rafters are of sufficient depth. For 2x6 rafters, fill the entire cavity with foam to achieve R-30.
COMMONWEALTH SUSTAINABILITY WORKS 540/219-8912 / PO Box 633, Culpeper, Virginia 22701
www.commonwealthsustainability.com
GREEN BUILDING + SUSTAINABLE COMMUNITIES + STRATEGIC PLANNING
SAMPLE ENERGY AUDIT REPORT – PAGE 15 OF 22
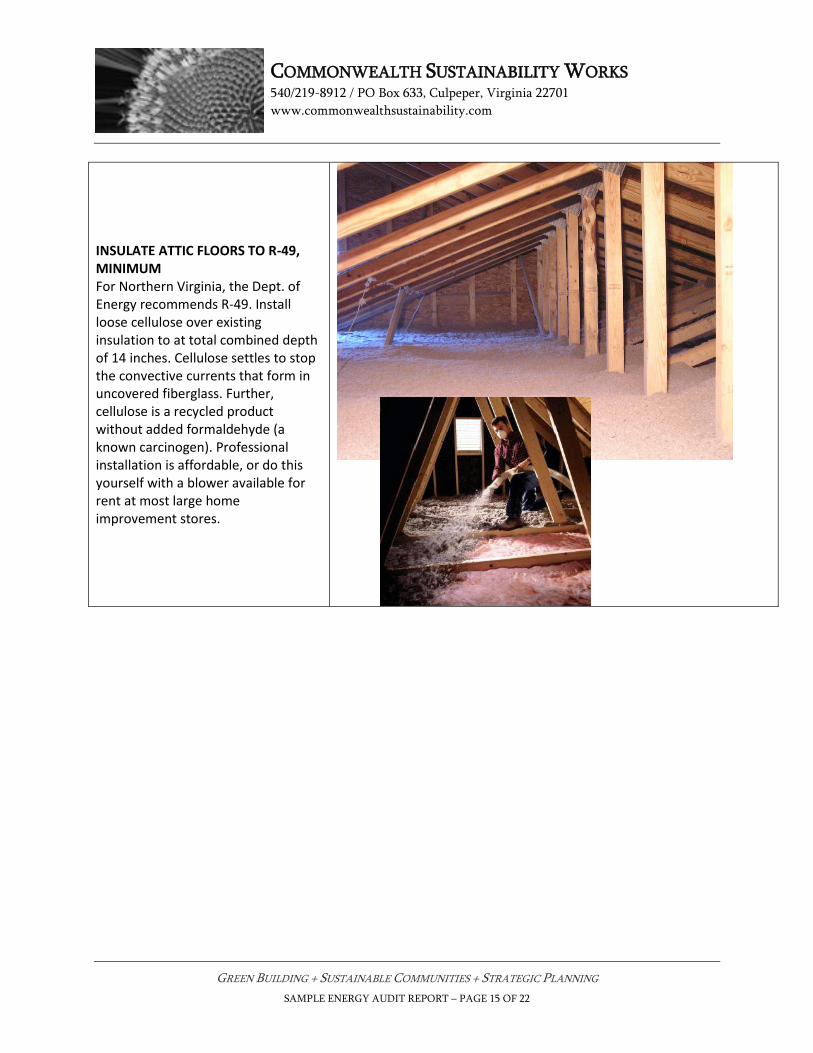
INSULATE ATTIC FLOORS TO R-49, MINIMUM For Northern Virginia, the Dept. of Energy recommends R-49. Install loose cellulose over existing insulation to at total combined depth of 14 inches. Cellulose settles to stop the convective currents that form in uncovered fiberglass. Further, cellulose is a recycled product without added formaldehyde (a known carcinogen). Professional installation is affordable, or do this yourself with a blower available for rent at most large home improvement stores.
COMMONWEALTH SUSTAINABILITY WORKS 540/219-8912 / PO Box 633, Culpeper, Virginia 22701
www.commonwealthsustainability.com
GREEN BUILDING + SUSTAINABLE COMMUNITIES + STRATEGIC PLANNING
SAMPLE ENERGY AUDIT REPORT – PAGE 16 OF 22
IN THE CRAWLSPACE
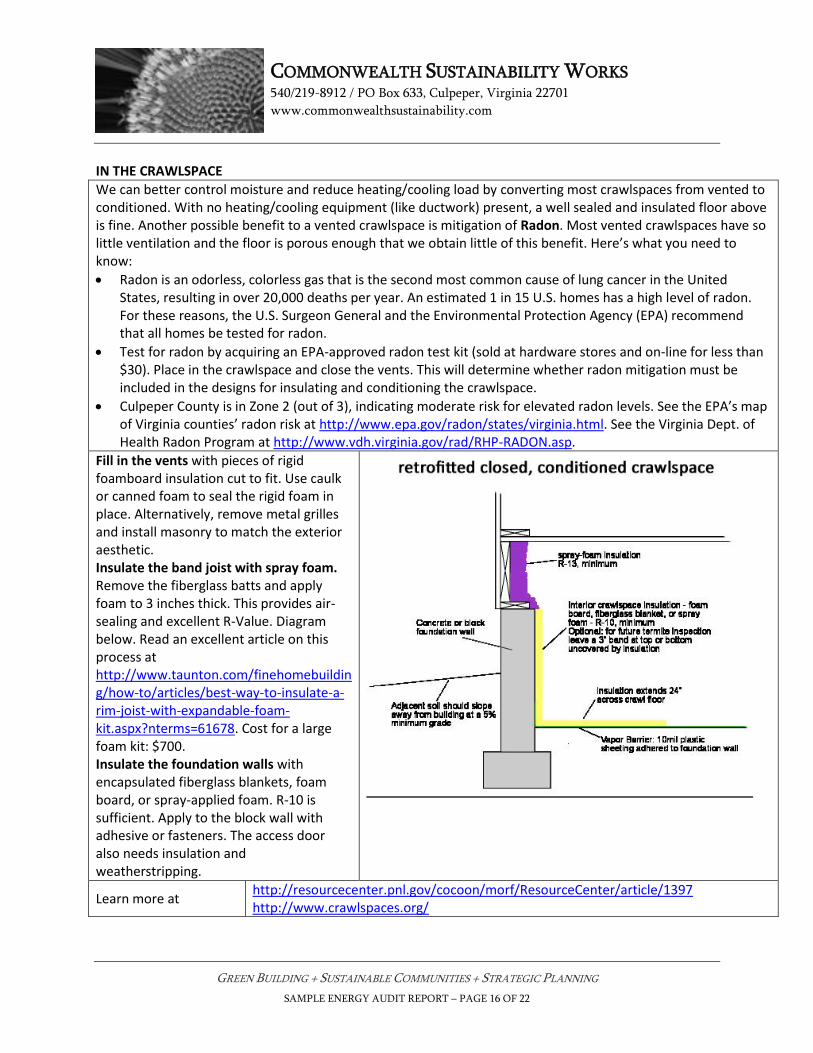
We can better control moisture and reduce heating/cooling load by converting most crawlspaces from vented to conditioned. With no heating/cooling equipment (like ductwork) present, a well sealed and insulated floor above is fine. Another possible benefit to a vented crawlspace is mitigation of Radon. Most vented crawlspaces have so little ventilation and the floor is porous enough that we obtain little of this benefit. Here’s what you need to know:
Radon is an odorless, colorless gas that is the second most common cause of lung cancer in the United States, resulting in over 20,000 deaths per year. An estimated 1 in 15 U.S. homes has a high level of radon. For these reasons, the U.S. Surgeon General and the Environmental Protection Agency (EPA) recommend that all homes be tested for radon.
Test for radon by acquiring an EPA-approved radon test kit (sold at hardware stores and on-line for less than $30). Place in the crawlspace and close the vents. This will determine whether radon mitigation must be included in the designs for insulating and conditioning the crawlspace.
Culpeper County is in Zone 2 (out of 3), indicating moderate risk for elevated radon levels. See the EPA’s map of Virginia counties’ radon risk at http://www.epa.gov/radon/states/virginia.html. See the Virginia Dept. of Health Radon Program at http://www.vdh.virginia.gov/rad/RHP-RADON.asp.
Fill in the vents with pieces of rigid foamboard insulation cut to fit. Use caulk or canned foam to seal the rigid foam in place. Alternatively, remove metal grilles and install masonry to match the exterior aesthetic. Insulate the band joist with spray foam. Remove the fiberglass batts and apply foam to 3 inches thick. This provides air-sealing and excellent R-Value. Diagram below. Read an excellent article on this process at http://www.taunton.com/finehomebuilding/how-to/articles/best-way-to-insulate-a-rim-joist-with-expandable-foam-kit.aspx?nterms=61678. Cost for a large foam kit: $700. Insulate the foundation walls with encapsulated fiberglass blankets, foam board, or spray-applied foam. R-10 is sufficient. Apply to the block wall with adhesive or fasteners. The access door also needs insulation and weatherstripping.
Learn more at http://resourcecenter.pnl.gov/cocoon/morf/ResourceCenter/article/1397 http://www.crawlspaces.org/
COMMONWEALTH SUSTAINABILITY WORKS 540/219-8912 / PO Box 633, Culpeper, Virginia 22701
www.commonwealthsustainability.com
GREEN BUILDING + SUSTAINABLE COMMUNITIES + STRATEGIC PLANNING
SAMPLE ENERGY AUDIT REPORT – PAGE 17 OF 22
WATER HEATING
Water heating accounts for approximately 10% of the energy use in most homes. There are a variety of ways to maximize efficiency of this system:
Temperature setting: Set your water heater thermostat to 120oF. This is plenty hot for all household applications.
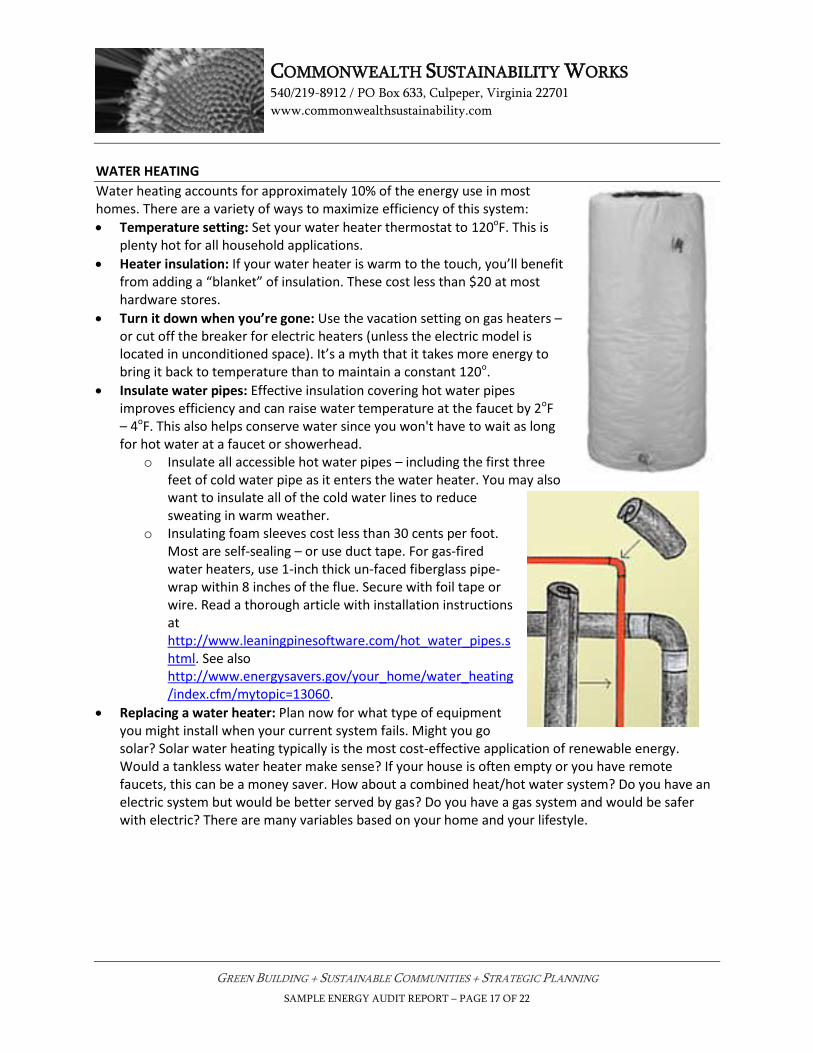
Heater insulation: If your water heater is warm to the touch, you’ll benefit from adding a “blanket” of insulation. These cost less than $20 at most hardware stores.
Turn it down when you’re gone: Use the vacation setting on gas heaters – or cut off the breaker for electric heaters (unless the electric model is located in unconditioned space). It’s a myth that it takes more energy to bring it back to temperature than to maintain a constant 120o.
Insulate water pipes: Effective insulation covering hot water pipes improves efficiency and can raise water temperature at the faucet by 2oF – 4oF. This also helps conserve water since you won't have to wait as long for hot water at a faucet or showerhead.
o Insulate all accessible hot water pipes – including the first three feet of cold water pipe as it enters the water heater. You may also want to insulate all of the cold water lines to reduce sweating in warm weather.
o Insulating foam sleeves cost less than 30 cents per foot. Most are self-sealing – or use duct tape. For gas-fired water heaters, use 1-inch thick un-faced fiberglass pipe-wrap within 8 inches of the flue. Secure with foil tape or wire. Read a thorough article with installation instructions at http://www.leaningpinesoftware.com/hot_water_pipes.shtml. See also http://www.energysavers.gov/your_home/water_heating/index.cfm/mytopic=13060.
Replacing a water heater: Plan now for what type of equipment you might install when your current system fails. Might you go solar? Solar water heating typically is the most cost-effective application of renewable energy. Would a tankless water heater make sense? If your house is often empty or you have remote faucets, this can be a money saver. How about a combined heat/hot water system? Do you have an electric system but would be better served by gas? Do you have a gas system and would be safer with electric? There are many variables based on your home and your lifestyle.
COMMONWEALTH SUSTAINABILITY WORKS 540/219-8912 / PO Box 633, Culpeper, Virginia 22701
www.commonwealthsustainability.com
GREEN BUILDING + SUSTAINABLE COMMUNITIES + STRATEGIC PLANNING
SAMPLE ENERGY AUDIT REPORT – PAGE 18 OF 22
HEATING, VENTILATION, AND AIR CONDITIONING (HVAC)
If possible, perform duct sealing before having the system serviced and airflow and static pressure checked. Leaky ducts affect airflow greatly. System Function Do-it-yourself, indoor unit (air handler or furnace)
1. Check air filters to see that they are in good condition. Replace as needed. For filters installed at the air handler, ensure that the filter compartment closes tightly to prevent air-leakage. Cover with tape as needed to make air-tight.
2. With power off, clean the coil with a brush, vacuum, or compressed air. If a cleanser is used, rinse the coil with water from a spray bottle afterwards.
3. Check condensate drain line for clogging, rust, etc. Clean as needed. Do-it-yourself, outside unit (compressor for AC or heat pump)
1. Clean leaves and debris out of the unit housing. 2. To clean outdoor coil: with power off, clean the condenser coil using a bristle brush, or vacuum
using a soft bush attachment, or lightly spray water or other cleaner. 3. Keep adjacent vegetation trimmed back at least two feet from the compressor.
Professional Servicing: Have equipment inspected by a superior contractor. Check the following:
1. Airflow across the coil should be within the range recommended by the OEM product data (if available).
2. Airflow across the heat exchanger should be within the range recommended by the OEM product data (if available). Heat exchanger airflow requirements should be considered separately from any combined and attached cooling coils sharing the same distribution duct system. Correct as needed.
3. Check the operating efficiency of furnace/boiler. If readings are more than 5% less than OEM design, remedy as needed.
4. Check air handler flow. Correct if below 350 cfm/ton of cooling or 10cfm/kBtu/h for heating. 5. Measure the system’s total static pressure and make necessary changes to bring into acceptable
range. 6. Measure refrigerant charge and correct as necessary. Coil airflow should be adjusted and
verified before refrigerant charge checked. Refrigerant charge-checking is particularly important with split-system air conditioners and heat pumps. Research indicates that more than 70% of installed systems have improper refrigerant charge – resulting in significant (5-20%) reductions in efficiency.
7. Install a programmable thermostat. Duct Leakage Research shows that the average duct system in the US leaks 15-20% of its air directly to the outside – providing no benefit at all. All duct work should be as air-tight as possible, particularly any that is located in unconditioned spaces. For major renovations and new construction, move the HVAC system or re-align the thermal envelope (insulation layer) to keep all HVAC equipment in conditioned space. Where ductwork is damaged beyond repair, replace with duct insulated to R-8. Have new systems tested for
COMMONWEALTH SUSTAINABILITY WORKS 540/219-8912 / PO Box 633, Culpeper, Virginia 22701
www.commonwealthsustainability.com
GREEN BUILDING + SUSTAINABLE COMMUNITIES + STRATEGIC PLANNING
SAMPLE ENERGY AUDIT REPORT – PAGE 19 OF 22
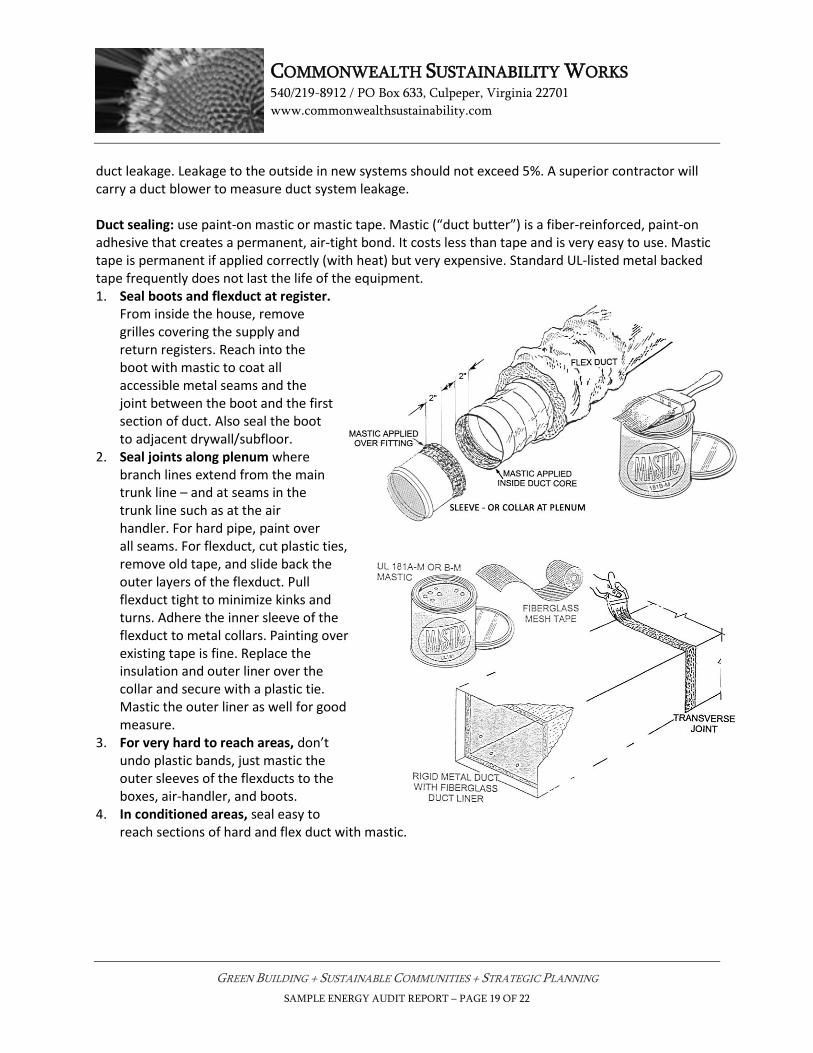
duct leakage. Leakage to the outside in new systems should not exceed 5%. A superior contractor will carry a duct blower to measure duct system leakage. Duct sealing: use paint-on mastic or mastic tape. Mastic (“duct butter”) is a fiber-reinforced, paint-on adhesive that creates a permanent, air-tight bond. It costs less than tape and is very easy to use. Mastic tape is permanent if applied correctly (with heat) but very expensive. Standard UL-listed metal backed tape frequently does not last the life of the equipment. 1. Seal boots and flexduct at register.
From inside the house, remove grilles covering the supply and return registers. Reach into the boot with mastic to coat all accessible metal seams and the joint between the boot and the first section of duct. Also seal the boot to adjacent drywall/subfloor.
2. Seal joints along plenum where branch lines extend from the main trunk line – and at seams in the trunk line such as at the air handler. For hard pipe, paint over all seams. For flexduct, cut plastic ties, remove old tape, and slide back the outer layers of the flexduct. Pull flexduct tight to minimize kinks and turns. Adhere the inner sleeve of the flexduct to metal collars. Painting over existing tape is fine. Replace the insulation and outer liner over the collar and secure with a plastic tie. Mastic the outer liner as well for good measure.
3. For very hard to reach areas, don’t undo plastic bands, just mastic the outer sleeves of the flexducts to the boxes, air-handler, and boots.
4. In conditioned areas, seal easy to reach sections of hard and flex duct with mastic.
COMMONWEALTH SUSTAINABILITY WORKS 540/219-8912 / PO Box 633, Culpeper, Virginia 22701
www.commonwealthsustainability.com
GREEN BUILDING + SUSTAINABLE COMMUNITIES + STRATEGIC PLANNING
SAMPLE ENERGY AUDIT REPORT – PAGE 20 OF 22
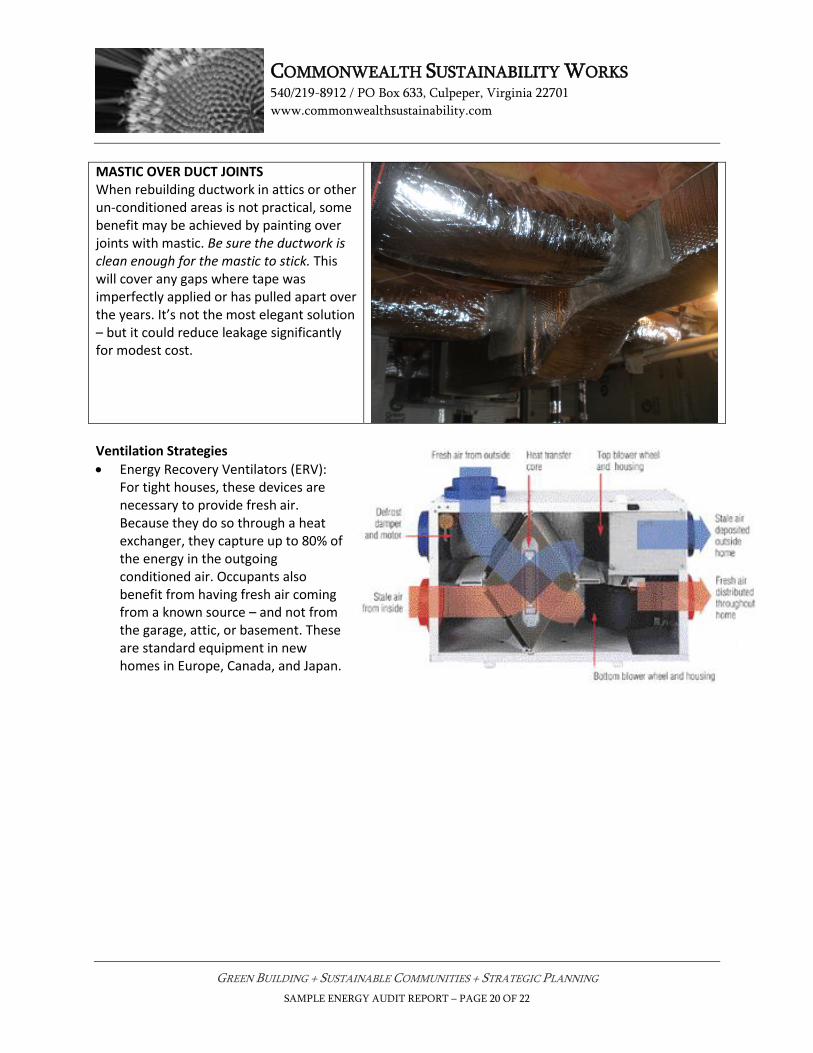
MASTIC OVER DUCT JOINTS When rebuilding ductwork in attics or other un-conditioned areas is not practical, some benefit may be achieved by painting over joints with mastic. Be sure the ductwork is clean enough for the mastic to stick. This will cover any gaps where tape was imperfectly applied or has pulled apart over the years. It’s not the most elegant solution – but it could reduce leakage significantly for modest cost.
Ventilation Strategies
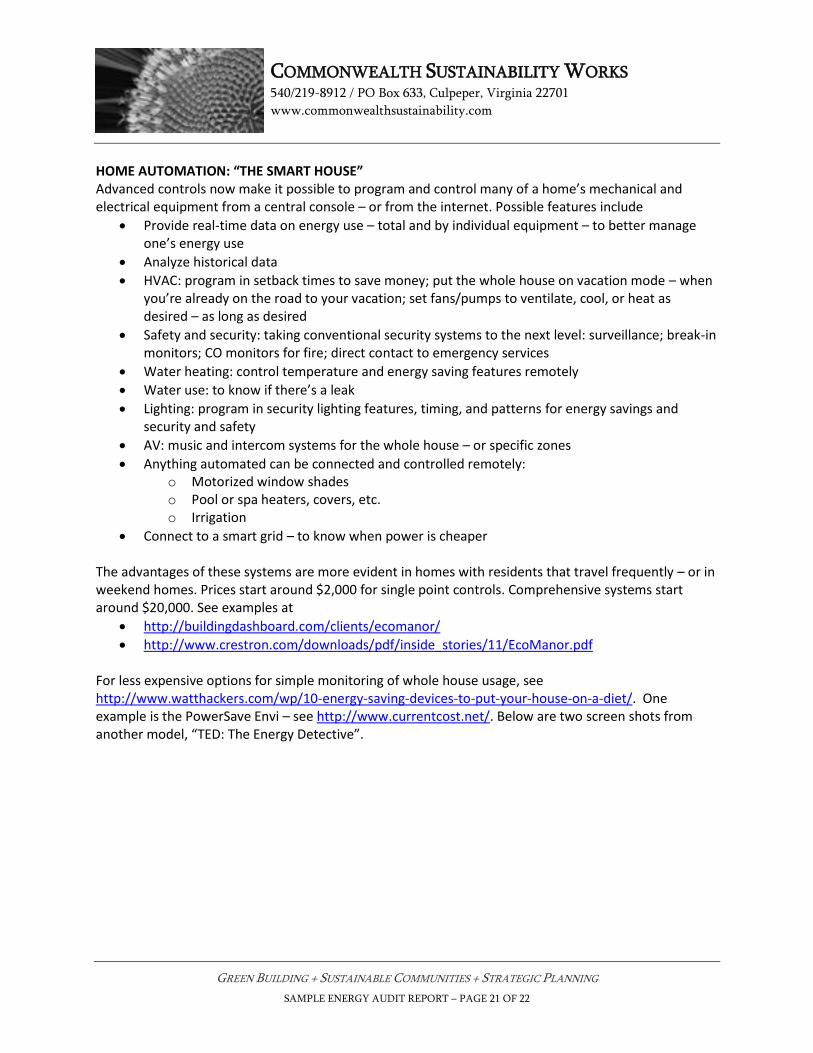
Energy Recovery Ventilators (ERV): For tight houses, these devices are necessary to provide fresh air. Because they do so through a heat exchanger, they capture up to 80% of the energy in the outgoing conditioned air. Occupants also benefit from having fresh air coming from a known source – and not from the garage, attic, or basement. These are standard equipment in new homes in Europe, Canada, and Japan.
COMMONWEALTH SUSTAINABILITY WORKS 540/219-8912 / PO Box 633, Culpeper, Virginia 22701
www.commonwealthsustainability.com
GREEN BUILDING + SUSTAINABLE COMMUNITIES + STRATEGIC PLANNING
SAMPLE ENERGY AUDIT REPORT – PAGE 21 OF 22
HOME AUTOMATION: “THE SMART HOUSE” Advanced controls now make it possible to program and control many of a home’s mechanical and electrical equipment from a central console – or from the internet. Possible features include
Provide real-time data on energy use – total and by individual equipment – to better manage one’s energy use
Analyze historical data
HVAC: program in setback times to save money; put the whole house on vacation mode – when you’re already on the road to your vacation; set fans/pumps to ventilate, cool, or heat as desired – as long as desired
Safety and security: taking conventional security systems to the next level: surveillance; break-in monitors; CO monitors for fire; direct contact to emergency services
Water heating: control temperature and energy saving features remotely
Water use: to know if there’s a leak
Lighting: program in security lighting features, timing, and patterns for energy savings and security and safety
AV: music and intercom systems for the whole house – or specific zones
Anything automated can be connected and controlled remotely: o Motorized window shades o Pool or spa heaters, covers, etc. o Irrigation
Connect to a smart grid – to know when power is cheaper The advantages of these systems are more evident in homes with residents that travel frequently – or in weekend homes. Prices start around $2,000 for single point controls. Comprehensive systems start around $20,000. See examples at
http://buildingdashboard.com/clients/ecomanor/
http://www.crestron.com/downloads/pdf/inside_stories/11/EcoManor.pdf For less expensive options for simple monitoring of whole house usage, see http://www.watthackers.com/wp/10-energy-saving-devices-to-put-your-house-on-a-diet/. One example is the PowerSave Envi – see http://www.currentcost.net/. Below are two screen shots from another model, “TED: The Energy Detective”.

COMMONWEALTH SUSTAINABILITY WORKS 540/219-8912 / PO Box 633, Culpeper, Virginia 22701
www.commonwealthsustainability.com
GREEN BUILDING + SUSTAINABLE COMMUNITIES + STRATEGIC PLANNING
SAMPLE ENERGY AUDIT REPORT – PAGE 22 OF 22
ELECTRICITY SIGNAL HARMONIZING Other products include advanced, whole house signal harmonizers that reduce the irregularities and counterproductive frequencies in the electric current coming from the grid to your house. These claim to reduce billed energy use by up to 25% while also providing surge protection for the entire house. See
GESPER: http://newpowernow.com/how_it_works.php
KVAR: http://www.kvarec.com/