Embed Size (px)
Citation preview
[1] JD Edwards EnterpriseOne ApplicationsRequirements Planning Implementation Guide
Release 9.2
E63942-04
April 2018
Describes how to set up and use JD Edwards EnterpriseOne Requirements Planning to create material schedules and detailed production plans.
JD Edwards EnterpriseOne Applications Requirements Planning Implementation Guide, Release 9.2
E63942-04
Copyright © 2014, 2018, Oracle and/or its affiliates. All rights reserved.
This software and related documentation are provided under a license agreement containing restrictions on use and disclosure and are protected by intellectual property laws. Except as expressly permitted in your license agreement or allowed by law, you may not use, copy, reproduce, translate, broadcast, modify, license, transmit, distribute, exhibit, perform, publish, or display any part, in any form, or by any means. Reverse engineering, disassembly, or decompilation of this software, unless required by law for interoperability, is prohibited.
The information contained herein is subject to change without notice and is not warranted to be error-free. If you find any errors, please report them to us in writing.
If this is software or related documentation that is delivered to the U.S. Government or anyone licensing it on behalf of the U.S. Government, then the following notice is applicable:
U.S. GOVERNMENT END USERS: Oracle programs, including any operating system, integrated software, any programs installed on the hardware, and/or documentation, delivered to U.S. Government end users are "commercial computer software" pursuant to the applicable Federal Acquisition Regulation and agency-specific supplemental regulations. As such, use, duplication, disclosure, modification, and adaptation of the programs, including any operating system, integrated software, any programs installed on the hardware, and/or documentation, shall be subject to license terms and license restrictions applicable to the programs. No other rights are granted to the U.S. Government.
This software or hardware is developed for general use in a variety of information management applications. It is not developed or intended for use in any inherently dangerous applications, including applications that may create a risk of personal injury. If you use this software or hardware in dangerous applications, then you shall be responsible to take all appropriate fail-safe, backup, redundancy, and other measures to ensure its safe use. Oracle Corporation and its affiliates disclaim any liability for any damages caused by use of this software or hardware in dangerous applications.
Oracle and Java are registered trademarks of Oracle and/or its affiliates. Other names may be trademarks of their respective owners.
Intel and Intel Xeon are trademarks or registered trademarks of Intel Corporation. All SPARC trademarks are used under license and are trademarks or registered trademarks of SPARC International, Inc. AMD, Opteron, the AMD logo, and the AMD Opteron logo are trademarks or registered trademarks of Advanced Micro Devices. UNIX is a registered trademark of The Open Group.
This software or hardware and documentation may provide access to or information about content, products, and services from third parties. Oracle Corporation and its affiliates are not responsible for and expressly disclaim all warranties of any kind with respect to third-party content, products, and services unless otherwise set forth in an applicable agreement between you and Oracle. Oracle Corporation and its affiliates will not be responsible for any loss, costs, or damages incurred due to your access to or use of third-party content, products, or services, except as set forth in an applicable agreement between you and Oracle.
iii
Contents
Preface ............................................................................................................................................................... xiii
Audience..................................................................................................................................................... xiiiJD Edwards EnterpriseOne Products ..................................................................................................... xiiiJD Edwards EnterpriseOne Application Fundamentals ..................................................................... xiiiDocumentation Accessibility ................................................................................................................... xivRelated Information .................................................................................................................................. xivConventions ............................................................................................................................................... xiv
1 Introduction to JD Edwards EnterpriseOne Requirements Planning
1.1 JD Edwards EnterpriseOne Requirements Planning Overview .......................................... 1-11.2 JD Edwards EnterpriseOne Requirements Planning Integrations ...................................... 1-21.2.1 JD Edwards EnterpriseOne Inventory Management ..................................................... 1-21.2.2 JD Edwards EnterpriseOne Configurator ........................................................................ 1-21.2.3 JD Edwards EnterpriseOne Forecast Management ........................................................ 1-21.2.4 JD Edwards EnterpriseOne Shop Floor Management ................................................... 1-21.2.5 JD Edwards EnterpriseOne Sales Order Management .................................................. 1-21.2.6 JD Edwards EnterpriseOne Procurement ........................................................................ 1-31.2.7 JD Edwards EnterpriseOne Engineer to Order ............................................................... 1-31.3 JD Edwards EnterpriseOne Requirements Planning Implementation ............................... 1-31.3.1 Global Implementation Steps............................................................................................. 1-31.3.2 Requirements Planning Implementation Steps............................................................... 1-4
2 Understanding Requirements Planning
2.1 Requirements Planning Overview ........................................................................................... 2-12.2 Requirements Planning Features.............................................................................................. 2-12.2.1 Resource and Capacity Planning....................................................................................... 2-12.2.2 Material Planning Operations............................................................................................ 2-22.2.3 Project Requirements Planning (PRP) .............................................................................. 2-22.2.4 Supplier Scheduling Systems............................................................................................. 2-32.3 Requirements Planning Tables ................................................................................................. 2-3
3 Understanding Requirements Planning Concepts
3.1 Single-Facility Versus Multifacility Planning ......................................................................... 3-13.2 Single-Level Versus Multilevel Planning ................................................................................ 3-13.3 Master Production Scheduling and Material Requirements Planning ............................... 3-2
iv
3.3.1 MPS and Manufactured Items ........................................................................................... 3-43.3.2 DRP and Purchased Items .................................................................................................. 3-43.3.3 What Are the Differences Between MRP and MPS?....................................................... 3-43.4 Requirements Planning Outputs .............................................................................................. 3-43.4.1 Planning Horizons............................................................................................................... 3-43.4.2 Quantity Types (34/QT) ..................................................................................................... 3-53.4.3 Time Fences and the Time Series....................................................................................... 3-53.4.3.1 MRP Period Calculations Using Planning Fence Rules .......................................... 3-73.4.3.2 Time Fence Rules for DRP, MRP, and MPS (UDC 34/TF) ..................................... 3-83.4.4 Time Series Calculations..................................................................................................... 3-93.4.4.1 Ending Available Calculation..................................................................................... 3-93.4.4.2 Available to Promise Calculation............................................................................ 3-103.4.4.3 Cumulative Available to Promise Calculation...................................................... 3-103.4.5 Planning Messages ........................................................................................................... 3-113.4.5.1 Message Types for DRP, MPS, MRP, and RCCP (34/MT).................................. 3-113.5 Parallel Processing ................................................................................................................... 3-13
4 Setting Up Requirements Planning
4.1 Understanding the Setup Requirements for Requirements Planning................................. 4-14.2 Setting Up Supply and Demand Inclusion Rules................................................................... 4-24.2.1 Understanding Supply and Demand Inclusion Rules ................................................... 4-24.2.2 Form Used to Set Up Supply and Demand Inclusion Rules ......................................... 4-24.2.3 Setting Processing Options for Supply/Demand Inclusion Rules (P34004)............... 4-34.2.3.1 WO Types ...................................................................................................................... 4-34.2.4 Setting Up Supply and Demand Inclusion Rules ........................................................... 4-34.3 Setting Up Inventory Management for Requirements Planning ......................................... 4-34.3.1 Stocking Type ....................................................................................................................... 4-44.3.2 Order Policy Rules............................................................................................................... 4-44.3.3 Lead Times............................................................................................................................ 4-54.4 Setting Up Quantity Type Subsets ........................................................................................... 4-54.4.1 Distribution Requirement Plan Quantity Type (34/DR) ............................................... 4-54.4.2 Master Production Schedule Quantity Type (34/MS) ................................................... 4-64.4.3 Adjusted Values Only (MPS) (34/AS).............................................................................. 4-74.4.4 Unadjusted Values Only (MPS) (34/US) ......................................................................... 4-74.5 Setting Up Multifacility Planning............................................................................................. 4-74.5.1 Understanding the Multifacility Planning Setup............................................................ 4-84.5.2 Form Used to Set Up Multifacility Planning ................................................................... 4-94.5.3 Setting Processing Options for Branch Relationships Revisions (P3403T).................. 4-94.5.3.1 Defaults .......................................................................................................................... 4-94.5.4 Setting Up Supply and Demand Relationships............................................................... 4-94.6 Setting Up Forecast Consumption......................................................................................... 4-114.6.1 Understanding the Forecast Consumption Setup........................................................ 4-114.6.2 Understanding the Customer Address Relationship Setup ....................................... 4-114.6.3 Prerequisites ...................................................................................................................... 4-124.6.4 Forms Used to Set Up Forecast Consumption.............................................................. 4-124.6.5 Setting Up Forecast Consumption Periods ................................................................... 4-124.6.6 Defining Customer Address Relationships .................................................................. 4-13
v
4.7 Setting Up Process Planning .................................................................................................. 4-134.7.1 Understanding Process Planning Setup ........................................................................ 4-134.7.2 Prerequisite ........................................................................................................................ 4-144.7.3 Form Used to Set Up Process Planning ......................................................................... 4-144.7.4 Setting Up the Co/By Products Planning Table .......................................................... 4-14
5 Setting Up Capacity Planning
5.1 Understanding Setup Requirements for Capacity Planning ................................................ 5-15.1.1 Prerequisite ........................................................................................................................... 5-15.2 Setting Up User-Defined Codes for Capacity Planning........................................................ 5-15.2.1 Capacity Requirements Planning Display (33/CR)........................................................ 5-15.2.2 Rough Cut Capacity Planning Display (33/RC)............................................................. 5-15.2.3 Resource Requirements Planning (33/RR) ...................................................................... 5-25.2.4 Unit Types (33/UT) ............................................................................................................. 5-25.3 Setting Up Work Center Capacity Information...................................................................... 5-25.3.1 Understanding Work Center Capacity Setup.................................................................. 5-25.3.2 Form Used to Set Up Work Center Capacity Information ............................................ 5-25.3.3 Setting Up Work Center Capacity Information............................................................... 5-25.4 Determining Available Capacity .............................................................................................. 5-55.4.1 Understanding Available Capacity................................................................................... 5-55.4.2 Understanding Resource Units Automatic Generation ................................................. 5-65.4.2.1 Resource Unit Calculations ......................................................................................... 5-65.4.3 Prerequisites ......................................................................................................................... 5-65.4.4 Form Used to Determine Available Capacity.................................................................. 5-75.4.5 Generating Resource Units Automatically ...................................................................... 5-75.4.6 Setting Processing Options for Work Center Resource Units Generation (R3007G). 5-75.4.6.1 Defaults .......................................................................................................................... 5-75.4.6.2 Process............................................................................................................................ 5-75.4.7 Setting Processing Options for Work Center Resource Units (P3007) ......................... 5-85.4.7.1 Defaults .......................................................................................................................... 5-85.4.8 Revising Resource Units Manually ................................................................................... 5-85.5 Generating Resource Profiles .................................................................................................... 5-95.5.1 Understanding Resource Profiles...................................................................................... 5-95.5.2 Understanding Resource Profile Automatic Generation............................................... 5-95.5.3 Prerequisites ...................................................................................................................... 5-105.5.4 Form Used to Generate Resource Profiles .................................................................... 5-115.5.5 Running Resource Profile Generation ........................................................................... 5-115.5.6 Setting Processing Options for Resource Profile Regeneration (R3365)................... 5-115.5.6.1 Process......................................................................................................................... 5-115.5.7 Defining Resource Profiles Manually ............................................................................ 5-12
6 Setting Up Supplier Release Scheduling
6.1 Understanding Supplier Release Scheduling Setup .............................................................. 6-16.2 Defining Supplier Contract Information ................................................................................. 6-26.2.1 Understanding Supplier Contract Information............................................................... 6-26.2.2 Prerequisite ........................................................................................................................... 6-2

vi
6.2.3 Form Used to Set Up Supplier Contracts ......................................................................... 6-36.2.4 Setting Processing Options for Supplier Schedule Master Revisions (P4321) ............ 6-36.2.4.1 Versions.......................................................................................................................... 6-36.2.4.2 Defaults .......................................................................................................................... 6-36.2.5 Setting Up Supplier Contracts ........................................................................................... 6-46.3 Defining Shipment Patterns ...................................................................................................... 6-56.3.1 Understanding Shipment Patterns.................................................................................... 6-56.3.2 Forms Used to Define Shipment Patterns ........................................................................ 6-66.3.3 Creating Shipment Patterns ............................................................................................... 6-66.3.4 Revising Shipment Dates.................................................................................................... 6-66.4 Defining Supplier Split Percentages......................................................................................... 6-76.4.1 Understanding Supplier Split Percentages ...................................................................... 6-76.4.2 Form Used to Set Up Supplier Split Percentages............................................................ 6-76.4.3 Setting Up Supplier Split Percentages .............................................................................. 6-7
7 Planning Production Capacity
7.1 Understanding Capacity Planning........................................................................................... 7-17.2 Generating Resource Requirements Plans .............................................................................. 7-37.2.1 Understanding Resource Requirements Planning.......................................................... 7-37.2.1.1 Work Centers to Process.............................................................................................. 7-47.2.1.2 Branch/plant and Dispatch Group............................................................................ 7-47.2.2 Prerequisites ......................................................................................................................... 7-47.2.3 Running Resource Requirements Planning ..................................................................... 7-47.2.4 Setting Processing Options for Resource Requirements Planning (R3380)................. 7-57.2.4.1 Bucket Info..................................................................................................................... 7-57.2.4.2 Process............................................................................................................................ 7-57.2.4.3 Forecast Types............................................................................................................... 7-67.2.4.4 UOM ............................................................................................................................... 7-67.3 Validating Resource Requirements Plans ............................................................................... 7-67.3.1 Understanding Resource Requirements Plan Validation .............................................. 7-77.3.1.1 Resource Requirements Plans..................................................................................... 7-77.3.1.2 Dispatch Groups for RRP ............................................................................................ 7-77.3.1.3 Work Center Load for RRP ......................................................................................... 7-77.3.1.4 Period Summaries ........................................................................................................ 7-87.3.1.5 Message Detail .............................................................................................................. 7-87.3.2 Forms Used to Validate Resource Requirements Plans ................................................. 7-97.3.3 Setting Processing Options for Capacity Message Summary (P3301) ......................... 7-97.3.3.1 Defaults .......................................................................................................................... 7-97.3.3.2 Versions....................................................................................................................... 7-107.3.4 Reviewing Dispatch Groups ........................................................................................... 7-107.3.5 Setting Processing Options for Capacity Load (P3313)............................................... 7-117.3.5.1 Defaults ....................................................................................................................... 7-117.3.5.2 Versions....................................................................................................................... 7-117.3.6 Reviewing Work Center Loads....................................................................................... 7-117.3.7 Setting Processing Options for Period Summary (P3312) .......................................... 7-127.3.7.1 Defaults ....................................................................................................................... 7-127.3.7.2 Versions....................................................................................................................... 7-12
vii
7.3.8 Reviewing Period Summaries......................................................................................... 7-127.3.9 Setting Processing Options for Capacity Planning Message Revisions (P3311)...... 7-137.3.9.1 Defaults ....................................................................................................................... 7-137.3.10 Reviewing Capacity Planning Message Details ........................................................... 7-13
8 Planning Material Requirements
8.1 Understanding MRP................................................................................................................... 8-18.2 Analyzing Planning Input ......................................................................................................... 8-18.2.1 Understanding Planning Input.......................................................................................... 8-18.2.1.1 Item Net Change........................................................................................................... 8-18.2.2 Prerequisite ........................................................................................................................... 8-38.2.3 Form Used to Analyze Planning Input............................................................................. 8-38.2.4 Setting Processing Options for Net Change Review (P3402) ........................................ 8-38.2.4.1 Defaults .......................................................................................................................... 8-38.2.5 Reviewing Items for Net Change ...................................................................................... 8-48.3 Generating Material Requirements Plans ............................................................................... 8-48.3.1 Understanding Master Schedules ..................................................................................... 8-48.3.2 Understanding Net Change Planning Schedules............................................................ 8-58.3.3 Understanding Material Requirements Planning........................................................... 8-58.3.3.1 Bill of Material............................................................................................................... 8-68.3.3.2 Low-Level Code............................................................................................................ 8-68.3.3.3 Generation Type ........................................................................................................... 8-68.3.3.4 Frozen Orders ............................................................................................................... 8-78.3.3.5 Data Selection................................................................................................................ 8-78.3.3.6 Requirements Planning for Lot-Controlled Items with Safety Stock.................... 8-78.3.4 Setting Processing Options for MRP/MPS Requirements Planning (R3482) ............. 8-78.3.4.1 Horizon .......................................................................................................................... 8-88.3.4.2 Parameters ..................................................................................................................... 8-88.3.4.3 On Hand Data ............................................................................................................ 8-108.3.4.4 Forecasting.................................................................................................................. 8-118.3.4.5 Document Types........................................................................................................ 8-128.3.4.6 Lead Times ................................................................................................................. 8-138.3.4.7 Performance ............................................................................................................... 8-138.3.4.8 Mfg Mode ................................................................................................................... 8-168.3.4.9 Parallel......................................................................................................................... 8-168.4 Analyzing Planning Output ................................................................................................... 8-178.4.1 Understanding Planning Output ................................................................................... 8-178.4.1.1 MPS/DRP Time Series.............................................................................................. 8-178.4.1.2 MRP Time Series........................................................................................................ 8-188.4.1.3 Time Fence Display Codes ....................................................................................... 8-198.4.1.4 Planning Family Messages....................................................................................... 8-198.4.1.5 Detail Messages ......................................................................................................... 8-208.4.1.6 Work Order Output from DRP/MPS/MRP.......................................................... 8-208.4.1.7 MRP Pegging Demand ............................................................................................. 8-218.4.2 Prerequisite ........................................................................................................................ 8-228.4.3 Forms Used to Analyze Planning Output..................................................................... 8-228.4.4 Setting Processing Options for MPS Time Series (P3413)........................................... 8-22
viii
8.4.4.1 Defaults ....................................................................................................................... 8-228.4.4.2 Process......................................................................................................................... 8-238.4.4.3 Versions....................................................................................................................... 8-238.4.5 Reviewing the Time Series .............................................................................................. 8-248.4.6 Reviewing Messages for a Planning Family ................................................................. 8-248.4.7 Setting Processing Options for MRP/MPS Detail Message Revisions (P3411) ....... 8-258.4.7.1 PO Info ........................................................................................................................ 8-258.4.7.2 WO Info....................................................................................................................... 8-268.4.7.3 OT Info ........................................................................................................................ 8-268.4.7.4 Blanket Info ................................................................................................................ 8-268.4.7.5 Versions....................................................................................................................... 8-268.4.7.6 Display ........................................................................................................................ 8-278.4.8 Reviewing Detail Messages............................................................................................. 8-278.4.9 Setting Processing Options for Pegging Inquiry (P3412)............................................ 8-288.4.9.1 Versions....................................................................................................................... 8-288.4.10 Reviewing Pegging Demand .......................................................................................... 8-288.5 Processing Planning Output................................................................................................... 8-288.5.1 Understanding Planning Output Processing ............................................................... 8-288.5.1.1 Work Order Messages .............................................................................................. 8-298.5.1.2 Purchase Order Messages ........................................................................................ 8-298.5.1.3 Purchase Order Consolidation ................................................................................ 8-308.5.1.4 Automatic Message Processing ............................................................................... 8-308.5.1.5 Freeze Codes .............................................................................................................. 8-308.5.2 Understanding MRP Supply and Demand................................................................... 8-318.5.2.1 Planning Fence Rule Effect on Supply and Demand Inquiry ............................. 8-318.5.3 Forms Used to Process Planning Output ...................................................................... 8-318.5.4 Processing Purchase Order Messages............................................................................ 8-328.5.5 Running the MRP/MPS Detail Message Processing Program .................................. 8-328.5.6 Setting Processing Options for MRP/MPS Detail Message Processing (R3411)..... 8-328.5.6.1 PO Info ........................................................................................................................ 8-328.5.6.2 WO Info....................................................................................................................... 8-338.5.6.3 OT Info ........................................................................................................................ 8-338.5.6.4 Blanket Info ................................................................................................................ 8-348.5.6.5 Versions....................................................................................................................... 8-348.5.6.6 SO Hold....................................................................................................................... 8-348.5.6.7 PO Hold ...................................................................................................................... 8-348.5.6.8 Subsystem Job ............................................................................................................ 8-358.5.7 Adding a Freeze Code to a Work Order ....................................................................... 8-358.5.7.1 Status & Type ............................................................................................................. 8-358.5.8 Adding a Freeze Code to a Purchase Order ................................................................. 8-358.5.9 Analyzing Supply and Demand..................................................................................... 8-35
9 Validating Requirements Plans
9.1 Understanding Requirements Plan Validation ...................................................................... 9-19.2 Regenerating CRP/RCCP.......................................................................................................... 9-29.2.1 Understanding Capacity Plan Regeneration ................................................................... 9-29.2.2 Prerequisites ......................................................................................................................... 9-3

ix
9.2.3 Running CRP/RCCP Regeneration .................................................................................. 9-39.2.4 Setting Processing Options for CRP/RCCP Regeneration (R3382).............................. 9-39.2.4.1 Process............................................................................................................................ 9-39.3 Validating Requirements Plans................................................................................................. 9-49.3.1 Understanding the Validation Process ............................................................................. 9-49.3.1.1 Period Summaries ........................................................................................................ 9-49.3.1.2 Work Center Scheduling Information ....................................................................... 9-59.3.1.3 Rate Schedule and Work Center Load ...................................................................... 9-59.3.1.4 Shop Floor Workbench ................................................................................................ 9-59.3.2 Prerequisites ......................................................................................................................... 9-59.3.3 Forms Used to Validate Requirements Plans .................................................................. 9-69.3.4 Reviewing Work Center Loads.......................................................................................... 9-69.3.5 Reviewing Period Summaries............................................................................................ 9-69.3.6 Setting Processing Options for Operation Dispatch Inquiry (P31220) ........................ 9-69.3.6.1 Defaults .......................................................................................................................... 9-69.3.6.2 Versions.......................................................................................................................... 9-79.3.6.3 Process............................................................................................................................ 9-89.3.7 Reviewing Work Schedules for Production Status......................................................... 9-89.3.8 Setting Processing Options for Work Center Schedule Review (P31224) ................... 9-89.3.8.1 Defaults .......................................................................................................................... 9-89.3.8.2 Disp Options (display options) .................................................................................. 9-99.3.8.3 WO Processing (work order processing) .................................................................. 9-99.3.8.4 Versions.......................................................................................................................... 9-99.3.9 Reviewing Rate Schedule and Work Center Loads........................................................ 9-99.3.10 Reviewing the Shop Floor Workbench for MRP............................................................. 9-9
10 Forecast Consumption
10.1 Understanding Forecast Consumption................................................................................. 10-110.2 Forecast Consumption Across Multiple Periods................................................................. 10-210.2.1 Past Due Time Buckets..................................................................................................... 10-210.2.2 Planning Horizon Time Periods ..................................................................................... 10-210.2.3 Forecast Consumption Calculation................................................................................ 10-310.3 Forecast Consumption by Customer..................................................................................... 10-410.3.1 Forecast Consumption by Customer Calculation ........................................................ 10-510.3.2 Forecast Consumption by Customer Considerations ................................................. 10-6
11 Working with Multilevel Master Schedules
11.1 Understanding Multilevel Master Schedules ...................................................................... 11-111.2 Setting Up a Feature Planned Percentage ............................................................................ 11-111.2.1 Understanding Planning Bills......................................................................................... 11-111.2.1.1 Example: Automobile with Two Engine Options................................................. 11-211.2.1.2 Example: Exploding Planned Orders ..................................................................... 11-211.2.2 Form Used to Set Up Feature Planned Percentages .................................................... 11-411.2.3 Setting Up a Feature Planned Percentage ..................................................................... 11-411.3 Generating a Multilevel Master Schedule ............................................................................ 11-411.3.1 Understanding Multilevel Master Schedule Generation ............................................ 11-4
x
11.3.2 Running the MPS Regeneration for Multilevel Schedules ......................................... 11-4
12 Planning for Process and Repetitive Manufacturing
12.1 Understanding Process Manufacturing Planning............................................................... 12-112.1.1 Batch Planning .................................................................................................................. 12-212.2 Understanding Repetitive Manufacturing Planning .......................................................... 12-312.3 Generating a Master Planning Schedule for Batch Bills..................................................... 12-312.3.1 Understanding MPS Generation for Batch Bills........................................................... 12-312.3.2 Generating MPS for Batch Bills....................................................................................... 12-512.4 Generating a Master Planning Schedule for Processes ...................................................... 12-512.4.1 Understanding MPS Generation for Processes ............................................................ 12-512.4.2 Prerequisites ...................................................................................................................... 12-612.4.3 Forms Used to Generate a Master Planning Schedule for Processes ........................ 12-612.4.4 Generating a Master Planning Schedule for Processes ............................................... 12-612.5 Generating a Master Planning Schedule for Repetitive Items .......................................... 12-612.5.1 Understanding MPS Generation for Repetitive Items ................................................ 12-612.5.2 Prerequisites ...................................................................................................................... 12-812.5.3 Forms Used to Generate Master Planning Schedules for Repetitive Items ............. 12-8
13 Working with Multifacility Planning
13.1 Understanding Multifacility Planning.................................................................................. 13-113.2 Understanding Multifacility Forecast Consumption.......................................................... 13-213.2.1 Calculations ....................................................................................................................... 13-313.2.2 Additional Options for Multifacility Forecast Consumption..................................... 13-313.3 Generating Multifacility Requirement Plans ....................................................................... 13-313.3.1 Understanding Multifacility Plan Generation.............................................................. 13-413.3.2 Prerequisite ........................................................................................................................ 13-413.3.3 Running the Master Planning Schedule - Multiple Plant Program........................... 13-413.3.4 Setting Processing Options for Master Planning Schedule - Multiple Plant (R3483) ........
13-413.3.4.1 Horizon ....................................................................................................................... 13-413.3.4.2 Parameters .................................................................................................................. 13-513.3.4.3 On-Hand ..................................................................................................................... 13-613.3.4.4 Forecasting.................................................................................................................. 13-813.3.4.5 Document Types........................................................................................................ 13-913.3.4.6 Lead Times.................................................................................................................. 13-913.3.4.7 Performance.............................................................................................................. 13-1013.3.4.8 Mfg Mode ................................................................................................................. 13-1313.3.4.9 Multi-Facility............................................................................................................ 13-1313.3.4.10 Parallel....................................................................................................................... 13-1413.4 Validating Multifacility Planning Output.......................................................................... 13-1513.4.1 Understanding Multifacility Planning Output........................................................... 13-1513.4.1.1 Branch Relationships............................................................................................... 13-1513.4.1.2 Reviewing the Time Series for the Multifacility Schedule ................................ 13-1513.4.1.3 Transfer Order Messages for the Multifacility Schedule ................................... 13-1513.4.2 Forms Used to Validate Multifacility Planning Output............................................ 13-16
xi
14 Working with Supplier Release Scheduling
14.1 Understanding Supplier Release Scheduling ...................................................................... 14-114.1.1 Supplier Release Scheduling Using the Self-Service Portal Workspaces ................. 14-214.2 Generating Contract-Based Supplier Release Schedules ................................................... 14-214.2.1 Understanding Supplier Schedule Generation ............................................................ 14-214.2.1.1 Self-Service Portal Workspaces ............................................................................... 14-314.2.2 Understanding Supplier Schedule Revisions ............................................................... 14-314.2.2.1 Self-Service Portal Workspaces ............................................................................... 14-414.2.3 Prerequisites ...................................................................................................................... 14-414.2.4 Form Used to Revise Contract-Based Supplier Release Schedules ........................... 14-414.2.5 Generating Contract-Based Supplier Release Schedules ............................................ 14-514.2.6 Setting Processing Options for Supplier Schedule Generation (R34400) ................. 14-514.2.6.1 Defaults ....................................................................................................................... 14-514.2.6.2 Commitment .............................................................................................................. 14-514.2.6.3 Adhoc Schedules ....................................................................................................... 14-514.2.6.4 Process......................................................................................................................... 14-614.2.7 Setting Processing Options for Supplier Schedules Revisions (P34301)................... 14-614.2.7.1 Versions....................................................................................................................... 14-714.2.7.2 Defaults ....................................................................................................................... 14-714.2.7.3 Status Update ............................................................................................................. 14-814.2.8 Revising Contract-Based Supplier Release Schedules................................................. 14-814.3 Entering Ad Hoc Schedules.................................................................................................... 14-914.3.1 Understanding Ad Hoc Schedules................................................................................. 14-914.3.2 Forms Used to Enter Ad Hoc Schedules ..................................................................... 14-1014.3.3 Setting Processing Options for Ad Hoc Schedule Revisions (P34302).................... 14-1014.3.3.1 Defaults ..................................................................................................................... 14-1014.3.4 Entering Ad Hoc Schedules .......................................................................................... 14-1114.4 Capturing Supplier Commitments...................................................................................... 14-1114.4.1 Understanding Supplier Collaboration ....................................................................... 14-1114.4.1.1 Commitments........................................................................................................... 14-1214.4.1.2 Portal Alerts.............................................................................................................. 14-1314.4.1.3 Shortages................................................................................................................... 14-1314.4.2 Forms Used to Capture Supplier Commitments ....................................................... 14-1414.4.3 Entering Supplier Commitments for Blanket Schedules Through the EnterpriseOne
Collaborative Portal 14-1414.4.4 Entering Supplier Commitments for Ad Hoc Schedules.......................................... 14-1414.4.5 Capturing Supplier Commitments Using EDI ........................................................... 14-1514.5 Releasing Supplier Schedules .............................................................................................. 14-1614.5.1 Understanding Supplier Schedule Release Generation ............................................ 14-1614.5.1.1 Ad Hoc Schedules ................................................................................................... 14-1714.5.2 Prerequisite ...................................................................................................................... 14-1714.5.3 Running Supplier Schedule Release Generation........................................................ 14-1714.5.4 Setting Processing Options for Supplier Schedule Release Generation (R34410) . 14-1714.5.4.1 Defaults ..................................................................................................................... 14-1714.5.4.2 Process....................................................................................................................... 14-18
xii
A JD Edwards EnterpriseOne Requirements Planning Reports
A.1 JD Edwards EnterpriseOne Requirements Planning Reports ............................................. A-1A.2 JD Edwards EnterpriseOne Requirements Planning Reports: A to Z................................ A-1A.3 JD Edwards EnterpriseOne Selected Requirements Planning Reports ............................. A-1A.3.1 R34460 - Supplier Schedule History................................................................................. A-1A.3.2 R34450 - Supplier Schedule Print ..................................................................................... A-2A.3.3 Processing Options for Supplier Schedule Print (R34450)............................................ A-2A.3.3.1 Process........................................................................................................................... A-2A.3.3.2 Versions......................................................................................................................... A-2A.3.3.3 Associated Text ............................................................................................................ A-3
B Delivered User Defined Objects for Requirements Planning (Release 9.2 Update)
B.1 Requirements Planning Notifications..................................................................................... B-1
xiii
Preface
Welcome to the JD Edwards EnterpriseOne Applications Requirements Planning Implementation Guide.
AudienceThis guide is intended for implementers and end users of the JD Edwards EnterpriseOne Requirements Planning system.
JD Edwards EnterpriseOne ProductsThis implementation guide refers to these JD Edwards EnterpriseOne products from Oracle:
■ JD Edwards EnterpriseOne Inventory Management
■ JD Edwards EnterpriseOne Configurator
■ JD Edwards EnterpriseOne Forecast Management
■ JD Edwards EnterpriseOne Manufacturing – Shop Floor
■ JD Edwards EnterpriseOne Manufacturing – PDM
■ JD Edwards EnterpriseOne Manufacturing – ETO Foundation
■ JD Edwards EnterpriseOne Sales Order Management
■ JD Edwards EnterpriseOne Procurement and Subcontract Management
JD Edwards EnterpriseOne Application FundamentalsAdditional, essential information describing the setup and design of the system appears in a companion volume of documentation called JD Edwards EnterpriseOne Applications Product Data Management Implementation Guide.
Customers must conform to the supported platforms for the release as detailed in the JD Edwards EnterpriseOne minimum technical requirements. See document 745831.1 (JD Edwards EnterpriseOne Minimum Technical Requirements Reference) on My Oracle Support:
https://support.oracle.com/epmos/faces/DocumentDisplay?id=745831.1
In addition, JD Edwards EnterpriseOne may integrate, interface, or work in conjunction with other Oracle products. Refer to the cross-reference material in the Program Documentation at http://oracle.com/contracts/index.html for Program
xiv
prerequisites and version cross-reference documents to assure compatibility of various Oracle products.
Documentation AccessibilityFor information about Oracle's commitment to accessibility, visit the Oracle Accessibility Program website at http://www.oracle.com/pls/topic/lookup?ctx=acc&id=docacc.
Access to Oracle SupportOracle customers that have purchased support have access to electronic support through My Oracle Support. For information, visit http://www.oracle.com/pls/topic/lookup?ctx=acc&id=info or visit http://www.oracle.com/pls/topic/lookup?ctx=acc&id=trs if you are hearing impaired.
Related InformationFor additional information about JD Edwards EnterpriseOne applications, features, content, and training, visit the JD Edwards EnterpriseOne pages on the JD Edwards Resource Library located at:
http://learnjde.com
ConventionsThe following text conventions are used in this document:
Convention Meaning
Boldface Boldface type indicates graphical user interface elements associated with an action, or terms defined in text or the glossary.
Italic Italic type indicates book titles, emphasis, or placeholder variables for which you supply particular values.
Monospace Monospace type indicates commands within a paragraph, URLs, code in examples, text that appears on the screen, or text that you enter.
1
Introduction to JD Edwards EnterpriseOne Requirements Planning 1-1
1Introduction to JD Edwards EnterpriseOne Requirements Planning
This chapter contains the following topics:
■ Section 1.1, "JD Edwards EnterpriseOne Requirements Planning Overview"
■ Section 1.2, "JD Edwards EnterpriseOne Requirements Planning Integrations"
■ Section 1.3, "JD Edwards EnterpriseOne Requirements Planning Implementation"
1.1 JD Edwards EnterpriseOne Requirements Planning OverviewJD Edwards EnterpriseOne Requirements Planning from Oracle provides a means for you to use resource planning tools in distribution or manufacturing environments. JD Edwards EnterpriseOne Requirements Planning enables you to use supply and demand balancing logic to create material schedules and detailed production plans that support single-facility or multifacility planning.
With JD Edwards EnterpriseOne Requirements Planning, you can:
■ Generate demand projections that you use as input for the planning and scheduling systems.
■ Use capacity planning to ensure that sufficient capacity is available to accomplish the planned production schedule.
■ Generate a distribution or production plan for one facility.
■ Produce a single-facility Material Requirements Planning (MRP) schedule for a single item or all items.
■ Compare prospective resource requirements to the capacity that is available in critical work centers.
■ Forecast consumption across multiple time periods.
■ Set up and generate multilevel master schedules.
■ Process work orders with a batch quantity that corresponds to a batch bill of material and use these orders for MRP processing.
■ Set up and use process planning by defining stocking types for the process, defining co-products and by-products, and generate Master Production Scheduling (MPS) for the process.
■ Use repetitive manufacturing for highly repetitive production that relies on a production rate.
JD Edwards EnterpriseOne Requirements Planning Integrations
1-2 JD Edwards EnterpriseOne Applications Requirements Planning Implementation Guide
■ Set up and maintain multifacility plans to define facility relationships at any level of detail for an entire facility, a product group, master planning family, or an individual item number.
■ Set up information for each of the suppliers and for the items that you are planning to purchase to generate ad hoc schedules interactively or generate them by running the Supplier Schedule Generation program.
1.2 JD Edwards EnterpriseOne Requirements Planning IntegrationsThe JD Edwards EnterpriseOne Requirements Planning system integrates with these JD Edwards EnterpriseOne systems from Oracle:
■ JD Edwards EnterpriseOne Inventory Management
■ JD Edwards EnterpriseOne Configurator
■ JD Edwards EnterpriseOne Forecast Management
■ JD Edwards EnterpriseOne Shop Floor Management
■ JD Edwards EnterpriseOne Sales Order Management
■ JD Edwards EnterpriseOne Procurement
■ JD Edwards EnterpriseOne Engineer to Order
The JD Edwards EnterpriseOne Requirements Planning system works with other JD Edwards EnterpriseOne systems. We discuss integration considerations in the implementation chapters in this implementation guide.
1.2.1 JD Edwards EnterpriseOne Inventory ManagementJD Edwards EnterpriseOne Inventory Management from Oracle supplies the basic information about each item (or ingredient), such as part number, description, unit of measure, stocking type, and location.
1.2.2 JD Edwards EnterpriseOne ConfiguratorJD Edwards EnterpriseOne Configurator from Oracle supplies information for assemble-to-order and make-to-order items.
1.2.3 JD Edwards EnterpriseOne Forecast ManagementJD Edwards EnterpriseOne Forecast Management from Oracle generates sales projections that are used to create demand and develop the master production schedule.
1.2.4 JD Edwards EnterpriseOne Shop Floor ManagementJD Edwards EnterpriseOne Shop Floor Management from Oracle uses the output from requirements planning as the basis for work order creation and to schedule work activity within the plant.
1.2.5 JD Edwards EnterpriseOne Sales Order ManagementJD Edwards EnterpriseOne Sales Order Management from Oracle provides a source of demand for purchased or manufactured items.
JD Edwards EnterpriseOne Requirements Planning Implementation
Introduction to JD Edwards EnterpriseOne Requirements Planning 1-3
1.2.6 JD Edwards EnterpriseOne ProcurementJD Edwards EnterpriseOne Procurement from Oracle uses expected deliver dates and recommends replenishment actions.
1.2.7 JD Edwards EnterpriseOne Engineer to OrderJD Edwards EnterpriseOne Engineer to Order from Oracle supplies information for engineer-to-order and project specific items.
1.3 JD Edwards EnterpriseOne Requirements Planning ImplementationThis section provides an overview of the steps that are required to implement the JD Edwards EnterpriseOne Requirements Planning system.
In the planning phase of the implementation, take advantage of all JD Edwards EnterpriseOne sources of information, including the installation guides and troubleshooting information.
When determining which electronic software updates (ESUs) to install for JD Edwards EnterpriseOne Requirements Planning, use the EnterpriseOne and World Change Assistant. EnterpriseOne and World Change Assistant, a Java-based tool, reduces the time required to search and download ESUs by 75 percent or more and enables you to install multiple ESUs at one time.
See JD Edwards EnterpriseOne Tools Software Updates Guide.
For information about the Oracle Business Accelerator solution for implementation of JD Edwards EnterpriseOne Requirements Planning, review the documentation available.
See http://docs.oracle.com/cd/E24705_01/index.htm.
1.3.1 Global Implementation StepsThis table lists the suggested implementation steps for the JD Edwards EnterpriseOne Requirements Planning system:
■ Set up global UDC tables.
See "Working with User Defined Codes in the JD Edwards EnterpriseOne Tools Runtime Administration Guide.
■ Set up fiscal date patterns.
See "Setting Up Fiscal Date Patterns" in the JD Edwards EnterpriseOne Applications Financial Management Fundamentals Implemenation Guide.
■ Set up companies.
See "Setting Up Companies" in the JD Edwards EnterpriseOne Applications Financial Management Fundamentals Implemenation Guide.
■ Set up business units.
See "Setting Up Business Units" in the JD Edwards EnterpriseOne Applications Financial Management Fundamentals Implemenation Guide.
■ Set up next numbers.
See "Setting Up Next Numbers" in the JD Edwards EnterpriseOne Applications Financial Management Fundamentals Implemenation Guide.
JD Edwards EnterpriseOne Requirements Planning Implementation
1-4 JD Edwards EnterpriseOne Applications Requirements Planning Implementation Guide
■ Set up accounts, and the chart of accounts. (Optional)
See "Creating the Chart of Accounts" in the JD Edwards EnterpriseOne Applications Financial Management Fundamentals Implemenation Guide.
■ Set up the General Accounting Constants.
See "Setting Up Constants for General Accounting" in the JD Edwards EnterpriseOne Applications General Accounting Implementation Guide.
■ Set up multicurrency processing, including currency codes and exchange rates.
See "Understanding Multicurrency Setup" in the JD Edwards EnterpriseOne Applications Multicurrency Processing Implementation Guide.
■ Set up ledger type rules. (Optional)
See "Setting Up Ledger Type Rules for General Accounting" in the JD Edwards EnterpriseOne Applications General Accounting Implementation Guide.
■ Set up address book records.
See "Entering Address Book Records" in the JD Edwards EnterpriseOne Applications Address Book Implementation Guide.
■ Set up default location and printers.
See "Working with Report Printing Administration" in the JD Edwards EnterpriseOne Tools Report Printing Administration Technologies Guide.
■ Set up branch/plant constants.
See "Setting Up Constants" in the JD Edwards EnterpriseOne Applications Inventory Management Implementation Guide.
■ Set up Manufacturing/Distribution Automatic Accounting Instructions (AAIs).
See "Setting Up AAIs in Distribution Systems" in the JD Edwards EnterpriseOne Applications Inventory Management Implementation Guide.
See "Defining Manufacturing AAIs" in the JD Edwards EnterpriseOne Applications Product Costing and Manufacturing Implementation Guide.
■ Set up document types.
See "Setting Up Document Type Information" in the JD Edwards EnterpriseOne Applications Inventory Management Implementation Guide.
■ Set up shop floor calendars.
See "Setting Up Shop Floor Calendars" in the JD Edwards EnterpriseOne Applications Shop Floor Management Implementation Guide.
■ Set up manufacturing constants.
See "Setting Up Manufacturing Constants" in the JD Edwards EnterpriseOne Applications Shop Floor Management Implementation Guide.
1.3.2 Requirements Planning Implementation StepsThis table lists the suggested application-specific implementation steps for JD Edwards EnterpriseOne Requirements Planning:
■ Set up supply and demand inclusion rules.
See Setting Up Supply and Demand Inclusion Rules.
■ Set up Inventory Management for Requirements Planning.
JD Edwards EnterpriseOne Requirements Planning Implementation
Introduction to JD Edwards EnterpriseOne Requirements Planning 1-5
See Setting Up Inventory Management for Requirements Planning.
■ Set up quantity type subsets.
See Setting Up Quantity Type Subsets.
■ Set up capacity planning.
See Determining Available Capacity.
See Generating Resource Profiles.
JD Edwards EnterpriseOne Requirements Planning Implementation
1-6 JD Edwards EnterpriseOne Applications Requirements Planning Implementation Guide
2
Understanding Requirements Planning 2-1
2Understanding Requirements Planning
This chapter contains the following topics:
■ Section 2.1, "Requirements Planning Overview"
■ Section 2.2, "Requirements Planning Features"
■ Section 2.3, "Requirements Planning Tables"
2.1 Requirements Planning OverviewJD Edwards EnterpriseOne Requirements Planning is part of Oracle's JD Edwards EnterpriseOne Supply Chain Management product line. Supply Chain Management (SCM) enables you to coordinate inventory, raw materials, and labor resources to deliver products according to a managed schedule. This closed-loop manufacturing system helps you manage data and optimize resources across the entire manufacturing and distribution logistics environment. SCM formalizes the activities of company and operations planning.
2.2 Requirements Planning FeaturesJD Edwards EnterpriseOne Requirements Planning consists of these features:
2.2.1 Resource and Capacity PlanningResource and Capacity Planning enables you to prepare a feasible production schedule that reflects demand forecasts and production capability. Resource and Capacity Planning consists of:
■ Resource Requirements Planning (RRP)
Uses a detail or summary forecast to estimate the time and resources that are needed to make a product family.
■ Rough Cut Capacity Planning (RCCP)
Compares the resource requirements from master production scheduling to the capacity that is available in critical work centers.
You use RCCP to determine whether you should revise the master schedule to create feasible workloads or improve the use of limited resources.
■ Capacity Requirements Planning (CRP)
Compares the material requirements plans to the capacity available in all work centers.
Requirements Planning Features
2-2 JD Edwards EnterpriseOne Applications Requirements Planning Implementation Guide
You use CRP to determine whether you should revise the material requirements plan to create feasible workloads or improve the use of the resources.
2.2.2 Material Planning OperationsMaterial Planning Operations provides a short-range plan to cover material requirements that are needed to make a product. Material Planning Operations analyzes demand from all the operational areas, including:
■ Central and satellite distribution centers and warehouses.
■ Items that are manufactured in both discrete and process environments.
■ Engineer-to-order contracted items.
■ Maintenance, repair, and operational items for plant and equipment maintenance.
■ Supplier-managed inventory.
Material Planning Operations consists of these feature sets:
■ Distribution Requirements Planning (DRP)
Plans and controls the distribution of finished goods, based upon demand.
■ Master Production Scheduling (MPS)
Creates a schedule of items and quantities that a company expects to manufacture.
■ Material Requirements Planning (MRP)
Uses the master production schedule, open orders, bills of material, and inventory records to calculate time-phased net requirements for every item, and creates a plan for covering material requirements.
■ Multifacility Planning
Provides centralized control of distribution inventories and creates a coordinated replenishment plan.
■ Project Requirements Planning (PRP)
Uses work breakdown structures from projects and related bills of material to create replenishment plans for project items.
2.2.3 Project Requirements Planning (PRP)PRP is an option within the MRP/MPS Requirements Planning program (R3482) that you use to generate replenishment schedules for production orders and components for an end item that are used in a project.
PRP recognizes the shippable items from the project as the supply of the end item and uses this supply to drive the demand for its components. Thus, the project supplies its own demand.
The system generates dependent demand by using the bill of material (BOM) structure or the work order parts list that is associated with the end items. Inventory that is acquired either by purchase order receipts or work order completions for these project-specific items should be used only for meeting the project's demand.
The system regards the project demand and supply as standalone or independent so that any additional demand or supply from forecasts, sales orders, work orders, or purchase orders on the end item does not interfere with the requirement from the project.
Requirements Planning Tables
Understanding Requirements Planning 2-3
2.2.4 Supplier Scheduling SystemsA dependency on goods and services from other organizations has increased the need to establish planning and information methods between the supplying links of a supply chain.
Through supplier scheduling, planners can provide suppliers with consistent shipping information and demand profiles to support production and delivery. Planners negotiate order contracts between consumer and supplier through scheduling tools. Order contracts are often defined as blanket orders with established quantities for a demand company. When a company forms a supply chain with a scheduling system, a supplier has accurate data to project plans for demand forecasts, ordering, production, and delivery. A consuming company benefits because its deliveries from a supplier are dependable. Enterprises can make point-of-use deliveries from the exact location where the supplier delivers the goods to the production location that consumes products. Instead of supplying inventory to stores or warehouses for dissemination, enterprises can deliver from the point of use.
Partnership contracts between companies reduce inventory-carrying costs, production lead times, and time-to-market for products. An enterprise uses supplier-scheduling methodologies to share planning information across business boundaries. Scheduling enables contributors to a product line to develop schedules that originate from known information. When schedules change, especially in dynamic industries such as electronics and automotive, the demand and supply partners establish communication links to accommodate changes as quickly as possible.
2.3 Requirements Planning Tables These tables are used throughout the JD Edwards EnterpriseOne Requirements Planning system:
Table Description
Item Master (F4101) Contains basic information about each item that is defined in inventory, such as:
■ Item numbers and descriptions
■ Category codes
■ Units of measure
Item Branch File (F4102) Contains warehouse or plant-level information, such as:
■ Costs
■ Quantities
■ Location
■ Branch level category codes
■ Lead times
■ Planning fences
■ Order policy codes
Bill of Material Master File (F3002) Contains information at the business unit level about bills of material, such as:
■ Costs and quantities of components.
■ Features and options.
■ Levels of detail for each bill.

Requirements Planning Tables
2-4 JD Edwards EnterpriseOne Applications Requirements Planning Implementation Guide
Capacity Message File (F3311) Contains the action messages that are generated by the RRP, RCCP, and CRP programs.
Forecast File (F3460) Contains the forecast data that MPS uses for calculations and that RRP validates.
Routing Master File (F3003) Stores routing information, including operation sequence, work center, run, setup, and machine time.
Work Center Resource Units (F3007) Contains the available capacity for each work center by day, month, and year.
Work Center Master File (F30006) Contains detail data about all defined work centers.
Capacity Resource Profile (F3303) Contains all of the resource profiles that are used in Resource Requirements Planning.
Branch Relationships Master File (F3403)
Contains the supply and demand relationship among the branches.
MPS/MRP/DRP Message File (F3411) Contains the action messages that are generated by MPS, MRP, or DRP.
MPS/MRP/DRP Lower Level Requirements File (F3412)
Contains the source of gross requirements that are posted to items from parent items.
MPS/MRP/DRP Summary File (F3413)
Contains the time series data for forms and reports.
Supplier Schedule Master File (F4321) Contains most of the data that controls scheduling arrangements with the supplier. This table also contains information that is required for creating and maintaining the schedule, including:
■ Ship lead time
■ Schedule days
■ Ship pattern
■ Shipment quantity
■ Delivery location
The system uses information from the Supplier Schedule Master File table for each line item on a blanket order that you use in the supplier scheduling process.
Supplier Schedule Master File (F43211)
Contains the data that identifies predetermined split percentages between suppliers, by item.
Table Description
3
Understanding Requirements Planning Concepts 3-1
3Understanding Requirements Planning Concepts
This chapter contains the following topics:
■ Section 3.1, "Single-Facility Versus Multifacility Planning"
■ Section 3.2, "Single-Level Versus Multilevel Planning"
■ Section 3.3, "Master Production Scheduling and Material Requirements Planning"
■ Section 3.4, "Requirements Planning Outputs"
■ Section 3.5, "Parallel Processing"
3.1 Single-Facility Versus Multifacility PlanningSingle-facility planning encompasses the generation of a distribution or production plan for one facility. All supply-and-demand data must be within a single branch plant. If an item is available in other branch plants, it is not considered during single-facility planning.
In contrast, multifacility planning is set up to consider supply and demand for the same item across multiple facilities. The objective of multifacility planning is to coordinate the distribution or production plan of several plants that are part of an integrated company. This type of planning is used to provide a number of business solutions, including:
■ Demand consolidation to support centralized procurement for multiple branch plants.
■ Demand fulfillment from an alternate branch plant to minimize inventory.
■ Demand integration, in which one plant produces semifinished items that are shipped to and assembled into end-item products at another plant.
You define supply-and-demand relationships between branch plants; the system transfers items among the plants using JD Edwards EnterpriseOne Sales Order Management and JD Edwards EnterpriseOne Procurement.
3.2 Single-Level Versus Multilevel Planning Single-level planning is the balance of supply and demand of an end item at the sales and operations planning level. The planning system does not explode down to the lower-level components in the bill of material.
Both manufacturing and distribution companies use single-level planning, depending on their process flows. Single-level planning is performed for Master Production
Master Production Scheduling and Material Requirements Planning
3-2 JD Edwards EnterpriseOne Applications Requirements Planning Implementation Guide
Scheduling (MPS) and Distribution Requirements Planning (DRP) to plan end items or families of end items. Single-level planning at the DRP and MPS levels provides flexibility to manage inventory by specific time buckets, which can be monthly, weekly, or daily.
DRP focuses on processing end items through the planning system. DRP develops messages only for the purchase of end items; no parent/component relationships exist.
For example, a distribution company that sells material building supplies forecasts faucets as a demand and purchases what is needed to meet the forecast. The company then sells the faucets to home builders.
MPS uses single-level planning to focus on the end item. It is run prior to Material Requirements Planning (MRP) to stabilize and firm up the schedule. Thus, single-level MPS does not explode down to lower-level components in the bill of material. MPS can develop both purchase order and work order messages.
For example, a manufacturer of building materials might buy bathtubs and then sell these end items to distributors. The manufacturer uses forecast as demand and purchases bathtubs to meet that demand. They then sell the bathtubs to a distributor. For end items that the manufacturer builds itself, such as faucets, the company runs single-level MPS to produce work-order messages for the faucets. By running single-level MPS, the manufacturer has the flexibility to change quantities and dates of the end items before sending the demand to lower-level components such as O-rings, washers, handles, and bolts.
Pegging records do not exist at the highest level of the bill of material structure because that is where the demand originates.
MRP is multilevel planning. The planning system explodes parent demand from end items down to lower level components in a bill of material. MRP creates messages for both purchased and lower-level manufactured items.
Pegging can be done to determine the parent source of demand.
3.3 Master Production Scheduling and Material Requirements PlanningAn MPS is a statement of what the company expects to produce, based on the tactical plan and budget constraints. A master-scheduled item is critical in its impact on lower-level components or resources, such as skilled labor, key machines, and revenues. Single-level scheduling implies master scheduling at the item level of an end deliverable. multilevel master schedules explode planned orders down to component items.
The master scheduling process consists of:
■ Determining gross demand (forecast, customer orders, and interplant demand).
■ Subtracting what you have (inventory, purchase orders, and work orders).
■ Calculating net requirements and determining when you need them.
You can generate a master schedule for all items or for a net-change generation, which includes only items that have been affected by transactions since the last generation. After you generate the master schedule, you can review and respond to messages.
MRP uses information from the bill-of-material and inventory records to calculate the time-phased net-material requirements for every component item and subassembly. MRP suggests a replenishment plan to support the production of the quantities that are specified in the MPS.
Master Production Scheduling and Material Requirements Planning
Understanding Requirements Planning Concepts 3-3
A single-facility requirements plan critically affects lower-level components or resources, such as skilled labor or revenues. Single-facility implies MRP at the component level.
The MRP process consists of:
■ Determining gross demand (forecast, customer orders, work orders, and interplant demands).
■ Subtracting what you have (inventory, purchase orders, and work orders).
■ Calculating net requirements and when you need them.
You can process a material requirements plan in one of two ways:
■ Freeze the MPS and generate MRP.
■ Validate the MPS, and then generate a combination of MPS and MRP.
When you process a material requirements plan, the system summarizes gross material requirements for each assembly, component, and part number for raw material. The requirements plan supports the MPS for each time period in the planning horizon.
You can generate a material requirements plan for all items or for a net change generation, which includes only the items that have changed since the last generation. After you generate MRP output, you can review and respond to messages.
The system uses these inputs to MRP:
■ Demand.
■ Forecast.
■ Sales orders.
■ Planned and firm work orders.
■ Supply.
■ Firm work orders.
■ Rate schedules.
■ Purchase orders.
■ Inventory.
■ In-receipt routing.
■ Product data.
■ Item Branch File data (F4102).
■ Bill of Material Master File data (F3002).
The system generates these outputs from MRP:
■ Action and warning messages.
■ Time series with calculated quantities for:
– Ending Available (EA).
– Available to Promise (ATP).
– Cumulative Available to Promise (CATP).
– Planned orders.
Requirements Planning Outputs
3-4 JD Edwards EnterpriseOne Applications Requirements Planning Implementation Guide
3.3.1 MPS and Manufactured ItemsYou use MPS to generate the master schedule for manufactured items. The JD Edwards EnterpriseOne systems plan replenishment for both purchased items and manufactured items in the same generation program. Processing options control how the system runs the generation.
3.3.2 DRP and Purchased ItemsFor distribution businesses, DRP provides replenishment plans for items that are purchased and resold in a distribution environment.
3.3.3 What Are the Differences Between MRP and MPS?MPS generally has independent demand, while MRP has dependent demand. Independent demand is demand for an item that is unrelated to the demand for other items, such as demand for finished goods. Dependent demand is demand that is directly related to or derived from the bill-of-material structure for other items or end products. MRP might also include forecast and sales orders if items are sold as service (spare) parts. The majority of demand, however, is demand from parent orders. The demands on MRP include:
■ Firm and planned work orders for a parent item.
■ Sales orders and forecast for a service part.
■ Interplant demands.
You use MRP to generate material plans for lower-level components. Processing options control how the system runs the generation.
3.4 Requirements Planning OutputsThe primary outputs of requirements planning include messages, time series, and planned orders. You need to know and understand the elements that affect the process and look for the outputs, including planning horizons, quantity types, time fences, and planning message definitions. These elements are common for all types of requirements planning.
This section discusses:
■ Planning horizons.
■ Quantity Types (user-defined code (UDC) 34/QT).
■ Time fences and the time series.
■ Time series calculations.
■ Planning messages.
3.4.1 Planning HorizonsThe Educational Society for Resource Management (APICS) defines a planning horizon as the amount of time that a plan extends into the future. Planning horizons must be long enough to cover the cumulative lead time for all low-level components. For higher-level planning, the horizon must be long enough to enable increased capacity adjustments, if needed. Changes that extend far into the planning horizon can be managed with little disruption to the planning schedule. Changes closer to the
Requirements Planning Outputs
Understanding Requirements Planning Concepts 3-5
current date or delivery due date might have significant schedule and cost impacts to the existing plan.
Cumulative lead time should include visibility to all aspects of the plan, including:
■ Engineering and development time.
■ Purchasing lead time.
■ Manufacturing lead time.
■ Final assembly lead time.
■ Delivery time to customer.
This example illustrates a planning horizon:
■ Order raw materials: 20 days.
■ Produce component items: 20 days.
■ Subassembly production: 20 days.
■ Final assembly: 20 days.
The planning horizon must be set to include the entire lead time from raw material through final assembly. Therefore, this planning horizon should be no fewer than 80 days in length.
3.4.2 Quantity Types (34/QT)The system uses the quantity type user-defined code (UDC) 34/QT. Quantity types are predefined codes that define the display data on the time series screens and reports that use the MPS/MRP/DRP Summary File table (F3413). The quantity types are used by the MRP/MPS Requirements Planning program (R3482) and the Master Planning Schedule - Multiple Plant program (R3483) to calculate supply and demand.
Quantity types are alpha codes that represent various types of supply or demand on the time series. Any code that is preceded by a + symbol designates supply. Any code that is preceded by a – symbol designates demand or a reduction of supply. Some quantity types are designated as unadjusted. Unadjusted quantity types display the original quantity without planning actions. All other quantity types are displayed as though all planning actions have been processed.
UDC 34/QT codes are hard-coded; however, the descriptions explaining the codes are not hard-coded. If changes are made to the descriptions, you should document these changes by using the Row menu to access the Attachments form. Creating an attachment to the code with a changed description provides an audit trail of what was changed and why the change was implemented.
Important: You should not change the 34/QT UDC because the MRP/MPS Requirements Planning and Master Planning Schedule - Multiple Plant programs build calculations for supply and demand based on these quantity types.
3.4.3 Time Fences and the Time SeriesPlanning horizons are divided into time frames that establish operation policies or guidelines for prioritizing activities.
The time fences define how priority decisions are made with respect to scheduling supply to meet demand. Time fences denote where defined planning rules are applied
Requirements Planning Outputs
3-6 JD Edwards EnterpriseOne Applications Requirements Planning Implementation Guide
in balancing the supply to meet existing demand. Time fences apply to sources of demand that are used to plan calculations. Time fence rules stipulate how forecast, customer demand, or a mixture of these are used during the netting calculations when you are establishing the schedule.
Time fences are points in time when you can make changes to either policy or operating procedures. JD Edwards EnterpriseOne software includes three fences:
■ Freeze
■ Planning
■ Message Display
This table describes each planning fence and its function:
Fence Type Function
Freeze Fence (F) The number of days from the generation start date during which the system should not create or replan order messages. For example, if the generation start date is January 3, and the freeze time fence is three days, the planning system does not display messages with dates that are prior to or equal to January 6.
Imbalances of supply and demand within the freeze fence are planned outside the freeze fence.
Planning Fence (P) The number of days that the system uses with the time fence rule to determine how demand is used. Enter the number of days after the generation start date when the time fence rule changes from the first rule to the second rule. For example, if the time fence rule is S (customer demand before the time fence, forecast after the time fence), the generation start date is January 3, and the planning time fence is three days, then the system plans according to customer demand through January 6. Beginning on January 7, the system plans according to the forecast.
Message Display Fence (D) The number of days after the generation start date during which the system should display messages. For example, if the generation start date is January 1, the shop calendar is seven days a week, and the message fence is 30 days, the system displays messages with dates before or equal to January 31. The system does not display messages with start dates of February 1 or later. However, the planning horizon for orders continues past this date and is reflected in available-to-promise totals.
Time fences are a critical input to the master schedule. The time series is the primary output of the master schedule.
The diagram is an example of a time series:
Requirements Planning Outputs
Understanding Requirements Planning Concepts 3-7
Figure 3–1 Time series
Final Assemblyand Delivery
StopMessageDisplay
AutomaticChanges
EmergencyChanges Only Manual Changes
ManufactureComponents
PurchaseMaterial
FlexibleSchedule
TodayFreezeFence
PlanningFence
MessageDisplay
In the Item Master program (P4101), you specify on the Manufacturing Data tab of the Additional System Information form the number of days after the generation start date to be included in each time fence period. For time fences:
■ The system does not count the generation start date; that is, the day after the generation start date is day 1.
■ For manufactured items, the system counts working days as defined in the Shop Floor Calendar.
■ For purchased items, the system counts calendar days.
Each of the fences is displayed on the time series in its respective bucket. Along with the codes F, P, and D, you will also see Level Lead time (L), Manufacturing Lead time (M), and Cumulative Lead time (C).
You can also generate a master schedule for items by using forecast consumption planning rule H. Forecast consumption occurs when forecasted demand is reduced by actual sales orders that are received or shipped, up to the forecasted quantity. By consuming the forecast, you can revise the production schedules to reflect the most up-to-date information.
3.4.3.1 MRP Period Calculations Using Planning Fence RulesMRP supply-and-demand netting calculations are generated on a period-by-period basis for each MRP-defined time bucket. The requirement generation uses the planning fence rule to determine what sources of demand to consider for a given duration.
The example is based on a G planning fence rule of 20 days. The greater than rule will be applied on a period-by-period basis within the planning fence duration.
Sources of Demand Week 1 Week 2 Week 3 Week 4 Week 5 Week 6
Forecast 100 100 100 100 100 100
Sales Orders 300 200
PLO 300 100 100 100 100 100
Requirements Planning Outputs
3-8 JD Edwards EnterpriseOne Applications Requirements Planning Implementation Guide
This MRP period-by-period comparison would be more pronounced if the MRP time buckets were in days and the rule duration remained at 20 days.
Note: The planning time-fence duration should approximate the replenishment lead time of the item.
3.4.3.2 Time Fence Rules for DRP, MRP, and MPS (UDC 34/TF)Time fences are points of time at which you can make changes to either policy or operating procedures. The system uses 34/TF as the UDC for time fence rules.
For example, you can use a time fence rule for planning that calculates an ending available amount that is based on the greater of forecast or customer demand. For rules C and G, this situation means that the forecast is reduced by the amount of the customer demand on that same time bucket. The system displays all adjusted and unadjusted values. In the table, this applies to rules C, G, and H.
JD Edwards EnterpriseOne software uses the time fence rules for planning:
Rule Description 1 Description 2 Uses
Rule C Customer demand Whichever is greater: forecast or customer demand
Rule C is commonly used for make-to-order, assemble-to-order, and engineer-to-order items.
Rule F Forecast Forecast plus customer demand
Rule F is commonly used for make-to-stock items for which forecast in Description 2 is insufficient for total demand or business policy supports the building of inventory due to volatile demand.
Rule G Whichever is greater: forecast or customer demand
Forecast Rule G is the default.
Rule G is commonly used for make-to-stock items with accurate forecast. Description 1 in Rule G provides a hedge to prevent lost sales or backorders.
Rule H Whichever is greater: forecast or customer demand
NA When you use planning fence Rule H, you should set the Planning Fence field on the Manufacturing Data tab on the Additional System Information form in the Item Master program to 999.
Rule H is commonly used for make-to-stock items, and it is used for forecast consumption. Forecast consumption enables you to plan for the entire planning horizon.
Rule S Customer Demand Forecast Rule S is commonly used for make-to-order, assemble-to-order, and engineer-to-order items. Similar to Rule C, Rule S does not take customer demand into consideration for Description 2.
Requirements Planning Outputs
Understanding Requirements Planning Concepts 3-9
3.4.4 Time Series CalculationsThe time series represents the proposed master schedule. Review the time series to decide whether to accept or override the planning that the system suggests.
Requirements Planning provides three time series calculations:
■ Ending available.
■ Available to promise.
■ Cumulative available to promise.
3.4.4.1 Ending Available CalculationEnding Available (EA) is the amount of product that is available at the end of a time bucket after the system calculates the effect of all supplies and all demands for the time bucket. The system uses the planning time-fence rule and the calculation to calculate the ending available amount:
■ Add within the time bucket.
■ Calculate Beginning Available (+BA):
– For the first time period, +BA = quantity on hand − safety stock.
– For remaining time periods, +BA = ending available from the previous time period (=EA).
■ Subtract according to the planning time fence rule:
– Forecast (-FCST).
– Customer demand (sales orders and interplant demand).
■ Equals ending available (EA).
The following table displays how the system calculates the amount of product that is available at the end of a time period. Assume that the order policy code equals lot for lot, safety stock equals 20, time fence rule for planning equals C, and lead time equals 1. The planning fence is between periods 4 and 5.
For example:
On hand (80) − safety (20) = Period 1 + BA (60)
Rule 1 Zero Forecast Rule 1 is used when you have constraints on the shop floor that dictate the workload. Neither forecast nor customer is considered in Description 1.
Rule 3 Zero Forecast plus customer demand
Rule 3 is similar to Rule 1; but Rule 3 is used for schedule constraints, and forecast is typically lower than total demand.
Note: With time fence rules C, G, and H, you can use the forecast consumption by customer functionality if you want to calculate net demand for an individual customer.
Rule Description 1 Description 2 Uses
Requirements Planning Outputs
3-10 JD Edwards EnterpriseOne Applications Requirements Planning Implementation Guide
Period 1 + BA (60) − S0(20) = EA (40)
Product Period Period Period Period Period Period Period Period
On Hand = 80
1 2 3 4 5 6 7 8
+BA 60 40 25 25 0 0 0 0
–FCST 20 20 20 20 20 20 20 20
–SO 20 15 40 45
=EA 40 25 25 0 0 0 0 0
+DRP 15 20 20 45 20
(order start)
15 20 20 45 20
3.4.4.2 Available to Promise CalculationAvailable to promise (ATP) is the uncommitted portion of a company's inventory or planned acquisitions. You use this amount to accurately promise customer orders. As long as manufacturing produces according to the MPS and sales makes commitments according to the ATP information, this method increases customer service and reduces inventory carrying cost.
ATP uses actual customer orders to identify inventory that can be promised to a customer. The time fence rule for planning has no effect on ATP. Forecast is never included in ATP calculations.
The system calculates the ATP quantity like this:
■ First period ATP = on-hand balance − safety stock + work orders + purchase orders + planned orders − sales orders − work order parts list demand − interplant demand − unconsumed lot quantities that are expired.
■ After the first period, ATP = work orders + purchase orders + planned orders − sales orders − work order parts list demand − interplant demand − unconsumed lot quantities that are expired.
The system does not display negative ATP for the next periods. However, the system reduces the CATP by the negative amount.
3.4.4.3 Cumulative Available to Promise CalculationCumulative available to promise (CATP) is a running total of the ATP.
For new products or seasonal products, building inventory might be part of the management strategy. In these cases, sales and marketing might not be expected to sell within the replenishment buckets. The bulk of sales might not be in the near future.
The system calculates CATP like this:
■ First period CATP = beginning available + replenishment − sum of customer orders and parent demand before the next replenishment.
■ After the first period, CATP = CATP from last period + replenishment − sum of customer orders and parent demand before the next replenishment.
CATP does not assume complete depletion. Rather, the system continues to add inventory.
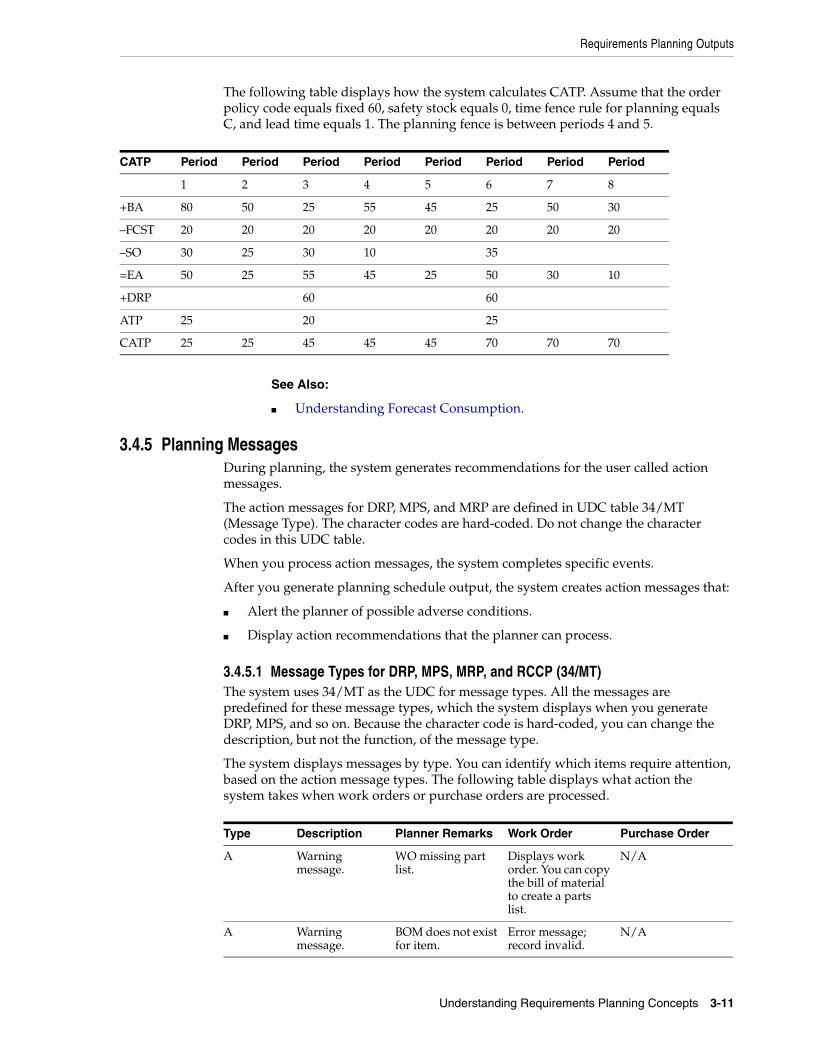
Requirements Planning Outputs
Understanding Requirements Planning Concepts 3-11
The following table displays how the system calculates CATP. Assume that the order policy code equals fixed 60, safety stock equals 0, time fence rule for planning equals C, and lead time equals 1. The planning fence is between periods 4 and 5.
CATP Period Period Period Period Period Period Period Period
1 2 3 4 5 6 7 8
+BA 80 50 25 55 45 25 50 30
–FCST 20 20 20 20 20 20 20 20
–SO 30 25 30 10 35
=EA 50 25 55 45 25 50 30 10
+DRP 60 60
ATP 25 20 25
CATP 25 25 45 45 45 70 70 70
See Also:
■ Understanding Forecast Consumption.
3.4.5 Planning MessagesDuring planning, the system generates recommendations for the user called action messages.
The action messages for DRP, MPS, and MRP are defined in UDC table 34/MT (Message Type). The character codes are hard-coded. Do not change the character codes in this UDC table.
When you process action messages, the system completes specific events.
After you generate planning schedule output, the system creates action messages that:
■ Alert the planner of possible adverse conditions.
■ Display action recommendations that the planner can process.
3.4.5.1 Message Types for DRP, MPS, MRP, and RCCP (34/MT)The system uses 34/MT as the UDC for message types. All the messages are predefined for these message types, which the system displays when you generate DRP, MPS, and so on. Because the character code is hard-coded, you can change the description, but not the function, of the message type.
The system displays messages by type. You can identify which items require attention, based on the action message types. The following table displays what action the system takes when work orders or purchase orders are processed.
Type Description Planner Remarks Work Order Purchase Order
A Warning message.
WO missing part list.
Displays work order. You can copy the bill of material to create a parts list.
N/A
A Warning message.
BOM does not exist for item.
Error message; record invalid.
N/A
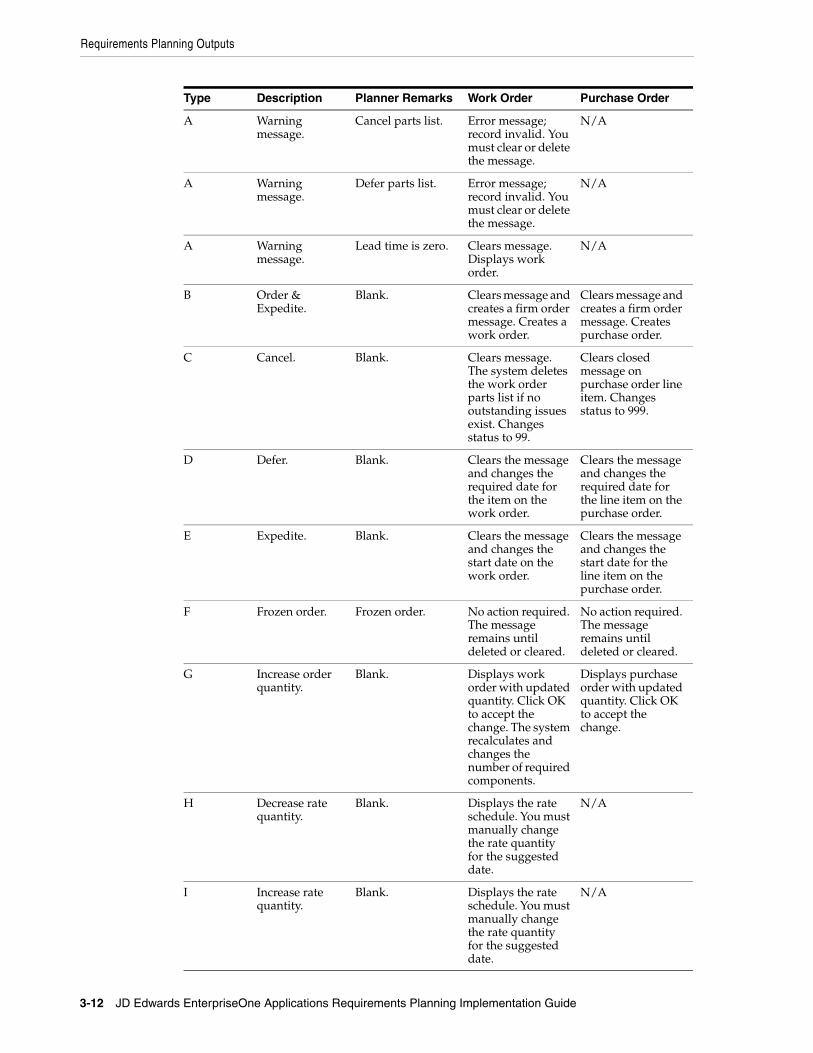
Requirements Planning Outputs
3-12 JD Edwards EnterpriseOne Applications Requirements Planning Implementation Guide
A Warning message.
Cancel parts list. Error message; record invalid. You must clear or delete the message.
N/A
A Warning message.
Defer parts list. Error message; record invalid. You must clear or delete the message.
N/A
A Warning message.
Lead time is zero. Clears message. Displays work order.
N/A
B Order & Expedite.
Blank. Clears message and creates a firm order message. Creates a work order.
Clears message and creates a firm order message. Creates purchase order.
C Cancel. Blank. Clears message. The system deletes the work order parts list if no outstanding issues exist. Changes status to 99.
Clears closed message on purchase order line item. Changes status to 999.
D Defer. Blank. Clears the message and changes the required date for the item on the work order.
Clears the message and changes the required date for the line item on the purchase order.
E Expedite. Blank. Clears the message and changes the start date on the work order.
Clears the message and changes the start date for the line item on the purchase order.
F Frozen order. Frozen order. No action required. The message remains until deleted or cleared.
No action required. The message remains until deleted or cleared.
G Increase order quantity.
Blank. Displays work order with updated quantity. Click OK to accept the change. The system recalculates and changes the number of required components.
Displays purchase order with updated quantity. Click OK to accept the change.
H Decrease rate quantity.
Blank. Displays the rate schedule. You must manually change the rate quantity for the suggested date.
N/A
I Increase rate quantity.
Blank. Displays the rate schedule. You must manually change the rate quantity for the suggested date.
N/A
Type Description Planner Remarks Work Order Purchase Order
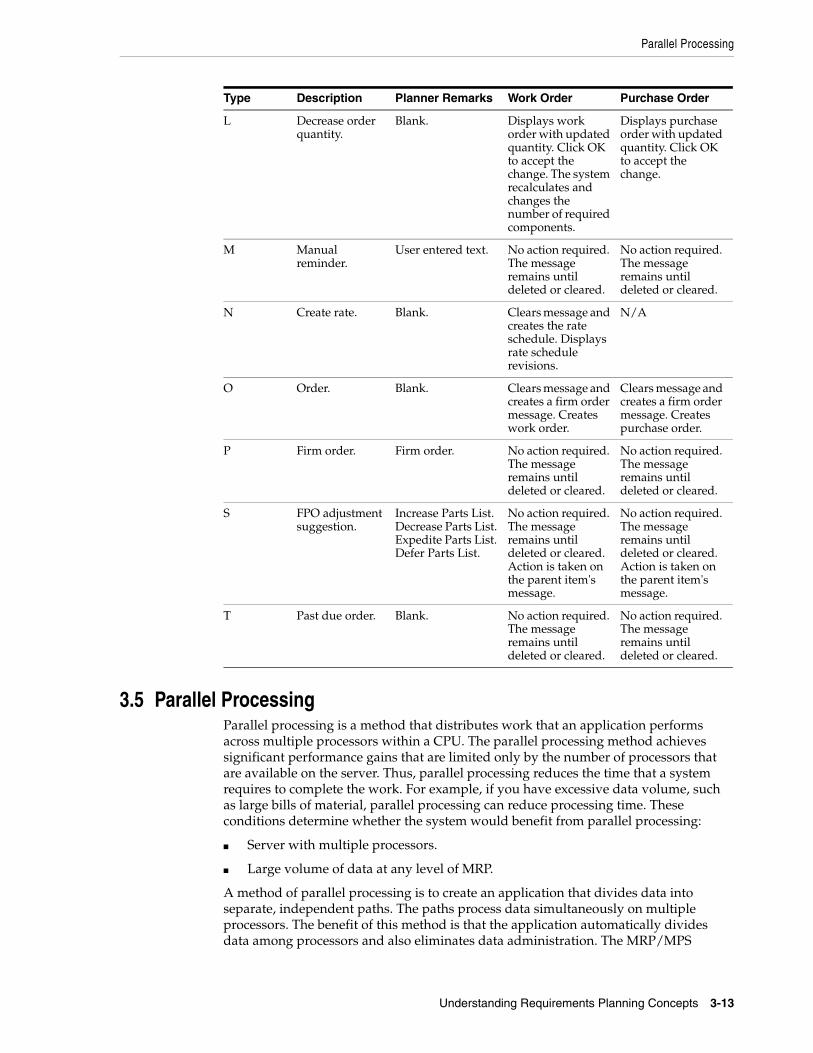
Parallel Processing
Understanding Requirements Planning Concepts 3-13
3.5 Parallel ProcessingParallel processing is a method that distributes work that an application performs across multiple processors within a CPU. The parallel processing method achieves significant performance gains that are limited only by the number of processors that are available on the server. Thus, parallel processing reduces the time that a system requires to complete the work. For example, if you have excessive data volume, such as large bills of material, parallel processing can reduce processing time. These conditions determine whether the system would benefit from parallel processing:
■ Server with multiple processors.
■ Large volume of data at any level of MRP.
A method of parallel processing is to create an application that divides data into separate, independent paths. The paths process data simultaneously on multiple processors. The benefit of this method is that the application automatically divides data among processors and also eliminates data administration. The MRP/MPS
L Decrease order quantity.
Blank. Displays work order with updated quantity. Click OK to accept the change. The system recalculates and changes the number of required components.
Displays purchase order with updated quantity. Click OK to accept the change.
M Manual reminder.
User entered text. No action required. The message remains until deleted or cleared.
No action required. The message remains until deleted or cleared.
N Create rate. Blank. Clears message and creates the rate schedule. Displays rate schedule revisions.
N/A
O Order. Blank. Clears message and creates a firm order message. Creates work order.
Clears message and creates a firm order message. Creates purchase order.
P Firm order. Firm order. No action required. The message remains until deleted or cleared.
No action required. The message remains until deleted or cleared.
S FPO adjustment suggestion.
Increase Parts List. Decrease Parts List. Expedite Parts List. Defer Parts List.
No action required. The message remains until deleted or cleared. Action is taken on the parent item's message.
No action required. The message remains until deleted or cleared. Action is taken on the parent item's message.
T Past due order. Blank. No action required. The message remains until deleted or cleared.
No action required. The message remains until deleted or cleared.
Type Description Planner Remarks Work Order Purchase Order
Parallel Processing
3-14 JD Edwards EnterpriseOne Applications Requirements Planning Implementation Guide
Requirements Planning program and the Master Planning Schedule - Multiple Plant program use this method of parallel processing.
When you run the parallel processing versions of the MRP/MPS Requirements Planning and Master Planning Schedule - Multiple Plant programs, you plan items concurrently within the same low-level code because the items do not depend on each other. The system processes items with a low-level code that equals 1. The system processes all of the items at the current level before it can process any items at the next level: current level + 1. The system repeats this process until it has processed all of the items. Also, if a server has multiple processors, you can plan multiple items concurrently with the same low-level codes.
Parallel processing uses the software's subsystem capabilities to run multiple copies of a batch program. The system provides a unique subsystem version of a Universal Batch Engine (UBE) that enables you to specify the number of available processors on the server. When the system runs the batch program, preprocessing fills the subsystem table and begins the subsystem jobs. The jobs run the same version of the application and access the same processing option values. Each record in the subsystem table contains data that the system passes to a report. Each subsystem job processes records from the same table, one at a time. After the system processes all of the records, the system terminates the subsystem jobs.
The system has several applications that parallel processing supports. To use the parallel processing versions, you must perform these tasks:
■ Indicate the maximum number of the same subsystem jobs that the system can process at the same time.
Add or modify the value, UBESubsystemLimit=N, in the UBE section of the jde.ini file.
N represents the maximum number of similar subsystem jobs.
■ Set up multithreaded job queues.
Note: Technical support must complete standard tasks in system setup before you can perform the parallel processing method.
The MRP/MPS Requirements Planning and Master Planning Schedule - Multiple Plant programs have a processing option, Number of Subsystem Jobs, on the Parallel tab that indicates how many concurrent jobs can process the MRP data. You must use subsystem parallel versions that are specifically designed for parallel processing.
Important: You should not run more than one version of MRP at a time.
See Also:
■ JD Edwards EnterpriseOne Tools Runtime Administration Guide
4
Setting Up Requirements Planning 4-1
4Setting Up Requirements Planning
This chapter contains the following topics:
■ Section 4.1, "Understanding the Setup Requirements for Requirements Planning"
■ Section 4.2, "Setting Up Supply and Demand Inclusion Rules"
■ Section 4.3, "Setting Up Inventory Management for Requirements Planning"
■ Section 4.4, "Setting Up Quantity Type Subsets"
■ Section 4.5, "Setting Up Multifacility Planning"
■ Section 4.6, "Setting Up Forecast Consumption"
■ Section 4.7, "Setting Up Process Planning"
4.1 Understanding the Setup Requirements for Requirements PlanningYou must complete setup tasks to define the information that the system uses prior to using material and capacity planning. You set up information in JD Edwards EnterpriseOne Inventory Management, JD Edwards EnterpriseOne Product Data Management, JD Edwards EnterpriseOne Shop Floor Management, JD Edwards EnterpriseOne Sales Order Management, and JD Edwards EnterpriseOne Requirements Planning.
Setup includes such tasks as defining user-defined codes (UDCs), order policy rules, and supply and demand inclusion rules. Requirements Planning uses setup information to determine how to select and display data.
To successfully create a single-level plan for Master Production Scheduling (MPS) or Distribution Requirements Planning (DRP), you must verify certain system setups.
You must verify that the Planning Code field on the Additional System Info form in the Item Branch program (P41026) is set to a value of 1. This setting indicates that the item is planned by MPS and DRP.
Verify that the Generation Type field on the Parameters tab in the MRP/MPS Requirements Planning program (R3482) is set to a value of 1. The generation types enable you to develop a strategy for the different planning levels for the items. A setting of 1 indicates that the system generates a single-level MPS or DRP plan.
For a single-level DRP run, you must set the Purchase Orders field on the Document Types tab in the MRP/MPS Requirements Planning program with the appropriate document type. This type is generally OP.
For a single-level MPS run, you must set both the Purchase Orders field and the Work Orders field on the Document Types tab in the MRP/MPS Requirements Planning
Setting Up Supply and Demand Inclusion Rules
4-2 JD Edwards EnterpriseOne Applications Requirements Planning Implementation Guide
program with the appropriate document type. These fields are generally set to OP and WO, respectively.
You must also set up the supply and demand inclusion rules. The system processes the supply and demand to include document types, line types, and status codes per the setup. DRP creates only purchase order messages while MPS creates both purchase order and work order messages.
When the supply and demand inclusion rules are set up, you must enter the rule version in the Version of Supply/Demand Inclusion Rules field on the Parameters tab in the MRP/MPS Requirements Planning program.
You set up quantity types that are specific to DRP and MPS. Quantity types are predefined codes that define the display of data on the time series in time-phased buckets. You might want to set up your own quantity types because DRP does not need to see codes for work orders, whereas MPS includes codes for work orders. The DRP quantity types are defined in UDC table 34/DR, and the MPS quantity types are defined in UDC table 34/MS.
4.2 Setting Up Supply and Demand Inclusion RulesThis section provides an overview of supply and demand inclusion rules and discusses how to:
■ Set processing options for Supply/Demand Inclusion Rules (P45004).
■ Set up supply and demand inclusion rules.
4.2.1 Understanding Supply and Demand Inclusion RulesYou set up supply and demand inclusion rules to define what order type, line type, and line status combinations should be considered as supply or demand for various planning calculations.
Select each record that includes the order type and line status for which you want the inclusion rules to apply, and click Select.
For example, a purchase order for a stock item that has already been received, (Order Type equals OP, Line Type equals S, Line Status equals 999) should not be included as supply because the quantity on the purchase order is already in inventory.
A sales order for a stock item that is waiting for a pick slip to be printed (Order Type equals SO, Line Type equals S, Line Status equals 540) should be included as demand because the items have not been picked from inventory yet.
When you apply inclusion rules to work order documents, line types do not appear. Line types are not applicable to the JD Edwards EnterpriseOne Work Order system from Oracle.
4.2.2 Form Used to Set Up Supply and Demand Inclusion Rules
Form Name FormID Navigation Usage
Work With Supply/Demand Inclusion Rules
W34004A Material Planning Setup (G3442), Supply/Demand Inclusion Rules
Set up supply and demand inclusion rules.
Select the order type, line type, and line status for which you want the inclusion rule to apply.

Setting Up Inventory Management for Requirements Planning
Setting Up Requirements Planning 4-3
4.2.3 Setting Processing Options for Supply/Demand Inclusion Rules (P34004)One processing option exists for Supply/Demand Inclusion Rules, which enables you to specify the work order type.
4.2.3.1 WO Types
Work Order Document TypesSpecify the work order document types for the inclusion rules. These can be stacked one on top of another for multiple document types. If you leave this processing option blank, WO will be used.
4.2.4 Setting Up Supply and Demand Inclusion RulesAccess the Work With Supply/Demand Inclusion Rules form.
Rule VersionEnter a UDC (40/RV) that identifies an inclusion rule that you want the system to use for this branch/plant. JD Edwards EnterpriseOne Manufacturing from Oracle and JD Edwards EnterpriseOne Warehouse Management from Oracle use inclusion rules in this way:
■ For JD Edwards EnterpriseOne Manufacturing:
Enable multiple versions of resource rules for running MPS, MRP, or DRP.
■ For JD Edwards EnterpriseOne Warehouse Management:
Enable multiple versions of inclusion rules for running putaway and picking. The system processes only those order lines that match the inclusion rule for a specified branch/plant.
Complete this field to locate the status values for the inclusion code.
Skip to Order TypeEnter a UDC (00/DT) that identifies the type of document. This code also indicates the origin of the transaction. The system has reserved document type codes for vouchers, invoices, receipts, and time sheets, which create automatic offset entries during the post program. (These entries are not self-balancing when you originally enter them.)
These document types are defined in the system and should not be changed:
P: Accounts Payable.
R: Accounts Receivable.
T: Payroll.
I: Inventory.
O: Purchase Order Processing.
J: General Accounting/Joint Interest Billing.
S: Sales Order Processing.
4.3 Setting Up Inventory Management for Requirements PlanningWhen you set up the item master and branch/plant information, you provide JD Edwards EnterpriseOne Requirements Planning with the information that it needs to create accurate master schedules, material requirements plans, and distribution
Setting Up Inventory Management for Requirements Planning
4-4 JD Edwards EnterpriseOne Applications Requirements Planning Implementation Guide
requirements plans. JD Edwards EnterpriseOne Requirements Planning uses the values in these fields:
■ Stocking Type
■ Planner Number
■ Buyer Number
■ Supplier
■ Lot Process Type
■ Master Planning Family
■ Category Code
■ Unit of Measure
■ Order Policy Code
■ Value Order Policy
■ Planning Code
■ Planning Fence Rule
■ Planning Fence
■ Freeze Fence
■ Message Display Fence
■ Time Basis
■ Shrink Factor
■ Leadtimes
■ Reorder Quantities
When the items are defined in the Item Master program (P4101), you can further define the items at the branch/plant level using the Item Branch program.
Use the Item Branch program to specify information for each item. This information is critical to JD Edwards EnterpriseOne Requirements Planning:
4.3.1 Stocking TypeIn the distribution systems, the stocking type for each item typically identifies how you stock the item. However, the planning system uses the second description and the special handling code in the stocking type UDC table definition (41/I) to determine whether the item is a manufactured, purchased, processed, or project-specific item.
4.3.2 Order Policy RulesYou must set up order policy rules to control how the planning system calculates dates and quantities. The order policy rules that you set up are:
Planning CodeEnter a code that the system uses to process the item when running the MRP/MPS Requirements Planning and Master Planning Schedule - Multiple Plant (R3483) programs. Use planning code 1, 2, or 3 for single-level or multilevel master scheduling. Use planning codes 4 and 5 for forecasting with a planning bill.
Setting Up Quantity Type Subsets
Setting Up Requirements Planning 4-5
Order Policy CodeEnter a code that the system uses to designate the rule for reordering inventories, including fixed-order quantity, lot for lot, and number of days supplied.
Order Policy ValueEnter a value that the system uses with order policy codes 1, 2, 4, and 5. For example, purchasing a 90-day supply of V-8 engines requires that the order policy code is set to 4 and the order policy value equals 90.
4.3.3 Lead TimesYou must set up lead times for items. You must set the lead time for phantom items to zero so that the parent-planned orders are recorded directly to the options as a gross requirement without being offset by the lead time. The system multiplies the planned orders by the feature planning percentage before placing the planned orders as component gross requirements.
See Also:
■ "Entering Item Master Information" in the JD Edwards EnterpriseOne Applications Inventory Management Implementation Guide.
■ "Entering Branch, Plant Information" in the JD Edwards EnterpriseOne Applications Inventory Management Implementation Guide.
4.4 Setting Up Quantity Type SubsetsYou should not change the 34/QT UDC table; however, you can create a subset or a custom quantity type UDC table. Because companies like to make decisions about what quantity types appear on the time series, creating a custom quantity type UDC table gives them flexibility. For example, a distribution warehouse does not want to see the quantity types for work orders.
The software provides multiple subsets of the UDC 34/QT, for example, 34/DR for Distribution Requirement Plan (DRP) and 34/MS for Master Production Schedule (MPS).
For the system to access UDC 34/QT during DRP, MPS, or Material Requirements Planning (MRP) generation, you must set the UDC Type field on the Parameters tab in the processing options for the MRP/MPS Requirements Planning and Master Planning Schedule - Multiple Plant programs. Setting this processing option with a value of QT enables the planning system to use all of the available data and create a time series for every transaction that it is capable of making.
You can use the custom UDC 34/DR or 34/MS quantity types by setting the Alternate UDC Type (Optional) field on the Defaults tab in the processing options for the MPS Time Series program (P3413). You can then use the Alternate Quantity Type option on the Work With Time Series form to determine which UDC quantity types you view in the time series.
4.4.1 Distribution Requirement Plan Quantity Type (34/DR)The system uses 34/DR as the UDC for DRP quantity types. Quantity types are predefined codes that define the display data on the time series screens and reports that use the MPS/MRP/DRP Summary File table (F3413).
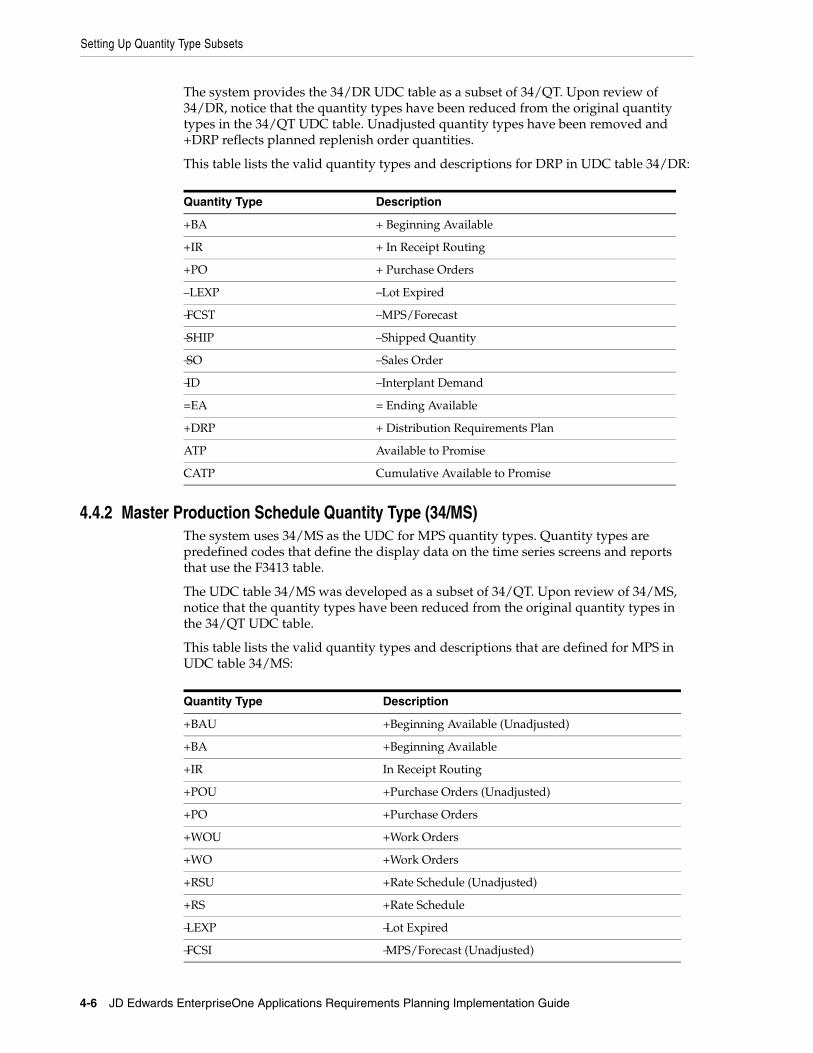
Setting Up Quantity Type Subsets
4-6 JD Edwards EnterpriseOne Applications Requirements Planning Implementation Guide
The system provides the 34/DR UDC table as a subset of 34/QT. Upon review of 34/DR, notice that the quantity types have been reduced from the original quantity types in the 34/QT UDC table. Unadjusted quantity types have been removed and +DRP reflects planned replenish order quantities.
This table lists the valid quantity types and descriptions for DRP in UDC table 34/DR:
Quantity Type Description
+BA + Beginning Available
+IR + In Receipt Routing
+PO + Purchase Orders
–LEXP − Lot Expired
−FCST − MPS/Forecast
−SHIP − Shipped Quantity
−SO − Sales Order
−ID − Interplant Demand
=EA = Ending Available
+DRP + Distribution Requirements Plan
ATP Available to Promise
CATP Cumulative Available to Promise
4.4.2 Master Production Schedule Quantity Type (34/MS)The system uses 34/MS as the UDC for MPS quantity types. Quantity types are predefined codes that define the display data on the time series screens and reports that use the F3413 table.
The UDC table 34/MS was developed as a subset of 34/QT. Upon review of 34/MS, notice that the quantity types have been reduced from the original quantity types in the 34/QT UDC table.
This table lists the valid quantity types and descriptions that are defined for MPS in UDC table 34/MS:
Quantity Type Description
+BAU +Beginning Available (Unadjusted)
+BA +Beginning Available
+IR In Receipt Routing
+POU +Purchase Orders (Unadjusted)
+PO +Purchase Orders
+WOU +Work Orders
+WO +Work Orders
+RSU +Rate Schedule (Unadjusted)
+RS +Rate Schedule
−LEXP −Lot Expired
−FCSI −MPS/Forecast (Unadjusted)
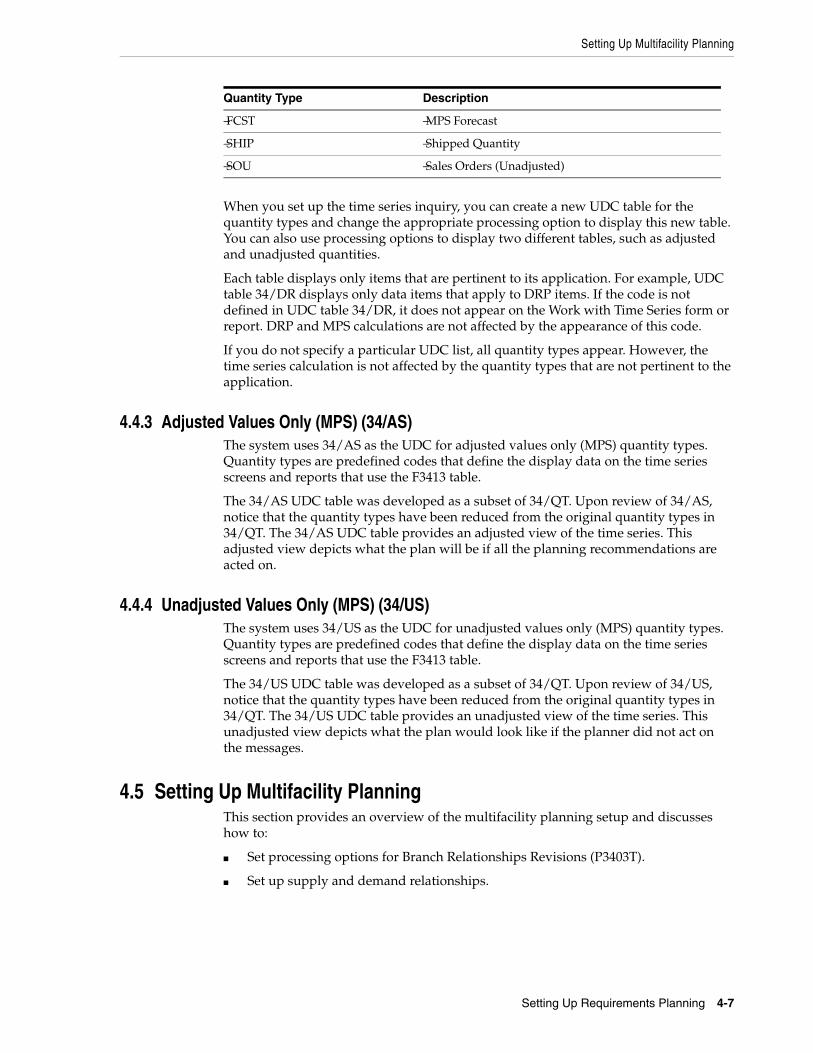
Setting Up Multifacility Planning
Setting Up Requirements Planning 4-7
When you set up the time series inquiry, you can create a new UDC table for the quantity types and change the appropriate processing option to display this new table. You can also use processing options to display two different tables, such as adjusted and unadjusted quantities.
Each table displays only items that are pertinent to its application. For example, UDC table 34/DR displays only data items that apply to DRP items. If the code is not defined in UDC table 34/DR, it does not appear on the Work with Time Series form or report. DRP and MPS calculations are not affected by the appearance of this code.
If you do not specify a particular UDC list, all quantity types appear. However, the time series calculation is not affected by the quantity types that are not pertinent to the application.
4.4.3 Adjusted Values Only (MPS) (34/AS)The system uses 34/AS as the UDC for adjusted values only (MPS) quantity types. Quantity types are predefined codes that define the display data on the time series screens and reports that use the F3413 table.
The 34/AS UDC table was developed as a subset of 34/QT. Upon review of 34/AS, notice that the quantity types have been reduced from the original quantity types in 34/QT. The 34/AS UDC table provides an adjusted view of the time series. This adjusted view depicts what the plan will be if all the planning recommendations are acted on.
4.4.4 Unadjusted Values Only (MPS) (34/US)The system uses 34/US as the UDC for unadjusted values only (MPS) quantity types. Quantity types are predefined codes that define the display data on the time series screens and reports that use the F3413 table.
The 34/US UDC table was developed as a subset of 34/QT. Upon review of 34/US, notice that the quantity types have been reduced from the original quantity types in 34/QT. The 34/US UDC table provides an unadjusted view of the time series. This unadjusted view depicts what the plan would look like if the planner did not act on the messages.
4.5 Setting Up Multifacility PlanningThis section provides an overview of the multifacility planning setup and discusses how to:
■ Set processing options for Branch Relationships Revisions (P3403T).
■ Set up supply and demand relationships.
−FCST −MPS Forecast
−SHIP −Shipped Quantity
−SOU −Sales Orders (Unadjusted)
Quantity Type Description
Setting Up Multifacility Planning
4-8 JD Edwards EnterpriseOne Applications Requirements Planning Implementation Guide
4.5.1 Understanding the Multifacility Planning SetupYou set up multifacility planning to track supply, demand, and movement of material among the individual facilities of the enterprise. Multifacility planning provides a flexible method for planning supply-and-resupply activities.
In multifacility planning, you must set up a table of supply-and-demand relationships among the facilities. The system uses these relationships to generate and maintain multifacility plans.
Set up supply-and-demand relationships for any level of detail that you select, including:
■ Branch/plant
■ Product group
■ Master planning family
■ Individual item number
This approach enables you to maintain supply-and-demand relationships in one central location and reduce inventory errors that are caused by complex facility relationships. In addition, when you set up supply-and-demand relationships, you can use these optional features:
■ Markup
You can have the system automatically mark up the cost of an item when you create a transfer order. The system can adjust the cost by a fixed amount or percentage.
■ Availability checking
You can ensure that the branch from which you are ordering has enough inventory in stock to fill the order. If the required quantity is not available, the system checks subsequent facilities in the sequence that you define.
■ Effectivity dates
Use effectivity dates to control the demands that are placed on the supply branches. If an effectivity date that was assigned to a supply branch has expired, the system checks for another facility.
The MRP, DRP, and MPS versions of the Branch Relationships Revisions program use the same processing options. You can vary the settings in the processing options to accommodate the different requirements for a material requirements plan.
Important: When you delete a supply-and-demand relationship, the system deletes the entire record.
Setting Up Multifacility Planning
Setting Up Requirements Planning 4-9
4.5.2 Form Used to Set Up Multifacility Planning
Form Name FormID Navigation Usage
Branch Relationship Revisions
W3403TC Multi-Facility Setup (G3443), Branch Relationships Revisions
On Work With Branch Relationships, click Add.
Define which branch/plants, product group, planning family, and item are included or excluded in generating a multifacility planning schedule.
4.5.3 Setting Processing Options for Branch Relationships Revisions (P3403T)You must set this processing option to ensure that the level of the component branch is one level higher than the header for the source branch. The branch level on the Defaults tab, along with the branch priority, determines the sequence in which the system processes supply-and-demand plants. The system processes the branches with the highest numerical branch levels first.
4.5.3.1 DefaultsUse these processing options to specify the default settings for branch relationship revisions.
1. Enter the default Branch Relationship display mode. Specify the default mode for the branch/plant.
D: Demand branch
S: Supply branch
2. Branch Level updateSpecify the update to the branch.
Enter 1 to automatically update the Branch Level field.
4.5.4 Setting Up Supply and Demand RelationshipsAccess the Branch Relationship Revisions form.
Item NumberEnter an item number to display all branch/plants that either supply or demand a certain part.
Planning Family Enter the planning family to display all branch/plants that either supply or demand parts that belong to a specific master planning family.
Branch LevelEnter the level at which a component branch should be processed in multiplant processing. The lowest-level branches (which are assigned a higher numerical value) are processed first, followed by the higher-level branches (which are assigned a lower numerical value).
Note: Assign branch levels carefully so that the planning system generates all demand before allocating supply.
Setting Up Multifacility Planning
4-10 JD Edwards EnterpriseOne Applications Requirements Planning Implementation Guide
Branch PriorityEnter a value to determine the sequence within a level in which the branches are processed in multiplant DRP/MPS/MRP. Use this field along with the Branch Level field to check inventory availability first in one branch, and then another.
Include/ ExcludeEnter a code that indicates whether the system includes or excludes the item/category code in the Branch Relationships Master table (F3403) when generating a multiplant schedule. If an item/category code is excluded, then that item/category code will be purchased or manufactured at the demand branch.
Some parts might come from certain branch/plants. In multifacility planning, if Exclude is selected, then the item is supplied by the demand branch only.
Transfer LeadtimeEnter the number of days to ship items from the supply branch to the demand branch.
This lead time is set up in the Branch Relationships Master table and can vary for different category codes or even for different items.
Effective FromEnter a date that indicates:
■ When a component part goes into effect on a bill of material.
■ When a rate schedule is in effect.
The default is the current system date.
You can enter future effective dates so that the system plans for upcoming changes. Items that are no longer effective in the future can still be recorded and recognized in JD Edwards EnterpriseOne Product Costing from Oracle, JD Edwards EnterpriseOne Shop Floor Management, and Capacity Requirements Planning. Material Requirements Planning determines valid components by effectivity dates, not by the bill-of-material revision level. Some forms display data based on the effectivity dates that you enter.
The default date comes from the bill of material.
Source PercentEnter an amount as a percent. The system uses source percentage to determine what percentage of the planned order should be supplied by the source branch.
For example:
Demand Branch − ATL
Supply Branch − DEN source percentage = 40 percent, CHI source percentage = 60 percent
If ATL needs 100 parts, the system generates a message to transfer 40 parts from DEN and 60 parts from CHI.
A source percentage of 100 transfers the entire supply from that branch/plant.
Availability CheckSpecify whether the planning system checks availability of the item or family at the supply branch/plant. If you enable availability checking on the item or family that is being demanded, the available inventory at the branch/plant is committed until a zero balance results. If you disable availability checking, the inventory balance in the supplying branch/plant can be negative.
Setting Up Forecast Consumption
Setting Up Requirements Planning 4-11
Percent To FillEnter a value that is used during multiplant processing to determine what percent of an order should be filled to place a transfer order message. For example:
■ Percent to Fill: 75 percent
■ Demand: 200
■ If the supply branch has 150 (75 percent of 200) or more available, then the planning system places the transfer order message.
The system generates the transfer order message when the percent to fill is zero.
This amount of the source percent must be available to be filled by this branch/plant. The percent of demand should be filled to place a transfer order message. A transfer order is generated if Availability Check is on.
4.6 Setting Up Forecast ConsumptionThis section provides overviews of the forecast consumption setup and the customer address relationship setup, lists prerequisites, and discusses how to:
■ Set up forecast consumption periods.
■ Define customer address relationships.
4.6.1 Understanding the Forecast Consumption SetupYou set up forecast consumption periods to identify a period of time in which forecasts are consumed by sales orders. The system stores this information in the Forecast Consumption Periods table (F3405).
You define the end date for each forecast consumption period on the Work With Forecast Consumption Revisions form. The periods apply system-wide. You cannot have different forecast consumption periods for different locations or branch/plants.
The system adds the forecast consumption periods to the number of time series periods that you specified in the processing options for the MRP/MPS Requirements Planning program. The total for all time periods cannot exceed 52.
Note: You are not confined to entering forecast in the same period patterns as the consumption periods. For example, you can have weekly forecasts to smooth the demand while having a monthly consumption period.
You must set up the Planning Fence field on the Additional System Information form, Plant Manufacturing tab with a value that is beyond the end of the planning horizon (a planning fence of 999 is recommended). If you do not set the planning fence beyond the planning horizon, the batch planning programs (DRP/MPS/MRP Regeneration and Net Change) do not work properly.
4.6.2 Understanding the Customer Address Relationship SetupTo use the forecast consumption by customer functionality, you have to be able to match forecast and sales order records by a common customer number. Because sales orders have two applicable address book numbers, sold to and ship to, you have to define which number the system uses to match a sales order to a forecast.
Setting Up Forecast Consumption
4-12 JD Edwards EnterpriseOne Applications Requirements Planning Implementation Guide
You can use the Forecast Consumption Customer Address Relationship program (P3406) to define whether the system uses the sold-to or the ship-to address when searching for sales orders. You can set up the relationship for the customer only, or you can set it up for a combination of item and customer.
When running MRP/MPS Requirements Planning or Master Planning Schedule - Multiple Plant, you can set a processing option that determines whether the system uses the sold-to or the ship-to number to search for sales orders. This processing option is used if no customer address relationship is set up in the F3406 table.
Note: You should use the processing option to provide a default value for the customer address relationship and use the Forecast Consumption Customer Address Relationship program to provide override information where necessary.
4.6.3 PrerequisitesBefore you complete the tasks in this section, verify that:
■ Planning fence rule H is in UDC 34/TF.
■ The order types in UDC 40/CF are included to support shipped-order calculations.
■ The −SHIP quantity type is in UDC 34/QT to calculate shipped orders quantity.
■ The order types in UDC 40/IU are included to update inventory (includes order type SO).
■ The Planning Fence Rule field on the Additional System Information form, Plant Manufacturing tab, is a value of H.
■ The Planning Fence field on the Additional System Information form, Plant Manufacturing tab, is a value beyond the end of the planning horizon.
■ The appropriate processing options are set in the MRP/MPS Requirements Planning program.
4.6.4 Forms Used to Set Up Forecast Consumption
Form Name FormID Navigation Usage
Work With Forecast Consumption Revisions
W3405A Material Planning Setup (G3442), Forecast Consumption Periods
Define the time series period for forecast consumption.
Forecast Consumption by Customer Address Relationship Revisions
W3406A Material Planning Setup (G3442), Work with Forecast Consumption by Customer Address Relationship
On Work With Forecast Consumption by Customer Address Relationship, click Add.
Define which customer number is used to match sales orders to forecast.
4.6.5 Setting Up Forecast Consumption PeriodsAccess the Work With Forecast Consumption Revisions form.
Setting Up Process Planning
Setting Up Requirements Planning 4-13
Period End DateEnter a date on which the defined forecast consumption period ends.
Period TypeEnter a type of record to be used in conjunction with Forecast Consumption. Values are:
FC: Forecast consumption period
TS: Time series bucket
4.6.6 Defining Customer Address RelationshipsAccess the Forecast Consumption by Customer Address Relationship Revisions form.
Customer NumberEnter a number that identifies an entry in Oracle's JD Edwards EnterpriseOne Address Book, such as employee, applicant, participant, customer, supplier, tenant, or location.
Item NumberEnter a number that identifies the item. The system provides three separate item numbers plus an extensive cross-reference capability to alternative item numbers. The three types of item numbers are:
■ Item Number (short): An 8-digit, computer-assigned item number.
■ 2nd Item Number: A 25-digit, user-defined, alphanumeric item number.
■ 3rd Item Number: Another 25-digit, user-defined, alphanumeric item number.
In addition to these three basic item numbers, the system provides an extensive cross-reference search capability. You can define numerous cross-references to alternative part numbers. For example, you can define substitute item numbers, replacements, bar codes, customer numbers, or supplier numbers.
Customer Address RelationshipEnter a value that specifies which address book number on a sales order the system uses to search for sales orders. Values are:
1: Ship To
2: Sold To
4.7 Setting Up Process PlanningThis section provides an overview of process planning setup, lists a prerequisite, and discusses how to set up the Co/By Products Planning Table.
4.7.1 Understanding Process Planning SetupYou use the Co-Product Planning/Costing Table program (P3404) to set up co-product and by-product processes for MRP/MPS Requirements Planning. The planning table specifies the percentage of the demand for co-products that is satisfied from a process work order, the percentage that is satisfied from process work orders, and the percentage that is satisfied from other sources.
You can also specify circumstances. For example, by entering 75 percent in the table, you specify that 75 percent of demand is satisfied from process work orders and the balance from other sources. The system automatically satisfies the balance, for example, by planning co-product work orders or creating purchase orders.
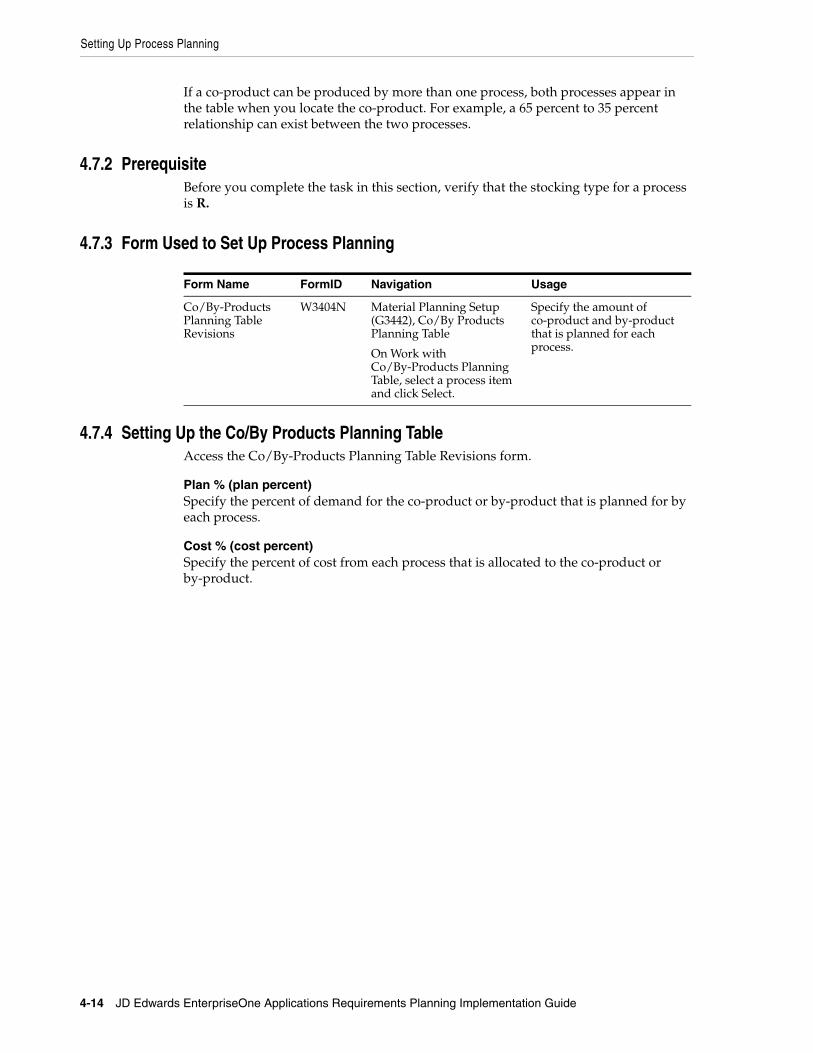
Setting Up Process Planning
4-14 JD Edwards EnterpriseOne Applications Requirements Planning Implementation Guide
If a co-product can be produced by more than one process, both processes appear in the table when you locate the co-product. For example, a 65 percent to 35 percent relationship can exist between the two processes.
4.7.2 PrerequisiteBefore you complete the task in this section, verify that the stocking type for a process is R.
4.7.3 Form Used to Set Up Process Planning
Form Name FormID Navigation Usage
Co/By-Products Planning Table Revisions
W3404N Material Planning Setup (G3442), Co/By Products Planning Table
On Work with Co/By-Products Planning Table, select a process item and click Select.
Specify the amount of co-product and by-product that is planned for each process.
4.7.4 Setting Up the Co/By Products Planning TableAccess the Co/By-Products Planning Table Revisions form.
Plan % (plan percent)Specify the percent of demand for the co-product or by-product that is planned for by each process.
Cost % (cost percent)Specify the percent of cost from each process that is allocated to the co-product or by-product.
5
Setting Up Capacity Planning 5-1
5Setting Up Capacity Planning
This chapter contains the following topics:
■ Section 5.1, "Understanding Setup Requirements for Capacity Planning"
■ Section 5.2, "Setting Up User-Defined Codes for Capacity Planning"
■ Section 5.3, "Setting Up Work Center Capacity Information"
■ Section 5.4, "Determining Available Capacity"
■ Section 5.5, "Generating Resource Profiles"
5.1 Understanding Setup Requirements for Capacity PlanningCapacity planning is the process of validating if you have sufficient resources to complete the requirements plan. Setting up capacity planning is the process of defining the available capacity and critical areas where capacity constraints exist.
5.1.1 PrerequisiteSet up the work centers and dispatch groups as business units.
See "Setting Up Business Unit Supplemental Data" in the JD Edwards EnterpriseOne Applications General Accounting Implementation Guide.
5.2 Setting Up User-Defined Codes for Capacity PlanningTo run capacity planning, you must set up the UDCs.
5.2.1 Capacity Requirements Planning Display (33/CR)The system uses 33/CR as the UDC for the capacity requirements planning display. Use the capacity requirements planning display to specify row descriptions for all Capacity Requirements Planning (CRP) forms and reports.
5.2.2 Rough Cut Capacity Planning Display (33/RC)The system uses 33/RC as the UDC for the rough cut capacity planning display. Use the rough cut capacity planning display to specify row descriptions for all Rough Cut Capacity Requirements (RCCP) forms and reports.
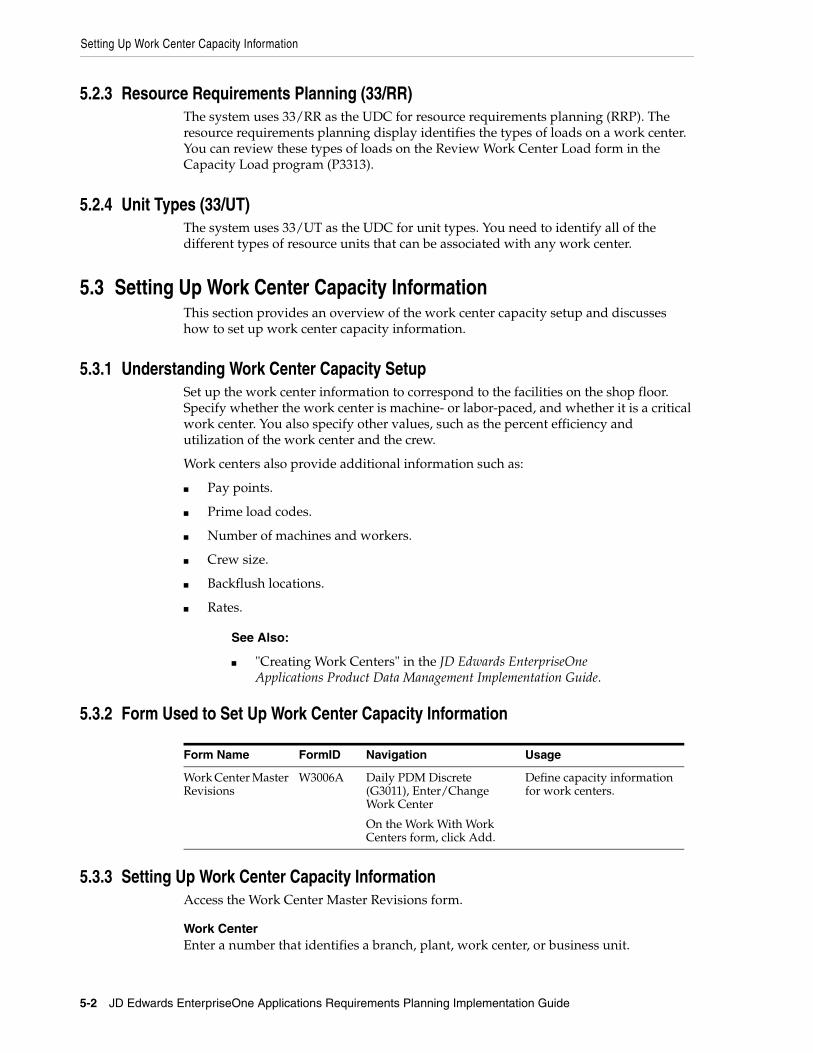
Setting Up Work Center Capacity Information
5-2 JD Edwards EnterpriseOne Applications Requirements Planning Implementation Guide
5.2.3 Resource Requirements Planning (33/RR)The system uses 33/RR as the UDC for resource requirements planning (RRP). The resource requirements planning display identifies the types of loads on a work center. You can review these types of loads on the Review Work Center Load form in the Capacity Load program (P3313).
5.2.4 Unit Types (33/UT)The system uses 33/UT as the UDC for unit types. You need to identify all of the different types of resource units that can be associated with any work center.
5.3 Setting Up Work Center Capacity InformationThis section provides an overview of the work center capacity setup and discusses how to set up work center capacity information.
5.3.1 Understanding Work Center Capacity SetupSet up the work center information to correspond to the facilities on the shop floor. Specify whether the work center is machine- or labor-paced, and whether it is a critical work center. You also specify other values, such as the percent efficiency and utilization of the work center and the crew.
Work centers also provide additional information such as:
■ Pay points.
■ Prime load codes.
■ Number of machines and workers.
■ Crew size.
■ Backflush locations.
■ Rates.
See Also:
■ "Creating Work Centers" in the JD Edwards EnterpriseOne Applications Product Data Management Implementation Guide.
5.3.2 Form Used to Set Up Work Center Capacity Information
Form Name FormID Navigation Usage
Work Center Master Revisions
W3006A Daily PDM Discrete (G3011), Enter/Change Work Center
On the Work With Work Centers form, click Add.
Define capacity information for work centers.
5.3.3 Setting Up Work Center Capacity InformationAccess the Work Center Master Revisions form.
Work CenterEnter a number that identifies a branch, plant, work center, or business unit.

Setting Up Work Center Capacity Information
Setting Up Capacity Planning 5-3
Dispatch GroupEnter a category code to group work centers within an overall business unit.
For example, you can use this code to group similar machines that operate out of several work centers and report to one business unit.
Location BranchSpecify the branch plant of the location that is associated with the work center.
Prime LoadEnter a code that determines if a work center is machine- or labor-intensive. The system also uses prime load codes in Resource Requirements Planning and Capacity Requirements Planning calculations to develop load profiles.
Codes are:
L: Run labor hours only.
M: Machine hours only.
B: Run labor plus setup labor hours.
C: Machine plus setup hours.
O: Other (will not generate resource units).
Critical W/C (critical work center)Enter a code that indicates whether the work center is critical or not critical when the system calculates capacity. Values are:
N: Not a critical work center.
1: A critical work center in calculating RRP only.
2: A critical work center in calculating RCCP and CRP.
3: A critical work center in calculating RRP, RCCP, and CRP.
The system also displays Type 3 work centers when you select Type 1 or Type 2 in this field.
4: Not a capacity work center. The system does not include this work center in capacity planning.
Note: The data selection is a system feature that processes certain groups of information with the RRP, RCCP, and CRP programs.
Resource OffsetEnter a value from the Resource Profile table (F3303) to determine the number of days that the actual use of a work center resource should be offset from the forecasted need date.
Standard CapacityEnter the standard capacity level at which a production line usually operates. Capacity is stated in units per hour. This level is used for repetitive processing only.
Capacity UOM (capacity unit of measure)Enter a unit of measure to express the capacity of a production line. Examples of units of measure include hours, number of stampings, coats of paint, and so on.
This item is used for repetitive processing only.
Setting Up Work Center Capacity Information
5-4 JD Edwards EnterpriseOne Applications Requirements Planning Implementation Guide
Minimum CapacityEnter the lower limit of the capacity, beyond which the production line should not operate. Management sets this limit based on factors such as efficiencies, costs, and so on.
Capacity is stated in units per hour. This limit is used for repetitive processing only.
Maximum CapacityEnter the upper limit of the capacity, beyond which a production line cannot produce. Capacity is stated in units per hour. This limit is used for repetitive processing only.
Queue HoursEnter the total hours that an order is expected to be in queue at work centers and moving between work centers.
The system stores this value in the Item Branch table (F4102) table. You can calculate this value using the Leadtime Rollup program (R30822A) or you can enter it manually. When you run the Leadtime Rollup program, the system overrides manual entries and populates the table with calculated values.
Move HoursEnter the planned hours that are required to move the order from this operation to the next operation in the same work center.
If the Routing Master values are blank, the system retrieves the default value from the work order routing. However, the system uses these values only for backscheduling variable leadtime items.
If you leave the Hours field on the Routing Revisions form blank, the system uses the value in this field for leadtime and scheduling calculations.
Replen. Hrs. (replenishment hours)Enter the time that is required before a consuming location has a replacement kanban available from its supplying location.
This value is used only for kanban card processing in JD Edwards EnterpriseOne Shop Floor Management.
EfficiencyEnter a user-defined value that indicates how efficiently a work center operates.
This value usually refers to staff efficiency. When you enter a value in this field and the Modify Cost by Work Center Efficiency field in the Job Shop Manufacturing Constants table (F3009) is set to Y, the system creates a new cost component (B4) from the cost calculated from the direct labor cost (B1).
For example, if the constant is set to Y, the value of this field is 80 percent, and the direct labor cost is 10, the system creates a B4 cost component for two in the Item Cost Component Add-Ons table (F30026).
The Work Center Resource Units Generation program (R3007G) also uses this value as a default when calculating rated capacity.
Enter percents as whole numbers. For example, enter 80 percent as 80.00.
Note: The system expects that the routing times for each operator are the actual times it takes to complete an operation. Efficiency does not affect total cost. Efficiency does reassign some of the costs into different cost components. Efficiency does not change the duration or backscheduling of a work order.
Determining Available Capacity
Setting Up Capacity Planning 5-5
UtilizationEnter a percentage that indicates how intensively a work center is being used. This value usually refers to machine use. It is the ratio of the direct time charged for production activities to the planned hours.
The Work Center Resource Units Generation program also uses this value as a default when calculating rated capacity.
Enter percents as whole numbers. For example, enter 80 percent as 80.00.
5.4 Determining Available CapacityThis section provides overviews of available capacity and resource units automatic generation, list prerequisites, and discusses how to:
■ Generate resource units automatically.
■ Set the processing options for Work Center Resource Units Generation (R3007G).
■ Set the processing options for Work Center Resource Units (P3007).
■ Revise resource units manually.
5.4.1 Understanding Available CapacityYou must determine how much production capacity the work centers have. You determine a work center's available capacity on a given day by entering resource units.
You can have the system generate resource units or you can enter them manually. Use the Work Center Resource Units Generation program to automatically recalculate the work center hours. The system generates resource units, based on an hour (HR) unit of measure. Revise units manually if you need to make adjustments.
You can assign resource units for different units of measure in different work centers. For example, you might want to estimate the square footage that you need to store items as well as the hours that you need to produce an item.
You can revise resource units manually if you need to make adjustments to them. For example, you might need to make adjustments to account for machine downtime or employee vacations. You can change the values on the Enter/Change Resource Units form to account for scheduled or unscheduled downtime, additional shifts, or vacation time.
Important: Each time that you run Work Center Resource Units Generation based on effectivity dates, the program recalculates the form values and overwrites the manual changes based on information in the Work Center Master File table (F30006), the Workday Calendar program (P00071) (shop floor calendar), and the F3009 table.
Determining Available Capacity
5-6 JD Edwards EnterpriseOne Applications Requirements Planning Implementation Guide
5.4.2 Understanding Resource Units Automatic GenerationRun the Work Center Resource Units Generation program (R3007G) to automatically recalculate the work center hours. You can view the results in the Work Center Resource Units program or on the Work Center Resource Unit Revision form (W3007B). You can also change values on the Work Center Resource Unit Revision form.
You should run this program whenever you revise the hours per day on the Manufacturing Constants Revision form, the number of machines in a work center, or the number of employees who are assigned to a work center. You can also run the program to define resource units for specific time periods.
The system recalculates the resource units for a work center based on:
■ Hours per day in the F30006 table.
■ Shop floor calendar.
■ The F3009 table.
Important: Based on effectivity dates, the system overwrites any manual changes that you make to the units on Work Center Resource Units when you run Work Center Resource Units Generation.
5.4.2.1 Resource Unit CalculationsThe program uses these resource unit calculations:
Resource Unit Resource Unit Calculation
Machine-related hours
(Prime load code = C or M)
Number of machines × work hours per day
Labor-related hours
(Prime load code = L or B)
Number of employees × work hours per day
5.4.3 PrerequisitesBefore you complete the tasks in this section:
■ Ensure that work centers exist for the resource units before you enter those resource units.
■ Set up manufacturing constants.
■ Determine the branch/plants for which you want to generate resource units.
■ Verify that you have set up a current shop calendar for the time period that you specify.
Determining Available Capacity
Setting Up Capacity Planning 5-7
5.4.4 Form Used to Determine Available Capacity
Form Name FormID Navigation Usage
Work Center Resource Unit Revision
W3007B Periodic Resource/Capacity Planning (G3321), Enter/Change Resource Units
On the Work with Resource Units form, complete the Branch/Plant and Work Center fields and click Find.
Select the record to revise.
Revise resource units manually.
5.4.5 Generating Resource Units AutomaticallySelect Periodic Resource / Capacity Planning (G3321), Refresh Resource Units.
5.4.6 Setting Processing Options for Work Center Resource Units Generation (R3007G)Use these processing options to specify the default processing for programs and reports.
5.4.6.1 DefaultsThese processing options define default values.
1. From DateSpecify the beginning date that the system uses to generate resource units. Enter the beginning date or select a date from the calendar. The system generates resource units and refreshes them for the month in which the From Date falls. For example, if the From Date is January 1, and the Thru Date is January 31, the system generates resource units for January. The system requires that you enter values for this processing option before you can run the generation.
2. Thru DateSpecify the ending date that the system uses to generate resource units. Enter the ending date or select a date from the calendar. Resource units are generated, refreshed, or both for the entire month. For example, if the From Date is January 1, and the Thru Date is January 31, the system generates resource units for January. The system requires that you enter values for this processing option before you can run the generation.
3. Branch/PlantSpecify the branch/plant that the system updates in the Work Center Resource Units table (F3007) when you generate resource units.
Enter the branch/plant or select a branch/plant from the Business Unit Master Search form. This processing option is required before you can run the generation.
5.4.6.2 ProcessThese processing options define processing criteria.
1. Shift Code through 6. Shift 6 CodeSpecify a UDC (06/SH) that identifies the type of shift (for example, day, night, or graveyard).
Determining Available Capacity
5-8 JD Edwards EnterpriseOne Applications Requirements Planning Implementation Guide
These processing options specify the shift codes to include in the resource unit generation. You can enter up to six different shift codes. Enter the code or select it from the Select User Define Code form. If you leave all shift codes blank, the system processes all valid shifts for the requested branch/plant.
5.4.7 Setting Processing Options for Work Center Resource Units (P3007)Processing options enable you to specify the default processing for programs and reports.
5.4.7.1 DefaultsThis processing option defines a default value.
Unit of Measure as InputSpecify a value from UDC 00/UM that indicates the default unit of measure for work center resource units. This is the quantity in which to express an inventory item (for example, CS [case] or BX [box]). If left blank, HR is used as the default unit of measure.
Enter Work Day Calendar Version (P00071)Enter the version of Work Day Calendar (P00071) that the system uses. If left blank, version ZJDE0001 will be used.
5.4.8 Revising Resource Units ManuallyAccess the Work Center Resource Unit Revision form.
Work CenterEnter a number that identifies the work center.
MonthEnter a number that corresponds to the month in a calendar year.
YearEnter the calendar year for this calendar.
Unit of MeasureDisplays the default value that comes from the component and production units of measure from the Item Master table.
Work Center EfficiencyEnter a user-defined value that indicates how efficiently a work center operates.
This value usually refers to staff efficiency. When you enter a value in this field and the Modify Cost by Work Center Efficiency field in the F3009 table is set to Y, the system creates a new cost component (B4) from the cost calculated from the direct labor cost (B1).
For example, if the constant is set to Y, the value of this field is 80 percent, and the direct labor cost is 10, then the system creates a B4 cost component for two in the F30026 table.
The Refresh Resource Units program also uses this value as a default when calculating rated capacity.
Enter percents as whole numbers. For example, enter 80 percent as 80.00.
Note: The system expects that the routing times for each operator are the actual times it takes to complete an operation. Efficiency does not affect total cost. Efficiency does reassign some of the costs into different cost components. Efficiency does not change the duration or backscheduling of a work order.
Generating Resource Profiles
Setting Up Capacity Planning 5-9
Work Center UtilizationEnter a percentage that indicates how intensively a work center is being used. This value usually refers to machine use. It is the ratio of the direct time charged for production activities to the planned hours.
The Refresh Resource Units program also uses this value as a default when calculating rated capacity.
Enter percents as whole numbers. For example, enter 80 percent as 80.00.
Total Resource UnitsIdentifies the monthly total resource units for the work center.
5.5 Generating Resource ProfilesThis section provides overviews of resource profiles and resource profile automatic generation, list prerequisites, and discusses how to:
■ Run resource profile generation.
■ Set the processing options for Resource Profile Generation (R3365).
■ Define resource profiles manually.
5.5.1 Understanding Resource ProfilesLong-range load is an estimate of how many load hours are required to meet sales projections. To determine long-range load, the system uses resource profiles. The resource profile is a list of all work centers and their load requirements for a master-scheduled item. The resource profile is the sum of all labor, machine, and setup hours that are required for all work centers and for all parts in the multilevel bill of material for a master-scheduled item.
You can have the system automatically generate a resource profile, or you can manually enter the profile. You manually enter the profile if you have not defined bills of material and routings for an end item. You can also use the manual method for prototype items and new products.
5.5.2 Understanding Resource Profile Automatic GenerationIf you have defined bills of material (BOMs) and routings for an end item and all of its subassemblies, you can run the Resource Profile Regeneration program (R3365) to automatically generate the resource profile. The program calculates the load on a work center by extending the hours in the routing by the forecasted quantities for the master-scheduled items.
The Resource Profile Regeneration program creates units of measure only in hours (HR). Enter the resource profile manually if you want to use other units of measure.
Resource Profile Regeneration changes or updates the resource profile by using components with effectivity dates within the period that you specify. The specific items that are affected by the program are determined by such factors as:
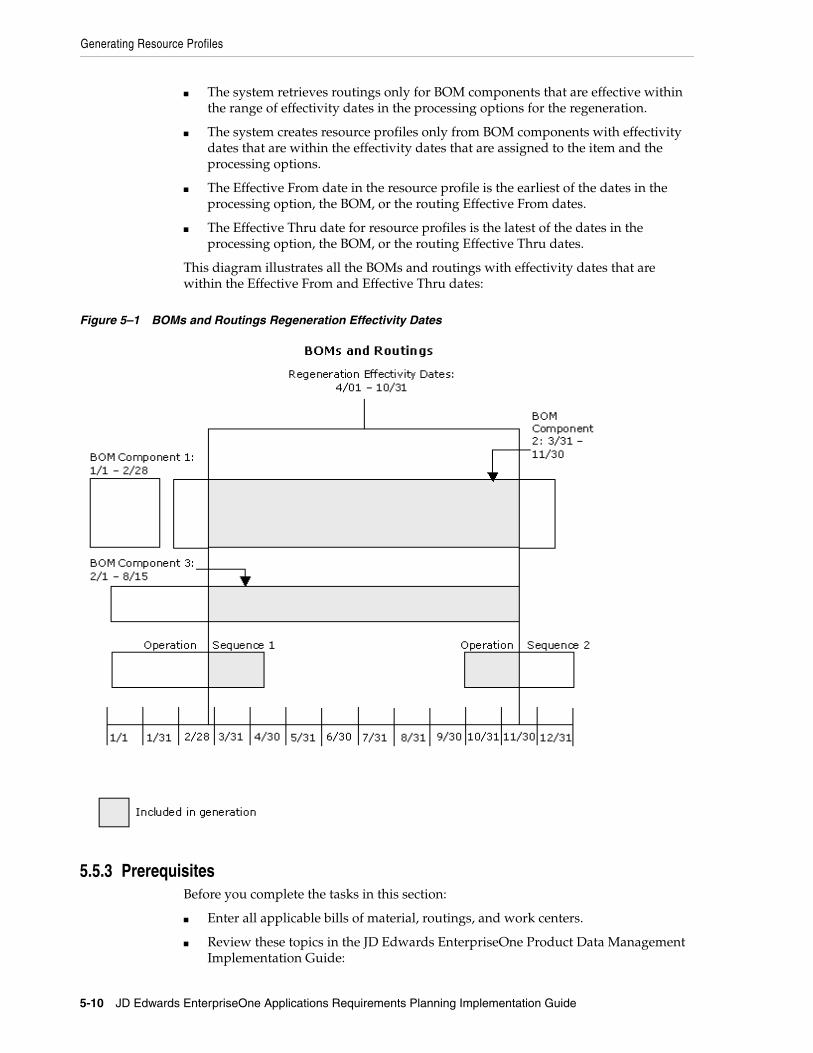
Generating Resource Profiles
5-10 JD Edwards EnterpriseOne Applications Requirements Planning Implementation Guide
■ The system retrieves routings only for BOM components that are effective within the range of effectivity dates in the processing options for the regeneration.
■ The system creates resource profiles only from BOM components with effectivity dates that are within the effectivity dates that are assigned to the item and the processing options.
■ The Effective From date in the resource profile is the earliest of the dates in the processing option, the BOM, or the routing Effective From dates.
■ The Effective Thru date for resource profiles is the latest of the dates in the processing option, the BOM, or the routing Effective Thru dates.
This diagram illustrates all the BOMs and routings with effectivity dates that are within the Effective From and Effective Thru dates:
Figure 5–1 BOMs and Routings Regeneration Effectivity Dates
5.5.3 PrerequisitesBefore you complete the tasks in this section:
■ Enter all applicable bills of material, routings, and work centers.
■ Review these topics in the JD Edwards EnterpriseOne Product Data Management Implementation Guide:
Generating Resource Profiles
Setting Up Capacity Planning 5-11
– Entering Bills of Material.
See "Setting Up Bills of Material" in the JD Edwards EnterpriseOne Applications Product Data Management Implementation Guide.
– Working With Routing Instructions.
See "Creating Routing Instructions" in the JD Edwards EnterpriseOne Applications Product Data Management Implementation Guide.
– Working with Work Centers.
See "Creating Work Centers" in the JD Edwards EnterpriseOne Applications Product Data Management Implementation Guide.
5.5.4 Form Used to Generate Resource Profiles
Form Name FormID Navigation Usage
Resource Profile Revisions
W3303B Periodic Resource/Capacity Planning (G3321), Enter/Change Resource Profile
On the Work With Resource Profile Revisions form, click Add.
Create resource profiles manually. You must set up item branch/plant information before entering a resource profile.
5.5.5 Running Resource Profile GenerationSelect Periodic Resource / Capacity Planning (G3321) Generate Resource Profile.
5.5.6 Setting Processing Options for Resource Profile Regeneration (R3365)Processing options enable you to specify the default processing for programs and reports.
5.5.6.1 ProcessThese processing options define processing criteria.
1. Enter the effectivity dates for the regeneration:Effective From:
Specify a date that indicates:
■ When a component part goes into effect on a bill of material.
■ When a routing step goes into effect as a sequence on the routing for an item.
■ That when a rate schedule is in effect, the default is the current system date.
You can enter future effective dates so that the system plans for upcoming changes. You can continue to record and recognize items that are no longer effective in the future in Oracle's JD Edwards EnterpriseOne Product Costing, JD Edwards EnterpriseOne Shop Floor Management, and Capacity Requirements Planning. Material Requirements Planning determines valid components by effectivity dates, not by the bill of material revision level. Some forms display data based on the effectivity dates you enter.
Effective Thru:

Generating Resource Profiles
5-12 JD Edwards EnterpriseOne Applications Requirements Planning Implementation Guide
Specify a date that indicates:
■ When a component part is no longer in effect on a bill of material.
■ When a routing step is no longer in effect as a sequence on the routing for an item.
■ When a rate schedule is no longer active. The default is December 31 of the default year that is defined in the Data Dictionary for Century Change Year.
You can enter future effective dates so that the system plans for upcoming changes. You can continue to record and recognize items that are no longer effective in the future in JD Edwards EnterpriseOne Product Costing, JD Edwards EnterpriseOne Shop Floor Management, and Capacity Requirements Planning. Material Requirements Planning determines valid components by effectivity dates, not by the bill of material revision level. Some forms display data based on the effectivity dates that you enter.
5.5.7 Defining Resource Profiles ManuallyAccess the Resource Profile Revisions form.
Unit TypeEnter a code that indicates the type of resource unit that is associated with this work center.
Possible types are:
1: Run Labor Hours
2: Setup Labor Hours
3: Machine Hours
9: Miscellaneous (storage space and so on)
Effective FromEnter a date that indicates:
■ When a component part goes into effect on a bill of material.
■ When a routing step goes into effect as a sequence on the routing for an item.
■ That when a rate schedule is in effect, the default is the current system date.
You can enter future effective dates so that the system plans for upcoming changes. You can continue to record and recognize items that are no longer effective in the future in JD Edwards EnterpriseOne Product Costing, JD Edwards EnterpriseOne Shop Floor Management, and Capacity Requirements Planning. Material Requirements Planning determines valid components by effectivity dates, not by the bill of material revision level. Some forms display data based on the effectivity dates you enter.
Effective Thru (effective through)Enter a date that indicates:
■ When a component part is no longer in effect on a bill of material.
■ When a routing step is no longer in effect as a sequence on the routing for an item.
■ When a rate schedule is no longer active.
The default is December 31 of the default year that is defined in the Data Dictionary for Century Change Year. You can enter future effective dates so that the system plans for upcoming changes. You can continue to record and recognize

Generating Resource Profiles
Setting Up Capacity Planning 5-13
items that are no longer effective in the future in JD Edwards EnterpriseOne Product Costing, JD Edwards EnterpriseOne Shop Floor Management, and Capacity Requirements Planning. Material Requirements Planning determines valid components by effectivity dates, not by the bill of material revision level. Some forms display data based on the effectivity dates that you enter.
Time BasisEnter a UDC (30/TB) that indicates how machine or labor hours are expressed for a product. Time basis codes identify the time basis or rate to use for machine or labor hours that are entered for every routing step (for example, 25 hours per 1,000 pieces or 15 hours per 10,000 pieces). You can maintain the time basis codes in the Time Basis Codes UDC (30/TB).
The system uses the values in the Description-2 field on the User-Defined Code form for costing and scheduling calculations. The description is what the code represents, but it is not used in calculations.

Generating Resource Profiles
5-14 JD Edwards EnterpriseOne Applications Requirements Planning Implementation Guide
6
Setting Up Supplier Release Scheduling 6-1
6Setting Up Supplier Release Scheduling
This chapter contains the following topics:
■ Section 6.1, "Understanding Supplier Release Scheduling Setup"
■ Section 6.2, "Defining Supplier Contract Information"
■ Section 6.3, "Defining Shipment Patterns"
■ Section 6.4, "Defining Supplier Split Percentages"
6.1 Understanding Supplier Release Scheduling SetupTo perform supplier release scheduling, you need to set up information for each of the suppliers and for the items that you are planning to purchase. The information that is required to generate supplier release schedules varies, depending on whether you want to generate schedules that are based on blanket orders or ad hoc schedules. You can enter ad hoc schedules interactively through the self-service portal work spaces or generate them when running the Supplier Schedule Generation program (R34400).
If you want to schedule releases against blanket orders, you set up supplier schedule master information that is tied to a blanket order, such as:
■ Shipment pattern and dates.
This setup indicates the days of the week that you accept deliveries.
■ Supplier split percentages.
You use this value to use more than one supplier for an item.
■ Frozen days
You use this value to specify the time period after the schedule generation date during which quantities cannot be changed and no releases are permitted.
■ Releasable schedule days
Releasable schedule days indicate the time fence from the schedule generation date for releasing committed quantities.
To create ad hoc schedules, you can set up shipment patterns and dates, as well as split percentages without a blanket order; and use information set up for the item in the Item Branch program (P41026), such as:
■ Supplier
■ Freeze fence
You do not have to set up a release fence for ad hoc schedules until you actually run the Supplier Schedule Release Generation program (R34410). You use a processing
Defining Supplier Contract Information
6-2 JD Edwards EnterpriseOne Applications Requirements Planning Implementation Guide
option to define the period in days from the generation start date within which committed quantities can be converted into purchase orders.
6.2 Defining Supplier Contract InformationThis section provides an overview of supplier contract information, lists a prerequisite, and discusses how to:
■ Set processing options for Supplier Schedule Master Revisions (P4321).
■ Set up supplier contracts.
6.2.1 Understanding Supplier Contract InformationWhen you set up a supplier contract that is based on a blanket order, you can define information such as time fence periods and releasable schedule days. You can also specify a delivery location, a minimum shipment quantity, and a shipment lead time. Finally, you can define whether you display the supplier schedule in days, weeks, or months.
When you generate a schedule, the system:
■ Sorts blanket order releases that are outstanding into appropriate time periods.
■ Accumulates past due quantities and quantities that you received before the requested date.
■ Expresses past due amounts as positive numbers in the Past Due field.
■ Expresses early receipt amounts in the Early Receipt field and adds the amounts to the cumulative received quantity.
When you regenerate the schedule, the system displays the quantities in the Past Due and Early Receipt fields on the Vendor Schedule Master Revisions form. When you delete supplier information, the system deletes the entire record, including the history.
Note: It is recommended that you specifically designate items for which you want to create vendor schedules. You can use category codes to use an item for supplier release scheduling.
6.2.2 PrerequisiteUsing blanket scheduling, create a blanket order line for every item that you want to schedule.
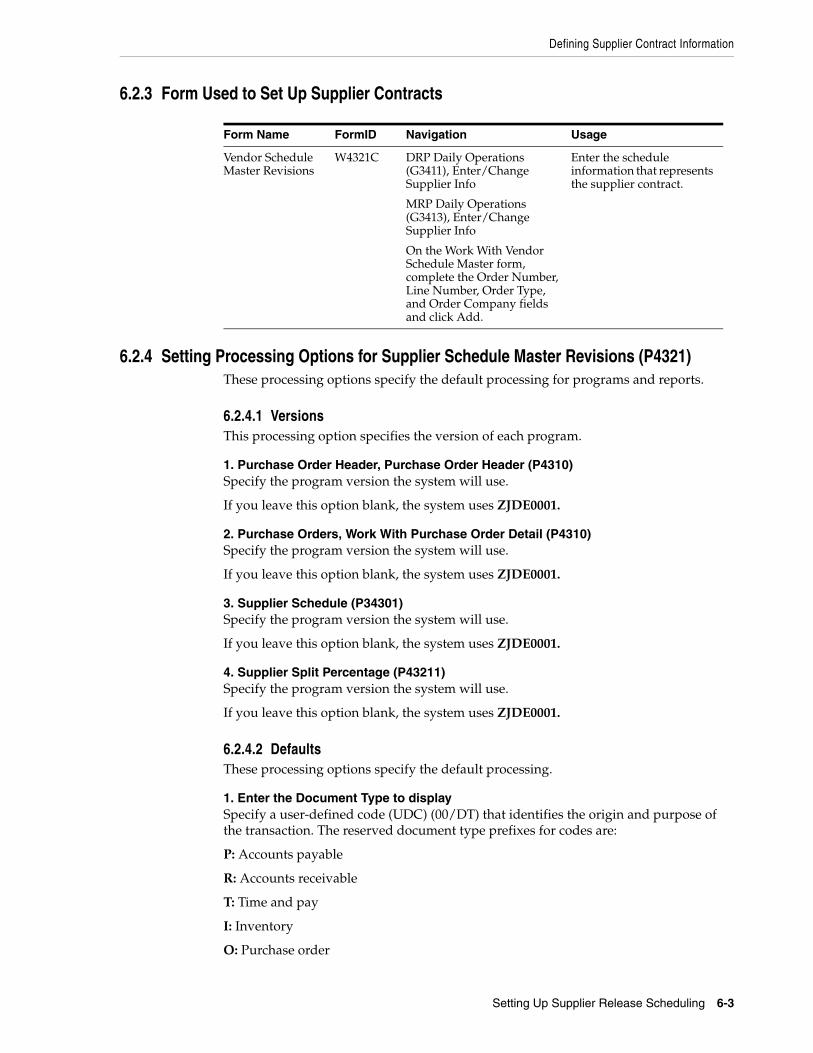
Defining Supplier Contract Information
Setting Up Supplier Release Scheduling 6-3
6.2.3 Form Used to Set Up Supplier Contracts
Form Name FormID Navigation Usage
Vendor Schedule Master Revisions
W4321C DRP Daily Operations (G3411), Enter/Change Supplier Info
MRP Daily Operations (G3413), Enter/Change Supplier Info
On the Work With Vendor Schedule Master form, complete the Order Number, Line Number, Order Type, and Order Company fields and click Add.
Enter the schedule information that represents the supplier contract.
6.2.4 Setting Processing Options for Supplier Schedule Master Revisions (P4321)These processing options specify the default processing for programs and reports.
6.2.4.1 VersionsThis processing option specifies the version of each program.
1. Purchase Order Header, Purchase Order Header (P4310)Specify the program version the system will use.
If you leave this option blank, the system uses ZJDE0001.
2. Purchase Orders, Work With Purchase Order Detail (P4310)Specify the program version the system will use.
If you leave this option blank, the system uses ZJDE0001.
3. Supplier Schedule (P34301)Specify the program version the system will use.
If you leave this option blank, the system uses ZJDE0001.
4. Supplier Split Percentage (P43211)Specify the program version the system will use.
If you leave this option blank, the system uses ZJDE0001.
6.2.4.2 DefaultsThese processing options specify the default processing.
1. Enter the Document Type to displaySpecify a user-defined code (UDC) (00/DT) that identifies the origin and purpose of the transaction. The reserved document type prefixes for codes are:
P: Accounts payable
R: Accounts receivable
T: Time and pay
I: Inventory
O: Purchase order
Defining Supplier Contract Information
6-4 JD Edwards EnterpriseOne Applications Requirements Planning Implementation Guide
S: Sales order
2. Work Day Calendar TypeSpecify a UDC (42/WD) to define how to use the calendar. For example, the calendar might be specific to an industry, such as banking, or you might use it to schedule delivery persons for a route.
Note: If you use the default value of * (asterisk), the system updates the value to blank even though blank is not set up as a value in the UDC table.
3. Work Day Calendar KeySpecify a code to classify values within a calendar type. For example, if the calendar type is ROUTE, you can enter a code that specifies a particular route, such as Daily or Weekend.
Note: The system does not validate the code that you enter.
6.2.5 Setting Up Supplier ContractsAccess the Vendor Schedule Master Revisions form.
Releasable DaysEnter a time fence that indicates the number of workdays from the generation start date to use when identifying the cutoff date for actual blanket order releases. The system uses the time fence when you run the supplier schedule release generation program.
Deliver to LocationEnter the location to which a shipment should be delivered, such as a particular receiving dock or work center.
Shipment QuantityEnter the minimum quantity that the supplier is willing to ship.
Ship Units/Cont (ship units/container)Enter the standard quantity of containers that you use in the manufacturing process (typically, in a repetitive manufacturing environment). The quantity that you enter determines the number of bar code labels that you will need for shipping. It also modifies order release quantities.
This value identifies the container requirements of the supplier. When the system generates the supplier schedule, it calculates the shipping units per container as a multiple and adjusts the planned quantities as needed.
Shipment LeadtimeEnter the time it takes a shipment to move from the supplier's dock to the customer's dock. The system uses this value to offset the required date to determine the actual date that the shipment should take place. The shipment leadtime is also known as transit time. The level leadtime for a purchased item should include the shipment leadtime.
Defining Shipment Patterns
Setting Up Supplier Release Scheduling 6-5
Vendor Lot SizeEnter a value that identifies the lot size requirements of the supplier. When the system generates the supplier schedule, it calculates the vendor lot size as a multiple and adjusts the planned quantities as needed.
Frozen DaysEnter the number of workdays from the generation start date that the quantity buckets will be frozen with no changes and releases possible. The system also uses this value to calculate the cumulative frozen quantity shown in the Cum Frozen field on the Other Information tab.
Fabrication DaysEnter the number of workdays, from the generation start date, that the customer guarantees the fabrication costs for the quantity that was ordered.
Raw Material DaysEnter the number of workdays, from the generation start date, that the customer guarantees the raw material costs for the quantity that was ordered.
Vendor Schedule D/W/M (vendor schedule days/weeks/months)Select an option to create the vendor schedule in days, weeks, or months.
NumberEnter the number of workdays, weeks, and months to display on the supplier schedule.
6.3 Defining Shipment PatternsThis section provides an overview of shipment patterns and discusses how to:
■ Create shipment patterns.
■ Revise shipment dates.
6.3.1 Understanding Shipment PatternsYou must define which days are valid to receive a shipment. You can define a pattern that governs the frequency of supplier deliveries. For example, you can define shipment patterns such as:
■ All work days.
■ Every Monday.
■ Monday through Friday of the first and third weeks of the month.
To set up shipment patterns and shipment dates for a supplier schedule that is based on a blanket order, you access the Shipment Pattern Revisions (P43212) and Shipment Date Revisions (P43213) programs from the Supplier Schedule Master Revisions program.
Note: If you are creating ad hoc schedules and need to set up a shipment pattern for the supplier, you access these programs from the menu.

Defining Shipment Patterns
6-6 JD Edwards EnterpriseOne Applications Requirements Planning Implementation Guide
6.3.2 Forms Used to Define Shipment Patterns
Form Name FormID Navigation Usage
Shipment Pattern Revisions
W43212A DRP Daily Operations (G3411), Enter/Change Supplier Info
MRP Daily Operations (G3413), Enter/Change Supplier Info
On the Vendor Schedule Master Revisions form, select Shipment Pattern from the Form menu.
Enter the date pattern for the shipments that you receive from a supplier.
Shipment Date Revisions
W43213B On the Vendor Schedule Master Revisions form, select Shipment Dates from the Form menu.
On the Work With Shipment Dates form, select a record and click Select.
Revise the shipment pattern you created previously.
6.3.3 Creating Shipment PatternsAccess the Shipment Pattern Revisions form.
Day of WeekSelect the check boxes to indicate the day or days that you allow shipments. Selecting any of the check boxes disables the Day Of Month and All Work Days options.
Day Of MonthEnter a specific day of the month (1 through 31) when you allow shipments.
All Work DaysSelect this check box to allow shipments on any work day.
Week of MonthSelect the check boxes to indicate the week or weeks that you allow shipments. Selecting the fourth check box indicates that the shipment pattern is valid from the 22nd through the 28th of the month.
Recur Every Week(s)Enter a code that determines the weekly pattern that the system builds based on the effective from date.
Codes are:
1: Every week is scheduled.
2: Every second week is scheduled.
6.3.4 Revising Shipment DatesAccess the Shipment Date Revisions form.
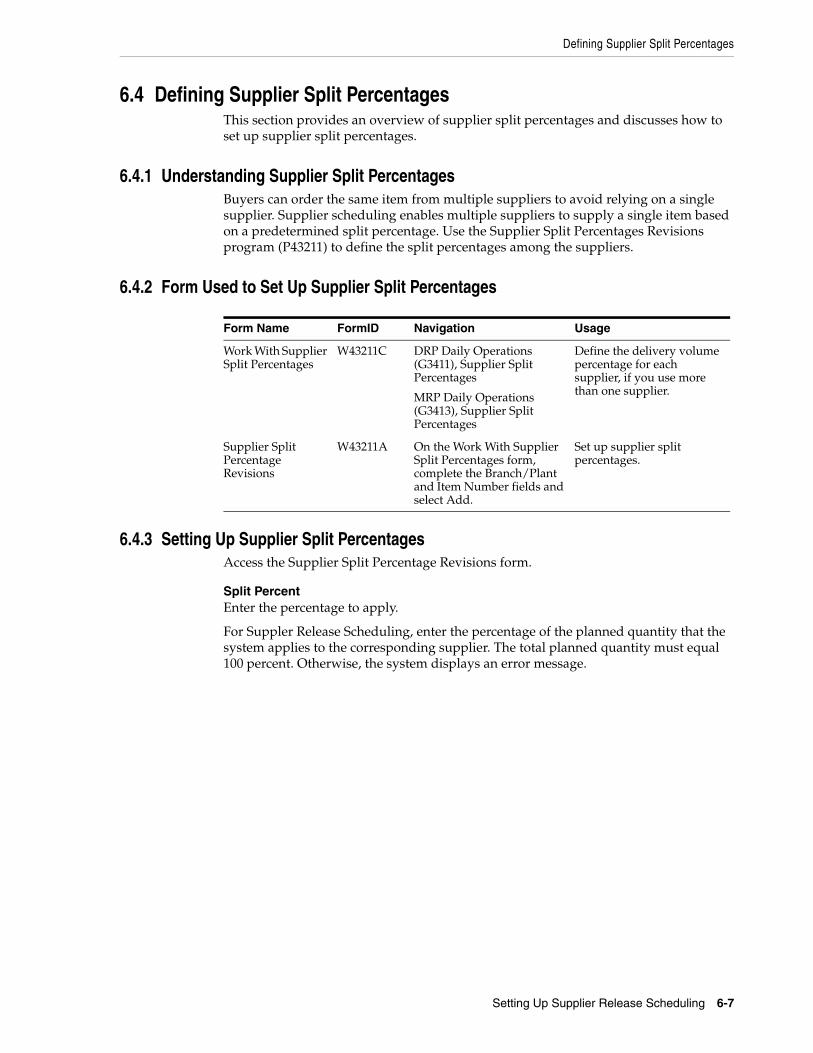
Defining Supplier Split Percentages
Setting Up Supplier Release Scheduling 6-7
6.4 Defining Supplier Split PercentagesThis section provides an overview of supplier split percentages and discusses how to set up supplier split percentages.
6.4.1 Understanding Supplier Split PercentagesBuyers can order the same item from multiple suppliers to avoid relying on a single supplier. Supplier scheduling enables multiple suppliers to supply a single item based on a predetermined split percentage. Use the Supplier Split Percentages Revisions program (P43211) to define the split percentages among the suppliers.
6.4.2 Form Used to Set Up Supplier Split Percentages
Form Name FormID Navigation Usage
Work With Supplier Split Percentages
W43211C DRP Daily Operations (G3411), Supplier Split Percentages
MRP Daily Operations (G3413), Supplier Split Percentages
Define the delivery volume percentage for each supplier, if you use more than one supplier.
Supplier Split Percentage Revisions
W43211A On the Work With Supplier Split Percentages form, complete the Branch/Plant and Item Number fields and select Add.
Set up supplier split percentages.
6.4.3 Setting Up Supplier Split PercentagesAccess the Supplier Split Percentage Revisions form.
Split PercentEnter the percentage to apply.
For Suppler Release Scheduling, enter the percentage of the planned quantity that the system applies to the corresponding supplier. The total planned quantity must equal 100 percent. Otherwise, the system displays an error message.

Defining Supplier Split Percentages
6-8 JD Edwards EnterpriseOne Applications Requirements Planning Implementation Guide
7
Planning Production Capacity 7-1
7Planning Production Capacity
This chapter contains the following topics:
■ Section 7.1, "Understanding Capacity Planning"
■ Section 7.2, "Generating Resource Requirements Plans"
■ Section 7.3, "Validating Resource Requirements Plans"
7.1 Understanding Capacity PlanningUse Capacity Planning to ensure that sufficient capacity is available to accomplish the planned production schedule that is generated by Master Production Schedule (MPS) or Material Requirements Planning (MRP). If sufficient capacity is not available, then you must alter the plan or the capacity.
JD Edwards EnterpriseOne Capacity Planning from Oracle comprises:
■ Resource Requirements Planning (RRP).
■ Rough Cut Capacity Planning (RCCP).
■ Capacity Requirements Planning (CRP).
This flowchart illustrates the planning system process:
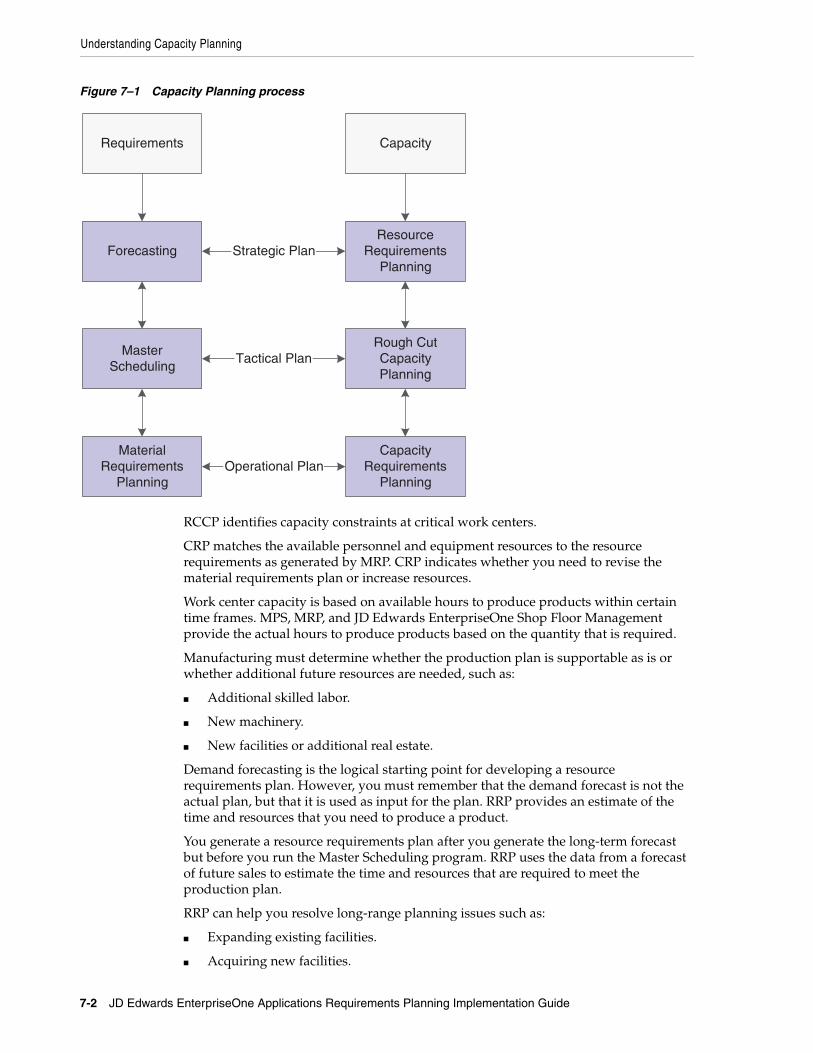
Understanding Capacity Planning
7-2 JD Edwards EnterpriseOne Applications Requirements Planning Implementation Guide
Figure 7–1 Capacity Planning process
Requirements
Forecasting
MasterScheduling
MaterialRequirements
Planning
Capacity
ResourceRequirements
Planning
Rough CutCapacityPlanning
CapacityRequirements
PlanningOperational Plan
Tactical Plan
Strategic Plan
RCCP identifies capacity constraints at critical work centers.
CRP matches the available personnel and equipment resources to the resource requirements as generated by MRP. CRP indicates whether you need to revise the material requirements plan or increase resources.
Work center capacity is based on available hours to produce products within certain time frames. MPS, MRP, and JD Edwards EnterpriseOne Shop Floor Management provide the actual hours to produce products based on the quantity that is required.
Manufacturing must determine whether the production plan is supportable as is or whether additional future resources are needed, such as:
■ Additional skilled labor.
■ New machinery.
■ New facilities or additional real estate.
Demand forecasting is the logical starting point for developing a resource requirements plan. However, you must remember that the demand forecast is not the actual plan, but that it is used as input for the plan. RRP provides an estimate of the time and resources that you need to produce a product.
You generate a resource requirements plan after you generate the long-term forecast but before you run the Master Scheduling program. RRP uses the data from a forecast of future sales to estimate the time and resources that are required to meet the production plan.
RRP can help you resolve long-range planning issues such as:
■ Expanding existing facilities.
■ Acquiring new facilities.
Generating Resource Requirements Plans
Planning Production Capacity 7-3
■ Staffing loads.
■ Determining capital expenditures for equipment.
RRP enables you to support the company's strategic business plan with a realistic tactical plan that:
■ Is shorter in range than the strategic plan and has a planning horizon of 12 months to three years.
■ Enables planning at the product family level and has greater detail than the strategic plan.
■ Validates the monetary amounts that are allotted to the business plan.
The Resource Requirements Planning program (P3380) generates a capacity plan by critical work center. To answer long-range planning questions, you need to know the current capacity and the requirements to support the planned workload.
7.2 Generating Resource Requirements PlansThis section provides an overview of resource requirements planning, lists prerequisites, and discusses how to:
■ Run resource requirements planning.
■ Set processing options for Resource Requirements Planning (R3380).
7.2.1 Understanding Resource Requirements PlanningAfter you have entered resource units and resource profiles, you run the Resource Requirements Planning Regeneration program to generate the resource requirements plan. The plan contains long-range estimates of the capacity needs at the work centers. These needs might include:
■ The number of production staff that you need to hire to meet future production needs.
■ The number of additional machines that you will need for a new product line.
■ The real estate that you will need to buy for additional facilities.
Because you use the forecast in place of work orders for long-range planning, the data that this program creates is an estimate of capacity needs that is based on the forecast. The resource profile offsets required dates for capacity.
The types of data that you can create include:
■ Over-capacity or under-capacity messages.
■ Period summaries about work centers.
■ New load profile information based on the type of work center load:
– Rated profile is the number of available units from the Work Center Resource Units table (F3007).
– Loaded profile is the forecasted load that is derived from the master planned item's forecasts and their resource profiles.
– Percent resource used is the loaded profile divided by the rated profile.
– Resource available is the rated profile minus the loaded profile.
Generating Resource Requirements Plans
7-4 JD Edwards EnterpriseOne Applications Requirements Planning Implementation Guide
– Accumulated resources available is a running total of the resources that are available.
When you set up the versions for planning the resource requirements, you need to determine the data selection for work centers, branch/plants, and dispatch groups that you want to process.
7.2.1.1 Work Centers to ProcessYou select one of these options:
■ N: Process only noncritical work centers.
■ 1: Process critical work centers in calculating resource requirement plans only.
■ 2: Process critical work centers in calculating capacity requirements plans only.
■ 3: Process critical work centers in calculating resource requirements plans and capacity requirements plans.
■ 4: Not a capacity work center (will not be processed in Capacity Requirements Planning).
7.2.1.2 Branch/plant and Dispatch GroupYou can select the following specific information for planning facilities and dispatch groups:
■ A specific planning facility, the dispatch groups, or both.
■ A group of planning facilities, the dispatch groups that are using the RANGE or LIST values, or both.
7.2.2 PrerequisitesBefore generating requirements plans, verify that:
■ Resource units exist for all of the work centers in the facility.
■ Resource profiles exist for all of the master-scheduled items.
■ A resource profile is set up with the appropriate units of measure.
You can use a maximum of five units of measure.
■ A detail forecast is created for the master-scheduled items using the Forecast Revisions program (P3460).
See "Working with Detail Forecasts" in the JD Edwards EnterpriseOne Applications Forecast Management Implementation Guide.
■ The forecast types that you want to use in the generation have been determined.
You can use a maximum of five.
See "Setting Up Summary Forecasts" in the JD Edwards EnterpriseOne Applications Forecast Management Implementation Guide.
■ A shop floor calendar is set up for all summary time periods for which you want to generate resource requirements plans.
7.2.3 Running Resource Requirements PlanningSelect Periodic Resource/Capacity Planning (G3321), Resource Requirements Planning.
Generating Resource Requirements Plans
Planning Production Capacity 7-5
7.2.4 Setting Processing Options for Resource Requirements Planning (R3380)Use these processing options to set planning parameters, specify forecast types used as input, and specify the output unit of measure.
7.2.4.1 Bucket InfoThese processing options specify the regeneration start date, the planning horizon periods, and the past due periods in a planning process.
1. Regeneration Start DateSpecify the date that the program uses to start the planning process. This date is also the beginning of the planning horizon.
If you leave this option blank, the system uses the system date.
2. Planning Horizon PeriodsSpecify the number of weeks and months that the system creates in a planning period.
Number of Planning WeeksSpecify the number of weeks that the system creates in a planning period. For example, when the system displays the Time Series program (P3413), the system also accesses data for the number of planning weeks.
Number of Planning MonthsSpecify the number of months that the system creates in a planning period. For example, when the systems displays the Time Series program, the system also accesses monthly data for the number of planning months.
3. Past Due PeriodsSpecify the number of past due periods that the system generates for a loaded profile. These values represent the number of past due periods for the program's generation date. Values are:
0: Zero periods (default)
1: One past due period
2: Two past due periods
7.2.4.2 ProcessThese processing options enable you to specify the branch that a system uses for the CRP/RCCP Regeneration program (R3382) and the percentages for underrated and overrated capacity. Additionally, you determine whether you want work centers to be rolled up by dispatch group in the planning.
1. BranchSpecify the branch that the system uses for the CRP/RCCP Planning Regeneration program.
2. Under Rated Capacity PercentSpecify the tolerance percent under the rated capacity that the system uses to determine whether a work center is underloaded. The system displays messages with a status of U (under) for capacity loads that are less than the identified percentage under the rated value.
For example, if the rated capacity is 100 units and the underrated capacity is set to 5 percent, then the system still considers a capacity load of 95 units as a valid load at a
Validating Resource Requirements Plans
7-6 JD Edwards EnterpriseOne Applications Requirements Planning Implementation Guide
work center. Similarly, the system would consider a capacity load of 94 units as an underload.
3. Over Rated Capacity PercentSpecify the tolerance percent over the rated capacity that the system uses to determine whether a work center is overloaded. The system displays messages with a status of O (over) for the capacity load that is greater than the identified percentage over the rated value.
For example, if the rated capacity is 100 units and the overrated capacity is set to 5 percent, then the system still considers a capacity load of 105 as a valid load at a work center. Similarly, the system would consider a capacity load of 106 units as an overload.
4. Roll Up To Dispatch GroupSpecify whether multiple work centers within a dispatch group roll up to that dispatch group for review. Values are:
Blank: Do not roll up work centers to a dispatch group.
1: Roll up work centers to a dispatch group.
7.2.4.3 Forecast TypesThese processing options enable you to specify the forecast type that the system processes when it runs the Resource Requirement Planning Regeneration program. You can enter up to five forecast types in the system. Forecast types are user defined and stored in the Forecast File (F3460) table.
1. Forecast Types Used (up to 5)Specify up to five forecast types that the system processes when you run the Resource Requirements Planning program.
Forecast Type 1 through Forecast Type 5Specify the forecast type that the system processes when you run the Resource Requirements Planning program.
Forecast types are user defined and are stored in the F3460 table (Detail Forecast table).
7.2.4.4 UOMThis processing option enables you to specify the units of measure that the system processes when you run the Resource Requirements Planning Regeneration program. The system can process up to five units of measure at a time.
1. Units of Measure Used (up to 5)Specify up to five units of measure that the system processes when you run the Resource Requirements Planning program.
Unit of Measure 1 through Unit of Measure 5Specify the unit of measure that the system processes when you run the Resource Requirements Planning program.
7.3 Validating Resource Requirements PlansThis section provides an overview of resource requirements plan validation and discusses how to:
■ Set processing options for Capacity Message Summary (P3301).
Validating Resource Requirements Plans
Planning Production Capacity 7-7
■ Review dispatch groups.
■ Set processing options for Capacity Load (P3313).
■ Review work center loads.
■ Set processing options for Period Summary (P3312).
■ Review period summaries.
■ Set processing options for Capacity Planning Message Revisions (P3311).
■ Review capacity planning message details.
7.3.1 Understanding Resource Requirements Plan ValidationValidating a resource requirements plan consists of identifying the overloaded work centers, adjusting the forecast or resources, and generating the plan again to see whether the adjustments distributed the loads among the work centers. Repeat the steps until all of the loads at each work center are appropriate.
7.3.1.1 Resource Requirements PlansWhen you generate a resource requirements plan, the system creates a time series that displays the load during each planning period for a work center. If you organize several work centers as a dispatch group according to common functions, similar operations, or steps in a routing, you can view the group to see how the production plan affects the capacity of the work centers as a group.
You can review summaries of each period to determine the load that is placed on a work center by each item or order. You can also review messages for each work center and delete, clear, or the hold messages.
If the system encounters over-capacity or under-capacity conditions, you can review the plan and identify the periods or work centers in which the conditions occur. You might have to adjust the forecast or capacity, and then generate the resource requirements plan again.
7.3.1.2 Dispatch Groups for RRPIf several work centers are organized as a dispatch group, you can review the group to determine how capacity affects all of the work centers in the group. Dispatch groups enable you to organize work centers according to common functions, similar operations, or steps in a routing.
When you review dispatch groups, you can also review messages about all the work centers in the group and use that information to redistribute the load within the group.
7.3.1.3 Work Center Load for RRPThe Resource Requirements Planning Regeneration program provides a numerical breakdown, by planning period, of the capacity load that is placed on a work center. Use this information to determine whether to adjust capacity or the forecast.
The code in the Prime Load field on the Work Center Master Revisions form determines the type of load. For example, if you enter machine and setup hours as the prime load code, the numbers that appear differ from those that appear if you enter machine hours only.
This table describes the calculations for the types of load:
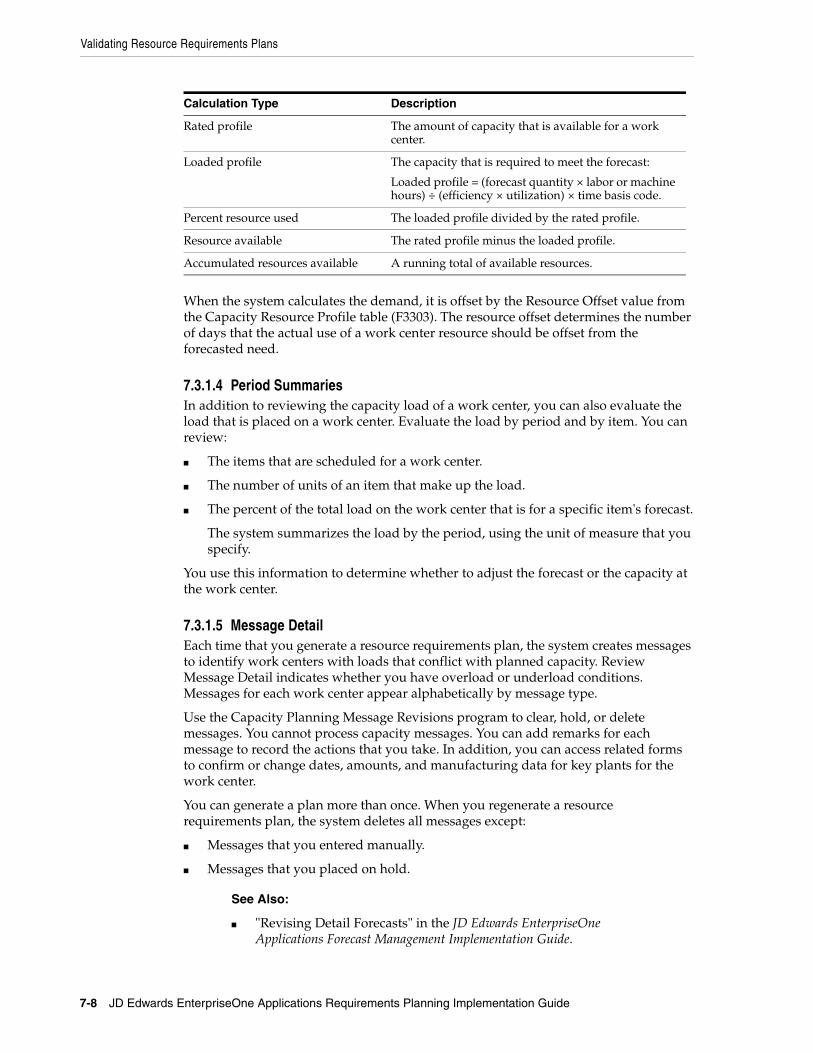
Calculation Type Description
Rated profile The amount of capacity that is available for a work center.
Loaded profile The capacity that is required to meet the forecast:
Loaded profile = (forecast quantity × labor or machine hours) ÷ (efficiency × utilization) × time basis code.
Percent resource used The loaded profile divided by the rated profile.
Resource available The rated profile minus the loaded profile.
Accumulated resources available A running total of available resources.
Validating Resource Requirements Plans
7-8 JD Edwards EnterpriseOne Applications Requirements Planning Implementation Guide
When the system calculates the demand, it is offset by the Resource Offset value from the Capacity Resource Profile table (F3303). The resource offset determines the number of days that the actual use of a work center resource should be offset from the forecasted need.
7.3.1.4 Period SummariesIn addition to reviewing the capacity load of a work center, you can also evaluate the load that is placed on a work center. Evaluate the load by period and by item. You can review:
■ The items that are scheduled for a work center.
■ The number of units of an item that make up the load.
■ The percent of the total load on the work center that is for a specific item's forecast.
The system summarizes the load by the period, using the unit of measure that you specify.
You use this information to determine whether to adjust the forecast or the capacity at the work center.
7.3.1.5 Message DetailEach time that you generate a resource requirements plan, the system creates messages to identify work centers with loads that conflict with planned capacity. Review Message Detail indicates whether you have overload or underload conditions. Messages for each work center appear alphabetically by message type.
Use the Capacity Planning Message Revisions program to clear, hold, or delete messages. You cannot process capacity messages. You can add remarks for each message to record the actions that you take. In addition, you can access related forms to confirm or change dates, amounts, and manufacturing data for key plants for the work center.
You can generate a plan more than once. When you regenerate a resource requirements plan, the system deletes all messages except:
■ Messages that you entered manually.
■ Messages that you placed on hold.
See Also:
■ "Revising Detail Forecasts" in the JD Edwards EnterpriseOne Applications Forecast Management Implementation Guide.

Validating Resource Requirements Plans
Planning Production Capacity 7-9
7.3.2 Forms Used to Validate Resource Requirements Plans
Form Name FormID Navigation Usage
Work With Capacity Message Summary
W3301A Daily Resource Requirements Planning (G3311), Review Dispatch Group
Determine how capacity affects work centers.
Review Work Center Load
W3313A Daily Resource Requirements Planning (G3311), Review Work Center Load
Determine required adjustments to capacity or forecast.
Work With Period Summary Review
W3312A Daily Resource Requirements Planning (G3311), Review Period Summary
Evaluate work center load.
Work With Capacity Messages
W3311B Daily Resource Requirements Planning (G3311), Review Message Detail
Release, clear, or place messages on hold.
Capacity Message Revisions
W3311A On the Work With Capacity Messages form, select Revisions from the Row menu.
Delete messages.
7.3.3 Setting Processing Options for Capacity Message Summary (P3301)Use these processing options to set default values and specify versions.
7.3.3.1 DefaultsThese processing options specify the default processing.
1. Enter the Critical Work Center Code to be displayed or blank for all Work CentersSpecify a code that indicates whether the work center is critical or not critical when the system calculates capacity. Values are:
N: Not a critical work center.
1: A critical work center in calculating RRP only.
2: A critical work center in calculating RCCP and CRP.
3: A critical work center in calculating RRP, RCCP, and CRP. The system also displays Type 3 work centers when you select Type 1 or Type 2 in this field.
4: Not a capacity work center. The system does not include this work center in capacity planning.
Note: The data selection is a system feature that processes certain groups of information with the RRP, RCCP, and CRP programs.
2. Enter the Capacity ModeSpecify a code indicating which planning is being used. Values are:
1: Resource Requirements
2: Rough Cut Capacity
Validating Resource Requirements Plans
7-10 JD Edwards EnterpriseOne Applications Requirements Planning Implementation Guide
3: Capacity Requirements
3. Enter the default Unit of MeasureSpecify a UDC (00/UM) that identifies the unit of measurement for an amount or quantity. For example, it can represent a barrel, box, cubic meter, liter, hour, and so on.
7.3.3.2 VersionsThis processing option specifies the version of the program.
Work Center Revision (P3006)Specify the version for the Work Center Revision program. If left blank, version ZJDE0001 will be used. This processing option identifies a specific set of data selection and sequencing settings for the application. Versions may be named using any combination of alpha and numeric characters.
7.3.4 Reviewing Dispatch GroupsAccess the Work With Capacity Message Summary form.
Dispatch GroupEnter a category code used to group work centers within an overall business unit.
For example, you can use this code to group similar machines operating from several work centers that report to one business unit.
All W/C (all work centers)Select the option to specify the type of processing for an event.
Critical W/C (critical work center)Enter a code that indicates whether the work center is critical or not critical when the system calculates capacity. Values are:
N: Not a critical work center.
1: A critical work center in calculating RRP only.
2: A critical work center in calculating RCCP and CRP.
3: A critical work center in calculating RRP, RCCP, and CRP. The system also displays Type 3 work centers when you select Type 1 or Type 2 in this field.
4: Not a capacity work center. The system does not include this work center in capacity planning.
Note: The data selection is a system feature that processes certain groups of information with the RRP, RCCP, and CRP programs.
Message TypeEnter a code that distinguishes different messages generated in Capacity Planning. Values are:
A: Warning messages
M: Manual messages
O: Over capacity
U: Under capacity
Validating Resource Requirements Plans
Planning Production Capacity 7-11
U/M (unit of measure)Enter a UDC (00/UM) that indicates the quantity in which to express an inventory item; for example, CS (case) or BX (box).
Outstanding MessagesEnter a brief description of an item, remark, or explanation.
This value provides a summary of the detailed messages for the work center. For example, if the work center has four under-capacity messages (message type U), this field displays UUUU.
7.3.5 Setting Processing Options for Capacity Load (P3313)Use these processing options to set default values and specify versions.
7.3.5.1 DefaultsThese processing options specify the defaults for processing.
1. Enter the Capacity ModeSpecify a code indicating which level of planning is being used. Values are:
1: Resource Requirements
2: Rough Cut Capacity
3: Capacity Requirements
2. Enter the User Defined Code for the list of row descriptions to appearSpecify a code that identifies the table that contains UDCs. The table is also referred to as a UDC type.
3. Enter the default Unit of MeasureSpecify a UDC (00/UM) that identifies the unit of measurement for an amount or quantity. For example, it can represent a barrel, box, cubic meter, liter, hour, and so on.
4. Enter the version of the Dispatch List program to call. The default is ZJDE0001.Specify a user-defined set of specifications that control how applications and reports run. You use versions to group and save a set of user-defined processing option values and data selection and sequencing options. Interactive versions are associated with applications (usually as a menu selection). Batch versions are associated with batch jobs or reports. To run a batch process, you must select a version.
7.3.5.2 VersionsThis processing option specifies the version of the Operation Dispatch Inquiry program. Enter the version for each program. If left blank, version ZJDE0001 will be used.
Operation Dispatch Inquiry (P31220)Specify the version of the program that the system uses. Specify a specific set of data selection and sequencing settings for the application.
7.3.6 Reviewing Work Center LoadsAccess the Review Work Center Load form.

Validating Resource Requirements Plans
7-12 JD Edwards EnterpriseOne Applications Requirements Planning Implementation Guide
DescriptionReview the type of calculation used to determine the work center load: Rated Profile, Loaded Profile,% Resource Used, Resource Available, Accumulated Resource Available.
7.3.7 Setting Processing Options for Period Summary (P3312)Use these processing options to set system defaults and specify versions.
7.3.7.1 DefaultsThese processing options specify the defaults used for processing.
1. Enter the Capacity ModeSpecify a code indicating which level of planning is being used. Values are:
1: Resource Requirements
2: Rough Cut Capacity
3: Capacity Requirements
2. Enter the default Unit of MeasureSpecify a UDC (00/UM) that identifies the unit of measurement for an amount or quantity. For example, it can represent a barrel, box, cubic meter, liter, hour, and so on.
3. Enter the version of the Dispatch List to callSpecify a user-defined set of specifications that control how applications and reports run. You use versions to group and save a set of user-defined processing option values and data selection and sequencing options. The default version is ZJDE0001.
7.3.7.2 VersionsThese processing options specify the version of the program. If left blank, version ZJDE0001 will be used.
1. Work Center Revision (P3006)Specify a specific set of data selection and sequencing settings for the application. Versions may be named using any combination of alpha and numeric characters.
If left blank, version ZJDE0001 will be used.
2. Forecast Revision (P3460)Specify a specific set of data selection and sequencing settings for the application. Versions may be named using any combination of alpha and numeric characters.
3. MRP/MPS Message Revision (P3411)Specify a specific set of data selection and sequencing settings for the application. Versions may be named using any combination of alpha and numeric characters.
4. Mfg Scheduling Workbench (P31225) (manufacturing scheduling workbench (P31225))Specify a specific set of data selection and sequencing settings for the application. Versions may be named using any combination of alpha and numeric characters.
7.3.8 Reviewing Period SummariesAccess the Work With Period Summary Review form.
Validating Resource Requirements Plans
Planning Production Capacity 7-13
Period EndDisplays the date that an item is scheduled to arrive or that an action is scheduled for completion.
UnitsDisplays a value that represents the available quantity, which might consist of the on-hand balance minus commitments, reservations, and backorders. You enter this value in the Branch/Plant Constants program.
PercentDisplays the percent received.
Order NumberDisplays a number that identifies an original document. This document can be a work order, a sales order, a forecast, a planned order, and so on.
7.3.9 Setting Processing Options for Capacity Planning Message Revisions (P3311)Use these processing options to specify system defaults.
7.3.9.1 DefaultsThese processing options specify the defaults used by the program.
1. Enter the Capacity ModeSpecify the capacity mode. Values are:
1: Resource Requirements
2: Rough Cut Capacity
3: Capacity Requirements
2. Enter the default Unit of MeasureSpecify a UDC (00/UM) that identifies the unit of measurement for an amount or quantity. For example, it can represent a barrel, box, cubic meter, liter, hour, and so on.
3. Enter the default version of Work Center Revision (P3006)Specify a specific set of data selection and sequencing settings for the application. Versions may be named using any combination of alpha and numeric characters.
7.3.10 Reviewing Capacity Planning Message DetailsAccess the Work With Capacity Messages form.
Message TypeDisplays a code that distinguishes different messages generated in Capacity Planning. Values are:
A: Warning messages
M: Manual messages
O: Over capacity
U: Under capacity
MessageReview the associated message.
To clear a message, select it and select Clear from the Row menu.
Validating Resource Requirements Plans
7-14 JD Edwards EnterpriseOne Applications Requirements Planning Implementation Guide
To view cleared messages, check the Include Cleared box and click Find.
To hold or release a message, select it and select Hold/Release from the Row menu. Messages on hold are highlighted. The system retains held messages until you manually release, clear, or delete them.
Total UnitsEnter a value that represents the available quantity, which might consist of the on-hand balance minus commitments, reservations, and backorders. You enter this value in the Branch/Plant Constants program.
To delete a message, access the Capacity Message Revisions form, select the message, and click Delete.
Planner RemarkEnter a remark about an item.
8
Planning Material Requirements 8-1
8Planning Material Requirements
This chapter contains the following topics:
■ Section 8.1, "Understanding MRP"
■ Section 8.2, "Analyzing Planning Input"
■ Section 8.3, "Generating Material Requirements Plans"
■ Section 8.4, "Analyzing Planning Output"
■ Section 8.5, "Processing Planning Output"
8.1 Understanding MRPSingle-facility planning encompasses the generation of a distribution or production plan for one facility. All supply and demand calculations occur within a single branch/plant. If an item is available in other branch/plants, it is not considered during single-facility planning.
8.2 Analyzing Planning InputThis section provides an overview of planning input, lists a prerequisite, and discusses how to:
■ Set processing options for Net Change Review (P3402).
■ Review items for net change.
8.2.1 Understanding Planning InputBefore generating a requirements plan, planners review input data, which is used by the planning system, for accuracy and changes. Data that is used by requirements planning is derived from sales orders, forecasts, bills of material, and item net change activities.
If forecasts change in response to market conditions, these changes affect the requirements plan generation. An inquiry on the bill of material provides information about item lead time and part availability.
8.2.1.1 Item Net ChangeUse the Net Change Review program to review items that have changed, either through planned or unplanned activities throughout the JD Edwards EnterpriseOne Requirements Planning system. You can locate a selected group of items by planner
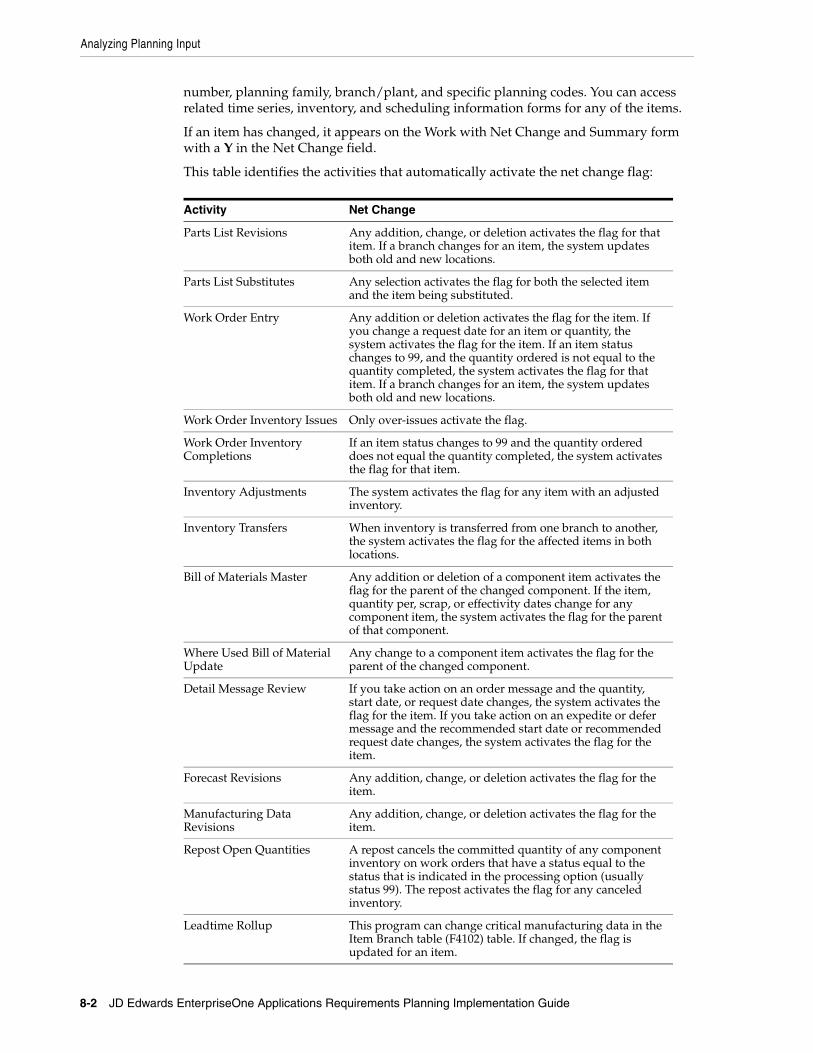
Analyzing Planning Input
8-2 JD Edwards EnterpriseOne Applications Requirements Planning Implementation Guide
number, planning family, branch/plant, and specific planning codes. You can access related time series, inventory, and scheduling information forms for any of the items.
If an item has changed, it appears on the Work with Net Change and Summary form with a Y in the Net Change field.
This table identifies the activities that automatically activate the net change flag:
Activity Net Change
Parts List Revisions Any addition, change, or deletion activates the flag for that item. If a branch changes for an item, the system updates both old and new locations.
Parts List Substitutes Any selection activates the flag for both the selected item and the item being substituted.
Work Order Entry Any addition or deletion activates the flag for the item. If you change a request date for an item or quantity, the system activates the flag for the item. If an item status changes to 99, and the quantity ordered is not equal to the quantity completed, the system activates the flag for that item. If a branch changes for an item, the system updates both old and new locations.
Work Order Inventory Issues Only over-issues activate the flag.
Work Order Inventory Completions
If an item status changes to 99 and the quantity ordered does not equal the quantity completed, the system activates the flag for that item.
Inventory Adjustments The system activates the flag for any item with an adjusted inventory.
Inventory Transfers When inventory is transferred from one branch to another, the system activates the flag for the affected items in both locations.
Bill of Materials Master Any addition or deletion of a component item activates the flag for the parent of the changed component. If the item, quantity per, scrap, or effectivity dates change for any component item, the system activates the flag for the parent of that component.
Where Used Bill of Material Update
Any change to a component item activates the flag for the parent of the changed component.
Detail Message Review If you take action on an order message and the quantity, start date, or request date changes, the system activates the flag for the item. If you take action on an expedite or defer message and the recommended start date or recommended request date changes, the system activates the flag for the item.
Forecast Revisions Any addition, change, or deletion activates the flag for the item.
Manufacturing Data Revisions
Any addition, change, or deletion activates the flag for the item.
Repost Open Quantities A repost cancels the committed quantity of any component inventory on work orders that have a status equal to the status that is indicated in the processing option (usually status 99). The repost activates the flag for any canceled inventory.
Leadtime Rollup This program can change critical manufacturing data in the Item Branch table (F4102) table. If changed, the flag is updated for an item.
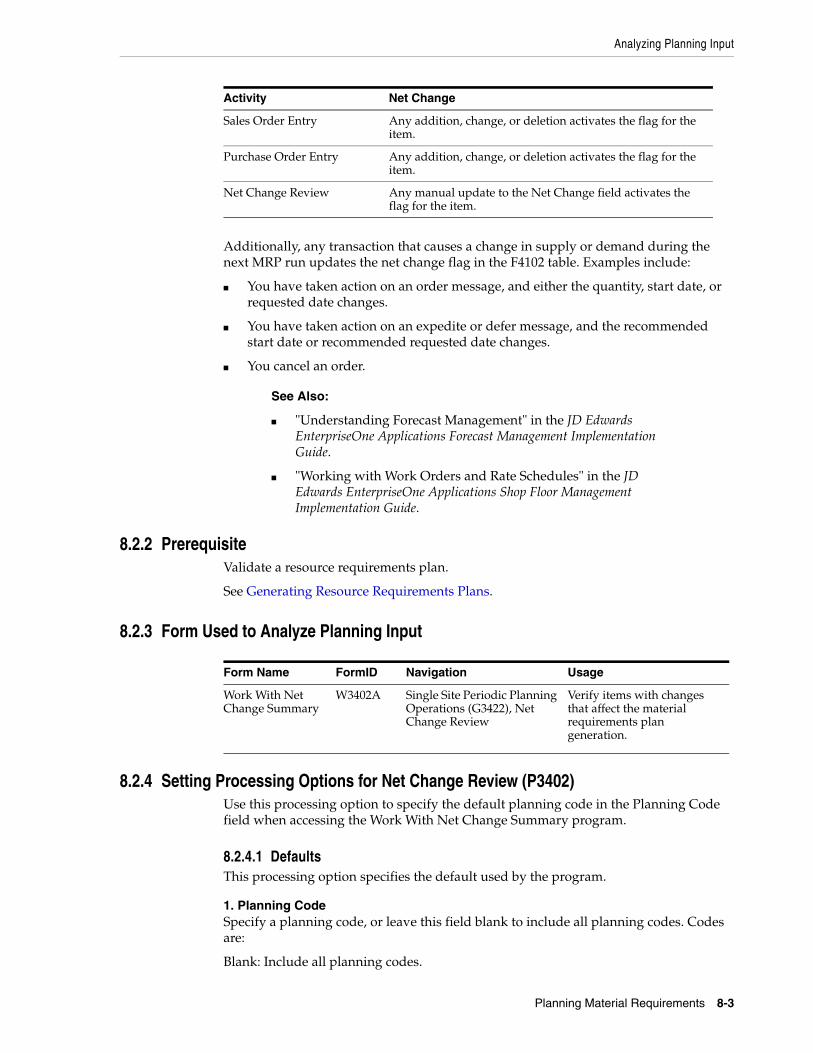
Analyzing Planning Input
Planning Material Requirements 8-3
Additionally, any transaction that causes a change in supply or demand during the next MRP run updates the net change flag in the F4102 table. Examples include:
■ You have taken action on an order message, and either the quantity, start date, or requested date changes.
■ You have taken action on an expedite or defer message, and the recommended start date or recommended requested date changes.
■ You cancel an order.
See Also:
■ "Understanding Forecast Management" in the JD Edwards EnterpriseOne Applications Forecast Management Implementation Guide.
■ "Working with Work Orders and Rate Schedules" in the JD Edwards EnterpriseOne Applications Shop Floor Management Implementation Guide.
8.2.2 PrerequisiteValidate a resource requirements plan.
See Generating Resource Requirements Plans.
8.2.3 Form Used to Analyze Planning Input
Form Name FormID Navigation Usage
Work With Net Change Summary
W3402A Single Site Periodic Planning Operations (G3422), Net Change Review
Verify items with changes that affect the material requirements plan generation.
8.2.4 Setting Processing Options for Net Change Review (P3402)Use this processing option to specify the default planning code in the Planning Code field when accessing the Work With Net Change Summary program.
8.2.4.1 DefaultsThis processing option specifies the default used by the program.
1. Planning CodeSpecify a planning code, or leave this field blank to include all planning codes. Codes are:
Blank: Include all planning codes.
Sales Order Entry Any addition, change, or deletion activates the flag for the item.
Purchase Order Entry Any addition, change, or deletion activates the flag for the item.
Net Change Review Any manual update to the Net Change field activates the flag for the item.
Activity Net Change
Generating Material Requirements Plans
8-4 JD Edwards EnterpriseOne Applications Requirements Planning Implementation Guide
0: Not planned by master production schedule (MPS), MRP, or distribution requirements planning (DRP).
1: Planned by MPS or DRP.
2: Planned by MRP.
3: Planned by MRP with additional independent forecast.
4: Planned by MPS, parent in planning bill.
5: Planned by MPS, component in planning bill.
These codes are hard-coded.
8.2.5 Reviewing Items for Net ChangeAccess the Work With Net Change Summary form.
Planner NumberEnter the address number of the material planner to limit the search for only those items associated with this planner.
Net ChangeReview the net change value.
If an item has changed, it appears on the Work with Net Change and Summary form with a Y in the Net Change field.
You can update the net change flag from the Net Change Review program. Set the security parameters so that only appropriate personnel, such as the master scheduling supervisors, have access.
8.3 Generating Material Requirements PlansThis section provides overviews of master schedules, net change planning schedules, and material requirements planning and discusses how to set processing options for MRP/MPS Requirements Planning (R3482).
8.3.1 Understanding Master SchedulesYou can generate a master schedule for a single item or all items. When you generate a master schedule, the system evaluates selected information, performs calculations, and recommends a time-phased planning schedule for all selected items. At a minimum, you should generate a master schedule weekly to keep the plan current.
DRP Regeneration and MPS Regeneration use versions of the MRP/MPS Requirements Planning program to produce a single-level DRP or MPS schedule for all items that meet the data selection criteria. The program:
■ Reads the selected forecast and sales orders.
■ Uses data from the DRP/MPS/MRP inclusion rules to calculate requirements for master planned items.
■ Does not explode planned orders to the bill of material components.
The MRP Regeneration version of the MRP/MPS Requirements Planning program explodes planned orders for bill of material items to produce a multilevel material plan.
Generating Material Requirements Plans
Planning Material Requirements 8-5
Before the program generates a schedule, it deletes the message and time series tables for the selected items.
When you set up the versions to generate a planning schedule, you should consider:
■ Data selection: base the data selection on branch/plant, category codes (usually master planning family), and planning code.
Any selection from based-on table fields can be processed.
■ Data sequence: copy the data sequence from the report example.
Do not change this sequence or unpredictable results might occur.
8.3.2 Understanding Net Change Planning SchedulesYou can set the Generation Mode processing option to use net change processing if you want to have Regeneration and Net Change versions. With net change processing, the system includes only those items that have changed since the last generation. Use the Net Change Review program to determine which items to include in the net change generation.
DRP Net Change, MPS Net Change, and MRP Net Change are versions of the MRP/MPS Requirements Planning program. Use a processing option to specify net change. You can further define the data selection to include only specific items that appear on the Work With Net Change Summary form. When you run DRP Net Change, MPS Net Change, or MRP Net Change, the system:
■ Evaluates selected information.
■ Performs calculations.
■ Generates a time series and messages for the selected items.
The system selects items from the Net Change Review program that are based on:
■ Bill of material changes.
■ Inventory transactions.
■ Forecast adjustments.
■ Work order changes.
■ Purchase order changes.
■ Lead time roll-up that results in new lead time values.
■ Sales order changes.
■ Changes in parent order requirements.
You should run net change on a regular basis to continually update the schedule. The program writes to the Action Message, Pegging, and Time Series tables. You can view the information that is generated by this program online by using the time series and message review programs.
8.3.3 Understanding Material Requirements PlanningUse the MRP- Gross Regeneration version of MRP/MPS Requirements Planning to produce a single-facility MRP planning schedule for the items that you select. Alternatively, you can use the MRP - Net Change version of MRP/MPS Requirements Planning to produce a single-facility MRP planning schedule. You can generate a material requirements plan for:
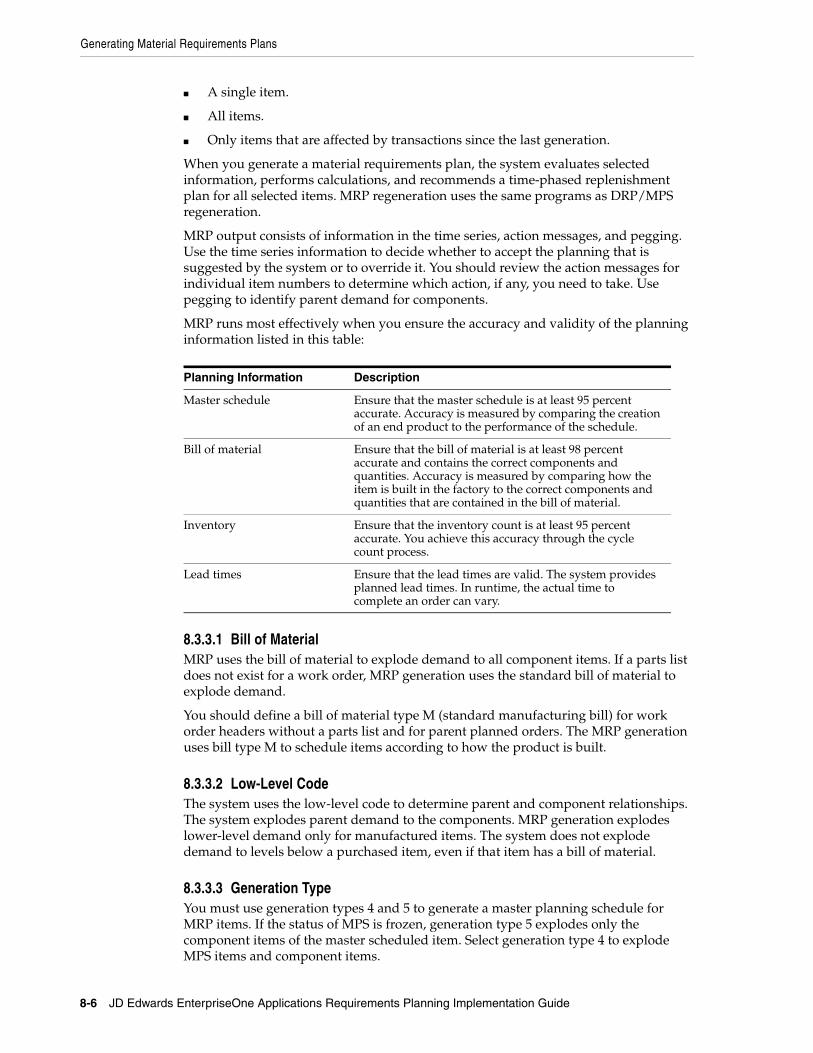
Generating Material Requirements Plans
8-6 JD Edwards EnterpriseOne Applications Requirements Planning Implementation Guide
■ A single item.
■ All items.
■ Only items that are affected by transactions since the last generation.
When you generate a material requirements plan, the system evaluates selected information, performs calculations, and recommends a time-phased replenishment plan for all selected items. MRP regeneration uses the same programs as DRP/MPS regeneration.
MRP output consists of information in the time series, action messages, and pegging. Use the time series information to decide whether to accept the planning that is suggested by the system or to override it. You should review the action messages for individual item numbers to determine which action, if any, you need to take. Use pegging to identify parent demand for components.
MRP runs most effectively when you ensure the accuracy and validity of the planning information listed in this table:
Planning Information Description
Master schedule Ensure that the master schedule is at least 95 percent accurate. Accuracy is measured by comparing the creation of an end product to the performance of the schedule.
Bill of material Ensure that the bill of material is at least 98 percent accurate and contains the correct components and quantities. Accuracy is measured by comparing how the item is built in the factory to the correct components and quantities that are contained in the bill of material.
Inventory Ensure that the inventory count is at least 95 percent accurate. You achieve this accuracy through the cycle count process.
Lead times Ensure that the lead times are valid. The system provides planned lead times. In runtime, the actual time to complete an order can vary.
8.3.3.1 Bill of MaterialMRP uses the bill of material to explode demand to all component items. If a parts list does not exist for a work order, MRP generation uses the standard bill of material to explode demand.
You should define a bill of material type M (standard manufacturing bill) for work order headers without a parts list and for parent planned orders. The MRP generation uses bill type M to schedule items according to how the product is built.
8.3.3.2 Low-Level CodeThe system uses the low-level code to determine parent and component relationships. The system explodes parent demand to the components. MRP generation explodes lower-level demand only for manufactured items. The system does not explode demand to levels below a purchased item, even if that item has a bill of material.
8.3.3.3 Generation TypeYou must use generation types 4 and 5 to generate a master planning schedule for MRP items. If the status of MPS is frozen, generation type 5 explodes only the component items of the master scheduled item. Select generation type 4 to explode MPS items and component items.
Generating Material Requirements Plans
Planning Material Requirements 8-7
8.3.3.4 Frozen OrdersIf you identify work orders or purchase orders for an item as frozen, the program does not replan any orders for the item. Instead, you receive a frozen order message for that item.
8.3.3.5 Data SelectionTo run an MRP regeneration, base the selection on branch/plant, category codes, and planning code. The system can process any selection from based-on table fields.
To run a net change generation, set the net change flag to 1 to select items that have changed since the program was last generated.
8.3.3.6 Requirements Planning for Lot-Controlled Items with Safety StockCompanies that work with lot-controlled inventory must consider expiration dates when managing this inventory. Satisfying demand from item lots before they expire is a key to efficient use of resources. The ability to satisfy demand from inventory that is set to expire but does not expire by the demand date overrides the need to maintain safety stock because safety stock can easily be replenished. Safety stock, including lots that are due to expire in the future, is considered available to meet demand.
When you generate requirement plans using the MRP/MPS Requirements Planning (R3482) or the Master Planning Schedule program (R3483), you can set up the system to use expiring lots from safety stock before generating additional planned order quantities. To ensure that expiring lots are included and that safety stock is decreased to satisfy demand, you must set the following processing options for the planning programs:
■ Include Lot Expiration Dates = 1 (Include)
■ Decrease safety stock = 1 (Decrease)
As a result, the system reduces safety stock by expiring lots, starting with the lots that are set to expire first, and only creates new planned orders to replenish safety stock and to satisfy any demand that exceeds the available quantity in safety stock.
The following example illustrates how the results of this process are displayed in the time series.
Assume you have safety stock of 20 lot-controlled items with 10 items to expire in the near future. You also have additional inventory of 20 that is available. Your planning system tells you that you have forecasted demand of 30. To satisfy demand, you can use regular inventory and take the 10 items that are due to expire from safety stock.
The time series indicates a reduction in the quantity of expired lot items (-LEXP) and a planned order quantity (+PLO) that is smaller than it would have been, had the safety stock been completely respected. You thus reduce waste by using lot-controlled items before they expire and avoid over-planning the item quantity needed for replenishment.
8.3.4 Setting Processing Options for MRP/MPS Requirements Planning (R3482)From Single Site Periodic Planning Operations, select DRP Regeneration, MPS Regeneration, or MRP Regeneration. For a net change version, select DRP Net Change, MPS Net Change, or MRP Net Change.
Generating Material Requirements Plans
8-8 JD Edwards EnterpriseOne Applications Requirements Planning Implementation Guide
8.3.4.1 HorizonThese processing options control the dates and time periods that the program uses when creating the plan.
1. Generation Start DateSpecify the date that the program uses to start the planning process. This date is also the beginning of the planning horizon.
2. Past Due PeriodsSpecify a value. The program includes supply and demand from this number of periods prior to the generation start date. Values are:
0: 0 periods (default)
1: 1 period
2: 2 periods
3. Planning Horizon PeriodsSpecify the periods used in the planning horizon.
Number of planning daysSpecify the number of days to be included in the plan. For example, when you view the time series, you see daily data for the number of planning days, then weekly data for the number of planning weeks, and then monthly data for the number of planning months.
Number of planning weeksSpecify the number of weeks to be included in the plan. For example, when you view the time series, you see daily data for the number of planning days, then weekly data for the number of planning weeks, and then monthly data for the number of planning months.
Number of planning monthsSpecify the number of months to be included in the plan. For example, when you view the time series, you see daily data for the number of planning days, then weekly data for the number of planning weeks, and then monthly data for the number of planning months.
8.3.4.2 ParametersThese processing options control processing criteria.
1. Generation ModeSpecify the generation mode. A gross regeneration includes every item in the data selection. A net change includes only those items in the data selection that have changed since the last time you ran the program. Values are:
1: Net change
2: Gross regeneration
2. Generation TypeSpecify the generation type. See the help for the Parameters tab for detailed information. Values are:
1: Single-level MPS/DRP.
2: Planning bill.
3: Multilevel MPS.
Generating Material Requirements Plans
Planning Material Requirements 8-9
4: MRP with or without MPS.
5: MRP with frozen MPS.
The generation type selection is important:
■ Generation Type 1, single-level MPS/DRP.
You can use this generation type either in a distribution environment for purchased parts with no parent-to-component relationship, or in a manufacturing environment with parent-to-component relationships. When you use this generation type, the system performs these actions:
- Produces a time series for each item that you specify in the data selection with a planning code of 1 on the Plant Manufacturing Data tab of the Work with Item Branch form. This code indicates whether the item is manufactured or purchased.
- Does not explode demand down to the components for manufactured items. Use generation type 1 if you first want to process only the master-scheduled end-items. Thus, you can stabilize the schedule before placing demand on the components.
- Does not create pegging records.
■ Generation Type 2, planning bill.
Use this generation type to plan for items that have a planning bill of material. A planning bill has a pseudo parent item that is never actually manufactured; rather, it is used to represent the average composition of a group of products.
This generation type explodes a parent forecast to its components by multiplying the parent's forecast by the feature planned percent (from the bill of material) for each component. The program then creates a new forecast for the components. For example, a pseudo parent item bike might have a forecast of 1,000. The program distributes that forecast into a forecast of 100 mountain bikes, 500 touring bikes, and 400 commuter bikes.
To use this generation type, set up the following information correctly:
- The pseudo parent item must have a planning code of 4 on the Additional System Information form: Plant Manufacturing tab.
- The components must have a planning code of 5.
- The feature planned percents must be set up correctly in the bill of material.
- You must specify in the processing options the forecast type to read from the parent and to create for the components.
■ Generation Type 3, multilevel MPS.
This generation type is an alternative to generation type 1 and performs a complete top-to-bottom processing of master-scheduled items. For all parent items that you specify in the data selection, the program explodes demand down to the components. You must specify all of the items to be processed in the data selection, not just the parent items. The program also creates pegging records.
■ Generation Type 4, MRP with or without MPS.
This generation type performs the same functions as generation type 3. After you perform a complete generation and stabilize the master schedule, you can limit data selection to MRP items (with planning codes of 2 or 3), thereby reducing processing time. This action is possible because the system still stores demand from the master-scheduled items in the MPS/MRP/DRP Lower Level Requirements File table (F3412).
Generating Material Requirements Plans
8-10 JD Edwards EnterpriseOne Applications Requirements Planning Implementation Guide
■ Generation Type 5, MRP with frozen MPS.
This generation type freezes the master schedule after it has been stabilized. Before using this generation type, make all necessary adjustments to master-scheduled items and release orders to provide supply for the demand. This generation type freezes the entire planning horizon, which is similar to the way the freeze fence freezes a part of the horizon. The results of running this generation type are:
- No new orders will be planned.
- No messages for existing orders will be created.
- The adjusted ending available quantity can be negative.
- Demand is exploded down to components from existing work orders only. No -PWO demand from parent items exists; only -FWO demand exists.
3. UDC TypeSpecify the user-defined code (UDC) table (system 34) that contains the list of quantity types to be calculated and written to the F3413 table. The default value is QT.
4. Version of Supply/Demand Inclusion RulesSpecify which version of supply/demand inclusion rules the program reads. These rules define the criteria that are used to select items for processing.
8.3.4.3 On Hand DataThese processing options control how the program calculates on-hand inventory.
1. Include Lot Expiration DatesSpecify whether the system performs lot validations when calculating on-hand inventory. Values are:
Blank: Do not include.
1: Include.
If you leave this processing option blank, the system does not perform lot validations when calculating on-hand inventory. If you set this processing option to 1, the system performs lot validations when calculating on-hand inventory.
See Also:
"Setting Up Dates for Lots" in the JD Edwards EnterpriseOne Applications Inventory Management Implementation Guide.
2. Safety Stock DecreaseSpecify whether to plan based on a beginning available quantity from which the safety stock quantity has been subtracted. Values are:
Blank: Do not decrease.
1: Decrease.
3. Receipt Routing QuantitiesSpecify whether items in transit, in inspection, or otherwise dispositioned are considered in the beginning available calculation or they are part of the In Receipt (+IR) bucket on the time series.
Quantity in TransitIn a manufacturing environment, sometimes it is necessary to establish where stock is in order to determine whether it is available for immediate use. Enter 1 if you want

Generating Material Requirements Plans
Planning Material Requirements 8-11
quantities in transit to be included in the Beginning Available calculation on the time series. Otherwise, the program includes these quantities in the In Receipt (+IR) line of the time series. The quantities are still considered available by this program; the only difference is how you view the quantities in the time series. Values are:
Blank: Do not include in on-hand inventory.
1: Include in on-hand inventory.
Quantity in InspectionIn a manufacturing environment, sometimes it is necessary to establish where stock is in order to determine whether it is available for immediate use. Enter 1 if you want quantities in inspection to be included in the Beginning Available calculation. Otherwise, the program includes these quantities in the In Receipt (+IR) line of the time series. The quantities are still considered available by this program; the only difference is how you view the quantities in the time series. Values are:
Blank: Do not include in on-hand inventory.
1: Include in on-hand inventory.
User Defined Quantity 1 and User Defined Quantity 2In a manufacturing environment, sometimes it is necessary to establish where stock is, in order to determine whether it is available for immediate use. Enter 1 if you want these user defined quantities (defined on the Receipt Routings Revisions form in the Update Operation 1 or Update Operation 2 fields) to be included in the Beginning Available calculation. Otherwise, the program includes these quantities in the In Receipt (+IR) line of the time series. The quantities are still considered available by this program; the only difference is how you view the quantities in the time series. Values are:
Blank: Do not include in on-hand inventory.
1: Include in on-hand inventory.
4. Lot Hold Codes (up to 5)Specify the lots to be included in the calculation of on-hand inventory. You can enter a maximum of five lot hold codes (41/L).
Blank: Do not include held lots in calculation of on-hand inventory.
*: Include all held lots in calculation of on-hand inventory.
5. Include Past Due Rates as a supplySpecify whether the system considers open quantities from rate schedules that are past due as a supply. If you enter a 1 in this processing option, the system includes these quantities in the calculation of the rate schedule unadjusted (+RSU) and the rate schedule adjusted (+RS) quantities. Values are:
Blank: Do not consider.
1: Consider.
8.3.4.4 ForecastingThese processing options control what forecast types the program reads as demand as well as the forecast consumption that is used by the system.
1. Forecast Types Used (up to 5)Specify up to five forecast types.
Generating Material Requirements Plans
8-12 JD Edwards EnterpriseOne Applications Requirements Planning Implementation Guide
Forecasts are a source of demand. You can create forecasts using 12 different forecast types (34/DF) within the JD Edwards EnterpriseOne Forecasting system from Oracle. One is considered the Best Fit (BF) type compared to an item's history of demand. Use this processing option to define which forecast quantities created by which forecast type are included in the planning process. Enter multiple values with no spaces, for example: 0102BF.
2. Forecast Type For Planning Bills/Forecast Consumption By CustomerSpecify the forecast type (UDC 34/DF) that the system uses to create forecasts for components when you explode generation type 2 planning bills. This value must equal that of the Forecast Types Used processing option for this feature.
When you set the Forecast Consumption Logic processing option to 2 (forecast consumption by customer), this processing option specifies the forecast type (34/DF) that is used to create a forecast for the actual daily demand by the customer. This value cannot equal the value for the Forecast Types Used processing option.
3. Forecast Consumption LogicSpecify whether to use forecast consumption logic during the requirements planning processing. Values are:
Blank: Do not use forecast consumption.
1: Use forecast consumption. This value invokes forecast consumption logic applied to aggregate sales order and forecast quantities within the forecast consumption period for selected items with a planning fence rule equal to H.
2: Use forecast consumption by customer. This value invokes forecast consumption logic applied to sales order and forecast quantities for individual customers. Use this value in conjunction with the Forecast Type for Planning Bills / Forecast Consumption by Customer processing option.
4. Default Customer Address Relationship for Forecast Consumption by CustomerSpecify which address book number on the sales order the system uses for calculation when you use forecast consumption by customer logic. Values are:
1: Ship to address book number.
2: Sold to address book number.
8.3.4.5 Document TypesThese processing options establish default document types.
1. Purchase OrdersSpecify the document type used when the system suggests creating purchase orders.
When you receive messages related to purchase order creation, this document type appears as the default. The default value is OP.
2. Work OrdersSpecify the document type used when the system suggests creating work orders.
When you receive messages related to work order creation, this document type appears as the default. The default value is WO.
3. Rate SchedulesSpecify the document type used when the system suggests creating rate schedules.
Generating Material Requirements Plans
Planning Material Requirements 8-13
When you receive messages that relate to rate schedule creation, this document type appears as the default. Enter the UDC 00/DT of the document type for the rate schedule that you want to use. The default value is SC.
8.3.4.6 Lead TimesUse safety lead times to allow extra time for delays in receipt or production. Use damper days to filter out unwanted messages.
1. Purchased Item Safety Lead TimeSpecify a value to be used in the lead time calculation.
For items with stocking type P, the program adds the value that you enter here to the item's level lead time to calculate the total lead time.
2. Manufactured Item Safety Lead TimeSpecify a value to be used in the lead time calculation.
For items with stocking type M, the program adds the value that you enter here to the item's level lead time to calculate the total lead time.
3. Expedite Damper DaysSpecify the number of days before the system generates an Expedite message. If the number of days between the date when the order is actually needed and the due date of the order is less than the number of days entered here, the system does not generate an Expedite message.
4. Defer Damper DaysSpecify the number of days before the system generates a Defer message. If the number of days between the date when the order is actually needed and the due date of the order is less than the number of days entered here, the system does not generate a Defer message.
8.3.4.7 PerformanceThese processing options define output, and increase or decrease processing time.
1. Clear F3411/F3412/F3413 Tables
Caution: Use this processing option with extreme caution!
If you enter 1, the system purges records in the F3411, F3412, and MPS/MRP/DRP Summary File (F3413) tables.
Access to this program should be limited. If multiple users run this program concurrently with this processing option set to 1, a record lock error results and prevents complete processing. Values are:
Blank: Do not clear tables.
1: Clear tables.
2. Input B/P Where Planning Tables Will Be Cleared (input branch/plant where planning tables will be cleared)Specify which branch/plant records in the F3411, F3412, and F3413 tables are purged.
Note: This option is only valid when the Clear F3411/F3412/F3413 Tables processing option on the Performance tab is set to 1 and the Delete Branch/Plant processing option has a valid branch/plant.
This processing option enables a preprocess purge of these tables. If this processing option is not enabled or set to Blank, the system purges records for a given branch/plant and item as you plan the item. Depending on processing option combinations, these scenarios can occur:
Example 1:
Clear F3411/F3412/F3413 Tables is set to 1.
(a) Delete Branch/Plant is set to Blank.
All records from the three tables will be prepurged.
(b) Delete Branch/Plant contains a valid branch/plant number.
Records for all the items that belong to the valid branch/plant will be prepurged from the three tables.
(c) Delete Branch/Plant contains an invalid branch/plant number.
No records will be prepurged from the three tables.
Example 2:
Clear F3411/F3412/F3413 Tables is set to Blank.
Delete Branch/Plant is not active.
No records from any of the three tables will be prepurged.
Generating Material Requirements Plans
8-14 JD Edwards EnterpriseOne Applications Requirements Planning Implementation Guide
3. Initialize MPS/MRP Print Code.Specify a value to initialize records in the F4102 table.
If you enter 1 in this processing option, the program initializes every record in the F4102 table by setting the Item Display Code (MRPD) to Blank.
If you leave this field blank, processing time is decreased. The system does not clear the records in the F4102 table.
Regardless of how you set this processing option for each item in the data selection, the MRPD field is updated as follows:
■ 1 if messages were not created.
■ 2 if messages were created.
The Print Master Production Schedule program (R3450) enables you to enter data selection based on the MRPD field. Values are:
Blank: Do not initialize.
1: Initialize.
4. Messages And Time Series For Phantom ItemsSpecify whether the program generates messages and time series for phantom items. Values are:
Blank: Do not generate.
1: Generate.
Generating Material Requirements Plans
Planning Material Requirements 8-15
5. Ending Firm Order StatusSpecify the work order status at which messages are no longer exploded to components. If you leave this processing option blank, all messages are exploded to components.
6. Extend Rate Based AdjustmentsSpecify whether adjustments for rate based items are exploded to components, thereby creating messages for the components. Values are:
Blank: Do not extend.
1: Extend.
7. Closed Rate StatusEnter the status of closed rates. When planning for a rate based item, the program does not consider rate orders at this status or higher.
8. Set Key Definition For Table F3411 and 9. Set Key Definition For Table F3412Specify to run multiple MRP/MPS jobs concurrently. The value that you enter specifies the range for the number of records in the F3411 and F3412 tables for a given run. This value must be large enough to include the number of records that will be generated for the table. For example, if you enter a value of 8 for the first run and 10 for the second run, the range of records that the system reserves for two simultaneous MRP/MPS runs would be as follows:
First run:
The system reserves records in the range of [1] to [1 × 10^8], or 1 through 100,000,000.
Second run:
The system reserves records in the range of [1 × 10^8 + 1] to [2 × 10^10], or 100,000,001 through 20,000,000,000.
Note: The values that you enter are the exponents in the previous calculations. Enter a value from 7 to 14. If you do not enter a value, the system uses 10.
This processing option is applicable only when a subsequent MRP/MPS job is submitted while an existing job is currently running. The number of records that the MRP/MPS Requirements Planning program and Master Planning Schedule - Multiple Plant program (R3483) generate is based on the values that you enter in this processing option. You determine the optimum number of records that the system includes. All values should be the same for all versions. If version settings differ, the system might generate unpredictable results.
10. Suppress Time SeriesSpecify whether the MRP/MPS Requirements Planning program generates the time series. Values are:
Blank: Generate.
1: Do not generate.
Note: Performance improves if the system does not generate the time series.
Generating Material Requirements Plans
8-16 JD Edwards EnterpriseOne Applications Requirements Planning Implementation Guide
11. Planning Control UDC TypeSpecify the UDC table in system 34 that contains the list of planning control flags. The default value is PC.
8.3.4.8 Mfg ModeThese processing options define whether the system generates plans for process items, projects, and configurator items.
1. Process PlanningSpecify plan generation for process items.
If you use process manufacturing, enter 1 to generate the plan based on the forecasts of the co-products and by-products for the process. The program then creates messages for the process. Values are:
Blank: Run Discrete planning.
1: Run Process planning.
2. Project PlanningSpecify whether the system includes supply and demand from items that are associated with Engineer to Order (ETO) projects or Project Manufacturing production numbers.
Project-specific items have a stocking type of G or H. ETO project-specific items have a Special Handling Code of type P. Values are:
Blank: Do not include items associated with ETO projects or Project Manufacturing production numbers.
1: Include items associated with ETO projects.
2: Include items associated with Project Manufacturing production numbers.
3. Configurator Components TableSpecify whether the system processes configurator components from the Configurator Component table (F3215) and adds them to the Sales Order Detail File table (F4211) and Work Order Parts List table (F3111). If you enter a 1 in this processing option, the system processes the items on the F3215 table as demand items.
Blank: Do not process.
1: Process.
8.3.4.9 ParallelThese processing options specify the number of processors that the system uses during parallel processing. These options also specify whether the system runs preprocessing during parallel processing.
1. Number of Subsystem JobsSpecify the number of subsystems in a server.
The default is 0 (zero).
2. Pre ProcessingSpecify whether the system runs preprocessing during parallel processing. During preprocessing, the system checks supply and demand and plans only the items within supply and demand. Preprocessing improves performance when you run MRP and is valid only when the number of items actually planned is less than the total number of items in the data selection. Values are:

Analyzing Planning Output
Planning Material Requirements 8-17
Blank: Do not run preprocessing.
1: Run preprocessing.
8.4 Analyzing Planning OutputThis section provides an overview of planning output, lists a prerequisite, and discusses how to:
■ Set processing options for MPS Time Series (P3413).
■ Review the time series.
■ Review messages for a planning family.
■ Set processing options for MRP/MPS Detail Message Revisions (P3411).
■ Review detail messages.
■ Set processing options for Pegging Inquiry (P3412).
■ Review pegging demand.
8.4.1 Understanding Planning OutputWhen generating a planning schedule, the planning system evaluates selected supply and demand information, performs calculations, and recommends a time-phased planning schedule for selected items. Planners are presented with action and warning messages that suggest new orders or the rescheduling of existing orders. Other planning tools include supply and demand inquiry and pegging records.
8.4.1.1 MPS/DRP Time SeriesThe time series is a record of time-phased supply and demand netting for selected items. The system retrieves this data from the most recent generation or net change that has been run.
Use the DRP or MPS versions of the MPS Time Series program to review the master schedule and decide whether to accept the planning that the system suggests or to override it. You should review the action messages for individual item numbers to determine what action, if any, to take.
Use processing options in the MRP/MPS Requirements Planning program to set up daily, weekly, or monthly time periods.
This table presents the data contained in the DRP and MPS time series:
Data Description
Quantities for specific time periods
You can review:
■ Time-phased inventory activity in any unit of measure.
■ Available-to-promise quantities in any valid unit of measure.
■ Time fences and the lead time at the item level.
■ Cumulative and manufacturing lead time occurrences.

Analyzing Planning Output
8-18 JD Edwards EnterpriseOne Applications Requirements Planning Implementation Guide
8.4.1.2 MRP Time SeriesThe Time Series - MRP inquiry is the same program as that used to inquire on the DRP/MPS time series. Use the appropriate version of the MPS Time Series program to review the item series for the material requirements plan. You can vary the settings in the processing options to accommodate the different requirements for MRP.
Use the MPS/MRP/DRP Key Window program (P34KEY) to review the quantity types that are generated for the material requirements plan. This table describes the quantity types:
Adjusted or unadjusted period quantities
Period quantities are either adjusted or unadjusted.
The calculations for adjusted quantities assume that the user will process the messages.
The calculations for unadjusted quantities assume that the user will not process the action messages. The U at the end of a quantity type indicates that period quantities are unadjusted.
Forecast consumption When you use planning time fence rule G, C, or H, which calculate demand based on the greater of forecast or customer orders, the forecast is consumed. Consumed means that the forecast is reduced by the amount of the customer demand in the same or related period.
Note: The time series displays the aggregate demand and forecast for all customers. If you are using forecast consumption by customer functionality, the aggregate forecast and customer demand quantities might appear out of balance from standard forecast consumption.
Various display formats You can display the time series in different formats. For example, you can:
■ Summarize all demand lines into one demand line.
■ Summarize all supply lines into one supply line.
■ Select rows of information to select or suppress.
■ Toggle between two different quantity type tables as set up in the processing options.
Access to other programs You can access these other programs while reviewing the time series:
■ Supply/Demand Inquiry and Pegging Inquiry to determine where higher level demands are being generated.
■ MRP/MPS Detail Message Revisions to review message detail and take appropriate actions.
■ Additional System Info to verify item setup details.
■ Detail Forecast Revisions to review item forecasts and sales history.
■ Rate Schedule Revisions to review item rate schedules.
■ MPS or DRP generation to run an online regeneration for the displayed item.
Quantity Type Description
Planned order (+PLO) Represents recommended replenishment orders for an item.
Data Description
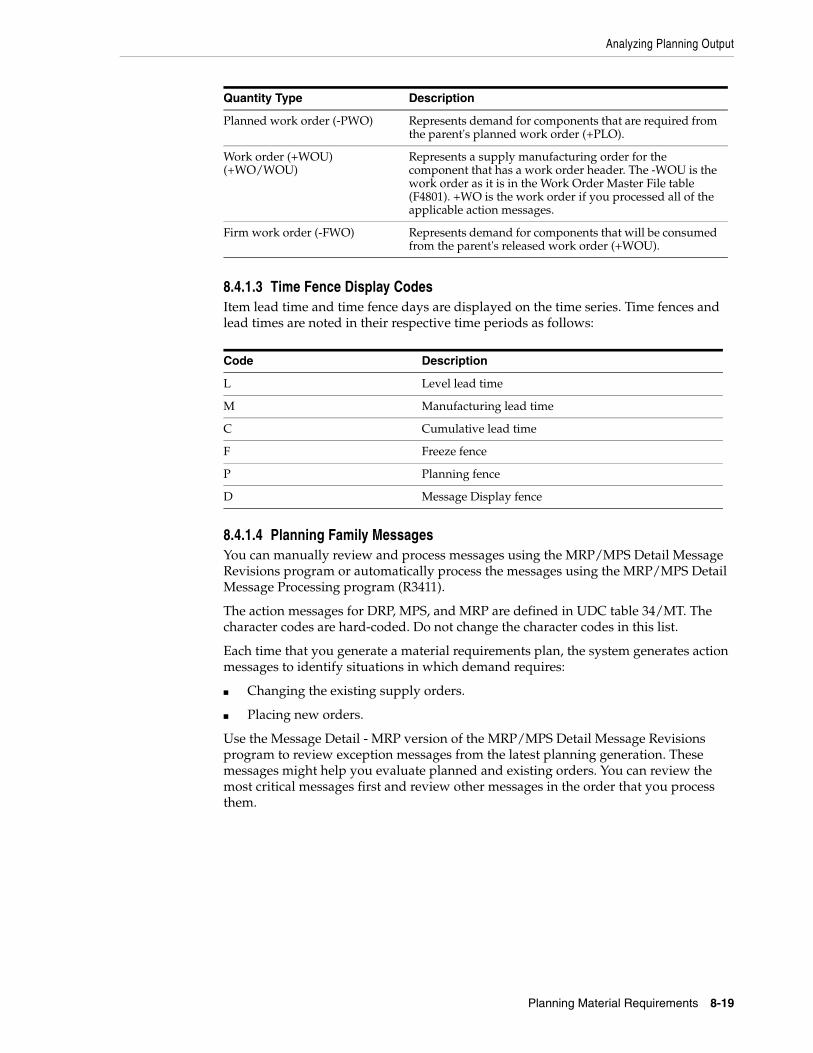
Analyzing Planning Output
Planning Material Requirements 8-19
8.4.1.3 Time Fence Display CodesItem lead time and time fence days are displayed on the time series. Time fences and lead times are noted in their respective time periods as follows:
Code Description
L Level lead time
M Manufacturing lead time
C Cumulative lead time
F Freeze fence
P Planning fence
D Message Display fence
8.4.1.4 Planning Family MessagesYou can manually review and process messages using the MRP/MPS Detail Message Revisions program or automatically process the messages using the MRP/MPS Detail Message Processing program (R3411).
The action messages for DRP, MPS, and MRP are defined in UDC table 34/MT. The character codes are hard-coded. Do not change the character codes in this list.
Each time that you generate a material requirements plan, the system generates action messages to identify situations in which demand requires:
■ Changing the existing supply orders.
■ Placing new orders.
Use the Message Detail - MRP version of the MRP/MPS Detail Message Revisions program to review exception messages from the latest planning generation. These messages might help you evaluate planned and existing orders. You can review the most critical messages first and review other messages in the order that you process them.
Planned work order (-PWO) Represents demand for components that are required from the parent's planned work order (+PLO).
Work order (+WOU) (+WO/WOU)
Represents a supply manufacturing order for the component that has a work order header. The -WOU is the work order as it is in the Work Order Master File table (F4801). +WO is the work order if you processed all of the applicable action messages.
Firm work order (-FWO) Represents demand for components that will be consumed from the parent's released work order (+WOU).
Quantity Type Description
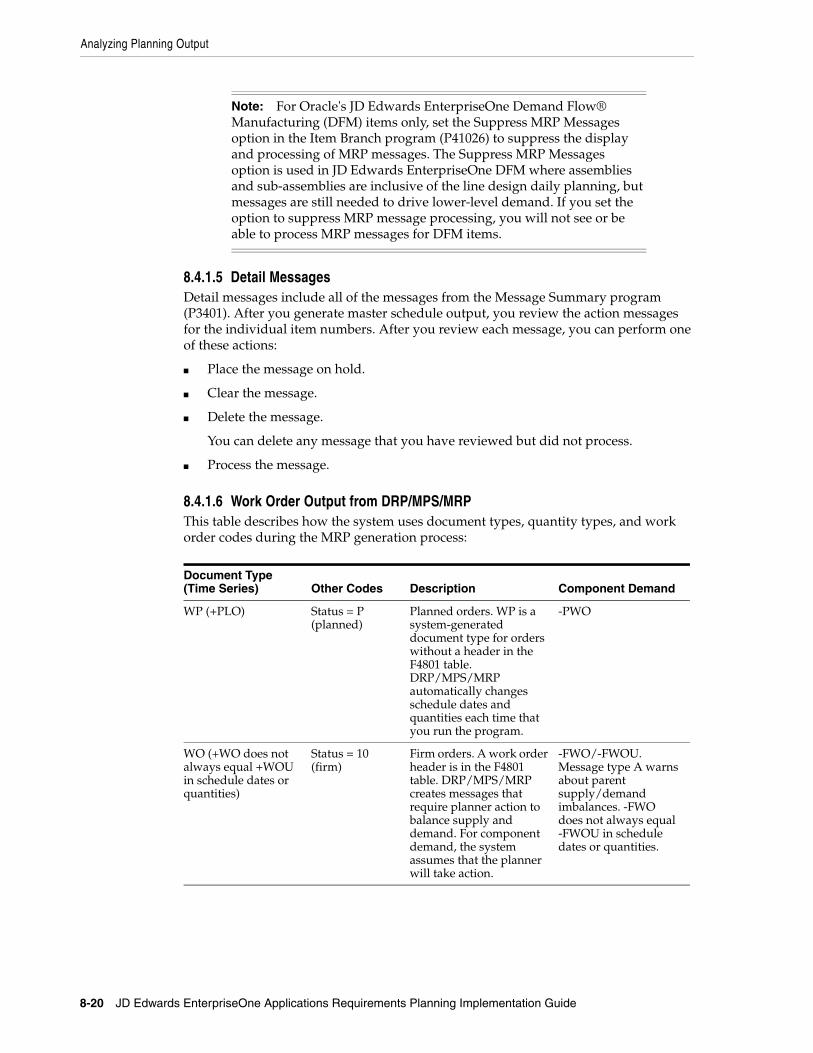
Note: For Oracle's JD Edwards EnterpriseOne Demand Flow® Manufacturing (DFM) items only, set the Suppress MRP Messages option in the Item Branch program (P41026) to suppress the display and processing of MRP messages. The Suppress MRP Messages option is used in JD Edwards EnterpriseOne DFM where assemblies and sub-assemblies are inclusive of the line design daily planning, but messages are still needed to drive lower-level demand. If you set the option to suppress MRP message processing, you will not see or be able to process MRP messages for DFM items.
Analyzing Planning Output
8-20 JD Edwards EnterpriseOne Applications Requirements Planning Implementation Guide
8.4.1.5 Detail MessagesDetail messages include all of the messages from the Message Summary program (P3401). After you generate master schedule output, you review the action messages for the individual item numbers. After you review each message, you can perform one of these actions:
■ Place the message on hold.
■ Clear the message.
■ Delete the message.
You can delete any message that you have reviewed but did not process.
■ Process the message.
8.4.1.6 Work Order Output from DRP/MPS/MRPThis table describes how the system uses document types, quantity types, and work order codes during the MRP generation process:
Document Type (Time Series) Other Codes Description Component Demand
WP (+PLO) Status = P (planned)
Planned orders. WP is a system-generated document type for orders without a header in the F4801 table. DRP/MPS/MRP automatically changes schedule dates and quantities each time that you run the program.
-PWO
WO (+WO does not always equal +WOU in schedule dates or quantities)
Status = 10 (firm)
Firm orders. A work order header is in the F4801 table. DRP/MPS/MRP creates messages that require planner action to balance supply and demand. For component demand, the system assumes that the planner will take action.
-FWO/-FWOU. Message type A warns about parent supply/demand imbalances. -FWO does not always equal -FWOU in schedule dates or quantities.

Analyzing Planning Output
Planning Material Requirements 8-21
8.4.1.7 MRP Pegging DemandUse Pegging Inquiry (P3412) to determine, or peg, the source of demand for dependent requirements. Pegging Inquiry displays only those parents that contain planned or open orders. Pegging Inquiry enables you to:
■ Display the parent work orders that require a particular item.
WO (+WO does not always equal +WOU in schedule dates or quantities)
Status = 40 (firm)
Firm orders that have parts lists and routing instructions attached. DRP/MPS/MRP creates messages that require planner action to balance supply and demand. For component demand, the system assumes that the planner will take action.
-FWO/-FWOU. Message type A warns about parent supply/demand imbalances. -FWO does not always equal -FWOU in schedule dates or quantities.
WO (+WO does not always equal +WOU in schedule dates or quantities)
Status = 41 (firm planned order)
Firm orders with firm plans. These are orders that have been planned by a generation of DRP/MPS/MRP, specifying status 41 in the Ending Work Order Status processing option. DRP/MPS/MRP creates messages that require planner action to balance supply and demand. For component demand, the system assumes that the planner will not take action. The messages have FPO planner remarks.
-FWO/-FWOU. Message type S warns about supply/demand imbalances for FPO parent. -FWO always equals -FWOU in schedule dates or quantities.
WO (+WO equals +WOU in schedule dates or quantities)
Inside freeze fence (any status code)
All firm orders inside freeze fence. DRP/MPS/MRP does not display action messages inside the freeze fence. The program creates message type A warnings to indicate a supply and demand imbalance inside the freeze fence. The program generates an action message outside the freeze fence to correct the supply/demand imbalance.
-FWO/-FWOU. The program does not create change messages from the parent demand.
WO (+WO equals +WOU in schedule dates or quantities)
Freeze code on work order header (any status code)
Frozen firm orders. DRP/MPS/MRP does not create action messages for these work orders. The program creates message type A and F warnings. The program creates messages for new orders to satisfy supply/demand imbalances.
-FWO/-FWOU. The program does not create change messages from the parent demand.
Document Type (Time Series) Other Codes Description Component Demand
Analyzing Planning Output
8-22 JD Edwards EnterpriseOne Applications Requirements Planning Implementation Guide
■ Trace the source of demand for each item.
■ Display the different levels in a bill of material so that you can peg demand from the beginning level through the parent item.
You can trace the path of dependent requirements up through parent items to the final assembled item and even to the sales order or forecast. You can use this information to determine if you need to reschedule or change orders.
8.4.2 PrerequisiteGenerate a current material requirements plan that includes the start and end dates for the planning periods that you want to review.
8.4.3 Forms Used to Analyze Planning Output
Form Name FormID Navigation Usage
Work With Time Series
W3413A DRP Daily Operations (G3411), DRP Time Series/ATP Inquiry
MPS Daily Operations (G3412), MPS Time Series/ATP Inquiry
MRP Daily Operations (G3413), MRP Time Series/ATP Inquiry
Review time-phased supply and demand quantities.
Work with Message Summary
W3401D DRP Daily Operations (G3411), DRP Planning Family Review
MPS Daily Operations (G3412), MPS Planning Family Review
MRP Daily Operations (G3413), MRP Planning Family Review
Review summarized message records by planning family.
Work With Detail Messages
W3411D DRP Daily Operations (G3411), DRP Detail Message Review
MPS Daily Operations (G3412), MPS Detail Message Review
MRP Daily Operations (G3413), MRP Detail Message Review
Review detail messages generated by the Requirements Planning Regeneration program.
Work With Pegging Inquiry
W3412A MRP Daily Operations (G3413), Pegging Inquiry
Review the sources of dependent demand.
8.4.4 Setting Processing Options for MPS Time Series (P3413)Use these processing options to set default values, define how the system processes data, and specify versions.
8.4.4.1 DefaultsThese processing options enable you to specify the required and alternate UDC types for the time series row descriptions in the MPS Time Series program.
Analyzing Planning Output
Planning Material Requirements 8-23
1. UDC Type (Required)Specify the UDC code in system 34 for the list of row descriptions that appear on the time series. If you leave this option blank, the system uses the quantity type code (QT).
2. Alternate UDC Type (Optional)Specify the UDC code in system 34 for the list of alternate row descriptions that appear on forms that are associated with the Time Series program. Select the Alternate Quantity Type option to display the alternate row descriptions. If you do not select an option, the system does not display the alternate row descriptions.
8.4.4.2 ProcessThese processing options identify what information appears on the Time Series form and how the information appears. You can select specific past due and forecast consumption periods. Additionally, you can select to summarize supply and demand data into a single row.
1. Past Due PeriodsSpecify the number of periods that the system displays prior to the MRP generation start date on the time series. Values are:
0: Zero periods (default) prior to the MRP generation start date.
1: One period prior to the MRP generation start date.
2: Two periods prior to the MRP generation start date.
This value should correspond to the MRP Generation (R3482/R3483) past due periods. If the MRP Generation program has one past due period, this option should be set to 1.
2. Summarize Supply and DemandSpecify whether to summarize supply lines into a single row and demand lines into another single row on forms that are associated with the Time Series program. Values are:
Blank: Do not summarize.
1: Summarize.
3. Forecast Consumption Periods (FCP)Specify whether the system indicates the forecast consumption periods in the Time Series program when MRP uses forecast consumption. Values are:
Blank: Do not indicate.
1: Indicate the forecast consumptions periods by placing an asterisk next to the date.
8.4.4.3 VersionsThese processing options enable you to specify versions of reports and programs such as MRP/MPS Requirements Planning and MRP/MPS Detail Message Revisions that you access through the Row and Form menus from the MPS Time Series program.
1. Single Item MRP (R3482)Specify the version of the Single Item MRP program (R3482) that the system uses when you access it from the Form menu on the Work With Time Series form. If you leave this option blank, the system uses the ZJDE0001 version.
Analyzing Planning Output
8-24 JD Edwards EnterpriseOne Applications Requirements Planning Implementation Guide
2. MRP Detail Message Review (P3411)Specify the version of the MRP Detail Message Review program (P3411) that the system uses when you access it from the Row menu on the Work With Time Series form. If you leave this option blank, the system uses the ZJDE0001 version.
3. Supply and Demand Inquiry (P4021)Specify the version of the Supply and Demand Inquiry program (P4021) that the system uses when you access it from the Form menu on the Work With Time Series form. If you leave this option blank, the system uses the ZJDE0001 version.
4. Forecast Revisions (P3460)Specify the version of the Forecast Revisions program (P3460) that the system uses when you access it from the Form menu on the Work With Time Series form. If you leave this option blank, the system uses the ZJDE0001 version.
5. Pegging Inquiry (P3412)Specify the version of the Pegging Inquiry program (P3412) that the system uses when you access it from the Form menu on the Work With Time Series form. If you leave this option blank, the system uses the ZJDE0001 version.
6. Rate Schedule Revisions (P3109)Specify the version of the Rate Schedule Revisions program (P3109) that the system uses when you access it from the Form menu on the Work With Time Series form. If you leave this option blank, the system uses the ZJDE0001 version.
7. Work Day Calendar (P00071)Specify the version of the Work Day Calendar program (P00071) that the system uses when you access it from the Form menu on the Work With Time Series form. If you leave this option blank, the system uses the ZJDE0001 version.
8. Item Branch (P41026)Specify the version of the Item Branch program (P41026) that the system uses when you access it from the Form menu on the Work With Time Series form. If you leave this option blank, the system uses the ZJDE0001 version.
8.4.5 Reviewing the Time SeriesAccess the Work With Time Series form.
Suppress Blank LinesSelect this check box to suppress blank lines so they do not appear on the screen.
Summarize Supply/DemandSelect this check box to display records in summarized form. Clear the check box to display records in detail form.
Alternate Quantity TypeSelect this check box to toggle between the alternate quantity types specified in the processing options of the Time Series program.
Item NumberEnter the item for which you want to review the time series.
8.4.6 Reviewing Messages for a Planning FamilyAccess the Work with Message Summary form.
Analyzing Planning Output
Planning Material Requirements 8-25
Planning FamilyEnter a UDC (41/P4) that represents an item property type or classification, such as commodity type or planning family. The system uses this code to sort and process like items.
See Also:
■ Processing Purchase Order Messages.
8.4.7 Setting Processing Options for MRP/MPS Detail Message Revisions (P3411)Processing options enable you to specify the default processing for programs and reports.
8.4.7.1 PO InfoUse these processing options to define purchase order information.
1. Line TypeSpecify how the system processes lines on a transaction. The line type affects the systems with which the transaction interfaces (Oracle's JD Edwards EnterpriseOne General Ledger, Oracle's JD Edwards EnterpriseOne Job Cost, Oracle's JD Edwards EnterpriseOne Accounts Payable, Oracle's JD Edwards EnterpriseOne Accounts Receivable, and JD Edwards EnterpriseOne Inventory Management). The line type also specifies the conditions for including a line on reports and in calculations. Some examples of values, which have been defined on the Line Type Constants Revisions form (P40205), are:
S: Stock item.
J: Job cost, subcontracts, or purchasing to the General Ledger.
B: GL account and item number.
N: Non-stock item.
F: Freight.
T: Text information.
M: Miscellaneous charges and credits.
W: Work order.
2. Beginning StatusSpecify the beginning status, which is the first step in the order process. You must specify a UDC (40/AT) that has been set up on the Order Activity Rules form for the order type and the line type that you are using.
3. ConsolidateSpecify whether you want to consolidate all processed messages that apply to one supplier on one purchase order. Values are:
1: Consolidate.
Blank: Do not consolidate.
4. Price ControlSpecify whether the system retrieves the price from a blanket order or the JD Edwards EnterpriseOne Procurement system. Values are:
Blank: Retrieve the price from the blanket order.
Analyzing Planning Output
8-26 JD Edwards EnterpriseOne Applications Requirements Planning Implementation Guide
1: Retrieve the price from the JD Edwards EnterpriseOne Procurement system.
8.4.7.2 WO InfoUse these processing options to define work order information.
1. Beginning StatusSpecify the UDC (00/SS) that identifies the default status of the work order to use when a work order is created.
2. Cancelled Orders StatusSpecify the default user defined status code (00/SS) for a canceled work order.
8.4.7.3 OT InfoUse this processing option to define transfer order information.
1. ConsolidateSpecify whether you want to consolidate all processed messages that apply to one branch/plant on one transfer order. Values are:
1: Consolidate.
Blank: Do not consolidate.
8.4.7.4 Blanket InfoUse this processing option to define blanket order information.
1. Blanket Order Document Type to ReleaseSpecify whether you want the program to perform an interactive release against a matching blanket order when processing messages to create purchase orders. Enter a document type (UDC 00/DT) to release against. If you leave this processing option blank, the program does not release against a blanket order.
8.4.7.5 VersionsUse these processing options to define what version to use when this program accesses another program. If left blank, the system will use version ZJDE0001.
When you select a version, review the version's processing options to ensure that the version meets the requirements.
1. Blanket Order Release (P43216)Specify a version of the Blanket Order Release program. The system calls this version when you access Blanket Order Release from this program.
2. Time Series (P3413)Specify a version of the Time Series program.
The system calls this version when you access Work with Time Series from the Form menu of the Work with Detail Messages or Detail Message Revisions form.
3. Pegging Inquiry (P3412)Specify a version of the Pegging Inquiry program. The system calls this version when you access Work with Pegging Inquiry from the Form menu of the Work with Detail Messages or Detail Message Revisions form.
Analyzing Planning Output
Planning Material Requirements 8-27
4. Supply/Demand Inquiry (P4021)Specify a version of the Supply and Demand Inquiry program. The system calls this version when you access Work with Supply and Demand from the Form menu of the Work with Detail Messages or Detail Message Revisions form.
5. Purchase Order Entry (P4310)Specify a version of the Purchase Orders program. The system calls this version when you access Work with Order Details from the Row menu of the Work with Detail Messages or Detail Message Revisions form.
6. Work Order Entry (P48013)Specify a version of the Work Order Processing program. The system calls this version when you access Work Order Processing from this program.
7. Rate Schedule Revisions (P3109)Specify a version of the Enter/Change Rate Schedule program. The system calls this version when you access Work with Rate Schedules from the Form menu of the Work with Detail Messages or Detail Message Revisions form.
8. Transfer Order Entry (P4210)Specify a version of the Sales Order Entry program. The system calls this version when you access Sales Order Entry from this program.
9. Scheduling Workbench (P31225)Specify a version of the Manufacturing Scheduling Workbench program. The system calls this version when you access Work with Work Order Scheduling from the Form menu of the Work with Detail Messages or Detail Message Revisions form.
10. Bill of Material Inquiry (P30200)Specify a version of the Bill of Material Inquiry program. The system calls this version when you access Bill of Material Inquiry from the Row menu of the Work with Detail Messages or Detail Message Revisions form.
11. Item Branch (P41026)Specify a version of the Item Branch program.
The system calls this version when you access Plant Manufacturing Data from the Row menu of the Work with Detail Messages or Detail Message Revisions form.
8.4.7.6 DisplayUse this processing option to specify whether to view messages for demand branch/plant or supply branch/plant.
1. Viewing Messages ForSpecify whether to view messages for demand branch/plant or supply branch/plant. Values are:
Blank or D: Demand branch/plant.
1 or S: Supply branch/plant.
8.4.8 Reviewing Detail MessagesAccess the Work With Detail Messages form.
Processing Planning Output
8-28 JD Edwards EnterpriseOne Applications Requirements Planning Implementation Guide
8.4.9 Setting Processing Options for Pegging Inquiry (P3412)Processing options enable you to specify the default processing for programs and reports.
8.4.9.1 VersionsEnter the version for each program. If you leave a processing option blank, the system uses version ZJDE0001.
1. Message File RevisionsSpecify a group of items that can be processed together such as reports, business units, or subledgers.
2. Time SeriesSpecify a sequence number that identifies versions of a menu selection. For example, where multiple versions of a report menu selection are set up, this sequence number identifies each of those versions.
3. Supply and Demand InquirySpecify multiple versions of certain menu selections (for example, reports). This sequence number identifies each of those versions.
4. Item Branch (P41026B)Specify a specific set of data selection and sequencing settings for the application. Versions may be named using any combination of alpha and numeric characters.
8.4.10 Reviewing Pegging DemandAccess the Work With Pegging Inquiry form.
Requested DateEnter the date that an item is scheduled to arrive or that an action is scheduled for completion.
8.5 Processing Planning OutputThis section provides overviews of planning output processing and MRP supply and demand, and discusses how to:
■ Process purchase order messages.
■ Run the MRP/MPS Detail Message Processing program.
■ Set processing options for MRP/MPS Detail Message Processing (R3411).
■ Add a freeze code to a work order.
■ Add a freeze code to a purchase order.
■ Analyze supply and demand.
8.5.1 Understanding Planning Output ProcessingAfter you have analyzed the planning output, you process the messages into orders to meet the demand.
You can place messages on hold so that the system does not change the message during the next generation (for example, to preserve a manual reminder). The system retains held messages until you manually clear or delete them.
Processing Planning Output
Planning Material Requirements 8-29
You can clear a message from the MRP/MPS Detail Message Revisions form if you decide not to process it.
8.5.1.1 Work Order MessagesWhen you process work order messages, the system creates work order headers in the F4801 table and assigns work order numbers. The system does not attach a parts list or routing information at this time.
You can process work order messages by using any of these methods:
■ Process a single action message for an item.
■ Process multiple action messages for an item.
■ Process messages using a planning family.
■ Process messages automatically.
The system first processes work order messages. Work order messages appear on the MRP/MPS Detail Message Revisions form with an order type of WO. The master schedule remains firm or does not change from the beginning date through the end date when the system processes these work order messages. These firm orders are not automatically replanned in subsequent MPS generations. However, if the subsequent MPS generation finds a mismatch between the supply quantities or dates and the demand quantities or dates, the program recommends realignment of the existing work orders.
When you use fixed order quantity (FOQ), MPS/DRP does not generate an Increase message for an existing order to cover demand. Instead, the system generates Order messages in multiples of FOQ as needed to cover the demand.
When you create or update an order, you can modify the status of the order to indicate the stage of production. To do so, enter a new status in the Status field. The system displays this field only for messages that are related to order processing.
8.5.1.2 Purchase Order MessagesPurchase order messages appear on the MRP/MPS Detail Message Revisions form with an order type of OP. You can process a purchase order message by using any of these methods:
■ Process a single action message without blanket order checking or consolidation.
■ Process one or more action messages with blanket order checking.
■ Process messages using purchase order consolidation to include more than one item on a purchase order.
■ Process purchase order messages by using a planning family.
■ Process messages using Oracle's JD Edwards EnterpriseOne Supplier Scheduling system.
Note: If an item does not have a supplier assigned to it, the system displays an error message. Enter a supplier number and click OK.
To expedite message processing, it is recommended that you set up a different version of MRP/MPS Detail Message Revisions for each of the previous methods. That is, set up one version to process a single action message without blanket order checking or

Processing Planning Output
8-30 JD Edwards EnterpriseOne Applications Requirements Planning Implementation Guide
consolidation, another version to process one or more action messages with blanket order checking, and so on.
Depending on how you set the processing option for the MRP/MPS Requirements Planning program, the program creates either a purchase requisition (document type OR) or a purchase order (document type OP). The program includes a user ID on the purchase order and uses the system date as the date on which the purchase order was created.
In addition, the program creates the purchase order in the purchasing unit of measure, even though the action message displays the primary unit of measure. The program makes the appropriate unit of measure conversions. After the next DRP/MPS regeneration, the quantities that are associated with processed messages appear in the time series display on the +PO Quantity Type row.
When you process messages, the system firms that portion of the DRP/MPS replenishment plan. Subsequent DRP/MPS regeneration does not change the timing or quantities that are associated with previously processed messages. However, if the new regeneration finds a mismatch between the supply and demand quantities or dates, the program issues a message recommending that you realign the existing +POs.
8.5.1.3 Purchase Order ConsolidationThe system creates one purchase order header with as many detail line items for messages as necessary. Dates correspond to the messages. If a part has more than one supplier, you can change the supplier number in the message detail area. The system produces a purchase order for each supplier.
8.5.1.4 Automatic Message ProcessingAs an alternative to processing messages interactively, you can run MRP/MPS Detail Message Processing (R3411). The program processes these types of messages for work orders, purchase orders, and transfer orders:
■ B: Order and expedite.
■ C: Cancel.
■ D: Defer.
■ E: Expedite.
■ G: Increase order quantity to.
■ L: Decrease order quantity to.
■ O: Order.
The program does not produce a report. Review error messages in the Work Center (P012501) in the Submitted Jobs queue. View any message that the program did not process on the Work with Detail Messages form.
8.5.1.5 Freeze CodesYou can freeze the time and quantity values in a purchase order so that DRP and MPS do not generate any action messages to change the order. You freeze purchase orders before negotiations are final or when a purchasing contract has been signed with a supplier.
You can freeze the time and quantity values in a work order so that DRP and MPS do not generate any action messages to change the order. You freeze work orders when the order is within the freeze time fence.
See Also:
■ Setting Processing Options for Net Change Review (P3402).
Processing Planning Output
Planning Material Requirements 8-31
8.5.2 Understanding MRP Supply and DemandUse the Supply and Demand Inquiry program to review the current demand for a selected item. Supply and Demand Inquiry enables you to:
■ Display the current inventory position, including all scheduled supply and demand.
■ Review item quantity supply, demand, and order availability in date order.
8.5.2.1 Planning Fence Rule Effect on Supply and Demand InquiryThe supply and demand inquiry view of the Supply and Demand Inquiry program uses the identified planning fence rule for an item when calculating real-time net requirement values. The supply and demand inquiry view respects the designated planning fence rule when identifying which demand elements are considered during real-time netting calculations for an item.
Note: Supply and demand inquiry reflects all of the planning fence rules with the exception of the Forecast Consumption rule (rule H). Forecast Consumption logic is displayed using the time series view only.
Available-to-promise calculations can be displayed on the demand inquiry view by setting the appropriate processing option for the Supply and Demand Inquiry program.
See Also:
■ "Entering Branch, Plant Manufacturing Information" in the JD Edwards EnterpriseOne Applications Inventory Management Implementation Guide.
8.5.3 Forms Used to Process Planning Output
Form Name FormID Navigation Usage
Work With Detail Messages
W3411D DRP Daily Operations (G3411), DRP Detail Message Review
MPS Daily Operations (G3412), MPS Detail Message Review
MRP Daily Operations (G3413), MRP Detail Message Review
Process work order and purchase order messages individually by selecting Process Message(s) from the Row menu.
Clear messages by selecting Clear Message from the Row menu.
Detail Message Revisions
W3411B On the Work With Detail Messages form, select a row, and select Message Revision from the Row menu. On the Detail Message Revisions form, select Hold/Release from the Row menu.
Place messages on hold.
Processing Planning Output
8-32 JD Edwards EnterpriseOne Applications Requirements Planning Implementation Guide
8.5.4 Processing Purchase Order MessagesAccess the Suppliers Selected for Order form.
To generate purchase orders, select the Generate Order options from the Form menu.
8.5.5 Running the MRP/MPS Detail Message Processing ProgramSelect DRP Daily Operations (G3411), DRP Detail Message Processing.
Select MPS Daily Operations (G3412), MPS Detail Message Processing.
Select MRP Daily Operations (G3413), MRP Detail Message Processing.
8.5.6 Setting Processing Options for MRP/MPS Detail Message Processing (R3411)Processing options enable you to specify the default processing for programs and reports.
8.5.6.1 PO InfoUse these processing options to specify processing specific to purchase orders.
1. Enter the Line TypeSpecify how the system processes lines on a transaction. The line type affects the systems with which the transaction interfaces (JD Edwards EnterpriseOne General
Suppliers Selected for Order
W43032A On the Work with Detail Messages form, select Process Message(s) from the Row menu. Click Close on the Work With Detail Messages form.
Generate purchase orders.
Work Order Details W48013A Daily Order Preparation - Discrete (G3111), Enter/Change Order
Select a work order, and click Select.
On the Work Order Details form, select the Status & Type tab.
Enter a freeze code for a work order.
Order Detail - Page II
W4310E Purchase Order Processing (G43A11), Enter Purchase Orders
On the Work With Order Headers form, select a purchase order.
Select Detail Revision from the Row menu.
On the Order Detail form, select a row, and then select Additional Info 2 from the Row menu.
Enter a freeze code for a purchase order.
Work With Supply and Demand
W4021B MRP Daily Operations (G3413), Supply/Demand Inquiry
Review supply and demand changes that result from orders.
Form Name FormID Navigation Usage

Processing Planning Output
Planning Material Requirements 8-33
Ledger, JD Edwards EnterpriseOne Job Cost, JD Edwards EnterpriseOne Accounts Payable, JD Edwards EnterpriseOne Accounts Receivable, and JD Edwards EnterpriseOne Inventory Management). The line type also specifies the conditions for including a line on reports and in calculations.
These examples of values are defined on the Line Type Constants Revisions form (P40205):
S: Stock item.
J: Job cost, subcontracts, or purchasing to the General Ledger.
B: GL account and item number.
N: Non-stock item.
F: Freight.
T: Text information.
M: Miscellaneous charges and credits.
W: Work Order.
2. Enter the Beginning StatusSpecify the beginning status, which is the first step in the order process. You must specify a UDC (40/AT) that has been set up on the Order Activity Rules form for the order type and the line type that you are using.
3. Enter '1' to Consolidate all messages onto one purchase order by supplierSpecify whether you want to consolidate all processed messages that apply to one supplier on one purchase order. Values are:
1: Consolidate.
Blank: Do not consolidate.
4. Price ControlSpecify whether the system retrieves the price from a blanket order or the JD Edwards EnterpriseOne Procurement system. Values are:
Blank: Retrieve the price from the blanket order.
1: Retrieve the price from the JD Edwards EnterpriseOne Procurement system.
8.5.6.2 WO InfoUse these processing options to specify processing specific to work orders.
1. Enter the Beginning Status.Specify the UDC (00/SS) that identifies the default status of the work order to use when a work order is created.
2. Enter the Status for Cancelled Orders.Specify the default UDC status code (00/SS) for a canceled work order.
8.5.6.3 OT InfoUse this processing option to specify processing specific to transfer orders.
1. Enter '1' to Consolidate Transfer Order messages.Specify whether you want to consolidate all processed messages that apply to one branch/plant on one transfer order. Values are:
Processing Planning Output
8-34 JD Edwards EnterpriseOne Applications Requirements Planning Implementation Guide
Blank: Do not consolidate.
1: Consolidate.
8.5.6.4 Blanket InfoUse these processing options to specify processing specific to blanket orders.
1. Enter Document Type associated with Blanket Orders. Blanks will not check for open blanket orders. Specify whether you want the program to perform an interactive release against a matching blanket order when processing messages to create purchase orders. Enter a document type to release against. If you leave this processing option blank, the program does not release against a blanket order.
8.5.6.5 VersionsAll versions use ZJDE0001 as the default.
When you select a version, review the version's processing options to ensure that the version meets the requirements.
1. Enter the version of WO Entry (P48013) to be used.Specify a version of the Work Order Processing program. The system calls this version when you access Work Order Processing from this program.
2. Enter the version of Purchase Order Entry (P4310) to be used.Specify a version of the Purchase Orders program. The system calls this version when you access Work with Order Details from the Row menu of the Work with Detail Messages or Detail Message Revisions form.
3. Enter the version of Rate Schedule Revisions (P3109) to be used.Specify a version of the Enter/Change Rate Schedule program. The system calls this version when you access Work with Rate Schedules from the Form menu of the Work with Detail Messages or Detail Message Revisions form.
4. Enter the version of Transfer Order Entry (P4210) to be called.Specify a version of the Sales Order Entry program. The system calls this version when you access Sales Order Entry from this program.
5. Enter the version of Blanket Release (P43216) to be called.Specify a version of the Blanket Order Release program. The system calls this version when you access Blanket Order Release from this program.
8.5.6.6 SO HoldUse these processing options to specify processing specific to sales orders.
1. Enter the Hold Code for the related sales order if a work order is cancelled, deferred, or expeditedSpecify a UDC (42/HC) that identifies why an order was placed on hold (for example, credit, budget, or margin standards were exceeded). If left Blank, the sales order will not be updated.
8.5.6.7 PO HoldUse these processing options to specify processing specific to purchase orders.
1. Enter the Hold Code for the related purchase order if a work order is cancelled,
Processing Planning Output
Planning Material Requirements 8-35
deferred or expeditedSpecify a UDC (42/HC) that identifies why an order is on hold. If left Blank, the purchase order will not be updated. The purchase order will be updated only if the work order routings are recalculated.
8.5.6.8 Subsystem JobUse this processing option to specify processing for subsystem jobs.
1. Enter a valid mode for the Subsystem Job. Use this option on the version specified for Subsystem Job.Specify a valid mode for the subsystem job. Values are:
Blank: Do not add job to subsystem.
1: Add job to subsystem.
8.5.7 Adding a Freeze Code to a Work OrderAccess the Work Order Details form.
8.5.7.1 Status & TypeAccess the Status & Type tab.
Freeze CodeEnter a code that indicates if the line on the order is frozen. MPS/MRP does not suggest changes to frozen orders. Values are:
Y: Yes, freeze the order.
N: No, do not freeze the order. This value is the default.
8.5.8 Adding a Freeze Code to a Purchase OrderAccess the Order Detail - Page II form.
Freeze CodeEnter a code that indicates if the line on the order is frozen. MPS/MRP does not suggest changes to frozen orders. Values are:
Y: Yes, freeze the order.
N: No, do not freeze the order. This value is the default.
8.5.9 Analyzing Supply and DemandAccess the Work With Supply and Demand form.
Promise DateDisplays the promised shipment date for either a sales order or a purchase order. The supply and demand programs use this date to calculate Available to Promise information. This value can be automatically calculated during sales order entry. This date represents the day that the item can be shipped from the warehouse.
DemandDisplays the number of units committed for shipment in Sales Order Entry, using either the entered or the primary unit of measure defined for this item.

Processing Planning Output
8-36 JD Edwards EnterpriseOne Applications Requirements Planning Implementation Guide
In the JD Edwards EnterpriseOne Manufacturing system and Work Order Time Entry, this field can indicate completed or scrapped quantities. The quantity type is determined by the type code entered.
SupplyDisplays a value that represents the available quantity, which might consist of the on-hand balance minus commitments, reservations, and backorders. You enter this value in the Branch/Plant Constants program (P41001).
Quantity AvailableDisplays a number that indicates the quantity that is available. For example, the available quantity might consist of the on-hand quantity minus commitments, reservations, and backorders. Availability is user defined. You can set up availability in the Branch/Plant Constants program (P41001).

9
Validating Requirements Plans 9-1
9Validating Requirements Plans
This chapter contains the following topics:
■ Section 9.1, "Understanding Requirements Plan Validation"
■ Section 9.2, "Regenerating CRP/RCCP"
■ Section 9.3, "Validating Requirements Plans"
9.1 Understanding Requirements Plan ValidationAfter you generate the requirements plan, either a master schedule or material requirements plan, you can validate it to ensure that you have sufficient work center capacity. Use the CRP/RCCP Regeneration program (R3382) to generate capacity planning information.
In JD Edwards EnterpriseOne software, the same batch program generates capacity planning information for both RCCP and CRP. The only difference is the work centers that you identify in the data selection.
The primary differences between RCCP and CRP are:
■ RCCP is generally run for end items on the Maser Production Schedule (MPS) and considers only critical work centers.
■ CRP is generally run for all manufactured items and considers all work centers.
If critical work centers appear in the routings of component work orders that are generated by Material Requirements Planning (MRP), then the system can also include MRP orders in RCCP because both RCCP and CRP use the same batch program.
The CRP/RCCP Regeneration program generates:
■ Over-capacity and under-capacity messages.
■ Work center load.
■ Period summary.
The pacing resource for critical work centers is either labor or machine, depending on which one would increase the work center's capacity. A work center is paced by labor if adding employees to the work center increases capacity. A work center is paced by machine if adding machines increases capacity. Use the Prime Load field on the Work Center Master Revisions form to define the pacing resource.
These terms are important for understanding master schedules:
Regenerating CRP/RCCP
9-2 JD Edwards EnterpriseOne Applications Requirements Planning Implementation Guide
Resource UnitsThe resource units are the units that are associated with a work center for each workday on the Work Day Calendar. The system displays resource units as hours, units, monetary amounts, floor space, and so on. This information is associated with a work center for each workday on the Work Day Calendar. The system uses this information to backschedule work orders in JD Edwards EnterpriseOne Shop Floor Management and to calculate available hours for capacity planning. You can manually enter or revise resource unit information for each work center and for each workday using the Work Center Resource Units program (P3007).
Work Center HoursWork center hours are recalculated using the Work Center Resource Units Generation program (R3007G). You use this program only for processing data. It does not produce a printed report. However, you can view the results of the most recent refresh operation on the Work Center Resource Units form.
9.2 Regenerating CRP/RCCPThis section provides an overview of capacity plan generation, lists prerequisites, and discusses how to:
■ Run CRP/RCCP Regeneration.
■ Set processing options for CRP/RCCP Regeneration (R3382).
9.2.1 Understanding Capacity Plan RegenerationUse the CRP/RCCP Regeneration program to compare prospective resource requirements to the capacity that is available in critical work centers. The capacity plan indicates whether you should revise the schedule to create feasible workloads or improve the use of limited resources.
When you run the CRP/RCCP Regeneration program, the system:
■ Identifies critical work centers.
■ Identifies the pacing resource for critical work centers.
■ Calculates the rated capacity for critical work centers.
■ Calculates the MPS load for critical work centers.
To calculate rated capacity for critical work centers, the system uses this standard formula:
Number of employees (or machines) × hours per day × efficiency factor × utilization factor
You can manually calculate efficiency by dividing standard hours by actual hours. For example, a crew requires ten hours to complete a job that has standard hours established at eight hours, the crew is working at 80 percent efficiency (8 ÷ 10 = .80).
For reference, the inverse operation (actual hours ÷ standard hours) is called realization.
The program calculates utilization by finding the number of hours in a day that the work center is actually available for working compared to standard. One hundred percent utilization is an unrealistic goal because preventive maintenance, employee breaks, and other factors typically affect utilization.
You calculate the MPS load for critical work centers by using either the routing table for planned work orders (+PLO) or the routing instruction table for firm work orders
Regenerating CRP/RCCP
Validating Requirements Plans 9-3
(+WO) with a routing attached. If the work order is firm (meaning that a header is created) but does not have a routing instruction attached, the system uses the routing table. The formulas for calculating MPS load are:
Planned orders × pacing hours from the routing table
Firm orders × pacing hours from the routing instruction table
The code in the Prime Load field in the Work Center Master File table (F30006) determines the type of pacing at the work center.
Operations are backscheduled using the same logic in JD Edwards EnterpriseOne Shop Floor Management. This operation schedule places load into the proper time frame. You must enter the time basis code and order quantity into the equation for load calculation.
The system uses this formula to calculate the load for an operation:
Work order quantity × number of pacing hours on routing ÷ time basis code
The system generates messages that indicate whether the load is over-capacity or under-capacity.
9.2.2 PrerequisitesCapacity Requirements Planning follows the same level of operational planning as Material Requirements Planning (MRP). You should synchronize this information for both MRP and CRP:
■ The planning horizon.
■ The work-order document types.
■ The statuses in the supply-and-demand inclusion rules.
9.2.3 Running CRP/RCCP RegenerationSelect Periodic Resource/Capacity Planning (G3321), Capacity Requirements Plan.
9.2.4 Setting Processing Options for CRP/RCCP Regeneration (R3382)Use these processing options to define how the system processes data.
9.2.4.1 ProcessThese processing options enable you to specify the variable information that the system uses to regenerate the CRP/RCCP.
1. Under Rated Capacity PercentSpecify the percent under the rated capacity that the system still considers as an underloaded work center. The system displays messages with a status of U (under) for a capacity load that is less than the identified percentage under the rated value.
2. Over Rated Capacity PercentSpecify the percent over the rated capacity that the system displays as overrated and as an overloaded work center. The system displays messages with an O status (over) for capacity loads that are greater than the identified percentage over the rated value.
3. BranchSpecify the branch that the system uses for the CRP/RCCP Planning Regeneration program.
Validating Requirements Plans
9-4 JD Edwards EnterpriseOne Applications Requirements Planning Implementation Guide
4. Supply/Demand Inclusion RuleSpecify which supply-and-demand inclusion rule the system uses for the generation of an item. Supply and demand inclusion rules define the criteria that the system uses to select active orders for processing.
5. Capacity ModeSpecify which capacity mode the system uses. Values are:
2: Use rough cut capacity planning.
3: Use capacity requirements planning.
6. Unit of MeasureSpecify the unit of measure that the system uses for backscheduling the capacity load. The default unit of measure is HR (hour).
7. Roll Up to Dispatch GroupSpecify whether the system rolls up multiple work centers to a dispatch group for review. Values are:
Blank: Do not roll up to a dispatch group.
1: Roll up to a dispatch group.
8. Closed Routing Operation StatusSpecify the status for closed routing operation. CRP will not calculate loads for operations whose status (OPST) is greater than or equal to this value. If you leave this processing option blank, loads will be calculated for all routing operation steps.
9.3 Validating Requirements PlansThis section provides an overview of the validation process, lists prerequisites, and discusses how to:
■ Review work center loads.
■ Review period summaries.
■ Set processing options for Operation Dispatch Inquiry (P31220).
■ Review work schedules for production status.
■ Set processing options for Work Center Schedule Review (P31224).
■ Review rate schedule and work center loads.
■ Review the Shop Floor Workbench for MRP.
9.3.1 Understanding the Validation ProcessThe validation process includes reviewing and revising capacity information in several programs.
9.3.1.1 Period SummariesUse the Period Summary program (P3312) to review specific items that make up the capacity load for a defined period for a work center. You can view the detail of all current and future orders that have been scheduled for a work center.
The system summarizes the load by period using the unit of measure that you select. The system also displays the percentage of total load that is planned for that period for an item on an order.
Validating Requirements Plans
Validating Requirements Plans 9-5
9.3.1.2 Work Center Scheduling InformationUse the Operation Dispatch Inquiry program to locate and update work center scheduling information. This workbench environment serves as a starting point for work center scheduling and the release of work to the shop floor. Use this program to:
■ Access work order information, including the header, the parts list, and the routing instructions.
■ Review work order information, such as work center, remaining labor, and machine and setup hours.
■ Sort work orders by start date, requested date, or operation status codes.
■ Change the work order status code, start date, or requested date.
9.3.1.3 Rate Schedule and Work Center LoadUse the Work Center Schedule Review program to review the rate schedule load and the work order load for a work center. You can review a day, week, or month of the rate schedule load and the work order load. You can also select a specific date range for which to view the load for the work center. If you need to adjust the scheduled load at the work center, you can access several different forms on which to make adjustments.
Work Center Schedule Review is used primarily for rate-based items and is an alternative for viewing the load on a work center. A processing option enables you to include loads that are generated by a work order before or after rate loads.
9.3.1.4 Shop Floor WorkbenchAfter a work order is on the shop floor, you must review the order and check capacity at the planned production line. You might need to change a schedule to keep the Material Requirements Planning schedule valid.
9.3.2 PrerequisitesBefore you complete the tasks in this section:
■ Report hours and quantities for operations that are complete or partially complete to ensure that the numbers for released load remaining for existing work orders are correct.
See "Understanding Shop Floor Management" in the JD Edwards EnterpriseOne Applications Shop Floor Management Implementation Guide.
■ Verify that resource units exist for all of the critical work centers in the generation.
See "Entering Work Centers and Routing Instructions" in the JD Edwards EnterpriseOne Applications Product Data Management Implementation Guide.
■ Set up supply and demand inclusion rules for RCCP.
■ Run the Master Production Schedule program.
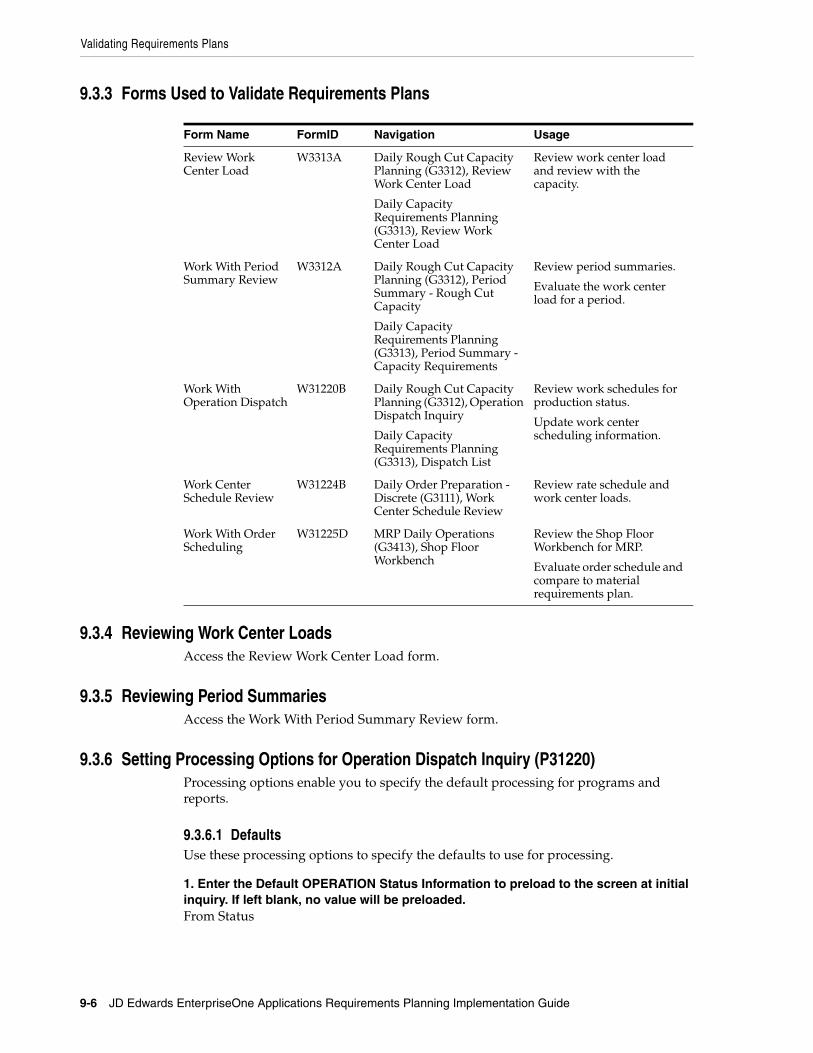
Validating Requirements Plans
9-6 JD Edwards EnterpriseOne Applications Requirements Planning Implementation Guide
9.3.3 Forms Used to Validate Requirements Plans
Form Name FormID Navigation Usage
Review Work Center Load
W3313A Daily Rough Cut Capacity Planning (G3312), Review Work Center Load
Daily Capacity Requirements Planning (G3313), Review Work Center Load
Review work center load and review with the capacity.
Work With Period Summary Review
W3312A Daily Rough Cut Capacity Planning (G3312), Period Summary - Rough Cut Capacity
Daily Capacity Requirements Planning (G3313), Period Summary - Capacity Requirements
Review period summaries.
Evaluate the work center load for a period.
Work With Operation Dispatch
W31220B Daily Rough Cut Capacity Planning (G3312), Operation Dispatch Inquiry
Daily Capacity Requirements Planning (G3313), Dispatch List
Review work schedules for production status.
Update work center scheduling information.
Work Center Schedule Review
W31224B Daily Order Preparation - Discrete (G3111), Work Center Schedule Review
Review rate schedule and work center loads.
Work With Order Scheduling
W31225D MRP Daily Operations (G3413), Shop Floor Workbench
Review the Shop Floor Workbench for MRP.
Evaluate order schedule and compare to material requirements plan.
9.3.4 Reviewing Work Center LoadsAccess the Review Work Center Load form.
9.3.5 Reviewing Period SummariesAccess the Work With Period Summary Review form.
9.3.6 Setting Processing Options for Operation Dispatch Inquiry (P31220)Processing options enable you to specify the default processing for programs and reports.
9.3.6.1 DefaultsUse these processing options to specify the defaults to use for processing.
1. Enter the Default OPERATION Status Information to preload to the screen at initial inquiry. If left blank, no value will be preloaded.From Status
Validating Requirements Plans
Validating Requirements Plans 9-7
Specify the status by selecting a user-defined code (UDC) (31/OS) on the Work with Operation Dispatch form that specifies the beginning date for the selection of work order information.
Thru Status
Specify the status (UDC 31/OS) on the Work with Operation Dispatch form that specifies the end date for the selection of work order information.
2. Enter the Default Number of DaysPrior to today's date for the From Date
Specify the from date on the Work with Operation Dispatch form. You can specify a from date prior to the current date by entering the number of days that the system must subtract from the current date. For example, if the current date is June 15 and you want the system to use June 10 as the from date, enter 5. The system subtracts five days and sets the from date to June 10. If you leave this processing option blank, the system uses the current date as the from date.
Note: The from date or period specifies that the system display transactions beginning with this date or period. Totals are calculated for the transactions that are displayed.
After today's date for the Thru Date
Specify the thru date on the Work with Operation Dispatch form. You can specify a thru date later than the current date by entering the number of days that the system adds to the current date. For example, if the current date is June 15 and you want the system to use June 20 as the thru date, you enter 5. The system adds five days and sets the thru date to June 20. If you leave this processing option blank, the system uses the current date as the thru date.
Note: The thru date/period specifies that the system display transactions ending with this date or period. Totals are calculated for the transactions that are displayed.
9.3.6.2 VersionsUse these processing options to specify the versions of programs.
1. Work Order Processing (P48013)Specify the version that the system uses when you select the Work Order Entry program (P48013) from the Row menu on the Work With Operation Dispatch form. If you leave this processing option blank, the system uses version ZJDE0001.
2. Work Order Routing (P3112)Specify the version that the system uses when you select the Work Order Routing program (P3112) from the Row menu on the Work With Operation Dispatch form. If you leave this processing option blank, the system uses version ZJDE0001.
3. Work Order Parts List (P3111)Specify the version that the system uses when you select the Work Order Parts List program (P3111) from the Row menu of the Work With Operation Dispatch form. If you leave this processing option blank, the system uses version ZJDE0001.

Validating Requirements Plans
9-8 JD Edwards EnterpriseOne Applications Requirements Planning Implementation Guide
4. Work Order Parts Inquiry (P3121)Specify the version that the system uses when you select the Work Order Parts List Inquiry program (P3121) from the Row menu on the Work With Operation Dispatch form. If you leave this processing option blank, the system uses version ZJDE0001.
5. Operation Dispatch Inquiry (P31220)Specify the version that the system uses when you select the Operation Dispatch Inquiry program (P31220) from the Row menu on the Work With Operation Dispatch form. If you leave this processing option blank, the system uses version ZJDE0001.
6. Work Order Quantity (P31121)Specify the version of the Work Order Quantity program (P31121) the system uses. If you leave this processing option blank, the system uses version ZJDE0001.
7. Work Order Hours (P31122)Specify the version of the Work Order Hours program (P31122) the system uses. If you leave this processing option blank, the system uses version ZJDE0001.
8. Scheduled WO Operations (P313003X) (Release 9.2 Update)Specify the version of the Scheduled Work Order Operations program (P313003X) that the system uses when you select Reschedule WO from the Row menu. If you leave this processing option blank, the system uses version ZJDE0001.
9.3.6.3 ProcessUse this processing option to specify system processing.
Quantity CalculationSpecify whether the system subtracts the quantity that is scrapped or canceled from the remaining quantity. Values are:
Blank: Include the quantity that is scrapped or canceled in the remaining quantity.
1: Subtract the quantity that is scrapped or canceled from the remaining quantity.
9.3.7 Reviewing Work Schedules for Production StatusAccess the Work With Operation Dispatch form.
Thru Op Status (through operation status)Enter a UDC (31/OS) that indicates the status of an operation. The thru operation status is used as an ending point to select work order information to display.
9.3.8 Setting Processing Options for Work Center Schedule Review (P31224)Use these processing options to set system defaults, define how the system processes data, and specify versions.
9.3.8.1 DefaultsThis processing option defines the default document type.
1. Document TypeSpecify the default document type that is associated with the work order or rate schedule. Document type is a UDC (00\DT) that identifies the origin and purpose of the document. Enter the document type to use as a default value, or select it from the Select User Define Code form.
Validating Requirements Plans
Validating Requirements Plans 9-9
9.3.8.2 Disp Options (display options)
1. Subfile DatesSpecify how the system calculates and displays the loads. Values are:
Blank: Calculates and displays daily loads.
1: Calculates and displays monthly loads.
2: Calculates and displays weekly loads.
3: Calculates and displays daily loads.
9.3.8.3 WO Processing (work order processing)
1. Include Work Order Generated LoadsSpecify whether the system includes work order loads before rate schedules, after rate schedules, or not at all. Values are:
Blank: The system does not recognize work order loads.
1: The system includes work order loads before rate schedules.
2: The system includes work order loads after rate schedules.
2. From Operation StatusSpecify the status that the system uses for the work orders or rate schedules as the routing steps are completed. Operation status is a UDC (31/OS) that describes the status of a work order or rate schedule. Enter the operation status to use as the default value, or select it from the Select User Define Code form.
3. To Operation StatusSpecify the operation status that the system uses for the work orders or rate schedules as the routing steps are completed. Operation status is a UDC (31/OS) that describes the status of a work order or rate schedule. Enter the operation status to use as the default value or select it from the Select User Define Code form.
9.3.8.4 Versions
1. Rate Revisions (P3109)Specify the version that the system uses when you access the Enter/Change Rate Schedule program from the Row menu from the Work Center Schedule Review program. If you leave this field blank, the system uses version ZJDE0001.
Versions control how the Enter/Change Rate Schedule program displays information. Therefore, you might need to set the processing options to specific versions to meet the needs of the organization.
9.3.9 Reviewing Rate Schedule and Work Center LoadsAccess the Work Center Schedule Review form.
9.3.10 Reviewing the Shop Floor Workbench for MRPAccess the Work With Order Scheduling form.
PlannerEnter the address book number of a manager or planner.
Note: A processing option for some forms enables you to enter a default value for this field based on values for category codes 1 (Phase), 2, and 3. You set up the default values on the Default Managers and Supervisors form. After you set up the default values and the processing option, the default information appears automatically on any work orders that you create if the category code criterion is met. You can either accept or override the default value.
Validating Requirements Plans
9-10 JD Edwards EnterpriseOne Applications Requirements Planning Implementation Guide
CustomerEnter a customer Address Book number.
Parent WO (parent work order)Enter a number that identifies the parent work order. You can use this number to:
■ Enter default values for new work orders, such as Type, Priority, Status, and Manager.
■ Group work orders for project setup and reporting.
Status FromEnter a UDC (00/ SS) that describes the status of a work order. Any status change from 90 through 99 automatically updates the date completed.
Search X-Ref (search cross-reference)Enter an alphanumeric value to use as a cross-reference or secondary reference number. Typically, this is the customer number, supplier number, or job number.
Quantity OpenEnter the original quantity for the order detail line, plus or minus any changes to that quantity, minus all quantities that are shipped, received, and vouchered to date.
10
Forecast Consumption 10-1
10Forecast Consumption
This chapter contains the following topics:
■ Section 10.1, "Understanding Forecast Consumption"
■ Section 10.2, "Forecast Consumption Across Multiple Periods"
■ Section 10.3, "Forecast Consumption by Customer"
See Also:
■ Setting Up Forecast Consumption.
10.1 Understanding Forecast ConsumptionForecast consumption is based on the assumption that actual sales orders reduce, or consume, the forecasted quantities. This approach ensures that sales orders are not treated as additional demand to the forecast during a planning period. The plan begins with gross forecast. Actual sales orders are placed that consume the forecast. The result is an adjusted forecast-that is, the forecast balance not consumed by sales orders.
In JD Edwards EnterpriseOne software, you have two types of forecast consumption strategies that are available to you:
■ Forecast consumption by period (time fence rules C and G).
■ Forecast consumption across multiple periods (time fence rule H).
Either of these options can be limited to forecast consumption by customer.
Forecast consumption by period only requires that you use planning fence rule C or G, and create a forecast for the item. The aggregate forecast will be reduced by the aggregate sale orders for a period.
Forecast consumption across multiple periods requires that you use planning fence rule H, create a forecast for the item, and define forecast consumption periods. These forecast consumption periods span multiple weekly or monthly planning periods or buckets. The aggregate forecast within the forecast consumption period is reduced by the aggregate sales order in the same period. This calculation includes shipped sales orders.
When you use the forecast consumption by customer functionality through processing options in requirements planning, the system only reduces the forecast quantities for specific customers by the sales order quantities for the same customer. If a customer does not have a customer-specific forecast, the system uses the aggregate forecast consumption logic.
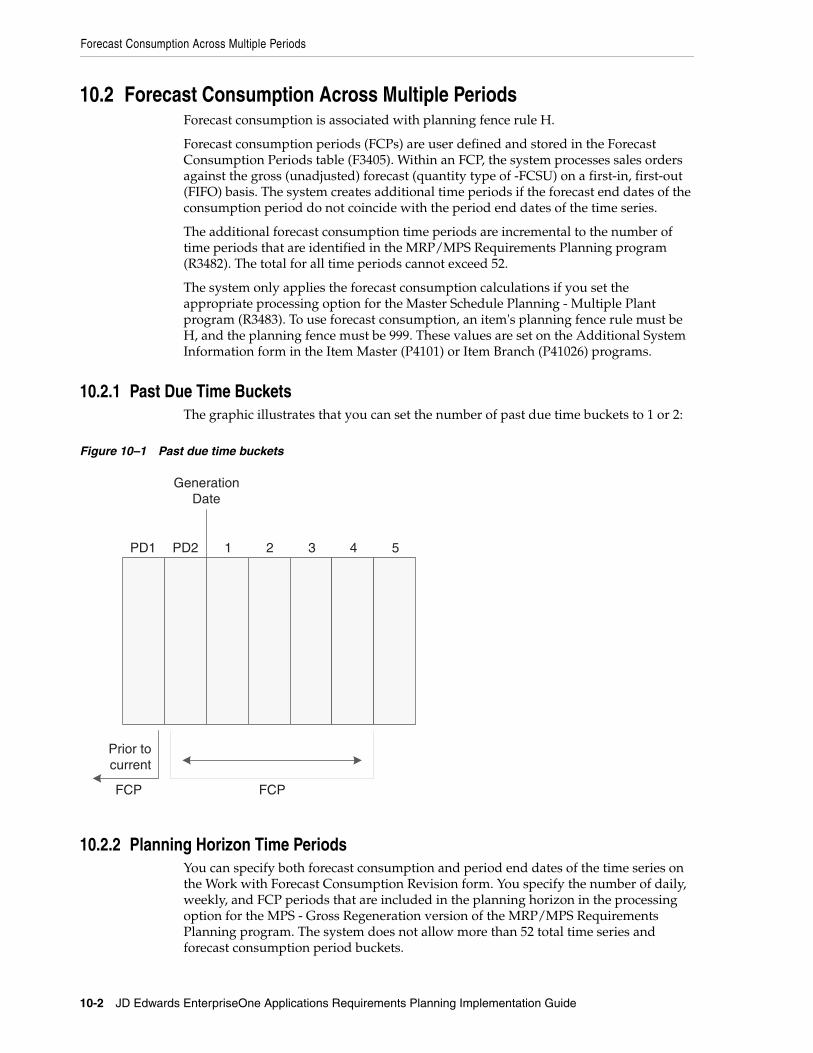
Forecast Consumption Across Multiple Periods
10-2 JD Edwards EnterpriseOne Applications Requirements Planning Implementation Guide
10.2 Forecast Consumption Across Multiple PeriodsForecast consumption is associated with planning fence rule H.
Forecast consumption periods (FCPs) are user defined and stored in the Forecast Consumption Periods table (F3405). Within an FCP, the system processes sales orders against the gross (unadjusted) forecast (quantity type of -FCSU) on a first-in, first-out (FIFO) basis. The system creates additional time periods if the forecast end dates of the consumption period do not coincide with the period end dates of the time series.
The additional forecast consumption time periods are incremental to the number of time periods that are identified in the MRP/MPS Requirements Planning program (R3482). The total for all time periods cannot exceed 52.
The system only applies the forecast consumption calculations if you set the appropriate processing option for the Master Schedule Planning - Multiple Plant program (R3483). To use forecast consumption, an item's planning fence rule must be H, and the planning fence must be 999. These values are set on the Additional System Information form in the Item Master (P4101) or Item Branch (P41026) programs.
10.2.1 Past Due Time BucketsThe graphic illustrates that you can set the number of past due time buckets to 1 or 2:
Figure 10–1 Past due time buckets
PD1 PD2 1 2 3 4 5
Prior tocurrent
FCP FCP
GenerationDate
10.2.2 Planning Horizon Time PeriodsYou can specify both forecast consumption and period end dates of the time series on the Work with Forecast Consumption Revision form. You specify the number of daily, weekly, and FCP periods that are included in the planning horizon in the processing option for the MPS - Gross Regeneration version of the MRP/MPS Requirements Planning program. The system does not allow more than 52 total time series and forecast consumption period buckets.
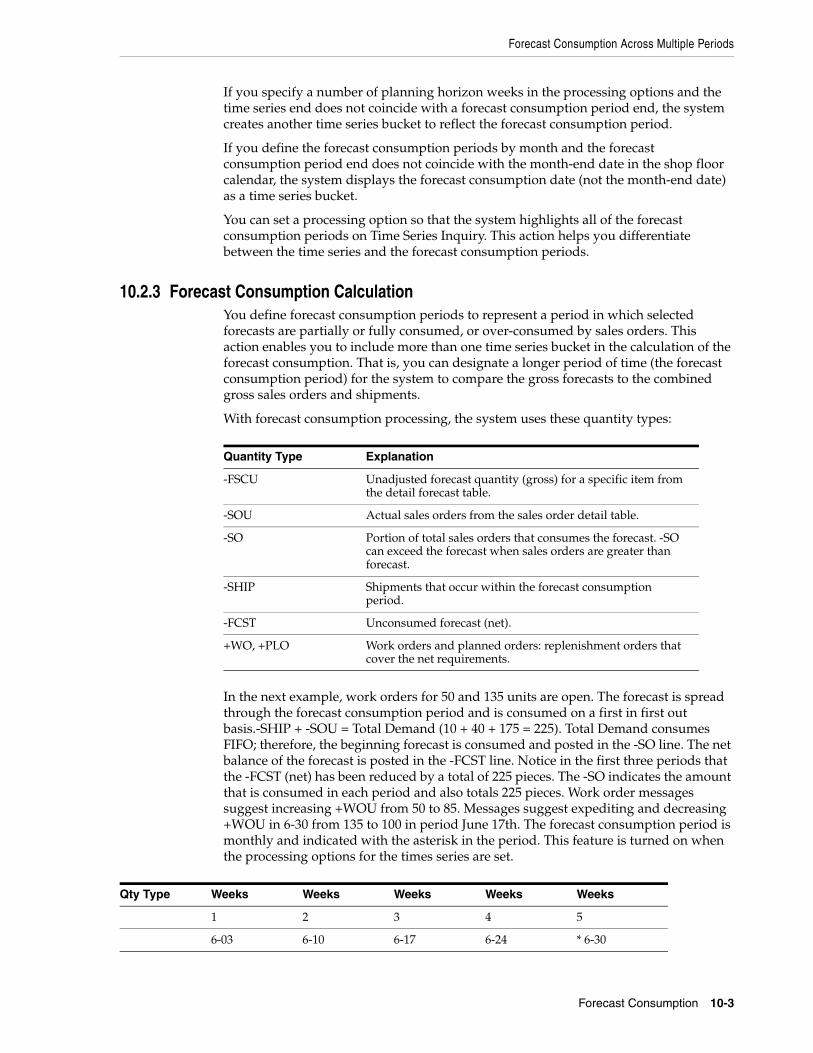
Forecast Consumption Across Multiple Periods
Forecast Consumption 10-3
If you specify a number of planning horizon weeks in the processing options and the time series end does not coincide with a forecast consumption period end, the system creates another time series bucket to reflect the forecast consumption period.
If you define the forecast consumption periods by month and the forecast consumption period end does not coincide with the month-end date in the shop floor calendar, the system displays the forecast consumption date (not the month-end date) as a time series bucket.
You can set a processing option so that the system highlights all of the forecast consumption periods on Time Series Inquiry. This action helps you differentiate between the time series and the forecast consumption periods.
10.2.3 Forecast Consumption CalculationYou define forecast consumption periods to represent a period in which selected forecasts are partially or fully consumed, or over-consumed by sales orders. This action enables you to include more than one time series bucket in the calculation of the forecast consumption. That is, you can designate a longer period of time (the forecast consumption period) for the system to compare the gross forecasts to the combined gross sales orders and shipments.
With forecast consumption processing, the system uses these quantity types:
Quantity Type Explanation
-FSCU Unadjusted forecast quantity (gross) for a specific item from the detail forecast table.
-SOU Actual sales orders from the sales order detail table.
-SO Portion of total sales orders that consumes the forecast. -SO can exceed the forecast when sales orders are greater than forecast.
-SHIP Shipments that occur within the forecast consumption period.
-FCST Unconsumed forecast (net).
+WO, +PLO Work orders and planned orders: replenishment orders that cover the net requirements.
In the next example, work orders for 50 and 135 units are open. The forecast is spread through the forecast consumption period and is consumed on a first in first out basis.-SHIP + -SOU = Total Demand (10 + 40 + 175 = 225). Total Demand consumes FIFO; therefore, the beginning forecast is consumed and posted in the -SO line. The net balance of the forecast is posted in the -FCST line. Notice in the first three periods that the -FCST (net) has been reduced by a total of 225 pieces. The -SO indicates the amount that is consumed in each period and also totals 225 pieces. Work order messages suggest increasing +WOU from 50 to 85. Messages suggest expediting and decreasing +WOU in 6-30 from 135 to 100 in period June 17th. The forecast consumption period is monthly and indicated with the asterisk in the period. This feature is turned on when the processing options for the times series are set.
Qty Type Weeks Weeks Weeks Weeks Weeks
1 2 3 4 5
6-03 6-10 6-17 6-24 * 6-30
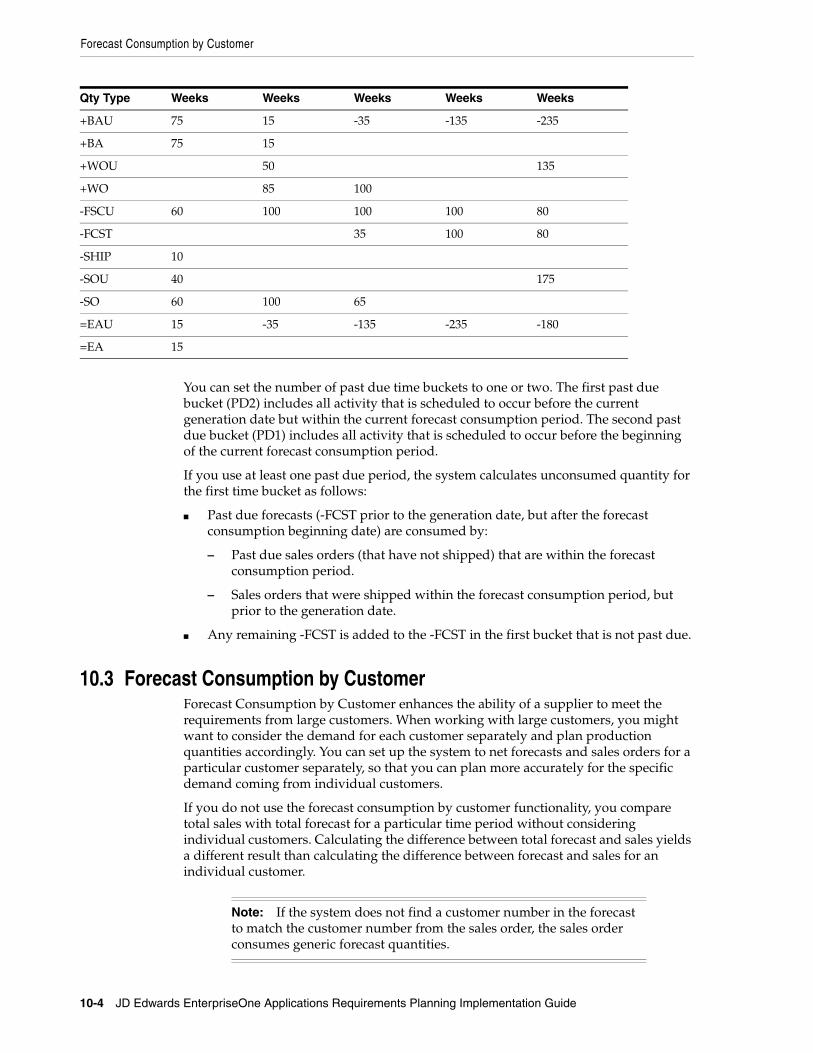
Forecast Consumption by Customer
10-4 JD Edwards EnterpriseOne Applications Requirements Planning Implementation Guide
You can set the number of past due time buckets to one or two. The first past due bucket (PD2) includes all activity that is scheduled to occur before the current generation date but within the current forecast consumption period. The second past due bucket (PD1) includes all activity that is scheduled to occur before the beginning of the current forecast consumption period.
If you use at least one past due period, the system calculates unconsumed quantity for the first time bucket as follows:
■ Past due forecasts (-FCST prior to the generation date, but after the forecast consumption beginning date) are consumed by:
– Past due sales orders (that have not shipped) that are within the forecast consumption period.
– Sales orders that were shipped within the forecast consumption period, but prior to the generation date.
■ Any remaining -FCST is added to the -FCST in the first bucket that is not past due.
10.3 Forecast Consumption by CustomerForecast Consumption by Customer enhances the ability of a supplier to meet the requirements from large customers. When working with large customers, you might want to consider the demand for each customer separately and plan production quantities accordingly. You can set up the system to net forecasts and sales orders for a particular customer separately, so that you can plan more accurately for the specific demand coming from individual customers.
If you do not use the forecast consumption by customer functionality, you compare total sales with total forecast for a particular time period without considering individual customers. Calculating the difference between total forecast and sales yields a different result than calculating the difference between forecast and sales for an individual customer.
Note: If the system does not find a customer number in the forecast to match the customer number from the sales order, the sales order consumes generic forecast quantities.
+BAU 75 15 -35 -135 -235
+BA 75 15
+WOU 50 135
+WO 85 100
-FSCU 60 100 100 100 80
-FCST 35 100 80
-SHIP 10
-SOU 40 175
-SO 60 100 65
=EAU 15 -35 -135 -235 -180
=EA 15
Qty Type Weeks Weeks Weeks Weeks Weeks

Forecast Consumption by Customer
Forecast Consumption 10-5
To use forecast consumption by customer, you have to enter a forecast for a specific customer. In this case, the forecast record has a customer number in the Customer Number field. Based on the customer number, the system can search for sales orders with matching customer numbers in the ship-to or sold-to field to calculate the remaining demand for the customer. You specify whether the system uses to the ship-to or sold-to field from the sales order by setting a processing option or by defining a customer address relationship.
When you run the MRP/MPS Requirements Planning program, you can set up the program to use forecast consumption by customer. You can use this functionality for items that are defined with planning fence rule C, G or H. You cannot use forecast consumption logic for process items.
When you run the MRP/MPS Requirements Planning program and have activated the Forecast Consumption by Customer functionality, the program calculates the net difference between forecast and sales orders for a period for individual customers. The process consists of these steps:
■ Check the Item Branch record for the item to see that the time fence rule is set to C, G or H.
■ Read the Forecast File table (F3460) and the Sales Order Header File table (F4201) record for each customer.
■ Compare sales orders and forecast for each customer to determine which is greater.
The greater value of the two is written to the F3460 as a new forecast record with a forecast type that indicates that it is the result of a Forecast Consumption by Customer calculation.
You can use the MPS Time Series program (P3413) to review the results of the calculation. The net forecast that results from the Forecast Consumption by Customer calculation is displayed as the adjusted forecast quantity (-FCST).
Note: You can use Forecast Consumption by Customer as well, if you are planning for multiple facilities, by using the Planning Schedule - Multiple Plant program. You can set the same processing options as for the MRP/MPS Requirements Planning program and determine, in addition, whether to consider interplant demand as customer demand.
10.3.1 Forecast Consumption by Customer CalculationThese tables illustrate the different results that are reached, depending on whether you differentiate by customer. The first table demonstrates the results of a calculation that does not differentiate by customer:
Customer Sales Order ForecastGreater of Forecast and Sales Order
A 100 80
B 400 375
C 700 750
Total 1200 1205 1205
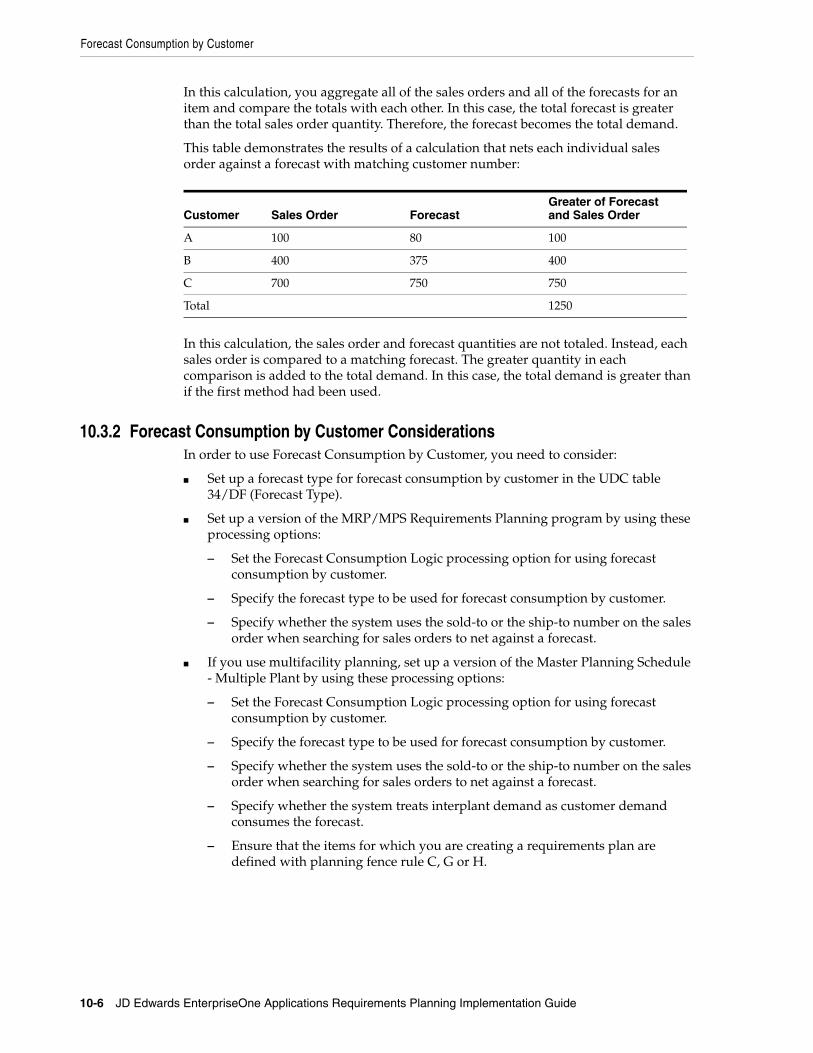
Forecast Consumption by Customer
10-6 JD Edwards EnterpriseOne Applications Requirements Planning Implementation Guide
In this calculation, you aggregate all of the sales orders and all of the forecasts for an item and compare the totals with each other. In this case, the total forecast is greater than the total sales order quantity. Therefore, the forecast becomes the total demand.
This table demonstrates the results of a calculation that nets each individual sales order against a forecast with matching customer number:
Customer Sales Order ForecastGreater of Forecast and Sales Order
A 100 80 100
B 400 375 400
C 700 750 750
Total 1250
In this calculation, the sales order and forecast quantities are not totaled. Instead, each sales order is compared to a matching forecast. The greater quantity in each comparison is added to the total demand. In this case, the total demand is greater than if the first method had been used.
10.3.2 Forecast Consumption by Customer ConsiderationsIn order to use Forecast Consumption by Customer, you need to consider:
■ Set up a forecast type for forecast consumption by customer in the UDC table 34/DF (Forecast Type).
■ Set up a version of the MRP/MPS Requirements Planning program by using these processing options:
– Set the Forecast Consumption Logic processing option for using forecast consumption by customer.
– Specify the forecast type to be used for forecast consumption by customer.
– Specify whether the system uses the sold-to or the ship-to number on the sales order when searching for sales orders to net against a forecast.
■ If you use multifacility planning, set up a version of the Master Planning Schedule - Multiple Plant by using these processing options:
– Set the Forecast Consumption Logic processing option for using forecast consumption by customer.
– Specify the forecast type to be used for forecast consumption by customer.
– Specify whether the system uses the sold-to or the ship-to number on the sales order when searching for sales orders to net against a forecast.
– Specify whether the system treats interplant demand as customer demand consumes the forecast.
– Ensure that the items for which you are creating a requirements plan are defined with planning fence rule C, G or H.

11
Working with Multilevel Master Schedules 11-1
11Working with Multilevel Master Schedules
This chapter contains the following topics:
■ Section 11.1, "Understanding Multilevel Master Schedules"
■ Section 11.2, "Setting Up a Feature Planned Percentage"
■ Section 11.3, "Generating a Multilevel Master Schedule"
11.1 Understanding Multilevel Master SchedulesMultilevel master schedules support assemble-to-order production and delivery.
You set up and generate multilevel master schedules to:
■ Define demand information on a family basis and make changes as needed.
■ Define planning bills to acquire the options and features that you expect to sell.
When several material purchasing options are available, the planners can make informed decisions within the available time frame. The system uses planning bills to notify planners when special attention is needed.
■ Update a product plan with a change in customer demand or design specifications.
■ Configure the schedule generation to include only the information that you require.
■ Explode planned orders down to component items.
11.2 Setting Up a Feature Planned PercentageThis section provides an overview of planning bills and discusses how to set up a feature planned percentage.
11.2.1 Understanding Planning BillsPlanning bills are groups of items in a bill of material format that reflect how an item is sold. Planning bills help you manage the acquisition of a variety of options and features that might be included in a saleable end item.
Planning bills enable you to configure a pseudo end item. For a pseudo item, you do not have to assign a unique part number or maintain a bill of material for every combination of options and features that might be included in the end product.
Setting Up a Feature Planned Percentage
11-2 JD Edwards EnterpriseOne Applications Requirements Planning Implementation Guide
You define planning bills to acquire the options and features in the proportion that you expect to sell. A final assembly schedule coordinates the material selection and assembly after you order the product options.
11.2.1.1 Example: Automobile with Two Engine OptionsA part number can be assigned to the engine feature for planning purposes. The two engine options cannot be assembled together, so the engine feature never actually exists in inventory. It is a pseudo item.
A stocking type of K identifies that the parent (automobile) is planned for in the same way as a kit. The feature item (engine) has a stocking type of 0 (phantom). Phantoms call for a special type of processing for which the leadtime is zero and the order policy is lot-for-lot.
The planner does not know which automobile will ship with which engine next month, but the ratio of engine types consumed is predictable. The planning bill of material identifies the percentages of each type of engine that you expect to ship.
By exploding this bill against the master schedule for the planning family of automobiles, the system can calculate the total requirements for each type of engine.
11.2.1.2 Example: Exploding Planned OrdersIn this example, the system uses phantom processing to pass planned order releases from the parent (T1000 automobile) directly through to the planned order releases of the engine feature. The system uses the feature planning percentages to explode the planned order releases for the engine feature down to the gross requirements for V-8 and V-6 engines.
This diagram depicts how feature planned percentages are used to explode a planned order release down to gross requirements:
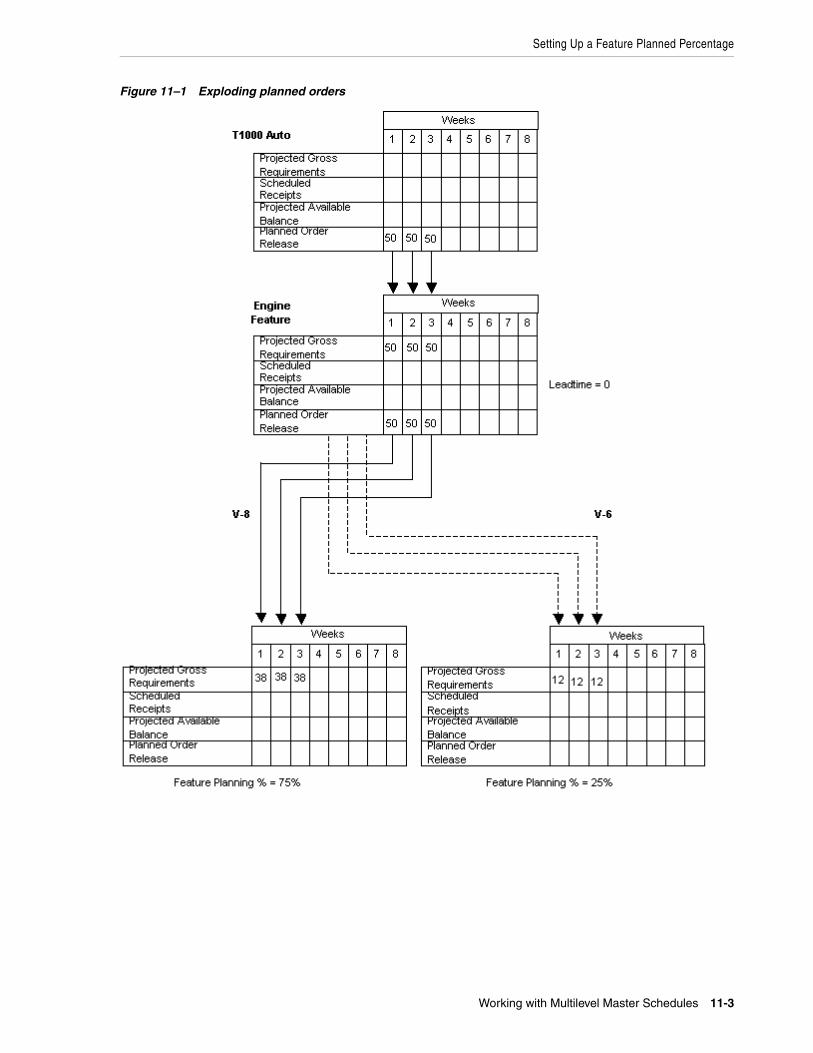
Setting Up a Feature Planned Percentage
Working with Multilevel Master Schedules 11-3
Figure 11–1 Exploding planned orders
Generating a Multilevel Master Schedule
11-4 JD Edwards EnterpriseOne Applications Requirements Planning Implementation Guide
11.2.2 Form Used to Set Up Feature Planned Percentages
Form Name FormID Navigation Usage
Enter Bill of Material Information
W3002A Daily PDM Discrete (G3011), Enter/Change Bill
On the Work with Bill of Material form, find and select a bill of material or click Add.
Set up a feature planned percentage.
Define the feature percentage for an item that is used for planning requirements.
11.2.3 Setting Up a Feature Planned PercentageAccess the Enter Bill of Material Information form.
Feat Plan % (feature planned percentage)Enter the percentage of demand for a specified feature based on projected production. For example, a company might produce 65 percent of their lubricant with high viscosity, and 35 percent with low viscosity, based on customer demand.
Material Planning uses this percentage to accurately plan for a process's co-products and by-products.
Enter percentages as whole numbers, for example, enter 5 percent as 5.0. The default value is 100.00 percent.
11.3 Generating a Multilevel Master ScheduleThis section provides an overview of multilevel master schedule generation and discusses how to run the MPS Regeneration for multilevel schedules.
11.3.1 Understanding Multilevel Master Schedule GenerationWhen you run the MPS - Gross Regeneration version of the MRP/MPS Requirements Planning program (R3482), the system compiles a master schedule. Select the MPS - Net Change version of the MRP/MPS Requirements Planning program when you want to include only those items that have changed since the last generation. You can create a version of the MRP/MPS Requirements Planning program specifically for multilevel master scheduling.
When you generate a multilevel master schedule, the system explodes planned orders to the bill of material component and identifies the percentages of all component items. By exploding the bill of material against the total number of expected sales of a parent item, you can obtain the total requirements for each item at each level in the bill of material.
When you generate a master schedule, the system evaluates selected information, performs calculations, and recommends a time-phased planning schedule for all selected items.
11.3.2 Running the MPS Regeneration for Multilevel SchedulesSelect Single Site Periodic Planning Operations (G3422), MPS Regeneration.
12
Planning for Process and Repetitive Manufacturing 12-1
12Planning for Process and Repetitive Manufacturing
This chapter contains the following topics:
■ Section 12.1, "Understanding Process Manufacturing Planning"
■ Section 12.2, "Understanding Repetitive Manufacturing Planning"
■ Section 12.3, "Generating a Master Planning Schedule for Batch Bills"
■ Section 12.4, "Generating a Master Planning Schedule for Processes"
■ Section 12.5, "Generating a Master Planning Schedule for Repetitive Items"
12.1 Understanding Process Manufacturing PlanningProcess manufacturing results in products such as liquids, fibers, powders, and gases. Pharmaceuticals, foodstuffs, and beverages are typical examples of process products. Products such as these are usually manufactured by a two-step process:
1. Mixing or blending
2. Filling or packaging
These kinds of products might involve intermediate steps, such as curing, baking, or preparation.
Process manufacturing uses ingredients and bills of material. Ingredients can be either consumed or produced during the manufacturing process. In a process bill of material, the quantity of a component can vary, according to its grade or potency.
Unique features of process manufacturing are:
■ Pacing co-products.
■ Planned co-products (by-products are unplanned).
■ Additional processing options in MPS/MRP.
Process manufacturing produces co-products and by-products. A co-product is a saleable end item that results from a process. A by-product is a material of value that is produced incidental to or as a residual of the process.
The different types of process manufacturing are:
■ Batch
■ Continuous
Understanding Process Manufacturing Planning
12-2 JD Edwards EnterpriseOne Applications Requirements Planning Implementation Guide
In batch processing, you usually produce a product in a standard run or lot size that is determined by vessel size, line rates, or standard run length. Because of the life cycle of the product after its completion, you typically schedule items that are made this way in short production runs. Co-products and by-products can be generated during batch processing. Typical items that are produced with batch processing include:
■ Pharmaceuticals
■ Foods
■ Inks and paints
■ Glues
■ Oil or chemical products
In the continuous flow environment, production runs typically continue for an extended duration. Equipment is dedicated to one product or product line. This method of manufacturing is characterized by difficulty in matching output volume with demand and varying yield from process operations. Examples are petroleum-based products and water purification. Co-products and by-products are generally more prevalent in continuous processing than in batch processing.
Master Production Scheduling (MPS) calculates the time series for co-products. Demand for the co-product generates MPS order messages to drive the production process. Co-products that are fully satisfied by the process do not receive order messages. Processes might also make a by-product that has value but is not the central purpose of the process. For example, the lubricant process has co-products of household lubricant and graphite lubricant, and a by-product of sludge. The lubricant would not be processed primarily to obtain sludge.
Usually, both batch and continuous processing methods require extensive record keeping, such as recording quality and tolerance values during the process, and strict adherence to lot tracing and tracking.
12.1.1 Batch PlanningWith batch manufacturing, a product is made from a bill of material in a standard run. The run is determined by vessel size or standard run length. Typical products that use batch manufacturing include:
■ Pharmaceuticals
■ Foods
■ Glues
■ Fermented beverages
■ Paints
The objective for batch manufacturing is to process work orders with a batch quantity that corresponds to a batch bill of material and to use these orders for Material Requirements Planning (MRP) processing. Just as the bill type uniquely defines a bill of material, you can use the batch quantity with bill type to further define a unique bill.
With this manufacturing method, some restrictions on capacity determine the size of the batch that is produced. For example, you might need to fill the vats to a certain level for the process to perform properly.
In addition, the system specifically defines the component quantities for the batch. For example, a 50-gallon vat requires a given quantity of one component, but the system
Generating a Master Planning Schedule for Batch Bills
Planning for Process and Repetitive Manufacturing 12-3
does not necessarily double the component for a 100-gallon vat. Such components are often enzymes or catalysts.
Vats are often physically located close to a more repetitive downstream process. For example, in the manufacture of bread, dough is mixed and left to rise in a vat before being formed into individual loaves and sent for baking and packaging.
You often express units of measure for batches in terms of volume or weight, such as liters or kilograms.
After you create a batch bill of material and batch routing for the work order header, you process the batch work order to attach the parts list and routing instructions to the work order header. Then you generate a master schedule of batch work orders and review the output.
12.2 Understanding Repetitive Manufacturing PlanningUse repetitive manufacturing for highly repetitive production that relies on a production rate. Repetitive manufacturing enables you to specify a rate schedule by effective date in daily, weekly, or monthly quantities.
Repetitive manufacturing has these characteristics:
■ Production volume is stable and predictable.
■ Lead time is short.
■ Factory layout is product-oriented and often characterized as cellular manufacturing in which dissimilar operations are physically grouped so that the product flows rapidly from one operation to the next.
■ Setups are short so that switching between products does not significantly affect the time that is available for production.
■ Group technology is often incorporated into the design engineering and manufacturing engineering to accommodate some variety with little effect on cost or production speed.
■ Unit of measure is often each.
However, it can also be volume- or weight-related when it is used in an environment that is similar to process manufacturing (as opposed to discrete).
Examples of repetitive products are:
■ Electronic goods.
■ Automobiles.
■ Durable consumer goods (washing machines, refrigerators, and so on).
12.3 Generating a Master Planning Schedule for Batch BillsThis section provides an overview of MPS generation for batch bills and discusses how to generate MPS for batch bills.
12.3.1 Understanding MPS Generation for Batch BillsUse the MPS - Gross Regeneration version of the MRP/MPS Requirements Planning program (R3482) to generate a master schedule for all items or for selected items. This program functions in different ways, depending on whether more than one batch bill exists.
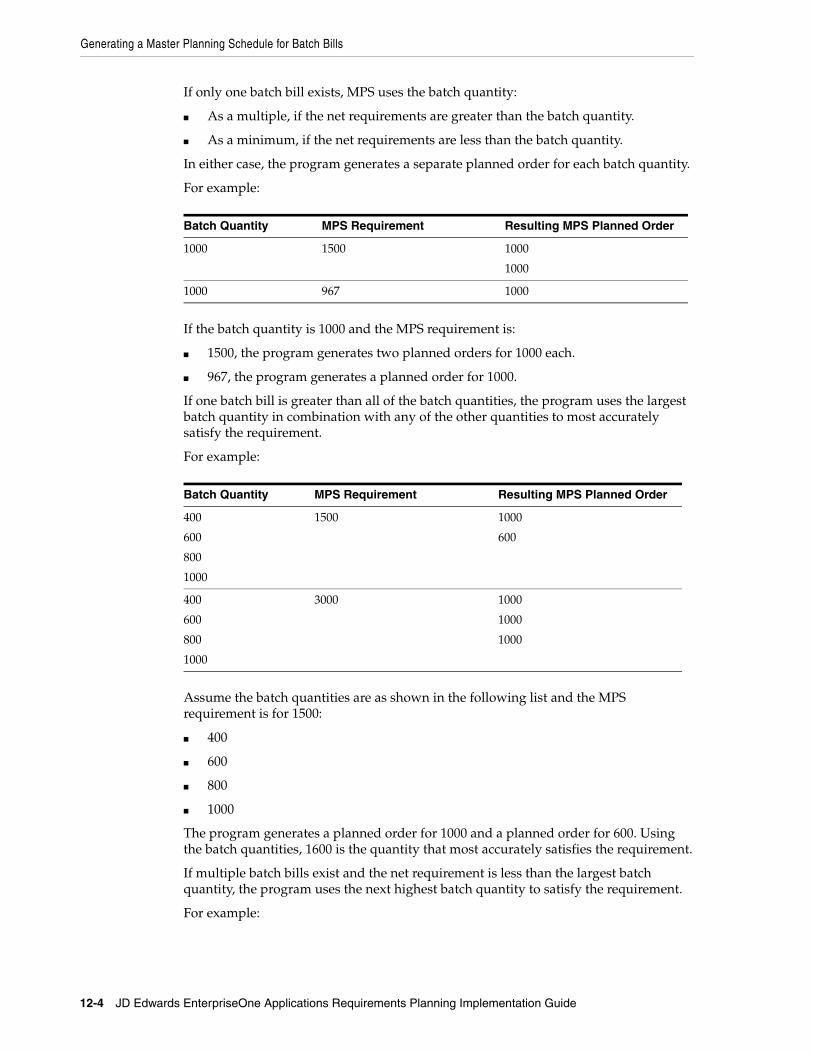
Generating a Master Planning Schedule for Batch Bills
12-4 JD Edwards EnterpriseOne Applications Requirements Planning Implementation Guide
If only one batch bill exists, MPS uses the batch quantity:
■ As a multiple, if the net requirements are greater than the batch quantity.
■ As a minimum, if the net requirements are less than the batch quantity.
In either case, the program generates a separate planned order for each batch quantity.
For example:
Batch Quantity MPS Requirement Resulting MPS Planned Order
1000 1500 1000
1000
1000 967 1000
If the batch quantity is 1000 and the MPS requirement is:
■ 1500, the program generates two planned orders for 1000 each.
■ 967, the program generates a planned order for 1000.
If one batch bill is greater than all of the batch quantities, the program uses the largest batch quantity in combination with any of the other quantities to most accurately satisfy the requirement.
For example:
Batch Quantity MPS Requirement Resulting MPS Planned Order
400
600
800
1000
1500 1000
600
400
600
800
1000
3000 1000
1000
1000
Assume the batch quantities are as shown in the following list and the MPS requirement is for 1500:
■ 400
■ 600
■ 800
■ 1000
The program generates a planned order for 1000 and a planned order for 600. Using the batch quantities, 1600 is the quantity that most accurately satisfies the requirement.
If multiple batch bills exist and the net requirement is less than the largest batch quantity, the program uses the next highest batch quantity to satisfy the requirement.
For example:
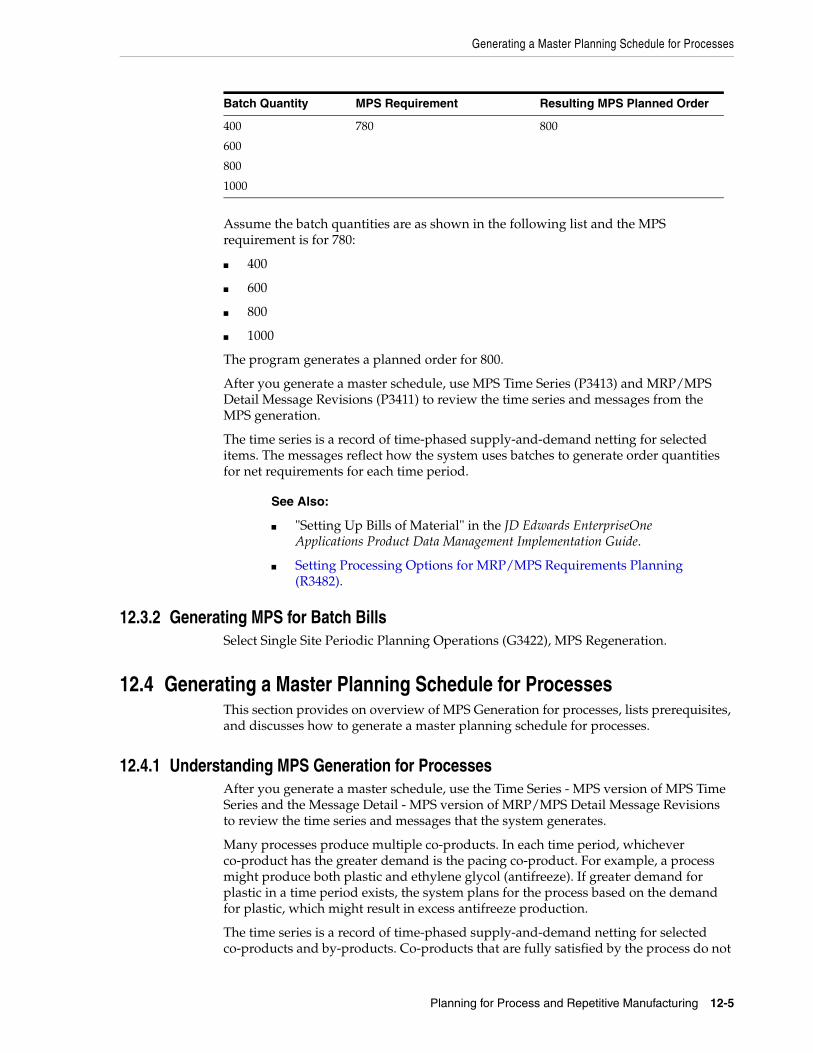
Batch Quantity MPS Requirement Resulting MPS Planned Order
400
600
800
1000
780 800
Generating a Master Planning Schedule for Processes
Planning for Process and Repetitive Manufacturing 12-5
Assume the batch quantities are as shown in the following list and the MPS requirement is for 780:
■ 400
■ 600
■ 800
■ 1000
The program generates a planned order for 800.
After you generate a master schedule, use MPS Time Series (P3413) and MRP/MPS Detail Message Revisions (P3411) to review the time series and messages from the MPS generation.
The time series is a record of time-phased supply-and-demand netting for selected items. The messages reflect how the system uses batches to generate order quantities for net requirements for each time period.
See Also:
■ "Setting Up Bills of Material" in the JD Edwards EnterpriseOne Applications Product Data Management Implementation Guide.
■ Setting Processing Options for MRP/MPS Requirements Planning (R3482).
12.3.2 Generating MPS for Batch BillsSelect Single Site Periodic Planning Operations (G3422), MPS Regeneration.
12.4 Generating a Master Planning Schedule for ProcessesThis section provides on overview of MPS Generation for processes, lists prerequisites, and discusses how to generate a master planning schedule for processes.
12.4.1 Understanding MPS Generation for ProcessesAfter you generate a master schedule, use the Time Series - MPS version of MPS Time Series and the Message Detail - MPS version of MRP/MPS Detail Message Revisions to review the time series and messages that the system generates.
Many processes produce multiple co-products. In each time period, whichever co-product has the greater demand is the pacing co-product. For example, a process might produce both plastic and ethylene glycol (antifreeze). If greater demand for plastic in a time period exists, the system plans for the process based on the demand for plastic, which might result in excess antifreeze production.
The time series is a record of time-phased supply-and-demand netting for selected co-products and by-products. Co-products that are fully satisfied by the process do not
Generating a Master Planning Schedule for Repetitive Items
12-6 JD Edwards EnterpriseOne Applications Requirements Planning Implementation Guide
receive order messages. Instead, the system creates warning messages for co-products that are planned by a process.
Note: Process item numbers do not have a time series.
After you have defined the stocking types and co-products and by-products for the process, you can generate and review a master schedule of all process work orders and output. This output consists of time series and messages for the co-products and by-products.
12.4.2 PrerequisitesBefore you complete the tasks in this section:
■ Define co-products and by-products for the process.
■ Set up stocking type for process.
See "Working With Process Manufacturing" in the JD Edwards EnterpriseOne Applications Product Data Management Implementation Guide.
12.4.3 Forms Used to Generate a Master Planning Schedule for Processes
Form Name FormID Navigation Usage
Work With Time Series
W3413A MPS Daily Operations (G3412), MPS Time Series/ATP Inquiry
Review time-phased supply-and-demand quantities.
Work With Detail Messages
W3411D MPS Daily Operations (G3412), MPS Detail Message Review
Review detail messages that were generated by this version of the Requirements Planning Regeneration program (R3482).
12.4.4 Generating a Master Planning Schedule for ProcessesSelect Single Site Periodic Planning Operations (G3422), MPS Regeneration.
12.5 Generating a Master Planning Schedule for Repetitive ItemsThis section provides an overview of MPS generation for repetitive items, lists prerequisites, and lists the forms used to generate master planning schedules for repetitive items.
12.5.1 Understanding MPS Generation for Repetitive ItemsWhen you run the MPS - Net Change version or the MPS - Gross Regeneration version of the MRP/MPS Requirements Planning program (P3482), the system:
1. Evaluates selected information.
2. Performs calculations.
3. Generates a time series and messages for the selected items.
To generate the master production schedule for repetitive items:
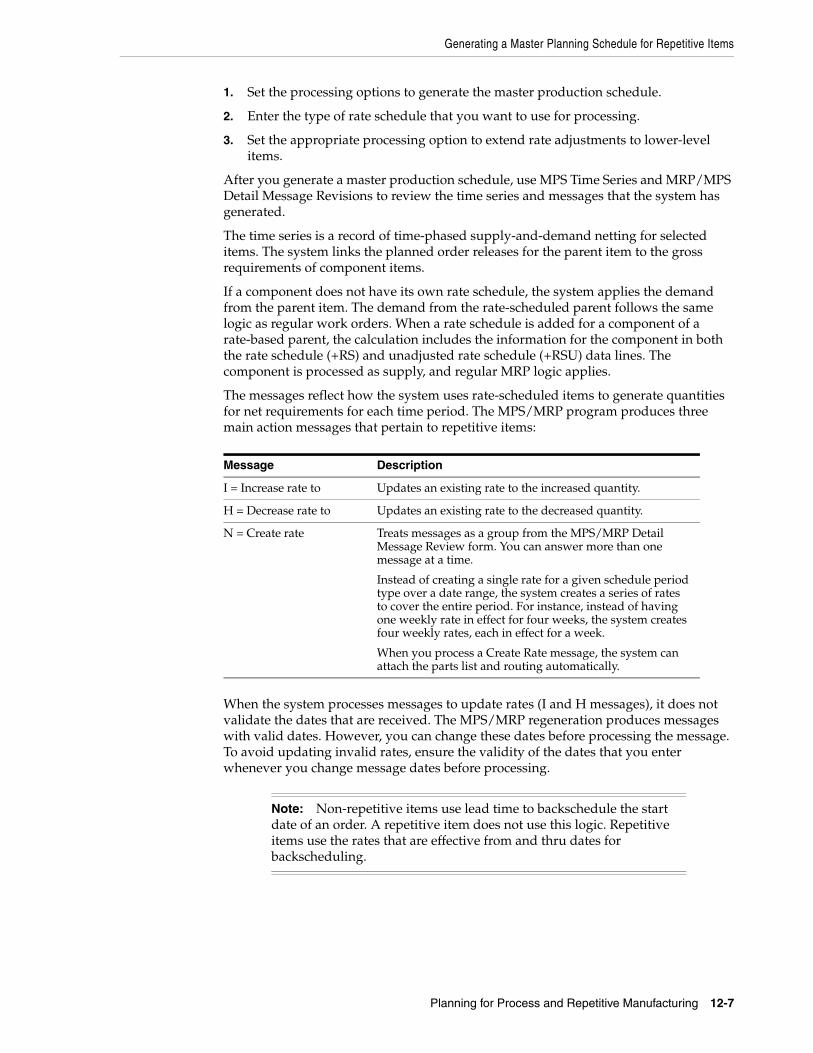
Generating a Master Planning Schedule for Repetitive Items
Planning for Process and Repetitive Manufacturing 12-7
1. Set the processing options to generate the master production schedule.
2. Enter the type of rate schedule that you want to use for processing.
3. Set the appropriate processing option to extend rate adjustments to lower-level items.
After you generate a master production schedule, use MPS Time Series and MRP/MPS Detail Message Revisions to review the time series and messages that the system has generated.
The time series is a record of time-phased supply-and-demand netting for selected items. The system links the planned order releases for the parent item to the gross requirements of component items.
If a component does not have its own rate schedule, the system applies the demand from the parent item. The demand from the rate-scheduled parent follows the same logic as regular work orders. When a rate schedule is added for a component of a rate-based parent, the calculation includes the information for the component in both the rate schedule (+RS) and unadjusted rate schedule (+RSU) data lines. The component is processed as supply, and regular MRP logic applies.
The messages reflect how the system uses rate-scheduled items to generate quantities for net requirements for each time period. The MPS/MRP program produces three main action messages that pertain to repetitive items:
Message Description
I = Increase rate to Updates an existing rate to the increased quantity.
H = Decrease rate to Updates an existing rate to the decreased quantity.
N = Create rate Treats messages as a group from the MPS/MRP Detail Message Review form. You can answer more than one message at a time.
Instead of creating a single rate for a given schedule period type over a date range, the system creates a series of rates to cover the entire period. For instance, instead of having one weekly rate in effect for four weeks, the system creates four weekly rates, each in effect for a week.
When you process a Create Rate message, the system can attach the parts list and routing automatically.
When the system processes messages to update rates (I and H messages), it does not validate the dates that are received. The MPS/MRP regeneration produces messages with valid dates. However, you can change these dates before processing the message. To avoid updating invalid rates, ensure the validity of the dates that you enter whenever you change message dates before processing.
Note: Non-repetitive items use lead time to backschedule the start date of an order. A repetitive item does not use this logic. Repetitive items use the rates that are effective from and thru dates for backscheduling.
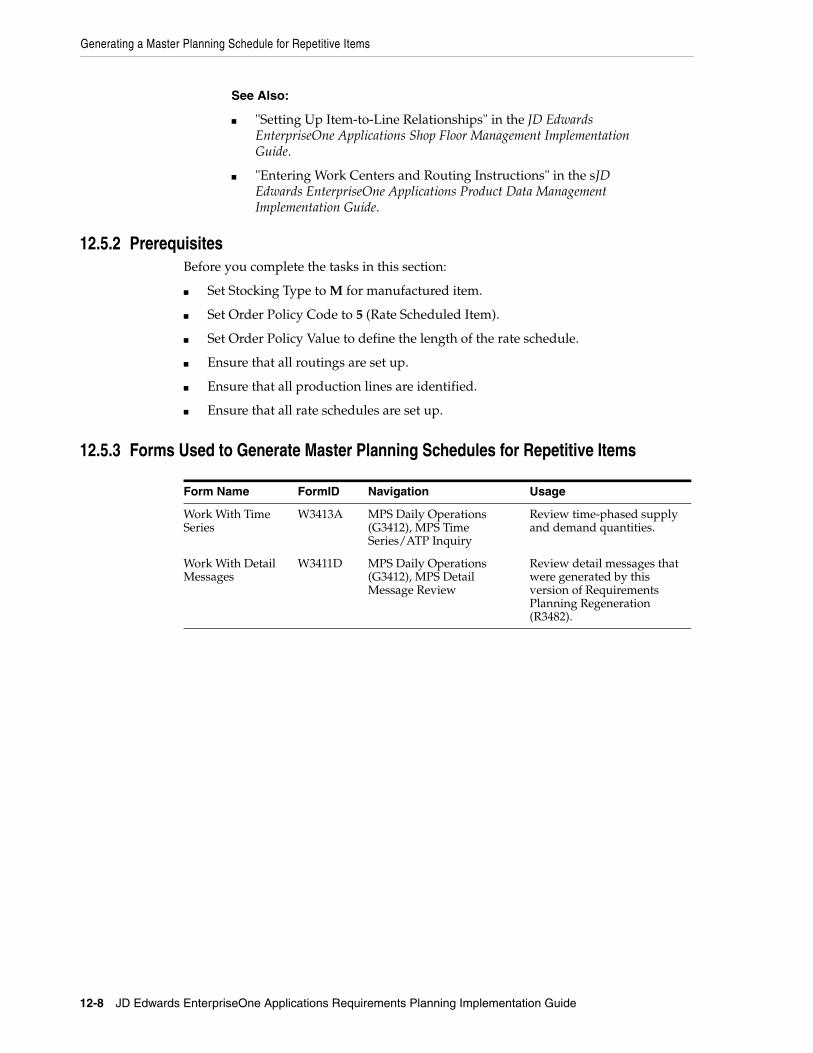
See Also:
■ "Setting Up Item-to-Line Relationships" in the JD Edwards EnterpriseOne Applications Shop Floor Management Implementation Guide.
■ "Entering Work Centers and Routing Instructions" in the sJD Edwards EnterpriseOne Applications Product Data Management Implementation Guide.
Generating a Master Planning Schedule for Repetitive Items
12-8 JD Edwards EnterpriseOne Applications Requirements Planning Implementation Guide
12.5.2 PrerequisitesBefore you complete the tasks in this section:
■ Set Stocking Type to M for manufactured item.
■ Set Order Policy Code to 5 (Rate Scheduled Item).
■ Set Order Policy Value to define the length of the rate schedule.
■ Ensure that all routings are set up.
■ Ensure that all production lines are identified.
■ Ensure that all rate schedules are set up.
12.5.3 Forms Used to Generate Master Planning Schedules for Repetitive Items
Form Name FormID Navigation Usage
Work With Time Series
W3413A MPS Daily Operations (G3412), MPS Time Series/ATP Inquiry
Review time-phased supply and demand quantities.
Work With Detail Messages
W3411D MPS Daily Operations (G3412), MPS Detail Message Review
Review detail messages that were generated by this version of Requirements Planning Regeneration (R3482).
13
Working with Multifacility Planning 13-1
13Working with Multifacility Planning
This chapter contains the following topics:
■ Section 13.1, "Understanding Multifacility Planning"
■ Section 13.2, "Understanding Multifacility Forecast Consumption"
■ Section 13.3, "Generating Multifacility Requirement Plans"
■ Section 13.4, "Validating Multifacility Planning Output"
13.1 Understanding Multifacility PlanningIn a multifacility operation, planned orders at the demand facility are the source of demand at the supply facility. You set up and maintain multifacility plans to:
■ Manage the movement of material through distribution networks and multiple production facilities.
■ Formalize the process of transferring items among the facilities.
■ Create internal transfer orders to help ensure traceability of materials and their costs between facilities.
■ Ensure that the facility from which you are ordering has enough inventory in stock to fill the order or schedule the supply plant to produce it.
■ Schedule production according to realistic time frames.
■ Use assembly lines at one plant to begin the assembly of a product and a different plant for final assembly.
■ Manage all resupply movements throughout the manufacturing network.
Multifacility plans enable greater control of the enterprise. You can define facility relationships at any level of detail for an entire facility, a product group, a master planning family, or an individual item number. In addition, you can incorporate all the facilities into a single plan.
In Material Requirements Planning (MRP), the system transfers items among the manufacturing plants at the component level. The system transfers component items by generating:
■ Purchase orders at the demand plant for the supply plant.
■ Sales orders from the demand plant at the supply plant.
In this example, the demand plant (M55) receives components from three different supply plants. Supply plants can also manufacture the end deliverable item. This diagram illustrates multifacility plan:
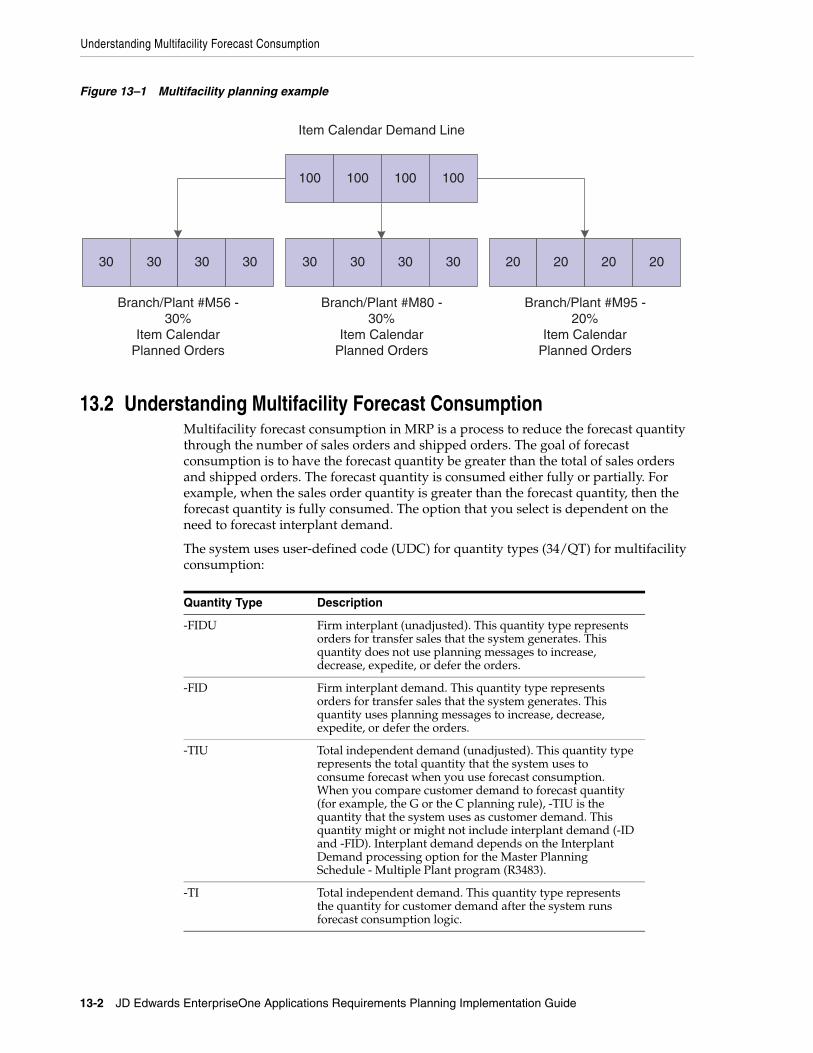
Understanding Multifacility Forecast Consumption
13-2 JD Edwards EnterpriseOne Applications Requirements Planning Implementation Guide
Figure 13–1 Multifacility planning example
Item Calendar Demand Line
30 30 30 30 30 30 30 30 20 20 20 20
100 100 100 100
Branch/Plant #M80 -30%
Item CalendarPlanned Orders
Branch/Plant #M56 -30%
Item CalendarPlanned Orders
Branch/Plant #M95 -20%
Item CalendarPlanned Orders
13.2 Understanding Multifacility Forecast ConsumptionMultifacility forecast consumption in MRP is a process to reduce the forecast quantity through the number of sales orders and shipped orders. The goal of forecast consumption is to have the forecast quantity be greater than the total of sales orders and shipped orders. The forecast quantity is consumed either fully or partially. For example, when the sales order quantity is greater than the forecast quantity, then the forecast quantity is fully consumed. The option that you select is dependent on the need to forecast interplant demand.
The system uses user-defined code (UDC) for quantity types (34/QT) for multifacility consumption:
Quantity Type Description
-FIDU Firm interplant (unadjusted). This quantity type represents orders for transfer sales that the system generates. This quantity does not use planning messages to increase, decrease, expedite, or defer the orders.
-FID Firm interplant demand. This quantity type represents orders for transfer sales that the system generates. This quantity uses planning messages to increase, decrease, expedite, or defer the orders.
-TIU Total independent demand (unadjusted). This quantity type represents the total quantity that the system uses to consume forecast when you use forecast consumption. When you compare customer demand to forecast quantity (for example, the G or the C planning rule), -TIU is the quantity that the system uses as customer demand. This quantity might or might not include interplant demand (-ID and -FID). Interplant demand depends on the Interplant Demand processing option for the Master Planning Schedule - Multiple Plant program (R3483).
-TI Total independent demand. This quantity type represents the quantity for customer demand after the system runs forecast consumption logic.
Generating Multifacility Requirement Plans
Working with Multifacility Planning 13-3
13.2.1 CalculationsIf the Interplant Demand processing option for the Master Planning Schedule - Multiple Plant program (R3483) is selected, the transfer orders consume the supply plant's forecast. The system does not plan the transfer orders again. The system uses these calculations when the Interplant Demand processing option is selected:
■ −TIU = (−SOU) + (−ID) + (−FID)
■ +PLO = (−FSCT) + (−TI)
If the Interplant Demand processing option is not selected, the system processes the transfer orders as additional demand for the supply plant. The system uses these calculations when the Interplant Demand processing option is not selected:
■ (TIU) = (−SOU)
■ +PLO = (−FSCT) + (−FID) + (−TI) + (−ID)
13.2.2 Additional Options for Multifacility Forecast ConsumptionTo have interplant demand consume forecast, you need to add the transfer order type to UDC table 40/CF. The system then accumulates ship-confirmed transfer orders in the −SHIP quantity type while still using the orders to consume forecast. Also, regardless of the setting of the Interplant Demand processing option, the system processes interplant demand consistently whether the order is planned demand or firm demand. For example, interplant demand either consumes or does not consume forecast.
If you do not want to use the new quantity types, you can make a copy of the UDC table (34/QT) with the necessary quantity types. The system completes the calculations but does not display them on the time series. The system displays these results when you remove quantity types:
Quantity Type Description
−FIDU The system does not write the orders to the time series.
−FID The system writes the orders to the −ID quantity type.
−TIU The system does not write the orders to the time series.
−TI The system writes the orders to the −SO quantity type.
13.3 Generating Multifacility Requirement PlansThis section provides an overview of multifacility plan generation, lists a prerequisite, and discusses how to:
■ Run the Master Planning Schedule - Multiple Plant program.
■ Set processing options for Master Planning Schedule - Multiple Plant (R3483).
-ID Interplant demand. This quantity type represents the quantity of demand that the system generates to support another facility's requirements.
Quantity Type Description
Generating Multifacility Requirement Plans
13-4 JD Edwards EnterpriseOne Applications Requirements Planning Implementation Guide
13.3.1 Understanding Multifacility Plan GenerationAfter you have set up the supply and demand relationships among the branch/plants, you can use the Distribution Requirements Planning (DRP), Master Production Scheduling (MPS), and MRP gross regeneration versions of Master Planning Schedule - Multiple Plant to generate a multifacility plan. Alternatively, you can use the DRP, MPS, and MRP net change versions of Master Planning Schedule - Multiple Plant to generate a multifacility plan.
When you generate a multifacility plan, the system evaluates selected information, performs calculations, and recommends a time-phased plan for all selected items.
13.3.2 PrerequisiteSet up DRP/MPS multifacility planning.
13.3.3 Running the Master Planning Schedule - Multiple Plant ProgramSelect Multifacility Planning (G3423), MPS Regeneration.
Alternatively, select Multifacility Planning (G3423), MRP Regeneration.
13.3.4 Setting Processing Options for Master Planning Schedule - Multiple Plant (R3483)
Use these processing options to:
■ Define the planning horizon.
■ Define program parameters.
■ Specify which inventory buckets the system considers on-hand.
■ Define the forecast to use as demand.
■ Define document types to use when creating supply.
■ Define the leadtimes and damper days.
■ Define the manufacturing mode and multifacility parameters.
13.3.4.1 HorizonThese processing options specify dates and time periods that the program uses when it creates the plan.
1. Generation Start DateSpecify the date for starting the planning process. This date is also the beginning of the planning horizon.
2. Past Due PeriodsSpecify the number of past due periods prior to the generation start date that is displayed on the time series. The program includes supply and demand. Values are:
0: 0 periods. This is the default value.
1: 1 period.
2: 2 periods.
Generating Multifacility Requirement Plans
Working with Multifacility Planning 13-5
3. Planning Horizon PeriodsSpecify the number of days, weeks, and months for which you want to see planning data.
Number of planning daysSpecify the number of days to be included in the plan. For example, when you view the time series, you see daily data for the number of planning days, then weekly data for the number of planning weeks, then monthly data for the number of planning months.
Number of planning weeksSpecify the number of weeks to be included in the plan. For example, when you view the time series, you see daily data for the number of planning days, then weekly data for the number of planning weeks, then monthly data for the number of planning months.
Number of planning monthsSpecify the number of months to be included in the plan. For example, when you view the time series, you see daily data for the number of planning days, then weekly data for the number of planning weeks, then monthly data for the number of planning months.
13.3.4.2 ParametersUse these processing options to define processing criteria.
1. Generation ModeSpecify the generation mode.
A gross regeneration includes every item that is specified in the data selection. A net change includes only those items in the data selection that have changed since the last time you ran the program. Values are:
1: Net change
2: Gross regeneration
2. Generation TypeSpecify the generation type. Values are:
1: Single-level MPS/DRP.
3: Multi-level MPS.
4: MRP with or without MPS.
5: MRP with frozen MPS.
The generation type selection is important:
■ Generation Type 1, single-level MPS/DRP.
You can use this generation type either in a distribution environment for purchased parts with no parent-to-component relationship, or in a manufacturing environment with parent-to-component relationships. When you use this generation type, the system performs these actions:
- Produces a time series for each item that you specify in the data selection with a planning code of 1 on the Plant Manufacturing Data tab of the Work with Item Branch form. This code indicates whether the item is manufactured or purchased.
Generating Multifacility Requirement Plans
13-6 JD Edwards EnterpriseOne Applications Requirements Planning Implementation Guide
- Does not explode demand down to the components for manufactured items. Use generation type 1 if you first want to process only the master-scheduled end-items. Thus, you can stabilize the schedule before placing demand on the components.
- Does not create pegging records.
■ Generation Type 3, multilevel MPS.
This generation type is an alternative to generation type 1 and performs a complete top-to-bottom processing of master-scheduled items. For all parent items that you specify in the data selection, the program explodes demand down to the components. You must specify all of the items to be processed in the data selection, not just the parent items. The program also creates pegging records.
■ Generation Type 4, MRP with or without MPS.
This generation type performs the same functions as generation type 3. After you perform a complete generation and stabilize the master schedule, you can limit data selection to MRP items (with planning codes of 2 or 3), thereby reducing processing time. This action is possible because the system still stores demand from the master-scheduled items in the MPS/MRP/DRP Lower Level Requirements File table (F3412).
■ Generation Type 5, MRP with frozen MPS.
This generation type freezes the master schedule after it has been stabilized. Before using this generation type, make all necessary adjustments to master-scheduled items and release orders to provide supply for the demand. This generation type freezes the entire planning horizon, which is similar to the way the freeze fence freezes a part of the horizon. Running this generation type produces results that apply to MPS items only:
- No new orders will be planned.
- No messages for existing orders will be created.
- The adjusted ending available quantity can be negative.
- Demand is exploded down to components from existing work orders only. No -PWO demand from parent items exists; only -FWO demand exists.
3. UDC TypeSpecify the UDC table (system 34) that contains the list of quantity types to be calculated and written to the Time Series table (F3413). The default is QT.
4. Version of Supply/Demand Inclusion RulesSpecify which version of supply/demand inclusion rules the program reads. These rules define the criteria that is used to select orders for processing.
13.3.4.3 On-HandThese processing options define how the program calculates on-hand inventory.
1. Include Lot Expiration DatesSpecify whether the system performs lot validations when calculating on-hand inventory. Values are:
Blank: Do not include.
1: Include.

Generating Multifacility Requirement Plans
Working with Multifacility Planning 13-7
If you leave this processing option blank, the system does not perform lot validations when calculating on-hand inventory. If you set this processing option to 1, the system performs lot validations when calculating on-hand inventory.
See Also:
"Setting Up Dates for Lots" in the JD Edwards EnterpriseOne Applications Inventory Management Implementation Guide.
2. Safety Stock DecreaseSpecify whether to plan based on a beginning available quantity from which the safety stock quantity has been subtracted. Values are:
Blank: Do not decrease.
1: Decrease.
3. Receipt Routing QuantitiesSpecify whether items in transit, in inspection, or otherwise dispositioned are considered in the beginning available calculation or are part of the In Receipt (+IR) bucket on the time series.
In a manufacturing environment, sometimes you need to establish where stock is to determine whether it is available for immediate use. Enter 1 in the Beginning Available field if you want quantities in transit to be included the beginning available calculation on the time series. Otherwise, the program includes these quantities in the In Receipt (+IR) line of the time series. The quantities are still considered available by this program. The only difference is in how you view the quantities in the time series. Values are:
Blank: Do not include in on-hand inventory.
1: Include in on-hand inventory.
Quantity in TransitSpecify whether to include quantities in transit when the system calculates the beginning available amount. Otherwise, the program includes these quantities in the In Receipt (+IR) line of the time series. The quantities are still considered available by this program. The difference is only in how you view the quantities in the time series. Values are:
Blank: Do not include in on-hand inventory.
1: Include in on-hand inventory.
Quantity in InspectionSpecify whether to include quantities in inspection when the system calculates the beginning available amount. Otherwise, the system includes these quantities in the In Receipt (+IR) line of the time series. The system still considers the quantities available, but the way in which you view the quantities in the time series differs. Values are:
Blank: Do not include
1: Include
User Defined Quantity 1 and User Defined Quantity 2Specify a value.
In a manufacturing environment, sometimes you need to establish where stock is to determine whether it is available for immediate use. Enter 1 if you want these user-defined quantities (defined on Receipt Routings Revisions in the Update Operation 1 field or the Update Operation 2 field) to be included in the beginning
Generating Multifacility Requirement Plans
13-8 JD Edwards EnterpriseOne Applications Requirements Planning Implementation Guide
available calculation. Otherwise, the program includes these quantities in the In Receipt (+IR) line of the time series. The quantities are still considered available by this program. The only difference is in how you view the quantities in the time series. Values are:
Blank: Do not include in on-hand inventory.
1: Include in on-hand inventory.
4. Lot Hold Codes (up to 5)Specify the lots to be included in the calculation of on-hand inventory. You can enter a maximum of five lot hold codes (41/L).
Blank: Include no held lots in the calculation of on-hand inventory.
*: Include all held lots in the calculation of on-hand inventory.
5. Include Past Due Rates as a supplySpecify whether the system considers open quantity from past-due rate orders as supply. If you enter 1, open quantities from past-due rate orders are included in the rate schedule unadjusted (+RSU) line as well as the rate schedule adjusted (+RS) line of the Master Planning Schedule - Multiple Plant program). Values are:
Blank: Do not consider.
1: Consider.
13.3.4.4 ForecastingThese processing options serve two purposes:
■ They determine which forecast types the program reads as demand.
■ They initiate special logic for forecast consumption.
■ 1. Forecast Types Used (up to 5)
Specify forecast types.
Forecasts are a source of demand. You can create forecasts using 12 different forecast types (34/DF) within the JD Edwards EnterpriseOne Forecasting system. One is considered the Best Fit (BF) type compared to an item's history of demand. Use this processing option to define which forecast quantities created by which forecast type are included in the planning process. Enter multiple values with no spaces, for example: 0102BF.
■ 2. Forecast Consumption Logic
Specify whether the system uses forecast consumption. If you use forecast consumption, any sales order that is due in the same period as the forecast is included as part of the forecast for that period. The sales order is not considered an additional source of demand. For forecast consumption to be used, the planning fence rule for the item must be H and the planning fence must be 999. You enter these values on the Plant Manufacturing Data form.
Note: When you use forecast consumption, the system applies forecast consumption logic to the aggregate sales order and forecast quantities.
Values are:
Blank: Do not use
Generating Multifacility Requirement Plans
Working with Multifacility Planning 13-9
1: Use
■ 3. Interplant Demand Consumes Forecast
Specify whether to use interplant demand to consume forecast when using forecast consumption. When using any other planning rule, you can use this option to specify whether to consider interplant demand as customer demand. When the option is set, the system considers interplant demand for firm and planned transfer orders.
When the option is blank, the system ignores interplant demand by forecast consumption or planning rules and considers interplant demand as a separate source of demand. Values are:
Blank: Do not consider interplant demand as customer demand.
1: Consider interplant demand as customer demand.
■ 4. Forecast type for forecast consumption by customer
Specify the forecast type UDC (34/DF) that the system uses to create a forecast for the actual daily demand by customer. This processing option applies when you set the Forecast Consumption Logic processing option to 2 (Forecast Consumption by Customer). This value cannot equal the value in the Forecast Types Used processing option.
■ 5. Default Customer Address Relationship for Forecast Consumption by Customer
Specify which address book number on the sales order the system uses for calculation when you use forecast consumption by customer logic. Values are:
1: Ship to address book number.
2: Sold to address book number.
13.3.4.5 Document TypesThese processing options establish default document types.
1. Purchase OrdersSpecify a value.
When you receive messages that are related to purchase order creation, this document type will appear as the default. The default value is OP.
2. Work OrdersSpecify a value.
When you receive messages that are related to work order creation, this document type will appear as the default. The default value is WO.
3. Rate SchedulesSpecify a value.
When you receive messages that are related to rate schedule creation, this document type will appear as the default. The default value is AC.
13.3.4.6 Lead TimesThese processing options let you specify safety lead times to allow extra time for delays in receipt or production. Use damper days to filter out unwanted messages.
Generating Multifacility Requirement Plans
13-10 JD Edwards EnterpriseOne Applications Requirements Planning Implementation Guide
1. Purchased Item Safety Lead TimeSpecify a value.
For items with stocking type P, the program adds the value that you enter here to the item's level lead time to calculate the total lead time.
2. Manufactured Item Safety Lead TimeSpecify a value.
For items with stocking type M, the program adds the value that you enter here to the item's level lead time to calculate the total lead time.
3. Expedite Damper DaysSpecify the number of days before the system generates an expedite message. If the number of days between the date when the order is actually needed and the due date of the order is less than the number of days that are entered here, the system does not generate an expedite message.
4. Defer Damper DaysSpecify the number of days before the system generates a defer message. If the number of days between the date when the order is actually needed and the due date of the order is less than the number of days entered here, the system does not generate a defer message.
13.3.4.7 PerformanceThese processing options define output and specify conditions that might decrease processing time.
1. Clear F3411/F3412/F3413 Tables
Caution: Use this processing option with extreme caution.
If you enter 1, all records in the MPS/MRP/DRP Message table (F3411), the MPS/MRP/DRP Lower Level Requirements (Pegging) table (F3412), and the MPS/MRP/DRP Summary (Time Series) (F3413) table are purged.
Access to this program should be limited. If multiple users run this program concurrently with this processing option set to 1, a record lock error results and prevents complete processing. Values are:
Blank: Do not clear tables.
1: Clear tables.
2. Input the Branch/Plant Where Planning Tables Will Be ClearedSpecify which Branch/Plant records in the MPS/MRP/DRP Message File table, the MPS/MRP/DRP Lower Level Requirements File table, and the MPS/MRP/DRP Summary (Time Series) table (F3411, F3412 and, F3413, respectively), are purged.
Note: This option is valid only when the Clear F3411/F3412/F3413 Tables processing option on the Performance tab is set to 1 and the Delete Branch/Plant processing option contains a valid branch/plant.
This processing option enables a preprocess purge of these tables. If this processing option is not enabled or is cleared, the system purges records for a given branch/plant
Generating Multifacility Requirement Plans
Working with Multifacility Planning 13-11
and item as you plan the item. Depending on processing option combinations, certain scenarios can occur.
Example 1:
Clear F3411/F3412/F3413 Tables is set to 1.
(a) Delete Branch/Plant is set to Blank.
All records from the three tables will be purged.
(b) Delete Branch/Plant contains a valid branch/plant.
Records for all the items that belong to the valid branch/plant will be purged from the three tables.
(c) Delete Branch/Plant contains an invalid branch/plant.
No records will be purged from the three tables.
Example 2:
Clear F3411/F3412/F3413 Tables set to Blank
Delete Branch/Plant is not active.
No records from the three tables will be purged.
3. Initialize MPS/MRP Print CodeSpecify a value to initialize the F4102 table.
If you enter 1 for this processing option, the program initializes every record in the Item Branch table (F4102) by setting the Item Display Code (MRPD) to blank.
If you leave this field blank, processing time is decreased. The system will not clear the records in the Item Branch table (F4102).
Regardless of how you set this processing option, for each item in the data selection the MRPD field is updated in this way:
■ 1 if messages were not created.
■ 2 if messages were created.
The Print Master Production Schedule program (R3450) enables you to enter data selection based on the MRPD field.
Values are:
Blank: Do not initialize the Item Branch file.
1: Initialize the Item Branch file.
4. Messages And Time Series For Phantom ItemsSpecify whether the program generates messages and time series for phantom items. Values are:
Blank: Do not generate.
1: Generate.
5. Ending Firm Order StatusSpecify the work order status at which messages are no longer exploded to components. If you leave this processing option blank, all messages are exploded to components.
Generating Multifacility Requirement Plans
13-12 JD Edwards EnterpriseOne Applications Requirements Planning Implementation Guide
6. Extend Rate Based AdjustmentsSpecify whether adjustments for rate based items are exploded to components, thereby creating messages for the components. Values are:
Blank: Do not extend
1: Extend
7. Closed Rate StatusSpecify the status of closed rates. When you plan for a rate-based item, the system does not process rate orders that are at a closed-rate status or a higher status.
8. Set Key Definition For Table F3411 and 9. Set Key Definition For Table F3412Specify whether to support concurrent MRP/MPS runs. The value that you enter determines the range for the number of records in the F3411/F3412 tables for a given run. The number must be large enough to include the number of records that will be generated for the table. For example, if you enter a value of 8 for the first run and 10 for the second run, the range of records that the system reserves for two simultaneous MRP/MPS runs will include:
First run:
The system reserves records in the range of 1 to [1*10^8], or 1 through 1,000,000,000.
Second run:
The system reserves records in the range of [1*10^8 + 1] to [2*10^10], or 100,000,001 through 20,000,000,000.
Notice that the values that you enter serve as the exponent in the previous equations. Values are:
Default value: 10
Minimum value: 7
Maximum value: 14
Note: This process runs only when a subsequent MRP/MPS job is submitted while an existing job is currently running. The MRP/MPS Requirements Planning program (R3482) and Master Planning Schedule - Multiple Plant program (R3483) enforce these values. You determine the optimal value for the key definition. All values for this table should be the same for all versions. If version settings are not the same, the results are unpredictable.
10. Set Maximum Number Of BranchesSpecify the maximum number of branches that the system processes when you run the Master Planning Schedule - Multiple Plant program (R3483). Because this processing option controls the allocation of memory for arrays, you should use the minimum number of branches that are necessary.
Caution: The system supports up to 99 locations. If you specify more locations than 99, the program might generate unpredictable results. You should make incremental adjustments to this value.
11. Suppress Time SeriesSpecify whether the system generates the time series. Values are:
Generating Multifacility Requirement Plans
Working with Multifacility Planning 13-13
Blank: Generate.
1: Do not generate.
Note: Performance improves when the time series is not generated.
12. Planning Control UDC TypeSpecify the UDC table in system 34 that contains the list of planning control flags. The default value is PC.
13.3.4.8 Mfg ModeThese processing options specify integration with other systems.
1. Process PlanningSpecify a value.
If you use process manufacturing, enter 1 to generate the plan based on the forecasts of the co- and by-products for the process. The program then creates messages for the process. Values are:
Blank: Discrete
1: Process
2. Configurator FunctionalitySpecify whether the system processes configurator components from the Configurator Component Table (F3215) and adds them to the Sales Order Detail File table (F4211) and the Work Order Parts List table (F3111). If you enter 1 in this processing option, the system processes the items on the Configurator Components table as demand items. Values are:
Blank: Do not process.
1: Process.
3. Project PlanningSpecify whether the system includes supply and demand from items that are associated with a project. Project-specific items have a stocking type of P. Values are:
Blank: Do not include.
1: Include.
13.3.4.9 Multi-FacilityThese processing options define criteria for a multifacility environment.
1. Date BranchSpecify the default branch/plant from which to retrieve the shop floor calendar.
If you leave this processing option blank, the calendar for each branch/plant is used and processing time increases.
2. Consolidation MethodSpecify a value.
The simple consolidation method (1) adds the supply and demand for each branch, calculates a new time series, and places the result in the consolidated branch that is specified in the Consolidation Branch processing option.
Generating Multifacility Requirement Plans
13-14 JD Edwards EnterpriseOne Applications Requirements Planning Implementation Guide
The branch relationships method (2) uses the Branch Relationships table. This is the default. Values are:
1: Simple consolidation.
2: Branch relationships (default).
3. Consolidation BranchSpecify a branch/plant.
If the consolidation method is 1 (simple consolidation), enter the branch/plant to contain the consolidated results. If the consolidated branch/plant also contains its own time series data, that data is included in the totals.
4. Category CodeSpecify a code.
If the consolidation method is 2 (branch relationships), enter the category code of the part that is supplied by one branch/plant to another. Five UDC tables are exist.
Values are:
1: 41/P1
2: 41/P2
3: 41/P3
4: 41/P4
5: 41/P5
5. Manufacture At OriginEnter 1 if manufactured and purchased items are in the same category code, but you want to obtain the purchased items from another branch/plant. Transfer order messages are created for purchased items, and work order messages are created for manufactured items. Values are:
Blank: Create transfer orders for manufactured and purchased items.
1: Create transfer orders only for purchased items.
6. Transfer Order Document TypeSpecify a document type.
When you receive messages that are related to transfer order creation, this document type will appear as the default. The default value is OT.
13.3.4.10 ParallelThese processing options specify the number of processors that the system uses during parallel processing. These processing options also specify whether the system runs preprocessing during parallel processing.
1. Number of Subsystem JobsSpecify the number of subsystems in a server.
The default is 0 (zero).
2. Pre ProcessingSpecify whether the system runs preprocessing during parallel processing. During preprocessing, the system checks supply and demand and plans only the items within supply and demand. Preprocessing improves performance when you run MRP and is
Validating Multifacility Planning Output
Working with Multifacility Planning 13-15
valid only when the number of items actually planned is less than the total number of items in the data selection. Values are:
Blank: Does not run preprocessing.
1: Runs preprocessing.
13.4 Validating Multifacility Planning OutputThis section provides an overview of multifacility planning output and lists the forms used to validate multifacility planning output.
13.4.1 Understanding Multifacility Planning OutputMultifacility planning output consists of information in the time series and transfer order messages. Use the time series information to either accept or override the planning that the system suggests. You should review the transfer order messages for individual item numbers to determine which action, if any, you need to take.
13.4.1.1 Branch RelationshipsUse the Branch Relationships Chart (P34031) to review supply and demand relationships in a graphical, hierarchical format. The Branch Relationships Chart displays:
■ Branch.
■ Level of the branch.
■ Supply branches for the corresponding demand branch.
The MRP, DRP, and MPS versions of the Branch Relationships Chart program use the same processing options. You can vary the settings in the processing options to accommodate the different requirements for a material requirements plan.
13.4.1.2 Reviewing the Time Series for the Multifacility ScheduleUse MPS Time Series (P3413) to review the time series for the multifacility schedule. The multifacility schedule is a record of time-phased supply and demand for selected items. This data is derived from the most recent regeneration or net change run. Processing options in the Master Planning Schedule - Multiple Plant program enable you to set up daily, weekly, or monthly time periods (buckets).
This table lists the quantity types displayed in the time series for multifacility planning:
Quantity Type Description
+PLO Planned orders. Represents the recommended replenishment orders for an item. This quantity type appears on the demand branch's time series.
−ID Interplant demand. This quantity type indicates the net demand that the system transfers to the supply branch/plant for all demand branch/plants.
13.4.1.3 Transfer Order Messages for the Multifacility ScheduleUse MRP/MPS Detail Message Revisions (P3411) to review the transfer order messages for the multifacility schedule. Multifacility scheduling creates messages that are appropriate to the demand and supply facilities. If you process the messages, the
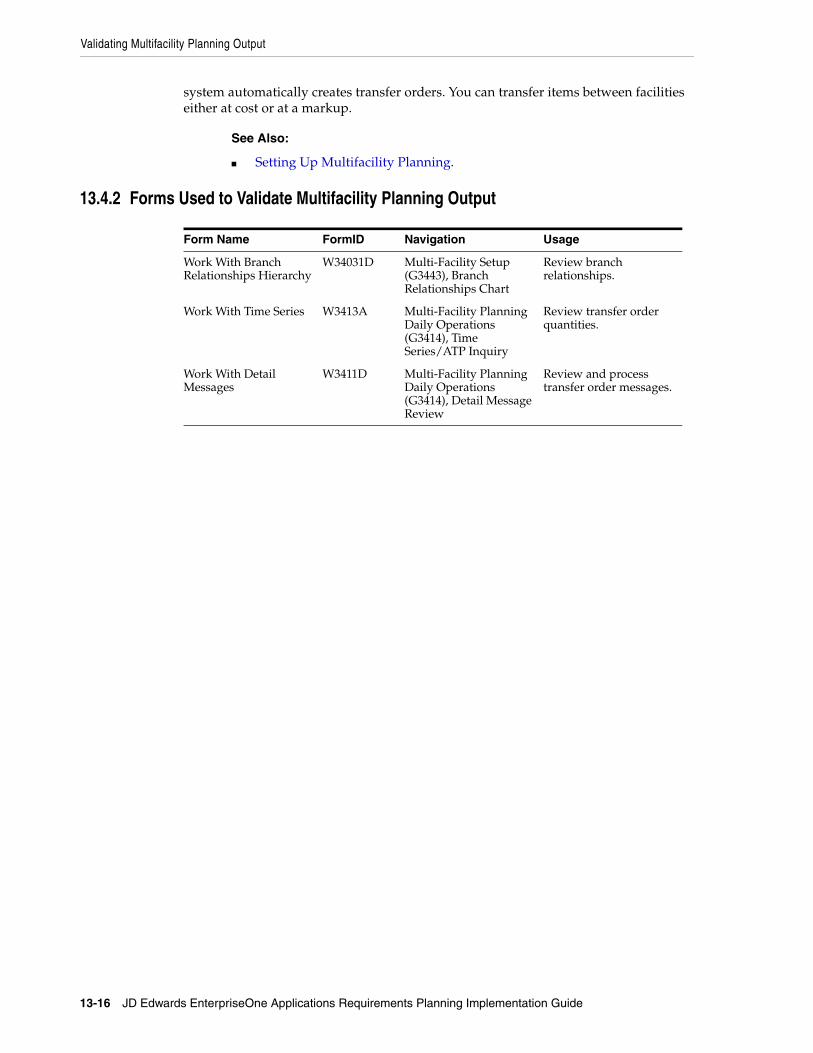
Validating Multifacility Planning Output
13-16 JD Edwards EnterpriseOne Applications Requirements Planning Implementation Guide
system automatically creates transfer orders. You can transfer items between facilities either at cost or at a markup.
See Also:
■ Setting Up Multifacility Planning.
13.4.2 Forms Used to Validate Multifacility Planning Output
Form Name FormID Navigation Usage
Work With Branch Relationships Hierarchy
W34031D Multi-Facility Setup (G3443), Branch Relationships Chart
Review branch relationships.
Work With Time Series W3413A Multi-Facility Planning Daily Operations (G3414), Time Series/ATP Inquiry
Review transfer order quantities.
Work With Detail Messages
W3411D Multi-Facility Planning Daily Operations (G3414), Detail Message Review
Review and process transfer order messages.
14
Working with Supplier Release Scheduling 14-1
14Working with Supplier Release Scheduling
This chapter contains the following topics:
■ Section 14.1, "Understanding Supplier Release Scheduling"
■ Section 14.2, "Generating Contract-Based Supplier Release Schedules"
■ Section 14.3, "Entering Ad Hoc Schedules"
■ Section 14.4, "Capturing Supplier Commitments"
■ Section 14.5, "Releasing Supplier Schedules"
14.1 Understanding Supplier Release Scheduling Supplier release scheduling provides the suppliers with consistent shipping information and advanced demand profiles to support the goal of just-in-time production and delivery. You can create supplier release schedules that meet the buyer's purchasing needs and enable suppliers to plan their production and shipping schedules. Using supplier schedules enables you to convert the purchase order messages that are generated by running the MRP/MPS Requirements Planning program (R3482) into a realistic supplier plan. The supplier schedule identifies both short-term and long-term needs for purchased items at the facility.
Buyers can use supplier schedule master information, based on blanket orders, to set up and maintain supplier contracts with information about delivery criteria. If you want to use more than one supplier for an item, you need to define supplier split percentages. You can communicate supplier schedules to the suppliers using electronic data interchange (EDI) or print.
Supplier release scheduling enables you to:
■ Support item-specific relationships for scheduled shipments at the supplier's site.
■ Set up blanket purchase orders and material shipping arrangements with each supplier.
■ Generate a shipping schedule for all supplier-scheduled demand within the release horizon.
■ Generate multiple supplier schedules for a single item.
■ Adjust the shipping schedule for unplanned events, and create blanket order releases.
■ Capture supplier commitments.
■ Release commitments against existing blanket orders in the form of purchase orders at the release fence automatically.
Generating Contract-Based Supplier Release Schedules
14-2 JD Edwards EnterpriseOne Applications Requirements Planning Implementation Guide
■ Print supplier schedule information, or send it to the supplier using EDI.
■ Maintain a history of supplier schedules and commitments.
14.1.1 Supplier Release Scheduling Using the Self-Service Portal WorkspacesIf you have Oracle's JD Edwards EnterpriseOne Supplier Relationship Management portal installed, you can collaborate with the supplier using the supplier self-service portal. The supplier can view the schedules that you have generated and enter commitments against them. The Buyer Workspace also enables the buyer to enter ad hoc schedules manually. You create ad hoc schedules when you have not set up supplier schedule information for a supplier.
Supplier release scheduling using the self-service workspaces enables you to:
■ Enter and maintain ad hoc schedules.
■ Capture supplier commitments.
■ Respond to exception messages in the form of portal alerts.
■ Release commitments against blanket and ad hoc schedules in the form of purchase orders.
14.2 Generating Contract-Based Supplier Release SchedulesThis section provides overviews of supplier schedule generation and supplier schedule revisions, lists prerequisites, and discusses how to:
■ Generate contract-based supplier release schedules.
■ Set processing options for Supplier Schedule Generation (R34400).
■ Set processing options for Supplier Schedules Revisions (P34301).
■ Revise contract-based supplier release schedules.
14.2.1 Understanding Supplier Schedule GenerationYou use the Supplier Schedule Generation program (R34400) to process purchase order messages of message types O, B, and G on the material requirements plan. You can use this program to generate blanket order-based schedules, as well as ad hoc schedules.
When you generate the supplier schedule, the system uses the messages from the most recent Material Requirements Planning (MRP) generation, blanket orders, and the information that is defined in the Supplier Schedule Master File table (F4321) to create a supplier schedule. The system determines demand from the MRP messages.
Important: Do not change the messages after the system has generated them from MRP.
You can set the appropriate processing option for the Supplier Schedule Generation program to clear MRP messages after schedule generation. The system clears only those messages that are inside the releasable time fence.
If you use multiple suppliers, the system creates multiple supplier schedules for a single item. It does so by splitting the MRP messages by the percentages that you defined in the F4321 table.

Generating Contract-Based Supplier Release Schedules
Working with Supplier Release Scheduling 14-3
When you generate a supplier schedule, the system creates a draft of the supplier schedule and prints a report that details any discrepancies that might make the supplier schedule ineffective. You can review the draft of the supplier schedule by using the Supplier Schedule Revisions program (P34301) and make any necessary revisions prior to committing to a final schedule. Blanket order-based schedules are stored in the Vendor Schedule Quantity File table (F3430).
When you have generated the schedule and communicated it to the supplier, the supplier can make commitments for items that require commitments. You can use the processing options to indicate whether you require commitments from the suppliers in response to the planned quantities on the supplier schedule. If you use EDI to send the schedule to the supplier, the supplier can communicate committed quantities back to you, using EDI standards. If you do not use EDI, the supplier can send commitments by other means, for example fax, and you enter the committed quantity into the schedule. Commitments that are entered for a blanket order-based schedule are stored in the Vendor Schedule Commitment File table (F3435).
You can run the Supplier Schedule Generation program multiple times to accommodate changes. For blanket order-based schedules, a snapshot of the schedule is saved to the Vendor Schedule History File table (F3440) every time that you run the program. You can view the values from the previous schedule in the previous quantity fields in the Supplier Schedule Revisions program.
If you rerun the schedule generation after the committed quantity was entered, the current Committed Quantity value does not change. If the Committed Quantity field was populated from the Planned Quantity field for an item that does not require a supplier commitment and the planned quantity changes due to a supplier schedule regeneration, the committed quantity changes accordingly.
14.2.1.1 Self-Service Portal WorkspacesIf you are working with the self-service portal workspaces, you can also use the Supplier Schedule Generation program to generate ad hoc schedules. You use processing options to determine whether the program generates ad hoc schedules and the date until which purchase-order planning messages can be converted into ad hoc schedules.
The self-service portal enables you to review both blanket and ad hoc schedules after you have generated them. You use the Supplier Schedule Revisions program to review and revise blanket schedules. You use the Ad Hoc Schedule Revisions program (P34302) to review and revise ad hoc schedules.
When the supplier has been notified by email that a schedule exists, he or she can use the supplier self-service portal to enter committed quantities into the schedule. Commitments that are entered for ad hoc schedules are stored in the Ad Hoc Vendor Schedule File table (F3450).
See Also:
■ "Working with Blanket Orders" in the JD Edwards EnterpriseOne Applications Procurement Management Implementation Guide.
14.2.2 Understanding Supplier Schedule RevisionsAfter you have generated a supplier schedule that is based on the supplier contract information that you have set up, you can use the Supplier Schedule Revisions program to review the schedule and make revisions. After you review the schedule and make any necessary revisions, you can commit to a final schedule.
Supplier Schedule Revisions enables you to:
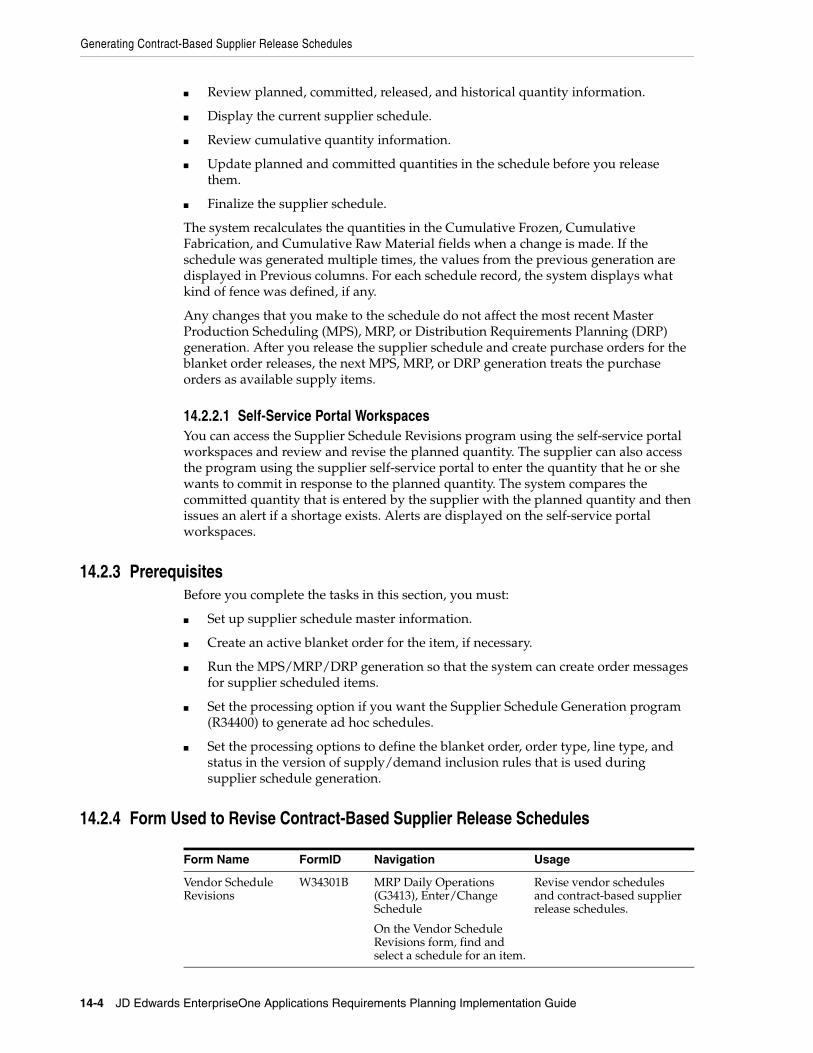
Generating Contract-Based Supplier Release Schedules
14-4 JD Edwards EnterpriseOne Applications Requirements Planning Implementation Guide
■ Review planned, committed, released, and historical quantity information.
■ Display the current supplier schedule.
■ Review cumulative quantity information.
■ Update planned and committed quantities in the schedule before you release them.
■ Finalize the supplier schedule.
The system recalculates the quantities in the Cumulative Frozen, Cumulative Fabrication, and Cumulative Raw Material fields when a change is made. If the schedule was generated multiple times, the values from the previous generation are displayed in Previous columns. For each schedule record, the system displays what kind of fence was defined, if any.
Any changes that you make to the schedule do not affect the most recent Master Production Scheduling (MPS), MRP, or Distribution Requirements Planning (DRP) generation. After you release the supplier schedule and create purchase orders for the blanket order releases, the next MPS, MRP, or DRP generation treats the purchase orders as available supply items.
14.2.2.1 Self-Service Portal WorkspacesYou can access the Supplier Schedule Revisions program using the self-service portal workspaces and review and revise the planned quantity. The supplier can also access the program using the supplier self-service portal to enter the quantity that he or she wants to commit in response to the planned quantity. The system compares the committed quantity that is entered by the supplier with the planned quantity and then issues an alert if a shortage exists. Alerts are displayed on the self-service portal workspaces.
14.2.3 PrerequisitesBefore you complete the tasks in this section, you must:
■ Set up supplier schedule master information.
■ Create an active blanket order for the item, if necessary.
■ Run the MPS/MRP/DRP generation so that the system can create order messages for supplier scheduled items.
■ Set the processing option if you want the Supplier Schedule Generation program (R34400) to generate ad hoc schedules.
■ Set the processing options to define the blanket order, order type, line type, and status in the version of supply/demand inclusion rules that is used during supplier schedule generation.
14.2.4 Form Used to Revise Contract-Based Supplier Release Schedules
Form Name FormID Navigation Usage
Vendor Schedule Revisions
W34301B MRP Daily Operations (G3413), Enter/Change Schedule
On the Vendor Schedule Revisions form, find and select a schedule for an item.
Revise vendor schedules and contract-based supplier release schedules.
Generating Contract-Based Supplier Release Schedules
Working with Supplier Release Scheduling 14-5
14.2.5 Generating Contract-Based Supplier Release SchedulesSelect Single Site Periodic Planning Operations (G3422), Generate Supplier Schedule.
14.2.6 Setting Processing Options for Supplier Schedule Generation (R34400)Processing options enable you to specify the default processing for programs and reports.
14.2.6.1 DefaultsThese processing options control the generation start date and document type, and which version of the supply/demand inclusion rules the system uses when you generate a supplier schedule.
1. Generation Start DateSpecify the date that the system uses to start the Supplier Schedule Generation process. If you do not specify a date, the system uses the current date.
2. Document TypeSpecify the document type (user-defined code (UDC) 00/DT) that the system uses to locate an item blanket order when you run the Supplier Schedule Generation program. If you leave this processing option blank, the system uses document type OB (blanket order).
3. Supply/Demand Inclusion RuleSpecify which version of the supply/demand inclusion rules the system reads. This rule defines the criteria that the program uses to select blanket orders to run the supplier scheduling process.
14.2.6.2 CommitmentThese processing options control whether, and for what types of items, suppliers are required to enter commitments.
1. ABC code typeSpecify which ABC code type the system uses when checking whether commitments are required for an item. Values are:
Blank: Do not use ABC codes because no commitments are required.
1: Use Sales - Inventory ABC codes.
2: Use Margin - Inventory ABC codes.
3: Use Investment - Inventory ABC codes.
2. Commitment required for Class A Items, 3. Commitment required for Class B Items, 4. Commitment required for Class C Items, and 5. Commitment required for Class D ItemsSpecify whether commitments are required for class A, B, C, or D items. Values are:
Blank: Not required.
1: Required.
14.2.6.3 Adhoc SchedulesThese processing options control whether the program creates ad hoc schedules and specify an end date for generating ad hoc schedules.
Generating Contract-Based Supplier Release Schedules
14-6 JD Edwards EnterpriseOne Applications Requirements Planning Implementation Guide
1. Create Adhoc ScheduleSpecify whether the system generates ad hoc release schedules. Values are:
0: Does not generate.
1: Generates.
2. End Adhoc Schedule DateSpecify the end date for generating ad hoc schedules. If you do not specify a date, the system generates ad hoc schedules for all planning messages that are available for the item after the generation start date. You generate ad hoc schedules only if no valid vendor schedule information was set up.
14.2.6.4 ProcessThese processing options control how the system clears messages and updates the schedule. In addition, you can specify the manner in which the system uses messages.
1. Supplier Schedule StatusSpecify the schedule status after the system runs the Supplier Schedule Generation program. If you leave this processing option blank, the system does not update the schedule.
2. Clear MessagesSpecify whether the system clears MPS/MRP/DRP messages after it runs the Supplier Schedule Generation program (R34400). Values are:
Blank: Does not clear messages.
1: Clears messages.
3. Regeneration FlagSpecify whether the system reruns the Supplier Schedule Generation program when the system uses previously cleared MPS/MRP/DRP messages. The system displays messages only after the MRP Regeneration program has run. Values are:
Blank: Use cleared messages.
1: Do not use cleared messages.
4. Frozen Days FlagSpecify whether the system ignores the frozen time fence for supplier release and enables normal operations within the frozen time fence. If the system ignores the frozen time fence, it places quantities within the frozen time fence. Values are:
Blank: Do not ignore.
0: Ignore.
5. Transfer Order Messages FlagSpecify whether the system ignores the transfer order messages while generating the schedule. If the system ignores the transfer order messages, it schedules quantities only for the purchase order messages. Values are:
Blank: Do not ignore.
0: Ignore.
14.2.7 Setting Processing Options for Supplier Schedules Revisions (P34301)Processing options enable you to specify the default processing for programs and reports.
Generating Contract-Based Supplier Release Schedules
Working with Supplier Release Scheduling 14-7
14.2.7.1 VersionsEnter the version for each program. If processing options 1 through 7 are left blank, version ZJDE0001 will be used.
1. Open Order Inquiry (P4310)Specify a version of the program.
2. Supply/Demand Inquiry (P4021)Specify a version of the program.
3. Purchase Order Entry (P4310)Specify a version of the program.
4. Vendor/Blanket Information (P4321)Specify a version of the program.
5. Pegging Information (P3412).Specify a version of the program.
6. Supplier Schedule Release Generation (R34410)Specify a version of the program.
7. Item Branch (P41026B)Specify a version of the program.
8. Enter the version of Supply/Demand Inclusion Rules to use for active Blanket Order selectionEnter a UDC (40/RV) that identifies an inclusion rule that you want the system to use for this branch/plant. The JD Edwards EnterpriseOne Manufacturing from Oracle and JD Edwards EnterpriseOne Warehouse Management systems use inclusion rules in this way:
■ For JD Edwards EnterpriseOne Manufacturing: Enables multiple versions of resource rules for running MPS, MRP, or DRP.
■ For JD Edwards EnterpriseOne Warehouse Management: Enables multiple versions of inclusion rules for running putaway and picking.
The system processes only those order lines that match the inclusion rule for a specified branch/plant.
9. Purchase Order Inquiry Self Service (P4310SS)Specify the version of the Purchase Order Self-Service Inquiry program (P4310SS) that the system uses to display purchase order information. If you leave this processing option blank, the system uses version ZJDE0001.
14.2.7.2 DefaultsThese processing options specify the defaults that are used by the program.
1. Document Order TypeEnter a UDC (00/DT) that identifies the type of document. This code also indicates the origin of the transaction.
1. Enter the document type to filter on the form. Values are:
P: Accounts Payable documents
R: Accounts Receivable documents
T: Payroll documents
Generating Contract-Based Supplier Release Schedules
14-8 JD Edwards EnterpriseOne Applications Requirements Planning Implementation Guide
I: Inventory documents
O: Purchase Order Processing documents
J: General Accounting/Joint Interest Billing documents
S: Sales Order Processing documents
2. Supplier Self Service FunctionalitySpecify whether to activate the supplier self-service feature in Java or HTML environments. Values are:
Blank: The system does not activate supplier self-service.
1: Activate Supplier Self Service functionality for use in JAVA/HTML.
3. Item Cross-Reference Type CodeSpecify the code with which the system searches cross-reference information using a supplier item number. Cross-references associate the internal item numbers with the supplier's item numbers. You can set up items in the Item Master Information table (F4101) and create the cross-reference information in the Item Cross Reference Revisions program (P4104). You must enter a value that has been set up in UDC 41/DT. If you leave this processing option blank, the system does not display or process any cross-reference information.
4. Allow changes to the scheduleSpecify whether to allow changes to the schedule. Values are:
Blank: Allow changes to the schedule.
1: Do not allow changes to the schedule.
Note: The row for planned schedules is disabled when the value is 1. This processing option is operational only when web mode is activated (Tab Defaults, Option 2).
14.2.7.3 Status UpdateThese processing options specify the statuses.
Vendor Schedule StatusEnter Status for vendor schedule update. This is updated as the schedule moves through the system.
To StatusEnter the status beyond which changes cannot be made to the vendor schedule. If this processing option is left blank, the schedule will always be open to change. This is updated as the schedule moves through the system.
14.2.8 Revising Contract-Based Supplier Release SchedulesAccess the Vendor Schedule Revisions form.
Planned QTY (planned quantity)Enter the quantity of units that are planned for each period in the time series or plan.
Committed QTY (committed quantity)Indicates the quantity that the vendor has committed to delivering in response to the planned quantity on the vendor schedule.
Entering Ad Hoc Schedules
Working with Supplier Release Scheduling 14-9
14.3 Entering Ad Hoc SchedulesThis section provides an overview of ad hoc schedules and discusses how to:
■ Set processing options for Ad Hoc Schedule Revisions (P34302).
■ Enter ad hoc schedules.
14.3.1 Understanding Ad Hoc SchedulesIf you do not have supplier information that is based on a blanket order, you can still perform supplier release scheduling by creating ad hoc schedules. You can create an ad hoc schedule when the schedule quantities have changed after you regenerate the supplier schedule to fulfill additional requirements.
Ad hoc schedules are created for the supplier who is specified in the order message in the MPS/MRP/DRP Message File table (F3411). During the MRP generation, the Supplier field on the message is populated from the Item Branch File table (F4102) if a supplier was defined for the item. If you did not define a supplier for the item, you can add a supplier to the message manually. If the message does not specify a supplier, the system uses the split percentage that was set up for the item in the Supplier Schedule Master File table. If no split was defined for the item, you cannot generate an ad hoc schedule.
Two methods are available for creating ad hoc schedules:
■ You can run the Supplier Schedule Generation program and set a processing option to create ad hoc schedules for items for which no blanket orders exist.
■ You can use the Ad Hoc Schedule Revisions program to enter ad hoc schedules manually, for example, to meet unplanned demand.
You create ad hoc schedules based on item branch information, as well as supplier information that you can set up independently from a blanket order. For example, you can set up shipment patterns and dates, as well as split percentages for the suppliers.
When you use the Supplier Schedule Generation program to create a supplier release schedule and no blanket order exists for the item, the system reads the MRP messages from the MPS/MRP/DRP Message File table and searches for available supplier information, for example, a shipment pattern that is defined for a supplier and an item. If the system locates a shipment pattern, it adjusts the MRP request date to the first available shippable date, based on the shipment pattern. If you did not define shipment dates for the item, the system uses the MRP message request date for scheduling.
The Ad Hoc Schedule Revisions program, which is accessible through the self-service portal workspaces, can be used by both the buyer and the supplier. This program enables you to enter schedules even when no MRP messages and no forecast exist for the item. The buyer can use this application for:
■ Entering a new ad hoc schedule, for example, in response to an alert.
■ Editing the planned quantity in an existing ad hoc schedule.
■ Editing the committed quantity that is entered by the supplier on an ad hoc schedule.
Every time that a schedule changes, the system automatically notifies the supplier using email.
The buyer can use the application to respond to a new ad hoc schedule by entering a commitment quantity.
Entering Ad Hoc Schedules
14-10 JD Edwards EnterpriseOne Applications Requirements Planning Implementation Guide
Schedules are displayed in chronological order, starting with the earliest date and displaying planned, committed, and released quantities, as well as cumulative values and the difference between planned and committed quantities.
14.3.2 Forms Used to Enter Ad Hoc Schedules
Form Name FormID Navigation Usage
Add Ad Hoc Schedules
W34302E EnterpriseOne Collaborative Portal, Ad Hoc Schedule Advanced Search.
On the Search For Ad Hoc Schedules form, complete the filter fields and click Find.
On the View Ad Hoc Schedules form, click Add Record.
Enter ad hoc schedules.
The supplier enters committed quantities.
Edit Ad Hoc Schedules
W34302C On the View Ad Hoc Schedules form, click Edit.
Edit ad hoc schedules.
14.3.3 Setting Processing Options for Ad Hoc Schedule Revisions (P34302)Processing options enable you to specify the default processing for programs and reports.
14.3.3.1 DefaultsThese processing options control default settings, such as the item cross-reference type code.
1. Item Cross-Reference Type CodeSpecify the code with which the system searches cross-reference information using a supplier item number. Cross-references associate the internal item numbers with the supplier's item numbers. You can set up items in Item Master Information and create the cross-reference information in the Item Cross Reference Revisions program. You must enter a value that has been set up in UDC (41/DT). If you leave this processing option blank, the system does not display or process any cross-reference information.
Specify whether to allow changes to the schedule. Values are:
Blank or 2: Allow changes to the schedule.
1: Do not allow changes to the schedule.
Note: The row for planned schedules is disabled when the value is 1. This processing option is operational only when web mode is activated (Tab Defaults, Option 2).
2. Allow changes to the scheduleSpecify whether to restrict users from making changes to the schedule. Values are:
Blank: Allow changes to the schedule.
1: Do not allow changes to the schedule.
Note: The row for planned schedules is disabled when the value is 1. This processing option is operational only when web mode is turned on (Tab Defaults, Option 2).
Capturing Supplier Commitments
Working with Supplier Release Scheduling 14-11
14.3.4 Entering Ad Hoc SchedulesAccess the Add Ad Hoc Schedules form.
Supplier NumberEnter a number that identifies an entry in Oracle's JD Edwards EnterpriseOne Address Book, such as employee, applicant, participant, customer, supplier, tenant, or location.
Start DateEnter the start date for the order. You can enter this date manually, or have the system calculate it using a backscheduling routine. The routine starts with the required date and offsets the total lead time to calculate the appropriate start date.
Planned QTY (planned quantity)Enter the quantity of units that are planned for each period in the time series or plan.
Committed QTY (committed quantity)Indicates the quantity that the vendor has committed to delivering in response to the planned quantity on the vendor schedule.
14.4 Capturing Supplier CommitmentsThis section provides an overview of supplier collaboration and discusses how to:
■ Enter supplier commitments for blanket schedules through the EnterpriseOne Collaborative Portal.
■ Enter supplier commitments for ad hoc schedules.
■ Capture supplier commitments using EDI.
14.4.1 Understanding Supplier CollaborationCollaboration between buyers, suppliers, and the JD Edwards EnterpriseOne planning systems is essential for supporting e-fulfillment processes. The system provides self-service programs that enable both buyers and suppliers to review and modify supplier schedules. By accessing these programs using the supplier self-service portal and the buyer workspace, buyer and supplier can collaborate in real time. After you have created a supplier schedule, the supplier can view it using the portal and respond to it by entering commitments.
The collaborative process includes a set of alerts that makes managing supplier schedules by exception possible. Under certain conditions, for example, if a mismatch exists between planned and committed quantity, the system issues alerts to both buyer and supplier to enable them to respond to the issue. The system captures a history of schedules and commitments that provides a basis for exception and comparative alerts.
The portal also enables buyers not only to review and revise blanket and ad hoc schedules that are created by running the Supplier Schedule Generation program, but also to manually enter ad hoc schedules when necessary. You can use ad hoc schedules to meet unexpected demand or to cope with shortages.

Capturing Supplier Commitments
14-12 JD Edwards EnterpriseOne Applications Requirements Planning Implementation Guide
To create ad hoc schedules, this information is required:
■ Supplier
■ Freeze fence
■ Shipment dates
14.4.1.1 CommitmentsAfter a supplier schedule is generated, based on MRP requirements and supplier information that is available in the system and communicated to the supplier, the supplier can facilitate planning and the smooth flow of orders and goods by creating commitments for the planned quantities on the supplier schedule. Commitments do not represent an order, but an intent to meet the order.
Important: Commitments that are used for supplier release scheduling are different from the commitments that are created and tracked in JD Edwards EnterpriseOne Procurement.
Depending on the needs of the business, you can specify whether you want suppliers to state their commitments. You use the processing options for the Supplier Schedule Generation program to determine commitments. You can specify that suppliers are not required to provide commitments in response to the planned quantity that is communicated using the supplier schedule. In that case, the planned quantity becomes the default value for the committed quantity when you run the schedule generation. If you want the suppliers to respond to the supplier schedule with commitments, you can indicate the type or types of items for which you require commitments, based on the ABC ranking that is assigned to an item in the Item Branch program (P41026). For example, after specifying which type of inventory value you want to use, you can indicate whether to make commitments for A, B, or C class items. ABC codes are used to categorize items by their sales, margin, or investment inventory value.
When a schedule is generated for an item class that requires a commitment, the supplier is notified by email and can enter committed quantities in the supplier self-service portal by using the Supplier Schedules Revisions program or the Ad Hoc Schedule Revisions program.
Note: If you communicate with the supplier using EDI, the supplier can send committed quantities using EDI.
If you have specified that commitments are necessary, but the supplier does not specify a committed quantity matching the planned quantity, the system issues an appropriate alert that, in most cases, is visible to both buyer and supplier.
After the supplier has sent the committed quantity information, you can review the information in the self-service programs. The commitments for blanket order-based schedules are stored in the Vendor Schedule Commitment File table; the commitments for ad hoc schedules are stored in the Ad Hoc Vendor Schedule File table. Committed quantities that are within the release fence (releasable days) are converted into purchase orders when you run the Supplier Schedule Release Generation program. Committed quantities that are scheduled outside the release fence remain committed.
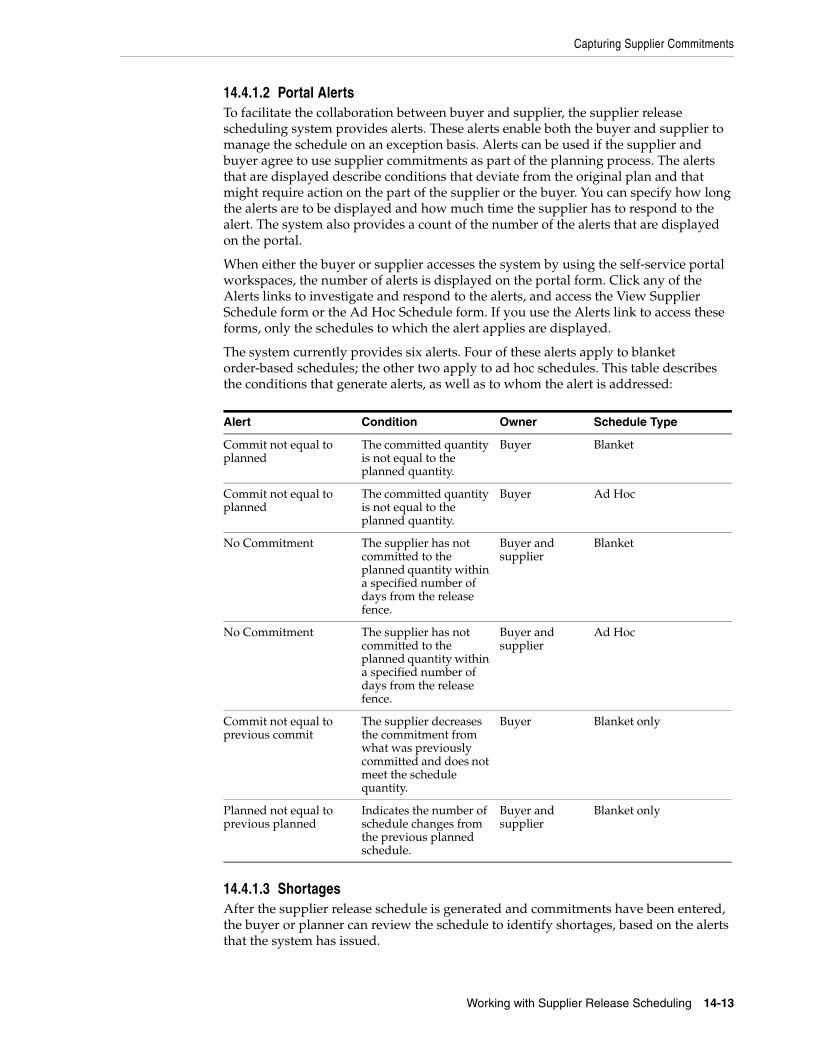
Capturing Supplier Commitments
Working with Supplier Release Scheduling 14-13
14.4.1.2 Portal AlertsTo facilitate the collaboration between buyer and supplier, the supplier release scheduling system provides alerts. These alerts enable both the buyer and supplier to manage the schedule on an exception basis. Alerts can be used if the supplier and buyer agree to use supplier commitments as part of the planning process. The alerts that are displayed describe conditions that deviate from the original plan and that might require action on the part of the supplier or the buyer. You can specify how long the alerts are to be displayed and how much time the supplier has to respond to the alert. The system also provides a count of the number of the alerts that are displayed on the portal.
When either the buyer or supplier accesses the system by using the self-service portal workspaces, the number of alerts is displayed on the portal form. Click any of the Alerts links to investigate and respond to the alerts, and access the View Supplier Schedule form or the Ad Hoc Schedule form. If you use the Alerts link to access these forms, only the schedules to which the alert applies are displayed.
The system currently provides six alerts. Four of these alerts apply to blanket order-based schedules; the other two apply to ad hoc schedules. This table describes the conditions that generate alerts, as well as to whom the alert is addressed:
Alert Condition Owner Schedule Type
Commit not equal to planned
The committed quantity is not equal to the planned quantity.
Buyer Blanket
Commit not equal to planned
The committed quantity is not equal to the planned quantity.
Buyer Ad Hoc
No Commitment The supplier has not committed to the planned quantity within a specified number of days from the release fence.
Buyer and supplier
Blanket
No Commitment The supplier has not committed to the planned quantity within a specified number of days from the release fence.
Buyer and supplier
Ad Hoc
Commit not equal to previous commit
The supplier decreases the commitment from what was previously committed and does not meet the schedule quantity.
Buyer Blanket only
Planned not equal to previous planned
Indicates the number of schedule changes from the previous planned schedule.
Buyer and supplier
Blanket only
14.4.1.3 ShortagesAfter the supplier release schedule is generated and commitments have been entered, the buyer or planner can review the schedule to identify shortages, based on the alerts that the system has issued.
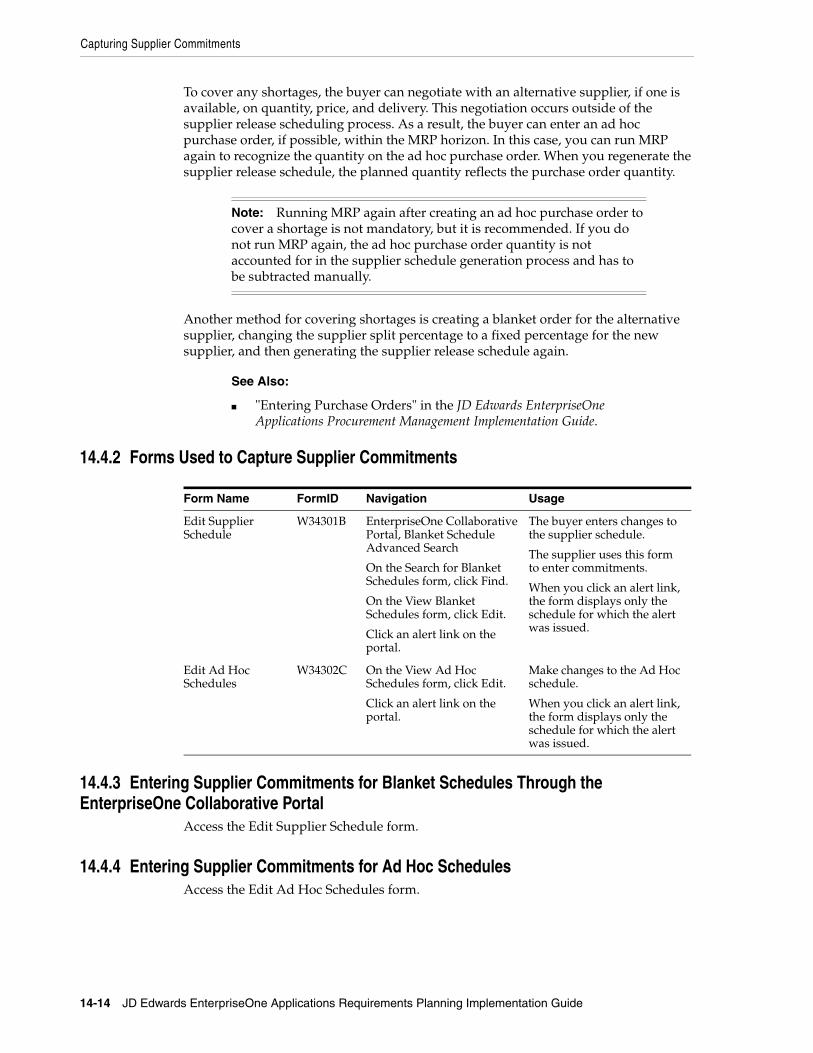
Capturing Supplier Commitments
14-14 JD Edwards EnterpriseOne Applications Requirements Planning Implementation Guide
To cover any shortages, the buyer can negotiate with an alternative supplier, if one is available, on quantity, price, and delivery. This negotiation occurs outside of the supplier release scheduling process. As a result, the buyer can enter an ad hoc purchase order, if possible, within the MRP horizon. In this case, you can run MRP again to recognize the quantity on the ad hoc purchase order. When you regenerate the supplier release schedule, the planned quantity reflects the purchase order quantity.
Note: Running MRP again after creating an ad hoc purchase order to cover a shortage is not mandatory, but it is recommended. If you do not run MRP again, the ad hoc purchase order quantity is not accounted for in the supplier schedule generation process and has to be subtracted manually.
Another method for covering shortages is creating a blanket order for the alternative supplier, changing the supplier split percentage to a fixed percentage for the new supplier, and then generating the supplier release schedule again.
See Also:
■ "Entering Purchase Orders" in the JD Edwards EnterpriseOne Applications Procurement Management Implementation Guide.
14.4.2 Forms Used to Capture Supplier Commitments
Form Name FormID Navigation Usage
Edit Supplier Schedule
W34301B EnterpriseOne Collaborative Portal, Blanket Schedule Advanced Search
On the Search for Blanket Schedules form, click Find.
On the View Blanket Schedules form, click Edit.
Click an alert link on the portal.
The buyer enters changes to the supplier schedule.
The supplier uses this form to enter commitments.
When you click an alert link, the form displays only the schedule for which the alert was issued.
Edit Ad Hoc Schedules
W34302C On the View Ad Hoc Schedules form, click Edit.
Click an alert link on the portal.
Make changes to the Ad Hoc schedule.
When you click an alert link, the form displays only the schedule for which the alert was issued.
14.4.3 Entering Supplier Commitments for Blanket Schedules Through the EnterpriseOne Collaborative Portal
Access the Edit Supplier Schedule form.
14.4.4 Entering Supplier Commitments for Ad Hoc SchedulesAccess the Edit Ad Hoc Schedules form.
Capturing Supplier Commitments
Working with Supplier Release Scheduling 14-15
14.4.5 Capturing Supplier Commitments Using EDICommunication of planned and committed quantities between buyers and suppliers can occur when you are using EDI.
The EDI 830 standard establishes both the contents and the standardized format for the transaction set that is required for a planning schedule with release capability. Using EDI 830 Planning Schedule with Release Capability for supplier release scheduling in the software, you can perform these transactions:
■ Send forecasts or supplier release schedules (both blanket order and ad hoc schedules) with planned quantities outbound.
■ Receive forecasts or supplier release schedules inbound.
The supplier can perform these transactions:
■ Send back a response with the committed quantities.
■ Send an inbound release schedule with planned quantities (both for blanket order and ad hoc schedules).
These processes can be used to support business scenarios:
■ The buyer sends a planning forecast that is for information only and conveys anticipated demand.
■ The buyer sends a net rolling forecast to the supplier, supported by a blanket order that commits resources to a stated time period.
The 862 Shipping Schedule transaction is sent as a separate release mechanism to support just-in-time releases.
■ The buyer sends a material release schedule in the form of a net rolling forecast to the supplier, supported by a blanket order that commits resources to a stated time period.
Firm requirements are identified as such and are released as soon as their dates fall within the prenegotiated time frame. Requirements falling outside this window are considered planned with resources committed, but not released.
■ The buyer sends a planning schedule containing gross requirements, inventory levels, and minimum and maximum inventory targets.
The supplier nets forecast data to determine shipping requirements, based on the buyer's inventory levels and minimum and maximum targets.
According to the material release schedule scenario, which is the most typical for supplier release scheduling, the buyer generates a material release schedule and sends it to the supplier. This schedule is regenerated on a regular basis, factoring in all the changes from the previous run. The supplier uses the material release schedule to plan for future orders from the buyer. If required, the supplier generates a response to the material release schedule. The buyer evaluates any responses that are received and takes appropriate action, for example, adjusting the schedule.
Using EDI to communicate planning forecasts and release schedules between buyer and supplier consists of these processes:
■ The planning schedule records are extracted from the F3430 table into the EDI Planning Schedule Header - Outbound table (F47066) and the EDI Planning Schedule Detail - Outbound table (F47067) by running the Outbound Extraction - Supplier program (R470621).
Whenever order number and type, company, suffix, line number item, or branch change, the system creates a new document number within the same batch.
Releasing Supplier Schedules
14-16 JD Edwards EnterpriseOne Applications Requirements Planning Implementation Guide
■ For ad hoc schedules, the records are extracted from the Ad hoc Vendor Schedule File table into the EDI 830 outbound tables by running the Outbound Extraction - Ad Hoc Supplier Release Schedules program (R470622).
For each supplier within the same batch, the system creates a new document number. You can run the universal batch engine (UBE) in proof and in final modes.
■ The records in the EDI 830 outbound tables are translated into flat file format by running the EDI Planning Schedule Extraction Conversion program (R47062C).
■ When the supplier sends an EDI 830 Response (Planning Schedule with Release Capability) indicating the committed quantity, it is received back into the system by running the Inbound Flat File Conversion program (R47002C) that populates the EDI Planning Schedule Header - Inbound table (F47061) and the EDI Planning Schedule Detail - Inbound table (F47062).
■ Running the Inbound EDI Planning Schedule Edit/Create program (R47061) reads the records from the EDI 830 inbound tables and updates the committed quantities in these tables if the document represents a response to the schedule from the supplier.
– Vendor Schedule Commitment File.
– Ad Hoc Vendor Schedule File.
■ Running the Inbound EDI Planning Schedule Edit/Create program reads the records from the EDI 830 inbound tables and updates the planned quantities in these tables if the inbound transaction is not a response to a planned quantity:
– Ad Hoc Vendor Schedule File.
– Vendor Schedule Quantity File.
You can view the results of this process in the Supplier Schedule Revisions program for blanket order-based schedules and in the Ad Hoc Schedule Revisions program for ad hoc schedules.
14.5 Releasing Supplier SchedulesThis section provides an overview of supplier schedule release generation, lists a prerequisite, and discusses how to:
■ Run Supplier Schedule Release Generation.
■ Set processing options for Supplier Schedule Release Generation (R34410).
14.5.1 Understanding Supplier Schedule Release GenerationAfter finalizing a schedule by using Supplier Schedule Revisions or Ad Hoc Schedule Revisions, you use the Supplier Schedule Release Generation program to release the current supplier schedule. The release process generates:
■ Purchase orders for all committed quantities within the release fence.
■ A shipping schedule that is based on when you need the items, the shipping lead time, and other defined variables.
After the schedule is processed, the system updates the planned, committed, and released quantities on the supplier schedule that are inside the time fence.
When you run the Supplier Schedule Release Generation program, the program releases both blanket order-based schedules and ad hoc schedules, if any exist. It creates purchase orders for quantities matching the committed quantities. Purchase
Releasing Supplier Schedules
Working with Supplier Release Scheduling 14-17
orders are created only for committed quantities with dates that are inside the release fence. Committed quantities outside the release fence remain committed. For schedules that are based on blanket orders, the system uses the value from the Releasable Days field in the Supplier Schedule Master Revisions program (P4321). After purchase orders are created, the Released Quantity field on the vendor schedule is updated with the purchase order quantity.
For blanket order-based schedules, the program creates purchase orders against the blanket order and uses the supplier schedule master information to create a release schedule. For ad hoc schedules, the purchase orders are created using the version of the Purchase Orders program that you define in the processing options.
In the process of generating release schedules, the program also consolidates the purchase orders. You can use a processing option to determine what criteria the system uses for consolidation. By default, the program consolidates purchase orders by branch, supplier, and item. However, you can also consolidate by branch and supplier only, or by branch, supplier, and date. In this process, purchase orders that are created against blanket orders and ad hoc schedules are merged.
14.5.1.1 Ad Hoc SchedulesWhen you run the Supplier Schedule Release Generation program for ad hoc schedules, you can use the processing options to specify release fence days. To create purchase orders for ad hoc schedules, the system searches for pricing blanket orders. If no pricing blanket orders are available, the system creates independent purchase orders.
14.5.2 PrerequisiteGenerate a current supplier schedule.
14.5.3 Running Supplier Schedule Release GenerationSelect Single Site Periodic Planning Operations (G3422), Release Supplier Schedule.
14.5.4 Setting Processing Options for Supplier Schedule Release Generation (R34410)Processing options enable you to specify the default processing for programs and reports.
14.5.4.1 DefaultsThese processing options control the version of the Purchase Orders program to use for creating purchase orders, as well as the consolidation method for purchase orders and the release fence for ad hoc schedules.
1. Purchase Order Entry Version (P4310)Specify which version of the Purchase Orders program the system calls to generate purchase orders when running the Supplier Schedule Release Generation program. If you leave this processing option blank, the system uses version ZJDE0001.
2. Purchase Order ConsolidationSpecify how to consolidate purchase orders when you run the Supplier Schedule Release Generation program. Values are:
Blank: Consolidate purchase orders by branch/plant supplier and item.
1: Consolidate purchase orders by branch/plant and supplier.
Releasing Supplier Schedules
14-18 JD Edwards EnterpriseOne Applications Requirements Planning Implementation Guide
2: Consolidate purchase orders by branch/plant, supplier, and date.
3. Release Fence Days for Adhoc SchedulesSpecify the release fence days for ad hoc schedules. Release fence days are the number of work days from the current date within which a release can occur.
14.5.4.2 ProcessThese options enable you to specify the processing that the system uses to generate the supplier schedule release.
1. Supplier Schedule StatusSpecify the supplier schedule status that the system assigns after you run the Supplier Schedule Release program.
If you leave this processing option blank, the system does not update the supplier schedule status.
2. Clear MessagesSpecify whether to clear MPS/MRP/DRP messages after the system runs the Supplier Schedule Release program. Supplier scheduling uses the messages from the most recent MRP generation to determine demand. The system clears only the messages that are inside the release fence. Values are:
Blank: Does not clear messages.
1: Clears messages.
3. Blanket Order ReleaseSpecify whether the system automatically releases blanket orders while the Supplier Schedule Release program is running. Values are:
Blank: Does not automatically release blanket orders.
1: Automatically releases blanket orders.
4. Price ControlSpecify whether the system retrieves the price from a blanket order or the JD Edwards EnterpriseOne Procurement Price Management system. Values are:
Blank: Blanket order.
1: Procurement Price Management.
A
JD Edwards EnterpriseOne Requirements Planning Reports A-1
AJD Edwards EnterpriseOne Requirements Planning Reports
This appendix contains the following topics:
■ Section A.1, "JD Edwards EnterpriseOne Requirements Planning Reports"
■ Section A.2, "JD Edwards EnterpriseOne Requirements Planning Reports: A to Z"
■ Section A.3, "JD Edwards EnterpriseOne Selected Requirements Planning Reports"
A.1 JD Edwards EnterpriseOne Requirements Planning ReportsThis product does not include many stand-alone reports.
A.2 JD Edwards EnterpriseOne Requirements Planning Reports: A to ZThis table lists the JD Edwards EnterpriseOne Requirements Planning reports, sorted alphanumerically by report ID.
Report ID and Report Name Description Navigation
R34450
Supplier Schedule Print
You can use Supplier Schedule Print to print a report of the supplier schedule.
Single Site Periodic Planning Operations (G3422), Print Supplier Release
R34460
Supplier Schedule History
You can use the Purge Supplier Schedule History program to delete history records that have become redundant.
Single Site Periodic Planning Operations (G3422), Purge Supplier Schedule History
A.3 JD Edwards EnterpriseOne Selected Requirements Planning ReportsSome reports include a more detailed description, as well as information about processing options. These reports are listed alphanumerically by report ID.
A.3.1 R34460 - Supplier Schedule HistoryJD Edwards EnterpriseOne provides a batch program that you can use to purge the supplier schedule history. You can use the Purge Supplier Schedule History program to delete history records that have become redundant. You can select to delete all of the history records in the Vendor Schedule History File table (F3440) or just a subset of these records. It is recommended that you run this batch program periodically.
JD Edwards EnterpriseOne Selected Requirements Planning Reports
A-2 JD Edwards EnterpriseOne Applications Requirements Planning Implementation Guide
A.3.2 R34450 - Supplier Schedule PrintYou can use Supplier Schedule Print to print a report of the supplier schedule. Run the Supplier Schedule Release Generation (R34410) batch process. The system uses the information that you have entered on the other forms to create the report. This program generates a consolidated report of both blanket and ad hoc schedules, and the purchase orders that the system generated. It displays planned committed and released quantities, as well as the cumulative difference between planned and committed quantities.
A.3.3 Processing Options for Supplier Schedule Print (R34450)Processing options enable you to specify the default processing for programs and reports.
A.3.3.1 Process
Blanket Order TypeSpecify a UDC (00/DT) that identifies the type of document to use when retrieving an item's blanket order. This code also indicates the origin of the transaction. If left blank, OB will be used.
P: Accounts Payable
R: Accounts Receivable
T: Payroll
I: Inventory
O: Purchase Order Processing
J: General Accounting/Joint Interest Billing
S: Sales Order Processing
Supplier Schedule StatusEnter the status to use for updates to the supplier schedule. If left blank, no change will be made to the schedule's current status.
A.3.3.2 Versions
Supply/Demand Inclusion Rules VersionSpecify a UDC (40/RV) that identifies an inclusion rule that you want the system to use for this branch/plant. Oracle's JD Edwards EnterpriseOne Manufacturing and Oracle's JD Edwards EnterpriseOne Warehouse Management use inclusion rules as follows:
1. Enter the version of Supply/Demand Inclusion rules to use for active blanket order selection.
■ For JD Edwards EnterpriseOne Manufacturing: Allows multiple versions of resource rules for running MPS, MRP, or DRP.
■ For JD Edwards EnterpriseOne Warehouse Management: Allows multiple versions of inclusion rules for running putaway and picking. The system processes only those order lines that match the inclusion rule for a specified branch/plant.
JD Edwards EnterpriseOne Selected Requirements Planning Reports
JD Edwards EnterpriseOne Requirements Planning Reports A-3
A.3.3.3 Associated Text
Print Associated Blanket Order TextSpecify whether the system prints associated blanket order text. Values are:
Blank: No associated text will be printed.
1: Print associated blanket order text.

JD Edwards EnterpriseOne Selected Requirements Planning Reports
A-4 JD Edwards EnterpriseOne Applications Requirements Planning Implementation Guide
B
Delivered User Defined Objects for Requirements Planning (Release 9.2 Update) B-1
BDelivered User Defined Objects for Requirements Planning (Release 9.2 Update)
This appendix discusses delivered user defined objects (UDOs) that you can use with the Requirements Planning system. It contains the following topic:
■ Requirements Planning Notifications
B.1 Requirements Planning NotificationsJD Edwards EnterpriseOne notifications enable you to improve your business efficiency through the use of proactive notifications that are actionable. Proactive notifications enable the system to notify users of business events as they happen without the need for the user to be online.
This section discusses delivered notifications that you can use with the Requirements Planning system. For a complete listing of available notifications, along with additional information about them, see the Notifications Cross Reference in Oracle Support (Document 2365066.1 - JD Edwards EnterpriseOne Delivered Notifications), which can be found at:
https://support.oracle.com/epmos/faces/DocumentDisplay?id=2365066.1
For additional information about using and subscribing to notifications, see these topics:
■ Creating a Notification in the JD Edwards EnterpriseOne Tools Notifications Guide.
■ Testing Notifications in the JD Edwards EnterpriseOne Tools Notifications Guide.
■ Subscribing to Notifications (Release 9.2.2) in the JD Edwards EnterpriseOne Tools Foundation Guide.
This table describes notifications that you can use with the Requirements Planning system:
Notification Description
JDE_NOTIFY_34_ScheduleThreats Notifies subscribers of MRP expedite, increase, and past due messages (production schedule/order fulfillment threats) for the subscription’s specific Branch/Plant.

Requirements Planning Notifications
B-2 JD Edwards EnterpriseOne Applications Requirements Planning Implementation Guide


![JD Edwards EnterpriseOne Tools BI Publisher for JD Edwards ... · PDF file[1]JD Edwards EnterpriseOne Tools BI Publisher for JD Edwards EnterpriseOne Guide Release 9.2 E53612-03 April](https://img.pdfslide.net/doc/110x75/5abe1b877f8b9a5d718c9747/jd-edwards-enterpriseone-tools-bi-publisher-for-jd-edwards-1jd-edwards-enterpriseone.jpg)


![JD Edwards EnterpriseOne Administration Guide[1]JD Edwards EnterpriseOne Administration Guide Release 9.2 E53541-04 February 2019 Describes JD Edwards EnterpriseOne administration](https://img.pdfslide.net/doc/110x75/5f0f067c7e708231d4421dd3/jd-edwards-enterpriseone-administration-guide-1jd-edwards-enterpriseone-administration.jpg)