Embed Size (px)
Citation preview

Jean Phillips
Schwerdtfeger Library
Space Science and Engineering Center
University of Wisconsin-Madison
November 2005
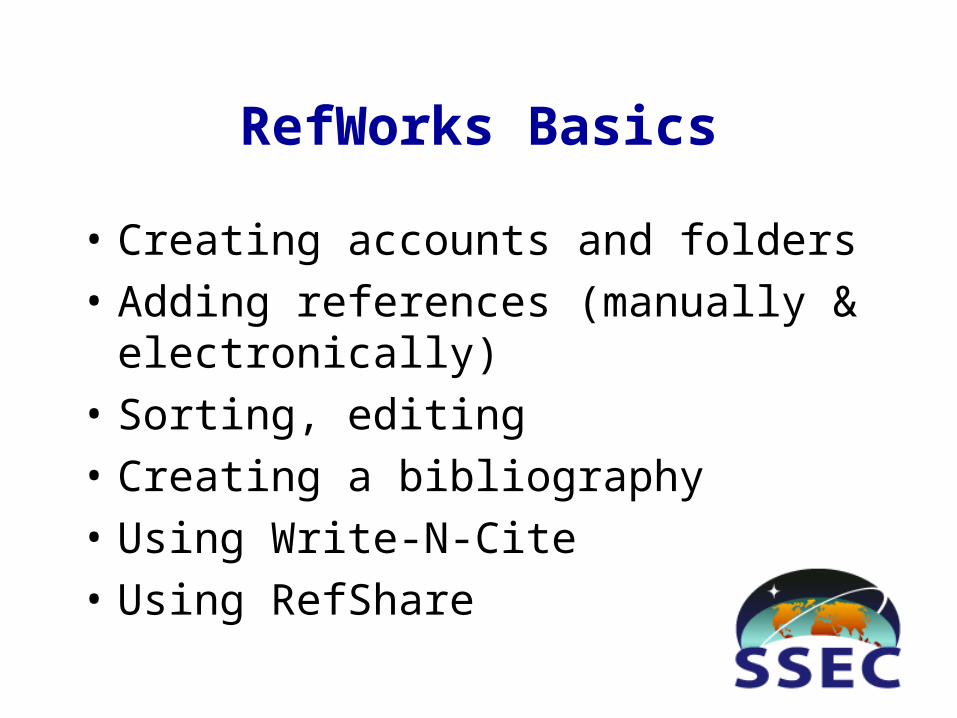
RefWorks Basics
• Creating accounts and folders
• Adding references (manually & electronically)
• Sorting, editing
• Creating a bibliography
• Using Write-N-Cite
• Using RefShare

Creating a RefWorks Account
• Login to RefWorks <http://www.refworks.com>• Click on Sign Up for an Individual Account• Enter required information (login & password)• Click on Register

Login to RefWorks

Creating Folders
• Select Create New Folder from Folders drop down menu

Name Folder

View Folder List

Adding References Manually
• Select Add New Reference from References drop down menu
• Select desired folder from In Folder(s) menu• Select reference type from Ref Type drop down
menu• Enter information: Required fields are marked
with *• Save

Select Style and FolderEnter Data and Save

Journal Abbreviations
• AMS journal abbreviations can can be found in Appendix C of their Author’s Guide
• For abbreviations not listed in Appendix C, see Chemical Abstracts Core Journals which serves as the standard reference

View Folder Contents

Moving Citations from CSA Databases into RefWorks
• Includes MGA, Aerospace Database, NTIS, Oceanic Abstracts, Conference Papers Index
• See Research Databases at http://library.ssec.wisc.edu• Perform search and select citations to save• Click the Save to RefWorks button• Make sure the radio button is selected for your Marked
Records• Select desired format for records from Show drop down
menu• Click on Save to RefWorks

In RefWorks
• Login to RefWorks• Citations will automatically be imported into the
Last Imported Folder• View records and save to folder of choice• Once records are transferred, delete records from
Last Imported Folder by selecting “all in list” and then, Remove From Folder

Perform Search in MGA

Mark or Select All Records and Export to RefWorks
(Only records for Published Works will be processed)

Records Imported to Last Imported Folder

View Last Imported Folder and Put in Folder: urban heat island(2)


Moving Citations from Web of Science into RefWorks
• Mark records• Submit Marks and click on Marked List• At Step 1 select desired fields• At Step 2 select Field Tagged from drop down
menu• Click on Save to File and then Save• Identify disk drive and filename plus the extension
.txt (plain text) in the File Name Box• Click on Save

Search, Mark Records, Submit Marks
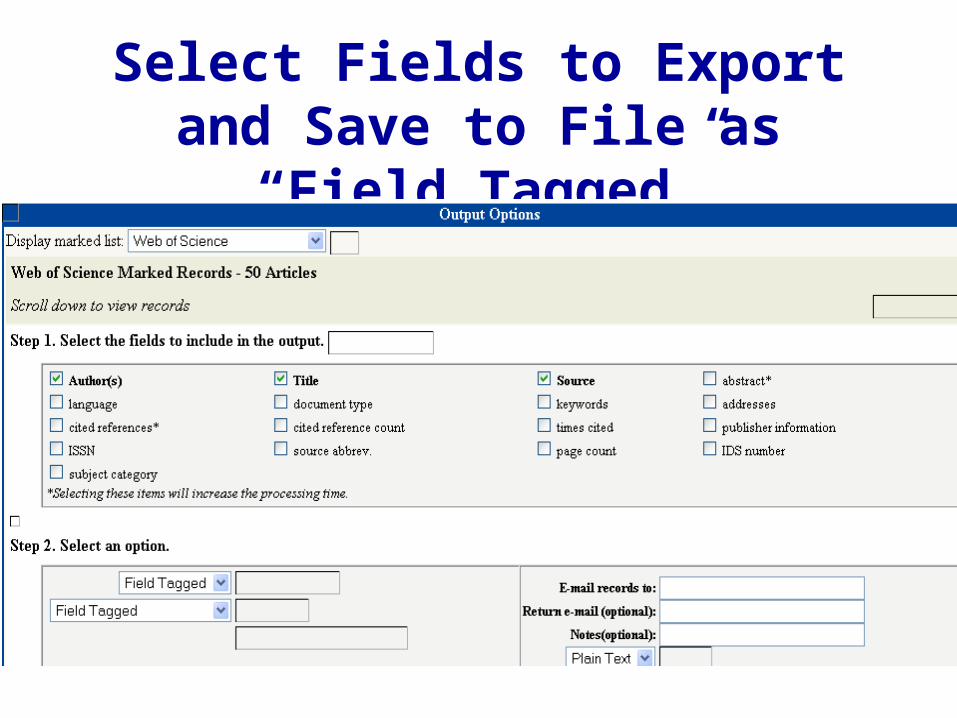
Select Fields to Export and Save to File as “Field Tagged”

File Saved to desktop as savedrecs.txt

In RefWorks
• Login to RefWorks
• Click on References and Import
• Select ISI (Institute for Scientific Information) from Import Filter/Data Source drop down menu
• Select Web of Science from the Database drop-down menu
• At the Import Data from the following Text File box click on the Browse button to select the file name of your saved records. Click on Import.
• Citations will be imported into the Last Imported Folder.
• View records or move to folder of your choice.

Select Import Filter/Data Source, Database, Folder and File

Records Imported to Last Imported Folder

View Last Imported Folder

Move “All in List” to Correct Folder and Remove Records from Last
Imported Folder

View “urban heat island(2)” Folder202 records
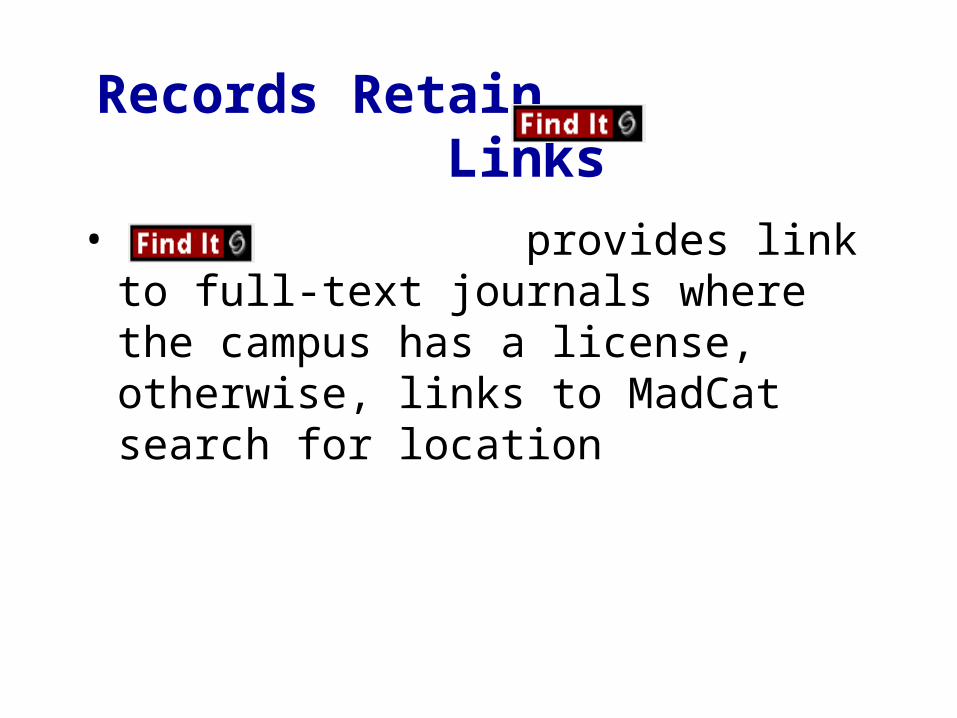
Records Retain Links
• provides link to full-text journals where the campus has a license, otherwise, links to MadCat search for location


Sorting References
• Select View from Folders drop down menu to select desired folder
• Select desired sort field from Sort By drop down menu at right of screen

View Folder and Sort By

Global Editing
• Click on Global Edit at top of screen• Click on radio button next to your choice at
References to Edit:• Select field to edit from Field to Edit drop down
menu• Type word or phrase in Change Field to: box• Click in desired radio button If Field Already
Contains Data• Click on OK

Global Edit

Review Changes: urban heat island added to Descriptor Field

• Caution!
• Delete: Deletes selected, page or all in list from entire database (all folders)
• Remove from Folder: Removes selected, page or all in list from current folder

Searching RefWorks
• Browse references by Author, Descriptor or Periodical using Lookup function
• Click on desired author, descriptor or periodical
• References associated with that author, descriptor or periodical will be displayed

Browse by Author

Search Using Search RefWorks
• Enter a single term or phrase in
• Searches entire database
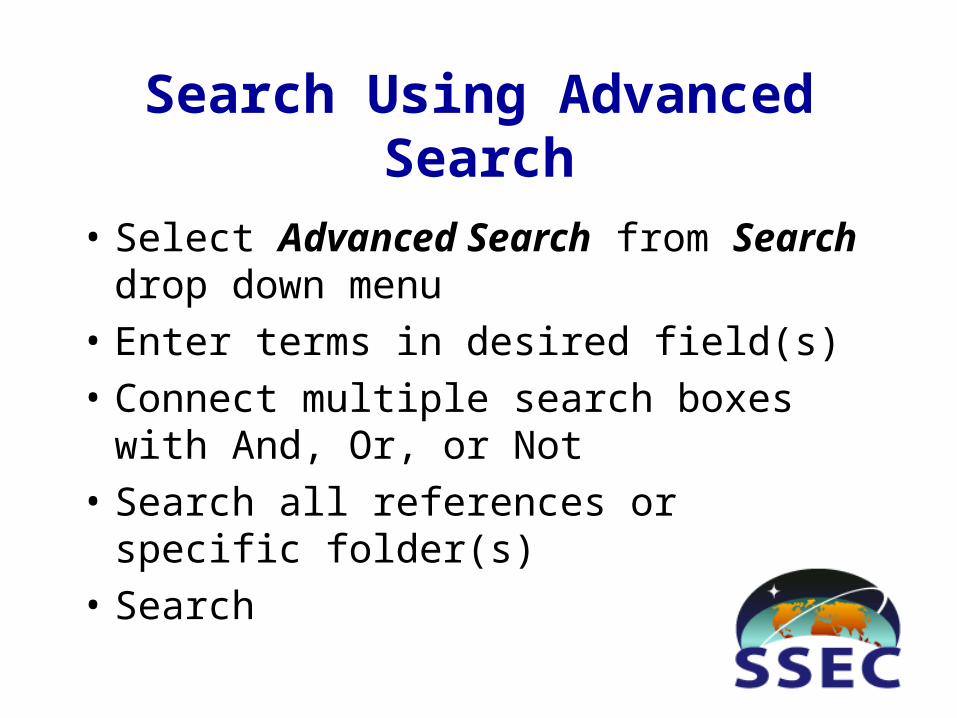
Search Using Advanced Search
• Select Advanced Search from Search drop down menu
• Enter terms in desired field(s)
• Connect multiple search boxes with And, Or, or Not
• Search all references or specific folder(s)
• Search

Advanced Search

Search Results: 2004, by Author

Create Bibliographies
• Click on Bibliography• Select style from Output Format menu• Select Format Bibliography from a List of
References• Select format from the File Type to Create drop
down menu• All References or References From: click on
desired folder from drop down menu• Click Create Bibliography
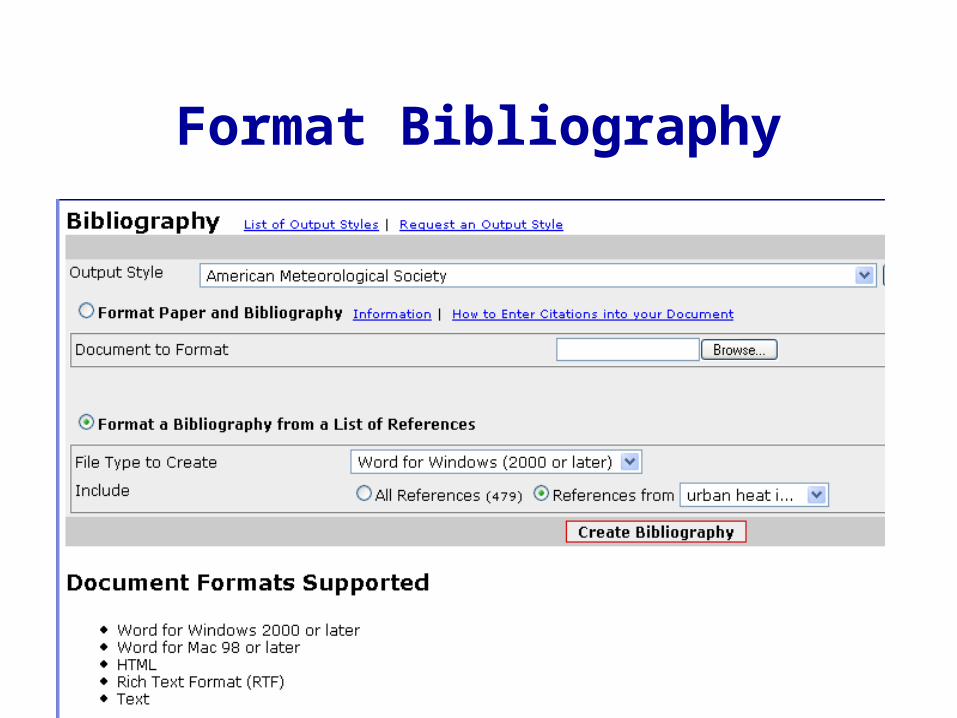
Format Bibliography

Download Bibliography and Save to Disk

Open Bibliography in Word

Using Write-N-Cite
• Under Tools menu, select Write-N-Cite to download plug-in
• Save to desired location
• Close RefWorks
• Find the RefWorks plug-in (wncinstall.exe) and click to start installation
• You’ll be prompted to restart your computer
• After the computer restarts, open Word and you should see the red Write-N-Cite button on the tools bar

Install Plug-In for Windows or Mac

Adding References to a Paper with Write-N-Cite
• Open Word
• To insert a reference, click on Write-N-Cite and a new window will open
• Login to RefWorks
• Select desired folder from View Folder menu
• Click in Word where you wish to place the reference
• Click on Cite to the left of the desired record in RefWorks

• A temporary reference will appear within curly brackets {{ }} in Word
• Add as many references as needed
• Save this document – this is your master from which you’ll create a final version.
• Click on Bibliography from Write-N-Cite window
• Select Output Format style from drop down menu
• Click on Create Bibliography
• A new Word doc will be created with ‘Final’ in front of the name you previously assigned. Includes bibliography and in-text citations
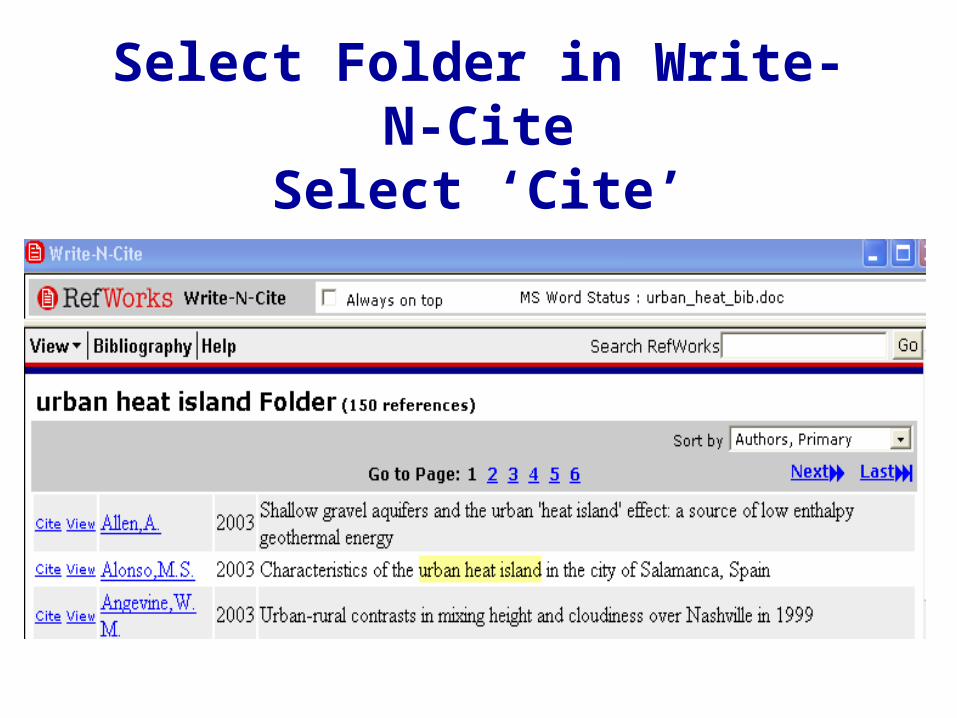
Select Folder in Write-N-CiteSelect ‘Cite’
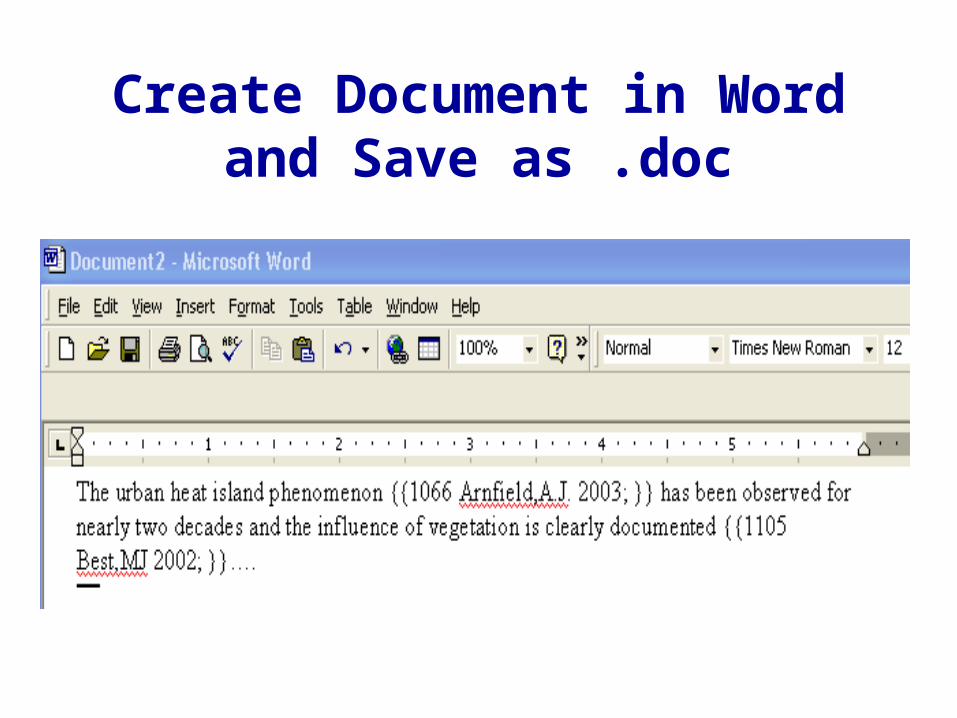
Create Document in Word and Save as .doc

Select Bibliography within Write-N-Cite, Select Ouput Style

Create Bibliography

Open ‘Final’ Version

How to Share RefWorks Citations
• Create separate group account
• Allow read-only access to your account
• Export RefWorks citations to another RefWorks user
• Publish a link to your RefWorks account/folder using RefShare

Create Separate Account
• Create a group account with a group name, e.g. Library Research Group
• Tell group members the login and password
• E-mail from RefWorks will go to the person who established the account
• Members can notes, commentary, new records

Read-Only Access of Your Account
• Login to RefWorks
• Under Tools, click Update User Info
• Enter a Read-only Password (must be different from your original password)

Read-only Password

Export RefWorks Citations
• From References drop-down menu, select Export
• Choose all references or specific folder

Export Formats
• Bibliographic Software: Saved in tagged format for importing into another bibliographic management tool such as ProCite, EndNote, Reference Manager
• BibTeX – Ref ID: Saved for use with LaTeX document preparation system
• Citation List: Creates list for use when writing offline
• RefWorks Tagged Format: Similar to bib software tagged format, but in RefWorks layout. Use for sharing data with other RefWorks users
• Tab Delimited: Saved with each field separated by a tab
• XML: Used to create export file in XML format

Publish Link to Account/Folder with RefShare
• From Folders or Tools menu, select Share Folders or Share References
• Click on appropriate Share Folder or Share Entire Database button, opening Shared Folder Options page containing URL for your shared folder/database.
• E-mail URL to recipients• Set permission options

Shared Folder/Permission Options

AMS Style
• Why are there discrepancies in journal abbreviations to begin with?
• Changing records to conform to AMS style (or any style)
• Under Search drop down menu, look up by periodical title: JGR
• Click on journal title• Select Global Edit to add correct journal
abbreviation

Lookup Periodical Title andSelect Title to Edit

Periodical Title: Global Edit

Periodical Title Abbreviated in all Selected Records

Recap
• RefWorks always opens to All References; take care when deleting refs
• Editing output styles and creating new filters
• Peculiarities with AMS output style
• Restoring and backing up databases
• Linux users: 1)Use Netscape or Mozilla 2)Write-N-Cite will not work, but use One Line/Cite View to format papers
• RefShare for sharing databases
• Directions for moving citations from online databases other than CSA and ISI: http://www.library.wisc.edu/instruction/refworks/importing.htm
• Find this presentation at: http://www.ssec.wisc.edu/library/teaching/refworks_fall_2005.htm
• E-mail: [email protected]