Embed Size (px)
Citation preview

© 2010 Dr. John M. Artz
Journey of the Dwarf Hunter
A Gentle Introduction to
World of Warcraft By Dr. John M. Artz

© 2010 Dr. John M. Artz
Introduction
Video games aren’t just for teenage boys any more. In fact, World of Warcraft has attracted the attention of numerous academics in fields from critical studies, to social science research, to leadership. However, for people who have not played a video game in ten year or who have not played a video game since Mario, the learning curve can be daunting. The purpose of this book is to make World of Warcraft accessible to those people. It is a work in progress and if you have any comments or feedback, please send an email to me at [email protected]. I look forward to hearing from you. As I add more to this book I will post it online and will provide a date next to the link telling when it was last updated.
This book is free to download and you may distribute it freely as long as you do not change the content in any way and as long as you don’t take any of it and claim credit for yourself. Enjoy!

© 2010 Dr. John M. Artz
Chapter 1: Creating Your Player Character
Welcome to Azeroth – The World of Warcraft
You are in for a treat. World of Warcraft is the most popular online video game, ever, with more than 11 million subscribers at this writing. And its popularity is not based on press hype or bandwagon effects. It popularity is based on the simple fact that it is a great game. It is fun to play! People become obsessive about World of Warcraft and for good reason. So, the developers of the game have actually build features into the game that encourage people to take breaks. Is there any other product or service that has to encourage its customers to not use it too much? As wildly popular as this game is, I believe that it could be even more popular if it were more accessible to a wider audience of players. Hard core gamers don’t mind having to figure things out as they go along. In fact, they are used to it. If you have played other games then some of the things you learned from the other games will help you understand World of Warcraft. And, if you know how these games work, you understand that figuring out the game as you go along is part of the fun.
However, there are a lot of people out there on the Internet who are not hard core gamers. They are the people who consider themselves technologically literate and fairly comfortable with a computer, but would be inclined to buy an introductory guide to a new piece of software rather than just playing with the software to figure it out. Hard core gamers may look askance at these people but hard core gaming isn’t for everyone. And, I believe, World of Warcraft is. Since I began playing World of Warcraft I have mentioned it to a number of people who say they had considered the game but the learning curve was too steep. They just didn’t have the time to put in hours and hours learning a game before beginning to enjoy it. And it is for those people that I am writing this book.
What I am attempting to do in this book is to provide a simplified introduction to World of Warcraft. That is, I want to get you started and well enough on your way that the enjoyment of the game kicks in and learning just becomes part of the process. I intend on achieving this in two ways. First, I will simplify the process by making decisions for you such as which character to use and what loot to keep. Later you can make these decisions on your own. But, first, you need to understand the basis for these decisions. So, second, as we go along, I will explain the basis for making these decisions so that, as you learn the game, you will begin making your own, better, decisions.
We will begin with a dwarf hunter character. Dwarf is a race (of which there are eight in the basic game, more in the expansions) and hunter is a class (this number varies from four to six depending on race). I chose this because it is the most straightforward character with which to learn. I will take your dwarf hunter from Coldridge Valley to Ironforge raising his level from one to ten. In the process you will learn about quests, inventory, spells, professions, talents, pets, armor, and weapons. And once we have done that, I will give you some pointers on how to proceed on your own. Given the magnitude of this game, this is barely a dent in what you need to know. Coldridge Valley is one of five starting places. Dwarf is one eight races. There are 70 levels of which we will cover only the first 10. And characters can be highly customized with spells, talents and professions which we will only introduce. However, I hope to get you
© 2010 Dr. John M. Artz
past the point where learning is frustrating and to the point where learning is fun. So, brace yourself. You are in for a good time.
I am assuming that you have World of Warcraft installed on your computer or have access to a copy to play. I am also assuming that you have an account that you can use to log in. If either of these is not the case, please go to Appendix A to find out how to do this. In this chapter we will begin choosing a realm, creating character, the Dwarf Hunter, go on a few quests, and learn some of the basics of World of Warcraft. So, double click on the WoW icon, bring up the software and log in.
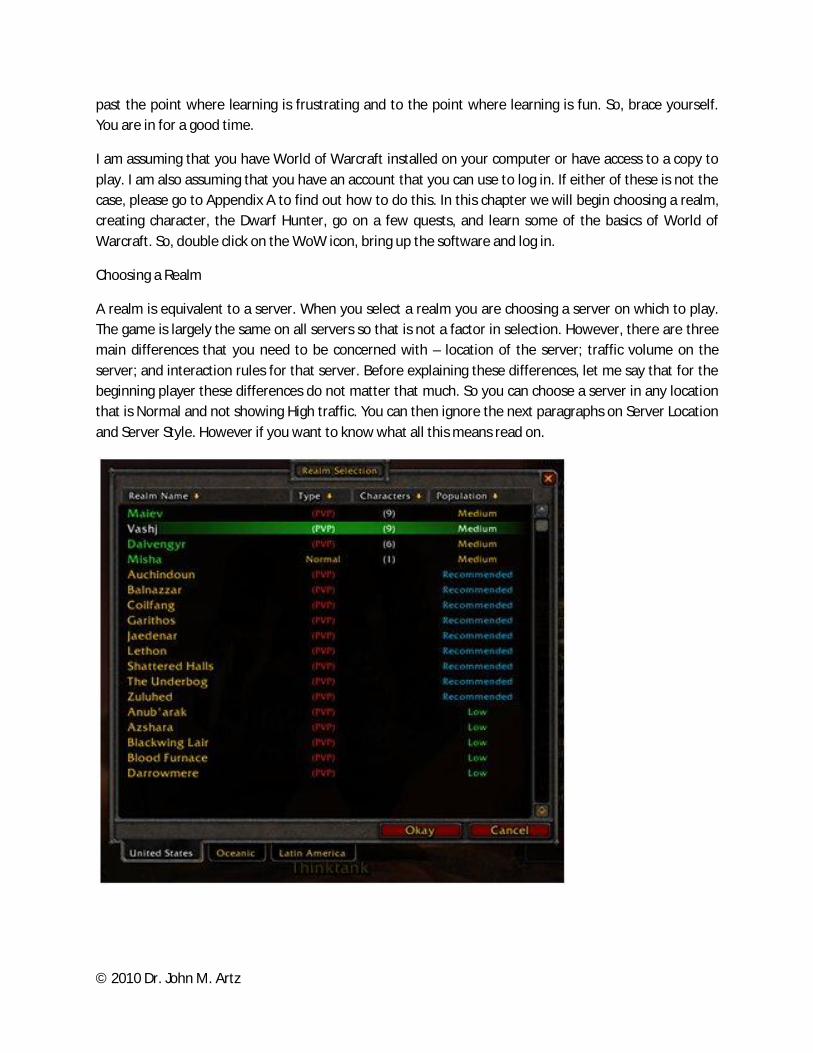
Choosing a Realm
A realm is equivalent to a server. When you select a realm you are choosing a server on which to play. The game is largely the same on all servers so that is not a factor in selection. However, there are three main differences that you need to be concerned with – location of the server; traffic volume on the server; and interaction rules for that server. Before explaining these differences, let me say that for the beginning player these differences do not matter that much. So you can choose a server in any location that is Normal and not showing High traffic. You can then ignore the next paragraphs on Server Location and Server Style. However if you want to know what all this means read on.

© 2010 Dr. John M. Artz
Server Location
Server locations include US, Oceanic, and South America. I don’t know if this reflects the actual location of the server, but it does indicate the patterns of usage. A US server, for example, is likely have heavy usage in the afternoon and evenings US time while having light usage in the wee hours of the morning. If you are on a heavily used server, there are two things you might notice. First, you might notice some minor performance issues although with all due credit to the people who determine server loads, the server has to be packed before you notice anything at all in this area. A larger problem will be completion for the mobile objects (mobs) or, in simple terms, the things you need to kill in order satisfy your quest. If you need to kill six wolves in order to satisfy a quest and you are competing with a dozen other players for the wolf population, it will take you a little longer to satisfy the quest than if you had all the wolves to yourself. So, for that reason, you might want to choose a server that will have light usage when you want to play. However, as you play you will meet other players on your server and will eventually go on quests with them. If you are on a server that has low usage when you like to play it may mean that the usage is low because the other players on that server are in bed. So finding times when you can go on quests together might be tricky. As you play the game more and more, you will almost certainly create characters on different servers. And if you land up on one server while all you friends are on another server you can pay to have your character moved as long at the target server does not already have a character with that name. So, the location of your server is not a critical decision at this point.
Server Style: Normal, PvP, or RP
On a Normal Server, also known as Player vs. Environment or PvE, your character goes after monsters in the environment such as wolves or troggs or other sorts of nasty things. The other players are also going after these nasty things. This is good because they are attacking monsters and not attacking you. In fact, they can’t attack you without asking first. Another player may ask you if you wish to fight a duel and you can accept or decline as the mood strikes you. Player vs. Player or PvP servers allow other players to attack you. However, they have to be in contested areas which are beyond where we will get in this book. So, for our purposes either of these options will do. On either of these types of servers, players can talk to each other using some minor variations of Instant Messaging. And many people will meet in a hang out place and chat either publically or privately. However, some of the stricter players think that chat violates the sense of place and feel you should remain in character at all times. That is, if you are a dwarf hunter you should talk like a dwarf hunter and not some fifteen year old kid from New Jersey. For example, in this medieval fantasy world you would not expect a dwarf hunter to say things like “lol” or “wtf”. So for game purists there are Role Play or RP regions where people are expected to remain in character at all times. As, I already mentioned, none of this will affect us. So, pick a realm. Having selected your realm, you should be presented with a screen which will let you create a character.
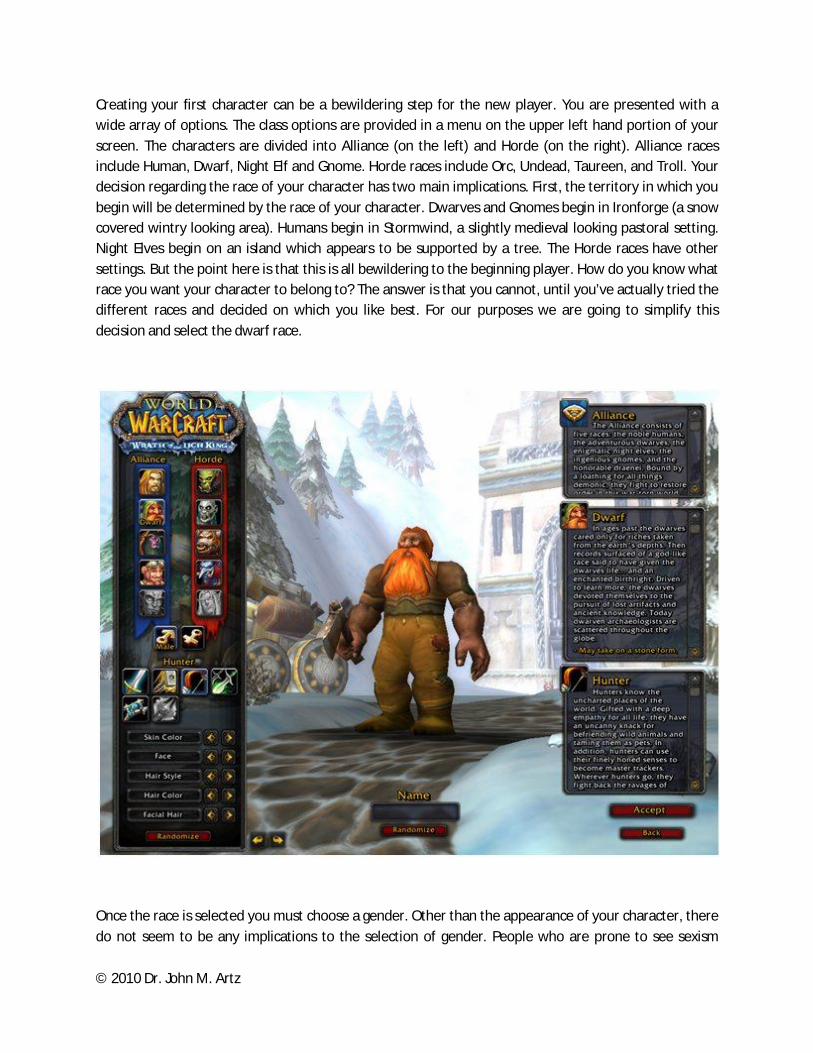
Creating Your Character
© 2010 Dr. John M. Artz
Creating your first character can be a bewildering step for the new player. You are presented with a wide array of options. The class options are provided in a menu on the upper left hand portion of your screen. The characters are divided into Alliance (on the left) and Horde (on the right). Alliance races include Human, Dwarf, Night Elf and Gnome. Horde races include Orc, Undead, Taureen, and Troll. Your decision regarding the race of your character has two main implications. First, the territory in which you begin will be determined by the race of your character. Dwarves and Gnomes begin in Ironforge (a snow covered wintry looking area). Humans begin in Stormwind, a slightly medieval looking pastoral setting. Night Elves begin on an island which appears to be supported by a tree. The Horde races have other settings. But the point here is that this is all bewildering to the beginning player. How do you know what race you want your character to belong to? The answer is that you cannot, until you’ve actually tried the different races and decided on which you like best. For our purposes we are going to simplify this decision and select the dwarf race.
Once the race is selected you must choose a gender. Other than the appearance of your character, there do not seem to be any implications to the selection of gender. People who are prone to see sexism
© 2010 Dr. John M. Artz
around every corner might suggest that female characters are less likely to be chosen for battle quests than male characters. But, I have not seen anything remotely like that. So pick a gender that you prefer.
The next decision is class. Dwarves can be warriors, hunters, mages, warlocks, or priests. Class is a fairly important decision as it will determine the player behavior and development options. Warriors, for example, can wear mail armor making them very hard to kill in melee combat (hand to hand combat such as sword fighting). On the other hand, their attack options are usually just to hack away at the opponent which some people find a little boring. Hunters are allowed ranged attack. That means they can stand back at a distance and shoot at things. But their armor levels are lower so when something gets close it can do more damage. Mages can throw fire balls and cast a number of spells. But their armor levels are even lower. There is, of course, much more to it than this. But these examples were intended to show that there are a number of factors to consider when choosing a class. In fact, there are, as with everything else in WoW a bewildering array of options to consider. So, once again we will just simplify the decision and select the Hunter.
Once race, gender and class have been selected, you get options for customizing the appearance of your character. These options are purely personal and do not affect play at all. So fiddle with the options that you have for appearance until you get the character appearance that you like. The most critical appearance decision is the hair style and color as that is what you will see most. If you pick green hair and can’t stand it, the game can get annoying after a while. Clothes and weapons will change over time so hair style and color is the thing you will have to live with.
The final step is to select a name for your character. There are several considerations in the selection of a name, some major and some minor. The first major consideration in selecting a name is that the name must be only alphabetic characters. So you could not have a name like Dwaft007. A related consideration is that only the initial letter will be capitalized and the rest will be lower case. So, if you chose a name like FriendsHunter, it would actually appear as Friendshunter. Probably the most important issue, however, is that the name must be unique on the server. So, unless you are one of the first on a new server, you are probably not going to be able to name your dwarf Shortie or your mage Merlin. But, even if you are one of the first on a server the uniqueness problem can still come back to bite you. Let’s say you create a mage called Merlin and invest a lot of time into the character leveling it up and developing useful skills. But, all your friends are on a different server. Well, you can pay to have your character moved to the other server, as long as that name is not currently being used on the target server. If your character’s name is Merlin, the chances that somebody else has not already chosen that name are not good.
Finally, here are a couple minor considerations. First, your name will be used in sentences when quest givers and trainers talk to you. I named one of my characters TheRifleman and kept running into quest givers saying things like “Hello, Therifleman, I’ve been expecting you.” It is of small significance but can be distracting and annoying. Second, if your friends refer to you in chat they have to spell out your name or some shortened version of it. So, if your name is Ibbldepixxiedust, your friends might have trouble typing it out in chat and might have trouble remembering the correct spelling if they want to email something to you. Once you have selected your name press the Accept button and hope that nobody

© 2010 Dr. John M. Artz
else has selected than name. If they have, just keep trying until you find a unique one. Once your name is accepted you are ready to enter the world of Ironforge and embark on all manner of new and exciting adventures. So, press the Enter World button and let’s get started.

© 2010 Dr. John M. Artz
Chapter 2: Entering World of Warcraft via Coldridge Valley
Getting a Quest
Presumably you have created a character and are ready to enter Azeroth. If you haven’t done that, go back to Chapter 1 and follow the instructions there. In this chapter we will take a newly created dwarf hunter character from the very beginning at the entry point in Coldridge Valley through the completion of his first quest in the Valley.
Different classes enter the world of Azeroth from different locations. The dwarves and gnomes enter via a snow covered mountainous land called Dunn Morogh. This assortment of names can be very confusing. So, for now, just to keep things simple, think of it in the following terms. Azeroth is the name of the world. The world has several continents including Kalimdor, Northrend, and the Eastern Kingdoms. On the continent of Eastern Kingdoms are numerous territories. On one of these is a dwarven territory named Dunn Morogh. In the territory of Dunn Morogh there is an area named Coldridge Valley and a major city named Ironforge. Over the next several chapters, we will take your dwarf hunter from Coldridge Valley to Ironforge via a small township named Kharanos. But that will take some time and effort. So, in this chapter we will get your hunter to level 6 and out of Coldridge Valley. If all these names are too much to remember, don’t worry about that now. Once you spend some time in these locations, the names will be easier to remember.
When you enter the world the first time with a new character, you get a short video that discusses the history of the plight of that race. The video for the dwarf hunter will take you from Ironforge to Coldridge Valley, the reverse of the quests that you are about to go on. The video only takes a few seconds. But, if you don’t want to see it or have already seen it, just press the Esc key and it will skip the video.
After the video (or after you hit the escape key) your character is left standing at the Entry Point in Coldridge Valley. You can move your character forward using either the mouse or arrow keys. The arrow keys will move the character forward or backward, or change direction left or right. However, it is best to get used to using the mouse because it is far more effective on complex maneuvers. Press both mouse keys at once and your character will move forward. In order navigate move the mouse around. Move it side to side. Twist it a bit and see what happens. This may take a little getting used to at first. But before you know it you will be performing complex maneuvers without even thinking.
The Quest Giver
Directly in front of your character when you appear in Coldridge Valley is a Quest Giver. The Quest Giver can be recognized by a yellow exclamation point over his head. Your experience in Azeroth will be, essentially, a series of quests that strengthen your character and allow you acquire resources. So, move your character forward directly in front of the quest giver. If you place your cursor over the quest giver a small box will pop up in the lower right hand corner of the screen with his name (Sten Stoutarm) and level. This is a handy feature when trying to determine the level of a monster that you may want to attack or another player that you may wish to duel. You can mouse over a mob and get information

© 2010 Dr. John M. Artz
without attracting its attention. If you right click on the quest giver, a quest giver window will pop up offering you one or more quests. In this case there is only one quest being offered. Click on “! Dwarven Outfitters” and a quest window will pop up describing the quest.
The Quest Window
The quest window explains the quest, what you need to do to complete it, and what rewards you will receive for completing it. This first quest (Dwarven Outfitters) asks you to get six chunks of wolf meat for which you will be given a choice of rewards. This is a typical quest. It provides a brief back story for the quest. It specifies what you need to do. And, it says what you will get for completing it. Press the Accept button to accept the quest. A little less obvious, but just as important, is the fact that you also obtain experience points in pursuing the quest. So, a word about leveling is probably in order before we embark on the quest.
The Experience Bar
Across the bottom of your screen are two bars, a wide one made of boxes at the very bottom and a narrower one on top of it. The narrower bar is your experience bar. If you put your cursor over top of it you will get a pop up that says XP Bar that explains what the bar is for and how to read it. Your character begins at a Level 1 and the highest level you can achieve (without going to the extended versions) is 65. As you gain experience your character becomes more powerful and certain capabilities and resources are only available as you achieve certain levels. For example, when your character reaches Level 10 (our goal by the end of this book) you can purchase more powerful bullets and you begin learning how to train a pet. You gain experience from slaying monsters and completing quests. So, as you pursue a quest or slay monsters, you notice that the blue (or purple) line in your experience bar increases in length stretching from left to right across the page. When it reaches the far right limit your character goes up a level meaning you are more powerful and able to do more things.
At the risk of complicating things too much, I should mention the difference between the purple and blue bars. Normally the experience bar reflects increases in experience using purple filler. However, if you are logged off of a while, you character becomes rested. When your character is rested, the experience bar filler turns blue until you are no longer rested. While you are rested you get double experience points for each mob you kill. If you look very closely at the Experience Bar in Figure x above, you will see a tiny little marker just above the red pouch in the third slot from the left below the experience bar. This marker shows how far you have to go before your character is no longer rested. Only experience gained killing mobs will contribute to the rested experience. Any experience gained from completing quests just moves the marker out further.
© 2010 Dr. John M. Artz
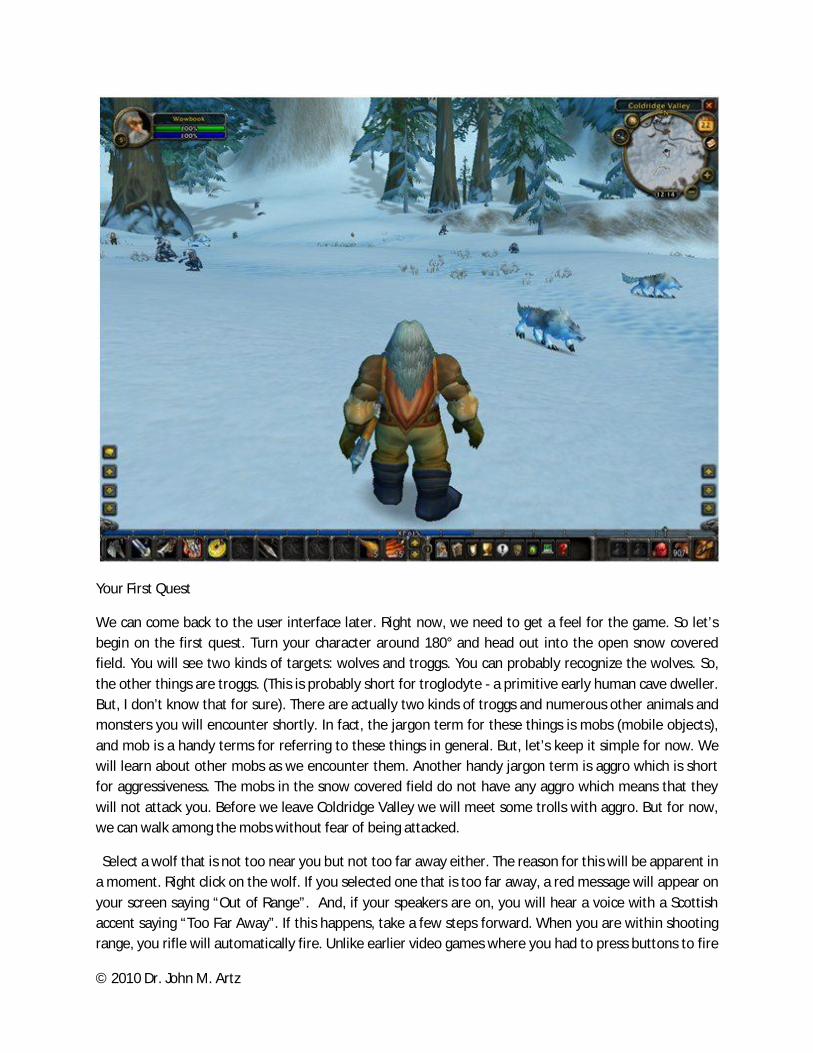
Your First Quest
We can come back to the user interface later. Right now, we need to get a feel for the game. So let’s begin on the first quest. Turn your character around 180° and head out into the open snow covered field. You will see two kinds of targets: wolves and troggs. You can probably recognize the wolves. So, the other things are troggs. (This is probably short for troglodyte - a primitive early human cave dweller. But, I don’t know that for sure). There are actually two kinds of troggs and numerous other animals and monsters you will encounter shortly. In fact, the jargon term for these things is mobs (mobile objects), and mob is a handy terms for referring to these things in general. But, let’s keep it simple for now. We will learn about other mobs as we encounter them. Another handy jargon term is aggro which is short for aggressiveness. The mobs in the snow covered field do not have any aggro which means that they will not attack you. Before we leave Coldridge Valley we will meet some trolls with aggro. But for now, we can walk among the mobs without fear of being attacked.
Select a wolf that is not too near you but not too far away either. The reason for this will be apparent in a moment. Right click on the wolf. If you selected one that is too far away, a red message will appear on your screen saying “Out of Range”. And, if your speakers are on, you will hear a voice with a Scottish accent saying “Too Far Away”. If this happens, take a few steps forward. When you are within shooting range, you rifle will automatically fire. Unlike earlier video games where you had to press buttons to fire

© 2010 Dr. John M. Artz
or stab, World of Warcraft will handle that automatically. Once you fire at the wolf, it will come charging towards you. Now it does have aggro and will attack you. As it runs toward you, the rifle will continue to fire until the wolf is too close at which point your character will switch to its axe. The axe does not kill the mob as quickly as the rifle which is the reason why you want to pick a wolf as far off as possible; so you can weaken it with rifle shots before it gets too close.
Now, here is a really handy trick. If you shot at a wolf that was too close, press the down arrow key and count to three. This will back your character up a few steps so that it is far enough away to shoot again. After it shoots repeat this until the wolf is dead. This handy trick does have limits however. Later when you are fighting more aggressive mobs, backing up must be done with great caution lest you back into another mob and get attacked from behind as well. Many of the quest givers you talk to will give you the advice to “watch your back”. This is good advice because it is not unusual to be hit from behind when you are not expecting it. A second limitation is that higher level mobs will have the ability to throw a net on you to prevent you from backing up like that. So, if your main fighting strategy is just backing up and shooting, you could find yourself in a tough situation with a net over you.
At some point, after a few shots and possibly a few hacks with your hand axe the wolf will succumb and give up the ghost. Now you can loot the corpse. Looting kills is one of the primary means of acquiring resources in World of Warcraft.

© 2010 Dr. John M. Artz
Looting Kills
If your kill did not fall close to you, as sometimes happens when shooting with a rifle, move closer to it and right click on the fallen body. If you are not close enough, you will get a message to that effect, in which case you just need to move a little closer. If you are close enough, a loot window will pop up with the items you acquire from killing this mob. You can move these items to your inventory by left clicking on each item. As you click on the items, they are moved from the loot window to your backpack. You can find your back pack at the far right of the line of boxes below the Experience Bar. Open your backpack by left clicking on it. Then watch the items go from the loot window to your backpack as you click on them. When the loot is all acquired, close the loot window by clicking on the “X” and close your backpack by left clicking on the same icon you clicked to open it.
The loot you acquire may consist of several different kinds of items. There may be money, in this case copper pennies, which increase the amount of money you have. You can see your money balance at the bottom of your backpack. There may be quest items, in this case the Tough Wolf Meat you are collecting for the quest. There may be clothing items such as a new pair of boots or pants. There may be items from the kill such as a tooth, a broken tusk or a ruined pelt. Finally, there may also be some randomly appearing items such as a new bag, a recipe of some kind, copper ore, or any number of other odd bits to confuse you.
The problem here is that your backpack has a limited number of slots and you have to decide what to take and what not to take. This can get to be a very tricky decision later in the game. But for now just take everything. Most of what you take will either be useful to you or you can sell it to a vendor. We will discuss inventory management later. So for now, just take everything you are given.
Experience and Leveling
You will need to understand these terms at some point so this is as good a time to address them as any. You don’t need to know this to complete the quest. But it is something you need to know. The experience bar that we referred to earlier runs the length of the screen across the bottom with purple (or blue) bars indicating how much experience you have at the current level. If you mouse over the experience bar, a pop up will tell you the percentage of experience you have towards the next level. As you kill more mobs your experience increases. When you reach 100% for the current level, a column of light will surround your character for a couple seconds to indicate that you have gone up a level. Going up a level will increase your ability to kill and not be killed. The experience gained in killing the wolves should move you from Level 1 to Level 2 at some point. I usually kill a few extra wolves and try to get halfway to Level 3. This increases the strength of my character and gets additional inventory for me to sell. Sometimes, players will just spend some time killing mobs to increase their level. This is called leveling up. The higher the level of a mob relative to your level, the harder it is to kill. So leveling up increases your chances of winning fights with mobs. This is not a big problem in Coldridge Valley where the mobs are low level with little aggro. But, later it can become a serious issue. If your only increases in experience level come from the mobs you kill to complete a quest, you will eventually find yourself at

© 2010 Dr. John M. Artz
too low a level to face mobs in future quests. Hence, leveling up eventually becomes a necessity. There are several ways to do this. However, for now we will level up by killing a few extra mobs beyond the requirement of the quest. So, kill some extra wolves until you reach a level of 2 and ½.

© 2010 Dr. John M. Artz
Chapter 3: Completing Your First Quest
Completing the Quest
From Chapter 2 you should have collected eight bits of Tough Wolf Meat needed for the quest and have leveled up to about 2 and ½. If you have not yet gotten this far, continue shooting and looting until you have. Then return to the quest giver. When you first approached the quest giver, there was a yellow exclamation point over his head indicating an available quest. (If you were not a sufficient level for that quest, the exclamation point would have been white.) When you accepted the quest, the exclamation point turned into a white question mark indicating a quest accepted but not yet satisfied. Once you satisfied the quest, the yellow exclamation point over the quest giver’s head turned into a yellow question mark indicating a completed quest.
Move close to the quest giver and right click on him. A quest window will pop up congratulating you on completing the quest and telling you what your reward is. In this case you have a choice of rewards and, once again, an opportunity to learn a little more about the game. Normally, you would choose the Wolf Handler Gloves and press the Complete Quest button. The Wolf Handler Gloves would be put in your back pack and from there you could equip them. The term ‘Equipping’ just means putting them on for protection. You would then move on to the next quest. However, we are going to take this opportunity to learn a little more about rewards and equipment.
Choosing Rewards
Your reward for completing this quest is that you can choose among three pairs of gloves - Rabbit Handler, Wolf Handler and Boar Handler. The Boar Handler Gloves will be tinted in red. There are a few tricks here that you need to know in order to make the most of the rewards you receive and the loot your recover. Put your cursor over the Boar Handler Gloves and a little popup will tell you about them.
Boar Handler Gloves The name of the item
Binds When Picked Up Once you accept this item, you cannot trade it or give it to another player
Hands This is the body part protected by this armor
Mail This is the armor material. It is in Red meaning it is too high a level for the hunter.
42 Armor This is the protection level. The higher the armor rating, the more protection.
There are several observations we can make regarding these choices. First, we want the highest level of protection that was can achieve for our character. So, the Boar Handler Gloves would seem the best choice at an armor level of 42. However, the Boar Handler Gloves are “Mail” armor and the Hunter class only uses armor made of cloth or leather. So, the item has a red tint indicating that it cannot be used by our character and when you mouse over the item the word Mail is in red indicating the reason why the item it not useful for our character. In other selections we might find the level or the type of weapon in

© 2010 Dr. John M. Artz
red indicating other reasons why a particular piece of equipment cannot be used. If you selected the Boar Handler Gloves and tried to equip them you would get a message saying that your character cannot use that yet suggesting, incorrectly, that if you just wait a little while longer then you character can use the item.
A second observation is that when we mouse over one of the choices a window will pop up next to the item window indicating what equipment we already have. The Wolf Handler Gloves have an armor rating of 21. You character currently has either no gloves or gloves rated around 4. So the Wolf Handler Gloves are useful to you. However, if you already had gloves with a rating in excess of 21, then it might make sense to choose an option such as the Boar Handle Glovers which you cannot use. However, you can always sell items that you cannot use. So, if there are no useful items you can select on and sell it back to a vendor. Select the Wolf Handler Gloves and press the Complete Quest button. The gloves will be copied into your inventory. Once they are in your inventory, you can open your backpack and right click on the gloves to equip them.

© 2010 Dr. John M. Artz
We are ready to take on our next quest. However, we will hold off on that until the next chapter. In the remainder of this chapter we will discuss a little more important background. There is nothing here that you cannot figure out for yourself. In fact, if you have played a lot of other games, you can probably figure it out fairly quickly. However, I am spelling it out in detail early on to help you avoid the frustration that comes with having to figure this all out for yourself. And, as we progress with the book I will provide fewer details and let you figure out more on your own. So, for now, let’s wrap up the chapter with Life and Death and Mana; Eating and Drinking; and Vendors.
Life and Death and Mana
In the upper left hand corner of your screen is a cameo portrait of you character. In this portrait there are a few pieces of important information including your experience level and how much life and mana you have. Your experience level will be represented by a number (probably 2 at this point) and your life and mana levels are represented by bars, green for life and blue for mana. As you are struck by an opponent, your life decreases until you die. At this early stage of the game your opponents are not that powerful so your life does not decrease all that quickly. And, once the fight is over, your levels of life creep back up again. In this first section you lose life slowly and recover it quickly but in later sections or it you go up against monsters with too high of a level, your life could drain away more quickly. The blue bar indicates your level of mana which is what you use to cast spells. Initially, with the hunter, you are not using much mana, but later you will. For example, you will acquire the ability to stun a charging opponent with a spelled shot. If you run out of mana, you will not be able to do that. In some altercations the difference between killing or being killed is the use of spelled shots. So keeping an eye on your mana levels is important. If you run out of mana you cannot cast spells. If you run out of life, you die.
When your character dies, you are put in a death state and your character is moved to the nearest graveyard. The color is drained from the environment leaving a ghostly you and a ghostly representation of the area in which you are in. In addition, you lose ability to interact with the environment. To get out of the death state you must return to the point where you were killed. This is referred to as ‘finding your corpse’. The graveyards are cleverly placed in plain sight in ways that cause you to over look them. When you go into a new area, it is always a good idea to find the graveyard. If you know where the graveyard is, you can find your way back to your corpse more easily. The graveyard in Coldridge Valley is behind the entry point area and elevated slightly. It would be useful to go to the graveyard and then open the map so that you can see where it is in relation to everything else. We will learn more about the map in a moment.

© 2010 Dr. John M. Artz
Let’s assume you got killed and are standing in the graveyard. You have two options. There is a Spirit Healer located in the graveyard that you can click on to return to life. If you do this you will pay a pretty stiff penal. Your character will incur damage (more on that later) and you will suffer from resurrection illness for a few minutes. Both weaken your character and inhibit its ability to perform. You would use this option only in extreme cases such as you were killed in a dungeon that you really don’t want to return to or the graveyard is far away from the point you were killed and you think there is a substantial danger of getting lost trying to find your corpse.
The best option, if possible, is to locate your corpse. When returning to your corpse it is a good idea to find it on the maps first so you know where it is and take roads back to it rather than just cutting across the territory. The reason for this is that there may be mountainous terrain that your character cannot traverse. And in the process of trying to find your way through mountains may increase your chances of getting lost.
The death model used in World of Warcraft is really quite clever. It may take several minutes of boring running to find your corpse thus making death undesirable. At the same time it is not as bad as being logged out for fifteen minutes or losing all of your possessions.
© 2010 Dr. John M. Artz
As you get close to your corpse a wooden looking tombstone will appear on the minimap. When you get even closer a popup will appear on the screen asking if you are ready to be reanimated. There is a reason why it asks you this. You make not want to be reanimated automatically. When your corpse is animated you will have low levels of life and mana. If you are reanimated next to a mob, it may attack you, killing you again and forcing you to spend several minutes running back to your corpse. So, it is a good idea to look around before you reanimate and make sure no mobs are nearby. If they are, move away a bit before reanimating. Once your character is reanimated you must restore your life and mana to full levels. You can do this by just waiting. However, it is quicker to do this by eating and drinking. And that is what we turn to next.
Eating and drinking
Open your backpack and you will see something that looks like a brown wine skin. Move your cursor over it and it will identify it as Refreshing Spring Water. If you right click on it, your character will sit down and appear to be drinking. An icon will appear at the top right of your screen with a timer on it. Refreshing Spring Water restores your mana at the rate of 151 units over 18 seconds. If you move, cast a spell or get attacked while drinking the process will be interrupted and you will lose the rest of that water. Later on, when you need more mana for restoration, milk and mellon juice will serve this same purpose. When your character was initially created you were given two bags of spring water. You may have acquired one or two more from looting kills. However, if you run out and need more, you can always purchase more from an appropriate vendor. Vendors will be discussed shortly.
In another slot in your backpack you will see an item that looks vaguely like a rack of ribs. Place the cursor over it. A pop up will describe it as Tough Jerky and you will see that it restores life at a rate of 61 over 18 seconds. You can right click on this and you character will sit as it did with the Refreshing Spring Water and an timer icon will appear at the top of your screen. Just as with the Spring Water, if you move, cast a spell or get attacked the process will be interrupted. However, there are a couple bright spots. As soon as your life is restored to 100% you can get up. You don’t need to wait for it to finish. And you can eat and drink at the same time. So, if both life and mana are low, it is a good idea to right click on the Refreshing Spring Water and the Tough Jerky.
Vendors
If you character is still where I left you last, you will be facing Sten Stoutarm who gave you your first quest. Take a few steps back and you will see a man standing in front of a wagon. Place your cursor over the character and an information bubble will pop up announcing that he is Adlin Pridedrift General Supplies. His name is not important but his designation as a General Supplies vendor is. As a vendor he can buy back goods that you looted. And as a General Supplies vendor he can sell you items such as Refreshing Spring Water to restore your mana or Tough Jerky to restore your life. He can also sell ammo
© 2010 Dr. John M. Artz
for your gun and later General Supplies vendors will be able to sell you additional backpacks to store your loot.
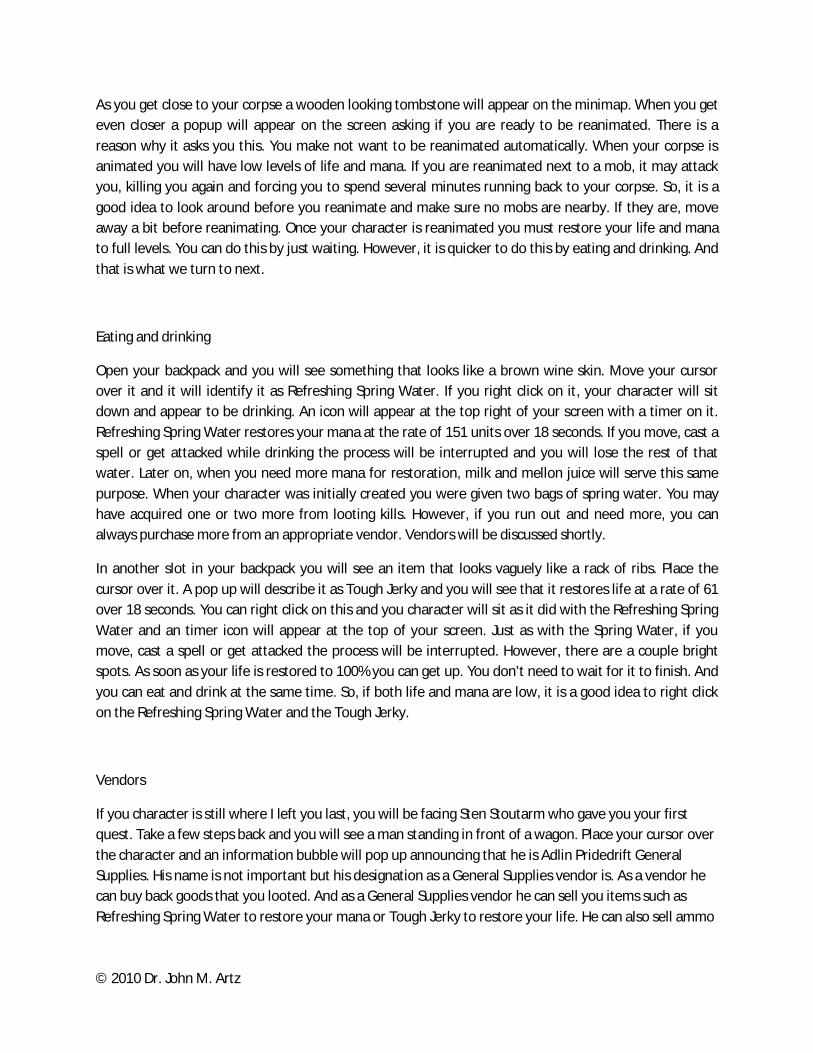
Move in front of him and right click. A window will pop up displaying his goods. We will get to the goods in a minute. But first click on the Buyback tab so we can sell some of the loot we acquired. The Buyback window opens with empty slots. If your backpack is not already open, open it and look for items such as “Broken Fang”, “Chipped Claw”, or “Ruined Pelt”. Left click on any one of these, move it to the buyback window, and left click again. The item will go in the vendor’s window and your money balance will be incremented by the value of the item. Sell back any clothing items that have a red word in their description as they are things you cannot use. What’s left is the Hearthstone, your Refreshing Spring Water, your Tough Jerky and some clothes. Close the vendor window now, so we can figure out which clothes to keep.
In the action bar at the bottom of the screen there is a button a little to the left of the center with a cameo of your character. If you mouse over it an information balloon will pop up saying Character Info. Left click on it and your character information will pop up. There is a lot of information here but we are going to focus on just a few things.

© 2010 Dr. John M. Artz
Near the bottom of the window you will see the word Armor and a number next to it which should be 42. That is the total armor level provided by your clothes. Along the right hand side you see a pair of pants. If you mouse over the pants, an information bubble will tell you they provide 2 Armor. Now, look in your back pack. You probably have a pair of pants in there with armor level 4. Right click on them and they will replace the level 2 armor pants that you are currently wearing. You will also see your armor level increase by 2 to 44. If you have any additional clothing items that you can wear, equip them now. Then sell back everything else to the vendor. If the vendor buyback slots get filled, you can log out and log back in to clear them.
Next to the Buyback tab is a Merchant tab. Press it and you will what products the vendor has to sell. Deciding how to best spend your resources is one of the major challenges in World of Warcraft. But, for now, this is fairly simple. You are not using spells yet so you don’t need mana. You initial allotment of Tough Jerky will probably suffice. In addition, Tough Jerky is frequently provided as loot. So we probably don’t need to buy any of that. However, we do need ammo for our gun. Next to your back pack you will see your ammo pouch. Open it by clicking on it. Then right click on the ammo icon in the vendors window. Ammo will be placed in your ammo pouch and your money balance will be deducted by the corresponding amount. It is a good idea to buy a few extra bags of ammo as you don’t want to be

© 2010 Dr. John M. Artz
shooting at a charging mob and run out. Now, close vendor window, character information, ammo pouch and backpack. We are ready for the next quest.

© 2010 Dr. John M. Artz
Chapter 4: Your Second Quest
In Chapter 3, I left you standing in front of Adlin Pridedrift the General Supplies vendor. Take a few steps back and turn a little to your left. There are two quest givers in the entry point who are waiting to give your next quest. In some cases the order of the quests makes no different at all and in some cases it does. In those cases where it does matter, it is usually because one quest involves lower level mobs in which case you would want to do it first. In other cases it has more to do with optimizing your travel time. I don’t have any easy answers on how to choose one quest over another the first time through. However, as you play, you will almost certainly create new characters in other classes and repeat these quests again. As you repeat them you will get smarter about the order in which to pursue them. For now you will just have to trust me. So, ignore Sten Stoutarm (who gave you your first quest), for the moment, and move in front of Balir Frosthammer. Balir has a quest called A New Threat. Right click on him to be offered the quest. Accept it and head back out into the field where you were killing the wolves. At this point you should be able to kill the number of troggs required to satisfy the quest. You should also be able to return to the quest giver for your reward and sell any excess loot to the vendor.
As you pursue this quest there are a few small things for me to point out. In this quest, you are killing two kinds of Troggs - Rockjaw Troggs and Burly Rockjaw Troggs. The Rockjaw Troggs are level one while the Burly Rockjaw Troggs are level two. Level two mobs are harder to kill than level one. Your level in relationship to the level of the mobs you are attacking is now important for three reasons. First, you should only attempt to kill mobs at your level or below. There are some exceptions to this rule. But those are not important at the moment. Second, if you kill mobs that are more than five or six levels below you, you will not get experience points. So, it doesn’t help your leveling. Third, the number of experience points that you get for killing mobs will decrease as the level differences increase. So, even though lower level mobs are easier to kill, they yield less benefit in contributing to your experience.
You will also notice that the Troggs provide slightly different loot than the wolves. The wolves provided fangs, chipped teeth and ruined pelts for the most part. These items were only good for selling back to vendors. The Troggs will drop more useful items such as leather armor items, weapons, or bags to hold more inventory. As you acquire these items you may want to equip them right away or you may want to wait until the quest is done and sort through the look then.
Finally, as you search for Troggs to kill, you will find yourself wondering all over the map. There is a good chance that you will get lost. So now is a good time to become familiar with the map. In the upper right hand corner of the screen is a minimap that shows where you are and some surrounding territory. This minimap not only shows where you are located, it also shows if a quest giver is nearby by displaying a question mark or exclamation point as appropriate. As you acquire tracking abilities for beasts, herbs, or minerals, these can be displayed on the minimap as well. So it is good to get used to it as soon as possible.

© 2010 Dr. John M. Artz
The Minimap and the Map
In the upper right hand corner of your screen is a map of the area surrounding you. This is called the Minimap. Over the minimap is the name of the area Coldridge Valley. As you move from one area to another, this will change. First, notice the “N” on the minimap indicating which direction is north. This is important because many quests will say to head east or west to find the quest and you need to know from the map which way to head. Next notice two round button-like appendages on the upper left side of the minimap. If you click on the lower of these two, it will pop up tracking options. For now, we don’t need to track anything so just select none on that menu if you opened it. Above the tracking button is a second button which, when pressed, will pop up a large map of the area. This map is important for giving you a larger sense of where you are and where you might be going. Sometimes it is difficult to tell from the scenery or the minimap whether you are heading towards or away from your destination. And finding shortcuts without the larger map is nearly impossible. However, the large map shows you the entire area as well as pointer showing you where your character is and in which direction he is heading. You will also see areas on the map that do not have any detail. As you enter a new area, the message “Discovering So and So” will appear on your screen. When it does, details of that area will be provided on the map. Look over the map for a minute or two so that you can orient yourself. If you get lost, at some point, you can pop up this map to see where you are and where you need to be. When you are done studying the map, close it and continue with your quest to kill Troggs.
Continuing With Quests
Continue killing Troggs until you have satisfied the quest and raised your level to approximately three and a half. You will have to kill extra Troggs to reach this level. But the extra kills also provide you with additional loot which you can wear or sell; so it isn’t a complete waste of time. Once you have completed this, return to Balir Frosthammer to receive your reward. You should choose either the Bear

© 2010 Dr. John M. Artz
Shawl or the Snow Boots and, at this point, you should also know why. Completing the quest will also give you additional experience and you can see your experience grow a bit as the quest completes.
Next, turn back to Sten Stoutarm whom we received the first quest from. He has two additional quests for you. Move closer, right click on him, and accept the two quests. These two quests are Etched Rune and Coldridge Valley Mail Delivery. Both represent slightly different kinds of quest from what we have seen so far. In the two quests already completed, we killed a specified number of mobs and received a reward. The purpose of the Etched Rune request is to introduce you to a character type that you need to know about. This character type is the Hunter Trainer. Each class has a trainer specific to that class and the trainer “teaches” you how to do things which members of the class need to know about. In reality, the trainer sells you capabilities that allow you to perform better but within the narrative of the game they are teaching you spells. The purpose of Coldrige Valley Mail Delivery is to send you out of the area in which you are currently located and into a new area where new quests lie. This also is a common quest technique for helping your move on or advance. Both of these quests also differ from the

© 2010 Dr. John M. Artz
preceding two quests in that you will not return to Sten Stoutarm to complete them. You are done with Sten and will complete these quests with other characters.
Anvilmar
There is a path in front of the entry point. Follow it west and continue to follow it as it bears north. It will take you into a large stone building called Anvilmar. Within each questing area there is usually some sort of well defined location where you can find vendors, trainers, and possibly more quest givers. It could be a town, a village, a fort, a camp or a building as is the case with Anvilmar. Head into the building and into the main area. There is a great deal to be learned from the characters in Anvilmar but we will hold off on that until the next chapter. We will close off this chapter with a review of what we have learned and a little more information about that Action Bar across the bottom of your screen.
A Review
We showed up in at the entry point to Coldridge Valley facing a quest giver. We recognized that quest giver by a yellow exclamation point over his head. We requested and accepted the quest, set out to satisfy it and returned to the quest giver for a reward. In pursuit of the quest we collected loot which we sold to a vendor. Had we begun with any other class such as warrior, mage or warlock, this would have been almost exactly the same. I say almost because there would be one fairly significant difference. The hunter uses a gun, the warrior hacks away at his prey with a weapon, the mage throws fireballs, and the warlock throws a shadow bolt which is similar to a fireball. Nonetheless, the experience up until this point would have been very similar. And, of course, we bought ammo for our hunter. The other classes do not use ammo. To carry this a step further, if we had chosen a different race such as Night Elf or Troll, the scenario would also have been very similar. The location would be different. But we would appear in front of a quest giver and the first couple quests, looting, and selling loot would be easily recognizable. So, we have learned not only about the Dwarf Hunter, but we have learned the beginning steps for most races and classes. Where we begin to see a difference is in the Etched Rune quest given by Sten Stoutarm. Our hunter received a quest to visit the Hunter Trainer. Other classes would receive quests to visit their respective trainers. And, at that point, the differences become a little more pronounced. In addition, in Anvilmar we will encounter weapon and armor vendors and once again the differences will become more pronounced. But we will get to that in good time. For now we will close this chapter with a brief discussion of the Action Bar.

© 2010 Dr. John M. Artz
The Action Bar
The Action Bar is a collection of boxes across the very bottom of the screen containing things that you need easy access to. It is divided into three segments. The far left boxes contain spells that you can perform. We will discuss these later. The middle segment contains icons that give you access to information about your character. The far right segment contains your inventory in bags or ammunition containers. You have already seen how to open your back pack. Next to your backpack is your ammunition holder. Left click to open it and you will see how many bullets you have left. Since you bought some ammo for the vendor, you should have plenty for now. But it is always a good idea to keep an eye on your ammo and remember where you can find the nearest ammo vendor. It won’t do to be shooting at some powerful mob and run out of ammo. But for now just close the ammunition holder. If you received a bag in loot you can left click on it in your back pack, move the cursor to an empty inventory slot in the action bar and left click again. This will make the bag available to hold additional inventory. You have room for three additional bags as the hunter uses one slot for ammo. If you did not get a bag from looting, which is most likely the case, you can wait until you do get one or buy one from a vendor later. Later as you progress you can buy bigger bags that hold more inventory. In fact, you can even select a profession that allows you to make bigger bags which you can use yourself, give to your other characters or sell to other players.
In the middle section of the action bar at the left end is an icon with a picture of your character we used this earlier to access information about armor levels. Next to the character icon is an icon of a book. It is your spell book and we will be accessing that shortly in Anvilmar. Looking further to your right you will see an icon that looks like a gold chalice. Clicking on that icon will give you access to your Quest Log. Moving further to the right is an icon of a computer. That icon will pop up the Game Menu which you can also access by hitting the Esc key. The game menu give you a variety of options such as logging off, exiting the game, or accessing the game interface menus and key bindings. For now, just knowing it is there is enough. Finally, in the middle section at the far right is an icon with a red question mark. This icon allows us to get in game help. You can access the knowledge base from this icon or send a support ticket to a game master.
The Action Bar section to the far left is a little more complicated. This is where you keep your spells and other actions such as drinking water to restore mana to which you need easy access. You probably have a Refreshing Spring Water icon already at the far right end of this section. You might also notice a [1] on the bar next to your Character Information Icon and arrows pointing up and down next to it. Press the up arrow and a [2] appears while your Refreshing Spring Water Icon disappears. You have six levels on this part of the action bar and organizing your spells for easy access can be a major challenge. But, no need to worry! When we get there, I will tell you exactly what to do and you can reorganize to suit yourself better when you are more familiar with the game.
One of the tips that the folks at World of Warcraft provide on the splash screen is to take breaks. This is good advice as this compelling game can draw you in to the point of exhaustion. If you have not taken a break up until this point, now is a good time to do so. When we return we will have a tour of Anvilmar.

© 2010 Dr. John M. Artz
© 2010 Dr. John M. Artz
Chapter 5: A Tour of Anvilmar – Meeting Vendors and Trainers
Welcome to Anvilmar
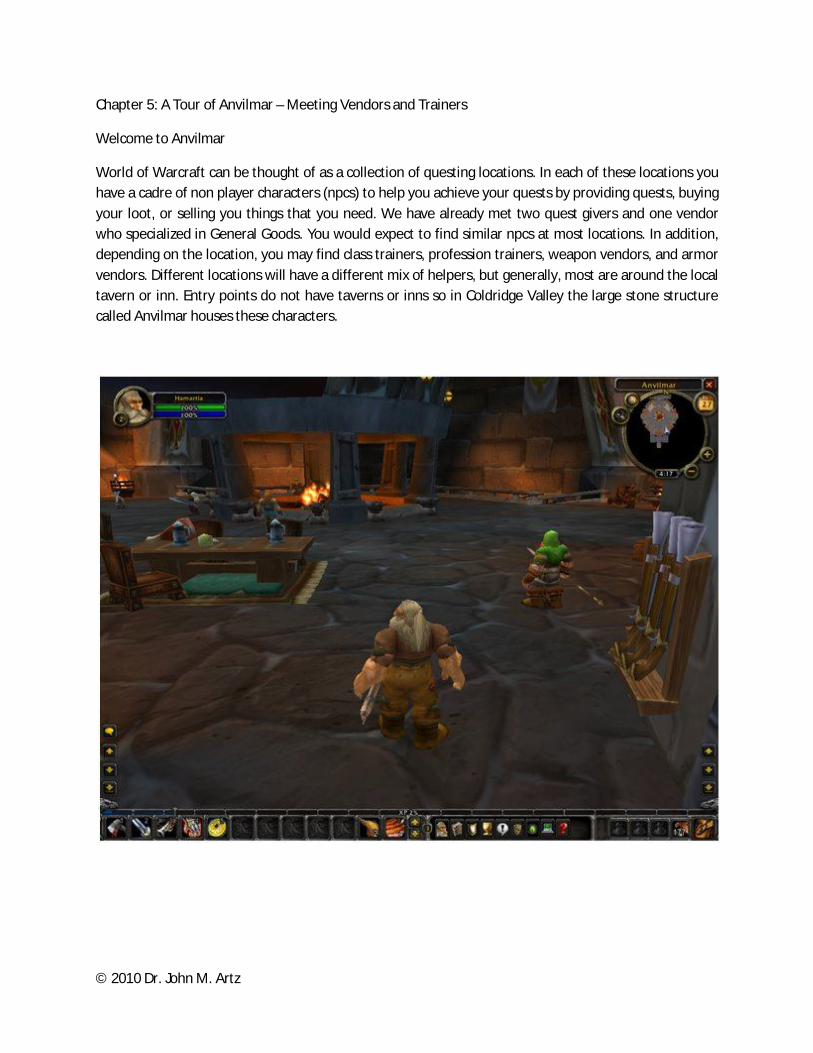
World of Warcraft can be thought of as a collection of questing locations. In each of these locations you have a cadre of non player characters (npcs) to help you achieve your quests by providing quests, buying your loot, or selling you things that you need. We have already met two quest givers and one vendor who specialized in General Goods. You would expect to find similar npcs at most locations. In addition, depending on the location, you may find class trainers, profession trainers, weapon vendors, and armor vendors. Different locations will have a different mix of helpers, but generally, most are around the local tavern or inn. Entry points do not have taverns or inns so in Coldridge Valley the large stone structure called Anvilmar houses these characters.

© 2010 Dr. John M. Artz
The Hunter Trainer
As you enter the main room in Anvilmar, look to your right and locate Thorgas Grimson the Hunter Trainer. He has a yellow exclamation point over his head indicating that you should see him for a completed quest. The completed quest is the Etched Rune quest that you were given at the entry point. Go over to the Hunter Trainer, right click on him, select Etched Rune and press the Complete the Quest button. You have found him and you will get a few experience points for your troubles. Right click on him again and you will get a list of available training options. These are capabilities that your character can purchase. Select Track Beasts if it isn’t already selected. The lower part of the window will tell you what this capability is, what level you must be to purchase it, and how much it will cost. The cost is only 9 coppers and you should have at least that much money from selling loot. So press the Train button. You now have this capability. So, what does that mean? If you go to the minimap and press the Tracking Type button, you will see Track Beasts as an option there. If you select this tracking option, dots will appear in the minimap indicating the location of beasts. We don’t want to do this yet because Coldridge Valley is full of beasts and the dots will just clutter the minimap. So select none to close the Tracking Type menu. The point is that we now have a capability that we did not have before and we acquired it by purchasing it from a trainer.
The next item in the training window is Aspect of the Monkey. This provides your hunter with an improved capability for dodging attacks. However, we cannot buy it yet because it requires a Level 4 character and costs 95 coppers which you may not have. Even if you have the 95 coppers, there are more important things to spend it on and one of the strategy elements in World of Warcraft is figuring out the best way to spend the money that you earn. As we level up and earn more money we can return to the Hunter Trainer and purchase more capabilities.
It is a good idea to remember where the trainers are so you can return to them to acquire capabilities as you level up. If your character seems to be getting killed a lot more often than it should one of the reasons may be that you did not purchase capabilities that you need from your trainer which would make you more effective in combat. So, what do you do if you need a trainer but don’t recall having seen one in the location where you are currently questing? Go to a guard and right click. A menu will pop up of the standard npcs. Click on Class Trainer and a list of the classes will pop up. Click on Hunter and the guard will tell you where the nearest Hunter Trainer is located. If you want to be really strategic in your leveling up, you should look at the next training spells in the list and see what levels are required to purchase them. Then, when you reach that level, return to the trainer and purchase more capabilities.
Now, turn your back on the Hunter Trainer and head counter clockwise around the room. You will see a Warrior Trainer and a Rogue Trainer. You can ignore these for now. But if, at some point, you create a Warrior or Rogue Dwarf these guys will be useful to you. Keep going, about halfway around the room and you will see Felix Whindlebolt with a quest. Take it.

© 2010 Dr. John M. Artz
The Weapon Vendor
Roughly to the left of Felix, standing in front of the center fireplace, you will see a Weaponsmith holding a large sword in each hand. Walk over to him and right click. A vendor window will pop up showing the weapons that he has for sale. All are tinted in red except the Hand Axe. The red tint indicates that you cannot use these weapons. Later you can purchase abilities to use additional weapons from a Weapons Master. But for now, you are stuck with the one handed axe. Mouse over the Hand Axe and two windows pop up. The window on the left shows the capabilities of the vendor’s axe. Note that it will do 2-4 Damage. The window on the right shows the capabilities of your axe. It will do 1-3 Damage. So, the vendor’s axe is more damaging and you should purchase it. If you have the 78 coppers required to purchase it, do so. Equip it and sell the old axe back to the vendor. If you do not have the 78 coppers, come back when you do and purchase it then.
Also note the anvil icon at the bottom of the vendor window. Mouse over it and it will tell you the cost of repairing your items. If you have enough money you should repair them. As you fight mobs, your armor and weapons incurs damage. As they become damaged, they provide less protection and your character becomes easier to kill. If you let the damage go long enough, a little character icon will appear below the minimap showing you where your character’s armor is damaged the most. At some point you will no longer be able to fight. If you are a long way from a vendor when this happens it can be very inconvenient. So, it is best to just keep your armor in repair. You can do this by clicking on the anvil. It will, in turn, deduct the coppers from your balance and restore your armor. As you progress on your journey through World of Warcraft, you will have to constantly make trade off decisions about whether to spend your money on better armor, better weapons, spells, or other sundries. These can be difficult trade off decisions. However, if you armor needs repair, it should always take priority over the other purchases.
The Armor Vendor
When you are finished with the Weapons Vendor, head a little further around the fireplace and find Grundel Harkin the Armorsmith. Right click on him to see his wares. All of his items are in red. This is because they are all Mail armor and this requires a word of explanation. Armor levels include Cloth, Leather and Mail. Cloth is the weakest level and is the top level for Priests, Mages and Warlocks. Leather is the intermediate level and is the top level for Hunters and Rogues. Mail is the highest level and is used by Warriors and Paladins. Classes can use armor of lower levels but not of higher levels. Since the Hunter’s highest armor level is leather, he cannot use the mail armor that this vendor sells.
To find a leather vendor, go back to the Hunter Trainer and take the stairs next to him Go downstairs and find the Cloth and Leather Merchant. Finding an appropriate armor vendor can be tricky some times. Some vendors will sell only one type such as Mail or Leather. Others will sell multiple types. Some will sell armor that is appropriate only to certain levels such as level 10 and below, levels 10 – 30, or only over level 30. So, the only advice I can give here is that when you enter a new location, you should check out the npcs and see what they have to offer. When you find a merchant that sells armor suitable to

© 2010 Dr. John M. Artz
your character, try to remember where you found him. Once you find the Cloth and Leather merchant look over his goods. You probably don’t have enough money to purchase much of anything just yet. But it is good to know where the vendor is so that you can return to him as you acquire more money.
While you are in the side room look around to see what else is there. This is always a good practice as you may discover something that you don’t need at the moment but may need later. For example, see if you can find the Mage Trainer and the Warlock trainer. You won’t ever need them as a Hunter but if you create a Mage or Warlock character in the future knowing where the trainers are can be handy.
On To Your Next Quest
When you a finished exploring Anvilmar, head back out of the building and take the path going west. This will be to your right if you haven’t figured out how to use the minimap yet. But you should get used to using it for navigation. Stick to the path until you come to the next quest giver. This will be a bit of a jog and holding down the two mouse keys to move the character forward can become tedious. If you press your Num Lock key it will lock your character into running mode and you can navigate using the right and left with the arrow keys. To stop the character from running, you can press Num Lock again, press both mouse keys, or press either the up or down arrow key.
The next quest giver is Talin Keeneye who you will find standing in front of a tent along the path. Right click on him and complete the Coldridge Valley Mail Delivery task. Note how it also offers you another Mail Delivery task to get you to the next quest giver. But before we move on, Talin has another quest for us – The Boar Hunter. Talin wants you to kill 10 Boars to complete his task. You can head into the field behind his tent to find the boars. As you seek out more boars to kill keep an eye on where you are on the map as you will have to return to Talin to get your reward. As you pursue this quest there are several observations we can make to reveal more about the game.
First, and most obvious, is the fact that the boars are a higher level and hence harder to kill than the wolves or troggs. Keep an eye on your life level. If you get killed, use the map to find your way back to the spot where you got killed. In order to be reanimated, you have to find your corpse which means returning to the spot where you were killed. It is best to wait a few seconds between kills to let your life levels restore. But, in the heat of battle it is hard to remember this.
Second, you will accumulate pelts and tusks as loot from the kills. You can sell these items back to vendors to get money to purchase weapons, armor or spells. However, if you did not get an extra bag in the loot you picked up thus far, you might find that your inventory fills up. If it does, return to Anvilmar and sell your loot to a vendor. While you are there you might wish to purchase something. However, hold off on that for a moment and return to the Boar Hunter quest. Continue with the quest until you have killed the ten boars and return to Talin to get the reward. The reward is a pair of Dwarven Leather Pants with an armor rating of 29. You could have purchased these from the Cloth and Leather Merchant. However, getting them for free as a quest reward is much better. Had you purchased them from the vendor, you would not need the reward. In this case, you can sell the pants back to a vendor but you will

© 2010 Dr. John M. Artz
get much less than you paid for them. So, another tricky decision is whether to buy armor which will make you harder to kill and then risk getting that armor for free later. Or do you hold out hoping to get the armor for free leaving your character more vulnerable with a lower armor rating? There is no easy answer to this. However, as you create more new characters and cover the same territory over again you will get a better idea of what to expect. If your experience level after completing The Boar Hunter task is not between 4 ½ and 5 (which it probably isn’t) kill some more mobs and collect more loot until you are between those levels.
Trade Offs, Trade Offs, Trade Offs
When you have finished the Boar Hunter quest you can return to Anvilmar, sell your loot and purchase something that will make you more powerful for the next quest. Or you can follow the path to the next quest which will give you a quest that sends you back to Anvilmar. World of Warcraft involves a lot of learning, planning, strategic thinking and optimizing. That is to say that the game is Trade Offs, Trade Offs, Trade Offs. I have tried to minimize the complexity somewhat by just telling you what to do and

© 2010 Dr. John M. Artz
making your decisions for you. However, the further we proceed the more decisions you will have to make on your own. So, return to Anvilmar to sell your loot or not, as you choose. Buy new capabilities or not, as you choose. Making mistakes is OK since you learn from mistakes any there are very few mistakes that cannot be overcome with a little more money. So, do what you need to do and then follow the path around to the final quest giver area in Coldridge Valley. In the next chapter we will begin with this final quest area.
© 2010 Dr. John M. Artz
Chapter 6 Finishing Coldridge Valley
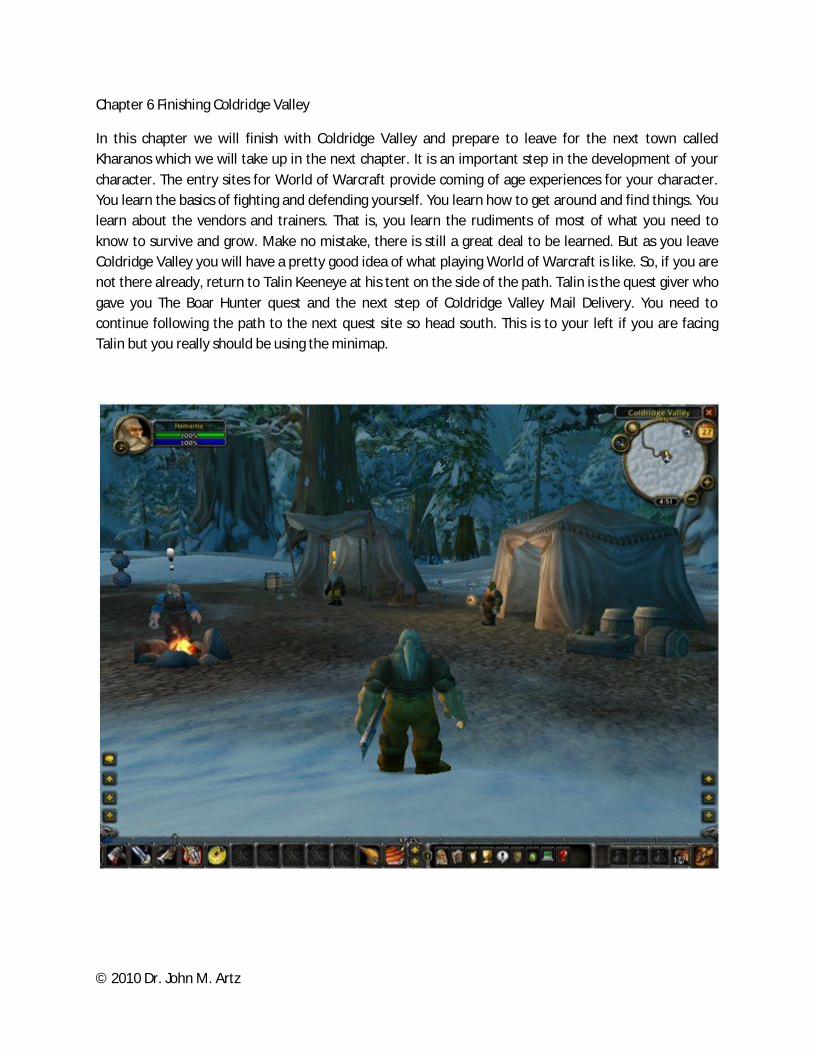
In this chapter we will finish with Coldridge Valley and prepare to leave for the next town called Kharanos which we will take up in the next chapter. It is an important step in the development of your character. The entry sites for World of Warcraft provide coming of age experiences for your character. You learn the basics of fighting and defending yourself. You learn how to get around and find things. You learn about the vendors and trainers. That is, you learn the rudiments of most of what you need to know to survive and grow. Make no mistake, there is still a great deal to be learned. But as you leave Coldridge Valley you will have a pretty good idea of what playing World of Warcraft is like. So, if you are not there already, return to Talin Keeneye at his tent on the side of the path. Talin is the quest giver who gave you The Boar Hunter quest and the next step of Coldridge Valley Mail Delivery. You need to continue following the path to the next quest site so head south. This is to your left if you are facing Talin but you really should be using the minimap.

© 2010 Dr. John M. Artz
The Final Quest Site in Coldridge Valley
Follow the path along to the final quest site which has a few tents and a couple quest givers. Open the larger map and orient yourself as you will have to find this place again after satisfying the quests and knowing where you are on the map will help a lot. This final quest site will provide some new challenges which can be less frustrating if we discuss them upfront. These new challenges include: timed quests, mobs with aggro, a cave, and some more complex decisions regarding the pursuit of the quests.
First, let’s look around and become a little more familiar with the quest site. We see Grelin Whitebeard with a yellow exclamation point over his head. We will see him to complete the Coldridge Valley mail delivery. He has two additional serial quests for us. Serial quests, as the name implies are quests that cannot be done concurrently. You have to complete one before being offered the next. We saw this earlier with Sten Stoutarm, at the entry point, who gave us the Dwarven Outfitters quest where we collected wolf meat. When that task was completed, Sten offered the Etched Rune quest and the first Coldridge Valley Mail Delivery. Grelin Whitebeard’s first task is the Troll Cave which asks us to kill fourteen troll whelps. The second quest will send us into the troll cave to recover a journal. But, we will hold off on those for a moment.
We also see Nori Pridedrift who will offer us a timed quest. Timed quests give you a time allotment for completing a quest. There is usually an abundant amount of time to complete the quest as long as you plan ahead so you don’t get lost and don’t dally along the way exploring or killing additional mobs. Nori’s quest will send us back to Anvilmar to deliver a mug of brew to one of the residents. Not surprisingly, there are several goals overlaid on this quest. First, it forces you to use the map so you don’t get lost on the way back to Anvilmar. Second, the time limit forces you to think more strategically. Third, the target of the quest - the vendor to whom you are delivering the brew - is a vendor you might need to know about and may have missed earlier. It is Durnan Furcutter the Cloth and Leather Merchant. We already met Durnan in our tour of Anvilmar. He was in the side room down the stairs. But, had you missed him, this question would force you to find him.
The mobs that we have encountered thus far have not shown any aggressiveness or aggro as it is known in the game. That is, they won’t attack you first. The trolls we are about to encounter do have aggro. They will attack you even if unprovoked. Not only will they attack you, but, if you are not careful, they may gang up on you. So the troll quests require you to be a little more alert and a little more careful in your attacks.
Grelin’s second quest will send us inside the troll cave. It is the first of many, many quest caves. Caves are also an introduction to more sophisticated quest sites called dungeons. These caves and dungeons differ from the more common quests in that it is much easier to get lost; there are usually surprises of some kind; the loots is usually a bit better; and you can raise you experience levels a little more quickly. You can usually handle the early caves on your own without too much difficulty if you have leveled up properly, proceed with due caution, and keep your eye on the map. Later dungeons will require groups as they are too difficult for a single player to conquer.
© 2010 Dr. John M. Artz
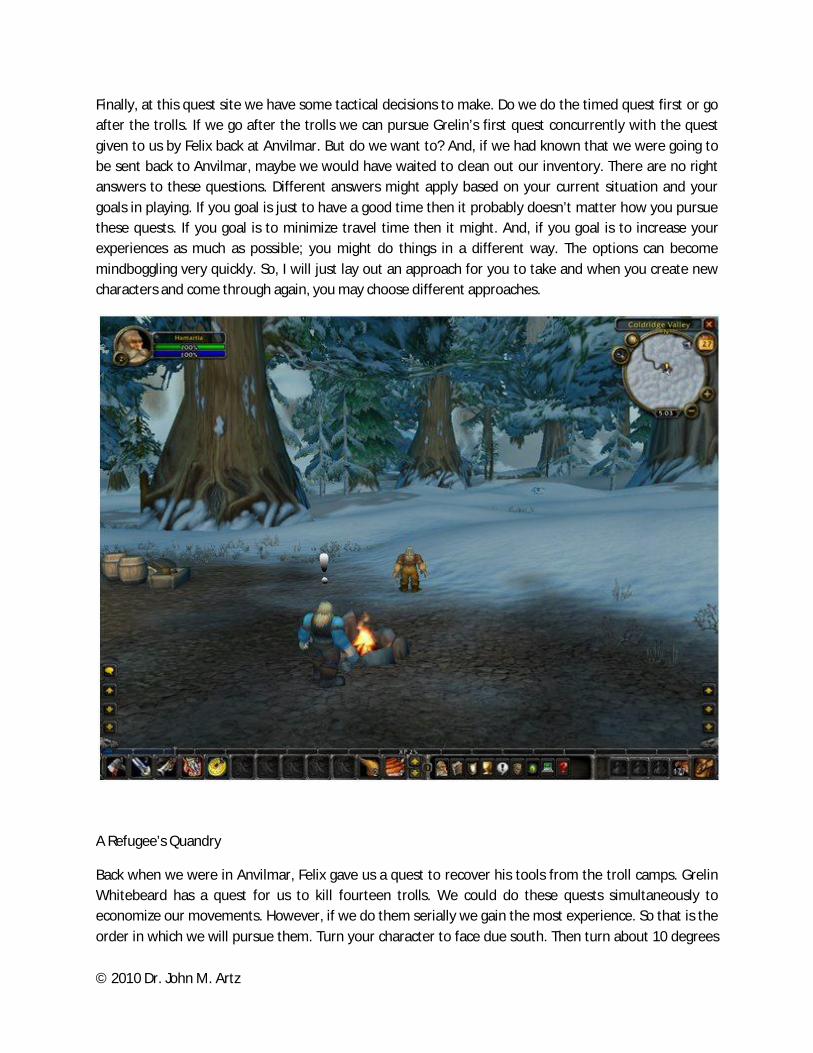
Finally, at this quest site we have some tactical decisions to make. Do we do the timed quest first or go after the trolls. If we go after the trolls we can pursue Grelin’s first quest concurrently with the quest given to us by Felix back at Anvilmar. But do we want to? And, if we had known that we were going to be sent back to Anvilmar, maybe we would have waited to clean out our inventory. There are no right answers to these questions. Different answers might apply based on your current situation and your goals in playing. If you goal is just to have a good time then it probably doesn’t matter how you pursue these quests. If you goal is to minimize travel time then it might. And, if you goal is to increase your experiences as much as possible; you might do things in a different way. The options can become mindboggling very quickly. So, I will just lay out an approach for you to take and when you create new characters and come through again, you may choose different approaches.
A Refugee’s Quandry
Back when we were in Anvilmar, Felix gave us a quest to recover his tools from the troll camps. Grelin Whitebeard has a quest for us to kill fourteen trolls. We could do these quests simultaneously to economize our movements. However, if we do them serially we gain the most experience. So that is the order in which we will pursue them. Turn your character to face due south. Then turn about 10 degrees

© 2010 Dr. John M. Artz
towards the south west. You will be facing a large tree in the distance. Head toward that tree and, as you come closer, you will see a troll standing there if another player has not already killed it. Try shooting from as far back as you can. If you are not close enough, move a few steps closer and try again. These trolls are a little tougher to kill. So you need to start shooting early to get enough shots in. Once you are too close to shoot, try the trick of stepping back a few steps to shoot again.
As you go around the tree, you will see a troll camp site. Next to the fire is a strongbox emitting particles. If you mouse over the strong box, your cursor will turn into a gear indicating it can be opened with a right click once you are close enough. It contains the first of three items we are recovering for Felix. We have to proceed with caution, however, and pick off the trolls one at a time and from a distance. If we charge in, they will attack and sometimes gang up. So, pick off all the trolls in the area and collect the item from the strongbox.
Once you have recovered the item from the strong box, turn northwest towards the next troll camp. If you look closely at the minimap, you will see a darken area in the direction in which you are heading. This is the camp site. Or you can just keep the mountains to your left and use that for navigation. The next strong box is again near the fire, but you need to pick off the trolls from a distance one by one. Don’t charge in and get ganged up on. Once you have looted the second strongbox, turn north northwest and head to the third camp site. It will also appear as a dark spot on the minimap. Again, pick

© 2010 Dr. John M. Artz
off the trolls one by one from a distance and collect the loot. When you have collected the third item for Felix, head back across the frozen lake which can be seen in the minimap and find the path. The path will appear on the minimap with the final quest site as a larger dark area at the end of it. Return to the final quest site. We cannot complete the quest here, but we can pick up another quest that will take us back to Anvilmar where we can.
Scalding Mornbrew Delivery: A Timed Quest
The next quest we will do it Nori Pridedrift’s quest Scalding Mornbrew Delivery. This will take us back to Anvilmar so we can complete Felix’s quest. As soon as you take Nori’s quest a timer will start. So, as soon as you accept the quest, head in a north eastern direction. You will come to the path to Anvilmar and should take the path the rest of the way. We could have just taken the path back from the quest site. But, instead we cut across the field to make the journey a little shorter.
Once you are in Anvilmar, head down the stairs next to the Hunter Trainer and into the side room where you will see Durnan Furcutter the Cloth and Leather Merchant. Complete the timed quest and accept his quest. Then, head out of the side room taking the stairs to the right and find Felix. Complete Felix’s quest.
While you are in Anvilmar you can sell any loot you acquired to the vendors and buy better weapons, better armor or spells. If you didn’t buy an upgraded axe from the weapon’s vendor earlier, you should now. We don’t really want to spend too much on armor just yet as we may still acquire some in loot. So go back to the Hunter Trainer, tell him you want some training and buy the Serpent Sting spell. Hopefully, you are at a level 5 now so you can purchase it. If not go back out and kill some mobs until you reach level 5.
Once you have purchased the spell it will be added to your spell book. You can see your spell book by pressing the spellbook icon which is next to the character information icon on the action bar. In the spellbook, press the Marksmanship tab and you will see the serpent sting spell. Left click on it and drag it to slot 7 in the action bar. This will make the spell accessible by pressing the F7 key and we will see how to use it when we go after the trolls again. Head back to the quest site we left either by following the path around or by cutting across the field. Give Nori his mug and take the Troll Cave quest from Grelin. In order to kill the 14 trolls needed to satisfy this quest, you can follow the same path you followed in satisfying Felix’s quest. When you are done, return to Grelin and take the axe reward.
The Final Quest
The final quest is the troll cave. You can find it at the first troll camp site. As you proceed into the cave to recover the lost journal to satisfy the quest you need to remember a few important pieces of advice. First, kill every troll you encounter as you approach them. If you try to sneak by, they will gang up on you. Second, start killing from a distance. Backing up to gain shooting distance can be tricky in an

© 2010 Dr. John M. Artz
enclosed space like a cave. Third, stay to your right as you go through the cave so you don’t get lost in one of the side passages. Staying to your right will take you to the stolen journal which is the object of the quest. Once you have acquired the stolen journal, which will be dropped as loot from one of the trolls at the end, return to the quest site to complete the quest. Neither reward is usable so pick one and sell it as loot. Return to Anvilmar and see Durnan Furcutter the Cloth and Leather Merchant. First, equip any better armor that you picked up as loot. Second, purchase any armor that is higher level that what currently have and for which you have money. If you have any money left over, you can purchase the Aspects of the Monkey spell from the Hunter Trainer. If not, you can get it later.
We are finished with Coldridge Valley and are ready to move on. Your level should be between 6 and 6 ½. If it is not, go kill some mobs until it is that high. When you are done with that, we are ready to move on and will do that in the next chapter.