Embed Size (px)
Citation preview
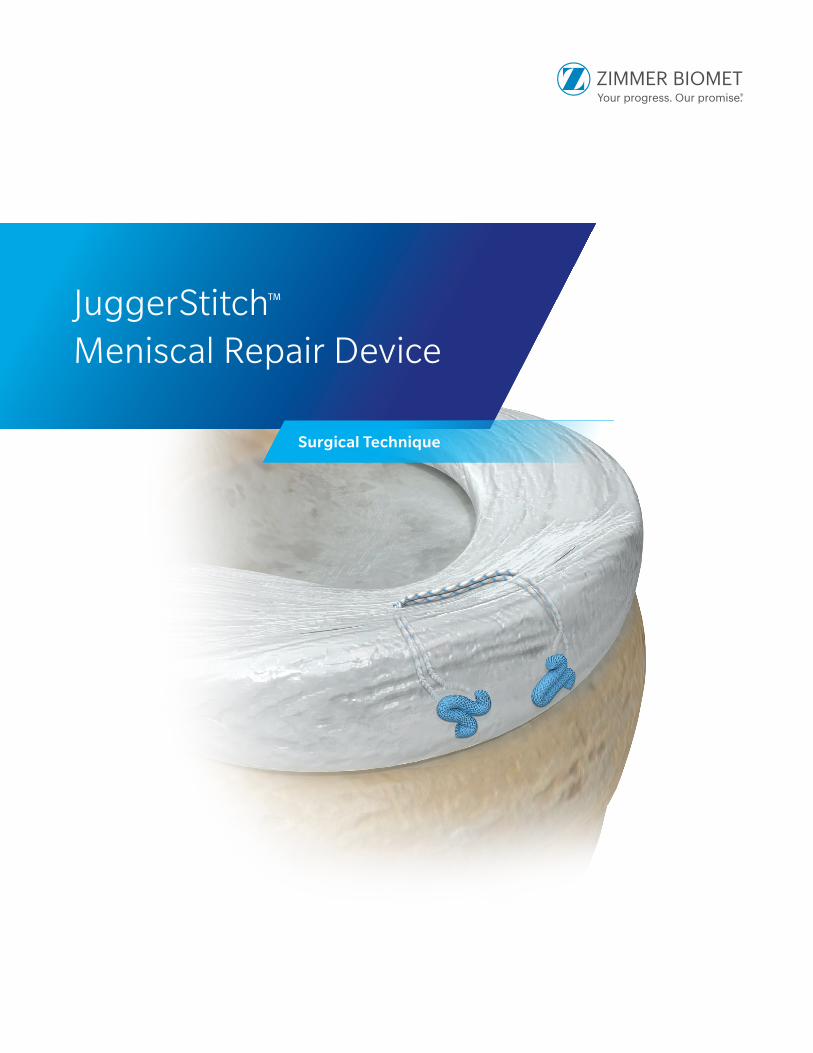
JuggerStitch™ Meniscal Repair Device
Surgical Technique


1 | JuggerStitch Meniscal Repair Device Surgical Technique
Diagnostic ArthroscopyAssess the location of the meniscal tear and determine the reparability of the lesion. Determine optimum medial portal placement using an 18-gauge spinal needle and direct arthroscopic visualization to create a medial working portal. Appropriate position is achieved when the needle enters just above the anterior medial meniscus parallel to the tibial joint surface (Figure 1).
Avoid placing the portal too superior or inferior and ensure the medial portal is large enough to readily pass the inserter and suture cutter.
Figure 1
For mid-body tears of the medial meniscus, the scope should be switched to the medial portal, and the lateral portal should be assessed by inserting the half pipe into the lateral portal. Should the half pipe not enter the joint just above the anterior lateral meniscus parallel to the tibial surface, the lateral portal should be expanded or a new lateral portal should be created.

2 | JuggerStitch Meniscal Repair Device Surgical Technique
Posterior horn tears, whether medial or lateral, should be approached from the medial portal (Figure 2a). Approach the mid-body tears from the contralateral portal (Figure 2b). If the needle depth needs to be adjusted, push down on the white depth control slider in a forward motion to decrease the needle length exposed (Figure 3).
Note: To determine the proper depth setting for the JuggerStitch device, surgeon should measure the distance from the back side of the meniscus to the desired needle penetration point. Additionally, for extracapsular anchor placement, there needs to be an additional 10 mm accounted for.
Decide on Proper ApproachBoth straight and curved needle options are available to optimize implant positioning for repair. Utilize a probe through the medial portal to help determine whether a straight or curved needle is optimal.
Figure 3
Figure 2a Figure 2b
Meniscal Depth Gauge
3 | JuggerStitch Meniscal Repair Device Surgical Technique
Figure 6
Figure 5
Figure 4
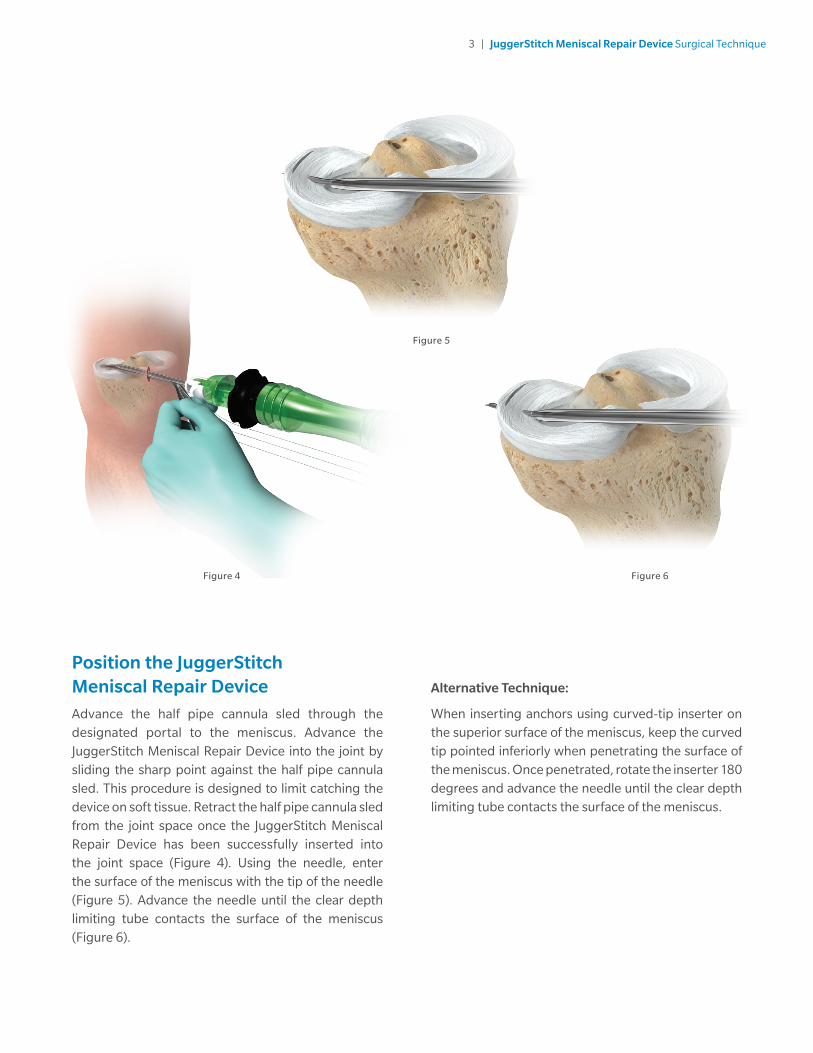
Position the JuggerStitch Meniscal Repair DeviceAdvance the half pipe cannula sled through the designated portal to the meniscus. Advance the JuggerStitch Meniscal Repair Device into the joint by sliding the sharp point against the half pipe cannula sled. This procedure is designed to limit catching the device on soft tissue. Retract the half pipe cannula sled from the joint space once the JuggerStitch Meniscal Repair Device has been successfully inserted into the joint space (Figure 4). Using the needle, enter the surface of the meniscus with the tip of the needle (Figure 5). Advance the needle until the clear depth limiting tube contacts the surface of the meniscus (Figure 6).
Alternative Technique:
When inserting anchors using curved-tip inserter on the superior surface of the meniscus, keep the curved tip pointed inferiorly when penetrating the surface of the meniscus. Once penetrated, rotate the inserter 180 degrees and advance the needle until the clear depth limiting tube contacts the surface of the meniscus.
4 | JuggerStitch Meniscal Repair Device Surgical Technique
Figure 8a
Figure 8b
Figure 9a
Figure 9b
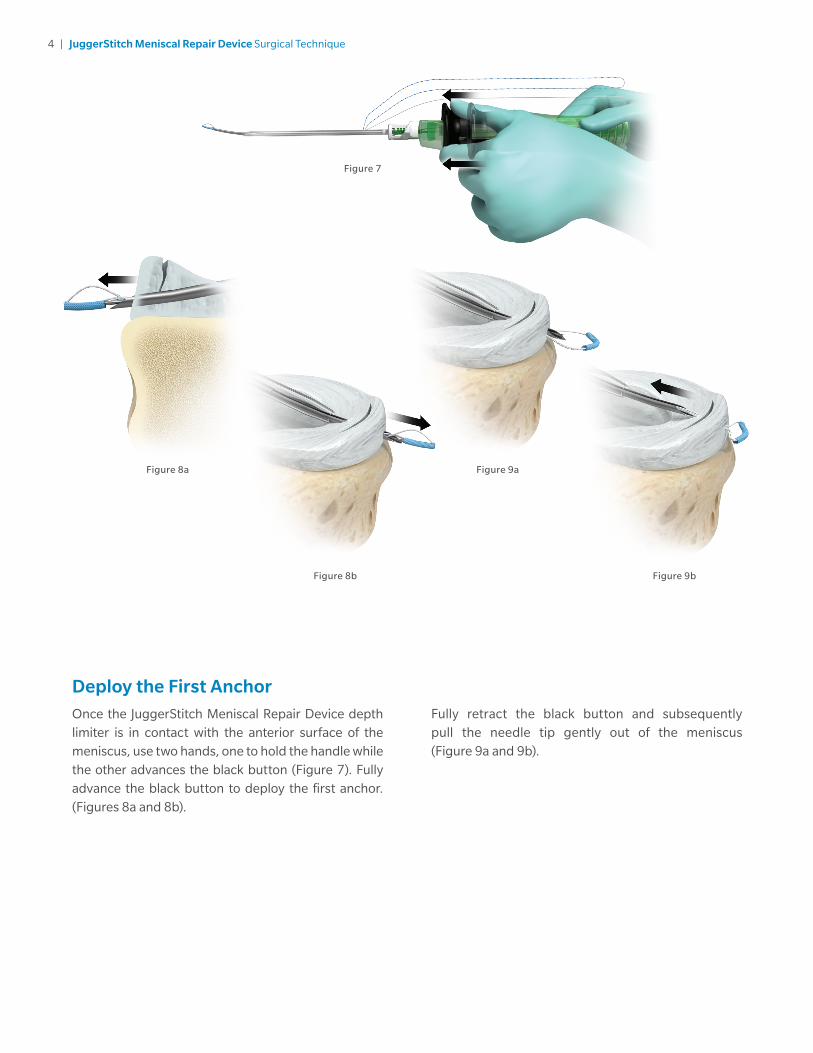
Figure 7
Fully retract the black button and subsequently pull the needle tip gently out of the meniscus (Figure 9a and 9b).
Deploy the First AnchorOnce the JuggerStitch Meniscal Repair Device depth limiter is in contact with the anterior surface of the meniscus, use two hands, one to hold the handle while the other advances the black button (Figure 7). Fully advance the black button to deploy the first anchor. (Figures 8a and 8b).
5 | JuggerStitch Meniscal Repair Device Surgical Technique
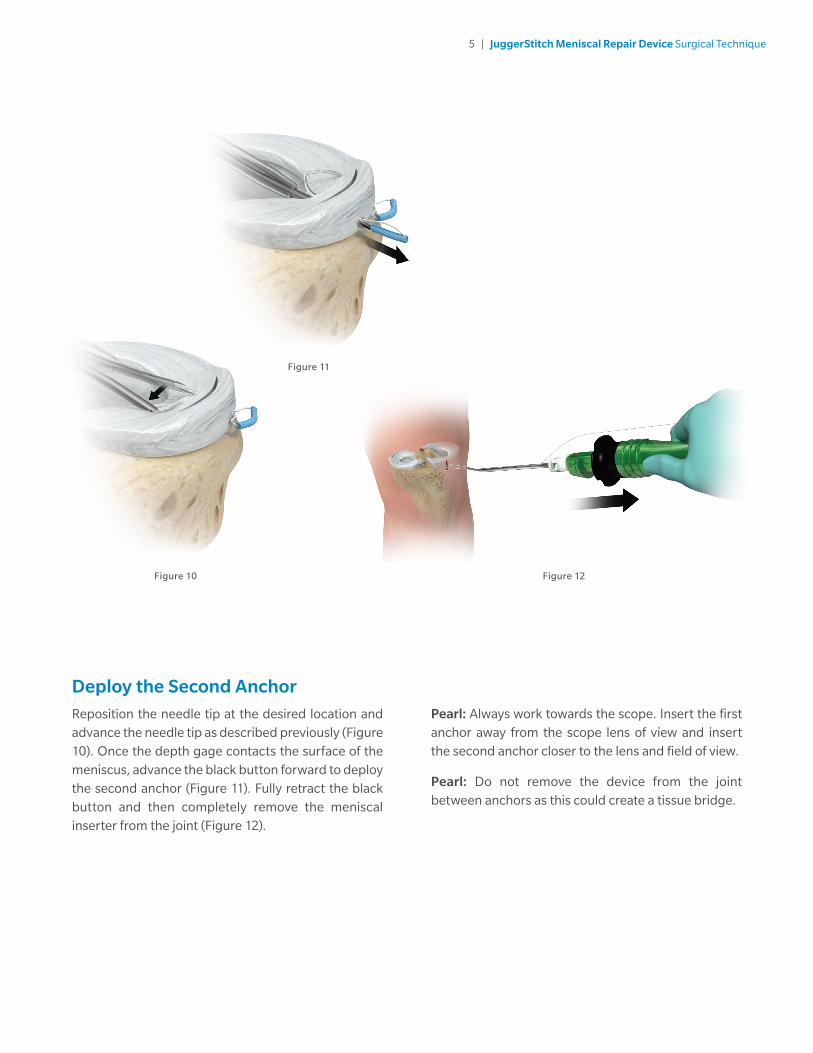
Pearl: Always work towards the scope. Insert the first anchor away from the scope lens of view and insert the second anchor closer to the lens and field of view.
Pearl: Do not remove the device from the joint between anchors as this could create a tissue bridge.
Figure 10
Deploy the Second AnchorReposition the needle tip at the desired location and advance the needle tip as described previously (Figure 10). Once the depth gage contacts the surface of the meniscus, advance the black button forward to deploy the second anchor (Figure 11). Fully retract the black button and then completely remove the meniscal inserter from the joint (Figure 12).
Figure 11
Figure 12
6 | JuggerStitch Meniscal Repair Device Surgical Technique
Figure 13a
Figure 13b
Figure 14
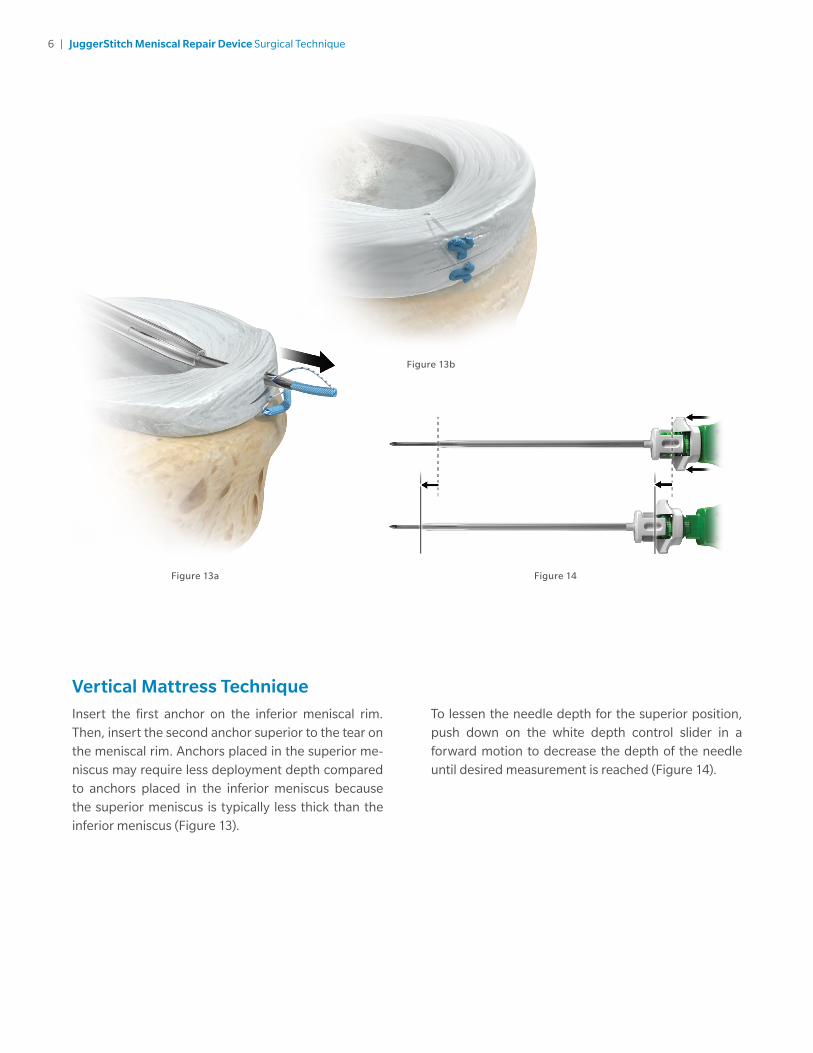
Vertical Mattress TechniqueInsert the first anchor on the inferior meniscal rim. Then, insert the second anchor superior to the tear on the meniscal rim. Anchors placed in the superior me-niscus may require less deployment depth compared to anchors placed in the inferior meniscus because the superior meniscus is typically less thick than the inferior meniscus (Figure 13).
To lessen the needle depth for the superior position, push down on the white depth control slider in a forward motion to decrease the depth of the needle until desired measurement is reached (Figure 14).
7 | JuggerStitch Meniscal Repair Device Surgical Technique
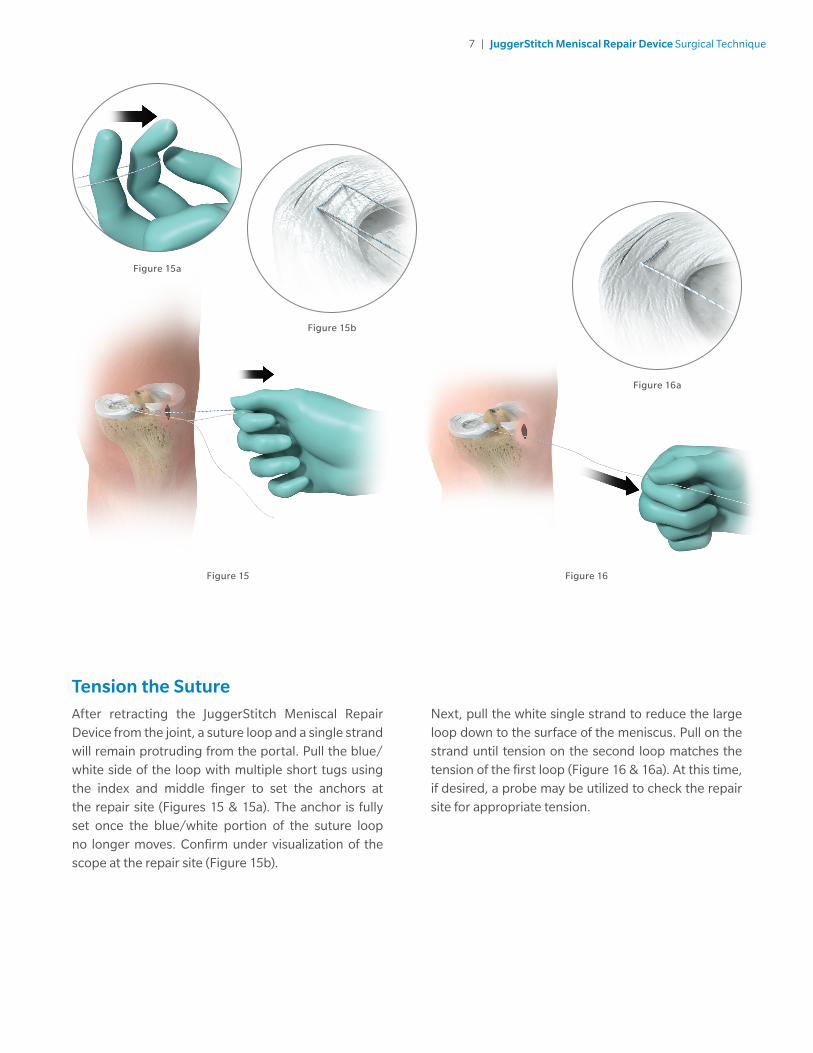
Tension the SutureAfter retracting the JuggerStitch Meniscal Repair Device from the joint, a suture loop and a single strand will remain protruding from the portal. Pull the blue/white side of the loop with multiple short tugs using the index and middle finger to set the anchors at the repair site (Figures 15 & 15a). The anchor is fully set once the blue/white portion of the suture loop no longer moves. Confirm under visualization of the scope at the repair site (Figure 15b).
Next, pull the white single strand to reduce the large loop down to the surface of the meniscus. Pull on the strand until tension on the second loop matches the tension of the first loop (Figure 16 & 16a). At this time, if desired, a probe may be utilized to check the repair site for appropriate tension.
Figure 15b
Figure 15a
Figure 16a
Figure 15 Figure 16
8 | JuggerStitch Meniscal Repair Device Surgical Technique
Figure 17 Figure 18
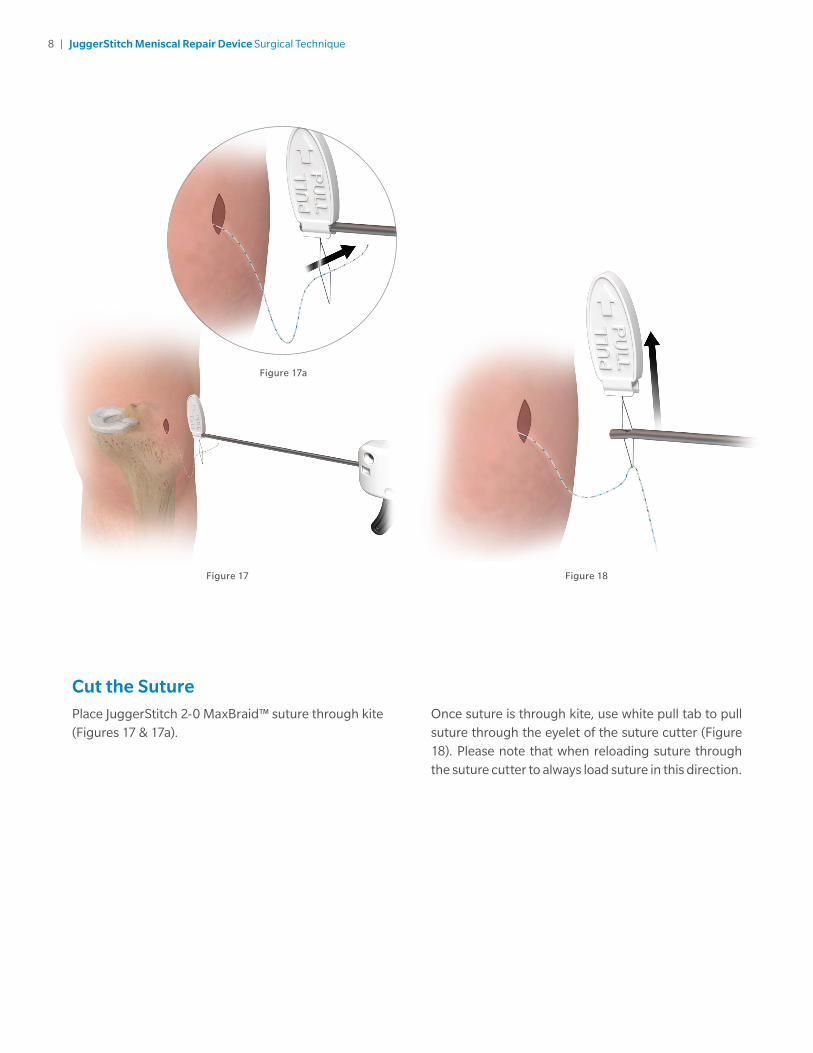
Cut the SuturePlace JuggerStitch 2-0 MaxBraid™ suture through kite (Figures 17 & 17a).
Figure 17a
Once suture is through kite, use white pull tab to pull suture through the eyelet of the suture cutter (Figure 18). Please note that when reloading suture through the suture cutter to always load suture in this direction.
9 | JuggerStitch Meniscal Repair Device Surgical Technique
Figure 19
Cut the Suture (cont.)
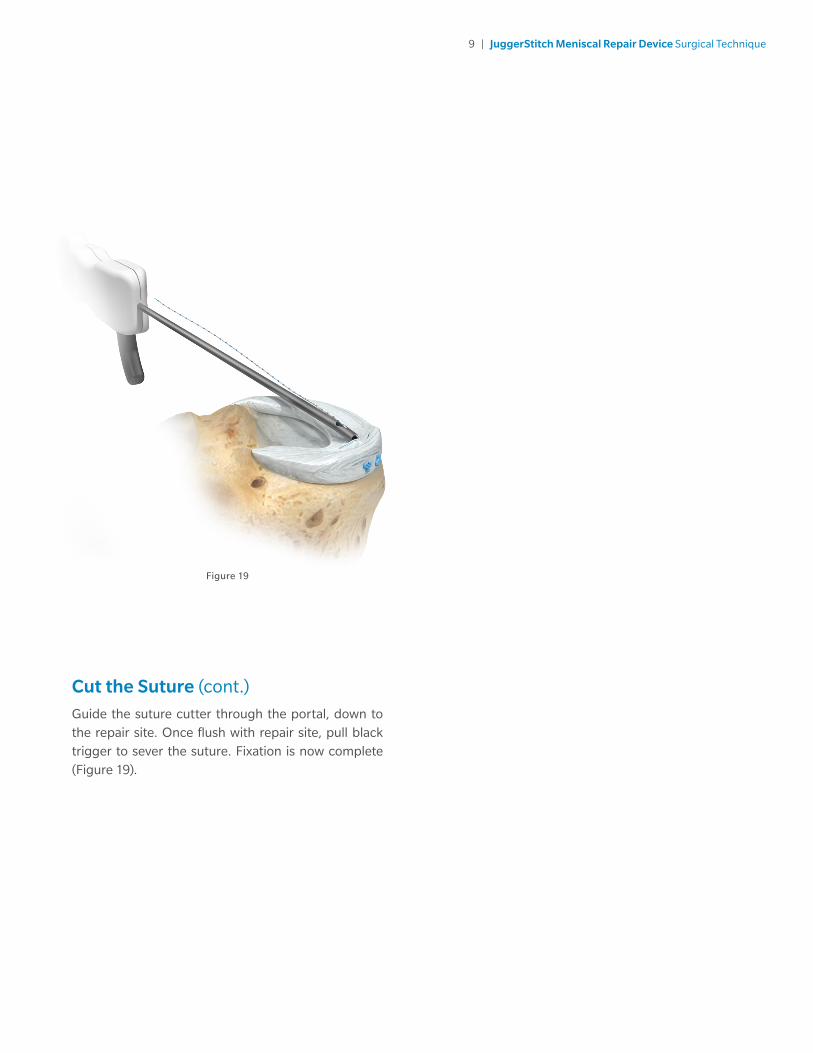
Guide the suture cutter through the portal, down to the repair site. Once flush with repair site, pull black trigger to sever the suture. Fixation is now complete (Figure 19).
10 | JuggerStitch Meniscal Repair Device Surgical Technique
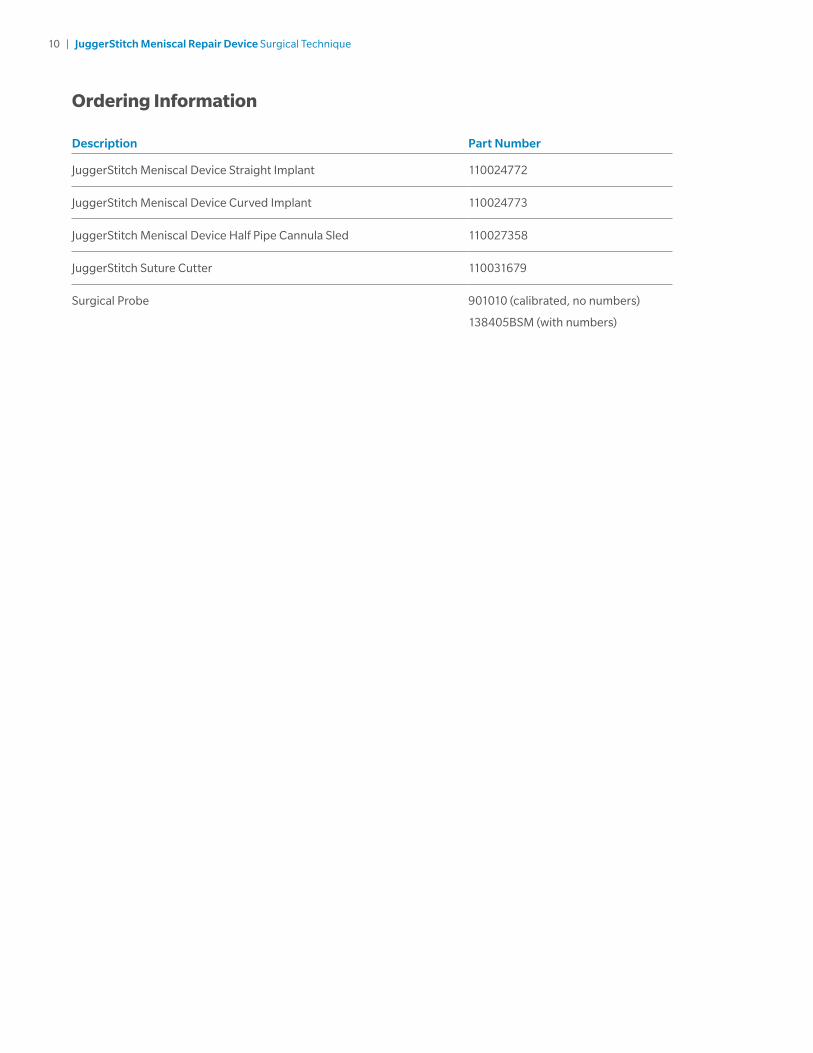
Ordering Information
Description Part Number
JuggerStitch Meniscal Device Straight Implant 110024772
JuggerStitch Meniscal Device Curved Implant 110024773
JuggerStitch Meniscal Device Half Pipe Cannula Sled 110027358
JuggerStitch Suture Cutter 110031679
Surgical Probe 901010 (calibrated, no numbers)
138405BSM (with numbers)
11 | JuggerStitch Meniscal Repair Device Surgical Technique
INDICATIONSBiomet Sports Medicine JuggerStitch Meniscal Repair Device is indicated for the repair of vertical longitudinal full thickness tears (e.g. bucket-handle) in the red-red and red-white zones. These devices are not to be used for meniscal tears in the avascular zone of the meniscus.
CONTRAINDICATIONS1. Active infection.
2. Patients with mental or neurologic conditions who are unwilling or incapable of following postoperative care instructions.
3. Meniscal tears not suitable for repair because of the degree of damage (marked irregularity and complex tearing) to the meniscus body including degenerative, radial, horizontal cleavage and flap tears.
PRECAUTIONSUser-initiated bending of the device needle may result in implant non-deployment. If needle bending is observed during use, a new device may be needed.
Metal instruments or fragments can be located by radiography or fluoroscopy. Nonmetal instruments or fragments may not be located by radiography or fluoroscopy, and should be accounted for at the end of the surgical procedure.
Any decision to remove or not remove a broken instrument or instrument fragments is left to the surgeon’s discretion and must take into account the associated risks

12 | JuggerStitch Meniscal Repair Device Surgical Technique
Notes

0031.4-GLBL-en-REV0519
Authorized RepresentativeBiomet UK LimitedWaterton Industrial EstateBridgendCF31 3XA United Kingdom
Legal ManufacturerBiomet Sports Medicine56 East Bell DriveP.O. Box 587Warsaw, Indiana 46581 USA
www.zimmerbiomet.com
All content herein is protected by copyright, trademarks and other intellectual property rights, as applicable, owned by or licensed to Zimmer Biomet or its affiliates unless otherwise indicated, and must not be redistributed, duplicated or disclosed, in whole or in part, without the express written consent of Zimmer Biomet.
Check for country product clearances and reference product specific instructions for use.
This material is intended for health care professionals. Distribution to any other recipient is prohibited.
For indications, contraindications, warnings, precautions, potential adverse effects and patient counselling information, see the package insert or contact your local representative; visit www.zimmerbiomet.com for additional product information.
Zimmer Biomet does not practice medicine. This technique was developed in conjunction with health care professionals. This document is intended for surgeons and is not intended for laypersons. Each surgeon should exercise his or her own independent judgment in the diagnosis and treatment of an individual patient, and this information does not purport to replace the comprehensive training surgeons have received. As with all surgical procedures, the technique used in each case will depend on the surgeon’s medical judgment as the best treatment for each patient. Results will vary based on health, weight, activity and other variables. Not all patients are candidates for this product and/or procedure. Caution: Federal (USA) law restricts this device to sale by or on the order of a surgeon. Rx only.
©2019 Zimmer Biomet
0086