Embed Size (px)
Citation preview
1
K – 5 Instructional Technology Lessons
Compiled by Henry Anker, ITAF, Local District 3, LAUSD
Each grade level’s list of skills builds on those mastered in previous grades.
Here are some general guidelines when managing all levels of students in a Computer
Lab, or in a classroom using laptops from a mobile cart:
Provide expectations for academic goals and behavior before walking over to Lab. Ensure
students’ hands are clean. When arriving at Lab, students are to be lined up quietly. Have
students enter in groups, 5 or so at a time, depending on how workstations are arranged
(generally in rows). Remind students not to touch computers until instructed to do so. Once
all students are seated, with their hands in their laps, reinforce expectations for behavior, and
explain why these rules are important to follow. Explain that students are going to be using
activities in reading, writing, math, and other subjects during the year. Remind students that
you will need to have them stop working at times, either to learn something new, deal with a
problem that came up, to share a discovery, or to stop because it is time to go. The most
effective way to have students stop and give you their attention is the have students put their
hands on their head (model this, and repeat). You might want to remind students that an
earthquake (or drill), or fire (or drill) could occur while they are in the Lab using computers,
and explain (or demonstrate) how to respond appropriately in that instance. Most schools have
a standard method of stopping work when an announcement is made over the PA system,
which you may want to remind students of as well.
Note: The lessons described here are modeled using the Apple Macintosh OSX 10.4.x or
higher interface, though most lessons can be easily modified for use with PCs running
Windows.
For students using laptops, it is especially important for them to learn to use the trackpad using
only one hand (the student’s dominant hand), using only the thumb and index finger. Learning
to do this correctly from day one is akin, though not life threatening, to a teenager learning to
drive using the right foot to control both the gas pedal and brake. As adults, we know it is not
possible to drive well having one foot on the gas and the other on the brake.
50
Third Grade
Review all of the skills and projects listed in the K-2 sections above with students
before beginning new lessons that follow…
Overview of Grade 3 skills and projects:
1. Competently uses Microsoft Word™
2. Masters capitalizing, punctuation, indenting, centering
3. Makes attempt at spell checking writing
4. Understand the anatomy of a finder window, be able to use the features of the
window to organize, locate items
5. Uses basic formatting tools and palettes
6. Uses quotation marks in dialog
7. Performs basic copy/paste within application, and between applications; i.e.:
image or text from web to Word, KidPix to Word
8. Writes a Friendly Letter with proper formatting
9. Creates a 4-6 slide PowerPoint™ adding at least one image
10. Saves to a specified folder or location independently
11. Imports pictures
12. Uses standard keyboard shortcuts (!-S = Save, !-P = Print, etc…)
13. Understands and follow rules of Internet Safety
14. Types 10-20 wpm with 85% + accuracy
51
Grade 3 - Lesson 1, 2, 5
Competently uses Microsoft Word™; masters capitalizing, punctuation,
indenting, centering; uses basic formatting tools and pallets
Students will need to have an edited, hand-written draft to do this lesson. The
writing sample should include a title and multiple paragraphs.
1. Have students place their draft between the monitor and keyboard at the
workstation where they are sitting. Have students spend a few minutes
reading their drafts silently.
2. Tell students, that in order to type efficiently, they will need to keep their
fingers over the Home Row keys and ‘chunk’ the text as they go. (Chunking
text refers to having students read and internalize several words in sequence
that they would then type, rather than typing one word at a time.)
3. Open MS Word, make sure Formatting Palette is visible (if not, assist
students in brining it out, either with the menu View ! Formatting Palette,
or through the toolbar). Have students change the size of their text to 18
4. Direct students to type their heading (Name, Teacher’s Name, Date) in the
upper left hand corner of their document, pressing return after each line.
5. Direct students to change their line spacing to 1.5 (second icon under
Alignment & Spacing). Have students choose Centered Text.
6. Have students type their title with capital letters in the appropriate places.
Press return twice after title.
7. Direct students to indent their first paragraph using the tab key. Remind
students to press return only after a paragraph is completed, and then to
press the tab key to indent each successive paragraph. Remind students of
the pattern of one space after each word, one space after a comma, two
spaces after a period, question mark, or exclamation point, but ensure that
students do not put spaces before punctuation mark.
8. After giving students 15-20 minutes to type independently as you use
52
proximity to ensure that all students are on task and working efficiently,
have students stop typing in order to save their work thus far.
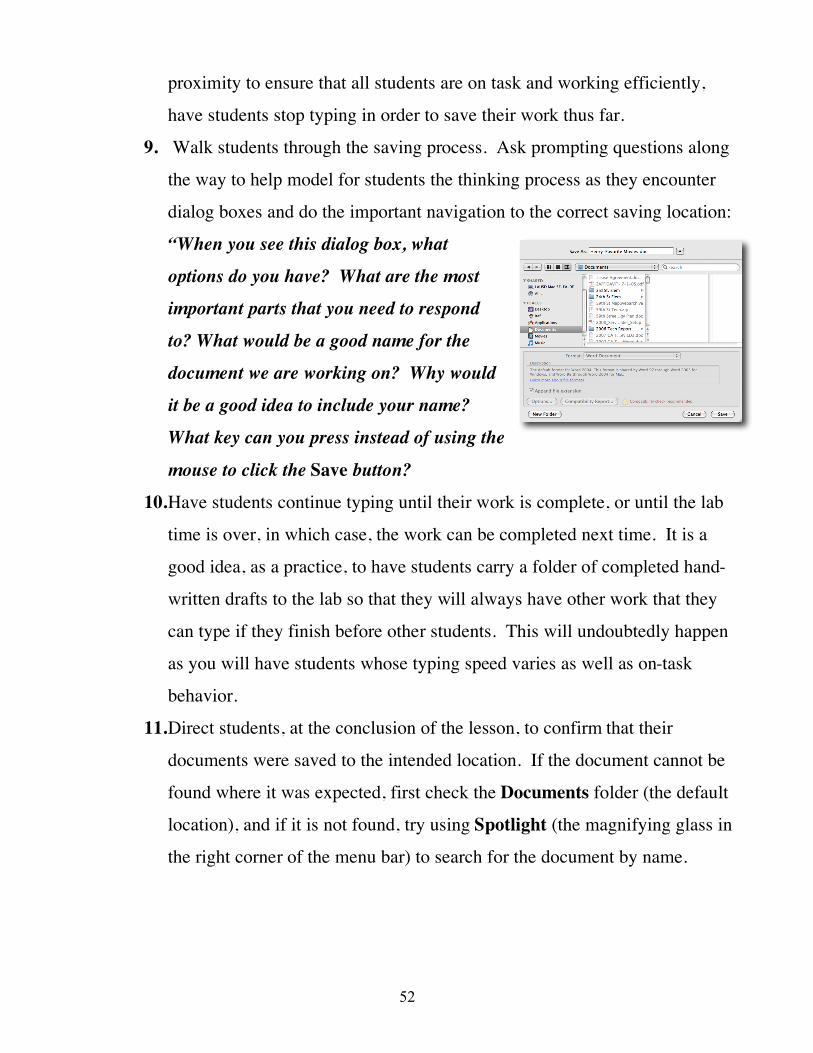
9. Walk students through the saving process. Ask prompting questions along
the way to help model for students the thinking process as they encounter
dialog boxes and do the important navigation to the correct saving location:
“When you see this dialog box, what
options do you have? What are the most
important parts that you need to respond
to? What would be a good name for the
document we are working on? Why would
it be a good idea to include your name?
What key can you press instead of using the
mouse to click the Save button?
10. Have students continue typing until their work is complete, or until the lab
time is over, in which case, the work can be completed next time. It is a
good idea, as a practice, to have students carry a folder of completed hand-
written drafts to the lab so that they will always have other work that they
can type if they finish before other students. This will undoubtedly happen
as you will have students whose typing speed varies as well as on-task
behavior.
11. Direct students, at the conclusion of the lesson, to confirm that their
documents were saved to the intended location. If the document cannot be
found where it was expected, first check the Documents folder (the default
location), and if it is not found, try using Spotlight (the magnifying glass in
the right corner of the menu bar) to search for the document by name.
53
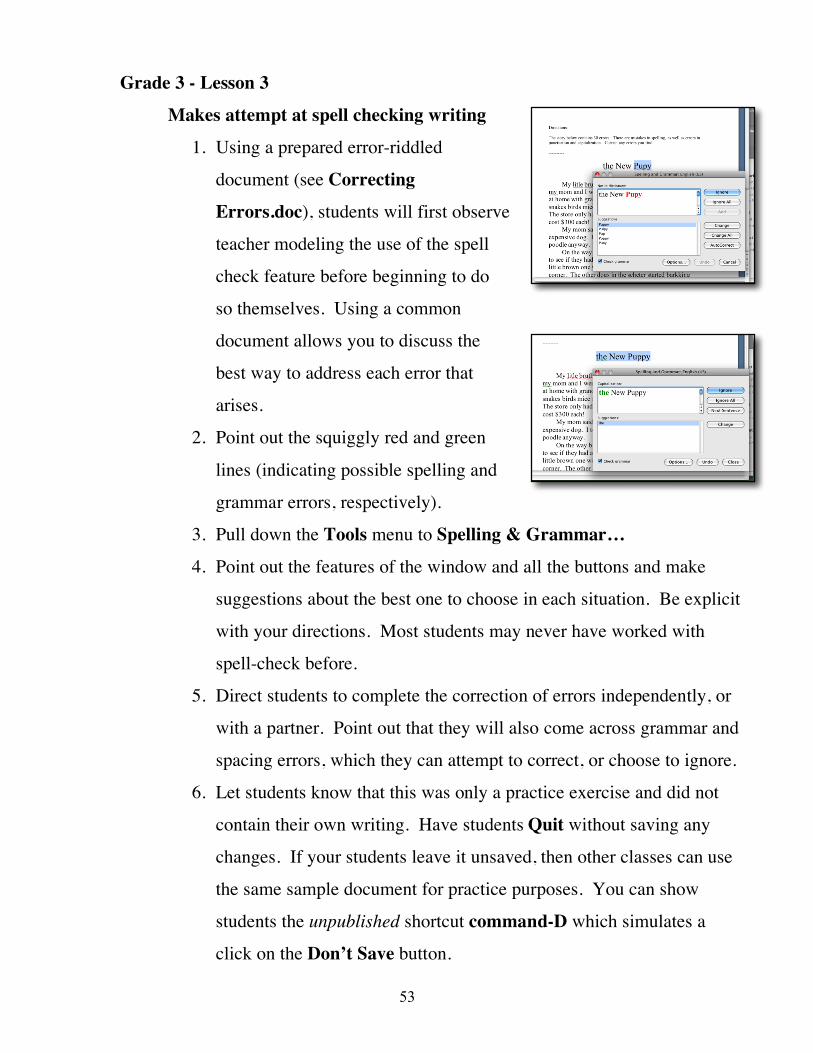
Grade 3 - Lesson 3
Makes attempt at spell checking writing
1. Using a prepared error-riddled
document (see Correcting
Errors.doc), students will first observe
teacher modeling the use of the spell
check feature before beginning to do
so themselves. Using a common
document allows you to discuss the
best way to address each error that
arises.
2. Point out the squiggly red and green
lines (indicating possible spelling and
grammar errors, respectively).
3. Pull down the Tools menu to Spelling & Grammar…
4. Point out the features of the window and all the buttons and make
suggestions about the best one to choose in each situation. Be explicit
with your directions. Most students may never have worked with
spell-check before.
5. Direct students to complete the correction of errors independently, or
with a partner. Point out that they will also come across grammar and
spacing errors, which they can attempt to correct, or choose to ignore.
6. Let students know that this was only a practice exercise and did not
contain their own writing. Have students Quit without saving any
changes. If your students leave it unsaved, then other classes can use
the same sample document for practice purposes. You can show
students the unpublished shortcut command-D which simulates a
click on the Don’t Save button.
54
Grade 3 - Lesson 3 (Part 2)
Makes (independent) attempt at spell checking writing
1. Using a hand-written draft of at least two paragraphs, students will
first use typical formatting and typing to create and save the
document.
2. Students save changes before beginning spell check process.
3. Remind students that spell-check is not a completely dependable way
to proofread a document. There are several errors that spell-check
may not catch:
a. proper nouns, especially names
b. errors in capitalization, spacing, punctuation
c. homophones used incorrectly (there-their, would-wood, etc…)
4. Students work independently, but may ask for assistance of their
neighbor.
5. Students will use established procedure to ask for help and to let
teacher know when they are finished spell checking their document
before printing, if applicable.
6. When students have completed their typing and spell-checking,
remind them to manually proofread their work to check for the
limitations of computerized spell checking.
55
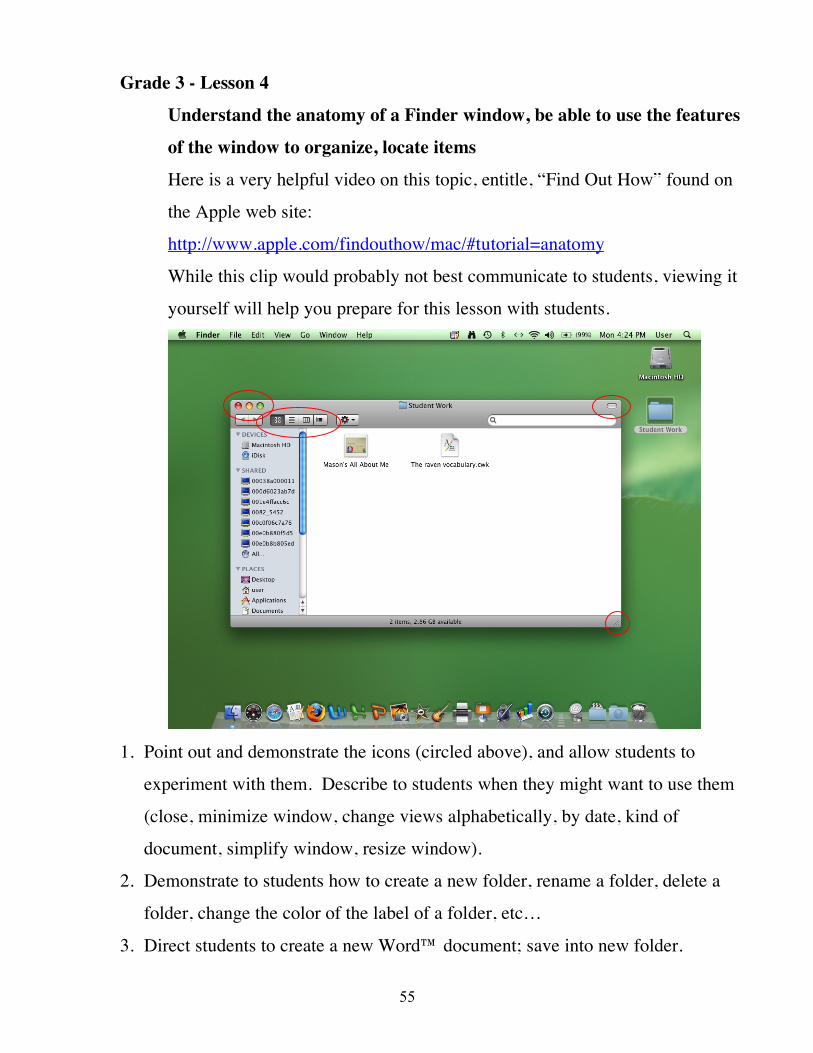
Grade 3 - Lesson 4
Understand the anatomy of a Finder window, be able to use the features
of the window to organize, locate items
Here is a very helpful video on this topic, entitle, “Find Out How” found on
the Apple web site:
http://www.apple.com/findouthow/mac/#tutorial=anatomy
While this clip would probably not best communicate to students, viewing it
yourself will help you prepare for this lesson with students.
1. Point out and demonstrate the icons (circled above), and allow students to
experiment with them. Describe to students when they might want to use them
(close, minimize window, change views alphabetically, by date, kind of
document, simplify window, resize window).
2. Demonstrate to students how to create a new folder, rename a folder, delete a
folder, change the color of the label of a folder, etc…
3. Direct students to create a new Word™ document; save into new folder.
56
Grade 3 - Lesson 6
Uses quotation marks in dialog (part 1)
The following description of this lesson activity can be done in the classroom
before beginning to use the computers.
1. Begin lesson by discussing what dialog is. Clarify for students who are
unclear about dialog, and what it looks like in written language. Emphasize
that there are important standard rules for the way dialog is written for the
reader, that an author must use, in order to make clear who is speaking, and
what words are spoken. Since this is a first lesson in the use of quotation
marks in dialog, the examples will be simple. Using the following sample
sentences on the board or chart, point to a sentence and ask a student to read.
Sample Sentences
I am hungry.
I like the color of your shirt.
May I go to the bathroom?
Hurry, we’re going to be late!
What time is it?
You are the best teacher ever!
My favorite show is Curious George. I am going to watch it when I
get home.
For each example, write in another location on the board, the name of the
child who read the sentence followed by the quote, in this form:
Freddy said, “I am hungry.”
Sheryl asked, “May I go to the bathroom?”
Point out the organizational features of these sentences, and repeat this
process with each example. When students have the idea, have them create their
own.
2. Using the same example sentences, but using different students to voice
57
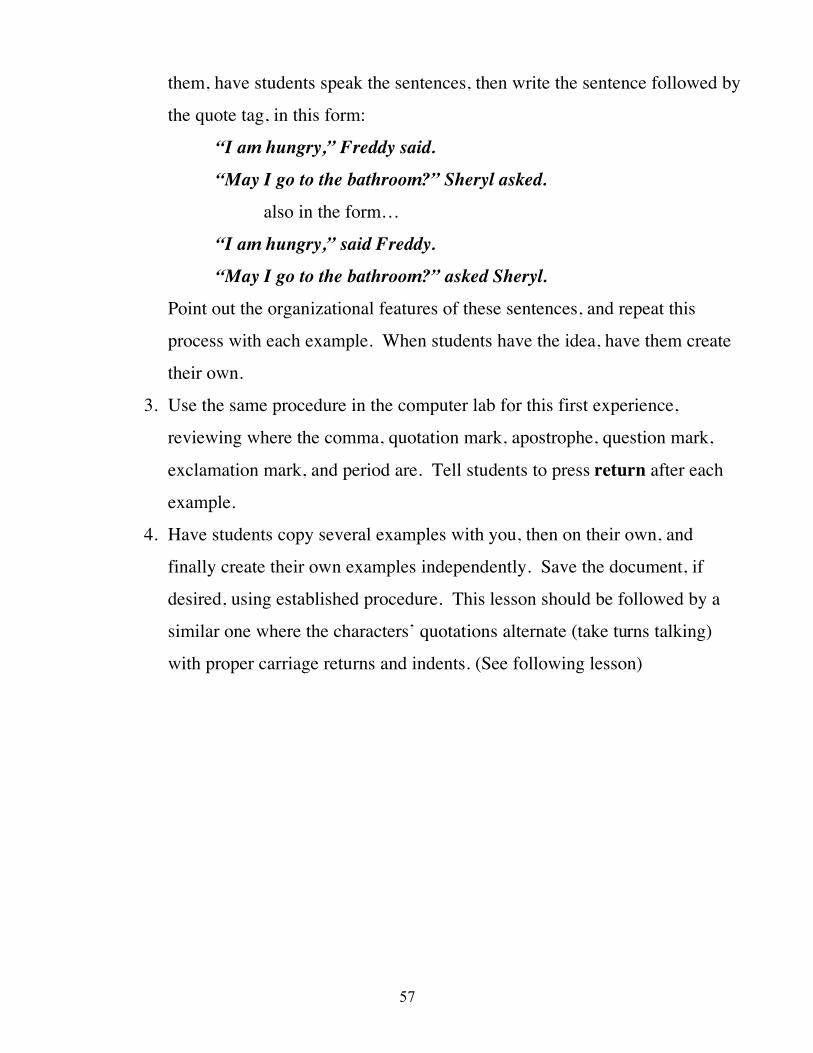
them, have students speak the sentences, then write the sentence followed by
the quote tag, in this form:
“I am hungry,” Freddy said.
“May I go to the bathroom?” Sheryl asked.
also in the form…
“I am hungry,” said Freddy.
“May I go to the bathroom?” asked Sheryl.
Point out the organizational features of these sentences, and repeat this
process with each example. When students have the idea, have them create
their own.
3. Use the same procedure in the computer lab for this first experience,
reviewing where the comma, quotation mark, apostrophe, question mark,
exclamation mark, and period are. Tell students to press return after each
example.
4. Have students copy several examples with you, then on their own, and
finally create their own examples independently. Save the document, if
desired, using established procedure. This lesson should be followed by a
similar one where the characters’ quotations alternate (take turns talking)
with proper carriage returns and indents. (See following lesson)
58
Grade 3 - Lesson 6 (Part 2)
Uses quotation marks in dialog
1. Call two students to the front of the room. Hand them each a copy of a
script from a familiar play or a scene you invent. Have them read their parts
aloud, taking turns, without stopping.
2. Explain to the class that what the two students just did is called a dialog.
3. Pass out copies of the script to all students (the copies can be shared by
students to save paper).
4. With the remainder of the students seated at their computers, model the
transposition of the first speaker’s voice into the correct quotation with tags
using the projected computer. Model the pressing of return key ! tab,
then begin transposing the next quotation, again using the projected
computer.
5. Ask for clarifying questions, and then allow students to begin working on
their own, and remind them that they can assist their neighbor.
6. Stop students periodically as you notice mistakes in form. This skill should
be practiced precisely, so that variations do not occur. Keep in mind that
this is a frequently tested Language Arts skill, and attention to detail is
important.
7. There are even chants you can practice with students to get them to
internalize the pattern, such as this one: “comma! quotation mark!
capital letter”
8. End lesson with enough time to save (if desired), and quit.
59
Grade 3 - Lesson 7
Performs basic copy/paste within application, and between applications; i.e.:
image or text from web to Word, KidPix to Word
This lesson should be presented to students as a practice opportunity for them in
using the skills needed to put a project together. These skills will appear throughout many
of the lessons for upper grade students.
Discuss with students that copying and pasting can only be done with their own
items, items their teacher has given them permission to use, and items online that are non-
copyrighted.
You will need to have a folder of files/documents/websites available on the desktop,
server, CD, etc… that the students can access in order to complete this lesson.
This is a long lesson with many types of interactions that may be new to students.
Do not rush through this lesson. This is essential knowledge that can be applied to
hundreds of computer skills. If it takes two visits to complete this lesson, that is fine.
1. Tell students that they will be practicing using multiple media items and
putting them together.
2. Open “The Copy / Paste Times” document and read it together with
students.
3. Begin by having students open a blank Word™ document. Point out that the
name of this Document (possibly with a number attached). Have students
click on the yellow dot in the upper left corner of the window to minimize
this window (shortcut is !-M). The document’s window shrinks down to
the lower right end of the Dock. (If Dock is not visible, pull down the Apple
menu to Dock " Turn Hiding Off.)
4. Next, have students open the Word™ document that contains regular text,
entitled, Text-Clip Word.doc.
5. Help students understand that there are now two Word documents open.
6. Explain to students that the portion (or all) of the text that they intend to
60
copy must first be selected.
7. Demonstrate the various methods for selecting text:
a. dragging across and down with mouse until all text is selected
b. using series of clicks:
i. double-click for a single word
ii. triple-click for a paragraph
c. using Edit ! Select All
d. click mouse, hold down shift key, then click mouse at end of selection
e. click at the beginning of selection, hold down shift key, then use
arrow key(s) (to the right, down, etc…) until you arrive at the end of
the selection
8. Once text desired is selected, Edit ! Copy (or shortcut "-C)
9. Minimize window, close window, or use Word menu ! Hide Word
10. Maximize blank Word document. Click on its icon in the lwer right end of
the Dock. Click where text is to be pasted Edit ! Paste (or shortcut "-V)
11. Press return key twice.
Make sure you have an Internet connection for the next two tasks.
12. Open web page location KidsHealth.org-webloc (this is in the folder where
you found the Copy-Paste file), or another web page that contains text. Use
one of the methods mentioned earlier to select text in the second paragraph
of the web page.
13. Once text desired is selected, Edit ! Copy (or shortcut "-C)
14. Minimize window, close window, or use Safari (or FireFox) menu ! Hide
Safari (or FireFox). If you choose to hide the browser, you will need to
click on the browser’s icon in the dock to bring it back to the front.
15. Open blank document. Click where text is to be pasted Edit ! Paste (or
shortcut "-V).
61
16. Press return key twice.
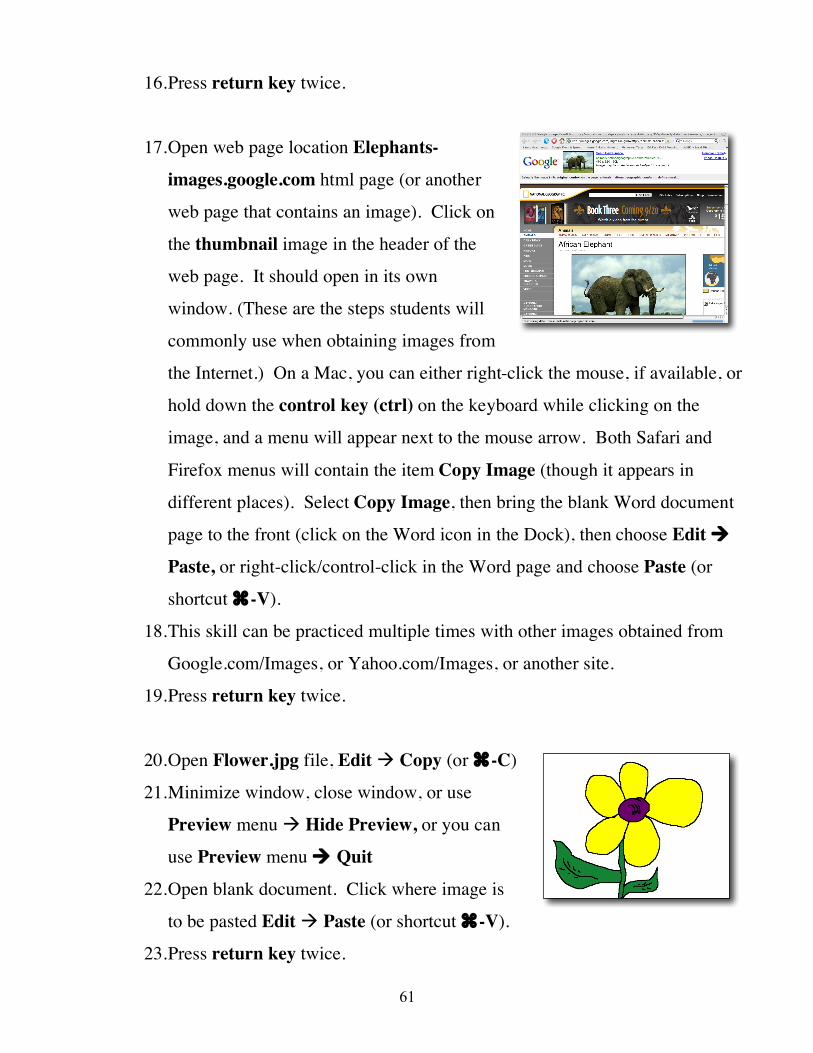
17. Open web page location Elephants-
images.google.com html page (or another
web page that contains an image). Click on
the thumbnail image in the header of the
web page. It should open in its own
window. (These are the steps students will
commonly use when obtaining images from
the Internet.) On a Mac, you can either right-click the mouse, if available, or
hold down the control key (ctrl) on the keyboard while clicking on the
image, and a menu will appear next to the mouse arrow. Both Safari and
Firefox menus will contain the item Copy Image (though it appears in
different places). Select Copy Image, then bring the blank Word document
page to the front (click on the Word icon in the Dock), then choose Edit !
Paste, or right-click/control-click in the Word page and choose Paste (or
shortcut "-V).
18. This skill can be practiced multiple times with other images obtained from
Google.com/Images, or Yahoo.com/Images, or another site.
19. Press return key twice.
20. Open Flower.jpg file, Edit ! Copy (or "-C)
21. Minimize window, close window, or use
Preview menu ! Hide Preview, or you can
use Preview menu ! Quit
22. Open blank document. Click where image is
to be pasted Edit ! Paste (or shortcut "-V).
23. Press return key twice.
62
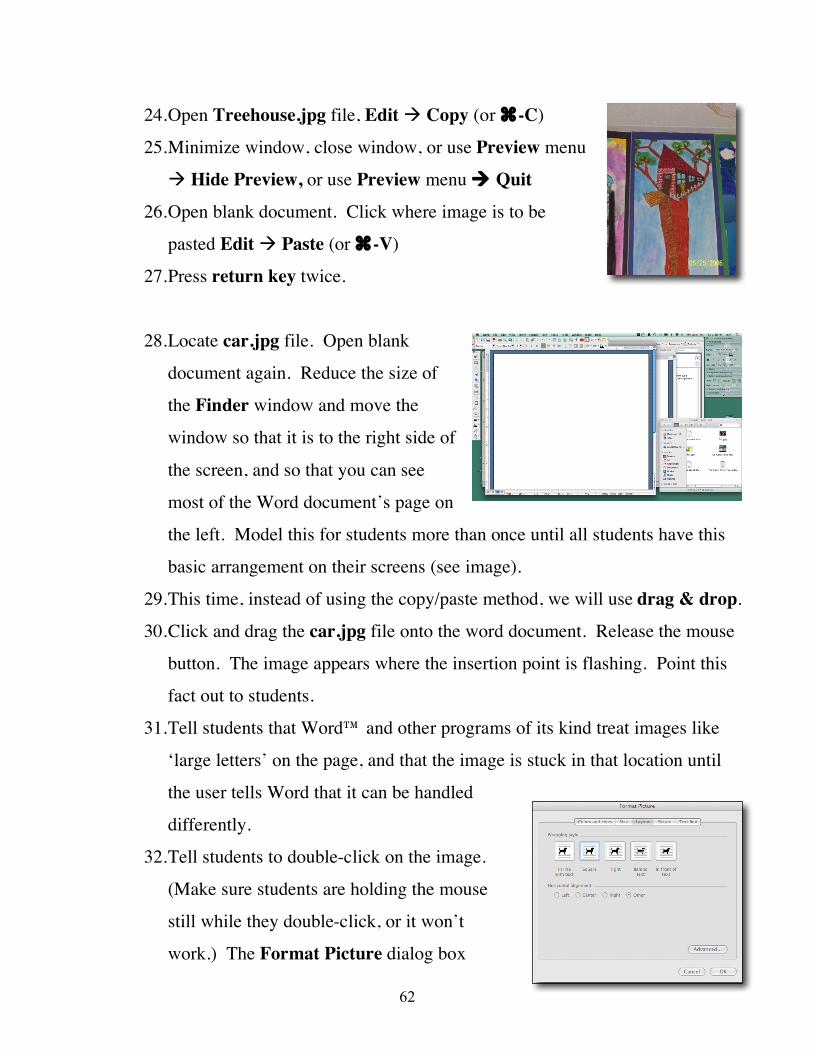
24. Open Treehouse.jpg file, Edit ! Copy (or "-C)
25. Minimize window, close window, or use Preview menu
! Hide Preview, or use Preview menu ! Quit
26. Open blank document. Click where image is to be
pasted Edit ! Paste (or "-V)
27. Press return key twice.
28. Locate car.jpg file. Open blank
document again. Reduce the size of
the Finder window and move the
window so that it is to the right side of
the screen, and so that you can see
most of the Word document’s page on
the left. Model this for students more than once until all students have this
basic arrangement on their screens (see image).
29. This time, instead of using the copy/paste method, we will use drag & drop.
30. Click and drag the car.jpg file onto the word document. Release the mouse
button. The image appears where the insertion point is flashing. Point this
fact out to students.
31. Tell students that Word™ and other programs of its kind treat images like
‘large letters’ on the page, and that the image is stuck in that location until
the user tells Word that it can be handled
differently.
32. Tell students to double-click on the image.
(Make sure students are holding the mouse
still while they double-click, or it won’t
work.) The Format Picture dialog box
63
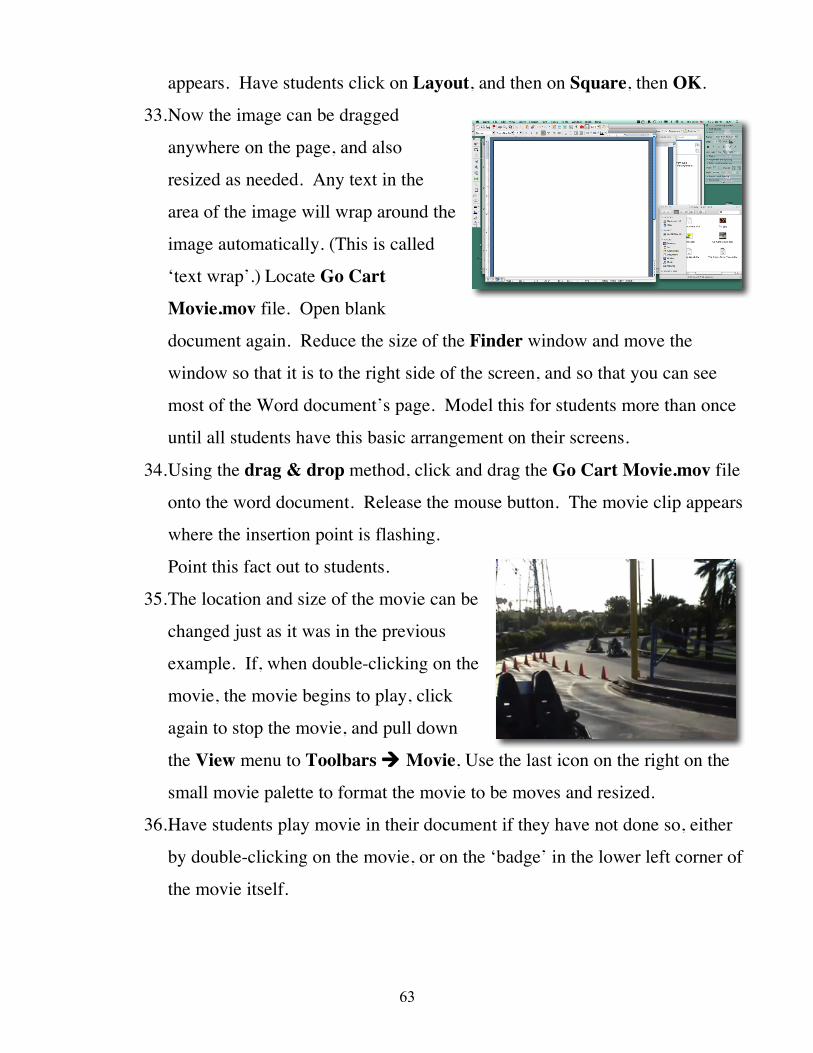
appears. Have students click on Layout, and then on Square, then OK.
33. Now the image can be dragged
anywhere on the page, and also
resized as needed. Any text in the
area of the image will wrap around the
image automatically. (This is called
‘text wrap’.) Locate Go Cart
Movie.mov file. Open blank
document again. Reduce the size of the Finder window and move the
window so that it is to the right side of the screen, and so that you can see
most of the Word document’s page. Model this for students more than once
until all students have this basic arrangement on their screens.
34. Using the drag & drop method, click and drag the Go Cart Movie.mov file
onto the word document. Release the mouse button. The movie clip appears
where the insertion point is flashing.
Point this fact out to students.
35. The location and size of the movie can be
changed just as it was in the previous
example. If, when double-clicking on the
movie, the movie begins to play, click
again to stop the movie, and pull down
the View menu to Toolbars ! Movie, Use the last icon on the right on the
small movie palette to format the movie to be moves and resized.
36. Have students play movie in their document if they have not done so, either
by double-clicking on the movie, or on the ‘badge’ in the lower left corner of
the movie itself.
64
This next example, using KidPix, is somewhat complicated, since KidPix does not
use a standard image file format known to other programs. This task will require
either quitting KidPix between the copy/paste in to Word, or using application
switching using the shortcut !-tab. Try it yourself first to evaluate your
readiness, and the readiness of your students to do it.
36. If the blank Word document is not already open, open it.
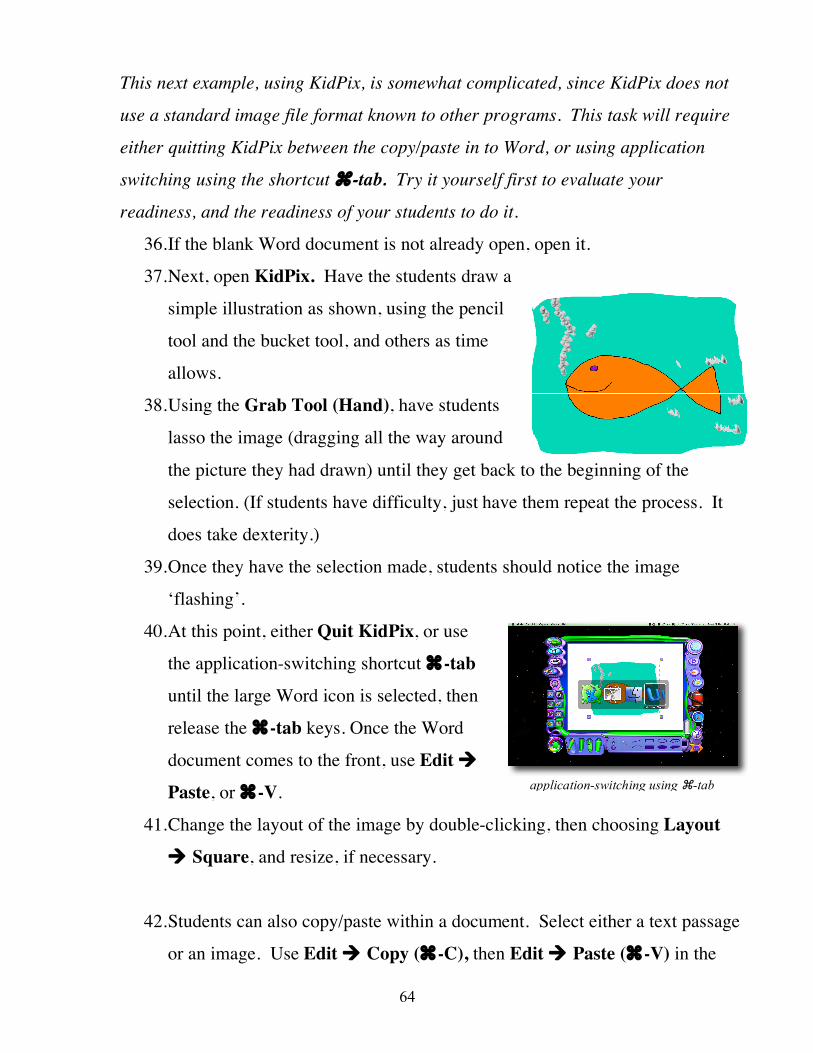
37. Next, open KidPix. Have the students draw a
simple illustration as shown, using the pencil
tool and the bucket tool, and others as time
allows.
38. Using the Grab Tool (Hand), have students
lasso the image (dragging all the way around
the picture they had drawn) until they get back to the beginning of the
selection. (If students have difficulty, just have them repeat the process. It
does take dexterity.)
39. Once they have the selection made, students should notice the image
‘flashing’.
40. At this point, either Quit KidPix, or use
the application-switching shortcut !-tab
until the large Word icon is selected, then
release the !-tab keys. Once the Word
document comes to the front, use Edit "
Paste, or !-V.
41. Change the layout of the image by double-clicking, then choosing Layout
" Square, and resize, if necessary.
42. Students can also copy/paste within a document. Select either a text passage
or an image. Use Edit " Copy (!-C), then Edit " Paste (!-V) in the
application-switching using !-tab
65
new location.
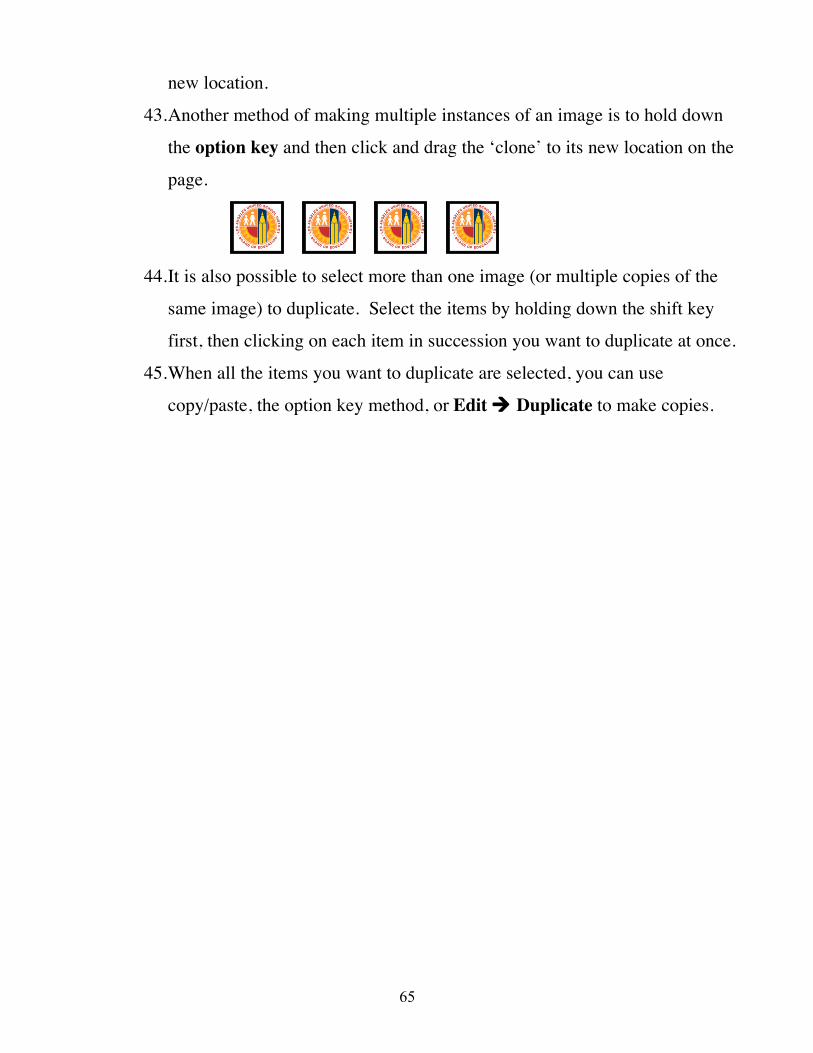
43. Another method of making multiple instances of an image is to hold down
the option key and then click and drag the ‘clone’ to its new location on the
page.
44. It is also possible to select more than one image (or multiple copies of the
same image) to duplicate. Select the items by holding down the shift key
first, then clicking on each item in succession you want to duplicate at once.
45. When all the items you want to duplicate are selected, you can use
copy/paste, the option key method, or Edit ! Duplicate to make copies.
66
Grade 3 - Lesson 8
Writes a Friendly Letter with proper formatting
After using the OCR exercises in creating a friendly letter by hand (multiple times,
with proper formatting), students can use their best example of a properly
formatted friendly letter as a draft to publish using the computer.
1. Explain to students that they will be using the Alignment & Spacing
portion of the Formatting Palette several times in this work.
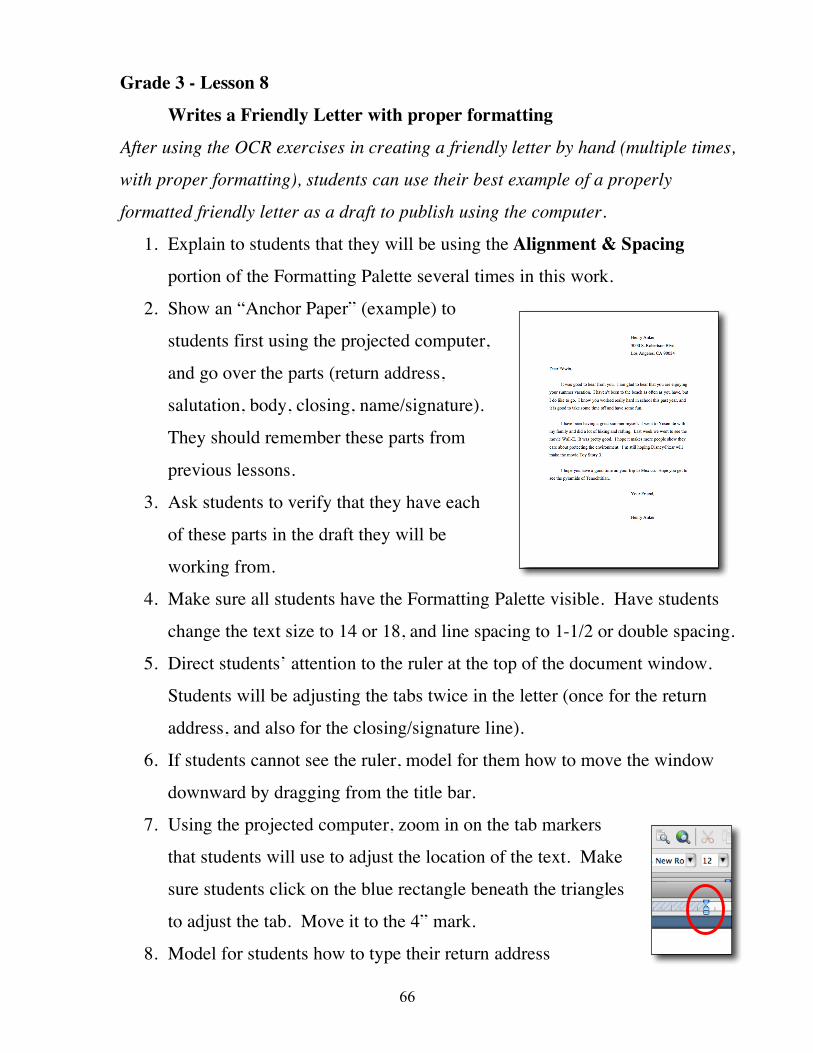
2. Show an “Anchor Paper” (example) to
students first using the projected computer,
and go over the parts (return address,
salutation, body, closing, name/signature).
They should remember these parts from
previous lessons.
3. Ask students to verify that they have each
of these parts in the draft they will be
working from.
4. Make sure all students have the Formatting Palette visible. Have students
change the text size to 14 or 18, and line spacing to 1-1/2 or double spacing.
5. Direct students’ attention to the ruler at the top of the document window.
Students will be adjusting the tabs twice in the letter (once for the return
address, and also for the closing/signature line).
6. If students cannot see the ruler, model for them how to move the window
downward by dragging from the title bar.
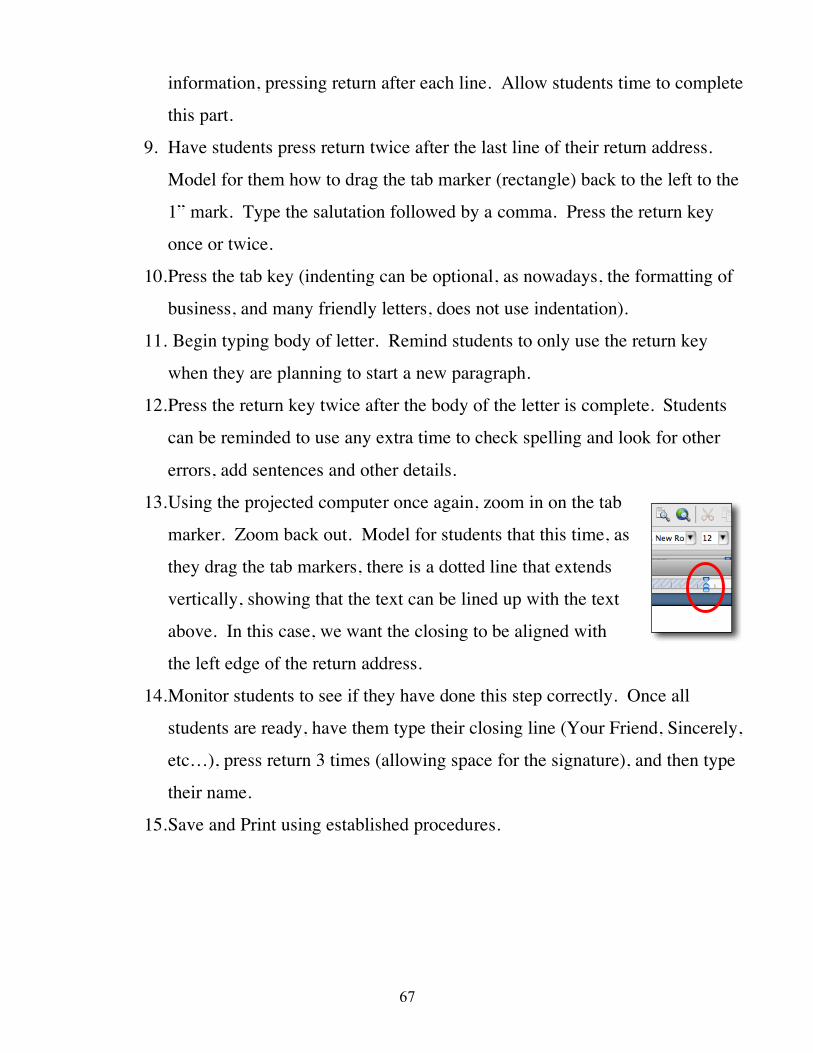
7. Using the projected computer, zoom in on the tab markers
that students will use to adjust the location of the text. Make
sure students click on the blue rectangle beneath the triangles
to adjust the tab. Move it to the 4” mark.
8. Model for students how to type their return address
67
information, pressing return after each line. Allow students time to complete
this part.
9. Have students press return twice after the last line of their return address.
Model for them how to drag the tab marker (rectangle) back to the left to the
1” mark. Type the salutation followed by a comma. Press the return key
once or twice.
10. Press the tab key (indenting can be optional, as nowadays, the formatting of
business, and many friendly letters, does not use indentation).
11. Begin typing body of letter. Remind students to only use the return key
when they are planning to start a new paragraph.
12. Press the return key twice after the body of the letter is complete. Students
can be reminded to use any extra time to check spelling and look for other
errors, add sentences and other details.
13. Using the projected computer once again, zoom in on the tab
marker. Zoom back out. Model for students that this time, as
they drag the tab markers, there is a dotted line that extends
vertically, showing that the text can be lined up with the text
above. In this case, we want the closing to be aligned with
the left edge of the return address.
14. Monitor students to see if they have done this step correctly. Once all
students are ready, have them type their closing line (Your Friend, Sincerely,
etc…), press return 3 times (allowing space for the signature), and then type
their name.
15. Save and Print using established procedures.
68
Grade 3 - Lesson 9, 11
Creates a 4-6 slide PowerPoint™ adding at least one image; saves to a
specified folder or location; imports pictures
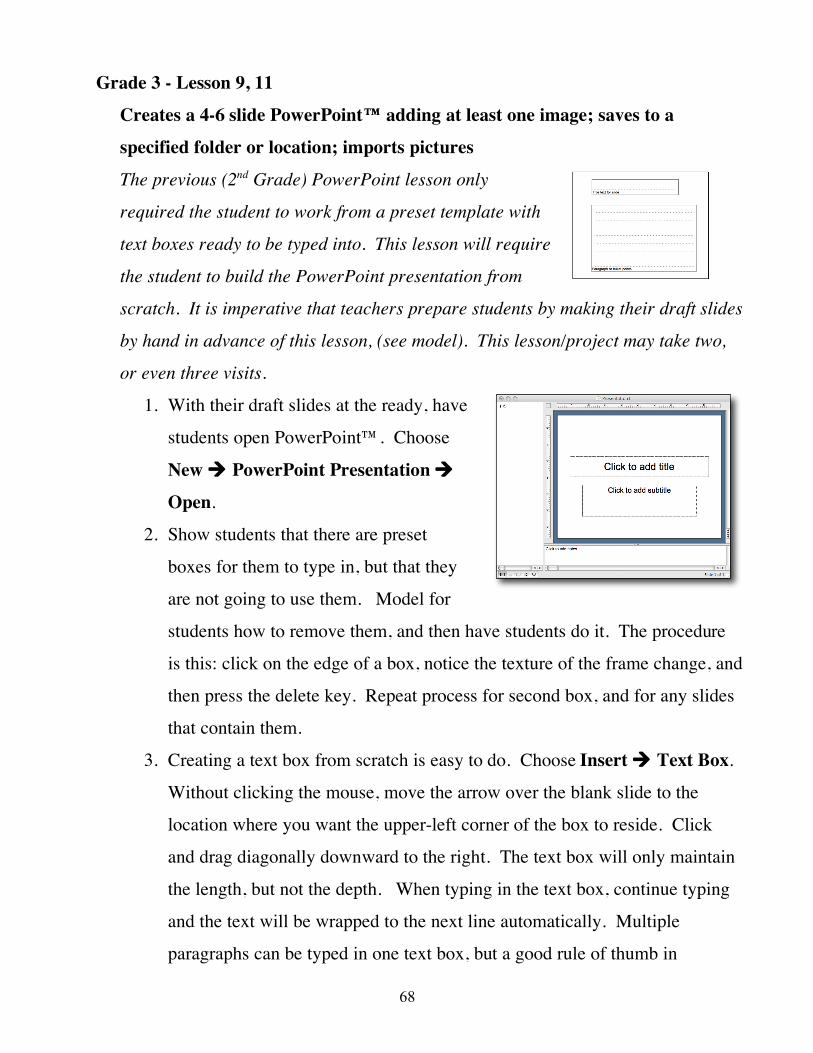
The previous (2nd Grade) PowerPoint lesson only
required the student to work from a preset template with
text boxes ready to be typed into. This lesson will require
the student to build the PowerPoint presentation from
scratch. It is imperative that teachers prepare students by making their draft slides
by hand in advance of this lesson, (see model). This lesson/project may take two,
or even three visits.
1. With their draft slides at the ready, have
students open PowerPoint™. Choose
New ! PowerPoint Presentation !
Open.
2. Show students that there are preset
boxes for them to type in, but that they
are not going to use them. Model for
students how to remove them, and then have students do it. The procedure
is this: click on the edge of a box, notice the texture of the frame change, and
then press the delete key. Repeat process for second box, and for any slides
that contain them.
3. Creating a text box from scratch is easy to do. Choose Insert ! Text Box.
Without clicking the mouse, move the arrow over the blank slide to the
location where you want the upper-left corner of the box to reside. Click
and drag diagonally downward to the right. The text box will only maintain
the length, but not the depth. When typing in the text box, continue typing
and the text will be wrapped to the next line automatically. Multiple
paragraphs can be typed in one text box, but a good rule of thumb in
69
PowerPoint is not to use more than 5 sentences on any one slide. Additional
text can always be put on the following slide.
4. Changing the appearance of text should be limited at this grade level, but it
can be done. Click on the edge of a text box, and then use the Formatting
Palette or Toolbar to change it. All the text in the box changes at once.
Alternatively, you can select text with the insertion point as is done in a
Word™ document, but that takes longer, and some text could be missed.
5. Repeat the process of creating text boxes and typing text into them on each
slide.
6. Model for students that when a new slide is needed, the student can use the
Insert menu ! New Slide. If the New Slide dialog box appears, the
student can click on the Blank Slide choice to avoid having to delete
unwanted text boxes. (If the New Slide dialog box does not appear, it has
been deselected in the Preferences. Follow this procedure: PowerPoint
menu ! Preferences ! View ! New Slide Dialog check box).
7. Once students have all begun work on their second slide and are working
independently, ask the students to stop and save their work. Most students
to this point have only saved work in Word, and only with assistance. Let
students know that the saving process in every application is similar.
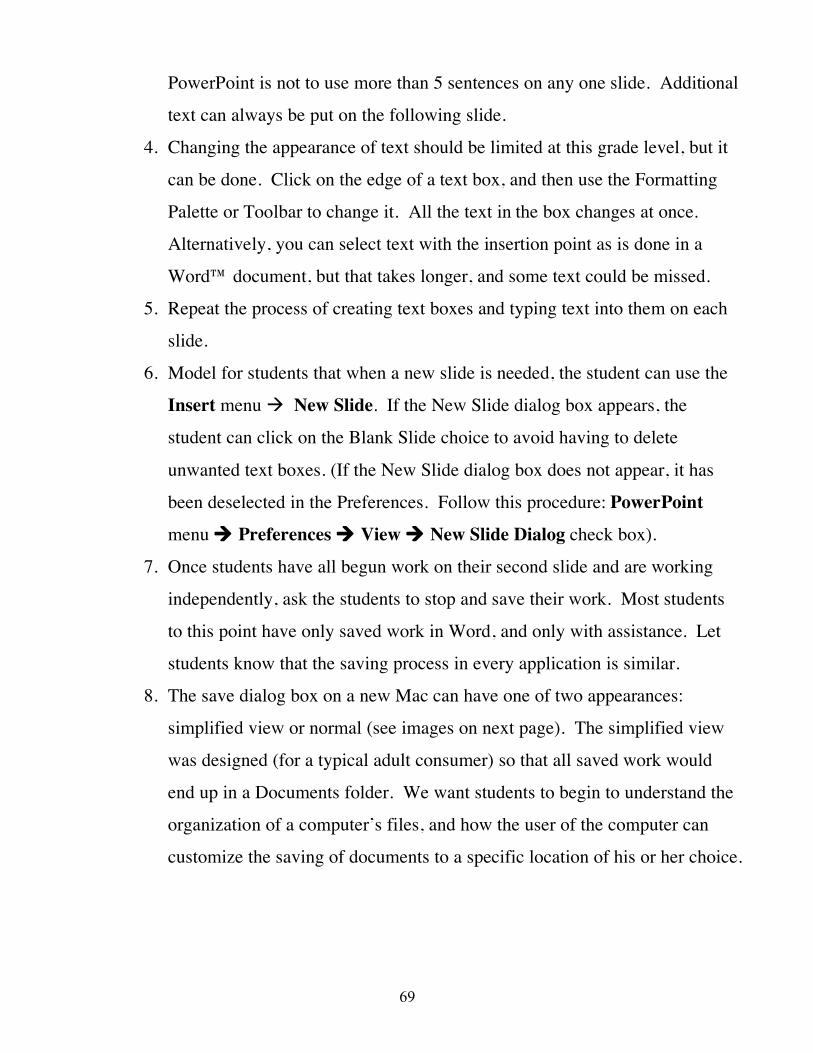
8. The save dialog box on a new Mac can have one of two appearances:
simplified view or normal (see images on next page). The simplified view
was designed (for a typical adult consumer) so that all saved work would
end up in a Documents folder. We want students to begin to understand the
organization of a computer’s files, and how the user of the computer can
customize the saving of documents to a specific location of his or her choice.
70
9. Direct students to click on the small
downward facing arrow to expand the save dialog box, if necessary. Depending
on the saving scheme that is set up at your school, your directions may vary.
Here’s an example (this may or may not be set up at your school):
a. “Click on the word Desktop in the blue navigation bar on the left
(you may have to scroll to see it). Look for a folder named ‘Student
Saved Work’. Click on it, and then click the Open button. Now you
see the names of teachers. Find the name of your teacher. Double-
click on it. Look for your name, and then double-click on it.
b. Look at the name of the document suggested by PowerPoint. Select
the text in the name, except for the suffix (.ppt). Replace this text
with the following “Steven-Animals.ppt”
10. Resume work on the PowerPoint presentation. Stop students about 10 minutes
later to show them how to change the background color of each slide. By this
time, students should have 3 or 4 slides completed. The following instructions
apply to PowerPoint in Office 2004. The instructions for
Office 2008 differ slightly.
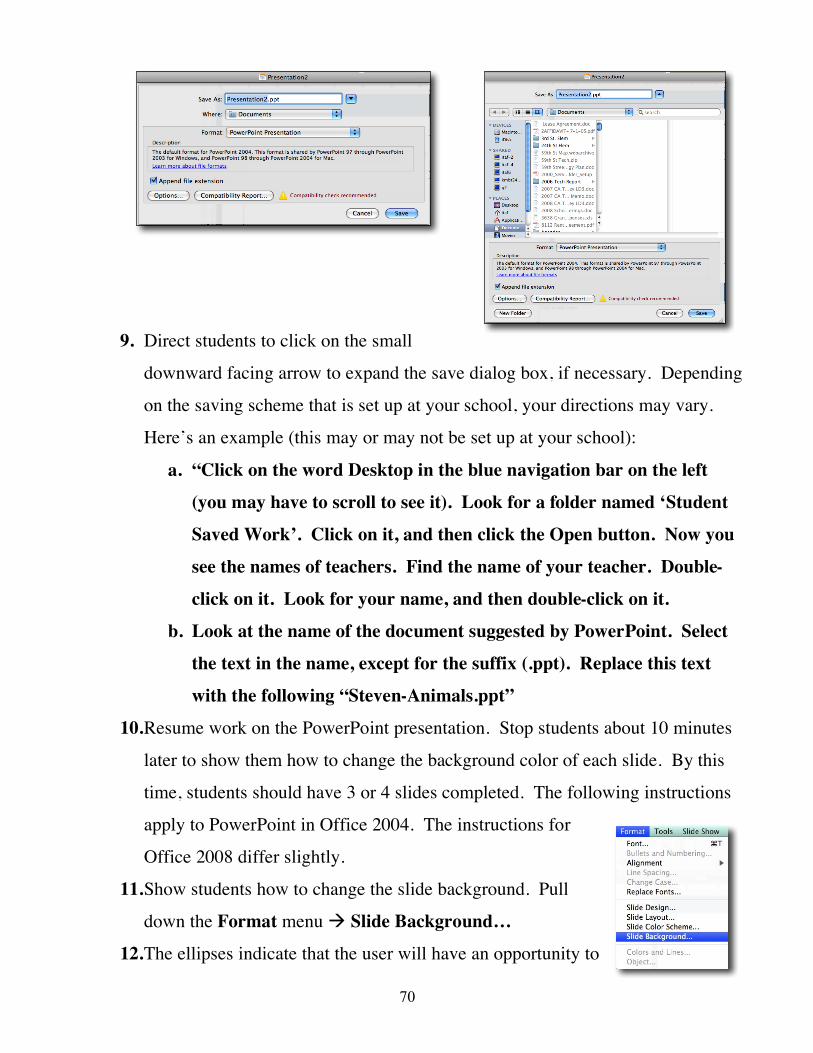
11. Show students how to change the slide background. Pull
down the Format menu ! Slide Background…
12. The ellipses indicate that the user will have an opportunity to
71
make choices here. The student can either choose one
of the suggested colors, or choose More colors… This
is a good opportunity to show students how the color
palette in the Mac OS system integrates with an
application like PowerPoint. Students can elect to
apply the color to all slides (which is normally a good
idea), but here you may want to instruct students to use a
distinct color on each slide so they can see the change as the
slides transition from one to another.
13. Give students a chance to make these background changes,
and let them know that they can continue to apply them to
additional slides they make in this presentation.
14. Ask students to stop working, and watch you demonstrate
how to do slide transitions. Pull down the Slide Show
menu to Slide Transitions… Once in the Slide
Transition dialog box, show students how to choose a
transition type, whether or no they want sound, and if
they want to require the user to click to advance the
slide, or have the show advance after a preset number of
seconds.
15. Remind students to save their work periodically, and at the end of their work
session. Once the majority of students have completed their writing on each
slide, provide a step-by-step demo of how to obtain an image from the Internet
that can be used in the presentation. For the purposes of this demo, students can
all get and use the same image, and then delete it if not wanted. Make sure all
students have saved their work before beginning this process.
16. Direct all students to navigate to the second slide in their presentation. One
way to do this is to go to the Slide Sorter in the lower left corner of the screen

72
(see image of the tiled rectangles), or in the View menu !
Slide Sorter. When students see the thumbnails on the
screen, they can double-click on the second slide.
17. Once on the second slide, have students resize their
PowerPoint window down somewhat in order to also
be able to see the browser window as they open
FireFox or Safari. Open FireFox or Safari. Type in
www.google.com/images. In the search field, have students type in a word
such as “plowing”. Have students spend a few moments browsing the images.
Bring students’ attention together, and then have them click on the image you
designate. The image chosen will appear in the top
panel of the web browser window.
18. Click on the thumbnail of the image at the top of
the window. The image will appear by itself in its
own window. The next step is to move the image
to the desktop of the computer. (This is necessary
because some images won’t simply copy/paste from their
web pages to another application.) Dragging the image to
the desktop will convert the image to a .jpg image that can
then be dragged onto a PowerPoint slide (or a Word
document, or other program).
19. Make sure the PowerPoint window is in view. Drag the image file from the
desktop onto the PowerPoint slide. (You
should see a small “+” sign next to the arrow
indicating that the image will be added to the
PowerPoint document.)
20. Once the image is on the slide, you can resize
it or move it.
73
21. Save the presentation.
22. Students should be given the opportunity to share their presentations with the
class as part of their assignment. Tips on giving effective presentations should
be shared with students beforehand, along with the chance to practice in class
and at home. Here are some tips for presenting:
a. Presenters should have note cards in hand
b. Presenters should not read text on slides verbatim to their audience, but
rather share additional information
c. Presenters should make frequent eye contact with their audience, speak in
an audible voice, changing inflection, and take questions
d. Presenters should rehearse many times before presenting
74
Grade 3 - Lesson 12
Uses standard keyboard shortcuts (Apple-S = Save, Apple-P = Print, etc…)
Keyboard shortcuts are very useful to both the students, and to the teacher,
as you will want students to complete cleanup tasks and other repeated tasks such
as saving and printing in an efficient manner.
For this week’s lesson, shortcuts can be practiced explicitly to give students
repeated practice that they can internalize.
1. Explain to students that they will be using computers throughout their
lives, in school, and the world of work, and also as consumers. (Show
students images of students and adults working with computers, in
school and in the workplace, and also show images of adults and
young people using computers in the home.) Tell students that the
more shortcuts they know, the better their interaction with computers
will be. Students should have already used the following shortcuts in
previous lessons: !-Q (Quit) !-P (Print) !-W (Close Window) !-C
(Copy) !-V (Paste)
2. Have students open MS Word™. Once a blank file is open on the
screen, direct students to press !-N (New Document). Do this
several times, creating many new blank documents.
3. Direct students to press !-W (Close Window). Do this several
times, until all the blank documents are closed.
4. Have students type their names in a blank document. Direct students
to pull down the press !-A (Select All). All of the text in their
names should be selected. Direct students to make a few changes to
the appearance of their names, changing font, size, style, and color.
Have the students click in any white area of the page to de-select the
stylized text.
5. Direct students to press !-A (Select All). All of the text in their
75
names should once again be selected.
6. Tell students that at times, we, as users of computers, make mistakes
where text or an image can be erased, and we need to be able to bring
it back. Tell students this is what they are about to simulate.
7. While their text is selected, tell students to press the space bar. Their
text should have ‘disappeared’. (Actually, their text was replaced by a
space). Tell students to say “Oh, no!” and then raise their hands over
their head. Tell students what happened and not to panic. The goal is
to show them what to do should this happen while they are working
on any writing or art project.
8. Tell students that there is a shortcut designed specifically to fix this
problem. Direct students to press !-Z (Undo). All of the text in their
document should reappear. Show students that the item is in the Edit
menu.
9. Repeat the previous process with other text, or an image accidentally
deleted with !-Z (Undo), so they can see the result again.
10. Try this procedure with students to show them the power of
copy/paste: Type first name only, press !-A (Select All) " press
!-C (Copy) " click after word to de-select text " press !-V
(Paste) " repeat, i.e.: Henry Henry Henry Henry Henry Henry
11. Reinforce for students that they can copy text or an image once, but
paste it an unlimited number of times. This feature is useful for
creating borders with small repeated images around the margin of a
document. (This was mentioned in an earlier lesson, but this, itself,
could be a separate lesson.)
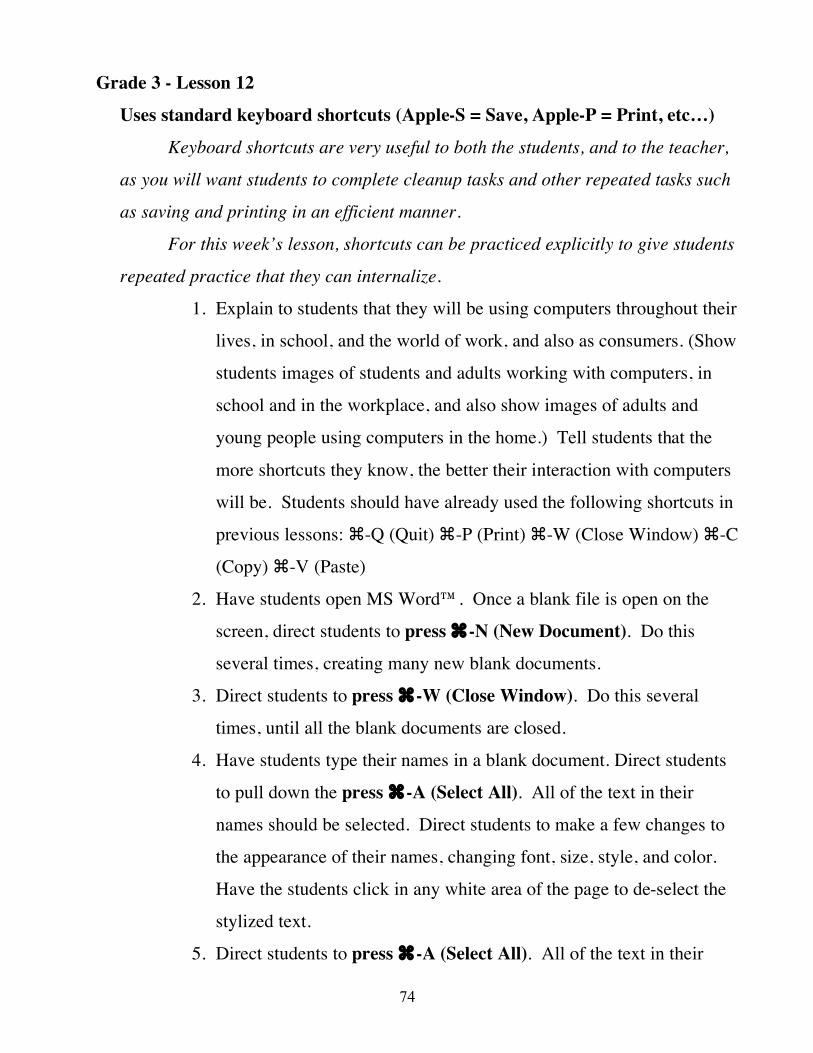
12. As a concluding activity, show students where
the shortcuts are listed in contextual menus in the
Finder and applications. Some shortcuts are

76
always the same, and some vary depending on the needs of the
program. Tell students there are also undocumented shortcuts that
they can memorize and share with their friends and family.
13. Here is an undocumented shortcut for shutting down a Macintosh
computer: control-eject key.
77
Grade 3 - Lesson 13
Understands and follows rules of Internet Safety
Internet safety should not be taught in isolation, and as only a one shot
lesson, but rather touched on in nearly every computer lesson where a connection
to the Internet is used. Internet safety can also be referenced in the course of other
lessons taught about safety regarding strangers, gangs, drugs, sexual harassment,
etc… in later grades.
This lesson does not need to be taught with students at their own computers.
You could conduct the reading of the article together as a class using an LCD
projector, or students can use the article here:
http://kidshealth.org/parent/positive/family/net_safety.html
as an opportunity to do research on Internet safety based on their reading of the
article and any personal experiences they may have had. Ask students to share
their opinions about weather the guidelines mentioned in the article are valid, and
why and why not.
This particular article is available in Spanish. Ideally, students will go
home and discuss these ideas with their parents and siblings. Students can report
back what rules they may have (or have established) for the use of the Internet at
home.
Students can write their own report on Internet safety at this age, but should
also do this in later grades to demonstrate their awareness of the dangers on line.
All LAUSD students should read, independently and together, the LAUSD AUP
(Acceptable Use Policy) for use of the Internet while at school. The contents of
this document should also be discussed openly in class.
The LAUSD AUP is available by clicking on the tiny link at the bottom of the
LAUSDnet Home Page. Another good source of information on Internet safety is
www.isafe.org. You can also call Henry Anker to do a presentation on this at your
school for teachers, students, or parents.
78
Grade 3 - Lesson 14
Types 10-20 wpm with 85% + accuracy
Keyboarding should be practiced regularly (at home, ideally, as
homework), but also in class during IWT, as a reward, the first or last 5-10
minutes of a lab visit, when work is completed, etc…
The purpose of this initial lesson is to get students to understand how
a published keyboarding program or web site works, and to develop good
habits of finger placement on the Home Row, as well as good posture. Once
these habits are established, students can practice independently, though
periodic review of work habits is a good idea.
Read the teacher’s guide and/or on-line tips for using the
program/web site. Also be sure to preview the lessons as a student would so
that you can anticipate problems students may have progressing through the
program.
Here are a few quality keyboarding programs and web sites* you can
purchase or use.
Mavis Beacon Teacher Typing
Type to Learn
Typing Tutor
Kid Type
Ten Thumbs Typing
Dance Mat Typing*
Power Typing*
Provide lots of positive reinforcement as well as a way to set benchmarks
and allow students to show that they have met the benchmark.