Embed Size (px)
Citation preview

KF-200 Knife Folding Machine
Serial Number ___________________________ Date ___________________________________
12-2016
Version 1.0

2
Page left blank intentionally

3
Table of Contents INTRODUCTION ............................................................................................................................... 5
PREFACE ....................................................................................................................................... 5
SPECIFICATIONS ........................................................................................................................... 5
ELECTRICAL SPECIFICATIONS ........................................................................................................... 6
SAFETY PROCEDURES ...................................................................................................................... 6
BEFORE USE: ................................................................................................................................ 6
DURING USE: ............................................................................................................................... 6
AFTER USE: .................................................................................................................................. 6
CARE AND MAINTENANCE ............................................................................................................... 7
BEARINGS/BUSHINGS: ................................................................................................................. 7
SENSOR EYE: ................................................................................................................................ 7
KEEP THE ROLLERS CLEAN: .......................................................................................................... 7
IMPORTANT NOTES BEFORE OPERATING THE KF-200 .................................................................... 7
DOUBLE FEEDING: ....................................................................................................................... 7
KNOB SETTINGS: .......................................................................................................................... 7
START DELAY: .............................................................................................................................. 7
COMPONENT IDENTIFICATION ........................................................................................................ 8
SETTING UP YOUR KF-200 ............................................................................................................... 9
DELIVERY TRAY INSTALLATION .................................................................................................... 9
BI-PASS TRAY INSTALLATION ....................................................................................................... 9
PAPER STOP ASSEMBLIES .......................................................................................................... 10
REGISTER GUIDE INSTALLATION ................................................................................................ 11
Connecting KF-200 to ACCUCREASER / FC114A ............................................................................ 12
CONNECTING TO OTHER EQUIPMENT ...................................................................................... 12
MAIN POWER ............................................................................................................................ 13
TOUCH SCREEN CONTROLLER ....................................................................................................... 14
TOUCH SCREEN OPERATION ...................................................................................................... 14
COUNT LOGO AND SERVICE ACCESS ......................................................................................... 14
AUTO SETUP SCREEN ................................................................................................................. 15
PAPER THICKNESS ...................................................................................................................... 15
KNOB SETTINGS / GAP ADJUSTMENT ........................................................................................ 16
4
MEASURE SHEET ........................................................................................................................ 17
RUN SCREEN .............................................................................................................................. 17
MICRO ADJUSTING THE FOLD POSITION ................................................................................... 18
REPEAT LAST JOB ....................................................................................................................... 18
BI-PASS MODE ........................................................................................................................... 18
TRANSPORT OPERATION ........................................................................................................... 19
AUTO FOLD SETUP ......................................................................................................................... 19
HALF FOLD SETUP: ..................................................................................................................... 19
TRI-FOLD SETUP: ........................................................................................................................ 20
Z FOLD SETUP: ........................................................................................................................... 20
LETTER FOLD SETUP:.................................................................................................................. 20
GATE FOLD SETUP: .................................................................................................................... 20
DOUBLE PARALLEL FOLD SETUP: ............................................................................................... 21
MANUAL SETUP ......................................................................................................................... 21
SAVING MANUAL FOLD JOBS .................................................................................................... 22
RECALLING MANUAL FOLD JOBS ............................................................................................... 22
IN FEED REGISTER GUIDE .............................................................................................................. 23
ADJUSTING THE MICRO SKEW OF THE IN-FEED REGISTER ........................................................ 23
DELIVERY TABLE ............................................................................................................................. 24
CHECKING THE SENSORS ........................................................................................................... 25
ROTATING PLASTIC COVER ........................................................................................................ 25
TROUBLE SHOOTING ..................................................................................................................... 26
5
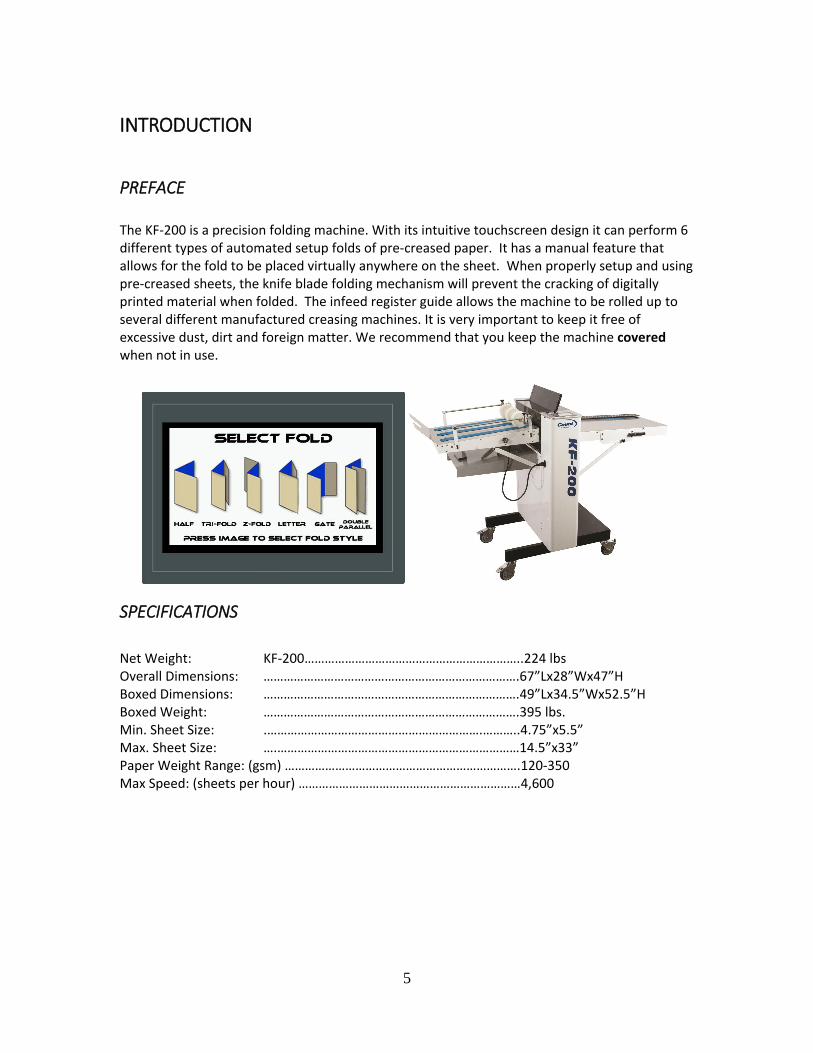
INTRODUCTION
PREFACE
The KF-200 is a precision folding machine. With its intuitive touchscreen design it can perform 6 different types of automated setup folds of pre-creased paper. It has a manual feature that allows for the fold to be placed virtually anywhere on the sheet. When properly setup and using pre-creased sheets, the knife blade folding mechanism will prevent the cracking of digitally printed material when folded. The infeed register guide allows the machine to be rolled up to several different manufactured creasing machines. It is very important to keep it free of excessive dust, dirt and foreign matter. We recommend that you keep the machine covered when not in use.
SPECIFICATIONS
Net Weight: KF-200………………………………………………………..224 lbs Overall Dimensions: ………………………………………………………………….67”Lx28”Wx47”H Boxed Dimensions: ………………………………………………………………….49”Lx34.5”Wx52.5”H Boxed Weight: ………………………………………………………………….395 lbs. Min. Sheet Size: .……………………………………………………….………..4.75”x5.5” Max. Sheet Size: ….………………………………………………………………14.5”x33” Paper Weight Range: (gsm) …………………………………………………………….120-350 Max Speed: (sheets per hour) …………………………………………………………4,600

6
ELECTRICAL SPECIFICATIONS
Power Requirement: 110v/220v, 60/50 HZ, AC 15AMP Circuit Protection: 5 AMP Circuit Breaker NOTE: Older buildings, overloaded lines, and bad grounds can affect the operation of your KF-200. A regulated dedicated line is recommended. Operating the machine through a power strip is not recommended.
SAFETY PROCEDURES
BE ALERT! BE CAREFUL!
BEFORE USE:
Read through the owner’s manual. Follow instructions CAREFULLY.
Don’t install the machine on uneven ground.
NEVER use in a wet area. Electric shock could occur.
Use at least a 15 amp power source at 110 v
Use a GROUNDED outlet and a GROUNDED circuit. Do no use ungrounded equipment on the same circuit.
Always use a dedicated line. DO NOT use with line splitting surge protector.
Make sure all safety covers are in place. The top cover has an interlock switch which will disable the unit if removed.
Open and close the plastic cover slowly.
DURING USE:
Exercise caution with long hair, loose fitting clothes when near the machine nip, while in operation.
Keep fingers and hands away from belts, folding blades, and rubber rollers.
Keep fingers away from any moving part.
Keep cords clear of moving parts.
Do not place any liquid on any surface of machine.
Do not put heavy matter on machine.
AFTER USE:
Turn off machine at the top panel, then unplug the main power cord. This will prevent damage to your machine by power/voltage spikes.
To unplug cords, always grasp the plug body, never pull on cords to disconnect. Wire fatigue and possible shock could result from improper disconnect procedures.
Disconnect the power before cleaning the inner machine.
Clean all rollers, belts and moving parts.
Cover the Machine.

7
CARE AND MAINTENANCE
The KF-200 is a precision machine. It is very important to keep it free of excessive dust, dirt and foreign matter. We recommend that you keep the machine covered when not in use.
BEARINGS/BUSHINGS: The bearings are sealed roller bearings and are designed to be self
lubricating, however dirt and dust can get into them causing clogging and dirt build up. It is recommended to oil them weekly under heavy use or monthly under light use. The bushings for the knife blades are Bronze and require lubrication more frequently. Oil these once a week under heavy use with a light machine oil or 3-1 oil.
SENSOR EYE: Clean the lower reflector tape located on the plate under the infeed register
regularly. Clean with water damp rag only. Dust will cause the beam to not reflect correctly. Clean when necessary.
KEEP THE ROLLERS CLEAN: Excess paper dust will cause slippage of the paper. You must
clean the rollers regularly to ensure good registration. To do this, unplug the machine carefully, lift plastic cover, and use a clean wet rag with water only and clean each roller. If you do keep your KF-200 clean and in top condition, it will give you years of service.
IMPORTANT NOTES BEFORE OPERATING THE KF-200
To ensure the smooth operation of this machine please read the following. If you do not understand these sections of how to operate the machine you may cause damage and unintentionally void your warranty.
DOUBLE FEEDING: The KF-200 is designed to run a single sheet. If a double sheet is fed
through the machine it will lock up. If the machine is not turned off immediately you may cause damage to the motor driver and void the warranty.
KNOB SETTINGS: The knob settings are directly related to how well the machine will run.
Please read the section on Knob settings before operation.
START DELAY: When pressing the RUN button there is a 2 second delay for the transport
motor to turn as the knife blades preform a homing cycle.

8
COMPONENT IDENTIFICATION
REFERENCES
Note: We are continuously improving and changing the machine. Specifications and information in this manual are updated as per the change and without any notice.
Register Table Assembly
Delivery Tray
Micro Skew Adjustment
Motorized Delivery
Paper Stop
Touch Screen Pg. 13 Register Table Assembly Pg. 10 Register Guide Rail Pg. 10 Motorized Delivery Pg. 23 Micro Skew Adjustment Pg. 22 Power Switch Pg. 12 Gap Settings Pg. 16 Delivery Tray Pg. 9
Register Guide Rail
Touch Screen
Power Switch
Gap Knobs

9
SETTING UP YOUR KF-200 This machine is 90% ready to go when it arrives on your dock. There are only a few items that need to be put into position before it is ready to use. Those items are below:
DELIVERY TRAY INSTALLATION
The motorized delivery is recommended to be installed by two people but can be done with one although it is more difficult. Locate the exit support shaft of the machine. Install the hooks on the delivery tray to the cuts outs show on the shaft below. Now support the end of the tray and position the arms into the larger slots on the exit panel.
Upper Position shown below
Plug delivery table into matching power receptacle on folder cover. Warning: Do not plug delivery table to any other power source!
BI-PASS TRAY INSTALLATION
Cut outs on shaft for delivery mounting

10
As shown below there are hooks that hold the bi-pass tray into position. If the magnetic paper stops have already been placed you should remove them for easier installation of the tray. Then angle upward and insert the hook into the slot then rotate downward to place the lower hook into the slot.
PAPER STOP ASSEMBLIES
There are two different paper stops. One will have a bend and one will be straight. The straight paper stop is the rear or back paper stop. The bent paper stop is the operator side paper stop. There is no paper stop for the non-operator side. The support arm acts as the stop for that side. They hold their position using a magnet which makes it easy for adjustment. The positions for the paper stops will change for each individual job. If the paper stops are set too close the paper will hit them as it exits the machine and will cause a paper jam. If they are set too loose the paper will stack in an unorganized manner. Getting the position correct is imperative to smooth operation of the machine.

11
REGISTER GUIDE INSTALLATION
The register guide for the machine is recommended to be installed by two people but can be done with one although it is more difficult. Start by removing the knobs located on the lower support arms. Next locate the entry pins. Install the hooks on the front of the register guide to the pins. Support the entry side of the register guide and rotate one of the support arms up to the slotted bracket and install the knob you removed earlier. Repeat for the other side. Tighten the knobs to hold position until the machine is rolled up to the creasing machine. Install the balls from the parts box into the holes along the register belt.
Rest the hooks on the pins above then attach the arms below.

12
Connecting KF-200 to ACCUCREASER / FC114A The KF-200 is designed to run in line with the Count Accucreaser and The Count FC-114 A creasing machines. To Connect them, there is a hook on the non operator side of the KF-200 register that needs to be attached to the exit shaft of the creasing machine as seen below. Once attached make sure the hook is against the non operator side frame so the plastic cover does not interfere. Once the machines are lined up lock the casters so the machines do not move if bumped.
CONNECTING TO OTHER EQUIPMENT The KF-200 can run behind many different manufacturers creasing machines. The in-feed register is height adjustable. Make sure when adjusting the height that the paper is coming out between the balls and plate of the infeed register. It is also very important that the paper enters the register guide as close to the non-operator frame as possible. This helps the register guide to ensure the paper has the time to register completely.

13
MACHINE OPERATION
There is one main power switch on the KF-200 located on the lower portion of the operator side cover. Everything else is controlled by the Touch Screen. All paper run through the KF-200 folding machine must be creased.
MAIN POWER
On the operator side cover on the right side is the main power switch. This is the on and off power for the machine. When switched on the led lights will illuminate just in front of the knobs. This is how you know the machine is on. Do not leave the machine on when not in use.

14
TOUCH SCREEN CONTROLLER
THE TOUCH SCREEN CONSISTS OF FIVE SECTIONS: 1. Count Logo and Service Access 2. Auto Setup 3. Manual Setup 4. Repeat Last Job 5. Bi-Pass Mode
TOUCH SCREEN OPERATION When the machine is turned on the display may take up to 7 seconds for the home screen to display. There is a screen saver that will turn the display off if the machine is not touched within 30 minutes. The power light will stay illuminated letting you know the machine is still on.
COUNT LOGO AND SERVICE ACCESS If the logo is pressed a password screen is displayed. This is for factory and service access only. This Screen is for manufacturer use only. The password is not given out.
1
2
4
3
5

15
AUTO SETUP SCREEN From the home screen press the Auto Setup button. The select fold screen appears. Press the desired image to select that fold.
Select the fold you want by pressing the image.
PAPER THICKNESS Select the thickness of paper to be folded. This is important as thinner stocks will fold differently than thicker stocks. This allows us to change the offset for the perfect fold.
By pressing a thickness, you will be directed to the knob setting screen.

16
KNOB SETTINGS / GAP ADJUSTMENT This adjustment is very important and affects the operation of the machine dramatically. The knobs are positioned from left to right. Knob 1 is on the left and knob 2 is on the right. Knob 1 controls gap 1 and knob 2 controls gap 2. The knob setting screen will display the recommended setting below the image. This is a starting point and some adjustment may need to take place once this setting has been made. Example if you are getting motor lock ups or paper jams you will need to increase the gap adjustment on knob 2. If you are getting registration or skewing you may need to adjust the gap lower on knob 1. It is important to read the warning on the side of the knob setting screen. The following gap adjustments are the suggested for the paper weight and fold patterns listed. Note: the finished results can be affected by the type of stock, type of finish, grain direction, and quality of paper. The values listed in the table are only suggested values.
Make sure the setting is correct on the machine before pressing the OK, I HAVE MADE THE ADJUSTMENT Button.

17
MEASURE SHEET The KF-200 will automatically set the distance of the fold using the smart measure feature. With one sheet on the register guide or ready to feed from the creasing machine press the start measuring button. The knife blades will move into position, then the transport will start to run, feeding in the sheet. Depending on the thickness of stock you selected, the sheet will either feed out the slot in the top of the plastic cover or the bi-pass tray.
Once measured press accept to go to the run screen.
RUN SCREEN On the Run Screen there is a counter that will count how many sheets are run through the machine. It can be reset by pressing the counter reset. When the run button is not selected you can jog the machine forward and backward using the jog arrows. There is an adjust button that will allow you to micro adjust the distance for each fold. There is a fold blade control button that will allow you to adjust the knifes manually out of the way if necessary to clear a paper jam. There is a parameters button that is used to change the default offsets of the machine. This is a password protected button. If you feel you need to change the default parameters please contact our customer service department for instructions.

18
MICRO ADJUSTING THE FOLD POSITION
It is very important to understand the relationship of the fold offset versus the crease offset. When folding a creased stock the nature of the creased paper when folded is to follow the crease. If possible, adjust the crease before micro adjusting the crease.
If you wish to move the position of the fold relative to the lead edge you would need to adjust the position of the crease and not necessarily the position of the fold. If you still feel you need to adjust the fold press the adjust button from the run screen. You can micro adjust each fold by pressing the arrow keys each direction. Each press will adjust by 1/10th of a mm. Each adjustment is relative to the one before it so if you adjust fold 1 by 3 clicks it will also move fold 2 as well in the same direction. To keep the subsequent folds in their same locations you would then need to adjust them each back the number of clicks you adjusted the previous location, in this case 3 clicks.
REPEAT LAST JOB Press the repeat last job button to go directly to the run screen and repeat the last job fold settings.
BI-PASS MODE Press the Bi-Pass mode button to enter Bi-Pass mode. This mode will allow paper to flow directly through the folding unit without folding the stocks. For some lighter stocks the knob setting must be set to the highest setting to allow for clearance of the exit roller.

19
TRANSPORT OPERATION
The Run Button will start the knife home function. Once the blades are in position the transport will start. This is about a 2 second delay and is normal. Press it again to stop the transport. Each Mode has a timeout feature to preserve the life of the machine.
A document may be slowly advanced through the transport by pushing and holding one of these buttons.
EXAMPLE: The motor should advance transport at slow speed and stop whenever your finger is lifted.
Controls on-off function of motor. EXAMPLE: Machine will run at mode and speed previously selected.
Machine will stop.
AUTO FOLD SETUP
HALF FOLD SETUP: Press the Auto Setup Button > Half > Paper Thickness > Adjust the Knob
Setting > OK, I have made the Adjustment > Start Measuring > Physically Run a sheet through the machine for the sensor to measure > Accept > Run.
20
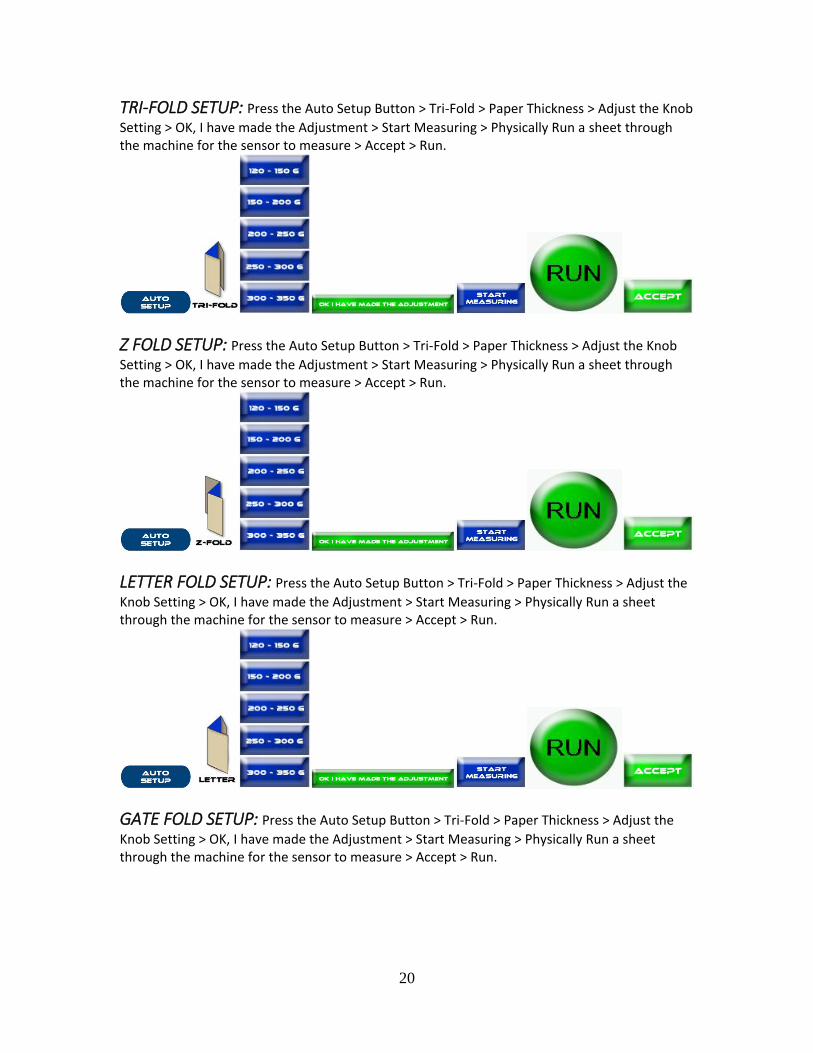
TRI-FOLD SETUP: Press the Auto Setup Button > Tri-Fold > Paper Thickness > Adjust the Knob
Setting > OK, I have made the Adjustment > Start Measuring > Physically Run a sheet through the machine for the sensor to measure > Accept > Run.
Z FOLD SETUP: Press the Auto Setup Button > Tri-Fold > Paper Thickness > Adjust the Knob
Setting > OK, I have made the Adjustment > Start Measuring > Physically Run a sheet through the machine for the sensor to measure > Accept > Run.
LETTER FOLD SETUP: Press the Auto Setup Button > Tri-Fold > Paper Thickness > Adjust the
Knob Setting > OK, I have made the Adjustment > Start Measuring > Physically Run a sheet through the machine for the sensor to measure > Accept > Run.
GATE FOLD SETUP: Press the Auto Setup Button > Tri-Fold > Paper Thickness > Adjust the
Knob Setting > OK, I have made the Adjustment > Start Measuring > Physically Run a sheet through the machine for the sensor to measure > Accept > Run.

21
DOUBLE PARALLEL FOLD SETUP: Press the Auto Setup Button > Tri-Fold > Paper
Thickness > Adjust the Knob Setting > OK, I have made the Adjustment > Start Measuring > Physically Run a sheet through the machine for the sensor to measure > Accept > Run.
MANUAL SETUP Manual Setup allows you to type in the distance in MM for the lengths you want the fold locations. This would allow for non-standard folds to be created. It is important to understand the way the machine folds when using the manual fold positions. If running a single fold you would only use the fold 1 position. When doing a tri-fold you would use both but understand that the first fold position is actually creating the second fold and the fold 2 setting is creating the first fold.

22
SAVING MANUAL FOLD JOBS Press the Manual Setup Button > Fold 1 > Enter In Distance For each fold in mm > Memory Save > Select Position to save in 1, 2, 3, or 4.
RECALLING MANUAL FOLD JOBS Press the Manual Setup Button > Memory Recall > 1, 2, 3, or 4 > Accept > Run.

23
IN FEED REGISTER GUIDE
ADJUSTING THE MICRO SKEW OF THE IN-FEED REGISTER
There is a skew adjust to the in-feed register that is set to square from the factory. If you are dealing with stock that is not cut square this is the procedure to adjusting the micro skew. You will need a 5/32 “L” Allen wrench to make this adjustment. There are 6 screws 2 by the skew adjust 2 in the middle and 2 right by the folding unit that need to be loosened to make this adjustment. Use the “L” Allen to adjust the hex bolt clock wise will adjust the register toward the operator counter clock wise will adjust the table to the non operator side.
Register Guide Ball Rack
Micro Skew Adjustment

24
DELIVERY TABLE The delivery table for the KF-200 is a motorized delivery that has a variable speed knob that is used to adjust the speed. It also has a smart sensor that ensures the paper only travel a short distance to ensure continued shingling. The speed of the conveyor is directly related to how tight the shingle of the sheets is. If the feed table is set too slow it will cause the paper to build up and could cause a paper jam.

25
CHECKING THE SENSORS 1. Turn machine power on and allow screen to turn on 2. There should be 2 lights on the sensor; a green indicating power is getting to the sensor and orange that is the reflecting signal. If both lights are not on, there is a problem and must be fixed before you are able to run. 3. Make sure the sensor reflector tape is located on the base plate and the red beam from the sensor is hitting the tape. If not loosen the screws on the sensor and adjust the beam until it is on the tape. 4. If all above steps work correctly, the sensor is working properly, if not, contact the service department.
ROTATING PLASTIC COVER This cover is not only a safety cover it also provides paper support for folding longer sheets in half. There is a safety switch that the cover engages and must be pressed or the machine will not function. Be very careful when opening this cover. Open it slowly and close it slowly as to make sure it does not break.

26
TROUBLE SHOOTING
POWER DOES NOT TURN ON 1. Check circuit breaker in electrical cabinet. 2. Check outlet for power. TRANSPORT “LOCKS UP” AFTER OR WHILE FOLDING
1. Check the knob setting. Increase gap. 2. Check the belts to ensure they are still tight. 3. Check pulleys to make sure they are securely tightened on shafts.
IN-FEED REGISTER NOT FEEDING CORRECTLY 1. Clean rollers. 2. Clean belt. 3. Make sure the paper is feeding into the belt portion of the register guide. FOLD IS NOT STRAIGHT
1. Check that the crease is square. 2. Check In-feed register that the sheet is registering all the way over.
NOT FOLDING IN THE CORRECT LOCATION 1. Not enough pressure on rollers. Check the knob setting. Decrease Gap.
2. Make sure there is no paper stuck in the machine. Restricting the paper travel. 3. Check for paper curl. Flatten sheet before feeding. FOLD APPEARS WEAK 1. Check the knob setting. Decrease Gap.
2. Micro adjust the crease location. TRANSPORT DOES NOT RUN AFTER PAPER JAM 1. Clear paper jam. 2. Motor driver possibly damaged. 3. Contact Customer Service. COUNTER NOT WORKING 1. Check the sensor.
2. Make sure the sensor is not blocked. TONER CRACKING AFTER FOLDED 1. Check the knob setting. Increase Gap. 2. Make sure the fold position is in alignment to the crease. PAPER JAM AT MOTORIZED DELIVERY 1. Check the position of the exit wheels. 2. Check delivery speed. Increase if necessary.

27
Page left blank intentionally

28
Martin Yale Industries, LLC
251 Wedcor Avenue, Wabash, IN 46992 • USA • Phone 260•563•0621 • Fax 260•563•4575
www.martinyale.com
M-S027972 R0 12/16