Embed Size (px)
Citation preview
Manual for KG-UVD1P Programming
Preparation: Equipment and accessories required
(a) A KG-UVD1P transceiver. (b) A serial port programming cable, OR: (c) A USB programming cable (with USB driver.) (d) The KG-UVD1P programming software.
Steps: There are some programming manual for your reference. Please read this before you
start up your first programming for wouxun KG-UVD1P series transceiver. This manual is still not perfect for any possible omission and any make-up information is welcome to keep us noted.
1. downloading:
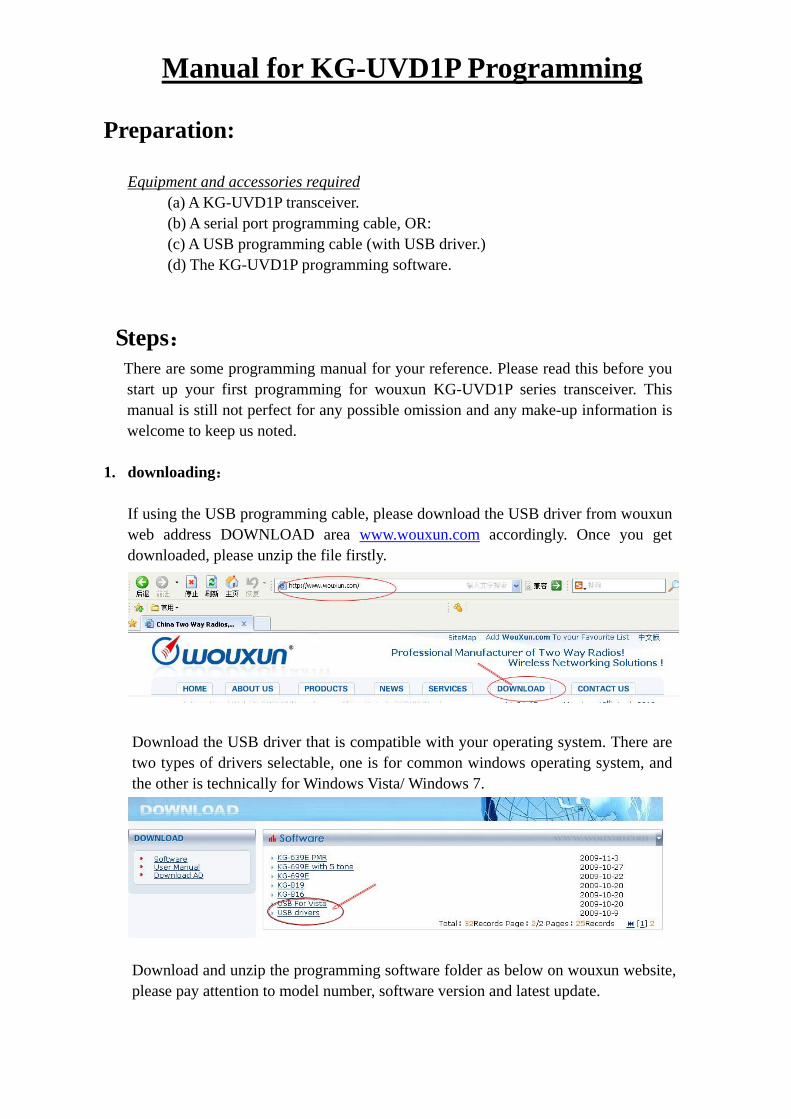
If using the USB programming cable, please download the USB driver from wouxun web address DOWNLOAD area www.wouxun.com accordingly. Once you get downloaded, please unzip the file firstly.
Download the USB driver that is compatible with your operating system. There are two types of drivers selectable, one is for common windows operating system, and the other is technically for Windows Vista/ Windows 7.
Download and unzip the programming software folder as below on wouxun website, please pay attention to model number, software version and latest update.

2. USB driver installment
Unzip the file, you will see the sub files as below picture. Please select the setup file to start up the installation. Follow the specified steps as request, at last, until you get FINISH to end installing the driver. Then restart your computer.
For detailed steps for installation, pls refer to the word file.
After the computer is restarted, plug into the USB programming cable and connect with your transceiver. Now you get the message that your computer successfully finds the new hardware and the USB driver is completed to use.
3. Cable ready
After installing the USB driver, carefully unclip the top of the plastic microphone socket cover and rotate it. (Note: The cover pivots at the bottom, and remains attached.) Insert the two pin end of the USB (or serial) cable and connect the other end to the computer.

★Note: Please make sure that the connection with the transceiver and your computer is contacted well. It is the first basic step to make sure that your following programming is going smoothly. Double check the cable is plug into your transceiver jack deeply enough, and the connection with your computer is good.
4. Software ready
After that, power on your transceiver and get your matching programming software ready. Please download the matching programming software, unzip it and fine the right procedure file icon as showed:
★Note: a. The downloaded file should be unzip firstly before being used. b. Please keep attention to our software updating on our official website. c. The programming software should be matching with your transceiver.
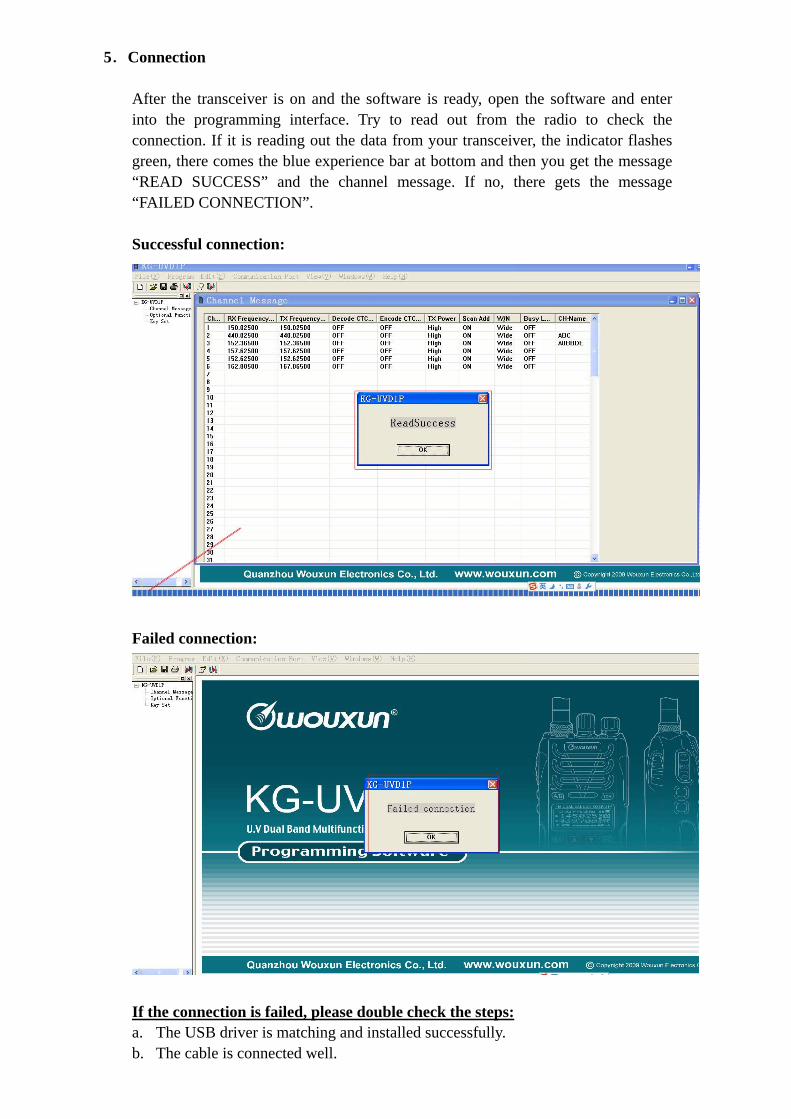
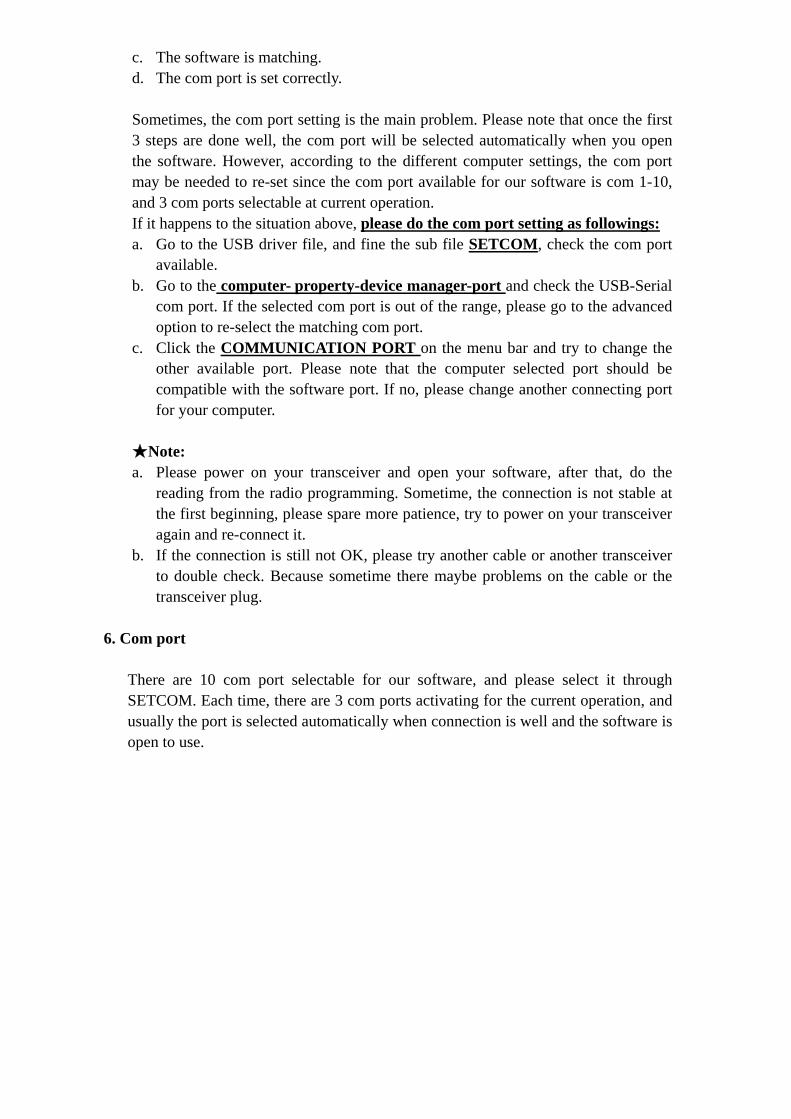
5.Connection After the transceiver is on and the software is ready, open the software and enter into the programming interface. Try to read out from the radio to check the connection. If it is reading out the data from your transceiver, the indicator flashes green, there comes the blue experience bar at bottom and then you get the message “READ SUCCESS” and the channel message. If no, there gets the message “FAILED CONNECTION”. Successful connection:
Failed connection:
If the connection is failed, please double check the steps: a. The USB driver is matching and installed successfully. b. The cable is connected well.
c. The software is matching. d. The com port is set correctly.
Sometimes, the com port setting is the main problem. Please note that once the first 3 steps are done well, the com port will be selected automatically when you open the software. However, according to the different computer settings, the com port may be needed to re-set since the com port available for our software is com 1-10, and 3 com ports selectable at current operation. If it happens to the situation above, please do the com port setting as followings: a. Go to the USB driver file, and fine the sub file SETCOM, check the com port
available. b. Go to the computer- property-device manager-port and check the USB-Serial
com port. If the selected com port is out of the range, please go to the advanced option to re-select the matching com port.
c. Click the COMMUNICATION PORT on the menu bar and try to change the other available port. Please note that the computer selected port should be compatible with the software port. If no, please change another connecting port for your computer.
★Note: a. Please power on your transceiver and open your software, after that, do the
reading from the radio programming. Sometime, the connection is not stable at the first beginning, please spare more patience, try to power on your transceiver again and re-connect it.
b. If the connection is still not OK, please try another cable or another transceiver to double check. Because sometime there maybe problems on the cable or the transceiver plug.
6. Com port
There are 10 com port selectable for our software, and please select it through SETCOM. Each time, there are 3 com ports activating for the current operation, and usually the port is selected automatically when connection is well and the software is open to use.

★Note: If the connection is well, actually you can see the connected com port number is the device manager. There shows the port of the computer which is being connected.
7. Language options
This software can support 3 options for the language setting: simplified Chinese, Chinese Traditional and English. Please choose the required LANGUAGE from the menu bar and click OK.
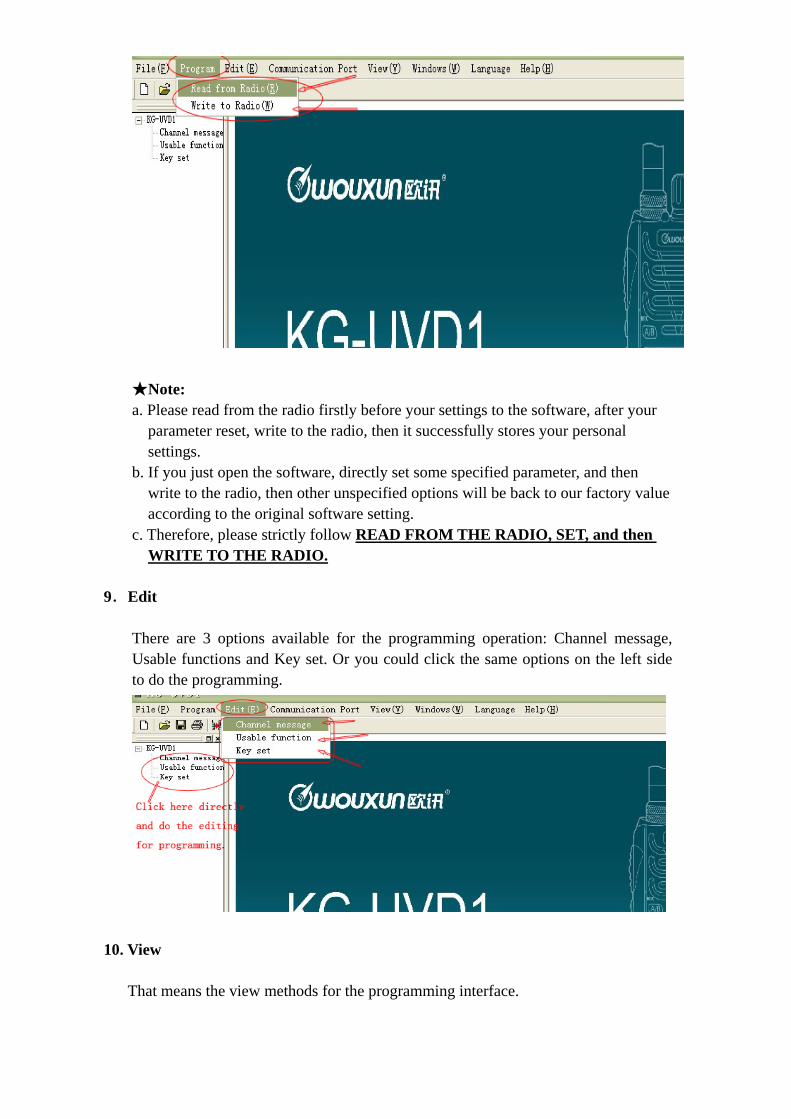
8. Program
The software can offer two programming options: Read from Radio and Write to Radio.
★Note: a. Please read from the radio firstly before your settings to the software, after your
parameter reset, write to the radio, then it successfully stores your personal settings.
b. If you just open the software, directly set some specified parameter, and then write to the radio, then other unspecified options will be back to our factory value according to the original software setting.
c. Therefore, please strictly follow READ FROM THE RADIO, SET, and then WRITE TO THE RADIO.
9.Edit
There are 3 options available for the programming operation: Channel message, Usable functions and Key set. Or you could click the same options on the left side to do the programming.
10. View That means the view methods for the programming interface.

11. Completion
After finishing the programming or making any alterations save and exit.
12. Help
There is an option called Assistance Topics, which introduces about how to program better for each programming step in detail. Please refer to some instruction by yourself.