Embed Size (px)
Citation preview
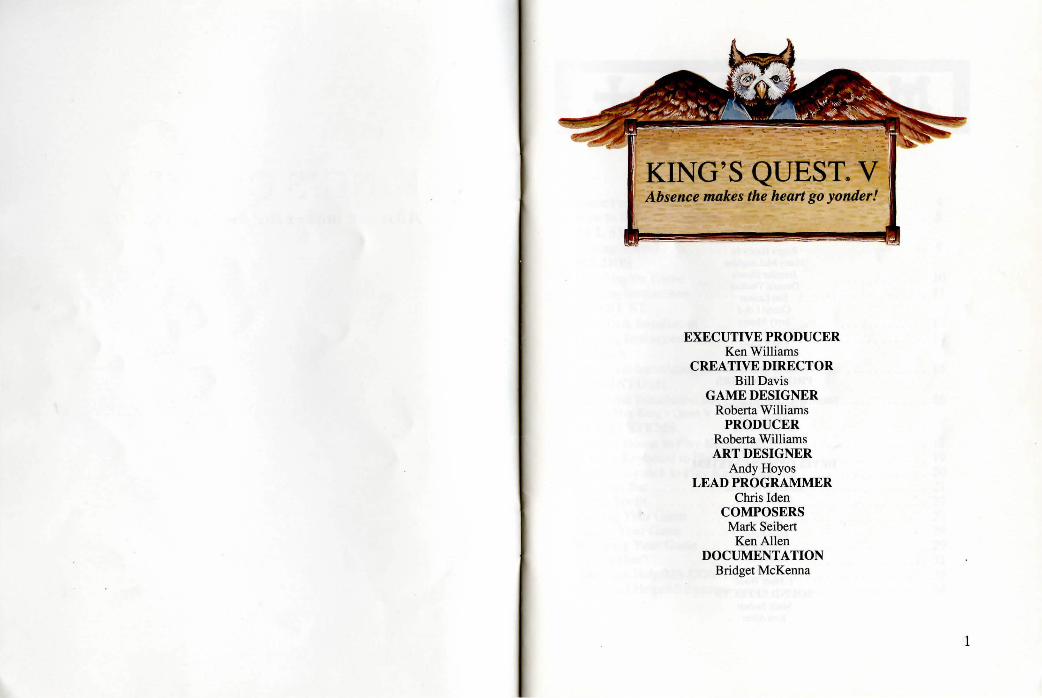
KING'S QUEST. V Absence makes the heart go yonder!
EXECUTIVE PRODUCER Ken Williams
CREATIVE DIRECTOR Bill Davis
GAME DESIGNER Roberta Williams
PRODUCER Roberta Williams ART DESIGNER
Andy Hoyos LEAD PROGRAMMER
Chris Iden COMPOSERS
Mark Seibert Ken Allen
DOCUMENTATION Bridget McKenna
1

2
CREATIVE CONSULT ANT William D. Skirvin
ARTISTS Ernie Chan
Douglas Herring Jeff Crowe
William D. Skirvin Maurice Morgan Vas Nokhoudian Barry T. Smith Cindy Walker Deena Benz
Tamra Dayton Dana Dean
Roger Hardy Jr. Harry McLaughlin
Jennifer Shontz Deanna Yhalkee
Jim Larson Cheryl Loyd Jerry Moore
Cheryl Sweeney Eric Kasner
Hector Martinez Richard D. Zeigler-Martin
PROGRAMMERS Chris Hoyt
Robert W. Lindsley Raoul Said
Doug Oldfield Carlos Escobar
Oliver Brelsford DEVELOPMENT SYSTEM
Jeff Stephenson Robert E. Heitman
Pablo Ghenis Corey Cole
Dan Foy John Rettig John Hartin Larry Scott Eric Hart
J. Mark Hood SOUND EFFECTS
Mark Seibert Ken Allen
THE KING'S QUEST V MANUAL TABLE OF CONTENTS
Quest For the Castle . . . . . . . . . . . . . . . . . . . . . . . . . . . . . . . . . . 4 How to Read This Manual . . . . . . . . . . . . . . . . . . . . . . . . . . . . . 8 ALL SYSTEMS Getting Started . . . . . . . . . . . . . . . . . . . . . . . . . . . . . . . . . . . . . . . 9 MS-DOS Installing the Game . . . . . . . . . . . . . . . . . . . . . . . . . . . . . . . . . . . 10 Loading Instructions . . . . . . . . . . . . . . . . . . . . . . . . . . . . . . . . . . 11 ATARI ST Hard Disk Installation . . . . . . . . . . . . . . . . . . . . . . . . . . . . . . . . . 13 Loading Instructions . . . . . . . . . . . . . . . . . . . . . . . . . . . . . . . . . . 14 AMIGA Hard Disk Installation and Loading Instructions ............ 15 MACINTOSH Hard Disk Installation and Loading Instructions . . . . . . . . . . . . 16 How to Play King's Quest V ALL SYSTEMS Using a Mouse to Play King's Quest V . . . . . . . . . . . . . . . . . . . 17 Using a Keyboard to Play King's Quest V ................. 19 Using a Joystick to Play King's Quest V . ......... ........ 20 The Icon Bar ........... .. . .. ..... . . ..... . .. ......... 21 Magic Spells . . . . . . . . . . . . . . . . . . . . . . . . . . . . . . . . . . . . . . . . 27 Pausing Y otir Game . . . . . . . . . . . . . . . . . . . . . . . . . . . . . . . . . . 27 Saving You; Game ................................... 28 Restoring Your Game . . . . . . . . . . . . . . . . . . . . . . . . . . . . . . . . . 29 Need a Hint? . . . . . . . . . . . . . . . . . . . . . . . . . . . . . . . . . . . . . . . . 31 Technical Help/MS-DOS ..... . ........................ 33 Technical Help/ All Systems . . . . . . . . . . . . . . . . . . . . . . . . . . . . 34
3
I + I ••• .. .
mn~(~'1'.&al
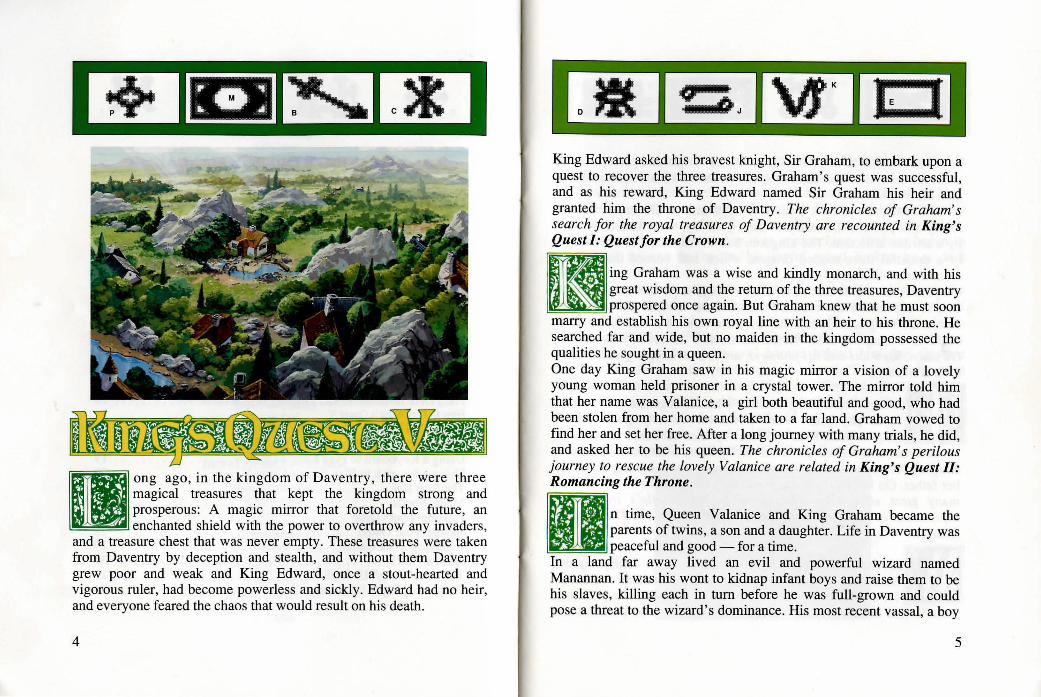
II ong ago, in the kingdom of Daventry, there were three magical treasures that kept the kingdom strong and prosperous: A magic mirror that foretold the future , an enchanted shield with the power to overthrow any invaders,
and a treasure chest that was never empty. These treasures were taken from Daventry by deception and stealth, and without them Daventry grew poor and weak and King Edward, once a stout-hearted and vigorous ruler, had become powerless and sickly. Edward had no heir, and everyone feared the chaos that would result on his death.
4
King Edward asked his bravest knight, Sir Graham, to embark upon a quest to recover the three treasures. Graham's quest was successful, and as his reward, King Edward named Sir Graham his heir and granted him the throne of Daventry. The chronicles of Graham's search for the royal treasures of Daventry are recounted in King's Quest I: Quest for the Crown .
•
ing Graham was a wise and kindly monarch, and with his great wisdom and the return of the three treasures, Daventry prospered once again. But Graham knew that he must soon
marry and establish his own royal line with an heir to his throne. He searched far and wide, but no maiden in the kingdom possessed the qualities he sought in a queen. One day King Graham saw in his magic mirror a vision of a lovely young woman held prisoner in a crystal tower. The mirror told him that her name was Valanice, a girl both beautiful and good, who had been stolen from her home and taken to a far land. Graham vowed to find her and set her free. After a long journey with many trials, he did, and asked her to be his queen. The chronicles of Graham's perilous journey to rescue the lovely Valanice are related in King's Quest II: Romancing the Throne.
D n time, Queen V alanice and King Graham became the parents of twins, a son and a daughter. Life in Daventry was peaceful and good - for a time.
In a land far away lived an evil and powerful wizard named Manannan. It was his wont to kidnap infant boys and raise them to be his slaves, killing each in turn before he was full-grown and could pose a threat to the wizard 's dominance. His most recent vassal, a boy
5
I le i 11o-:. .. [!] he called Gwydion, was, however, unusually bright and perceptive. He mastered several of Manannan' s spells and turned them against him to gain his freedom. After a time, Gwydion's travels brought him to Daventry, not the lovely and peaceful Daventry of days gone by, but a land devastated by a terrible affliction. The kingdom had fallen victim to the ravages of a dreadful three-headed dragon, which had burned the land all around and killed many people. Gwydion was able to use his newfound magical powers to destroy the dragon and rescue an intended victim from its lair. He was taken before the King and Queen and rewarded in such a way as he never could have imagined in his life as Manannan's slave. The chronicles of Gwydion, his trials and his journeys, are told in King's Quest III: To Heir is Human.
D n later years, King Graham's health began to fail, and the royal physicians were powerless to help him. Only a magical fruit from the faraway land of Tamir could bring
about a cure and restore the health of Daventry's monarch. Graham's daughter, Princess Rosella, set off in pursuit of this healing magic for her father. On her journey, she performed many brave deeds, and had many great adventures. The chronicles of Rosella's travels and experiences in Tamir are described in King's Quest IV: The Perils of Rosella.
ll ith the king's health fully restored, and his family together once more, it was a happy and fulfilled Graham who set out for a walk in the forest one spring day almost a year since
Rosella had returned from Tamir. The kingdom was peaceful and
6
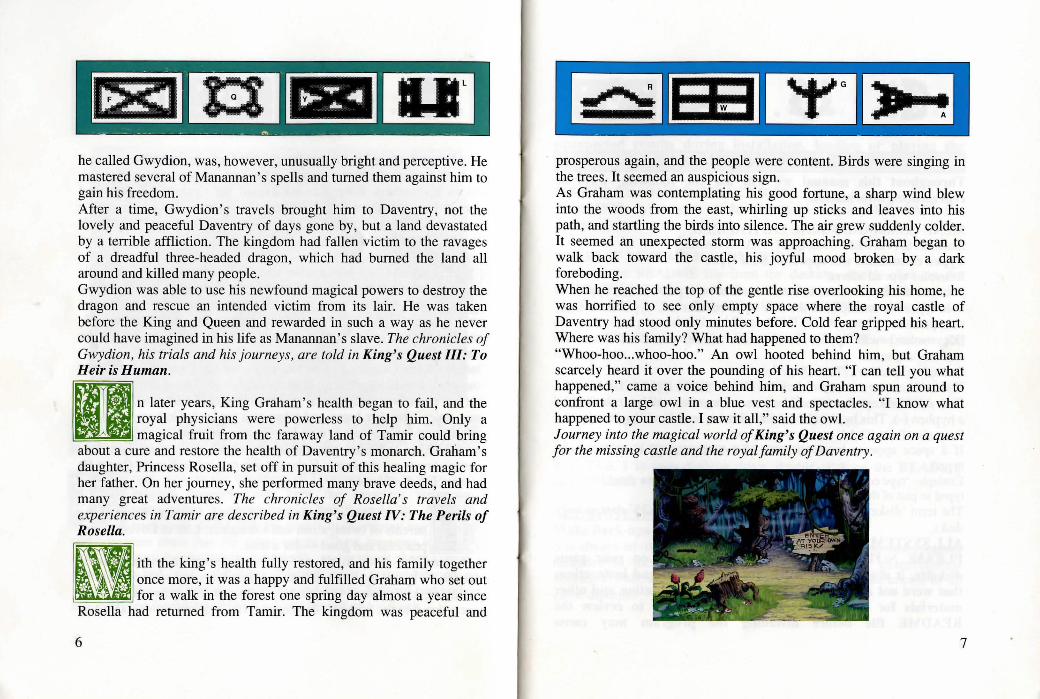
I ....-...;. I w I 'Y' I ....,, prosperous again, and the people were content. Birds were singing in the trees. It seemed an auspicious sign. As Graham was contemplating his good fortune, a sharp wind blew into the woods from the east, whirling up sticks and leaves into his path, and startling the birds into silence. The air grew suddenly colder. It seemed an unexpected storm was approaching. Graham began to walk back toward the castle, his joyful mood broken by a dark foreboding. When he reached the top of the gentle rise overlooking his home, he was horrified to see only empty space where the royal castle of Daventry had stood only minutes before. Cold fear gripped his heart. Where was his family? What had happened to them? "Whoo-hoo .. . whoo-hoo." An owl hooted behind him, but Graham scarcely heard it over the pounding of his heart. "I can tell you what happened," came a voice behind him, and Graham spun around to confront a large owl in a blue vest and spectacles. "I know what happened to your castle. I saw it all," said the owl. Journey into the magical world of King's Quest once again on a quest for the missing castle and the royal family of Daventry.
7
How to Read this Manual Throughout this manual we will use the following ways of representing information:
MENU COMMANDS will be CAPITALIZED. Example: SA VE, RESTORE, QUIT, PAUSE GAME Typed commands will appear as bold type. Example: 'type cd \sierra ' Portions of the command line not meant to be typed will not appear in bold type. For example, in the line ' type cd \sierra' , ' type' should nQ1
be typed. [Keystrokes] will appear in brackets setting them off from the surrounding text. Example: [Spacebar] , [Tab], [PageUp] The brackets are not keystrokes and should not be typed. Two or more keys that should be pressed together will be separated by a hyphen (-). This hyphen is not a keystroke, and should not be typed. Example: 'Press [Ctrl-1] to view your inventory.' If a space appears between parts of a command, it .is meant to be typed. Example: 'type cd \sierra ' (the space between cd and \sierra should be typed as part of the command) The term 'diskette' is used to refer to either 3.5" or 5.25" data storage disks. ALL SYSTEMS: Readme Files PLEASE NOTE: If there is a README file on your game diskette, it may contain important information and instructions that were not available at the time the documentation and other materials for this game were printed. Failure to review the README file before installing the program may cause
8
unexpected results during installation, loading or playing the game.
MS-DOS README INSTRUCTIONS From DOS, type type readmejmore to see the README file onscreen.
ATARI ST README INSTRUCTIONS To view the README file from the desktop, double-click on the README.DOC icon. You will see a message box with choices for SHOW, PRINT, and CANCEL. Choose SHOW to view the file onscreen one page at a time. Press [ENTER] to see the next screen. Choose PRINT to print the file. Choose CANCEL to escape the message box.
AMIGA README INSTRUCTIONS With Disk 1 in your diskette drive, double-click on the SIERRA disk icon, then double-click on the README.DOC icon.
MACINTOSH README INSTRUCTIONS With Disk 1 in your diskette drive, double-click on the README icon.
ALL SYSTEMS: Getting Started Make Back-ups It is always advisable to make back-up copies of your master program diskettes to increase the life of the masters and guard against accidents. Follow your computer' s instructions to make copies of all game diskettes.
9
I ltrl, I +, I • ., I . + I Create a 'Save Game' Disk Even if you will be playing from a hard disk, you may want to format a blank diskette for saving games. Follow your computer's instructions to format a blank diskette and keep it handy for saving your game as you play. For some helpful tips on saving games, see 'Saving Your Game' (page 28). About the Drivers Disk When installing your program, you may be prompted to insert a 'Drivers ' disk. If you receive this prompt, please examine your disks, insert the disk marked 'Drivers' and press [ENTER] so that the appropriate drivers will be loaded. Some games do not include a separate 'Drivers ' disk.
MS-DOS INST ALLING THE GAME
Look at the headings below for the combination of diskette drives that describes your system, and read the instructio~s for that particular combination to install the game.
1 Low Density (360K) 5.25" drive + 1 3.5" drive: 1. Place the back-up copy you have made of the 5.25" STARTUP diskette into the 5.25" drive. 2. Type the letter of the drive you have placed the diskette into followed by a colon (for example: a:), and press [ENTER] . Type: install and press [ENTER]. All other diskettes you will be prompted to insert during the INSTALL procedure will be 3.5" diskettes. The 5.25" STARTUP diskette will remain in your drive at all times while you are playing the game.
10
lu lMlc l I 1 High Density (l.2M) 5.25" drive + 1 3.5" drive: 1. Place the copy you have made of the 3.5" STARTUP diskette into the 3.5" drive. 2. Type the letter of the drive you have placed the diskette into followed by a colon (for example: a:) , and press [ENTER]. Type: install and press [ENTER]. All other diskettes you will be prompted to insert during the INSTALL procedure will be 5.25" diskettes. The 3.5 STARTUP diskette will remain in your drive at all times while you are playing the game.
1 High Density (1.2M) 5.25" drive and 1 Low Density (360K) 5.25" drive: 1. Place the back-up copy you have made of the 5.25" STARTUP diskette into the Low Density drive. 2. Type the letter of the drive you have placed the diskette into followed by a colon (for example: a:), and press [ENTER]. Type: install and press [ENTER]. All other diskettes you will be prompted to insert during the INST ALL procedure will be High Density diskettes. The STARTUP diskette will remain your drive at all times while you are playing the game.
2 Low Density 5.25" drives: (If both your drives are low density, it will be necessary for you to order King's Quest V in the special low-density version directly from Sierra On-Line.) Insert the STARTUP diskette into either drive. Type the letter of the drive you have placed the diskette into followed by a colon (for
11
example: a:), and press [ENTER]. Type: install and press [E~ffER]. Insert the other disks as prompted by the INST ALL procedure mto the other drive. The STARTUP diskette will remain in the original drive at all times while you are playing the game. The INST ALL Procedure Answer the onscreen questions using the up and down [Arrow] keys to highlight your selections, then press [ENTER] to select. Installing to Hard Disk You will be asked if you wish to install the game on your hard disk. If you do not wish the game to be installed on your hard disk, press [ESC] to skip this step. If you want to install the game on your hard disk, enter the letter designation of your hard disk (usually C) and follow the prompts. There are lli'.Q Hard Disk Installation options to choose from: Regular Install will copy the contents of all game disks to your hard drive. Choose Regular Install if you want to install the entire game. Small Install will copy only the contents of the STARTUP disk onto your hard disk. As you play the game, you will be prompted to ins~rt other game disks as necessary. The INST ALL procedure will recommend Small Install if you do not have the minimum amount of storage space available on your hard disk for the entire game. Choose Small Install if you want to install STARTUP files to your hard disk for ease of play, but do not have enough memory (or do not want to use enough memory) to install the entire game.
12
I LOADING INSTRUCTIONS After completing the INST ALL procedure: From diskettes: 1. Place Disk 1 into the A: drive. 2. Type a: and press [ENTER]. 3. Type kq5 and press [ENTER]. From hard disk: From your root directory, type kq5 and press [ENTER].
ATARI ST HARD DISK INSTALLATION There are lli'.Q Hard Disk Installation options to choose from: Regular Install will copy the contents of al~ game disks ~o your hard drive. Choose Regular Install if you want to mstall the entire game. Small Install will copy only the contents of the STARTUP disk. onto your hard disk. As you play the game, you will be prompted to ms~rt other game disks as necessary. The INST AL~. procedure will recommend Small Install if you do not have the mm1mum amount of storage space available on your hard disk for th~ entire game. Cho~se Small Install if you want to install STARTUP files to your hard disk for ease of pl~y, but do not have enough memory to install the entire game. . . . . 1. Open the hard disk by double-clicking on its icon. . 2. Create a game folder by choosing NEW FOLDER ... ~ro'!1 the F~le menu. Name the new folder, then open it by double-clicking on its icon. 3. Place Disk 1 in drive a: .
13
I ---Em I 4. Copy the game disk into the new game folder by dragging the drive a: icon into the window you opened in Step 2. 5. Repeat steps 3 and 4 for each of the other game disks. 6. Put the master disks away in a safe place. CHOOSE A MUSIC DEVICE (Optional) Your Sierra game is initially set up to play music and sounds through the Atari ST's internal speaker. If you have one of the supported MIDI synthesizers, you may run the MUSIC program to have the game play music through the synthesizer. 1. Open the game disk/folder by double-clicking on its icon. 2. Run the MUSIC program by double-clicking on the MUSIC.PRG icon. 3. Select MUSIC DEVICE from the Options menu. 4. Select your synthesizer (or 'Atari ST Internal Sound' ) by clicking on the appropriate button. Then click on OK. 5. Select INSTALL GAME from the File menu. This will replace the RESOURCE.CFG file on your disk. Please note: It is important to tum your synthesizer on before starting the game. LOADING INSTRUCTIONS From diskettes: 1. Place Disk 1 in drive a:, and open the disk by double-clicking on its icon. 2. Start the game by double clicking on SIERRA.PRG. From A Hard Disk: 1. Open the disk by double-clicking on its icon, then open the game folder by double-clicking on the game folder icon. 2. Start the game by double-clicking on SIERRA.PRG.
14
AMIGA
--61111-
HARD DISK INSTALLATION
la l I PLEASE NOTE: At least lM of memory is needed in order to run King's Quest V on your Amiga if you want to install the entire game to a hard disk. PLEASE NOTE: RENAME your copies of all game disks to remove the words 'COPY OF' from the disk name. If the words 'COPY OF' are not removed from the disk names of ALL the copies, the system will continue to ask for the original disk, and will not run the game. There are two Hard Disk Installation options to choose from: Regular Install will copy the contents of all game disks to your hard drive. Choose Regular Install if you want to install the entire game. Small Install will copy only the contents of the STARTUP disk onto your hard disk. As you play the game, you will be prompted to insert other game disks as necessary. The INST ALL procedure will recommend Small Install if you do not have the minimum amount of storage space available on your hard disk for the entire game. Choose Small Install if you want to install STARTUP files to your hard disk for ease of play, but do not have enough memory to install the entire game. 1. Boot your system with Workbench, and insert Disk 1 of your Sierra game. 2. Double-click on the disk icon, then double-click on the INST ALL icon. 3. Follow the onscreen prompts to complete the installation. LOADING INSTRUCTIONS From Diskettes: 1. Insert Disk 1 into drive DFO:.
15
I + I 2. Turn on your system. From Hard Disk: 1. Load Workbench and double-click on your hard disk icon. 2. Double-click on the SIERRA drawer. 3. Double-click on the KING'S QUEST V drawer. 4. Double-click on the KING'S QUEST V icon.
MACINTOSH HARD DISK INSTALLATION There are two Hard Disk Installation options to choose from: Regular Install will copy the contents of all game disks to your hard drive. Choose Regular Install if you want to install the entire game. Small Install will copy only the contents of the STARTUP disk onto your hard disk. As you play the game, you will be prompted to insert other game disks as necessary. The INST ALL procedure will recommend Small Install if you do not have the minimum amount of storage space available on your hard disk for the entire game. Choose Small Install if you want to install STARTUP files to your hard disk for ease of play, but do not have enough memory to install the entire game. 1. Place the back-up copy you have made of Disk 1 in the diskette drive. 2. Double click on the INST ALL icon, and follow the on-screen prompts to complete the installation. LOADING INSTRUCTIONS After completing the INST ALL procedure: From Diskettes: 1. Place the back-up copy you have made of Disk 1 in the diskette drive.
16
2. Double-click on the King's Quest V icon. From Hard Disk: 1. Double-click on the Sierra folder. 2. Double-click on the King's Quest V folder. 3. Double-click on the King's Quest V icon.
How To Play King's Quest V
ALL SYSTEMS Using a Mouse to Play King's Quest V To position the onscreen cursor, move the mouse to the desired position. To move your character, position the cursor and click the mouse button. To execute a command, click the mouse button (multi-button mouse users, click the left button). For more detailed mouse instructions, see below.
1- Button Mouse
[ENTER]
[SHIFT- CLICK] Cycle through available cursors. [Ctrl- Click] Toggle between WALK and last cursor chosen.
17
1~1 ~ lu l w I 2 - Button Mouse
[ENTER]
3- Button Mouse
[ENTER]
Cycle through _. available cursors
[Ctrl- Click] Toggle between WALK and last cursor chosen.
Toggle between WALK and last cursor chosen.
~ Cycle through available cursors.
For other commands, mouse users can use the numeric keypad.
18
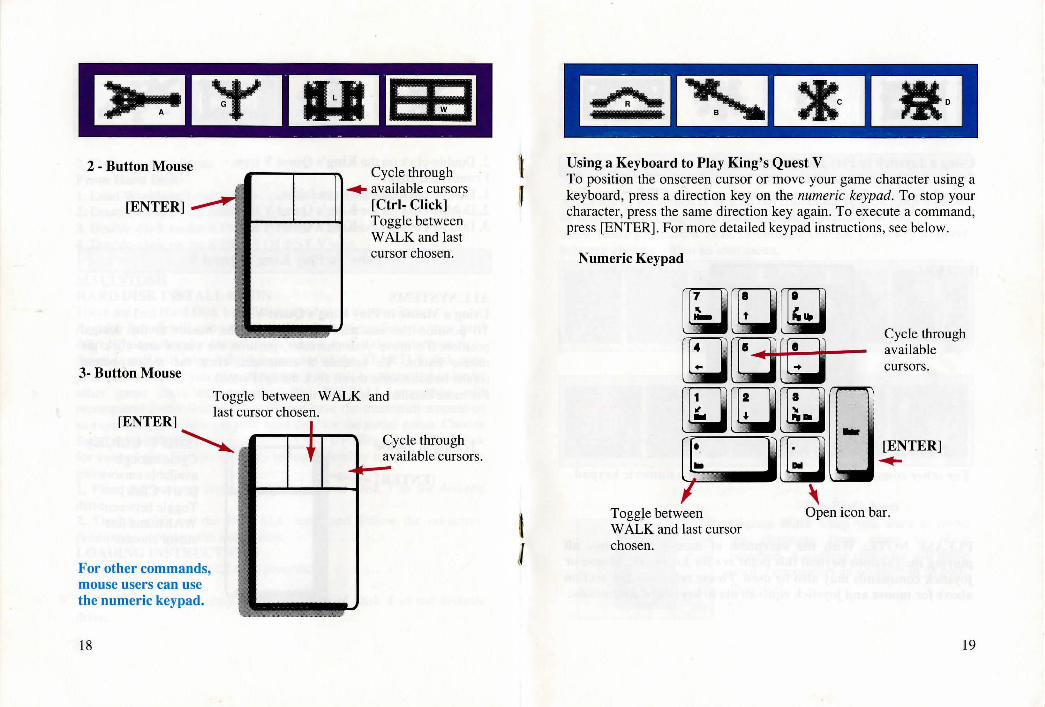
l l
Using a Keyboard to Play King's Quest V To position the onscreen cursor or move your game character using a keyboard, press a direction key on the numeric keypad. To stop your character, press the same direction key again. To execute a command, press [ENTER]. For more detailed keypad instructions, see below.
Numeric Keypad
ToggJe between WALK and last cursor chosen.
Cycle through available cursors.
Open icon bar.
19
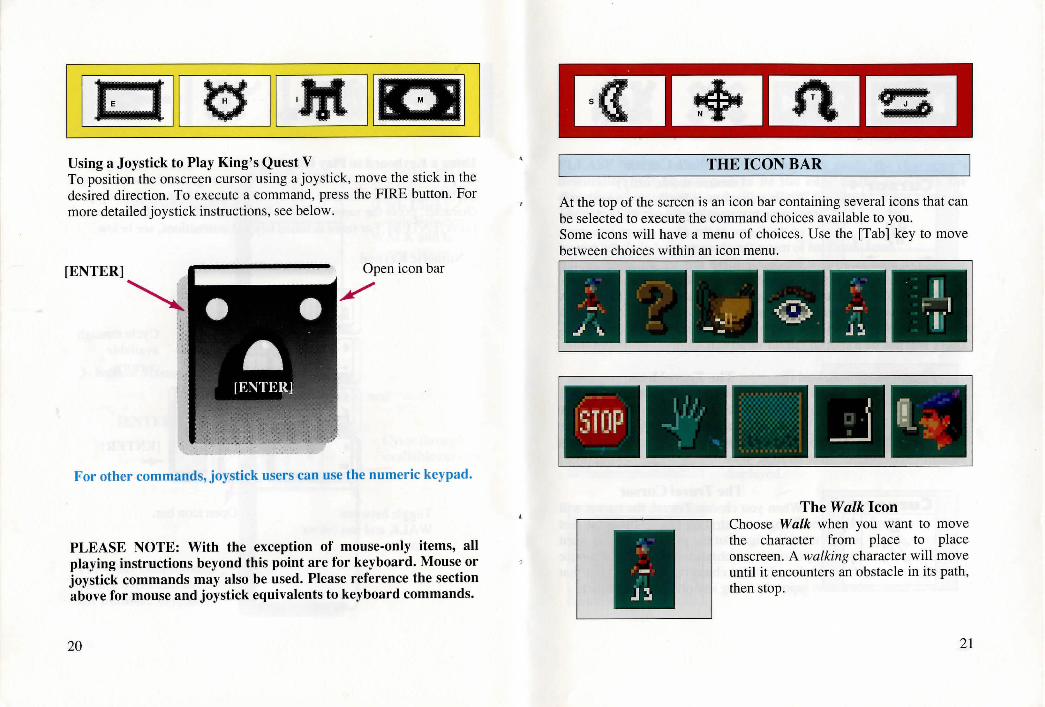
Using a Joystick to Play King's Quest V To position the onscreen cursor using a joystick, move the stick in the desired direction. To execute a command, press the FIRE button. For more detailed joystick instructions, see below.
[ENTER] Open icon bar
r
For other commands, joystick users can use the numeric keypad.
PLEASE NOTE: With the exception of mouse-only items, all playing instructions beyond this point are for keyboard. Mouse or joystick commands may also be used. Please reference the section above for mouse and joystick equivalents to keyboard commands.
20
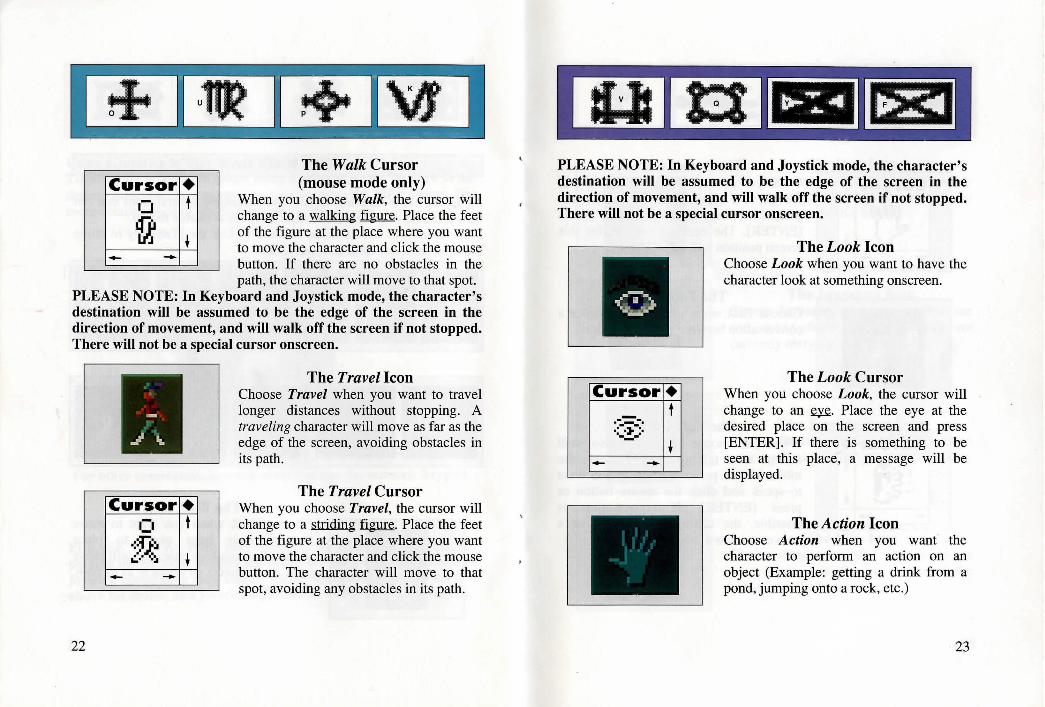
THE ICON BAR
At the top of the screen is an icon bar containing several icons that can be selected to execute the command choices available to you. Some icons will have a menu of choices. Use the [Tab] key to move between choices within an icon menu.
The Walk Icon Choose Walk when you want to move the character from place to place onscreen. A walking character will move until it encounters an obstacle in its path, then stop.
21
I + I ,~ I+ 1'4 I --- -- - - - --- ---~ . - - - - - - -
Cursor Cl Lfi• tJ;
- .....
• t
~
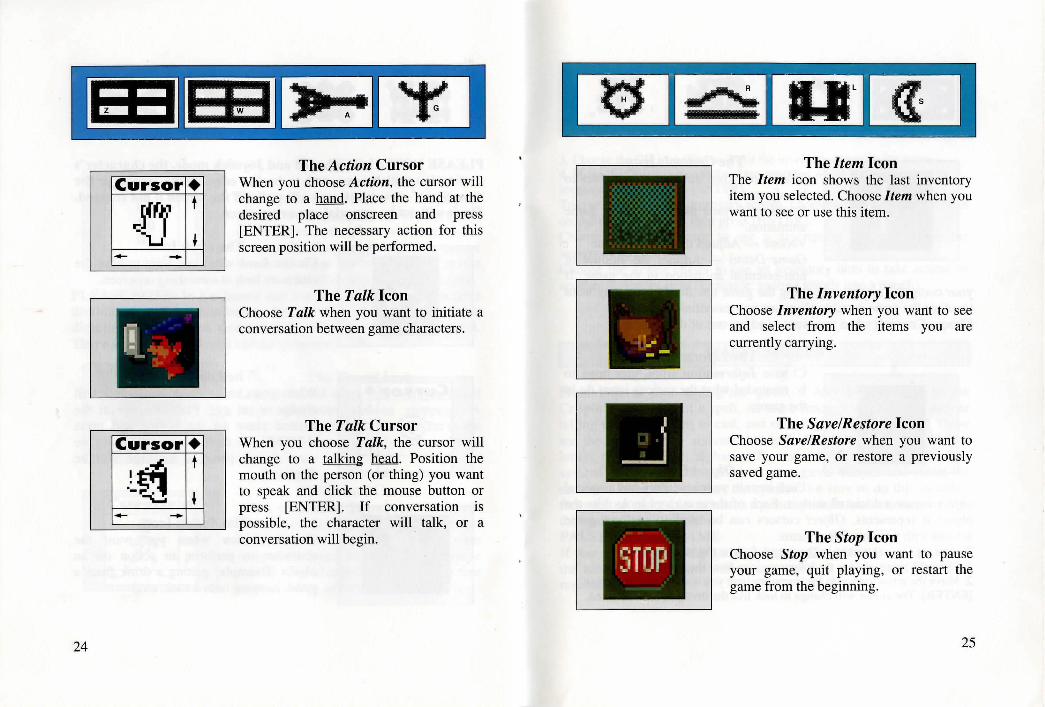
The Walk Cursor (mouse mode only)
When you choose Walk, the cursor will change to a walking figure. Place the feet of the figure at the place where you want to move the character and click the mouse button. If there are no obstacles in the path, the character will move to that spot.
PLEASE NOTE: In Keyboard and Joystick mode, the character's destination will be assumed to be the edge of the screen in the direction of movement, and will walk off the screen if not stopped. There will not be a special cursor onscreen.
Cursor C•
-:=ij:. .:,..· ··:. - .....
22
• t
~
The Travel Icon Choose Travel when you want to travel longer distances without stopping. A traveling character will move as far as the edge of the screen, avoiding obstacles in its path.
The Travel Cursor When you choose Travel, the cursor will change to a striding ~- Place the feet of the figure at the place where you want to move the character and click the mouse button. The character will move to that spot, avoiding any obstacles in its path.
.,.... ........ .. I I PLEASE NOTE: In Keyboard and Joystick mode, the character's destination will be assumed to be the edge of the screen in the direction of movement, and will walk off the screen if not stopped. There will not be a special cursor onscreen.
Cursor
-- -<~>
- .....
• t
~
The Look Icon Choose Look when you want to have the character look at something onscreen.
The Look Cursor When you choose Look, the cursor will change to an ~- Place the eye at the desired place on the screen and press [ENTER]. If there is something to be seen at this place, a message will be displayed.
The Action Icon Choose Action when you wanf the character to perform an action on an object (Example: getting a drink from a pond, jumping onto a rock, etc.)
23
I
24
-~- lsal~I '¥ I Cursor
~''~~ -=- I 1..J - -
Cursor
.!~ -.... ""'\...:.i - -
• t
~
• t
~
The Action Cursor When you choose Action, the cursor will change to a hand. Place the hand at the desired place onscreen and press [ENTER] . The necessary action for this screen position will be performed.
The Talk Icon Choose Talk when you want to initiate a conversation between game characters.
The Talk Cursor When you choose Talk, the cursor will change to a talking ~. Position the mouth on the person (or thing) you want to speak and click the mouse button or press [ENTER]. If conversation is possible, the character will talk, or a conversation will begin.
- - - - - - -- - . - - - -- -
The Item Icon The Item icon shows the last inventory item you selected. Choose Item when you want to see or use this item.
The Inventory Icon Choose Inventory when you want to see and select from the items you are currently carrying.
The Save/Restore Icon Choose Save/Restore when you want to save your game, or restore a previously saved game.
The Stop Icon Choose Stop when you want to pause your game, quit playing, or restart the game from the beginning.
25
I The Controls Icon
This icon allows three game variables to be adjusted: Speed - Adjusts the speed of the game animation. Volume -Adjusts the sound volume Game Detail - Adjusts the amount of non-essential animation in the game. If
your computer system is running the game too slowly, you may want to adjust the game detail to eliminate non-essential animation. Choose Controls when you want to adjust one of these areas.
The Information Icon Choose Information when you need to be reminded what the various icons do in the game.
Object Cursors Each item in your inventory has a special
object cursor associated with it. Each of these cursors looks like the object it represents. Object cursors can be used to perform game actions with your inventory items. To use an Object cursor in the game, follow the steps below: 1. From the game, choose the Inventory icon from the icon bar. 2. Move the arrow cursor to the inventory item you want to use, and press [ENTER]. The cursor will change to look like the item you have selected.
26
3. Choose the OK icon. You will exit the inventory screen to the game. 4. Move the Object cursor to the place onscreen where you want to use the inventory item and press [ENTER]. To use cursors in the inventory ~. choose a cursor and position it on the inventory item, then press [ENTER]. Choose the Look cursor to see a description of the item on the inventory screen. Choose the Action cursor to use an inventory item to take action on another inventory item (Example: putting jewels into a pouch).
MAGIC SPELLS
From time to time during the game, it may be necessary to use Crispin's wand to cast a spell. At these times, a window will appear telling you which spell to cast, and showing you four symbols. These are the symbols that activate the spell. Below the symbols are the letters of the English alphabet. To make the spell work, find each symbol and its matching letter in your game manual and select the onscreen letter that matches the symbol. Be sure to do this in order, from left to right. If you match up the symbols and letters correctly, the spell will be successful. PAUSING YOUR GAME If you wish to pause the game, select the Stop icon (stop sign) from the icon bar. The game will pause until you select CONTINUE to resume play.
27

I + I ... " .. ..
SAVING YOUR GAME IMPORTANT!! If you're playing from diskettes, you must have a separate formatted diskette ready before you can save a game. Since each disk can only hold a limited number of games, we recommend that you have more than one disk formatted, in order to assure adequate space for save game storage. To allow for errors in judgement and creative exploration, we recommend that you frequently save your game in progress, and that you save several different games from different points as you play. You will always want to save your game before encountering potentially dangerous situations. You should also save your game after you have made significant progress. You may name your saved games using standard English phrases. For example, if you are standing on a beach, you might call your game ' standing on beach ', or simply 'beach'. SINGLE DISKETTE DRIVE SYSTEMS 1. Choose the Save/Restore icon (diskette) from the icon bar and select SA VE GAME. The Save Game menu will appear. 2. When you are prompted to insert your Save Game diskette in the disk drive, replace your game diskette with a blank formatted diskette. 3. Select OK. 4. Type the description of your saved game, and press [ENTER] to save the game. When the process is complete, you will be prompted to re-insert the game diskette. DOUBLE DISKETTE DRIVE SYSTEMS 1. Choose the Save/Restore icon (diskette) from the icon bar and select SA VE GAME. The Save Game menu will appear. 2. You will be prompted to insert your Save Game diskette into your primary drive (example: a: or dfO:). Using your [Tab] key, select CHANGE DIRECTORY*. 3. Insert a blank formatted diskette in your secondary drive.
28
4. Press [Ctrl-C] to clear the command line, and type the name of your secondary drive (example: b: or dfl: ), and the name of the directory* you wish to save to. 5. Select OK, and press [ENTER]. 6. Type the description of your saved game, and press [ENTER] to save the game.
HARD DISK USERS NOTE: If you choose to save games to your hard disk, we suggest that you create one or more save game directories or folders on your hard disk. See your computer's instructions for creating directories. 1. Choose the Save/Restore icon (diskette) from the icon bar and select SA VE GAME. The Save Game menu will appear. 2. If you wish to save the game to a directory* other than the one you are currently playing on, select CHANGE DIRECTORY*. Press [Ctrl-C] to clear the command line, and type the drive and name of the new directory*. 3. Select OK and press [ENTER]. 4. Type the description of your saved game, and press [ENTER] to save the game. RESTORING YOUR GAME 1. Choose the Save/Restore icon (diskette) from the icon bar and select RESTORE GAME. You will be prompted to select the game you wish to restore. (On a single drive system, you will be prompted to insert your save game disk) . 2. Highlight the ·desired game and select RESTORE. 3. If the game you wish to restore is in a different directory, select CHANGE DIRECTORY, then type the name of the directory* you wish to restore from. *The term 'directory' refers to directories, drawers and folders.
29
I la l QUITTING YOUR GAME To stop playing, choose the Stop icon from the icon bar and select QUIT. RESTARTING YOUR GAME To restart your game at any time during play, choose the Stop icon from the icon bar and select ST ART NEW GAME. The game will begin again in front of Crispin' s cottage. MESSAGE WINDOWS Message windows will appear at various times during the game. When you have read the message, press [ENTER] to remove the window and resume play. NOTE: Some message windows are program controlled. LOOK everywhere. Thoroughly explore your surroundings. Open doors and drawers. Look closely at all objects you encounter or you may miss important details. EXPLORE each area of the game very carefully, and DRAW A MAP as you progress through the game. Make a note of each area you visit, and include information about objects found there and dangerous areas nearby. If you miss an area, you may miss an important clue! GET objects you think you will need. You can see an inventory of items on hand by choosing the Inventory icon at any time. USE the items you have picked up to solve problems in the game. Different approaches to a puzzle may bring about a different outcome. BE CAREFUL, and remain alert at all times - disaster may strike in the most unlikely of places! , SA VE YOUR GAME OFTEN, especially when you are about to try something new or potentially dangerous. This way, if the worst should happen, you won't have to start all over again from the beginning. Save games at different points, so you will always be able to return to
30
1~1 w I 'Y' l~I a desired point in the game. In effect, this will enable you to travel backward through time and do things differently if you wish.
DON'T GET DISCOURAGED. If you come to an obstacle that seems insurmountable, don't despair. Spend some time exploring another area, and come back later. Every problem in the game has at least one solution, and some have more than one. Sometimes solving a problem one way will make it harder to solve the next, and sometimes it will make it easier. If you get stuck, you might try backtracking to an earlier point in the game, then choosing a different path. If all else fails, you can buy the King's Quest V hint book from the dealer who sold you the game, or you can order it directly from Sierra On-Line by calling (800) 326-6654. BRING ALONG SOME HELP. You may find it helpful (and fun) to play the game with a friend. Two (or more) heads are better than one at interpreting clues and solving problems.
NEED A HINT
If you find yourself 'a little stuck' while playing a Sierra game, try the following ideas: 1. If you have a modem, you can talk to the Sierra Bulletin Board through the fallowing number
(209) 683-4463 Our settings are 300, 1200 or 2400 Baud; 8 Data; N Parity; 1 Stop
Bit. Our sysop will be happy to help you. 2. Many other bulletin boards also provide hints to many of our games.
31
r." .. .. I A. Compuserve: Go into the Gamers Forum (GO GAMERS) or write E-Mail to 76004,2143. B. Prodigy: Write E-Mail to 'HTWS90E', or go to the PC Club and enter the adventure games forum (Jumpword: PC CLUB).
C. PCLink: Select PCLink Plus, enter Publisher's Connection, select Publishers Forums, then Sierra On-Line. E-Mail may be written to the User ID 'SierraOnLi'. D. AppleLink: Select the KEYWORD option from the 'Goto' menu, and type: Sierra. E-Mail may also be written to the User ID 'Sierras'. E. GEnie: From the main menu select 10 (Games), then select 1 (Games Round Table). Select 1 (Games Bulletin Board), and type set 22 at the '?'prompt. This will take you into the Sierra On-Line area. For more information on these BBS lines, you can call these toll-free numbers:
Compuserve (800) 848-8199 Prodigy (800) 822-6922 PCLink (800) 458-8532 AppleLink (800) 227-6364 GEnie (800) 638-9636
3. The magazine Questbuster's Journal is a helpful source of many game hints. 4. Your local software dealer may carry our hint books, or may be willing to order them for you. 5. If you are unable to obtain a hint book through a dealer, you can order one directly from us. Call (800) 326-6654 to place your order with a Visa, MasterCard or American Express card, or write :
32
Sierra On-Line Inc., Order Department, P.O. Box 485, Coarsegold, CA 93614. 6. If the hint book is not yet available for the game you are playing, call our automated hint line at (900) 370-KLUE to receive a hint. NOTE: California residents, please dial (900) 370-5113.
THIS SERVICE IS AVAILABLE 24 HOURS A DAY. THE CHARGES ARE: 75 CENTS FOR THE FIRST MINUTE AND 50 CENTS FOR EACH ADDITIONAL MINUTE. IF YOU ARE UNDER 18 YEARS OF AGE, YOU MUST HAVE A PARENT'S PERMISSION TO CALL. THE CONTENTS OF ALL MESSAGES ARE SOLELY THE RESPONSIBILITY OF SIERRA ON-LINE. HINTS WILL NOT BE GIVEN ON OTHER SIERRA TELEPHONE LINES.
PROBLEM DISK? TECHNICAL HELP (MS DOS ONLY) If you receive any of the following messages:
'Insert Disk #_' when you have already inserted that diskette, or have installed the game on your hard disk 'Out of Handles' or 'Out of Heap', or if the game locks up at any
point 'Disk Error' ·
Please try these suggestions before assuming the disk is faulty: You may have memory resident programs loaded into your RAM memory. You will need to boot your system from a diskette containing your operating system only. Follow these instructions to create a 'Sierra Boot Disk'.
33
I ~, I + I· ·, I.+ I Format a blank disk with DOS system files (using /s) to make a bootable disk.
FORMATTING FROM A HARD DRIVE A) Place a blank disk in drive a: B) At the C prompt, type: format a:/s NOTE: If your A: drive is a high density drive and you are using low density disks, you will need to type: format a:/4/s (for 5.25" disks) or type: format a:/n:9/s (for 3.5" disks) FORMATTING FROM A DISKETTE DRIVE A) Place your original DOS disk in drive A. B) At the A prompt, type: format a:/s NOTE: If your A: drive is a high density drive and you are using low
density disks, you will need to type: format a:/4/s (for 5.25" disks) or type: format a:/n:9/s (for 3.5" disks) C) Be sure to switch to a blank disk when prompted by the FORMAT program. D) Respond to DOS prompts. Now you should create a CONFIG.SYS file on your Sierr·a Boot Disk, with a files=20 statement. Follow these instructions to create this file: A) Type: a: [ENTER] B) Type: copy con config.sys [ENTER] C) Type: files=20 [ENTER] D) Press [F6] [ENTER] You should see the message: '1 File(s) copied' . You will now have to re-boot your computer with your new Sierra Boot Disk in the drive. Turn your computer off then on, or press [Ctrl-Alt-Del].
34
-. - ... .. . - .... . -· - .
I U l\6 ICII I -~ - -· - --- ~ - - .. -
If this does not clear the above messages, call (209) 683-8989 for technical help. Our technical staff will be happy to help you. TECHNICAL HELP (ALL SYSTEMS) Technical assistance is only a telephone call away. Call (209) 683-8989 for convenient, person-to-person service, or if you prefer, you may request assistance by mail. If you choose to write to us with your request, please state your computer type and the nature of your problem. If you find that you need to send for replacement diskettes, send the original disk #1 in the size you need (3.5" or 5.25") to:
Sierra On-Line P.O. Box48S Coarsegold, CA 93614 Attention: RETURNS
Be sure to include a note stating your computer type, and the size of diskette you need (5 .25" or 3.5"). We will gladly replace your program free of charge for the first 90 days of ownership (please enclose a copy of your dated sales receipt with your request) . After 90 days there is a $5.00 charge for 5.25" diskettes, and a $10.00 charge for 3.5" diskettes.
35

IT IS ILLEGAL TO MAKE UNAUTHORIZED COPIES OF
THIS SOFTWARE This software is protected under federal
copyright law. rt is illegal to make or distribufe copies of this software except
to make a backuJI copy for archival _11urposes only. Duplication of this
software for any other reason includinp for sale, loan, rental or lift is a federa
crime. Penalties inclu e fines of as much as •.ooo and jail terms of up
five years.
f!'SIERRA as a member ol the Software Publishers Association (SPA),
supports the industry's effort to tight the illegal copying of personal computer software.
Report copyright violations to : SPA, 1101 Connecticut Avenue, NW, Suite 901
Washington, DC 20036
LIMITED WARRANTY NOTICE Sierra On-Line, Inc. wants your continued business. If you fill out the
enclosed product registration card and return it to us, you are covered by our warranty. If your software should fail within 90 days of purchase, return it to your dealer or directly to us, and we will replace it free. After 90 days, enclose $5 for 5.25" disks (or $10 for 3.5" disks) and return the software directly to us. Sorry, without the registration card you are not covered by the warranty. This warranty gives you specific legal rights, and you may also have other rights which vary from state to state.
COPYRIGHT NOTICE This manual, and the software described in this manual, are
copyrighted. All rights are reserved. No part of this manual or the described software may be copied, reproduced, translated or reduced to any electronic medium or machine-readable form without the prior written consent of Sierra On-Line, Inc., P.O. Box 485, Coarsegold, CA 93614.
36