Embed Size (px)
Citation preview
KLIMAXLoudspeaker System English
OOwner’s Manual
Copyright and AcknowledgementsCopyright © 2008 Linn Products Ltd. First edition April 2008.
Linn Products Limited, Glasgow Road, Waterfoot, Eaglesham, Glasgow, G76 OEQ,Scotland, United Kingdom
All rights reserved. No part of this publication may be reproduced, stored in aretrieval system, or transmitted, in any form or by any means, electronic,mechanical, photocopying, recording, or otherwise, without the prior writtenpermission of the publisher.
Printed in the United Kingdom.
Trade marks used in this publication: Linn and the Linn logo are registered trademarks of Linn Products Limited. Klimax, Kisto, Aktiv, Sekrit, Chakra and Skeets aretrade marks of Linn Products Limited.
The information in this manual is furnished for informational use only, is subject tochange without notice, and should not be construed as a commitment by LinnProducts Limited. Linn Products Limited assumes no responsibility or liability forany errors or inaccuracies that may appear in this manual.
Linn Products Limited disclaims any proprietary interest in trade marks and tradenames other than its own.
Klimax 350 - UK Registered Design no: 3014677Klimax 340 - UK Registered Design no: 3014676Klimax 320 - UK Registered Design no: 3014671Klimax 345 - UK Registered Design no: 3014675
Pack 1420/E
KLIMAX Loudspeaker SystemOwner’s Manual
Copyright and Acknowledgements English
KLIMAX Loudspeaker SystemOwner’s Manual
Contents English
Contents
Introduction 1The Klimax system 1Klimax features 3Aktiv operation 5
Klimax 350, 340 and 320 7Unpacking 7Fabric grilles 7Cleaning 7Positioning and levelling 8
Positioning 8
Levelling 9
Connecting 10General 10
Connection of standard 350 model 10
Wiring and amping options 11
Link strip information 11
Single-wiring 12
Bi-wiring or bi-amping 12
Tri-wiring or tri-amping 12
Quad-wiring or quad-amping 12
Standard models in fully Aktiv mode 13
Aktiv Bass connection (BALANCED AUDIO IN) 13
Upper frequency connections 13
Connection of fully Aktiv models(Klimax 350A, 340A and 320A) 13
Fine adjustment 14Adjustment switches 14
Room acoustics 15
Operation 15
Klimax 345 17Unpacking 17Fabric grille 17Positioning 17Cleaning 17Connecting 18Operation 19
Operating modes 19
Parameters 19
Technical Specification 21
Guarantee and Service 23
1KLIMAX Loudspeaker System
Owner’s Manual
Introduction English
IIntroductionAt Linn, we recognise that the way people access sound is changing. Entertainmentsystems are becoming ever more integrated and the line between music and moviesystems is no longer clear. As the popularity of new and improved hi-resolution musicformats increases, multi-channel systems are no longer for the movie enthusiast only.
As we change the way we access sound, the equipment we use to relay that sound mustalso change. A modern loudspeaker must offer greater levels of flexibility, reproduce awider range of sounds and playback at a higher resolution to truly communicate the fullpotential of the system. The loudspeaker communicating the awesome force of anexplosion in a movie blockbuster must be subtle enough to replay the tone and emotionof the softest female jazz vocal.
With this in mind, Linn presents Klimax - a gorgeous sounding high-performanceloudspeaker system which combines simply stunning performance with luxuriousappearance to deliver sumptuous, expressive and totally communicative playback.
The Klimax system
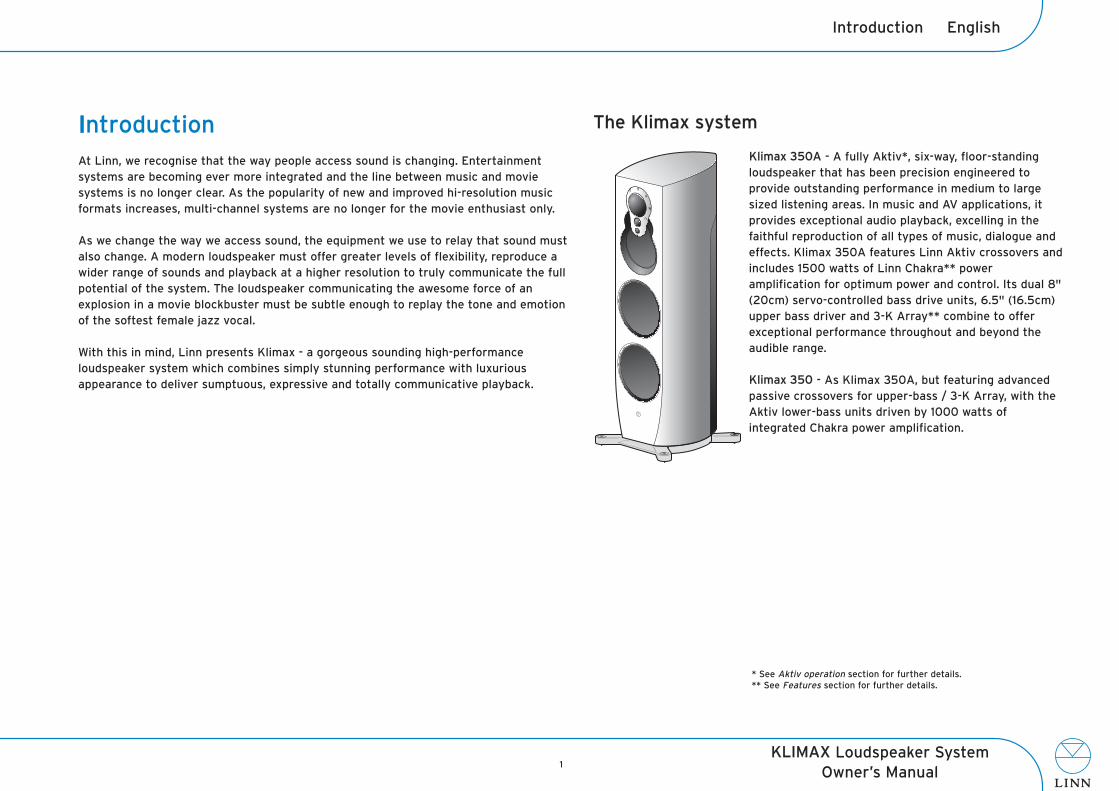
Klimax 350A - A fully Aktiv*, six-way, floor-standingloudspeaker that has been precision engineered toprovide outstanding performance in medium to largesized listening areas. In music and AV applications, itprovides exceptional audio playback, excelling in thefaithful reproduction of all types of music, dialogue andeffects. Klimax 350A features Linn Aktiv crossovers andincludes 1500 watts of Linn Chakra** poweramplification for optimum power and control. Its dual 8"(20cm) servo-controlled bass drive units, 6.5" (16.5cm)upper bass driver and 3-K Array** combine to offerexceptional performance throughout and beyond theaudible range.
Klimax 350 - As Klimax 350A, but featuring advancedpassive crossovers for upper-bass / 3-K Array, with theAktiv lower-bass units driven by 1000 watts ofintegrated Chakra power amplification.
* See Aktiv operation section for further details.** See Features section for further details.
2KLIMAX Loudspeaker System
Owner’s Manual
English Introduction
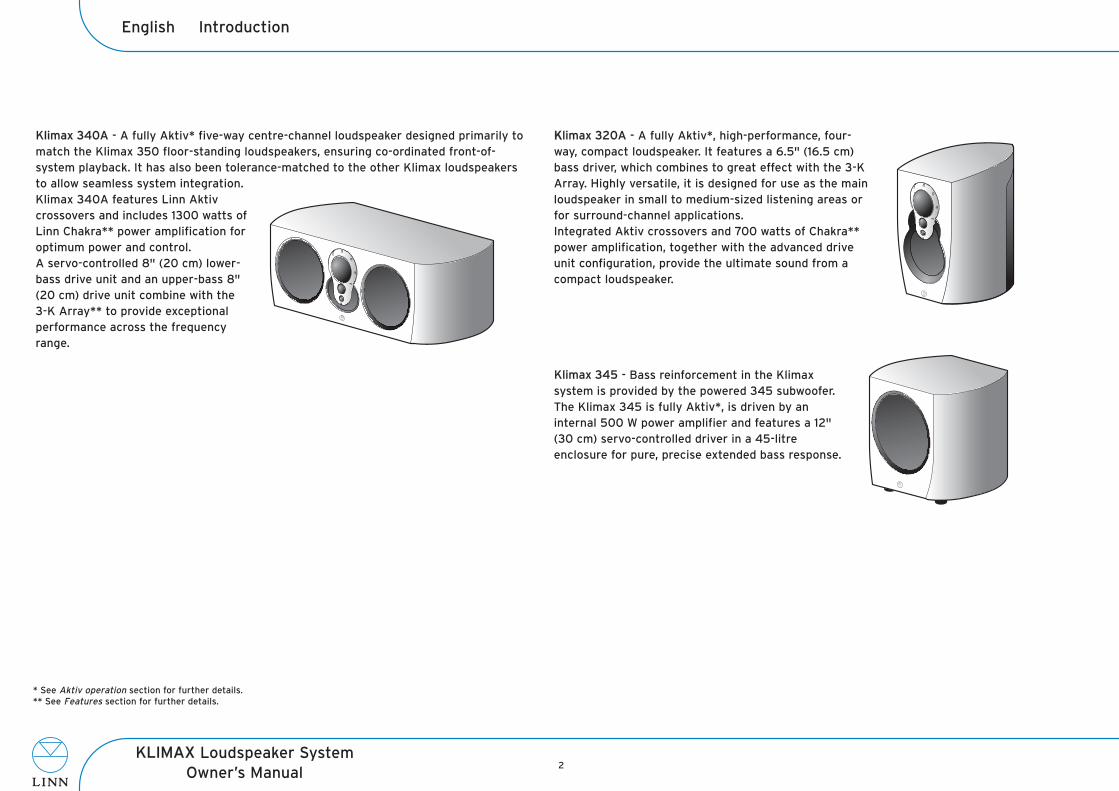
KKlimax 320A - A fully Aktiv*, high-performance, four-way, compact loudspeaker. It features a 6.5" (16.5 cm)bass driver, which combines to great effect with the 3-KArray. Highly versatile, it is designed for use as the mainloudspeaker in small to medium-sized listening areas orfor surround-channel applications. Integrated Aktiv crossovers and 700 watts of Chakra**power amplification, together with the advanced driveunit configuration, provide the ultimate sound from acompact loudspeaker.
Klimax 345 - Bass reinforcement in the Klimaxsystem is provided by the powered 345 subwoofer.The Klimax 345 is fully Aktiv*, is driven by aninternal 500 W power amplifier and features a 12"(30 cm) servo-controlled driver in a 45-litreenclosure for pure, precise extended bass response.
Klimax 340A - A fully Aktiv* five-way centre-channel loudspeaker designed primarily tomatch the Klimax 350 floor-standing loudspeakers, ensuring co-ordinated front-of-system playback. It has also been tolerance-matched to the other Klimax loudspeakersto allow seamless system integration.Klimax 340A features Linn Aktivcrossovers and includes 1300 watts ofLinn Chakra** power amplification foroptimum power and control.A servo-controlled 8" (20 cm) lower-bass drive unit and an upper-bass 8"(20 cm) drive unit combine with the3-K Array** to provide exceptionalperformance across the frequencyrange.
* See Aktiv operation section for further details.** See Features section for further details.

3KLIMAX Loudspeaker System
Owner’s Manual
Introduction English
KKlimax features
Chakra amplifier technology (Klimax 350A, 350, 340A and 320A)The Klimax loudspeakers incorporate Chakra, the very latestproprietary Linn power amplifier technology. Chakraperfectly combines the speed and precision of integratedMOSFET circuitry with smooth and highly robust discretebipolar transistors for precisely controlled power at alllistening levels.
Linn 3-K Array(Klimax 350A, 350, 340A, and 320A)This Linn designed and engineered acousticarray delivers optimised dispersion andperformance. The array provides open,natural presentation and clear, precisedialogue and effects. All components used inthe array are matched to a close tolerance,retaining sonic purity and consistencythroughout. The 3-K Array incorporates mid, tweeter andsuper-tweeter drive units.
Fully Aktiv* models (Klimax 350A, 340A, 320A and 345) On the fully Aktiv versions of the Klimaxloudspeakers, all the circuitry required for fullAktiv operation - i.e. amplifier channels andAktiv crossovers for the entire frequency rangeare integrated into the module at the rear of theloudspeaker cabinet. This allows directconnection to the audio output of apre-amplifier or system controller, such as theLinn Kisto system controller.
Easy adjustment of key loudspeaker characteristics(All models)TREBLE SHELF (fully Aktiv models only), BASS SHELF and BASS ROLL-ON settings onthe Klimax 350, 340 and 320 models can be adjusted using slide switches on the rear ofthe loudspeakers. Seven different parameters can be adjusted on the Klimax 345 bass extensionloudspeaker using its select and adjustment switches.
4KLIMAX Loudspeaker System
Owner’s Manual
English Introduction
AAdvanced cabinet properties(All models)As well as presenting an elegant, contemporary and dynamic look, with its graceful,curved design; the arched shape maximises the overall strength and rigidity of theenclosure and optimises the internal acoustic properties of the cabinet. The complex, pressure-formed natural laminate material, exquisitely finished with a realwood veneer provides the perfect combination of strength, flexibility, durability, sonicperformance and a natural, beautiful finish.
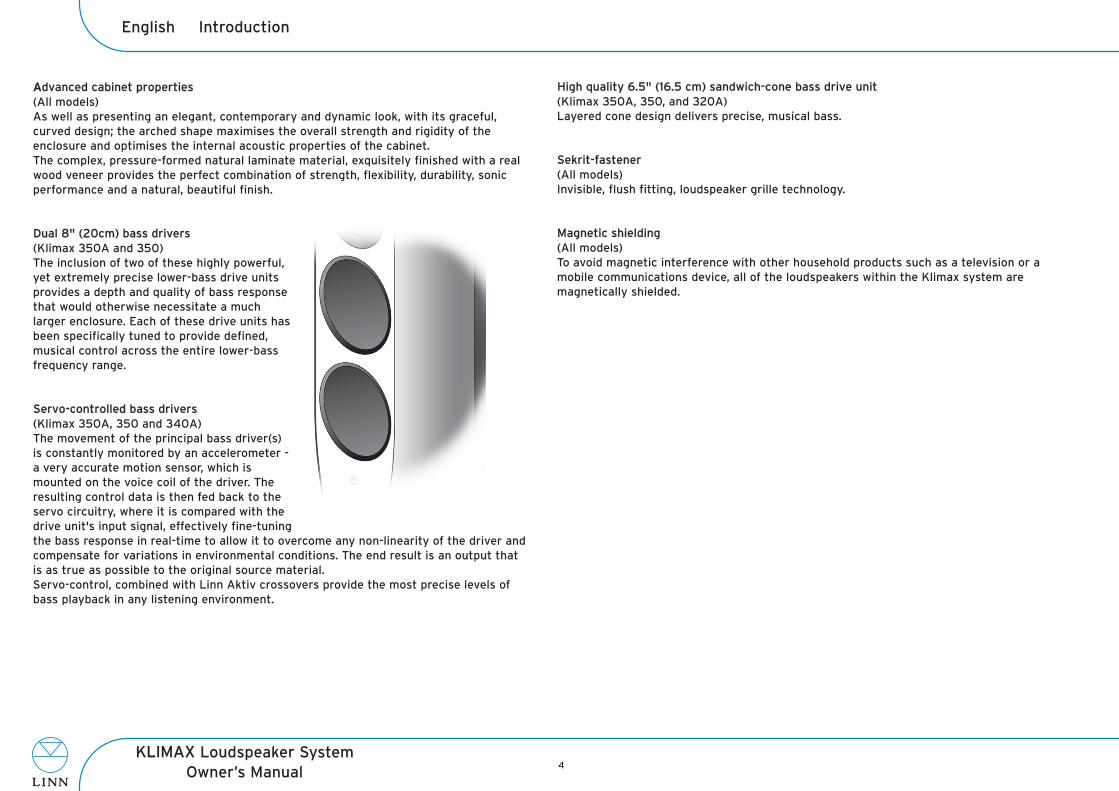
Dual 8" (20cm) bass drivers (Klimax 350A and 350)The inclusion of two of these highly powerful,yet extremely precise lower-bass drive unitsprovides a depth and quality of bass responsethat would otherwise necessitate a muchlarger enclosure. Each of these drive units hasbeen specifically tuned to provide defined,musical control across the entire lower-bassfrequency range.
Servo-controlled bass drivers(Klimax 350A, 350 and 340A) The movement of the principal bass driver(s)is constantly monitored by an accelerometer -a very accurate motion sensor, which ismounted on the voice coil of the driver. Theresulting control data is then fed back to theservo circuitry, where it is compared with thedrive unit's input signal, effectively fine-tuningthe bass response in real-time to allow it to overcome any non-linearity of the driver andcompensate for variations in environmental conditions. The end result is an output thatis as true as possible to the original source material. Servo-control, combined with Linn Aktiv crossovers provide the most precise levels ofbass playback in any listening environment.
High quality 6.5" (16.5 cm) sandwich-cone bass drive unit (Klimax 350A, 350, and 320A) Layered cone design delivers precise, musical bass.
Sekrit-fastener(All models)Invisible, flush fitting, loudspeaker grille technology.
Magnetic shielding(All models)To avoid magnetic interference with other household products such as a television or amobile communications device, all of the loudspeakers within the Klimax system aremagnetically shielded.

5KLIMAX Loudspeaker System
Owner’s Manual
Introduction English
AAktiv operation
The term 'Aktiv' refers to the proprietary Linn active crossovers and loudspeakerconfiguration.
Aktiv or passive?In passive mode, the output from the power amplifier is passed through the passivecrossover in the loudspeaker, which results in some loss of audio signal as some of itsenergy is used to power the crossover circuitry and therefore is effectively lost. In an Aktiv system, on the other hand, the crossover circuitry is mains powered and sodoes not rely on the signal. The fact that it is powered also allows advanced circuitry tobe included, which exerts a much greater degree of control over the processing of theaudio signal, providing a more precise audio output to the drive units. This results insignificantly improved sonic performance.
7KLIMAX Loudspeaker System
Owner’s Manual
Klimax 350, 340, 320 English
KKlimax 350, 340 and 320UnpackingWe recommend that your Klimax loudspeakers are unpacked, installed and adjusted byan authorised Linn retailer.
IMPORTANT:The Klimax loudspeakers are heavy; take great care when moving them. Whenunpacking, lifting or moving them, we recommend that two people are utilised in orderto avoid personal injury.
If you are using a cutting implement to open the boxes, please be very careful not topuncture the packaging and damage the loudspeakers and accessories within.
Be very careful when handling the unpacked loudspeaker(s) - rings, bracelets, buttons onclothing etc can damage the veneer while lifting. Do not lay the speaker on its front andbe careful not to touch the front of the loudspeaker while handling, in order to avoiddamaging the drive units.
To unpack:
• Move the (boxed) loudspeaker to an uncluttered area adjacent to its eventual position(this will avoid any excessive moving and carrying of unpacked loudspeakers).
• Stand the loudspeaker box on its base. (In the case of the Klimax 350 stand the boxupside down).
• Very carefully cut the bands holding the end-caps in place.
• Lift off the top end-cap.
• Remove the cardboard sleeve by lifting it straight up until it clears the top of thecabinet. (Or unclip wrap-around sleeve).
• Lift the loudspeaker out of the base end-cap and remove its protective bag.
• Once you have positioned the loudspeakers, VERY CAREFULLY snip the plastic tieholding the 3-K Array cover in place and remove the cover.
Notes:If you require to stand the Klimax 350 or 320 upside down, use the end-cap to hold it inposition.
We recommend that you retain the packaging in case you need to transport yourloudspeaker(s) at a later date.
Each pair of Klimax 350 floor-standing loudspeakers is supplied with the followingaccesssories:
• loudspeaker stand kit• spike adjustment tool• 2 mains cables
The Klimax 340 centre loudspeaker is supplied with the following accessories:
• spike kit• mains cable
Each pair of Klimax 320 compact loudspeakers is supplied with the followingaccessories:
• spike kit• 2 mains cables
Fabric grillesThe Klimax 350, 340 and 320 loudspeakers are supplied with fabric grilles. Thesegrilles are held in place by Sekrit-Fasteners (shielded magnets hidden within thecabinets). The fabric grilles can easily be removed by gently pulling them towards you.
IMPORTANT:Do not attempt to remove the metal grilles.
CleaningRemove dust and fingerprints from the cabinets with a soft, dry, lint-free cloth. Avoidusing domestic cleaning products as they may damage the veneer. The fabric grilles should be removed from the cabinets and cleaned carefully with a softbrush.

8KLIMAX Loudspeaker System
Owner’s Manual
English Klimax 350, 340, 320
PPositioning and levelling
We recommend that your Klimax loudspeakers are unpacked, installed and adjusted byan authorised Linn retailer.
To get the best from your Linn Klimax loudspeakers, it is important that they arepositioned and levelled correctly. Please note, in order to achieve the very best from your Klimax loudspeakers, someadjustment may be required after positioning, levelling and connecting. See the Fineadjustment section.
Positioning
The very nature of the 3-K Array with its close driver proximity ensures uniformdispersion characteristics and therefore should not require any significant degree oftoeing-in to improve performance.
A loudspeaker placed too close to a wall will tend to affect bass definition creating abass 'bloom', so a minimum of 4" (10cm) is recommended between the back of aloudspeaker and the closest wall and a minimum distance of 12" (30cm) from thenearest side wall.
9KLIMAX Loudspeaker System
Owner’s Manual
Klimax 350, 340, 320 English
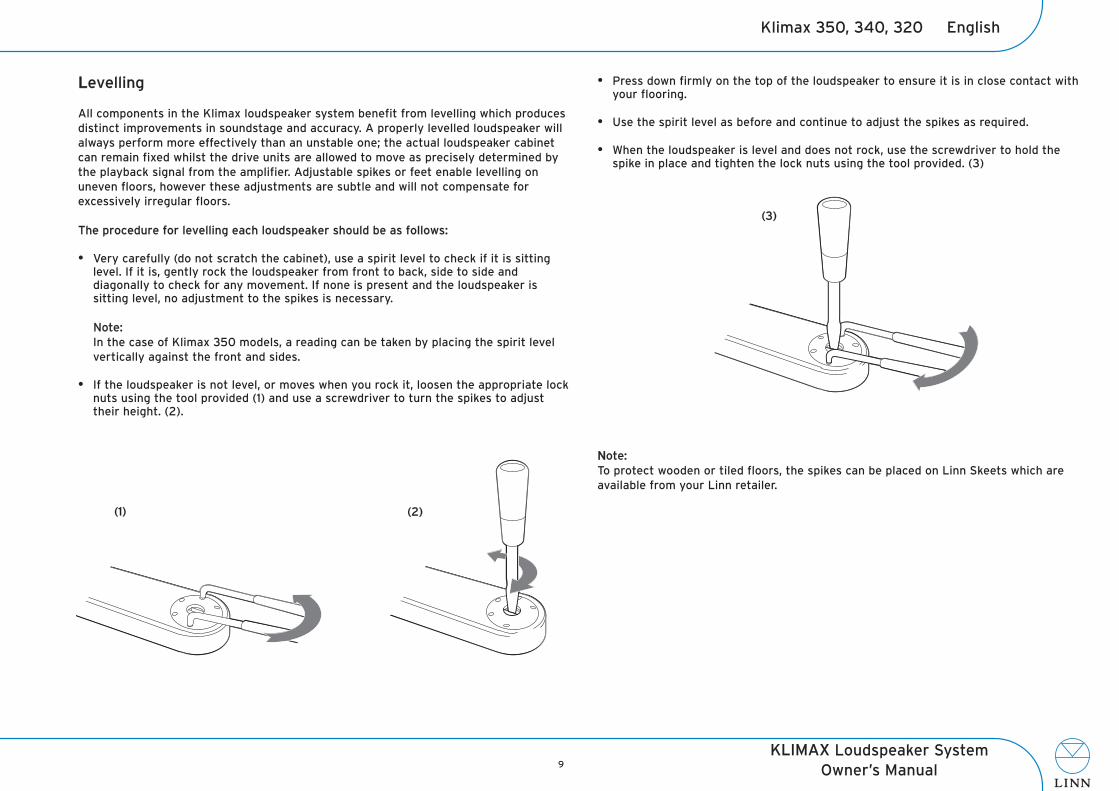
• Press down firmly on the top of the loudspeaker to ensure it is in close contact withyour flooring.
• Use the spirit level as before and continue to adjust the spikes as required.
• When the loudspeaker is level and does not rock, use the screwdriver to hold thespike in place and tighten the lock nuts using the tool provided. (3)
NNote:To protect wooden or tiled floors, the spikes can be placed on Linn Skeets which areavailable from your Linn retailer.
LLevelling
All components in the Klimax loudspeaker system benefit from levelling which producesdistinct improvements in soundstage and accuracy. A properly levelled loudspeaker willalways perform more effectively than an unstable one; the actual loudspeaker cabinetcan remain fixed whilst the drive units are allowed to move as precisely determined bythe playback signal from the amplifier. Adjustable spikes or feet enable levelling onuneven floors, however these adjustments are subtle and will not compensate forexcessively irregular floors.
The procedure for levelling each loudspeaker should be as follows:
• Very carefully (do not scratch the cabinet), use a spirit level to check if it is sittinglevel. If it is, gently rock the loudspeaker from front to back, side to side anddiagonally to check for any movement. If none is present and the loudspeaker issitting level, no adjustment to the spikes is necessary.
Note:In the case of Klimax 350 models, a reading can be taken by placing the spirit levelvertically against the front and sides.
• If the loudspeaker is not level, or moves when you rock it, loosen the appropriate locknuts using the tool provided (1) and use a screwdriver to turn the spikes to adjusttheir height. (2).
(1) (2)
(3)
10KLIMAX Loudspeaker System
Owner’s Manual
English Klimax 350, 340, 320
CConnectingWe recommend that your Klimax loudspeakers are unpacked, installed and adjusted byan authorised Linn retailer.
GeneralIMPORTANT:Before making any connections, switch off all products in your system and disconnecteach Klimax loudspeaker from the mains.
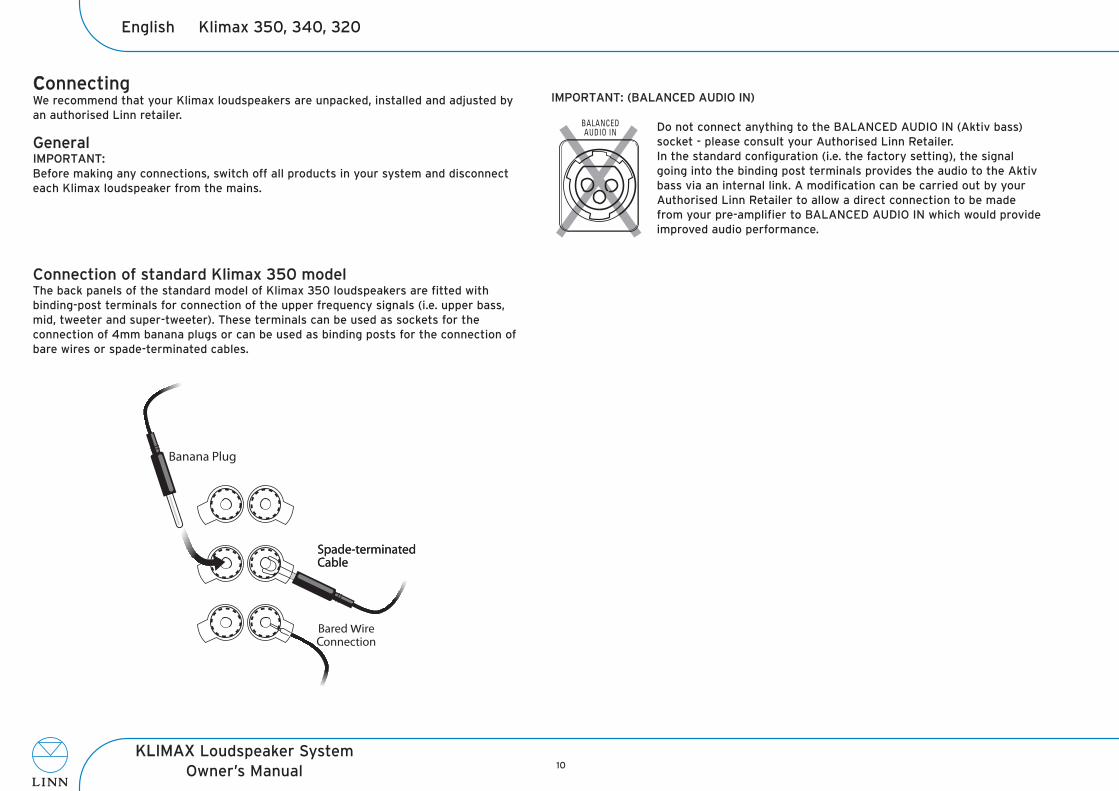
Connection of standard Klimax 350 modelThe back panels of the standard model of Klimax 350 loudspeakers are fitted withbinding-post terminals for connection of the upper frequency signals (i.e. upper bass,mid, tweeter and super-tweeter). These terminals can be used as sockets for theconnection of 4mm banana plugs or can be used as binding posts for the connection ofbare wires or spade-terminated cables.
IMPORTANT: (BALANCED AUDIO IN)
Do not connect anything to the BALANCED AUDIO IN (Aktiv bass)socket - please consult your Authorised Linn Retailer.In the standard configuration (i.e. the factory setting), the signalgoing into the binding post terminals provides the audio to the Aktivbass via an internal link. A modification can be carried out by yourAuthorised Linn Retailer to allow a direct connection to be madefrom your pre-amplifier to BALANCED AUDIO IN which would provideimproved audio performance.
11KLIMAX Loudspeaker System
Owner’s Manual
Klimax 350, 340, 320 English
WWiring and amping options
The standard Klimax 350 is supplied with terminal link strips (factory-fitted). The linksconnect the terminals together for single-wiring, or can be cut or removed to providemulti-wiring or multi-amping options. When connecting the standard models in passive mode, it will benefit the sonicperformance to upgrade from single-wiring. Using a separate cable for each drive unitconnection (multi-wiring) will tend to provide the best sound from a single amplifierchannel; or to provide further improvement, use a separate amplifier channel for eachdrive unit connection (multi-amping). For best audio performance however, your loudspeakers should be driven in AKTIVmode, which provides benefits over and above that which can be gained from multi-wiring/ multi-amping (see Aktiv operation section, above).
Please ensure that the positive (+) or red-coloured connectors from your amplifier(s)connect to the positive (+) connectors on your loudspeaker(s). And that the negative (-)or black-coloured connectors from your amplifier(s), connect to the negative (-)connectors on your loudspeaker(s). Where external amplification is being used, Linn power amplifiers are recommended. Ifnon-Linn amplifiers are being used in a multi-amping situation, please ensure that thegain figures match each other, in order to avoid any imbalance.
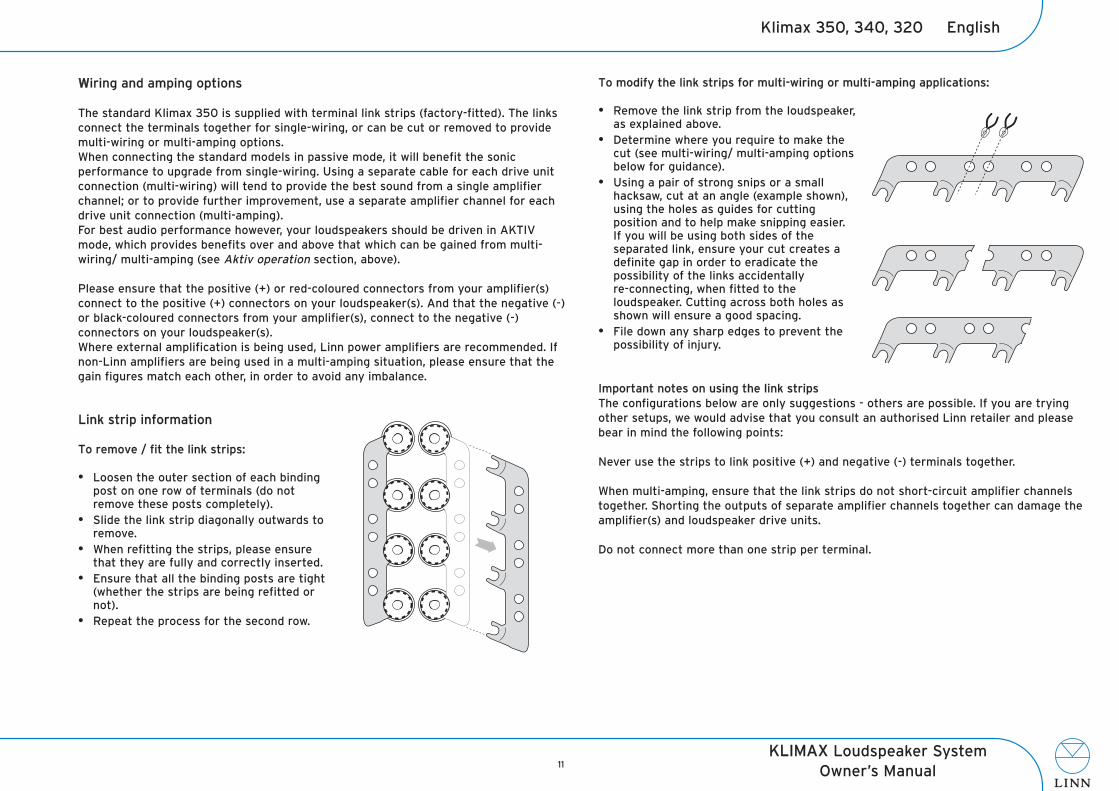
Link strip information
To remove / fit the link strips:
• Loosen the outer section of each bindingpost on one row of terminals (do notremove these posts completely).
• Slide the link strip diagonally outwards toremove.
• When refitting the strips, please ensurethat they are fully and correctly inserted.
• Ensure that all the binding posts are tight(whether the strips are being refitted ornot).
• Repeat the process for the second row.
To modify the link strips for multi-wiring or multi-amping applications:
• Remove the link strip from the loudspeaker,as explained above.
• Determine where you require to make thecut (see multi-wiring/ multi-amping optionsbelow for guidance).
• Using a pair of strong snips or a smallhacksaw, cut at an angle (example shown),using the holes as guides for cuttingposition and to help make snipping easier.If you will be using both sides of theseparated link, ensure your cut creates adefinite gap in order to eradicate thepossibility of the links accidentallyre-connecting, when fitted to theloudspeaker. Cutting across both holes asshown will ensure a good spacing.
• File down any sharp edges to prevent thepossibility of injury.
Important notes on using the link stripsThe configurations below are only suggestions - others are possible. If you are tryingother setups, we would advise that you consult an authorised Linn retailer and pleasebear in mind the following points:
Never use the strips to link positive (+) and negative (-) terminals together.
When multi-amping, ensure that the link strips do not short-circuit amplifier channelstogether. Shorting the outputs of separate amplifier channels together can damage theamplifier(s) and loudspeaker drive units.
Do not connect more than one strip per terminal.

12KLIMAX Loudspeaker System
Owner’s Manual
English Klimax 350, 340, 320
SSingle-wiring
Position of link strips if single-wiring (i.e. using a single cable from one power amplifierchannel). No link adjustments or cuts are required.
Bi-wiring or bi-amping
Suggested position of separated link strips if bi-wiring (i.e. using two cables from onepower amplifier channel) or bi-amping (i.e. using two power amplifier channels).
Tri-wiring or tri-amping
Suggested position of separated link strips if tri-wiring (i.e. using three cables from onepower amplifier channel) or tri-amping (i.e. using three power amplifier channels).
Quad-wiring or quad-amping
Link strips MUST be removed if quad-wiring (i.e. using four cables from one poweramplifier channel) or quad-amping (i.e. using four power amplifier channels).
SUPERTWEETER
TWEETER
MID
UPPER BASS
SUPERTWEETER
TWEETER
MID
UPPER BASS
SUPERTWEETER
TWEETER
MID
UPPER BASS
SUPERTWEETER
TWEETER
MID
UPPER BASS
KLIMAX 350
KLIMAX 350
KLIMAX 350
KLIMAX 350
13KLIMAX Loudspeaker System
Owner’s Manual
Klimax 350, 340, 320 English
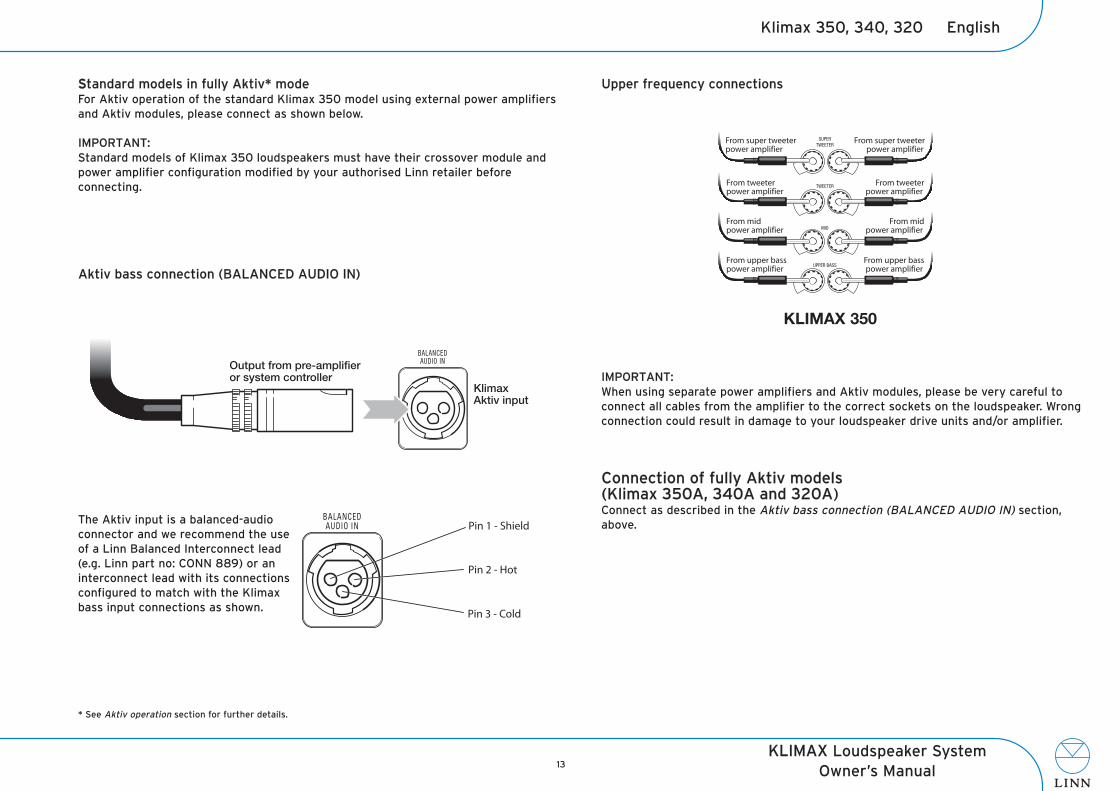
SStandard models in fully Aktiv* mode For Aktiv operation of the standard Klimax 350 model using external power amplifiersand Aktiv modules, please connect as shown below.
IMPORTANT:Standard models of Klimax 350 loudspeakers must have their crossover module andpower amplifier configuration modified by your authorised Linn retailer beforeconnecting.
Aktiv bass connection (BALANCED AUDIO IN)
* See Aktiv operation section for further details.
Upper frequency connections
IMPORTANT:When using separate power amplifiers and Aktiv modules, please be very careful toconnect all cables from the amplifier to the correct sockets on the loudspeaker. Wrongconnection could result in damage to your loudspeaker drive units and/or amplifier.
Connection of fully Aktiv models(Klimax 350A, 340A and 320A) Connect as described in the Aktiv bass connection (BALANCED AUDIO IN) section,above.
SUPERTWEETER
TWEETER
MID
UPPER BASS
KlimaxAktiv input
Output from pre-amplifieror system controller
The Aktiv input is a balanced-audioconnector and we recommend the useof a Linn Balanced Interconnect lead(e.g. Linn part no: CONN 889) or aninterconnect lead with its connectionsconfigured to match with the Klimaxbass input connections as shown.
KLIMAX 350
14KLIMAX Loudspeaker System
Owner’s Manual
English Klimax 350, 340, 320
FFine adjustment
Once your Klimax loudspeakers are correctly positioned, levelled and connected, sometuning of the sound may benefit the performance.
The acoustics of a room are dependent on many factors including size, shape, contentsand textures. The information below will assist in helping you to achieve optimum soundfrom your loudspeakers in any setting.
Adjustment switchesThe Klimax loudspeakers are provided with adjustment switches on the back panel. Thefactory settings will provide the best performance in the majority of room settings,however if a room's acoustics are found to be a little bright or perhaps a bit bass-heavy,these switches allow certain parameters to be fine-tuned, in order to allow theloudspeaker performance to match the room acoustics more closely.When making adjustments, the loudspeakers must first be correctly positioned andconnected (see the Positioning and levelling section and the Connecting section). Thenplay a passage of music and listen, using the 'tune' method, i.e. how easy is it to followthe tune? Make a single adjustment and listen to the same passage of music again. Is iteasier or more difficult to follow the tune?Continue to do this (adjust/ listen/ adjust etc), one parameter at a time, until you focusthe sound to its optimum, in terms of tuneful performance.
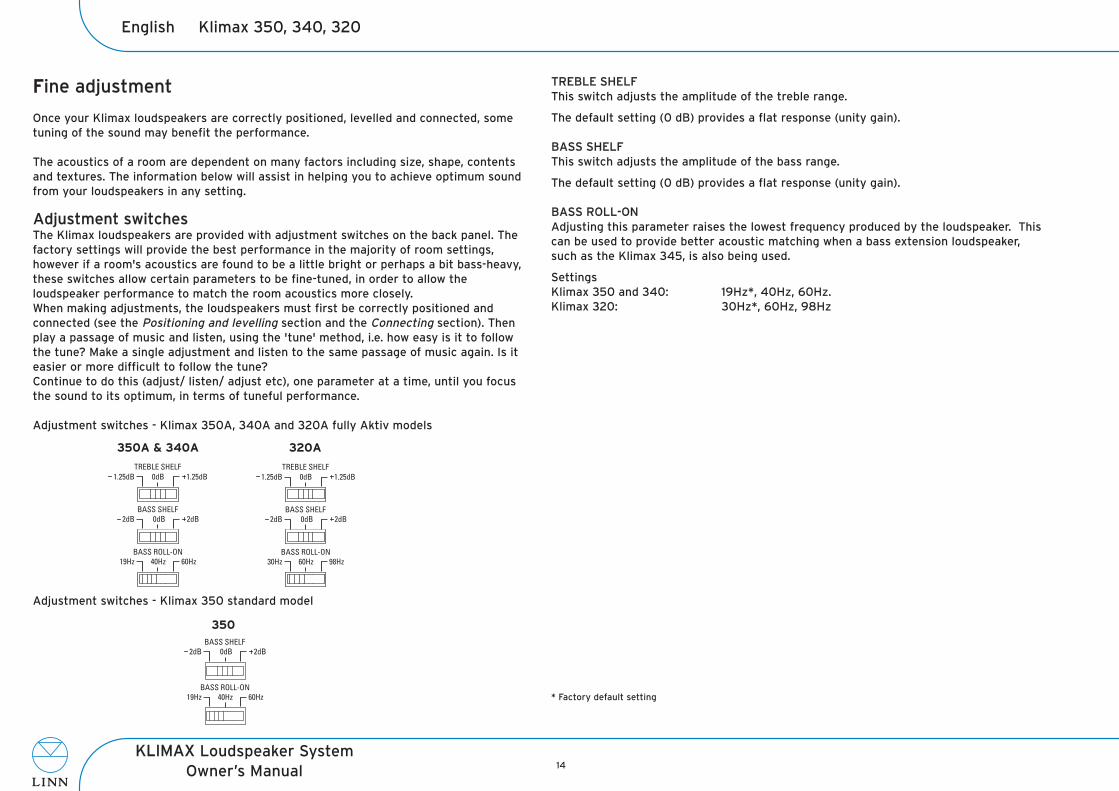
Adjustment switches - Klimax 350A, 340A and 320A fully Aktiv models
Adjustment switches - Klimax 350 standard model
TREBLE SHELFThis switch adjusts the amplitude of the treble range.
The default setting (0 dB) provides a flat response (unity gain).
BASS SHELFThis switch adjusts the amplitude of the bass range.
The default setting (0 dB) provides a flat response (unity gain).
BASS ROLL-ONAdjusting this parameter raises the lowest frequency produced by the loudspeaker. Thiscan be used to provide better acoustic matching when a bass extension loudspeaker,such as the Klimax 345, is also being used.
Settings Klimax 350 and 340: 19Hz*, 40Hz, 60Hz.Klimax 320: 30Hz*, 60Hz, 98Hz
* Factory default setting
BASS SHELF
30Hz 60HzBASS ROLL-ON
TREBLE SHELF0dB
2dB0dB2dB
1.25dB 1.25dB
98Hz
BASS SHELF
19Hz 40HzBASS ROLL-ON
TREBLE SHELF0dB
2dB0dB2dB
1.25dB 1.25dB
60Hz
BASS SHELF
19Hz 40HzBASS ROLL-ON
2dB0dB2dB
60Hz
350A & 340A
350
320A
15KLIMAX Loudspeaker System
Owner’s Manual
Klimax 350, 340, 320 English
RRoom acoustics
When used in certain rooms it may also be beneficial to alter the room layout in order toachieve the very best performance. If the sound seems overly bright, even after the Klimax's adjustment switches have beenset, adding more in the way of soft materials will usually help - e.g. carpets, rugs, wall-hangings, heavy curtains, sofas etc. If the sound seems dull, reducing the amount of softmaterials in the room can help. Also, breaking up flat, unbroken surfaces such as largeareas of wall, ceiling, floor and large windows with furniture, fittings and otherirregularly shaped items can prevent echoes and 'standing waves' (when sound wavesbounce back and forth across a room instead of being dispersed).
Notes:If you alter the acoustics of the room, it may then be necessary to re-adjust theloudspeaker settings to match the new characteristics of the layout. See Adjustmentswitches, above.
Klimax loudspeakers will function to specification from new and do not require anyspecific measures for 'running in'. After you have been using your loudspeakers for aperiod of time (perhaps a week or two, depending on conditions and usage patterns), theperformance may improve slightly as the drive units and other major components adjustto their new surroundings.
If you have any difficulties in achieving the best from your Klimax loudspeakers, yourLinn retailer will be able to examine your room setup and advise you on appropriatemeasures.
Operation
GeneralThe blue LED will be dim when power is first applied and will remain dimmed when theamplifier is in standby mode.
Signal sensingWhen an input signal is detected, the Chakra amplifier is enabled and the LEDbrightens. In the absence of an audio signal, the amplifier reverts to a low powerstandby mode after approximately 20 minutes. The signal detector is quite sensitive and if there is noise in your system, such as humor hiss, it could trigger the detector. If this occurs, try to eliminate the source of thenoise.
Protection
OperationIf an amplifier channel overheats or detects an overload condition, the power supply forthat channel will shut down in order to protect the amplifier and the loudspeaker driveunit(s) to which it is connected. Please note: all channels that are powered by that same power supply will also shutdown so more than one channel may be affected.
DurationOnce the condition that caused the amplifier to activate its protection has passed, theamplifier will automatically resume normal operation. How long the channels remain inprotection will depend on the cause. If the protection operates for more than a fewseconds, it could indicate overheating which may take some minutes of cooling torectify. A lengthier delay (10 minutes or more) could indicate a persistent overload condition(e.g. one of the components connected to the amplifier is faulty). Try switching the unitoff at the mains for 30 minutes or so and try again. If it remains non operational,consult your retailer who can examine your system and determine the source of theproblem.
17KLIMAX Loudspeaker System
Owner’s Manual
Klimax 345 English
KKlimax 345
Unpacking
The Klimax 345 bass reinforcement loudspeaker is heavy: take care when removing itfrom its packaging.
The Klimax 345 loudspeaker is supplied with the following accessories:
• mains lead• phono lead
To unpack:
• Move the (boxed) loudspeaker to an uncluttered area adjacent to its eventual position(this will avoid any excessive moving and carrying of unpacked loudspeakers).
• Stand the loudspeaker box on its base.
• Very carefully cut the bands holding the end-caps in place.
• Lift off the top end-cap.
• Remove the cardboard sleeve by lifting it straight up until it clears the top of thecabinet.
• Lift the loudspeaker out of the base end-cap and remove its protective bag.
We recommend that you retain the packaging in case you need to transport the Klimax345 loudspeaker at a later date.
Fabric grille
The Klimax 345 loudspeaker is supplied with a fabric grille. This grille is held in place bySekrit-Fasteners (shielded magnets hidden within the cabinets). The fabric grille caneasily be removed by gently pulling it towards you.
IMPORTANT:Do not attempt to remove the metal grille.
Positioning
The Klimax 345 loudspeaker can be placed anywhere you find convenient but pleaseconsider the following points:
• The Klimax 345 loudspeaker is best suited to be positioned on a floor, not a table,shelf etc. It is heavy and must be stably supported.
• For best results, position your Klimax 345 loudspeaker as close as possible to eitheryour left front or right front loudspeaker.
• Bass notes will be accentuated if the Klimax 345 loudspeaker is positioned close to awall or in a corner.
• Experimenting with the position may be necessary in order to match the sound of theKlimax 345 loudspeaker with other loudspeakers in your system and the acoustics ofthe room.
Cleaning
Disconnect the Klimax 345 loudspeaker from the power supply before cleaning. Removedust and fingerprints from the cabinet with a soft, dry, lint-free cloth. Avoid usingdomestic cleaning products on the cabinet as they may damage the veneer.
18KLIMAX Loudspeaker System
Owner’s Manual
English Klimax 345
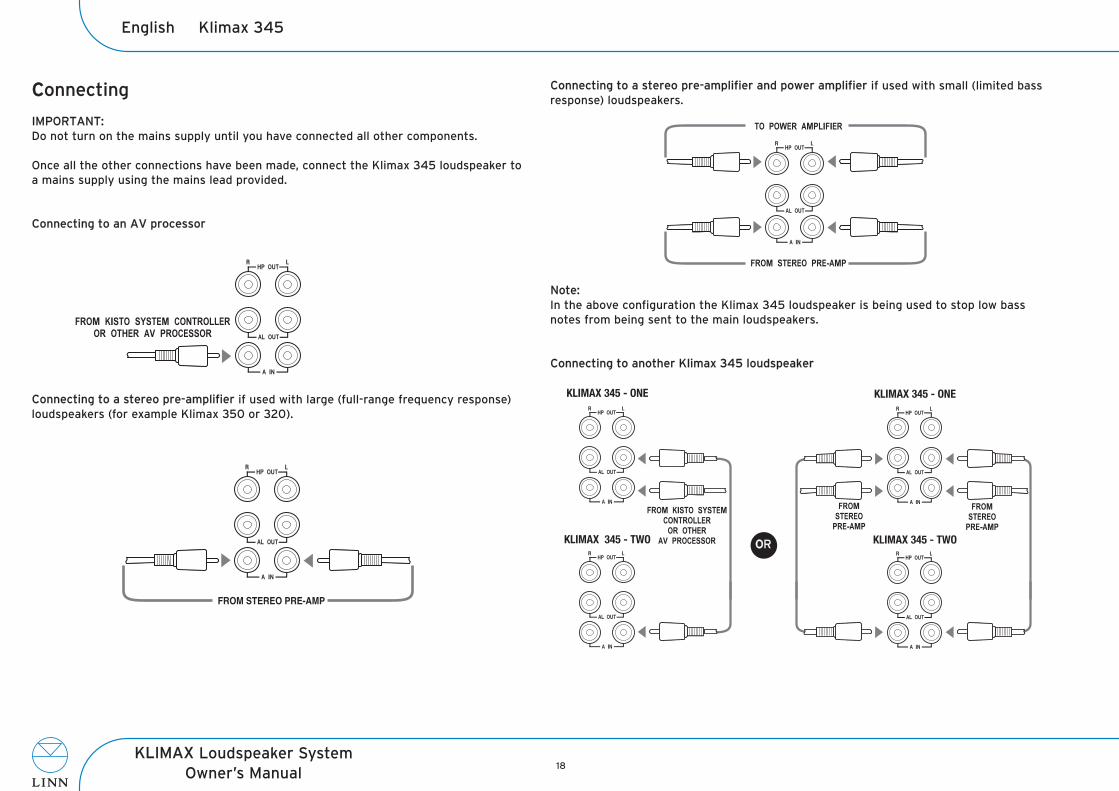
CConnecting
IMPORTANT:Do not turn on the mains supply until you have connected all other components.
Once all the other connections have been made, connect the Klimax 345 loudspeaker toa mains supply using the mains lead provided.
Connecting to an AV processor
Connecting to a stereo pre-amplifier if used with large (full-range frequency response)loudspeakers (for example Klimax 350 or 320).
Connecting to a stereo pre-amplifier and power amplifier if used with small (limited bassresponse) loudspeakers.
Note:In the above configuration the Klimax 345 loudspeaker is being used to stop low bassnotes from being sent to the main loudspeakers.
Connecting to another Klimax 345 loudspeaker
KLIMAX 345 - ONE
KLIMAX 345 - TWO
KLIMAX 345 - ONE
KLIMAX 345 - TWOOOR
19KLIMAX Loudspeaker System
Owner’s Manual
Klimax 345 English
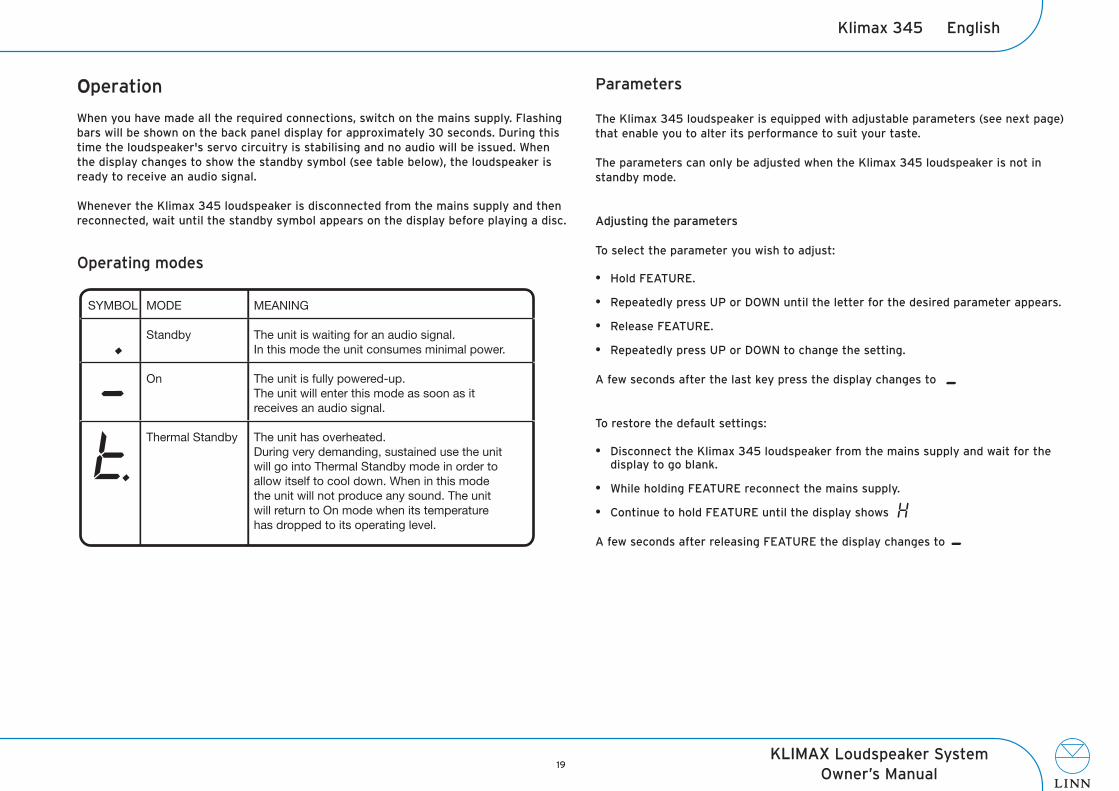
OOperation
When you have made all the required connections, switch on the mains supply. Flashingbars will be shown on the back panel display for approximately 30 seconds. During thistime the loudspeaker's servo circuitry is stabilising and no audio will be issued. Whenthe display changes to show the standby symbol (see table below), the loudspeaker isready to receive an audio signal.
Whenever the Klimax 345 loudspeaker is disconnected from the mains supply and thenreconnected, wait until the standby symbol appears on the display before playing a disc.
Operating modes
Parameters
The Klimax 345 loudspeaker is equipped with adjustable parameters (see next page)that enable you to alter its performance to suit your taste.
The parameters can only be adjusted when the Klimax 345 loudspeaker is not instandby mode.
Adjusting the parameters
To select the parameter you wish to adjust:
• Hold FEATURE.
• Repeatedly press UP or DOWN until the letter for the desired parameter appears.
• Release FEATURE.
• Repeatedly press UP or DOWN to change the setting.
A few seconds after the last key press the display changes to
To restore the default settings:
• Disconnect the Klimax 345 loudspeaker from the mains supply and wait for thedisplay to go blank.
• While holding FEATURE reconnect the mains supply.
• Continue to hold FEATURE until the display shows
A few seconds after releasing FEATURE the display changes to
SYMBOL MODE MEANING
Standby The unit is waiting for an audio signal.
In this mode the unit consumes minimal power.
On The unit is fully powered-up.
The unit will enter this mode as soon as it
receives an audio signal.
Thermal Standby The unit has overheated.
During very demanding, sustained use the unit
will go into Thermal Standby mode in order to
allow itself to cool down. When in this mode
the unit will not produce any sound. The unit
will return to On mode when its temperature
has dropped to its operating level.
20KLIMAX Loudspeaker System
Owner’s Manual
English Klimax 345
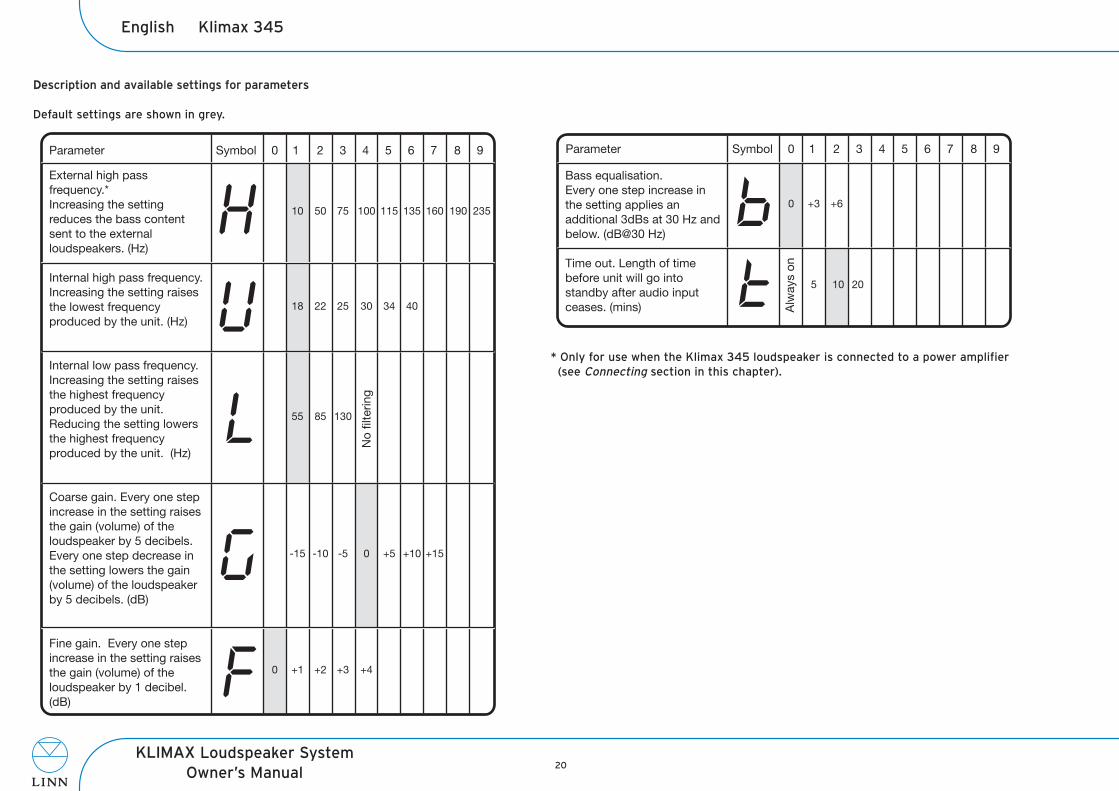
DDescription and available settings for parameters
Default settings are shown in grey.
Parameter Symbol 0 1 2 3 4 5 6 7 8 9
10 50 75 100 115 135 160 190 235
18 22 25 30 34 40
55 85 130
-15 -10 -5 0 +5 +10 +15
0 +1 +2 +3 +4
External high pass
frequency.*
Increasing the setting
reduces the bass content
sent to the external
loudspeakers. (Hz)
Internal high pass frequency.
Increasing the setting raises
the lowest frequency
produced by the unit. (Hz)
Internal low pass frequency.
Increasing the setting raises
the highest frequency
produced by the unit.
Reducing the setting lowers
the highest frequency
produced by the unit. (Hz)
Coarse gain. Every one step
increase in the setting raises
the gain (volume) of the
loudspeaker by 5 decibels.
Every one step decrease in
the setting lowers the gain
(volume) of the loudspeaker
by 5 decibels. (dB)
Fine gain. Every one step
increase in the setting raises
the gain (volume) of the
loudspeaker by 1 decibel.
(dB)
No
filt
ering
* Only for use when the Klimax 345 loudspeaker is connected to a power amplifier (see Connecting section in this chapter).
0 +3 +6
5 10 20
Bass equalisation.
Every one step increase in
the setting applies an
additional 3dBs at 30 Hz and
below. (dB@30 Hz)
Time out. Length of time
before unit will go into
standby after audio input
ceases. (mins)
Parameter Symbol 0 1 2 3 4 5 6 7 8 9
Alw
ays o
n
21KLIMAX Loudspeaker System
Owner’s Manual
Technical Specification English
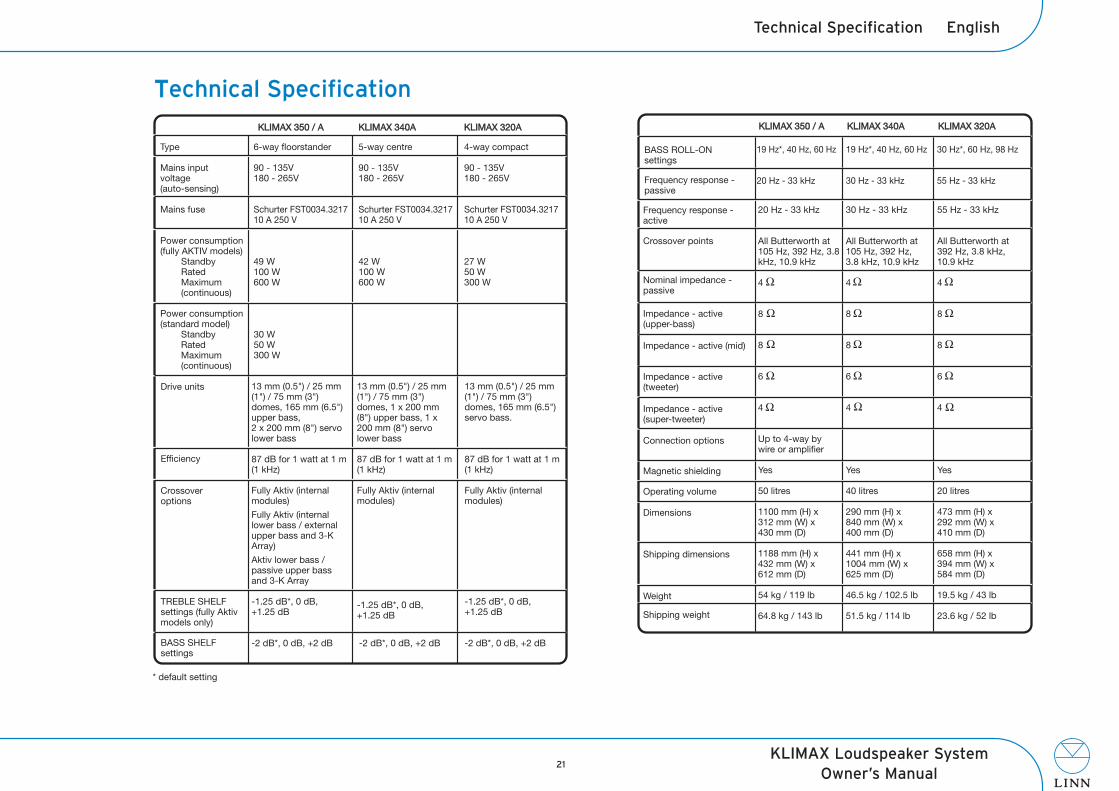
TTechnical Specification
KLIMAX 350 / A KLIMAX 340A KLIMAX 320AKLIMAX 350 / A KLIMAX 340A KLIMAX 320A
Type 6-way floorstander 5-way centre 4-way compact
Mains input 90 - 135V 90 - 135V 90 - 135Vvoltage 180 - 265V 180 - 265V 180 - 265V(auto-sensing)
Mains fuse Schurter FST0034.3217 Schurter FST0034.3217 Schurter FST0034.3217 10 A 250 V 10 A 250 V 10 A 250 V
Power consumption(fully AKTIV models) Standby 49 W 42 W 27 W Rated 100 W 100 W 50 W Maximum 600 W 600 W 300 W (continuous)
Power consumption(standard model) Standby 30 W Rated 50 W Maximum 300 W (continuous)
19 Hz*, 40 Hz, 60 Hz
20 Hz - 33 kHz
19 Hz*, 40 Hz, 60 Hz
30 Hz - 33 kHz
30 Hz*, 60 Hz, 98 Hz
55 Hz - 33 kHz
BASS ROLL-ON settings
Frequency response - passive
KLIMAX 350 / A KLIMAX 340A KLIMAX 320A KLIMAX 350 / A KLIMAX 340A KLIMAX 320A
20 Hz - 33 kHz
All Butterworth at 105 Hz, 392 Hz, 3.8 kHz, 10.9 kHz
4
8
8
6
4
Up to 4-way by wire or amplifier
Yes
50 litres
1100 mm (H) x 312 mm (W) x 430 mm (D)
1188 mm (H) x 432 mm (W) x 612 mm (D)
54 kg / 119 lb
64.8 kg / 143 lb
30 Hz - 33 kHz
All Butterworth at 105 Hz, 392 Hz, 3.8 kHz, 10.9 kHz
4
8
8
6
4
Yes
40 litres
290 mm (H) x 840 mm (W) x 400 mm (D)
441 mm (H) x 1004 mm (W) x 625 mm (D)
46.5 kg / 102.5 lb
51.5 kg / 114 lb
55 Hz - 33 kHz
All Butterworth at 392 Hz, 3.8 kHz, 10.9 kHz
4
8
8
6
4
Yes
20 litres
473 mm (H) x 292 mm (W) x 410 mm (D)
658 mm (H) x 394 mm (W) x 584 mm (D)
19.5 kg / 43 lb
23.6 kg / 52 lb
Frequency response - active
Impedance - active (upper-bass)
Crossover points
Impedance - active (super-tweeter)
Impedance - active (mid)
Impedance - active (tweeter)
Nominal impedance - passive
Connection options
Magnetic shielding
Operating volume
Shipping dimensions
Shipping weight
Dimensions
Weight
13 mm (0.5") / 25 mm (1") / 75 mm (3") domes, 165 mm (6.5") upper bass, 2 x 200 mm (8") servo lower bass
87 dB for 1 watt at 1 m (1 kHz)
Fully Aktiv (internal modules)
Fully Aktiv (internal lower bass / external upper bass and 3-K Array)
Aktiv lower bass / passive upper bass and 3-K Array
-1.25 dB*, 0 dB,+1.25 dB
-2 dB*, 0 dB, +2 dB
13 mm (0.5") / 25 mm (1") / 75 mm (3") domes, 1 x 200 mm (8") upper bass, 1 x 200 mm (8") servo lower bass
87 dB for 1 watt at 1 m (1 kHz)
Fully Aktiv (internal modules)
-1.25 dB*, 0 dB,+1.25 dB
13 mm (0.5") / 25 mm (1") / 75 mm (3") domes, 165 mm (6.5") servo bass.
87 dB for 1 watt at 1 m (1 kHz)
Fully Aktiv (internal modules)
-1.25 dB*, 0 dB,+1.25 dB
-2 dB*, 0 dB, +2 dB
Drive units
Efficiency
Crossover options
TREBLE SHELF settings (fully Aktiv models only)
BASS SHELF settings
* default setting
-2 dB*, 0 dB, +2 dB

22KLIMAX Loudspeaker System
Owner’s Manual
English Technical Specification
KLIMAX 345KLIMAX 345
Type 1-way bass reinforcement
Drive unit 300 mm (12") servo bass
Mains input voltage (auto-sensing) 90 - 135V 180 - 265V
Mains supply frequency 50 - 60 Hz
Mains fuse 6.3 A, slow-blow, 5 x 20 mm, Littlefuse 21806.3
Magnetic shielding Yes
External frequency response Adjustable from 10 Hz - 235 Hz in 9 steps. Default is 10 Hz.
Internal frequency response Adjustable from 55 Hz - 130 Hz in 3 steps and flat (to allow external low pass filtering). Default is 55 Hz.
Gain Adjustable in 1 dB steps
Line input impedance 18 k
Line output level Electronically in parallel with line input
Power consumption Standby 11 W Rated 60 W Maximum (continuous) 150 W
Output power 500 W RMS, 1000 W peak
Operating volume 45 litres
Dimensions 420 mm (H) x 491 mm (W) x 410 mm (D)
Shipping dimensions 596 mm (H) x 595 mm (W) x 534 mm (D)
Weight 27 kg / 59.5 lb
Shipping weight 30 kg / 66 lb
23KLIMAX Loudspeaker System
Owner’s Manual
Guarantee and Service English
GGuarantee and ServiceThis product is guaranteed under the conditions which apply in the country ofpurchase and your statutory rights are not limited. In addition to any statutory rightsyou may have, Linn undertake to replace any parts which have failed due to faultymanufacture. To help us, please ask your Linn retailer about the Linn warrantyscheme in operation in your country.
In parts of Europe, the United States of America and some other markets, extendedwarranty may be available to customers who register their purchase with Linn. Youcan register your warranty online at www.linn.co.uk
WarningUnauthorised servicing or dismantling of the product invalidates the manufacturer’swarranty. There are no user serviceable parts inside the product and all enquiriesrelating to product servicing should be referred to authorised retailers only.
Technical support and informationFor technical support, product queries and information, please contact either yourlocal retailer or one of the Linn offices opposite.
Full details of your local retailer/distributor can be found on the Linn web site:www.linn.co.uk
Important
• Please keep a copy of the sales receipt to establish the purchase date of theproduct.
• Please ensure that your equipment is insured by you during any transit orshipment for repair.
Linn Products LimitedGlasgow RoadWaterfootEagleshamGlasgow G76 0EQScotland, UK
Phone: +44 (0)141 307 7777Fax: +44 (0)141 644 4262Helpline: 0500 888909Email: [email protected]: www.linn.co.uk
Linn Incorporated8787 Perimeter Park BoulevardJacksonvilleFL 32216USA
Phone: +1 (904) 645 5242Fax: +1 (904) 645 7275Helpline: 888-671-LINNEmail: [email protected]: www.linninc.com
Linn Deutschland GmbHHühnerposten 1d D-20097 Hamburg Deutschland
Phone: +49-(0) 40-890 660-0Fax: +49-(0) 40-890 660-29Email: [email protected]: www.linn.co.uk