Embed Size (px)
Citation preview

A-617935K7032
User’s Guide
A3 Size Flatbed Accessoryfor Kodak or Alaris Scanners


Safety
User precautions• Only use the scanner and power supply indoors in a dry location.• Make sure the electrical power outlet is located within 1.52 meters (5 feet) of the scanner and is easily
accessible. • Be sure the power cord is securely plugged into the wall outlet.• Do not damage, knot, cut or modify the power cord. • Use only the AC adapter that is supplied with the scanner. Do not use the scanner’s AC adapter with
any other product.• Leave sufficient space around the power outlet so it can be easily unplugged in case of an emergency.• Do not use the scanner if it becomes inordinately hot, has a strange odor, emits smoke, or makes
unfamiliar noises. Immediately stop the scanner and disconnect the power cord from the power outlet. Contact Kodak Service.
• Do not disassemble or modify the scanner or the AC power adapter.• Follow the Kodak recommended cleaning procedures. Do not use air, liquid or gas spray cleaners.
These cleaners displace dust, dirt and debris to another location within the scanner, which may cause the scanner to malfunction.
Environmental information• The Kodak A3 Size Flatbed Accessory is designed to meet worldwide environmental requirements.• Guidelines are available for the disposal of consumable items that are replaced during maintenance or
service; follow local regulations or contact Kodak locally for more information.• Disposal of this material may be regulated due to environmental considerations. For recycling or reuse
information, contact your local authorities, or in the USA, go to: www.kodakalaris.com/go/scannerrecycling.
• The product packaging is recyclable.• Parts are designed for reuse or recycling.• Safety Data Sheets (SDS) for chemical products are available on the Kodak Alaris website at:
www.kodakalaris.com/go/ehs. When accessing the SDSs from the website, you will be required to provide the catalog number of the consumable you want the Safety Data Sheet for.
European UnionThis symbol indicates that when the last user wishes to discard this product, it must be sent to appropriate facilities for recovery and recycling. Please contact your local Kodak representative or refer to www.kodakalaris.com/go/recycle for additional information on the collection and recovery programs available for this product.Please consult www.kodakalaris.com/go/REACH for information about the presence of substances included on the candidate list according to article 59(1) of Regulation (EC) No.
1907/2006 (REACH).
Acoustic emissionMaschinenlärminformationsverordnung – 3, GSGVDer arbeitsplatzbezogene Emissionswert beträgt <70 db(A).[Machine Noise Information Ordinance — 3, GSGVThe operator-position noise emission value is <70 dB(A).]

EMC statementsUnited States: This equipment has been tested and found to comply with the limits for a Class B digital device pursuant to Part 15 of the FCC rules. These limits are designed to provide reasonable protection against harmful interference in a residential installation. This equipment generates, uses, and can radiate radio frequency energy and, if not installed and used in accordance with the instruction manual, may cause harmful interference to radio communications. However, there is no guarantee that interference will not occur in a particular installation. If this equipment does cause harmful interference to radio or television reception, which can be determined by turning the equipment off and on, the user is encouraged to try to correct the interference by one or more of the following measures:• Reorient or relocate the receiving antenna.• Increase the separation between the equipment and receiver.• Connect the equipment into an outlet on a circuit different from that to which the receiver is connected.• Consult the dealer or an experienced radio/TV technician for additional suggestions.Any changes or modifications not expressly approved by the party responsible for compliance could void the user’s authority to operate the equipment. Where shielded interface cables have been provided with the product or specified additional components or accessories elsewhere defined to be used with the installation of the product, they must be used in order to ensure compliance with FCC regulation.Korea: As this equipment has obtained EMC registration for household use, it can be used in an area including residential areas.
Japan: This is a Class B product based on the standard of the Voluntary Control Council for interference by information Technology Equipment (VCCI). If this is used near a radio or television receiver in a domestic environment, it may cause radio interference. Install and use the equipment according to the instruction manual.

Using the Kodak A3 Size Flatbed Accessory
Contents Unlocking the flatbed ......................................................................... 1Locking the flatbed............................................................................. 2Connecting the flatbed ....................................................................... 2Start/Resume button .......................................................................... 3Using the flatbed ................................................................................ 4Scanning multiple documents from the flatbed .................................. 5Cleaning the flatbed ........................................................................... 6Specifications..................................................................................... 7
The Kodak A3 Size Flatbed Accessory allows you to scan exception documents with your Kodak or Alaris Scanners. The cable included with the Flatbed Accessory easily connects your flatbed to the host PC.NOTES:
• Terminology usage within this document: “Scanner” refers to the Kodak or Alaris Scanner; “Flatbed” refers to the Kodak A3 Size Flatbed Accessory.
• The Flatbed Accessory must be used with your Kodak or Alaris Scanner; it cannot be used as a standalone device.
Unlocking the flatbed When the Kodak A3 Size Flatbed Accessory is shipped, the flatbed camera is placed in a Locked position. Unlock the flatbed camera before using the flatbed. The Lock/Unlock lever is on the bottom of the flatbed.
1. Carefully lift the flatbed up to locate the Lock/Unlock lever.
2. Move the lever into the Unlocked position.
NOTE: It is not necessary to lock the flatbed accessory unless you move it to another location.
A-61793 November 2017 1

Locking the flatbed To prevent damage to internal components when relocating the flatbed do the following:
1. If your scanning application provides a “Ship Scanner” option, enable this option before locking the flatbed. Enabling this option will ensure proper locking.
If your scanning application does not provide a “Ship Scanner” option, scan one document on the flatbed before proceeding to Step 2.
2. Power down the scanner and carefully lift the flatbed up and slide the Lock/Unlock lever to the Lock position.
Connecting the flatbed
1. Power down the scanner.
2. If you have not already installed the flatbed software, install it before connecting the flatbed.
3. Select the appropriate power cord for your region from the supply of plug cords packed with your flatbed.
4. Connect the power supply, power cord and USB cable to the flatbed. Refer to the illustration below for making proper connections.
5. Connect the other end of the USB cable to an open USB port on your PC.
NOTE: If you have a Scan Station 700 Series or S2000 Series scanner, connect the other end of the USB cable to the scanner.
6. Turn on the scanner.
2 A-61793 November 2017

7. Press the power button on the flatbed. If the flatbed is being connected for the first time, wait for the PC to find and install the device drivers for the flatbed.
When the Start/Resume button is green and steady, the flatbed is ready to use.
NOTE: If you need to remove the cable from the scanner or flatbed, turn off the scanner or the flatbed, then release the cable from its position.
Start/Resume button You can scan a document using the Start/Resume button on the flatbed.
If you are scanning several exception documents using the flatbed, it may be easier to use the Start/Resume button on the flatbed to start scanning.
Indicator status:• Steady green: flatbed is on, ready to scan, or scanning.• Steady red: USB cable is not connected, has lost USB
communication with host PC after power up or there is a flatbed failure or error.
• Flashing green: waiting/Power Saver mode.
Power button
Start/Resume button
When you press the Start/Resume button on the flatbed, you will get the same result as pressing the Start/Resume button on the scanner. The application that is associated with the number displayed in the operator control panel on the scanner is launched. By default, the displayed numbers are associated with Smart Touch. The displayed numbers 1-9 are mapped to Smart Touch task shortcuts1-9.
A-61793 November 2017 3
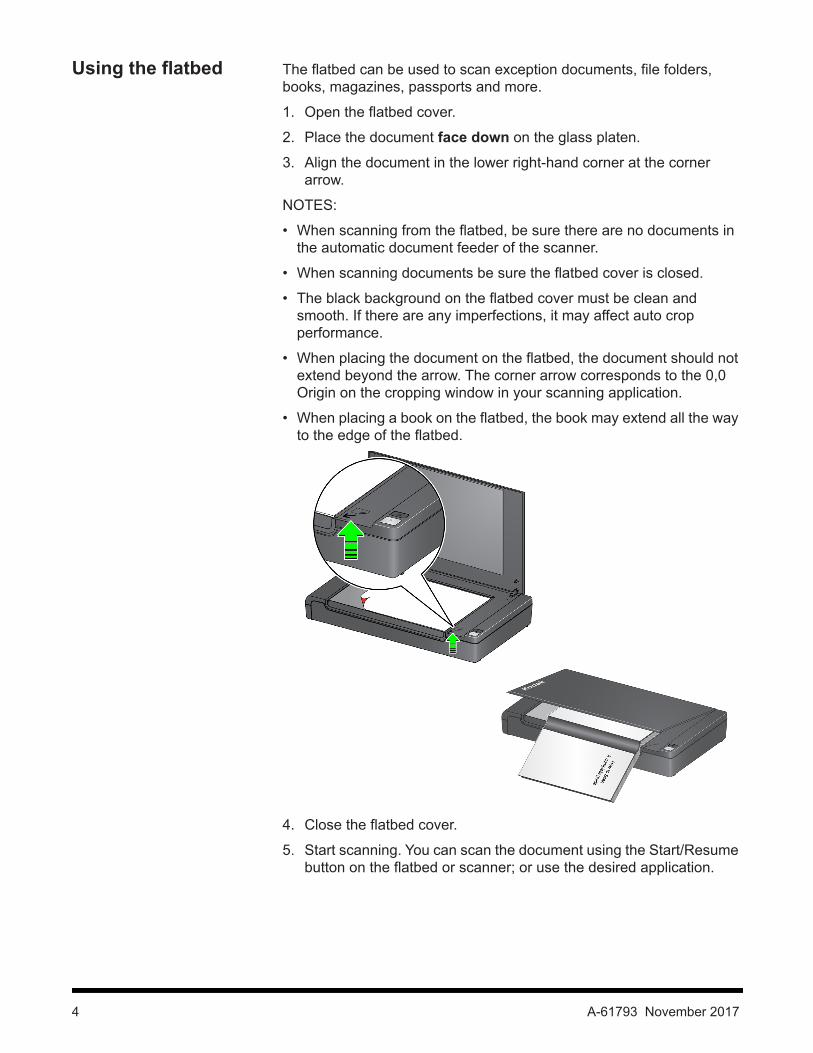
Using the flatbed The flatbed can be used to scan exception documents, file folders, books, magazines, passports and more.
1. Open the flatbed cover.
2. Place the document face down on the glass platen.
3. Align the document in the lower right-hand corner at the corner arrow.
NOTES:
• When scanning from the flatbed, be sure there are no documents in the automatic document feeder of the scanner.
• When scanning documents be sure the flatbed cover is closed.
• The black background on the flatbed cover must be clean and smooth. If there are any imperfections, it may affect auto crop performance.
• When placing the document on the flatbed, the document should not extend beyond the arrow. The corner arrow corresponds to the 0,0 Origin on the cropping window in your scanning application.
• When placing a book on the flatbed, the book may extend all the way to the edge of the flatbed.
4. Close the flatbed cover.
5. Start scanning. You can scan the document using the Start/Resume button on the flatbed or scanner; or use the desired application.
4 A-61793 November 2017

Scanning multiple documents from the flatbed
If you want to scan several documents on the flatbed scanner at one time, the flatbed will scan the documents and output one image for each document it finds. For example, if you place three documents on the flatbed, three separate images will be output.
1. Open the flatbed cover.
2. Place the documents you want to scan face down on the glass platen.
3. Close the flatbed cover.
4. Start scanning.
You can scan the documents using the Start/Resume button on the flatbed or scanner; or use the desired application.
A-61793 November 2017 5

Cleaning the flatbed The flatbed’s glass platen can collect fingerprints and dust. Use Brillianize Detailer Wipes for Kodak Scanners (CAT No. 826 6488) to clean the glass platen.
1. Open the flatbed cover.
2. Wipe the glass platen with a “Step 1” Brillianize Detailer wipe.
3. Wipe the glass platen again using the “Step 2” Brillianize Detailer wipe to remove any debris and polish the surface.
4. Close the flatbed cover.
IMPORTANT: Do not spray or pour cleaning liquids on the flatbed’s glass platen, as these liquids may seep under the glass and cause damage.
6 A-61793 November 2017

Specifications Following are specifications for the Kodak A3 Size Flatbed Accessory.
Scanning Technology CCD Image SensorColor bit depth: 24-bit
Optical Resolution 600 dpiImage Processing features
Based on the ADF Scanner capabilities
Maximum Thickness Up to 50.8 mm (2 in.)Maximum Document Size 304.8 x 457.2 mm (12 x 18 in.)Recommended Daily Volume
100 pages per day
Illumination Indirect LED DualScanner Dimensions Height: 108 mm / 4.25 in.
Length: 698.5 mm / 27.5 in.Width: 419.1 mm / 16.5 in.
Flatbed Weight - with power adapter
9.5 kg (21 lbs)
Host Connection USB 2.0Operating Temperature 15°C to 35°C (59 to 95°F)Operating Humidity 15 to 80% RHPower Consumption - Scanner
Sleep mode: <2.75 watts
Acoustic Noise(Sound Power level)
Operating: less than 70 dBOff mode or Ready mode: less than 46 dB
Electrical rating 24 Vdc 2.5 AElectrical requirement 100 - 240 V (international) 50/60 Hz
A-61793 November 2017 7

Kodak Alaris Inc.2400 Mount Read Blvd.Rochester, NY 14615© 2017 Kodak Alaris Inc.TM/MC/MR: AlarisAll rights reserved.The Kodak trademark andtrade dress are used under licensefrom Eastman Kodak Company.