Embed Size (px)
Citation preview
KODAK DIRECTVIEWCR Mammography Feature
User’s Guide
17 September 20109G3741Version 1.0
Carestream Health, Inc.150 Verona StreetRochester, NY 14608
CARESTREAM, DIRECTVIEW, and DRYVIEW are trademarks of Carestream Health, Inc.The Kodak trademark and trade dress are used under license from Kodak.
© Carestream Health, Inc. 2010
Table of Contents
1 CR Mammography Feature
Document Conventions ....................................................................................................................................... 1About This Guide................................................................................................................................................. 1For European Markets ........................................................................................................................................ 2Safety and Related Information............................................................................................................................ 2Mammography Imaging Chain............................................................................................................................. 4
Acquisition .................................................................................................................................................... 5Capture and Processing................................................................................................................................. 5Softcopy Viewing / Storage ............................................................................................................................ 6Hardcopy Printing / Viewing.......................................................................................................................... 6
CR Mammography Feature .................................................................................................................................. 6Indications for Use ........................................................................................................................................ 6CR Systems.................................................................................................................................................... 6CR Mammography Cassettes .......................................................................................................................... 7Before You Begin .......................................................................................................................................... 8
Workflow and Operation................................................................................................................................... 10Performing a Mammography Exam ................................................................................................................... 11
Preparing the Cassettes ............................................................................................................................... 11Creating a Patient Record............................................................................................................................ 12Using CR Mammography Cassettes .............................................................................................................. 14Exposing the Cassette .................................................................................................................................. 14
Compatibility with X-ray Systems ....................................................................................................................... 15Technique Considerations ........................................................................................................................... 16X-ray Techniques ........................................................................................................................................ 16Automatic Exposure Control (AEC) ............................................................................................................. 17Automatic Exposure Control (AEC) Calibration ........................................................................................... 18Exposure Index ........................................................................................................................................... 19
Recording Exposure Parameters ....................................................................................................................... 19Mammography X-ray Interface .................................................................................................................... 19
General Radiography Workflow............................................................................................................. 20Mammography Workflow...................................................................................................................... 20Transmitted Data................................................................................................................................... 21
Scanning the Cassette ........................................................................................................................................ 22
i
Scanner Bar-Code Messages ...................................................................................................................... 22Reviewing and Accepting Images....................................................................................................................... 22
Skin Line Enhancement............................................................................................................................... 25Using the Image Processing Preference Editor .................................................................................................. 26
The Family of Looks .................................................................................................................................... 27For Software Versions 5.1 and 5.2 ........................................................................................................ 27For Software Version 5.2 Additional Looks Mammography Patch and Version 5.4 Default .................... 28For Software Version 5.4 Mammography Update 2010-01 License Enabled .......................................... 28For Software Version 5.4 SNP Parameter Database................................................................................ 29
Preference Editor Controls.......................................................................................................................... 30Slider Control Behavior............................................................................................................................... 32Defining a Look .......................................................................................................................................... 32Brightness................................................................................................................................................... 32Latitude....................................................................................................................................................... 33Contrast ...................................................................................................................................................... 33Sharpness ................................................................................................................................................... 33Noise .......................................................................................................................................................... 33
Delivering Mammography Images..................................................................................................................... 34Justification of Right Mammography images................................................................................................ 34Presentation of Images................................................................................................................................ 34Printing Mammography Images .................................................................................................................. 35Creating Multi-format Prints........................................................................................................................ 35
Mammography Cassette Use Instructions .......................................................................................................... 37Opening the Cassette ................................................................................................................................... 37Cleaning the Cassette Shell .......................................................................................................................... 38Handling and Maintaining the Screen.......................................................................................................... 39Cleaning the Screen .................................................................................................................................... 40Cleaning Method......................................................................................................................................... 40Disinfecting the Screen or the Cassette ........................................................................................................ 41Disposing of the Screen .............................................................................................................................. 41
Quality Control.................................................................................................................................................. 42Acceptance and Quality Control Testing ...................................................................................................... 42
Troubleshooting ............................................................................................................................................... 42Black Surround Masking ............................................................................................................................ 43Manual Black Surround.............................................................................................................................. 43Overscan Check .......................................................................................................................................... 45
Getting Help ...................................................................................................................................................... 45Glossary ............................................................................................................................................................ 46Acronyms.......................................................................................................................................................... 48
ii

CR Mammography Feature
1 CR Mammography Feature
The information contained herein is based on the experience and knowledge relating to the subject matter gained by Carestream Health, Inc. prior to publication. No patent license is granted by this information.
Carestream Health reserves the right to change this information without notice, and makes no warranty, express or implied, with respect to this information. Carestream Health shall not be liable for any loss or damage, including consequential or special damages, resulting from any use of this information, even if loss or damage is caused by Carestream Health’s negligence or other fault.
Document ConventionsThis manual uses three types of messages to emphasize information or potential risks to personnel or equipment: Notes, Important, and Caution.
NOTE: Notes provide additional information, such as expanded explanations, hints, or reminders.
IMPORTANT: Important highlights critical policy information that affects how you use this manual and this product.
CAUTION:Cautions point out procedures that you must follow precisely to avoid injury to yourself, others, damage to the system or any of its components, loss of data, or corruption of files in software applications.
About This GuideUse the KODAK DIRECTVIEW CR Mammography Feature User’s Guide for specific information on the use of the CR Mammography Feature. This guide does not provide all operational use information on KODAK DIRECTVIEW CR Systems and is intended to be used in conjunction with the following document:
• KODAK DIRECTVIEW CR Systems User Guide information
9G3741 1-1

CR Mammography Feature
NOTE: All references in this document to CR Mammography Cassettes and screens apply to the following unless otherwise specified:
• KODAK DIRECTVIEW CR Mammography Cassette with EHR-M Screen
• KODAK DIRECTVIEW CR Mammography Cassette with EHR-M2 Screen
• CARESTREAM CR Mammography Cassette with EHR-M3 Screen.
• CARESTREAM CR Mammography Cassette with SNP-M1 Screen.
NOTE: CR Mammography Cassettes are not available for sale in the United States.
NOTE: See the Glossary section for a brief description of terms used in this guide.
NOTE: Use of the term applicable regulations throughout this document means: as per current country, state, local, and/or facility-specific regulations applicable for use in mammography.
For European MarketsAuthorized European Agent:
Carestream Health FranceLES MERCURIALES40, rue Jean Jaures
93176 BAGNOLET CEDEXFrance
Safety and Related InformationNOTE: The following information applies to any KODAK DIRECTVIEW CR
System that has the CR Mammography Feature installed. For more information, see the KODAK DIRECTVIEW CR System Safety and Regulatory Information included in your CR Systems User’s Guide.
CAUTION:A trained Service Representative is to install and verify the CR System is set up and functioning properly for use of the Mammography Feature.
See: “Before You Begin” on page 1-8.
1-2 9G3741
CR Mammography Feature
CAUTION:Calibrate all components in the Mammography Imaging Chain at the recommended intervals, according to the manufacturer’s instructions, and before use.
See: “Mammography Imaging Chain” on page 1-4.
CAUTION:A Medical Physicist or qualified personnel is to establish or approve the exposure techniques used. A technique chart should be posted near the X-ray unit generator control panel.
See: “Technique Considerations” on page 1-16.
CAUTION:The Medical Physicist or qualified personnel is to perform the Acceptance and Quality Control Tests as mandated by applicable regulations.
CAUTION:Follow and perform the Quality Control procedures for all components in the Mammography Imaging Chain at the recommended intervals, according to the manufacturer’s instructions and per applicable regulations. The facility must ensure that the image quality produced by all equipment in the Mammography Imaging Chain meets the requirements for clinical use.
See: “Mammography Imaging Chain” on page 1-4.
CAUTION:Primary interpretation of softcopy images shall be performed on a workstation cleared for mammography and supporting the DICOM 3.0 standard. The workstation shall have at least two displays, each with a minimum image array size of five megapixels.
CAUTION:Primary interpretation of hardcopy images shall be performed on a printer cleared for mammography and supporting the DICOM 3.0 standard. The printer shall have a 50 micrometer m pixel pitch or less and maximum film optical density of at least 3.6.
9G3741 1-3

CR Mammography Feature
CAUTION:Use CR Mammography Cassettes only for Mammographic Imaging. Do not use CR Mammography Cassettes for general radiography imaging applications. Do not use CR Cassettes, intended for general radiography, for Mammography imaging applications.
CAUTION:KODAK DIRECTVIEW CR Systems allow CR Mammography Cassettes with EHR-M, EHR-M2, EHR-M3, and SNP-M1 screen types to be scanned. Only scan cassettes with the same screen type on the CR System, and do not intermix the cassette/screen types when performing a patient exam. Intermixing the cassette/screen types may result in an inconsistency in the quality of the image.
NOTE: For hardcopy printing of Mammography images, Carestream Health recommends that you configure the CR System for use with a KODAK DRYVIEW Mammography Laser Imager using KODAK DRYVIEW Mammography Laser Imaging Film. Contact your Carestream Health Sales Representative for more product information.
NOTE: For softcopy viewing of Mammography images, Carestream Health recommends that you configure the CR System for use with a KODAK DIRECTVIEW Mammography Workstation. Contact your Carestream Health Sales Representative for more product information.
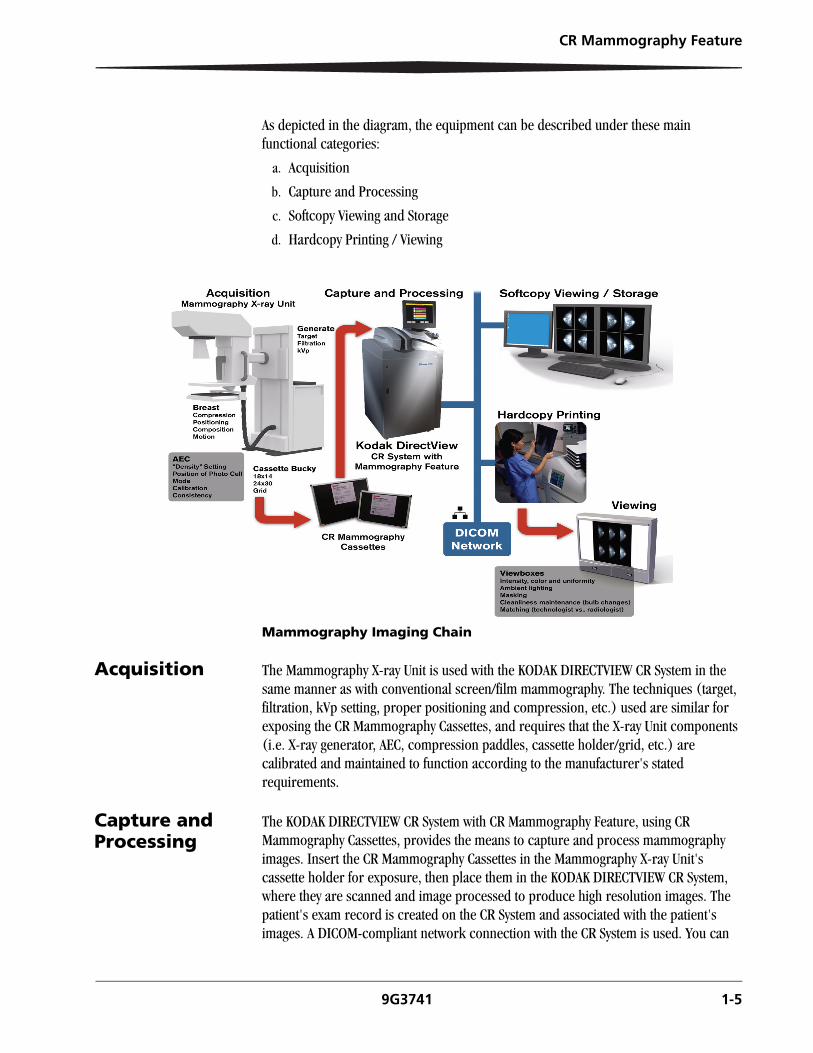
Mammography Imaging ChainThe Mammography Imaging Chain with the KODAK DIRECTVIEW CR System diagram shows an overview of the equipment necessary for producing diagnostic quality mammograms. Obtaining high quality mammography images is dependent on many factors. All equipment in the Mammography Imaging Chain must be properly calibrated for use and quality control checked for proper functionality per each manufacturer's recommendations.
The Technologist plays a key role in successfully achieving high quality digital mammograms by understanding the best exposure techniques to use, based on breast thickness and composition, and the capabilities of the equipment in the imaging chain. In addition to the KODAK DIRECTVIEW CR System with CR Mammography Feature, Carestream Health provides Mammography Workstation and Mammography Printer solutions, thus optimizing the system performance of this equipment in the Mammography Imaging Chain.
1-4 9G3741
CR Mammography Feature
As depicted in the diagram, the equipment can be described under these main functional categories:
a. Acquisition
b. Capture and Processing
c. Softcopy Viewing and Storage
d. Hardcopy Printing / Viewing
Mammography Imaging Chain
Acquisition The Mammography X-ray Unit is used with the KODAK DIRECTVIEW CR System in the same manner as with conventional screen/film mammography. The techniques (target, filtration, kVp setting, proper positioning and compression, etc.) used are similar for exposing the CR Mammography Cassettes, and requires that the X-ray Unit components (i.e. X-ray generator, AEC, compression paddles, cassette holder/grid, etc.) are calibrated and maintained to function according to the manufacturer's stated requirements.
Capture and Processing
The KODAK DIRECTVIEW CR System with CR Mammography Feature, using CR Mammography Cassettes, provides the means to capture and process mammography images. Insert the CR Mammography Cassettes in the Mammography X-ray Unit's cassette holder for exposure, then place them in the KODAK DIRECTVIEW CR System, where they are scanned and image processed to produce high resolution images. The patient's exam record is created on the CR System and associated with the patient's images. A DICOM-compliant network connection with the CR System is used. You can
9G3741 1-5
CR Mammography Feature
search Patient Worklist information from a site's HIS/RIS and use it to create the patient's exam record on the CR System. The patient record and images are then sent via the DICOM network to the desired output destination for diagnostic interpretation.
Softcopy Viewing / Storage
From the KODAK DIRECTVIEW CR System, digital mammogram images can be sent to a DICOM-compatible Mammography Workstation where a diagnostic review can be performed in softcopy. The workstation consists of a mammography-capable, high-resolution display monitor, keyboard, mouse and computer. The Technologist uses the mouse and keyboard to select, review, and manipulate images for desired viewing. You can save preferences for selecting digital images and patient information and recall them for later use. The operator can send images from the workstation to an archive image storage system, or to other network DICOM compatible devices, including hardcopy printers.
Hardcopy Printing / Viewing
From the KODAK DIRECTVIEW CR System, digital mammogram images can be sent to a DICOM compatible Mammography Printer. The Mammography Printer can produce high-resolution, diagnostic quality, hardcopy (film) output of the digital mammogram images. The hardcopy print is then viewed for diagnosis on a View Box. The View Box must be of adequate brightness with uniform light output across the entire viewing area to ensure that the image captured on the film can be effectively diagnosed.
CR Mammography Feature
Indications for Use
The CR Mammography Feature together with CR Mammography Cassette comprise a device which, when used in conjunction with a KODAK DIRECTVIEW CR System and a mammographic X-ray machine, generates digital mammographic images that can be used for screening and diagnosis of breast cancer. It is intended for use in the same clinical applications as traditional screen-film based mammographic systems. The mammographic images can be interpreted by a qualified physician using either hardcopy film or softcopy display at a workstation.
CR Systems You can install and use the CR Mammography Feature in the following KODAK DIRECTVIEW CR Systems:
• CR 850
• CR 950
• CR 975
• Classic/Elite CR
NOTE: See the KODAK DIRECTVIEW CR System Hardware Guide for descriptions of these systems. Older manufactured CR 850/950/975 Systems may require hardware and software updates in order to use the CR Mammography Feature. Contact your Carestream Health Sales Representative for information.
1-6 9G3741
CR Mammography Feature
NOTE: The KODAK DIRECTVIEW CR System with CR Mammography Feature, using CR Mammography Cassettes is designed to work under normal room light conditions.
IMPORTANT: Keep the CR System, its surrounding area, and the storage locations for the CR Mammography Cassettes clean. This will help prevent dust or debris from entering the CR System and cassettes, which can result in image artifacts.
To enable the CR Mammography Feature:
1. Purchase and install the CR Mammography Feature Option.
2. Log on as the Key Operator.
3. Enter the Mammography Feature code to automatically enable the feature.
When the CR Mammography Feature is enabled, the KODAK DIRECTVIEW CR System produces high-resolution Mammography images using CR Mammography Cassettes. Only CR Systems with the CR Mammography Feature enabled will support the use of the CR Mammography Cassettes.
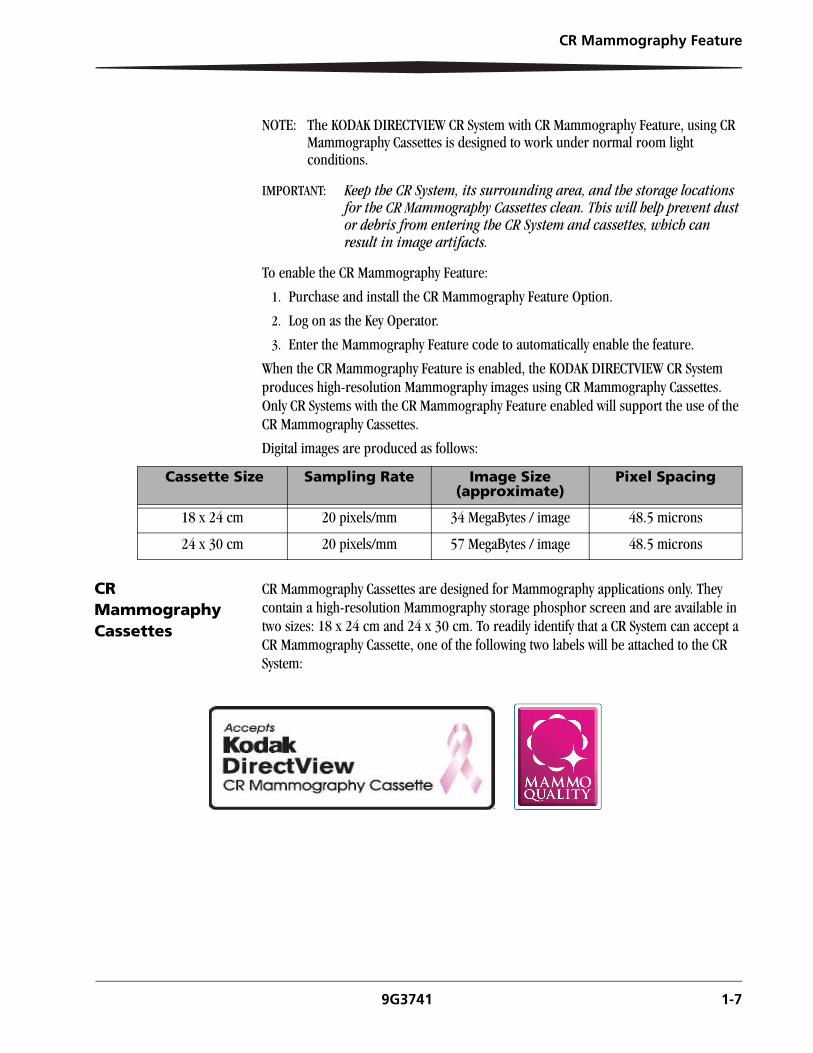
Digital images are produced as follows:
CR Mammography Cassettes
CR Mammography Cassettes are designed for Mammography applications only. They contain a high-resolution Mammography storage phosphor screen and are available in two sizes: 18 x 24 cm and 24 x 30 cm. To readily identify that a CR System can accept a CR Mammography Cassette, one of the following two labels will be attached to the CR System:
Cassette Size Sampling Rate Image Size (approximate)
Pixel Spacing
18 x 24 cm 20 pixels/mm 34 MegaBytes / image 48.5 microns
24 x 30 cm 20 pixels/mm 57 MegaBytes / image 48.5 microns
9G3741 1-7
CR Mammography Feature
The Mammography storage phosphor screen is not physically contacted when transported or scanned by the CR System. Not withstanding possible wear conditions, there is no established total number of times the CR Mammography Cassette can be used for image exposure before replacement is required.
IMPORTANT: CR Mammography Cassettes should not be stored or left unattended in the exam room. When an X-ray exposure occurs, scatter radiation can expose the cassettes that are located in the exam room, resulting in fogged or low contrast appearance in image quality. You can use the Erase Cassette function on the CR System to assure the cassette is fully erased prior to using for patient exposure.
Before You BeginAfter installing the CR Mammography Feature in the CR System and before clinical use:
1. A trained Service Representative should check that the CR System:
– Is properly configured and contains KODAK DIRECTVIEW CR Software Version 5.1 or higher.
– Has the CR Mammography Feature enabled.
– Is calibrated for use with CR Mammography Cassettes.
– Operates within specification to produce expected image quality.
2. A Medical Physicist or, if permitted by applicable regulations, qualified personnel under direction of a Medical Physicist, should:
– Performs the necessary acceptance testing according to applicable regulations.
– Check the Mammography X-ray Unit’s Automatic Exposure Control (AEC) is properly calibrated for use with CR Mammography Cassettes and meets applicable regulations. AEC calibration is to be performed by a qualified X-ray equipment service representative.
– Establish and/or approve the use of an exposure technique control chart.
3. A Carestream Health Applications Consultant can:
– Configure various interface features and functions as desired.
– Train Key Operators/Radiographers on use of the CR System, CR Mammography Cassettes, and on the use of an established technique control chart.
– Work with Key Operators/Radiographers/Radiologists to make X-ray exposures, modify mammography views, and optimize image quality.
1-8 9G3741
CR Mammography Feature
IMPORTANT: See the KODAK DIRECTVIEW CR System User Guide Information for information on operating parameters and configuring the CR System.
Recommended Mammography-specific configurations include Mammography views to use for producing mammography images.
IMPORTANT: New CR Systems are configured from the factory with default views to be used for General Radiography and Mammography applications.
• Breast Type
– Breast
– Breast Homogeneously Dense
– Breast Heterogeneously Dense
– Breast Implant
– Breast Fatty
• Mammography Projection
– Cranio-Caudal (CC)
– Mediolateral Oblique (MLO)
– Lateral (ML and LM)
– MLO_Mag (Mediolateral Oblique_Magnification)
– CC_Mag (Craniocaudal_Magnification)
NOTE: These 36 combinations, with both Left and Right laterality, result in 72 Mammography Views. Select the view that matches the exam.
9G3741 1-9
CR Mammography Feature
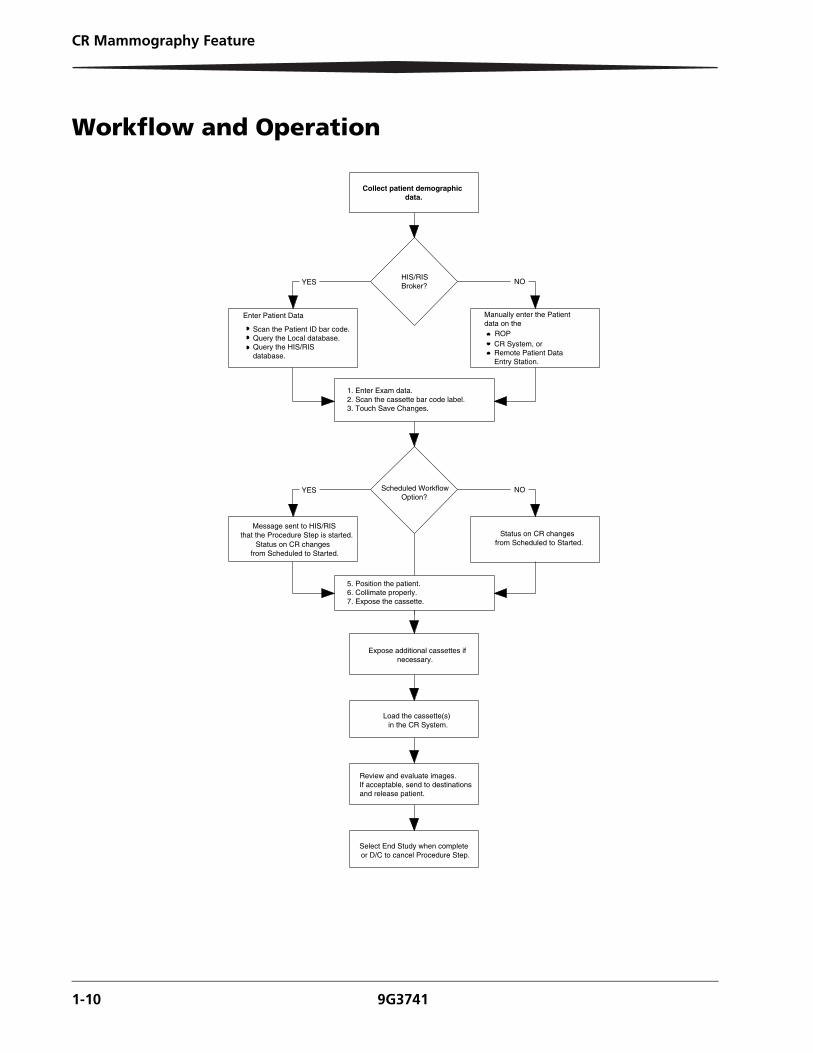
Workflow and Operation
Select End Study when completeor D/C to cancel Procedure Step.
from Scheduled to Started.Status on CR changes
Message sent to HIS/RISthat the Procedure Step is started.
7. Expose the cassette.6. Collimate properly.5. Position the patient.
NOYES Scheduled WorkflowOption?
in the CR System.Load the cassette(s)
Collect patient demographic data.
HIS/RISBroker?
Manually enter the Patientdata on the
Enter Patient Data
ROPCR System, orRemote Patient DataEntry Station.
Scan the Patient ID bar code.Query the Local database.Query the HIS/RISdatabase.
NOYES
2. Scan the cassette bar code label.1. Enter Exam data.
3. Touch Save Changes.
Expose additional cassettes ifnecessary.
Review and evaluate images.If acceptable, send to destinationsand release patient.
from Scheduled to Started.Status on CR changes
000EC
1-10 9G3741
CR Mammography Feature
Performing a Mammography ExamThis section describes the steps necessary to perform a typical four-view breast exam using the CR System:
• CC
• MLO
IMPORTANT: See the KODAK DIRECTVIEW CR Systems User Guide Information for configuration use differences, entering patient and exam data, viewing and maintaining image quality, and printing and managing images.
Preparing the Cassettes
You will need four unexposed CR Mammography Cassettes, 18 x 24 cm or 24 x 30 cm, as needed, for the four views.
NOTE: If you have purchased the X-ray Interface, it is not necessary to apply a reusable sticker on each cassette to indicate the image view (RCC, LCC, LMLO, or RMLO) that will be exposed on the cassette, or the kVp and mAs settings used for the exposure, or a possible comment regarding the patient exam. See “Mammography X-ray Interface” on page 1-19.
IMPORTANT: Erase CR Mammography Cassettes each day prior to clinical imaging, when you suspect the cassettes have been exposed to any X-ray radiation, or when you use the local user interface on the Classic/Elite CR System.
Insert the cassette into the CR System. This procedure erases all information on the cassette.
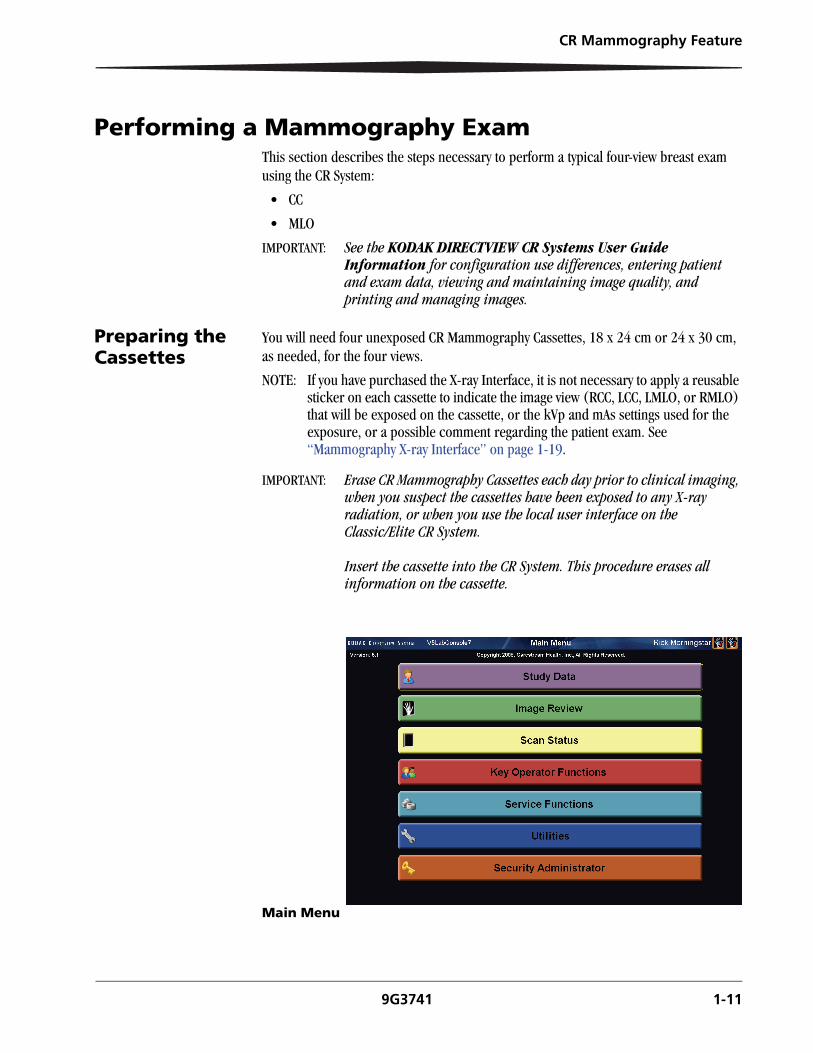
Main Menu
9G3741 1-11
CR Mammography Feature
Creating a Patient Record
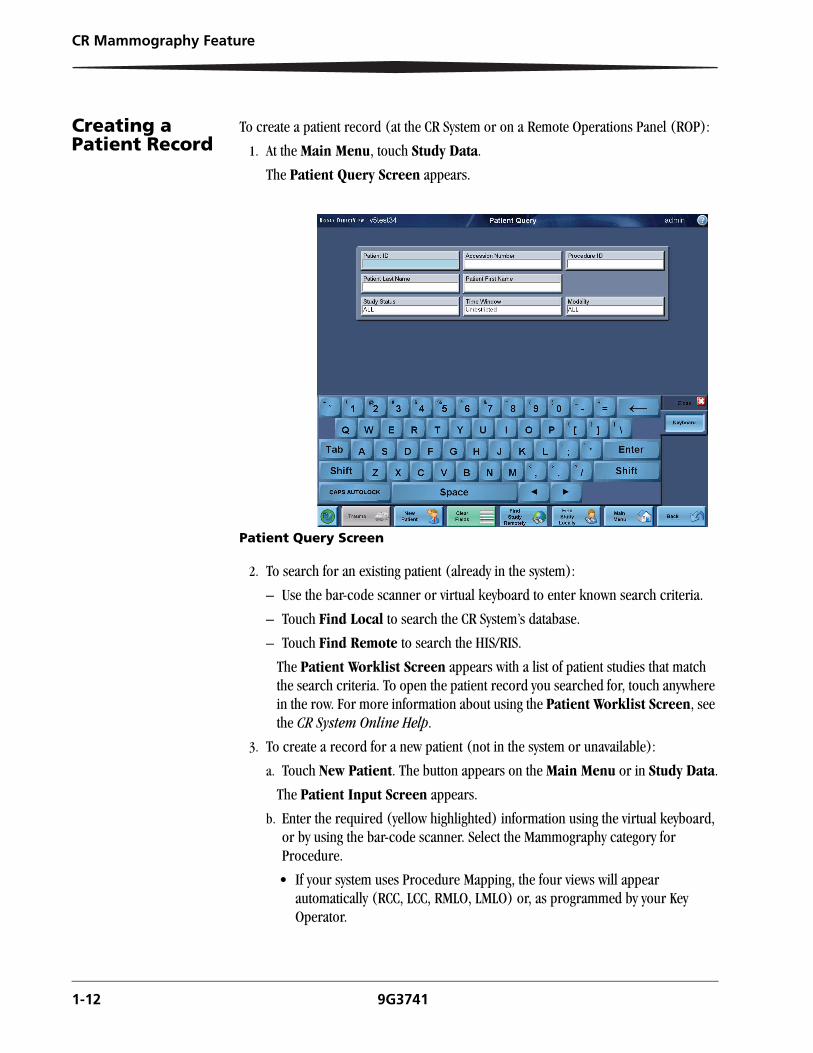
To create a patient record (at the CR System or on a Remote Operations Panel (ROP):
1. At the Main Menu, touch Study Data.
The Patient Query Screen appears.
Patient Query Screen
2. To search for an existing patient (already in the system):
– Use the bar-code scanner or virtual keyboard to enter known search criteria.
– Touch Find Local to search the CR System’s database.
– Touch Find Remote to search the HIS/RIS.
The Patient Worklist Screen appears with a list of patient studies that match the search criteria. To open the patient record you searched for, touch anywhere in the row. For more information about using the Patient Worklist Screen, see the CR System Online Help.
3. To create a record for a new patient (not in the system or unavailable):
a. Touch New Patient. The button appears on the Main Menu or in Study Data.
The Patient Input Screen appears.
b. Enter the required (yellow highlighted) information using the virtual keyboard, or by using the bar-code scanner. Select the Mammography category for Procedure.
• If your system uses Procedure Mapping, the four views will appear automatically (RCC, LCC, RMLO, LMLO) or, as programmed by your Key Operator.
1-12 9G3741
CR Mammography Feature
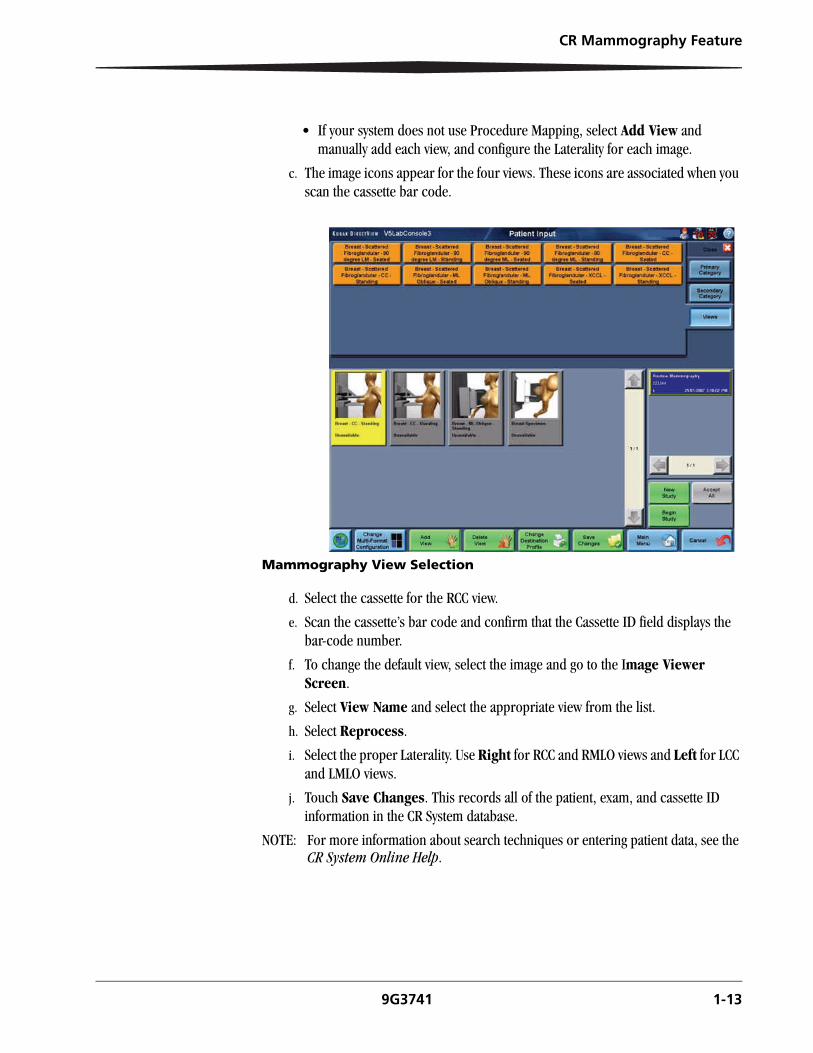
• If your system does not use Procedure Mapping, select Add View and manually add each view, and configure the Laterality for each image.
c. The image icons appear for the four views. These icons are associated when you scan the cassette bar code.
Mammography View Selection
d. Select the cassette for the RCC view.
e. Scan the cassette’s bar code and confirm that the Cassette ID field displays the bar-code number.
f. To change the default view, select the image and go to the Image Viewer Screen.
g. Select View Name and select the appropriate view from the list.
h. Select Reprocess.
i. Select the proper Laterality. Use Right for RCC and RMLO views and Left for LCC and LMLO views.
j. Touch Save Changes. This records all of the patient, exam, and cassette ID information in the CR System database.
NOTE: For more information about search techniques or entering patient data, see the CR System Online Help.
9G3741 1-13
CR Mammography Feature
Using CR Mammography Cassettes
• Use only CR Mammography Cassettes for creating Mammograms.
• Do not use CR Mammography Cassettes for general radiography imaging applications.
• Do not use CR Cassettes, intended for general radiography, for Mammography imaging applications. See “CR Mammography Cassettes” on page 1-7.
• Carestream Health recommends using the same type of CR Mammography screen for all images within the study.
Exposing the Cassette
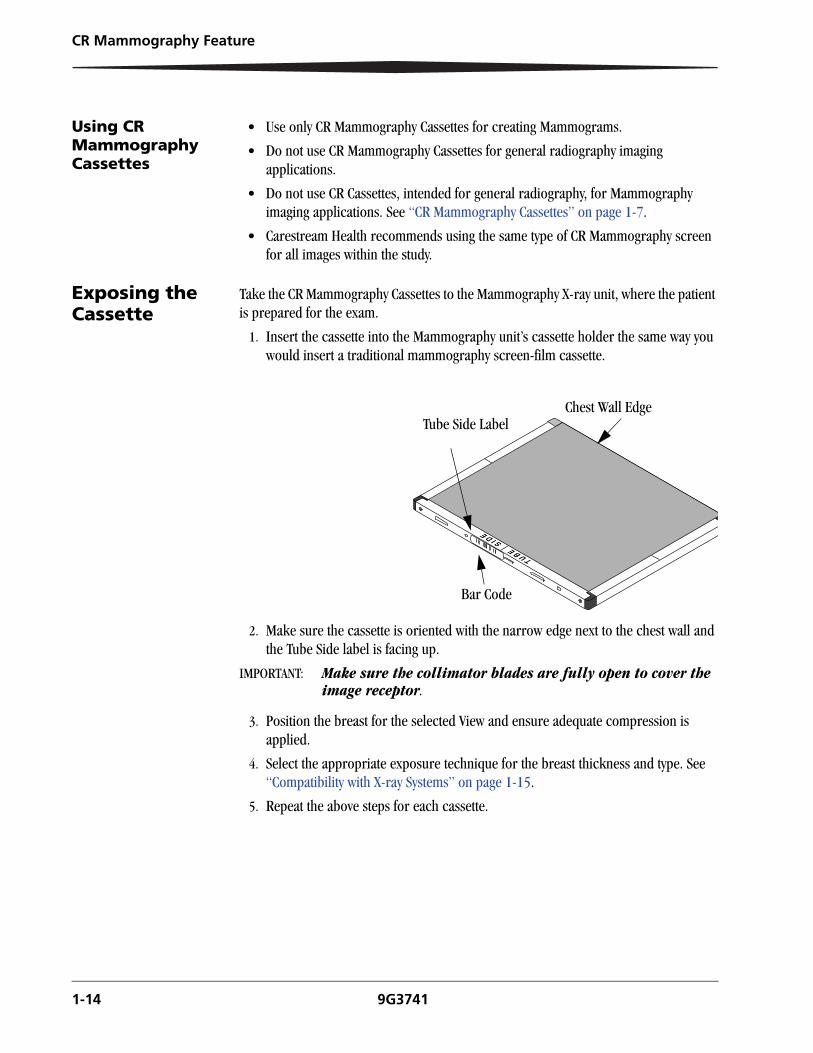
Take the CR Mammography Cassettes to the Mammography X-ray unit, where the patient is prepared for the exam.
1. Insert the cassette into the Mammography unit’s cassette holder the same way you would insert a traditional mammography screen-film cassette.
2. Make sure the cassette is oriented with the narrow edge next to the chest wall and the Tube Side label is facing up.
IMPORTANT: Make sure the collimator blades are fully open to cover the image receptor.
3. Position the breast for the selected View and ensure adequate compression is applied.
4. Select the appropriate exposure technique for the breast thickness and type. See “Compatibility with X-ray Systems” on page 1-15.
5. Repeat the above steps for each cassette.
T U B E S I D
E
Chest Wall Edge
Bar Code
Tube Side Label
1-14 9G3741
CR Mammography Feature
Compatibility with X-ray SystemsThe KODAK DIRECTVIEW CR System with CR Mammography Feature, using CR Mammography Cassettes, is specifically designed to be compatible with mammography X-ray systems and all other system accessories (such as anti-scatter grids and magnification options) that use screen-film cassettes. The CR Mammography Cassettes are intended to be used in the same manner as mammographic screen-film cassettes. They operate over the same range of kVp and target filter combinations as screen-film cassettes and can be exposed under manual or automatic exposure control.
• The X-ray tube must have as a minimum a molybdenum target and molybdenum filter (Mo/Mo) combination (needed for calibration of the CR System) and, as is clinicially practiced with screen-film, support use of the following anode target and filter combinations: molybdenum target with rhodium filter (Mo/Rh), rhodium target with rhodium filter (Rh/Rh), and tungsten target with rhodium filter (W/Rh).
• Automatic Exposure Control (AEC) may be of the type controlling mAs only, or mAs and kVp, or mAs, kVp and filter, or mAs, kVp, filter, and target.
The following items list some of the features of the CR Mammography Cassettes that allow their use in place of conventional screen-film cassettes:
• The physical dimensions of the CR Mammography Cassettes are the same as screen-film mammography cassettes (18 x 24 cm and 24 x 30 cm) and comply with the ISO 4090 standard for cassette design.
Therefore, CR Mammography Cassettes are physically compatible with modern mammography X-ray unit 18 x 24 and 24 x 30 cassette holders.
• The CR Mammography Cassettes are specifically designed for use with the Mammography X-ray unit's Automatic Exposure Control (AEC). The cassettes contain a low absorption region for compatibility with the X-ray systems Automatic Exposure Control (AEC) detector. The dimensions of the low absorption region comply with the ISO 4090 standard for possible placements of the AEC detector.
NOTE: Adjustment of the AEC configuration may be necessary to account for the transmission of the CR Mammography Cassette. This is similar to the adjustment necessary when a new screen-film system is first introduced into the clinic. This should be done under guidance of the X-ray equipment service personnel and/or a qualified Medical Physicist.
• The CR Mammography Cassettes are constructed to provide chest wall imaging access. The distance between the edge of the storage phosphor screen to the outside edge wall of the cassette is specified to be 3 mm or less.
IMPORTANT: Mammography X-ray systems use anti-scatter moving grids or cassette holders. As with screen-film systems, failure of the grid to reciprocate, especially during a short exposure time, may result in a wavy artifact in the produced image known as a moire‘pattern, when using a CR Mammography Cassette. Ensuring proper operation of the reciprocating grid will prevent this artifact from occurring.
9G3741 1-15
CR Mammography Feature
Technique Considerations
• The KODAK DIRECTVIEW CR System has a wide exposure latitude and will operate over a broad range of mammographic exposure conditions, but is intended for use with acquisition techniques similar to those used with modern screen-film systems.
• When using the CR System the same care and attention to detail should be taken to ensure high-quality images as was practiced with screen-film systems.
• Medical Physicist should be consulted for assistance with technique factor selections and to ensure that the patient dose complies with applicable regulations.
• When using the Automatic Exposure Control (AEC) of the X-ray machine, the facility should ensure the AEC is appropriately calibrated.
• A technique chart should be produced and posted near each X-ray unit. The chart should summarize the acquisition parameters for producing X-ray images that comply with all local and national regulations on patient dose. It should also ensure the image quality is consistent with the local clinical expectations.
IMPORTANT: The dose shall be determined with technique factors and conditions used clinically for a standard breast. The maximum dose must comply with applicable regulations.
The following sections provide general guidance on X-ray techniques to use with the CR System and on configuration of the AEC.
X-ray Techniques
The selection of X-ray technique includes the selection of specific beam parameters (kilovoltage, target, filtration) and the exposure level (mAs) as a function of patient thickness and glandularity.
• Personnel familiar with screen-film mammography have become accustomed to X-ray technique factors designed for the screen-film image receptor. For example, if film processing is maintained in control, the use of insufficient X-ray technique produces images that are too light. Likewise the use of excessive X-ray technique produces images that are unacceptably dark. As with all digital imaging modalities, CR Mammography images may not appear too light or too dark if inappropriate X-ray technique is used. Hence, it is essential to develop and consistently utilize an appropriate X-ray technique chart to avoid suboptimal image quality or excessive radiation dose.
• Due to the wide variety of different X-ray machine capabilities, user preference for noise and image sharpness, and the range of applicable regulations that control the allowed patient dose, there is no single specific recommendation for acquisition techniques that can be provided for use with the CR System.
As a guide, a “typical” acquisition technique for a “standard” 4.5 cm thick breast with 50/50 composition might be 26 kVp, Mo/Mo and ~100 mAs. This technique produces a mean glandular dose (MGD) of ~2 mGy. There could be considerable variation from this typical technique as an institution adjusts for its local preferences.
1-16 9G3741
CR Mammography Feature
• In general, when imaging thinner or more fatty breasts, it is common to use a softer X-ray spectrum and lower mAs values. Softer X-ray spectra are achieved by using lower kVp settings as well as choosing the molybdenum target and filter combination. When imaging thicker and denser breasts, it is common practice to use a harder X-ray spectrum and higher mAs values. Harder X-ray spectra are achieved by using higher kVp settings as well as choosing the rhodium filter and rhodium or tungsten target where available.
• Increasing the mAs for a given beam spectra will lower the noise and increase the dose. Conversely lowering the mAs for a given beam spectra will lower the dose and increase the level of noise in the image. (It is important to operate the system at a dose that meets applicable regulations. Consult a Medical Physicist for help in ensuring the technique is appropriate).
IMPORTANT: Test or change X-ray exposure factors only after consultation with a qualified Medical Physicist. The site is responsible for ensuring that the system is in compliance with applicable regulations or restrictions on X-ray exposures.
IMPORTANT: The dose shall be determined with technique factors and conditions used clinically for a standard breast. The maximum dose must comply with applicable regulations.
Automatic Exposure Control (AEC)
The KODAK DIRECTVIEW CR System is compatible for use with the AEC function of the X-ray equipment.
• If you are currently using a screen-film system it is possible to adjust the density setting of the X-ray machine to account for the difference in X-ray transmission between your current screen-film cassette and the CR Mammography Cassette (see below).
• If you are not using a screen-film system, it is necessary to contact a qualified service professional to perform a calibration of the AEC function to implement your specific technique chart.
IMPORTANT: Test or change X-ray exposure factors only after consultation with a qualified Medical Physicist. The site is responsible for ensuring that the system is in compliance with applicable regulations or restrictions on X-ray exposures.
9G3741 1-17
CR Mammography Feature
Automatic Exposure Control (AEC) Calibration
CR replacing an existing Screen-Film Combination:
The following procedure can be used for changing from screen-film to CR Mammography Cassettes by using the density control adjustment of the X-ray machine.
IMPORTANT: This procedure assumes that the AEC function of the X-ray equipment is properly calibrated for use with the current screen-film system to meet applicable regulations.
IMPORTANT: This procedure must be performed for each mammography unit. Attempting to use the same density control change for multiple mammography units without verification is strongly discouraged. The effect of changing a single step (e.g., from 0 to +1 density) of density control can vary dramatically among different manufacturers or even for the same manufacturer and model number, depending on the AEC software revision level.
1. Use a standard phantom that represents the “average” breast. If no standard phantom is available, use 4 cm of PMMA or BR-12 breast-equivalent material.
2. Under AEC control, determine the mAs for an exposure of the phantom with the X-ray unit settings (exposure mode, filtration, kVp, density setting) that would be used with the current film-screen system or CR Mammography Cassette type.
3. For the same X-ray unit settings, determine the mAs for the image of the same phantom taken with the CR Mammography Cassette.
4. If there is a difference in the mAs, then adjust the density setting (- to lower mAs, + to raise mAs) to achieve the closest match in mAs. This density setting should be used in place of the screen-film density setting for CR exposures.
5. Repeat steps 1 to 4 for PMMA thicknesses of 2cm and 6cm and for each operational mode of the system.
IMPORTANT: The X-ray exposure influences the level of noise in the image. Increasing the density control setting increases the exposure and patient dose, but reduces the perceived noise in the image. Conversely, a lower density control setting lowers the exposure and patient dose, but may increase the perceived noise in the image.
IMPORTANT: If you cannot achieve a similar technique, it may be necessary for a qualified X-ray equipment service representative to recalibrate the X-ray System's Automatic Exposure Control (AEC) using the CR Mammography Cassette.
CR without an existing Screen-Film System:
The AEC system must be specifically calibrated using the CR Mammography Cassettes by a qualified X-ray equipment Service Representative.
1-18 9G3741
CR Mammography Feature
Exposure Index
The system provides an exposure index (EI), which is displayed on the CR Console's image viewer screen. This is a measure of the X-ray exposure incident on the CR Mammography Cassette. The EI is calculated from knowledge of the signal values in the clinically relevant portion of the patient image. EI can be useful as a guide to understanding the exposure in a given image.
IMPORTANT: The Exposure Index is a measure of cassette input exposure and IS NOT a measure of entrance skin exposure or patient absorbed dose.
• For a correctly calibrated system, the equation below provides the nominal relationship between Exposure Index and Cassette Input Exposure:
Exposure Index = 1000 × log10 (Cassette Input Exposure in mR) + 1000
It should be recognized that this relationship between EI and cassette input exposure is only valid for the specific beam conditions used for system calibration (i.e. the service performed CR System calibration using conditions of 28 kVp Mo/Mo with added 2 mm Al filtration). For other acquisition conditions (including different kVp, target filter combinations and patient thickness/composition) this relationship becomes less accurate.
• Typical Exposure Index values displayed for the range of patient thickness, composition, and acquisition techniques used, should be in the range 2100 ±200. Individual site preference for patient dose and image quality can change this exposure index range.
• If the Exposure Index value is lower than typically expected, check the image for excessive noise. To improve noise, increase mAs or use a softer X-ray spectrum. If the Exposure Index value is higher than typically expected, check the technique used as patient dose may be higher than necessary.
Recording Exposure ParametersInformation about the patient, the exam and the exposure parameters may be electronically recorded on the Mammography image using a Text Box. CR cassettes do not use a flash exposure device and a cassette ID window as traditional screen-film cassettes do. For more information, see Text Box Configuration in the CR Systems User Guide Information.
Mammography X-ray Interface
The DIRECTVIEW Mammography X-ray Interface is an accessory device that automatically transfers technique information from the X-ray generator to the CR image. The information is displayed at the CR System on the More Information Tab on the Patient Input Screen. If you purchase the CR Mammography Feature, you may want to add the Mammography X-ray Interface to your workflow. This device is installed by your Carestream Health Service Representative, and sends exposure information from the Mammography X-ray generator to the CR System or ROP. The Mammography X-ray Interface associates exposure information from selected X-ray generators and automatically associates with the Mammography image that is highlighted on the Patient Input Screen.
9G3741 1-19

CR Mammography Feature
The Mammography X-ray Interface has three elements:
• Interface box
• Connecting cable
• Installations and connection to the X-ray device
To ensure that the data associates with the correct image, make sure the following
is true:
• Connect the Mammography X-ray Interface to an ROP whenever the CR System is shared between Mammography and General Radiography exams, or when shared among several Radiographers.
• The highlighted icon on the Patient Input Screen is the next exposure.
• The Patient Input Screen remains open until the study is complete.
The following image states may be reflected in the border of the image:
• Unavailable—The corresponding image has not been scanned.
• Exposed—Exposure report has been received from the X-ray Interface for the indicated view, but the image has not been scanned.
NOTE: Unassigned images or image icons that are not highlighted at the time of exposure will not capture the transmitted data. There is no way to resend this exposure information from the mammography unit, and it must be entered manually into the appropriate fields. See “General Radiography Workflow” on page 1-20 and “Mammography Workflow” on page 1-20.
General Radiography Workflow
In the General Radiography Workflow, you use the bar-code scanner to enter the cassette ID prior to exposing and receiving the exposure report. The manual selection of the correct icon is not needed.
1. Highlight the View icon.
2. Scan the Cassette ID bar code.
3. Expose the cassette.
4. Scan the cassette. The next View icon is automatically highlighted. The highlight always moves left to right, top to bottom through the Views.
Mammography Workflow
In the Mammography Workflow, you must manually select the icon, assign it, and expose each View one at a time.
1. Select the icon of the first View in the exam.
2. Assign a cassette to the View by scanning its ID number.
3. Expose the cassette with the image while the View icon is still highlighted. The X-ray Interface forwards the exposure report to the CR System. The next View icon is automatically highlighted. The CR System can read the cassettes in any sequence. To change the sequence, select any unexposed View and proceed with step 2.
Repeat steps 2 and 3 to select, assign, and expose for the remaining views.
1-20 9G3741
CR Mammography Feature
4. Scan the cassette.
When the X-ray Interface is used with the CR System, the highlight on the Patient Input Screen moves to the next icon when the System receives the exposure report from the Interface. Scanning the bar code on a cassette does not advance the highlight to the next icon.
NOTE: When General Radiography and Mammography workflows are both needed on the same CR System, attach the Interface to an ROP (with mammo workflow) and use the General Radiography workflow at the CR Console.
Transmitted Data The DIRECTVIEW Mammography Interface can receive most data sent by the generator. The specific data fields vary by generator, but generally include the following items:
• kVp
• mAs
• Source to Image Distance (SID)
• Compressed Thickness
• Compression Force (N)
• Angle of Exposure
• Anode Target Material
• Filter
• Magnification Ratio
NOTE: The Key Operator can select from 15 different screen layouts that accommodate this data.
9G3741 1-21
CR Mammography Feature
Scanning the CassetteTake the exposed cassettes to the CR System and load them correctly. See the CR Systems User Guide Information.
The CR System reads the cassette bar code, scans and stores the image from the cassette, then erases the cassette for its next use.
If the CR System cannot read the cassette bar code, the following messages will appear. Take the appropriate actions as described in “Scanner Bar-Code Messages” on page 1-22.
Scanner Bar-Code Messages
Reviewing and Accepting ImagesSee the KODAK DIRECTVIEW CR Systems User Guide Information for information about viewing images and maintaining image quality on a CR System.
CAUTION:The CR System or ROP monitor displays a sub-sampled (lower-resolution) version of the full-resolution, stored, mammography image. Do NOT use the sub-sampled mammography image displayed on the CR System or ROP monitor for screening or diagnostic interpretation purposes. The CR System monitor or ROP must only be used to verify correct positioning and image processing selection. Do not use the display to evaluate CR System performance.
NOTE: Carestream Health recommends that you set your viewing mode to QA by image mode, to review and accept the mammography images before sending them to their destinations. Pass-through mode, which delivers images to destinations without inspection, can be used, but is not recommended. For more information about viewing modes, see the CR System Online Help.
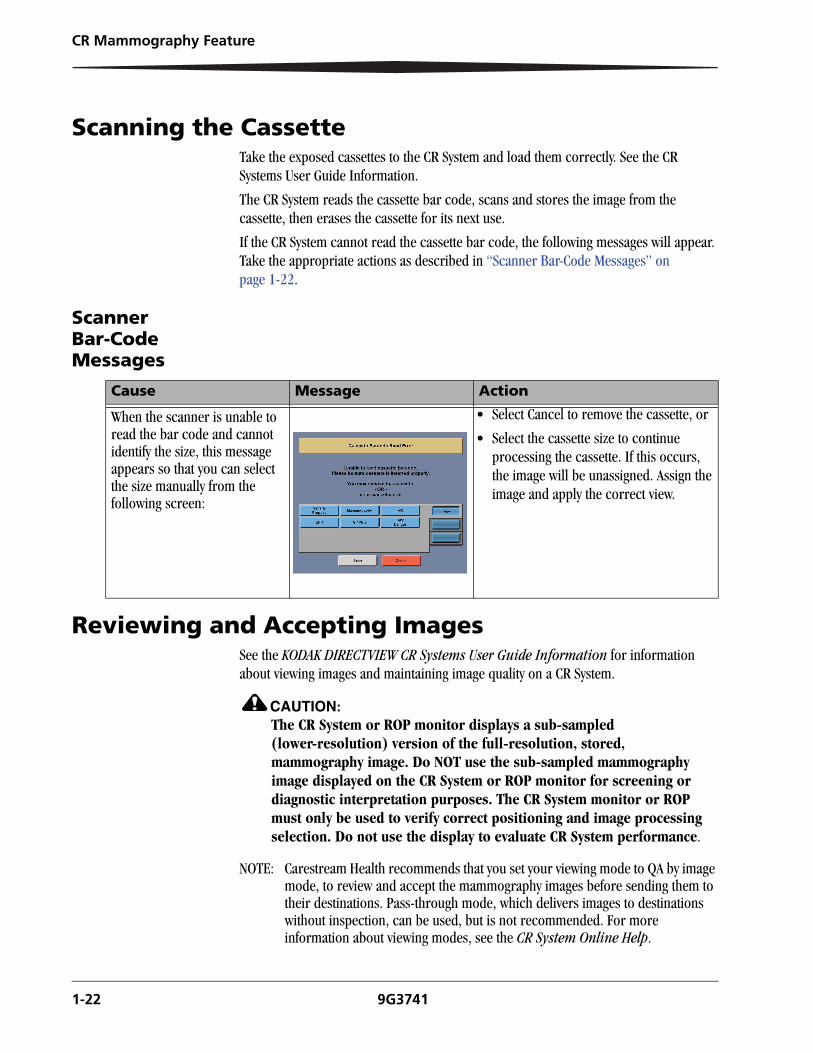
Cause Message Action
When the scanner is unable to read the bar code and cannot identify the size, this message appears so that you can select the size manually from the following screen:
• Select Cancel to remove the cassette, or
• Select the cassette size to continue processing the cassette. If this occurs, the image will be unassigned. Assign the image and apply the correct view.
1-22 9G3741
CR Mammography Feature
1. On the CR System monitor, or the ROP display, make sure that a thumbnail image is present on the Patient Input Screen for each cassette scanned. If the thumbnail images do not display, open another image or exit and re-enter the Patient Input Screen.
NOTE: Wait for all of the images to appear. If they do not appear, exit the Patient Input Screen and re-enter.
2. Enter the kVp and mAs (if recorded) on the More Image Information Screen and any comment information on the More Patient Information Screen. Press Save Changes to store this information as part of the Patient Record.
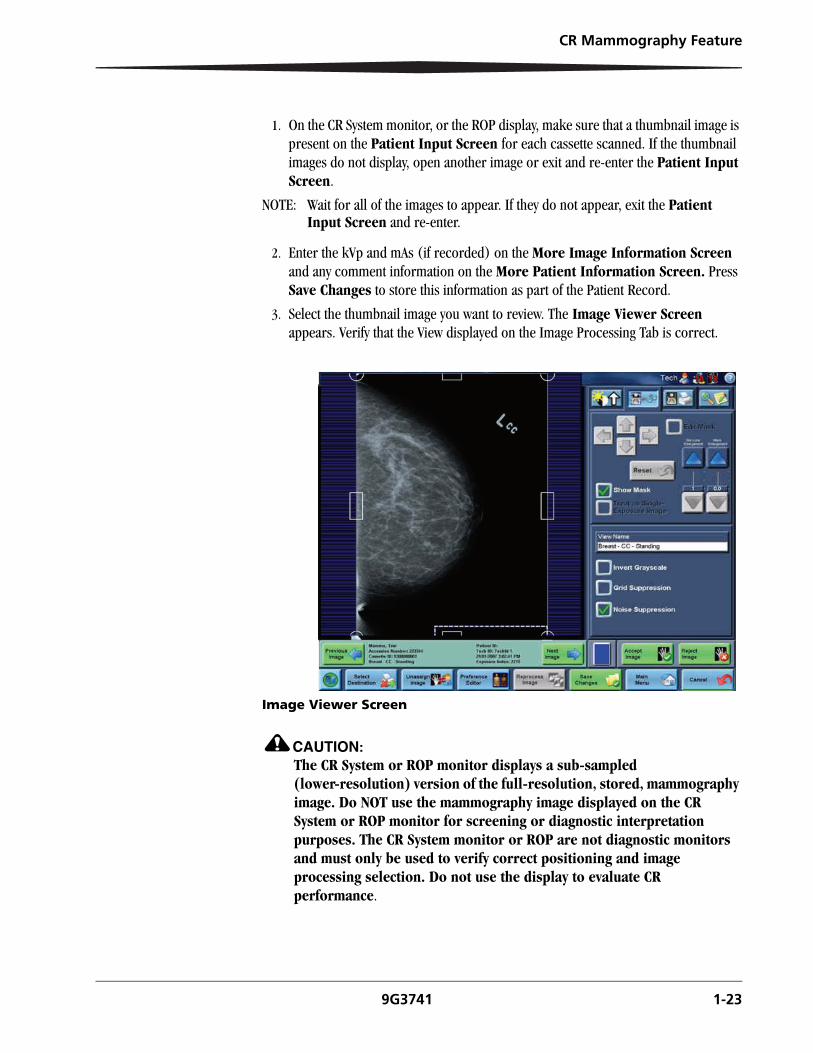
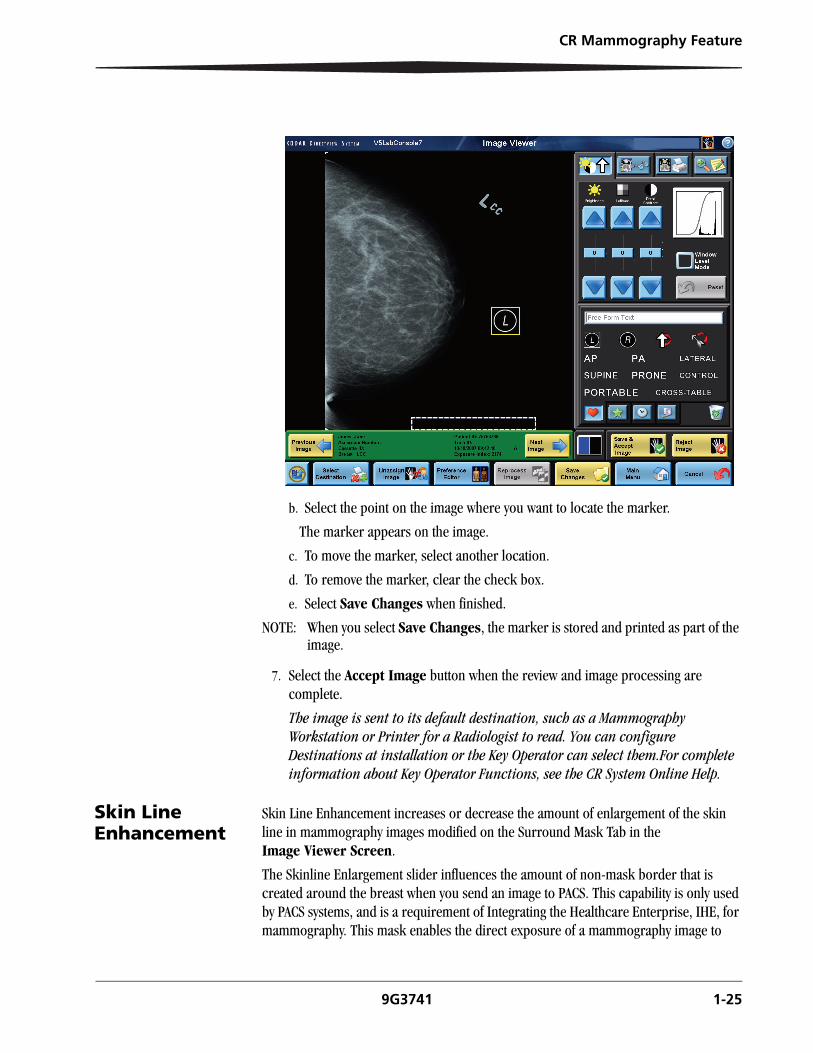
3. Select the thumbnail image you want to review. The Image Viewer Screen appears. Verify that the View displayed on the Image Processing Tab is correct.
Image Viewer Screen
CAUTION:The CR System or ROP monitor displays a sub-sampled (lower-resolution) version of the full-resolution, stored, mammography image. Do NOT use the mammography image displayed on the CR System or ROP monitor for screening or diagnostic interpretation purposes. The CR System monitor or ROP are not diagnostic monitors and must only be used to verify correct positioning and image processing selection. Do not use the display to evaluate CR performance.
9G3741 1-23
CR Mammography Feature
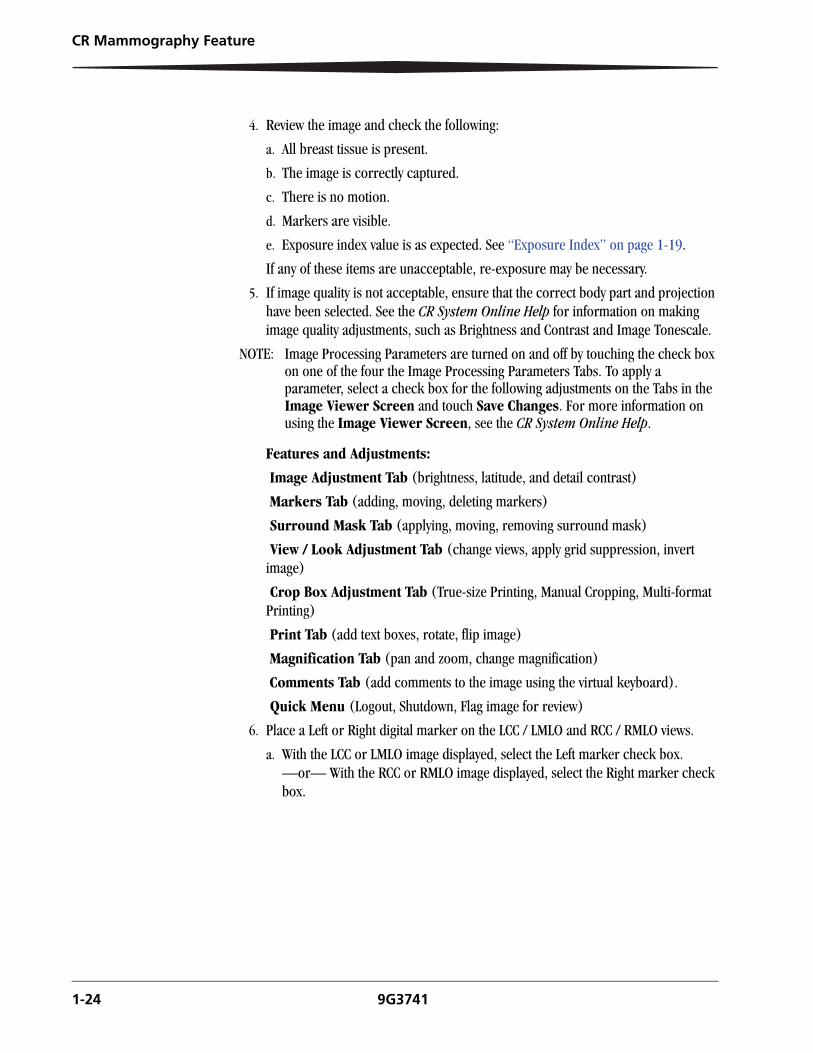
4. Review the image and check the following:
a. All breast tissue is present.
b. The image is correctly captured.
c. There is no motion.
d. Markers are visible.
e. Exposure index value is as expected. See “Exposure Index” on page 1-19.
If any of these items are unacceptable, re-exposure may be necessary.
5. If image quality is not acceptable, ensure that the correct body part and projection have been selected. See the CR System Online Help for information on making image quality adjustments, such as Brightness and Contrast and Image Tonescale.
NOTE: Image Processing Parameters are turned on and off by touching the check box on one of the four the Image Processing Parameters Tabs. To apply a parameter, select a check box for the following adjustments on the Tabs in the Image Viewer Screen and touch Save Changes. For more information on using the Image Viewer Screen, see the CR System Online Help.
Features and Adjustments:
Image Adjustment Tab (brightness, latitude, and detail contrast)
Markers Tab (adding, moving, deleting markers)
Surround Mask Tab (applying, moving, removing surround mask)
View / Look Adjustment Tab (change views, apply grid suppression, invert image)
Crop Box Adjustment Tab (True-size Printing, Manual Cropping, Multi-format Printing)
Print Tab (add text boxes, rotate, flip image)
Magnification Tab (pan and zoom, change magnification)
Comments Tab (add comments to the image using the virtual keyboard).
Quick Menu (Logout, Shutdown, Flag image for review)
6. Place a Left or Right digital marker on the LCC / LMLO and RCC / RMLO views.
a. With the LCC or LMLO image displayed, select the Left marker check box. —or— With the RCC or RMLO image displayed, select the Right marker check box.
1-24 9G3741
CR Mammography Feature
b. Select the point on the image where you want to locate the marker.
The marker appears on the image.
c. To move the marker, select another location.
d. To remove the marker, clear the check box.
e. Select Save Changes when finished.
NOTE: When you select Save Changes, the marker is stored and printed as part of the image.
7. Select the Accept Image button when the review and image processing are complete.
The image is sent to its default destination, such as a Mammography Workstation or Printer for a Radiologist to read. You can configure Destinations at installation or the Key Operator can select them.For complete information about Key Operator Functions, see the CR System Online Help.
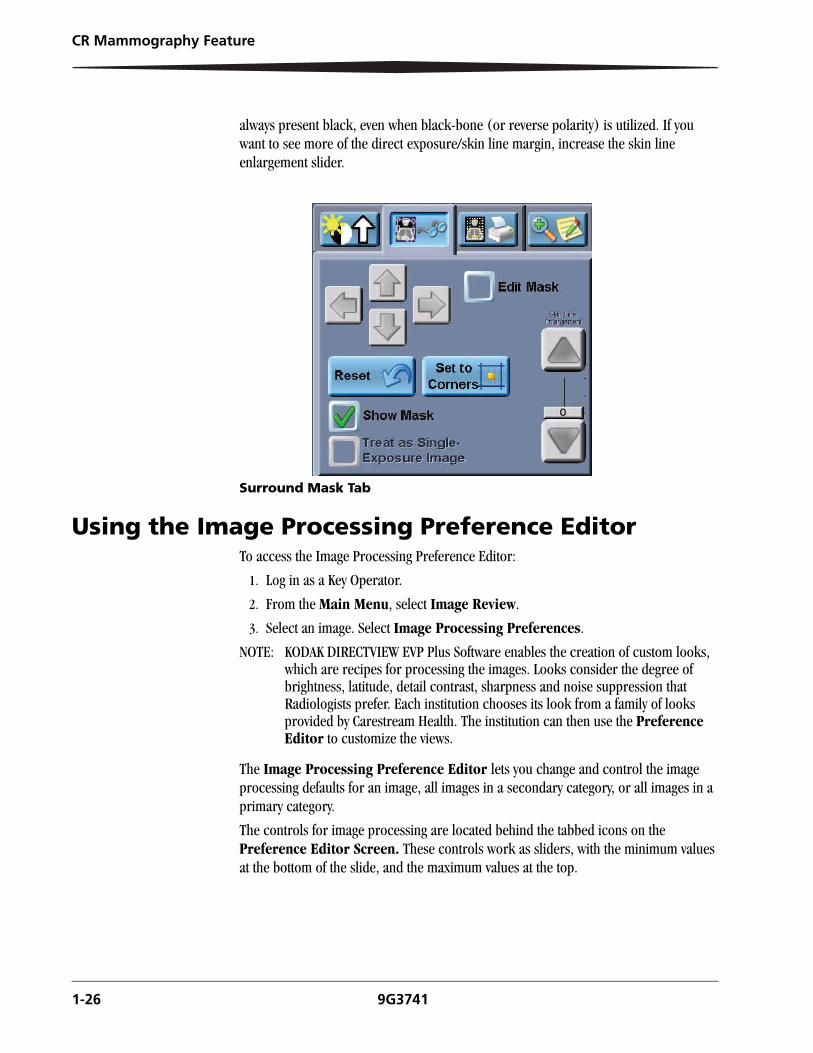
Skin Line Enhancement
Skin Line Enhancement increases or decrease the amount of enlargement of the skin line in mammography images modified on the Surround Mask Tab in the Image Viewer Screen.
The Skinline Enlargement slider influences the amount of non-mask border that is created around the breast when you send an image to PACS. This capability is only used by PACS systems, and is a requirement of Integrating the Healthcare Enterprise, IHE, for mammography. This mask enables the direct exposure of a mammography image to
9G3741 1-25
CR Mammography Feature
always present black, even when black-bone (or reverse polarity) is utilized. If you want to see more of the direct exposure/skin line margin, increase the skin line enlargement slider.
Surround Mask Tab
Using the Image Processing Preference EditorTo access the Image Processing Preference Editor:
1. Log in as a Key Operator.
2. From the Main Menu, select Image Review.
3. Select an image. Select Image Processing Preferences.
NOTE: KODAK DIRECTVIEW EVP Plus Software enables the creation of custom looks, which are recipes for processing the images. Looks consider the degree of brightness, latitude, detail contrast, sharpness and noise suppression that Radiologists prefer. Each institution chooses its look from a family of looks provided by Carestream Health. The institution can then use the Preference Editor to customize the views.
The Image Processing Preference Editor lets you change and control the image processing defaults for an image, all images in a secondary category, or all images in a primary category.
The controls for image processing are located behind the tabbed icons on the Preference Editor Screen. These controls work as sliders, with the minimum values at the bottom of the slide, and the maximum values at the top.
1-26 9G3741
CR Mammography Feature
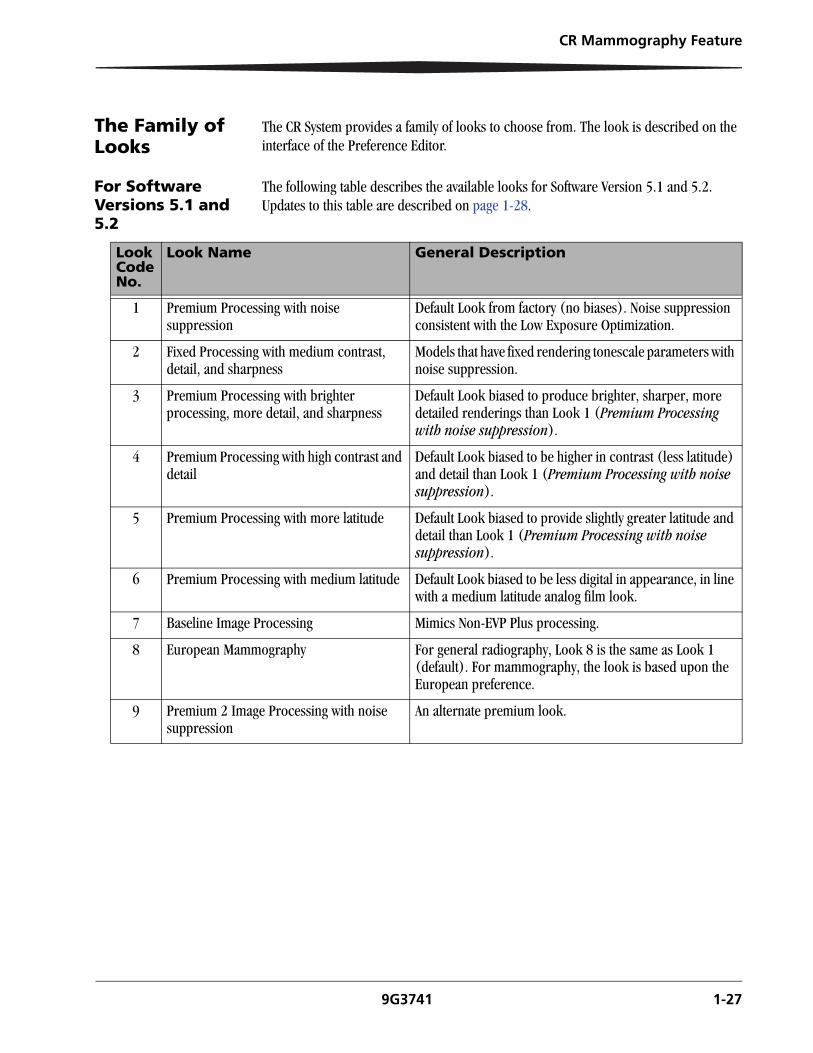
The Family of Looks
The CR System provides a family of looks to choose from. The look is described on the interface of the Preference Editor.
For Software Versions 5.1 and 5.2
The following table describes the available looks for Software Version 5.1 and 5.2. Updates to this table are described on page 1-28.
Look Code No.
Look Name General Description
1 Premium Processing with noise suppression
Default Look from factory (no biases). Noise suppression consistent with the Low Exposure Optimization.
2 Fixed Processing with medium contrast, detail, and sharpness
Models that have fixed rendering tonescale parameters with noise suppression.
3 Premium Processing with brighter processing, more detail, and sharpness
Default Look biased to produce brighter, sharper, more detailed renderings than Look 1 (Premium Processing with noise suppression).
4 Premium Processing with high contrast and detail
Default Look biased to be higher in contrast (less latitude) and detail than Look 1 (Premium Processing with noise suppression).
5 Premium Processing with more latitude Default Look biased to provide slightly greater latitude and detail than Look 1 (Premium Processing with noise suppression).
6 Premium Processing with medium latitude Default Look biased to be less digital in appearance, in line with a medium latitude analog film look.
7 Baseline Image Processing Mimics Non-EVP Plus processing.
8 European Mammography For general radiography, Look 8 is the same as Look 1 (default). For mammography, the look is based upon the European preference.
9 Premium 2 Image Processing with noise suppression
An alternate premium look.
9G3741 1-27
CR Mammography Feature
For Software Version 5.2 Additional Looks Mammography Patch and Version 5.4 Default
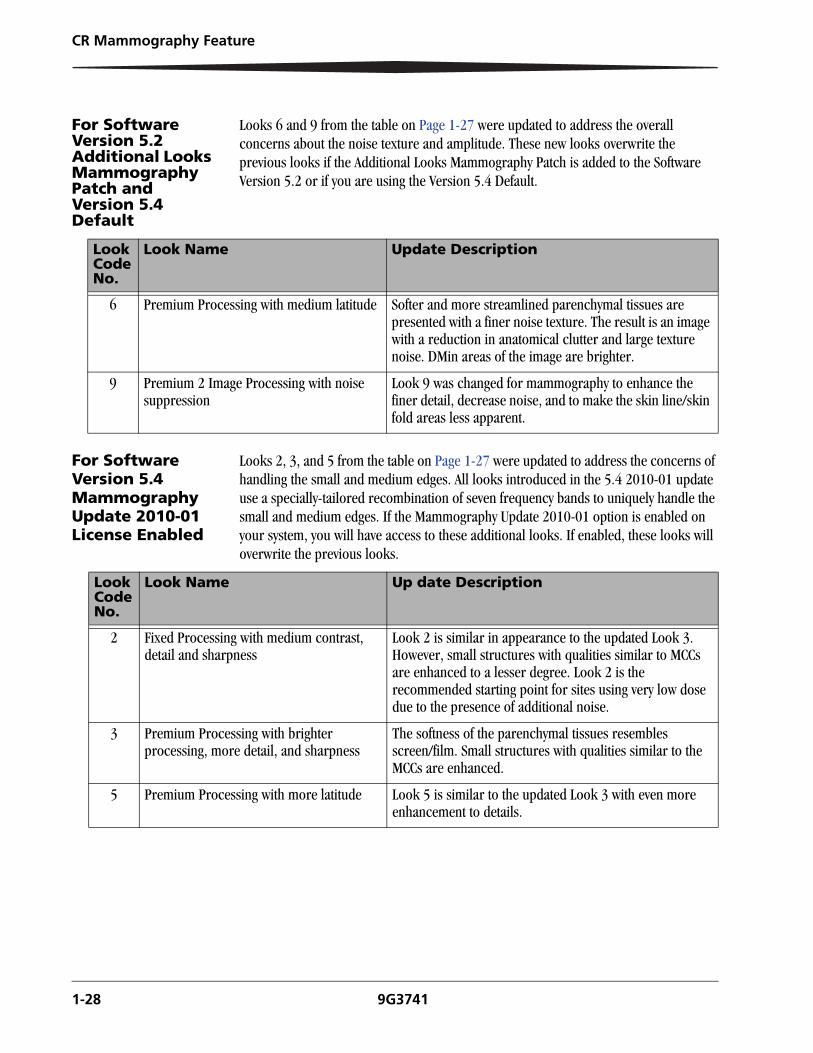
Looks 6 and 9 from the table on Page 1-27 were updated to address the overall concerns about the noise texture and amplitude. These new looks overwrite the previous looks if the Additional Looks Mammography Patch is added to the Software Version 5.2 or if you are using the Version 5.4 Default.
For Software Version 5.4 Mammography Update 2010-01 License Enabled
Looks 2, 3, and 5 from the table on Page 1-27 were updated to address the concerns of handling the small and medium edges. All looks introduced in the 5.4 2010-01 update use a specially-tailored recombination of seven frequency bands to uniquely handle the small and medium edges. If the Mammography Update 2010-01 option is enabled on your system, you will have access to these additional looks. If enabled, these looks will overwrite the previous looks.
Look Code No.
Look Name Update Description
6 Premium Processing with medium latitude Softer and more streamlined parenchymal tissues are presented with a finer noise texture. The result is an image with a reduction in anatomical clutter and large texture noise. DMin areas of the image are brighter.
9 Premium 2 Image Processing with noise suppression
Look 9 was changed for mammography to enhance the finer detail, decrease noise, and to make the skin line/skin fold areas less apparent.
Look Code No.
Look Name Up date Description
2 Fixed Processing with medium contrast, detail and sharpness
Look 2 is similar in appearance to the updated Look 3. However, small structures with qualities similar to MCCs are enhanced to a lesser degree. Look 2 is the recommended starting point for sites using very low dose due to the presence of additional noise.
3 Premium Processing with brighter processing, more detail, and sharpness
The softness of the parenchymal tissues resembles screen/film. Small structures with qualities similar to the MCCs are enhanced.
5 Premium Processing with more latitude Look 5 is similar to the updated Look 3 with even more enhancement to details.
1-28 9G3741
CR Mammography Feature
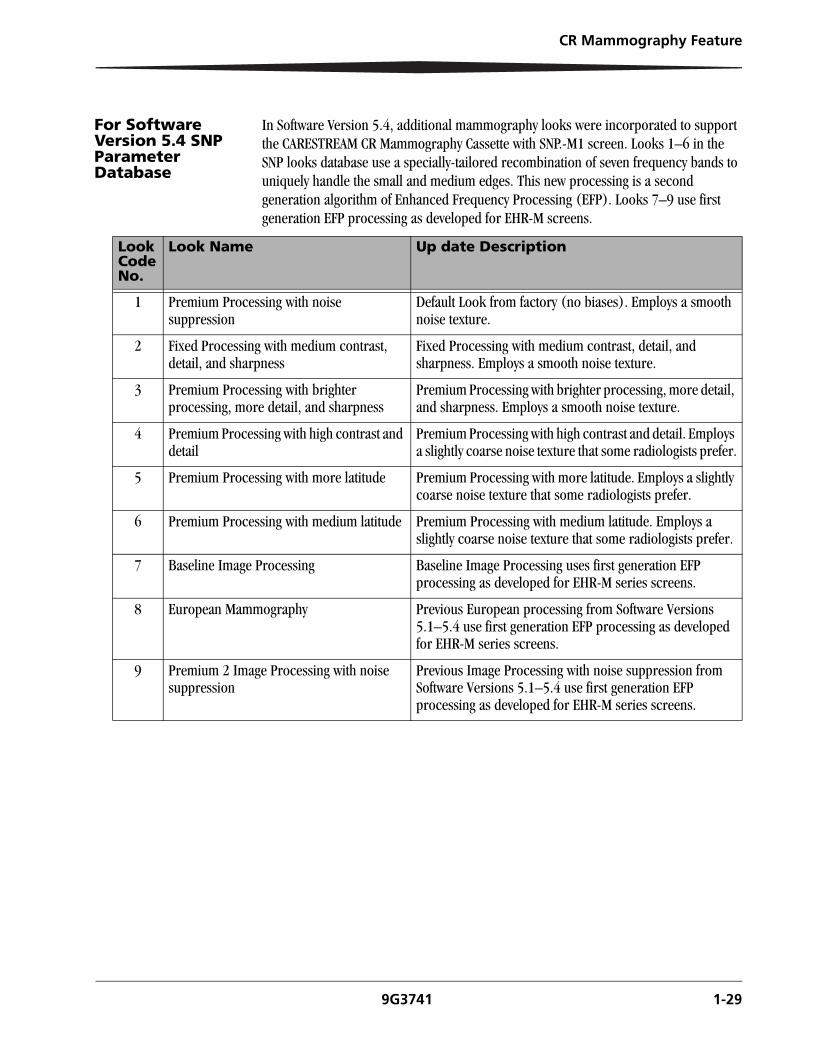
For Software Version 5.4 SNP Parameter Database
In Software Version 5.4, additional mammography looks were incorporated to support the CARESTREAM CR Mammography Cassette with SNP.-M1 screen. Looks 1–6 in the SNP looks database use a specially-tailored recombination of seven frequency bands to uniquely handle the small and medium edges. This new processing is a second generation algorithm of Enhanced Frequency Processing (EFP). Looks 7–9 use first generation EFP processing as developed for EHR-M screens.
Look Code No.
Look Name Up date Description
1 Premium Processing with noise suppression
Default Look from factory (no biases). Employs a smooth noise texture.
2 Fixed Processing with medium contrast, detail, and sharpness
Fixed Processing with medium contrast, detail, and sharpness. Employs a smooth noise texture.
3 Premium Processing with brighter processing, more detail, and sharpness
Premium Processing with brighter processing, more detail, and sharpness. Employs a smooth noise texture.
4 Premium Processing with high contrast and detail
Premium Processing with high contrast and detail. Employs a slightly coarse noise texture that some radiologists prefer.
5 Premium Processing with more latitude Premium Processing with more latitude. Employs a slightly coarse noise texture that some radiologists prefer.
6 Premium Processing with medium latitude Premium Processing with medium latitude. Employs a slightly coarse noise texture that some radiologists prefer.
7 Baseline Image Processing Baseline Image Processing uses first generation EFP processing as developed for EHR-M series screens.
8 European Mammography Previous European processing from Software Versions 5.1–5.4 use first generation EFP processing as developed for EHR-M series screens.
9 Premium 2 Image Processing with noise suppression
Previous Image Processing with noise suppression from Software Versions 5.1–5.4 use first generation EFP processing as developed for EHR-M series screens.
9G3741 1-29
CR Mammography Feature
Preference Editor Controls
Once a change is made in the Preference Editor and saved, the change stays with the view. The Key Operator and the Technologist see the changes on their slider controls.
Image Processing Preference Editor
�
�
�
� ���
�
�
� � � � �
�
� �
21
Item Description
� Thumbnail Gallery Previews all of the images related to the view selection.
� Preference Editor Display Displays the selected image. Lets you see the changes applied to the image processing values.
� Patient Name
Patient ID
Searches the local database for a patient by name or by Patient ID.
� Brightness Tab Access to brightness, latitude. and detail contrast controls, including the kernel, which influences the detail frequency band (tone scale kernel).
� Sharpness Tab Access to the sharpness controls.
� Noise Suppression Tab Access to the noise suppression controls.
� Grid Suppression Tab Access to the Grid detection and suppression processing. Detects if a stationary grid was used, and if found, suppresses the appearance of the grid lines.
1-30 9G3741
CR Mammography Feature
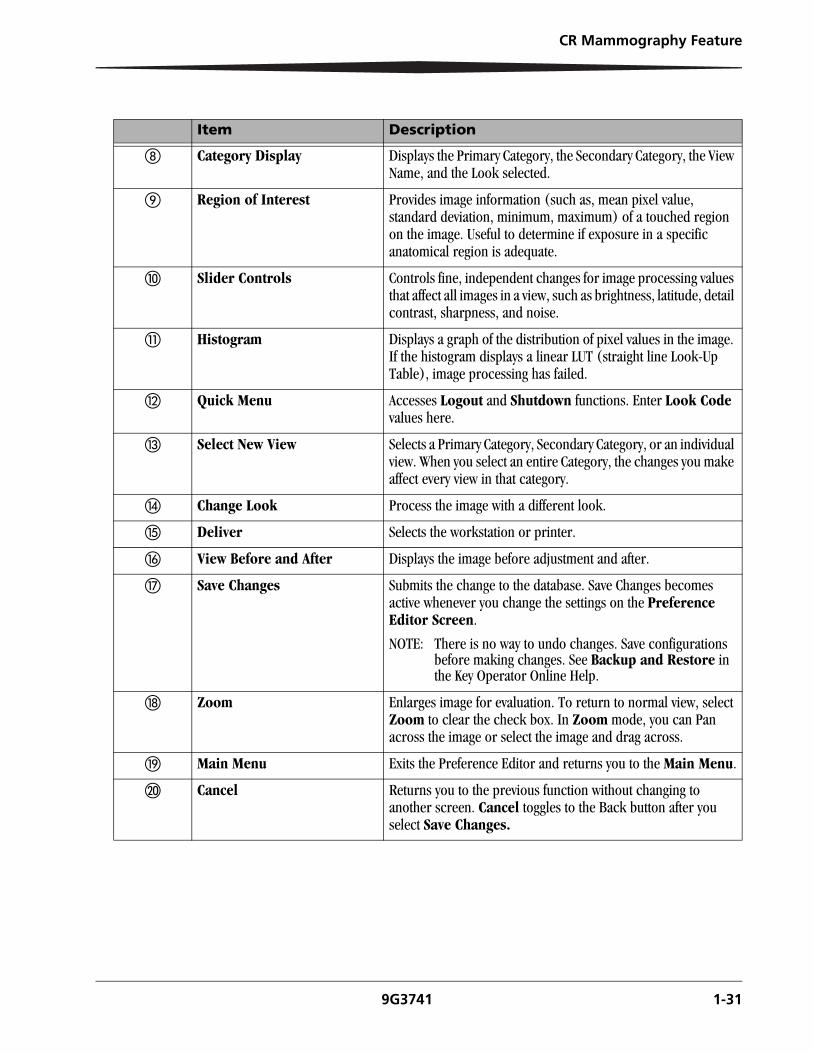
� Category Display Displays the Primary Category, the Secondary Category, the View Name, and the Look selected.
Region of Interest Provides image information (such as, mean pixel value, standard deviation, minimum, maximum) of a touched region on the image. Useful to determine if exposure in a specific anatomical region is adequate.
Slider Controls Controls fine, independent changes for image processing values that affect all images in a view, such as brightness, latitude, detail contrast, sharpness, and noise.
� Histogram Displays a graph of the distribution of pixel values in the image. If the histogram displays a linear LUT (straight line Look-Up Table), image processing has failed.
Quick Menu Accesses Logout and Shutdown functions. Enter Look Code values here.
� Select New View Selects a Primary Category, Secondary Category, or an individual view. When you select an entire Category, the changes you make affect every view in that category.
� Change Look Process the image with a different look.
� Deliver Selects the workstation or printer.
� View Before and After Displays the image before adjustment and after.
� Save Changes Submits the change to the database. Save Changes becomes active whenever you change the settings on the Preference Editor Screen.
NOTE: There is no way to undo changes. Save configurations before making changes. See Backup and Restore in the Key Operator Online Help.
� Zoom Enlarges image for evaluation. To return to normal view, select Zoom to clear the check box. In Zoom mode, you can Pan across the image or select the image and drag across.
� Main Menu Exits the Preference Editor and returns you to the Main Menu.
� Cancel Returns you to the previous function without changing to another screen. Cancel toggles to the Back button after you select Save Changes.
Item Description
9G3741 1-31
CR Mammography Feature
Slider Control Behavior
Two user image adjustment interfaces reside on the Console. They are selected based on the login that was used and the task that was performed, such as reviewing a single image or defining image preferences. The slider control behavior is different for each of these interfaces.
• Image Viewer—This simple interface allows the Technologist to adjust contrast, latitude, and detail contrast. Note that the detail contrast slider is a single slider that equally influences both the low and high density detail settings in the rendering process. Therefore, if the Technologist increases the detail contrast slider by five, both the lower and upper density detail contrast settings are increased by the same amount (each click is a 5% change), roughly a 25% increase for both.
• Key Operator Preference Editor—A more complex interface, where the Key Operator can set preferences (deltas) on the brightness, latitude, detail (single slider for both upper and lower) sharpness (single slider for both upper and lower), and noise. Any changes in detail contrast and sharpness are equally applied to both the upper and lower density controls.
Defining a Look
KODAK DIRECTVIEW EVP Plus Software enables the creation of custom “looks,” which are recipes for processing the images. Looks consider the degree of brightness, latitude, detail contrast, sharpness and noise suppression that Radiologists prefer. Each institution chooses its look from a family of looks provided by Carestream Health. The institution can then use the Preference Editor to customize the views
When a look is selected as a starting point for a view, the sliders are set to a neutral position (or zero). All slider adjustments are relative to the look being used for that view, except for the kernel, grid suppression, and skin line enlargement sliders, which adjust absolute values. The adjustment of a slider by one click is designed to produce a difference that is just noticeable or a “difference that matters.”
Brightness The Brightness parameter defines the log exposure code value that is mapped by the tone-scale LUT to mid-density. The slider adjustment is in output density space in order to produce a change that is perceptually meaningful across images. The density change is mapped back through the tone-scale LUT to calculate the log exposure code value, which is used in EVP Plus Software. Each slider click produces a 0.05 density change relative to the selected look.
Increasing the Slider Decreasing the Slider
Brightens the image. Darkens the image.
1-32 9G3741
CR Mammography Feature
Latitude Latitude is proportional to the number of shades of gray (or range of exposures) that are visible in an image, and is inversely proportional to the degree of difference between the lightest and darkest areas of an image (global contrast). Each slider click produces a 5% change in latitude relative to the selected look.
Contrast Controls the local contrast of medium sized structures such as joint spaces, vertebral body spacings, and ribs in lower density regions of the image.
NOTE: In the Image Viewer, and the Key Operator Image Viewer, the low and high contrast controls are linked together and adjusted simultaneously by the Contrast control. This affects the appearance of the image to the Technologist. The Technologist can affect the appearance of only one image at a time.
Sharpness Controls the sharpness of finer structures, such as bony trabeculae, lung markings and microcalcifications in lower density regions of the image.
Noise Controls the level of noise suppression applied to the image. Each slider click produces a 0.03 change in noise suppression level relative to the selected look.
Increasing the Slider Decreasing the Slider
Widens the latitude (or decreases the global contrast).
Narrows the latitude (or increases the global contrast).
Increasing the Slider Decreasing the Slider
Makes medium sized structures in brighter areas more pronounced.
Makes medium sized structures in brighter areas less pronounced.
Increasing the Slider Decreasing the Slider
Increases the sharpness of finer structures in the lower-density regions of the image.
Decreases the sharpness of finer structures in lower-density regions of the image.
Increasing the Slider Decreasing the Slider
Reduces the level of noise suppression.
Decreases the appearance of noise in the image (or increases the level of noise suppression).
9G3741 1-33
CR Mammography Feature
Delivering Mammography ImagesSee the KODAK DIRECTVIEW CR Systems User Guide Information for information about printing and managing images on a CR System. The following information applies specifically to mammography images.
Justification of Right Mammography images
In previous versions of software, it was necessary to select Laterality (Right or Left) on a Mammography image. Selecting Laterality automatically rotated an image for proper chest-wall display and printing.
When using Software Version 5.1, you must select Left and Right Views that have the appropriate Rotation and Flip settings to achieve the proper printing with the KODAK DRYVIEW 8900 Laser Imager or KODAK DRYVIEW 6800 Laser Imager. On the Image Viewer Screen, fill in the laterality field for PACS systems.
The KODAK DRYVIEW 5850 Laser Imager supports CR Mammography printing but does not support justification of Mammography images.
Presentation of Images
Presentation on the CR System
• If the image does not present as expected, verify that you are using the correct view.
• Check that the correct laterality has been used.
Presentation on a DX Workstation
This may be workstation-dependent. Check that the correct view (body part, projection,
position) and laterality are correctly entered.
Presentation on a Printer
• Lines—If lines appear in images that are not on the original CR image, print a test page and check the film to see if the lines reappear. If the lines are present, it could
be a film or printer problem. Call your Carestream Health Service Representative.
• Text Box misplaced—If the Text Box appears on the chest wall of the image when it is sent to the printer, check that the correct view (body part, projection) and laterality were entered on the Patient Input Screen. In addition, make sure the image on the CR System monitor displays the Text Box in the correct position.
• Poor image contrast—If the contrast has changed since installation, re-calibrate for that film size and reprint the image.
1-34 9G3741
CR Mammography Feature
Printing Mammography Images
• Use only a Mammography Printer that is intended for use in Mammography applications when reviewing hardcopy printed images.
• For hardcopy printing of Mammography images, Carestream Health recommends that you configure the CR System for use with a KODAK DRYVIEW Mammography Laser Imager using KODAK DRYVIEW Mammography Laser imaging Film. Contact your Carestream Health Sales Representative for more product information
• When you select justification on multi-format mammography prints, only one millimeter separates the prints for comparison viewing.
• Overscan that occurs during mammography exposures of the chest wall can be configured to automatically crop out or display on both print and PACS.
• You can achieve a D max of 4.0 (the darkest part of the image) to display soft tissue, without adding contrast.
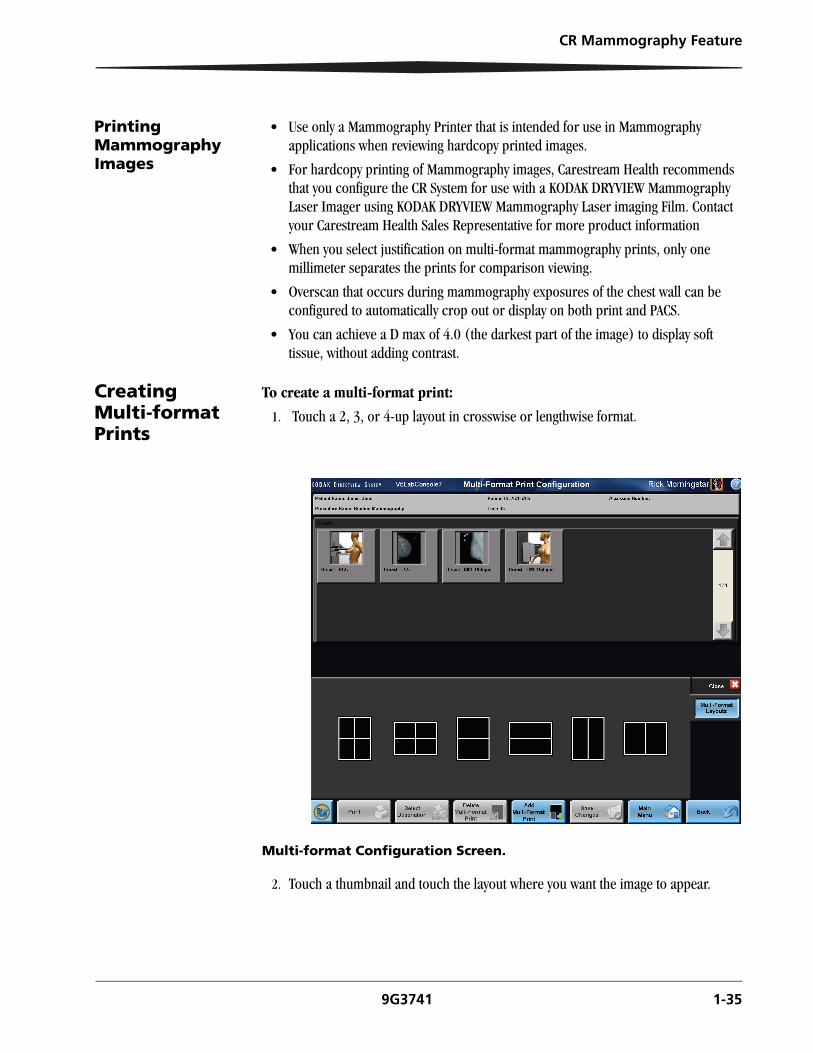
Creating Multi-format Prints
To create a multi-format print:
1. Touch a 2, 3, or 4-up layout in crosswise or lengthwise format.
Multi-format Configuration Screen.
2. Touch a thumbnail and touch the layout where you want the image to appear.
9G3741 1-35
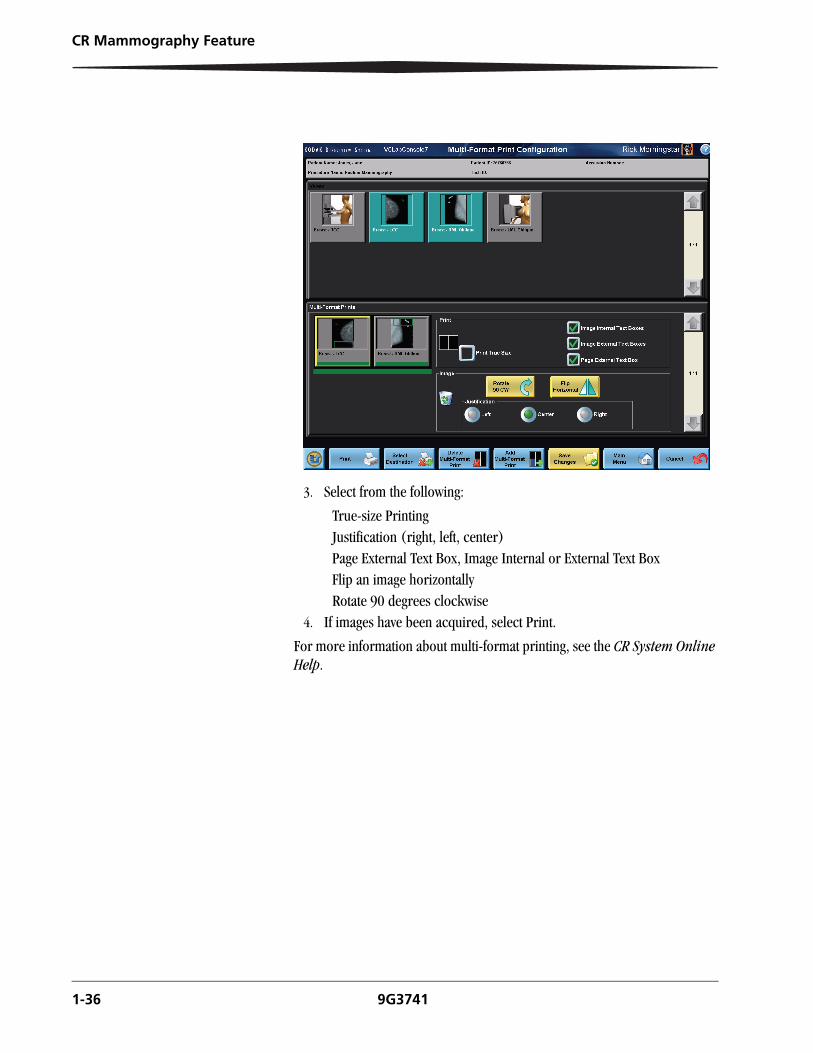
CR Mammography Feature
3. Select from the following:
True-size PrintingJustification (right, left, center)Page External Text Box, Image Internal or External Text BoxFlip an image horizontallyRotate 90 degrees clockwise
4. If images have been acquired, select Print.
For more information about multi-format printing, see the CR System Online Help.
1-36 9G3741
CR Mammography Feature
Mammography Cassette Use InstructionsCAUTION:The CR Mammography cassettes and phosphor screens are fragile. Take care when handling the plate. Do not drop, bend or apply pressure to the plate. Protect it from scratching and contamination. Do not leave the plate in hot or moist places, and protect it from sunlight, ultraviolet rays, fluorescent light, X-ray, and gamma ray sources. Do not discard or incinerate. Please consult federal, state, and local regulations for proper disposal.
IMPORTANT: When cleaning a cassette and screen, take care to maintain the integrity of the phosphor screen and avoid introducing artifacts. Inspect all phosphor screens monthly and clean as necessary with KODAK Screen Cleaner used according to the manufacturer’s instructions. When wear is evident, replace the screen.
Opening the Cassette The following steps require a small, pointed tool such as the end of a paper clip.
Slot A
9G3741 1-37

CR Mammography Feature
1. Position the cassette on a flat surface such as a table with the Tube Side up.
2. Place the pointed tool in Slot A and slide the latch to the right.
3. Pull out the screen and plate using the flat surface as a guide to avoid touching the phosphor on the cassette shell.
4. Inspect the screen and plate, and clean as described in the following procedures.
5. Slide the screen and plate back into the cassette using the flat surface as a guide.
6. Place the pointed tool in the opening at Slot B and press lightly to lock.
7. Make sure the screen and plate are secure in the cassette.
Cleaning the Cassette Shell
NOTE: Read and Follow instructions in the Material Safety Data Sheets (MSDS) for KODAK Screen Cleaner prior to use.
• Remove the screen and plate before cleaning the cassette’s outer shell. (See “Opening the Cassette” on page 1-37.)
• Do not allow water or cleaning solution to enter the shell.
Clean the outer shell surfaces with any of the following solutions:
Slot B
1-38 9G3741
CR Mammography Feature
• Mild soap-and-water.
• KODAK Screen Cleaner
CAUTION:Do not pour the cleaning solution directly onto cassettes or screens. Apply the solution to a lint-free cloth.
CAUTION:Do not use soaps or detergents with brightening agents, as they will damage the storage phosphor screen.
Handling and Maintaining the Screen
Handle phosphor screens with care. Hold screens by the edges. Avoid contact with the screen’s white (phosphor) side. Make sure hands are clean and dry. For best results, wear clean, soft, lint-free Nitrile gloves.
CAUTION:Under normal use conditions, phosphor screens will eventually show wear. Screen wear can result in artifacts on radiographs. This wear may occur from abrasion of the protective overcoat or inadvertent physical damage to the surface.
CAUTION:Screen damage can result from contact with certain materials used in facilities performing radiography. Contact with Isopropyl alcohol, peroxides, citrus-based cleaners, hand lotions, and water-less hand sanitizers, as well as surfactants and lubricants may cause visible or hidden damage to the screen and could result in immediate or future image artifacts. AVOID CONTACT BETWEEN THESE MATERIALS AND PHOSPHOR SCREENS.
CAUTION:Moisture can cause immediate or future screen damage and image artifacts. Minimize contact with moisture and ALWAYS DRY SCREENS IMMEDIATELY.
CAUTION:Read and follow instructions in Material Safety Data Sheets (MSDS) for KODAK Screen Cleaner.
9G3741 1-39

CR Mammography Feature
Cleaning the Screen Do not expose screens to:
• materials containing peroxides
• Isopropyl alcohol
• citrus-based hand cleaners
• hand lotions
• water-less hand sanitizers
• surfactants
• lubricants
• excessive moisture
Use a clean, dry, soft, lint-free cloth to remove dust. Use one of the following approved cleaners to remove other dirt.
NOTE: When using a cleaning solution, apply the solution to a clean, soft, lint-free cloth. Do not pour the cleaning solution directly onto the screen.
Cleaning Method Wear soft, lint-free gloves. Do not touch the white (phosphor) side with bare hands.
1. See “Opening the Cassette” on page 1-37. Place the screen with the white (phosphor) side up on a clean, dry, non-abrasive surface.
2. Wipe the screen gently to remove dust.
3. Follow the directions for the cleaning product being used.
4. Wipe the surface dry with a clean, soft, lint-free cloth.
NOTE: Do NOT allow the screen to air dry.
Catalog Number Cleaning Material
845 4977 KODAK Screen Cleaner
1-40 9G3741
CR Mammography Feature
Disinfecting the Screen or the Cassette
NOTE: If the cassette is visibly contaminated with blood or body fluids, removal of the blood and/or body fluids followed by intermediate-level disinfection is indicated prior to use.
The following instructions are for low-level disinfection.
CAUTION:Dilute bleach solutions may cause eye irritation and dry skin. Wash hands with soap and water following use. Consult manufacturer’s material safety data sheet (MSDS) prior to use.
1. Wipe with a soft lint-free cloth thoroughly dampened with a dilute bleach solution (dilute one part of 5.25% sodium hypochlorite (household bleach) with 10 parts of water) or use a commercially prepared equivalent solution of dilute bleach.
NOTE: Follow the Center for Disease Control (CDC) guidelines regarding solution contact time to adequately disinfect the cassette or screen.
2. Remove the bleach residue with a soft, lint-free cloth dampened with water.
3. Wipe dry with a soft, lint-free cloth. Allow screens to air dry.
Disposing of the Screen
Dispose of the screens according to applicable regulations. They must be managed and transported as hazardous waste.
CAUTION:The screen, when discarded, is a hazardous waste (EPA waste code D005) under the Resource Conservation and Recover Act (RCRA) due to the leachability of barium. Hazardous waste must be managed and transported in accordance with country, federal, state, and local regulations. Please contact your local authorities for disposal or recycling information.
For additional information, call Carestream Health at 1-800-328-2910. If outside the USA, contact the Customer Support Center in your country.
9G3741 1-41
CR Mammography Feature
Quality ControlCarestream Health provides the following information to test the operation of the CR System and CR Mammography Cassettes as part of an overall quality control program.
CAUTION:The facility must ensure a quality control program that is established and practiced according to applicable regulations. Quality control practices should include the manufacturer’s quality control recommendations for all equipment in the Mammography Imaging Chain. See the Mammography Imaging Chain on page 3.
Acceptance and Quality Control Testing
For specific testing to perform and the methods to record results follow all applicable regulations as per current country, state, local, and/or facility-specific regulations applicable for use in mammography.
TroubleshootingFor information about troubleshooting the CR System, see the KODAK DIRECTVIEW CR Systems User Guide Information.
Black Surround Masking may not always be applied correctly and result in the conditions described in the table below. Should these conditions occur, reprocess the image using the resolutions listed as follows:
Condition Resolution
Black Surround Masking covers up 1 mm of image area along the chest wall edge.
Reprocess the image with Manual Surround.
Black Surround Masking covers up image information along short edges due to collimation.
Reprocess the image with Manual Surround. Make sure the X-ray beam has not been collimated into the cassette.
Black Surround Masking may occasionally have a jagged edge.
Reprocess the image with Manual Surround, or perform the Overscan Check.
Black Surround Masking may mask off the entire image or may not be applied at all.
Reprocess the image with Manual Surround, or perform the Overscan check.
1-42 9G3741

CR Mammography Feature
Black Surround Masking
Black Surround Masking darkens the unexposed area around the image and masks that area from the rest of the image. Black Surround Masking should be turned on by default for mammography images by the Key Operator.
To apply Black Surround Masking:
1. At the CR System Image Viewer Screen, touch the Image Processing Tab.
2. Touch the Surround Mask check box to select it.
3. Touch Save Changes.
The image is masked automatically, making it easier to see soft tissue and low contrast areas.
To turn off Black Surround Masking:
1. Select the Surround Mask check box to clear it.
2. Select Save Changes.
The masking process stops immediately. Unexposed areas are not darkened.
Manual Black Surround
The Manual Black Surround feature lets you apply Surround Masking to the image and adjust the masked area manually. You can move the mask to a variety of four-sided geometric shapes by dragging the edges of the mask on the Image Viewer Screen. When the image reprocesses, you can view the result on the Image Viewer Screen or on the thumbnail on the Patient Input Screen. Use this feature when the Automatic Mask fails.
To mask selected image areas:
1. Make sure the Edit Mask check box is selected.
2. Circles appear at guide points on the mask.
3. Touch the edge of the mask at one of the arrows and slowly drag the edge across the screen to change the position.
4. Select Reset to return to the original mask.
5. Select Reprocess.
6. Select Save Changes.
For more information about applying masking, see the CR System Online Help.
9G3741 1-43
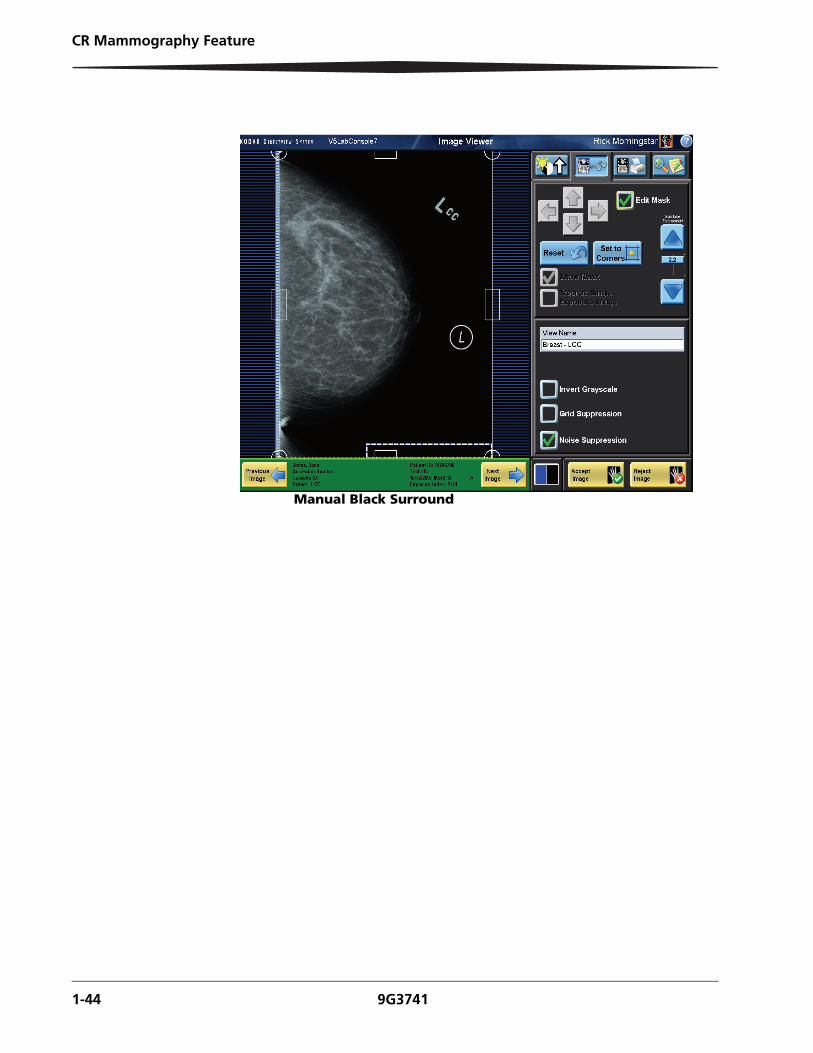
CR Mammography Feature
Manual Black Surround
1-44 9G3741
CR Mammography Feature
Overscan Check The CR System overscans the CR Mammography Cassette to:
• Capture all the image data at the chest wall edge.
• Support proper operation of the Surround Mask feature.
When the CR System is properly calibrated, the nominal overscan width is 2.5 mm on a flat-field exposure, printed True-size for an 18 x 24 cm or 24 x 30 cm CR Mammography Cassette. In the image above, the bright image at the chest wall is the overscan. Overscan is cropped when the image is sent to destinations.
Getting HelpBefore you contact Carestream Health for help, see “Troubleshooting” for more information. Next, contact your Key Operator. If the problem persists, in the U.S. and Canada, call the Technical Service Center at 800-328-2910. Elsewhere in the world, contact your Carestream Health Service Representative.
9G3741 1-45

CR Mammography Feature
GlossaryAccession Number A DICOM term; it is a number assigned to an exam and linked to the site's billing system.
Surround Mask Fills in the area outside of the Region of Interest with a dark background.
Compression To uniformly reduce the thickness of the breast using a rigid, plastic device so that the breast is more readily and uniformly penetrated by the X-ray beam.
Dose Measurements
The measure of the amount of energy (using a dosimeter) deposited in tissue due to X-ray exposure.
Entrance Exposure
That amount of radiation at the skin of the breast, quantitated by measuring the amount of ionization in air caused by the radiation.
Exam A collection (set) consisting of a raw image, its versions, Exam Information, and Patient Information.
Exam Information The data that pertains to the way in which an exam is performed.
Exam Type View. Body part and projection (from the Exam Information) and, optionally, position.
Exposure Factor Technical factors in the design of the mammography machine that affect production of the mammographic image. The goal is to produce consistent, high-contrast diagnostic images.
Focal Spot Size The focal spot dimensions.
Half-Value Layer The thickness of a specified substance which, when introduced into the path of a given beam of radiation, reduces the exposure rate by one-half. HVL is a measure of beam quality and usually is specified by millimeters of aluminum for diagnostic units. The higher the HVL, the more penetrating the X-ray beam.
Image A data structure that contains image data, patient information, and information relating to the method of creating the image data; in a DICOM-compliant format.
Image Receptor The screen-film combination is the standard image receptor used in mammography. For Computed Radiography, the image receptor is the phosphor screen.
kVp Accuracy and Reproducibility
Test used to ensure that the indicated peak X-ray beam energy is accurate and reproducible so that consistent X-ray output and contrast are maintained.
Mammography Workstation
Also described as a softcopy (electronic display) viewing station, the workstation is designed for and used by Radiologists to read mammograms.
Medical Physicist A trained specialist who conducts a number of mammography-related tests, at least annually, intended to assess the continuing performance of mammography equipment.
Pass-Through Mode
The operating mode in which the CR System accepts, processes, and routes the exam without user intervention.
Patient Information
The demographic data pertaining to a patient.
Processed Image An image that has been tone-scaled and unsharp-masked.
1-46 9G3741
CR Mammography Feature
Phantom A test object that simulates the average composition of various structures within the breast.
Positioning The art and skill the Radiographer/Technologist uses to adequately demonstrate the breast tissue in different projections, known as the craniocaudal and mediolateral projections.
Projection Also referred to as a View. Is the demonstration of breast tissue from a specific angle depending on what area of the breast needs to be seen.
QA Mode The operating mode in which the CR System requires user input to route an exam.
Radiographer/Tech-nologist
Trained person who performs the mammography examination that creates the images needed for diagnosis.
Radiopaque Marker
A permanent identification label to indicate right or left laterality and projection. This marker is placed on the top of the cassette holder near the auxiliary portion of the breast.
Raw Image The image that is read from the storage phosphor plate.
Routing The act of transferring an image from the CR System to a specified destination.
Study A collection (set) consisting of a series of images.
Technique Technical factors in the design of the Mammography machine that affect production of the mammographic image. The goal is to produce consistent, diagnostic images.
Tonescale A graduated range of gray values constructed to optimize an image for clinical diagnosis by highlighting the body structures of interest to a Radiologist.
View See Projection.
Worklist The list of patient records that describes the patients to be examined during a given time interval.
9G3741 1-47
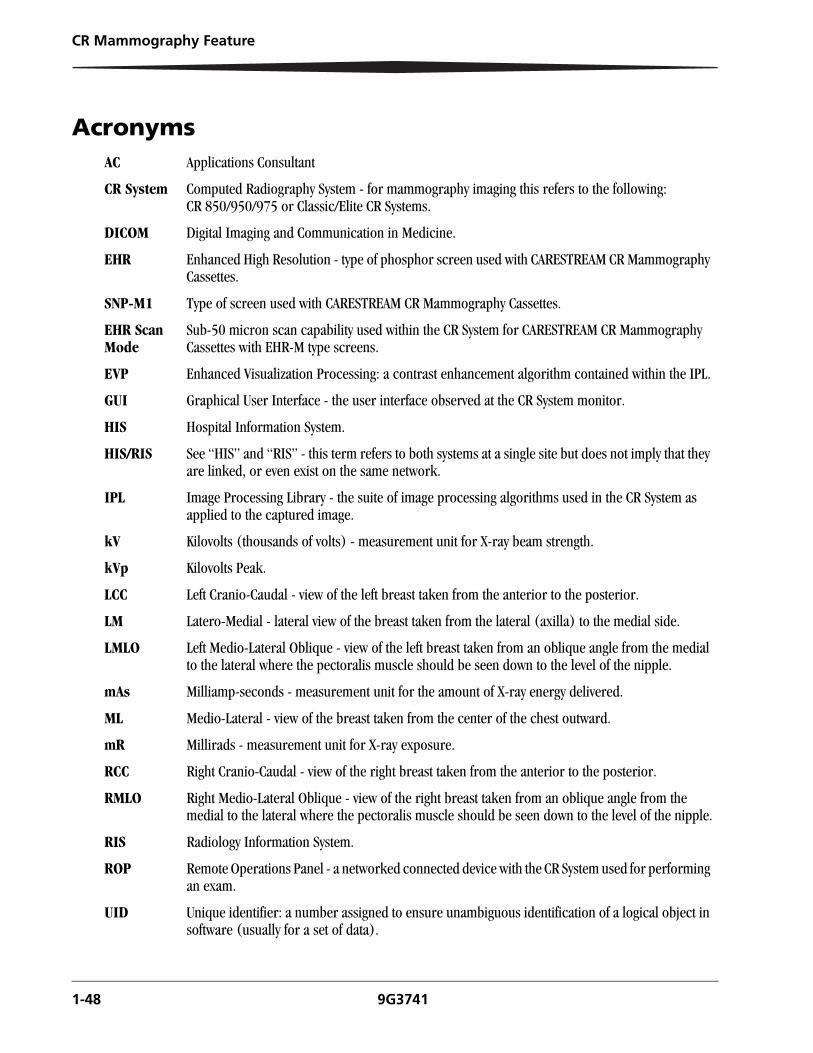
CR Mammography Feature
AcronymsAC Applications Consultant
CR System Computed Radiography System - for mammography imaging this refers to the following: CR 850/950/975 or Classic/Elite CR Systems.
DICOM Digital Imaging and Communication in Medicine.
EHR Enhanced High Resolution - type of phosphor screen used with CARESTREAM CR Mammography Cassettes.
SNP-M1 Type of screen used with CARESTREAM CR Mammography Cassettes.
EHR Scan Mode
Sub-50 micron scan capability used within the CR System for CARESTREAM CR Mammography Cassettes with EHR-M type screens.
EVP Enhanced Visualization Processing: a contrast enhancement algorithm contained within the IPL.
GUI Graphical User Interface - the user interface observed at the CR System monitor.
HIS Hospital Information System.
HIS/RIS See “HIS” and “RIS” - this term refers to both systems at a single site but does not imply that they are linked, or even exist on the same network.
IPL Image Processing Library - the suite of image processing algorithms used in the CR System as applied to the captured image.
kV Kilovolts (thousands of volts) - measurement unit for X-ray beam strength.
kVp Kilovolts Peak.
LCC Left Cranio-Caudal - view of the left breast taken from the anterior to the posterior.
LM Latero-Medial - lateral view of the breast taken from the lateral (axilla) to the medial side.
LMLO Left Medio-Lateral Oblique - view of the left breast taken from an oblique angle from the medial to the lateral where the pectoralis muscle should be seen down to the level of the nipple.
mAs Milliamp-seconds - measurement unit for the amount of X-ray energy delivered.
ML Medio-Lateral - view of the breast taken from the center of the chest outward.
mR Millirads - measurement unit for X-ray exposure.
RCC Right Cranio-Caudal - view of the right breast taken from the anterior to the posterior.
RMLO Right Medio-Lateral Oblique - view of the right breast taken from an oblique angle from the medial to the lateral where the pectoralis muscle should be seen down to the level of the nipple.
RIS Radiology Information System.
ROP Remote Operations Panel - a networked connected device with the CR System used for performing an exam.
UID Unique identifier: a number assigned to ensure unambiguous identification of a logical object in software (usually for a set of data).
1-48 9G3741
Index
Bbar code
error message, 22reading, 22selecting the cassette size, 22
Black Surround Maskautomatic, 43automatic, applying, 43automatic, turning off, 43manual, 43manual, applying, 43manual, reset button, 43overscan check, 43
brightness, 32brightness tab, 30
Ccassette
exposing, 11cassettes
placing on bucky, 2category display, 30collimating the cassette, 14CR Mammography Feature
compatible CR Systems, 6enabling, 7
CR Systemrequirements, 8
CR Systems, 6creating a patient record, 12
new patient, 12
Ddefinition, 30detail contrast, 26, 31, 32diagnosing from monitor, 24DICOM, 46, 48DICOM-compatible, 6DICOM-compatible printer, 6documentation, additional, 1
EEHR Scanning
mammography cassette, 7Equipment and Cassettes
cleaning storage phosphor screens, 40erasing, 11erasing cassettes, frequency, 11
GGrid Suppression, 30grid suppression, 32grid suppression tab, 30
IImage Processing Preference Editor, accessing, 26image quality
rejecting the image, 24image viewer window, 30
Kkey operator preference editor, 32kVp, 5, 11, 23, 46
, 46, 48entering, 23
Llabeling, 11laterality, selecting, 13looks, 27
Mmammography imaging chain
Acquisition, 5capture and processing, 5hardcopy printing and viewing, 6softcopy viewing and storage, 6
mammography label, 7manual black surround mask, 43markers
digital, 24
9G3741 I-1

Index
left, right, 24mAs, 11, 23masking, 43
resetting, 43selected image areas, 43
more buttonsMore Patient Information, 22
Nnoise suppression tab, 30
Ooverscan line, 45
Ppatient ID, 30patient name, 30phosphor screen
cleaning, 40disinfecting, 41harmful materials, 40recommended cleaning products, 39
preference editor, controls, 30preference editor, illustration, 30printing, 6
equipment, 4projections, 9
RRegion of Interest, 31
Ssearching for a patient, 12sharpness tab, 30skin line enlargement, 32slider control behavior, 32slider control behavior, image viewer, 32slider controls, 31softcopy viewing
workstation, 6Submit button, 13
Ttabs, image viewer, 30thumbnail gallery, 30thumbnail images, viewing, 23
VViewbox, 6viewing modes
Pass-through, 23QA mode, 22
viewing thumbnail images, 23
I-2 9G3741


Carestream Health, Inc.150 Verona Street
Rochester, NY 14608CARESTREAM, DIRECTVIEW, and DRYVIEW are trademarks of Carestream Health, Inc.
The Kodak trademark and trade dress are trademarks of Kodak used under license.
© Carestream Health, Inc., 2010
PN 9G3741