Embed Size (px)
Citation preview

User�s Reference GuideKonica Print Utility

NOTICE:
Konica Business Technologies, Inc. has made every effort to ensure that the information in this manual is completeand accurate. However, constant efforts are also being made to improve and update the product. Therefore, KonicaBusiness Technologies, Inc. shall not be liable for errors in this manual or for any consequential damage resultingfrom the use of this manual. The information contained herein is subject to change without notice.
All product names referenced herein may be trademarks or registered trademarks of their respective companies,and are hereby acknowledged as such.
MANUAL PART NUMBER:OP-KP-01
Web Site Address:http://www.konicabt.com
CORRESPONDENCE:Correspondence regarding this manual may be mailed to the address shown below.
KONICA BUSINESS TECHNOLOGIES, INC.System Engineering Center
550 Marshall Phelps Rd.Windsor, CT 06095
© 2002 by Konica Business Technologies, Inc.
Konica Print Utility ii

Chapter One - Introduction 1
Overview 2
Features 3
Supported Platforms 3
Chapter Two - Installation 4
README File 5
Chapter Three - Before You Configure 6
Overview 7
PostScript Printer Definition (PPD) Files 8
Important Information 9
Chapter Four - Configuration 10
kpconfig Command 11
Sample Configuration 12
Printer Choice 13
PPD Files 13
Ctrl-D 14
Configuration Options 14
Completing Configuration 15
Chapter Five - Printing with KP 16
kp Command 17
Printer Options 19
Chapter Six - Using KP Alias 36
Overview 37
Creating a KP Alias 37
Printing with KP Alias 43
Chapter Eight - Using KP Pop Up 44
Overview 45
Printing with KPP 45
Index A-1
Table of Contents

Chapter OOne
Introduction

Introduction
Konica Print Utility (KP) is a printer utility developed by the Systems Engineering Center of Konica Business Technologies, Inc. specifically for users running a UNIX/LINUX operating system. KP is fully customizable and easy to use. This user's manual is intended to show you how to set up KP once it is installed and how to configure KP for your Konica Workgroup Document System. For more information about your Konica Workgroup Document System, please refer to the User's Reference Guide provided with your specific machine.
Konica Print Utility has three forms:
KP: An interactive command line utility.
KPALIAS: A version of KP that allows you to select your desired printing options and save them as a single "command" for later use.
KPP: A version of KP that appears within a "pop-up" window when invoked by an application
Konica Print Utility allows you to print PostScript®- and text-based files. With PostScript® files, KP allows you to use any of the finishing options associated with your Konica Workgroup Document System, so that you may take advantage of all features that your Konica system offers. With text-based documents, KP not only allows you to use finishing options, but also allows you to make basic formatting changes (font size, lines per page, etc.) to modify the physical layout of the file you are printing.
Konica Print Utility 2

Introduction
FEATURES OF KONICA PRINT UTILITY:
! Works with all Konica 20+ ppm PostScript Printers.! Provides all of a printer's finishing capabilities specified by the printer's PPD file.! Allows you to select features via a text-based menu system, which is accessible from a console,
terminal or X-terminal window.! Allows font style and size selections for text documents.! Provides control over the number of characters per line as well as the number of lines per
page for text documents.! Prints text documents in portrait or landscape orientation.! Allows you to save often-used print settings for repeated use (KPALIAS).! Allows supported applications to invoke KP instead of lp (KPP).
Konica Print Utility 3
! Sun Solaris 7 & 8 (Intel/Sparc)
! SCO Open Server 5.0x
! IBM AIX 4.3 & 5.0
! HP-UX 10.2 & 11.x (PA-RISC)
! HP-UX 11.2 (Itanium)
! Digital Unix 4.x & Compaq Tru64 5.x (Alpha)
! OpenBSD Unix 2.9
! FreeBSD 4.4
! Red Hat Linux 7.1
! Caldera OpenLinux 3.1
! SuSE Linux 7.2 (Intel)
! SuSE Linux 7.1 (PPC)
! Slackware Linux 8.0
! TurboLinux 6.1
! Mandrake Linux 8.0
! Debian Linux 2.2
KP is Supported on the Following Platforms:

Chapter TTwo
Installing KKP

Installing KKP
Your KP distribution contains a readme.txt file that describes how to install KP on your platform. Please read this file before attempting installation. It contains information pertaining specifically to your individual distribution of KP that cannot be found in this manual.
Installation information will vary based upon the distribution of KP that you areinstalling. All the information necessary to install your KP distribution is contained in the readme.txt file.
To view the readme.txt file, use one of the following commands:
# vi# cat# more
Konica Print Utility 5

Chapter TThree
Before YYou Configure KKP

Konica Print Utility 7
Before YYou CConfigure KKP
The following sections of this manual assume that you have an active printer established on your Unix/Linux system and that you have installed KP. If this is not the case, please create an active printer session for your system now and install KP. Please refer to the readme.txt file that came with your KP distribution for detailed installation instructions (see page 5 for details).
Since Konica Print Utility is fully customizable, its configuration will differ based upon the Konica Workgroup Document System that you use. The configuration in this manual is intended solely as a guide,from which you may learn the basis of configuration.
The configuration in this manual is based upon a Konica 7065 Workgroup Document System with an FS-106 Finisher, an LT-352 large capacity tray, 32 MB ERDH RAM and an IP-303 with 64 MB of RAM.
The Konica 7065 has many popular features that are available on other Konica Workgroup Document Systems. The fundamental processes for configuring and using these features within KP are the same for all Konica printers.
To properly configure your Konica printer, you need to know what Konica printer model you have and the optional accessories installed on it. If you are unsure about your printer and its installed accessories, please contact your Konica representative.

Before YYou CConfigure KKP
PostScript® Printer Definition Files (PPD)
When configuring a printer for use with KP, you will be prompted to choose a PostScript Printer Definition file (PPD). The following table lists those PPD files that are automatically installed along with KP. Please consult this table to ensure a PPD file is present for your Konica printer.
If the print system you are using is not listed in this table, please contact Konica to obtain the appropriate KP PPD file for your system. The appropriate PPD file can be downloaded from the Konica website (www.sec.konicabt.com).
Please add the PPD file to your system according to the instructions given in the readme.txt file provided with your KP distribution.
Konica Print Utility 8
PPD Filename Konica Printing System
7033-US.ppd IP-402/7033 Printing System
7033-INT.ppd IP-402+/7033 Printing System
IP-411/7033 Printing System
7040-US.ppd IP-402/7033 Printing System
7040-INT.ppd IP-402+/7033 Printing System
IP-411/7033 Printing System
70502-US.ppd IP-302/7050 Printing System
70502-INT.ppd IP-302+/7050 Printing System
IP-302/Force50 Printing System
IP-302+/Force50 Printing System
7060-US.ppd IP-302/7060 Printing System
7060-INT.ppd IP-302+/7060 Printing System
IP-302/Force60 Printing System
IP-302+/Force60 Printing System
PPD Filename Konica Printing System
7065-US.ppd IP-303/7065 Printing System
7065-INT.ppd
Ko30465u.ppd IP-304/7065 Printing System(US)
IP-304/7165 Printing System(US)
K042120u.ppd IP-421/7020 Printing System(US)
Ko43145u.ppd IP-431/7045 Printing System(US)
Ko601751.ppd IP-601/7075 Printing System
NOTE: PPDs for US paper sizes (i.e. 8.5"X11", 11"X17", etc.) are des-ignated with �-US.� PPDs for International paper sizes (i.e. A4, B6) are desig-nated with �-INT.�

Before YYou CConfigure KKP
Important Information
To successfully complete your KP configuration, you will need to have specific information about your printing system readily available. This information is as follows:
� Memory: How much memory you have available in your IP Print Controller, not ERDH.
� Finisher: What type of finisher you have installed on your Konica Printing System.
� Sheet Feeder: What type of sheet feeder you have installed on your Konica Printing System.
� Large Capacity Tray: What type of large capacity tray (LCT) you have on your Konica Printing System.
� Tandem: Whether your system is tandem enabled.
It is important that you have this information available before you attempt to configure KP for use with your Konica Printing System.
Konica Print Utility 9

Chapter FFour
Configuring KKP

Configuring KKP
The following procedure outlines the steps necessary to configure a system printer for use with Konica Print Utility. Please note that you must have lp or root privileges to configure a printer.
1. Add a new printer to your UNIX/LINUX system using the instructions given in your KP distribution�s readme file.
2. Configure your new printer by using the kpconfig command. It will prompt you for the printer that you would like configure. Select the printer you have just added.
3. You will be asked to pick a PPD file that matches your printer. The list of PPD files installed is displayed.
4. You will be asked whether you want a Ctrl-D appended to each print job. Ctrl-D is the "end of job" command and it is not harmful to always send it. It is optional, as there are rare cases in which it may cause problems. You should choose to append Ctrl-D, unless you have a reason not too.
5. Finally, you will be prompted for "installable options." These are printer-specific options, which may be installed. Select the options that are installed on your printer.
FOR MORE INFORMATION, REFER TO THE SAMPLE CONFIGURATION PROVIDED ON PAGES 12-15.
Konica Print Utility 11
Configuring KKP
Sample Configuration
Since KP is fully customizable, the exact configuration will differ based upon which Konica printer you are using. The following are detailed, step-by-step instructions on how to configure a Konica 7065 Workgroup Document System for use with KP. The Konica 7065 has many popular features that are available on other Konica printers. The fundamental processes for configuring these features within KP is the same for all Konica printers.
IMPORTANT: This sample is intended solely as a guide, from which you may learn the basis for configuration.
The configuration in this sample is based upon a Konica 7065 Workgroup Document System with an FS-106 Finisher, an LT-352 large capacity tray, 32 MB ERDH and an IP-303 Print Controller with 64 MB of RAM.
IMPORTANT: At any point during your use of KP or kpconfig, you may type Ctrl-C to cancel the settings you have made and return to the shell prompt. If you feel you have entered an incorrect selection, type Ctrl-C to exit.
IMPORTANT: kpconfig will prompt you only for the options available for the printer that you specify during installation.
Konica Print Utility 12
!
!
!

Configuring KKP
Sample Configuration (Continued)
1. Begin configuration with the kpconfig command. Typing -a after the kpconfig command will produce a list of printers available on your platform that you may configure.
# ./ kpconfig -a
2. Choose the printer you would like to configure from the list provided by entering the number preceding the printer name.
Printer choices1. Konica70502. k7065
Enter selection number for Printer: 2
IMPORTANT: The kpconfig command assumes that you have already installed your printer. kpconfig is for currently existing system printers only. If you do not see your printer in the printer choices list, refer to the readme.txt file for your specific Unix/Linux distribution for instructions on how to add a system printer.
3. The following list of available PPD files will appear. Please refer to page 8for a complete list of the available kp PPD files.
Installed PPD files1. /etc/lp/ppd/7033-INT.ppd2. /etc/lp/ppd/7033-US.ppd3. /etc/lp/ppd/7040-INT.ppd4. /etc/lp/ppd/7040-US.ppd5. /etc/lp/ppd/70502-US.ppd6. /etc/lp/ppd/70502INT.ppd7. /etc/lp/ppd/7060-INT.ppd8. /etc/lp/ppd/7060-US.ppd9. /etc/lp/ppd/7065-INT.ppd10. /etc/lp/ppd/7065-US.ppd11. /etc/lp/ppd/Ko30465u.ppd12. /etc/lp/ppd/Ko42120u.ppd13. /etc/lp/ppd/Ko43145u.ppd14. /etc/lp/ppd/Ko601751.ppd
Enter selection number for PPD file: 10
In this case, since we are using a Konica 7065 system and require US paper measurements, the selection needed is 10.
Konica Print Utility 13
!

Configuring KKP
Sample Configuration (Continued)
NOTE: At this point in the configuration, specific information about your printer is now necessary to complete your configuration. Refer to page 9 for a list of the required configuration information.
4. You will be asked whether you would like to append a Ctrl-D command to the end of your files. This is an end-of-file marker, and we recommend that you type Y for this question.
Do you want a Ctrl-D to be appended to each print job? [y|n] Y
Next you will be prompted to answer a series of questions about your Konica Workgroup Document System.
5. Memory. You will be asked to input your amount of available memory. This value should be the amount of memory you have in your IP Print Controller, not your ERDH Memory.
Memory Configuration choices1. 32MB RAM (default)2. 64MB RAM3. 96MB RAM4. 128MB RAM5. 144MB RAM6. 160MB RAM7. 192MB - 224MB RAM8. 256MB - 512MB RAM
Enter selection number for Memory Configuration [1]: 2
In this case, we have an IP-303 with an available 64 MB of RAM, so the proper entry is 2.
6. Finisher. You will be asked what type of finisher you have installed on your Konica System.
Finisher Installed choices1. No Finisher2. FS-106 (default)3. FS-108B (BookletMaker)
Enter selection number for Finisher Installed [2]: 2
In this case, we have an FS-106 Finisher, so the proper entry is 2.
Konica Print Utility 14

Configuring KKP
Sample Configuration (Continued)
7. Sheet Feeder. You will be asked what type of sheet feeder you have installed on your Konica system.
Sheet Feeder choices1. None (default)2. PI-108
Enter selection number for Sheet Feeder [1]: 1
In this case, we do not have a sheet feeder installed, so the proper entry is 1.
8. Large Capacity Tray. You will be asked whether you have a Large Capacity Tray installed on your Konica system.
Large Capacity Tray choices1. Not Installed (default)2. Installed
Enter selection number for Large Capacity Tray [1]: 2
In this case, we have an LT-352 large capacity tray installed, so the proper entry is 2.
9. Tandem Configuration. You will be asked if you have tandem configuration installed on your Konica system. Tandem configuration refers to the connection of two or more Konica printing systems to increase speed and provide job redundancy.
Tandem Configuration choices1. Not Installed (default)2. Installed
Enter selection number for Tandem Configuration [1]:1
In this case, we do not have tandem installed, so the proper entry is 1.
Konica Print Utility 15
Completing Your Configuration
Completing step 9 will return you to the shell prompt. When you are returned to the shellprompt, configuration is complete.
If you believe that you have made a mistake when installing or configuring your printer, usethe following commands:
./ kpconfig -l Lists all printers configured for KP and the configurations established for each printer.
./ kpconfig -d [printer name] Deletes a printer configuration from your system, sothat you may and reconfigure your system.

Chapter FFive
Printing wwith KKP

Printing wwith KKP
IMPORTANT: Printing is based upon the options that you chose when you configured your Konica printing system with the kpconfig command. The options listed when you print differ for each type of Konica Workgroup Document System that you install. This is a basic sample,offered as an example.
Konica Print Utility offers many features, all of which can also be invoked from the command line. For more information about these features, as well as command line invocation, please reference the man page, by typing kp man at the shell prompt.
NOTE: The menus and options listed in the following printing samples are based upon the config-urations completed in the previous Sample Configuration.
1. To begin your printing session, type kp at the shell prompt.
# kpKonica Print Utility 1.5Copyright (c) 2001 Konica Business Technologies Inc.
2. You are asked to choose the printer to which you want to print. Enter the number corre-sponding to the Konica Workgroup Document System to which you want your print jobs sent.
Printer choices1. Konica70502. k7065
Enter selection number for Printer: 2
In this case, we are printing to the Konica 7065, so the proper entry is 2.
3. You are asked to enter the name of the file that you would like to print.
Enter file(s) to print: sample.txt
In this case, we are going to print the sample.txt text file. If the file does not exist in your current working directory, you may enter the entire path name to the file (example: \home\pubs\sample.txt).
4. You are asked how many copies you would like to print. Enter the number of copies.
Number of copies to print: 1
In this case, we only want one copy, so the proper entry is 1.
Konica Print Utility 17
!
Printing wwith KKP
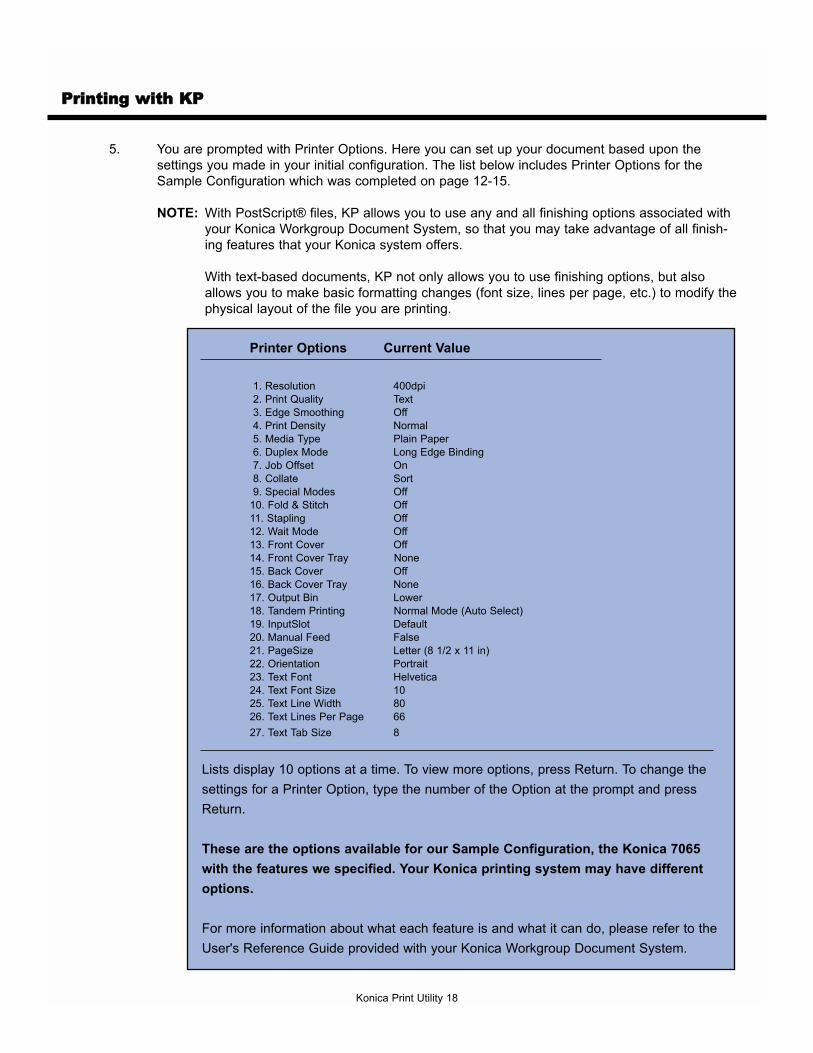
5. You are prompted with Printer Options. Here you can set up your document based upon the settings you made in your initial configuration. The list below includes Printer Options for the Sample Configuration which was completed on page 12-15.
NOTE: With PostScript® files, KP allows you to use any and all finishing options associated with your Konica Workgroup Document System, so that you may take advantage of all finish-ing features that your Konica system offers.
With text-based documents, KP not only allows you to use finishing options, but also allows you to make basic formatting changes (font size, lines per page, etc.) to modify the physical layout of the file you are printing.
Konica Print Utility 18
Printer Options Current Value
1. Resolution 400dpi2. Print Quality Text3. Edge Smoothing Off4. Print Density Normal5. Media Type Plain Paper6. Duplex Mode Long Edge Binding7. Job Offset On8. Collate Sort9. Special Modes Off
10. Fold & Stitch Off11. Stapling Off12. Wait Mode Off13. Front Cover Off14. Front Cover Tray None15. Back Cover Off16. Back Cover Tray None17. Output Bin Lower18. Tandem Printing Normal Mode (Auto Select)19. InputSlot Default20. Manual Feed False21. PageSize Letter (8 1/2 x 11 in)22. Orientation Portrait23. Text Font Helvetica24. Text Font Size 1025. Text Line Width 8026. Text Lines Per Page 6627. Text Tab Size 8
Lists display 10 options at a time. To view more options, press Return. To change thesettings for a Printer Option, type the number of the Option at the prompt and pressReturn.
These are the options available for our Sample Configuration, the Konica 7065with the features we specified. Your Konica printing system may have differentoptions.
For more information about what each feature is and what it can do, please refer to theUser's Reference Guide provided with your Konica Workgroup Document System.

Printing wwith KKP
Printer Options
The list of options is arranged with the function on the left and the current value on the right. To change the current value, enter the number of the function. To change the settings for any of the Printer Options, type the number of the Option at the prompt. A new menu with choices for that specific option will be displayed. Make the desired selection and press Return to go back to the Printer Options list. At any time, you may enter P to print. At any time, you may enter Ctrl-C, to cancel your operation and return to your initial prompt.
NOTE: Defaults are contained in brackets before the prompt and denoted in parentheses after the description. Press Return at a section's prompt to retain defaults in the section and return to the Printer Options List.
1. Resolution
To access your choices for the Resolution feature, enter 1 at the Printer Options List. The choices you will see are as follows:
Resolution choices
1. 400dpi (default)
2. 600dpi
Enter selection number for Resolution [1]:
To change the setting, press the number of your choice; pressing Return will take you to the Printer Options List.
$ 400dpi and 600dpi resolution modes provide optimal image quality for photos, complicated graphics and text requiring high to very high compression.
For more information about Resolution, refer to the User's Reference Guide
included with your Konica Workgroup Document System.
Konica Print Utility 19

Printing wwith KKP
Printer Options
2. Print Quality
To access your choices for the Print Quality feature, enter 2 at the Printer Options List. The choices you will see are as follows:
Print Quality choices1. Text (default)2. Medium3. High
Enter selection number for Print Quality [1]: 1
To change the setting, press the number of your choice; pressing Return will take you back to the Printer Options List.
$ You can select various image quality modes to produce various levels of grayscale. The following table shows the available image quality modes and the grayscale levels they produce.
For more information about Print Quality settings, refer to the User's Reference Guide included with your Konica Workgroup Document System.
Konica Print Utility 20
Print Mode Print Engine Print Controller Grayscale
Text 1-Bit Mode 1-Bit Mode 2 Levels (No error diffusion)
Medium 2-Bit Mode 8-Bit Mode 4 Levels(Error diffusion)
High 4-Bit Mode 8-Bit Mode 16 Levels(Error diffusion)
Printing wwith KKP
Printer Options
3. Edge Smoothing
To access your choice for the Edge Smoothing feature, enter 3 at the Printer Options List. The choices you will see are as follows:
Edge Smoothing choices1. Off (default)2. Text Only3. All Objects
Enter selection number for Edge Smoothing [1]:
To change the setting, press the number of your choice; pressing Return will take you back to the Printer Options List.
$ Edge Smoothing fills in the feathered edges of text and images with extra toner, to produce a crisper, smoother output result.
For more information about Edge Smoothing settings, refer to the User's Reference Guideincluded with your Konica Workgroup Document System.
4. Print Density
To access your choices for the Print Density feature, enter 4 at the Printer Options List. The choices you will see are as follows:
Print Density choices1. Normal (default)2. Toner Save3. Draft
Enter selection number for Print Density [1]:
To change the setting, press the number of your choice; pressing Return will take you back to the Printer Options List.
$ Use this option to change the darkness or lightness of your output print. Normal mode (default) prints with the density to which you are most accustomed. Toner Save mode will save toner by printing a very light copy of your document. Draft will print an even lighter copy of your document.
For more information about Print Density settings, refer to the User's Reference Guide included with your Konica Workgroup Document System.
Konica Print Utility 21

Printing wwith KKP
Printer Options
5. Media Type
To access your choices for the Media Type feature, enter 5 at the Printer Options List. Thechoices you will see are as follows:
Media Type choices1. Plain Paper (default)2. OHP Transparency3. Thin Paper4. Thick Paper
Enter selection number for Media Type [1]:
To change the setting, press the number of your choice; pressing Return will take you back to the Printer Options List.
$ Media Type selection allows you to set the printer to print on a specific type of paper. For best results, use only paper recommended by Konica.
For more information about Media Type settings, refer to the User's Reference Guide included with your Konica Workgroup Document System.
6. Duplex Mode
To access your choices for the Duplex Mode feature, enter 6 at the Printer Options List. The choices you will see are as follows:
Duplex Mode choices1. Off (default)2. Long Edge Binding3. Short Edge Binding
Enter selection number for Duplex Mode [1]:
To change the setting, press the number of your choice; pressing Return will take you back to the Printer Options List.
$ Duplex printing prints on both sides of a sheet. Descriptions of binding options are as follows:
For more information about Duplex settings, refer to the User's Reference Guide included with your Konica Workgroup Document System.
Konica Print Utility 22
Long Edge Binding Short Edge Binding

Printing wwith KKP
Printer Options
7. Job Offset
To access your choices for the Job Offset feature, enter 7 at the Printer Options List. The choices you will see are as follows:
Job Offset choices1. On (default)2. Off
Enter selection number for Job Offset [1]:
To change the setting, press the number of your choice; pressing Return will take you back to the Printer Options List.
$ Offset On will allow you to sort or group your output prints as shown in the examples in number 8. Offset off will output your prints on top of each other, in the normal fashion. Refer to the figures in the following section for Offset On options.
$ Offset Off
For more information about Job Offset settings, refer to the User's Reference Guide included with your Konica Workgroup Document System..
Konica Print Utility 23
Printing wwith KKP
Printer Options
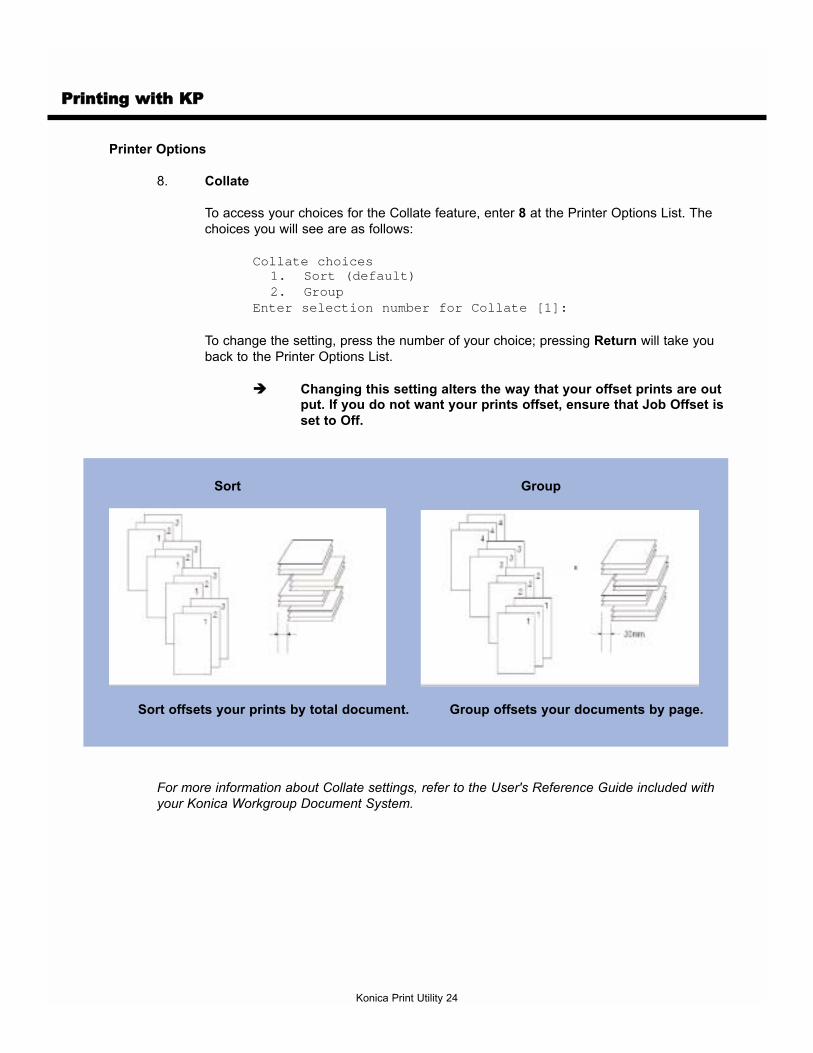
8. Collate
To access your choices for the Collate feature, enter 8 at the Printer Options List. The choices you will see are as follows:
Collate choices1. Sort (default)2. Group
Enter selection number for Collate [1]:
To change the setting, press the number of your choice; pressing Return will take you back to the Printer Options List.
$ Changing this setting alters the way that your offset prints are output. If you do not want your prints offset, ensure that Job Offset is set to Off.
For more information about Collate settings, refer to the User's Reference Guide included with your Konica Workgroup Document System.
Konica Print Utility 24
Sort Group
Sort offsets your prints by total document. Group offsets your documents by page.

Printing wwith KKP
Printer Options
9. Special Modes
To access your choices for the Special Modes feature, enter 9 at the Printer Options List. The choices you will see are as follows:
Special Modes choices1. Off (default)2. 2-in-13. Booklet
Enter selection number for Special Modes [1]:
To change the setting, press the number of your choice; pressing Return will take you back to the Printer Options List.
$ 2-in-1 Mode prints two pages on the same side of one sheet of paper. Refer to the diagram below.
$ Use the Booklet with trays 1, 2, 3, or 4, or the Multi-sheet bypass trayto make a multiple page signature booklet on both sides of ledger, legal, 8.5"x11"R, or 5.5"x8.5"R paper. Original images are automatically arranged in booklet format in correct order.
For more information about Special Modes settings, refer to the User's Reference Guide included with your Konica Workgroup Document System.
Konica Print Utility 25

Printing wwith KKP
Printer Options
10. Fold & Stitch
To access your choices for the Fold & Stitch feature, enter 10 at the Printer Options List. The choices that you will see are as follows:
Fold & Stitch choices1. Off
Enter selection number for Fold & Stitch:
The printer that we configured in the sample configuration does not have Fold & Stitch capabilities. Therefore, no options are available in this section.
To change the setting, press the number of your choice; pressing Return will take you back to the Printer Options List.
$ Fold and Stitch Mode, when available, allows you to fold your booklets and bind them with staples. Refer to the diagram below.
For more information about Fold & Stitch settings, refer to the User's Reference Guide included with your Konica Workgroup Document System
Konica Print Utility 26
Fold & Stitch

Printing wwith KKP
Printer Options
11. Stapling
To access your choices for the Stapling feature, enter 11 at the Printer Options List. The choices that you will see are as follows:
Stapling choices1. Off (default)2. Single (Portrait)3. Single (Landscape)4. Double Side (Portrait)5. Double Side (Landscape)6. Double Top (Portrait)7. Double Top (Landscape)
Enter selection number for Stapling [1]:
To change the setting, press the number of your choice; pressing Return will take you back to the Printer Options List.
$ Staple positions are explained in the diagrams below.
2 & 3 Single Portrait, Single Landscape
4 & 5 Double Side Portrait, Double Side Landscape
6 & 7 Double Top Portrait, Double Top Landscape
For more information about Stapling choices, please refer to the User�s Reference Guide included with your Konica Workgroup Document System.
Konica Print Utility 27
Printing wwith KKP
Printer Options
12. Wait Mode
To access your choices for the Wait Mode feature, enter 12 at the Printer Options List. The choices you will see are as follows:
Wait Mode choices1. Off (default)2. Wait3. Wait with Proof
Enter selection number for Wait Mode [1]:
To change the setting, press the number of your choice; pressing Return will take you back to the Printer Options List.
$ Wait mode holds your print job in the queue until you press the check button on the main body of the printer. Wait with Proof mode allows you to view a preliminary copy of your print job before printing your entire run.
For more information about Wait Mode settings, refer to the User's Reference Guide included with your Konica IP Print Controller.
13. Front Cover
To access your choices for the Front Cover feature, enter 13 at the Printer Options List. The choices you will see are as follows:
Front Cover choices1. Off (default)2. Printed3. Blank
Enter selection number for Front Cover [1]:
To change the setting, press the number of your choice; pressing Return will take you back to the Printer Options List.
$ You may choose to insert a blank or printed cover. Please refer to the diagram on page 30 for more details about Front Cover mode.
For more information about Front Cover settings, refer to the User's Reference Guide included with your Konica Workgroup Document System.
Konica Print Utility 28

Printing wwith KKP
Printer Options
14. Front Cover Tray
To access your choices for the Front Cover Tray feature, enter 14 at the Printer Options List. The choices you will see are as follows:
Front Cover Tray choices1. None (default)2. Manual Feed3. Manual Feed (Thick)4. Tray 15. Tray 26. Tray 37. Tray 48. Tray 5
Enter selection number for Front Cover Tray [1]:
To change the setting, press the number of your choice; pressing Return will take you back to the Printer Options List.
$ Use this mode to select the tray from which you would like the cover of your document to print.
For more information about Front Cover Tray settings, refer to the User's Reference Guideincluded with your Konica Workgroup Document System.
15. Back Cover
To access your choices for the Back Cover feature, enter 15 at the Printer Options List. The choices you will see are as follows:
Back Cover choices1. Off (default)2. Printed3. Blank
Enter selection number for Front Cover [1]:
To change the setting, press the number of your choice; pressing Return will take you back to the Printer Options List.
$ You may choose to inset a blank or printed cover. Please refer to the diagram on page 30 for more details about Back Cover mode.
For more information about Back Cover settings, refer to the User's Reference Guide included with your Konica Workgroup Document System.
Konica Print Utility 29

Printing wwith KKP
Printer Options
16. Back Cover Tray
To access your choices for the Back Cover Tray feature, enter 16 at the Printer Options List. The choices you will see are as follows:
Back Cover Tray choices1. None (default)2. Manual Feed3. Manual Feed (Thick)4. Tray 15. Tray 26. Tray 37. Tray 48. Tray 5
Enter selection number for Back Cover Tray [1]:
To change the setting, press the number of your choice; pressing Return will take you back to the Printer Options List.
$ Use this mode to select the tray from which you would like the back cover of your document to print.
For more information about Back Cover Tray settings, refer to the User's Reference Guideincluded with your Konica Workgroup Document System.
Konica Print Utility 30
Cover Options: Front and Back

Printing wwith KKP
Printer Options
17. Output Bin
To access your choices for the Output Bin feature, enter 17 at the Printer Options List. The choices you will see are as follows:
Output Bin choices1. Upper2. Lower (default)
Enter selection number for Output Bin [2]:
To change the setting, press the number of your choice; pressing Return will take you back to the Printer Options List.
$ Use this mode to select which tray you would like your finished documents to be output into.
For more information about Output Bin settings, refer to the User's Reference Guide included with your Konica Workgroup Document System.
18. Tandem Printing
To access your choices for the Tandem Printing feature, enter 18 at the Printer Options List. The choices you will see are as follows:
Tandem Printing choices1. Normal Mode (Auto Select) (default)
Enter selection number for Tandem Printing [1]:
The printer that we configured in the sample configuration does not have tandem printing options. Therefore, no options are available in this section.
To change the setting, press the number of your choice; pressing Return will take you back to the Printer Options List.
$ The optional tandem kit enables a Primary copier to work in tandem with a Secondary copier for the purpose of complet-ing large copying jobs faster. Two units working in tandem can distribute a job in half the time of non-tandem mode.
For more information about Tandem Printing settings, refer to the User's Reference Guide included with your Konica Workgroup Document System.
Konica Print Utility 31

Printing wwith KKP
Printer Options
19. Input Slot
To access your choices for the Input Slot feature, enter 19 at the Printer Options List. The choices you will see are as follows:
InputSlot choices1. Tray 12. Tray 23. Tray 34. Tray 45. Tray 5
Enter selection number for InputSlot:
To change the setting, press the number of your choice; pressing Return will take you back to the Printer Options List.
$ The Input Slot selection mode allows you to choose the tray from which you would like the printer to draw paper for your document. Use this mode if you have selected a specific typeof paper in option 5 (Media Type) and need to direct the print-er to the tray in which that paper type is contained.
For more information about Input Slot settings, refer to the User's Reference Guide includ-ed with your Konica Workgroup Document System.
20. Manual Feed
To access your choices for the Manual Feed feature, enter 20 at the Printer Options List. The choices you will see are as follows:
Manual Feed choices1. True2. False (default)
Enter selection number for Manual Feed [2]:
To change the setting, press the number of your choice; pressing Return will take you back to the Printer Options List.
$ To choose to manually feed special paper into the printer, choose True. To have paper selected from an available tray, choose False (default).
For more information about Manual Feed settings, refer to the User's Reference Guide included with your Konica Workgroup Document System.
Konica Print Utility 32

Printing wwith KKP
Printer Options
21. Page Size
To access your choices for the Page Size feature, enter 21 at the Printer Options List. Thechoices you will see are as follows:
PageSize choices1. Half-letter (5 1/2 x 8 1/2 in)2. Letter (8 1/2 x 11 in) (default)3. Legal (8 1/2 x 14 in)4. Tabloid (11 x 17 in)5. A36. A47. A58. B49. B510. B611. F4
Enter selection number for PageSize [2]:
To change the setting, press the number of your choice; pressing Return will take you back to the Printer Options List.
$ This mode changes the size of paper you are using to print your document.
For more information about Page Size settings, refer to the User's Reference Guide included with your Konica Workgroup Document System.
Konica Print Utility 33
Printing wwith KKP
Printer Options
NOTE: The following selections will only appear when you are printing a text-based document. When printing a PostScript® document, these menu options do not appear.
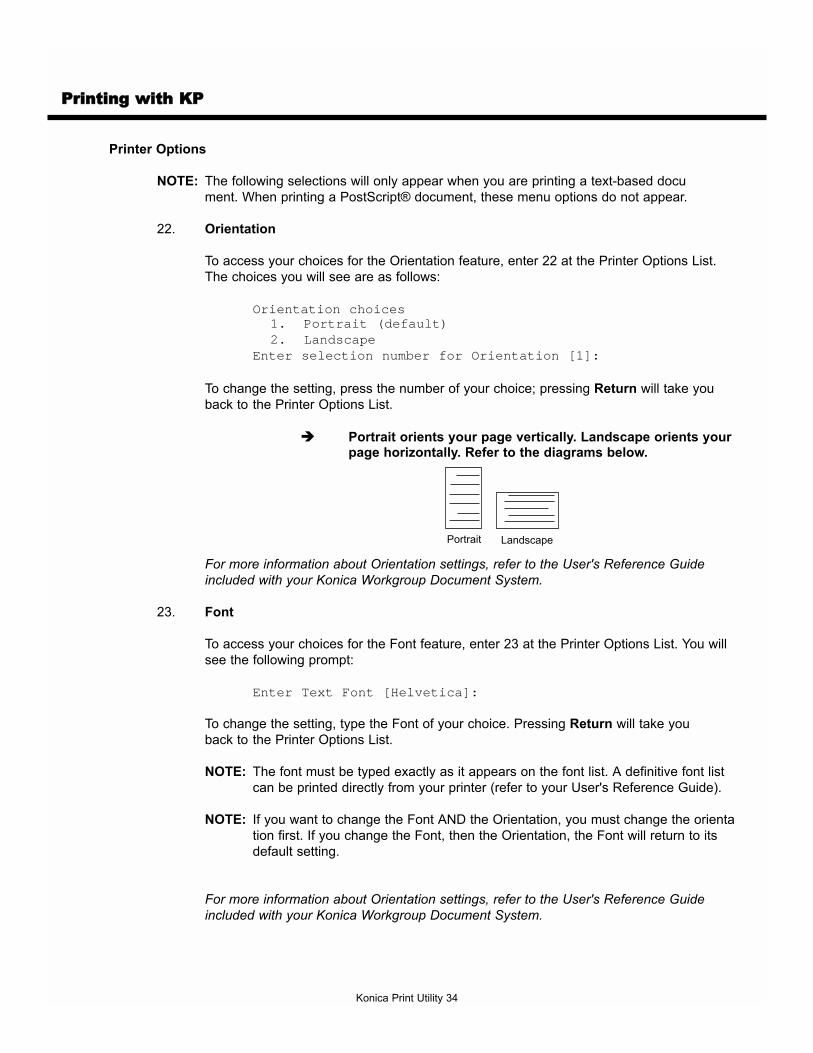
22. Orientation
To access your choices for the Orientation feature, enter 22 at the Printer Options List. The choices you will see are as follows:
Orientation choices1. Portrait (default)2. Landscape
Enter selection number for Orientation [1]:
To change the setting, press the number of your choice; pressing Return will take you back to the Printer Options List.
$ Portrait orients your page vertically. Landscape orients your page horizontally. Refer to the diagrams below.
For more information about Orientation settings, refer to the User's Reference Guide included with your Konica Workgroup Document System.
23. Font
To access your choices for the Font feature, enter 23 at the Printer Options List. You will see the following prompt:
Enter Text Font [Helvetica]:
To change the setting, type the Font of your choice. Pressing Return will take you back to the Printer Options List.
NOTE: The font must be typed exactly as it appears on the font list. A definitive font list can be printed directly from your printer (refer to your User's Reference Guide).
NOTE: If you want to change the Font AND the Orientation, you must change the orientation first. If you change the Font, then the Orientation, the Font will return to its default setting.
For more information about Orientation settings, refer to the User's Reference Guide included with your Konica Workgroup Document System.
Konica Print Utility 34
Portrait Landscape

Printing wwith KKP
Printer Options
24. Font Size
To access your choices for the Font Size feature, enter 24 at the Printer Options List.
Enter Text Font Size [10]:
To change the setting, enter the Font Size of your choice; pressing Return will take you back to the Printer Options List.
$ This function allows you to change the point size of your font.
25. Text Line Width
To access your choices for the Text Line Width feature, enter 25 at the Printer Options List.
Enter Text Line Width [80]:
To change the setting, enter the Text Line Width of your choice; pressing Return will take you back to the Printer Options List.
$ This option allows you to change the amount of characters per line on your printed page.
26. Text Lines Per Page
To access your choices for the Text Lines Per Page feature, enter 26 at the Printer Options List.
Enter Text Lines Per Page [66]:
To change the setting, enter the Text Lines Per Page of your choice; pressing Return will take you back to the Printer Options List.
$ This option allows you to change the amount of lines on your print-ed page.
27. Tab Size
To access your Tab Size selection, enter 27 at the Printer Options List.
Enter Text Tab Size [8]:
$ This function allows you to change the amount of spaces your "tab" key spans on your printed document.
To change the setting, enter the Tab Size of your choice; pressing Return will take you back to the Printer Options List.
Konica Print Utility 35
Chapter SSix
Using KKP AAlias

Using KKP Alias
Description
KP Alias allows you to save printing parameters that you use often as a single command. KP Alias offers a simple way to print documents without manually making changes to each setting in the Printer Options list every time.
Creating a KP Alias
Listed here are the steps you would take to create an alias that will print a weekly-generated report with the following parameters.
# Printed on 8.5"x11" paper# 12 copies# Duplexed along the long edge# Single-stapled# Text is landscaped# Text is printed using Times-Roman font
1. At your initial prompt, type kpalias, rather than kp.
# kpalias
Konica Print Alias 1.5
Copyright (c) 2001 Konica Business Technologies Inc.
2. You are asked which printer you would like to use. Select the printer to which you would like to have your document print.
Printer choices
1. Konica7050
2. k7065
Enter selection number for Printer: 2
Konica Print Utility 37

Using KKP Alias
Creating a KP Alias
3. You are asked to enter an alias name.
This is the name of the file in which KP Alias will save all of the printer options you specify. Therefore, make sure the name you enter reflects the intended pur-pose of the alias. In this example, this report is generated weekly. Although the content of the report changes, the format is always the same. To create an alias for this "weekly report", type weeklyreport at the "Enter alias name" prompt.
Enter alias name: weeklyreport
If you wish to create the alias in a directory other than your current working directory, include the full path (i.e., /path/to/weeklyreport).
4. You are asked how many copies you would like to print. The number you enter here will become part of your print parameters. Each time weeklyreport executes, it will print the number of copies you specify here. Since this report needs to be distributed to 12 individuals, enter 12 at this prompt.
Number of copies to print: 12
Konica Print Utility 38

Using KKP Alias
Creating a KP Alias
5. The Printer Options list is now displayed so you can specifiy the printing options for weeklyreport. Please note that "S to save" has replaced the "P to print" selection on the prompt line.
NOTE: Do not save your parameters until you have made all of your changes.
This report needs to be duplexed along the long edge, so enter 6 to change this parameter.
Printer Options Current Value=============== =============1. Resolution 400dpi2. Print Quality Text3. Edge Smoothing Off4. Print Density Normal5. Media Type Plain Paper6. Duplex Mode Off7. Job Offset On8. Collate Sort9. Special Modes Off
10. Fold & Stitch TrueEnter option number, S to save, or RETURN for more options: 6
Enter 2 to select Long Edge Binding.
Duplex Mode choices1. Off (default)2. Long Edge Binding3. Short Edge Binding
Enter selection number for Duplex Mode [1]: 2
Konica Print Utility 39

Using KKP Alias
Creating a KP Alias
6. This report also needs to be stapled, so press the Return (or Enter) key to see more Printer Options, then choose 11.
Printer Options Current Value=============== =============
11. Stapling Off12. Wait Mode Off13. Front Cover Off14. Front Cover Tray None15. Back Cover Off16. Back Cover Tray None17. Output Bin Lower18. Tandem Printing Normal Mode (Auto Select)19. InputSlot default20. Manual Feed False
Enter option number, S to save, or RETURN for more options: 11
Since the report's orientation will be landscaped, enter 3 at this prompt.
Stapling choices1. Off (default)2. Single (Portrait)3. Single (Landscape)4. Double Side (Portrait)5. Double Side (Landscape)6. Double Top (Portrait)7. Double Top (Landscape)
Enter selection number for Stapling [1]: 3
Konica Print Utility 40

Using KKP Alias
Creating a KP Alias
7. To see the current orientation option, press the Return (or Enter) key to view the last page of the Printer Options List.
Orientation is currently set to "Portrait". Since this report needs to be printed with a land-scape orientation, enter 22 to change the orientation.
Printer Options Current Value=============== =============21. PageSize Letter (8 1/2 x 11 in)22. Orientation Portrait23. Text Font Helvetica24. Text Font Size 1025. Text Line Width 8026. Text Lines Per Page 6627. Text Tab Size 8Enter option number, S to save, or RETURN for more options: 22
The orientation choices are displayed; enter 2 to select Landscape.
Orientation choices1. Portrait (default)2. Landscape
Enter selection number for Orientation [1]: 2
NOTE: Orientation must be changed before Font. Font setting will return to default if Orientation is changed afterwards.
8. To change the font, select 23.
Printer Options Current Value=============== =============21. PageSize Letter (8 1/2 x 11 in)22. Orientation Landscape23. Text Font Helvetica24. Text Font Size 1025. Text Line Width 13226. Text Lines Per Page 5027. Text Tab Size 8Enter option number, S to save, or RETURN for more options: 23
Type the name of the font that is required for the report.
Enter Text Font [Helvetica]: Times-Roman
NOTE: The font must be typed exactly as it appears on the printer's font list. Refer to your User's Reference Guide for information on how to print the font list.
Konica Print Utility 41

Using KKP Alias
Creating a KP Alias
9. Since these are the only parameters required for the report, type S and press the Return(or Enter) key to save these settings.
Printer Options Current Value=============== =============21. PageSize Letter (8 1/2 x 11 in)22. Orientation Landscape23. Text Font Times-Roman24. Text Font Size 1025. Text Line Width 13226. Text Lines Per Page 5027. Text Tab Size 8Enter option number, S to save, or RETURN for more options: S
When you press s to save your parameters, you will be returned to the shell prompt.
Your KP alias has been created and saved, and is now ready for your use.
Konica Print Utility 42

Using KKP Alias
Printing with KP Alias
1. At the shell prompt, type [\path\to\kpaliasname] [path\to\filename].
Using the alias we created in the previous section of this manual, print a weekly report for the week ending September 22, 2002. To do this, type the following command:
# weeklyreport 09-22-02report.txt
In this case, �weeklyreport� is the alias name and �09-22-02report.txt� is the name of the file containing the text that we will print with the parameters contained in the alias.
The KP alias, weeklyreport, will use the parameters established in the previous chapter�s example to create a printed document with its pages duplexed along the long edge, and single-stapled, and its text landscaped, with Times-Roman font.
Konica Print Utility 43

Chapter EEight
Using KKP PPop UUp
Using KKP Pop-UUp ((KPP)
Description
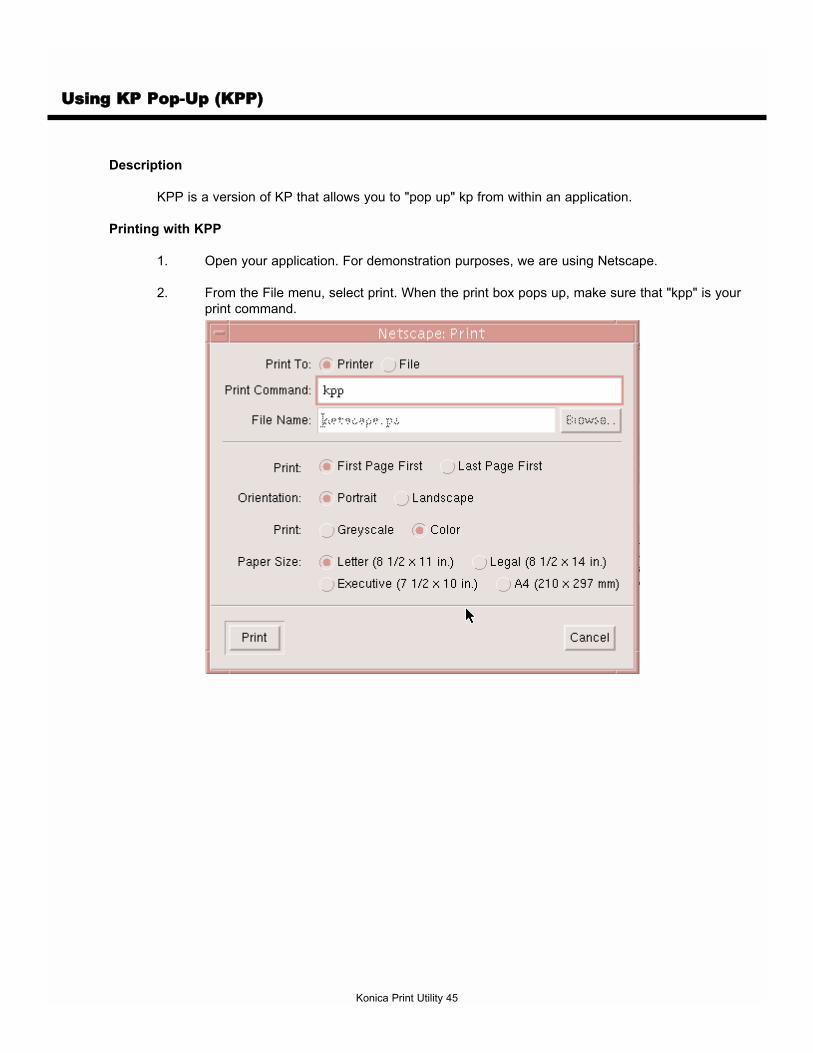
KPP is a version of KP that allows you to "pop up" kp from within an application.
Printing with KPP
1. Open your application. For demonstration purposes, we are using Netscape.
2. From the File menu, select print. When the print box pops up, make sure that "kpp" is your print command.
Konica Print Utility 45

Using KKP Pop-UUp ((KPP)
Printing with KPP
3. Click Print.
4. From this window, you may access all features and options of Konica Print Utility in just the same way you would from the command line. Refer to page 17 (Printing with KP) for detailed instructions on printing with this utility.
Konica Print Utility 46

Appendix
Index

Index
Konica Print Utility A-1
BBack Cover 29Back Cover Tray 30
CCollate 24Completing Configuration 15Configuration Choices 14Configuring KP 11Cover Positions 30Creating a KP Alias 37
DDuplex Mode 22
EEdge Smoothing 21
FFeatures of Konica Print Utility 3Fold & Stitch 26Font 34Font Size 35Front Cover 28Front Cover Tray 29
IInput Slot 32Installing KP 5
JJob Offset 23
KKP Alias 37kp Command 17KP Pop-Up 45kpalias Comman 37kpconfig Command 11, 13
MManual Feed 32Media Type 22
OOrientation 34Output Bin 31
PPage Size 33PostScript Printer Definition (PPD) Files 8Print Density 21Print Quality 20Printer Options List 18Printing with KP 17Printing with KP Alias 43Printing with KPP 45
RReadme File 5, 7Resolution 19
SSample Configuration 12Saving a kpalias 42Selecting PPD Files 13Special Modes 25Stapling 27Supported Platforms 3
TTab Size 35Tandem Printing 31Text Line Width 35Text Lines Per Page 35
WWait Mode 28

MANUAL PART NUMBER:OP-KP-01
Web Site Address:http://www.konicabt.com
CORRESPONDENCE:Correspondence regarding this manual may be mailed to the address shown below.
KONICA BUSINESS TECHNOLOGIES, INC.System Engineering Center
550 Marshall Phelps Rd.Windsor, CT 06095
© 2002 Konica Business Technologies, Inc.