Embed Size (px)
Citation preview

Pa4
X |
New
Fea
ture
s 3.
1
© KORG Italy 2019. All rights reserved PART NUMBER: MAN0010107
AddressKORG ITALY SpAVia Cagiata, 8560027 Osimo (AN)Italy
Webwww.korg.com
MAN0010
107
15E
Pa4
X

2|
Pa4X NEW FEATURES OS VERSION 3.1
Installation and new features
Installing the new operating system
If new, your instrument might already include the new operating system. To check it, please go to the Media > Utility page, and read the version number in the lower area of the display.
To install the new operating system, please read the ‘Pa-Series – Loading the OS’ instructions supplied with the installation file in our web site (www.korg.com).
Note: By loading the new operating system, you also load all the features added by the previous updates.
OS v2.0 needed before installing OS v3.1
Before installing this update, be sure your Pa4X already includes OS v2.0.0 or a later version (you can check it in the Media > Utility page). If it still in-cludes a previous version (v1.x.x), please download and install v2.0.0 before installing this update. You can find v2.0.0 at our web site.
Be sure to save all your custom data
This OS update could overwrite all the Factory and User data. Please follow the ‘Pa-Series – Loading the OS’ instructions, and save all your custom data into a new SET folder before upgrading the operating system.
|3
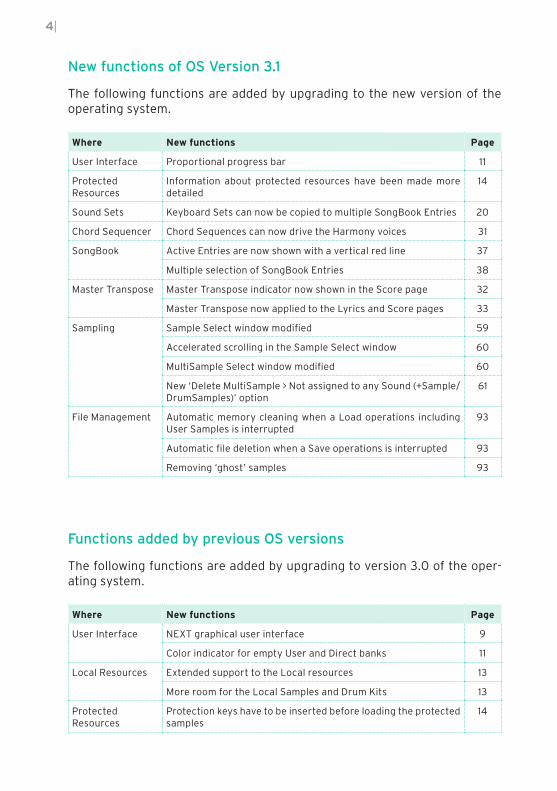
Clean the User Sample memory
If you still have OS v2.x installed, before installing the operating system be sure to clean the User Sample Memory. Failing to do so will prevent the new system from loading. Please follow the ‘Pa-Series – Loading the OS’ instruc-tions to do it.
After loading the new OS, execute a Factory Restore
If you update from OS v2.x, after having loaded the operating system please use the Media > Utility > Factory Restore command to update the musical resources. Musical resources are loaded with the operating system, but must be updated using this command.
Reload the Add-On data
After you install the new operating system and make a Factory Restore to install the updated musical resources, reload the Add-On data (if you have an Add-On installed). Please follow the instructions coming with the sepa-rate package.
Reload your custom data
After the Factory Restore operation, if you have saved your custom data be-fore updating the operating system, reload them by using the Media > Load operations. See the chapter dedicated to the file management in the User’s Manual for more information.
Separate User resources
Together with the operating system, we supply a separate file (Pa4X NEXT Musical Resources.SET) containing the new musical resources installed with the v3/NEXT update. In case you want to mix your own User data and our original content, you are free to load single banks or resources from this file.
Going back to OS v2.2
If needed, you can install OS v2.2 again. First, download and install v2.0.0. Then, download and install v2.2. You can find the older OS versions at our web site.
4|
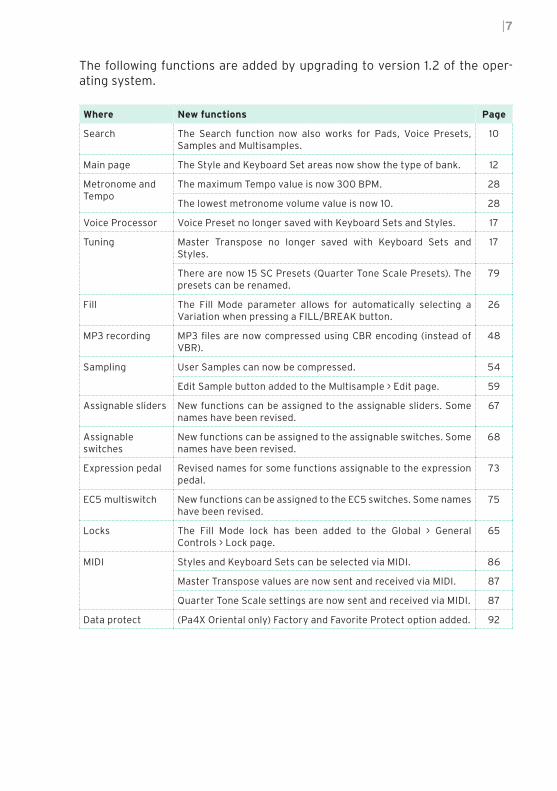
New functions of OS Version 3.1
The following functions are added by upgrading to the new version of the operating system.
Where New functions Page
User Interface Proportional progress bar 11
Protected Resources
Information about protected resources have been made more detailed
14
Sound Sets Keyboard Sets can now be copied to multiple SongBook Entries 20
Chord Sequencer Chord Sequences can now drive the Harmony voices 31
SongBook Active Entries are now shown with a vertical red line 37
Multiple selection of SongBook Entries 38
Master Transpose Master Transpose indicator now shown in the Score page 32
Master Transpose now applied to the Lyrics and Score pages 33
Sampling Sample Select window modified 59
Accelerated scrolling in the Sample Select window 60
MultiSample Select window modified 60
New ‘Delete MultiSample > Not assigned to any Sound (+Sample/DrumSamples)’ option
61
File Management Automatic memory cleaning when a Load operations including User Samples is interrupted
93
Automatic file deletion when a Save operations is interrupted 93
Removing ‘ghost’ samples 93
Functions added by previous OS versions
The following functions are added by upgrading to version 3.0 of the oper-ating system.
Where New functions Page
User Interface NEXT graphical user interface 9
Color indicator for empty User and Direct banks 11
Local Resources Extended support to the Local resources 13
More room for the Local Samples and Drum Kits 13
Protected Resources
Protection keys have to be inserted before loading the protected samples
14

|5
Where New functions Page
Sound Sets Added Solo status icon 17
Added User Sounds and Drum Kit locations 17
Copying Keyboard Sets between Styles and/or SongBook Entries 18
Keyboard Sets Lock added 22
Drawbars Revised Digital Drawbars 23
Song Play Added total length/time and position indicator 32
Record Consolidated Record/Edit menu to access any Record mode 42
Revised Quick Record page 46
Sound Edit Modified Mono Legato 49
Portamento now featuring Rate and Time parameters 50
Sampling Direct reading, for increased User Sample memory 53
Compression, short loops, low volume 55
Sample Info page added 56
Memory Info page added 56
‘Play from preload buffer’ option added to the Write Sample di-alog
58
Clock Low battery warning at startup 65
MIDI Added MIDI Presets to connect external devices 83
Remote control of the Synchro Start/Stop commands 86
Audio Out Different MAXX EQ curves can now be selected 89
Shortcuts New shortcut to quickly select Samples and Multisamples 96
Musical Resources New Styles, Keyboard Sets, Sounds 98
The following functions are added by upgrading to version 2.2 of the oper-ating system.
Where New functions Page
Sampling Increased maximum number of User Samples 53
The following functions are added by upgrading to version 2.1 of the operat-ing system.
Where New functions Page
Controllers Added compatibility with the VOX V860 volume pedal 66
Curve presets for the volume/expression pedal 66

6|
The following functions are added by upgrading to version 2.0 of the oper-ating system.
Where New functions Page
User Interface Some page names have been changed 10
Parameter and command names changed 10
Split Point Split Point saved with each Keyboard Set 26
Style Controls Style to Kbd Set programming 27
Chord Sequencer Revised Record and Play procedures 29
SongBook Selected song indicator in a Set List blinking 40
Direct SongBook 37
Saving different Styles or Songs 41
Style Record Added pages to the Style Record mode 43
New ways of listening to the recorded Style 43
Empty Chord Variations shown by an asterisk 44
Checking the available Chord Variations 44
Style Creator Bot importing Chord Sequences 45
Song Record Backing Sequence recording the KAOSS effects 47
Converting MIDI Song’s notes to chords 47
Audio In Accurate microphone input metering 62
Effects Noise Gate added to some guitar effects 63
KAOSS FX The KAOSS FX feature has been added 64
Song Preferences Saving the Song Preferences is now a page menu command 65
MIDI The USB HOST port can be used to connect other musical instru-ments to be used as controllers
83
Fixed Note Off Velocity on received notes 87
Video Out Video Mode saved in the Global 88
File management Direct folder selection procedure revised 90
Renaming the Favorite/User/Direct banks 91
Importing from older instruments procedure revised 92
Musical Resources New Styles, Keyboard Sets, Sounds, Drum Kits, Multisamples 100
|7
The following functions are added by upgrading to version 1.2 of the oper-ating system.
Where New functions Page
Search The Search function now also works for Pads, Voice Presets, Samples and Multisamples.
10
Main page The Style and Keyboard Set areas now show the type of bank. 12
Metronome and Tempo
The maximum Tempo value is now 300 BPM. 28
The lowest metronome volume value is now 10. 28
Voice Processor Voice Preset no longer saved with Keyboard Sets and Styles. 17
Tuning Master Transpose no longer saved with Keyboard Sets and Styles.
17
There are now 15 SC Presets (Quarter Tone Scale Presets). The presets can be renamed.
79
Fill The Fill Mode parameter allows for automatically selecting a Variation when pressing a FILL/BREAK button.
26
MP3 recording MP3 files are now compressed using CBR encoding (instead of VBR).
48
Sampling User Samples can now be compressed. 54
Edit Sample button added to the Multisample > Edit page. 59
Assignable sliders New functions can be assigned to the assignable sliders. Some names have been revised.
67
Assignable switches
New functions can be assigned to the assignable switches. Some names have been revised.
68
Expression pedal Revised names for some functions assignable to the expression pedal.
73
EC5 multiswitch New functions can be assigned to the EC5 switches. Some names have been revised.
75
Locks The Fill Mode lock has been added to the Global > General Controls > Lock page.
65
MIDI Styles and Keyboard Sets can be selected via MIDI. 86
Master Transpose values are now sent and received via MIDI. 87
Quarter Tone Scale settings are now sent and received via MIDI. 87
Data protect (Pa4X Oriental only) Factory and Favorite Protect option added. 92

8|
The following functions are added by upgrading to version 1.1 of the operat-ing system.
Where New functions Page
Sequencer MIDI Songs can be imported without initializing the current set-tings.
48
Sound / Drum Kit editing
When editing a Sound or Drum Kit, volume levels are expressed in decibels (dB), with a resolution of 0.1 dB.
51
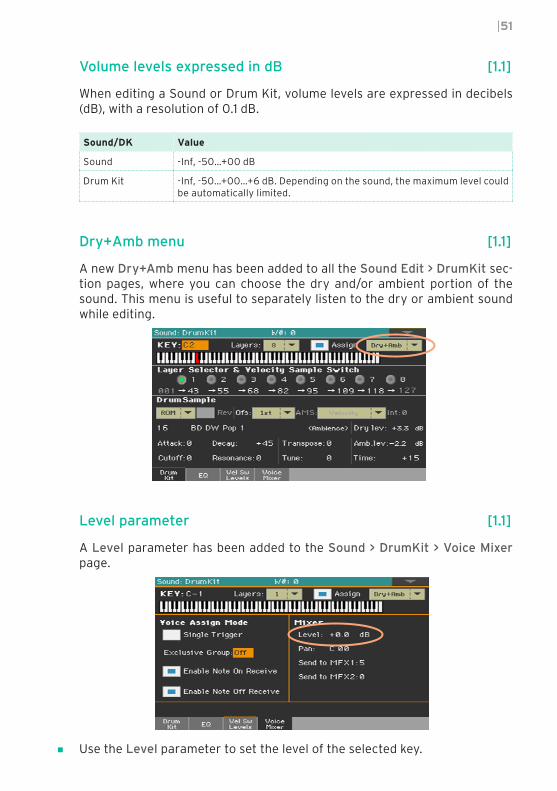
A new Dry+Amb menu has been added to all the Sound Edit > DrumKit section pages.
51
A Level parameter has been added to the Sound > DrumKit > Voice Mixer page.
51
A new Velocity Switch Levels page has been added to the Drum Kit Edit mode, to help you mix the Drum Kit layers.
52
Effects The Early Reflections Hi Dens FX can now only be assigned to the MFX A2/3 or B2 effect processors.
63
Locks The Slider Mode lock has been added to the Global > General Controls > Lock page.
65
Style Element Scale
The Style Element’s Scale can now only be a User scale. 80
The Retune Style / Chord Follow function has been added, to let you automatically or manually retune the Style Element’s Scale.
80
Date and Time Date and time are now assigned to each single musical resource (a single Sound, a single Style…).
90
Other New shortcuts have been added. 96
|9
User Interface
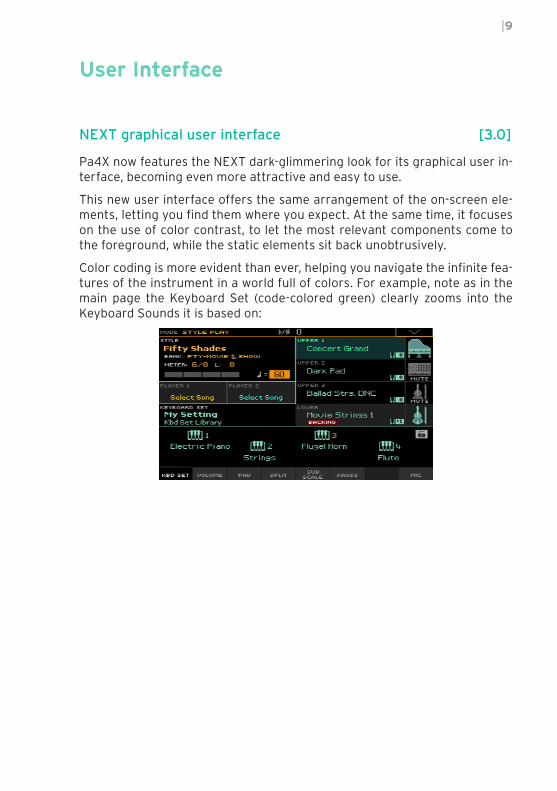
NEXT graphical user interface [3.0]
Pa4X now features the NEXT dark-glimmering look for its graphical user in-terface, becoming even more attractive and easy to use.
This new user interface offers the same arrangement of the on-screen ele-ments, letting you find them where you expect. At the same time, it focuses on the use of color contrast, to let the most relevant components come to the foreground, while the static elements sit back unobtrusively.
Color coding is more evident than ever, helping you navigate the infinite fea-tures of the instrument in a world full of colors. For example, note as in the main page the Keyboard Set (code-colored green) clearly zooms into the Keyboard Sounds it is based on:
10|
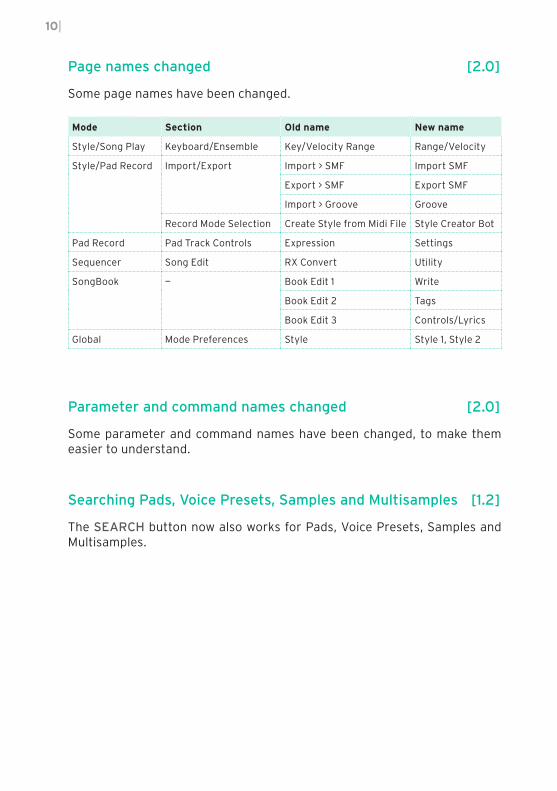
Page names changed [2.0]
Some page names have been changed.
Mode Section Old name New name
Style/Song Play Keyboard/Ensemble Key/Velocity Range Range/Velocity
Style/Pad Record Import/Export Import > SMF Import SMF
Export > SMF Export SMF
Import > Groove Groove
Record Mode Selection Create Style from Midi File Style Creator Bot
Pad Record Pad Track Controls Expression Settings
Sequencer Song Edit RX Convert Utility
SongBook — Book Edit 1 Write
Book Edit 2 Tags
Book Edit 3 Controls/Lyrics
Global Mode Preferences Style Style 1, Style 2
Parameter and command names changed [2.0]
Some parameter and command names have been changed, to make them easier to understand.
Searching Pads, Voice Presets, Samples and Multisamples [1.2]
The SEARCH button now also works for Pads, Voice Presets, Samples and Multisamples.

|11
Color indicator for empty User and Direct banks [3.0]
When Favorite/User and Direct banks or pages are empty, the corresponding side tabs or tabs in the Select windows are dimmed.
Bank containing at least some data
Bank containing no data (dimmed)
Pages containing no data (dimmed)
Pages containing at least some data
Proportional progress bar [3.1]
When an operation requires some time to complete, a progress bar now shows the approximate completion time. Please note that this is not an exact indication, but just an approximate forecast.
12|
Main page
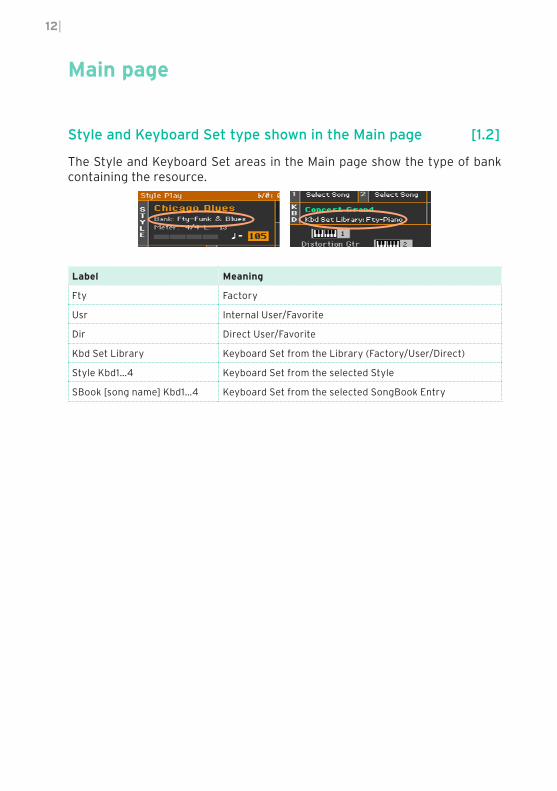
Style and Keyboard Set type shown in the Main page [1.2]
The Style and Keyboard Set areas in the Main page show the type of bank containing the resource.
Label Meaning
Fty Factory
Usr Internal User/Favorite
Dir Direct User/Favorite
Kbd Set Library Keyboard Set from the Library (Factory/User/Direct)
Style Kbd1…4 Keyboard Set from the selected Style
SBook [song name] Kbd1…4 Keyboard Set from the selected SongBook Entry

|13
Local Resources
Extended support to the Local resources [3.0]
Local banks are now available for all types of musical resources.
More room for the Local Samples [3.0]
Local Samples and Drum Kits gain more room, so your KORG Distributor will be able to offer you an increased content for any Localized Add-Ons.
14|
Protected Resources
Protection keys have to be inserted before loading or using the protected samples [3.0/3.1]
You may have purchased third-party Sounds, coming on a USB memory stick or a microSD card. This storage device also works as a protection key for the data.
Loading the protected samples
Before loading the protected data, the protection key has to be connected to the instrument, or inserted in the dedicated slot.
1 Before loading the protected Samples, or a group of data including protected Samples, insert the original protection key in one of the USB HOST ports or the microSD slot.
2 If the protection key is an USB memory stick, leave it inserted for at least 15 seconds. Then, you are free to leave it connected, or remove it.
3 If you have more than a single protection key, insert the other protection keys one after the other, as seen above. Since Pa4X has two USB HOST ports and a microSD slot, you can connect three protection keys at the same time.
4 Load the protected data.
If you have started loading without the protection key inserted…
You may have loaded some data, before an error message has warned you that you are trying to load protected data without the protection key inserted. In this case, the instrument’s memory may contain incomplete data, that can prevent the instrument from playing as expected.
If this happens, insert the protection key(s) as seen above, then do a Media >Load All operation to overwrite all the incomplete data already loaded.
Using the protected samples after loading
If you want to use protected data, the protection key has to be connected to the instrument, or inserted in the dedicated slot, when turning the instru-ment on.

|15
When turning the instrument on without a protection key inserted, you are asked to insert it and touch Retry.
If you forget to insert the protection key when turning the instrument on, and you want to use protected data, please insert the key and restart the instrument.
If the protection key is an USB memory stick, leave it inserted for at least 15 seconds after the instrument has completed startup. Then, you are free to leave it connected, or remove it.
If you don’t have the protection key with you…
In case you don’t have the protection key with you, you will not be able to choose protected Sounds, Styles, and/or other protected data.
If you are trying to load data at startup, and you don’t have the protection key with you, just touch Cancel to confirm you want to proceed when the warning message appears; protected data will not play, but you will be able to load and use any other data.
While in Sampling mode, protected Samples will be shown dimmed, and can-not be selected for editing. A Prot(ected) flag will appear next to their name in the Sample Select window. Waveforms will not be seen.
Protected sample
Mixing ordinary and protected data
You can mix ordinary and protected Samples. For example, you can build Sounds, Multisamples or Drum Kits making use of both internal Samples, and protected Samples originally contained in one or more protection keys. If the protection key is missing, only non-protected Samples will play.
Managing protected data
Protected data can be managed as any other data; only, be sure to keep the original protection key safe.
16|
Protected Samples cannot be exported. When exporting mixed data, a mes-sage will warn you that protected Samples will not be exported.
While in Sampling mode, you can delete protected Samples, to make room for other Samples. In case you want to save the resulting SET folder over the original SET folder, be sure you have a backup copy of your original protect-ed data.
|17
Sound Sets
Added Solo status icon [3.0]
When a Sound is soloed, the Solo icon ( ) will flash in the mixer channel.
Added User Sounds and Drum Kit locations [3.0]
More User Sound and Drum Kit locations have been added. Now you can have up to 768 User Sounds and 384 User Drum Kits.
Voice Preset no longer saved with Keyboard Sets and Styles [1.2]
The selected Voice Preset is no longer saved with the Keyboard Sets and Styles. This means that choosing a different Keyboard Set or Style will no longer change the Voice Preset.
If you want to save the selected Voice Preset together with the Keyboard Sets, Styles or Songs, you can create a new SongBook Entry based on them. Choose the Voice Preset, together with the desired Keyboard Sets, Style or Song, then keep the SONGBOOK button pressed for about one second to create a new SongBook Entry.
Master Transpose no longer saved with Keyboard Sets and Styles [1.2]
The Master Transpose value (set with the TRANSPOSE buttons on the con-trol panel) is no longer saved with the Keyboard Sets and Styles. This means that choosing a different Keyboard Set or Style will no longer change the Master Transpose.
If you want to save the Master Transpose value together with the Keyboard Sets, Styles or Songs, you can create a new SongBook Entry based on them. Choose them, then keep the SONGBOOK button pressed for about one sec-ond to create a new SongBook Entry.
To let the SongBook Entry change the Master Transpose value when select-ed, be sure the Master Transpose lock is deselected in the Global > General Controls > Lock > Tuning page.

18|
Copying Keyboard Sets between Styles and/or SongBook Entries [3.0]
You can copy Keyboard Sets between Styles and SongBook Entries.
Select the source
1 Select the Style or SongBook Entry from which to copy the Keyboard Set(s).
Access the Copy dialog
2 While in the main page of the Style Play or Song Play mode, or in any page of the SongBook, choose the source Style or SongBook Entry from which to copy the Keyboard Set(s).
3 Choose the Copy Keyboard Set command from the page menu.
The Copy Keyboard Set dialog will appear.
Copy all, or only a single Keyboard Set
4 Decide if you want to copy all the Keyboard Sets contained in the source Style or SongBook Entry, or just one of them.
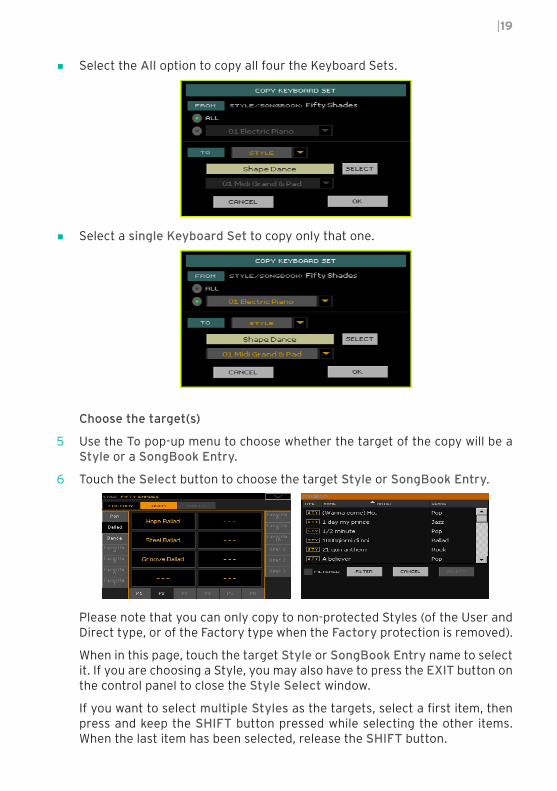
|19
▪ Select the All option to copy all four the Keyboard Sets.
▪ Select a single Keyboard Set to copy only that one.
Choose the target(s)
5 Use the To pop-up menu to choose whether the target of the copy will be a Style or a SongBook Entry.
6 Touch the Select button to choose the target Style or SongBook Entry.
Please note that you can only copy to non-protected Styles (of the User and Direct type, or of the Factory type when the Factory protection is removed).
When in this page, touch the target Style or SongBook Entry name to select it. If you are choosing a Style, you may also have to press the EXIT button on the control panel to close the Style Select window.
If you want to select multiple Styles as the targets, select a first item, then press and keep the SHIFT button pressed while selecting the other items. When the last item has been selected, release the SHIFT button.

20|
If you prefer to cancel the operation and close the Select window, don’t select anything, and either press the EXIT button on the control panel, or touch the Cancel button on the display.
Confirm the copy
7 When back to the Copy Keyboard Set dialog, touch the OK button to confirm the copy.
Keyboard Sets can now be copied to multiple SongBook Entries [3.1]
When copying Keyboard Sets from a Style or SongBook Entry to a SongBook Entry, you can now select multiple Entries as the target.
The target page now includes a Select Mode button.
Select Mode
When selecting multiple items by keeping the SHIFT button pressed, you can select either a set of adjacent items, or separate items. To decide how selection will work, use the Select Mode button that appears on the right of the page command buttons.
Select Mode Meaning
Choose this option to select the target Entries consecutively (i.e., in a row).
Choose this option to select the target Entries separately (i.e., with other Entries in the middle).
Select multiple Entries separately
1 Touch the Select Mode button to choose the SHIFT function.
2 Select the first Entry to be selected.

|21
3 Press and keep the SHIFT button pressed.
4 Select a second Entry to be selected.
5 While keeping the SHIFT button pressed, continue selecting the other Entries to be selected.
6 Release the SHIFT button.
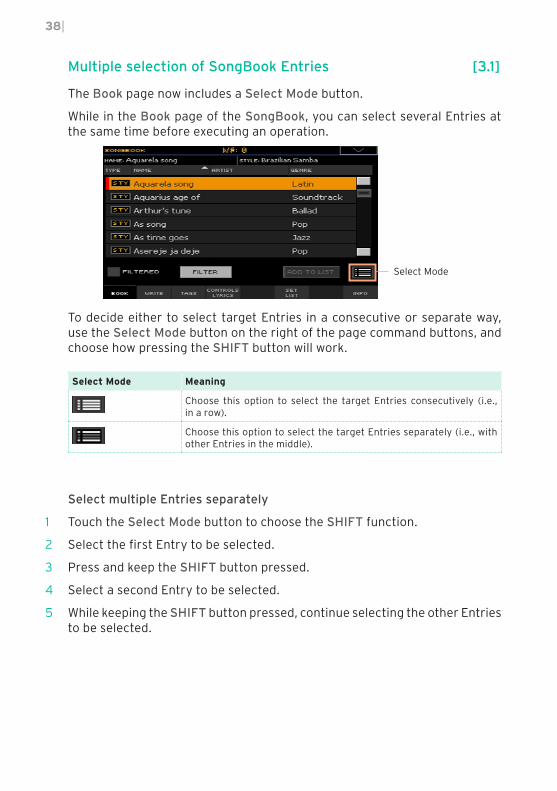
Select multiple Entries consecutively
1 Touch the Select Mode button to choose the SHIFT function.
2 Select the first Entry to be selected.
3 Press and keep the SHIFT button pressed.
4 Select the last Entry to be selected.
5 Release the SHIFT button.
Deselect the Entries
▪ To deselect one or more Entries, without deselecting everything, keep SHIFT pressed and touch the item to be deselected.
▪ To deselect everything, select any other Entry. All selected Entries will be deselected.

22|
Keyboard Sets Lock added [3.0]
A Keyboard Set 1-4 lock has been added to the Global > General Controls > Lock Control page.
When this lock is closed, the four currently selected Keyboard Sets are pre-served, when choosing a different Style or SongBook Entry.
With this lock open, selecting a Style or SongBook Entry will select the four Keyboard Sets they contain.

|23
Revised Digital Drawbars [3.0]
The Digital Drawbars pages has been revised, to feel more like the clas-sic organ console and being easier to use. The sound quality of the Digital Drawbars has also been refined to be even more realistic.
As in the previous version, access the Digital Drawbars page by choosing a DRAWBARS sound from the Organ group.
The Rotary/Percussion page
The Percussion/Rotary page has been renamed as Rotary/Percussion, and deeply redesigned. The parameters can now be controlled via big switches and sliders.
▪ The Foot parameter has been renamed as Harmonic, and its parameters are now the Second or Third harmonic.
▪ The Length parameter has been renamed as Decay, and its parameters are now Fast or Slow.
The Tone/Noise page
The Tone/Noise page has the same parameters as in the previous version, but has been deeply redesigned. The parameters can now be controlled via big switches and knobs.

24|
The Rotary FX Set page
A new Rotary FX Set page has been added. This page lets you separately program the rotor and horn’s volume, effects, miking and cabinet simulation.
Please note the individual parameters can only be accessed if one of the insert effects (IFX) or master effects MFX has the Rotary SpeakerOD effect assigned. In case there isn’t some or all of the parameters in this page might not be accessible.
Program the Overdrive parameters
The overdrive simulator recreates the amp distortion, increasing realism.
Overdrive Meaning Value
Overdrive On/Off Use this switch to turn overdrive on or off. On, Off
Gain Determines the degree of distortion. 0…100
Tone Sets the tonal quality of the overdrive. 0…15
Level Sets the overdrive output level. 0…100
Turn the Cabinet on/off
You can use the Cabinet switch to turn the cabinet simulator on or off. Simulating the cabinet resonance would greatly increase realism, but you can decide to turn it off for greater flexibility.
|25
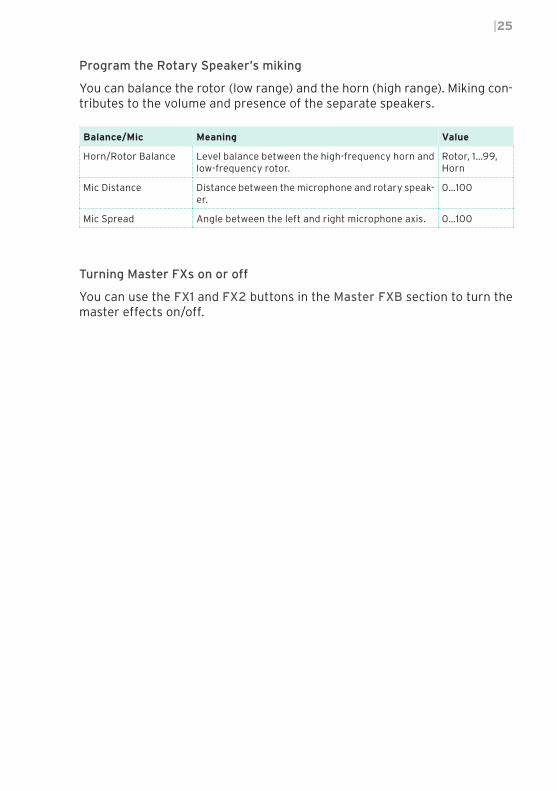
Program the Rotary Speaker’s miking
You can balance the rotor (low range) and the horn (high range). Miking con-tributes to the volume and presence of the separate speakers.
Balance/Mic Meaning Value
Horn/Rotor Balance Level balance between the high-frequency horn and low-frequency rotor.
Rotor, 1…99, Horn
Mic Distance Distance between the microphone and rotary speak-er.
0…100
Mic Spread Angle between the left and right microphone axis. 0…100
Turning Master FXs on or off
You can use the FX1 and FX2 buttons in the Master FXB section to turn the master effects on/off.

26|
Style Play
Split Point saved with each Keyboard Set [2.0]
The local split point can be memorized into a Keyboard Set. Each Keyboard Set associated to a Style or SongBook Entry can have a different split point (instead of a single one).
Fill Mode [1.2]
The Fill Mode parameters have been added to the Style Play > Style Controls > Drum/Fill page:
The Fill Mode parameters allow for automatically choosing a Variation at the end of each Fill, after having pressed one of the FILL or BREAK buttons. These settings can be saved to the Style Settings or a SongBook Entry, so you can have a different Fill Mode configuration for each Style or SongBook Entry.
Fill Mode Meaning
Off The same Variation, playing before selecting a Fill, will be selected again.
V1&V2 … V3&V4 The specified Variations will be alternatively selected, when one of them is se-lected. For example, with the V1&V2 option, if Variation 1 is selected, Variation 1 and Variation 2 will be alternatively selected after the end of the Fill.
Var.Up/Var.Down The next higher/lower numbered Variation is selected, in cycle. After Variation 4, an Up command will select Variation 1. After Variation 1, a Down command will select Variation 4.
Var.Inc/Var.Dec The next higher/lower numbered Variation is selected. When Variation 4 is reached, an Inc command will select Variation 4 again. When Variation 1 is reached, a Dec command will select Variation 1 again.
To Var.1 … To Var.4 Fill to Variation (->1, ->2, ->3, ->4) automatically selects one of the four available Style Variations at the end of the fill.
|27
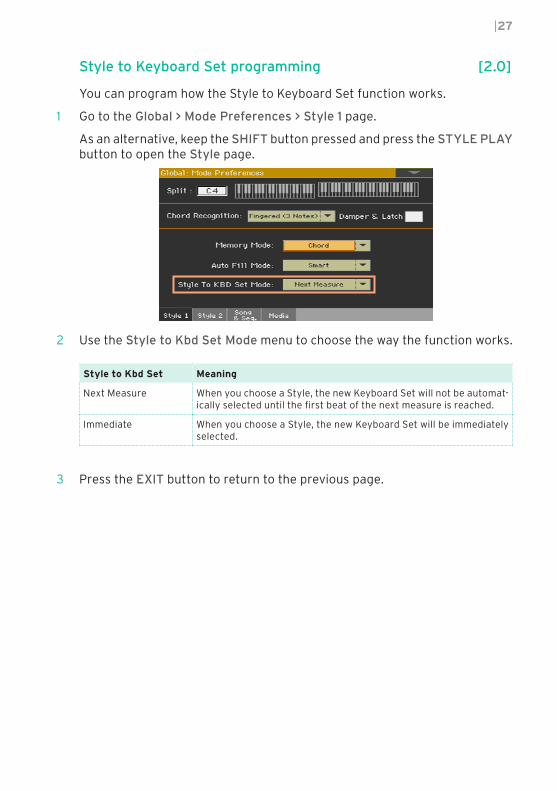
Style to Keyboard Set programming [2.0]
You can program how the Style to Keyboard Set function works.
1 Go to the Global > Mode Preferences > Style 1 page.
As an alternative, keep the SHIFT button pressed and press the STYLE PLAY button to open the Style page.
2 Use the Style to Kbd Set Mode menu to choose the way the function works.
Style to Kbd Set Meaning
Next Measure When you choose a Style, the new Keyboard Set will not be automat-ically selected until the first beat of the next measure is reached.
Immediate When you choose a Style, the new Keyboard Set will be immediately selected.
3 Press the EXIT button to return to the previous page.
28|
Tempo and Metronome
Maximum Tempo value [1.2]
The maximum Tempo value is now 300 BPM.
Lowest Metronome Volume [1.2]
The lowest metronome volume value is now 10.

|29
Chord Sequencer
Revised Chord Sequencer Record and Play procedures [2.0]
Chord Sequencer playback and recording has been improved. It is now much easier using it, and a small symbol next to the name of the Style ( ) now shows if a sequence is currently available.
Recording a Chord Sequence while the Accompaniment is playing
(This procedure remains mostly the same as in the previous OS).
You can start recording while the Arranger is playing.
1 Press the START/STOP button to start the automatic accompaniment.
2 Press the CHORD SEQUENCER > RECORD ( ) buttons to start recording.
While in record, you will see the red Chord Record icon flashing in the dis-play.
3 At the beginning of the next measure, start recording your Chord Sequence.
4 When the Chord Sequence is done, press the CHORD SEQUENCER > RECORD ( ) buttons together again to stop recording.
The red Chord Record icon will disappear from the display.
The icon will appear next to the name of the Style, to show a Chord Sequence is available.
The Chord Sequence will remain in memory until you record a new Chord Sequence, choose a different Style or SongBook Entry, or turn the instru-ment off. If the sequence is locked, it will not change when choosing a differ-ent Style or SongBook Entry.
30|
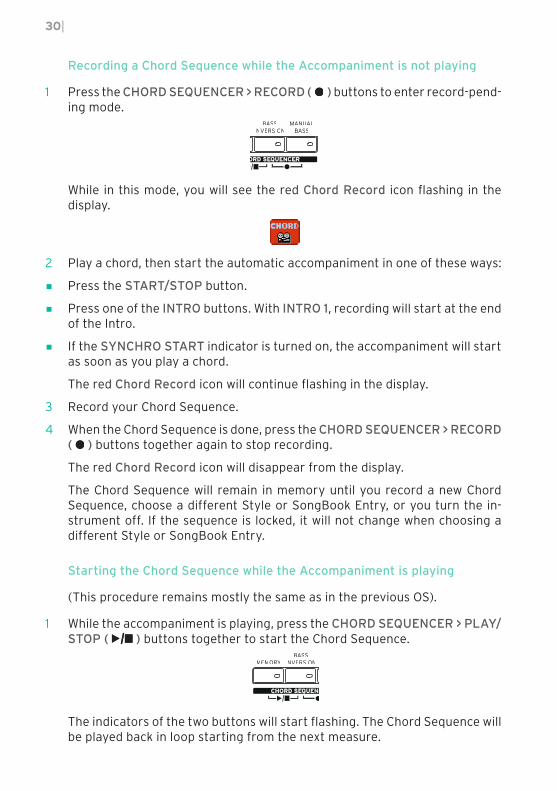
Recording a Chord Sequence while the Accompaniment is not playing
1 Press the CHORD SEQUENCER > RECORD ( ) buttons to enter record-pend-ing mode.
While in this mode, you will see the red Chord Record icon flashing in the display.
2 Play a chord, then start the automatic accompaniment in one of these ways:
▪ Press the START/STOP button.
▪ Press one of the INTRO buttons. With INTRO 1, recording will start at the end of the Intro.
▪ If the SYNCHRO START indicator is turned on, the accompaniment will start as soon as you play a chord.
The red Chord Record icon will continue flashing in the display.
3 Record your Chord Sequence.
4 When the Chord Sequence is done, press the CHORD SEQUENCER > RECORD ( ) buttons together again to stop recording.
The red Chord Record icon will disappear from the display.
The Chord Sequence will remain in memory until you record a new Chord Sequence, choose a different Style or SongBook Entry, or you turn the in-strument off. If the sequence is locked, it will not change when choosing a different Style or SongBook Entry.
Starting the Chord Sequence while the Accompaniment is playing
(This procedure remains mostly the same as in the previous OS).
1 While the accompaniment is playing, press the CHORD SEQUENCER > PLAY/STOP ( ) buttons together to start the Chord Sequence.
The indicators of the two buttons will start flashing. The Chord Sequence will be played back in loop starting from the next measure.
|31
2 Play your solo part, while the Chord Sequence plays the chords for you.
During Chord Sequence looping, you can freely select any Fill or Variation, as if you where playing chords with your hands.
3 Press the CHORD SEQUENCER > PLAY/STOP ( ) buttons together again to stop the Chord Sequence. The button indicators will stop flashing.
If you stop the automatic accompaniment, the Chord Sequence is also stopped.
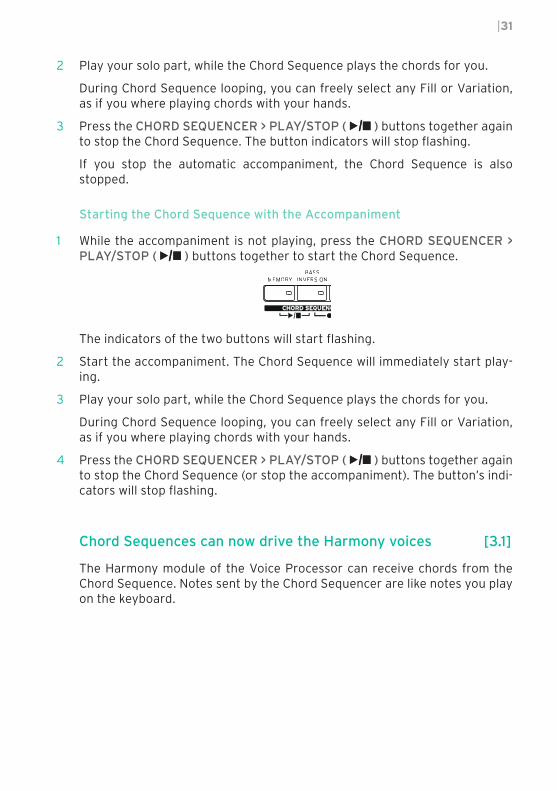
Starting the Chord Sequence with the Accompaniment
1 While the accompaniment is not playing, press the CHORD SEQUENCER > PLAY/STOP ( ) buttons together to start the Chord Sequence.
The indicators of the two buttons will start flashing.
2 Start the accompaniment. The Chord Sequence will immediately start play-ing.
3 Play your solo part, while the Chord Sequence plays the chords for you.
During Chord Sequence looping, you can freely select any Fill or Variation, as if you where playing chords with your hands.
4 Press the CHORD SEQUENCER > PLAY/STOP ( ) buttons together again to stop the Chord Sequence (or stop the accompaniment). The button’s indi-cators will stop flashing.
Chord Sequences can now drive the Harmony voices [3.1]
The Harmony module of the Voice Processor can receive chords from the Chord Sequence. Notes sent by the Chord Sequencer are like notes you play on the keyboard.
32|
Song Play
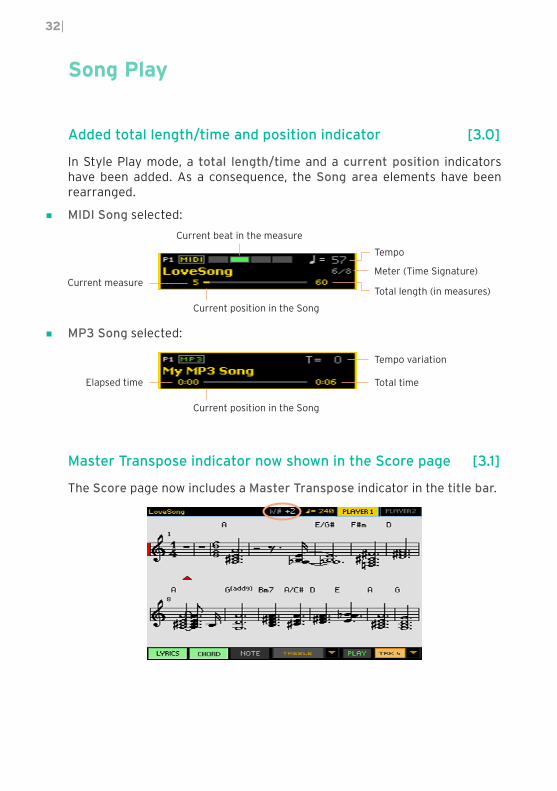
Added total length/time and position indicator [3.0]
In Style Play mode, a total length/time and a current position indicators have been added. As a consequence, the Song area elements have been rearranged.
▪ MIDI Song selected:
Current measure
Current position in the Song
Current beat in the measure
Total length (in measures)
Tempo
Meter (Time Signature)
▪ MP3 Song selected:
Elapsed time
Current position in the Song
Total time
Tempo variation
Master Transpose indicator now shown in the Score page [3.1]
The Score page now includes a Master Transpose indicator in the title bar.

|33
Master Transpose now applied to the Lyrics and Score pages [3.1]
The Master Transpose value can be applied to the Lyrics and Score pages. You can combine the Master Transpose options in the following three ways.
Transpose options Score and Chord symbols
A Keyboard: Immediate/Next Measure
Player: On
Not transposed. Read by the keyboard player.
B Keyboard: Off
Player: On
Transposed. Read by the keyboard player and a musician partner.
C Keyboard: Immediate/Next Measure
Player: Off
Transposed. Read by the keyboard player.
When no transposition is applied, the score and chord symbols always ap-pear as in the original file.
Score and chord symbols can be read in the internal display and/or an exter-nal monitor. They can be useful for you – the keyboard player – and/or your musician partner (a guitar player, a sax player…).
34|
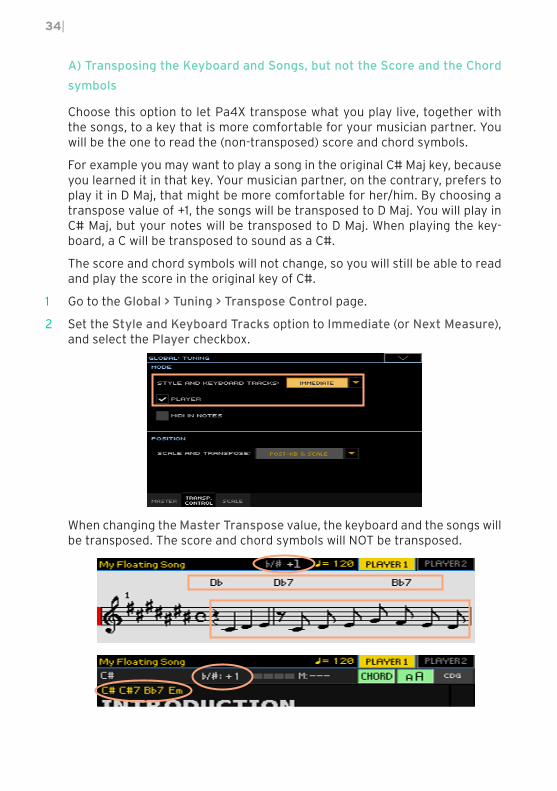
A) Transposing the Keyboard and Songs, but not the Score and the Chord
symbols
Choose this option to let Pa4X transpose what you play live, together with the songs, to a key that is more comfortable for your musician partner. You will be the one to read the (non-transposed) score and chord symbols.
For example you may want to play a song in the original C# Maj key, because you learned it in that key. Your musician partner, on the contrary, prefers to play it in D Maj, that might be more comfortable for her/him. By choosing a transpose value of +1, the songs will be transposed to D Maj. You will play in C# Maj, but your notes will be transposed to D Maj. When playing the key-board, a C will be transposed to sound as a C#.
The score and chord symbols will not change, so you will still be able to read and play the score in the original key of C#.
1 Go to the Global > Tuning > Transpose Control page.
2 Set the Style and Keyboard Tracks option to Immediate (or Next Measure), and select the Player checkbox.
When changing the Master Transpose value, the keyboard and the songs will be transposed. The score and chord symbols will NOT be transposed.

|35
B) Transposing the Songs, Score and Chord symbols, but not the Keyboard
Choose this option when you want to let Pa4X transpose the songs to a key that is more comfortable for your musician partner. You will play in the trans-posed key. You and your musician partner will be able to read the (trans-posed) score and chord symbols.
For example, both you and your musician partner want to play a song, orig-inally in the key of C# Maj, in D Maj, because it is easier for both of you. By choosing a transpose value of +1, the songs will be transposed to D Maj. The keyboard will not be transposed, so you will play right in D Maj. When playing the keyboard, a C will still be a C.
The score and chords symbols will change, so you will be able to read and play the score in the transposed key of D Maj.
1 Go to the Global > Tuning > Transpose Control page.
2 Set the Style and Keyboard Tracks option to Off, and select the Player checkbox.
When changing the Master Transpose value, the keyboard will NOT be trans-posed, while the songs, score and chord symbols will be transposed.
36|
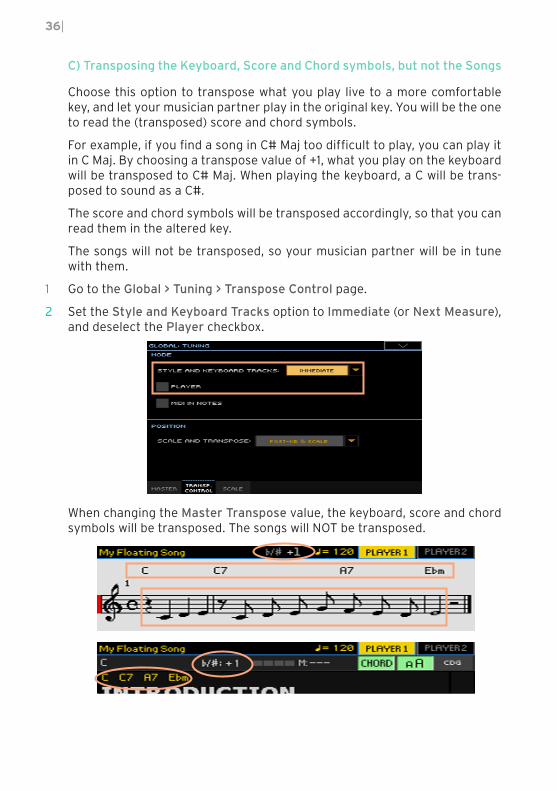
C) Transposing the Keyboard, Score and Chord symbols, but not the Songs
Choose this option to transpose what you play live to a more comfortable key, and let your musician partner play in the original key. You will be the one to read the (transposed) score and chord symbols.
For example, if you find a song in C# Maj too difficult to play, you can play it in C Maj. By choosing a transpose value of +1, what you play on the keyboard will be transposed to C# Maj. When playing the keyboard, a C will be trans-posed to sound as a C#.
The score and chord symbols will be transposed accordingly, so that you can read them in the altered key.
The songs will not be transposed, so your musician partner will be in tune with them.
1 Go to the Global > Tuning > Transpose Control page.
2 Set the Style and Keyboard Tracks option to Immediate (or Next Measure), and deselect the Player checkbox.
When changing the Master Transpose value, the keyboard, score and chord symbols will be transposed. The songs will NOT be transposed.
|37
SongBook
Direct SongBook [2.0]
In addition to the internal SongBook, residing in your Pa4X, you can also choose Entries and Set Lists from an external, Direct SongBook, that will extend your internal database on the fly.
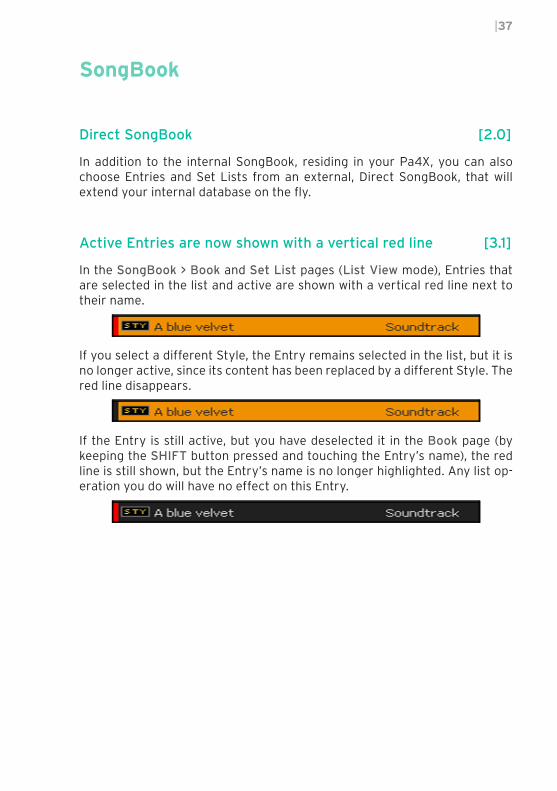
Active Entries are now shown with a vertical red line [3.1]
In the SongBook > Book and Set List pages (List View mode), Entries that are selected in the list and active are shown with a vertical red line next to their name.
If you select a different Style, the Entry remains selected in the list, but it is no longer active, since its content has been replaced by a different Style. The red line disappears.
If the Entry is still active, but you have deselected it in the Book page (by keeping the SHIFT button pressed and touching the Entry’s name), the red line is still shown, but the Entry’s name is no longer highlighted. Any list op-eration you do will have no effect on this Entry.
38|
Multiple selection of SongBook Entries [3.1]
The Book page now includes a Select Mode button.
While in the Book page of the SongBook, you can select several Entries at the same time before executing an operation.
Select Mode
To decide either to select target Entries in a consecutive or separate way, use the Select Mode button on the right of the page command buttons, and choose how pressing the SHIFT button will work.
Select Mode Meaning
Choose this option to select the target Entries consecutively (i.e., in a row).
Choose this option to select the target Entries separately (i.e., with other Entries in the middle).
Select multiple Entries separately
1 Touch the Select Mode button to choose the SHIFT function.
2 Select the first Entry to be selected.
3 Press and keep the SHIFT button pressed.
4 Select a second Entry to be selected.
5 While keeping the SHIFT button pressed, continue selecting the other Entries to be selected.
|39
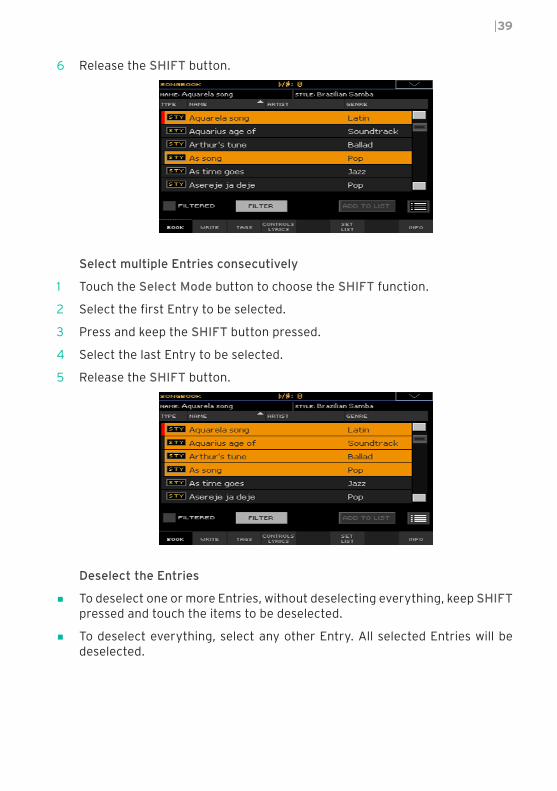
6 Release the SHIFT button.
Select multiple Entries consecutively
1 Touch the Select Mode button to choose the SHIFT function.
2 Select the first Entry to be selected.
3 Press and keep the SHIFT button pressed.
4 Select the last Entry to be selected.
5 Release the SHIFT button.
Deselect the Entries
▪ To deselect one or more Entries, without deselecting everything, keep SHIFT pressed and touch the items to be deselected.
▪ To deselect everything, select any other Entry. All selected Entries will be deselected.
40|
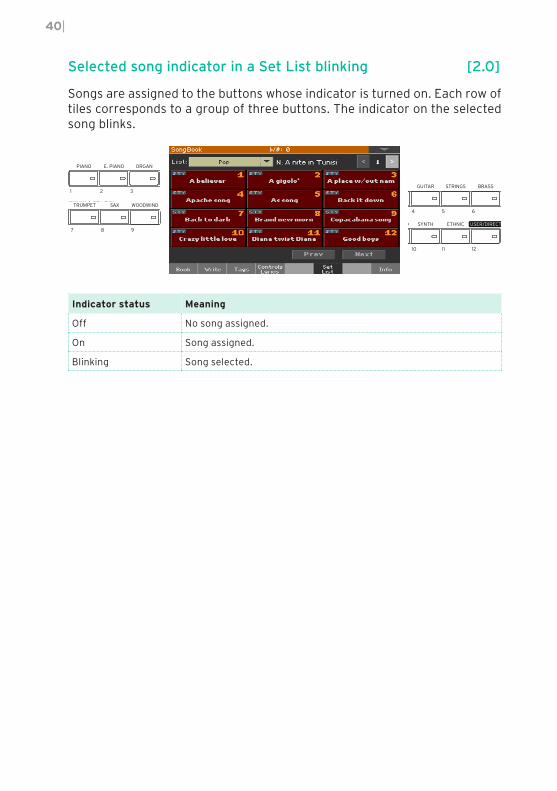
Selected song indicator in a Set List blinking [2.0]
Songs are assigned to the buttons whose indicator is turned on. Each row of tiles corresponds to a group of three buttons. The indicator on the selected song blinks.
Indicator status Meaning
Off No song assigned.
On Song assigned.
Blinking Song selected.

|41
Saving different Styles or Songs [2.0]
With each SongBook Entry, a reference to a Style or Song is saved. When editing an Entry, you can change it with a different Style or Song.
1 Choose the SongBook Entry to be edited.
2 Go to the SongBook > Write page, and touch the Style/Song > Select button to open the Style Select or Song Select window.
Touch to choose a different Style or Song
3 Choose a different Style or Song.
The Style/Song area will show the Style or Song you just selected.
Replaced Style or Song
4 Be sure the Style/Song > Write checkbox is selected, to save the new Style or Song and replace the older one.
5 If you don’t want to replace the Keyboard Sets or Voice Preset, be sure the other Write checkboxes are not selected.
6 Touch the Write button to save over the exiting SongBook Entry.
42|
Record/Edit
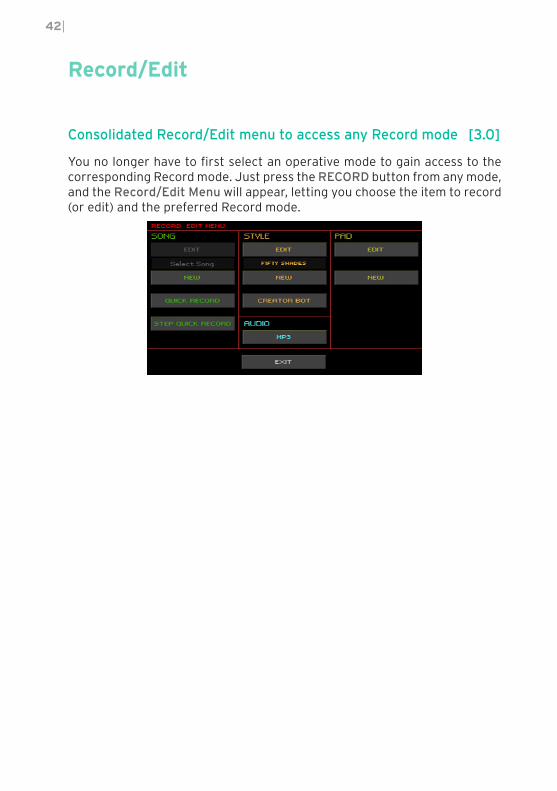
Consolidated Record/Edit menu to access any Record mode [3.0]
You no longer have to first select an operative mode to gain access to the corresponding Record mode. Just press the RECORD button from any mode, and the Record/Edit Menu will appear, letting you choose the item to record (or edit) and the preferred Record mode.
|43
Style Record
Added pages to the Style Record mode [2.0]
To make Style editing faster, the following pages have been added to the Style Record mode. These pages are the same you can find in the Song Play mode.
Mode Section Page
Style Record Style Track Controls Mode
Drum Edit
Sound Edit
Drum Map
Range/Wrap
Mixer/Tuning Volume/Pan
Insert FX
FX Send
EQ Gain
EQ Control
Tuning
Master Effects FX A
New ways of listening to the recorded Style [2.0]
The procedure for listening to the recorded Styles has been revised.
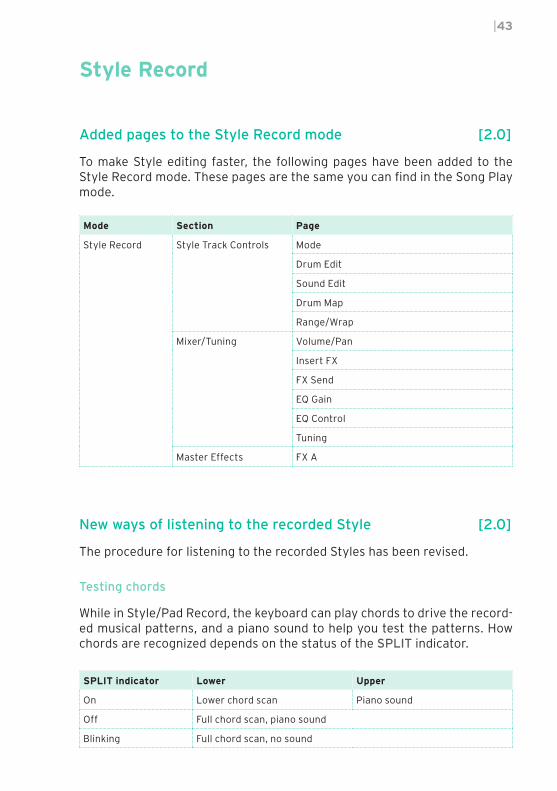
Testing chords
While in Style/Pad Record, the keyboard can play chords to drive the record-ed musical patterns, and a piano sound to help you test the patterns. How chords are recognized depends on the status of the SPLIT indicator.
SPLIT indicator Lower Upper
On Lower chord scan Piano sound
Off Full chord scan, piano sound
Blinking Full chord scan, no sound

44|
Listening to the results
1 Press the START/STOP button to check how the musical pattern works.
2 Play a chord, and test the patterns.
3 Press START/STOP again to stop playback.
Empty Chord Variations shown by an asterisk [2.0]
While in Style Record, when an asterisk (*) appears next to a CV abbreviation (CV1* … CV6*), the Chord Variation is empty. Abbreviations are no longer shown in lower cases.
Checking the available Chord Variations [2.0]
You can see which Chord Variations contain data (having been recorded or imported) in the current Style.
▪ Go to the Style Record > Chord Table & Variation > Chord Variation page.
Dimmed Chord Variations are empty.
While in the Chord Table page you can see which Chord Variations have been used in the current Style Element, this page lets you see which Chord Variations are contained in the whole Style. If there are unused Chord Variations, you may choose to delete them to make the Style file lighter, or to assign them to a chord.
|45
Style Creator Bot importing Chord Sequences [2.0]
The Style Creator Bot (formerly, MIDI to Style Converter) now also imports chords into a Chord Sequence. After conversion, you will get a Style includ-ing all the Style Elements, the four Pads, the four Keyboard Sets and a Chord Sequence containing the chords recognized in the source MIDI Song.
46|
Sequencer
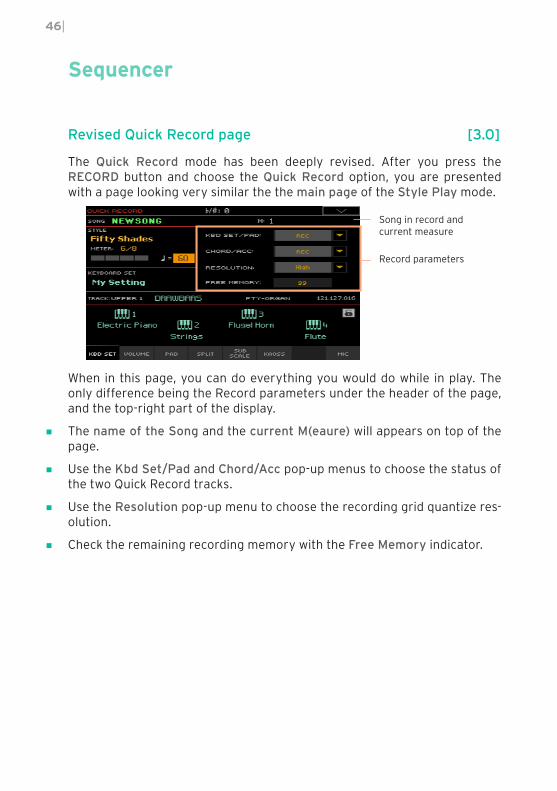
Revised Quick Record page [3.0]
The Quick Record mode has been deeply revised. After you press the RECORD button and choose the Quick Record option, you are presented with a page looking very similar the the main page of the Style Play mode.
Song in record and current measure
Record parameters
When in this page, you can do everything you would do while in play. The only difference being the Record parameters under the header of the page, and the top-right part of the display.
▪ The name of the Song and the current M(eaure) will appears on top of the page.
▪ Use the Kbd Set/Pad and Chord/Acc pop-up menus to choose the status of the two Quick Record tracks.
▪ Use the Resolution pop-up menu to choose the recording grid quantize res-olution.
▪ Check the remaining recording memory with the Free Memory indicator.
|47
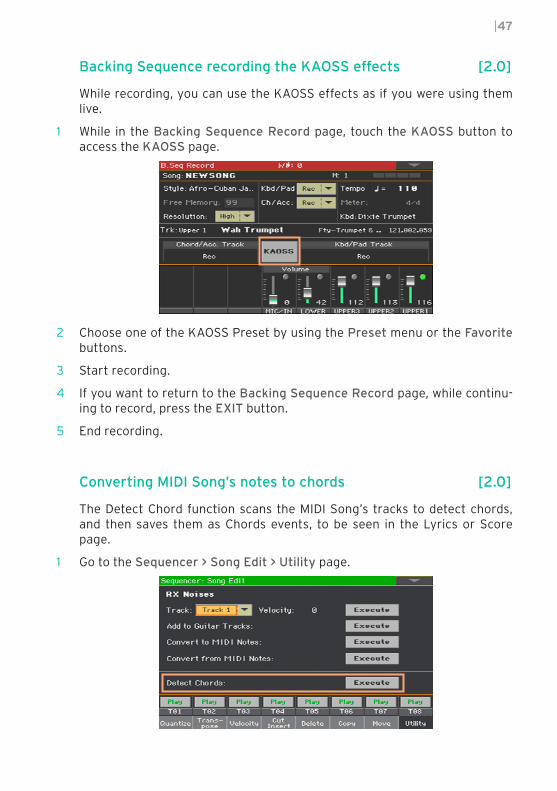
Backing Sequence recording the KAOSS effects [2.0]
While recording, you can use the KAOSS effects as if you were using them live.
1 While in the Backing Sequence Record page, touch the KAOSS button to access the KAOSS page.
2 Choose one of the KAOSS Preset by using the Preset menu or the Favorite buttons.
3 Start recording.
4 If you want to return to the Backing Sequence Record page, while continu-ing to record, press the EXIT button.
5 End recording.
Converting MIDI Song’s notes to chords [2.0]
The Detect Chord function scans the MIDI Song’s tracks to detect chords, and then saves them as Chords events, to be seen in the Lyrics or Score page.
1 Go to the Sequencer > Song Edit > Utility page.

48|
2 Touch the Execute button next to the Detect Chords parameter to automat-ically analyze the Standard MIDI File, and find chords.
This command scans the whole Standard MIDI File, looking for chords. After scanning, chords will be automatically saved in the file as Chords events.
Importing a MIDI Song without initializing the current settings [1.1]
While in the Sequencer mode, you can import a MIDI Song without initializing the current Sequencer settings. This is useful when you are, for example, programming a Song on an external sequencer, and at the same time ed-iting the Sounds, Effects, EQ, Volume Levels, Pan values, Drum Family pa-rameters, etc., right on the Pa4X. Importing the MID file will not reset these settings.
1 Press the SEQUENCER button to go to the main page of the Sequencer mode.
2 Choose the Import command from the page menu, and open the Song Selection window.
3 Browse through the files and folders. When you see the MIDI Song (.mid) you want to import, touch it, then touch the Select button to import it.
MP3 encoding [1.2]
When recording MP3 Songs, the resulting MP3 files are now encoded as CBR files, instead of VBR. While VBR (Variable Bit Rate) could be more efficient in reducing the file size, CBR (Constant Bit Rate) will always result in a predict-able audio quality, but will produce a slightly larger file.
Quality Meaning
Highest 256 kbps
High 192 kbps
Medium 128 kbps

|49
Sound Edit
Modified Mono Legato [3.0]
The Mono Legato now includes the new Legato Offset option. The On/Off checkbox of the previous version is now replaced by a pop-up menu.
While in the Sound > Basic > Sound page, with the Legato checkbox selected, you can now choose one of the following options.
Legato Meaning
Legato Off Legato phrasing will produce the same sound as detached playing.
Legato Legato will make the second note’s attack smoother. Envelope and LFO will not be retriggered. This is particularly effective analog synth-type sounds.
Legato Offset When you play legato, the second and subsequent notes will restart with-out playing the attack part of the sample. This is particularly effective with real sounds, like wind instruments.
The resulting effect depends on the selected multisample.
50|
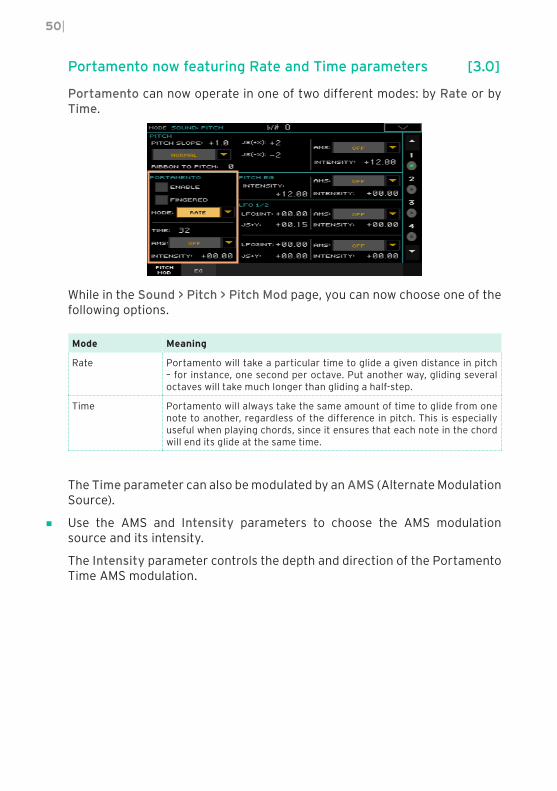
Portamento now featuring Rate and Time parameters [3.0]
Portamento can now operate in one of two different modes: by Rate or by Time.
While in the Sound > Pitch > Pitch Mod page, you can now choose one of the following options.
Mode Meaning
Rate Portamento will take a particular time to glide a given distance in pitch – for instance, one second per octave. Put another way, gliding several octaves will take much longer than gliding a half-step.
Time Portamento will always take the same amount of time to glide from one note to another, regardless of the difference in pitch. This is especially useful when playing chords, since it ensures that each note in the chord will end its glide at the same time.
The Time parameter can also be modulated by an AMS (Alternate Modulation Source).
▪ Use the AMS and Intensity parameters to choose the AMS modulation source and its intensity.
The Intensity parameter controls the depth and direction of the Portamento Time AMS modulation.
|51
Volume levels expressed in dB [1.1]
When editing a Sound or Drum Kit, volume levels are expressed in decibels (dB), with a resolution of 0.1 dB.
Sound/DK Value
Sound -Inf, -50…+00 dB
Drum Kit -Inf, -50…+00…+6 dB. Depending on the sound, the maximum level could be automatically limited.
Dry+Amb menu [1.1]
A new Dry+Amb menu has been added to all the Sound Edit > DrumKit sec-tion pages, where you can choose the dry and/or ambient portion of the sound. This menu is useful to separately listen to the dry or ambient sound while editing.
Level parameter [1.1]
A Level parameter has been added to the Sound > DrumKit > Voice Mixer page.
▪ Use the Level parameter to set the level of the selected key.
52|
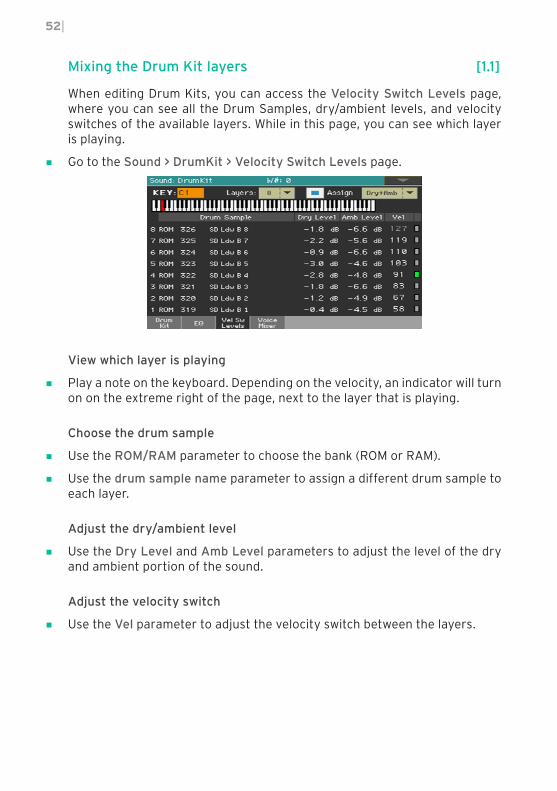
Mixing the Drum Kit layers [1.1]
When editing Drum Kits, you can access the Velocity Switch Levels page, where you can see all the Drum Samples, dry/ambient levels, and velocity switches of the available layers. While in this page, you can see which layer is playing.
▪ Go to the Sound > DrumKit > Velocity Switch Levels page.
View which layer is playing
▪ Play a note on the keyboard. Depending on the velocity, an indicator will turn on on the extreme right of the page, next to the layer that is playing.
Choose the drum sample
▪ Use the ROM/RAM parameter to choose the bank (ROM or RAM).
▪ Use the drum sample name parameter to assign a different drum sample to each layer.
Adjust the dry/ambient level
▪ Use the Dry Level and Amb Level parameters to adjust the level of the dry and ambient portion of the sound.
Adjust the velocity switch
▪ Use the Vel parameter to adjust the velocity switch between the layers.
|53
Sampling
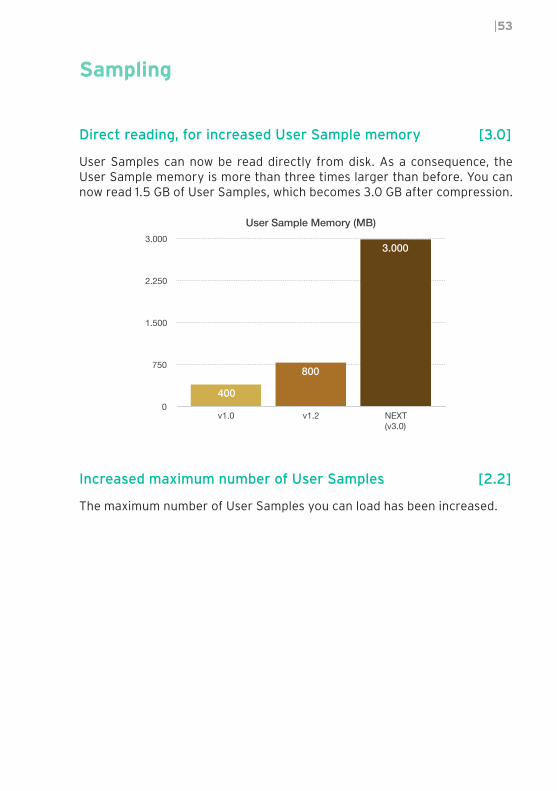
Direct reading, for increased User Sample memory [3.0]
User Samples can now be read directly from disk. As a consequence, the User Sample memory is more than three times larger than before. You can now read 1.5 GB of User Samples, which becomes 3.0 GB after compression.
User Sample Memory (MB)
0
750
1.500
2.250
3.000
v1.0 v1.2 NEXT(v3.0)
3.000
800
400
Increased maximum number of User Samples [2.2]
The maximum number of User Samples you can load has been increased.
54|
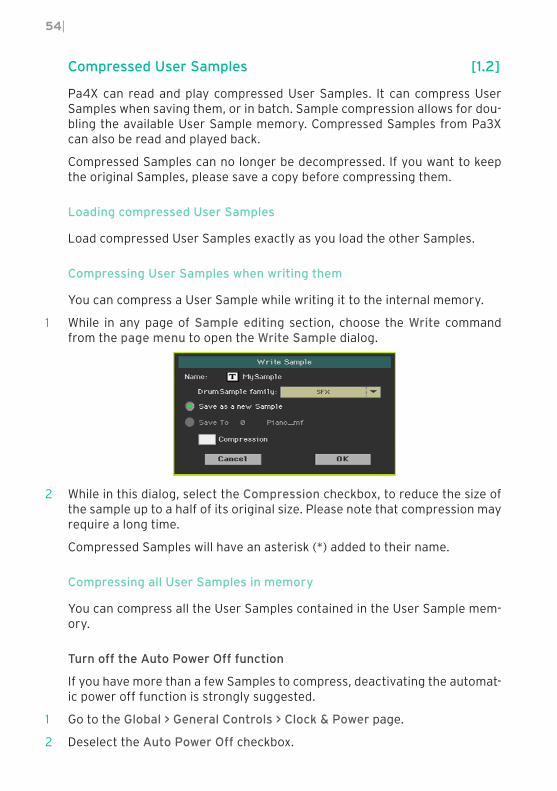
Compressed User Samples [1.2]
Pa4X can read and play compressed User Samples. It can compress User Samples when saving them, or in batch. Sample compression allows for dou-bling the available User Sample memory. Compressed Samples from Pa3X can also be read and played back.
Compressed Samples can no longer be decompressed. If you want to keep the original Samples, please save a copy before compressing them.
Loading compressed User Samples
Load compressed User Samples exactly as you load the other Samples.
Compressing User Samples when writing them
You can compress a User Sample while writing it to the internal memory.
1 While in any page of Sample editing section, choose the Write command from the page menu to open the Write Sample dialog.
2 While in this dialog, select the Compression checkbox, to reduce the size of the sample up to a half of its original size. Please note that compression may require a long time.
Compressed Samples will have an asterisk (*) added to their name.
Compressing all User Samples in memory
You can compress all the User Samples contained in the User Sample mem-ory.
Turn off the Auto Power Off function
If you have more than a few Samples to compress, deactivating the automat-ic power off function is strongly suggested.
1 Go to the Global > General Controls > Clock & Power page.
2 Deselect the Auto Power Off checkbox.

|55
Compress the Samples
1 While in any page of Sample editing section, choose the Compress all sam-ples command from the page menu to run compression.
2 A message appears, warning about the long times needed to compress all the Samples. Touch OK to confirm.
Please do not turn the instrument off while compression is going on.
When finished, compressed Samples will appear with an asterisk (*) added to their name.
Turn on the Auto Power Off function
1 Go to the Global > General Controls > Clock & Power page.
2 Select the Auto Power Off checkbox.
Compression, short loops, low volume [3.0]
Loops shorter than 16 samples, and samples with volume too low (often re-sulting from sample slicing) can’t be compressed. If you can’t write a sample while in the Write Sample dialog, disable the Compression option, then retry writing.
56|
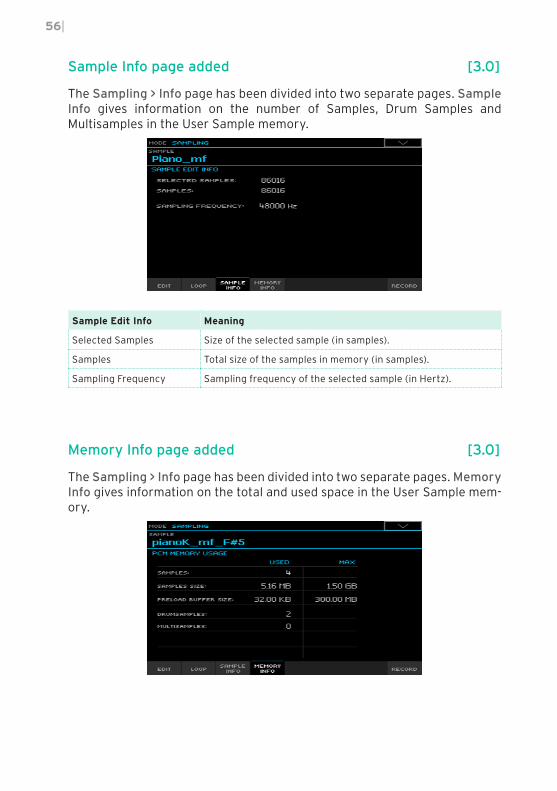
Sample Info page added [3.0]
The Sampling > Info page has been divided into two separate pages. Sample Info gives information on the number of Samples, Drum Samples and Multisamples in the User Sample memory.
Sample Edit Info Meaning
Selected Samples Size of the selected sample (in samples).
Samples Total size of the samples in memory (in samples).
Sampling Frequency Sampling frequency of the selected sample (in Hertz).
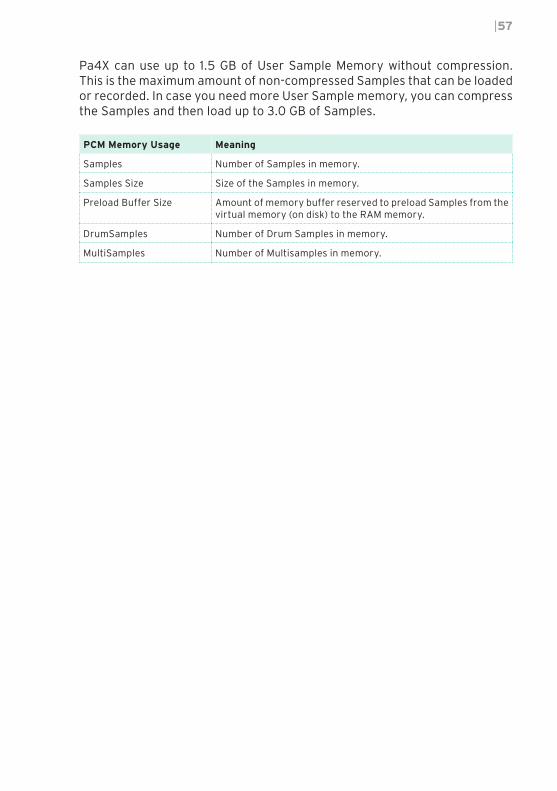
Memory Info page added [3.0]
The Sampling > Info page has been divided into two separate pages. Memory Info gives information on the total and used space in the User Sample mem-ory.
|57
Pa4X can use up to 1.5 GB of User Sample Memory without compression. This is the maximum amount of non-compressed Samples that can be loaded or recorded. In case you need more User Sample memory, you can compress the Samples and then load up to 3.0 GB of Samples.
PCM Memory Usage Meaning
Samples Number of Samples in memory.
Samples Size Size of the Samples in memory.
Preload Buffer Size Amount of memory buffer reserved to preload Samples from the virtual memory (on disk) to the RAM memory.
DrumSamples Number of Drum Samples in memory.
MultiSamples Number of Multisamples in memory.

58|
‘Play from preload buffer’ option added to the Write Sample dialog [3.0]
The Play from preload buffer option has been added to the Write Sample dialog. When this option is selected, the sample will be entirely loaded to the RAM memory the next time it is selected.
This option is normally not needed. You can however select it when you need the sample to play over the full pitch range, or if you plan to use the sample in reverse.
With some Samples, you may not be able to transpose up enough, and high-er-pitched notes may sound at the wrong pitch. Since Samples entirely read from RAM can be transposed higher than Samples read direct-from-disk, if there are issues with higher-pitched notes, you may want to try with this option checked.
Also, reversing User Samples is only allowed when the Samples are fully loaded into the RAM memory.
Preload buffer and compression
Since compression can’t be applied to Samples loaded to RAM, when the Compression parameter is checked you can’t select the Play from preload buffer parameter.
Compressed Samples can be transposed more than non-compressed Samples read direct-from-disk. They can be transposed less than non-com-pressed Samples entirely read from RAM.
Type of sample Transposition
Non-compressed direct-from-disk Less
Compressed direct-from-disk Average
Non-compressed from RAM More
|59
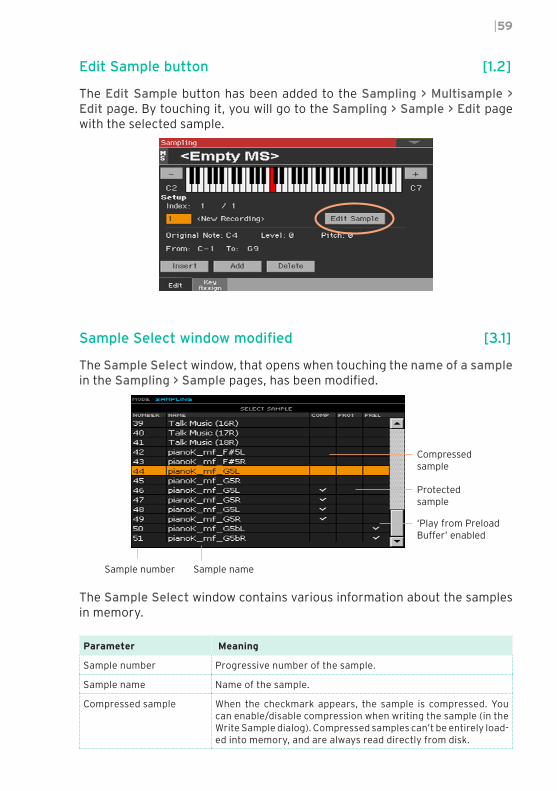
Edit Sample button [1.2]
The Edit Sample button has been added to the Sampling > Multisample > Edit page. By touching it, you will go to the Sampling > Sample > Edit page with the selected sample.
Sample Select window modified [3.1]
The Sample Select window, that opens when touching the name of a sample in the Sampling > Sample pages, has been modified.
Sample number
Compressed sample
Protected sample
‘Play from Preload Buffer’ enabled
Sample name
The Sample Select window contains various information about the samples in memory.
Parameter Meaning
Sample number Progressive number of the sample.
Sample name Name of the sample.
Compressed sample When the checkmark appears, the sample is compressed. You can enable/disable compression when writing the sample (in the Write Sample dialog). Compressed samples can’t be entirely load-ed into memory, and are always read directly from disk.

60|
Parameter Meaning
Protected sample When the checkmark appears, the sample is copy protected. Be sure the protection key was inserted when turning the instru-ment on, or you will not be able to use the protected data. If you forgot to do it, insert the protection key and restart the instru-ment.
‘Play from Preload Buffer’ enabled
When the checkmark appears, the sample contains the ‘Play from Preload Buffer’ flag, and will be entirely loaded into mem-ory. You can enable/disable this flag when writing the sample (in the Write Sample dialog). This type of sample can’t be com-pressed.
Accelerated scrolling in the Sample Select window [3.1]
While in the Sample Select window of the Sampling mode, you can scroll the list of samples by rotating the VALUE dial. When rotating it faster, the scrolling speed increases exponentially.
MultiSample Select window modified [3.1]
The Multisample Select window, that opens when touching the name of a multisample in the Sampling > MultiSample pages, has been slightly modi-fied.
Multisample number
Multisample name
|61
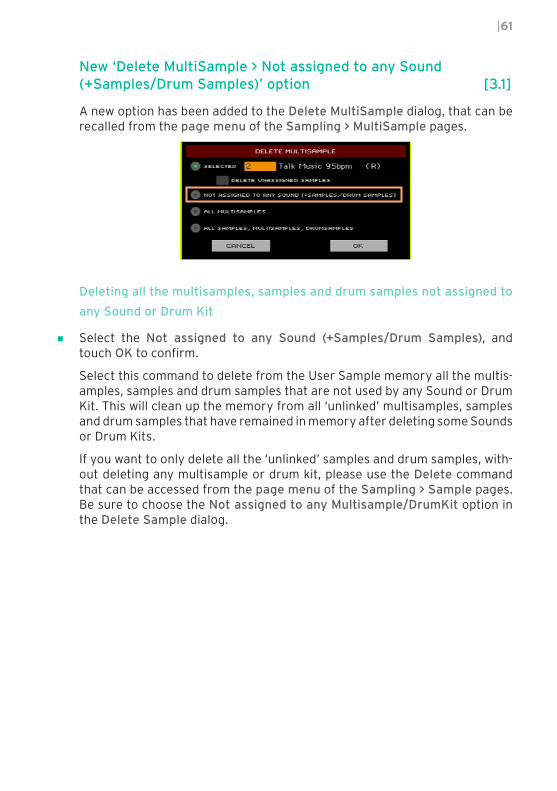
New ‘Delete MultiSample > Not assigned to any Sound (+Samples/Drum Samples)’ option [3.1]
A new option has been added to the Delete MultiSample dialog, that can be recalled from the page menu of the Sampling > MultiSample pages.
Deleting all the multisamples, samples and drum samples not assigned to
any Sound or Drum Kit
▪ Select the Not assigned to any Sound (+Samples/Drum Samples), and touch OK to confirm.
Select this command to delete from the User Sample memory all the multis-amples, samples and drum samples that are not used by any Sound or Drum Kit. This will clean up the memory from all ‘unlinked’ multisamples, samples and drum samples that have remained in memory after deleting some Sounds or Drum Kits.
If you want to only delete all the ‘unlinked’ samples and drum samples, with-out deleting any multisample or drum kit, please use the Delete command that can be accessed from the page menu of the Sampling > Sample pages. Be sure to choose the Not assigned to any Multisample/DrumKit option in the Delete Sample dialog.
62|
Audio Inputs
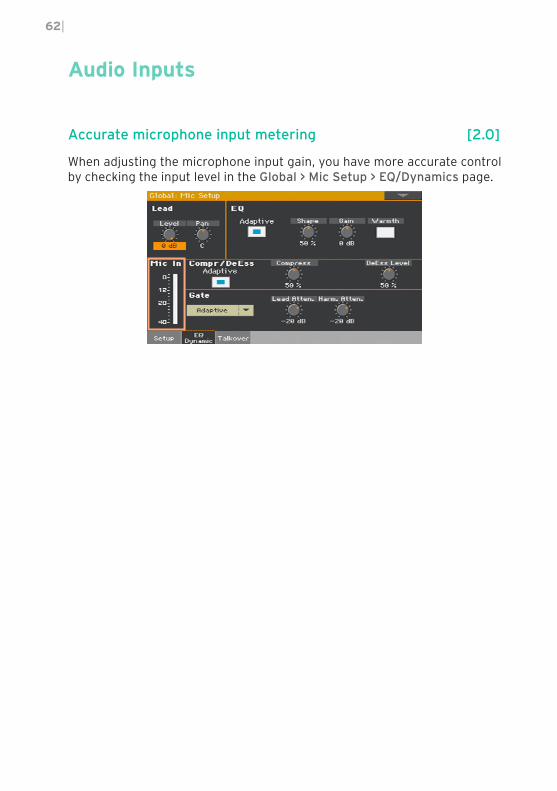
Accurate microphone input metering [2.0]
When adjusting the microphone input gain, you have more accurate control by checking the input level in the Global > Mic Setup > EQ/Dynamics page.

|63
Effects
Early Reflections Hi Dens FX assignment [1.1]
The Early Reflections Hi Dens FX can now only be assigned to the MFX A2/3 or B2 effect processors. This will ensure it always has the needed processing power.
Noise Gate added to some guitar effects [2.0]
A Noise Gate has been added to the following effects: GuitarAmp + Cabinet, Amp Clean Combo + Cab, Amp California + Cab, Amp Tweed + Cab, Amp Modded OD + Cab.

64|
KAOSS FX
KAOSS FX feature added [2.0]
KAOSS effects are a new, easy-to-use set of computer-assisted composition features.
Please, refer to the User Manual for detailed information on how to use them.

|65
Global and Preferences
Locking the Slider Mode [1.1]
A new lock has been added to the Global > General Controls > Lock > Control page.
Control lock Meaning
Slider Mode When locked, selecting a Keyboard Set, Style or SongBook Entry will not change the status of the SLIDER MODE indicator.
Locking the Fill Mode [1.2]
A new lock has been added to the Global > General Controls > Lock > Style page.
Control lock Meaning
Fill Mode When locked, the selected Fill Mode will not change when choosing a different Style or SongBook Entry.
Low battery warning at startup [3.0]
When the clock backup battery has a low charge, you are warned at startup. Please replace the battery with a new one, as explained in the Quick Guide or User Manual.
After replacing the battery, please set the date and clock, as explained in the User Manual.
Saving the Song Preferences is now a menu command [2.0]
The Write Song Play Track & FX command is now in the page menu.
▪ Go to the Global > Mode Preferences > Song & Seq. page, and choose the Write Song Play Track & FX command from the page menu.
66|
Controllers
Added compatibility with the VOX V860 volume pedal [2.1]
Pa4X is now compatible with the VOX V860 volume pedal.
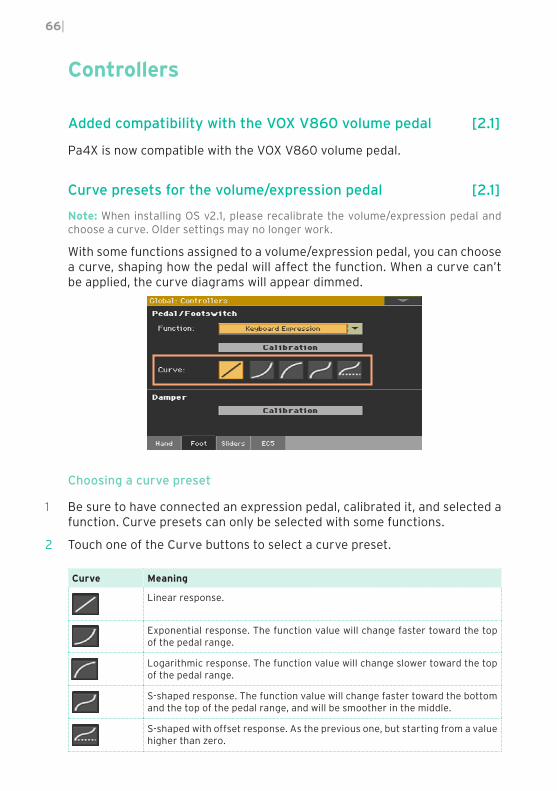
Curve presets for the volume/expression pedal [2.1]
Note: When installing OS v2.1, please recalibrate the volume/expression pedal and choose a curve. Older settings may no longer work.
With some functions assigned to a volume/expression pedal, you can choose a curve, shaping how the pedal will affect the function. When a curve can’t be applied, the curve diagrams will appear dimmed.
Choosing a curve preset
1 Be sure to have connected an expression pedal, calibrated it, and selected a function. Curve presets can only be selected with some functions.
2 Touch one of the Curve buttons to select a curve preset.
Curve Meaning
Linear response.
Exponential response. The function value will change faster toward the top of the pedal range.
Logarithmic response. The function value will change slower toward the top of the pedal range.
S-shaped response. The function value will change faster toward the bottom and the top of the pedal range, and will be smoother in the middle.
S-shaped with offset response. As the previous one, but starting from a value higher than zero.
|67
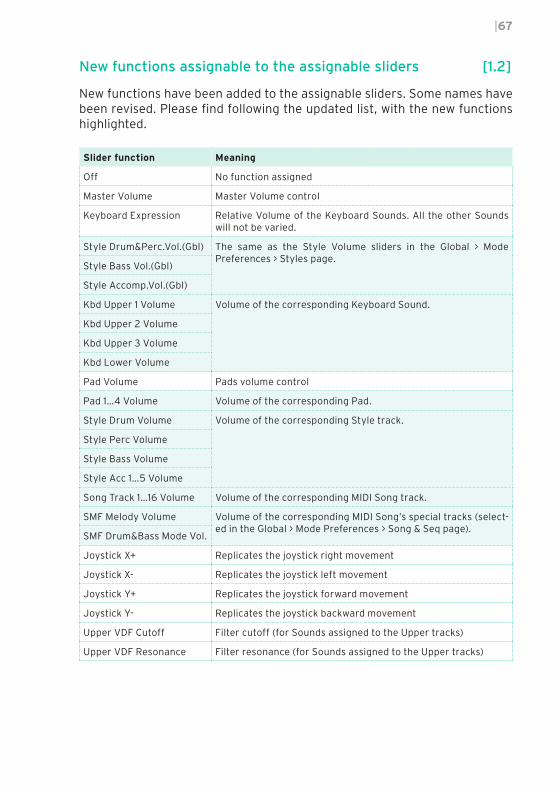
New functions assignable to the assignable sliders [1.2]
New functions have been added to the assignable sliders. Some names have been revised. Please find following the updated list, with the new functions highlighted.
Slider function Meaning
Off No function assigned
Master Volume Master Volume control
Keyboard Expression Relative Volume of the Keyboard Sounds. All the other Sounds will not be varied.
Style Drum&Perc.Vol.(Gbl) The same as the Style Volume sliders in the Global > Mode Preferences > Styles page.
Style Bass Vol.(Gbl)
Style Accomp.Vol.(Gbl)
Kbd Upper 1 Volume Volume of the corresponding Keyboard Sound.
Kbd Upper 2 Volume
Kbd Upper 3 Volume
Kbd Lower Volume
Pad Volume Pads volume control
Pad 1…4 Volume Volume of the corresponding Pad.
Style Drum Volume Volume of the corresponding Style track.
Style Perc Volume
Style Bass Volume
Style Acc 1…5 Volume
Song Track 1…16 Volume Volume of the corresponding MIDI Song track.
SMF Melody Volume Volume of the corresponding MIDI Song’s special tracks (select-ed in the Global > Mode Preferences > Song & Seq page).
SMF Drum&Bass Mode Vol.
Joystick X+ Replicates the joystick right movement
Joystick X- Replicates the joystick left movement
Joystick Y+ Replicates the joystick forward movement
Joystick Y- Replicates the joystick backward movement
Upper VDF Cutoff Filter cutoff (for Sounds assigned to the Upper tracks)
Upper VDF Resonance Filter resonance (for Sounds assigned to the Upper tracks)
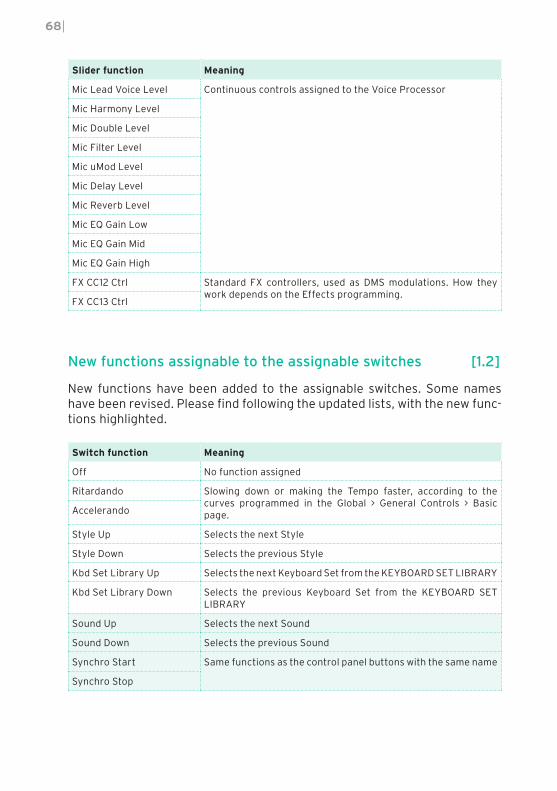
68|
Slider function Meaning
Mic Lead Voice Level Continuous controls assigned to the Voice Processor
Mic Harmony Level
Mic Double Level
Mic Filter Level
Mic uMod Level
Mic Delay Level
Mic Reverb Level
Mic EQ Gain Low
Mic EQ Gain Mid
Mic EQ Gain High
FX CC12 Ctrl Standard FX controllers, used as DMS modulations. How they work depends on the Effects programming.
FX CC13 Ctrl
New functions assignable to the assignable switches [1.2]
New functions have been added to the assignable switches. Some names have been revised. Please find following the updated lists, with the new func-tions highlighted.
Switch function Meaning
Off No function assigned
Ritardando Slowing down or making the Tempo faster, according to the curves programmed in the Global > General Controls > Basic page.Accelerando
Style Up Selects the next Style
Style Down Selects the previous Style
Kbd Set Library Up Selects the next Keyboard Set from the KEYBOARD SET LIBRARY
Kbd Set Library Down Selects the previous Keyboard Set from the KEYBOARD SET LIBRARY
Sound Up Selects the next Sound
Sound Down Selects the previous Sound
Synchro Start Same functions as the control panel buttons with the same name
Synchro Stop

|69
Switch function Meaning
Style Drum Mute Mute of the corresponding track
Style Perc Mute
Style Bass Mute
Style Acc1…5 Mute
Style Acc 1-5 Mute Mute/Unmute all the Acc tracks at once
Song Melody Mute Mutes the MIDI Song track set as the Melody track (Global > Mode Preference > Song & Seq.)
Vocal Remover Removes the lead voice from the MP3 Song
Song Drum&Bass Mode Mute of all MIDI Song tracks, except the Bass and Drum tracks (as set in the Global > Mode Preference > Song & Seq. page). It doesn’t work on MP3 Songs.
Solo Selected Track Turns track solo on/off
Bass&Lower Backing When the Style is not playing and the keyboard is in Split mode, you can play the Lower Sound with your left hand, while the Bass still plays the chord root.
QuarterTone Turns Quarter Tone on/off
Retune Style Makes the instrument wait for a chord. The root of the chord will be the new root of the scale used by some of the Style tracks.
Global-Scale When the switch or footswitch is pressed, the Global > Tuning > Scale page is recalled
SubScale Preset 1…15 - SC1…15
Same functions as the SC Preset buttons in the display
Mic Talk Switch controls assigned to the Voice Processor
Mic Lead On/Off
Mic Filter On/Off
Mic HardTune On/Off
Mic uMod On/Off
Mic Delay On/Off
FX CC12 Switch Standard FX switches. How they work depends on the Effects programming.
FX CC13 Switch
Rotary Spkr On/Off Rotary Speaker effect controls
Rotary Spkr Fast/Slow
Drawbar Perc On/Off Turns Drawbar Percussion of/off
Text Page Next These options let you move to the previous or next page, when reading a text file automatically loaded with a Song or SongBook Entry, or manually loaded from the Lyrics page.Text Page Prev
Set List Next Moves to the next SongBook Entry in the selected Set List
Set List Prev Moves to the previous SongBook Entry in the selected Set List

70|
Switch function Meaning
Sound Controller 1 DNC Sound Controllers (CC#80 and CC#81). They control the function assigned in Sound Edit in DNC Sounds.
Sound Controller 2
Functions assignable to a footswitch pedal [1.1]
New functions have been added to the footswitch pedal. Some names have been revised. Please find following the updated list, with the new functions highlighted.
Footswitch function Meaning
Off No function assigned
Style Start/Stop Same functions as the control panel buttons with the same name
Play/Stop Player 1
Play/Stop Player 2
Go to Beginning Player 1
Go to Beginning Player 2
Chord Seq. Record
Chord Seq. Play
Synchro Start
Synchro Stop
Tap Tempo/Reset
Tempo Lock
Ritardando Slowing down or making the Tempo faster, according to the curves programmed in the Global > General Controls > Basic page.Accelerando
Tempo Up Same functions as the control panel buttons with the same name
Tempo Down
Intro 1…3/Count In Selects the corresponding Intro
Ending 1…3 Selects the corresponding Ending
Fill 1…4 Selects the corresponding Fill
Break Selects the Break
Variation 1…4 Selects the corresponding Variation
Variation Up Selects the next Variation
Variation Down Selects the previous Variation
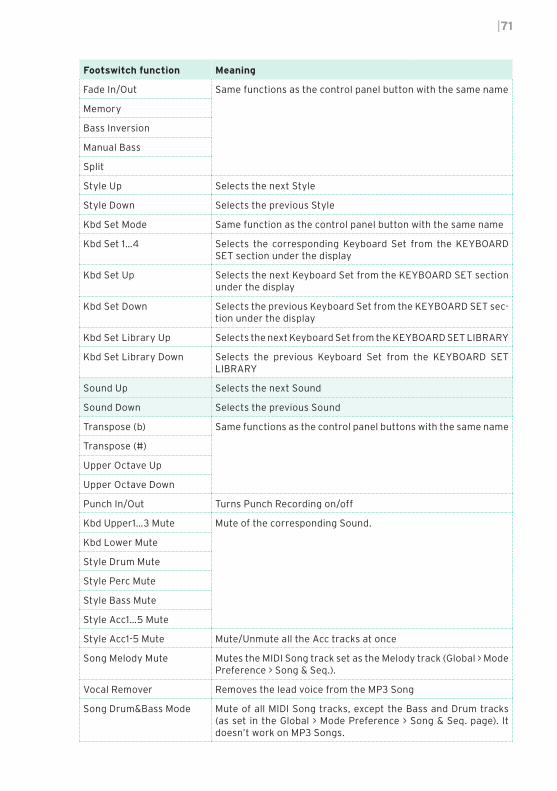
|71
Footswitch function Meaning
Fade In/Out Same functions as the control panel button with the same name
Memory
Bass Inversion
Manual Bass
Split
Style Up Selects the next Style
Style Down Selects the previous Style
Kbd Set Mode Same function as the control panel button with the same name
Kbd Set 1…4 Selects the corresponding Keyboard Set from the KEYBOARD SET section under the display
Kbd Set Up Selects the next Keyboard Set from the KEYBOARD SET section under the display
Kbd Set Down Selects the previous Keyboard Set from the KEYBOARD SET sec-tion under the display
Kbd Set Library Up Selects the next Keyboard Set from the KEYBOARD SET LIBRARY
Kbd Set Library Down Selects the previous Keyboard Set from the KEYBOARD SET LIBRARY
Sound Up Selects the next Sound
Sound Down Selects the previous Sound
Transpose (b) Same functions as the control panel buttons with the same name
Transpose (#)
Upper Octave Up
Upper Octave Down
Punch In/Out Turns Punch Recording on/off
Kbd Upper1…3 Mute Mute of the corresponding Sound.
Kbd Lower Mute
Style Drum Mute
Style Perc Mute
Style Bass Mute
Style Acc1…5 Mute
Style Acc1-5 Mute Mute/Unmute all the Acc tracks at once
Song Melody Mute Mutes the MIDI Song track set as the Melody track (Global > Mode Preference > Song & Seq.).
Vocal Remover Removes the lead voice from the MP3 Song
Song Drum&Bass Mode Mute of all MIDI Song tracks, except the Bass and Drum tracks (as set in the Global > Mode Preference > Song & Seq. page). It doesn’t work on MP3 Songs.

72|
Footswitch function Meaning
Solo Selected Track Turns track solo on/off
Damper Pedal Damper function. Corresponds to the right pedal of an acoustic piano. It holds the notes played when the pedal is pressed down.
Soft Pedal Soft function. Corresponds to the ‘una corda’ pedal of an acous-tic piano. Makes the sound softer.
Sostenuto Pedal Sostenuto function. Corresponds to the left pedal of a grand piano. It holds the notes already held when pressing the pedal down.
Bass&Lower Backing When the Style is not playing and the keyboard is in Split mode, you can play the Lower Sound with your left hand, while the Bass still plays the chord root.
Ensemble Turns Ensemble on/off
QuarterTone Turns Quarter Tone on/off
Retune Style Makes the instrument wait for a chord. The root of the chord will be the new root of the scale used by some of the Style tracks.
Global-Scale When the switch or footswitch is pressed, the Global > Tuning > Scale page is recalled.
SubScale Preset 1…15 - SC1…15
Same functions as the SC Preset buttons in the display
Chord Latch Holds the recognized chord until the pedal is released
Glide When the pedal is pressed, affected notes on Upper tracks are bent down, according to settings for the Pitch Bend on the same tracks. When the pedal is released, notes return to the normal pitch, at the speed defined in the Global > General Controls > Basic page.
Mic In Mute Switch controls assigned to the Voice Processor
Mic Talk
Mic Lead On/Off
Mic Harmony On/Off
Mic Double On/Off
Mic Filter On/Off
Mic Hard Tune On/Off
Mic uMod On/Off
Mic Delay On/Off
Mic Reverb On/Off
FX CC12 Switch Standard FX switches. How they work depends on the Effects programming.
FX CC13 Switch
Rotary Spkr On/Off Rotary Speaker effect controls
Rotary Spkr Fast/Slow
|73
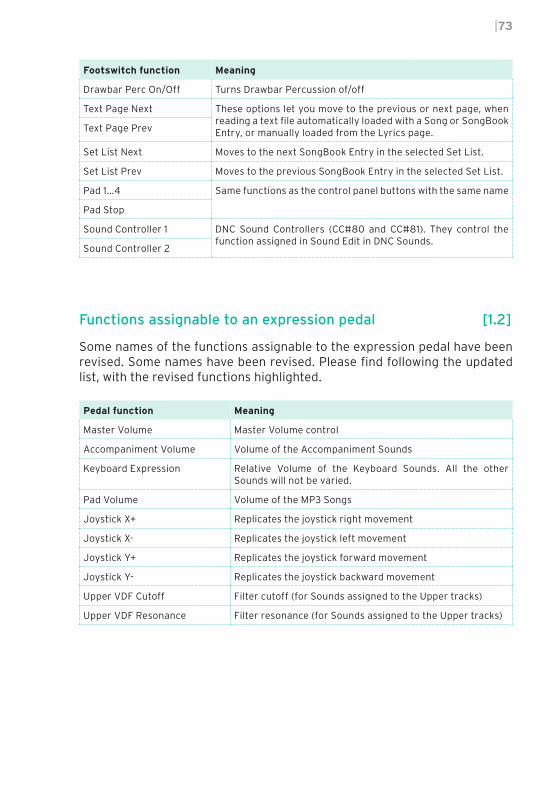
Footswitch function Meaning
Drawbar Perc On/Off Turns Drawbar Percussion of/off
Text Page Next These options let you move to the previous or next page, when reading a text file automatically loaded with a Song or SongBook Entry, or manually loaded from the Lyrics page.Text Page Prev
Set List Next Moves to the next SongBook Entry in the selected Set List.
Set List Prev Moves to the previous SongBook Entry in the selected Set List.
Pad 1…4 Same functions as the control panel buttons with the same name
Pad Stop
Sound Controller 1 DNC Sound Controllers (CC#80 and CC#81). They control the function assigned in Sound Edit in DNC Sounds.
Sound Controller 2
Functions assignable to an expression pedal [1.2]
Some names of the functions assignable to the expression pedal have been revised. Some names have been revised. Please find following the updated list, with the revised functions highlighted.
Pedal function Meaning
Master Volume Master Volume control
Accompaniment Volume Volume of the Accompaniment Sounds
Keyboard Expression Relative Volume of the Keyboard Sounds. All the other Sounds will not be varied.
Pad Volume Volume of the MP3 Songs
Joystick X+ Replicates the joystick right movement
Joystick X- Replicates the joystick left movement
Joystick Y+ Replicates the joystick forward movement
Joystick Y- Replicates the joystick backward movement
Upper VDF Cutoff Filter cutoff (for Sounds assigned to the Upper tracks)
Upper VDF Resonance Filter resonance (for Sounds assigned to the Upper tracks)
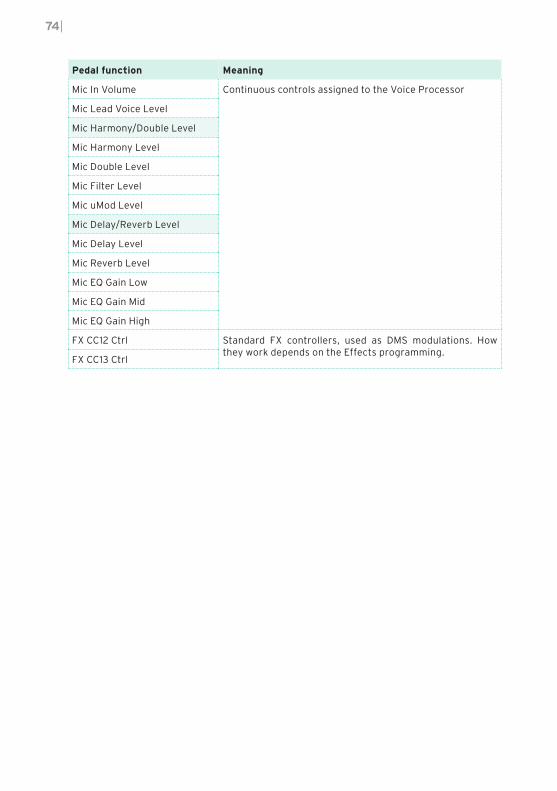
74|
Pedal function Meaning
Mic In Volume Continuous controls assigned to the Voice Processor
Mic Lead Voice Level
Mic Harmony/Double Level
Mic Harmony Level
Mic Double Level
Mic Filter Level
Mic uMod Level
Mic Delay/Reverb Level
Mic Delay Level
Mic Reverb Level
Mic EQ Gain Low
Mic EQ Gain Mid
Mic EQ Gain High
FX CC12 Ctrl Standard FX controllers, used as DMS modulations. How they work depends on the Effects programming.
FX CC13 Ctrl

|75
Functions assignable to an EC5 switch [1.2]
New functions have been added to the EC5 switches. Some names have been revised. Please find following the updated list, with the new functions high-lighted.
EC5 function Meaning
Off No function assigned
Style Start/Stop Same functions as the control panel buttons with the same name
Play/Stop Player 1
Play/Stop Player 2
Go to Beginning Player 1
Go to Beginning Player 2
Chord Seq. Record
Chord Seq. Play
Synchro Start
Synchro Stop
Tap Tempo/Reset
Tempo Lock
Ritardando Slowing down or making the Tempo faster, according to the curves programmed in the Global > General Controls > Basic page.Accelerando
Tempo Up Same functions as the control panel buttons with the same name
Tempo Down
Intro 1…3/Count In Selects the corresponding Intro
Ending 1…3 Selects the corresponding Ending
Fill 1…4 Selects the corresponding Fill
Break Selects the Break
Variation 1…4 Selects the corresponding Variation
Variation Up Selects the next Variation
Variation Down Selects the previous Variation
Fade In/Out Same functions as the control panel button with the same name
Memory
Bass Inversion
Manual Bass
Split
Style Up Selects the next Style
Style Down Selects the previous Style

76|
EC5 function Meaning
Kbd Set Mode Same function as the control panel button with the same name
Kbd Set 1…4 Selects the corresponding Keyboard Set from the KEYBOARD SET section under the display
Kbd Set Up Selects the next Keyboard Set from the KEYBOARD SET section under the display
Kbd Set Down Selects the previous Keyboard Set from the KEYBOARD SET sec-tion under the display
Kbd Set Library Up Selects the next Keyboard Set from the KEYBOARD SET LIBRARY
Kbd Set Library Down Selects the previous Keyboard Set from the KEYBOARD SET LIBRARY
Sound Up Selects the next Sound
Sound Down Selects the previous Sound
Transpose (b) Same functions as the control panel buttons with the same name
Transpose (#)
Upper Octave Up
Upper Octave Down
Punch In/Out Turns Punch Recording on/off
Kbd Upper1…3 Mute Mute of the corresponding Sound.
Kbd Lower Mute
Style Drum Mute
Style Perc Mute
Style Bass Mute
Style Acc1…5 Mute
Style Acc1-5 Mute Mute/Unmute all the Acc tracks at once
Song Melody Mute Mutes the MIDI Song track set as the Melody track (Global > Mode Preference > Song & Seq.).
Vocal Remover Removes the lead voice from the MP3 Song
Song Drum&Bass Mode Mute of all MIDI Song tracks, except the Bass and Drum tracks (as set in the Global > Mode Preference > Song & Seq. page). It doesn’t work on MP3 Songs.
Solo Selected Track Turns track solo on/off
Damper Pedal Damper function. Corresponds to the right pedal of an acoustic piano. It holds the notes played when the pedal is pressed down.
Soft Pedal Soft function. Corresponds to the ‘una corda’ pedal of an acous-tic piano. Makes the sound softer.
Sostenuto Pedal Sostenuto function. Corresponds to the left pedal of a grand piano. It holds the notes already held when pressing the pedal down.
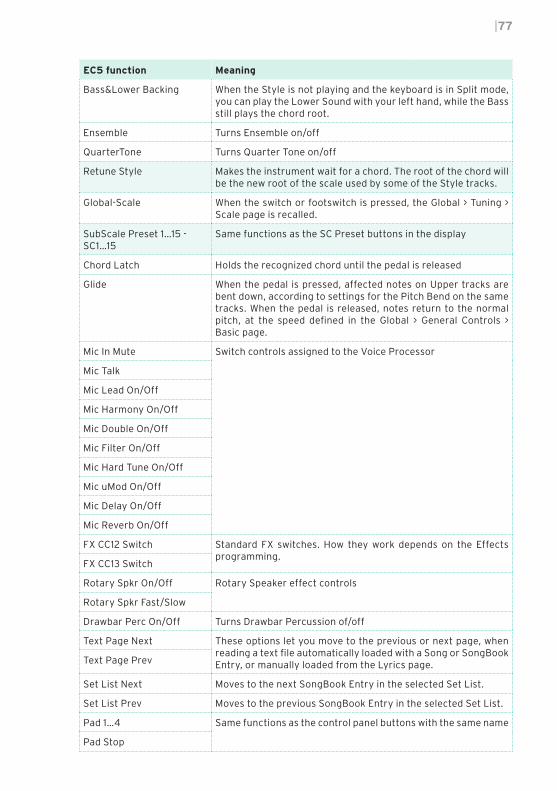
|77
EC5 function Meaning
Bass&Lower Backing When the Style is not playing and the keyboard is in Split mode, you can play the Lower Sound with your left hand, while the Bass still plays the chord root.
Ensemble Turns Ensemble on/off
QuarterTone Turns Quarter Tone on/off
Retune Style Makes the instrument wait for a chord. The root of the chord will be the new root of the scale used by some of the Style tracks.
Global-Scale When the switch or footswitch is pressed, the Global > Tuning > Scale page is recalled.
SubScale Preset 1…15 - SC1…15
Same functions as the SC Preset buttons in the display
Chord Latch Holds the recognized chord until the pedal is released
Glide When the pedal is pressed, affected notes on Upper tracks are bent down, according to settings for the Pitch Bend on the same tracks. When the pedal is released, notes return to the normal pitch, at the speed defined in the Global > General Controls > Basic page.
Mic In Mute Switch controls assigned to the Voice Processor
Mic Talk
Mic Lead On/Off
Mic Harmony On/Off
Mic Double On/Off
Mic Filter On/Off
Mic Hard Tune On/Off
Mic uMod On/Off
Mic Delay On/Off
Mic Reverb On/Off
FX CC12 Switch Standard FX switches. How they work depends on the Effects programming.
FX CC13 Switch
Rotary Spkr On/Off Rotary Speaker effect controls
Rotary Spkr Fast/Slow
Drawbar Perc On/Off Turns Drawbar Percussion of/off
Text Page Next These options let you move to the previous or next page, when reading a text file automatically loaded with a Song or SongBook Entry, or manually loaded from the Lyrics page.Text Page Prev
Set List Next Moves to the next SongBook Entry in the selected Set List.
Set List Prev Moves to the previous SongBook Entry in the selected Set List.
Pad 1…4 Same functions as the control panel buttons with the same name
Pad Stop

78|
EC5 function Meaning
Sound Controller 1 DNC Sound Controllers (CC#80 and CC#81). They control the function assigned in Sound Edit in DNC Sounds.
Sound Controller 2
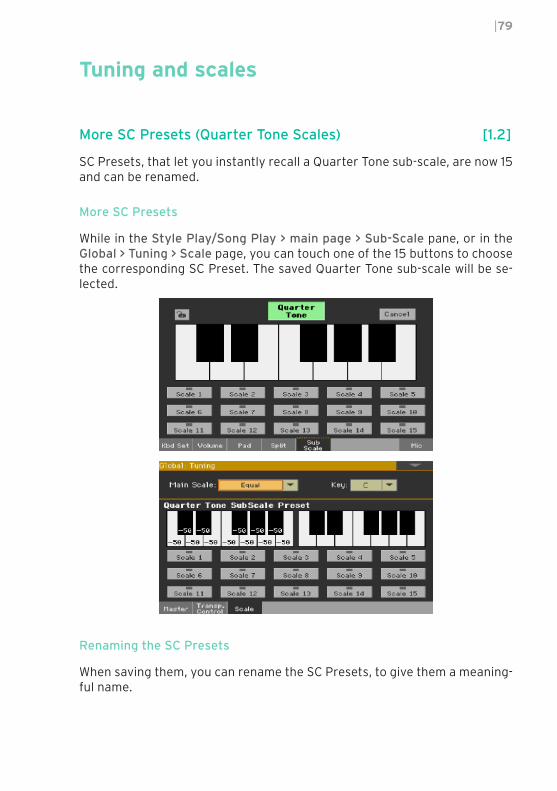
|79
Tuning and scales
More SC Presets (Quarter Tone Scales) [1.2]
SC Presets, that let you instantly recall a Quarter Tone sub-scale, are now 15 and can be renamed.
More SC Presets
While in the Style Play/Song Play > main page > Sub-Scale pane, or in the Global > Tuning > Scale page, you can touch one of the 15 buttons to choose the corresponding SC Preset. The saved Quarter Tone sub-scale will be se-lected.
Renaming the SC Presets
When saving them, you can rename the SC Presets, to give them a meaning-ful name.

80|
1 While in the Global > Tuning > Scale page, choose the Write Quarter Tone SC Preset command from the page menu to open the Write Quarter Tone Scale Preset dialog.
2 Touch the Text Edit ( ) button if you want to assign the SC Preset a new name.
3 Choose one of the SC Preset locations to save the new scale, then confirm by touching the OK button.
Style Element’s Scale [1.1]
To make programming easier, the Style Element’s Scale can only be a User scale. The Style Record > Style Element Track Controls > Scale page has been modified to include this change.
Retuning the Style while playing [1.1]
While in the Style Record > Style Element Track Controls > Scale page, you can choose a sub-scale for each Style Element, and enable the sub-scale on each track of the Style Element.
This scale starts from a root key, that can change with each recognized chord, or after a deliberate command. Depending on your style of music, you will choose how to retune the Style.

|81
How you choose the scale’s root key will depend on two concurrent parame-ters: the Chord Follow option inside the Style, and the Retune Style param-eter assigned to an assignable switch, footswitch or EC5 switch.
Retune Style Chord Follow Scale’s Root Key
– On From each recognized chord.
Off From the chord recognized when the accompaniment is not playing.
Assigned On From the chord recognized while the accompaniment is not playing, or after pressing the assignable switch.
Off
Enabling the Chord Follow option
1 Go to the Style Record > Style Element Track Controls > Scale page.
2 Use the Chord Follow checkbox to turn the option on or off. See the table above to see how it works.
While each Style Element can have its own scale, this option is common to all Style Elements in the Style.
Assigning the Retune Style command to an assignable switch, footswitch
or EC5 switch
Assign the Retune Style command to an assignable switch
1 Go to the Style Play/Song Play > Pad/Switch > Switch page.
2 Use one of the Switch 1…3 menus to choose a command to be assigned to the corresponding switch. Since the first two switches are usually assigned to the Sound Controllers, we suggest you use Switch #3.
3 Write the changes to a Keyboard Set. Writing to the special MY SETTING Keyboard Set makes this setting available when turning the instrument on.

82|
4 Be sure the lock is closed; this will leave the assignable switch functions un-changed when choosing different Keyboard Sets.
Assign the Retune Style command to a footswitch or EC5 switch
1 Go to the Global > Controllers > Foot or EC5 page.
2 Use the Function or one of the A…E menus to choose a command to be as-signed to the corresponding switch.
Using the Retune Style command
When the Retune Style command is assigned to an assignable switch, footswitch or EC5 switch, use it to change the Style Element Scale’s root key.
After choosing a Style, check the main page of the Style Play mode. If at least one of the Style Elements has a sub-scale assigned, and it is enabled on at least one of the tracks, the Key parameter will appear in the Style area.
Retune with an assignable switch
1 Just before having to retune the Style, press the assignable switch. The indicator will start flashing.
2 Play a chord in the chord recognition area. The root of the chord will be the new root of the scale. The indicator will stop flashing.
Retune with a footswitch or EC5 switch
1 Just before having to retune the Style, press the footswitch or EC5 switch.
2 Play a chord in the chord recognition area. The root of the chord will be the new root of the scale.
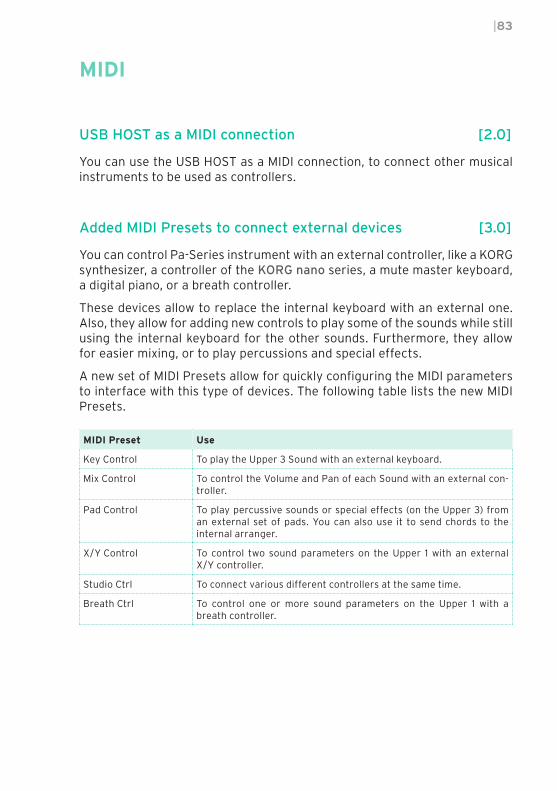
|83
MIDI
USB HOST as a MIDI connection [2.0]
You can use the USB HOST as a MIDI connection, to connect other musical instruments to be used as controllers.
Added MIDI Presets to connect external devices [3.0]
You can control Pa-Series instrument with an external controller, like a KORG synthesizer, a controller of the KORG nano series, a mute master keyboard, a digital piano, or a breath controller.
These devices allow to replace the internal keyboard with an external one. Also, they allow for adding new controls to play some of the sounds while still using the internal keyboard for the other sounds. Furthermore, they allow for easier mixing, or to play percussions and special effects.
A new set of MIDI Presets allow for quickly configuring the MIDI parameters to interface with this type of devices. The following table lists the new MIDI Presets.
MIDI Preset Use
Key Control To play the Upper 3 Sound with an external keyboard.
Mix Control To control the Volume and Pan of each Sound with an external con-troller.
Pad Control To play percussive sounds or special effects (on the Upper 3) from an external set of pads. You can also use it to send chords to the internal arranger.
X/Y Control To control two sound parameters on the Upper 1 with an external X/Y controller.
Studio Ctrl To connect various different controllers at the same time.
Breath Ctrl To control one or more sound parameters on the Upper 1 with a breath controller.
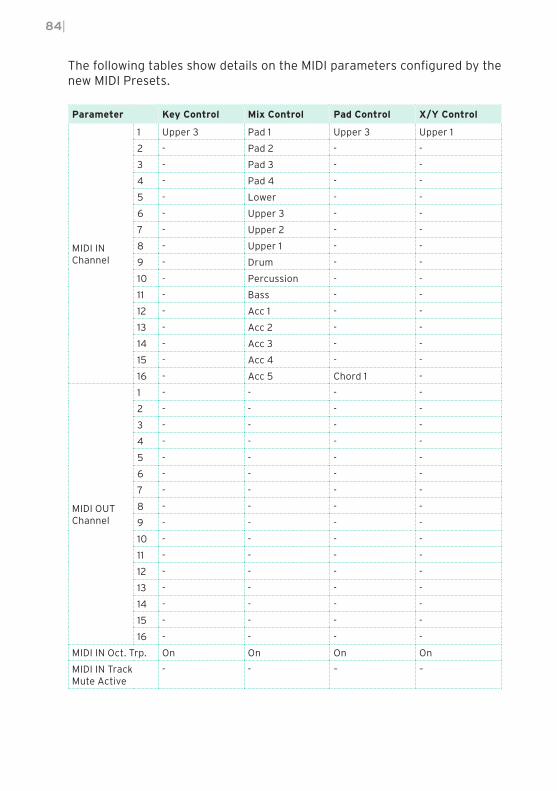
84|
The following tables show details on the MIDI parameters configured by the new MIDI Presets.
Parameter Key Control Mix Control Pad Control X/Y Control
MIDI IN Channel
1 Upper 3 Pad 1 Upper 3 Upper 1
2 - Pad 2 - -
3 - Pad 3 - -
4 - Pad 4 - -
5 - Lower - -
6 - Upper 3 - -
7 - Upper 2 - -
8 - Upper 1 - -
9 - Drum - -
10 - Percussion - -
11 - Bass - -
12 - Acc 1 - -
13 - Acc 2 - -
14 - Acc 3 - -
15 - Acc 4 - -
16 - Acc 5 Chord 1 -
MIDI OUT Channel
1 - - - -
2 - - - -
3 - - - -
4 - - - -
5 - - - -
6 - - - -
7 - - - -
8 - - - -
9 - - - -
10 - - - -
11 - - - -
12 - - - -
13 - - - -
14 - - - -
15 - - - -
16 - - - -
MIDI IN Oct. Trp. On On On On
MIDI IN Track Mute Active
- - – –

|85
Parameter Studio Ctrl Breath Ctrl
MIDI IN Channel
1 Upper 1 Upper 1
2 Upper 2 -
3 Upper 3 -
4 Lower -
5 Pad 1 -
6 Pad 2 -
7 Pad 3 -
8 Pad 4 -
9 Drum -
10 Percussion -
11 Bass -
12 Acc 1 -
13 Acc 2 -
14 Acc 3 -
15 Acc 4 -
16 Acc 5 -
MIDI OUT Channel
1 - -
2 - -
3 - -
4 - -
5 - -
6 - -
7 - -
8 - -
9 - -
10 - -
11 - -
12 - -
13 - -
14 - -
15 - -
16 - -
MIDI IN Oct. Trp. On On
MIDI IN Track Mute Active
- -

86|
Choosing the Styles and Keyboard Sets via MIDI [1.2]
Styles and Keyboard Sets (from the Library) can be remotely selected via MIDI. To select them, send a sequence of Control Change #00, Control Change #32 and Program Change messages on the special Control channel.
Configuring the Control channel
1 Go to the Global > MIDI > General Controls page and choose a MIDI Preset to be used as a starting point.
2 Go to the Global > MIDI > Midi In Channel page, and assign the Control option to one of the sixteen available MIDI channels (usually one of the higher-num-bered ones, for example #16).
3 When done, save these settings to a new or existing MIDI Preset, by choosing the Write Midi Preset command from the page menu. Blank locations are shown as a series of dashes (‘–––’).
Selecting the Styles and Keyboard Sets
The Control Change/Program Change values corresponding to each Style and Keyboard Set is shown in the relevant lists in the Appendix of the User Manual.
In general, these are the values of Control Change #00.
Styles CC00 Keyboard Sets (Library) CC00
Factory 0 Factory 16
Favorite 1 User 17
User 2 Direct User 18
Direct Favorite 3
Direct User 4
Remote control of the Synchro Start/Stop commands [3.0]
The Synchro Start and Synchro Stop commands can now be turned on/off via MIDI. You can remotely control them, by sending the Program Change #106 (Synchro Start) and #107 (Synchro Stop) messages on the Control channel.
|87
Fixed Note Off Velocity on received notes [2.0]
Received notes can now have a fixed Note Off velocity value. This is useful when playing Pa4X with a controller sending a too high Note Off velocity value (usually 64).
1 Go to the Global > MIDI > MIDI IN Controls page.
2 Use the Fixed Note Off Velocity parameter to set a fixed Note Off velocity value for all the notes received via MIDI.
Master Transpose and Quarter Tone Scales sent and received via MIDI [1.2]
Master Transpose and Quarter Tone Scale settings are now sent and re-ceived via MIDI.
▪ Master Transpose is in a standard format, that can be received by all GM-compliant devices.
▪ Quarter Tone Scale settings are in a proprietary format, that can be under-stood by all Pa-Series instruments including this feature.
88|
Video Output
Video Mode saved in the Global [2.0]
The Video Mode (Lyrics or Display Mirror) is no longer reset on startup.
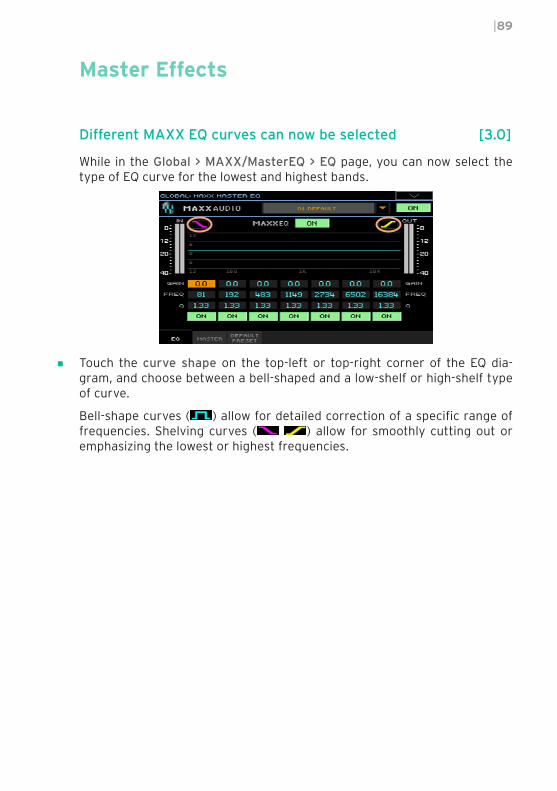
|89
Master Effects
Different MAXX EQ curves can now be selected [3.0]
While in the Global > MAXX/MasterEQ > EQ page, you can now select the type of EQ curve for the lowest and highest bands.
▪ Touch the curve shape on the top-left or top-right corner of the EQ dia-gram, and choose between a bell-shaped and a low-shelf or high-shelf type of curve.
Bell-shape curves ( ) allow for detailed correction of a specific range of frequencies. Shelving curves ( ) allow for smoothly cutting out or emphasizing the lowest or highest frequencies.
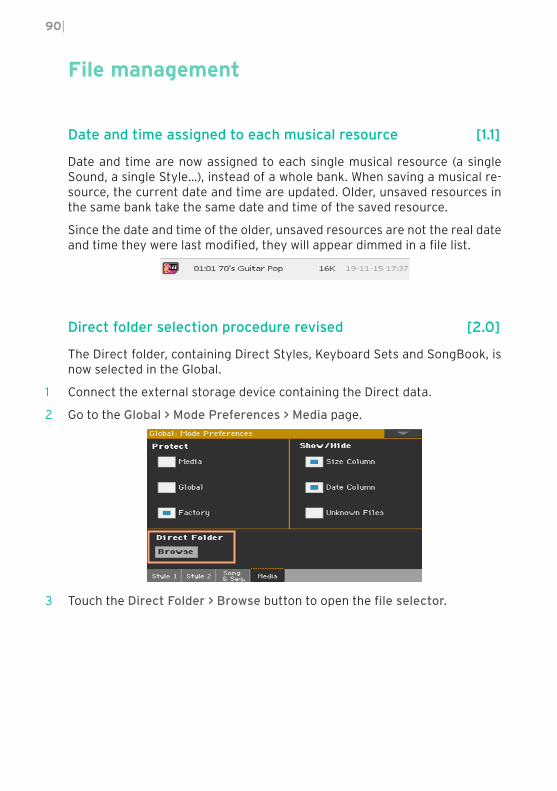
90|
File management
Date and time assigned to each musical resource [1.1]
Date and time are now assigned to each single musical resource (a single Sound, a single Style…), instead of a whole bank. When saving a musical re-source, the current date and time are updated. Older, unsaved resources in the same bank take the same date and time of the saved resource.
Since the date and time of the older, unsaved resources are not the real date and time they were last modified, they will appear dimmed in a file list.
Direct folder selection procedure revised [2.0]
The Direct folder, containing Direct Styles, Keyboard Sets and SongBook, is now selected in the Global.
1 Connect the external storage device containing the Direct data.
2 Go to the Global > Mode Preferences > Media page.
3 Touch the Direct Folder > Browse button to open the file selector.

|91
4 Browse though the drives and folders, and select the SET folder to be used as the Direct set of banks.
5 Touch the Select button to confirm.
Please note that you can only have a single Direct folder of Keyboard Sets, Styles, SongBook.
6 If you select a folder from a different Pa-Series model, you are asked if you want to convert the data to the Pa4X own format. If you confirm, you are prompted to choose a name and position for the new SET folder. (If you touch Cancel, no Direct folder is selected).
7 When done, go to a Select window, and see how the Direct type of data can be selected from the tabs on top of the list.
The Direct SongBook Entries and Set Lists will be automatically added to the internal Entries and Set Lists.
Renaming the Favorite/User/Direct banks [2.0]
You can rename the User/Favorite and Direct User/ Favorite banks, to create your own sets of Keyboard Sets, Styles, or Pads.
1 Open the Keyboard Set, Style, or Pad Select window, and select the User or Direct type of data.
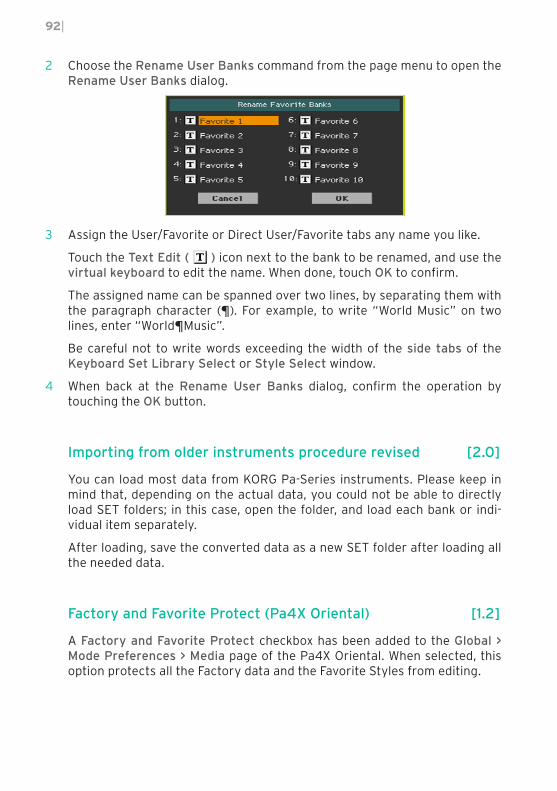
92|
2 Choose the Rename User Banks command from the page menu to open the Rename User Banks dialog.
3 Assign the User/Favorite or Direct User/Favorite tabs any name you like.
Touch the Text Edit ( ) icon next to the bank to be renamed, and use the virtual keyboard to edit the name. When done, touch OK to confirm.
The assigned name can be spanned over two lines, by separating them with the paragraph character (¶). For example, to write “World Music” on two lines, enter “World¶Music”.
Be careful not to write words exceeding the width of the side tabs of the Keyboard Set Library Select or Style Select window.
4 When back at the Rename User Banks dialog, confirm the operation by touching the OK button.
Importing from older instruments procedure revised [2.0]
You can load most data from KORG Pa-Series instruments. Please keep in mind that, depending on the actual data, you could not be able to directly load SET folders; in this case, open the folder, and load each bank or indi- vidual item separately.
After loading, save the converted data as a new SET folder after loading all the needed data.
Factory and Favorite Protect (Pa4X Oriental) [1.2]
A Factory and Favorite Protect checkbox has been added to the Global > Mode Preferences > Media page of the Pa4X Oriental. When selected, this option protects all the Factory data and the Favorite Styles from editing.
|93
Automatic memory cleaning when a Load operations including User Samples is interrupted [3.1]
When you load a single User Sound, or a bank of User Sounds, based on User Samples, you might reach the maximum size of sample data, or the maxi-mum number of samples allowed in memory.
In this case, the Load operation is interrupted, and all the samples and mul-tisamples just loaded are removed from the memory. All the samples and multisamples already contained in the memory before starting the Load op-eration are left untouched.
Sounds and Drum Kits are however left in memory. If you select them in the Sound Select window, you may end up with them not sounding, since the referring samples are missing. Please delete them, or repeat loading with selected Sounds or Sound banks.
Automatic file deletion when a Save operations is interrupted [3.1]
If, when saving, there isn’t enough free space in the target disk, the Save operation is interrupted. Any new SET folder you were creating is removed. If you were saving over an existing SET folder, this is restored. No data will be saved.
Please choose a different (and bigger) target device, and repeat the Save operation.
Removing ‘ghost’ samples [3.1]
How to identify ‘ghost’ samples in memory
‘Ghost’ samples are items that only exist as names and pointers, but not as actual sample data. They are usually the result of corrupt data, maybe cre-ated by importing of malformed data.
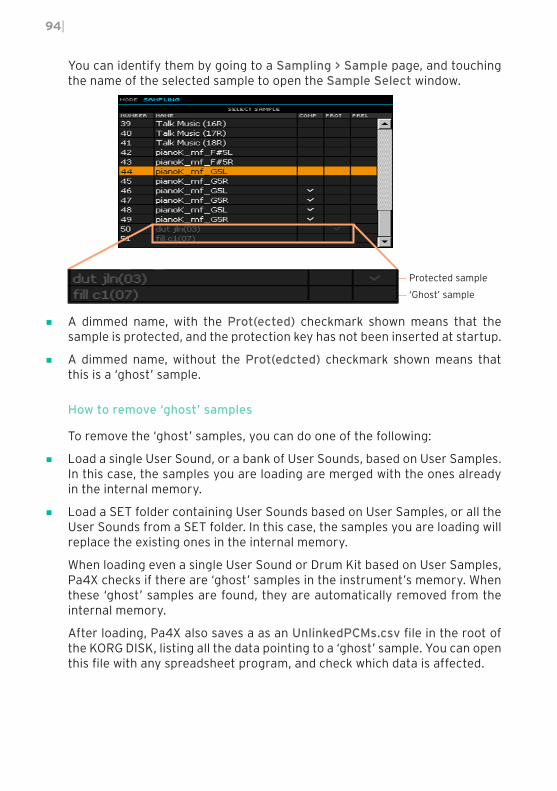
94|
You can identify them by going to a Sampling > Sample page, and touching the name of the selected sample to open the Sample Select window.
Protected sample
‘Ghost’ sample
▪ A dimmed name, with the Prot(ected) checkmark shown means that the sample is protected, and the protection key has not been inserted at startup.
▪ A dimmed name, without the Prot(edcted) checkmark shown means that this is a ‘ghost’ sample.
How to remove ‘ghost’ samples
To remove the ‘ghost’ samples, you can do one of the following:
▪ Load a single User Sound, or a bank of User Sounds, based on User Samples. In this case, the samples you are loading are merged with the ones already in the internal memory.
▪ Load a SET folder containing User Sounds based on User Samples, or all the User Sounds from a SET folder. In this case, the samples you are loading will replace the existing ones in the internal memory.
When loading even a single User Sound or Drum Kit based on User Samples, Pa4X checks if there are ‘ghost’ samples in the instrument’s memory. When these ‘ghost’ samples are found, they are automatically removed from the internal memory.
After loading, Pa4X also saves a as an UnlinkedPCMs.csv file in the root of the KORG DISK, listing all the data pointing to a ‘ghost’ sample. You can open this file with any spreadsheet program, and check which data is affected.
|95
How to delete Sounds and Drum Kits that were referring to ‘ghost’ sam-
ples
By opening the automatically generated UnlinkedPCMs.csv file, you can see the name of the Sounds and Drum Kits that contain references to the deleted ‘ghost’ samples.
At this point, you can go to the main page, open the Sound Select window and delete them. You can also find them by using the Search function.
How to delete multisamples that were referring to ‘ghost’ samples
After having removed the ‘ghost’ samples and the Sounds and Drum Kit that were referring to them, you can automatically remove the ‘orphaned’ mul-tisamples.
1 Go to a Sampling > MultiSample page.
2 Choose the Delete command from the page menu to open the Delete Multisample dialog, and select the Not assigned to any Sound (+Samples/Drum Samples) option.
3 Confirm deleting the ‘orphaned’ multisamples from memory.
Save the cleaned data
After the ‘ghost’ samples and all the referring data have been removed, go to the Media > Save page, and save the User Sounds into a SET folder, that will be cleaned of unwanted data. You can save the User Sounds alone, or do a Save All to entirely regenerate the SET folder.
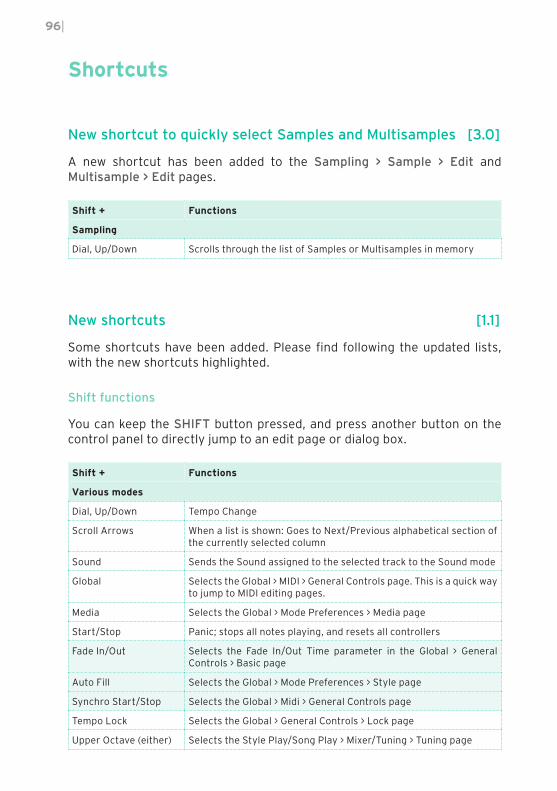
96|
Shortcuts
New shortcut to quickly select Samples and Multisamples [3.0]
A new shortcut has been added to the Sampling > Sample > Edit and Multisample > Edit pages.
Shift + Functions
Sampling
Dial, Up/Down Scrolls through the list of Samples or Multisamples in memory
New shortcuts [1.1]
Some shortcuts have been added. Please find following the updated lists, with the new shortcuts highlighted.
Shift functions
You can keep the SHIFT button pressed, and press another button on the control panel to directly jump to an edit page or dialog box.
Shift + Functions
Various modes
Dial, Up/Down Tempo Change
Scroll Arrows When a list is shown: Goes to Next/Previous alphabetical section of the currently selected column
Sound Sends the Sound assigned to the selected track to the Sound mode
Global Selects the Global > MIDI > General Controls page. This is a quick way to jump to MIDI editing pages.
Media Selects the Global > Mode Preferences > Media page
Start/Stop Panic; stops all notes playing, and resets all controllers
Fade In/Out Selects the Fade In/Out Time parameter in the Global > General Controls > Basic page
Auto Fill Selects the Global > Mode Preferences > Style page
Synchro Start/Stop Selects the Global > Midi > General Controls page
Tempo Lock Selects the Global > General Controls > Lock page
Upper Octave (either) Selects the Style Play/Song Play > Mixer/Tuning > Tuning page
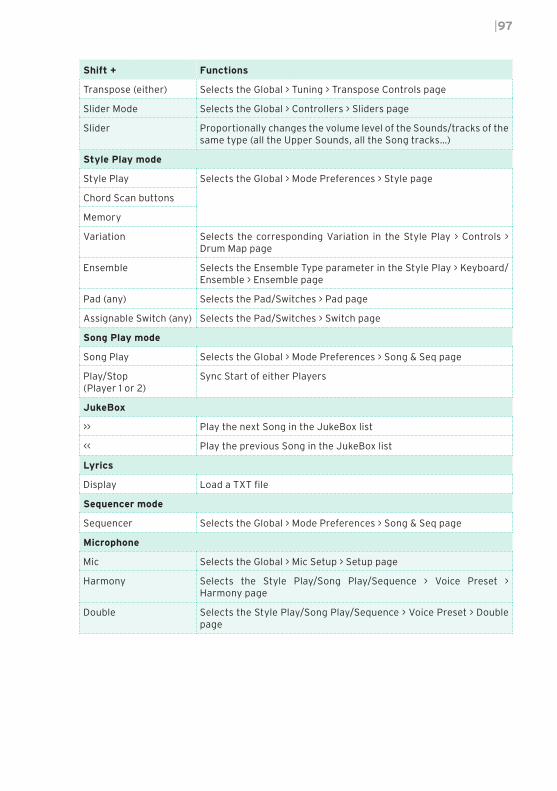
|97
Shift + Functions
Transpose (either) Selects the Global > Tuning > Transpose Controls page
Slider Mode Selects the Global > Controllers > Sliders page
Slider Proportionally changes the volume level of the Sounds/tracks of the same type (all the Upper Sounds, all the Song tracks…)
Style Play mode
Style Play Selects the Global > Mode Preferences > Style page
Chord Scan buttons
Memory
Variation Selects the corresponding Variation in the Style Play > Controls > Drum Map page
Ensemble Selects the Ensemble Type parameter in the Style Play > Keyboard/Ensemble > Ensemble page
Pad (any) Selects the Pad/Switches > Pad page
Assignable Switch (any) Selects the Pad/Switches > Switch page
Song Play mode
Song Play Selects the Global > Mode Preferences > Song & Seq page
Play/Stop (Player 1 or 2)
Sync Start of either Players
JukeBox
>> Play the next Song in the JukeBox list
<< Play the previous Song in the JukeBox list
Lyrics
Display Load a TXT file
Sequencer mode
Sequencer Selects the Global > Mode Preferences > Song & Seq page
Microphone
Mic Selects the Global > Mic Setup > Setup page
Harmony Selects the Style Play/Song Play/Sequence > Voice Preset > Harmony page
Double Selects the Style Play/Song Play/Sequence > Voice Preset > Double page

98|
Long keypress
You can keep a button pressed for about one second to directly jump to an edit page or dialog box.
Long keypress Functions
Any mode
Split Opens the Split Point dialog box. Play a note to set the new Split Point.
Style Play mode
Style buttons Opens the Write Current Style Settings window
Style Play and Song Play mode
Keyboard Set Library buttons
Opens the Write Keyboard Set to Library window
Keyboard Set buttons (under the display)
Opens the Write Keyboard Set to Style window
My Setting Opens the Write My Setting window
Mic/Voice Preset Opens the Write Voice Preset window
SongBook Create a new SongBook Entry and opens the Write Song window (only if pressed outside the SongBook)
Record Opens the MP3 Record dialog box
Global mode
Global Touch Panel Calibration
Special functions
Other available shortcuts are the following ones.
Style Play mode
Tempo +/– (together) Original Tempo
Transpose #/b (together) Set the Master Transpose to 0
Upper Octave +/- (together) Set the Upper Octave to the original setting
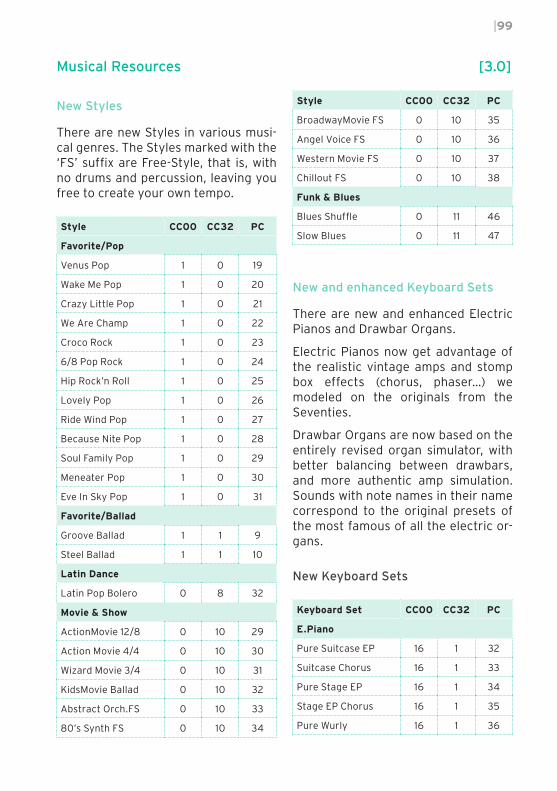
|99
Musical Resources [3.0]
New Styles
There are new Styles in various musi-cal genres. The Styles marked with the ‘FS’ suffix are Free-Style, that is, with no drums and percussion, leaving you free to create your own tempo.
Style CC00 CC32 PC
Favorite/Pop
Venus Pop 1 0 19
Wake Me Pop 1 0 20
Crazy Little Pop 1 0 21
We Are Champ 1 0 22
Croco Rock 1 0 23
6/8 Pop Rock 1 0 24
Hip Rock’n Roll 1 0 25
Lovely Pop 1 0 26
Ride Wind Pop 1 0 27
Because Nite Pop 1 0 28
Soul Family Pop 1 0 29
Meneater Pop 1 0 30
Eve In Sky Pop 1 0 31
Favorite/Ballad
Groove Ballad 1 1 9
Steel Ballad 1 1 10
Latin Dance
Latin Pop Bolero 0 8 32
Movie & Show
ActionMovie 12/8 0 10 29
Action Movie 4/4 0 10 30
Wizard Movie 3/4 0 10 31
KidsMovie Ballad 0 10 32
Abstract Orch.FS 0 10 33
80’s Synth FS 0 10 34
Style CC00 CC32 PC
BroadwayMovie FS 0 10 35
Angel Voice FS 0 10 36
Western Movie FS 0 10 37
Chillout FS 0 10 38
Funk & Blues
Blues Shuffle 0 11 46
Slow Blues 0 11 47
New and enhanced Keyboard Sets
There are new and enhanced Electric Pianos and Drawbar Organs.
Electric Pianos now get advantage of the realistic vintage amps and stomp box effects (chorus, phaser…) we modeled on the originals from the Seventies.
Drawbar Organs are now based on the entirely revised organ simulator, with better balancing between drawbars, and more authentic amp simulation. Sounds with note names in their name correspond to the original presets of the most famous of all the electric or-gans.
New Keyboard Sets
Keyboard Set CC00 CC32 PC
E.Piano
Pure Suitcase EP 16 1 32
Suitcase Chorus 16 1 33
Pure Stage EP 16 1 34
Stage EP Chorus 16 1 35
Pure Wurly 16 1 36
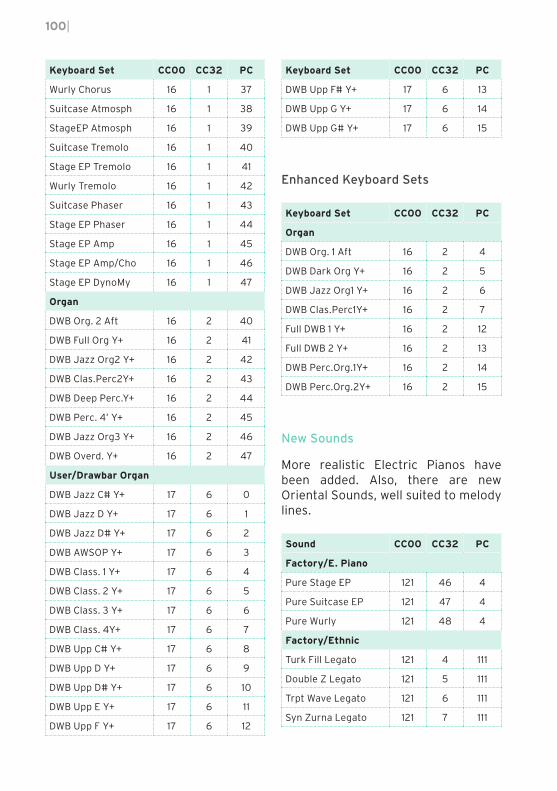
100|
Keyboard Set CC00 CC32 PC
Wurly Chorus 16 1 37
Suitcase Atmosph 16 1 38
StageEP Atmosph 16 1 39
Suitcase Tremolo 16 1 40
Stage EP Tremolo 16 1 41
Wurly Tremolo 16 1 42
Suitcase Phaser 16 1 43
Stage EP Phaser 16 1 44
Stage EP Amp 16 1 45
Stage EP Amp/Cho 16 1 46
Stage EP DynoMy 16 1 47
Organ
DWB Org. 2 Aft 16 2 40
DWB Full Org Y+ 16 2 41
DWB Jazz Org2 Y+ 16 2 42
DWB Clas.Perc2Y+ 16 2 43
DWB Deep Perc.Y+ 16 2 44
DWB Perc. 4’ Y+ 16 2 45
DWB Jazz Org3 Y+ 16 2 46
DWB Overd. Y+ 16 2 47
User/Drawbar Organ
DWB Jazz C# Y+ 17 6 0
DWB Jazz D Y+ 17 6 1
DWB Jazz D# Y+ 17 6 2
DWB AWSOP Y+ 17 6 3
DWB Class. 1 Y+ 17 6 4
DWB Class. 2 Y+ 17 6 5
DWB Class. 3 Y+ 17 6 6
DWB Class. 4Y+ 17 6 7
DWB Upp C# Y+ 17 6 8
DWB Upp D Y+ 17 6 9
DWB Upp D# Y+ 17 6 10
DWB Upp E Y+ 17 6 11
DWB Upp F Y+ 17 6 12
Keyboard Set CC00 CC32 PC
DWB Upp F# Y+ 17 6 13
DWB Upp G Y+ 17 6 14
DWB Upp G# Y+ 17 6 15
Enhanced Keyboard Sets
Keyboard Set CC00 CC32 PC
Organ
DWB Org. 1 Aft 16 2 4
DWB Dark Org Y+ 16 2 5
DWB Jazz Org1 Y+ 16 2 6
DWB Clas.Perc1Y+ 16 2 7
Full DWB 1 Y+ 16 2 12
Full DWB 2 Y+ 16 2 13
DWB Perc.Org.1Y+ 16 2 14
DWB Perc.Org.2Y+ 16 2 15
New Sounds
More realistic Electric Pianos have been added. Also, there are new Oriental Sounds, well suited to melody lines.
Sound CC00 CC32 PC
Factory/E. Piano
Pure Stage EP 121 46 4
Pure Suitcase EP 121 47 4
Pure Wurly 121 48 4
Factory/Ethnic
Turk Fill Legato 121 4 111
Double Z Legato 121 5 111
Trpt Wave Legato 121 6 111
Syn Zurna Legato 121 7 111
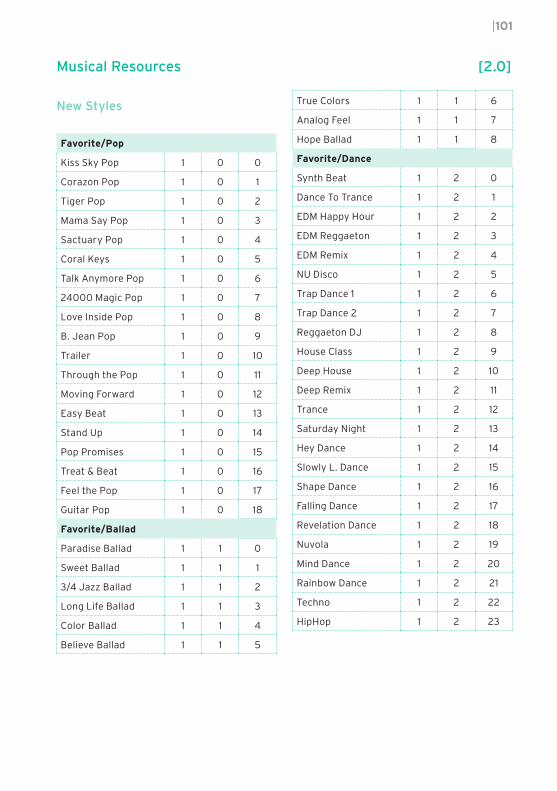
|101
Musical Resources [2.0]
New Styles
Favorite/Pop
Kiss Sky Pop 1 0 0
Corazon Pop 1 0 1
Tiger Pop 1 0 2
Mama Say Pop 1 0 3
Sactuary Pop 1 0 4
Coral Keys 1 0 5
Talk Anymore Pop 1 0 6
24000 Magic Pop 1 0 7
Love Inside Pop 1 0 8
B. Jean Pop 1 0 9
Trailer 1 0 10
Through the Pop 1 0 11
Moving Forward 1 0 12
Easy Beat 1 0 13
Stand Up 1 0 14
Pop Promises 1 0 15
Treat & Beat 1 0 16
Feel the Pop 1 0 17
Guitar Pop 1 0 18
Favorite/Ballad
Paradise Ballad 1 1 0
Sweet Ballad 1 1 1
3/4 Jazz Ballad 1 1 2
Long Life Ballad 1 1 3
Color Ballad 1 1 4
Believe Ballad 1 1 5
True Colors 1 1 6
Analog Feel 1 1 7
Hope Ballad 1 1 8
Favorite/Dance
Synth Beat 1 2 0
Dance To Trance 1 2 1
EDM Happy Hour 1 2 2
EDM Reggaeton 1 2 3
EDM Remix 1 2 4
NU Disco 1 2 5
Trap Dance 1 1 2 6
Trap Dance 2 1 2 7
Reggaeton DJ 1 2 8
House Class 1 2 9
Deep House 1 2 10
Deep Remix 1 2 11
Trance 1 2 12
Saturday Night 1 2 13
Hey Dance 1 2 14
Slowly L. Dance 1 2 15
Shape Dance 1 2 16
Falling Dance 1 2 17
Revelation Dance 1 2 18
Nuvola 1 2 19
Mind Dance 1 2 20
Rainbow Dance 1 2 21
Techno 1 2 22
HipHop 1 2 23
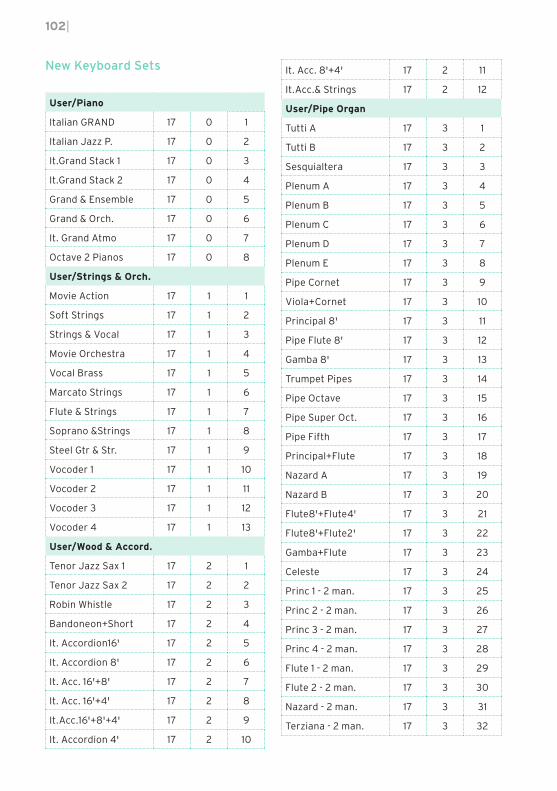
102|
New Keyboard Sets
User/Piano
Italian GRAND 17 0 1
Italian Jazz P. 17 0 2
It.Grand Stack 1 17 0 3
It.Grand Stack 2 17 0 4
Grand & Ensemble 17 0 5
Grand & Orch. 17 0 6
It. Grand Atmo 17 0 7
Octave 2 Pianos 17 0 8
User/Strings & Orch.
Movie Action 17 1 1
Soft Strings 17 1 2
Strings & Vocal 17 1 3
Movie Orchestra 17 1 4
Vocal Brass 17 1 5
Marcato Strings 17 1 6
Flute & Strings 17 1 7
Soprano &Strings 17 1 8
Steel Gtr & Str. 17 1 9
Vocoder 1 17 1 10
Vocoder 2 17 1 11
Vocoder 3 17 1 12
Vocoder 4 17 1 13
User/Wood & Accord.
Tenor Jazz Sax 1 17 2 1
Tenor Jazz Sax 2 17 2 2
Robin Whistle 17 2 3
Bandoneon+Short 17 2 4
It. Accordion16' 17 2 5
It. Accordion 8' 17 2 6
It. Acc. 16'+8' 17 2 7
It. Acc. 16'+4' 17 2 8
It.Acc.16'+8'+4' 17 2 9
It. Accordion 4' 17 2 10
It. Acc. 8'+4' 17 2 11
It.Acc.& Strings 17 2 12
User/Pipe Organ
Tutti A 17 3 1
Tutti B 17 3 2
Sesquialtera 17 3 3
Plenum A 17 3 4
Plenum B 17 3 5
Plenum C 17 3 6
Plenum D 17 3 7
Plenum E 17 3 8
Pipe Cornet 17 3 9
Viola+Cornet 17 3 10
Principal 8' 17 3 11
Pipe Flute 8' 17 3 12
Gamba 8' 17 3 13
Trumpet Pipes 17 3 14
Pipe Octave 17 3 15
Pipe Super Oct. 17 3 16
Pipe Fifth 17 3 17
Principal+Flute 17 3 18
Nazard A 17 3 19
Nazard B 17 3 20
Flute8'+Flute4' 17 3 21
Flute8'+Flute2' 17 3 22
Gamba+Flute 17 3 23
Celeste 17 3 24
Princ 1 - 2 man. 17 3 25
Princ 2 - 2 man. 17 3 26
Princ 3 - 2 man. 17 3 27
Princ 4 - 2 man. 17 3 28
Flute 1 - 2 man. 17 3 29
Flute 2 - 2 man. 17 3 30
Nazard - 2 man. 17 3 31
Terziana - 2 man. 17 3 32

|103
Cornet - 2 man. 17 3 33
Larigot - 2 man. 17 3 34
Trumpet - 2 man. 17 3 35
Plenum1 - 2 man. 17 3 36
Plenum2 - 2 man. 17 3 37
Tutti - 2 man. 17 3 38
User/Synth
Poly6 + JP8 17 4 1
JP8 17 4 2
80's Mellow 17 4 3
80's Super Pad 17 4 4
Analog Synth 17 4 5
Synth Yes 17 4 6
EDM Synth 17 4 7
Dance Basic 17 4 8
Thin PulSeq DNC 17 4 9
Noise Lead DNC 17 4 10
Synth Whooo 17 4 11
Mellow Perc. Pad 17 4 12
Dance Syn Perc 17 4 13
Lfo Sound bpm 17 4 14
Spire Synth 17 4 15
Leadscape 17 4 16
Fing.GlideSquare 17 4 17
Big Side Attack 17 4 18
Groove SynthGtr. 17 4 19
Dubstep Synth 17 4 20
Caos Synth 17 4 21
Robert Bass 17 4 22
Fifth Bass 17 4 23
Widebass 17 4 24
Triangle Solo 17 4 25
Square Solo 17 4 26
Saw Solo 17 4 27
Square & Pulse 17 4 28
16-8-4 & Sub32 17 4 29
User/Fantasy
Mixed Echoes 17 5 1
Runningbpm 17 5 2
Fisarmony 17 5 3
Pacific Sea 17 5 4
Nighthawk 17 5 5
Wave Echoes 17 5 6
Hans Sound 17 5 7
Landscape 17 5 8
Waterland 17 5 9
Meditation Stack 17 5 10
Layers Enjoy 17 5 11
Ipnotic bpm 17 5 12
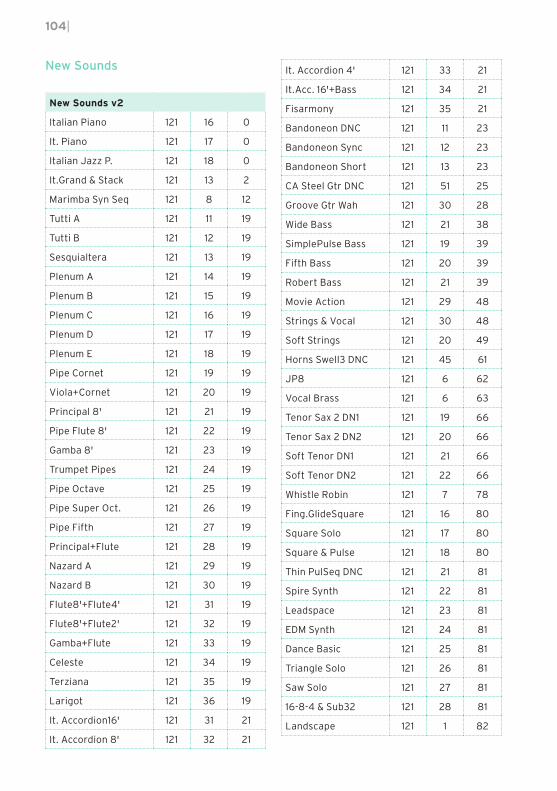
104|
New Sounds
New Sounds v2
Italian Piano 121 16 0
It. Piano 121 17 0
Italian Jazz P. 121 18 0
It.Grand & Stack 121 13 2
Marimba Syn Seq 121 8 12
Tutti A 121 11 19
Tutti B 121 12 19
Sesquialtera 121 13 19
Plenum A 121 14 19
Plenum B 121 15 19
Plenum C 121 16 19
Plenum D 121 17 19
Plenum E 121 18 19
Pipe Cornet 121 19 19
Viola+Cornet 121 20 19
Principal 8' 121 21 19
Pipe Flute 8' 121 22 19
Gamba 8' 121 23 19
Trumpet Pipes 121 24 19
Pipe Octave 121 25 19
Pipe Super Oct. 121 26 19
Pipe Fifth 121 27 19
Principal+Flute 121 28 19
Nazard A 121 29 19
Nazard B 121 30 19
Flute8'+Flute4' 121 31 19
Flute8'+Flute2' 121 32 19
Gamba+Flute 121 33 19
Celeste 121 34 19
Terziana 121 35 19
Larigot 121 36 19
It. Accordion16' 121 31 21
It. Accordion 8' 121 32 21
It. Accordion 4' 121 33 21
It.Acc. 16'+Bass 121 34 21
Fisarmony 121 35 21
Bandoneon DNC 121 11 23
Bandoneon Sync 121 12 23
Bandoneon Short 121 13 23
CA Steel Gtr DNC 121 51 25
Groove Gtr Wah 121 30 28
Wide Bass 121 21 38
SimplePulse Bass 121 19 39
Fifth Bass 121 20 39
Robert Bass 121 21 39
Movie Action 121 29 48
Strings & Vocal 121 30 48
Soft Strings 121 20 49
Horns Swell3 DNC 121 45 61
JP8 121 6 62
Vocal Brass 121 6 63
Tenor Sax 2 DN1 121 19 66
Tenor Sax 2 DN2 121 20 66
Soft Tenor DN1 121 21 66
Soft Tenor DN2 121 22 66
Whistle Robin 121 7 78
Fing.GlideSquare 121 16 80
Square Solo 121 17 80
Square & Pulse 121 18 80
Thin PulSeq DNC 121 21 81
Spire Synth 121 22 81
Leadspace 121 23 81
EDM Synth 121 24 81
Dance Basic 121 25 81
Triangle Solo 121 26 81
Saw Solo 121 27 81
16-8-4 & Sub32 121 28 81
Landscape 121 1 82
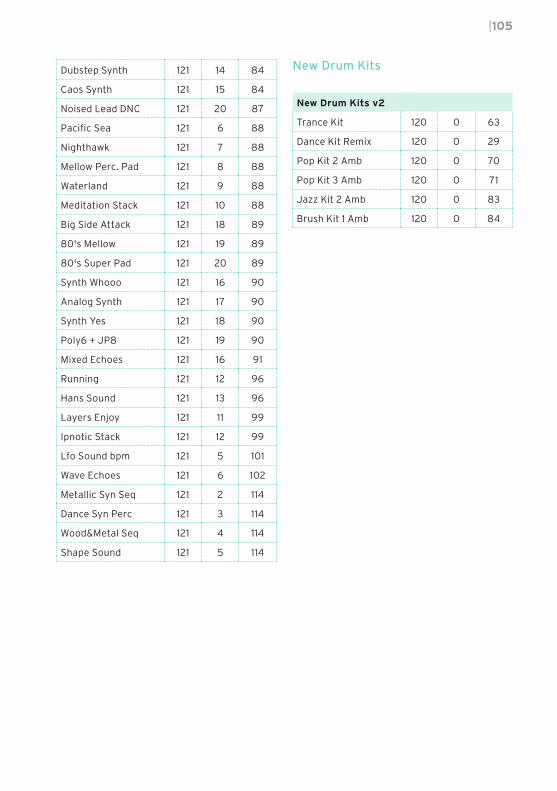
|105
Dubstep Synth 121 14 84
Caos Synth 121 15 84
Noised Lead DNC 121 20 87
Pacific Sea 121 6 88
Nighthawk 121 7 88
Mellow Perc. Pad 121 8 88
Waterland 121 9 88
Meditation Stack 121 10 88
Big Side Attack 121 18 89
80's Mellow 121 19 89
80's Super Pad 121 20 89
Synth Whooo 121 16 90
Analog Synth 121 17 90
Synth Yes 121 18 90
Poly6 + JP8 121 19 90
Mixed Echoes 121 16 91
Running 121 12 96
Hans Sound 121 13 96
Layers Enjoy 121 11 99
Ipnotic Stack 121 12 99
Lfo Sound bpm 121 5 101
Wave Echoes 121 6 102
Metallic Syn Seq 121 2 114
Dance Syn Perc 121 3 114
Wood&Metal Seq 121 4 114
Shape Sound 121 5 114
New Drum Kits
New Drum Kits v2
Trance Kit 120 0 63
Dance Kit Remix 120 0 29
Pop Kit 2 Amb 120 0 70
Pop Kit 3 Amb 120 0 71
Jazz Kit 2 Amb 120 0 83
Brush Kit 1 Amb 120 0 84
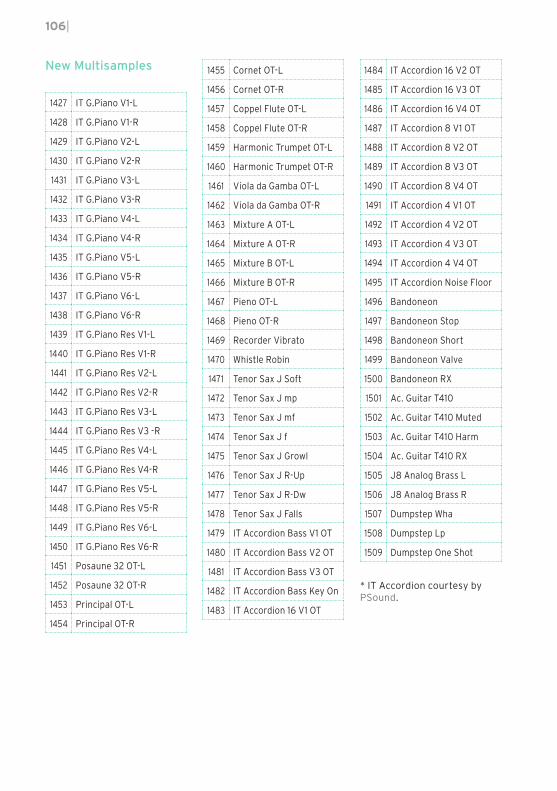
106|
New Multisamples
1427 IT G.Piano V1-L
1428 IT G.Piano V1-R
1429 IT G.Piano V2-L
1430 IT G.Piano V2-R
1431 IT G.Piano V3-L
1432 IT G.Piano V3-R
1433 IT G.Piano V4-L
1434 IT G.Piano V4-R
1435 IT G.Piano V5-L
1436 IT G.Piano V5-R
1437 IT G.Piano V6-L
1438 IT G.Piano V6-R
1439 IT G.Piano Res V1-L
1440 IT G.Piano Res V1-R
1441 IT G.Piano Res V2-L
1442 IT G.Piano Res V2-R
1443 IT G.Piano Res V3-L
1444 IT G.Piano Res V3 -R
1445 IT G.Piano Res V4-L
1446 IT G.Piano Res V4-R
1447 IT G.Piano Res V5-L
1448 IT G.Piano Res V5-R
1449 IT G.Piano Res V6-L
1450 IT G.Piano Res V6-R
1451 Posaune 32 OT-L
1452 Posaune 32 OT-R
1453 Principal OT-L
1454 Principal OT-R
1455 Cornet OT-L
1456 Cornet OT-R
1457 Coppel Flute OT-L
1458 Coppel Flute OT-R
1459 Harmonic Trumpet OT-L
1460 Harmonic Trumpet OT-R
1461 Viola da Gamba OT-L
1462 Viola da Gamba OT-R
1463 Mixture A OT-L
1464 Mixture A OT-R
1465 Mixture B OT-L
1466 Mixture B OT-R
1467 Pieno OT-L
1468 Pieno OT-R
1469 Recorder Vibrato
1470 Whistle Robin
1471 Tenor Sax J Soft
1472 Tenor Sax J mp
1473 Tenor Sax J mf
1474 Tenor Sax J f
1475 Tenor Sax J Growl
1476 Tenor Sax J R-Up
1477 Tenor Sax J R-Dw
1478 Tenor Sax J Falls
1479 IT Accordion Bass V1 OT
1480 IT Accordion Bass V2 OT
1481 IT Accordion Bass V3 OT
1482 IT Accordion Bass Key On
1483 IT Accordion 16 V1 OT
1484 IT Accordion 16 V2 OT
1485 IT Accordion 16 V3 OT
1486 IT Accordion 16 V4 OT
1487 IT Accordion 8 V1 OT
1488 IT Accordion 8 V2 OT
1489 IT Accordion 8 V3 OT
1490 IT Accordion 8 V4 OT
1491 IT Accordion 4 V1 OT
1492 IT Accordion 4 V2 OT
1493 IT Accordion 4 V3 OT
1494 IT Accordion 4 V4 OT
1495 IT Accordion Noise Floor
1496 Bandoneon
1497 Bandoneon Stop
1498 Bandoneon Short
1499 Bandoneon Valve
1500 Bandoneon RX
1501 Ac. Guitar T410
1502 Ac. Guitar T410 Muted
1503 Ac. Guitar T410 Harm
1504 Ac. Guitar T410 RX
1505 J8 Analog Brass L
1506 J8 Analog Brass R
1507 Dumpstep Wha
1508 Dumpstep Lp
1509 Dumpstep One Shot
* IT Accordion courtesy by PSound.
|107
IMPROVEMENTS AND BUG FIXES
Bug fixes in OS 3.1.0
Where Bug fixes
Keyboard Sets Switching from Split to Full keyboard mode could reset the Expression values.
Pads Pads started at the same time could sometimes be out of sync.
Song Play JukeBox playback could be interrupted when playing very large MIDI files.
The wrong Style could be selected in Song Play mode, when the Pad Lock was activated.
Lyrics When using linked TXT files, only seven lines of text were shown instead of eight.
Step Backing Sequence
The wrong Program Change could be selected after editing.
File Management No operation could be done on a Direct SET folder, after having accessed to the internal drive (KORG DISK) from an external computer.
Bug fixes in OS 3.0.1
Where Bug fixes
Audio Inputs In some cases, the phantom power could no longer be activated on the Microphone input.
Voice Presets The unique Voice Preset bank can no longer be renamed.
Styles In some cases, when choosing a different User Style, the wrong Sounds could be assigned to the Accompaniment tracks.
Pads Pads could play out of sync.
MIDI Songs With MIDI Songs using both A and B FX blocks, FX B could sometimes not work.
108|
Improvements and bug fixes in OS 3.0.0
Several minor bug fixes and improvements.
Improvements and bug fixes in OS 2.2.0
General performance improvements.
Improvements and bug fixes in OS 2.1.0
General performance improvements.
Bug fixes in OS 2.0.1
Where Bug fixes
Split With the Keyboard Mode (Split/ Full) lock selected, when exiting Style Record mode the keyboard mode was blocked to Full.
SongBook There were some issues with the Write command, when the filter was enabled in the Book page.
Sampling The page menu could trigger the wrong commands.
CDG Lyrics With CDG Lyrics associated to MP3 Songs, selecting a second MP3 Song wouldn’t also select the corresponding CDG file. Lyrics were still those of the previous Song.
Improvements and bug fixes in OS 2.0.0
Several minor bug fixes and improvements.
Bug fixes in OS 1.2.4
Where Bug fixes
Style Play The Damper&Latch status (Global > Mode Preferences > Style page) was not always saved.
Style Record When entering Style Record mode a second time on a track set to External mode (Style Play > Track Controls > Mode page), notes were not recorded.

|109
Where Bug fixes
Sequencer Repeated transposing of all tracks in Song Edit (Sequencer > Song Edit > Transpose page) could crash the system.
Musical Resources Factory Samples #379 and #380 contained a looping error.
Improvements and bug fixes in OS 1.2.2, 1.2.3
Maintenance versions only.
Bug fixes in OS 1.2.1
Where Bug fixes
Keyboard Sounds When the Upper Volume Link parameter was selected, the proportional volume change of the Upper Sounds didn’t always behave correctly.
Style Play Fill Mode settings where not saved in the Style Settings and SongBook Entries.
When the Fill Mode Lock was selected, depending on the status of other Locks the system could freeze when choosing a Style.
Song Play After having selected a Song by entering its ID number, the Select button in the Song Select window could no longer be accessed, and no Song could be selected.
SongBook Depending on the selected Columns preferences, some information where not shown correctly, or some parameters could blink.
Sampling When loading samples that had been compressed in Pa3X, then decom-pressed in Pa4X v1.1.3, the samples could play wrongly under Pa4X v1.2.0 if loaded under some circumstances (loading separate Sounds, or only the SOUND folder). Please note that samples saved again with Pa4X v1.1.3 or v1.2.0 were not damaged, and could play correctly after recom-pressing them; no data could be lost.
Effects for Sounds When choosing a Style with an Acc track type set to Drum, the Send 2 FX level could appear as set to zero, but a Delay effect could still be heard.
MIDI After booting, the Clock Send parameter could appear selected, but no clock message was actually sent.

110|
Bug fixes in OS 1.2.0
Where Bug fixes
Style Play When the Memory Mode parameter (Global > Mode Preferences > Style page) was set to Chord + Lower or Fixed Arrangement + Lower, and you selected the Intro 1 or Ending 1, the Lower Sound continued to play.
Keyboard Set (from SongBook or Style)
The name of Keyboard Sets (from the SongBook or Style), if written with a non-Latin alphabet, could be shown with the wrong characters.
Style Record MIDI events were not recorded in Style Record Mode.
Song Play If Fast Play was switched on, Player 2 could select the wrong Program Change on track #10.
Sound After Touch did not work in Sound mode.
Sampling Some User Samples could be too loud.
Effects for Sounds The Phase parameter was missing from the St. MultiModeFilter effect.
MIDI The Clock Send status was not automatically saved to memory.
Bug fixes in OS 1.1.3
Where Bug fixes
Boot Some problems when booting have been solved.
Bug fixes in OS 1.1.2
Where Bug fixes
Boot When routing the MP3 Player to the Out 1+2 audio outputs, the instru-ment could not boot.
Improvements in OS 1.1.1
Where Improvements
FX default parameters
Song Play and Sequencer mode FX default settings have been revised. To load the new parameters, be sure to do a Factory Restore (Global only) after loading the new OS.
Internal HD To avoid delays in some operations, the internal HD never goes to sleep while the instrument is functioning.
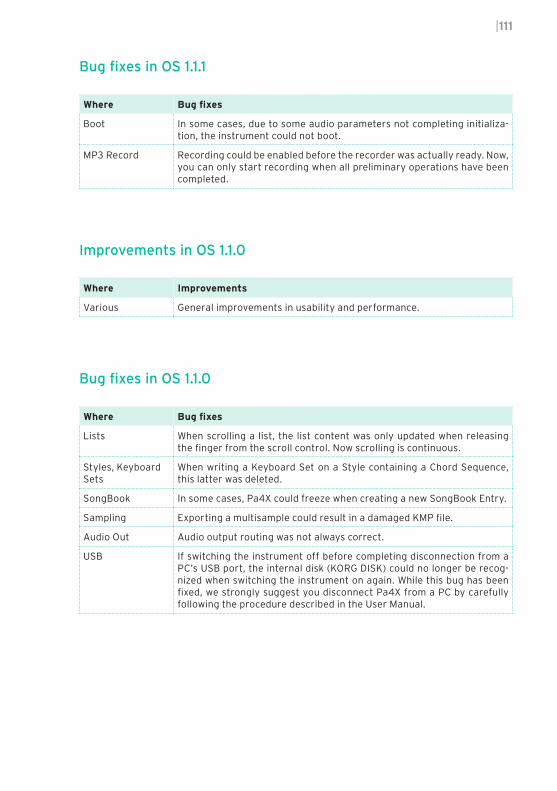
|111
Bug fixes in OS 1.1.1
Where Bug fixes
Boot In some cases, due to some audio parameters not completing initializa-tion, the instrument could not boot.
MP3 Record Recording could be enabled before the recorder was actually ready. Now, you can only start recording when all preliminary operations have been completed.
Improvements in OS 1.1.0
Where Improvements
Various General improvements in usability and performance.
Bug fixes in OS 1.1.0
Where Bug fixes
Lists When scrolling a list, the list content was only updated when releasing the finger from the scroll control. Now scrolling is continuous.
Styles, Keyboard Sets
When writing a Keyboard Set on a Style containing a Chord Sequence, this latter was deleted.
SongBook In some cases, Pa4X could freeze when creating a new SongBook Entry.
Sampling Exporting a multisample could result in a damaged KMP file.
Audio Out Audio output routing was not always correct.
USB If switching the instrument off before completing disconnection from a PC’s USB port, the internal disk (KORG DISK) could no longer be recog-nized when switching the instrument on again. While this bug has been fixed, we strongly suggest you disconnect Pa4X from a PC by carefully following the procedure described in the User Manual.

112|

Pa4
X |
New
Fea
ture
s 3.
1
© KORG Italy 2019. All rights reserved PART NUMBER: MAN0010107
AddressKORG ITALY SpAVia Cagiata, 8560027 Osimo (AN)Italy
Webwww.korg.com
MAN0010
107
15E
Pa4
X