Embed Size (px)
Citation preview
Kronos Exercise Guides
❖ Payroll
ATTEMPT THESE EXERCISES ON YOUR OWN, USE THE SOLUTIONS AS A WAY TO CHECK YOUR PROGRESSION

Payroll Exercises
Agenda
➢Finding your team
➢Timecards
➢Payroll
➢Scheduling

IntroductionTHIS GUIDE WILL WALK YOU THROUGH SPECIFIC EXAMPLES OF THE MATERIAL IN THE INSTRUCTOR LED TRAININGS. IN ORDER TO GET THE BEST OF OUT OF THIS GUIDE SELECT AN EMPLOYEE TO WORK WITH AND USE THEM THROUGHOUT.
KRONOS IMPLEMENTATION
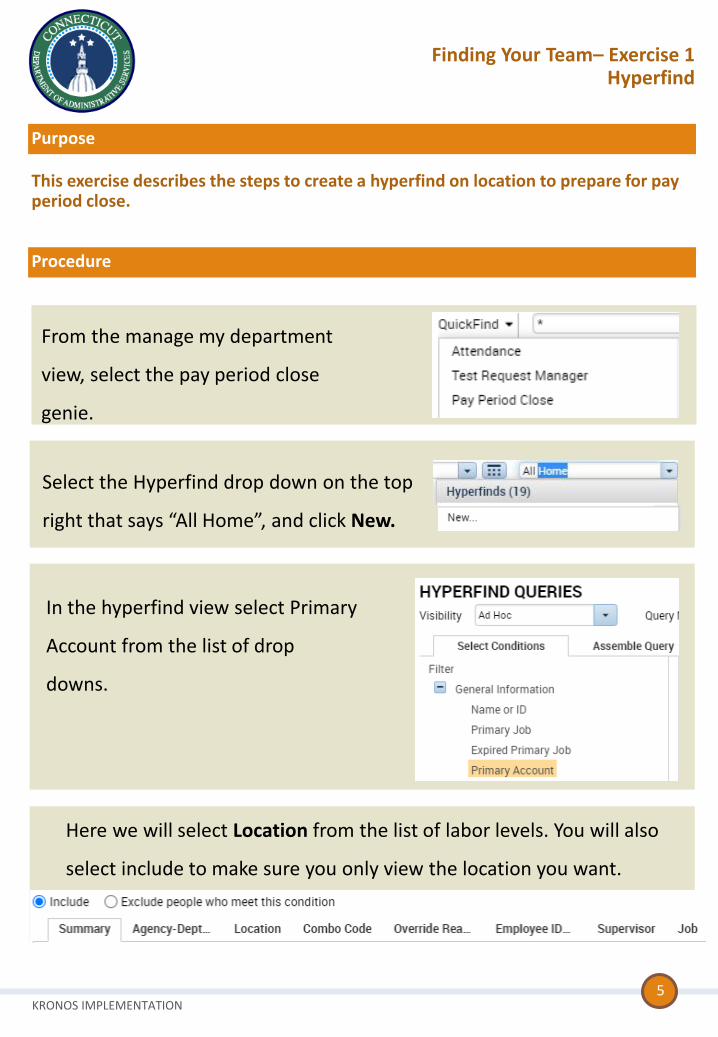
From the manage my department
view, select the pay period close
genie.
Select the Hyperfind drop down on the top
right that says “All Home”, and click New.
This exercise describes the steps to create a hyperfind on location to prepare for pay period close.
Purpose
Procedure
Finding Your Team– Exercise 1Hyperfind
5
In the hyperfind view select Primary
Account from the list of drop
downs.
Here we will select Location from the list of labor levels. You will also
select include to make sure you only view the location you want.
KRONOS IMPLEMENTATION
Procedure
6
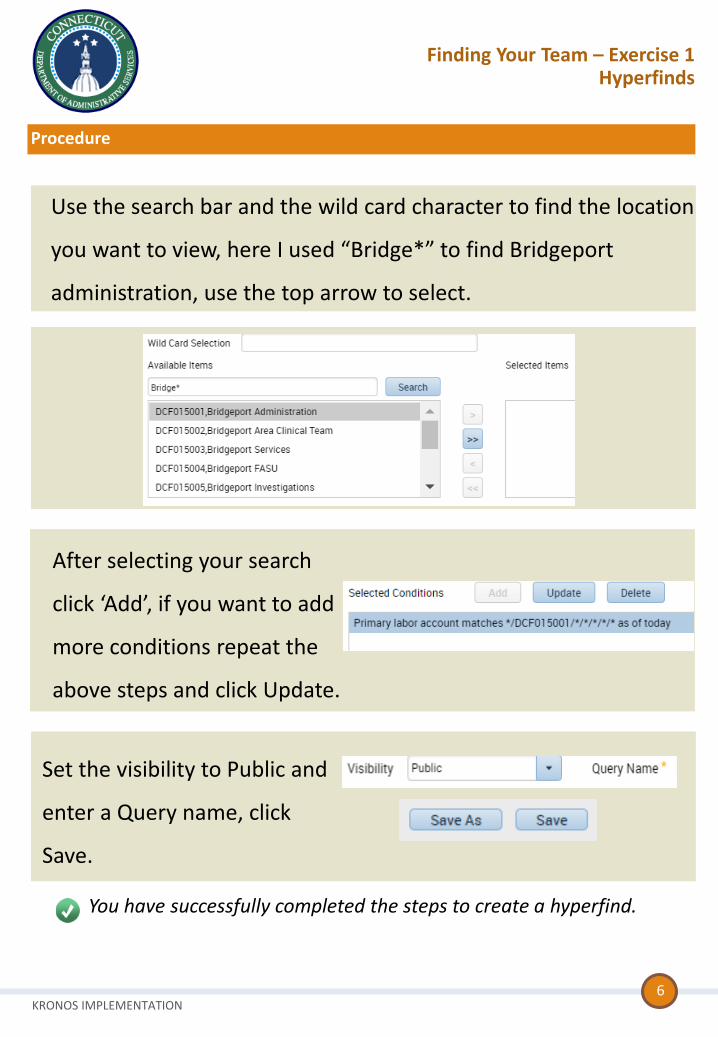
Use the search bar and the wild card character to find the location
you want to view, here I used “Bridge*” to find Bridgeport
administration, use the top arrow to select.
Finding Your Team – Exercise 1Hyperfinds
After selecting your search
click ‘Add’, if you want to add
more conditions repeat the
above steps and click Update.
Set the visibility to Public and
enter a Query name, click
Save.
You have successfully completed the steps to create a hyperfind.
KRONOS IMPLEMENTATION
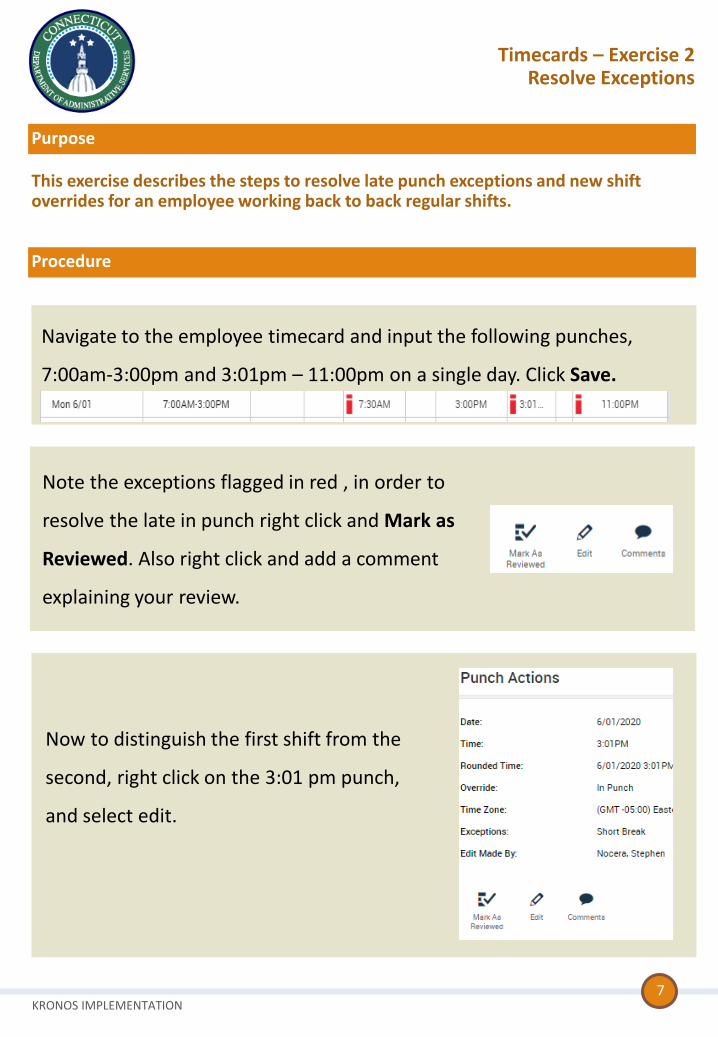
Navigate to the employee timecard and input the following punches,
7:00am-3:00pm and 3:01pm – 11:00pm on a single day. Click Save.
Note the exceptions flagged in red , in order to
resolve the late in punch right click and Mark as
Reviewed. Also right click and add a comment
explaining your review.
This exercise describes the steps to resolve late punch exceptions and new shift overrides for an employee working back to back regular shifts.
Purpose
Procedure
Timecards – Exercise 2Resolve Exceptions
7
Now to distinguish the first shift from the
second, right click on the 3:01 pm punch,
and select edit.
KRONOS IMPLEMENTATION
Procedure
8
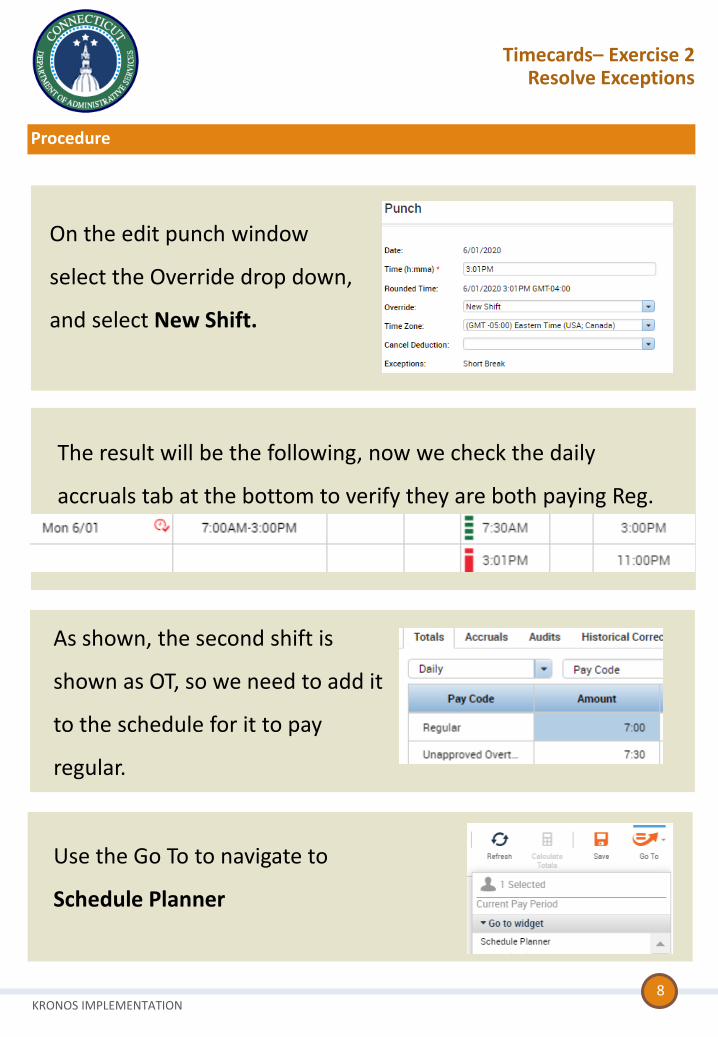
On the edit punch window
select the Override drop down,
and select New Shift.
The result will be the following, now we check the daily
accruals tab at the bottom to verify they are both paying Reg.
Timecards– Exercise 2Resolve Exceptions
As shown, the second shift is
shown as OT, so we need to add it
to the schedule for it to pay
regular.
Use the Go To to navigate to
Schedule Planner
KRONOS IMPLEMENTATION
Procedure
9
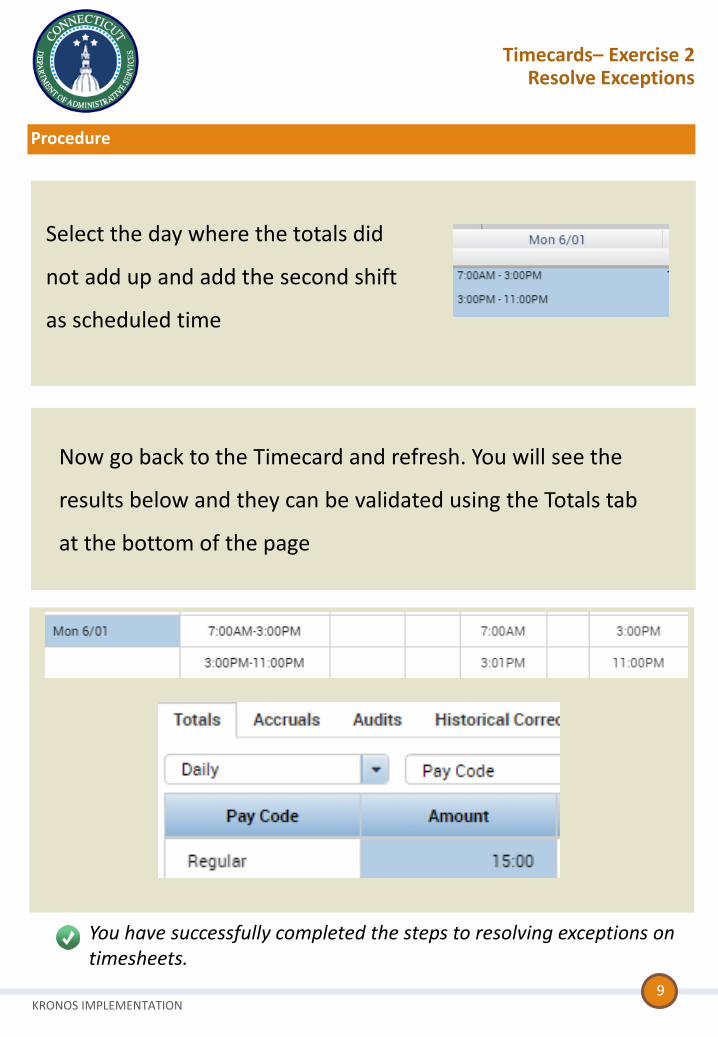
Select the day where the totals did
not add up and add the second shift
as scheduled time
Now go back to the Timecard and refresh. You will see the
results below and they can be validated using the Totals tab
at the bottom of the page
Timecards– Exercise 2Resolve Exceptions
You have successfully completed the steps to resolving exceptions on timesheets.
KRONOS IMPLEMENTATION
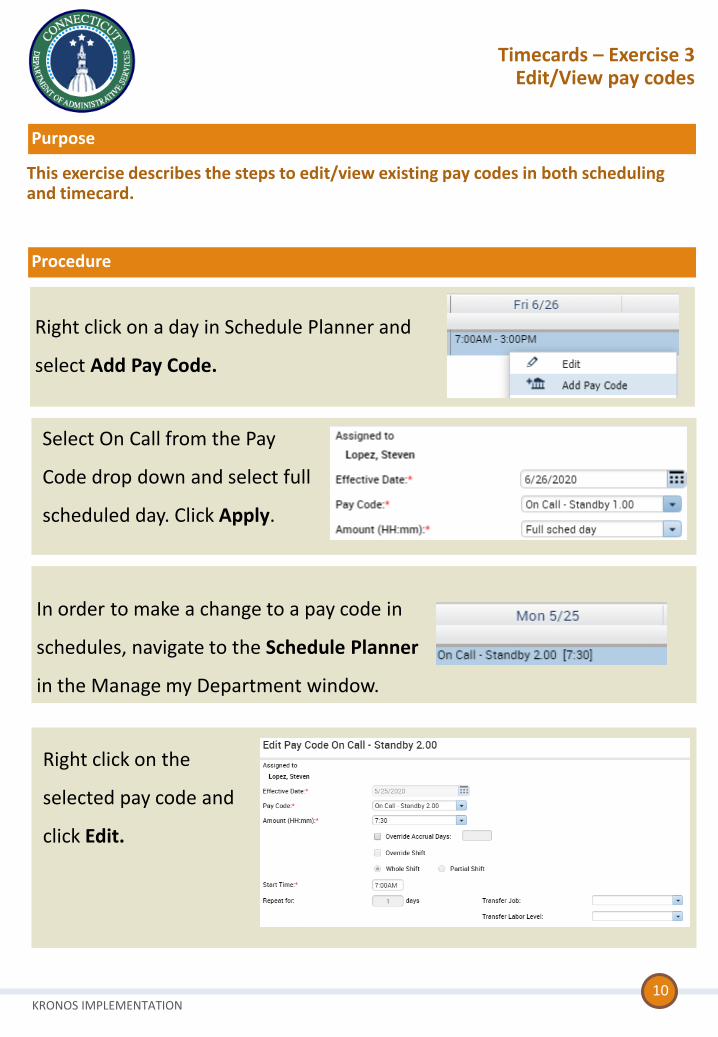
In order to make a change to a pay code in
schedules, navigate to the Schedule Planner
in the Manage my Department window.
Right click on the
selected pay code and
click Edit.
This exercise describes the steps to edit/view existing pay codes in both scheduling and timecard.
Purpose
Procedure
Timecards – Exercise 3Edit/View pay codes
10
Right click on a day in Schedule Planner and
select Add Pay Code.
Select On Call from the Pay
Code drop down and select full
scheduled day. Click Apply.
KRONOS IMPLEMENTATION
Procedure
11
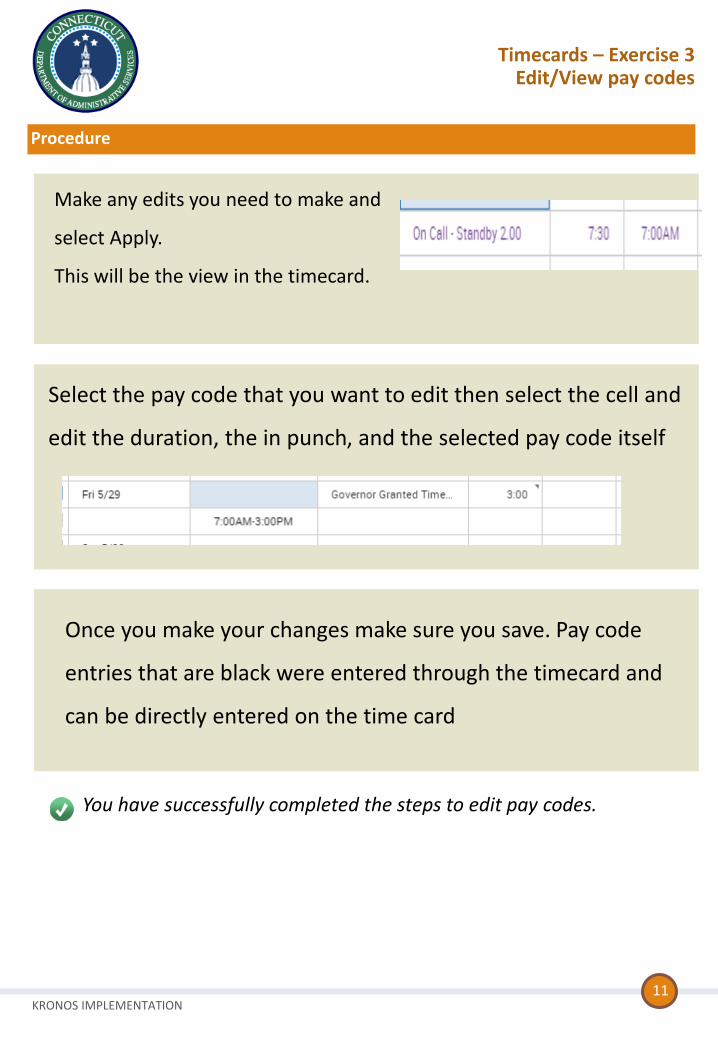
Select the pay code that you want to edit then select the cell and
edit the duration, the in punch, and the selected pay code itself
Timecards – Exercise 3Edit/View pay codes
Once you make your changes make sure you save. Pay code
entries that are black were entered through the timecard and
can be directly entered on the time card
Make any edits you need to make and
select Apply.
This will be the view in the timecard.
You have successfully completed the steps to edit pay codes.
KRONOS IMPLEMENTATION
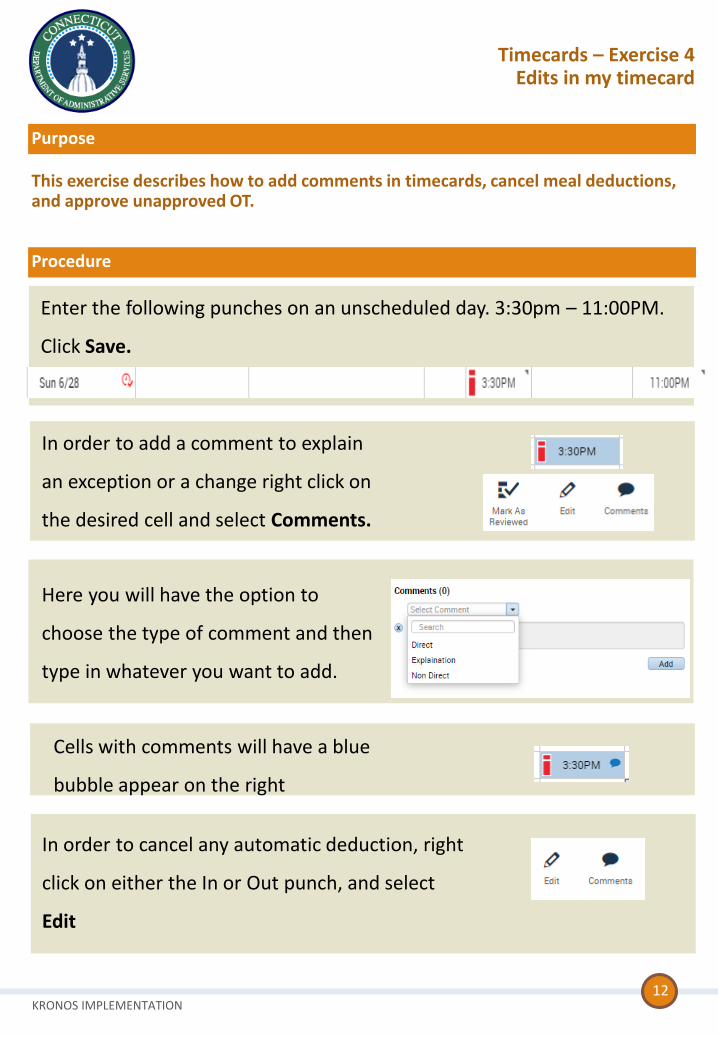
In order to add a comment to explain
an exception or a change right click on
the desired cell and select Comments.
Here you will have the option to
choose the type of comment and then
type in whatever you want to add.
This exercise describes how to add comments in timecards, cancel meal deductions, and approve unapproved OT.
Purpose
Procedure
Timecards – Exercise 4Edits in my timecard
12
In order to cancel any automatic deduction, right
click on either the In or Out punch, and select
Edit
Cells with comments will have a blue
bubble appear on the right
Enter the following punches on an unscheduled day. 3:30pm – 11:00PM.
Click Save.
KRONOS IMPLEMENTATION
Procedure
13
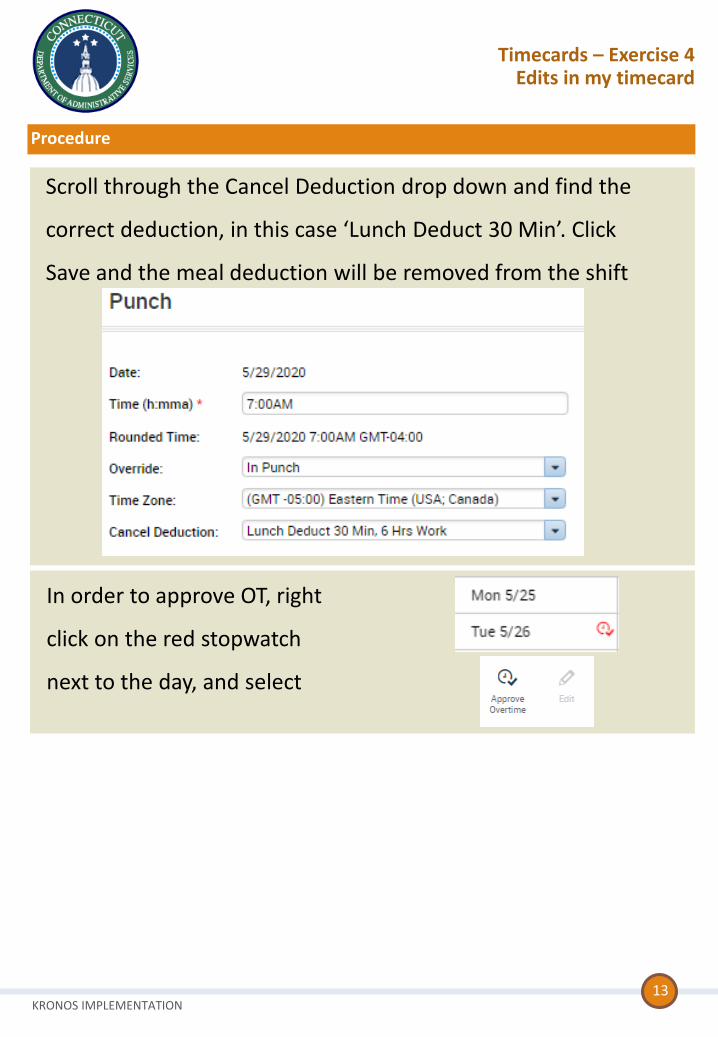
Scroll through the Cancel Deduction drop down and find the
correct deduction, in this case ‘Lunch Deduct 30 Min’. Click
Save and the meal deduction will be removed from the shift
In order to approve OT, right
click on the red stopwatch
next to the day, and select
Timecards – Exercise 4Edits in my timecard
KRONOS IMPLEMENTATION
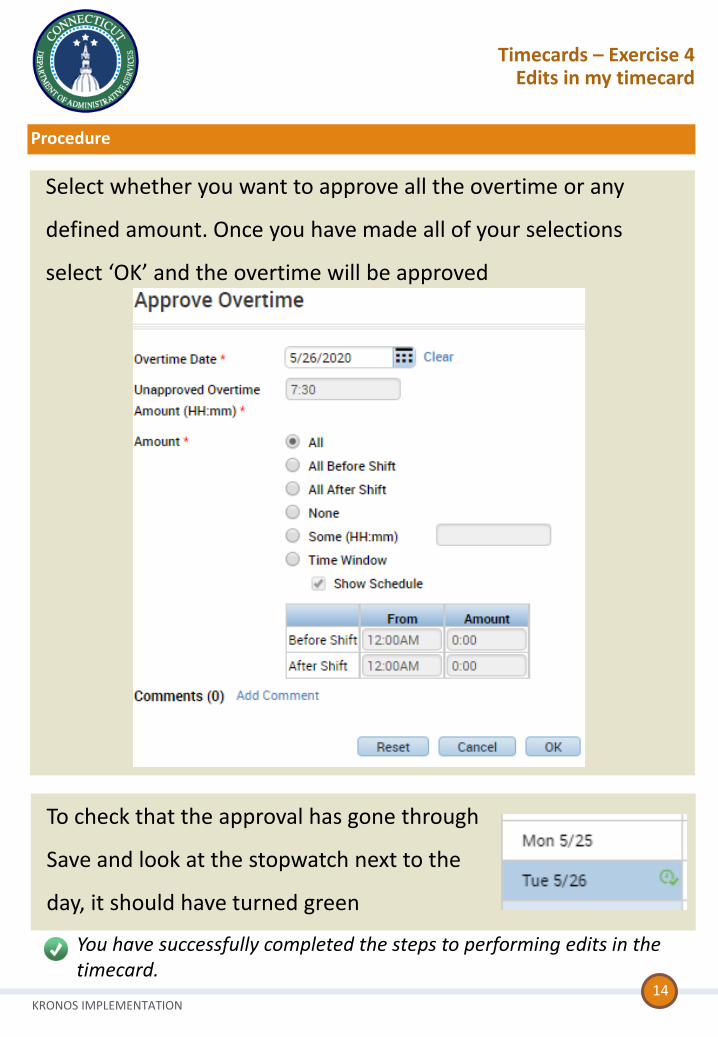
To check that the approval has gone through
Save and look at the stopwatch next to the
day, it should have turned green
Procedure
14
Select whether you want to approve all the overtime or any
defined amount. Once you have made all of your selections
select ‘OK’ and the overtime will be approved
Timecards – Exercise 4Edits in my timecard
You have successfully completed the steps to performing edits in the timecard.
KRONOS IMPLEMENTATION
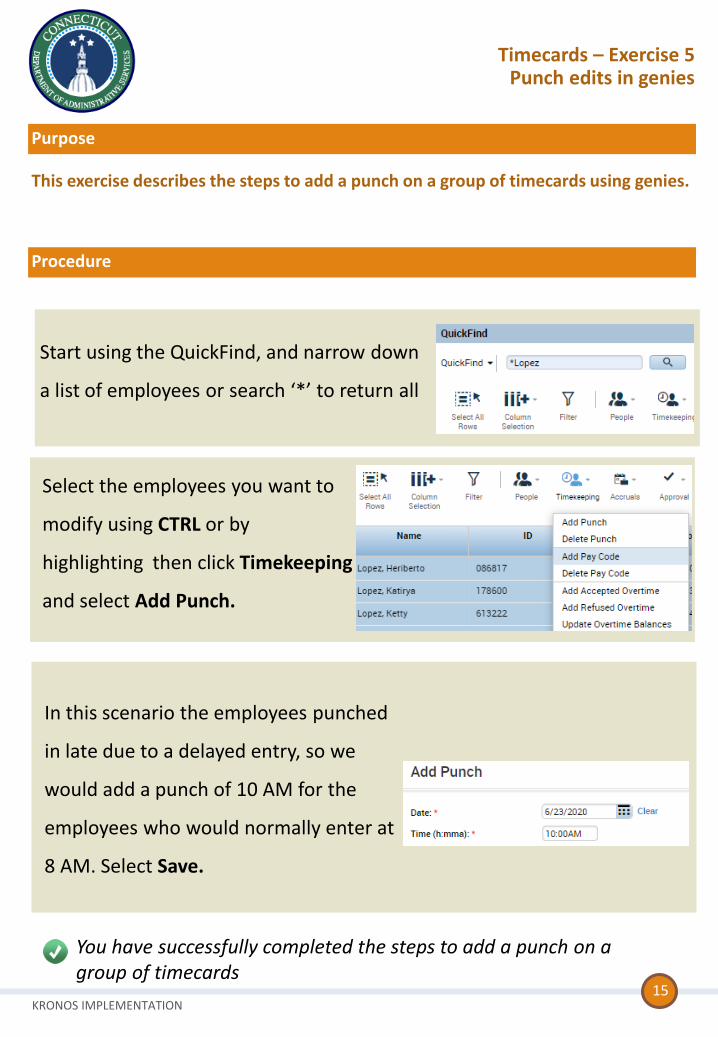
Start using the QuickFind, and narrow down
a list of employees or search ‘*’ to return all
Select the employees you want to
modify using CTRL or by
highlighting then click Timekeeping
and select Add Punch.
This exercise describes the steps to add a punch on a group of timecards using genies.
Purpose
Procedure
Timecards – Exercise 5Punch edits in genies
15
In this scenario the employees punched
in late due to a delayed entry, so we
would add a punch of 10 AM for the
employees who would normally enter at
8 AM. Select Save.
You have successfully completed the steps to add a punch on a group of timecards
KRONOS IMPLEMENTATION
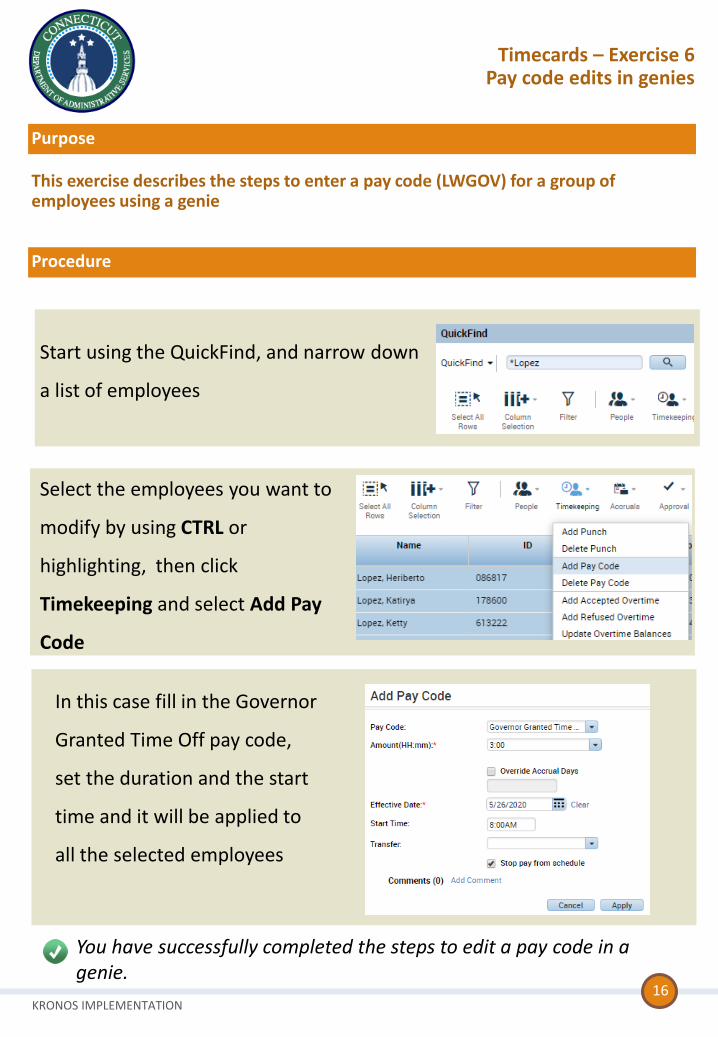
Start using the QuickFind, and narrow down
a list of employees
Select the employees you want to
modify by using CTRL or
highlighting, then click
Timekeeping and select Add Pay
Code
This exercise describes the steps to enter a pay code (LWGOV) for a group of employees using a genie
Purpose
Procedure
Timecards – Exercise 6Pay code edits in genies
16
In this case fill in the Governor
Granted Time Off pay code,
set the duration and the start
time and it will be applied to
all the selected employees
You have successfully completed the steps to edit a pay code in a genie.
KRONOS IMPLEMENTATION
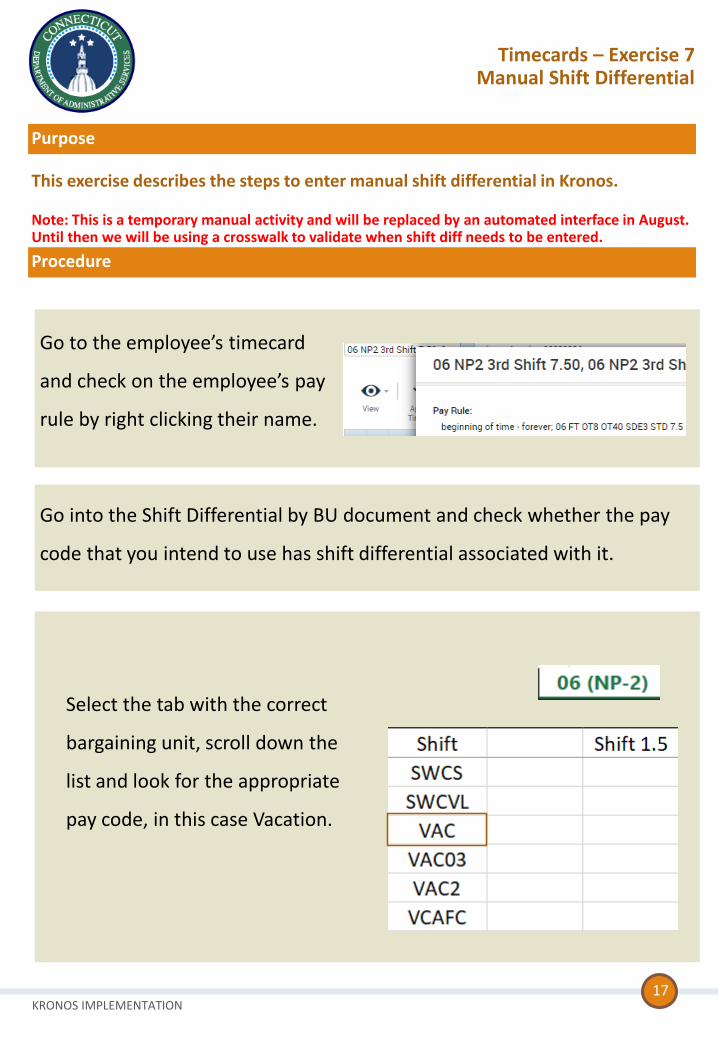
Go to the employee’s timecard
and check on the employee’s pay
rule by right clicking their name.
Go into the Shift Differential by BU document and check whether the pay
code that you intend to use has shift differential associated with it.
This exercise describes the steps to enter manual shift differential in Kronos.
Note: This is a temporary manual activity and will be replaced by an automated interface in August. Until then we will be using a crosswalk to validate when shift diff needs to be entered.
Purpose
Procedure
Timecards – Exercise 7Manual Shift Differential
17
Select the tab with the correct
bargaining unit, scroll down the
list and look for the appropriate
pay code, in this case Vacation.
KRONOS IMPLEMENTATION
Procedure
18
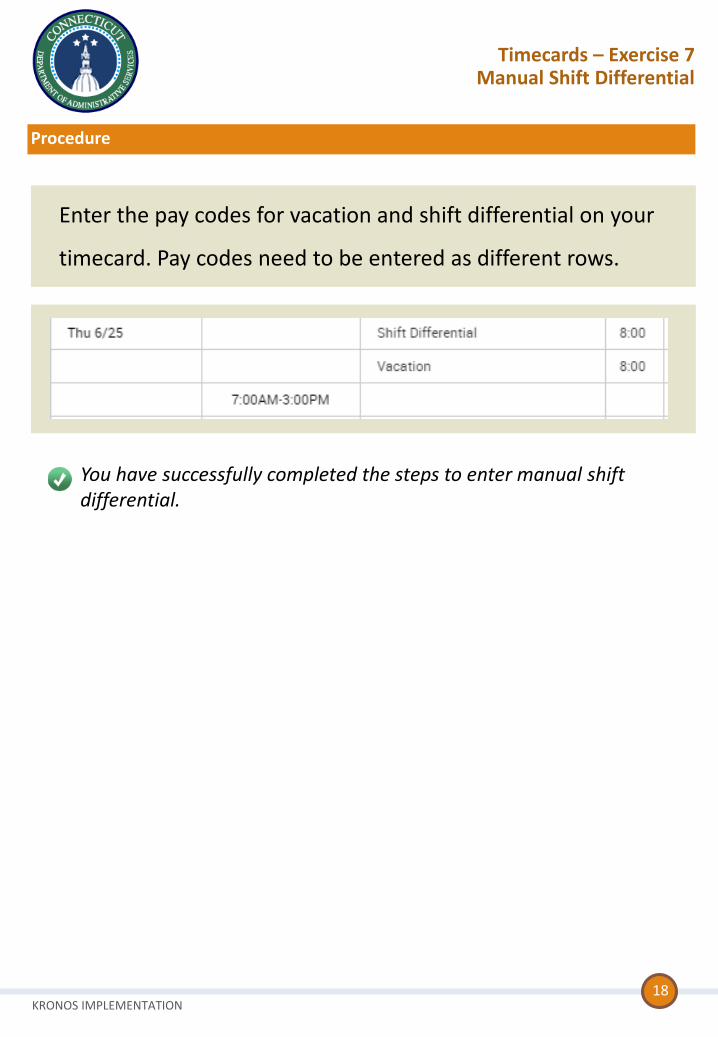
Enter the pay codes for vacation and shift differential on your
timecard. Pay codes need to be entered as different rows.
Timecards – Exercise 7Manual Shift Differential
You have successfully completed the steps to enter manual shift differential.
KRONOS IMPLEMENTATION
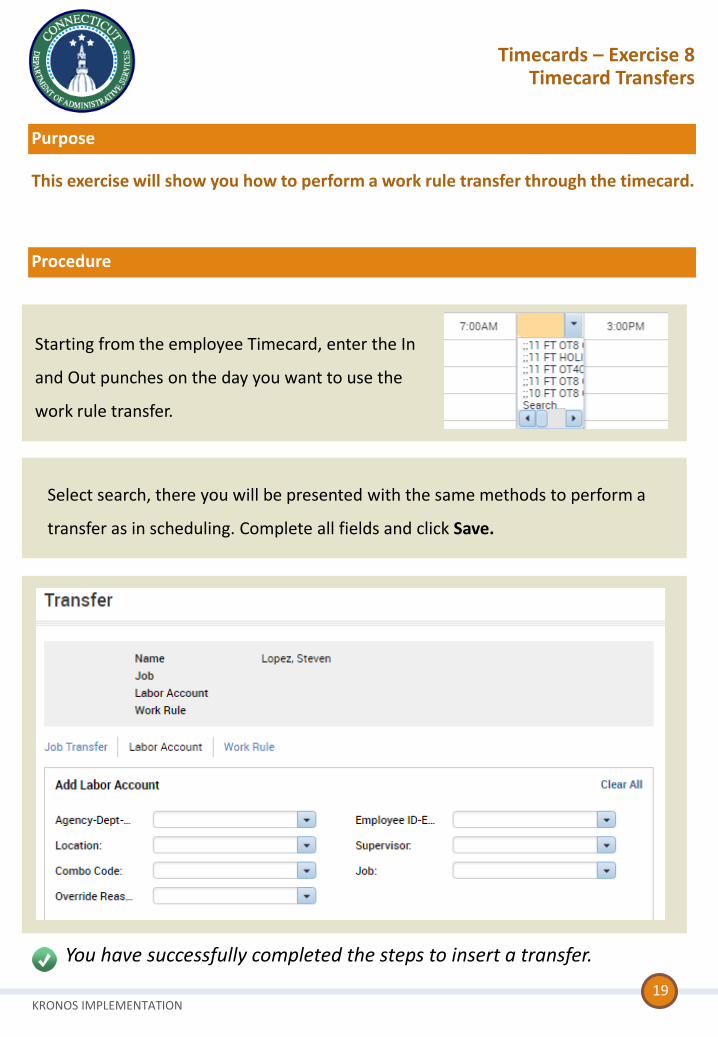
Select search, there you will be presented with the same methods to perform a
transfer as in scheduling. Complete all fields and click Save.
This exercise will show you how to perform a work rule transfer through the timecard.
Purpose
Procedure
Timecards – Exercise 8Timecard Transfers
19
Starting from the employee Timecard, enter the In
and Out punches on the day you want to use the
work rule transfer.
You have successfully completed the steps to insert a transfer.
KRONOS IMPLEMENTATION
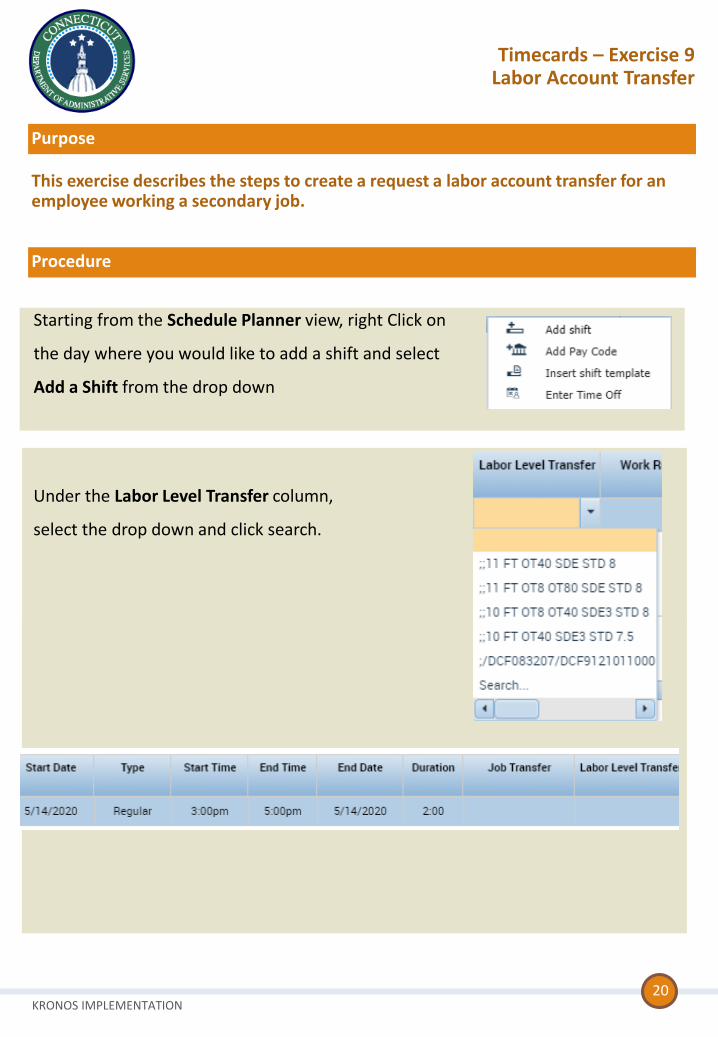
Under the Labor Level Transfer column,
select the drop down and click search.
This exercise describes the steps to create a request a labor account transfer for an employee working a secondary job.
Purpose
Procedure
Timecards – Exercise 9Labor Account Transfer
20
Starting from the Schedule Planner view, right Click on
the day where you would like to add a shift and select
Add a Shift from the drop down
KRONOS IMPLEMENTATION
Procedure
21
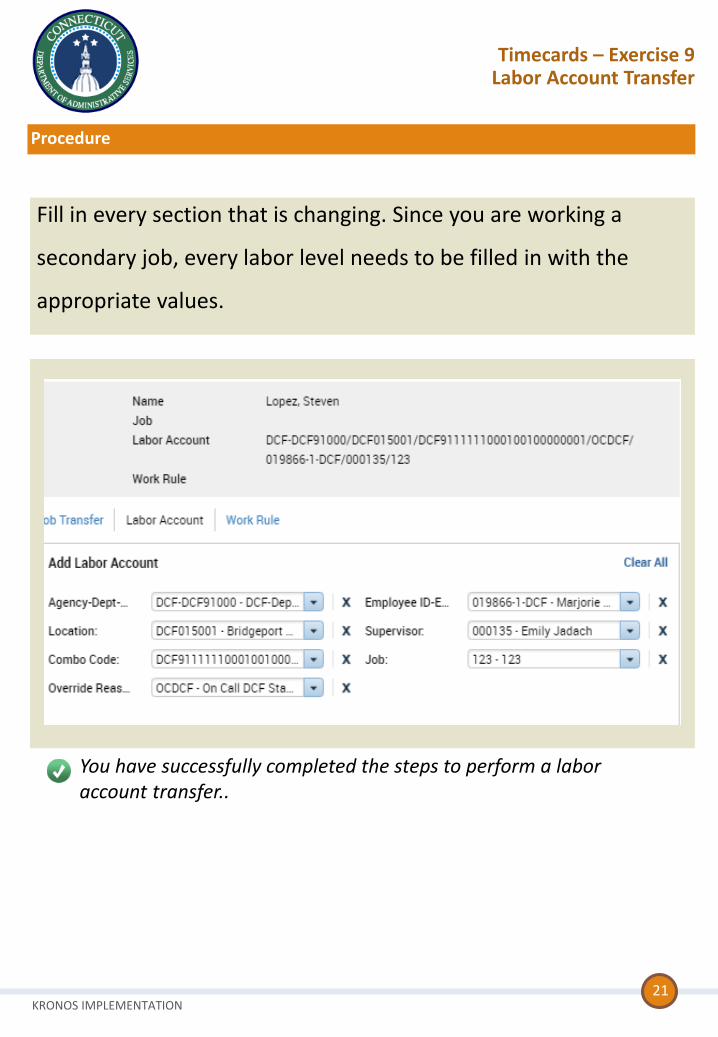
Fill in every section that is changing. Since you are working a
secondary job, every labor level needs to be filled in with the
appropriate values.
Timecards – Exercise 9Labor Account Transfer
You have successfully completed the steps to perform a labor account transfer..
KRONOS IMPLEMENTATION
This exercise describes the steps to create a work rule transfer for an employee working mandated overtime.
Purpose
Procedure
Timecards – Exercise 10Work Rule Transfer
22
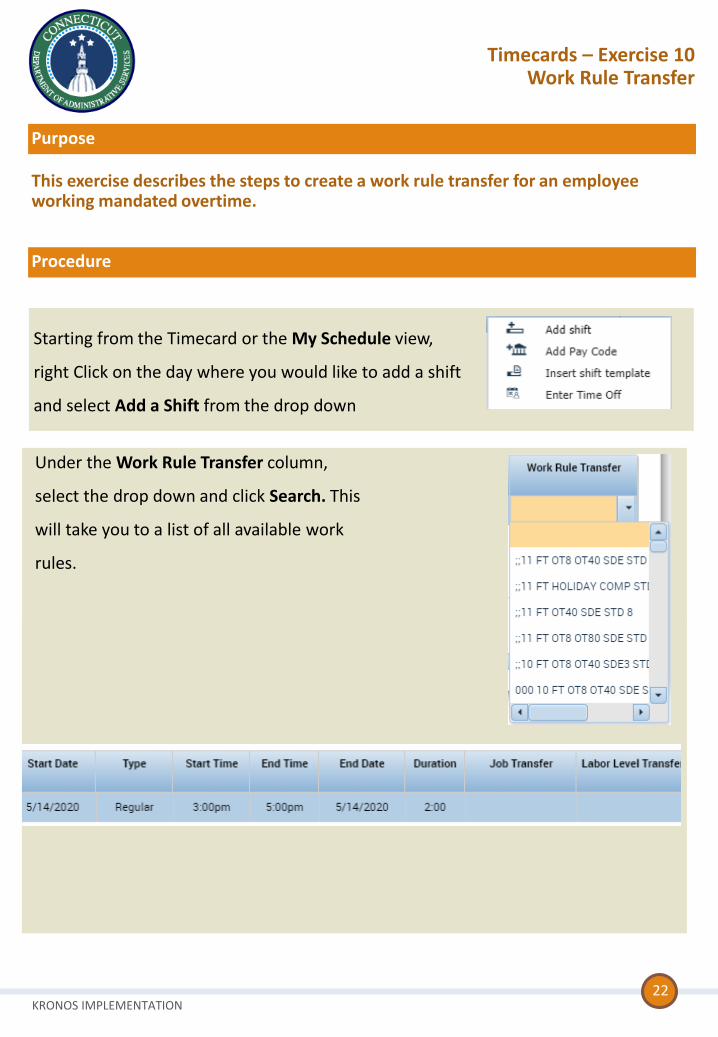
Starting from the Timecard or the My Schedule view,
right Click on the day where you would like to add a shift
and select Add a Shift from the drop down
Under the Work Rule Transfer column,
select the drop down and click Search. This
will take you to a list of all available work
rules.
KRONOS IMPLEMENTATION
Procedure
23
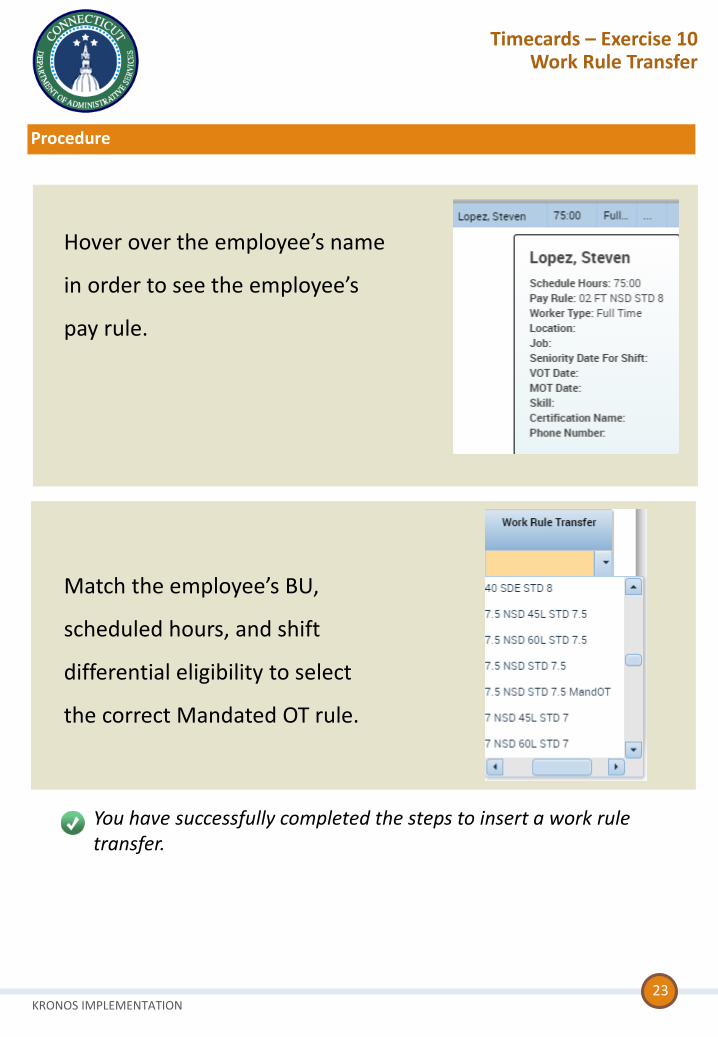
Hover over the employee’s name
in order to see the employee’s
pay rule.
Timecards – Exercise 10Work Rule Transfer
Match the employee’s BU,
scheduled hours, and shift
differential eligibility to select
the correct Mandated OT rule.
You have successfully completed the steps to insert a work rule transfer.
KRONOS IMPLEMENTATION
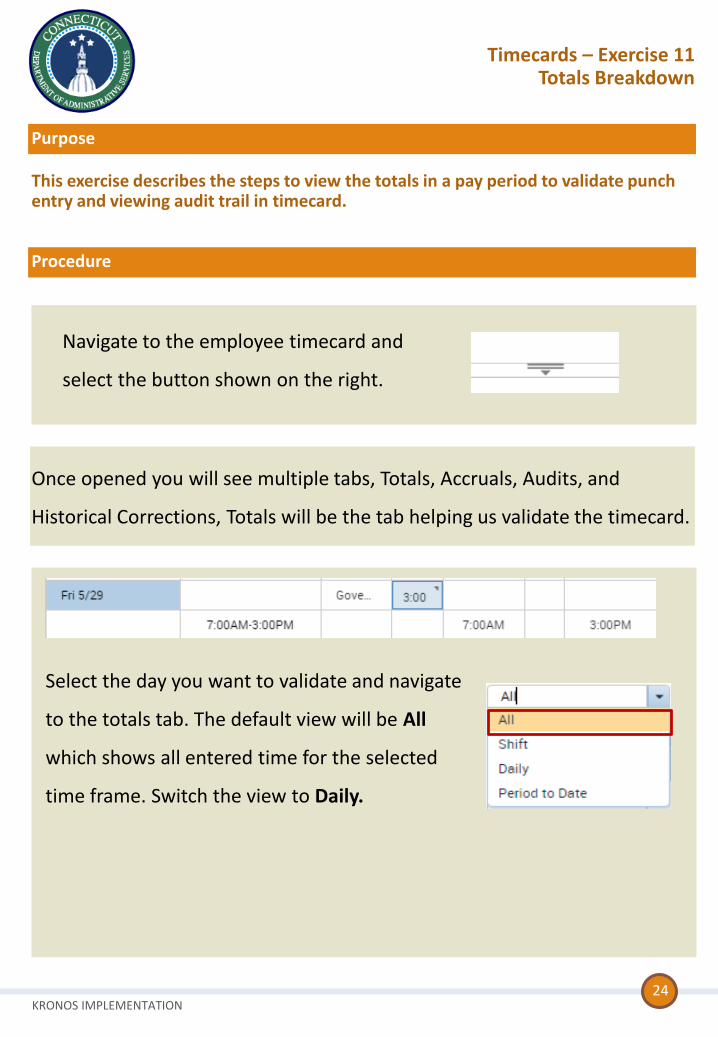
Navigate to the employee timecard and
select the button shown on the right.
Once opened you will see multiple tabs, Totals, Accruals, Audits, and
Historical Corrections, Totals will be the tab helping us validate the timecard.
This exercise describes the steps to view the totals in a pay period to validate punch entry and viewing audit trail in timecard.
Purpose
Procedure
Timecards – Exercise 11Totals Breakdown
24
Select the day you want to validate and navigate
to the totals tab. The default view will be All
which shows all entered time for the selected
time frame. Switch the view to Daily.

KRONOS IMPLEMENTATION
Procedure
25
Select the day where the totals will
display what pay codes are being paid
on each day
Through Accruals, you
can view the balances
of every accrual bucket
Timecards – Exercise 11 Totals Breakdown
Note: The Historical Corrections tab will be covered in a job aid
that explains the steps to perform prior period adjustments in
both Kronos and Core CT
Click the Audits tab to view all
the changes recently made by
anyone on the timecard.
You have successfully completed the steps to understand the totals section.
KRONOS IMPLEMENTATION
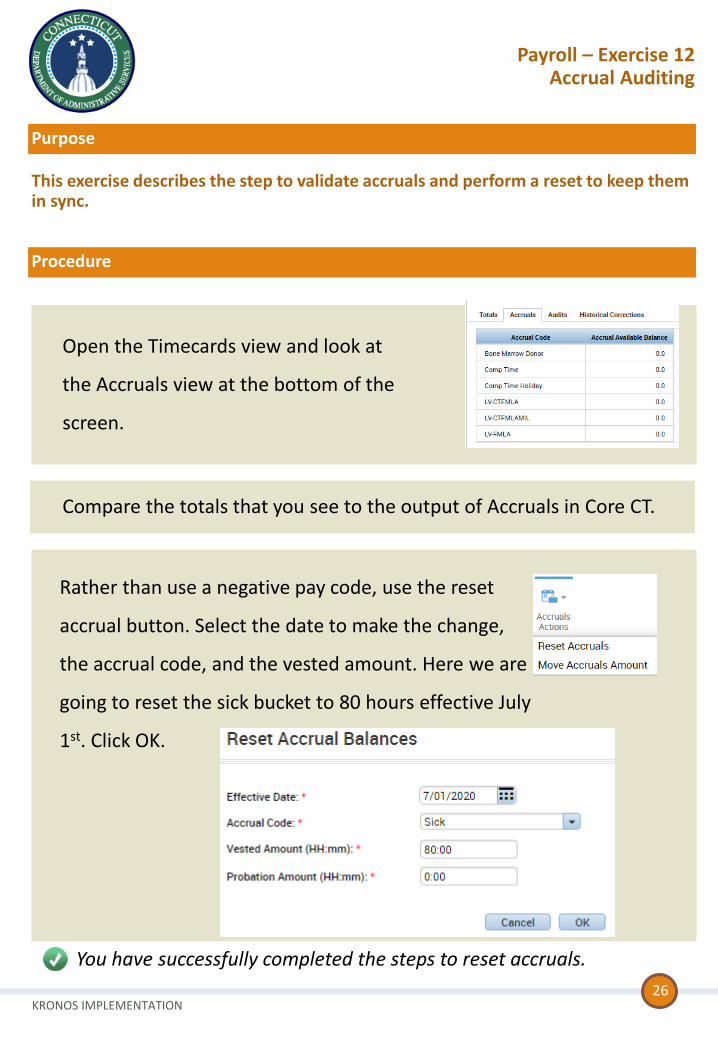
Open the Timecards view and look at
the Accruals view at the bottom of the
screen.
Compare the totals that you see to the output of Accruals in Core CT.
This exercise describes the step to validate accruals and perform a reset to keep them in sync.
Purpose
Procedure
Payroll – Exercise 12Accrual Auditing
26
Rather than use a negative pay code, use the reset
accrual button. Select the date to make the change,
the accrual code, and the vested amount. Here we are
going to reset the sick bucket to 80 hours effective July
1st. Click OK.
You have successfully completed the steps to reset accruals.
KRONOS IMPLEMENTATION
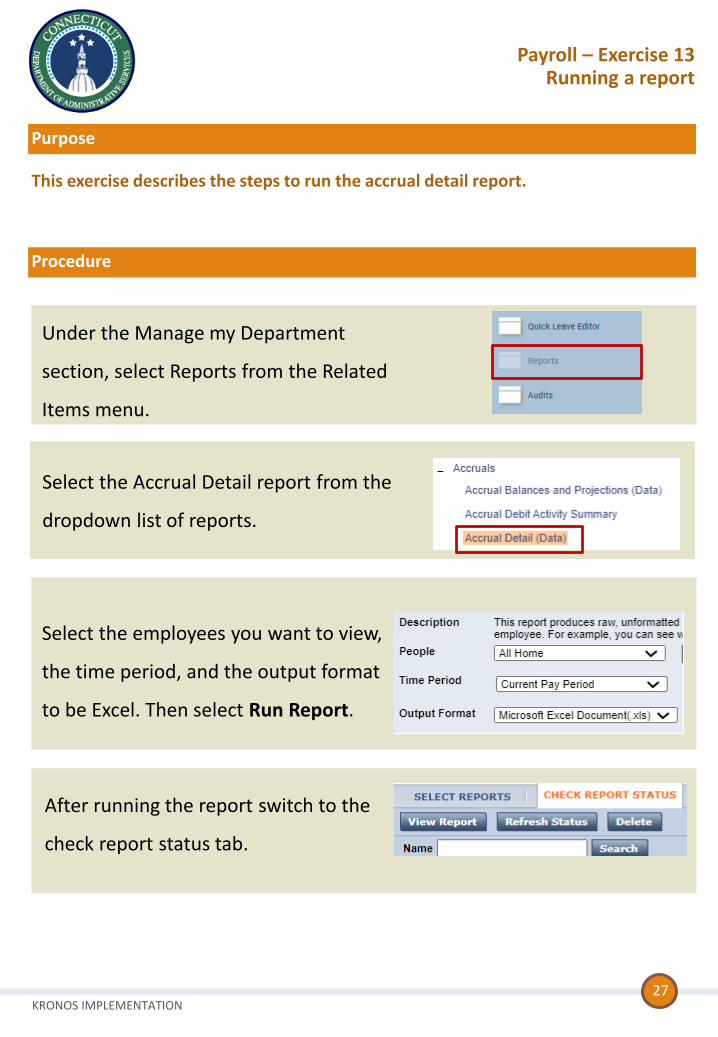
Under the Manage my Department
section, select Reports from the Related
Items menu.
Select the Accrual Detail report from the
dropdown list of reports.
This exercise describes the steps to run the accrual detail report.
Purpose
Procedure
Payroll – Exercise 13Running a report
27
Select the employees you want to view,
the time period, and the output format
to be Excel. Then select Run Report.
After running the report switch to the
check report status tab.
KRONOS IMPLEMENTATION
Procedure
28
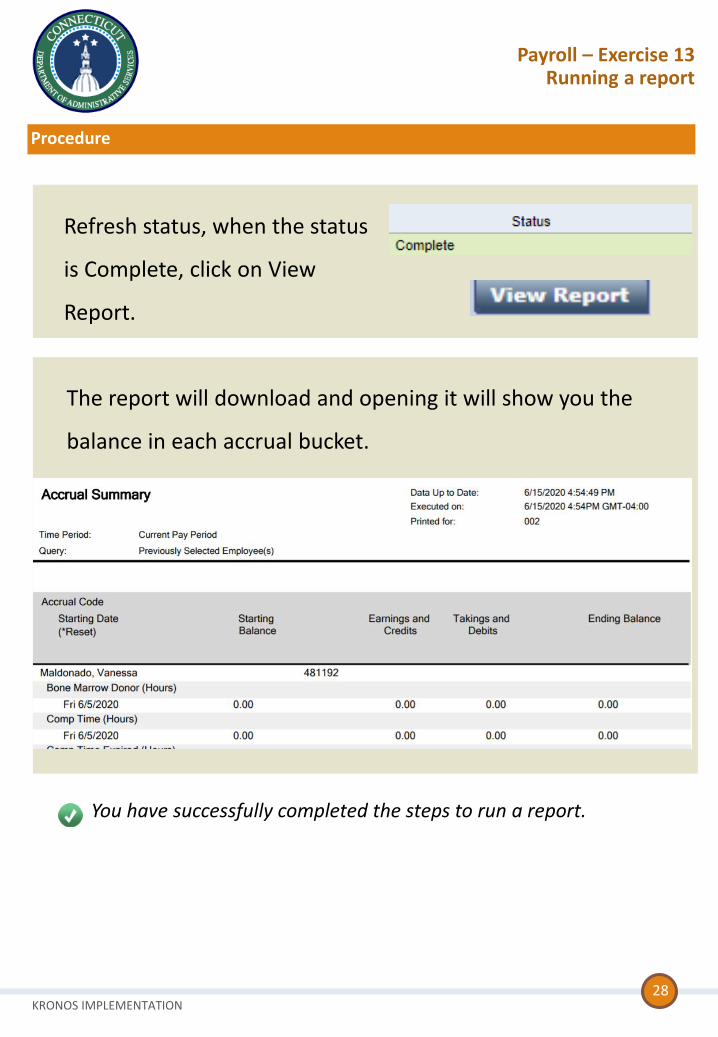
Refresh status, when the status
is Complete, click on View
Report.
Payroll – Exercise 13Running a report
The report will download and opening it will show you the
balance in each accrual bucket.
You have successfully completed the steps to run a report.
KRONOS IMPLEMENTATION
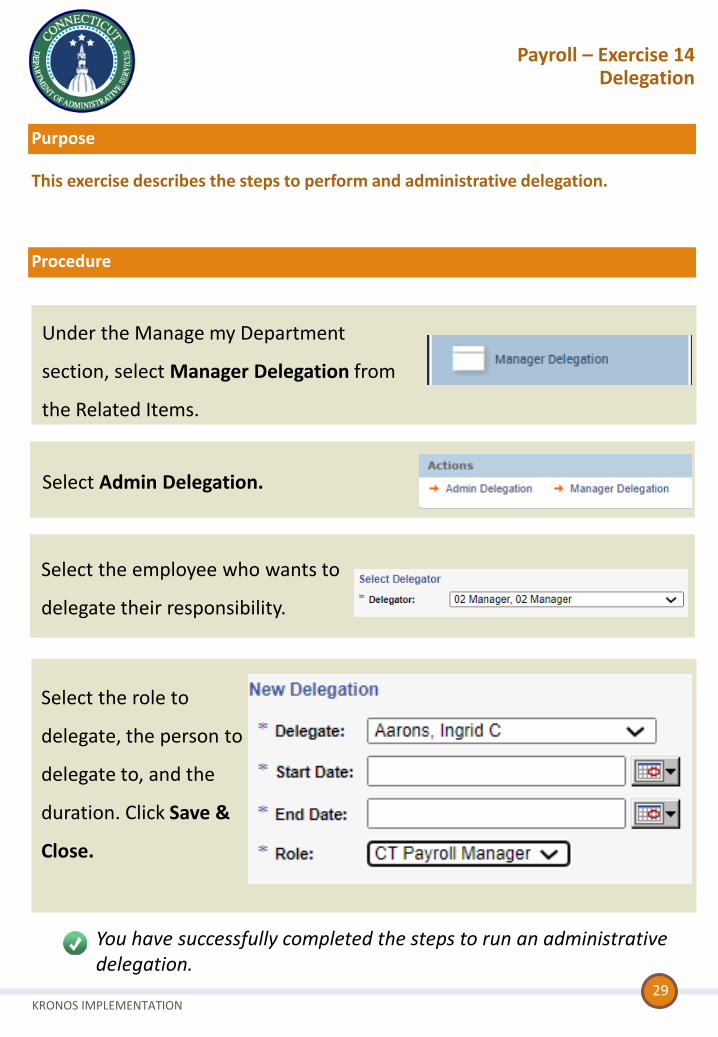
Under the Manage my Department
section, select Manager Delegation from
the Related Items.
Select Admin Delegation.
This exercise describes the steps to perform and administrative delegation.
Purpose
Procedure
Payroll – Exercise 14Delegation
29
Select the employee who wants to
delegate their responsibility.
Select the role to
delegate, the person to
delegate to, and the
duration. Click Save &
Close.
You have successfully completed the steps to run an administrative delegation.
KRONOS IMPLEMENTATION
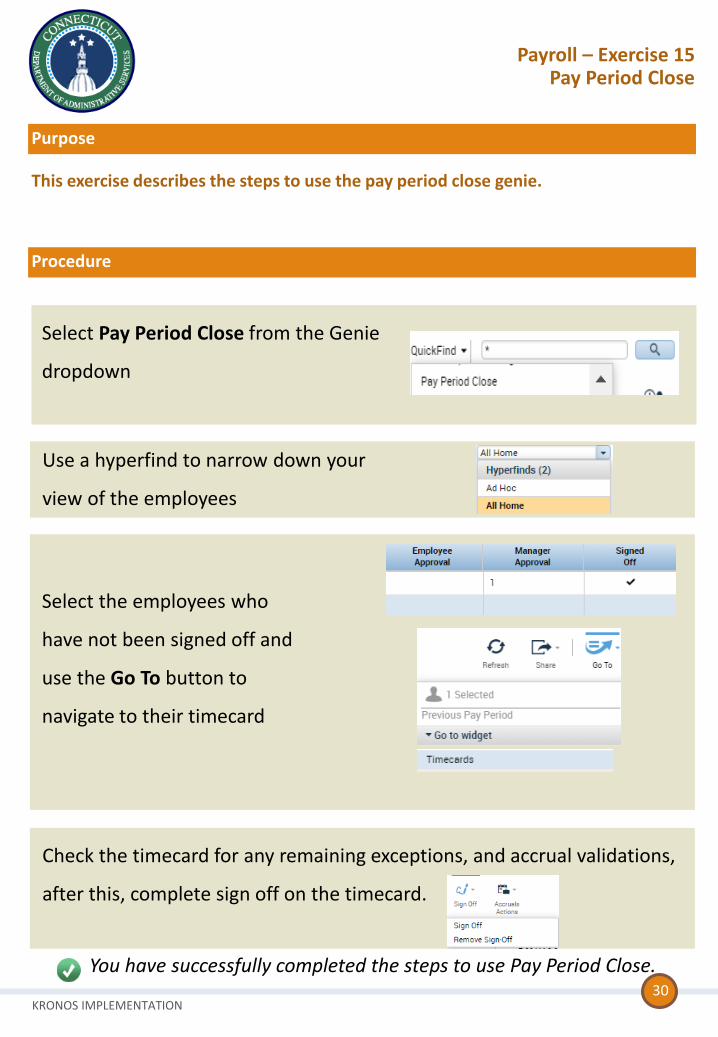
Select Pay Period Close from the Genie
dropdown
Use a hyperfind to narrow down your
view of the employees
This exercise describes the steps to use the pay period close genie.
Purpose
Procedure
Payroll – Exercise 15Pay Period Close
30
Select the employees who
have not been signed off and
use the Go To button to
navigate to their timecard
Check the timecard for any remaining exceptions, and accrual validations,
after this, complete sign off on the timecard.
You have successfully completed the steps to use Pay Period Close.
KRONOS IMPLEMENTATION
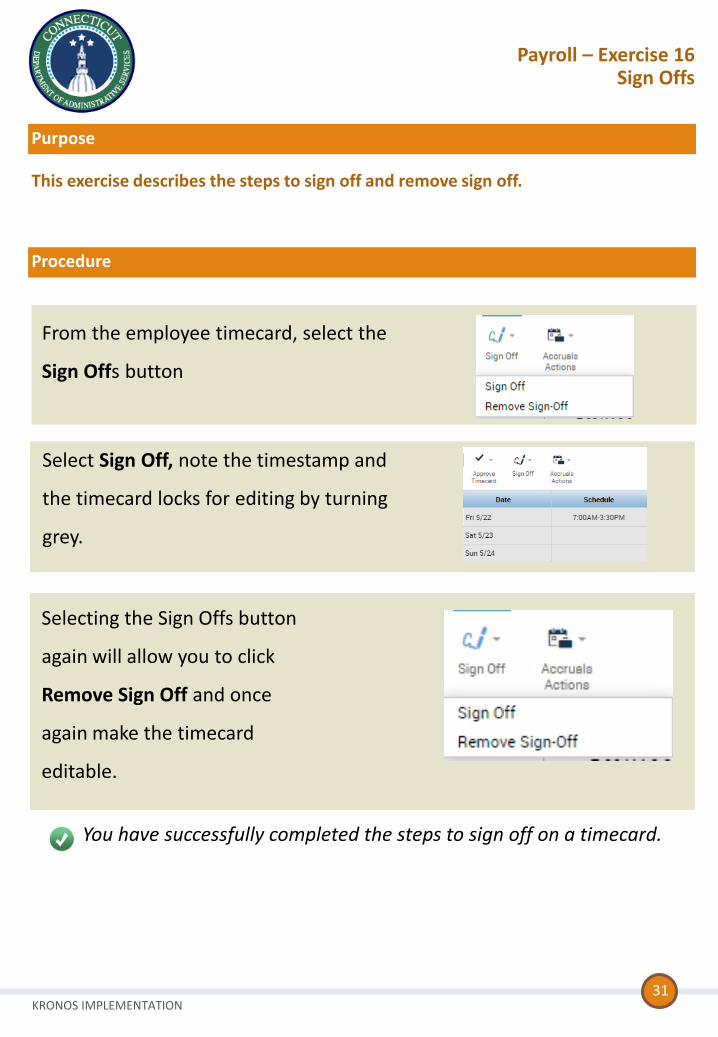
From the employee timecard, select the
Sign Offs button
Select Sign Off, note the timestamp and
the timecard locks for editing by turning
grey.
This exercise describes the steps to sign off and remove sign off.
Purpose
Procedure
Payroll – Exercise 16Sign Offs
31
Selecting the Sign Offs button
again will allow you to click
Remove Sign Off and once
again make the timecard
editable.
You have successfully completed the steps to sign off on a timecard.
KRONOS IMPLEMENTATION
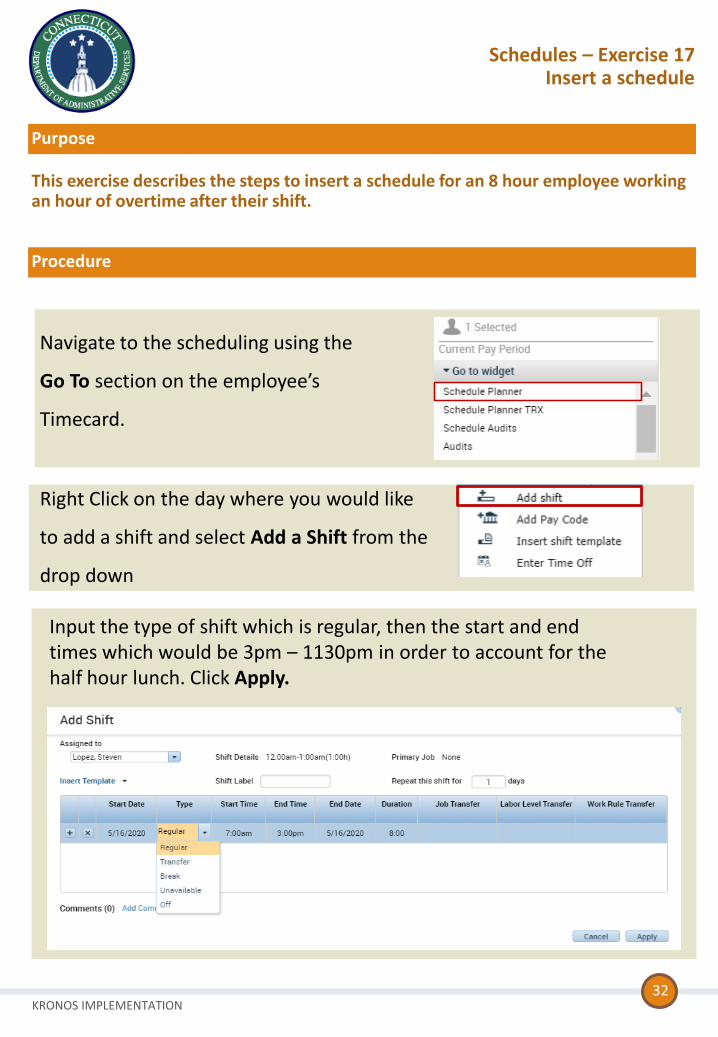
Navigate to the scheduling using the
Go To section on the employee’s
Timecard.
Right Click on the day where you would like
to add a shift and select Add a Shift from the
drop down
This exercise describes the steps to insert a schedule for an 8 hour employee working an hour of overtime after their shift.
Purpose
Procedure
Schedules – Exercise 17Insert a schedule
32
Input the type of shift which is regular, then the start and end times which would be 3pm – 1130pm in order to account for the half hour lunch. Click Apply.
KRONOS IMPLEMENTATION
Procedure
33
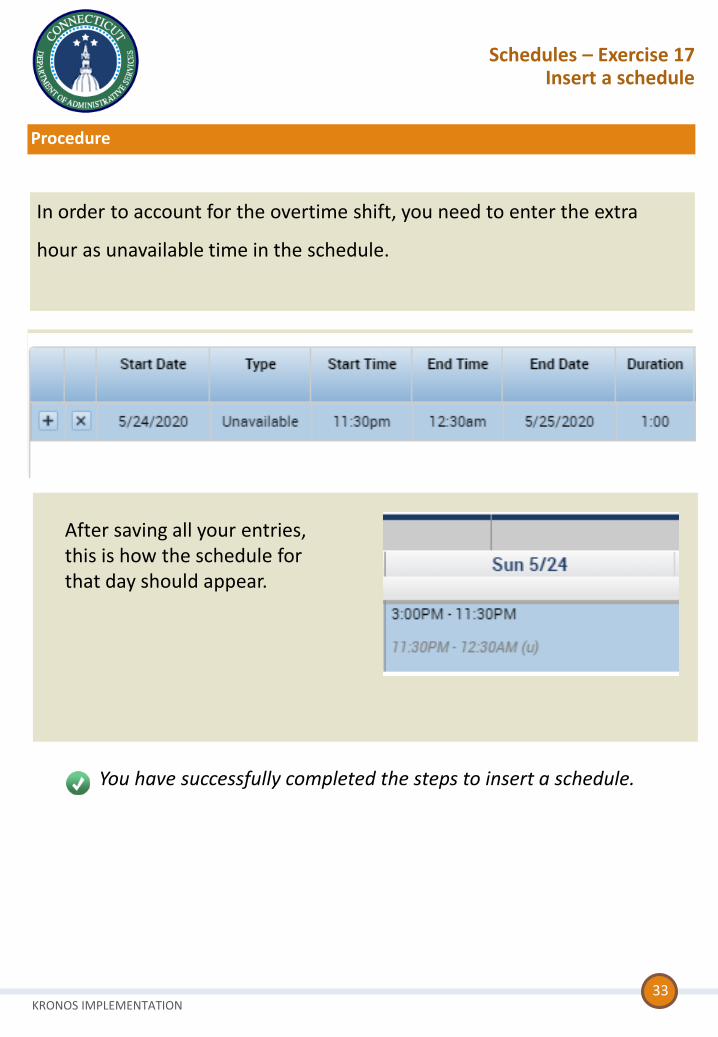
In order to account for the overtime shift, you need to enter the extra
hour as unavailable time in the schedule.
Schedules – Exercise 17Insert a schedule
After saving all your entries, this is how the schedule for that day should appear.
You have successfully completed the steps to insert a schedule.
KRONOS IMPLEMENTATION
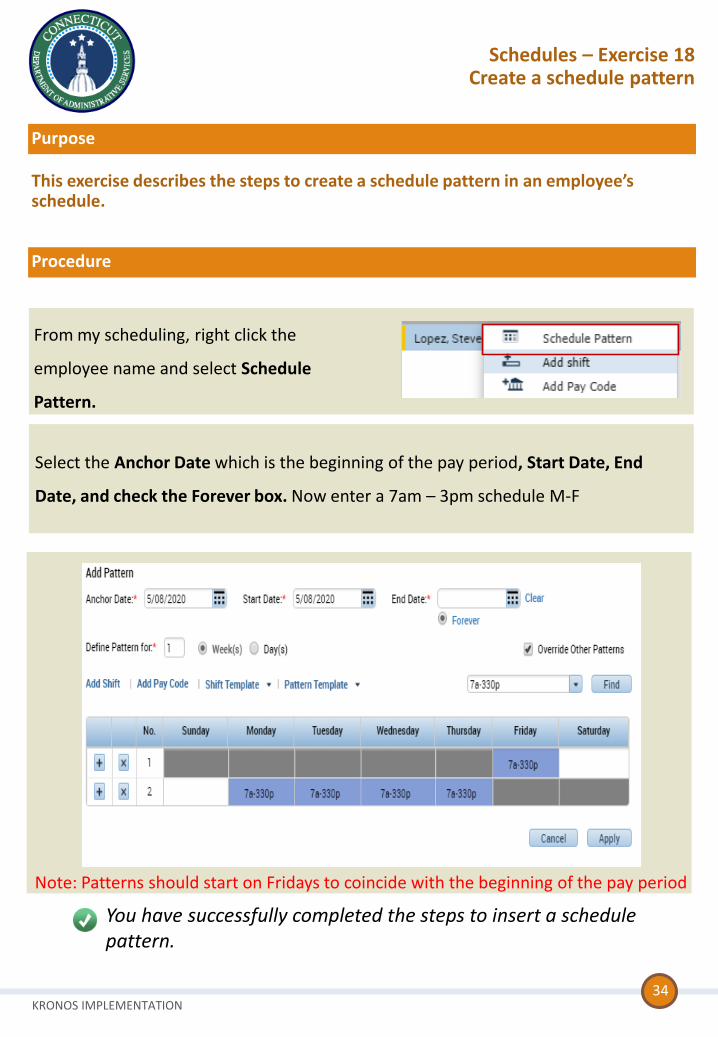
From my scheduling, right click the
employee name and select Schedule
Pattern.
Select the Anchor Date which is the beginning of the pay period, Start Date, End
Date, and check the Forever box. Now enter a 7am – 3pm schedule M-F
This exercise describes the steps to create a schedule pattern in an employee’s schedule.
Purpose
Procedure
Schedules – Exercise 18Create a schedule pattern
34
Note: Patterns should start on Fridays to coincide with the beginning of the pay period
You have successfully completed the steps to insert a schedule pattern.