Embed Size (px)
Citation preview

Kronos Scheduler: Scheduling Overtime or Extra Shifts
Page 1
Purpose
The purpose of this document is to provide clear instructions on how schedules should be completed in advanced scheduler when scheduling overtime or extra shifts. Due to how overtime is calculated in Kronos Timekeeping, the process of scheduling of overtime/extra shifts is crucial as it will impact how the employee is paid. It is important to note that based on if the employee is remaining in their home unit or transferring to another unit the process will differ. Related Documents:
• Kronos VOT, MOT, ESOS

Kronos Scheduler: Scheduling Overtime or Extra Shifts
Page 2
Legend on Schedule Type
Schedule Shift Type Description
Regular A schedule shift type of Regular indicates that the employee is working their regular shift. The daily coverage numbers will reflect accurately with this schedule shift type.
Transfer A schedule shift type of Transfer indicates that the employee is transferring from their home unit to another location. The daily coverage numbers will display accurately in the location that the employee is transferring.
Unavailable A schedule shift type of Unavailable indicates that the employee is Unavailable. For the purposes of scheduling, using this type will show in a grayed-out form with a (u) on the schedule to show that the employee is scheduled. This type will not carry the schedule over to Timekeeper.
This is important because for Timekeeper to pay the employee Overtime, Timekeeper needs to think the employee was not scheduled. This type should be used on the employee when scheduling extra shifts in the employee’s home unit. (i.e. a typical regular shift)

Kronos Scheduler: Scheduling Overtime or Extra Shifts
Page 3
Scheduling Overtime/Extra Shifts in Employee’s Home Unit Steps to scheduling overtime and extra shifts in an
employee’s home unit.
1 From the Home Page, click the Plus “+” next to the My Information Tab. Next select Manage My Department
2 From the Related Items pane, select Schedule Planner
3 In the Show drop-down list, select a department location query OR select Select Locations to pull up your population of employees. *Note – if your location query does not include the Float Pool you will want to modify so that you also see the Float Pool.

Kronos Scheduler: Scheduling Overtime or Extra Shifts
Page 4
4 In the Time Period drop down list, select a specific time period or Range of Dates
5 In this example, on Tuesday 1/12/2021 there is a vacancy for Second Shift. The employee working First Shift from 6:45AM – 3:15PM has decided to stay and work the extra shift in the Second Shift zone from 3:15PM – 11:15PM.
Kronos Scheduler: Scheduling Overtime or Extra Shifts
Page 5
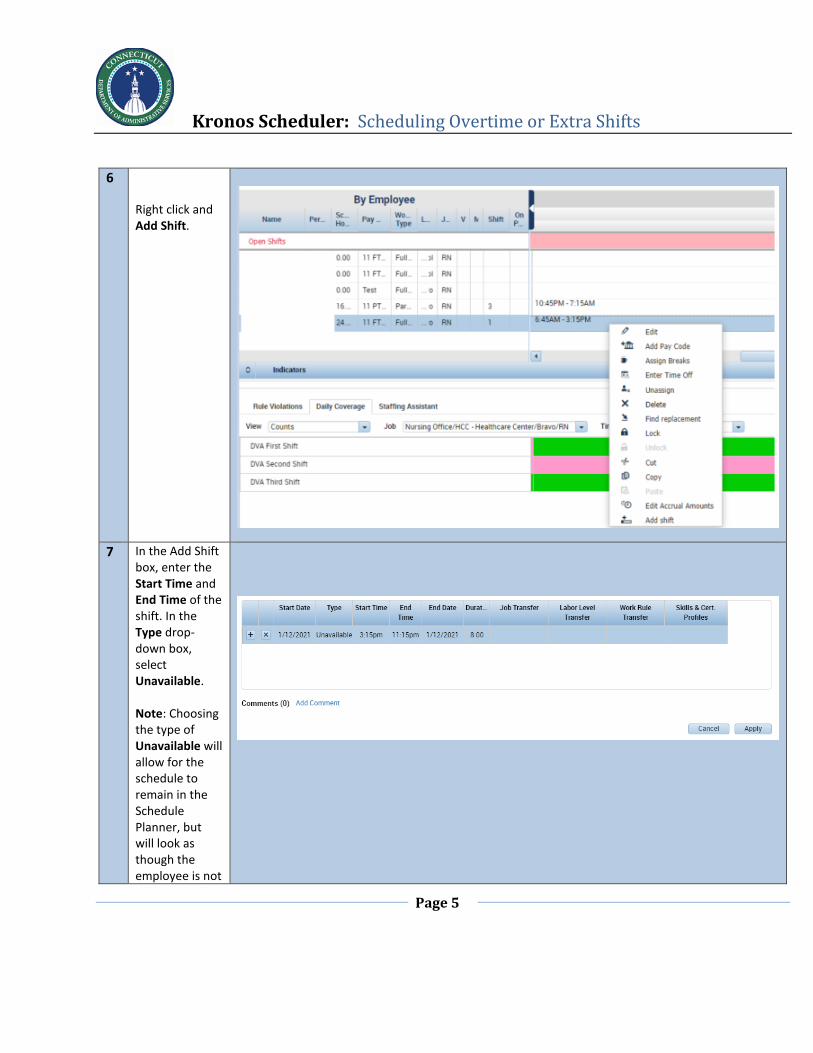
6 Right click and Add Shift.
7 In the Add Shift box, enter the Start Time and End Time of the shift. In the Type drop-down box, select Unavailable. Note: Choosing the type of Unavailable will allow for the schedule to remain in the Schedule Planner, but will look as though the employee is not

Kronos Scheduler: Scheduling Overtime or Extra Shifts
Page 6
scheduled in Timekeeper. This will allow for the employee to receive Overtime pay accurately. Click Apply and Save your changes.
8 The shift now appears in the employee’s schedule and is grayed out with a (u) next to the shift that indicates “Unavailable.” Notice how the daily coverage numbers have not changed and the Schedule Planner still appears as though there is a vacancy on Second Shift. This is because the type of Unavailable does not count towards the daily coverage numbers. In order for the daily coverage to reflect
Kronos Scheduler: Scheduling Overtime or Extra Shifts
Page 7
accurately, proceed to the next step.
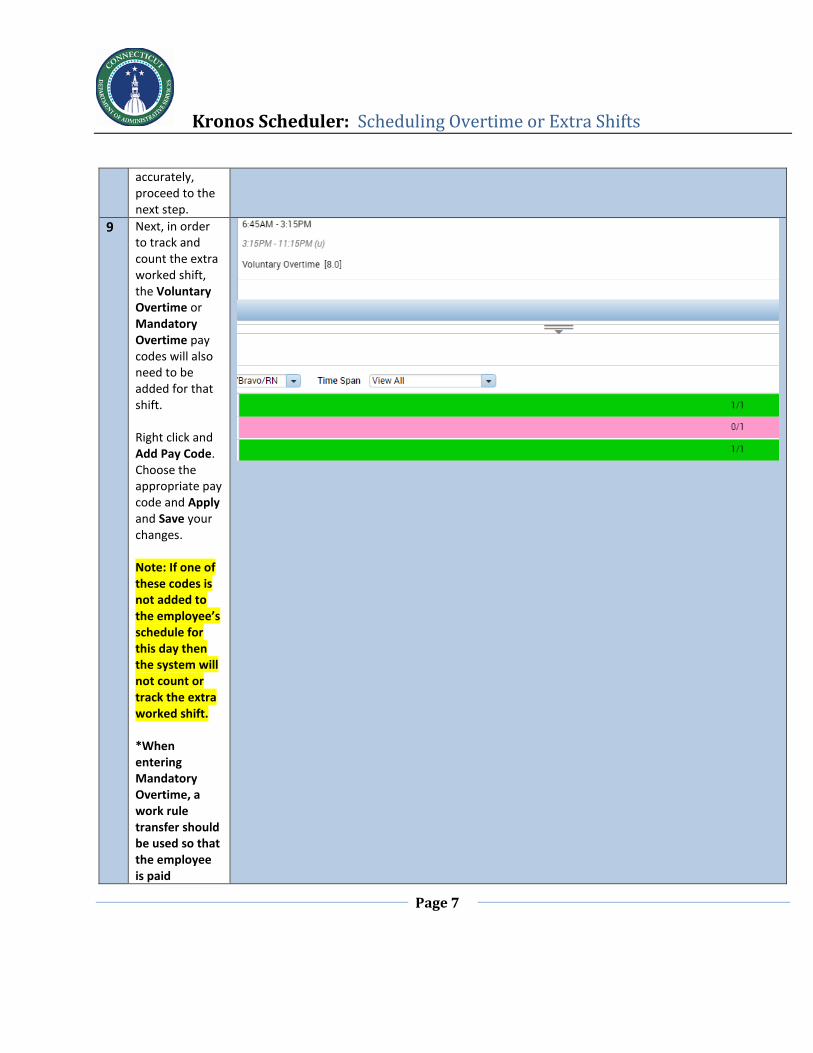
9 Next, in order to track and count the extra worked shift, the Voluntary Overtime or Mandatory Overtime pay codes will also need to be added for that shift. Right click and Add Pay Code. Choose the appropriate pay code and Apply and Save your changes. Note: If one of these codes is not added to the employee’s schedule for this day then the system will not count or track the extra worked shift. *When entering Mandatory Overtime, a work rule transfer should be used so that the employee is paid

Kronos Scheduler: Scheduling Overtime or Extra Shifts
Page 8
Overtime at Double Time. Refer to the VOT/MOT job aid that is linked in this document.
10 From the Float Pool, select a Float Pool person with the same job type as the person working the extra shift. (i.e. Float Pool RN for an RN) Add Shift to insert the extra shift on the day for the Float Pool placeholder employee.

Kronos Scheduler: Scheduling Overtime or Extra Shifts
Page 9
11 Since the Float Pool employee’s home unit is the Float Pool, a transfer to the correct location will need to be completed. In the Job Transfer drop-down box, transfer the POOL employee to the correct unit/job. The Start Time and End Time fields should match the extra shift that the regular employee is working. Click Apply and Save

Kronos Scheduler: Scheduling Overtime or Extra Shifts
Page 10
12 The daily coverage numbers are now updated and accurate. If the employee transferred to another location not in their home unit refer below for next steps.
Kronos Scheduler: Scheduling Overtime or Extra Shifts
Page 11
Scheduling Overtime/Extra Shifts when an employee transfers to another
location Steps to scheduling overtime and extra shifts when an
employee transfers to another location.
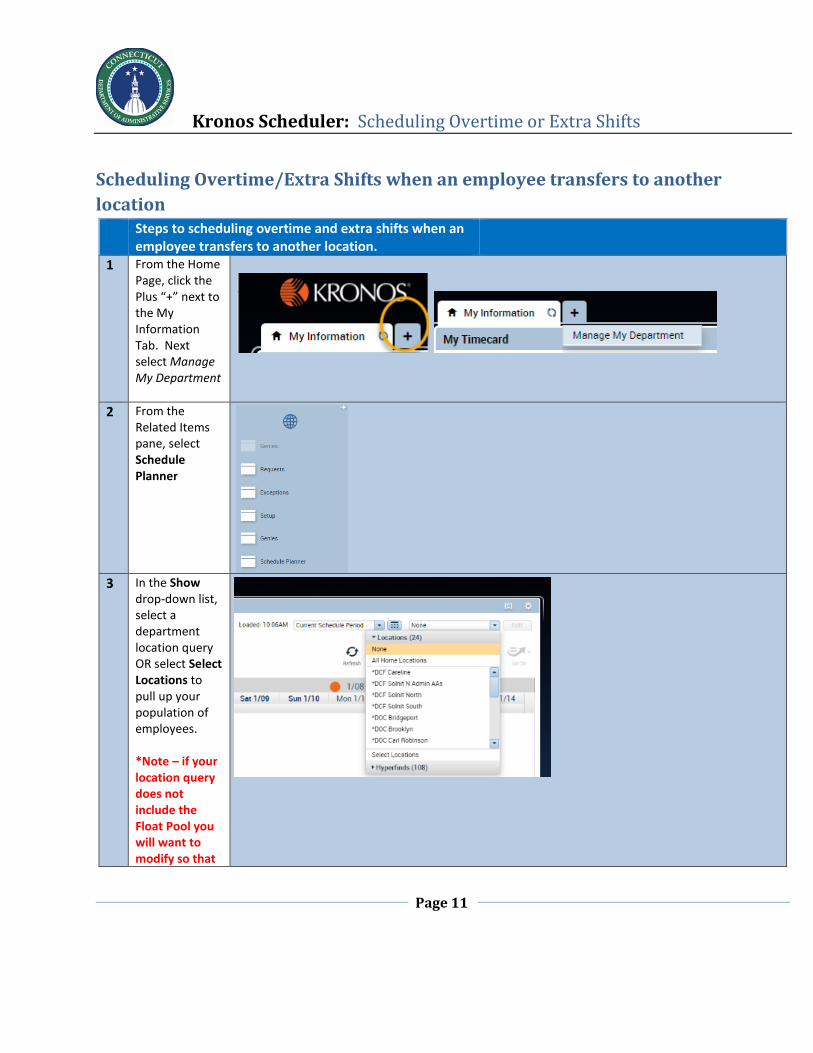
1 From the Home Page, click the Plus “+” next to the My Information Tab. Next select Manage My Department
2 From the Related Items pane, select Schedule Planner
3 In the Show drop-down list, select a department location query OR select Select Locations to pull up your population of employees. *Note – if your location query does not include the Float Pool you will want to modify so that

Kronos Scheduler: Scheduling Overtime or Extra Shifts
Page 12
you also see the Float Pool.
4 In the Time Period drop down list, select a specific time period or Range of Dates
5 In this example, on Saturday 3/13/2021 there is a vacancy for Second Shift on another unit. Right click and Add Shift.

Kronos Scheduler: Scheduling Overtime or Extra Shifts
Page 13
7 In the Add Shift box, enter the Start Time and End Time of the shift. In the Type drop-down box, select UNAVAILABLE. *Note: Choosing the type of UNAVAILABLE will allow for the schedule to remain in the Schedule Planner, but will look as though the employee is not scheduled in Timekeeper. This will allow for the employee to receive Overtime pay accurately. Click Apply and Save your changes.

Kronos Scheduler: Scheduling Overtime or Extra Shifts
Page 14
Next, in order to track and count the extra worked shift, the Voluntary Overtime or Mandatory Overtime pay codes will also need to be added for that shift. Right click and Add Pay Code.
Select the pay
code from the pay code drop-down box. Enter the Amount of hours and correct start time of the shift. Click Apply and Save your changes.

Kronos Scheduler: Scheduling Overtime or Extra Shifts
Page 15
In referencing the daily coverage for the unit that the employee transferred to, notice how the daily coverage numbers have not changed and the Schedule Planner still appears as though there is a vacancy on Second Shift. If you want the daily coverage numbers to reflect accurately, follow steps then a placeholder employee will need to be transferred to the applicable location in the schedule planner.

Kronos Scheduler: Scheduling Overtime or Extra Shifts
Page 16
To transfer the employee to the correct location, highlight the employee and select GO TO Timecard
After the
employee has worked the shift and their IN and OUT punches are on their timecard, you can enter a transfer to another location in the Transfer drop-down box. Select the Transfer drop-down box and click Search.

Kronos Scheduler: Scheduling Overtime or Extra Shifts
Page 17
In the Job Transfer section, follow the path to select the job within the transferred location that the employee worked. Click Apply and Save your changes.
Reference the
timecard to confirm that the job transfer is now listed. Approve any hours listed as “Unapproved – outside of STD HRS.”