Embed Size (px)
DESCRIPTION
Manual
Citation preview

ⓤM1. J8
0. E
120509
Kuvings US Customer Service:
Phone 1 (888) 682-5559Email [email protected]
Headquarters:
NUC Electronics CO., Ltd679, Chimsan-3Dong, Buk-gu, Daegu, 702-053, Korea
©2012 Kuvings All rights reserved
Carefully read and save these instructionsHousehold use only / US&CANADA use only (110/120V)
INSTRUCTION MANUAL

The following information is critical to prevent any injuries or damage to the appliance.Please read the following instructions and use the appliance properly.
Warning: This sign warns risk of death or severe injuries.
Caution: This sign warns risk of injuries or product damage.
Prohibited Do not disassemble Must take action
When using electrical appliances, basic safety precautions should always be followed including the following:
1. Read all instructions. 2. To protect against risk of electrical shock do not put motor or base of unit in water or other liquid. 3. Close supervision is necessary when any appliance is used by or near children. 4. Unplug from outlet when not in use, before putting on or taking off parts, and before cleaning. 5. Avoid contacting moving parts. 6. Do not operate any appliance with a damaged cord or plug or after the appliance malfunctions, or is dropped or damaged in any manner. Return appliance to the nearest authorized service facility for examination, repair or electrical or mechanical adjustment. 7. The use of attachments not recommended or sold by the manufacturer may cause fi re, electric shock or injury. 8. Do not use outdoors. 9. Do not let cord hang over edge of table or counter.10. Always make sure juicer cover is clamped securely in place before motor is turned on. Do not unfasten clamps while juicer is in operation.11. Be sure to turn switch to OFF position after each use of your juicer. Make sure the motor stops completely before disassembling.12. Do not put your fi ngers or other objects into the juicer opening while it is in operation. If food becomes lodged in opening, use food pusher or another piece of fruit or vegetable to push it down. When this method is not possible turn the motor off and disassemble juicer to remove the remaining food.13. Do not use the appliance if the rotating sieve is damaged.14. When a separable pulp container is provided, Do not operate without the pulp container in place.
Safety precautions
03

Use a dry towel to clean the power cord. *It may cause an explosion or electric shock.
Do not use any hazardous chemicals to clean the appliance. * It may change the color of the appliance or could result in a fi re.
Do not repair, disassemble the base, or customize the appliance. * The appliance may not operate properly causing fi re, electric shock, or injury.
Do not use the appliance on an uneven surface. * It may cause a malfunction if the appliance tips over.
Do not keep or operate the appliance near infants or toddlers. *It may injure them.
Do not spray water or fl ammable sprays near the appliance. * It may cause an explosion
or electrical shock.
Unplug the power cord when not in use.
Do not put the juicer parts in the dishwasher or extremely hot water. *The parts may wear faster.
Safety warning
05
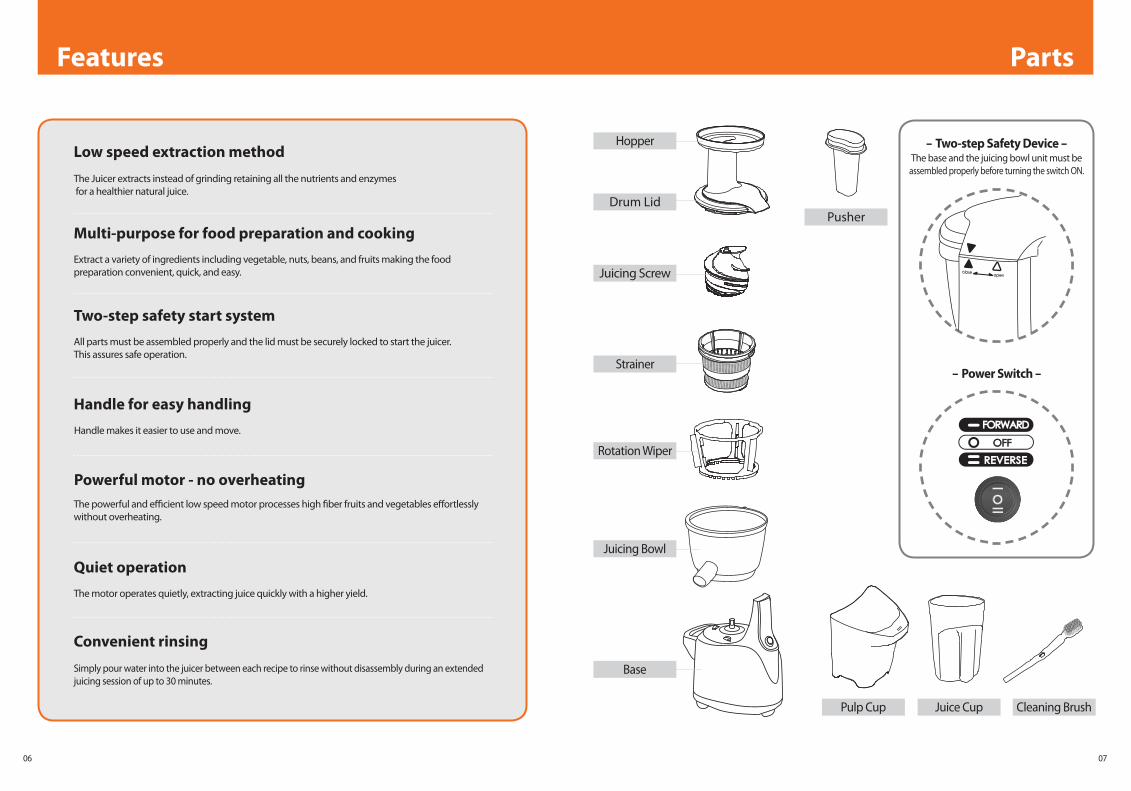
Easy to use
The juicing bowl and base can be separated for easy cleaning and assembly.- Power Switch -
- Two-step Safety Device - The base and the juicing bowl unit must be
assembled properly before turning the switch ON.
Juicing Screw
Rotation Wiper
Strainer
Drum Lid
Hopper
Pusher
Juicing Bowl
Base
Pulp Cup Juice Cup Cleaning Brush
0706
Parts Features
Low speed extraction method
The Juicer extracts instead of grinding retaining all the nutrients and enzymes for a healthier natural juice.
Multi-purpose for food preparation and cooking
Extract a variety of ingredients including vegetable, nuts, beans, and fruits making the food preparation convenient, quick, and easy.
Two-step safety start system
All parts must be assembled properly and the lid must be securely locked to start the juicer. This assures safe operation.
Handle for easy handling
Handle makes it easier to use and move.
Powerful motor - no overheating
The powerful and effi cient low speed motor processes high fi ber fruits and vegetables eff ortlessly without overheating.
Quiet operation
The motor operates quietly, extracting juice quickly with a higher yield.
Convenient rinsing
Simply pour water into the juicer between each recipe to rinse without disassembly during an extended juicing session of up to 30 minutes.

Place the juicing screw into the center of strainer, and place the set into therotation wiper.* Turn and push in the juicing screw until it clicks into place.
Assemble the entire top set onto the base ensuring the arrow symbol on the drum lid is aligned with the arrow symbol on the base.
Align the red dot on the strainer with the red dot on the juicing bowl and push down the strainer until it clicks into place.
Turn the top set clockwise ensuring the arrow symbol is aligned with the arrow symbol .
Align the red dots and place the drum lid on the juicing bowl.
Place the provided juice cup and pulp cup into position.
Turn the drum lid clockwise ensuring the double line mark and red dot are aligned.
1 5
2 6
3 74
Juicing Screw
Strainer
Red dot on the strainer
Red dot on the juicing bowl
Rotation Wiper
Drum Lid
Juicing Bowl
Red dot on the drum lid
Red dot on the juicing bowl
If the juicing screw is assembled incorrectly, the lid will not close properly. Ensure the juicing screw is fi tted securely inside the juicing bowl. (turn and push in the juicing screw until it clicks into place)
TIP
How to assemble
0908
CAUTION
Check that the compression silicone is assembled properly in the unit.The juice may leak if the compression silicone is not assembled properly.

. Do not operate the juicer without inputting any food for more than 30 seconds. (It may cause a malfunction). Place juice cup and pulp cup into position to prevent any spill or to minimize clean up.. During the operation, the juicer may produce a squeaking noise. It will disappear after inserting ingredients into the juicer.
Use the pusher only when needed.
Do not push down food using spoons, spatulas, fi ngers, or any other utensils.
If the juicer stops during operation...
Let the juicer stop completely before using the REVERSE switch. (It may cause the juicer to malfunction if the juicer is not completely stopped before changing operating direction.)
While operating the juicer on REVERSE switch, lightly hold the hopper with one hand while pressing the RESERSE switch. (The drum lid may come loose while operating in REVERSE without holding the hopper.)
If the juicer still does not work, disassemble and clean the parts before operating the juicer again.
1
1
2
23 3
REVERSEOFF FORWARD
Press the REVERSE switch for a few seconds to push up the ingredients that are stuck between the juicing screw and the strainer. Press the FORWARD switch to continue.(Repeat the process if necessary)*REVERSE switch: Pushes the ingredients back up. (REVERSE switch only works while holding down the switch)
How to use the juicer
1110
Ensure the power switch is in OFF position before plugging the power cord into a wall outlet. Turn off the juicer after ensuring the extraction process is complete.*The drum lid may not open easily if there is a lot of remaining pulp in the juicer - see the instructions on “how to disassemble” on page 12 for details.
Press the power switch to operate.*Forward: pulls down the ingredients to extract*Reverse: pushes up the ingredients to unjam
Wash and prepare your selection of fruits and vegetables.*Cut to 4-5 inches long and 1 in wide. Stringy vegetables like celery should be chopped fi ne.* For the best result, insert one piece of ingredients at a
time. When extracting diff erent types of ingredients, wait until the juicer fi nishes extracting one type before inserting another one.
1 4
2
3
Do not operate with wet hands. (It may cause an explosion or electric shock.) CAUTION
CAUTION
CAUTION
CAUTION
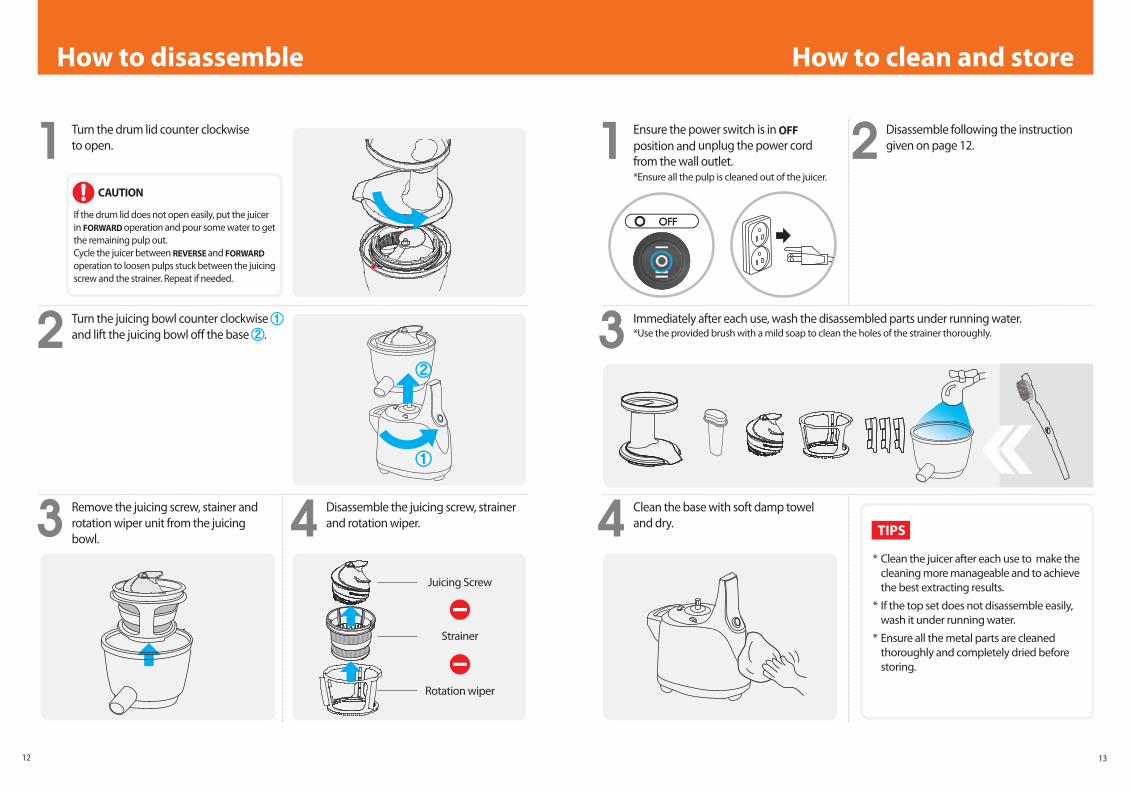
Turn the drum lid counter clockwiseto open.
Ensure the power switch is in OFF position and unplug the power cord from the wall outlet.*Ensure all the pulp is cleaned out of the juicer.
Disassemble following the instruction given on page 12.
Turn the juicing bowl counter clockwise and lift the juicing bowl off the base .
Immediately after each use, wash the disassembled parts under running water.*Use the provided brush with a mild soap to clean the holes of the strainer thoroughly.
Remove the juicing screw, stainer and rotation wiper unit from the juicing bowl.
Clean the base with soft damp towel and dry.
Disassemble the juicing screw, strainer and rotation wiper.
1 1 2
2 3
3 44Juicing Screw
Strainer
Rotation wiper
If the drum lid does not open easily, put the juicer in FORWARD operation and pour some water to get the remaining pulp out. Cycle the juicer between REVERSE and FORWARD operation to loosen pulps stuck between the juicing screw and the strainer. Repeat if needed.
* Clean the juicer after each use to make the cleaning more manageable and to achieve the best extracting results.
* If the top set does not disassemble easily, wash it under running water.
* Ensure all the metal parts are cleaned thoroughly and completely dried before storing.
How to clean and storeHow to disassemble
1312
TIPS
CAUTION

Carefully read before extractingThe silicone parts can be removed and cleaned separately. Dry thoroughly after cleaning and assemble the silicone parts following the instructions below.*Juice may leak if the silicone parts are not assembled correctly.
<Silicone Brush>
Gently pull out the silicone brush from the rotation wiper. After cleaning, with the tail of the silicone brush pointing down, insert into the slot in the order as shown in the illustration.
<Compression Silicone>
Unplug before cleaning. After cleaning, plug the compression silicone back in until it is fi tted securely.
<Silicone Ring>
Remove the silicone ring from the juicing bowl. After cleaning, push in the silicone ring until it is fi tted securely.
*Position the silicone ring as shown in the illustration.
tail
① For the best result, insert one piece of ingredients at a time. When extracting
diff erent types of ingredients, wait until the juicer fi nishes extracting one type
before inserting another one.
② When extracting high fi ber ingredients like celery and parsley, cut fi nely in to 1/2 in
segments for optimal extraction.
③ When extracting ingredients like carrots or beets, extract with a combination of
other fruits and vegetables with more water content to increase the juice yield.
④ If the ingredients are not fresh, the juice yield will be lower due to the decreased
water content in the ingredients. Soak the ingredients in water before extracting
to obtain the best yield.
⑤ Some ingredients are not appropriate for juicing, like bananas.
⑥ During the operation, the juicer may occasionally squeak when juicing ingredients
like carrots or fruits with hard skins. This is normal.
⑦ When extracting, juice may spray out of the hopper especially with ingredients like
grapes and cherry tomatoes.
⑧ Fruits with pits or hard seeds like peaches, plums, or cherries must be pitted
before extraction. Fruits with hard skins should be peeled before extraction.
The silicone partsExtracting tips
1514
Motor is stuck or has stopped
Juice yield is low
Juicing bowl shakes in the middle of operation
Seems like juicing screw is grinding
Juicer is noisy
ㆍCheck that the cord is plugged in properlyㆍCheck all parts are assembled correctly.ㆍ The juicer may stop if the ingredients are fed into the hopper too quickly. ㆍ Turn the switch to OFF position and press down REVERSE switch to push up the
ingredients. Press the FORWARD switch to pull the ingredients down. (repeat if needed)
ㆍ Turn the switch to OFF position and unplug the power cord from the wall outlet. Let the juicer rest to cool off from overheating.
ㆍ When using the ingredients with hard seeds, pit before extraction. Seeds may damage the strainer if not pitted from the ingredients.
ㆍ Every ingredient yields diff erent amounts of juice.ㆍ Soak the ingredients in water before extracting if the ingredients are dry or
not fresh.ㆍ When extracting ingredients like carrots or beets, extract with a combination of
other fruits and vegetables with more water content to increase the juice yield. Cut ingredients to 4-5 inches long and 1 in wide for optimal extraction.
ㆍ Check that the compression silicone is assembled properly in the unit.ㆍ When extracting seeded fruits like tomatoes, the strainer may get clogged with
the excessive amount of small seeds. Pour water through the hopper to unclog before continuing extraction.
ㆍIt is normal for the juicing bowl to shake a little bit during operation.
ㆍ The juicing screw and the strainer are closely aligned with small tolerances. Do not operate without inputting any ingredients for more than 30 seconds.
ㆍ The rotation wiper may make a squeaking noise while wiping the juicing bowl. After inserting ingredients the noise should disappear.
ㆍ Turn the switch to OFF position and unplug the power cord from the wall outlet. Check the parts are assembled properly.
ㆍ Check that the juicer is on a level surface.ㆍ Check that the ingredients are cut to appropriate size.
*The warranty and product liability do not cover problems related to commercial or improper use of the product.
Problem Possible Reasons & Solution
I see a separation in the juice extracted
The juice leaks out of the top set
I see discoloration of the plastic parts
ㆍ There may be a separation in the juice due to the ingredients' density after extraction. This is diff erent from oxidation that is caused by juicing with a traditional high speed juicer.
ㆍ The juice may leak if the compression silicone is not assembled properly. Disassemble and ensure the compression silicone is assembled properly. (pg 15)
ㆍ After use, clean the juicer immediately to prevent discoloration.ㆍ Beta carotene (found in carrots and spinach) pigment may discolor the plastic
parts of the juicer. Rub the parts with a little bit of cooking oil then clean with a mild soup.
ㆍ The silicone parts can be removed and cleaned separately.
Problem Possible Reasons & Solution
‘LIFE TASTES GOOD’ GLOBAL COMPANY
Troubleshooting
1716
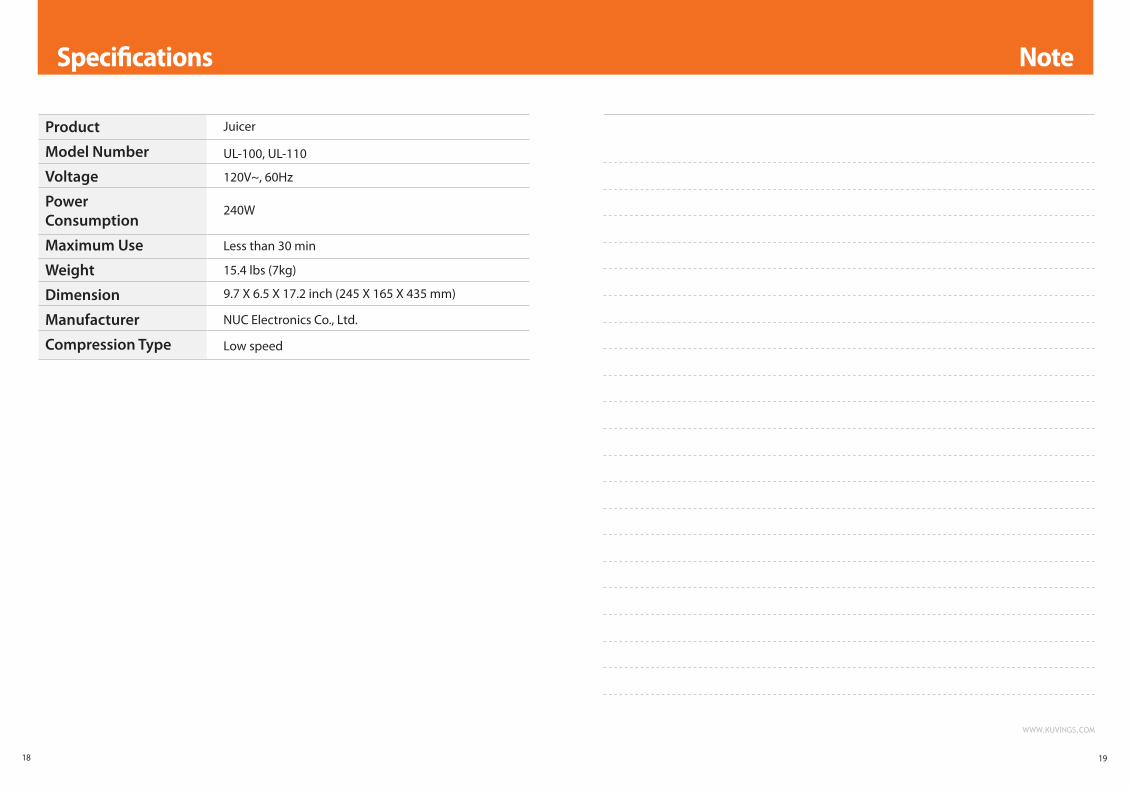
Product
Model Number
Voltage
Power
Consumption
Maximum Use
Weight
Dimension
Manufacturer
Compression Type
Juicer
UL-100, UL-110
120V~, 60Hz
240W
Less than 30 min
15.4 lbs (7kg)
9.7 X 6.5 X 17.2 inch (245 X 165 X 435 mm)
NUC Electronics Co., Ltd.
Low speed
NoteSpecifi cations
1918
WWW.KUVINGS.COM


![English Speaker Package Package Enceintes NS-P350€¦ · Speaker Package Package Enceintes NS-P350 (NS-PC350 + NS-PB350) G Owner’s Manual ... English [NS-PC350] • Type: 2-way,](https://img.pdfslide.net/doc/110x75/5b5847787f8b9a657c8bc1c1/english-speaker-package-package-enceintes-ns-p350-speaker-package-package-enceintes.jpg)