Embed Size (px)
Citation preview
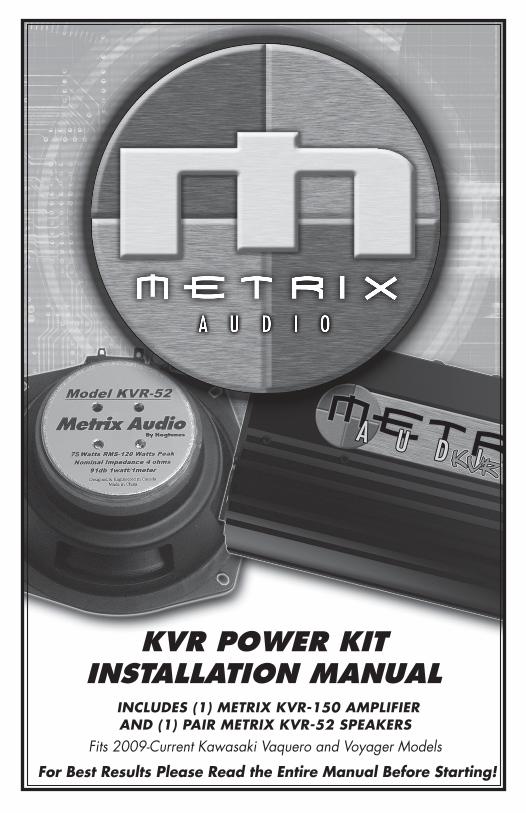
Includes (1) metrIx KVr-150 AmplIfIer And (1) pAIr metrIx KVr-52 speAKers
Fits 2009-Current Kawasaki Vaquero and Voyager Models
for Best results please read the entire manual Before starting!
kvr power kitinstallation Manual

Congratulations!
Congratulations and thank-you for purchasing Metrix Audio’s
KVR Power kit by Hogtunes. Since positive word of mouth is the
best way to grow our business, we want your new kit to work as
well as designed to. If you have any questions or concerns, we
are here to help! Please contact us during regular business hours
via email or phone.
metrix Audio contact Information
Email: [email protected]
Tel: 705-719-6361
If you still need help, then please consider a professional
installation by your retail dealer.
2
3
i n s t a l l a t i o n
Step #1: Remove the seat, and power and ground wires from the battery. Remove the bikes outer fairing/headlamp assembly from the bike. Refer to your manual if you need help with this.
note: A towel or something similar over the front fender may help prevent unnecessary scratches and dings. High volume expletives, and having your friends laugh at you may also be kept to a minimum.
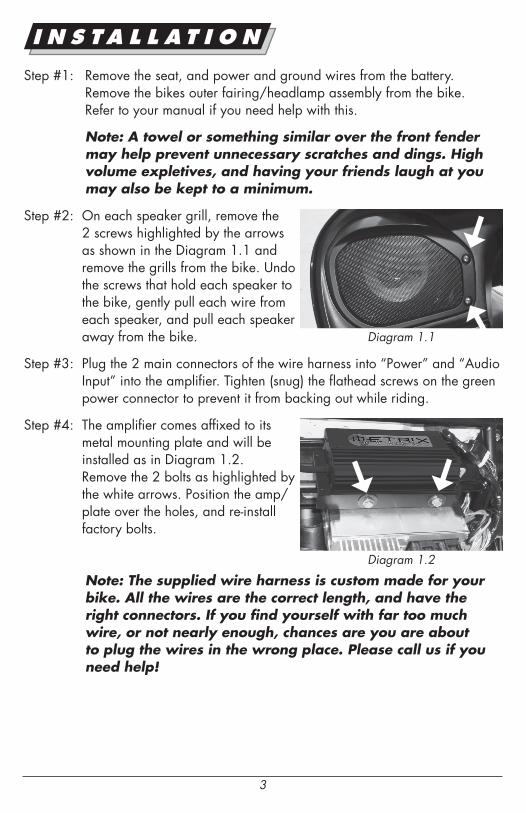
Step #2: On each speaker grill, remove the 2 screws highlighted by the arrows as shown in the Diagram 1.1 and remove the grills from the bike. Undo the screws that hold each speaker to the bike, gently pull each wire from each speaker, and pull each speaker away from the bike.
Step #3: Plug the 2 main connectors of the wire harness into “Power” and “Audio Input” into the amplifier. Tighten (snug) the flathead screws on the green power connector to prevent it from backing out while riding.
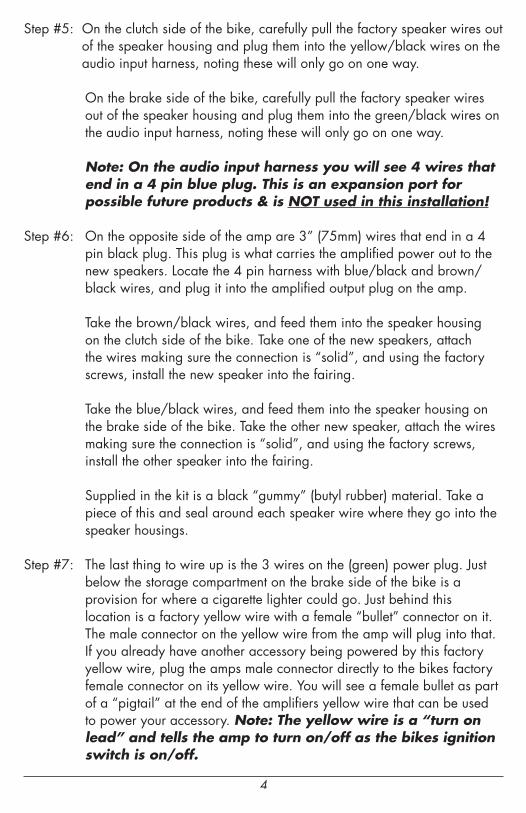
Step #4: The amplifier comes affixed to its metal mounting plate and will be installed as in Diagram 1.2. Remove the 2 bolts as highlighted by the white arrows. Position the amp/plate over the holes, and re-install factory bolts.
note: the supplied wire harness is custom made for your
bike. All the wires are the correct length, and have the right connectors. If you find yourself with far too much wire, or not nearly enough, chances are you are about to plug the wires in the wrong place. please call us if you need help!
Diagram 1.1
Diagram 1.2
4
Step #5: On the clutch side of the bike, carefully pull the factory speaker wires out of the speaker housing and plug them into the yellow/black wires on the audio input harness, noting these will only go on one way.
On the brake side of the bike, carefully pull the factory speaker wires out of the speaker housing and plug them into the green/black wires on the audio input harness, noting these will only go on one way.
note: On the audio input harness you will see 4 wires that end in a 4 pin blue plug. this is an expansion port for possible future products & is nOt used in this installation!
Step #6: On the opposite side of the amp are 3” (75mm) wires that end in a 4 pin black plug. This plug is what carries the amplified power out to the new speakers. Locate the 4 pin harness with blue/black and brown/black wires, and plug it into the amplified output plug on the amp.
Take the brown/black wires, and feed them into the speaker housing on the clutch side of the bike. Take one of the new speakers, attach the wires making sure the connection is “solid”, and using the factory screws, install the new speaker into the fairing.
Take the blue/black wires, and feed them into the speaker housing on the brake side of the bike. Take the other new speaker, attach the wires making sure the connection is “solid”, and using the factory screws, install the other speaker into the fairing.
Supplied in the kit is a black “gummy” (butyl rubber) material. Take a piece of this and seal around each speaker wire where they go into the speaker housings.
Step #7: The last thing to wire up is the 3 wires on the (green) power plug. Just below the storage compartment on the brake side of the bike is a provision for where a cigarette lighter could go. Just behind this location is a factory yellow wire with a female “bullet” connector on it. The male connector on the yellow wire from the amp will plug into that. If you already have another accessory being powered by this factory yellow wire, plug the amps male connector directly to the bikes factory female connector on its yellow wire. You will see a female bullet as part of a “pigtail” at the end of the amplifiers yellow wire that can be used to power your accessory. note: the yellow wire is a “turn on lead” and tells the amp to turn on/off as the bikes ignition switch is on/off.
5
Step #8: Routing the power/ground harness. You will see place where factory wires harnesses exit the fairing, towards the frame of the bike. The amps power and ground wires will exit there, and run down the brake side “backbone” of the frame, under the fuel tank. You may need to undo the 2 bolts that secure the back of the fuel tank and gently lift the tank up to help run these wires. With the back of the tank up, you may find that a make shift wire “snake” will make things easier.
Connect the amps red power wire and factory positive wire to the positive post of the battery.
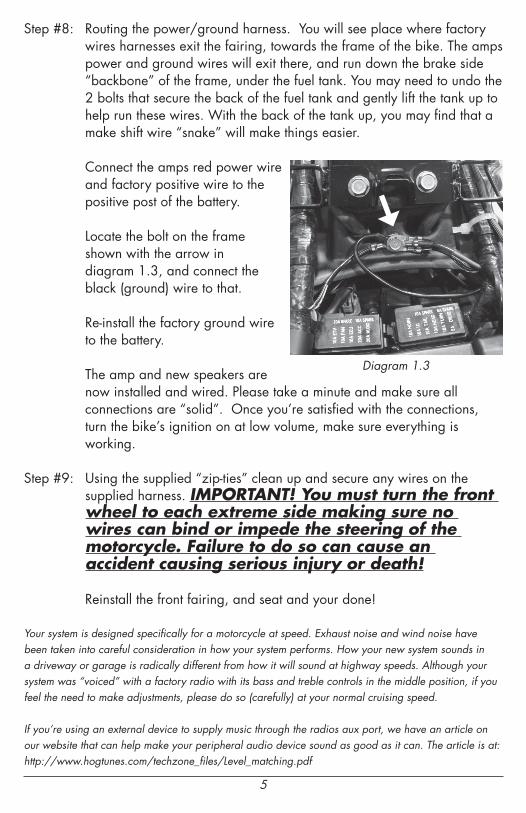
Locate the bolt on the frame shown with the arrow in diagram 1.3, and connect the black (ground) wire to that.
Re-install the factory ground wire to the battery.
The amp and new speakers are now installed and wired. Please take a minute and make sure all connections are “solid”. Once you’re satisfied with the connections, turn the bike’s ignition on at low volume, make sure everything is working.
Step #9: Using the supplied “zip-ties” clean up and secure any wires on the supplied harness. ImpOrtAnt! You must turn the front wheel to each extreme side making sure no wires can bind or impede the steering of the motorcycle. failure to do so can cause an accident causing serious injury or death!
Reinstall the front fairing, and seat and your done!
Your system is designed specifically for a motorcycle at speed. Exhaust noise and wind noise have been taken into careful consideration in how your system performs. How your new system sounds in a driveway or garage is radically different from how it will sound at highway speeds. Although your system was “voiced” with a factory radio with its bass and treble controls in the middle position, if you feel the need to make adjustments, please do so (carefully) at your normal cruising speed.
If you’re using an external device to supply music through the radios aux port, we have an article on our website that can help make your peripheral audio device sound as good as it can. The article is at: http://www.hogtunes.com/techzone_files/Level_matching.pdf
Diagram 1.3
6
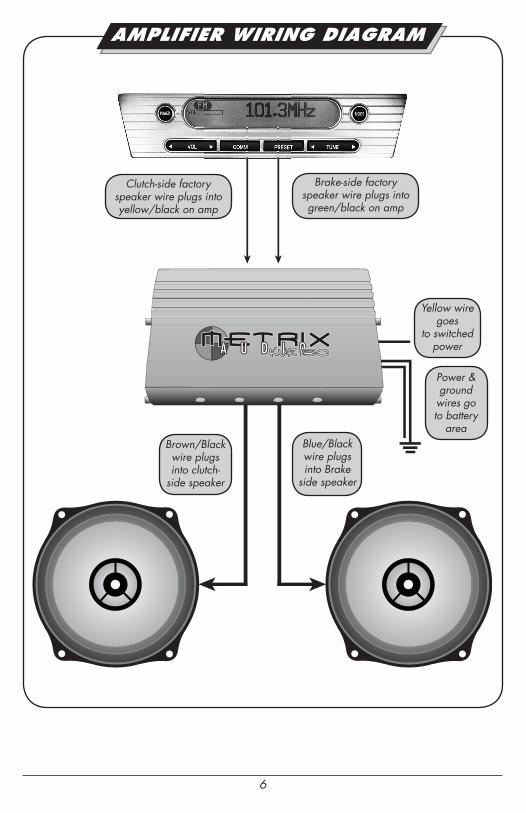
Amplifier wiring diAgrAm
Brake-side factory speaker wire plugs into green/black on amp
Brown/Black wire plugs into clutch-
side speaker
Blue/Black wire plugs into Brake
side speaker
Clutch-side factory speaker wire plugs into yellow/black on amp
Yellow wire goes
to switched power
Power & ground
wires go to battery
area
7
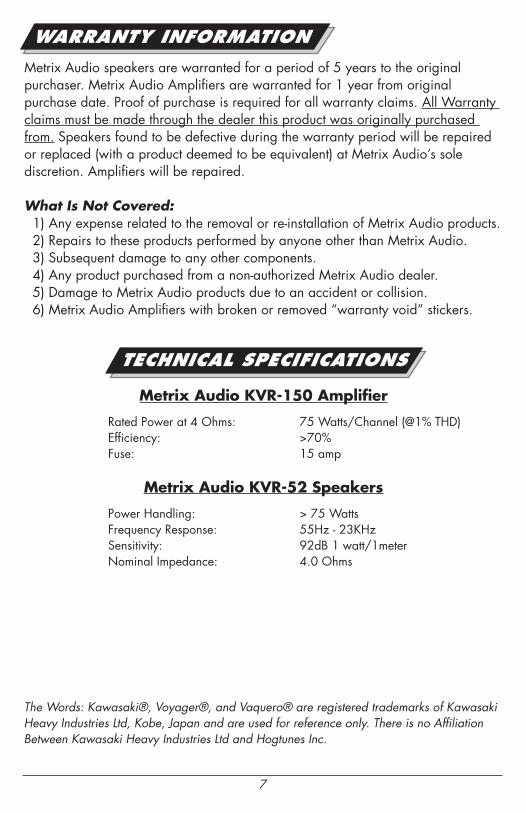
wArrAnty informAtion
Metrix Audio speakers are warranted for a period of 5 years to the original purchaser. Metrix Audio Amplifiers are warranted for 1 year from original purchase date. Proof of purchase is required for all warranty claims. All Warranty claims must be made through the dealer this product was originally purchased from. Speakers found to be defective during the warranty period will be repaired or replaced (with a product deemed to be equivalent) at Metrix Audio’s sole discretion. Amplifiers will be repaired.
What Is not covered: 1) Any expense related to the removal or re-installation of Metrix Audio products. 2) Repairs to these products performed by anyone other than Metrix Audio. 3) Subsequent damage to any other components. 4) Any product purchased from a non-authorized Metrix Audio dealer. 5) Damage to Metrix Audio products due to an accident or collision. 6) Metrix Audio Amplifiers with broken or removed “warranty void” stickers.
teChniCAl SpeCifiCAtionS
Metrix Audio KVR-150 Amplifier
Rated Power at 4 Ohms: 75 Watts/Channel (@1% THD) Efficiency: >70% Fuse: 15 amp
Metrix Audio KVR-52 Speakers
Power Handling: > 75 Watts Frequency Response: 55Hz - 23KHz Sensitivity: 92dB 1 watt/1meter Nominal Impedance: 4.0 Ohms
The Words: Kawasaki®, Voyager®, and Vaquero® are registered trademarks of Kawasaki Heavy Industries Ltd, Kobe, Japan and are used for reference only. There is no Affiliation Between Kawasaki Heavy Industries Ltd and Hogtunes Inc.

Metrix Audio products will play much louder than the original equipment, which can be a distraction to the rider and/or passenger. Please use caution
when adjusting, or playing your stereoat high volume, especially in traffic.
You are a valued customer so please:
ride alertarrive alive!
www.metrixaudio.com