Embed Size (px)
Citation preview

La Bataille de Tudela 1808
La Bataille de Tudela 1808 is an amateur game based on the La Bataille game system published by Clash of Arms and Marshal Enterprises, designed and produced solely by myself. It has no commercial object. I can answer questions or comments on the Consimworld LaBat Message Board. Stephen Maurer
Dedication: To my mother, who always found a way to find a couple extra dollars to subsidize the latest game “fix” of her adolescent son; and to my father, who always swore to put an end to all
the game-buying – but never did. For that, and so much more, thank you.
Disclaimers: At the risk of making these rules longer, I have justified many concepts and values with my reasoning, as gamers are likelier to question or suspect them than a professional, commercial product. My expectation was that if the Spanish could fight this battle without one hand tied behind their backs (as happened historically) that a competitive game would result; my playtests suggest otherwise. I have some playbalance suggestions, but was unable to fully test all of them.
1. Introduction On 23 November, 1808, two combined Spanish armies were decisively defeated by a reinforced French corps in a battle that they did not need to fight. The Spanish were hampered by a lengthy position to defend, a divided command, and some division commanders who were near-mutinous in their lack of response to orders (Charles Oman’s typically harsh assessment of the treatment they deserved after the battle: essentially, shot at dawn). The situation is interesting to recreate for the tabletop for a number of reasons:
• A number of “What ifs”. What if Jose Palafox had led his small army? What if the Spanish had better concentrated their forces? What if Spanish commanders had obeyed orders and been more aggressive on the battlefield?
• It is one of the larger Franco-Spanish battles in the Peninsula.
• It gives players a chance to experience the “old” Spanish army, before it was diluted with new drafts.
• Some unusual units make appearances: a generous proportion of foreign troops for the French - including a large regiment of lancers - and everything from Guards to a penal unit for the Spanish.
• An interesting melange of uniforms makes for a colorful countermix. By happy coincidence, the French have an especially varied assortment of regimental facing colors, which can appear if one closes one eye to history.
In contrast to other games in the La Bataille (LB) series, the flavor of this battle can only be tasted with some additional command and control rules for the Spanish. This does not mean that we hope to slavishly recreate the events of the battle – far from it. Because all chroniclers are appalled at the behavior of a number of the Spanish generals, it shows that their actions were extraordinary, and should not be easily replicable. In game terms, Castanos made some bad die rolls in the Command Segments. With average luck, for example, Grimarest and Villariezo’s divisions should appear on the battlefield earlier than they did, and Lapena should provide better support. I have endeavored throughout the rules to show my reasoning behind everything from counter values to certain rules, and welcome constructive criticism that would improve this game. I acknowledge my newness in playing the game system, and hope that these rules are comprehensible and reasonable.
2. Components A complete upload of Tudela 1808 is composed of: 1. East and West game maps 2. An Off-map Movement Display for PGD units to rout to
3. 2 French countersheets 4. 2 Spanish countersheets 5. 2 pages of tables unique to the game 6. A 2-page French Organizational Display 7. A 3-page Spanish Organizational Display 8. A Game Tracks page for Passage of Time, Morale Levels, Battery Boxes, and Reinforcements 9. These Exclusive Rules Players should use counter markers and tables for Fire, Melee, and their modifiers from an existing series game, or as downloaded at the LaBat website.
3. Counters 3.1 General The counters adopt the style and conventions of other LaBat Series game counters, with some differences. Counter colors reflect the coats, trousers, and facing colors of the participants. I have made some effort to express unit and place names and relevant abbreviations in their native tongues, but as an English-only speaker, there are undoubtedly errors.

French Infantry Spanish Infantry Front Reverse Front Reverse
French Cavalry Spanish Cavalry Front Reverse Front Reverse
French Leader Spanish Leader Front Reverse Front Reverse
French Artillery Spanish Artillery Front Reverse Front Reverse
Voltigeur Companies (French only, Experimental) Voltigeur Markers
Markers Passive “Fixed in Place” units (Spanish, Lapena Division only) Divisional Reinforcements (Spanish and French)
Pending Reinforcements (Spanish and French)
3.2 Counter Values
1. All standard LB counter information and values are in effect. Values particular to Tudela 1808 are noted below. Regimental counters are provided with battalion counters if they are large.
Corps
Division
Increments Move
Potential
Regiment
Battalion Printed
Fire
Melee Value
Morale
Army Unit Size
Unit Name
Identification Strip
Brigade Unit
Name Skirmish
Value
Unit Size
ID Highlight Name Infantry
and Cavalry Melee Mod.
Arty and Morale Mod.
Short Medium
Long Fire Values
Division or Brigade Arty Range
Morale
Melee
Parent Battalion
Parent Regiment

2. French units are designated by Corps, and is for historical interest only – the French command structure is unaffected by a unit’s corps designation. Spanish units are designated by Army: Ce (Army of the Center) or Ar (Army of Aragon). Villalba’s Murcian Division and Roca’s 5th Division are designated AC, with their Army designation, relevant Morale Track, and depot depending on the scenario played and the procedure being checked!
3. French regiments are designated by number, with a few exceptions. Spanish regiments are designated by name, usually abbreviated on the front of the counter with their regimental coat of arms. A generic coat of arms is pictured for militias or newly-raised line infantry. Complete unit names are presented on the counter backs. When known, battalion numbers are given. Smaller Spanish regiments cannot be broken into battalions. NATO symbology indicates unit type, as well as size: ooo Regiment, oo Battalion, o Detachment.
4. French cavalry regiments are grouped by brigade with their commander’s name. 5. Identification strip colors are unique to divisions or cavalry brigades. Units with obstructing art (ie, hussars with
a barrel sash) will not have a strip. Leaders’ strips match the formation they command; French leader strips can be overwhelmed by the art frippery, so their division number is also highlighted by their color.
6. Artillery units of both sides are named only by division (no battery numbers).
7. Red increment values indicate Green units, with effects on fire multipliers and inability to forming Square during a Charge.
3.3 Counter Colors A number of works were consulted on how to express the counters’ colors. The French and the Spanish pre-conflict units were easy enough to research, but some deserve comment.
1. French provisional battalions are parti-colored to reflect their mixed-unit status. French provisional cavalry regiments were impossible to present in this manner, so their counters reflect one of the units that were part of their makeup.
2. The French Line Infantry are more colorful than usual because they are depicted with the regimental facing colors selected for the abortive issue of white coats. It certainly does not reflect their appearance at this battle, but it is historically-based, and near enough to the coat issue and replacement that I feel I can depict this; mostly, I like the way I can better keep track of the colorful regiments as the battle proceeds.
3. The Legion de Reserve regiments were supposed to have changed from sky-blue coats to white in Summer 1808, but I thought it possible that they had not yet undergone this change, as a splash of light blue would look nice in the French countermix.
4. The French 14th regiment is noted as possibly wearing white uniforms in Spain, which would, again, add variety to their mix.
5. Santiago’s book was a big help with some of the obscure, newly-raised Spanish units, but many of their uniforms are unknown to me. Generally, doing them up in brown with a facing color that differed from their divisional fellows is the course that I took.
6. A couple Spanish militia units are listed in inspections as having poor or nonexistent uniforms, so they have a “washed out” looking counter.
3.4 Unit Quality and Organization An amateur work such as this must necessarily build on the professional works that preceded it. To that end, I have consulted earlier games in the LB series, such as Talavera and Corunna, along with the PNP games uploaded at the LaBat website, such as Bailen, in attempting to gauge the relative worth of the participants. Complicating matters, the COA games have been published over a wide period of time, and are not always consistent in unit ratings (or the artillery or terrain values, for example), so I have had to exercise a lot of judgement in assigning said values. I believe the values assigned to Spanish units in the Talavera game are a little harsh, and I have improved the quality of them somewhat (and in any case, Tudela is set in 1808, not 1809). Sources differ widely on the composition of the forces engaged, especially the Spanish. The order of battle (and deployments) was determined exclusively from Santiago’s book (which is itself based – I think – on an article from Researching and Dragona journal).

After settling on values for “typical” units, I tweaked them up or down based on recorded events, such as “in country” service prior to Tudela, selections for hazardous undertakings in the near past or future, previous exposure to battle, a willingness to sustain casualties, etc. I do want to mention a few of the subjective judgements that I made.
1. Sources are divided on when Marshal Lannes sustained a nasty accident in Spain – just before or just after Tudela. I am assuming before, and making him less mobile and Melee aggressive than would be normal.
2. The French provisional battalions cannot form regiments by design, as a reflection of their lack of (military) integrity.
3. The Spanish Walloon Guard unit is listed as “Desertores”, which I can’t help but believe is some Spanish military idiom that I remain ignorant about (wouldn’t they just execute deserters instead of forming them into a unit?), so I have not punished them with poor ratings.
4. Oman’s opinion of the pre-war Spanish Provincial Militias is that they were pretty much on par with the Regulars, and I have rated them accordingly.
5. Much is made in Oman’s book of the unhealthy state of the Spanish at Tudela, especially the Aragonese and Murcians, so the Aragonese are presented at about 85% of their paper strength, and everybody else at 90%. Castanos himself estimated his effective strength at about 42,000 during the battle, Oman suggests 45,000, and their numbers in this game come to just over 47,000. In the interests of play balance, I have reluctantly buffed up the number of increments of Spanish cavalry (they are expressed at their paper strength and not reduced to account for sickness or desertions).
6. The Penas of San Pedro sound to me like paroled convicts or an 19th Century version of a penal battalion. In either case they don’t sound like promising material.
7. I see Palafox as a talented amateur not up to snuff as a corps commander, and O’Neill as probably unaccustomed to corps command.
8. The name of the officer commanding the Spanish cavalry division has been lost to history. A pseudonym has been provided.
9. One source has the Suizos de Aragon filled out at least partially with Polish deserters (from the Vistula Legion?) – again, they don’t sound promising, and a cut below what Swiss would rate.
10. Sources conflict on which army Villalba’s Division belonged to. I settled on the Army of the Center, otherwise Castanos would have left the vicinity of Tudela (why stay to command only one division?) at the start of the battle and ridden west to gather the rest of his command.
11. One source lists Villalba as an artillery officer, so he presumably knew something about siting guns, hence his Artillery modifier. Too bad he only has popguns to command.
12. Sources differ widely on the artillery carried by the participants. Santiago’s book does give the total number of French guns, and if the “standard” complement of pieces is assumed for the French batteries (8 for foot, 6 for horse), the total numbers work almost perfectly. The estimates of the Spanish guns remain all over the ballpark, and are guesses.
4. Map The map is based on a map of the Battle of Tudela found in the Atlas de la Guerra de Independencia and posted as a pdf at the Instituto Geografico Nacional. 1 hex = 100 meters. The Atlas map is dotted with cryptic letters that are doubtlessly abbreviations for terrain features (such as V “Vina” for Vineyard or O “Olivar” for Olives), but I have been unable to discover their nature or how much ground they cover, as no legend was provided. Whether the features are crops, farmsteads, vineyards, orchards, olive groves, walls, etc., I am betting that most fall into the terrain feature “Cultivated”, “Orchard”, or “Vineyard”. Other terrain, such as the two large patches of olive groves (the Olivar de Cardete and Huerta Mayor) are named plainly on the Atlas map. I have depicted these patches smaller than they are typically shown on other maps of the battle, as I feel that the cartographer could have s-t-r-e-t-c-h-e-d his lettering to reflect a larger area, but did not do so. The color of the streams on the East and West maps may not match perfectly. When each map is printed to standard 34 x 22” size it will have hexagons approximately 5/8” across. As a side note, the French player should not feel that the abutting of the Cerro de Santa Barbara against the north edge of the map is cheating him of a chance to outflank it. The canal runs along that side and, if anything, comes closer to the cerro than the hexsides will allow.

4.1 Terrain
Depictions of terrain and their effects on movement and combat are on the Movement and Combat Effects Table. Everything seemed to have gotten lighter-looking after transferring my work to Windows 10! To counter this, I have manually darkened the maps, resulting in darker background terrain than I intended. The depictions are largely self-explanatory, but some clarifications are helpful:
1. The difference between hills and steep hills is the darker shade of the steep hills. Examples are the Cerro de Santa Barbara or the northern faces of the Santa Quiteria and Cabeza Malla.
2. Only 2 of the hexes containing the Ebro may be entered: the road bridge leading into Tudela, and the road/river hex adjacent to it.
3. Cultivated hexes have furrows, tree-breaks, live or dead crops, decorative vegetation and occasionally a building, the latter representing an estate/facility.
4. Towns generally have two or more buildings in their hex (a very few have one), with brown cross-hatching. Individual buildings may be part of a cultivated hex. No Special Structures exist on this map.
5. Orchards have orderly rows of five or six trees, representing either fruit trees or decorative displays of vegetation.
6. Entry/Exit hexes on the game map correspond to Entry hexes on the Off-map Movement Display. Entry/Exit hexes are how :
• Routing PGD units move off the game map and onto the OMMD
• Recovered units move off the OMMD and back onto the game map
• Reinforcements or newly-arriving units enter the game map 7. Units must be in Road Column in order to maintain road movement rates at bridges or fords. 8. Aside from the Ebro, the rivers in the game are treated as “streams” in LB terminology, as the Queiles just below the Ebro was rated as “fordable” (see the Movement and Combat Effects Table). The green airbrushing bordering the water is cosmetic, and does not represent measurable elevation differences, though employment of Play Balance rules makes them costlier for cavalry).
5. The Off-map Movement Display The Off-map Movement Display (OMMD) is used to provide PGD units Areas to rout to, as units routing off-map are usually lost to the game. This construct is necessary due to the nearness of the map edges in Tudela 1808 (which is fought on the length of the map, rather than its width). As units recover their morale, they move towards the map and may re-enter when the Regroup chit is picked (or Maneuver segment, if they are in Command). The physical space occupied by the Areas on the Display does not correspond to the space the inset map, nor do spaces and routes depicted conform to actual locations (sometimes one just has to make a box fit someplace). Only routing units (or Leaders) may enter the OMMD, and only through a friendly Entry/Exit point on the game map. Spanish units must, additionally, rout to a point that corresponds to their particular Army (Center or Aragon). There is no stacking limit to Entry Hexes or Areas. The OMMD is a bit clunky to use, and in retrospect I should have simply had a couple off-board boxes and entry/exit markers to place on routed-off-board units.
5.1 The Display 1. Entry Hexes: These are only for the entry of rallied units back onto the game map, and are analogous to
reinforcements that are assumed to be one hex off-map just prior to entry. Each corresponds to an Entry/Exit arrowed hex on the game map. PGD units routing off map and onto the OMMD ignore these hexes and proceed to the nearest Area. Note that these hexes are not the same as Entry/Exit Hexes printed on the game map.
2. Areas: These squares are Clear or Non-Clear. The presence of terrain does not impede movement, but is used to determine where PGD units are permitted to stop and rally in place during the Reorganization Segment as if they were on the game map. As per 21.1 of the XXX Regulations, PGD units must continue routing until a non-clear space is reached. Any number of units may occupy an Area.
3. Road and Paths: Areas and Entry Hexes are connected by Roads (red) or Trails (brown). Each should be considered as being 7-8 hexes (roughly!) between Areas.
4. Depots: These appear on the OMMD and not the game map. As per LaBat rules, units rout in the direction of their Depots, whether they are on the game map or the OMMD. The Spanish Army of the Center uses the “C”
depot, while the Spanish Army of Aragon uses the “A” depot. The Army of Aragon and the French Army have the convenience of two Depot locations because these roads intersect further on.
5.2 Movement on the OMMD 1. Units and Leaders maneuver on the OMMD with movement costs and potentials as given on the Display.
Leaders move at the Cavalry rate. 2. PGD units routing from the game map onto the Display expend 3.5 MPs (or all remaining MPs, if less than 3.5
MPs are possessed), moving into the first Area box, and with each remaining set of 3.5 MPs (or fractional amounts) being the equivalent of 0.5 MP on the OMMD. After this initial entry onto the OMMD, normal rates as listed on the Display will apply. Unit movement on following turns is performed at the rates listed on the Display. PGD units rout during the Reorganization Segment until they reach Non-Clear terrain.
3. Rallied units moving on the OMMD towards the game map do so during the Maneuver Segment if In Command and the Regroup if not. Upon reaching an Entry hex they stop. They may re-enter the game map on a subsequent turn at the Player’s discretion and at the corresponding Entry/Exit hex on the game map, during Maneuver or Regroup as appropriate. Once on the game map, they behave as any In or Out of command units.
4. Opposing units cannot enter a non-friendly Area (ie, French units cannot enter Spanish areas and vice versa).
5.3 Rallying on the OMMD 1. Units rally on the OMMD during the Reorganization segment as normal, with Rout continuing to a Non-clear
Area after failure to Rally if in a Clear Area. 2. Good Order Enemy units occupying or adjacent to an Entry/Exit hex on the game map that are two Areas away
from a PGD unit on the OMMD, inclusive, will force that PGD unit to move further in order to permit rallying, as with PGD units on the game map that are less than 15 hexes distant from enemy units.
6.0 Army-Specific Rules 6.1 French 1. Reinforcements: Grandjean’s division is not available for play in Scenarios 1 through 4. It is available as an Alfaro reinforcement only in Scenario 5. The French have differing Morale Levels for Scenarios 1-4 and 5 due to this reinforcement.
6.2 Spanish 1. Reinforcements: Grimarest and Villariezo’s divisions are available for play as Tarazona reinforcements in Scenario 4 (both enter play automatically as scheduled reinforcements in Scenario 3). Grimarest, Villariezo, and Rangel’s divisions are available as Tarazona reinforcements in Scenario 5. The Spanish player has the option of placing Grimarest and Villariezo’s divisions on the map At Start in Scenario 5. 2. Morale Levels: In Scenarios 1 through 4, Roca and Villalba’s divisions (and the cavalry division) trace their retreats and key their Morale Level modifiers to the Army of Aragon’s depot locations and Morale Track. In Scenario 5 Roca and Villalba’s divisions (and the cavalry division) trace retreats and key their Morale Level modifiers to the Army of the Center’s depot locations and Morale Track. The cavalry division belonging to the Army of the Center retreats to the Army of the Center depot and is keyed to the Center Morale Track as well. Important: Spanish units of 2 increments or less count as a ½ increment for purposes of determining Morale Level when losses are assessed every :40 Turn. 3. Maneuver Units: Despite the conditions described in 6.2.2 above, in all scenarios Roca and Villalba may receive MUs only from the Army of the Center. In all scenarios that employ the optional Palafox leader, the Army of Aragon must designate its Command Point to its army commander. 4. Spanish Cavalry: No Spanish cavalry is considered Heavy Cavalry, regardless of their Maneuver Value (this is due to the poorness of their mounts – cavalry such as the Borbon Regiment has been assigned slightly higher Melee values per increment to reflect a theoretically greater affinity for close combat). Spanish Cavalry attempting a Charge a Cheval must take a Morale Check prior to executing it (before expending its 5 Charge MPs); failing the MC causes no disorganization, but the checking unit may not execute its Charge. When Spanish cavalry attempts a Reaction Charge

or Opportunity Charge and takes its Morale Check prior to executing it, failure of the MC does result in Disorganization; a natural (not modified) roll of 11, 12, or 13 results in a PGD placement and immediate Rout of the unit. Spanish cavalry may not attack in concert with any other cavalry unit. Exception: The Royal Carabiniers in Villariezo’s Division may stack freely with any Spanish cavalry. 5. If Castanos is eligible to “fly” to escape capture by enemies entering his hex, if he is closer to an Entry/Exit hex than a friendly unit, he is instead moved onto the OMMD from that Entry/Exit hex, moving towards the Spanish depot a number of spaces equal to 1 die roll. 6. Palafox (optional rule; this has not been playtested): Jose Palafox was a gifted and driven individual who organized and inspired many, but his mercurial temperament sometimes led to odd decisions on his part. These were evident in his operational work, and it is easy to imagine that his tactical decisions could be equally unpredictable. One of these odd decisions was to leave the field just before the battle began. This option assumes he remained to direct his army. In scenarios 1, 2, 4 or 5:
a) Do not use the Fiballer Leader counter as commander of O’Neill’s division of the Army of Aragon; instead use the O’Neill division leader counter. Do not use the O’Neill Army Commander counter as the Commander of the Army of Aragon; instead use the Palafox Leader counter and the Palafox AdC counter (his brother Francisco). The Army of Aragon receives its Command Point only through Palafox – the divisional commanders are not directly-eligible recipients.
b) When Palafox receives a Command Point in the Command Segment and confers MU(s), roll two dice on the Palafox Command Decision table and apply the result.
c) Attack Results: The given # of In-Command units (or more, at player’s option) must attempt an Assault and/or Charge if it is legally possible. Which unit(s) are affected is the Spanish player’s option.
d) Standfast/Retreat Results: “No Move” results: No In-Command units may move or move more than 1 hex in any direction. “Depot” direction moves force all In-Command units to move the required # of hexes closer to the Aragon Army depot location if they can legally do so. Which unit(s) are affected is the Spanish player’s option.
7.0 Command Organization is shown for each army on the Order of Battle displays. Both sides have odd command structures and operation.
7.1 French Though Marshal Lannes was placed in overall command of the French forces by Napoleon, it is unclear to me if he had replaced Moncey as Corps commander or Moncey maintained command of the corps, but was subject to orders from Lannes, much like General Meade maintaining command of the Army of the Potomac in 1864 while taking orders from General Grant. For the sake of simplicity, Lannes is assumed to be the overall commander of III Corps and attached units and giving orders directly to all subordinate commanders.
1. The French receive 1 “overall” Command Point for usage by any desired leader, and 1 Command Point specifically for their cavalry brigades or cavalry commander. Marshal Lannes is the overall French commander and if given a CP may confer MUs to any divisional or cavalry brigade leader(s) within his Command Span (Corps Activation rule 8.4.3.1 does not apply). General Lefebvre-Desnouettes is commander of the cavalry brigades, and if given the cavalry CP may confer MUs to any cavalry brigade leaders within his Command Span. This would allow, for example, the operation of a lone division commander and lone brigade commander, at the cost of leaving the two primary leaders dormant (as Lagrange and Digeon did, historically), or two separate cavalry brigades operating at the cost of dormancy for all other commands..
2. Moncey enters the game with Lannes. Without any command abilities while Lannes is commanding, he may move freely over the map during any one MU activation and provide combat and morale modifiers as appropriate. If Lannes is removed from the game, Moncey assumes command of the army on the next game turn. Moncey may be used to replace a III Corps division commander who is removed from the game as a casualty (and in precedence to Lannes’ ADC). If in play as a replacement division commander and Lannes is removed, replacing the army commander takes precedence for Moncey. Otherwise, standard Leader replacement rules apply.

3. The cavalry brigade leaders Wathier, and Colbert are both Light Cavalry leaders as per Rule 8.5, and may roll for MU initiative if not within a superior’s Command Span (excluding Moncey, if Lannes is in command). General Lefebvre-Desnouettes is a Cavalry Leader of Special Ability and may conduct Grand Charges.
7.2 Spanish The Spanish forces were split, due to the central Junta’s tolerance of regional army formations, rather than national corps and army structures and an overall commander. The two armies present at Tudela – the Armies of the Center, and Aragon, commanded by Javier Castanos and the energetic amateur Jose Palafox, respectively) – had been attempting a strategic outflanking of the French while loosely cooperating in the effort. When the Army of the Center shifted out of necessity to a defensive posture, Palafox left the field in an apparent fit of pique (he had been advocating an offensive), leaving divisional commander O’Neill as default Army Commander of two divisions. Meanwhile, the press of circumstances had thrown Villalba’s and Roca’s divisions among the Aragonese units in the vicinity of Tudela. Further complicating matters, Castanos’ divisional subordinates seemed to regard his orders as mere suggestions to be followed at their own judgement. The night before the battle, Castanos attempted to get the combined forces into defensive positions outside Tudela, but his orders were not obeyed; O’Neill was under no obligation to follow Castanos, though he would have been wise to do so – the Spanish forces were out of position and a large French force was bearing down on them. Two more Center Army divisions were within reach, and another, Lapena’s, within sight of the developing battle, but inexplicably not moving to help (inaction that Lapena would repeat at the Battle of Barrosa a few years later). Apparently aware of his subordinates’ recalcitrance, Castanos seems to have visited Lapena in mid-morning (rather than sending written orders to begin moving) and was headed to see him again later when he was chased off the field by French cavalry, effectively removing him from the battle. Oman criticizes Castanos for not sending a staff officer to handle this, but Castanos clearly felt his presence was necessary.
1. The Spanish receive 1 Command Point for the Army of the Center; Castanos is its overall commander and if given the Command Point may confer MU to any divisional commander(s) within his Command Span (Corps Activation rule 8.4.3.1 does not apply). The Spanish also receive 1 Command Point for the Army of Aragon; the overall Commander of the Army of Aragon is O’Neill or, if playing Optional rule 6.2.5, Palafox (and note that if Palafox is commanding, only he can receive the Army of Aragon Command point). If given the Command Point O’Neill may confer MU to either or both divisional commander(s) within his Command Span (Corps Activation rule 8.4.3.1 does not apply). The commander of the Spanish Cavalry Division of the Army of the Center is not eligible for self-MU initiative as per Rule 8.5. Standard Leader replacement rules apply when casualties occur.
2. Lapena Until Activated, followed by Release of individual units, Lapena’s division must stay within 3 hexes of any Cascante town hex (for Scenario 4) or within 5 hexes of any chosen setup hex (for scenario 5) – its “Center of Mass; note that the division begins Scenario 3 already in an Activated state. Until Activated, the units of this division are not eligible for MU, and can only move by Leader and Regroup chit pulls during the Maneuver Segment within the confines of their setup. If players wish, mark these units with a “passive” marker as a reminder. The division is Activated in one of three ways:
• The instant a French unit moves within 10 hexes of any one of its units;
• The player spends the Army of the Center Command Point on this division and successfully rolls a 1-5 on a d6;
• Castanos begins a Command Segment in the same hex as the Lapena leader counter (this does not require the expenditure of the Command Point, though the player has the option to do so as well in order to get the division moving immediately).
Though now Activated and eligible for MU, the division’s constituent units must be Released (whether In Command or not) during the Maneuver Segment before they can be used for movement and combat. Units are released on a one by one/individual basis in one of two ways:
• By die roll on the Lapena Release Table, which is rolled each time the division is part of an MU;
• The instant a French unit moves within 5 hexes of the unit.

As units are Released, remove their Passive markers. Once Released, units remain Released permanently for whatever use the player wishes, and do not need to be rolled for again. Released but Out of Command units may move out of their intial confines during Regroup Chit pulls. The Lapena leader counter does not require Release, and can move freely after Activation.
3. Villalba and Roca: Though part of the Army of the Center, for Scenarios 1-4 these two divisions are part of the Army of Aragon Morale Track and retreat towards the Aragonese Depot, though receiving MUs from Castanos. In Scenario 5 (only) they are part of the Army of the Center Morale Track, retreat towards the Army of the Center Depot, and continue to receive MUs from Castanos.
8.0 Reinforcements
Divisional-sized reinforcements may be available to either or both players. Reinforcements can be those that are “scripted” to appear by scenario rules, while others, those present in the towns of Tarazona and Alfaro, are “purchased” by the players. These latter potential divisional reinforcements are placed in their holding boxes on the Tracks and Boxes page: Tarazona for the Spanish (a town approximately 18 Km from Cascante) and Alfaro for the French (a town approximately 14 Km from the north board edge). Players may “buy” these reinforcements by ceding Victory Points to their opponent. In Scenario 5 the Spanish player has the option of beginning one or both of these divisions on the game map. During the battle, the Spanish divisions (Villariezo and Grimarest) stationed at Tarazona (Rangel’s was further beyond Tarazona) were slow to arrive at the Tudela battlefield, and for this their commanders have been criticized. However, I feel there was a valid military reason for maintaining a presence at Tarazona: Marshal Ney, with approximately 10,000 men of his VI Corps, was advancing by forced marches in their direction, via Soria. His troops were exhausted and straggling was likely considerable, but this threat was poised to strike the Spanish forces in their flank or descend upon their rear. Whether this was uppermost in the minds of Generals Villariezo and Grimarest is not known, but it is a reason why their reinforcements come at a cost. Grandjean’s Division of the French III Corps is typically rendered in the tactical maps of this battle in an amorphous “reserve” status, but more recent OOB s place it squarely astride the French LOC, from Alfaro to Vitoria, obviously guarding communications and supply. Assembling the division would have taken a few days, and not undertaken lightly, since it would leave the LOC open to attacks by bandits, raiders, or irate citizens. For this reason, this reinforcement also comes at a cost.
8.1 Reinforcement Activation Before a division in a Holding Box can become eligible for reinforcement, it must first pass its Activation Roll; this is analogous to the Activation described in 7.2.2, but handled differently for these off-board units. Activation Rolls can only be made at the Top (x:00 turns) of every hour of gameplay. Each side has a different Activation number, and is printed on the Tracks and Boxes page (1-4d6 for the French, 1-3d6 for the Spanish). After passing the Activation roll, the division is then placed on the Passage of Time Recorder a number of turns ahead, with a Pending Reinforcement marker on top: 12 turns for the Spanish and 7 turns for the French (the disparity is because Alfaro is closer to the game map than Tarazona, and because the French are assumed to march faster). All units of an Activated division in a Holding Box are eligible for entry (unlike Lapena’s Division). Once Activated, Players are not obligated to bring the division onto the board as a reinforcement – they can cancel the Pending Reinforcement Roll, but must then permanently cancel that division as a reinforcement. The French may commence Activation attempts beginning with the 9:00 AM Turn. The Spanish may commence Activation attempts beginning with the 8:00 AM Turn (this being a “pre-game” roll). The Spanish Player may activate their divisions at different times, or simultaneously. These procedures will only be relevant in Scenarios 4 and 5.

8.2 Pending Reinforcement The Pending Reinforcement marker allows the division to enter the game map at its designated entry/exit point with a variable entry by rolling a 1-2 on a d6 when a Reinforcement chit is drawn. If a 1-2 is not rolled, the player must wait until the next turn to attempt entry again (advance the pending stack to the next space on the Turn recorder). They enter on a designated Entry/Exit hex. Although technically covering the ground found on the OMMD, Activated Reinforcements never move there, and appear directly on the game map.
8.3 French One French division is available for reinforcement: Grandjean’s 4th Division of the III Corps, and only in Scenario 5. If Activated and successfully rolled its Pending Reinforcement, it may enter the game map at Entry/Exit hexes 1,2,3, or 4. The Spanish Player receives ½ Victory Point upon a successful Activation Roll for this division, regardless if the French Player later cancels the reinforcement by declining to make the Pending Reinforcement roll. The Spanish Player receives an additional 1½ Victory Points upon the French Player making a successful Pending Reinforcement roll.
8.4 Spanish In the two-map Scenarios, 2-3 Spanish divisions are available for reinforcement for the Army of the Center: Villariezo’s 1st Division and Grimarest’s 2nd Division for scenarios 4 and 5, and Rangel’s 3rd Division in Scenario 5 (note that Villariezo and Grimarest are “scheduled” reinforcements that appear automatically in Scenario 3). Additionally, the Spanish player has the option of placing Villariezo’s and Grimarest’s Divisions on the game map at the start of Scenario 5. Terminus Hexes for the Amy of the Center reinforcements are the town hex of Urzante, any town hexes of Cascante, any town hexes of Murchante, the Molina de Cartan, or any hex within the Command Span of General Castanos. Once on map, they do not require further Activation. The French Player receives ¼ Victory Point upon a successful Activation Roll each Tarazona division, regardless if the Spanish Player later cancels the reinforcement by declining to make the Pending Reinforcement roll. The French Player receives an additional ¼ Victory Point per division upon the Spanish Player making a successful Pending Reinforcement roll for it. If the Spanish Player opts to begin Scenario 5 with Villariezo’s and/or Grimarest’s divisions already on the game map at start, the French Player receives 1 Victory Point for each division.
10.0 Scenarios 10.1 Scenario 1: Race for the Hills
1. Introduction On 23 November 1808, advance elements of the French III Corps under Marshal Lannes advancing on the town of Tudela surprise Spanish pickets posted near the town. Noticing the lack of any prepared deployment by the Spanish, Lannes orders immediate attacks by the three available divisions as they enter the field. Once again, sources are divided on which French divisions attacked which hills – Oman has Morlot assaulting the Santa Barbara and Mathieu assaulting Cabeza Malla, and the Atlas map and more recent publications (Santiago) showing the reverse. I am portraying the latter.
2. Time: The game begins with the 9:00 AM Turn. It ends at the conclusion of the 2:00 PM Turn. 3. Boundary: Only the East map is used. 4. Command:
The French receive one Command Point per turn. The Spanish Army of Aragon receives one Command Point per turn. Roll one die for the Spanish Army of the Center: on a 1-5 it receives one Command Point (on a 6 it is assumed that Castanos directing a courier to try to jab Lapena into action).

The respective Morale Tracks for Scenario 1-4 are used, only the Army of Aragon for the Spanish. The cavalry division has no effect on the Army of Aragon Morale Track. If Castanos should exit the map prior to the end of the scenario (see below), the Spanish player rolls one die during the Command Segment; on a 1-3, he receives one Command Point to place on any one Center Army division.
5. Deployment: Spanish player sets up first, one division at a time, in any order he chooses. Units may deploy into any formation/facing desired unless specified otherwise. All regiments must be broken into constituent battalions. Spanish Army of the Center Castanos and ADC: Start in or within 1 hex of any Tudela town hex. Roca’s Division: Start in indicated hexes of Tudela. Random Placement (see below). Villalba’s Division: Start in indicated hexes of Tudela. Villalba is Activated. Random Placement (see below).
Fiasco’s Cavalry Division: Start in any hex south of Tudela town hexes and south/east of the Rio Queiles. Spanish Army of Aragon O’Neill: Start on any hex south and east of the Rio Queiles. Consider this placement carefully – it determines where the O’Neill/Fiballer Division will march. St. March’s Division: Start on any shaded hilltop hexes of Santa Quiteria. Random Placement (see below).
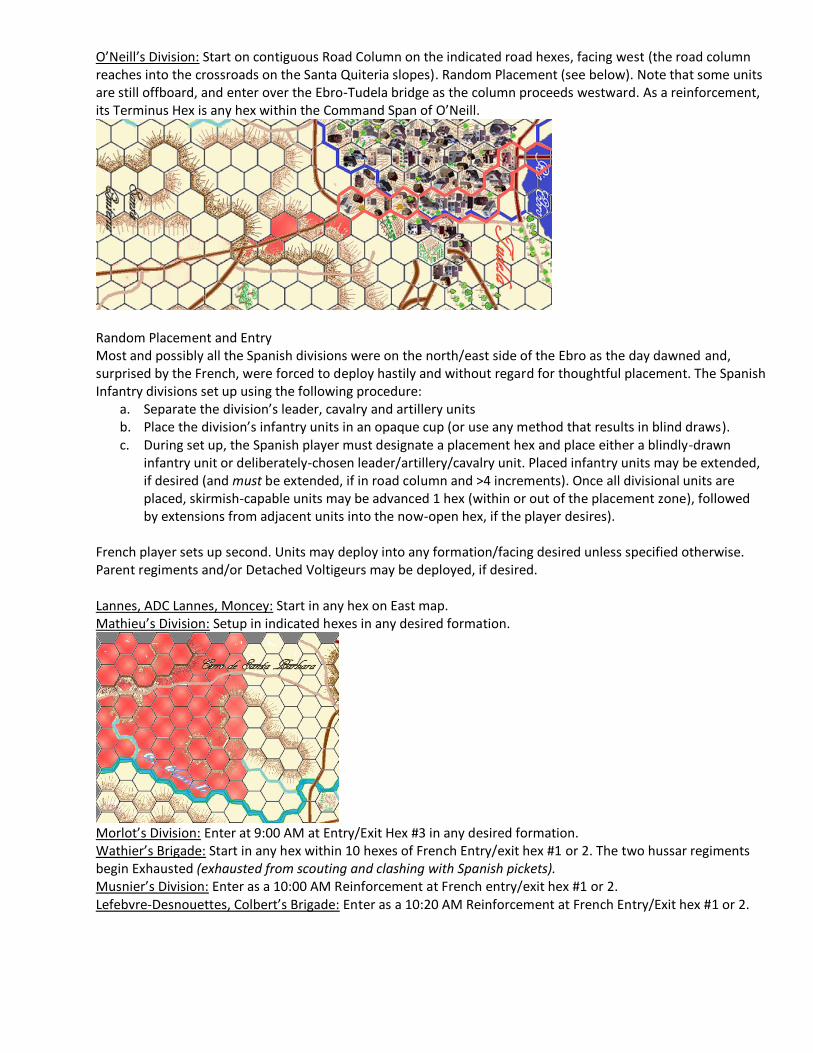
O’Neill’s Division: Start on contiguous Road Column on the indicated road hexes, facing west (the road column reaches into the crossroads on the Santa Quiteria slopes). Random Placement (see below). Note that some units are still offboard, and enter over the Ebro-Tudela bridge as the column proceeds westward. As a reinforcement, its Terminus Hex is any hex within the Command Span of O’Neill.
Random Placement and Entry Most and possibly all the Spanish divisions were on the north/east side of the Ebro as the day dawned and, surprised by the French, were forced to deploy hastily and without regard for thoughtful placement. The Spanish Infantry divisions set up using the following procedure:
a. Separate the division’s leader, cavalry and artillery units b. Place the division’s infantry units in an opaque cup (or use any method that results in blind draws). c. During set up, the Spanish player must designate a placement hex and place either a blindly-drawn
infantry unit or deliberately-chosen leader/artillery/cavalry unit. Placed infantry units may be extended, if desired (and must be extended, if in road column and >4 increments). Once all divisional units are placed, skirmish-capable units may be advanced 1 hex (within or out of the placement zone), followed by extensions from adjacent units into the now-open hex, if the player desires).
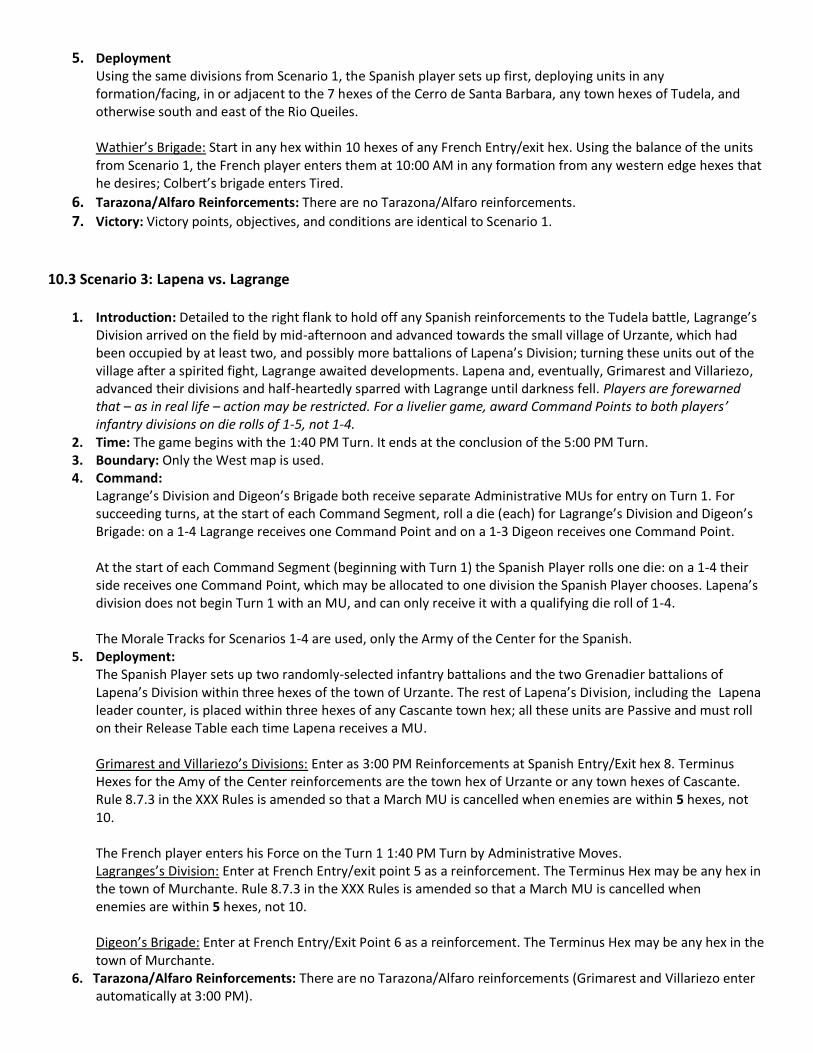
French player sets up second. Units may deploy into any formation/facing desired unless specified otherwise. Parent regiments and/or Detached Voltigeurs may be deployed, if desired. Lannes, ADC Lannes, Moncey: Start in any hex on East map. Mathieu’s Division: Setup in indicated hexes in any desired formation.
Morlot’s Division: Enter at 9:00 AM at Entry/Exit Hex #3 in any desired formation. Wathier’s Brigade: Start in any hex within 10 hexes of French Entry/exit hex #1 or 2. The two hussar regiments begin Exhausted (exhausted from scouting and clashing with Spanish pickets). Musnier’s Division: Enter as a 10:00 AM Reinforcement at French entry/exit hex #1 or 2. Lefebvre-Desnouettes, Colbert’s Brigade: Enter as a 10:20 AM Reinforcement at French Entry/Exit hex #1 or 2.

6. Tarazona/Alfaro Reinforcements: There are no Tarazona/Alfaro reinforcements. 7. Victory:
The players receive Victory Points for achieving the following goals and objectives: 1+VP: The French Player receives 1VP for each level of Army Morale Level lost by the Spanish. 2+VP: The Spanish Player receives 2VP for each level of Army Morale Level lost by the French. 1VP: Castanos exits the south edge of the map by any hex. 1VP: Occupying or being the last to move through all 7 hexes of the Cerro de Santa Barbara with In Command combat units. Contested control grants no VP to either player. 1VP: Occupying or being the last to move through at least 21 town hexes of Tudela with In Command infantry units (ie, cavalry units cannot be solely used to secure this objective). 1VP: Uncontested control of all 18 hilltop hexes of the Cabeza Malla; defined as having one or more friendly combat unit(s) on these hexes (or being the last to occupy) with no opposing unit(s) on same. Contested control grants no VP to either player. 1VP: Uncontested control of all 18 shaded hilltop hexes of the Santa Quiteria; defined as having one or more friendly combat unit(s) on these hexes (or being the last to occupy) with no opposing unit(s) on same. Contested control grants no VP to either player.
The side with the greater number of VPs at scenario end is the winner.
10.2 Scenario 2: Prepared Defense (Hypothetical)
1. Introduction: This scenario supposes that most or all of the Spanish divisions cross the Rio Ebro on the 22nd of November, allowing some care to be exercised in their deployment. It is assumed that the French see no incentive to make a hasty attack, delaying action until all their forces are available.
2. Time: The game begins with the 10:00 AM Turn. It ends at the conclusion of the 3:00 PM Turn. 3. Boundary: Only the East map is used. 4. Command:
The French receive one Command Point per turn. The Spanish Army of Aragon receives one Command Point per turn. Roll one die for the Spanish Army of the Center: on a 1-5 it receives one Command Point (on a 6 it is assumed that Castanos is trying to job Lapena into action). The respective Morale Tracks for Scenario 1-4 are used, only the Army of Aragon for the Spanish. If Castanos should exit the map prior to the end of the scenario, the Spanish player rolls one die during the Command Segment; on a 1-3, he receives one Command Point to place on any one Center Army division.
5. Deployment Using the same divisions from Scenario 1, the Spanish player sets up first, deploying units in any formation/facing, in or adjacent to the 7 hexes of the Cerro de Santa Barbara, any town hexes of Tudela, and otherwise south and east of the Rio Queiles. Wathier’s Brigade: Start in any hex within 10 hexes of any French Entry/exit hex. Using the balance of the units from Scenario 1, the French player enters them at 10:00 AM in any formation from any western edge hexes that he desires; Colbert’s brigade enters Tired.
6. Tarazona/Alfaro Reinforcements: There are no Tarazona/Alfaro reinforcements. 7. Victory: Victory points, objectives, and conditions are identical to Scenario 1.
10.3 Scenario 3: Lapena vs. Lagrange
1. Introduction: Detailed to the right flank to hold off any Spanish reinforcements to the Tudela battle, Lagrange’s Division arrived on the field by mid-afternoon and advanced towards the small village of Urzante, which had been occupied by at least two, and possibly more battalions of Lapena’s Division; turning these units out of the village after a spirited fight, Lagrange awaited developments. Lapena and, eventually, Grimarest and Villariezo, advanced their divisions and half-heartedly sparred with Lagrange until darkness fell. Players are forewarned that – as in real life – action may be restricted. For a livelier game, award Command Points to both players’ infantry divisions on die rolls of 1-5, not 1-4.
2. Time: The game begins with the 1:40 PM Turn. It ends at the conclusion of the 5:00 PM Turn. 3. Boundary: Only the West map is used. 4. Command:
Lagrange’s Division and Digeon’s Brigade both receive separate Administrative MUs for entry on Turn 1. For succeeding turns, at the start of each Command Segment, roll a die (each) for Lagrange’s Division and Digeon’s Brigade: on a 1-4 Lagrange receives one Command Point and on a 1-3 Digeon receives one Command Point. At the start of each Command Segment (beginning with Turn 1) the Spanish Player rolls one die: on a 1-4 their side receives one Command Point, which may be allocated to one division the Spanish Player chooses. Lapena’s division does not begin Turn 1 with an MU, and can only receive it with a qualifying die roll of 1-4. The Morale Tracks for Scenarios 1-4 are used, only the Army of the Center for the Spanish.
5. Deployment: The Spanish Player sets up two randomly-selected infantry battalions and the two Grenadier battalions of Lapena’s Division within three hexes of the town of Urzante. The rest of Lapena’s Division, including the Lapena leader counter, is placed within three hexes of any Cascante town hex; all these units are Passive and must roll on their Release Table each time Lapena receives a MU. Grimarest and Villariezo’s Divisions: Enter as 3:00 PM Reinforcements at Spanish Entry/Exit hex 8. Terminus Hexes for the Amy of the Center reinforcements are the town hex of Urzante or any town hexes of Cascante. Rule 8.7.3 in the XXX Rules is amended so that a March MU is cancelled when enemies are within 5 hexes, not 10. The French player enters his Force on the Turn 1 1:40 PM Turn by Administrative Moves. Lagranges’s Division: Enter at French Entry/exit point 5 as a reinforcement. The Terminus Hex may be any hex in the town of Murchante. Rule 8.7.3 in the XXX Rules is amended so that a March MU is cancelled when enemies are within 5 hexes, not 10. Digeon’s Brigade: Enter at French Entry/Exit Point 6 as a reinforcement. The Terminus Hex may be any hex in the town of Murchante.
6. Tarazona/Alfaro Reinforcements: There are no Tarazona/Alfaro reinforcements (Grimarest and Villariezo enter automatically at 3:00 PM).

7. Victory Either side may secure a Minor Victory by maintaining an In-Command combat unit in the town hex of Urzante that can trace a path free of enemy ZOIs to a friendly Entry/Exit hex. Either side may secure a Major Victory that supersedes the above: Spanish: 7+ French non-artillery units are PGD or off-map at game’s end or 20+ Spanish unit increments are exited off the north/ east map edge. French: 12+ Spanish infantry units are PGD or off-map at game’s end.
Variant: Assume that Castanos was not fleeing for his life from French cavalry, but instead got through their lines to lead his subordinates personally. The parameters for Scenario 3 are modified as follows: 2. Time: The game begins with the 1:20 PM Turn. It ends at the conclusion of the 5:00 PM Turn. 4. Command: At the start of each Command Segment (beginning with Turn 1) the Spanish Player rolls one die: on a 1-4 their side receives one Command Point. 5. Deployment: Castanos sets up in the same hex as Lapena. Lapena is not currently Prompted. At 3:20 the French Player receives Musnier’s division in its entirety, with any town hex of Murchante as a Terminus Hex. The French divisions still have the potential to receive one Command Point per turn, and must decide to confer the MU on either Lagrange or Musnier (not both).
10.4 Scenario 4: The Battle of Tudela 1. Introduction: Without having any compelling reason to fight for the surrounding territory (other than some
stores maintained by the Army of the Center in Cascante), the combined Spanish armies had committed themselves to the battle seemingly out of pride. The Army of the Center remained dispersed, with only three of its divisions in the vicinity of Tudela. They were taken by surprise by the French mid-morning advance on the 23rd, owing to their divided commands, and had to deploy hastily. Brushing aside French advance elements, probably skirmishers, they won the race for the hills of Santa Barbara, Santa Quitera, and Cabeza Malla, and withstood further immediate assaults. However, despite personally-delivered orders to provide support, Lapena’s division remained an onlooker of the action; Castanos’s second trip to spur him to further action resulted in his being chased off the field by French cavalry and his staff dispersed. While this occurred, renewed French efforts bore fruit with the capture of the Santa Barbara and Cabeza Malla hills, along with a cavalry charge led by Lefebvre-Desnouettes that split the middle of the Spanish positions. The late–arriving divisions of Villariezo and Grimarest added little to the Spanish cause as the Army of Aragon began a precipitate retreat to Zaragoza.
2. Time: The game begins with the 9:00 AM Turn. It ends at the conclusion of the 5:00 PM Turn. 3. Boundary: The East and West maps are used. 4. Command: Command is per Rule 6.0 of the Exclusive Rules. The Morale tracks for scenarios 1-4 are used, with
the Armies of Aragon and the Center for the Spanish. Though Lapena’s setup is identical to Scenario 3, the division is not yet Activated.
5. Deployment: At Start Deployments for both sides are identical to Scenarios 1 and 3. The setup for Scenario 2 can be used as the starting point for a variant of Scenario 4. French reinforcements: Morlot’s Division: Enter at 9:00 AM at Entry/Exit Hex #3 in any desired formation. Musnier’s Division: Enter as a 10:00 AM Reinforcement at French Entry/Exit hex #1 or 2. Lefebvre-Desnouettes, Colbert’s Brigade: Enter as a 10:20 AM Reinforcement at French Entry/Exit hex #1 or 2. Lagranges’s Division: Enter as a 1:00 PM Reinforcement at French Entry/Exit point #1 or 2.
OR

Enter as a 1:20 PM Reinforcement at French Entry/Exit point #3. OR
Enter as a 1:40 PM Reinforcement at French Entry/exit point #4 or 5. Terminus Hexes are any town hex of Muchante, Cascante, or Urzante, Molina de Cartan, or any hex with the Command Span of Lannes (or Moncey, if Lannes is a casualty). Digeon’s Brigade: Enter as a 12:40 PM Reinforcement at French Entry/Exit point #1 or 2.
OR Enter as a 1:00 PM Reinforcement at French Entry/Exit point #3.
OR Enter as a 1:20 PM Reinforcement at French Entry/Exit Point #5 or 6. Optional: rather than allowing the French Player to deal with the exigencies of the moment, force him to pre-commit the Lagrange and Digeon reinforcements to specific allowable Entry Points and times (use a sealed envelope to hold the choices).
6. Tarazona/Alfaro Reinforcements: Place the divisions of Grimarest and Villariezo in the Tarazona box. The Spanish player may attempt a pre-game Activation attempt for one or both of these divisions, with the attempt assumed to be occurring at 8:00 AM (so success places the Pending Reinforcements at 12:00); otherwise, the standard Tarazona/Alfaro reinforcement rules apply. Map entry is through Spanish Entry/Exit Points 6 thru 10. The Terminus Hex may be any hex in the towns of Murchante, Cascante, Urzante, or the Molina de Cartan. Rule 8.7.3 in the XXX Rules is amended so that a March MU is cancelled when enemies are within 5 hexes, not 10. If a Terminus Hex is interfered with by the presence of enemy forces, the reinforcing division my still enter by expenditure of a CP instead of the “free” CP that reinforcements receive.
There are no Alfaro Reinforcements for the French.
7. Victory The players receive Victory Points for achieving the following goals and objectives; at game’s end, subtract the Spanish points from the French to determine Victory Level: French: 1 VP for each level of Army Morale reduction for each of the two Spanish armies (ie, a maximum of 3 VP per Army). 1 VP for holding or being the last side to move a combat unit through 10 or more of the 19 town hexes of Cascante. 1 VP for advancing 15 or more increments of in-command infantry onto or south and east of the road that runs south and east of the Rio Queiles and between Tudela and Cascante at game’s end (this represents a splitting of the two Spanish armies, increasing the likelihood of their being beaten in detail). 1 VP for reducing a Spanish Army Morale Track to its lowest level whilst maintaining 25 or more increments of in-command infantry or cavalry on two or more Spanish Entry/Exit hexes leading to that army’s LOC (this represents pursuit of a beaten army). ¼ VP for each successful Activation of a Spanish Tarazona reinforcement division, with an additional ¼VP when a division makes a successful Pending Reinforcement roll and map entry.
1VP for controlling the town hex of Urzante at game’s end.
Spanish: 2 VP for each level of French Army Morale reduction (ie, up to 6 VP). 1 VP if the Army of Aragon has not sustained a Morale reduction by 12:00 PM. 1 VP for maintaining 25 or more increments of In-command infantry or cavalry on or adjacent to two or more French Entry/Exit hexes from 1 to 5 (this represents organized soldiery advancing on the French LOC). 1 VP if Marshal Lannes is killed.
1VP for having undisputed control of all town hexes of Cascante at game’s end. 1VP for controlling the town hex of Urzante at game’s end (contingent on having undisputed control of all town hexes of Cascante). 1VP for having undisputed control of all town hexes of Murchante at game’s end (contingent on having undisputed control of all town hexes of Cascante and Urzante). Holding Urzante and/or Cascante represent either the Spanish threatening the flank of any French advance towards Zaragoza or, conversely, the French protecting said flank.
Victory Level: -6 or less: Complete Spanish Victory -5 to -3: Substantial Spanish Victory -2 to 0: Tactical Spanish Victory 1 to 2: Draw 3 to 5: Tactical French Victory 6 to 7: Substantial French Victory 8+: Complete French Victory The historical result is judged to be a +7 Substantial French Victory
10.5 Scenario 5: Concentrated Defense, Deliberate Attack
1. Introduction (Hypothetical): In the second week of November, Castanos fell ill, and Jose Palafox’s deputy
(and brother) Francisco took the liberty of issuing orders to the armies of the Center and Aragon, intent on pursuing an offensive on both sides of the Ebro River. Before being called off, this had the effect of sowing confusion amongst the Spanish divisional commanders and scattering their units far and wide. This scenario assumes that Palafox did not pursue this offensive, but instead began to coalesce the Spanish divisions near the Ebro several days earlier than was done historically. As a result, the divisions of Grimarest, Villariezo, and Rangel are much closer, with the former two even available for immediate deployment at Tudela. Meanwhile, Marshal Lannes is kept apprised of these movements, owing to the dominance of the French cavalry arm, which provides scouting reports of the Spanish concentration. Aware of the growing numbers of Spanish troops gathering in front of him, he orders General Grandjean to begin assembling his division, currently scattered across the French lines of communication, at the town of Alfaro. It will be available for the coming battle if he so wishes. Though prudence would dictate that he await the support of the remainder of the VI Corps under Marshal Ney, he will naturally try to achieve a glorious victory all by himself. Thanks to cavalry dominance, Lannes will be able to freely pick his points of attack and with a better knowledge of Spanish deployment. The game begins on or about November 25, days later than the historical battle.
2. Time: The game begins with the 9:00 AM game turn. It ends at the conclusion of the 5:00 PM game turn. 3. Boundary: The East and West maps are used.

4. Command: Command is per Rule 6.0 of the Exclusive Rules. The Morale tracks for scenario 5 are used, with the Armies of Aragon and the Center for the Spanish. If the divisions of Grimarest or Villariezo start play on the game map (see below) they do not require activation of any sort.
5. Deployment: Spanish: Set up first. Place the divisions of Grimarest, Villariezo, and Rangel in the Tarazona Holding Box. Using the remaining divisions, the Spanish player sets up first. All divisions and leaders may set up anywhere south and east of the Rio Queiles, but inclusive of the towns of Tudela and Cascante, and the Cerro de Santa Barbara, and within three hexes of any town hex. Mark Lapena’s position with a spare counter (see 7.2.2). Units may deploy into any formation/facing desired. Regiments may be placed intact or be broken into constituent battalions. Chevaux de Frise: Using a rule borrowed from the Ligny game, the Spanish may deploy four CdF counters in any Town hex. CdF face one hexside, provide a +3 pre-melee modifier to the morale of defenders occupying the counter’s hex, multiply the Defensive Fire of its occupiers by 1.5, and penalize attackers crossing its hexside with a -6 pre-melee modifier to their morale. CdF are fixed in place and can be removed if a French unit successfully crosses one in Melee. If attacking exclusively through a CdF hexside, a maximum of 6 increments may attack. Given adequate time, some veterans of the First Siege of Zaragossa would presumably prepare the town(s) for the imminent attack. During deployment, the Spanish player has the option of also deploying the divisions of Grimarest and Villariezo with his At Start divisions, at the cost of 1VP per division so deployed (double the cost of Scenario 4, due to their greater length of time on the map). Rangel must remain in the Tarazona Box. No divisions belonging to the Army of the Center deployed At Start on the map have been Activated. French: Set up second. Place Grandjean’s division in the Alfaro Holding Box. The French Player enters some or all of his entire remaining countermix, including the Corps Asset artillery battery – presumably, Lannes would be able to haul up some heavier 12 lb guns from the artillery train for the big battle - on Turn 1 at French Entry/Exit Points 1 thru 5. Terminus hexes for the original Turn 1 entry can be any crossroads hex or hex within the Command Span of Lannes after he enters the map. At his discretion, some units may be kept off map and entered as reinforcements at the same given Points; divisions and brigades must maintain their organizational integrity – no separating of units. The Reinforcement chit is automatically drawn first on Turn 1.
6. Tarazona/Alfaro Reinforcements Rangel’s division is available as a Tarazona reinforcement for the Spanish, along with Grimarest and Villariezo’s divisions, if they are not already deployed on-map. Map entry is through Spanish Entry/Exit Points 6 thru 10. The Spanish player may attempt a pre-game Activation attempt for any offboard divisions, with the attempt assumed to be occurring at 8:00 AM (so success places the Pending Reinforcements at 12:00); otherwise, the standard Tarazona/Alfaro reinforcement rules apply. Grandjean’s division is available as an Alfaro reinforcement for the French. It enters the map at French Entry/Exit points 1,2, or 3. Terminus Hexes are any town hex of Muchante, Cascante, or Urzante, Molina de Cartan, or any hex with the Command Span of Lannes (or Moncey if Lannes is a casualty). Grandjean’s enrty hex must be predesignated at the time of Activation. A pre-game 8:00 AM Activation may be attempted after viewing the Spanish initial setup. Either or both players may begin Activation Roll attempts for these divisions on Turn 1.

7. Victory The players receive Victory Points for achieving the following goals and objectives; at game’s end, subtract the Spanish points from the French to determine Victory Level:
French:
1 VP for each level of Army Morale reduction for each of the two Spanish armies (ie, a maximum of 3 VP per Army). 1 VP for holding or being the last side to move a combat unit through 5 or more of the 19 town hexes of Cascante. 1 VP for advancing 15 or more increments of in-command infantry onto or south and east of the road that runs south and east of the Rio Queiles and between Tudela and Caascante at game’s end (this represents a splitting of the two Spanish armies, increasing the likelihood of their being beaten in detail at a later date). 1 VP for reducing a Spanish Army Morale Track to its lowest level whilst maintaining 25 or more increments of in-command infantry or cavalry on Spanish Entry/Exit hexes leading to that army’s LOC (this represents pursuit of a beaten army). ¼ VP for each successful Activation of a Spanish Tarazona reinforcement division, with an additional ¼VP when a division makes a successful Pending Reinforcement roll and map entry. 1 VP per division of Grimarest and Villariezo that begins the game deployed At Start on the game map.
1VP for controlling the town hex of Urzante at game’s end.
Spanish: 2 VP for each level of French Army Morale reduction (ie, up to 6 VP). 1 VP if neither the Army of Aragon or the Army of the Center has sustained a Morale reduction by 12:00 PM. 1 VP for maintaining 25 or more increments of In-command infantry or cavalry on or adjacent to French Entry/Exit hexes from 1 to 5 (this represents organized soldiery advancing on the French LOC). 1 VP if Marshal Lannes is killed. ½ VP for successful activation of Grandjean’s division in Alfaro, with an additional 1½ VP when the division makes a successful Pending Reinforcement roll and map entry.
1VP for having undisputed control of all town hexes of Cascante at game’s end. 1VP for controlling the town hex of Urzante at game’s end (contingent on having undisputed control of all town hexes of Cascante). 1VP for having undisputed control of all town hexes of Murchante at game’s end (contingent on having undisputed control of all town hexes of Cascante and Urzante).
Holding Urzante and/or Cascante represent either the Spanish threatening the flank of any French advance towards Zaragoza or, conversely, the French protecting said flank.
Holding Urzante and/or Cascante represent either the Spanish threatening the flank of any French advance towards Zaragoza or, conversely, the French protecting said flank.
Victory Level: -6 or less: Complete Spanish Victory -5 to -3: Substantial Spanish Victory -2 to 0: Tactical Spanish Victory 1 to 2: Draw 3 to 4: Tactical French Victory 5 to 6: Substantial French Victory 7+: Complete French Victory

11. Play Balance Sadly, I haven’t been able to properly assess the victory conditions for the scenarios because the course of the battle becomes clear well before the end is near. My own (imperfect and solitaire) playtesting suggests that the French advantage in cavalry is eventually overwhelming and unbalancing to the game; the advantage is even greater than it looks on paper (a +1,000 man advantage), as so many of the Spanish cavalry increments are dispersed throughout tiny, nearly useless, cavalry regiments. Their numerous tiny infantry battalions are also a liability. I hope my assessment is incorrect, but if your opinion is similar, here are some historically-based ways to hobble the French, incorporating some or all of the following (I have also taken the liberty of expressing Spanish cavalry at paper strengths):
• Remove the 2nd Provisional Hussars Regiment from Wathier’s Brigade; it has no recorded officer casualties for this battle, and may not have been committed. Some maps and accounts omit both provisional hussar regiments of the French cavalry force, so remove both from Wathier’s Brigade (perhaps they were spent from their scouting duties?). Impose this even for Scenario 5, for a similar reason: they are holding the Spanish cavalry at bay, allowing unobserved deployment by the French.
• Treat the Spanish Heavy Cavalry as actual Heavy Cavalry (ie, 2x vs. Light Cavalry in Melee, etc.) – these regiments are the Navy Blue/Light Yellow counters with the fleur.
• Do not permit any unit of Mathieu’s Division to cross a hexside of the Rio Queiles; this has the effect of forcing it to fight through the Cerro de Santa Barbara and Tudela town hexes in order to advance to the eastern side of the map (this is Morlot’s division if you play with the traditionally known presentation of the battle).
• Musnier’s Division was either very lightly engaged in the northern part of the battlefield, or not at all, since it moved to assist Lagrange in the closing stages of the day, where it was, again, either lightly engaged or not at all (this division is never mentioned when French casualties are totaled). Consequently, if any battalion of this division suffers an increment loss, deduct 1 VP from the French total at game’s end.
• Consider Melee by cavalry following Charges vs. hexes adjacent to rivers or streams (any hex with green airbrushing) to be Short Charges at 1/3 strength and with a cost of 2 MP to enter for cavalry (the hexes are assumed to hold further small watercourses and ditches that are no serious obstacle to walking horses picking their way, but impede chargers).
• Allow up to three Spanish infantry units to freely stack in one hex, up to 9 increments maximum per hex (this is intended to offer some protection to the numerous two and three increment sized battalions). If forming Square, do not roll for Square formation disorder unless a third battalion is attempting to enter a two-battalion stack.
• As noted earlier, force the French player to precommit the time and entry hex for Lagrange’s division.
• Disallow use of the Voltigeur rule, either for the Provisional battalions only, or for all French infantry.
12. Optional and Experimental Rules 12.1 French Voltigeurs (Experimental) It was never my intention to add company-sized skirmishers to this game, even though my reading of the period indicated that one of the problems the Spanish faced was being heavily outnumbered in skirmish infantry. But there are so many Spanish battalion-sized units in their OOB that are designated as “ligero”(never mind that many of them were probably not skirmish capable) that it dawned on me that, under some circumstances, the French might face the ahistorical situation of being beset by swarms of Spanish skirmishers. I did not feel like arbitrarily deciding which Spanish “ligeros”, most likely the newly-raised units, were not capable, and decided to grant the French more skirmishers of their own to counter them. These detached companies are a pain to keep track of, so only use them if you really need them. The “Default” presentation of French battalions and regiments is without their Voltigeur companies. Each French or Allied infantry battalion in Good Order may generate one Voltigeur company at a cost of 1 MP in the Maneuver Segment at the start or end of its movement (exception: the 4th Battalion, 50th Line is assumed to be too low in manpower to field a significant light company, so a counter is not provided for one); consolidated regiments may generate companies equal to the number of battalions they comprise. Place a “Detached Voltigeurs” counter beneath the generating unit that is proportional in strength loss to the number of companies being detached. The Voltigeur is placed
on the top or bottom of the stack as the player wishes, and assumes the facing of its parent. Opportunity Fire from enemies is possible.
1. Voltigeur companies may freely stack with their parent battalion (or regiment, as appropriate) or with other Voltigeurs of their regiment. Both units inherit the cost of Detachment, so whichever unit moves second (if at all) adds to its costs for the rest of the turn. Apply common sense, fairness, and logic. Examples: A battalion moves and expends 5 MP, then detaches a Voltigeur for 1 MP; the Voltigeur begins its Segment with a “debt” of 6 MP and can expend 3 more MP. A battalion detaches a Voltigeur as its first action, which moves away; then the parent battalion begins its movement with a debt of 1 MP for the detachment. A battalion detaches a Voltigeur, which moves away and adjacent to an enemy unit; then the parent battalion declares an Assault versus that enemy unit, moving adjacent and through its Voltiguer in a Pas de Charge. A Voltigeur moves 3 MP to its parent, expending another MP to reattach; the parent unit begins its movement with a debt of 4 MP.
2. Voltigeurs must attempt to remain within 2 hexes of their parent unit at the end of the Maneuver Segment, even at the cost of drawing Opportunity Fire, Charges, etc in the attempt; they may not deliberately stray further than the 2 hex limit. If at the beginning of a Reorganization Segment, a voltigeur company is not within 2 hexes of its parent, it routs towards its parent, a “Reattached Voltigeur” counter placed beneath the parent on arrival, and the parent is Disordered (already Disordered parents do not Rout). Routing to parent occurs regardless of proximity of enemies or ZOIs. Player may wish to mark separated Voltigeurs with a “Separated Voltigeurs” marker as a reminder to rout them in the Reorganization Segment.
3. Parent units are counted as having 1 increment less for purposes of calculating Fire or Melee combat, but not for Morale purposes.
4. Voltigeurs may Reattach to parents at a cost of 1 MP when stacked with the parent (it need not expend 1 MP to assume facing on entry to the parent hex). Parents remain in Good Order, Disorder or PGD as they were prior to Reattachment. Disordered Voltigeurs may reattach at no further detriment to the parent or themselves. The Disordered counter is removed. Remove the voltigeur from the map until it is Detached again. Flip the “Detached” counter to its “Reattached” side (Exception: if a Voltigeur begins the Maneuver Segment stacked with its parent unit, do not flip the counter to its “Reattach” side, but simply remove the counter; the parent is made “whole” in one step). A unit with a “Reattached” counter beneath it cannot generate Voltigeurs for the rest of its Maneuver Segment. Remove the “Reattached” counter at the end of the Reorganization Segment; it can Detach again on its next turn (the Player may wish to place the Reattached counter atop its stack as a reminder to remove it at turn’s end). Detached voltigeurs may reattach to their parent during Melee Reserve Commitment, adding their melee value (do not place the “Reattached’ counter). Detached Voltigeurs may also Reattach to their parent during morale recovery during the Reorganization Segment if both occupy the same hex.
5. If a Voltigeur is displaced in a Pas de Charge, and the displacing unit is the parent battalion/regiment, the player
has the option of reattaching the voltigeur to the parent, and placing the “Reattached” counter with the parent. The same procedure is used for voltigeurs that Retreat before Combat in Melee and are in front of their parent unit. Note that the Voltiguer will not be counted as part of the parent’s strength in any coming Fire or Melee.
6. If a detached voltigeur is eliminated from play, an appropriately-sized “Eliminated Voltigeur” counter is placed with its parent battalion/regiment, and is treated as a permanent casualty to its increments. After a battalion has sustained a Voltigeur casualty (or for a regiment, equal to its number of battalions), it may no longer detach Voltigeurs. Regiments carrying Eliminated Voltigeur counters must apportion them to their battalions if they break down to battalions at some future time.
12.2 Communicating Battalions (Optional) Adopting an older LaBat rule, the Command Span of divisional commanders is extended beyond 3 hexes if it is traced through a continuous string of adjacent units, all from the same division. Any breaks in the line by open spaces or units from another organization severs the span to that point.

13. Bibliography Burnham, R., Charging Against Wellington: The French Cavalry in the Peninsular War, Frontline Books, 2011. Chandler, D., The Campaigns of Napoleon, Macmillan, 1966. Chandler, D., Dictionary of the Napoleonic Wars, Simon & Shuster, 1993. Chartrand, R., Napoleonic Wars Napoleon’s Army, Brassey’s, 1996. Cronin, G., and Summerfield, S., Spanish Infantry of the Early Peninsular War, Ken Trotman Publishing, 2014. Cronin, G., and Summerfield, S., Spanish Cavalry of the Early Peninsular War, Ken Trotman Publishing, 2016. Griffith, H. (ed.), A History of the Peninsular War (vol IX Modern Studies), Greenhill Books, 1999. Haythornthwaite, P. and Chappell, M., Uniforms of the Peninsular Wars, Arms and Armour Press, 1995. Knotel, R. et al, Uniforms of the World, Arms and Armour Press, 1980. Oman, C., A History of the Peninsular War (vol I), Greenhill Books, 1995. Partridge, R. and Oliver, M., Battle Studies in the Peninsular War, Constable, 1998. Santiago, F. V., Tudela 1808, Almena Ediciones, 2015.

Tables of Command and Organization
French
III/VI Corps Corps Arty Lannes/Moncey
1 Div (III) 2 Div (III) 3 Div (III) 4 Div (III) 2 Div (VI) Mathieu Musnier Morlot Grandjean Lagrange Combined Cavalry Lefebvre-Desnouettes Cav Bde (III) Cav Bde (VI) Cav Bde (Res) Wathier Colbert Digeon
Spanish
Army of the Center Castanos
1 Div 2 Div 3 Div 4 Div 5 Div Murcian Div Cav Div Villariezo Grimarest Rangel Lapena Roca Villalba Fiasco
Army of Aragon O’Neill/Palafox
1 Div 2 Div FIballer/O’Neill St. March
1CP
1CP
1CP
1CP OR
1CP
Scenarios 1,2, & 4: PGD units of Roca and Villalba rout to Aragon depots and key to Aragon Morale Track and levels.