Embed Size (px)
Citation preview

1
LAB 1
Discussion: Peterson Monthly Sky Maps SFA Star Charts Equatorial Coordinates
Indoor Lab Assignment: Star Charts
Outdoor Lab Assignment: Finding Constellations
2
Name:_____________________________ Date:______________
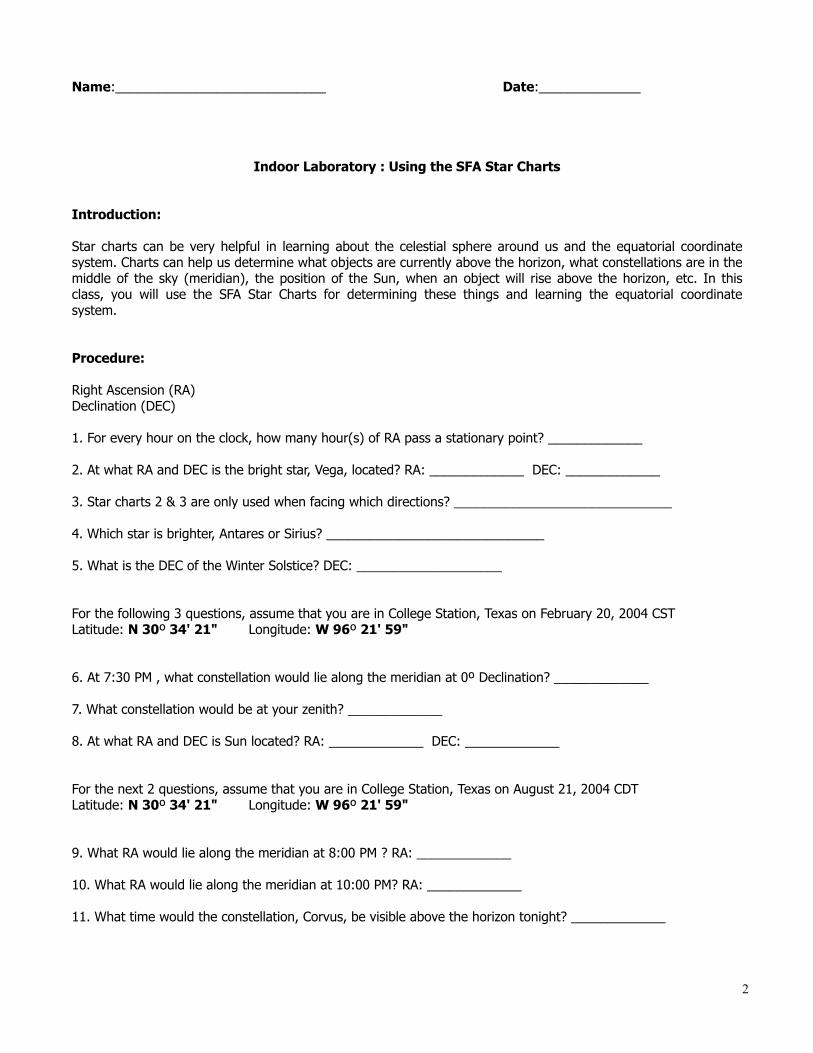
Indoor Laboratory : Using the SFA Star Charts
Introduction:
Star charts can be very helpful in learning about the celestial sphere around us and the equatorial coordinate system. Charts can help us determine what objects are currently above the horizon, what constellations are in the middle of the sky (meridian), the position of the Sun, when an object will rise above the horizon, etc. In this class, you will use the SFA Star Charts for determining these things and learning the equatorial coordinate system.
Procedure:
Right Ascension (RA)Declination (DEC)
1. For every hour on the clock, how many hour(s) of RA pass a stationary point? _____________
2. At what RA and DEC is the bright star, Vega, located? RA: _____________ DEC: _____________
3. Star charts 2 & 3 are only used when facing which directions? ______________________________
4. Which star is brighter, Antares or Sirius? ______________________________
5. What is the DEC of the Winter Solstice? DEC: ____________________
For the following 3 questions, assume that you are in College Station, Texas on February 20, 2004 CSTLatitude: N 30º 34' 21" Longitude: W 96º 21' 59"
6. At 7:30 PM , what constellation would lie along the meridian at 0º Declination? _____________
7. What constellation would be at your zenith? _____________
8. At what RA and DEC is Sun located? RA: _____________ DEC: _____________
For the next 2 questions, assume that you are in College Station, Texas on August 21, 2004 CDTLatitude: N 30º 34' 21" Longitude: W 96º 21' 59"
9. What RA would lie along the meridian at 8:00 PM ? RA: _____________
10. What RA would lie along the meridian at 10:00 PM? RA: _____________
11. What time would the constellation, Corvus, be visible above the horizon tonight? _____________
3
Name:_____________________________ Date:______________
Outdoor Laboratory: Using the Peterson Monthly Sky Maps
Introduction
In astronomy, it is very important to have some idea of what the sky looks like. Constellations act as landmarks to the sky. To the observer familiar with the constellations, the sky is always recognizable. This lab will help familiarize you with the constellations and how to use the Monthly Sky Maps to find constellations. Likewise, you should know the common names of the brightest stars.
Procedure
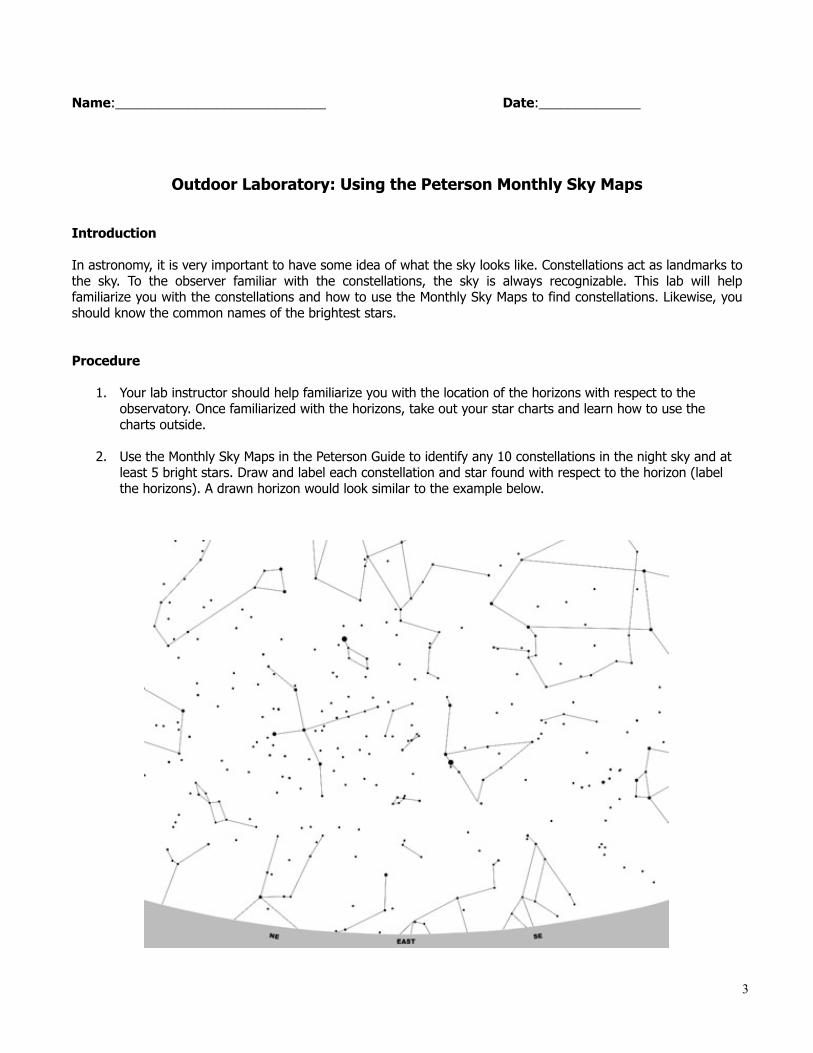
1. Your lab instructor should help familiarize you with the location of the horizons with respect to the observatory. Once familiarized with the horizons, take out your star charts and learn how to use the charts outside.
2. Use the Monthly Sky Maps in the Peterson Guide to identify any 10 constellations in the night sky and at least 5 bright stars. Draw and label each constellation and star found with respect to the horizon (label the horizons). A drawn horizon would look similar to the example below.
4
Name: _____________________ Date: _______________________
Constellation & Bright Star Lab Practical
Introduction
This lab practical will be give after the 4th Week of classes.
Tonight is your constellation lab practical. You will prove to your instructor that you know the constellations and bright stars in the night sky. Below is the general procedure and grading scheme.
Procedure
1. You may not use any star chart or monthly sky map or other reference aid.
2. You must identify at least 10 constellations and 5 bright stars.
3. Your instructor may have you use a beta-green laser pointer to assist in pointing.
4. Your instructor may put a time constraint on the practical and deduct points for exceeding the time limit.
100% Identified = 100
90% - 95% Identified = 95
80% - 89% Identified = 80
70% - 79% Identified = 70
60% - 69% Identified = 60
< 60% Identified = 50
Score __________________
5
LAB 2
Discussion: Types of Telescopes, Time (UTC)
Indoor Lab Assignment: Instructor’s Discretion
Outdoor Lab Assignment: Using the Telescopes
6
Name:_____________________________ Date:______________
Outdoor Laboratory: Telescope Familiarization
Introduction
In this lab, you will become familiar wi the the operation and various parts of the 8” Schmidt-Cassegrain telescope, which you will be using for the duration of the course. You should have read through the instructions or have been coached by your instructor. This lab will outline the rough points, but if you get stuck, refer to the handout or ask your instructor.
Procedures
3. The Mount: Notice that the telescope you’re using has an equatorial mount. This can be seen by noticing that when the telescope is first mounted on the wedge, the tube of the telescope points directly to Polaris (our North Star). The telescope has two directions of motion, which will allow you to locate stars on the celestial sphere. These directions are called Right Ascension and Declination.
Right Ascension (RA) corresponds to East and West on the Celestial Sphere.Declination (Dec) corresponds to North and South on the Celestial Sphere.
4. The Telescope: Become familiar with the different parts of the telescope
The Finder Scope Lens Cap RA Lock, Fine Adjustment Knob, Setting Circle Dec Lock, Fine Adjustment Knob, Setting Circle Focus Knob Eyepiece Tracking Motors Primary and Secondary Mirrors
5. The Declination Setting Circle: Point your telescope at a bright star that has a declination that you know. Make sure that the declination setting circle on your telescope has the correct reading. After you have centered the star in the eyepiece and have verified the setting circle is correct, show your instructor your telescope.
6. The Finder Scope: The purpose of the finder scope is to make finding an object easier. Unfortunately, due to the constant use, the finder scope may not always be pointing in the same direction as the telescope. If you notice the finder not pointing in the correct direction, ask your instructor for assistance in aligning the Finder Scope.
After you have checked the Declination Setting Circle and verified the pointing accuracy of the Finder Scope, practice aligning your telescope to various stars. Your instructor will assist you in the process of finding objects and using the equatorial coordinate system.
7
LAB 3
Discussion: Stars and Binary Stars
Indoor Lab Assignment: Flare Stars
Outdoor Lab Assignment: Rotation of the Earth
8
Name: _____________________ Date: _______________________
Indoor Laboratory: Flare Stars1
Introduction
When stars begin to leave the main sequence, they can enter a phase of instability. This is due to the fact that there is an imbalance of the energy production and the gravitational contraction in the star. These stars will flare in brightness and these flares can happen up to once a day and can last as long as 30 minutes! The change in brightness can be several magnitudes, making a naked eye star into a very bright star in the night sky. Unfortunately, flare events cannot be predicted; so, we just have to hope that we are looking in the right direction at the right time. In this lab, we will use sample data taken from a known flare star, UV Ceti.
Part IProcedure
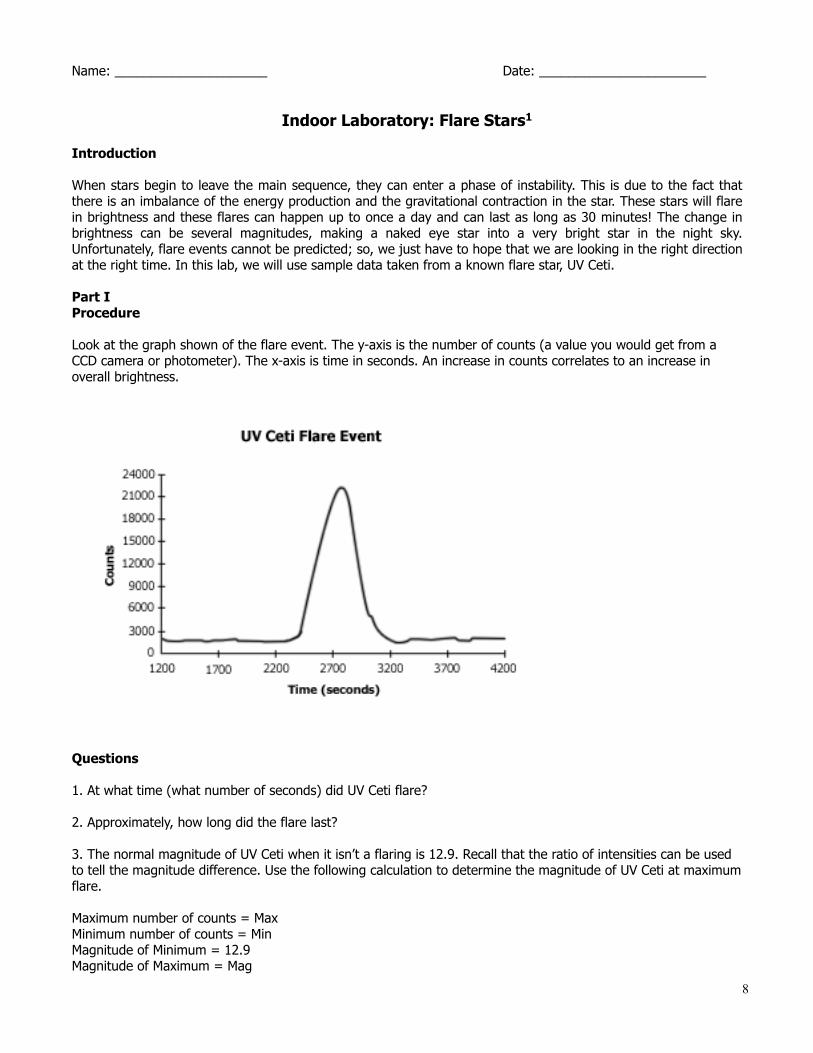
Look at the graph shown of the flare event. The y-axis is the number of counts (a value you would get from a CCD camera or photometer). The x-axis is time in seconds. An increase in counts correlates to an increase in overall brightness.
Questions
1. At what time (what number of seconds) did UV Ceti flare?
2. Approximately, how long did the flare last?
3. The normal magnitude of UV Ceti when it isn’t a flaring is 12.9. Recall that the ratio of intensities can be used to tell the magnitude difference. Use the following calculation to determine the magnitude of UV Ceti at maximum flare.
Maximum number of counts = MaxMinimum number of counts = MinMagnitude of Minimum = 12.9Magnitude of Maximum = Mag
9
Mag = -2.5 * log(Max/Min) + 12.9
Magnitude of UV Ceti at Maximum = ____________________
If this were the Sun, what would the absolute magnitude be during the flare? The normal absolute magnitude of the Sun is 4.
Part IIIntroduction
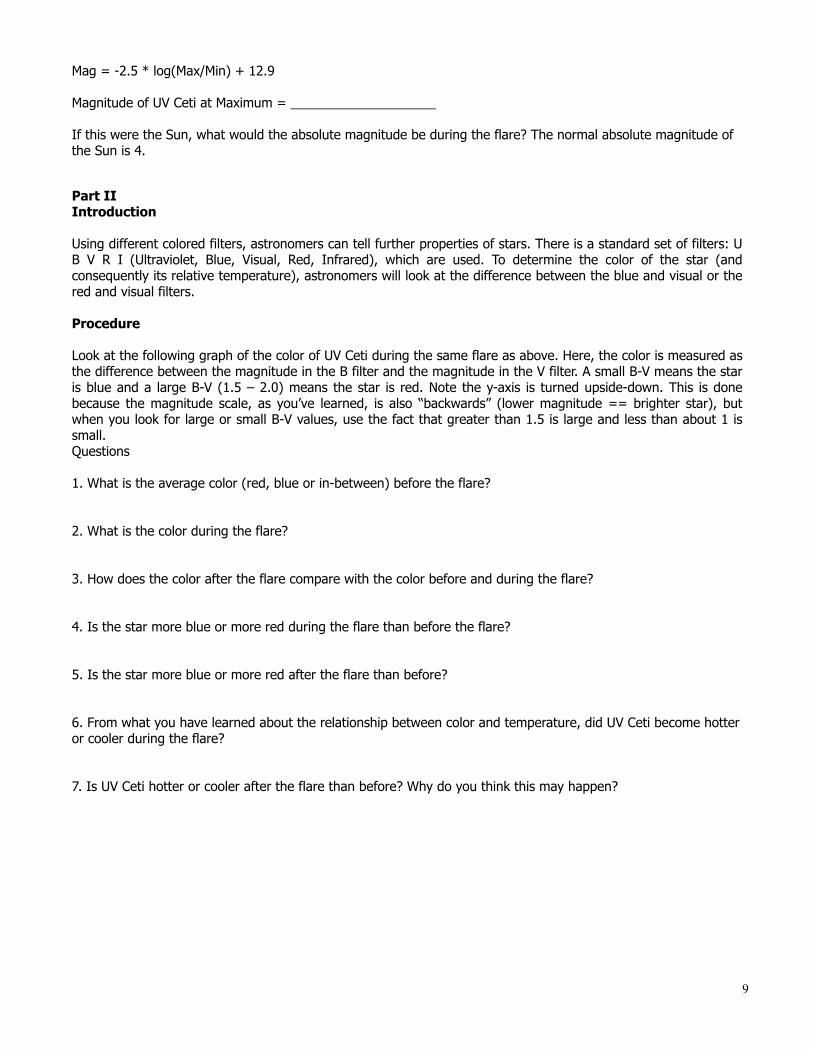
Using different colored filters, astronomers can tell further properties of stars. There is a standard set of filters: U B V R I (Ultraviolet, Blue, Visual, Red, Infrared), which are used. To determine the color of the star (and consequently its relative temperature), astronomers will look at the difference between the blue and visual or the red and visual filters.
Procedure
Look at the following graph of the color of UV Ceti during the same flare as above. Here, the color is measured as the difference between the magnitude in the B filter and the magnitude in the V filter. A small B-V means the star is blue and a large B-V (1.5 – 2.0) means the star is red. Note the y-axis is turned upside-down. This is done because the magnitude scale, as you’ve learned, is also “backwards” (lower magnitude == brighter star), but when you look for large or small B-V values, use the fact that greater than 1.5 is large and less than about 1 is small.Questions
1. What is the average color (red, blue or in-between) before the flare?
2. What is the color during the flare?
3. How does the color after the flare compare with the color before and during the flare?
4. Is the star more blue or more red during the flare than before the flare?
5. Is the star more blue or more red after the flare than before?
6. From what you have learned about the relationship between color and temperature, did UV Ceti become hotter or cooler during the flare?
7. Is UV Ceti hotter or cooler after the flare than before? Why do you think this may happen?
10
1 Some content in this lab is courtesy of Dr Michael Castelaz of East Tennessee State University
11
Name:_____________________________ Date:______________
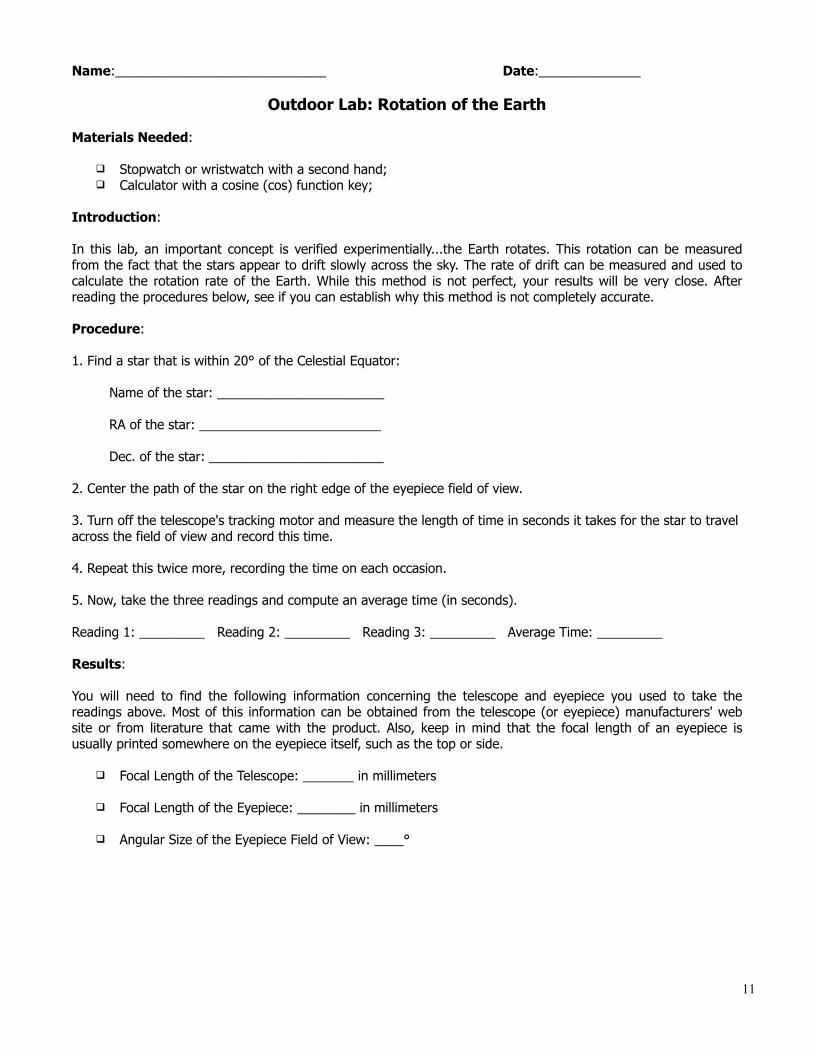
Outdoor Lab: Rotation of the Earth
Materials Needed:
Stopwatch or wristwatch with a second hand; Calculator with a cosine (cos) function key;
Introduction:
In this lab, an important concept is verified experimentially...the Earth rotates. This rotation can be measured from the fact that the stars appear to drift slowly across the sky. The rate of drift can be measured and used to calculate the rotation rate of the Earth. While this method is not perfect, your results will be very close. After reading the procedures below, see if you can establish why this method is not completely accurate.
Procedure:
1. Find a star that is within 20° of the Celestial Equator:
Name of the star: _______________________
RA of the star: _________________________
Dec. of the star: ________________________
2. Center the path of the star on the right edge of the eyepiece field of view.
3. Turn off the telescope's tracking motor and measure the length of time in seconds it takes for the star to travel across the field of view and record this time.
4. Repeat this twice more, recording the time on each occasion.
5. Now, take the three readings and compute an average time (in seconds).
Reading 1: _________ Reading 2: _________ Reading 3: _________ Average Time: _________
Results:
You will need to find the following information concerning the telescope and eyepiece you used to take the readings above. Most of this information can be obtained from the telescope (or eyepiece) manufacturers' web site or from literature that came with the product. Also, keep in mind that the focal length of an eyepiece is usually printed somewhere on the eyepiece itself, such as the top or side.
Focal Length of the Telescope: _______ in millimeters
Focal Length of the Eyepiece: ________ in millimeters
Angular Size of the Eyepiece Field of View: ____°
12
Using the information gathered in the Results section, you can calculate the magnification of the telescope:
Magnification = Focal Lenth of the Telescope / Focal Length of the eyepiece
Magnification = ____________
It can be seen from this formula that greater magnification results if you use an eyepiece with a shorter focal length.
The angular size of the field of view of a telescope can be calculated using the following equation; where, s = the angular field of view of the telescope.
S = Angular Size of the Eyepiece Field of View / Magnification of the Telescope
S = ______________
Now, you can calculate the rotational frequency of the Earth to six (if possible) significant figures using the following equation. Remember to put your calculator in 'degree' mode when you take the cosine of the declination of the star.
tavg = the average of your readings in seconds; Dec = the declination of the star used in the 'Procedure' section above.
rev/day = ((S*(1/360)) /(tavg *(1/86400))) / cos(Dec)
Enter your answer here: rev/day= ____________________.
How does your findings compare to the accepted period of rotation of 23h 56m 04s (0.997269)?
How can you improve your method of gathering data to make your findings more accurate?
13
LAB 4
Discussion: Hertzprung-Russell Diagram
Indoor Lab Assignment: Spectral Classification
Outdoor Lab Assignment: Finding Binary Stars
14
Indoor Laboratory: Spectral Classification
Introduction (Partly Contributed by NASA GSFC)
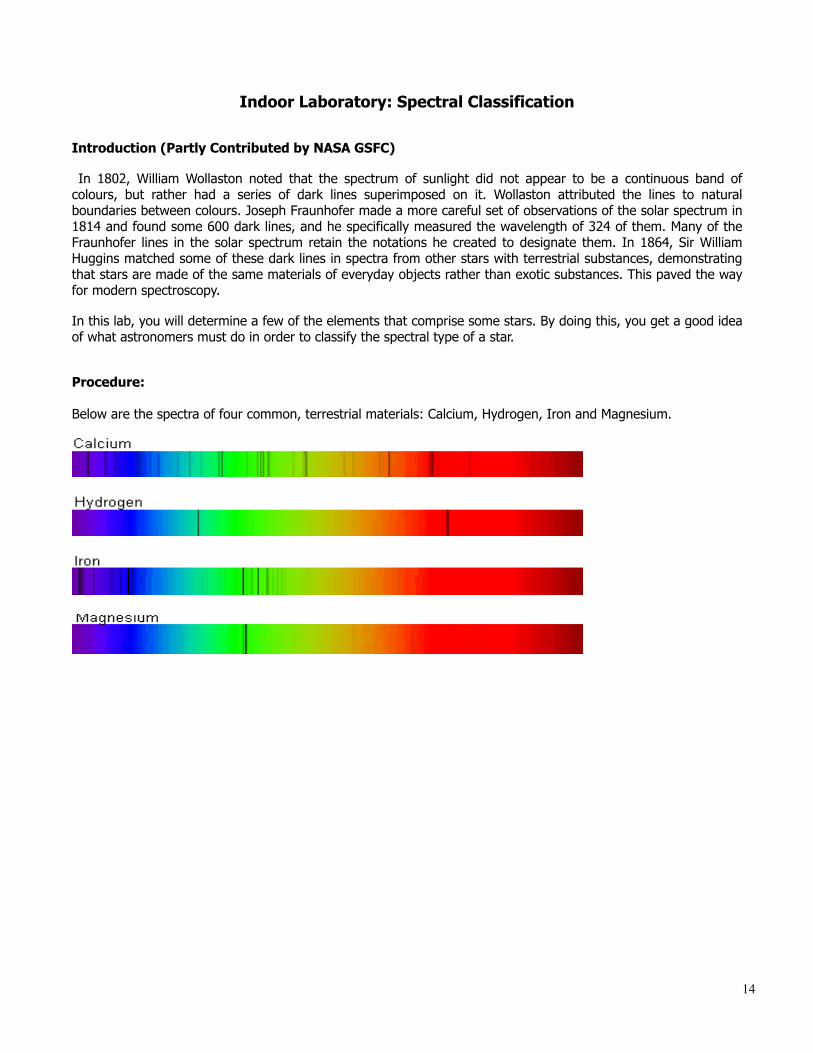
In 1802, William Wollaston noted that the spectrum of sunlight did not appear to be a continuous band of colours, but rather had a series of dark lines superimposed on it. Wollaston attributed the lines to natural boundaries between colours. Joseph Fraunhofer made a more careful set of observations of the solar spectrum in 1814 and found some 600 dark lines, and he specifically measured the wavelength of 324 of them. Many of the Fraunhofer lines in the solar spectrum retain the notations he created to designate them. In 1864, Sir William Huggins matched some of these dark lines in spectra from other stars with terrestrial substances, demonstrating that stars are made of the same materials of everyday objects rather than exotic substances. This paved the way for modern spectroscopy.
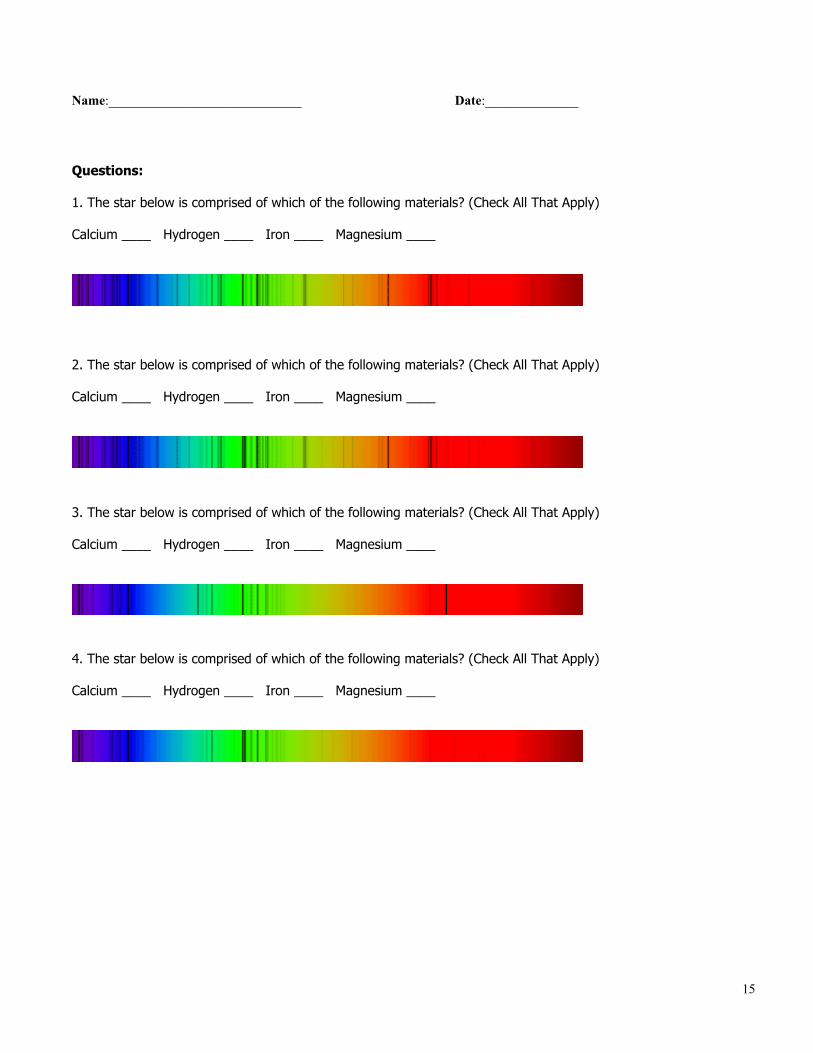
In this lab, you will determine a few of the elements that comprise some stars. By doing this, you get a good idea of what astronomers must do in order to classify the spectral type of a star.
Procedure:
Below are the spectra of four common, terrestrial materials: Calcium, Hydrogen, Iron and Magnesium.
15
Name:_____________________________ Date:______________
Questions:
1. The star below is comprised of which of the following materials? (Check All That Apply)
Calcium ____ Hydrogen ____ Iron ____ Magnesium ____
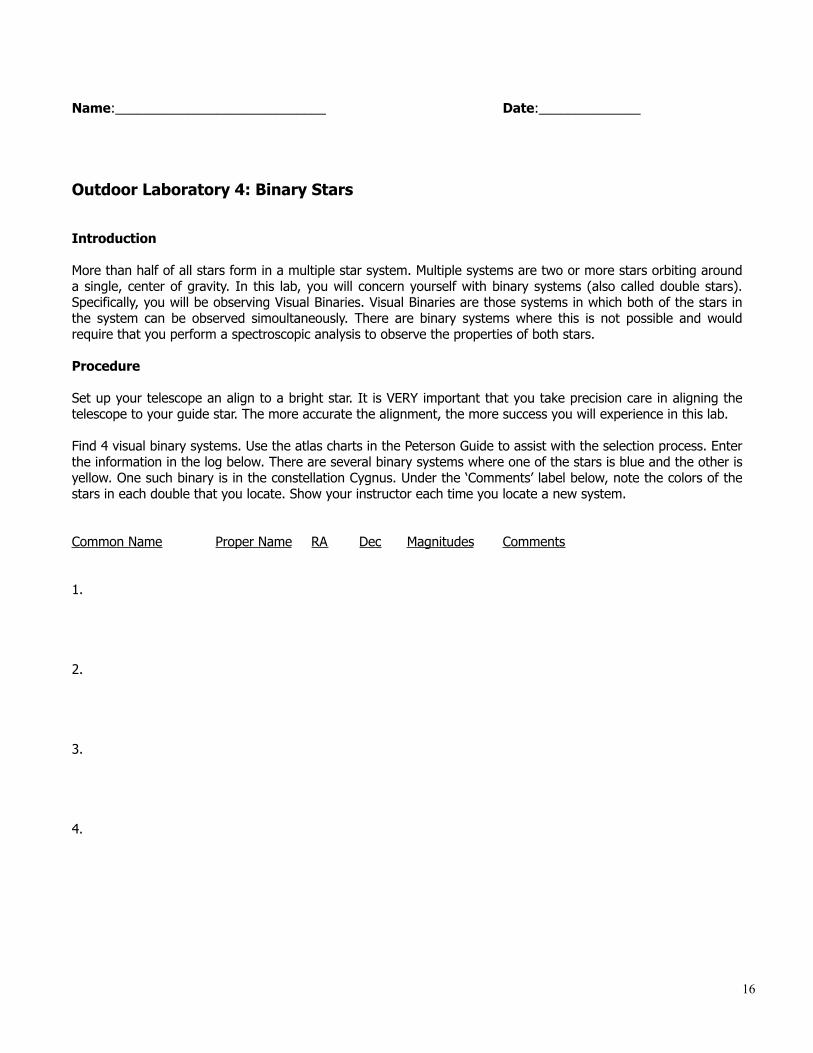
2. The star below is comprised of which of the following materials? (Check All That Apply)
Calcium ____ Hydrogen ____ Iron ____ Magnesium ____
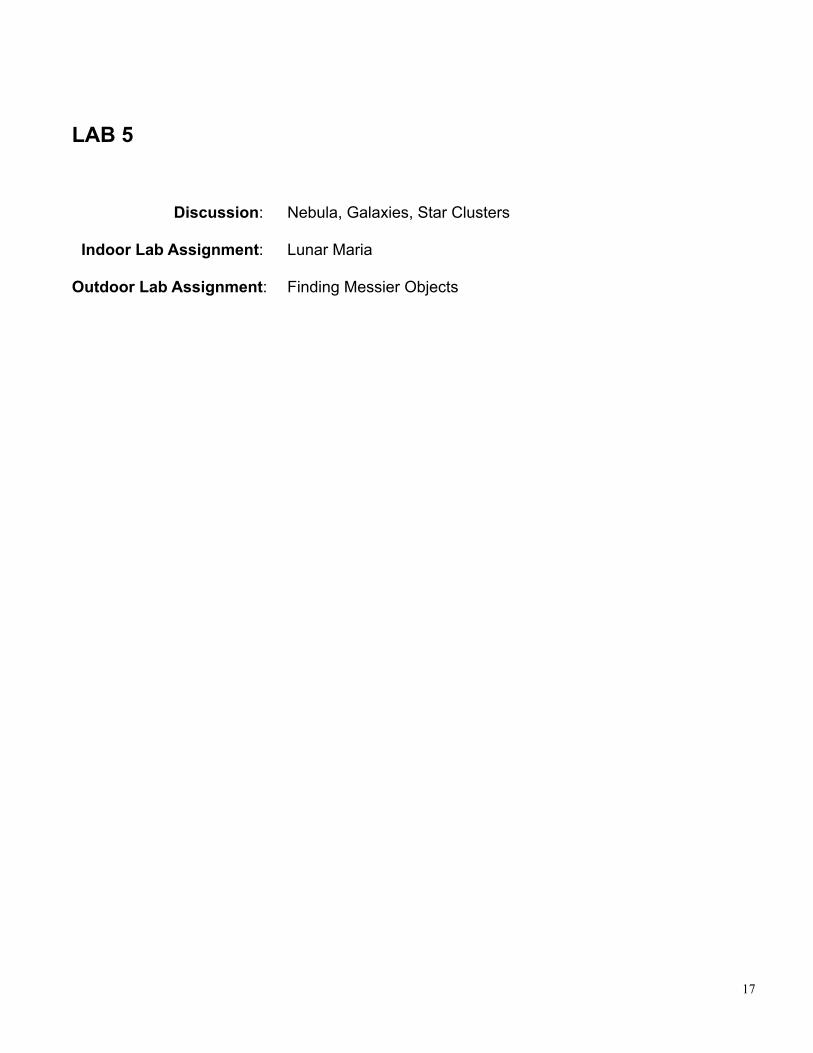
3. The star below is comprised of which of the following materials? (Check All That Apply)
Calcium ____ Hydrogen ____ Iron ____ Magnesium ____
4. The star below is comprised of which of the following materials? (Check All That Apply)
Calcium ____ Hydrogen ____ Iron ____ Magnesium ____
16
Name:_____________________________ Date:______________
Outdoor Laboratory 4: Binary Stars
Introduction
More than half of all stars form in a multiple star system. Multiple systems are two or more stars orbiting around a single, center of gravity. In this lab, you will concern yourself with binary systems (also called double stars). Specifically, you will be observing Visual Binaries. Visual Binaries are those systems in which both of the stars in the system can be observed simoultaneously. There are binary systems where this is not possible and would require that you perform a spectroscopic analysis to observe the properties of both stars.
Procedure
Set up your telescope an align to a bright star. It is VERY important that you take precision care in aligning the telescope to your guide star. The more accurate the alignment, the more success you will experience in this lab.
Find 4 visual binary systems. Use the atlas charts in the Peterson Guide to assist with the selection process. Enter the information in the log below. There are several binary systems where one of the stars is blue and the other is yellow. One such binary is in the constellation Cygnus. Under the ‘Comments’ label below, note the colors of the stars in each double that you locate. Show your instructor each time you locate a new system.
Common Name Proper Name RA Dec Magnitudes Comments
1.
2.
3.
4.
17
LAB 5
Discussion: Nebula, Galaxies, Star Clusters
Indoor Lab Assignment: Lunar Maria
Outdoor Lab Assignment: Finding Messier Objects
18
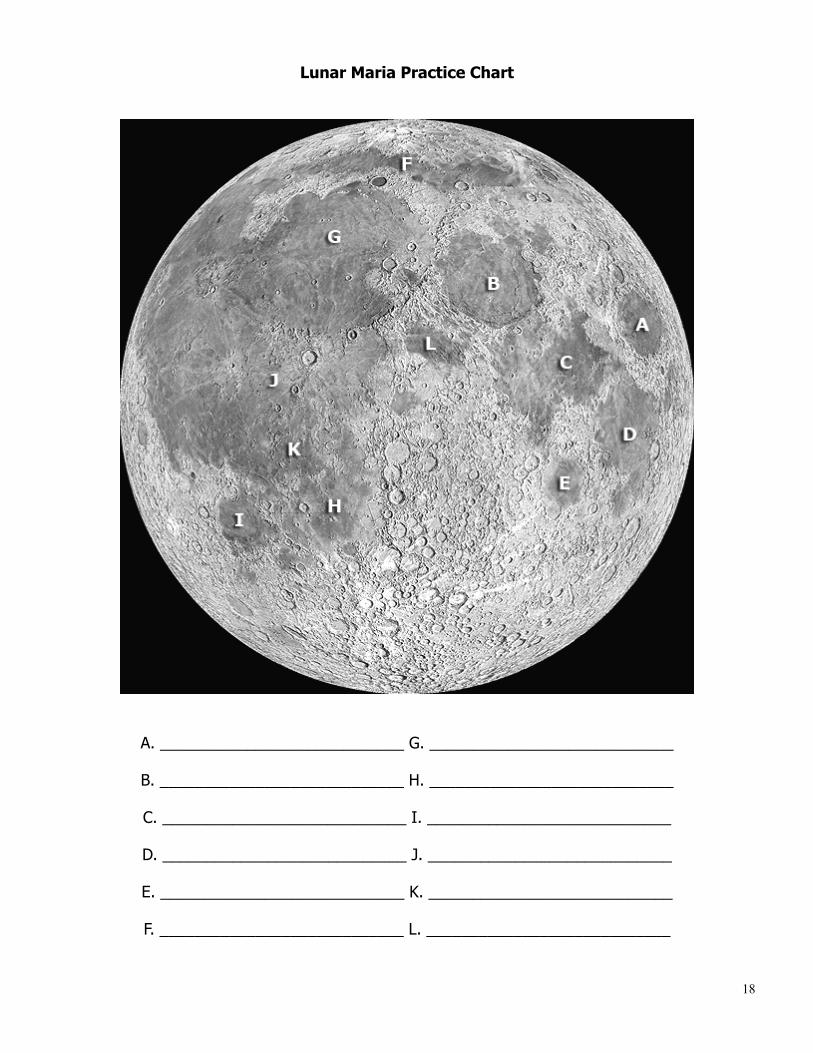
Lunar Maria Practice Chart
A. ____________________________ G. ____________________________
B. ____________________________ H. ____________________________
C. ____________________________ I. ____________________________
D. ____________________________ J. ____________________________
E. ____________________________ K. ____________________________
F. ____________________________ L. ____________________________

19
Name: _____________________ Date: _______________
Outdoor Laboratory: Messier Deep Sky
Introduction
In this lab, you will be looking for Messier Objects. During the years from 1758 to 1782 Charles Messier, a French astronomer (1730 - 1817), compiled a list of approximately 100 diffuse objects that were difficult to distinguish from comets through the telescopes of the day. The original catalog, published in 1774, contained only 45 objects. Discovering comets was the way to make a name for yourself in astronomy in the 18th century -- Messier's aim was to catalog the objects that were often mistaken for comets. Fortunately for us, the Messier Catalog became well known for a much higher purpose, as a collection of the most beautiful objects in the sky including nebulae, star clusters, and galaxies. However, he was famous in his lifetime for the discovery of 19 comets, 13 of which were original discoveries that he is still credited with today.
Like anything else, observing requires practice. You must train your eyes to look into the telescope to find things and to observe detail in distant and near objects. Training your eyes simply means looking through a telescope often. You will not see much detail in many of these objects right away. Be patient! Over time your observing vision will improve. Most of the Messier objects are between Magnitude 5 and 10, which should tell you that they can be very dim. For now, you will likely see what appears to be a blue or green ‘fuzzy’ object in the eyepiece.
The key is to make sure your telescope is calibrated as best as possible. Don’t get frustrated with any one object! Try to find it. If you are not successful, let your partner have a try.
Procedure
1. Set up your telescope and align it to a bright star. Be sure your alignment is very accurate as this will make it easier to find the objects.
2. Locate the types of objects identified by your instructor.
Note: Your Peterson Field Guide: Stars and Planets will be extremely beneficial for this lab as its Atlas Charts are very detailed. Keep track of any interesting finds and/or difficulties as you locate these objects in the comments section.
Name RA Dec Comments
1.
2.
3.
4.
20
LAB 6
Discussion: The Moon
Indoor Lab Assignment: Diameter of Lunar Features
Outdoor Lab Assignment: Finding NGC Objects
21
Name: _____________________ Date: _______________________
Indoor Laboratory: Approximating the Diameter of Lunar Craters
Introduction
As an amateur astronomer, you may need to estimate the distance of a lunar feature or the distance between two lunar features. The good news is that this can be done with little effort. If you know the diameter of an object, you can approximate the distance across any feature on its surface using a photograph, a ruler, and a calculator. In this lab, you will determine the diameter of several lunar features. While this method is not completely accurate, you can obtain a good estimate of distance.
Common Conversions
Inches to Millimeters = Multiply Inches by 25.4Kilometers to Miles = Multiply Kilometers by 0.621371Centimeters to Inches = Multiply Centimeters by 0.393701
Procedure
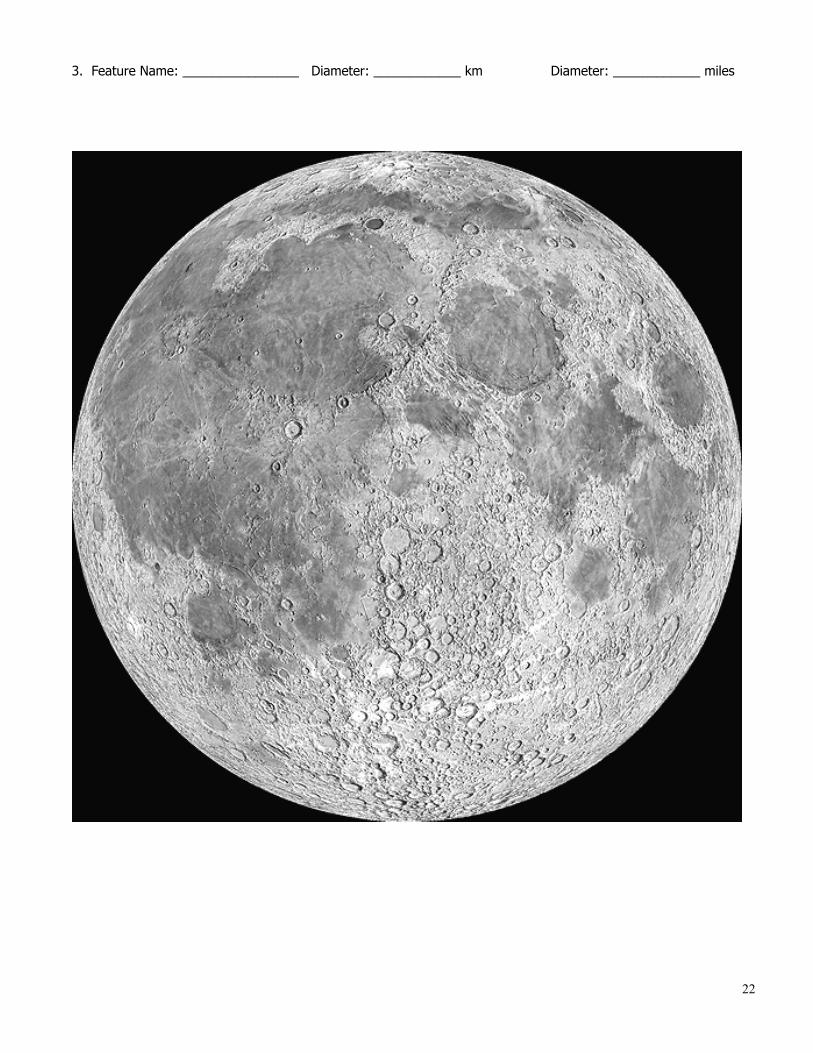
Using the image of the Moon and the Lunar Atlas charts in the Peterson Guide, complete the following laboratory exercise. Distances between features should be measured from the center of one feature to the center of the other. Likewise, distances across features should be measured from multiple angles and the average obtained.
The most important aspect of this lab is to always use the same units for measuring. If you begin using millimeters, use millimeters for all of your measurements, etc. You will need to measure the distance from the left limb (edge) of the Moon in the lunar photograph to the right limb. This will be Diameter1. Then, measure the distance from the top limb to the bottom limb. This will be Diameter2. Average the two measurements. The average will be DiameterA. Do not forget to note the units you are using!
Diameter1 = ________ ____ Diameter2 = ________ ____ DiameterA = ________ ____
The accepted diameter of the Moon is 3,476 Kilometers. Use this to determine your scale per unit of measure.
Scale = 1 _____ = ____________ km
Locate the crater Ptolemaeus in the photograph. (Use the Lunar Atlas charts in the Peterson Guide to assist you in locating the feature.) Measure the distance across the crater Ptolemaeus and note its actual diameter.
Measured Diameter = ________ ____ Actual Diamter = ____________ km
Find the Following
What is the distance, in miles, between the crater Ptolemaeus and the crater Tycho? ________________ miles
What is the distance, in miles, across Mare Nectaris? ________________ miles
Find the diameter (in kilometers) of 3 craters of your choosing not already used in this lab:
1. Feature Name: ________________ Diameter: ____________ km Diameter: ____________ miles
2. Feature Name: ________________ Diameter: ____________ km Diameter: ____________ miles
22
3. Feature Name: ________________ Diameter: ____________ km Diameter: ____________ miles
23
Name: ______________________ Date: ________________
Outdoor Lab 6: The NGC Catalog
Introduction
In 1888, J.L.E. Dreyer published the New General Catalogue (NGC). The catalog was the first attempt to document all of the known star clusters, galaxies and nebula of the period. The process of collecting all of the known information and logged observations of objects was an incredible undertaking. The current NGC catalog contains 7,840 objects. As with any catalog of this size, there were errors in the original publication. In fact, many of those errors are still being corrected today. Some objects have no observational data logged. Meaning, the object is known to exist; however, no one has logged any current descriptions. Unlike the Messier objects where the magnitudes are rather bright, the NGC objects can be extremely dim. Some are 30th Magnitude and dimmer! Obviously, you will concern yourself with brighter objects in the catalog given the limits of your telescope.
Today, the NGC/IC project is an attempt to correct this by calling for amateur astronomers to log observations on any of the NGC objects. The Texas A&M Astronomical Observatory has been involved with the data collection of a number of the NGC objects. As amateur astronomers, you can also be involved in bringing the catalog up-to-date by reporting observations!
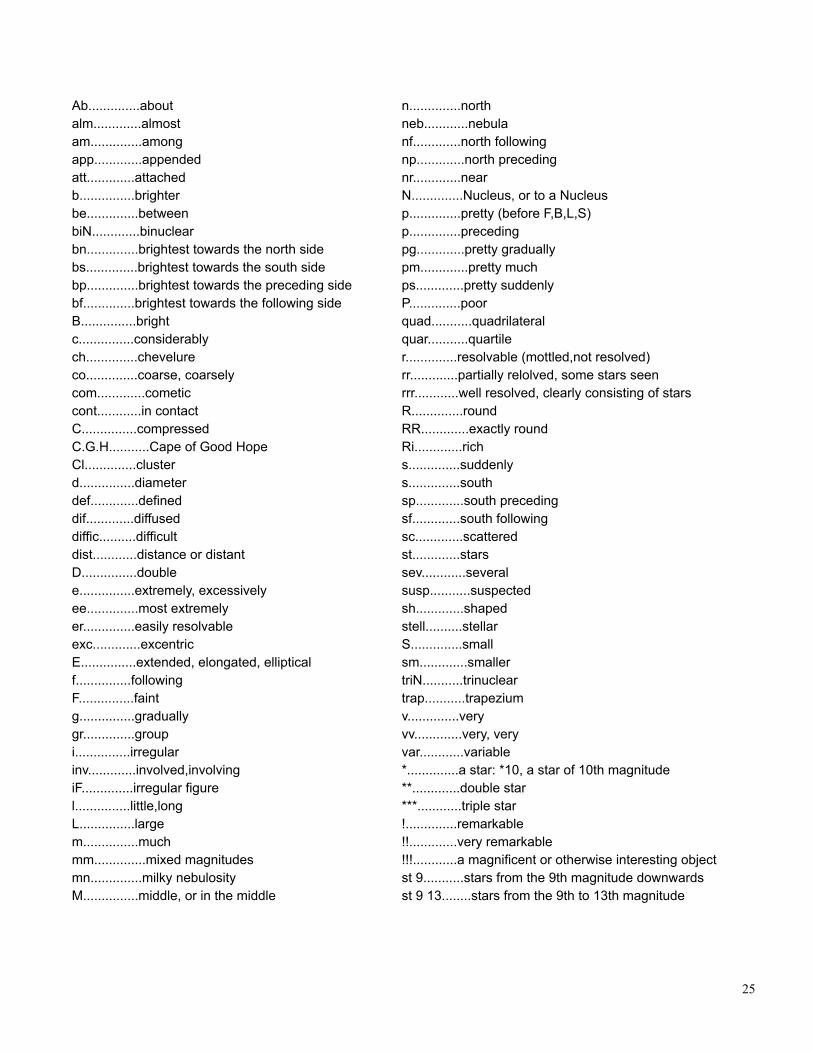
Tonight, you will do just that. You will make observations on three NGC objects, log the time and date in UTC and write a description. Descriptions in the NGC catalog are uniform, in that, there is a specific code that is used to explain what you see in the eyepiece. The complete list of abbreviations used in the Dreyer description of an object appears on the last page.
To use the code, simply attach the abbreviations that make your statement. For instance, if you found an object that was very faint and elliptical in shape, you would describe it as vFE. Similarly, the galaxy NGC 2863 in Hydra is described as: cF, S, E, be 2 st 12, 16 which means "considerably faint, small, elongated, between two stars of magnitude 12 and 16".
Now that you understand the general concept of the Dreyer descriptions, let’s put this into real practice.
Procedure:
Locate the 3 NGC objects identified by your instructor and log the information as appropriate. Take your time when entering the coded description (Dreyer Description) so that your observations are well documented.
24
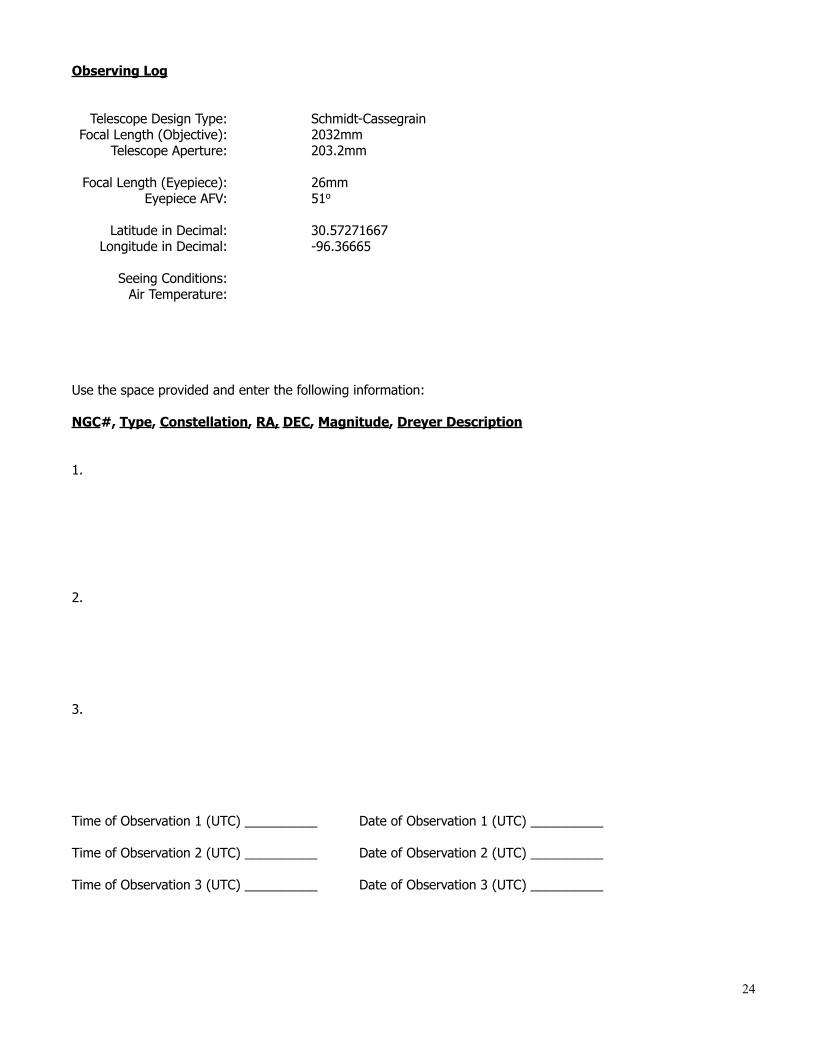
Observing Log
Telescope Design Type: Schmidt-Cassegrain Focal Length (Objective): 2032mm Telescope Aperture: 203.2mm
Focal Length (Eyepiece): 26mm Eyepiece AFV: 51o
Latitude in Decimal: 30.57271667 Longitude in Decimal: -96.36665
Seeing Conditions: Air Temperature:
Use the space provided and enter the following information:
NGC#, Type, Constellation, RA, DEC, Magnitude, Dreyer Description
1.
2.
3.
Time of Observation 1 (UTC) __________ Date of Observation 1 (UTC) __________
Time of Observation 2 (UTC) __________ Date of Observation 2 (UTC) __________
Time of Observation 3 (UTC) __________ Date of Observation 3 (UTC) __________
25
Ab..............about n..............north alm.............almost neb............nebula am..............among nf.............north following app.............appended np.............north preceding att.............attached nr.............near b...............brighter N..............Nucleus, or to a Nucleus be..............between p..............pretty (before F,B,L,S) biN.............binuclear p..............preceding bn..............brightest towards the north side pg.............pretty gradually bs..............brightest towards the south side pm.............pretty much bp..............brightest towards the preceding side ps.............pretty suddenly bf..............brightest towards the following side P..............poor B...............bright quad...........quadrilateral c...............considerably quar...........quartile ch..............chevelure r..............resolvable (mottled,not resolved)co..............coarse, coarsely rr.............partially relolved, some stars seencom.............cometic rrr............well resolved, clearly consisting of starscont............in contact R..............round C...............compressed RR.............exactly round C.G.H...........Cape of Good Hope Ri.............rich Cl..............cluster s..............suddenly d...............diameter s..............south def.............defined sp.............south preceding dif.............diffused sf.............south following diffic..........difficult sc.............scattered dist............distance or distant st.............stars D...............double sev............several e...............extremely, excessively susp...........suspected ee..............most extremely sh.............shaped er..............easily resolvable stell..........stellar exc.............excentric S..............small E...............extended, elongated, elliptical sm.............smaller f...............following triN...........trinuclear F...............faint trap...........trapezium g...............gradually v..............very gr..............group vv.............very, very i...............irregular var............variable inv.............involved,involving *..............a star: *10, a star of 10th magnitudeiF..............irregular figure **.............double star l...............little,long ***............triple star L...............large !..............remarkable m...............much !!.............very remarkable mm..............mixed magnitudes !!!............a magnificent or otherwise interesting object mn..............milky nebulosity st 9...........stars from the 9th magnitude downwardsM...............middle, or in the middle st 9 13........stars from the 9th to 13th magnitude

26
LAB 7
Discussion: Observing the Planets
Indoor Lab Assignment: Kepler’s Laws
Outdoor Lab Assignment: Visible Planets
27
Name: _____________________ Date: _______________________
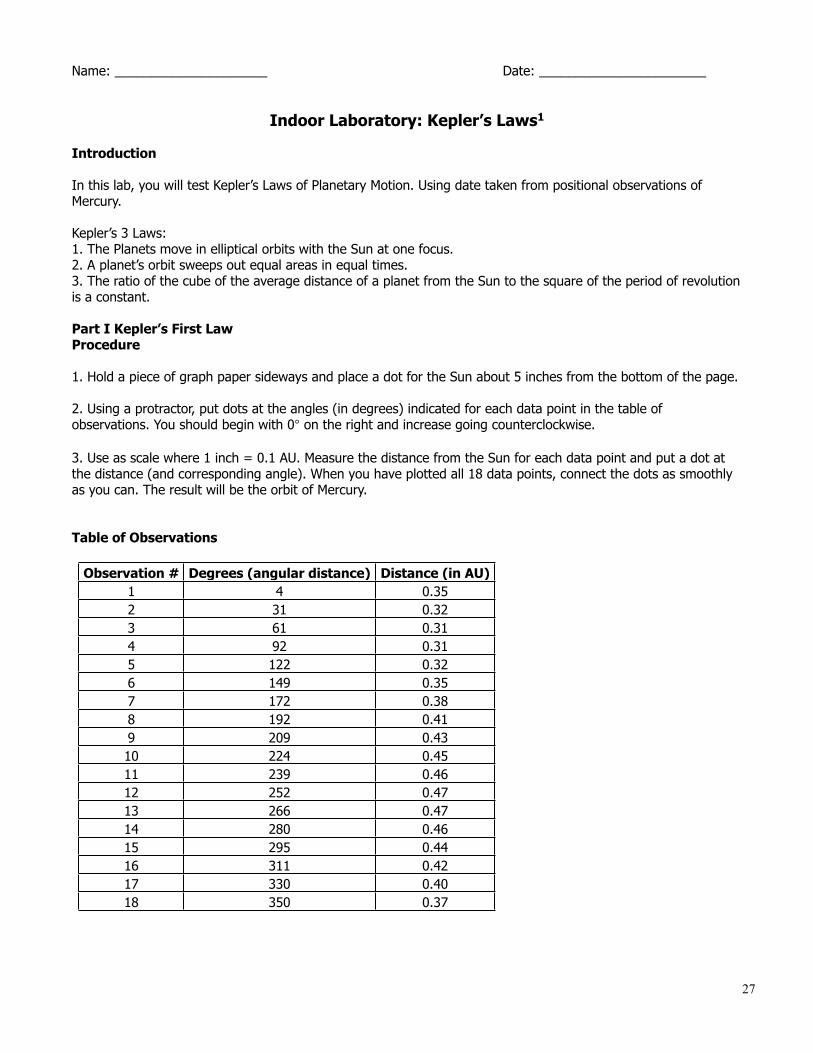
Indoor Laboratory: Kepler’s Laws1
Introduction
In this lab, you will test Kepler’s Laws of Planetary Motion. Using date taken from positional observations of Mercury.
Kepler’s 3 Laws:1. The Planets move in elliptical orbits with the Sun at one focus.2. A planet’s orbit sweeps out equal areas in equal times.3. The ratio of the cube of the average distance of a planet from the Sun to the square of the period of revolution is a constant.
Part I Kepler’s First LawProcedure
1. Hold a piece of graph paper sideways and place a dot for the Sun about 5 inches from the bottom of the page.
2. Using a protractor, put dots at the angles (in degrees) indicated for each data point in the table of observations. You should begin with 0° on the right and increase going counterclockwise.
3. Use as scale where 1 inch = 0.1 AU. Measure the distance from the Sun for each data point and put a dot at the distance (and corresponding angle). When you have plotted all 18 data points, connect the dots as smoothly as you can. The result will be the orbit of Mercury.
Table of Observations
Observation # Degrees (angular distance) Distance (in AU)1 4 0.352 31 0.323 61 0.314 92 0.315 122 0.326 149 0.357 172 0.388 192 0.419 209 0.4310 224 0.4511 239 0.4612 252 0.4713 266 0.4714 280 0.4615 295 0.4416 311 0.4217 330 0.4018 350 0.37
28
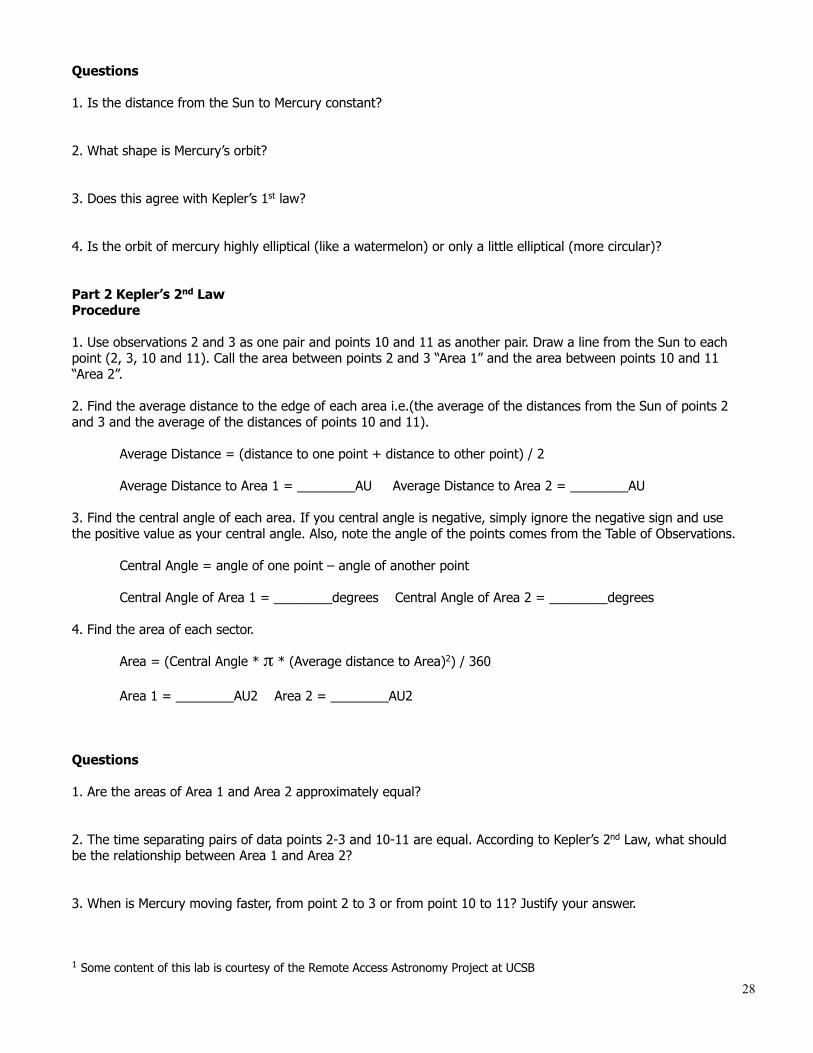
Questions
1. Is the distance from the Sun to Mercury constant?
2. What shape is Mercury’s orbit?
3. Does this agree with Kepler’s 1st law?
4. Is the orbit of mercury highly elliptical (like a watermelon) or only a little elliptical (more circular)?
Part 2 Kepler’s 2nd LawProcedure
1. Use observations 2 and 3 as one pair and points 10 and 11 as another pair. Draw a line from the Sun to each point (2, 3, 10 and 11). Call the area between points 2 and 3 “Area 1” and the area between points 10 and 11 “Area 2”.
2. Find the average distance to the edge of each area i.e.(the average of the distances from the Sun of points 2 and 3 and the average of the distances of points 10 and 11).
Average Distance = (distance to one point + distance to other point) / 2
Average Distance to Area 1 = ________AU Average Distance to Area 2 = ________AU
3. Find the central angle of each area. If you central angle is negative, simply ignore the negative sign and use the positive value as your central angle. Also, note the angle of the points comes from the Table of Observations.
Central Angle = angle of one point – angle of another point
Central Angle of Area 1 = ________degrees Central Angle of Area 2 = ________degrees
4. Find the area of each sector.
Area = (Central Angle * π * (Average distance to Area)2) / 360
Area 1 = ________AU2 Area 2 = ________AU2
Questions
1. Are the areas of Area 1 and Area 2 approximately equal?
2. The time separating pairs of data points 2-3 and 10-11 are equal. According to Kepler’s 2nd Law, what should be the relationship between Area 1 and Area 2?
3. When is Mercury moving faster, from point 2 to 3 or from point 10 to 11? Justify your answer.
1 Some content of this lab is courtesy of the Remote Access Astronomy Project at UCSB
29
LAB 8
Discussion: Variable Stars (Cepheid and rr Lyra)
Indoor Lab Assignment:
Outdoor Lab Assignment: Finding Lunar Features
30
Name_________________________ Date______________
Outdoor Laboratory: Observing the Moon
Introduction
In this lab, we will view some of the major features of the Moon: Craters and Maria. We will also find its right ascension (RA) and declination (Dec). In addition, we will determine the phase of the Moon. It might be helpful to wear sunglasses during this lab, as the moonlight is very bright through the telescope.
Craters are obvious impacts from debris in the solar system. Large impacts cause rays to extend from the crater impact as is the cases of the Copernicus, Kepler, and Tycho craters. The rays are caused by debris being scattered long distances by the impact. Maria are the lowlands of the surface of the Moon and are the regions low in altitude which were successively filled with dark lava flows about 3.2 billion years ago.
Procedure
Calibrate (Align) the telescope in the usual way, by setting the RA and Dec using a known star. Now, determine the RA and Dec of the Moon by aligning the telescope with the center of the Moon. Convert the RA to a decimal value and enter it onto the “RA (Decimal)” line.
1. RA: _____________________ Dec: _____________________
2. RA (Decimal): _____________________
Using your SC001 star chart, determine which constellation the Moon is nearest. Check your results by finding this constellation in the night sky. Record your results below. Because the Moon is so bright, you probably will not be able to see the constellation that it is in. But, you can see which ones are on either side of it and check your findings against the star chart.
3. Constellation: _____________________
How far above or below the ecliptic is the Moon in degrees of declination? You can find this by locating the Moon on the star chart based on the RA and Dec you entered above and then find the difference between the declination of the Moon and the declination of the ecliptic along the same RA.
4. Degrees: _____________________ North / South of the ecliptic. (Circle One)
Using your star chart, determine the RA and Dec of the sun for today’s date. The Sun’s RA and Dec can be found by finding today’s date along the ecliptic and then noting the coordinates of that point. Convert the RA to a decimal value and enter it onto the “RA (Decimal)” line.
5. RA: _____________________ Dec: _____________________
6. RA (Decimal): _____________________
In which constellation is the Sun for today’s date?
7. Constellation: _____________________
31
One can determine the phase of the Moon by determining which of the following equations is best satisfied. (Replace RAmoon and RAsun with the decimal values for each respectively.)
RAmoon – RAsun = 0h New MoonRAmoon – RAsun = +3h or –21h Waxing CrescentRAmoon – RAsun = +6h or –18h First QuarterRAmoon – RAsun = +9h or –15h Waxing GibbousRAmoon – RAsun = +12h or –12h Full MoonRAmoon – RAsun = +15h or –9h Waning GibbousRAmoon – RAsun = +18h or –6h Third QuarterRAmoon – RAsun = +21h or –3h Waning Crescent
Now, use your results to determine the phase of the Moon tonight.
8. RAmoon – RAsun = _____________________
9. Moon Phase: _____________________
Using the Lunar maps in your text as a reference, locate the maria from the following list on the lunar surface through your eyepiece or by projection. Once you can locate each of these, verify with your instructor that you can identify all 12 without the use of this list.
Imbrium, Nubium, Serenitatis, Fecunditatis, Tranquillitatis, Nectaris, Humorum, Crisium, Frigoris, Insularum, Cognitum, Vaporum
Using the Lunar maps in your text, locate at least 5 major craters from the list below. Verify each find with your instructor. Place a check mark next to each crater found.
___Tycho ___Plato ___Copernicus ___Kepler ___Ptolemaeus
___Hercules ___Atlas ___Archimedes ___Reinhold ___Eratosthenes
___Theophilus ___Arzachel ___Aristoteles ___Bullialdus ___Gassendi
32
LAB 9
Discussion:
Indoor Lab Assignment: Instructor’s Discretion
Outdoor Lab Assignment: Lab Practical
33
Name: _____________________ Date: _______________________
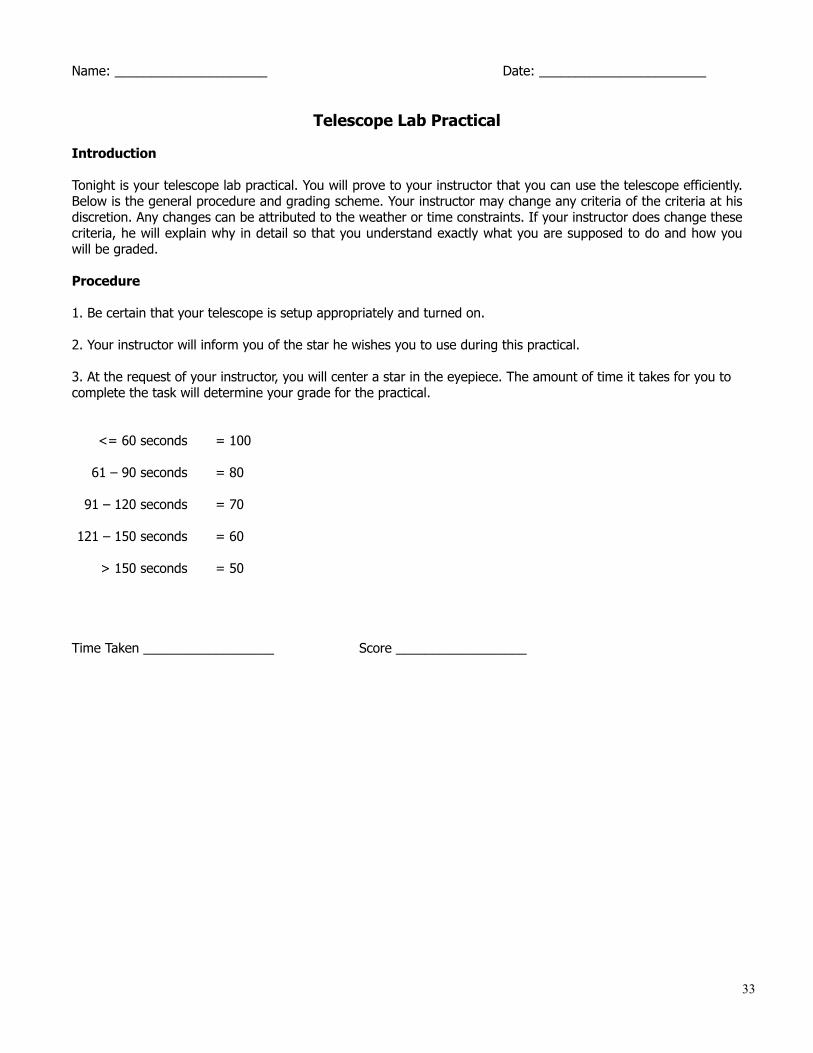
Telescope Lab Practical
Introduction
Tonight is your telescope lab practical. You will prove to your instructor that you can use the telescope efficiently. Below is the general procedure and grading scheme. Your instructor may change any criteria of the criteria at his discretion. Any changes can be attributed to the weather or time constraints. If your instructor does change these criteria, he will explain why in detail so that you understand exactly what you are supposed to do and how you will be graded.
Procedure
1. Be certain that your telescope is setup appropriately and turned on.
2. Your instructor will inform you of the star he wishes you to use during this practical.
3. At the request of your instructor, you will center a star in the eyepiece. The amount of time it takes for you to complete the task will determine your grade for the practical.
<= 60 seconds = 100
61 – 90 seconds = 80
91 – 120 seconds = 70
121 – 150 seconds = 60
> 150 seconds = 50
Time Taken __________________ Score __________________
34
LAB 10
Discussion:
Indoor Lab Assignment: Energy Released by an Impact
Outdoor Lab Assignment: Finding Messier Objects
35
Name: _____________________ Date: _______________________
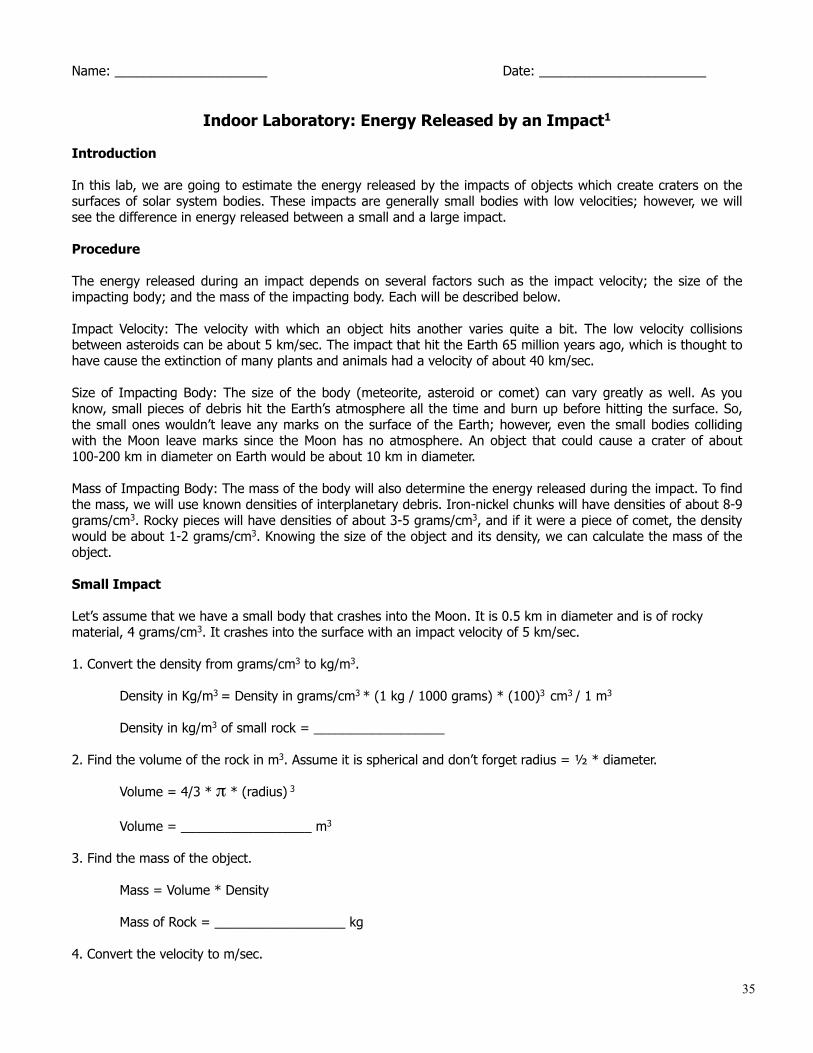
Indoor Laboratory: Energy Released by an Impact1
Introduction
In this lab, we are going to estimate the energy released by the impacts of objects which create craters on the surfaces of solar system bodies. These impacts are generally small bodies with low velocities; however, we will see the difference in energy released between a small and a large impact.
Procedure
The energy released during an impact depends on several factors such as the impact velocity; the size of the impacting body; and the mass of the impacting body. Each will be described below.
Impact Velocity: The velocity with which an object hits another varies quite a bit. The low velocity collisions between asteroids can be about 5 km/sec. The impact that hit the Earth 65 million years ago, which is thought to have cause the extinction of many plants and animals had a velocity of about 40 km/sec.
Size of Impacting Body: The size of the body (meteorite, asteroid or comet) can vary greatly as well. As you know, small pieces of debris hit the Earth’s atmosphere all the time and burn up before hitting the surface. So, the small ones wouldn’t leave any marks on the surface of the Earth; however, even the small bodies colliding with the Moon leave marks since the Moon has no atmosphere. An object that could cause a crater of about 100-200 km in diameter on Earth would be about 10 km in diameter.
Mass of Impacting Body: The mass of the body will also determine the energy released during the impact. To find the mass, we will use known densities of interplanetary debris. Iron-nickel chunks will have densities of about 8-9 grams/cm3. Rocky pieces will have densities of about 3-5 grams/cm3, and if it were a piece of comet, the density would be about 1-2 grams/cm3. Knowing the size of the object and its density, we can calculate the mass of the object.
Small Impact
Let’s assume that we have a small body that crashes into the Moon. It is 0.5 km in diameter and is of rocky material, 4 grams/cm3. It crashes into the surface with an impact velocity of 5 km/sec.
1. Convert the density from grams/cm3 to kg/m3.
Density in Kg/m3 = Density in grams/cm3 * (1 kg / 1000 grams) * (100)3 cm3 / 1 m3
Density in kg/m3 of small rock = __________________
2. Find the volume of the rock in m3. Assume it is spherical and don’t forget radius = ½ * diameter.
Volume = 4/3 * π * (radius) 3
Volume = __________________ m3
3. Find the mass of the object.
Mass = Volume * Density
Mass of Rock = __________________ kg
4. Convert the velocity to m/sec.
36
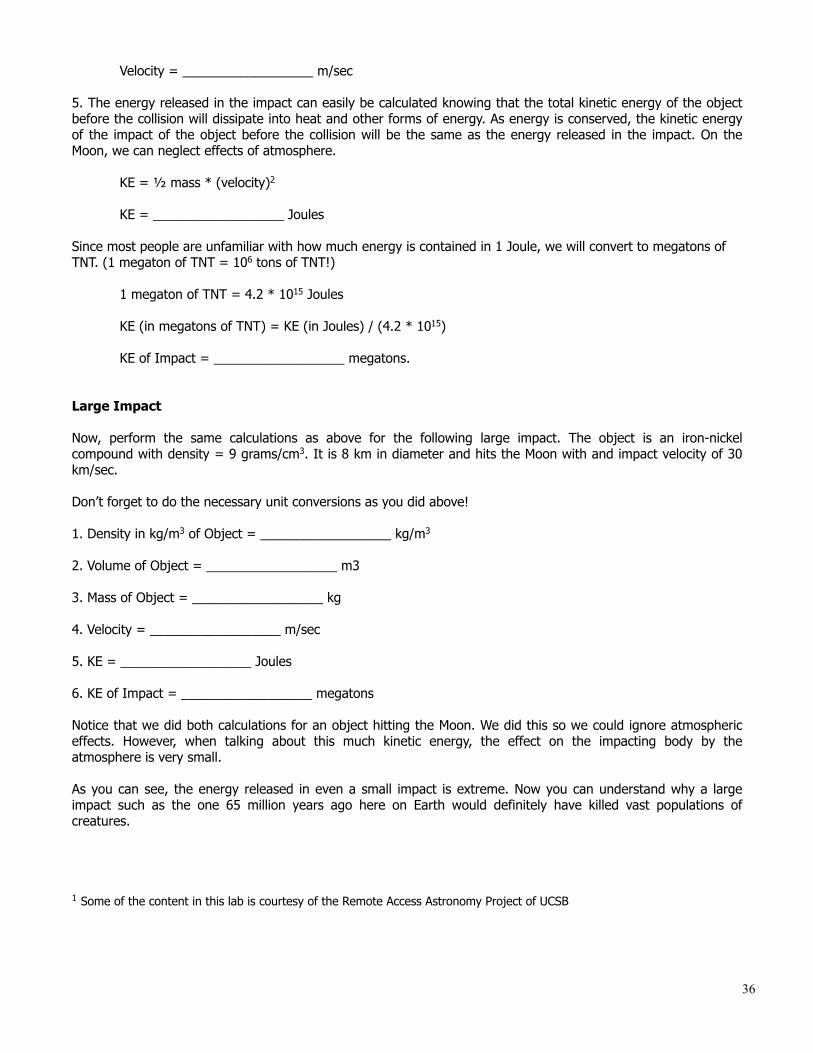
Velocity = __________________ m/sec
5. The energy released in the impact can easily be calculated knowing that the total kinetic energy of the object before the collision will dissipate into heat and other forms of energy. As energy is conserved, the kinetic energy of the impact of the object before the collision will be the same as the energy released in the impact. On the Moon, we can neglect effects of atmosphere.
KE = ½ mass * (velocity)2
KE = __________________ Joules
Since most people are unfamiliar with how much energy is contained in 1 Joule, we will convert to megatons of TNT. (1 megaton of TNT = 106 tons of TNT!)
1 megaton of TNT = 4.2 * 1015 Joules
KE (in megatons of TNT) = KE (in Joules) / (4.2 * 1015)
KE of Impact = __________________ megatons.
Large Impact
Now, perform the same calculations as above for the following large impact. The object is an iron-nickel compound with density = 9 grams/cm3. It is 8 km in diameter and hits the Moon with and impact velocity of 30 km/sec.
Don’t forget to do the necessary unit conversions as you did above!
1. Density in kg/m3 of Object = __________________ kg/m3
2. Volume of Object = __________________ m3
3. Mass of Object = __________________ kg
4. Velocity = __________________ m/sec
5. KE = __________________ Joules
6. KE of Impact = __________________ megatons
Notice that we did both calculations for an object hitting the Moon. We did this so we could ignore atmospheric effects. However, when talking about this much kinetic energy, the effect on the impacting body by the atmosphere is very small.
As you can see, the energy released in even a small impact is extreme. Now you can understand why a large impact such as the one 65 million years ago here on Earth would definitely have killed vast populations of creatures.
1 Some of the content in this lab is courtesy of the Remote Access Astronomy Project of UCSB

37
Name: _____________________ Date: _______________
Outdoor Laboratory: Messier Deep Sky
Introduction
In this lab, you will be looking for Messier Objects. During the years from 1758 to 1782 Charles Messier, a French astronomer (1730 - 1817), compiled a list of approximately 100 diffuse objects that were difficult to distinguish from comets through the telescopes of the day. The original catalog, published in 1774, contained only 45 objects. Discovering comets was the way to make a name for yourself in astronomy in the 18th century -- Messier's aim was to catalog the objects that were often mistaken for comets. Fortunately for us, the Messier Catalog became well known for a much higher purpose, as a collection of the most beautiful objects in the sky including nebulae, star clusters, and galaxies. However, he was famous in his lifetime for the discovery of 19 comets, 13 of which were original discoveries that he is still credited with today.
Like anything else, observing requires practice. You must train your eyes to look into the telescope to find things and to observe detail in distant and near objects. Training your eyes simply means looking through a telescope often. You will not see much detail in many of these objects right away. Be patient! Over time your observing vision will improve. Most of the Messier objects are between Magnitude 5 and 10, which should tell you that they can be very dim. For now, you will likely see what appears to be a blue or green ‘fuzzy’ object in the eyepiece.
The key is to make sure your telescope is calibrated as best as possible. Don’t get frustrated with any one object! Try to find it. If you are not successful, let your partner have a try.
Procedure
3. Set up your telescope and align it to a bright star. Be sure your alignment is very accurate as this will make it easier to find the objects.
4. Locate the types of objects identified by your instructor.
Note: Your Peterson Field Guide: Stars and Planets will be extremely beneficial for this lab as its Atlas Charts are very detailed. Keep track of any interesting finds and/or difficulties as you locate these objects in the comments section.
Name RA Dec Comments
1.
2.
3.
4.
38
LAB 11
Discussion:
Indoor Lab Assignment: Distance to SMC
Outdoor Lab Assignment: Finding Messier Objects
39
Cepheid Variables and Extra-Galactic Distance
Introduction
Cepheid (se-f(E-)id) Variables are often referred to as “yard-sticks” to the universe. Because of the nature of these interesting variable stars, we can use them to estimate distances to objects outside of our own galaxy. Have you ever wondered how far it is to another galaxy? In this lab, you’re going to find the distance to the second closest galaxy to the Milky Way: the Small Magellanic Cloud. Unfortunately for those of us in the Northern Hemisphere, we cannot see the Large or Small Magellanic Clouds. Only those living in the Southern Hemisphere have a view to these exciting and nearby galaxies.
So, what is a Cepheid you ask? Similar to other variable stars, the brightness of Cepheids change with time. What separates Cepheids from other variables is that the time (called a period) it takes a Cepheid variable to complete one cycle (known as a pulsation) is directly related to its average brightness. The longer the period, the brighter the star. Cepheids pulsate due to an imbalance between their inward gravitational pull and outward pressure. Thus, expanding and contracting in very short periods that range from 1 to 70 days depending on the Cepheid.
Information and Procedures
Apparent Visual Magnitude (mv) is an excellent reference aid for finding objects in the night sky; however, to find the distance to an object, one must also know the object’s Absolute Magnitude (Mv). That is, the object’s intrinsic brightness as if it were 10 Parsecs ( 32.6 Light Years) from Earth. By comparing stars from this distance, we can fully appreciate how bright one star is to that of another. The formula for calculating Absolute Magnitude is:
Formula 1: Mv = ( mv + 5 ) - ( 5 * Log( d ) ) Where “d” is the distance.
Formula 1 cannot be used to determine the Mv of the Cepheid Variables in the Magellanic Clouds because we do not know their distances. However, Absolute Magnitude can be derived from the base 10 logarithm of the period of the Cepheid in place of the distance given by the following formula:
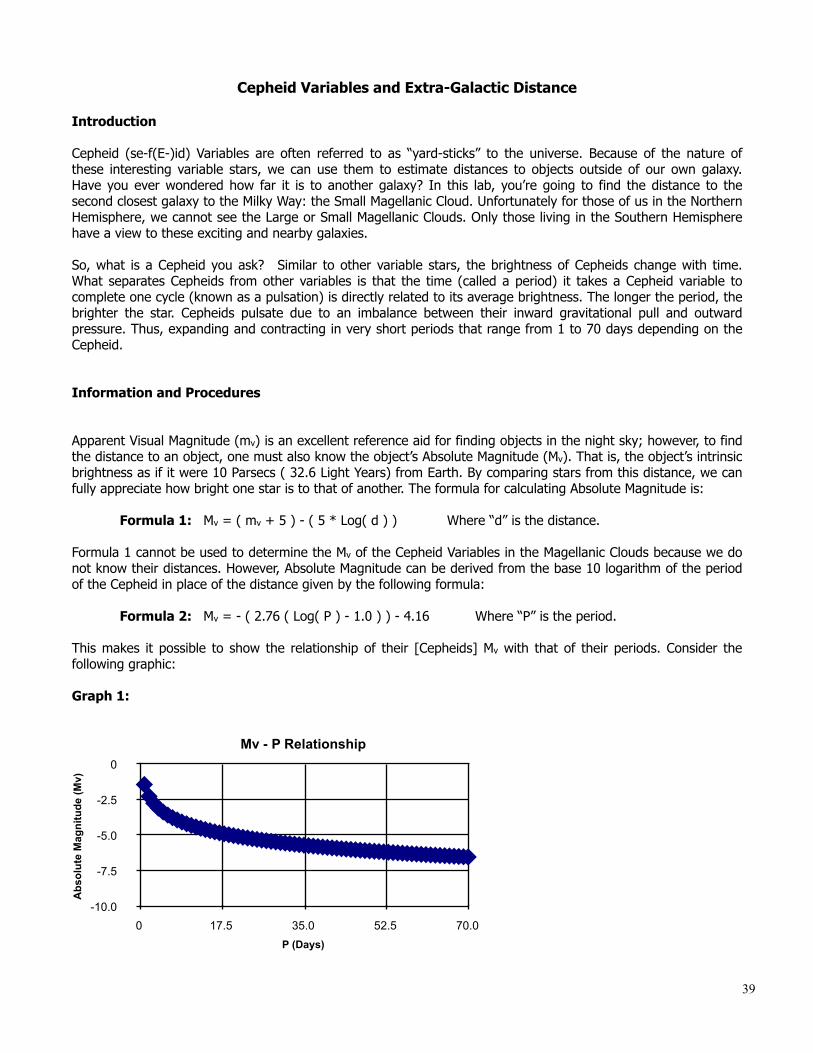
Formula 2: Mv = - ( 2.76 ( Log( P ) - 1.0 ) ) - 4.16 Where “P” is the period.
This makes it possible to show the relationship of their [Cepheids] Mv with that of their periods. Consider the following graphic:
Graph 1:
-10.0
-7.5
-5.0
-2.5
0
0 17.5 35.0 52.5 70.0
Mv - P Relationship
Abs
olut
e M
agni
tude
(Mv)
P (Days)
40
Establishing the Distance of the SMC
Finding the distance of one Cepheid in a galaxy is not enough to establish the distance to the galaxy. Rather, one must find the Periods, Apparent Visual Magnitudes and Absolute Magnitudes of several Cepheids within the same galaxy to establish the distance.
Table 1: Cepheids in the Small Magellanic Cloud (SMC)
Cepheid P (days) mv
HV1871 1.2413 17.21HV1907 1.6433 16.96HV11114 2.7120 16.54HV2015 2.8742 16.47HV1906 3.0655 16.31HV11216 3.1148 16.31HV11113 3.2139 16.56HV212 3.9014 15.89HV11112 6.6931 15.69
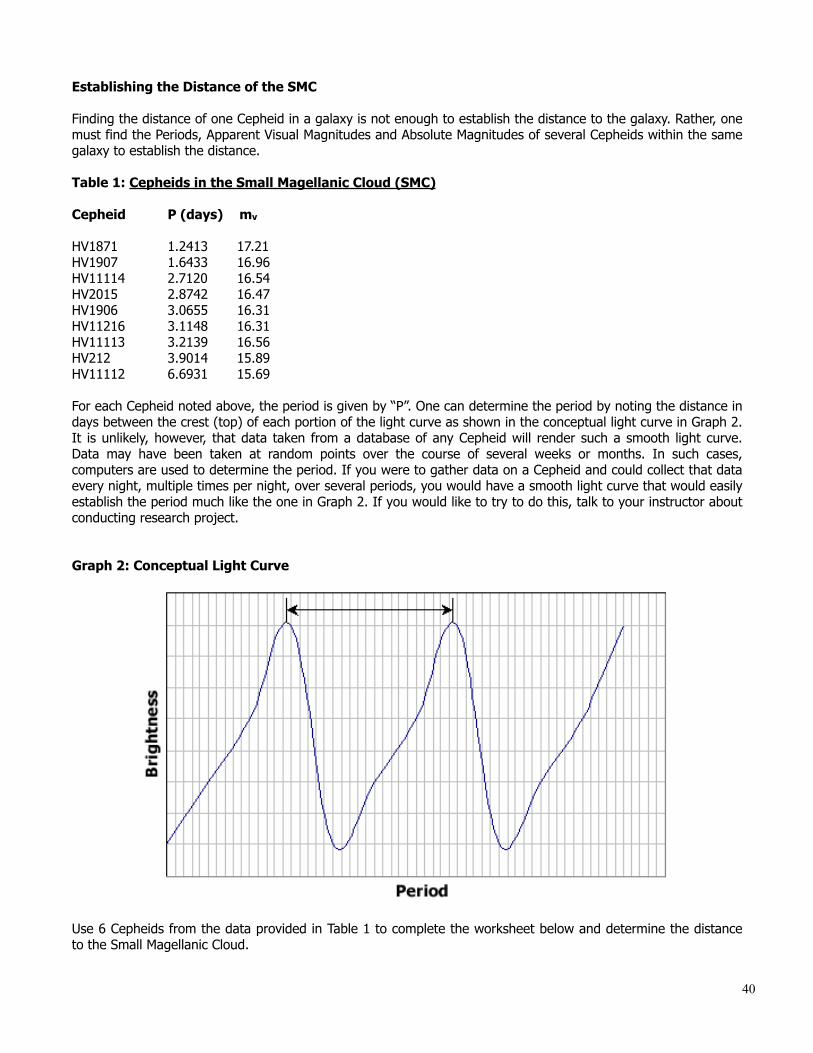
For each Cepheid noted above, the period is given by “P”. One can determine the period by noting the distance in days between the crest (top) of each portion of the light curve as shown in the conceptual light curve in Graph 2. It is unlikely, however, that data taken from a database of any Cepheid will render such a smooth light curve. Data may have been taken at random points over the course of several weeks or months. In such cases, computers are used to determine the period. If you were to gather data on a Cepheid and could collect that data every night, multiple times per night, over several periods, you would have a smooth light curve that would easily establish the period much like the one in Graph 2. If you would like to try to do this, talk to your instructor about conducting research project.
Graph 2: Conceptual Light Curve
Use 6 Cepheids from the data provided in Table 1 to complete the worksheet below and determine the distance to the Small Magellanic Cloud.
41
Name: ______________________ Date: ________________
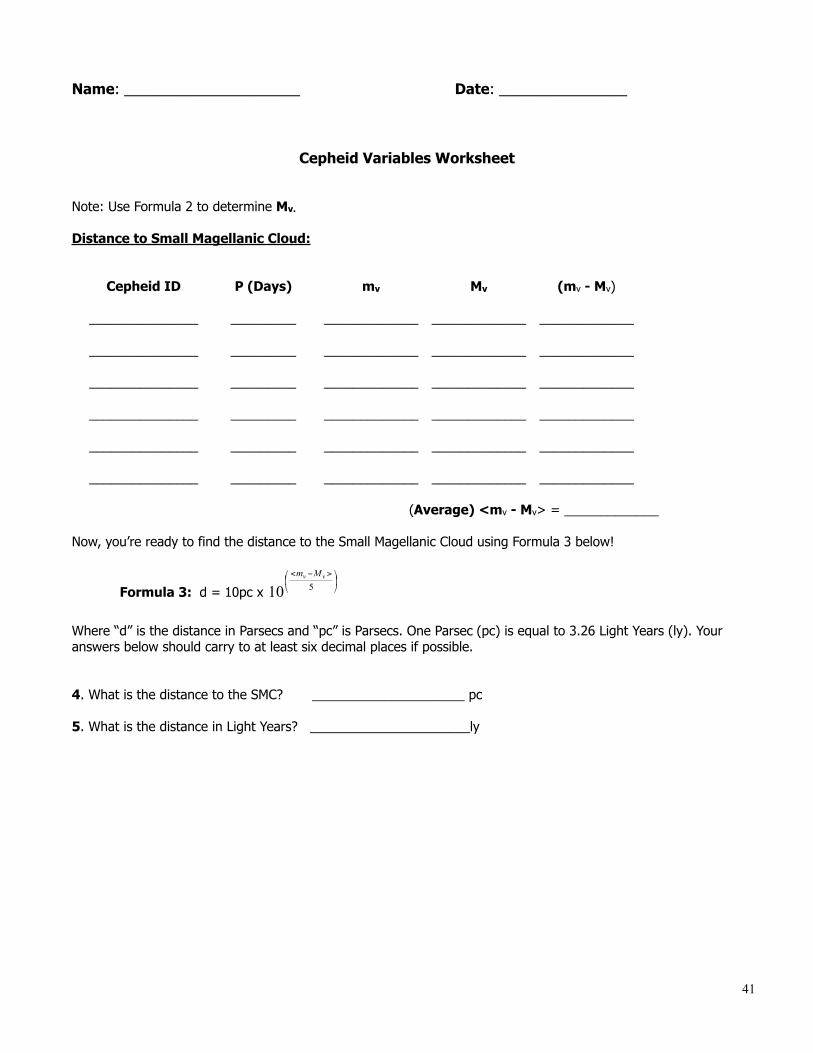
Cepheid Variables Worksheet
Note: Use Formula 2 to determine Mv.
Distance to Small Magellanic Cloud:
Cepheid ID P (Days) mv Mv (mv - Mv)
_______________ _________ _____________ _____________ _____________
_______________ _________ _____________ _____________ _____________
_______________ _________ _____________ _____________ _____________
_______________ _________ _____________ _____________ _____________
_______________ _________ _____________ _____________ _____________
_______________ _________ _____________ _____________ _____________
(Average) <mv - Mv> = _____________
Now, you’re ready to find the distance to the Small Magellanic Cloud using Formula 3 below!
Formula 3: d = 10pc x
>−<
510vv Mm
Where “d” is the distance in Parsecs and “pc” is Parsecs. One Parsec (pc) is equal to 3.26 Light Years (ly). Your answers below should carry to at least six decimal places if possible.
4. What is the distance to the SMC? _____________________ pc
5. What is the distance in Light Years? ______________________ly

42
Name: _____________________ Date: _______________
Outdoor Laboratory: Messier Deep Sky
Introduction
In this lab, you will be looking for Messier Objects. During the years from 1758 to 1782 Charles Messier, a French astronomer (1730 - 1817), compiled a list of approximately 100 diffuse objects that were difficult to distinguish from comets through the telescopes of the day. The original catalog, published in 1774, contained only 45 objects. Discovering comets was the way to make a name for yourself in astronomy in the 18th century -- Messier's aim was to catalog the objects that were often mistaken for comets. Fortunately for us, the Messier Catalog became well known for a much higher purpose, as a collection of the most beautiful objects in the sky including nebulae, star clusters, and galaxies. However, he was famous in his lifetime for the discovery of 19 comets, 13 of which were original discoveries that he is still credited with today.
Like anything else, observing requires practice. You must train your eyes to look into the telescope to find things and to observe detail in distant and near objects. Training your eyes simply means looking through a telescope often. You will not see much detail in many of these objects right away. Be patient! Over time your observing vision will improve. Most of the Messier objects are between Magnitude 5 and 10, which should tell you that they can be very dim. For now, you will likely see what appears to be a blue or green ‘fuzzy’ object in the eyepiece.
The key is to make sure your telescope is calibrated as best as possible. Don’t get frustrated with any one object! Try to find it. If you are not successful, let your partner have a try.
Procedure
5. Set up your telescope and align it to a bright star. Be sure your alignment is very accurate as this will make it easier to find the objects.
6. Locate the types of objects identified by your instructor.
Note: Your Peterson Field Guide: Stars and Planets will be extremely beneficial for this lab as its Atlas Charts are very detailed. Keep track of any interesting finds and/or difficulties as you locate these objects in the comments section.
Name RA Dec Comments
1.
2.
3.
4.
43
LAB 12
Discussion:
Indoor Lab Assignment: Final Exam Review
Outdoor Lab Assignment: Lab Practical (If Necessary) Instructor’s Discretion
44
LAB 13
Discussion:
Indoor Lab Assignment: Instructor’s Discretion
Outdoor Lab Assignment: Instructor’s Discretion
45
LAB 14
Discussion:
Indoor Lab Assignment: Final Exam
Outdoor Lab Assignment: Instructor’s Discretion