Embed Size (px)
Citation preview
CompTIA Security+® Lab Series
Lab 10: Analyze and Differentiate Types of
Attacks Using Windows Commands
CompTIA Security+® Domain 3 - Threats and Vulnerabilities
Objective 3.2: Analyze and differentiate among types of attacks
Document Version: 2013-08-02
Organization: Moraine Valley Community College Author: Jesse Varsalone
Copyright © Center for Systems Security and Information Assurance (CSSIA), National Information Security, Geospatial Technologies Consortium (NISGTC) The original works of this document were funded by the National Science Foundation’s (NSF) Advanced Technological Education (ATE) program Department of Undergraduate Education (DUE) Award No. 0702872 and 1002746; Center for Systems Security and Information Assurance (CSSIA) at Moraine Valley Community College (MVCC).
This work has been adapted by The Department of Labor (DOL) Trade Adjustment Assistance Community College and Career Training (TAACCCT) Grant No. TC-22525-11-60-A-48. The National Information Security, Geospatial Technologies Consortium (NISGTC) is authorized to create derivatives of identified elements modified from the original works. These elements are licensed under the Creative Commons Attributions 3.0 Unported License. To view a copy
of this license, visit http://creativecommons.org/licenses/by/3.0/ or send a letter to Creative Commons, 444 Castro Street, Suite 900, Mountain View, California, 94041, USA. The Network Development Group (NDG) is given a perpetual worldwide waiver to distribute per US Law this lab and future derivatives of these works.
Lab 10: Analyze and Differentiate Types of Attacks Using Windows Commands
8/2/2013 Copyright © 2013 CSSIA, NISGTC Page 2 of 26
Contents Introduction ........................................................................................................................ 3
Objective: Analyze and Differentiate Among Types of Attacks ......................................... 3
Pod Topology ...................................................................................................................... 4
Lab Settings ......................................................................................................................... 5
1 Viewing Network Resources ........................................................................................ 6
1.1 Using the Net Command to View Resources ....................................................... 6
1.2 Conclusion .......................................................................................................... 13
1.3 Discussion Questions .......................................................................................... 13
2 Using PSEXEC to Connect to a Remote System ......................................................... 14
2.1 Using PSEXEC ...................................................................................................... 14
2.2 Conclusion .......................................................................................................... 19
2.3 Discussion Questions .......................................................................................... 19
3 Stopping, Starting, and Removing Services ............................................................... 20
3.1 Using the NET and SC Commands ...................................................................... 20
3.2 Conclusion .......................................................................................................... 25
3.3 Discussion Questions .......................................................................................... 25
References ........................................................................................................................ 26
Lab 10: Analyze and Differentiate Types of Attacks Using Windows Commands
8/2/2013 Copyright © 2013 CSSIA, NISGTC Page 3 of 26
Introduction
This lab is part of a series of lab exercises designed through a grant initiative by the Center for Systems Security and Information Assurance (CSSIA) and the Network Development Group (NDG), funded by the National Science Foundation’s (NSF) Advanced Technological Education (ATE) program Department of Undergraduate Education (DUE) Award No. 0702872 and 1002746. This work has been adapted by The Department of Labor (DOL) Trade Adjustment Assistance Community College and Career Training (TAACCCT) Grant No. TC-22525-11-60-A-48. This series of lab exercises is intended to support courseware for CompTIA Security+® certification. By the end of this lab, students will be able to view resources on the network, map network drives, and perform administration on remote systems from the command line. Many commands built into the operating system, such as the net command, can be used to access resources. These commands can be used by an insider to attack the network. This lab includes the following tasks:
1 – Viewing and Accessing Network Resources 2 – Using PSEXEC to Connect to a Remote System 3 – Stopping, Starting, and Removing Services
Objective: Analyze and Differentiate Among Types of Attacks
While hackers may utilize various tools to attack network systems, there are many tools built into the Windows operating system, which will perform similar tasks. Many individuals are unaware of how to utilize these commands to attack a network. These Windows commands are very powerful if an attacker has internal network access. For this lab, the following terms and concepts will be of use: psexec – This is a Sysinternals (a subsidiary of Microsoft ) tool that will allow you to execute a command on a remote Windows machine. In order to execute a command on a remote system, you must have the credentials of an account on the remote machine. net command – The net command has been around since the days of MS-DOS. It helps Windows users perform tasks like creating users, stopping services, mapping drives, and viewing other computers on the network. Command Shell – The Windows command shell allows users to interact with the operating system from a command line environment. Virtually anything that can be done in the Graphical User Interface, or GUI, in Windows can be done from the command line. A command shell can be sent from a victim’s machine to an attacker’s machine. Once the attacker has a command shell connected to the victim’s machine, they can run commands on the remote system, and perform administrative tasks.
Lab 10: Analyze and Differentiate Types of Attacks Using Windows Commands
8/2/2013 Copyright © 2013 CSSIA, NISGTC Page 4 of 26
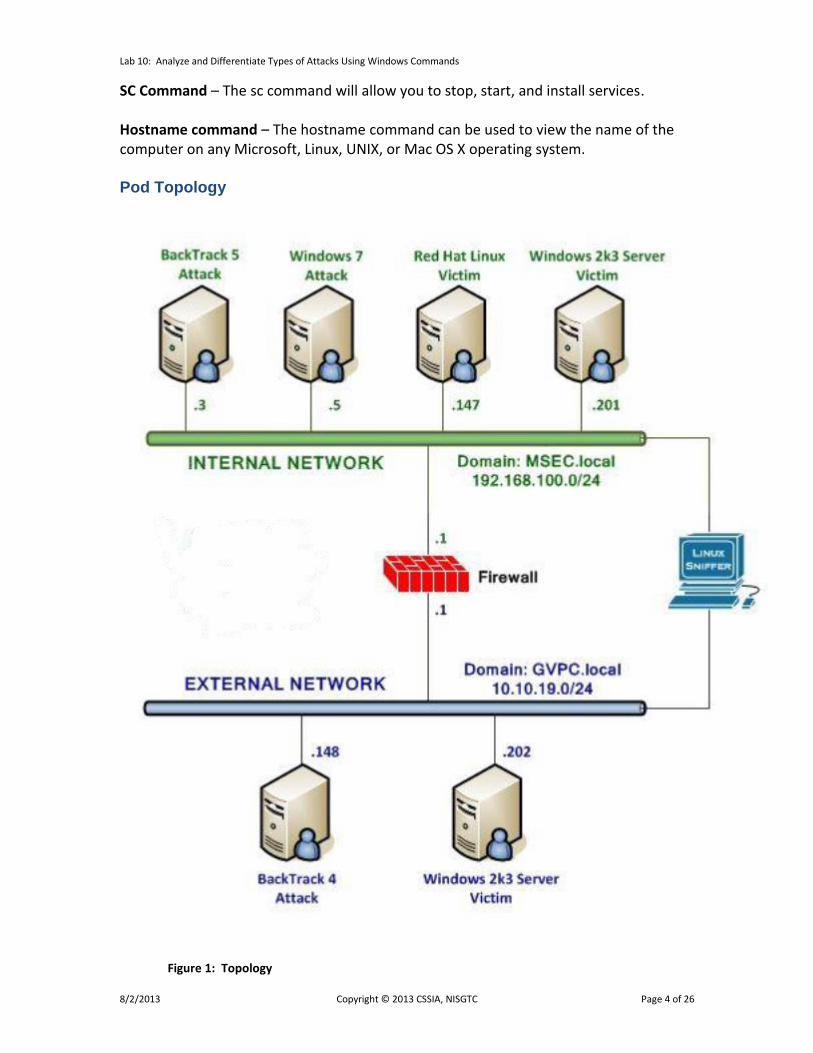
SC Command – The sc command will allow you to stop, start, and install services. Hostname command – The hostname command can be used to view the name of the computer on any Microsoft, Linux, UNIX, or Mac OS X operating system. Pod Topology
Figure 1: Topology
Lab 10: Analyze and Differentiate Types of Attacks Using Windows Commands
8/2/2013 Copyright © 2013 CSSIA, NISGTC Page 5 of 26
Lab Settings
The information in the table below will be needed in order to complete the lab. The task sections below provide details on the use of this information. Required Virtual Machines and Applications Log in to the following virtual machines before starting the tasks in this lab: Windows 7 Internal Attack Machine
192.168.100.5
Windows 7 student password
Password
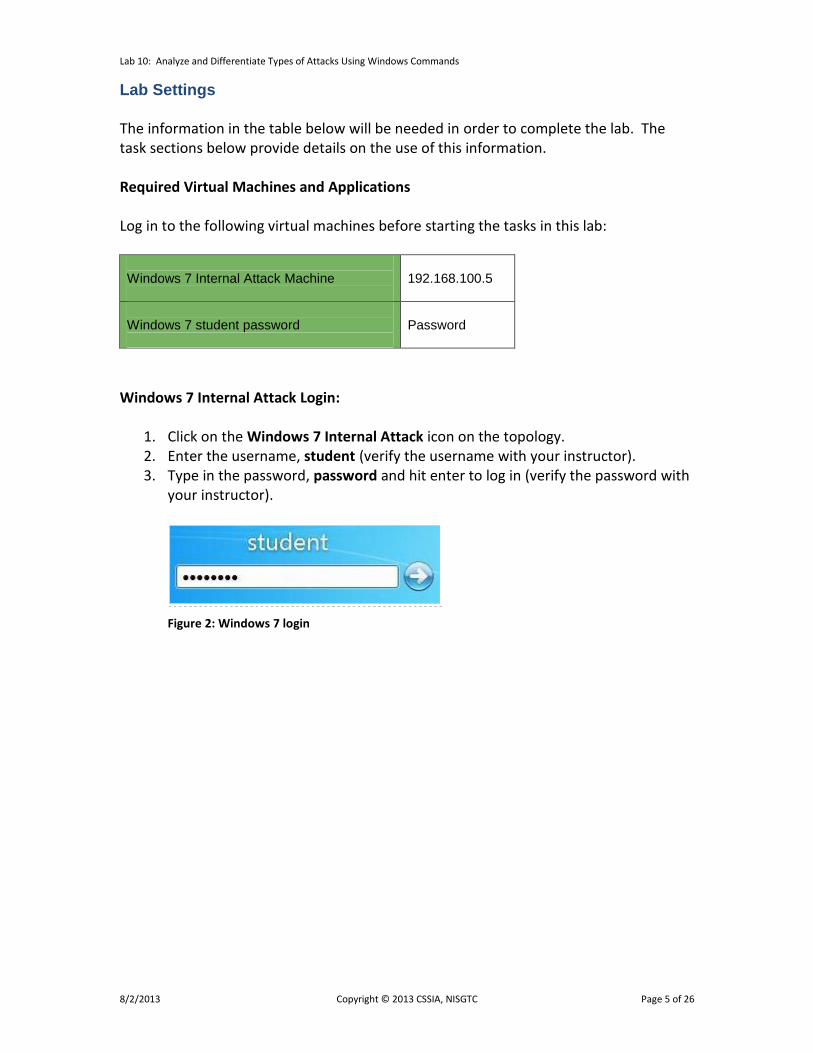
Windows 7 Internal Attack Login:
1. Click on the Windows 7 Internal Attack icon on the topology. 2. Enter the username, student (verify the username with your instructor). 3. Type in the password, password and hit enter to log in (verify the password with
your instructor).
Figure 2: Windows 7 login
Lab 10: Analyze and Differentiate Types of Attacks Using Windows Commands
8/2/2013 Copyright © 2013 CSSIA, NISGTC Page 6 of 26
1 Viewing Network Resources
The net command can be used to perform a variety of tasks within Windows, including:
Viewing network resources
Mapping Drives
Managing User Accounts
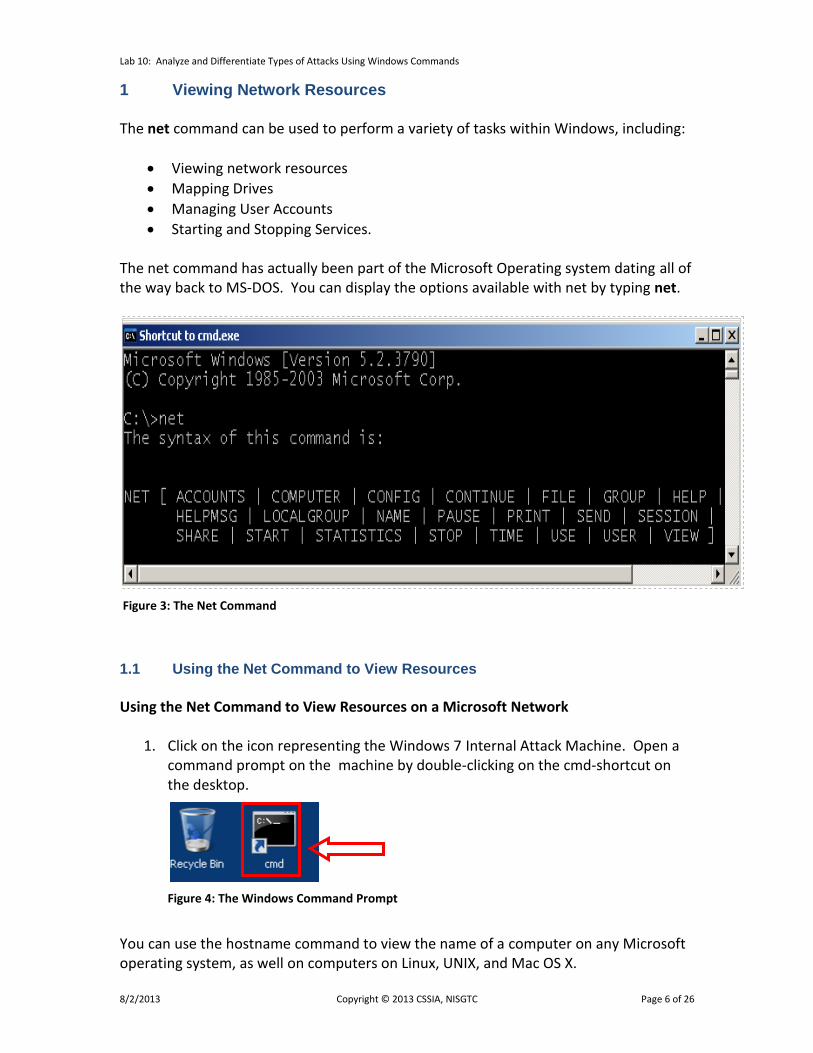
Starting and Stopping Services. The net command has actually been part of the Microsoft Operating system dating all of the way back to MS-DOS. You can display the options available with net by typing net.
Figure 3: The Net Command
1.1 Using the Net Command to View Resources
Using the Net Command to View Resources on a Microsoft Network
1. Click on the icon representing the Windows 7 Internal Attack Machine. Open a command prompt on the machine by double-clicking on the cmd-shortcut on the desktop.
Figure 4: The Windows Command Prompt
You can use the hostname command to view the name of a computer on any Microsoft operating system, as well on computers on Linux, UNIX, and Mac OS X.
Lab 10: Analyze and Differentiate Types of Attacks Using Windows Commands
8/2/2013 Copyright © 2013 CSSIA, NISGTC Page 7 of 26
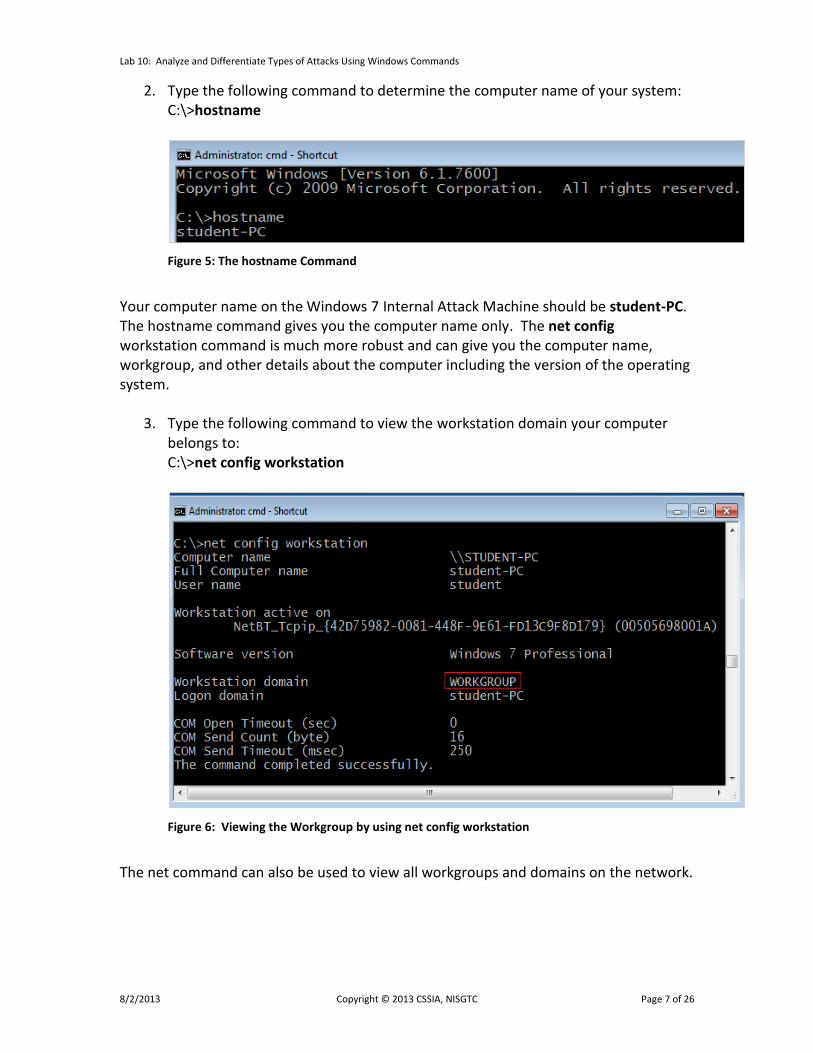
2. Type the following command to determine the computer name of your system: C:\>hostname
Figure 5: The hostname Command
Your computer name on the Windows 7 Internal Attack Machine should be student-PC. The hostname command gives you the computer name only. The net config workstation command is much more robust and can give you the computer name, workgroup, and other details about the computer including the version of the operating system.
3. Type the following command to view the workstation domain your computer belongs to:
C:\>net config workstation
Figure 6: Viewing the Workgroup by using net config workstation
The net command can also be used to view all workgroups and domains on the network.
Lab 10: Analyze and Differentiate Types of Attacks Using Windows Commands
8/2/2013 Copyright © 2013 CSSIA, NISGTC Page 8 of 26
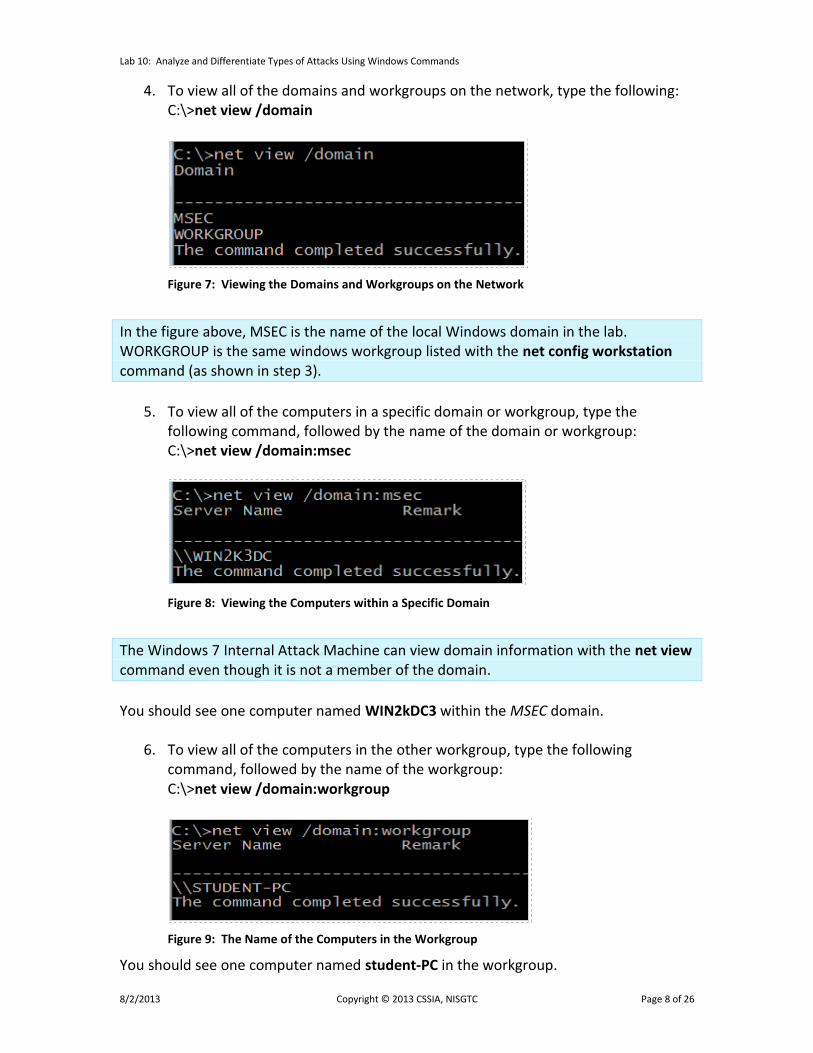
4. To view all of the domains and workgroups on the network, type the following: C:\>net view /domain
Figure 7: Viewing the Domains and Workgroups on the Network
In the figure above, MSEC is the name of the local Windows domain in the lab. WORKGROUP is the same windows workgroup listed with the net config workstation command (as shown in step 3).
5. To view all of the computers in a specific domain or workgroup, type the
following command, followed by the name of the domain or workgroup: C:\>net view /domain:msec
Figure 8: Viewing the Computers within a Specific Domain
The Windows 7 Internal Attack Machine can view domain information with the net view command even though it is not a member of the domain.
You should see one computer named WIN2kDC3 within the MSEC domain.
6. To view all of the computers in the other workgroup, type the following command, followed by the name of the workgroup:
C:\>net view /domain:workgroup
Figure 9: The Name of the Computers in the Workgroup
You should see one computer named student-PC in the workgroup.
Lab 10: Analyze and Differentiate Types of Attacks Using Windows Commands
8/2/2013 Copyright © 2013 CSSIA, NISGTC Page 9 of 26
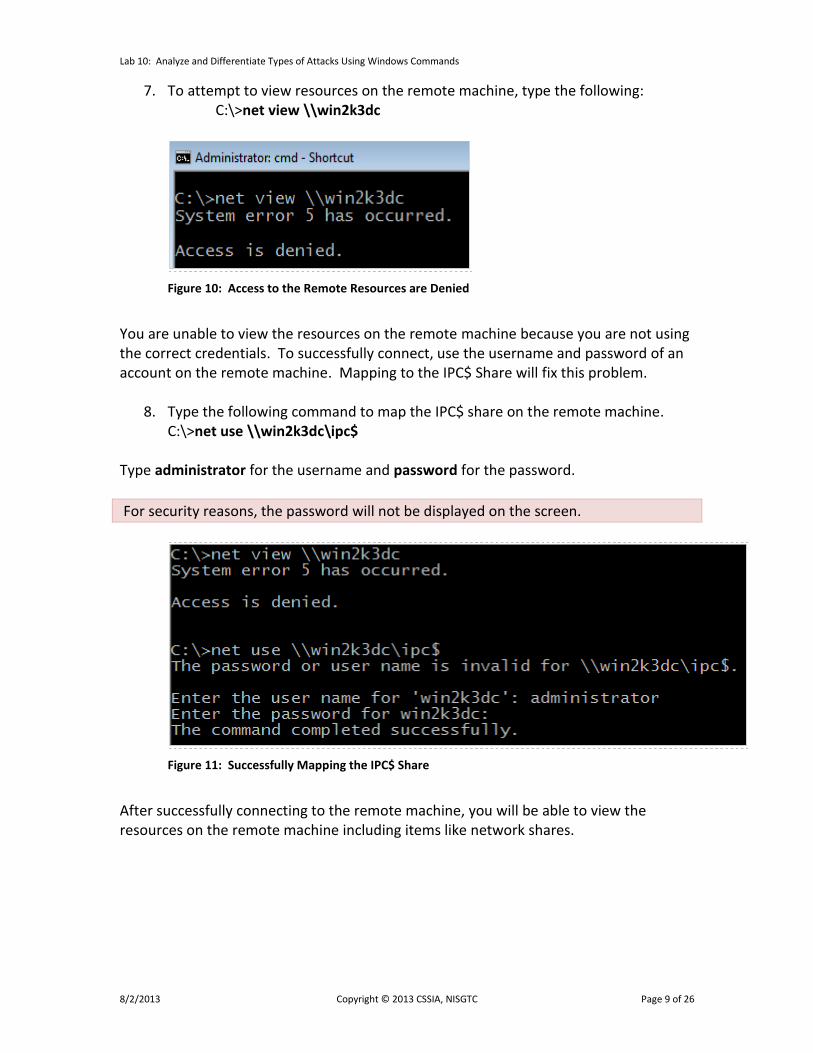
7. To attempt to view resources on the remote machine, type the following: C:\>net view \\win2k3dc
Figure 10: Access to the Remote Resources are Denied
You are unable to view the resources on the remote machine because you are not using the correct credentials. To successfully connect, use the username and password of an account on the remote machine. Mapping to the IPC$ Share will fix this problem.
8. Type the following command to map the IPC$ share on the remote machine. C:\>net use \\win2k3dc\ipc$ Type administrator for the username and password for the password.
For security reasons, the password will not be displayed on the screen.
Figure 11: Successfully Mapping the IPC$ Share
After successfully connecting to the remote machine, you will be able to view the resources on the remote machine including items like network shares.
Lab 10: Analyze and Differentiate Types of Attacks Using Windows Commands
8/2/2013 Copyright © 2013 CSSIA, NISGTC Page 10 of 26
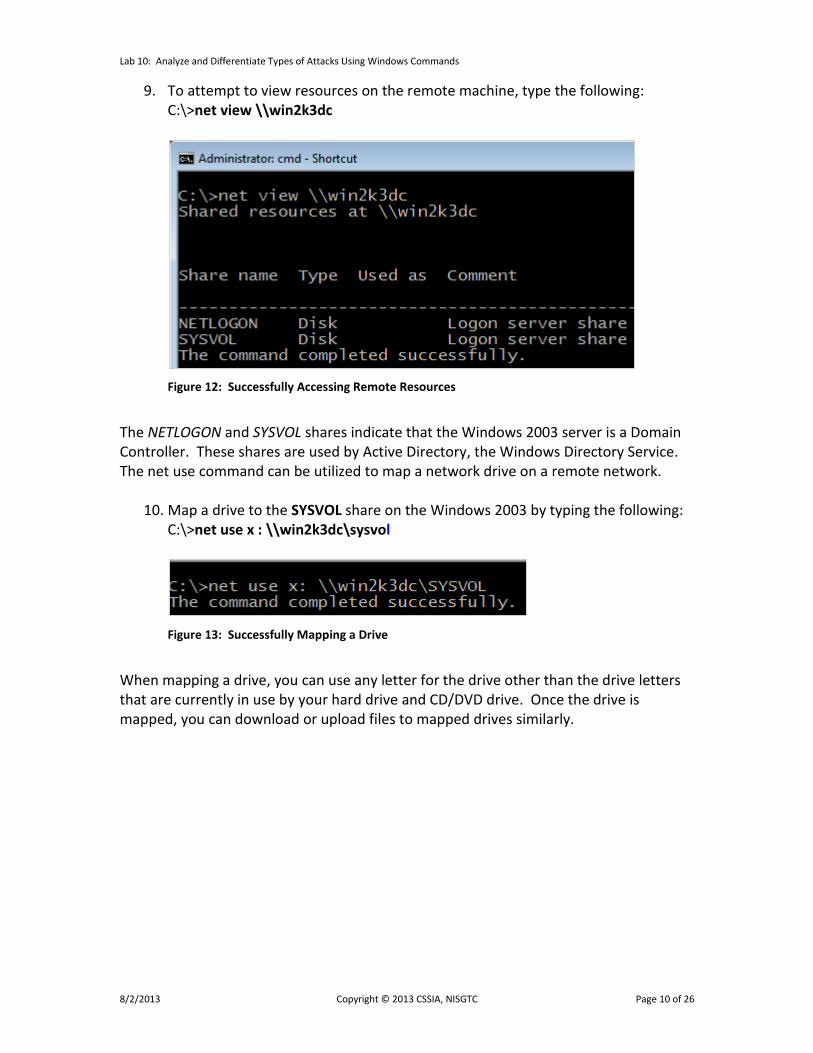
9. To attempt to view resources on the remote machine, type the following: C:\>net view \\win2k3dc
Figure 12: Successfully Accessing Remote Resources
The NETLOGON and SYSVOL shares indicate that the Windows 2003 server is a Domain Controller. These shares are used by Active Directory, the Windows Directory Service. The net use command can be utilized to map a network drive on a remote network.
10. Map a drive to the SYSVOL share on the Windows 2003 by typing the following: C:\>net use x : \\win2k3dc\sysvol
Figure 13: Successfully Mapping a Drive
When mapping a drive, you can use any letter for the drive other than the drive letters that are currently in use by your hard drive and CD/DVD drive. Once the drive is mapped, you can download or upload files to mapped drives similarly.

Lab 10: Analyze and Differentiate Types of Attacks Using Windows Commands
8/2/2013 Copyright © 2013 CSSIA, NISGTC Page 11 of 26
11. You can view the mapped drive by clicking on Start and selecting Computer.
Figure 14: Viewing the Mapped Drive in Computer
12. View the list of all mapped drives can also be viewed by typing net use.
C:\>net use
Figure 15: Viewing the Mapped Drives from the Command Line
The X: drive is listed as a mapped drive to the SYSVOL folder on the Win2k3dc machine.
Lab 10: Analyze and Differentiate Types of Attacks Using Windows Commands
8/2/2013 Copyright © 2013 CSSIA, NISGTC Page 12 of 26
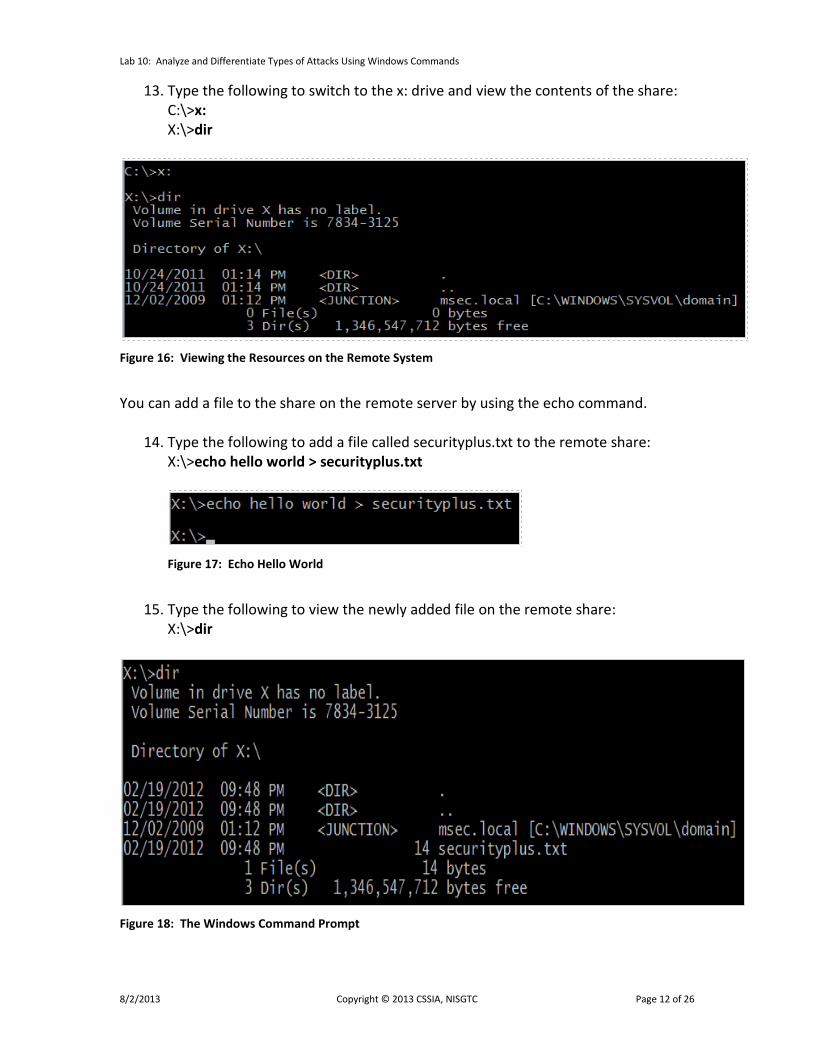
13. Type the following to switch to the x: drive and view the contents of the share: C:\>x: X:\>dir
Figure 16: Viewing the Resources on the Remote System
You can add a file to the share on the remote server by using the echo command.
14. Type the following to add a file called securityplus.txt to the remote share: X:\>echo hello world > securityplus.txt
Figure 17: Echo Hello World
15. Type the following to view the newly added file on the remote share:
X:\>dir
Figure 18: The Windows Command Prompt
Lab 10: Analyze and Differentiate Types of Attacks Using Windows Commands
8/2/2013 Copyright © 2013 CSSIA, NISGTC Page 13 of 26
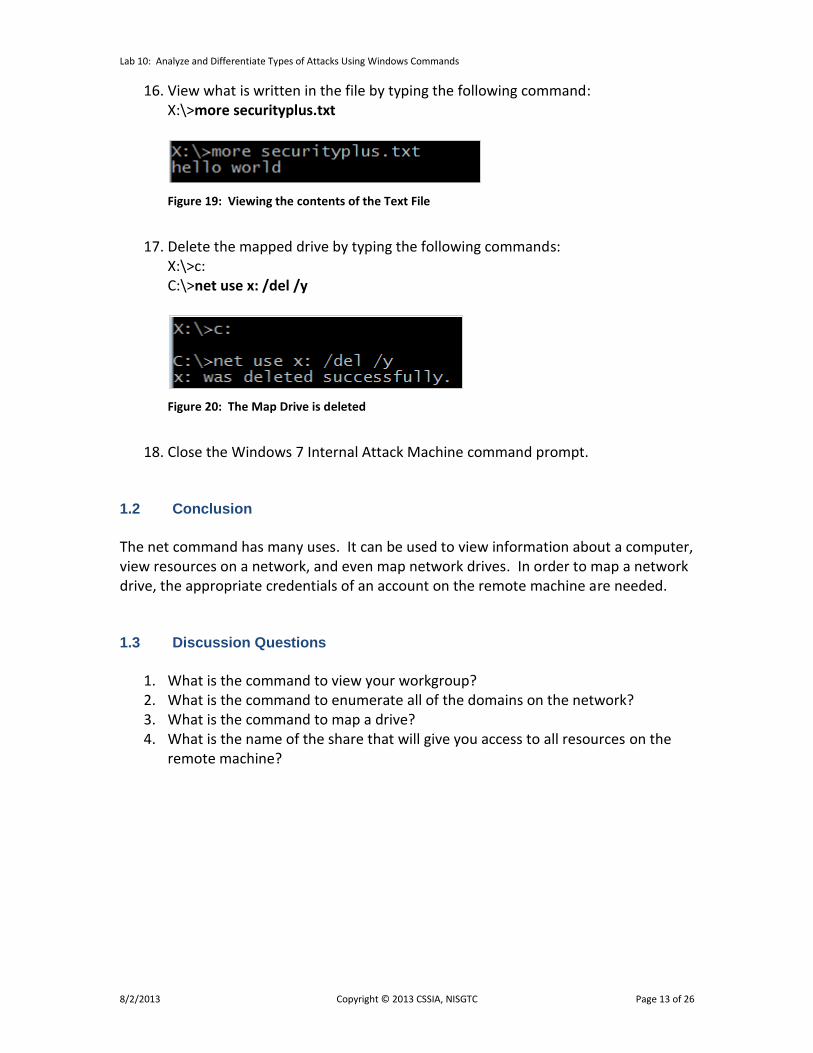
16. View what is written in the file by typing the following command: X:\>more securityplus.txt
Figure 19: Viewing the contents of the Text File
17. Delete the mapped drive by typing the following commands:
X:\>c: C:\>net use x: /del /y
Figure 20: The Map Drive is deleted
18. Close the Windows 7 Internal Attack Machine command prompt.
1.2 Conclusion
The net command has many uses. It can be used to view information about a computer, view resources on a network, and even map network drives. In order to map a network drive, the appropriate credentials of an account on the remote machine are needed. 1.3 Discussion Questions
1. What is the command to view your workgroup? 2. What is the command to enumerate all of the domains on the network? 3. What is the command to map a drive? 4. What is the name of the share that will give you access to all resources on the
remote machine?
Lab 10: Analyze and Differentiate Types of Attacks Using Windows Commands
8/2/2013 Copyright © 2013 CSSIA, NISGTC Page 14 of 26
2 Using PSEXEC to Connect to a Remote System
PSEXEC is a Sysinternals (a subsidiary of Microsoft) tool that will allow you to execute a command on a remote Windows machine. In order to execute a command on a remote system, you must have the credentials of an account on the remote machine. The command is not built into the Windows operating systems. It must be downloaded from the following link: http://technet.microsoft.com/en-us/sysinternals/bb897553 2.1 Using PSEXEC
The psexec command can be used to run a command on a remote system. Before using the psexec command, the user must agree to the End User License Agreement (EULA).
1. Log in to the Windows 7 Internal Attack Machine system. Open a command prompt by double clicking on the cmd.exe shortcut on the desktop.
If you are already logged into the machine, you may skip this step.
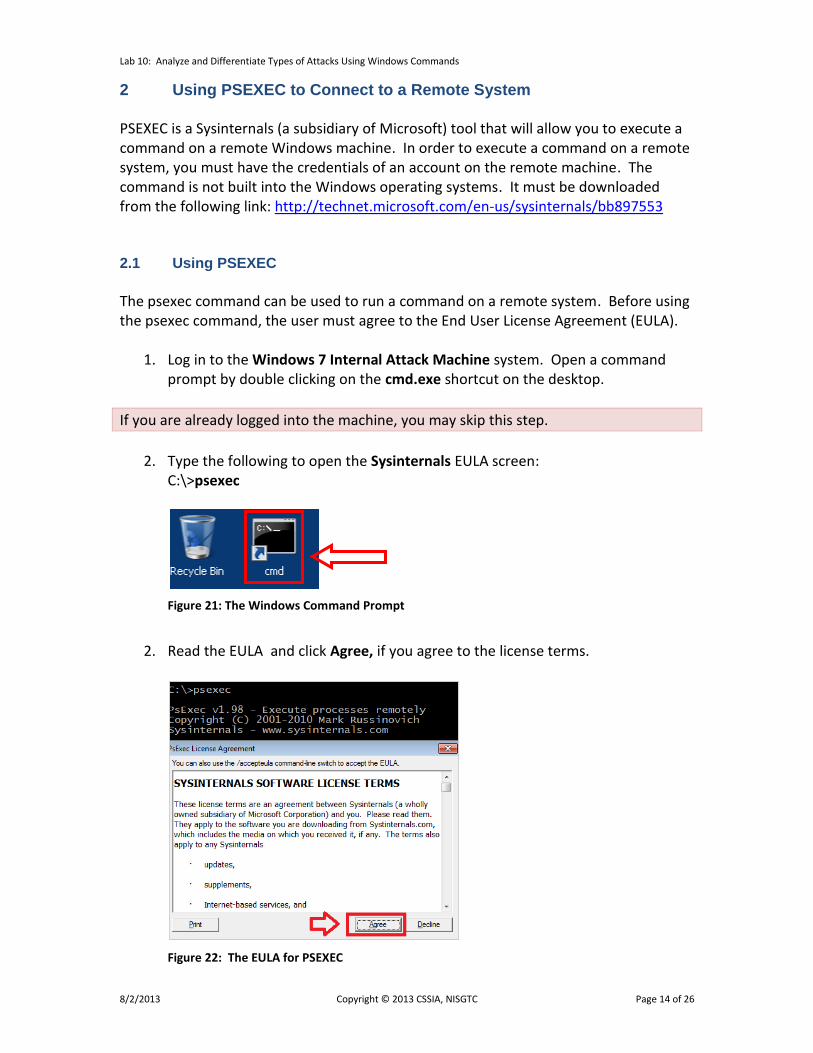
2. Type the following to open the Sysinternals EULA screen:
C:\>psexec
Figure 21: The Windows Command Prompt
2. Read the EULA and click Agree, if you agree to the license terms.
Figure 22: The EULA for PSEXEC
Lab 10: Analyze and Differentiate Types of Attacks Using Windows Commands
8/2/2013 Copyright © 2013 CSSIA, NISGTC Page 15 of 26
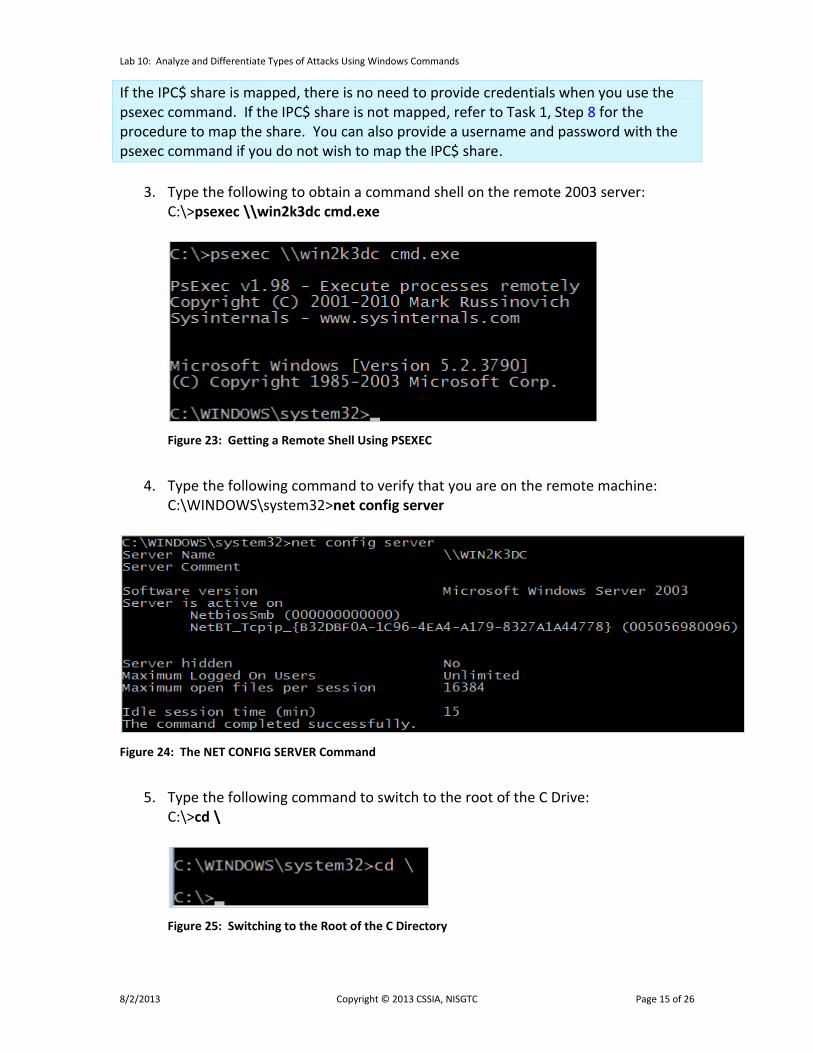
If the IPC$ share is mapped, there is no need to provide credentials when you use the psexec command. If the IPC$ share is not mapped, refer to Task 1, Step 8 for the procedure to map the share. You can also provide a username and password with the psexec command if you do not wish to map the IPC$ share.
3. Type the following to obtain a command shell on the remote 2003 server:
C:\>psexec \\win2k3dc cmd.exe
Figure 23: Getting a Remote Shell Using PSEXEC
4. Type the following command to verify that you are on the remote machine:
C:\WINDOWS\system32>net config server
Figure 24: The NET CONFIG SERVER Command
5. Type the following command to switch to the root of the C Drive:
C:\>cd \
Figure 25: Switching to the Root of the C Directory
Lab 10: Analyze and Differentiate Types of Attacks Using Windows Commands
8/2/2013 Copyright © 2013 CSSIA, NISGTC Page 16 of 26
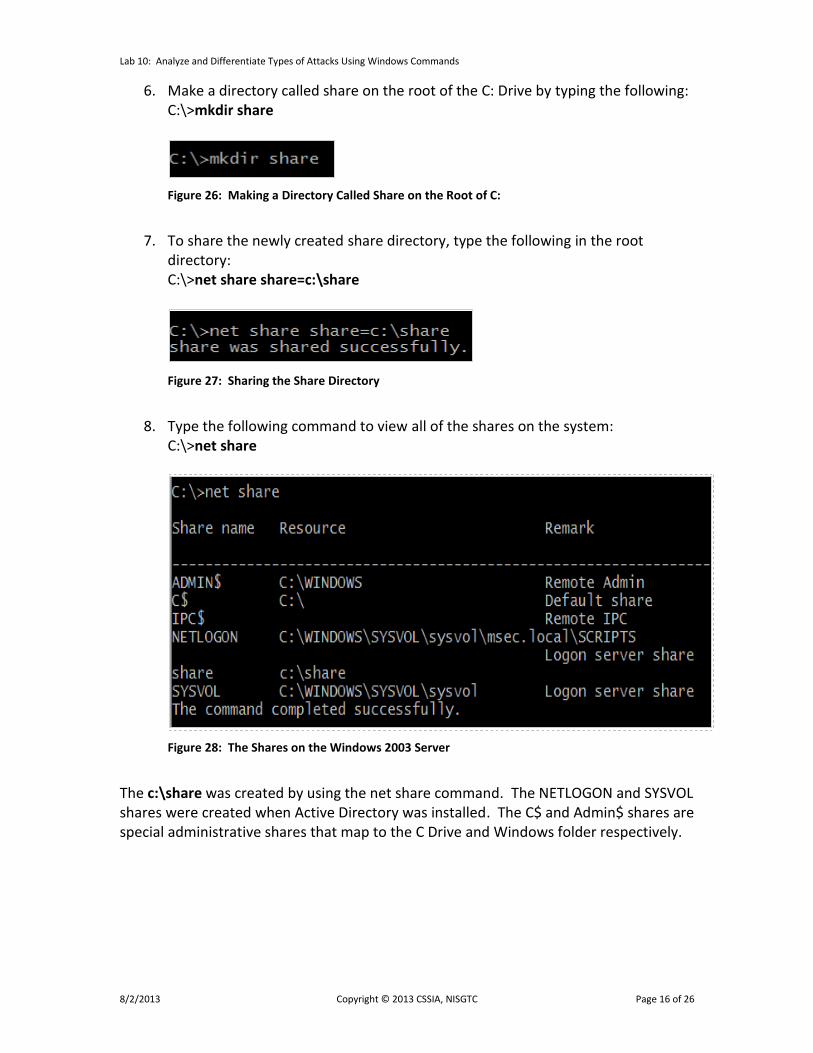
6. Make a directory called share on the root of the C: Drive by typing the following: C:\>mkdir share
Figure 26: Making a Directory Called Share on the Root of C:
7. To share the newly created share directory, type the following in the root
directory: C:\>net share share=c:\share
Figure 27: Sharing the Share Directory
8. Type the following command to view all of the shares on the system:
C:\>net share
Figure 28: The Shares on the Windows 2003 Server
The c:\share was created by using the net share command. The NETLOGON and SYSVOL shares were created when Active Directory was installed. The C$ and Admin$ shares are special administrative shares that map to the C Drive and Windows folder respectively.
Lab 10: Analyze and Differentiate Types of Attacks Using Windows Commands
8/2/2013 Copyright © 2013 CSSIA, NISGTC Page 17 of 26
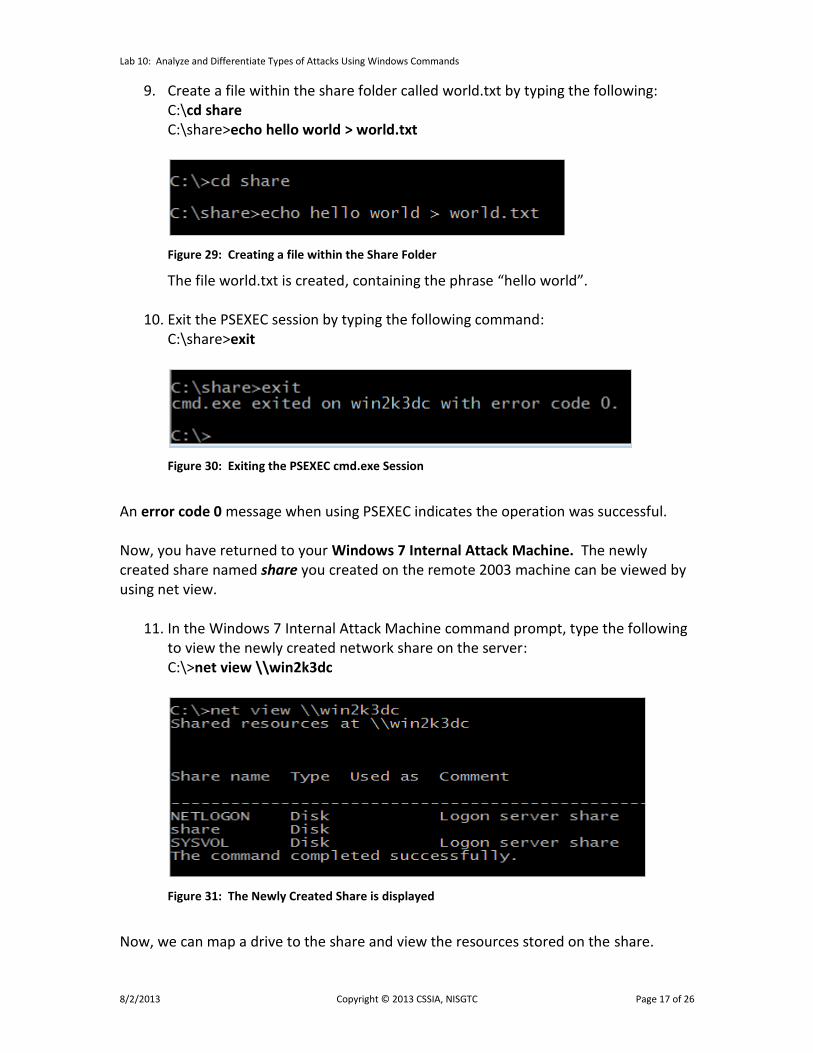
9. Create a file within the share folder called world.txt by typing the following: C:\cd share C:\share>echo hello world > world.txt
Figure 29: Creating a file within the Share Folder
The file world.txt is created, containing the phrase “hello world”.
10. Exit the PSEXEC session by typing the following command: C:\share>exit
Figure 30: Exiting the PSEXEC cmd.exe Session
An error code 0 message when using PSEXEC indicates the operation was successful. Now, you have returned to your Windows 7 Internal Attack Machine. The newly created share named share you created on the remote 2003 machine can be viewed by using net view.
11. In the Windows 7 Internal Attack Machine command prompt, type the following to view the newly created network share on the server:
C:\>net view \\win2k3dc
Figure 31: The Newly Created Share is displayed
Now, we can map a drive to the share and view the resources stored on the share.
Lab 10: Analyze and Differentiate Types of Attacks Using Windows Commands
8/2/2013 Copyright © 2013 CSSIA, NISGTC Page 18 of 26
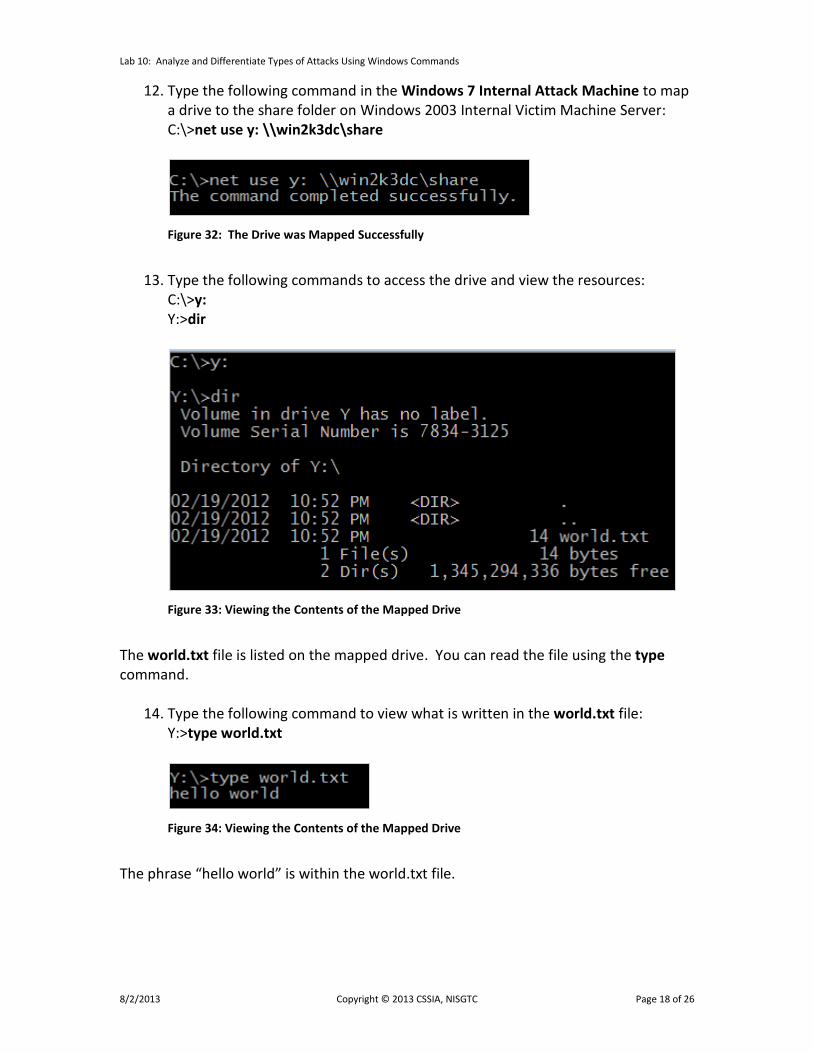
12. Type the following command in the Windows 7 Internal Attack Machine to map a drive to the share folder on Windows 2003 Internal Victim Machine Server: C:\>net use y: \\win2k3dc\share
Figure 32: The Drive was Mapped Successfully
13. Type the following commands to access the drive and view the resources:
C:\>y: Y:>dir
Figure 33: Viewing the Contents of the Mapped Drive
The world.txt file is listed on the mapped drive. You can read the file using the type command.
14. Type the following command to view what is written in the world.txt file: Y:>type world.txt
Figure 34: Viewing the Contents of the Mapped Drive
The phrase “hello world” is within the world.txt file.
Lab 10: Analyze and Differentiate Types of Attacks Using Windows Commands
8/2/2013 Copyright © 2013 CSSIA, NISGTC Page 19 of 26
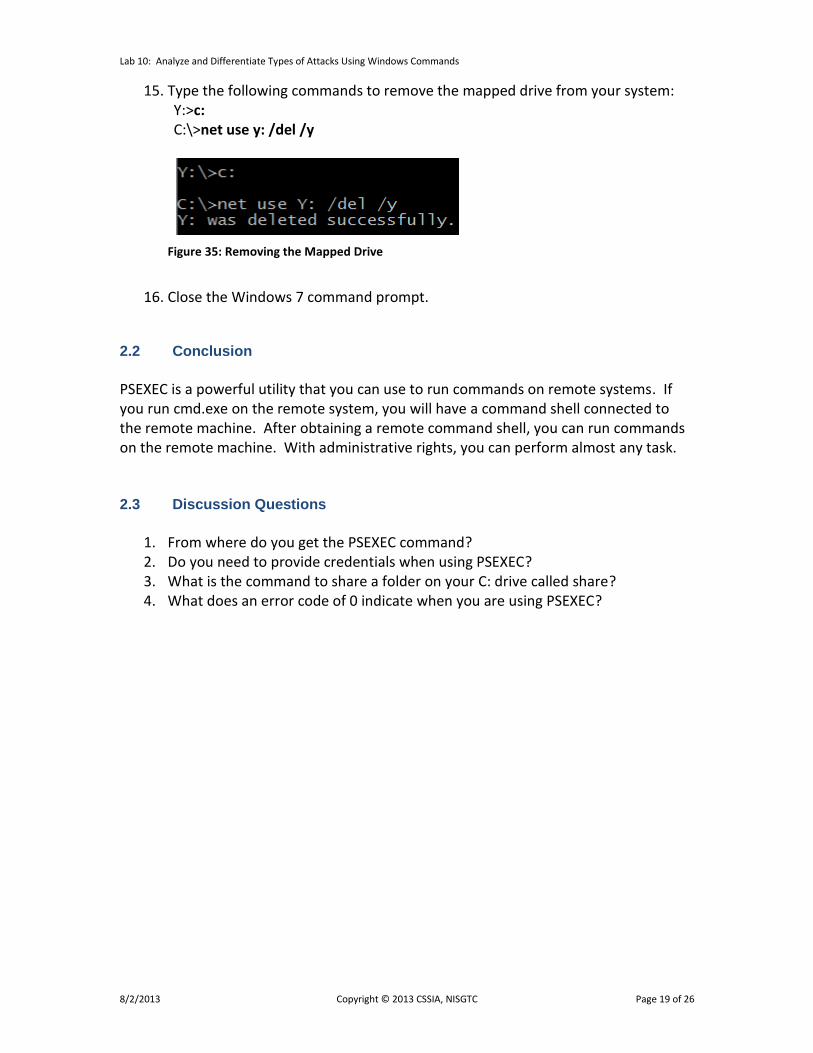
15. Type the following commands to remove the mapped drive from your system: Y:>c: C:\>net use y: /del /y
Figure 35: Removing the Mapped Drive
16. Close the Windows 7 command prompt.
2.2 Conclusion
PSEXEC is a powerful utility that you can use to run commands on remote systems. If you run cmd.exe on the remote system, you will have a command shell connected to the remote machine. After obtaining a remote command shell, you can run commands on the remote machine. With administrative rights, you can perform almost any task. 2.3 Discussion Questions
1. From where do you get the PSEXEC command? 2. Do you need to provide credentials when using PSEXEC? 3. What is the command to share a folder on your C: drive called share? 4. What does an error code of 0 indicate when you are using PSEXEC?

Lab 10: Analyze and Differentiate Types of Attacks Using Windows Commands
8/2/2013 Copyright © 2013 CSSIA, NISGTC Page 20 of 26
3 Stopping, Starting, and Removing Services
In this section, you will start and stop services on a remote machine from the command line. This can be done by using the sc, which stands for service control, command or using the net command if you are connected to the machine through a remote shell. 3.1 Using the NET and SC Commands
If you can obtain a shell on a remote system using PSEXEC, you can stop and start services from the command line. You can also stop, start, install, and uninstall services by using the sc, or service control command. The sc command, which has been included with the Windows operating system since Windows XP, can be used to run stop, start, install, and uninstall services on a local computer or on a remote machine. Open a Terminal to Get Started
1. Open a command prompt on the Windows 7 Internal Attack machine by double clicking on the cmd-shortcut on the Desktop.
Figure 36: Opening a Command Prompt on Windows 7
2. Type the following to obtain a command shell on the remote 2003 server:
C:\>psexec \\win2k3dc cmd.exe If the IPC$ share is not mapped, refer to Task 1, Step 8 for the procedure to map the share. You can also provide a username and password with the psexec command if you do not wish to map the IPC$ share.
Figure 37: Getting a Remote Shell Using PSEXEC
Lab 10: Analyze and Differentiate Types of Attacks Using Windows Commands
8/2/2013 Copyright © 2013 CSSIA, NISGTC Page 21 of 26
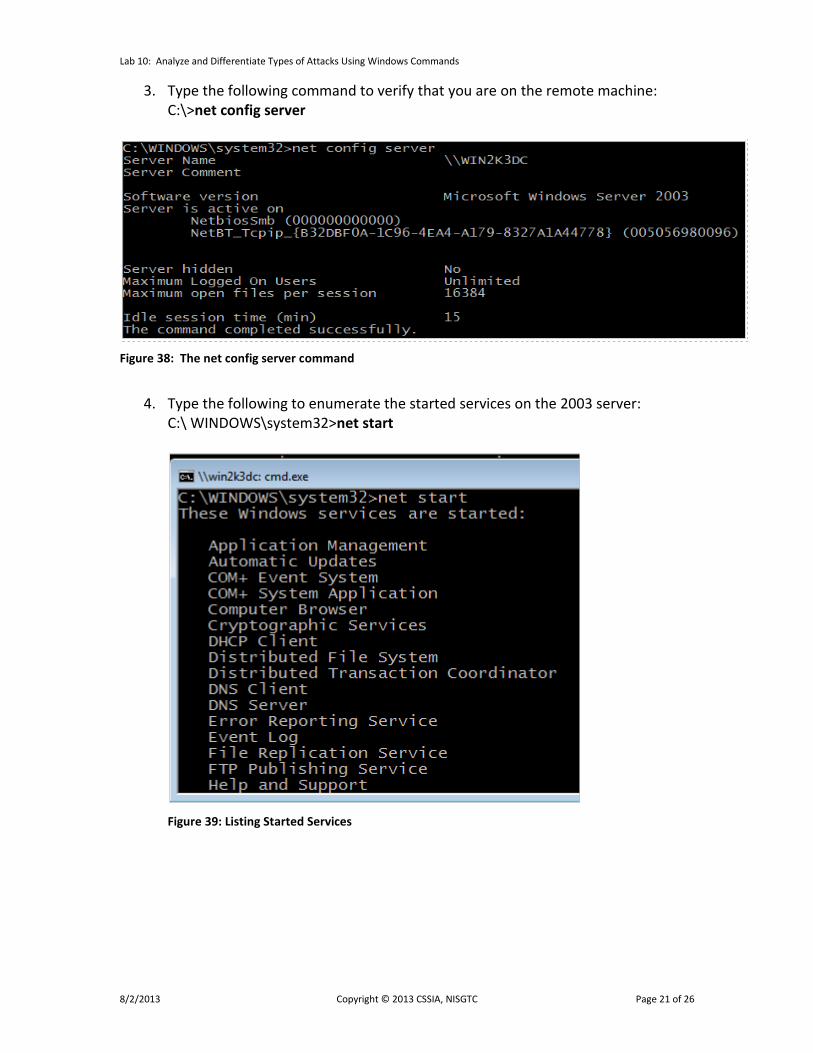
3. Type the following command to verify that you are on the remote machine: C:\>net config server
Figure 38: The net config server command
4. Type the following to enumerate the started services on the 2003 server:
C:\ WINDOWS\system32>net start
Figure 39: Listing Started Services
Lab 10: Analyze and Differentiate Types of Attacks Using Windows Commands
8/2/2013 Copyright © 2013 CSSIA, NISGTC Page 22 of 26
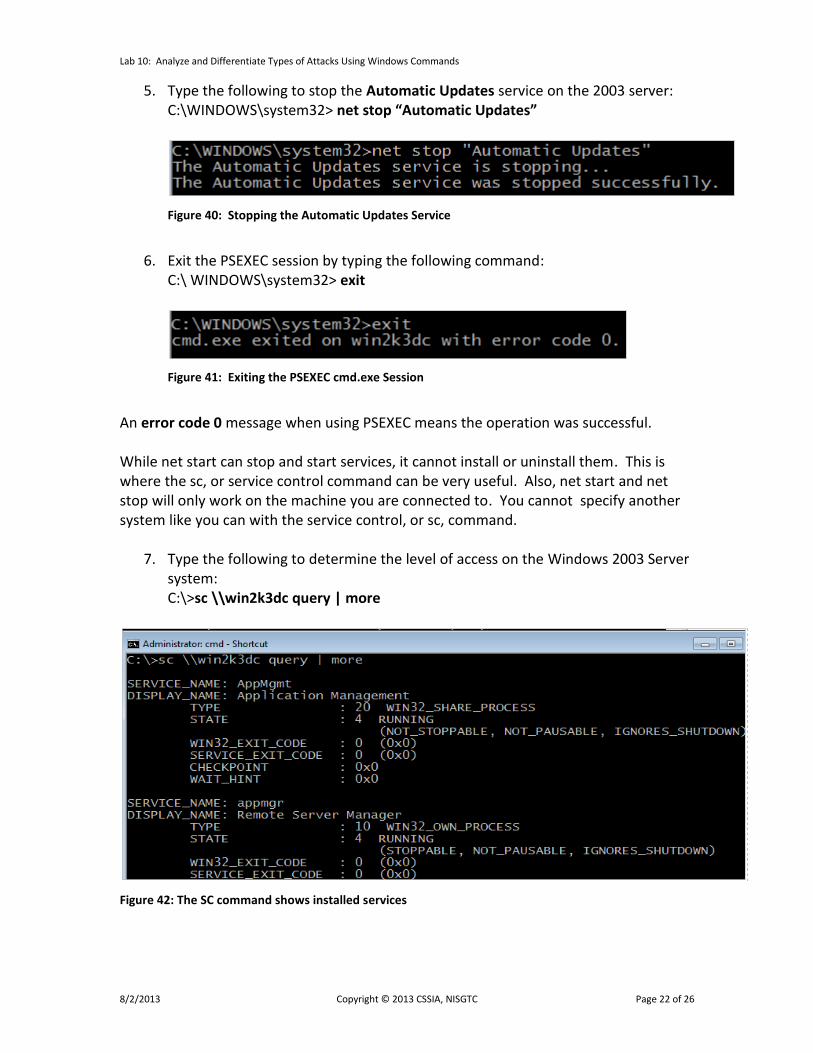
5. Type the following to stop the Automatic Updates service on the 2003 server: C:\WINDOWS\system32> net stop “Automatic Updates”
Figure 40: Stopping the Automatic Updates Service
6. Exit the PSEXEC session by typing the following command:
C:\ WINDOWS\system32> exit
Figure 41: Exiting the PSEXEC cmd.exe Session
An error code 0 message when using PSEXEC means the operation was successful. While net start can stop and start services, it cannot install or uninstall them. This is where the sc, or service control command can be very useful. Also, net start and net stop will only work on the machine you are connected to. You cannot specify another system like you can with the service control, or sc, command.
7. Type the following to determine the level of access on the Windows 2003 Server system:
C:\>sc \\win2k3dc query | more
Figure 42: The SC command shows installed services
Lab 10: Analyze and Differentiate Types of Attacks Using Windows Commands
8/2/2013 Copyright © 2013 CSSIA, NISGTC Page 23 of 26
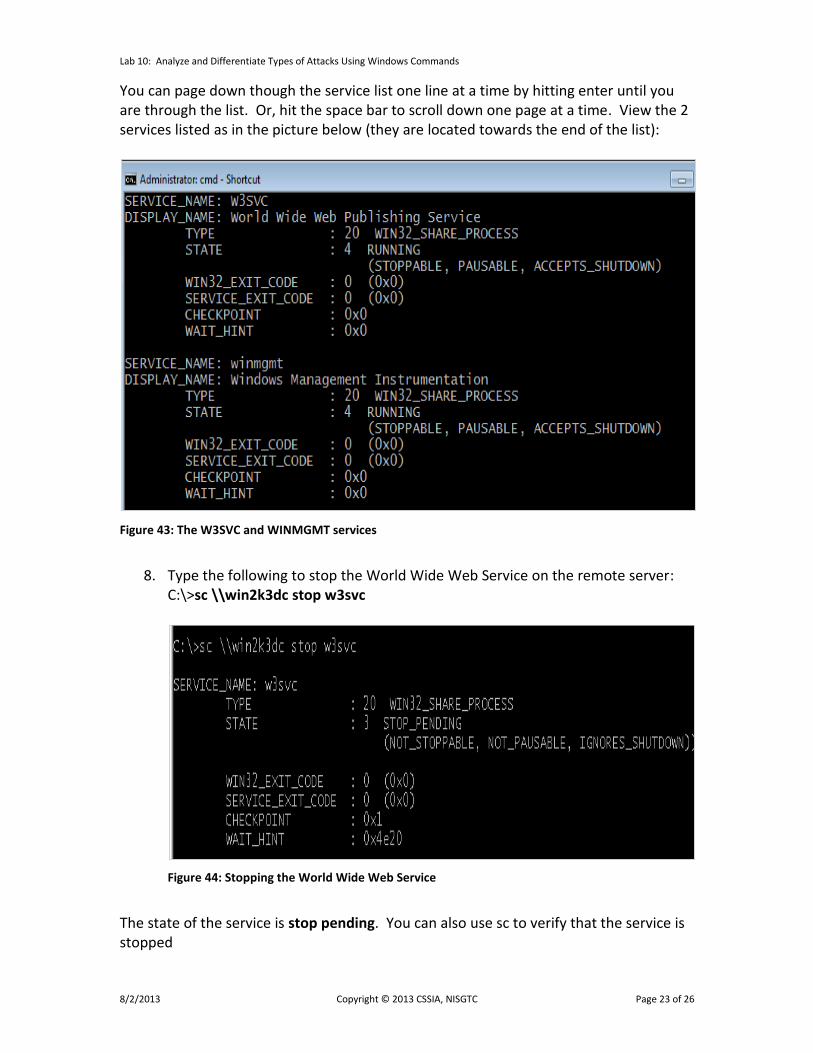
You can page down though the service list one line at a time by hitting enter until you are through the list. Or, hit the space bar to scroll down one page at a time. View the 2 services listed as in the picture below (they are located towards the end of the list):
Figure 43: The W3SVC and WINMGMT services
8. Type the following to stop the World Wide Web Service on the remote server:
C:\>sc \\win2k3dc stop w3svc
Figure 44: Stopping the World Wide Web Service
The state of the service is stop pending. You can also use sc to verify that the service is stopped

Lab 10: Analyze and Differentiate Types of Attacks Using Windows Commands
8/2/2013 Copyright © 2013 CSSIA, NISGTC Page 24 of 26
9. Type the following to view the World Wide Web Service status on the server: C:\>sc \\win2k3dc query w3svc
Figure 45: A Query of the W3SCV Service indicates it is Stopped
10. Type the following to start the World Wide Web Service on the remote server:
C:\>sc \\win2k3dc start w3svc
Figure 46: Indication that the W3SVC Service is starting
It says start pending. You can also use sc to verify that the service is running.
11. Type the following to view the World Wide Web Service status on the server: C:\>sc \\win2k3dc query w3svc
Figure 47: A Query of the W3SCV Service indicates it is Running
12. Close the command prompt when finished.
Lab 10: Analyze and Differentiate Types of Attacks Using Windows Commands
8/2/2013 Copyright © 2013 CSSIA, NISGTC Page 25 of 26
3.2 Conclusion
With the sc and net command, services can be stopped and started from the command line. The net command only allows you to stop and start services on a local machine. However, you can use PSEXEC to obtain a command prompt on a remote system, then use net stop and net start on that system. The sc, or service control, command works on remote systems and allows you to stop, start, install, and uninstall services. 3.3 Discussion Questions
1. What is the net command to stop the Windows Update Service? 2. What is the sc command to get the list of services on a remote machine 3. What is the sc command to stop the W3SVC service on a remote system? 4. What is the sc command to start the W3SVC service on a remote system?
Lab 10: Analyze and Differentiate Types of Attacks Using Windows Commands
8/2/2013 Copyright © 2013 CSSIA, NISGTC Page 26 of 26
References
1. PSEXEC: http://technet.microsoft.com/en-us/sysinternals/bb897553
2. NET Command:
http://www.computerhope.com/nethlp.htm
3. SC Command: http://technet.microsoft.com/en-us/library/bb490995.aspx
4. Mapping Drives:
http://support.microsoft.com/kb/308582
5. Hidden Shares: http://support.microsoft.com/kb/314984