Embed Size (px)
Citation preview

COMP 2000 W 2012 Lab no. 3 Page 1 of 11
Lab Introduction
Background
The Internet is based on packet-switched protocols. Information is carried in packets (it is divided into packets), which can be imagined as small parcels being passed from computer to computer. Large chunks of data are usually broken up into several smaller packets before being sent through the network. The delivery mechanism employs protocols to encode the packet, ensures safe transit, and provides a way of reconstructing the data when it reaches its destination. The main protocols used on the Internet are referred to as TCP/IP, standing for Transmission Control Protocol / Internet Protocol.
Before beginning this lab, you should have already tried using Wireshark for examining traffic and be familiar with the ping and traceroute programs on wired workstations (with physical internet connections). You should have used wireshark to examine HTTP packets created when browsing the Web. In this lab, you will be examining the use of wireless devices for the same kind of activity.
Programs used in the Lab
traceroute is a computer network diagnostic tool for displaying the route (path) and measuring transit delays of packets across an Internet Protocol (IP) network. It attempts to show a possible route over the network between two systems, listing all the nodes (intermediate routers) it can find at one hop distance, two hops distance, three hops, and so on. These are potentially the nodes a packet must pass through to get to its destination. It can help you determine why your connections to a given server might be poor, and can often help you figure out where exactly the problem is. It can also show how systems are connected to each other, letting you see how your Internet Service Provider ISP connects to the Internet as well as how the target system is connected. Unfortunately, many hosts or firewalls prevent the packets traceroute sends (it uses the ICMP protocol to get responses) from getting to their destination, so traceroute does not always provide the desired information.
ping is a simpler program that attempts to get a specific host to respond and show the delay time in getting a message back from that host. Like traceroute, many hosts or firewalls prevent the packets from getting to their destination, or they simply ignore the requests, so ping may not always work.
Wireshark is a sophisticated packet analysis tool, too complicated to discuss in detail here. There is some information at the end of this section. It captures packet information for traffic passing through a specific network node.
COMP 2000 W 2012 Lab no. 3 Page 2 of 11
Connecting an ipod to the campus network (lab activity 1 and 2)
Connect IPod to the internet:
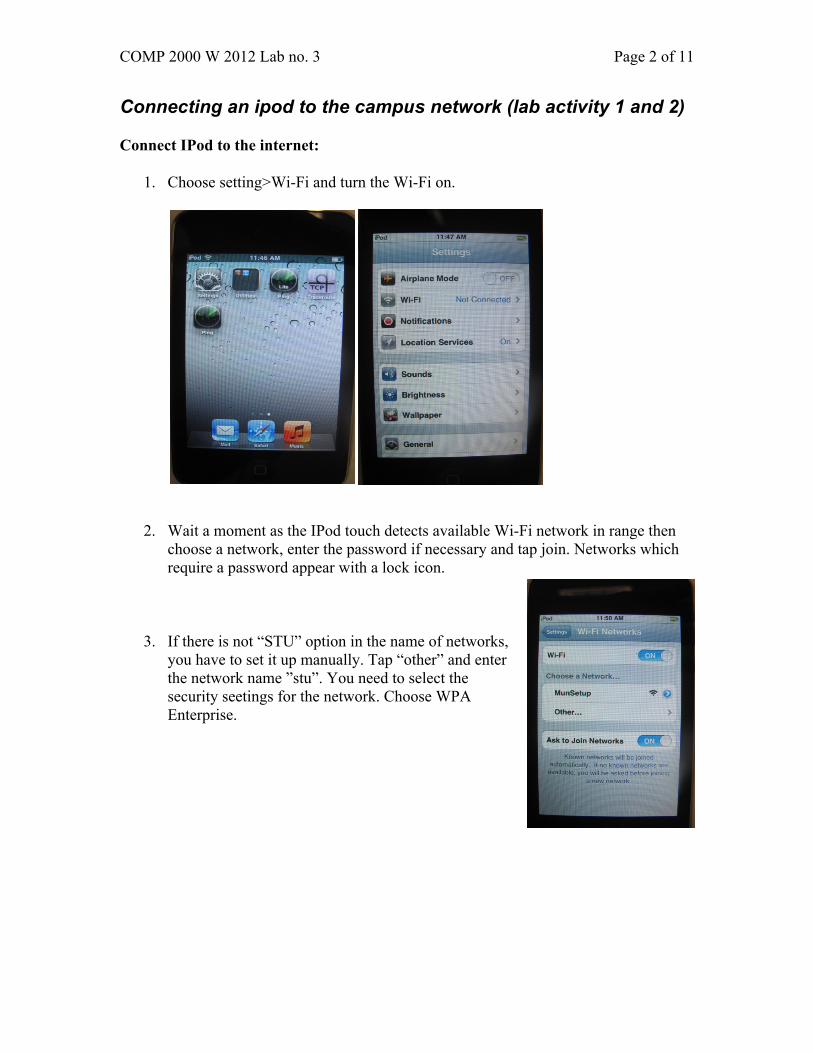
1. Choose setting>Wi-Fi and turn the Wi-Fi on.
2. Wait a moment as the IPod touch detects available Wi-Fi network in range then choose a network, enter the password if necessary and tap join. Networks which require a password appear with a lock icon.
3. If there is not “STU” option in the name of networks, you have to set it up manually. Tap “other” and enter the network name ”stu”. You need to select the security seetings for the network. Choose WPA Enterprise.

COMP 2000 W 2012 Lab no. 3 Page 3 of 11
4. Fill in the user name and password with the user name and password which you use for connecting to the campus wireless at MUN. If you don’t have a wireless account, you will have to borrow a connected device in the lab.
5. Check your connection by using the safari web browser on the ipod.
Description of application “traceroute” on Ipod
Traceroute shows a possible route to the target host. At the same time you can know the open/close status of the TCP port on the host. If the port is open, the target host label is shown by green color. If the port is closed, it is colored with red. The default port number is 80 (http) and the maximum TTL (Time-‐To-‐Live) is 30. You may set the port number and the TTL. There are various traceroute programs on different devices that work similarly.
For traceroute on the ipod:
1. Connect to campus internet service 2. Tap traceroute icon on iPod touch 3. Enter the internet host you want to find 4. Press start
This picture shows the trace route of www.mun.ca.

COMP 2000 W 2012 Lab no. 3 Page 4 of 11
How to make an ipod touch forget a Wi-Fi network:
Do not return the ipod with your password on it.
Once you connect to a WiFi network once the iPhone automatically remembers the network and connects you to it later. To forget a network so you don't get automatically connected: Choose the "WiFi" option on the menu. Tap the right arrow button next to one of the networks that the iPhone already remembers. Then tap "Forget This Network" to erase the phone's memory of the network.
Connecting an ipod to the isolated network (lab activity 3 and 4)
How to connect to the router: (without security) 1. Choose setting>Wi-Fi, turn wifi on. 2. In available network list, choose “unsecure”(the name of network). Now you are
connected to the WLAN network “unsecure”. (If you press the arrow next to the “unsecure” you can see the IP address which your Ipod is working with.
3. If you want to check your Ipod is in connect with web server/ router you can tap the “Ping” icon (one of the application installed on your IPods), then fill the web server/ Ipod IP address in the related space and tap start.
Browsing the web page for activity 3:
Tap safari Icon on your ipod, enter “http://webserver IP address
goes here/comp2000” as the web page address; enter a message and submit it. Let the lab instructor know to finish your data capture.
Check with the lab assistant to get access to the captured data.

COMP 2000 W 2012 Lab no. 3 Page 5 of 11
How to connect to the router: (with security) 1. Choose setting>Wi-Fi, turn wifi on. 2. In available network list, choose “secured” As for password type “iamsecured”.
Now you are connected to the WLAN network “secured”. (If you press the arrow next to the “secured” you can see the IP address which your Ipod is working with.
Browsing the web page for activity 4:
Tap safari Icon on your ipod, enter “http://webserver IP address goes here/comp2000” as the web page address; enter a message and submit it. Let the lab instructor know to finish your data capture.
More about Wireshark
Installing Wireshark
Wireshark software is easy to install. Simply go to http://www.wireshark.org/download.html, download the software for your applicable operating system, and perform the installation.
Capturing packets
In our lab, the lab assistant will do the wireless data capture part. The following information is included here so you will have an idea what the lab assistant is doing.
A problem you’ll likely run into is that Wireshark may not display any packets after starting a capture using your existing 802.11 client card, especially if running in Windows. The issue is that many of the 802.11 cards don’t support promiscuous mode. In this case, you can try turning promiscuous mode off (from inside Wireshark), but you’ll only see (at best) packets being sent to and from the computer running Wireshark.
If you have trouble getting Wireshark working with existing client cards, then consider purchasing a USB-based 802.11 receiver designed to work effectively with Wireshark.
Before capturing packets, configure Wireshark to interface with an 802.11 client device; otherwise, you’ll get an alert “No capture interface selected!” when starting a packet capture. To select an interface, click the Capture menu, choose Options, and select the appropriate interface.
Be certain to monitor the correct RF channel. For example, if the wireless network is set to channel 1 for the traffic you’re interested in, then configure Wireshark to monitor channel 1. To do this, click the Capture menu, choose Options, and click

COMP 2000 W 2012 Lab no. 3 Page 6 of 11
Wireless Settings. The menu Advanced Wireless Settings will appear where you can change the channel.
Consider filtering the packet capture to reduce clutter when analyzing packet traces. For example, you may be troubleshooting a particular client device connecting to the network. In this case, you can set a filter that excludes all packets except those associated with the IP address of the client you’re troubleshooting. To set a filter, click the Capture menu, choose Options, and click Capture Filter. The Wireshark Capture Filter window will appear where you can set various filters.
To start the packet capturing process, click the Capture menu and choose Start. Wireshark will continue capturing and displaying packets until the capture buffer fills up. The buffer is 1 Mbytes by default. This size is generally good enough, but to change it click the Capture menu, choose Options, and adjust the Buffer size value accordingly. When you’re done capturing packets, click the Capture menu and choose Stop.
Alternatively, you can set the capture run length (in packets or minutes), and the capture will automatically stop when that length has been met. You’ll be prompted to save the capture for later viewing.
The packet capture will display the details of each packet as they were transmitted over the wireless LAN. The figure is a screenshot of a sample packet capture window. The top panel of the window identifies each packet’s source and destination nodes, the protocol used, and further information about each packet. You can select a specific packet to display more details. For example, packet 334 in the figure contains an HTTP message. The middle panel displays information about this packet, and you can choose a specific field of the packet, and the contents of that field are displayed in binary and ASCII format in the bottom panel. As a result, you’re able to analyze the flow and view each field (including data field payloads) of all packets.

COMP 2000 W 2012 Lab no. 3 Page 7 of 11
Website
You will find lots of useful information on the Wireshark homepage at http://www.wireshark.org. The Wireshark Wiki at http://wiki.wireshark.org provides a wide range of information related to Wireshark and packet capturing in general. You will find a lot of information not part of this user’s guide. You can find another wireshark user guide at http://www.wireshark.org/docs/wsug_html_chunked/
There are samples of captured file at http://wiki.wireshark.org/SampleCaptures.

COMP 2000 W 2012 Lab no. 3 Page 8 of 11
Lab 3. Network Packets and Wireless Devices In this lab, you are encouraged to explore network traffic from and to a wireless device using the Wireshark packet analysis program.. The lab has four activities, labelled as “explorations”. The first 2 activities are worth 15 points each; the last two activities are worth 35 points each. Create a lab report to be submitted, which includes your observations for each activity. Observations should include any program out you consider relevant, answers to the questions put forward on in these lab instructions, and any conclusions appropriate to the activity. You can create your lab report using a word processor to type your observations, including screen images. You may need to learn how to make screen captures and paste the screen images into your lab report. The lab makes use of ipod Touch mobile devices and their internet connection. In activities 1 and 2, you need to connect to the campus network. If you have a wireless account and password, you can use them to connect. Otherwise, you may need to borrow one of the devices from an instructor or a classmate for these activities. Activities 3 and 4 involve using wireshark to look at packets sent to and from the ipod device. Since the university network uses secure encryption, you won’t be able to see many details in the data traffic. Everything inside the 802.11 link layer protocol (that is, the wireless protocol) may be encrypted. For this reason, and also because we should only be sniffing traffic with the users permission, we will set up a wireless router and server that is not connected to the internet, and you can examine packets sent to and from that isolated server. In activity 3, you will look at unsecure unencrypted traffic, and in activity 4, you will look at the traffic with router-level encryption turned on. Before beginning activities 1 and 2, you will need to connect the ipod device to the campus network. Instructions for connecting the device are included at the beginning of the lab.
Lab Exploration 1. Latency with PING Instructions: Using the PING utility from an ipod Touch device, determine the latency to two common sites. Try something close, like www.mun.ca, and something more remote, like www.google.com. Explain the different results.
Keep in mind with this exercise that many sites may not respond to the requests sent by

COMP 2000 W 2012 Lab no. 3 Page 9 of 11
ping or the responses may be blocked by intervening sites.
Lab Exploration 2. Multiple hops using Labnet
Instructions: Using the TRACEROUTE utility from an ipod Touch device, to show the intervening hops between you and those sites. Try something close, like www.mun.ca, and something more remote, like www.google.com. If any intervening sites have domain names, see if you can tell anything about them. Explain why the results are different for the two different sites.
Keep in mind with this exercise that many sites may not respond to the requests sent by traceroute or the responses may be blocked by intervening sites.
Lab Exploration 3. Examine Wireless packets
For this exercise, you should disconnect the wireless device (ipod) from the internet and connect to our isolated router and server. Remember to remove all of your account and/or password information from the device after completing lab exercise 2.
This exercise has two parts: (1) using the wireless service with the mobile device, while the lab assistant collects traffic information, and (2) using wireshark to analyze the data.
You won’t be able to perform the data capture yourself on the wireless device.
Part 1. Use the wireless service
A. Connect to the wireless service. See the introduction on connecting to the router
(without security) B. Start the ipod web browser Safari program C. Make sure the lab assistant is started capturing wireless packets using wireshark. D. Browse to the website on the isolated server. The URL Web Address will be
provided for you by the lab assistant. E. You should see the web site shown in the figure below. Type in some unique
message to distinguish your message from other people in the class. F. Submit your answer on the web page. You should get a response back from the
server. G. Let the lab assitant know you have completed the task, so packet capture can stop.

COMP 2000 W 2012 Lab no. 3 Page 10 of 11
Part 2. Packet analysis The lab assistant will now put the saved packet capture on a common file for you to access. You’ll need to log onto a workstation, start up wireshark and load the file in order to see the data.
A. Start Wireshark, installing it if necessary. B. Get the location of the captured data file from the lab assistant C. Load the captured data file into Wireshark D. Complete the lab activity as instructed below
Instructions: Recall the web page access you performed in part 1. Find the packets corresponding to sending your unique message to the web server, and the packet that carries the web server’s response. HINT: these should correspond to POST and GET actions under the HTTP protocol. Include the packets you found in your observations (you may want to use screen capture for this). In the packet, identify your IP address for your device. Also identify the unique message you entered in the web page, indicating where it occurs in the packet data. Practice: This is not required, but you can practice wireshark by looking at some data already captured in the lab. Data files are available on the course web page for this practice. In order to look for the information in the packets, you need to know that in this practice scenario, the server URL web page address was http://192.168.0.104/comp2000, the server IP address was: 192.168.0.104, the Ipod IP address was: 192.168.0.103, and the message typed into the webpage was “why are dog noses always wet?”

COMP 2000 W 2012 Lab no. 3 Page 11 of 11
Lab Exploration 4. Examine Secure Wireless packets This activity repeats the activity of exploration 4, but this time the router will be set to encrypt all of the traffic. This means that everything above the Link Layer of the Protocol Stack should be encrypted by the router for its “hop” to your ipod device, and you should not be able to see any information that is secured in this fashion, even using wireshark. In this activity, the instructions have changed so you can examine what information is now hidden from the user, and you are asked to reflect on the security effects. Wait for the lab instructor to start the secure router service, then repeat the steps of Activity 3, part 1, A-E, connecting to the secure server in step A. Wait for the lab instructor to make the new capture of secure data available as a data file, and then Repeat the steps of Activity 3, part 2, A-D, but use the instructions below. Instructions: Try to find the packets corresponding to sending your unique message to the web server, and the packet that carries the web server’s response. What difficulties do you encounter that were not apparent in the unsecure version of this activity? Explain what information is no longer available to Wireshark that you used in activity 3, and explain how the devices are still able to communicate without this information being available in the captured data. Show packet traffic to illustrate your discussion of what information is unavailable. Practice: This is not required, but you can practice wireshark by looking at some data already captured in the lab. Data files are available on the course web page for this practice. For the secured data capture, you need to know that in this practice scenario, the server URL web page address was http://192.168.1.147/comp2000, the server IP address was: 192.168.1.147, the Ipod IP address was: 192.168.1.148, and the message typed into the webpage was “because they lick their noses “