Embed Size (px)
Citation preview
LAB MANUAL
for
Object Oriented
Programming Lab
(CS594D)
Course Objective:
Students should know essential object-oriented concepts such as encapsulation, the separation
of design from implementation; the use of inheritance and polymorphism. These concepts
will be described using appropriate UML diagrams. Students will also learn about good design
principles for reuse, with opportunities to realize these principles using object-oriented
programming languages such Java.
Learning Outcomes:
Upon completion of the course, the student should be able to:
1. Understand and articulate the object-oriented approach to developing software programs.
2. Design, using good design principles with consideration for reuse and maintainability,
simple software programs to solve problems.
3. Implement a given design using Java.
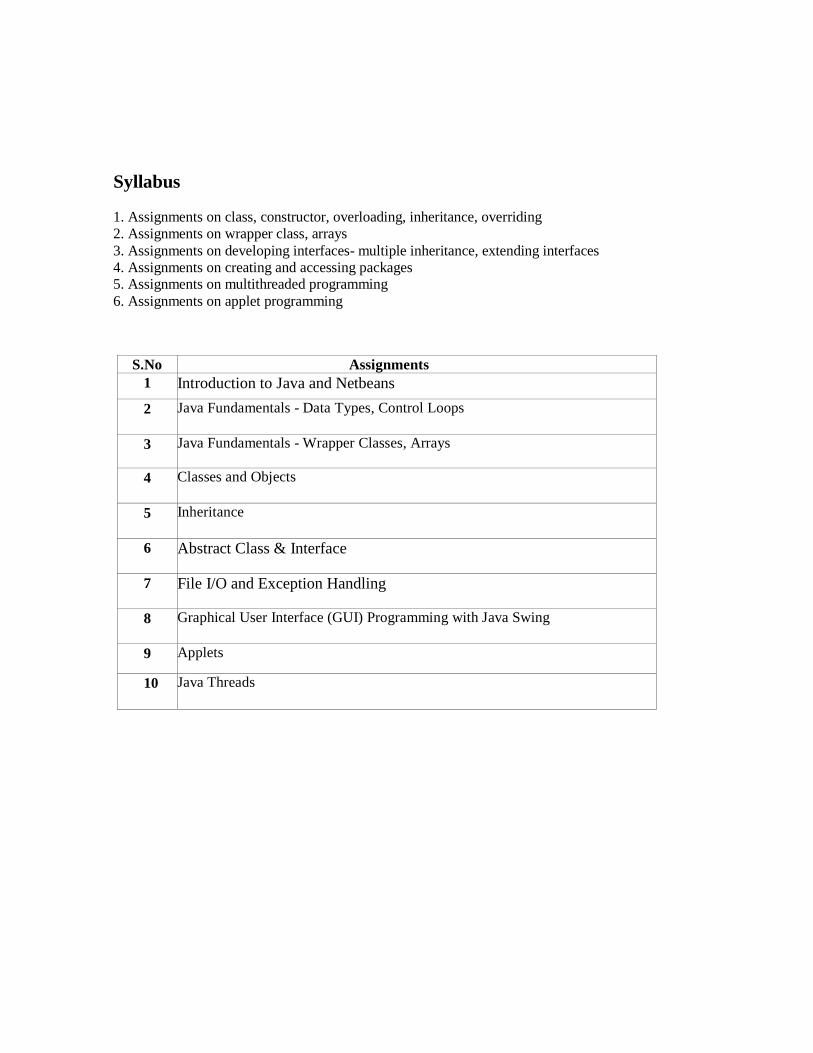
Syllabus 1. Assignments on class, constructor, overloading, inheritance, overriding
2. Assignments on wrapper class, arrays
3. Assignments on developing interfaces- multiple inheritance, extending interfaces
4. Assignments on creating and accessing packages 5. Assignments on multithreaded programming
6. Assignments on applet programming
S.No Assignments
1 Introduction to Java and Netbeans
2 Java Fundamentals - Data Types, Control Loops
3 Java Fundamentals - Wrapper Classes, Arrays
4 Classes and Objects
5 Inheritance
6 Abstract Class & Interface
7 File I/O and Exception Handling
8 Graphical User Interface (GUI) Programming with Java Swing
9 Applets
10 Java Threads
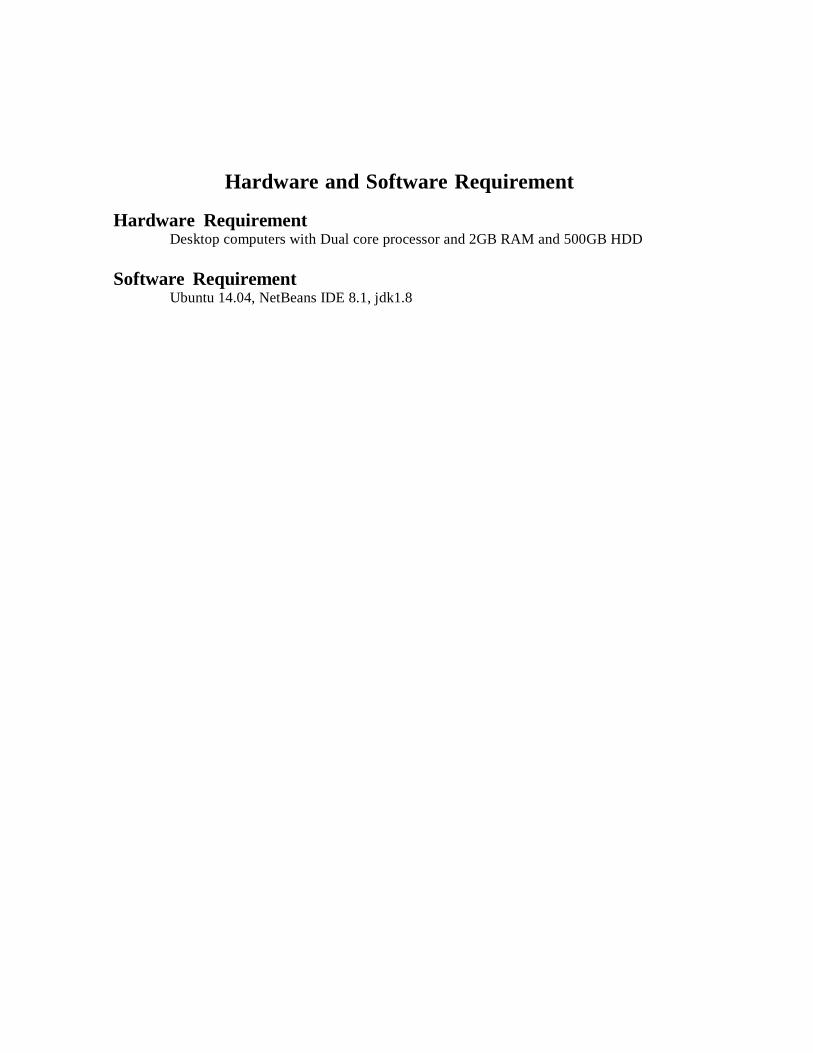
Hardware and Software Requirement
Hardware Requirement Desktop computers with Dual core processor and 2GB RAM and 500GB HDD
Software Requirement Ubuntu 14.04, NetBeans IDE 8.1, jdk1.8
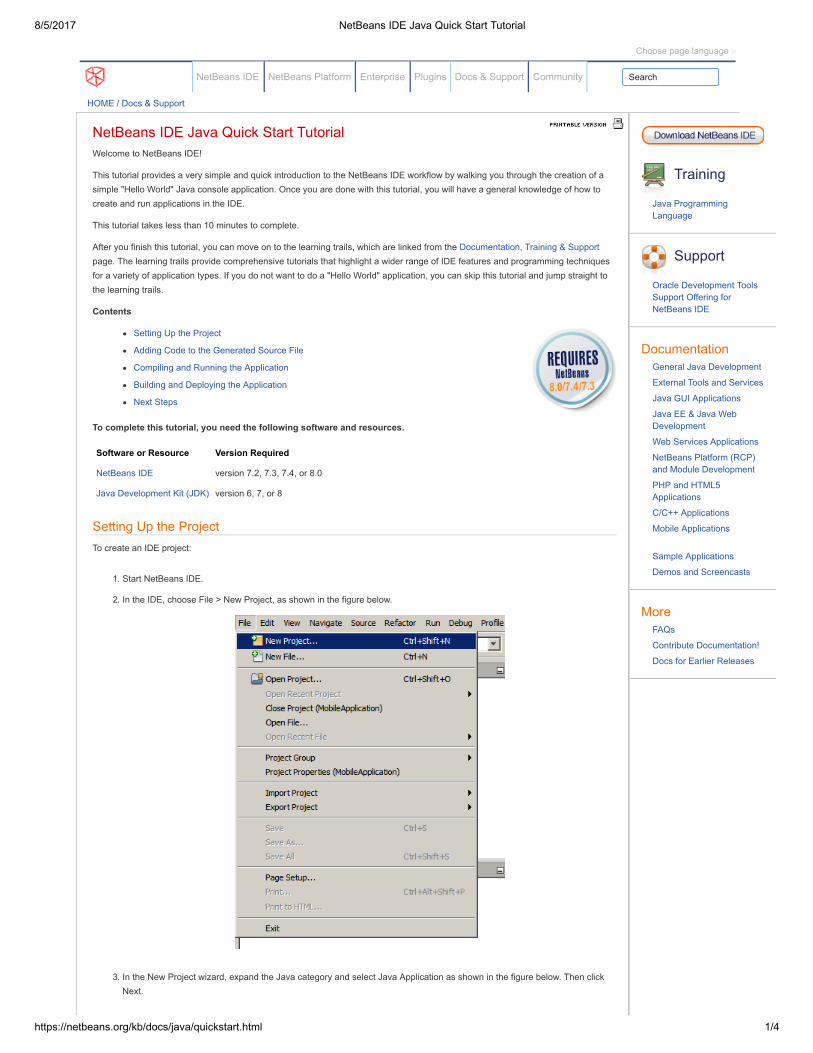
8/5/2017 NetBeans IDE Java Quick Start Tutorial
https://netbeans.org/kb/docs/java/quickstart.html 1/4
NetBeans IDE NetBeans Platform Enterprise Plugins Docs & Support Community Search
HOME / Docs & Support
NetBeans IDE Java Quick Start TutorialWelcome to NetBeans IDE!
This tutorial provides a very simple and quick introduction to the NetBeans IDE workflow by walking you through the creation of asimple "Hello World" Java console application. Once you are done with this tutorial, you will have a general knowledge of how tocreate and run applications in the IDE.
This tutorial takes less than 10 minutes to complete.
After you finish this tutorial, you can move on to the learning trails, which are linked from the Documentation, Training & Supportpage. The learning trails provide comprehensive tutorials that highlight a wider range of IDE features and programming techniquesfor a variety of application types. If you do not want to do a "Hello World" application, you can skip this tutorial and jump straight tothe learning trails.
Contents
Setting Up the Project
Adding Code to the Generated Source File
Compiling and Running the Application
Building and Deploying the Application
Next Steps
To complete this tutorial, you need the following software and resources.
Software or Resource Version Required
NetBeans IDE version 7.2, 7.3, 7.4, or 8.0
Java Development Kit (JDK) version 6, 7, or 8
Setting Up the ProjectTo create an IDE project:
1. Start NetBeans IDE.
2. In the IDE, choose File > New Project, as shown in the figure below.
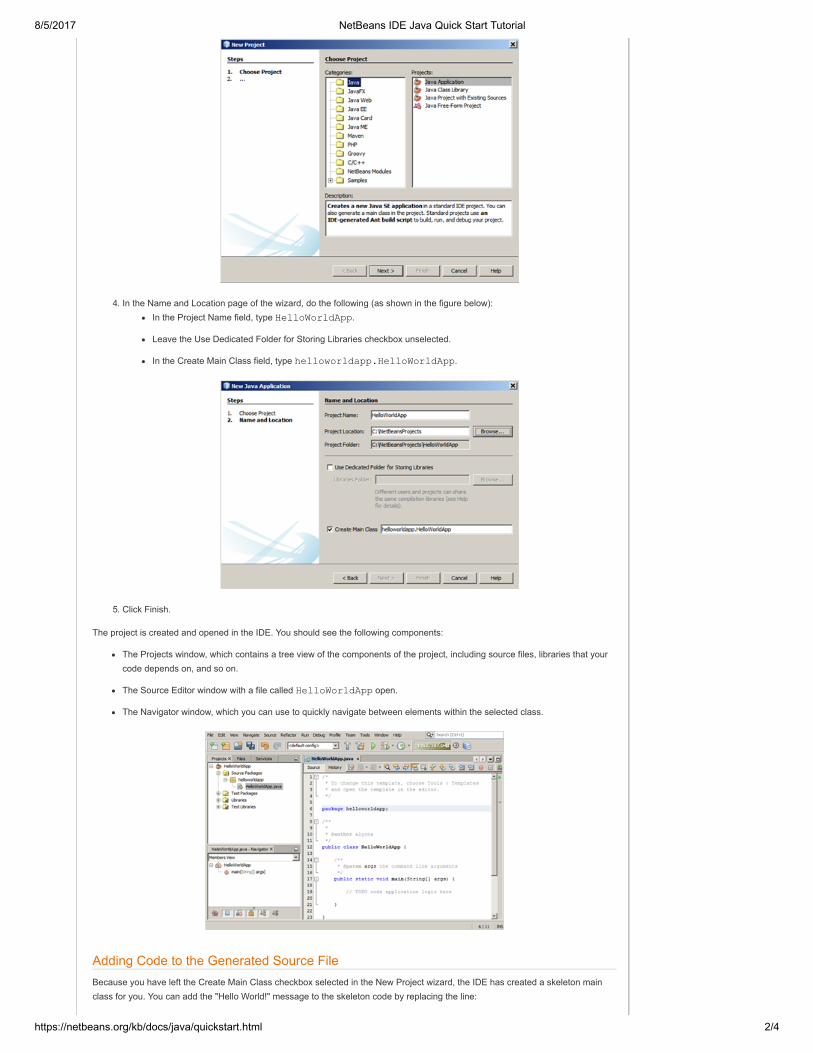
3. In the New Project wizard, expand the Java category and select Java Application as shown in the figure below. Then clickNext.
Training
Java ProgrammingLanguage
Support
Oracle Development ToolsSupport Offering forNetBeans IDE
DocumentationGeneral Java Development
External Tools and Services
Java GUI Applications
Java EE & Java WebDevelopment
Web Services Applications
NetBeans Platform (RCP)and Module Development
PHP and HTML5Applications
C/C++ Applications
Mobile Applications
Sample Applications
Demos and Screencasts
MoreFAQs
Contribute Documentation!
Docs for Earlier Releases
Choose page language
8/5/2017 NetBeans IDE Java Quick Start Tutorial
https://netbeans.org/kb/docs/java/quickstart.html 2/4
4. In the Name and Location page of the wizard, do the following (as shown in the figure below):In the Project Name field, type HelloWorldApp.
Leave the Use Dedicated Folder for Storing Libraries checkbox unselected.
In the Create Main Class field, type helloworldapp.HelloWorldApp.
5. Click Finish.
The project is created and opened in the IDE. You should see the following components:
The Projects window, which contains a tree view of the components of the project, including source files, libraries that yourcode depends on, and so on.
The Source Editor window with a file called HelloWorldApp open.
The Navigator window, which you can use to quickly navigate between elements within the selected class.
Adding Code to the Generated Source FileBecause you have left the Create Main Class checkbox selected in the New Project wizard, the IDE has created a skeleton mainclass for you. You can add the "Hello World!" message to the skeleton code by replacing the line:
8/5/2017 NetBeans IDE Java Quick Start Tutorial
https://netbeans.org/kb/docs/java/quickstart.html 3/4
// TODO code application logic here
with the line:
System.out.println("Hello World!");
Save the change by choosing File > Save.
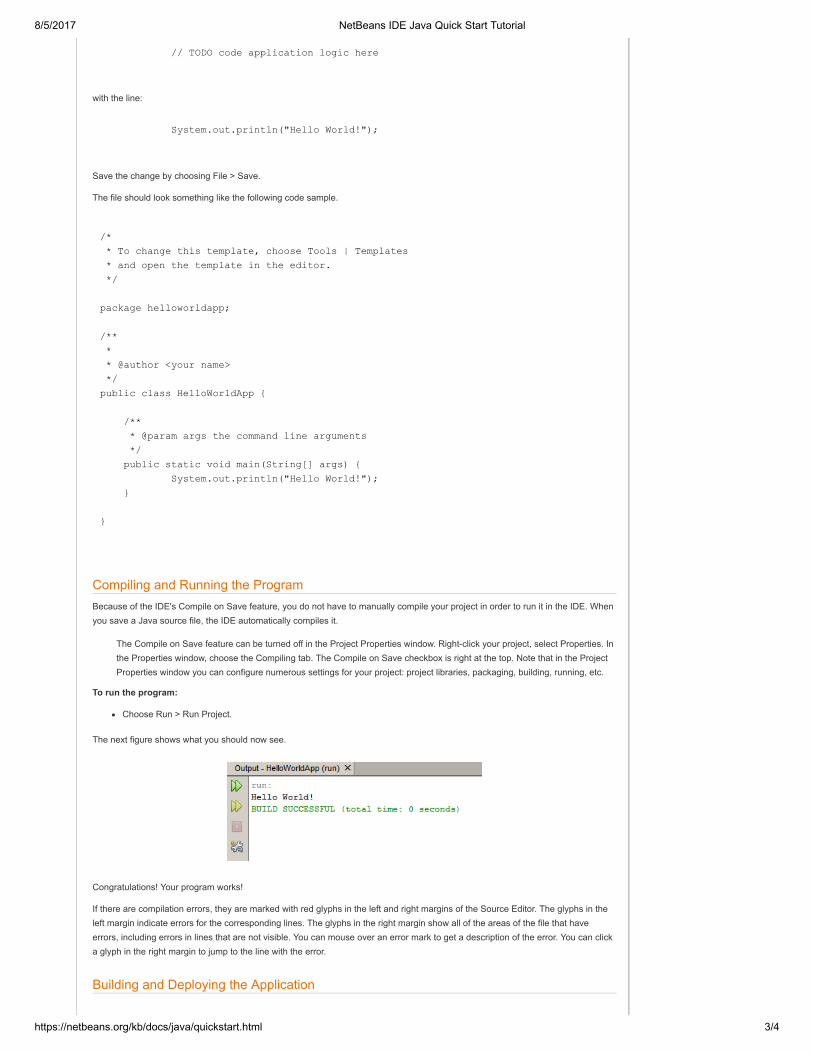
The file should look something like the following code sample.
/*
* To change this template, choose Tools | Templates
* and open the template in the editor.
*/
package helloworldapp;
/**
*
* @author <your name>
*/
public class HelloWorldApp {
/**
* @param args the command line arguments
*/
public static void main(String[] args) {
System.out.println("Hello World!");
}
}
Compiling and Running the ProgramBecause of the IDE's Compile on Save feature, you do not have to manually compile your project in order to run it in the IDE. Whenyou save a Java source file, the IDE automatically compiles it.
The Compile on Save feature can be turned off in the Project Properties window. Right-click your project, select Properties. Inthe Properties window, choose the Compiling tab. The Compile on Save checkbox is right at the top. Note that in the ProjectProperties window you can configure numerous settings for your project: project libraries, packaging, building, running, etc.
To run the program:
Choose Run > Run Project.
The next figure shows what you should now see.
Congratulations! Your program works!
If there are compilation errors, they are marked with red glyphs in the left and right margins of the Source Editor. The glyphs in theleft margin indicate errors for the corresponding lines. The glyphs in the right margin show all of the areas of the file that haveerrors, including errors in lines that are not visible. You can mouse over an error mark to get a description of the error. You can clicka glyph in the right margin to jump to the line with the error.
Building and Deploying the Application
8/5/2017 NetBeans IDE Java Quick Start Tutorial
https://netbeans.org/kb/docs/java/quickstart.html 4/4
Send Feedback on This Tutorial
SiteMap About Us Contact Legal & Licences
Once you have written and test run your application, you can use the Clean and Build command to build your application fordeployment. When you use the Clean and Build command, the IDE runs a build script that performs the following tasks:
Deletes any previously compiled files and other build outputs.
Recompiles the application and builds a JAR file containing the compiled files.
To build your application:
Choose Run > Clean and Build Project.
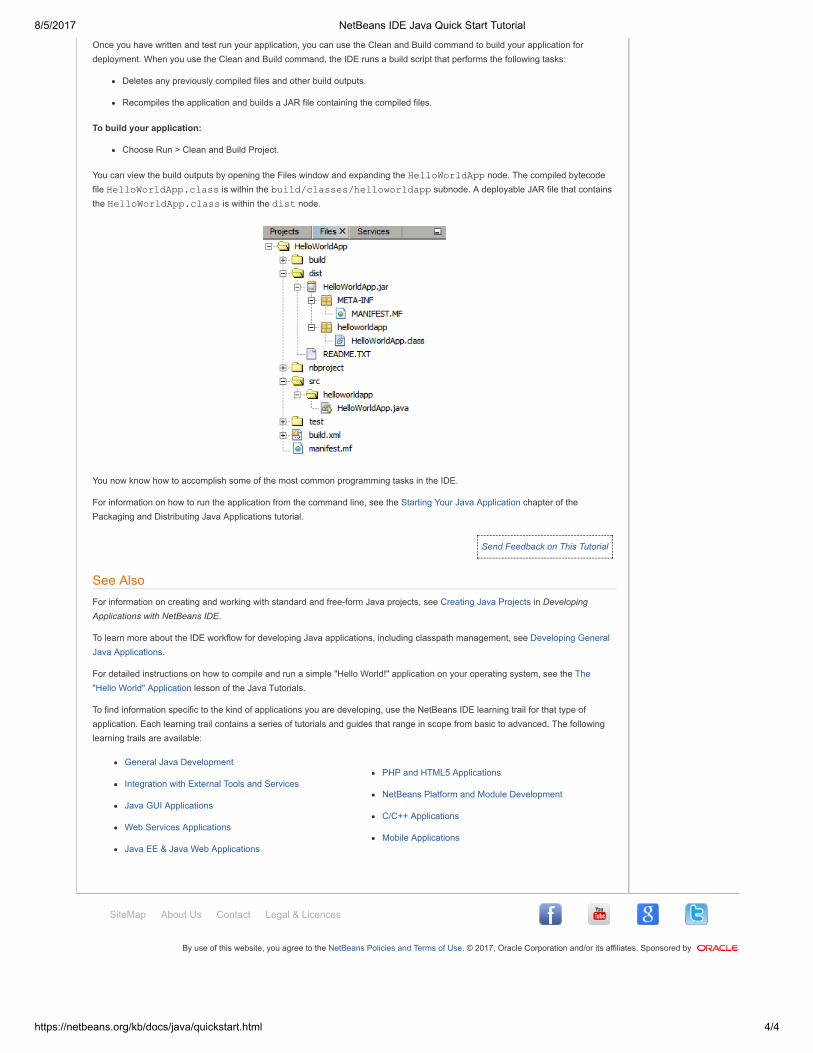
You can view the build outputs by opening the Files window and expanding the HelloWorldApp node. The compiled bytecodefile HelloWorldApp.class is within the build/classes/helloworldapp subnode. A deployable JAR file that containsthe HelloWorldApp.class is within the dist node.
You now know how to accomplish some of the most common programming tasks in the IDE.
For information on how to run the application from the command line, see the Starting Your Java Application chapter of thePackaging and Distributing Java Applications tutorial.
See AlsoFor information on creating and working with standard and free-form Java projects, see Creating Java Projects in DevelopingApplications with NetBeans IDE.
To learn more about the IDE workflow for developing Java applications, including classpath management, see Developing GeneralJava Applications.
For detailed instructions on how to compile and run a simple "Hello World!" application on your operating system, see the The"Hello World" Application lesson of the Java Tutorials.
To find information specific to the kind of applications you are developing, use the NetBeans IDE learning trail for that type ofapplication. Each learning trail contains a series of tutorials and guides that range in scope from basic to advanced. The followinglearning trails are available:
General Java Development
Integration with External Tools and Services
Java GUI Applications
Web Services Applications
Java EE & Java Web Applications
PHP and HTML5 Applications
NetBeans Platform and Module Development
C/C++ Applications
Mobile Applications
By use of this website, you agree to the NetBeans Policies and Terms of Use. © 2017, Oracle Corporation and/or its affiliates. Sponsored by
Home (/) / Middleware (/en/middleware/) / NetBeans 8.2 (../index.html)
NetBeans Developing Applications withNetBeans IDE
2 Working with NetBeans IDEThis chapter describes the basics of using and configuring NetBeans IDE.
This chapter contains the following sections:
About Working with NetBeans IDE (#BABBHDCJ)
Working with the Options Window (#A1147272)
Managing IDE Windows (#A1147296)
Customizing Toolbars in the IDE (#A1150286)
Working with Keyboard Shortcuts (#A1151102)
Understanding the Source Editor Features (#A1151635)
Setting Startup Parameters (#A1152090)
Setting Fonts and Colors for IDE Windows (#A1154497)
Managing Plugins in the IDE (#A1154745)
Displaying IDE Help in a Web Browser (#BABIHAIH)
Internationalizing Source Code (#BABDFEAH)
Managing and Creating Projects (#A1147660)
Working with Source Files in the IDE (#A1147848)
Working with Resource Bundles (#A1148183)
Working with Javadoc Documentation (#A1165923)
Viewing IDE Notifications (#BABCIHFE)
2.1 About Working with NetBeans IDEThe IDE enables you to configure options for its many areas of functionality as well as customize its workspace.The primary tools you can use to configure and update the IDE include the following:
(//docs.oracle.com/en/)
Sign In (http://www.oracle.com/webapps/redirect/signon?nexturl=http://docs.oracle.com/netbeans/nb82/netbeans/NBDAG/working_nbeans.htm#NBDAG115)
Options Window. The Options window enables you to set general IDE settings, edit any of the IDE'sconfigurable settings and set keyboard shortcuts. You open the Options window by choosing Tools > Options.(On Mac OS X, choose NetBeans > Preferences.)
Plugins Manager. The Plugins manager enables you to enable and disable installed plugins and add new orupdated plugins to the IDE.
For more information, see Section 2.9, "Managing Plugins in the IDE" (#A1154745) .
You can also pass startup parameters to the IDE launcher in the IDE-HOME/etc/netbeans.conf file by usingstartup switches. For more information, see Section 2.7, "Setting Startup Parameters" (#A1152090) .
2.2 Working with the Options WindowThe Options window enables you to change any of the IDE's configurable settings. You select a category at thetop of the window to display its settings in the lower pane. Depending on the category, you can click on the tabs inthe lower pane to access additional settings. The changes are applied when you click Apply.
2.2.1 How to Edit IDE SettingsYou use the Options window to specify global settings for the IDE. Settings that you specify at the project leveloverride the settings that you specify in the Options window.
To edit IDE settings in the Options window:
1. Open the Options window by choosing Tools > Options from the main menu. (If you are running on MacOS X, choose NetBeans > Preferences.)
2. Select the category in the upper pane to display the configurable settings.
3. Modify the settings.
4. Click Apply.
2.2.2 How to Export IDE Settings as Zip ArchiveYou can export your IDE settings as an archive that you can use as a backup or that you can import into aninstallation of the IDE on another machine.
To export IDE settings as a zip archive:
1. Open the Options window by choosing Tools > Options from the main menu. (If you are running on MacOS X, choose NetBeans > Preferences.)
2. Click Export at the bottom of the Options window.
3. Specify the location and name of the zip archive that you want to create to contain your settings.

4. Select the Options categories that you want to export. Click OK.
2.2.3 How to Import IDE SettingsWhen you launch a new version of the IDE for the first time, you are prompted with the option of importing settingsfrom a previous version of the IDE. This prompt occurs only if you have a user directory on your system from theprevious version of the IDE and the user directory is in the default location.
The settings that are imported include the following items:
Keyboard shortcuts
Most Source Editor font and color settings
Java Platform Manager contents
Library Manager contents
Database drivers
Servers
You can recreate the conditions of the first launch at any time by deleting your current userdir. When you restartthe IDE you will be prompted with the option of importing settings from a previous version of the IDE.
For more details about locating your current userdir, see the following FAQ.
http://wiki.netbeans.org/FaqWhatIsUserdir (http://wiki.netbeans.org/FaqWhatIsUserdir)
Note:If you delete your userdir you could lose other important settings. In addition, you might also lose anymodules you have installed through the Update Center in the new version and you may need to reinstallor reactivate those modules.
If you do not import the settings at the first launch but later decide that you would like to import the settings from aprevious installation, you can choose the settings that you would like to import in the Options window.
Importing settings may overwrite your existing settings. To prevent possible loss of your settings, use the Exportsettings function to create a backup of your IDE settings.
To import IDE settings:
1. Open the Options window by choosing Tools > Options from the main menu. (If you are running on MacOS X, choose NetBeans > Preferences.)
2. Click Import at the bottom of the Options window.
3. Click Browse and locate either of the following:
the zip archive that contains your settings
the userdir of the IDE installation that has the settings that you want to import
4. Select the Options categories that you want to import. Click OK.
You will need to restart the IDE to apply the imported settings.
2.3 Managing IDE WindowsEach window in the IDE appears as a tab in the pane in which it resides. The IDE's windowing system enablesyou to arrange windows anywhere in the IDE by dragging and dropping. The IDE remembers the position of bothmanually and automatically closed windows the next time they are opened.
Some windows only appear when you are performing a task to which they are related. For example, the Debuggerwindows only appear when you are in a debugging session. You can manually open task-related windows so thatthey are always open.
To open a task-related window, simply choose the window from the Windows menu.
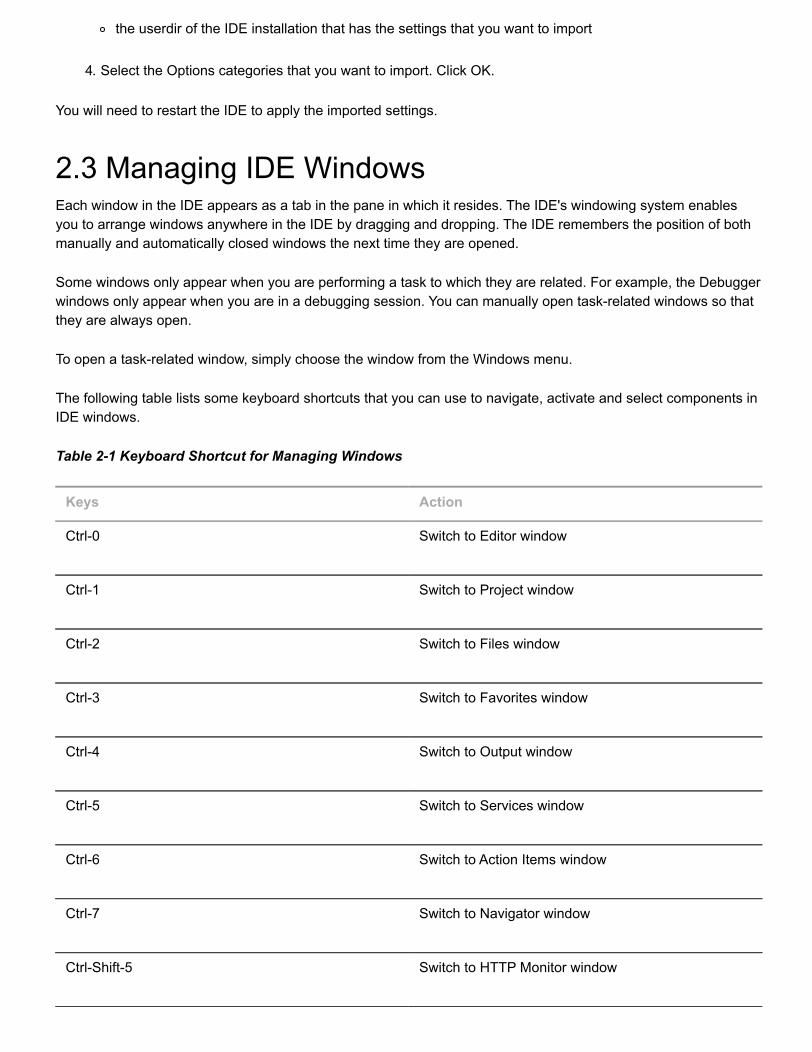
The following table lists some keyboard shortcuts that you can use to navigate, activate and select components inIDE windows.
Table 2-1 Keyboard Shortcut for Managing Windows
Keys Action
Ctrl-0 Switch to Editor window
Ctrl-1 Switch to Project window
Ctrl-2 Switch to Files window
Ctrl-3 Switch to Favorites window
Ctrl-4 Switch to Output window
Ctrl-5 Switch to Services window
Ctrl-6 Switch to Action Items window
Ctrl-7 Switch to Navigator window
Ctrl-Shift-5 Switch to HTTP Monitor window
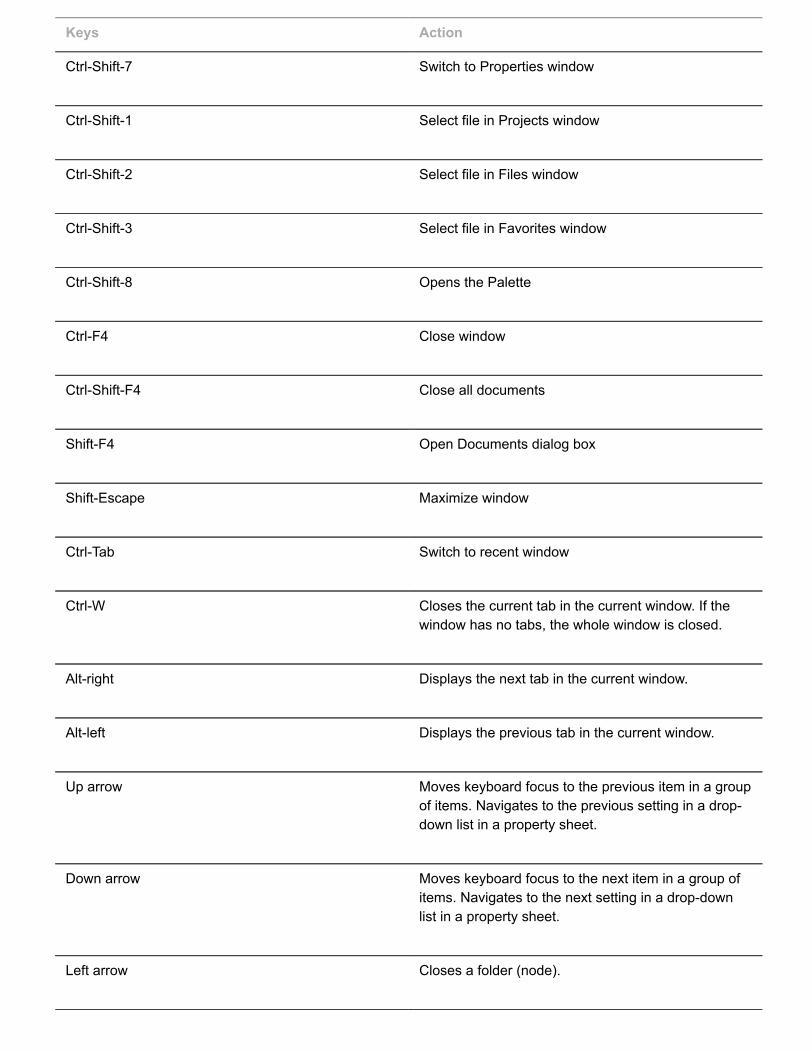
Keys Action
Ctrl-Shift-7 Switch to Properties window
Ctrl-Shift-1 Select file in Projects window
Ctrl-Shift-2 Select file in Files window
Ctrl-Shift-3 Select file in Favorites window
Ctrl-Shift-8 Opens the Palette
Ctrl-F4 Close window
Ctrl-Shift-F4 Close all documents
Shift-F4 Open Documents dialog box
Shift-Escape Maximize window
Ctrl-Tab Switch to recent window
Ctrl-W Closes the current tab in the current window. If thewindow has no tabs, the whole window is closed.
Alt-right Displays the next tab in the current window.
Alt-left Displays the previous tab in the current window.
Up arrow Moves keyboard focus to the previous item in a groupof items. Navigates to the previous setting in a drop-down list in a property sheet.
Down arrow Moves keyboard focus to the next item in a group ofitems. Navigates to the next setting in a drop-downlist in a property sheet.
Left arrow Closes a folder (node).
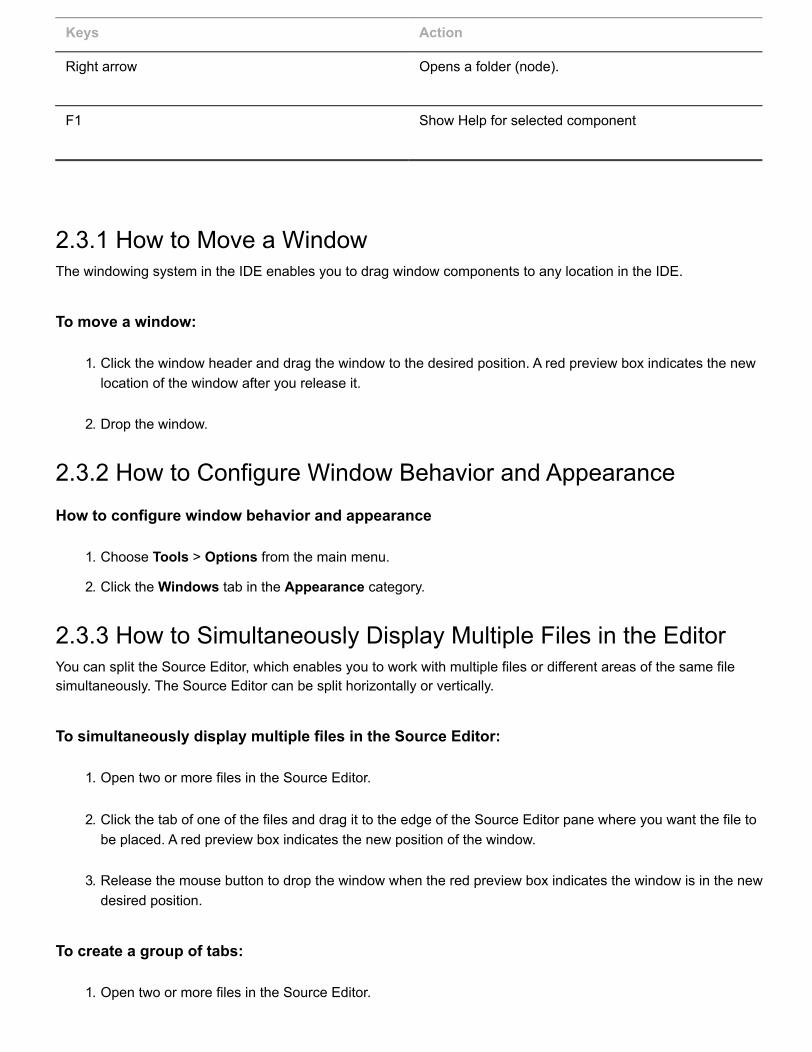
Keys Action
Right arrow Opens a folder (node).
F1 Show Help for selected component
2.3.1 How to Move a WindowThe windowing system in the IDE enables you to drag window components to any location in the IDE.
To move a window:
1. Click the window header and drag the window to the desired position. A red preview box indicates the newlocation of the window after you release it.
2. Drop the window.
2.3.2 How to Configure Window Behavior and Appearance
How to configure window behavior and appearance
1. Choose Tools > Options from the main menu.
2. Click the Windows tab in the Appearance category.
2.3.3 How to Simultaneously Display Multiple Files in the EditorYou can split the Source Editor, which enables you to work with multiple files or different areas of the same filesimultaneously. The Source Editor can be split horizontally or vertically.
To simultaneously display multiple files in the Source Editor:
1. Open two or more files in the Source Editor.
2. Click the tab of one of the files and drag it to the edge of the Source Editor pane where you want the file tobe placed. A red preview box indicates the new position of the window.
3. Release the mouse button to drop the window when the red preview box indicates the window is in the newdesired position.
To create a group of tabs:
1. Open two or more files in the Source Editor.
2. Right-click the tab for one of the files and choose New Document Tab Group.
2.3.4 How to Clone the View of a Single FileYou can create a clone of a tab if you want to open two tabs with the same file. If you drag one of the tabs to splitthe editor view or create a tab group you can view different parts of the same file simultaneously.
How to clone a tab:
1. Right-click the document tab in the Source Editor and choose Clone.
2. Click the tab of the cloned document and drag it to the part of the window where you want the copy to beplaced.
2.3.5 How to Manage Open Files
How to navigate between open files:
1. Choose Window > Documents from the main menu.
2. Select a document from the list in the Documents window.
3. Click Switch to Document.
How to close or save open files:
1. Choose Window > Documents from the main menu.
2. Select a document or documents from the list in the Documents window.
You can use the ctrl and shift keys to select multiple documents.
3. Click Close Document(s) or Save Document(s).
2.4 Customizing Toolbars in the IDEThe IDE provides comprehensive control over how toolbars are presented. You can add and remove toolbars andposition and control the visibility and contents of toolbars. You can also create customized toolbar configurations.
Choose View > Toolbars from the main menu to see a list of the available toolbars. The submenu displays all thetoolbars in the IDE.
2.4.1 How to Show or Hide a ToolbarToolbars that are currently visible are indicated by a check mark in the Toolbars submenu.
To show or hide a toolbar:

Choose View > Toolbars from the main menu and choose a toolbar name in the submenu. Alternatively, right-click the empty space in the toolbar area and choose the toolbar name from the pop-upmenu.
To find the name of a toolbar, rest the pointer on the textured drag area of the toolbar to display a tool tip with thetoolbar name.
2.4.2 How to Move a Toolbar
To move a toolbar:
Click in the textured drag area on the left side of the toolbar and drag the toolbar to the desired location.
2.4.3 How to Add a Toolbar Button to a ToolbarYou can add buttons for many IDE commands and actions to the toolbar of the IDE.
To add a toolbar button to a toolbar:
1. Choose View > Toolbars > Customize to open the Customize Toolbars window.
2. Select the button of the action you want to add to the IDE toolbar and drag and drop the button onto thetoolbar in the main window.
2.4.4 How to Remove a Button from a ToolbarThe Customize Toolbars window must be open when you are removing toolbar buttons.
To remove a toolbar button from a toolbar:
1. Choose View > Toolbars > Customize to open the Customize Toolbars window.
2. In the main window, click and drag the toolbar button above the toolbar. Alternatively, you can drag thebutton from the toolbar into the Customize Toolbars window.
2.4.5 How to Reorder a Button in a ToolbarYou can customize the order that buttons appear in the toolbar.
To reorder a button in a toolbar:
1. Choose View > Toolbars > Customize to open the Customize Toolbars window.
2. In the main window, drag and drop the button to the desired position.
2.4.6 How to Change the Size of Toolbar ButtonsYou can select either small or large icons for the toolbar buttons.
To change the size of toolbar buttons:
Choose View > Toolbars > Small Toolbar Icons Alternately, right-click the empty space in the toolbar area and choose Small Toolbar Icons from the popupmenu.
2.4.7 How to Add a New Toolbar to the Main WindowYou can create custom toolbars to group sets of buttons.
To add a new toolbar to the main window:
1. From the main window, choose View > Toolbars > Customize.
2. In the Customize Toolbars window, click New Toolbar.
3. In the New Toolbar dialog box, type a name for the toolbar and click OK.
4. Drag icons from the Customize Toolbars window into the new toolbar.
The new toolbar must have at least one icon.
2.5 Working with Keyboard ShortcutsYou can edit keyboard settings for individual commands or switch between preconfigured sets of keyboardshortcuts. The shortcut sets are designed for users that are already used to the keyboard shortcuts of othereditors and IDEs.
2.5.1 How to Add or Remove a Keyboard Shortcut for a MenuCommandYou can use the Options window to customize the keyboard shortcuts for menu commands.
To add or remove a keyboard shortcut for a menu command:
1. From the main window, choose Tools > Options.
2. Click Keymap in the Options window.
3. Locate the command for which you want to change a keyboard shortcut.
4. Double-click in the text field in the Shortcut column of the command and type the new keyboard shortcut.
As you press the key sequence, the correct syntax for that sequence automatically appears in the text field. If yousimultaneously hold down the Alt key, the Control key, and the J key, "Alt+Ctrl+J" appears. You can only specify akeyboard shortcut that is not being used by another command.
Note:To set keyboard shortcuts for recorded macros, go to Editor > Macros in the Options window, select themacro name and edit the keyboard shortcut.
2.5.2 How to Customize Keyboard Shortcuts
To customize keyboard shortcuts:
1. Choose Tools > Options > Keymap.
2. Do either of the following:
Select a predefined set of keyboard shortcuts, which is called Profile.
Edit particular keyboard shortcuts.
You can save customized sets of your shortcuts as profiles. Then, you can switch from one profile to another toquickly change multiple settings.
To create a custom profile of keyboard shortcuts:
1. In the Options > Keymap window, click Manage profiles.
2. Select the profile you want to use as a base for your new profile and click Duplicate.
3. Enter the new profile name and click OK.
4. Ensure that the new profile is selected and modify the shortcuts you need.
To edit a shortcut, double-click in the Shortcut field or click the ellipsis button (...). As you press thesequence of keys, the syntax for them is added.
If you want to add special characters, such as Tab, Escape, or Enter, click the ellipsis button (...) again andselect the key from the pop-up window.
5. When finished editing, click OK in the Options window.
Note:To find a shortcut for a specific command, type the command name in the Search field. To find acommand by a combination, insert the cursor in the Search in Shortcuts field and press the shortcutkey combination.
2.5.3 How to Switch Between Keyboard Shortcut SetsYou can use the Options window to switch between any of the existing keyboard shortcuts sets. The IDE includesseveral sets of keyboard shortcuts with shortcut mappings that correspond to the shortcuts in other editors andIDEs.
To switch between keyboard shortcut sets:
1. From the main window, choose Tools > Options.
2. Click Keymap in the Options window.
3. Choose an existing keyboard set from the Profiles drop-down list at the top of the dialog box.
2.5.4 How to Create a New Keyboard Shortcut SetYou can configure the IDE to have multiple sets of keyboard shortcuts. You can use the Options window to createcustom sets of keyboard shortcuts.
To create a new keyboard shortcut set:
1. From the main window, choose Tools > Options.
2. Click Keymap in the Options window.
3. Choose an existing keyboard set from the Profiles drop-down list at the top of the dialog box.
4. Click Duplicate to duplicate the currently selected shortcut set. Then edit the shortcuts in the new copy.
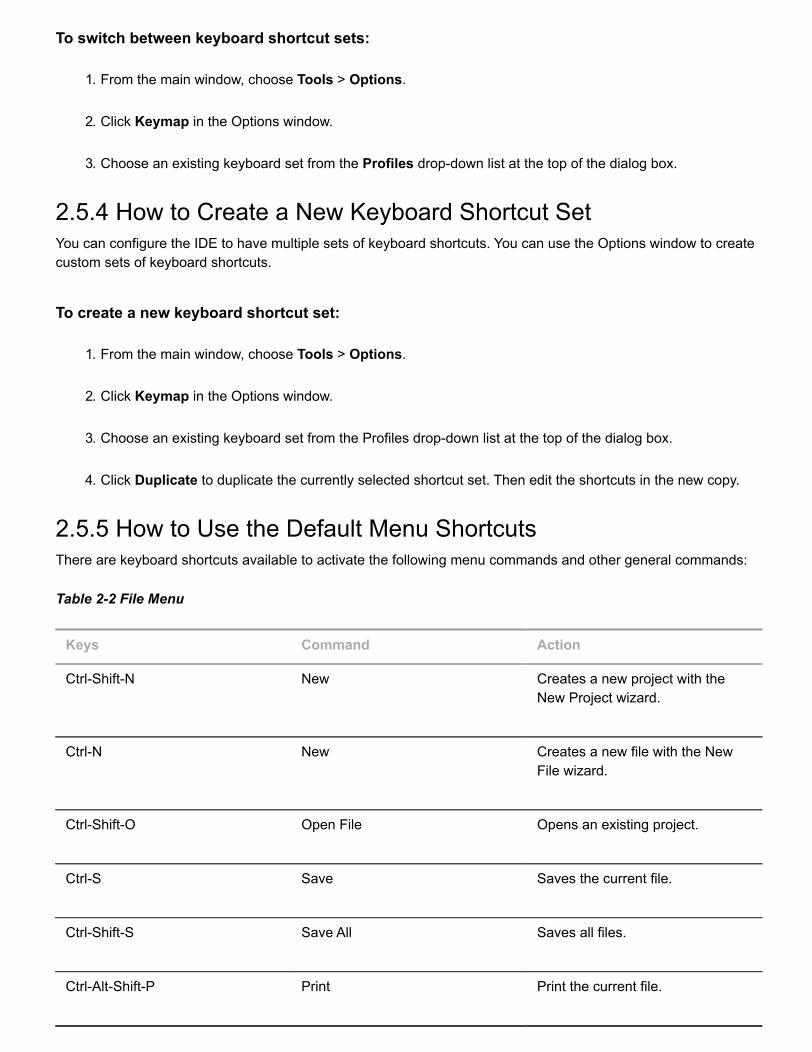
2.5.5 How to Use the Default Menu ShortcutsThere are keyboard shortcuts available to activate the following menu commands and other general commands:
Table 2-2 File Menu
Keys Command Action
Ctrl-Shift-N New Creates a new project with theNew Project wizard.
Ctrl-N New Creates a new file with the NewFile wizard.
Ctrl-Shift-O Open File Opens an existing project.
Ctrl-S Save Saves the current file.
Ctrl-Shift-S Save All Saves all files.
Ctrl-Alt-Shift-P Print Print the current file.
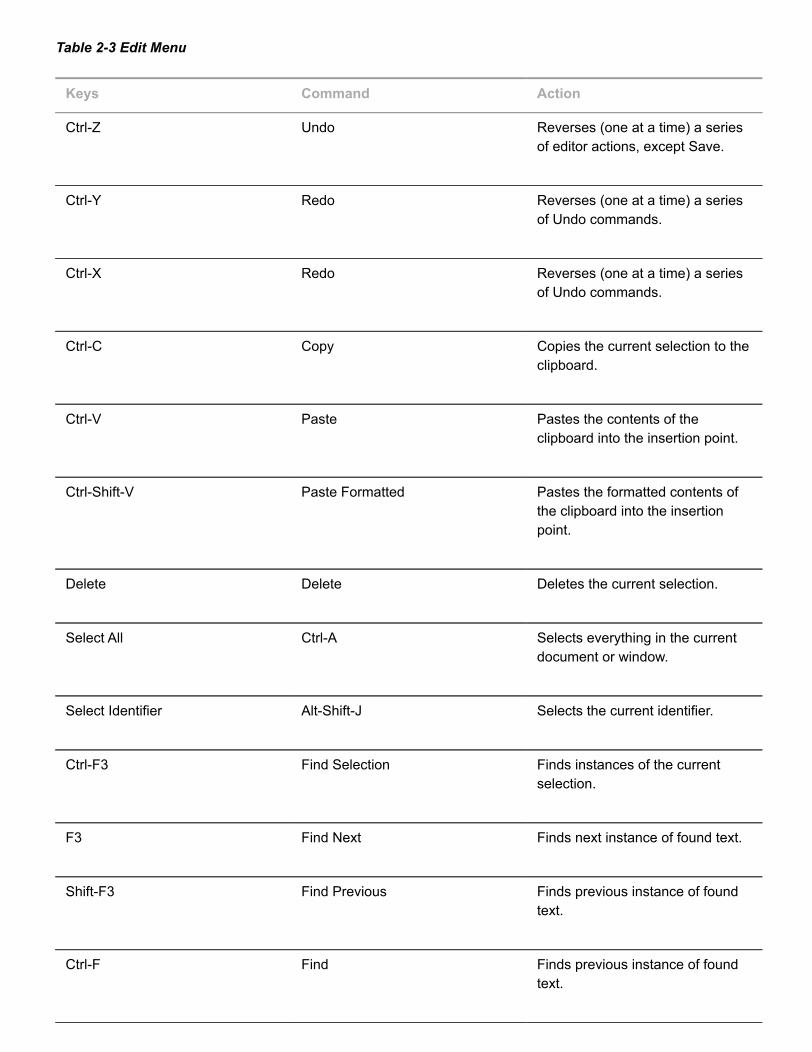
Table 2-3 Edit Menu
Keys Command Action
Ctrl-Z Undo Reverses (one at a time) a seriesof editor actions, except Save.
Ctrl-Y Redo Reverses (one at a time) a seriesof Undo commands.
Ctrl-X Redo Reverses (one at a time) a seriesof Undo commands.
Ctrl-C Copy Copies the current selection to theclipboard.
Ctrl-V Paste Pastes the contents of theclipboard into the insertion point.
Ctrl-Shift-V Paste Formatted Pastes the formatted contents ofthe clipboard into the insertionpoint.
Delete Delete Deletes the current selection.
Select All Ctrl-A Selects everything in the currentdocument or window.
Select Identifier Alt-Shift-J Selects the current identifier.
Ctrl-F3 Find Selection Finds instances of the currentselection.
F3 Find Next Finds next instance of found text.
Shift-F3 Find Previous Finds previous instance of foundtext.
Ctrl-F Find Finds previous instance of foundtext.
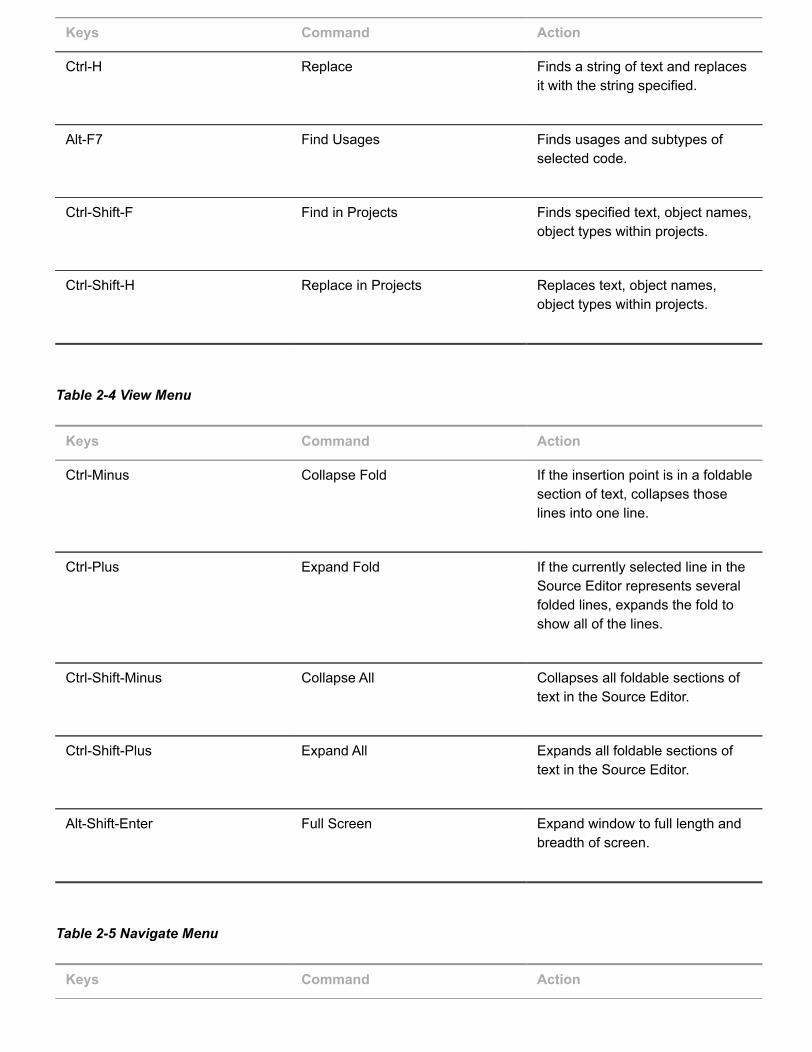
Keys Command Action
Ctrl-H Replace Finds a string of text and replacesit with the string specified.
Alt-F7 Find Usages Finds usages and subtypes ofselected code.
Ctrl-Shift-F Find in Projects Finds specified text, object names,object types within projects.
Ctrl-Shift-H Replace in Projects Replaces text, object names,object types within projects.
Table 2-4 View Menu
Keys Command Action
Ctrl-Minus Collapse Fold If the insertion point is in a foldablesection of text, collapses thoselines into one line.
Ctrl-Plus Expand Fold If the currently selected line in theSource Editor represents severalfolded lines, expands the fold toshow all of the lines.
Ctrl-Shift-Minus Collapse All Collapses all foldable sections oftext in the Source Editor.
Ctrl-Shift-Plus Expand All Expands all foldable sections oftext in the Source Editor.
Alt-Shift-Enter Full Screen Expand window to full length andbreadth of screen.
Table 2-5 Navigate Menu
Keys Command Action

Alt-Shift-O Go to File Find and open a specific file.
Ctrl-O Go to Type Find and open a specific class orinterface.
Ctrl-Alt-Shift-O Go to Symbol Find and open a specific symbol.
Alt-Shift-B Go to Spring Bean Find and open a specific Springbean.
Ctrl-Shift-T Go to Test Find and open a specific test.
Ctrl-Back Quote Go to Previous Document Open the document last openedbefore the current one.
Ctrl-Shift-B Go to Source Displays the source file containingthe definition of the selected class.
Ctrl-B Go to Declaration Jump to the declaration of the itemunder the cursor.
Ctrl-Shift-P Go to Super Implementation Jump to the super implementationof the item under the cursor.
Ctrl-Q Last Edit Location Scroll the editor to the last placewhere editing occurred.
Alt-Left Back Navigate back
Alt-Right Forward Navigate forward
Ctrl-G Go to Line Jump to the specified line.
Ctrl-Shift-M Toggle Bookmark Set a bookmark on a line of code.
Ctrl-Shift-Period Next Bookmark Cycle forward through thebookmarks.
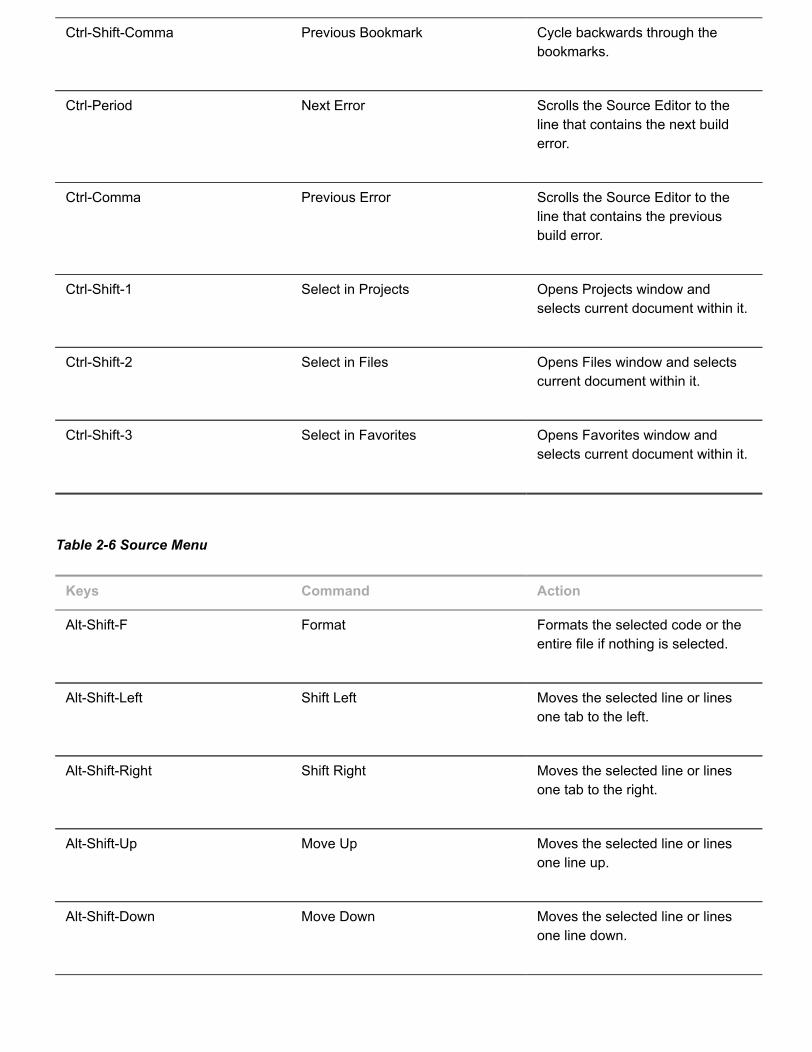
Ctrl-Shift-Comma Previous Bookmark Cycle backwards through thebookmarks.
Ctrl-Period Next Error Scrolls the Source Editor to theline that contains the next builderror.
Ctrl-Comma Previous Error Scrolls the Source Editor to theline that contains the previousbuild error.
Ctrl-Shift-1 Select in Projects Opens Projects window andselects current document within it.
Ctrl-Shift-2 Select in Files Opens Files window and selectscurrent document within it.
Ctrl-Shift-3 Select in Favorites Opens Favorites window andselects current document within it.
Table 2-6 Source Menu
Keys Command Action
Alt-Shift-F Format Formats the selected code or theentire file if nothing is selected.
Alt-Shift-Left Shift Left Moves the selected line or linesone tab to the left.
Alt-Shift-Right Shift Right Moves the selected line or linesone tab to the right.
Alt-Shift-Up Move Up Moves the selected line or linesone line up.
Alt-Shift-Down Move Down Moves the selected line or linesone line down.
Keys Command Action
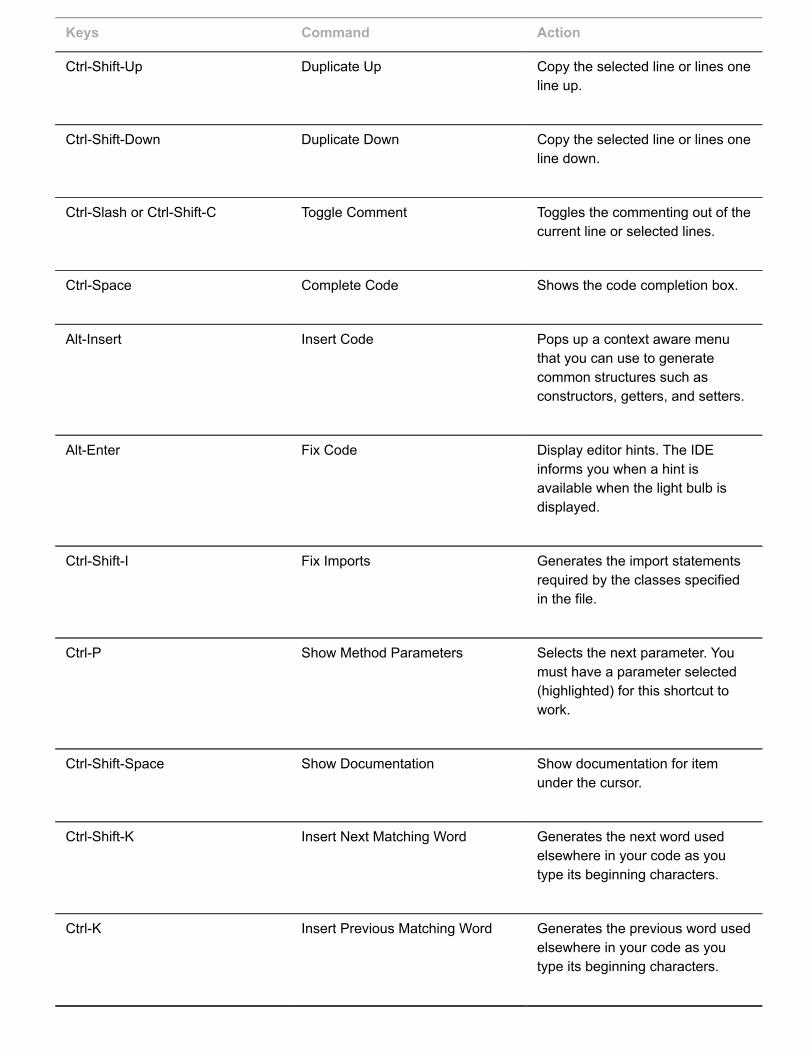
Ctrl-Shift-Up Duplicate Up Copy the selected line or lines oneline up.
Ctrl-Shift-Down Duplicate Down Copy the selected line or lines oneline down.
Ctrl-Slash or Ctrl-Shift-C Toggle Comment Toggles the commenting out of thecurrent line or selected lines.
Ctrl-Space Complete Code Shows the code completion box.
Alt-Insert Insert Code Pops up a context aware menuthat you can use to generatecommon structures such asconstructors, getters, and setters.
Alt-Enter Fix Code Display editor hints. The IDEinforms you when a hint isavailable when the light bulb isdisplayed.
Ctrl-Shift-I Fix Imports Generates the import statementsrequired by the classes specifiedin the file.
Ctrl-P Show Method Parameters Selects the next parameter. Youmust have a parameter selected(highlighted) for this shortcut towork.
Ctrl-Shift-Space Show Documentation Show documentation for itemunder the cursor.
Ctrl-Shift-K Insert Next Matching Word Generates the next word usedelsewhere in your code as youtype its beginning characters.
Ctrl-K Insert Previous Matching Word Generates the previous word usedelsewhere in your code as youtype its beginning characters.
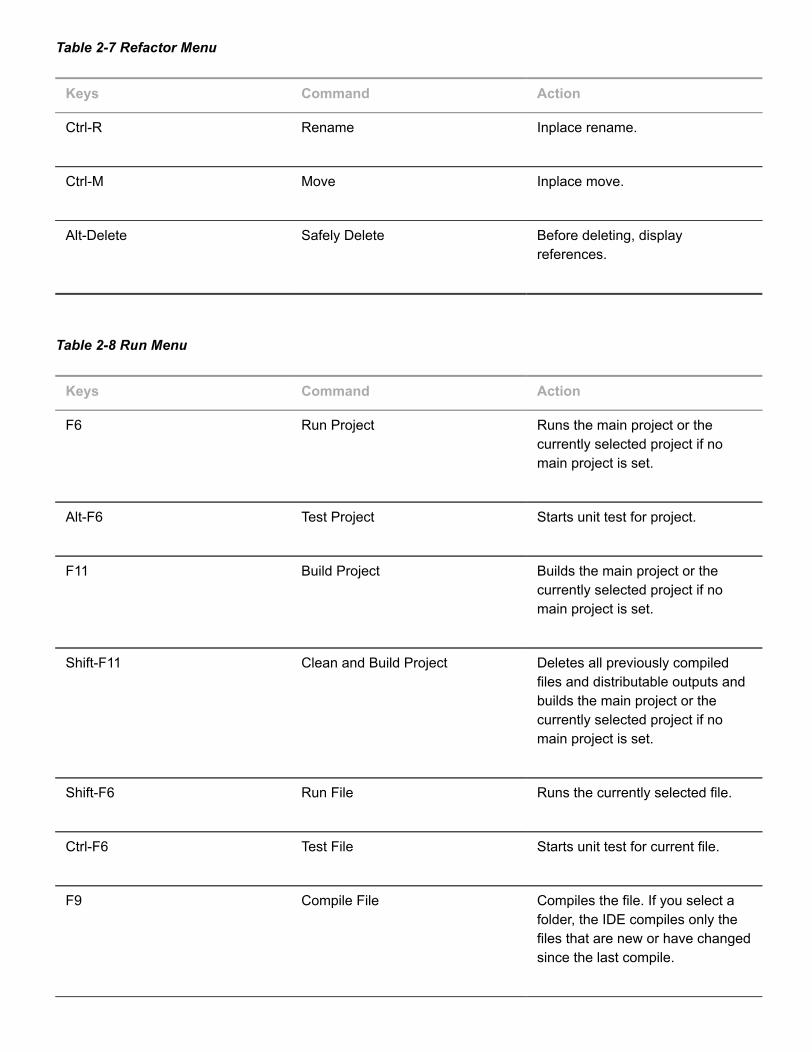
Table 2-7 Refactor Menu
Keys Command Action
Ctrl-R Rename Inplace rename.
Ctrl-M Move Inplace move.
Alt-Delete Safely Delete Before deleting, displayreferences.
Table 2-8 Run Menu
Keys Command Action
F6 Run Project Runs the main project or thecurrently selected project if nomain project is set.
Alt-F6 Test Project Starts unit test for project.
F11 Build Project Builds the main project or thecurrently selected project if nomain project is set.
Shift-F11 Clean and Build Project Deletes all previously compiledfiles and distributable outputs andbuilds the main project or thecurrently selected project if nomain project is set.
Shift-F6 Run File Runs the currently selected file.
Ctrl-F6 Test File Starts unit test for current file.
F9 Compile File Compiles the file. If you select afolder, the IDE compiles only thefiles that are new or have changedsince the last compile.

Keys Command Action
Alt-F9 Check File Checks file dependencies in thecurrently selected project whenbuilding.
Alt-Shift-F9 Validate File Validates file dependencies in thecurrently selected project whenbuilding.
Ctrl-F11 Repeat Build/Run Runs/builds the currently selectedproject once again.
Table 2-9 Debug Menu
Keys Command Action
Ctrl-F5 Debug Project Debugs the main project or thecurrently selected project if nomain project is set.
Ctrl-Shift-F5 Debug File Starts debugging session forcurrently selected file.
Ctrl-Shift-F6 Debug Test File Starts debugging test for file.
Shift-F5 Finish Debugger Session Ends the debugging session.
F5 Continue Resumes debugging until the nextbreakpoint or the end of theprogram is reached.
F8 Step Over Executes one source line of aprogram. If the line is a methodcall, executes the entire methodthen stops.
Shift-F8 Step Over Expression Steps over the expression andthen stops the debugging.
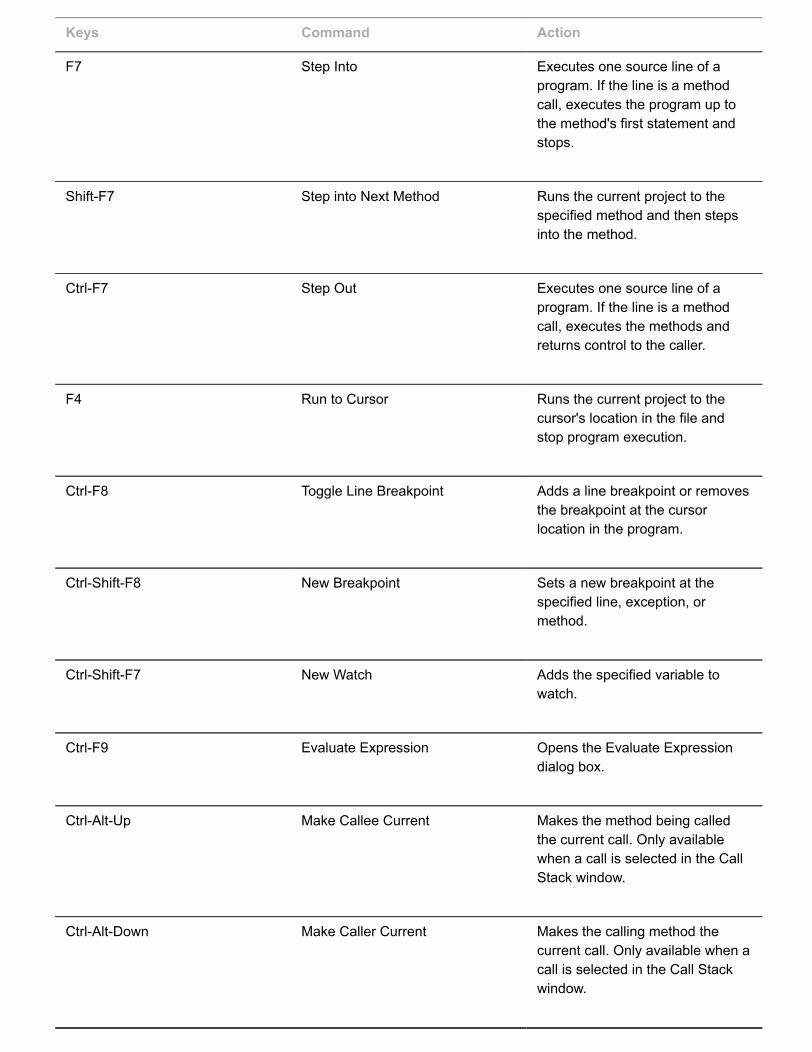
Keys Command Action
F7 Step Into Executes one source line of aprogram. If the line is a methodcall, executes the program up tothe method's first statement andstops.
Shift-F7 Step into Next Method Runs the current project to thespecified method and then stepsinto the method.
Ctrl-F7 Step Out Executes one source line of aprogram. If the line is a methodcall, executes the methods andreturns control to the caller.
F4 Run to Cursor Runs the current project to thecursor's location in the file andstop program execution.
Ctrl-F8 Toggle Line Breakpoint Adds a line breakpoint or removesthe breakpoint at the cursorlocation in the program.
Ctrl-Shift-F8 New Breakpoint Sets a new breakpoint at thespecified line, exception, ormethod.
Ctrl-Shift-F7 New Watch Adds the specified variable towatch.
Ctrl-F9 Evaluate Expression Opens the Evaluate Expressiondialog box.
Ctrl-Alt-Up Make Callee Current Makes the method being calledthe current call. Only availablewhen a call is selected in the CallStack window.
Ctrl-Alt-Down Make Caller Current Makes the calling method thecurrent call. Only available when acall is selected in the Call Stackwindow.
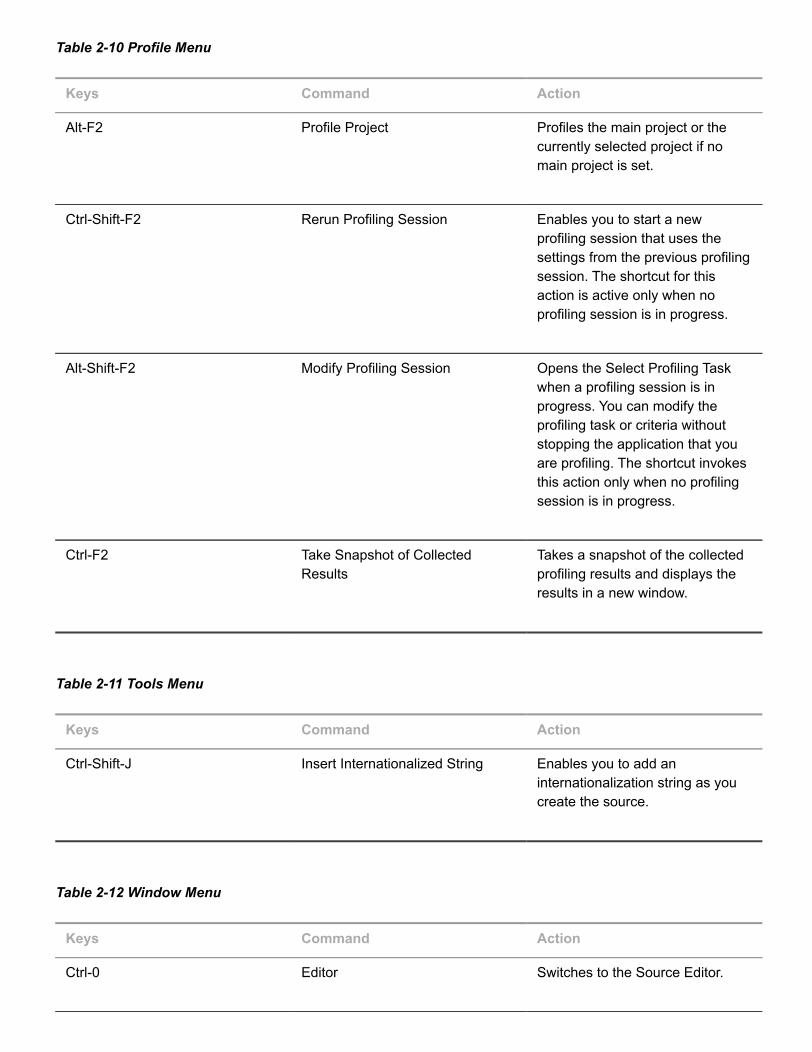
Table 2-10 Profile Menu
Keys Command Action
Alt-F2 Profile Project Profiles the main project or thecurrently selected project if nomain project is set.
Ctrl-Shift-F2 Rerun Profiling Session Enables you to start a newprofiling session that uses thesettings from the previous profilingsession. The shortcut for thisaction is active only when noprofiling session is in progress.
Alt-Shift-F2 Modify Profiling Session Opens the Select Profiling Taskwhen a profiling session is inprogress. You can modify theprofiling task or criteria withoutstopping the application that youare profiling. The shortcut invokesthis action only when no profilingsession is in progress.
Ctrl-F2 Take Snapshot of CollectedResults
Takes a snapshot of the collectedprofiling results and displays theresults in a new window.
Table 2-11 Tools Menu
Keys Command Action
Ctrl-Shift-J Insert Internationalized String Enables you to add aninternationalization string as youcreate the source.
Table 2-12 Window Menu
Keys Command Action
Ctrl-0 Editor Switches to the Source Editor.
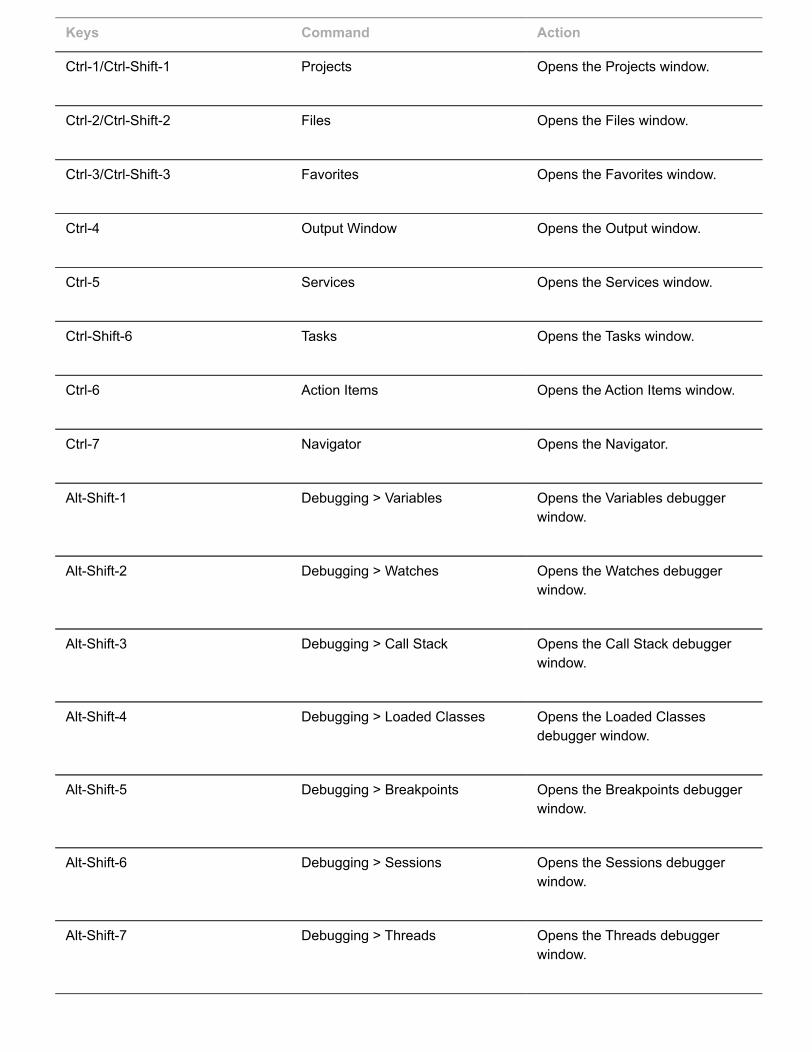
Keys Command Action
Ctrl-1/Ctrl-Shift-1 Projects Opens the Projects window.
Ctrl-2/Ctrl-Shift-2 Files Opens the Files window.
Ctrl-3/Ctrl-Shift-3 Favorites Opens the Favorites window.
Ctrl-4 Output Window Opens the Output window.
Ctrl-5 Services Opens the Services window.
Ctrl-Shift-6 Tasks Opens the Tasks window.
Ctrl-6 Action Items Opens the Action Items window.
Ctrl-7 Navigator Opens the Navigator.
Alt-Shift-1 Debugging > Variables Opens the Variables debuggerwindow.
Alt-Shift-2 Debugging > Watches Opens the Watches debuggerwindow.
Alt-Shift-3 Debugging > Call Stack Opens the Call Stack debuggerwindow.
Alt-Shift-4 Debugging > Loaded Classes Opens the Loaded Classesdebugger window.
Alt-Shift-5 Debugging > Breakpoints Opens the Breakpoints debuggerwindow.
Alt-Shift-6 Debugging > Sessions Opens the Sessions debuggerwindow.
Alt-Shift-7 Debugging > Threads Opens the Threads debuggerwindow.
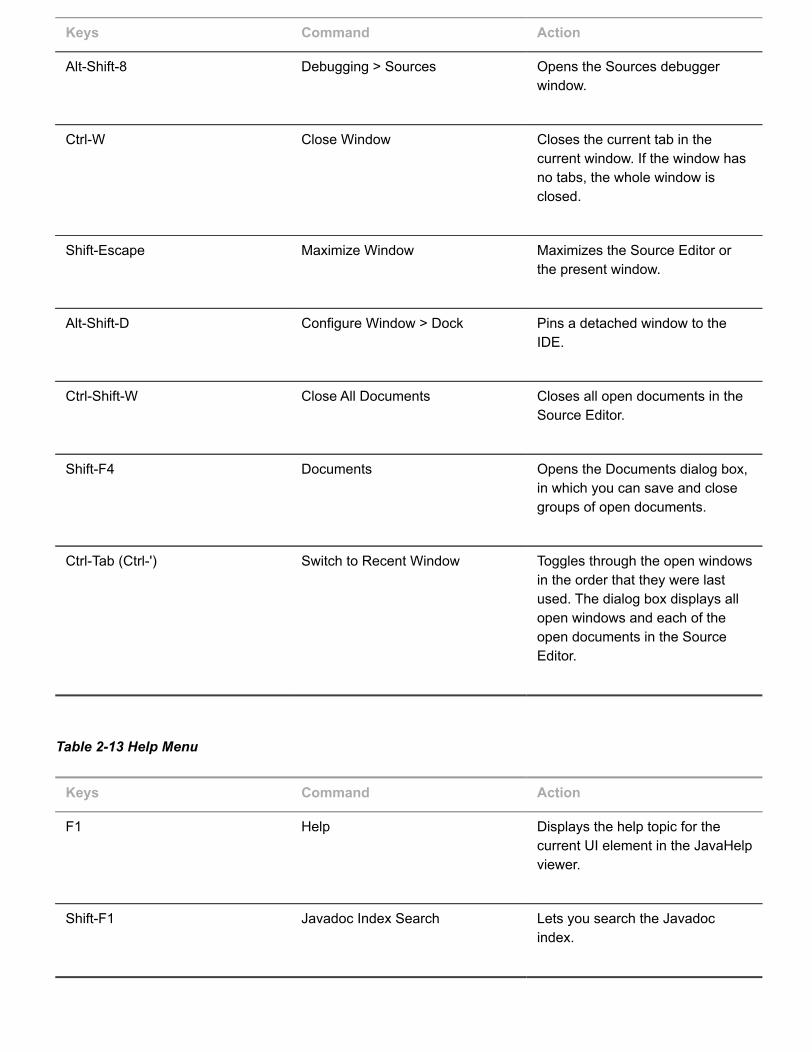
Keys Command Action
Alt-Shift-8 Debugging > Sources Opens the Sources debuggerwindow.
Ctrl-W Close Window Closes the current tab in thecurrent window. If the window hasno tabs, the whole window isclosed.
Shift-Escape Maximize Window Maximizes the Source Editor orthe present window.
Alt-Shift-D Configure Window > Dock Pins a detached window to theIDE.
Ctrl-Shift-W Close All Documents Closes all open documents in theSource Editor.
Shift-F4 Documents Opens the Documents dialog box,in which you can save and closegroups of open documents.
Ctrl-Tab (Ctrl-') Switch to Recent Window Toggles through the open windowsin the order that they were lastused. The dialog box displays allopen windows and each of theopen documents in the SourceEditor.
Table 2-13 Help Menu
Keys Command Action
F1 Help Displays the help topic for thecurrent UI element in the JavaHelpviewer.
Shift-F1 Javadoc Index Search Lets you search the Javadocindex.
2.5.6 How to Customize Keyboard ShortcutsNetBeans IDE supports customizable shortcuts to improve your productivity but and increase your overall typingspeed.
To customize keyboard shortcuts:
1. Choose Tools > Options > Keymap.
2. Do either:
Select a predefined set of keyboard shortcuts, which is called Profile.
Edit particular keyboard shortcuts.
You can save customized sets of your shortcuts as profiles. Then, you can switch from one profile to another toquickly change multiple settings.
To create a custom profile of keyboard shortcuts:
1. In the Options > Keymap window, click Manage profiles.
2. Select the profile you want to use as a base for your new profile and click Duplicate.
3. Enter the new profile name and click OK.
4. Ensure that the new profile is selected and modify the shortcuts you need.
To edit a shortcut, double-click in the Shortcut field or click the ellipsis button (...). As you press thesequence of keys, the syntax for them is added.
If you want to add special characters, such as Tab, Escape, or Enter, click the ellipsis button (...) again andselect the key from the pop-up window.
5. When finished editing, click OK in the Options window.
To find a shortcut for a specific command, type the command name in the Search field. To find a command by acombination, insert the cursor in the Search in Shortcuts field and press the shortcut key combination.
2.6 Understanding the Source Editor FeaturesThe Source Editor is a full-featured text editor that is integrated with the GUI Builder, the compiler, the debugger,and other parts of the IDE. You can generally open the Source Editor by double-clicking a node in the Projectswindow, Files window, or Navigator window.
The top of the Source Editor has a tab for each open document. Each tab shows the name of the document. Thename of the document is displayed in bold if the document has been modified and has not been saved. You canright-click the tab to open a popup menu that lists commands that can be invoked on the tab.
If multiple files are open, you can split the Source Editor view by clicking and dragging the tab. As you drag todifferent parts of the editing area, you see a red outline that shows you the location of the new window. When oneof these boxes appears, you can drop the document and split the pane. You must close the split file if you want theeditor to return to its unsplit state.
2.6.1 How to Use the ToolbarThe editor toolbar is at the top of the Source Editor window. The toolbar has buttons for various navigating andediting shortcuts, which vary according to the type of file you are editing. Hold the cursor over a button to display adescription of the command.
How to toggle the editor toolbar:
Choose View > Show Editor Toolbar to hide or display the editor toolbar.
The following table provides descriptions of icons that are used in the source editor toolbar.
Table 2-14 Icons in Source Editor Toolbar
Icon Description
Source/History Toggle between source code and local history views.Local history includes diffs between all save points.
Last Edit (Ctrl+Q) Moves to the last edit you made.
Back (Alt+LEFT) Moves back to previously opened document.
Forward (Alt+RIGHT) Moves forward to next opened document.
Find Selection (Ctrl+F3) Finds the item in which the cursor is currentlyinserted.
Find Previous Occurrence (Shift+F3) Moves the insertion point to the previous foundoccurrence of the text that you previously searchedfor.
Find Next Occurrence (F3) Moves the insertion point to the next foundoccurrence of the text that you previously searchedfor.
Toggle Highlight Search (Alt+Shift+H) Turns off or turns on the highlighting of search text.
Icon Description
Toggle Rectangular Selection (Ctrl+Shift+R) Turns off or turns on the rectangular block selection.
Previous Bookmark Moves the insertion point to the previous bookmark inthe file.
Next Bookmark Moves the insertion point to the next bookmark in thefile.
Toggle Bookmark Inserts a bookmark on the current line or removes abookmark on the current line.
Shift Line Left (Alt+Shift+LEFT) Reduces the indentation by one tab stop.
Shift Line Right (Alt+Shift+RIGHT) Increases the indentation by one tab stop.
Start Macro Recording Starts recording a macro containing keystrokes andcursor movements.
Stop Macro Recording Stops macro recording.
Check XML (Alt+F9) Check XML document is well-formed.
Validate XML (Alt+Shift+F9) Validate XML document against DTD or schemaspecified in document.
Run XSL Run XSL transformation on open XSLT document.
Next Matching Completes the word you are typing to match the nextword in the file that matches the word you are typing.
Previous Matching Completes the word you are typing to match theclosest previous word in the file that matches theword you are typing.
Comment Comments out the selected lines
Uncomment Removes the comment marks from the selected lines
2.6.2 How to Use the Left MarginThe left margin displays annotation glyphs that indicate line status, such as breakpoints, the program counter, orbuild errors. You can right-click the left margin to display a pop-up menu with a list of commands and options.
If you click the left margin of a Java, JavaScript or PHP file, a breakpoint is set on the corresponding line. You canclick the left margin of a line to remove a breakpoint.
For more information about setting breakpoints and other glyphs used by the debugger, see Chapter 10,"Managing Breakpoints." (run_debug_japps.htm#BABIIDHH)
The following table shows some of the annotation glyphs that can appear in the left margin of the Source Editor.
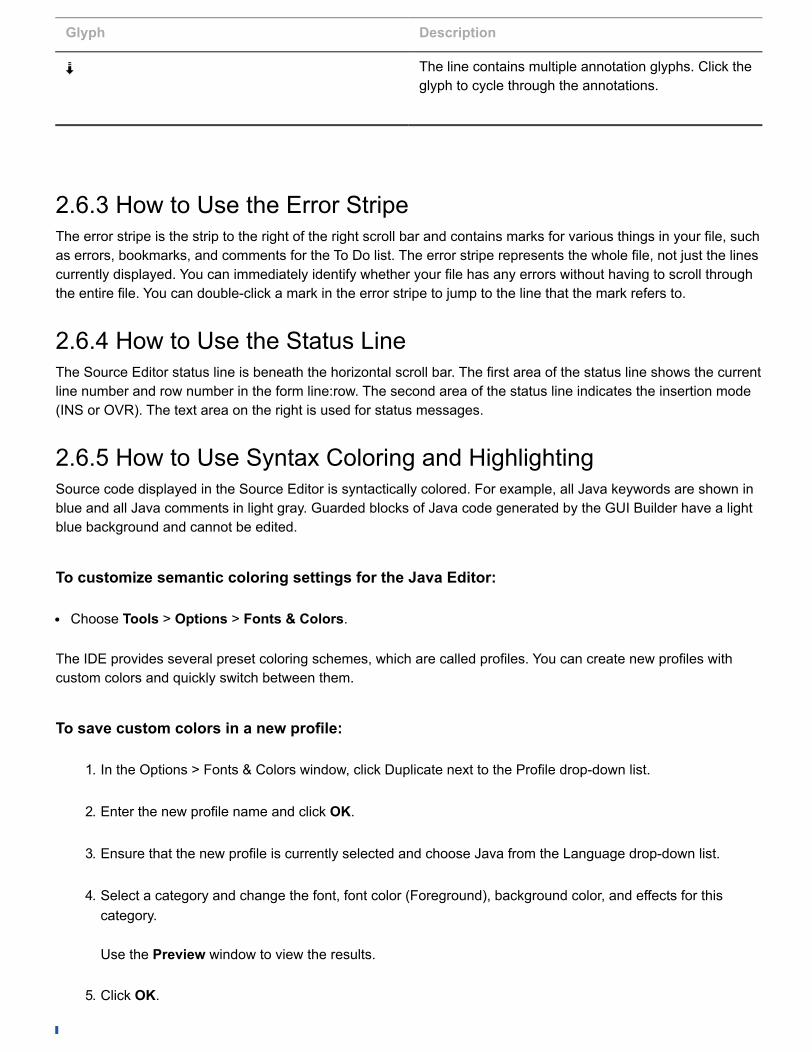
Table 2-15 Table of Common Editor Glyphs and Descriptions
Glyph Description
The line contains an error. You can place the mousepointer over the glyph to display a tooltip withinformation on the error.
The line contains a method that overrides a methodfrom another class. Place your mouse pointer overthe glyph to display a tooltip with name of theoverridden method's class. This glyph only applies toJava classes.
The line contains a method that implements a methodfrom an interface or an abstract class. Place yourmouse pointer over the glyph to display a tooltip withname of the implemented method's class. This glyphonly applies to Java classes.
The line is bookmarked. You can cycle forward andbackward through your Source Editor bookmarks bypressing Ctrl-Shift-Period/Comma. You can add orremove a bookmark by pressing Ctrl-Shift-M.
The line contains a debugging line breakpoint. Youcan remove the breakpoint by clicking the glyph. Youcan set another breakpoint by clicking in the leftmargin next to the line where you want the breakpointto appear.
Glyph Description
The line contains multiple annotation glyphs. Click theglyph to cycle through the annotations.
2.6.3 How to Use the Error StripeThe error stripe is the strip to the right of the right scroll bar and contains marks for various things in your file, suchas errors, bookmarks, and comments for the To Do list. The error stripe represents the whole file, not just the linescurrently displayed. You can immediately identify whether your file has any errors without having to scroll throughthe entire file. You can double-click a mark in the error stripe to jump to the line that the mark refers to.
2.6.4 How to Use the Status LineThe Source Editor status line is beneath the horizontal scroll bar. The first area of the status line shows the currentline number and row number in the form line:row. The second area of the status line indicates the insertion mode(INS or OVR). The text area on the right is used for status messages.
2.6.5 How to Use Syntax Coloring and HighlightingSource code displayed in the Source Editor is syntactically colored. For example, all Java keywords are shown inblue and all Java comments in light gray. Guarded blocks of Java code generated by the GUI Builder have a lightblue background and cannot be edited.
To customize semantic coloring settings for the Java Editor:
Choose Tools > Options > Fonts & Colors.
The IDE provides several preset coloring schemes, which are called profiles. You can create new profiles withcustom colors and quickly switch between them.
To save custom colors in a new profile:
1. In the Options > Fonts & Colors window, click Duplicate next to the Profile drop-down list.
2. Enter the new profile name and click OK.
3. Ensure that the new profile is currently selected and choose Java from the Language drop-down list.
4. Select a category and change the font, font color (Foreground), background color, and effects for thiscategory.
Use the Preview window to view the results.
5. Click OK.
Note:All NetBeans IDE settings and profiles are stored in the NetBeans userdir (refer to the FAQ on how tolocate the userdir for your operating system). When upgrading to newer versions of NetBeans, youcan export old settings and import them to the newer version.
In addition to coloring, the Source Editor highlights similar elements with a particular background color. Thus, youcan think of the highlighting feature as an alternative to the Search command, because in combination with errorstripes, it gives you a quick overview of where the highlighted places are located within a file.
The IDE highlights usages of the same element, matching braces, method exit points, and exception throwingpoints.
If you place the cursor in an element, such as a field or a variable, all usages of this element are highlighted. Notethat error stripes in the Editor's right margin indicate the usages of this element in the entire source file. Click theerror stripe to quickly navigate to the desired usage location.
To rename all the highlighted instances:
Choose Refactor > Rename (or Ctrl-R).
2.6.6 How to Use Insert Mode and Overwrite ModeWhen the Source Editor is in insert mode, the default insertion point is a vertical bar, and text that you type isinserted. In overwrite mode, the default insertion point is a solid block, and text that you type replaces the existingtext.
Use the Insert key to toggle between the two modes.
Whenever the insertion point in the Source Editor is located immediately after a brace, bracket, or parenthesis, thematching brace, bracket, or parenthesis is highlighted.
If the Source Editor beeps when you try to enter new text, the file is a read-only file.
2.6.7 How to Set Editor OptionsYou can set options for the source editor in the Options window. The Editor category in the Options windowcontains tabs where you can set options for editor features, including code completion, formatting and folding.
You can set options for the colors of text and background colors in the Fonts and Colors category. The IDEincludes several fonts and colors settings that are saved as profiles. You can choose to use one of the defaultsettings profiles or create a custom profile that saves your font and color preferences.
How to set global editor options:
1. Choose Tools > Options from the main menu.
2. Click the Editor category and then click a tab to edit the settings for that feature.
How to specify global fonts and colors in the editor:
1. Choose Tools > Options from the main menu.
2. Click the Fonts & Colors category and then click a tab to edit the settings for that feature.
3. Select an item in the Category or Highlighting pane and then modify the color or other properties for thatelement in the right pane of the Options window.
How to enable a default profile:
1. Choose Tools > Options from the main menu.
2. Click the Fonts & Colors category.
3. Select a profile from the Profiles drop-down list.
When you select a profile you can see an example of the new settings in the Preview pane.
How to create a custom profile for fonts and colors
1. Choose Tools > Options from the main menu.
2. Click the Fonts & Colors category.
3. Select a profile from the Profile drop-down list to use as a base for the custom profile.
4. Click Duplicate and type a name for the new profile.
5. Modify the font and color options as desired.
When you modify the new profile you can see an example of the new settings in the Preview pane.
6. Click Apply in the Options window.
How to set formatting options for a project:
1. Right-click the project node in the Projects window and choose Properties.
2. Select the Formatting category in the Project Properties window.
3. Select Use project specific options in the Formatting panel and specify the options.
2.6.8 How to Insert and Highlight Occurrences in the EditorBy default, the IDE automatically inserts matching pairs of braces, brackets, and quotes. When you type anopening curly brace and then press Enter, the closing brace is added automatically. For (, [, ", and ', the editorinserts a matching pair.
To enable inserting matching pairs:
1. Choose Tools > Options > Editor > Code Completion.
2. Select the Insert Closing Brackets Automatically checkbox.
By default the editor highlights the occurrences of various code symbols and keywords when the insert cursor islocated in one of the occurrences. You can disable the highlighting completely or limit the highlighting to specificelements.
How to select types of occurrences to highlight in the editor:
1. Choose Tools > Options from the main menu, and then click the Highlighting tab in the Editor category.
2. Select a language in the drop-down list.
3. Deselect the types of elements that you do not want to be highlighted.
You can disable the highlighting of all types of elements for the specified language by deselecting MarkOccurrences Of Symbol Under Caret.
2.6.9 How to Record MacrosYou can use macros in the source editor that can generate common source code snippets or perform commoneditor tasks. After you record a macro you can assign a keyboard shortcut to run the macro on the current file.
How to record a macro:
1. Click the Start Macro Recording icon in the toolbar of the source editor.
2. Perform the tasks or type the code that you want to record.
3. Click the Stop Macro Recording icon in the toolbar.
When you click Stop Macro Recording the IDE opens the New Macro Dialog.
4. Type a name for the macro. Click OK.
5. Select the new macro in the Editor Macros dialog box and click Set Shortcut.
6. Type a shortcut in the Add Shortcut dialog box. Click OK.
7. Click OK in the Editor Macros dialog box.
The new macro will not be saved if you click Cancel in the Editor Macros dialog box.
To view or modify your saved macros, choose Tools > Options in the main menu and click the Macros tab in theEditor category.
A special macro syntax is used to define these macros. For example, if you want to clear the current line in theeditor from the cursor, your macro definition would be as follows: selection-end-line remove-selection.
Then you can assign "Ctrl+L" as the keyboard shortcut for this macro. Whenever you press that key combination,the whole line, from the position of the cursor, will be deleted.
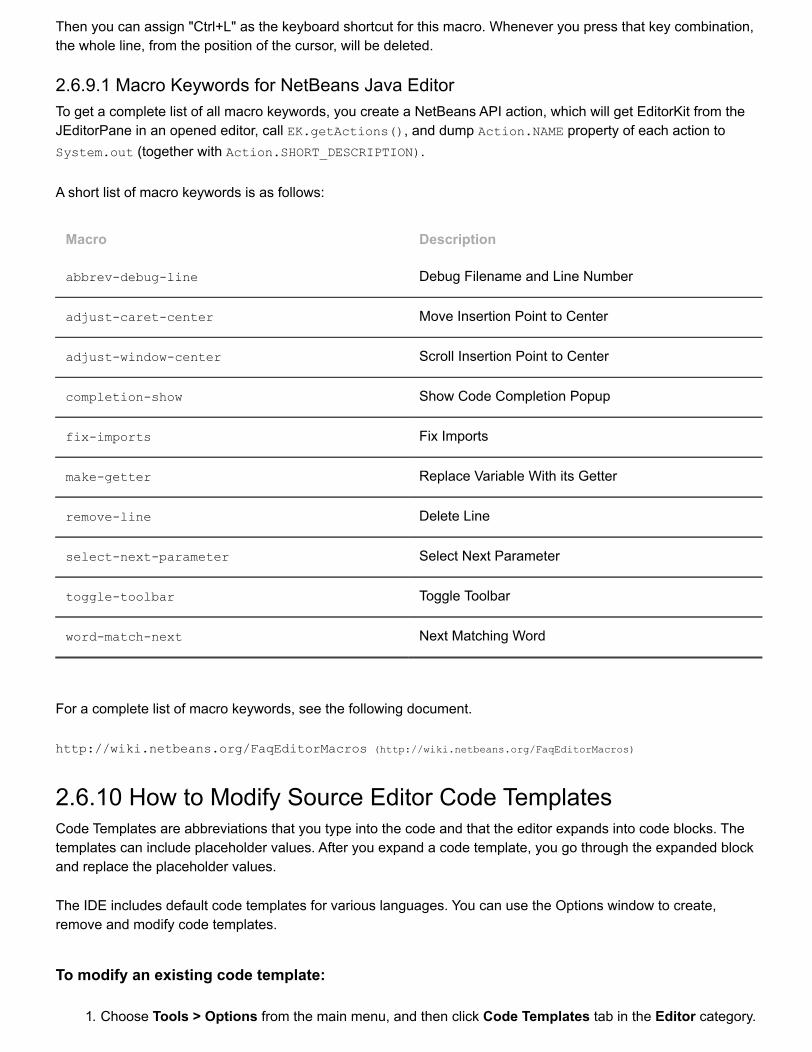
2.6.9.1 Macro Keywords for NetBeans Java EditorTo get a complete list of all macro keywords, you create a NetBeans API action, which will get EditorKit from theJEditorPane in an opened editor, call EK.getActions(), and dump Action.NAME property of each action toSystem.out (together with Action.SHORT_DESCRIPTION).
A short list of macro keywords is as follows:
Macro Description
abbrev-debug-line Debug Filename and Line Number
adjust-caret-center Move Insertion Point to Center
adjust-window-center Scroll Insertion Point to Center
completion-show Show Code Completion Popup
fix-imports Fix Imports
make-getter Replace Variable With its Getter
remove-line Delete Line
select-next-parameter Select Next Parameter
toggle-toolbar Toggle Toolbar
word-match-next Next Matching Word
For a complete list of macro keywords, see the following document.
http://wiki.netbeans.org/FaqEditorMacros (http://wiki.netbeans.org/FaqEditorMacros)
2.6.10 How to Modify Source Editor Code TemplatesCode Templates are abbreviations that you type into the code and that the editor expands into code blocks. Thetemplates can include placeholder values. After you expand a code template, you go through the expanded blockand replace the placeholder values.
The IDE includes default code templates for various languages. You can use the Options window to create,remove and modify code templates.
To modify an existing code template:
1. Choose Tools > Options from the main menu, and then click Code Templates tab in the Editor category.
2. Select a language from the drop-down list to see the code templates available for that language.
3. Select a code template from the list.
4. Type in the Expanded Text tab to modify the expanded code that the template produces.
5. Type in the Description tab to modify the description of the code template. Click OK in the Optionswindow.
To remove an existing code template:
1. Choose Tools > Options from the main menu, and then click the Editor category.
2. Select a language from the drop-down list to see the code templates available for that language.
3. Select a code template from the list.
4. Click Remove.
To create a code template:
1. Choose Tools > Options from the main menu, and then click the Editor category.
2. Select a language from the drop-down list.
3. Click New.
4. Type an abbreviation for the new code template in the dialog box.
5. Type the expanded code in the Expanded Text tab.
6. Type a description for the code in the Description tab.
7. Click OK in the Options window.
2.6.11 How to Use Code CompletionThe NetBeans IDE's Source Editor helps you quickly complete and generate code through the "smart" codecompletion feature. In a general sense, code completion is very useful when you want to fill in the missing code,look at the options available in the context of your application, and generate blocks of code when needed.
Use code completion to:
generate code from the code completion window
complete keywords in your code. The editor analyzes the context and suggests the most relevant keywords
choose a name that matches the type of a new field or a variable that you are adding
complete Javadoc tags after you type the "@" symbol
suggest parameters for variables, methods, or fields
quickly fill in the most commonly used prefixes and single suggestions
To invoke code completion:
Press Ctrl-Space (or choose Source > Complete Code from the main menu) to open the code completion box.
While you are typing, the list of suggestions shortens. The suggestions listed include those imported in yoursource file and symbols from the java.lang package.
The suggestions that are the most relevant for the context of your code are displayed at the top, above theblack line in the code completion window.
If the "smart" suggestions are not the ones you want to use, press Ctrl-Space again to see a complete list.
To invoke tooltips with method parameters:
Press Ctrl-P (or choose Source > Show Method Parameters from the main menu).
The editor guesses on the parameters for variables, methods, or fields and displays the suggestions in a pop-upbox.
For example, when you select a method from the code completion window which has one or more arguments, theEditor highlights the first argument and displays a tooltip suggesting the format for this argument. To move to thenext argument, press the Tab or Enter keys.
To fill in the most commonly used prefixes and single suggestions:
1. Type a name or part of a name (for example, System.out.p) and wait for code completion to show allfields and methods that start with "p." All the suggestions will be related to "print."
2. Press the Tab key and the editor automatically fills in the "print".
You can continue and type "l" and, after pressing Tab, the "println" will be added.
To customize the code completion settings:
Select Tools > Options > Editor > Code Completion.
To invoke the code completion window automatically when you are typing certain characters:
1. Select Tools > Options > Editor > Code Completion.
2. On the Code Completion tab, select the Auto Popup Completion Window checkbox.
The default character is ".", but you can add your own characters.
To add characters that invoke the code completion window:
1. Select Java from the Language drop-down list.
2. Type your characters in the Auto Popup Triggers for Java field.
The code completion window will pop up every time you type the specified characters.
Note:When the Auto Popup Completion Window checkbox is disabled, you need to press Ctrl-Space eachtime you want to use code completion.
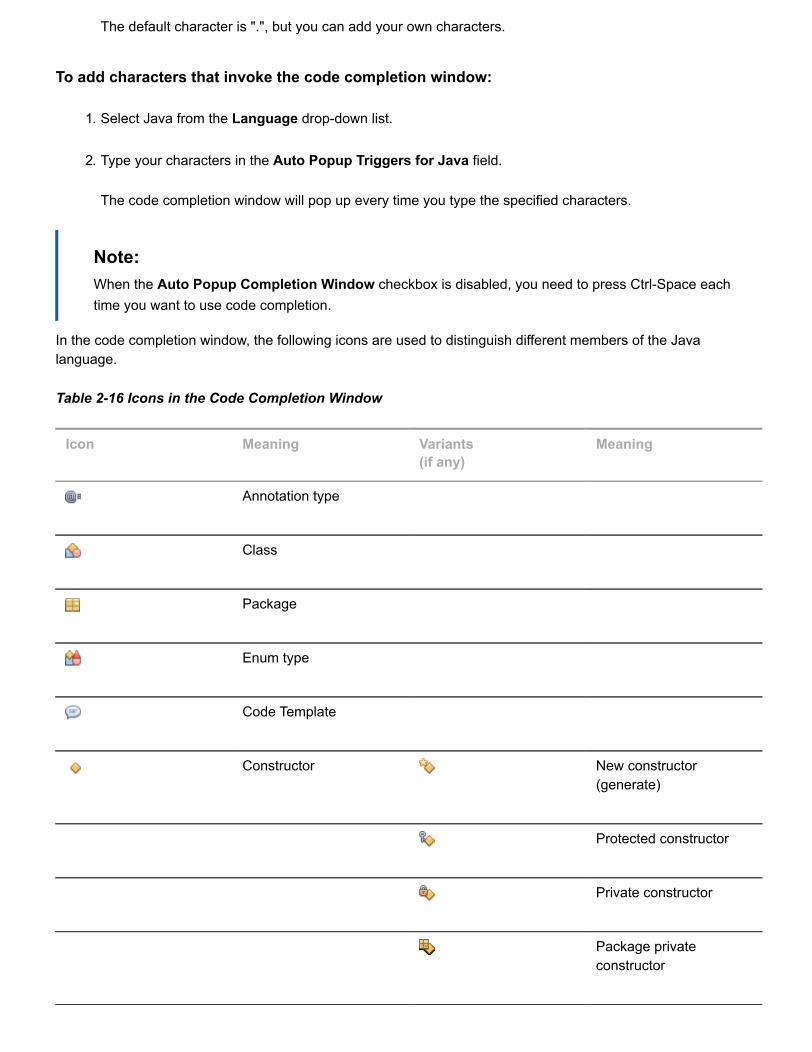
In the code completion window, the following icons are used to distinguish different members of the Javalanguage.
Table 2-16 Icons in the Code Completion Window
Icon Meaning Variants (if any)
Meaning
Annotation type
Class
Package
Enum type
Code Template
Constructor New constructor(generate)
Protected constructor
Private constructor
Package privateconstructor
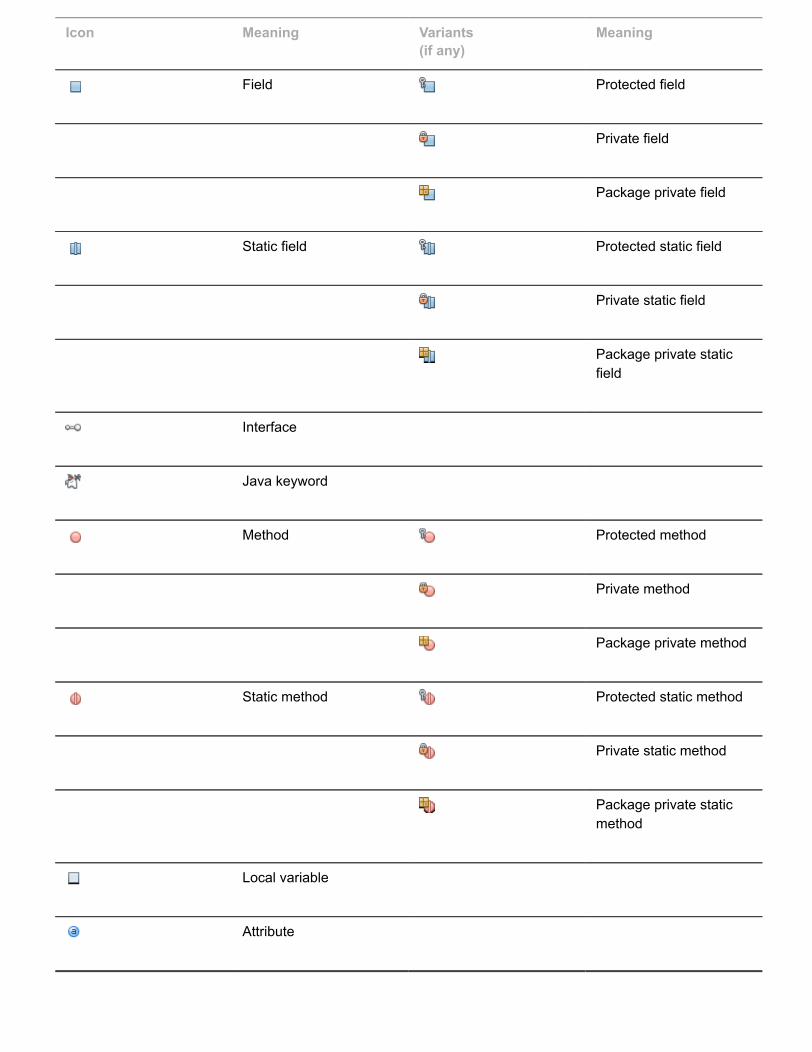
Icon Meaning Variants (if any)
Meaning
Field Protected field
Private field
Package private field
Static field Protected static field
Private static field
Package private staticfield
Interface
Java keyword
Method Protected method
Private method
Package private method
Static method Protected static method
Private static method
Package private staticmethod
Local variable
Attribute
2.6.12 How to Use HintsWhile you are typing, the Source Editor checks your code and provides suggestions of how you can fix errors andnavigate through code.
For the most common coding mistakes, you can see hints in the left-hand margin of the Editor. The hints areshown for many types of errors, such as missing field and variable definitions, problems with imports, braces, andother. Click the hint icon and select the fix to add.
Hints are displayed automatically by default.
To view all hints:
Choose Source > Fix Code (or press Alt-Enter).
To limit the number of categories for which hints are displayed:
1. Choose Tools > Options > Editor > Hints.
2. From the Language drop-down list, select the language and view a list of elements for which hints aredisplayed (their checkboxes are selected).
3. To disable hints for some categories, clear the appropriate checkboxes.
Note:On the Hints tab, you can also disable or limit the scope of dependency scans (DependencyScanning option). These steps can significantly improve the performance of the IDE.The IDE detects compilation errors in your sources by locating and recompiling classes thatdepend on the file that you are modifying (even if these dependencies are in the files that are notopened in the editor). When a compilation error is found, red badges are added to source file,package, or project nodes. Dependency scanning within projects can be resource consumingand degrade performance, especially if you are working with large projects.
To improve IDE's performance, you can do one of the following:
Limit the scope of dependency scans to the Source Root (search for dependencies only in thesource root where the modified class is located) or current Project.
Disable dependency scanning (choose Project Properties > Build > Compiling and deselectthe Track Java Dependencies option). In this case, the IDE does not scan for dependenciesor updates the error badges when you modify a file.
To surround pieces of your code with various statements:
Select a block in your code that you want to surround with a statement and click the bulb icon in the left-handmargin (or press Alt-Enter). The editor displays a list of suggestions from which you select the statement youneed.
You can surround pieces of your code with various statements, such as for, while, if, try/catch, and other.
2.6.13 How to Navigate Through CodeUse the Go To.. commands located under the Navigate menu item to quickly jump to target locations.
To go to declaration:
1. Hold down the Ctrl key and click the usage of a class, method, or field to jump to its declaration. You canalso place the cursor on the member (a class, method, or field).
2. Choose Navigate > Go To Declaration.
To go to source:
1. Hold down the Ctrl key and click a class, method, or field to jump to the source code, if the source isavailable. You can also place the cursor on the member (a class, method, or field).
2. Choose Navigate > Go To Source in the main menu.
To go to type, file, or symbol:
If you know the name of the type (class, interface, annotation or enum), file, or symbol to where you want tojump, choose Navigate > Go to Type (Go to File, or Go to Symbol) and type the name in the new window.
Note:You can use prefixes, camel case, and wildcards.
To go to line:
1. Choose Navigate > Go To Source in the main menu.
2. Enter the line number to which you want to jump.
To quickly return to your last edit:
Even if your last edit is in another file or project, press Ctrl-Q or use the button in the top left corner of theSource Editor toolbar.
The last edited document opens, and the cursor is at the position, which you edited last.
To switch between open files:
To go to the previously edited file or move forward, choose Navigate > Back or Navigate > Forward, or pressthe corresponding buttons on the editor toolbar.
The file opens and the cursor is placed at the location of your last edit. When you click one of the buttons, youcan expand the list of the recent files and click to navigate to any of them.
To toggle between files, press Ctrl-Tab to display all open files in a pop-up window, hold down the Ctrl key andpress several times the Tab key to choose the file you would like to open.
To go to bookmarks:
Choose Navigate > Bookmark History Popup Next in the main menu, to go to your next bookmark.
Choose Navigate > Bookmark History Popup Previous in the main menu, to go to the previous bookmark.
2.6.14 How to Work with Import StatementsThere are several ways of how you can manage import statements in NetBeans IDE. The IDE's Java Editorconstantly checks your code for the correct use of import statements and immediately warns you when non-imported classes or unused import statements are detected.
When a non-imported class is found, the error mark appears in the IDE's left-hand margin (this margin is alsocalled the glyph margin). Click the error mark and choose whether to add the missing import or create this class inthe current package.
Note:When you select a class from the code completion window, the Editor automatically adds an importstatement for it.
To add all missing import statements at once:
Choose Source > Fix Imports from the menu (or press Ctrl-Shift-I) while you are typing.
Note:To quickly see if your code contains unused or missing imports, watch the error stripes in the right-hand margin: orange stripes mark missing or unused imports.
To add an import only for the type at which the cursor is located:
Press Alt-Shift-I.
To remove one unused import or all unused imports:
If there are unused import statements in your code, press the warning mark in the Editor left-hand marginand choose either to remove one unused import or all unused imports.
Note:
In the Editor, unused imports are underlined.
2.6.15 How to Generate CodeWhen working in the Source Editor, you can automatically generate pieces of code in one of the two ways: byusing code completion or from the Code Generation dialog box.
To insert code from the Code Generation dialog box:
Choose Source > Insert Code (or Press Alt-Insert anywhere in the Editor).
The suggested list is adjusted to the current context.
In the IDE's Source Editor, you can automatically generate various constructs and whole methods, override anddelegate methods, add properties and more.
To generate code from the Code Completion window:
Press Ctrl-Space to open the code completion window and choose the most appropriate item.
The Editor generates a piece of code appropriate for the current context.
Note:In the code completion window, the constructors that can be automatically generated are marked withthe icon and the generate note.
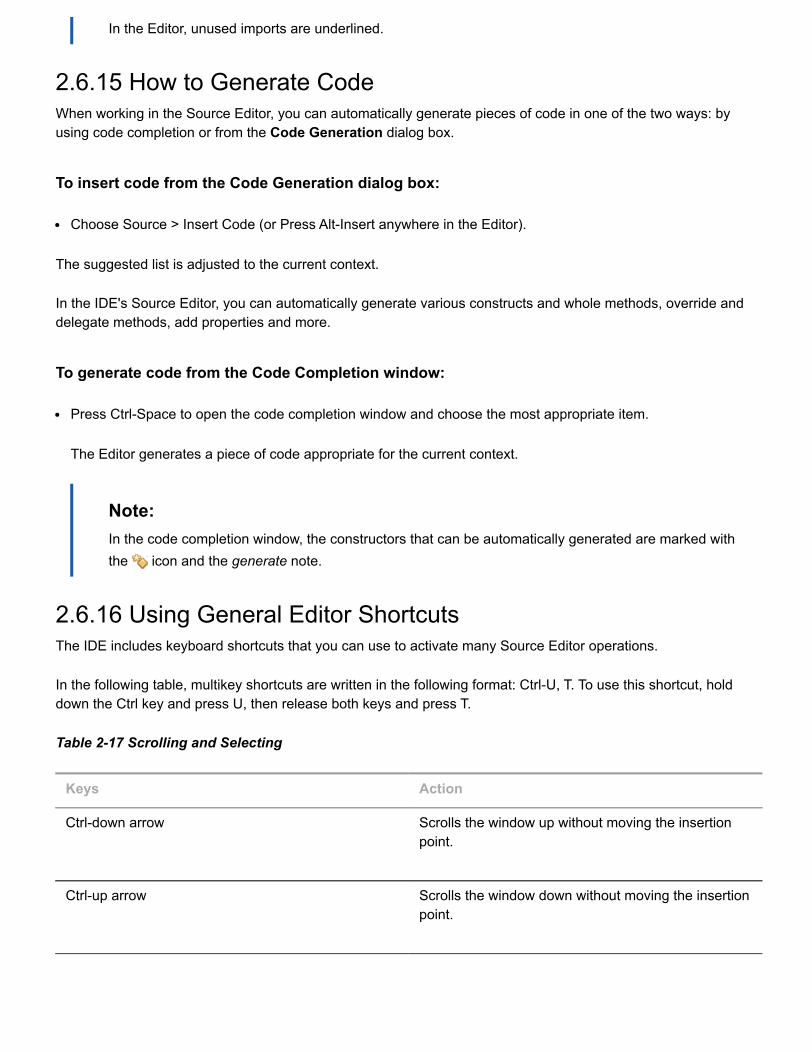
2.6.16 Using General Editor ShortcutsThe IDE includes keyboard shortcuts that you can use to activate many Source Editor operations.
In the following table, multikey shortcuts are written in the following format: Ctrl-U, T. To use this shortcut, holddown the Ctrl key and press U, then release both keys and press T.
Table 2-17 Scrolling and Selecting
Keys Action
Ctrl-down arrow Scrolls the window up without moving the insertionpoint.
Ctrl-up arrow Scrolls the window down without moving the insertionpoint.
Keys Action
Ctrl-[ Moves the insertion point to the highlighted matchingbracket. This shortcut only works when the insertionpoint is immediately after the opening or closingbracket.
Ctrl-Shift-[ Selects the block between a pair of brackets. Thisshortcut only works when the insertion point isimmediately after either the opening or closingbracket.
Ctrl-G Jumps to any specified line.
Ctrl-A Selects all text in the file.
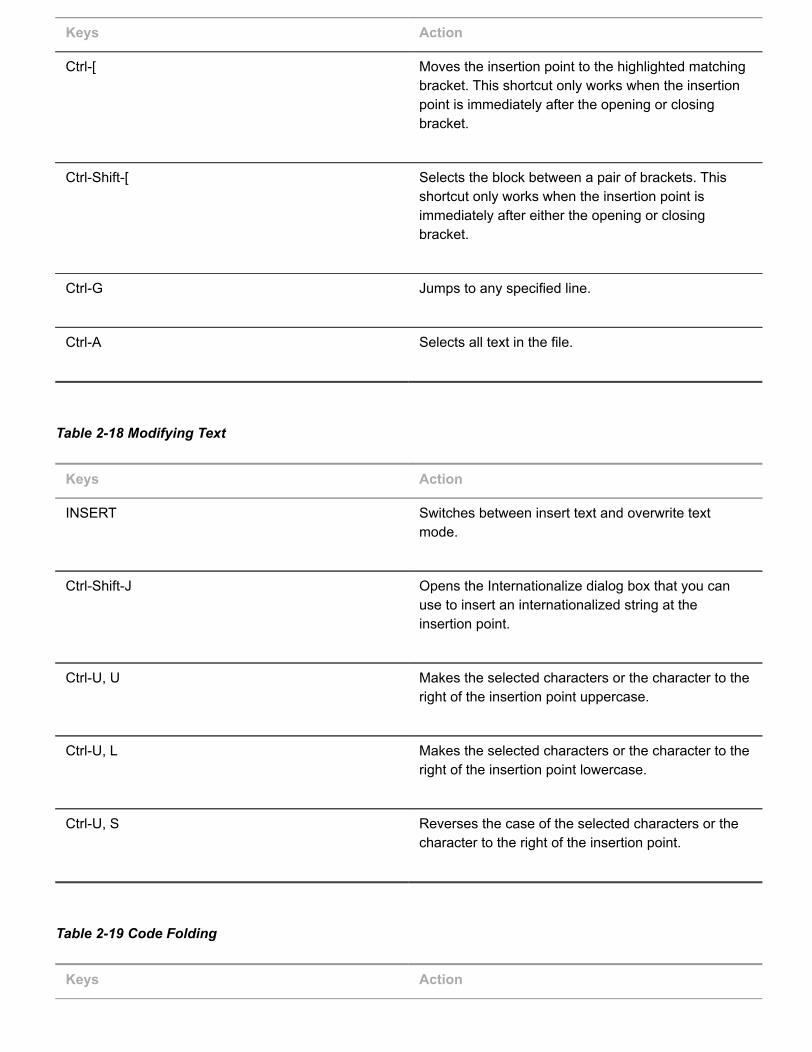
Table 2-18 Modifying Text
Keys Action
INSERT Switches between insert text and overwrite textmode.
Ctrl-Shift-J Opens the Internationalize dialog box that you canuse to insert an internationalized string at theinsertion point.
Ctrl-U, U Makes the selected characters or the character to theright of the insertion point uppercase.
Ctrl-U, L Makes the selected characters or the character to theright of the insertion point lowercase.
Ctrl-U, S Reverses the case of the selected characters or thecharacter to the right of the insertion point.
Table 2-19 Code Folding
Keys Action
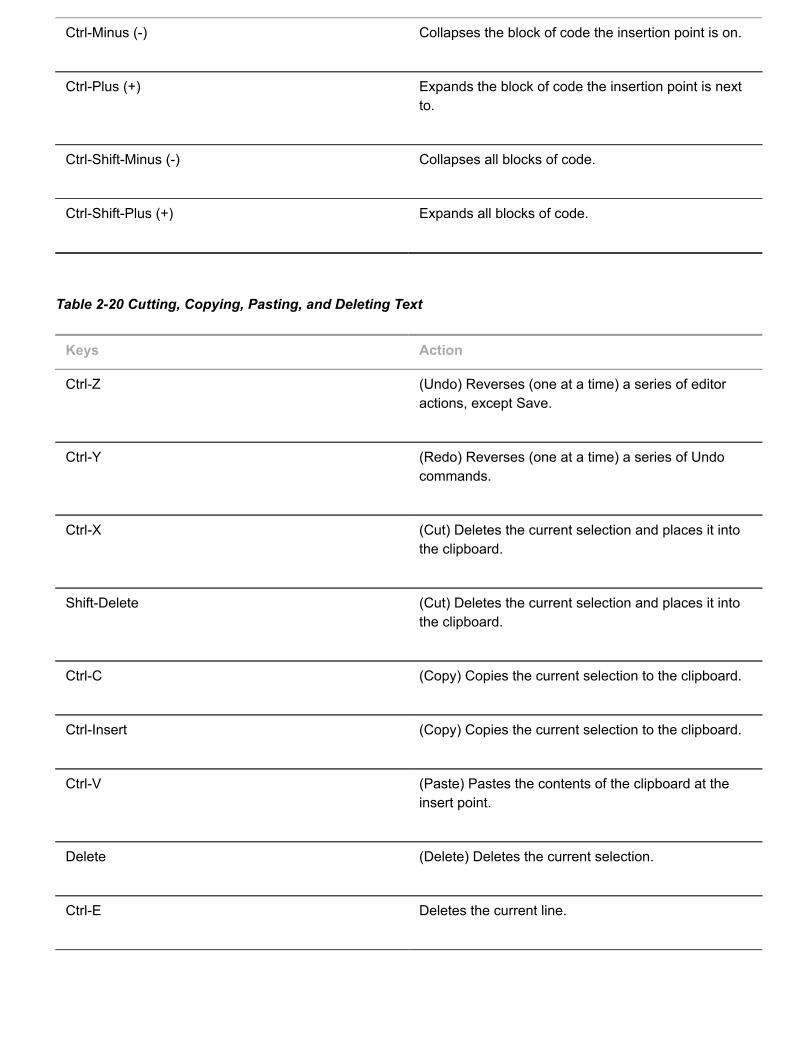
Ctrl-Minus (-) Collapses the block of code the insertion point is on.
Ctrl-Plus (+) Expands the block of code the insertion point is nextto.
Ctrl-Shift-Minus (-) Collapses all blocks of code.
Ctrl-Shift-Plus (+) Expands all blocks of code.
Table 2-20 Cutting, Copying, Pasting, and Deleting Text
Keys Action
Ctrl-Z (Undo) Reverses (one at a time) a series of editoractions, except Save.
Ctrl-Y (Redo) Reverses (one at a time) a series of Undocommands.
Ctrl-X (Cut) Deletes the current selection and places it intothe clipboard.
Shift-Delete (Cut) Deletes the current selection and places it intothe clipboard.
Ctrl-C (Copy) Copies the current selection to the clipboard.
Ctrl-Insert (Copy) Copies the current selection to the clipboard.
Ctrl-V (Paste) Pastes the contents of the clipboard at theinsert point.
Delete (Delete) Deletes the current selection.
Ctrl-E Deletes the current line.
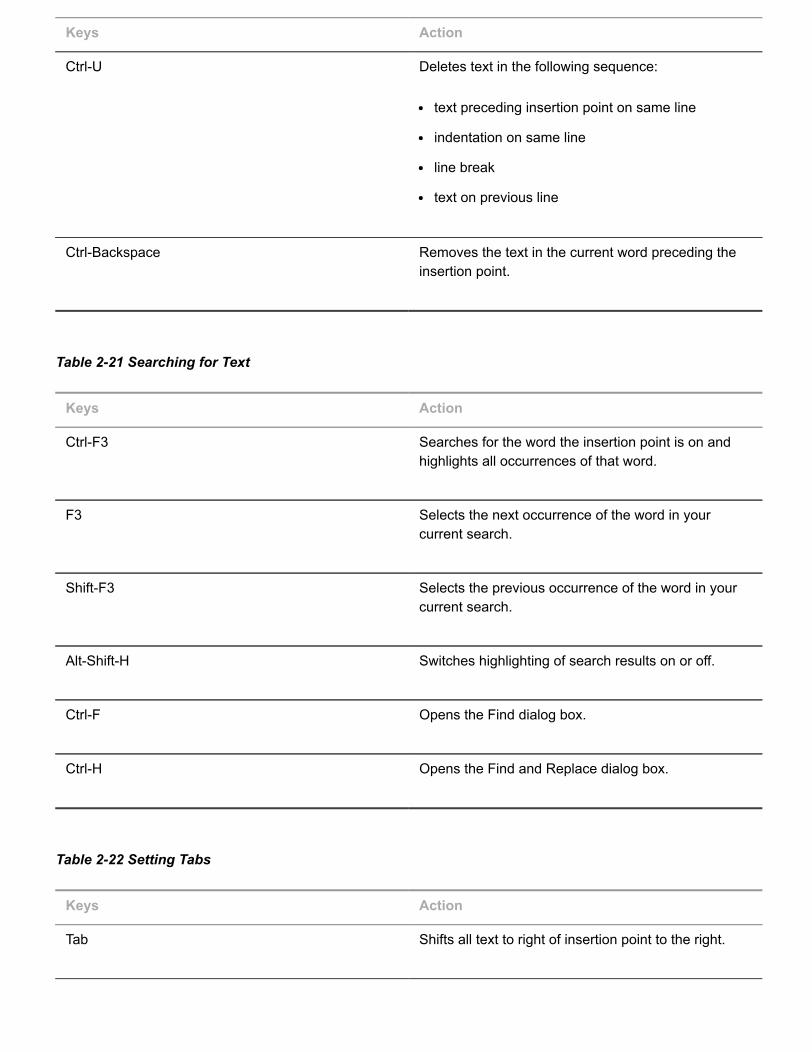
Keys Action
Ctrl-U Deletes text in the following sequence:
text preceding insertion point on same line
indentation on same line
line break
text on previous line
Ctrl-Backspace Removes the text in the current word preceding theinsertion point.
Table 2-21 Searching for Text
Keys Action
Ctrl-F3 Searches for the word the insertion point is on andhighlights all occurrences of that word.
F3 Selects the next occurrence of the word in yourcurrent search.
Shift-F3 Selects the previous occurrence of the word in yourcurrent search.
Alt-Shift-H Switches highlighting of search results on or off.
Ctrl-F Opens the Find dialog box.
Ctrl-H Opens the Find and Replace dialog box.
Table 2-22 Setting Tabs
Keys Action
Tab Shifts all text to right of insertion point to the right.
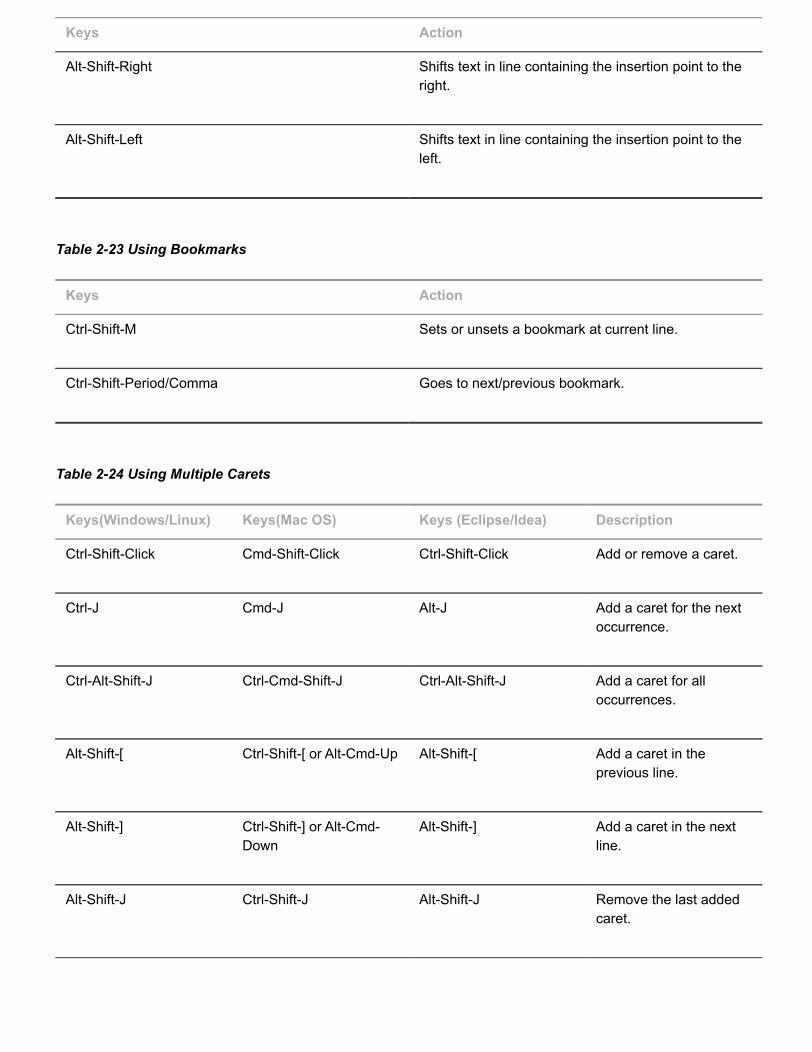
Keys Action
Alt-Shift-Right Shifts text in line containing the insertion point to theright.
Alt-Shift-Left Shifts text in line containing the insertion point to theleft.
Table 2-23 Using Bookmarks
Keys Action
Ctrl-Shift-M Sets or unsets a bookmark at current line.
Ctrl-Shift-Period/Comma Goes to next/previous bookmark.
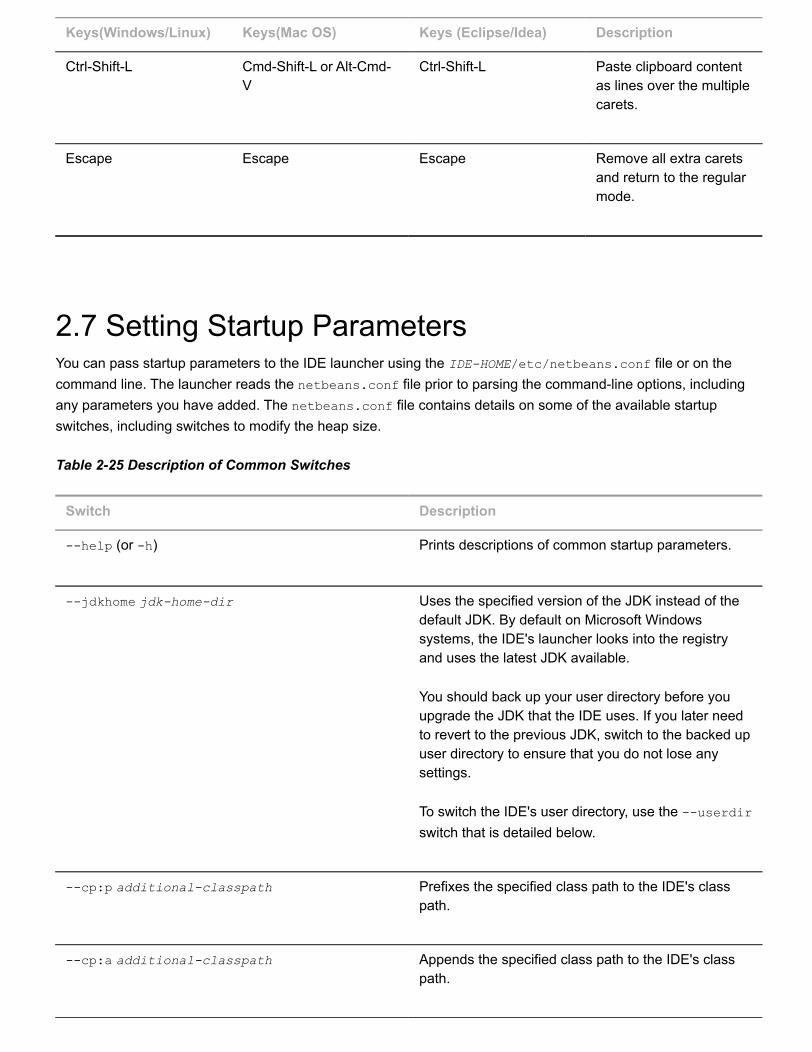
Table 2-24 Using Multiple Carets
Keys(Windows/Linux) Keys(Mac OS) Keys (Eclipse/Idea) Description
Ctrl-Shift-Click Cmd-Shift-Click Ctrl-Shift-Click Add or remove a caret.
Ctrl-J Cmd-J Alt-J Add a caret for the nextoccurrence.
Ctrl-Alt-Shift-J Ctrl-Cmd-Shift-J Ctrl-Alt-Shift-J Add a caret for alloccurrences.
Alt-Shift-[ Ctrl-Shift-[ or Alt-Cmd-Up Alt-Shift-[ Add a caret in theprevious line.
Alt-Shift-] Ctrl-Shift-] or Alt-Cmd-Down
Alt-Shift-] Add a caret in the nextline.
Alt-Shift-J Ctrl-Shift-J Alt-Shift-J Remove the last addedcaret.
Keys(Windows/Linux) Keys(Mac OS) Keys (Eclipse/Idea) Description
Ctrl-Shift-L Cmd-Shift-L or Alt-Cmd-V
Ctrl-Shift-L Paste clipboard contentas lines over the multiplecarets.
Escape Escape Escape Remove all extra caretsand return to the regularmode.
2.7 Setting Startup ParametersYou can pass startup parameters to the IDE launcher using the IDE-HOME/etc/netbeans.conf file or on thecommand line. The launcher reads the netbeans.conf file prior to parsing the command-line options, includingany parameters you have added. The netbeans.conf file contains details on some of the available startupswitches, including switches to modify the heap size.
Table 2-25 Description of Common Switches
Switch Description
--help (or -h) Prints descriptions of common startup parameters.
--jdkhome jdk-home-dir Uses the specified version of the JDK instead of thedefault JDK. By default on Microsoft Windowssystems, the IDE's launcher looks into the registryand uses the latest JDK available.
You should back up your user directory before youupgrade the JDK that the IDE uses. If you later needto revert to the previous JDK, switch to the backed upuser directory to ensure that you do not lose anysettings.
To switch the IDE's user directory, use the --userdirswitch that is detailed below.
--cp:p additional-classpath Prefixes the specified class path to the IDE's classpath.
--cp:a additional-classpath Appends the specified class path to the IDE's classpath.
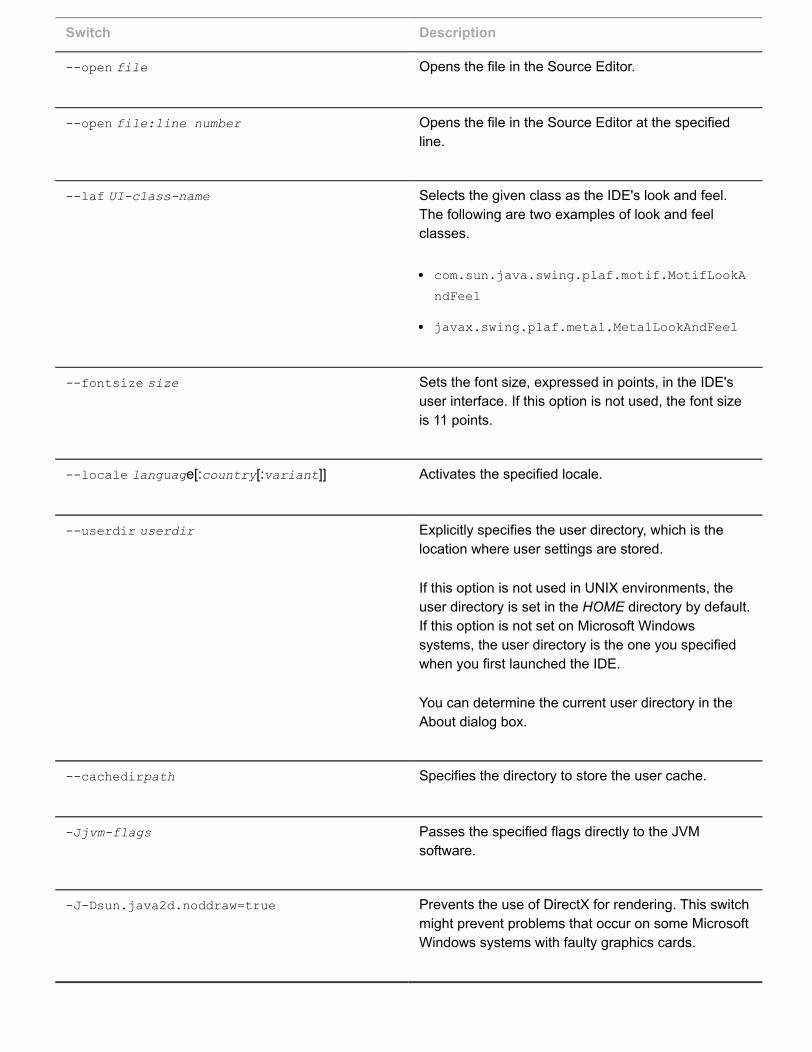
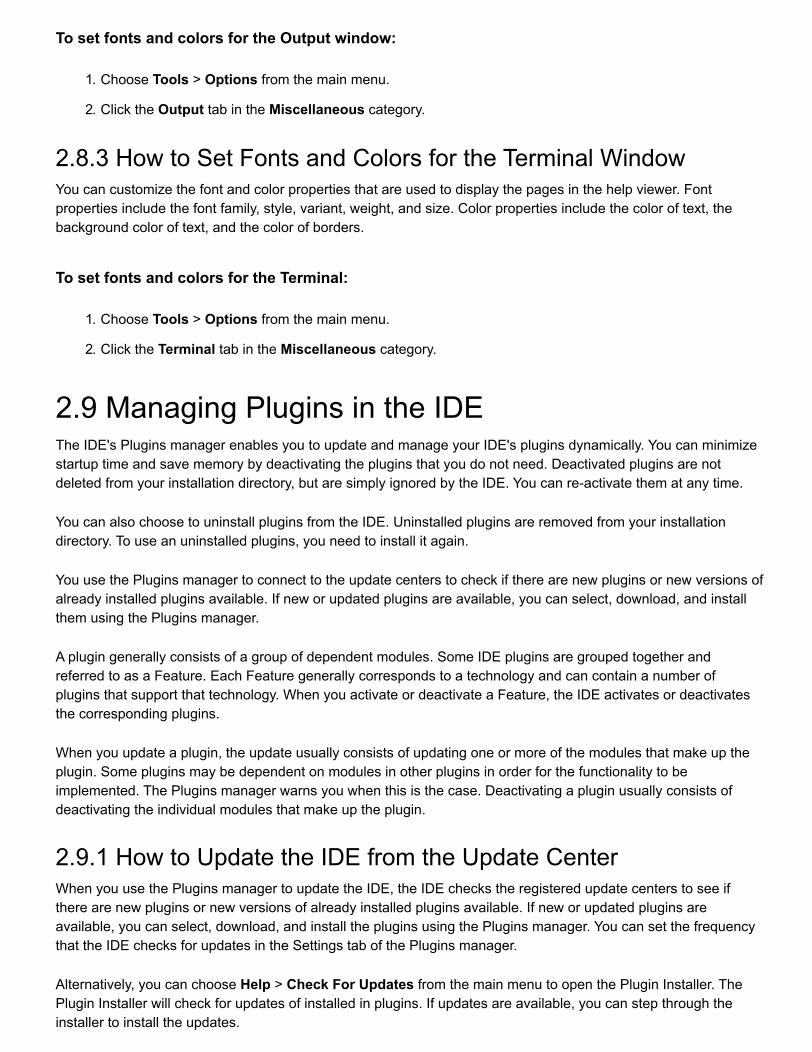
Switch Description
--open file Opens the file in the Source Editor.
--open file:line number Opens the file in the Source Editor at the specifiedline.
--laf UI-class-name Selects the given class as the IDE's look and feel.The following are two examples of look and feelclasses.
com.sun.java.swing.plaf.motif.MotifLookA
ndFeel
javax.swing.plaf.metal.MetalLookAndFeel
--fontsize size Sets the font size, expressed in points, in the IDE'suser interface. If this option is not used, the font sizeis 11 points.
--locale language[:country[:variant]] Activates the specified locale.
--userdir userdir Explicitly specifies the user directory, which is thelocation where user settings are stored.
If this option is not used in UNIX environments, theuser directory is set in the HOME directory by default.If this option is not set on Microsoft Windowssystems, the user directory is the one you specifiedwhen you first launched the IDE.
You can determine the current user directory in theAbout dialog box.
--cachedirpath Specifies the directory to store the user cache.
-Jjvm-flags Passes the specified flags directly to the JVMsoftware.
-J-Dsun.java2d.noddraw=true Prevents the use of DirectX for rendering. This switchmight prevent problems that occur on some MicrosoftWindows systems with faulty graphics cards.

Note:When adding startup switches, you can break options into multiple lines.
For information about your userdir and cachedir, see the following document.
http://wiki.netbeans.org/FaqWhatIsUserdir (http://wiki.netbeans.org/FaqWhatIsUserdir)
For information about performance-related startup switches, see the following document.
http://performance.netbeans.org/howto/jvmswitches/
(http://performance.netbeans.org/howto/jvmswitches/)
For information about modifying the JVM heap size, see the following FAQ on the NetBeans wiki.
http://wiki.netbeans.org/FaqSettingHeapSize (http://wiki.netbeans.org/FaqSettingHeapSize)
2.8 Setting Fonts and Colors for IDE WindowsYou can customize the font and color properties that are used in various windows in the IDE. Font propertiesinclude the font family, style, variant, weight, and size. Color properties include the color of text, the backgroundcolor of text, and the color of borders.
2.8.1 How to Set Fonts and Colors for the Help ViewerYou can customize the font and color properties that are used to display the pages in the help viewer. Fontproperties include the font family, style, variant, weight, and size. Color properties include the color of text, thebackground color of text, and the color of borders.
To set fonts and colors for displaying help pages:
1. From the main window, choose File > Open File.
2. In the Open dialog box, navigate to IDE-install-directoryide/docs/org/netbeans/modules/usersguide and open the file ide.css.
The ide.css file is the style sheet that describes how to present the fonts and colors in the help pages.
3. Edit ide.css to your preferences.
4. Choose File > Save.
5. Open the help viewer and verify your changes.
2.8.2 How to Set Fonts and Colors for the Output WindowYou can customize the font and color properties that are used to display the pages in the help viewer. Fontproperties include the font family, style, variant, weight, and size. Color properties include the color of text, thebackground color of text, and the color of borders.
To set fonts and colors for the Output window:
1. Choose Tools > Options from the main menu.
2. Click the Output tab in the Miscellaneous category.
2.8.3 How to Set Fonts and Colors for the Terminal WindowYou can customize the font and color properties that are used to display the pages in the help viewer. Fontproperties include the font family, style, variant, weight, and size. Color properties include the color of text, thebackground color of text, and the color of borders.
To set fonts and colors for the Terminal:
1. Choose Tools > Options from the main menu.
2. Click the Terminal tab in the Miscellaneous category.
2.9 Managing Plugins in the IDEThe IDE's Plugins manager enables you to update and manage your IDE's plugins dynamically. You can minimizestartup time and save memory by deactivating the plugins that you do not need. Deactivated plugins are notdeleted from your installation directory, but are simply ignored by the IDE. You can re-activate them at any time.
You can also choose to uninstall plugins from the IDE. Uninstalled plugins are removed from your installationdirectory. To use an uninstalled plugins, you need to install it again.
You use the Plugins manager to connect to the update centers to check if there are new plugins or new versions ofalready installed plugins available. If new or updated plugins are available, you can select, download, and installthem using the Plugins manager.
A plugin generally consists of a group of dependent modules. Some IDE plugins are grouped together andreferred to as a Feature. Each Feature generally corresponds to a technology and can contain a number ofplugins that support that technology. When you activate or deactivate a Feature, the IDE activates or deactivatesthe corresponding plugins.
When you update a plugin, the update usually consists of updating one or more of the modules that make up theplugin. Some plugins may be dependent on modules in other plugins in order for the functionality to beimplemented. The Plugins manager warns you when this is the case. Deactivating a plugin usually consists ofdeactivating the individual modules that make up the plugin.
2.9.1 How to Update the IDE from the Update CenterWhen you use the Plugins manager to update the IDE, the IDE checks the registered update centers to see ifthere are new plugins or new versions of already installed plugins available. If new or updated plugins areavailable, you can select, download, and install the plugins using the Plugins manager. You can set the frequencythat the IDE checks for updates in the Settings tab of the Plugins manager.
Alternatively, you can choose Help > Check For Updates from the main menu to open the Plugin Installer. ThePlugin Installer will check for updates of installed in plugins. If updates are available, you can step through theinstaller to install the updates.
In addition to the default IDE Update Center, you can choose from several update centers that offer different typesof plugins, such as experimental new plugins or old plugins that are no longer in regular distribution.
To update installed plugins from the Update Center:
1. Choose Tools > Plugins from the main menu to open the Plugins manager.
2. Click the Updates tab to display available updates of installed plugins.
3. In the left pane, select the plugins you wish to update and click Update.
4. Complete the pages in the installer to download and install the update.
The left pane of the Updates tab displays the installed plugins which have updates available from the updatecenters. By default, the IDE regularly checks the registered update centers for available updates of installedplugins. If no plugins are displayed in the left pane, it means that no updates were available the last time the IDEchecked the update center.
To add new plugins from the Update Center:
1. Choose Tools > Plugins from the main menu to open the Plugins manager.
2. Click the Available Plugins tab to display plugins that are available but not installed.
3. In the left pane, select the plugins you wish to add and click Install.
4. Complete the pages in the installer to download and install the plugin.
Note:Some plugins may require you to restart the IDE to complete the update process or to activate ordeactivate them.
2.9.2 How to Install Downloaded PluginsIf you have already downloaded a plugin's .nbm file, you can manually install it without having to connect to anupdate center.
To install a downloaded plugin:
1. Choose Tools > Plugins from the main menu and select the Downloaded tab.
2. Click Add Plugins and browse to the location of the downloaded .nbm file. Select the file and click Open.
3. Repeat the previous step for each plugin that you wish to add.
4. Click Install and complete the pages of the installer to install the plugin.
If the plugin that you have selected in the file chooser does not appear in the Downloaded tab of the Pluginsmanager, you probably have the same or a newer version of that plugin already installed. You can check theInstalled tab to verify that the plugin is installed and activated.
2.9.3 How to Activate and Deactivate PluginsThe IDE enables you to deactivate installed plugins that you do not need to minimize startup time and savememory. Deactivated plugins are not deleted from your installation directory, but are simply ignored by the IDE.You can re-activate them at any time. You do not need to download the plugins again.
To activate or deactivate an installed plugin:
1. Choose Tools > Plugins from the main menu and then click the Installed tab in the Plugins manager.
2. In the left pane, select the plugin you wish to activate or deactivate.
The icon in the Active column indicates the status of the plugin.
3. Click Activate or Deactivate to activate or deactivate the plugin.
The icon for the plugin in the left pane reflects the new status of the plugin.
4. Click Close to exit the Plugins manager.
If you want to completely remove a plugin from your local system, select the checkbox for the plugin in the leftpane and then click Uninstall.
The following table defines the icons used in the Installed tab of the Plugins manager to indicate the status ofplugins.
Table 2-26 Plugin Status Icons
Icon Description
The plugin is installed and activated.
The plugin will be fully deactivated after you restartthe IDE.
The plugin is installed but deactivated.
2.9.4 How to Globally Install Plugins
If you are using a multi-user installation of the IDE, you can install a plugin globally so that the plugin is availableto all users. When you install or update a plugin using the Plugins manager, the IDE places the plugin JAR anddocs in your user directory. The IDE places JAR and docs for globally installed plugins in your installation directoryinstead of an individual user directory.
To globally install a plugin:
1. Choose Tools > Plugins to open the Plugins manager.
2. Click the Settings tab and then select Force install into shared directories in the Plugin Install Locationdrop-down list.
3. Click the Available Plugins tab, select the Install checkbox for the plugin and click Install.
You can also install manually downloaded plugins in the Downloaded tab.
4. Follow the wizard instructions to complete the installation of the plugin.
5. Restart the IDE to activate the new plugin, if necessary.
To install a plugin globally, you must have write access for the IDE installation directory.
2.9.5 How to Add an Update CenterThe IDE's Plugins manager enables you to update your IDE's installed plugins from registered update centers.You can specify the update centers you want the IDE to check and how often the IDE checks the update centers.
You can manage the registered update centers in the Settings tab of the Plugins manager. In addition to thedefault IDE Update center, you can add other update centers that offer different types of plugins, such asexperimental new plugins or old plugins that are no longer in regular distribution.
To add an update center:
1. Choose Tools > Plugins from the main menu to open the Plugins manager.
2. Click the Settings tab to display the registered update centers.
3. Click Add to open the Update Center Customizer dialog box.
4. Type the name of the update center and the URL and click OK.
In the Settings tab of the Plugins manager you can also do the following:
Deactivate an update center by deselecting the Active checkbox for the update center you wish to deactivate.You can reactivate the update center later if you wish.
Edit the details of an update center by selecting the update center in the left pane and clicking Edit in the rightpane.

Remove an update center by selecting the update center in the left pane and clicking Remove in the right pane.
2.9.6 How to Schedule Update ChecksBy default, the IDE periodically checks the update centers for new updates. You can set the interval or specify thatthe IDE should not automatically check for updates.
To schedule update checks:
1. In the Settings tab of the Plugins manager, choose a frequency from the Check Interval drop-down list.Choose Never if you do not want the IDE to automatically check for updates.
2. Click Proxy Settings if you need to set any proxy settings needed to enable the IDE to access the updatecenters.
2.10 Displaying IDE Help in a Web BrowserThe online help is designed to be viewed in the JavaHelp viewer, which is integrated into the IDE. If you prefer,you can view the online help in the IDE's web browser or in another HTML browser.
2.10.1 How to Extract IDE Help from a JAR FileThe online help is divided into several help sets. Most help sets are packaged in a JAR file, while a few help setsare packaged in a zip file. Help sets are typically stored in the ide/modules/docs directory in your installationdirectory.
To extract the online help from a JAR file:
1. In a command window, change to the install-directory/ide/modules/docs directory and list the filesin that directory.
2. Use the jar command-line utility to unpack the JAR file in which you are interested. On Microsoft Windowssystems and UNIX systems, the command is as follows:
jar xf jar-file
For jar-file, use the file name of the JAR file from which you want to extract files.
The Jar tool makes copies of the files and writes them to the current directory. The directory structure isreproduced according to the package structure in the archive.
2.10.2 How to View IDE Help in a Web Browser
To view the online help in a web browser:
1. From the IDE main window, choose View > Web Browser.
2. In the web browser use the File Browser and navigate to the files you just extracted.
2.11 Internationalizing Source CodeThe IDE's internationalization tools let you easily insert internationalization strings while you write your code aswell as internationalize files that are already written. You can also check resource bundles to make sure each keyreferenced by your code exists.
When you internationalize existing source files, the IDE searches for every customizable occurrence of a quotedtext string. If you decide to internationalize the string, the IDE replaces it with a method call and adds the string tothe appropriate resource bundle. You can select from several code formats for generating internationalized strings,or you can use your own custom format.
2.11.1 How to Enable Automatic InternationalizationAs you design a form in the GUI Builder, you can have the code generated as internationalized code.
To turn on automatic internationalization for a form:
1. Open the form and make sure that the form appears in the Design view.
2. In the Navigator window, select the root node for the form.
3. In the Properties window, select the Automatic Internationalization checkbox.
2.11.2 How to Internationalize a Single FileThe Internationalize dialog box enables you to replace hard-coded strings in a single file with internationalizedstrings. If you need to internationalize several Java sources into one or more resource bundles, use theInternationalization wizard.
To internationalize source code:
1. In the Files or Projects window, right-click the class file you want to internationalize and choose Tools >Internationalization > Internationalize.
The Internationalize dialog box opens enabling you to edit each string in the file consecutively.
If a resource bundle already exists for the file, the bundle properties file in which the strings are saved isdisplayed in the Bundle Name field. The Replace String field also displays a preview of theinternationalized string.
If no resource bundle exists for the file, the Bundle Name and Replace String fields are empty. You canclick the ellipsis (...) button to specify a properties file or create a new one in which to saveinternationalized strings.
2. If you want to change the method used to generate the localized string, click Format.
3. If you want to add arguments to the method call, click Arguments. You can only add arguments to themethod call if you use the java.text.MessageFormat or org.openide.util.NbBundle.getMessageformats.
4. Check that the key and value are correct. By default, the Internationalize dialog box gives the key the samename as the string being replaced.
5. Click Replace to generate the internationalized string.
The next string to be internationalized is then displayed in the Value text field.
6. Click Skip to ignore any strings you do not want to internationalize.
The IDE automatically dismisses the dialog box once the last string has been replaced.
To get information about the highlighted string in the Source Editor, click Info to see the name of the componentcontaining the string and the property that the string is associated with.
2.11.3 How to Use the Internationalization WizardThe Internationalization wizard enables you to replace hard-coded strings with internationalized strings in multiplefiles. If you are localizing the source into more than one language, the Internationalization wizard also lets youspecify the localized string for multiple locales.
To automatically internationalize strings in multiple source files:
1. Choose Tools > Internationalization > Internationalization Wizard from the main window.
2. Click Add Source(s) to add one or more source files to internationalize. Click Next to proceed.
3. Click Select All if you want a single resource bundle to contain the key and value pairs for all the listedsources. To select a resource bundle for specific source files, select the desired sources and click SelectResource. In the Select Resource dialog box, select the desired .properties file or create a new file.Click Next to proceed.
To modify key and value pairs:
a. From the Source drop-down list, select the source file in which you want to create the variable.
b. Select the Generate Field checkbox and set the variable's modifiers.
c. Type the name of the identifier in the Identifier text field.
d. The Init String field gives you a preview of the code that the variable will use to reference theresource bundle. To change this code, click Format and select the desired code format from the InitCode Format Editor.
e. Click Next to generate the field.
4. In the Modify Found Strings pane, set the key name and localized values for each of the strings you wantto internationalize by entering a new value in the appropriate column. Use the Source drop-down list toswitch between source files. Deselect the checkbox in the first column for any string you do not want tointernationalize.
5. To change the code format used to generate the internationalized string or add arguments to the methodcall, click the ellipsis button (...) at the end of the string's row.
6. Click Finish to internationalize the strings for all of the selected source files.
2.11.4 How to Insert an Internationalized String Into Source CodeThe Insert Internationalized String command enables you to add internationalization strings one at a time as youcreate the source.
To insert an internationalized string into your source code:
1. In the Source Editor, put the insertion point at the location in the source file where you want to insert aninternationalized string.
2. Right-click the desired location and choose Tools > Internationalization > Insert InternationalizedString from the pop-up menu, or use the keyboard shortcut (Ctrl-Shift-J).
The Insert Internationalized String dialog box appears enabling you to edit each string in the fileconsecutively. To choose a different .properties file or create a new file, click the ellipsis (...) button.
3. Click Format if you want to change the method used to generate the localized string.
4. Click Arguments if you want to add arguments to the method call. You can only add arguments to themethod call if you use the java.text.MessageFormat or org.openide.util.NbBundle.getMessageformats.
5. Type in values for the Key and Value properties and click OK.
2.11.5 How to Internationalize a String With the GUI BuilderIf you need to internationalize a GUI application, you can use the GUI Builder to replace a GUI component's hard-coded text with internationalized strings.
To insert an internationalized string with the GUI Builder:
1. Open the desired file in the GUI Builder by double-clicking its node in the Files or Projects window.
2. Select the appropriate GUI component in the Navigator window.
3. In the Properties window, select the property that you want to internationalize (for example, the textproperty of jLabel).
4. Select Resource Bundle from the drop-down list at the top of the dialog box.
The property editor switches to resource bundle mode.
If a resource bundle already exists for the source, the bundle properties file into which the internationalizedstrings will be saved is displayed in the Bundle Name field.
5. If no .properties file is listed in the Bundle Name field, click the ellipsis (...) button next to the field toopen the Select Resource Bundle dialog box. In the dialog box, specify an existing .properties file orcreate a new file. Click OK to return to the property editor.
6. If you want to change the method used to generate the internationalized string, click the Format button.
7. If you want to add arguments to the method call, click Arguments. You can add arguments to the methodcall only if you use the java.text.MessageFormat or org.openide.util.NbBundle.getMessageformats.
8. Type in values for the Key and Value properties and click OK.
2.11.6 How to Test a Bundle for Internationalized StringsYou can check resource bundles for missing key and value pairs by using the Internationalization Test wizard. Thewizard looks for all internationalized string keys (with a customizable meaning) in the source and checks for acorresponding key and value pair in the specified resource bundle. You can use the wizard to add any missingpairs.
To test a bundle for internationalized strings:
1. Choose Tools > Internationalization > Internationalization Test Wizard.
2. Click Add Source(s) and select one or more source files to test in the Select Sources dialog that appears.Click Next to proceed.
3. Specify the resource bundles for the source files. Click Select All to check one resource bundle for all thelisted sources. To select a specific resource bundle for one or more source files, select the desired sourcesand click Select Resource. Click Next to proceed.
The wizard lists all of the internationalized strings with missing key and value pairs in the selected file. Thewizard automatically suggests key names and values for the string.
4. Use the Source drop-down list to switch between source files. Deselect the checkbox in the first column forany string you do not want to include in the resource bundle. Change the key name and value for anystring by typing a new value in the appropriate column.
5. Click Finish to add the missing key and value pairs to the resource bundle.
2.11.7 How to Add Arguments for Message FormatsThe java.text.MessageFormat code format lets you use strings that are constructed dynamically at runtime.The dynamically added elements are stored in an array of objects, which is passed as a parameter tojava.text.MessageFormat. You can use the Message Format Arguments dialog box to specify the values ofthese objects.
You can add arguments when you use the org.openide.util.NbBundle.getMessage format. This format ispart of the NetBeans APIs and is used to build modules for the IDE. Consult the NetBeans API documentation formore information on this format.
To enter substitution parameters for a message format:
1. In the Internationalize dialog box, click the Format button.
2. Select the java.text.MessageFormat format or the org.openide.util.NbBundle.getMessage formatfrom the Replace Code Format drop-down list. Then click OK.
3. In the Internationalize dialog box, click the Arguments button.
4. Click the Add button next to the Arguments text field.
A series of parameters, beginning with 0, is added to the text field.
5. Type a value for the parameter in the Code field.
6. Use the Add and Remove buttons to add or remove message parameters. When you are done, click OK toclose the dialog box.
7. Finish entering values for the key and value fields as normal.
The arguments you supply are substituted for the {arguments} wild card in the following format:
java.text.MessageFormat(java.util.ResourceBundle.getBundle("bundle
name").getString("key"), new Object[] {arg1, arg2, arg3})
2.12 Managing and Creating ProjectsA NetBeans project is a group of source files and the settings with which you build, run, and debug those sourcefiles. In the IDE, all development has to take place within a project. For applications that involve large code bases,it is often advantageous to split your application source code into several projects.
2.12.1 How to Create a ProjectNetBeans IDE provides wizards that enable you to create projects that are based on project templates. The IDEincludes several project templates designed to support different types of development including general Javaapplications, Java web and enterprise applications, HTML5 applications and PHP applications.
To create a project:
1. Choose File > New Project (Ctrl-Shift-N) from the main menu.
2. Select the appropriate project template in the New Project wizard.
3. Follow the steps in the remainder of the wizard.
For information on creating a Java Application Project, see Chapter 6, "Creating Java Projects."(create_japps.htm#BABCGJJB)
For information on creating a Java Web Application Project, see Chapter 12, "Developing Web Applications."(dev_web_apps.htm#BACGGCJH)
For information on creating a Java EE Project, see Chapter 14, "Developing Enterprise Applications."(dev_jee_apps.htm#BACBBGAB)
For information on creating an HTML5 Application Project, see Chapter 20, "Developing HTML5/JavaScriptApplications." (dev_html_apps.htm#CHDCBCDA)
For information on creating a PHP Application Project, see Chapter 21, "Developing PHP Applications."(dev_php_apps.htm#BABHIDDD)
For information on creating a Java ME Application Project, see Chapter 22, "Developing Java ME Applications."(dev_jme_apps.htm#BACDBIJJ)
2.12.2 How to Work with Character Encodings for a ProjectBy default, newly-created projects in the IDE use UTF-8 character encoding. This encoding determines how theIDE interprets characters beyond the ASCII character set. The IDE displays and saves any new files you createusing the encoding set by the project in which they reside. If you want to change encoding properties, the IDEprovides you with the ability to do so manually.
The IDE implements the FileEncodingQuery (FEQ) layer model. FEQ is an interface for obtaining informationabout which encoding can be used for reading from/writing to a particular file. The layer model prioritizes encodingbased on the following hierarchy:
1. File FEQ. The encoding value declared within a file.
2. Project FEQ. The value of the current global project encoding in a session.
3. Fallback FEQ. The encoding of the locale in which the IDE is running.
Project created in NetBeans IDE 5.x and older did not implement the FEQ and will be opened using the fallbackFEQ, the default locale set by your system's environment.
WARNING:If you change the project encoding property on a project that already contains files that were created using aspecific character encoding, there is a risk that compiling and running the project may not succeed. This is dueto the fact that the programming compiler needs to be passed an encoding value, and there can only be onesuch value. Neither the IDE nor the programming language performs automatic encoding detection of files.
2.12.2.1 Changing the Character Encoding of a ProjectWhen you change the encoding for a project, all new files are created using the new project encoding.
To change the character encoding for a project:
1. Right-click the project node in the Projects window and choose Properties.
2. In the left column under Categories, select Sources.
3. In the Encoding drop-down list, select the character encoding that you want to be applied to the project.Click OK. The new encoding is applied to the project you are working in.
Note:The new value that you set for project encoding is retained as the global project encoding value for newprojects. Therefore, when you create a new project, the IDE uses the encoding value of the previouslycreated project for the new project.
2.12.3 How to Organize Projects into GroupsYou can create groupings of projects so that you can open and close several projects at once. In addition, eachgroup can have a different main project. After you create a project group, that project group is available in theProject Group menu. When you select a project group from that menu, all other open projects are closed. If youwant to close all open projects, choose File > Project Group > (none).
To create a project group:
1. Choose File > Project Groups from the main menu.
2. Click New Group in the Manage Groups dialog box.
3. Type the name of the new group in the Create New Group dialog box.
4. Select the options for the group. Click Create Group.
If you select the Automatically Save Project List option in the dialog box, projects that you open or closewill automatically be added to or removed from the group.
To create a project group that contains a specific set of projects:
1. Close any projects that you do not want to include in the group.
2. Choose File > Project Groups to open the Manage Groups dialog box.
3. Click New Group.
4. Select Free Group in the Create New Group dialog box.
5. Select Use Currently Open Projects.
If you created a free group and deselected the Automatically Save Project List option when you created the group,you can perform the following steps to modify the contents of the group.
To modify the contents of a free group:
1. Open the project group that you want to modify.
2. Open any projects that you want to add to the group.
3. Close any projects that you want to remove from the group.
4. Choose File > Project Groups.
5. Select the group or groups in the Manage Groups dialog box. Click Properties.
6. Select Automatically Save Project List in the Project Group Properties dialog box. Click OK.
2.13 Working with Source Files in the IDEThe IDE provides tools that enable you to find, compare and move the files in your projects. You can also modifythe properties of files and create file templates that you can use when you create files.
For information on editing Java source files, see Chapter 7, "Working with Java Code."(work_java_code.htm#CACGCAGE)
2.13.1 How to Find Files in ProjectsYou can use the Find in Projects command to locate the occurrences of specific text strings in files in your project.You can invoke the command from the popup menu in the Projects, Files and Favorites windows.
The results of the search are displayed in the Search Results window. The Search Results window displays anode for each file that contains the search string. When a file contains more than one occurrence of the string youcan expand the node to view a list of each occurrence in the file. You can double-click an occurrence in the SearchResults window to open the file in the editor at the line containing the search string.
To find a string in project files:
1. Right-click the project or folder that you want to search and choose Find in the popup menu to open theFind in Projects dialog.
Alternatively, you can select an element in the Projects, Files or Favorites windows and choose Edit > Findin the main menu.
2. Type the search string in the Containing Text field.
3. Specify any additional options that you want to apply to the search string.
4. Specify the Scope of the search.
By default the scope is the folder that you selected, but you can use the drop-down menu to modify thescope.
5. Specify any File Name Patterns to limit the search to certain types of files.
6. Click Find.
2.13.2 How to Specify Editor Formatting OptionsYou can specify how the source editor formats source code for various languages. You can specify formattingoptions globally to apply to all files in that language and also at the project level to specify the options for a specificproject.
To specify global editor formatting options:
1. Choose Tools > Options in the main menu to open the Options window.
2. Click the Formatting tab in the Editor category.
3. Select a language in the Languages drop-down list.
4. Select a formatting category in the Category drop-down list.
5. Specify the formatting options for the category. Click Apply in the Options window.
In addition to global settings, you can specify the editor formatting options at the project level that will only apply tothe current project. You can also use the formatting options specified for an existing project and apply the optionsto the current project.
To specify editor formatting options for a project:
1. Right-click the project node in the Projects window and choose Properties in the popup menu.
2. Select Formatting in the Project Properties window.
3. Select Use project-specific options.
4. Select a language in the Languages drop-down list.
Alternatively, click Load from other project to use the formatting options from an existing project.
5. Select a formatting category in the Category drop-down list.
6. Specify the formatting options for the category. Click OK.
2.13.3 How to Compare Two FilesYou can use the diff viewer included in the IDE to compare source files. You can export a diff patch file directlyfrom the diff viewer window.
The IDE can display diffs in either of two modes:
Graphical Diff Viewer. (Default) The graphical diff viewer displays the two files side by side and usesbackground highlight colors to display the differences between the two files. By default, changed lines arehighlighted in blue, added lines are highlighted in green, and removed lines are highlighted in red.
Textual Diff Viewer. The textual diff viewer shows you the diff output in text so that you can copy and paste theoutput into a file or into an email.
You can use either the built-in diff engine or a command-line diff engine.
Built-in Diff Engine. (Default) The built-in diff engine enables you to compare two files without your needing acommand-line diff executable installed on your system.
Command-line Diff Engine. Before you can use the command-line diff engine on a Microsoft Windows system,you must have a command-line diff executable (for example, from a Cygwin distribution) installed on yoursystem. For the UNIX environment, there is a diff executable installed and available to you by default.
You can specify the diff engine in the Diff tab in the Miscellaneous category of the Options window. You can openthe Diff tab by clicking Options in the diff viewer window or by choosing Tools > Options in the main menu.
To compare two files:
1. Select two files in the IDE.
2. Right-click and choose Tools > Diff from the pop-up menu to run the diff command.
By default, the IDE opens the diff viewer window in graphical mode. You can click the Textual tab to viewthe diff in the textual diff viewer.
You can click Options in the diff viewer window to open the Options window and select the diff engine thatis used to find differences between files.
3. Click Export in the diff viewer window to save the diff as a diff patch file.
2.13.4 How to Apply a Diff Patch to a FileA patch file enables you to modify or patch a file based on the differences between the two versions of the file. Thedifferences between the versions are contained in a diff patch file. Patch files enable software developers who arenot sharing a common repository to distribute and integrate changes that have been made to the code. The IDEenables you to create and apply patches that update copies of source files so that you do not have to incorporatethe changes manually.
You can apply a patch to an individual file or a folder. Patches that are applied to folders use relative paths to thefiles within them. Folder patches must be applied on the same folder node that the patch was created on to ensurethat the patch is applied properly. If you are uncertain to which file or folder the patch should be applied, you canfind the context information in the patch file itself. Patch files generated by the IDE contain the context in which thepatch was originally created in the first few lines of the file.
How to apply a patch file to a file:
1. In the Projects window, right-click the file or folder to which you want to apply the diff patch and chooseTools > Apply Diff Patch in the popup menu.
2. Locate the patch file in the file browser and click Patch.
When you apply the patch, the IDE applies the changes contained in the selected patch to the chosen file or folderand informs you that patch is successfully applied. In the Question dialog box, click Yes to view applied changes inthe Diff Viewer or No to close the dialog box.
For details on applying patches to files that are under version control, see Section 3.3.16, "How to Create andApply a Patch (Subversion)," (version_control.htm#CHDJJFBJ) and Section 3.5.17, "How to Create and Apply a Patch."(version_control.htm#CHDICDED)
2.13.5 How to Access Files Outside of a ProjectWhen developing applications, you must create a project for your source code and related files. If you need toaccess a file outside of your projects, you can do either of the following things:
Choose File > Open File in the main menu and navigate to the location of the file on your system.
Use the Favorites window to access the file.
To use the Favorites window:
1. Choose Window > Favorites (Ctrl-3) in the main menu.
2. Right-click in the Favorites window and choose Add to Favorites.
3. Select the folder that you want to access and click OK.
Project-level commands, such as Run Project, are not available from the Favorites window. For such commandsto be available, you need to have a project open in the Projects window.
2.13.6 How to Create a File TemplateYou can save a file as a template and add it to the types of templates available in the template chooser in the NewFile wizard.
To create a new template:
1. In the Projects window, right-click the file you would like to turn into a template and choose Save AsTemplate.
2. In the Save As Template dialog box, select a category for the template and click OK.
To modify a an existing template:
1. Choose Tools > Templates from the main menu.
2. In the Template Manager, expand the appropriate category node and select the template.
3. Click Open in Editor.
4. In the Source Editor, make the desired changes to the template.
5. Choose File > Save from the main menu.
In the Template Manager, you can click Duplicate to create new templates based on existing templates. You cancreate new folders and move templates between folders.
Note:Templates are not project-specific. If you modify a template that is used by a wizard in the IDE themodified template will be used by that wizard for generating files in all projects.
2.13.7 How to Work with Unknown File ExtensionsIf you want to work with a file of a type that the IDE does not recognize, you can associate it with one of the filetypes that the IDE is familiar with.
To register a file extension as belonging to a specific file type:
1. Choose Tools > Options from the main menu.
2. Click the Files tab in the Miscellaneous category.
3. Click New to open the Enter New File Extension dialog box.
4. Enter the file extension that you want to register and click OK.
5. In the Associated File Type (MIME) field, select the file and MIME type that you want to associate with yournew file extension.
Note:For some object types, such as Java objects, it is not possible to add an extension.
2.13.8 How to Specify Files to IgnoreIf you have files that you do not want to be recognized by the IDE, you can configure the IDE to ignore these files.
Note:If you set the IDE to ignore .class files, these files are not visible in the Files window under the buildfolder.
To specify files to be ignored:
1. From the main window, choose Tools > Options and click Miscellaneous.
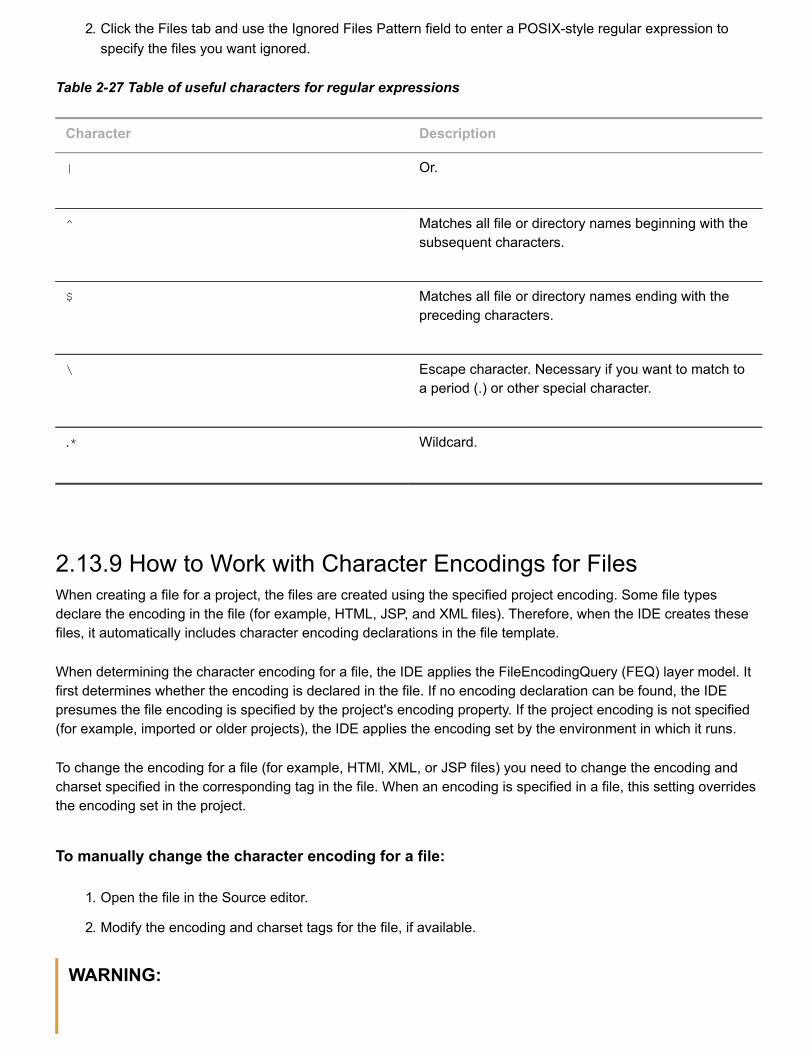
2. Click the Files tab and use the Ignored Files Pattern field to enter a POSIX-style regular expression tospecify the files you want ignored.
Table 2-27 Table of useful characters for regular expressions
Character Description
| Or.
^ Matches all file or directory names beginning with thesubsequent characters.
$ Matches all file or directory names ending with thepreceding characters.
\ Escape character. Necessary if you want to match toa period (.) or other special character.
.* Wildcard.
2.13.9 How to Work with Character Encodings for FilesWhen creating a file for a project, the files are created using the specified project encoding. Some file typesdeclare the encoding in the file (for example, HTML, JSP, and XML files). Therefore, when the IDE creates thesefiles, it automatically includes character encoding declarations in the file template.
When determining the character encoding for a file, the IDE applies the FileEncodingQuery (FEQ) layer model. Itfirst determines whether the encoding is declared in the file. If no encoding declaration can be found, the IDEpresumes the file encoding is specified by the project's encoding property. If the project encoding is not specified(for example, imported or older projects), the IDE applies the encoding set by the environment in which it runs.
To change the encoding for a file (for example, HTMl, XML, or JSP files) you need to change the encoding andcharset specified in the corresponding tag in the file. When an encoding is specified in a file, this setting overridesthe encoding set in the project.
To manually change the character encoding for a file:
1. Open the file in the Source editor.
2. Modify the encoding and charset tags for the file, if available.
WARNING:
The IDE does not convert characters when the encoding of a file changes. If you manually change theencoding declaration within the file, and that encoding does not match the project encoding, you mayencounter problems when compiling and running the project. The encoding tag affects how file contents areviewed internally - not only during runtime, but also during the design phase such as when you add content inthe Source Editor.
WARNING:Manually changing the character encoding declaration within a file changes how the IDE reads and displaysthat file. When you change the file encoding, the IDE does not convert the existing contents of the file to thenew encoding. Care should be taken when changing the encoding of a file because the file may containcharacters that cannot be saved or that may not display properly in the new encoding.
2.13.10 How to Specify Action ItemsYou can create a list of things that you need to resolve in your various projects and view the list as entries in theAction Items window. The list of action items can include compilation errors that are identified by the IDE, issues inan issue tracker and tasks that are identified by specific ToDo character patterns in project files. The IDEautomatically scans your projects for action items and displays the items in the Action Items window.
Action items are created by some types of errors and by the occurrence of specific character patterns in the file.The list of action items can include the following types of items.
Compiler errors
Hudson tasks
Issues
Maven POM problems
TODO
Whitelist violations
By default, you can create action items by adding comments that contain the following patterns to a file.
TODO
XXX
FIXME
Javadoc comments that contain the @todo keyword (Java projects)
To create a custom pattern:
Choose Tools > Options from the main menu.
Click the Action Items tab in the Team category.
Click Add and type the new pattern in the table. Click OK.

To edit or remove a pattern:
Choose Tools > Options from the main menu.
Click the Action Items tab in the Team category.
Select a pattern in the table and click Edit to edit the selected pattern or Remove to delete the selected pattern.Click OK.
The IDE includes the following patterns as action items by default.
The pattern <<<<<<, which denotes merge conflicts in CVS and other version control systems
Lines where compiler errors are registered (Java projects)
To open the Action Items window:
Choose Window > Action Items.
You can double-click an entry in the Action Items window to jump to the line of the file where the action item needsto be resolved or open the issue in the IDE.
To create a filter for items in the Action Items window:
1. Choose Window > Action Items to open the Action Items window.
2. Click the Filter button in the Action Items window toolbar to open the Action Items Filter dialog box.
3. Click New to create a new filter and type a name for the filter.
4. Select the types of action items that you want to be displayed.
5. (Optional) Click the Keywords tab and specify any additional criteria that needs to be met.
6. Click OK.
To apply a filter to the list of action items, click the arrow on the Filter button and select a filter from the drop-downlist.
2.13.11 How to Use Bookmarks in FilesBookmarks enable you to quickly navigate to a specific line in a file. After you set a bookmark in a file you can usekeyboard shortcuts to jump to the bookmark or between bookmarks in the file. You can view a list of yourbookmarks in the Bookmarks window. When you double-click a bookmark in the Bookmarks window the IDEopens the file in the source editor at the line that contains the bookmark.
How to toggle a bookmark in a file:
1. Place the insert cursor in the line in the file.
2. Type Ctrl-Shift-M.
How to move between bookmarks in a file:
1. Type Ctrl-Shift-Period or Ctrl-Shift-Comma to open the Bookmarks popup menu.
2. Use the up and down arrows to navigate in the popup menu. Select a bookmark in the menu to open thefile at the line containing the bookmark or select <Bookmarks> in the popup menu to open the Bookmarkswindow.
How to view a list of all bookmarks:
1. Choose Windows > IDE Tools > Bookmarks from in the main menu.
2.14 Working with Resource BundlesResource bundles store selected characteristics of an object as key and value pairs in a set of .properties files.You can store a variety of characteristics in resource bundles, like localized strings used to internationalize yourcode or properties for an Ant script. The IDE displays resource bundles as properties object nodes ( ) thatcontain nodes for each of its locales ( ) and keys ( ).
When used for internationalizing source code, the IDE stores each locale's characteristics in a .properties filewhich is contained within the resource bundle. Each key corresponds to the name of a property and must be thesame for each locale. The key value is the localized string displayed by the object at runtime and can vary foreach locale.
The IDE also enables you to automate the process of internationalizing your source code. You can use the IDE'sinternationalization features to:
Automatically replace hard-coded strings with internationalized ones
Insert new internationalized strings as you write code
Check your resource bundles to ensure they contain all of the necessary keys
Note:Though resource bundles and locales are both .properties files, the IDE displays resource bundlesand the locales they contain using different icons in the Files window to avoid confusion.
2.14.1 How to Create and Delete Resource BundlesThe IDE enables you to manage resource bundles and the various key and locale pairs stored within them. Whenyou use the New wizard to create a new properties file, the IDE automatically creates a .properties file for thedefault locale to which you can then add specific properties and additional locales.
A properties file is created with a .properties suffix. The Files window displays a properties object node ( )for the resource bundle with one locale subnode ( ) for the default locale.
To create a resource bundle:
1. Choose File > New to open the New wizard.
2. Select the project in which you want to create the resource bundle.
3. Expand the Other node in the Categories pane, select Properties File in the File Types pane, and clickNext.
4. Type the file name in the File Name field.
5. Enter the location where you want to create the resource bundle. Click Finish.
To delete a resource bundle:
1. Right-click the properties file in the Files window and choose Delete.
2. In the verification dialog box, click Yes to remove the file.
2.14.2 How to Edit a Resource BundleThere are two ways of editing the properties files contained in your resource bundles:
In the Source Editor as text files. The Source Editor displays one text file for each of the resource bundle'slocales. Each locale file lists all the key and value pairs for that locale
In the Properties Editor, a special editor that is displayed inside the Source Editor. The Properties Editordisplays key and value pairs for all locales of your resource bundle in table layout.
To edit a properties file in the Properties Editor:
1. In the Files window, right-click the properties object node ( ) and choose Open.
The Properties Editor is displayed showing all existing keys and their values for each locale.
2. If you want to change a property's key, type the new name in the Key column.
3. If you want to change a property's value for a locale, type the new value in the locale's Value column.
4. If you want to add or remove keys, use the New Property and Remove Property keys.
To edit a property file as a text file:
1. Right-click the properties object node and choose Edit to edit the default locale.
2. If you want to edit a different locale, expand the properties object node, right-click the node for the localeyou want to modify and choose Edit.
2.14.3 How to Add and Remove a PropertyThe IDE's Properties Editor enables you to manage the properties in all of the locales in your resource bundle. Youcan also add a property to or remove a property from only one locale.
To add a new property to all locales in a resource bundle:
1. In the Files window, right-click the properties object node ( ) and choose Open.
The Properties Editor is displayed showing all existing keys and their values for each locale.
2. In the Properties Editor, click the New Property button.
3. Enter a key and its default value for the new property.
You can also add a comment along with the key and value. The comment is displayed when you click thevalue for that locale's key.
4. Click OK.
The property appears in the Properties Editor with the default value entered for each existing locale.
5. If you want to set a different value for each locale, enter the new values in each locale's column.
6. Choose File > Save to save the file.
To add a new property to a specific locale:
1. In the Files window, expand the properties object node for the resource bundle that contains the locale.
2. Right-click the node of the locale to which you want to add a property and choose Add Property.
3. Enter a key and a value for the new property and click OK.
4. Choose File > Save to save the file.
To remove a property from all locales in a resource bundle:
1. In the Files window, right-click the properties object node and choose Open.
2. In the Properties Editor, select the key for the property you want to remove.
3. Click the Remove Property button.
4. Click Yes in the verification dialog box.
To remove a property from a specific locale:
1. In the Files window, right-click the properties object node and choose Delete.
2. Click Yes in the verification dialog box
You can also delete an entire resource bundle and all of the .properties files contained within it by right-clickingits properties object node ( ) and choosing Delete.
2.14.4 How to Add and Remove a LocaleThe New Locale dialog box provides an extensive list of predefined locales. It also lets you define your own localeby choosing the appropriate language code, country code, and language variant.
To add a locale:
1. Right-click the properties object node ( ) in the Files window and choose Add Locale.
2. Select a language code, country code, and variant from the drop-down lists. You can also select from thelist of predefined locales in the bottom of the dialog box.
3. Click OK to add the locale.
To remove a locale:
1. Expand the resource bundle's object node in the Files window.
2. Right-click the locale and choose Delete.
You can also delete an entire resource bundle and all of the .properties files contained within it by right-clickingits properties object node ( ) and choosing Delete.
2.14.5 How to Edit a LocaleThe localized strings for each locale are stored in that locale's .properties file. You can modify a locale in theSource Editor as a text file or in the Properties Editor. You can also edit a specific locale using its customizer.
To edit a locale in the Properties Editor:
1. Right-click the properties object node ( ) in the Files window and choose Open.
The Properties Editor is displayed showing all existing keys and their values for each locale.
2. If you want to change a property's key, type the new name in the Key column.
3. If you want to change a property's value for a locale, type the new value in the locale's Value column.
4. If you want to add or remove keys, use the New Property and Remove Property keys.
To edit a locale as a text file in the Source Editor:
1. Right-click the properties object node and choose Edit to edit the default locale.
2. If you want to edit a different locale, expand the properties object node, right-click the node for the localeyou want to modify and choose Edit.
To edit a locale using the customizer:
1. Expand the properties object node in the Files window.
2. Right-click the desired locale and choose Customize.
The Locale customizer opens listing the locale name and each existing key.
3. If you want to switch locales, click the ellipsis (...) button. This option is not available for the default locale.
4. If you want to add a new property to the locale, click Add Key and enter the key name and value.
5. If you want to remove a property from the locale, select the property and click Remove Key.
Note:You cannot edit the existing values of properties with the customizer.
2.15 Working with Javadoc DocumentationJavadoc is a tool for generating API documentation in HTML format from doc comments in source code.
NetBeans supports the Javadoc standard for Java documentation: both viewing and generating Javadoc. Itprovides a solid documentation tool when working with code.
2.15.1 How to Add Javadoc to a ProjectYou can make Javadoc documentation for a JAR file's class available in the IDE by associating thatdocumentation with the JAR file.
When you add a required project to a project's classpath, the required project's Javadoc and sources areautomatically added to the project as well.
When you create a Java class library for a single JAR file, you can simply add the JAR file to the project'sclasspath to make the associated Javadoc and source code available. If your Java library contains multiple JARfiles, however, you must add the library itself to the classpath. Adding the library to the classpath also makes iteasier to share the project with other developers.
To add Javadoc for a JAR file:
1. Choose Tools > Libraries from the main menu.
2. In the left pane of the Ant Library Manager, select the project library within which the JAR file you want toadd Javadoc documentation to is located.
Note:Only libraries already registered with the IDE are listed in the Ant Library Manager's ClassLibraries list.
3. If the JAR file for which you want to add Javadoc documentation has not already been added to aregistered library, create a new empty library using the New Library button. Next, in the Classpath tab clickAdd JAR/Folder and specify the location of the JAR file containing the compiled class files.
Note:You can also associate the Javadoc with a JAR file using the project's Project Properties window.However, doing so creates the association only for that project. Open the Project Propertiesdialog box by right-clicking the project node and choosing Properties. Select the Libraries nodein the Categories pane. Then select the JAR with which you want to associate the Javadoc andclick Edit. You can then specify the sources to be associated.A class library can contain multiple JAR files as well as their Javadoc documentation and sourcecode.
4. In the Javadoc tab, click Add ZIP/Folder and specify the location of the Javadoc files.
5. Click OK to exit the Ant Library Manager.
2.15.2 How to Add the JDK Javadoc to the IDEThe API documentation for your Java platform can be used for reference or as a learning tool.
To add JDK Javadoc to the IDE:
1. Choose Tools > Java Platforms from the main window.
2. Select the platform to which you want to add Javadoc in the left panel of the dialog box.
3. In the Javadoc tab, click Add ZIP/Folder and specify the location of the Javadoc files. Click Close.
Note:You can download and install Java SE Documentation files from the Oracle Technology Network (forexample, JDK 7 documentation is available athttp://www.oracle.com/technetwork/java/javase/documentation/java-se-7-doc-
download-435117.html (http://www.oracle.com/technetwork/java/javase/documentation/java-se-7-doc-
download-435117.html) .)
2.15.3 How to View Javadoc DocumentationAfter you add a Javadoc library to the project, you can view the documentation for any of the library's classes inthe Source Editor, browse the documentation in your external browser, and search the library using the JavadocIndex Search.
To view Javadoc documentation for any elements of code you are writing, you must add the Javadoc librarycontaining the documentation to the project.
To view Javadoc documentation:
In the Source Editor, place the pointer on the code element whose documentation you want to display and doone of the following:
Choose Source > Show Documentation (or press Ctrl-Shift-Space) to view Javadoc documentation for theselected element in a separate IDE window.
Press Alt-F1 to view Javadoc documentation in an external browser window.
Choose Window > Other > Javadoc to open the Javadoc page that will show Javadoc dynamically for thecode elements you are editing.
Choose Help > Javadoc Index Search (Shift-F1). The Javadoc Index Search window opens in an editor taband displays the results of the search for the code element that is currently selected in the Source Editor. TheHTML Viewer displays the Javadoc for the selected element in the search results. Click the Toggle the Displayof the HTML Viewer button to hide or show the HTML viewer. You can double-click an element in the searchresults to open the Javadoc documentation for the element in a page in your browser.
2.15.4 How to Generate Javadoc DocumentationFor each of your projects, you can produce a set of Javadoc HTML pages that describe the project's classes, innerclasses, interfaces, constructors, methods, and fields. The Javadoc is constructed from the structure of your codeand the Javadoc comments embedded in your code. You can also configure how the IDE generates Javadocdocumentation for each of your projects.
To generate Javadoc documentation for a project:
1. Select the project in the Projects window.
2. Choose Run > Generate Javadoc for Project.
The IDE generates the Javadoc to the dist/javadoc folder in your project directory and opens the index page inthe IDE's designated web browser.
You can select multiple projects in the Projects window and generate Javadoc documentation for them at once bychoosing Run > Generate Javadoc (number of selected projects) Projects from the main IDE's menu.
To configure how the IDE generates Javadoc documentation:
1. In the Projects window, right-click the project node and choose Properties.
2. Expand the Build node and select Documenting in the left pane of the dialog box.
3. Set the desired options and click OK.
Note:In Free-form projects the Generate Javadoc command is disabled by default. If your Ant script containsa target for generating Javadoc documentation, you can map the target to the Generate Javadoccommand in the Project Properties dialog box's Build and Run panel.
To create a Javadoc stub:
Place the cursor above a method or a class that has no Javadoc, type /**, and press Enter.
The IDE creates a skeletal structure for a Javadoc comment filled with some content. If you have a Javadocwindow open, you will see the changes immediately while you are typing.
2.15.5 How to Enter Javadoc Comments in Source CodeYou can use editor hints to automatically generate basic Javadoc comments for code elements in your sourcefiles. The generated comments include required tags for the particular code element. For example, if a methodtakes a parameter, a @param tag is inserted. You can also use hints to generate corrections to Javadoccomments, such as when the comments contain incorrect tags.
You are notified of an editor hint by a light bulb icon that appears in the left margin of the Source Editor. You canread the hint by clicking the light bulb icon or by pressing Alt-Enter. You can generate the code suggested by thehint by clicking the hint or by pressing Enter.
The hints for Javadoc generation are turned off by default.
To turn on hints for Javadoc comments:
1. Choose Tools > Options > Editor > Hints.
2. On the Hints tab, select Java from the Language drop-down list.
3. Select the Javadoc checkbox or expand it to fine-tune your choice.
By default, the Javadoc hints work for protected elements and public elements. If you would like to change thescope of the hints, expand the Javadoc node and select one of the subnodes. Then choose the radio button forthe scope to which you would like the hints to apply.
For more information about Javadoc tags, see:
http://java.sun.com/javase/6/docs/technotes/tools/solaris/javadoc.html
(http://java.sun.com/javase/6/docs/technotes/tools/solaris/javadoc.html)
For information on how to write Javadoc comments, see:
http://java.sun.com/products/jdk/javadoc/writingdoccomments/index.html
(http://java.sun.com/products/jdk/javadoc/writingdoccomments/index.html)
2.15.6 How To Analyze and Fix Javadoc CommentsTo identify the places in your code that need Javadoc comments and quickly insert these comments, you can usethe Javadoc Analyzer tool available in the Java Editor.
To analyze and fix Javadoc comments:
1. Select a project, a package, or an individual file and choose Tools > Analyze Javadoc from the mainmenu.
The Analyzer window displays suggestions for adding or fixing Javadoc comments, depending on thescope of your selection.
2. Select one or several checkboxes where you would like to fix Javadoc and click the Fix Selected button.
3. Click Go Over Fixed Problems and use the Up and Down arrows to actually add your comments. Thismight be helpful if you selected to fix several instances at once and now want to revisit the stubs.
2.16 Viewing IDE NotificationsThe Notifications window displays a list of all notifications that occurred in the current IDE session. Notificationsindicate the change in the status of various IDE processes, including available IDE updates, the status of buildsand test results. A new notification is indicated by a notification icon in the status bar of the IDE. The notificationicon is displayed in the status bar until you view the notification.
How to view IDE notifications:
1. Perform either of the following to view the list of IDE notifications.
Click the Notifications icon in the status bar, if available.
Choose Window > IDE Tools > Notifications from the main menu.
2. Select a notification in the list to display details about the notification.
Page 6 of 28 (http://docs.oracle.com/netbeans/nb82/netbeans/NBDAG/gs_nbeans.htm) (http://docs.oracle.com/netbeans/nb82/netbeans/NBDAG/version_control.htm)
About Oracle (http://www.oracle.com/corporate/index.html) Contact Us (http://www.oracle.com/us/corporate/contact/index.html) Legal Notices
(http://www.oracle.com/us/legal/index.html) Terms of Use (http://www.oracle.com/us/legal/terms/index.html) Your Privacy Rights (http://www.oracle.com/us/legal/privacy/index.html)
Copyright © 2017, Oracle and/or its affiliates. All rights reserved.
(#)