Embed Size (px)
Citation preview
© 2015 Cisco and/or its affiliates. All rights reserved. This document is Cisco Public. Page 1 of 14
Lab - Remote Assistance in Windows
Introduction In this lab, you will remotely connect to a computer, examine device drivers, and provide remote assistance.
Recommended Equipment • Two Windows 7, Windows 8, or Vista computers connected to a LAN.
• The two computers must be part of the same Workgroup and on the same subnet.
Step 1: Create a Remote Assistance folder on the desktop of PC-2.
a. Log on to PC-2 as a member of the administrator group. Ask your instructor for the user name and password.
b. Right-click PC-2’s desktop and select New > Folder. Name the folder Remote Permission.
c. Right-click the Remote Permission folder, then select Properties > Sharing > Advanced Sharing.
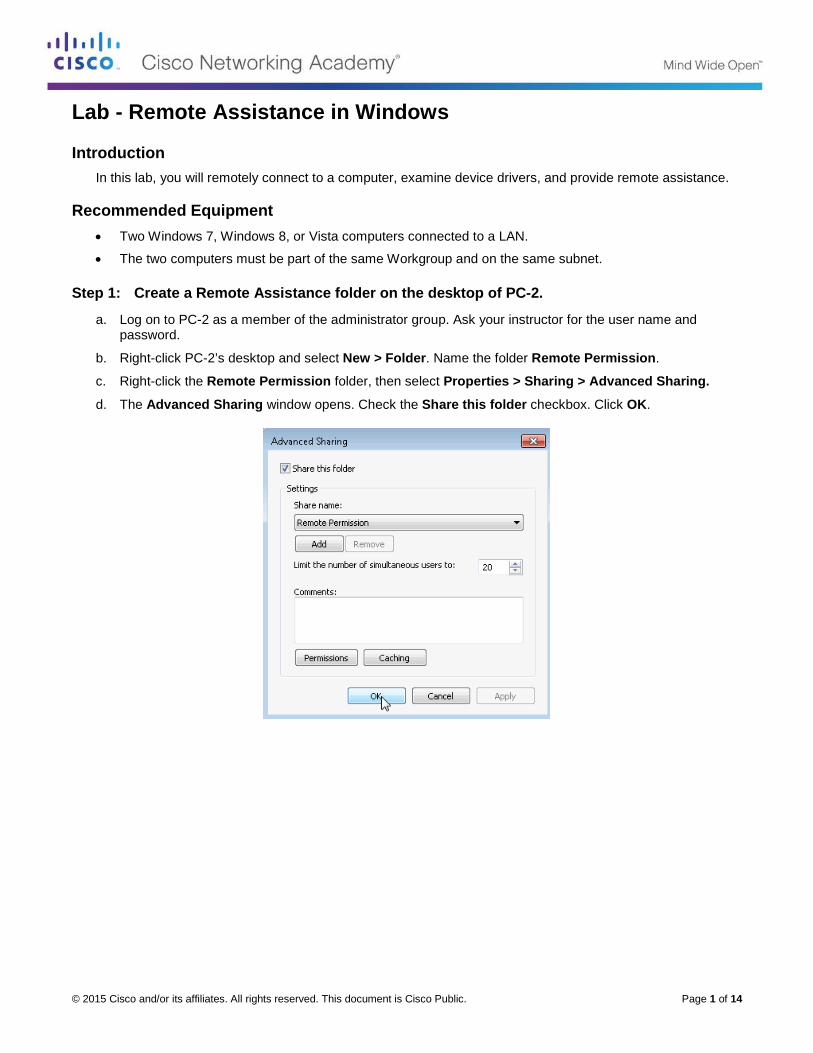
d. The Advanced Sharing window opens. Check the Share this folder checkbox. Click OK.
Lab – Remote Assistance in Windows
© 2015 Cisco and/or its affiliates. All rights reserved. This document is Cisco Public. Page 2 of 14
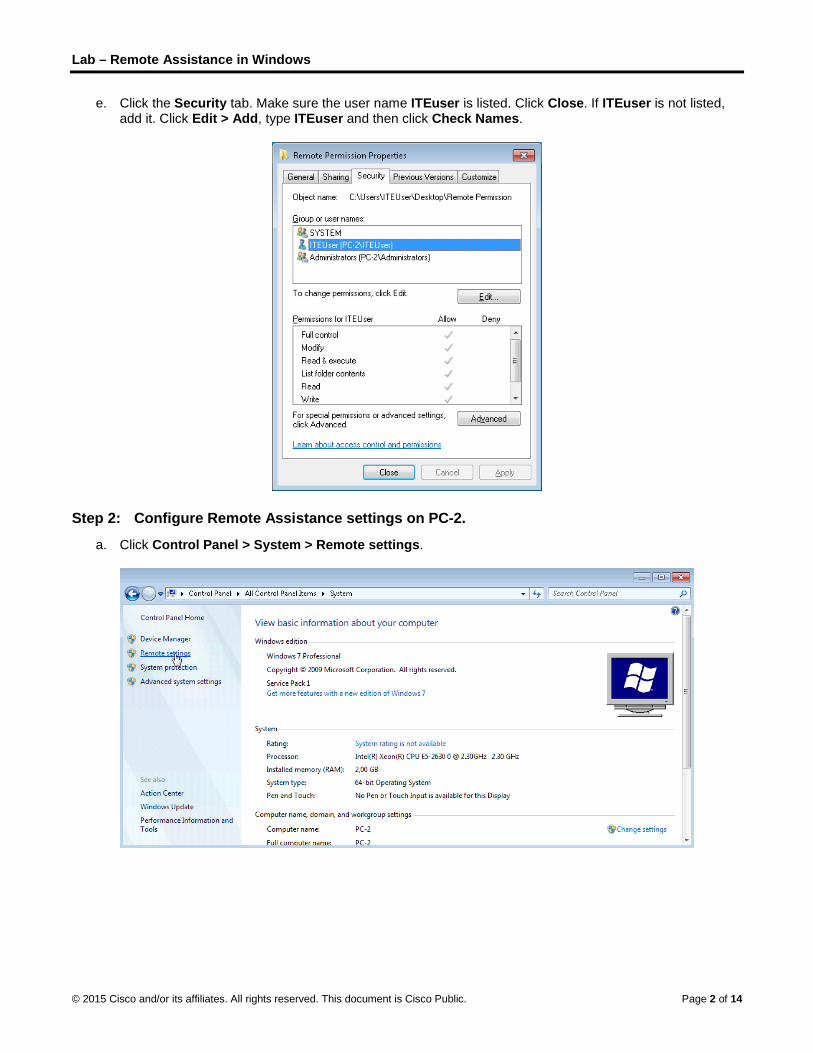
e. Click the Security tab. Make sure the user name ITEuser is listed. Click Close. If ITEuser is not listed, add it. Click Edit > Add, type ITEuser and then click Check Names.
Step 2: Configure Remote Assistance settings on PC-2.
a. Click Control Panel > System > Remote settings.
Lab – Remote Assistance in Windows
© 2015 Cisco and/or its affiliates. All rights reserved. This document is Cisco Public. Page 3 of 14
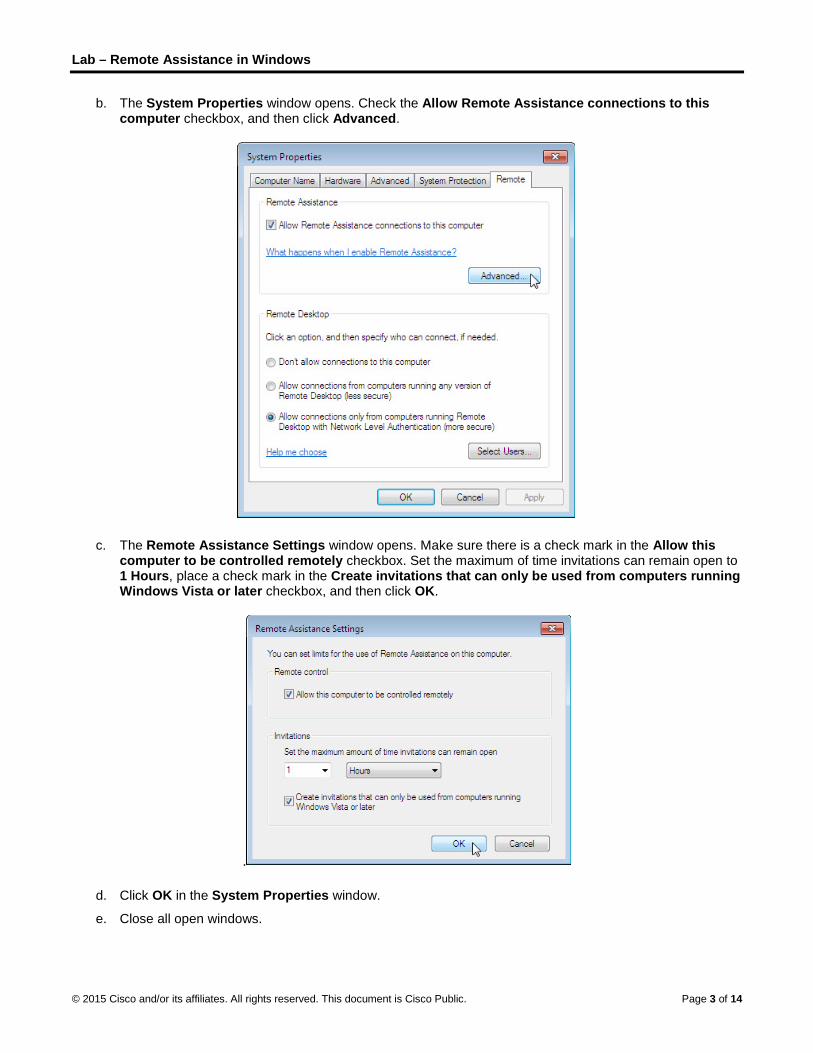
b. The System Properties window opens. Check the Allow Remote Assistance connections to this computer checkbox, and then click Advanced.
c. The Remote Assistance Settings window opens. Make sure there is a check mark in the Allow this computer to be controlled remotely checkbox. Set the maximum of time invitations can remain open to 1 Hours, place a check mark in the Create invitations that can only be used from computers running Windows Vista or later checkbox, and then click OK.
.
d. Click OK in the System Properties window.
e. Close all open windows.
Lab – Remote Assistance in Windows
© 2015 Cisco and/or its affiliates. All rights reserved. This document is Cisco Public. Page 4 of 14
Step 3: Create a Remote Assistance Invitation on PC-2.
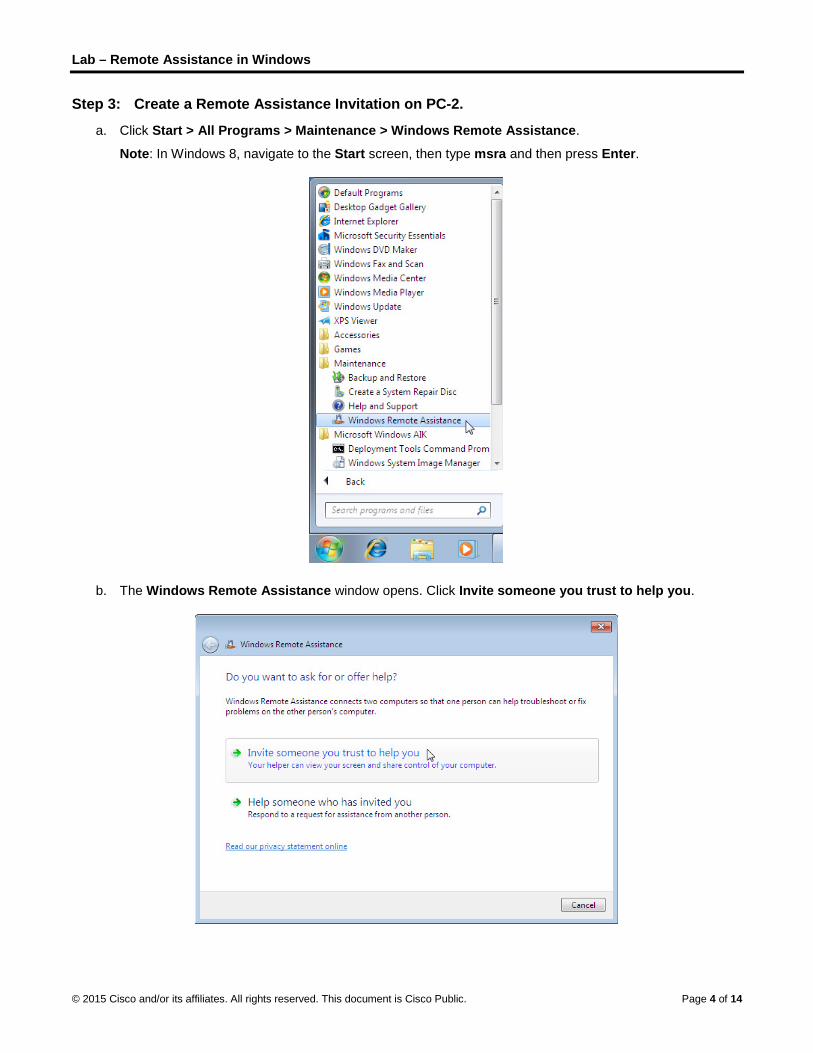
a. Click Start > All Programs > Maintenance > Windows Remote Assistance.
Note: In Windows 8, navigate to the Start screen, then type msra and then press Enter.
b. The Windows Remote Assistance window opens. Click Invite someone you trust to help you.
Lab – Remote Assistance in Windows
© 2015 Cisco and/or its affiliates. All rights reserved. This document is Cisco Public. Page 5 of 14
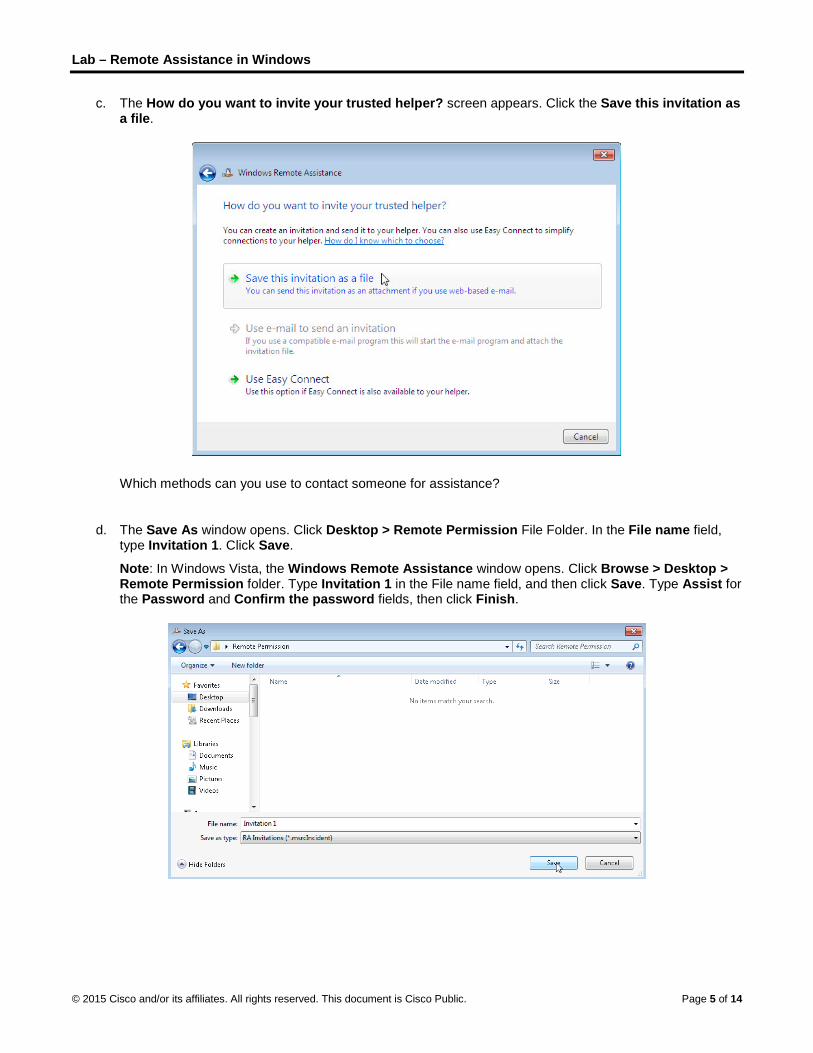
c. The How do you want to invite your trusted helper? screen appears. Click the Save this invitation as a file.
Which methods can you use to contact someone for assistance?
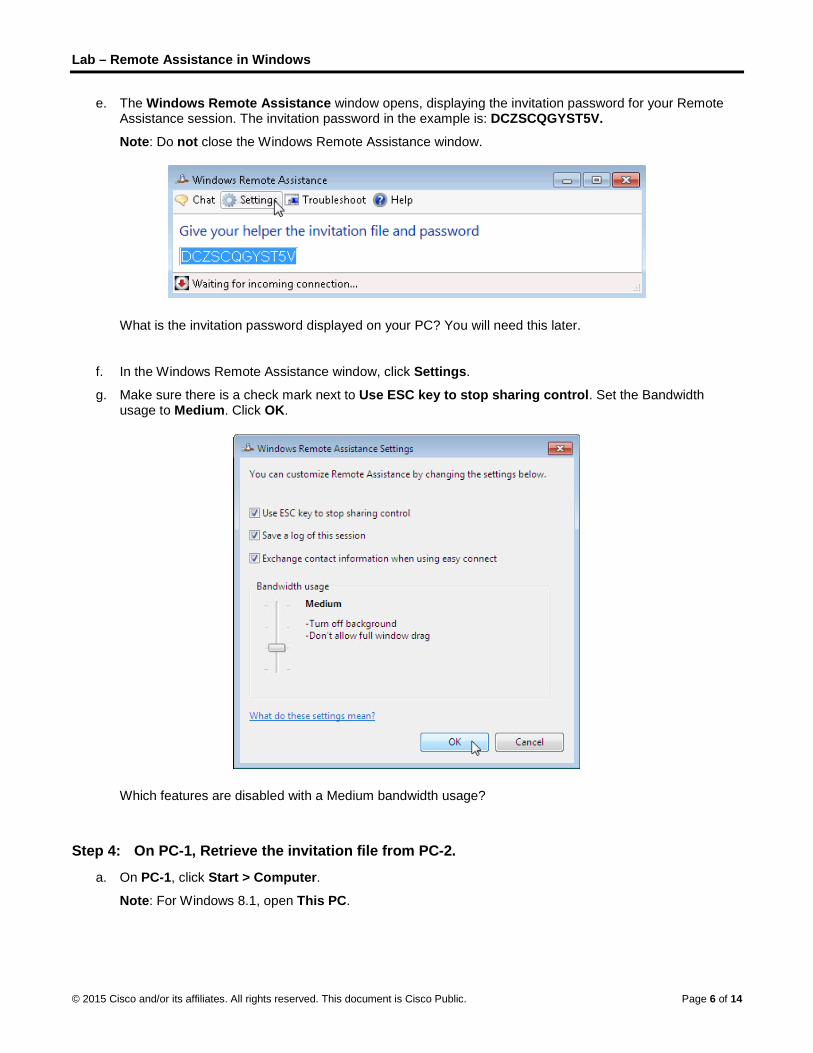
d. The Save As window opens. Click Desktop > Remote Permission File Folder. In the File name field, type Invitation 1. Click Save.
Note: In Windows Vista, the Windows Remote Assistance window opens. Click Browse > Desktop > Remote Permission folder. Type Invitation 1 in the File name field, and then click Save. Type Assist for the Password and Confirm the password fields, then click Finish.
Lab – Remote Assistance in Windows
© 2015 Cisco and/or its affiliates. All rights reserved. This document is Cisco Public. Page 6 of 14
e. The Windows Remote Assistance window opens, displaying the invitation password for your Remote Assistance session. The invitation password in the example is: DCZSCQGYST5V.
Note: Do not close the Windows Remote Assistance window.
What is the invitation password displayed on your PC? You will need this later.
f. In the Windows Remote Assistance window, click Settings.
g. Make sure there is a check mark next to Use ESC key to stop sharing control. Set the Bandwidth usage to Medium. Click OK.
Which features are disabled with a Medium bandwidth usage?
Step 4: On PC-1, Retrieve the invitation file from PC-2.
a. On PC-1, click Start > Computer.
Note: For Windows 8.1, open This PC.
Lab – Remote Assistance in Windows
© 2015 Cisco and/or its affiliates. All rights reserved. This document is Cisco Public. Page 7 of 14
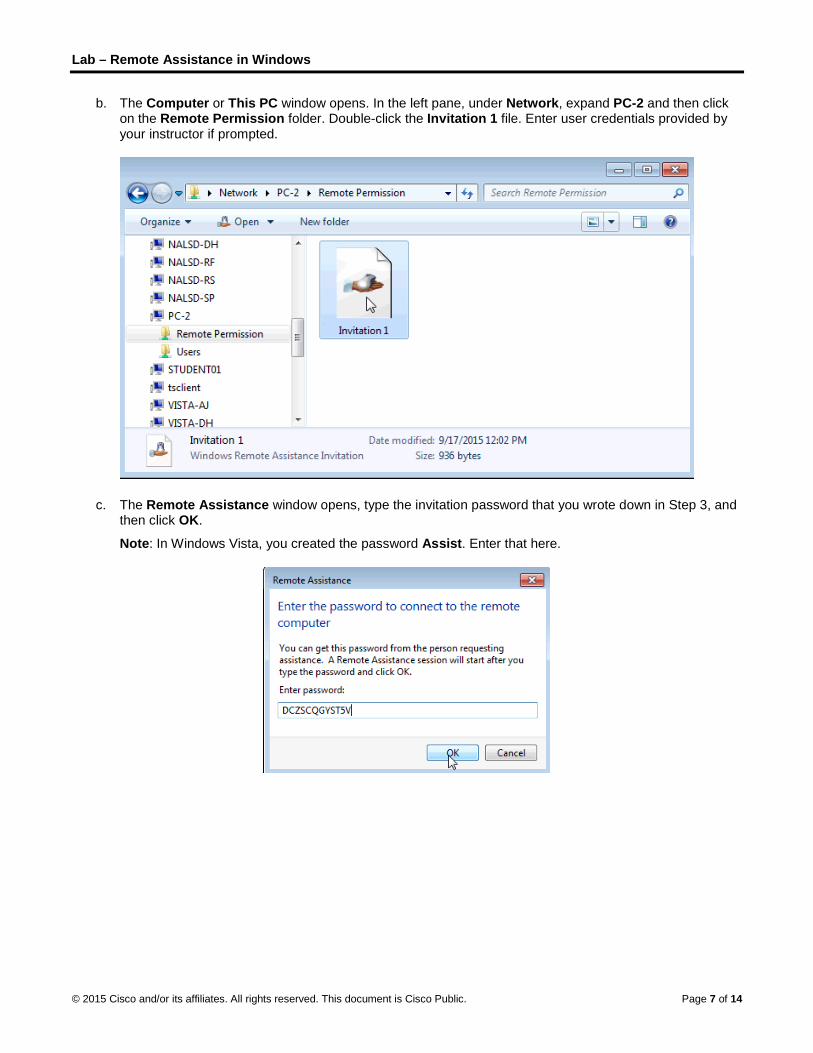
b. The Computer or This PC window opens. In the left pane, under Network, expand PC-2 and then click on the Remote Permission folder. Double-click the Invitation 1 file. Enter user credentials provided by your instructor if prompted.
c. The Remote Assistance window opens, type the invitation password that you wrote down in Step 3, and then click OK.
Note: In Windows Vista, you created the password Assist. Enter that here.
Lab – Remote Assistance in Windows
© 2015 Cisco and/or its affiliates. All rights reserved. This document is Cisco Public. Page 8 of 14
Step 5: Allow PC-1 Remote Access to PC-2.
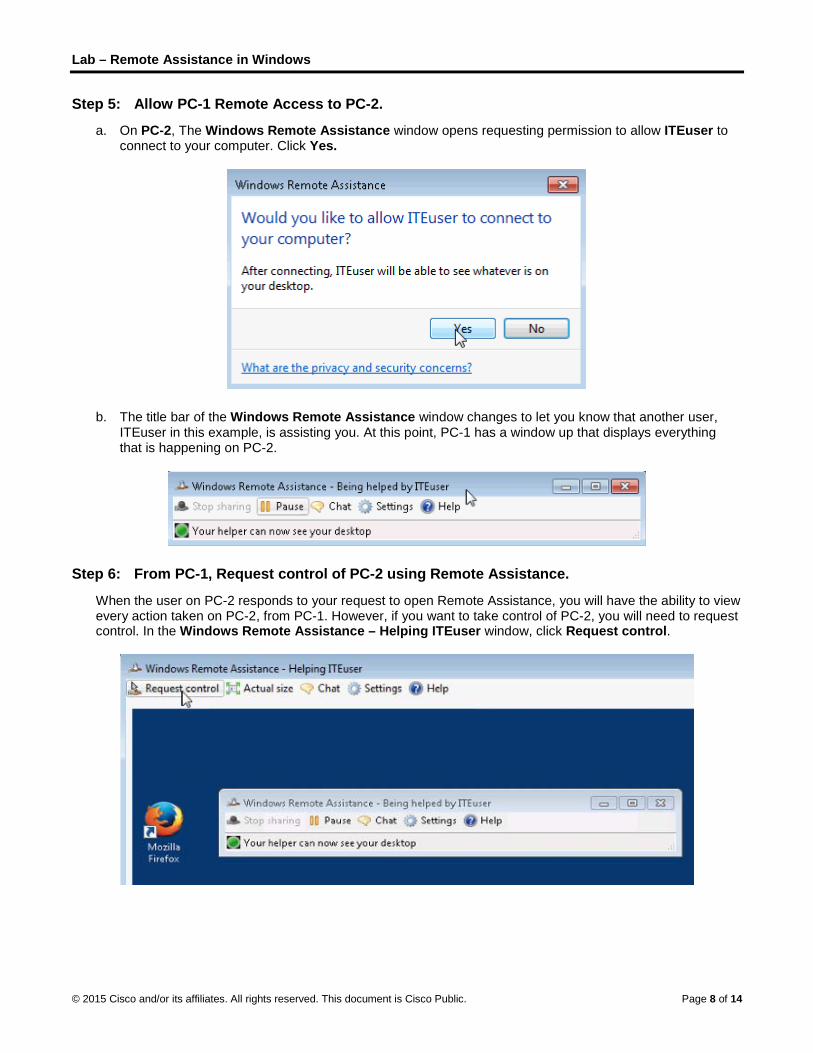
a. On PC-2, The Windows Remote Assistance window opens requesting permission to allow ITEuser to connect to your computer. Click Yes.
b. The title bar of the Windows Remote Assistance window changes to let you know that another user, ITEuser in this example, is assisting you. At this point, PC-1 has a window up that displays everything that is happening on PC-2.
Step 6: From PC-1, Request control of PC-2 using Remote Assistance.
When the user on PC-2 responds to your request to open Remote Assistance, you will have the ability to view every action taken on PC-2, from PC-1. However, if you want to take control of PC-2, you will need to request control. In the Windows Remote Assistance – Helping ITEuser window, click Request control.
Lab – Remote Assistance in Windows
© 2015 Cisco and/or its affiliates. All rights reserved. This document is Cisco Public. Page 9 of 14
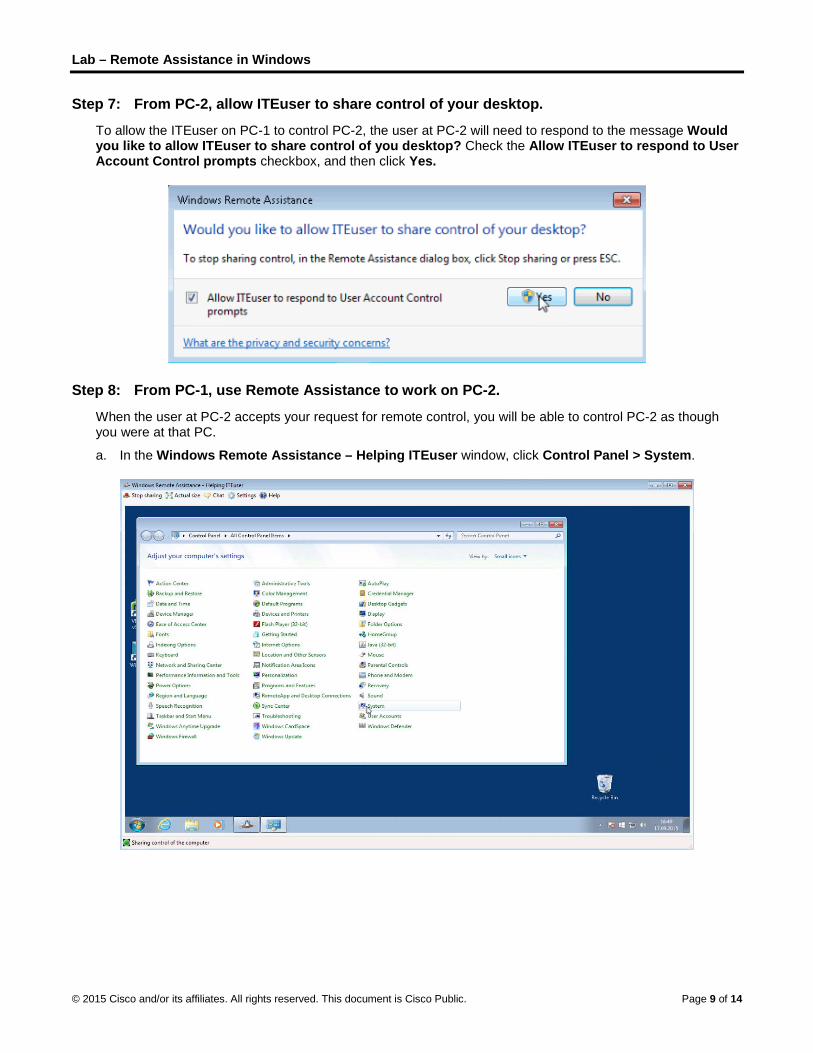
Step 7: From PC-2, allow ITEuser to share control of your desktop.
To allow the ITEuser on PC-1 to control PC-2, the user at PC-2 will need to respond to the message Would you like to allow ITEuser to share control of you desktop? Check the Allow ITEuser to respond to User Account Control prompts checkbox, and then click Yes.
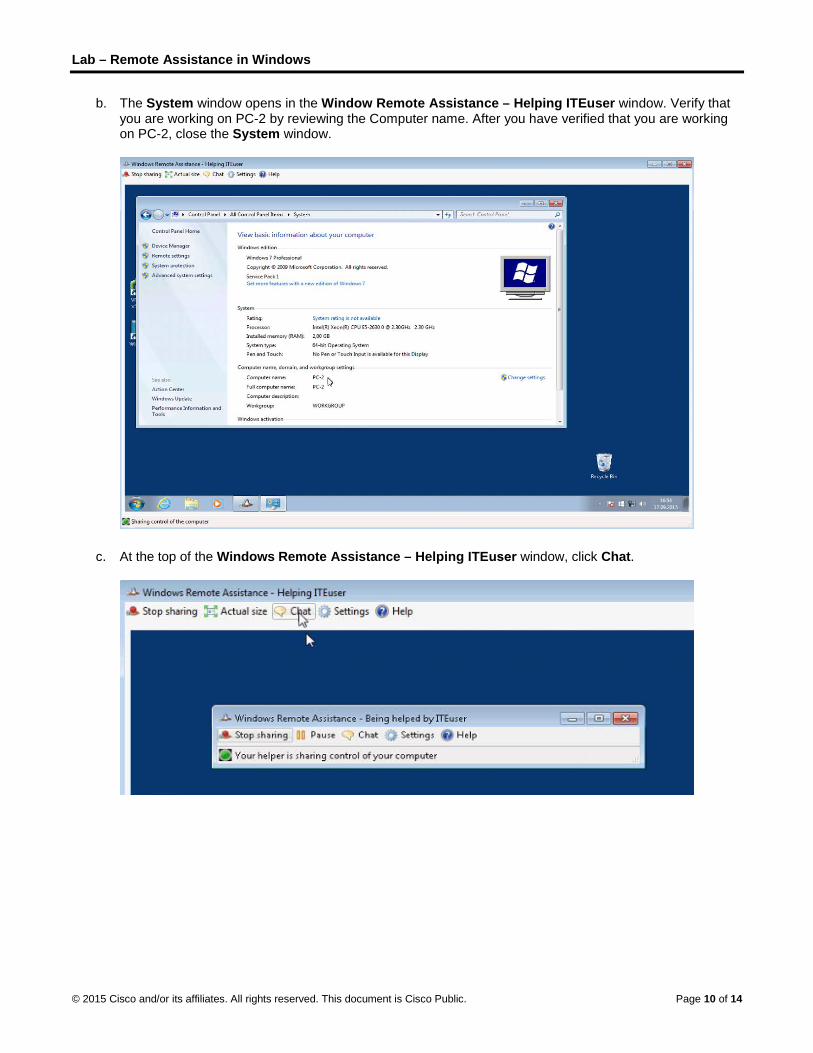
Step 8: From PC-1, use Remote Assistance to work on PC-2.
When the user at PC-2 accepts your request for remote control, you will be able to control PC-2 as though you were at that PC.
a. In the Windows Remote Assistance – Helping ITEuser window, click Control Panel > System.
Lab – Remote Assistance in Windows
© 2015 Cisco and/or its affiliates. All rights reserved. This document is Cisco Public. Page 10 of 14
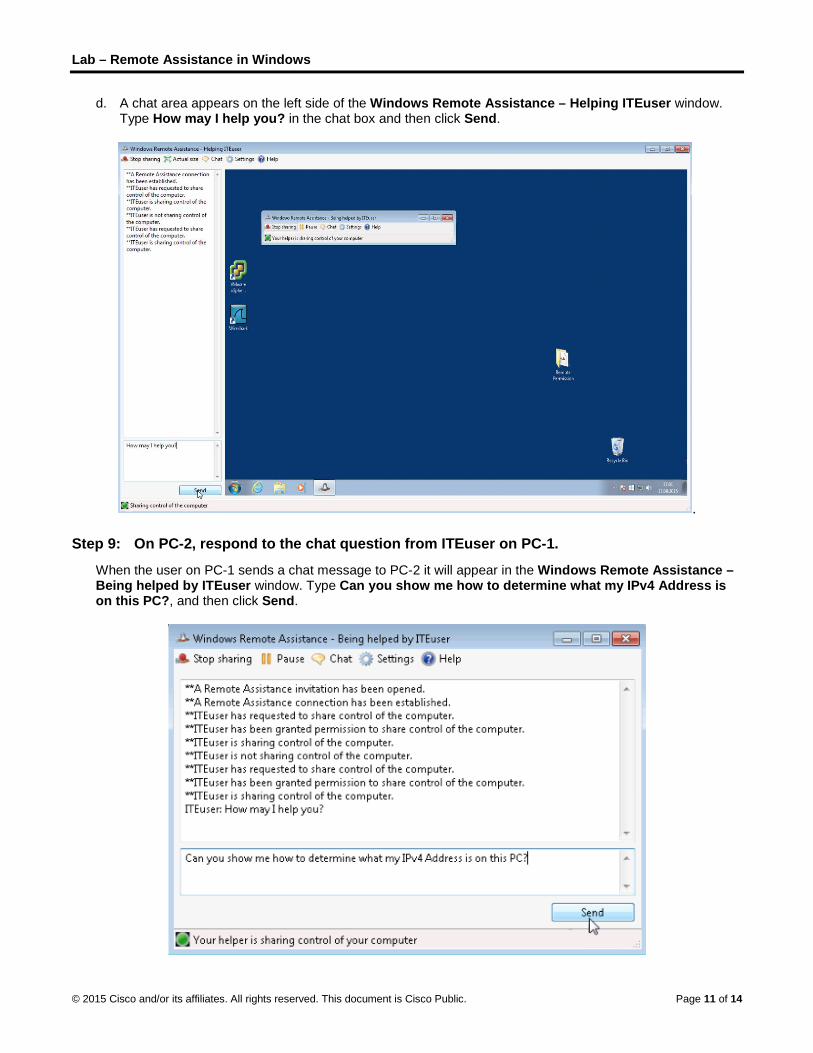
b. The System window opens in the Window Remote Assistance – Helping ITEuser window. Verify thatyou are working on PC-2 by reviewing the Computer name. After you have verified that you are workingon PC-2, close the System window.
c. At the top of the Windows Remote Assistance – Helping ITEuser window, click Chat.
Lab – Remote Assistance in Windows
© 2015 Cisco and/or its affiliates. All rights reserved. This document is Cisco Public. Page 11 of 14
d. A chat area appears on the left side of the Windows Remote Assistance – Helping ITEuser window. Type How may I help you? in the chat box and then click Send.
.
Step 9: On PC-2, respond to the chat question from ITEuser on PC-1.
When the user on PC-1 sends a chat message to PC-2 it will appear in the Windows Remote Assistance – Being helped by ITEuser window. Type Can you show me how to determine what my IPv4 Address is on this PC?, and then click Send.
Lab – Remote Assistance in Windows
© 2015 Cisco and/or its affiliates. All rights reserved. This document is Cisco Public. Page 12 of 14
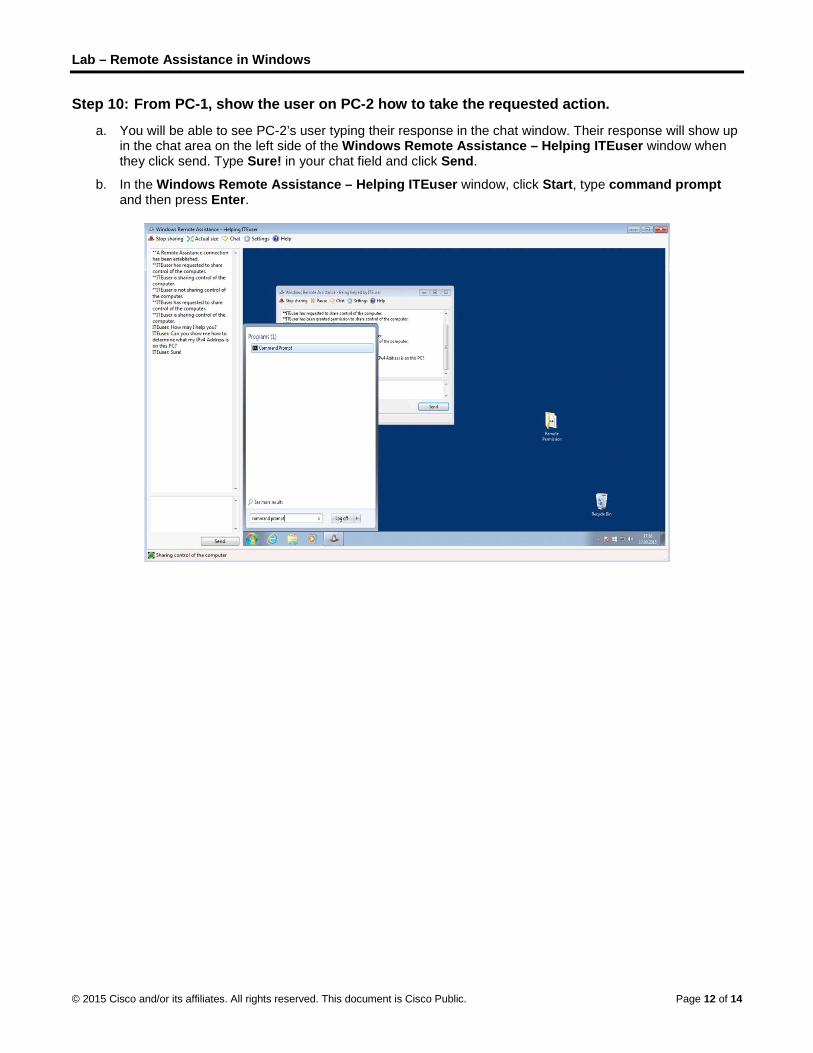
Step 10: From PC-1, show the user on PC-2 how to take the requested action.
a. You will be able to see PC-2’s user typing their response in the chat window. Their response will show up in the chat area on the left side of the Windows Remote Assistance – Helping ITEuser window when they click send. Type Sure! in your chat field and click Send.
b. In the Windows Remote Assistance – Helping ITEuser window, click Start, type command prompt and then press Enter.
Lab – Remote Assistance in Windows
© 2015 Cisco and/or its affiliates. All rights reserved. This document is Cisco Public. Page 13 of 14
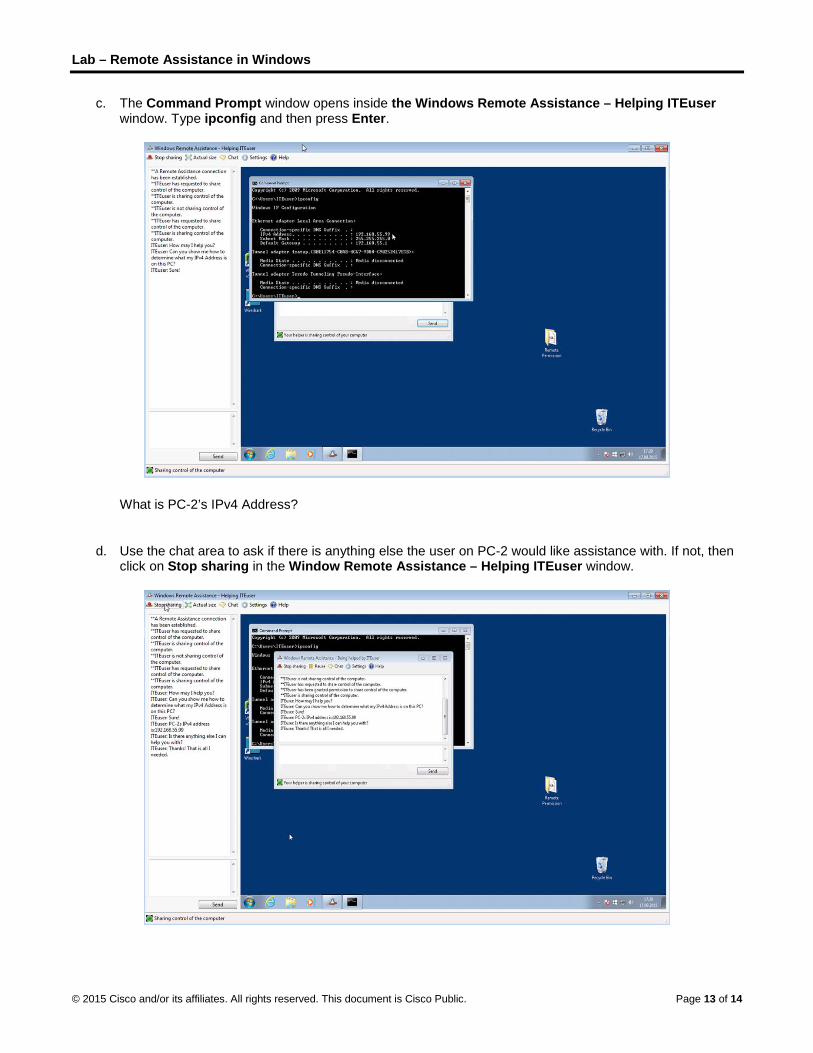
c. The Command Prompt window opens inside the Windows Remote Assistance – Helping ITEuser window. Type ipconfig and then press Enter.
What is PC-2’s IPv4 Address?
d. Use the chat area to ask if there is anything else the user on PC-2 would like assistance with. If not, then click on Stop sharing in the Window Remote Assistance – Helping ITEuser window.

Lab – Remote Assistance in Windows
© 2015 Cisco and/or its affiliates. All rights reserved. This document is Cisco Public. Page 14 of 14
e. Close the Windows Remote Assistance – Helping ITE user window on PC-1.
Step 11: From PC-2, close Remote Assistance and delete the invitation folder.
a. You will receive a message that The Remote Assistance connection has ended in the chat window when the ITEuser disconnects. Close all open windows.
Note: You may receive an Are you sure you want to close Remote Assistance? message. Click Yes.
b. Right-click the Remote Permission folder on the desktop, and select Delete from the menu.
c. The Delete folder window opens, click Yes.
d. The Sharing window opens, click Continue.
Reflection Why is it a good idea to delete the Remote Permission folder you created on the Desktop of PC-2 after the Remote Assistance session has ended?


![Remote Lab Monitoringprocesses on remote machine[3]. But Remote Lab Monitoring will display each Student’s desktop live on Teachers machines so it will easy to monitor Lab. Now days](https://img.pdfslide.net/doc/110x75/5ecdc45fc40b7627b63600a5/remote-lab-monitoring-processes-on-remote-machine3-but-remote-lab-monitoring.jpg)