Embed Size (px)
Citation preview
LABORATORY ANIMAL BIOMETHODOLOGY WORKSHOP
MODULE 3 – Rodent Analgesia and Anesthesia
Table of Contents
1. ANALGESIA ................................................................................................................................... 2
2. GENERAL CONSIDERATIONS ...................................................................................................... 2
3. PAIN RECOGNITION AND ASSESSMENT .................................................................................... 2
4. ANALGESIA PLAN ......................................................................................................................... 5
5. CLASSES OF ANALGESIC DRUGS .............................................................................................. 5
6. ANESTHESIA ................................................................................................................................. 9
7. MONITORING DURING ANESTHESIA ........................................................................................ 10
8. GAS ANESTHESIA ...................................................................................................................... 11
9. INJECTABLE ANESTHESIA ........................................................................................................ 17
10. REFERENCES ............................................................................................................................. 18

CMARC Rodent Module 3 Handout Revised 2016.09 2
1. ANALGESIA
1.1. Definition of pain Pain is defined by the International Association for the Study of Pain as an unpleasant sensory or emotional experience associated with actual or potential tissue damage.
1.2. Definition of analgesia Analgesia is the inability to feel pain without loss of consciousness.
2. GENERAL CONSIDERATIONS
• A procedure which would be expected to be painful if it was done on humans must be considered painful to the animal.
• When there is a question of whether or not a procedure is painful, the animal should receive the benefit of analgesia.
• General anesthetics used in rodents such as isoflurane and barbiturates do not provide significant analgesia and need to be complemented by appropriate analgesics.
• Analgesia should be provided at an appropriate dose and frequency to control pain.
• Any deviation from procedures described in your Animal Use Protocol (AUP) form must be justified by the investigator and approved by the appropriate Facility Animal Care Committee (FACC).
3. PAIN RECOGNITION AND ASSESSMENT
• Because rodents are prey animals, they will tend to hide any signs of pain in presence of an observer. The most reliable signs of pain and distress are the changes in behavior, but those changes can be very subtle and this implies a sound knowledge of species-typical behavior by the observer and prolonged observation time. Because pain assessment is extremely difficult in rodents, we rely mainly on the basic principles listed in section 2. The absence of clinical signs does not rule out pain or distress, but the presence of clinical signs is indicative of pain or distress:
• Adapt the frequency of observation to the protocol (minimum once a day).
• Start by observing the animal from a distance so the animal's behavior is not altered by the presence of the observer. Then proceed to observe the animal more closely.
• Look for any changes in the behavior.
• Report animals which appear to be in pain to the veterinary care staff by filling out a Rodent Illness and Injury Report form.
• Common clinical signs indicative of pain or distress include: − Avoidance − Vocalization − Aggressiveness (mainly if the animal cannot escape) − Spontaneous activities are reduced. The animal is isolated from the social group − Altered gait − Hunched posture − Piloerection − Reduced grooming; dark-red stain around the eyes and nostrils (can be observed in rats
only) − Reduced appetite and subsequent weight loss

CMARC Rodent Module 3 Handout Revised 2016.09 3
3.1. The Mouse Grimace Scale (Langford et al. 2010)

CMARC Rodent Module 3 Handout Revised 2016.09 4
3.2. The Rat Grimace Scale (Sotocinal et al. 2011)
CMARC Rodent Module 3 Handout Revised 2016.09 5
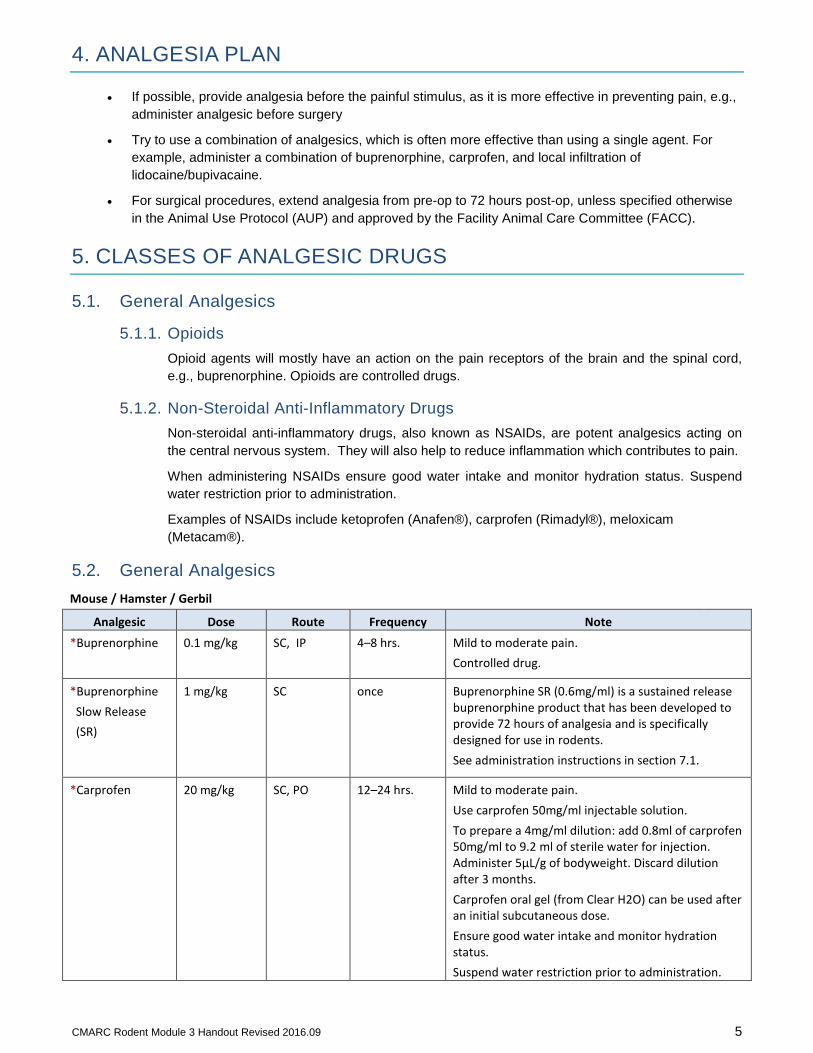
4. ANALGESIA PLAN
• If possible, provide analgesia before the painful stimulus, as it is more effective in preventing pain, e.g., administer analgesic before surgery
• Try to use a combination of analgesics, which is often more effective than using a single agent. For example, administer a combination of buprenorphine, carprofen, and local infiltration of lidocaine/bupivacaine.
• For surgical procedures, extend analgesia from pre-op to 72 hours post-op, unless specified otherwise in the Animal Use Protocol (AUP) and approved by the Facility Animal Care Committee (FACC).
5. CLASSES OF ANALGESIC DRUGS
5.1. General Analgesics
5.1.1. Opioids Opioid agents will mostly have an action on the pain receptors of the brain and the spinal cord, e.g., buprenorphine. Opioids are controlled drugs.
5.1.2. Non-Steroidal Anti-Inflammatory Drugs Non-steroidal anti-inflammatory drugs, also known as NSAIDs, are potent analgesics acting on the central nervous system. They will also help to reduce inflammation which contributes to pain.
When administering NSAIDs ensure good water intake and monitor hydration status. Suspend water restriction prior to administration.
Examples of NSAIDs include ketoprofen (Anafen®), carprofen (Rimadyl®), meloxicam (Metacam®).
5.2. General Analgesics Mouse / Hamster / Gerbil
Analgesic Dose Route Frequency Note *Buprenorphine 0.1 mg/kg SC, IP 4–8 hrs. Mild to moderate pain.
Controlled drug.
*Buprenorphine Slow Release (SR)
1 mg/kg SC once Buprenorphine SR (0.6mg/ml) is a sustained release buprenorphine product that has been developed to provide 72 hours of analgesia and is specifically designed for use in rodents. See administration instructions in section 7.1.
*Carprofen 20 mg/kg SC, PO 12–24 hrs. Mild to moderate pain. Use carprofen 50mg/ml injectable solution. To prepare a 4mg/ml dilution: add 0.8ml of carprofen 50mg/ml to 9.2 ml of sterile water for injection. Administer 5µL/g of bodyweight. Discard dilution after 3 months. Carprofen oral gel (from Clear H2O) can be used after an initial subcutaneous dose. Ensure good water intake and monitor hydration status. Suspend water restriction prior to administration.
CMARC Rodent Module 3 Handout Revised 2016.09 6
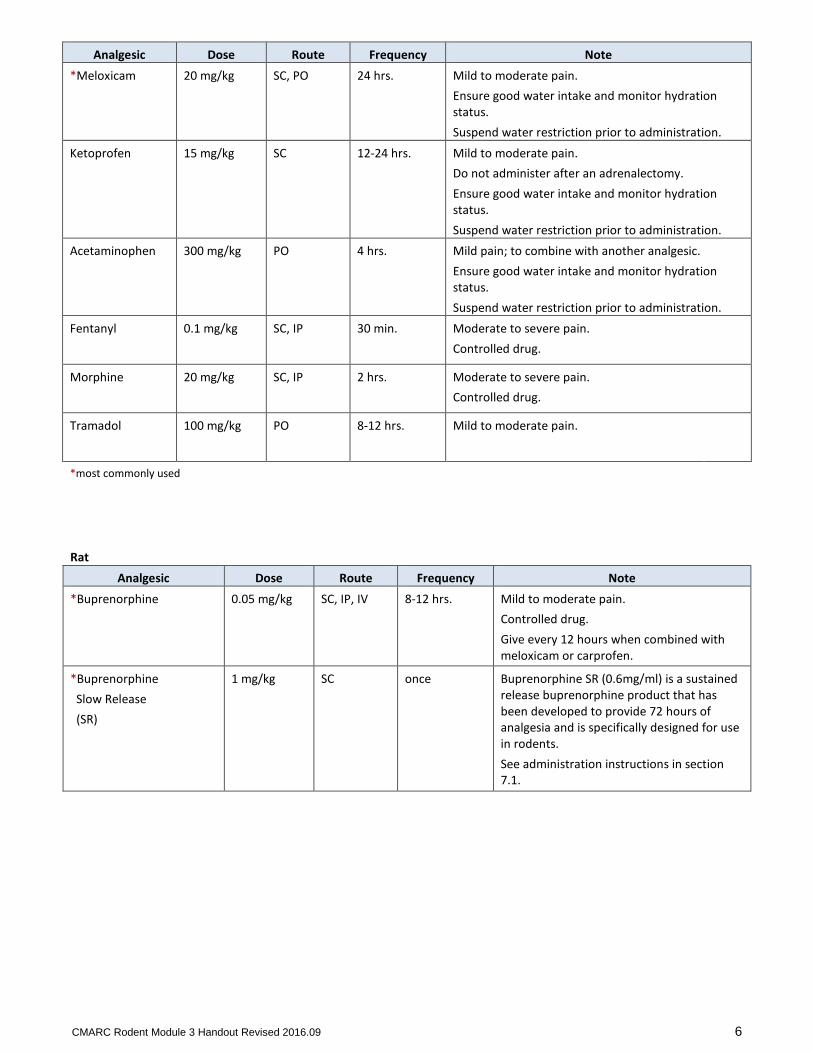
Analgesic Dose Route Frequency Note *Meloxicam 20 mg/kg SC, PO 24 hrs. Mild to moderate pain.
Ensure good water intake and monitor hydration status. Suspend water restriction prior to administration.
Ketoprofen 15 mg/kg SC 12-24 hrs. Mild to moderate pain. Do not administer after an adrenalectomy. Ensure good water intake and monitor hydration status. Suspend water restriction prior to administration.
Acetaminophen 300 mg/kg PO 4 hrs. Mild pain; to combine with another analgesic. Ensure good water intake and monitor hydration status. Suspend water restriction prior to administration.
Fentanyl 0.1 mg/kg SC, IP 30 min. Moderate to severe pain. Controlled drug.
Morphine 20 mg/kg SC, IP 2 hrs. Moderate to severe pain. Controlled drug.
Tramadol 100 mg/kg PO 8-12 hrs. Mild to moderate pain.
*most commonly used
Rat Analgesic Dose Route Frequency Note
*Buprenorphine 0.05 mg/kg SC, IP, IV 8-12 hrs. Mild to moderate pain. Controlled drug. Give every 12 hours when combined with meloxicam or carprofen.
*Buprenorphine Slow Release (SR)
1 mg/kg SC once Buprenorphine SR (0.6mg/ml) is a sustained release buprenorphine product that has been developed to provide 72 hours of analgesia and is specifically designed for use in rodents. See administration instructions in section 7.1.

CMARC Rodent Module 3 Handout Revised 2016.09 7
Rat Analgesic Dose Route Frequency Note
*Carprofen 5-10 mg/kg SC, PO 12–24 hrs. Mild to moderate pain. Use carprofen 50mg/ml injectable solution. To prepare a 5mg/ml dilution: add 1ml of carprofen 50mg/ml to 9 ml of sterile water for injection. Administer 0.1-0.2ml/100g of bodyweight. Discard dilution after 3 months. Ensure good water intake and monitor hydration status. Suspend water restriction prior to administration.
*Meloxicam 1 mg/kg SC, PO 24 hrs. Mild to moderate pain. Ensure good water intake and monitor hydration status. Suspend water restriction prior to administration.
Ketoprofen 2–5 mg/kg SC, PO 12–24 hrs. Mild to moderate pain. Do not administer after an adrenalectomy. Ensure good water intake and monitor hydration status. Suspend water restriction prior to administration.
Acetaminophen 100–300 mg/kg 5 mg/ml solution in drinking water
PO 4 hr. Give medicated water 24 hours before painful procedure.
Mild pain; to combine with another analgesic. Provide acetaminophen-treated drinking water at least 24 hours in advance of painful procedure. Used in conjunction with buprenorphine enhances pain relief. Prepare solution by mixing Children’s Tylenol Elixir to drinking water. Mix bottle thoroughly and use. Fresh solution should be prepared and added to clean bottles every 3-4 days for maximum efficacy. Ensure good water intake and monitor hydration status. Suspend water restriction prior to administration.
Fentanyl 0.1 mg/kg SC, IP 30 min. Moderate to severe pain. Controlled drug.
Morphine 20 mg/kg SC, IP 2 hrs. Moderate to severe pain. Controlled drug.
Tramadol 100 mg/kg PO 8-12 hrs. Mild to moderate pain.
*most commonly used
CMARC Rodent Module 3 Handout Revised 2016.09 8
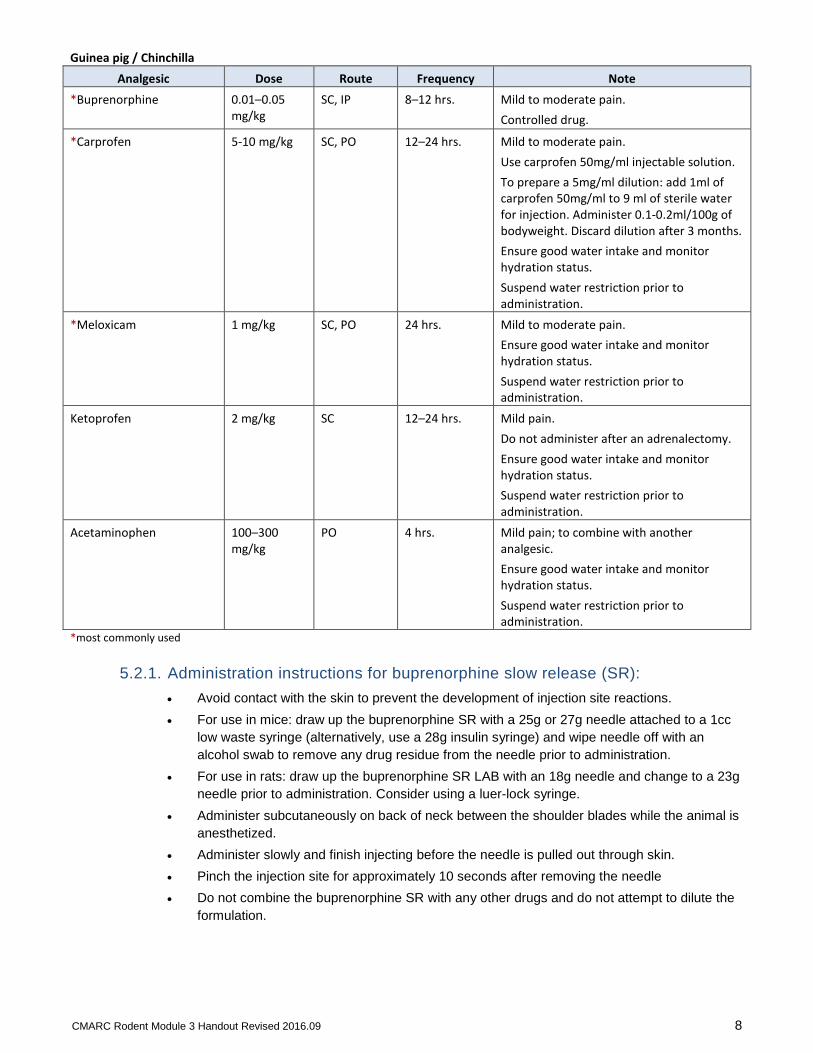
Guinea pig / Chinchilla Analgesic Dose Route Frequency Note
*Buprenorphine 0.01–0.05 mg/kg
SC, IP 8–12 hrs. Mild to moderate pain. Controlled drug.
*Carprofen 5-10 mg/kg SC, PO 12–24 hrs. Mild to moderate pain. Use carprofen 50mg/ml injectable solution. To prepare a 5mg/ml dilution: add 1ml of carprofen 50mg/ml to 9 ml of sterile water for injection. Administer 0.1-0.2ml/100g of bodyweight. Discard dilution after 3 months. Ensure good water intake and monitor hydration status. Suspend water restriction prior to administration.
*Meloxicam 1 mg/kg SC, PO 24 hrs. Mild to moderate pain. Ensure good water intake and monitor hydration status. Suspend water restriction prior to administration.
Ketoprofen 2 mg/kg SC 12–24 hrs. Mild pain. Do not administer after an adrenalectomy. Ensure good water intake and monitor hydration status. Suspend water restriction prior to administration.
Acetaminophen 100–300 mg/kg
PO 4 hrs. Mild pain; to combine with another analgesic. Ensure good water intake and monitor hydration status. Suspend water restriction prior to administration.
*most commonly used
5.2.1. Administration instructions for buprenorphine slow release (SR): • Avoid contact with the skin to prevent the development of injection site reactions. • For use in mice: draw up the buprenorphine SR with a 25g or 27g needle attached to a 1cc
low waste syringe (alternatively, use a 28g insulin syringe) and wipe needle off with an alcohol swab to remove any drug residue from the needle prior to administration.
• For use in rats: draw up the buprenorphine SR LAB with an 18g needle and change to a 23g needle prior to administration. Consider using a luer-lock syringe.
• Administer subcutaneously on back of neck between the shoulder blades while the animal is anesthetized.
• Administer slowly and finish injecting before the needle is pulled out through skin. • Pinch the injection site for approximately 10 seconds after removing the needle • Do not combine the buprenorphine SR with any other drugs and do not attempt to dilute the
formulation.
CMARC Rodent Module 3 Handout Revised 2016.09 9
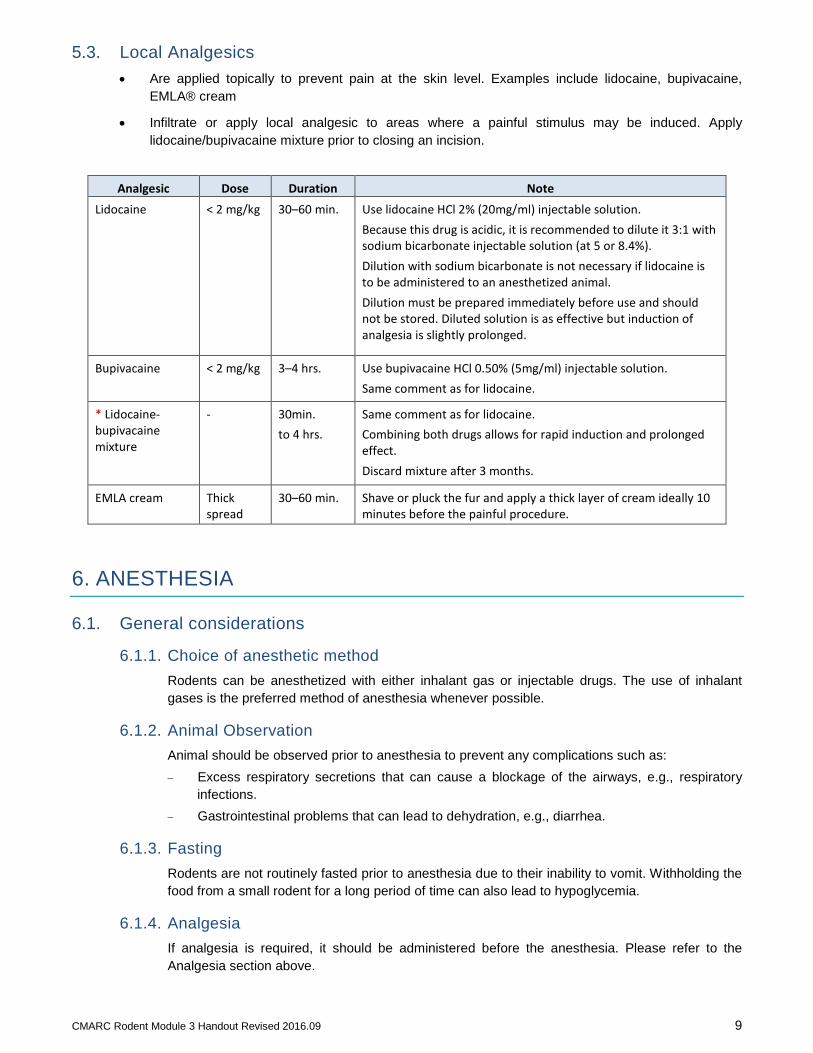
5.3. Local Analgesics • Are applied topically to prevent pain at the skin level. Examples include lidocaine, bupivacaine,
EMLA® cream
• Infiltrate or apply local analgesic to areas where a painful stimulus may be induced. Apply lidocaine/bupivacaine mixture prior to closing an incision.
Analgesic Dose Duration Note Lidocaine < 2 mg/kg 30–60 min. Use lidocaine HCl 2% (20mg/ml) injectable solution.
Because this drug is acidic, it is recommended to dilute it 3:1 with sodium bicarbonate injectable solution (at 5 or 8.4%). Dilution with sodium bicarbonate is not necessary if lidocaine is to be administered to an anesthetized animal. Dilution must be prepared immediately before use and should not be stored. Diluted solution is as effective but induction of analgesia is slightly prolonged.
Bupivacaine < 2 mg/kg 3–4 hrs. Use bupivacaine HCl 0.50% (5mg/ml) injectable solution. Same comment as for lidocaine.
* Lidocaine- bupivacaine mixture
- 30min. to 4 hrs.
Same comment as for lidocaine. Combining both drugs allows for rapid induction and prolonged effect. Discard mixture after 3 months.
EMLA cream Thick spread
30–60 min. Shave or pluck the fur and apply a thick layer of cream ideally 10 minutes before the painful procedure.
6. ANESTHESIA
6.1. General considerations
6.1.1. Choice of anesthetic method Rodents can be anesthetized with either inhalant gas or injectable drugs. The use of inhalant gases is the preferred method of anesthesia whenever possible.
6.1.2. Animal Observation Animal should be observed prior to anesthesia to prevent any complications such as: − Excess respiratory secretions that can cause a blockage of the airways, e.g., respiratory
infections. − Gastrointestinal problems that can lead to dehydration, e.g., diarrhea.
6.1.3. Fasting Rodents are not routinely fasted prior to anesthesia due to their inability to vomit. Withholding the food from a small rodent for a long period of time can also lead to hypoglycemia.
6.1.4. Analgesia If analgesia is required, it should be administered before the anesthesia. Please refer to the Analgesia section above.

CMARC Rodent Module 3 Handout Revised 2016.09 10
6.1.5. Dehydration Rodents dehydrate much faster than other larger species.
Administer from 0.2 to 0.5mL/10g body weight of isotonic fluids (a solution having the same osmotic pressure as blood) such as 0.9% saline, subcutaneously, prior to or during anesthesia for survival procedures. Isotonic fluids can be warmed prior to administration.
6.1.6. Eye Lubrication Since the rodent’s eyes remain open during anesthesia, it is important to lubricate them with a sterile ophthalmic ointment as it can cause irreversible damage to their corneas and alter their sight. Ophthalmic ointment should be reapplied as needed.
6.1.7. Hypothermia Heat loss is rapid in anesthetized rodents due to their small size, the absence of muscular activity and the cooling that can result from the inhalation of anesthetic gases. If hypothermia is not prevented it can lead to death.
It is important to keep the animal warm during the procedure and until it recovers from the anesthesia. Heat loss can be prevented by using one of the following: − Gauze pad: place gauze on the animal’s tail. − Towel: wrapped around the animal. − Heat lamp with a red light bulb: at a reasonable distance away from the animal.
(Approximately 2-3 feet for a 250W bulb). − Warm water circulating pad: under the animal cage or in indirect contact with the animal. − Bubble wrap: wrapped around the animal. − Warm bottles: placed against the animal. − Microwavable heating disc: under the animal cage or in indirect contact with the animal. Note: The use of electrical heating pads is strongly discouraged. These types of pads heat
unevenly and may cause skin burns.
Do not overheat the animal as it can cause an irreversible hyperthermia.
7. MONITORING DURING ANESTHESIA
7.1. Reflexes • Palpebral reflex is stimulated by gently touching the edge of the eyelids with the tip of a finger or the
corner of a clean gauze for smaller animals. Note: not reliable with the use of ketamine as the animal will lose this reflex before losing
consciousness.
• Pedal withdrawal reflex is stimulated by pinching the skin between the toes and/or toe pads using blunt forceps. The pinch needs to be strong enough to create a painful stimulus in order to evaluate the depth of anesthesia. Under general anesthesia, this reflex becomes weaker as the depth of anesthesia increases. It disappears completely at the 3rd stage of anesthesia (animal is anesthetized deeply enough to undergo surgery).
7.2. Respiration • Assessed by observing the animal unless specific monitoring equipment is present.
• Should be regular, thoracic and abdominal.

CMARC Rodent Module 3 Handout Revised 2016.09 11
7.3. Heart Rate • Cannot be evaluated unless specific monitoring equipment is present since the heart rate is too fast
to be visually assessed.
7.4. Oxygen Saturation • Assessed by observing the color of the mucous membranes of the nose and the mouth. Their color
should remain pink. Pink color of the mucous membranes indicates adequate blood oxygen levels. Specialized monitoring equipment can also be used to monitor the oxygen saturation.
7.5. Temperature • Can be determined using an infrared thermometer or other specific monitoring equipment designed
for small rodents.
8. GAS ANESTHESIA
8.1. Advantages • Gas anesthetics are not controlled agents.
• The depth of anesthesia can easily be adjusted by the anesthetist.
• The elimination of the anesthetic gas is mainly through the lungs.
• Allows a constant and high concentration of oxygen to be delivered to the animal (close to 100%).
• Induction and recovery are rapid.
8.2. Disadvantages • Waste anesthetic gases need to be eliminated as they can be harmful to the user.
8.3. Procedure for Isoflurane Anesthesia Prior to anesthesia: − Open the oxygen tank and verify the level on the tank pressure gauge. − Verify the level of isoflurane left in the vaporizer through the sight glass.
Induction: − Adjust the oxygen flowmeter to 0.8 to 1.5 L/min. − Place the animal(s) in the induction chamber.
Note: Do not overload the induction chamber. Mice can be placed with their cage mates in the chamber. Rats must be placed in the induction chamber individually. Keep the induction chamber clean to minimize odors that might distress animals subsequently anesthetized.
− Set the isoflurane vaporizer between 3% and 5%. − Wait until the animal loses consciousness and then follow the steps in the maintenance section
below.
Maintenance: − Use the mask connected to the Bain circuit. − Adjust the oxygen flowmeter to 0.4 to 0.8 L/min. − Set the isoflurane vaporizer between 2 and 2.5%.

CMARC Rodent Module 3 Handout Revised 2016.09 12
− Apply lubricating ophthalmic ointment to both eyes. Reapply as needed. − Asses the depth of anesthesia by testing the pedal reflexes of the animal by pinching the toe pads
with a pair of forceps. − Adjust the isoflurane vaporizer according to the desired depth of anesthesia.
Recovery: − Turn off the isoflurane vaporizer but keep the animal on oxygen. Provide heat source. − Transfer the animal to its cage once it begins to move and allow to recover fully (sternal position).
Note: Never leave an anesthetized animal unattended.
8.4. In Case of Respiratory or Cardiac Arrest: • Decrease or stop isoflurane administration.
• Keep the animal under 100% oxygen.
• Stimulate the animal by pinching a toe or inserting a 25G needle in between the two nostrils.
8.5. Flow of Anesthetic Gases
The oxygen contained under pressure in the tank will pass through the oxygen flowmeter which delivers oxygen at a controlled rate measured in liters per minute. Once the vaporizer is opened, the volatile liquid anesthetic is converted into gas. As the oxygen passes through the vaporizer, a controlled amount of anesthetic gas mixes with the oxygen and exits through the feed tube. The flow of fresh gas (oxygen mixed with anesthetic gas) will pass through the induction chamber or the inner tube of the Bain system and will be delivered to the patient.
The patient will exhale the waste anesthetic gases in the induction chamber or the outer tube of the Bain system. The waste gas will then pass through the evacuation port to finally be released through the scavenger system.
O2 Tank O2 Flowmeter Vaporizer Feed Tube
Bain System
(Inner tube)
Induction Chamber
PATIENT
FRESH GAS
Scavenger system
WASTE GAS
Bain System
(Outer tube)
PATIENT
Induction Chamber
Evacuation port
CMARC Rodent Module 3 Handout Revised 2016.09 13
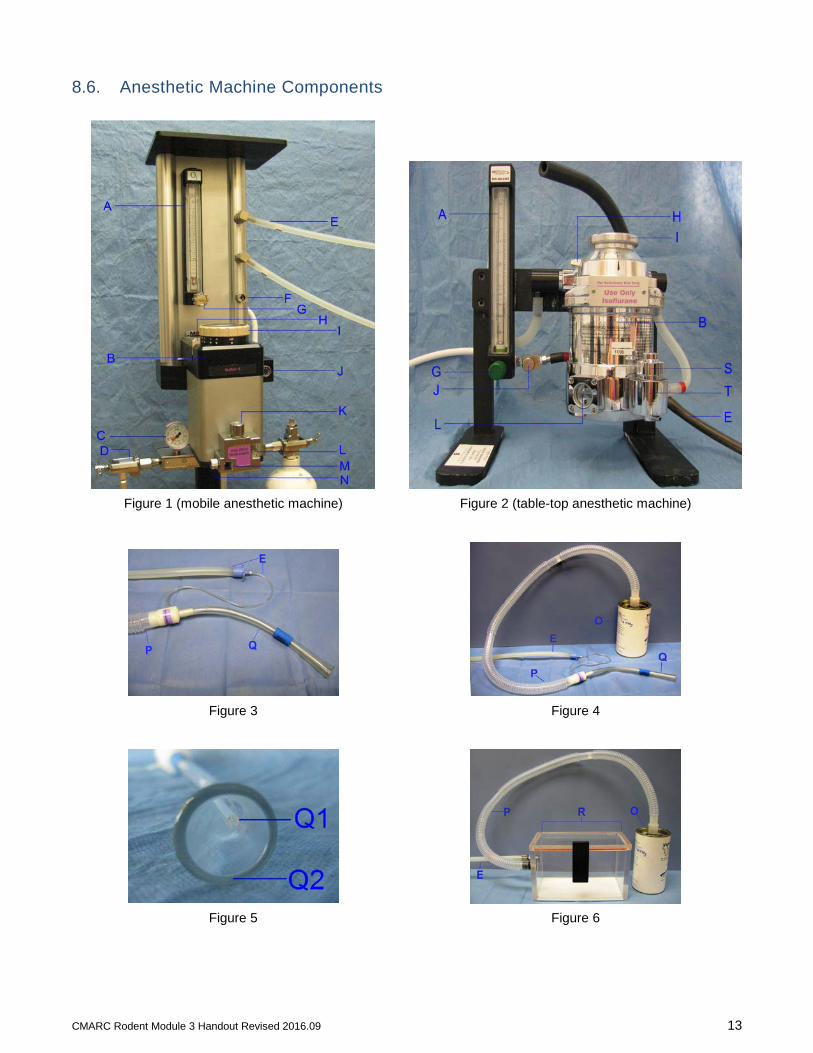
8.6. Anesthetic Machine Components
Figure 1 (mobile anesthetic machine) Figure 2 (table-top anesthetic machine)
Figure 3 Figure 4
Figure 5 Figure 6
CMARC Rodent Module 3 Handout Revised 2016.09 14
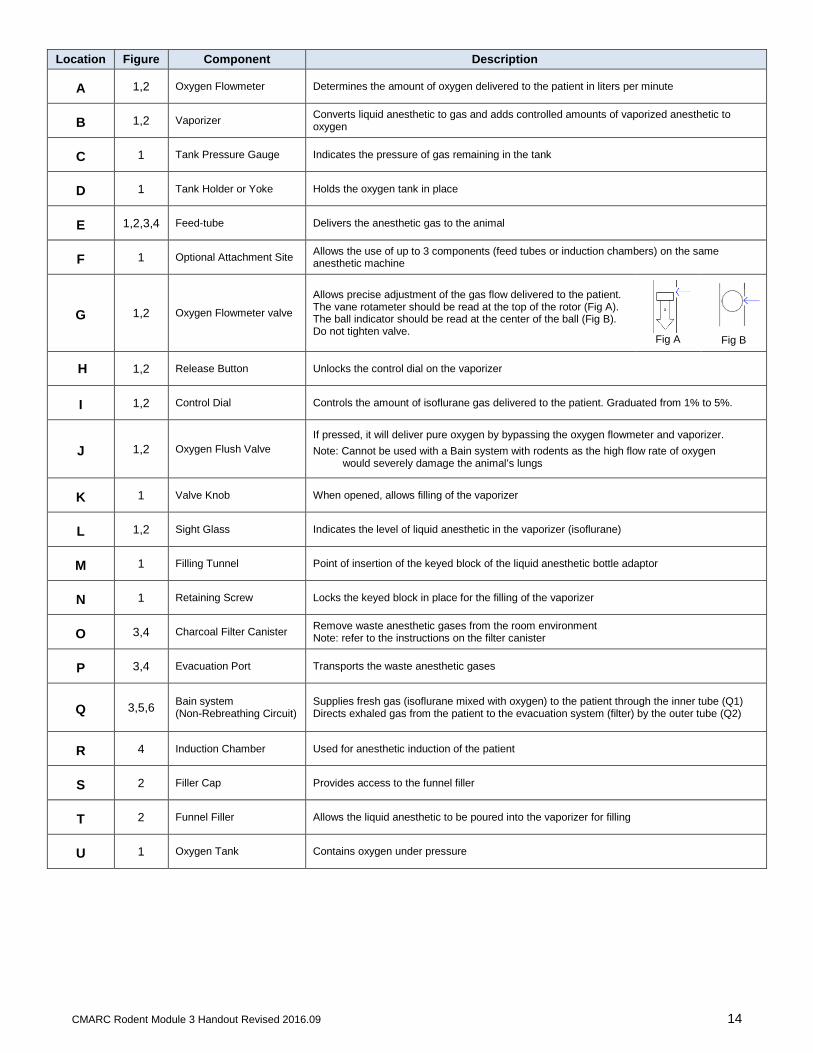
Location Figure Component Description
A 1,2 Oxygen Flowmeter Determines the amount of oxygen delivered to the patient in liters per minute
B 1,2 Vaporizer Converts liquid anesthetic to gas and adds controlled amounts of vaporized anesthetic to oxygen
C 1 Tank Pressure Gauge Indicates the pressure of gas remaining in the tank
D 1 Tank Holder or Yoke Holds the oxygen tank in place
E 1,2,3,4 Feed-tube Delivers the anesthetic gas to the animal
F 1 Optional Attachment Site Allows the use of up to 3 components (feed tubes or induction chambers) on the same anesthetic machine
G 1,2 Oxygen Flowmeter valve
Allows precise adjustment of the gas flow delivered to the patient. The vane rotameter should be read at the top of the rotor (Fig A). The ball indicator should be read at the center of the ball (Fig B). Do not tighten valve.
Fig A
Fig B
H 1,2 Release Button Unlocks the control dial on the vaporizer
I 1,2 Control Dial Controls the amount of isoflurane gas delivered to the patient. Graduated from 1% to 5%.
J 1,2 Oxygen Flush Valve If pressed, it will deliver pure oxygen by bypassing the oxygen flowmeter and vaporizer. Note: Cannot be used with a Bain system with rodents as the high flow rate of oxygen would severely damage the animal’s lungs
K 1 Valve Knob When opened, allows filling of the vaporizer
L 1,2 Sight Glass Indicates the level of liquid anesthetic in the vaporizer (isoflurane)
M 1 Filling Tunnel Point of insertion of the keyed block of the liquid anesthetic bottle adaptor
N 1 Retaining Screw Locks the keyed block in place for the filling of the vaporizer
O 3,4 Charcoal Filter Canister Remove waste anesthetic gases from the room environment Note: refer to the instructions on the filter canister
P 3,4 Evacuation Port Transports the waste anesthetic gases
Q 3,5,6 Bain system (Non-Rebreathing Circuit)
Supplies fresh gas (isoflurane mixed with oxygen) to the patient through the inner tube (Q1) Directs exhaled gas from the patient to the evacuation system (filter) by the outer tube (Q2)
R 4 Induction Chamber Used for anesthetic induction of the patient
S 2 Filler Cap Provides access to the funnel filler
T 2 Funnel Filler Allows the liquid anesthetic to be poured into the vaporizer for filling
U 1 Oxygen Tank Contains oxygen under pressure
CMARC Rodent Module 3 Handout Revised 2016.09 15
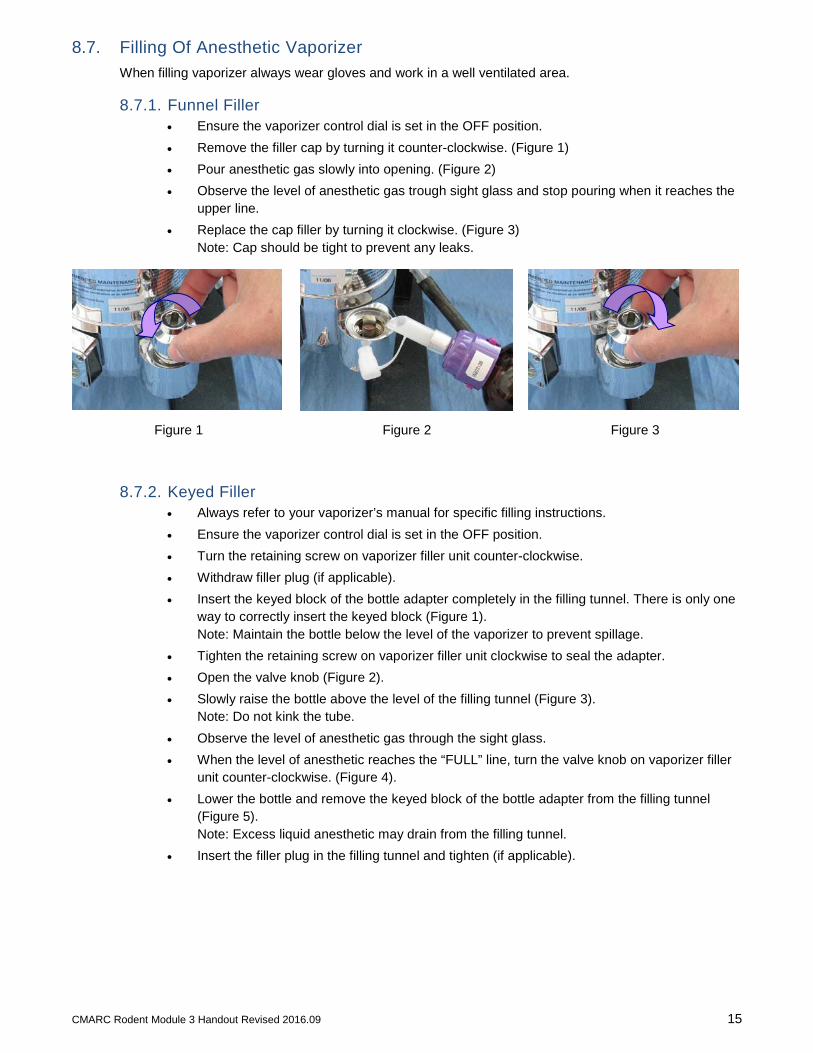
8.7. Filling Of Anesthetic Vaporizer When filling vaporizer always wear gloves and work in a well ventilated area.
8.7.1. Funnel Filler • Ensure the vaporizer control dial is set in the OFF position. • Remove the filler cap by turning it counter-clockwise. (Figure 1) • Pour anesthetic gas slowly into opening. (Figure 2) • Observe the level of anesthetic gas trough sight glass and stop pouring when it reaches the
upper line. • Replace the cap filler by turning it clockwise. (Figure 3)
Note: Cap should be tight to prevent any leaks.
Figure 1 Figure 2 Figure 3
8.7.2. Keyed Filler • Always refer to your vaporizer’s manual for specific filling instructions. • Ensure the vaporizer control dial is set in the OFF position. • Turn the retaining screw on vaporizer filler unit counter-clockwise. • Withdraw filler plug (if applicable). • Insert the keyed block of the bottle adapter completely in the filling tunnel. There is only one
way to correctly insert the keyed block (Figure 1). Note: Maintain the bottle below the level of the vaporizer to prevent spillage.
• Tighten the retaining screw on vaporizer filler unit clockwise to seal the adapter. • Open the valve knob (Figure 2). • Slowly raise the bottle above the level of the filling tunnel (Figure 3).
Note: Do not kink the tube. • Observe the level of anesthetic gas through the sight glass. • When the level of anesthetic reaches the “FULL” line, turn the valve knob on vaporizer filler
unit counter-clockwise. (Figure 4). • Lower the bottle and remove the keyed block of the bottle adapter from the filling tunnel
(Figure 5). Note: Excess liquid anesthetic may drain from the filling tunnel.
• Insert the filler plug in the filling tunnel and tighten (if applicable).

CMARC Rodent Module 3 Handout Revised 2016.09 16
Figure 1 Figure 2 Figure 3
Figure 4 Figure 5
8.8. Waste Anesthetic Gas Scavenging Waste anesthetic gases can be potentially hazardous to personnel. Adequate waste anesthetic gas scavenging systems must be used to minimize exposure.
To eliminate waste anesthetic gases from the work area and minimize exposure of personnel, follow these guidelines: − Work in a well-ventilated area, ideally under a fume hood or a hard-ducted biosafety cabinet (which
vents directly to the outside without recirculation within the building). − Maintain a reasonable distance from the source of the gas. − Use an adequately-sized anesthetic mask to ensure a tight seal around the animal’s face and
prevent leaks. − Clean the induction chambers with disinfecting solution immediately after each use to avoid residual
anesthetic waste release into the environment. Waste anesthetic gases can continue to be released for up to 3 hours.
− Use an appropriate scavenging option:
a. Direct the exhaust from the anesthetic circuit to a fume hood, a hard-ducted biosafety cabinet or to the room exhaust if it is evacuated directly outside the building without recirculation. Ensure a minimum room ventilation air exchange is maintained (10–15 air changes per hour).
b. Perform procedures under a certified fume hood when using an induction chamber to capture the gas escaping the chamber when the lid is opened.
c. Activated charcoal canisters: ⋅ Do not to occlude the vent holes. ⋅ Weigh the canister before and after each use to evaluate the remaining absorption
capacity, and record the weight on the canister in the space provided ⋅ Shake canister briefly before replacing to evenly redistribute contents. ⋅ Discard the canisters in the trash inside a sealed plastic bag after the maximum
recommended weight increase.
CMARC Rodent Module 3 Handout Revised 2016.09 17
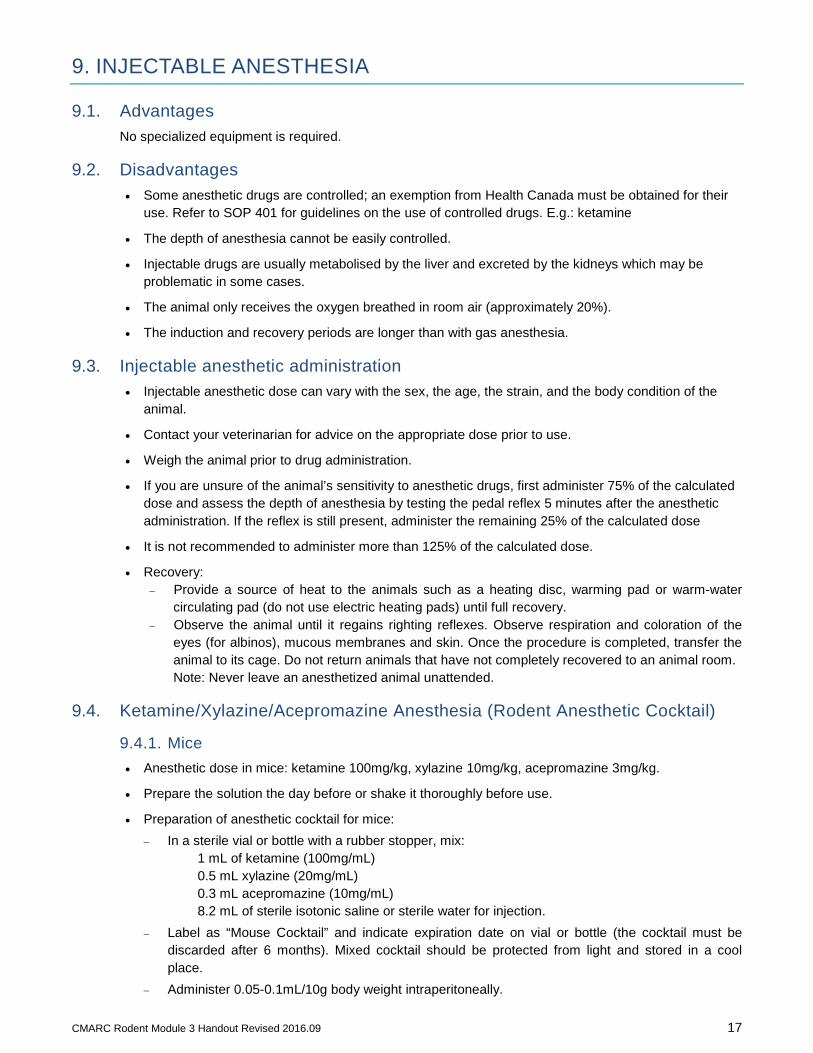
9. INJECTABLE ANESTHESIA
9.1. Advantages No specialized equipment is required.
9.2. Disadvantages • Some anesthetic drugs are controlled; an exemption from Health Canada must be obtained for their
use. Refer to SOP 401 for guidelines on the use of controlled drugs. E.g.: ketamine
• The depth of anesthesia cannot be easily controlled.
• Injectable drugs are usually metabolised by the liver and excreted by the kidneys which may be problematic in some cases.
• The animal only receives the oxygen breathed in room air (approximately 20%).
• The induction and recovery periods are longer than with gas anesthesia.
9.3. Injectable anesthetic administration • Injectable anesthetic dose can vary with the sex, the age, the strain, and the body condition of the
animal.
• Contact your veterinarian for advice on the appropriate dose prior to use.
• Weigh the animal prior to drug administration.
• If you are unsure of the animal’s sensitivity to anesthetic drugs, first administer 75% of the calculated dose and assess the depth of anesthesia by testing the pedal reflex 5 minutes after the anesthetic administration. If the reflex is still present, administer the remaining 25% of the calculated dose
• It is not recommended to administer more than 125% of the calculated dose.
• Recovery: − Provide a source of heat to the animals such as a heating disc, warming pad or warm-water
circulating pad (do not use electric heating pads) until full recovery. − Observe the animal until it regains righting reflexes. Observe respiration and coloration of the
eyes (for albinos), mucous membranes and skin. Once the procedure is completed, transfer the animal to its cage. Do not return animals that have not completely recovered to an animal room. Note: Never leave an anesthetized animal unattended.
9.4. Ketamine/Xylazine/Acepromazine Anesthesia (Rodent Anesthetic Cocktail)
9.4.1. Mice • Anesthetic dose in mice: ketamine 100mg/kg, xylazine 10mg/kg, acepromazine 3mg/kg.
• Prepare the solution the day before or shake it thoroughly before use.
• Preparation of anesthetic cocktail for mice: − In a sterile vial or bottle with a rubber stopper, mix:
1 mL of ketamine (100mg/mL) 0.5 mL xylazine (20mg/mL) 0.3 mL acepromazine (10mg/mL) 8.2 mL of sterile isotonic saline or sterile water for injection.
− Label as “Mouse Cocktail” and indicate expiration date on vial or bottle (the cocktail must be discarded after 6 months). Mixed cocktail should be protected from light and stored in a cool place.
− Administer 0.05-0.1mL/10g body weight intraperitoneally.
CMARC Rodent Module 3 Handout Revised 2016.09 18
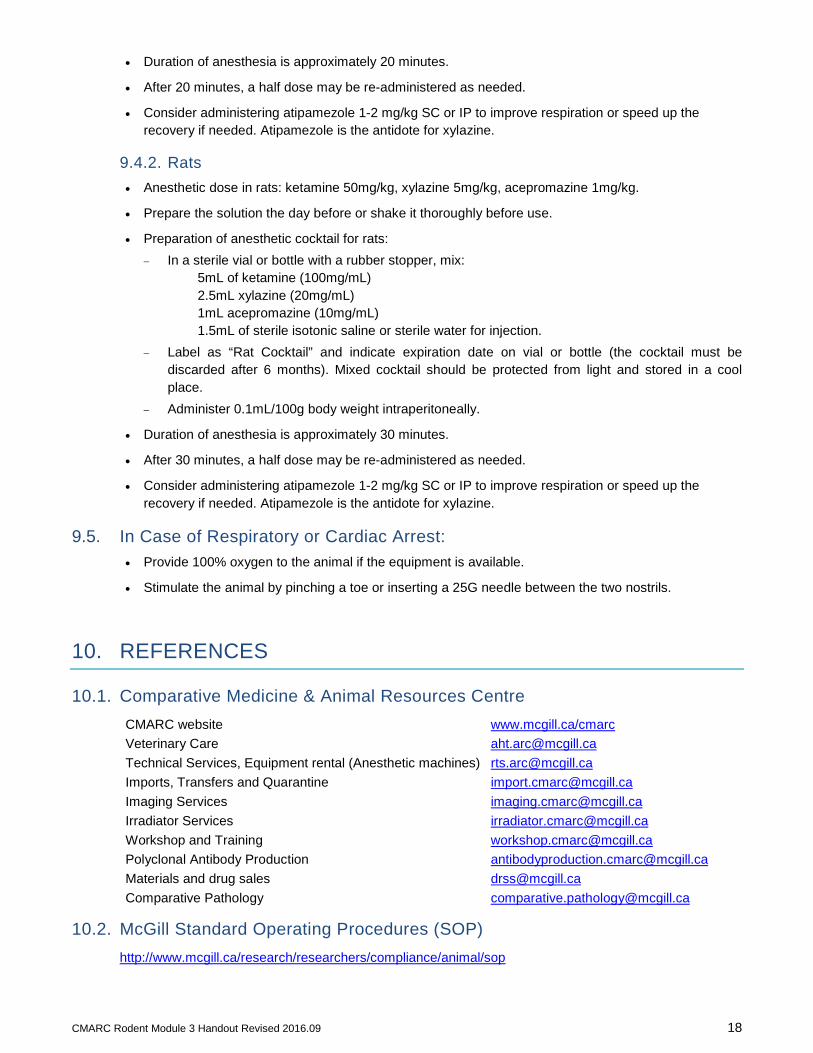
• Duration of anesthesia is approximately 20 minutes.
• After 20 minutes, a half dose may be re-administered as needed.
• Consider administering atipamezole 1-2 mg/kg SC or IP to improve respiration or speed up the recovery if needed. Atipamezole is the antidote for xylazine.
9.4.2. Rats • Anesthetic dose in rats: ketamine 50mg/kg, xylazine 5mg/kg, acepromazine 1mg/kg.
• Prepare the solution the day before or shake it thoroughly before use.
• Preparation of anesthetic cocktail for rats: − In a sterile vial or bottle with a rubber stopper, mix:
5mL of ketamine (100mg/mL) 2.5mL xylazine (20mg/mL) 1mL acepromazine (10mg/mL) 1.5mL of sterile isotonic saline or sterile water for injection.
− Label as “Rat Cocktail” and indicate expiration date on vial or bottle (the cocktail must be discarded after 6 months). Mixed cocktail should be protected from light and stored in a cool place.
− Administer 0.1mL/100g body weight intraperitoneally.
• Duration of anesthesia is approximately 30 minutes.
• After 30 minutes, a half dose may be re-administered as needed.
• Consider administering atipamezole 1-2 mg/kg SC or IP to improve respiration or speed up the recovery if needed. Atipamezole is the antidote for xylazine.
9.5. In Case of Respiratory or Cardiac Arrest: • Provide 100% oxygen to the animal if the equipment is available.
• Stimulate the animal by pinching a toe or inserting a 25G needle between the two nostrils.
10. REFERENCES
10.1. Comparative Medicine & Animal Resources Centre CMARC website www.mcgill.ca/cmarc Veterinary Care [email protected] Technical Services, Equipment rental (Anesthetic machines) [email protected] Imports, Transfers and Quarantine [email protected] Imaging Services [email protected] Irradiator Services [email protected] Workshop and Training [email protected] Polyclonal Antibody Production [email protected] Materials and drug sales [email protected] Comparative Pathology [email protected]
10.2. McGill Standard Operating Procedures (SOP) http://www.mcgill.ca/research/researchers/compliance/animal/sop

GAS ANESTHESIA CHECKLIST Before you begin
Analgesia
Check expiry date on drugs. Find the concentration and the dose to administer to the animal(s). Weigh the animal(s). Calculate the amount to administer. Analgesia can be given approximately 20-30 min. prior to the procedure.
Preparation of Anesthetic Machine
Open the oxygen tank and verify the level of gas left on the tank pressure gauge. Verify the level of isoflurane left in the vaporizer by looking through the sight glass.
Induction Check for proper connections. Adjust the oxygen flowmeter between 0.8 to 1.5 L/min. Place the animal in the induction chamber. Adjust the isoflurane vaporizer between 3% to 5% and wait until the animal loses consciousness.
Maintenance Once the animal is unconscious, decrease the oxygen flow between 0.4 to 0.8L/min. Change the connection to the bain system. Remove the animal from the induction chamber and use the mask connected to the bain system. Adjust the isoflurane vaporizer between 2% to 2.5%. Provide a source of heat to the animal (microwavable disc, heat lamp with a red bulb, etc) Apply ophthalmic ointment. Asses the depth of anesthesia by testing the pedal reflex of the animal by pinching the toe pads and the
paws with a pair of forceps. If the animal still has reflexes, adjust the isoflurane vaporizer accordingly.
Monitoring During Anesthesia (approximately every 3-5 minutes) Reflexes: pedal withdrawal reflex (toe pads + paws). Respiration: should be regular, thoracic and abdominal. Mucous Membranes: color surrounding the nose and mouth should remain pink.
Recovery Administer from 0.2 to 0.5mL/10g body weight of isotonic fluids subcutaneously. Turn off the isoflurane vaporizer. Keep the animal on 100% oxygen. Transfer the animal to its cage once it begins to move. Provide a source of heat to the animals until full recovery (keep animals in sternal position).
Post Procedure Close the oxygen flowmeter and close the oxygen tank. Press on the oxygen flush valve to empty the lines. If properly closed, the tank pressure gauge should
indicate “0”. Disconnect tubings. Clean equipment and work surface.
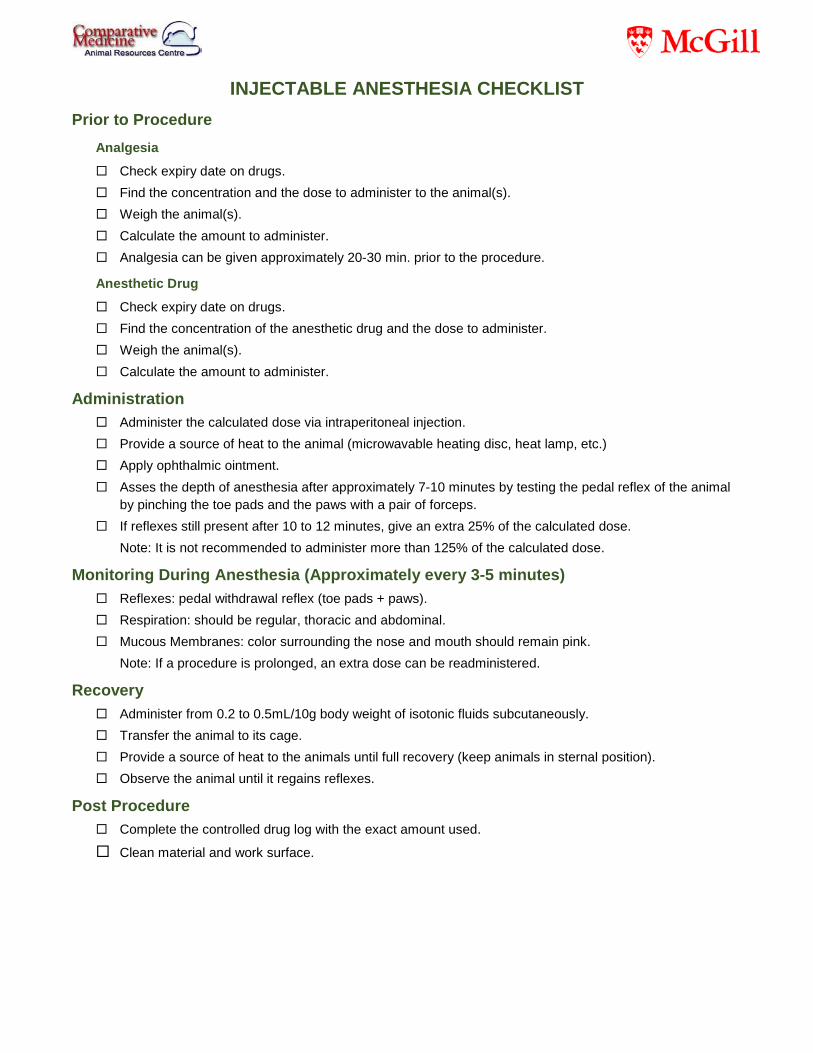
INJECTABLE ANESTHESIA CHECKLIST Prior to Procedure
Analgesia
Check expiry date on drugs. Find the concentration and the dose to administer to the animal(s). Weigh the animal(s). Calculate the amount to administer. Analgesia can be given approximately 20-30 min. prior to the procedure.
Anesthetic Drug
Check expiry date on drugs. Find the concentration of the anesthetic drug and the dose to administer. Weigh the animal(s). Calculate the amount to administer.
Administration Administer the calculated dose via intraperitoneal injection. Provide a source of heat to the animal (microwavable heating disc, heat lamp, etc.) Apply ophthalmic ointment. Asses the depth of anesthesia after approximately 7-10 minutes by testing the pedal reflex of the animal
by pinching the toe pads and the paws with a pair of forceps. If reflexes still present after 10 to 12 minutes, give an extra 25% of the calculated dose.
Note: It is not recommended to administer more than 125% of the calculated dose.
Monitoring During Anesthesia (Approximately every 3-5 minutes) Reflexes: pedal withdrawal reflex (toe pads + paws). Respiration: should be regular, thoracic and abdominal. Mucous Membranes: color surrounding the nose and mouth should remain pink.
Note: If a procedure is prolonged, an extra dose can be readministered.
Recovery Administer from 0.2 to 0.5mL/10g body weight of isotonic fluids subcutaneously. Transfer the animal to its cage. Provide a source of heat to the animals until full recovery (keep animals in sternal position). Observe the animal until it regains reflexes.
Post Procedure Complete the controlled drug log with the exact amount used.
Clean material and work surface.
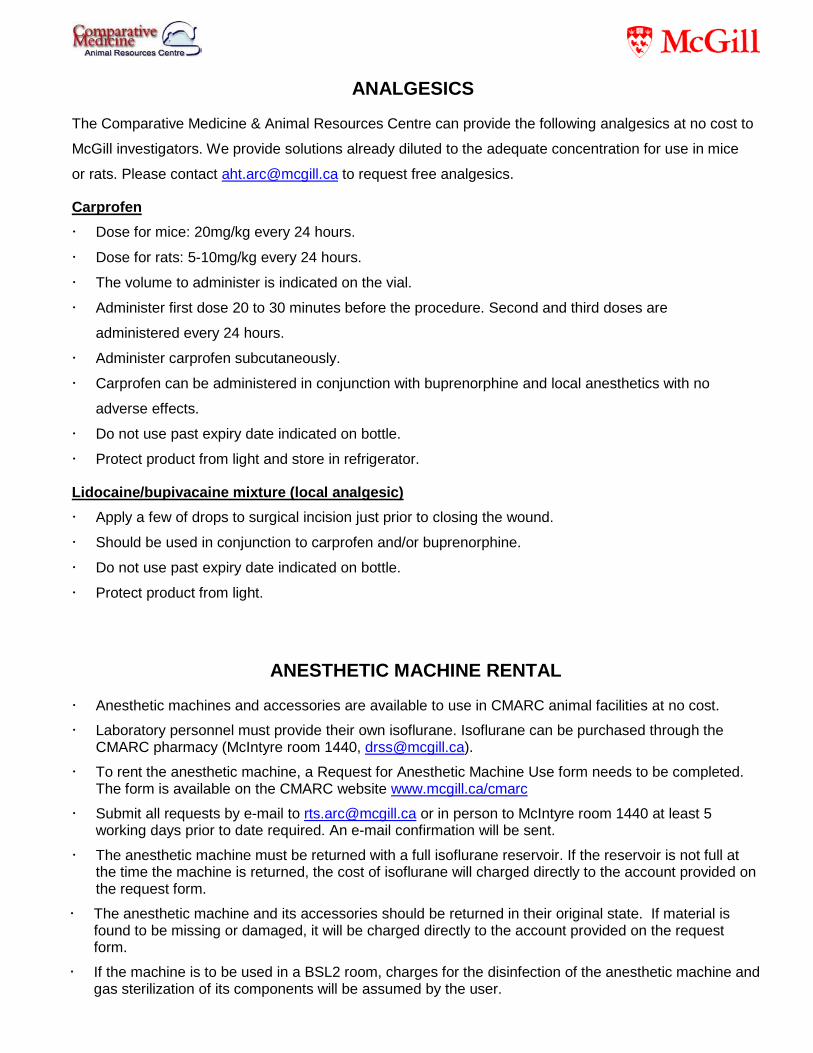
ANALGESICS
The Comparative Medicine & Animal Resources Centre can provide the following analgesics at no cost to
McGill investigators. We provide solutions already diluted to the adequate concentration for use in mice
or rats. Please contact [email protected] to request free analgesics.
Carprofen Dose for mice: 20mg/kg every 24 hours.
Dose for rats: 5-10mg/kg every 24 hours.
The volume to administer is indicated on the vial.
Administer first dose 20 to 30 minutes before the procedure. Second and third doses are
administered every 24 hours.
Administer carprofen subcutaneously.
Carprofen can be administered in conjunction with buprenorphine and local anesthetics with no
adverse effects.
Do not use past expiry date indicated on bottle.
Protect product from light and store in refrigerator.
Lidocaine/bupivacaine mixture (local analgesic) Apply a few of drops to surgical incision just prior to closing the wound.
Should be used in conjunction to carprofen and/or buprenorphine.
Do not use past expiry date indicated on bottle.
Protect product from light.
ANESTHETIC MACHINE RENTAL
Anesthetic machines and accessories are available to use in CMARC animal facilities at no cost.
Laboratory personnel must provide their own isoflurane. Isoflurane can be purchased through the CMARC pharmacy (McIntyre room 1440, [email protected]).
To rent the anesthetic machine, a Request for Anesthetic Machine Use form needs to be completed. The form is available on the CMARC website www.mcgill.ca/cmarc
Submit all requests by e-mail to [email protected] or in person to McIntyre room 1440 at least 5 working days prior to date required. An e-mail confirmation will be sent.
The anesthetic machine must be returned with a full isoflurane reservoir. If the reservoir is not full at the time the machine is returned, the cost of isoflurane will charged directly to the account provided on the request form.
The anesthetic machine and its accessories should be returned in their original state. If material is found to be missing or damaged, it will be charged directly to the account provided on the request form.
If the machine is to be used in a BSL2 room, charges for the disinfection of the anesthetic machine and gas sterilization of its components will be assumed by the user.